

Page 1
1.
SERVICE MANUAL
MYTH 9
COMPACT DISC
PLAYER
STOP PREV TIME SHU F REPEAT STBY
PLAY NEXT PAUSE PROG PEAK OPEN
Page 2

SPHINX Myth 9 Service Manual
2
1. UNPACKING.......................................................................................................................................3
2. CONTACTING THE MANUFACTURER.............................................................................................3
3. THE CD PLAYER AT A GLANCE......................................................................................................4
Front panel................................................................................................................................................... 4
Rear panel ...................................................................................................................................................5
4. OPERATION .......................................................................................................................................6
Power on...................................................................................................................................................... 6
Playing a CD................................................................................................................................................6
Different time display ...................................................................................................................................6
Playing a different track ...............................................................................................................................6
Playing tracks in a different order.................................................................................................................6
Program Play (PROG) .................................................................................................................................7
Programming tracks.....................................................................................................................................7
Playing the programmed tracks ...................................................................................................................7
To stop Program Play ..................................................................................................................................7
Shuffle Play (SHUF).....................................................................................................................................7
Repeat Play (REPEAT)................................................................................................................................ 7
To temporarily halt Play (PAUSE)................................................................................................................8
To stop Play (STOP)....................................................................................................................................8
Power off...................................................................................................................................................... 8
Special modes for recording CD’s................................................................................................................8
The PEAK mode..........................................................................................................................................8
The FADE mode..........................................................................................................................................8
5. THE SPHINX REMOTE CONTROL....................................................................................................9
Buttons.........................................................................................................................................................9
Operation...................................................................................................................................................10
Selecting without switching........................................................................................................................10
Batteries.....................................................................................................................................................10
Encountering problems..............................................................................................................................10
6. TECHNICAL SPECIFICATIONS.......................................................................................................11
7. ADJUSTMENT PROCEDURES........................................................................................................12
8. PROBLEMS AND SOLUTIONS .......................................................................................................13
9. DIAGRAMS AND PARTS LIST........................................................................................................14
General Overview Myth 9...........................................................................................................................15
Power Supply ............................................................................................................................................. 16
D/A converter.............................................................................................................................................17
Input / Output.............................................................................................................................................18
Display.......................................................................................................................................................19
Parts List....................................................................................................................................................20
Page 3

SPHINX Myth 9 Service Manual
3
The Sphinx Myth 9 design
This service manual will help you to optimally
service and repair the Sphinx Myth 9 CD player.
The heart of this very special CD player is formed
by the newest Philips CDM-12.4 transport
mechanism.
Two independent Bitstream D/A converters will
guarantee unsurpassed detailed audio
reproduction.
A unique feature is that the output sections are of a
totally discrete Class A design.
The “O core” power transformer uses completely
separated sections for the digital and analogue
supply. Combined with the integrated power line
suppression filter this ensures an extremely high
S/N ratio.
Almost all functions are accessible with the supplied
Sphinx Remote Control.
To obtain the maximum quality from this CD player
it is necessary to use it with top quality audio
components, preferably with other Sphinx
components.
1. UNPACKING
Before leaving the factory every Myth 9 is subjected
to stringent and extensive technical and exterior
quality inspection.
This ensures you will enjoy many years of high
quality audio performance from a perfect-looking
product.
After unpacking your Myth 9 we therefore
recommend you carefully check it for any transport
damage.
Even if the component is in perfect condition you
should still keep the packing materials. If you need
to transport your Myth 9 at a later time it will be best
protected by the original packing materials.
2. CONTACTING THE MANUFACTURER
In case of any problem not covered in this manual
or if you have other questions you may contact the
Sphinx International Service Department in The
Netherlands (local time: GMT +1h) during office
hours at the following numbers:
Telephone (+31) 35 602 0302
Fax (+31) 35 602 2806
E-mail audionl@euronet.nl
It is always very helpful and efficient if you have all
relevant information about the specific product and
the problem ready.
Please also refer to the User Manual of the
Myth 9 for information about functions not
described in this manual.
It is important to familiarise yourself with the
special functions, operation and possibilities
of the Sphinx Myth 9.
Page 4
SPHINX Myth 9 Service Manual
4
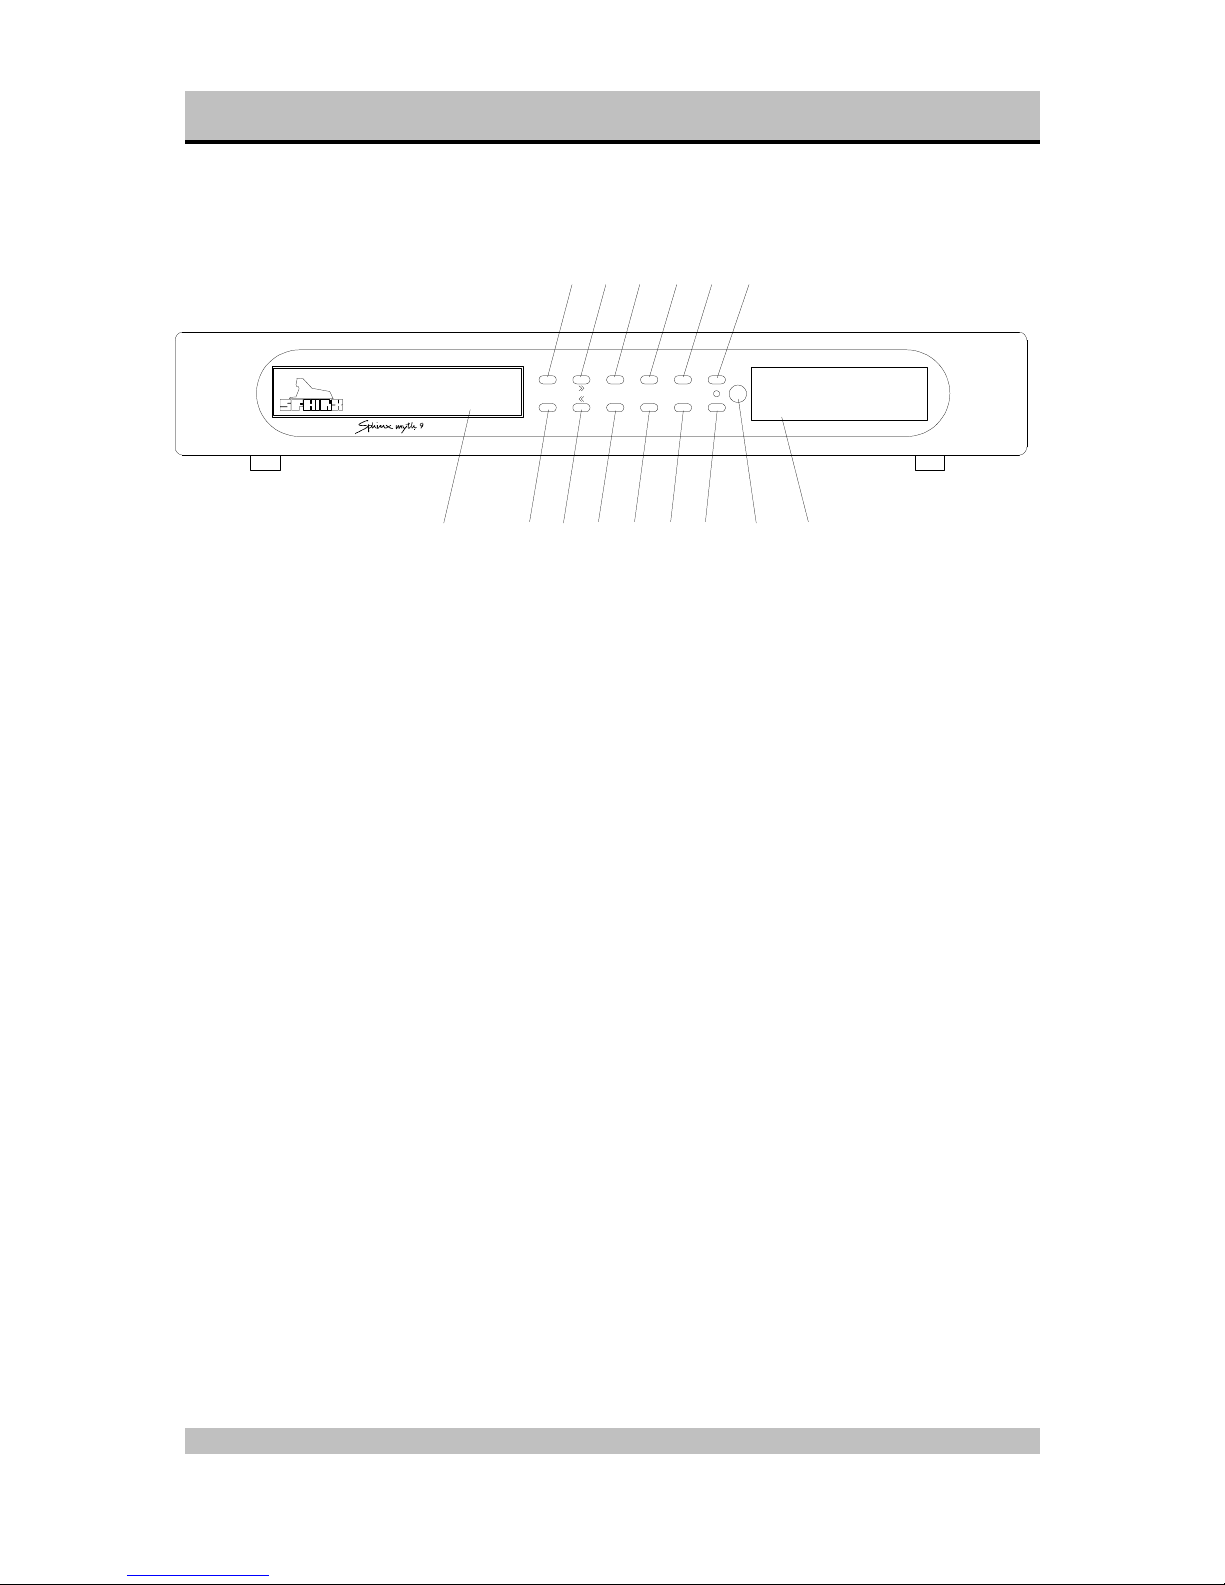
3. THE CD PLAYER AT A GLANCE
Front panel
1. CD tray: To be opened with the OPEN button.
Place the CD here.
To close: press the OPEN button or the PLAY
button or softly push against the front of the tray.
2. STOP: To stop CD playback.
3. PREV: To select a lower number track.
If you hold the button depressed it will activate a
fast reverse search in the current track.
4. TIME: This button selects the timer mode (righthand side of display):
l Remaining Track Time,
l Total Remaining Time,
l Track Time.
5. SHUF: To select the Shuffle Play mode, which
plays the tracks in random order. The SHUFFLE
indication will light.
6. REPEAT: To activate the Repeat Play mode. The
Play, Shuffle Play and Program Play modes will
be repeated until you deactivate the function.
The REPEAT indication will light.
7. STBY: To switch the CD player on and off. The
LED next to the button indicates the selected
function:
on LED is off
off LED is red
8. Receptor window for the IR signals from the
Remote Control.
9. Display: This will show all important data (more
information can be found on page 6)
10. PLAY: To start playback of the track indicated in
the left-hand side of the display
Note: If the CD tray is still open, it will close
automatically.
11. NEXT: To select a higher number track.
If you hold the button depressed it will activate a
fast forward search in the current track.
12. PAUSE: To temporarily interrupt the CD
playback. The display will show the PAUSE
indication. Pressing this button again (or PLAY)
will resume playback.
13. PROG: To select the Program mode: this enables
you to play only certain selected tracks. The
display will show »PROGR« and the PROGRAM
indication will blink.
14. PEAK: Pressing this button during STOP
activates the Peak Search mode. The PEAK
indication will light.
Pressing this button during Play mode activates
the Fade mode.
15. OPEN: To open and close the CD tray.
STOP PREV TIME SHU F REPEAT STBY
PLAY NEXT PAUSE PROG PEAK OPEN
1
23456
789
10111213141
5
Page 5

SPHINX Myth 9 Service Manual
5
Rear panel
1. OUTPUT L and R: Connect this to the CD input
of the amplifier.
2. Control IN and OUT: To connect the optical
cable from the pre-amplifier and to the next
Sphinx component (e.g. tuner).
3. Manufacturer’s label: This shows important
data for the component, such as serial number
and mains power voltage.
4. Warning!: This shows important information
about the safety regulations for the Myth 9.
5. AC Power: Connect the mains cable to a mains
power outlet (100 - 240 VAC). Mains power
switch for the CD player.
The mains fuse is placed behind the cover.
Warning!
!
Do not open!
High voltage inside!
Do not expose this unit
to rain or moisture.
ACVoltage:230V/60Hz.
Max.Power: 40W
Made in The Netherlands
Manufactured by :
Sphinx Laboratories
Fuse: 0,5AT
OUTPUT
CONTROL
IN OUT
L
R
1
234
5
Page 6

SPHINX Myth 9 Service Manual
6
4. OPERATION
Connect the mains cable to a mains outlet.
Once you have finished connecting all components,
you can power on the Myth 9 with the mains switch
O / I (23).
The STBY LED (13) will light. The CD player is now
in standby mode.
From now on you should switch the CD player on or
off with the m STBY button (13).
That way, all circuits will remain at optimum
operating temperatures and the audio quality will be
100% immediately after switching on. Additionally it
significantly increases the life span of the
component.
Power on
Switch the Myth 9 on with the m STBY button.
It automatically checks whether there is a CD in de
tray (the display shows »READ«). If there is no CD
the display will show »noDISC«.
Playing a CD
Press the m OPEN button (12): the tray opens.
Place a CD in the tray and close it with the m OPEN
button (or the m PLAY button or by gently pushing
the tray inwards).
When the tray is closed the display shows »READ«
after which you will see the total number of tracks
(max. 99, left) and the total playing time of the CD
(right) in minutes:seconds. The lower horizontal row
of numbers indicates all tracks that have not been
played (in this case all of them).
With a press on m PLAY you start the playback of
Track 1. The display now shows the track number
(left) and the track’s playing time from the start
(right). This last indication will increase as long as
the CD is playing.
All tracks will be played sequentially in the normal
order.
Different time display
With the m TIME button you may select between
three different time displays. TRACK TIME is the
default. With each press on the button you then
select in this order:
REM TRACK TIME: remaining track time or
TOTAL REM TIME: remaining CD time or
TRACK TIME: track time from start of play.
Playing a different track
If you would like to play another track then you may
select it in a number of ways.
l Each press on the m NEXT button will select the
next (higher number) track.
Example: To select track 5 while track 1 is playing
depress the m NEXT button 4 times. The display
shows the new track number (left) and in the 1-15+
line the numbers from track 5 to the last will be lit.
l Each press on the m PREV button will select the
previous (lower number) track.
From track 1 you select the last track on the CD with
one button push.
The display shows the new track number (left) and
in the 1-15+ line the numbers from the current track
to the last will be lit.
l From the Remote you may directly select the
track number with the m 1-0 buttons (for more
information, see page 10).
Playing tracks in a different order
Normally the tracks are played in the order of the
CD. There are however three modes that allow you
to change the playing order and even can prevent
tracks from playing altogether.
The three modes are Program Play (PROG), Shuffle
Play (SHUF) and Repeat Play (REPEAT).
Page 7

SPHINX Myth 9 Service Manual
7
Program Play (PROG)
With Program Play you can change the playback of
a CD:
Only play the tracks you want to hear (and thus
skip the others).
Play certain tracks a number of times.
Change the complete playing order.
Select those tracks that exactly fill one side of a
tape.
To do this you first have to select the wanted tracks
and program them into memory. Then you can start
Program Play mode.
Note: Tracks will be played in the order of
programming.
Programming is only possible when the CD has
stopped (STOP). If you press the m PROG button
during Play mode the display will show » GO TO
STOP «, while nothing further will happen.
Programming tracks
l Press the m PROG button.
The display shows »PROGR« and the PROGRAM
indication (right) blinks.
l Select the first track with the m NEXT or m PREV
button.
The display shows under TRACK the track number.
l Press the m PROG button to store the track in
memory.
The display will show:
Under TRACK: the programmed tracks (in this
case 1…).
Under TOTAL TIME the total playing time of the
program.
In the 1-15 line all the selected tracks.
Note: To play the selected track more than once,
press the m PROG button the required number of
times.
l Select all other tracks with the same method.
After each selection the display will be updated.
Note: You can program up to 30 tracks. If you try to
program more the display will show » FULL «.
Note: If you have selected a wrong track you can
not delete it from the program. You then have to
press the m STOP button twice and redo the whole
Programming procedure.
Playing the programmed tracks
After you have finished programming the tracks you
can start playing the program.
l Press the m PLAY button. The PROGRAM
indication (right) will light and playing starts with the
track that has been programmed first. All selected
tracks will then be played in the order of
programming.
l You may also press the m PAUSE button. The
CD player first locates the start position of the first
programmed track and then selects Pause mode.
This might be handy when recording a tape. You
first can select the recorder to record-ready and
position the tape at the correct position. You may
start Program Play with another press on the
m PAUSE button.
Note: If you select the TOTAL REM TIME display
with the m TIME button the display will show the
remaining time for the program.
To stop Program Play
To temporarily stop Program Play: press the
m STOP button once. Pressing the m PLAY button
will resume Program Play.
To stop Program Play completely: press the
m STOP button twice.
The display then will show the same CD data as
right after placing a new CD in the tray.
Shuffle Play (SHUF)
The Shuffle Play mode lets you play the tracks in
random order during Play and Program Play modes.
The m SHUF button activates this mode (the
SHUFFLE indication will light) and random play will
start immediately.
At any time you may de-activate this mode with
another press on the m SHUF button. The playback
will continue and after the current track the next
track will now be played and not a random track.
Repeat Play (REPEAT)
The Repeat mode will repeat the selected Play
mode: Play, Program Play and Shuffle Play. There
are two options.
Repeat 1: Play will be repeated once.
Repeat: Play will be repeated continuously.
You may select the Repeat 1 mode by pressing the
m REPEAT button once: the REPEAT1 indication
will light.
With a second press you select the Repeat mode:
the REPEAT indication will now be lit.
Another press de-activates the mode.
Page 8

SPHINX Myth 9 Service Manual
8
To temporarily halt Play (PAUSE)
All Play modes can be temporarily interrupted with
the m PAUSE button. Another press on this button
(or on the m PLAY button) will resume Play mode.
To stop Play (STOP)
Pressing the m STOP button during any mode will
de-activate this mode completely, the CD will stop
and the display will show the same CD data as right
after placing a new CD in the tray.
At any time you can also press the m OPEN button:
all modes will stop immediately and the tray will
open.
Power off
You switch the Myth 9 off (to stand-by) with the
m STBY button (13).
Special modes for recording CD’s
Recording a CD is highly simplified with two special
modes: Peak and Fade. The first will automatically
find the loudest signal level on the CD, the second
enables you to fade tracks in and out.
The m PEAK button (10) activates the:
Peak mode when the CD has stopped (STOP)
Fade mode when the CD is playing.
The PEAK mode
In Peak mode the CD player scans and analyses
the CD (the PEAK indication will blink). Finally the
display will show under TRACK the track number
and under TRACK TIME the time code of the
loudest part on the CD.
About 3 sec of this part will then continuously be
repeated (the time display will fallback to the starting
point) and the signal is sent to the output.
You can now simply adjust the recording level of the
recorder to the maximum value. So you don’t have
to worry about sudden signal peaks causing
distortion or noise caused by too low a recording
level!
You may de-activate the Peak mode by pressing the
m PLAY, m STOP or m OPEN button.
The FADE mode
With the Fade mode you can fade-out a track
(slowly decrease the level to 0), create a longer
space between two tracks and fade-in a track.
During Play mode (with the correct track and at the
correct moment!) press the m PEAK button. The
display will show sequentially (this will take some 5
seconds):
» FADE ≡≡ «
» FADE = «
» FADE − «
At the same time the signal level is slowly reduced
to 0 (fade-out) and the Pause mode is selected. The
display shows the PAUSE indication (left), the track
number and the time at which the track has been
halted.
To resume playback you have two options:
1. Pressing the m PEAK button resumes playback
and the display will show (this takes some 5
seconds):
» FADE − «
» FADE = «
» FADE ≡≡ «
At the same time the signal level is slowly increased
from 0 to the previous level (fade-in).
2. Pressing the m PAUSE or m PLAY button will
extinguish the PAUSE indication and the track will
resume playback, only now with the level
immediately at maximum: there is no fade-in!
Page 9

SPHINX Myth 9 Service Manual
9
5. THE SPHINX REMOTE CONTROL
This single Sphinx Remote Control lets you control
all functions: not only of the Myth 9 but also of all
other Sphinx equipment.
Only the following buttons on the Remote apply to
the Myth 9 CD player (when pressed the »(((O« will
light in the lower left-hand side of the display), the
other buttons will not function:
Buttons
1. CD: To select the CD player. All buttons pressed
hereafter will control only the CD player
functions.
Note: The TUNER and PRE-AMP buttons will
not function.
2. STANDBY: Only works if you use a Sphinx
(pre-)amp and the Myth 9 is connected via the
optical cable
3. MUTE: Only works if you use a Sphinx (pre-)
amp, you don’t have to pre-select PRE-AMP.
4. 1 - 0: With these numbered buttons you may
select each CD track directly. To input a two digit
number (e.g. 16): shortly depress the button for
the first digit (the display shows »1—«) and
immediately select the second digit (6). If you
wait to long the player will select track 1.
Example: To select track 16 press 1 and 6.
5. ññ/òò VOLUME: Only work if you use a Sphinx
(pre-)amp, you don’t have to pre-select PREAMP.
6. BAND: This button has the same function as the
OPEN button on the front panel (12).
7. STOP: This button has the same function as the
STOP button on the front panel (3).
8. PAUSE: This button has the same function as
the PAUSE button on the front panel (6).
9. PLAY: This button has the same function as the
PAUSE button on the front panel (6).
10. PREV. TRACK: This button has the same
function as the PREV button on the front panel
(5).
11. REV. SEARCH: This button has the same
function as when you hold the PREV button (5)
depressed.
12. FWD. SEARCH: This button has the same
function as when you hold the NEXT button (4)
depressed.
13. NEXT TRACK: This button has the same
function as the NEXT button on the front panel
(4).
2
3
1
4
5
6
9
13
12
8
7
10
11
Page 10

SPHINX Myth 9 Service Manual
10
Operation
The Sphinx Remote is used with several different
models and can therefore transmit different control
codes, depending on which model has been
selected with the select buttons (1).
Important: Always press the m CD button before you
send a command (even if you only have one Sphinx
component).
Otherwise it is possible that, although the Remote
sends a signal, nothing happens because the
transmitted signal is not 'recognised' by the
component.
You may check this yourself: if you press a button
and the symbol »(((O« in the display does not light,
the signal is not recognised.
Indoor the Remote may be used up to a distance of
7 meter, provided there is no strong sunlight in the
room and if you aim the Remote at the component.
Always aim the Remote straight at the front panel of
the component, the maximum offset angle is 30°.
Selecting without switching
Suppose, for instance, that you would like to select
the tuner to Radio 4 without interrupting CD
playback.
In that case you momentarily depress (not longer
than 0.5 sec) the m TUNER button and the m '4'
button. The same procedure is used for the other
system components.
If you depress the select button longer than 0.5 sec,
the system will select a different signal source (in our
example you will then hear the tuner playback).
Batteries
The two batteries have a life span of approximately
one year during normal use, but shorter when used
more intensely.
Replacement batteries: 1.5 V, model micro or penlite
or LR03 or AAA or AM4 (one of these codes is
indicated on the packaging and the batteries). You
may also use rechargeable 1.5 V batteries.
Note: Position the new batteries exactly as shown in
the illustration at the bottom of the battery
compartment, otherwise Remote will not work!
Encountering problems...
Remote Control does not work
Wrong component selected Select the correct one
Distance to component
exceeds 7 m
Use Remote at closer
range
Angle between Remote and
component exceeds ±30°
Decrease angle
Sensor window on front dirty Clean window
Batteries empty or incorrectly
placed
Use new batteries or
replace the old ones
correctly
Strong (sun)light in room Shade off light source
Component is not switched on
(!)
Switch it on
Component reacts differently than expected or
not at all
Wrong component selected Select the correct one
Component or Remote does
not function
Check component with
its original remote
Batteries in Remote empty Use new batteries
Page 11

SPHINX Myth 9 Service Manual
11
6. TECHNICAL SPECIFICATIONS
Transport Philips CDM-12.4
D/A converter 1-Bitstream, TDA 1315 H + 2x TDA 1305 DAC
Completely independent for each channel
Bandwidth 0 – 20,000 Hz (+0/-0.2 dB)
Phase response error <0.5°
THD+N (IHF-A) <0.006% (2
nd
harm., 10 – 20,000 Hz)
IMD <0.01%
S/N ratio (IHF-A) >100 dB
Channel separation >94 dB
Output section Class AB, discrete throughout
Outputs 2x cinch (gold-plated)
Impedance <10 ohm
Sphinx Control 1x optical IN, 1x optical OUT
Remote Control Sphinx System full function
Power supply Internal, completely separate sections for digital
and analogue with integrated power line
suppression filter
Supply capacitance 16.280 µF total
Power consumption 11 W (9 W stand-by)
Dimensions (h x w x d) 75 x 434 x 330 mm
Weight 7 kg
This unit conforms to the EMC interference regulations issued by the EU and to the CE standards.
This unit complies with safety regulation VDE 0860 and therefore with international safety regulation IEC 65.
Technical specifications may be changed by SPHINX without prior notice if technical developments make this
necessary.
© 1999 Audioscript BV
Page 12

SPHINX Myth 9 Service Manual
12
7. ADJUSTMENT PROCEDURES
The Myth 9 has no parameters needing adjustment!
Any specific and particular serviceable items may
be found in the ensuing Problems and Solutions
table on the next page.
Page 13

SPHINX Myth 9 Service Manual
13
8. PROBLEMS AND SOLUTIONS
At the moment of writing the Myth 9 has no known
specific problems.
If in the future you encounter any problem(s) you
may enter the info in this table. This table can then
be used for future reference.
Please also send (by fax or e-mail) the specific
information to the Sphinx International Service
Department (see page 3): this info can then be
added to the general database to aid others.
Problem Cause Solution Refer to
page…
Page 14

SPHINX Myth 9 Service Manual
14
9. DIAGRAMS AND PARTS LIST
The next pages contain a complete set of schematic
drawings including the associated parts list (if
applicable).
Page 15

SPHINX Myth 9 Service Manual
15
General Overview Myth 9
DAC
dac.sch
Display
front.sch
Power supply
supply.sch
In- and output
io.sch
Page 16

SPHINX Myth 9 Service Manual
16
Power Supply
C1
100n
C4
100n
C3
100n
C2
100n
D1
BYD17
D2
BYD17
D3
BYD17
D4
BYD17
R1
1R
R2
1R
+ C5
4700u/25V
C6
100n
Vout Vin
GND
U1
7805
C7
100n
+ C8
10u/16V
C1_2
C1_3
C9
100n
C12
100n
C11
100n
C10
100n
D5
BYD17
D6
BYD17
D7
BYD17
D8
BYD17
R3
1R
R4
1R
+ C13
4700u/25V
C14
100n
Vout Vin
GND
U2
7805
C15
100n
+ C16
10u/16V
C1_4
C1_5
C17
100n
C20
100n
C19
100n
C18
100n
D9
BYD17
D10
BYD17
D11
BYD17
D12
BYD17
R5
1R
R6
1R
+ C21
4700u/25V
C22
100n
Vout Vin
GND
U3
7050-12
C23
100n
+ C24
10u/16V
C1_6
C1_7
C25
100n
C28
100n
C27
100n
C26
100n
D13
BYD17
D14
BYD17
D15
BYD17
D16
BYD17
R7
1R
R8
1R
+ C29
4700u/25V
C30
100n
Vout Vin
GND
U4
7050-12
C31
100n
+ C32
10u/16V
C1_8
C1_9
AC1
AC2
AC3
AC4
AC5
AC6
AC7
AC8
GNDA
SW1.1
115_230
SW1.2
115_230
AC21
AC11
AC10
AC20
ACP2
ACP3
ACP4
ACP1
230
115
230
115
F1
1AT
F2
1AT
C2_1
C2_2
C2_3
C2_1
REL1B
COM1
REL1C
COM2
NO1
NC1
NO2
NC2
REL1A
NEC62R
D18
BYD17
C1_14
C1_15
C1_16
D17
AMP_PHDIOD
TR1
AMP_PHTRAN
C1_10
C1_11
C1_12
C1_13
C1_1
Page 17

SPHINX Myth 9 Service Manual
17
D/A converter
SCK
37
WS
36
SD
35
SDAUX
34
DEEM31MUTE
32
I2SOEN
38
I2SSEL
33
VDD2
17
VDD1
42
IECOEN
9
IECO
8
IECIN0
6
IECIN1
5
INUAL
30
VSSD141VSSD2
18
CHMODE
16
UNLOCK
12
FS3213FS4414FS48
15
COPY
29
PD
20
TESTA
28
TESTB
10
TESTC
11
RESET
19
CTRLM
21
STROBE
26
LDATA
25
LCLK
24
LMODE
23
IECSEL7RCint44Vref2VSSA4SYSCLO40SYSCLI39LADDR22UDAV
27
CLKSEL43RCfil1VDDA
3
IC4
TDA1315
LRCK
5
SCLK
4
SDATA
6
SCLKO
16
DEEM1
17
CLKS28CLKS1
7
MUSB
19
SCLKI
12
DEEM2
18
DSMB
20
ATSB
21
TEST13TEST2
11
VREF
26
CFR
24
VOR
25
VOL
23
CFL
23
DGND115DGND29VD+10DGND27AGND2VA+1VO+
28
IC5
TDA1305T
1
2
4
IC2A
7400
147
IC2E
7400
C7
100n
C6
10n
R16
3R9
R8
75R
DIG_IN
CN1
CN3
+5VD
DGND
DGND
SCLK
SDATA
LRCK
DGND
DEEM
D28
LED
D27
LED
D26
LED
D25
LED
D29
LED
R10
1k
R9
1k
+5VD
D9
1N4148D81N4148
R3
4k7R44k7
PLL
PROF
FS32
FS44
FS48
DEEM
DGND
C15
100n
+5VD
C11
2n2
C10
100n
C14
100n
+
C12
6u8/35V
+
C13
68u/6V3
R11
470R
R12
3R9
+5VD
DGND
LRCK
SCLK
SDATA
256FS
C29
100n
C37
100n
C34
100n
+
C30
10u/16V
+
C31
470u/25V
R31
3R9
R1
4k7
DGND
DGND
+5VD
+
C36
470u/25V
+
C35
10u/16V
+
C39
470u/25V
+
C38
10u/16V
R33
3R9
+5VA
R32
3R9
+5VA
C32
100n
+
C33
10u/16V
C48
1n
C41
1n
DGND
LRCK
5
SCLK
4
SDATA
6
SCLKO
16
DEEM1
17
CLKS28CLKS1
7
MUSB
19
SCLKI
12
DEEM2
18
DSMB
20
ATSB
21
TEST13TEST2
11
VREF
26
CFR
24
VOR
25
VOL
23
CFL
23
DGND115DGND29VD+10DGND27AGND2VA+1VO+
28
IC6
TDA1305T
LRCK
SCLK
/SDATA
C1
100n
C18
100n
C8
100n
+
C2
10u/16V
+
C3
470u/25V
R17
3R9
R2
4k7
DGND
DGND
+5VD
+
C17
470u/25V
+
C16
10u/16V
+
C20
470u/25V
+
C19
10u/16V
R52
3R9
+5VA
R51
3R9
+5VA
C4
100n
+
C5
10u/16V
C21
1n
C65
1n
DGND
SDATA
R5
3R9
C76
100n
DGND
+5VD
DEEM2
DEEM1
DEEM1
DEEM2
-
2
+
3
6
U2A
AD711N
C46
100p_pol
C45
100p_pol
R35
120R
R37
3k3
R36
3k3
DCADJL
R68
10k
R69
120R
C70
100p_pol
C83
33p
R66
10k
R67
OPT
Q3
BC807
Q2
BC807
Q6
2SA1668
Q7
2SC4382
Q5
BC817
Q4
BC817
R56
560R
R57
560R
R58
10R
R59
10R
R54
560R
R55
560R
R53
4k7
D11
LED
C66
100n
DCL-
DCL+
-
2
+
3
6
U1A
TL071P
R65
100k
C67
1u/50V
R63
100k
R64
100k
C68
100n
DCADJL
R6
49R9
C51
470p_pol
-
2
+
3
6
U4A
AD711N
C44
100p_pol
C43
100p_pol
R38
120R
R41
3k3
R86
3k3
DCADJR
R84
10k
R85
120R
C75
100p_pol
C84
33p
R82
10k
R83
OPT
Q9
BC807
Q8
BC807
Q12
2SA1668
Q13
2SC4382
Q11
BC817
Q4
BC817
R74
560R
R75
560R
R76
10R
R77
10R
R72
560R
R73
560R
R71
4k7
D12
LED
C71
100n
DCR-
DCR+
-
2
+
3
6
U5A
TL071P
R81
100k
C72
1u/50V
R79
100k
R80
100k
C73
100n
DCADJR
R7
49R9
C52
470p_pol
256FS
74
U2B
AD711N
74
U1B
TL071P
C53
100n
C54
100n
+
C57
10u/16V
+
C58
10u/16V
+
C62
470u/25V
+
C61
470u/25V
DCL+
DCL-
+15V
-15V
R61
3R9
R60
3R9
74
U4B
AD711N
74
U5B
TL071P
C55
100n
C56
100n
+
C60
10u/16V
+
C59
10u/16V
+
C63
470u/25V
+
C64
470u/25V
DCR+
DCR-
+15V
-15V
R61
3R9
R60
3R9
CN4
REL1B
REL1C
RIGHT LEFT
LEFT
RIGHT
Page 18

SPHINX Myth 9 Service Manual
18
Input / Output
21
IC1A
7404
43
U1B
7404
65
U1C
7404
89
U1D
7404
1011
U1E
7404
1213
U1F
7404
147
U1G
7404
R20
47k
R48
47k
C9
100n
DGND
C2_2
C2_1
+5VD
C1_1
R23
1K
R22
100K
D1
1N4148
D3
6V2
+
C27
220u/25V
Q14
BCV47
R28
1K
R18
4K7
R19
1K
D6
1N4148
D4
1N4148
+
C26
1u/16V
R24
47K
R25
4K7
D5
6V2
R26
1K
D7
1N4148
R27
47K
R30
1K
R29
4K7
Q1
BCV47
C28
100n
D10
BYD77
REL1A
6V/150mW
+5VD
R21
3R9
+
C25
10u/16V C24
100n
DGND
+5VD
DGND
S
6
D
5
CLK
3
R4Q
2
Q
1
IC3A
4013
S
8
D
9
CLK
11
R10Q
12
Q
13
IC3B
4013
147
IC3C
4013
C22
100n
R93
47k
DGND
+5VD
R94
4k7
R87
1k
R88
4k7
Q16
BCV47
DGND
R50
390R
frontpr
C1_12 C1_10
C1_13 C1_11
R92
4k7
R95
390R
Q17
BCV47
R91
100k
DGND
+5VD
D14
1N4148
R89
1k
R90
4k7
Q15
BCV47
DGND
C1_15
C1_14
+5VD
POWER_RELAYS
DGND
D13
BYD17
D2
BYD17
R15
4k7
+5VD +5VA
C1_2
C1_3
C1_4
C1_5
C1_6
C1_7
C1_8
C1_9
C1_16
+
C23
470u/25V
+5VD
+
C42
470u/25V
+5VA
R14
3R9
+
C77
470u/25V
R98
0R
R96
0R
+15V
+
C78
470u/25V
R97
0R
-15v
C82
100n
C81
100n
C80
100n
C79
100n
C2_3
DGND DGND
opto_in opto_out
frontpr
AC1
Page 19

SPHINX Myth 9 Service Manual
19
Display
V+
2
D
1
GND
3
IR
IR1
SFH506-38
DGND
IR
IR+
1-8
1-7
1-6
1-5
1-4
1-3
1-2
1-1
4-3
4-2
4-1
1-7
1-8
3-4
1-6
1-5
1-4
1-3
1-2
1-1
3-5
4-3
4-2
4-1
3-1
3-2
3-3
3-6
3-7
PAUSE TRACK PEAK TOTAL REM TTIME
SPACE
1 2 3 4 5 6 7 8 9 10 11 12 13 14
DISPLAY_BOARD
SHUFFLE TIME
REPEAT STOP
PLAY
OPEN/CL
PAUSE PREVIOUS
PEAK
NEXT
PROGRAM
STANDBY
D1
1N4148
D2
1N4148
D3
1N4148
D4
LED
C2-2
C2-3C2-1
DGND
Page 20

SPHINX Myth 9 Service Manual
20
Parts List
Designator Part Type Description
C1 100n MKT capacitor
C1 100n MKT capacitor
C10 100n MKT capacitor
C10 100n MKT capacitor
C11 100n MKT capacitor
C11 2n2 MKT capacitor
C12 100n MKT capacitor
C12 6u8/35V Electrolytic capacitor
C13 4700u/25V Electrolytic capacitor
C13 68u/6V3 Electrolytic capacitor
C14 100n MKT capacitor
C14 100n MKT capacitor
C15 100n MKT capacitor
C15 100n MKT capacitor
C16 10u/16V Electrolytic capacitor
C16 10u/16V Electrolytic capacitor
C17 100n MKT capacitor
C17 470u/25V Electrolytic capacitor
C18 100n MKT capacitor
C18 100n MKT capacitor
C19 100n MKT capacitor
C19 10u/16V Electrolytic capacitor
C2 100n MKT capacitor
C2 10u/16V Electrolytic capacitor
C20 100n MKT capacitor
C20 470u/25V Electrolytic capacitor
C21 1n MKT capacitor
C21 4700u/25V Electrolytic capacitor
C22 100n MKT capacitor
C22 100n MKT capacitor
C23 100n MKT capacitor
C23 470u/25V Electrolytic capacitor
C24 100n MKT capacitor
C24 10u/16V Electrolytic capacitor
C25 100n MKT capacitor
C25 10u/16V Electrolytic capacitor
C26 100n MKT capacitor
C26 1u/16V Electrolytic capacitor
C27 100n MKT capacitor
C27 220u/25V Electrolytic capacitor
C28 100n MKT capacitor
C28 100n MKT capacitor
C29 100n MKT capacitor
C29 4700u/25V Electrolytic capacitor
C3 100n MKT capacitor
C3 470u/25V Electrolytic capacitor
C30 100n MKT capacitor
C30 10u/16V Electrolytic capacitor
Page 21

SPHINX Myth 9 Service Manual
21
Designator Part Type Description
C31 100n MKT capacitor
C31 470u/25V Electrolytic capacitor
C32 100n MKT capacitor
C32 10u/16V Electrolytic capacitor
C33 10u/16V Electrolytic capacitor
C34 100n MKT capacitor
C35 10u/16V Electrolytic capacitor
C36 470u/25V Electrolytic capacitor
C37 100n MKT capacitor
C38 10u/16V Electrolytic capacitor
C39 470u/25V Electrolytic capacitor
C4 100n MKT capacitor
C4 100n MKT capacitor
C41 1n MKT capacitor
C42 470u/25V Electrolytic capacitor
C43 100p_pol Styroflex capacitor
C44 100p_pol Styroflex capacitor
C45 100p_pol Styroflex capacitor
C46 100p_pol Styroflex capacitor
C48 1n MKT capacitor
C5 10u/16V Electrolytic capacitor
C5 4700u/25V Electrolytic capacitor
C51 470p_pol Styroflex capacitor
C52 470p_pol Styroflex capacitor
C53 100n MKT capacitor
C54 100n MKT capacitor
C55 100n MKT capacitor
C56 100n MKT capacitor
C57 10u/16V Electrolytic capacitor
C58 10u/16V Electrolytic capacitor
C59 10u/16V Electrolytic capacitor
C6 100n MKT capacitor
C6 10n MKT capacitor
C60 10u/16V Electrolytic capacitor
C61 470u/25V Electrolytic capacitor
C62 470u/25V Electrolytic capacitor
C63 470u/25V Electrolytic capacitor
C64 470u/25V Electrolytic capacitor
C65 1n MKT capacitor
C66 100n MKT capacitor
C67 1u/50V MKT capacitor
C68 100n MKT capacitor
C7 100n MKT capacitor
C7 100n MKT capacitor
C70 100p_pol Styroflex capacitor
C71 100n MKT capacitor
C72 1u/50V MKT capacitor
C73 100n MKT capacitor
C75 100p_pol Styroflex capacitor
C76 100n MKT capacitor
Page 22

SPHINX Myth 9 Service Manual
22
Designator Part Type Description
C77 470u/25V Electrolytic capacitor
C78 470u/25V Electrolytic capacitor
C79 100n MKT capacitor
C8 100n MKT capacitor
C8 10u/16V Electrolytic capacitor
C80 100n MKT capacitor
C81 100n MKT capacitor
C82 100n MKT capacitor
C83 33p Styroflex capacitor
C84 33p Styroflex capacitor
C9 100n MKT capacitor
C9 100n MKT capacitor
CN1 CN4 CINCH-2P
D1 1N4148 Diode
D1 1N4148 Diode
D1 BYD17 Diode
D10 BYD17 Diode
D10 BYD77 Diode
D11 BYD17 Diode
D11 LED LED red
D12 BYD17 Diode
D12 LED LED red
D13 BYD17 Diode
D13 BYD17 Diode
D14 1N4148 Diode
D14 BYD17 Diode
D15 BYD17 Diode
D16 BYD17 Diode
D17 AMP_PHDIOD optical output
D18 BYD17 Diode
D2 1N4148 Diode
D2 BYD17 Diode
D2 BYD17 Diode
D25 LED LED red
D26 LED LED red
D27 LED LED red
D28 LED LED red
D29 LED LED red
D3 1N4148 Diode
D3 6V2 Zener diode
D3 BYD17 Diode
D4 1N4148 Diode
D4 BYD17 Diode
D4 LED LED red
D5 6V2 Zener diode
D5 BYD17 Diode
D6 1N4148 Diode
D6 BYD17 Diode
Page 23

SPHINX Myth 9 Service Manual
23
Designator Part Type Description
D7 1N4148 Diode
D7 BYD17 Diode
D8 1N4148 Diode
D8 BYD17 Diode
D9 1N4148 Diode
D9 BYD17 Diode
F1 1AT Fuse
F2 1AT Fuse
IC1 7404 Digital IC
IC2 7400 Digital IC
IC3 4013 Digital IC
IC4 TDA1315 DIGITAL AUDIO RECEIVER
IC5 TDA1305T AUDIO DAC
IC6 TDA1305T AUDIO DAC
IR1 SFH506-38 IR-receiver
Q1 BCV47 Transistor
Q11 BC817 Transistor
Q12 2SA1668 Transistor
Q13 2SC4382 Transistor
Q14 BCV47 Transistor
Q15 BCV47 Transistor
Q16 BCV47 Transistor
Q17 BCV47 Transistor
Q2 BC807 Transistor
Q3 BC807 Transistor
Q4 BC817 Transistor
Q4 BC817 Transistor
Q5 BC817 Transistor
Q6 2SA1668 Transistor
Q7 2SC4382 Transistor
Q8 BC807 Transistor
Q9 BC807 Transistor
R1 1R Resistor
R1 4k7 Resistor
R10 1k Resistor
R11 470R Resistor
R12 3R9 Resistor
R14 3R9 Resistor
R15 4k7 Resistor
R16 3R9 Resistor
R17 3R9 Resistor
R18 4K7 Resistor
R19 1K Resistor
R2 1R Resistor
R2 4k7 Resistor
R20 47k Resistor
Page 24

SPHINX Myth 9 Service Manual
24
Designator Part Type Description
R21 3R9 Resistor
R22 100K Resistor
R23 1K Resistor
R24 47K Resistor
R25 4K7 Resistor
R26 1K Resistor
R27 47K Resistor
R28 1K Resistor
R29 4K7 Resistor
R3 1R Resistor
R3 4k7 Resistor
R30 1K Resistor
R31 3R9 Resistor
R32 3R9 Resistor
R33 3R9 Resistor
R35 120R Resistor
R36 3k3 Resistor
R37 3k3 Resistor
R38 120R Resistor
R4 1R Resistor
R4 4k7 Resistor
R41 3k3 Resistor
R48 47k Resistor
R5 1R Resistor
R5 3R9 Resistor
R50 390R Resistor
R51 3R9 Resistor
R52 3R9 Resistor
R53 4k7 Resistor
R54 560R Resistor
R55 560R Resistor
R56 560R Resistor
R57 560R Resistor
R58 10R Resistor
R59 10R Resistor
R6 1R Resistor
R6 49R9 Resistor
R60 3R9 Resistor
R60 3R9 Resistor
R61 3R9 Resistor
R61 3R9 Resistor
R63 100k Resistor
R64 100k Resistor
R65 100k Resistor
R66 10k Resistor
R67 OPT Resistor
R68 10k Resistor
R69 120R Resistor
R7 1R Resistor
R7 49R9 Resistor
Page 25

SPHINX Myth 9 Service Manual
25
Designator Part Type Description
R71 4k7 Resistor
R72 560R Resistor
R73 560R Resistor
R74 560R Resistor
R75 560R Resistor
R76 10R Resistor
R77 10R Resistor
R79 100k Resistor
R8 1R Resistor
R8 75R Resistor
R80 100k Resistor
R81 100k Resistor
R82 10k Resistor
R83 OPT Resistor
R84 10k Resistor
R85 120R Resistor
R86 3k3 Resistor
R87 1k Resistor
R88 4k7 Resistor
R89 1k Resistor
R9 1k Resistor
R90 4k7 Resistor
R91 100k Resistor
R92 4k7 Resistor
R93 47k Resistor
R94 4k7 Resistor
R95 390R Resistor
R96 0R Resistor
R97 0R Resistor
R98 0R Resistor
REL1 6V/150mW Relay
REL1 NEC62R Relay
SW1.1 115_230 Switch
SW1.2 115_230 Switch
TR1 AMP_PHTRAN optical output
U1 LM7805 Voltage regulator
U1 TL071P DSA converter
U2 LM7805 Voltage regulator
U2 AD711N DSA converter
U3 7050-12 IC
U4 7050-12 IC
U4 AD711N DSA converter
U5 TL071P DSA converter
DISPLAY_BOARD DISPLAY MYTH 9
Page 26

SPHINX Myth 9 Service Manual
26
©1999 Audioscript BV
Version: 1999-04-21 23:37
 Loading...