


Wireless
Digital Picture Frame
User Guide / Livret Utilisateur
Manuale del Utilisator / Benutzerhandbuch
Guia do Utilizador / Guía del Usuario
2019-06

Hi There!
Welcome to your new Pix-Star® Wi-Fi Photo Frame. Thank you very much for your trust in our
product and service.
This Digital Photo Frame is a totally new generation of product with wireless capabilities and
innovative features that we believe you will enjoy immensely.
This frame will allow you to share all of your photographic moments with friends and family in
just a few seconds wherever and whenever. It also includes the traditional features of a Digital
Photo Frame by displaying pictures and other media files from USB memory sticks and
compatible memory cards.
If you run into any issue during set up or have questions or comments, do not hesitate to reach
out by contacting us through our web site www.pix-star.com.
Notice: This user guide has been simplified to review the basic features of this frame.
However, due to constant improvements made to our products there may be features in your
frame not listed here. We recommend that you check our website at www.pix-star.com to find
regularly updated information.
REGISTRATION
To register your Pix-Star frame go to www.pix-star.com, and click on "register my new frame,"
you will be able to instantly send/receive pictures to/from your friends and family!
Enjoy your Pix-Star®

Recommended Use and Safety Warnings
Do not install your Digital Picture Frame near water (minimum 1.50 m away from a water
source) or in a humid environment, for example the bathroom, laundry room, or kitchen.
Warning: This is an electronic product, if the front or back cover of the frame are removed or
exposed to rain, water or moisture there is a risk of electrical shock or fire. Do not remove
the cover or back of the frame. Do not expose the device to rain, water or moisture.
This product has been designed to work indoors and should not be used outside. Avoid using
the product in a dusty environment.
This product only works in temperatures between 10°C and 35°C or 50°F and 95°F.
Only use this product with the power adapter that was provided. Using any other adapter will
void your warranty.
Do not place this product on an unstable desk or table. Never place heavy or sharp objects on
the LCD panel of the device.
This product is not recommended for use by children.
Protect the power cord from being stepped on or pinched particularly at plugs, receptacles and
the point where the cord attaches to the device.
The CE mark indicates that the product is in compliance with the main requirements of the
European parliament and council directive 2002/96/EC for telecommunications terminals, user
health and safety and for electromagnetic disturbance.
This terminal has been designed for private, indoor use (CPE customer premises equipment)
within the European Union. It has been tested according to the technical dispositions for radio
equipment (EN 300328). The manufacturer therefore declines all responsibility in case of noncompliance with the current regulations in the country of installation.
If you suspect there is a problem with the device, the remote control or the power adapter
please contact us immediately through our web site www.pix-star.com, we will supply a
replacement part, if needed, free of charge. For your safety, DO NOT ATTEMPT to repair the
device or the adapter yourself.
The declaration of conformity and the warranty are accessible upon request by contacting
us through our web site www.pix-star.com.
Always keep a back up of your pictures!
The warranty does not cover damage caused by incorrect use of this product as well as
memory devices.
When using earphones for private listening with this product always turn the volume down
before plugging the earphones into the device and limit the amount of time you listen
through earphones at high volume. Excessive exposure to loud sounds can cause hearing
damage.
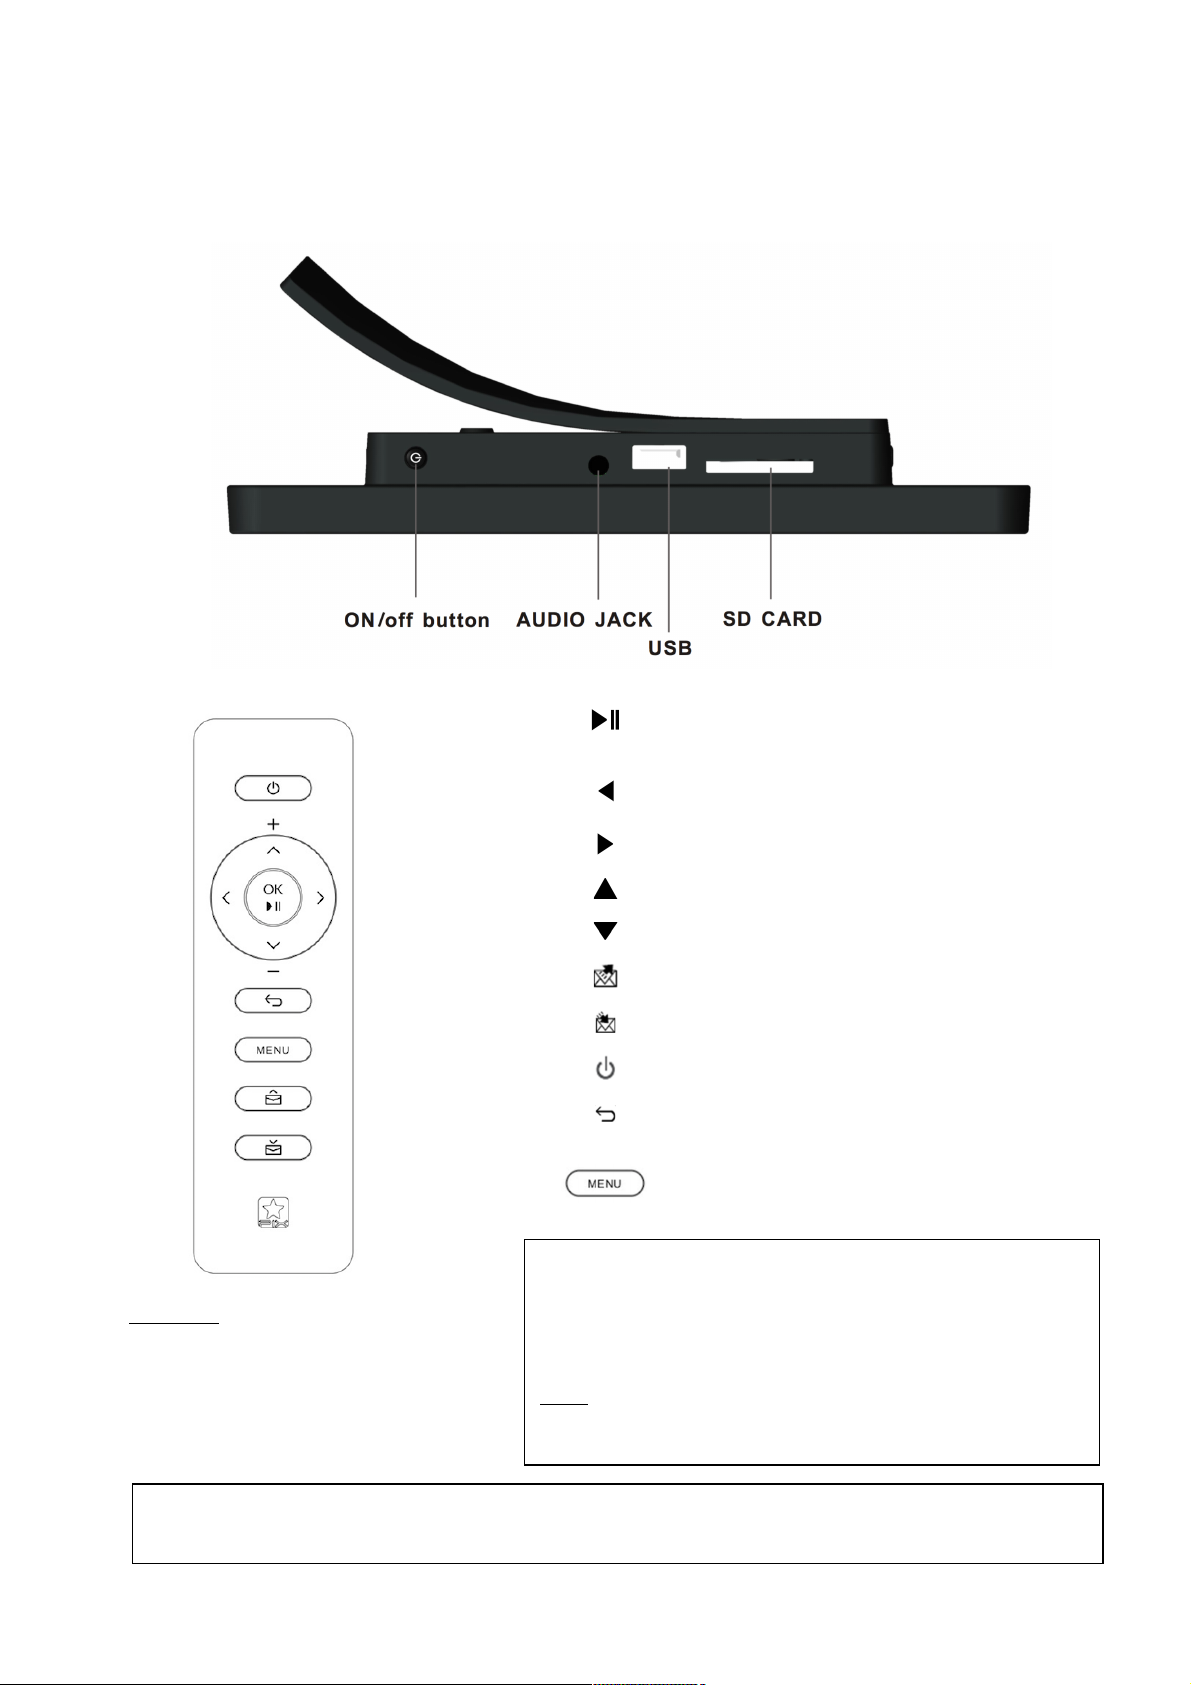
1. Overview of the device
CAUTION
Do not attempt to recharge, disassemble or burn the batteries.
Inappropriate handling of batteries may cause them to explode.
Play/pause when in slideshow mode
To enter a sub-menu in menu mode
To confirm the selection
Move left in the menu mode
Move to previous picture in slideshow mode
Move right in the menu mode
Move to next picture in the slideshow mode
Move up in the menu mode
Move down in the menu mode
Share: Open the user interface to send/share pictures
Inbox: Open the inbox to view pictures received by email
Switch On/Off the LCD (Standby mode)
To move back to previous menu in menu mode
To quit the slideshow when slideshow is playing
Display slide show menu bar (when slideshow is playing)
Display main menu
Box contains:
- 1 x remote control
- 1 x user manual
- 1 x Pix-Star photo frame
- 1 x power adapter AC 100/220V
Note:
Insert the batteries in the remote control prior to using it. Batteries
are to be inserted at the back of the remote control, be careful to
insert them in the right DIRECTION.
Always point the remote control toward the remote sensor located
below the screen of the frame.
ATTENTION: batteries CANNOT be recharged!
2. Installation and Power On
First, plug the AC adapter into the back of the device, then plug the AC adapter to a power
outlet.
To turn on the device, hold the power button located on the back/bottom of the device for 3
seconds. The screen should display a logo.
Wait about 25 seconds for the device to start up.
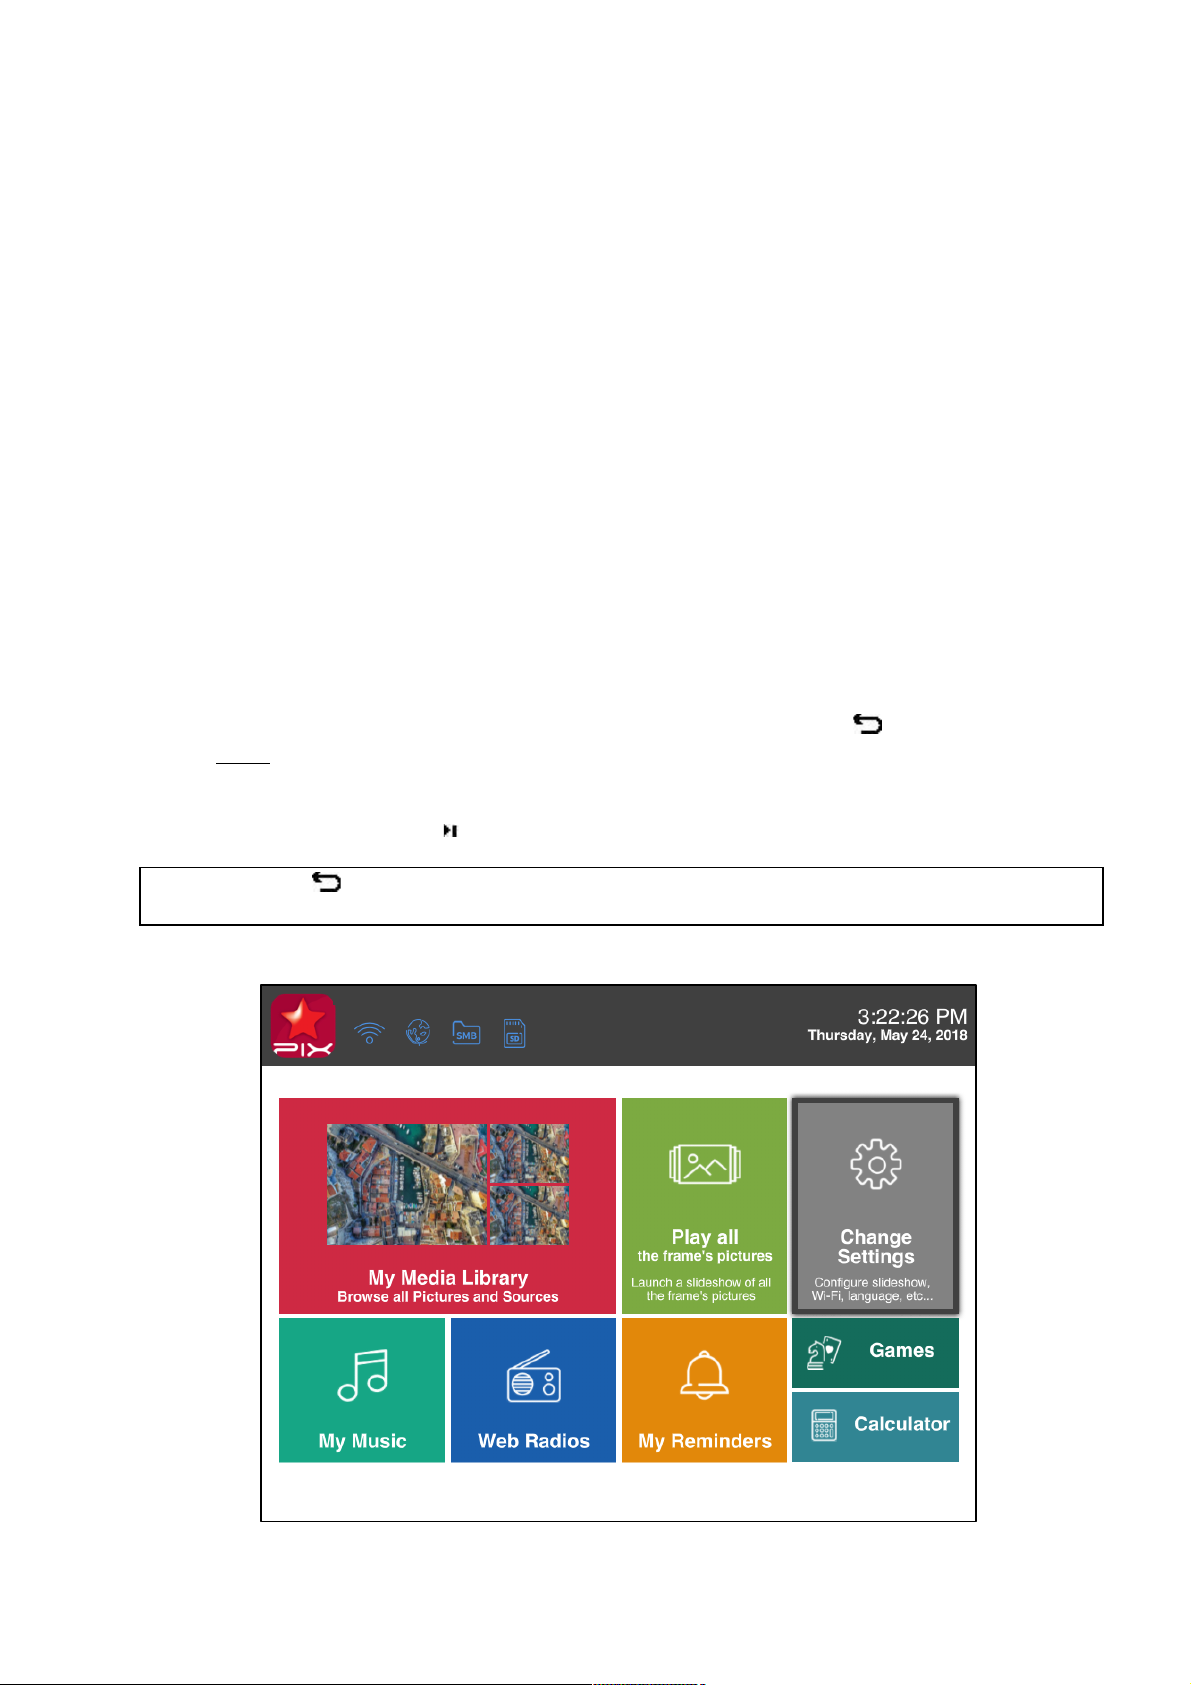
3. Introduction to the Main User Interface
After you power on the device and wait for approximately 25 seconds your Pix-Star will display
the main menu.
You can navigate the menus using the remote control or the buttons located on the back of the
device.
To stop the slideshow and go back to the main menu press the Back button or the Menu
button twice.
When the main menu is displayed on the screen, select the menu you want by using the UP and
DOWN buttons then press the / OK button.
Note: The Back button on the remote control allows you to go back to the previous menu
(upper level menu)

My Media Library
Access all your files and sources of pictures in
this menu:
- Access photo-mail already received;
- Access pictures from your SD card;
- Access pictures from your USB source;
- Access Web Albums created inside
www.pix-star.com and external
providers such as Facebook, Google
photos, Dropbox, etc…
- Access UPnP/DLNA pictures stored in
your DLNA server over the local network;
- Configure & access Samba disk over the
local network;
- Configure & access Photo RSS feeds
Play all the Frame’s Pictures
Play a slide show of all the frame’s picture.
Change Settings
-
Language
- Date & Time
- Auto On/Off
- Slide-Show
- Photo-Mail
- Wi-Fi
- About
- Factory Reset
Choose a language for the user interface
Set the date and time
Set the device’s automatic sleep mode
Configure all the slide show settings
Set up Photo-Mail receiving mode
Connect to your wireless network
Information related to the device
Reset the device to factory settings
My Music
Play music (mp3 and wav files) from SD card
and USB sources.
Web Radios
Play a selection of Web Radios from the World.
My Reminders
Configure and manage reminders and alarms.
Games
Play a selection of fun games.
Calculator
A handy calculator.

4. Wi-Fi and Internet Setup
4.1 Connect the device to a Wi-Fi network
You can set up a dedicated email address for your frame, which makes it possible for the
device to receive pictures directly from email. To receive pictures, the device must be
connected to the Internet through a Wi-Fi gateway.
Here is how to connect your photo frame to a local Wi-Fi network:
1. Access the Main Menu (If you are playing a slideshow press the MENU button twice
slowly)
2. Scroll to CHANGE SETTINGS and press " " to enter it
3. Scroll to Wi-Fi and press " ". The device will automatically start a scanning process
to discover available wireless networks
4. Using the UP and DOWN keys to navigate the interface and select the Wi-Fi network
you want to connect to
5. Press the button to connect to the selected network
If the network security is enabled, the device will automatically pop up a window where you
can enter the security key. All other parameters are AUTOMATICALLY configured by your PixStar frame.
After you enter the security key in the interface using the virtual keyboard, press CONFIRM
then press JOIN, it will start the Wi-Fi connection process.
Note 1: A DHCP server must be running on your network in order to automatically assign an IP
address to your device. Most personal Wi-Fi networks run a DHCP server.
Note 2: Connection to Public Hotspots or to a network that requires an authentication with
user name and password through a web page (HTML) or that requires to accept some terms and
conditions to access internet are NOT supported by this product as there is no web browser in
the device. If you use a router with a “guest” access that uses this web page authentication
mode please connect to the “main” access instead.

4.2 Register and Manage the Device on the WEB
First-time users should register their frame online by following these instructions: Go to
www.pix-star.com and click on the “Register a new Pix-Star” button.
Complete the form, choose a password and an email address you want to assign to your
frame, and you’ll be ready to go!
You can find the device ID (serial number also called “MAC ADDRESS”) by accessing the
CHANGE SETTINGS menu then the ABOUT menu which gives all the information on your
device.
5. Receive Pictures by Email Directly on the Device
To add a picture to your device, simply send an email with a picture attachment directly to the
email address you create for your frame. Your email address is customizable and totally unique
like “sarahbee7@mypixstar.com.”
Note 1: You can send several pictures in the same email.
Note 2: You can configure FILTERS on incoming emails to select who is allowed to send photo-
mails to your Pix-Star frame. To manage the filtering options, log into your account at pixstar.com.
You can configure the way Pix-Star handles incoming photo-mails by going to the CHANGE
SETTINGS menu, then PHOTO-MAIL menu. You have the following choices:
- Accept Manually (default configuration)
In this mode, when a new photo-mail arrives, your frame displays an envelope icon on
top of the slide show and a message on the main menu. You can manually open the
photo-mail by pressing the button at the bottom of the remote control or by
selecting ''You have a new message'' that appears in the Main Menu. It opens a window
that displays photos individually, and provides the sender’s email address, date and
time (GMT format) and the subject of the email. You can then decide which photos to
KEEP or DELETE.
The “manual confirm” mode is for those who want full control of incoming photo-mails.
- Accept Auto & Show
In this mode the device AUTOMATICALLY accepts photo-mails. Photo-mails open one by
one and the attached pictures are displayed for 10 seconds then automatically stored in
the local memory of your frame.
This mode is for users who want simplicity, as it does not require much interaction with
the device.
- Accept Automatically
This mode is the same as “Accept Auto & Show” except that the device AUTOMATICALLY
accepts photo-mails WITHOUT previewing them on the screen for 10 seconds. There is
no notification when receiving new photo-mail and they are saved locally.

This mode is for users who want to accept all photos that are sent to them without
previewing, saving or deleting.
Note 1: The photos arriving by email are stored in the “My Media Library” menu, then
“PHOTO-MAILS” and inside the folder “My Photo-Mail Inbox.”
Note 2: If you delete a photo received by email on the frame, there is still a copy of it online
in www.pix-star.com in your personal account.
6. Share Pictures Directly from the Frame
The frame allows you to easily share pictures with your friends and family. While the picture
you want to share is being displayed press the button (this is the 2nd button starting from
the bottom of the remote control). A menu will pop up with the following options:
- Add a new contact: This option allows you to send the picture to another device or an email
address by entering it using the keyboard.
- Or select a contact from the contact list below: These contacts are linked to your contact
lists stored on your account at www.pix-star.com. You can quickly send pictures to all your
contacts or certain frames by selecting them. If you want to modify your contact lists, log in to
the web site. The email addresses you receive pictures from on your frame are automatically
added to your contact list.
7. Manage and View Online Albums
7. 1 Upload Pictures to your personal account online.
The frame can display a slide show of pictures you store in your online account. You can upload
pictures from two different sources: your computer and online external providers.
-How to upload pictures from your computer
Create a “Pix-Star Album”
1. Log in to your account at www.pix-star.com
2. Choose “My web albums” on the left, then “View my web album”
3. Select “Create a new album” and follow the online instructions to upload pictures
from your computer
After you create your “Pix-Star Album” you can manage it from the online sub-menu “My web
album.” In this sub-menu, you can also remotely change the slide show settings on your frame.
Pictures uploaded to the web album will sync automatically to the frame in a few minutes.

-Accessing pictures stored in online albums from external providers
You can access pictures stored in online albums from a variety of providers such as Google
Photos, Facebook, Smugmug, Shutterfly, Google Drive, Dropbox, Onedrive, FlickR, etc.
1. Log in to your account at www.pix-star.com
2. Choose “My web albums” then “Import external pictures”
3. Click on the logo of the provider then follow the instructions
4. Manage your imported pictures in “My web album.” In this sub-menu you can also
remotely change the slide show settings on your frame
7. 2 View Online Albums on your Frame
Once pictures have been uploaded to your online account they can be viewed and edited
immediately. They should be visible on the frame within a few minutes.
When a picture is added to an online web album, it will also be added to the frame’s local
memory. When a picture is removed from an online web album, it will be removed from the
frame’s local memory as well. The frame does this AUTOMATICALLY. But sometimes it takes a
few minutes for the changes to show. Please be patient.
When you want to play a slideshow of an online album on the frame:
1. Go to “My Media Library” in the main menu of the frame
2. At the top move right to “WEB ALBUMS”
3. Choose “Play all the Web Albums below” OR click on “Select Web Albums to Play”
4. After selecting the content, select “Play Selected Web Albums”
8. Accessing pictures stored inside UPnP/DLNA servers on the local
network
Our frames are UPnP/DLNA compatible, which means you can access photos stored on a local
network inside UPnP/DLNA servers directly from the device itself without copying the pictures
to the frame’s local memory.

To access your UPnP/DLNA server content from the frame:
1. Go to “My Media Library” in the main menu of the frame
2. At the far right there is “DLNA”
3. Here you can browse your DLNA server content at each level. For each folder you
can either click on “Play all pictures” or “select files / folders” to launch a slide
show
The frame will automatically scan for devices on the network and display a list of those
supporting UPnP/DLNA Note: Make sure your Wi-Fi connection is configured properly before
entering this menu.
Once a UPnP/DLNA server is found you will see it on the frame menu, just select it then enter
the menu to browse the content and launch a slide show of the selected folders.
When playing a slide show of UPnP/DLNA folders the pictures are pulled from the server in
streaming mode so it is necessary to keep the UPnP/DLNA server running to avoid interruption.
Also, Wi-Fi needs to be constantly available.
Note: Some UPnP/DLNA servers need special configuration in order to work properly with the
frame. Do not hesitate to check our KNOWLEDGE BASE in the www.pix-star.com web site
where some explanations are provided or contact us.
9. Online Account Features
-How to select weather forecasts for specific cities
Your frame can show weather forecasts in the main menu. Log in to your online account to
select specific cities. Under “Weather Forecast,” each city will be listed by country. Under “My
weather” you can choose to display several cities and countries in the same directory.
-How to manage your contacts
Your online account allows you to add contacts and create contact lists so sending emails from
your frame is more convenient. You can modify, add or delete contacts from your lists
anytime.
You can also create groups and instantly send your favorite photos to all members of a specific
group.

-How to filter your emails
You may choose to filter all incoming emails to control who is allowed to send pictures to your
Pix-Star® photo frame. You can choose one of the following options:
o No filtering - THIS IS THE DEFAULT MODE
Anyone who knows your Pix-Star® email address can send pictures to your frame
o Refuse all incoming emails except those coming from your “white list” (authorized
individuals)
o Accept all incoming emails except those coming from your “black list” (unauthorized
individuals)
10. Slide show and display modes
The slide show can run in different display modes:
- the “Normal mode”
- the “Collage 4 pix” mode
- the “Collage 5 pix” mode
- the “Smart Fill” mode
- the “Upscale to fit (keep ratio)” mode
- the “Collage 4 pix (No crop)” mode
- the “Collage 5 pix (No crop)” mode
By default, “Collage 5 pix” is running. When a slide show starts, whether automatically or
launched from a menu on the device, it will display 5 pictures at a time in a “collage”
arrangement on the screen.
To change this configuration:
1. Press MENU button when a slide show is playing
2. A menu bar will show up from the left of the screen
3. Go down to the 2nd icon from the BOTTOM named “Slide show Options” and press
4. Go to “Display Mode” then choose one of the other modes
Or
From the main menu:
1. Go to “ Change Settings” by pressing
2. Enter the “Slide-Show” sub-menu
3. Go to “Display Mode” then choose one of the several available modes
The “Normal” mode shows 1 picture at a time on the screen.
The “Collage 4 pix” and “Collage 5 pix” are both a collage of 4 and 5 pictures.
The “Smart Fill” mode shows 1 picture at a time on the screen but if the picture is slightly
smaller than the screen it will be stretched a little. NOTE: in this mode pictures are stretched
ONLY IF the picture size ratio is close to 4:3 to avoid too much distortion.

11. How to Change the Device Configuration
You can change most of the device settings from the CHANGE SETTINGS menu accessible from
the Main menu.
- LANGUAGE: The language of the user interface
- DATE & TIME: Adjust the date and time
- AUTO ON/OFF: Adjust the auto on and off configuration
- SLIDE-SHOW: Adjust all the settings of the slide-show
- PHOTO-MAIL: Adjust the settings regarding photo-mail
- WI-FI: Configure the Wi-Fi connection & show related information
- ABOUT: Show information about the device and memory use
- RESET: Reset the device to factory settings
To show display options, when a slide show is running, press the MENU button on the remote
then OPTIONS.
Here you can adjust:
- PLAY MODE: Normal, repeat recent photos, play only recent photos
- SORTING MODE: Normal, Newest first, Oldest, first, Random
- DISPLAY MODE: Slide-show mode, normal, collage or smart fill
- DISPLAY CLOCK: Configure the way date and time is shown on the slide-show
- DISPLAY DETAILS: Show the details of the picture in the slide-show
- TRANSITIONS: The type of transitions you want between pictures
- INTERVALS: The time intervals between 2 pictures
- BRIGHTNESS: Adjust screen brightness.
- DAILY INFORMATION: Activate calendar showing every n hours automatically
- VIDEO-MAIL OPTIONS: Adjust options on how video-clips are played
- ORIENTATION MODE: Landscape or portrait

12. How to Play Web Radio on the Device
From the main menu:
1. Go to Web Radios
2. Select the web radio of your choice according to country or genre
From the slide show:
1. Press the Menu button
2. Go to “Music On/Off” (Fourth icon from the bottom)
3. Select “Play”
4. Go to “Recent Radios” and choose the web radio station you want to play
Note 1: From the slide show, you can only select a radio station you have listened to recently.
If you want to listen to a new station, you need to go through the Main Menu.
Note 2: Not all Web Radio stations are in the device database.
- How to listen to audio files?
From the main menu:
1. Go to “My Music”
2. Go to “SD CARD” or “USB SOURCE” and select the music files of your choice
NOTE: The frame only plays audio files from an SD card or a USB source.
When a slide show is playing you can manage the audio:
1. Using the UP and DOWN keys to adjust the volume
2. The name of the song/web radio will be displayed. Press to pause and use the left
and right keys to skip the song
13. Use USB Speakers with the frame
If you’d like better sound quality, you can plug USB speakers into the USB port at the back of
your frame.
Note: Most of the USB speakers on the market should work but we cannot guaranty that all USB
speakers will work with this device. Contact us if needed.

14. Games
Your Pix-Star frame is not only a powerful photo frame it’s also loaded with free games to
exercise your brain and entertain!
- Sliding Puzzle
- 2048
- Sudoku
- Mine Sweeper
- Snake
- Find the Pair
- Chess Checkmate
- Get the Number
To access these games:
1. Go to “Games'' from the Main menu
2. Select the game you want to play
Game menu:
- ''Play game''
- Check the ''Highscores''
- Choose the level in ''Options''
- Check the game's rules in ''Help''
15. My Reminders
This handy frame can also help organize your daily activities and remind you of appointments
you’ve made.
Where to find them:
1. Go to ''My Reminders'' from the Main menu
3. From here, you can ''Create a new reminder'' or delete or edit a reminder by clicking on it
There are two types of Reminder alerts:
- ''Reminder – one time only'' Set a time and a date (MM/DD/YYYY) for a one-time reminder
- ''Alarm – with repetition''. Set the time of the alarm and the frequency of repetition
If your frame is in sleep mode the screen will display the reminder, but the alarm will not
sound. The frame will go back to sleep mode after about 60 seconds.
Note: If the frame is turned off, NO alarm or message will appear.

16. Technical Specifications
Data provided for reference only.
The manufacturer reserves the right to modify the specifications without any prior notice.
Format supported
Images – JPG, JPEG, BMP, PNG, GIF
(including animated GIFs)
Memory card
SD / SDHC / SDXC / MMC
USB
USB memory sticks
Storage capacity
Up to 30,000 pictures in the device’s
local memory.
Energy consumption
Max. 6W for the 10 inch version and
12W for the 15 inch version.
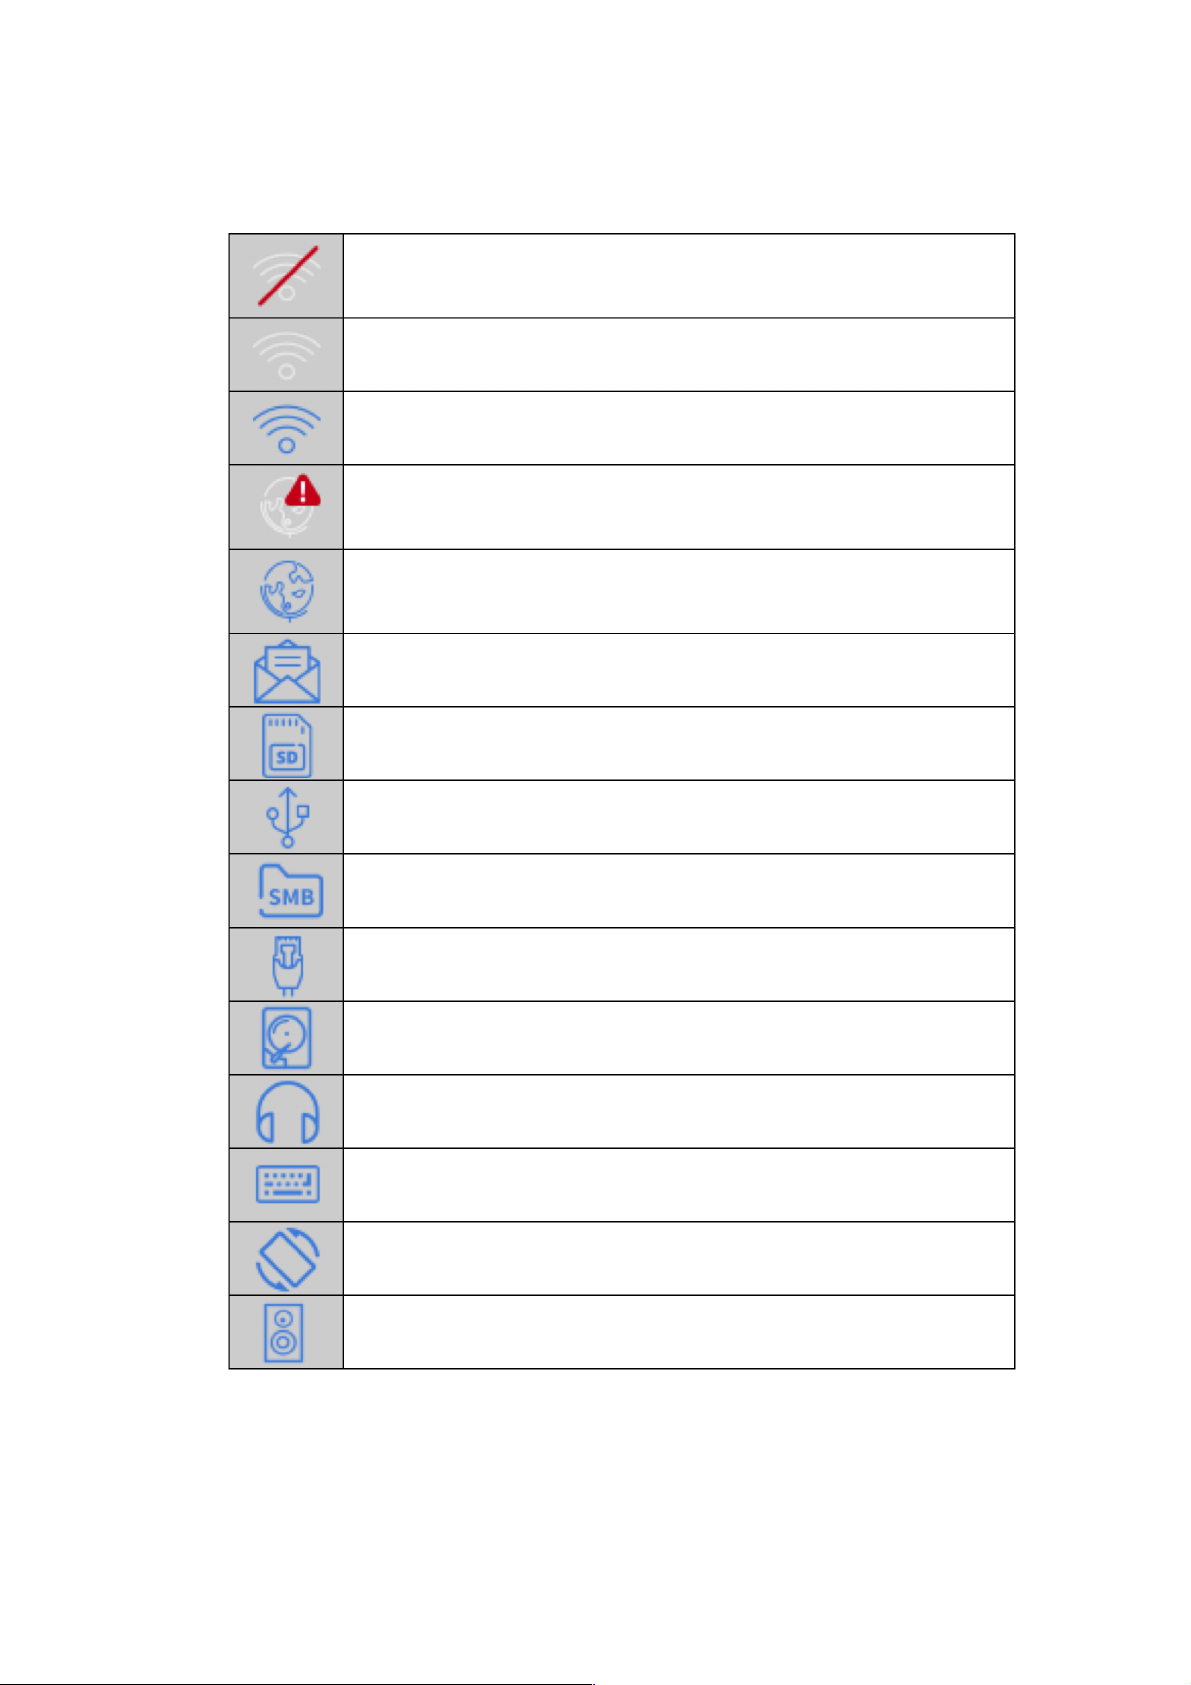
17. Glossary of Menu Icons
PROBLEM! Not connected to a Wi-Fi network.
Check the Wi-Fi connection configuration and ensure the Wi-Fi
network is available.
Connected to a Wi-Fi network with WEAK signal.
Connected to a Wi-Fi network with STRONG signal.
PROBLEM! The frame cannot access the Internet
This usually happens when Wi-Fi is not properly configured or the
internet connection of your Wi-Fi gateway is down.
Connection to the Internet is working properly.
The device is ready to receive / send email and synchronize web
albums.
Notification that the Pix-Star® photo frame has received new
photo email.
SD/SDHC/MMC card detected and ready to use
USB device detected and ready to use
A Samba disk is mounted and accessible from the frame
Ethernet cable connected to the frame through a USB-TOETHERNET adapter
The Frame’s memory is full
A headset is connected to the frame through the jack plug at the
back / side
A USB keyboard is now connected to the frame
The frame is now playing the slideshow in portrait mode (main
menu does not rotate, only slide show rotates to portrait mode)
A USB speaker or speaker bar is connected to the frame to
output the audio
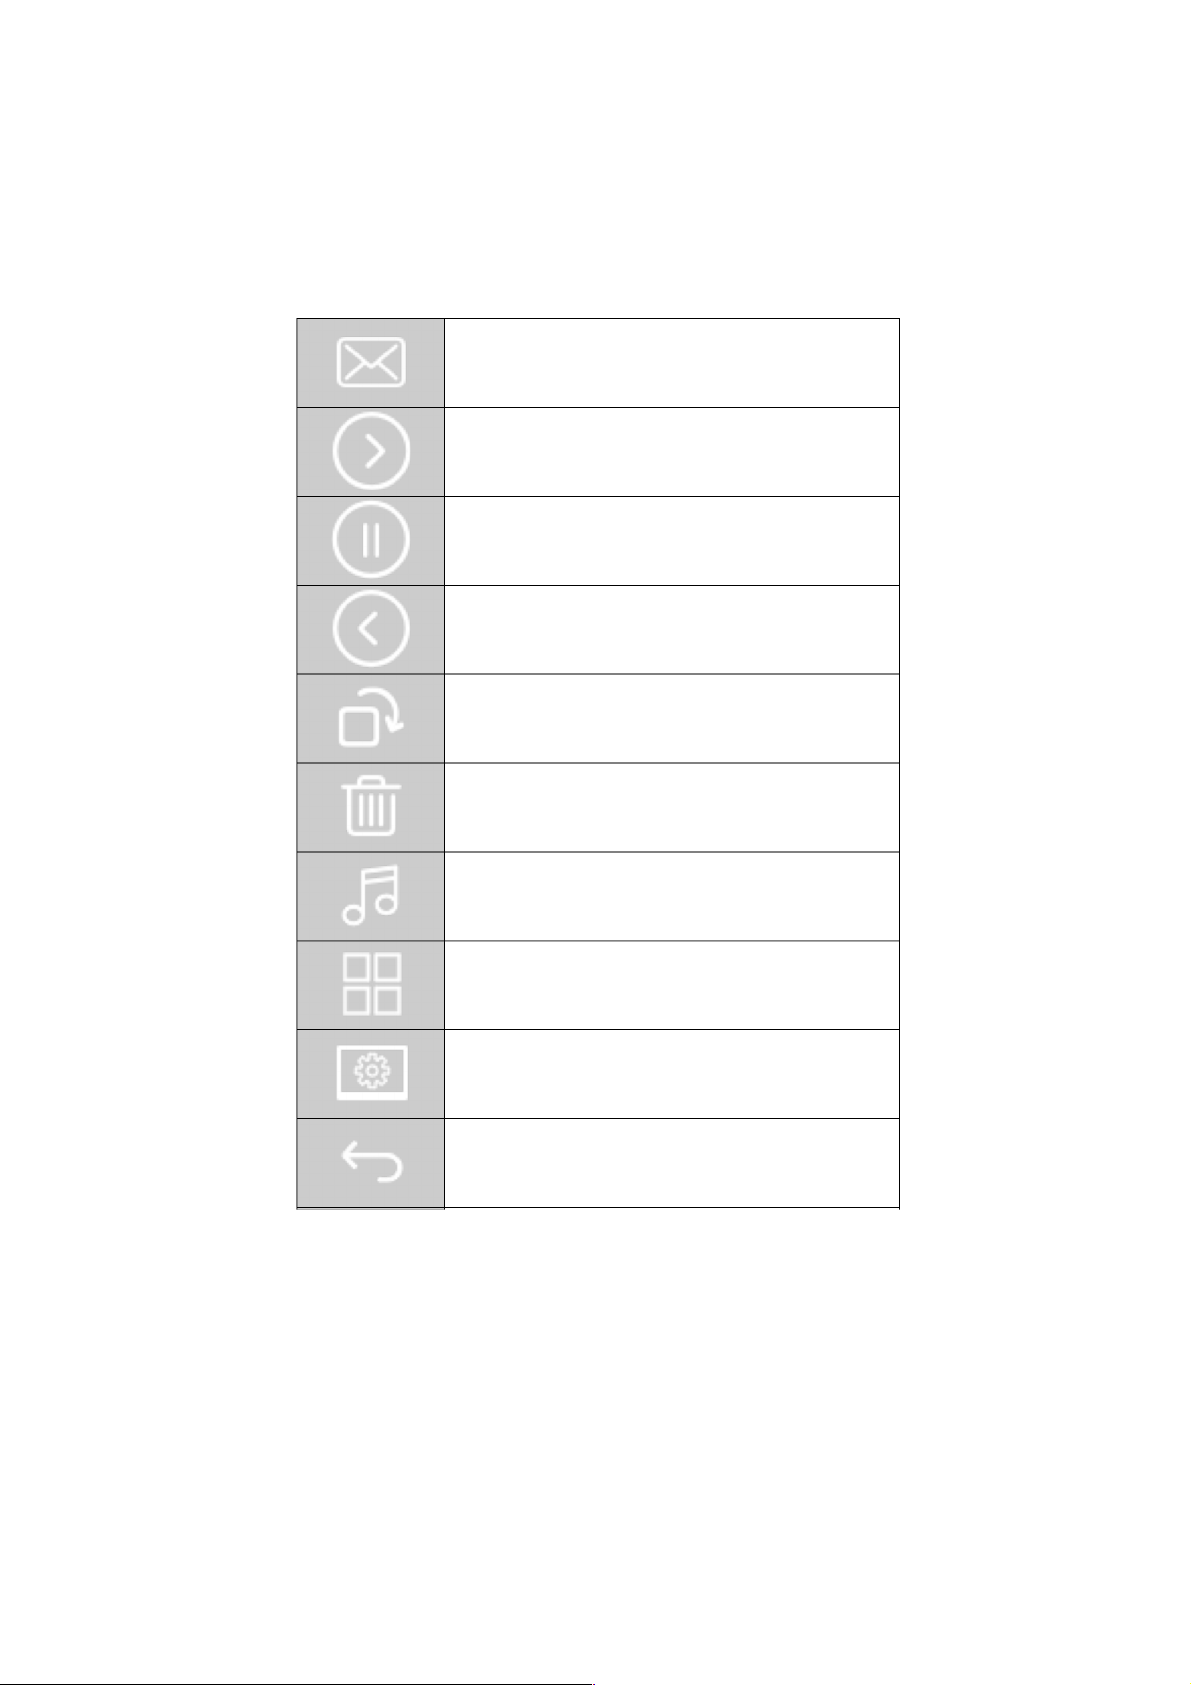
18. Glossary of the Slide Show Menu Bar Icons
When a slide show is playing on your frame you can press the MENU button on the remote
control to display the slide show menu.
Send photo-mail
Next picture
Pause slide show (when Playing)
Play slideshow (when in Pause)
Pause slide show (when Playing)
Rotate photo to the right
Delete picture
Music on/off
Photo thumbnail
More options (configure the slide show)
Close and go back to Main Menu

19. Warranty
The warranty is void if you or any unauthorized person has tried to repair the frame.
If the frame is emitting smoke, noise, or an unusual smell, immediately turn it off and unplug
it. If you do not plan to use the frame for a while make sure to unplug the power cord.
The warranty covers the digital photo frame and the following accessories:
- The power supply unit
- The remote control
If your frame, power supply, or remote control stop working please contact us through
www.pix-star.com.
Warranty period
This digital frame is under warranty for 24 months. The warranty period begins on the date the
frame is purchased. To take advantage of the warranty coverage, you must be able to present
proof of purchase showing the date of purchase and the model purchased.
Coverage
If this digital frame is defective please contact us to return it and include an explanation.
If this digital frame presents a defect during the warranty period, the authorized After-Sales
Service will decide whether to replace the digital frame, in part or in whole.
If the digital frame is exchanged by our After-Sales Service, the warranty period is not
extended. The initial purchase date determines the start date for the warranty period.
Exclusions
Damage or defects caused by improper use or handling of the digital frame, or by the use of
accessories, which are not original or not recommended in these instructions, are not covered
by the warranty.
The warranty does not cover damage caused by outside elements, like lightning, water, or fire,
or any other damage caused during transport.
No warranty coverage may be claimed if the digital frame’s serial number has been modified,
removed, erased, or made illegible.
No warranty coverage may be claimed if the digital frame has been repaired, altered, or
modified by the buyer or any repair personnel not officially qualified and authorized.
The manufacturer does not guarantee the technical properties described in this manual. The
hardware and accessories described in this manual are subject to change without advance
notice. For this reason, the manufacturer reserves the right to change the related documents,
components, options, and characteristics without advance notice.

20. Declaration of Conformity
We, Spheris Digital Ltd., declare under our sole responsibility that the products PXT510WR08H,
PXT515WR08H are in conformity with the provisions of the Council Directive on Radio
Equipment and Telecommunications Terminal Equipment.
The product is marked with the CE making
Environmental protection
At the end of its life, we recommend taking the frame to public collecting points set up for
recycling, reusing electrical and electronic devices.
The following symbol on the product, the instruction manual or the package indicates that this
product is subjected to the European Directive 2002/96/EU.
Spheris Digital Ltd - www.pix-star.com

FCC RF Exposure Information and Statement
This device meets the government's requirements for exposure to radio waves. The guidelines
are based on standards that were developed by independent scientific organizations through
periodic and thorough evaluation of scientific studies. The standards include a substantial
safety margin designed to assure the safety of all persons regardless of age or health. The SAR
limit of USA (FCC) is 1.6 W/kg averaged. Device types: Wireless Digital Display (FCC ID: YHOPXT51019 and FCC ID: YHO-PXT51519) have also been tested against this SAR limit. SAR
information on this and other pad can be viewed on‐line at
http://www.fcc.gov/oet/ea/fccid/. Please use the device FCC ID number for search. This
device was tested simulation typical 0mm to body. To maintain compliance with FCC RF
exposure requirements, the use of belt clips, holsters and similar accessories should not
contain metallic components in its assembly; the use of accessories that do not satisfy these
requirements may not comply with FCC RF exposure requirements, and should be avoided.
FCC Warning
This device complies with Part 15 of the FCC Rules. Operation is subject to the following two
conditions: (1) This device may not cause harmful interference, and (2) this device must
accept any interference received, including interference that may cause undesired operation.
NOTE 1: This equipment has been tested and found to comply with the limits for a Class B
digital device, pursuant to part 15 of the FCC Rules. These limits are designed to provide
reasonable protection against harmful interference in a residential installation. This equipment
generates, uses and can radiate radio frequency energy and, if not installed and used in
accordance with the instructions, may cause harmful interference to radio communications.
However, there is no guarantee that interference will not occur in a particular installation. If
this equipment does cause harmful interference to radio or television reception, which can be
determined by turning the equipment off and on, the user is encouraged to try to correct the
interference by one or more of the following measures:
- Reorient or relocate the receiving antenna. - Increase the separation between the equipment
and receiver. -Connect the equipment into an outlet on a circuit different from that to which
the receiver is connected. -Consult the dealer or an experienced radio/TV technician for help.
NOTE 2: Any changes or modifications to this unit not expressly approved by the party
responsible for compliance could void the user's authority to operate the equipment.
THE MANUFACTURER IS NOT RESPONSIBLE FOR ANY RADIO OR TV INTERFERENCE
CAUSED BY UNAUTHORIZED MODIFICATIONS TO THIS EQUIPMENT. SUCH
MODIFICATIONS COULD VOID THE USER’S AUTHORITY TO OPERATE THE
EQUIPMENT.
NOTE 2: Any changes or modifications to this unit not expressly approved by the party
responsible for compliance could void the user's authority to operate the equipment.

IC RF Exposure Information and Statement
This device meets the government's requirements for exposure to radio waves. The guidelines
are based on standards that were developed by independent scientific organizations through
periodic and thorough evaluation of scientific studies. The standards include a substantial
safety margin designed to assure the safety of all persons regardless of age or health. The SAR
limit of Canada (IC) is 1.6 W/kg averaged. Device types: Wireless Digital Display (IC: 11141APXT51019 and IC: 11141A-PXT51519) have also been tested against this SAR limit. This device
was tested simulation typical 0mm to body. To maintain compliance with FCC RF exposure
requirements, the use of belt clips, holsters and similar accessories should not contain metallic
components in its assembly; the use of accessories that do not satisfy these requirements may
not comply with FCC RF exposure requirements, and should be avoided.
IC WARNING
This device complies with Industry Canada’s licence-exempt RSSs. Operation is subject to the
following two conditions: (1) This device may not cause interference; and (2) This device must
accept any interference, including interference that may cause undesired operation of the
device.
Le présent appareil est conforme aux CNR d'Industrie Canada applicables aux appareils radio
exempts de licence. L'exploitation est autorisée aux deux conditions suivantes: (1) l'appareil ne
doit pas produire de brouillage, et (2) l'utilisateur de l'appareil doit accepter tout brouillage
radioélectrique subi, même si le brouillage est susceptible d'en compromettre le
fonctionnement.

Bienvenue !
Vous venez d'acquérir un cadre photo numérique Pix-Star® et nous vous remercions pour la
confiance que vous nous accordez.
Votre Pix-Star® appartient à la nouvelle génération des cadres photos numériques
communicants dotés de capacités de connexion Internet sans fil.
Avec ce cadre numérique vous pourrez très facilement, via Internet, partager des photos avec
vos amis et les membres de votre famille, recevoir directement des photos par e-mail sur le
cadre, ou encore accéder à vos photos stockées en ligne. Vous pourrez aussi utiliser des
fonctionnalités plus classiques, comme la lecture de photos numérique stockées sur un support
de type carte mémoire SD ou une clé USB.
Nous espérons que vous apprécierez ce produit. N'hésitez pas à nous faire part de votre avis et
de vos suggestions d'amélioration via notre site www.pix-star.com.
Remarque: Ce manuel d'utilisation est un guide simplifié des fonctionnalités de base de votre
cadre Pix-Star®. Cependant, en raison de l'amélioration constante de nos services, certaines
informations peuvent être manquantes, aussi n'hésitez pas à vous rendre sur www.pixstar.com notamment voir notre base de connaissances (en anglais) où vous trouverez des
informations régulièrement mises à jour. Vous y trouverez également la garantie du cadre.
Vous pouvez aussi bien sûr nous contacter via notre site web www.pix-star.com.
ENREGISTREMENT
Pour enregistrer dès maintenant votre Pix-Star® en ligne, rendez vous sur
www.pix-star.com et sélectionner "Je veux enregistrer et choisir une adresse
Email pour mon Pix-Star !" Vous aurez alors la liberté de recevoir et d'envoyer
instantanément vos photos à vos amis et proches.
Bon Pix-Star
®

Recommandations d'utilisation et avertissements de sécurité
Ne pas installer le cadre numérique à proximité d'une source d'eau (laisser au minimum 1,50m
de distance entre le cadre et toute source d’eau potentielle) ou dans un environnement
humide (cuisine, salle de bain, etc.)
Ce produit a été conçu pour fonctionner en intérieur et ne peut en aucun cas être utilisé en
extérieur. Éviter d'installer le produit dans un environnement poussiéreux ou en plein soleil.
N’utiliser que l’adaptateur secteur fourni avec l’appareil, l’utilisation de tout autre adaptateur
secteur rendrait la garantie invalide.
Ne pas placer ce produit sur un bureau, une table ou tout support instable.
Ce produit ne doit pas être utilisé par un enfant de moins de 12 ans.
Prendre les précautions nécessaires pour éviter que toute personne ne marche sur le cordon de
adaptateur secteur au risque de tomber.
Ce produit doit être utilisé à une température située entre 10°C et 35°C.
Le marquage CE indiqué sur le produit et sur l'emballage certifie que ce produit est compatible
avec les exigences de la directive européenne 2002/96/EU concernant les équipements de
communication, la sécurité et la santé des usagers, et pour les perturbations
électromagnétiques.
Ce terminal a été conçu pour un usage privé au sein de l'Union Européenne. Il a été testé selon
les dispositions techniques pour les équipements radio (EN 300328). En conséquence, le
fabricant décline toute responsabilité en cas de non compatibilité avec les règles locales dans
le pays d'installation.
La déclaration de conformité peut-être obtenue sur simple demande
en nous contactant via notre site web www.pix-star.com.

1. Description du produit
Remarque : Le capteur de la télécommande se situant sur la droite du cadre, pointer votre
télécommande en direction de la sortie audio pour une utilisation plus fluide de la
télécommande.
AVERTISSEMENT
En cas de mauvaise manipulation, la pile peut exploser. Ne tentez pas de la recharger,
de la démonter ou de la jeter au feu.
Arrêter/ démarrer le diaporama
Entrer dans le sous-menu sélectionné
Valider la sélection
Touche de navigation à gauche dans le menu
Afficher la photo précédente dans le mode diaporama
Touche de navigation à droite dans le menu
Afficher la photo suivante dans le menu diaporama
Touche de navigation vers le haut dans le menu
Touche de navigation vers le bas dans le menu
Fonction « Partage » de photos et ouverture de la liste de contacts
INBOX : Fonction « Réception » de photos et ouverture de la boîte
de réception pour afficher les photos reçues par e-mail
Éteindre / Allumer l’écran (mode veille)
Note : pour éteindre ou allumer l’appareil, utiliser le bouton situé
à l'arrière du cadre.
Revenir au menu précédent dans le mode menu
Afficher le menu associé au diaporama (en mode diaporama)
Afficher le menu principal (en mode menu)
Sont inclus dans le boîtier :
- Un adaptateur secteur AC 100/220V
- Une télécommande
- Un cadre photo numérique
- Un guide de démarrage

2. Installation
Brancher l'adaptateur secteur à l’arrière de l'appareil. Raccorder ensuite l'adaptateur sur la
prise secteur.
Pour mettre en route le cadre, appuyer sur le bouton situé à l’arrière du cadre. L'appareil
démarre, au bout de 2 secondes, l'écran s'allume, il est opérationnel au bout de 20 secondes
environ.
3. Présentation de l'interface principale
Environ 20 secondes après la mise en route de l'appareil, votre Pix-Star affiche le menu
principal. Puis au bout de 20 secondes environ le diaporama démarre automatiquement.
En utilisant les boutons situés à l'arrière de l'appareil ou bien la télécommande, vous pouvez
naviguer à l'intérieur des menus. Pour ouvrir le MENU principal, appuyer sur le bouton
« MENU ». Pour entrer dans le sous-menu souhaité presser la touche " ".
Pour quitter le mode diaporama et revenir au menu principal, utiliser la télécommande et
appuyer sur la touche ou deux fois sur la touche MENU.
Remarque : A tout moment, appuyer sur la touche pour revenir au menu précédent.

Arborescence du menu principal
Ma librairie de medias
Afficher les photo-mails reçus sur votre cadre
ainsi que les albums web, les photo de carte
SD de source USB mais aussi accèder à vos
équipements UPnP-DLNA sur le réseau local et
vous connecter à des disques Samba ou des
flus de photo RSS.
Jouer toutes les photos du cadre
Lancer un diaporama jouant la totalité des
photos du cadre
Configuration
-
Langue
- Date/heure
- Mode veille
- Diaporama
- Photo-Mail
-
- Wi-Fi
- A propos de
- Reset usine
Configurer la langue de votre cadre
Configurer la date/heure de votre cadre
Régler la mise en veille et l’allumage
automatique de votre cadre
Configurer les paramètres du diaporama
Configurer le mode de réception des photomails
Choisir le réseau Wifi et connecter
Informations utiles du cadre
Effectuer une réinitialisation du cadre
Ma musique
Jouer vos fichiers audio sur carte SD ou source
USB.
Radios Web
Afficher et jouer une large sélection de radios
web du monde entier.
Notifications
Programmer des événements et alarmes.
Jeux
Jouer un peu pour se détendre !
Calculatrice
Un petite calculette bien pratique !

4. Configuration de la connexion Wi-Fi et du compte utilisateur
4.1 Connexion de l'appareil au réseau Wi-Fi
Chaque appareil dispose d'une adresse e-mail qui lui est propre, ce qui lui permet de recevoir
et d’envoyer directement les photos via le réseau Internet.
Pour pouvoir se connecter au réseau Internet Pix-Star utilise le Wi-Fi . Il est donc nécessaire de
disposer d'une borne Wi-Fi, de la relier à Internet et de configurer la connexion Wi-Fi entre
l'appareil et cette borne Wi-Fi.
Pour cela :
1. Se placer dans le menu principal (si un diaporama est en cours, appuyer deux fois sur
le bouton Menu de la télécommande pour revenir au menu principal).
2. Choisir le sous-menu « Configuration » et presser la touche .
3. Choisir ensuite le menu « Wi-Fi » et presser .
L'appareil commence alors une recherche automatique des réseaux Wi-Fi disponibles.
Choisir alors le réseau Wi-Fi auquel vous voulez connecter votre Pix-Star puis appuyer sur la
touche de confirmation .
Si votre réseau Wi-Fi est en mode sécurisé (clé WEP ou WPA/WPA2), Pix-Star vous demandera
alors d’entrer la clé de sécurité, les autres paramètres sont configurés AUTOMATIQUEMENT.
4.2 Configuration du compte utilisateur, enregistrement du produit (première
utilisation)
Lors de la première utilisation, il est nécessaire de créer un compte, une adresse e-mail
associée au produit et de s'enregistrer sur le site web www.pix-star.com en allant dans le lien
situé sur la page d'accueil « Enregistrer mon nouveau Pix-Star ». Il vous y sera demandé le
numéro de série, qui figure au dos du produit ou dans le menu « Configuration » puis le sousmenu « A propos ».
Remarque 1 : Un serveur DHCP doit être activé sur votre borne Wi-Fi afin d'affecter
automatiquement une adresse IP à votre appareil. La plupart des réseaux Wi-Fi en sont
équipés.
Remarque 2 : La connexion Wi-Fi à un hotspot ainsi qu’à un réseau Wi-Fi nécessitant une
identification par mot de passe et nom d’utilisateur à travers un navigateur internet
(page HTML) ne sont PAS supportés par ce produit car il ne dispose pas de navigateur
internet.

5. Réception de photos par e-mail directement sur l'appareil
Pour incorporer des photos dans la mémoire du cadre afin qu'elles apparaissent dans le
diaporama principal vous pouvez les envoyer via e-mail. Pour cela, envoyer un e-mail à
l'adresse du cadre avec les photos que vous souhaitez inclure au diaporama en fichier joint,
c’est un « photo-mail ».
Votre entourage peut donc envoyer des photos très facilement sur votre cadre par e-mail. Pour
cela, il vous suffit de leur communiquer l'adresse e-mail associée à votre Pix-Star® que vous
avez choisi au moment de l’enregistrement de votre cadre sur www.pix-star.com (par
exemple : pierre@mypixstar.com).
Remarque: Vous pouvez mettre plusieurs photos en pièce jointe des e-mail
envoyés vers votre Pix-Star, mais il est préférable toutefois que le total des
fichiers joints ne dépasse pas 30 MB.!
Il existe trois modes de réception des photo-mails.
En allant dans le menu CONFIGURATION puis le sous-menu PHOTO-MAIL, le premier menu
permet de choisir entre ces 3 modes :
- Manuel (mode par défaut)
Dans ce mode lorsqu’un photo-mail arrive dans l’appareil, celui-ci affiche une petite
enveloppe en haut à gauche de l’écran du diaporama.
1. Vous devez alors manuellement ouvrir ce photo-mail en appuyant sur la touche de
la télécommande (en bas) ou en sélectionnant le sous-menu « Nouveau(x) Message(x) »
qui apparaît dans l'interface du menu principal.
2. Une fenêtre s’ouvre qui affiche la photo reçue et vous propose, soit de la conserver,
soit de la supprimer. Cet écran indique aussi l’e-mail de la personne qui l’a envoyée, la
date et l’heure (GMT) et le sujet du mail.
Si vous avez reçu plusieurs photo-mails ils s'afficheront les uns à la suite des autres et
vous pourrez choisir pour chaque photo de la conserver ou non.
Ce mode est particulièrement intéressant pour garder un contrôle total sur les photomails entrant et ainsi décider au fur et à mesure qu’ils arrivent de les conserver ou de
les effacer immédiatement.
- Automatique avec alerte
Dans ce mode l’appareil accepte automatiquement les photo-mails entrants.
Lorsqu’un photo-mail est reçu, il est ouvert automatiquement et la photo est affichée
pendant 10 secondes à l’écran puis acceptée automatiquement et stockée dans la
“INBOX”.
Ce mode est particulièrement adapté pour les personnes souhaitant simplicité et
absence d’interaction avec l’appareil.

- Automatique
Ce mode est le même mode que le précédent, simplement les photo-mails sont
acceptés sans affichage pendant 10 secondes de la photo à l’écran. Rien ne signale
l'arrivée d'une nouvelle photo qui est intégrée automatiquement au diaporama.
Ce mode est particulièrement adapté pour les personnes souhaitant simplicité et
absence d’interaction avec l’appareil.
Remarque: si vous choisissez d'effacer une image reçu par e-mail sur le cadre, celle-ci n'est
pas perdue car elle reste stockée sur le site web et vous pourrez la visionner ou la décharger à
nouveau en vous y connectant.
6. Partager des photos avec d'autres personnes à partir du cadre
Le cadre vous permet de partager des photos avec les membres de votre famille et vos amis de
manière très simple. Vous pouvez par exemple envoyer une photo par e-mail à une autre
personne ou directement sur un autre cadre Pix-Star®.
Pour cela, appuyer sur la touche de la télécommande lorsque la photo que vous souhaitez
partager s'affiche à l'écran. Ensuite, un menu apparaît vous permettant de choisir à qui
envoyer cette photo. Dans cette fenêtre, vous pouvez choisir parmi les options suivantes :
- « Choisir parmi les contacts existants »: votre liste de contacts rassemble les
destinataires dont vous avez saisis l’adresse e-mail sur le site web, ou à qui vous avez
déjà envoyé des photos ou bien qui vous ont déjà envoyé des photos par e-mail et qui
ont été automatiquement ajoutés à cette liste par le système.
- « Envoyer à un nouveau contact »: permet d'envoyer une photo en entrant
manuellement l’adresse e-mail du destinataire. Cette option est à utiliser dans le cas
ou le destinataire n’est pas dans la liste de contacts, sinon utiliser de préférence la
liste de contacts pour plus de simplicité !
7. Créer et visualiser des albums web
7. 1 Créer des albums web
Il est possible de visualiser sur cet appareil des photos stockées en ligne sur votre compte
personnel Pix-Star. Ces photos peuvent provenir de deux sources différentes : votre ordinateur
et des fournisseurs externes.
- Comment télécharger des photos stockées sur mon ordinateur ?
Afin de faire cela, vous devez créer un ‘Pix-Star web album’ :
1. Se rendre dans votre espace personnel sur le site web www.pix-star.com
2. Sélectionner la rubrique «Mes albums web» puis «Voir mes albums web»
3. Sélectionner «Nouvel album Pix-Star» et suivre les indications afin de télécharger des photos
stockées dans votre ordinateur.

Après la création de votre Pix-Star web album, vous pouvez le gérer depuis le sous-menu «Voir
mes albums web» (vous pouvez notamment changer depuis cette interface le diaporama
affiché sur votre cadre).
- Comment télécharger vos photos stockées en ligne chez des
fournisseurs externes?
Vous pouvez accéder à vos photos stockées en ligne sur de nombreux sites tel que Facebook,
Picassa, Smugmug, Shutterfly, FlickR, Photo RSS, Padeleon, Instagram, ect.
Avant de pouvoir les jouer sur votre cadre, vous devez d’abord les télécharger sur votre espace
personnel Pix-Star :
1. Se rendre dans votre espace personnel sur le site web www.pix-star.com
2. Sélectionner la rubrique «Mes albums web» puis « Importer photos externes »
3. Suivre les indications.
7. 2 Visionner votre web album sur votre cadre
Une fois les photos importées dans le site web, le cadre va automatiquement les télécharger à
partir du site web pour les stocker sur sa mémoire locale.
Pour les afficher dans un diaporama :
1. Aller dans le sous-menu « ma librairie de medias » depuis le menu principal
2. Sélectionner l’album web que vous souhaitez afficher,
3. Cliquer sur « Jouer la sélection d'albums ».
Votre Pix-Star vérifie périodiquement le contenu de l'album web et synchronise son contenu
afin de rester constamment à jour. Si, par exemple, des images sont rajoutées sur l'album web
depuis Internet via l’interface www.pix-star.com, le cadre les rajoutera dans son diaporama
quelques minutes plus tard. De la même manière, si des images sont supprimées depuis
Internet, elles le seront de même sur le diaporama interne du cadre.
8. Accéder aux photos stockées dans un serveur UPnP/DLNA sur le
réseau local
Cet appareil est compatible UPnP/DLNA. Il peut donc accéder, à distance, via le réseau local
(grâce à la connexion Wi-Fi) aux photos stockées dans les serveurs UPnP/DLNA connectés à ce
réseau.
Pour cela aller dans :
1. Le sous-menu « Ma librairie de medias » accessible depuis le menu principal du cadre
2. Le sous-menu « DLNA» sur la droite.
Au bout de quelques secondes la liste des serveurs UPnP/DLNA trouvés sur le réseau local va
apparaître.
Remarque : il est impératif à ce stade d’avoir configuré la connexion Wi-Fi de l’appareil.
A partir là, vous pouvez facilement naviguer dans les répertoires du serveur et lancer à tout
moment un diaporama des photos que vous souhaitez visualiser.

Lorsque vous jouez un diaporama d’une source UPnP/DLNA, les photos sont récupérées au fur
et à mesure (streaming). Il est donc impératif que le serveur UPnP/DLNA reste en permanence
allumé et connecté au réseau local.
Remarque: Certains équipements UPnP/DLNA nécessitent une légère configuration pour
pouvoir fonctionner correctement avec cet équipement. Consulter notre “base de
connaissances” via le site web www.pix-star.com pour plus d’infos ou nous contacter.
9. Fonctionnement du diaporama
Le diaporama dispose de 4 modes d’affichage :
- Le mode « normal »,
- Le mode « collage 4 photos ».
- Le mode « collage 5 photos ».
- Le mode « adapter à l'écran ».
Le mode collage 5 photos est activé par défaut. A chaque démarrage d’un diaporama, 5 photos
s’affichent à la fois sur l’écran dans un assemblage appelé « collage ».
Si vous souhaitez désactiver le mode collage, aller dans :
1. Le menu CONFIGURATION (menu principal)
2. Le sous-menu Diaporama.
3. Le sous-menu Mode d'affichage.
Ou bien, lorsqu'un diaporama est en cours de visionnage :
1. Cliquer sur le bouton MENU de la télécommande.
2. Aller dans Options (deuxième choix en partant du bas).
3. Sélectionner le sous-menu Mode d'affichage.
10. Changer la configuration de l’appareil
L’appareil contient deux menus à partir desquels vous pouvez changer son paramétrage.
Le menu CONFIGURATION accessible depuis le menu principal. A l’intérieur vous pouvez ainsi
régler les paramètres suivants :
- La langue de l’interface utilisateur ;
- Ajuster la date et l'heure ;
- Ajuster le mode veille de l’écran (heures d’extinction automatique) ;
- Ajuster les options du diaporama ;
- Ajuster le mode de réception du photo-mail ;
- Changer la configuration de la connexion Wi-Fi ;
Le menu OPTIONS dans la barre de menu sur la gauche du diaporama.
Lorsqu’un diaporama est en cours, appuyer sur le bouton MENU, dans la barre de menu qui
s’affiche sur la gauche de l’écran descendre sur l’avant dernier choix appelé « OPTIONS » et
appuyer sur pour l’ouvrir.
Dans ce menu il est alors possible de régler :
- Le mode de lecture des photos ;
!
!

- L'ordre des photos, alphabétique, aléatoire, chronologique ou anti chronologique ;
- Le mode d'affichage des photos (normal, collage ou adapter à l'écran) ;
- L'affichage de l'heure ;
- L'affichage des détails des photos ;
- Le type de fond d’écran du menu principal ;
- L'effet de transitions entre les photos ;
- L’intervalle entre deux photos (temps d’affichage) ;
- La luminosité de l’écran.
11. Comment utiliser l’interface web
Comment choisir sa météo ?
A partir de l’interface web, vous avez la possibilité de consulter sur votre cadre l'évolution
météorologique des villes ou des pays de votre choix.
Pour cela, rien de plus simple : rendez vous sur www.pix-star.com dans la rubrique « Infos
météo » pour visionner les villes classées par pays.
Vous pouvez également constituer votre propre répertoire en cliquant sur « Ma liste météo ».
Vous pourrez ensuite visualiser votre choix météo depuis votre cadre en vous rendant dans
l’espace « Mes albums web », accessible depuis le menu principal.
Comment gérer ses contacts ?
Ajouter ses contacts depuis l’interface web www.pix-star.com permet de constituer un
répertoire visible depuis son cadre pour envoyer directement un e-mail à ses amis sans avoir à
réécrire leur adresse. Il vous est également possible de supprimer vos contacts.
En plus d’être un gain de temps, vous pouvez également constituer des groupes d’amis et, en
un seul clic, envoyer l’image de votre choix à l’ensemble des membres de cette liste.
Comment filtrer ses e-mails ?
Vous pouvez activer le filtrage des "e-mails entrants" afin de décider des personnes autorisées
à envoyer des photos sur votre Pix-Star®. Pour cela, il suffit sur le site web de cliquer dans le
sous menu « Filtrage e-mail ». Plusieurs choix sont alors proposés :
- Ne pas appliquer de filtre (c’est le mode par DEFAUT) ;
- REFUSER systématiquement tous les e-mails SAUF ceux de la liste «blanche» autorisés;
- ACCEPTER tous les e-mails entrants SAUF ceux de la liste des personnes non autorisées.

12. Écouter des radios web ou des fichiers audio
Votre cadre vous permet aussi d’écouter des radios web ainsi que de la musique tout en
visionnant vos photos.
- Comment écouter une radio web ?
Depuis le menu principal :
1. Aller dans « Radios web »
2. Sélectionner votre radio en fonction de son pays ou de son genre
Depuis un diaporama :
1. Cliquer sur le bouton Menu de la télécommande.
2. Aller dans « Contrôle de l'audio » (quatrième icône en partant du bas)
3. Sélectionner « Lecture » en appuyant sur ou la flèche droite de la télécommande.
4. Sélectionner « Radios récentes » puis la radio récente de votre choix .
Remarque 1 : Depuis le diaporama, il n'est possible que de sélectionner une radio récente à
écouter. Si vous souhaitez écouter une nouvelle radio, vous devez passer par l'interface du
menu principal.
Remarque 2 : Il est possible d'avoir accès très facilement aux radios web que vous avez joué.
Pour cela, une fois dans le sous-menu « Mes radios web », choisir « Radios web jouées
récemment ».
- Comment écouter un fichier audio ?
Depuis le menu principal :
1. Aller dans « Ma musique » dans le menu principal.
2. Sélectionner « Carte SD» pour « Source USB» puis le fichier de votre choix
Depuis un diaporama :
1. Cliquer sur le bouton Menu de la télécommande.
2. Aller dans Contrôle de l'audio » (quatrième icône en partant du bas)
3. Sélectionner « Lecture » en appuyant sur ou la flèche droite de la télécommande.
4. Sélectionner le support de votre choix puis le fichier audio.
ATTENTION, seuls les fichiers audio disponibles sur une carte SD ou une source USB insérées
dans l'appareil peuvent être joués par le cadre.
Lorsque le diaporama joue, vous pouvez contrôler l'audio :
1. Appuyer sur les flèches haut et bas de la télécommande pour régler le volume
2. Le nom du morceau joué va s'afficher. Appuyer sur (de la télécommande) pour
mettre en pause et sur les flèches droite ou gauche pour changer le morceau.
13. Brancher une enceinte USB

Votre cadre vous offre aussi la possibilité de brancher une enceinte USB afin de profiter d’un
meilleur son lorsque vous visionnez un diaporama.
Pour cela, il vous suffit de connecter l’enceinte USB au cadre en la branchant sur le port USB à
l’arrière de l’appareil.
14. Jeux d'entraînement cérébral
Afin de rendre votre cadre plus ludique, Pix-Star a intégré au cadre 4 jeux du type
entraînement cérébral :
- Taquin
- 2048
- Sudoku
- Démineur
- Snake
- Trouver la paire
- Problème d'échec
- Le compte est bon !
Pour accéder à ces jeux, il vous suffit de
1. Sélectionner « Mes radios, jeux & notifications » depuis le menu principalement
2. Sélectionner « Mes jeux »
3. Cliquer sur le jeu de votre choix.
Une fois dans le menu du jeux de votre choix, plusieurs options s'offrent à vous :
- Jouer en cliquant sur « jeu »
- Connaître les « Meilleurs scores »
- Choisir la difficulté dans « Options »
- Connaître les règles du jeu dans « Aide »
15. Mes notifications
Afin que votre cadre soit un véritable outil d'accompagnement dans votre quotidien, votre
cadre Pix-Star vous offre la possibilité de programmer des alarmes et des notifications.
Pour cela, rien de plus simple :
1. Dans le menu principal, cliquer sur « Mes radios, jeux & notifications »
2. Puis sélectionner « Mes notifications »
3. De là, vous pouvez gérer toutes vos notifications. Pour créer une notification, cliquer sur
« Ajouter une nouvelle notification ». Pour modifier ou supprimer une notification, cliquer sur
la notification en question.
Il existe deux types de notifications :
- Notifications sans récurrence (une seule fois). Vous devez choisir l'heure et la date (format
JJ/MM/AA) de votre notification.
- Alarme (avec récurrence). Vous devez choisir l'heure et les jours de répétitions de votre
alarme.
Pour les deux types de notifications, une sonnerie se déclenche à la date et heure
préalablement programmées.

Lorsque le cadre est en mode veille, un message affichant la notification apparaît mais sans
aucun son. Le cadre se remet automatiquement en mode veille au bout de 50 secondes
environ.
Attention: si le cadre est éteint (bouton on/off à l'arrière du cadre), aucune alarme ou
message ne se déclenche.
16. Caractéristiques techniques
Format supporté
Image - JPG, JPEG, BMP, PNG, GIF
Type de mémoire
Cartes SD / SDHC / SDXC / MMC
USB Clé USB
Capacité de stockage
Environ 30 000 photos pour les deux versions 10 pouces
et 15 pouces dans la mémoire interne du cadre.
Consommation électrique
Max. 6 W pour la version 10 pouces
Max. 12 W pour la version 15 pouces
Les informations fournies dans ce document sont données à titre indicatif et peuvent à tout
moment faire l'objet de modifications de la part du fabriquant.

17. Signification des icônes du menu
PROBLEME ! non connecté au Wi-Fi.
Vérifier la connexion Wi-Fi dans le menu configuration
Connecté au Wi-Fi mais le signal est faible
Connecté au Wi-Fi et le signal est maximum
PROBLEME! Le cadre ne parvient pas à accéder à internet
Cela arrive si la connexion internet a un problème ou votre
router Wi-Fi n’est pas connecté à internet.
La connexion internet fonctionne correctement, le cadre peut
envoyer et recevoir des photos sans problème.
Information d’information que le cadre vient de recevoir un
nouveau photo-mail.
Une carte SD/SDHC/MMC est présente.
Une source USB est présente.
Un disque Samba est monté dans le cadre.
Un cable Ethernet est connecté au cadre à travers un adpateur
USB-Ethernet.
La mémoire interne du cadre est pleine !
Un casque audio est connecté au cadre via la prise jack.
Un clavier USB est connecté au cadre via le port USB.
Le diaporama du cadre est en mode portrait.
Une enceinte USB est connectée au cadre

18. Signification des icônes du diaporama
Envoyer photo-mail
Photo suivantes
Met le diaporama en pause
Photo précédente
Tourne la photo vers la droite
Efface la photo
Audio on/off
Liste des photos en miniature
Options (configure le diaporama)
Fermer et retour au menu principal

19. Déclaration de conformité
Nous, Spheris Digital Ltd., déclarons sous notre seule responsabilité que les produits
PXT510WR08H, PXT515WR08H sont en conformité avec les recommandations du Council
Directive on Radio Equipment and Telecommunications Terminal Equipment. Ce produit est
marqué du label CE :
Nous vous conseillons de retourner votre cadre à la fin de sa durée de vie d’utilisation dans les
centres de récupération publics pour le recyclage et la réutilisation des objets électriques et
électroniques.
Le symbole suivant sur le produit, le manuel d’instructions ou l’emballage indiquent que le
produit est soumis à la directive européenne 2002/96/EU.
Spheris Digital Ltd - www.pix-star.com

Willkommen
Sie haben gerade einen Wireless digitalen Bilderrahmen bekommen und wir bedanken uns
herzlich für Ihr Vertrauen von unserem Produkt und unserer Läsung.
Dieser Digitaler Bilderrahmen ist komplett eine neue Generation von dem Produkt mit den
Wireless Fähigkeiten und innovativen Eigenschaften was, wir glauben, Sie entzücken werden.
Mit dem Produkt kännen Sie jeder Zeit und ganz einfach Ihre besten Momente innerhalb ein
paar Sekunden an Ihren Freunden und Ihrer Familie teilhaben egal wo die sind. Gleichzeitig hat
dieses Produkt die traditionellen Eigenschaften von einem digitalen Bilderrahmen der die
Möglichkeit hat die Bilder und andere Mediadateien von USB Memory Stick und kompatiblen
Speicherkarten anzuzeigen.
Wir hoffen dass Sie das Nutzen von unserem Produkt geniessen. Zögern Sie nicht uns Ihr
Feedback und Ihre Vorschläge zu geben indem Sie sich bei unserer Webseite www.pix-star.com
anmelden.
Warnung : Dies Handbuch für die Nutzung der Pix-Star® Bilder Rahmen ist simplifiert. Für mehr
Informationen oder die Limited Warranty des Produkt zu haben, gehen Sie auf unsere webseite www.pix-star.com in der “support” Sektion.
ANMELDUNG
Für Ihrer Pix-Star Online anmeleden, gehen Sie auf www.pix-star.com, und
klicken Sie auf "Meinen neuen Pix-Star Bilderrahmen registrieren". Empfangen
und senden Sie Bilder von/an Ihrem Freunden und Verwandten aus der ganzen
Welt!
Enjoy your Pix-Star
®

Empfehlungen der Anwendung
und der Sicherheitswarnungen
Installieren Sie den digitalen Bilderrahmen nicht dicht zu einer Wasserquelle (min. 1,5 m von
einer Wasserquelle) oder in einer feuchten Umgebung (wie z.B. Badezimmer, Wäscherei, Küche
etc.).
Dieses Produkt ist konstruiert wurden für eine Arbeit in einem Zimmer oder in einem Haus und
kann nicht draussen benutzt werden.
Dieses Produkt muss bei einer Temperatur zwischen 10°C und 35°C benutzt werden.
Benutzen Sie dieses Produkt nur mit dem Hauptleistungsadapter der mit dem Produkt
zusammen ist.
Die CE Kennzeichung zertifiziert dass das Produkt in Übereinstimmung mit den
Hauptanforderungen der Rechtlinie von dem Europäischen Parlament und dem Gemeinderat
1995 / 5 / EC für die Telekommunikationsterminals, die Gesundheit des Benutzers und fÜr die
elektromagnetische Störung ist.
Das Terminal ist konstruiert wurden fürs private Hausebenutzen (CPE customer premises
equipment) innerhalb der europäischen Union. Das ist getestet worden Gemäß den technischen
Dispositionen für den Radioapparat (EN 300328). Deswegen fällt der Lieferant alle
Verantwortung ab im Falle von keiner Übereinstimmung mit den aktuellen Bestimmungen im
Land wo installiert wird.
Die Erklärung der Übereinstimmung kann konsultiert werden durch unsere Webseite von
www.pix-star.com oder kann erhalten werden indem man eine E-mail an support@pix-
star.com schickt.

1. Überblick vom Gerät
WARNUNG
Durch unsachgemäße Behandlung kann die Batterie explodieren. Versuchen Sie nicht,
sie wieder aufzuladen, auseinanderzubauen und werfen Sie sie nicht ins Feuer.
Pause/ Spielen der Diashow
Ein Sub-Menümodus eingeben
Eine Auswahl bestätigen
Im Menüsmodus nach links umsetzen
Im Modus vom gleitenden Show zu dem letzten Bild umsetzen
Im Menüsmodus nach rechts umsetzen
Im Modus vom gleitenden Show zu dem nächsten Bild umsetzen
Im Menüsmodus absetzen
Im Menüsmodus runtersetzen
Teilhaben: Die Kontackt list aufmachen um die Bilder zu schiken /
teilhaben
Eingang: Den Eingang öffnen um die per Email erhaltenen Bilder
anzuschauen
LCD ein/ausschalten (standby Modus)
Zurück
Menü Slideshow anschauen
Menü Seite anschauen
Verpackung enhält :
- 1 x IR Fernbedienung
- 1 x Bedienungsanleitung
- 1 x Pix-Star Fotorahmen
- 1 x Netzteil 100/220Volt

2. Installation
Stecken Sie den AC Adapter am Gerät an. Sein Anschluß ist fixiert an der Seite vom Gerät.
Dann stecken Sie den AC Adapter zu einer Netzleitung an.
Um das Gerät einzuschalten setzen Sie den Knopf vom Einschalten um der an der linken Seite
vom Gerät fixiert ist. Danach soll das Gerät ein LOGO am Bildschirm anzeigen. Warten Sie ganz
kurz, das Gerät braucht etwa 30 Sekunden bevor das zum Benutzen bereit ist.
3. Einführung fürs Hauptinterface
Nachdem Sie das Gerät einschalten und ganz kurz warten sollen die Bilder angezeigt werden.
Benutzen Sie den Knopf hinter dem Gerät und dann können Sie in die Menüs reingehen und die
durchsuchen. Um das Hauptmenü zu öffnen drücken Sie den Knopf Menu. Fünf Bildzeichen die
verschiedene Menüs bedeuten werden angezeigt.
Sie können die durchsuchen durch die Knöpfe ← und →. Um ins gewünschte Menü reinzugehen
drücken Sie den Knopf " ".
Hinweis: die Position Back erlaubt Ihnen zu
dem letzten Menü zurückgehen zu lassen.

4. Wi-Fi und Internetinstallation
4.1 Das Gerät zum Wi-Fi Wireless Netzwerk anschließen
Jedes Gerät hat eine dedizierte E-mailadresse die dem Gerät eine mäglichkeit gibt die Bilder
direkt vom Internet zu bekommen. Um die Bilder zu bekommen muss das Gerät durch ein Wi-Fi
Gateway zum Internet angeschloßen werden
Hier ist wie Sie das machen indem Sie Wi-Fi Netzwerk benutzen:
Drücken Sie den Knopf Menu um das Hauptmenü aufzumachen. Rollen Sie zu der Position
Einstellungen Und drücken Sie nochmal Menu. Dann rollen Sie zur Position Wi-Fi Einstellungen
und Drücken Sie Menü.
Das Gerät startet einen AUTOMATISCHEN scanning process für ein gültiges Wireless Netzwerk.
4.2 Das Gerät registieren und das Gert am Web managen
Normalerweise soll Ihr Gerät schon mit einer E-mailadresse konfiguriert werden (Sehen Sie den
Zettel an der Abdeckung vorne oder hinten des Geräts).
Besuchen Sie unsere Webseite um Ihren Bilderrahmen zu managen.
Wenn keine E-mailadresse bei dem Gerät angeboten war sollen Sie die online
registieren mit folgenden Anweisungen:
Besuchen Sie die Webseite von Pix-Star und klicken Sie Join Now an. Füllen Sie das Formular
auf und Ihr Gerät wird zum Benutzen bereit sein! Sie können Gerät ID im Menü Basic
Information vom Menü Einstellungen vom Gerät finden. Wählen Sie ein Passwort und die Emailadresse die Sie zu Ihrem Gerät übertragen möchten.
5. Die Bilder per E-mails direkt am Gerät erhalten
Um ein Bild ins Gerät reinzutragen schicken Sie einfach eine E-mail mit Ihrem Bild als Anhang
direkt zu der E-mailadresse des Geräts.
Wenn ein neues Bild am Gerät angekommen ist wird ein kleines Bildzeichen "EINGANG" an der
Seite oben links des Bildschirms angezeigt. Dann drücken Sie nur den Knopf um das Bild ins
gleitende Show einzutragen.
Hinweis: Sie können ein paar Bilder bei der gleichen E-Mail schicken. Aber Sie müssen
sicher sein dass die Größe von Ihrer E-mail nicht mehr als 20 Mbytes sein darf.
Hinweis: Ein DHCP Server muss an Ihrem Netzwerk
laufen und eine IP Adresse fürs geräte anbieten. Die
meisten persönlichen Wi-Fi Netzwerker haben ein DHCP

6. Bilder mit Freunden direkt am Gerät teilhaben
Das Gerät erlaubt Ihnen Ihren Freunden an Ihren Bildern teilhaben zu lassen.
Um das zu machen drücken Sie den Knopf ↑ wenn das Bild das Sie schicken möchten angezeigt
ist. Dann kommt ein Menü vor das aus mehreren Positionen besteht:
- Übergang zur Webseite: wenn Sie diese Position auswählen wird das
Bild zum Server geschickt. Dann können Sie das in Ihrer persönlichen Zone in der Webseite
sehen.
- DPF: diese Position erlaubt Ihnen das Bild zu einem anderen Gerät oder zu einer Emailadresse zu schicken. Wählen Sie die aus und tragen Sie Gerät ID oder die E-mailadresse ein
zu der Sie das Bild hinschicken.
- Andere Positionen: diese Positionen sind die Kontakte (ein anderes Gerät oder E-mail) die im
Server eingetragen sind. Sie können die Bilder schnell zu denen hinschicken indem Sie die
auswählen.
7. Landschaftsbilder von Ihrem Online-Album am Gerät
Das Gerät kann eine gleitende Show von den Bildern anzeigen die innerhalb Ihrem in der
Webseite geschafften Online-Album gelagert sind.
Um das Gerät angegliedert mit dem Album online zu managen melden Sie Ihre persänliche
Zone in der Gerät Webseite an. Wöhlen Sie das Menu „ Album “ aus wo Sie neue Bilder abladen
oder manche Bilder vom Album löschen können. Sie kännen auch definieren welches Album am
Gerät angezeigt wird. Soblad die Bilder zur Gerät Webseite abgeladen worden sind, sind sie
sofort einsehbar in der Weitseite und nach normalerweise weniger als 1 Minute am Gerät.
Bei dem Mode von der gleitenden Show im Webalbum wird das Gerät AUTOMATISCH und
periodisch seinen Inhalt mit der Webseite synchronisieren.
Wenn ein Bild zum Online Webalbum hingefügt ist wird das Gerät das Bild später zu seinem
lokalen gleitenden Show hinfügen. Wenn ein Bild vom Online-Album versetzt ist wird das Gerät
das Bild später von seinem lokalen leitenden Show versetzen. Am mindesten wird die
Aktualisierung des Geräts mit dem Online-Album in jeder Minute gemacht.

8. Überblick von anderen Funktionalitäten
Das Gerät besteht aus folgenden nützlichen Funktionalitäten:
- Pause
Das Gerät zeigt manchmal die Bilder als ein automatisches gleitendes show an. Allerdings,
wenn Sie ein einzelnes statisches Bild anzeigen mächten, können Sie das gleitendes Show
unterbrechen indem Sie den Knopf Pause vom Hauptmenü auswählen. Wählen Sie die Position
Play um das gleitendes Show nochmal laufen zu lassen.
-Verschiedene Optionen
Ein paar Optionen können von der Position Basic Information vom Menü Einstellungen geändert
werden. Es besteht aus Sprache, Transitionen und Zeit per Gleiten.
- Bewegliche Geräte
Da Gerät kann die Bilder die in einer SD karte oder in einem USB Masse Speicher Dongle
abgespeichert sind auch lesen. Stecken Sie eine von denen ins Gerät an, wählen Sie die rechte
Speicherzone im Menü Bilder Management und suchen Sie die Adressenbücher durch um eins zu
finden das Ihr Bild enthält. Dann klicken Sie Weiter an um ein gleitendes Show bestehend aus
ihren Bildern anzuzeigen.
- Bilder Management
Das Gerät erlaubt Ihnen Ihre Bilder managen zu lassen. Gehen Sie ins Menü Dateimanager rein
und wählen Sie den Speicher aus wo Ihre Bilder festgestellt sind. Dann können Sie ein paar
Aktionen durchführen wie z.B. Löschen, Kopieren ...
9. Technische Eigenschaften
Unterstütztes Format
Image - JPG, JPEG, BMP, PNG, GIF
Memory Karte
SD / SDHC / SDXC / MMC
USB
USB kompatibel
mit Masse speicher Peripherie
Speicherkapazität
30 000 Image
Energieverbrauch
Max. 6W (10 inch version)
Max. 12W (15 inch version)
Alle Daten sind nur für die Erstellung zuständig. Änderungen von Daten werden von der
Herstellern nicht benachrichtet.

10. Die Bedeutung der Symbole im Menü
PROBLEM! Not connected to a Wi-Fi network.
Check the Wi-Fi connection configuration and ensure the Wi-Fi
network is available.
Connected to a Wi-Fi network with WEAK signal.
Connected to a Wi-Fi network with STRONG signal.
PROBLEM! The frame cannot access the Internet
This usually happens when Wi-Fi is not properly configured or the
internet connection of your Wi-Fi gateway is down.
Connection to the Internet is working properly.
The device is ready to receive / send email and synchronize web
albums.
Notification that the Pix-Star® photo frame has received new
photo email.
SD/SDHC/MMC card detected and ready to use
USB device detected and ready to use
A Samba disk is mounted and accessible from the frame
Ethernet cable connected to the frame through a USB-TOETHERNET adapter
The Frame’s memory is full
A headset is connected to the frame through the jack plug at the
back / side
A USB keyboard is now connected to the frame
The frame is now playing the slideshow in portrait mode (main
menu does not rotate, only slide show rotates to portrait mode)
A USB speaker or speaker bar is connected to the frame to
output the audio

11. Die Bedeutung der Symbole im Diashow
Send photo-mail
Next picture
Pause slide show (when Playing)
Play slideshow (when in Pause)
Pause slide show (when Playing)
Rotate photo to the right
Delete picture
Music on/off
Photo thumbnail
More options (configure the slide show)
Close and go back to Main Menu

12. Erklärung der Übereinstimmung
Wir, Spheris Digital Ltd, erklären unter unserer einzelnen Verantwortung dass das Produkt,
PXT510WR08H, PXT515WR08H in Übereinstimmung mit den Einrichtungen von der Rechtlinie
des Rates am Radioapparat und Telekommunikationsterminalapparat ist.
Das Produkt ist mit der CE Kennzeichung eingezeichnet.
Umweltschutz
Sie werden vorgeschlagen, dieser Rahmen am Ende seines Lebens zu den Öffentlichen
Versammlungspunkten zurückzugeben die für die Rückschleusung, die Wiederverwendung und
elektronische Geräte gerÜndet sind.
Das folgende Symbol am Produkt, das Anweisungshandbuch oder die Verpackung zeigt dass das
Produkt der Europäischen Rechtlinie 2002 / 96 / EU untergeordnet ist.
Spheris Digital Ltd - www.pix-star.com

Benvenuti
Complimenti per aver acquistato il nostro prodotto e per aver riposto la vostra fiducia nella
nostra azienda. Avete appena acquistato una cornice fotografica digitale senza fili.
Questa Cornice Fotografica Digitale é un prodotto di nuova generazione con capacitá operative
senza fili e caratteristiche del tutto innovative.
Utilizzando questo prodotto potrete condividere i migliori momenti della vostra vita assieme a
amici e familiari. Oltre alla classica funzione di una cornice digitale, questo
prodotto permette di visualizzare file provenienti da dispositivi USB e schede di memoria
compatibili.
Per qualsiasi informazione o suggerimento potete contattarci tramite il nostro sito Internet
www.pix-star.com
REGISTRAZIONE
Per registrare il Vostro Pix-Star on line, andate semplicemente sul sito www.pix-
star.com
e cliccate su "Voglio scegliere un indirizzo mail per il mio Pix-Star"!
Potrete cosi’ instantaneamente spedire/ricevere foto a/da amici e famigliari.
Enjoy your Pix-Star
®

Importanti indicazioni sulla sicurezza e sul prodotto
Non installare la cornice fotografica digitale nelle vicinanze di sorgenti d`acqua (distanza
minima di 1.5 metri) oppure in ambienti eccessivamente umidi (come per esempio sale da
bagno, lavanderie, cucine, ecc.).
Questo prodotto é stato concepito per uso esclusivamente interno e non puó essere usato
all`aperto. Evitare d`installare l`unitá in ambienti polverosi.
Questo prodotto deve essere utilizzato ad una temperatura compresa tra 10 e 35.
Utilizzare il prodotto solamente con l`adattatore elettrico allegato alla confezione.
Il simbolo CE garantisce che il prodotto é conforme ai requisiti dell`Unione Europea ed alle
regolamentazioni 1999/5/EC per I terminali telecomunicativi, salute utente, sicurezza ed
interferenza elettromagnetica.
Questo terminale é stato designato per solo uso privato(unitá per uso
personale CPE) all`interno dell`Unione Europea. É stato inoltre testato secondo le disposizioni
tecniche per apparecchiature radio (EN 300328). Il costruttore non si assume alcuna
responsabilitá in caso di mancato ottemperamento delle condizioni appena citate nel paese
d`installazione.
La dichiarazione di conformitá e la garanzia puó essere consultata sul nostro sito Internet
www.pix-star.com oppure essere ricevuta via e-mail contattando l`indirizzo support@pix-
star.com

1. Descrizione generale dell`unitá
Pausa / riprodurre la slideshow
Entrare nel sotto-menu in modalita` di menu
Confermare la selezione
Spostare il selettore verso sinistra nella modalita` di menu
Spostare l`immagine precedente in modalita` diaporama
Spostare il selettore verso destra nella modalita` di menu
Spostare l`immagine seguente in modalita` diaporama
Spostare il selettore verso l`alto in modalita` di menu
Spostare il selettore verso il basso in modalita` di menu
Convidisione: aprire la lista di contatti per inviare / condevidere le
immagini
Sviluppo: Inbox: Aprire l`inbox per vizualizzare le immagini
ricevute via email
Accendere/Spegnere lo schermo LCD (Modalita` di attesa)
Indietro al menu precedente
Visualizzare menu principale
La scatola contiene:
- 1 x Telecomando IR
- 1 x Manuale d'istruzioni
- 1 x Cornice foto Pix-Star
- 1 x Adattatore di corrente 100/220V

2. Installazione
L`installazione dell`unitá é estremamente facile.
Collegare l`adattatore AC all`unitá. La relativa presa é situata sul lato destro del prodotto.
Quindi collegare l`adattatore alla presa elettrica.
Per accendere il prodotto, premere Il pulsante locato sulla parte superiore
dell`unitá. Sullo schermo appare un LOGO. Attendere qualche istante, il prodotto necessita di
circa 30 secondi prima di poter essere utilizzato.
3. Introduzione all`interfaccia principale
Dopo aver acceso il prodotto, le vostre immagini verranno visualizzate sullo schermo. Se
l`unitá viene utilizzata per la prima volta, nessuna immagine sará visualizzata in quanto la
memoria é vuota.
Utilizzare I pulsanti nella parte posteriore del prodotto, entrare e scorrere il menu. Per aprire
il menu principale, premere il pulsante Enter. Sullo schermo verranno rappresentate cinque
differenti icone. Scorrerle utilizzando i pulsanti ← e →; per entrare nel menu desiderato,
premere il pulsante Enter.
Nota: la voce Back vi permette di ritornare al menu precedente.

4. Wi-Fi e setup Internet
4.1 Connettere l`unitá alla rete Wi-Fi senza fili
Ogni unitá possiede un indirizzo email speciale da cui é possibile ricevere fotografie e
scambiarle direttamente tramite Internet. Per ricevere fotografie, é necessario connettere la
cornice digitale alla rete tramite il la porta Wi-Fi :
Premere il pulsante Enter per aprire il menu principale. Selezionare Setting e premere Enter.
Quindi selezionare Wi-Fi Setting e premere Enter. L`unitá inizia un processo di scansione
AUTOMATICO per individuare le reti disponibili.
4.2 Registrare l`unitá e gestire il prodotto tramite la rete
In genere, il vostro prodotto è giá stato configurato con un indirizzo e-mail (vedere etichetta
sulla parte frontale oppure posteriore).
Per gestire la cornice d`immagine, visitare il nostro sito internet.
Se non viene fornito alcun indirizzo e-mail, é necessario registrare l`unitá online seguendo la
procedura ivi indicata:
Entrare nella homepage di Pix-Star e cliccare su Join Now. Compilare i campi richiesti; la
vostra unitá potrá immediatamente essere utilizzata! L`ID dell`unitá potrá essere identificato
nel menu d`informazioni dell`unitá. Selezionare una password e l`indirizzo e-mail desiderato.
5. Ricevere immagini direttamente tramite E-MAIL sull`unitá
Per inserire e visualizzare nel Vostro apparecchio immagini provenienti dal Web, inviare
semplicemente una e-mail con l'immagine allegata all`indirizzo di posta.
Quando viene ricevuta una nuova immagine sull`unitá, nella parte alta a destra dello schermo
appare l`icona INBOX. Premere il pulsante per inserire l`immagine nella modalitá di
diaporama.
6. CONDIVIDERE le immagini con altre persone tramite l`unitá
L`unitá Vi permette di condividere immagini con I Vostri amici. Premere il pulsante per
selezionare l`immagine che si desidera inviare. Sullo schermo appare un menu di dialogo:
-WEB ALBUM: se viene selezionata questa voce, l`immagine verrá inviata al server.
Potrete vedere la Vostra area personale sul sito Internet.
Nota: é possibile inviare più immagini nella stessa e-mail,
assicurandosi che la dimensione dell'allegato non superi I 20 Mbyte.
Nota: é necessaria la presenza di un server DHCP e di un indirizzo IP per
utilizzare la rete. La maggior parte delle reto Wi-Fi utilizza server

-CONTACT LIST: questa voce Vi permette di inviare immagini ad un`altra unita oppure
ad un`altro indirizzo email. Selezionare la voce e digitare l`ID dell`unitá oppure l`indirizzo
email a cui si desidera inviare la fotografia.
-Other items: Tali voci sono state registrate dal server (oppure da un’ altra
unitá/email). Potete condividerle con i vostri amici. Se si desidera aggiungere altri contatti o
funzioni è necessario registrarsi sul sito.
7.Visualizzare immagini dall`ALBUM ONLINE sull`unitá
L`unitá é in grado di visualizzare immagini in formato diaporama precedentemente
memorizzate in un album Internet.
Per gestire l`unitá associata all`album online, entrare nell`area personale dell`unitá.
Selezionare il menu “Album” da dove possono essere aggiornate le immagini oppure
cancellarne altre. Inoltre è possibile definire l`album di visualizzazione dell`unitá.
Una volta che le immagini sono state aggiornate sul sito internet dell`unitá, saranno
immediatamente visibili sulla rete ed in meno di 1 minuto sull`unitá stessa.
In modalitá di album diaporama, l`unitá automaticamente e periodicamente sincronizza il suo
contenuto con il sito Internet.
Quando un`immagine viene aggiunta all`album internet, l`unitá la memorizzerá a sua volta in
modalitá diaporama. Quando un`immagine viene RIMOSSA dall`album internet, l`unitá la
rimuoverá anche dalla sua memoria. L`aggiornamento dell`unitá viene effettuato ogni minuto.
8. Altre funzioni
L`unitá include le seguenti funzioni:
- Pause
l`unitá visualizza le immagini in modalitá diaporama. Se si desidera visualizzare un`immagine
statica singola, é possibile interrompere la modalitá di diaporama selezionando il pulsante di
Pause sul menu principale. Per riprendere la funzione di diaporama, selezionare la voce Play.
-Miscellaneous options
Diverse opzioni possono essere modificate partendo dalla voce Basic Info nel menu
d`impostazione.
- Removable devices
L`unitá é in grado di leggere le immagini memorizzate in schede SD oppure USB.
Collegare l`unitá esterna al prodotto, selezionare l`area di memorizzazione in Picture
Management e quindi scorrere le directory per trovare l`immagine interessata; cliccare su
Continue per visualizzare la diaporama.
- Picture management
L'`unitá vi permette di gestire le immagini memorizzate. Entrare in Picture
Management e selezionare la memoria dove le immagini sono state salvate. É quindi possibile
implementare diverse funzioni come Delete, Copy, ecc…

9. Caratteristiche tecniche
Formato supportato
Image – JPG, JPEG, BMP, PNG, GIF
Scheda di memoria
SD / SDHC / SDXC / MMC
USB
Porta USB 1.1 compatibile
conunitá esterna periferica 1.1
Capacitá di memorizzazione
30 000 pictures
Consumo elettrico
Max. 6W (10 inch version)
Max. 12W (15 inch version)
Tutti I dati sono forniti per puro scopo di referenza. Il costruttore si riserva il diritto di
modificare le specifiche tecniche senza previa notifica.

10. Dichiarazione di conformitá
Noi, Spheris Digital Ltd., dichiara che la sola responsabilitá consiste nel fatto che il prodotto é
in conforme alle regolamentazioni del Consiglio Direttivo in materia di Equipaggiamenti Radio
e Telecomunicazioni.
Il prodotto é indicato con il marchio
Protezione ambientale
Al termine della sua durata operativa, suggeriamo all`utente di portare il cornice al centro di
raccolta specalizzato più vicino alla Vostra area.
Il seguente simbolo presente sul prodotto, sul manuale d`istruzioni oppure sulla confezione
indica che il prodotto é soggetto alla Direttive Europee 2002/96/EU.
Spheris Digital Ltd - www.pix-star.com

Bienvenido
Usted acaba de adquirir uno marco digital inalámbrico y gustaríamos de agradecerle por su
confianza en nuestro producto y solución.
Este Marco Digital es una generación totalmente nueva con capacidad de red inalámbrica e
innovadoras características que creemos irán deleitarlo.
Utilizando el producto usted estará apto a compartir los suyo mejores momentos con sus
amigos y su familia en sólo algunos segundos en cualquier lugar que estén a cualquier
momento. Este producto incluye las tradicionales características de uno Marco Digital, que es
capaz de exhibir retratos y otros tipos de archivos a partir de una tarjeta de memoria USB y
tarjetas de memoria compatibles.
Esperamos que aprecie nuestro producto. No hesite en darnos su solución y sugerencias
entrando en nuestro sitio Web www.pix-star.com. También se puede descargar la garantía
limitada del producto en línea.
REGISTRO
Para registrar su pix-star en línea ahora, simplemente vaya a www.pix-star.com
y haga clic en "Me gustaría elegir un e-mail a mi Pix-Star
®
"! Usted será capaz de
recibir/enviar imágenes de forma instantánea desde/a tus amigos y familiares!
Disfrute de su Pix-Star
®

Recomendaciones del uso y avisos de la seguridad
No instale suyo Marco Digital cerca de una fuente de agua (mínimo 1.50 m de una fuente de
agua) o en un ambiente húmedo (tal como el cuarto de ba–o, la tintorería, la cocina, etc.).
Este producto fue proyectado trabajar dentro de un cuarto o de una casa y no puede ser usado
fuera. Evite instalar el producto en un ambiente empolvado.
Este producto debe ser usado en una escala de temperatura entre 10°C y 35°C.
Use este producto solamente con el adaptador de fuerza principal proveído junto con el
producto.
La marca CE demuestra que el producto está en conformidad con las exigencias
principales del Parlamento Europeo y de la directriz orientadora de consejo 1999/5/EC para
terminales de telecomunicaciones, salud y seguridad del usuario y para el disturbio
electromagnético.
Este terminal fue proyectado para el uso confidencial, interno (equipamiento de premisa del
cliente del CPE) dentro de la Unión Europea. Él fue probado de acuerdo con las disposiciones
técnicas para equipamiento de radio (EN 300328). Así, el fabricante declina toda la
responsabilidad en caso de no conformidad con las normativas actuales en el pa’s de la
instalación.
La declaración de conformidad puede ser consultada en nuestro sitio en www.pix-star.com o
puede ser obtenida emitiendo un mensaje electrónico la support@pix-star.com .

1. Descripción del DISPOSITIVO
Parar / Iniciar la presentación de diapositivas
Para entrar en un submenú cuando en la modalidad de menú
Confirma la selección
Mueve a la izquierda en la modalidad de menú. Mueve hacia el
retrato precedente en la modalidad de presentación de
diapositivas
Mueve a la derecha en la modalidad de menú. Mueve hacia el
retrato precedente en la modalidad de presentación de
diapositivas
Mueve arriba en la modalidad de menú.
Mueve abajo en la modalidad de menú.
Share: Abra la lista de contactos para enviar / compatir retratos
Inbox:Abre la caja de recepción para ver los retratos recididos por
correo electrónico
Con. / Des. la pantalla (modalidad de espera)
Espalda
Exponer menú
El paquete contiene:
- 1 x Mando a distancia IR
- 1 x Guía de usuario
- 1 x Marco de fotos Pix-Star
- 1 x Adaptador de corriente 100/220V

2. Instalación
Primeramente, conecte el adaptador de CA en el DISPOSITIVO. El enchufe del adaptador está
situado en el lado del dispositivo. Entonces, conecte el adaptador de CA la una línea eléctrica.
Para conectar el DISPOSITIVO, mueva la tecla de interruptor situada al lado del dispositivo, a la
derecha. Después de esto, el DISPOSITIVO debe mostrar un LOGOTIPO en su pantalla. Espere un
poco, el DISPOSITIVO necesita de aproximadamente 30 segundos antes de estar pronto para ser
utilizado.
3. Introducción al interfaz principal
Después de usted conectar el DISPOSITIVO y esperar un poco, retratos deben ser exhibidos.
Usando las teclas atrás del DISPOSITIVO, usted puede entrar en los menús y consultarlos. Para
abrir el menú principal, presione la tecla menu. Cinco iconos que representan menús
diferentes son indicados. Usted puede consultarlos utilizando las teclas y . Para entrar en el
menú deseado, presione la tecla " ".
Nota: El ítem “Back” permite que usted vuelva al menú precedente.

4. Instalación del Wi-Fi e Internet
4.1 Conecte el DISPOSITIVO a la red inalámbrica Wi-Fi
Cada DISPOSITIVO tiene una dirección electrónica dedicada que hace posible que el
DISPOSITIVO reciba retratos directamente de la Internet. Para poder recibir retratos el
DISPOSITIVO debe ser conectado internet a través de una pasarela Wi-Fi .
Aquí están las instrucciones de cómo hacer esto utilizando su red Wi-Fi :
Presione la tecla menu para abrir el menœ principal. Ruede para el ítem ajustes y presione
menu otra vez. Entonces, ruede a los ajustes de Wi-Fi y presione menu.
El DISPOSITIVO comienza un proceso de exploración AUTOMÁTICA de redes inalámbricas
disponibles.
4.2 Registre y control el DISPOSITIVO en la web
Normalmente su dispositivo debe ya estar configurado con una dirección electrónica (vea la
etiqueta en la tapa delantera o en la tapa trasera del dispositivo).
Para controlar su moldura digital, vaya a nuestro sitio Web. Si ninguna dirección electrónica
fue proporcionada con el DISPOSITIVO, usted debe registrarlo en línea siguiendo las
instrucciones abajo:
Vaya a lo sitio Web de la Pix-Star y clique en Participar Ahora. ¡Llene el formulario y su
DISPOSITIVO estará pronto para ser utilizado! Usted puede encontrar la identificación del
DISPOSITIVO en el menú de información básica del menú ajustes de su DISPOSITIVO. Escoja una
contraseña y la dirección electrónica que usted desea atribuir a su DISPOSITIVO.
5. RECIBA retratos por CORREO ELECTRÓNICO directamente en el
dispositivo
Para poner un retrato en su DISPOSITIVO, emita simplemente un correo electrónico con su
retrato agregado a la dirección electrónica de su DISPOSITIVO directamente.
Cuando un retrato nuevo es recibido en el DISPOSITIVO, un icono pequeño de “INBOX” estará
indicado en el lado derecho superior de la pantalla. Entonces, sólo presione la tecla para
introducir el retrato en el demonstración de diapositivas.
Nota: Un servidor de DHCP debe estar en ejecución en su red y suministrar una
dirección IP al DISPOSITIVO. La mayoría de las redes Wi-Fi personales mantiene
un servidor DHCP en.
Nota: Usted puede emitir diversos retratos en el mismo
correo, pero usted debe estar correcto de que el tamaño
de su correo electrónico no excede 20 Mbytes.

6. COMPARTIR retratos con amigos directamente en el dispositivo
El DISPOSITIVO permite que usted comparta sus retratos con sus amigos.
Para tanto, presione la tecla mientras el retrato que usted desea emitir que sea exhibido.
Entonces, un menú compuesto de diversos ítems aparece:
- TRANSFERENCIA A LO SITIO WEB:
Si usted selecciona este ítem, el retrato será emitido al servidor. Usted podrá verlo en su área
personal en lo sitio Web.
-DPF : Este ítem permite que usted emita el retrato a un otro DISPOSITIVO
a o a una dirección electrónica. Selecci—nelo e inserte la identificación del DISPOSITIVO
b o la dirección electrónica que usted quiera.
-Otros ítems: Estos ítems son compañeros (otro DISPOSITIVO o dirección electrónica) que son
grabados en el servidor. Usted puede rápidamente enviar retratos para ellos seleccionándolos.
Si desear añadir más compañeros, entre en el web sitio.
7. Ver retratos de su ÁLBUM ONLINE en el dispositivo
El dispositivo es capaz de exhibir una presentación de diapositivas de los retratos guardados
dentro de su álbum online, creado en el sitio web.
Para gerencia del álbum online asociado al DISPOSITIVO, entre en su área personal en el sitio
web del DISPOSITIVO. Escoja el menú “Album” donde usted puede transferir nuevos retratos o
excluir algunos de los retratos del álbum. Usted puede también definir cual álbum para ser
exhibido en el DISPOSITIVO.
Una vez que los retratos hayan sido transferidos hacia el sitio web del DISPOSITIVO, ellos son
visibles inmediatamente en el sitio web y después, frecuentemente, de 1 minuto en el
dispositivo.
Cuando en el modo de presentación de diapositivas del álbum web el DISPOSITIVO irá
AUTOMÁTICAMENTE y periódicamente sincronizar su contenido con el sitio web.
Cuando un retrato es acrecentado al álbum online, el DISPOSITIVO después lo acrecienta en su
presentación de diapositivas local. Cuando un retrato es REMOVIDO del álbum online, el
DISPOSITIVO después lo removerá de su presentaci—n de diapositivas local. La actualización del
DISPOSITIVO con el álbum online es completada en algunos minutos.
8. Vista de otras funcionalidades
El DISPOSITIVO incluye las siguientes œtiles funcionalidades:
- Pausa
El DISPOSITIVO usualmente exhibe los retratos como una presentación de diapositivas
automática. Pero, si usted desea exhibir sólo un retrato estático, usted puede interrumpir la
presentación de diapositivas seleccionando el botón Pause del menœ principal. Para exhibir la
presentación de diapositivas nuevamente, seleccione el ítem Play.

- Opciones diversas
Muchas opciones pueden ser modificadas a partir del ítem Basic info del menœ Settings. Este
incluye Idioma, Transicón y Tiempo por diapositiva.
- Dispositivos Desprendibles
El DISPOSITIVO es también capaz de leer retratos guardados en una tarjeta SD
o en un Disco Amovible. Conecte uno de ellos en el DISPOSITIVO, seleccione el área de
almacenamiento correcta en el menú Picture Management y consulte
los directorios para encontrar aquel que incluye su retrato, entonces presione
Continúe para exhibir una presentación de diapositivas compuesta por sus retratos.
- Gerencia de retratos
El DISPOSITIVO permite que usted controle sus retratos. Entre en el menú Gestor de archivos y
seleccione la memoria donde sus retratos están localizados. Después de, usted puede ejecutar
una serie de acciones, como Excluir, Copiar...

9. Características técnicas
Formatos soportados
Image – JPG, JPEG, BMP, PNG, GIF
Tarjeta de Memoria
SD / SDHC / SDXC / MMC
USB
Puerto USB 1.1, compatible con
periféricos de memoria de masa 1.1
Capacidad de Almacenamiento
30 000 images
Consumo de Energía
Max. 6W for the 10 inch version
Max. 12W for the 15 inch version
Todos los datos son proveídos como referencia sólo. El fabricante se reserva el derecho de
modificar las especificaciones sin cualquier aviso previo.

10. Declaración de Conformidad
Nosotros, Spheris Digital Ltd., declaramos con nuestra única responsabilidad que el producto
está en conformidad con las provisiones de la Directriz del Consejo para Equipamientos de
Radio y Equipamientos de Terminales de Telecomunicaciones.
El producto es identificado con la marca CE.
Protección ambiental
Es sugerido que usted retorne el producto en el fin de su vida útil a los puntos de colecta
públicos para reciclaje, reutilización de dispositivos eléctricos y electrónicos.
El siguiente símbolo en el producto, en el manual de instrucciones o en el paquete indica que
su marco está sujeto a la Directriz Europea 2002/96/EU.
Spheris Digital Ltd - www.pix-star.com

FCC RF Exposure Information an d Statement
This device meets the government's requirements for exposure to radio waves. The guidelines are
based on standards that were developed by independent scientific organizations through periodic and
thorough evaluation of scientific studies. The standards include a substantial safety margin desig ned t o
assure the safety of all persons regardless of age or health. The SAR limit of USA (FCC) is 1.6 W/kg
averaged. Device types: Wireless Digital Display (FCC ID: YHO-PXT51519) has also been tested
against this SAR limit. SAR information on this and other pad can be viewed on ‐ line
at http://www.fcc.gov/oet/ea/fccid/. Please use the device FCC ID number for search. This device
was tested wear on 0 mm to body. To maintain compliance with FCC RF exposure requirements, use
accessories should mainta in a separation distance between the user's bodies mentioned above.
FCC Warning
This device complies with Part 15 of the FCC Rules. Operation is subject to the following two
conditions:
(1) This device may not cause harmful interference, and ( 2) This device must accep t any interference
received, including interference that may cause undesired oper ation.
NOTE 1: This equipment has been tested and found to comply with the limits for a Class B digital
device, pursuant to part 15 of the FCC Rules. These limits are designed to provide reasonable
protection against har mf ul inter fer en ce in a r esid ent ial i nstallation. Th is equi p ment generates, uses and
can radiate radio frequency energy and, if not installed and us ed in accordance with the instr uctions,
may cause harmful interference to radio communications. However, there is no guarantee that
interference will not occur in a particular installation. If this equipment does cause harmful
interference to radio or television reception, which can be determined by turning the equipment off
and on, the user is encouraged to try to correct the interference by one or more of the following
measures:
- Reorient or relocate the receiving antenna.
- Increase the separation between the equipment and receiver.
- Connect the equipment into an outlet on a circuit different from that to which the receiver is
connected.
- Consult the dealer or an experienced radio/TV technician for help.
NOTE 2: Any changes or modifications to this unit not expressly approved by the party responsible
for compliance could void the user's author ity to operate the equipment.
IC WARNING
This device contains licence-exemp t transmitter(s) that comply with Innovation, Science and
Economic Development Canada’s licence-exempt RSS(s). Operation is subject to the following two
conditions:
(1) This device may not cause interference.
(2) This device must accept any interference, including interference that may cause undesired
operation of the device.
L’émetteur/récepteur exempt de licence contenu dans le présent appareil est conforme aux CNR
d’Innovation, Sciences et Développement économique Canada applicables aux appareils radio
exempts de licence. L’exploitation est autorisée aux deux conditions suivantes:
1. L’appareil ne doit pas produire de brouillage;
2. L’appareil doit accepter tou t brouillage radioélectrique subi, même si le brouillage est susceptible
d’en compromettre le fonctionnement.
 Loading...