

Spheris Digital PXT408410 User Manual

Wi
reless Digital Picture
Frame
er Guide / Livret Utilisateur
Us
Manuale del Utilisator / Benutzerhandbuch
Guia do Utilizador / Guía del Usuario

2
Welcome
You have just acquired a Pix-Star® WiFi Photo Frame and we would like to thank you very much
for your trust in our product and solution.
This Digital Photo Frame is a totally new generation of product with wireless capabilities and
innovative features that we be lie v e w ill d e lig h t y o u .
Using the product you will be able to easily share your best mom ents with your friends and family
in just a few seconds where v e r they are, at any moment. At th e same time, this product includes
the traditional features of a Digital Photo Frame which is the possibility to display pictures and
other media files from USB memory stick and compatible memory cards.
We hope you will enjoy using our product. Do not hesitate to give us your feedback and
suggestions by logging on our web site www.pix-star.com.
Notice : This user manual is a simplified guide which would allow you to understand the basic
functionnalities of this frame. N e ve rthe le ss th e se explanations might not be exhaustive due to th e
constant improvments made on your Pix-Star
®
. Therefore, do not hesitate to go to check our
website www.pix-star.com in the BLOG and FORUM sections where you can find regularly updated
information. You can also send u s a n e mail to info@pix-star.com.
REGISTRATION
To register your Pix-Star Online now, simply go to www.pix-star.com, and click
on "I want to choose an Email address for m y Pix-Star"! You will be able to
instantly send/receive picture s to / fr om your friends and relatives!
Enjoy your Pix-Star®

3
1. Overview of the device 5
2. Installation 6
3. Introduction to the main interface 6
4. WiFi and Internet setup 7
4.1 Connect the device to the WiFi wireless network
4.2 Register and manage the device on the WEB
5. Receive pictures by email directly on the device 8
6. Share pictures with friends directly on the device 8
7. View pictures from your online albums on the device 8
8. How to use the web site 9
9. Overview of other functionalities 10
10. Technical characteristics 10
11. Signification of menu icons 11
12. Signification of thumbnail menu 11
13. Frame Map 12
14. Files manager 13
15. Declaration of conformity 13

4
Recommendations of use and safety warnings
Do not install your Digital Picture Frame close to a water source (minimum 1.50 m from a water
source) or in a humid environment (such as bath room, laundry, kitche n, etc .).
This product has been designed to work inside a room or a house and cannot be used outside.
Avoid installing the product in a dusty environment.
This product must be used in temperature between 10
°C and 35 °C.
Use this product only with the main power adapter provided together with the product.
The CE mark testifies that the product is in compliance with the main requirements of the
European parliament and council directive 2002/96/EC for telecommunications terminals, user
health and safety and for electromagnetic disturbance.
This terminal has been designed for private, indoor use (CPE customer premises equipment)
within the European Union. It has been tested according to the technical dispositions for radio
equipment (EN 300328). So the manufacturer declines all responsibility in case of non compliance
with the current regulations in the country of installation.
The declaration of conformity and the warranty are accessible at www.pix-star.com or you can
request them by sending an email to support@pix-star.com.
5
Scroll the menu up
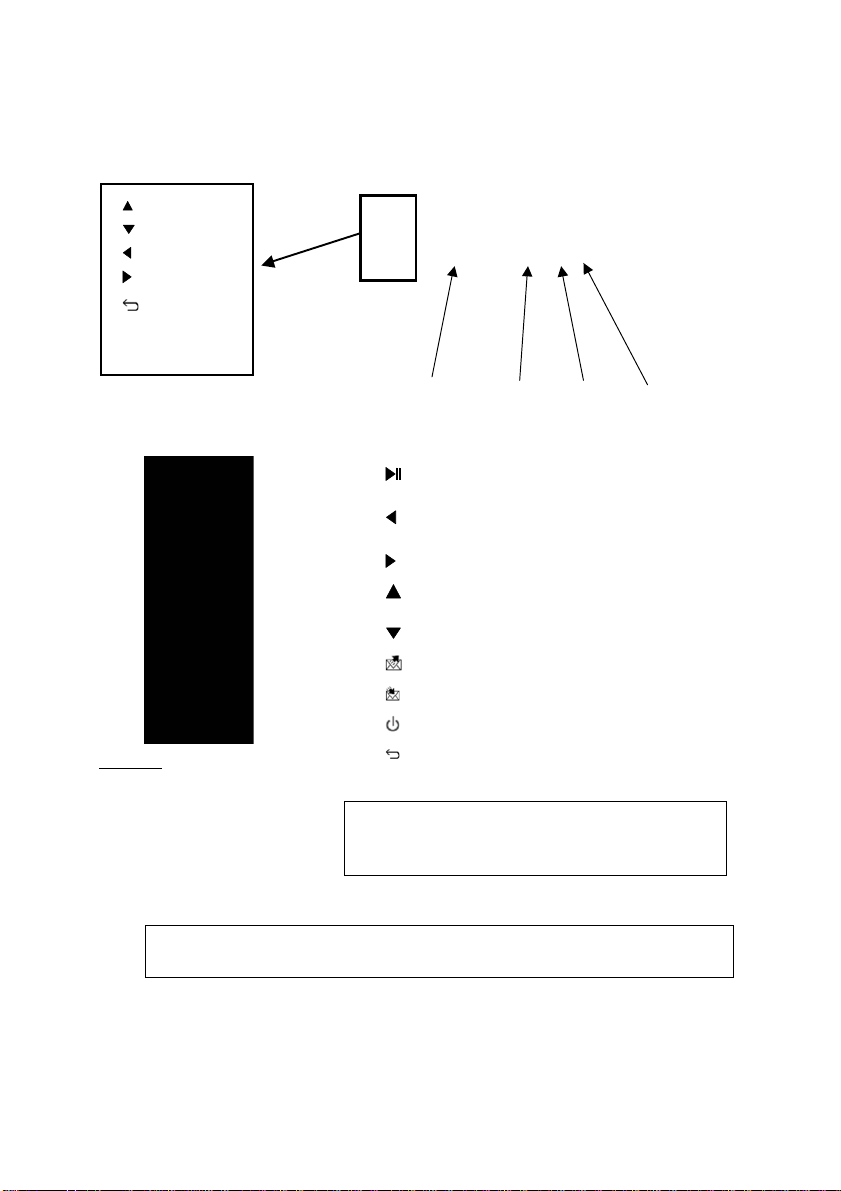
1. Overview of the device
CAUTION
In case of bad manipulation th e b at te ry might explode. Do not attempt to reload it,
disassemble it nor throw it into the fire.
Play/pause when in slideshow mode
To enter a sub-menu in menu mode
To confirm the selection
Move left in the menu mode
Move to previous picture in slideshow mode
Move right in the menu mode
Move to next picture in the slideshow mode
Move up in the menu mode
Increase volume in the slideshow mode
Move down in the menu mode
Decrease volume in the slideshow mode
Share: Open the contact list to send/share pictures
Inbox: Open the inbox to view pictures received by
email
Switch On/Off the LCD (Standby mode)
To move back to previous menu in menu mode
Display slide show menu
Display main menu
Box contains :
- 1 x remote control
- 1 x user manual
- 1 x Pix-Star photo frame
- 1 x frame stand
- 1 x power adaper AC 100/220V
- 1 x Pix-Star Warranty
Note: the remote control is delivered with a 3V lithium battery (type
CR2025) already installed. Remove the plastic tab to start using the
remote control.
ATTENTION: this battery can not be recharged !
OK / Select
SD card reader
Scroll the menu left
Power on/off
Go back
AC adapter port
Main menu
USB port
Scroll the menu down
Scroll the menu right
6
2. Installation
First, plug the AC adapter in the DEVICE. Its plug is located on the side of the device. Then, plug
the AC adapter to a power line.
To power on the device, move the switch button located o n the side of the device, on the left.
After that, the device should display a logo on its screen. Wait for a while, the device needs
about 30 seconds before being ready to be used.
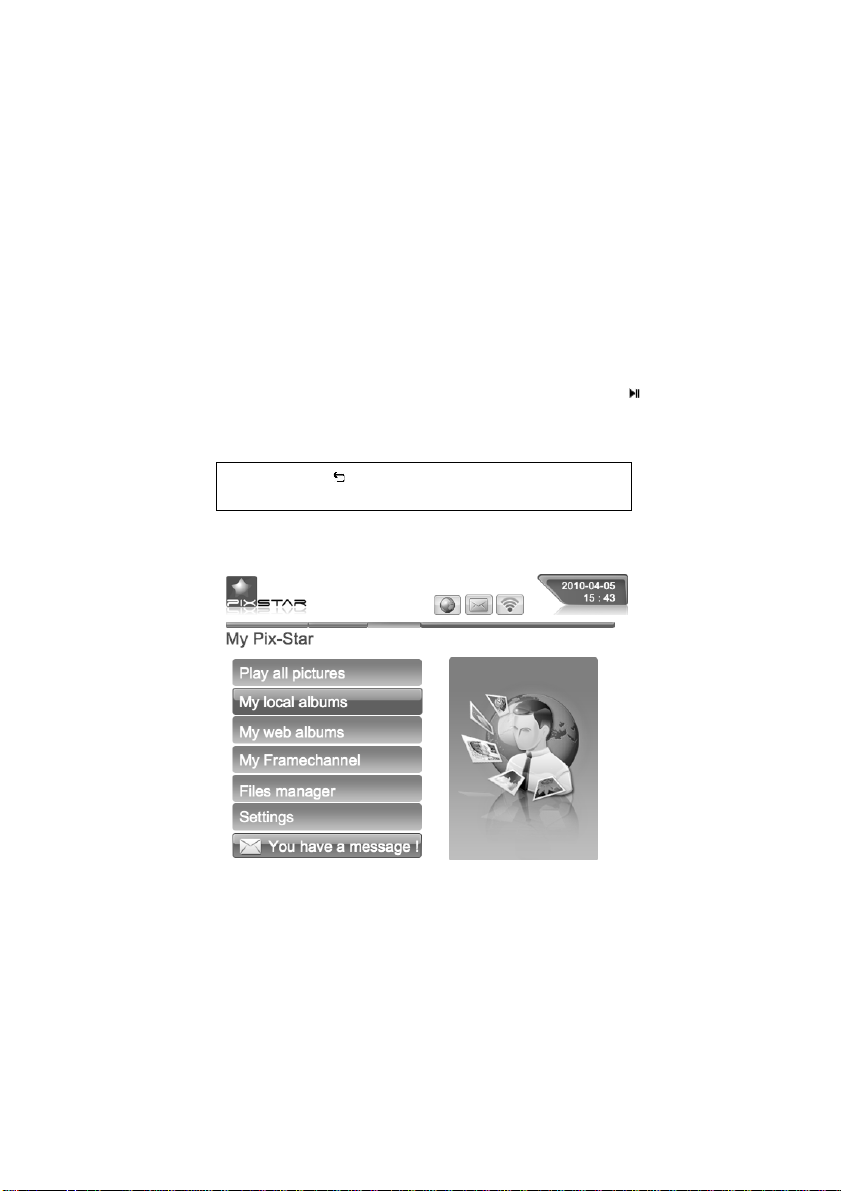
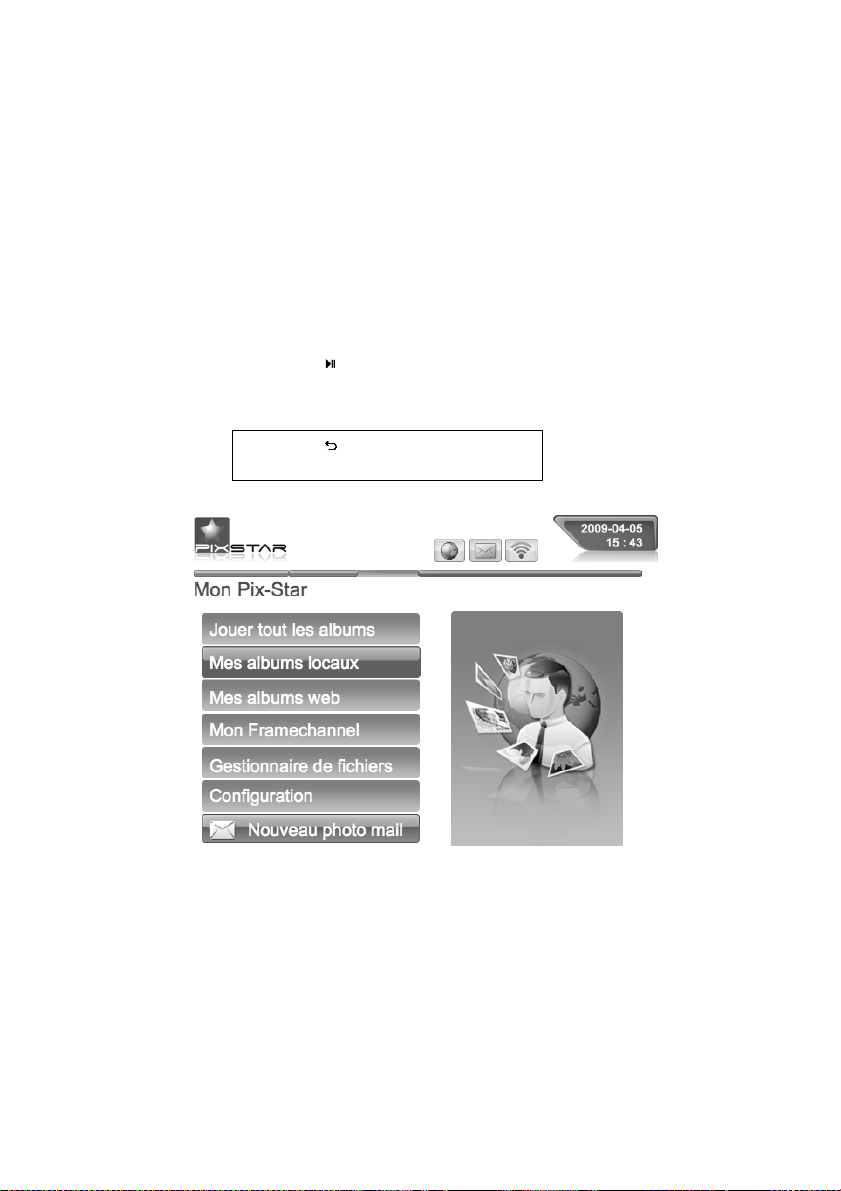
3. Introduction to the main interface
After you power the device on and wait for a while, pictures should be displayed.
Using the buttons behind the device, you can enter the menus and browse them. To open the
main menu, press the Menu button twice. To enter the desired menu, press the
button.
Note: The Back button on the remote control a llo w s y o u
to go back to the previous menu or to leave the main
7
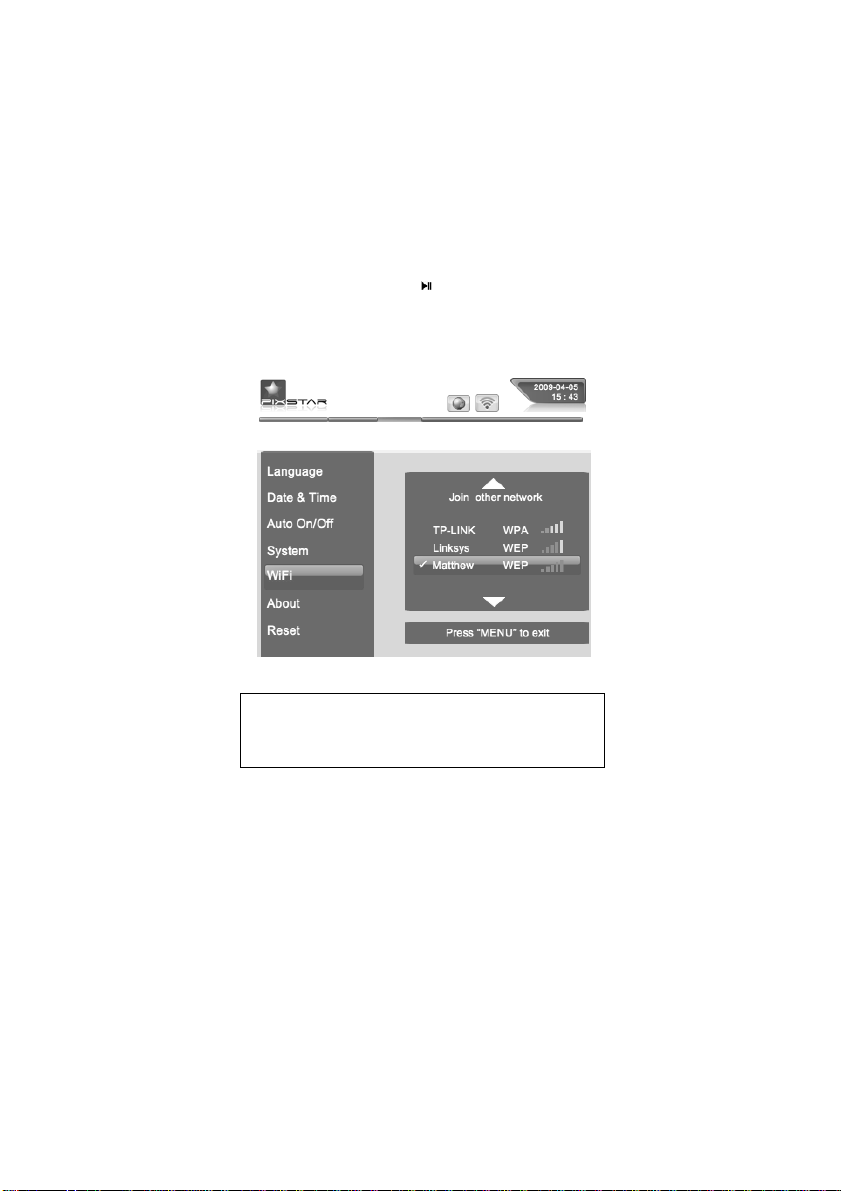
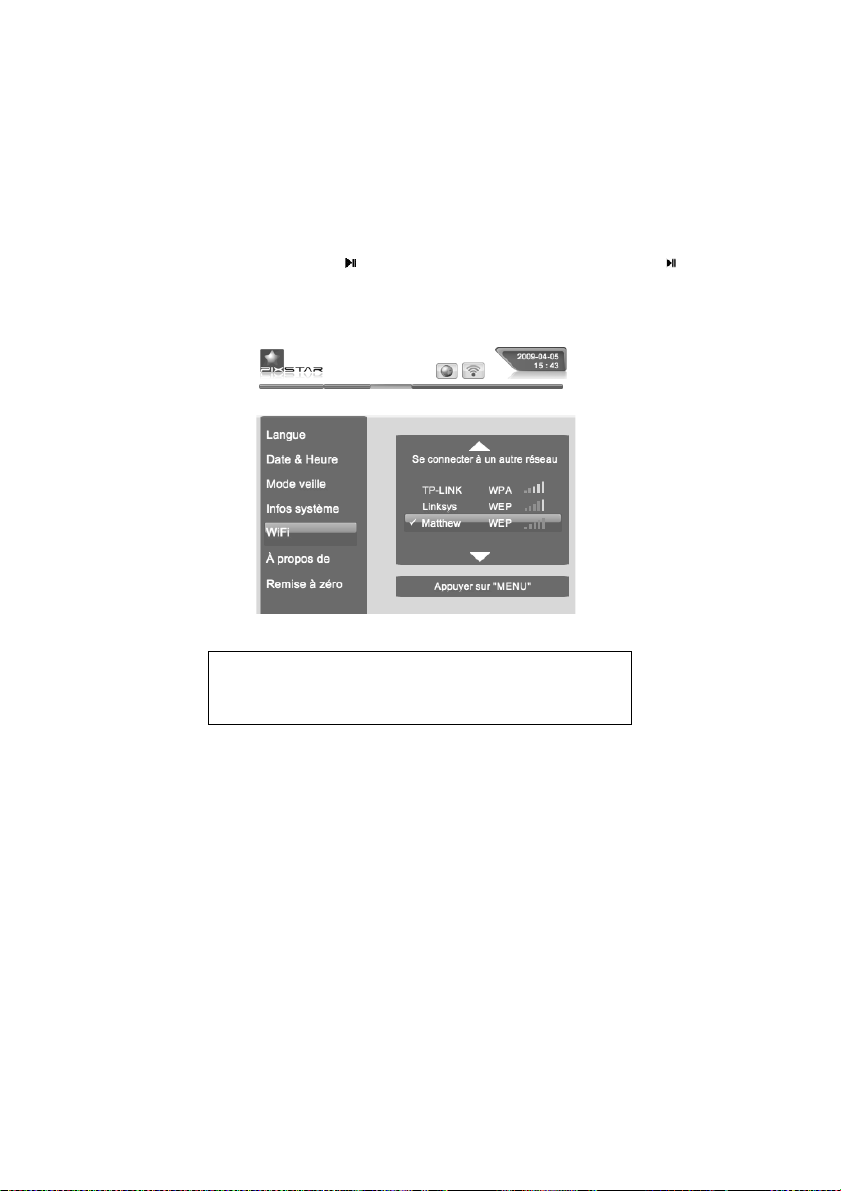
4. WiFi and internet setup
4.1 Connect the device to the WiFi wireless network
Each device has a dedicated email address which makes it possible for the device to receive
pictures directly from the Internet. To be able to receive pictures the device must be connected
to the Internet through a WiFi gateway.
Here is how to do that using your WiFi network:
Press the Menu button to open the main menu. Scroll to the Settings item and press Menu again.
Then scroll to the WiFi settings item and press "
".
The device starts an automatic scanning process for available wireless
networks.
Note: A DHCP server must be running on your network
and provides an IP address to the device. Most personal
WiFi networks run a DHCP server.

8
4.2 Register and manage the device on the WEB
If it is your first time using t h e frame , you should register online by following the instructions
below:
Go to the Pix-Star
®
webpage and click on “I want to register and choose an email address for my
Pix-Star
®
”. Fill the form and your device will be ready to use! You can find the device ID in the
Basic Information menu of the Settings menu of your device. Choose a password and the email
address you want to be assigned to your device.
5. Receive pictures by Email directly on the device
To put a picture in your device, simply send an email with your picture attached to the email
address of your device directly.
When a new picture is received on the device, a small “Inbox” icon will be displayed on the upper
right side of the screen.
If you choose to delete a picture on the frame, this on e will still be backed up on the website.
Therefore, you will be able to view it or to remove it permanently
6. Share pictures with friends directly on the device
The device allows you to share your pictures with your friends. To do so, press the button while
the picture you want to send is displayed. Then, a menu composed of several items app ears:
- To web albums:
When you choose this item, the picture will be sent to selected web album. You
will be able to see it in your personal area on the web site.
- To another Email
: This item allows you to send the picture to another device or to an email
address. Select it and input the email address you want to send the picture to.
- To my friends
: this item is linked to y ou r c on tact list (of your friend’s frames or personal emails)
which is recorded on the server. You can quickly send pictures to them by selecting them. If you
want to add more contacts, log on the web site.
7. View pictures from your online albums on the device
The device is able to display a slide show of the pictures stored inside your online album created
on the web site.
To manage the device associated album online, log on your personal area on the device web site.
Choose the “My web albu m s” menu where you can upload new albums or delete some. You can
also define which album to be displayed on the device.
Once the pictures have been uploaded onto the device web site they are visible immediately on
the web site and after usually less than 1 minute o n t h e de v ice .
When in the web album slideshow mode the device will automatically and periodically synchronize
its content with the web site.
When a picture is added to the online web album, the device will later add it onto its local slide
show. When a picture is removed from the online album the device later rem ove it from its local
slide show. The update of the device with the online album is done at least every min ute .
Note: You can send several pictures in the
same mail but you must be sure that the size
of your email does not exceed 20 Mbytes.

9
8. How to use on the web site?
- How to select the weather forecast of the cities and countries of your choice?
From the website, you can choose how to display your forecasts on your device. In “Weather
Forecast”, each city will be ranked by country (where every country is an album). In “My
weather” you can display in the same album a mix of cities and countries all together.
The weather forecast will be visible on the device in “My web albums”on the main menu.
- How to manage your contacts?
Easily adding contacts directly from www.pix-star.com will create a contact list visible from your
device. It will be useful to send direct emails to your friends, no need to type their address on the
frame. You can easily modify, add or delete a co nt ac t of th is list.
Moreover, you can build groups, and instantly send your favorite photos to all the members of this
group.
- How to filter your emails?
You may choose to apply filtering to all incoming emails to better control who is allowed to send
pictures to your Pix-Star
®
photo frame. You can choose the following options:
o No filtering (Anyo ne who knows your Pix-Star
®
email address can send pictures
to your photo frame)
o Refuse all incoming emails except the ones coming from the “w hite list” of your
authorized persons
o Accept all incoming emails except the ones coming from the “black list” of non
authorized persons

10
9. Overview of other functionalities
The device includes the following useful functionalities:
- Pause
The device usually displays the pictures as an automatic slideshow. Ho w eve r, if you want to
display a single sta tic picture, you can interrupt th e slideshow by choosing the P au se button of
the main menu. To play the slideshow again, choose the Play item.
- Setting
Several options can be modified from the Settings menu.
- Removable devices
The device is also able to read pictures stored in a SD card or in a USB Mass storage dongle. Plug
one of them in the device, select the right storage area in the files man ager menu and choose
browse the directories to find the one that includes your picture the n click to display a slideshow
composed of their pictures.
- Picture management
The device allows you to manage your pictures. Enter the files manager menu and select the
memory where your pictures are located. Then, you can perform several actions such as delete,
Copy.
10. Technical characteristics
All data is provided as reference only. Th e manufacturer reserves th e right to modify the
specifications without any prior notice.
Format supported
Image – JPG- BMP, PNG
Memory card
SD / SDHC / MMC
USB
Port USB 1.1, compatible with
mass storage peripheral
Storage capacity
1GB total memory including
system, approx. 400 MB for
local memory storage and
approx. 400 for web album
storage*
*Actual storage capacity will vary based on
image content.
Energy consumption
5W, max. 7W
11
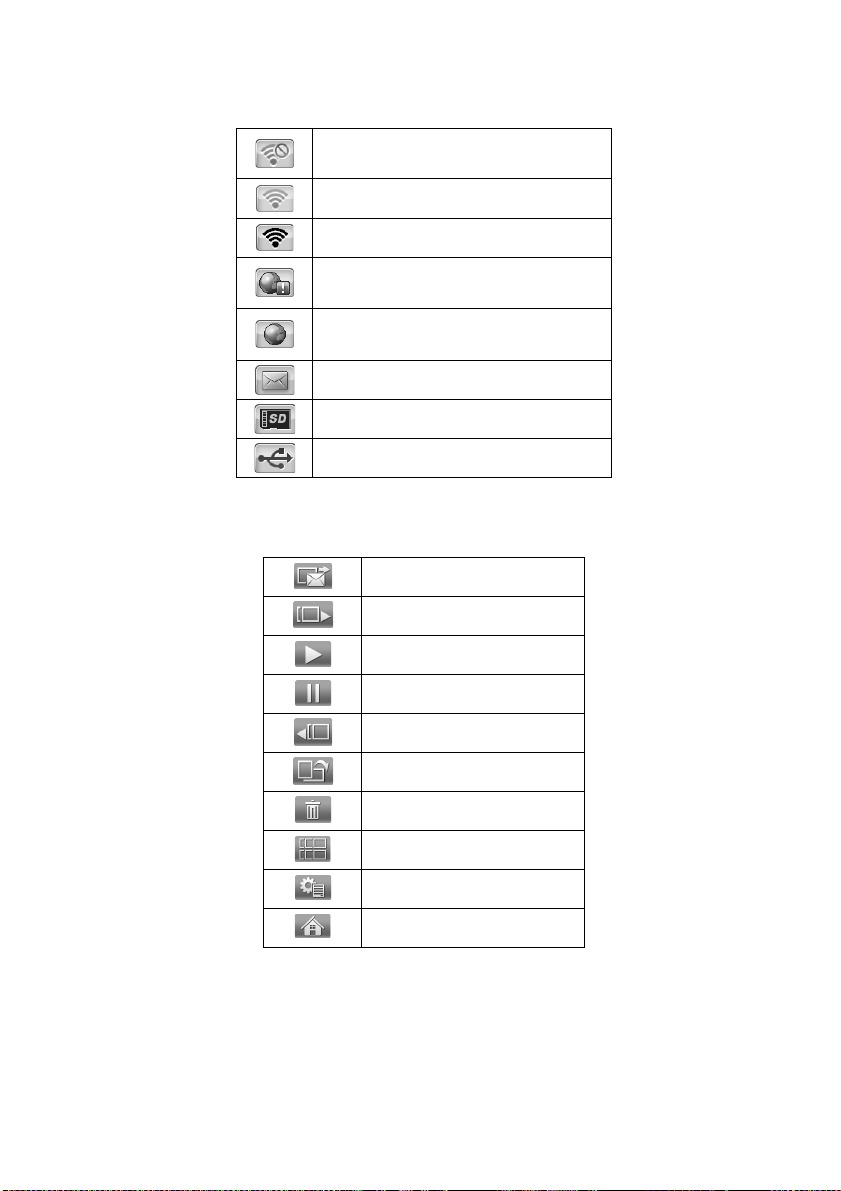
11. Signification of menu icons
12. Signification of thumbnail icons
Not connected to the WiFi network (Check the
WiFi connection configuration or the WiFi
network is not available)
Connected to the WiFi network but signal
MINIMUM
Connected to the WiFi network and signal
MAXIMUM
Pix-Star® platform not reachable (This usually
happen when the WiFi or the Internet
connection is down)
Connected to the Pix-Star® platform (Ready to
receive or send Email and synchronize web
albums)
Notification that new Photo emails arrived in
the Pix-Star® photoframe
SD/SDHC/MMC card detected and ready to use
USB device detected and ready to use
Send photo email
Next photo
Play slideshow
Pause slideshow
Previous photo
Rotate photo
Delete this photo
Photo thumbnail
More options
Close

12
13. Frame Map
My local albums
- My Pix-Star® frame
(Inbox)
Display the photos of your friends sent by email
or transferred via SD card or USB stick.
My web albums
- +WEATHER+
- Arcor
- Ezubi
- Facebook
- FlickR
- Kotoo
- MobileMe
- Padeleon
- Phanfare
- Photobucket
- Photo RSS
- Picasa
- Pikeo
- Pix-Star®
- Shutterfly
- Signaelive
- SmugMug
- XiaoNei
- WindowsLive
Manage your web albums displayed on the frame
from the web site www.pix-star.com. The web
albums will be displayed only if they have been
linked first on the website.
Files manager
- My Pix-Star®
- USB
- Carte SD
Manage your files saved on the local memory of
the device.
Settings
- Language
- Date & Time
- Time zone
- Auto On/Off
- System
- WiFi
- About
- Reset
Configure the language of the device
Configure the date and the time of the device
Select the time zone of your country
Set up the time of the automatic sleep mode of
the device
Configure the settings of the device (image)
Select your wireless network
Technical details of the device
Execute a factory reset of the device

13
14. Files manager
- How to create a new folder in a re p er to ry ?
Choose a location where you want to add this folder, then pre ss the “Menu” button of the remote
control, and select “New folder”. A pop up will appear and ask you to choose a name for this new
folder.
- How to copy a file in another fo ld e r?
Select the files you want to delete by clicking on the cen tral button of the rem ote control (
).
Click on the “Menu” button of the remote control, and select “copy selected files to…” Go back (
), and select the folder of your choice. Click on “Menu” again and “se lec t”. The copied files
will appear in this folder.
- How to delete a file?
Select th e file(s) you want to remove with the central button of the remote control (
), press
“Menu”, and “Delete files”.
15. Declaration of conformity
We, Spheris Digital Ltd., declare under our sole responsibility that the product PXT408WR01 is in
conformity with the provisions of the Council Directive on Radio Equipment and
Telecommunications Terminal Equipment.
The product is marked with the CE making
Environmental protection
You are suggested to return your frame a t the end of its live to the public collecting points set up
for recycling, reusing electrical and electronic device s.
The following symbol on the product, the instruction manual or the package indicates that this
product is subjected to the European Directive 2002 /9 6 /E U .
Spheris Digital Ltd. Info@pix-star.com www.pix-star.com

FCC Statement
This equipment has been tested and found to comply with the limits for a Class B digital
device, pursuant to Part 15 of the FCC Rules. These limits are designed to provide reasonable
protection against harmful interference in a residential installation.
This equipment generates, uses and can radiate radio frequency energy and, if not installed and
used in accordance with the instructions, may cause harmful interference to radio communications. However, there is no guarantee that interference will not occu r in a particu lar installation .
If this equipment does cause harmful interference to radio or television reception, which can be
determined by turning the equipment off and on, the user is encouraged to try to correct the
interference by one of the following measures:
Reorient or relocate the receiving antenna.
Increase the separation between the equipment and receiver.
Connect the equipment into an outlet on a circuit different from that to which the receiver
is connected.
Consult the dealer or an experienced radio/TV technician for help.
To assure continued compliance, any changes or modifications not expressly approved by the
party responsible for compliance could void the user's authority to operate this equipment.
(Example - use only shielded interface cables when connecting to computer or peripheral
devices).
FCC Radiation Exposure Statement
This equipment complies with FCC RF radiation exposure limits set forth for an uncontrolled
environment. This equipment should be installed and operated with a minimum distance of 20
centimeters between the radiator and your body.
This device complies with Part 15 of the FCC Rules. Operation is su bject to the following two
conditions:
(1) This device may not cause harmful interference, and
(2) This device must accept any interference received, including interference that may cause
undesired operation.
This transmitter must not be co-located or operating in conjunction with any other antenna or
transmitter.

14
Bienvenue !
Vous venez d'acquérir un cadre photo numérique Pix-Star® et nous vous remercions pour la
confiance que vous nous accordez.
Votre Pix-Star
®
, qui appartient à la nouvelle génération de s cadres photos numérique s
communicants et est doté de capacités de connexion Internet sans fil qui vous éblouira.
Avec ce cadre numérique vous pourrez très facilement, via Internet, partager des photos avec vos
amis et les membres de votre famille, recevoir directement des photos par e-mail sur le cadre
photo, ou encore accéder à vos photos stockées en ligne. Vous pourrez aussi utiliser des
fonctionnalités plus classiques comme la lecture de photos numérique stockées sur un support de
type carte mémoire SD compatibles ou une clé USB.
Nous espérons que vous apprécierez ce produit. N'hésitez pas à nous faire part de votre avis et de
vos suggestions d'amélioration via notre site www.pix-star.com.
Remarque: Ce manuel d'utilisation est un guide simplifié des fonctionnalités de base de votre
cadre Pix-Star
®
. Cependant, en raiso n de l'amélioration constante de nos services, certaines
informations peuvent être manquantes aussi n'hésitez pas à vous rendre sur www.pixstar.com dans les rubriques BLOG et FORUM où vous trouverez des informations régulièrement
mises à jour. Vous y trouverez également la garantie du cadre. Vous pouvez aussi bien sûr nous
contacter par l'email info@pix-star.com.
ENREGISTREMENT
Pour enregistrer dès maintenant votre Pix-Star® en ligne, rendez vous sur
www.pix-star.com et sélection ne r "Je veux enre gistrer et choisir une adresse
Email pour mon Pix-Star!" Vou s aurez alors la liberté de recevoir et d'envoyer
instantanément vos photos à vo s a mis et proches.
Bon Pix-Star®

15
1. Description du produit 17
2. Installation 18
3. Présentation de l'interface principale 18
4. Configuration de la connexion WiFi 19
4.1 Connexion de l'appareil au réseau WiFi
4.2 Enregistrement du produit (première utilisation)
5. Réception de photos par e-mail directement sur l'appareil 20
6. Partager des photos avec d'autres personnes à partir du cadre 20
7. Visualiser les photos stockées dans un album en ligne sur Internet 20
8. Comment utiliser l’interface web 21
9. Présentation des autres fonctionnalités 22
10. Caractéristiques techniques 22
11. Signification des icônes du menu 23
12. Signification des icônes du diaporama 23
13. Arborescence des menus du cadre 24
14. Gestionnaire de fichiers 25
15. Déclaration de conformité 25

16
Recommandations d'utilisation et avertissements de sécurité
Ne pas installer le cadre numérique à proximité d'une source d'eau (laisser au minimum 1,50m de
distance entre le cadre et toute source d’eau potentielle) ou dans un environnement humide
(cuisine, salle de bain, etc.)
Ce produit a été conçu pour fonctionner en intérieur et ne peut en aucun cas être u tilisé en
extérieur. Éviter d'installer le produit dans un environnement poussiéreux ou en plein soleil.
Ce produit doit être utilisé à une température située entre 10
°C et 35°C.
Utiliser le cadre photo uniquement avec l'adaptateur secteur fourni.
Le marquage CE indiqué sur le produit et sur l'emballage certifie que ce produit est compatible
avec les exigences de la directive européenne 2002/96/EU concernant les équipements de
communication, la sécurité et la santé des usagers, et pour les perturbations électromagnétiques.
Ce terminal a été conçu pour un usage privé au sein de l'Union Européenne. Il a été testé selon les
dispositions techniques pour les équipements radio (EN 300328). En conséquence, le fabricant
décline toute responsabilité en cas de non compatibilité avec les règles locales dans le pays
d'installation.
La déclaration de conformité peut-être consultée sur notre site web www.pix-star.com et peut
être obtenue sur simple demande en envoyant un e-mail à support@pix-star.com.

17
Menu défiler haut
1. Description du produit
AVERTISSEMENT
En cas de mauvaise manipulation, la pile peut exploser. Ne tentez pas de la recharger,
de la démonter ou de la jeter au feu.
Entrer dans le sous-menu sélectionné
Valider la sélection
Touche de navigation à gauche dans le menu
Afficher la photo précédente dans le mode diaporama
Touche de navigation à droite dans le menu
Afficher la photo suivante dans le menu diaporama
Touche de navigation vers le haut dans le menu
Touche de navigation vers le bas dans le menu
Fonction « Partage » de photos et ouverture de la liste de
contacts
INBOX : Fonction « Réception » de photos et ouverture de la
boîte de réception pour afficher les photos reçues par e-mail
Eteindre / Allumer l’écran (mode stand by)
Note : pour éteindre ou allumer l’appareil, utiliser le bouton
situé sur le côté
Revenir au menu précédent dans le mode menu
Afficher le menu associé au diaporama (en mode diaporama)
Afficher le menu principal (en mode menu)
Sont inclus dans le boitier :
- Un adaptateur secteur AC 100/220V
- Une télécommande
- Un cadre photo numérique
- Un pied
- Un guide de démarrage
- Une garantie Pix-Star
Note: La télécommande est délivrée avec une batterie au Lithium de 3 Volts
(type CR2025). Retirer le plasique de séparation pour vous servir de la
télécommande.
ATTENTION: Cette batterie ne peut pas être rechargée!
OK / Sélectionner
Port carte SD
Menu défiler gauche
Allumage /
retour
Adaptateur
Menu principal
Port USB
Menu défiler bas
Menu défiler droite
18
2. Installation
Brancher l'adaptateur secteur sur le côté de l'appareil. Raccorder ensuite l'adaptateur sur la prise
secteur.
Pour mettre en route le cadre, appuyer sur le bouton situé sur le côté de l'appareil à droite.
L'appareil se met en route et l'écran s'allume, il est opérationnel au bout de 30 secondes environ.
3. Présentation de l'interface principale
Environ 30 secondes après la mise en route de l'appareil, le diaporama démarre
automatiquement.
En utilisant les boutons situés à l'arrière de l'appareil, vous pou ve z naviguer à l'intérieur des
menus. Pour ouvrir le MENU principal, appuyer sur le bouton « menu ». Pour entrer dans le sousmenu souhaité presser la touche "
".
Remarque: permet de revenir au menu
précédent ou de sortir du menu principal.
19
4. Configuration de la connexion WiFi
4.1 Connexion de l'appareil au réseau WiFi
Chaque appareil dispose d'une adresse e-mail qui lui est propre, ce qui lui permet de recevoir et
d’envoyer directement les photos via le web. Aussi, afin de se connecter au réseau Internet, il est
nécessaire de disposer d'une borne WiFi, de la relier à Internet et de configurer la connexion de
l'appareil. Voici comment proc é d e r :
Appuyer sur le bouton « Menu » pour accéder au menu principal. Choisir le sous-menu
"Configuration" et presser la touch e "
". Choisir ensuite le menu « WiFi » et presser " ".
L'appareil commence alors une recherch e a u to matique des réseaux WiFi disponibles.
4.2 Enregistrement du produit (première utilisation)
Lors de la première utilisation, il est n écessaire de créer un compte, une adresse e-mail associée
au produit et de s'enregistrer sur le site web www.pix-star.com en allant dans le lien situé sur la
page d'accueil. Il vous y sera demandé le numéro de série de l'appareil, qui figure au dos du
produit ou dans le menu « informations produit ».
Remarque: Un serveur DHCP doit être activé sur votre borne
WiFi afin d'affecter automatiquement une adresse IP à votre
appareil. La plupart des réseaux WiFi en sont équipés.

20
5. Réception de photos par e-mail directement sur l'appareil
Pour incorporer des photos dans la mém oire du cadre afin qu'elles apparaissent dans le diaporama
principal vous pouvez les envoyer via e-mail. Pour cela, envoyer un e-mail à l'adresse du cadre
avec les photos que vous souhaitez, inclure au diaporama en fichier joint.
Votre entourage peut donc vous envoyer des photos très facilement sur votre cadre par e-mail.
Pour cela, il vous suffit de leur communiquer l'adresse e-mail associée à votre Pix-Star
®
(exemple@mypixstar.com).
Lorsqu'une nouvelle photo arrive par e-mail sur l'appareil une petite icône apparaît en haut à
droite de l'écran. Les images reçues apparaissent les unes après les autres et vous pouvez soit
choisir de les conserver soit de les effacer. Si vous choisissez d'effacer une image sur le cadre,
celle-ci n'est pas perdue car elle reste stockée sur le site web et vous pourrez la visionner ou la
supprimer à nouveau en vous y connectant.
6. Partager des photos avec d'autres personnes à partir du cadre
Le cad re vous perm et de partager des photos avec les membres d e votre famille et vos amis de
manière très simple. Vous pouvez par exemple envoyer une photo par e-mail à une autre personne
ou directement sur un autre cadre photo Pix-Star
®
. Pour cela, appuyer sur la touche lorsque la
photo que vous souhaitez partager s'affiche à l'écran. Ensuite, un menu apparaît vous permettant
de choisir à qui la photo doit être envoyée. Le contenu de ce menu peut être modifié sur le site
web. Vous pouvez aussi choisir les options suivantes :
- Web album :
votre photo sera transférée vers l'alb u m web seléctionné.
- "Envoi vers un cadre ou e-mail" :
permet d'envoyer une photo vers un autre cadre ou une
adresse e-mail. Il suffit alors de rentrer l'adresse électronique complète de votre
destinataire.
- Liste de contacts
: elle rassemble les destinataire s dont vous a ve z saisis l’adresse e-mail
sur le site web, ou à qui vous ave z dé jà en voy é de s ph otos e t qui on t été au tom a tique m en t
ajoutés à cette liste.
7. Visualiser les photos stockées dans un album en ligne sur Inte r n e t
Le cadre peut afficher des photos stockées sur l'Internet dans un album photo déterminé.
Pour choisir l'album que vous souhaitez afficher sur le cadre, se rendre sur le site web dans
l'espace « albums web» et suivre les indications.
Une fois cette configuration effectuée, l'appareil téléchargera les photos automatiquement à
partir du site web pour les stocker sur sa mémoire locale. Pour les afficher dans le diaporama,
aller dans le menu « mes albums web ». Les photos de l'album en ligne apparaîtront dans un
diaporama.
Lorsque ce mode est activé, le cadre vérifie périodiquement le contenu de l'album web et
synchronise son contenu afin de rester constamment à jou r. Si, pa r exe m ple, d es im ag es son t
rajoutées sur l'album web depuis Internet, le cadre les rajoutera dans son diaporama quelques
minutes plus tard. De la même manière, si des images sont supprimées depuis Internet, elles le
seront de même sur le diaporama interne du cadre.
Remarque: Vous pouvez mettre plusieurs photos en pièce
jointe des messages e-mail envoyés mais assurez-vous que
le total des fichiers joints ne dépa sse p a s 2 0 MB.

21
8. Comment utiliser l’interface web
Comment choisir sa météo ?
A partir de l’interface web, vous avez la possibilité de consulter sur votre cadre l'évolution météo
des villes ou des pays de votre choix.
Pour cela, rien de plus simple : rendez vous sur www.pix-star.com dans la rubrique « Infos
météo » pour visionner les villes classées par pays.
Vous pouvez également constituer votre propre répertoire en cliquant sur « Ma liste météo ».
Vous pourrez ensuite visualiser votre choix météo depuis votre cadre en vous rendant dans
l’espace « Web album », accessible depuis le menu principal.
Comment gérer ses contacts ?
Ajouter ses contacts depuis l’interface web www.pix-star.com permet de constituer un répertoire
visible depuis son cadre pour envoyer directement un email à ses amis sans avoir à réécrire leur
adresse. Il vous est également possible de supprimer vos contacts.
En plus d’être un gain de temps, vous pouvez également constituer des groupes d’amis et, en un
seul clic, envoyer l’image de votre choix à l’ensemble des mem br e s d e ce tt e liste .
Comment filtrer ses e-mails ?
Vous pouvez activer le filtrage des "e-mails entrant" afin de décider des personnes autorisées à
envoyer des photos sur votre Pix-Star
®
. Pour cela, il vous suffit sur le site web de cliquer dans le
sous menu « Filtrage e-mail ». Vous pourrez alors le choix de :
- Ne pas appliquer de filtre
- Refuser systématiquemen t to us le s e-mails SAUF ceux de la liste «blanche» de vos invités
- Accepter tous les e-mails entrant SAUF ceux de la liste «rouge» des personnes non autorisées
 Loading...