

Page 1

RH/Temperature
SD Card Datalogger
800021
Instruction Manual
Page 2

RH/Temperature SD Card Datalogger 800021
Copyright ©2010 by Sper Scientific
ALL RIGHTS RESERVED
Printed in the USA
The contents of this manual may not
be reproduced or transmitted in any
form or by any means electronic,
mechanical, or other means that do
not yet exist or may be developed,
including photocopying, recording, or
any information storage and retrieval
system without the express
permission from Sper Scientific.
7720 E. Redfield Rd. Suite #7,
Scottsdale, AZ 85260
Tel: (480) 948-4448 Fax: (480) 967-8736
Web: www.sperscientific.com
- 2 -
Page 3

TABLE OF CONTENTS
INTRODUCTION. . . . . . . . . . . . . . .
FEATURES . . . . . . . . . . . . . . . . . . .
MATERIALS SUPPLIED. . . . . . . . . .
POWER SUPPLY. . . . . . . . . . . . . . .
METER COMPONENTS . . . . . . . . .
KEYPAD. . . . . . . . . . . . . . . . . . . . .
SETUP. . . . . . . . . . . . . . . . . . . . . . .
MEASUREMENT PROCEDURES. .
DATALOGGER. . . . . . . . . . . . . . . .
BATTERY REPLACEMENT . . . . . .
TROUBLESHOOTING. . . . . . . . . . .
PC CONNECTION. . . . . . . . . . . . . .
OPTIONAL ACCESSORIES. . . . . . .
SPECIFICATIONS . . . . . . . . . . . . . .
WARRANTY . . . . . . . . . . . . . . . . . .
4
5
7
8
9
11
12
19
26
31
32
33
38
39
44
- 3 -
Page 4

INTRODUCTION
The Sper Scientific RH/Temperature
SD Card Datalogger (Model 800021)
is an extremely accurate meter with
fast response times that reads
relative humidity (RH), ambient
temperature, dew point, wet bulb, and
functions as a Type K/J thermocouple
thermometer.
This meter features a real time SD
memory card datalogger. Standard,
portable SD memory cards provide
unlimited data storage and upload
pre-formatted data directly to Excel,
eliminating the need for cables or
software. Alternatively, manually
record 99 readings for on-screen
review or stream data directly to a
computer using the optional software
and cables. Each data set includes
temperature, RH, time and date.
- 4 -
Page 5

FEATURES
•
Functions as humidity/
temperature, dew point, wet bulb,
and Type K/J thermometer
•
SD memory card datalogger
•
Manual datalogger option
•
Fast response time for humidity
•
Highly accurate microcomputer
circuit
•
RS232 or USB PC connection
•
Direct upload of data to Excel
•
Detachable probe for measuring
flexibility
•
Internal clock and calendar
•
Touch-tone
•
Tripod mounting screw
•
Built-in tabletop stand
- 5 -
Page 6

FEATURES
•
Maximum and minimum
•
Hold function
•
Auto-power-off
•
Low battery indicator
•
Backlight
- 6 -
Page 7

MATERIALS SUPPLIED
•
Meter
•
Probe
•
SD Card
•
6 AA Batteries
•
Instruction Manual
•
Soft Carrying Case
- 7 -
Page 8

POWER SUPPLY
This meter can be powered by six AA
(1.5 V, UM3) batteries or an optional
9 Volt DC adapter. See page 31 for
battery replacement instructions.
Plug the adaptor into the power port
labeled “DC 9V,” located on the side
of the meter.
Note
When using the adapter to run the
meter, the meter will remain
permanently on and the POWER
button will be disabled.
- 8 -
Page 9
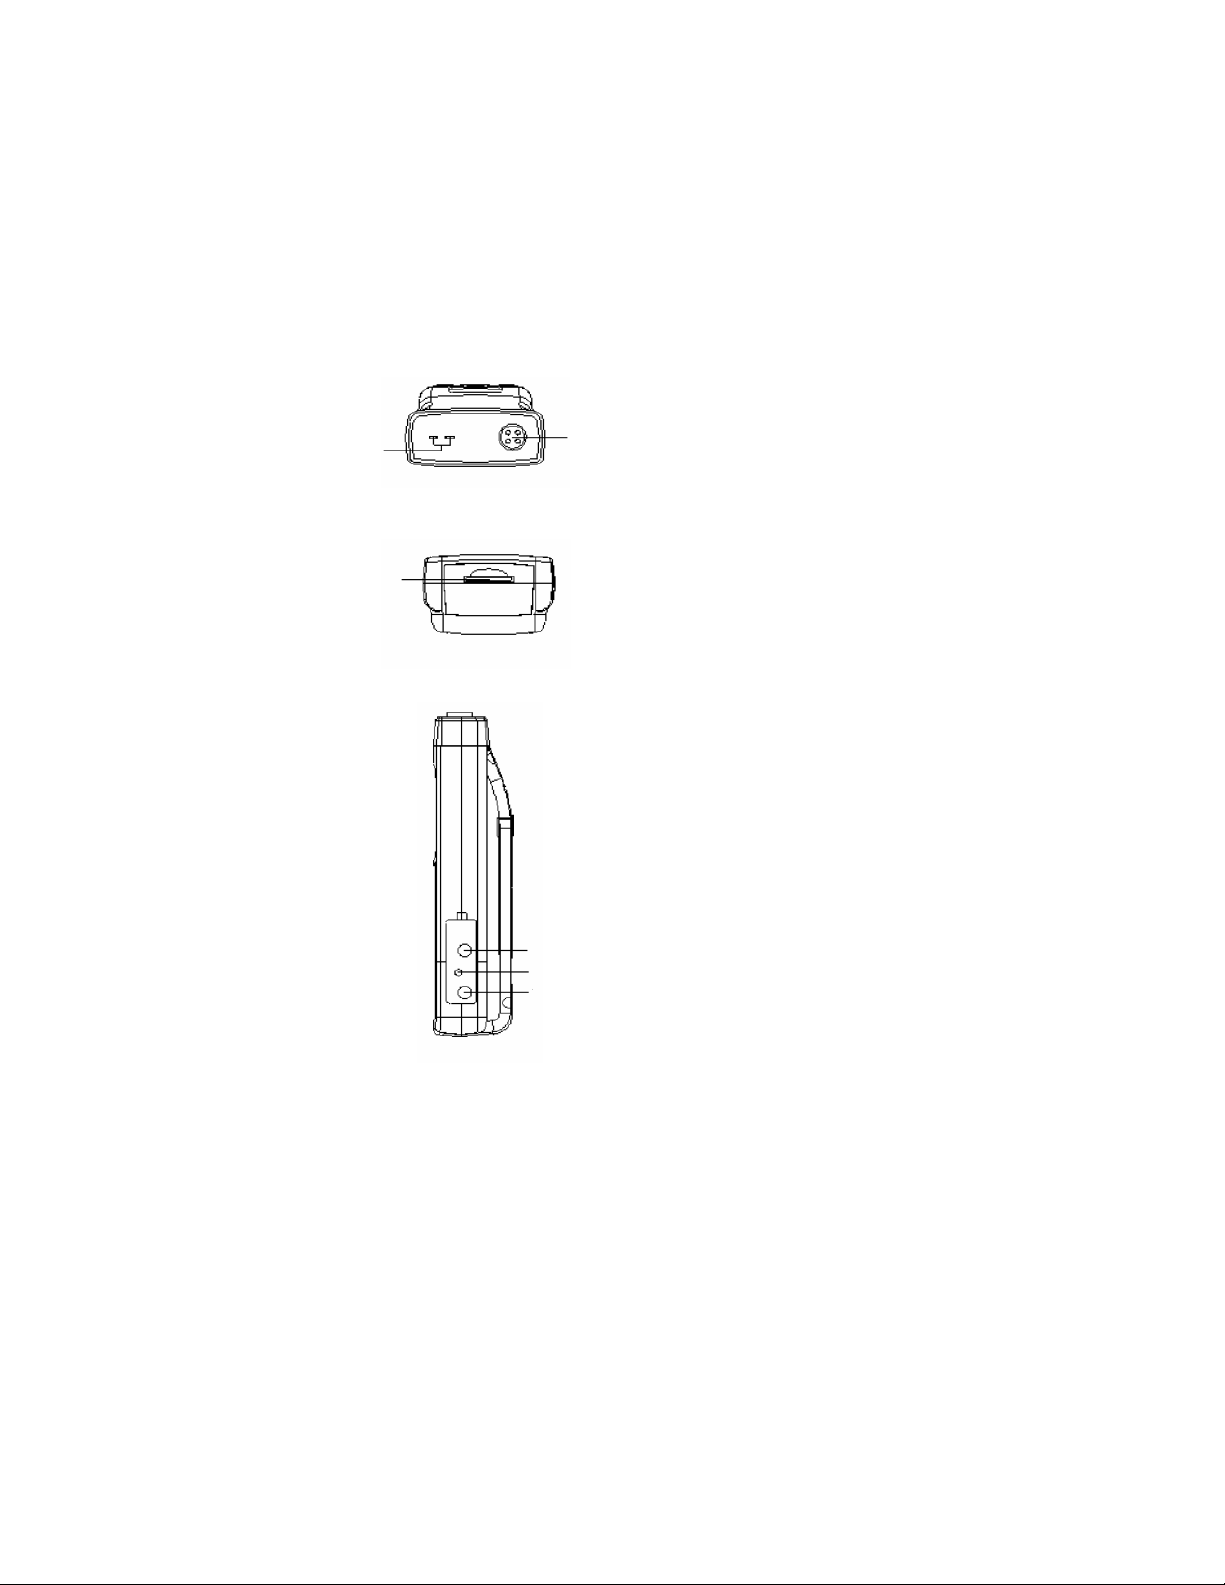
METER COMPONENTS
Top of Meter
Type K/J
Thermometer
Socket
Bottom of Meter
SD Card
Socket
Side of Meter
Humidity/
Temperature
Probe Input
Socket
- 9 -
RS232 Output
RESET
DC 9V
Adapter Input
Socket
Page 10

METER COMPONENTS
Back of Meter
Tripod
Mounting
Screw
Battery
Cover
Screws
Stand
Probe
Battery
Compartment/
Cover
Probe
Head
Probe
Handle
Probe
Plug
- 10 -
Page 11

POWER
(ESC,
Backlight)
KEYPAD
LCD
Display
HOLD/
NEXT
REC/
ENTER
SET
(▲,
TIME
CHECK)
LOGGER
(▼,
SAMPLING
TIME
CHECK)
- 11 -
Page 12

SETUP MODE
The advanced Setup Mode allows
you to customize the following meter
preferences and defaults:
•
Real Time Clock
•
Decimal Type
•
Auto Power Off
•
Touch-Tone
•
Thermometer Type K/J
•
Temperature Units
•
Sampling Time
•
SD Memory Card Format
Note
The setup functions can be
performed under any parameter but
not while utilizing the datalogger
function. Once selections are saved,
the meter will default to the selected
preferences when the meter is turned
off and on again. Once a selection is
- 12 -
Page 13

SETUP MODE
saved, the meter automatically
advances to the next setup function
(i.e., after setting the real time clock,
the meter will automatically enter the
decimal type setup function).
1. Press POWER to turn the meter
on.
2. Press SET for 2 seconds or
longer to enter Setup Mode.
3. Press NEXT to cycle through the
setup functions.
Note
Press ESC to exit Setup Mode. The
meter will return to Normal Mode.
Real Time Clock
1. Enter the clock function from
Setup Mode (as described
above). “dAtE” appears on the
LCD.
2. Press ENTER. The year will
appear on the LCD.
- 13 -
Page 14

SETUP MODE
3. Press ▲ or ▼ to adjust the value.
Press ENTER to save the value.
4. Repeat Step 3 to adjust the
month, date, hour, minute and
second.
Note
This procedure adjusts the meter’s
internal clock. The internal clock will
function when the meter is turned off
but only when the batteries have
adequate power (not with low battery
power.)
Decimal Type
Although the decimal is commonly
expressed as the “.” symbol (such as
20.6 or 1000.53), some (European)
countries use a “,” symbol to
represent the decimal (such as 20,6
or 1000,53). The meter defaults to
the period symbol. To adjust:
1. Enter the decimal type function
from Setup Mode (see page 13).
“dEC” appears on the LCD.
- 14 -
Page 15

SETUP MODE
2. Press ▲ or ▼ to select Basic (.)
or Euro (,). Press ENTER to save
the selection.
Auto Power Off
The meter automatically turns off
after 10 minutes of inactivity, however
this function can be disabled.
1. Enter the auto power off function
from Setup Mode (see page 13).
“PoFF” appears on the LCD.
2. Press ▲ or ▼ to select yes (auto
power off enabled) or no (auto
power off disabled). Press
ENTER to save the selection.
Touch-Tone
1. Enter the touch-tone function from
Setup Mode (see page 13).
“bEEP” appears on the LCD.
2. Press ▲ or ▼ to select yes
(touch-tone enabled) or no (touchtone disabled). Press
- 15 -
Page 16

SETUP MODE
ENTER to save the selection.
Thermometer Type K/J
1. Enter the thermometer type
function from Setup Mode (see
page 13). “tYPE” appears on the
LCD.
2. Press ▲ or ▼ to select K or J.
Press ENTER to save the
selection.
Temperature Units
1. Enter the temperature units
function from Setup Mode (see
page 13). “t-CF” appears on the
LCD.
2. Press ▲ or ▼ to select C
(degrees Celcius) or F (degrees
Farhenheit). Press ENTER to
save the selection.
Sampling Time
The sampling time is the time allotted
- 16 -
Page 17

SETUP MODE
between successive measurements.
To adjust the sampling time (in
seconds):
1. Enter the sampling time function
from Setup Mode (see page 13).
“SP-t” appears on the LCD.
2. Press ▲ or ▼ to adjust the value
(1, 2, 5, 10, 30, 60, 120, 300, 600,
800, 1800, 3600 seconds). Press
ENTER to save the value.
SD Memory Card Format
Enabling this function will format the
SD memory card to work specifically
with your meter. Formatting the SD
card will erase any previous memory
on the card. New SD cards should
be formatted to work with your meter.
1. Enter the SD memory card format
function from Setup Mode (see
page 13). “Sd F” appears on the
LCD.
2. Press ▲ or ▼ to select yes
- 17 -
Page 18

SETUP MODE
(format the SD memory card) or
no (do not format the SD memory
card). Press ENTER to confirm
your selection. If selecting yes,
“yES Enter” will appear on the
LCD, press ENTER again and the
meter will format the SD card.
- 18 -
Page 19

MEASUREMENT
PROCEDURES
Turning the Unit On/Off
1. Press POWER to turn the meter
on.
2. Press and hold POWER for 2
seconds to turn the meter off.
Selecting the Function
1. Press and hold FUNC to cycle
through the options listed below.
Release FUNC when you reach
the desired function.
•
Humidity/temperature
“rH” appears on the LCD.
•
Dew point
“dP” appears on the LCD.
•
Wet bulb
“Et” appears on the LCD.
•
Type K/J thermometer
“tP” appears on the LCD.
- 19 -
Page 20

MEASUREMENT
PROCEDURES
Note
The meter will default to the last
function setting used when it is turned
off and on again.
Humidity and Temperature
1. Press POWER to turn the meter
on.
2. Plug the probe plug into the probe
input socket.
3. Press and hold FUNC to cycle
through the options until “rH”
appears on the LCD. Release the
FUNC button. The humidity value
(%RH) appears on the upper
display and the temperature value
(°C or °F) appears on the lower
display.
Note
When using the meter for the first
time, the meter will default to the
humidity/temperature function and to
the Celsius scale for the temperature
value. See page 16 for instructions
- 20 -
Page 21

MEASUREMENT
PROCEDURES
on changing the temperature scale.
Dew Point
1. Follow Steps 1-2 in the preceding
Humidity and Temperature
section.
2. Press and hold FUNC to cycle
through the options until “dP”
appears on the LCD. Release the
FUNC button. The dew point
value (°C or °F) appears on the
upper display and “dP” appears
on the lower display.
Wet Bulb
1. Follow Steps 1-2 in the preceding
Humidity and Temperature
section.
2. Press and hold FUNC to cycle
through the options until “Et”
appears on the LCD. Release the
FUNC button. The wet bulb value
(°C or °F) appears on the upper
display and “Et” appears on the
- 21 -
Page 22

MEASUREMENT
PROCEDURES
lower display.
Type K/J Thermometer
1. Press POWER to turn the meter
on.
2. Press and hold FUNC to cycle
through the options until “tP”
appears on the LCD. Release the
FUNC button.
3. Plug a thermocouple temperature
probe (type K or J) into the type
K/J thermometer socket. The
LCD will display the measurement
value from the temperature probe.
4. “K” or “J” appear on the LCD to
indicate the type of thermometer.
Note
When using the meter for the first
time, the meter will default to K type
thermocouple. See page 16 for
instructions on selecting the
thermocouple type.
- 22 -
Page 23

MEASUREMENT
PROCEDURES
Hold Function
1. When measuring any parameter,
press HOLD to freeze the reading
on the display. “HOLD” will
appear on the LCD.
2. Press HOLD again to release the
hold function. “HOLD” will
disappear from the LCD.
Maximum and Minimum
To record maximum and minimum
readings:
1. When measuring any parameter,
press REC to begin recording the
maximum and minimum values.
“REC” appears on the LCD.
2. Press REC. The maximum value
and “REC MAX” will appear on
the LCD.
- 23 -
Page 24

MEASUREMENT
PROCEDURES
3. Press REC. The minimum value
and “REC MIN” will appear on the
LCD.
4. To delete the maximum or
minimum value, press HOLD.
“REC” appears on the LCD and
the meter will begin recording the
maximum and minimum values
again.
5. To exit the min/max function,
press and hold REC for 2 seconds
or longer. The meter will return to
Normal Mode.
Note
The meter cannot be turned off from
the memory record function. Exit the
function, then press and hold
POWER to turn the meter off.
Backlight
1. The backlight turns on
automatically when the meter is
turned on.
- 24 -
Page 25

MEASUREMENT
PROCEDURES
2. Press to turn the backlight off.
3. Press to turn the backlight on.
View Real Time Clock
To view the time function during
normal measurement (not during
datalogging):
1. Press TIME CHECK. The time
information (Year, Month/Date,
Hour/Minute) will appear on the
lower display of the LCD.
View Sampling Time
To view the sampling time function
during normal measurement (not
during datalogging):
1. Press SAMPLING CHECK. The
sampling time (in seconds) will
appear on the lower display of the
LCD.
- 25 -
Page 26

DATALOGGER
Preparing the Datalogger
1. Insert the SD card into the SD
card socket on the bottom of the
meter, ensuring that the front of
the SD card faces the back of the
meter.
2. Format the SD card as needed
(see page 17).
3. Set the real time clock if using the
meter for the first time (see page
13).
4. Set the decimal type if using the
meter for the first time (see page
14.)
Auto Datalogging
1. Set the sampling time to ≥ 1
second. Refer to page 16.
2. Press REC. “REC will appear on
the LCD.
- 26 -
Page 27

DATALOGGER
3. Press LOGGER. “REC” will flash
on the LCD and the alarm will
sound while the measurement
data and time information are
saved to memory.
4. To pause datalogging, press
LOGGER. The meter will
temporarily stop recording and
“REC” will stop flashing on the
LCD. Press LOGGER again to
resume datalogging. “REC” will
flash on the LCD.
5. To finish datalogging, while the
datalogger is paused, press REC
for 2 seconds or longer. “REC”
will disappear from the LCD to
indicate that datalogging has
ended.
Note
To enable/disable the touch-tone
feature, see page 15.
- 27 -
Page 28

DATALOGGER
Manual Datalogging
1. Set the sampling time to 0
seconds. Refer to page 16.
2. Press REC. “REC will appear on
the LCD.
3. Press LOGGER. “REC” will flash
on the LCD and the alarm will
sound while the measurement
data and time information are
saved to memory. The position
(location) number will appear on
the bottom of the LCD and will
also be recorded on the SD card.
Note
To enable/disable the touch-tone
feature, see page 15. To change the
position number, press ▼. The
position number will flash on the
LCD. Press ▲ or ▼ to set the
position number (from 1 to 99). To
indicate the position location, P x (x =
1 to 99) will appear on the lower
display. After selecting the position
number, press ENTER to confirm.
- 28 -
Page 29

DATALOGGER
4. To finish datalogging, press REC
for longer than 2 seconds. “REC”
will disappear from the LCD to
indicate that datalogging has
ended.
SD Card Data Structure
1. The first time a SD card is used in
this meter, a folder HTA01 will be
generated.
2. If the datalogger is being used for
the first time, a new file
HTA01001.XLS will be generated
under the route HTA01\. After
exiting the datalogger and
executing the function again, the
data is saved to the
HTA01001.XLS file until the data
reach 30,000 data columns. A
new file will then be generated
(i.e., HTA01002.XLS).
3. The folder HTA01\ will hold 99
files. A new route (i.e., HTA02\)
will be generated when exceeding
99 files.
- 29 -
Page 30

DATALOGGER
4. The file’s route structure:
HTA01\
HTA01001.XLS
HTA01002.XLS
QQQQQQQ
HTA01099.XLS
HTA02\
HTA02001.XLS
HTA02002.XLS
QQQQQQQ
HTA02099.XLS
HTAXX\
QQQQQQQ
QQQQQQQ
Note
XX: Maximum value is 10.
- 30 -
Page 31

BATTERY REPLACEMENT
This meter uses six AA (1.5 V, UM3)
batteries. When the low battery
indicator appears on the LCD,
battery replacement is needed. After
the icon appears on the LCD, in-spec
measurement can still be made for
several hours before becoming
inaccurate.
1. Press POWER to turn the meter
off.
2. Unscrew the battery cover and
remove from the meter.
3. Remove the old batteries and
replace with six new AA batteries,
ensuring correct polarity.
4. Replace the battery cover.
Tighten the screws on the battery
cover to secure to the meter.
- 31 -
Page 32

TROUBLESHOOTING
System Reset
If the meter is not functioning
properly (i.e., the system is frozen
and the keypad is non-operational),
reset the meter:
1. Press POWER to turn the meter
on.
2. Use a small tool (such as a
disassembled paperclip or a pin)
to press the RESET button
(located on the right side of the
meter under the protective black
cover). Wait a few seconds for
the meter to restart.
- 32 -
Page 33

PC CONNECTION
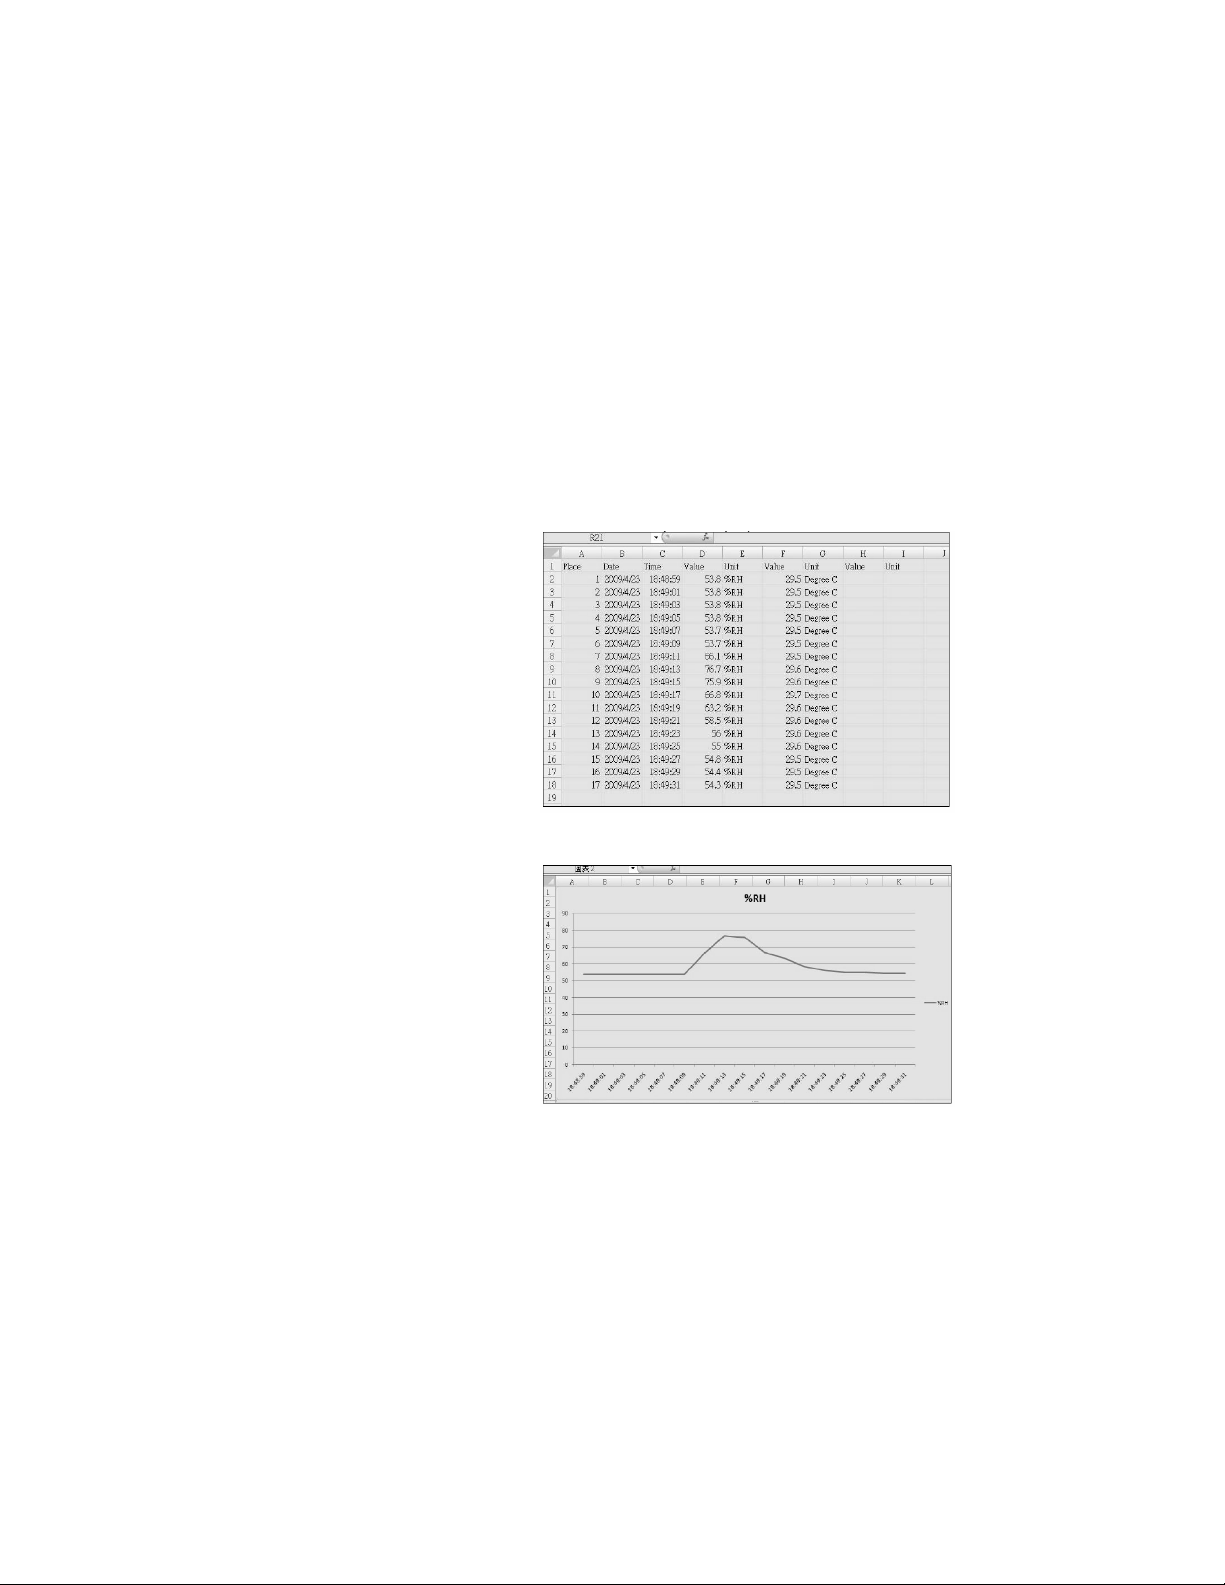
To save data from the SD card to a
PC (using Excel software):
1. After datalogging is complete,
remove the SD card from the
meter’s SD card socket.
2. Insert the SD card into the
computer’s SD card slot (if built
into the computer) or into a SD
card adapter (ensuring that the
adapter is connected to the
computer).
3. Turn the computer on and run the
Excel program.
4. Download the saved data file (i.e.,
HTA01001.XLS, HTA01002.XLS)
from the SD card to the computer.
The saved data will appear in the
Excel software screen. The data
can then be used in Excel to
create graphs, etc.
Note
When uploading to Excel, the rH
- 33 -
Page 34
PC CONNECTION
channel will upload rH and
temperature data; the dP channel will
upload dP, rH and temperature data;
the Et channel will upload Et, rH and
temperature data; and the tP channel
will upload tP data only.
Excel Data Screen
Excel Graphic Screen
- 34 -
Page 35
PC CONNECTION
RS232 PC Serial Interface
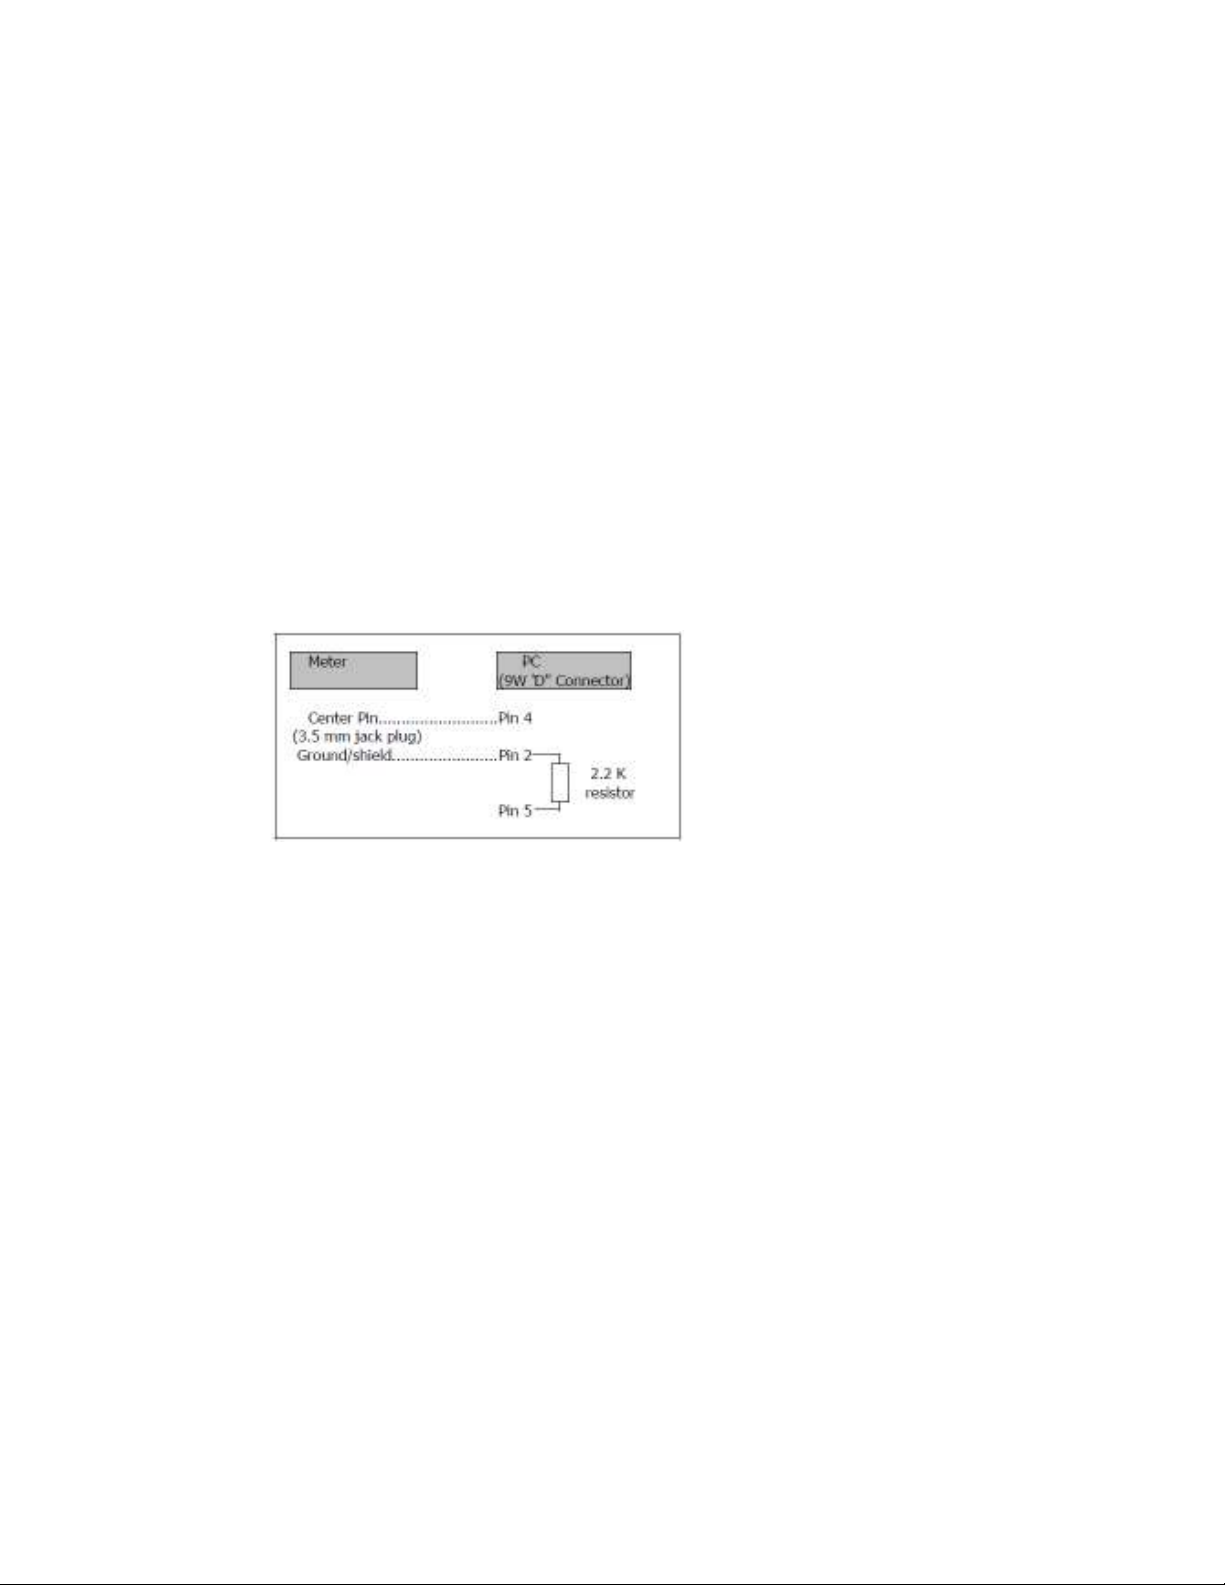
This meter has a RS232 PC serial
interface via a 3.5 mm terminal. The
data output is a 16 digit stream that
can be utilized for the user’s specific
application.
A RS232 lead with the following
connection will be required to link the
meter with the PC serial port:
The 16 digit data stream will display
in the following format:
D15 D14 D13 D12 D11 D10 D9 D8
D7 D6 D5 D4 D3 D2 D1 D0
Each digit indicates the following
status:
- 35 -
Page 36

PC CONNECTION
DO End word
D1 & D8 Display reading, D1 =
LSD, D8 = MSD
For example: If the
display reading is 1234,
then D8 to D1 is
00001234
D9 Decimal point (DP)
position from right to left
0 = No DP, 1 = 1 DP, 2 =
2 DP, 3 = 3DP
D10 Polarity, 0 = Positive,
1 = Negative
D11 &
D12
Annunciator for Display
°C = 01 °F = 02 % RH
= 04
D13 When send the upper
display data = 1
When send the lower
display data = 2
D14 4
D15 Start word
- 36 -
Page 37

PC CONNECTION
RS232 Format: 9600, N, 8, 1
Baud rate 9600
Parity No parity
Data bit no. 8 Data bits
Stop bit 1 Stop bit
- 37 -
Page 38

OPTIONAL ACCESSORIES
800060~77 Type K Thermocouple
Probes
840057 RS232 Computer
Cable
840059 2GB SD Card
840090 Water Resistant
Instrument Pouch
840093 Field Tripod
840094 USB Computer
Cable
840097 AC Adaptor
850080 Software
- 38 -
Page 39

SPECIFICATIONS
General
Circuit Custom one-chip of
microprocessor LSI circuit
Display LCD size: 52 mm x 38 mm
Backlight function
Measurement
Unit
Temperature
Compensation
Sampling Time
of Display
Data Output RS232/USB PC computer
Memory Card SD card 1 GB to 16 GB
Operating
Temperature
Humidity/Temp:
%RH/°C or °F
Dew point (Humidity):
°C or °F
Wet bulb (Humidity):
°C or °F
Type K/J Thermometer:
°C or °F
Automatic temperature
compensation for the
humidity function and the
type K/J thermometer
Approximately 1 second
interface
0 ~ 50°C
- 39 -
Page 40

Operating
Humidity
SPECIFICATIONS
< 85%RH
Power Supply
Power Current Normal Operation (without
Dimensions 177 x 68 x 45 mm
Weight 489 g
Alkaline or heavy duty DC
1.5 V battery (UM3, AA) x 6
pieces
DC 9V adapter input (AC/
DC power adapter is
optional)
use of the datalogger or
backlight):
Approximately DC 3.5 mA
Datalogger Operation
(backlight is off):
Approximately DC 28 mA
If the backlight is on, the
power consumption will
increase by approximately
12 mA.
7 x 2 ¾ x 2”
(1 lb)
- 40 -
Page 41

SPECIFICATIONS
Humidity
Range
Resolution 0.1% RH
Accuracy ≥ 70% RH:
5% ~ 95% RH
± (3% reading + 1% RH)
< 70% RH:
± 3% RH
Temperature
Range 0°C ~ 50°C
(32°F ~ 122°F)
Resolution 0.1°
Accuracy
°C ± 0.8°C
°F ± 1.5°F
Dew Point (Humidity)
°C Range -25.3°C ~ 48.9°C
Resolution 0.1°C
°F
Range -13.5°F ~ 120.1°F
Resolution 0.1°F
- 41 -
Page 42

SPECIFICATIONS
Note
The dew point value is automatically
calculated from the humidity/
temperature measurement. The dew
point accuracy is the sum accuracy
value of the humidity and
temperature measurement.
Wet Bulb (Humidity)
°C Range -21.6°C ~ 50.0°C
Resolution 0.1°C
°F
Range -6.9°F ~ 122.0°F
Resolution 0.1°F
Note
The wet bulb value is automatically
calculated from the humidity/
temperature measurement. The wet
bulb accuracy is the sum accuracy
value of the humidity and
temperature measurement.
- 42 -
Page 43

SPECIFICATIONS
Type K/J Thermometer
Sensor
Type
Range Resolution Accuracy
Type K -50.0 ~
1300°C
-50.1 ~
-100°C
-58.0 ~
2372°F
-58.1 ~
-148°F
Type J -50.0 ~
1200°C
-50.1 ~
-100°C
-58.0 ~
2192°F
-58.1 ~
-148°F
0.1°C ± (0.4%
reading +
0.5°C)
± (0.4%
reading +
1°C)
0.1°F ± (0.4%
reading +
1°F)
± (0.4%
reading +
1.8°F)
0.1°C ± (0.4%
reading +
0.5°C)
± (0.4%
reading +
1°C)
0.1°F ± (0.4%
reading +
1°F)
± (0.4%
reading +
1.8°F)
- 43 -
Page 44
WARRANTY
Sper Scientific warrants this product against
defects in materials and workmanship for a
period of five (5) years from the date of
purchase, and agrees to repair or replace
any defective unit without charge. If your
model has since been discontinued, an
equivalent Sper Scientific product will be
substituted if available. This warranty does
not cover probes, batteries, battery leakage,
or damage resulting from accident,
tampering, misuse, or abuse of the product.
Opening the meter to expose its electronics
will void the warranty. To obtain warranty
service, ship the unit postage prepaid to:
SPER SCIENTIFIC LTD
7720 E Redfield Rd, Suite 7
Scottsdale, AZ 85260
The defective unit must be accompanied by a
description of the problem and your return
address. Register your product online at
www.sperscientific.com, or return your
warranty card within 10 days of purchase.
Rev. 6/17/2011
- 44 -
 Loading...