

Sperian SURVIVAIR Opti-Fit 7641, SURVIVAIR Opti-Fit 7540, SURVIVAIR Opti-Fit 7640, SURVIVAIR Opti-Fit 7741, SURVIVAIR Opti-Fit 7740 Operation And Maintenance Manual
...Page 1

SURVIVAIR Opti-Fit™ Convertible Facepiece
Models 7540/7640/7740/7541/7641/7741
OPERATION and MAINTENANCE MANUAL
for Air Purifying Respirator (APR), Continuous Flow Supplied Air Respirator
(CF–SAR), and Powered Air Purifying Respirator (PAPR) Congurations
Air Purifying Respirator
Front Adapter Cap
Air Purifying Respirator
Low Prole Nozzle Plug
CF-Supplied Air Respirator
Side-mount Breathing Tube
SURVIVAIR Opti-Fit
™
Convertible Facepiece
CF-Supplied Air Respirator
Front-mount Breathing Tube
Powered Air Purifying
Respirator Mask-mount Blower
Powered Air Purifying
Respirator Belt-mount Blower
CF-Supplied Air Respirator
P100 Filter Escape
DO NOT USE your respirator until you read and completely understand this
instruction manual. You are required to inspect the adapter prior to putting it
into service. Please refer to the inspection procedures in this manual. Failure
to comply with this warning may result in personal injury, illness, or death.
©
Copyright SPERIAN Respiratory Protection USA, LLC
April 2008 All Rights Reserved
P/N 764099 REV D 03/09
WARNING
AN ISO 9001
REGISTERED
COMPANY
SPERIAN Respiratory Protection USA, LLC
3001 South Susan St., Santa Ana, CA 92704
Toll-Free 888.APR.SCBA or 714.545.0410
Fax 714.850.0299
www.sperianprotection.com
Page 2

NIOSH APPROVAL CAUTIONS AND LIMITATIONS
The Cautions and Limitations applicable to the air purifying respirator (APR), continuous ow supplied air respirator
(CF-SAR), and powered air purifying respirator (PAPR) congurations are listed below:
Operating Conguration Cautions and Limitations
Air Purifying Respirator (APR) ABCHJLMNOPS
Continuous Flow Supplied Air Respirator (SAR) ABCDEGHJLMNOPS
Powered Air Purifying Respirator (PAPR) ABCFHIJLMNOPS
Cautions and Limitations Key:
A - Not for use in atmospheres containing less than 19.5 percent oxygen.
B - Not for use in atmospheres immediately dangerous to life or health.
C - Do not exceed maximum use concentrations established by regulatory standards.
D - Air line respirators can be used only when the respirators are supplied with respirable air meeting the requirements
of CGA G-7.1 Grade D or higher quality.
E - Use only the pressure ranges and hose lengths specied in the User’s Instructions.
F - Do not use respirator if airow is less than four cfm (115 lpm) for tight tting facepieces or six cfm (170 lpm) for hoods
and/or helmet.
G - If airow is cut off, switch to lter and/or cartridge and immediately exit to clean air.
H - Follow established cartridge and canister change schedules or observe ESLI to ensure that cartridges and canisters
are replaced before breakthrough occurs.
I - Contains electrical parts which have not been evaluated as an ignition source in ammable or explosive atmospheres
by MSHA/NIOSH.
J - Failure to properly use and maintain this product could result in injury or death.
L - Follow the User’s Instructions for changing cartridges, canisters and/or lters.
M - All approved respirators shall be selected, tted, used, and maintained in accordance with MSHA, OSHA, and other
applicable regulations.
N - Never substitute, modify, add, or omit parts. Use only exact replacement parts in the conguration as specied by
the manufacturer.
O - Refer to Users Instructions, and/or maintenance manuals for information on use and maintenance of these respirators.
P - NIOSH does not evaluate respirators for use as surgical masks.
S - Special or critical User’s Instructions and/or specic use limitations apply. Refer to User’s Instructions before donning.
i
Page 3

SURVIVAIR Opti-Fit™ Convertible Facepiece
TABLE OF CONTENTS
NIOSH APPROVAL CAUTIONS AND LIMITATIONS ....................................................i
TABLE OF CONTENTS .........................................................................ii
I. INTRODUCTION.............................................................................1
II. SAFETY PRECAUTIONS......................................................................1
III. DESCRIPTIONS OF RESPIRATOR OPERATING CONFIGURATIONS .................................1
A. Air Purifying Respirator (APR) Conguration ...................................................1
B. Supplied Air Respirator (CF-SAR) Conguration ................................................1
C. Powered Air Purifying Respirator (PAPR) Conguration ...........................................2
IV. General Warnings for All Respirator Congurations .................................................2
V. RESPIRATOR OPERATING CONFIGURATIONS SCHEMATIC ........................................5
VI. PARTS LIST ...............................................................................6
Table 1. Air Purifying Respirator (APR) Filters and Cartridges ........................................8
Table 2. Continuous Flow Supplied Air Respirator (CF-SAR) Air Hose Components .......................8
Table 3. Powered Air Purifying Respirator (PAPR) Belt-Mounted Cartridges .............................8
VII. FACEPIECE PREPARATION USING INCLUDED ITEMS............................................9
VIII. OPERATING INSTRUCTIONS FOR SPECIFIC RESPIRATOR CONFIGURATIONS .....................10
A. Air Purifying Respirator (APR) Conguration ..................................................10
1. Installing Chemical Cartridges and Particulate Filters ......................................... 11
2. Donning Instructions for APR Conguration.................................................12
3. Fit Check Instructions for APR Conguration ................................................13
4. How to Use the Respirator ..............................................................13
5. Dofng Instructions for APR Conguration..................................................13
6. Chemical and Particulate Filter Service Life and Replacement ..................................13
B. Continuous Flow Supplied Air Respirator (CF-SAR) Congurations.................................15
1. Air Supply ...........................................................................16
2. Quick Coupler Assembly ...............................................................16
3. Breathing Tube Setup..................................................................17
4. Donning Instructions for CF-SAR Congurations .............................................18
5. Fit Check Instructions for CF-SAR Congurations ............................................19
6. How to Use the Respirator ..............................................................20
7. Dofng Instructions for CF-SAR Congurations ..............................................21
8. Pressure Tables for Continuous Flow Supplied Air Respirator (CF-SAR) ..........................21
9. P100 Filter Service Life and Replacement ..................................................22
C. Powered Air Purifying Respirator (PAPR) Congurations .........................................22
1. Battery Pack Charging .................................................................22
2. Cartridge and Filter Installation...........................................................23
3. Pre-operational Flow Check .............................................................24
4. Donning Instructions for PAPR Congurations ...............................................26
5. Fit Check Instructions for PAPR Congurations ..............................................27
6. How to Use the Respirator ..............................................................28
7. Dofng Instructions for PAPR Congurations ................................................28
8. Chemical and Particulate Filter Service Life and Replacement ..................................28
9. Decontamination......................................................................30
IX. MAINTENANCE ...........................................................................30
A. Cleaning ..............................................................................30
B. Inspection .............................................................................31
C. Repair ................................................................................32
D. Storage ...............................................................................32
X. SHIPMENT................................................................................32
XI. OVERHAUL FREQUENCY...................................................................32
XII. ADDITIONAL INFORMATION ................................................................32
XIII. WARRANTY AND LIMITATION OF LIABILITY ...................................................33
XIV. RESPIRATOR INSPECTION TABLES . . . . . . . . . . . . . . . . . . . . . . . . . . . . . . . . . . . . . . . . . . . . . . . . . . . . . . . . . 34
ii
Page 4
SURVIVAIR Opti-Fit™ Convertible Facepiece
I. INTRODUCTION
This manual provides instructions for the use and maintenance of the various respirator operating congurations achievable with the SURVIVAIR Opti-Fit™ Convertible full facepiece respirator models 7540, 7640, 7740,
7541, 7641, and 7741. The base conguration of the
SURVIVAIR Opti-Fit facepiece allows use as an air purifying respirator (APR) in conjunction with S Series par-
ticulate lters, gas and vapor cartridges, and cartridge/
lter combinations as required for specic contaminant
protection. Additional components can be attached to
the SURVIVAIR Opti-Fit Convertible to easily convert it
to a front or side hose connection continuous ow supplied air respirator (CF-SAR) and mask or belt mounted
powered air purifying respirator (PAPR) congurations.
Before using a respirator in a contaminated work
place, you must, at a minimum, understand the elements of a respirator program, your work place, and
the contaminants you are trying to protect yourself
against. Determining the applicability of a respirator
is difcult. You must be able to calculate the service
life of the cartridges, determine the type and concentration of contaminants, and determine whether
the contaminants have poor warning properties,
etc. If you do not have a complete understanding
of the use of respirators, you must seek the aid of
a certied industrial hygienist or contact SPERIAN.
You must read and understand this manual and be
trained in the proper use of the respirator before
wearing it in a contaminated atmosphere.
II. SAFETY PRECAUTIONS
The Warnings, Cautions, and Notes contained in this
instruction sheet have the following signicance
WARNING
Maintenance or operating procedures
and techniques that may result in serious personal injury, serious personal illness, or death if not carefully followed.
CAUTION
Maintenance or operating procedures and
techniques that may result in damage to
equipment and/or minor to moderate personal injury if not carefully followed.
NOTE
Maintenance or operating procedures and
techniques or information considered impor-
tant enough to emphasize.
III. DESCRIPTIONS OF RESPIRATOR OPERATING
CONFIGURATIONS
The SURVIVAIR Opti-Fit full facepiece contains two
connectors on each side of the lens for attaching par-
ticle lters, gas/vapor cartridges or air hoses, as well
as a front adapter for a supplied air breathing hose or
powered air purifying blower. This range of connections
allows the SURVIVAIR Opti-Fit Convertible facepiece
to be congured, through the use of additional components, as a supplied air respirator (CF-SAR) or powered
air purifying respirator (PAPR).
The full facepiece is designed with a wide lip silicone
skirt and ve point head strap harness (models 7540,
7640, and 7740). The facepiece is also available with
a Headnet™ retention system (models 7541, 7641, and
7741). All facepieces contain a lens treated with an
abrasion resistant coating. The facepiece is available
in three sizes, small, medium and large. While a nose
cup is standard, the facepiece may be equipped with an
optional spectacles kit, clear or tinted lens covers and
neck strap kit.
The connection versatility of the SURVIVAIR Opti-Fit™
Convertible full facepiece and available components and
accessories (see Section VI, Parts List) allow it to be as-
sembled into the following operating congurations:
A. Air Purifying Respirator (APR) Conguration
The side port connectors are used to attach S series
particulate lters, gas and vapor cartridges, and cartridge/lter combinations as required for a specic con-
taminant protection. The front adapter can be removed
and replaced with a plug to reduce the front prole of
the mask.
B.Continuous Flow Supplied Air Respirator
(CF-SAR) Conguration
With one side port connector port capped with a supplied screw cap, a high volume, low pressure breathing tube can be attached to the second side connector
to provide a constant ow of air to the facepiece when
connected to an external air source. An alternate connection option uses a breathing tube connected to the
front adapter with both side port connectors capped. An
optional Vortex air cooler may also be connected in-line
to provide cool air to the facepiece.
NOTE
The Vortex air cooler cannot be used in
conjunction with ambient air pump supply
systems.
The SURVIVAIR Opti-Fit™ Convertible can also be con-
gured as a CF-SAR with P100 lter cartridges and the
breathing tube connected to the front adapter. When the
air line hose is disconnected from the air line quick coupler, a check valve in the air line couple assembly prevents leakage of contaminated air through the facepiece
hose, and the wearer’s air is drawn through the P100
lters. This feature allows for safe entry, exit or escape
from a dangerous area in case of air supply failure.
For all CF-SAR congurations, when used at pressures
specied in the tables in Section VIII, Part B.8, air is de-
livered to the facepiece at a rate between 115 and 425
liters per minute (4-15 cubic feet per minute [cfm]).
1
Page 5

SURVIVAIR Opti-Fit™ Convertible Facepiece
WARNING
The pressure within the full facepiece
continuous ow supplied air respirator
(CF-SAR) remains positive under most
working conditions, but as with all respirators, negative pressure excursions are
possible. Conditions when a respirator
can experience negative facepiece pressures include, but are not limited to:
1) the respirator is improperly worn,
2) the respirator is not used in accordance with the instructions, or
3) the respirator is over-breathed during
heavy work rates. The respirator will
provide reduced protection when operated in a negative pressure mode. Failure to comply with this warning may result in personal injury, illness, or death.
The ANSI Z88.2-1992 assigned protection factor (APF)
for full facepiece continuous ow atmosphere supplying respirators is 1000. An APF of 1000 means that this
device, when properly used, will reduce exposure by a
factor of 1000.
C. Powered Air Purifying Respirator (PAPR)
Conguration
The SURVIVAIR Opti-Fit™ Convertible full facepiece
can be congured into a mask-mounted or belt-mounted powered air purifying respirator. In the mask-mount-
ed conguration, a high efciency (HE) lter/blower
mounts directly to the nozzle of the facepiece and deliv-
ers air to the facepiece at a ow rate greater than 115
liters per minute (4 cubic feet per minute). The blower
is powered by a belt mounted rechargeable nickel cadmium battery pack equipped with an ON/OFF switch.
This conguration is NIOSH approved and SPERIAN
recommended for respiratory protection against dusts,
fumes and mists, including asbestos-containing dusts
and mists, particulate radionuclides, and radon daughters attached to dusts, fumes and mists.
The belt-mounted PAPR respirator uses the SURVIVAIR
Opti-Fit™ Convertible facepiece, a rubber breathing
tube, a belt mounted blower with three (3) cartridges or
lters and a rechargeable Nickel Cadmium (NiCad) battery pack. Filtered breathing air is provided to the face-
piece at a ow rate greater than 170 liters per minute
(6 cubic feet per minute). To maintain NIOSH approval,
only the equipment and accessories listed on the appropriate NIOSH approval label may be used together.
IV. GENERAL WARNINGS FOR ALL RESPIRATOR
CONFIGURATIONS
The following general warnings must be observed for
proper operation of all air purifying (APR), continuous
ow supplied air (CF-SAR) and powered air purifying
(PAPR) respirator congurations. Additional warnings for
specic operating congurations are listed in Section VIII,
Parts A, B, and C, and must also be observed for proper
operation of the respective respirator conguration.
General Warnings for All Respirator Congurations:
WARNING
● Your employer (or you, if you do not
have an employer) is responsible for
establishing that this respirator is
suitable for the user’s application.
● SPERIAN cannot predict what will
happen to this respirator in every potential environment. Materials can be
chemically attacked if exposed to the
wrong environment and may exhibit
excessive corrosion or other forms
of damage. Permeation or penetration
of gases, liquids or particles through
the materials could be excessive. Extremes of temperature might cause
thermal degradation. Each of these
things, or a combination of them, could
create conditions in which this respirator would be dangerous to use.
● Before entering a hazardous environment while wearing this respirator,
you must conduct safe, scientic
tests to determine if the environment
could render the equipment unsafe.
Results of this testing should be well
documented. Seek the help of a certi-
ed safety professional or industrial
hygienist. DO NOT USE this equipment if the user would be endangered
in any way through environmentally
induced degradation of the materials
in the apparatus.
● All persons using this SPERIAN
breathing apparatus must be made
aware of its limitations. We cannot
be responsible for any damage to
property, personal injury, or death in
which environmental exposure is a
contributing factor.
● Do not use this respirator if anything
comes between the facepiece and
your face (e.g., hair, bandanna, head
covering, etc.). This condition will
prevent a good facepiece seal and
may allow the leakage of contaminants into the facepiece.
● Do not use this respirator in environments where the concentrations of contaminants are unknown or are immediately dangerous to life or health (IDLH).
IDLH atmospheres are dened as:
a. Those that the wearer could not
breathe for short periods.
b. Those from which the wearer
could not escape without the aid
of a respirator.
c. Those which have an immediate or
delayed adverse effect on health.
● Do not use this respirator at ambient
temperatures above 130°F (55°C).
2
Page 6

SURVIVAIR Opti-Fit™ Convertible Facepiece
WARNING─Continued
● Do not use this respirator where en-
vironmental conditions could cause
the respirator facepiece to be dislodged or slip.
● Immediately return to a non-contaminated area if:
You taste or smell contaminants, a.
or if your eyes, nose, or throat
become irritated.
Breathing becomes difcult.b.
The air you are breathing be-c.
comes uncomfortably warm.
You feel nauseous or dizzy.d.
You notice a loss or decrease in e.
airow.
The facepiece moves, slips, or f.
leaks.
● This respirator does not protect exposed areas of the body. Some contaminants can be absorbed directly
through the skin while others may
irritate exposed areas.
● This respirator does not provide protection from hazardous rays or harm-
ful noise. Always wear proper head
and ear protection.
● This respirator must not be used
underwater, for fumigation, interior structural fire fighting, abrasive
blasting operations, or in areas where
high heat, sparks, or flames could
contact the respirator. If this respirator will be used during welding, it
is the user’s responsibility to obtain
the proper equipment for protection
against sparks, optical radiation, and
impact. This respirator will not pro-
tect you against these hazards.
● This respirator must be used in con-
junction with a written respirator
program meeting the requirements
of the OSHA Standard for Respiratory Protection, 29 CFR 1910.134,
available from the U.S. Department
of Labor, Occupational Safety and
Health Administration. The program
must include procedures for evaluating air contaminants and selecting
appropriate respirators; procedures
for proper use of respirators; procedures for testing the facepiece fit of
respirators; procedures for cleaning,
disinfecting, inspecting, maintaining,
and storing respirators; procedures
for determining if workers are physically and medically capable of wearing respirators; and procedures for
training employees in the use and
care of respirators and in recognizing the hazards associated with con-
taminants in the work place.
WARNING─Continued
● Do not wear this respirator if a satis-
factory fit, as determined by a qualitative or quantitative fit test, cannot
be obtained. See ANSI Z88.2, latest
issue, and OSHA 29 CFR 1910.134,
latest edition. Beards, stubble, or
sideburns will prevent a good facepiece seal, and facial hair may interfere with valve function. Do not use
this respirator unless you are clean
shaven. Absence of one or both dentures can seriously affect the fit of
the respirator.
● This respirator will reduce, but will
not eliminate the inhalation of contaminants. Some sensitive individuals may experience health problems when exposed to even minute
amounts of contaminants. This respirator will not prevent health problems to those individuals.
● Use of components other than those
listed on the NIOSH approval label
and in this manual, or as authorized
by SPERIAN, or modification of this
respirator in any manner will void
the NIOSH certification and invalidates all SPERIAN’s warranties for
the respirator.
● Always read and follow the instructions listed in the Material Safety
Data Sheet for the chemicals that are
present in the work area.
● Do not use if you have a preexisting
skin condition (for example, folliculitus or vitiligo) until you obtain clearance from a medical doctor.
● This respirator must be worn and
used as specified in SPERIAN’s instructions. No respirator can provide complete protection from all
conditions. Use extreme care for
emergency conditions.
● Some individuals are sensitive to
chemicals (e.g., isocyanates, latex,
oil mists, etc.) or may have some
type of respiratory disorder (e.g.
asthma, chronic obstructive airway
disease, etc.). If you are sensitive to
any chemical or have a respiratory
disorder, you may have a severe reaction at contaminant levels well below
accepted health levels, such as the
OSHA Permissible Exposure Limit
(PEL), ACGIH Threshold Limit Value
(TLV), or the NIOSH Recommended
Exposure Limits (REL). Many chemicals (e.g., isocyanates, Mercury, etc.)
have no physical warning properties
and you cannot taste or smell the
contaminants even though they may
3
Page 7

SURVIVAIR Opti-Fit™ Convertible Facepiece
WARNING─Continued
be present in the respirator facepiece. This respirator will reduce, but
will not eliminate the possibility of
contaminants entering the facepiece
and causing a severe reaction. Do not
use this respirator until you obtain
clearance from a medical doctor.
● Users must clean and maintain this
respirator only in accordance with
SPERIAN’s instructions. Accessories
not offered by SPERIAN may degrade
performance, and will void NIOSH
certification.
● The respirator facepiece assembly
contains natural rubber latex, which
may cause allergic reactions in some
individuals. Discontinue use if you
experience an allergic reaction.
● Discontinue use if you experience
skin irritation or discoloration.
● This product may provide less than
adequate protection if improperly
used, which may result in personal
injury, illness, or death.
● For use by trained, qualified personnel
only.
● Do not use this respirator if it has
been left exposed in a contaminated
environment as contaminants could
collect on the inside of the facepiece
and be inhaled when the gas mask is
donned.
● Routinely used respirators must be
inspected before and after each use.
Stored emergency respirators must
be inspected after each use and at
least every 30 days. A written record
must be kept of emergency respirator inspections.
FAILURE TO OBSERVE ALL WARNINGS MAY RESULT IN PERSONAL INJURY, ILLNESS, OR DEATH.
4
Page 8
SURVIVAIR Opti-Fit™ Convertible Facepiece
V. RESPIRATOR OPERATING CONFIGURATIONS SCHEMATIC
Cartridges and
Filters See
cartridge table
in Section VI
for available
cartridge part
numbers.
Side-mount
Tube and Belt
Kits*:
Light Duty
P/N 981415
Heavy Duty
P/N 981416
SURVIVAIR Opti-Fit
Convertible Facepiece
5-Pt. Strap
Small/Medium/Large
754000/764000/774000
Mesh Headnet
Small/Medium/Large
754100/764100/774100
™
APR
Air Purifying
Respirator (APR)
SURVIVAIR Opti-Fit
Facepiece
Side-mount Tube
CF-Supplied Air
Respirator (CF-SAR)
PAPR
CF-SAR
Front- mount
Tube and
Screw Caps
Kit*:
P/N 981205
Front- mount
Tube and P100
Filters
Kit*:
981209
Mask- mount
PAPR
Kit
520075
SURVIVAIR Opti-Fit
Facepiece Front-
mount Tube CF-SAR
5-Pt. Strap S/M/L
981500/981501/981503
Mesh Headnet™ S/M/L
981550/981551/981553
SURVIVAIR
Opti-Fit Facepiece
P100 Escape
CF-Supplied Air
Respirator (CF-SAR)
SURVIVAIR Opti-Fit
Facepiece
Mask-mount PAPR
5-Pt. Strap S/M/L
520500/520600/520700
Mesh Headnet™ S/M/L
520520/520620/520720
* All continuous ow supplied air respirator (CF-SAR) and powered air purifying respirator (PAPR) kit components are
available individually. See Parts List in Section VI.
Belt- mount
PAPR
Components
Blower Kit*:
500085
Breathing Tube:
B420030
5
SURVIVAIR Opti-Fit
Facepiece Kit Belt-mount
PAPR 5-Pt. Strap S/M/L
540510/540610/540710
Mesh Headnet™ S/M/L
541510/541610/541710
Blower/Battery Kit 500085
Page 9
SURVIVAIR Opti-Fit™ Convertible Facepiece
VI. PARTS LIST
A. Please refer the Parts List Matrix in Part B for component descriptions and identication of their use with the
various operating congurations of the SURVIVAIR Opti-Fit Convertible Facepiece.
2b
APR
29
Headnet
™
Air Purifying Respirator
Cartridges
CF-SAR
SURVIVAIR Opti-Fit Convertible
Facepiece Models
5 Pt. Headstrap
7540/7640/7740
Mesh Headnet
™
7541/7641/7741
CF-Supplied Air
Respirator
Side-mount Breathing Tube
PAPR
CF-Supplied Air
Respirator
Front-mount Breathing Tube
CF-Supplied Air
Respirator
P100 Escape
Powered Air Purifying Respirator
Mask-mounted Blower
Powered Air Purifying Respirator
Belt-mounted Blower
6
Page 10
SURVIVAIR Opti-Fit™ Convertible Facepiece
B. Parts List Matrix
SURVIVAIR
7
Page 11

SURVIVAIR Opti-Fit™ Convertible Facepiece
Table 1. Air Purifying Respirator (APR) Filters and
Cartridges
Part No. Protection/Description
Filters
1050 P100
1060 Filter Pad, N95
1070 Filter Pad, N99/R95
1190 P100 Slimline
1195 P100 Disk
Cartridges
100100 Organic Vapors
100200 Acid Gases
100300 Organic Vapors and Acid Gases
100400 Ammonia and Methylamine
100600 Mercury Vapor and Chlorine
100800 Multi-contaminant
1051 Combination Organic Vapors and P100
1052 Combination Acid Gases and P100
1053 Combination Organic Vapors, Acid Gases, and P100
1054 Combination Ammonia, Methylamine, and P100
1056 Combination Multi-contaminant and P100
1058 Combination Multi-contaminant and P100
Table 2. Continuous Flow Supplied Air Respirator
(CF-SAR) Air Hose Components
Part No. Item Description
930861 High performance hose—25 feet (requires quick coupler kit)
930862 High performance hose—50 feet (requires quick coupler kit)
930864 High performance hose—100 feet (requires quick coupler kit)
930801 Light weight hose—25 feet (requires quick coupler kit
930802 Light weight hose—50 feet (requires quick coupler kit
930804 Light weight hose—100 feet (requires quick coupler kit
985241 Light weight hose with OBAC couplings—25 feet
985242 Light weight hose with OBAC couplings—50 feet
985244 Light weight hose with OBAC couplings—100 feet
930810 Quick coupler kit—style: Foster
930820 Quick coupler kit—style: Schrader
930830 Quick coupler kit—style: Hansen
930840 Quick coupler kit—style: OBAC
Table 3. Powered Air Purifying Respirator (PAPR)
Belt-Mounted Cartridges
Part No. Item Description
150100 OV Cartridge
150200 AG Cartridge
150300 OV/AG Cartridge
150400 AM/MA Cartridge
158100 OV/HEPA Cartridge
158200 AG/HEPA Cartridge
158300 OV/AG/HEPA Cartridge
158400 AM/MA/HEPA Cartridge
108000 HEPA Filter
APR Cartridge Considerations:
WARNING
The following is a partial list of materials
that have either poor warning properties, will develop high heats of reaction
with the sorbent in the canister, have
extremely short service times, or will
not be absorbed at all. Respirators cannot be used to protect you against many
of these chemicals. Contact a certied
industrial hygienist or SPERIAN if you
have any of these materials present in
the work place. The use of a respirator
for these materials may lead to personal
injury, illness, or death.
Acroline Carbonyls Hydrogen
Aniline Cyanogen Isocyanates:
Arsine Dimethylaniline Methanol Phosphine
Boron
Hydrides
Bromine Ethyl Cyanide Nitro
Carbon
Dioxide
Carbon
Monoxide
Dimethyl Sulfate Methyl
Fluorine Sulfur Chloride
Hydrogen
Cyanide
Selenide
TDI, HDI, MDI
Bromide
Methyl
Chloride,
Methylene
Chloride
Compounds:
Nitrogen
Oxides
Nitroglycerin
Nitrobenzene
Nitromethane
Ozone
Phosgene
Phosphorous
Trichloride
Stibine
Vinyl Chloride
VII. FACEPIECE PREPARATION USING INCLUDED
ITEMS
The SURVIVAIR Opti-Fit Convertible is shipped with
side connector port screw caps and a nozzle plug kit
that must be used to congure the facepiece for the
various operating congurations as detailed below.
8
Page 12
SURVIVAIR Opti-Fit™ Convertible Facepiece
A. Air Purifying Respirator (APR)
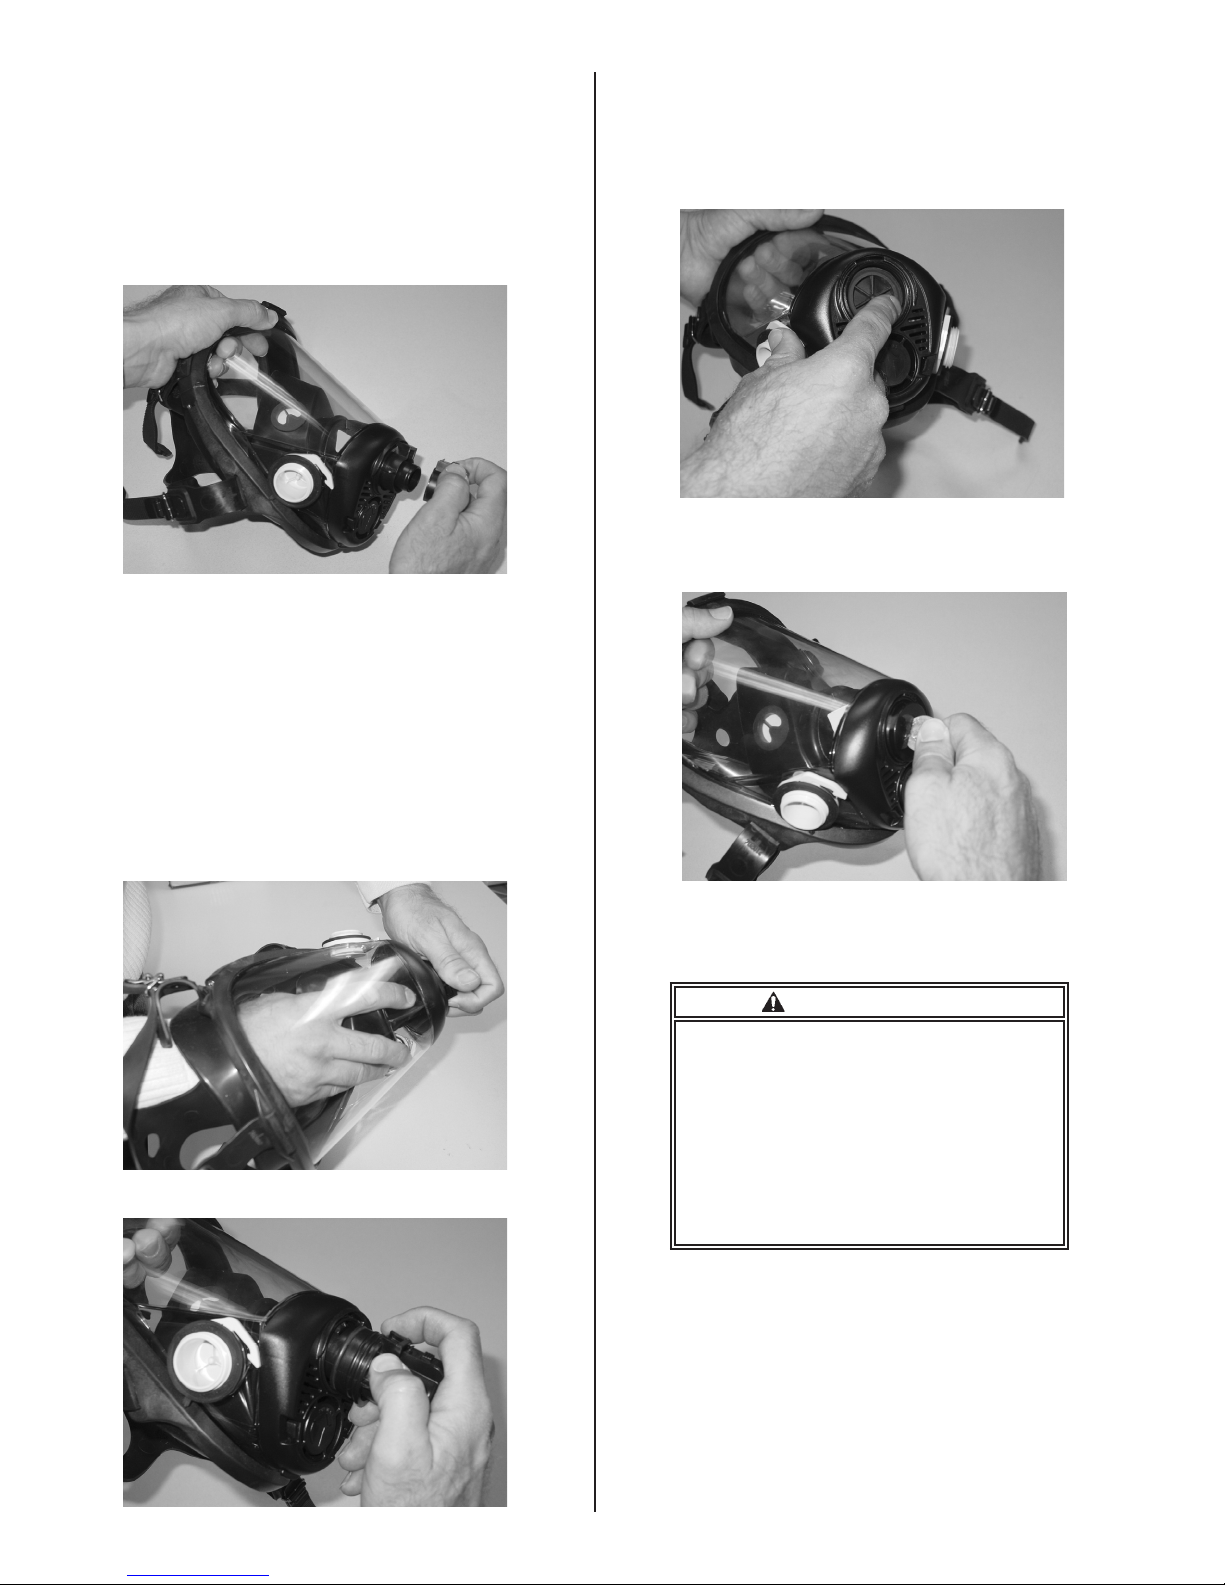
The SURVIVAIR Opti-Fit Convertible is shipped from the
factory with the nozzle adapter (item 20, P/N 702045)
installed in the facepiece nozzle. This adapter must be
capped using the included adapter cap (item 24, P/N
420020) for the facepiece to be used as an APR respirator. When attaching the adapter cap, an audible click
should be heard (Figure 1).
Figure 1. Adapter Cap
Figure 4. Insert Nozzle Gasket into Facepiece
If a low prole nozzle setup is desired, the nozzle
adapter can be removed from the facepiece and the
nozzle plug kit installed in its place. Unscrew the nozzle
adapter from the facepiece by pressing down on the
adapter locking tab from inside the lens and turning the
adapter counterclockwise (Figures 2 and 3). Insert the
nozzle gasket (item 25, P/N 763016) into the nozzle
port (Figure 4). Thread in the nozzle plug (item 26, P/N
962066), using a quarter or similar item in the molded
slot to hand-tighten (Figure 5).
Figure 2. Push Down on Adapter Locking Tab
Figure 5. Tighten Nozzle Plug with Coin
in Molded Slot
WARNING
The included screw caps (item 27, P/N
985020) are not to be used on the facepiece side ports when using the SURVIVAIR Opti-Fit Convertible in the air puri-
fying respirator (APR) conguration. See
Section VIII, Part A.1 for installing chemi-
cal cartridges and particulate lters to
the facepiece side connector ports. Failure to comply with this warning may lead
to personal injury, illness, or death.
Figure 3. Remove Adapter
9
Page 13

SURVIVAIR Opti-Fit™ Convertible Facepiece
B. Continuous Flow Supplied Air Respirator(CF-SAR)
1. Side-mounted Breathing Tube
When using the SURVIVAIR Opti-Fit Convertible
as a supplied air respirator (CF-SAR) with sidemounted breathing tube, the nozzle adapter and
the side port not in use by the breathing tube
must be capped for proper operation. Attach
the nozzle adapter cap (item 24, P/N 420020)
to the nozzle adapter, making sure to hear an
audible click has the cap is pushed into place
(Figure 1).
If a low prole nozzle setup is desired, the nozzle adapter can be removed from the facepiece
and the nozzle plug kit installed in its place. Unscrew the nozzle adapter from the facepiece by
pressing down on the adapter locking tab from
inside the lens and turning the adapter counterclockwise (Figures 2 and 3). Insert the nozzle
gasket (item 25, P/N 763016) into the nozzle
port (Figure 4). Thread in the nozzle plug (item
26, P/N 962066), using a quarter or similar item
in the molded slot to hand-tighten (Figure 5).
Thread one of the provided screw caps (item 27,
P/N 985020) onto the side connector port not
in use by the side-mounted breathing tube and
hand-tighten (Figure 6).
C. Powered Air Purifying Respirator (PAPR)
Both the mask-mounted and belt-mounted powered air
purifying respirator (PAPR) congurations require both
side connector ports to be capped with the included screw
caps (item 27, P/N 985020). Thread the screw caps onto
the side connector ports and hand-tighten (Figure 6).
Use of the nozzle adapter is necessary for connecting
the mask-mounted blower or breathing tube and there-
fore the low-prole nozzle plug kit cannot be used.
WARNING
● Do not attempt to use the SURVIVAIR
Opti-Fit Convertible with both the
nozzle adapter and the side connector ports capped.
● Failure to securely cap unused
threaded side port connectors and/
or the front adapter port for the APR,
CF-SAR or PAPR configuration you
are using can allow contaminants
to leak into the respirator and cause
personal injury, illness, or death.
VIII. OPERATING INSTRUCTIONS FOR SPECIFIC
RESPIRATOR CONFIGURATIONS
Figure 6. Thread Screw Cap onto Side Connection
Port (CF-SAR and PAPR Only)
2. Front-mounted Breathing Tube and P100
Escape
When using the SURVIVAIR Opti-Fit Convertible as a supplied air respirator (CF-SAR) with
front-mounted breathing tube, both of the side
connector ports must be capped with the included screw caps (item 27, P/N 985020). Thread
the screw caps onto the side connector ports
and hand-tighten (Figure 6). If the facepiece
is to be congured as an CF-SAR with P100
escape, the screw caps are not required, and
a P100 lter cartridge (item 38, P/N 105001)
should be screwed onto each side connector
port. Use of the nozzle adapter is necessary
for connecting the breathing tube and therefore
the low-prole nozzle plug kit cannot be used.
A. Air Purifying Respirator (APR) Conguration
In addition to the General Warnings listed in Section IV,
the following warnings apply to air purifying respirator
(APR) congurations:
WARNING
● When using this respirator for protection against any gas or vapor, including gases or vapors with poor warning properties (e.g., HDI, MDI, or TDI
isocyanates, paint hardeners, etc.),
OSHA 29 CFR 1910.134 requires the
canister to have an end-of-servicelife indicator (ESLI). If the canister
does not have an ESLI, OSHA requires the canister be changed at
intervals derived from a change-out
schedule that is based on objective
information or data that ensures the
canister is changed before the end of
its service life.
● Do not use for protection against
gases or vapors which generate high
heats of reaction with the sorbent
material or against gases or vapors
which are not readily absorbed by
the sorbent (e.g., methanol).
● There are gases and vapors (e.g., acetone, acetaldehyde, etc.) that have a
boiling point below 149ºF (65ºC). Gas
masks should not be used for protection against these chemicals
10
Page 14

SURVIVAIR Opti-Fit™ Convertible Facepiece
WARNING─Continued
for more than 8 hours or one shift,
even though the calculated service
life estimate is greater that 8 hours or
one shift. These contaminants can migrate through the canister even when
the canister is not in use (e.g., overnight) and collect in the facepiece.
● Do not use this respirator without the
appropriate SPERIAN cartridges and/
or lters securely attached onto the
facepiece. Always read cartridge labels prior to use and be certain that
you have cartridges and/or lters
that will provide the required protection. This respirator must be used
for protection against only those air
contaminants listed on the air purify-
ing cartridge, lter and/or the NIOSH
approval label. Respirators labeled
for protection against particulates
only shall not be used for gases/vapors. Respirators labeled for protection against gases/vapors only shall
not be used for particulates.
● This respirator does not supply oxygen. Do not use the respirator in
atmospheres containing less than
19.5% oxygen by volume.
● Failure to comply with this warning
may lead to personal injury, illness,
or death.
1. Installing Chemical Cartridges and Particulate
Filters
a. Mercury Vapor Cartridges
Special or Critical User’s Instructions: The mercury vapor cartridges incorporate passive endof-service-life indicators (ESLI). Each ESLI,
yellow in color when new, turns gray when
exposed to mercury vapor. Do no use these
cartridges unless you can distinguish between
the safe and discard colors of the ESLI. The
indicators must be visible when wearing the
respirator without having to manipulate either
the facepiece or the indicator. If the indicators
cannot be seen, do not wear the respirator. The
cartridges must be replaced when the ESLI
change color from yellow to gray, when the
ESLI become dirty or damaged, after 30 days
of use, or if removed from their original packaging and not used within 30 days. Never enter
or remain in a hazardous atmosphere if one or
more of the ESLI is gray.
b. Particulate Filters
Before using a particulate lter, you must conrm the atmosphere is non-IDLH and not oxygen decient, the contaminant is a particulate
hazard, and you must determine the hazard ratio (hazard concentration/exposure limit). If the
hazard ratio is less than 10, you may use a half
mask respirator with a lter efciency of 95% or
higher. If the hazard ratio is less than 20, you
may use a full facepiece respirator with a lter
efciency of 95% or higher. If the hazard ratio is
less than 100, you may use a full facepiece res-
pirator with a lter efciency of 99% or higher. If
the hazard ratio is greater than 100, you must
use another type of respirator.
N-series lters must only be used for non-oil
containing aerosols or particulates. R or P-
series lters can be used if the atmosphere
contains oil (e.g., lubricants, cutting uids,
glycerin, etc.). An R-series lter used in an oil-
containing atmosphere must be replaced after
each 8-hour shift. A P-series lter can be used
for more than one 8-hour shift. Please refer to
Section VIII, Part A.6, Chemical and Particulate
Filter Service Life and Replacement, for important additional information. Refer to the NIOSH
publication Guide to the Selection and Use of
Particulate Respirators Certied Under 42CFR
84 for additional guidelines on use limitations
for lters.
WARNING
Filters improperly used or improperly
assembled to the facepiece could cause
leakage, which could lead to personal
injury, illness, or death.
c. Cartridge/Filter Installation
Ensure that you have the correct cartridge and/
or lter type for the contaminants in your work
area. If you are not sure, consult your supervisor or safety professional.
Install cartridges and lters by threading i.
them onto the facepiece connectors and
hand tightening. Do not overtighten.
If using lter pads, insert the appropriate ii.
pad into the lter retainer so that the side
stamped with the model number will face
towards the facepiece when installed.
Completely snap the lter retainers onto
the cartridges or lter holders.
Inspect the lter through the retainer to iii.
ensure that the entire edge of the lter is
making contact with the retainer and the
lter is not bunched or folded. The outer
edge of the pad must be compressed be-
tween the top edge of the cartridge or lter
holder and the inner sealing rings of the
retainer. Install lter holders in the same
manner as cartridges.
11
Page 15

SURVIVAIR Opti-Fit™ Convertible Facepiece
2. Donning Instructions for APR Conguration
WARNING
● Your employer (or you, if you do not
have an employer) is responsible for
establishing that this respirator is
suitable for the user’s application.
● Always read cartridge labels prior to
use to be certain that you have car-
tridges and/or lters that will provide
the required protection. Filters labeled for protection against particulates only shall not be used for gases/vapors, and cartridges labeled for
protection against gases/vapors only
shall not be used for particulates.
Both cartridges/lters must be of the
same type.
● Ensure that the o-ring (Item 23, P/N
824014), is in the cap (Item 24, P/N
420020) and the cap plug is securely
seated on the adapter. If the nozzle
plug (Item 26, P/N 962066) is to be
used instead of the cap, be sure
that the Nozzle Gasket (Item 25, P/N
763016) is installed with an inhalation valve.
● The failure to comply with this warning may lead to personal injury, illness, or death.
7. Hold the facepiece against your face and pull
the straps over your head.
8. Tighten the two lower straps, temple straps, then
the top straps until a good seal is obtained and
all straps lie at on your head. Do not overtighten the straps. See Figure 8a. For respirators
with a Headnet, tighten the two lower straps and
the temple straps until a good seal is obtained
and all straps lie at on your head. Flatten the
Headnet with a wiping motion toward the back
of your head. See Figure 8b. Retighten straps
as necessary. Do not overtighten.
Figure 8a. Adjust Lower Straps First
1. Inspect the respirator as described in Section
IX, Part B.
2. Verify that unused ports are capped as detailed in
Section VII for the APR operational conguration.
3. Verify that two lters and/or cartridges are at-
tached to the threaded side connectors of the
facepiece.
4. Adjust the top straps until one inch of strap extends through each buckle. Fully loosen the
lower straps. For respirators featuring a Headnet, fully loosen all straps.
5. Place the neck strap (if installed) over your head.
6. Place your chin against the chin cup and center
the facepiece on your face. See Figure 7.
Figure 8b. Flatten Headnet with Wiping Motion
NOTE
When properly adjusted, the head strap hub
should be centered on the back of your head
and the lower straps should be below your
ears. See Figure 9a. For the Headnet version, the backstrap should be at the nape of
the neck. The Headnet should lie at on the
head and not bunch up. See Figure 9b.
Figure 7. Place Chin in Chin Cup
12
Page 16

SURVIVAIR Opti-Fit™ Convertible Facepiece
whether the cartridges are correctly seated against
the facepiece. It is your responsibility to ensure that
the face seal is not disturbed when reinstalling the
cartridges and that each cartridge is sealed against
the facepiece.
Inhale gently and hold your breath to slightly collapse
the facepiece. If air leakage occurs, readjust the
facepiece and head strap, then retest. If lter retainers are used, do not remove them after the t check
is completed. Removing the lter retainers may shift
the facepiece and break the face seal.
Figure 9a. Properly Center Head Strap Hub
Figure 9b. Properly Fitted Headnet
3. Fit Check Instructions for APR Conguration
You must perform the following t check each time
the respirator is worn or before entering the contaminated area.
WARNING
If a leak-tight seal is not obtained during
the following t check, do not wear the
respirator. Ask your supervisor or safety
professional for assistance. The failure
to comply with this warning may lead to
personal injury, illness, or death.
4. How to Use the Respirator
To receive the maximum protection available from
your respirator, you must read, understand, and
follow all the warnings, limitations, and instructions
contained in this manual and follow your employer’s
instructions on the use and maintenance of the respirator. Read and understand the following warnings
prior to using the respirator.
WARNING
● Never remove the respirator for any
reason while in the work area.
● You must leave the work area immediately if the facepiece-to-face seal is
disturbed for any reason such as:
a. Slippage due to sweating or ex-
cessive head movement.
b. The facepiece becomes dislodged
as a result of being knocked.
c. Sneezing or coughing while wear-
ing the facepiece.
d. You need to blow your nose,
scratch your face or adjust your
spectacles.
● For any other reason that would cause
the facepiece seal to be disturbed.
● You must restore the facepiece-to-
face seal and perform a fit check in
a non-hazardous environment before
re-entering the work area.
● Failure to comply with this warning
may lead to personal injury, illness,
or death.
Negative Pressure Fit Check
Cover the inlet of the cartridges and/or lters with the
palms of your hands or another suitable item, such
as a thin sheet of plastic or rubber. When the respi-
rator is equipped with cartridges, lter retainers may
be used as an aid. Alternatively, the cartridges may
be removed to perform the t check. If removed,
SPERIAN recommends someone other than you
reinstall them after a leak-tight t is achieved. It
is difcult for the wearer to reinstall the cartridges
without disturbing the face seal and to determine
5. Dofng Instructions for APR Conguration
1. Loosen the two lower head straps completely
(for ve strap head harness or Headnet).
2. Grasp the nozzle rmly, and pull the facepiece
upward over the head.
6. Chemical and Particulate Filter Service Life
and Replacement
a. Chemical Cartridge Service Life and Replacement
13
Page 17

SURVIVAIR Opti-Fit™ Convertible Facepiece
WARNING
● OSHA allows the use of air purifying respirators for protection against
contaminants with poor warning
properties. You must replace cartridges when the end-of-service-life
indicator (ESLI) has changed color
or in accordance with an OSHA compliant cartridge change-out schedule
that is based on objective information
or data that ensures the cartridges
are changed before the end of their
service life.
● You must immediately leave the contaminated area if you taste or smell
contaminants, or if your eyes or
throat become irritated. Replace cartridges and/or filters before re-entering the contaminated area.
● Establishing the cartridge service
life for mixtures of contaminants is a
complex task, and one that requires
considerable professional judgment
to create a reasonable change-out
schedule. OSHA provides a “rule-ofthumb” method for determining the
cartridge service life for mixtures.
The method addresses two situations. The first is where the individual
compounds of the mixture have similar breakthrough times (i.e., within
one order of magnitude). In this case,
OSHA recommends adding the concentrations of all the components of
the mixture to determine a “total concentration,” then determine the mixture service life by applying the total
concentration to the component with
the shortest service life. The second
is where the individual compounds
have breakthrough times that vary
by two orders of magnitude or greater. In this case, OSHA recommends
the mixture service life be based
on the contaminant with the shortest breakthrough time. The OSHA
rule-of-thumb methods may not be
applicable for all mixtures. In some
cases, the actual mixture service life
may be much lower than the one calculated. For this reason, SPERIAN
recommends that the cartridge service life for mixtures be determined
using experimental methods. If you
are unsure of how to determine the
cartridge service life for mixtures,
please contact SPERIAN.
● Failure to comply with this warning
may lead to personal injury, illness,
or death.
The cartridge service life depends on the user’s
breathing rate, the characteristics of the contaminant, and the environmental conditions such as
temperature and humidity. Saturated cartridges will
leak trace amounts of contaminant to the wearer,
which may be detected by odor, taste, and/or irritation. Replace cartridges when the end-of-service-life indicator (ESLI) has changed color, at the
rst trace of the characteristic contaminant odor
or taste, at regularly scheduled intervals recommended by your safety professional, if they show
any signs of damage, or in accordance with an
OSHA compliant cartridge change-out schedule.
The service life of the cartridge can be estimated
using SPERIAN’s cartridge service life estimation
program, available from SPERIAN. Always replace
cartridges in pairs.
Replace cartridges as follows:
1. Return to fresh air.
2. Remove cartridges by turning counterclockwise. Dispose of used cartridges
in accordance with Federal, state, and
local guidelines.
3. Install new cartridges, taken only from
sealed packages, as described in Section VIII, Part A.1.C.
4. Perform a facepiece t check as described in Section VIII, Part A.3.
b. Particulate Filter Service Life and Replacement
WARNING
You must replace the lters when breathing becomes uncomfortable or difcult.
As particulates collect on the lter sur-
face, the breathing resistance of the
facepiece increases. If you wait too long
to replace the lters, the particulates
may leak past the face seal instead of
being collected on the lters. Therefore,
SPERIAN strongly recommends that the
lters be changed at least daily.
Failure to comply with this warning
may lead to personal injury, illness, or
death.
The service life of the lter depends on the lter
series, the way in which the lter captures the con-
taminant (either mechanically or by electrostatic
means), the characteristics of the contaminant,
the user’s breathing rate, and the environmental
conditions such as humidity, temperature, etc.
SPERIAN’s N95, N99, R95 and Slimline P100 lters use electrostatic charges to capture particles.
High humidity and temperatures, as well as contact with oil or non-oil based liquid aerosols, may
affect the capture of contaminants by these lters.
All new SPERIAN lters must be maintained in fac-
tory sealed bags and must only be removed when
14
Page 18

SURVIVAIR Opti-Fit™ Convertible Facepiece
they are to be used. Used lters must be stored in
a protective bag, and in a clean, dry environment.
Detailed guidelines for each lter series are provided below.
1. N-Series Filters
These lters are only NIOSH approved for use
against solid and water-based particulates
and must not be used in any area that contains oil aerosols. N-series lters capture particles using electrostatic charges, and these
types of lters may be subject to some loss of
efciency if they are exposed to certain liquid
aerosols. The N-series (N95 and N99) lters
must be replaced immediately whenever:
● they are damaged, soiled, soaked with
liquids such as water or alcohol, or appear to be suspect or damaged in any
manner, or
● the user notices an increase in breathing
resistance such that the respirator becomes uncomfortable to wear.
If none of the above occurs and there is a
respiratory protection program per OSHA
29 CFR 1910.134 in place, then these lters
may be used continually, but only for a maximum of 30 days or 40 total hours, whichever
comes rst. However, SPERIAN recommends
that all lters be replaced daily because the
user may be unable to detect small defects
resulting in a loss of lter efciency, and the
determination of when breathing resistance
becomes too uncomfortable is subjective.
Further, SPERIAN recommends that these
lters be replaced daily when there are any
liquid aerosols present and there is no respirator program in place.
2. R-Series Filters
These lters are NIOSH approved for use
against any type of particulate, except that
for atmospheres that contain oil. The lters
can only be used for 8 hours or a single shift,
whichever comes rst. When used in either
oil-containing or non-oil containing atmo-
spheres, these lters must be replaced immediately whenever:
● they are damaged, soiled, soaked with liq-
uids such as water or alcohol, or appear to
be suspect or damaged in any manner, or
● the user notices an increase in breathing resistance such that the respirator becomes
uncomfortable to wear.
If none of the above occurs, the lter is used
in an area that does not contain oil, and there
is a respiratory protection program per OSHA
29 CFR 1910.134 in place, then these lters
may be used continually, but only for a maximum of 30 days or 40 total hours, whichever
comes rst. Even when used in non-oil containing atmospheres, SPERIAN recommends
that all lters be replaced daily because the
user may be unable to detect small defects
resulting in a loss of lter efciency, and the
determination of when breathing resistance
becomes too uncomfortable is subjective.
3. P-Series Filters
These lters are NIOSH approved for long
duration use against any type of particulate.
When used in either oil-containing or non-oil
containing atmospheres, these lters must be
replaced immediately whenever:
● they are damaged, soiled, soaked with
liquids such as water or alcohol, or appear to be suspect or damaged in any
manner, or
● the user notices an increase in breathing
resistance such that the respirator becomes uncomfortable to wear.
If none of the above occurs and there is a
respiratory protection program per OSHA
29 CFR 1910.134 in place, then these lters
may be used continually, but only for a maximum of 30 days or 40 total hours, whichever
comes rst. However, service time for the
Model 1050 P100 lter can be extended if l-
ter performance to 42 CFR Part 84 can be
demonstrated. Whether used in oil-containing
or non-oil containing atmospheres, SPERIAN
recommends that all lters be replaced daily
because the user may be unable to detect
small defects resulting in a loss of lter efciency, and the determination of when breathing resistance becomes too uncomfortable is
subjective.
WARNING
Failure to properly assemble lter pads
to cartridges or lter holders can cause
leakage, which could lead to personal
injury, illness or death.
1. Return to fresh air.
2. Remove cartridges or P100 lters by
turning them counterclockwise. Dispose
of used cartridges and lters in accordance with Federal, state, and local
guidelines.
3. If using lter pads, remove the lter retainers from the cartridges or lter holders. Remove the used lter pads and
dispose of them in accordance with Federal, state, and local guidelines. Clean
the lter retainer and cartridge or holder
if necessary.
4. Install new P100 lters or lter pads,
taken only from sealed packages, as
described in Section VIII, Part A.1.C.
5. Perform a facepiece t check as described in Section VIII, Part A.3.
15
Page 19

SURVIVAIR Opti-Fit™ Convertible Facepiece
B. Supplied Air Respirator (CF-SAR) Congurations
In addition to the General Warnings listed in Section IV,
the following warnings apply to supplied air respirator
(CF-SAR) congurations:
WARNING
● SPERIAN respirators, accessories,
and associated equipment should
not be used in atmospheres that
may contain contaminant concentrations above the lower explosive level
(LEL). Intrinsic safety certification
of electronic components does not
eliminate potential danger from ignition in these atmospheres.
● Do not exceed maximum use concentrations established by regulatory standards.
● Air line respirators can be used only
when the respirators are supplied
with respirable air meeting the requirements of CGA-7.1, Grade D or
higher quality.
● Use only the pressure ranges and
hose lengths specified in these user
instructions.
● Do not use this respirator in confined
spaces.
● For the P100 escape configuration:
Never use this respirator without two
SPERIAN Model 1050 P100 filters securely threaded onto the facepiece.
● For the P100 escape configuration:
The P100 escape filter functionality
of the P100 escape CF-CF-SAR configuration is not to be used in atmospheres containing less than 19.5%
oxygen.
● FAILURE TO COMPLY WITH THIS
WARNING MAY LEAD TO PERSONAL
INJURY, ILLNESS, OR DEATH.
1. Air Supply (applicable to side-mounted tube, front-
mounted tube and P100 escape congurations)
The following warnings regarding air supply are ap-
plicable to all continuous ow supplied air respirator
(CF-SAR) congurations (side-mounted tube, front-
mounted tube, P100 escape), and should be followed for safe operation of a supplied air respirator.
WARNING
● Compressors, storage cylinders,
valves, regulators, fittings, and other hardware must be large enough
to deliver the air volume required by
all users at peak demand.
● You are responsible for air quality and
compliance with safety and health
codes applicable to your area.
● See the tables in Section VIII, Part B.8
for hose length, air supply pressure,
and quick coupler requirements.
● Do not mix hose types or coupler assemblies except as specified in the
tables in Section VIII, Part B.8.
● Be sure that all respirable air system
piping, tubing, fittings, and couplings
are incompatible with non-respirable
gas systems.
● If an air pump or compressor is used
to supply breathing air, the following
precautions must be taken:
The air pump or compressor in-1.
take must not be located in an area
that could possibly contain contaminants, such as but not limited
to engine exhaust, spray booth
exhaust, or other toxic gases.
The air pump or compressor must 2.
have intake and exhaust filters
capable of removing dirt, carbon
dust, oil, oil vapor, and excess
water mist that may be present in
the area of the intake or may be
generated within the air pump or
compressor itself. Carbon monoxide alarms should be installed on
oil lubricated compressors and in
any other situation where carbon
monoxide may be present.
Frequently test the purity of the air 3.
delivered by the air pump or compressor. Air pumps and compressors deteriorate with age, as does
the quality of the air they deliver.
Set the pressure regulator and/or 4.
relief valve to maintain the pressure within the range specified in
the tables in Section VIII, Part B.8.
● FAILURE TO COMPLY WITH THIS
WARNING MAY LEAD TO PERSONAL
INJURY, ILLNESS, OR DEATH.
Ensure that the air supply is type 1, Grade D or better, as described in the Compressed Gas Association
Commodity Specication for Air, G-7.1.
Set relief valves at a maximum pressure of 150 psig
(1.03 Mpa).
16
Page 20

SURVIVAIR Opti-Fit™ Convertible Facepiece
2. Quick Coupler Assembly (applicable to sidemounted tube, front-mounted tube and P100 es-
cape congurations)
A male plug from one of the air line coupler kits
listed in the Parts List, Section VI, must be assembled to the open end of the breathing tube. This
operation requires a torque wrench.
WARNING
Do not use pipe thread sealing tape
on the quick coupler or air line hose
threads. The tape could restrict air-
ow or tape fragments could enter the
air system. Failure to comply with this
warning may lead to personal injury, illness, or death.
The steps and considerations required for com-
pleting the Quick Coupler assembly are as follow:
1. Breathing Tube
a. Apply Loctite No. 567 PST pipe sealant
or equivalent to the ¼ NPT threads of the
male quick coupler plug. Ensure that no
sealant enters the quick coupler or air line
hose.
b. Thread the male plug into the female t-
ting on the breathing tube. Torque to 150
±5 in-lb.
NOTE
The Vortex air cooler is not approved for use
with the low pressure ambient air pump.
2. Air Supply Hose
Each length of hose is equipped with a ¼ inch
female NPT swivel nut at each end and a male
to male ¼ inch NPT adapter. The male to male
adapter may be used to connect two lengths of
hose or connect the hose to the air supply. Four
approved methods of connecting hose lengths
and air supply are illustrated in Figure 10.
WARNING
● The full facepiece is NIOSH approved
only when supplied with respirable
breathing air through no more than
three (3) lengths of 9308 Series hose,
or two (2) lengths of 9852 Series air
line hose at the pressures listed in
Tables I and II, located in Section VIII,
Part B.8. Do not mix hose types from
different columns.
● The third pressure column in Table
I should be used when using a low
pressure ambient air pump. No more
than two (2) lengths of 9852 Series
air line hose may be used. The air
supply must be coupled to the air
source and the breathing tube with
the OBAC couplers and plugs.
● FAILURE TO COMPLY WITH THIS
WARNING MAY LEAD TO PERSONAL
INJURY, ILLNESS, OR DEATH.
CAUTION
Do not exceed the maximum continuous
duty or maximum intermittent duty operating pressure of the low pressure ambient air
pump. Refer to your pump user manual.
Figure 10. Methods of Hose Connection
3. When assembling the quick disconnect ttings
of the coupler or the male to male adapters to
the hose, verify that the hose gaskets are in
place and torque to 90 ±5 in-lb. Thread sealant
is not required.
4. The air supply connection using the ¼ inch male
to male adapter illustrated in Method 2 is also
approved for use with Methods 3 and 4.
● Method 1 is preferred when only one length
of hose is required since it allows the hose to
be disconnected from the air supply.
● Method 3 is preferred when multiple lengths
of hose (maximum of three) are required,
eliminating the cost of quick disconnect couplers at the hose junctions.
5. Pressurize and check for leaks with a bubble
type leak detector. If leaks are detected:
● Disassemble and repeat steps 3 through 5.
● If the leaks persist, remove the hose from ser-
vice and have repairs made by a SPERIAN
certied technician.
● Disassemble and repeat steps 3 through 5.
● If the leaks persist, remove the hose from ser-
vice and have repairs made by a SPERIAN
certied technician.
17
Page 21

SURVIVAIR Opti-Fit™ Convertible Facepiece
WARNING
Always verify that the swivel nut gaskets
are in place and undamaged before assembly. Missing or damaged swivel nut
gaskets may allow contaminants to leak
into the system, causing illness or death.
3. Breathing Tube Setup (applicable to side-mounted tube, front-mounted tube and P100 escape
congurations)
1. Inspect the equipment as described in Section
IX, Part B.
2. Verify that the O-ring is installed at the base of
the nozzle inlet. See Figure 11.
5. Attach the breathing tube to the facepiece.
● For side-mounted tube CF-SAR conguration:
Thread one end of breathing tube onto one
side connector of the facepiece. Verify that
the other side connector is securely capped
with a screw cap.
● For front-mounted tube and P100 escape CFSAR congurations: An audible click should
be heard when attaching the breathing tube
to the front adapter port on the facepiece
nozzle. See Figure 13.
Figure 13. Front Adapter Port and Screw Caps
Figure 11. Inlet O-ring
3. Verify that unused ports are capped as detailed
in Section VII for the applicable CF-SAR opera-
tional conguration.
4. Verify that the o-ring is installed into the end of
the breathing tube as shown in Figure 12.
6. Connect the air line hose to the air supply.
7. Adjust the regulator at the air supply to the proper pressure. Refer to the tables in Section VIII,
Part B.8 for determining the required pressure.
8. Don the waist belt, positioning the snap hook
over the left hip. Tighten snugly.
9. Attach the waist belt snap hook to the breathing
tube clip.
10. Plug the male quick coupler of the breathing
tube into the air line quick coupler, and verify
that breathing air ows into the facepiece. From
the inside of the facepiece, you can verify air-
ow by placing your hand near the back side of
the nozzle inlet.
11. With the air owing, verify that the air supply
pressure is within the appropriate pressure
range listed in the tables in Section VIII, Part
B.8. Adjust if necessary.
12. Disconnect the breathing tube quick coupler
from the air line and proceed with donning the
facepiece.
4. Donning Instructions for CF-SAR Congurations
Figure 12. Breathing Tube O-ring
WARNING
Always don, remove, and t check the
respirator in a safe, uncontaminated
area. Failure to comply with this warning may lead to personal injury, illness,
or death.
18
Page 22

SURVIVAIR Opti-Fit™ Convertible Facepiece
1. Inspect the respirator as described in Section
IX, Part B.
NOTE
If the waist belt was not previously donned
during the Breathing Tube Setup procedure
of Section VIII, Part B.3, don the waist belt
now. Position the snap hook over the left hip
and attach it to the breathing tube.
2. Verify that unused ports are capped as detailed
in Section VII for the applicable CF-SAR operational conguration. (See Figure 14 for a representation of the side-mounted tube CF-SAR
conguration).
Figure 15a. Adjust Lower Straps
Figure 14. Place Chin in Chin Cup
3. Adjust the top straps until one inch of strap extends through each buckle. Fully loosen the
lower straps. For respirators featuring a Headnet, fully loosen all straps.
4. Place the neck strap (if installed) over your
head.
5. Place your chin against the chin cup and center
the facepiece on your face. See Figure 14.
6. Hold the facepiece against your face and pull
the straps over your head.
7. Tighten the two lower straps, temple straps,
then the top straps until a good seal is obtained
and all straps lie at on your head. Do not overtighten the straps. See Figure 15a. For respirators with a Headnet, tighten the two lower
straps and the temple straps until a good seal
is obtained and all straps lie at on your head.
Flatten the Headnet with a wiping motion toward the back of your head. Retighten straps
as necessary. Do not overtighten the straps.
See Figure 15b.
Figure 15b. Flatten Headnet with a Wiping Motion
NOTE
When properly adjusted, the head strap hub
should be centered on the back of your head
and the lower straps should be below your
ears. See Figure 16a. For the Headnet version, the backstrap should be at the nape of
the neck. The Headnet should lie at on the
head and not bunch up. See Figure 16b.
Figure 16a. Properly Center Head Strap Hub
19
Page 23

SURVIVAIR Opti-Fit™ Convertible Facepiece
Figure 16b. Properly Fitted Headnet
5. Fit Check Instructions for CF-SAR Congurations
You must perform the following t checks appropriate for the CF-SAR conguration you are using
each time the respirator is worn or before entering
the contaminated area.
WARNING
If a leak-tight seal is not obtained during
the following t check, do not wear the
respirator. Ask your supervisor or safety
professional for assistance. The failure
to comply with this warning may lead to
personal injury, illness, or death.
A. Positive Pressure Fit Check for Side-mounted
Tube CF-SAR Conguration
Hold the palm of your hand gently over the exhalation valve outlet of the nozzle cover as shown in
Figure 17 and cover the open end of the breathing
tube with your other hand. Do not distort the natural shape of the facepiece. Exhale gently and hold
your breath to create and maintain a slight positive
pressure inside the facepiece. If air leakage occurs, readjust the facepiece and head straps, then
retest.
NOTE
The negative pressure t check detailed below can be performed as an alternate (or ad-
ditional) t check method for the side-mounted tube CF-SAR conguration.
B. Negative Pressure Fit Check for Side-mounted
Tube, Front-mounted Tube, and P100 escape CF-
SAR Congurations
● For all CF-SAR congurations: Plug the end of
the breathing tube with a suitable plug.
● For P100 escape CF-SAR congurations:
Cover the inlets of the lters with the palms of
your hands or another suitable item such as a
thin sheet of plastic or rubber.
NOTE
Alternatively, the P100 lters may be removed to perform the t check. If removed,
SPERIAN recommends someone other
than you reinstall them after a leak-tight t is
achieved. It is difcult for the user to reinstall
the lters without disturbing the face seal and
to determine whether the lters are correctly
installed. It is your responsibility to ensure
that the face seal is not disturbed when reinstalling the lters and that each lter is installed correctly.
Inhale gently and hold your breath to slightly collapse the facepiece. The facepiece should remain
collapsed on your face without leaking. If the facepiece leaks, reposition, check the straps, and repeat
the t check.
If a good t was achieved, remove the plug from the
breathing tube. If using the P100 escape CF-CF-
SAR conguration, reinstall the P100 lters.
Attach the breathing tube to the air line hose. The
continuous ow supplied air respirator (CF-SAR) is
now ready for use.
WARNING
Never use this respirator unless the
quick connect is fully engaged in the
locked position. Failure to comply with
this warning may lead to personal injury, illness, or death.
Figure 17. Positive Pressure Fit Check
If a good t was achieved, attach the breathing tube
to the air line hose. The continuous ow supplied
air respirator (CF-SAR) is now ready for use.
6. How to Use the Respirator
Before entering the work area for the rst time, or
for re-entry, you must verify proper operation of the
respirator in accordance with Section VIII, Parts B.1,
B.2, and B.3, and follow the donning and t checking procedures described in Section VIII, Parts B.4
and B.5.
To receive the maximum protection available from
your respirator, you must read, understand, and
follow all the warnings, limitations, and instructions
contained in this manual and follow your employ-
20
Page 24

SURVIVAIR Opti-Fit™ Convertible Facepiece
er’s instructions on the use and maintenance of
the respirator. Read and understand the following
warnings prior to using the respirator.
If you are using an ambient air pump, turn off the
pump when the respirator is not in use. Operating the
pump without a connected supply hose and respirator will cause the pump to overheat. Turn the pump
on before reentering the work area and verify that the
pump outlet pressure is correct (See Tables I and II),
and that the respirator is providing air as described in
Section VIII, Part B.8.
WARNING
● The respirator consists of a full facepiece constructed of silicone with a
polycarbonate lens, EPDM or EVA
breathing tube, and PVC or rubber
air line hoses. It is the user’s responsibility to verify the respirator materials are acceptable for their intended
use. If you are unsure, consult your
local safety professional to verify
that no possible contaminants and/
or liquids will permeate through any
of the respirator materials.
● Do not don, doff, or store the respirator in an area where contaminants
can contact or accumulate inside
any component of the respirator.
Contaminants inside the facepiece,
breathing tube, or air line hoses may
be inhaled or absorbed upon reuse
of the respirator.
● Never remove the respirator for any
reason while in the work area.
● You must leave the work area imme-
diately if the facepiece-to-face seal is
disturbed for any reason such as:
Slippage due to sweating or ex-1.
cessive head movement.
The facepiece becomes dislodged 2.
as a result of being knocked.
Sneezing or coughing while wear-3.
ing the facepiece.
You need to blow your nose, 4.
scratch your face, or adjust your
spectacles.
For any other reason that would 5.
cause the facepiece seal to be disturbed.
● You must restore the facepiece-to-
face seal and perform a fit check in
a non-hazardous environment before
re-entering the work area.
● FAILURE TO COMPLY WITH THIS
WARNING MAY LEAD TO PERSONAL
INJURY, ILLNESS, OR DEATH.
7. Dofng Instructions for CF-SAR Congurations
a. Loosen the two lower head straps completely
(for ve strap head harness or Headnet).
b. Grasp the nozzle rmly, and pull the facepiece
upward over the head.
S – Special or Critical User’s Instructions
8. Pressure Tables for Supplied Air Respirators (SAR)
Table I in Section VIII, Part B.8 provides the pressure range settings for the air supply regulator for
the SURVIVAIR Opti-Fit Continuous Flow Supplied Air Respirator. Refer to Table II when using
the vortex air cooler. Refer to Section VI, Parts
List, for a listing of the approved air line hose types
and coupler kits. No more that three (3) lengths of
9308 Series hose or two (2) lengths of 9852 Series
hose at the listed pressures may be used. Do not
mix hose types from different columns.
WARNING
● Compressors, storage cylinders,
valves, regulators, fittings, and other hardware must be large enough
to deliver the air volume required by
all users at peak demand.
● You are responsible for providing
CGA G-7.1, Type 1, Grade D or better air and ensuring compliance with
safety and health codes applicable
to your area.
● FAILURE TO COMPLY WITH THIS
WARNING MAY LEAD TO PERSONAL INJURY, ILLNESS, OR DEATH.
CAUTION
Do not exceed the maximum continuous
duty or maximum intermittent duty operating pressure of the low pressure ambient air
pump. Refer to your pump user manual.
NOTE
● The third column in Table I should be used
when using a low pressure ambient air
pump. No more than two (2) lengths of
9852 Series air line hose may be used. The
air supply line must be coupled to the air
source and the breathing tube with OBAC
couplers and plugs.
● The vortex air cooler is not approved for use
with the low pressure ambient air pump.
21
Page 25

SURVIVAIR Opti-Fit™ Convertible Facepiece
TABLE I
SURVIVAIR Opti-Fit Full Facepiece
Hose
Length
(feet)
0* 1 to 4* 2 to 14* —
25 5 to 12 9 to 12
50 7 to 17 13 to 23
75 10 to 22 17 to 30 —
100 15 to 25 20 to 25
150 19 to 35 25 to 35 —
200 19 to 35 25 to 25 —
250 20 to 45 30 to 45 —
300 20 to 50 30 to 50 —
9308 Series
Hose w/OBAC
Couplings
Pressure (psig)
9308 Series Hose
w/Foster/Hansen/
Schrader Couplings
9852 Series
Hose
(985241)2.5
to 8
(985242)3.6
to 12
(985244)6.3
to 21
*Indicates the pressure range required when no sup-
plied air line hose is being used, and the respirator
breathing tube is connected directly to the air supply
source. The breathing tube must be connected to the
air supply with a quick-disconnect tting.
TABLE II
SURVIVAIR Opti-Fit Full Facepiece
with Vortex Air Cooler (P/N 981847)
Hose
Length
(feet)
25 45 to 75 (985241) 40 to 75
50 45 to 80 (985242) 40 to 80
75 50 to 80 —
100 50 to 85 (985244) 40 to 85
150 55 to 85 —
200 55 to 90 —
250 60 to 100 —
300 60 to 100 —
9308 Series Hose
w/Foster/ Hansen/Schrader/
OBAC Couplings
9852 Series Hose
9. P100 Filter Service Life and Replacement
WARNING
You must replace the lters when breathing becomes uncomfortable or difcult.
As particulates collect on the lter sur-
face, the breathing resistance of the
facepiece increases. If you wait too long
to replace the lters, the particulates
may leak past the face seal instead of
being collected on the lters. Therefore,
SPERIAN strongly recommends that the
lters be changed at least daily. Failure
to comply with this warning may lead to
personal injury, illness, or death.
Before using a particulate lter, you must conrm
that the atmosphere is non-IDLH and not oxygen de-
cient, the contaminant is a particulate hazard, and
you must determine the hazard ratio (hazard concentration/exposure limit). If the hazard ratio is less than
100, you may use a full facepiece respirator with a
lter efciency of 99% or higher. If the hazard ratio
is greater than 100, you must use another type of
respirator.
The service life of the lter depends on the characteristics of the contaminant, the user’s breathing rate,
and the environmental conditions such as humidity,
temperature, etc. All new SPERIAN lters must be
maintained in factory sealed bags and must only be
removed when they are to be used. Used lters must
be stored in a protective bag, and in a clean, dry environment.
SPERIAN Model 1050 P100 lters are NIOSH approved for long duration use against any type of
particulate. When used in either oil-containing (e.g.,
lubricants, cutting uids, glycerin, etc.) or non-oilcontaining atmospheres, these lters must be replaced immediately whenever:
● they are damaged, soiled, soaked with liquids
such as water or alcohol, or appear to be suspect
or damaged in any manner, or
● the user notices an increase in breathing resistance such that the respirator becomes uncomfortable to wear.
If none of the above occurs, and there is a respiratory protection program per OSHA 29 CFR 1910.134
in place, then these lters may be used continually,
but only for a maximum of 30 days or 40 total hours,
whichever comes rst. However, service time for the
Model 1050 P100 lter can be extended if lter per-
formance to 42 CFR Part 84 can be demonstrated.
Whether used in oil-containing or non-oil containing
atmospheres, SPERIAN recommends that all lters
be replaced daily because the user may be unable
to detect small defects resulting in a loss of lter efciency, and the determination of when breathing re-
sistance becomes too uncomfortable is subjective.
a. Return to fresh air.
b. Unscrew the used P100 lters from the face-
piece connectors and discard them in accordance with applicable local, state and Federal
guidelines.
c. Securely install new P100 lters onto the face-
piece threaded connectors as described in
Section VIII, Part B.3.
d. Perform a facepiece t check as described in
Section VIII, Part B.5.
C. Powered Air Purifying Respirator (PAPR)
Congurations
In addition to the General Warnings listed in Section
IV, the following warnings apply to powered air puri-
fying respirator (PAPR) congurations:
22
Page 26

SURVIVAIR Opti-Fit™ Convertible Facepiece
WARNING
● SPERIAN respirators, accessories,
and associated equipment should
not be used in atmospheres that
may contain contaminant concentrations above the lower explosive
level (LEL). Intrinsic safety certification of electronic components does
not eliminate potential danger from
ignition in these atmospheres.
● This respirator does not supply oxygen. Do not use the respirator in
atmospheres containing less than
19.5% oxygen by volume.
● For the mask mounted blower configuration: NEVER use this respirator without a SPERIAN HE filter, P/N
108000, securely threaded into the
blower.
● For the mask mounted blower configuration: The respirator does not
protect against gases or vapors. It is
only for protection against particulate contaminants.
● FAILURE TO COMPLY WITH THIS
WARNING MAY LEAD TO PERSONAL INJURY, ILLNESS, OR DEATH.
1. Battery Pack Charging (Mask-mounted and
Belt-mounted PAPR Congurations)
The battery pack must be charged before the rst
use and should be recharged after each use.
WARNING
● The SPERIAN PAPR chargers, both
individual and gang-type, are for indoor use only and must not be exposed to outdoor elements.
● Battery pack charging must be done
in a safe, non-hazardous location.
Failure to do so may result in injury
or death.
● Only SPERIAN P/N 520060 or 522000
Nickel-Cadmium battery packs can
be charged with a SPERIAN P/N
520073 charger. Charging other
types of batteries could cause explosions resulting in injury or death.
● FAILURE TO COMPLY WITH THIS
WARNING MAY LEAD TO PERSONAL INJURY, ILLNESS, OR DEATH.
NOTE
● The battery switch may be left in the ON or
OFF position during charging.
● The battery is equipped with an automatic
fault protection circuit; no fuse is required.
1. Plug the battery charger into a 110 to 120 VAC
power outlet.
2. Connect the charger outlet cable to the battery
pack. The red light on the battery charger will
illuminate when an electrical connection to the
battery is made. If the light does not come on,
the charger or battery pack may be damaged.
3. Allow the battery pack to charge for 14 to 16
hours. The charger light will remain on whenever the battery is being charged.
NOTE
SPERIAN does not recommend charging the
battery for more than 24 hours. Charging the
battery pack for longer periods will not normally damage the battery pack but may reduce the life of the battery
4. If the charger (and light) cycles on and off, there
is a problem with the battery pack and it should
be replaced.
2. Cartridge and Filter Installation
a. Mask-mounted PAPR Conguration – Filter In-
stallation
WARNING
● Use only SPERIAN HE filters, P/N
108000. Use of any other filter will
void the equipment’s NIOSH approval and may allow leakage that could
result in serious illness or death.
● Never use the PAPR without the
blower inlet gasket (Figure 18) in
place. Use of the PAPR without the
blower inlet gasket could allow contaminants to leak into the facepiece,
resulting in illness or death.
● Use only components identified in
this manual and on the NIOSH approval label. Substitute components
will void approval and may result in
illness or death.
CAUTION
SPERIAN recommends that the battery
pack be charged at temperatures between
40°F and 80°F (4.5°C and 26.7°C). Charging at higher temperatures may cause a reduction in capacity and may reduce battery
pack life.
1. Verify that the rubber gasket is in place at
the bottom of the threaded blower inlet as
shown in Figure 18.
23
Page 27

SURVIVAIR Opti-Fit™ Convertible Facepiece
2. If installing chemical cartridges, remove the
screw cap and plug from each cartridge.
Retain for reuse.
3. Install the three (3) cartridges or lters and
hand tighten.
4. Connect the power cord between the blower
and battery pack.
3. Pre-operational Flow Check
a. Mask-mounted PAPR Conguration–Pre-opera-
tional Flow Check
Figure 18. Blower Inlet Gasket
2. Install a SPERIAN HE Filter, P/N 108000,
and hand tighten. A SPERIAN shower
cap, P/N 981177, may be tted over the
lter inlet.
b. Belt-mounted PAPR Conguration–
Cartridge and Filter Installation
WARNING
● Always read cartridge labels prior
to use to be certain that you have
cartridges and/or filters that will
provide the required protection. Filters labeled for protection against
particulates only shall not be used
for gases/vapors, and cartridges labeled for protection against gases
and vapors only shall not be used
for particulates.
● Only use three (3) cartridges or filters
of the same type.
● Never use the PAPR without all four
(4) blower inlet gaskets in place (Figure 19). Use of the PAPR without the
blower inlet gasket could allow contaminants to leak into the facepiece.
● FAILURE TO COMPLY WITH THIS
WARNING MAY LEAD TO PERSONAL INJURY, ILLNESS, OR DEATH.
WARNING
Flow check, facepiece t check, donning, and dofng must be done in a safe,
uncontaminated area. Failure to comply
with this warning may lead to personal
injury, illness, or death.
The airow must be veried before each use.
Use the following procedure to verify that the
blower is supplying adequate airow.
1. Detach the blower from the facepiece by
pressing down the catch on top of the
blower and pulling the blower away from
the facepiece. See Figure 20.
Figure 20. Blower Catch
1. Verify that the rubber gaskets are in place
at the bottom of the threaded blower inlets
as shown in Figure 19.
Figure 19. Blower Inlet Gaskets
2. Connect the power cord to the battery pack
and blower assembly and start the blower
by pressing the battery ON/OFF switch.
3. With the blower outlet facing upward, insert the Flow Meter, P/N 580009, with the
arrow pointing upward, being careful not
to cover the slots in the side of the ow
meter tube. See Figure 21.
24
Page 28

SURVIVAIR Opti-Fit™ Convertible Facepiece
b. Belt-mounted PAPR Conguration–Pre-opera-
tional Flow Check
Flow check, facepiece t check, donning, and dofng must be done in a safe,
uncontaminated area. Failure to comply
with this warning may lead to personal
injury, illness, or death.
WARNING
Figure 21. Flow Meter Attached
to Mask-mounted Blower
4. If the ball rises above the line on the ow meter indicating that the ow exceeds 4 cubic
feet per minute, proceed to the step 6.
WARNING
If the ow meter ball does not rise above
the line, DO NOT USE the PAPR until the
cause can be determined and corrected.
Use of a PAPR with a low ow may result in illness or death.
5. If the ball is below the line indicating low
ow, the most probable causes are:
a. The lter is blocked by dust or water.
Replace with a new SPERIAN HE lter,
P/N 108000.
b. Low battery voltage. Recharge the bat-
tery for 14 to 16 hours.
Identify and correct any low ow problems
before proceeding to step 6.
6. Remove the ow meter and detach the
power cord from the battery pack. Reattach the blower to the facepiece, ensuring
that the catch snaps into the slot on the
facepiece nozzle.
7. Slip the belt through the loops on the battery pack and adjust the battery pack so
that the belt rides comfortably on the hips.
Tighten the belt.
8. Attach the power cord to the battery pack.
WARNING
If changing the lter and/or recharging
the battery pack does not restore normal
airow, DO NOT USE the PAPR. Have the
PAPR repaired by the SPERIAN factory
repair center.
Using a PAPR that is operating improperly may result in illness or death.
The airow must be veried before each use.
Use the following procedure to verify that the
blower is supplying adequate airow.
1. Verify the tightness of all three (3) cartridges
or lters.
2. Insert the Flow Meter, P/N 580009, into
the blower outlet with the arrow pointing
upward as shown in Figure 22.
Figure 22. Flow Meter Attached
to Belt-Mounted Blower
3. Connect the power cord to the battery pack
and blower assembly, and start the blower
by pressing the battery ON/OFF switch.
NOTE
Do not cover the inlet area of any cartridges,
lters, or slots in the side of the ow meter
tube when performing the airow check.
4. Verify the airow is greater than 170 liters
per minute (6 cfm) at the blower outlet
as shown in Figure 22. The ow meter is
designed so that a reading of 170 lpm or
greater at the blower outlet will ensure the
airow is greater than 115 lpm at the full
facepiece. If the ball rises above the line
on the ow meter indicating that the ow
exceeds 170 lpm, proceed to step 6.
25
Page 29

SURVIVAIR Opti-Fit™ Convertible Facepiece
WARNING
If the ow meter ball does not rise above
the line, DO NOT USE the PAPR until the
cause can be determined and corrected.
Use of a PAPR with a low ow may result in illness or death.
5. If the ball is below the line indicating low
ow, the most probable causes are:
a. The lter is blocked by dust or water.
Replace with a new SPERIAN HE lter,
P/N 108000.
b. Low battery voltage. Recharge the battery
for 14 to 16 hours.
Identify and correct any low ow problems
before proceeding to step 6.
6. Remove the ow meter from the blower
housing.
7. Slip the belt through the loops on the
blower, then through the loops on the battery pack. If you prefer to have the battery
pack located on your left side, feed the
belt through the battery pack rst.
8. Attach power cord to the battery pack.
NOTE
Do not attach the breathing tube to the blower at this point. Instructions for attaching the
breathing tube to the blower are listed in the
Fit Check instructions found after the instructions for donning the respirator.
WARNING
If changing the lter and/or recharging
the battery pack does not restore normal
airow, DO NOT USE the PAPR. Have the
PAPR repaired by the SPERIAN factory
repair center. Using a PAPR that is operating improperly may result in illness
or death.
4. Donning Instructions for PAPR Congurations
WARNING
● Always don, remove, and fit check
the respirator in a safe, uncontaminated area.
● Prior to donning the SPERIAN mask-
mounted PAPR, ensure that the
blower inlet gasket is in place (Figure 18), and that the blower o-ring
is in place in the blower outlet. Use
of the PAPR without the blower inlet gasket and/or blower o-ring in
place could allow contaminants to
leak into the facepiece, resulting in
illness or death.
● Prior to donning the SPERIAN belt-
mounted PAPR, ensure that the
blower outlet gasket is in place, and
that the connector O-ring is in place
in the breathing tube (Figure 24). Use
of the PAPR without the blower outlet gasket and /or connector o-ring
in place could allow contaminants
to leak into the facepiece, resulting
in illness or death.
● When the PAPR is used in a contaminated environment, both screw caps
(Item 27, P/N 985020) must be securely installed on the gray threaded
connectors as shown in figure 1. For
the mask-mounted PAPR, the HE filter, P/N 108000, must be installed
on the blower assembly. Improperly
installed screw caps or filter could
allow contaminants to leak into the
facepiece, causing illness or death.
1. Inspect the respirator as described in Section
IX, Part B.
2. Verify that unused side connector ports are
capped as detailed in Section VII for the PAPR
operational conguration. See Figure 23.
Figure 23. O-ring and Screw Caps
26
Page 30

SURVIVAIR Opti-Fit™ Convertible Facepiece
● For belt-mounted setup: Also detach the breath-
ing tube from the facepiece, if attached, and
verify that an o-ring is installed at the base of
the adapter inlet. See Figure 24.
Figure 24. Breathing Tube O-ring
3. Verify that the power cord is connected between
the battery pack and blower.
4. If the waist belt was not donned while perform-
ing the pre-operational ow check, don the
waist belt now and tighten snugly. Secure any
excess belt length.
5. Slide the battery pack and blower into position
around your waist.
● For mask-mounted setup: Position the battery
pack to your right or left side.
● For belt-mounted setup: Position the blower
around to your back and the battery pack to
your right or left side.
6. Adjust the top straps until one inch of strap ex-
tends through each buckle. Fully loosen the
lower straps. For respirators with a Headnet,
loosen all straps.
7. Place the neck strap (if installed) over your head.
8. Place your chin against the chin cup and center
the facepiece on your face. See Figure 25.
9. Tighten the two lower straps, temple straps,
then the top straps until a good seal is obtained
and all straps lie at on your head. See Figure
26a. For respirators with a Headnet, tighten the
two lower straps, then the temple straps, until
a good seal is obtained and all straps lie at on
your head. Flatten the Headnet with a wiping
motion toward the back of your head. Retighten straps as necessary. Do not overtighten the
straps. See Figure 26b.
Figure 26a. Adjust Lower Straps
Figure 26b. Flatten Headnet with a Wiping Motion
NOTE
When properly adjusted, the head strap hub
should be centered on the back of your head
and the lower straps should be below your
ears. See Figure 27a. For the Headnet version, the backstrap should be at the nape of
the neck. The Headnet should lie at on the
head and not bunch up. See Figure 27b.
Figure 25. Place Chin in Chin Cup
Hold the facepiece against your face and pull
the straps over your head.
Figure 27a. Properly Center the Head Strap Hub
27
Page 31

SURVIVAIR Opti-Fit™ Convertible Facepiece
Figure 27b. Properly Fitted Headnet
5. Fit Check Instructions for PAPR Congurations
You must perform the following t check each time
the respirator is worn or before entering the contaminated area.
WARNING
If a leak-tight seal is not obtained during
the following t check, do not wear the
respirator. Ask your supervisor or safety
professional for assistance. The failure
to comply with this warning may lead to
personal injury, illness, or death.
1. Turn off the blower
For mask-mounted setup: Remove the lter from
the blower.
For belt-mounted setup: Remove the breathing
tube from the facepiece nozzle.
2. Cover the blower inlet with your hand and inhale
gently, slightly collapsing the facepiece.
3. Hold your breath for approximately 5 seconds.
The facepiece should remain slightly collapsed.
If it does not, readjust the facepiece and perform
the t check again. If a seal is still not achieved,
do not wear the respirator. Ask your supervisor
or safety professional for assistance.
4. If a good t was achieved:
For mask-mounted setup: Reattach the lter
onto the blower assembly and press the ON/OFF
switch on the battery pack to start the blower.
For belt-mounted setup:
● Attach the breathing tube to the facepiece noz-
zle: Push the facepiece connector end of the
breathing tube onto the nozzle of the facepiece.
Align the catch on the connector with the slot
in the nozzle. Push the connector until the latch
completely engages with the nozzle.
● Screw the breathing tube into the blower outlet
and tighten securely.
● Press the ON/OFF switch on the battery pack to
start the blower.
NOTE
In the event of a decrease or loss of airow
from the blower for both the mask-mounted
and belt-mounted PAPR congurations, the
wearer can safely breathe through the blower/lter assembly until reaching an uncontaminated area.
WARNING
Verify that the blower is providing air to
the facepiece before entering a hazardous environment. You should feel air
blowing onto your face. Improper airow may result in inhalation of contaminants. The failure to comply with this
warning may lead to personal injury, illness, or death.
6. How to Use the Respirator
Before entering the work area for the rst time or re-
entering for any reason, you must verify proper operation of the respirator in accordance with the Preoperational Flow Check procedure of Section VIII,
Part C.3, and also follow the donning procedures
described in Section VIII, Part C.4.
To receive the maximum protection available from
your respirator, you must read, understand, and
follow all the warnings, limitations, and instructions
contained in this manual and follow your employer’s
instructions on the use and maintenance of the respirator. Read and understand the following warnings
prior to using the respirator.
WARNING
● The respirator consists of a full facepiece constructed of silicone with
a polycarbonate lens, blower, filter,
battery, power cord, and a belt. It is
the user’s responsibility to verify
that the respirator materials are acceptable for their intended use. If
you are unsure, consult you local
safety professional to verify that no
possible contaminants and/or liquids will permeate through any of
the respirator materials.
● Do not don, doff, or store the respirator in an area where contaminants
can contact or accumulate inside
any component of the respirator.
Contaminants inside the facepiece
may be inhaled or absorbed upon
reuse of the respirator.
● Never remove the respirator for any
reason while in the work area.
28
Page 32

SURVIVAIR Opti-Fit™ Convertible Facepiece
WARNING─Continued
● You must leave the work area imme-
diately if the facepiece-to-face seal is
disturbed for any reason, such as:
a. Slippage due to sweating or ex-
cessive head movement.
b. The facepiece becomes dislodged
as a result of being knocked.
c. Sneezing or coughing while wear-
ing the facepiece.
d. You need to blow your nose,
scratch your face, or adjust your
spectacles.
e. For any other reason that would
cause the facepiece seal to be disturbed.
● You must restore the facepiece-toface seal and perform a t check in
a non-hazardous environment before
re-entering the work area.
● FAILURE TO COMPLY WITH THIS
WARNING MAY LEAD TO PERSONAL
INJURY, ILLNESS, OR DEATH.
7. Dofng Instructions for PAPR Congurations
1. Loosen the two lower head straps completely
(for ve strap head harness or Headnet).
2. Grasp the nozzle rmly, and pull the facepiece
upward over the head.
8. Chemical and Particulate Filter Service Life
and Replacement
1. Chemical Cartridge Service Life– Belt-mounted
PAPR Conguration
WARNING
● OSHA allows the use of air purifying
respirators for protection against
contaminants with poor warning
properties. You must replace cartridges when the end-of-service-life
indicator (ESLI) has changed color
or in accordance with an OSHA
compliant cartridge change-out
schedule that is based on objective
information or data that ensures the
cartridges are changed before the
end of their service life.
● You must immediately leave the
contaminated area if you taste or
smell contaminants, or if your eyes
or throat become irritated. Replace
cartridges and/or filters before reentering the contaminated area.
WARNING─Continued
● Establishing the cartridge service
life for mixtures of contaminants is a
complex task, and one that requires
considerable professional judgment
to create a reasonable change-out
schedule. OSHA provides a “ruleof-thumb” method for determining
the cartridge service life for mixtures. The method addresses two
situations. The first is where the individual compounds of the mixture
have similar breakthrough times
(i.e., within one order of magnitude).
In this case, OSHA recommends
adding the concentrations of all the
components of the mixture to determine a “total concentration,” then
determine the mixture service life
by applying the total concentration
to the component with the shortest
service life. The second is where
the individual compounds have
breakthrough times that vary by
two orders of magnitude or greater.
In this case, OSHA recommends
the mixture service life be base on
the contaminant with the shortest
breakthrough time. The OSHA ruleof-thumb methods may not be applicable for all mixtures. In some
cases, the actual mixture service life
may be much lower than the one calculated. For this reason, SPERIAN
recommends that the cartridge service life for mixtures be determined
using experimental methods. If you
are unsure of how to determine the
cartridge service life for mixtures,
please contact SPERIAN.
● FAILURE TO COMPLY WITH THIS
WARNING MAY LEAD TO PERSONAL
INJURY, ILLNESS, OR DEATH.
The cartridge service life depends on the user’s
breathing rate, the characteristics of the contaminant, and the environmental conditions such as
temperature and humidity. Saturated cartridges will
leak trace amounts of contaminant to the wearer,
which may be detected by odor, taste, and/or irritation. Replace cartridges when the end-of-service-life indicator (ESLI) has changed color, at the
rst trace of the characteristic contaminant odor
or taste, at regularly scheduled intervals recommended by your safety professional, if they show
any signs of damage, or in accordance with an
OSHA compliant cartridge change-out schedule.
The service life of the cartridge can be estimated
using SPERIAN’s cartridge service life estimation
program, available from SPERIAN. Always replace
all cartridges at the same time.
29
Page 33

SURVIVAIR Opti-Fit™ Convertible Facepiece
Replace cartridges as follows:
1. Return to fresh air.
2. Remove cartridges from the blower by
turning counterclockwise. Dispose of used
cartridges in accordance with Federal,
state, and local guidelines.
3. Install new cartridges, taken only from
sealed packages, as described in Section
VIII, Part C.2.B.
4. Perform a pre-operational ow check as
described in Section VIII, Part C.3.B
2. Particulate Filter Service Life– Mask-mounted
and Belt-mounted PAPR Congurations
WARNING
You must replace the combination cartridges or HE lters in a non-contaminated area when they become contaminated such that they do not permit
adequate ow during the ow check
or while in use. As particulates collect
on the lter surfaces, the resistance of
the lter increases, causing the ow
of clean air into the facepiece to decrease. If you wait too long to change
the combination cartridges or lters,
particulates may leak past the face seal
instead of being collected on the lters.
Therefore, SPERIAN strongly recommends that combination cartridges or
lters be changed at least daily. Failure
to comply with this warning may lead
to personal injury, illness or death.
The combination cartridge and HE lter are NIOSH
approved for long duration use against any type
of particulate. When used in either oil-containing
(e.g., lubricants, cutting uids, glycerin, etc.) or
non-oil-containing atmospheres, the combination
cartridges or lters must be replaced immediately
whenever:
● they are damaged, soiled, soaked with liquids
such as water or alcohol, or appear to be suspect or damaged in any manner, or
● the user notices an increase in breathing resis-
tance such that the respirator becomes uncomfortable to wear.
● they become contaminated such that they do not
permit adequate ow during the ow check or
while in use.
Replace the combination cartridges or HE lter
as follows:
1. Return to fresh air.
2. Remove the combination cartridges or HE
lter from the blower by turning counterclockwise. Dispose of used cartridges in
accordance with Federal, state, and local
guidelines.
3. Install new cartridges, taken only from
sealed packages, as described in Section
VIII, Part C.2.A or Part C.2.B.
4. Perform a pre-operational ow check as
described in Section VIII, Part C.3.A or
Part C.3.B.
9. Decontamination – Mask-mounted and Belt-
mounted PAPR Congurations
CAUTION
● Do not allow water to enter the blower. If
water is allowed to remain in the blower
for more than a few minutes, permanent damage will occur. Should water
accidentally enter the blower, start the
blower and shake the water out. Before
storing the PAPR, allow the blower to
run for a least ten (10) minutes. Verify
that the PAPR is dry.
● To prevent water from entering the blower
during decontamination, leave the blower attached to the facepiece, and the lter securely attached to the blower.
● Cartridges and/or lters that have been
soaked cannot be used.
● Ensure that water does not enter the
blower from inside the facepiece during
removal or decontamination.
● The battery cable must remain attached
to the blower and battery pack during decontamination to prevent water from entering the battery pack case or blower.
NOTE
For mask-mounted PAPR setup: Leave the
blower attached to the mask and the lter
securely attached to the blower. Inhaled air
will be drawn through the lter during decontamination.
1. Adjust the shower caps (Item 44, P/N 981177)
on the lters so that the opening is pointing
away from the water spray.
2. Proceed through the shower, following approved
decontamination methods.
IX. MAINTENANCE
NOTE
Inspect this respirator for defects before and
after each use, and at least once monthly if
not used. Repair as necessary, clean and
disinfect after each use, and store properly
to assure that the respirator is maintained in
satisfactory working condition. Keep a record
of inspection and repair dates and results.
Refer to the Inspection Tables in Section XIV
of this manual.
30
Page 34

SURVIVAIR Opti-Fit™ Convertible Facepiece
A. Cleaning (applicable for all APR, SAR,and PAPR
congurations)
Clean respirators after each day’s use by washing with
mild soap and warm water. Then disinfect the respirators with a suitable sanitizing solution. OSHA 1910.134,
latest edition, and ANSI Z88.2, latest edition, also provide information and guidelines on the cleaning and
sanitizing of respirators.
WARNING
● It is the user’s responsibility to ensure that the cleaning process chosen provides adequate decontamination and disinfection.
● Specialized processes are required
to disinfect and decontaminate a
respirator. You must follow the instructions of the manufacturer of
the equipment and chemicals.
● In the absence of a commercial sanitizing product, the hypochlorite so-
lution described below will eliminate
many, but not all biohazards.
● FAILURE TO COMPLY WITH THIS
WARNING MAY LEAD TO PERSONAL
INJURY, ILLNESS, OR DEATH.
1. To Clean the Facepiece:
a. Make a cleaning solution of warm water and
mild detergent.
b. Disconnect the blower assembly from the face-
piece by depressing the hook latch and pulling
the blower free of the facepiece. Take care not
to lose the o-ring inside the blower connector.
c. Immerse the facepiece top rst in the solution
until the exhalation valve is covered.
d. Agitate the facepiece and gently clean with a
soft brush.
e. Thoroughly rinse the facepiece in fresh water,
paying particular attention to removal of all soap
residue from the exhalation valve. If possible,
direct running water onto the exhalation valve.
f. Disinfect the facepiece in a warm, (120°F or
48°C maximum), suitable sanitizing solution,
such as “hypochlorite solution” for 2 to 3 minutes. A 50 ppm hypochlorite solution can be
prepared by mixing 2 tablespoons (0.13 ounce)
of chlorine bleach per each gallon of water.
Rinse thoroughly with fresh warm (120°F or
48°C maximum) water.
g. Allow the facepiece to drip dry, or dry with a lint-free
cloth. Warm air may be used to speed up drying.
CAUTION
● For PAPR Configurations: DO NOT
place the battery pack, blower assembly, or battery cord in water or solvents.
Damage to the equipment will result.
● Do not use ultrasonic cleaners to clean
respirators equipped with speaking diaphragms.
● Do not use gasoline, organic based sol-
vents, or chlorinated degreasing fluids
to clean any part of this respirator.
● Do not clean the facepiece with the
blower attached.
● You must ensure that this respirator is not
damaged when using disinfecting or decontamination equipment or chemicals.
● The facepiece lens can be scratched
through careless or abusive handling.
Do NOT use abrasive cleaners or pads.
Do not towel dry.
NOTE
Silicone and rubber parts of the facepiece
may be cleaned between washings with
SPERIAN mask wipes, P/Ns 140096 and
140082.
NOTE
Washing the lens will remove any user applied anti-fog coating. Recoat with SPERIAN
Anti-fog solution, P/N 951015 (1 oz.), or
951016 (16 oz.), or use SPERIAN single use
anti-fog wipes, P/N 981803.
h. After cleaning, apply three drops of anti-fog so-
lution as required to the inner surface of the lens
and spread with your nger. Buff with a lint-free
cloth. If using an ant-fog wipe, follow the instructions on the wipe packet.
I. Hold the facepiece rmly against your face and
exhale several times to ensure that the exhalation valve functions smoothly.
j. Carefully inspect the respirator as described in
Section IX, Part B.
k. Reconnect breathing tube or cartridges to the
facepiece before use.
For APR Congurations: Reconnect cartridges
and/or lters to threaded side connectors.
For CF-SAR and PAPR Congurations: Reconnect the breathing tube to either threaded
side connector or front adapter on the facepiece. For breathing tubes connected to the front
adapter on the facepiece nozzle, make sure the
latch locks rmly when reconnecting the tube.
2. To Clean Breathing Tubes and Blowers:
a. Wash the breathing tube, avoiding wetting the
inside of the tube as much as possible.
31
Page 35

SURVIVAIR Opti-Fit™ Convertible Facepiece
b. Clean the blower assembly, battery, and battery
cord with a brush or damp cloth, then dry with a
clean, lint-free cloth. Do not allow water to enter
the blower.
CAUTION
● To prevent mildew, ensure that the inside of the breathing tube is completely
dried after washing.
● If the possibility exists that water may
have entered the blower, run the blower
for a least 10 minutes afterward to dry
the inside. The filter should remain on
the unit whenever the blower is operating in an atmosphere with a high water
content.
B. Inspection (applicable for all APR, SAR, and
PAPR congurations)
Inspect the respirator before and after each use as described in the Inspection Tables of Section XIV and replace any damaged component. See Section IX, Part C
for repair instructions.
WARNING
● Do not use the respirator with dam-
aged or improperly operating valves.
● Ensure that the twin seal is in the
o-ring groove between the lens and
connector. Ensure that the part number tab on the o-ring is visible and in
the notch provided on the lens.
● For APR and CF-SAR side-mounted
hose configurations: Ensure that the
o-ring (See Figure X in Section VIII,
Part A.2) is in the adapter cap (item
24, P/N 420020) and the cap is securely seated on the adapter. Using
the facepiece in applicable configurations without the adapter cap securely seated could allow contaminants to leak into the facepiece.
● For PAPR configurations: Do not at-
tempt to disassemble the blower or
battery pack. Disassembly by other
than SPERIAN certified technicians
might render the equipment unsafe
or void NIOSH approvals and your
warranty.
● Failure to comply with this warning
may lead to personal injury, illness or
death.
C. Repair (applicable for all APR, SAR, and PAPR
congurations)
Repair by the user is limited to replacement of components listed in the Repair Tables of Section XV and
as listed on the NIOSH approval lavel. Disassembly
should be performed only to the extent necessary to re-
place the components. To protect your warranty and the
NIOSH certication of the equipment, all other repairs
must be done only by authorized SPERIAN technicians
and repair centers. Consult your SPERIAN distributor
for the one nearest you. You must perform a t check
as described in this user manual after any repair and
before respirator use.
WARNING
For CF-SAR and PAPR Configurations:
Do not disasseble this respirator until
the air supply has been disconnected
or shut off. Failure to comply with this
warning may lead to personal injury,
illness, or death.
D. Storage (applicable for all APR, SAR, and PAPR
congurations)
After inspection and cleaning, store your SURVIVAIR
Opti-Fit facepiece to protect it against dust, sunlight, extreme heat and cold, excessive moisture, or damaging
chemicals.
WARNING
The respirator does not have a defined storage life. Carefully inspect the
respirator before each use. Failure to
comply with this warning may lead to
personal injury, illness, or death.
CAUTION
The maximum storage temperature for
the respirator is 140°F (60°C). Longterm storage at elevated temperatures
may cause premature deterioration.
For PAPR Congurations:
Before storing the PAPR, allow the blower to a.
run at least 10 minutes. Check to ensure that
the PAPR is dry. After inspection and cleaning,
the SPERIAN Mask Mounted PAPR should be
stored to protect it against dust, sunlight, extreme
heat and cold, excessive moisture, or damaging
chemicals.
Follow the charging instructions after removing b.
the PAPR batteries from long term storage.
X. SHIPMENT
All products returned to SPERIAN’s factory, distributors, or repair centers must be decontaminated prior to
shipment.
PRODUCTS CONTAMINATED WITH
DANGEROUS SUBSTANCES WILL BE
REFUSED AND RETURNED FREIGHT
COLLECT.
32
Page 36

SURVIVAIR Opti-Fit™ Convertible Facepiece
XI. OVERHAUL FREQUENCY
The SPERIAN air purifying, supplied air and powered
air purifying respirator (APR, SAR, PAPR) congurations do not have an overhaul requirement other than
that required in Section IX, Maintenance.
XII. ADDITIONAL INFORMATION
If you need assistance or additional information on
any SPERIAN product, consult your local distributor
or contact:
SPERIAN
3001 S Susan Street
Santa Ana, CA 92704
Tel: (714) 545-0410 or (888) APR-SCBA
FAX: (714) 850-0299
XIII. WARRANTY AND LIMITATION OF LIABILITY
LIMITED WARRANTY: SPERIAN warrants this product
to be free from defects in materials and workmanship
for one (1) year from the date of purchase. During this
period, SPERIAN will repair or replace defective parts,
at SPERIAN’s option. Freight charges to and from the
SPERIAN factory shall be paid by the purchaser.
EXCLUSIONS: NOT WITH STANDING ANY CONTRARY TERM IN THE PURCHASER’S PURCHASE
ORDER OR OTHERWISE, THE ONLY WARRANTY
EXTENDED BY SPERIAN IS THE EXPRESSED LIMITED WARRANTY DEFINED ABOVE. THIS WARRANTY IS EXCLUSIVE AND IN LIEU OF ANY IMPLIED
WARRANTY OF MERCHANTABILITY, OR FITNESS
FOR A PARTICULAR PURPOSE.
CONDITIONS: To maintain this warranty this product
must be used, maintained, and inspected as prescribed
in the owner’s instruction manual, including prompt replacement or repair of defective parts and such other
necessary maintenance and repair as may be required.
Normal wear and tear; parts damaged by abuse, misuse, negligence, or accidents; and batteries or damage
from battery leakage are specically excluded from this
warranty.
LIMITATION OF LIABILITY: No other oral warranties,
representations, or guarantees of any kind have been
made by SPERIAN, its distributors, or the agents of either
of them, that in any way alter the terms of this warranty.
EXCEPT AS HERE IN PROVIDED, SPERIAN SHALL
HAVE NO LIABILITY FOR ANY LOSS OR DAMAGE,
WHETHER DIRECT, INDIRECT, INCIDENTAL, OR
CONSEQUENTIAL, TO ANY PURCHASER OR USER
OF THIS PRODUCT ARISING FROM THE SALE, USE,
OR OPERATION OF THIS PRODUCT.
WARNING
The failure to use and maintain this
equipment in strict conformance with
the applicable instruction manual may
result in personal injury, illness, or
death. The equipment’s use in any man-
ner that is not expressly authorized
pursuant to the applicable instruction
manual may result in severe adverse
impacts to human health.
33
Page 37

SURVIVAIR Opti-Fit™ Convertible Facepiece
XIV. RESPIRATOR INSPECTION TABLES
General Inspection Table
The following table lists general inspection steps to be followed for all respirator congurations (APR, SAR, PAPR).
COMPONENT LOOK FOR
FACEPIECE LENS 1. Nicks, scratches, or abrasions that could impair visibility.
2. Deep gouges or cracks which could reduce impact resistance.
3. Anti-fog coating in need of replacement.
FACEPIECE RIMS 1. Deformed, cracked, or broken.
2. Loose screws. Do not overtighten.
FACEPIECE SKIRT 1. Cuts, gouges, or punctures.
2. Tears or nicks in the sealing area.
3. Deterioration from age, heat, or contamination.
FACEPIECE HEADSTRAP
AND BUCKLE STRAPS
FACEPIECE BUCKLE Crushed, bent, broken, or corroded.
FACEPIECE INLET NOZZLE
AND NOZZLE ADAPTER
O-RINGS/TWIN SEALS Cuts, nicks, abrasions, or excess stretching.
CARTRIDGE CONNECTORS 1. Cracks, heat, or impact damage.
HEADNET 1. Signs of deterioration, weakening, and wear in the the Headnet and straps.
1. Abrasions or nicks.
2. Deterioration from age, heat, or contamination.
1. Heat or impact damage.
2. Nicks, cracks, tears, or creases in the exhalation valve. Remove the valve
cover to inspect the exhalation valve.
3. Nicks, cracks or dents in the exhalation valve seat.
4. Sticking exhalation valve. Exhale a few times to test. The valve must close
after each exhalation. Valves that fail to close must be replaced.
5. Cuts, nicks, abrasions, or excess stretching to the Nozzle Adapter O-rings.
2. Cuts, nicks, or abrasions on connector sealing ange.
2. Unraveled or loose stitching.
Additional Inspection Table for Supplied Air Respirators (SAR)
For supplied air respirators (SAR), the following inspection steps should be followed in addition to the general inspection
steps listed in the General Inspection Table above.
COMPONENT LOOK FOR
BREATHING TUBE
(ALL CF-SAR CONFIGURATIONS)
Air Line Hoses (all CF-SAR congurations) 1. Fittings corroded, cracked, or leaking.
Belt (all CF-SAR congurations) 1. Webbing color change, excessive wear, fraying, cuts, nicks, or broken
1. Cuts, nicks, cracks, punctures, or tears that may reduce the level of protection.
2. Age or heat induced cracking, checking, or hardening.
3. Crushed, broken, or cracked connectors.
4. Tube is securely attached to the connectors and the hose clamps are tight.
2. Cuts, nicks, cracks, punctures, age or heat induced cracking, checking,
abrasions, blistering, holes, crushing, kinking, or hardening.
3. Tightness of connectors and quick couplers.
4. Swivel nut gaskets in place and undamaged.
stitching.
2. Buckle damaged or corroded.
3. Loose hardware.
34
Page 38

SURVIVAIR Opti-Fit™ Convertible Facepiece
XIV. RESPIRATOR INSPECTION TABLES─Continued
Additional Inspection Table for Powered Air Purifying Respirators (PAPR)
For powered air purifying respirators (PAPR), the following inspection steps should be followed in addition to the general inspection
steps listed in the General Inspection Table above.
COMPONENT LOOK FOR
Blower
(mask-mounted and belt-mounted PAPR)
Battery and Cord
(mask-mounted and belt-mounted PAPR)
Belt
(mask-mounted and belt-mounted PAPR)
Breathing Tube
(belt-mounted PAPR)
1. Cracked or nicked gasket
2. Missing gaskets.
3. Loose cover screws.
4. Test for leaks and cracks in the unit by equipping the blower with three (3)
OV cartridges, P/N 150100, donning the unit and facepiece, turning on
the blower, and passing a t test ampule, P/N 140098, near the facepiece,
breathing tube, and blower. If the wearer detects the banana oil odor, a leak
is detected.
1. Cord or connector cracked or broken.
2. Loose battery case lid or damaged connector.
3. Properly working battery switch.
1. Webbing color change, fraying, cuts, nicks, or broken stitching.
2. Buckle damaged or corroded.
3. Loose hardware.
1. Cuts, nicks, cracks, punctures, or tears that may reduce the level of protection.
2. Age or heat-induced cracking, checking, or hardening.
3. Crushed, broken, or cracked connectors.
4. The tube is securely attached to the connectors and the hose clamps are tight.
35
Page 39

SURVIVAIR Opti-Fit™ Convertible Facepiece
XV. RESPIRATOR REPAIR TABLES
General Repair Table
The following repair table lists general repair steps to be followed for all respirator congurations (APR, SAR, PAPR).
COMPONENT INSTRUCTIONS
Head Strap/Headnet Remove the old head strap from the facepiece, noting the routing of the straps.
Install new head strap/Headnet.
Twin Seal/Connector 1. To remove, rotate the connector clockwise. Lift the connector hook and
Nozzle Cover 1. To remove, pinch the two lower latches while lifting the lower tab.
Nozzle 1. Remove the nozzle cover as described above.
Nozzle Adapter 1. Slightly rotate the Adapter clockwise (tightening) to allow the latch to spring
rotate the connector counterclockwise, and pull outward.
2. Remove the twin seal o-ring from the groove in lens.
3. To install, gently separate the o-ring and gasket halves of the new twin seal.
A small part number tab should remain attached to each half. Do not use
the o-ring if it is damaged.
4. Place the o-ring into the groove on the lens with the part number tab aligned
with the slot.
5. Align the three lugs on the underside of the connector with the three slots
in the lens. Insert the connector into the lens port and rotate clockwise. An
audible click should be heard.
6. Install the new gasket onto the connector. The gasket must be seated in the
groove in the connector.
2. Disengage the upper hook by lifting the cover upward.
3. To install, engage the cover on the nozzle upper hook.
4. Rotate cover downward until both lower latches engage the cover. An audible click should be heard.
2. Grasp the outside of the lens with both hands so that both thumbs can push
the latches inward and downward.
3. To install, verify that the nozzle o-ring is free from debris and install the oring onto the nozzle.
4. Apply Christolube lubricant, SPERIAN P/N 910452, or equivalent, to o-ring.
5. From the inside of the lens, align the top and bottom ribs on the front of the
nozzle with the notches in the lens.
6. Push the nozzle inward until both latches engage the lens. An audible click
should be heard.
7. Inspect the installed nozzle o-ring for proper installation and seal. If the oring appears twisted, pinched, or extruding out of the o-ring groove, remove
the nozzle, relubricate the o-ring, and reinstall the nozzle.
8. Install the nozzle cover as described above.
up and down freely.
2. From the inside of the mask, locate the word “PUSH” on the Adapter latch.
Push the latch down and unscrew the Adapter from the Nozzle.
3. Install a new front (small) and rear (large) o-ring onto the Adapter.
4. Apply Christolube lubricant, SPERIAN P/N 910452, or equivalent, to the
larger rear o-ring.
5. Screw the Adapter back into the nozzle until an audible click is heard.
36
Page 40

www.sperianprotection.com
 Loading...