

Page 1
90013198 ind B
1
Page 2

Index
GB
F
D
E
P
NL
DK
FIN
NOR
SWE
English. . . . . . . . . . . . . . . . . . . . . . . . . . . . . . . . . . . . . . . . . . . . . . . . . . . . . . . . . . . . . . . . . . . . . . . . . . . . . . . . . . . . . . . . . . . . . . . . . . . . . . . . 4
Français . . . . . . . . . . . . . . . . . . . . . . . . . . . . . . . . . . . . . . . . . . . . . . . . . . . . . . . . . . . . . . . . . . . . . . . . . . . . . . . . . . . . . . . . . . . . . . . . . . . . . 8
Deutsh . . . . . . . . . . . . . . . . . . . . . . . . . . . . . . . . . . . . . . . . . . . . . . . . . . . . . . . . . . . . . . . . . . . . . . . . . . . . . . . . . . . . . . . . . . . . . . . . . . . . . 12
Español . . . . . . . . . . . . . . . . . . . . . . . . . . . . . . . . . . . . . . . . . . . . . . . . . . . . . . . . . . . . . . . . . . . . . . . . . . . . . . . . . . . . . . . . . . . . . . . . . . . 16
Português . . . . . . . . . . . . . . . . . . . . . . . . . . . . . . . . . . . . . . . . . . . . . . . . . . . . . . . . . . . . . . . . . . . . . . . . . . . . . . . . . . . . . . . . . . . . . 20
Nederlands . . . . . . . . . . . . . . . . . . . . . . . . . . . . . . . . . . . . . . . . . . . . . . . . . . . . . . . . . . . . . . . . . . . . . . . . . . . . . . . . . . . . . . . . . . 24
Dansk . . . . . . . . . . . . . . . . . . . . . . . . . . . . . . . . . . . . . . . . . . . . . . . . . . . . . . . . . . . . . . . . . . . . . . . . . . . . . . . . . . . . . . . . . . . . . . . . . . . . . . . 28
Suomi . . . . . . . . . . . . . . . . . . . . . . . . . . . . . . . . . . . . . . . . . . . . . . . . . . . . . . . . . . . . . . . . . . . . . . . . . . . . . . . . . . . . . . . . . . . . . . . . . . . . . . . 32
Norsk . . . . . . . . . . . . . . . . . . . . . . . . . . . . . . . . . . . . . . . . . . . . . . . . . . . . . . . . . . . . . . . . . . . . . . . . . . . . . . . . . . . . . . . . . . . . . . . . . . . . . . . . 36
Svenska . . . . . . . . . . . . . . . . . . . . . . . . . . . . . . . . . . . . . . . . . . . . . . . . . . . . . . . . . . . . . . . . . . . . . . . . . . . . . . . . . . . . . . . . . . . . . . . . . . 40
Italiano. . . . . . . . . . . . . . . . . . . . . . . . . . . . . . . . . . . . . . . . . . . . . . . . . . . . . . . . . . . . . . . . . . . . . . . . . . . . . . . . . . . . . . . . . . . . . . . . . . . . 44
I
Polska. . . . . . . . . . . . . . . . . . . . . . . . . . . . . . . . . . . . . . . . . . . . . . . . . . . . . . . . . . . . . . . . . . . . . . . . . . . . . . . . . . . . . . . . . . . . . . . . . . . . . . . 48
PL
2
Page 3

3
Page 4

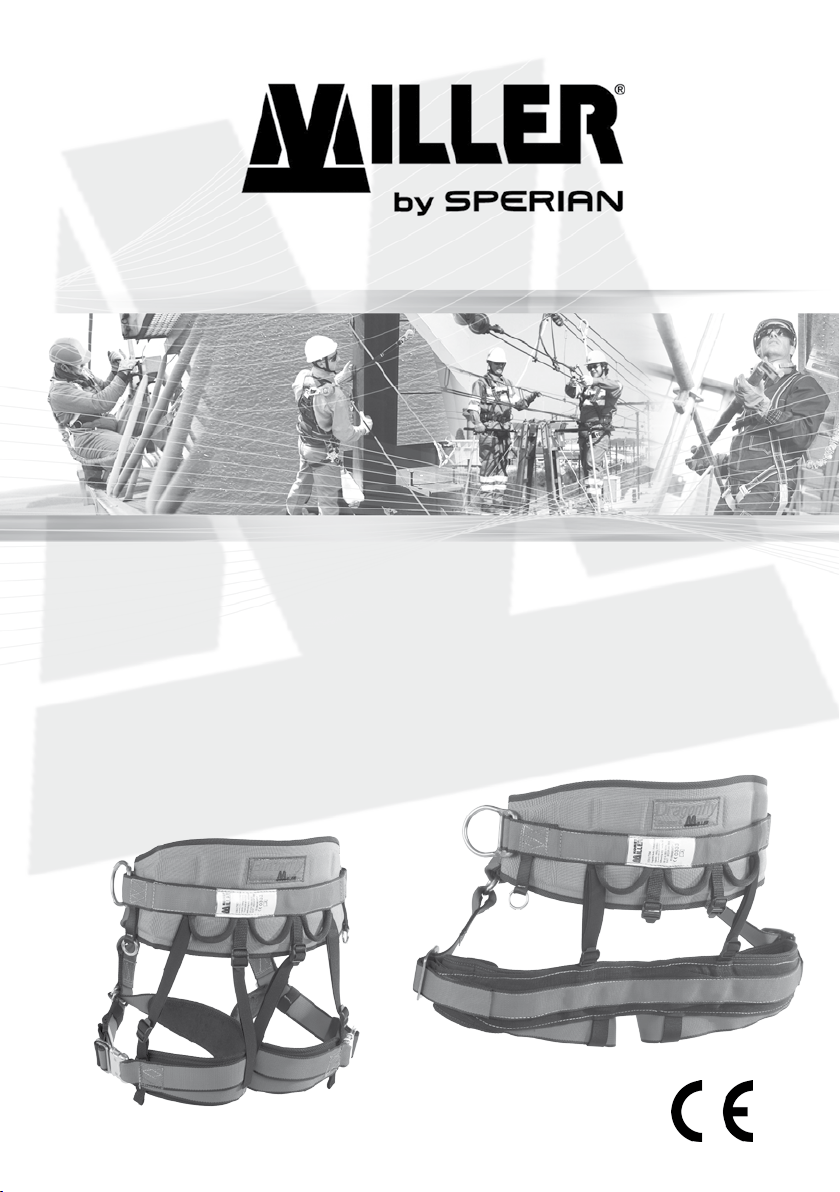
Personal Protection Equipment
GB
Work Positioning Belt
Miller by Sperian Buttery II & Dragony II
Conforming to standard EN 358:1999 Work Positioning System
And EN 813:1997 Thigh belts
Refs concerned: 1011701 Buttery II S,1011702 Buttery II M/L, 1013641 Buttery II XL
1016681 Dragony II S, 1016682 Dragony II M/L, 1016683 Dragony II XL
1013724, 1013725, 1013726, 1013727, 1013728, 1013729
Additional user sheet
This user sheet is an addition to the PPE work positioning instructions.
Please refer to the instructions supplied with the PPE to refer to all the recommendations.
Materials used:
Main strap: polyester ; central point: polyamide, back: cordura
Cleaning your PPE and strap:
It is advisable to clean regularly the PPE and especially the strap in soapy water. Do not use any other cleaning
method.
Drying method: it is necessary to allow any parts that have been wet during use or washing, naturally, well away
from any direct ame or source of heat.
Product service life:
The maximal life of PPE that is predominantly textile is evaluated as being 10 years after the date of manufacture
Rescue:
Note that before and during use, you should give some thought to how a rescue might be staged eciently and
safely.
This PPE has been put through testing as per the standard EN 358:1999 for a work positioning system and
EN813: 1997 thigh belt.
Caution:
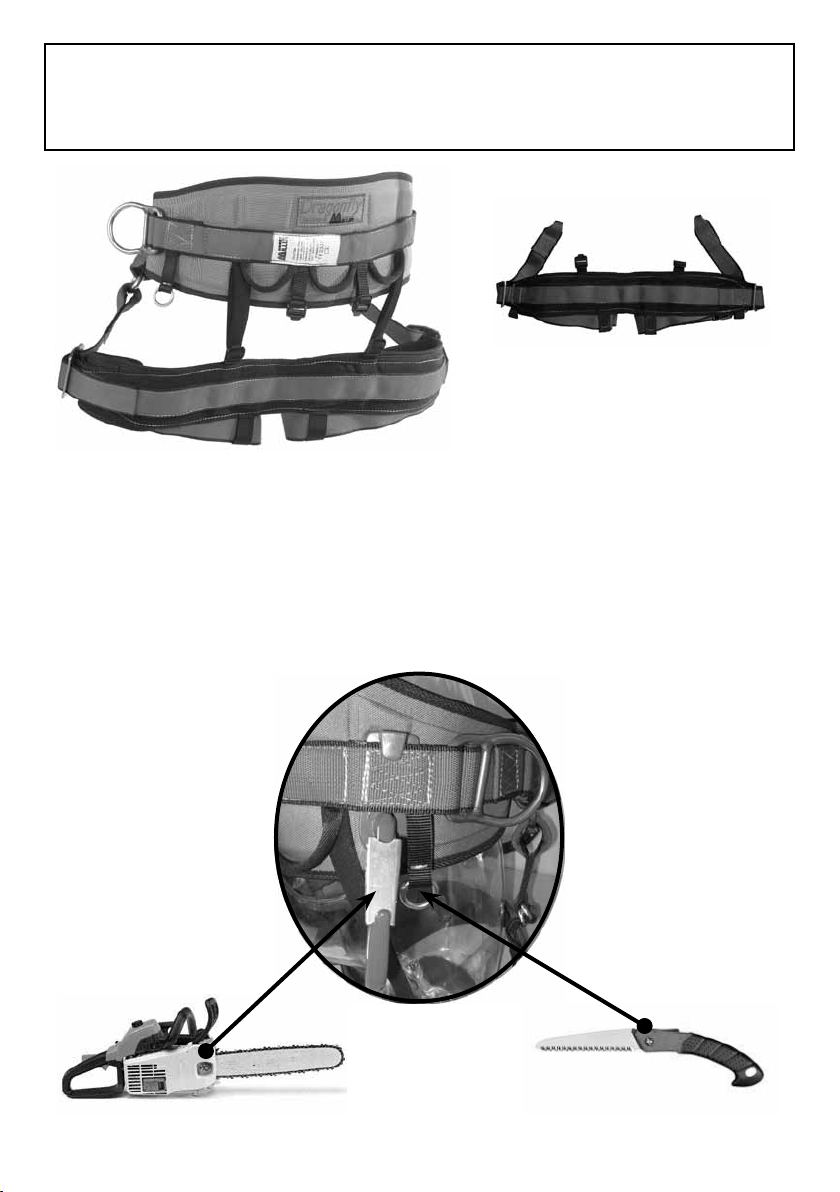
- Never use the belt without the thigh straps or the base.
- Each time you intend to use the equipment, be sure to check visually the central point strap. Using a PPE
with a damaged strap could be dangerous.
You will nd the reference of the PPE on the back with the description, size, date
of manufacture, the standard to which it conforms, the serial number, a pictogram ‘i’ indicating that the user instructions should be referred to, CE followed
by the number of the ocial organization in charge of annual testing - AFAQ.
How to choose a belt size?
Size S Buttery II / Dragony II: min 76cm, max 118cm
Size M/L Buttery II, Dragony II: min 86cm, max 128cm
The belt is suitable for the user if after adjusting the belt and thigh straps
(or seat strap), the side loops are within easy reach.
4
Page 5

Refs concerned: Belts: 1011701, 1011702, 1013641, 1016681, 1016682, 1016683, 1013724,
1013725, 1013726, 1013727, 1013728, 1013729
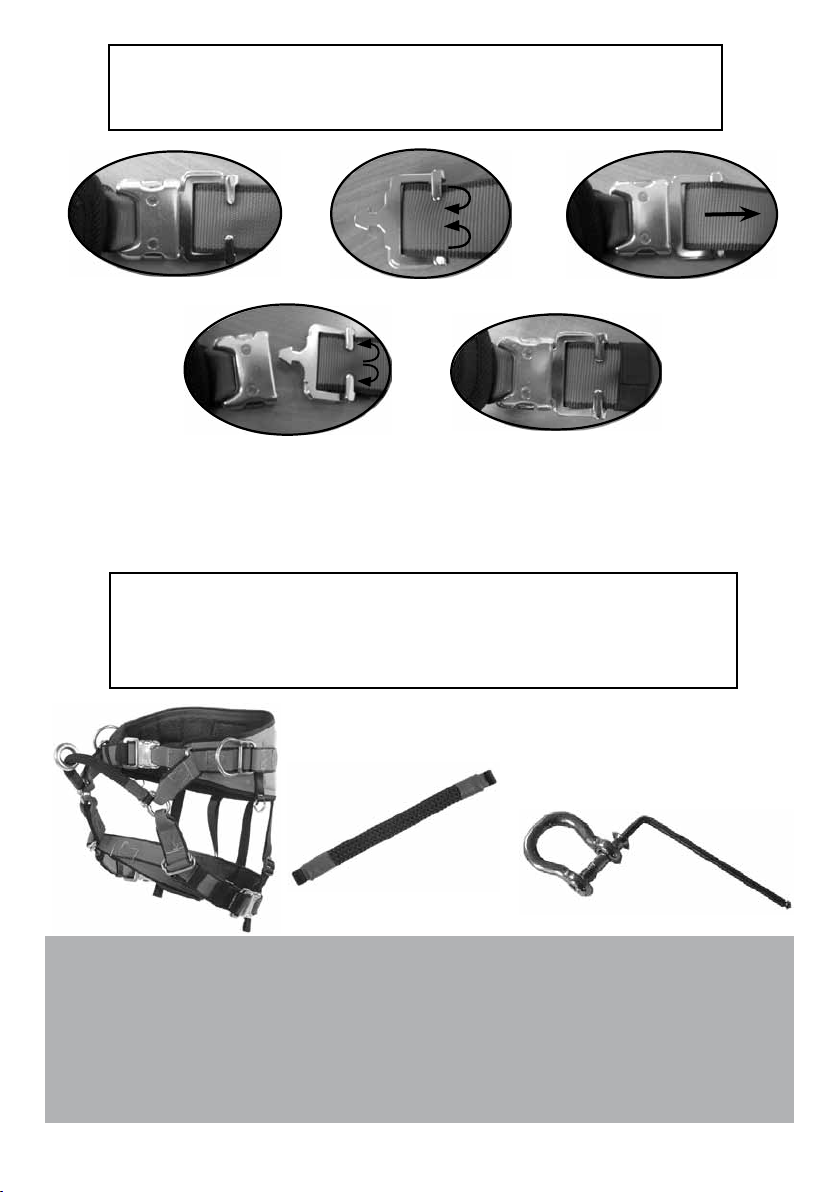
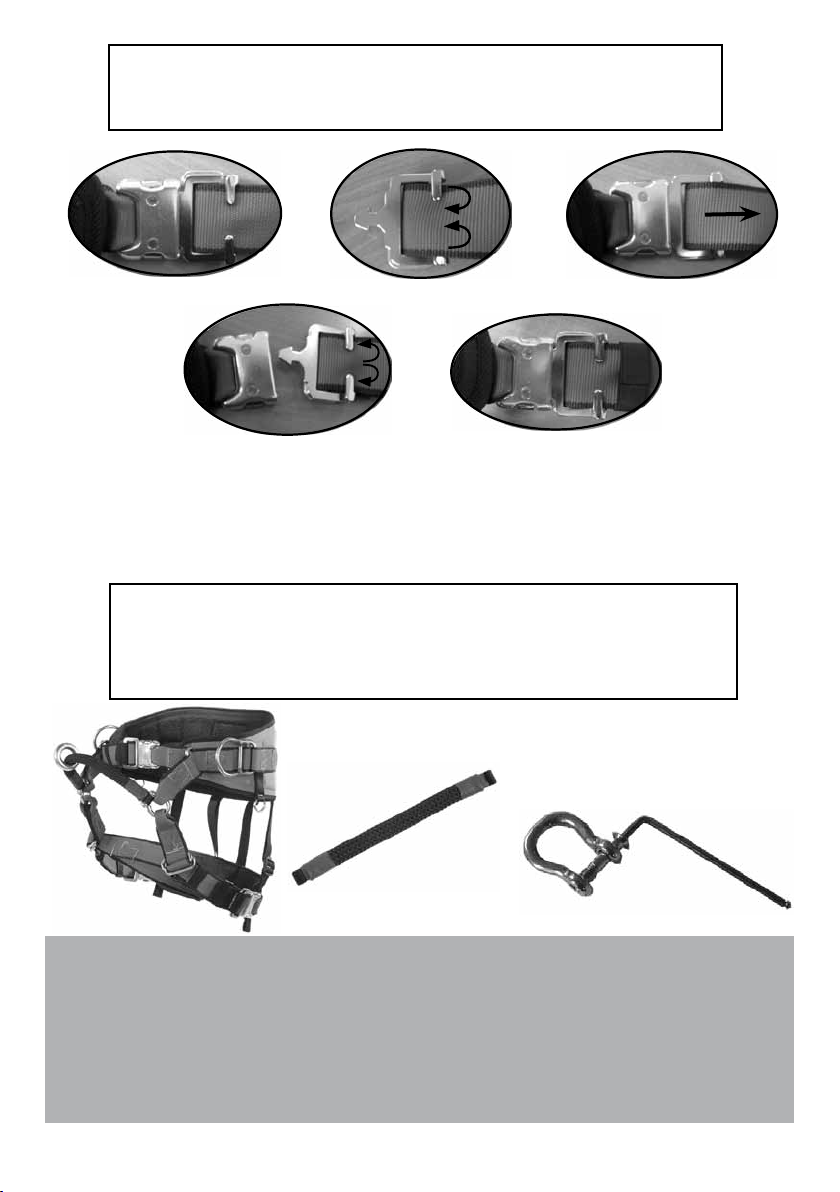
Automatic buckles
g. 1
g. 4
To prevent sliding, the belt strap (red with black edging) is placed under the two tabs tted to the automatic
buckle of the belt (male section) Fig 1.
Pull the two thicknesses of the strap out of these tabs Fig2. Close the buckle. Pull rmly and smoothly on the
strap to t it to your waist size Fig3. After adjustment, open the buckle and put the two strap thicknesses back
under the tabs Fig4.
The excess length of strap can be slid underneath the black elastic on the male buckle end Fig5.
Refs concerned: Belts: 1011701, 1011702, 1013641, 1016681, 1016682, 1016683, 1013724,
g. 2 g. 3
g. 5
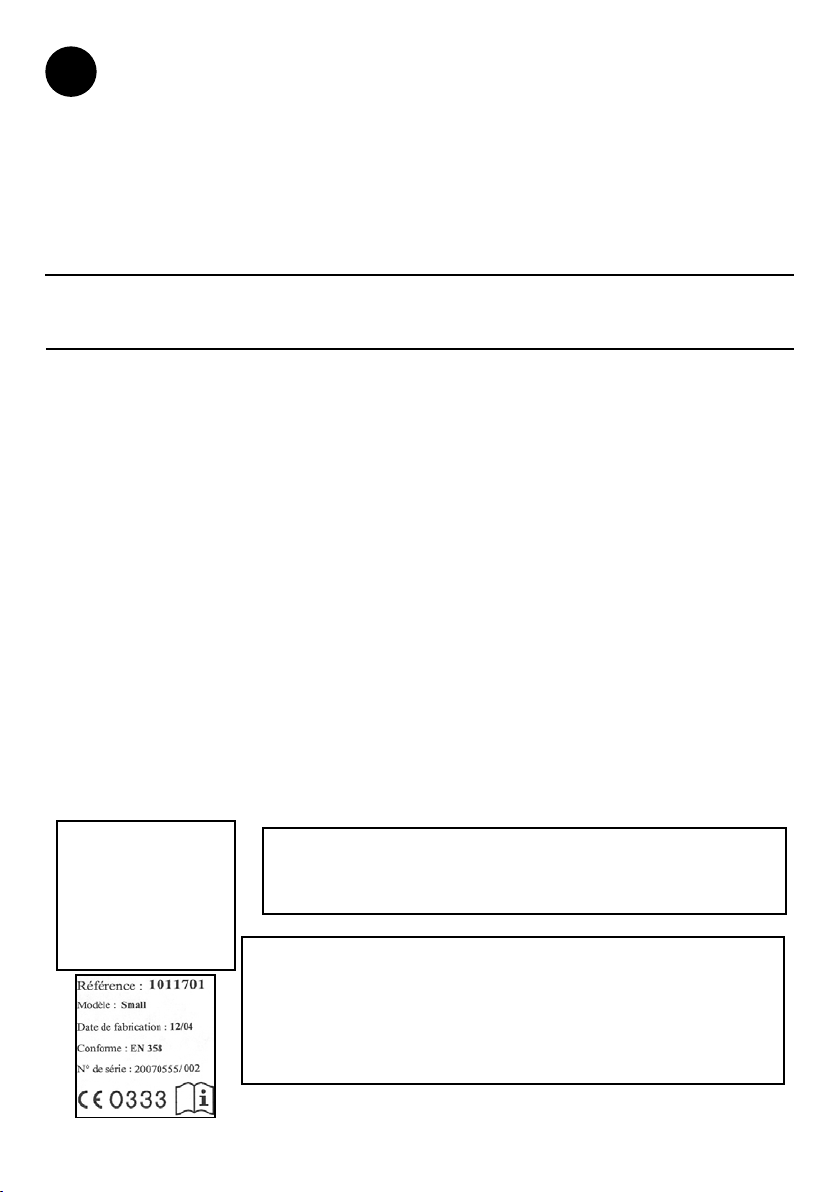
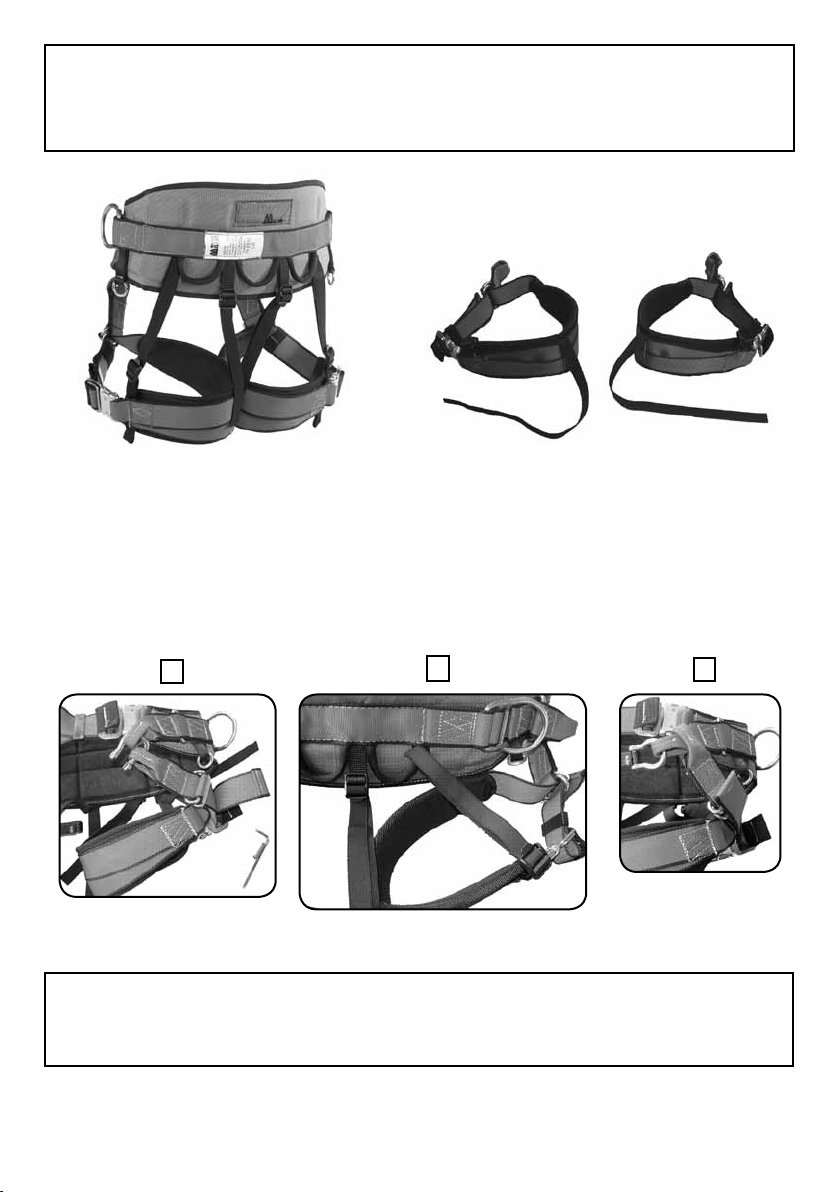
Disassembly of central point
1013725, 1013726, 1013727, 1013728, 1013729
Central points: 1011705, 1011706, 1011707, 1012232
Equipment required:
No 4 allen wrench
1- To disassemble the central point: use a No 4 Allen wrench to unscrew the 2 shackles.
2- Insert the new central point in one of the shackles, ensure that it is free of any grease and
screw up to contact and tighten by a half-turn.
NB: Because the screws are already coated (“TUFLOCK” type coating) there is no need to add Loctite.
The pre-coated screws can be removed/installed up to 4 times. After that, they need to be replaced
(available spare parts).
3- Repeat the above operations for the other side.
5
Page 6

Refs concerned; Belts: 1011701, 1011702, 1013641, 1016681, 1016682, 1016683
1013724, 1013725, 1013726, 1013727, 1013728, 1013729
1- Remove the central point according to the indications: « Disassembling the central point »
2- Place the right leg strap in the right cleat and the left leg strap in the left cleat.
!! the automatic buckle must always be on the outside of the thigh.
3- Replace the central point in accordance with the indications: « Disassembling the central point »
4- Run the elastics of the 2 thigh belts through the plastic clips provided for the purpose
Changing legs straps
Legs strap pair kit: 1011710
2
5- Another alternative :
For users who want to reduce the gap between the leg straps and the belt, the legs straps web
bing can be run directly through the belt webbing as shown below.
4
5
6
Page 7
Change of seat strap
Refs concerned: Belts: 1011701, 1011702, 1013641, 1016681, 1016682, 1016683,
1- Remove the central point according to the indications: « Disassembly of central point »
2- Place the seat strap in the belt loops.
!! The thigh straps of the base must be positioned at the bottom
3- Replace the central point in accordance with the indications: « Disassembly of central point »
4- Run the elastics of the belt through the plastic loops of the base provided for the purpose
1013724, 1013725, 1013726, 1013727, 1013728, 1013729
Seat strap : 1011718 (S/M/L), 1011709 (XL)
7
Page 8

Equipement de protection Individuel
F
Ceinture de maintien au travail
Miller by Sperian Buttery II & Dragony II
Conforme à la norme EN 358:1999 Système de maintien au travail
Et EN 813:1997 Ceintures à cuissardes
Réf concernées : 1011701 Buttery II S, 1011702 Buttery II M/L, 1013641 Buttery II XL
1016681 Dragony II S, 1016682 Dragony II M/L, 1016683 Dragony II XL
1013724, 1013725, 1013726, 1013727, 1013728, 1013729
Feuillet complémentaire d’utilisation
Ce feuillet d’utilisation est un avenant à la notice des EPI de maintien a travail.
Merci de vous reportez à la notice fournie avec l’EPI pour obtenir la totalité des recommandations.
Matériaux utilisés :
Sangle principale : polyester, point centraux : polyamide, dosseret : cordura
Nettoyage de l’EPI et de la sangle :
Il est recommandé de nettoyer régulièrement l’EPI et plus particulièrement la sangle au moyen d’une eau
savonneuse. Toute autre méthode de nettoyage est à proscrire.
Méthode de séchage : il est nécessaire de laisser sécher naturellement et à distance de tout feu direct ou de
toute source de chaleur, les éléments ayant pris l’humidité soit en cours d’utilisation, soit lors de leur nettoyage.
Durée de vie du produit :
On estime la durée de vie maximale de l’EPI à dominante textile à 10 ans à partir de la date de fabrication
Sauvetage :
Notez qu’avant et pendant l’utilisation, il y a lieu d’envisager la façon dont le sauvetage éventuel pourrait être
assuré de manière ecace et en toute sécurité.
Cet EPI a été soumis à des essais suivant la norme EN 358:1999 système de maintien au travail et EN813
:1997ceinture à cuissardes.
!! Attention :
- Ne pas utiliser la ceinture sans les cuissardes ou la sellette.
- Contrôler visuellement et avant chaque utilisation la sangle du point central. L’utilisation d’un EPI avec
une sangle abîmée peut s’avérer dangereuse.
Vous trouverez au dos de l’EPI sa référence, sa description, sa
taille, sa date de fabrication, la norme à laquelle il est conforme,
le n° se série, un pictogramme ‘i’ signiant qu’il faut se reporter
à la notice d’utilisation, le CE suivi du N° de l’organisme notié
chargé du contrôle annuel - AFAQ.
Comment choisir la taille de sa ceinture ?
Taille S Buttery II / Dragony II: mini 76cm, maxi 118cm
Taille M/L : mini 86cm, maxi 128cm
La ceinture est adaptée à l’utilisateur si après réglage de la ceinture et des
cuissardes (ou de la sellette), les anneaux latéraux sont facilement accessibles.
8
Page 9
g. 1
Boucles automatiques
Réf concernées : Ceintures : 1011701, 1011702, 1013641, 1016681, 1016682, 1016683
1013724, 1013725, 1013726, 1013727, 1013728, 1013729
g. 2 g. 3
g. 4
Pour éviter le glissement, la sangle de ceinture (rouge à bordure noire) est placée sous les deux languettes dont
est équipée la boucle automatique de ceinture (partie mâle) Fig 1.
Sortir les deux épaisseurs de sangle de ces languettes Fig.2. Fermer la boucle. Tirer fermement et régulièrement
sur la sangle pour l’ajuster à votre taille Fig.3. Le réglage fait, ouvrir la boucle et remettre les deux épaisseurs de
sangle sous les languettes Fig.4. L’excédent de sangle peut être glissé sous l’élastique noir situé côté boucle mâle
Fig.5.
Démontage du point central
Réf concernées : Ceintures : 1011701, 1011702, 1013641, 1016681, 1016682, 1016683
1013724, 1013725, 1013726, 1013727, 1013728, 1013729
Point centraux : 1011705, 1011706, 1011707, 1012232
g. 5
Matériel à utiliser :
Clé Allen N°4
1- Pour démonter le point central : utiliser une clé Allen N°4 pour dévisser les 2 manilles.
2- Mettre le nouveau point central dans l’une des manilles, s’assurer de la non présence de
corps gras, visser jusqu’ au contact et serrer d’un demi tour.
NB : Les vis étant déjà pré-enduites (enduction type « TUFLOCK »), il n’est plus nécessaire de rajouter de
loctite. Les vis pré-enduites sont démontables/remontables jusqu’à 4 fois, au-delà un changement de
vis s’impose (pièces détachées disponibles).
3 - Répéter les opérations ci-dessous pour l’autre côté.
9
Page 10

Changement des cuissardes
Réf concernées : Ceintures : 1011701, 1011702, 1013641, 1016681, 1016682, 1016683, 1013724, 1013725,
1- Enlever le point central selon les indications : « Démontage du point central »
2- Placer la ganse de la cuissarde droite dans la manille droite, et la ganse de la cuissarde gauche dans la
manille gauche.
!! la boucle automatique doit toujours se trouver du côté extérieur de la cuisse.
3- Replacer le point central selon les indications : « Démontage du point central »
4- Faire passer les élastiques des 2 cuissardes dans les clips plastiques prévus à cet eet
1013726, 1013727, 1013728, 1013729
Kit paire Cuissardes : 1011710
2
5- Autre alternative :
Pour les utilisateurs désirant réduire l’écart entre la cuissarde et la ceinture on pourra passer
directement la ganse de la cuissarde dans la ganse de la ceinture comme indiqué ci dessous.
4
5
10
Page 11

Changement de la sellette
Réf concernées : Ceintures : 1011701, 1011702, 1013641, 1016681, 1016682, 1016683, 1013724, 1013725,
1- Enlever le point central selon les indications : « Démontage du point central »
2- Placer les ganses de la sellette dans les manilles de la ceinture.
!! les sangles cuissardes de la sellette devant être positionnées en bas
3- Replacer le point central selon les indications : « Démontage du point central »
4- Faire passer les élastiques de la ceinture dans les clips plastiques de la sellette prévus à cet eet
1013726, 1013727, 1013728, 1013729
Sellettes : 1011708 (S/M/L), 1011709 (XL)
11
Page 12
Persönliche Schutzausrüstung Haltegurt
D
Miller by Sperian Buttery II & Dragony II
Gemäß Norm EN 358:1999 Haltesystem
und EN 813:1997 Sitzgurte
Betroene Best.-Nummern: 1011701 Buttery II S, 1011702 Buttery II M/L, 1013641 Buttery II XL
1016681 Dragony II S, 1016682 Dragony II M/L, 1016683 Dragony II XL
1013724, 1013725, 1013726, 1013727, 1013728, 1013729
Ergänzungsblatt zur Gebrauchsanweisung
Dieses Ergänzungsblatt ist eine Erweiterung der Gebrauchsanweisung für PSA zum Halten.
Für alle übrigen Empfehlungen bitte die mit der PSA gelieferte Anweisung einsehen.
Benutzte Werkstoe :
Hauptgurt : Polyester, Hauptbefestigungspunkt : Polyamid, Rückengurt : Cordura
Reinigen der PSA und des Gurtes :
Es empehlt sich, die PSA und besonders den Gurt regelmäßig mit Seifenwasser zu reinigen. Von jeder anderen
Art der Reinigung ist abzuraten.
Trocknen : Bei der Benutzung oder durch die Reinigung feucht gewordene Teile müssen auf natürliche Weise vor
direktem Feuer und jeglicher sonstigen Hitzequelle geschützt unbedingt trocknen.
Lebensdauer des Produktes :
Die maximale Lebensdauer von PSA mit textilem Hauptanteil wird auf 10 Jahre ab dem Fertigungsdatum
geschätzt
Rettung :
Es sei darauf hingewiesen, dass vor und im während der Benutzung bedacht werden muss, wie eine eventuelle
Rettung wirksam und sicher zu erfolgen hätte.
Diese PSA ist den Tests gem. Norm EN 358:1999 Haltesystem und EN813 :1997 Sitzgurt unterzogen worden.
Achtung :
- Den Hüftgurt nicht ohne die Schenkelgurte oder den Sitzgurt benutzen.
- Vor jeder Benutzung den Gurt des Zentralpunktes visuell überprüfen. Die Benutzung einer PSA mit
einem schadhaften Gurt kann gefährlich werden.
Best.-Nr. 1011701
Modell : Small
Fertigungsdatum : 12/04
Gemäß Norm : EN 358
Serien-Nr. :
Auf der Rückseite der PSA nden sich ihre Bestell.-Nr., ihre Bezeichnung, ihre
Größe, ihr Fertigungsdatum, die von ihr erfüllte Norm, die Seriennummer, ein
Symbol ‘i’, das auf die Gebrauchsanweisung aufmerksam macht, das Siegel CE
mit der Nummer der für die jährliche Überprüfung zuständigen Stelle - AFAQ.
Zur Wahl der Gurtgröße
Größe S Buttery II / Dragony II : min. 76cm, max. 118cm,
Größe M/L: min. 86cm, max. 128cm
Der Gurt ist passend für den Benutzer, wenn die seitlichen Bandschlingen nach
Einstellung des Hüftgurtes und der Schenkelgurtbänder (oder des Sitzgurtes) gut
zugänglich sind.
12
Page 13
Automatikschmallen
Betroene Best.-Nummern : Hüftgurte : 1011701, 1011702, 1013641, 1016681, 1016682,
1016683, 1013724, 1013725, 1013726, 1013727, 1013728, 1013729
g. 1
g. 4
Damit der Gurt (rot mit schwarzem Rand) nicht rutscht, liegt er unter den zwei Zapfen der Gurtautomatikschnallen (Einsteckteil) Fig 1.
Die zwei Gurtlagen aus diesen Zapfen lösen. Schnalle schließen. Fest und gleichmäßig am Gurt ziehen, um ihn
an Ihre Taillenweite anzupassen. Nach Einstellen der Länge die Schnalle önen und die zwei Gurtlagen wieder
unter den Zapfen hindurchführen.
Die überschüssige Gurtlänge kann mit dem schwarzen Gummiband am Einsteckteil der Schnalle gehalten
werden.
Betroene Best.-Nummern : Hüftgurte : 1011701, 1011702, 1013641, 1016681, 1016682,
1016683, 1013724, 1013725, 1013726, 1013727, 1013728, 1013729
g. 2 g. 3
g. 5
Ausbauen des Zentralpunktes
Zentralpunkte : 1011705, 1011706, 1011707, 1012232
Nötiges Zubehör :
Sechskantschlüssel N°4
1- Zum Ausbauen des Zentralpunktes: mit einem Sechskantschlüssel N°4 die 2 Schäkel lösen.
2- Den neuen Zentralpunkt in einen der Schäkel einführen, darauf achten, dass die Teile fettfrei
sind; bis zum Anschlag einschrauben und um eine weitere halbe Umdrehung festziehen.
NB: Da die Schrauben schon präpariert sind (Beschichtung Typ « TUFLOCK »), ist ein Gewindekleber
(Loctite) überüssig. Die beschichteten Schrauben können bis zu 4mal aus-/eingeschraubt werden;
danach müssen sie ersetzt werden (verfügbare Ersatzteile)
3- Die beschriebenen Vorgänge auf der anderen Seite wiederholen.
13
Page 14
Auswechseln der Schenkelgurte
Betroene Best.-Nummern : Hüftgurte : 1011701, 1011702, 1013641, 1016681, 1016682 , 1016683? 1013724,
1- Zentralpunkt entsprechend der Anleitung : « Ausbauen des Zentralpunktes » auslösen
2- Schlaufe des rechten Schenkelgurtes in den rechten Schäkel, Schlaufe des linken Schenkelgurtes in
den linken Schäkel legen !! Die selbstschließende Schnalle muss immer an der Schenkelaußenseite
iegen.
3- Zentralpunkt entsprechend der Anleitung : « Ausbauen des Zentralpunktes » wieder anbringen
4- Gummibänder der 2 Schenkelgurte durch die hierzu vorgesehenen Plastikklipse ziehen
1013725, 1013726, 1013727, 1013728, 1013729
Schenkelgurtpaar : 1011710
2
5- Alternativlösung :
Für Benutzer, die den Abstand zwischen Schenkelgurt und Hüftgurt reduzieren möchten, kann
die Schlaufe des Schenkelgurtes wie auf der untenstehenden Abbildung direkt durch die
Schlaufe des Hüftgurtes geführt werden.
4
5
14
Page 15

Auswechseln des Sitzgurtes
Betroenen Best.-Nummern : Hüftgurte : 1011701, 1011702, 1013641, 1016681, 1016682 , 1016683? 1013724,
1- Zentralpunkt entsprechend der Anleitung : « Ausbauen des Zentralpunktes » auslösen
2- Die Schlaufen des Sitzgurtes in die Schäkel des Hüftgurtes legen.
! ! dabei müssen die Schenkelgurte des Sitzgurtes unten liegen
3- Zentralpunkt entsprechend der Anleitung : « Ausbauen des Zentralpunktes » wieder anbringen
4- Die Gummibänder des Hüftgurtes durch die hierzu vorgesehenen Plastikklipse des Sitzgurtes ziehen.
1013725, 1013726, 1013727, 1013728, 1013729
Sitzgurte : 1011718 (S/M/L), 1011709 (XL)
15
Page 16
E
Equipo de protección Individual
Cinturón de mantenimiento en el trabajo
Miller by Sperian Buttery II & Dragony II
Conforme a la norma EN 358:1999 Sistemas de mantenimiento en el
trabajo
Y EN 813:1997 Cinturones de entrepiernas
Ref. concernidas: 1011701 Buttery II S, 1011702 Buttery II M/L, 1013641 Buttery II XL
1016681 Dragony II S, 1016682 Dragony II M/L, 1016683 Dragony II XL
1013724, 1013725, 1013726, 1013727, 1013728, 1013729
Hoja complementaria de utilización
Esta hoja de utilización es una póliza adicional al folleto de los EPI de mantenimiento en el trabajo.
Sírvase consultar el folleto entregado con el EPI para obtener todas las recomendaciones
Materiales utilizados:
Correa principal: poliéster, puntos centrales: poliamida, placa posterior: cordura
Limpieza de los EPI y la correa:
Se recomienda limpiar regularmente el EPI y más particularmente la correa con agua y jabón. Cualquier otro
método de limpieza debe proscribirse.
Método de secado: es necesario dejar secar naturalmente y lejos de cualquier fuego directo o fuente de calor, los
elementos que se hayan humedecido durante la utilización o durante su limpieza.
Duración de vida del producto:
La duración de vida máxima de l’EPI en el que domina el textil se estima a 10 años a partir de la fecha de fabricación
Salvamento:
Tome nota que antes y durante la utilización, cabe prever el modo como podrá efectuarse el eventual salvamento, de manera ecaz y en toda seguridad.
Este EPI ha sido sometido a pruebas según la norma EN 358:1999 sistemas de mantenimiento en el trabajo y EN813:1997 cinturones de entrepiernas.
Atención:
- No utilizar el cinturón sin las entrepiernas o el sillín.
- Controlar visualmente y antes de cada utilización la correa del punto central. La utilización de un EPI con
una correa dañada puede resultar peligrosa.
Referencia: 1011701
Modelo: Small
Fecha de fabricación:12/04
Conforme a: EN 358
Nº de serie: 20070555/002
En el reverso del EPI encontrará su referencia, su descripción, su
talla, su fecha de fabricación, la norma a la cual está conforme, el
n° de serie, un pictograma ‘i’ que evoca la necesidad de consultar
el folleto de utilización, el CE seguimiento del Nº del organismo
noticado encargado del control anual - AFAQ.
¿Cómo elegir la talla de su cinturón?
Talla S Buttery II/Dragony II: mini 76cm, máximo 118cm,
Talla M/L: mini 86cm, máximo 128cm
El cinturón está adaptado al usuario si después de haber ajustado el cinturón y
las entrepiernas (o el sillín), los anillos laterales son fácilmente accesibles.
16
Page 17

g. 1
Hebillas automáticas
Ref. concernidas: Cinturones: 1011701, 1011702, 1013641, 1016681, 1016682, 1016683
1013724, 1013725, 1013726, 1013727, 1013728, 1013729
g. 2 g. 3
g. 4
Para evitar el deslizamiento, la correa de cinturón (roja con borde negro) se coloca debajo de las dos lengüetas
de las que está equipada la hebilla automática del cinturón (parte macho) Fig 1.
Sacar los dos espesores de correa de estas lengüetas Fig 2. Cerrar la hebilla. Tirar de manera rme y regular de la
correa para ajustarla a su talle Fig 3. Una vez el ajuste hecho, abrir la hebilla y volver a poner los dos espesores de
correa debajo de las lengüetas Fig 4.
El excedente de correa puede deslizarse por debajo de la goma negra situada del lado hebilla macho Fig 5.
Desmontaje del punto central
Ref. concernidas: Cinturones: 1011701, 1011702, 1013641, 1016681, 1016682, 1016683
1013724, 1013725, 1013726, 1013727, 1013728, 1013729
Punto centrales: 1011705, 1011706, 1011707, 1012232
g. 5
Material que debe utilizarse:
Llave Allen N°4
1- Para desmontar el punto central: utilizar una llave Allen N°4, para destornillar las 2 anillas.
2- Poner el nuevo punto central en una de las anillas, cerciorarse de que no haya cuerpos gra
sos, atornillar hasta el contacto y apretar media vuelta.
NB: Puesto que los tornillos ya se han embadurnado previamente (inducción tipo “TUFLOCK”), no es
necesario añadir loctita. Los tornillos embadurnados pueden desmontarse y montarse hasta 4 veces,
después de esto, es necesario cambiar los tornillos (piezas sueltas disponibles)
3- Repetir las siguientes operaciones del otro lado.
17
Page 18

Cambio de las entrepiernas
Ref. concernidas: Cinturones: 1011701, 1011702, 1013641, 1016681, 1016682, 1016683, 1013724, 1013725,
1- Retirar el punto central según las indicaciones: «Desmontaje del punto central»
2- Colocar la cinta de la entrepierna derecha en la anilla derecha, y la cinta de la entrepierna izquierda en
la anilla izquierda. ¡¡la hebilla automática deberá estar siempre del lado exterior del muslo!!
3- Poner de nuevo el punto central según las indicaciones: «desmontaje del punto central»
4- Hacer pasar las gomas de las 2 entrepiernas por los clips de plástico previstos para este n.
1013726, 1013727, 1013728, 1013729
Kit par entrepiernas : 1011710
2
5- Otra alternativa:
Para los usuarios que desean reducir la distancia entre la entrepierna y el cinturón, se podrá
pasar directamente la cinta de la entrepierna por la cinta del cinturón como se indica a conti
nuación.
4
5
18
Page 19

Cambio del sillín
Ref. concernidas: Cinturones: 1011701, 1011702, 1013641, 1016681, 1016682 , 1016683
1013724, 1013725, 1013726, 1013727, 1013728, 1013729
sillín : 1011718 (S/M/L), 1011709 (XL)
1- Retirar el punto central según las indicaciones: «Desmontaje del punto central»
2- Colocar las cintas del sillín en las anillas del cinturón. ¡¡las correas de las entrepiernas del sillín deberán
colocarse abajo.
3- Poner de nuevo el punto central según las indicaciones: «desmontaje del punto central»
4- Hacer pasar las gomas del cinturón por los clips de plástico del sillín previstos para este n.
19
Page 20

Equipamento de protecção Individual
P
Cinto de xação ao trabalho
Miller by Sperian Buttery II & Dragony II
Conforme à norma EN 358:1999 Sistema de xação ao trabalho
E EN 813:1997 Cintos de polainas
Ref. Em causa: 1011701 Buttery II S, 1011702, Buttery II M/L, 1013641 Buttery II XL
1016681 Dragony II S, 1016682 Dragony II M/L, 1016683 Dragony II XL
1013724, 1013725, 1013726, 1013727, 1013728, 1013729
Folheto complementar de utilização
Este folheto de utilização é uma nota adicional ao manual dos EPI de xação ao trabalho.
É favor consultar o manual fornecido com o EPI para obter a totalidade das recomendações.
Materiais utilizados:
Tira principal: poliéster, ponto centrais: poliamida, Costas: cordura
Limpeza do EPI e da tira:
Recomenda-se uma limpeza regular do EPI e especialmente da tira com água e sabão. Qualquer outro método
de limpeza é proibido.
Método de secagem: é necessário deixar secar naturalmente e à distância de qualquer fogo directo ou de qualquer fonte de calor, os elementos que caram com humidade durante a utilização ou durante a limpeza.
Duração de vida do produto:
Avalia-se a duração de vida máxima do EPI com dominante têxtil a 10 anos a partir da data de fabrico
Salvamento:
É de notar que antes e durante a utilização, é necessário planear a forma como o salvamento poderia eventualmente ser garantido de forma ecaz e em toda a segurança.
Este EPI foi submetido a ensaios de acordo com a norma EN 358:1999 sistema de xação ao trabalho e
EN813 :1997 cinto de polainas.
Aviso:
- Não utilize o cinto sem polainas ou sem o banco.
- Controle visualmente e antes de cada utilização a tira do ponto central. A utilização de um EPI com uma
tira danicada pode ser perigosa.
Referência: 1011701
Modelo: small
Data de fabrico: 12/04
Conforme; EN 358
N.º de série: 20070555/002
Encontrará na parte traseira do EPI a referência, a descrição, o
tamanho, a data de fabrico, a norma de conformidade, o n.° de
série, um pictograma ‘i’ indicando que é necessário consultar o
manual de utilização, o CE seguindo do N° do organismo noticado encarregado do controlo anual - AFAQ
Como escolher o tamanho do cinto?
Tamanho S Buttery II / Dragony II : mini 76cm, maxi 118cm,
Tamanho M/L: mini 86cm, maxi 128cm
O cinto é adaptado ao utilizador se após ajuste do cinto e das polainas (ou do
banco), os anéis laterais forem facilmente acessíveis.
20
Page 21

Argolas automáticas
Ref. em causa: Cintos: 1011701, 1011702, 1013641, 1016681, 1016682, 1016683, 1013724,
1013725, 1013726, 1013727, 1013728, 1013729
g. 1
g. 4
Para evitar o deslizamento, a tira do cinto (vermelha com extremidade preta) está colocada debaixo das duas
linguetas de que está equipada a argola automática do cinto (parte macho) Fig 1.
Tirar as duas espessuras da tira destas linguetas Fig 2. Fechar a argola. Puxar rme e regularmente na tira para a
ajustar ao seu tamanho Fig 3. O ajuste faz abrir a argola e volta a colocar as duas espessuras de tira debaixo das
linguetas Fig 4.
O excesso de tira pode ser introduzido debaixo do elástico preto situado ao lado da argola macho Fig 5.
Ref. em causa: Cintos: 1011701, 1011702, 1013641, 1016681, 1016682, 1016683, 1013724,
g. 2 g. 3
g. 5
Desmontagem do ponto central
1013725, 1013726, 1013727, 1013728, 1013729
Pontos centrais: 1011705, 1011706, 1011707, 1012232
Material a utilizar:
Chave Allen N°4
1- Para desmontar o ponto central: utilize uma chave Allen N°4 desapertar as 2 manilhas.
2- Ponha o novo ponto central numa das manilhas, vericar a não presença de corpos oleosos,
apertar até sentir um contacto e apertar de uma semi-volta.
Nota: Os parafusos estando pré-enduzidos (endução tipo «TUFLOCK»), já não é necessário adicionar
loctite. Os parafusos pré-enduzidos são desmontáveis/remontáveis até 4 vezes, além disso impõe-se
uma mudança de parafuso (peças sobressalentes disponíveis).
3- Repita as operações abaixo para o outro lado.
21
Page 22

Substituição do banco
Ref. em causa: Cintos: 1011701, 1011702, 1013641, 1016681, 1016682 , 1016683, 1013724, 1013725, 1013726,
1- Retire o ponto central seguindo as indicações: « Desmontagem do ponto central »
2- Coloque a presilha da polaina direita na manilha direita e a presilha da polaina esquerda na manilha esquerda
!!! A argola automática deve encontrar-se sempre no lado exterior da coxa.
3- Volte a colocar o ponto central seguindo as indicações: « Desmontagem do ponto central »
4- Passe os elásticos das 2 polainas nos clipes de plásticos previstos para este efeito
1013727, 1013728, 1013729
Kit par de Polainas: 1011710
2
5- Outra alternativa:
Para os utilizadores querendo reduzir a diferença entre a polaina e o cinto, poderemos passar
directamente a presilha da polaina na presilha do cinto como abaixo indicado.
4
5
22
Page 23

Ref. em causa: Cintos: 1011701, 1011702, 1013641, 1016681, 1016682 , 1016683, 1013724, 1013725, 1013726,
1- Retire o ponto central seguindo as indicações: « Desmontagem do ponto central »
2- Coloque as presilhas do banco nas manilhas do cinto.
As tiras das polainas do banco têm de car posicionados para baixo
3- Volte a colocar o ponto central seguindo as indicações: « Desmontagem do ponto central »
4- Passe os elásticos do cinto nos clipes de plásticos do banco previsto para este efeito.
Substituição do banco
1013727, 1013728, 1013729
1011718 (S/M/L), 1011709 (XL)
23
Page 24

NL
Persoonlijk beschermingsmiddel
voor werkplekpositionering
Miller by Sperian Buttery II & Dragony II
Conform de norm EN 358:1999 Systemen voor werkplekpositionering
En EN 813:1997 Riemen en zitgordels
Betreft ref: 1011701 Buttery II S, 1011702 Buttery II M/L, 1013641 Buttery II XL
1016681 Dragony II S, 1016682 Dragony II M/L, 1016683 Dragony II XL
1013724, 1013725, 1013726, 1013727, 1013728, 1013729
Aanvullende gebruiksaanwijzing
Deze gebruiksaanwijzing is een aanhangsel bij de gebruiksaanwijzing van de PBM’s voor werkplekpositionering.
Gelieve de gebruiksaanwijzing, geleverd bij het PBM, te raadplegen om kennis te nemen van alle aanbevelingen.
Gebruikte materialen:
Hoofdriem: polyester, centrale punten: polyamide, schouderbanden: cordura
Reinigen van het PBM en van de riem:
Wij raden aan het PBM regelmatig en in het bijzonder de riem met zeepwater te reinigen. Alle andere reingingsmiddelen zijn verboden.
Drogen: laat de elementen van het PBM, die ijdens het gebruik of na een reinigingsbeurt nat geraakt zijn, op
natuurlijke wijze drogen, verwijderd van rechtstreeks vuur of andere warrmtebronnen.
Levensduur van het product:
De maximale levensduur van persoonlijke beschermingsmiddelen die voornamelijk uit textiel bestaan, wordt op
10 jaar geschat vanaf de fabricagedatum
Reddingsoperaties:
Noteer dat, voor en tijdens het gebruik, men moet overwegen hoe men een eventuele reddingsoperatie op een
doeltreende en veilige manier kan uitvoeren.
Dit PBM werd onderworpen aan de testen van de norm EN 358:1999 Systemen voor werplekpositionering
en EN813 :1997 zitgordel.
Opgelet:
- De riem niet gebruiken zonder de zitgordel of het zitje.
- Controleer visueel voor elk gebruik de riem van het centraal punt. Het gebruik van een PBM met een
beschadigde riem kan gevaarlijk zijn
Referentie: 1011701
Model: Small
Fabrikatiedatum: 12/04
Conform: EN 358
Serienummer: 20070555/002
Op de achterzijde van het PBM vindt u de referentie, de beschrijving,
de maat, de fabricatiedatum, de norm waarmee het conform is, het
serienummer, een pictogram ‘i’ dat betekent dat men de gebruiksaanwijzing moet raadplegen, het CE, gevolgd door het erkend
organisme dat de jaarlijkse controle uitvoert. - AFAQ.
Hoe kiest u de maat van de riem?
Maat S Buttery II / Dragony II: min 76cm, max 118cm,
Maat M/L: min 86cm, max 128cm
De riem is aan de gebruiker aangepast als, na het aanpassen van de riem en van
de zitgordel, de laterale ringen makkelijk toegankelijk zijn.
24
Page 25

Automatische gespen
Betreft ref: riemen: 1011701, 1011702, 1013641, 1016681, 1016682, 1016683
1013724, 1013725, 1013726, 1013727, 1013728, 1013729
g. 1
g. 4
Om het afglijden te vermijden, dient de gesp van de band (rood met zwarte rand) onder de twee lipjes te worden geplaatst waarmee de automatische gesp van de riem is uitgerust (mannelijke stuk) Fig 1.
Haal de twee uiteinden van de band uit de lipjes Fig.2. Sluit de gesp. Trek de gesp stevig en regelmatig aan om
deze op uw maat af te stellen Fig 3. Zodra deze is afgesteld, opent u je de gesp en doet u de twee uiteinden van
de band onder de lipjes Fig 4.
Het niet gebruikte deel van de band kan onder het zwarte elastiek worden gegleden dat zich aan de kant van de
mannelijke gesp bevindt Fig 5.
Betreft ref: riemen: 1011701, 1011702, 1013641, 1016681, 1016682, 1016683
g. 2 g. 3
g. 5
Demontage van het centraal punt
1013724, 1013725, 1013726, 1013727, 1013728, 1013729
Centrale punten: 1011705, 1011706, 1011707, 1012232
Te gebruiken materiaal:
Inbussleutel N°4
1- Gebruik bij de demontage van het centraal punt een inbussleutel n°4 om de 2 sluitingen los te
schroeven.
2- Plaats het nieuw centraal punt in één van de sluitingen, controleer dat er geen vet aanwezig
is, schroef vast tot het contact en klem vast met een halve draai.
NB : de schroeven zijn voorbehandeld (met het type ‘TUFLOCK’) en het is niet langer nodig Loctite toe
te voegen. De voorbehandelde schroeven zijn maximaal 4 keer te demonteren/opnieuw vast te schroeven, daarna is een vervanging van de schroef noodzakelijk (onderdelen zijn beschikbaar).
3- Herhaal de punten hierboven voor de andere kant.
25
Page 26

Vervangen van de zitgordel
Betreft ref: riemen: 1011701, 1011702, 1013641, 1016681, 1016682 , 1016683, 1013724, 1013725, 1013726,
1- Verwijder het centraal punt volgens de aanwijzingen: “Demontage van het centraal punt”.
2- Plaats de koord van de zitgordel rechts in de rechtersluiting en de koord van de zitgordel links in de
linkersluiting. De automatische lus moet zich altijd aan de buitenkant van de dij bevinden.
3- Plaats het centraal punt terug volgens de aanwijzingen: “Demontage van het centraal punt”.
4- Doe de elastieken van de zitgordel in de hiervoor bedoelde plastic clips glijden.
1013727, 1013728, 1013729
Kit zitgordel: 1011710
2
5- Alternatief:
Voor gebruikers die de afstand tussen de zitgordel en de riem willen verminderen, volstaat het
de koord van de zitgordel rechtstreeks in de koord van de riem te glijden, zoals hieronder
aangegeven.
4
5
26
Page 27

Vervangen van het zitje
Betreft ref: riemen: 1011701, 1011702, 1013641, 1016681, 1016682 , 1016683, 1013724, 1013725, 1013726,
1- Verwijder het centraal punt volgens de aanwijzingen: “Demontage van het centraal punt”.
2- Plaats de koorden van het zitje in de sluitingen van de riem.
!! De dijriemen van het zitje moeten onderaan geplaatst zijn.
3- Pllaats het centraal punt terug volgens de aanwijzingen: “Demontage van het centraal punt”.
4- Doe de elastieken van de riem in de hiervoor bedoelde plastic clips glijden.
1013727, 1013728, 1013729
1011718 (S/M/L), 1011709 (XL)
27
Page 28

Personligt Beskyttelses Udstyr Støttebælte
DK
Miller by Sperian Buttery II & Dragony II
I overensstemmelse med EU standard EN 358:1999 Støtteudstyr
og EN 813:1997 Støttebælter med lårremme
Omhandlede referencer : 1011701 Buttery II S, 1011702 Buttery II M/L, 1013641 Buttery II XL
1016681 Dragony II S, 1016682 Dragony II M/L, 1016683 Dragony II XL
1013724, 1013725, 1013726, 1013727, 1013728, 1013729
Supplerende brugsanvisning
Herværende brugsanvisning er et supplement til anvisningen for Personligt Beskyttelses Udstyr (PBU) til støtte
Man bedes venligst bruge den med det Personligt Beskyttelses Udstyr (PBU) leverede vejledning for at få kends-
Anvendte materialer:
Hovedselen: polyester, central elementer: polyamid, rygstøtte: cordura
Rensning af Personligt Beskyttelses Udstyr (PBU) og remme:
Det anbefales regelmæssigt at vaske PBU og navnlig remmene i sæbevand. Enhver anden metode bør forbydes.
Tørring: De elementer, der under brug, eller ved rensning er blevet fugtige eller våde, bør tørres naturligt og på
afstand af enhver form for ild eller varmekilde.
Produktets levetid:
Den maksimale levetid for personligt sikkerhedsudstyr (EPI) overvejende af tekstil vurderes til 10 år fra fabrikationsdatoen at regne
Redning:
Det bemærkes, at man før og under brug, bør overveje/planlægge hvordan en eventuel redningsaktion bedst og
mest eektivt kan organiseres under optimale sikkerhedsforhold.
under arbejde.
kab til samtlige anvisninger
Dette Personlige Sikkerheds Udstyr har været underkastet følgende tests i overensstemmelse med EU
standard EN 358:1999 støtteudstyr og EN813 :1997 støttebælte med lårremme.
NB:
- Støttebæltet bør ikke bruges uden lårremmme eller sæderem.
- Central elementets rem skal kontrolleres visuelt før hver brug. Brug af PBU med en beskadiget rem kan
være farligt.
På ryggen af PBU ndes etiketten med udstyrets reference, beskrivelse, størrelse, fabrikationsdato, EU standard, serienummer, ‘i’
piktogram, der henviser til brugsanvisningen, CE fulgt af Nr på den
organisme, der er anmeldt som ansvarlig for den årlige kontrol - AFAQ.
Hvordan vælges størrelse for støttebæltet ?
Størrelse S Buttery II / Dragony II: minimum 76cm, maksimum 118cm,
Størrelse M/L: mini 86cm, maksimum 128cm
Støttebæltet passer Brugeren, dersom det efter indstilling af bæltet og lårremmene (eller sæderemmen) er nemt at komme til sideringene.
28
Page 29

Omhandlede referencer: Støttebælter : 1011701, 1011702, 1013641, 1016681, 1016682,
1016683, 1013724, 1013725, 1013726, 1013727, 1013728, 1013729
kvik-luk spænder
g. 1
g. 4
For at undgå at den glider skal bæltegjorden (rød med sort kant) placeres under de to tappe i bæltets kvik-luk
spænde (“han”delen).
Den bukkede gjord tages ud af tappene. Spændet lukkes. Gjorden tilpasses Deres størrelse ved fast jævnt træk.
Når gjorden er tilpasset, åbnes spændet og den bukkede gjord sættes tilbage under tappene.
Overskydende gjord kan puttes ind under den sorte elastik i spændets «han»side.
Omhandlede referencer: Støttebælter : 1011701, 1011702, 1013641, 1016681, 1016682,
1016683, 1013724, 1013725, 1013726, 1013727, 1013728, 1013729
g. 2 g. 3
g. 5
Afmontering af central elementet
Central punkter: 1011705, 1011706, 1011707, 1012232
Brug af materiale:
Allen nøgle Nr4
1- Ved afmonteriong af central elementet bruges: en Allen nøgle Nr4 til afskruning af de 2
sjækler.
2- Det nye central element sættes i sjæklen, man sikrer sig der ingen fedtstoer er tilstede, man
skruer til der er kontakt og strammer med en halv tur.
NB: Da skruerne er forhåndsbehandlede (belægning af typen « TUFLOCK »), er det ikke længere
nødvendigt at påsmøre loctite. De forhåndsbehandlede skruer kan afmonteres/genmonteres op til 4
gange, derudover er udskiftning af skruerne nødvendig (til rådighed værende reservedele).
3- Gentag ovenfor beskrevne aktioner på den anden side.
29
Page 30

Udskiftning af lårremme
Omhandlede referencer: Støttebælter : 1011701, 1011702, 1013641, 1016681, 1016682, 1016683, 1013724,
1- Afmontering af central elementet som anvist i: « Afmontering af centralelementet»
2- Højre lårrems gjord sættes i højre sjækkel, og venstre lårrems gjord sættes i venstre sjækkel.
!! Det automatiske spænde skal altid være på ydersiden af låret
3- Central elementet sættes på plads som anvist i: « Afmontering af centralelementet»
4- De 2 lårremmes elastikker sættes på plads i de dertil beregnede snapspænder
1013725, 1013726, 1013727, 1013728, 1013729
Kit et par lårremme : 1011710
2
5- Anden mulighed :
For de brugere, der ønsker at mindske afstanden mellem lårremmene og bæltet er det muligt
ar sætte lårremmens gjord direkte i bæltets gjord som vist nedenfor.
4
5
30
Page 31

Udsqkiftning af sæderem
Omhandlede referencer: Støttebælter : 1011701, 1011702, 1013641, 1016681, 1016682, 1016683, 1013724,
1- Afmontering af central elementet som anvist i: « Afmontering af centralelementet»
2- Sæderemmens gjorde sættes i bæltets sjækler.
!! på sæderemmens forside skal gjordene til lårremmene vende nedad
3- Central elementet sættes på plads som anvist i: « Afmontering af centralelementet»
4- Bæltets elastikker sættes på plads i de dertil beregnede snapspænder
1013725, 1013726, 1013727, 1013728, 1013729
1011718 (S/M/L), 1011709 (XL)
31
Page 32

Henkilökohtainen turvavyö (EPI) suojaksi työskennellessä
FIN
Miller by Sperian Buttery II & Dragony II
Standardin EN 358:1999 mukainen: Turvajärjestelmä työssä
Et EN 813:1997 Vyöt ja säärystimet
Aiheeseen liittyvät viitteet: 1011701 Buttery S, 1011702 Buttery M/L, 1013641 Buttery II XL
1016681 Dragony II S, 1016682 Dragony II M/L, 1016683 Dragony II XL
1013724, 1013725, 1013726, 1013727, 1013728, 1013729
Tämä käyttöohje on lisäys työskentelyn turvalaitteiden EPI aikaisempaan selostukseen.
Tutustu EPI:n mukana seuranneeseen selostukseen nähdäksesi kaikki suositukset.
Käytetyt materiaalit:
Pääremmi: polyesteri, Keskikiinnikkeet: polyamidi, selkätuki: cordura
EPI:n ja remmin puhdistus:
On suositeltavaa puhdistaa EPI säännöllisesti, varsinkin remmi, saippuavedellä. Kaikki muunlainen puhdistustapa
on kielletty.
Kuivatus: Osien kuivatus, jotka ovat kostuneet joko käytössä tai puhdistettaessa, on tehtävä luonnollisella tavalla
loitolla tulesta ja tai muusta lämpölähteestä.
Tuotteen kestoikä :
Pääosin tekstiilirakenteisen henkilökohtaisen turvavarusteen (EPI) maksimikäyttöiäksi arvioidaan valmistuspäivästä lukien 10 vuotta
Pelastus:
Pidä mielessä ennen käyttöä ja sen aikana, että on valmistauduttava mahdolliseen pelastustoimeen tehokkaalla
ja täysin turvallisella tavalla.
Käyttöohjeiden lisäys
Tälle EPI:lle on suoritettu standardin EN 358:1999, työskentelyn turvajärjestelmä, ja standardin EN813
:1997 säärystinremmi, mukaiset testit.
Huomio:
- Älä käytä vyötä ilman säärystimiä ja selkätukea.
- Tarkista keskuspiste silmämääräisesti ja ennen jokaista remmin käyttöä. EPI:n käyttö, jonka remmi on
viallinen, saattaa osoittautua vaaralliseksi.
Viitenumero: 1011701,
Koko: Pieni,
Valmistus-pvm.: 12/04
Yhdenmukaisuus: EN358,
Sarjanumero: 200…
EPIN taustassa on sen viitenumero, kuvaus, koko, valmistus pvm., sitä
koskeva standardi, sarjanumero, kuvake ‘i’, joka merkitsee, että on luettava
käyttöohje, CE ja vuosikatsastuksen suorittavan järjestön numero - AFAQ.
Kuinka vyön pituus on valittava ?
Koko S Buttery II / Dragony II : 76 cm – 118 cm,
Koko M/L 86 cm – 128 cm
Vyö on käyttäjälle sopiva, jos vyön ja säärystimien (tai selkätuen) säädön jälkeen
sivulenkit ovat helposti ulottuvilla.
32
Page 33

Viitenumerot : Vyöt : 1011701, 1011702, 1013641, 1016681, 1016682, 1016683, 1013724,
1013725, 1013726, 1013727, 1013728, 1013729
Automaattinen solki
g. 1
g. 4
Aseta vyötäröhihna (mustareunustettu punainen) liukumisen estämiseksi vyön automaattisen soljen (urospuoli)
kahden kielekkeen alle Fig 1.
Ota kaksi paksunnosta pois näistä kielekkeistä Fig 2. Sulje solki. Sovita hihna vyötäröösi vetämällä sitä lujasti ja
tasaisesti Fig 3. Avaa solki, kun säätö on tehty, ja aseta kaksi paksunnosta takaisin kielekkeiden alle Fig 4.
Hihnan ylimäärän voi työntää urossoljen sivussa olevan mustan kuminauhan alle Fig 5.
Viitenumerot : Vyöt : 1011701, 1011702, 1013641, 1016681, 1016682, 1016683, 1013724,
g. 2 g. 3
g. 5
Keskuspisteen irrotus
1013725, 1013726, 1013727, 1013728, 1013729
Keskuspisteet : 1011705, 1011706, 1011707, 1012232
Kuusiotappiavain N°4
1- Keskuspisteen irrotus: Avaa 2 ketjulukkoa N:o 4 kuusiotappiavaimella
2- Aseta uusi keskuspiste yhteen ketjulukkoon, varmista, ettei läsnä ole rasvoja. Ruuvaa koske
tukseen saakka ja kiristä puoli kierrosta.
Huom.: Koska ruuvit on jo esisilvelty (voitelutyyppi «TUFLOCJ») ei ole tarpeen lisätä loctiea. Esivoidellut ruuvit ovat asennus/purkauskelpoiset aina 4 kertaa, minkä jälkeen on vaihdettava uusi ruuvi
(saatavat vaihto-osat)
3- Toista vaiheet toisella puolella.
33
Page 34

Säärystimien vaihto
Viitenumerot: Vyöt: 1011701, 1011702, 1013641, 1016681, 1016682, 1016683, 1013724, 1013725, 1013726,
1- Irrota keskuspiste ohjeiden mukaisesti: : « Keskuspisteen irrotus »
2- Aseta säärystimen oikeanpuoleinen nauha oikeanpuoleiseen ketjulukkoon ja vasen nauha vasem
paan ketjulukkoon !! Automaattisen soljen on oltava aina reiden ulkosivulla.
3- Vaihda keskuspiste ohjeiden mukaisesti: : « Keskuspisteen irrotus »
4- Pujota molempien säärystimien kaksi kuminauhaa niille varattuihin muovisalpoihin.
1013727, 1013728, 1013729
Säärystinpari: 1011710
2
5- Muut vaihtoehdot :
Käyttäjä, joka haluaa lyhentää säärystimien ja vyön välistä etäisyyttä tai pujottaa säärystimen
nauhan suoraan vyön nauhaan alla esitetyllä tavalla.
4
5
34
Page 35

Viitenumerot: Vyöt : 1011701, 1011702, 1013641, 1016681, 1016682 , 1016683, 1013724, 1013725, 1013726,
1- Irrota keskuspiste ohjeiden mukaisesti: «Keskuspisteen irrotus »
2- Aseta selkätuen nauhat vyön ketjulukkoihin
!! Selkätuen säärysremmit on asetettava alas
3- Aseta keskuspiste takaisin ohjeiden mukaan : « Keskuspisteen irrotus »
4- Pujota vyön kuminauhat niille varattuihin selkätuen muovisalpoihin.
Selkätuen vaihto
1013727, 1013728, 1013729
1011718 (S/M/L), 1011709 (XL)
35
Page 36

Personlig verneutstyr - Støttefangbelte
NOR
Miller by Sperian Buttery II & Dragony II
I overensstemmelse med norm EN 358:1999 Støttefangsystem
og EN 813:1997 Belte med lårstropper
Gjelder følgende referanser: 1011701 Buttery II S, 1011702 Buttery II M/L, 1013641 Buttery II XL
1016681 Dragony II S, 1016682 Dragony II M/L, 1016683 Dragony II XL
1013724, 1013725, 1013726, 1013727, 1013728, 1013729
Vennligst les bruksanvisningen som følger med verneutstyret for å få full oversikt over alle instruksjoner.
Dette dokumentet er et tillegg til bruksanvisningen for støttefangbelter.
Materiale som brukes:
Hovedrem: polyester, sentrale punkter: polyamid, ryggstøtte: cordura
Rengjøring av verneutstyret og av remmene:
Det anbefales å foreta regelmessig rengjøring av verneutstyret, og da spesielt remmene, ved hjelp av såpevann.
Ingen annen rengjøringsmetode skal benyttes.
Tørking: alle elementer som har blitt våte under bruk eller som ha vært vasket, skal lufttørkes på god avstand fra
åpen ild eller andre varmekilder.
Produktets bruksvarighet:
Man beregner den maksimale holdbarhetstid til PVU med tekstilmaterialer som hovedkomponent til10 år fra
produksjonsdatoen
Redningsoperasjoner :
Før og under operasjonen er det viktig å vurdere hvordan redningsoperasjonen best kan utføres for at den skal
være eektiv og risikofri.
Tilleggsopplysninger til bruksanvisningen
Dette personlige verneutstyret har vært utsatt for tester i henhold til norm EN 358:1999 som gjelder for
støttefangbelter, og norm EN813 :1997 som gjelder for belte med lårstropper.
Viktig:
- Beltet skal ikke brukes uten lårstroppene eller uten setestroppen.
- Foreta visuell kontroll av remmen ved det sentrale punktet hver gang før beltet tas i bruk. Det kan
medføre fare å bruke et verneutstyr med defekte remmer og stropper.
Referanse : 1011701
Modell : Small
Fabrikasjonsdato : 12/04
I overensstemmelse med : EN 358
Serienr. : 20070555/002
Bak på vernutstyret nner du utstyrets referanse, beskrivelse, størrelse,
fabrikasjonsdato, normen den svarer til, serienummeret og et ‘i’ – symbol
som henviser til bruksanvisningen, samt symbolet CE etterfulgt av nummeret for den organisasjonen som er ansvarlig for den årlige kontroll
- AFAQ.
Hvordan velge riktig størrelse?
Størrelse S Buttery II / Dragony II : min. 76 cm, maks. 118 cm,
Størrelse M/L: min. 86 cm, maks. 128 cm
Beltet er riktig tilpasset brukeren når sidekrokene er lett tilgjengelige etter at
beltet og lårstroppene (eller setestroppen) er justert.
36
Page 37

Gjelder referansene: Belte: 1011701, 1011702, 1013641, 1016681, 1016682, 1016683
1013724, 1013725, 1013726, 1013727, 1013728, 1013729
Automatiske spennen
g. 1
g. 4
For at den ikke skal gli ut, skal beltestroppen (som er rød med sorte kanter) plasseres under de to tungestykkene
på den automatiske beltespennen (på innstikkerdelen).
Ta begge de to lagene av stroppen ut av disse tungestykkene. Lukk igjen spennen. Trekk hardt og jevnt på stroppen for å regulere den. Når reguleringen er gjort, åpne opp spennen og før de to lagene av beltestroppen under
tungestykkene igjen.
Den ekstra beltestropplengden kan føres under den sorte strikken på innstikkerdelen av spennen.
Gjelder referansene: Belte: 1011701, 1011702, 1013641, 1016681, 1016682, 1016683
g. 2 g. 3
g. 5
Demontering av det sentrale punktet
1013724, 1013725, 1013726, 1013727, 1013728, 1013729
Sentrale punkter: 1011705, 1011706, 1011707, 1012232
Materiell som skal brukes:
Sekskantnøkkel nr. 4
1- Slik demonteres det sentrale punktet: bruk en sekskantnøkkel nr. 4 for å løsne på de to bøylene.
2- Plasser det nye sentrale punktet i en av de to bøylene, påse at det ikke forekommer fett og
stram til med en halv omdreining.
NB: Da skruene allerede har blitt forhåndssmurt (smøring av typen ”TUFLOCK”) er det ikke nødvendig
å tilføye loctite-lim. De forhåndssmurte skruene kan demonteres/tilbakemonteres opp til 4 ganger.
Etter det må skruen skiftes ut (tilgjengelig som reservedel).
3- Gå frem på samme måte på den andre siden.
37
Page 38

Skifte av lårstropper
Gjelder følgende referanse: Belte: 1011701, 1011702, 1013641, 1016681, 1016682 , 1016683, 1013724, 1013725,
1- Demonter det sentrale punktet som angitt i avsnittet: « Demontering av det sentrale punktet »
2- Anbring remmen for høyre lårstropp i høyre bøyle, og remmen for venstre lårstropp i venstre bøyle. !!
Den automatiske bøylen skal alltid benne seg på lårets utside.
3- Tilbakemonter den sentrale punktet i henhold til indikasjonen som gis i avsnittet: « Demontering av
det sentrale punktet »
4- Før de to elastiske remmene på de to lårstroppene gjennom plastklipsene
1013726, 1013727, 1013728, 1013729
Sett med ett par lårstropper: 1011710
2
5- Alternativ:
Brukere som ønsker å redusere avstanden mellom lårstroppen og beltet, kan føre remmen til
lårstroppen gjennom remmen til beltet som vist under.
4
5
38
Page 39

Gjelder følgende referanser: Belter: 1011701, 1011702, 1013641, 1016681, 1016682 , 1016683, 1013724,
1013725, 1013726, 1013727, 1013728, 1013729
1- Demonter det sentrale punktet som angitt i avsnittet: « Demontering av det sentrale punktet »
2- Anbring remmene til setestroppen i beltets bøyler.
!! lårremmene på setestroppen skal vende nedover
3- Tilbakemonter det sentrale punktet i henhold til indikasjonene som gis i: « Demontering av det sen
trale punktet »
4- Før de elastiske stroppene på beltet gjennom plastklipsene
Skifte av setestropp
1011718 (S/M/L), 1011709 (XL)
39
Page 40

Individuell skyddsutrustning
SWE
Fasthållningsbälte under arbetet
Miller by Sperian Buttery II & Dragony II
Uppfyller normen EN 358:1999 Fasthållningssystem under arbetet
och EN 813:1997 Bälten med lårsele
Tillämpliga beteckningar: 1011701 Buttery II S, 1011702 Buttery II M/L, 1013641 Buttery II XL
1013724, 1013725, 1013726, 1013727, 1013728, 1013729
1016681 Dragony II S, 1016682 Dragony II M/L, 1016683 Dragony II XL
Detta blad med kompletterande bruksanvisning är ett tillägg till bruksanvisningen till individuell skyddsutrust-
Vi ber om att hänvisa till bruksanvisningen som levererats med den individuella skyddsutrustningen för fullstän-
Använda materialämnen:
Huvudrem: polyester, centralpunkter: polyamid, ryggparti: cordura
Rengöring av den individuell skyddsutrustningen och av remmen:
Vi rekommenderar att med jämna mellanrum rengöra den individuella skyddsutrustningen och remmen i synnerhet med tvålblandat vatten. Alla andra rengöringsmetoder är otillåtna.
Torkningsmetod: Alla element som fuktats under användningen eller under rengöringen måste få torka naturligt, på avstånd från öppen eld eller från all annan värmekälla.
Produktens livslängd:
Man uppskattar att maximal livslängd på en personlig skyddsutrustning med övervägande textil, uppgår till 10
år, från tillverkningsdatum räknat
Räddningsinsatser:
Observera att man före och efter användningen bör planlägga sättet varpå en eventuell räddningsinsats ska
genomföras på ett eektivt och betryggande sätt.
Kompletterande bruksanvisning
ning för fasthållning under arbetet.
diga rekommendationer.
Denna individuella skyddsutrustning har undergått olika prov enligt normen EN 358:1999 för fasthållningssystem under arbetet och EN813 :1997 bälte med lårsele.
Observera:
- Använd inte bältet utan lårsele eller utan sadeln.
- Före varje användningstillfälle, gör en okulärbesiktning av centralpunktens rem. Att använda en individuell skyddsutrustning med skadad rem kan vara farligt.
medføre fare å bruke et verneutstyr med defekte remmer og stropper.
Beteckning:1011701
Modell:Small
Tillverkningsdatum:12/04
Uppfyller :EN358
Serienummer: 20070555/002
På den individuella skyddsutrustningens rygg står dess beteckning, dess
beskrivning, storlek, tillverkningsdatum, normen som den uppfyller, serienumret, bildsymbolen ‘i’ som hänvisar till bruksanvisningen, CE-märket
åtföljt av numret på den organisation som en gång om året ansvarar för
kontrollen - AFAQ.
Hur bör man välja rätt bältesstorlek?
Storlek S Buttery II / Dragony II : min 76cm, max 118cm,
Storlek M/L: min 86cm, max 128cm
Bältet passar användaren om bältet och lårselen (eller sadeln), sidoringarna är
lättåtkomliga.
40
Page 41

Tillämpliga beteckningar: Bälten: 1011701, 1011702, 1013641, 1016681, 1016682, 1016683, 1013724,
1013725, 1013726, 1013727, 1013728, 1013729
Automatlåsande spännen
g. 1
g. 4
För att undvika all glidning, placeras (den svartkantade röda) bältesremmen under de båda tungor som bältets
automatspänne är utrustat med (han-del) Fig 1.
Dra ut remmens båda skikt ur dessa tungor Fig 2. Lås in spännet. Dra stadigt och jämnt i remmen för att anpassa
den till midjan Fig 3. Efter avslutad justering, öppna spännet och skjut remmens båda skikt inunder tungorna Fig
4.
Den överblivna rembiten kan skjutas in under det svarta plaststycke som sitter på hanspännets sida Fig 5.
Tillämpliga beteckningar: Bälten: 1011701, 1011702, 1013641, 1016681, 1016682, 1016683,
g. 2 g. 3
g. 5
Demontering av centralpunkten
1013724, 1013725, 1013726, 1013727, 1013728, 1013729
Centralpunkter: 1011705, 1011706, 1011707, 1012232
Nödvändig materiel:
Insexnyckel N°4
1- För att demontera centralpunkten: använd en insexnyckel nr 4 för att skruva loss de 2 låsby glarna.
2- Placera den nya centralpunkten i en av låsbyglarna, försäkra dig om att det inte nns några
feta kroppar, skruva tills kontakten uppnås och dra åt ett halvt varv.
OBS! Skruvarna är redan försmorda (ytbeläggning av typ ”TUFLOCK”), ingen tillsats av loctite behövs.
De försmorda skruvarna går att demontera/montera igen upp till 4 gånger, därefter måste skruvarna
bytas ut (nns tillgängliga som reservdelar).
3- Ta om nedanstående arbetsmoment på andra sidan.
41
Page 42

Byte av lårselar
Tillämpliga beteckningar: Bälten: 1011701, 1011702, 1013641, 1016681, 1016682 , 1016683, 1013724, 1013725,
1- Ta ut centralpunkten enligt anvisningarna: ”Demontering av centralpunkten”
2- Placera den högra lårselens gans i högra låsbygeln och den vänstra lårselens gans i vänstra låsbygeln.
!! Det automatiska spännet ska alltid sitta på lårets utsida.
3- Montera tillbaka centralpunkten enligt anvisningarna: ”Demontering av centralpunkten”.
4- Sätt in de båda lårselarnas gummiband i plastklämmorna avsedda för detta ändamål.
1013726, 1013727, 1013728, 1013729
Sats med ett par lårselar: 1011710
2
5- Annat valalternativ:
För användare som önskar reducera avståndet mellan lårselen och bältet, kan man föra in lårselens gans
direkt i bältets gans enligt nedanstående bild.
4
5
42
Page 43

Tillämpliga beteckningar: Bälten: 1011701, 1011702, 1013641, 1016681, 1016682 , 1016683, 1013724, 1013725,
1013726, 1013727, 1013728, 1013729
1- Ta ut centralpunkten enligt anvisningarna: ”Demontering av centralpunkten”
2- Placera sadelns ganser i bältets låsbyglar.
!! Sadelns remmar till lårselarna ska vara placerade längst ner
3- Montera tillbaka centralpunkten enligt anvisningarna ”Demontering av centralpunkten”
4- Sätt in bältets gummiband i sadelns plastklämmor avsedda för detta ändamål.
Byte av sadeln
1011718 (S/M/L), 1011709 (XL)
43
Page 44

I
Cintura di posizionamento sul lavoro
Miller by Sperian Buttery II & Dragony II
Conforme alla norma EN 358:1999 Sistema di posizionamento sul
lavoro E EN 813:1997 Cinture con cosciali
Rif interessati: 1011701 Buttery II S, 1011702 Buttery II M/L, 1013641 Buttery II XL
1016681 Dragony II S, 1016682 Dragony II M/L, 1016683 Dragony II XL
1013724, 1013725, 1013726, 1013727, 1013728, 1013729
Dispositivo di protezione Individuale
Questo foglio di utilizzo è un’aggiunta all’avvertenza dei DPI di posizionamento sul lavoro.
Si prega di riferirsi all’avvertenza fornita insieme al DPI per maggiori raccomandazioni.
Materiali utilizzati:
Cinghia principale: poliestere, punti centrali: poliammide, parte dorsale: cordura
Pulizia del DPI e della cinghia:
Si raccomanda di pulire regolarmente il DPI e in particolare la cinghia usando acqua e sapone. Qualsiasi altro
metodo è da proscrivere.
Metodo di asciugatura: è necessario far asciugare naturalmente e a distanza da qualsiasi fuoco diretto o fonte di
calore, gli elementi che hanno preso l’umidità durante l’utilizzo o la loro pulizia.
Durata di vita del prodotto:
Si stima la durata di vita massima del DPI a dominante tessile a 10 anni a partire dalla data di fabbricazione
Salvataggio:
Notare che prima e durante l’utilizzo bisogna considerare il modo in cui l’eventuale salvataggio potrebbe essere
eseguito in modo ecace e in totale sicurezza.
Foglio aggiuntivo di utilizzo
Questo DPI è stato sottoposto a prove secondo la norma EN 358: 1999 sistema di posizionamento sul
lavoro e EN813: 1997 cintura con cosciali.
Attenzione:
- Non usare la cintura senza i cosciali o la selletta.
- Eseguire un controllo visivo e prima di ogni utilizzo controllare la cinghia del punto centrale. L’utilizzo di
un DPI con una cinghia danneggiata puo’ essere pericoloso.
Riferimento: 1011701
Modello:Small
Data di fabbricazione: 12/04
Conforme: EN358
N. di serie: 20070555/002
Troverete sul retro del DPI il suo riferimento, la sua descrizione, la taglia,
la data di fabbricazione, la norma alla quale è conforme, il n. di serie, un
pittogramma ‘i’ indicando che bisogna riferirsi all’avvertenza di utilizzo,
il CE seguito dal N. dell’ente noticato in carica del controllo annuale AFAQ.
Come scegliere la taglia della cintura?
Taglia S Buttery II / Dragony II: mini 76cm, maxi 118cm,
Taglia M/L: mini 86cm, maxi 128cm
La cintura è adatta per l’utente se dopo la regolazione della cintura e dei cosciali
(o della selletta), gli anelli sono facilmente accessibili.
44
Page 45

Rif interessate: Cinture: 1011701, 1011702, 1013641, 1016681, 1016682, 1016683, 1013724, 1013725,
Fibbie automatiche
1013726, 1013727, 1013728, 1013729
g. 1
g. 4
Per evitare lo scivolamento, la cinghia della cintura (rossa con bordo nero) viene posizionata sotto le due linguette della bbia automatica della cintura (parte maschio).
Tirare fuori i due spessori della cinghia da queste linguette. Chiudere la bbia. Tirare con decisione e con pari
forza sull’imbracatura per regolarla alla propria taglia. Una volta regolata, aprire la bbia e rimettere i due spessori della cinghia sotto le linguette.
La cinghia in eccedenza può essere fatta scivolare sotto l’elastico nero che si trova sul lato bbia maschio.
Rif interessate: Cinture: 1011701, 1011702, 1013641, 1016681, 1016682, 1016683, 1013724,
g. 2 g. 3
g. 5
Smontaggio del punto centrale
1013725, 1013726, 1013727, 1013728, 1013729
Punti centrali: 1011705, 1011706, 1011707, 1012232
Materiale da usare:
Chiave Allen N.4
1- Per smontare il punto centrale: usare una chiave Allen N. 4 per svitare le 2 maniglie.
2- Introdurre il nuovo punto centrale in una delle maniglie, accertarsi che non vi sia del grasso,
avvitare no al contatto e stringere di mezzo giro.
NB: Essendo le viti pre-rivestite (rivestimento tipo “TUFLOCK”), non è più necessario aggiungere della
Loctite. Le viti pre-rivestite si possono smontare/rimontare no a 4 volte, oltre questo si dovrà cambiare la vite (pezzi di ricambio disponibili).
3- Ripetere le operazioni sopraccitate per l’altro lato.
45
Page 46

Changing legs straps
Refs concerned: Belts: 1011701, 1011702, 1013641, 1016681, 1016682, 1016683, 1013724, 1013725, 1013726,
1- Remove the central point according to the indications: « Disassembling the central point »
2- Place the right leg strap in the right cleat and the left leg strap in the left cleat.
!! the automatic buckle must always be on the outside of the thigh.
3- Replace the central point in accordance with the indications: « Disassembling the central point »
4- Run the elastics of the 2 legs straps through the plastic clips provided for the purpose
1013727, 1013728, 1013729
Legs straps kit: 1011710
2
5- Another alternative :
For users who want to reduce the gap between the leg strap and the belt, the leg strap web
bing can be run directly through the belt webbing as shown below.
4
5
46
Page 47

Refs concerned: Belts: 1011701, 1011702, 1013641, 1016681, 1016682, 1016683
1013724, 1013725, 1013726, 1013727, 1013728, 1013729
Seat straps: 1011718 (S/M/L), 1011709 (XL)
1- Remove the central point according to the indications: « Disassembly of central point »
2- Place the seat strap in the belt loops.
!! The thigh straps of the seat strap must be positioned at the bottom
3- Replace the central point in accordance with the indications: « Disassembly of central point »
4- Run the elastics of the belt through the plastic loops of the base provided for the purpose
Change of seat strap
47
Page 48

Indywidualne wyposażenie zabezpieczające -
PL
pas zabezpieczający
Miller by Sperian Buttery II & Dragony II
Zgodny z normą EN 358:1999 System zabezpieczający w czasie pracy
i EN 813:1997 Pasy udowe
Ref.: 1011701 Buttery II S, 1011702 Buttery II M/L, 1013641 Buttery II XL
1016681 Dragony II S, 1016682 Dragony II M/L, 1016683 Dragony II XL
1013724, 1013725, 1013726, 1013727, 1013728, 1013729
Prosimy skorzystanie z instrukcji dostarczonej z wyposażeniem w celu zapoznania się z wszystkimi zaleceniami.
Karta obsługi jest załącznikiem do instrukcji zabezpieczenia w czasie pracy.
Użyte materiały:
Pas główny: poliester, punkt środkowy: poliamid, tył: cordura
Czyszczenie zabezpieczenia i pasa:
Zaleca się regularne czyszczenie wyposażenia, a zwłaszcza pasa za pomocą wody z płynem do mycia. Każda inna
metoda nie jest zalecana.
Suszenie: zaleca się suszenie naturalne z dala od źródeł ognia lub źródeł ciepła, wszystkich elementów wilgotnych po użyciu lub po czyszczeniu.
Okres przydatności:
Maksymalną trwałość indywidualnego wyposażenia asekuracyjnego z przewagą materiałów tekstylnych przewiduje się na 10 lat licząc od daty produkcji
Czynności ratunkowe:
Należy pamiętać, że przed i w czasie użytkowania należy przewidzieć możliwość przeprowadzenia czynności
ratunkowych w sposób skuteczny i bezpieczny.
Karta uzupełniająca
Wyposażenie zostało poddane testom zgodnie z normą EN 358:1999 System zabezpieczający w czasie
pracy i EB813 :1997 pas udowy.
Uwaga :
- Nie używać bez pasów udowych lub siodełka.
- Sprawdzić wzrokowo i przed każdym użyciem pas punktu środkowego. Używanie zabezpieczenia z
uszkodzonym pasem może być niebezpieczne.
W tylnej części wyposażenia znajduje się jego oznaczenie, opis, rozmiar,
datę produkcji, normę zgodności, nr seryjny, piktogram przypominający
o konieczności skorzystania z instrukcji obsługi, znak CE z numerem
instytucji odpowiedzialnej za kontrolę roczną - AFAQ.
Jak wybrać rozmiar pasa?
Rozmiar S Buttery II / Dragony II: mini 76cm, maks 118cm,
Rozmiar M/L: mini 86cm, maks 128cm
Pas jest dostosowany do użytkownika, jeżeli po regulacji pasa i pasów udowych
(lub siodełka), pierścienie boczne są łatwo dostępne.
48
Page 49

Ref.: Pasy: 1011701, 1011702, 1013641, 1016681, 1016682, 1016683, 1013724, 1013725, 1013726,
1013727, 1013728, 1013729
xxxx
g. 1
g. 4
Per evitare lo scivolamento, la cinghia della cintura (rossa con bordo nero) viene posizionata sotto le due linguette della bbia automatica della cintura (parte maschio).
Tirare fuori i due spessori della cinghia da queste linguette. Chiudere la bbia. Tirare con decisione e con pari
forza sull’imbracatura per regolarla alla propria taglia. Una volta regolata, aprire la bbia e rimettere i due spessori della cinghia sotto le linguette.
La cinghia in eccedenza può essere fatta scivolare sotto l’elastico nero che si trova sul lato bbia maschio.
Ref.: Pasy: 1011701, 1011702, 1013641, 1016681, 1016682, 1016683, 1013724, 1013725,
g. 2 g. 3
g. 5
Demontaż punktu środkowego
1013726, 1013727, 1013728, 1013729
Punkty środkowe: 1011705, 1011706, 1011707, 1012232
Zastosowane wyposażenie:
Klucz imbusowy nr 4
1- Demontaż punktu środkowego: użyć klucz imbusowy nr 4, aby odkręcić 2 łączniki.
2- Założyć nowy punkt środkowy w jeden z łączników, upewnić się, że nigdzie nie znajduje się
tłuszcz, przykręcić do pełnego kontaktu i obrócić o pół obrotu.
Uwaga: Ponieważ śruby zostały już wstępnie powleczone (powlekanie typu „TUFLOCK”), dodawanie
środka loctite nie jest już konieczne. Śruby wstępnie powleczone można zdjąć i założyć do 4 razy, po
przekroczeniu tej liczby należy je wymienić (dostępne części zamienne).
3- Powtórzyć poniższe operacje dla drugiego boku.
49
Page 50

Wymiana pasów udowych
Ref.: Pasy: 1011701, 1011702, 1013641, 1016681, 1016682, 1016683
1013724, 1013725, 1013726, 1013727, 1013728, 1013729
Zestaw pary pasów udowych: 1011710
1- Zdjąć punkt środkowy zgodnie z zaleceniami: «Demontaż punktu środkowego»
2- Założyć uchwyt pasa udowego prawego w łącznik prawy i uchwyt pasa udowego lewego w łącznik
lewy. !! zapięcie automatyczne musi znajdować się zawsze po zewnętrznej stronie uda.
3- Założyć punkt środkowy zgodnie z zaleceniami: «Demontaż punktu środkowego»
4- Przełożyć elementy elastyczne 2 pasów w zaciski plastikowe przewidziane do tego celu
2
5- Inna możliwość:
Dla użytkowników pragnących zmniejszyć odstęp między pasem udowym i pasem można
przełożyć bezpośrednio uchwyt pasa udowego w uchwyt pasa zgodnie z rysunkiem.
4
5
50
Page 51

Ref.: Pasy: 1011701, 1011702, 1013641, 1016681, 1016682, 1016683
1013724, 1013725, 1013726, 1013727, 1013728, 1013729
1- Zdjąć punkt środkowy zgodnie z zaleceniami: «Demontaż punktu środkowego»
2- Założyć uchwyty siodełka w łączniki pasa.
!! pasy udowe siodełka muszą być ustawione w dole
3- Założyć punkt środkowy zgodnie z zaleceniami: «Demontaż punktu środkowego»
4- Przełożyć elementy elastyczne pasa w zaciski plastikowe przewidziane do tego celu
Wymiana siodełka
1011718 (S/M/L), 1011709 (XL)
51
Page 52

SPERIAN FALL PROTECTION France
35 - 37, rue de la Bidauderie
18100 VIERZON - France
 Loading...