

Page 1
AIR-PURIFYING RESPIRATOR
Series 4000
FULL FACEPIECE
WARNING
DO NOT USE this respirator until you completely read and understand this instruction manual. You are
required to inspect your respirator prior to putting it into eld service. Please refer to the inspection
procedures in this manual.
I. INTRODUCTION
This manual provides instruction in the use and maintenance of the SPERIAN Series 4000 Full Facepiece AirPurifying Respirator. You must read and understand
this manual and be trained in the proper use of this
respirator before wearing it in a contaminated at-
mosphere.
The following table lists the current models available.
Model Description
410010 Small Facepiece, Blue, 4-Strap
410015 Small Facepiece, Blue, 5-Strap
410071 Small Facepiece, Blue, 4-Strap with Nose Cup
410075 Small Facepiece, Blue, 5-Strap with Nose Cup
410079 Small Facepiece, Black, 5-Strap with Nose Cup
410090 Small Facepiece, Black, 5-Strap
420010 Standard Facepiece, Blue, 4-Strap
420015 Standard Facepiece, Blue, 5-Strap
420071 Standard Facepiece, Blue, 4-Strap with Nose Cup
420075 Standard Facepiece, Blue, 5-Strap with Nose Cup
420079 Standard Facepiece, Black, 5-Strap with Nose Cup
420090 Standard Facepiece, Black, 5-Strap
II. SAFETY PRECAUTIONS
The Warnings, Cautions, and Notes contained in this
manual have the following signicance:
WARNING
Maintenance or operating procedures
and techniques that will result in personal injury or death if not carefully followed.
NOTE
Maintenance or operating procedures and techniques or information considered important enough
to emphasize.
III. DESCRIPTION
This SPERIAN air purifying respirator consists of a
full facepiece made of pliable silicone rubber with two
threaded connectors for attaching particulate lters, gas
and vapor cartridges, and cartridge/lter combinations
as required for specic contaminant protection.
WARNING
• The employer is responsible for establishing that this
respirator is suitable for the user’s applications.
• This facepiece must be worn and used as specied in
SPERIAN’s instructions.
• Your SPERIAN respirator has been constructed of
materials selected for their performance, safety,
and durability. However, all materials have exposure
limitations to extremes of heat and cold or to the many
chemicals in use today, and could be degraded by
exposure beyond their limitations, creating conditions
in which this SPERIAN equipment would be dangerous
to use.
• Before entering an environment while wearing SPERIAN
equipment, you must conduct safe, scientic tests
to determine if the environment could render the
equipment unsafe. Results of this testing should be
well documented. Seek the help of a certied safety
professional or industrial hygienist. DO NOT USE this
equipment if the user would be endangered in any way
through environmentally induced degradation of the
materials
CAUTION
Maintenance or operating procedures and
techniques that will result in damage to
equipment if not carefully followed.
©
Copyright Sperian Respiratory Protection USA, LLC
April 2008 All Rights Reserved
P/N 420094 REV C 03/09
AN ISO 9001
REGISTERED
COMPANY
Sperian Respiratory Protection USA, LLC
3001 South Susan St., Santa Ana, CA 92704
Toll-Free 888.APR.SCBA or 714.545.0410
Fax 714.850.0299
www.sperianprotection.com
Page 2

in the apparatus. SPERIAN cannot be responsible for
damage to property, personal injury, or death in which
environmental exposure is a contributing factor.
• Do not use this respirator in environments where the
concentrations of contaminants are unknown, or where
the atmosphere is immediately dangerous to life or
health (IDLH). IDLH atmospheres are dened as:
1. Those which the wearer could not breathe for short
periods.
2. Those from which the wearer could not escape
without the aide of the respirator.
3. Those which have an immediate or delayed adverse
effect on health.
• Never use this respirator without appropriate SPERIAN
cartridges/lters identied on the NIOSH approval label
securely threaded onto the face piece.
• This respirator does not supply oxygen and must not be
used in the atmospheres containing less than 19.5%
oxygen by volume.
• Our engineers cannot predict what will happen to this
equipment in every potential environment. Materials
can be chemically attacked if exposed to the wrong
environment and may exhibit excessive corrosion or
other forms of damage. Permeation of gases and liquids
through the materials could be excessive. Extreme of
temperature might cause thermal degradation. Each of
these things, or a combination of them, could crated
conditioning with this SPERIAN equipment would be
dangerous to use.
• All persons using this SPERIAN breathing apparatus
must be amde aware of its limitations.
We cannot be responsible for any damage to property,
personal injury, or dath in which environmental
exposure is a contributing factor.
• Always read cartridge labels prior to use to be certain
that you have cartridges and/or lters that will provide
the required protection. Cartridges/lters labeled for
protection against particulate only shall not be used
for gases/vapors, and cartridges/lters labeled for
protection against gases/vapor only shall not be used
for particulates:
• Immediately return to a non-contaminated area if:
a. You taste or smell contaminates , or if your eyes,
nose, or throat become irritated. blasting, underwater
diving, or interior structural re ghting.
b. Breathing becomes difcult.
c. The air you are breathing becomes uncomfortably
warm.
d. You feel nauseous or dizzy.
• This respirator does not protect exposed areas of the
body. Some contaminates can be absorbed directly
through the skin while other may irritate exposed area.
• This respirator must not be used for abrasive blasting,
underwater diving, or interior structural re ghting.
WARNING
• Do not use this respirator at temperatures below -30°F
(-1°C) or above 130°F (71°C). Do not wear this respirator
if a satisfactory t, as determined by a qualitative or
quantitative t test, cannot be obtained. See ANSI
Z88.2 1992 and OSHA Standards for Asbestos and
Lead. Beards, stubble, or sideburns will prevent a good
facepiece seal. Do not use this respirator unless you
are clean shaven. Absence of one or both dentures can
seriously affect the t of the facepiece.
• No respirator can provide complete protection from all
conditions. Use extreme care for emergency operations.
Do not use this respirator for applications involving
exposure to high heat or direct ame.
• Accessories not offered by SPERIAN may degrade
performance, and will void NIOSH certication.
• NEVER use this respirator without SPERIAN cartridges
or lters securely threaded onto the facepiece. This
respirator must be used in conjunction with a written
respirator program meeting the requirements of the
OSHA Standard for Respiratory Protection, 29 CFR
1910.134, available from the U.S. Department of Labor,
Occupational Safety and Health Administration. The
program must include procedures for evaluating air
contaminants and selecting appropriate respirators,
procedures for proper use of respirators, procedures
for testing the facepiece-to-face t of respirators,
procedures for cleaning, disinfecting, inspecting,
maintaining, and storing respirators, procedures for
determining if workers are physically and medically
capable of wearing respirators, and procedures for
training employees in the use of respirators and in
recognizing the hazards associated with contaminants
in the work place. When used with a written respirator
program, this respirator will reduce, but not eliminate
the inhalation of contaminants.
• SPERIAN respirators, accessories, and associated
equipment should not be used in atmospheres which
may contain contaminant concentrations above the
lower explosive level (LEL). Intrinsic safety certication
of electronic components does not eliminate potential
danger from ignition in these atmospheres.
• FAILURE TO OBSERVE ALL WARNINGS MAY RESULT IN
PERSONAL INJURY, SERIOUS ILLNESS, OR DEATH.
2
Page 3
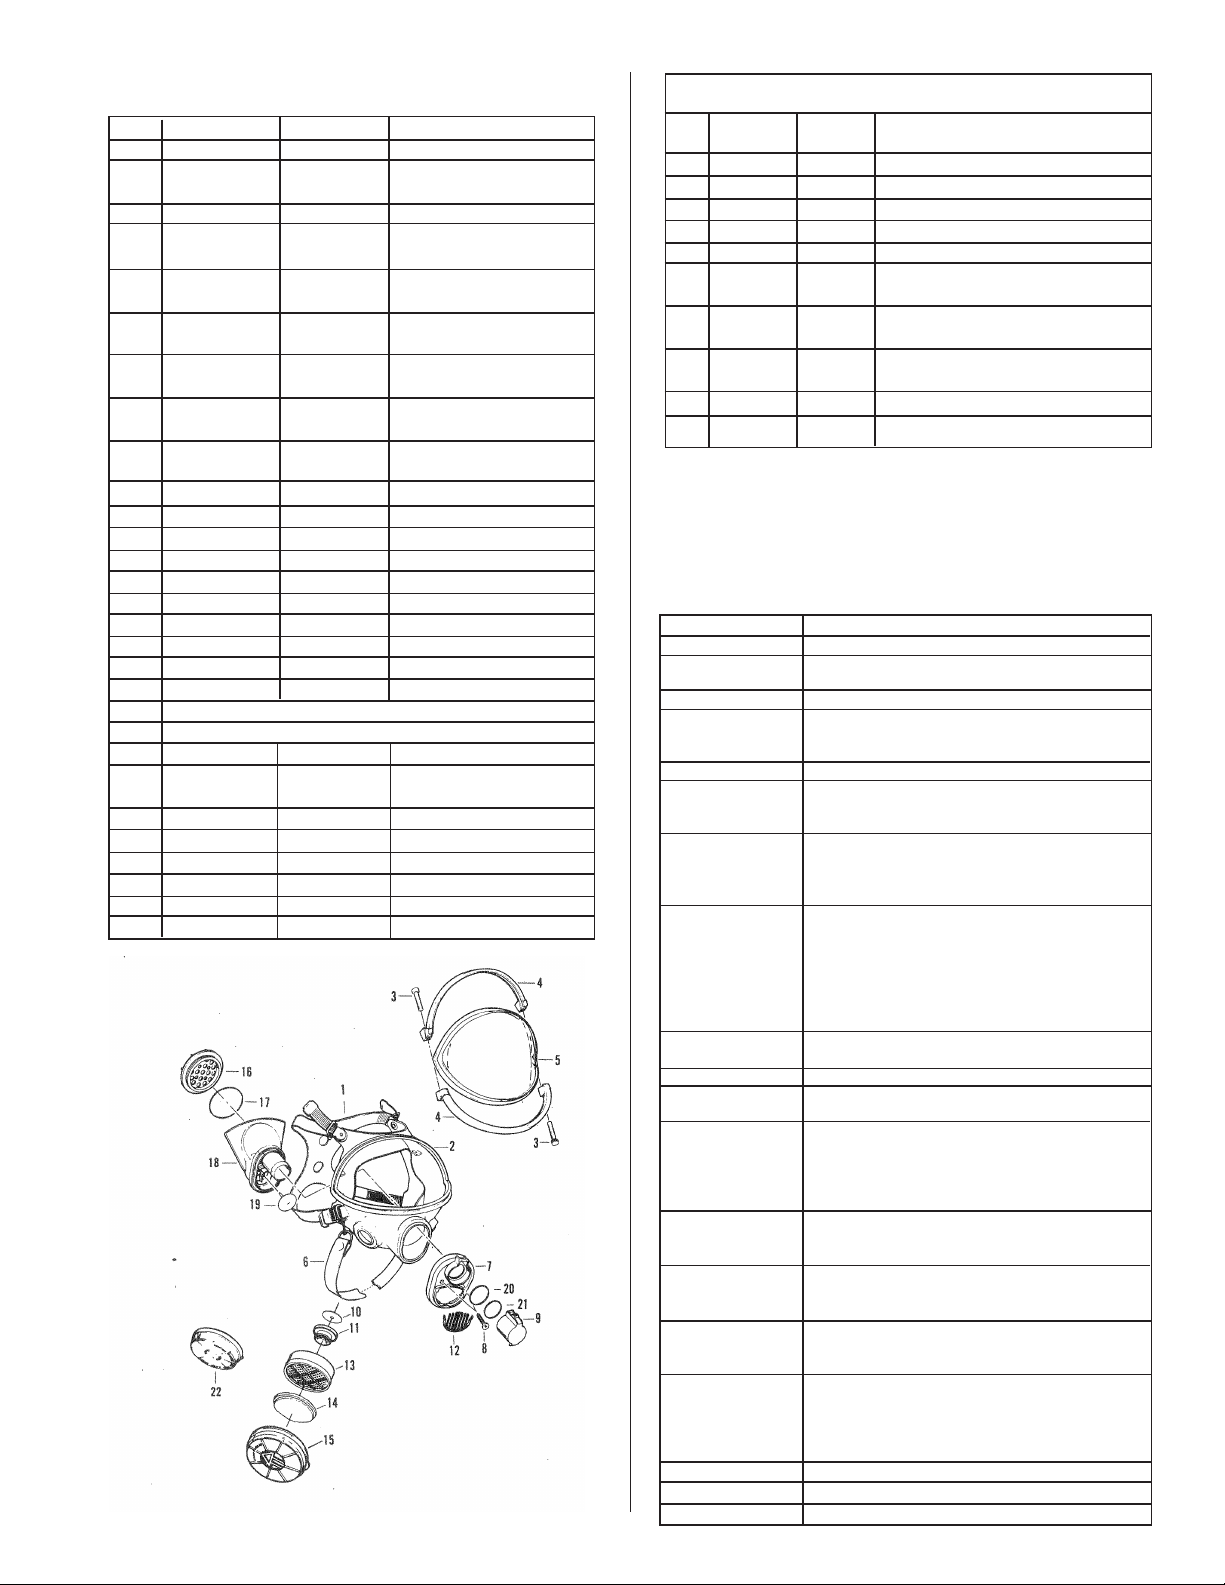
IV. PARTS LIST
ITEM QTY. (Ea.) P/N DESCRIPTION
1 1 941723 Headstrap, 4-Strap, Blue
968424 Headstrap, 5-Strap,
Black
961094 Headstrap, 5-Strap, Blue
2 1 420002 Standard Skirt, 4-Strap,
Blue
420003 Standard Skirt, 5-Strap,
Black
420081 Standard Skirt, 5-Strap,
Blue
1 410002 Small Skirt, 4-Strap,
Blue
410003 Small Skirt, 5-Strap,
Black
410081 Small Skirt, 5-Strap,
Blue
3 2 839102 Screw
4 2 941280 Rim
5 1 941712 Lens
6 1 940135 Strap Assy.
7 1 520039 Cover
8 2 955805 Screw
9 1 420020 Cap
10 1 pkg. of 6 140001 Inhalation Valve
11 1 pkg. of 2 140002 Threaded Connector
12 1 420008 Grill
13 Cartridges —See Table 1
14 Filters — See Table 1
15 1 140079 Filter Retainer
16 1 941759 Speaking Diaphragm
Assy.
17 1 820031 O-ring
18 1 980081 Nozzle
19 1 pkg. of 4 140003 Exhalation Valve
20 1 824014 Leak Check O-ring
21 1 824014 Cap O-ring
22 1 981177 Filter Shower Cap
Figure 1. Series 4000 APR
ACCESSORIES
P/N DESCRIPTION
980003 Spectacles Kit
980017 Nose Cup Kit
140095 Lens Cover
951015 Anti-fog Solution (1 oz.)
951016 Anti-fog Solution (16 oz.)
430000 Welding Shield, Standard Weld
ing Plate
430030 Welding Shield, Auto-Dark, Vari
able 9-12 Shade
430040 Welding Shield, Auto-Dark, Fixed
10 Shade
430005 Welding Bib, Lower
430010 Welding Bib, Upper
NOTE
Use only components with the part numbers listed on the
NIOSH approval label. Use of any other components will
void the approval.
TABLE 1. CARTRIDGES AND FILTERS
MODEL NO. CARTRIDGES
100100 Organic Vapors
100200 Acid Gases: Sulfur Dioxide, Chlorine, Hy
drogen Chloride, Formaldehyde
100300 Organic Vapors and Acid Gases: Organic
Vapors; Sulfur Dioxide, Chlorine, Hydrogen
Chloride, Chlorine Dioxide, Hydrogen Fluo
ride, Hydrogen Sulde (Escape Only)
100400 Ammonia and Methylamine
109100 Combination Organic Vapors; HEPA;
Dusts, Fumes, and Mists; Pesticides; and
Mists of Paint, Lacquer, and Enamel
109200 Combination Acid Gases; HEPA; and
Dusts, Fumes, and Mists: Sulfur Dioxide,
Chlorine, Hydrogen Chloride; HEPA; Dusts,
Fumes, and Mists
109300 Combination Organic Vapors; Acid Gases;
HEPA; Dusts, Fumes, and Mists; and
Pesticides: Organic Vapors; Sulfur Dioxide,
Chlorine, Hydrogen Chloride, Chlorine
Dioxide, Hydrogen Fluoride, Hydrogen
Sulde (Escape Only); HEPA; Dusts,
Fumes, and Mists; Pesticides
109400 Combination Ammonia; Methylamine; HEPA;
and Dusts, Fumes, and Mists
1091 Combination Organic Vapors and P100
1092 Combination Acid Gases and P100: Sulfur Diox
ide, Chlorine, Hydrogen Chloride; and P100
1093 Combination Organic Vapors; Acid Gases;
and P100: Organic Vapors; Sulfur Dioxide,
Chlorine, Hydrogen Chloride, Chlorine Dioxide,
Hydrogen Fluoride, Hydrogen Sulde (Escape
Only); and P100
1094 Combination Ammonia; Methylamine; and
P100
FILTERS
101000 Dusts and Mists when used with 100100,
100200, 100300, or 100400 cartridge, and
140079 retainer.
102000 Paint, Lacquer, and Enamel Mists, and Dusts
& Mists when used with 100100 cartridge and
140079 retainer.
104000 Pesticides; Paint, Lacquer, and Enamel
Mists; and Dusts, Fumes, and Mists when
used with 100100 cartridge and 140079 retainer.
Dusts, Fumes, and Mists when used with
100300 cartridge and 140079 retainer.
109000 HEPA; and Dusts, Fumes, and Mists
1090 P100
1195 P100 Disk
3
Page 4

WARNING
Following is a partial list of materials for which these respirators
MUST NOT be used. This list is far
from complete. Contact SPERIAN
for information on other materials.
Acroline Hydrogen Selenide
Aniline Isocyanates: TDI, HDI, MDI
Arsine Methanol
Boron Hydrides Methylene Chloride, Methyl
Bromine Nitro Compounds:
Carbon Dioxide
Carbon Monoxide
Carbonyls
Cyanogen
Dimethylaniline Ozone
Dimethyl Sulfate Phosgene
Ethyl Cyanide Phosphine
Fluorine Phosphorous Trichloride
Hydrogen Cyanide Stibine
Sulfur Chloride Vinyl Chloride
V. USE INSTRUCTIONS
Bromide, Methyl Chloride
Nitrogen Oxides
Nitroglycerin
Nitrobenzene
Nitromethane
A. Filter/Cartridge Installation
Ensure that you have the correct lter and/or 1.
chemical cartridge for the specic contaminants in
your work area. If you are not sure, consult your
supervisor or safety professional.
Thread the P100 or HEPA lters or correct chemi-2.
cal cartridges onto the facepiece connectors.
Carefully hand-tighten, ensuring a good seal 3.
against the facepiece. Do not over tighten.
To install lter pads, insert the correct lter pad 4.
into the lter retainer with the side stamped with
the part number facing the wearer.
Snap the lter retainer onto the chemical car-5.
tridge.
When using the transparent lter retainer, P/N 6.
140079, inspect the assembly through the re-
tainer and ensure that:
The edge of the lter makes contact with the a.
entire retainer wall.
The lter is not bunched or folded.b.
The lter completely covers the top of the c.
cartridge.
B. Donning
WARNING
Always read cartridge labels prior to use to
be certain that you have cartridges and/or
lters that will provide the required protection. Cartridges/lters labeled for protection
against particulates only shall not be used
for gases/vapors, and cartridges/lters labeled for protection against gases/vapors
only shall not be used for particulates. Both
cartridges/lters must be of the same type.
Inspect the respirator as described in section VI, 1.
paragraph B.
Adjust the top facepiece straps until one inch of 2.
strap extends through each buckle. Fully loosen
the lower straps.
Place the neck strap around the back of your 3.
neck.
Place your chin against the chin cup and center 4.
the facepiece.
Grasp the facepiece with your hand, and pull the 5.
straps over your head.
Tighten the bottom straps until a good seal is ob-6.
tained. Adjust the top straps if required.
For the 5-strap facepiece, tighten the lower straps, 7.
the temple straps, then the top strap, until all the
headstraps lie at on your head.
NOTE
When properly adjusted, the headstrap hub should
be centered on the back of your head, and the lower
straps should be below your ears.
C. Facepiece Fit Check
WARNING
If a leak-tight seal is not obtained during the
following t checks, do not wear the respirator. Ask your supervisor or safety professional for assistance.
1. Positive Pressure Fit Check
a. Hold your palm over the exhalation valve grill.
b. Exhale gently to create a positive pressure
inside the facepiece.
c. If leakage occurs, readjust facepiece and
straps until leak-tight. If you are unable
to obtain a proper fit, consult your safety
professional.
2. Negative Pressure Fit Check
a. Remove the lters and cover the lter inlets
with your hands and inhale gently. Hold your
breath for a few seconds. The facepiece
should collapse on your face without leaking.
b. If the facepiece leaks, reposition, check straps,
and repeat the leak check.
c. If a good t was achieved, reinstall the lters.
D. Using the Respirator
To receive the maximum protection available from your
respirator, you must follow your employer’s instructions
on the use and maintenance of the respirator. Read and
understand the following warnings prior to using the
respirator.
WARNING
● Never remove your respirator for any reason while you are in the work area.
● You must leave the work area immediately
if the face piece seal is disturbed for any
reason, such as:
4
Page 5

Warning —Continued
a. Slipping due to excessive sweating or
excessive head movement.
b. The facepiece becomes dislodged as a result
of being knocked.
c. You sneeze or cough while wearing the
facepiece.
d. You need to blow your nose, scratch covered
areas of your face, or need to adjust your
spectacles kit.
e. For any other reason that would cause the
facepiece seal to be disturbed.
You must restore the facepiece seal and perform
a t check before reentering the work area.
G. Cartridge Replacement
The cartridges must be replaced whenever you smell
or taste contaminants, or if your eyes, nose, or throat
become irritated. Cartridges must also be replaced
if they show any sign of damage. Dispose of used
cartridges in accordance with applicable local, state,
and federal guidelines.
Return to an area with clean air.1.
Unscrew the used cartridges from the facepiece 2.
connectors and discard.
Securely install new cartridges onto threaded 3.
facepiece connectors as described in section V,
paragraph A.
E. Dofng
CAUTION
Always loosen the two lower headstraps completely prior to removing the facepiece.
Loosen the two lower headstraps completely.1.
CAUTION
Do not twist the nozzle when removing the facepiece
Grasp the nozzle rmly and pull the facepiece upward 2.
over your head.
Remove the neck strap from around your neck3. .
F. Filter Replacement
SPERIAN recommends that the lters be changed at
least daily, and more often if necessary. The lters must
be replaced whenever they become contaminated with
dust or water; if you smell or taste contaminants; if your
eyes, nose, or throat become irritated; or if breathing
becomes difcult. Filters must also be replaced if they
show any sign of damage. Dispose of used lters in
accordance with applicable local, state, and federal
guidelines.
Return to an area with clean air.1.
Remove the lter retainer from the chemical 2.
cartridge. If using a P100 or HEPA lter, unscrew
the used lters from the facepiece connectors
and discard them.
Remove and discard the lter pad.3.
Clean the lter retainer if required.4.
Insert the correct lter pad into the lter retainer 5.
with the side stamped with the part number
facing up.
Snap the lter retainer onto the chemical cartridge. 6.
If using a P100 or HEPA lter, securely install new
lters onto the threaded facepiece connectors as
described in section V, paragraph A.
Perform a t check.7.
VI. MAINTENANCE
NOTE
Inspect this respirator for defects before and after
each use, and at least once monthly if not used.
Repair as necessary, clean and disinfect after each
use, and store properly to assure that the respirator is
maintained in satisfactory working condition. Keep a
record of inspection and repair dates and results. Refer
to the inspection table in the back of this manual.
A. Cleaning
WARNING
Specialized processes are required to disinfect and decontaminate a respirator. You
MUST follow the instructions of the manufacturer who supplies the disinfecting or de-
contamination equipment or chemicals.
NOTE
Silicone and rubber parts of the facepiece may be
cleaned between washings with SPERIAN Mask
Wipes, P/N 140096.
1. Make a cleaning solution of warm water and a mild
detergent.
2. Remove the cartridges/lters from the facepiece.
3. Immerse the facepiece top rst in the solution until
the exhalation valve is covered.
4. Agitate the facepiece and gently clean with a soft
brush.
5. Thoroughly rinse the facepiece in fresh water,
paying particular attention to removal of all soap
residue from the exhalation valve. If possible, direct
running water onto the exhalation valve.
6. Disinfect the facepiece in a warm (48°C or 120°F
maximum) suitable sanitizing solution such as
a “hypochlorite solution” for 2 to 3 minutes. A
hypochlorite solution can be made by mixing two
(2) tablespoons of chlorine bleach per each gallon
of water. Rinse thoroughly with fresh warm (48°C
or 120°F maximum) water.
7. Allow the facepiece to drip dry. Warm air may be
used to speed up drying.
5
Page 6

NOTE
Cleaning solutions containing ammonia or repeated
washing will remove the lens anti-fog coating. Recoat
with SPERIAN Anti-Fog Solution, P/N 951015 (1 oz.),
or 951016 (16 oz.).
8. After cleaning, apply three drops of anti-fog
solution as required to the inner surface of the
lens and spread with a lint-free cloth. Allow to dry
for 15 minutes.
9. Hold the facepiece rmly against your face and
exhale several times to ensure that the exhalation
valve functions smoothly.
B. Inspection (See the Inspection Table in the Back
of this Manual)
WARNING
Ensure that the o-ring, P/N 824014, is in the cap plug,
P/N 420020, and that the cap plug is securely seated
on the nozzle. Using the APR without the cap plug oring or without the cap plug securely seated could allow contaminants to leak into the facepiece, resulting
in illness or death.
NOTE
The leak check o-ring, item 20 of Figure 1, located
between the cap plug (item 9) and the cover (item 7)
is to allow the positive pressure t check only.
E. Shipment
All products returned to SPERIAN’s factory, distributors, or repair centers must be decontaminated prior
to shipment.
F. Overhaul Frequency
This SPERIAN respirator does not have an overhaul
requirement other than that required in Section VI,
Maintenance.
G. Additional Information
If you need assistance or additional information on
any SPERIAN product, consult your local distributor
or contact:
SPERIAN
3001 South Susan Street
Santa Ana, CA 92704
(714) 545-0410 or toll free 888-APR-SCBA
FAX (714) 850-0299
ALL RETURNED PRODUCTS MUST BE
DECONTAMINATED PRIOR TO SHIPMENT. PRODUCTS CONTAMINATED
WITH DANGEROUS SUBSTANCES WILL
BE REFUSED AND RETURNED FREIGHT
COLLECT.
C. Repair (See the Repair Table in the Back of this
Manual)
Repair by the user is limited to replacement of
components as listed on the NIOSH approval label.
Disassembly should be performed only to the extent
necessary to replace the components. To protect your
warranty and the NIOSH certication of the equipment,
all other repairs must be done only by authorized
SPERIAN technicians and repair centers. Consult your
SPERIAN distributor for the one nearest you.
D. Storage
WARNING
This SPERIAN respirator does not have
a dened storage life. Carefully inspect it
before each use.
CAUTION
The maximum storage temperature for this device is 140°F (60°C). Long term exposure to elevated storage temperatures could cause premature deterioration.
After inspection and cleaning, store your SPERIAN
APR to protect it against dust, sunlight, extreme heat
and cold, excessive moisture, or damaging chemicals.
6
Page 7

VII. INSPECTION TABLE
IF ANY OF THE DEFECTS LISTED BELOW ARE FOUND, HAVE THE RESPIRATOR REPAIRED BEFORE USE.
COMPONENT LOOK FOR
FACEPIECE LENS Nicks, scratches, or abrasions which could impair visibility.
FACEPIECE RIMS Deformed, cracked, or broken.1.
FACEPIECE SKIRT Cuts, gouges, or punctures.1.
FACEPIECE HEADSTRAP Abrasions or nicks.1.
FACEPIECE BUCKLES Crushed, bent, or corroded.1.
FACEPIECE INLET NOZZLE Loose cover screws.1.
SPEAKING DIAPHRAGM Holes or tears. Do not remove to inspect.
1.
Deep gouges or cracks which could reduce impact resistance.2.
Anti-fog coating in need of replacement.3.
Loose screws. Do not overtighten.2.
Tears or nicks in the sealing area.2.
Deterioration from age, heat, or contamination.3.
Deterioration from age, heat, or contamination.2.
Damaged or loose rivets.2.
Heat or impact damage.2.
Nicks, cracks, or dents in the exhalation valve seat.3.
Nicks, cracks, tears, or creases in the exhalation valve.4.
Sticking exhalation valve. Exhale a few times to test. The valve must close after 5.
each exhalation. Valves that fail to close must be replaced.
VIII. REPAIR TABLE
COMPONENT INSTRUCTIONS
HEADSTRAP REPLACEMENT Remove the old headstrap from the facepiece, noting the routing of the straps.
NOSE CUP Unscrew the speaking diaphragm ring counterclockwise and remove it, along with 1.
FACEPIECE LENS REPLACEMENT Use a 5/32 inch Allen wrench to remove the two rim screws.1.
EXHALATION VALVE Remove the valve grill cover form the nozzle.1.
ACCESSORIES Each modication kit and acessory purchased from SPERIAN has installation
1.
Install new headstrap.2.
the o-ring from the nozzle. NOTE: If the speaking diaphragm ring is too tight to
remove by hand, use the Speaking Diaphragm Tool, P/N 980019.
Discard the old nose cup.
2.
If removed, reinstall the o-ring on the speaking diaphragm ring.3.
Fit the speaking diaphragm ring into the nose cup.4.
Position the nose cup inside the facepiece with the locating pins seated in the 5.
exhalation valve hole.
Tighten the speaking diaphragm ring.
6.
Perform a facepiece t check as described in section V, paragraph C.7.
Gently sepearte the rims from the facepiece.2.
Pull the facepiece skirt away from the lens.3.
Remove the old lens.4.
Match one corner of the new olens with the corner of the skirt.5.
Place the edge of the lens inside the lens channel fo the skirt.6.
Knead the skirt until it ts evenly around the edge of the lends, and the corners of 7.
the skirt match the corners of the lens.
Install the two rims. Start both scrws but do not tighten. CAUTION-Do not pinch
8.
the skirt between the rims.
Alternatley tighten each screw until rmly tightened.
9.
NOTE ─ The corners of the skirt should be centered between each rim when installation is complete.
Perform a facepiece t check as described in section V, paragraph C.
10.
Remove and discard teh old exhalation valve.2.
Insert a new valve and pull the valve stem until it snaps into place.3.
Replace teh valve grill cover.4.
Perform a facepiece t check as described in section V, paragraph C.5.
instructions. Use these instructions for removing and replacing any accessory.
www.sperianprotection.com
7
 Loading...