

Spengler EFFItens AMI Instruction Manual
Instruction manual - Manuel d’utilisation
Manual de instrucciones - Manuale di istruzioni
Bedienungs-anleitung - Instructiehandleiding
Automatic upper arm blood pressure monitor
Tensiomètre automatique au bras
Tensiómetro automático de brazo
Sfigmomanometro automatico da braccio
Automatisches Oberarm-Blutdruckmessgerät
Bloeddrukmeter polsmodel

EN
FR
ES
IT
DE
NL
AR
2 I Spengler

EN
FR
ES
IT
DE
NL
AR
EFFItens AMI®I 1
CONTENTS
Information You Should Know Before
Operating the Unit 1
About the Unit 3
Explanation of Displays 3
Preparation for Use
Installing/Replacing Batteries 4
Attaching the Pressure Cuff 4
Measuring Posture 5
Operations
Setting the Clock 6
Measuring Blood Pressure 6
Recalling Memories 8
Erasing Memories 8
Care and Maintenance 10
Error Message 11
Specifications 12
Guidance and Manufacturer's
Declaration 14
INFORMATION YOU SHOULD
KNOW BEFORE OPERATING THE UNIT
Caution
1. Consult your physician to verify your blood pressure
range before obtaining them at home with this unit.
2. If the cuff causes any discomfort during measure-
ment, press the power button to turn off the unit
immediately.
3. Pull off the velcro strap to detach the cuff if the
pressure is over 300mmHg and the cuff does not
deflate automatically.
Blood pressure measurements obtained with this unit
are equivalent to those obtained by a trained person
using the cuff/ stethoscope auscultation method,
within the limits prescribed by the American National.
Standard, Manual, electronic, or automated sphygmomanometers.
WARRANTY: Three years from the date of purchase.
EN
FR
ES
IT
DE
NL
AR
2 I Spengler
What is blood pressure?
A force is created by the heart as the ventricle forcibly
ejects blood into the blood vessels and through
the transport system. Another force is created by the
arteries as they resist the blood flow. Blood pressure
is the result of these two forces.
What are systolic and diastolic pressures?
Systolic pressure represents the highest pressure at
the height of the heart's contraction. Diastolic pressure is the lowest pressure when the heart is resting.
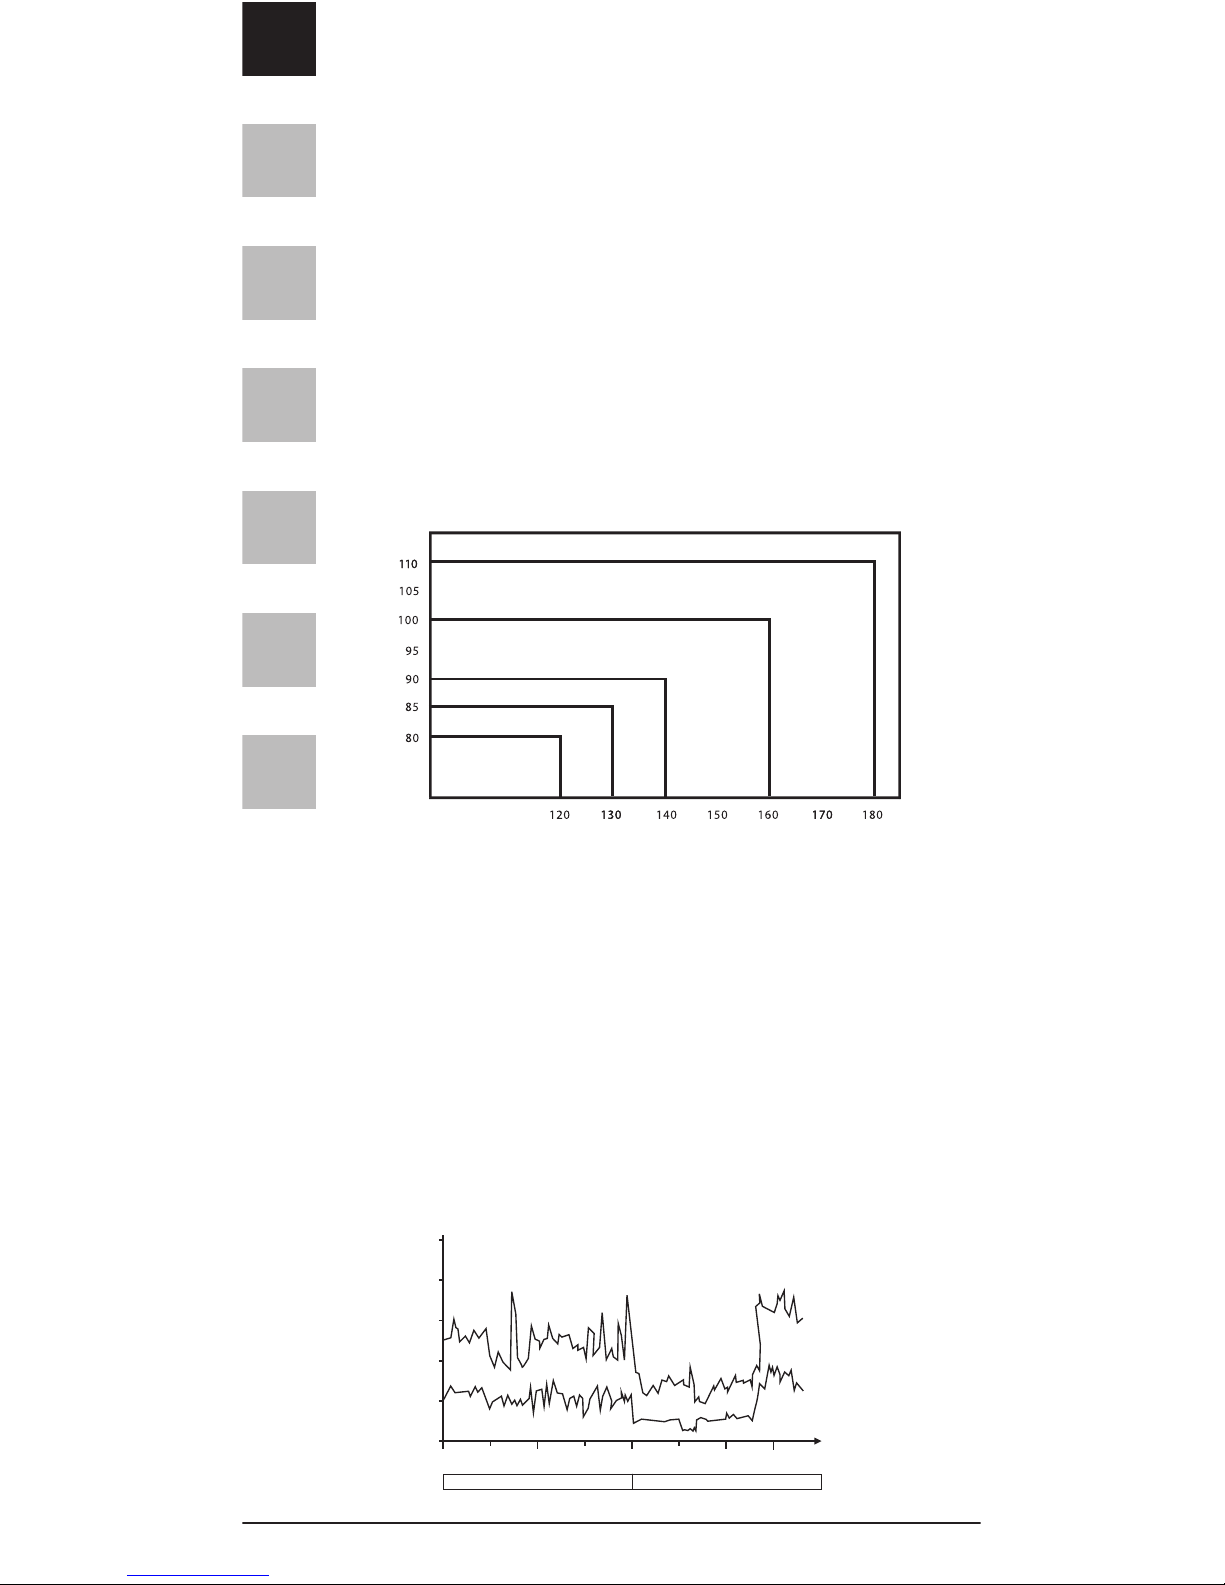
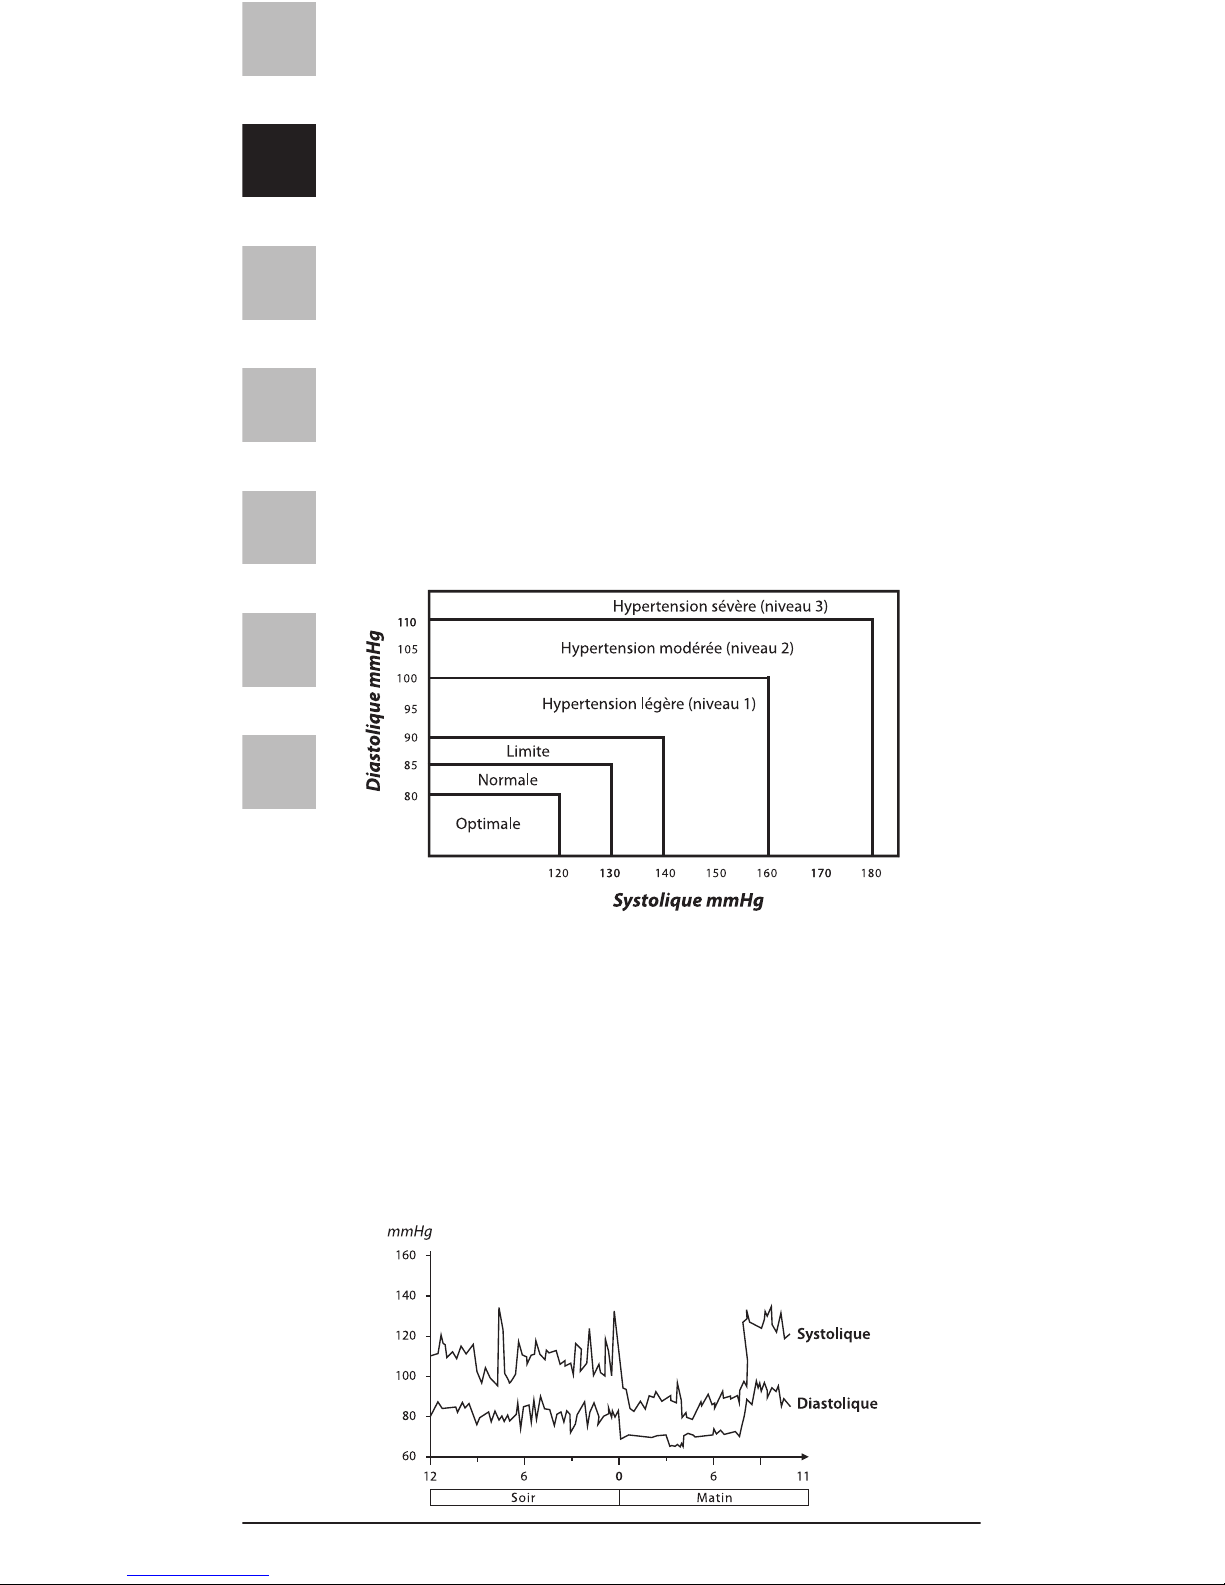
Comparison to WHO recommendations
See the following blood pressure classification chart
released by the WHO (World Health Organization) for
evaluation of your blood pressure level.
WHO recommendations are based on historical data,
which may not be applicable to a specific patient.
Please consult your physician for further advice.
What about low blood pressure?
In general, lower blood pressure reading is better unless it causes some uncomfortable symptoms such as
fainting and/or lightheadedness.
Fluctuation and variation in blood pressure
The following chart shows possible blood pressure
fluctuations during a 24hr period.
Severe Hypertension (Grade 3)
Systolic mmHg
Diastolic mmHg
Moderate Hypertension (Grade 2)
Mild Hypertension (Grade 1)
Borderline
Normal
Optimal
PM AM
Systolic
Diastolic
mmHg
160
140
120
100
80
60
12 6 0 6 11
EN
FR
ES
IT
DE
NL
AR
EFFItens AMI®I 3
The following factors will influence blood pressure
measurement results and cause variations.
• Bathing • Breathing
• Conversation • Moving
• Drinking alcohol • Meals
• Mental tension • Exercise
• Thoughts • Smoking
• Temperature change, etc...
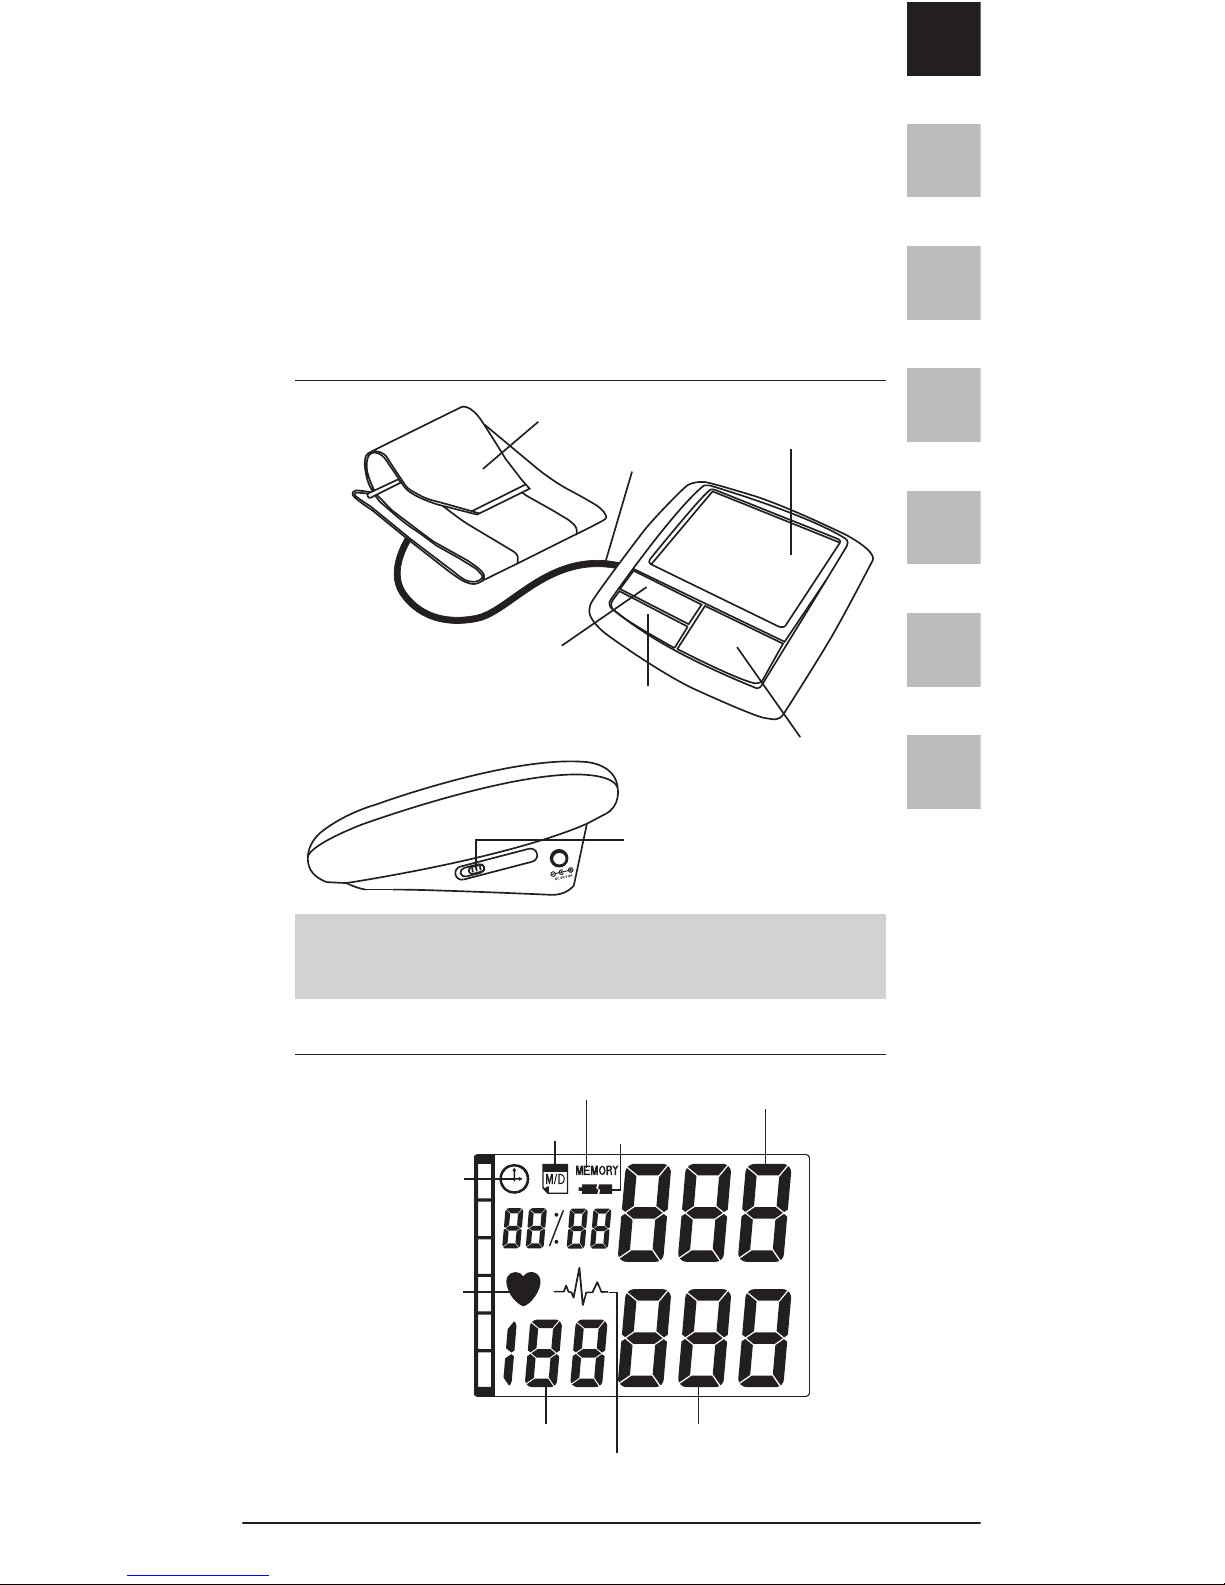
ABOUT THE UNIT
The cuff is designed to fit arm sizes between 22 and
32cm (8.7 to 12.6 inches.)
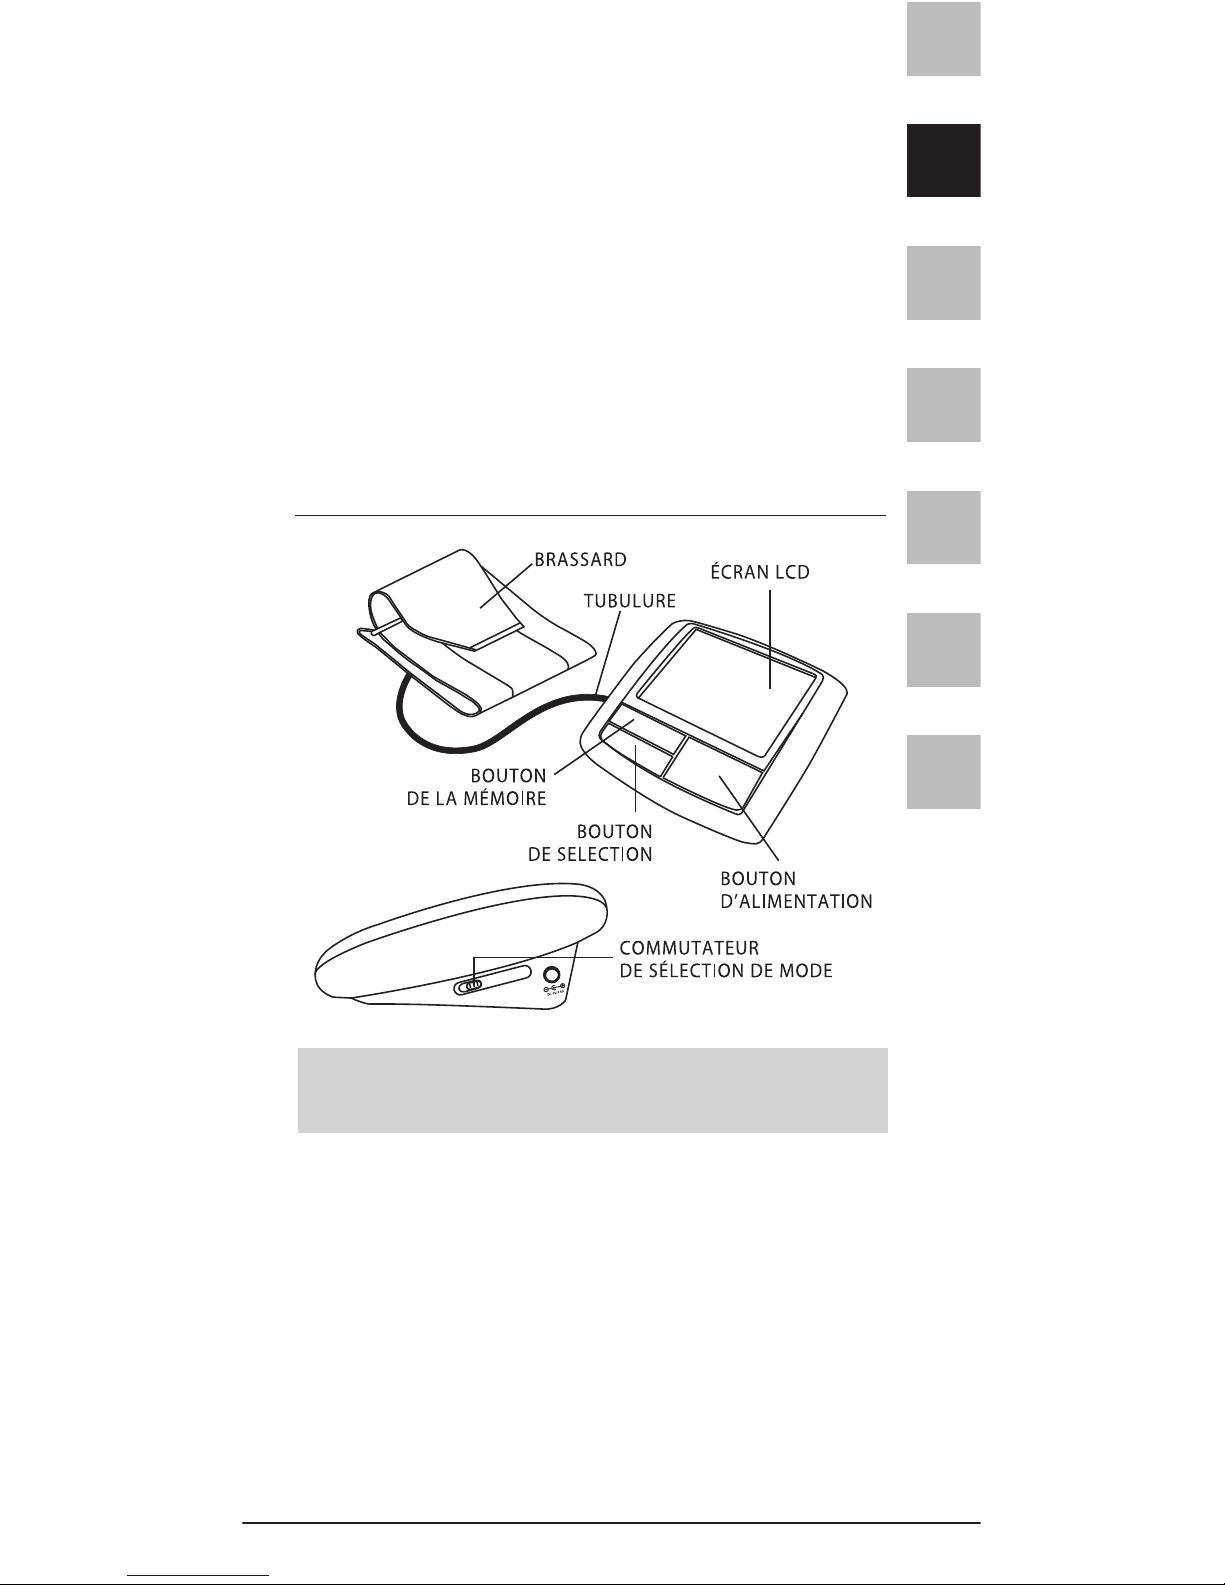
EXPLANATION OF DISPLAYS
LC D DIS P LAY
CU FF
PO W ER
BU T TON
MO D E SE L ECTI O N
SW I TCH
ME M ORY B UTTO N
US E RS S E LECT I ON
BU T TON
TU B ING
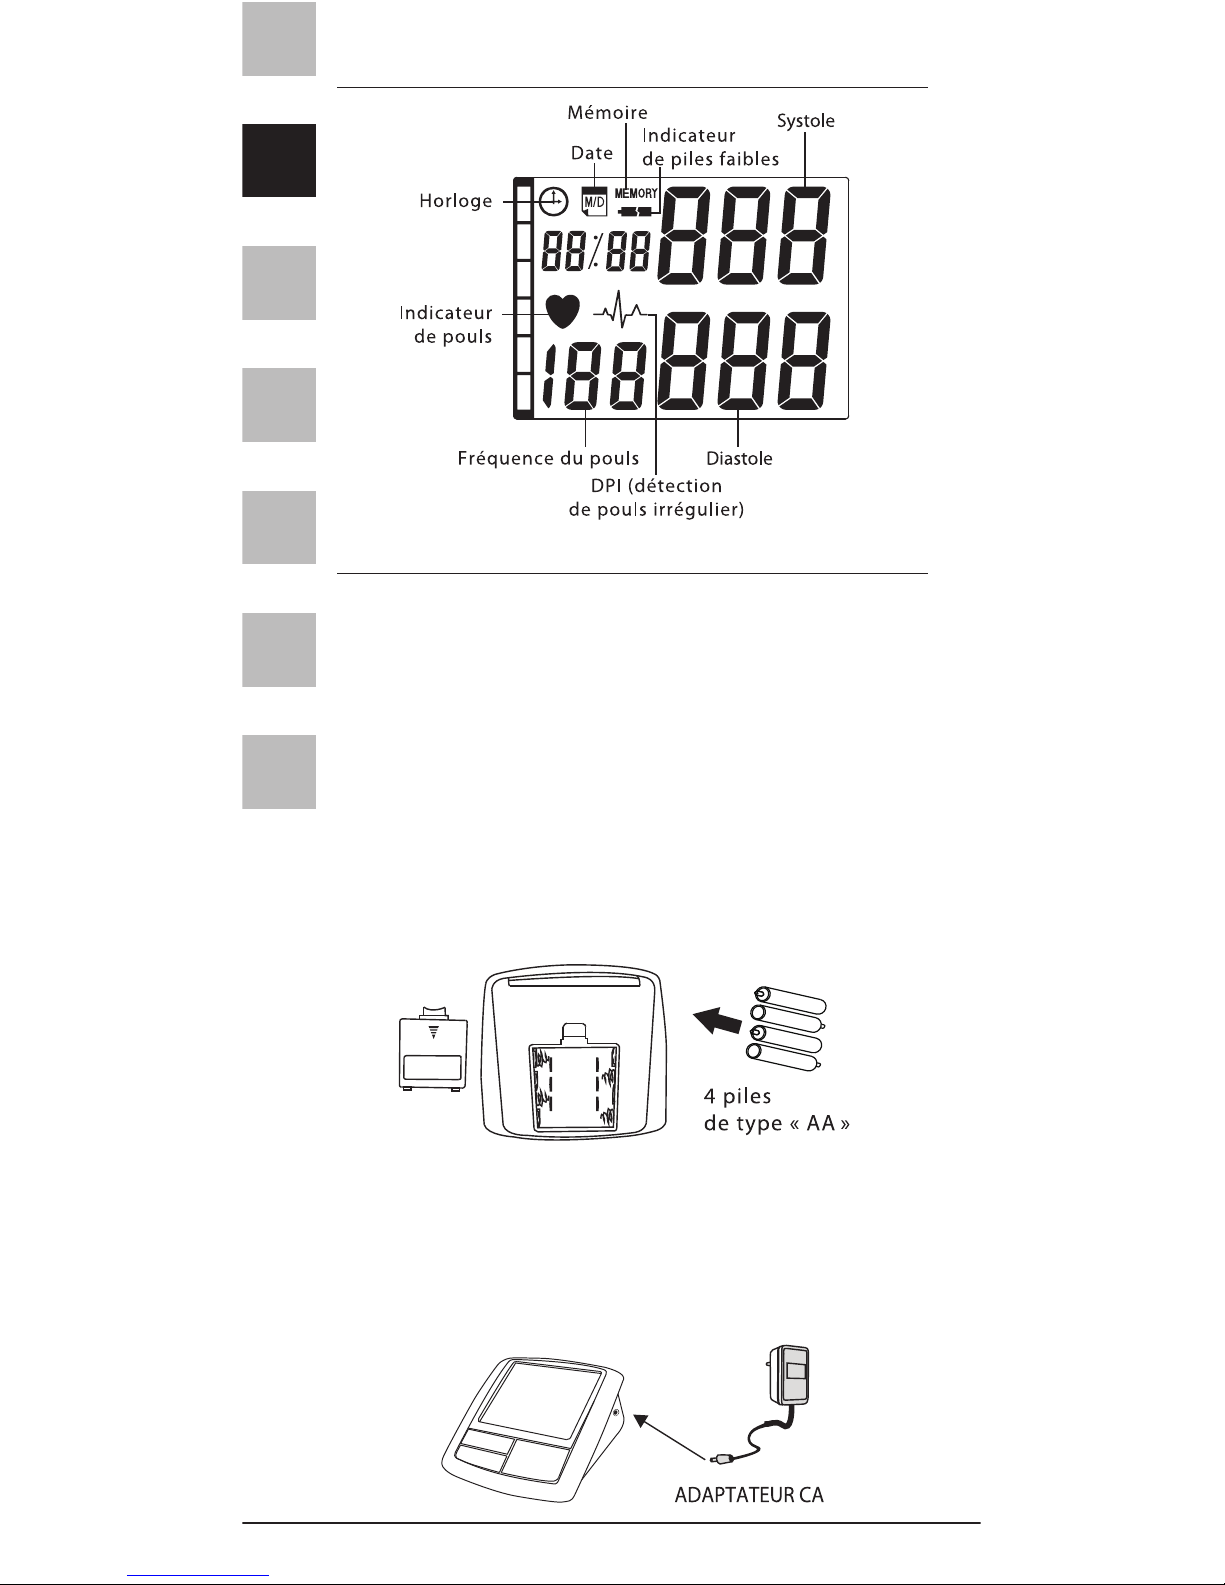
Systolic
Diastolic
Date
Memory
Clock
Pulse Rat e
Pulse
Indicator
Low Batte ry
Indicator
IPD (irre gular
pulse det ection)

EN
FR
ES
IT
DE
NL
AR
4 I Spengler
PREPARATION FOR USE
Installing/Replacing Batteries
1. Insert the batteries into the battery compartment
matching correct polarities "+" and "-".
2. Replace all batteries if the low battery indicator
appears.
3. Remove the batteries if the unit will not be used for
a long period of time.
NOTE: It is recommended that the same type of
alkaline batteries be used to avoid incompatibility.
AC Adapter (optional)
It is recommended to use an AC adapter(output 6V
DC/0.8A) to operate the device.
1. Connect the AC adapter to the socket located on
the right side of the device as shown in the figure.
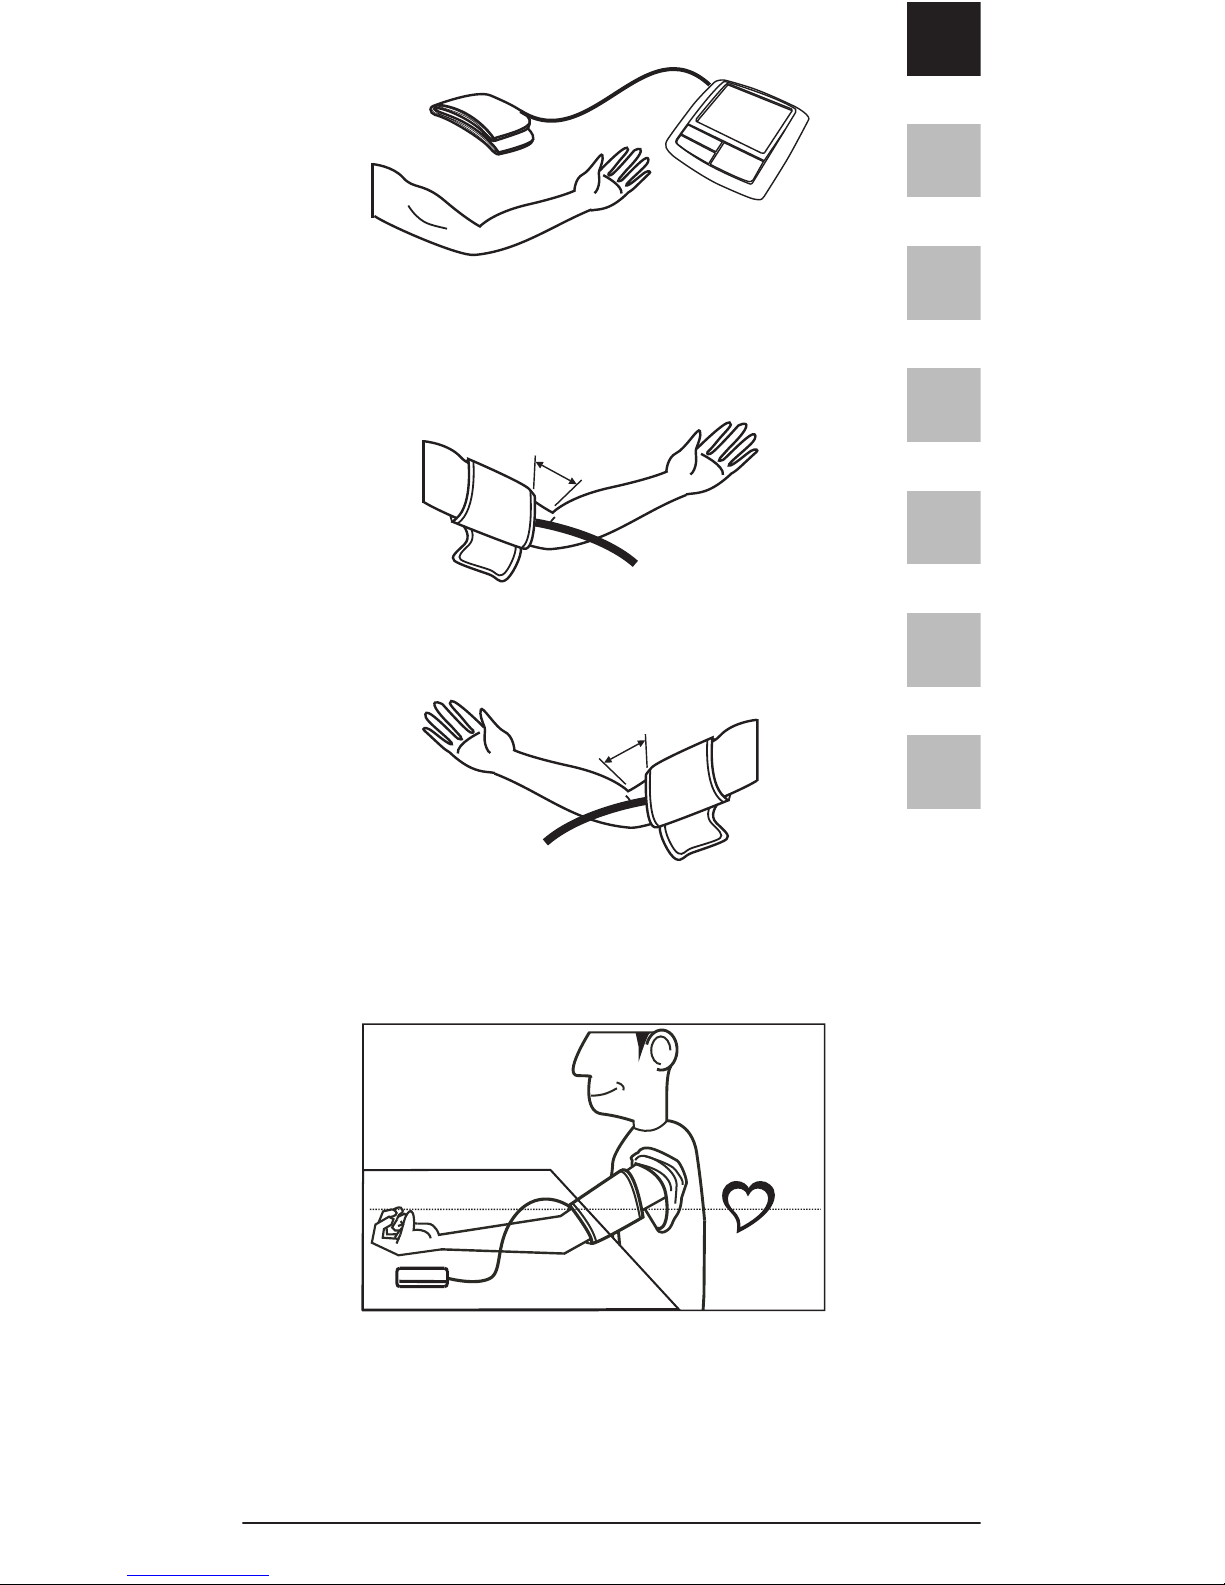
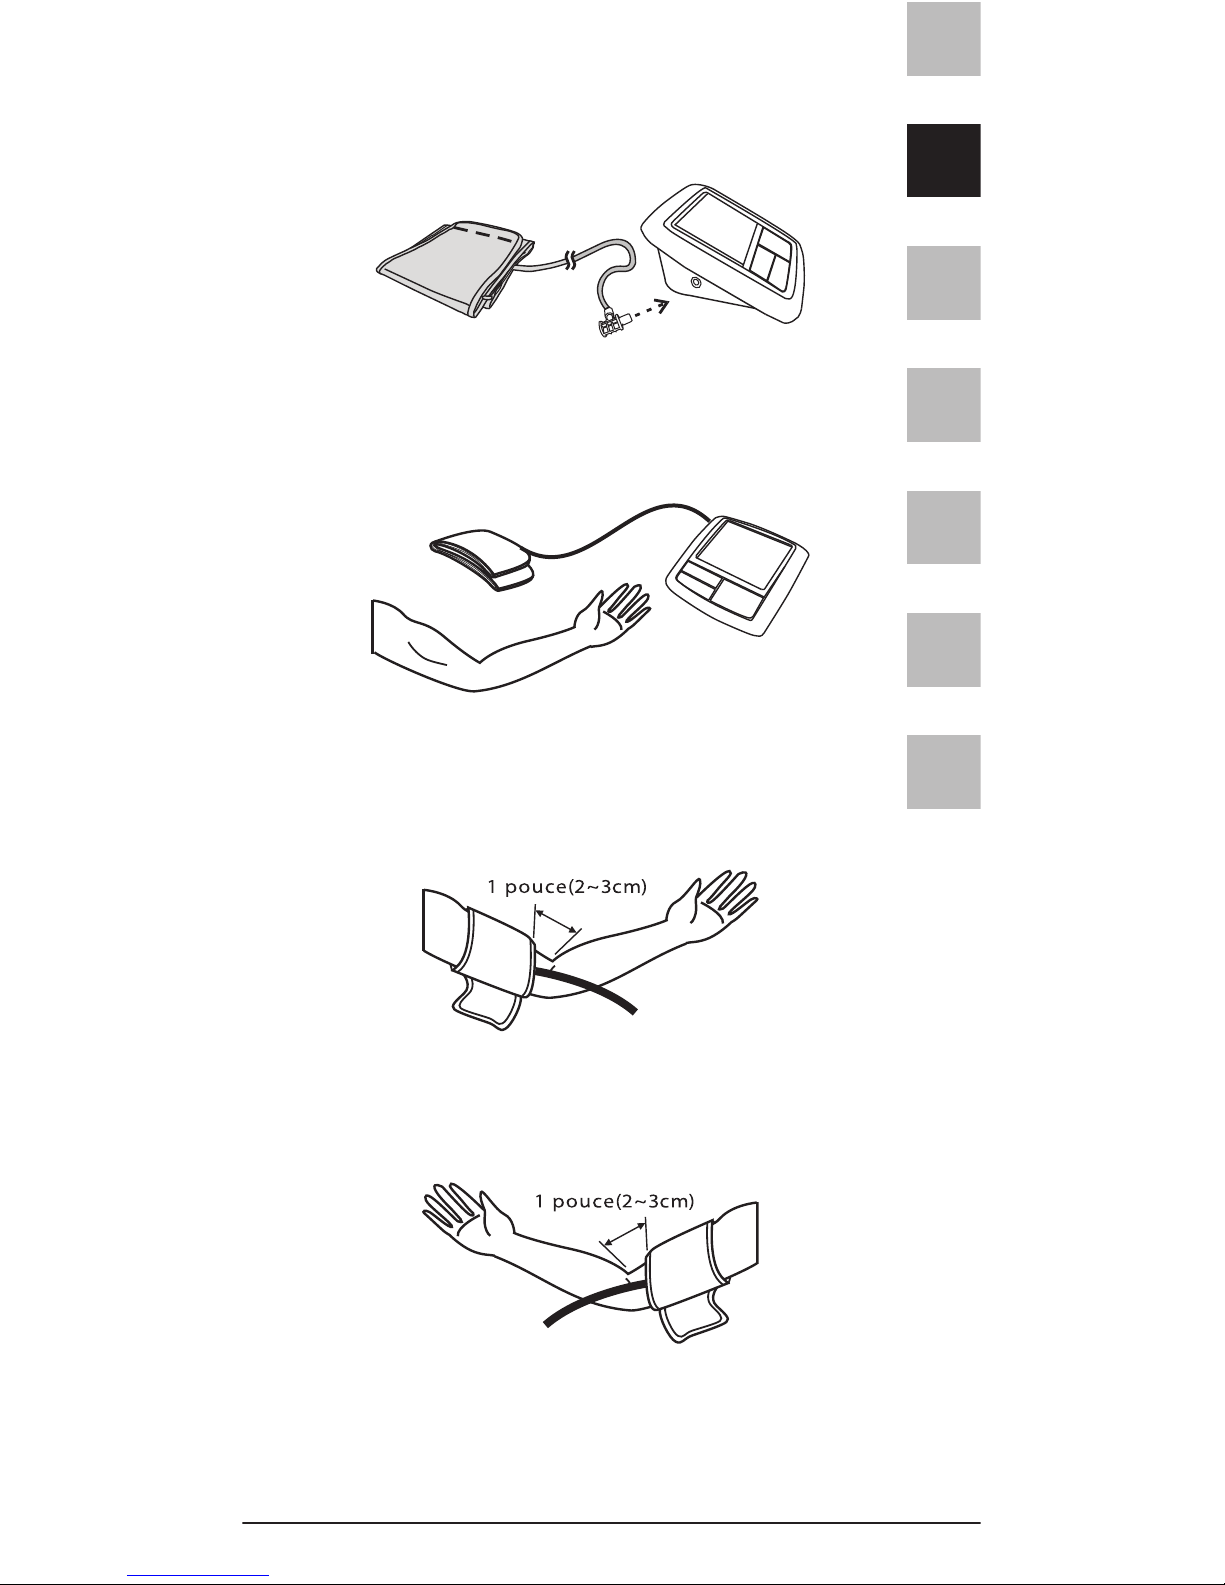
Attaching the Pressure Cuff to the Unit
1. Connect the tube connector to the socket of the
unit as shown in the figure.
Attaching the Pressure Cuff around the Arm
1. Wrap the cuff around bare-skinned left arm.
4 type "AA"
batteries
AC AD APTER
EN
FR
ES
IT
DE
NL
AR
EFFItens AMI®I 5
2. Fasten the cuff. Make sure it is not too tight. The
cuff's lower edge should be approximately one inch
from the crook of the arm.
3. If it is not possible to measure on the left arm.
Attach the cuff on the right arm as shown in the figure.
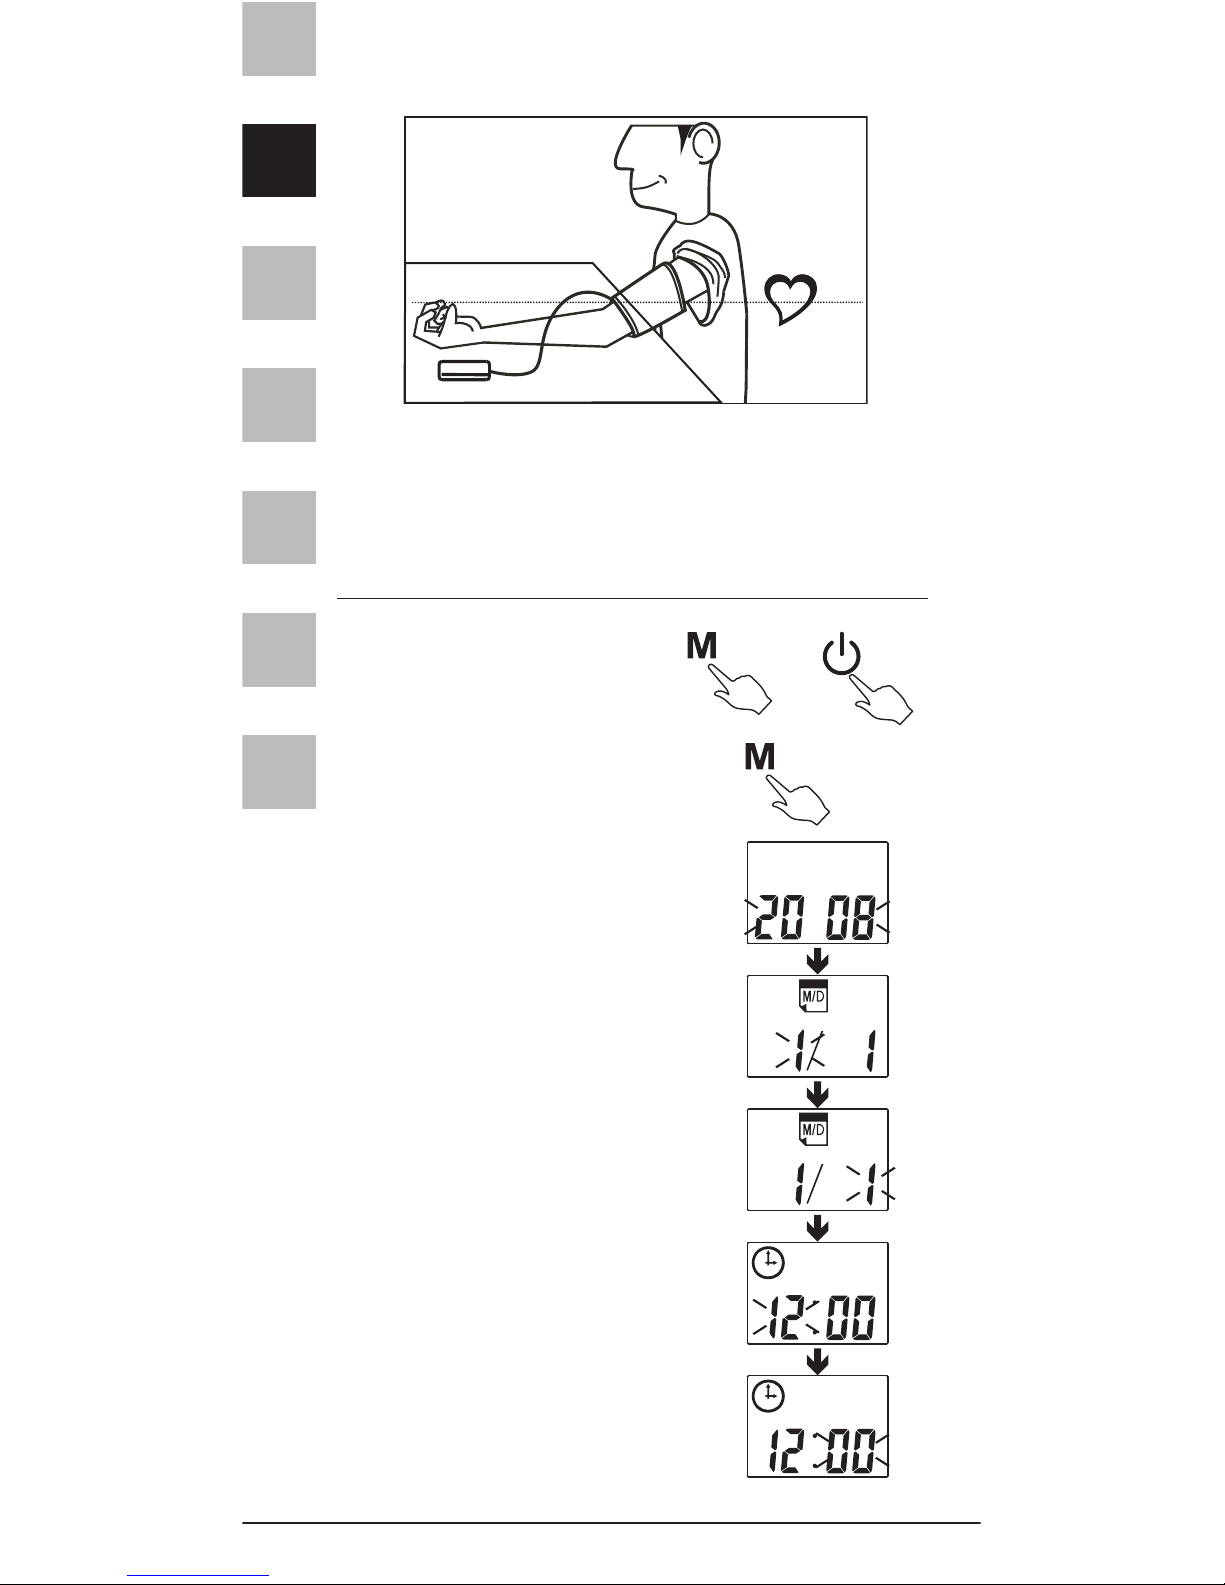
Measuring Posture
1. Sit upright and ensure that the measuring site is at
heart level. Relax and measure in a natural position.
2 . Measure and record blood pressure at the same
time every day to establish your blood pressure
pattern.
1i nch(2~3cm)
1i nch(2~3cm)
EN
FR
ES
IT
DE
NL
AR
6 I Spengler
HOW TO OPERATE THE UNIT
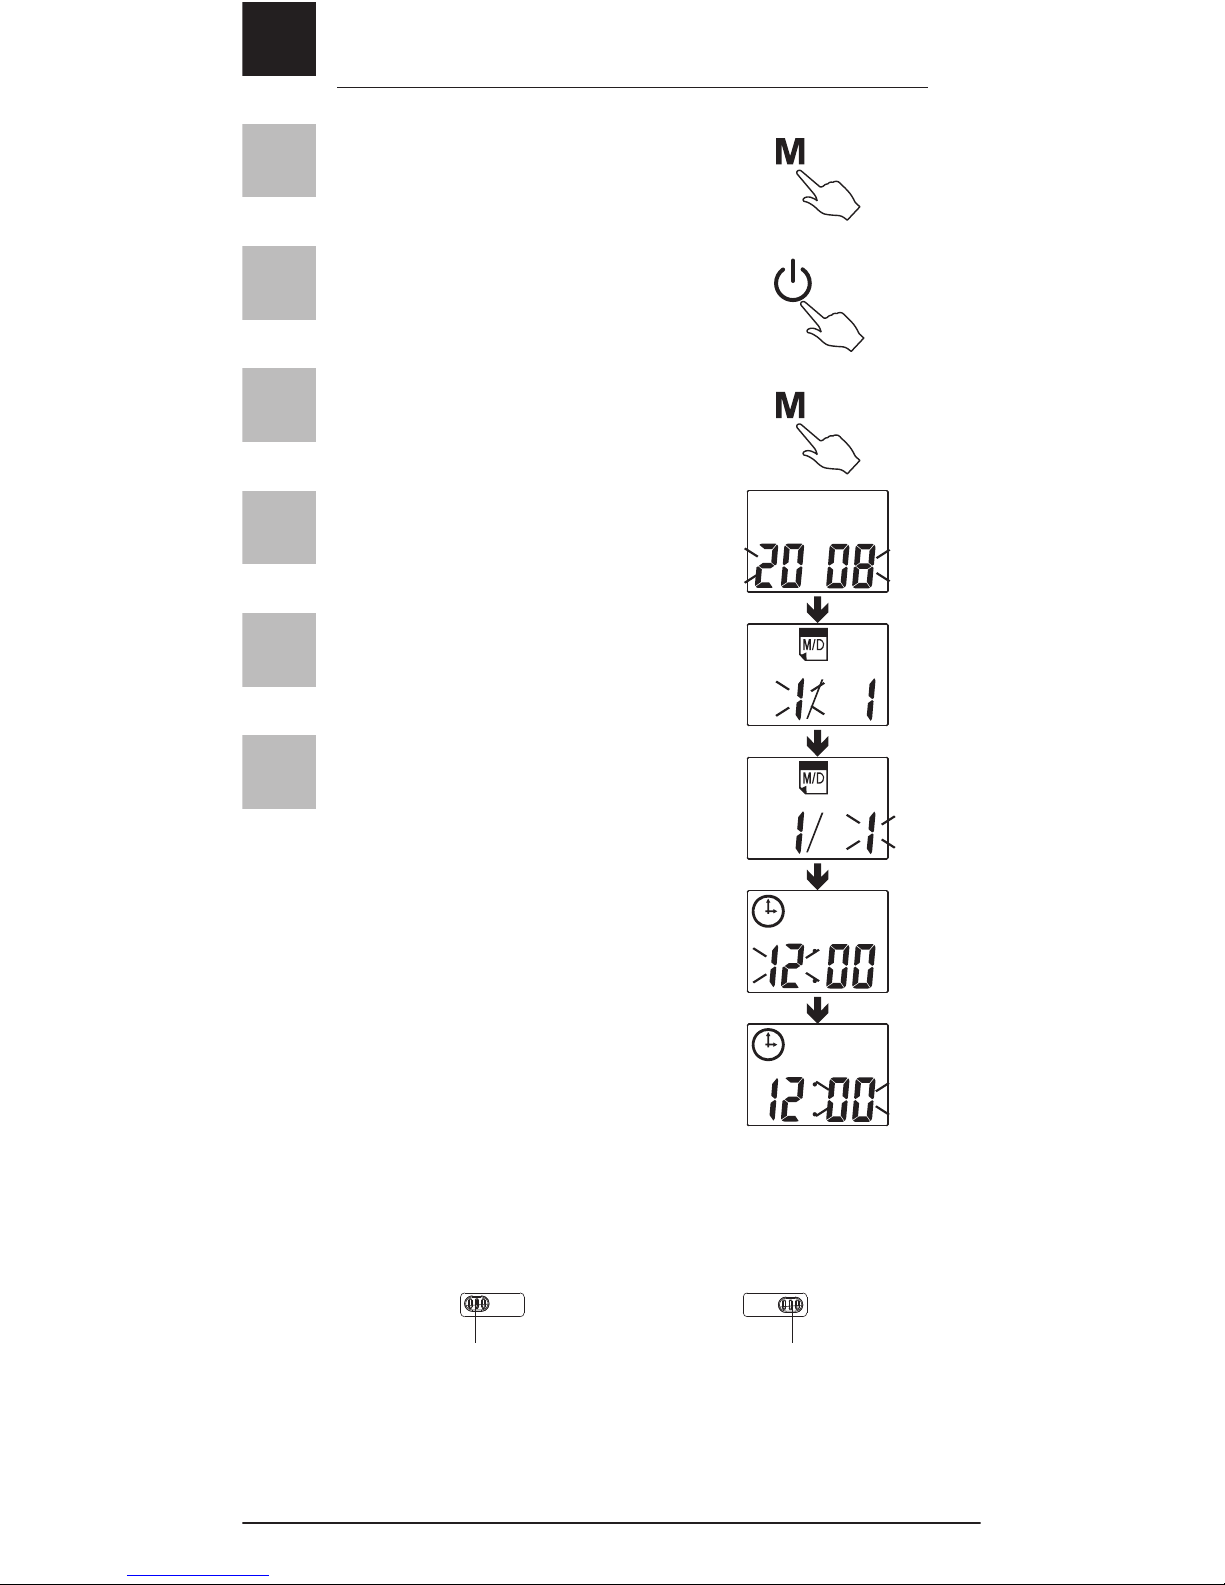
1. Setting the Clock
Under power-off, press the
MEMORY button until the
display shows a blinking
year.
Press the POWER button to
adjust the year when it is
blinking.
Then press the MEMORY
button again, "month" will
appear and blink to be
adjusted, and then "date",
"hour", and "minute" will
follow as you press and
release the MEMORY button
again.
To adjust the clock
Press the POWER button to
adjust the values of
"month", "date", "hour" and
"minute" when they are
blinking.
2. Measuring Blood Pressure
2.1 Select preffered measuring mode using the
MODE SELECTION SWITCH.
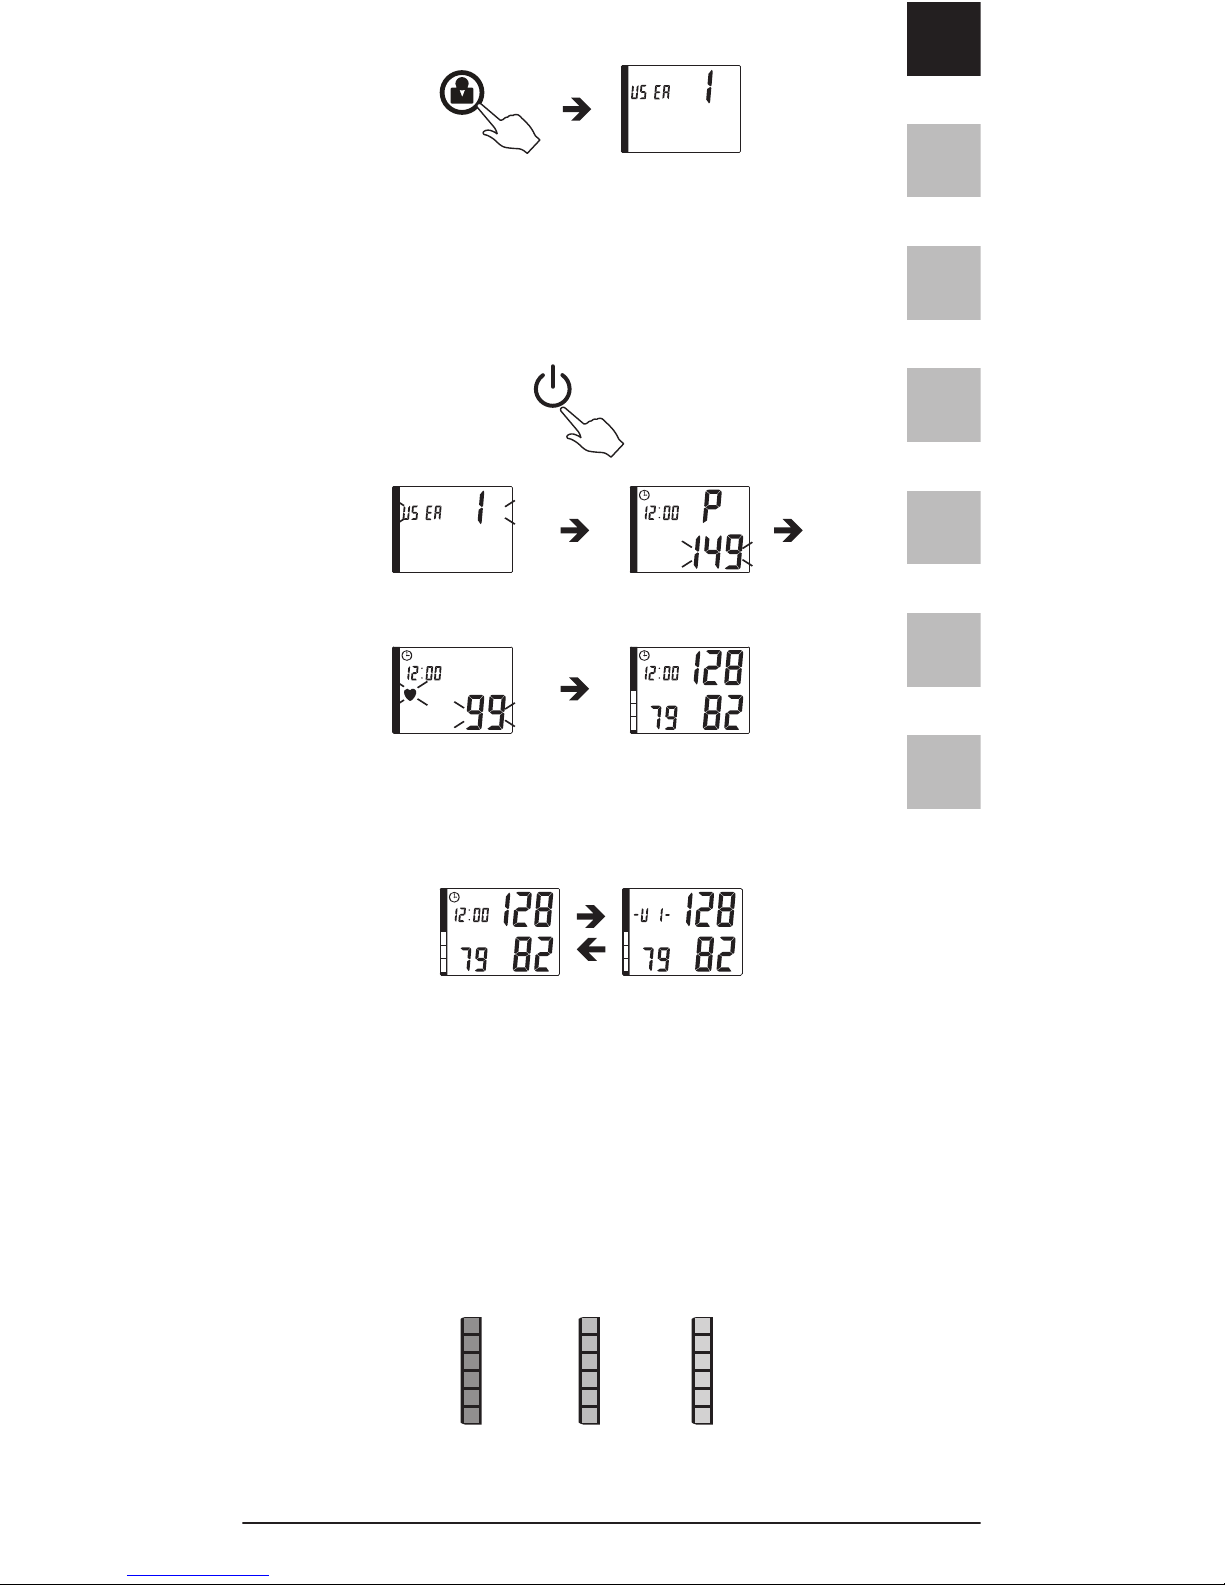
2.2 Press the USER SELECTION
Button to choose the User Number for memory
storage. (The default setting is Number 1)
MOMI (AMI)
Regular
EN
FR
ES
IT
DE
NL
AR
EFFItens AMI®I 7
User selection can also be made or changed by
pressing the USER SELECTION button after measurement when the result is displayed on the LCD.
2.3 Press and release the POWER button to start
measuring.
2.4 When the measurement is completed ,the
display will show the measured blood pressure
value, pulse rate and user number.
2.5 Press the Power button to turn off the
unit. Otherwise it will turn off automatically after
150 seconds.
2.6 Depending on the height and color of the bar,
the readout value is either with the normal ( green),
borderline (yellow) or hypertension (red) range.
The classification corresponds to the WHO 6 ranges
recommendations, as described in page 1.
Re d Ye llow
Gr een
Initial display
Measurement
Pumping
Displaying
the results
EN
FR
ES
IT
DE
NL
AR
8 I Spengler
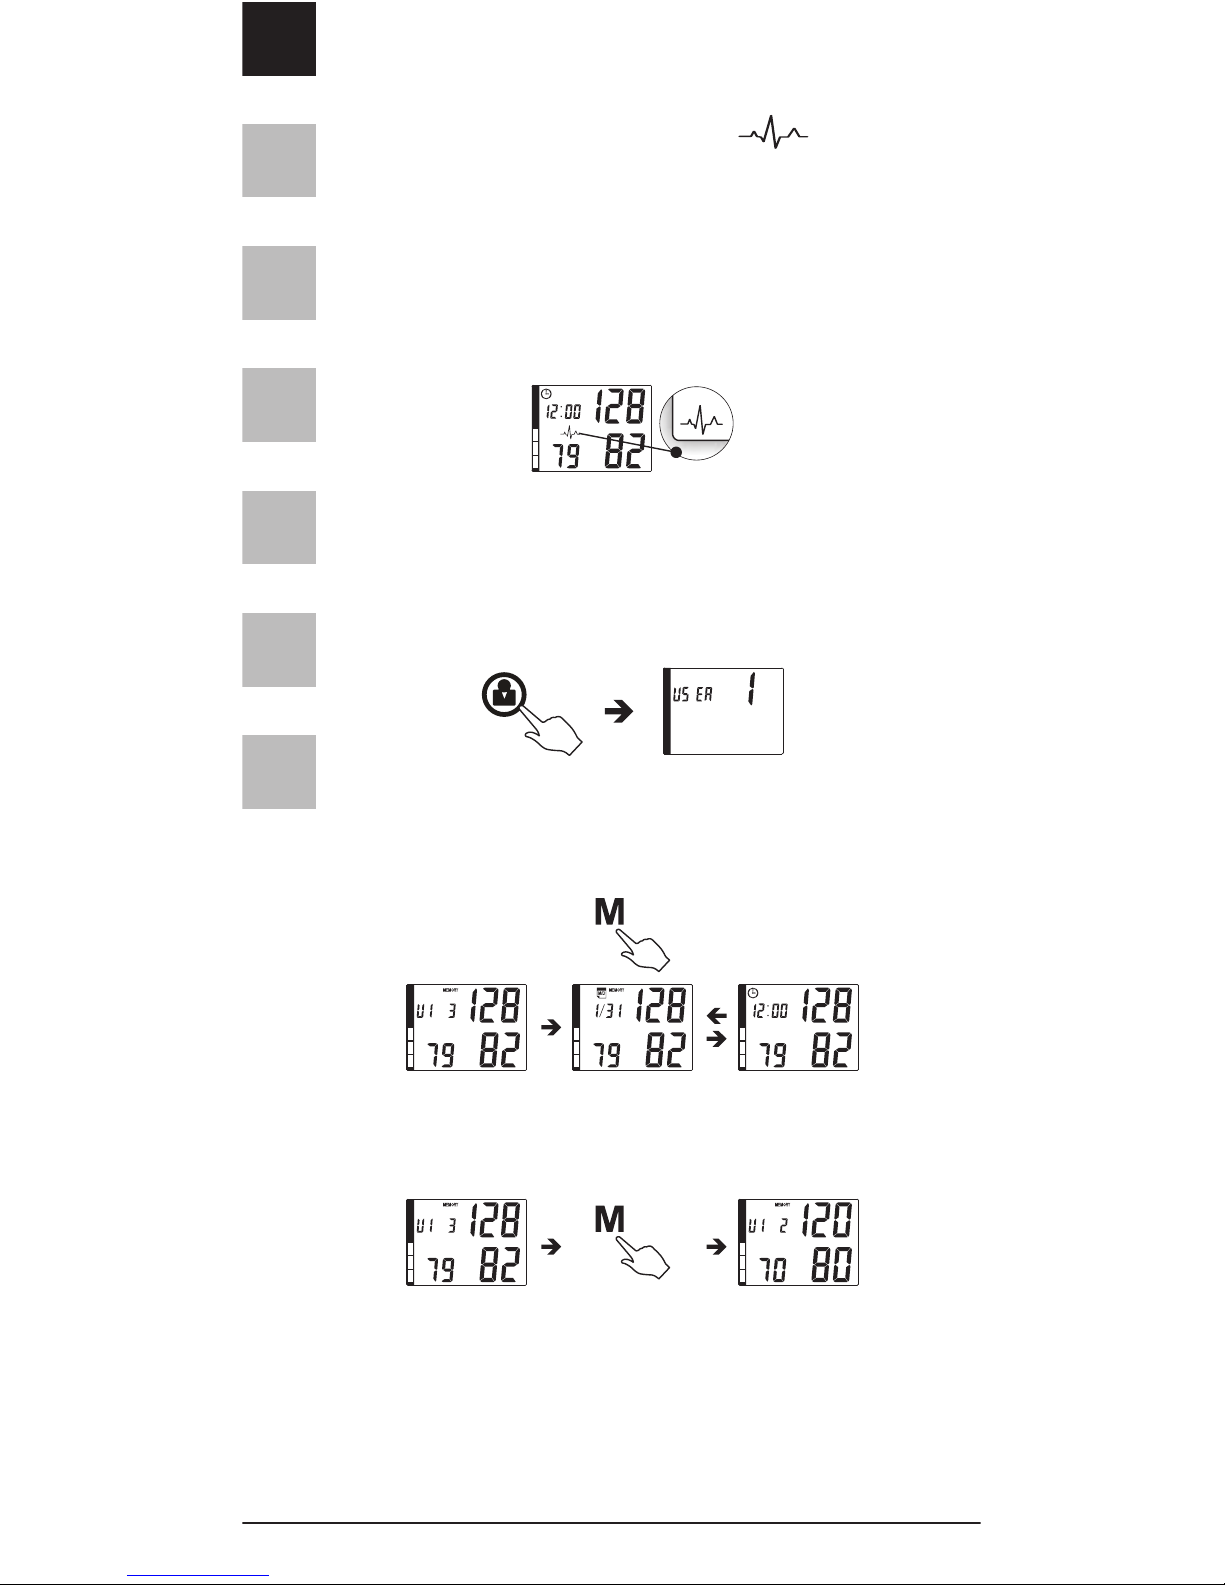
IPD (Irregular Pulse Detection): The device can
analyse the pulse during blood pressure measurement. When the IPD symbol appears,
it means more than three irregular pulses was
detected during measurement. An irregular pulse
is dened as a heartbeat pulse interval is more
than 5/3 times the average pulse interval while the
monitor is measuring the blood pressure. If the
symbol appears more frequently, please consult a
qualied physician for professional advice.
3. Recalling Memories
3.1 Press the USER SELECTION button to choose the
desired user number.
3.2 Press the MEMORY button to recall the last
stored measurement value.
3.3 Press the MEMORY button to go to previous
memories.
4. Erasing Memories
You may erase one or all records from each user's
memory section.
EN
FR
ES
IT
DE
NL
AR
EFFItens AMI®I 9
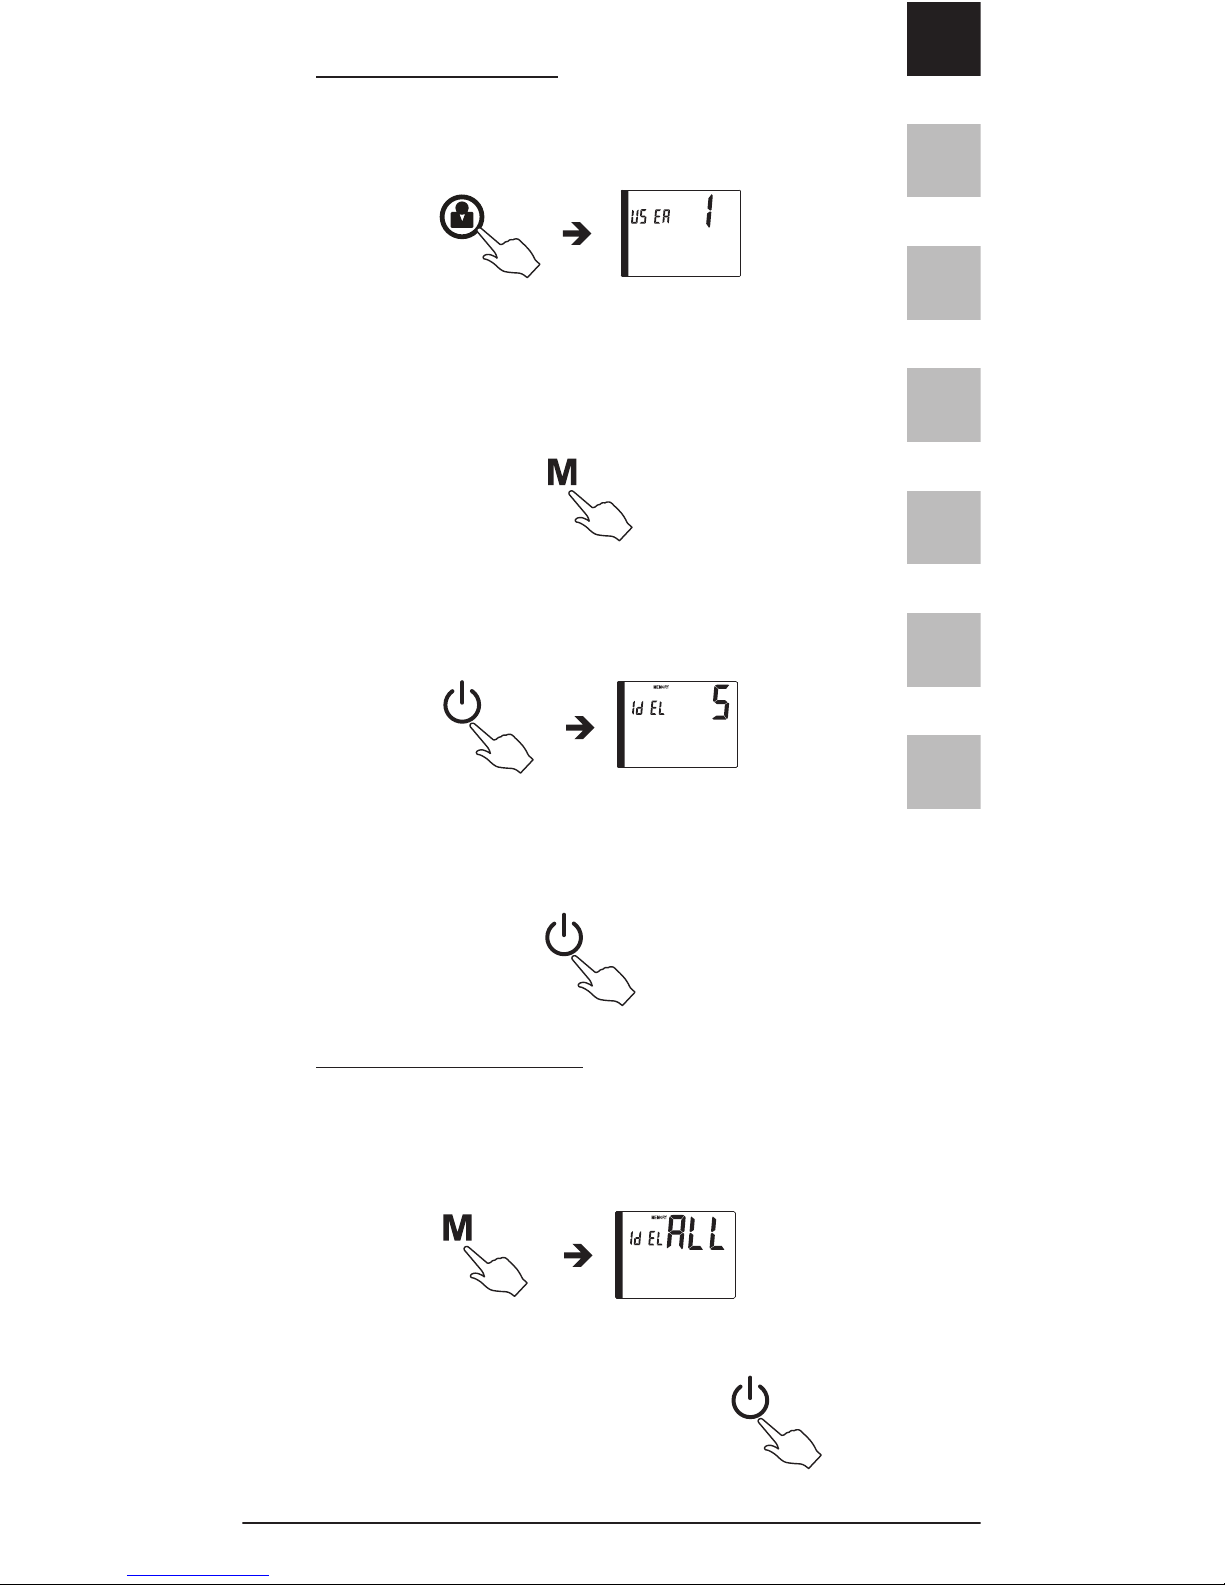
To delete one record:
Step1: Press the USER SELECTION button to choose
the desired user number.
Step2: Press and release MEMORY button to display
records. Press and release MEMORY button again to
choose the record that you wish to delete.
Step3: Press and hold the START/STOP button until
the Display shows"dEL".
Step4: Press and hold the START/ STOP button. After
three beeps are heard, the selected record is deleted.
To delete all memories:
Follow steps 1 and 3 above.
Step4: Press the MEMORY button again and the
display shows "dEL ALL".
Step5:Press and hold the START/
STOP button. After three beeps
are heard, all records are deleted.
EN
FR
ES
IT
DE
NL
AR
10 I Spengler
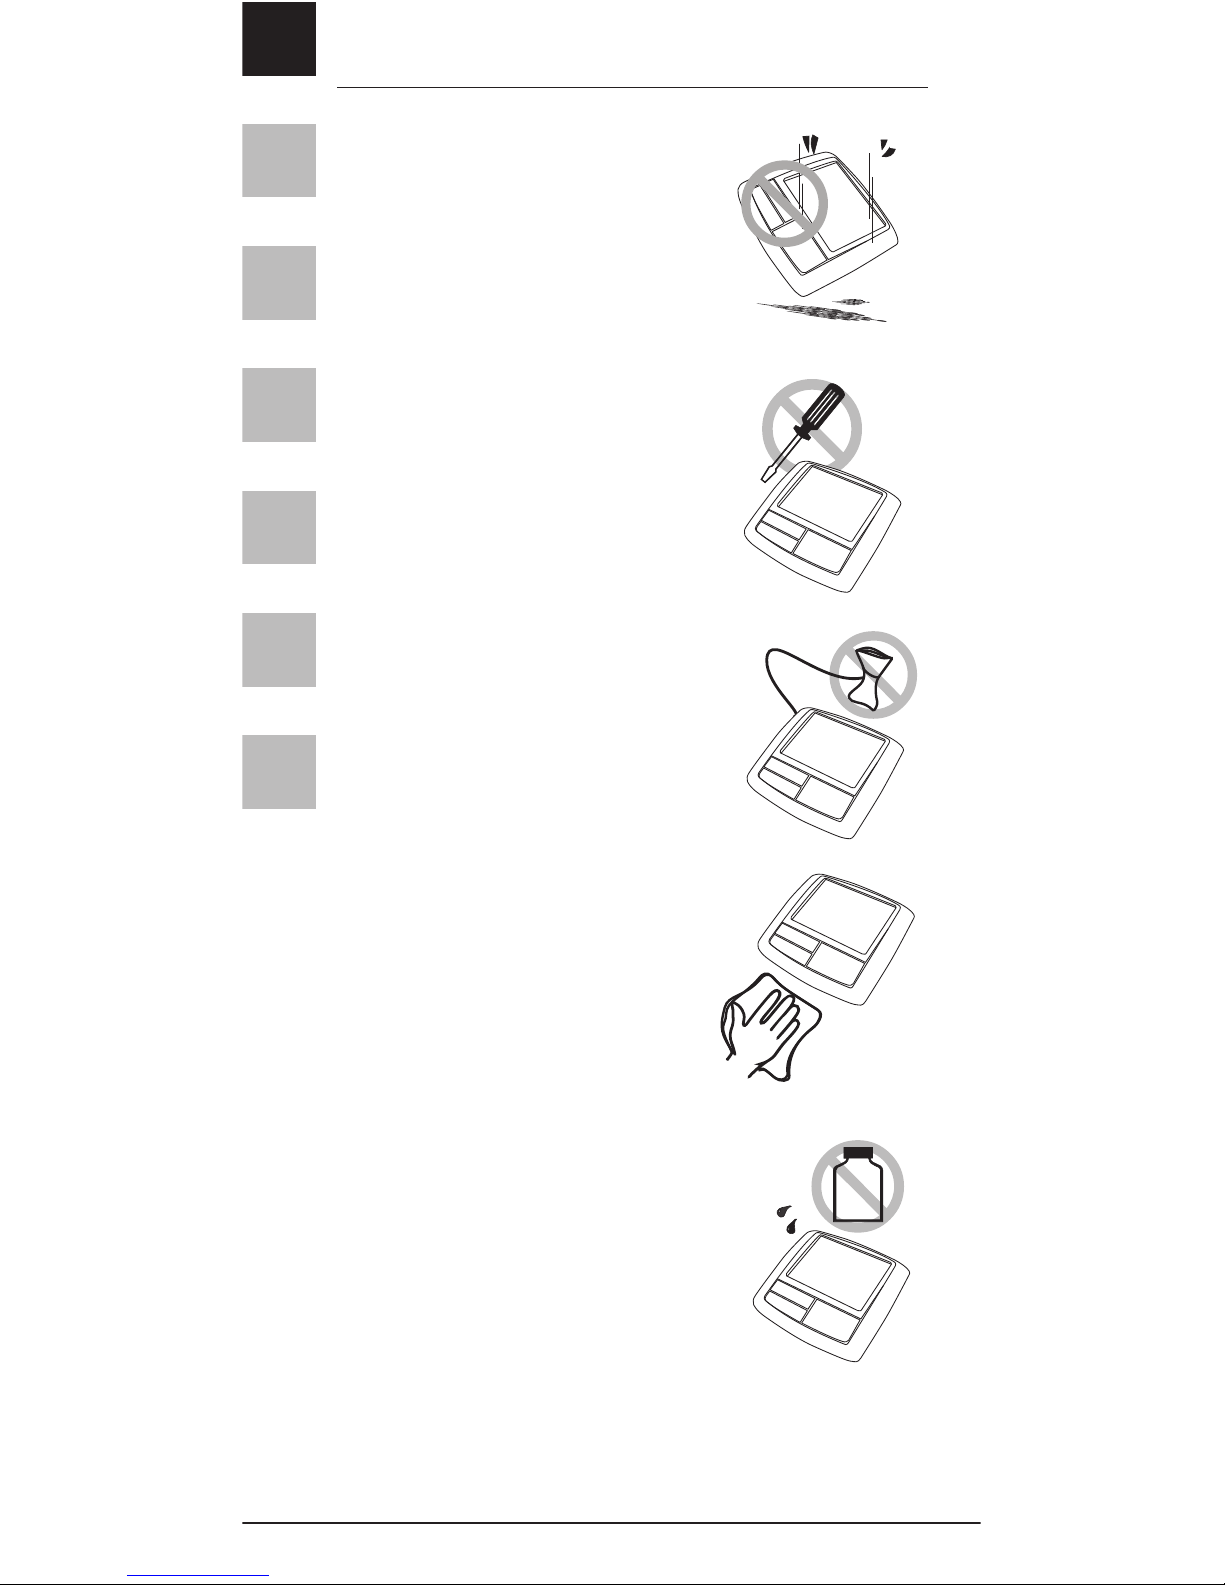
CARE AND MAINTENANCE
Do not drop the unit.
It is not shock proof.
Do not modify or disassemble
the unit or the arm cuff.
Do not twist the arm cuff.
Use a cloth moistened with
water or neutral detergent to
clean the body of the unit and
then wipe it dry.
Avoid thinner, benzene, and
other harsh cleaners.
EN
FR
ES
IT
DE
NL
AR
EFFItens AMI®I 11
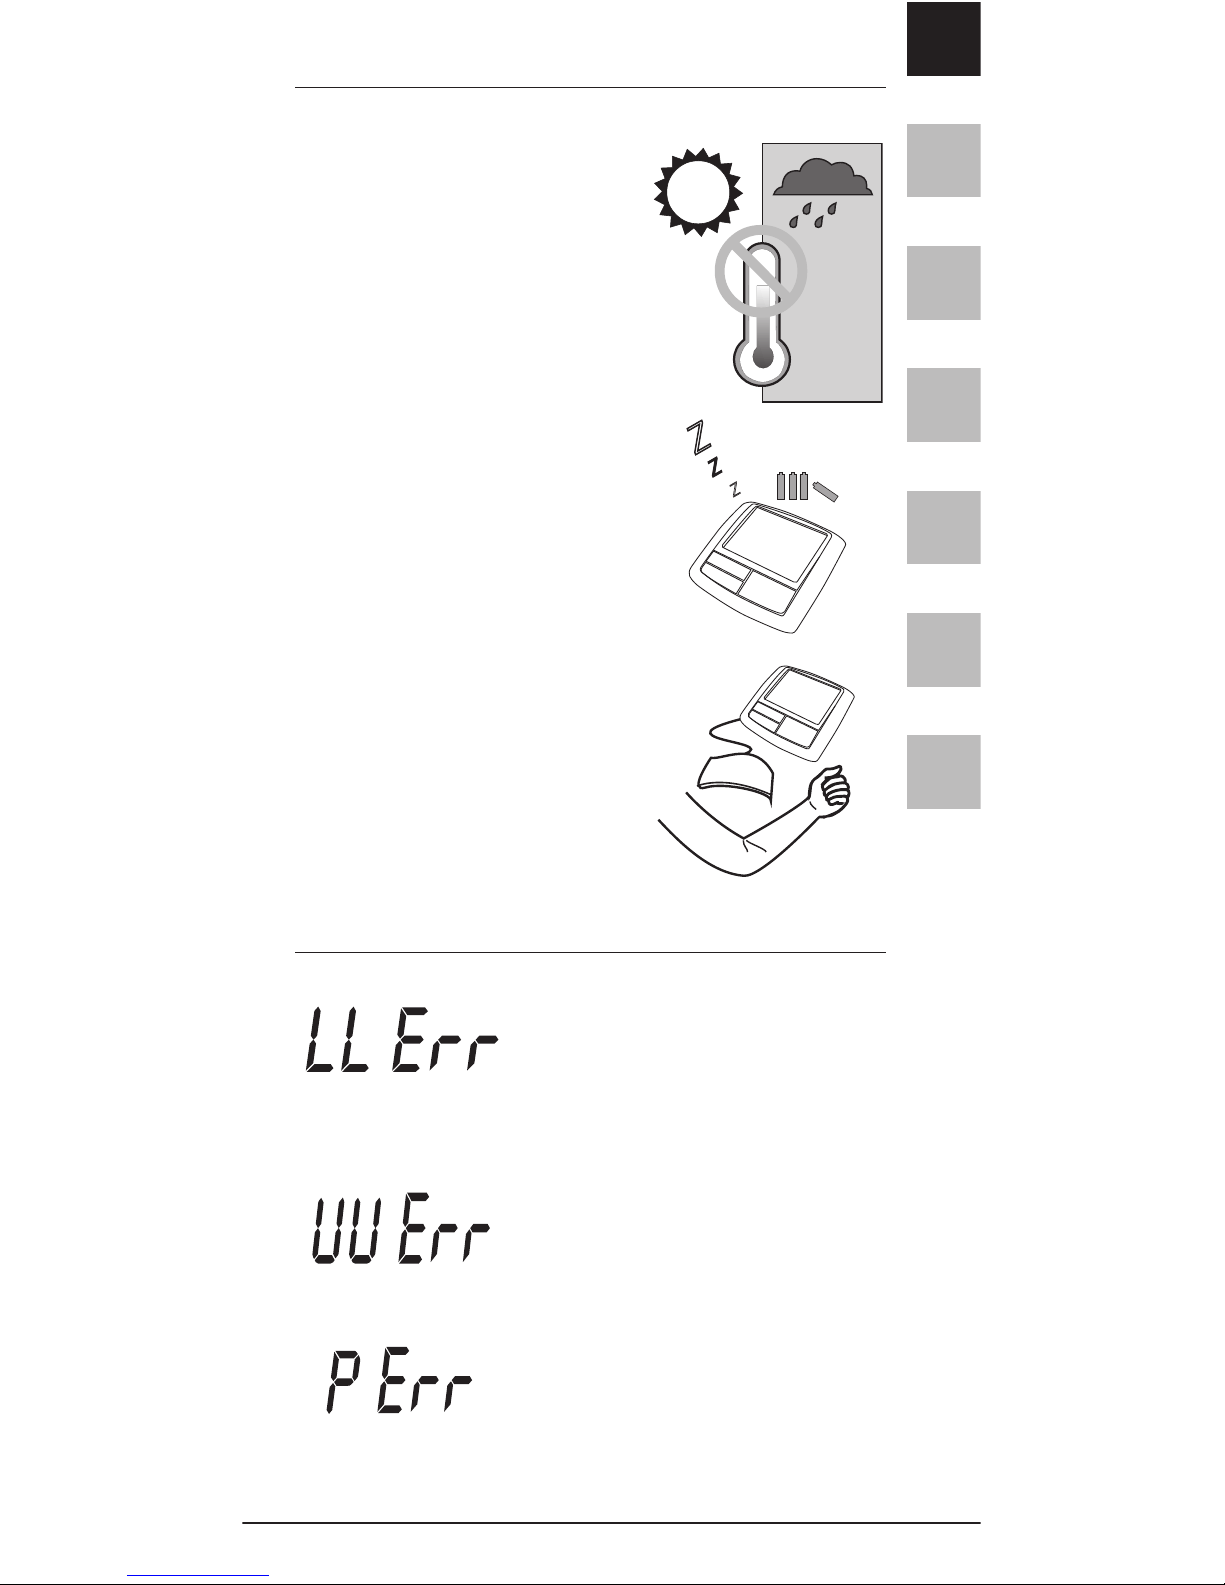
CARE AND MAINTENANCE
ERROR MESSAGE
Keep the unit in a suitable
place. Avoid high temperature,
direct sunlight, high moisture,
and dust.
Remove the batteries if the
unit will not be used for a
long time.
Do not press the POWER
button if the cuff has not
been properly wrapped
around the arm.
The pressure measured was
lower than 20mmHg.
Please measure again.
The pressure measured was
higher than 300mmHg.
Please measure again.
Pumping error.
Please check cuff and try again.
Z
Z
Z
EN
FR
ES
IT
DE
NL
AR
12 I Spengler
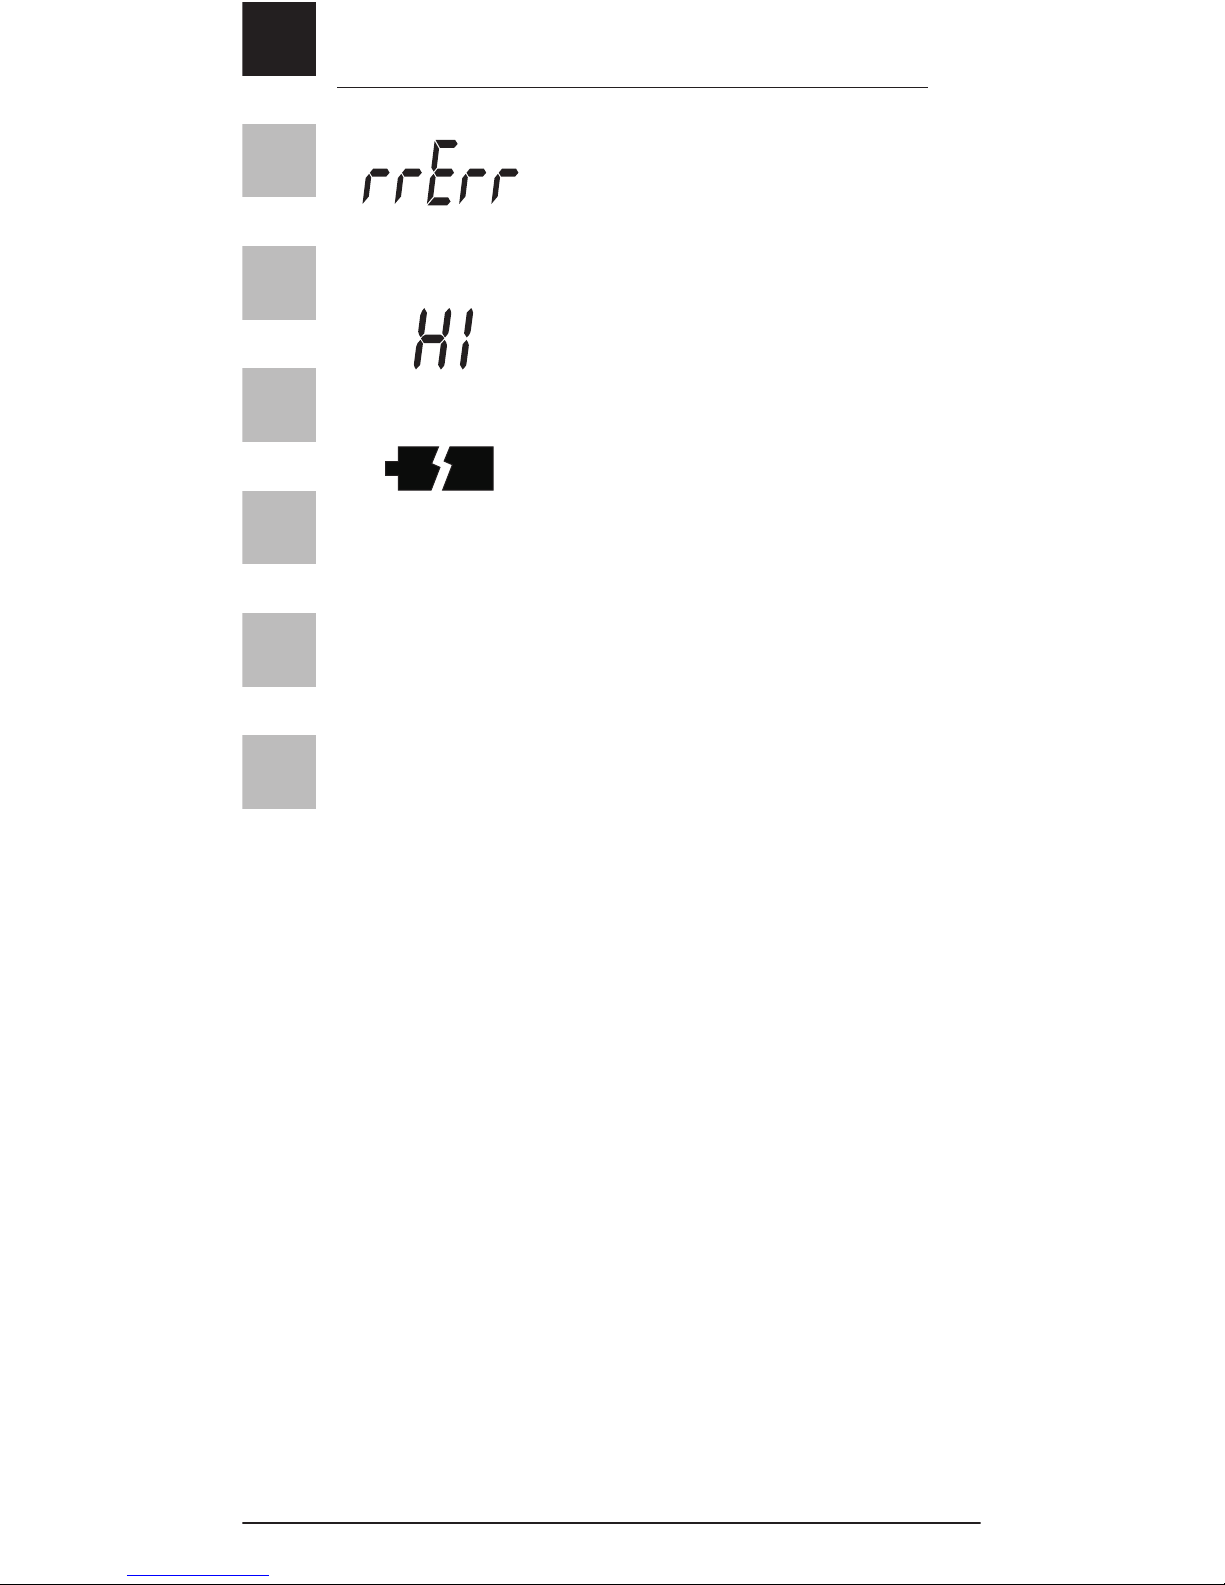
ERROR MESSAGE
or
No display
The pressure can not be
measured due to signal noise.
Please measure again.
The pumping pressure is higher
than 300mmHg.
Please measure again.
Low battery. Check and
replace the 4 batteries if
necessary.

EN
FR
ES
IT
DE
NL
AR
EFFItens AMI®I 13
SPECIFICATIONS
Display System Liquid Crystal Display
Measuring Method Oscillometric
Power Source 6Vdc; "AA" type battery x 4
Measuring 20~300mmHg
Range 40~200 Pulse/minute
Accuracy ±3 mmHg or 2% (pressure)
±5% of readings (pulse rate)
Ination Micro rolling pump
Pressure Electrical Solenoid valve
Exhaust
Memory 2x50 sets
Display LCD (year/date/time, pressure and
pulse)
Low Battery Yes
Indicator
Auto Power-Off 150 secs. w/o any operation
Battery Life Around 250 operations
Operating +10°C +40°C; RH<85%
Environment (+50°F~+104°F)
Storage -10°C +50°C; RH<85%
Environment (+14°F~+122°F)
Dimensions 142 x 138 x 63 mm
Weight Approx. 480g
(Including batteries)
Specications are subject to change for improvement
without notice.
Calibration is recommended every two years.
EN
FR
ES
IT
DE
NL
AR
14 I Spengler
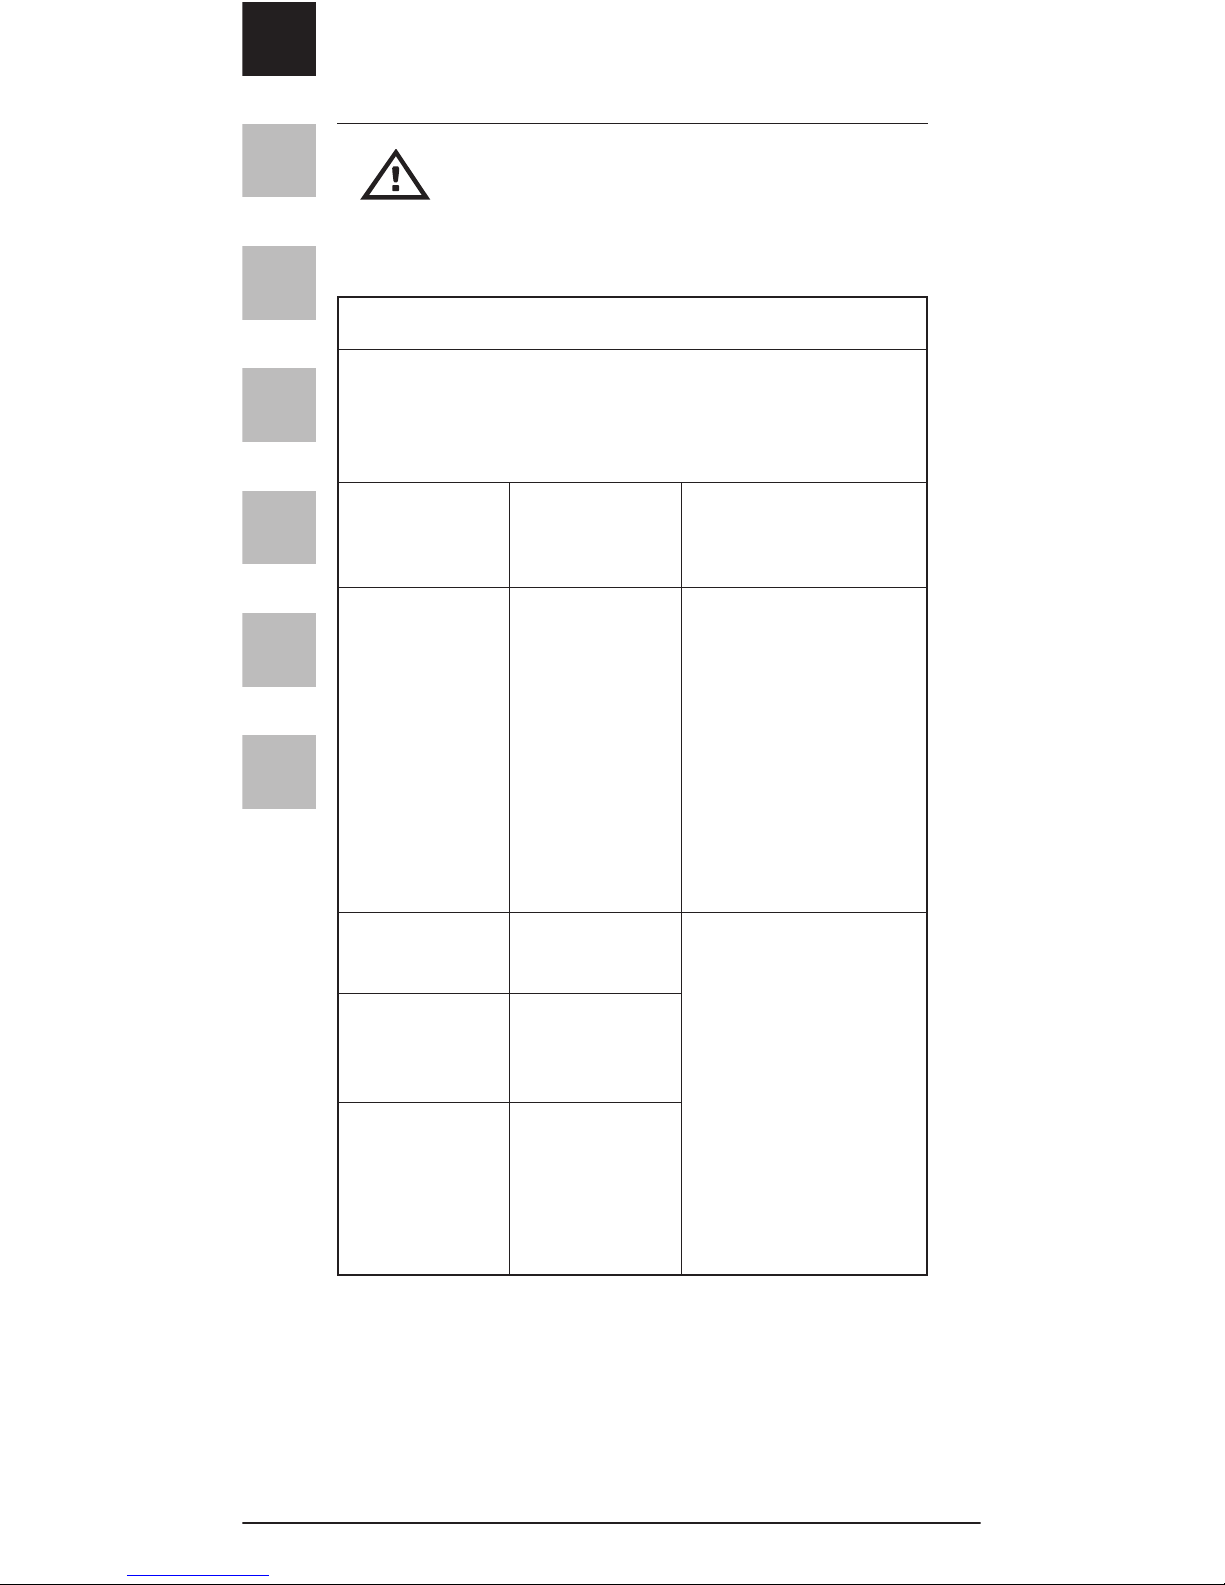
GUIDANCE AND MANUFACTURER'S
DECLARATION
Portable and mobile RF communications equip-
ment can affect this device. The user of this device
needs special precautions regarding EMC and needs to be
installed and put into service according to the EMC
information provided in the guidance provided below.
Electromagnetic Emission
The blood pressure monitor is intended for use in the
electromagnetic environment specified below. The customer
or the user of the blood pressure monitor should assure that
it is used in such an environment.
Emission Test
RF emissions
CISPR 11
RF emissions
CISPR 11
Harmonic
missions
IEC 61000-3-2
Voltage
fluctuations/
flicker
emissions
IEC 61000-3-3
Compliance
Group 1
Class B
Class A
Complies
Electromagnetic
Environment Guidance
The blood pressure
monitor uses RF
energy only for its
internal function.
The refore, its RF
emissions are very
low and are not
likely to cause any
interference in
nearby electronic
equipment.
The blood pressure
monitor is suitable
for use in all
establishments other
than domestic and
those directly
connected to the
public low-voltage
power supply network
that supplies buildings
used for domestic
purposes.
EN
FR
ES
IT
DE
NL
AR
EFFItens AMI®I 15
E
lectromagnetic Immunity
T
he blood pressure monitor is intended for use in the electromagnetic environment specified below. The customer or the
user of the blood pressure monitor should assure that it is
used in such an environment.
Immunity
Test
Electrostatic
discharge
(ESD) IEC
61000-4-2
Electrical fast
transient/b
urst
IEC 610004-4
Surge
IEC 610004-5
Voltage dip,
short
interruptions
and voltage
variations
on power
supply
input lines
IEC 610004-11
IEC
60601
test level
±6 kV
contact
±8 kV air
±2 kV for
power
supply
lines
±1 kV
line(s) to
line(s)
<5 % U
T
(>95 %
dip in UT)
for 0.5
cycle
40 % U
T
(60 % dip
in UT) for 5
cycles
70 % U
T
(30 % dip
in UT) for
25 cycles
<5 % U
T
(>95 %
dip in U
T
)
for 5 s
Compliance
level
±6 kV
contact
±8 kV air
±2kV for
power
supply
lines
±1 kV line(s)
to line(s)
<5 % U
(>95
T
% dip
in UT) for 0.5
cycle
40 % U
T
(60 % dip
in UT) for
5 cycles
70 % U
T
(30 % dip in
U ) for T
25 cycles
<5 % U
T
(>95 % dip
in U
T
)
for 5 s
Electromagnetic
Environment Guidance
Floors should be
wood, concrete or
ceramic tile. If floors
are covered with
synthetic material,
the relative humidity
should be at least
30%.
Mains power quality
should be that of a
typical commercial
or hospital
environment.
Mains power quality
should be that of a
typical commercial
or hospital
environment.
Mains power quality
should be that of a
typical commercial
or hospital environment. If the user of
the blood pressure
monitor requires
continued
operation during
power mains
interruptions, it is
recommended that
the blood pressure
monitor be powered
from an uninterruptible power supply
or a battery.
EN
FR
ES
IT
DE
NL
AR
16 I Spengler
NOTE UTis the a.c. mains voltage prior to application of the
test level.
Electromagnetic Immunity
The blood pressure monitor is intended for use in the
electromagnetic environment specified below. The customer
or the user of the blood pressure monitor should assure that
it is used in such an environment.
Power
frequency
(
50/60 Hz)
magnetic
field
IEC610004-8
3 A/m
3 A/m
Power frequency
magnetic fields
s
hould be at levels
characteristic of a
typical location in a
typical commercial
or hospital
environment.
Immunity
Test
Conducted
RF
IEC 610004-6
Radiated
RF
IEC 610004-3
IEC
60601
test level
3Vrms
150 kHz
to 80 MHz
3 V/m
80MHz to
2.5GHz
Compliance
Level
3 Vrms
3 V/m
Electromagnetic
Environment
Guidance
Portable and mobile
RF communications
equipment should
be used no closer
to any part of the
blood pressure
monitor, including
cables, than the
recommended
separation distance
calculated from the
equation applicable
to the frequency of
the transmitter.
Recommended
separation
distance
D = 1.2√ P 80 MHz
to 800 MHz
d = 2.3√ P 800 MHz
to 2.5 GHz
Where P is the
maximum output
power rating of the
transmitter in watts
(W) according to
the transmitter
manufacturer and d
is the
EN
FR
ES
IT
DE
NL
AR
EFFItens AMI®I 17
NOTE 1 At 80 MHz and 800 MHz, the higher frequency range
applies.
NOTE 2 These guidelines may not apply in all situations.
Electromagnetic propagation is affected by absorption and
reflection from structures, objects and people.
a Field strengths from fixed transmitter, such as base stations
for radio (cellular/cordless) telephones and land mobile radio,
amateur radio, AM and FM radio broadcast and TV broadcast
cannot be predicted theoretically with accuracy. To assess the
electromagnetic environment due to fixed RF transmitters,
an electromagnetic site survey should be considered. If the
measured field strength in the location in which the blood
pressure monitor is used exceeds the applicable RF
compliance level above, the blood pressure monitor should
be observed to verify normal operation. If abnormal performance is observed, additional measures may be necessary,
such as re-orienting or relocating the blood pressure monitor.
b Over the frequency range 150 kHz to 80 MHz, field strengths
should be less then 3 V/m.
recommended
separation distance
i
n meters (m). Field
strengths from
fixed RF transmitters, as determined
by an electromagnetic site survey,a
should be less than
the compliance
level in each
frequency range
b
.
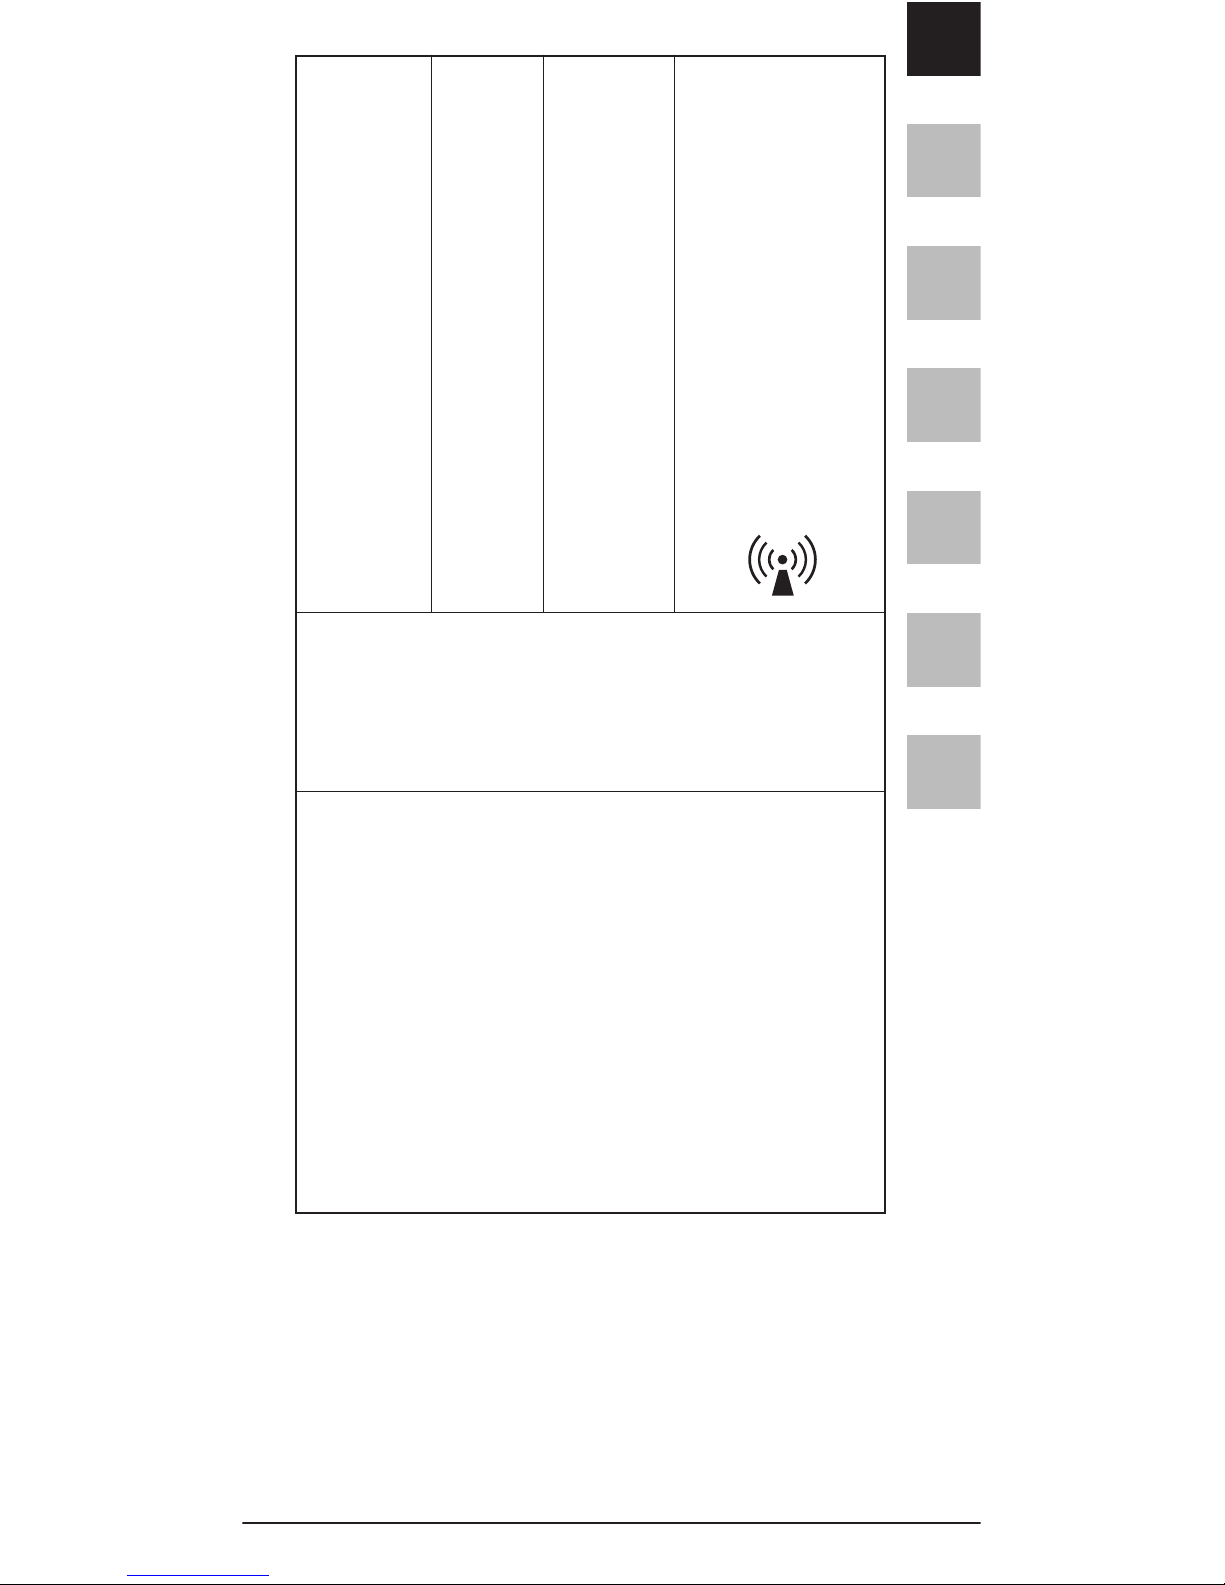
Interference may
occur in the vicinity
of equipment
marked with the
following symbol:

EN
FR
ES
IT
DE
NL
AR
18 I Spengler
R
ecommended separation distances between portable
and mobile RF communications equipment and the
blood pressure monitor
The blood pressure monitor is intended for use in an electromagnetic environment in which radiated RF disturbances are
controlled. The customer or the user of the blood pressure
monitor can help prevent electromagnetic interference
by maintaining a minimum distance between portable and
mobile RF communications equipment (transmitters)
and the blood pressure monitor as recommended below,
according to the maximum output power of the communications equipment.
Rated
maximum
output
power of
transmitter
W
150 kHz
to 80 MHz
d = 1.2 √P
Separation distance according to frequency
of transmitter M
800 kHz
to 2.5 GHz
d = 2.3 √P
80 kHz
to 800 MHz
d = 1.2 √P
0.01
0.1
1
10
100
0.12
0,37
1.2
3.7
12
0.23
0.74
2.3
7.4
23
0.12
0.37
1.2
3.7
12
For transmitters rated at a maximum output power not listed
above, the recommended separation distance d in meters (m)
can be estimated using the equation applicable to the
frequency of the transmitter, where P is the maximum output
power rating of the transmitter in watts (W) according to the
transmitter manufacturer.
Note 1 At 80 MHz and 800 MHz, the separation distance for
the higher frequency range applies.
Note 2 These guidelines may not apply in all situations.
Electromagnetic propagation is affected by absorption and
reflection from structures, objects and people.
Spengler SAS
ZI La Limoise - Rue Robert Maréchal
36100 ISSOUDUN - FRANCE

EN
FR
ES
IT
DE
NL
AR
EFFItens AMI®I 19
SOMMAIRE
Informations
indispensables à l’utilisation de l’appareil 19
Présentation de l’appareil 21
Description des écrans 22
Préparation à l’utilisation
Installation/changement des piles 22
Mise en place du brassard 23
Position de mesure 23
Fonctions
Réglage de l’horloge 24
Mesure de la tension artérielle 25
Rappel des mémoires 26
Effacement des mémoires 27
Entretien et maintenance 28
Messages d’erreur 30
Caractéristiques 31
Directives et déclaration du fabricant 32
INFORMATIONS INDISPENSABLES
À L’UTILISATION DE L’APPAREIL
Mise en garde
1. Consultez votre médecin pour qu’il vérifie le niveau
de votre tension artérielle avant de prendre vous-
même votre tension à l’aide de cet appareil.
2. Si le brassard vous gêne pendant la procédure,
appuyez immédiatement sur le bouton d’alimenta-
tion pour éteindre l’appareil.
3. Tirez sur la bande Velcro pour retirer le brassard si
la tension est supérieure à 300 mmHg et si le
brassard ne se dégonfle pas automatiquement.
Les mesures de la tension artérielle données par cet
appareil sont équivalentes à celles obtenues par la
méthode d'auscultation avec brassard/stéthoscope
réalisée par un spécialiste, dans les limites définies par
l’ANSI (American National Standard Institute) pour
les sphygmomanomètres manuels, électroniques ou
automatiques.
GARANTIE: trois ans à compter de la date d’achat.
20 I Spengler
Qu’est-ce que la tension artérielle?
Le cœur crée une force lorsque le ventricule éjecte le
sang vers les vaisseaux sanguins et le système de
transport. La résistance des artères au flux sanguin
crée une autre force. La tension artérielle est le résultat
de ces deux forces.
Quelle est la différence entre la pression
systolique et la pression diastolique?
La pression systolique est la pression maximale
au moment de la contraction du cœur. La pression
diastolique est la pression minimale au moment du
relâchement du cœur.
Classication de la tension artérielle par l’OMS
Le graphique ci-dessous est la classification de la
tension artérielle établie par l’OMS (Organisation
mondiale de la santé).
Les recommandations de l’OMS sont basées sur des
données historiques qui peuvent ne pas s’appliquer à
certains patients. Pour plus d’informations, veuillez
consulter votre médecin.
Qu’est-ce que l’hypotension?
Il est généralement préférable d’avoir une tension
artérielle basse, sauf si elle donne lieu à des symptômes
gênants, comme des évanouissements et/ou des
étourdissements.
EN
FR
ES
IT
DE
NL
AR
EFFItens AMI®I 21
EN
FR
ES
IT
DE
NL
AR
Fluctuation et variation de la tension artérielle
Le graphique ci-dessus indique les variations possibles
de la tension artérielle sur une période de 24 heures.
Les facteurs suivants peuvent avoir une influence sur
les mesures de la tension artérielle et donner lieu à
des variations.
• Baignade • Conversation
• Consommation d'alcool • Tension mentale
• Pensées • Respiration
• Déplacement • Repas
• Exercice physique
• Consommation de tabac
• Changement thermique, etc.
PRÉSENTATION DE L’APPAREIL
Le brassard est adapté à des tailles de bras
comprises entre 22 et 32cm (8,7 à 12,6 pouces).
22 I Spengler
DESCRIPTION DES ÉCRANS
PRÉPARATION À L’UTILISATION
Installation/changement des piles
1. Insérer les piles dans le compartiment en respec-
tant les polarités «+» et «-».
2. À l’affichage de l’indicateur de piles faibles, changer
toutes les piles.
3. Retirer les piles si l’appareil ne doit pas être utilisé
pendant une longue période.
REMARQUE : il est conseillé d’utiliser des piles
alcalines de même type pour éviter tout problème
d’incompatibilité.
Adaptateur CA (en option)
L’utilisation d’un adaptateur courant alternatif est
recommandée (sortie 6 V CC/0,8 A).
1. Brancher l’adaptateur CA dans la prise située sur le
côté droit de l’appareil, comme illustré.
EN
FR
ES
IT
DE
NL
AR
EFFItens AMI®I 23
EN
FR
ES
IT
DE
NL
AR
Branchement du brassard sur l’appareil
1. Brancher le connecteur du tube dans la prise de
l’appareil, comme illustré.
Mise en place du brassard sur le bras
1. Enrouler le brassard autour du bras gauche à même
la peau.
2. Fixer le brassard. Ne pas trop serrer. Le bord
inférieur du brassard doit être à environ 2 ou 3 cm (1
pouce) du creux du bras.
3. Si la prise de la tension ne peut être effectuée sur le
bras gauche, fixer le brassard sur le bras droit, comme
illustré cidessous.
Position de mesure
1. S’asseoir bien droit et vérifier que le brassard est au
niveau du cœur. Se détendre et prendre la
24 I Spengler
mesure dans une position naturelle.
2 . Effectuer la mesure et enregistrer la tension
artérielle à la même heure chaque jour pour établir
son modèle de tension artérielle.
UTILISATION DE L’APPAREIL
1. Réglage de l’horloge
Mettre l’appareil hors tension, appuyer sur le bouton
MÉMOIRE jusqu’à ce que
l’année clignote à l’écran.
Appuyer sur le bouton
d’alimentation pour régler
l’année.
Appuyer de nouveau sur le
bouton MÉMOIRE: le mois
clignote à l’écran. Procéder
comme pour l’année, puis
de même pour la date,
l’heure et les minutes.
Pour régler l’heure
Appuyer sur le bouton
d’alimentation pour régler
le mois, la date, l'heure et
les minutes lorsque les
valeurs clignotent à l'écran.
EN
FR
ES
IT
DE
NL
AR
EFFItens AMI®I 25
EN
FR
ES
IT
DE
NL
AR
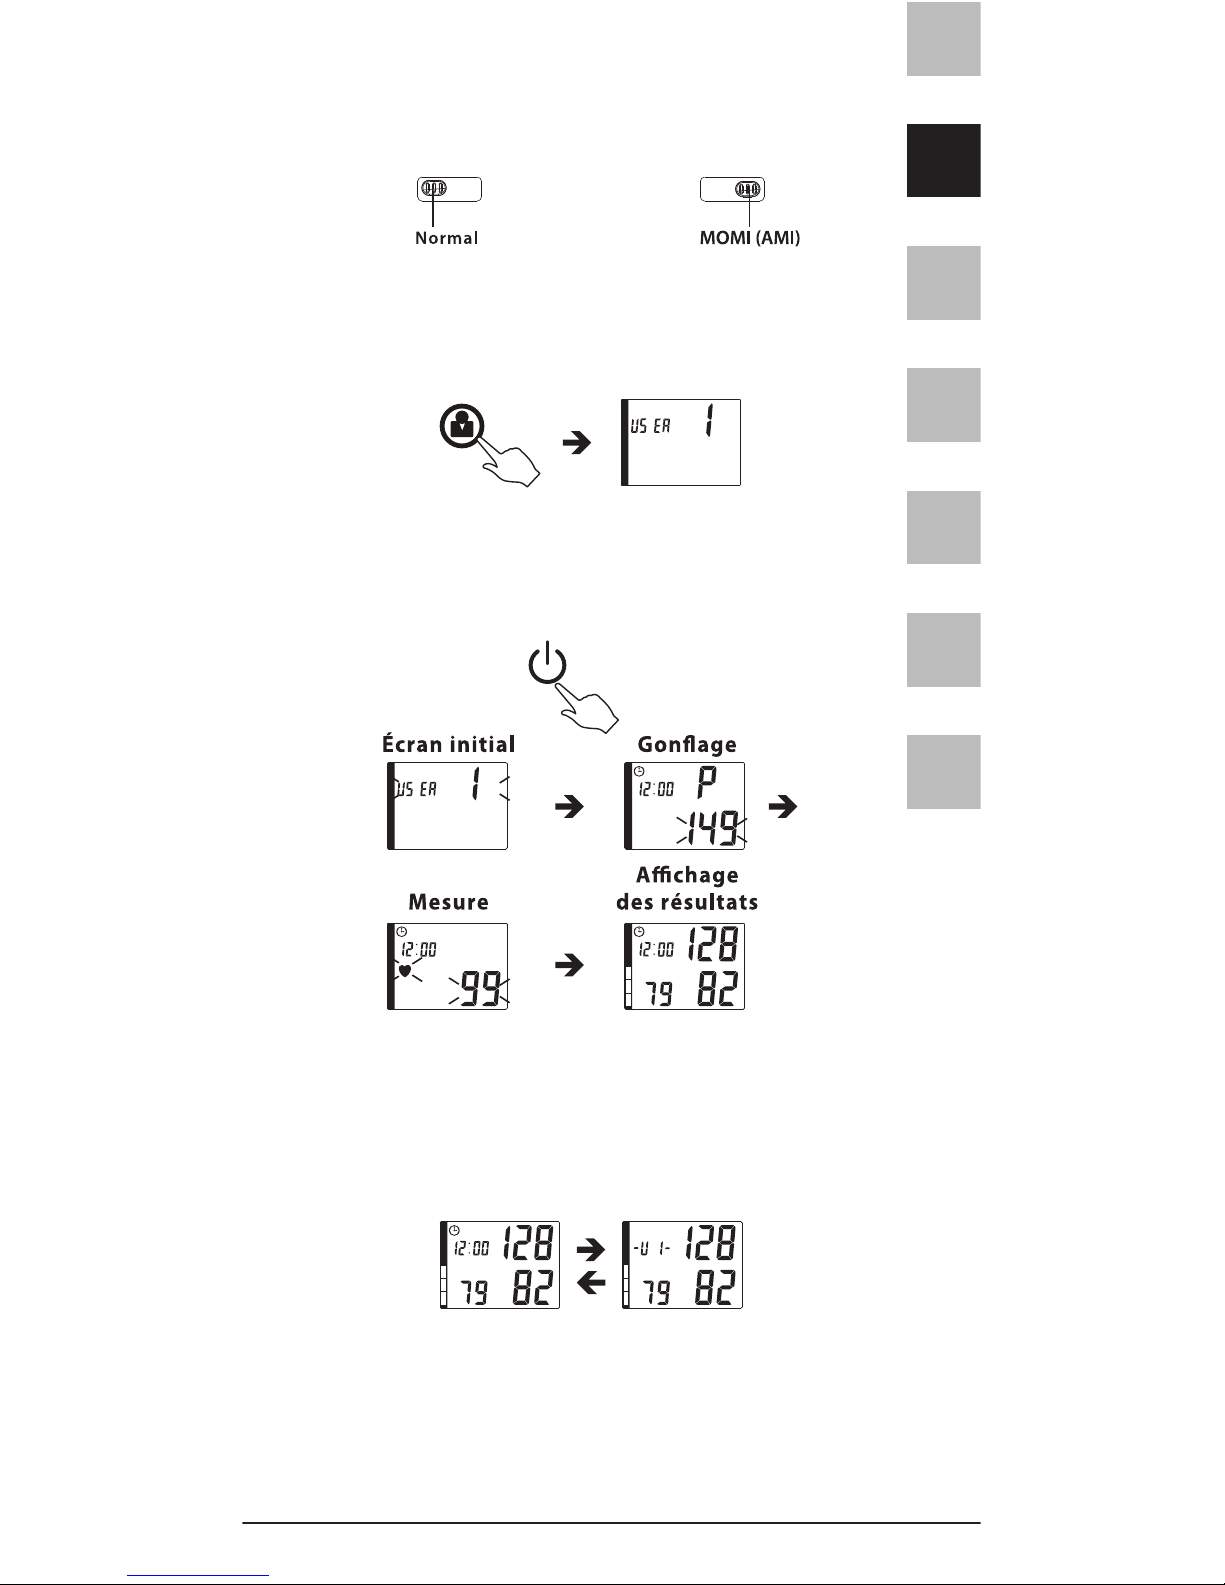
2. Mesure de la tension artérielle
2.1 Sélectionner le mode de mesure préféré à l’aide
du commutateur de sélection de mode.
2.2 Appuyer sur le bouton de sélection pour choisir
un numéro d’utilisateur associé au stockage des
données (numéro par défaut: 1).
Il est également possible de choisir un numéro
d’utilisateur après la prise d’une mesure en
appuyant sur le bouton de sélection lorsque le
résultat s’affiche sur l’écran LCD.
2.3 Appuyer sur le bouton d’alimentation, puis le
relâcher pour procéder à la mesure.
2.4 Au terme de la procédure de mesure, l’écran
affiche la valeur de la tension artérielle, de la
fréquence du pouls, ainsi que le numéro d’utilisateur.
2.5 Appuyer sur le bouton d’alimentation pour
éteindre l’appareil. Dans le cas contraire, l’appareil
s’éteint automatiquement au bout de 150
secondes.
26 I Spengler
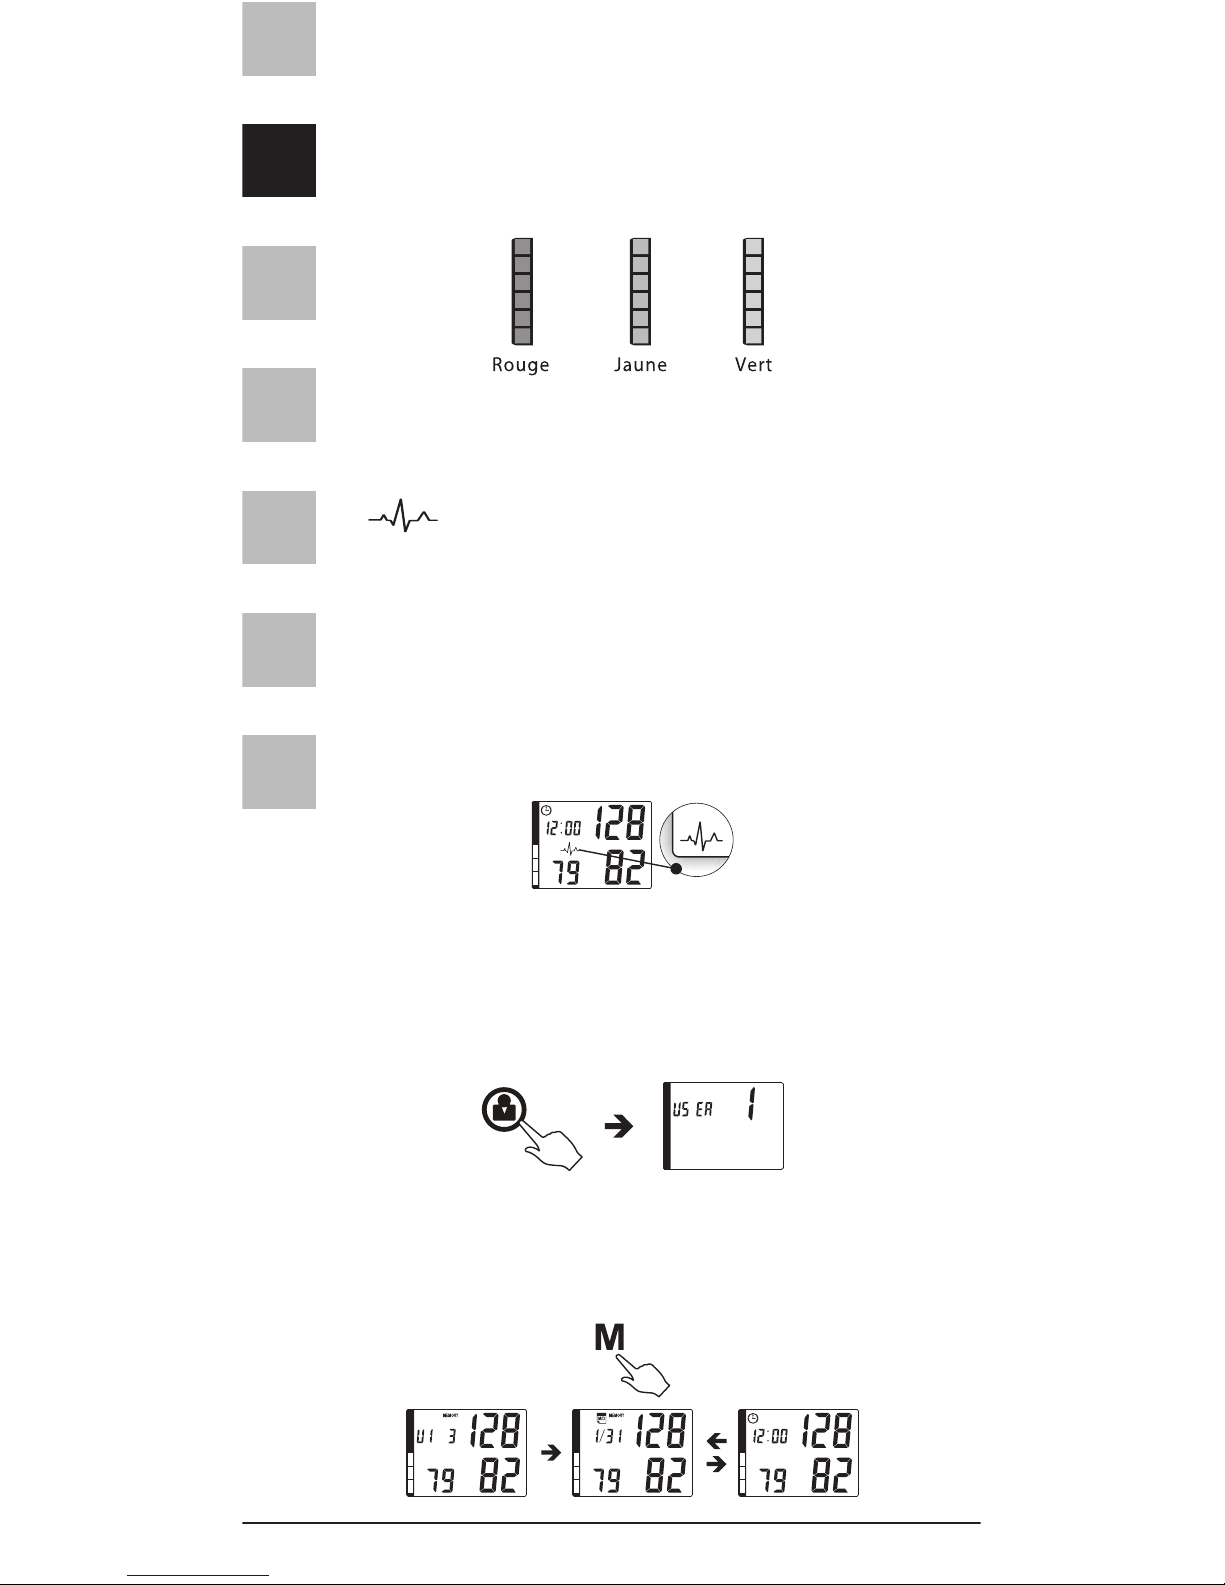
2.6 Selon la hauteur et la couleur de la barre, la
valeur mesurée correspond à la plage normale
(vert), limite (jaune) ou d’hypertension (rouge). La
classification correspond à celle établie par l’OMS
(voir page 19).
Détection de pouls irrégulier (IPD: irregular pulse
detection): l’appareil peut analyser le pouls pendant la mesure de la tension artérielle. Le symbole
apparaît lorsque l’appareil détecte trois
pulsations irrégulières pendant la mesure. On
considère que le pouls est irrégulier lorsque l’intervalle entre deux pulsations cardiaques est de 3
à 5 fois supérieur à l’intervalle moyen entre deux
pulsations cardiaques pendant que le tensiomètre
procède à la mesure de la tension artérielle. Si ce
symbole apparaît régulièrement, consultez un
médecin spécialiste.
3. Rappel des mémoires
3.1 Appuyer sur le bouton de sélection pour choisir
le numéro d’utilisateur souhaité.
3.2 Appuyer sur le bouton MÉMOIRE pour rappeler
la dernière mesure enregistrée.
EN
FR
ES
IT
DE
NL
AR
EFFItens AMI®I 27
EN
FR
ES
IT
DE
NL
AR
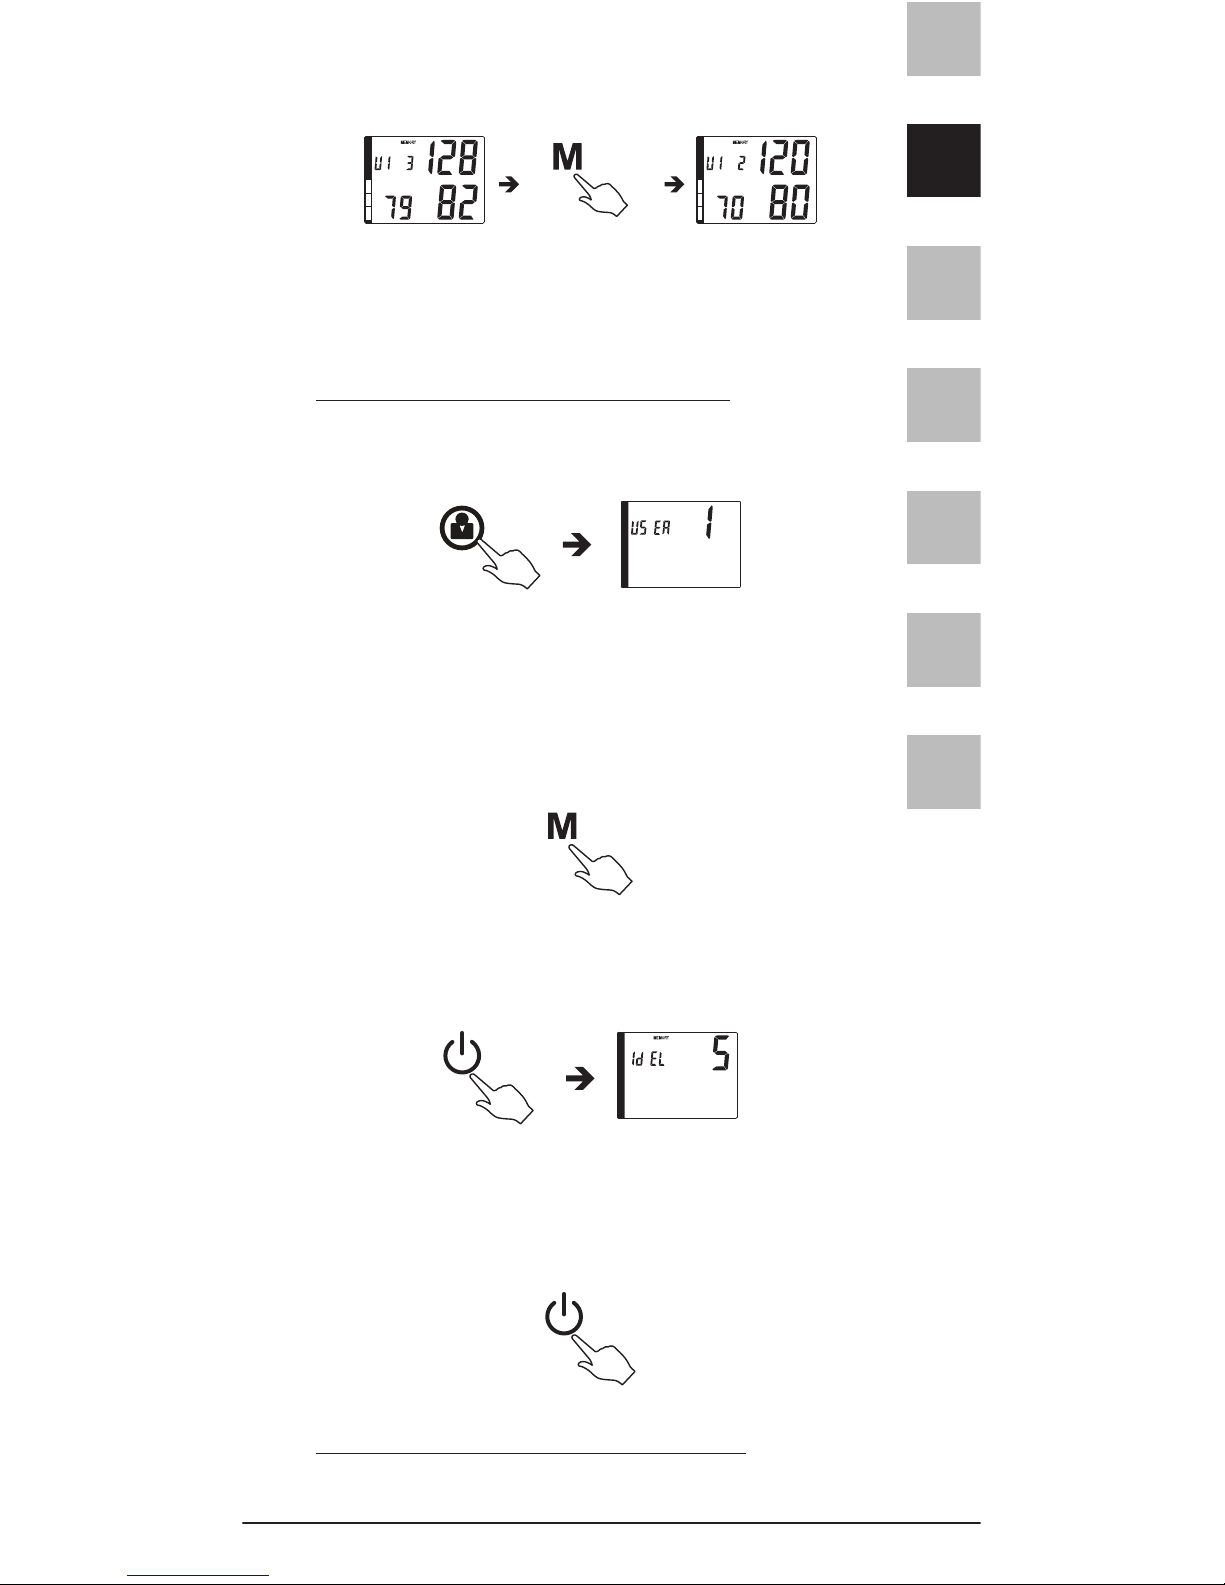
3.3 Appuyer sur le bouton MÉMOIRE pour afficher
les valeurs précédemment enregistrées.
4. Effacement des mémoires
Il est possible d’effacer tout ou partie des valeurs
enregistrées dans la mémoire d’un utilisateur.
Pour supprimer un enregistrement:
Étape 1 : appuyer sur le bouton de sélection pour
choisir le numéro d’utilisateur souhaité.
Étape 2 : appuyer sur le bouton MÉMOIRE, puis le
relâcher pour afficher les valeurs enregistrées.
Appuyer de nouveau sur le bouton MÉMOIRE, puis le
relâcher pour choisir l’enregistrement à supprimer.
Étape 3 : maintenir enfoncé le bouton d’alimentation
jusqu’à affichage de l’écran «dEL».
Étape 4 :maintenir enfoncé le bouton d’alimentation.
L’appareil émet trois bips pour confirmer la suppression de l’enregistrement.
Pour supprimer toutes les mémoires:
Répéter les étapes 1 et 3 ci-dessus.
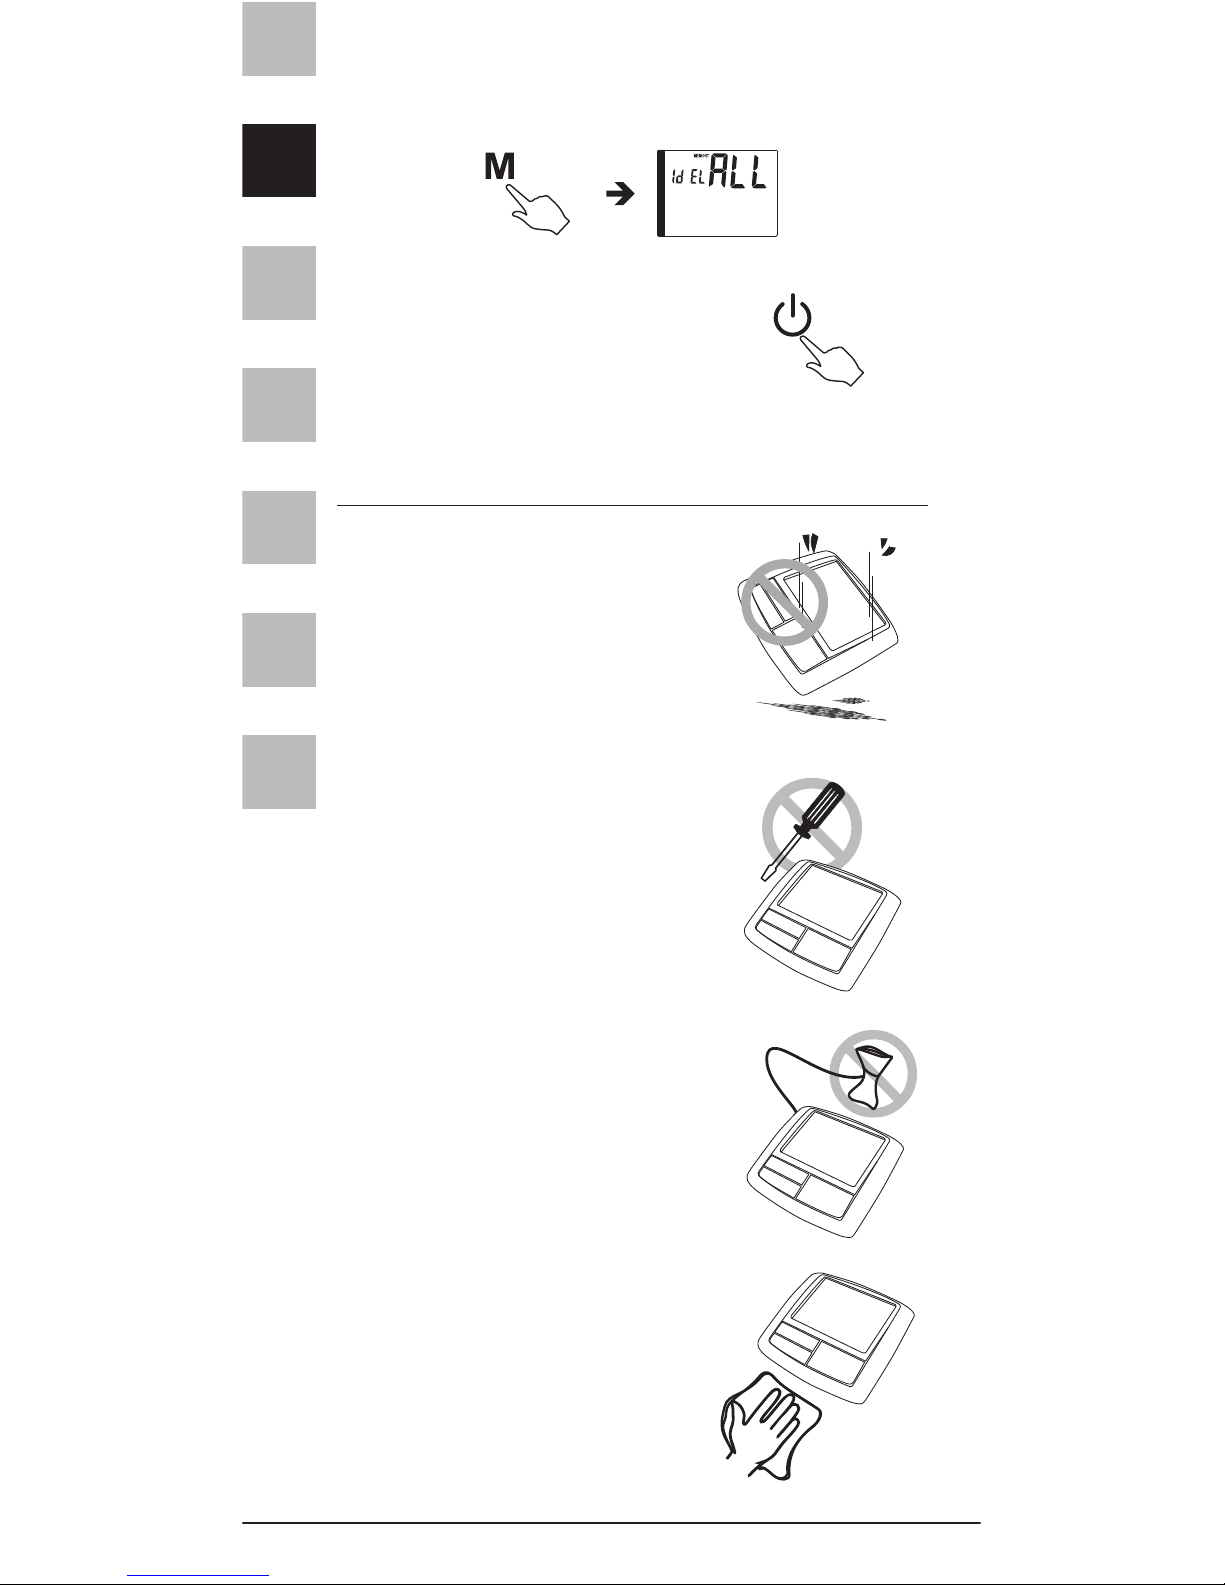
28 I Spengler
Étape 4 : appuyer de nouveau sur le bouton
MÉMOIRE; le message «dEL ALL» apparaît à l’écran.
Étape 5 : maintenir enfoncé le
bouton d’alimentation. L’appareil
émet trois bips pour confirmer la
suppression de tous les enregistrements.
ENTRETIEN ET MAINTENANCE
Nettoyer le corps de l’unité avec
un chiffon humidifié avec de
l’eau ou un détergent neutre.
Essuyer ensuite avec un chiffon
sec.
Ne pas faire tomber l’appareil.
Il n’est pas antichoc.
Ne pas modifier ou démonter
l’appareil ou le brassard.
Ne pas tordre le brassard.
EN
FR
ES
IT
DE
NL
AR
 Loading...