

Page 1
Thank you for your purchase of the Glimmer Hot Foil System!
Please take some time to get familiar with the Machine by reading
through this instruction booklet. Please make sure that you read through
all of the Safety warnings on the next page before using the device.
You can now use the Glimmer Hot Foil System to add foil and holographic
eects to your cards, projects, mixed media, books, invitations, ribbons,
and so much more. This Machine was designed to be used with the
Spellbinders® Platinum™ and Platinum 6™ Die-Cutting Machines. It can also
be used with common other die-cutting machines as well.
Visit our YouTube playlist for Glimmer Hot Foil System at https://goo.gl/YMKeFt
Includes:
- Hot Foil Stamp Press Machine
- Power Cord (6 ft.)
- Acrylic Spacer Shim
- Thin Shim
- Silicone Cooling Pad
- Tweezers
- Glimmer Plates (2)
- Starter Foil Rolls: Silver & Rose Gold
PLEASE READ ALL OF THE SAFETY PRECAUTIONS ON THE
NEXT PAGE BEFORE USING THE GLIMMER HOT FOIL SYSTEM
Page 2

1. HOT SURFACE. AVOID CONTACT.
DO NOT touch the hot surfaces.
When handling, use handle and sides of
Platform. To reduce risk of electrical shock
and burns, DO NOT hold hot surfaces.
2. To protect yourself from electrical shock
do not immerse the Cord, Plug, Platform
and base in water or any other liquid.
3. Close supervision is required when
the system is used by or near children.
4. Do not leave device unattended when
in use or cooling down.
5. Ensure Power Cord is in a secure location
where no one can step on or trip over
Power Cord. Make sure Power Cord does
not become tangled or is in reach
of children.
6. Extension Cord Use: A short power supply
cord is provided to reduce the hazards
1. Only use Machine for its intended use
and not for any other purpose.
2. Household use only.
1. DO NOT use Platform for
die-cutting. The Silicone Heating Pad
is not replaceable nor repairable.
2. This Machine can reach temperatures
up to 250°F / 121°C.
3. Ensure the system is on a
stable surface.
4. When not in use, unplug from outlet.
When unplugging Machine from outlet,
Before operating the Glimmer Hot Foil System,
PLEASE READ ALL INSTRUCTIONS BEFORE USE.
2
Visit our YouTube playlist for Glimmer Hot Foil System at https://goo.gl/YMKeFt
from entanglement or tripping over a
longer cord. Use of an extension cord
may be used with care and caution.
Ensure that the Cord cannot be pulled
on by children or tripped over.
The marked electrical rating should be
at least as great as the electrical rating
of the Machine.
7. CAUTION: Do not immerse or use
in water.
8. DO NOT use when body is wet.
9. To reduce the risk of electric shock, this
product has a polarized Plug (one blade
is wider than the other). This Plug is
intended to fit in a polarized outlet only
one way. When the Plug does not fit fully
in the outlet, reverse the Plug. When
it still does not fit, contact a qualified
electrician to install the proper outlet.
Do not change the Plug in any way.
pull on the Plug not the Cord. Allow
the system to cool down before
storing or cleaning.
5. Do not attempt to repair device,
Power Cord, or its accessories.
Please consult a qualified person as
directed by the manufacturer for any
needed repairs.
6. Product intended for use in country
or region intended.
IMPORTANT SAFETY PRECAUTIONS
WARNINGS
IMPORTANT
NOTICE
3. SAVE THESE INSTRUCTIONS.
Page 3
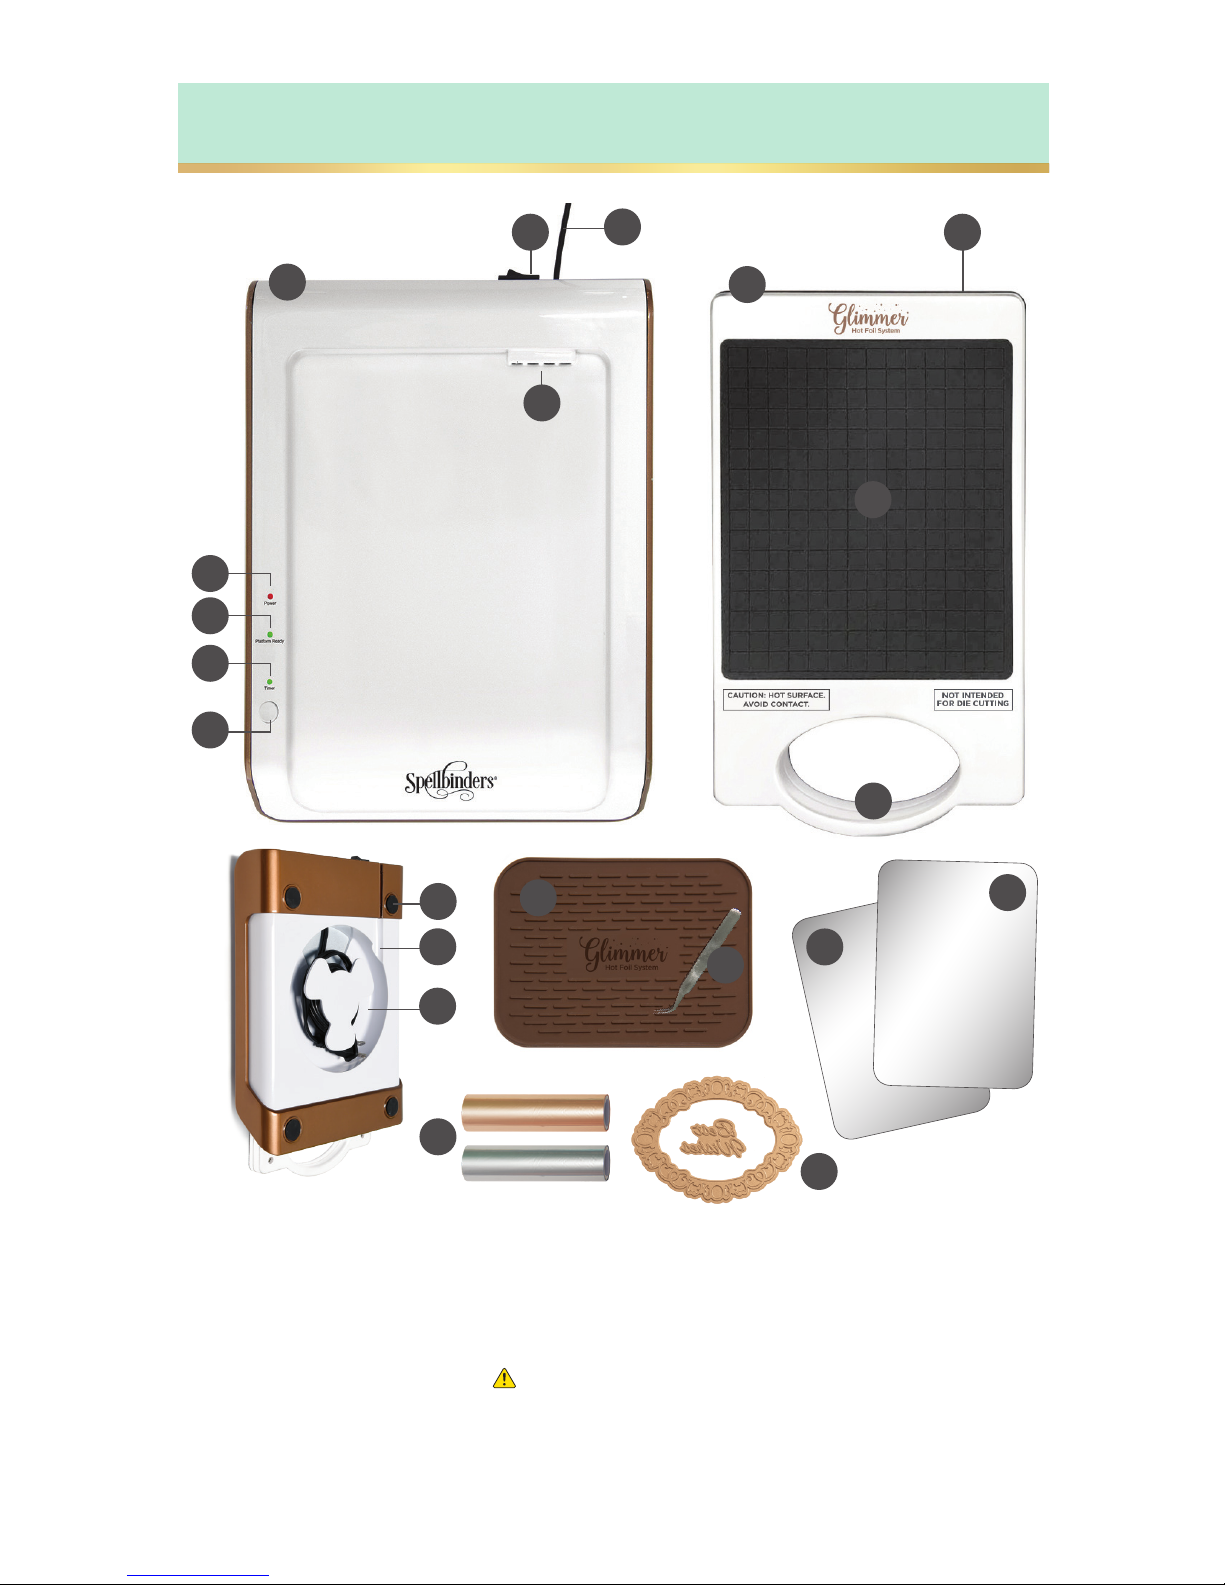
1. Base
2. Base Connector
3. Power Switch
4. Power Light Indicator
5. Platform Ready Light
Indicator
6. Timer Light Indicator
7. Timer Power Button
CONTENTS
1
2
4
5
6
7
8
3 13
12
14
15
18
19
9
10
11
8. Power Cord
9. Power Cord Storage
10. Power Cord Groove
11. Base Non-Slip Feet
12. Platform
13. Platform Connector
14. HOT SURFACE.
AVOID CONTACT.
15. Platform Handle
16. Acrylic Spacer Shim (8½” x 6”)
17. Thin Shim (8½” x 6”)
18. Tweezers
19. Silicone Cooling Pad
20. Rose Gold and Silver Foil
Sampler Rolls (5 in x 8 ft )
21. Two Glimmer Plates
16
17
20
3
Visit our YouTube playlist for Glimmer Hot Foil System at https://goo.gl/YMKeFt
21
Page 4
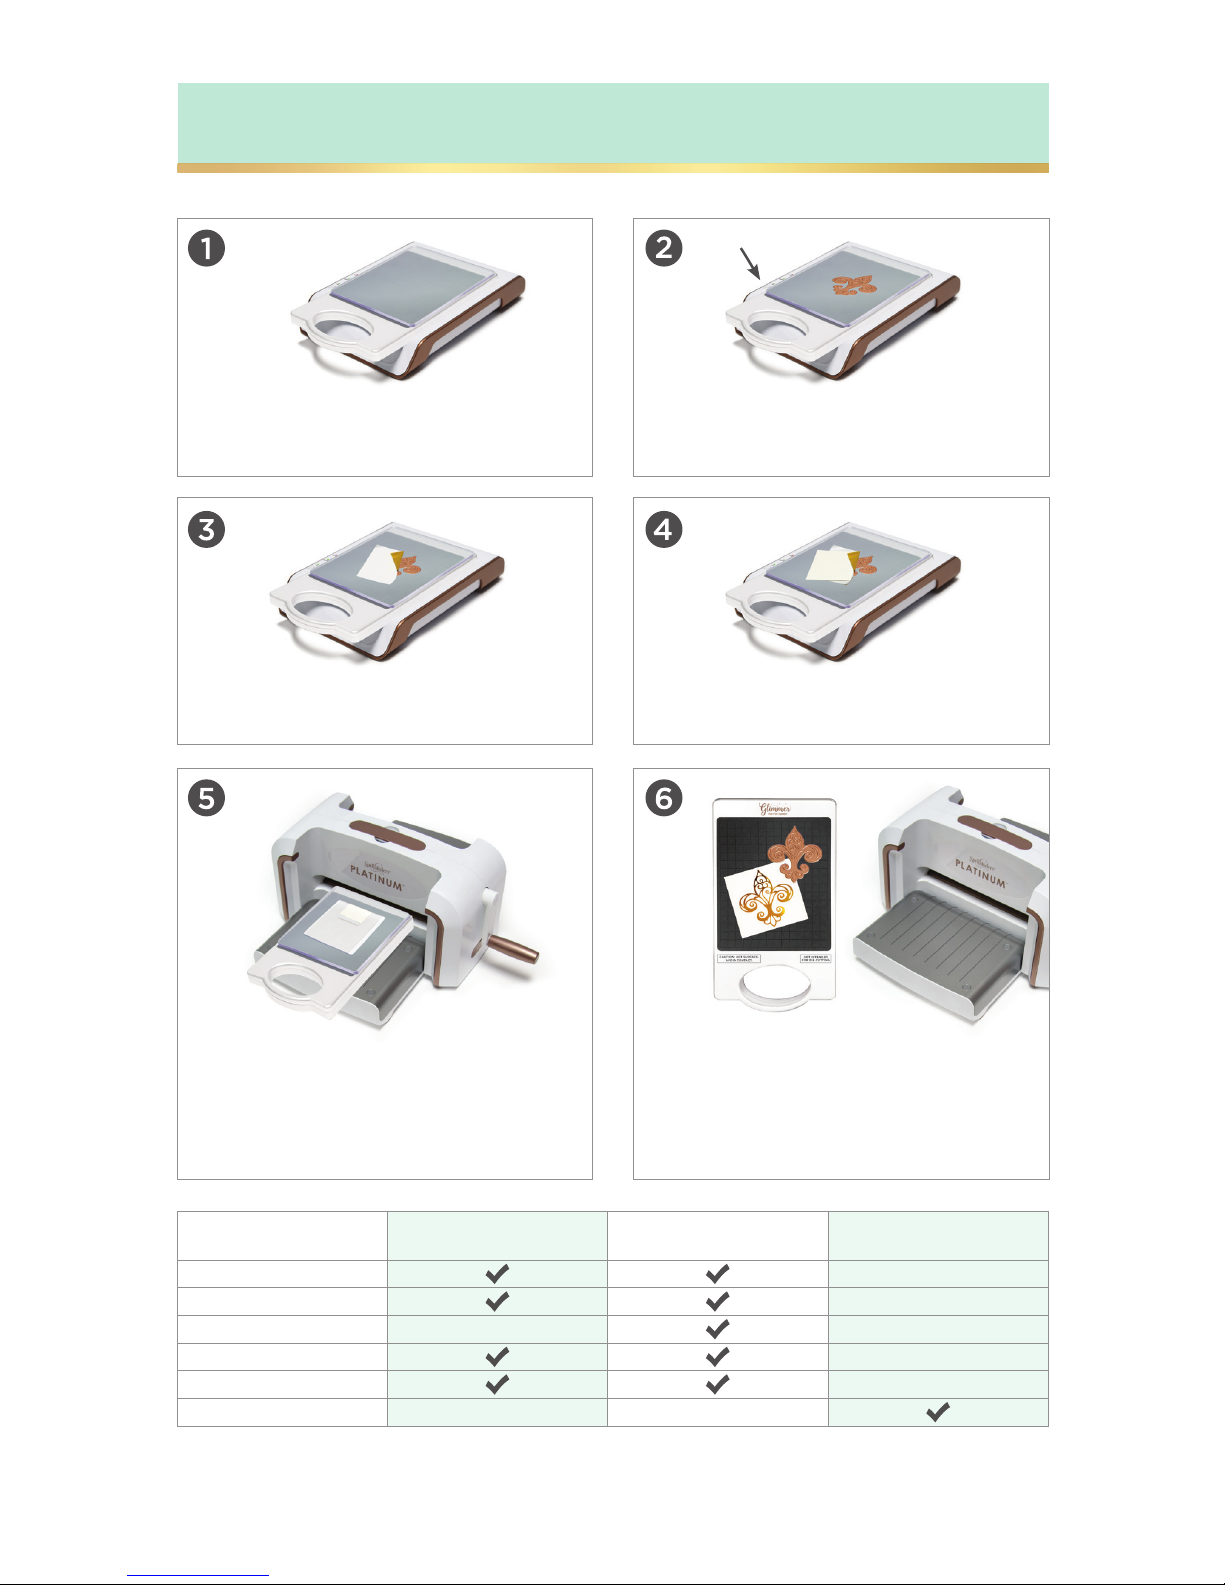
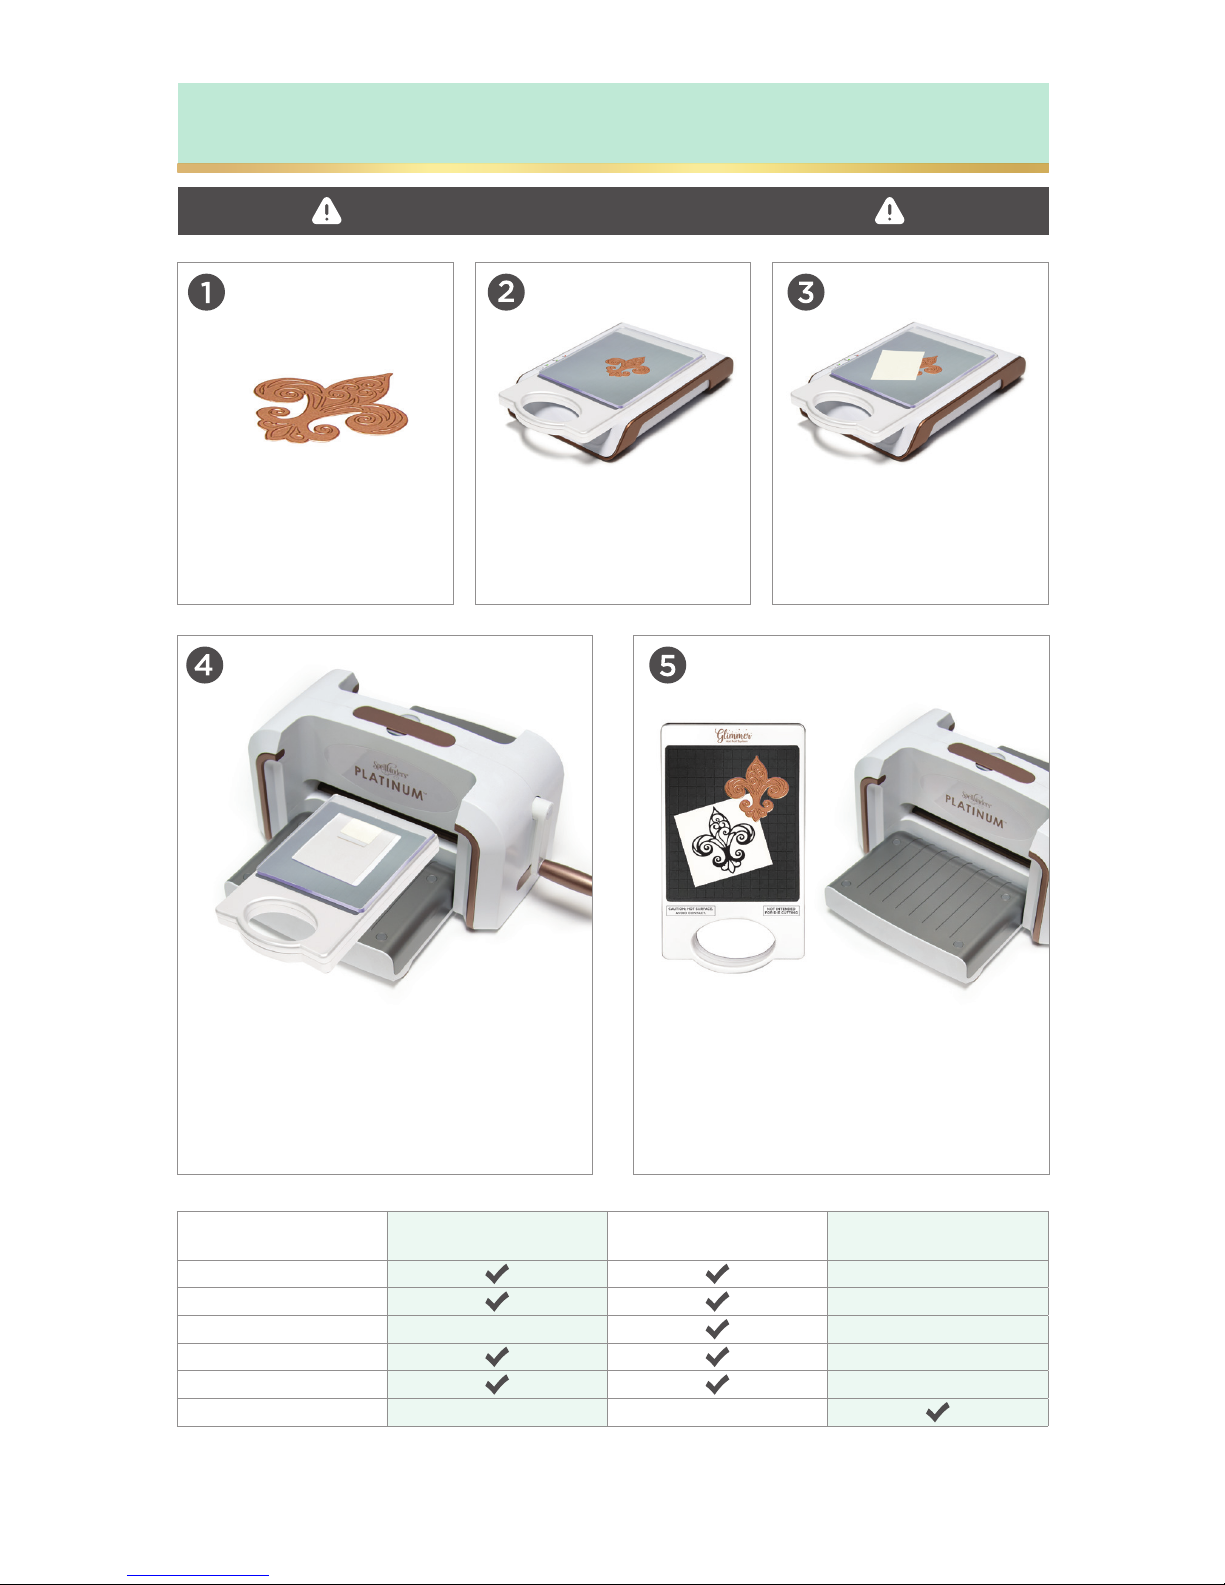
STEPS TO GLIMMER HOT FOIL SYSTEM
Plug in, turn on Machine and wait
for it to heat up. The Platform Ready
Light Indicator will turn green.
Place Glimmer Foil (shiny side
facing down) on the hot foil plate.
Remove the whole Platform and
sandwich and roll it slowly through
the Spellbinders® Platinum™ Machine
or any other approved die-cutting
machine and back.
Remove Shims. Place the Platform
back in base. Slowly peel Foil from
material and enjoy the lovely foil
finish on your material.
Place Glimmer Plate on the heating
surface. Press Timer button and wait
until it turns solid green.
Add desired material and the necessary
shims. See Material chart below.
Material Chart
Glimmer Thin Shim Glimmer Spacer Pad
Cutting Plate
(from Die-Cutting Machine)
Cardstock
Watercolor Paper
Chipboard
Fabric
Ribbon
Leather
4
Visit our YouTube playlist for Glimmer Hot Foil System at https://goo.gl/YMKeFt
Page 5
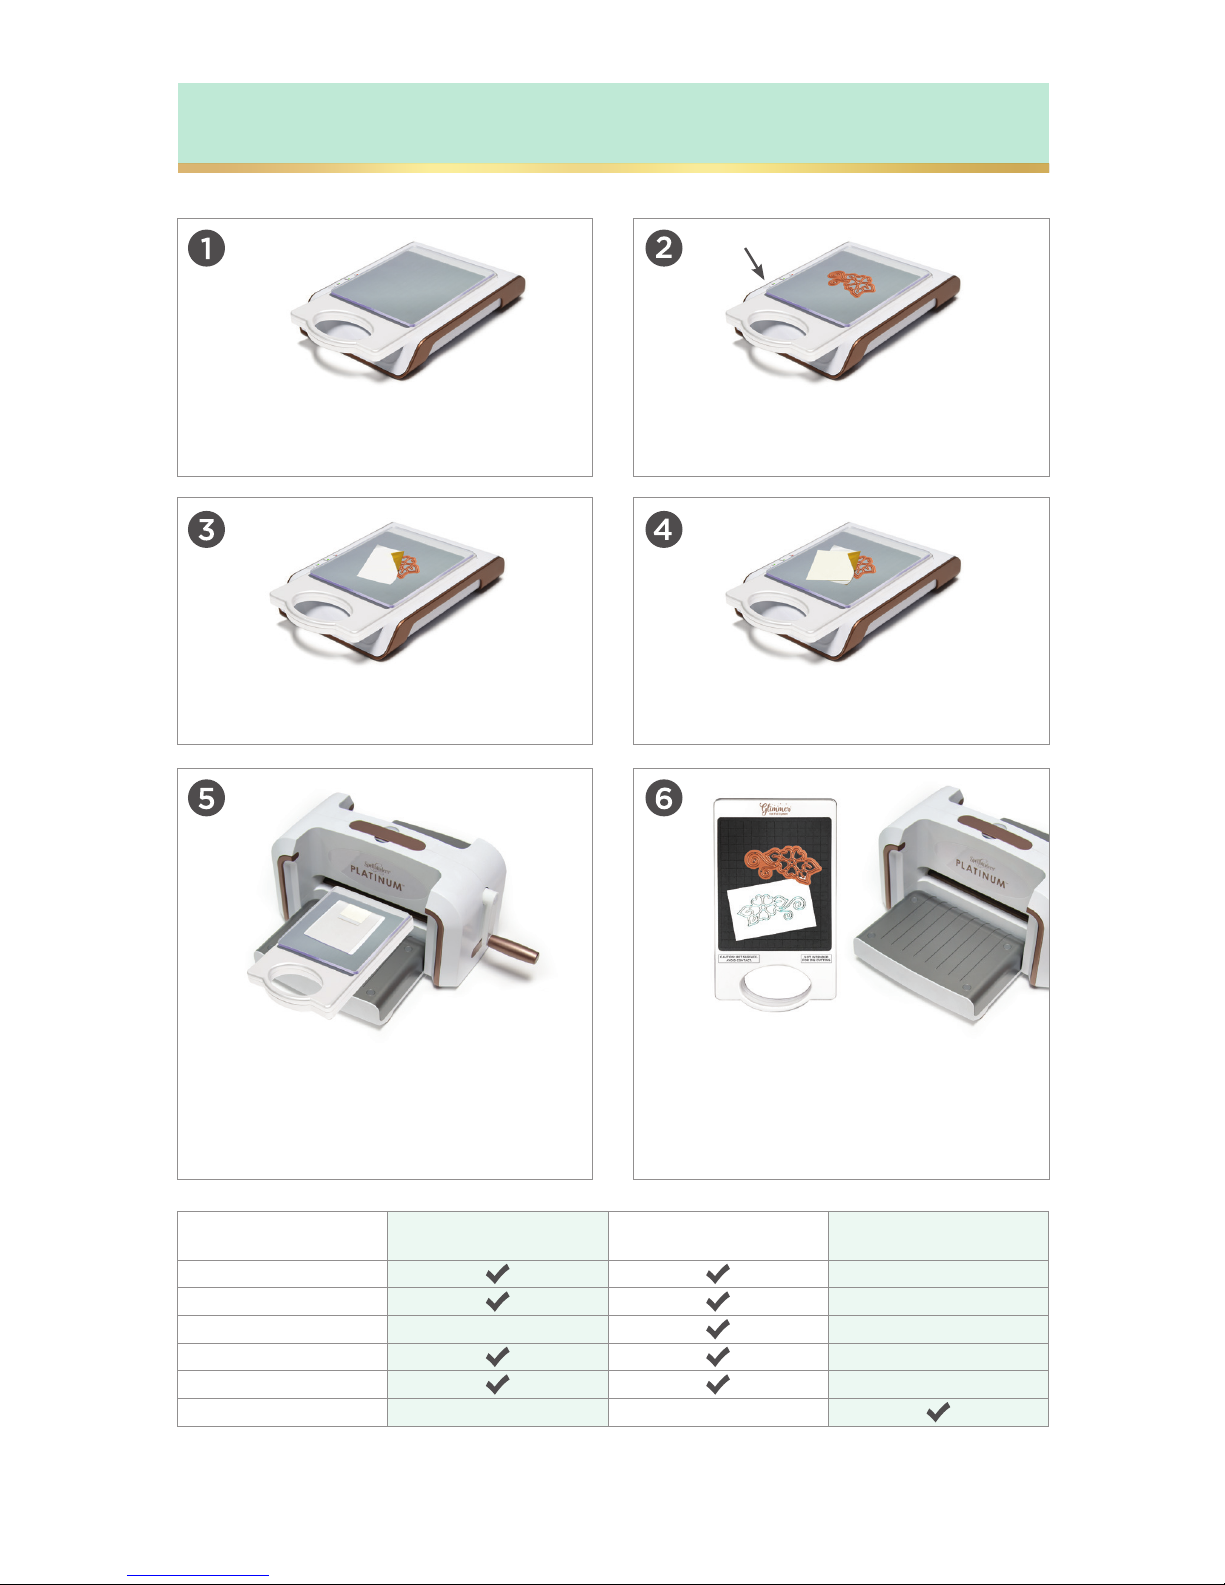
WORKS WITH SELECT ETCHED/WAFER-THIN DIES
WITH GLIMMER HOT FOIL SYSTEM
Plug in, turn on Machine and wait
for it to heat up. The Platform Ready
Light Indicator will turn green.
Place Glimmer Foil (shiny side
facing down) on the etched die.
Remove the whole Platform and
sandwich and roll it slowly through
the Spellbinders® Platinum™ Machine
or any other approved die-cutting
machine and back.
Remove Shims. Place the Platform
back in base. Slowly peel Foil from
material and enjoy the lovely foil
finish on your material.
Place Etched/Wafer-thin die on the
heating surface. Press Timer button
and wait until it turns solid green.
Add desired material and the necessary
Shims. See Material chart below.
Material Chart
Glimmer Thin Shim Glimmer Spacer Pad
Cutting Plate
(from Die-Cutting Machine)
Cardstock
Watercolor Paper
Chipboard
Fabric
Ribbon
Leather
5
Visit our YouTube playlist for Glimmer Hot Foil System at https://goo.gl/YMKeFt
Page 6
Material Chart
Glimmer Thin Shim Glimmer Spacer Pad
Cutting Plate
(from Die-Cutting Machine)
Cardstock
Watercolor Paper
Chipboard
Fabric
Ribbon
Leather
STEPS TO LETTERPRESS
With Glimmer Hot Foil System
Ink the Glimmer Plate or
leave it not inked.
Add desired material
and the necessary Shims.
See Material chart below.
Remove the whole Platform and
sandwich and roll it slowly through
the Spellbinders® Platinum™ Machine
or any other approved die-cutting
machine and back.
Remove Shims. Place the Platform
back in base. Enjoy the lovely
embossed image or letterpress
on your material.
Place Glimmer Plate on
the Platform.
DO NOT HEAT UP PLATFORM FOR LETTERPRESS
6
Visit our YouTube playlist for Glimmer Hot Foil System at https://goo.gl/YMKeFt
Page 7

TRICKS
TRICKS & TECHNIQUES
• Cut the corners of the Foil
cut-outs to prevent the Foil
corners from curling up
• Slowly roll the Platform
through the Die-Cutting
Machine to ensure an even
foiltransfer
• Place your Glimmer Plate
on your Foil and generously
trace an outline on the Foil
using a marker. Cut the
outline out and use it to
avoid stray foilmarkings
• Be careful where you place
your Platform after running
it through your Die-Cutting
Machine. It is still hot and
can still induce bodily harm
or burn materials on your
workspace. We recommend
to always connect the
platform back intothe base.
• Always use your Tweezers to
remove the Glimmer Plates
from the Machine.
• Use the Glimmer Plates as
stamps. Apply inks to the
Glimmer Plates. Roll through
the Die-cutting Machine with
no heating necessary
• Use the hot foil Plates as an
embossing folder. Paper/
material and the Silicone Pad
(provided by your
Die-Cutting Machine).
• Die-cut your hot foil creations.
After you apply Foil, cut it out
with an etched die.
• Ink/stamp up your foil creation
- Foil is an ink-resist material so
feel free to ink and stamp up
your foil creation while leaving
the Foil intact and not covered.
TECHNIQUES
7
Visit our YouTube playlist for Glimmer Hot Foil System at https://goo.gl/YMKeFt
Page 8

Spellbinders Paper Arts Company, L.L.C.
Phoenix, Arizona
Toll Free 888-547-0400
Local 602-385-7700
2018 © All Rights Reserved
Made in China
 Loading...