

Speidel Braumeister 47070, Braumeister 45050 Operating Instructions Manual
Translated from Original
Operating/ Brewing Instructions
for
Speidels Braumeister
Item no.: 47070, 45050
Version February 2011

1
GENERAL ......................................................................................................... 3
2
SAFETY NOTES: .............................................................................................. 3
2.1 General safety notes .................................................................................................................................... 3
2.2 Special safety notes...................................................................................................................................... 4
3
COMPONENTS AND SCOPE OF DELIVERY .................................................. 5
4
TECHNICAL SPECIFICATIONS FOR BRAUMEISTER.................................... 5
5
SETTING UP THE BRAUMEISTER .................................................................. 6
6
CLEANING THE BRAUMEISTER ..................................................................... 6
7
STORING THE BRAUMEISTER ....................................................................... 6
8
PRIOR TO FIRST USE ...................................................................................... 6
9
DISPOSAL......................................................................................................... 7
10 WORKING WITH THE BRAUMEISTER............................................................ 8
10.1 Language selection.................................................................................................................................. 8
10.2 Notes on temperature control ................................................................................................................ 8
10.3 Notes on the circulating pump............................................................................................................... 8
10.4 Notes on the container lid....................................................................................................................... 9
10.5 Notes on hygiene ..................................................................................................................................... 9
11 BREWING WITH THE BRAUMEISTER .......................................................... 10
11.1 Introduction .......................................................................................................................................... 10
11.2 Preparations .......................................................................................................................................... 10
11.3 Programming/ starting automatic brewing ........................................................................................ 11
11.4 Mashing ................................................................................................................................................. 11
11.5 Purification............................................................................................................................................ 13
11.6 Hops boiling........................................................................................................................................... 14
11.7 Cooling................................................................................................................................................... 15
11.8 Main fermentation ................................................................................................................................ 16
11.9 Maturation ............................................................................................................................................ 17
12 BREWING EXAMPLE/ BRIEF INSTRUCTIONS ............................................. 18
13 BREWING FAULTS/ TROUBLESHOOTING .................................................. 21
14 LEGAL ASPECT OF HOME BREWING ......................................................... 23
15 BREWING RECORD ....................................................................................... 24
16 CLEANING INSTRUCTIONS........................................................................... 25
17 GUARANTEE CONDITIONS, HANDLING A GUARANTEE ........................... 27

Speidel’s Braumeister
Page 3 of 32
1 General
Dear customer
You have purchased a new device from our company. Many thanks for trusting in us.
Quality and functionality of our products rate high on our list of priorities.
Use according to intended purpose:
The Braumeister has been designed and produced for brewing smaller quantities (approx.
20l / 50l) of beer. Prior to each brewing procedure, a safety inspection must be performed
for proper functionality of the Braumeister.
Operating instructions:
These operating and brewing instructions have been compiled to ensure reliable and safe
commissioning and operation of the Braumeister right from the start. Please read the
instructions carefully and in full before brewing your first beer. Compliance with these
notes and instructions will ensure that your Braumeister operates to your utmost
satisfaction, and has a long lifespan. Weight and volume indications are always for 20l/
50l. The first specification applies to the 20l Braumeister and the second to the 50l
Braumeister.
Conformity declaration:
SPEIDEL Tank- und Behälterbau GmbH hereby declares that the “Braumeister” product
mentioned in these instructions and to which this declaration applies complies with the
regulations of the following European guidelines:
EMC 2004/108/EC, Low Voltage 2006/95/EC
Manufacturer:
Speidel Tank- und Behälterbau GmbH
Krummenstrasse 2
72131 Ofterdingen
Germany
www.speidels-braumeister.de
www.speidel-behaelter.de
2 Safety notes:
2.1 General safety notes
• The device and mains cable must be inspected regularly for any signs of damage. In
the event of signs of damage, the device may no longer be used.
• Always disconnect the plug from the socket (pull the plug, not the cable) if you no
longer wish to use the device, for cleaning or in the event of a fault.
• Ensure that you lay the mains cable such that it does not come into contact with sharp
objects. The cable must be fully unwound.
• Where extension cables are used, these must have the same wire gauge and also be
fully unwound. Do not use multi sockets as the output of this device is too high.
Overloading the electric fuse must be avoided. As the Braumeister requires extra
power, do not switch any additional “large consumers” to the same fuse. Fire hazard!
Speidel’s Braumeister
Page 4 of 32
• The Braumeister may only be used as intended and in a safe, fault-free condition.
Ensure that you check the proper condition prior to each use.
Children and frail persons:
• For the safety of your children, do not allow packaging parts (cartons, polystyrene
etc.) to be readily accessible. Do not allow small children to play with foil. A risk of
suffocation exists!
• This device is not meant to be handled by persons (including children) with limited
physical, sensory or mental capabilities, or lack of experience and/or know-how,
unless they are being supervised by a person responsible for their safety or have
received instructions on how to use the device.
• Children should be supervised to ensure that they are kept away from the device and
do not play with the device.
2.2 Special safety notes
• The container, lid and add-on parts reach an extremely high temperature. Towards the
end of the brewing process, the boiler contains boiling beer wort. Pay attention to the
notes on setup. Never move the Braumeister in a hot state. Always use pot holders or
gloves when working on and with the Braumeister. Risk of burning!
• When lifting the lid, ensure that the condensation on the underside of the lid flows
back into the container. For this, hold the lid over the container at an angle. Scalding
risk!
• When performing cleaning activities on the Braumeister always ensure that the plug is
disconnected (disconnection from mains). Do not spray the device down or allow
spray to come into contact with electric components. Risk of electric shock!
• Important: It is imperative that you secure the plug connections at the rear of the
device (pump and heating) during operation of the device. Operating the device
without securing plug and socket devices can lead to overheating. Fire hazard!
• Please use the thermal sleeve available as an accessory for insulation. When using
your own insulation ensure that the electronics and the lower part of the Braumeister
are sufficiently ventilated, as a heat build-up and damage to the control may otherwise
occur.
• The pump must be vented prior to each use to prevent dry running. Venting takes
place routinely in automatic operation. In manual operation, the pump must be
switched on and off several times until no more air bubbles escape.
Speidel’s Braumeister
Page 5 of 32
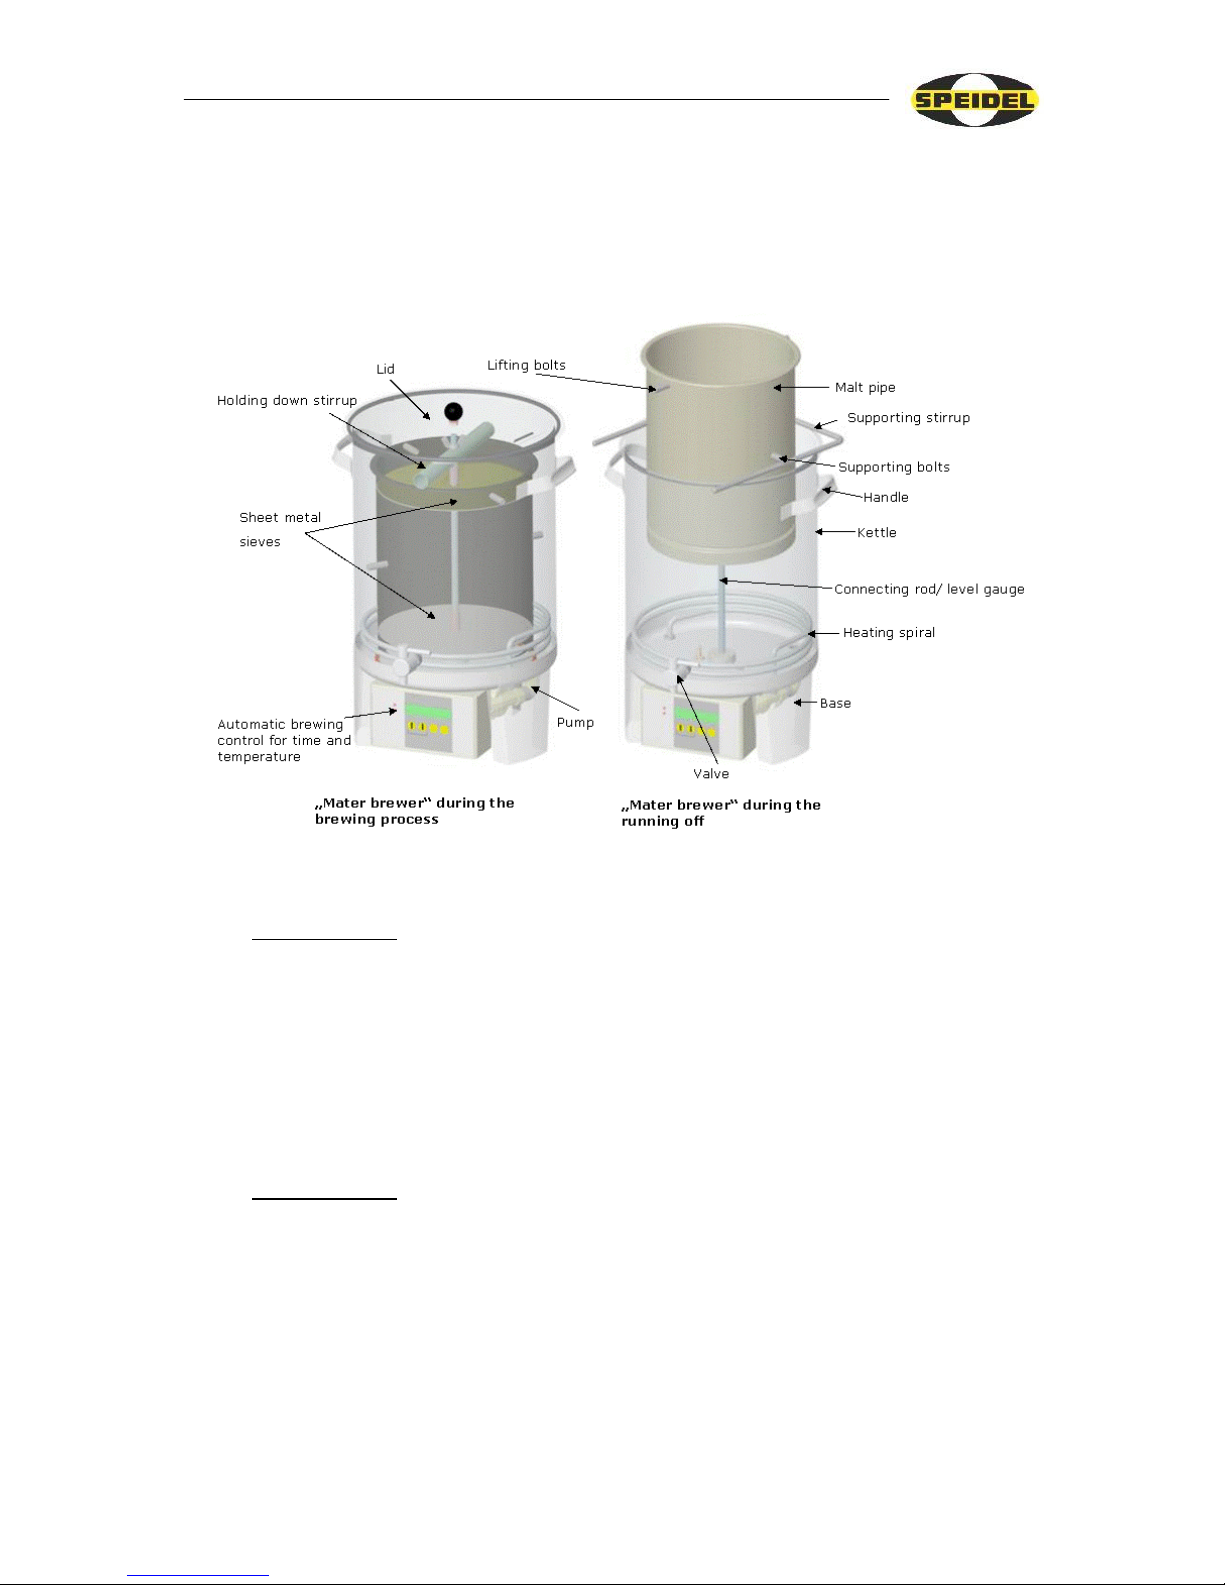
3 Components and scope of delivery
Please refer to the following illustration for components and the scope of delivery
(cooling coil and fermentation vessel not included): The 50l Braumeister is operated
with 2 circulation pumps and 2 heating coils, and has an additional handle on the rear
(not illustrated here).
4 Technical specifications for Braumeister
Braumeister 20l
Weight: 15 kg including internal fittings and lifting bows
Heating coil: 2000 Watt heating capacity
Pump : 1 x 23 Watt
Power connection: 230 V ~
Min. fuse protection: 10 Amp
Contents Brewing quantity approx. 20l ready-to-drink beer (regular beer)
= approx. 23l beer wort
Max. filling level: Upper marking on tie rod = 25l
Braumeister 50l
Weight: 24 kg including internal fittings and lifting bows
Heating coil: 3200 Watt heating capacity
Pump: 2 x 23 Watt
Power connection: 230 V ~
Min. fuse protection: 16 Amp
Contents: Brewing quantity approx. 50l ready-to-drink beer (regular beer)
= approx. 53l beer wort
Max. filling level: Upper marking on tie rod = 55l
Speidel’s Braumeister
Page 6 of 32
5 Setting up the Braumeister
The Braumeister must be positioned on a stable, secure and horizontal support
structure prior to use. Take note that the Braumeister can weigh up to 50kg/ 90kg in a
filled state and that it contains boiling hot beer wort. Horizontal positioning is a
prerequisite for transfer pumping during the brewing process. Avoid an unsteady base.
Most suitable are a stable wooden box or a table that is not too high. The Braumeister
may not be moved during the brewing process. The handles are only meant for
transporting the device in an empty state. It is imperative to keep children and frail
persons away from the device while it is in operation.
6 Cleaning the Braumeister
The Braumeister must be cleaned immediately after the brewing process. Avoid
surface drying of wort and malt remnants, as this will significantly impair the cleaning
process. All stainless steel components can be cleaned using a conventional detergent.
Abrasive agents and sponges/brushes that cause scratching are not suitable. Ideally use
a pipe cleaner thread to clean the heating coil. The pump and its internal drive ball
should also be rinsed regularly. For this, simple turn the Braumeister upside down and
loosen the screws, which should at all times only be hand tightened. The pump can be
removed completely from the Braumeister by simply loosening the plug screws. When
cleaning the brewing vessel ensure that no water spray or moisture comes into contact
with the electrical components. The current supply must be disconnected for
performing cleaning activities on the Braumeister. Before starting the brewing process,
remove all dust and dirt from the Braumeister and all internal fittings by means of
warm water. Also rinse the pump and lines by means of transfer pumping. Caution: If
you allow the pump to run longer than a few seconds for cleaning, ensure that it is
sufficiently vented to avoid dry running (switching the pump on and off several times
provides good venting). Ensure that you include the malt pipe seal and drainage tap as
well. Make sure that no detergent remnants whatsoever remain in the Braumeister, as
these could have a negative impact on the foam stability of the beer. Please refer to the
detailed cleaning instructions on page 26 (cleaning set available as an accessory).
7 Storing the Braumeister
The Braumeister must be stored in a dry location. Avoid contact with ferrous or rusty
objects.
8 Prior to first use
Clean the Braumeister thoroughly using lukewarm water prior to initial use (see
Chapter 6). Also ensure that the Braumeister is securely set up as per Chapter 5.
Confirm that the Braumeister is in proper condition. Also take notice of the safety
notes in Chapter 2. For the rest, the Braumeister has been constructed for immediate
commissioning.

Speidel’s Braumeister
Page 7 of 32
9 Disposal
Meaning of the “refuse bin” symbol on the Braumeister: Protect our environment;
electrical devices should not be disposed of as household refuse. Make use of
collection points for disposal of electrical devices and hand in all electrical devices
that you no longer wish to use at these points. In this manner, you can avoid a
potential impact on the environment and human health caused by incorrect disposal.
This is your contribution to recycling and other forms of use of waste electrical and
electronic equipment. You can find information on where to dispose of the devices
from your district or municipal administration.
Speidel’s Braumeister
Page 8 of 32
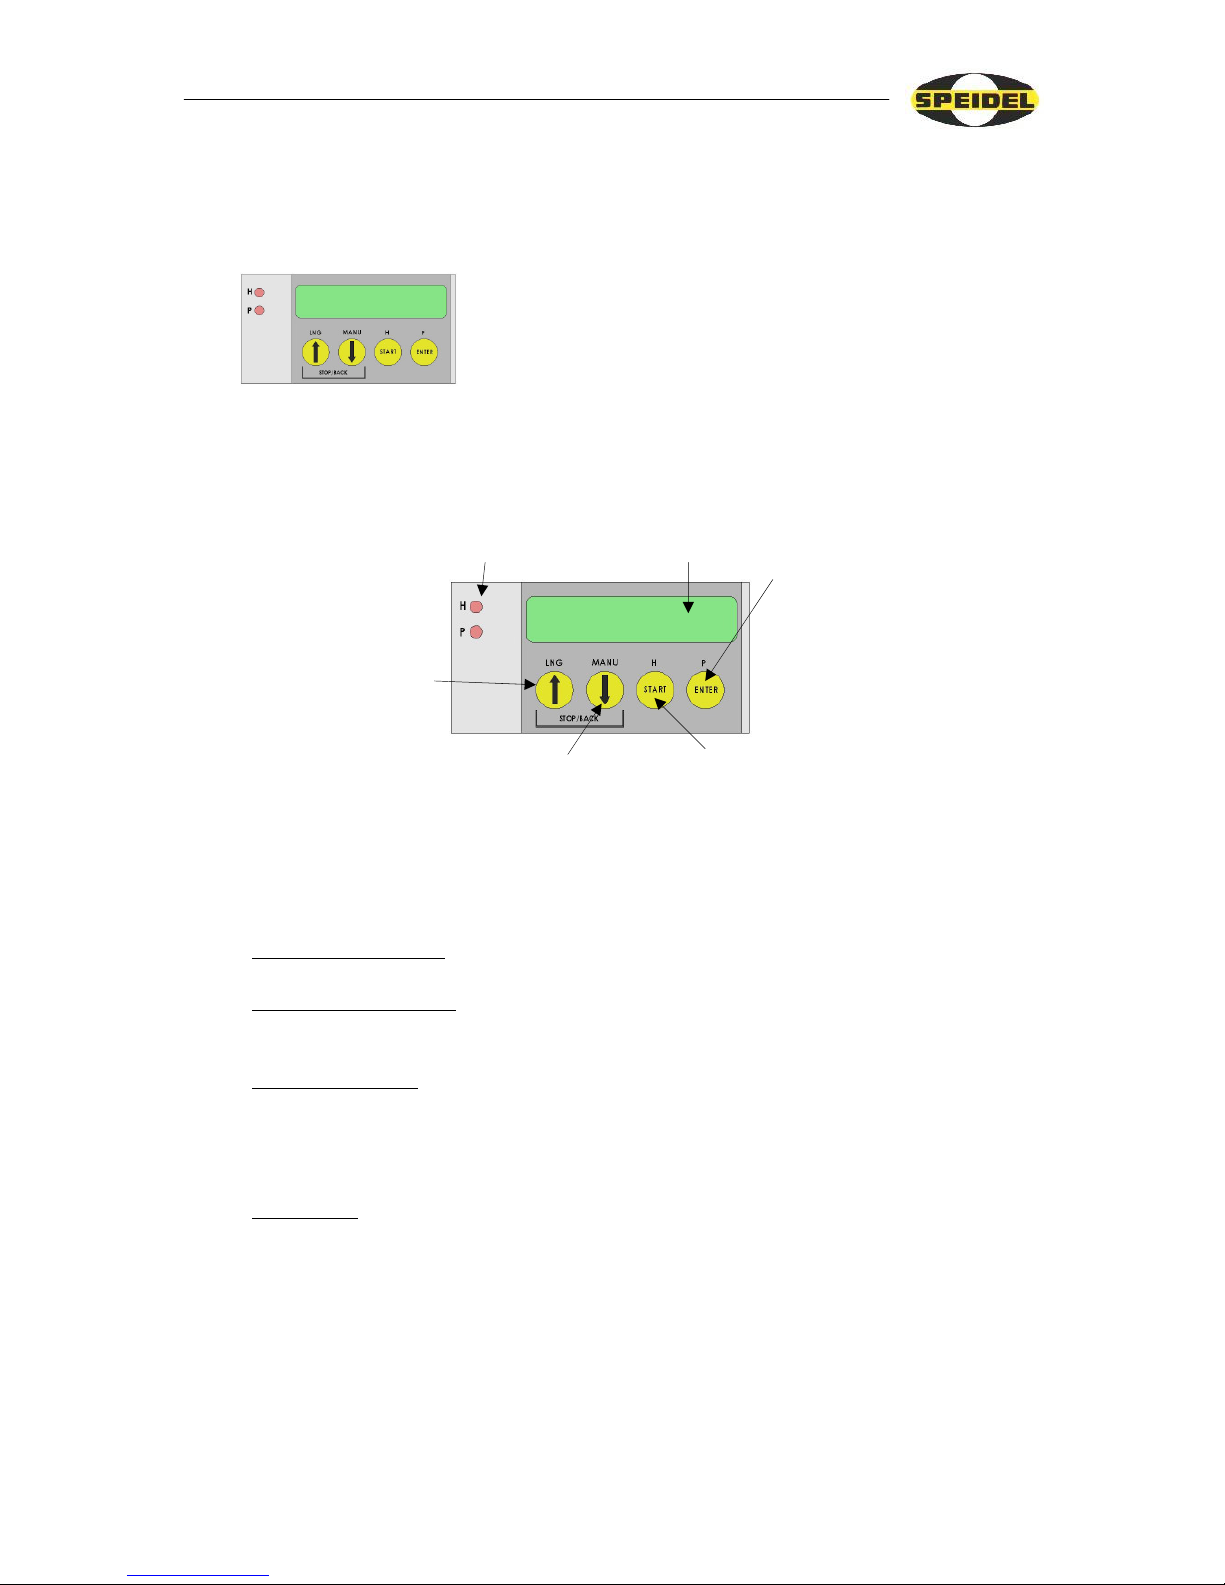
Speidels Braumeister
act temp T=015°C
10 Working with the Braumeister
10.1 Language selection
Press the UP ARROW (LNG) for 3 seconds to move from
the basic setting to the language selection menu. Use the
arrows to select between GERMAN, ENGLISH, FRENCH
and SPANISH. Press enter to set the language selected.
10.2 Notes on temperature control
Automatic operation: Begin with START (1 sec). A detailed description can be
found in the chapter below – “Brewing with the Braumeister”.
Programming module: Use the ENTER button (1 sec) to enter programming mode. A
detailed description can also be found in the chapter below –
“Brewing with the Braumeister”.
Manual operation: Press the ↓ (1 sec) to go to manual operation of the
Braumeister. Press START to switch the heating (H) on/off.
Press ENTER to switch the pump (P). Set the temperature by
means of the arrow keys. Return to the initial display of the
Braumeister by simultaneously pressing ↓+↑.
Stop/ Back: Press the keys ↓+↑ simultaneously to return to the initial
setting from all operation types (automatic, programming
mode and manual operation).
10.3 Notes on the circulating pump
Switch the circulating pump on and off in manual operation using the “Enter” or “P”
key. It is important to vent the pump in manual operation after filling it with liquid, so
as to ensure that it does not run dry and possible incur damage. This can be achieved
by filling the pump with water and switching it on and off several times at an
installation position of approx. 45° (until no more air bubbles escape and the sound of
Display
ENTER
• Change in programming mode (1 sec)
• Confirmation of values in programming
mode
• Acknowledgement of prompts in automatic
operation
• Pump On/Off in manual operation
LED heating
LED pump
START
• Starting automatic brewing (1 sec)
• Confirmation button during brewing process
• Heating On/Off in manual operation
ARROW UP
• Increase time/ temp in
programming mode and in
manual operation
• Language settings (3 sec)
• Arrow up + arrow down = Stop
automatic operation or return
ARROW DOWN
• Decrease time/ temp in programming mode and in
manual operation
• Change in manual operation (1 sec)
• Arrow up + arrow down = Stop automatic operation or
return from manual operation

Speidel’s Braumeister
Page 9 of 32
the pump is almost inaudible). During the brewing process, the pump switches off
automatically in manual operation for purposes of protection as soon as the
temperature exceeds 88°C.
10.4 Notes on the container lid
The lid assists in reaching the temperatures more quickly in the heating up phase. The
ventilation slits avoid pressure forming in the vessel and allow for light air circulation.
Higher water temperatures cause condensation to occur on the underside of the lid.
When lifting the lid, ensure that you hold the lid rim over the vessel opening (at an
angle) so that the condensation can run back into the vessel.
10.5 Notes on hygiene
Hygiene is of top priority when brewing beer. Especially in the cold process area
(while cooling off, when decanting and while fermenting), the beer and the wort are
susceptible to infection, which causes the beer to spoil, meaning that all work could be
in vain. For this reason, take particular care in ensuring that all containers
(fermentation vessel, bottles) and work materials (spoon, taps, seals) are meticulously
clean. Sulphuric acid or a similar substance is particularly suitable for disinfecting
these containers and objects, and can be purchased at specialist winery shops and
commercial outlets that specialise in hobby brewing equipment. Mix and dilute the
powder with water and push this solution into the fermentation lock for disinfection of
the fermentation vessel, all other equipment and even your hands. We recommend
preparing a bucket with sulphuric acid, for example, and using this solution for
disinfecting your hands and all equipment during the brewing process and prior to
decanting. Fill the fermentation vessel with a little sulphuric acid and leave to stand
for a few hours. Shake the vessel several times at intervals. Empty it and allow to dripdry prior to use. Rinsing the vessel with water is not necessary. A few drops or a little
residue of the sulphuric acid in the beer is completely harmless. Storage and
maturation vessels are disinfected in the same way as fermentation vessels. Where the
beer is filled into flip-top bottles for maturation after fermenting, disinfect the bottles
by heating in the oven. Remove rubber seals and disinfect by boiling in hot water or
bathing in sulphuric acid. Heat the bottles in the oven until they reach a temperature of
approx. 130°C. Then switch the oven off and allow the bottles to cool to room
temperature again. Cap using the disinfected seals. In this manner you can ensure that
the fermented beer is filled into meticulously clean bottles. The disinfection process
should be performed a few days before the end of maturation, to ensure that the filling
procedure can take place quickly and without rush.

Speidel’s Braumeister
Page 10 of 32
11 Brewing with the Braumeister
11.1 Introduction
Making beer with the Braumeister can be split into different phases, whereby each
phase is individually described below. To start off, all phases are described in general:
The brewing procedure applies to all beer types and recipes. An actual brewing
example for first-time brewers and a special recipe with precise indications of
quantity, brewing times and temperature levels are provided in the chapters that
follow. Before starting to brew beer, we recommend that you gain an overview of the
individual steps required for preparing a ready-to-drink beverage. To ensure that you
do not leave out any steps and to allow you to gain an overview of your brewing
procedures in retrospect, we recommend keeping a brewing record (see Record in
attachment or at www.speidels-braumeister.de ). Another tip: Allow yourself a day for
your first brewing attempt, and where possible have another person join you, as it is
much more fun together and another set of hands can be very helpful. Note that
brewing beer requires a little experience and that each brewing process is an
improvement on the previous one. So don’t be disappointed if your first beer does not
quite meet your expectations. This is perhaps best illustrated by the words of a witty
German poem that suggests that the beer from the first attempt is neither here nor there
and is bound to cause flatulence, while the second is mediocre, causing you to pass
more liquid than you consumed. The third attempt results in a true beer enjoyed by
men and women alike:
„Das erste Bier ist ein Plempel,
der den Bauern d´Hosen z´sprengt:
Andern zum Exempel.
Das zweite ist ein Mittelbier,
Trinkst drei Maß, so pieselst vier.
Das dritte ist ein Bier vom Kern,
das trinken d`Herrn und d´Frauen gern.“
11.2 Preparations
Procuring the ingredients
Organise the required brewing ingredients (hops, malt and yeast) in good time. Ensure
that the malt is fresh. After crushing the malt (breaking open the corns – not too fine)
use it up as quickly as possible. Quantity indications vary according to recipe,
whereby the malt quantity is between 4-5/ 9-11 kg and the hops quantity between 2050/ 50-100 g. Hops is mostly available in a pressed form, as pellets. We recommend
using dry yeast for fermentation as it can be more easily stored and has a longer shelf
life. These ingredients are available at commercial outlets for hobby brewers and via
the internet. A third option for procuring the ingredients is a brewery in your vicinity.
Why not just ask?
Cleaning the devices
Before starting the brewing process, rinse the Braumeister with warm water and flush
the pump by switching it on. All other equipment such as the beer spindle, wooden
spoon and fermentation vessel should be ready for use and clean. See also the notes in
the chapters “Notes on hygiene” and “Cleaning the Braumeister” in this regard.
 Loading...