

Speidel Braumeister 200 L, Braumeister 500 L, Braumeister 1000 L Operating Manual
Translation from the German Original
Operating manual/brewing instructions
Speidels Braumeister
Item No.: 45200, 46500, 4100
Issue October 2018

1 GENERAL INFORMATION ............................................................................... 3
2 SAFETY INSTRUCTIONS ................................................................................. 3
2.1 General safety notes ................................................................................................................................ 3
2.2 Safety instructions .................................................................................................................................. 4
3 COMPONENTS AND SCOPE OF DELIVERY .................................................. 5
4 TECHNICAL SPECIFICATIONS FOR BRAUMEISTER .................................... 6
5 SETTING UP THE BRAUMEISTER .................................................................. 7
6 CLEANING THE BRAUMEISTER ..................................................................... 7
7 STORING THE BRAUMEISTER ....................................................................... 7
8 PRIOR TO FIRST USE ...................................................................................... 7
9 MAINTENANCE AND SERVICES ..................................................................... 8
10 DISPOSAL ......................................................................................................... 8
11 WORKING WITH THE BRAUMEISTER ............................................................ 9
11.1 Language selection/time ......................................................................................................................... 9
11.2 Brewing control information ................................................................................................................. 9
11.3 Circulation pump information............................................................................................................. 10
11.4 Notes on the container lid ..................................................................................................................... 10
11.5 Information pertaining to the piping layout and the position of the valves ..................................... 10
11.6 Lifting equipment information ............................................................................................................ 10
11.7 Notes on hygiene ................................................................................................................................... 11
11.8 Information about the cooling jacket and water quality ................................................................... 11
12 BREWING WITH THE BRAUMEISTER .......................................................... 12
12.1 Introduction .......................................................................................................................................... 12
12.2 Preparations .......................................................................................................................................... 12
12.3 Programming/ starting automatic brewing ........................................................................................ 13
12.4 Mashing ................................................................................................................................................. 13
12.5 Purification ............................................................................................................................................ 16
12.6 Hops boiling process ............................................................................................................................. 17
12.7 Cooling ................................................................................................................................................... 19
12.8 Main fermentation ................................................................................................................................ 20
12.9 Maturation ............................................................................................................................................ 21
13 BREWING EXAMPLE/ BRIEF INSTRUCTIONS ............................................. 22
14 BREWING FAULTS/TROUBLESHOOTING ................................................... 26
15 LEGAL ASPECT OF HOME BREWING (VALID IN GERMANY): .................. 27
16 BREWING RECORD ....................................................................................... 28
17 CLEANING INSTRUCTIONS........................................................................... 29
18 GUARANTEE CONDITIONS, HANDLING A GUARANTEE ........................... 31
Speidels Braumeister
Page 3 of 32
1 General information
Dear customer,
You have purchased a new device from our company. Thank you for your trust in our
product. Quality and functionality of our products rate high on our list of priorities.
Please read the user guide before the first use completely and make this any user of the
master brewer accessible.
Use according to intended purpose:
The Braumeister is designed and produced to brew beer in quantities of approx. 200 L or
500 L or 1000 L. Prior to each brewing procedure, a safety inspection must be performed
for your safety and proper functionality of the Braumeister.
Operating instructions:
These operating and brewing instructions have been compiled to ensure reliable and safe
commissioning and operation of the Braumeister right from the start. Please read the
instructions carefully and in full before brewing your first beer. Compliance with these
notes and instructions will ensure that your Braumeister operates to your utmost
satisfaction, and has a long lifespan.
Conformity declaration:
SPEIDEL Tank- und Behälterbau GmbH hereby declares that the “Braumeister” product
mentioned in these instructions, and to which this declaration applies, complies with the
requirements of the European guidelines.
Manufacturer
Speidel Tank- und Behälterbau GmbH
Krummenstraße 2
72131 Ofterdingen
Germany
www.speidels-braumeister.de
www.speidel-behaelter.de
2 Safety instructions
2.1 General safety notes
The Braumeister consists nearly completely of stainless steel (electrically conductive).
The equipment is categorised as protection class 1 (protective earthing). In operation
the connection of a protective conductor is imperative.
The device and mains cable must be inspected regularly for any signs of damage. In
the event of signs of damage, do not use the device!
Always disconnect the plug from the socket (pull the plug, not the cable) if you no
longer wish to use the device, for cleaning or in the event of a fault. Only properly a
trained electrician shall be permitted to perform maintenance and repair work. The
terminals may still be live after the equipment has been shut down. Wait at least 3
minutes. Risk of electric shock!
Speidels Braumeister
Page 4 of 32
Ensure that you lay the mains cable such that it does not come into contact with sharp
objects. The cable must be fully unwound.
The Braumeister must only be used as intended. It must only be operated in a safe,
fault-free condition. Ensure to check the proper condition prior to each use.
Children, pets and frail persons:
For the safety of your children, keep packaging parts (cartons, polystyrene etc.) out of
children’s reach. Keep foils out of children’s reach. Asphyxiation risk!
This device is not meant to be handled by persons (including children) with limited
physical, sensory or mental capabilities, or lack of experience and/or know-how,
unless they are being supervised by a person responsible for their safety or the person
has received instructions on how to use the device safely.
Children and pets must be supervised to ensure that they are kept away from the
device and do not play with the device.
2.2 Safety instructions
The temperature of the container, lid, and add-on parts can become extremely high.
Towards the end of the brewing process, the boiler contains boiling beer wort.
Observe the installation instructions. Never attempt to move the Braumeister while it
is hot. Always use pot holders or gloves when working on and with the Braumeister.
Risk of burning!
When lifting the lid, ensure that the condensation on the underside of the lid flows
back into the container. For this, hold the lid over the container at an angle. Scalding
risk!
The Braumeister always operate via a residual current circuit breaker with a
tripping current of max. 100 mA type B (AC-DC sensitive). A technical defect
carries the inherent risk of electrical shock!
When performing cleaning activities on the Braumeister always ensure that the plug is
disconnected (disconnection from mains). . The terminals may still be live after the
equipment has been shut down. Wait at least 3 minutes. Do not spray the device down
or allow spray to come into contact with electric components. Danger of electric
shock!
Important: It is imperative that you lock the plug connections at the rear of the device
(pump and heater) during the operation of the device. Operating the device without
securing plug and socket devices can lead to overheating. Fire hazard!
Please use the thermal sleeve available as an accessory for insulation. When using
your own insulation ensure that the electronics and the lower part of the Braumeister
are sufficiently ventilated, as a heat build-up and damage to the control may otherwise
occur.
The pump must be vented prior to each use to prevent dry running. Venting takes
place routinely in automatic operation. In the manual operation, the pump must be
switched on and off several times until no more air bubbles escape.
In order to prevent any danger that may be caused by outdated components,
compliance with the maintenance and inspection instructions is mandatory.
Speidels Braumeister
Page 5 of 32
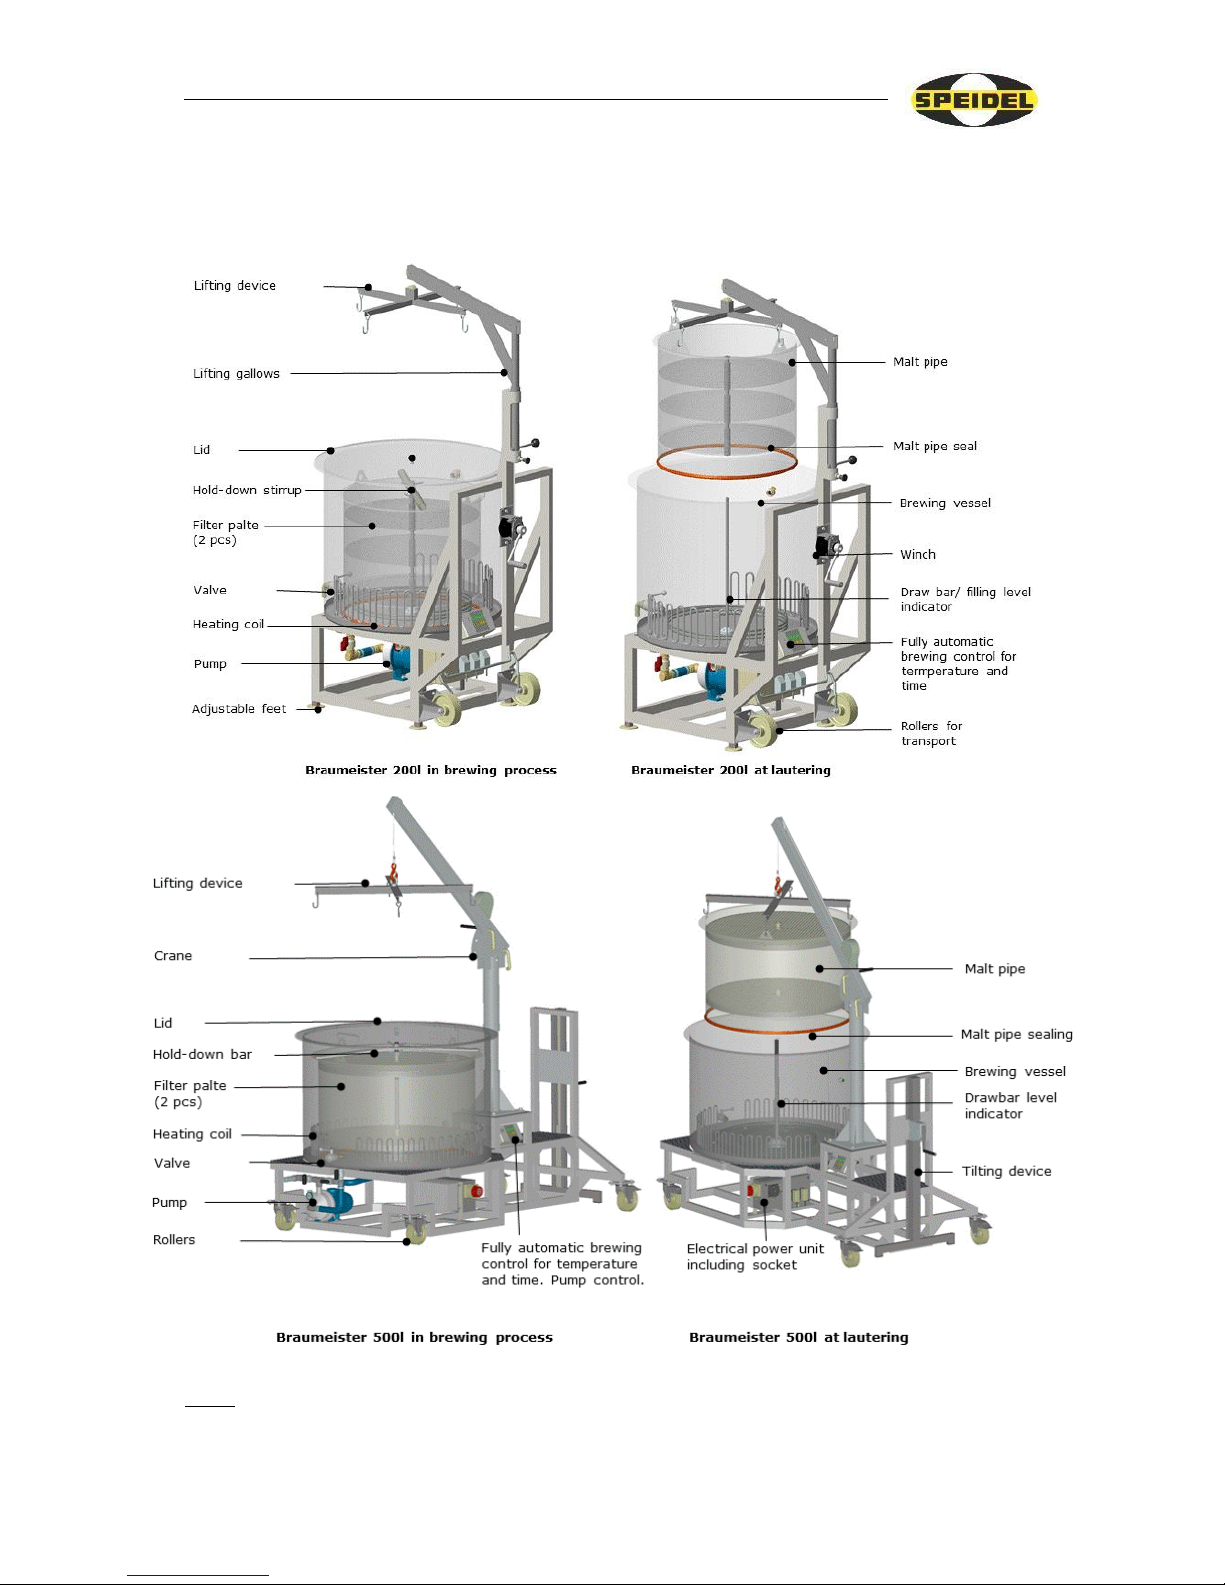
3 Components and scope of delivery
Please refer to the following illustration for components and scope of delivery:
Note: The following illustrations refer to Braumeister 200 L; however, the instruction
for the Braumeister 500 L or 1000 L are similar or identical.

Speidels Braumeister
Page 6 of 32
4 Technical specifications for Braumeister
Braumeister 200 L
Weight 150 kg including internal fittings and lifting equipment
Dimensions: L 136 cm x W 90 cm x H 208 cm
Heating coil: Heating capacity 3 x 3000 Watt
Pump: 1 x 370 Watt – with speed control
Power connection: 400V ~
Min. fuse protection: 16 Amp
Total connection: 9.4 kW
Cooling system: Double-walled shell area 1.2m²
Contents Brewing quantity approx. 200 L ready-to-drink beer (regular
beer) = approx. 210 L beer wort
amount of malt: max. amount of malt 42 kg
max. fill level: upper marking on tie rod = 230 L
min. fill level: lower marking on tie rod = 170 L
Braumeister 500 L
Weight 380 kg including internal fittings and lifting equipment
Dimensions: L 253 cm x W 130 cm x H 277 cm
Heating coil: Heating capacity 6 x 3000 Watt
Pump: 1 x 370 Watt – with speed control
Power connection: 400V ~
Min. fuse protection: 32 Amp
Total connection: 18.4 kW
Cooling system: Double-walled shell area 1.8m² plus cooling spiral (included in
delivery)
Contents Brewing quantity approx. 500 L ready-to-drink beer (regular
beer) = approx. 550 L beer wort
amount of malt: max. amount of malt 120 kg
max. fill level: Upper marking on tie rod = 575 L
min. fill level: lower marking on tie rod = 425 L
Braumeister 1000 L
Weight 850 kg including internal fittings and lifting equipment
Dimensions: L 305 cm x W 180 cm x H 345 cm
Heating coil: Heating capacity 4 x 3000 Watt + 8 x 2725 Watt
Pump: 1 x 370 Watt – with speed control
Power connection: 400V ~
Min. fuse protection: 63 Amp in Star, minimum 125 Amp. In Delta
Total connection: 34.2 kW
Cooling system: Double-walled shell area 2.56m²
Contents Brewing quantity approx. 1000 L ready-to-drink beer (regular
beer) = approx. 1200 L beer wort
amount of malt: max. amount of malt 225 kg
max. fill level: Upper marking on tie rod = 1300 L
min. fill level: lower marking on tie rod = 850 L
Speidels Braumeister
Page 7 of 32
5 Setting up the Braumeister
The Braumeister must be positioned on a stable, secure and horizontal support
structure prior to use. Caution! The Braumeister can weigh up to 420 kg or 1000 kg or
2200 kg while full and that it contains boiling hot beer wort. Horizontal positioning is
a prerequisite for transfer pumping during the brewing process. Avoid placing the
equipment on shaky and uneven ground. The Braumeister may not be moved during
the brewing process. It is imperative to keep children and frail persons away from the
device while it is in operation. Danger of burning! Furthermore, exposure to direct
sunlight (the lifting rope on 200 L equipment may become brittle) and extreme high
temperatures must be avoided
6 Cleaning the Braumeister
The Braumeister must be cleaned immediately after the brewing process. Avoid
surface drying of wort and malt remnants, as this will significantly impair the cleaning
process. All stainless steel components can be cleaned using a conventional detergent.
Abrasive agents and sponges/brushes that cause scratching are not suitable. Ideally,
use washing-up brush to clean the heating coil. The pump, its piping, including all
valves must be thoroughly flushed. During the tank-to-tank pumping, the valves must
be opened and closed during the cleaning process. Once in a while, hoses/pipes must
be removed and cleaned, using a separate brush. When cleaning the brewing vessel,
ensure water spray or moisture does not comes in contact with the electrical
components. The current supply must be disconnected for performing cleaning
activities on the Braumeister. Before starting the brewing process, remove all dust and
dirt from the Braumeister and all internal fittings by means of warm water. Also rinse
the pump and lines by means of transfer pumping. Caution: Ensure that you include
the malt pipe seal and drainage tap as well. Make sure that no detergent remnants
whatsoever remain in the Braumeister, as these could have a negative impact on the
foam stability of the beer. In order to ensure the valves are dry and discharged
completely, they must remain open. Please refer to the detailed cleaning instructions
on page 29 (cleaning set available as an accessory).
7 Storing the Braumeister
The Braumeister must be stored in a dry location. Avoid contact with ferrous or rusty
objects.
8 Prior to first use
Clean the Braumeister thoroughly using lukewarm water prior to initial use (see
Chapter 6). Refer to the safe installation of the Braumeister. See description in Chapter
5. Ensure that the Braumeister is in a flawless condition. Refer to the safety
instructions in Chapter 2. The Braumeister is designed for immediate use. Take care
that the pump is running prior the direction of the arrow. A wrong direction can be
caused by a wrong wiring of the electrical source.
Speidels Braumeister
Page 8 of 32
9 Maintenance and services
Compliance with the following maintenance and service information as well as the
intervals is highly recommended.
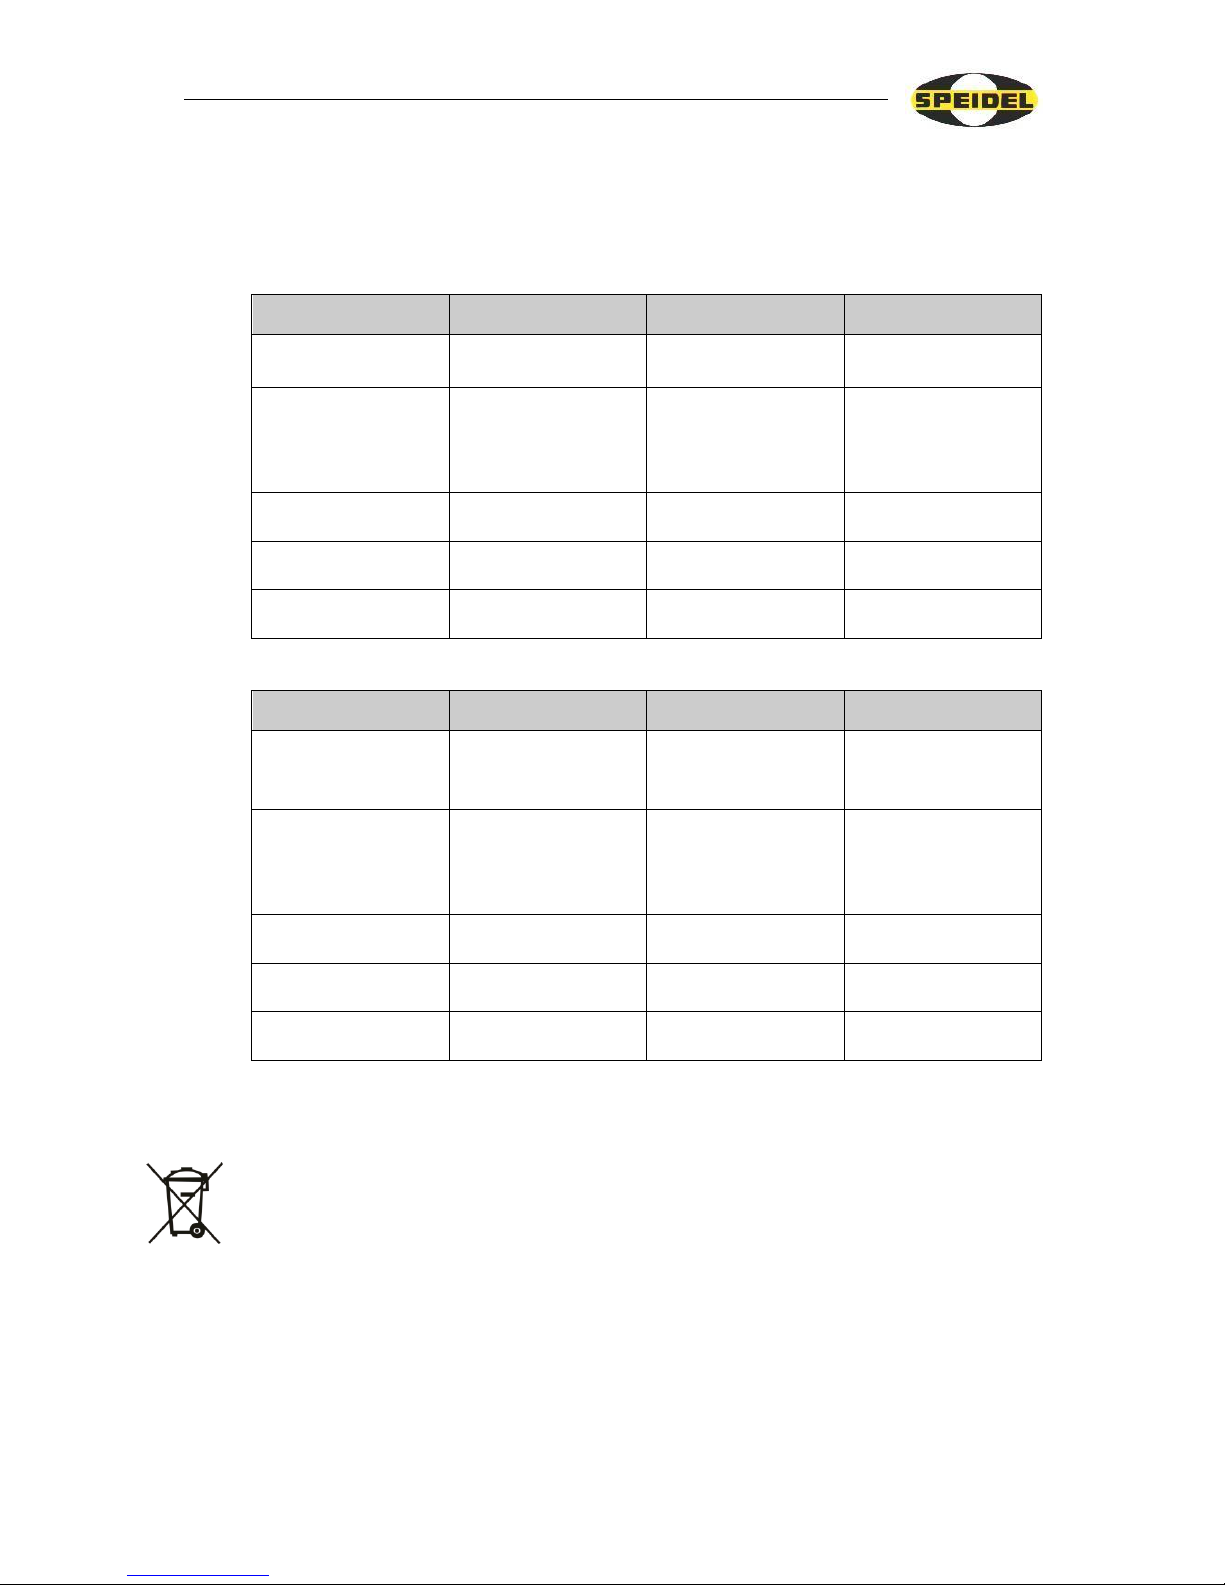
Braumeister 200 L
Component
Prior to any brewing
process
every 12 months or after
20 brewing processes
every 24 months or after
40 brewing processes
Lifting rope
(Item No.: 63212)
Visual inspection
for damage
Replacement
Cable winch
(Item No.: 64272)
Lubrication
according to
separate
instructions
Hoses
(Item No.: 77337)
Replacement
Malt pipe seal (Item
No.: 77362)
Replacement
Filter cloth
(Item No.: 77350)
Replacement
Braumeister 500 L/ 1000 L
Component
Prior to any brewing
process
every 12 months or after
20 brewing processes
every 24 months or after
40 brewing processes
Hoisting
equipment
Visual inspection
for damage
According to
hoisting equipment
instructions
Geared winch for
tilted position
(Item No.: 78030)
Lubrication
according to
separate
instructions
Hoses
(Item No.: 77337)
Replacement
Malt pipe seal (Item
No.: 77381)
Replacement
Filter cloth
(Item No.: 77350)
Replacement
10 Disposal
Meaning of the “refuse bin” symbol on the Braumeister: Protect our environment;
electrical devices should not be disposed of as household refuse. Make use of
collection points for disposal of electrical devices and hand in all electrical devices
that you no longer wish to use at these points. In this manner, you can avoid a
potential impact on the environment and human health caused by incorrect disposal.
This is your contribution to recycling and other forms of use of waste electrical and
electronic equipment. You can find information on where to dispose of the devices
from your district or municipal administration.
Speidels Braumeister
Page 9 of 32
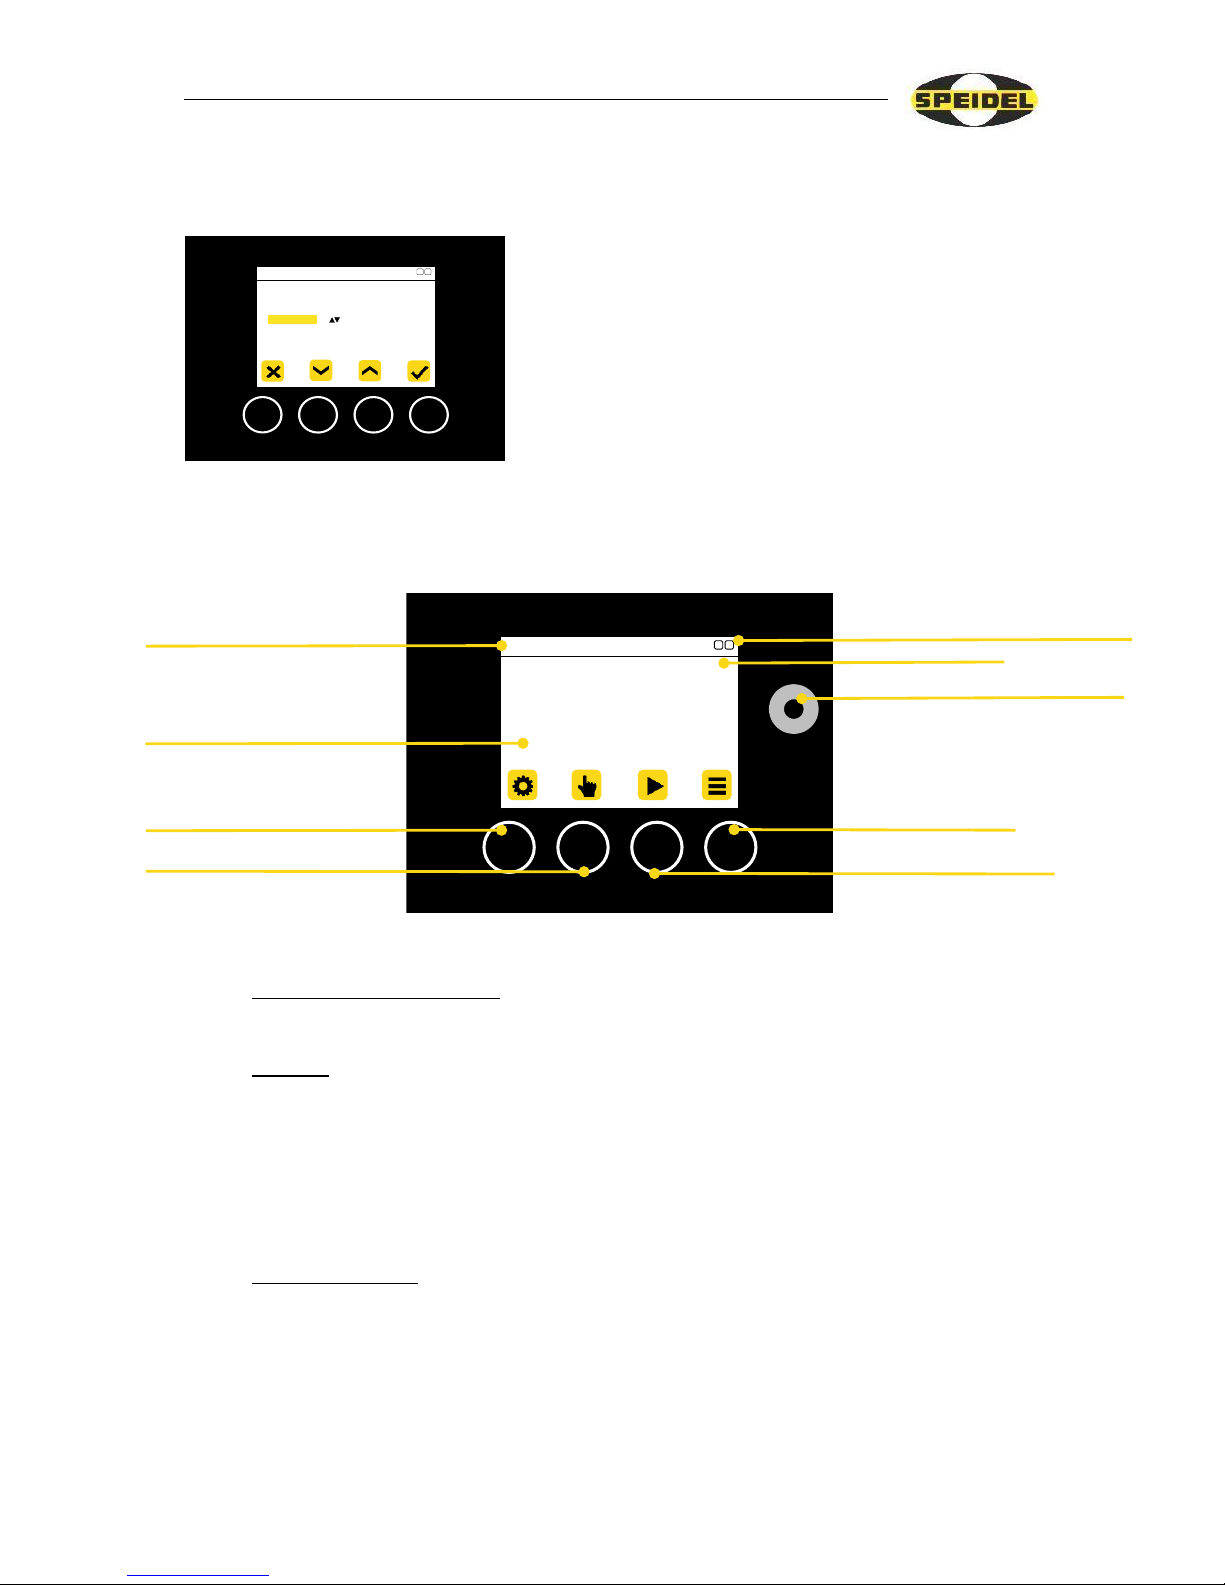
11 Working with the Braumeister
11.1 Language selection/time
When pressing the Settings button in the ‘Start’ menu,
the language, illumination, and time screen opens. The
arrow keys allow you to make a selection, and choosing
the Select function takes you to the various options.
These, in turn, can also be selected by activating the
arrow keys. Acknowledge your selection by pressing the
Select button. Press the Abort button to return to the
Start menu.
11.2 Brewing control information
Automatic operating mode: Press Brewstart, select a recipe and press Select to start.
Follow the instructions. A detailed description can be found in the
chapter below “Brewing with the Braumeister”.
Recipes: Up to 10 recipes can be stored when selecting the Recipe
function. When you receive the equipment, 2 recipes are included.
Use the arrow keys to select a recipe first, create a new one or
delete a recipe. Pressing the Select function to change an existing
recipe. The arrow keys allow you to modify any entries. Use the
Select key to move to the next recipe item until you have reached
the end. Once all items of the recipe have been acknowledged by
pressing the Select key, the recipe is applied and stored.
Manual operation: During the manual operating mode, the pump and the heater can
be switched on and off. The symbols on the upper right-hand
corner indicate whether the pump is on or off. If the symbol is
highlighted in yellow colour, the pump is on A light yellow
colour of the symbol indicates that the pump is activated,
however, it is not started. This indicates that the liquid is still too
hot or the heater is activated but the actual value is higher than the
setpoint. Use the Temperature button on the right-hand side to set
Settings
Abort
Down
Up
Select
11:45
HP
Language
Lightning
Set Time
Temp 15 C
Speidels Braumeister
Main menu 11:45
Settings
Manual Brewstart R ecipe
HP
Menu display/status display
Settings
Time, Diode (P)ump/(H)eater
Display of time, temperature,
recipe, instructions
Progress bar
To manual operating
Starting a brew recipe
Processing a recipe
Potentiometer for controlling
the pump flow
Speidels Braumeister
Page 10 of 32
the target temperature; then, activate the arrow keys and the Select
button.
Cancel: When pressing the Abort button, you are taken back the Start
menu; regardless of the operating mode you are currently in
(Automatic/Brew start/Recipes, and Manual mode). While in
Automatic mode, the red-coloured light elements are lit. A
prompt will be displayed asking whether the procedure shall be
finally aborted or whether this process shall continue.
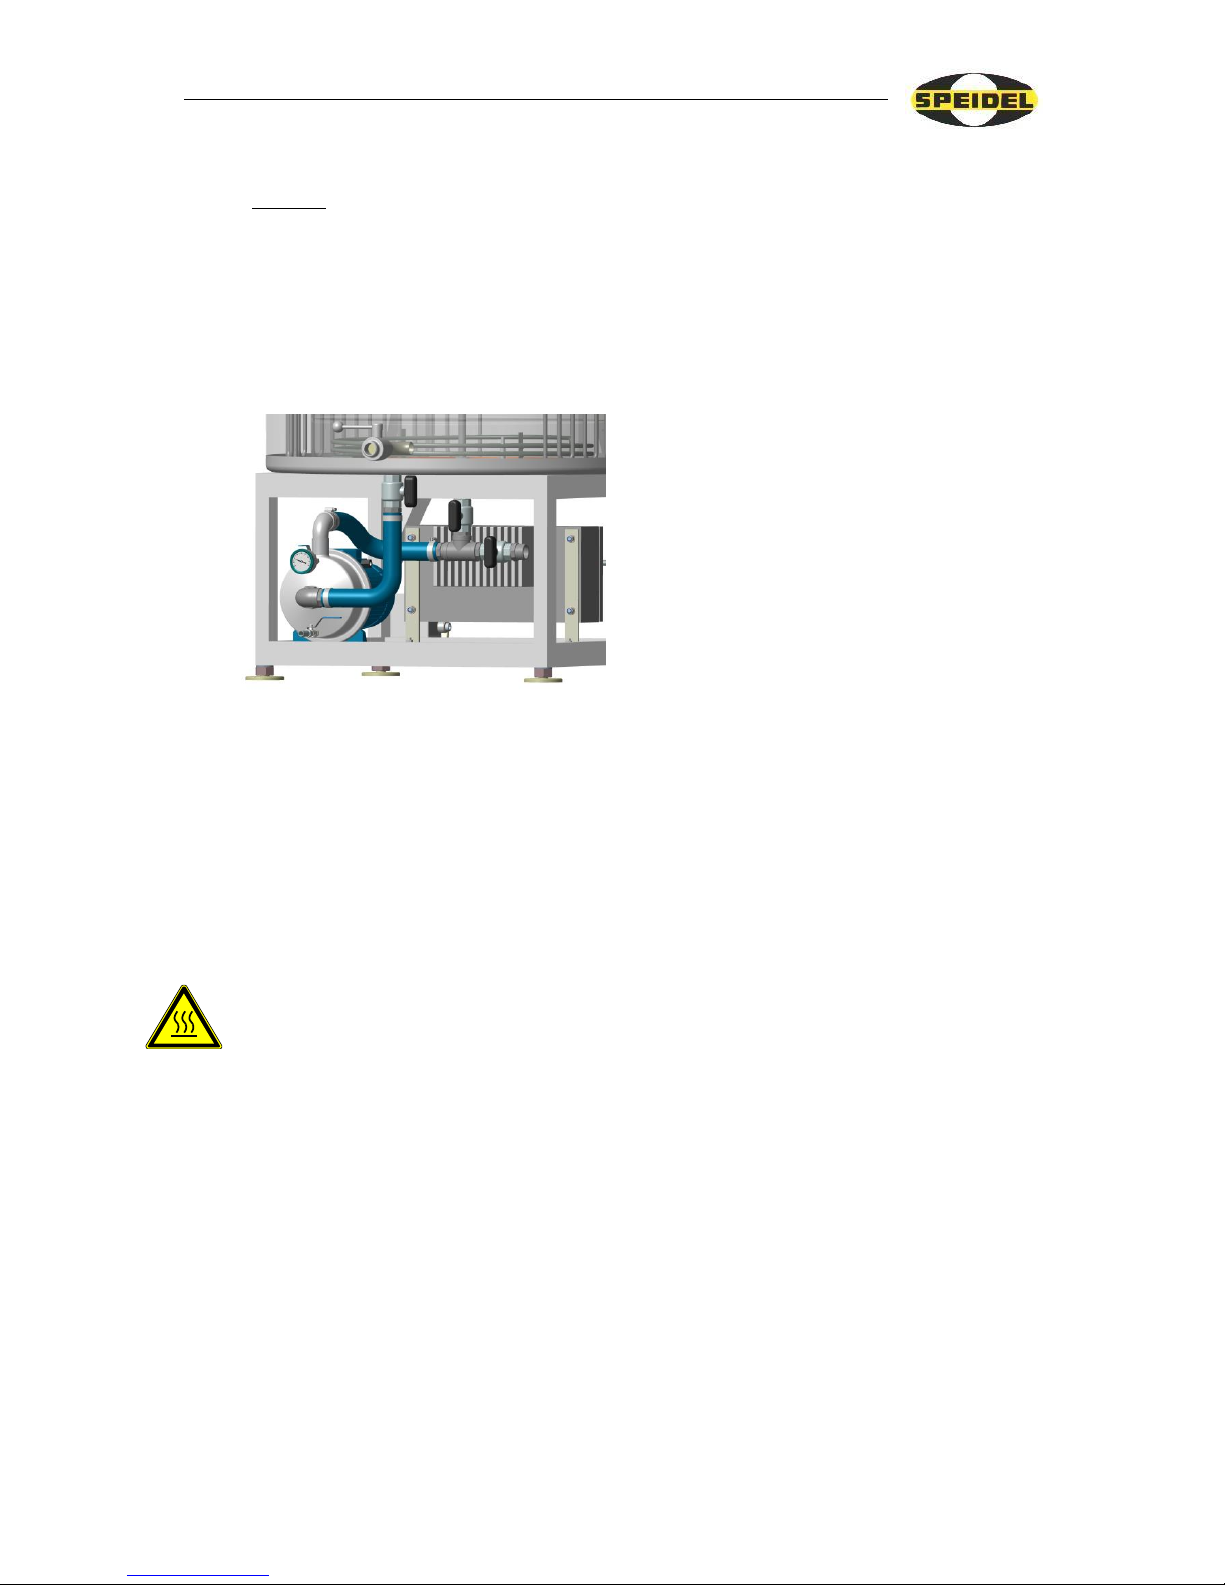
11.3 Circulation pump information
While in the manual mode, the circulation
pump can be switched on and off. It is
important to vent the pump while in manual
operating mode after filling it with liquid, so
as to ensure that it does not run dry and
possible incur damage. This can be achieved
by filling the pump with water and switching
it on and off several times (until no more air
bubbles escape). The automatic mode occurs
automatically. During the brewing process
and while in manual mode, the pump
switches off automatically as soon as the temperature exceeds 88°C. This protects the
system. If the temperature drops to 84°C the operation continues. The speed and the
flow of the pump can be regulated by using the rotary knob on the control panel.
When using the 200l or 500 L/ 1000 L BM, the recirculation pressure is optimised at
approx. 0.2 bar or 0.15 bar (displayed on the pump’s pressure gauge during the mash
process). In order to prevent excessive pressure in the malt pipe, a pressure of 0.2 bar
or 0.15 bar must not be exceeded. The pump output is limited to approx. 0.25 bar for
the 200 L equipment and 0.2 bar for the 500 L/ 1000 L Braumeister.
11.4 Notes on the container lid
The lid assists in reaching the temperatures more quickly in the heating up phase.
Higher water temperatures cause condensation to occur on the underside of the lid.
When lifting the lid, ensure that you hold the lid rim over the vessel opening (at an
angle) so that the condensation can run back into the vessel.
11.5 Information pertaining to the piping layout and the position of the valves
By default, the Braumeister uses 3 feed-through and drain valves on the bottom as
well as one valve on the vessel itself. Valves at the bottom must be positioned
differently depending on the application and the section of the brewing process. The
valve on top of the vessel is used to remove the wort; at the same time it serves as inlet
for the whirlpool application. The following description of the brewing process
describes the relevant valve positions again and in more detail.
11.6 Lifting equipment information
The entire equipment comprises the lifting device, the cable winch, the cable, and
cross bar incl. hooks. Prior to each brewing process, these components must be
visually inspected for damage and their flawless condition must be insured. Additional
information and safety instructions can be found in the attached winch instructions. If
 Loading...