

Speidel 47070 Operating And Brewing Instructions
Operating and brewing instructions
for
Speidel´s Master Brewer
Updated July 2008

1 GENERAL........................................................................................................... 1
2 PRESENTATION OF THE MASTER BREWER ................................................. 2
2.1
Components and extent of supply ......................................................................................................... 2
2.2
Installation of the Master Brewer ......................................................................................................... 2
2.3
Cleaning the Master Brewer .................................................................................................................. 2
2.4
Storage of the Master Brewer ................................................................................................................ 3
2.5
Technical data about the Master Brewer ............................................................................................. 3
2.6
Language selection.................................................................................................................................. 3
3 WORKING WITH THE MASTER BREWER ....................................................... 4
3.1
Advice about safety................................................................................................................................. 4
3.2
Advice about the temperature control unit .......................................................................................... 4
3.3
Advice about the recirculating pump.................................................................................................... 5
3.4
Advice about the container’s lid ............................................................................................................ 5
3.5
Advice about hygiene.............................................................................................................................. 5
4 BREWING WITH THE MASTER BREWER........................................................ 6
4.1
Introduction ............................................................................................................................................ 6
4.2
Preparations ............................................................................................................................................ 6
4.3
Programming / starting the Master Brewer ......................................................................................... 7
4.4
Mashing (brewing).................................................................................................................................. 7
4.5
Running off.............................................................................................................................................. 9
4.6
Boiling the hops..................................................................................................................................... 10
4.7
Cooling................................................................................................................................................... 12
4.8
Main fermentation ................................................................................................................................ 12
4.9
Maturation (ripening)........................................................................................................................... 13
5 A BREWING EXAMPLE AND BRIEF INSTRUCTIONS ................................... 15
6 BREWING DEFECTS AND ELIMINATING PROBLEMS ................................. 18
7 LEGAL ASPECTS OF DOMESTIC BREWING
(VALID JUST FOR GERMANY)
..... 20
8 ADVICE ABOUT LITERATURE AND PURCHASING SOURCES ................... 21
9 BREWING RECORD......................................................................................... 22
10 PUMP CLEANING......................................................................................... 23
11 WARNINGS................................................................................................... 26

Speidel’s Master Brewer
Page 1 of 26
1 General
Dear Customer,
You have acquired a new device from our company. We thank you for choosing it.
We give priority to the quality and functionality of our products.
Use:
The Master Brewer is designed and produced to brew small quantities of beer (approx.
20 litres).
Operating instructions:
We have written these operating and brewing instructions in order to ensure that the
Master Brewer is commissioned and operated reliably and safely from the start. Please
read them through carefully and completely, before you start to brew for the first time.
Your Master Brewer will work to your full satisfaction and have a long service life, if you
have followed this advice and instructions precisely.
Advice about safety:
Please follow the advice about safety.
Declaration of conformity:
We, SPEIDEL Tank- und Behälterbau GmbH, of Krummenstrasse 2, D-72131
Ofterdingen, declare ourselves to be solely responsible for the product - which is named
in these instructions as ‘Speidel’s Master Brewer’ and to which this declaration refers complying with the regulations of the following European Guidelines: 89/336/EWG and
72/73/EWG.
Legally binding signature: Ofterdingen, November 2006.
Stefan Speidel
Speidel Tank- und Behälterbau GmbH
Krummenstrasse 2, D-72131 Ofterdingen.
Speidel’s Master Brewer
Page 2 of 26
2 Presentation of the Master Brewer
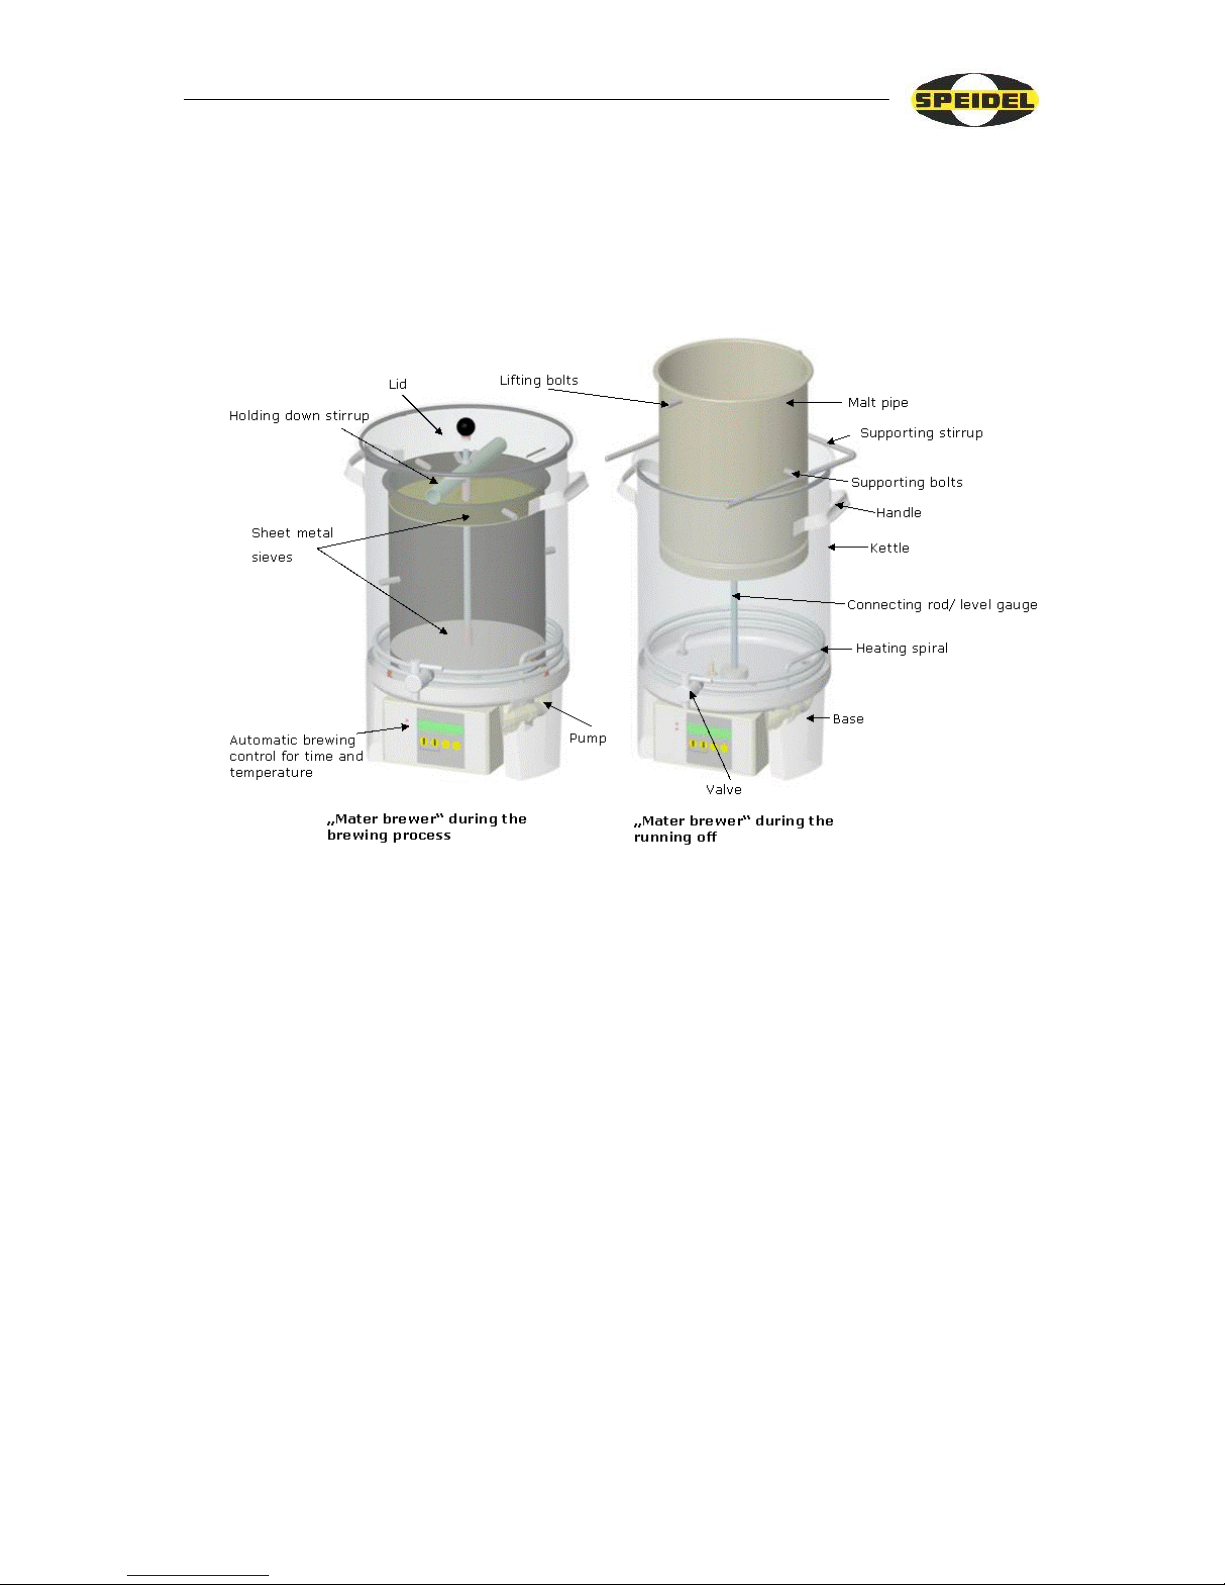
2.1 Components and extent of supply
Please find out about the components and the extent of supply from the
following illustration (the cooling spiral and fermenting cask are not included).
2.2 Installation of the Master Brewer
The Master Brewer must be placed on a sturdy, stable and horizontal base before use
or before the brewing process. Note that the Master Brewer can weigh up to 50 kg
when it is in a filled condition and full up with boiling hot wort. Horizontal installation
is a prerequisite for the pumped recirculation during the brewing process. Avoid a
wobbly base. A sturdy wooden box or a table that is not too high is ideally suitable.
The Master Brewer is not allowed to be moved during the brewing process.
The handles are only intended for transporting and handling it in an empty condition.
It is imperative to keep children away from the device when it is in use.
2.3 Cleaning the Master Brewer
The Master Brewer must be cleaned immediately after the brewing process.
The cleaning is considerably eased by preventing the residual wort and malt from
drying out. All stainless steel parts can be cleaned with a conventional, domestic
washing-up liquid [mixed with water]. Scouring agents and sponges or brushes that
cause scratches are unsuitable. The heating spiral can best be cleaned with a pipecleaning thread. The pump and the drive ball located inside it should also be flushed
out regularly. Fresh water is pumped through the pump several times beforehand. Just
invert the Master Brewer and loosed the screwed connection – which should only be
tightened manually – in order to open the pump. The pump can be easily removed by
completely detaching the plug’s screwed connection from the Master Brewer.
Speidel’s Master Brewer
Page 3 of 26
Speidels Braumeister
Ist Temp T=015°C
Care must be taken when cleaning the brewing boiler, that no sprayed water or
moisture comes into contact with the electrical components. The power supply must
be disconnected in order to clean the Master Brewer. The Master Brewer and the
associated internal fitments only have to be freed of dust and dirt with warm water
before the brewing begins. The pump and conduits also have to be rinsed out by means
of pumped recirculation. Take care that you also include the malt pipe’s seal and the
stop cock. Ensure that no residue at all from the flushing agent remains in the Master
Brewer any longer, which could have a negative effect on the beer’s content of foam.
2.4 Storage of the Master Brewer
The Master Brewer must be stored in dry conditions. Avoid contact with ferrous or
rusty objects.
2.5 Technical data about the Master Brewer
Weight: 15 kg with fittings and the lifting stirrup.
Heating spiral: 2,000 watts of heat output.
Pump: 23 watts.
Mains power supply: 230 V.
Capacity: a brewing quantity of approx. 20 litres of manufactured beer
(normal beer) = approx. 23 litres of wort.
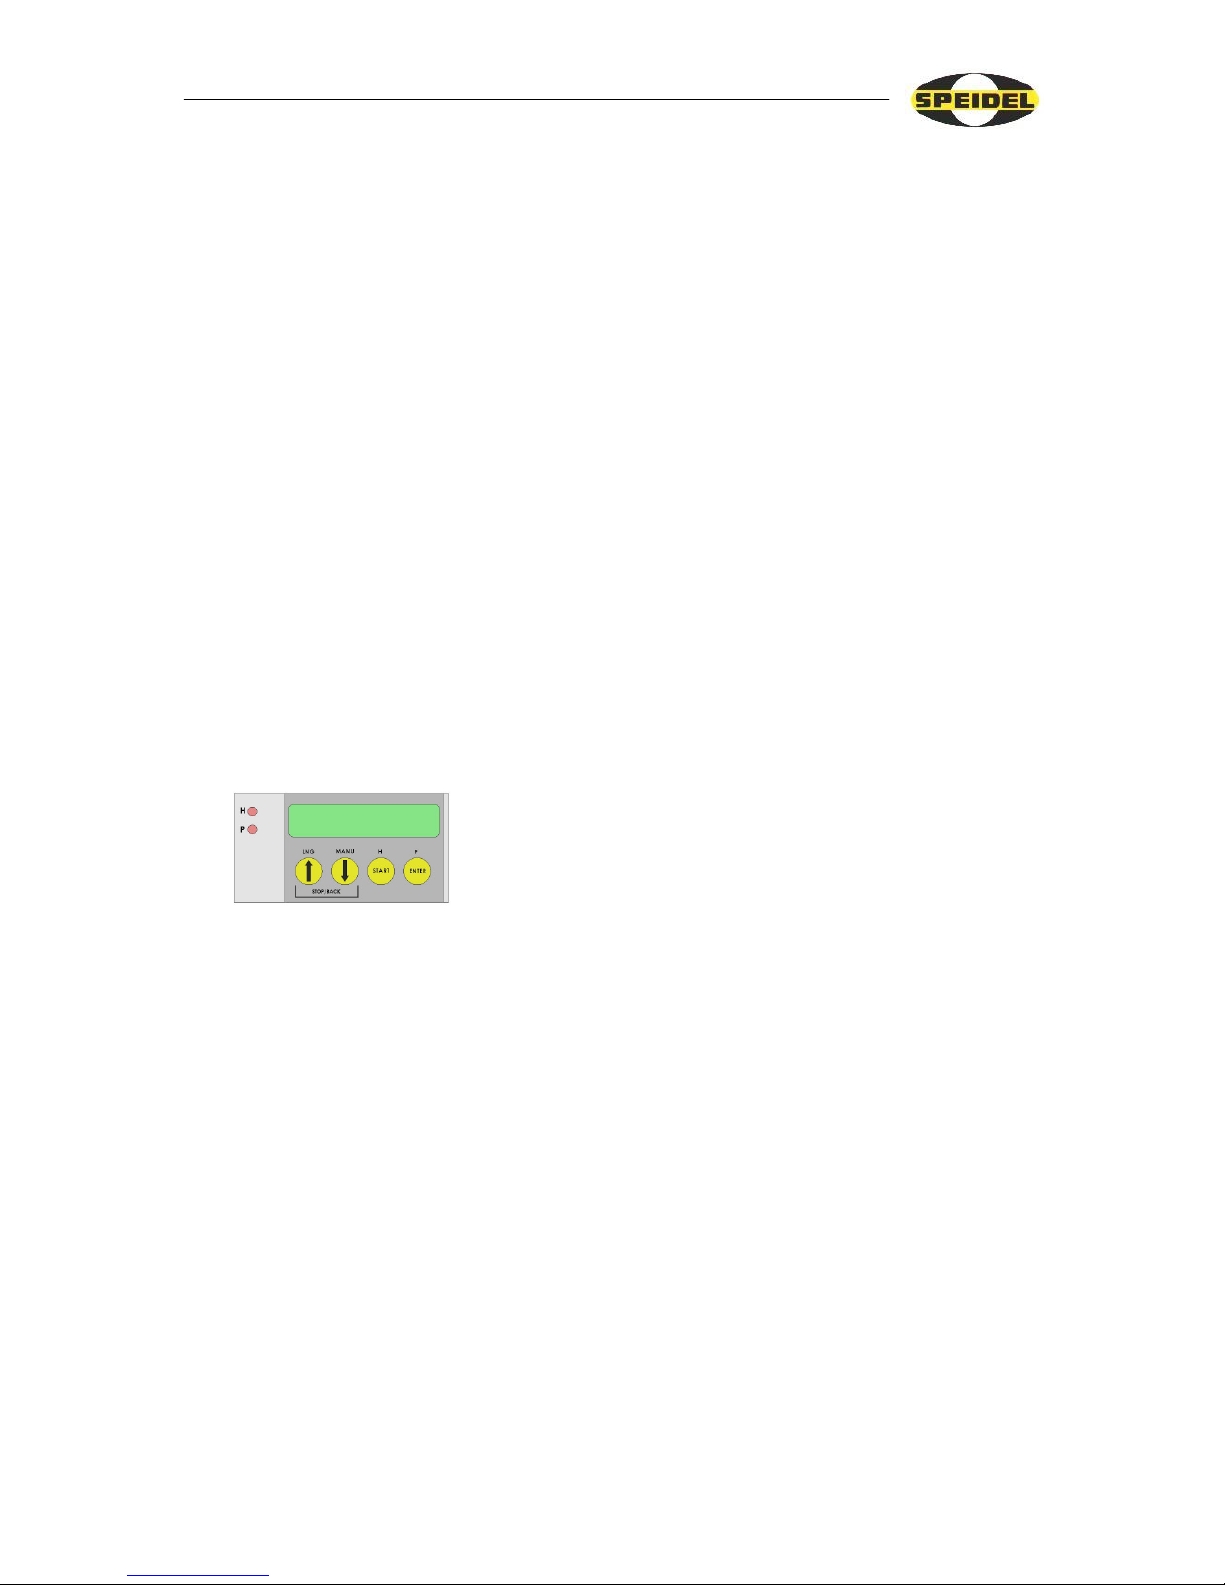
2.6 Language selection
The language selection menu is accessed from the basic
display by pressing and holding the UP ARROW (LNG)
for 3 seconds. The language can then be set using the arrow
buttons to GERMAN, ENGLISH, FRENCH or SPANISH.
The selected language is accepted by pressing the ENTER
button.
Speidel’s Master Brewer
Page 4 of 26
3 Working with the Master Brewer
3.1 Advice about safety
Caution: danger of burning! The container, lid and fittings become very hot.
The boiler contains boiling wort at the end of the brewing process. Follow the advice
about installation. Never move the Master Brewer when it is in a hot condition.
Keep children away. You should always use oven cloths or gloves when working on
and with the Master Brewer.
Caution: danger of condensation! Take care when lifting the lid that the condensed
water on its underside runs back into the container. Hold the lid obliquely over the
container accordingly.
Caution: electricity! Only carry out cleaning work on the Master Brewer when the
plug has been pulled out of the mains socket outlet (separated from the mains power
supply). Avoid overloading the electrical fuse. Do not connect any other appliance
with a high electrical rating to the same fuse because the Master Brewer has a high
consumption of electricity. Important: for operation of the control unit, the plug
connections on the rear side (pump and heating) of the unit must be locked at all times.
Operating the unit without the plug connections locked will create the danger of
overheating, damage to the Master Brewer and danger to the user.
3.2 Advice about the temperature control unit
Automatic operation: Start by pressing START (1 sec). A comprehensive description
is given in the following chapter “Brewing with the Master
Brewer”.
Programming module: The programming module is accessed by pressing the ENTER
button (1 sec). A comprehensive description is also given in
the following chapter “Brewing with the Master Brewer”.
Manual operation: Press ↓ (1sec) to switch to manual operation of the Master
Brewer. The heating (H) is switched on/off by pressing
START. Pressing ENTER also activates the pump (P). The
temperature can be set by means of the arrow buttons.
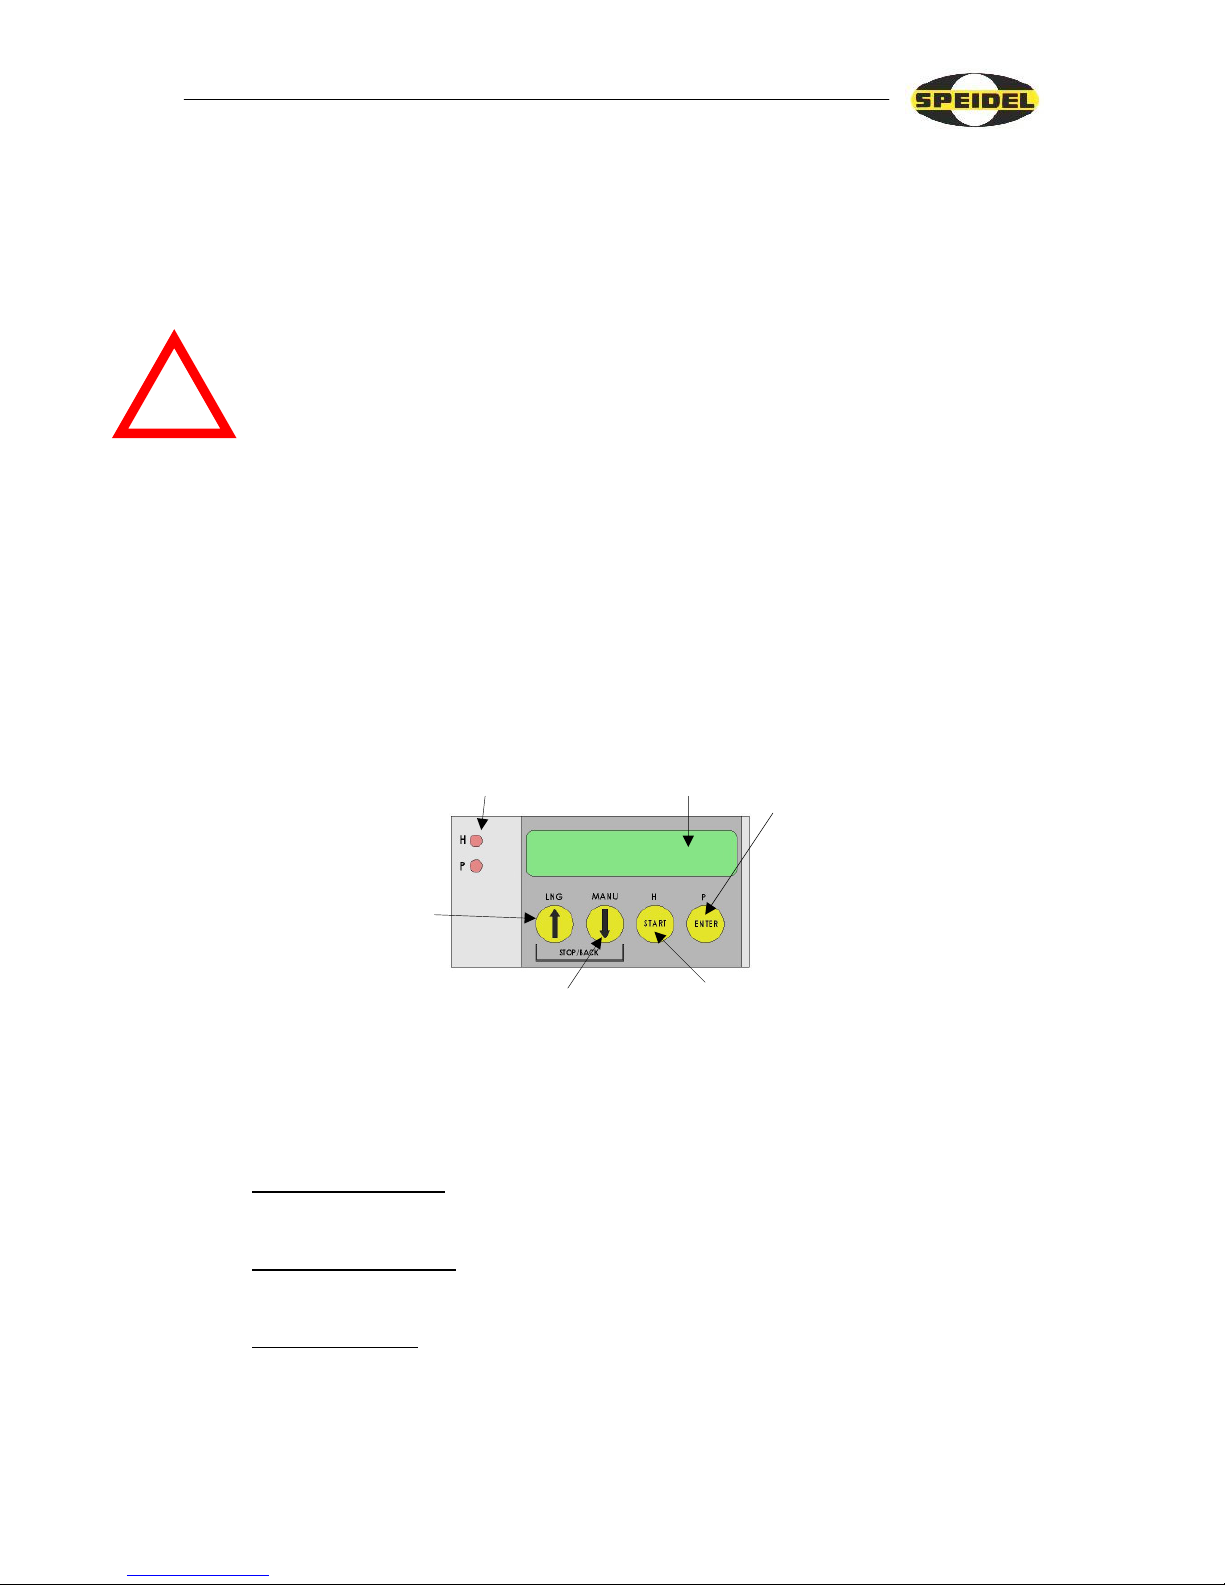
Display
ENTER
• Switch to programming mode (1 sec)
• Confirmation of values in programming
mode
• Technology of requests in automatic
operation
• Pump On/Off in manual operation
LED heating
LED pump
START
• Start automatic brewing (1 sec)
• Confirmation but within the brewing process
• Heating On/Off in manual operation
UP ARROW
• Increase time / temperature in
programming mode and in
manual operation
• Language settings (3 sec)
• Up + down arrows = Stop
automatic or return from manual
operation
DOWN ARROW
• Reduce time / temperature in programming mode and in
manual operation
• Switch to manual operation (1sec)
• Up + down arrows = Stop automatic or return from
manual operation
!

Speidel’s Master Brewer
Page 5 of 26
Pressing ↓+↑ simultaneously returns to the initial display of the
Master Brewer.
Cancel / back: In all operating modes (automatic, programming mode and
manual operation), pressing the buttons ↓+↑ returns the user to
the initial position.
3.3 Advice about the recirculating pump
The recirculating pump can be switched on and off via the switch that is located on the
electrical box. It is important that the pump is ventilated after filling up with brewing
water, so that it has the full output. This is done by switching the pump on and off
several times when filled up with water and a mounting position of the pump of 45°
(until no bubbles of air escape any longer and hardly any noise can be heard from the
pump).
3.4 Advice about the container’s lid
The lid assists the temperature being reached more quickly during heating. The
ventilating slots avoid pressure building up in the boiler and they allow the air to
circulate slightly. Water condenses on the lid’s underside at higher temperatures. Care
must be taken when lifting the lid, that the lid’s rim is held over the boiler’s opening,
so that the condensation which runs off (when holding the lid obliquely), runs back
into the boiler and does not run down outside it.
3.5 Advice about hygiene
Hygiene is of paramount importance when brewing beer. The beer or the wort is
exposed to the danger of infection in the cold area especially (when cooling, bottling
[decanting] and fermenting), which can spoil the beer and ruin the whole work.
Therefore pay special attention to absolutely clean containers, (fermenting cask and
bottles) and working materials (spoons, stop cocks and seals). Sulphurous acid is
particularly suitable for disinfecting these containers and objects: it is obtainable from
specialized vintners and hobby-brewing shops. This powder is mixed with water and
thinned: it is suitable for pouring into the fermenting bung, for disinfecting the
fermenting container, other utensils and even the hands. It is typically recommended to
use a bucket of sulphurous acid, in which the hands and utensils are disinfected during
the brewing and before the bottling. The fermenting cask containing 3 to 5 litres of
sulphurous acid is sealed and allowed to stand for several hours. Shake the cask
several times in the meantime, then empty it and allow droplets to drain out before
use. It is unnecessary to rinse it out with water. A few droplets or residue from the
sulphurous acid in the beer are not a cause for concern as a result. Storage casks and
maturing casks are disinfected just like the fermenting containers. The bottles are
disinfected by heating them up in an oven, if the beer is decanted into bottles with
stirrup stoppers for maturation and storage after the fermentation. The rubber seals are
removed from the stirrup stoppers and then boiled in hot water or immersed in
sulphurous acid. The bottles are heated up in the oven to a temperature of approx.
130°C. The bottles are allowed to cool down to room temperature after that by means
of switching off the oven and they are then sealed with the disinfected seals. It is thus
guaranteed that the fermented beer will be decanted into absolutely sterile containers.
This work should be done several days before the fermenting, so that the decanting
process can take place quickly and not at a frantic pace.

Speidel’s Master Brewer
Page 6 of 26
4 Brewing with the Master Brewer
4.1 Introduction
Manufacturing beer with the Master Brewer can be split up into different phases: each
of which is described in detail below. These phases are described generally first of all,
in order to cover the brewing process and all sorts of beer and recipes for them. The
following section gives a definitive example of brewing for the novice brewer, as well
as a special recipe with exact information about quantities, brewing times and
temperature levels. It would be ideal if you could review the individual steps that lead
to the manufactured beverage first of all, before you begin with brewing the beer. It is
recommended to keep a record [e.g., a logbook] of brewing (refer to the record in the
appendix or at www.speidel-behaelter.de), so as to ensure that you do not omit any
steps: it will give you a review of your brewing processes retrospectively too. Some
more advice: you should allow a whole day for your first brewing attempt and do the
brewing with another person because that is more enjoyable and one can make good
use of the extra help. You should also bear in mind that brewing beer requires some
experience and one becomes more proficient when progressing from one brewing
process to the other. Do not be disappointed therefore, if the first beer does not meet
your expectations completely. A poem expresses this idea best of all.
“The first beer tastes so awful
that the farmer wets his trousers:
as an example for the others.
The second beer is a mediocre score,
you drink three measures and then pee four.
The third beer is from the core,
men and women drink it gladly for ever more.”
4.2 Preparations
Obtaining the ingredients
Obtain the requisite brewing ingredients in good time (hops, malt and yeast). It is
important that the malt is fresh while doing so. The malt should be used as quickly as
possible after the milling (grinding or crushing of the grains – not too finely). The
quantitative information varies somewhat according to the recipe: whereby the amount
of malt should be about 4-5 kg, whereas the amount of hops should be between 30 g
and 50 g. The hops are usually offered in pressed form as pellets. Dry yeast is
recommended for the fermentation because it is easier to store and it has a longer shelf
life. These ingredients have to be bought in a hobby-brewing shop or via the internet.
A third possibility of procuring the ingredients is from a brewery in your vicinity. Just
have a go at making enquiries!
Cleaning the equipment
The Master Brewer is rinsed out with warm water and the pump is rinsed through by
means of switching it on, before the brewing. The other utensils like beer spindles, a
wooden spoon and fermenting container should be ready for use and they must have
been cleaned too. Refer to the advice in the sections entitled “Advice about hygiene”
and “Cleaning the Master Brewer” for this purpose.

Speidel’s Master Brewer
Page 7 of 26
Speidels Braumeister
act temp T=015°C
prog 1. phase
set time t=005min
Water filled in ?
start
Softening the brewing water
The brewing water can be softened if necessary. The water (cold tap water) is boiled
for 30 minutes in the Master Brewer for this purpose, then it is cooled and stored
temporarily – e.g., in the fermenting container – until the brewing. The separated lime
has been deposited on the bottom of the container and it will be disposed of. The
Master Brewer is designed to brew approximately 20 litres of manufactured beer
(normal beer). Between 25 and 30 litres of brewing water will be required for this
purpose in that case. However, normal (hygienically faultless, colourless and
odourless) cold tap water is also usable for the novice or for the first brewing attempts,
in order to keep the expense and effort somewhat limited at the beginning. The
brewing water should have a hardness of less than 10° dH on principle. The softer the
water, the more suitable it is for brewing.
4.3 Programming / starting the Master Brewer
Connect the Master Brewer. The controls are then in the basic
condition. To programme a recipe and its time and temperature
values, press the ENTER button for 1 sec.
Select the time and temperature with the aid of the ARROW
BUTTONS, confirming each value by pressing the ENTER
button. Programme the mashing, phases 1-5 and the boiling of
the hops. The mode 5 is set to 0 and is only used for special
recipes.
After confirming all programme stages with ENTER, the
display returns to the basic condition. From here, you can now
start the automatic brewing by pressing the START button (1
sec). Now follow the instructions of the programme!
4.4 Mashing (brewing)
The mixing of crushed malt [i.e. grist] and water is described as mashing. The
objective of the entire mashing process is to dissolve the malt starch that is stored in
the malt and to convert it into sugar with the aid of enzymes that are present in the
malt. The various enzymes are effective at different temperatures, which is why the
various temperature stages are then passed through as well.
Mashing
About 23 litres of brewing water is poured into the boiler (up to approx. 2 cm below
the upper marker) first of all. The malt pipe is not installed yet while doing so. The
markers that are fitted on the connecting rod indicate the level of 15 litres, 20 litres
and 25 litres. Confirm that you have added the water by pressing START. This
switches the pump and heating on. The pump switches on and off several times in
order to ventilate it.
 Loading...