

Page 1
User Manual
SPEEDYTEL Technology CO Ltd
User Manual
T20/T20P
Page 2

User Manual
SPEEDYTEL Technology CO Ltd
Safety Notices
Please read the following safety notices before installing or using this
phone. They are crucial for the safe and reliable operation of the device.
Please use the external power supply that is included in the package.
Other power supplies may cause damage to the phone, affect the
behavior or induce noise.
Before using the external power supply in the package, please check
with home power voltage. Inaccurate power voltage may cause fire and
damage.
Please do not damage the power cord. If power cord or plug is
impaired, do not use it, it may cause fire or electric shock.
The plug-socket combination must be accessible at all times because it
serves as the main disconnecting device.
Do not drop, knock or shake it. Rough handling can break internal
circuit boards.
Do not install the device in places where there is direct sunlight. Also
do not put the device on carpets or cushions. It may cause fire or
breakdown.
Avoid exposure the phone to high temperature, below 0℃ or high
humidity. Avoid wetting the unit with any liquid.
Do not attempt to open it. Non-expert handling of the device could
damage it. Consult your authorized dealer for help, or else it may cause
fire, electric shock and breakdown.
Do not use harsh chemicals, cleaning solvents, or strong detergents to
clean it. Wipe it with a soft cloth that has been slightly dampened in a
mild soap and water solution.
When lightning, do not touch power plug or phone line, it may cause an
electric shock.
Do not install this phone in an ill-ventilated place.
You are in a situation that could cause bodily injury. Before you work
on any equipment, be aware of the hazards involved with electrical
circuitry and be familiar with standard practices for preventing
accidents.
Page 3

User Manual
SPEEDYTEL Technology CO Ltd
Table of Content
1 INTRODUCING T20 VOIP PHONE ................................................... 6
1.1 THANK YOU FOR YOUR PURCHASING T20 ............................................................ 6
1.2 DELIVERY CONTENT ........................................................................................... 6
1.3 KEYPAD ............................................................................................................. 7
1.4 PORT FOR CONNECTING ...................................................................................... 8
1.5 ICON INTRODUCTION .......................................................................................... 8
1.6 LED STATUS INTRODUCTION .............................................................................. 9
2 INITIAL CONNECTING AND SETTINGS ......................................... 10
2.1 CONNECT THE POWER AND NETWORK ............................................................... 10
2.1.1 Connect to network ............................................................................... 10
2.1.2 Power adapter connection .................................................................... 11
2.2 BASIC INITIALIZATION ...................................................................................... 11
2.2.1 Network Settings ................................................................................... 11
3 THE BASIC FUNCTION OF T20 ...................................................... 13
3.1 MAKING A CALL ................................................................................................ 13
3.1.1 Call Device ............................................................................................. 13
3.1.2 Call Methods .......................................................................................... 13
3.2 ANSWERING A CALL .......................................................................................... 14
3.3 DND ............................................................................................................... 14
3.4 CALL FORWARD ............................................................................................... 14
3.5 CALL HOLD ...................................................................................................... 14
3.6 CALL WAITING ................................................................................................. 15
3.7 CALL TRANSFER ............................................................................................... 15
3.8 THREE-WAY CONFERENCE CALL ........................................................................ 15
4 ADVANCED FUNCTION OF T20 ..................................................... 16
4.1 CLICK TO DIAL .................................................................................................. 16
4.2 AUTO ANSWER ................................................................................................. 16
4.3 HOTLINE .......................................................................................................... 16
4.4 APPLICATION ................................................................................................... 16
4.4.1 SMS ........................................................................................................ 16
4.4.2 Memo ...................................................................................................... 17
Page 4

User Manual
SPEEDYTEL Technology CO Ltd
4.4.3 Voice Mail .............................................................................................. 17
5 OTHER FUNCTIONS OF T20 ........................................................... 18
5.1 AUTO HANDDOWN ........................................................................................... 18
5.2 DIAL PLAN ....................................................................................................... 18
5.3 DIAL PEER ....................................................................................................... 18
5.4 AUTO REDIAL .................................................................................................. 18
5.5 CALL COMPLETION ........................................................................................... 18
5.6 POWER LIGHT .................................................................................................. 19
5.7 HIDE DTMF .................................................................................................... 19
5.8 PASSWORD DIAL .............................................................................................. 19
5.9 ACTION URL & ACTIVE URI ............................................................................ 19
5.10 PUSH XML ................................................................................................... 20
6 THE BASIC SETTINGS OF T20 ........................................................ 20
6.1 KEYBOARD ...................................................................................................... 20
6.2 SCREEN SETTINGS ............................................................................................ 20
6.3 RING SETTINGS ................................................................................................ 20
6.4 VOICE VOLUME ................................................................................................ 21
6.5 TIME & DATE .................................................................................................. 21
6.6 GREETING WORDS ........................................................................................... 21
6.7 LANGUAGE ....................................................................................................... 21
7 ADVANCED SETTINGS OF T20 ...................................................... 22
7.1 ACCOUNTS ....................................................................................................... 22
7.2 NETWORK ....................................................................................................... 22
7.3 SECURITY ......................................................................................................... 22
7.4 MAINTENANCE ................................................................................................. 22
7.5 FACTORY RESET ............................................................................................... 22
8 WEB CONFIGURATION ................................................................... 23
8.1 INTRODUCTION OF CONFIGURATION .................................................................. 23
8.1.1 Ways to configure ................................................................................. 23
8.1.2 Password Configuration ....................................................................... 23
8.2 SETTING VIA WEB BROWSER ............................................................................. 23
8.3 CONFIGURATION VIA WEB ............................................................................... 24
8.3.1 BASIC .................................................................................................... 24
8.3.2 NETWORK ........................................................................................... 29
8.3.3 VOIP ....................................................................................................... 39
Page 5

User Manual
SPEEDYTEL Technology CO Ltd
8.3.4 PHONE ....................................................................................................... 56
8.3.5FUNCTION KEY ........................................................................................ 71
8.3.6 Maintenance ............................................................................................... 72
8.3.7 SECURITY ................................................................................................. 80
8.3.8 LOGOUT .................................................................................................... 87
9 APPENDIX ......................................................................................... 89
9.1.1 SPECIFICATION HARDWARE ............................................................................. 89
9.1.2 Voice features ............................................................................................. 89
9.1.3 Network features ........................................................................................ 90
9.1.4 Maintenance and management ................................................................. 91
9.2 DIGIT-CHARACTER MAP TABLE ...................................................................... 91
Page 6

User Manual
SPEEDYTEL Technology CO Ltd
1 Introducing T20 VOIP Phone
1.1 Thank you for your purchasing T20
Thank you for your purchasing T20, T20 is a full-feature telephone that
provides voice communication over the same data network that your
computer uses. This phone’s functions not only much like a traditional
phone, allowing to place and receive calls, and enjoy other features that
traditional phone has, but it also own many data services features which
you could not expect from a traditional telephone.
This guide will help you easily use the various features and services
available on your phone.
1.2 Delivery Content
Please check whether the delivery contains the following parts:
The base unit with display and keypad
The handset
The handset cable
The Ethernet cable
The power supply
Attentions: The T20 may cause damage if you do not use a power adapter
with T20. Power adapter specifications due to different areas or differentiated
shipments, if the product supplied power adapter can not be used locally, please
consult your local dealer.
The user manual(you may download from our website)
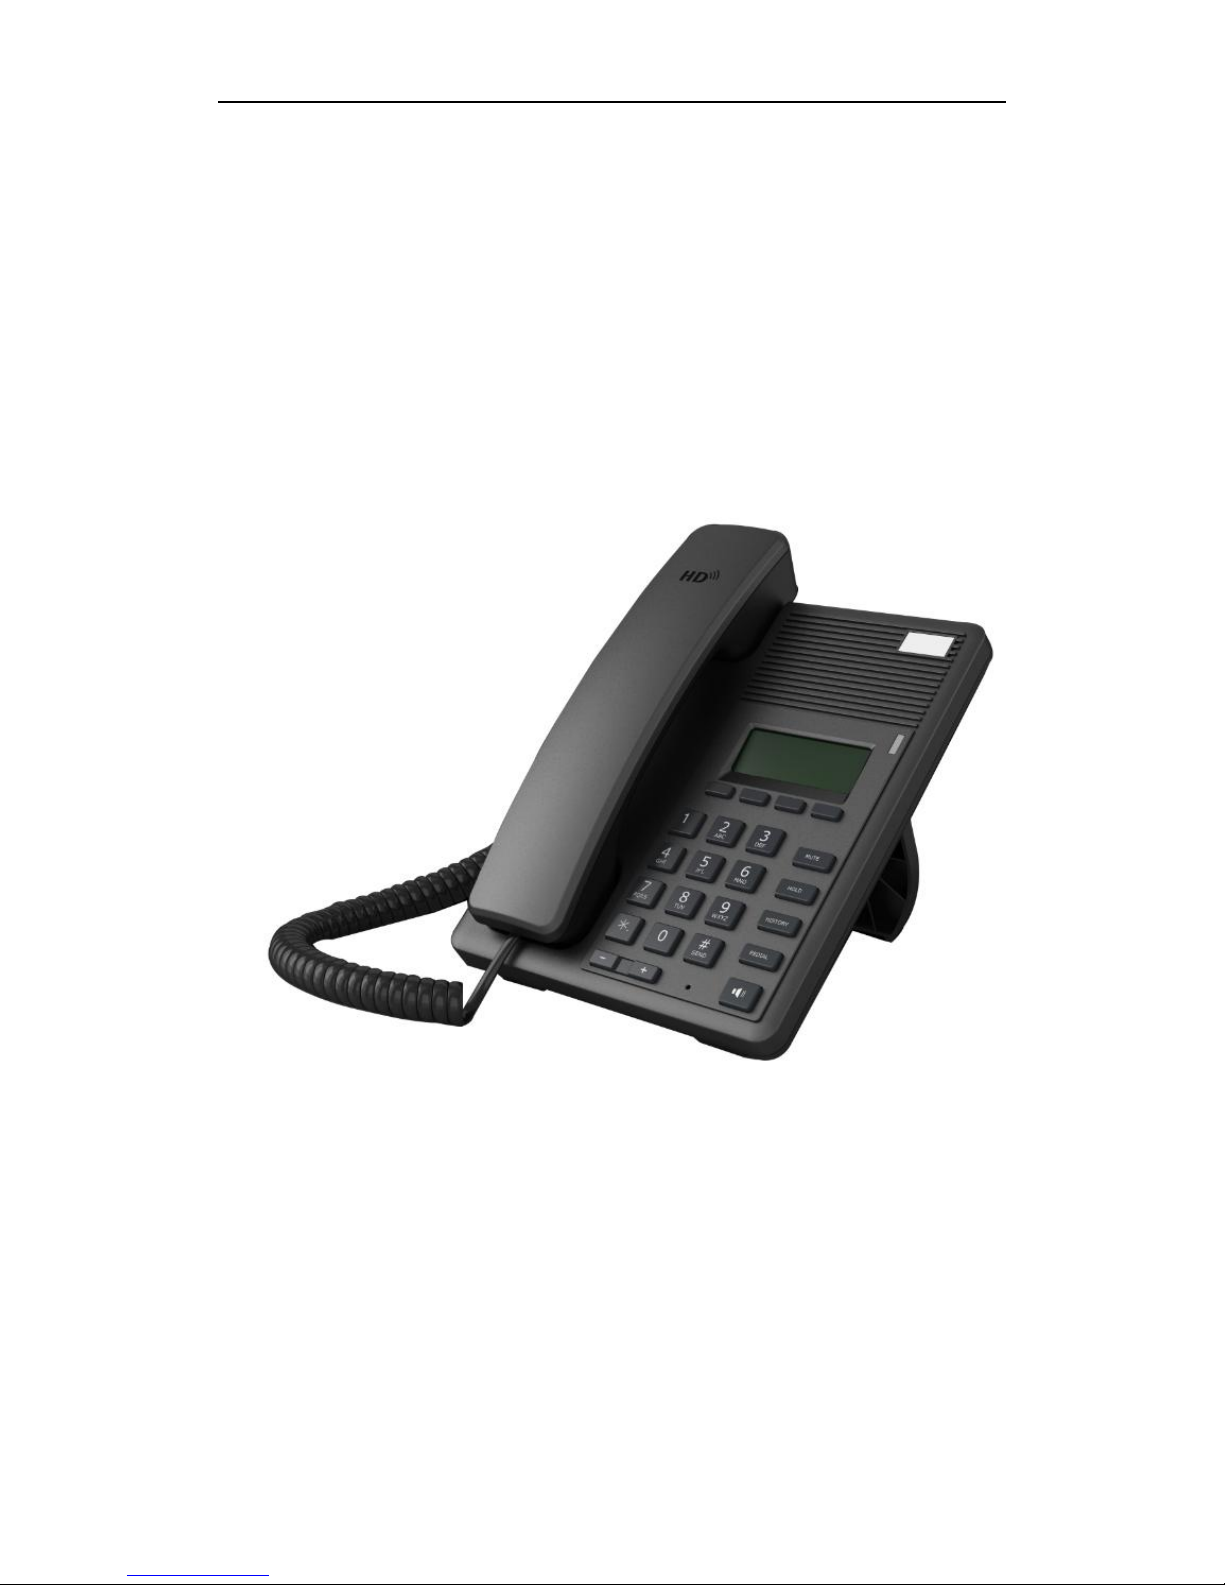
Here is the appearance of IP Phone description:
Page 7
User Manual
SPEEDYTEL Technology CO Ltd
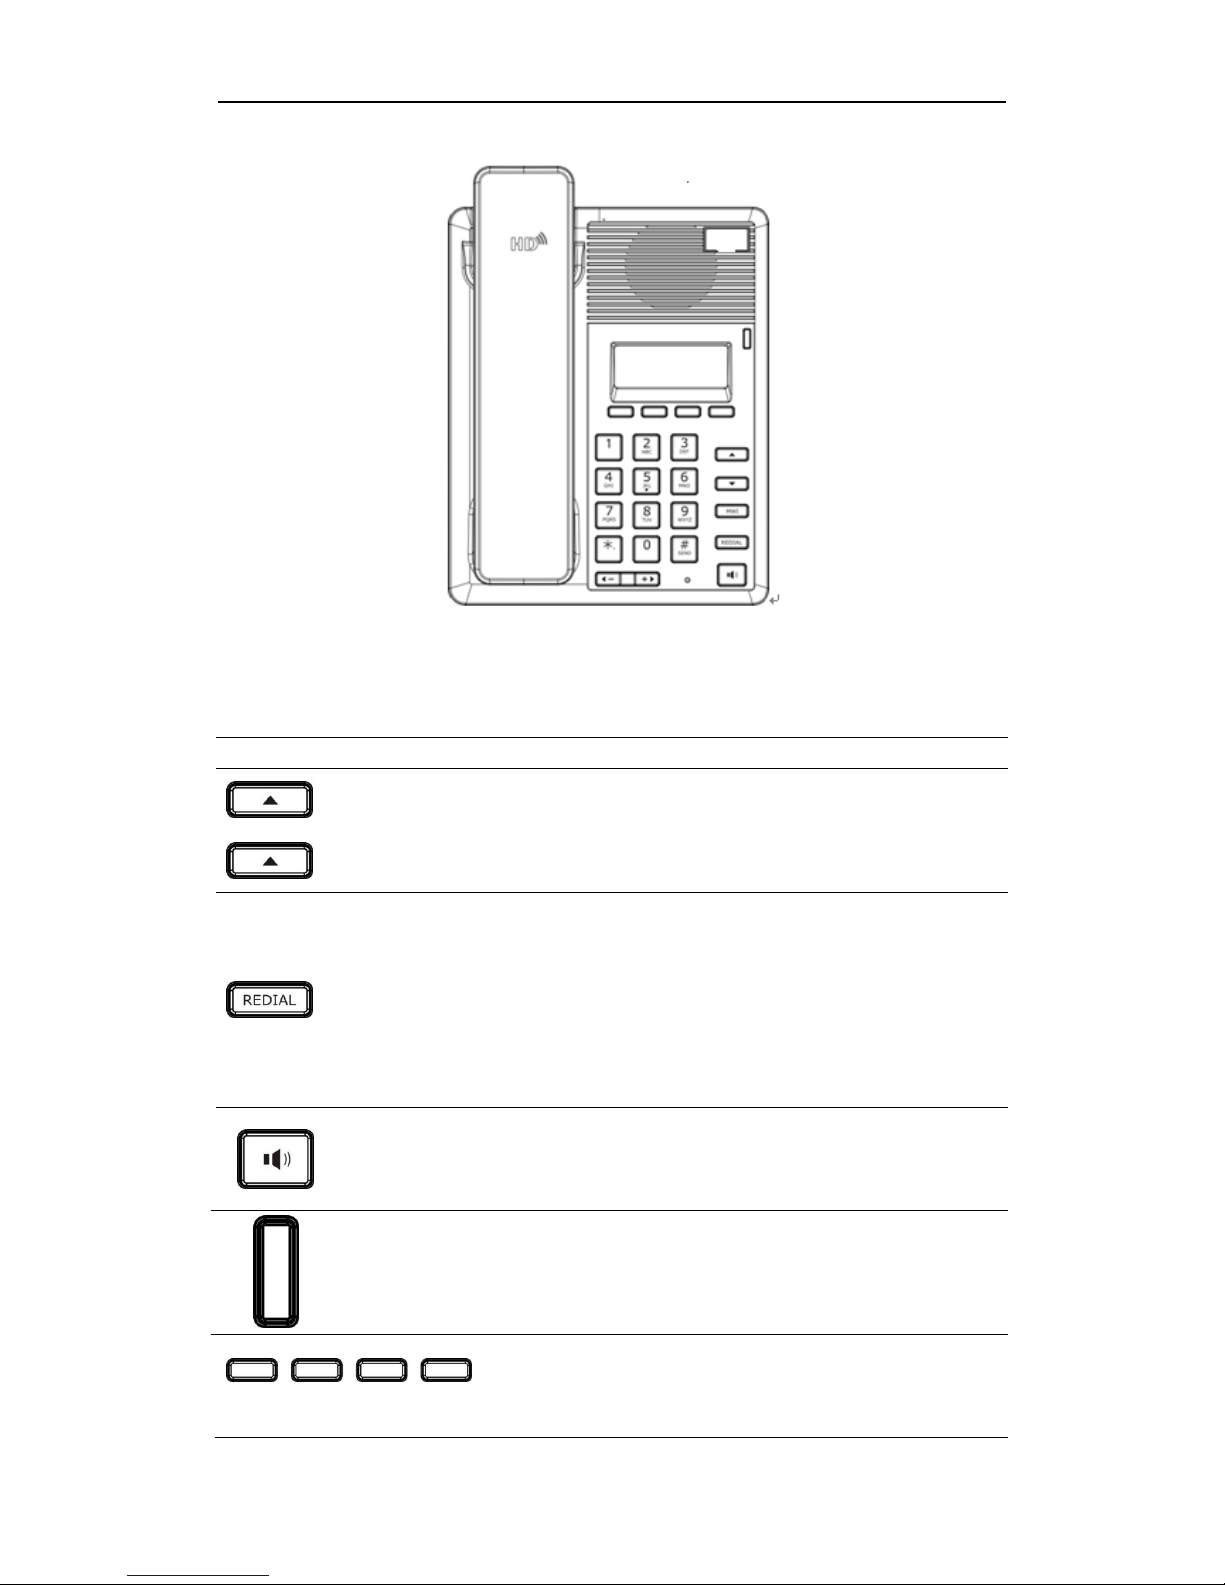
1.3 Keypad
Key
Key name
Function Description
Navigation
Navigation key assist users for operating more
convinient.
Redial
1. In the hook off/hands-free mode, use the key to
dial the last call number;
2. In stand-by mode, it has a function to check the
Outgoing Call.
3. You could also find the specify contacts in
phone book/call records, and use this number for
quick dialing, press this button, you can dial quickly.
Hands-free
Make the phone into hands-free mode.
Indicate
light
This light will flash when there is a missed call
Soft key 1/2/3/4
Keys combination, include functions such as
History/Directory/DND/Menu/Del/Redial/Sen
d/
Page 8
User Manual
SPEEDYTEL Technology CO Ltd
Quit/Answer/Divert/Reject/Hold/Transfer/Co
nf/Close and so on.
Digital
keyboard
Inputting the phone number or DTMF
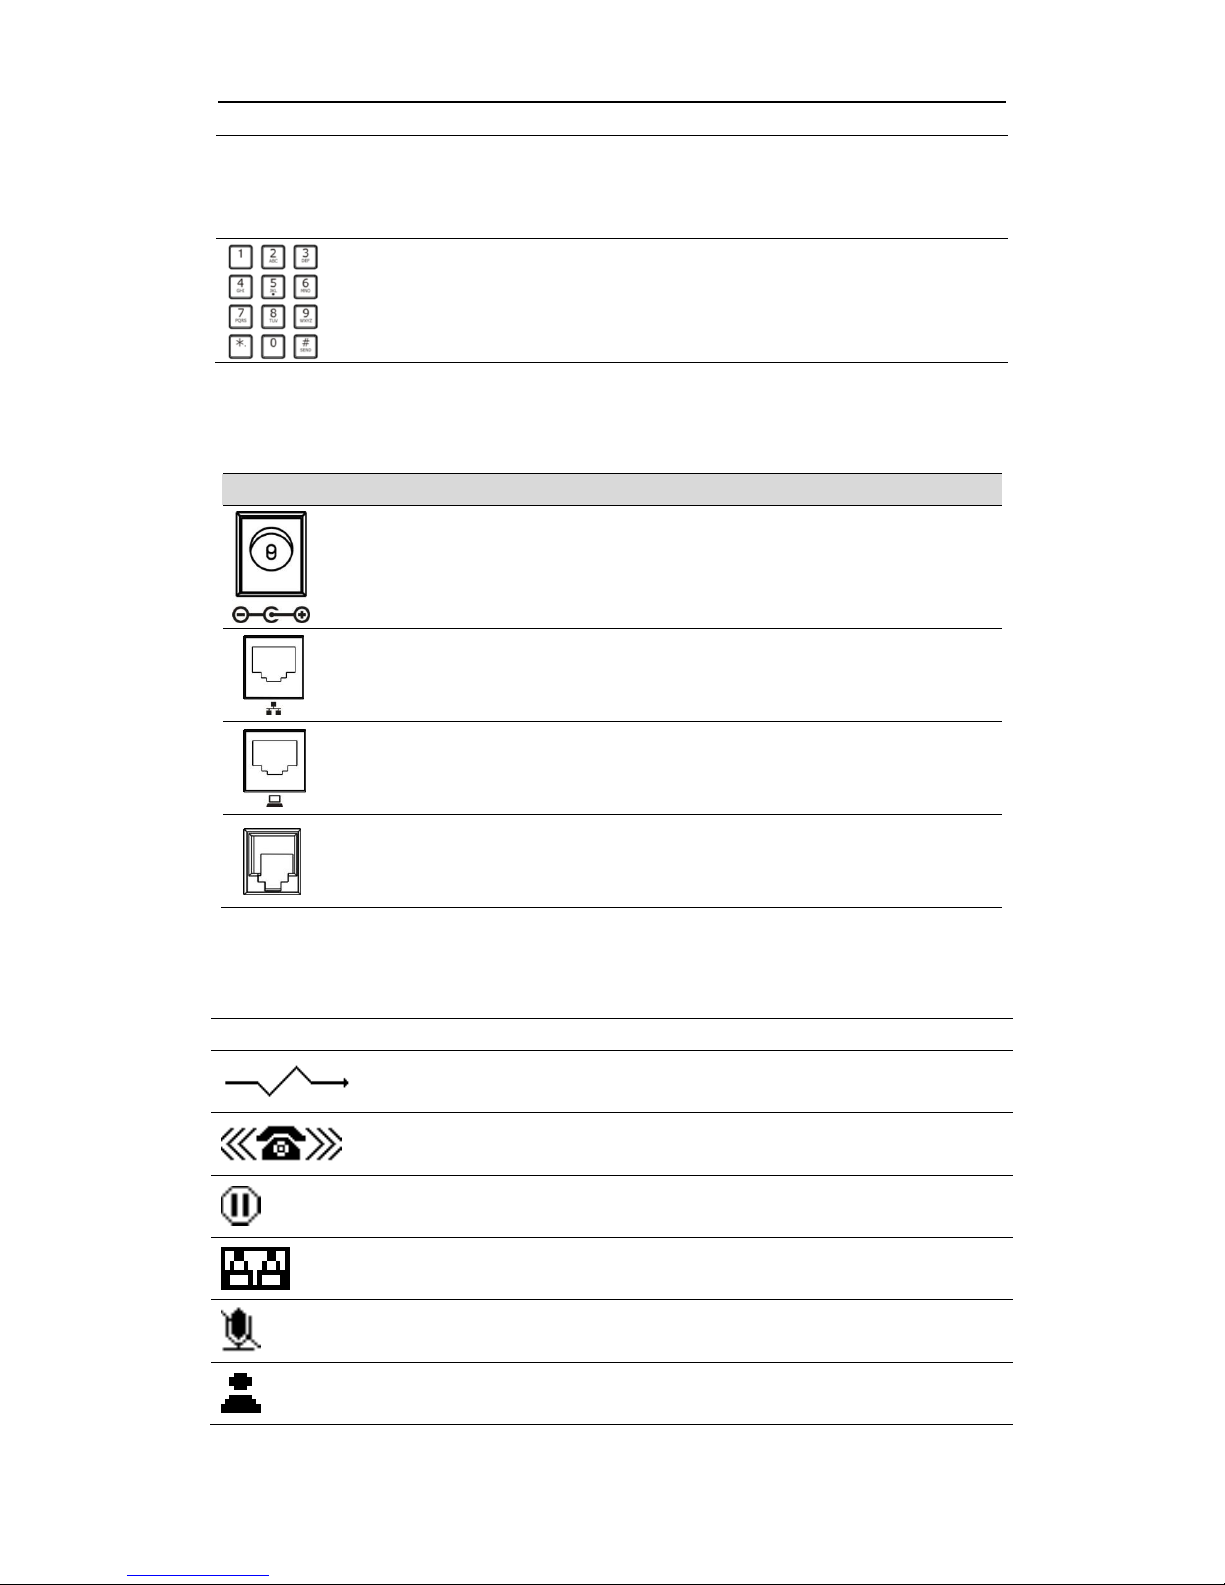
1.4 Port for connecting
Port
Name
Description
Power swtich
Input: 5V AC, 1A
WAN
10/100M Connect it to Network
LAN
10/100M Connect it to PC
Headset
Port type: RJ-9 connector
1.5 Icon introduction
Icon
Description
Call out
Call in
Call hold
Auto answer
Call mute
Contact
Page 9

User Manual
SPEEDYTEL Technology CO Ltd
DND(Do not Disturb)
In hand-free mode
In hook mode
SMS
Missed call
Call forward
1.6 LED Status introduction
Table 1 Power Indication LED
LED Status
Description
Steady red
Power on.
Fast Blinking red
There is an incoming call.
Off
Power off.
Page 10
User Manual
SPEEDYTEL Technology CO Ltd
2 Initial connecting and Settings
2.1 Connect the power and network
2.1.1 Connect to network
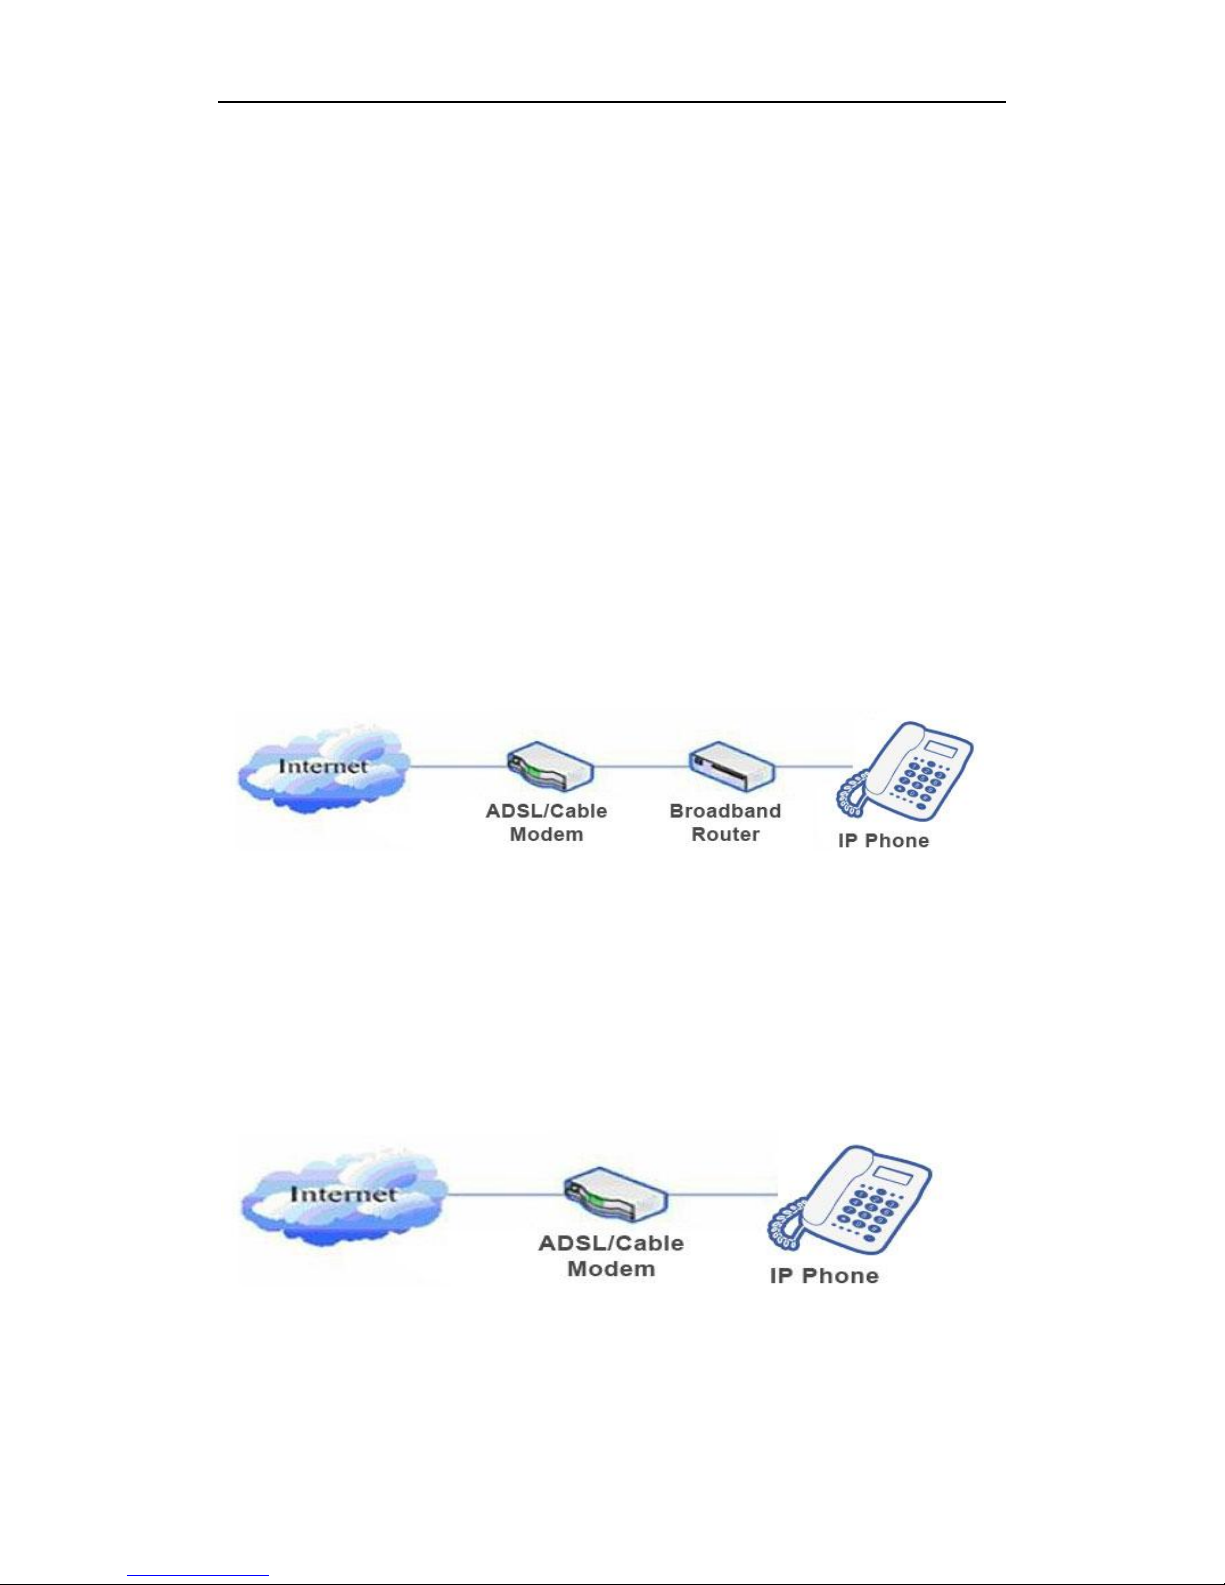
Please make sure your environment already have broadband internet access
capability during this step.
1. Broadband Router
Connect one end of the network cable to the T20’s WAN port the other end
is connected to your broadband router’s LAN port, so that the completion of
the network hardware connections. In most cases, you must configure your
network settings to DHCP mode. The details setting mode please refer to
2.2.1—Network Settings.
2. No broadband router
Connect one end of the network cable to the T20’s WAN port, the other end
is conneted to your broadband modem’s LAN port, so that the completion of
the network hardware connections. In most cases, if you are using a TV cable
broadband, you must configure your network settings to DHCP mode: if you
are using ADSL, you must set your T20 to PPPOE mode. The details setting
mode please refer to 2.2.1- Network Settings.
3. Worked as a broadband router
T20 have broadband routing capability, as long as the T20 properly
connected to the WAN port on the broadband modem and connect your
computer or other Internet-capable devices connected to the T20’s LAN
Page 11

User Manual
SPEEDYTEL Technology CO Ltd
port,then you can use the phone’s ability to connect to the Internet
broadband routing. The details setting mode please refer to 2.2.1-Network
Settings.
2.1.2 Power adapter connection
During this step, please make sure your power connector match the power
outlet, meanwhile, both voltage and electric current are also comply with the
work phone.
1. Plug power adapter to power socket.
2. Plug power adaptor’s DC output to the DC5V port of T20 to start up.
3. There will be displayed black line and “INITIALIZING” on the screen. After
finishing startup, phone will show greeting, current date and time and so forth.
4. If phone has registered to the server, you can place or answer calls
2.2 Basic Initialization
T20 is provided with a plenty of functions and parameters for configuration. User
needs some network and VoIP knowledge so that user could understand the
meanings of parameters. In order to make user use the phone more easily and
convenient, there are basic configurations introduced which is mandatory to
ensure phone calls.
2.2.1 Network Settings
During setting network of the phone please make sure that network is
connected already. T20 uses DHCP to get WAN IP configurations, so phone
could access to network as long as there is DHCP server in it. If there is no
DHCP server available, phone has to be changed WAN network setting to
Static IP or PPPoE.
Setting PPPOE mode(For ADSL connection)
1. Get PPPoE account and password first.
2. Press Menu->Settings->Advanced Settings, then enter passwords, and
choose network ->WAN settings->Connection Mode, enter and choose
PPPoE through navigation keys and press the Save key.
Page 12

User Manual
SPEEDYTEL Technology CO Ltd
3. Press Back, then choose PPPoE Set, press Enter.
4. The screen will show the current information. Press Del to delete it, then
input your PPPoE user and password and press Save.
5. Press Back six times to return to the idle screen.
6. Check the status. If the screen shows “Negotiating…” it shows that the
phone is trying to access to the PPPoE Server; if it shows an IP address,
then the phone has already get IP with PPPoE.
Setting Static IP mode(Static ADSL/Cable, or no PPPOE/DHCP network)
1. Prepare the network’s parameters first, such as IP Address, Net mask,
Default Gateway and DNS server IP address. If you don’t know this
information, please contact the service provider or technician of network.
2. Press Menu->Settings->Advanced Settings, then enter passwords, and
choose network ->WAN settings->Connection Mode, enter and choose
Static through navigation keys and press the Save key.
3. Press Back, then choose Static Set, press Enter.
4. The screen will show the current information, and then press Del to
delete. Input your IP address, Mask, Gateway, DNS and press Save to save
what you input.
5. Press Back six times to return to the idle screen.
6. Check the status, the screen shows “Static” .the screen shows the IP
address and gateway which were set just now, if the phone could display
the right time, it shows that Static IP mode takes effect.
Setting DHCP mode
1. Press Menu->Settings->Advanced Settings, then enter passwords, and
choose network ->WAN settings->Connection Mode, enter and choose
DHCP through navigation keys and press the Save key.
2. Press Back six times to return to the idle screen.
3. Check the status, the screen shows “DHCP”, If the screen shows the IP
address and gateway which were set just now, it shows that DHCP mode
takes effect.
Page 13

User Manual
SPEEDYTEL Technology CO Ltd
3 The basic function of T20
3.1 Making a call
3.1.1 Call Device
You can make a phone call via the following devices:
1、Pick up the handset, icon will be showed in the idle screen.
2、Press the Speaker button, icon will be showed in the idle screen.
3、Press the headset button if the headset is connected to the Headset Port in
advance.The icon will be showed in the idle screen.
You can also dial the number first, and choose the method you will use to speak
to the other party.
3.1.2 Call Methods
1. Speed Dial
In standby mode, you simply enter your number to dial and press [#] or
press [Redial] to make a call
2. Hook dialing
Pick up the handset and hear dial tone, you can start dialing. After
entering the destination number, press the [#] key, T20 can
immediately start connecting with each other. When you hear the
beep ... beep ... long beep, the other phone started ringing, until the
other party pick up the handset or use the speakerphone (time of the
call is displayed on the screen), you can start talking. When the call is
completed, replace the handset hang up the call.
3. Hands-free Dialing
Press the speakerphone key and hear a dial tone, you can start dialing.
After entering the destination number, press the [#] key, T20 can
immediately start connecting with each other. When you hear the
beep ... beep ... long beep, the other phone started ringing, until the
other party pick up the handset or use the speakerphone when you can
start talking. When the call is finished, press the Speakerphone key to
end the call.
4. Using the Redial button
If you try to call over the telephone, you can press [Redial] key to call a
recently dialed number one. Note that you restart the phone, the
Page 14

User Manual
SPEEDYTEL Technology CO Ltd
system will clear the call log, dial [Redial] key at this time will be
invalid.
3.2 Answering a call
Answering an incoming call:
1. If you have no other line telephone, lift the handset using, or press the
Speaker button/ Answer softkey to answer using the speaker phone.
2. If you are on a call currently, press the answer softkey.
During the conversation, you can alternate between Headset and Speaker
phone by pressing the corresponding buttons or picking up the handset.
3.3 DND
Press DND softkey to active DND Mode. Further incoming calls will be
rejected and the display shows: icon. Press DND softkey twice to
deactivate DND mode. You can find the incoming call record in the Call
History.
3.4 Call Forward
This feature allows you to forward an incoming call to another phone
number. The display showed icon.
The following call forwarding events can be configured:
Off: Call forwarding is deactivated by default.
Always: Incoming calls are immediately forwarded.
Busy: Incoming calls are immediately forwarded when the phone is busy.
No Answer: Incoming calls are forwarded when the phone is not
answered after a specific period.
To configure Call Forward via Phone interface:
1. Press Menu ->Features->Enter->Call Forwarding->Enter.
2. There are 4 options: Disabled, Always, Busy, and No Answer.
3. If you choose one of them (except Disabled), enter the phone number
you want to forward your call to. Press Save to save the changes.
3.5 Call Hold
Press the Hold button or Hold softkey to put your active call on hold.。
1. If there is only one call on hold, press the hold softkey to retrieve the call.
Page 15

User Manual
SPEEDYTEL Technology CO Ltd
2. If there are more than one call on hold, press the line button, and the Up/Down
button to highlight the call, then press the Unhold button to retrieve the call.
3.6 Call Waiting
1. Press Menu ->Features->Enter->Call Waiting->Enter.
2. Use the navigation keys to active or inactive call waiting.
3. Then press the Save to save the changes.
3.7 Call Transfer
1. Blind Transfer
During talk, press the key Transf, and then dial the number that you want to
transfer to, and finished by "#". Phone will transfer the current call to the third
party. After finishing transfer, the call you talk to will be hanged up. User cannot
select SIP line when phone transfers call.
2. Attended Transfer
During talk, press the key Transf, then input the number that you want to
transfer to and press Send. After that third party answers, then press Transfer
to complete the transfer. (You need enable call waiting and call transfer first). If
there are two calls, you can just talk to one, and keep hold to the other one. The
one who is keep hold cannot speak to you or hear from you. In other way, if user
wants to invite the third party during the call, they can press Conf to make calls
mode in conference mode. If user wants to stop conference, user can press Split.
(User must enable call waiting and three way call first).
Note: the server that user uses must support RFC3515 or it might not be used
3. Alert Transfer
During the talk, press Transf firstly, and then press Send after inputting the
number that you want to transfer. You are waiting for connection, now, press
Transf and the transfer will be done. (To use this feature, you need enable call
waiting and call transfer first).
3.8 Three-Way conference call
1. Press the Conf softkey during an active call.
2. The first call is placed on hold. Then you will hear a dial tone. Dial the number
to conference in, then press Send key.
3. When the call is answered, press Conf and add the first call to the conference.
4. If you want to release the conference, press Split key.
Page 16

User Manual
SPEEDYTEL Technology CO Ltd
4 Advanced function of T20
4.1 Click to dial
When user A browses in an appointed Web page, user A can click to call
user B via a link (this link to user B), then user A’s phone will ring, after A
hooks off, the phone will dial to B.
Notice:It needs a external software what supports click to dial.
4.2 Auto answer
When there is an incoming call, after no answer time, the phone will
answer the call automatically.
4.3 Hotline
You can set hotline number for every sip, and then enter the dialer
interface and after Warm Line Time, the phone will call out the hotline
number automatically.
4.4 Application
4.4.1 SMS
1) Press Menu ->Applications->Enter->SMS->Enter.
2) Use the navigation keys to highlight the options. You can read the
message in the Inbox/Outbox.
3) After view the new message, you can press Reply to reply the message,
and use the 2aB softkey to change the Input Method, when enter the reply
message, press OK, then use the navigation keys to select the line from
which you want to send, then Send.
4) If you want to write a message, you can press New and enter message.
Use the 2aB softkey to change the Input Method. When you input the
message you want to send, press OK, then use the navigation keys to select
the line from which you want to send, then Send.
Page 17

User Manual
SPEEDYTEL Technology CO Ltd
5) If you want to delete the message, after view the message, press Del,
then you have three options to choose: Yes, All, No.
4.4.2 Memo
You can add some memos to record some important things to remind you.
Press Menu->Application->Memo->Enter->Add.
There are some options to configure: Mode, Date, Time, text, Ring. When
the configuration is completed, press Save.
4.4.3 Voice Mail
1) Press Menu->Application->Voice Mail->Enter.
2) Use the navigation keys to highlight the line for which you want to set,
press Edit, and use the navigation key to turn on the mode, and the input
the number. Press 2aB softkey to choose the proper input method.
3) Press Save to save the change.
4) To view the new voicemail, Press the Voicemail softkey directly. Press
Dial, then you may be prompted to enter the password, then you can listen
to your new and old messages.
Page 18

User Manual
SPEEDYTEL Technology CO Ltd
5 Other functions of T20
5.1 Auto Handdown
1. Press Menu ->Features-> Enter->Auto Handdown-> Enter.
2. Set the Mode Enable through the navigation key, then set Time, unit is
minute, then press Save.
3. When the call ends, after the time that you have set, the phone will back
to the idle interface.
5.2 Dial Plan
1. Press Menu ->Features-> Enter->Dial Plan-> Enter.
2. The following plans you can set: Press # to Send, Timeout to Send,
Timeout, Fixed Length Number, Press # to Do BXFER, BXFER On Onhook,
AXFER On Onhook. You can enable or disable each dial plan.
5.3 Dial Peer
1. Press Menu ->Features-> Enter->Dial Peer-> Enter.
2. Press Add to enter the Edit interface, and then input number and destination.
For example: Number:1, Destination:1234, Then press Save.
3. Input 1# number in the dial interface, you can dial out 1234.
5.4 Auto Redial
1. Press Menu ->Features-> Enter->Auto Redial-> Enter.
2. Choose Mode Enabled or Disabled through the navigation key. If you
choose Enable, you also need to set Interval and Times, and then press
Save.
3. After enable auto redial, calling out someone, if he is in busy, it will pop
up a prompt box whether to auto redial, press OK, the phone will call out
him according the Interval and Times that you set.
5.5 Call completion
1. Press Menu ->Features-> Enter->Call Completion-> Enter.
2. Enable the function through the navigation key, and then Save.
Page 19

User Manual
SPEEDYTEL Technology CO Ltd
3. Call out others, if he is in busy, it will pop up a prompt Call Completion
Waiting number? Press OK, when he is in idle, it will pop up a prompt Call
Completion Call number? Press OK, the phone will call out the number
automatically.
5.6 Power Light
1. Press Menu ->Features-> Enter->Power Light-> Enter.
2. Enable this function through the navigation key.
5.7 Hide DTMF
1. Press Menu ->Features-> Enter->Hide DTMF-> Enter.
2. Through the navigation key to choose: Disabled, All, Delay, Last Show.
When you set up a call with others and need to input the DTMF, the DTMF
will show as you have set.
5.8 Password Dial
1. Press Menu ->Features-> Enter->Password Dial-> Enter.
2. Enable this function , you can also set Prefix and Length. For example,
you want call out 1234567 and you set Password Dial Prefix 123 and
Password Length 3, then enter the dial interface and input 1234567, and
then the screen will show 123***7.
5.9 Action URL & Active URI
1. Action URL,achieve results com from a functional understanding that
end a phone Action produce a URL, Action which means the side of the phone
receieves incoming(Incoming call), outgoing calls(Outgoing call), turn DND(open
DND), hang up the phone(On hook), etc. To set the phone web page lists all its
support of the action, each action corresponds to a user-defined URL. When
generating an action the phone is issued for the URL HTTP Get, so as to achieve
the purpose of reporting their actions.
2. Active URI,achieve results come from a functional understanding that
the remote(eg PC) to send a URL to the phone, the phone received will produce
an action, such as dial , DND and so on. Enter the phone web pages
PHONE->FEATURE, enter the Active URL limit IP(such as a PC IP) Push XML
Page 20

User Manual
SPEEDYTEL Technology CO Ltd
Enter the web page of the phone->PHONE->FEATURE, input Push XML
Server(e.g. PC’IP), then PC can push text, SMS, phonebook, advertisement,,
execute etc. to phone to update the message or the phone makes an action.
5.10 Push XML
Enter the web page of the phone->PHONE->FEATURE, input Push XML
Server(e.g. PC’IP), then PC can push text, SMS, phonebook, advertisement,,
execute etc. to phone to update the message or the phone makes an action.
6 The Basic Settings of T20
6.1 Keyboard
1. Press Menu ->Settings-> Enter->Basic Settings->
Enter->Keyboard->Enter.
2. There are four items: DSS Key settings, Programmable Keys, Desktop
Long Pressed, Soft Key , You can set up respectively on them. Press the key
Enter to the interface, then use the navigation keys to choose the function
for the key according to you want.
3. Press the key OK to save.
6.2 Screen Settings
1. Press Menu ->Settings-> Enter->Basic Settings-> Enter->Screen
Settings->Enter.
2. You can set Contrast, Contrast Calibration and Backlight, press Enter and
use the navigation keys to set, then press the key Save.
6.3 Ring Settings
1. Press Menu ->Settings-> Enter->Basic Settings-> Enter->Ring
Settings->Enter.
2. You can set Ring Volume and Ring Type, press Enter and use the
navigation keys to set, then press the key Save. In the Ring Type, the
Page 21

User Manual
SPEEDYTEL Technology CO Ltd
default system rings have nine and the custom ringtones have three that
can be set through the web page.
6.4 Voice Volume
1. Press Menu ->Settings-> Enter->Basic Setting-> Enter->Voice
Volume->Enter.
2. Use the navigation keys to turn down or turn up the voice volume, then
press the key Save.
6.5 Time & Date
1. Press Menu ->Settings->Enter->Basic Settings-> Enter->Time &
Date->Enter.
2. You have two options to choose: Auto and Manual, use the navigation
keys to choose, then press Save.
6.6 Greeting Words
1. Press Menu ->Settings-> Enter->Basic Settings-> Enter->Greeting
Words->Enter.
2. You can enter the message and press Save, it will display in the phone
screen when the phone start up.
6.7 Language
1. Press Menu ->Settings-> Enter->Basic Settings-> Enter->Language
->Enter.
2. T20 support three languages, you can use the navigation keys to choose.
The default two languages are English and Chinese.
Page 22

User Manual
SPEEDYTEL Technology CO Ltd
7 Advanced Settings of T20
7.1 Accounts
Press Menu->Enter->Advanced settings, and then input the password to
enter the interface, the default password is 123. You can set it through the
web page. Then choose Account then press Enter, you can do some sip
settings.
7.2 Network
Press Menu->Enter->Advanced settings, and then input the password to
enter the interface. Then choose Network and press Enter, you can do
network settings, you can refer to 2.2.1 Network settings.
7.3 Security
Press Menu->Enter->Advanced settings, and then input the password to
enter the interface. Then choose Security, you can configure Menu
Password, Key lock Password, Key lock Status and whether to ban
Outgoing.
7.4 Maintenance
Press Menu->Enter->Advanced settings, and then input the password to
enter the interface. Then choose Maintenance and press Enter, you can
configure Auto Provision, Backup, and Upgrade.
7.5 Factory Reset
Press Menu->Enter->Advanced settings, and then input the password to
enter the interface. Then choose Factory Reset and press Enter, you can
choose Yes or No.
Page 23

User Manual
SPEEDYTEL Technology CO Ltd
8 Web Configuration
8.1 Introduction of configuration
8.1.1 Ways to configure
T20 has three different ways to different users.
Use phone keypad.
Use web browser (recommendatory way).
Use telnet with CLI command.
8.1.2 Password Configuration
There are two levels to access to phone: root level and general level. User
with root level can browse and set all configuration parameters, while user
with general level can set all configuration parameters except SIP (1-2) or
IAX2’s that some parameters cannot be changed, such as server address
and port. User will has different access level with different username and
password.
Default user with general level:
Username: guest
Password: guest
Default user with root level:
Username: admin
Password: admin
The default password of phone screen menu is 123.
8.2 Setting via web browser
When this phone and PC are connected to network, enter the IP address of
the wan port in this phone as the URL (e.g. http://xxx.xxx.xxx.xxx/ or
http://xxx.xxx.xxx.xxx:xxxx/).
If you do not know the IP address, you can look it up on the phone’s
display by pressing Status button.
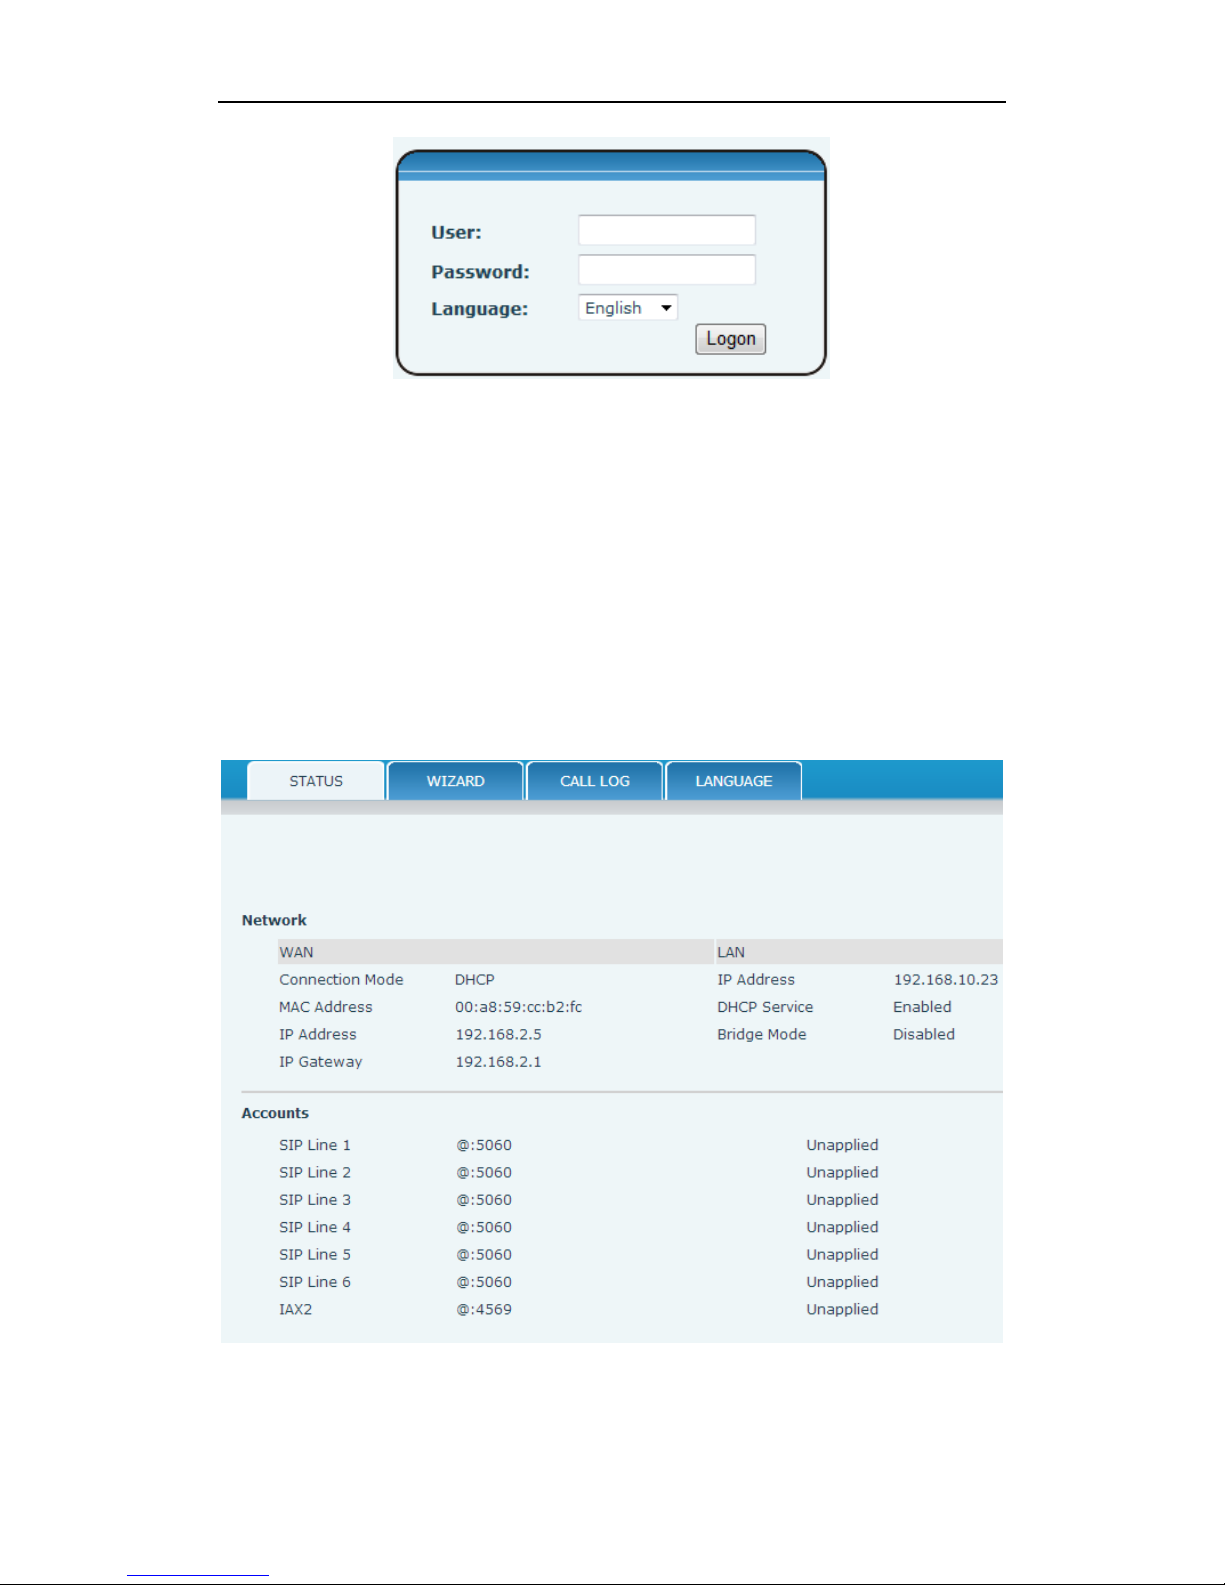
The login page is as below picture.
Page 24
User Manual
SPEEDYTEL Technology CO Ltd
After you configure the IP phone, you need click save button in config
under Maintenance in the left catalog to save your configuration.
Otherwise the phone will lose your modification after power off and on.
8.3 Configuration via WEB
8.3.1 BASIC
8.3.1.1 STATUS
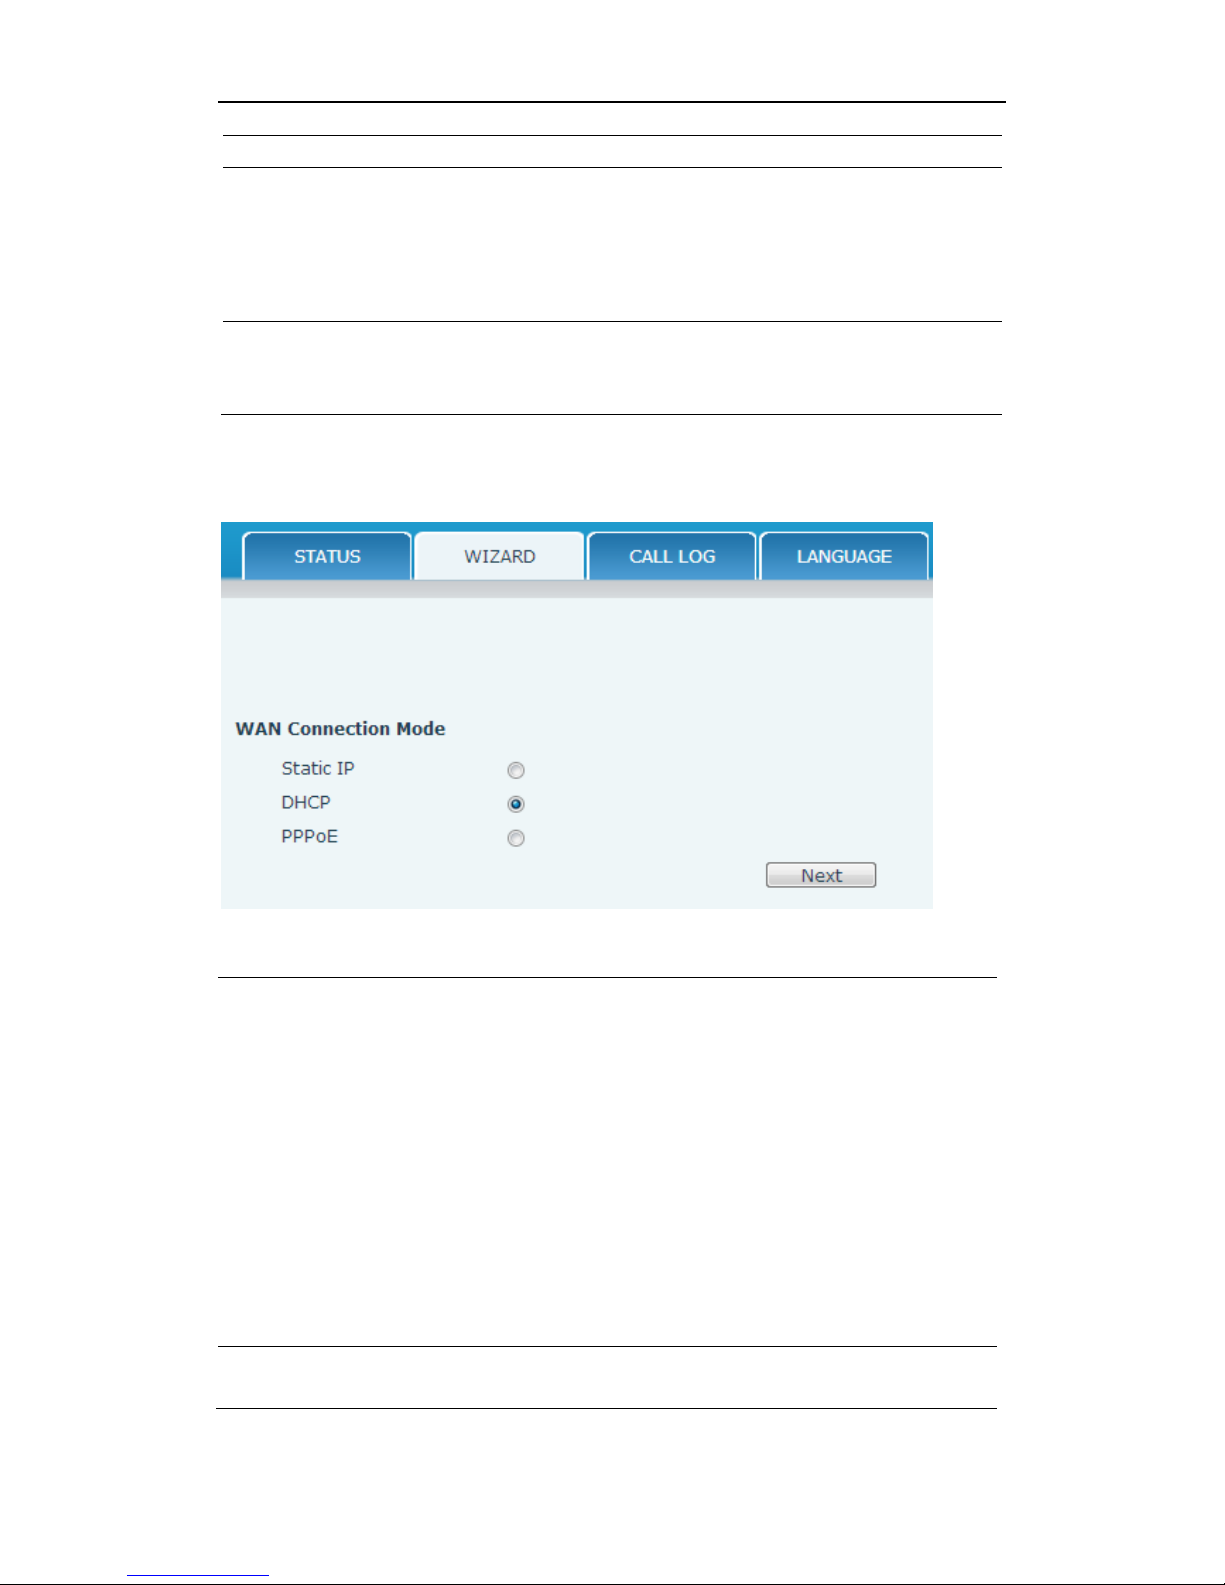
Status
Page 25
User Manual
SPEEDYTEL Technology CO Ltd
Field name
Explanation
Network
Shows the configuration information on WAN and
LAN port, including the connect mode of WAN port
(Static, DHCP, PPPoE), MAC address, the IP address
of WAN port and LAN port, ON or OFF of DHCP
mode of LAN port and bridge mod
Accounts
Shows the phone numbers provided by the SIP
LINE 1-2 servers and IAX2.
The last line shows the version number .
8.3.1.2 WIZARD
Wizard
Please select the proper network mode according to the network
condition. T20 provide three different network settings:
Static: If your ISP server provides you the static IP address, please
select this mode, and then finish Static Mode setting. If you don’t
know about parameters of Static Mode setting, please ask your ISP
for them.
DHCP: In this mode, you will get the information from the DHCP
server automatically; need not to input this information artificially.
PPPoE: In this mode, you must input your ADSL account and
password.
You can also refer to2.2.1 Network setting to speed setting your
network.
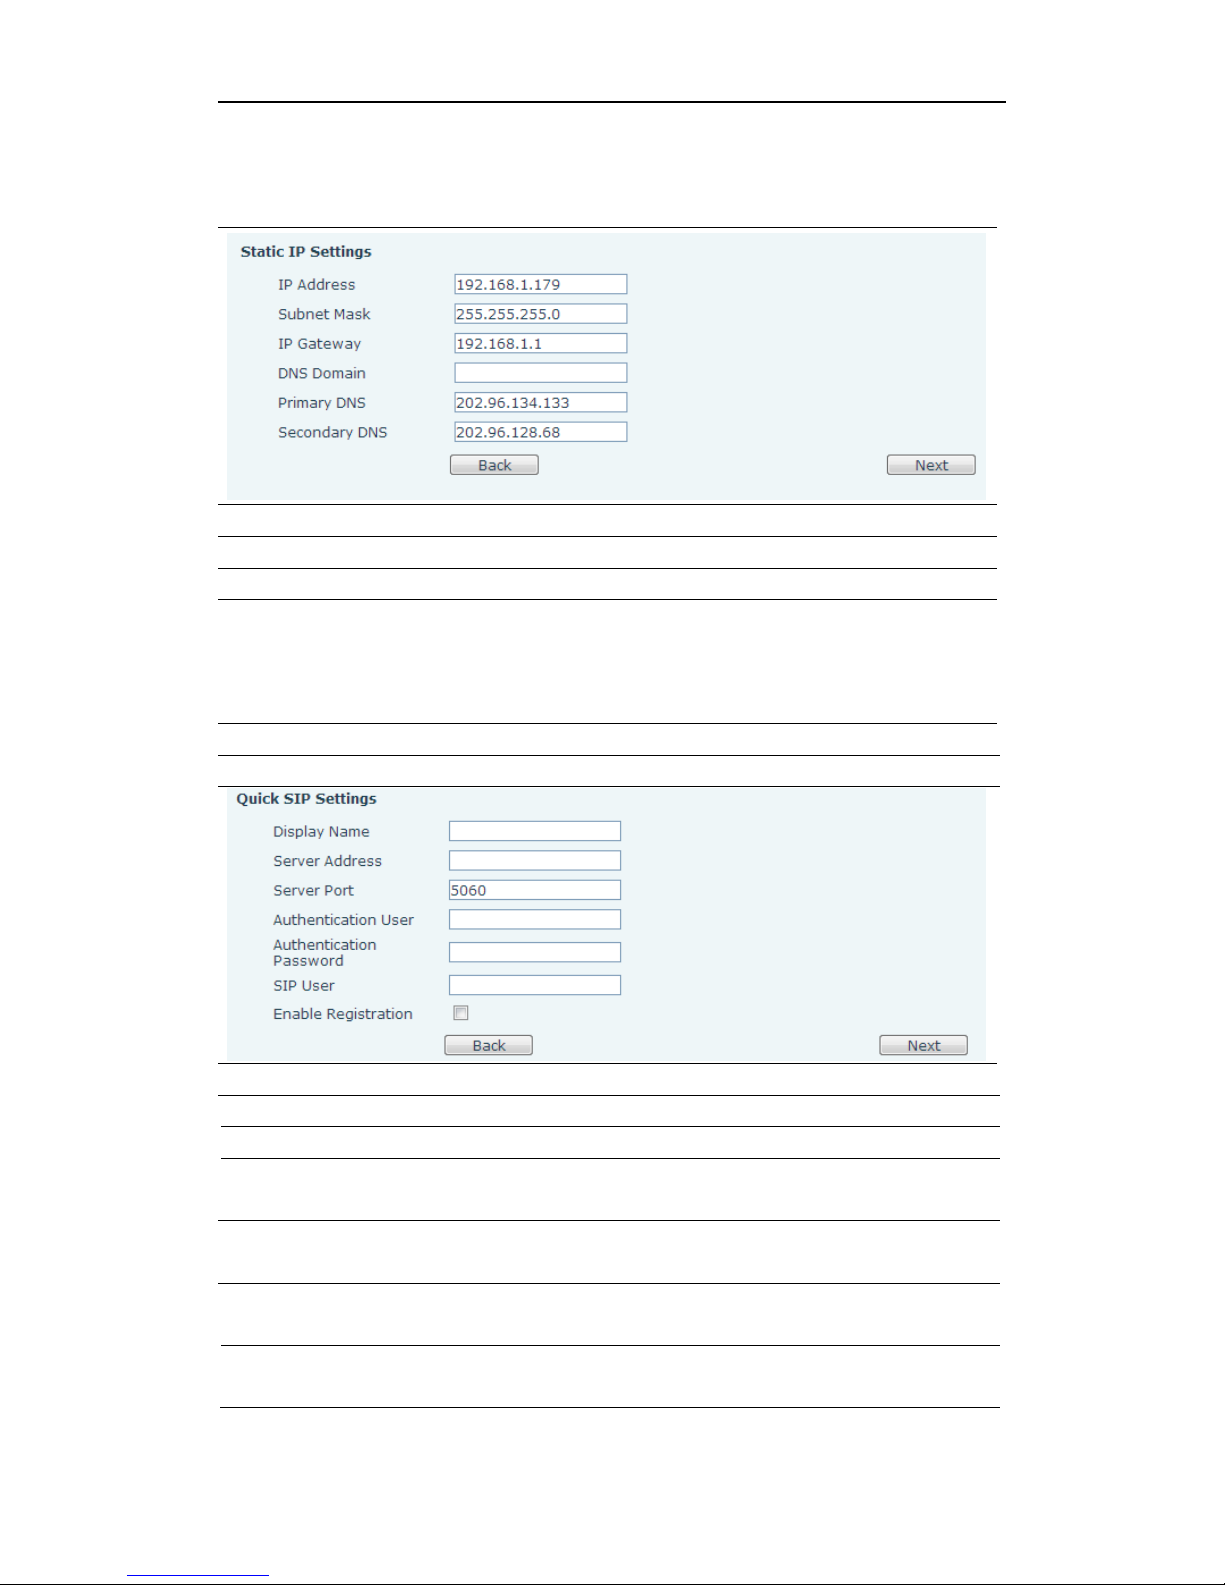
Choose Static IP MODE, click【NEXT】can configure the network and
Page 26
User Manual
SPEEDYTEL Technology CO Ltd
SIP(default SIP1)simply, also can browse too. Click【BACK】can return to
the last page.
IP Address
Input the IP address distributed to you
Subnet Mask
Input the Netmask distributed to you.
IP Gateway
Input the Gateway address distributed to you.
DNS Domain
Set DNS domain postfix. When the domain which
you input cannot be parsed, phone will
automatically add this domain to the end of the
domain which you input before and parse it again.
Primary DNS
Input your primary DNS server address.
Secondary DNS
Input your standby DNS server address.
Display Name
Set the display name.
Server Address
Input your SIP server address.
Server Port
Set your SIP server port.
Authentication
User
Input your SIP register account name.
Authentication
Password
Input your SIP register password.
SIP User
Input the phone number assigned by your VOIP
service provider.
Enable
Registration
Start to register or not by selecting it or not.
Page 27
User Manual
SPEEDYTEL Technology CO Ltd
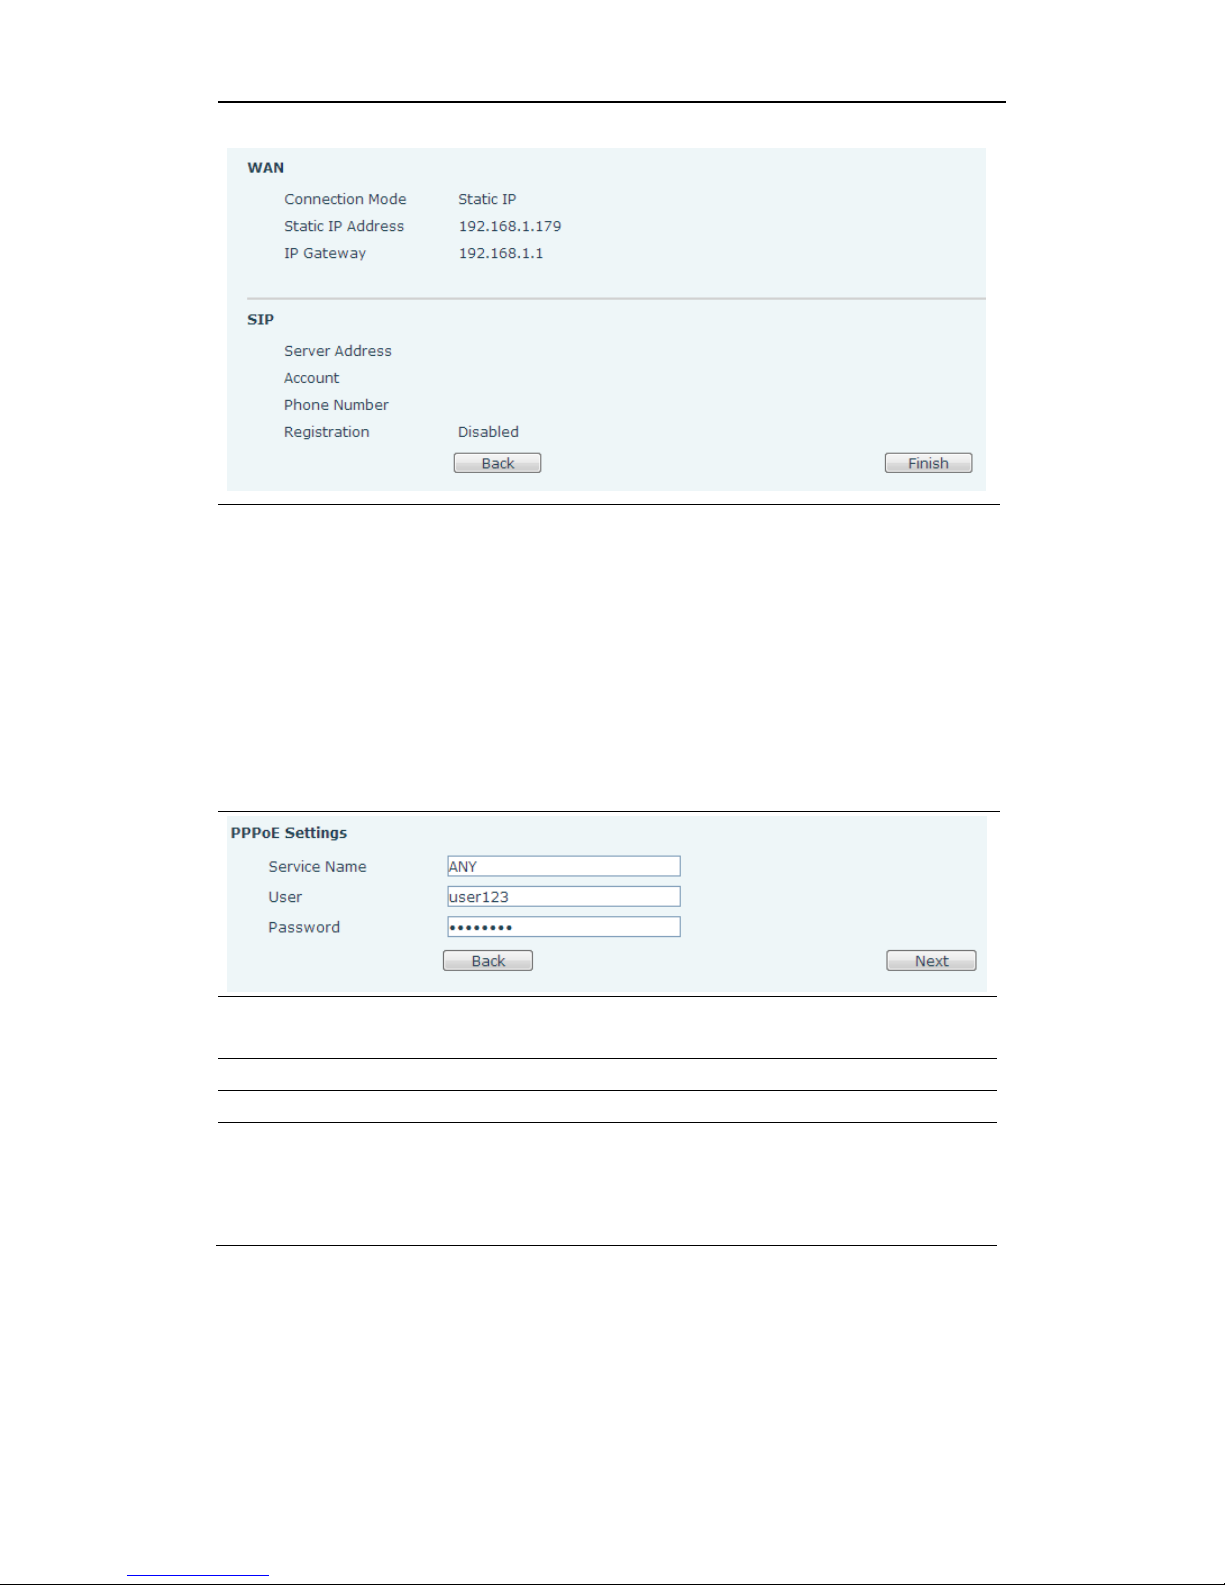
Display detailed information that you manual config.
Choose DHCP MODE, click【Next】can config SIP (default SIP1) simply,
also can browse too. Click Back can return to the last page. Like Static IP
MODE.
Choose PPPoE MODE, click 【Next】 can config the PPPoE
account/password and SIP (default SIP1) simply, also can browse too.
Click 【Back】 can return to the last page. Like Static IP MODE.
PPPOE Server
Server name, if PPPOE service providers are no special
requirements, this name is usually the default value.
User
Input your ADSL account
Password
Input your ADSL password
Notice: Click【Finish】button after finished your setting, IP Phone will
save the setting automatically and reboot, After reboot, you can dial by
the SIP account.
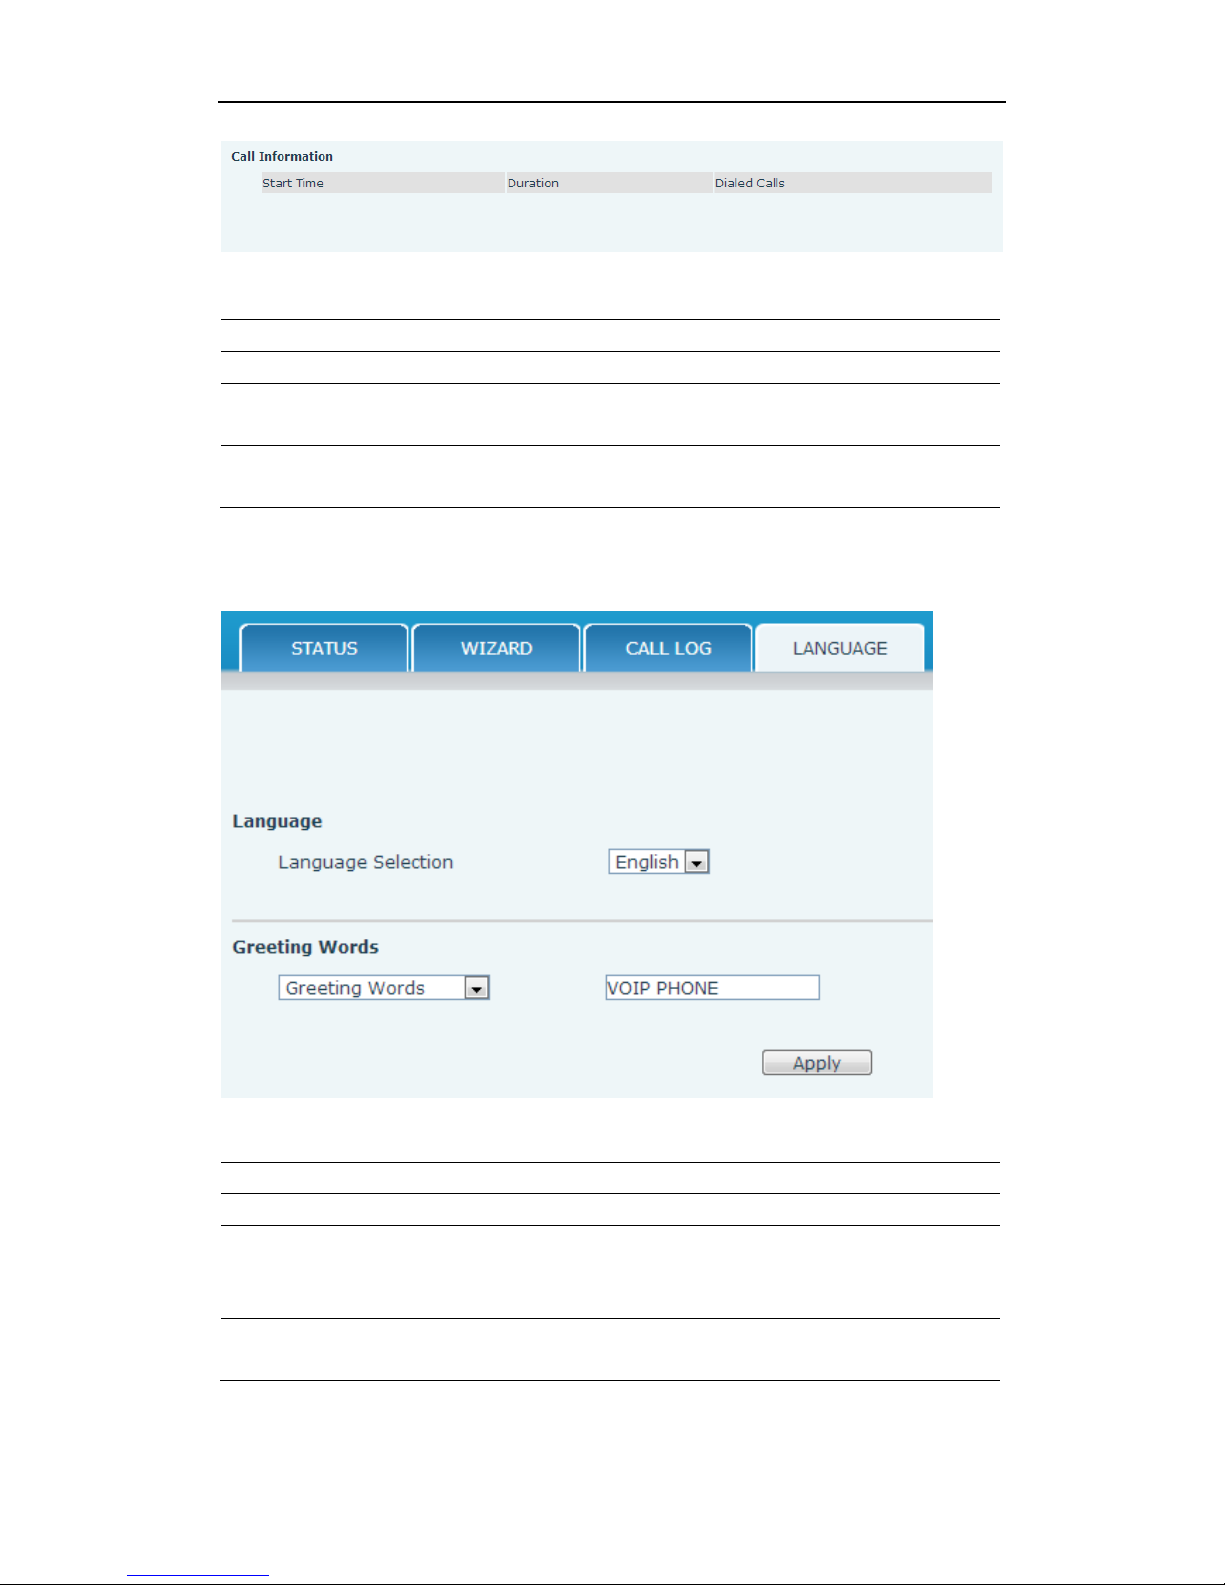
8.3.1.3 CALL LOG
You can query all the outgoing through this page.
Page 28
User Manual
SPEEDYTEL Technology CO Ltd
Call log
Field name
explanation
Start Time
Display the start time of the outgoing record.
Duration
Display the conversation time of the outgoing
record.
Dialed Calls
Display the account/protocol/line of the outgoing
record.
8.3.1.4 LANGUAGE
LANGUAGE
Field name
Field name
Language
Set the language of phone, English is default.
Greeting Words
The greeting words will display on LCD when
phone is idle. It can support 12 chars. the default
chars are VOIP PHONE.
Notice: the maximal length of the greeting message is twelve English
characters and five Chinese characters.
Page 29
User Manual
SPEEDYTEL Technology CO Ltd
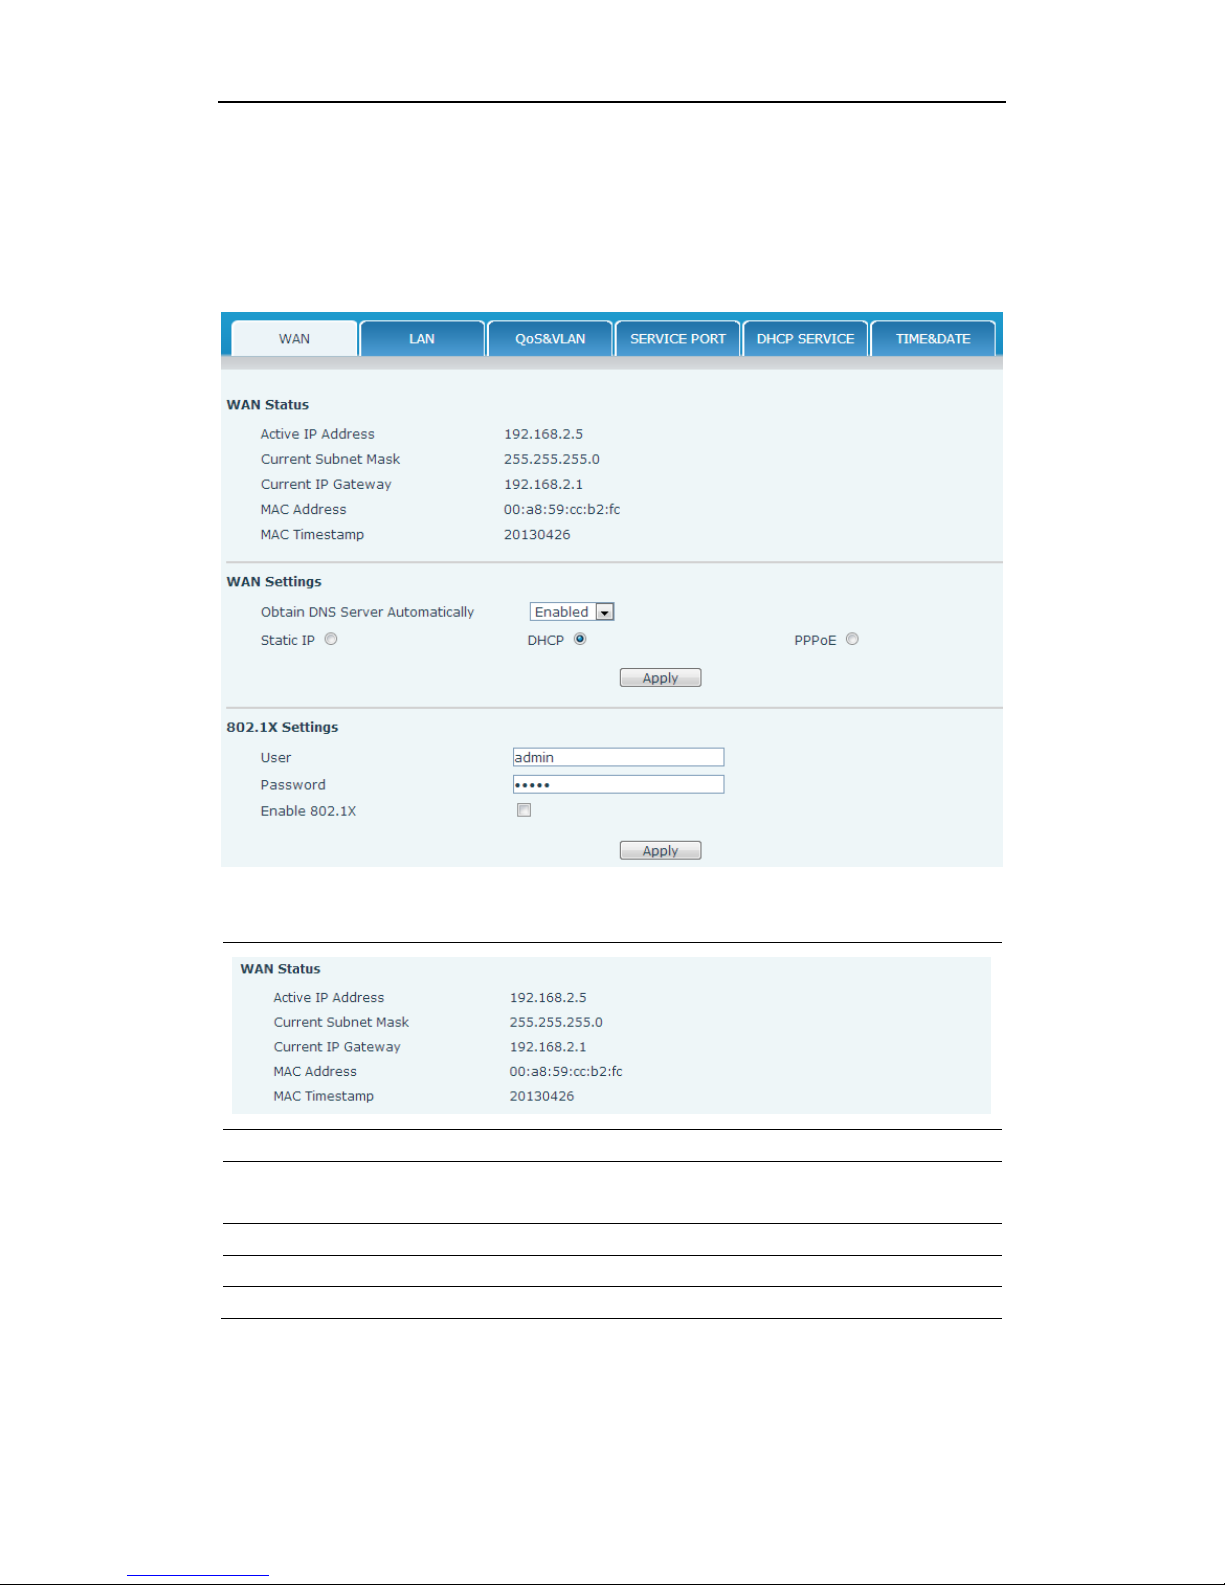
8.3.2 NETWORK
8.3.2.1 WAN
WAN Status
Active IP Address
The current IP address of the phone
Curren Subenet
Mask
The current Netmask address
MAC Address
The current MAC address of the phone
Current IP Gateway
The current Gateway IP address
MAC Timestamp
Shows the time of getting MAC address
Page 30
User Manual
SPEEDYTEL Technology CO Ltd
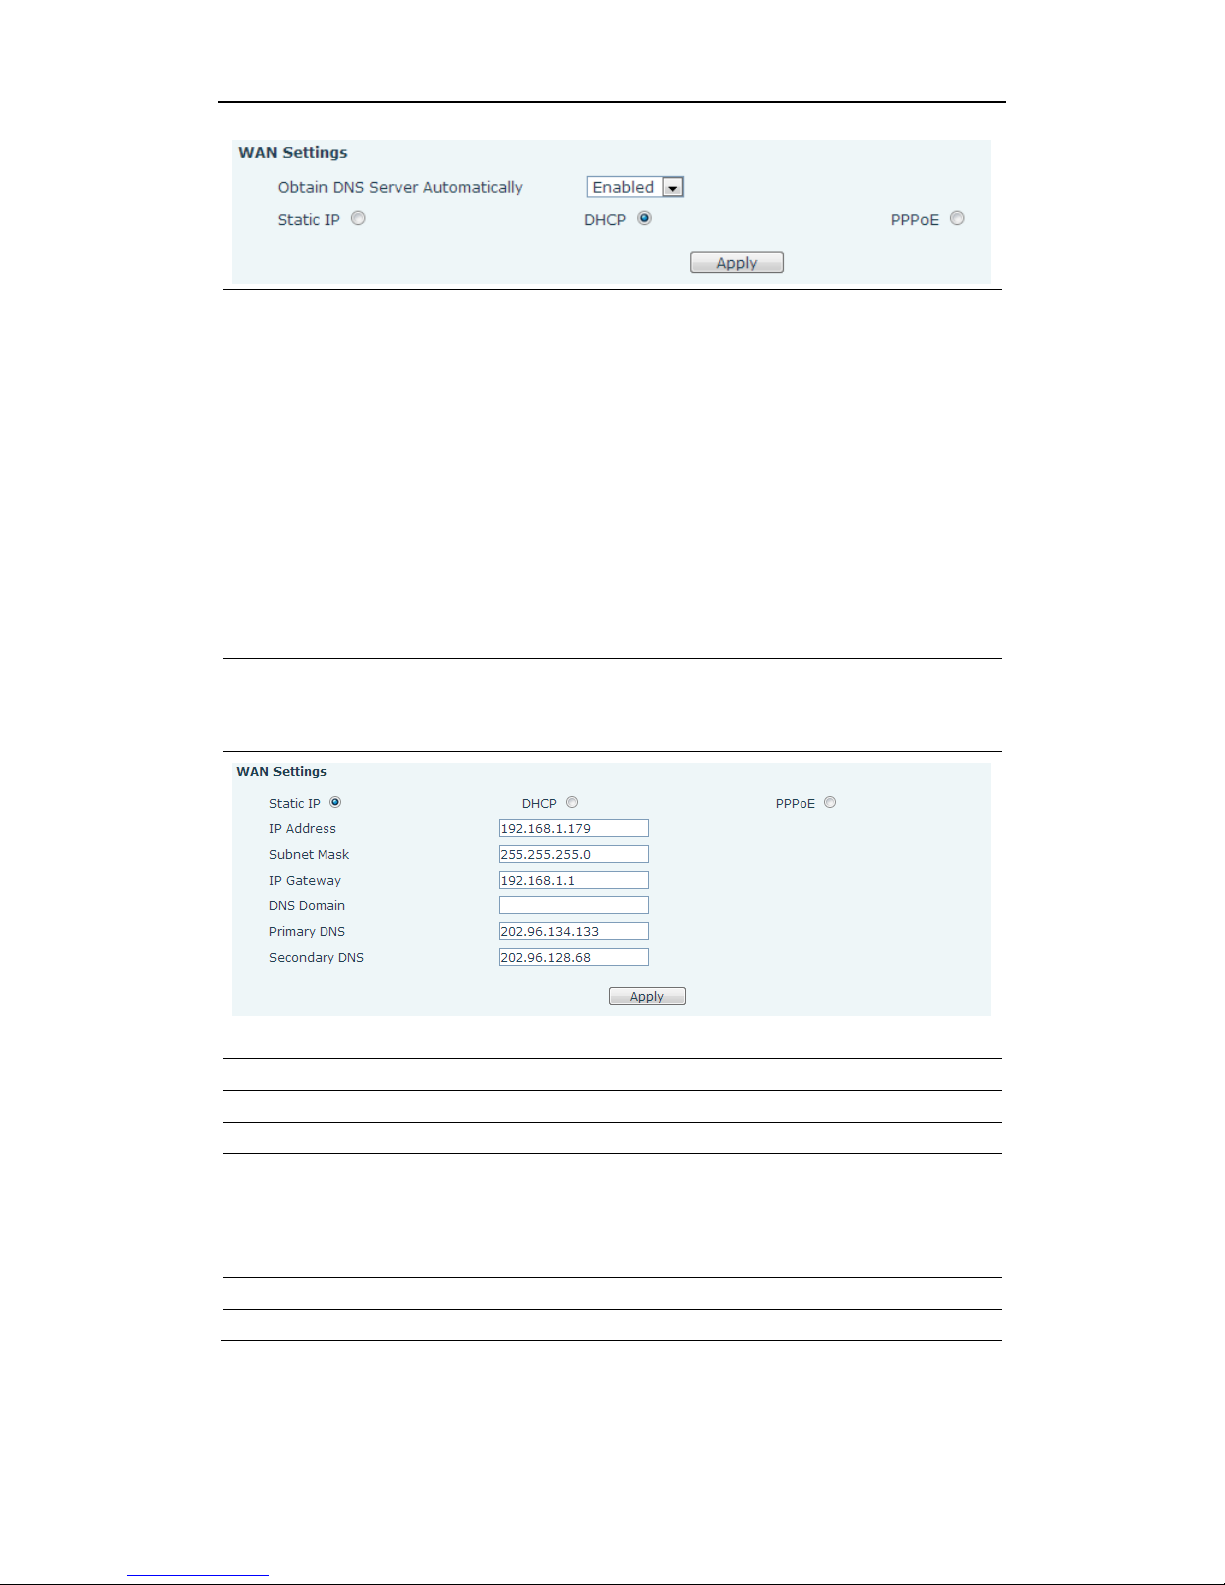
Please select the proper network mode according to the network
condition. T20 provide three different network settings:
Static: If your ISP server provides you the static IP address, please
select this mode, and then finish Static Mode setting. If you don’t
know about parameters of Static Mode setting, please ask your ISP
for them.
DHCP: In this mode, you will get the information from the DHCP
server automatically; need not to input this information artificially.
PPPoE: In this mode, you must input your ADSL account and
password.
You can also refer to 2.2.1 Network setting to speed setting your
network.
Obtain DNS server
automatically
Select it to use DHCP mode to get DNS address, if
you don’t select it, you will use static DNS server.
The default is selecting it.
If you user static mode, you need set it.
IP Address
Input the IP address distributed to you.
Subnet Mask
Input the Netmask distributed to you.
IP Gateway
Input the Gateway address distributed to you.
DNS Domain
Set DNS domain postfix. When the domain which
you input cannot be parsed, phone will
automatically add this domain to the end of the
domain which you input before and parse it again.
Primary DNS
Input your primary DNS server address.
Secondary DNS
Input your standby DNS server address.
Page 31
User Manual
SPEEDYTEL Technology CO Ltd
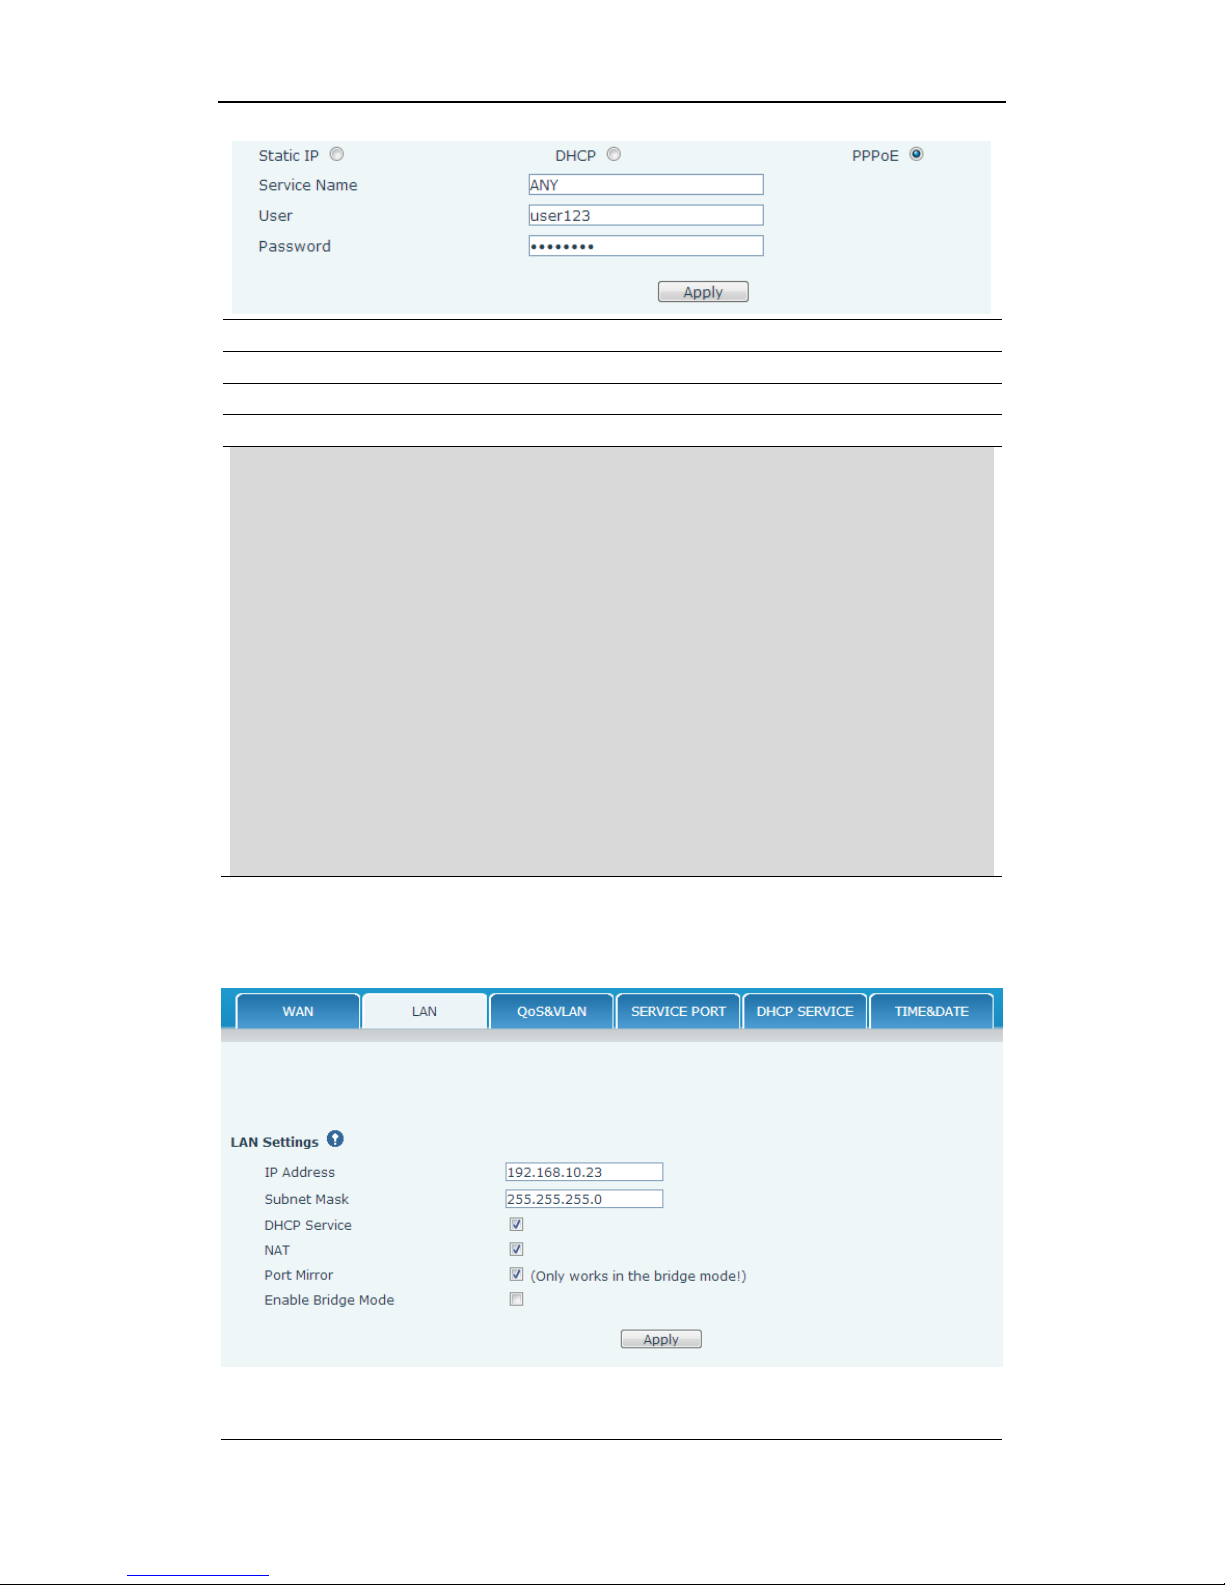
If you uses PPPOE mode, you need to make the above setting.
Service Name
It will be provided by ISP.
User
Input your ADSL account.
Password
Input your ADSL password.
Note:
1) Click “Apply” button after finished your setting, IP Phone willsavethe
setting automatically and new setting will take effect.
2) If you modify the IP address, the web wills not response by the old IP
address. Your need input new IP address in the address column to logon
in the phone.
3) If networks ID which is DHCP server distributed is same as network
ID which is used by LAN of system, system will use the DHCP IP to set
WAN, and modify LAN’s networks ID (for example, system will change
LAN IP from 192.168.10.1 to 192.168.11.1) when system uses DHCP
client to get IP in startup; If system uses DHCP client to get IP in
running status and network ID is also same as LAN’s, system will
refuse to accept the IP to configure WAN. So WAN’s active IP will be
0.0.0.0.
8.3.2.2 LAN
LAN Config
Page 32
User Manual
SPEEDYTEL Technology CO Ltd
Field name
explanation
LAN IP Address
Specify LAN static IP
Subnet Mask
Specify LAN Netmask
DHCP Service
Select the DHCP server of LAN port or not. After
you modify the LAN IP address, phone will amend
and adjust the DHCP Lease Table and save the
result amended automatically according to the IP
address and Netmask. You need reboot the phone
and the DHCP server setting will take effect.
NAT
Select NAT or not
Port Mirror
Select Port Mirror or not, it only works in bridge
mode, the function of the port mirror is that copy
the data stream from the WAN port to the LAN port
of the phone.
Enable Bridge
Mode
Select Bridge Mode or not: If you select Bridge
Mode, the phone will no longer set IP address for
LAN physical port,LAN and WAN will join in the
same network. Click “Apply”, the phone will reboot.
Notice: When LAN IP or bridge mode status is changed, the system will
reboot!
If you choose the bridge mode, the LAN configuration will be disabled.
8.3.2.3 QoS&VLAN
The VOIP phone support 802.1Q/P protocol and DiffServ configuration.
VLAN functionality can use different VLAN IDs by setting voice VLAN and
data VLAN. The VLAN application of this phone is very flexible.
Page 33
User Manual
SPEEDYTEL Technology CO Ltd
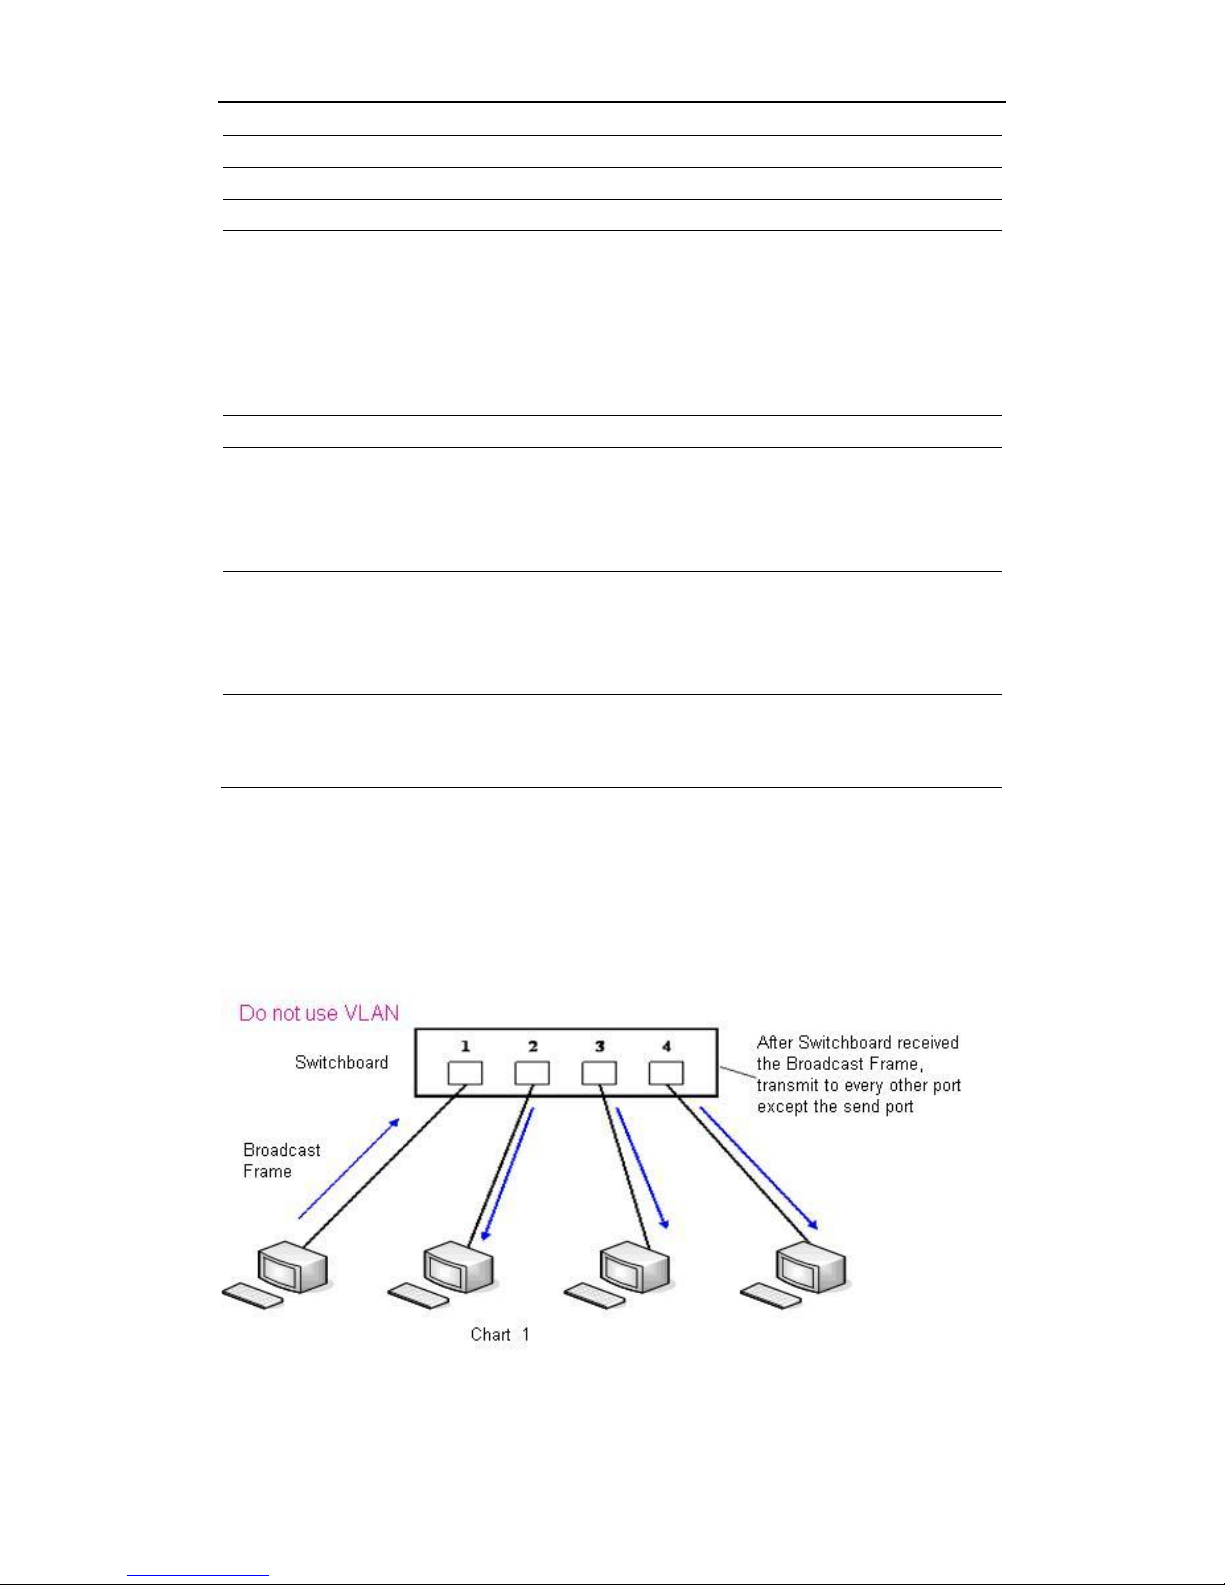
In chart 1, there is a layer 2 that switches without setting VLAN. Any
broadcast frame will be transmitted to the other ports except the send port.
For example, a broadcast information is sent out from port 1 then
transmitted to port 2,3and 4.
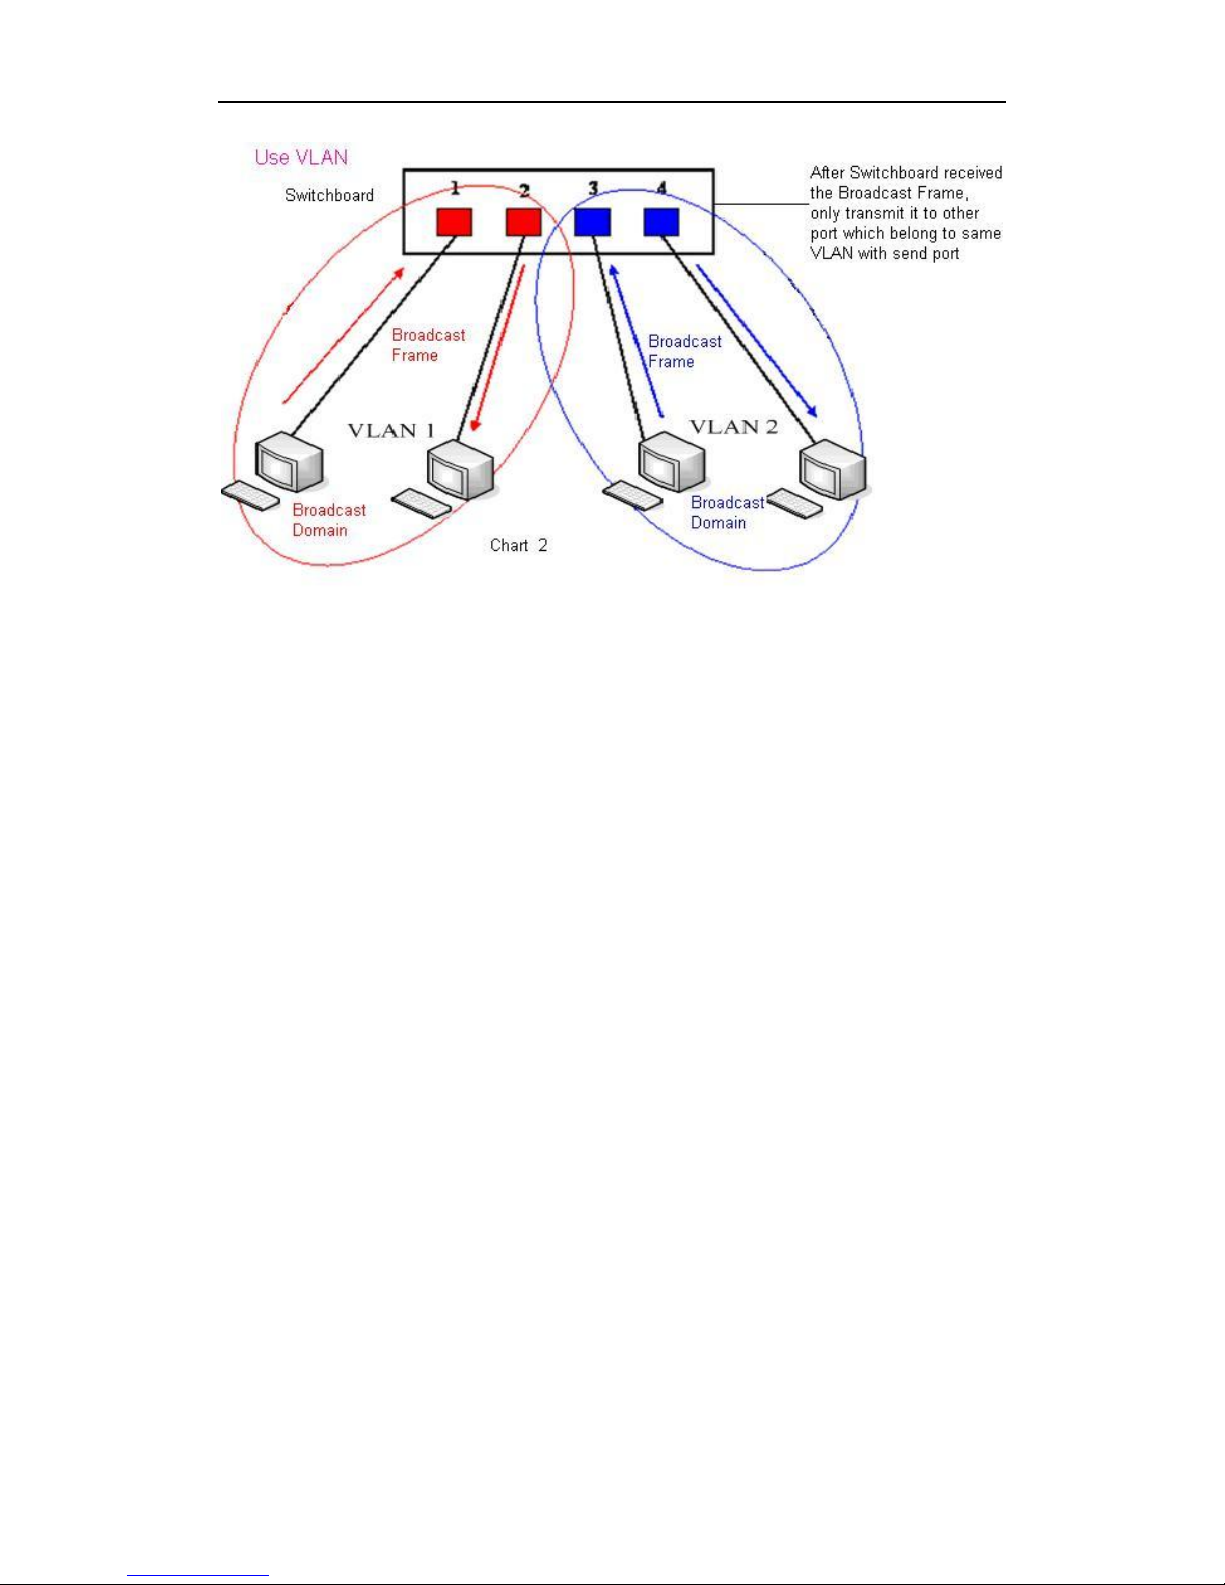
In chart 2, red and blue indicate two different VLANs in the switch, and
port 1 and port 2 belong to red VLAN, port 3 and port 4 belong to blue
VLAN. If a broadcast frame is sent out from port 1, switch will transmit it
to port 2, the other port in the red VLAN and not transmit it to port3 and
port 4 in blue VLAN. By this means, VLAN divide the broadcast domain via
restricting the range of broadcast frame transition.
Note: chart 2 use red and blue to identify the different VLAN, but in
practice, VLAN uses different VLAN IDs to identify.
Page 34
User Manual
SPEEDYTEL Technology CO Ltd
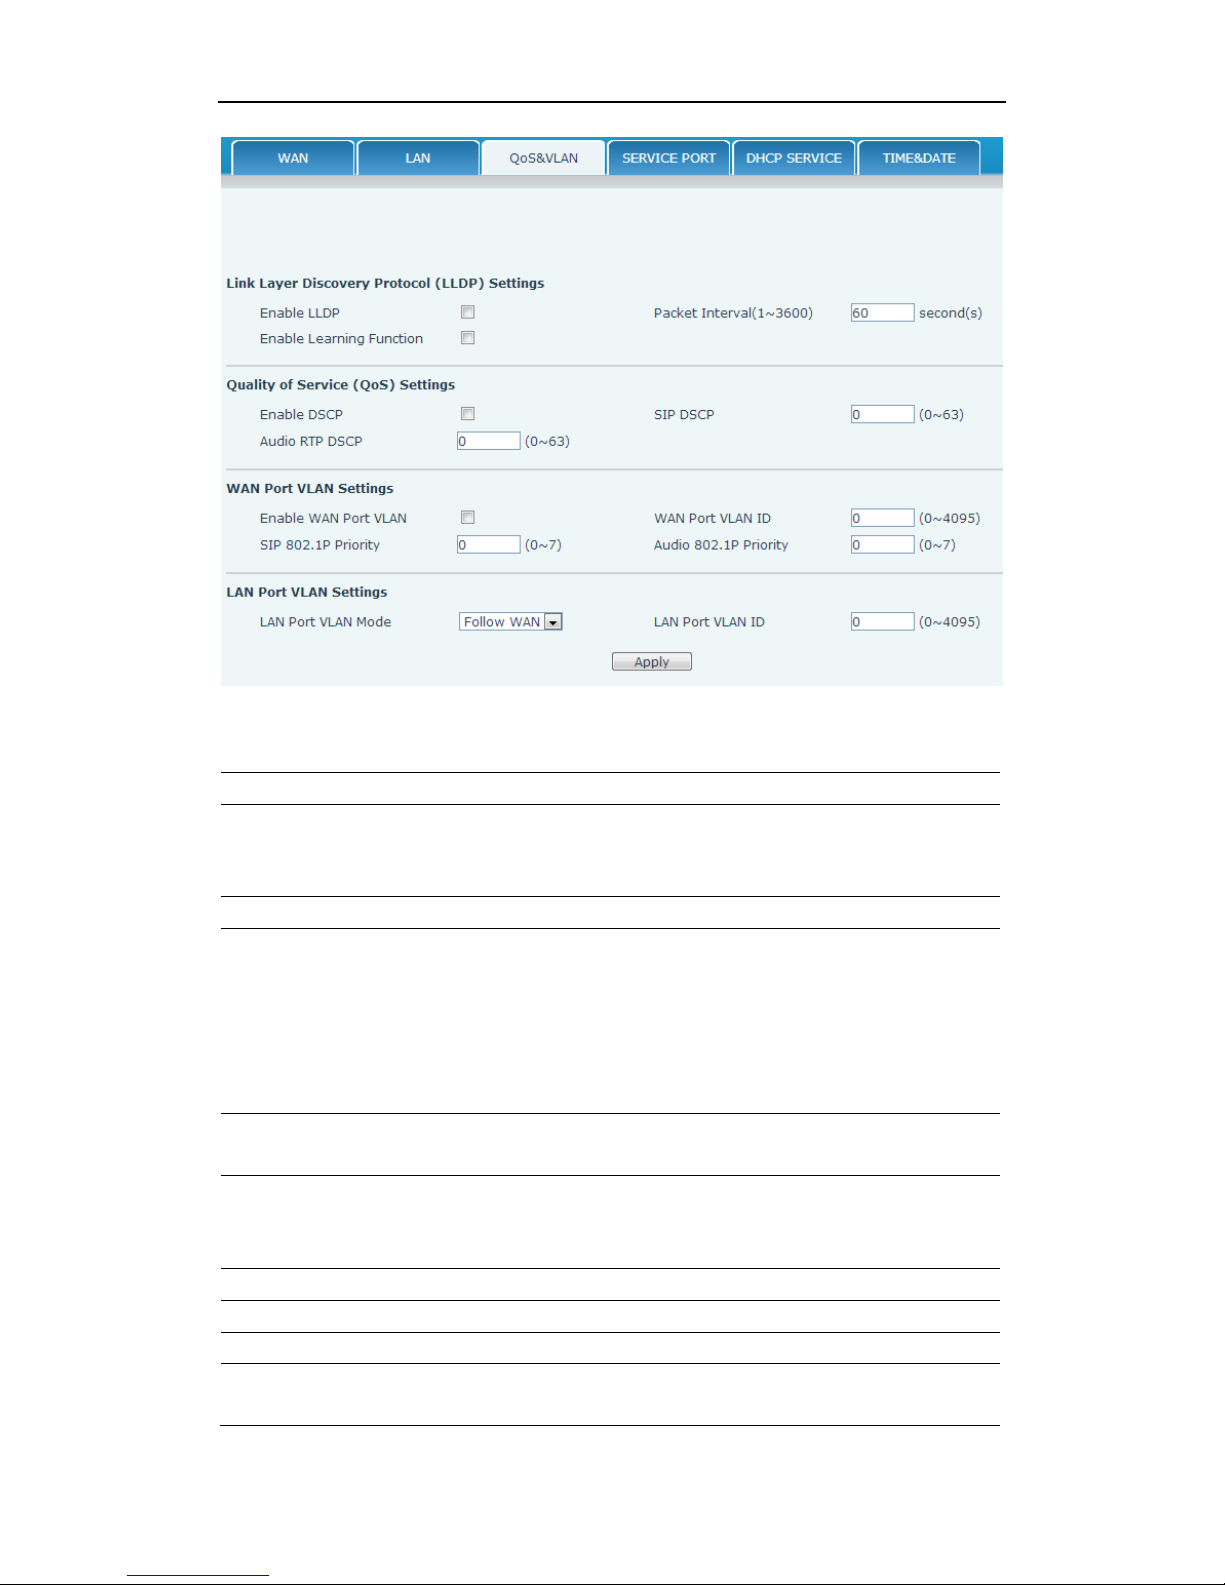
QoS & VLAN Configuration
Field name
explanation
Link Layer
Discovery Protocol
(LLDP) Settings
Enabel LLDP
Enable LLDP by selecting it.
Enable Learning
Funcion
After enabling LLDP Learn, telephone can
automatically learn the data of DSCP, 802.1p, VLAN
ID from the switch. If the data is different from the
data of the LLDP server, telephone will change its
own value as the value of the switch (Synchronous
with VLAN in switch).
Package
Interval(1-3600)
The time interval of sending LLDP Packet.
Quality of
Service(QOS)
Settings
Enable DSCP
Enable DSCP by selecting it.
SiP DSCP
Specify the value of the SIP DSCP.
Audio RTP DSCP
Specify the value of the Audio RTP DSCP.
WAN Port VLAN
Settings
Page 35
User Manual
SPEEDYTEL Technology CO Ltd
Enable WAN Port
VLAN
Enable WAN Port VLAN by selecting it.
WAN Port VLAN ID
Specify the value of the WAN Port VLAN ID, the
range of the value is 0-4095.
SIP 802.1p Priority
Specify the value of the sip 8021.p priority, the
range of the value is 0-7.
Audio 802.1p
Priority
Specify the value of the audio 802.1p priority, the
range of the value is 0-7.
LAN Port VLAN
Settings
LAN Port Vlan
Follow WAN: Follow the WAN ID.
Disable: Disable Port VALN.
Enable: Enable Port VLAN and specify the Port
VLAN ID different from WAN ID.
LAN Port VLAN ID
Specify the value of the Port VLAN ID different
from WAN ID, the range of the value is 0-4095.
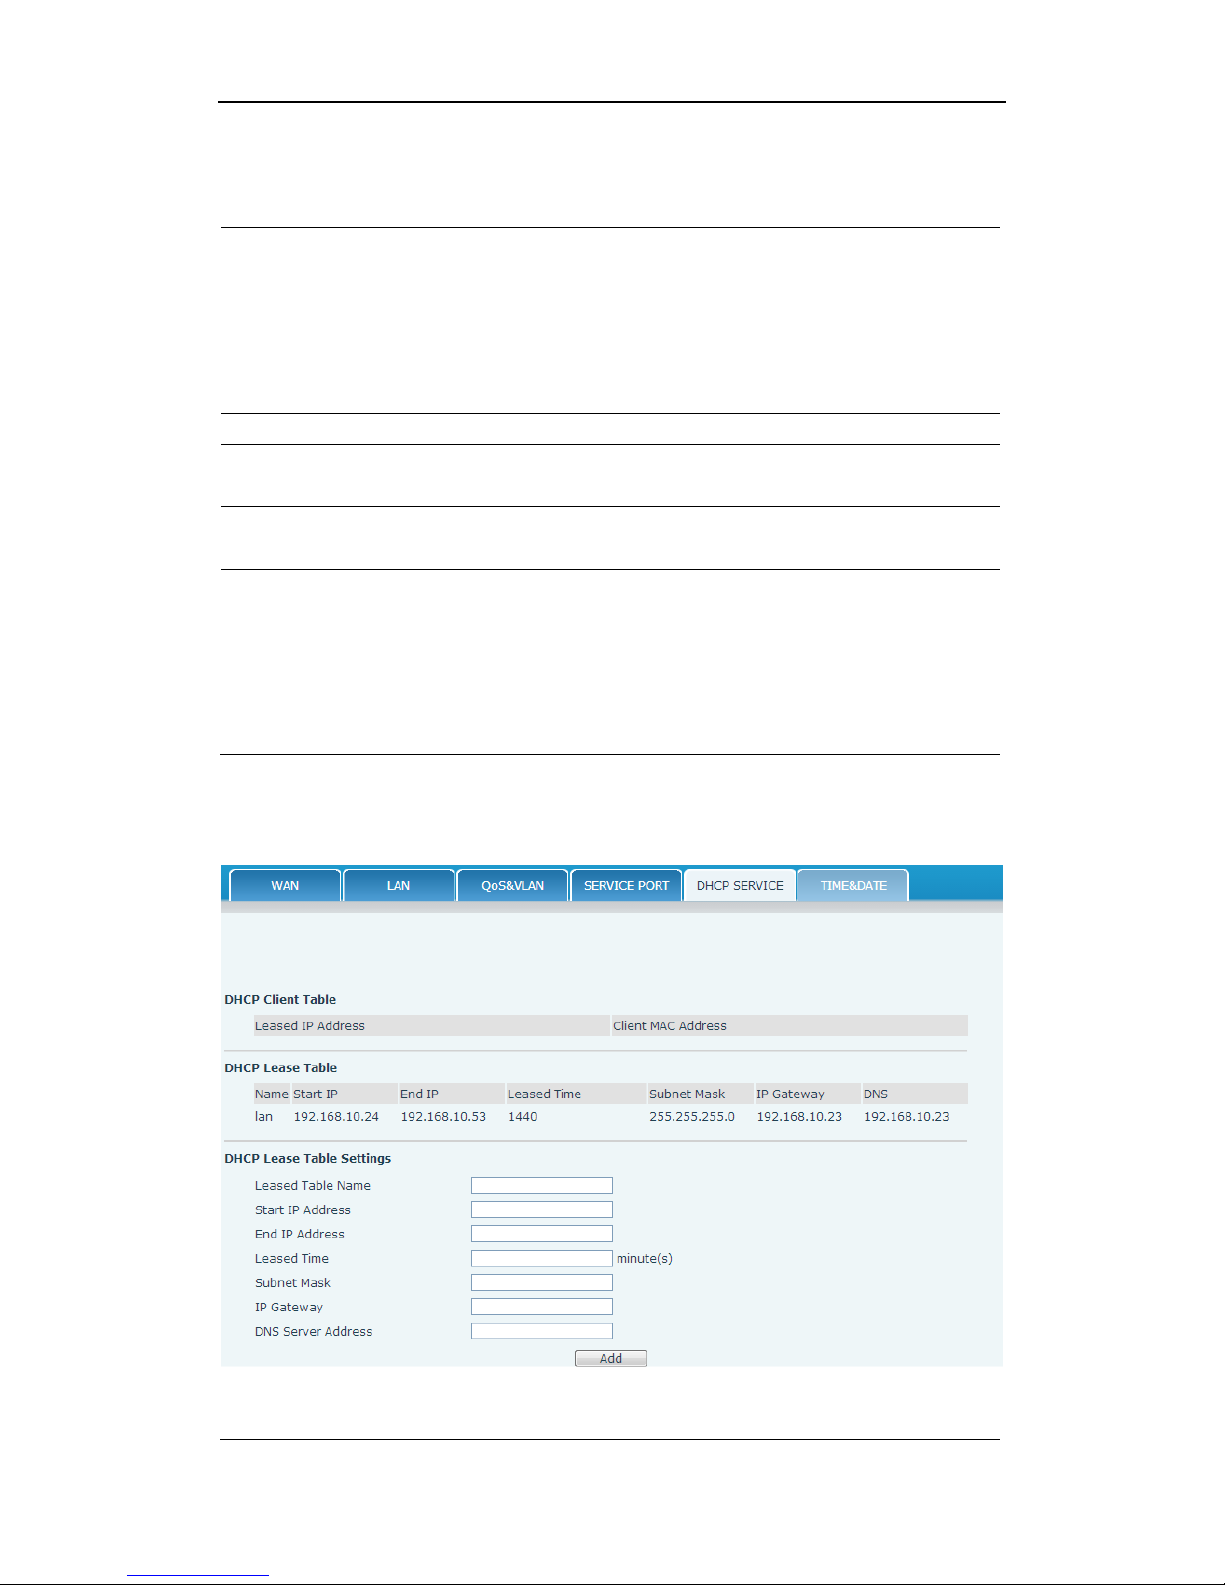
8.3.2.4 Service Port
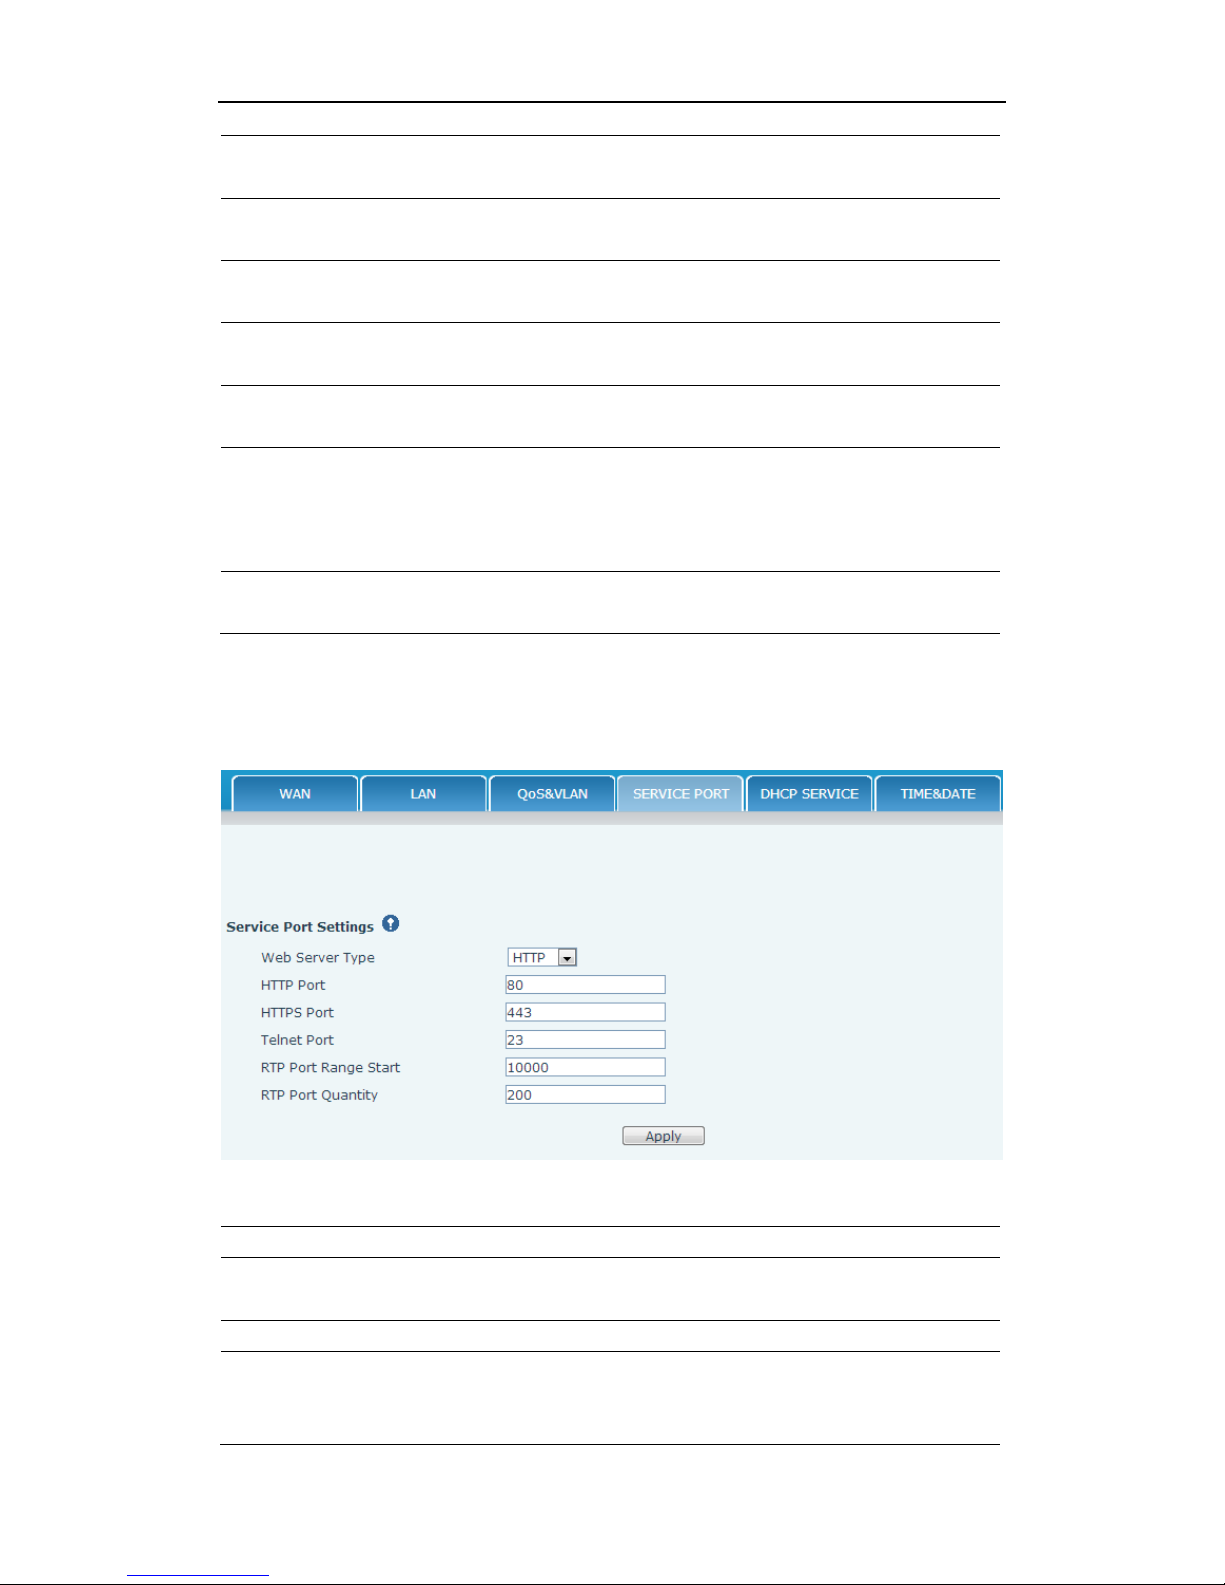
You can set the port of telnet/HTTP/RTP by this page.
Service Port
Field name
explanation
Service Port
Settings
Web Server Type
Specify Web Server Type.
HTTP Port
Set web browser port, the default is 80 port, if you
want to enhance system safety, you'd better change
it into non-80 standard port;
Page 36
User Manual
SPEEDYTEL Technology CO Ltd
Example: The IP address is 192.168.1.70. and the
port value is 8090, the accessing address is
http://192.168.1.70:8090.
HTTPS Port
Before using the https, you must download https
authentication certification into the phone, then
set web browser port, the default is 443 port, if you
want to enhance system safety, you'd better change
it into non-443 standard port. You can access to the
web in https after rebooting the phone.
Telnet Port
Set Telnet Port, the default is 23.
RTP Port Range
Start
Set the RTP Start Port. It is dynamic allocation.
RTP Port Quantity
Set the maximum quantity of RTP Port, the default
is 200.
Notice:
1) You need save the configuration and reboot the phone after set this
page.
2) Please REBOOT the system if you modify the HTTP or telnet port
number (the new number should be greater than 1024).
3) If you set 0 for the HTTP port, it will disable HTTP service.
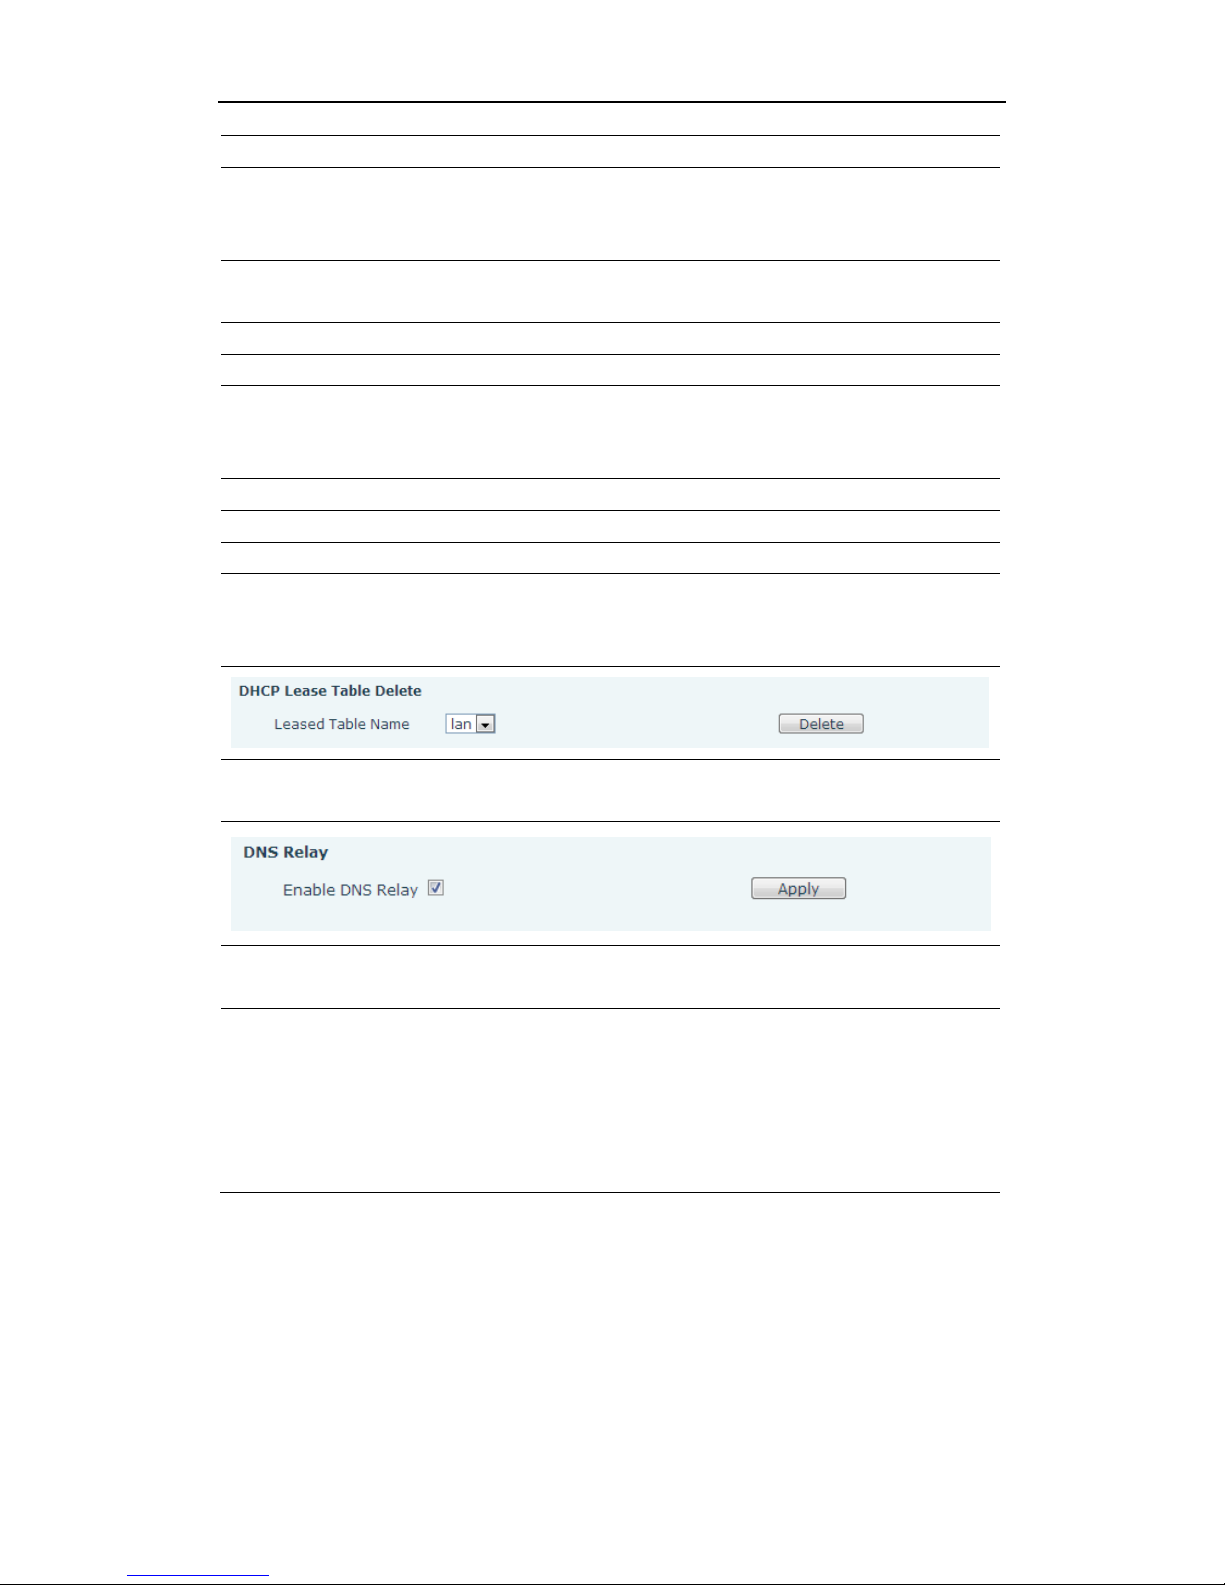
8.3.2.5 DHCP SERVICE
DHCP SERVICE
Page 37
User Manual
SPEEDYTEL Technology CO Ltd
Field name
explanation
DHCP Lease Table
IP-MAC mapping table. If the LAN port of the
phone connects to a device, this table will show
the IP and MAC address of this device.
Shows the DHCP Lease Table, the unit of Lease time is Minute.
Lease Table Name
Specify the name of the lease table.
Start IP Address
Set the start IP address of the lease table.
End IP Address
Set the end IP address of the lease table, the
network device connected to LAN port will get IP
address between Start IP and End IP by DHCP.
Leased Time
Set the Lease Time of the lease table.
Subnet Mask
Set the Netmask of the lease table.
IP Gateway
Set the Gateway of the lease table.
DNS
Set the default DNS server IP of the lease table;
Click the Add button to submit and add this lease
table.
Select name of lease table, click the Delete button will delete the
selected lease table from DHCP lease table.
Enable DNS Relay
Select DNS Relay, the default is enabled. Click the
Apply button to become effective.
Notice:
1) The size of lease table cannot be larger than the quantity of C network
IP address. We recommend you to use the default lease table and not
modify it.
2) If you modify the DHCP lease table, you need save the configuration
and reboot.
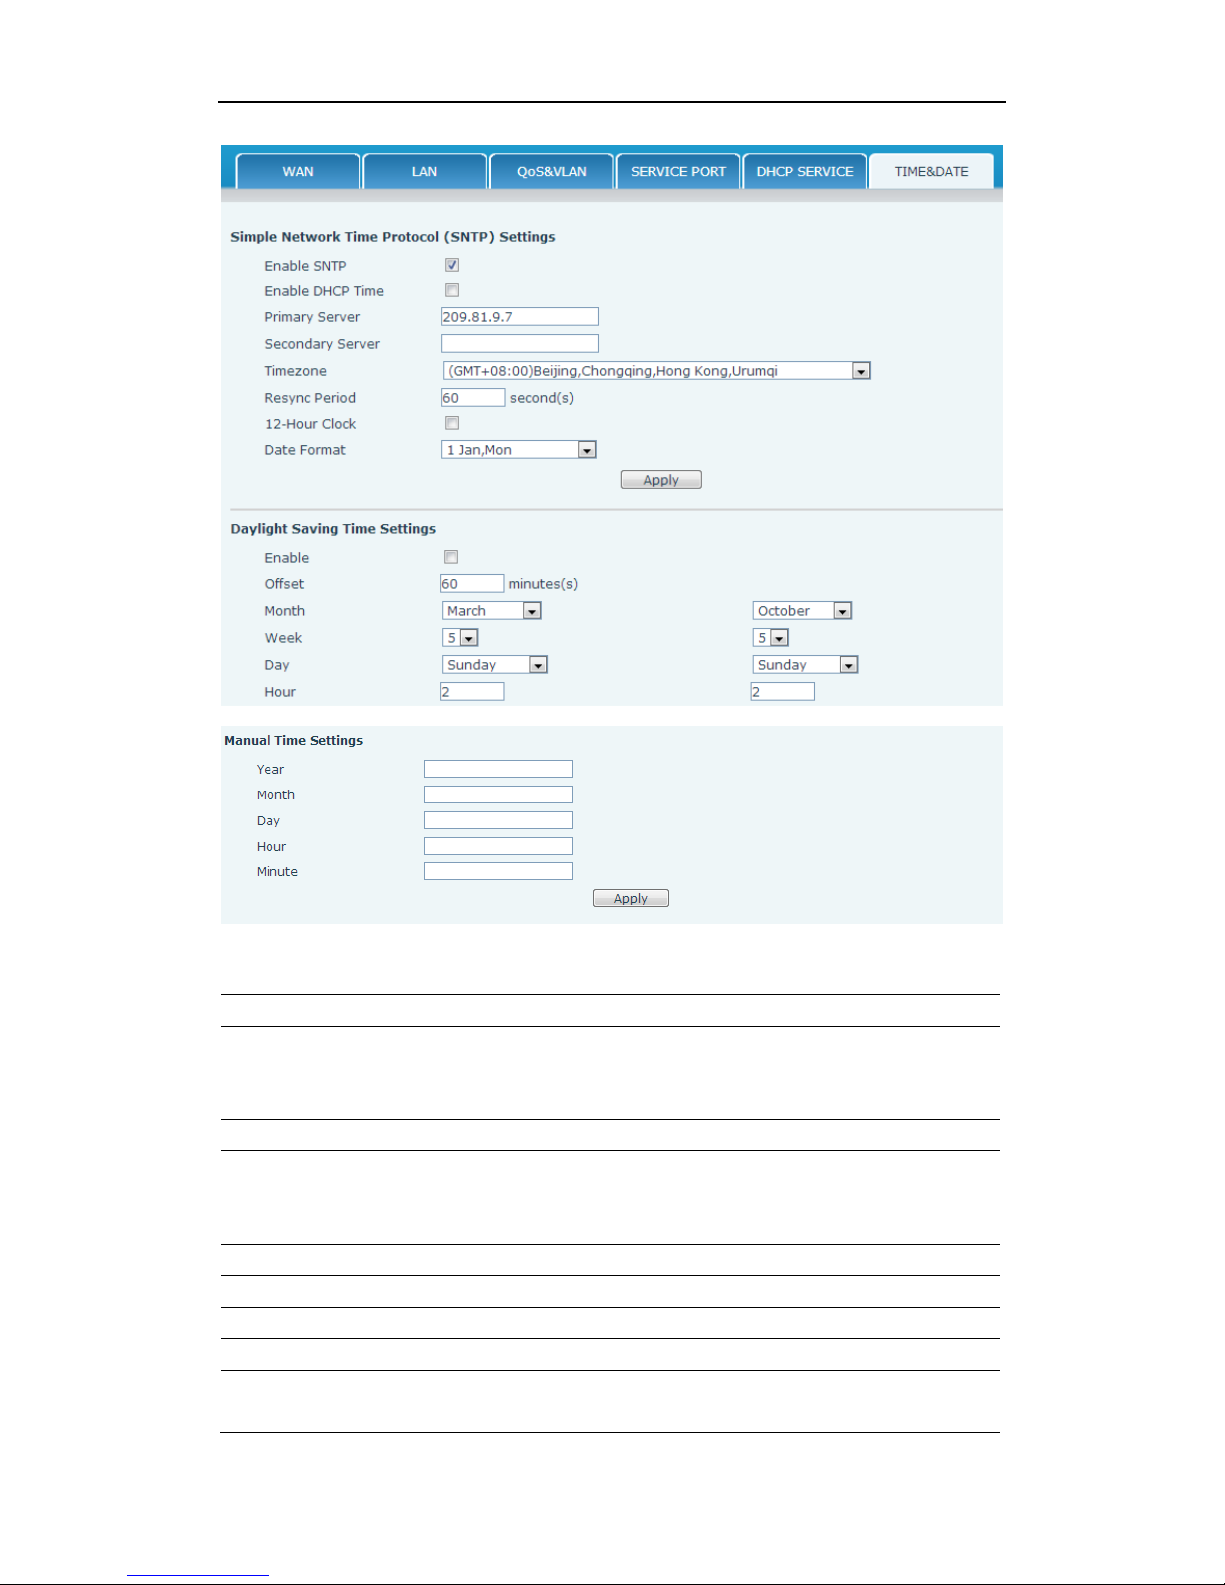
8.3.2.6 TIME&DATE
Setting time zone and SNTP (Simple Network Time Protocol) server
according to your location, you can also manually adjust date and time in
this web page.
Page 38
User Manual
SPEEDYTEL Technology CO Ltd
TIME&DATE
Field Name
Explanation
Simple Network
Time Protocol
(SNTP) Settings
Enable SNTP
Enable SNTP by selecting it.
Enable DHCP Time
Enable DHCP Time by selecting it, then the
phone will automatically synchronize the standard
time.
Primary Server
Set SNTP Primary Server IP address.
Secondary Server
Set SNTP Secondary Server IP address.
Time Zone
Select the Time zone according to your location.
Resync Period
Set the time out, the default is 60 seconds.
12 -Hour Clock
Switch the time mechanism between 12 hours and
24 hours.
Page 39
User Manual
SPEEDYTEL Technology CO Ltd
Default is 24 hours mode.
Date format
Specify the date format.
Daylight Saving
Time Settings
Enable
Enable daylight saving time.
Offset(minutes)
Setup the variety length.
Month
Setup start and end month.
Week
Setup start and end week.
Day
Setup start and end day.
Hour
Setup start and end hours.
Minute
Setup start and end minutes.
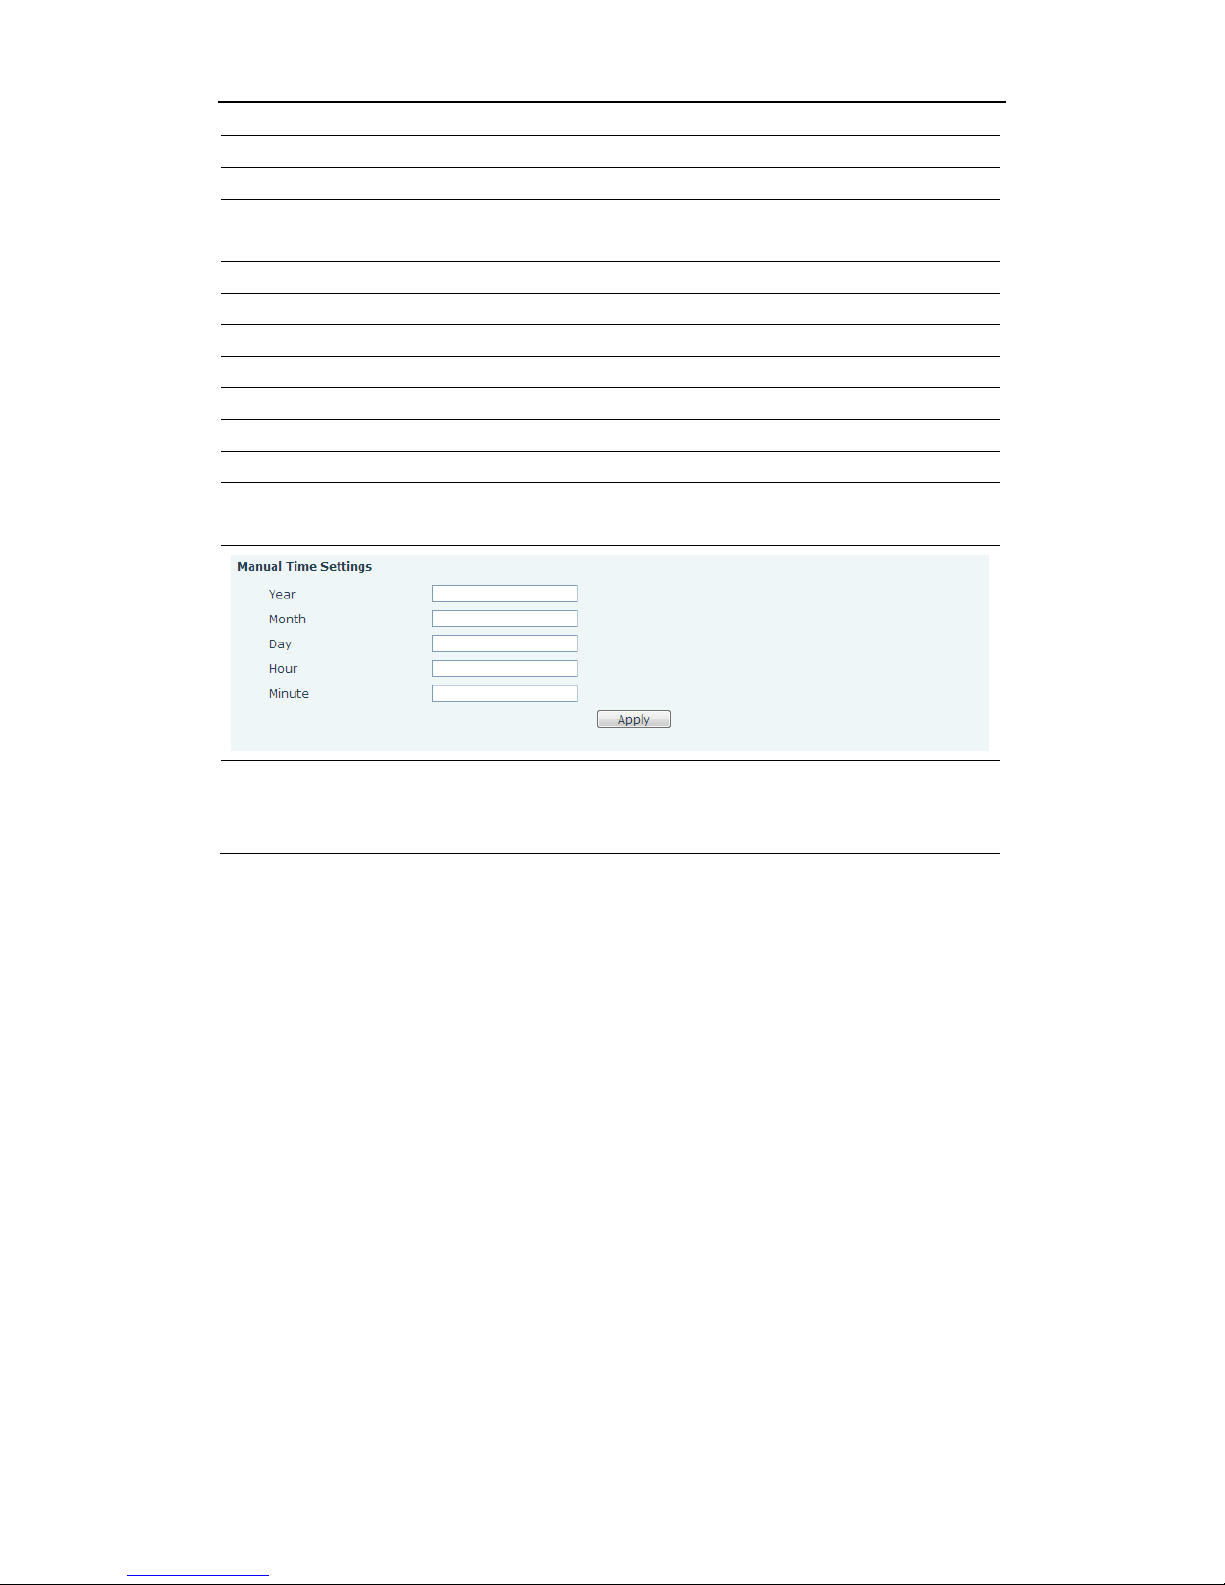
Manual Time
Settings
Notice: First of all,you need to disable the SNTP service, and above the
date hours minutes each of which is required to complete and submit to
make manual.
8.3.3 VOIP
8.3.3.1 SIP
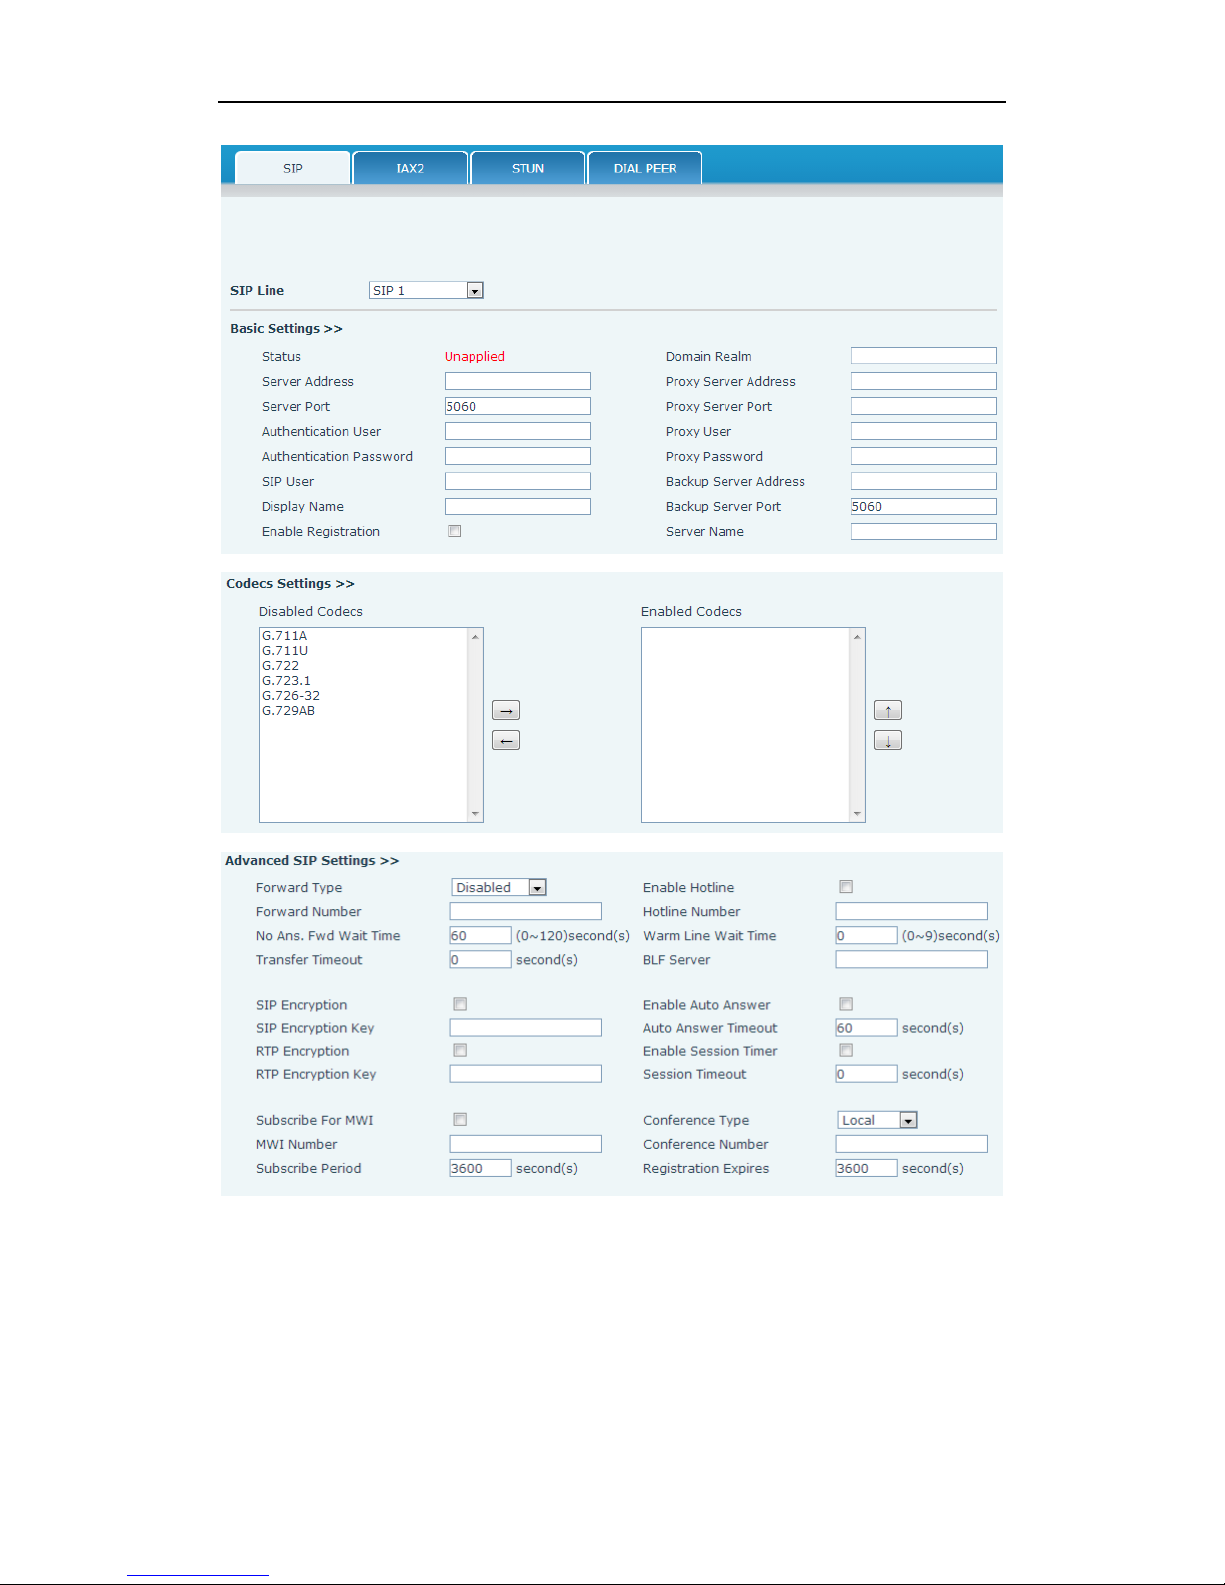
Set your SIP server in the following interface.
Page 40
User Manual
SPEEDYTEL Technology CO Ltd
Page 41
User Manual
SPEEDYTEL Technology CO Ltd
SIP Config
Field name
explanation
SIP Line
Choose line to set info about SIP, there are 4 lines to choose. You can
switch by【Load】button.
Basic Settings
Status
Shows if the phone has been registered the SIP
server or not; or so, show Unapplied.
Server Address
Input your SIP server address.
Server Port
Set your SIP server port.
Authentication User
Input your SIP register account name.
Authentication
Password
Input your SIP register password.
SIP User
Input the phone number assigned by your VoIP
service provider. Phone will not register if there
is no phone number configured.
Display Name
Set the display name.
Set proxy server IP address (Usually, Register SIP
Server configuration is the same as Proxy SIP
Page 42

User Manual
SPEEDYTEL Technology CO Ltd
Proxy Server
Address
Server. But if your VoIP service provider gives
different configurations between Register SIP
Server and Proxy SIP Server, you need make
different settings).
Proxy Server Port
Set your Proxy SIP server port.
Proxy User
Input your Proxy SIP server account.
Proxy Password
Input your Proxy SIP server password.
Domain Realm
Set the sip domain if needed, otherwise this VoIP
phone will use the Register server address as sip
domain automatically. (Usually it is same with
registered server and proxy server IP address).
Backup Server
Address
Input the Backup Server Address, if the primary
server is unavailable, then the phone will enable
the Backup Server Address.
Backup Server Port
Specify the Backup Server Port.
Enable Registration
Start to register or not by selecting it or not.
Codecs Settings
Disable
Codecs/Enable
Codecs
Use the navigation keys to highlight the desired
one in the Enable/Disable Codecs list, and press
the desired to move to the other list.
Advanced SIP
Setting
Forward Type
Select call forward mode, the default is Disabled.
Off: Close down calling forward.
Busy: If the phone is busy, incoming calls will be
forwarded to the appointed phone.
No answer: If there is no answer, incoming calls
will be forwarded to the appointed phone after a
specific.
Always: Incoming calls will be forwarded to the
appoint phone immediately.
The phone will prompt the incoming while doing
forward.
Forward Number
Specify the number you want to forward.
No Answer Forward
Wait Time
Specify the No Answer Forward Delay Time, if the
Forward Type is No answer, incoming calls will
be forwarded after the no answer forward wait
time.
Enable Hot Line
Specify Hot Line by selecting it.
Hot Line Number
Specify Hot Line Number, the phone dial the hot
line number automatically at hands-free mode or
handset mode after warm line time.
Page 43

User Manual
SPEEDYTEL Technology CO Ltd
Warm Line Wait
Time
Specify the Warm Line Time.
Transfer Timeout
For the phone supports the transfer of certain
special features server, set interval time between
sending “bye” and hanging up after the phone
transfers a call.
BLF Server
Ordinary BLF application is that the phone send
subscription package to the registered server, if
your server does not support subscription
package, please input the BLF server so that it
can separate register server and BLF server
SIP Encryption
Enable/Disable SIP Encryption.
SIP Encryption Key
Set the key for sip encryption.
RTP Encryption
Enable/Disable RTP encryption.
RTP Encryption Key
Set the key for RTP encryption.
Enable Auto Answer
Enable Auto Answer by selecting it.
Auto Answer
Timeout
Specify Auto Answer Time, the phone auto
answers the incoming call after Auto Answer
Time.
Enable Session
Timer
Set Enable/Disable Session Timer, whether
support RFC4028.It will refresh the SIP sessions.
Session Timeout
Set the session timeout.
Subscribe for MWI
Enable the Subscribe for MWI by selecting it, the
phone will send subscribe message for MWI to
the SIP Server.
MWI Number
Specify the MWI Number; Please contact your
system administrator for the connecting code.
Different systems have different codes.
Subscribe Period(s)
Overtime of resending subscribe packet. Suggest
using the default configuration.
Conference Type
Specify the Conference Type, if you select the
local, you needn’t input the conference number.
Conference Number
Specify the network conference number, please
contact your system administrator for the
network conference number.
Registration
Expire(s)
Set expire time of SIP server register, default is
60 seconds. If the register time of the server
requested is longer or shorter than the expired
time set, the phone will change automatically the
time into the time recommended by the server,
and register again.
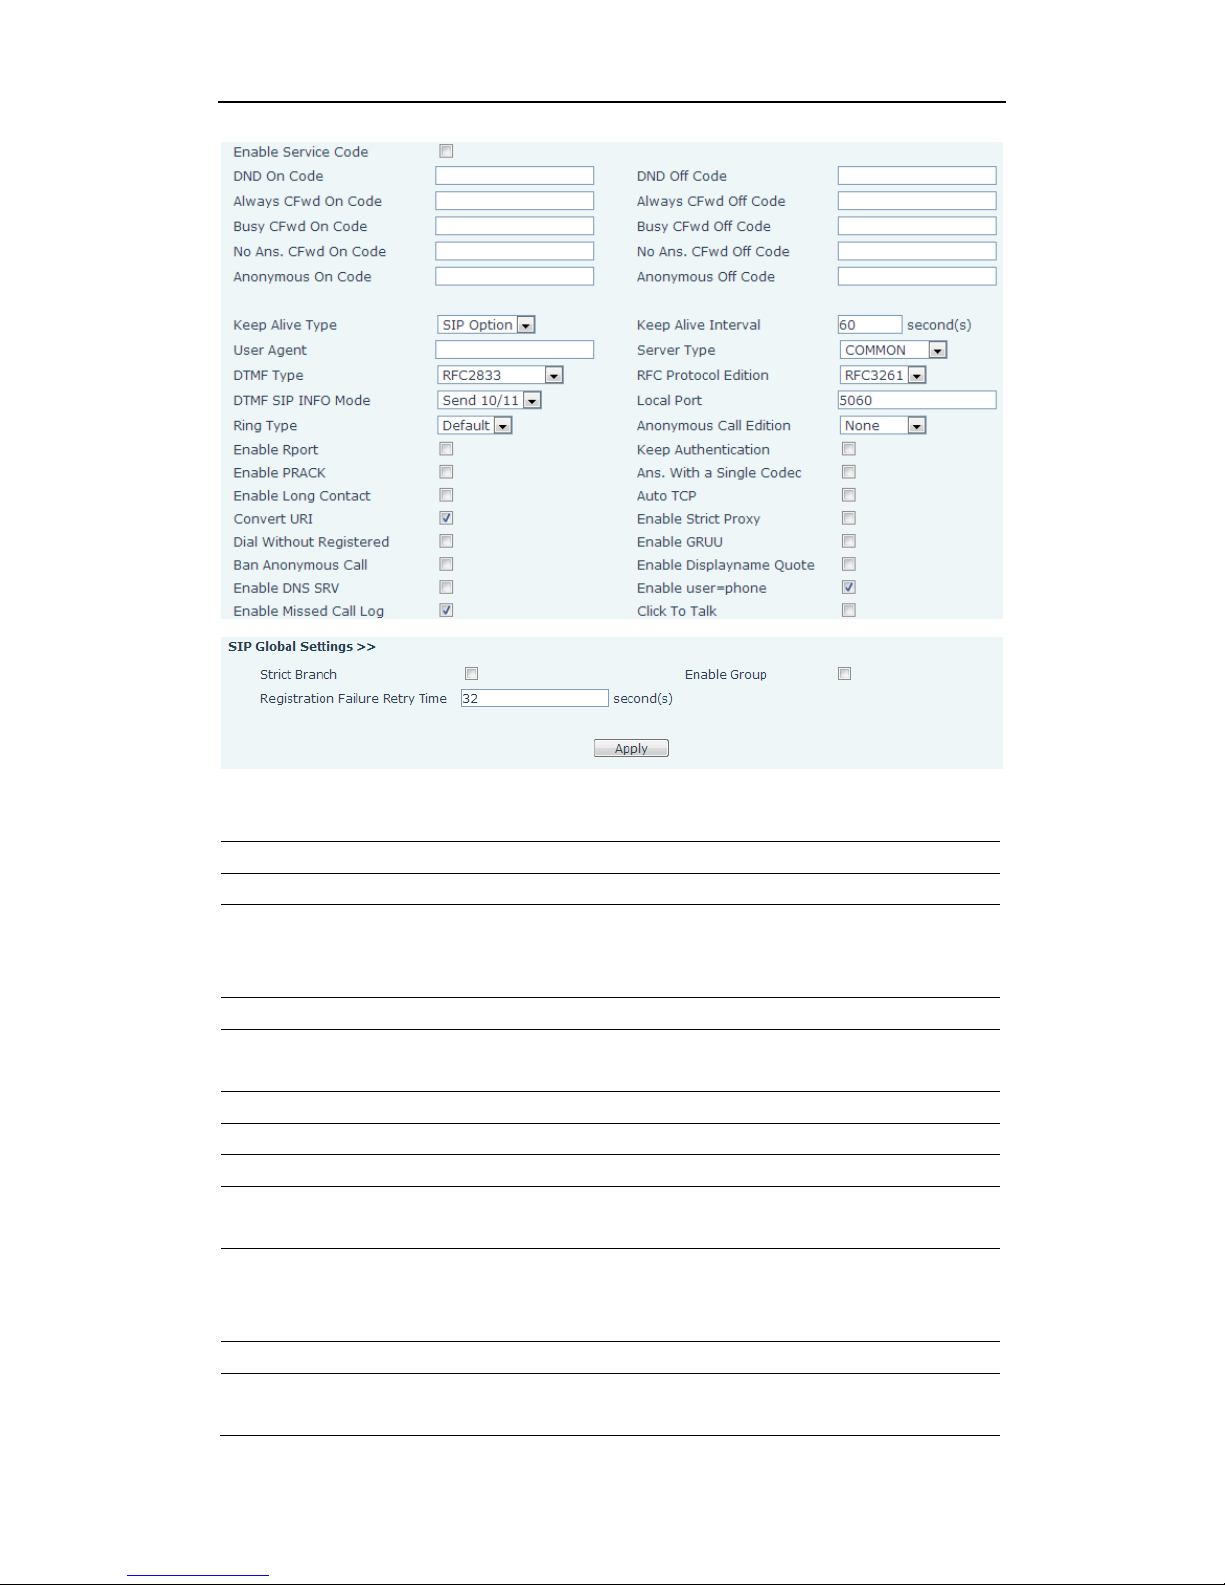
Enable Service Code
If you want to realize the following function by
Page 44

User Manual
SPEEDYTEL Technology CO Ltd
the server, please enter the On Code and Off Code
option, then when you choose to enable/disable
following function on your IP phone, it will send
message to the server, and the server will turn
on/off the function immediately.
DND On Code
Set the DND On Code, When you press the DND
hot key, the phone will send a message to the
server, and the server will turn on the DND
function. Then any calls to the extension will be
rejected by the server automatically. And the
incoming call record will not be displayed in the
Call History.
DND Off Code
Set the DND Off Code, When you press the DND
hot key, the phone will send a message to the
server, and the server will turn off the DND
function.
Always CFwd On
Code
Set the Always CFwd On Code, when you choose
to enable the always forward function on your
phone, it will send message to the server, and the
server will turn on the function immediately.
When there are calls to the extension, the server
will always forward it to the set number
automatically. And the IP phone will not show the
record in the call history anymore.
Always CFwd Off
Code
Set the Always CFwd Off Code, when you choose
to disable the always forward function on your
phone, it will send message to the server, and the
server will turn off the function immediately.
Busy CFwd On Code
Set the Busy CFwd On Code, when you choose to
enable the busy forward function v on your
phone, it will send message to the server, and the
server will turn on the function immediately.
When there are calls to the extension, the server
will forward it to the set number automatically
based the forward type. And the IP phone will not
show the record in the call history anymore.
Busy CFwd Off Code
Set the Busy CFwd Off Code, when you choose to
disable the busy forward function on your phone,
it will send message to the server, and the server
will turn off the function immediately.
No Answer CFwd On
Code
Set the No Answer CFwd On Code, when you
choose to enable the on answer forward function
Page 45

User Manual
SPEEDYTEL Technology CO Ltd
on your phone, it will send message to the server,
and the server will turn on the function
immediately. When there are calls to the
extension, the server will forward it to the set
number automatically based the forward type.
And the IP phone will not show the record in the
call history anymore.
No Answer CFwd Off
Code
Set the No Answer CFwd Off Code, when you
choose to disable the busy forward function on
your phone, it will send message to the server,
and the server will turn off the function
immediately.
Anonymous On Code
Set the Anonymous On Code, When you choose to
enable the anonymous call function on your IP
phone, it will send information to the server, and
the server will enable the anonymous call
function for your IP phone automatically.
Anonymous Off Code
Set the Anonymous Off Code, When you choose to
disable the anonymous call function on your IP
phone, it will send information to the server, and
the server will disable the anonymous call
function for your IP phone automatically.
Keep Alive Type
Specify the keep alive type, if the type is option,
the
phone will send option sip message to server
every NAT Keep Alive Period(s), then the server
responses with 200 to keep alive. If the type is
UDP, the phone will send UDP message to server
to keep alive every NAT Keep Alive Period(s).
Keep Alive Interval
Set examining interval of the server, default is 60
seconds.
User Agent
Set the user agent if have, the default is VoIP
Phone 1.0.
DTMF Type
Select DTMF sending mode, there are three
modes:
DTMF_RELAY
DTMF_RFC2833
DTMF_SIP_INFO
Different VoIP Service providers may provide
different modes.
DTMF SIP INFO
Mode
There are two options: send 10/11 and send * /
#
Page 46

User Manual
SPEEDYTEL Technology CO Ltd
Local Port
Set sip port of each line.
Ring Type
Set ring type of each line.
Enable Via Rport
Enable/Disable system to support RFC3581. Via
rport is special way to realize SIP NAT.
Enable PRACK
Enable or disable SIP PRACK function, suggest
use the default config.
Enable Long Contact
Set more parameters in contact field; connection
with SEM server.
Convert URI
Convert # to %23 when send the URI.
Dial Without
Registered
Set call out by proxy without registration;
Ban Anonymous Call
Set to ban Anonymous Call;
Enable DNS SRV
Support DNS looking up with _sip.udp mode.
Server Type
Select the special type of server which is
encrypted, or has some unique requirements or
call flows.
RFC Protocol Edition
Select SIP protocol version to adapt for the SIP
server which uses the same version as you select.
For example, if the server is CISCO5300, you need
to change to RFC2543; else phone may not cancel
call normally. System uses RFC3261 as default.
Transport Protocol
Set transport protocols, TCP or UDP;
Anonymous call
Edition
Set Anonymous call out safely; Support
RFC3323and RFC3325;
Keep Authentication
Enable/Disable Keep Authentication System will
take the last authentication field which is passed
the authentication by server to the request
packet. It will decrease the server’s repeat
authorization work, if it is enable.
Answer With A
Single Codec
Enable/Disable the function when call is
incoming, phone replies SIP message with just
one codec which phone supports.
Auto TCP
Set to use automatically TCP protocol to
guarantee usability of transport as message is
above 1300 byte
Enable Strict Proxy
Support the special SIP server-when phone
receives the packets sent from server,phone will
use the source IP address, not the address in via
field.
Enable GRUU
Set to support GRUU
Enable Display name
Quote
Set to make quotation mark to display name as
the phone sends out signal, in order to be
Page 47

User Manual
SPEEDYTEL Technology CO Ltd
compatible with server.
Enable user=phone
Enable user=phone by selecting it, it is contained
in the invite sip message, in order to be
compatible with server.
Enable Missed Call
Log
Enable the missed call log by it, the phone will
save the missed call log into the call history
record and display the missed calls on the idle
screen, or won’t save the missed call log into the
call history record and display the missed calls
on the idle screen.
Click to talk
Set click to Talk (need practical software
support).
Enable BLF List
Enable BLF List by selecting it, BLF list is a
function which can monitor the group status, it is
not one to one monitoring, but the information
feedback from the server to decide which BLF list
will monitor.
Use VPN
Phone use vpn ip to communicate
BLF List Number
Specify the BLF List Number.
SIP Global Settings
Strict Branch
Enable the Strict Branch, the value of the branch
must be in the beginning of z9hG4k in via field of
the invite sip message received, or the phone
won’t response to the invite sip message.
Notice: the deployment will become effective in
all sip lines.
Enable Group
Enable Group by selecting it, then the phone
enable the sip group backup function.
Notice: the deployment will become effective in
all sip lines.
Registration Failure
Retry Time
Specify the registration failure retry time, if the
phone register failed, the phone will register
again after registration failure retry time.
Notice: the deployment will become effective in
all sip lines.
Page 48
User Manual
SPEEDYTEL Technology CO Ltd
8.3.3.2 IAX2
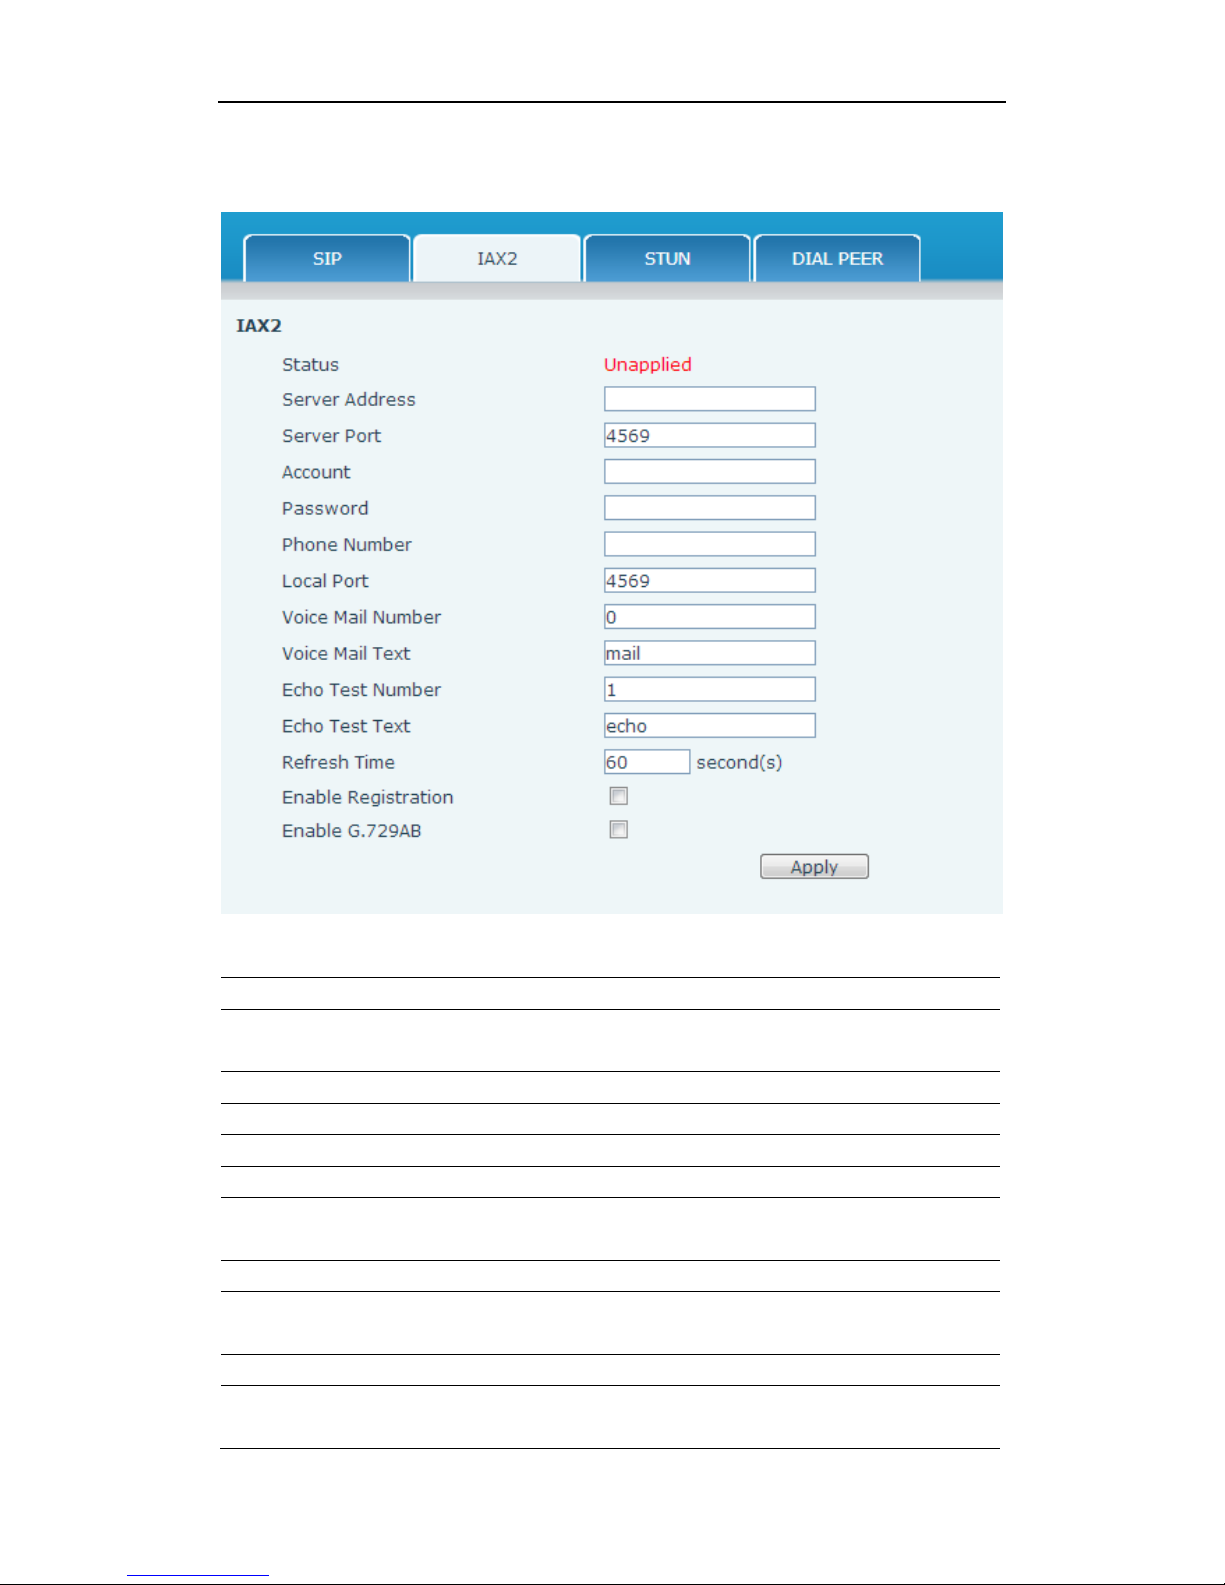
IAX2 Config
Field name
explanation
Status
Shows if the phone has been registered the IAX2
server or not.
Server Address
Input your IAX2 server address.
Server Port
Set your IAX2 server port, the default is 4569.
Account
Input your IAX2 register account name.
Password
Input your IAX2 register password.
Phone Number
Input your assigned phone number (usually it is
same you’re your IAX2 account name).
Local Port
Set your local sport, the default is 4569.
Voice Mail
Number
Specify the voice mail’s number.
Voice Mail Text
Specify the voice mail’s name.
Echo Test
Set echo test number. If IAX2 server supports echo
test, and echo test number is non- numeric, system
Page 49
User Manual
SPEEDYTEL Technology CO Ltd
Number
could set an echo test number to replace the echo
test text. So user can dial the numeric number to test
echo voice test. This function is provided with server
to make endpoint to test whether endpoint could
talk through server normally.
Echo Test Text
Specify echo test text’s name.
Refresh Time
Set expire time of IAX2 server register, you can set it
between 60 and 3600 seconds.
Enable
Registration
Start to register the IAX2 server or not by selecting it
or not.
Enable G.729AB
Enable or disable code G.729 by selecting it or not.
8.3.3.3 Stun
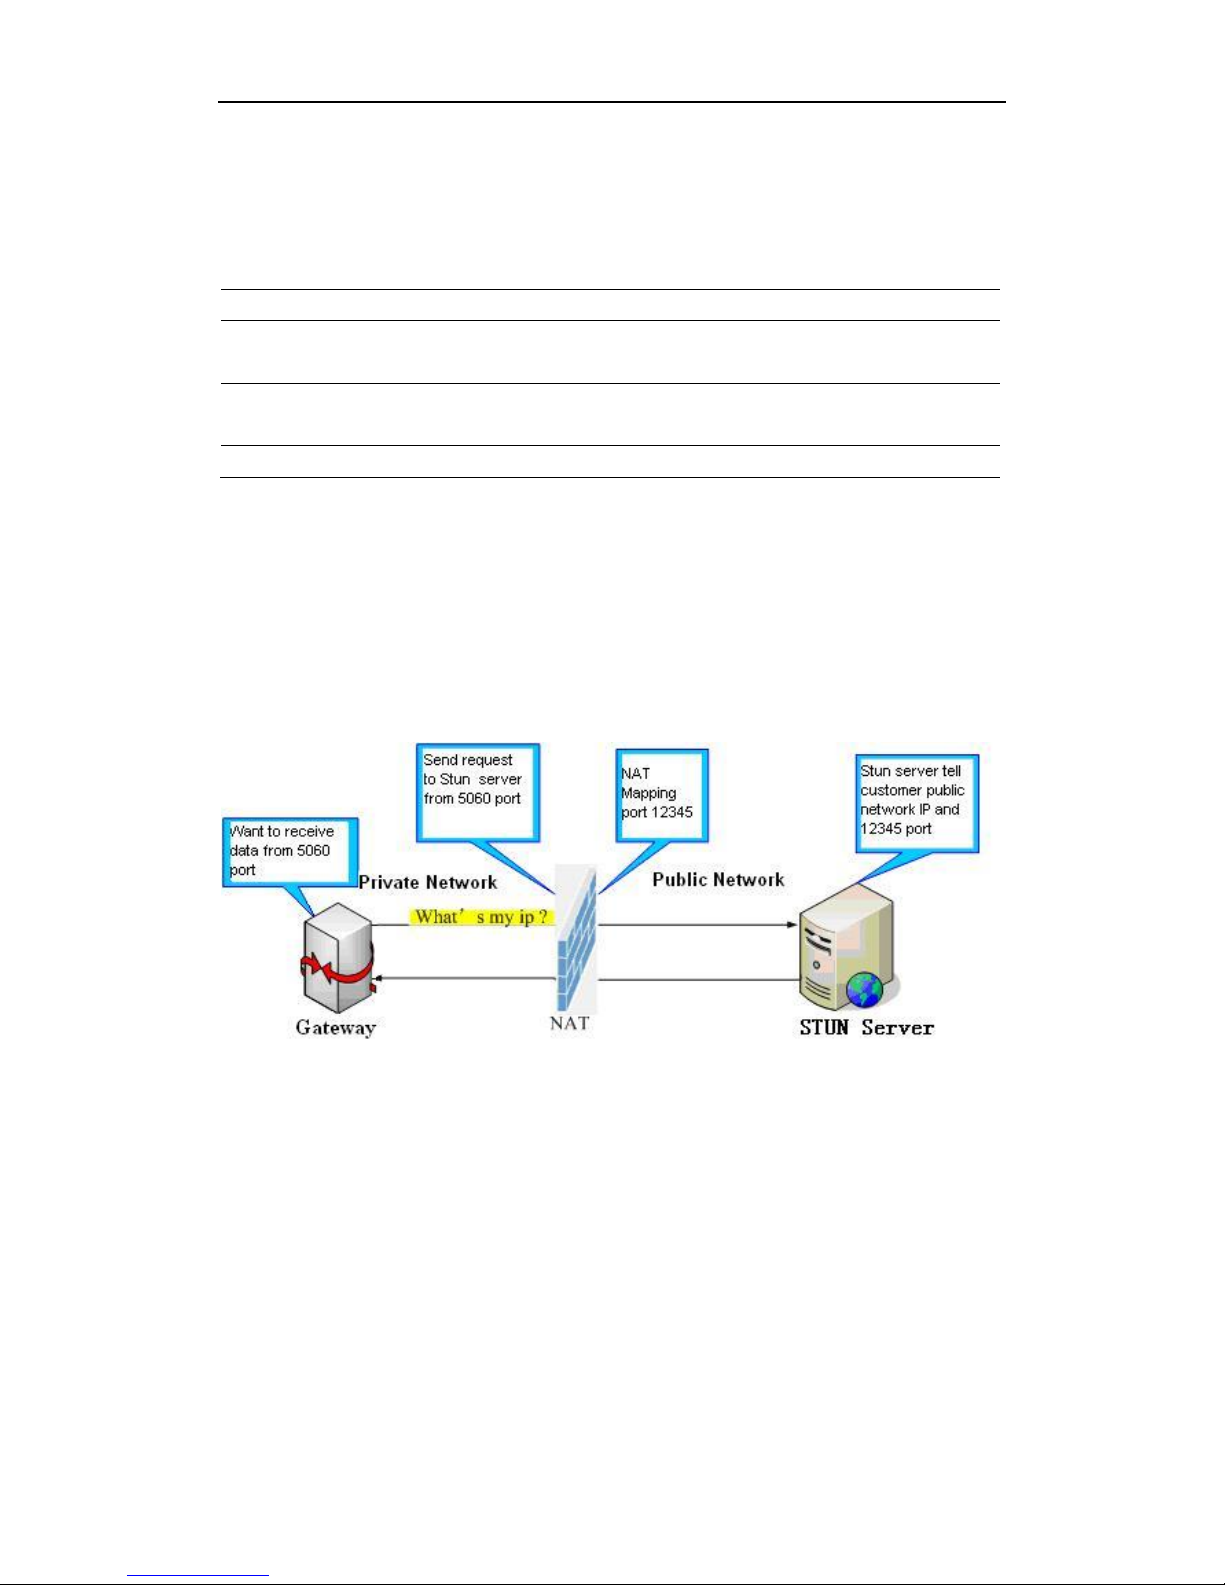
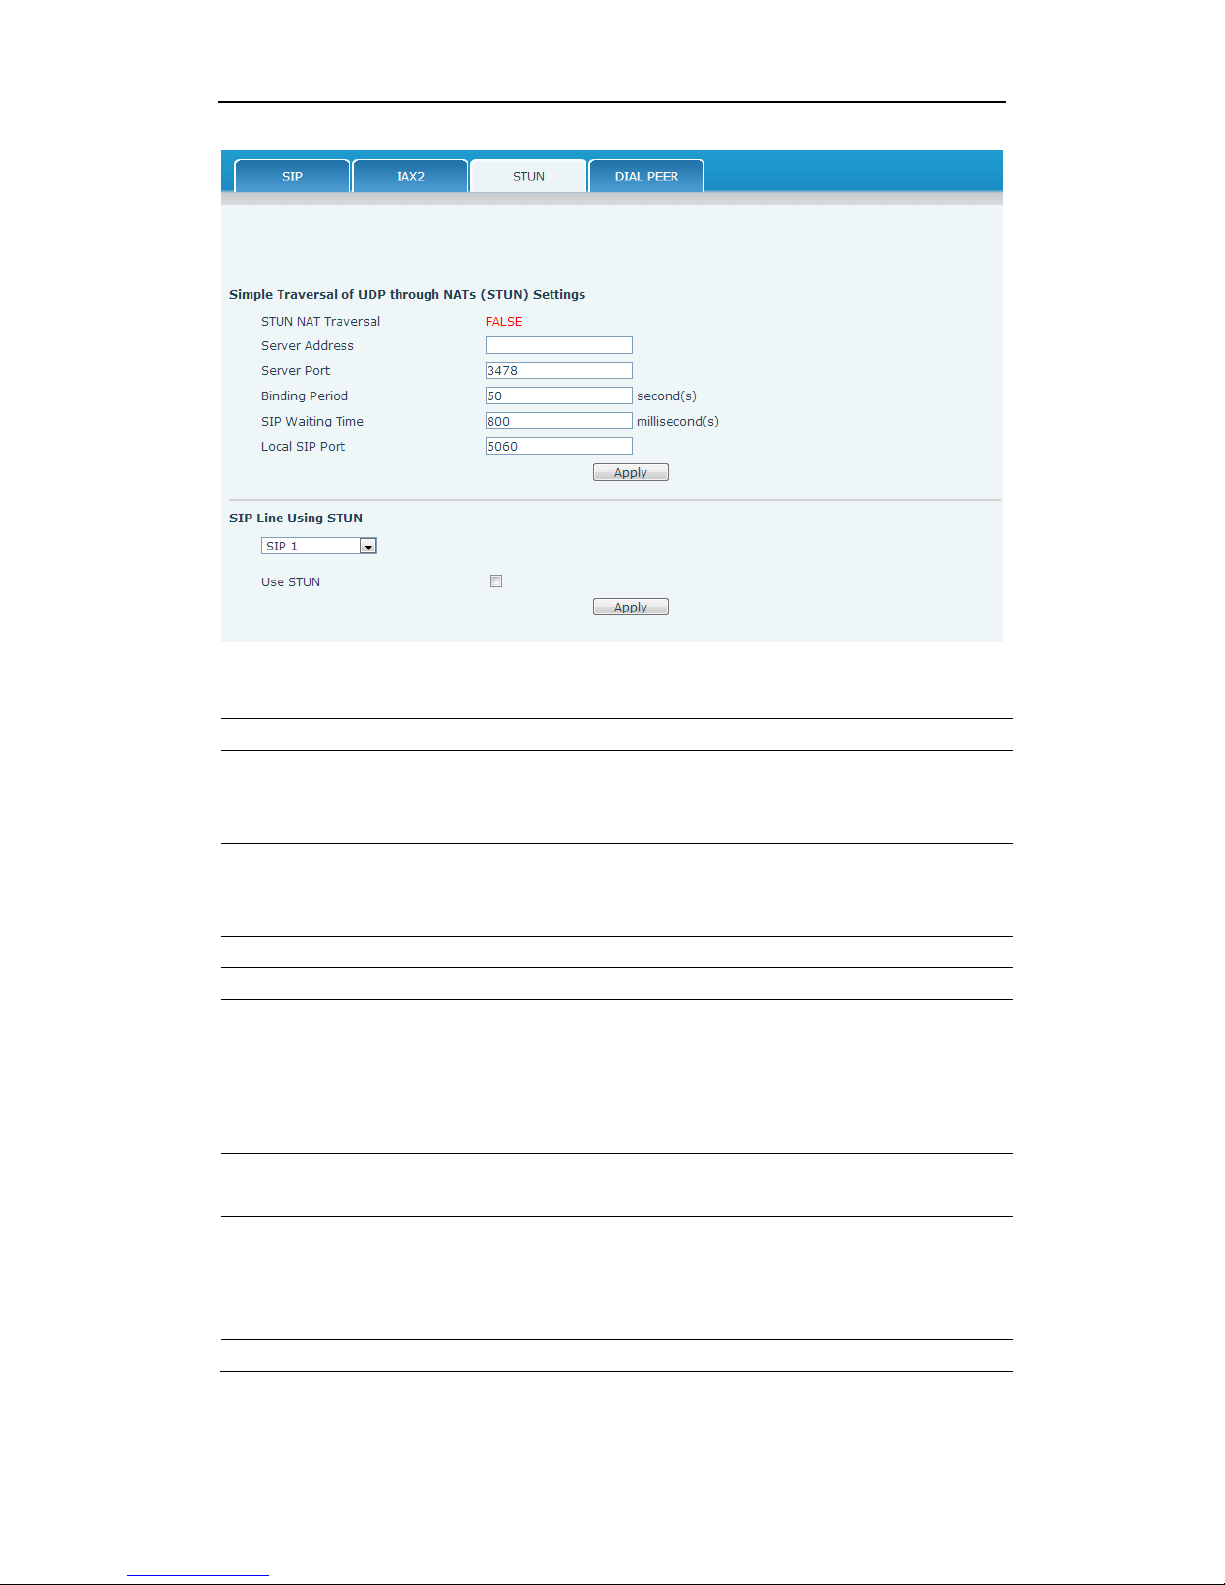
In this web page, you can config SIP STUN.
STUN: By STUN server, the phone in private network could know the type
of NAT and the NAT mapping IP and port of SIP. The phone might register
itself to SIP server with global IP and port to realize the device both calling
and being called in private network.
Page 50
User Manual
SPEEDYTEL Technology CO Ltd
STUN
Field name
explanation
Simple Traversal of
UDP through NATs
(STUN) Settings
STUN NAT Traversal
Shows STUN NAT Transverse estimation, true
means STUN can penetrate NAT, while False
means not.
Server Address
Set your SIP STUN Server IP address.
Server Port
Set your SIP STUN Server Port.
Blinding Period(s)
Set STUN blinding period(s). If NAT server finds
that a NAT mapping is idle after time out, it will
release the mapping and the system need send a
STUN packet to keep the mapping effective and
alive.
SIP Waiting Time
Specify the sip wait stun time; you can input the
time depended on your network condition.
Local SIP Port
Configuration the local SIP Port, the default
value is5060(this port immediate effect ,modify,
SIP call will use the modified port
communication )
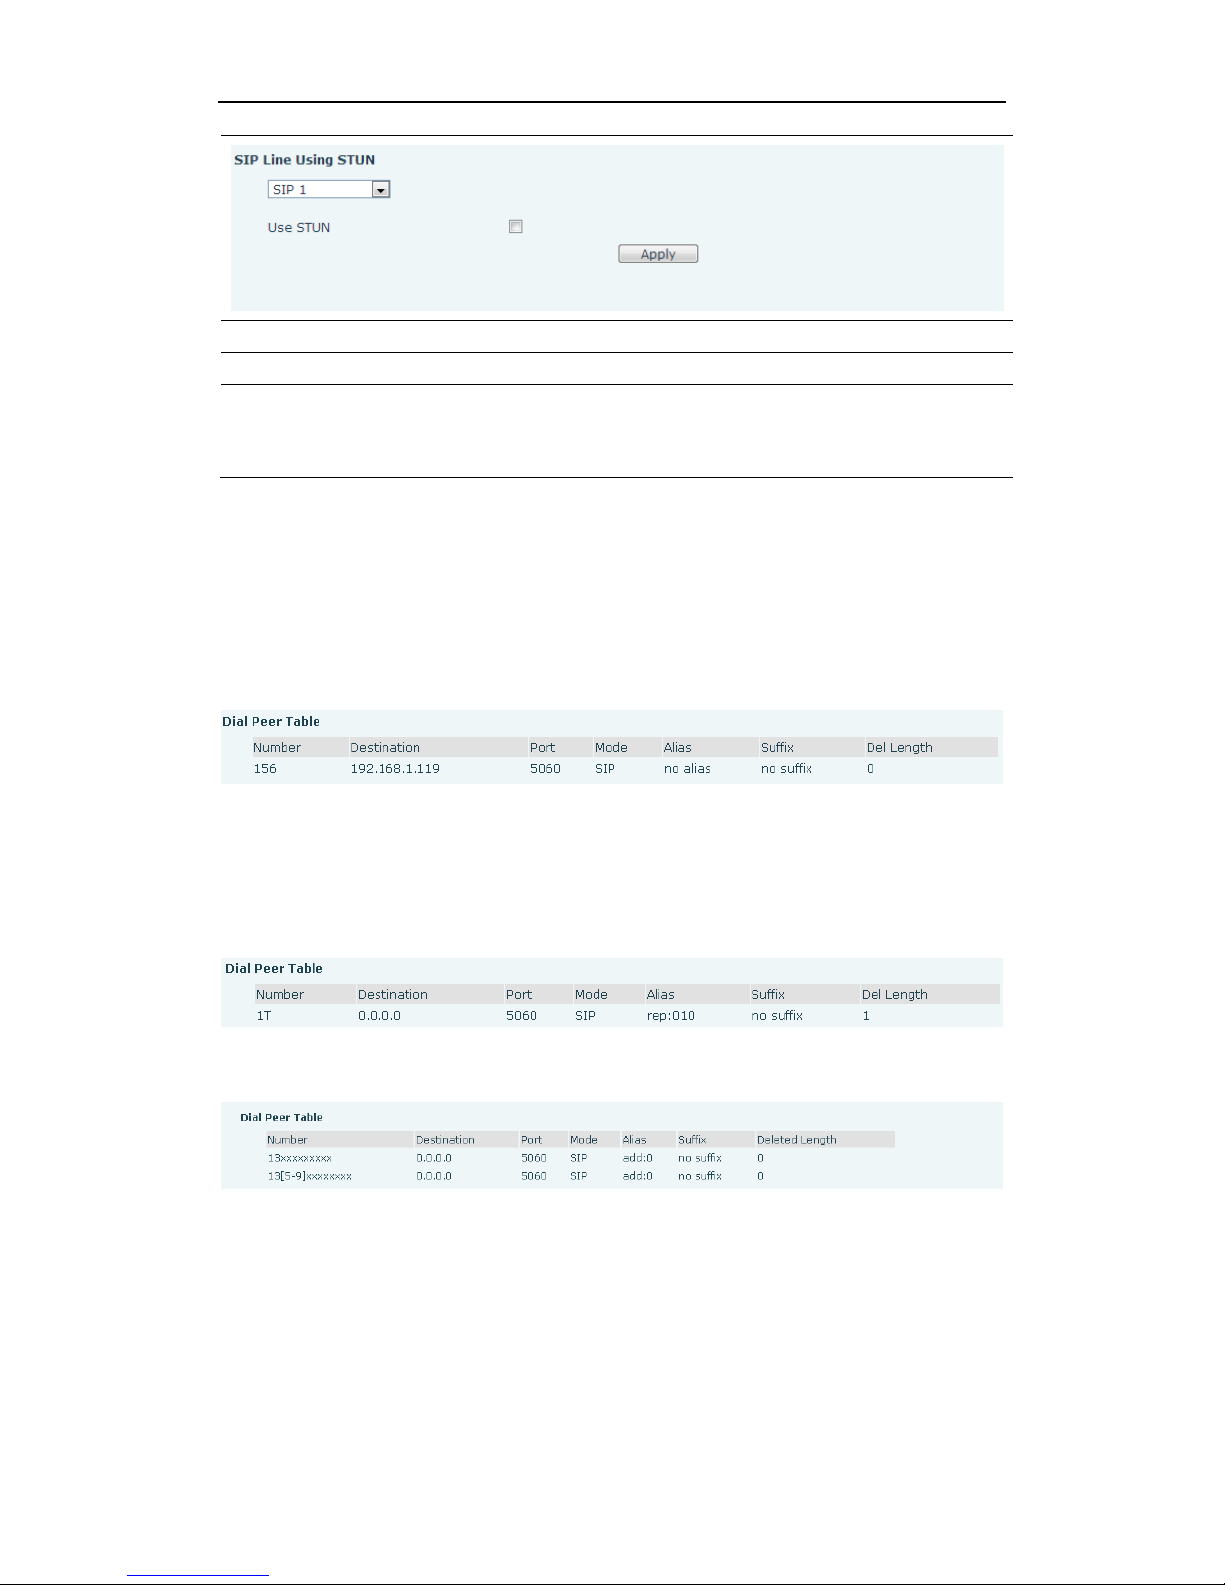
Sip Line Using STUN
Page 51
User Manual
SPEEDYTEL Technology CO Ltd
Choose line to set info about SIP, There are 2 lines to choose.
Use STUN
Enable/Disable SIP STUN.
Notice: SIP STUN is used to realize SIP penetration to NAT. If your phone
configures STUN Server IP and Port (default is 3478), and enable SIP
Stun, you can use the ordinary SIP Server to realize penetration to NAT.
8.3.3.4 DIAL PEER
This functionality offers you more flexible dial rule, you can refer to the
following content to know how to use this dial rule. When you want to dial
an IP address, the entry of IP addresses is very cumbersome, but by this
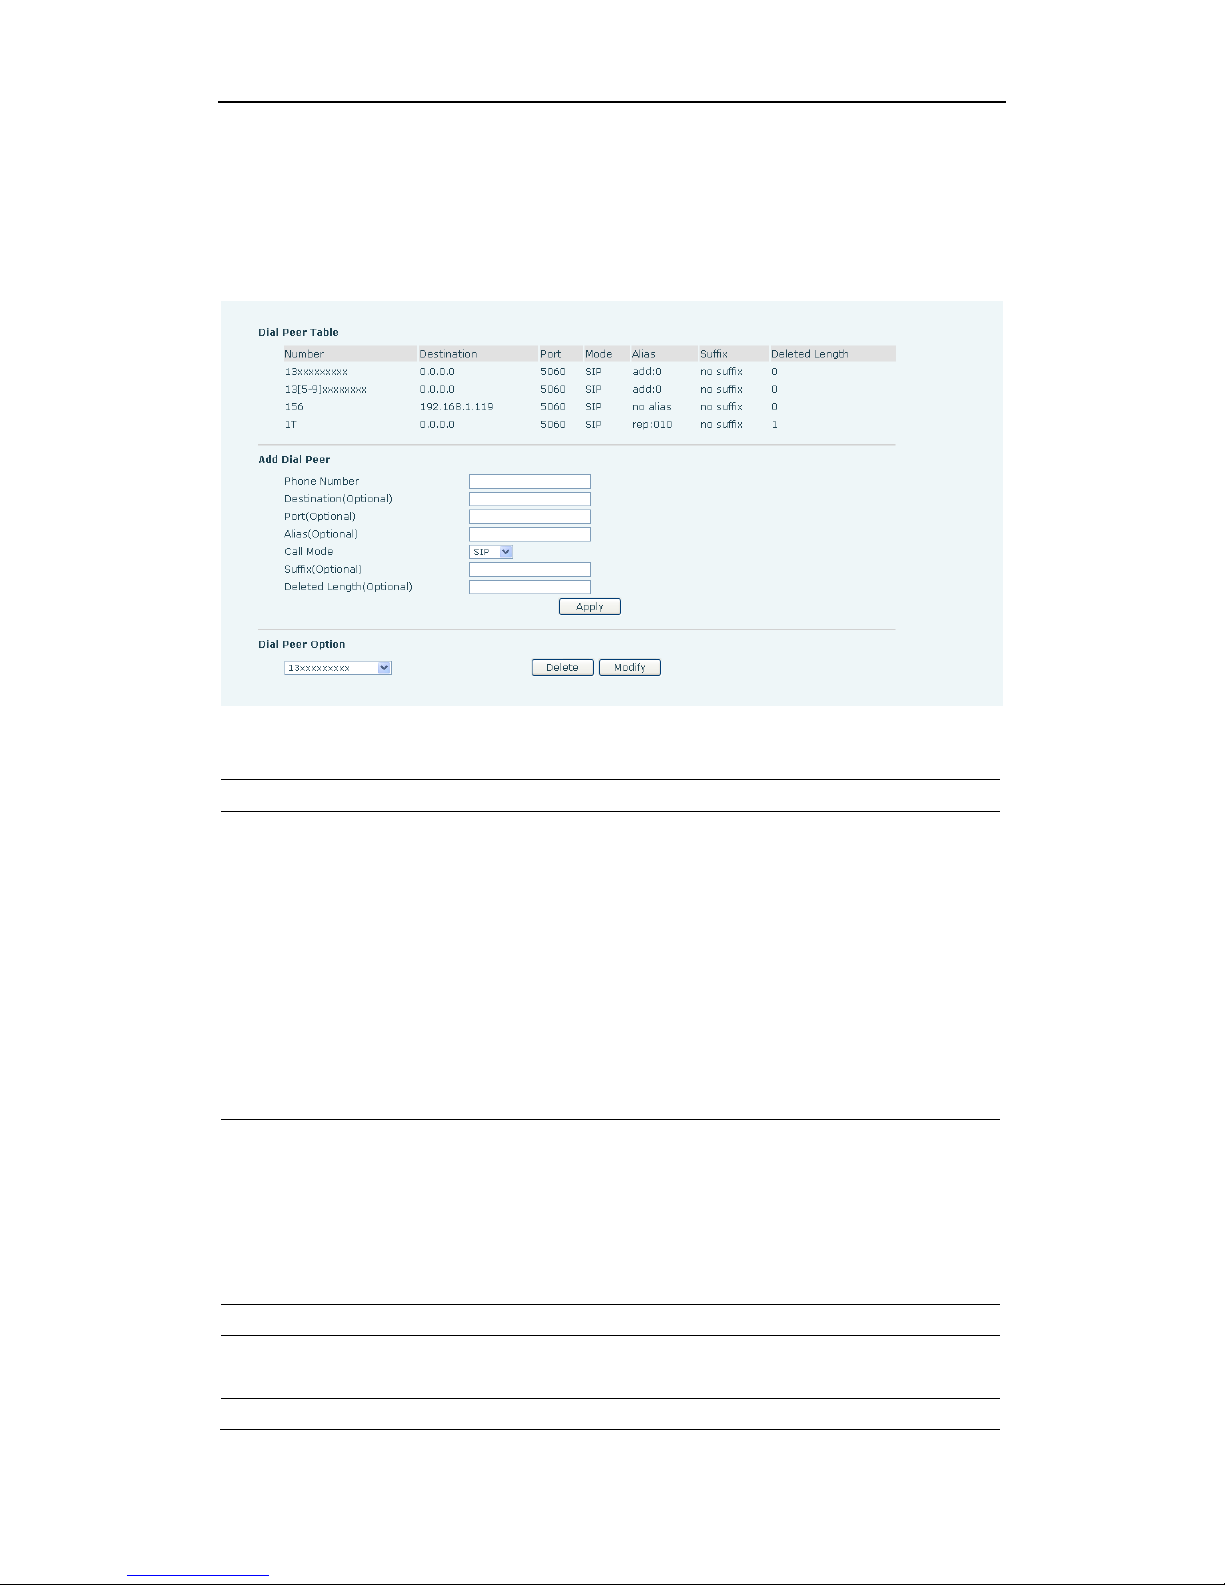
functionality, you can set number 156 to replace 192.168.1.119 here.
When you want to dial a long distance call to Beijing, you need dial an area
code 010 before local phone number, but you can also dial number 1
instead of 010 after we make a setting according to this dial rule. For
example, you want to dial 01062213123, but you need dial only
162213123 to realize your long distance call after you make this setting.
To save the memory and avoid abundant input of user, add the follow
functions:
1. Increase in x matches any single digit, for example:
If user makes the above configuration, after user dials 11 digit numbers
started with 13, the phone will send out 0 plus the dialed numbers
automatically.
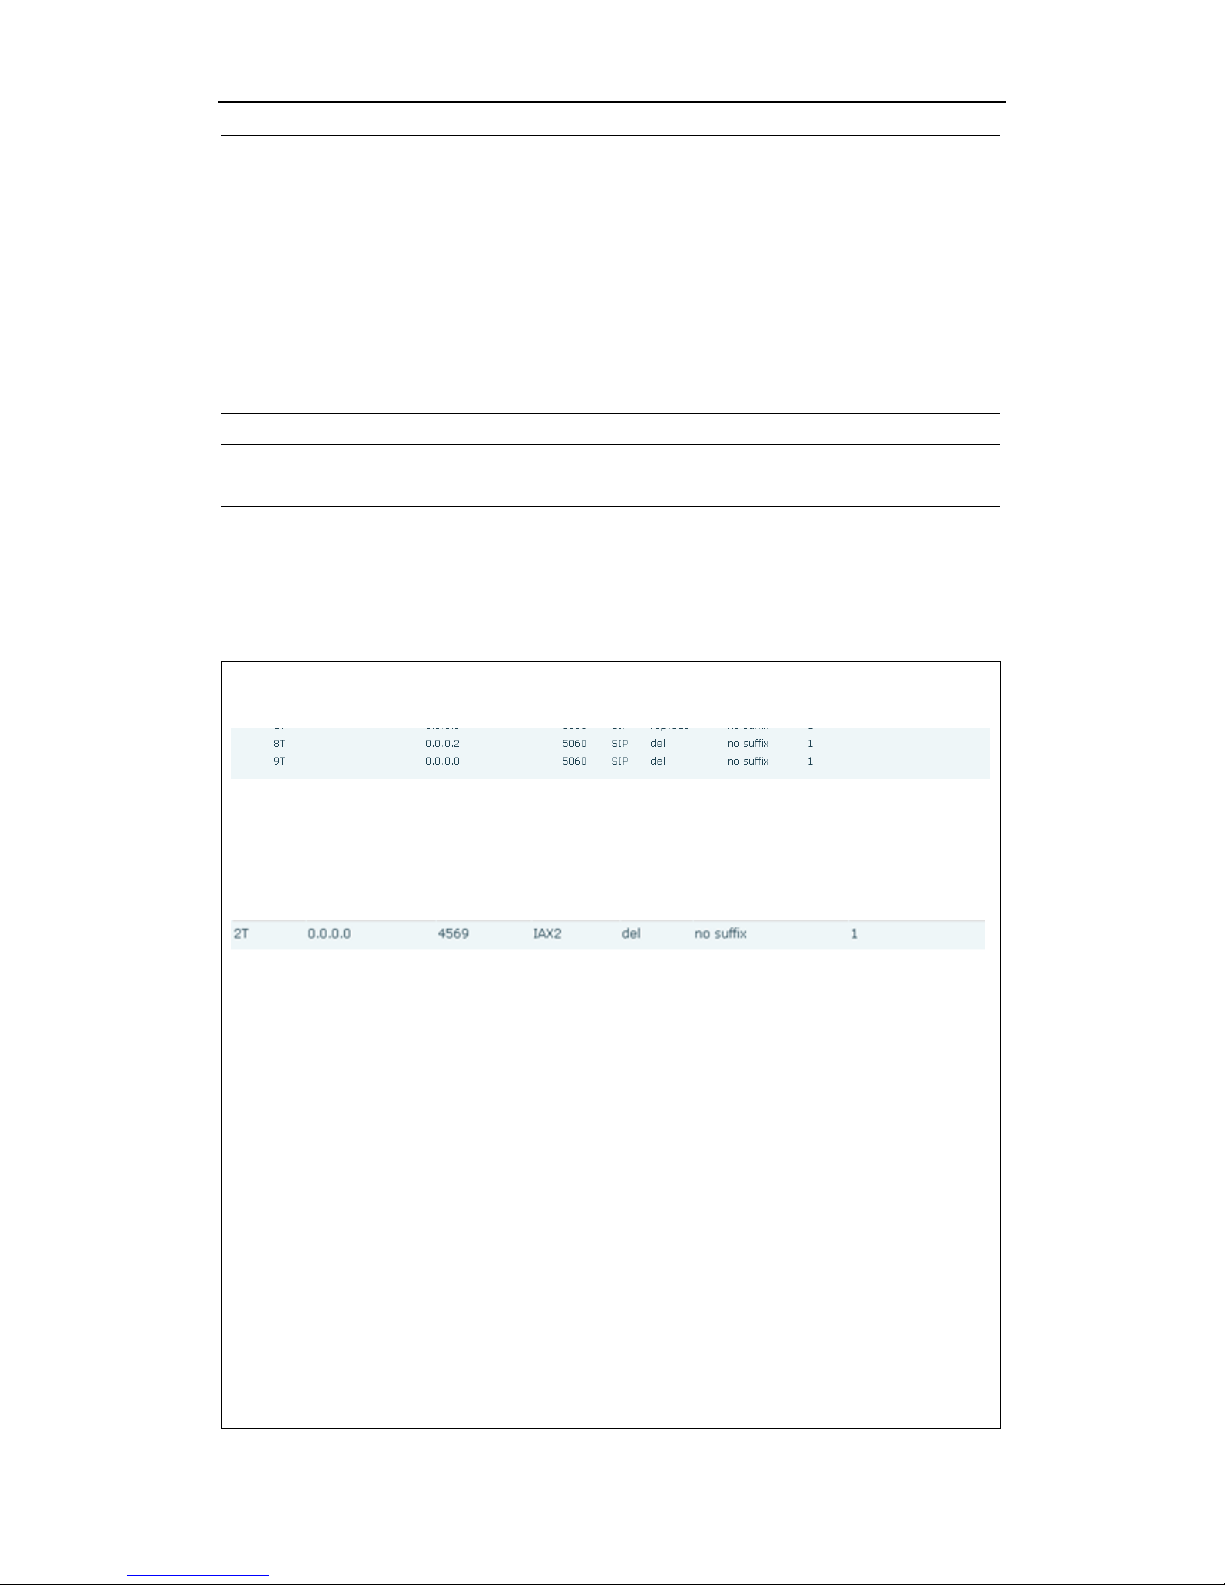
2. [] Specifies a range that will match digit. It may be a range, a list of
ranges separated by commas, or a list of digits.
Page 52
User Manual
SPEEDYTEL Technology CO Ltd
If user makes the above configuration, after user dials 11 digit numbers
started with from 135 to 139, the phone will send out 0 plus the dialed
numbers automatically.
Use this phone you can realize dialing out via different lines without
switch in web interface.
DIAL PEER
Field name
explanation
Phone number
There are two types of matching conditions: one is
full matching, the other is prefix matching. In the
Full matching, you need input your desired phone
number in this blank, and then you need dial the
phone number to realize calling to what the phone
number is mapped. In the prefix matching, you
need input your desired prefix number and T; then
dial the prefix and a phone number to realize
calling to what your prefix number is mapped. The
prefix number supports at most 30 digits.
Destination
Set Destination address. This is optional config
item. If you want to set peer to peer call, please
input destination IP address or domain name. If
you want to use this dial rule on SIP2 line, you need
input 255.255.255.255 or 0.0.0.2 in it.SIP3 into
0.0.0.3
Port
Set the Signal port, the default is 5060 for SIP.
Alias
Set alias. This is optional config item. If you don’t
set Alias, it will show no alias.
Note: There are four types of aliases.
Page 53
User Manual
SPEEDYTEL Technology CO Ltd
1) Add: xxx, it means that you need dial xxx in front of phone number,
which will reduce dialing number length.
2) All: xxx, it means that xxx will replace some phone number.
3) Del: It means that phone will delete the number with length
appointed.
4) Rep: It means that phone will replace the number with length and
number appointed.
You can refer to the following examples of different alias application to
know more how to use different aliases and this dial rule.
Call Mode
Select different signal protocol, SIP or IAX2
Suffix
Set suffix, this is optional config item. It will show
no suffix if you don’t set it.
Delete Length
Set delete length. This is optional config item. For
example: if the delete length is 3, the phone will
delete the first 3 digits then send out the rest digits.
You can refer to examples of different alias
application to know how to set delete length.
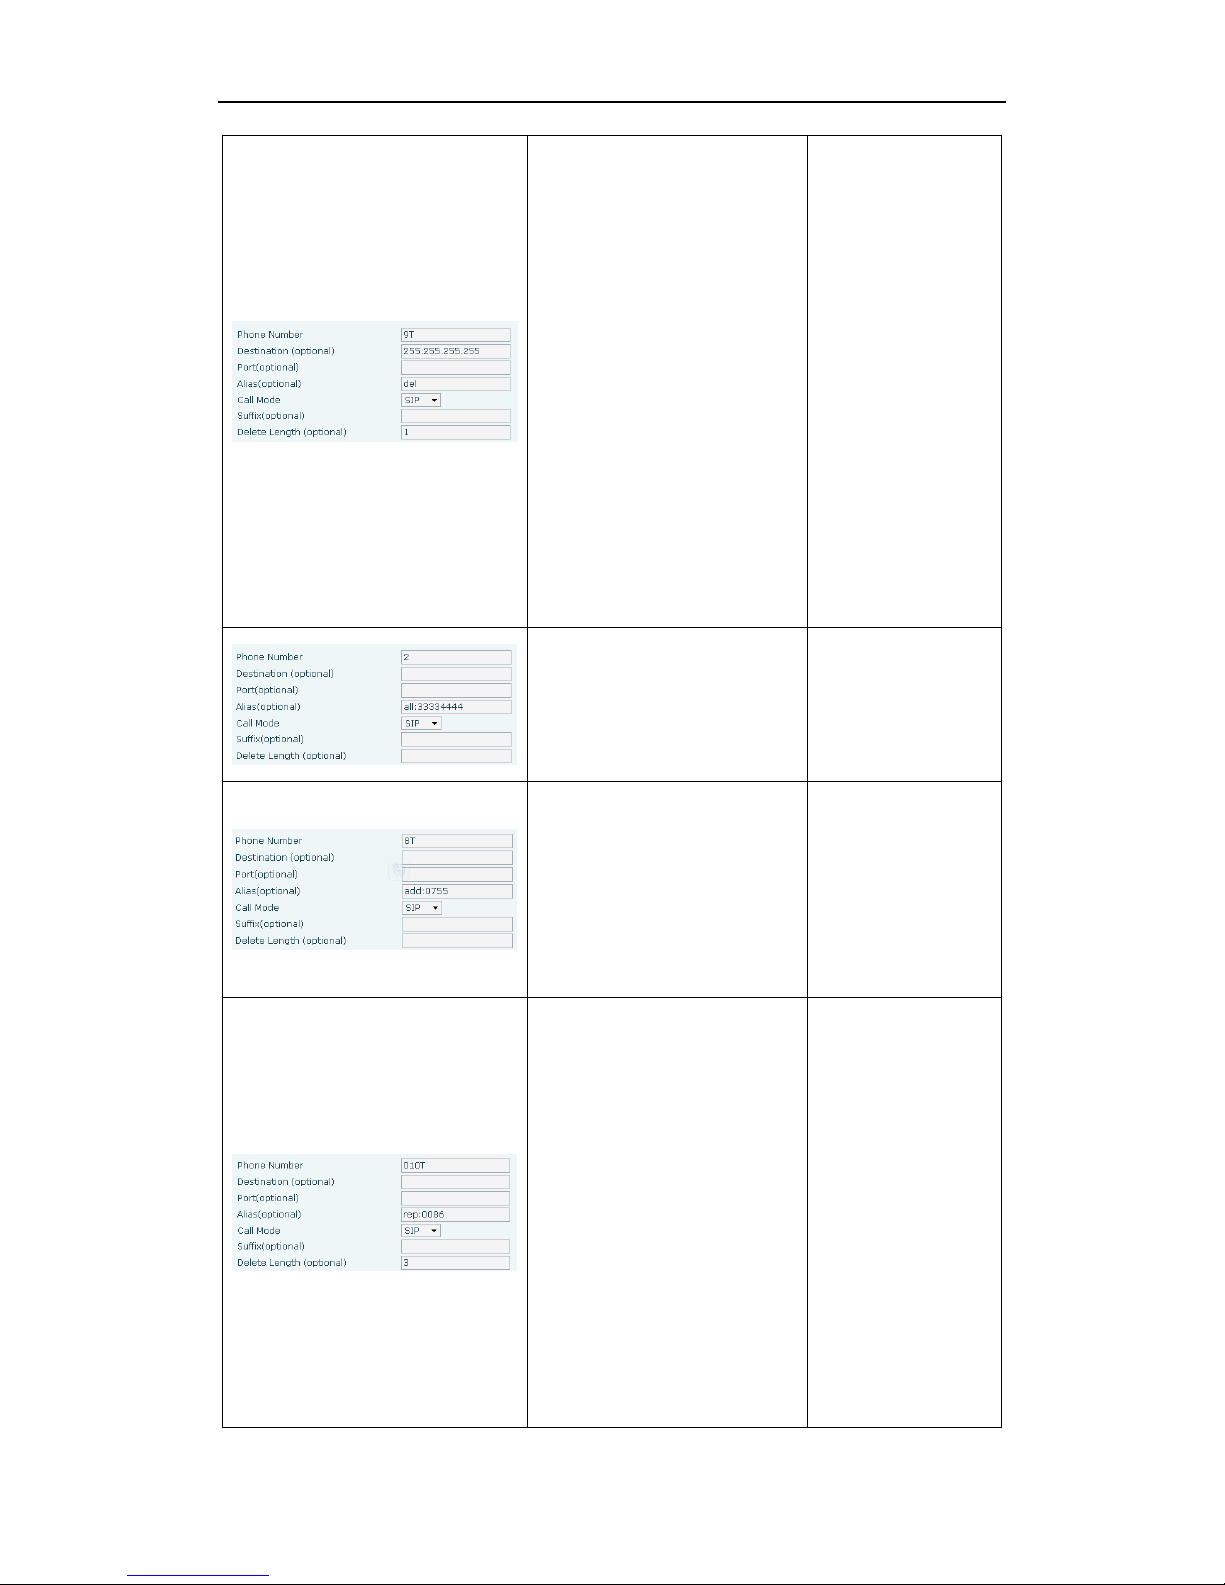
The following describes how to configure the number IP table to achieve the
configuration of multiple accounts simultaneously:
9T means when you configure the SIP1 server and register, then the user
through all SIP1 call to dial a 9 before the number;
8T means when you configure the SIP2 server and register, then the user
through all the numbers before calling SIP2 dial 8;
2T means when you configure the IAX2 server and register, then the user
through all the IAX2 protocol number before the call can dial 2.
Note: For compatibility with 1.6 functions in the 1.7 version of the
configuration file, add "Dialpeer With Line:" This field indicates whether to
enable the on-line inquiry function, 0 is not enabled, 1 means enabled. The
default is 0.
Differences are as follows:
1. Not enabled on-line inquiry
The function and the 1.6 version of the function is the same.
Type: This rule indicates what protocol needs to go.
Destination: indicates the destination address.
0.0.0.1 represents go sip1 line
0.0.0.2 represents go sip2 line
0.0.0.x represents go sipx line
(For compatibility with old code 0.0.0.0 means go sip1 line, 255.255.255.255
Page 54
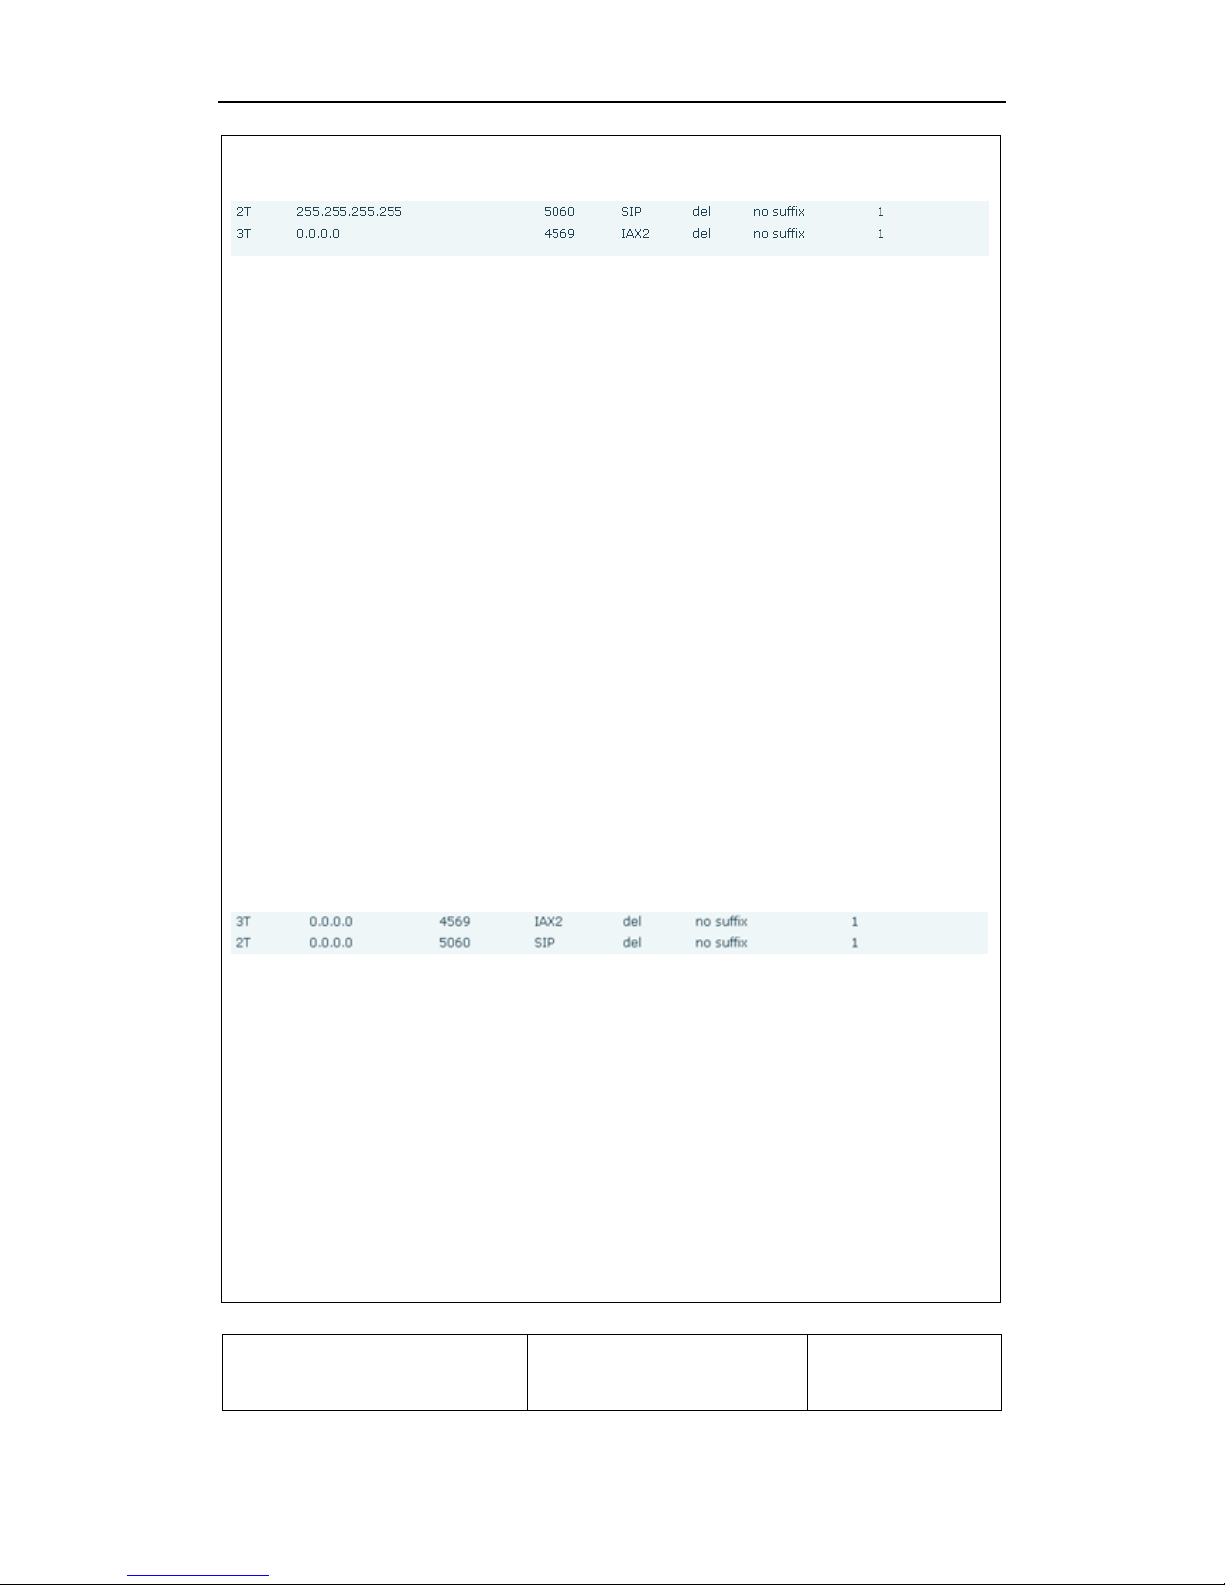
User Manual
SPEEDYTEL Technology CO Ltd
indicates go sip2 line)
Configuration examples are as follows:
If the phone dial 21111, the fact is through SIP2 and called number is 1111.
If the phone dial 32222, the fact is through IAX2 and called number is 2222.
2. Enable on-line query capabilities
Enable on-line query function on the premise that: The phone must be
multi-line products, you can choose when dialing protocol and line. So that
each end of the dial, and also selected protocol and line.
Dialpeer table in the query, the first comparison dialing protocol is selected in
the table and dialpeer agreement, if the same, continue down the match,
otherwise, check the next one.
Step match line information, comparing the selected dial-up line is a line in the
table and dialpeer is the same, if the same, continue down the match,
otherwise the next query.
The third step is for a prefix or exact match.
Mode: to sip, it means that this rule is only used for sip protocol calls; iax2, it
means that this rule is only used iax2 protocol calls.
Destination: indicates the destination address.
0.0.0.1 Indicates that the rule only calls for sip1 online
0.0.0.2 Indicates that the rule only calls for sip2 online
0.0.0.x Indicates that the rule only calls for sipX online
0.0.0.0 Indicates that the rules used in all online calls
Configuration Application examples
The handset off-hook exhale (if SIP1 registration is successful, the default is
SIP1) If the dial 21111, then exhaled directly through SIP1 and the called
number is 21111
If the phone off-hook exhale (if SIP1 registration is successful, the default is
SIP1) If dialing 32222, directly and through SIP1 outgoing called number is
32222
To make the configuration take effect dialpeer function,
Only when the handset off-hook exhaled choose SIP2, and dials 21111, the
corresponding rule is matched by SIP2 exhaled and the called number is 1111
Only when the handset off-hook exhaled Select IAX2, and dials 32222, the
corresponding rule is matched by IAX2 outgoing and called number is 2222
Examples of different alias application
Set by web
explanation
example
Page 55
User Manual
SPEEDYTEL Technology CO Ltd
You need set phone
number, Destination,
Alias and Delete Length.
Phone number is XXXT;
Destination is
255.255.255.255
(0.0.0.2) and Alias is del.
This means any phone
No. that starts with your
set phone number will
be sent via SIP2 line
after the first several
digits of your dialed
phone number are
deleted according to
delete length.
If you dial
“93333”, the
SIP2 server will
receive “3333”.
This setting will realize
speed dial function, after
you dialing the numeric
key “2”, the number
after all will be sent out.
When you dial
“2”, the SIP1
server will
receive
33334444.
The phone will
automatically send out
alias number adding
your dialed number, if
your dialed number
starts with your set
phone number.
When you dial
“8309“, the SIP1
server will
receive
“07558309”.
You need set Phone
Number, Alias and
Delete Length. Phone
number is XXXT and
Alias is rep: xxx
If your dialed phone
number starts with your
set phone number, the
first digits same as your
set phone number will
be replaced by the alias
number specified and
New phone number will
be send out.
When you dial
“0106228”, the
SIP1 server will
receive
“86106228”.
Page 56
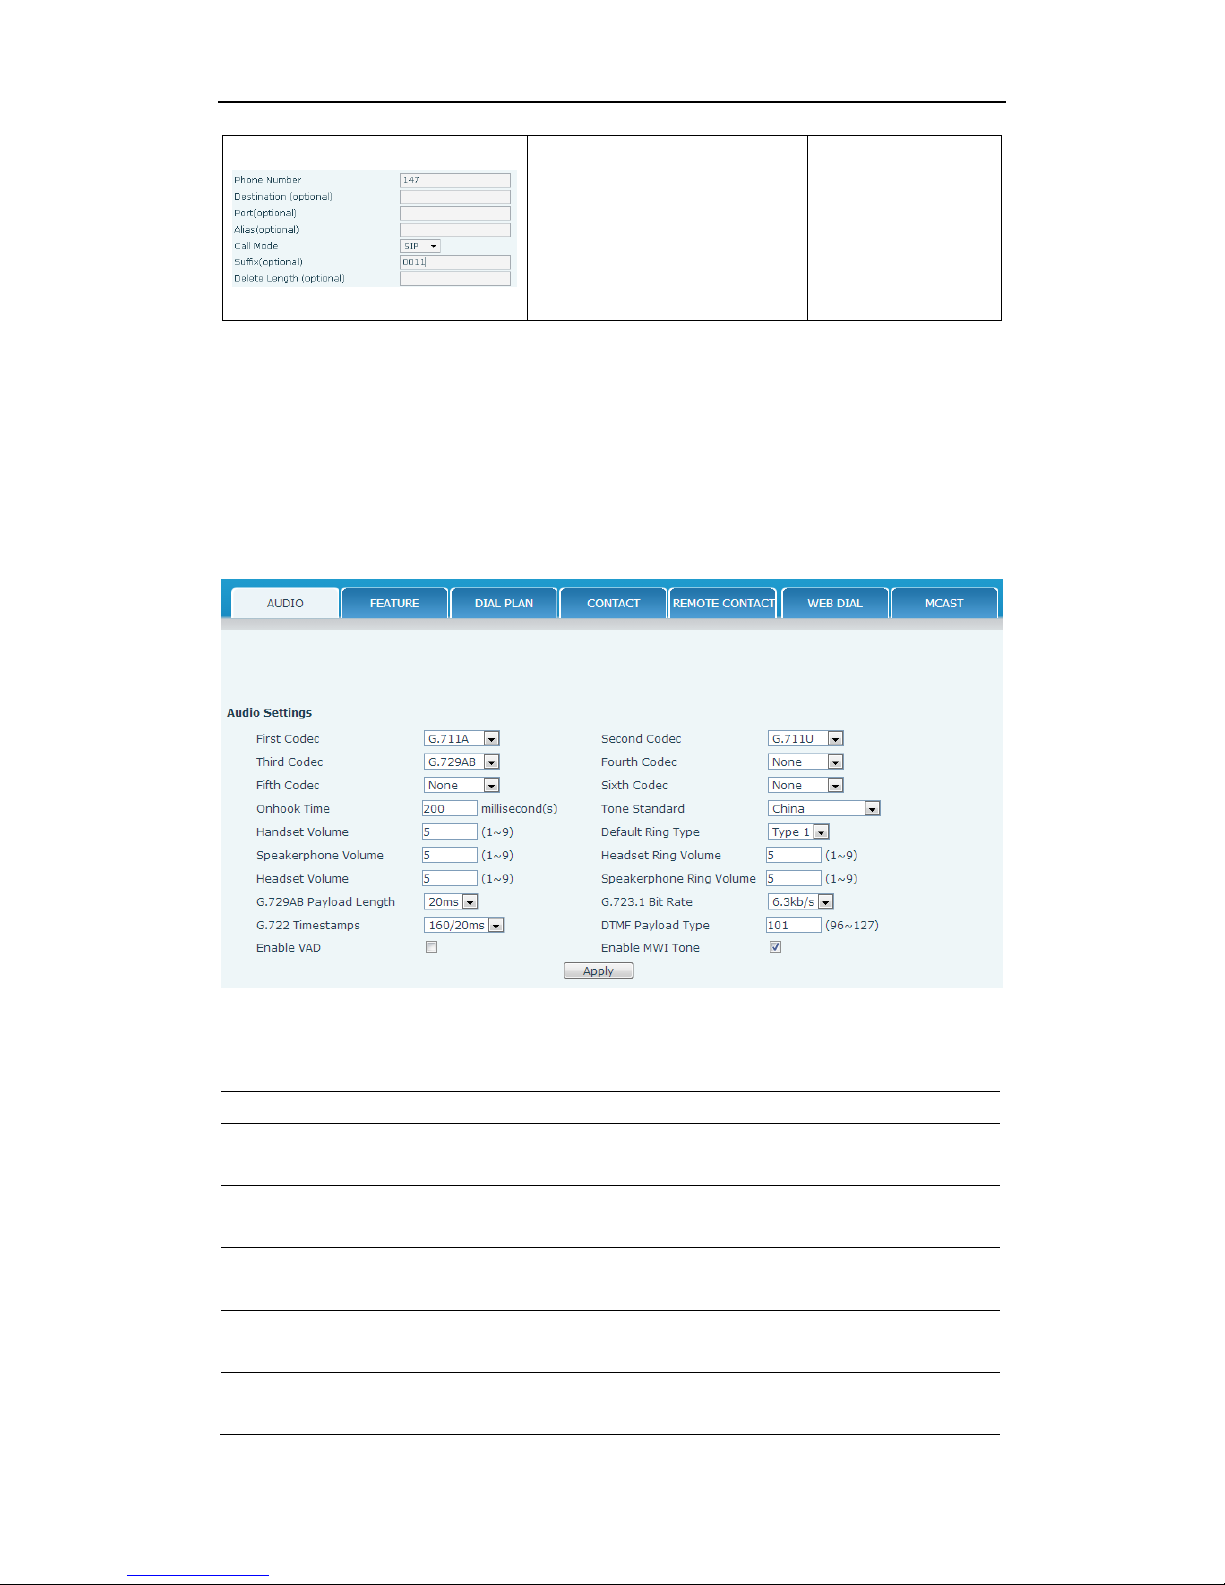
User Manual
SPEEDYTEL Technology CO Ltd
If your dialed phone
number starts with your
set phone number. The
phone will send out your
dialed phone number
adding suffix number.
When you dial
“147”, the SIP1
server will
receive
“1470011”.
8.3.4 PHONE
8.3.4.1 AUDIO
In this page, you can configure voice codec, input/output volume and so
on.
AUDIO Configuration
Field name
explanation
First Codec
The first preferential DSP codec: G.711A/u, G.722,
G.723.1,726-32 G.729AB,None.
Second Codec
The second preferential DSP codec: G.711A/u,
G.722, G.723.1,726-32 G.729AB,None.
Third Codec
The third preferential DSP codec: G.711A/u, G.722,
G.723.1,726-32 G.729AB,None.
Fourth Codec
The forth preferential DSP codec: G.711A/u, G.722,
G.723.1,726-32 G.729AB,None.
Fifth Codec
The fifth preferential DSP codec: G.711A/u, G.722,
G.723.1,726-32 G.729AB,None.
Page 57

User Manual
SPEEDYTEL Technology CO Ltd
Sixth codec
The sixth preferential DSP codec: G.711A/u, G.722,
G.723.1,726-32 G.729AB,None.
Onhook Time
Specify the least reflection time of Hand down, the
default is 200ms.
Default Ring Type
Set up the ring by default.
Handset Output
Volume
Specify Output (receiver) Volume grade.
Speakerphone
volume
Specify Speakerphone Volume grade.
G729AB Payload
Length
Set G729 Payload Length.
Tone Standard
Select Tone Standard.
G722 Timestamps
160/20ms or 320/20ms is available.
G723.1 Bit Rate
5.3 kb/s or 6.3 kb/s is available.
Enable VAD
Select it or not to enable or disable VAD. If enable
VAD, G729 Payload length could not be set over
20ms.
DTMF Payload
Type
Set DTMF Payload Type.
8.3.4.2 FEATURE
In this web page, you can configure Hotline, Call Transfer, Call Waiting, 3
Ways Call, Black List, white list Limit List and so on.
Page 58
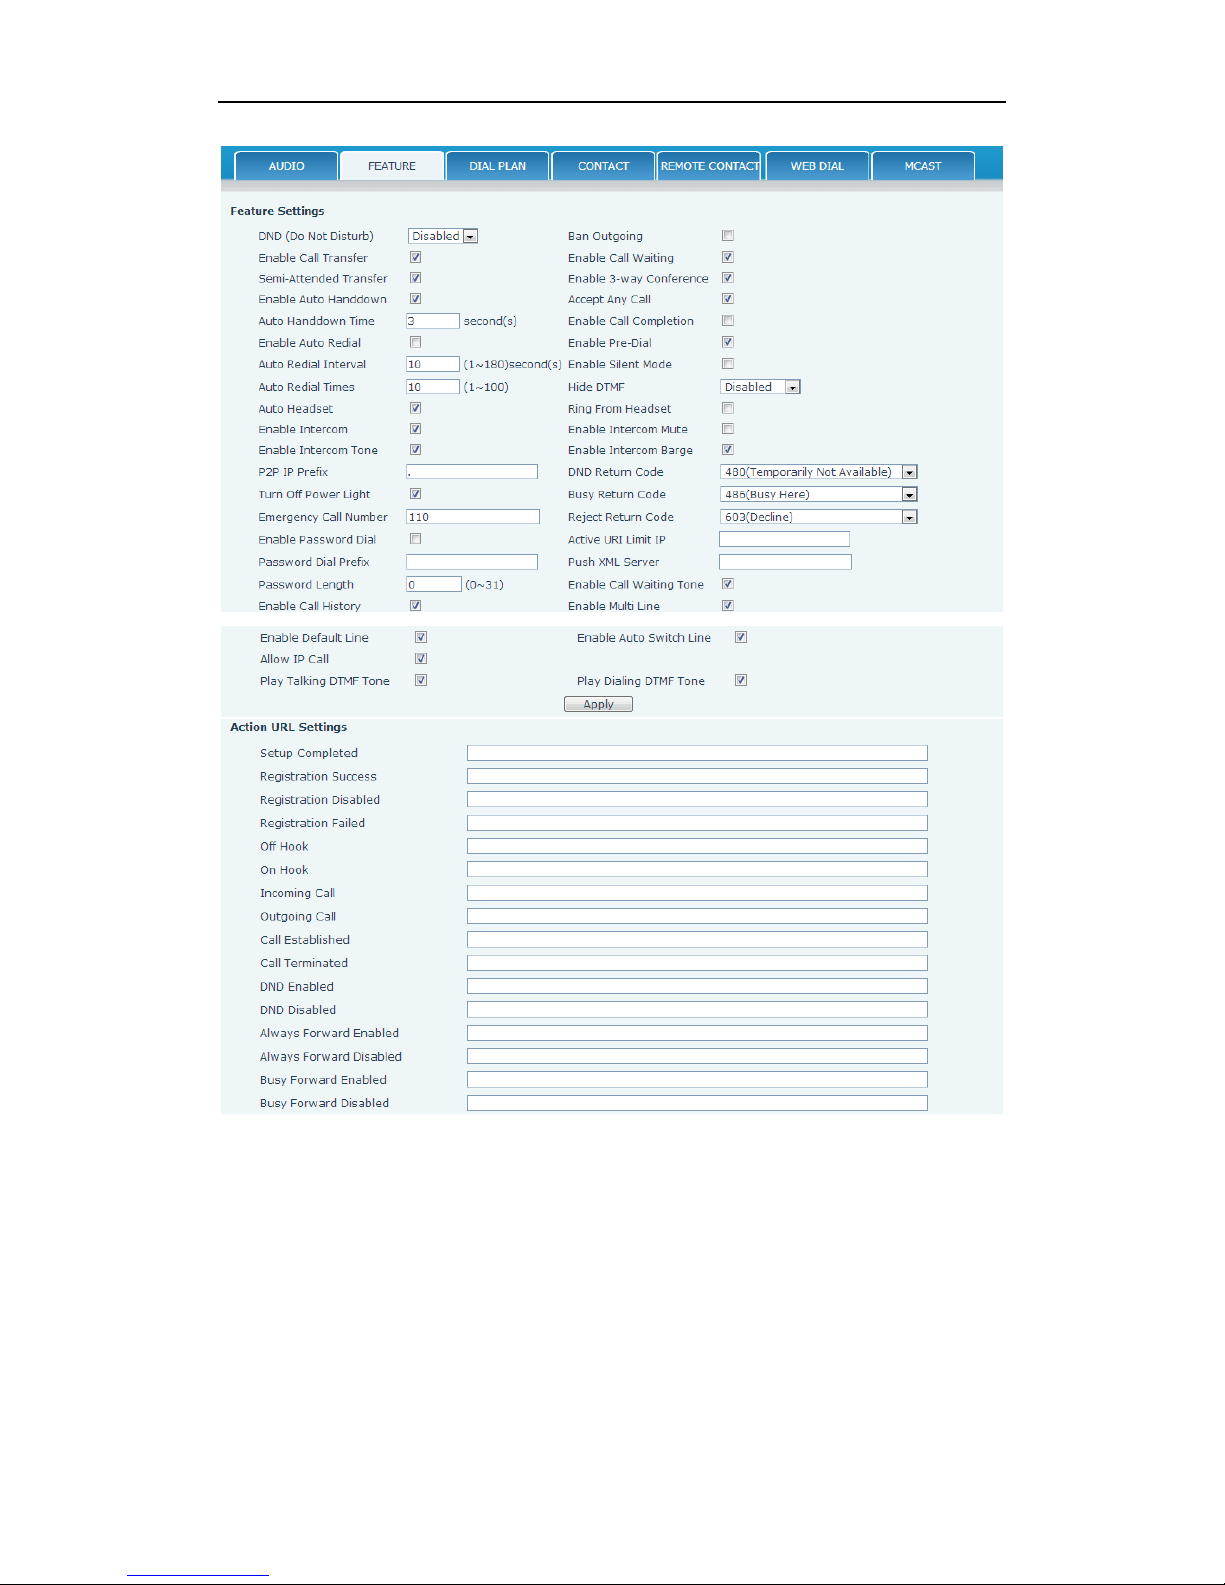
User Manual
SPEEDYTEL Technology CO Ltd
Page 59
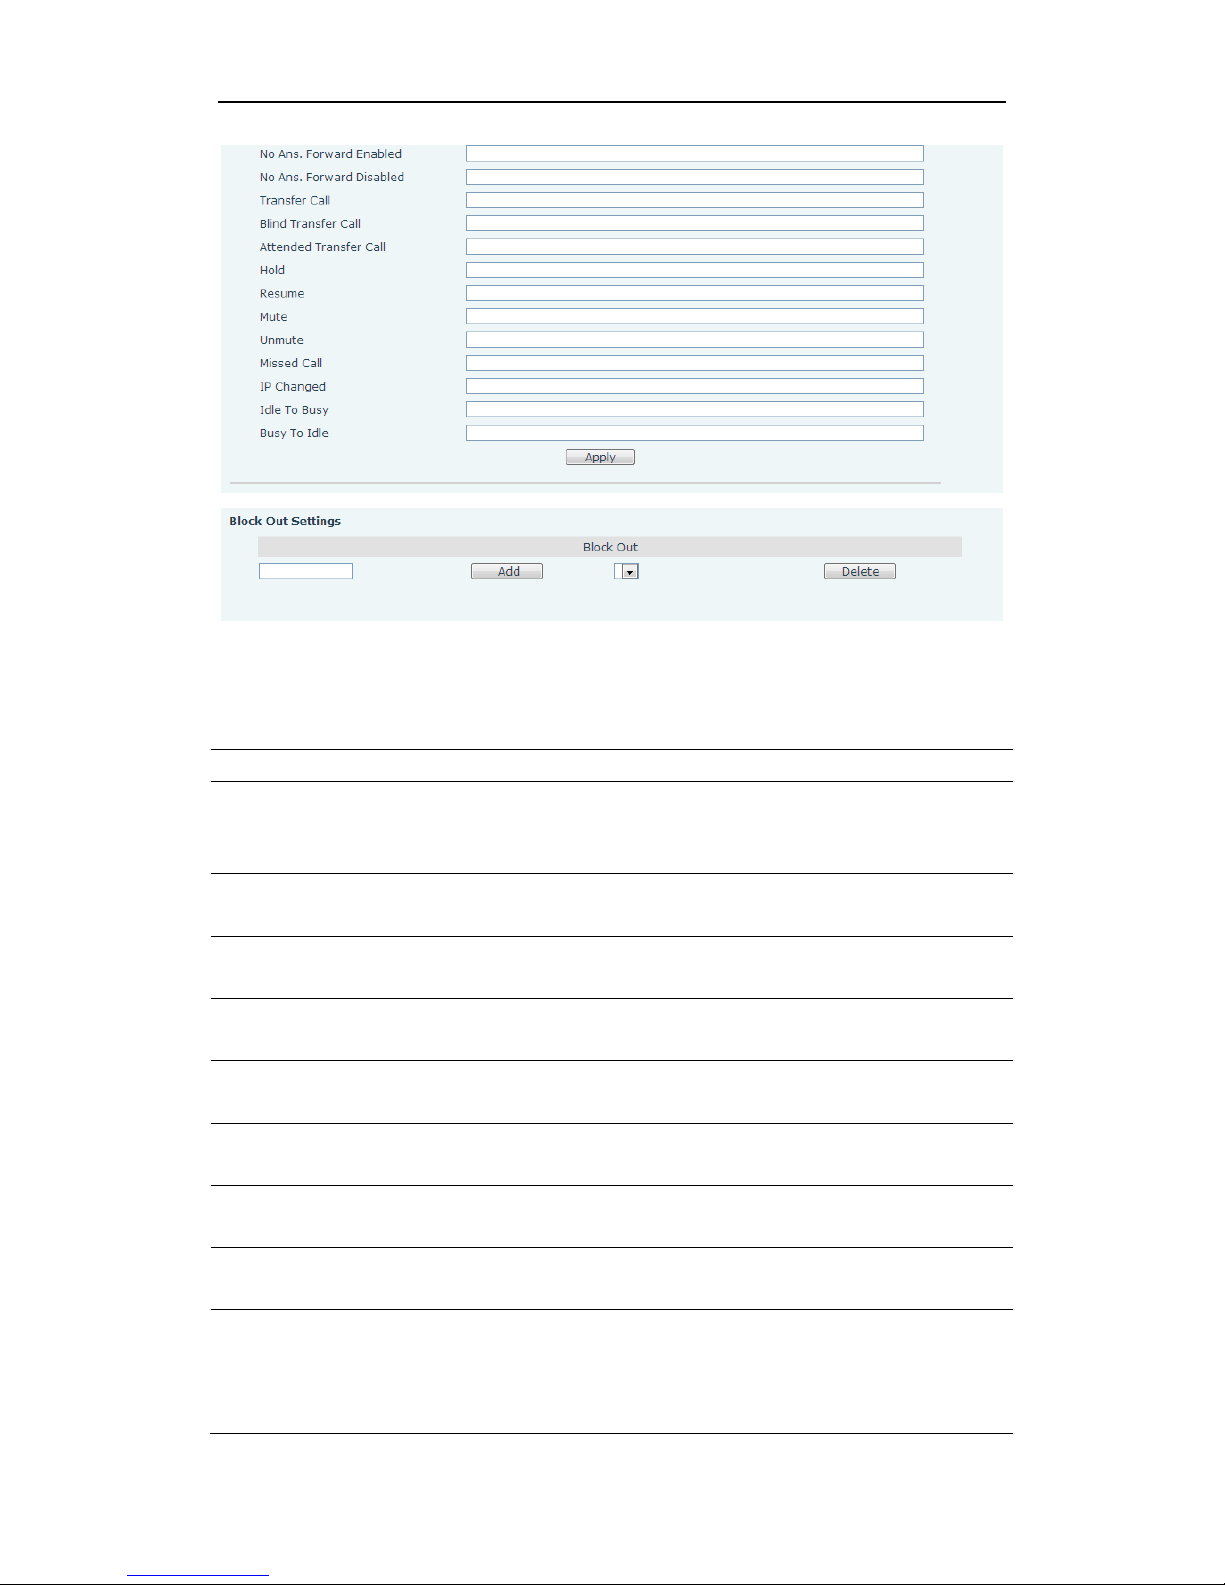
User Manual
SPEEDYTEL Technology CO Ltd
FEATURE
Field name
explanation
Do Not
Disturb
Select DND, the phone will reject any incoming call, the
callers will be reminded by busy, but any outgoing call from
the phone will work well.
Ban
Outgoing
If you select Ban Outgoing to enable it, and you cannot dial
out any number.
Enable Call
Transfer
Enable Call Transfer by selecting it.
Semi-Attend
ed Transfer
Enable Semi-Attended Transfer by selecting it.
Enable Auto
Redial
Enable Auto Redial by selecting it, then the phone reminds
whether redial, when the caller is busy or rejects.
Auto Redial
interval
Specify the Auto Redial interval.
Auto Redial
Times
Specify the Auto Redial interval.
Enable Call
Completion
Enable Call Completion by selecting it.
Enable
Pre-Dial
Disable this feature, in standby interface next number, will
realize the number rules ”send out over the time”;Enable
the feature ,then the number will not be send out over the
time.
Page 60

User Manual
SPEEDYTEL Technology CO Ltd
Enable Call
Waiting
Enable Call Waiting by selecting it. Then the phone reminds
whether redial, when the caller is busy or rejects. if it’s ok
and the phone finds out that the caller is idle by sip
message, it will reminds whether redial.
Enable
3-way
Conference
Enable 3-way conference by selecting it.
Enable Call
Waiting
Tone
Disdale this function ,you will not hear the tone “beep”
when there have multiple incoming calls
Accept Any
Call
If select it, the phone will accept the call even if the called
number is not belong to the phone.
Enable Auto
Hand down
The phone will hang up and return to the idle automatically
at hands-free mode.
Auto Hand
down Time
Specify Auto Hand down Time, the phone will hang up and
return to the idle automatically after Auto Hand down Time
at hands-free mode, and play dial tone Auto Hand down
Time at handset mode.
Ring From
Headset
Enable Ring From Handset by selecting it, the phone plays
ring tone from handset.
Enable
Intercom
Enable Intercom Mode by selecting it.
Enable
Intercom
Mute
Enable mute mode during the intercom call.
Enable
Intercom
Tone
If the incoming call is intercom call, the phone plays the
intercom tone.
Enable
Intercom
Barge
Enable Intercom Barge by selecting it, the phone auto
answers the intercom call during a call. If the current call is
intercom call, the phone will reject the second intercom call.
Enable
Silent Mode
Enable Silent Mode by selecting it, the phone light will red
blink to remind that there is a missed call instead of playing
ring tone.
Turn Off
Power Light
Enable Turn Off Power Light by selecting it.
Emergency
Call Number
Specify the Emergency Call Number. Despite the keyboard is
locked, you can dial the emergency call number.
Enable
Password
Dial
Enable Password Dial by selecting it, When number entered
is beginning with the password prefix, the following N
numbers
After the password prefix will be hidden as *, N stand for
Page 61
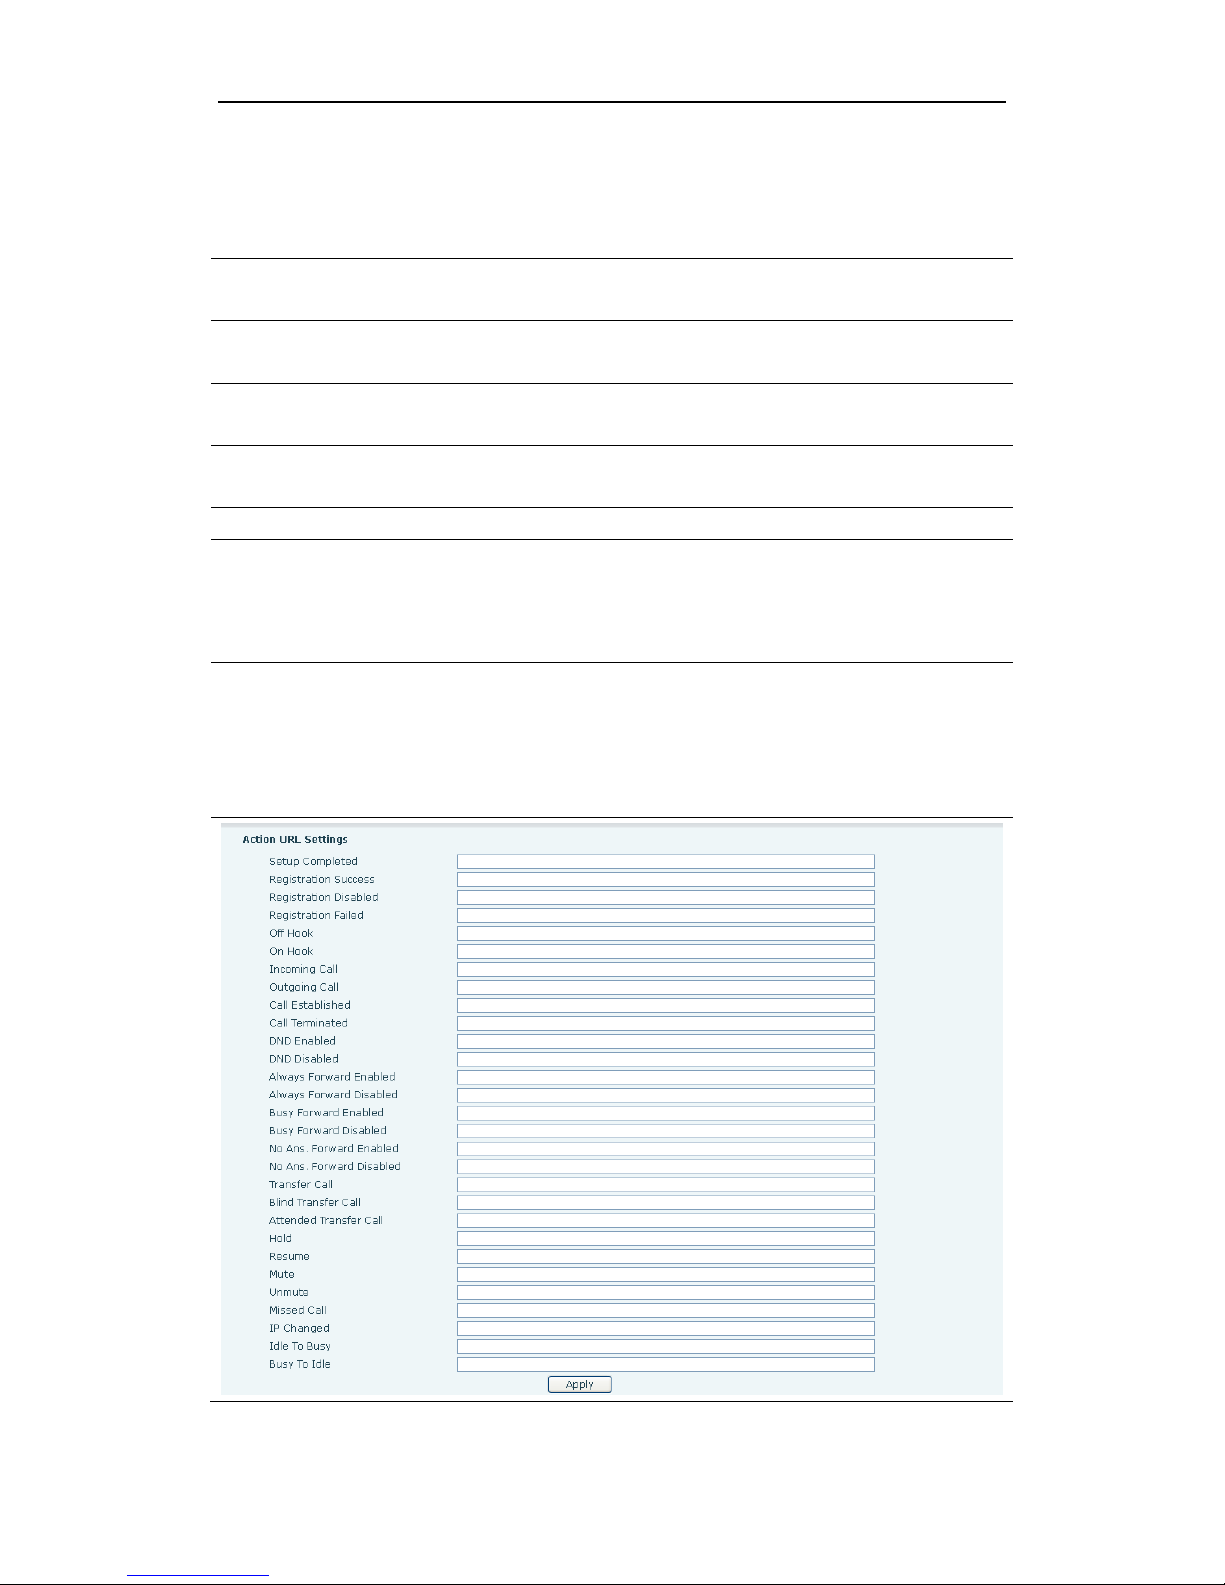
User Manual
SPEEDYTEL Technology CO Ltd
the value which you enter in the Password Length field. For
example: you set the password prefix is 3, enter the
Password Length is 2, then you enter the number 34567, it
will display 3**67 on the phone.
Password
Length
Specify the Password length.
DND Return
Code
Specify DND Return code.
Busy Return
Code
Specify Busy Return Code.
Reject
Return Code
Specify Reject Return Code.
Hide DTMF
Specify the hide DTMF mode.
Push XML
Server
Specify the Push XML Server, when phone receives request,
it
will determine whether to display corresponding content
on the phone which sent by the specified server or not.
P2P IP
Prefix
Set Prefix in peer to peer IP call. For example: what you
want to dial is 192.168.1.119, If you define P2P IP Prefix as
192.168.1., you dial only #119 to reach 192.168.1.119.
Default is “.”. If there is no “.” Set, it means to disable dialing
IP.
Page 62
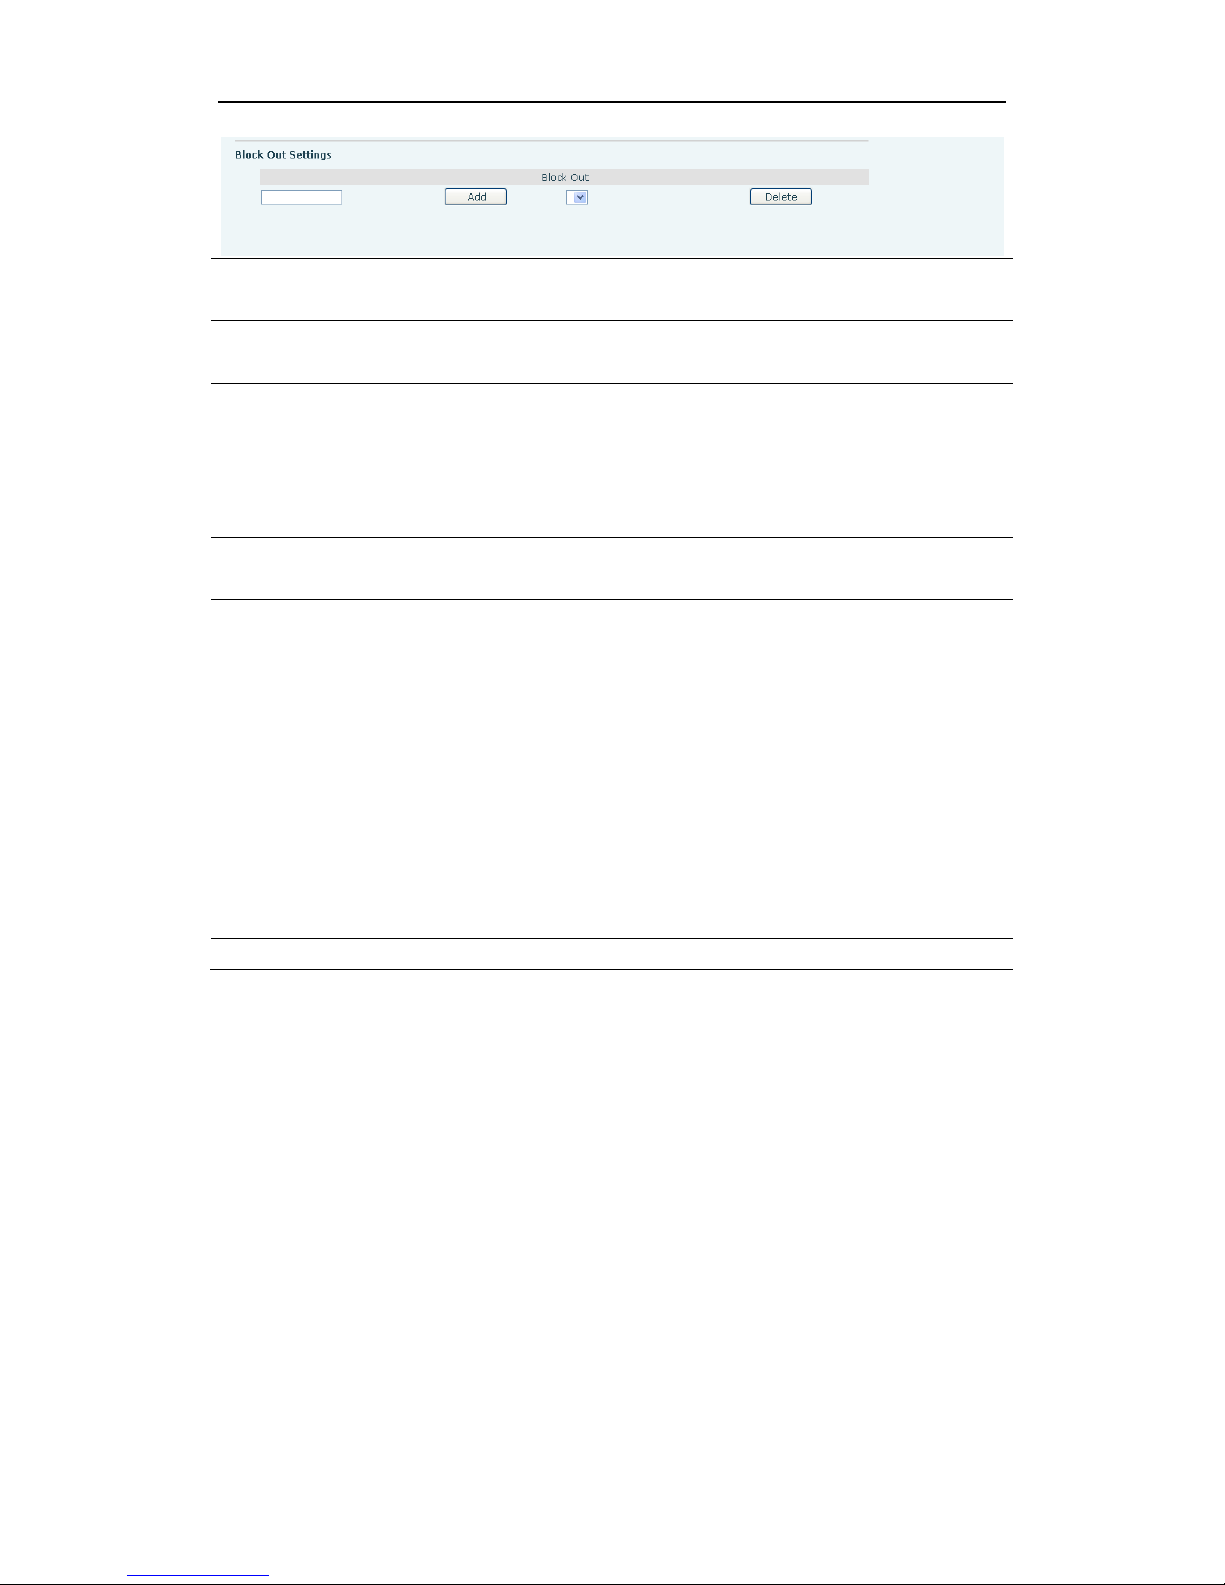
User Manual
SPEEDYTEL Technology CO Ltd
Active URI
Limit IP
Specify the server IP that remote control phone for
corresponding operation.
Action URL
Settings
Action URL
Settings
Specify the Action URL that Record the operation of phone;
send this corresponding information to server, url:
http://InternalServer /FileName.xml? (Internal Server is
server IP. Filename is name of xml that contains the action
message).
Block Out
Settings
Block out
Set Add/Delete Limit List. Please input the prefix of those
phone numbers which you forbid the phone to dial out. For
example, if you want to forbid those phones of 001 as prefix
to be dialed out, you need input 001 in the blank of limit list,
and then you cannot dial out any phone number whose
prefix is 001.
X and are wildcard x means matching any single digit. For
example, 4xxx expresses any number with prefix 4 which
length is 4 will be forbidden to dialed out means matching
any arbitrary number digit. For example, 6 expresses any
number with prefix 6 will be forbidden to dialed out.
Notice: Black List and Limit List can record at most10 items respectively.
8.3.4.3 DIAL PLAN
This system supports those dial modes as followings:
1) End with “#”: dial your desired number, and then press #.
2) Fixed Length: the phone will intersect the number according to your
specified length.
3) Time Out: After you stop dialing and waiting time out, system will send
the number collected.
4) Press # to Do Blind Transfer: input the number you want to transfer to
then press“#” you can transfer the current call to the number.
5) Blind Transfer on OnHook : input the number you want to transfer to
then hang up handle or press speaker, you can transfer the current call to
the number.
Page 63
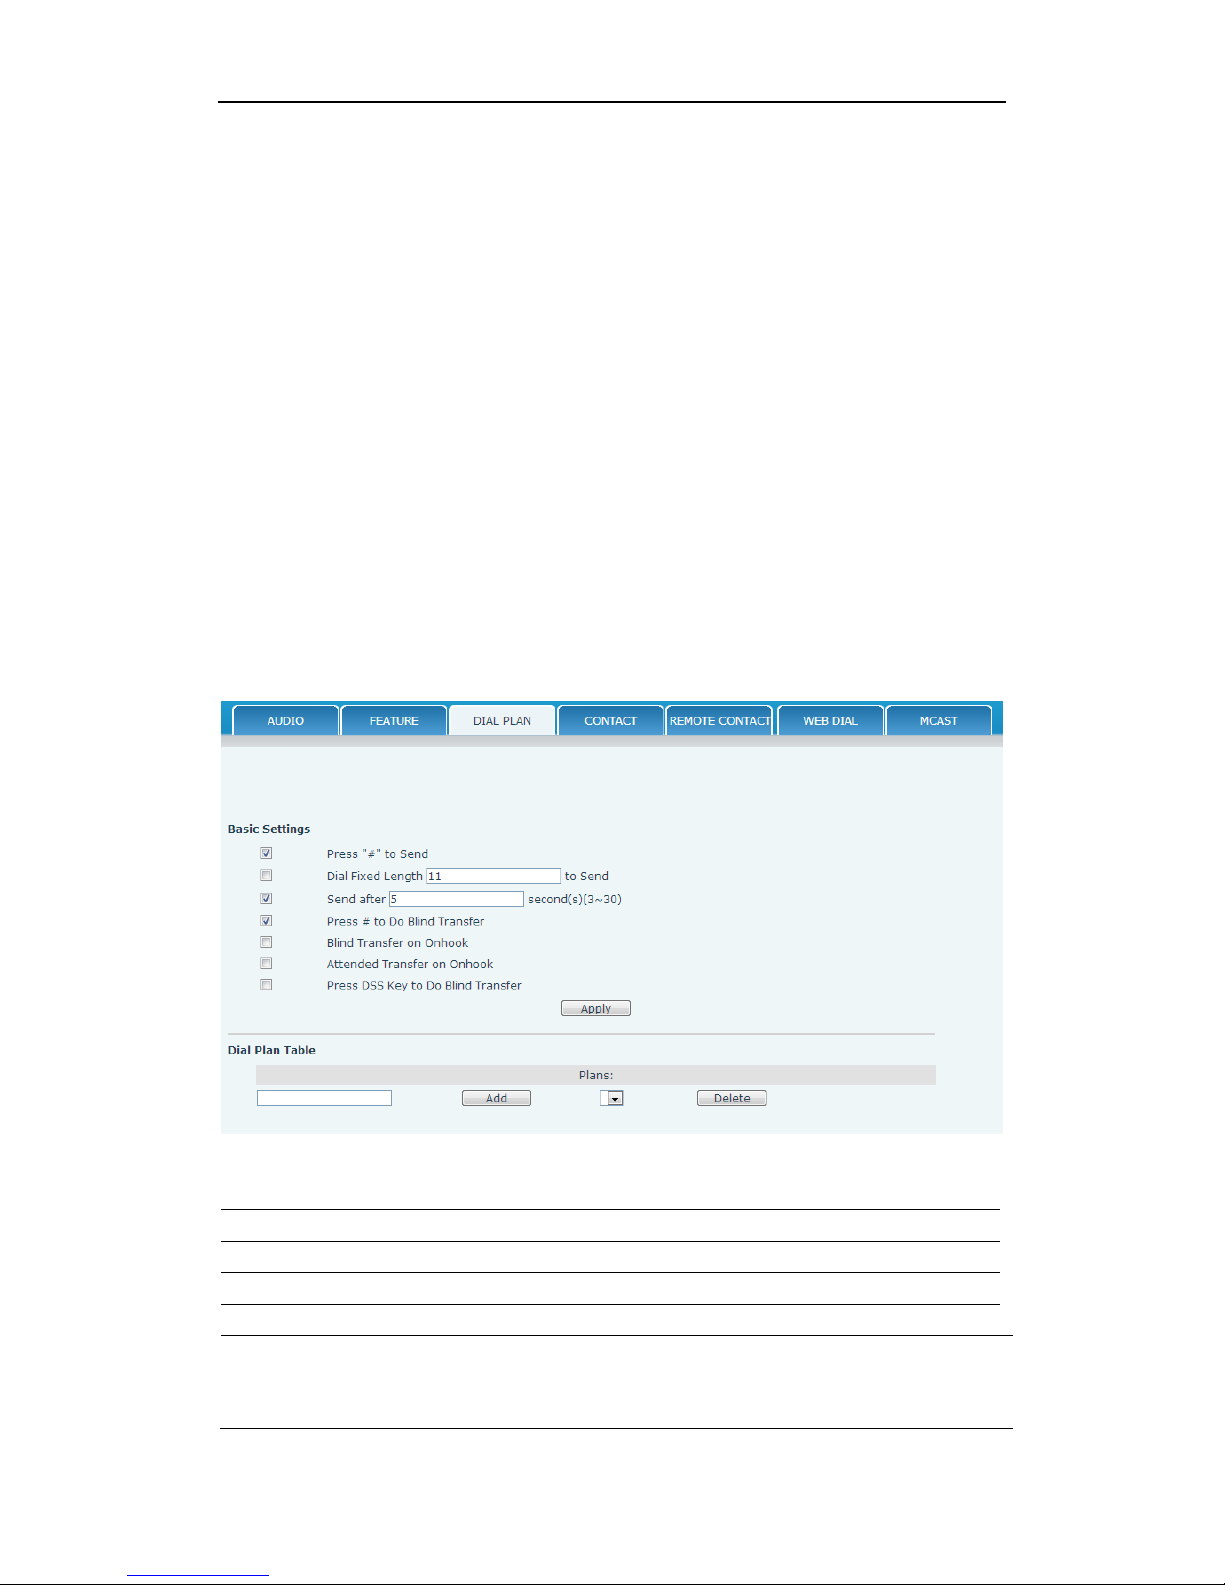
User Manual
SPEEDYTEL Technology CO Ltd
6) Attend Transfer on OnHook: hang up handle or press speaker you can
realize the blind transfer function
7)Press the DSS key Blind: Press dss key, the current call will turn out
blind.
7) User defined: you can customize digital map rules to make dialing more
flexible. It is realized by defining the prefix of phone number and number
length of dialing.
In order to maintain the end-user pbx secondary dial for dialing call mode.
When requested to enter a phone number prefix, the sytem according to
the rules in the closing number configuration rules, re-issue the dial tone,
the user continues to enter the number, after the end of the closing
number, the phone number will be prefixed and analog secondary dial
tone is sent to the back of the numbers together server.
For example:
In the list of rules in the configuration of the closing number 9, xxxxxxxx
then when the user dials 9, the system to re-play the dial tone, dial the
number the user to continue; dial-up is complete, the phone is actually
sent containing 9 9 numbers.
DIAL PLAN Configuration
Field name
explanation
Basic Setting
Press "#" to Send
Set Enable/Disable the phone ended with “#” dial.
Dial Fixed Length
Specify the Fixed Length of phone ending with.
Press # to Do Blind
Transfer
Enable Blind Transfer On Hook, when executing
Blind Transfer End with #, press # after inputting
the number that you want to transfer, the phone
Page 64
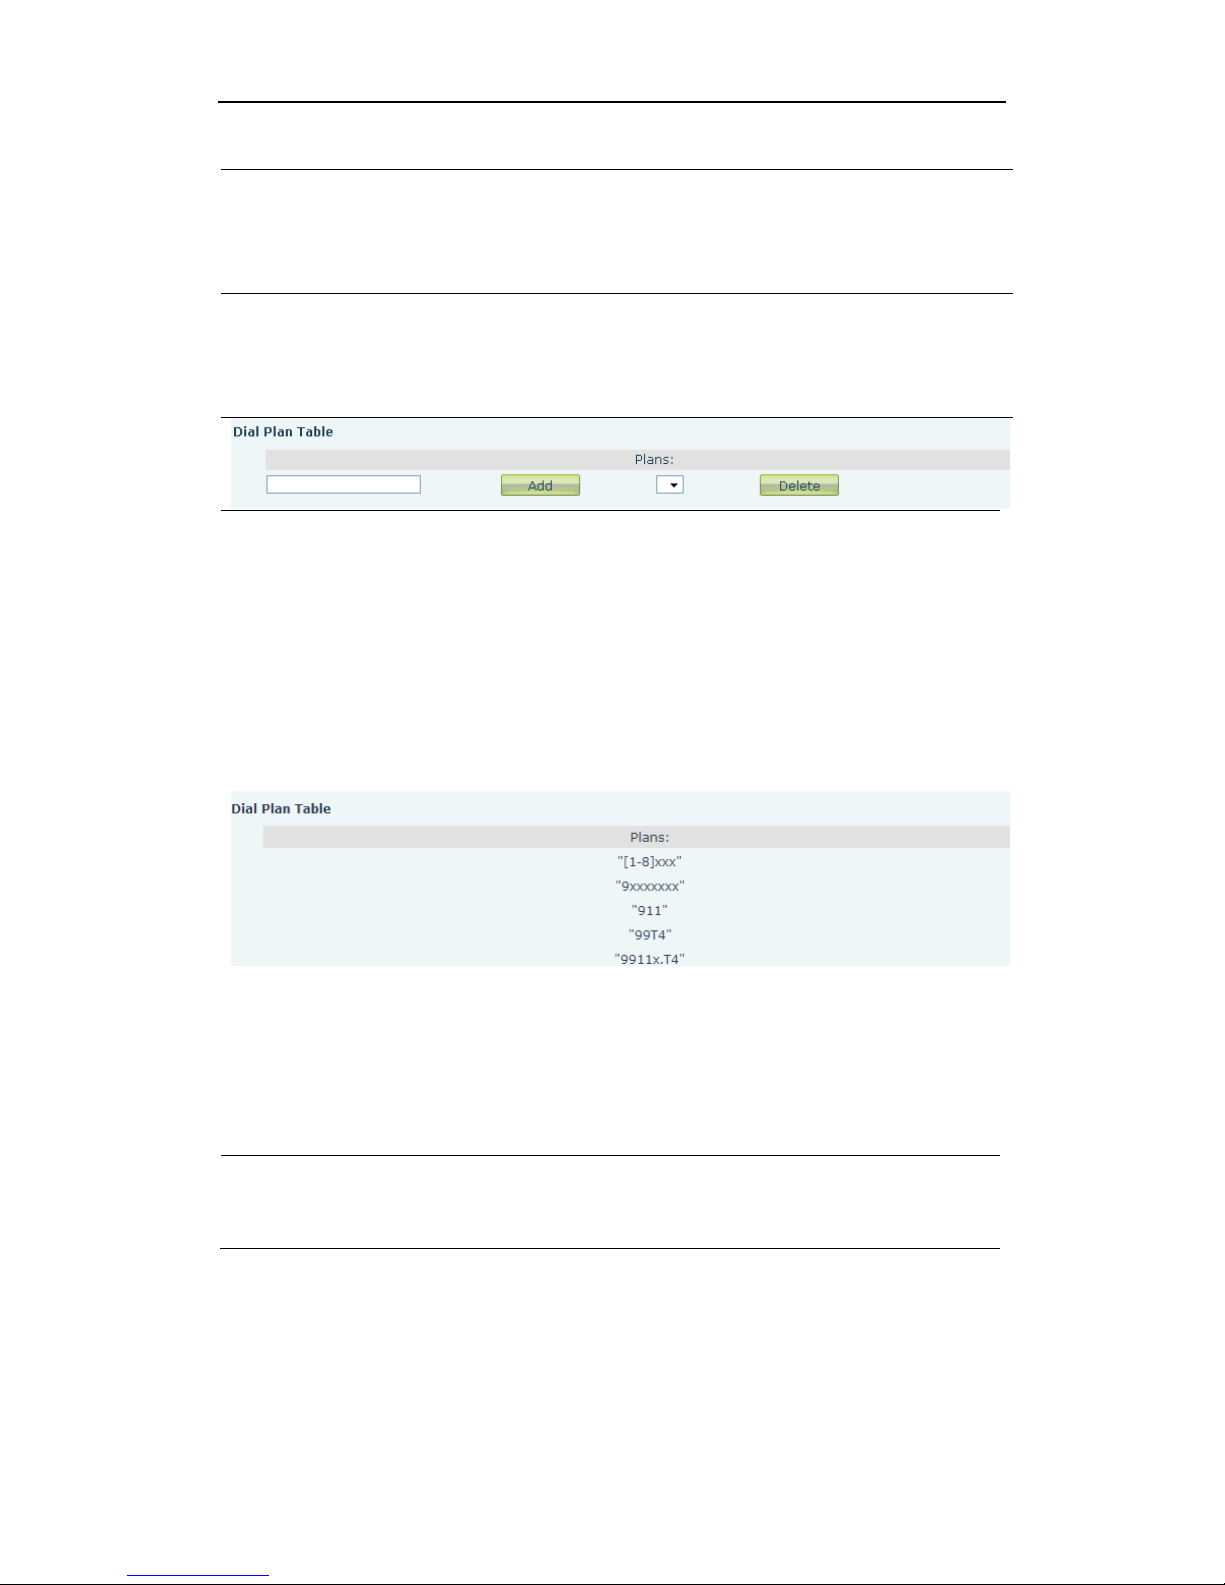
User Manual
SPEEDYTEL Technology CO Ltd
will transfer the current call to the third party.
Blind Transfer on
OnHook
Enable Blind Transfer on On Hook, when executing
Blind Transfer, hang up after inputting the number
that you want to transfer, the phone will transfer
the current call to the third party.
Attend Transfer on
OnHook
Enable Attend Transfer on On Hook, when
executing Attended Transfer, hang up after the third
party answers, the phone will transfer the current
call to the third party.
Below is user-defined digital map rule:
[] Specifies a range that will match digit. May be a range, a list of ranges
separated by commas, or a list of digits.
* Match any single digit that is dialed.
. Match any arbitrary number of digits including none.
Tn Indicates an additional time out period before digits are sent of n
seconds in length. n is mandatory and can have a value of 0 to 9 seconds.
Tn must be the last 2 characters of a dial plan. If Tn is not specified it is
assumed to be T0 by default on all dial plans.
Cause extensions 1000-8999 to be dialed immediately.
Cause 8 digit numbers started with 9 to be dialed immediately.
Cause 911 to be dialed immediately after it is entered.
Cause 99 to be dialed after 4 seconds.
Cause any number started with 9911 to be dialed 4 seconds after dialing
ceases.
Notice: End with “#”, Fixed Length, Time out and Digital Map Table can
be used simultaneously, System will stop dialing and send
number according to your set rules.
8.3.4.4 CONTACT
You can input the name, phone number and select ring type for each name
here.
Page 65
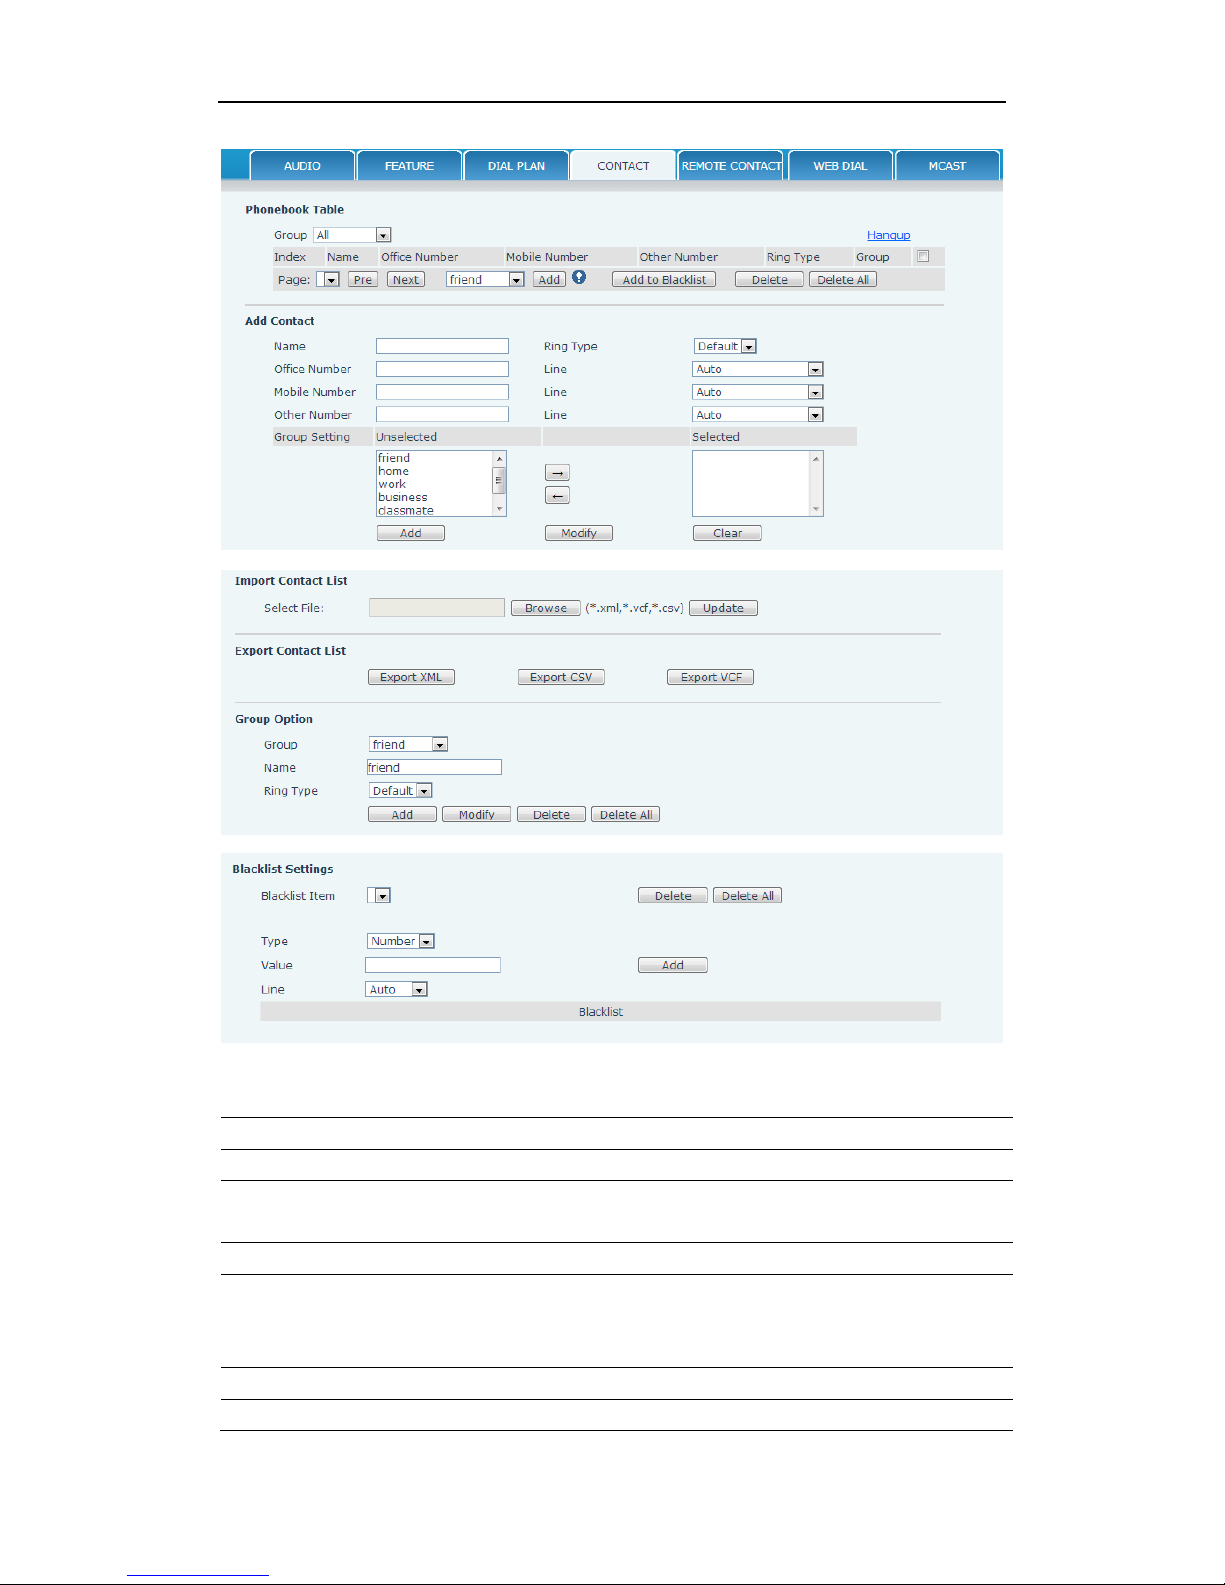
User Manual
SPEEDYTEL Technology CO Ltd
Contact
Field name
explanation
Phonebook Table
Name
Shows the name corresponding to the phone
number.
Shows the detail of current phonebook.
Notice: the maximum capability of the phonebook is 500 items, you can
select many or a contact to add to group and add to blacklist, and delete
many or a contact, and delete all contacts.
Add Contact List
Name
Specify the name corresponding to the phone
Page 66

User Manual
SPEEDYTEL Technology CO Ltd
number.
Office Number
Specify the office number.
Mobile Number
Specify the mobile number.
Other Number
Specify the other number.
Ring Type
Specify the ring type for the phone number.
Line
Specify the sip line for the each number.
Group setting
Select the group from the unselected group to
selected list for the contact; you can select many
groups for the contact.
Notice: the add button for adding a new contact, the modify button for
modifying the added contact, the clear all button for clear all input
information of the contact.
Group Option
Group
Select the added groups then modify or delete
and so on.
Name
Input the name of the group, then click the add
button, you can add a new group.
Ring Type
Specify the ring type for the group as adding a
new group.
Blacklist Settings
Type
Select the blacklist type, you can select number
or prefix of number.
Value
Input number or prefix of number.
Line
Select the sip line.
Notice: the add button for adding a new blacklist, the delete button for
deleting one item, the delete all button for deleting all items.
If user does not want to answer some phone calls, add these phone
numbers to the Black List, and these calls will be rejected x and are
wildcard x means matching any single digit. For example, 4xxx expresses
any number with prefix 4 which length is 4 will be forbidden to be
responded.
DOT (.) means matching any arbitrary number digit. For example, 6.
expresses any number with prefix 6 will be forbidden to be responded.
If user wants to allow a number or a series of number incoming, he may
add the number(s) to the list as the white list rule. The configuration rule
is -number, for example, -123456, or -1234xx.
Means any incoming number is forbidden except for 4119
Note: End with DOT (.) when set up the white list.
Page 67
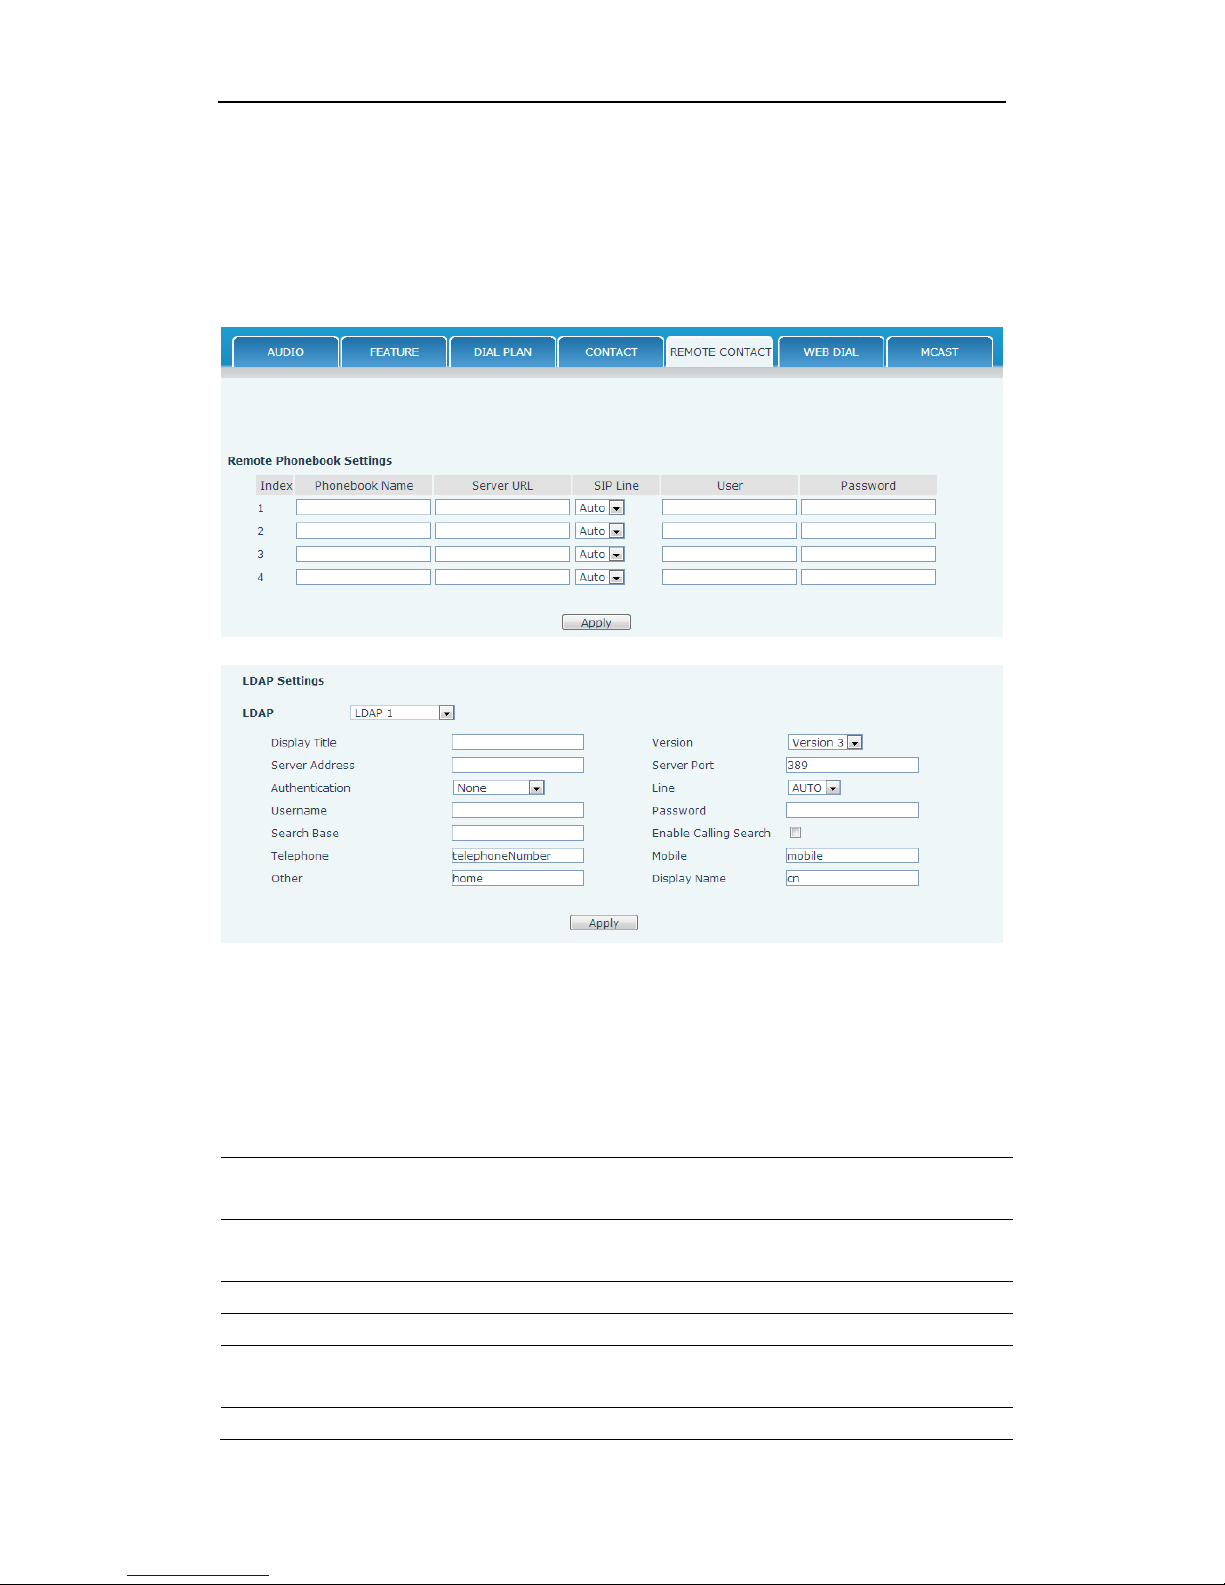
User Manual
SPEEDYTEL Technology CO Ltd
8.3.4.5 REMOTE CONTACT
You need to match a XML Phonebook address and you can directly access
to the corresponding remote phonebook on the phone.
For example: Set the Phonebook Name as SPEEDYTEL, Server URL is
tftp://192.168.1.3/admin/phonebook/index.xml.
Or Set the Phonebook Name as ldap, Server URL is
ldap://192.168.1.3/dc=winline,dc=com.
Remote Phonebook
Setting
Phonebook Name
Custom the phonebook name displayed on the
phone.
Server URL
Specify the server url of the remote phonebook.
SIP Line
Specify the sip line for the remote phonebook.
Authentication
Specify the authentication mode for remote
phonebook.
User/password
Input the authentication username and
Page 68
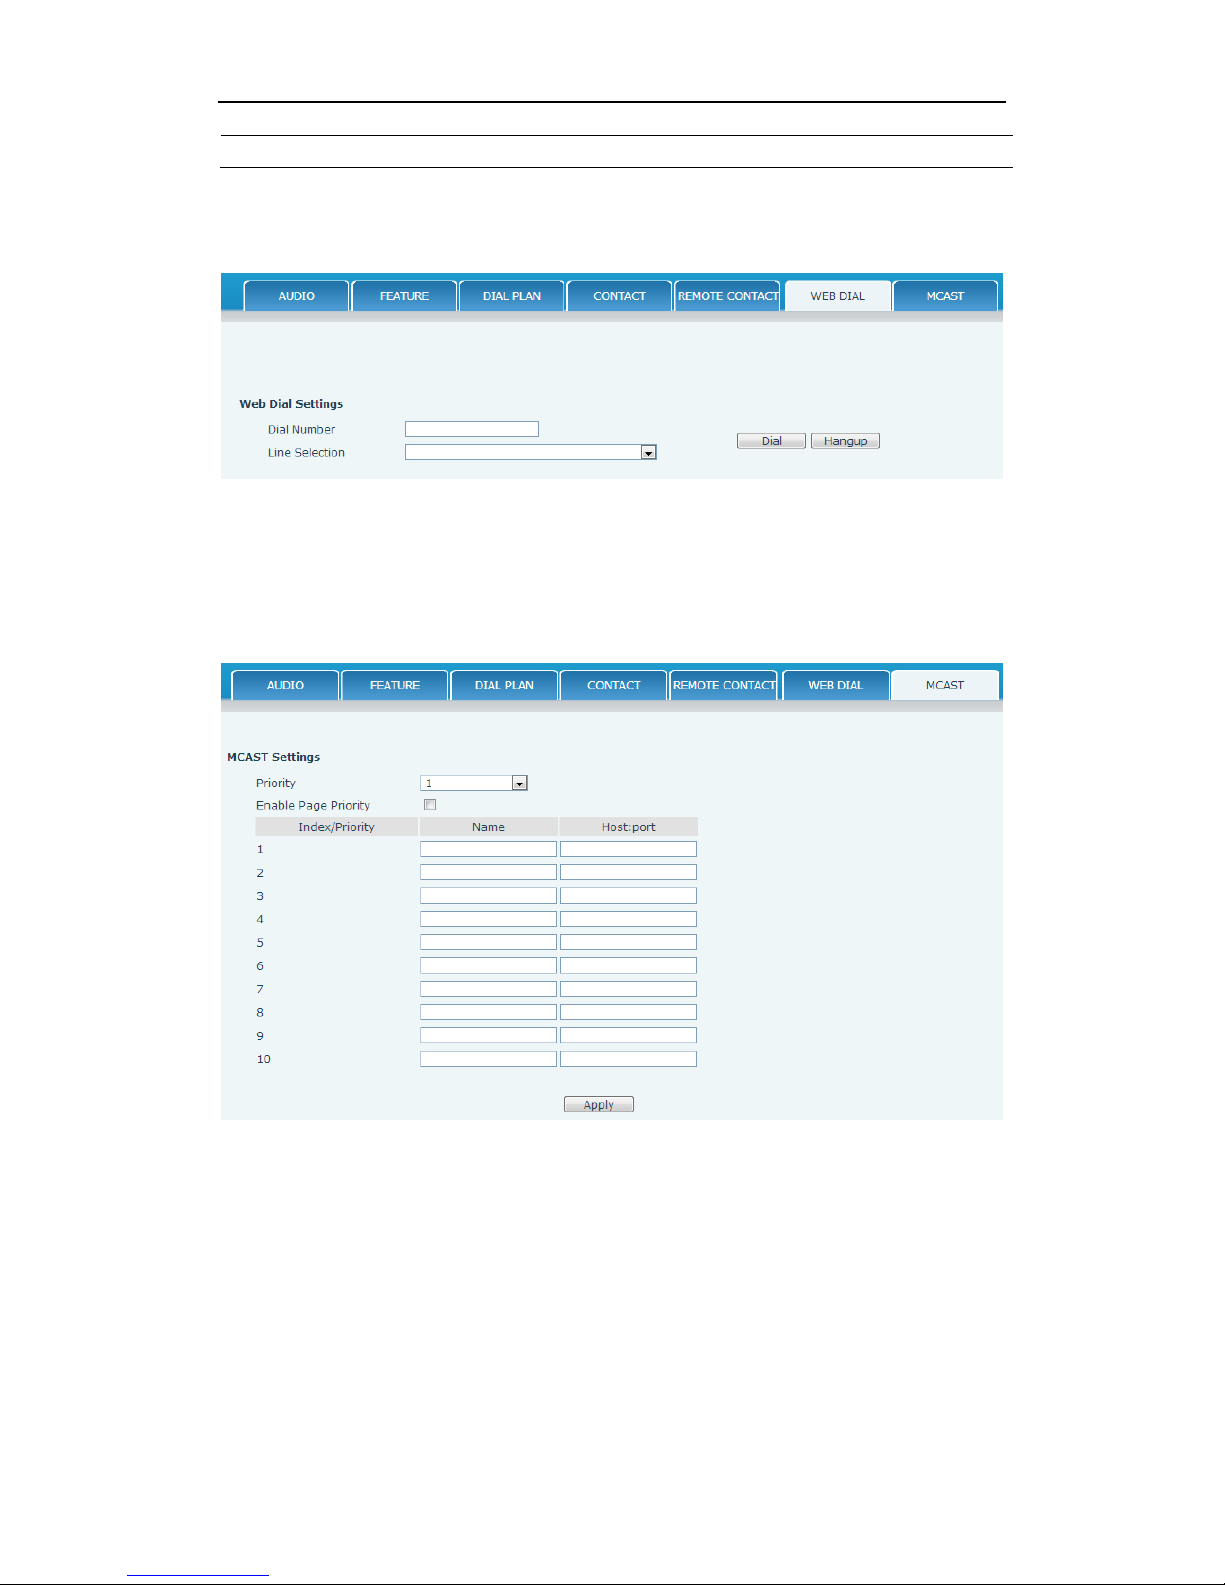
User Manual
SPEEDYTEL Technology CO Ltd
password.
8.3.4.6 WEB DIAL
You can make a call through the WEB DIAL, enter the Dial Number then
press Dial, if you want to finish the talk, press Hang-up.
8.3.4.7 MCAST
Use the multicast function to send notice to every member of the multicast
is simple and easy. By setting the multicast key on your phone, you can
send multicast RTP flow to the pre-configured multicast address. By
listening multicast address is configured on the phone, listen and play the
multicast address to send the RTP stream.
Send multicast setting
On the phone web page,function key-function key,set a function key,as
shown
Page 69
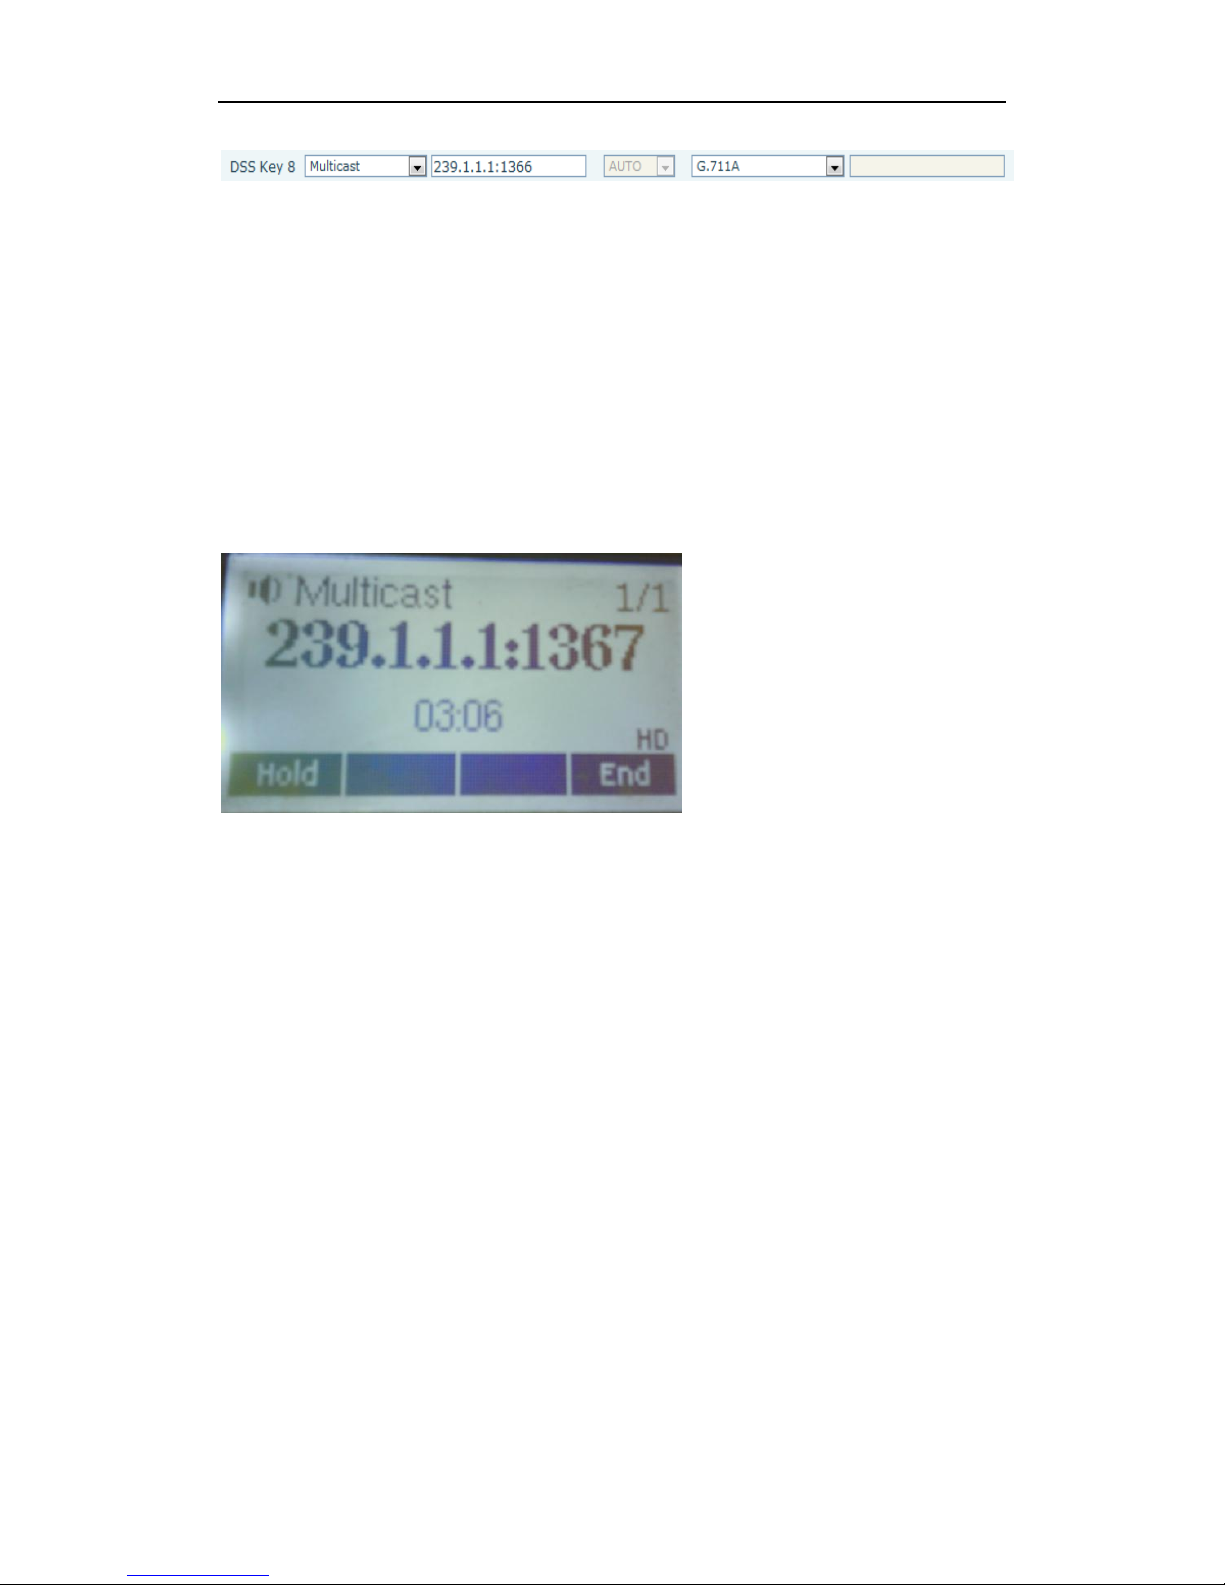
User Manual
SPEEDYTEL Technology CO Ltd
Value format IP:Port,the IP address of multicast is range from 224.0.0.0 to
239.255.255.255,port is greater than 1024
If multicast codec is G722, the LCD screen will displays "HD", which means
the phone is sending high-definition voice stream
Operate steps:
1、 When the phone is idle, press multicast key
Multicast RTP stream is sended to pre-configured multicast address (IP:
Port)。The phone which listens to multicast address in the local network
can receive the RTP stream. Multicast functionkey LED lights yellow.
LCD screen displays the following:
2、 Press the hold softkey to hold the current multicast session
3、 Press the end softkey again or multicast functionkey, multicast session
can be stopped
Notice: RTP stream is one side, that is from a sender to a receiver. when
the phone initiates a multicast RTP session in a call,the current call is on
hold.
Receive multicast setting
You can set up the phone monitoring 10 different multicast addresses to
receive these multicast RTP stream.
You have two method to receive RTP stream of multicast that can be set up
through the web page: Enable priorities of normal calls and Enable page
Priority:
Enable priorities of normal call by select it, if the incoming RTP stream
priority of multicast lower than the priority of current for normal calls, the
phone will ignore the RTP stream of multicast. If the incoming RTP stream
priority of multicast higher than the priority of current for normal calls,
the phone will receive the RTP stream of multicast, and hold the current
call.
Disabled priorities of normal call by select disable, the phone will
Page 70
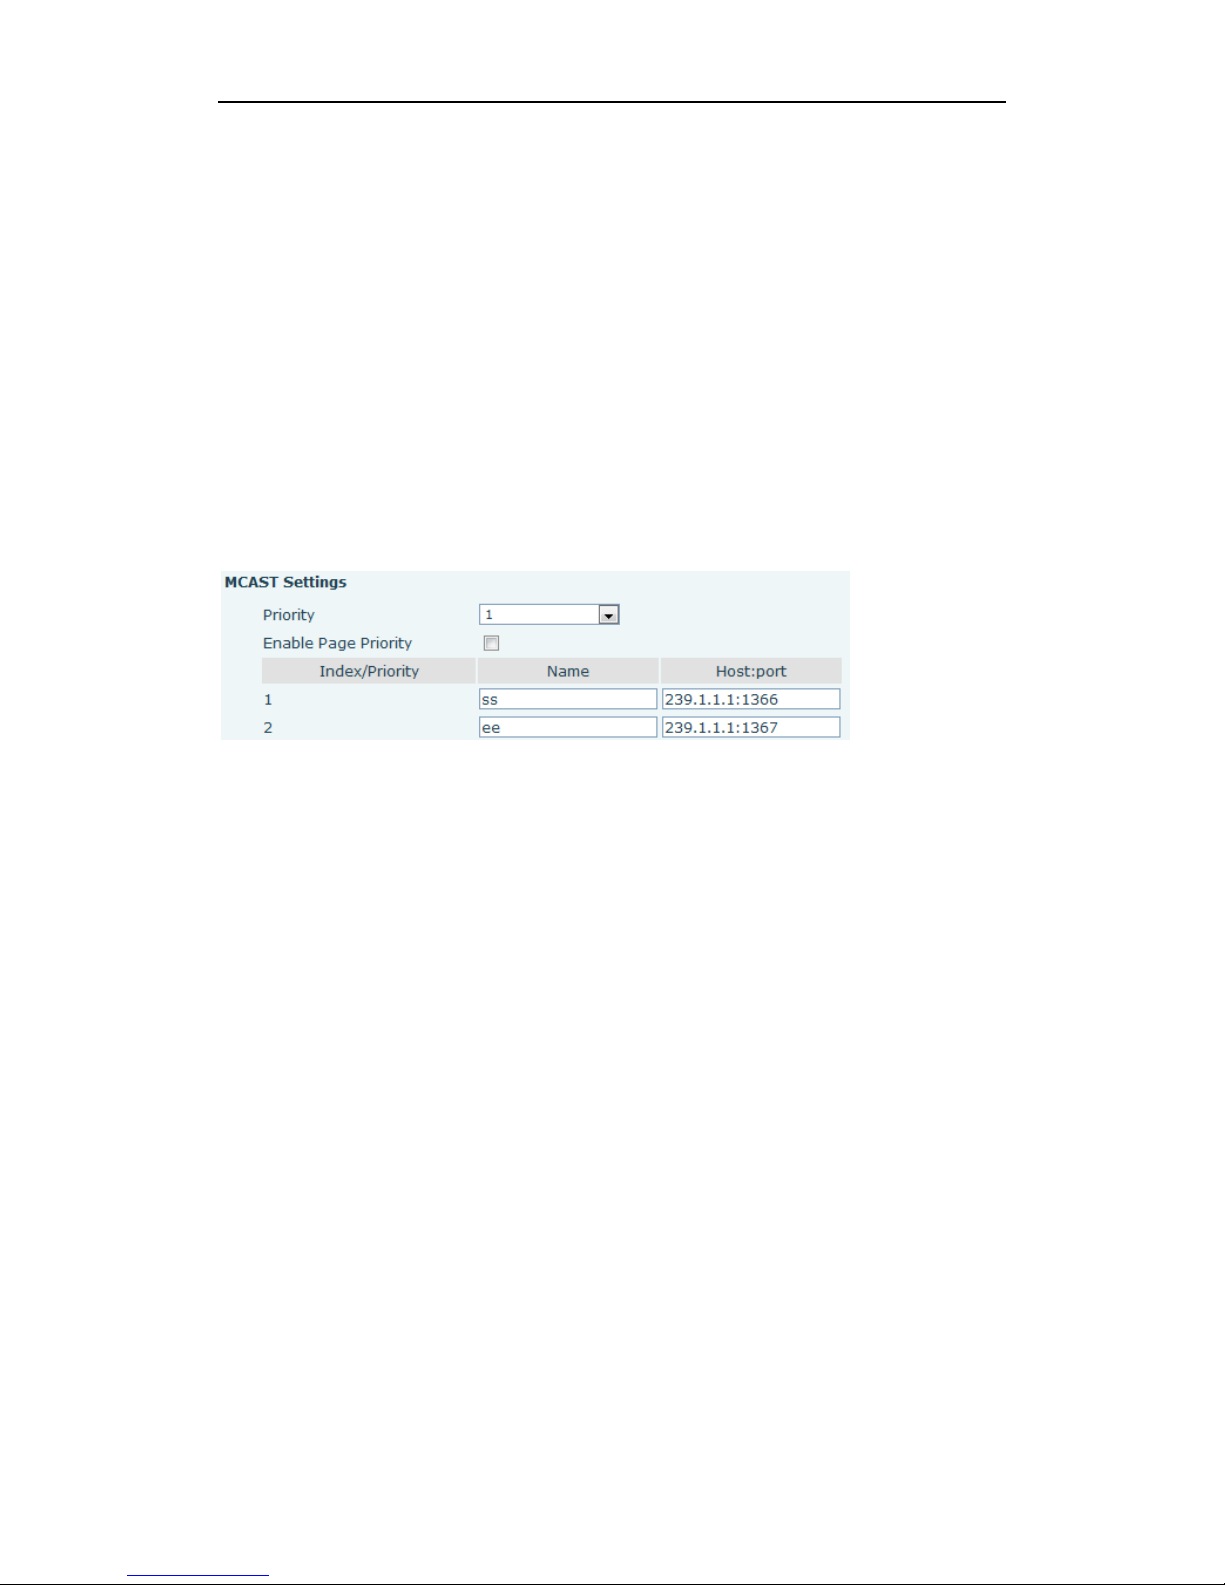
User Manual
SPEEDYTEL Technology CO Ltd
ignore all local network RTP stream of multicast.
Options as follows:
1-10:the priority defined for normal calls,1 the highest level,10 the lowest
level
Disabled: Ignore all RTP stream of multicast
Enable Page Priority
Page priority determines the phone how to handle the newly received
multicast RTP stream when in a multicast session. Enabled page priority,
the phone will automatically ignore the low priority multicast RTP stream
and receive the high priority multicast RTP stream and hold the current
multicast session; If not enabled, the phone will automatically ignore all
incoming multicast RTP stream.
Web page is set as follows:
Now multicast ss has higher priority than multicast ee, the highest priority
is for normal calls
Notice: When a multicast session begins, multicast sender and receiver will
beep
Page 71
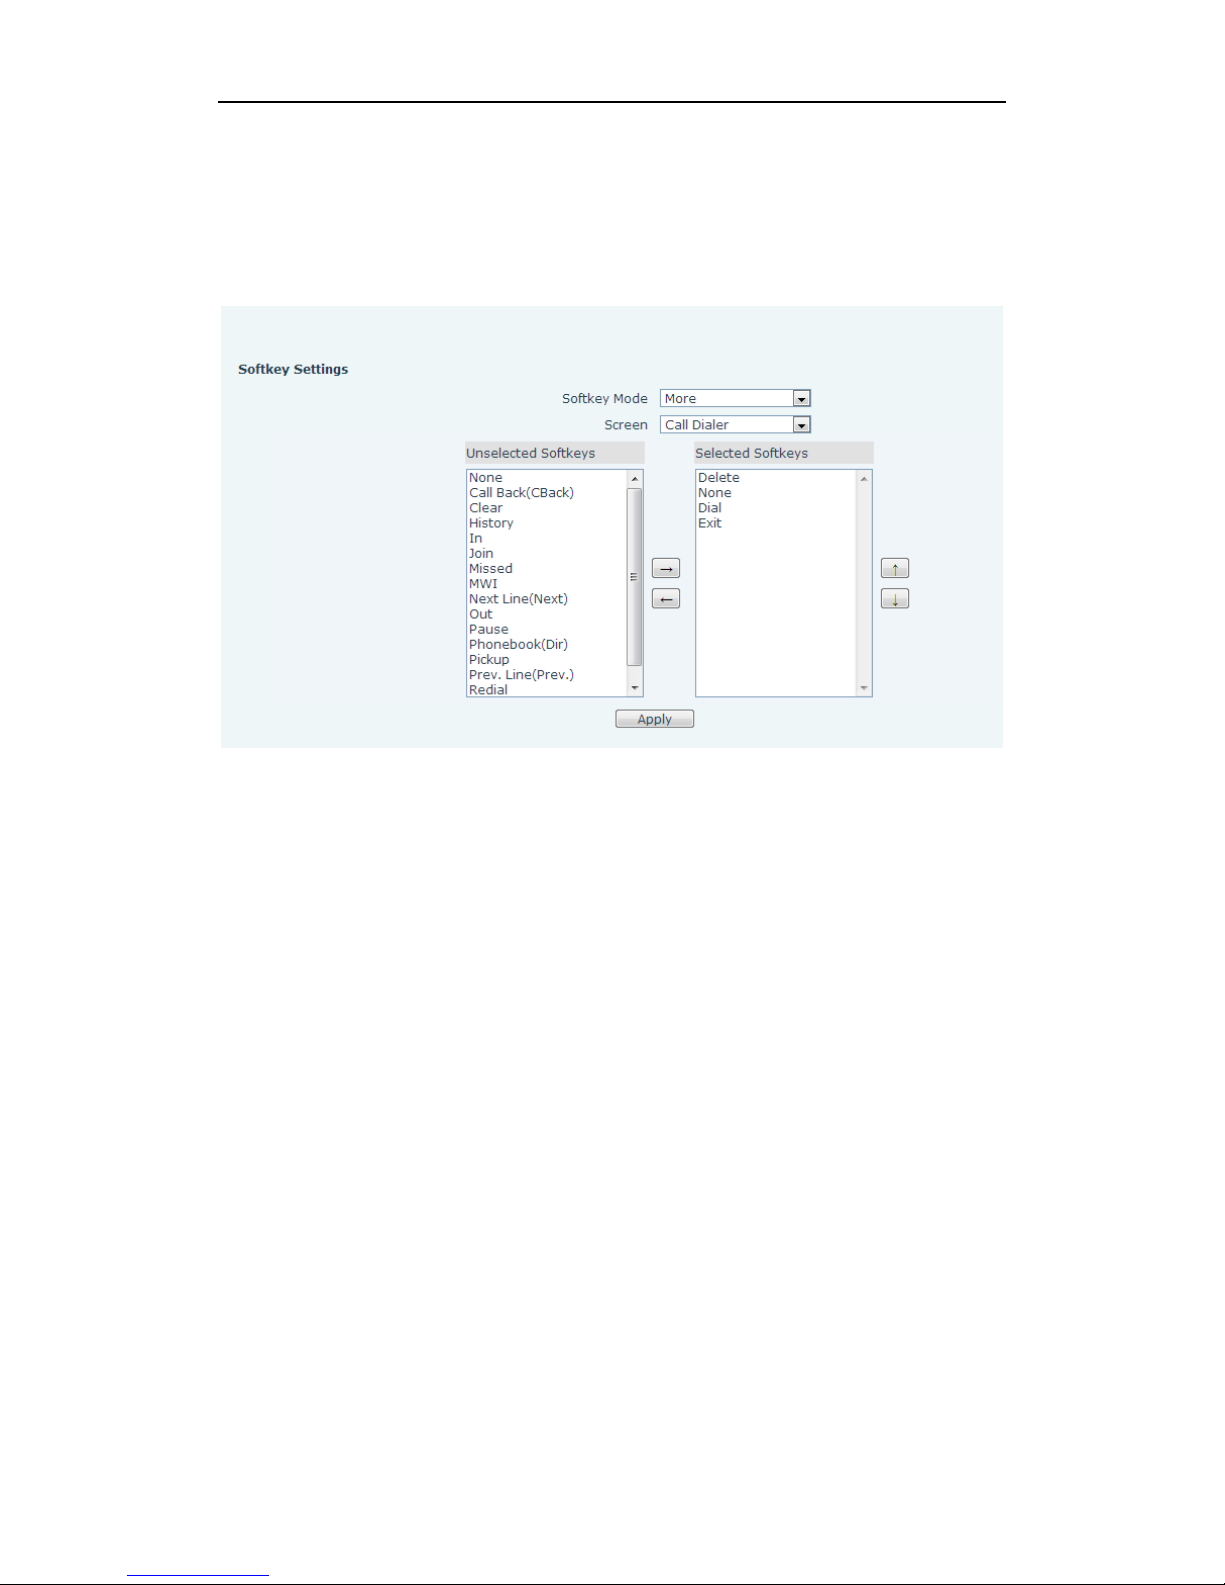
User Manual
SPEEDYTEL Technology CO Ltd
8.3.5FUNCTION KEY
8.3.5.1 SOFTKEY
SOFTKEY
You can configure different functions in different screens for every softkey.
Page 72
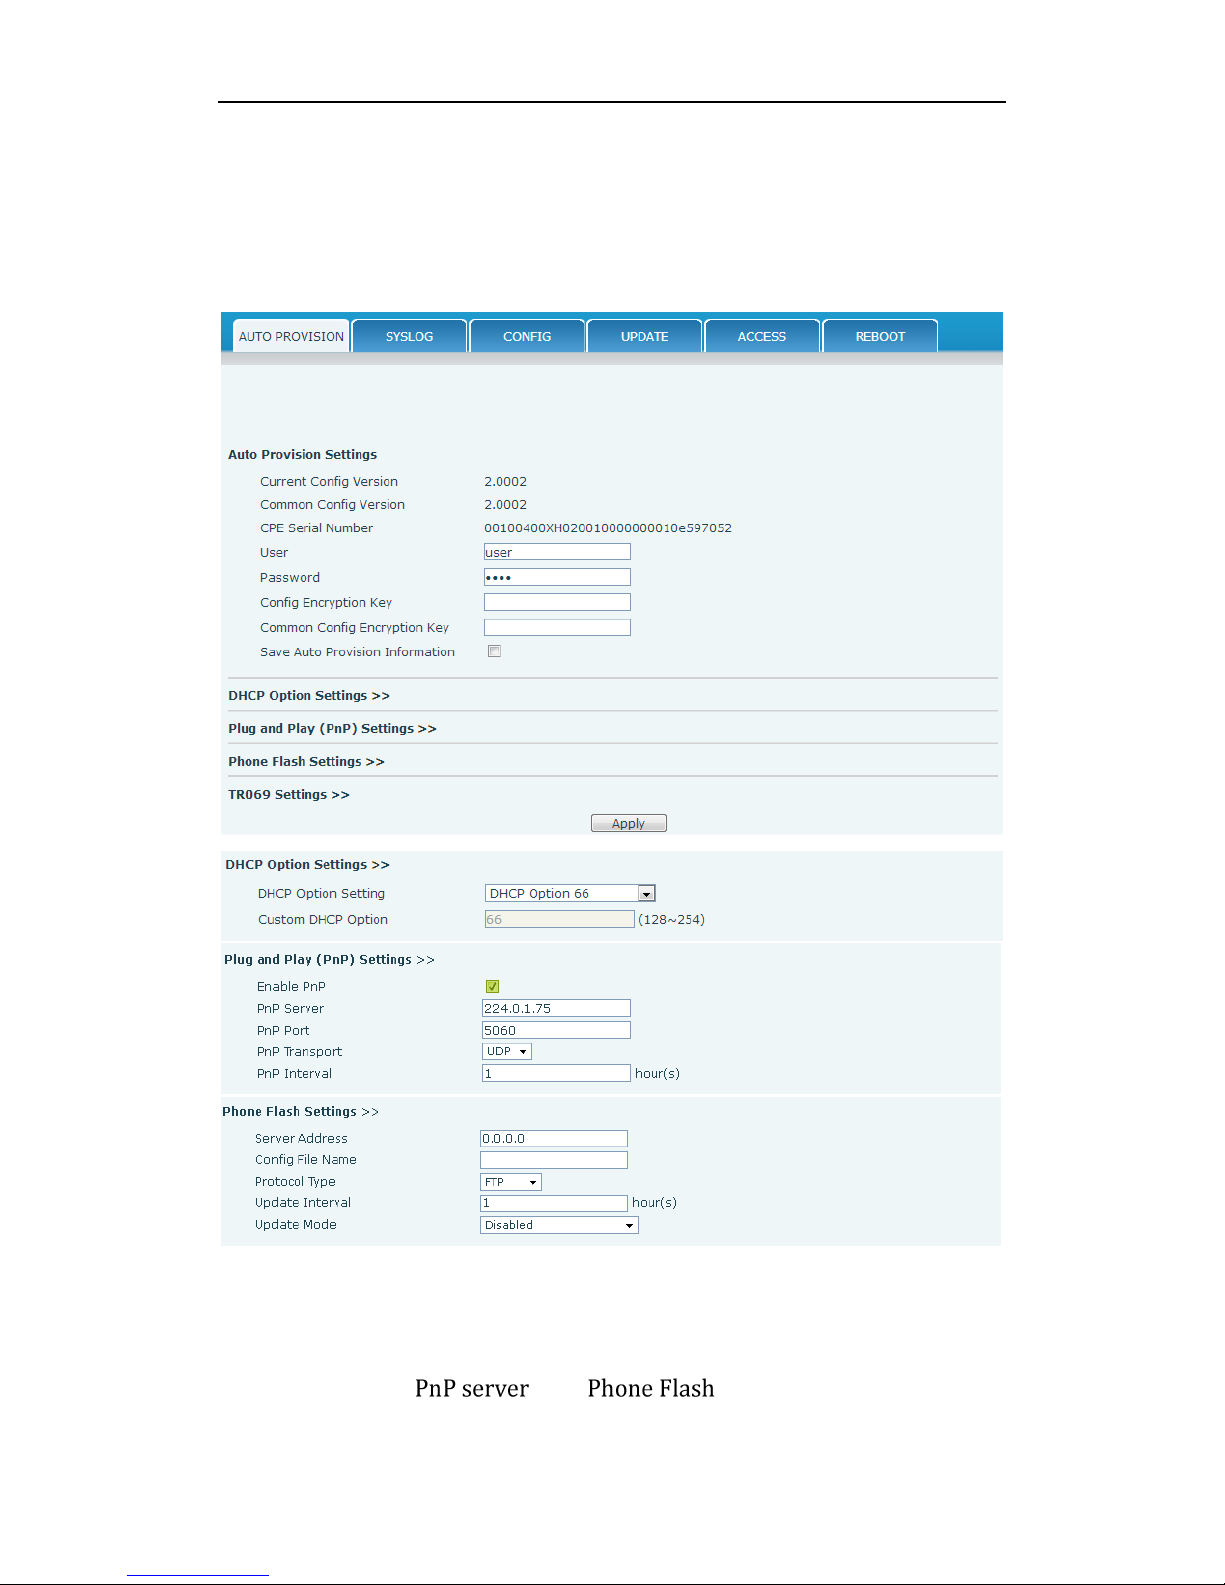
User Manual
SPEEDYTEL Technology CO Ltd
8.3.6 Maintenance
8.3.6.1 Auto Provision
SPEEDYTEL endpoint supports PnP and DHCP and Phone Flash to obtain
the parameters. The PnP and DHCP and Phone Flash are all deployed,
endpoint will go by the following process to try to obtain the server
address and other parameters, when it boots up:
DHCP option
Page 73

User Manual
SPEEDYTEL Technology CO Ltd
Auto Provision
Field name
explanation
Auto Update
Setting
Current Config
Version
Show the current config file’s version. If the version
of the configuration downloaded is higher than the
version of the running configurations, the auto
provision would upgrade, or stop here. If the
endpoints confirm the configuration by Digest
method, the endpoints wouldn’t upgrade
configuration unless the configuration in the server
is different with the running configuration.
Common Config
Version
Show the common config file’s version. If the
configuration downloaded and the running
configurations are the same, the auto provision
would stop here. If the endpoints confirm the
configuration by Digest method, the endpoints
wouldn’t upgrade configuration unless the
configuration in the server is different with the
running configuration.
CPE Serial Number
Show CPE Serial Number.
User
Specify FTP/HTTP/HTTPS server Username.
System will use anonymous if username keep
blank.
Password
Specify FTP/HTTP/HTTPS server Password.
Config Encrypt
Key
Input the Encrypt Key, if the configuration file is
encrypted.
Common Config
Encrypt Key
Input the Common Encrypt Key, if the Common
Configuration file is encrypted.
Save
Autoprovision
Information
Save the username and password authentication
message of http/https/ftp and input ID message in
the phone until the url in the server changes.
DHCP Option
Setting
DHCP Option
Setting
Specify DHCP Option. DHCP option supports DHCP
custom option and DHCP option 66 and DHCP
option 43 to obtain the parameters. You could
choose one method among them; the default is
DHCP option disable.
Custom DHCP
Option
A valid Custom DHCP Option is from 128 to 254.
The Custom DHCP Option must be in accordance
Page 74

User Manual
SPEEDYTEL Technology CO Ltd
with the one defined in the DHCP server.
Plug and Play
Enable PnP
Enable PnP by selecting it, than the phone will send
SIP SUBSCRIBE messages to a multicast address
when it boots up. Any SIP server understanding
that message will reply with a SIP NOTIFY message
containing the Auto Provisioning Server URL where
the phones can request their configuration.
PnP Server
Specify the PnP Server.
PnP Port
Specify the PnP Server.
PnP Transport
Specify the PnP Transfer protocol.
PnP Interval
Specify the Interval time, unit is hour.
Phone Flash
Server Address
Set FTP/TFTP/HTTP server IP address for auto
update. The address can be IP address or Domain
name with subdirectory.
Config File Name
Set configuration file’s name which need to update.
System will use MAC as config file name if config
file name keep blank. For example, 000102030405.
Protocol Type
Specify the Protocol type FTP, TFTP or HTTP.
Update Interval
Specify update interval time, unit is hour.
Update Mode
Different update modes:
1. Disable: means no update.
2. Update after reboot: means update after reboot.
3. Update at time interval: means periodic update.
TR069 Settings
Enable TR069
Enable TR069 by selecting it.
ACS Server Type
Specify the ACS Server Type.
ACS Server URL
Specify the ACS Server URL.
ACS User
Specify ACS User.
ACS Password
Specify ACS Password.
TR069 Auto Login
Enable TR069 Auto Login by selecting it.
"Inform" Sending
Period
Specify the “inform” Sending Period, unit is second.
8.3.6.2 SYSLOG
Syslog is a protocol which is used to record the log messages with
client/server mechanism. Syslog server receives the messages from clients,
and classifies them based on priority and type. Then these messages will
Page 75
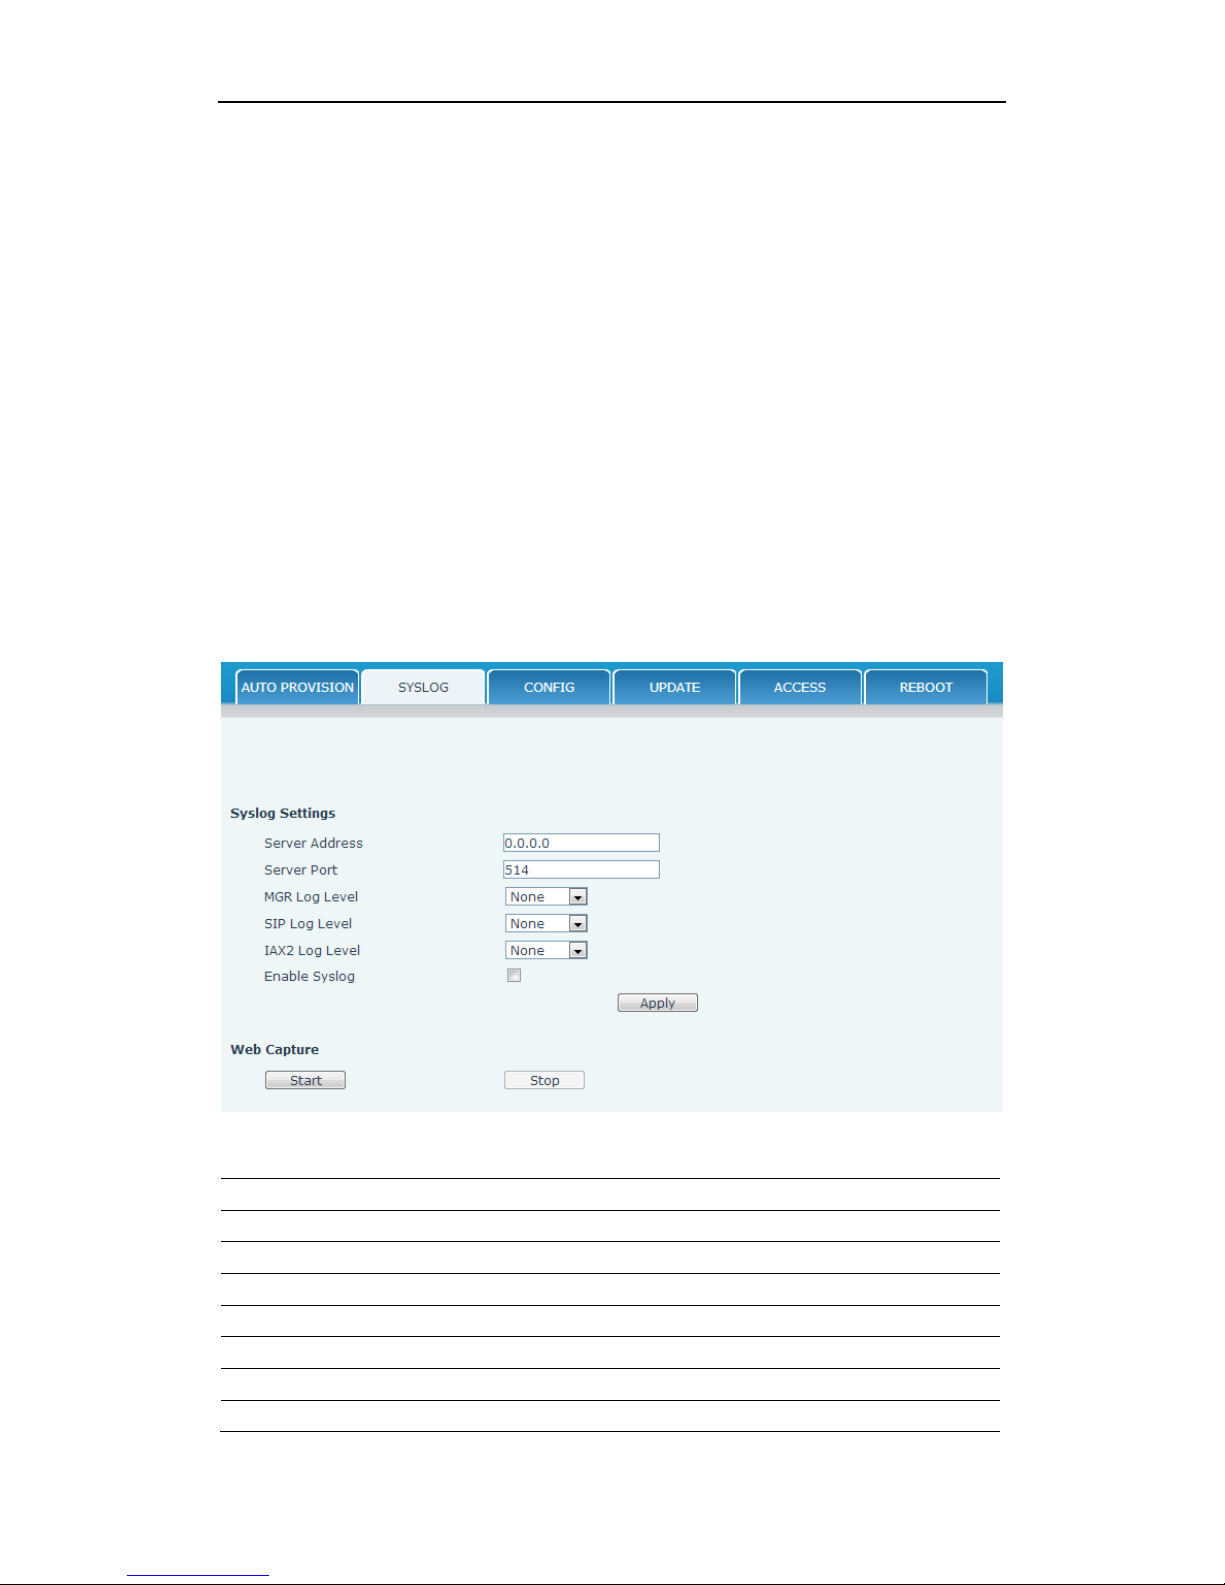
User Manual
SPEEDYTEL Technology CO Ltd
be written into log by some rules which administrator can configure. This
is a better way for log management.
8 levels in debug information:
Level 0---emergency: This is highest default debug info level. You system
cannot work.
Level 1---alert: Your system has deadly problem.
Level 2---critical: Your system has serious problem.
Level 3---error: The error will affect your system working.
Level 4---warning: There are some potential dangers. But your system can
work.
Level 5---notice: Your system works well in special condition, but you need
to check its working environment and parameter.
Level 6---info: the daily debugging info.
Level 7---debug: the lowest debug info Professional debugging info from
R&D person.
At present, the lowest level of debug information is info; debug level only
can be displayed on telnet.
Syslog Configuration
Field name
explanation
Syslog Setting
Server Address
Set Syslog server IP address.
Server Port
Set Syslog server port.
MGR Log Level
Set the level of MGR log.
SIP Log Level
Set the level of SIP log.
IAX2 Log Level
Set the level of IAX2 log.
Enable Syslog
Select it or not to enable or disable syslog.
Page 76
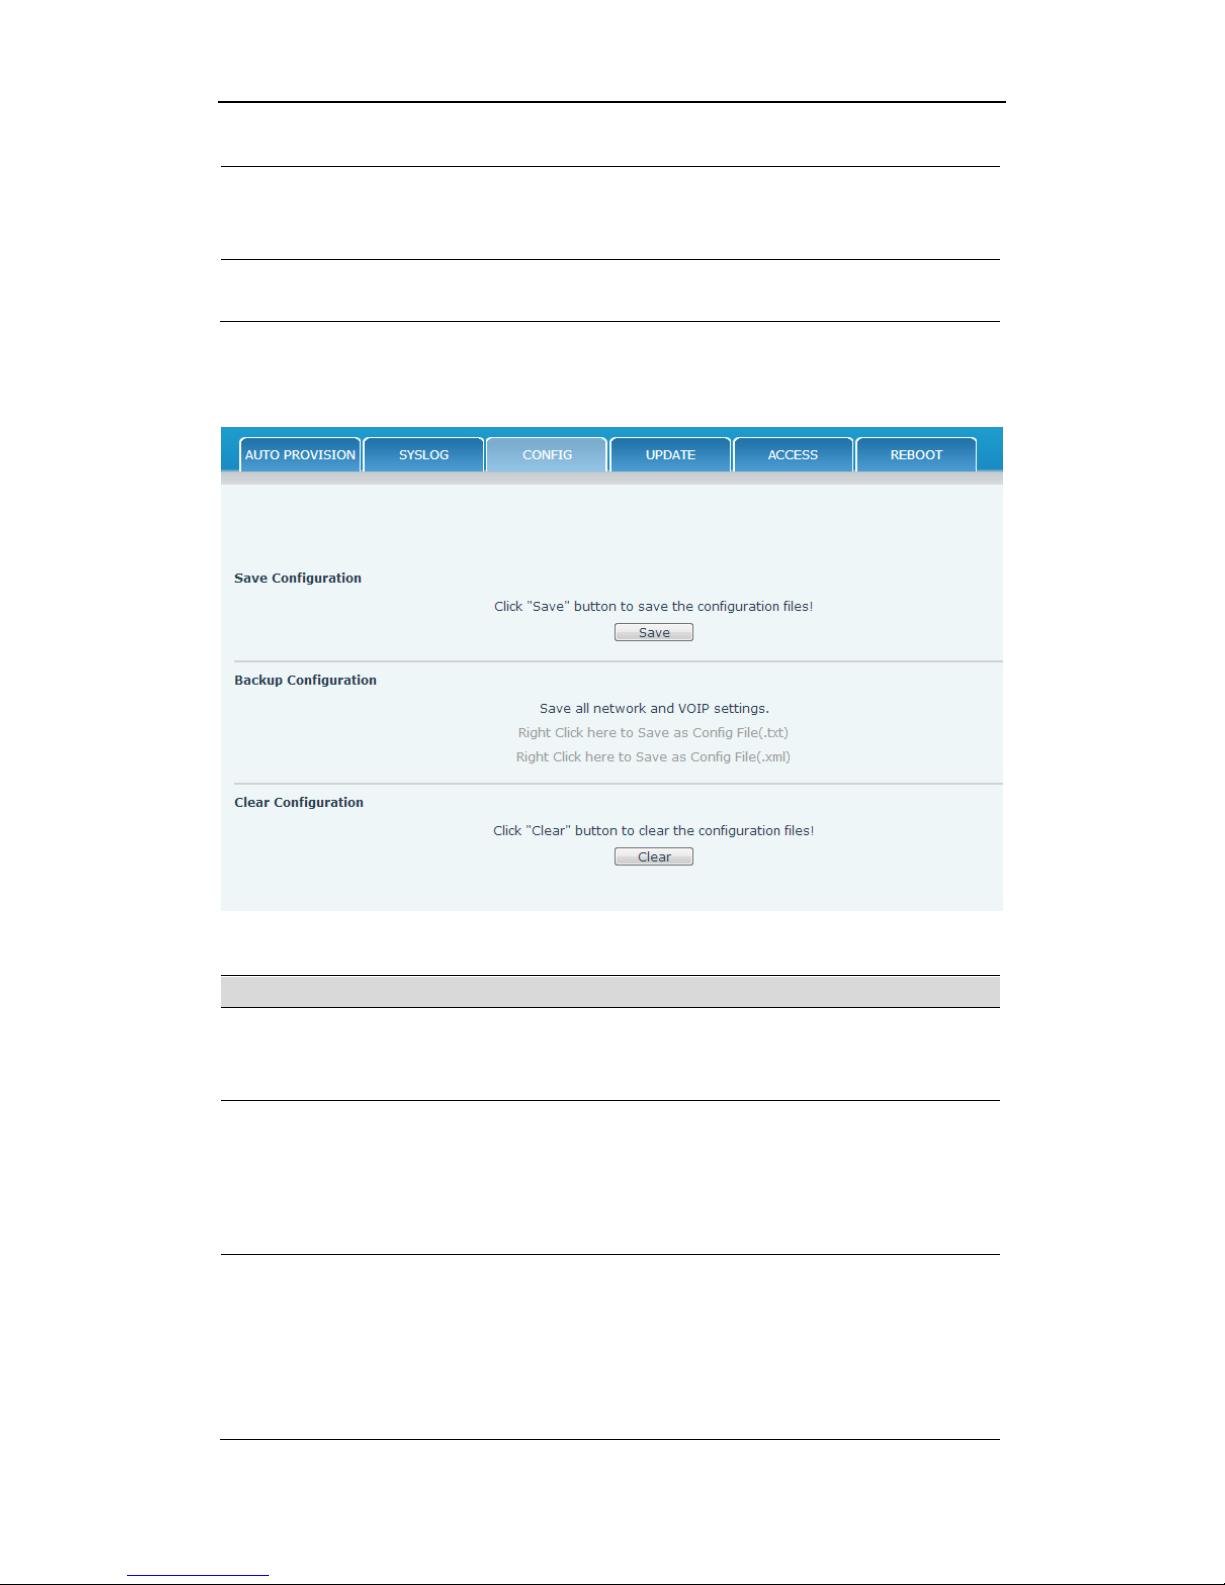
User Manual
SPEEDYTEL Technology CO Ltd
Web Capture
Start
Click the start button when you need capture the
WAN packet stream of the phone, then open or
save the file as the interface.
Stop
Click the end button to stop capturing the packet
stream.
8.3.6.3 CONFIG
Config Setting
Field name
Explanation
Save Configuration
You can save all changes of configurations. Click the
Save button, all changes of configuration will be
saved, and be effective immediately.
Backup
Configuration
Right clicks on “Right click here…” and select “Save
Target As config File(.txt)” then you will save the
config file in .txt format, or select “Save Target As
config File(.xml)” then you will save the config file
in .xml format.
Clear
Configuration
User can restore factory default configuration and
reboot the phone.
If you login as Admin, the phone will reset all
configurations and restore factory default; if you
login as Guest, the phone will reset all
configurations except for VoIP accounts (SIP1-2
Page 77
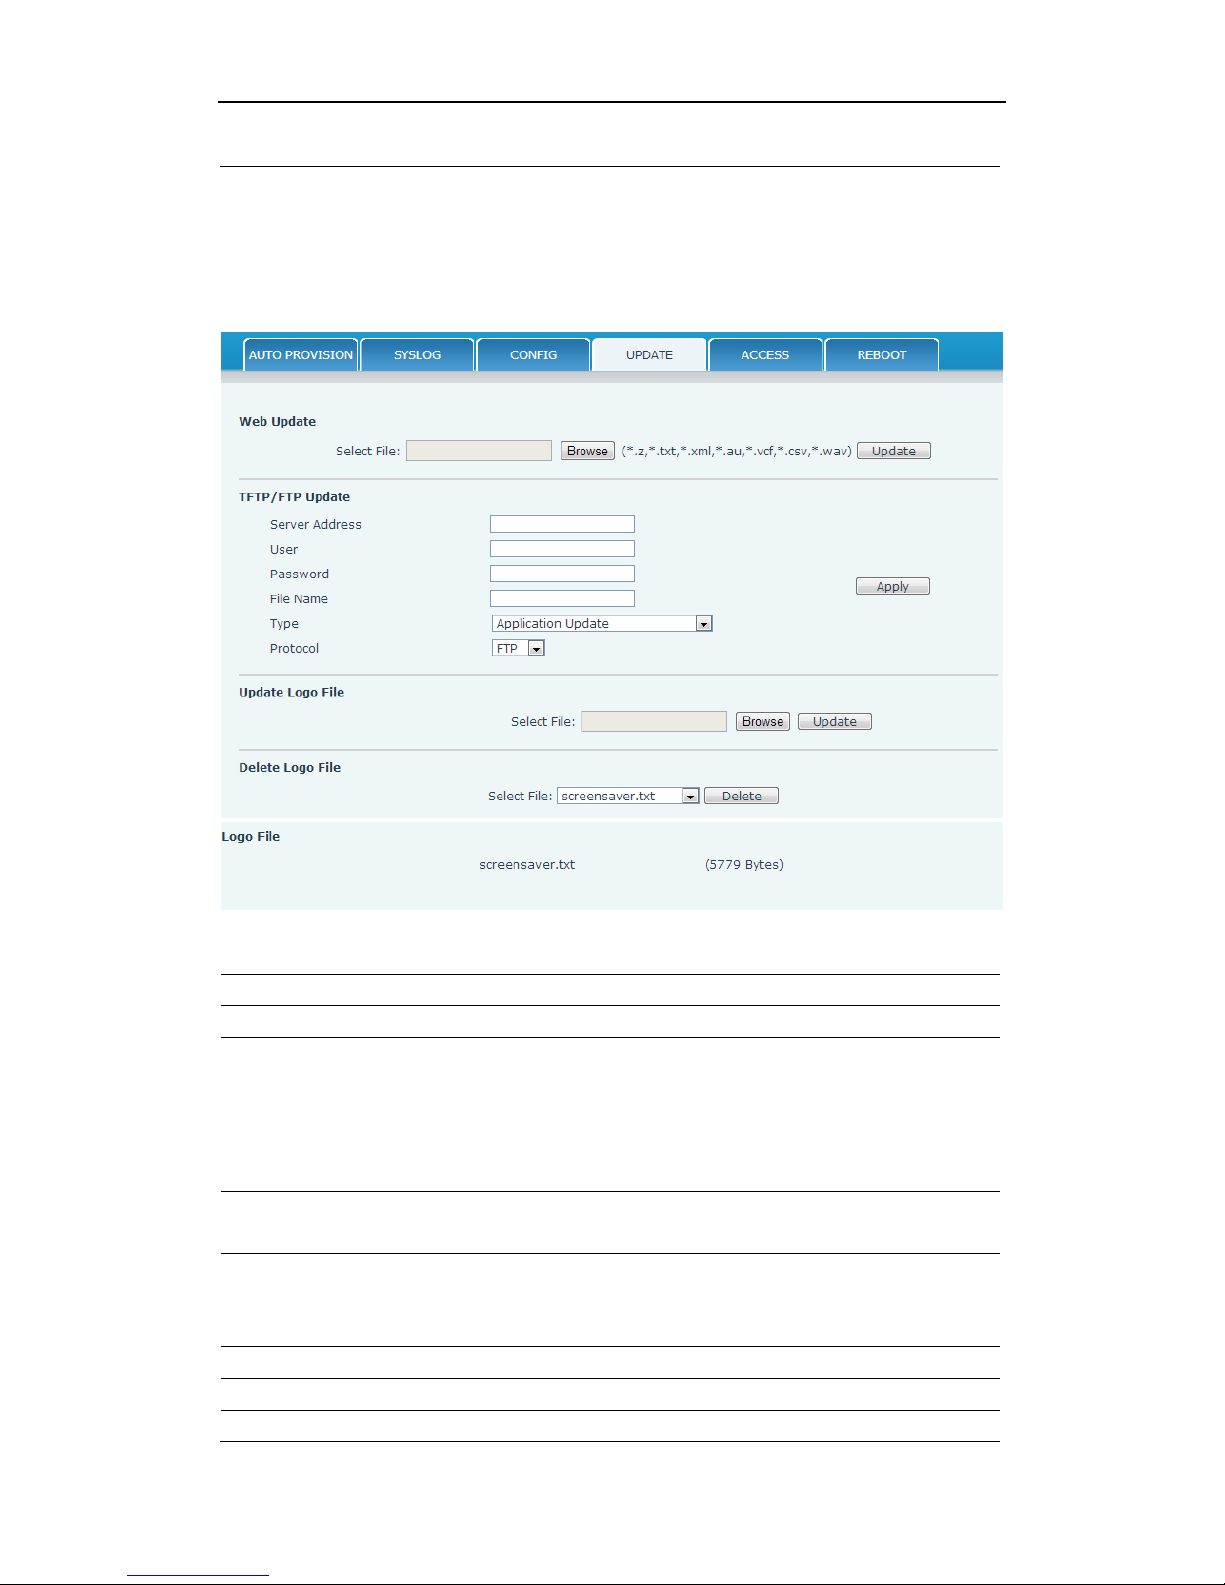
User Manual
SPEEDYTEL Technology CO Ltd
and IAX2) and version number.
8.3.6.4 UPDATE
You can update your configuration with your config file in this web page.
Update
Field name
Explanation
Web Update
Web Update
Click the browse button, find out the config file
saved before or provided by manufacturer,
download it to the phone directly, press “Update”
to save. You can also update downloaded update
file, logo picture, ring, mmiset file by web.
TFTP/FTP
Update
Server Address
Set the FTP/TFTP server address for
download/upload. The address can be IP address
or Domain name with subdirectory.
User
Set the FTP server Username for download/upload.
Password
Set the FTP server password for download/upload.
File name
Set the name of update file or config file. The
Page 78

User Manual
SPEEDYTEL Technology CO Ltd
default name is the MAC of the phone, such as
000102030405.
Notice: You can modify the exported config file. And you can also
download config file which includes several modules that need to be
imported. For example, you can download a config file just keep with SIP
module. After reboot, other modules of system still use previous setting
and are not lost.
Type
Action type that system want to execute:
1. Application update: download system update
file.
2. Config file export: Upload the config file to
FTP/TFTP server, name and save it.
3. Config fie import: Download the config file to
phone from FTP/TFTP server. The configuration
will be effective after the phone is reset.
4. Phone book export (.vcf): Upload the phonebook
file to FTP/TFTP server, name and save it.
5. PhoneBook import (.vcf): Download the
phonebook file to phone from FTP/TFTP server.
Protocol
Select FTP/TFTP server.
Update Logo File
Select File
Specify the url of the logo file.
Delete Logo File
Select File
Select the logo that you want to delete.
Logo File
Logo File
Show the logo file.
8.3.6.5 ACCESS
You can add or delete user account, and change the authority of each user
account in this web page.
Page 79
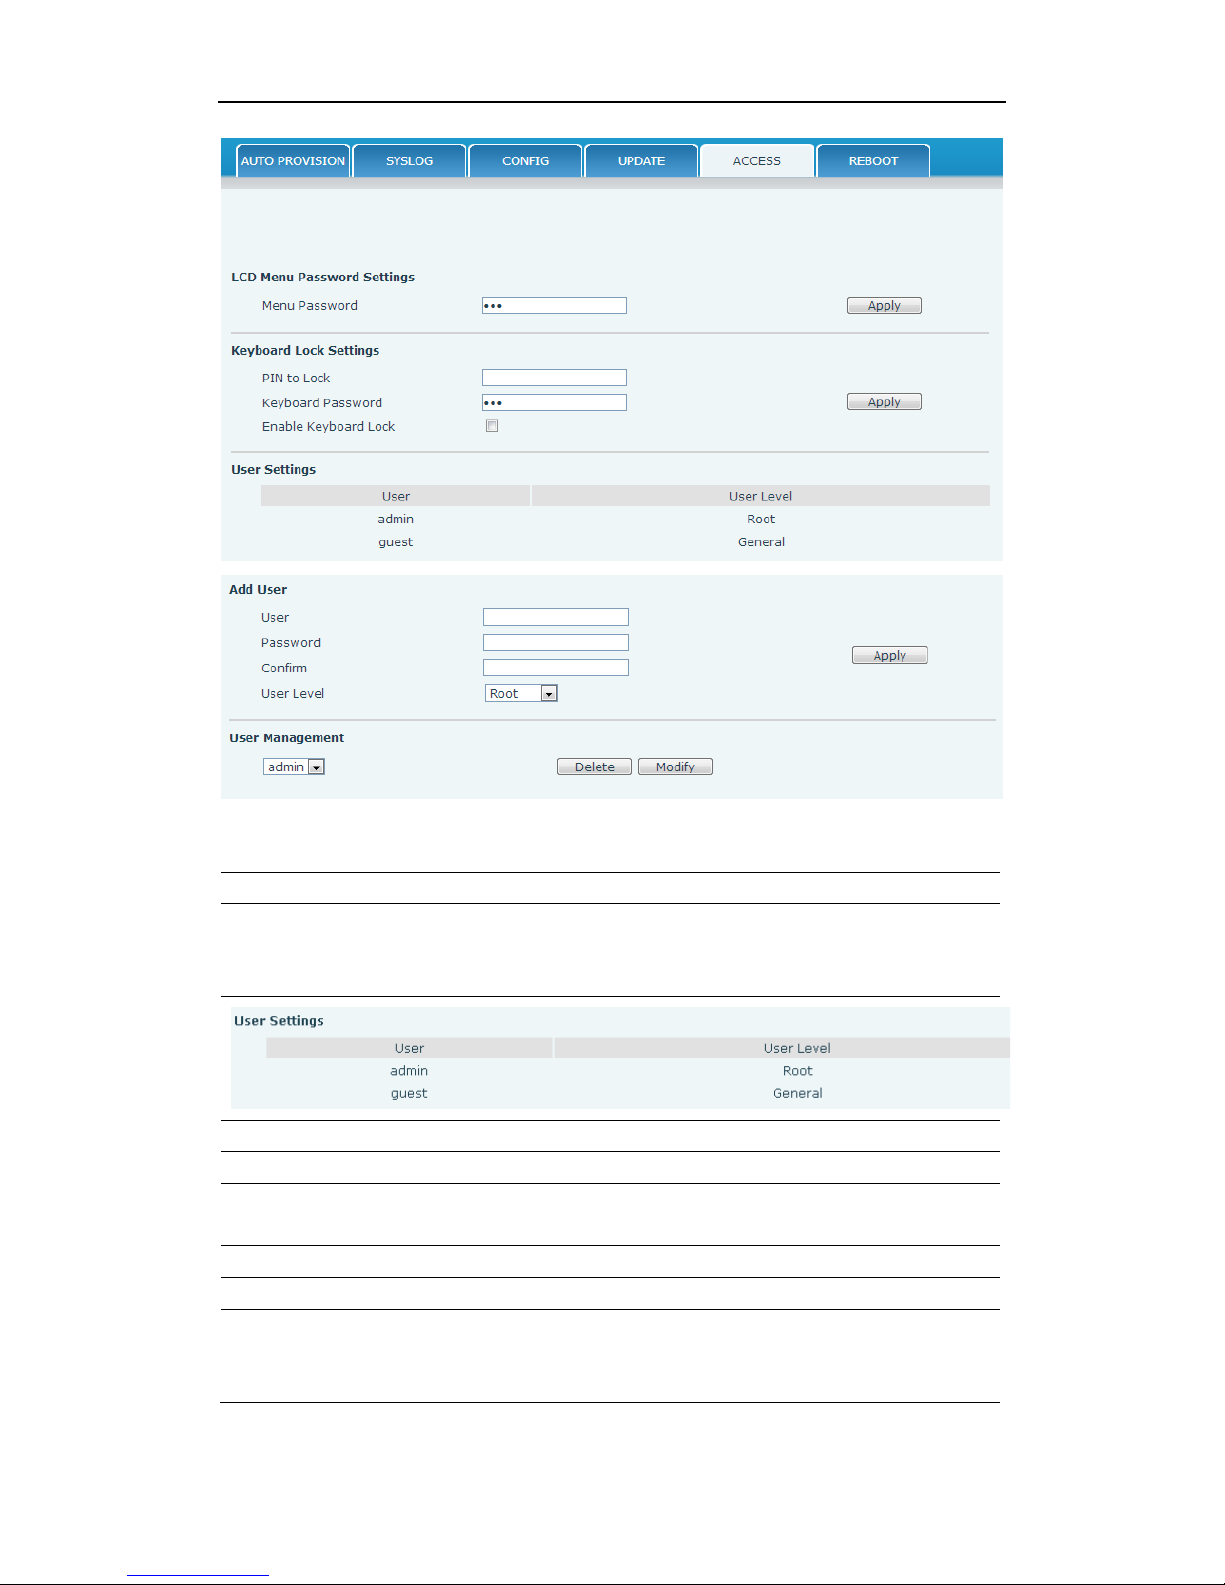
User Manual
SPEEDYTEL Technology CO Ltd
Access Configuration
Field name
explanation
Keyboard
Password
Set the password for entering the setting menu of
the phone by the phone‘s key board. The password
is digit.
This table shows the current user existed.
User
Set account user name.
User Level
Set user level, Root user has the right to modify
configuration, General can only read.
Password
Set the password.
Confirm
Confirm the password.
Select the account and click the Modify to modify the selected account,
and click the Delete to delete the selected account.
General user only can add the user whose level is General.
Page 80
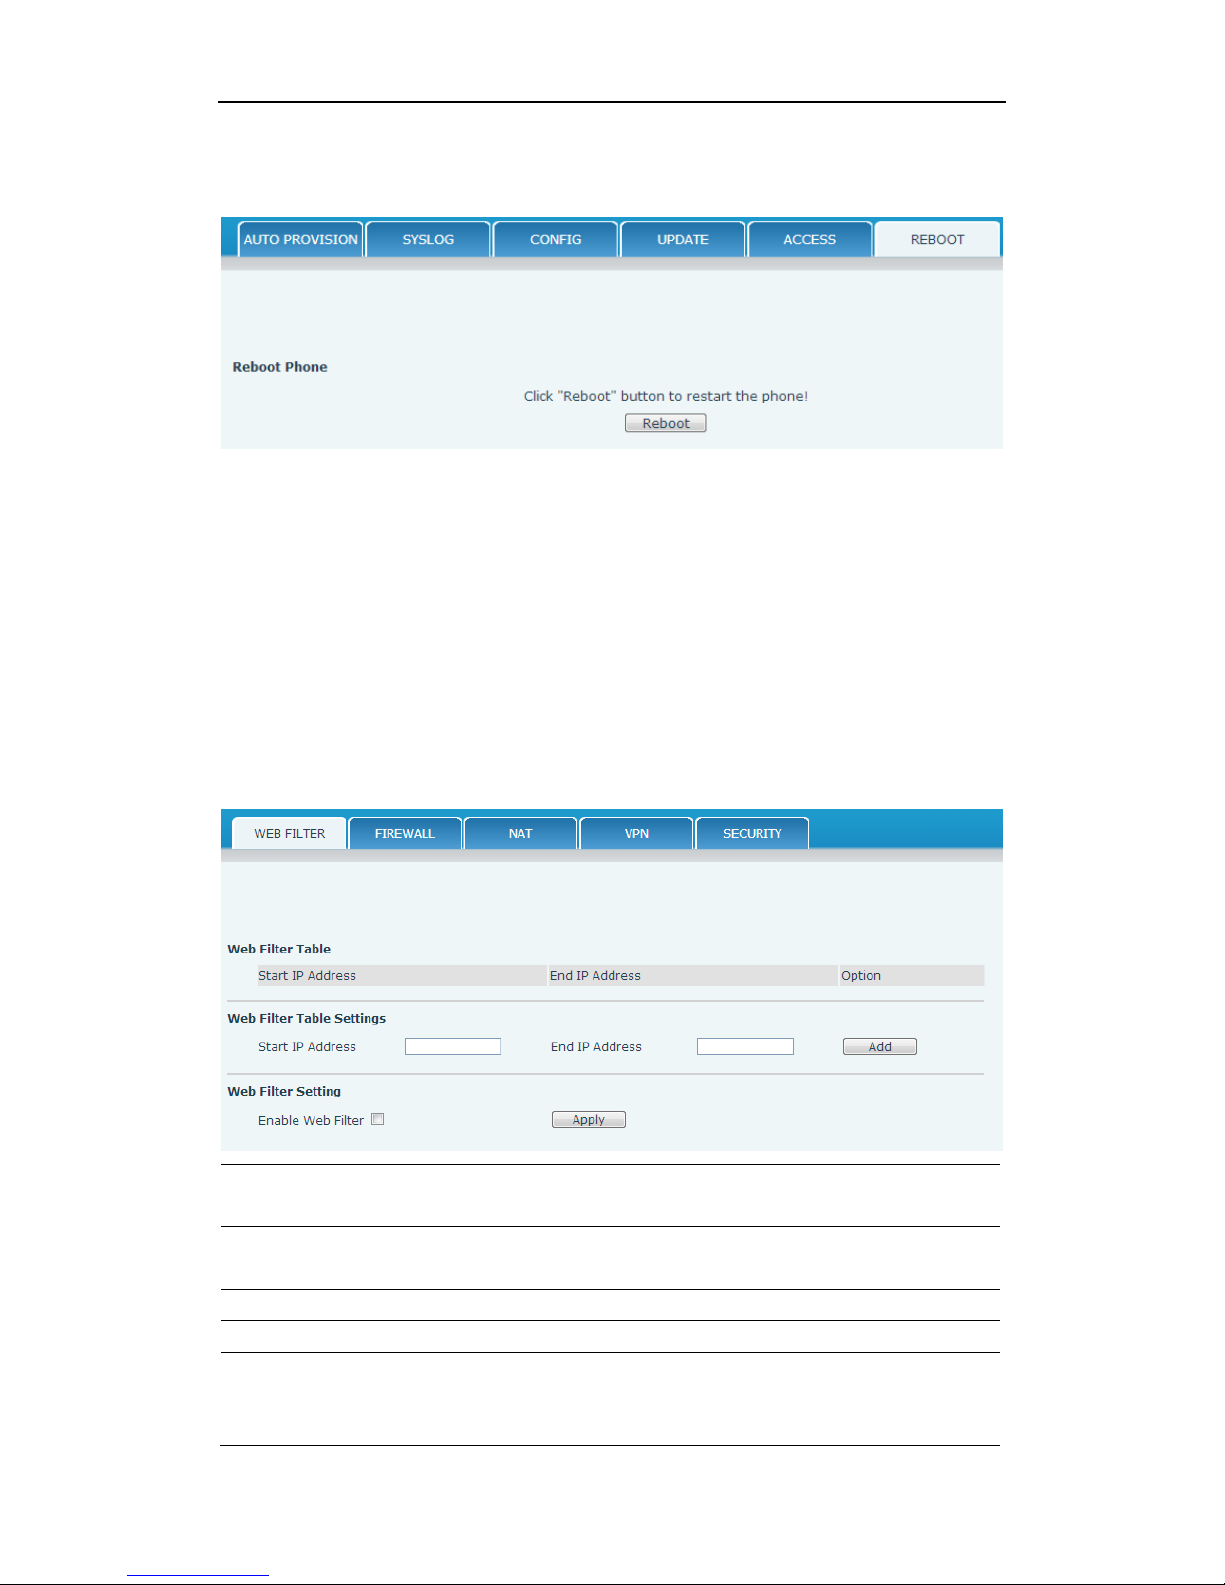
User Manual
SPEEDYTEL Technology CO Ltd
8.3.6.6 REBOOT
If you modified some configurations which need the phone’s reboot to be
effective, you need click the Reboot, then the phone will reboot
immediately.
Notice: Before reboot, you need confirm that you have saved all
configurations.
8.3.7 SECURITY
8.3.7.1 WEB FILTER
WEB Filter
User could make some device own IP, which is pre-specified, access to
the MMI of the phone to config and manage the phone.
Field name
explanation
Web Filter Table Settings:
Add or delete the IP address segments that access to the phone.
Set initial IP address in the Start IP column, Set end IP address in the End
IP column, and click Add to add this IP segment. You can also click Delete
Page 81
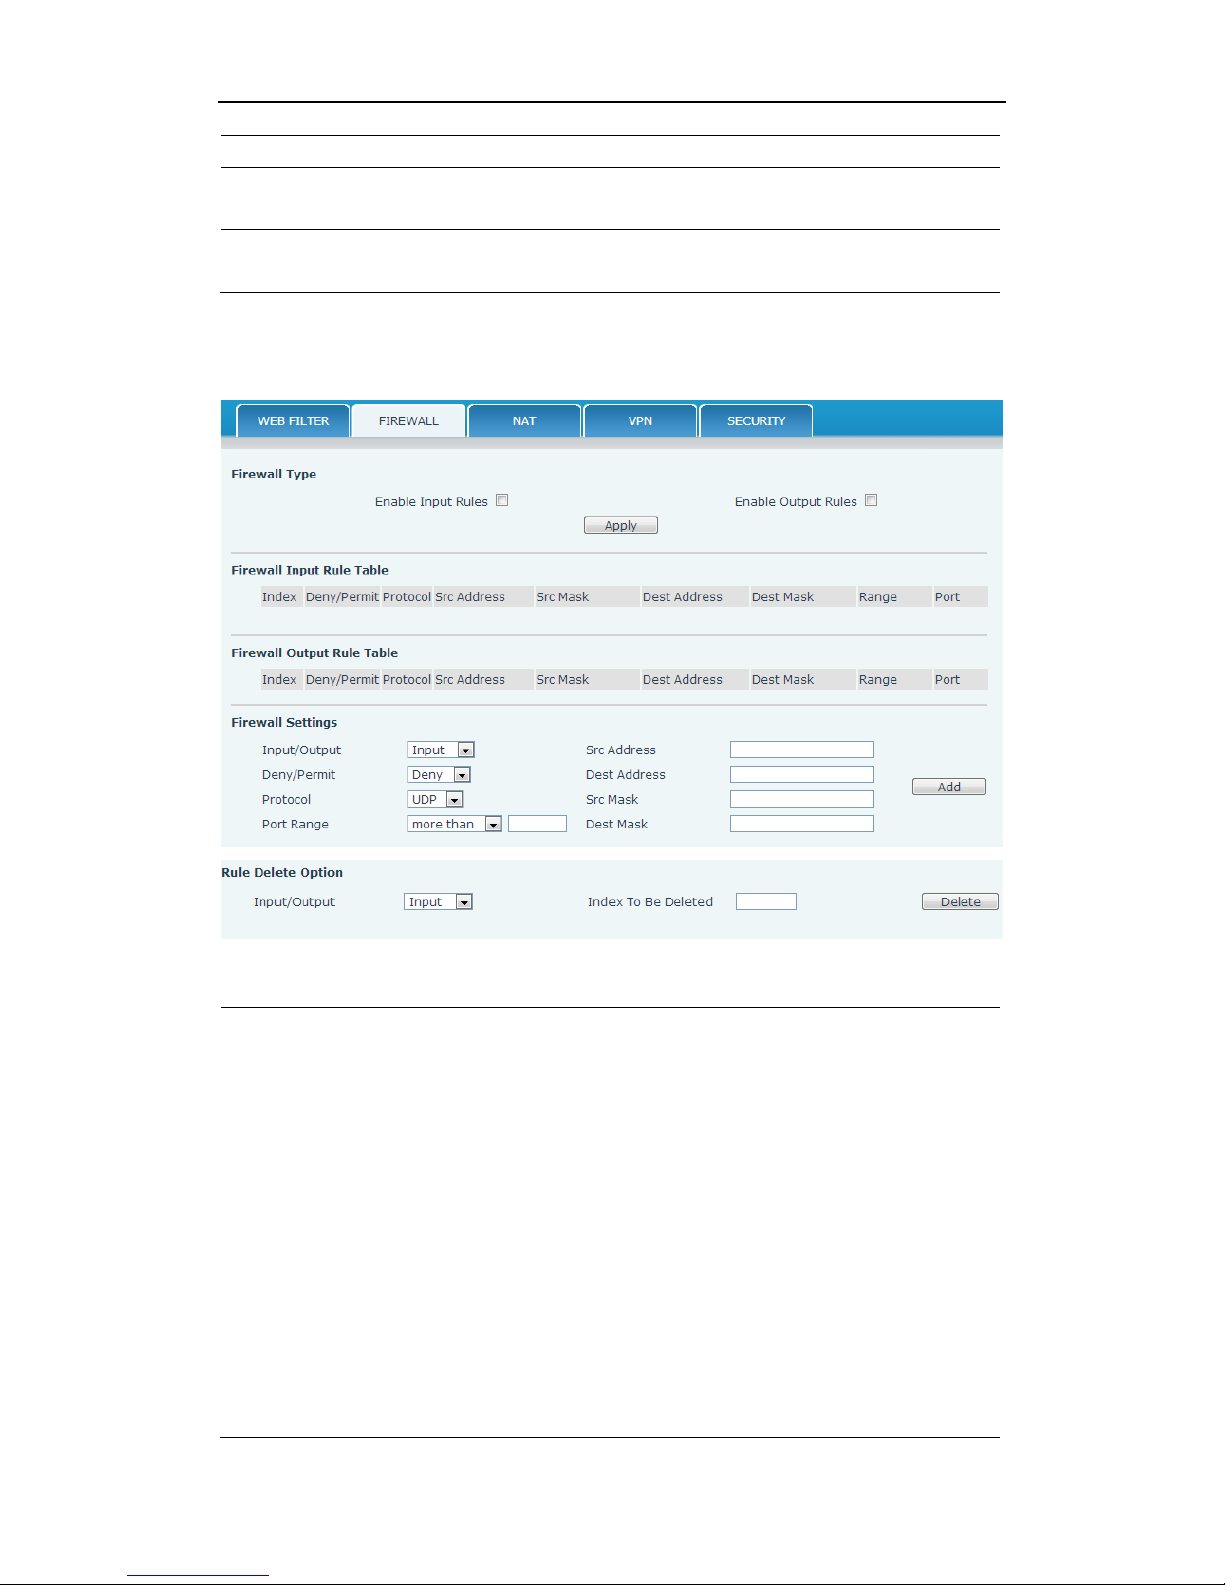
User Manual
SPEEDYTEL Technology CO Ltd
to delete the selected IP segment.
Web Filter setting
Select it or not to enable or disable Web Filter. Click
Apply to make it effective.
Notice: Do not set your visiting IP outside the Web filter range,
otherwise, you cannot logon through the web.
8.3.7.2 FIREWALL
Firewall Configuration
In this web interface, you can set up firewall to prevent unauthorized
Internet users from accessing private networks connected to the
Internet (input rule), or prevent unauthorized private network devices
from accessing the Internet (output rule).
Firewall supports two types of rules: input access rule and output access
rule. Each type supports at most 10 items.
Through this web page, you could set up and enable/disable firewall
with input/output rules. System could prevent unauthorized access, or
access other networks set in rules for security. Firewall, is also called
access list, is a simple implementation of a Cisco-like access list
(firewall). It supports two access lists: one for filtering input packets,
and the other for filtering output packets. Each kind of list could be
added 10 items.
We will give you an instance for your reference.
Page 82

User Manual
SPEEDYTEL Technology CO Ltd
Field name
explanation
Enable Input Rules
Select it to Enable Input Rules.
Enable Output
Rules
Select it to Enable Output Rules.
Input / Output
Specify current adding rule by selecting input rule
or output rule.
Deny/Permit
Specify current adding rule by selecting Deny rule
or Permit rule.
Protocol
Filter protocol type. You can select TCP, UDP, ICMP,
or IP.
Port Range
Set the filter Port range.
Src Address
Set source address. It can be single IP address,
network address, complete address 0.0.0.0, or
network address similar to *.*.*.0.
Des Address
Set the destination address. It can be IP address,
network address, complete address 0.0.0.0, or
network address similar to *.*.*.*.
Src Mask
Set the source address’ mask. For example,
255.255.255.255 means just point to one host;
255.255.255.0 means point to a network which
network ID is C type.
Dest Mask
Set the destination address’ mask. For example,
255.255.255.255 means just point to one host;
255.255.255.0 means point to a network which
network ID is C type.
Click the Add button if you want to add a new output rule.
Then enable out access, and click the Apply button.
So when devices execute to ping 192.168.1.118, system will deny the
request to send icmp request to 192.168.1.118 for the out access rule.
But if devices ping other devices which network ID is 192.168.1.0, it will
be normal.
Click the Delete button to delete the selected rule.
8.3.7.3 NAT
NAT is abbreviated from Net Address Translation; it’s a protocol
responsible for IP address translation. In other word, it is responsible for
transforming IP and port of private network to public, also is the IP
address mapping which we usually say.
Page 83
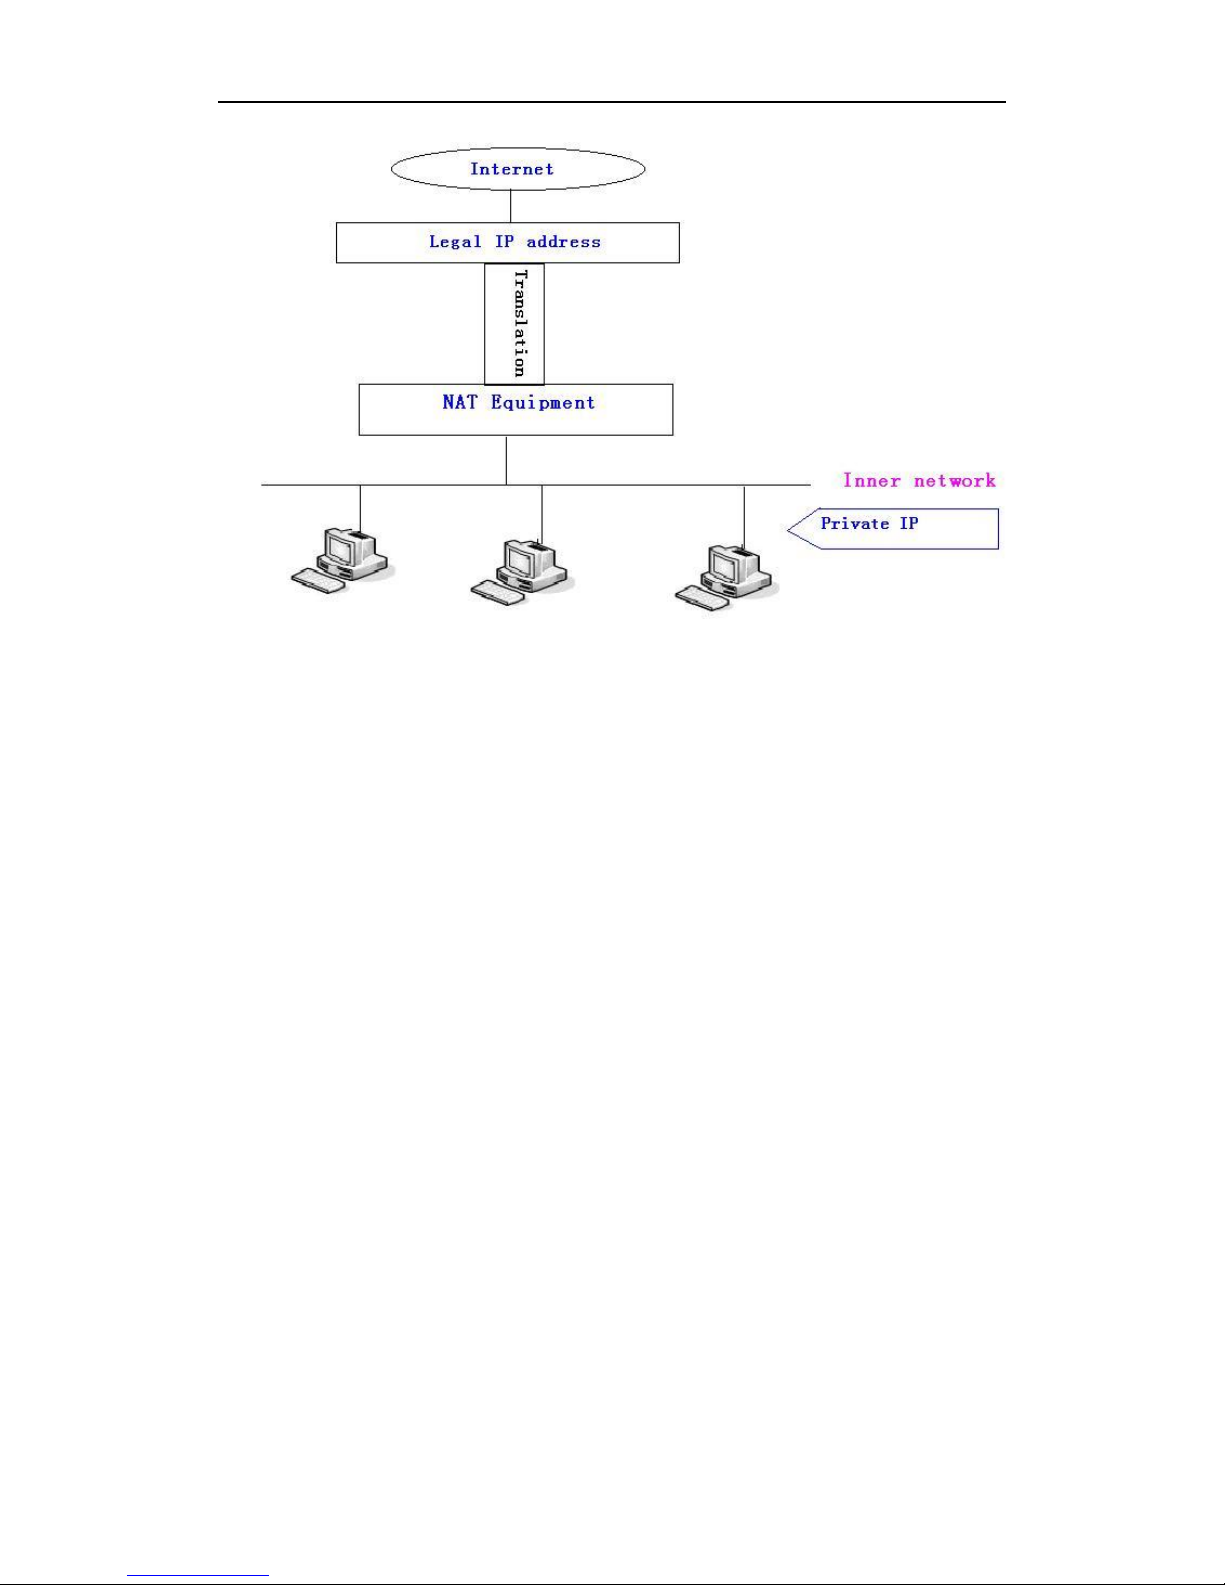
User Manual
SPEEDYTEL Technology CO Ltd
DMZ config:
In order to make some intranet equipment support better service for
extranet, and make internal network security more effectively, these
equipment open to extranet need be separated from the other equipment
not open to extranet by the corresponding isolation method according to
different demands. We can provide the different security level protection
in terms of the different resources by building a DMZ region which can
provide the network level protection for the equipment environment,
reduce the risk which is caused by providing service to distrust customer,
and is the best position to put public information
The following chart describes the network access control of DMZ.
Page 84
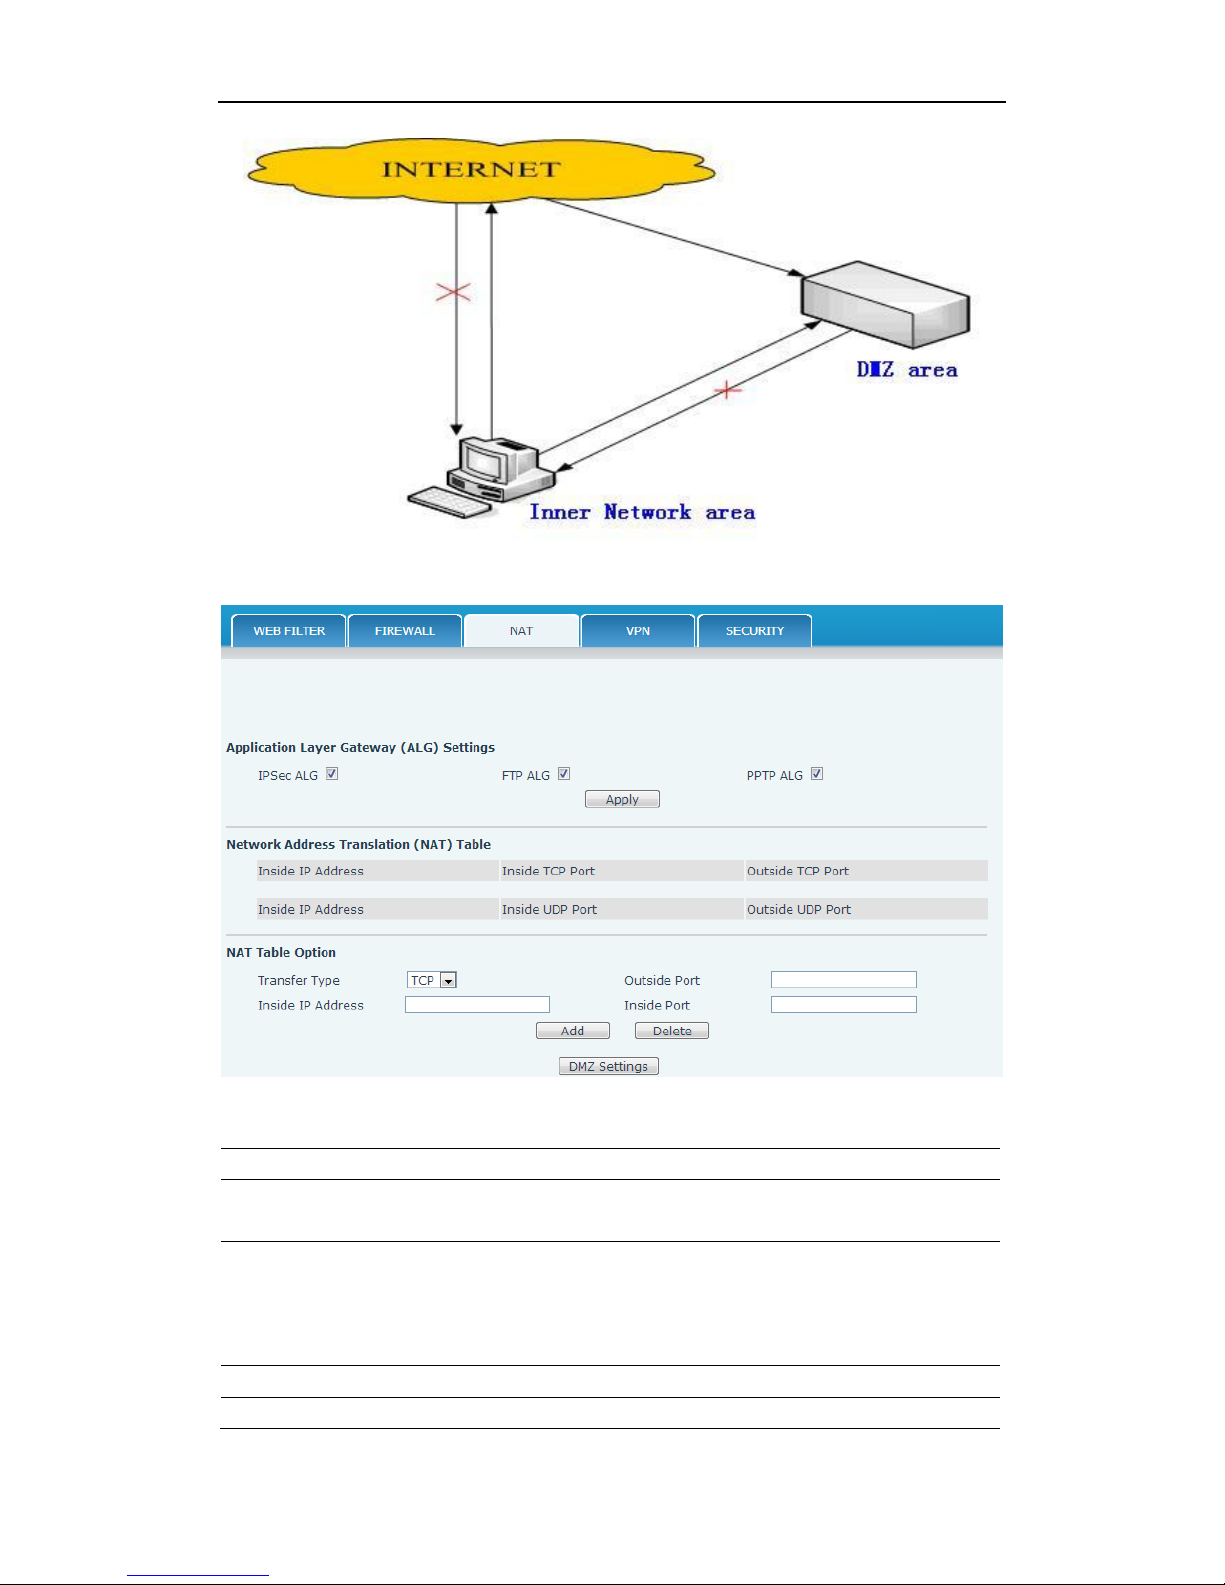
User Manual
SPEEDYTEL Technology CO Ltd
NAT Configuration
Field name
explanation
IPSec ALG
It is an encryption technology. Select it to enable
IPSec ALG, the default is enabled.
FTP ALG
FTP is a service of connection layer which can
transform intranet IP into extranet IP when
intranet IP is sending out packet.
Select it to enable FTP ALG, the default is enabled.
PPTP ALG
Select it enable PPTP ALG, the default is enabled.
Shows the NAT TCP mapping table
Page 85
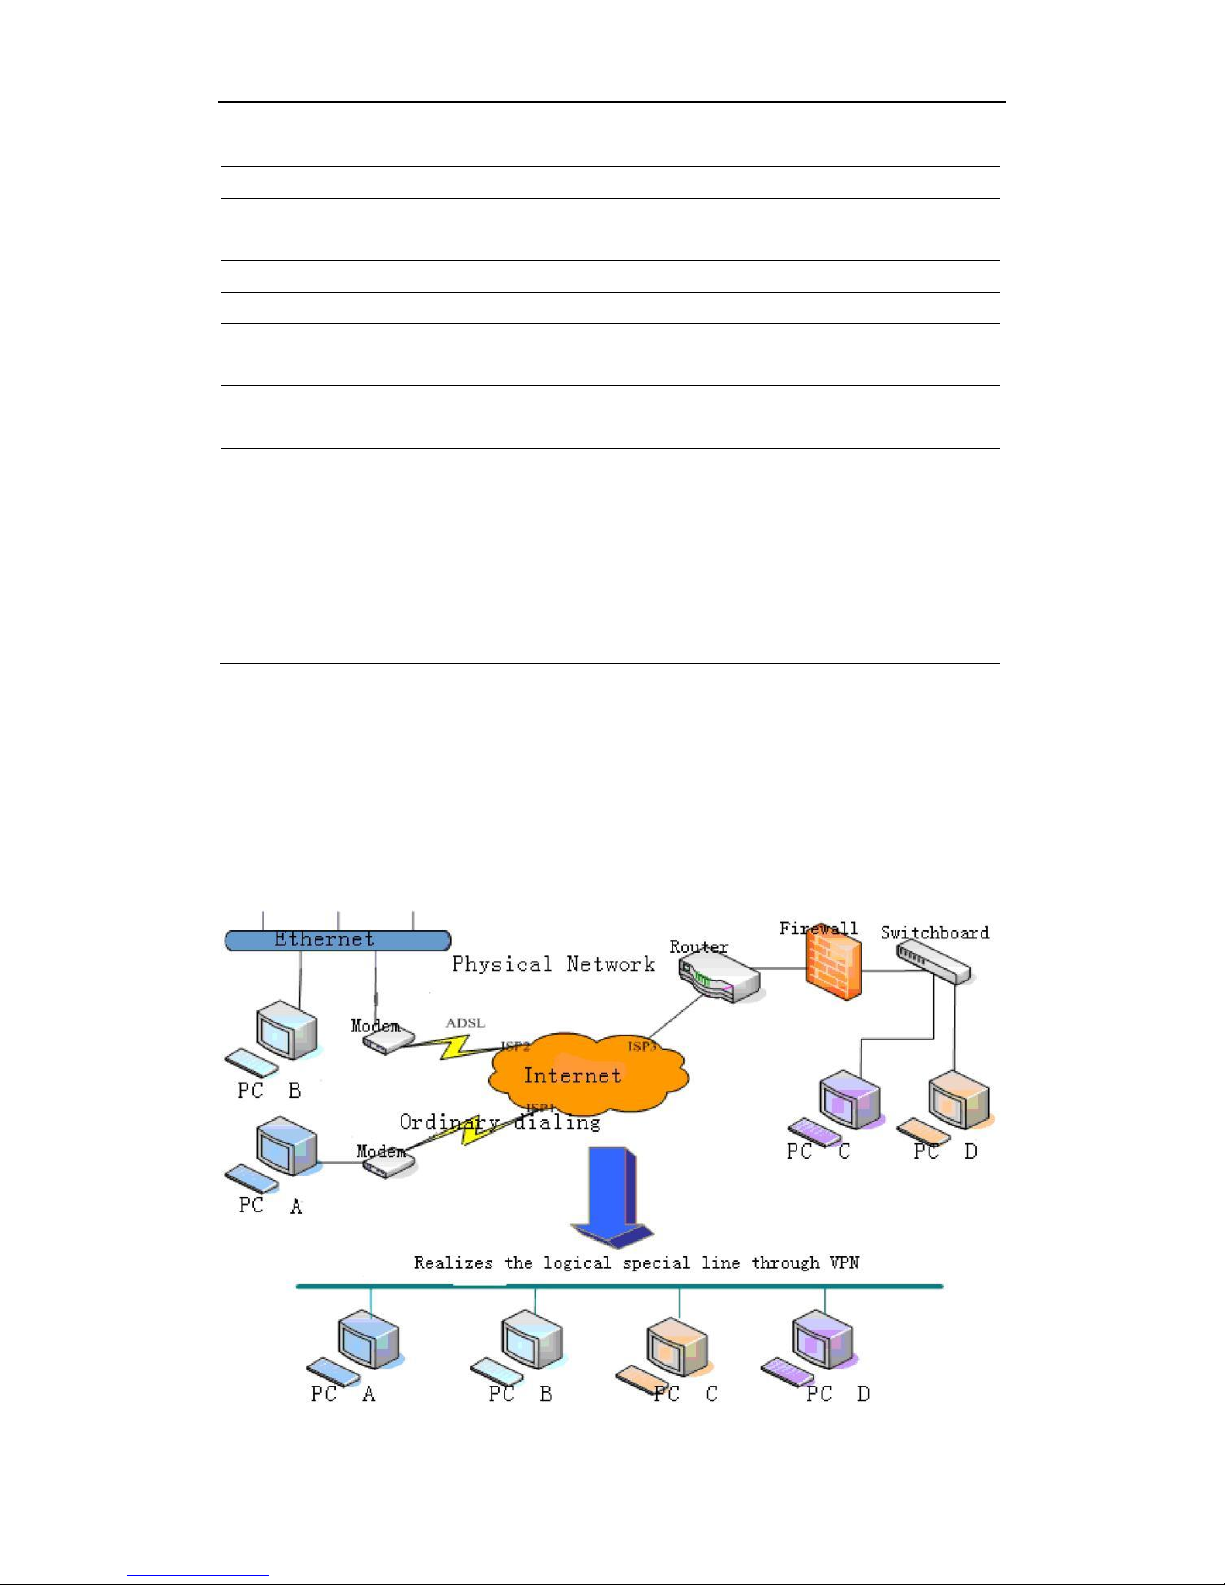
User Manual
SPEEDYTEL Technology CO Ltd
Shows the NAT UDP mapping table
Transfer Type
Select the NAT mapping protocol style, TCP or UDP
Inside IP
Set the IP address of device which is connected to
LAN interface to do NAT mapping.
Inside Port
Set the LAN port of the NAT mapping
Outside Port
Set the WAN port of the NAT mapping
Notice: After finish setting, click the Add button to add new mapping
table; click the Delete button to delete the selected mapping table.
Shows the outside WAN port IP address and the inside LAN port IP
address.
Notice: 10M/100M adaptive means the network card, and other
equipment physical consultations speed, testing speed under bridge
mode near to 100M, in order to ensure the quality of voice and
communications real-time performance, we made some sacrifices of
NAT under the transmission performance. Transmit with full capability
only when system is idle, so cannot guarantee that the transmission
speed reach to 100M.
8.3.7.4 VPN
This web page provides us a safe connect mode by which we can make
remote access to enterprise inner network from public network. That is to
say, you can set it to connect public networks in different areas into inner
network via a special tunnel.
Page 86
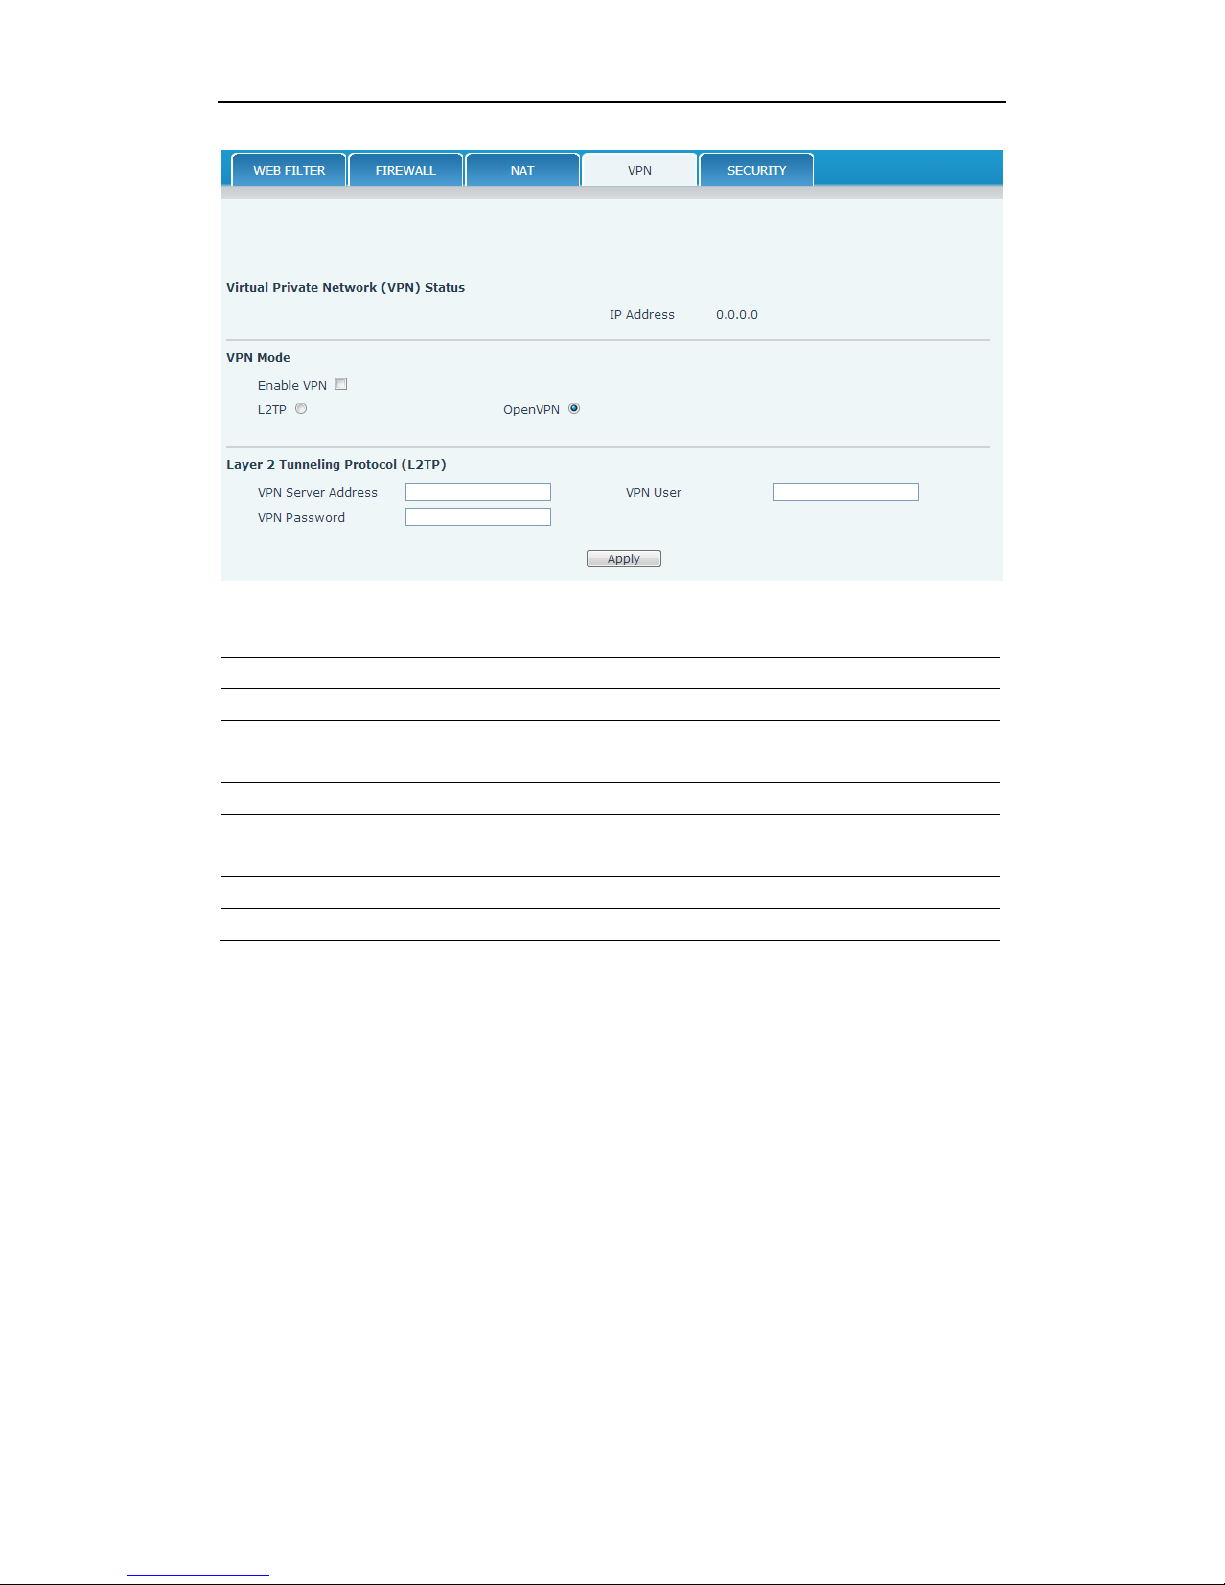
User Manual
SPEEDYTEL Technology CO Ltd
VPN Configuration
Field name
explanation
VPN IP
Shows the current VPN IP address.
Select L2TP. You can choose only one for current state. After you select
it, you’d better save configuration and reboot your phone.
Enable VPN
Select it or not to enable or disable VPN.
VPN Server
Address
Set VPN L2TP Server IP address.
VPN User
Set User Name access to VPN L2TP Server.
VPN Password
Set Password access to VPN L2TP Server.
Page 87
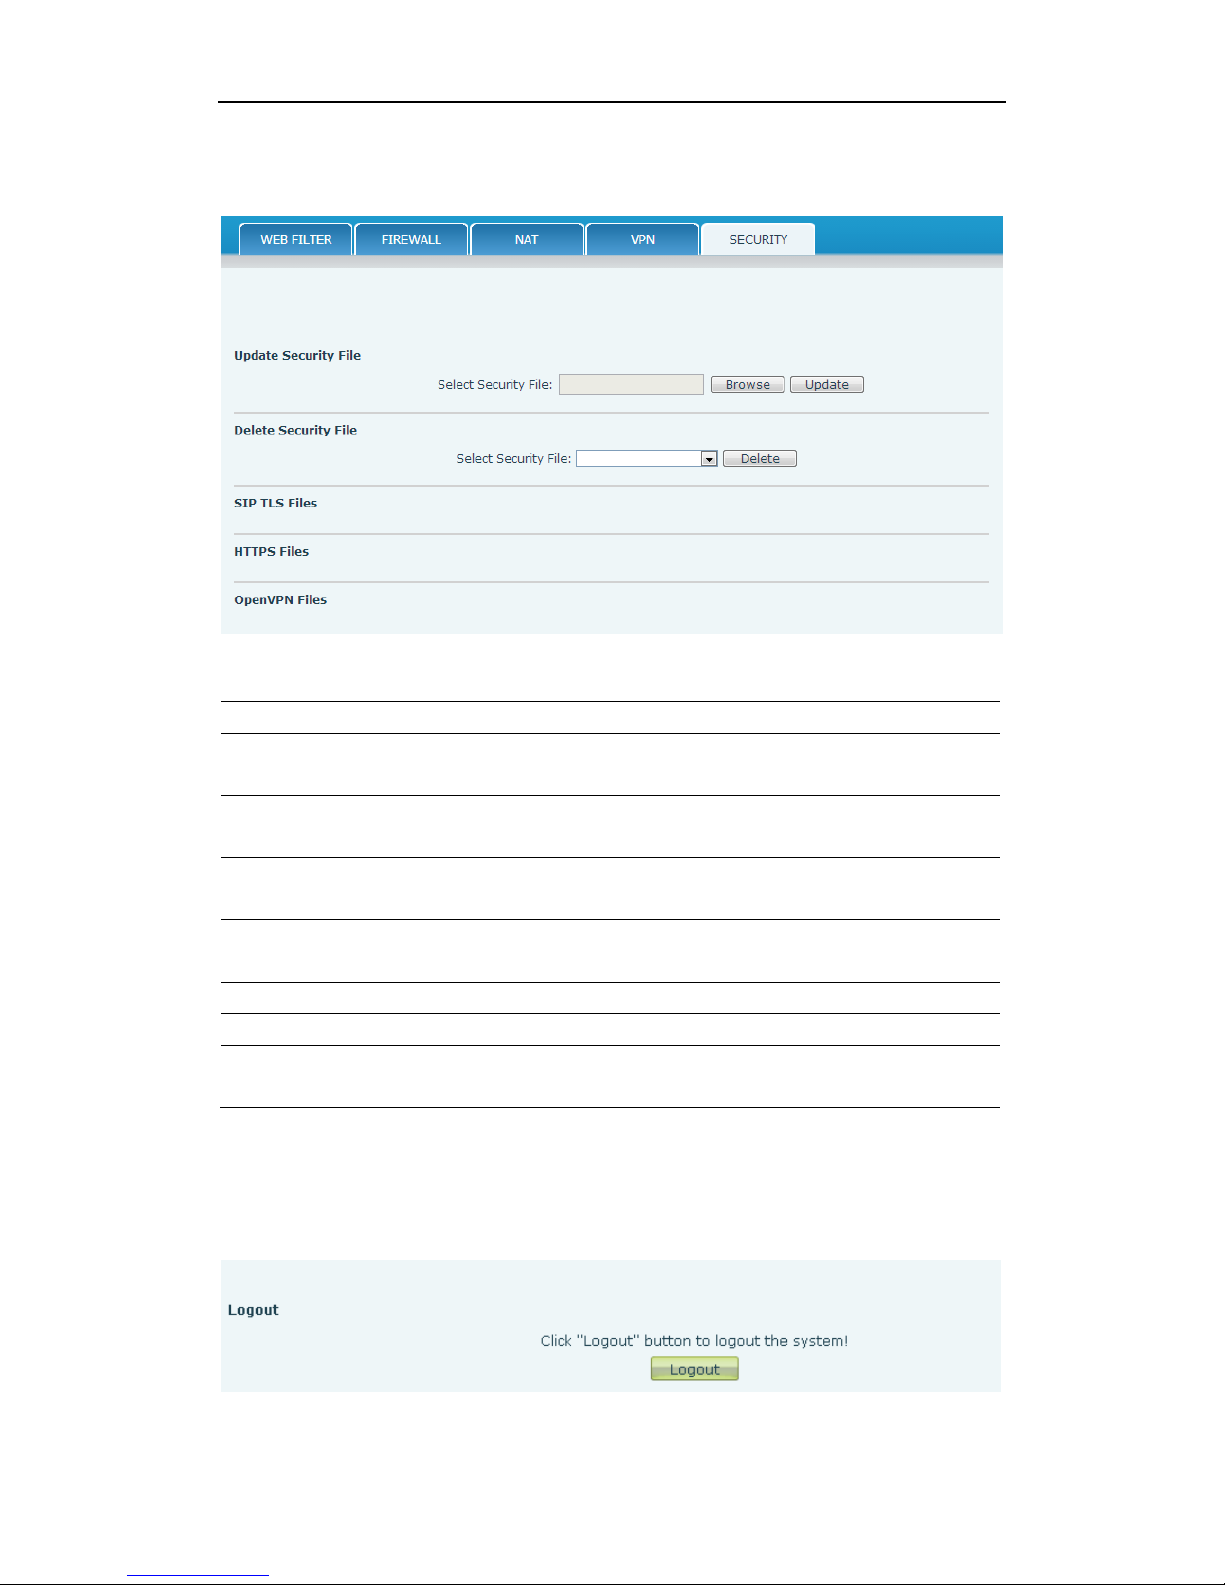
User Manual
SPEEDYTEL Technology CO Ltd
8.3.7.5 SECURITY
Security
Field name
explanation
Update Security
File
Select Security File
Select the security file you want to update, then
click Update button to update.
Delete Security
File
Select Security File
Select the security file you want to delete, then
click Delete button to update.
SIP TLS File
Show SIP TLS authentication certification file.
HTTPS File
Show HTTPS authentication certification file.
Open VPN Files
Show Open VPN File authentication certification
file.
8.3.8 LOGOUT
Page 88

User Manual
SPEEDYTEL Technology CO Ltd
Click Logout,and you will exit web page. If you want to enter it next time,
you need input user name and password again.
Page 89

User Manual
SPEEDYTEL Technology CO Ltd
9 Appendix
9.1.1 Specification Hardware
Item
T20(P)
Adapter
(Input / Output)
Input: 100-240V
Output: 5V 1A
port
WAN
10/100Base- T RJ-45 1 PORT
LAN
10/100Base- T RJ-45 1 PORT
Power
Consumption
Idle: 2.5W/Active: 2.8W
LCD Size
128x48
62 x 22mm
Operation
Temperature
0~40℃
Relative Humidity
10~65%
CPU
Broadcom VoIP chipset
SDRAM
16MB
Flash
4MB
Dimension(L x W x
H)
155×185×130mm
Weight
0.84kg
9.1.2 Voice features
SIP supports 2 SIP servers
Support SIP 2.0 (RFC3261) and correlative RFCs
Support IAX2
Support multiple call queuing
Support IAX2 line key to call
Codec: G.711A/u, G.723.1, G.729a/b, G.722.1, G.726
Support HD voice
Echo cancellation: G.168 Compliance in LEC, additional acoustic echo
cancellation(AEC) can reach 96ms max filter length in hands-free mode
Support Voice Gain Setting, VAD, CNG
Support full duplex hands-free
SIP support SIP domain, SIP authentication(none basic, MD5), DNS
name of server, Peer to Peer/ IP call
Page 90

User Manual
SPEEDYTEL Technology CO Ltd
Support DTMF type: SIP info, DTMF Relay, RFC2833
Support 9 systems ringtones and three user-defined ringtongs
Soft keys programmable
SIP application: support Call forward / transfer (blind transfer /
attended transfer / Ringing Transfer) / Call hold / call waiting /
conference call / paging and intercom / call park / then grab /
interpolation / Automatic Callback / Click call / auto secondary dial /
Flexible call control functions: flexible dialing, support hotline number,
calling reject, reject blacklist, certification calls, white list barring, do
not disturb, speakerphone automatic answer, caller ID, anonymous
calls, outgoing calls etc.
Support phonebook 500 records, Incoming calls / outgoing calls /
missed calls. Each supports 300 records.
Support SMS
Support MWI
Support XML phonebook/browser
Support Speed dial
Support SRTP
Code synchronization via IP PBX/IMS
Support click to dial via web phone book
Voice codec setting for each SIP line
Customized lcd logo
Headset, speakerphone Ringing Selection
Ringing tone custom configuration parameters
Group listening
9.1.3 Network features
WAN/LAN: support bridge and router model
Support basic NAT and NAPT
Support PPPoE for xDSL
Support VLAN (optional: voice vlan/ data vlan)
NAT Penetrate, Stun Penetrate
Support DMZ
Support VPN (L2TP/OPEN VPN) function
Wan Port supports main DNS and secondary DNS server can select
dynamically to get DNS in DHCP mode or statically set DNS address.
Support DHCP client on WAN
Support DHCP server on LAN
QoS with DiffServ
Network tools in telnet server: including ping, trace route, telnet client
Page 91
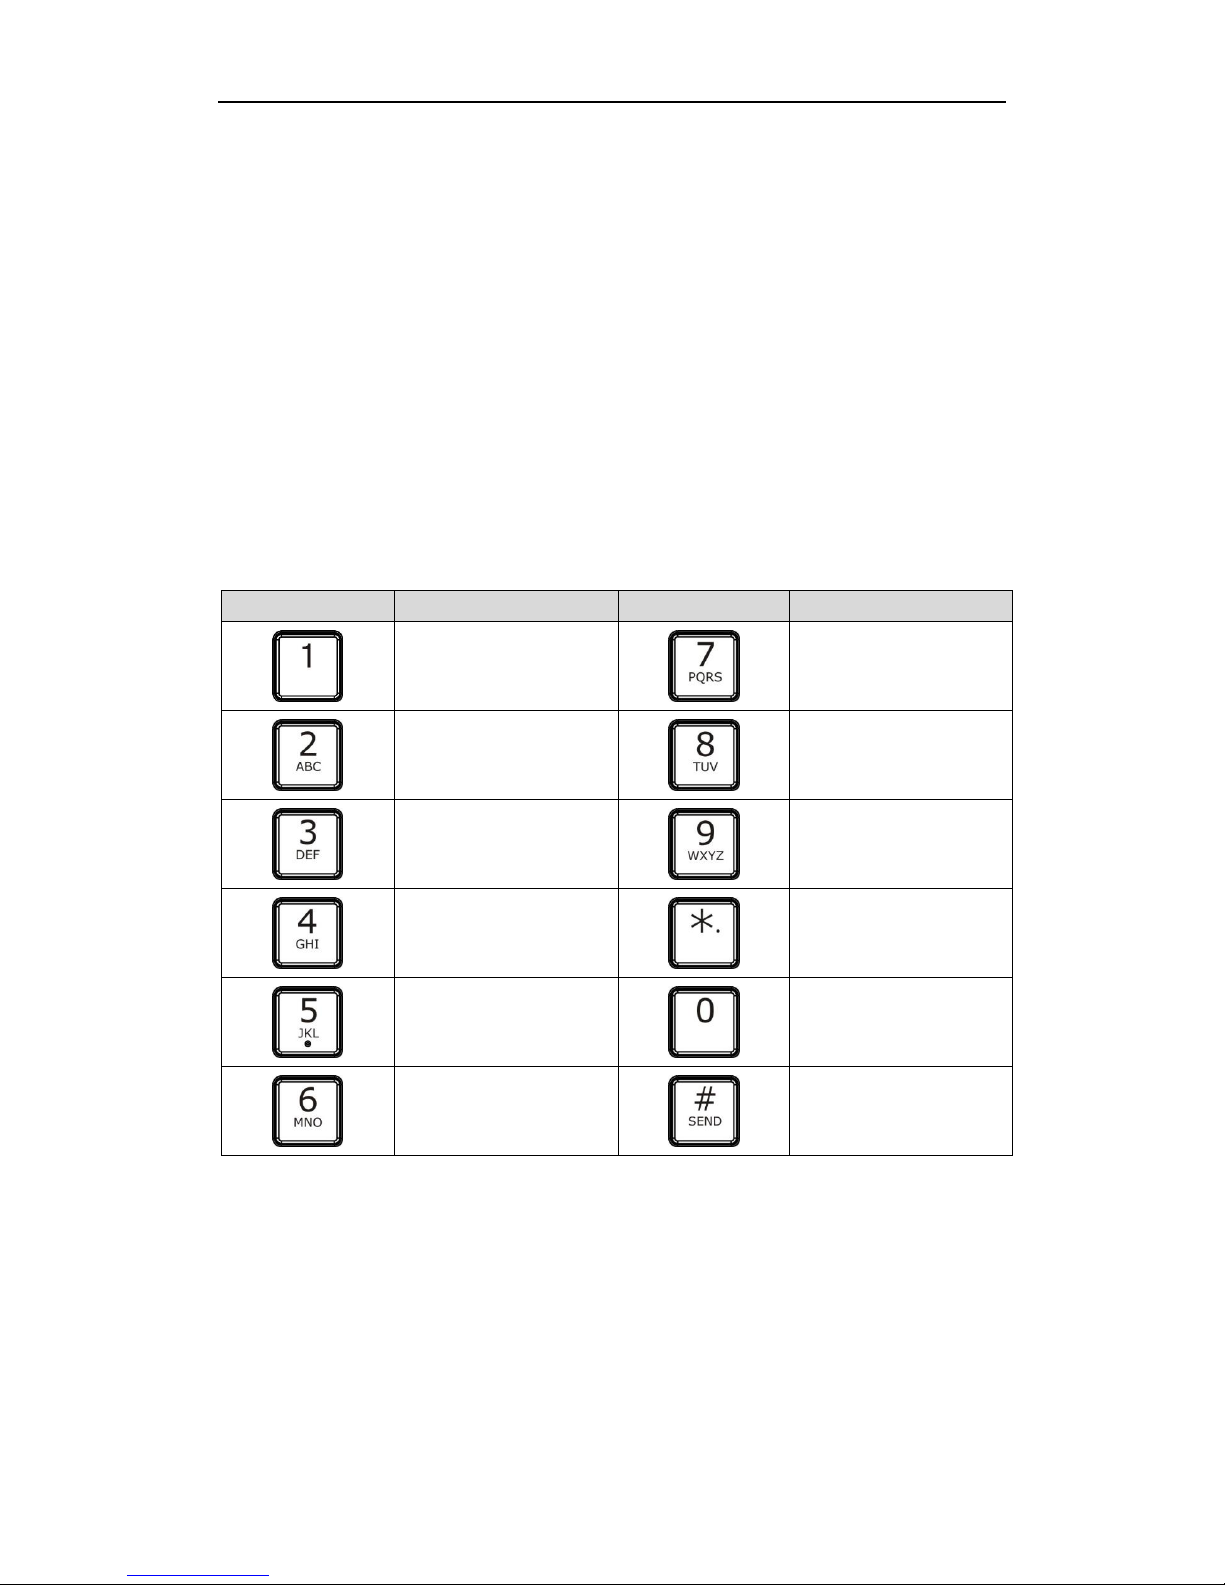
User Manual
SPEEDYTEL Technology CO Ltd
9.1.4 Maintenance and management
Upgrade firmware through POST mode
Web ,telnet and keypad management
Management with different account right
LCD and WEB configuration can be modified into requested language,
and support multi-language dynamically shifted
Upgrade firmware through HTTP, FTP or TFTP Telnet remote
management/ upload/download setting file
Support Syslog
Support Auto Provisioning (upgrade firmware or configuration file)
9.2 Digit-character map table
Keypad
Character
Keypad
Character
1 @
7 P Q R S p q r s
2 A B C a b c
8 T U V t u v
3 D E F d e f
9 W X Y Z w x y z
4 G H I g h i
*/.
5 J K L j k l
0
6 M N O m n o
#/SEND
 Loading...