

Page 1
Quick Sta Manual
Page 2
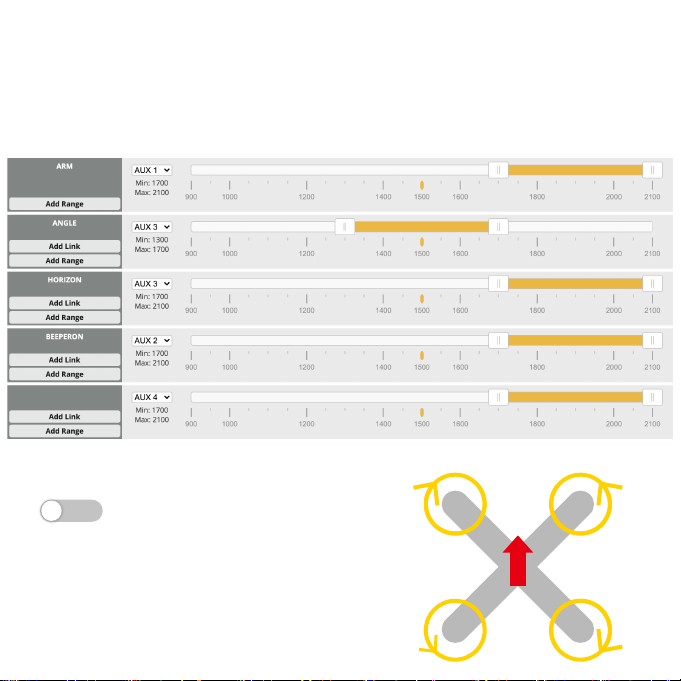
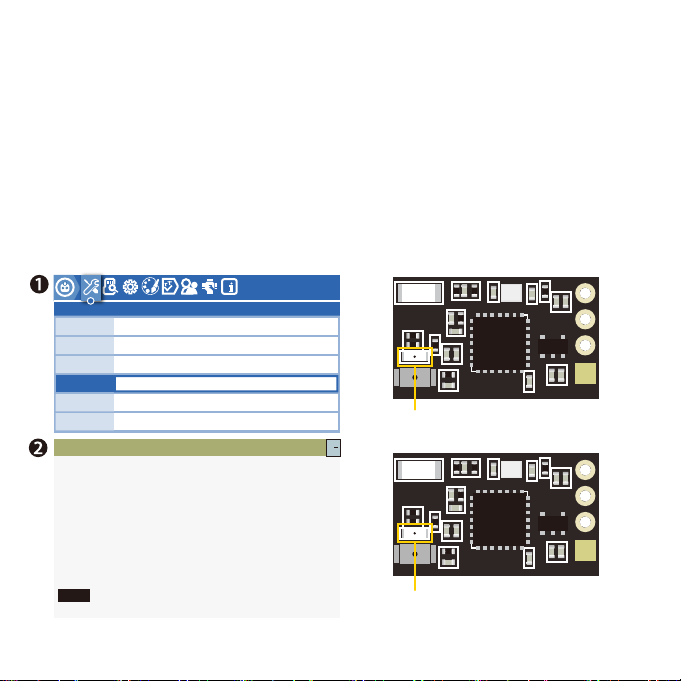
ARM & Modes
The quad has been set for functions of switches or radio. Please go into the Modes tab
of SpeedyBee App, test each switch of function. The corresponding function will be
turned on when the yellow cursor gets moved to the set range.
LED LOW
Motor direction is reversed
Disconnect BetaFlight, power on the drone,
the default motor rotation direction is not reversed.
4 2
3
1
Page 3
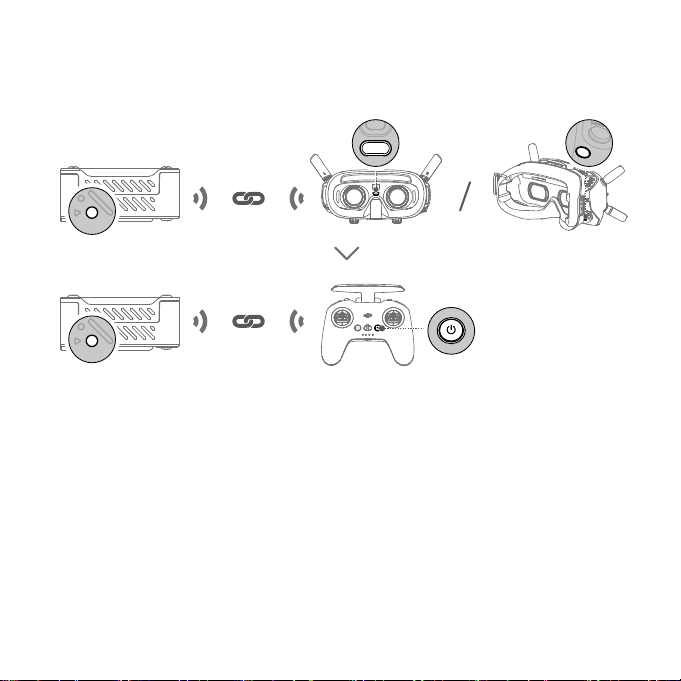
DJI O3 Air Unit Binding
Make sure that all devices have been updated to the latest rmware
versions before linking.
The air unit must be linked to the goggles before the remote controller.
1. Power on the air unit, the goggles, and the remote controller.
2. Press the link button of the air unit and the goggles respectively. The linking status indicator of the
air unit blinks red and the goggles sta to beep continually.
3. Make sure the distance between the air unit and the goggles is within 0.5 m. Once linking is successful,
the linking status indicator of the air unit turns solid green. The goggles stop beeping and the live view
will be displayed.
4. Press the link button of the air unit and the linking status indicator of the air unit blinks red.
Press and hold the power button of the remote controller. The remote controller stas to beep
continually and the batte level LEDs blink in sequence.
5. Make sure the distance between the air unit and the remote controller is within 0.5 m.
Once linking is successful, the linking status indicator of the air unit turns solid green and the remote
controller stops beeping.
Page 4
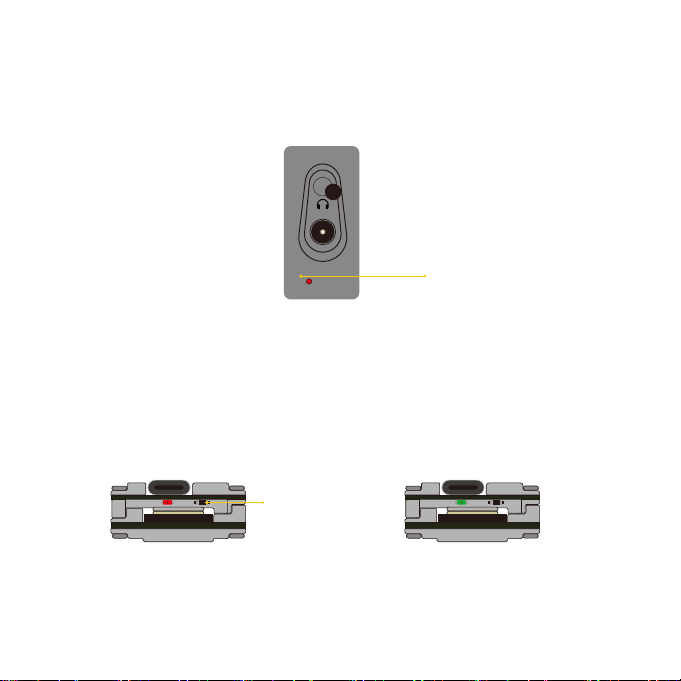
How to bind Falcon
1. Turn on the FPV Goggles, Remote Controller, and power the Quadcopter. Click the bind button of
FPV Goggles, the beep sound indicates that Goggles are in the binding status.
POWER
Bind Button
2. Press the Falcon button, light turns red, indicating that Falcon is binding. When the bind succeeds,
Goggles make beep sounds, the light will be solid green, and FPV Goggles will display the live images.
Bind Button
Binding Binding Succeeded
Page 5
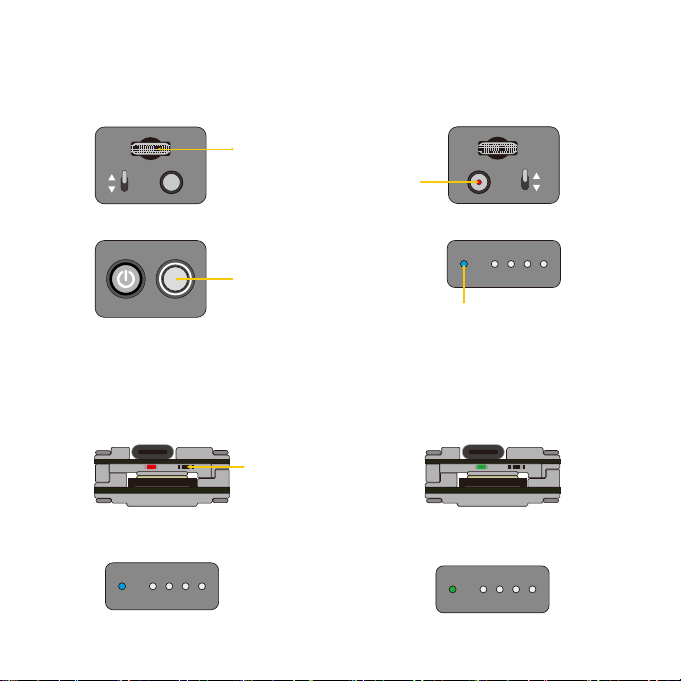
3. Press the C1 Custom Button, Record Button and Right Scrool Wheel Button at the same time. The
blue light ashes with beep sounds, indicating that the controller is at binding status.
Right Scroll Wheel Button
SQ
BACK
Record Button
SA
C1 Custom Button
Status Indicator
4. Press the Falcon Bind Button, the light turns red indicating binding. When the binding succeeds,
the Falcon light and the light of controller will turn green.
Bind Button
Binding
Binding Succeeded
Binding Binding Succeeded
Page 6
First Usage Guidance
Search and download 'SpeedyBee' on Google Play or App Store.
Power the quad and launch the SpeedyBee app and search the quad via Bluetooth.
The rst usage guidance will show up in the app. Follow the
steps to bind your radio receiver. Then enjoy ying!
Page 7
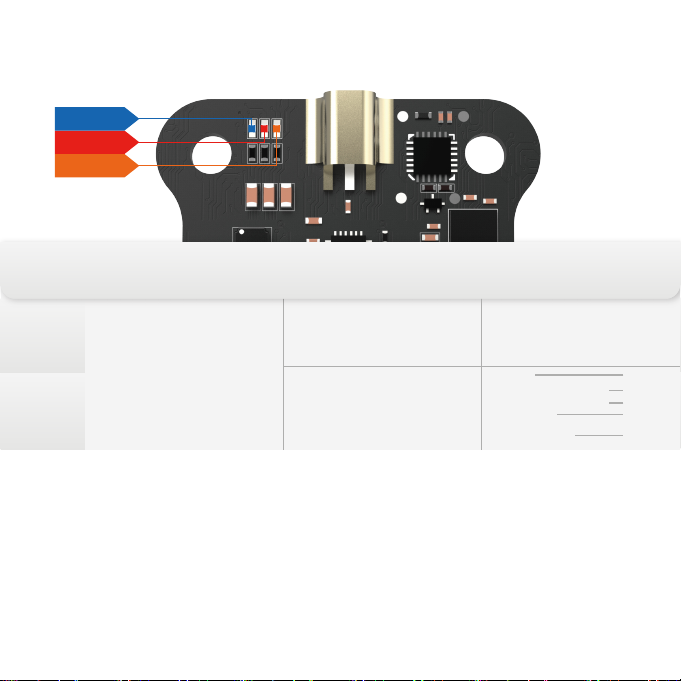
TX800 Settings
LED LIGHT
CHANNEL
BAND
POWER
Red L E D
Band
will keep blinking, at this
Red LED
time the Red LED is not used to
indicate the current Band
information.
Constantly ON:
the current band is Band1
Constantly ON:
the current band is one of
Band 2 ~ Band 6.
Orang e L E D
Powe r
Orange LED
at this timethe Orange LED is not
used for indicating the current
Power information.
Light OFF
Binking once in 2 seconds 200mW
Blinking once in 1 second 400mW
Constantly ON
Blinking twice in 1
second (fastFlash)
will keep blinking,
25mW
800mW
PIT mode
Lock
Unlock
Blue LED
Channel
Constantly ON:
The current frequency
point is Channel 1
OFF:
The current frequency point
is one of Channel 2~Channel 8.
Power Setup(Lock & Unlock)
The facto default setting is in LOCK mode with red LED blinking and only 25mW is available.
You can switch to UNLOCK mode by long pressing the buttonfor 10 seconds, and the red LED
will be constant ON or OFF, but not blinking.
Note:
Before you get VTX unlocked, it is highly recommended to know about the rules and regulations in your
count about the frequency to avoid a ne or conscation of your device.
Page 8
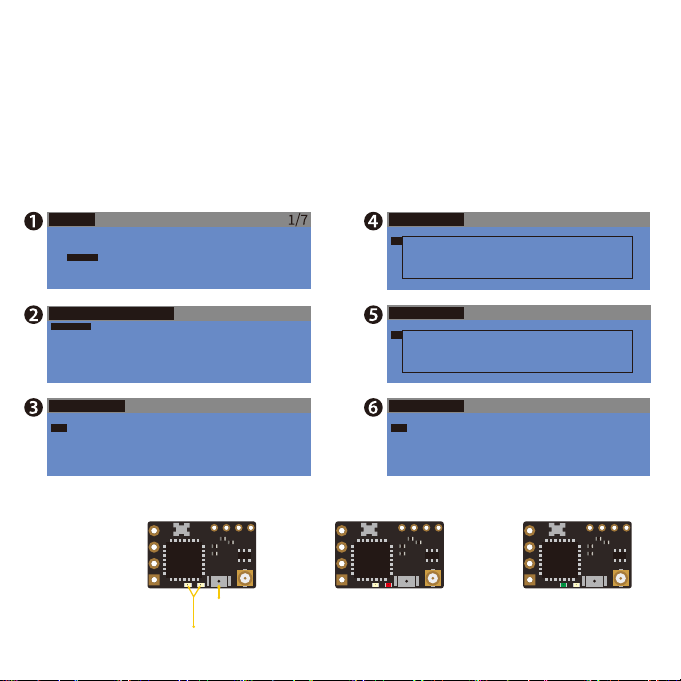
How to bind TBS Nano RX
1.Press and hold the bind button of the TBS Nano Rx receiver, and power on the quad at the same.
Release the bind button, the green light on the receiver stas to blink rapidly. Then long press the
bind button again for 8 seconds until the green light goes o and the red light blinks slowly.
At this time, a dialog of 'Update Micro TX?' will show up on the radio screen, select '[ENTER]'.
2.It will bind automatically after updating. When the Binding succeeds, screen will show "Binding OK",
and the receiver will show a solid green light.
TOOLS
01 FrSky GaSsuite
02 FrSky SBEC
03 FrSky SxR
crossre
04
05 ......
CROSSFIRE SETUP
XF Micro TX
XF Wi
XF Micro TX
SET Fallsafe
Bind
Ceneral
Max Power
Dyn Power
Frequency
......
TBS NanoRX
Open
25mW
O
915MHz
XFnano
45
Indicator Light
XF Micro TX
SET Fallsafe
Bind
Binding
Ceneral
Max Power
Dyn Power
[EXIT]
Frequency
......
XF Micro TX
SET Fallsafe
Bind
Update Micro RX?
Ceneral
Max Power
Dyn Power
[EXIT] [ENTER]
Frequency
......
XF Micro TX
SET Fallsafe
Bind
Ceneral
Region
Dyn Power
Frequency
Max Power
XFnano
45
Binding Binding SucceededBind Button
Open
25mW
O
915MHz
Open
25mW
O
915MHz
[Binding OK]
Open
25mW
O
915MHz
XFnano
45
Page 9
ELRS Binding
Before binding, it is recommended to check if the rmware of the module and the receiver
are consistent. If they are not, please use SpeedyBee APP to update rmware.
1.Power on and o the drone three times, enabling the receiver to enter binding mode. When LED
of the receiver ashes quickly twice, it indicates that the receiver has entered binding mode.
2.For the RadioMaster TX16S remote controller, power on it, and long press the SYS button to access
TOOLS inteace, slide the cursor down, select ExpressLRS, and then select Bind and press Enter.
3.When the receiver has a solid LED on, it indicates that the binding
is successful.
19�46
TOOLS
lua
lua
lua
lua
lua
lua
Packet Rate
Telem Ratio
Switch Mode
Model Match
>TX Power
>TX Administrator
>WIFI Connectivity
>Backpack
[BLE Joystick]
[Bind]
2.5.1 ISM2G4 a7e2e4
Crossre congure
DSM Forward Progr amming v0.2
ELRS
ExpressLRS
FrSky GaSuite
FrSky RB30_RB40
500(-105dbm)Hz
1�128
Hybrid
O
LED blinks twice: during binding
0/500
Solid LED: binding successful
Page 10

Check before take of
1. Please conduct an inspection for the drone. Check if there are broken pas or
damage, and please conduct fuher check or repair if needed;
2. Please conrm whether the propellers are in the correct direction, and whether
screws are locked;
3. Please check if batte is xed by the strap. To adjust or x it for balance in case
that it gets hit by propellers;
4. Please check the batte voltage. When the batte is fully charged, it should be
16.8V for a 4S, 25.2V for a 6S;
5. Turn on the controller and select the correct model. Please make sure that the
arming switch is "disarmed" and the throttle is in the lowest position;
6. Turn on the FPV Goggles or screen to check whether there are inteerence;
7. After powering the drone, please test arming in a safe distance (at least 3
meters), and check whether propellers work normally;
8. Please take o in a safe area without people, and enjou your ying!
After-sale Seice
Please send feedback via SpeedyBee App or send an e-mail to
[email protected]
*Problems will be solved quicker if we could be provided with screenshots of order,
clear photos of product and a demonstration video of problem.
 Loading...