

Tempmate Wireless Thermometer – Speedtech Model EW-1
(with sensor model ET-1)
Features:
• Indoor temperature (measured in display unit)
• Remote temperature (measured in remote sensor and transmitted to display unit)
• Temperature alarms for high and low (inside and remote)
• Time with offset for displaying second time location
• Alarm clock with snooze (8 minute)
• Backlight for viewing in dim lighting (push on, auto off)
• Maximum and min imum temper ature memory
• Includes one remote sensor, up to three total possible (see your retailer for additional sensors)
• Detachable probe allows for measuring extreme temperatures or water, soil, or freezer
Quick start (detailed instructions follow):
1. Remove battery covers on display unit and remote sensor
2. Insert batteries in display unit first **important!
3. Insert batteries in remote unit(s) within three minutes
4. Replace battery covers, and wait five minutes before pressing any buttons. Set
time (below) and select measuring units (press the “°C/°F/+” button to toggle).
Detailed Battery Installation for the Display Unit
Please insert batteries for receiving unit before doing so for the remote units.
1. Remove the stand (if it is in place) by rotating the rear edge down.
2. Press and slide down to open the battery cover. Insert 2 pcs AAA size batteries with matching (+) and (-)
polarity marks on battery comp artment. Then close the battery cover and i nstall the stand back.
3. (---) dash icon will flash on the lower part of the LCD; it is now ready to register with the sensor(s) signal.
Detailed Battery Installation for the Remote Sensor Unit
Within three minutes of the battery installation of the receiving unit
1. Lift off the bracket stand by releasing the bottom two fixing snaps.
2. Use a small Phillips screwdriver to remove the screws on the battery cover.
3. Insert 2pcs AAA size batteries according to polarity mark on the battery compartment.
4. Once the batteries are inserted, the sensor will start transmitting temperature reading at 30 seconds intervals
automatically to the receiving unit.
5. The lower part of LCD of the receiving unit will display remote channel 1 and the temperature reading.
6. For each additional sensor (if applicable), press and hold the “- (Hold Seek)” button until it beeps, then insert
batteries in remote sensor(s).
7. When all s ensors are r egistered, r eplace all b attery cove rs.
Note
After you have placed the sensor in the remote location, if the (---) dash icon displays and flashes for one
channel, the signal has been lost. Try rotating the sensor in 45° steps, and wait at least 3 minutes after each
position change. If not, move the remote sensor closer to the receiving unit or reposition both receiving unit and
remote sensor until reception is observed, or limit the obstacles (such as wells) that lie in a straight path from
the sensor to the display. Also, be sure the display and sensor are away from possible sources of interference
such as other wireless products (weather stations, phones, baby monitors).
Setting the Clock
1. To set the clock, press & hold “MODE” button for 2 seconds. The 12 or 24 hr. is blinking.
2. Use the “+” or “- (Hold Seek)” button to select 12 hr (am/pm) or 24 hr. (“military”) and then press “MODE”
3. The clock digits will blink, use “+” button to advance hour and “- (Hold Seek)” to advance minutes (each press
the button will increase the digits by one). Press “MODE” to confirm.
4. The offset will blink. Repeat the same procedure to enter time offset (optional to view second time location)
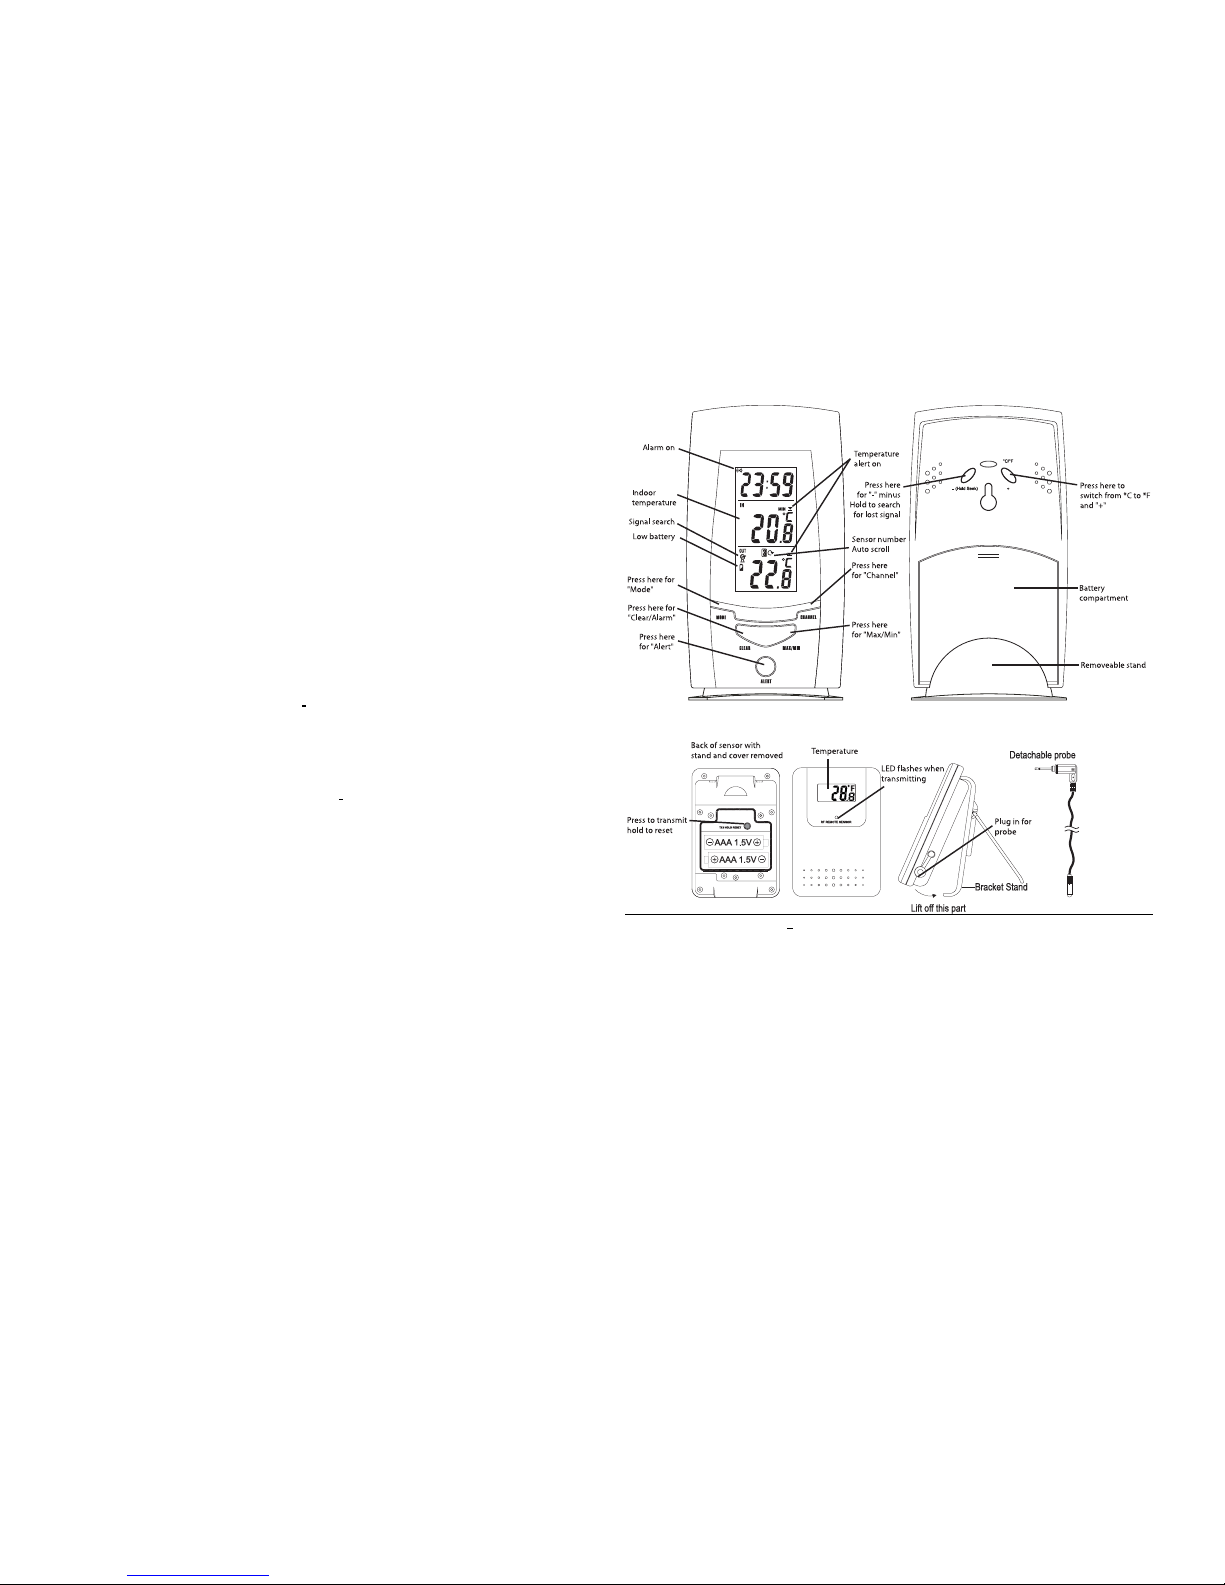
Display unit diagram:
Remote sensor diagram:
Using 6 foot Temperature Probe
Your wireless thermometer is equipped with a 6 feet cord temperature probe for measuring water, soil, or
temperatu res below 32 °F.
• Open the rubber covers of the hole at the side of the remote sensor and insert the probe plug completely.
• If the outside temperatu re is extremely low (below 3 2°F) extend the 6 feet probe cord, leave probe sensor
outside, and keep the remote sensor unit inside to avoid freezing the batteries.
• For measuring temperature in a freezer, keep sensor outside of freezer and run probe inside, taking care to
secure the wire to avoid damage from the door.. An alarm can also be set to warn of high temperature.
• The probe can be used at all times if desired (for air temperature) as it has a greater range of temperature.
Installation of Remote Sensor(s)
It is recommended to place the sensor on the North side of a house to avoid direct sunlight. Locating remote
sensor in clear open area can attain a maximum 100 ft. (30 meters) transmission distance. The actual
transmission distance can be reduced by walls between the remote sensor(s) and the receiving unit. The remote
sensor(s) can be hung on a flat wall by means of a screw or tape, or the bracket has a folding stand for use on a
horizontal surface, such as a t able.

Remote Channel Auto Scroll
This device is equipped with and “
” Auto Scroll function that when 2 or 3 units of remote sensors are active, it
will automatically cycle through the remote channels 1 to 3 continuously.
1. To enable or disable the “
” auto scroll function, press & hold “CHANNEL” button 3 seconds.
2. To retrieve manually the specific remote sensor temperature reading, press the “CHANNEL” button until
desired channel is displayed.
Minimum and M aximum Temperature Memory
This device records and displays min./max temperature readings for the receiver unit and remote sensor
locations. (The remote min/max readings will be only shown for the channel actually on display.).
• To read min./max records for 5 seconds press “MIN/MAX” button.
• To erase the min or max record, press “CLEAR” button while viewing the min or max record
Daily Alarm
1. Press “MODE” button once to enter daily alarm mode. Press & hold “ALERT” button for 2 seconds. The digits
and “
” alarm icon will blink.
2. Press “+” button to advance the hours and press “- (Hold Seek)” button advance the minutes. Then press
“MODE” button to confirm (if the mode
3. The “
” alarm icon will be displayed indicating that the alarm set above is now activated.
4. A short press “CLEAR” button to enable or disable the alarm.
5. When the alarm sounds beep, press “SNOOZE/LIGHT” button to temporarily stop the alarm for 8 minutes. To
stop the alarm for 24 hours, press any button (except “SNOOZE/LIGHT” button).
SNOOZE/LIGHT button
• Press the button once for backlight (auto turn-off after five seconds)
+ °C/°F button
• Press to select temper ature readings in Celsius or Fahrenheit (the sensor ’s LCD will always read in °F)
Temperature alerts for Indoor Temp and each Remote channels procedure
This device can be programmed to alert that the temperature has gone above or below the set levels. This is
useful for pools, spas, freezers, or to warn of frost. Separate alarms can be set for each location, and is
constantly monitored, even if a different sensor number is displayed.
a. Press “ALERT” button to enable or disable temperature alert. Press & hold “ALERT” button for 2 seconds to
start setting. The alarm will sound if the temperature rises above the upper limit or falls below the lower limit.
b. The “
” upper/lower icon will blink. Using “+” or “- (Hold Seek)” button to select Indoor, Channel 1, 2 or 3
(if 3 sensors are available). Press “ALERT” button to confirm. The “ ” upper limit and (---) icon will blink.
c. Using “+” or “- (Hold Seek)” button to enter upper limit value. Press “ALERT” to confirm. The “ ” lower
limit icon will blink.
d. Using “+” or “- (Hold Seek)” button to enter lower limit value, and press “ALERT” to confirm.
e. To set alert values for other registered channel, select the desired channel and repeat procedure from (a to d).
The “
” upper/lower icon appears and all alarms previously set for each channel and indoor become active
when temperature alert is enabled. When alarm occurs, audible signal will beep and temperature and
upper/lower icon will flash.
Battery Replacement
A “
” low batter icon will appear on the display of the receiving unit when the batteries of the receiving unit
and remote sensor(s) need to be replaced (the sensor also has a low battery indicator on its LCD). For replacing
batteries always use new batteries, and follow instructions carefully (replace all batteries at this time).
Precautions
Do not subject the units to excessive exposure to direct sunlight. The remote sensor is splash proof design, but
should not be immersed in water or exposed to heavy rain. Do not clean the units with abrasive or corrosive
compound or subject the units to excessive shock, dust, temperature or humidity. Do not tamper with these
units’ internal components. Doing so will invalidate the warranty on the unit.
Troubleshooting
Lost Signal (“--.-”): If unit has been in operation successfully, check to be sure remote is still functioning (LCD
is lit, with no low battery signal). Position sensor and display closer, or limit number of walls that lie in a
straight path between remote and sensor. Press and hold the “-/Hold Seek” button until the display beeps once
(display will search for the signal and beep upon receiving). If this does not work, simply remove all batteries
and replace with new batteries, closely following the instructions.
Incorrect Temperature readings: Be sure all units are away from sources of heat or cold, such as vents,
radiators, and lights (including sunlight). Be sure probe is completely plugged or unplugged from sensor. Allow
several minutes for units to adjust to a new temperature (such as bringing in from outside). The accuracy of
temperature measurement is +/- 2°F, and keep in mind other thermometers may be inaccurate.
Other issues: If other issues arise, please remove all batteries and replace with new ones, carefully following
the instructions. On occasion, as with all electronics, undesired occurrences take place. Removing the batteries
and replacing with new ones will solve those problems. Your Speedtech Tempmate comes with particular
testing sequences that can be activated with certain combinations of button pr esses. These combinations are n ot
required for regular use, but can cause the units to appear to malfunction, and removing all batteries will solve
these issues. You may refer to our website for more detailed explanations and further troubleshooting.
Specifications
Recommended remote sensor temperature operating/measuring range
Indoor temperature range: +32°F to +122°F (0°C to +50°C); +/- 2°F (1°C)
Sensor with LCD display (without probe): +32°F to +122°F (0°C to +50°C) ; +/- 2°F (1°C)
Detachable outdoor probe: -58°F to +158°F (-50°C to +70°C) ; +/- 2°F (1°C)
Batteries
Thermometer station: Two size AAA (display/receiver)
Remote Sensor: Two size AAA (remote sensor)
Battery life (status): 6 to 9 months typical
Transmission range: Maximum 100 feet (30 meters) open area
Temperature sampling: Indoor - every 10 seconds - Outdoor - every 10 seconds
Temperature Transmission: Every 30 seconds
Transmission frequency: 433.92 MHz.
Clock: Quartz
Warranty:
Speedtech’s Tempmate model EW-1 comes with a limited one-year warranty. Please refer to the help section
located in this manual before con tacting Sp eedtech with any techni cal assistan ce. For tech nical assi stance,
replacement parts, and/or to obtain a return authorization, please call 703-430-8055.
FCC DISCLAIMER:
This equipment has been tested and found to comply with limits for a Class B digital device, pursuant to Part
15 of the FCC Rules. These limits are designed to provide reasonable protection against harmful interference
in a residential installation. This equipment generates, uses and can radiate radio frequency energy and, if not
installed and used in accordance with the instruction, may cause harmful interference to radio communications.
However, these is no guarantee that interference will not occur in a particular installation. If this equipment
does cause harmful interference to radio or television reception, which can be determined by turning the
equipment off and on, the user is encouraged to try to correct the interference by one or more of the following
measures: Reorient or relocate the receiving antenna. - Increase the separation between the equipment and
receiver. - Connect the equipment into an outlet on a circuit different from that to which the receiver is
connected. - Consult the dealer or an experienced radio/TV technician for help
Speedtech Instrument ~ 45449 Severn Way #165 ~ Sterling, VA 20166
703-430-8055 ~ www.speedtech.com
 Loading...