

Page 1

Installation and Maintenance
Instructions for Drying
Tumblers
30 Pound (13 Kg) Capacity
JCB30CE, JCB30CG, JCB30CSH, JCB30CSL, JCB30WE, JCB30XG,
SCB30CE, SCB30CG, SCB30CSH, SCB30CSL, SCB30WE and SCB30XG
50 Pound (22 Kg) Capacity
JC50CE, JC50CG, JC50CSH, JC50EG, JCB50CE, JCB50CG, JCB50CSH,
JCB50EG, SC50CE, SC50CG, SC50CSH, SC50EG, SCB50CE, SCB50CG,
SCB50CSH and SCB50EG
75 Pound (34 Kg) Capacity
JC75CE, JC75CG, JC75CSH, JCB75CE, JCB75CG, JCB75CSH, SC75CE,
SC75CG, SC75CSH, SCB75CE, SCB75CG and SCB75CSH
ATTENTION: Please read the enclosed instructions before using the machine.
KEEP THESE INSTRUCTIONS FOR FUTURE REFERENCE.
(If this tumbler changes ownership, be sure this manual
accompanies the tumbler).
A copy of the operating instruction must remain with the tumbler after
installation.
To locate the servicer nearest you, call (414) 748-3121.
Manufactured By:
Speed Queen Company
P.O. Box 990
Ripon, WI 54971-0990
U.S.A.
Part No. M412616
1/95
Distributed By:
Page 2

Page 3

WARNINGS AND LABELS
aWARNING
FAILURE TO INSTALL, MAINTAIN, AND/OR OPERATE THIS MACHINE ACCORDING TO
MANUFACTURER’S INSTRUCTIONS MAY RESULT IN CONDITIONS WHICH CAN
PRODUCE SERIOUS INJURY, DEATH AND/OR PROPERTY DAMAGE.
NOTE: The WARNING and IMPORTANT instructions appearing in this manual are not meant to cover all
possible conditions and situations that may occur. It must be understood that common sense, caution
and carefulness are factors which CANNOT be built into this tumbler. These factors MUST BE supplied
by the person(s) installing, maintaining or operating the tumbler.
Always contact your dealer, distributor, service agent or the manufacturer on any problems or conditions you do
not understand.
aWARNING
To reduce the risk of fire, electrical shock, serious injury or death to persons do not
operate the tumbler if it does not perform according to these instructions. Immediately
disconnect electrical service, shut off gas supply and contact an authorized service
representative. Service and repairs are to be performed by authorized service
representatives only.
aWARNING
To reduce the risk of fire, electrical shock, serious injury or death to persons when
using the tumbler unit, follow these basic precautions:
· Read all instructions before using tumbler.
· DO NOT tamper with controls.
· DO NOT bypass any safety devices.
· Always follow the fabric care instructions supplied by the garment manufacturer.
· Remove laundry immediately after the tumbler stops.
· DO NOT reach into tumbler if cylinder is revolving.
aWARNING
To avoid creating any flammable vapors which may explode, ignite or cause corrosive
damage, DO NOT dry the following materials:
· Articles that have been cleaned in, soaked in, washed in or spotted with gasoline,
dry cleaning solvents or other flammable/explosive substances.
· Plastics or articles containing foam rubber or similarly textured rubberlike
materials.
· Articles that have traces of flammable substances like cooking oil, machine, oil,
flammable chemicals or thinner.
· Articles containing wax or cleaning chemicals.
· Fiberglass curtains or draperies (unless the label says it can be done).
aWARNING
To reduce the risk of serious injury, install lockable door(s) to prevent public access to
rear of tumblers.
© Copyright 1994. All Rights Reserved.
M412616
1
Page 4

WARNING
維
To reduce the risk of fire, electric shock, serious injury or death to persons when using
your dryer, follow these basic precautions:
1. Do not allow children to play on or in the tumbler. Close supervision of children is necessary when the tumbler
is used near children. This is a safety rule for all appliances.
2. Before the tumbler is removed from service or discarded, remove the door to the drying compartment.
3. Do not install or store the tumbler where it will be exposed to water and/or weather.
4. Failure to install, maintain, and/or operate this machine according to the manufacturer’s instructions may
result in conditions which can produce serious injury, death and/or property damage.
5. Run tumbler with a load before putting tumbler into service.
6. Always disconnect the electrical power to the tumbler before servicing. Disconnect power by shutting off
appropriate circuit breaker or fuse and by turning off the disconnect switch located on the rear of te tumbler.
7. All manually operated models are factory-equipped with an emergency stop button located on the front panel.
If the emergency stop function is desired on coin-operated models, an external emergency stop switch may
be installed as specified on the machine wiring diagram.
NOTE: Activation of the emergency stop switch stops all machine control circuit functions, but does not
remove all electrical power from machine.
NOTE: This drying tumbler produces sound rated at 65 dbA.
The following warning labels will be found on the drying tumbler:
A clothes dryer produces combustible
lint. TUMBLER MUST BE
EXHAUSTED OUTDOORS.
Do not touch surface until it has
cooled.
Do not operate without guards in
place.
Disconnect electrical power before
servicing.
Do not touch rotating parts.
WARNING!
To reduce risk of accumulating
unsafe concentrations of combustion
gases, tumbler MUST BE
EXHAUSTED OUTDOORS.
2
M412616
Page 5

TABLE OF CONTENTS
NAMEPLATE LOCATION ........................................4
REPLACEMENT PARTS INFORMATION ................4
SECTION I
ROUGHING-IN DIMENSIONS AND
SPECIFICATIONS
30 pound (13 kg) Narrow Cabinet:
Gas Tumblers ........................................................5
Electric Tumblers ...................................................7
30 Pound (13 kg):
Gas Tumblers ........................................................9
Electric Tumblers .................................................11
Steam Tumblers ..................................................13
50 Pound (22 kg):
Gas Non-reversing Tumblers ..............................15
Gas and Steam Reversing Tumblers...................17
Electric Non-reversing Tumblers .........................18
Electric Reversing Tumblers................................20
Steam Non-reversing Tumblers ........................... 21
Electrical Requirements:
30 Pound (13 kg) Narrow Cabinet Tumblers ...... 35
30 Pound (13 kg) Tumblers ................................ 36
50 Pound (22 kg) Tumblers ................................ 38
75 Pound (34 kg) Tumblers ................................ 40
Electrical Connections............................................ 41
Positioning the Drying Tumbler .............................. 42
Leveling the Drying Tumbler .................................. 42
Gas Requirements (Gas Drying Tumblers) ............ 42
Example of Gas Loop Piping .............................. 43
Example of Gas Supply Piping ........................... 43
Gas Connections (Gas Drying Tumblers) .............. 45
Drying Tumbler Enclosure Construction ................ 46
Steam Requirements (Steam Drying Tumblers) .... 47
Steam Connections (Steam Drying Tumblers) ....... 47
Lighting and Shutting Down Gas Ignition System .. 49
Accessory Timing Cam Installation ........................ 50
Preliminary Operating Checks ............................... 51
Final Operating Checks.......................................... 51
SECTION III
ADJUSTMENTS
75 Pound (34 kg):
Gas Non-reversing Tumblers ..............................23
Gas and Steam Reversing Tumblers...................24
Electric Non-reversing Tumblers .........................26
Electric Reversing Tumblers................................27
Steam Non-reversing Tumblers ........................... 29
SECTION II
INSTALLATION INSTRUCTIONS
Receiving Inspection ...............................................31
Materials Required (Obtain Locally) ........................31
Facilities Required:
Floor .................................................................... 31
Layout ..................................................................31
Venting ................................................................31
Make-Up Air.........................................................32
Main Gas Burner Air Shutter (All Gas Models)....... 53
Air Flow Switch (Gas and Electric Models) ............ 53
Loading Door Switch .............................................. 55
Cylinder Door Strike ............................................... 55
Drive V-Belt ............................................................ 56
SECTION IV
PREVENTIVE MAINTENANCE INSTRUCTIONS
Daily ....................................................................... 57
Monthly................................................................... 57
Quarterly ................................................................ 58
Biannually............................................................... 58
Maintenance Check Chart...................................... 59
SECTION V
DECOMMISSIONING INSTRUCTIONS
Decommissioning Instructions .............................. 61
M412616
3
Page 6
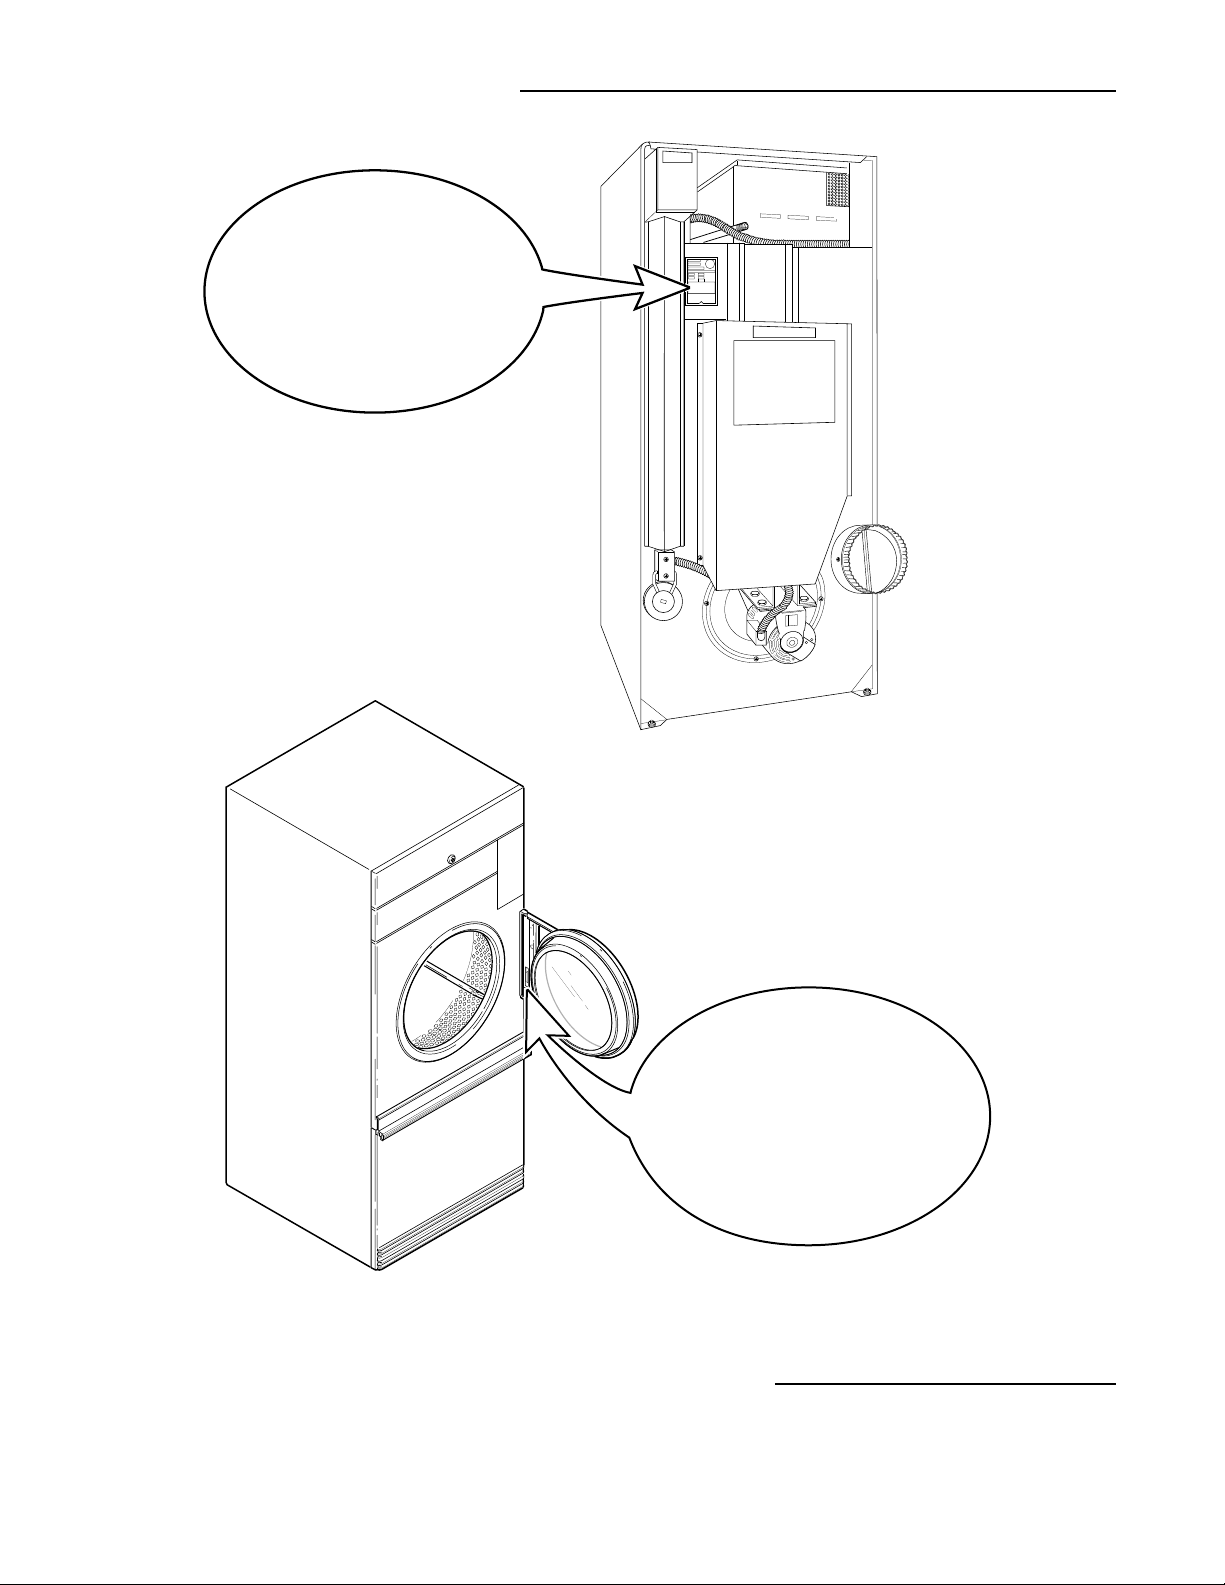
NAMEPLATE LOCATION
IMPORTANT
When writing for information on
any tumbler, be sure to mention
model and serial numbers. The
model and serial numbers will
be found on the nameplate as
shown on rear of tumbler or
underneath the door hinge.
T238IE3A
IMPORTANT
When writing for information on any
tumbler, be sure to mention model and
serial numbers. The model and serial
numbers will be found on the nameplate
as shown on the rear of tumbler or
underneath the door hinge.
T276IE3A
REPLACEMENT PARTS INFORMATION
If replacement parts are required, contact the source from whom you purchased your tumbler or, contact the
Ripon Service Parts Center, P.O. Box 990, Ripon, Wisconsin 54971-0990, for the name and address of the
nearest authorized parts distributor.
4
M412616
Page 7

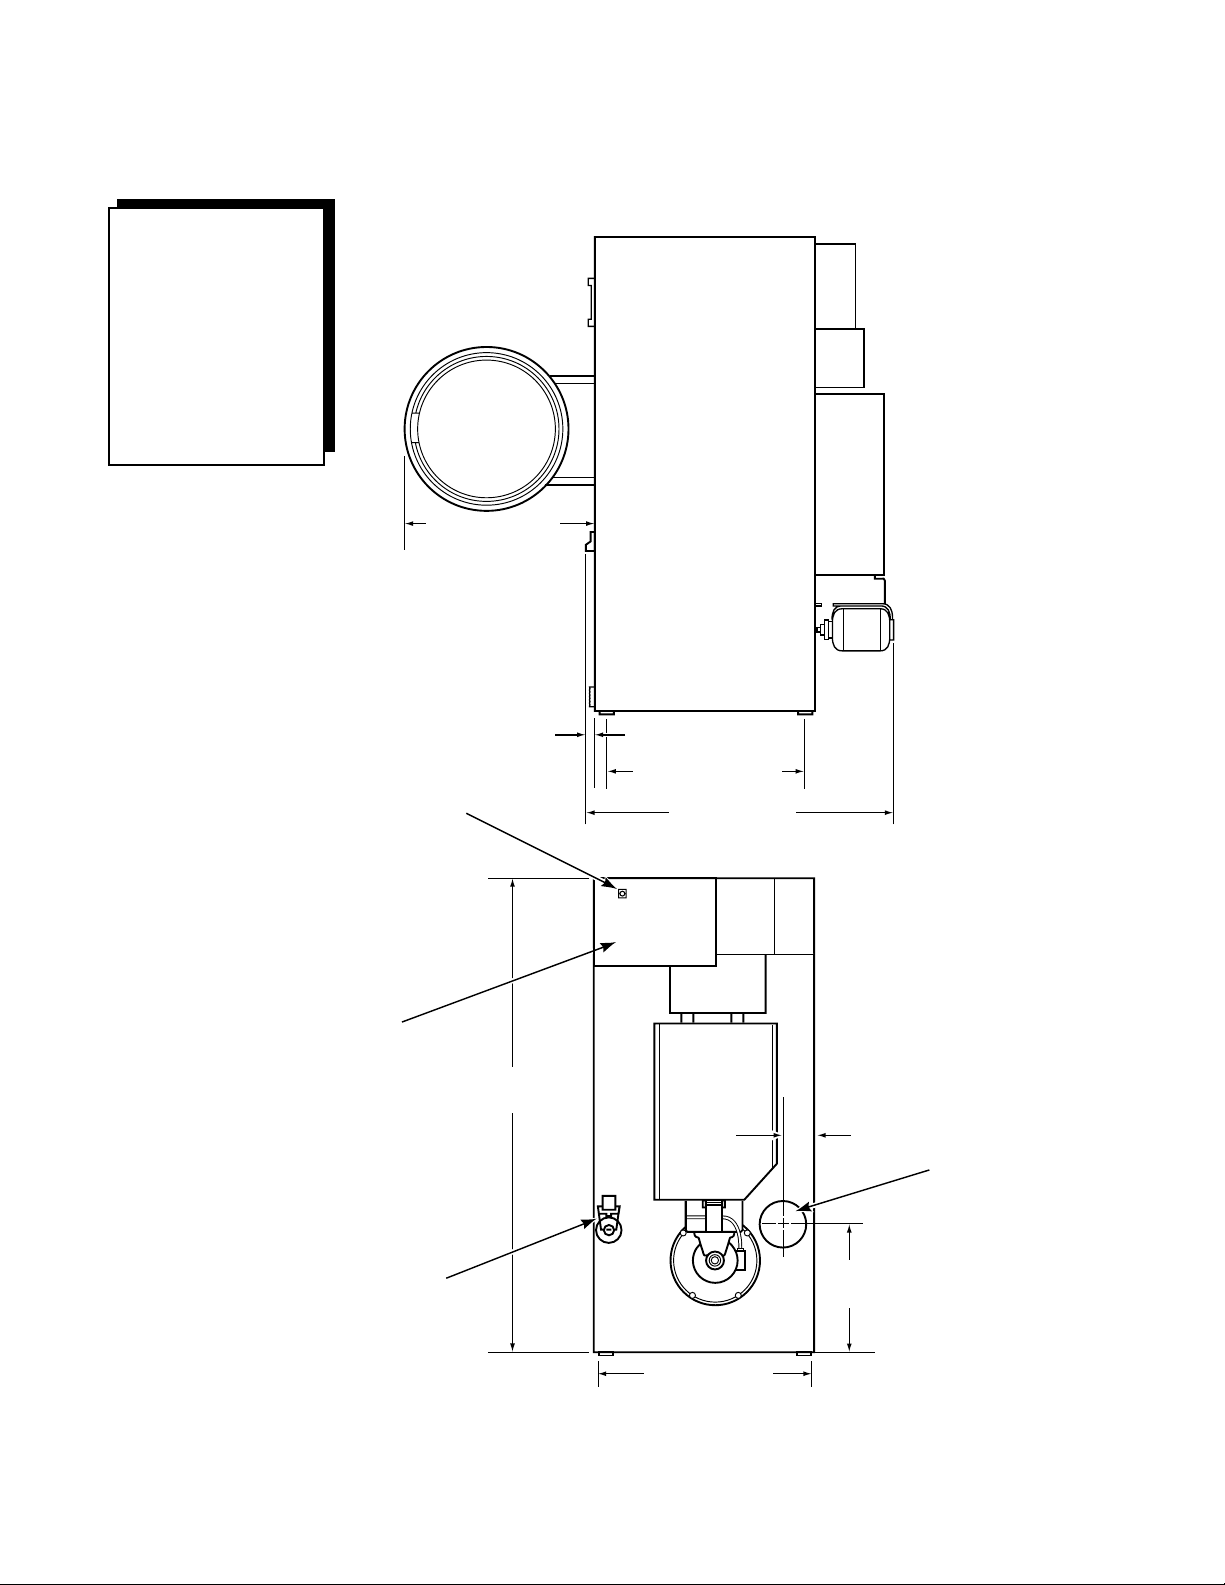
SECTION I
Roughing-In Dimensions and Specifications
30 Pound (13 kg) Narrow Cabinet Gas Tumbler
SIDE
PANEL
8.59 cm
(3-3/8")
67.95 cm
(26-3/4")
3.81 cm
(1-1/2")
DISCONNECT
SWITCH
183.52 cm (72-1/4")
81.76 cm (32-3/16")
113.98 cm (44-7/8")
T258IE3A
15.24 cm (6")
DIAMETER
EXHAUST
AIR FLOW
SWITCH
CONNECTION
AND SHUT OFF
ELECTRICAL
JUNCTION BOX
8.59 cm
(3-3/8")
T024IE3B
TOP VIEW
OF EXHAUST
GAS
VALVE
CLEARANCES: Minimum
to nearest Combustible
Material
Top —
12" (30.5 cm) Minimum.
0" permitted for first 4"
(10.2 cm) along front of
machine.
Back — 0" - 24" (61 cm)
Minimum recommended
for service access.
Sides — 0" Permitted.
M412616
71.12 cm (28")
T257IE3B
5
Page 8

30 Pound (13 kg) Narrow Cabinet Gas Tumbler
Cabinet Finish: Electrostatically applied thermosetting polyester.
Cylinder: 26.5" x 30" (67.3 cm x 76.2 cm)
perforated galvanized steel with three baffles
Motor: ¹⁄₃ H.P., lifetime lubricated, internal overload protected
Electrical Requirements: 230 Volt, 50 Hertz, 1 Phase; 5.5 Amps
Gas Consumption: 75,000 BTU per hour (79.1 MJ/hr.)
Gas Connection: 1/2" (12.7 mm) N.P.T.
Types of Gas: Factory equipped with Natural/Mixed Gas
(6¹⁄₂ ± 1¹⁄₂ inch water column line pressure)
(1.62 ± .37 kPa); or Liquefied Petroleum gas
(11 ± .3" water column line pressure) (2.74 ± .07 kPa)
Air Flow: 370 C.F.M. at 0.5" W.C. (175 liters/sec. at 1.25 mBar)
Net Weight: 350 Pounds (159 kg) (approximate)
6
M412616
Page 9

30 Pound (13 kg) Narrow Cabinet Electric Tumbler
SIDE
PANEL
8.59 cm
(3-3/8")
67.95 cm
(26-3/4")
3.81 cm
(1-1/2")
ELECTRICAL
JUNCTION BOX
81.76 cm (32-3/16")
113.98 cm (44-7/8")
DISCONNECT
SWITCH
8.59 cm
(3-3/8")
T024IE3B
TOP VIEW
OF EXHAUST
T258IE3A
15.24 cm (6")
DIAMETER
EXHAUST
M412616
AIR FLOW
SWITCH
183.52 cm (72-1/4")
71.12 cm (28")
CLEARANCES: Minimum
to nearest Combustible
Material
Top —
12" (30.5 cm) Minimum.
0" permitted for first 4"
(10.2 cm) along front of
machine.
Back — 0" - 24" (61 cm)
Minimum recommended
for service access.
Sides — 0" Permitted.
T259IE3B
7
Page 10

30 Pound (13 kg) Narrow Cabinet Electric Tumbler
Cabinet Finish: Electrostatically applied thermosetting polyester.
Cylinder: 26.5" x 30" (67.3 cm x 76.2 cm)
perforated galvanized steel with three baffles
Motor: ¹⁄₃ H.P., lifetime lubricated, internal overload protected
Electrical Requirements: 230 Volt, 50 Hertz, 1 Phase; 90 Amps
(See nameplate for 230 Volt, 50 Hertz, 3 Phase; 53 Amps
voltage of your tumbler) 380 Volt, 50 Hertz, 3 Phase; 33 Amps
415 Volt, 50 Hertz, 3 Phase; 30 Amps
Element: 18,000 Watts
Air Flow : 625 C.F.M. at 0.5" W.C. (294 liters/sec. at 1.25 mBar)
Net Weight: 410 Pounds (184.5 kg) (approximate)
8
M412616
Page 11

CLEARANCES: Minimum
to nearest Combustible
Material
Top — 12" (30.5 cm)
Minimum.
0" permitted for first 4"
(10.2 cm) along front of
machine.
Back — 0" - 24" (61 cm)
Minimum recommended
for service access.
Sides — 0" Permitted.
30 Pound (13 kg) Gas Tumbler
71.5 cm (28-1/4")
DISCONNECT
GAS CONNECTION
AND
SHUT OFF VALVE
ELECTRICAL
JUNCTION BOX
AIR FLOW SWITCH
(Energy Saver Models)
SWITCH
3.81 cm
(1-1/2")
183.5 cm (72-1/4")
157.8 cm (62-1/8")
81.75 cm (32-3/16")
114 cm (44-7/8")
118.6 cm (46-11/16")
11.3 cm
(4-7/16")
AIR FLOW SWITCH
(Standard Models)
140.7 cm
(55-3/8")
55.6 cm
(21-7/8")
20.3 cm (8")
DIAMETER
EXHAUST DUCT
THIMBLE
CONNECTION
(Energy Saver
Models)
20.3 cm (8")
DIAMETER
EXHAUST DUCT
THIMBLE
CONNECTION
(Standard
Models)
M412616
80 cm (31-1/2")
9
T266IE3B
Page 12

30 Pound (13 kg) Gas Tumbler
Cabinet Finish: Electrostatically applied thermosetting polyester
Cylinder: 30" x 30" (76.2 x 76.2 cm) perforated galvanized steel with three baffles;
30 pounds (13.6 kg) dry weight (cotton load)
Motor: ¹⁄₃ H.P., lifetime lubricated, internal overload protected
Electrical Requirements: 230 Volt, 50 Hertz, 1 Phase, 5.5 Amp
Gas Consumption: Energy Saver Models — 80,000 BTU per hour (84.4 MJ/hr.)
Standard Models — 105,000 BTU per hour (110.8 MJ/hr.)
Types of Gas: Factory equipped with Natural/Mixed Gas
(6¹⁄₂ ± 1¹⁄₂ inch water column line pressure) (1.62 ± .37 kPa); or
Liquefied Petroleum gas (11 ± .3" water column line pressure)
(2.74 ± .07 kPa)
Gas Connection: ¹⁄₂ inch (12.7 mm) N.P.T.
Air Flow: 600 C.F.M. at 0.5 " W.C. (283 liters/sec. at 1.25 mBar)
Net Weight: 450 Pounds (204 kg.) (approximate)
Calorific Value: Natural Gas — 8900 kCal/m3 (37.2 MJ/m3)
L.P. Gas — 22,250 kCal/m3 (93.1 MJ/m3)
10
M412616
Page 13
30 Pound (13 kg) Electric Tumbler
CLEARANCES: Minimum
to nearest Combustible
Material
Top — 12" (30.5 cm)
Minimum.
0" permitted for first 4"
(10.2 cm) along front of
machine.
Back — 0" - 24" (61 cm)
Minimum recommended
for service access.
Sides — 0" Permitted.
71.7 cm (28-1/4")
DISCONNECT
ELECTRICAL
JUNCTION BOX
SWITCH
AIR FLOW
SWITCH
3.81 cm
(1-1/2")
81.75 cm (32-3/16")
114 cm (44-7/8")
183.5 cm
(72-1/2")
11.3 cm
(4-7/16")
20.3 cm (8")
DIAMETER
EXHAUST DUCT
THIMBLE
CONNECTION
55.6 cm
(21-7/8")
M412616
11
80 cm (31-1/2")
T267IE3B
Page 14

30 Pound (13 kg) Electric Tumbler
Cabinet Finish: Electrostatically applied thermosetting polyester
Cylinder: 30" x 30" (76.2 x 76.2 cm) perforated galvanized steel with three baffles;
30 pounds (13.6 kg) dry weight (cotton load)
Motor: ¹⁄₃ H.P., lifetime lubricated, internal overload protected
Electrical Requirements: 230 Volt, 50 Hertz, 1 Phase, 90 Amp
(see nameplate for voltage 230 Volt, 50 Hertz, 3 Phase, 54 Amp
of your tumbler) 380 Volt, 50 Hertz, 3 Phase, 33 Amp
415 Volt, 50 Hertz, 3 Phase, 30 Amp
Element: 21,000 Watts (all voltages)
Air Flow: 600 C.F.M. at 0.5" W.C. (283 liters/sec. at 1.25 mBar)
Net Weight: 450 pounds (204 kg) (approximate)
12
M412616
Page 15

30 Pound (13 kg) Steam Tumbler
CLEARANCES: Minimum
to nearest Combustible
Material
Top — 12" (30.5 cm)
Minimum.
0" permitted for first 4"
(10.2 cm) along front of
machine.
Back — 0" - 24" (61 cm)
Minimum recommended
for service access.
Sides — 0" Permitted.
71.75 cm (28-1/4")
DISCONNECT
SWITCH
ELECTRICAL
JUNCTION BOX
3.81 cm
(1-1/2")
183.5 cm (72-1/4")
174.6 cm (68-3/4")
155.6 cm (61-1/4")
81.75 cm (32-3/16")
114 cm (44-7/8")
(High Pressure Models)
114.4 cm (45-1/32")
(Low Pressure Models)
35.6 cm
(14")
11.27 cm
(4-7/16")
19.05 cm (7-1/2")
1.9 cm (3/4")
I.D. STEAM
OUTLET
1.9 cm (3/4") I.D.
STEAM OUTLET
20.3 cm (8")
DIAMETER
EXHAUST DUCT
THIMBLE
CONNECTION
M412616
80 cm (31-1/2")
13
(21-7/8")
55.56 cm
T268IE3B
Page 16

30 Pound (13 kg) Steam Tumbler
Cabinet Finish: Electrostatically applied thermosetting polyester
Cylinder: 30" x 30" (76.2 x 76.2 cm) perforated galvanized steel with three baffles;
30 pounds dry weight (13.6 kg) (cotton load)
Motor: High Pressure (4 coils) ¹⁄₂ H.P.
Low Pressure (4 coils) ³⁄₄ H.P.
Boiler Horsepower: 4 coil High Pressure – 3.7 Bhp (123,950 BTU/hr., 58 kg/hr, 31,235 kCal/hr.)
4 coil Low Pressure – 2.6 Bhp (87,100 BTU/hr., 40 kg/hr, 21,949 kCal/hr.)
Electrical Requirements: Low Pressure:
(see nameplate for 230 Volt, 50 Hertz, 1 Phase, 8 Amp
voltage of tumbler) 380 Volt, 50 Hertz, 3 Phase, 3 Amp
415 Volt, 50 Hertz, 3 Phase, 3 Amp
High Pressure:
230 Volt, 50 Hertz, 1 Phase, 4 Amp
380-415 Volt, 50 Hertz, 3 Phase, 2 Amp
Air Flow: Low Pressure — 600 C.F.M. at 0.5 W.C. (283 liters/sec. at 1.25 mBar)
High Pressure — 600 C.F.M. at 0.5 W.C. (283 liters/sec. at 1.25 mBar)
Net Weight: 470 pounds (214 kg) (approximate)
14
M412616
Page 17

50 Pound (22 kg) Gas Non-reversing Tumblers
CLEARANCES: Minimum
to nearest Combustible
Material
Top — 12" (30.5 cm)
Back — 0" - 24" (61 cm)
Sides — 0" Permitted.
Minimum.
0" permitted for first 4"
(10.2 cm) along front of
machine.
Minimum recommended
for service access.
71.75 cm (28-1/4")
DISCONNECT
ELECTRICAL
JUNCTION BOX
AIR FLOW
SWITCH
(Energy Saver
Models)
SWITCH
3.81 cm
(1-1/2")
GAS CONNECTION
194.6 cm (76-5/8")
167 cm (65-3/4")
81.75 cm (32-3/16")
119.4 cm (47")
AND SHUT OFF
VALVE
13.65 cm
(5-3/8")
AIR FLOW SWITCH
(Standard Models)
146.37 cm (57-5/8")
34 cm
(13-3/8")
20.3 cm (8")
DIAMETER
EXHAUST DUCT
THIMBLE
CONNECTION
(Energy Saver
Models)
20.3 cm (8")
DIAMETER
EXHAUST DUCT
THIMBLE
CONNECTION
(Standard
Models)
M412616
98.1 cm (38-5/8")
15
T269IE3B
Page 18

50 Pound (22 kg) Gas Tumblers
Cabinet Finish: Electrostatically applied thermosetting polyester
Cylinder: 37" x 30" (94 cm x 76.2 cm) perforated galvanized steel with four baffles;
50 pounds (22.7 kg) dry weight (cotton load)
Motor: 1/2 H.P., lifetime lubricated, internal overload protected
(Nonreversing Models) (See below for reversing models.)
Electrical Requirements: 230 Volt, 50 Hertz, 1 Phase, 6.0 Amp
Non-Reversing Models
Electrical Requirements: 230 Volt, 50 Hertz, 1 Phase, 8.0 Amp
Reversing Models
Gas Consumption: Energy Saver Models — 95,000 BTU per hour (100.2 MJ/hr.)
Standard Models — 120,000 BTU per hour (126.6 MJ/hr.)
Types of Gas: Factory equipped with Natural/Mixed Gas
(6-1/2 ± 1-1/2 inch water column line pressure) (1.62 ± .37 kPa); or
Liquefied Petroleum gas (11 ± .3" water column line pressure)
(2.74 ± .07 kPa)
Gas Connection: 1/2 inch (12.7 mm) N.P.T.
Air Flow: Energy Saver Models — 390 C.F.M. at 0.5" W.C. (185 liters/sec. at 1.25 mBar)
Standard Models — 600 C.F.M. at 0.5" W.C. (284 liters/sec. at 1.25 mBar)
Net Weight: 545 Pounds (247 kg) (approximate)
Calorific Value: Natural Gas — 8900 kCal/m3 (37.2 MJ/m3)
L.P. Gas — 22,250 kCal/m3 (93.1 MJ/m3)
REVERSING MOTOR SIZES
STEAM
GAS ELECTRIC
HIGH PRESSURE LOW PRESSURE
FAN
50 LB.
CYLINDER
1/3 H.P. 1/3 H.P. 1/3 H.P. 1/2 H.P.
1/3 H.P. 1/3 H.P. 1/3 H.P. 1/3 H.P.
16
M412616
Page 19

50 Pound (22 kg) Gas and Steam Reversing
Tumblers
ELECTRICAL
DISCONNECT
SWITCH
JUNCTION BOX
CYLINDER
MOTOR
20.3 cm (8")
DIAMETER
EXHAUST THIMBLE
CONNECTOR
(Energy Saver
Gas Models)
AIRFLOW
SWITCH
194.6 cm
(76-5/8")
146.4 cm
(57-5/8")
20.3 cm (8")
DIAMETER
EXHAUST
THIMBLE
CONNECTION
34 cm
(13-3/8")
M412616
FAN
MOTOR
13.65 cm
(5-3/8")
98.1 cm
(38-5/8")
T264IE3B
17
Page 20

50 Pound (22 kg) Electric Non-reversing Tumblers
CLEARANCES: Minimum
to nearest Combustible
Material
Top — 12" (30.5 cm)
Back — 0" - 24" (61 cm)
Sides — 0" Permitted.
Minimum.
0" permitted for first 4"
(10.2 cm) along front of
machine.
Minimum recommended
for service access.
71.75 cm (28-1/4")
DISCONNECT
SWITCH
ELECTRICAL
JUNCTION BOX
AIR FLOW
SWITCH
3.81 cm
(1-1/2")
81.75 cm (32-3/16")
13.65 cm
194.6 cm (76-5/8")
119.4 cm (47")
(5-3/8")
20.3 cm (8")
DIAMETER
EXHAUST DUCT
THIMBLE
CONNECTION
34 cm
(13-3/8")
98.1 cm (38-5/8")
18
T270IE3B
M412616
Page 21

50 Pound (22 kg) Electric Tumblers
Cabinet Finish: Electrostatically applied thermosetting polyester
Cylinder: 37" x 30" (94 x 76.2 cm) perforated galvanized steel with four baffles;
50 pounds (22.7 kg) dry weight (cotton load)
Motor: 1/2 H.P., lifetime lubricated, internal overload protected
(Nonreversing models) (See below for reversing models.)
Electrical Requirements: 230 Volt, 50 Hertz, 1 Phase, 90 Amp
(see nameplate for voltage 230 Volt, 50 Hertz, 3 Phase, 78 Amp
of your tumbler) 380 Volt, 50 Hertz, 3 Phase, 48 Amp
415 Volt, 50 Hertz, 3 Phase, 45 Amp
Element: 30,000 watts (all voltages) Long life nichrome wire
Air Flow: 900 C.F.M. maximum at .5" W.C.
(425 liters/sec at 1.25 mBar)
Net Weight: 550 pounds (250 kg) (approximate)
REVERSING MOTOR SIZES
GAS ELECTRIC
FAN
50 LB.
CYLINDER
1/3 H.P. 1/3 H.P. 1/3 H.P. 1/2 H.P.
1/3 H.P. 1/3 H.P. 1/3 H.P. 1/3 H.P.
STEAM
HIGH PRESSURE LOW PRESSURE
M412616
19
Page 22

50 Pound (22 kg) Electric Reversing Tumblers
CYLINDER
MOTOR
DISCONNECT
194.6 cm
(76-5/8")
SWITCH
ELECTRICAL
JUNCTION BOX
AIRFLOW
SWITCH
MOTOR
FAN
20.3 cm (8")
DIAMETER
EXHAUST
THIMBLE
CONNECTION
34 cm
(13-3/8")
13.65 cm
(5-3/8")
98.1 cm
(38-5/8")
T263IE3B
20
M412616
Page 23

50 Pound (22 kg) Steam Non-reversing Tumblers
71.75 cm (28-1/4")
203.2 cm (80") (6 Coil)
194. 6 cm (76-5/8") (4 Coil)
ELECTRICAL
JUNCTION BOX
3.81 cm
(1-1/2")
81.75 cm (32-3/16")
119.4 cm (47")
38.7 cm (15-1/4") 19.05 cm (7-1/2")
1.9 cm (3/4") I.D.
STEAM OUTLET
13.65 cm
(5-3/8")
200 cm (78-3/4") (6 Coil)
164.5 cm (64-3/4")
184.8 cm (72-3/4") (4 Coil)
1.9 cm (3/4") I.D.
STEAM INLET
20.3 cm (8")
DIAMETER
EXHAUST DUCT
THIMBLE
CONNECTION
M412616
98.1 cm (38-5/8")
21
34 cm (13-3/8")
T271IE3A
Page 24

50 Pound (22 kg) Steam Tumblers
Cabinet Finish: Electrostatically applied thermosetting polyester
Cylinder: 37" x 30" (94 x 76.2 cm) perforated galvanized steel with four baffles;
50 pounds (22.7 kg) dry weight (cotton load)
Motor: High Pressure Steam — 1/2 H.P.
(Nonreversing Models) Low Pressure Steam — 3/4 H.P.
Both motors are lifetime lubricated, internal
overload protected
(See below for reversing models.)
Boiler Horsepower: High Pressure Steam (6 Coil) — 4.60 BHP
(154,100 BTU/hr, 72.1 kg/hr, 38,833 kCal/nr.)
Low Pressure Steam (4 Coil) — 3.00 BHP
(134,000 BTU/hr, 62.7 kg/hr, 33,768 kCal/hr.)
Electrical Requirements: Low Pressure
(see nameplate for voltage 230 Volt, 50 Hertz, 1 Phase, 7.0 Amp
of your tumbler)
High Pressure
230 Volt, 50 Hertz, 1 Phase, 7.0 Amp
380 Volt, 50 Hertz, 3 Phase, 3.0 Amp
415 Volt, 50 Hertz, 3 Phase, 2.5 Amp
Air Flow: Low Pressure — 950 C.F.M. at 0.5" W.C. (449 liters/sec. at 1.25 mBar)
High Pressure — 900 C.F.M. at 0.5" W.C. (426 liters/sec. at 1.25 mBar)
Net Weight: 4 Coil Tumbler — 565 pounds (257 kg) (approximate)
6 Coil Tumbler — 580 pounds (263 kg) (approximate)
REVERSING MOTOR SIZES
STEAM
GAS ELECTRIC
HIGH PRESSURE LOW PRESSURE
FAN
50 LB.
CYLINDER
1/3 H.P. 1/3 H.P. 1/3 H.P. 1/2 H.P.
1/3 H.P. 1/3 H.P. 1/3 H.P. 1/3 H.P.
22
M412616
Page 25

75 Pound (34 kg) Gas Non-reversing Tumblers
71.75 cm (28-1/4")
CLEARANCES: Minimum
to nearest Combustible
Material
Top — 12" (30.5 cm)
Minimum.
0" permitted for first 4"
(10.2 cm) along front of
machine.
Back — 0" - 24" (61 cm)
Minimum recommended
for service access.
Sides — 0" Permitted.
DISCONNECT
SWITCH
ELECTRICAL
JUNCTION BOX
AIR FLOW
SWITCH
3.81 cm
(1-1/2")
194.6 cm (76-5/8")
167 cm (65-3/4")
97 cm (38-3/16")
134.6 cm (53")
13.65 cm
(5-3/8")
GAS CONNECTION
AND
SHUT OFF VALVE
20.3 cm (8")
DIAMETER
EXHAUST DUCT
THIMBLE
CONNECTION
(Standard Models)
34 cm
(13-3/8")
M412616
23
98.1 cm (38-5/8")
T272IE3B
Page 26

75 Pound (34 kg) Gas and Steam Reversing
Tumblers
DISCONNECT
SWITCH
194.6 cm
(76-5/8")
ELECTRICAL
JUNCTION BOX
CYLINDER
MOTOR
AIRFLOW
SWITCH
FAN
MOTOR
20.3 cm (8")
DIAMETER
EXHAUST
THIMBLE
CONNECTION
34 cm
(13-3/8")
13.65 cm
(5-3/8")
98.1 cm
(38-5/8")
T265IE3B
24
M412616
Page 27

75 Pound (34 kg) Gas Tumblers
Cabinet Finish: Electrostatically applied thermosetting polyester
Cylinder: 37" x 36" (94 x 91.4 cm) perforated galvanized steel cylinder with four baffles;
75 pounds (34.1 kg) dry weight (cotton load)
Motor: 3/4 H.P., lifetime lubricated, internal overload protected.
(Non-reversing models) (See below for reversing models.)
Electrical Requirements
Nonreversing Models: 230 Volt, 50 Hertz, 1 Phase, 9.0 Amp
Electrical Requirements
Reversing Models: 230 Volt, 50 Hertz, 1 Phase, 9.0 Amp
Gas Consumption: 165,000 B.T.U. per hour (174.1 MJ/hr.)
Types of Gas: Factory equipped with Natural/Mixed gas (6-1/2 A 1-1/2 inch
water column line pressure) (1.62 A .37 kPa); or Liquefied Petroleum gas
(11.0 A .3 inch water column line pressure) (2.74 A .07 kPa)
Gas Connection: 1/2 inch (12.7 mm) N.P.T.
Air Flow: 1000 C.F.M. at 0.5" W.C.
(472 liters/sec. at 1.25 mBar)
Net Weight: 550 Pounds (250 kg) (approximate)
Calorific Value: Natural Gas — 8900 kCal/m
3
(37.2 MJ/m3)
L.P. Gas — 22250 kCal/m3 (93.1 MJ/m3)
REVERSING MOTOR SIZES
GAS ELECTRIC
HIGH PRESSURE LOW PRESSURE
FAN
75 LB.
CYLINDER
1/3 H.P. 1/3 H.P. 1/3 H.P. 1/2 H.P.
1/3 H.P. 1/3 H.P. 1/3 H.P. 1/3 H.P.
STEAM
M412616
25
Page 28

75 Pound (34 kg) Electric Non-reversing Tumblers
CLEARANCES: Minimum
to nearest Combustible
Material
Top — 12" (30.5 cm)
Back — 0" - 24" (61 cm)
Sides — 0" Permitted.
Minimum.
0" permitted for first 4"
(10.2 cm) along front of
machine.
Minimum recommended
for service access.
71.75 cm (28-1/4")
DISCONNECT
SWITCH
ELECTRICAL
JUNCTION BOX
AIR FLOW
SWITCH
3.81 cm
(1-1/2")
97 cm (38-3/16")
194.6 cm (76-5/8")
134.6 cm (53")
13.65 cm
(5-3/8")
20.3 cm (8")
DIAMETER
EXHAUST DUCT
THIMBLE
CONNECTION
26
98.1 cm (38-5/8")
34 cm
(13-3/8")
T273IE3B
M412616
Page 29

75 Pound (34 kg) Electric Reversing Tumblers
CYLINDER
MOTOR
DISCONNECT
194.6 cm
(76-5/8")
SWITCH
ELECTRICAL
JUNCTION BOX
AIRFLOW
SWITCH
MOTOR
FAN
20.3 cm (8")
DIAMETER
EXHAUST
THIMBLE
CONNECTION
34 cm
(13-3/8")
13.65 cm
(5-3/8")
98.1 cm
(38-5/8")
T263IE3B
M412616
27
Page 30

75 Pound (34 kg) Electric Tumblers
Cabinet
Finish: Electrostatically applied thermosetting polyester
Cylinder: 3 7" x 36" (94 x 91.4 cm) perforated galvanized steel with four baffles;
75 pounds (34.1 kg) dry weight (cotton load)
Motor: 3/4 H.P., lifetime lubricated internal overload protected.
(Non-reversing models) (See below for reversing models.)
Electrical
Requirements: 230 Volt, 50 Hertz, 3 Phase, 77 Amps
(See nameplate 380 Volt, 50 Hertz, 3 Phase, 50 Amps
for voltage of 415 Volt, 50 Hertz, 3 Phase, 45 Amps
your tumbler)
Element: 30,000 Watts (all models)
Air Flow: 850 C.F.M. at 0.5" W.C. (401 liters/sec at 1.25 mBar)
Net Weight: 555 Pounds (252 kg) (approximate)
75 LB.
FAN
CYLINDER
REVERSING MOTOR SIZES
STEAM
GAS ELECTRIC
HIGH PRESSURE LOW PRESSURE
1/3 H.P. 1/3 H.P. 1/3 H.P. 1/2 H.P.
1/3 H.P. 1/3 H.P. 1/3 H.P. 1/3 H.P.
28
M412616
Page 31

75 Pound (34 kg) Steam Non-reversing Tumblers
CLEARANCES: Minimum
to nearest Combustible
Material
Top — 12" (30.5 cm)
Back — 0" - 24" (61 cm)
Sides — 0" Permitted.
Minimum.
0" permitted for first 4"
(10.2 cm) along front of
machine.
Minimum recommended
for service access.
DISCONNECT
ELECTRICAL
JUNCTION BOX
71.75 cm (28-1/4")
SWITCH
3.81 cm
(1-1/2")
97 cm (38-3/16")
39.1 cm
(15-1/4")
203 cm (80") (6 Coil)
194.6 cm (76-5/8") (4 Coil)
134.6 cm (53")
19 cm (7-1/2")
1.9 cm (3/4")
I.D. STEAM INLET
1.9 cm (3/4")
I.D. STEAM OUTLET
M412616
200 cm (78-3/4") (6 Coil)
164.5 cm (64-3/4")
184.8 cm (72-3/4") (4 Coil)
98.1 cm (38-5/8")
29
13.65 cm
(5-3/8")
20.3 cm (8")
DIAMETER
EXHAUST DUCT
THIMBLE
CONNECTION
34 cm
(13-3/8")
T274IE3B
Page 32

75 (34 kg) Pound Steam Tumblers
Cabinet Finish: Electrostatically applied thermosetting polyester
Cylinder: 37" x 36" (94 x 91.4 cm) perforated galvanized steel with four baffles;
75 pounds (34.1 kg) dry weight (cotton load)
Motor: High Pressure Steam — 3/4 H.P.
(Non-reversing models) Low Pressure Steam — 3/4 H.P.
Both motors are lifetime lubricated, internal overload protected.
(See below for reversing models.)
Boiler High Pressure Steam (6 Coil) — 4.60 BPH
Horsepower: (154,100 BTU/hr., 72.1 kg/hr., 38,833 kCal/hr.)
Low Pressure Steam (4 Coil) — 4.00 BHP
(134,000 BTU/hr., 62.7 kg/hr., 33,768 kCal/hr.)
Electrical Requirements: Low Pressure — 230 Volt, 50 Hertz, 1 Phase, 8.5 Amp
(See nameplate for voltage
of your tumbler) High Pressure — 230 Volt, 50 Hertz, 1 Phase, 9.0 Amp
Air Flow: Low Pressure — 950 C.F.M. at 0.5" W.C. (449 liters/sec at 1.25 mBar)
High Pressure — 900 C.F.M. at 0.5" W.C. (425 liters/sec at 1.25 mBar)
Net Weight: 615 Pounds (280 kg) (approx.)
REVERSING MOTOR SIZES
GAS ELECTRIC
FAN
75 LB.
CYLINDER
1/3 H.P. 1/3 H.P. 1/3 H.P. 1/2 H.P.
1/3 H.P. 1/3 H.P. 1/3 H.P. 1/3 H.P.
STEAM
HIGH PRESSURE LOW PRESSURE
30
M412616
Page 33

SECTION II
Installation Instructions
RECEIVING INSPECTION
Upon delivery, visually inspect crate carton and parts
for any visible shipping damage. If crate, carton
or cover are damaged or signs of possible damage
are evident, have carrier note condition on shipping
papers before shipping receipt is signed, or advise
carrier of condition as soon as it is discovered.
Remove crate and protective cover as soon as
possible and check items listed on packing list.
Advise carrier of any damaged or missing articles as
soon as possible. A written claim should be filed with
carrier immediately if articles are damaged or
missing.
IMPORTANT: Remove shipping tape from two
back draft dampers located in exhaust thimble
MATERIALS REQUIRED (Obtain Locally)
GAS, ELECTRIC OR STEAM DRYING
TUMBLERS
••
• One circuit breaker.
••
GAS DRYING TUMBLERS ONLY
••
• One gas shut-off valve for gas service line to each
••
tumbler.
STEAM DRYING TUMBLERS ONLY
••
• One steam shut-off gate valve for steam service
••
line to be connected upstream of solenoid steam
valve.
••
• Two steam shut-off gate valves for each
••
condensate return line.
••
• Flexible steam hoses with a 125 psig (pounds per
••
square inch gauge) (8.79 kg/sq. cm) working
pressure for connecting steam coils,
and 25.
••
• Two steam traps for steam coil outlet to
••
condensate return line.
••
• One steam pressure relief valve rated at 125 psig.
••
(8.79 kg/cm2).
.
Figures 24
FACILITIES REQUIRED
FLOOR
Drying tumbler may be installed on any level floor
capable of supporting 100 pounds per square foot
(488 kg/m2). Floor covering materials such as
carpeting or tile should be removed.
LAYOUT
Whenever possible, tumbler should be installed along
an outside wall where duct length can be kept to a
minimum, and make-up air can be easily accessed.
M412616
Construction must not block airflow at top rear of
tumbler. Doing so would prevent adequate air supply
to tumbler’s combustion chamber.
VENTING
For maximum efficiency and minimum lint
accumulation, tumbler air must be exhausted to
outdoors by shortest possible route.
31
Page 34

Proper sized exhaust ducts are essential for proper
operation. All elbows should be sweep type. Do not
install elbows with a radius less than shown in table
below. Exhaust ducts must be assembled so interior
surfaces are smooth to reduce accumulation of lint.
Do not use sheet metal screws to join vent sections.
Improperly sized or assembled ductwork causes
excess back pressure which results in slow drying,
lint collecting in duct, lint blowing back into room, and
increased fire hazard.
Exhaust ducts shall be constructed of sheet metal
or other noncombustible material. Such ducts
must be equivalent in strength and corrosion
resistance to ducts made of galvanized sheet
steel not less than 0.0195 inches (0.495 mm)
thick.
Where exhaust duct pierces a combustible wall or
ceiling, an opening having a diameter of 4 inches
(10.2 cm) larger than diameter of exhaust duct shall
be provided, with duct centered in opening. When
ducts pass through walls, ceilings, floors or partitions,
space around the duct shall be sealed with noncombustible material. See
••
• Individual Venting
••
Figures 1, 2
and
3.
For maximum efficiency and performance, it is
preferred to exhaust tumbler(s) individually to
outdoors. At no point may cross area of
installed venting be less than cross area of
exhaust thimble of tumbler.
Maximum allowable length of venting is 14 feet
(4.3 m) and two 90° elbows or equivalent. If
equivalent length of a duct required for an
installation exceeds maximum allowable
equivalent length, diameter of a round duct must
be increased by 10% for each additional 20 feet
(6.1 m). Cross section area of a rectangular duct
must be increased by 20% for each additional 20
feet (6.1 m). Table below shows how to determine
equivalent venting:
DUCT
DIAMETER
6" (15.2 cm)
8" (20.3 cm)
10" (25.4 cm)
12" (30.5 cm)
EQUIVALENT LENGTH OF
STRAIGHT DUCT
One 90° elbow = 7' (2.1 m)
One 90° elbow = 9.3' (2.83 m)
One 90° elbow = 11.6' (3.5 m)
One 90° elbow = 14' (4.3 m)
With tumbler in operation, airflow at any point in
duct must be at least 1200 feet (366 m) per
minute to insure that lint remains airborne.
••
• Collector Venting
••
While it is preferable to exhaust tumblers
individually to outdoors, a main collector duct may
be used if it is sized according to
Figure 3.
NOTE: This illustration indicates minimum
diameters, and should be increased if collector
length exceeds 20 feet (6.1 m).
Collector duct may be rectangular in cross
section, as long as area is not reduced. Provisions
should be made for lint removal and cleaning of
collector duct.
Collector duct must be tapered, as shown in
Figure 3.
Individual tumbler ducts must enter the
collector duct at a 45° angle in direction of air flow.
Never connect a tumbler duct at a 90° angle to
collector duct. Doing so will cause excessive
back pressure, resulting in poor performance.
Never connect two tumbler exhaust ducts
directly across from each other at point of
entry to collector duct.
Collector system must be designed so static back
pressure measured 12 inches (30.5 cm) from
exhaust thimble does not exceed maximum
allowable pressure specified on installation sticker
on rear of tumbler. Measured with all tumblers
running that are vented into collector.
MAKE-UP AIR
A tumbler is forced air exhausted and requires
provisions for make-up air to replace the air
exhausted by tumbler.
Manufacturer’s recommended make-up air opening
for each tumbler is 144 square inches (928 sq. cm)
for 30 and 50 pound tumblers and 195 square inches
(1258 sq. cm) for 75 pound tumblers. At a minimum,
tumblers must have at least 1 in2 (2.54 cm2) of
opening for every 1000 BTU/hr (252 Kcal/hr) of
input rating for proper combustion.
Example: A tumbler with a rated input of 120,000
BTU/hr (30,240 Kcal) requires 120 in
(774 cm2) of free opening.
2
Equivalent Length (feet) (m) =
1.17 x Duct Diameter (inches) (cm)
Example: A 6-inch (15.2 cm) diameter duct’s
equivalent length of 14 feet (4.3 m) of duct
and two 90° elbows is:
Equivalent length
= 14 feet (4.3 m) + (2) 90° elbows
= 14 feet (4.3 m) + 7 feet (2.1 m) + 7 feet (2.1 m)
= 28 feet (8.5 m)
Protective louvers in opening to outdoors can reduce
air movement by approximately 40%. Opening must
compensate for area taken up by louvers.
Make-up air openings for a room containing
tumbler(s) and/or gas fired hot water heater or other
gravity vented appliances must be increased
sufficiently to prevent downdrafts in any vents when
all tumblers are in operation. Do not locate gravity
vented appliances between tumbler(s) and make-up
air openings. If it is necessary to duct make-up air to
tumbler(s), increase area of work by 25% to
compensate for any restriction in air movement.
32
M412616
Page 35

WARNINGWARNING
WARNING
WARNINGWARNING
維
Solvent gases and vapors from dry
cleaning machines create acids when
drawn through the heater of a drying
tumbler. These acids are corrosive to
the drying tumbler as well as to the
laundry load being dried. Be sure
make-up air is free of solvent gases
and vapors.
If the dry cleaning machines are in the
same area as the tumbler, then the
tumbler make-up air must come from
a source free of solvent gases and
vapors.
FOR BEST PERFORMANCE
Provide an individual exhaust
duct for each tumbler. Do not
install a hot water heater in
room containing tumblers. It is
better to have the water heater
in a separate room with a
separate air inlet.
WARNINGWARNING
WARNING
WARNINGWARNING
維
To reduce the risk of fire and
accumulation of combustible gases,
DO NOT exhaust tumbler air into a
window well, gas vent, chimney or
enclosed, unventilated area such as an
attic wall, ceiling, crawl space under a
building, or concealed space of a
building.
NOTE: Do not install wire
mesh or screen in this
opening as lint will build up
and prevent proper discharge
of air from tumblers.
ROOF 30" (76.2 CM)
T075IE3A
REMOVABLE STRIP OF PANEL IN FRAMING WALL TO
PERMIT REMOVAL OF TUMBLER FROM FRAMING WALL
ONE
TUMBLER
T108IE3A
TWO
TUMBLERS
THREE
TUMBLERS
ROOF 30" (76.2 cm)
PARTITION OR
BULKHEAD
CONSULT YOUR LOCAL BUILDING
CODE FOR REGULATIONS WHICH
MAY ALSO APPLY
NOTE: Inside of duct shall be
smooth. Do not use sheet
metal screws to join sections.
CEILING
WALL
36 INCHES
(91.4 cm)
RECOMMENDED
SERVICE AREA
24 INCHES
(61.0 cm)
MINIMUM
T108IE3B
M412616
Figure 1
33
Page 36

VERTICAL EXHAUST INSTALLATION
HORIZONTAL EXHAUST INSTALLATION
WALL
CONNECT TO
TUMBLER
2" (5.1 cm)
MINIMUM
WALL
2" (5.1 cm)
MINIMUM
WALL
CONNECT TO
TUMBLER
EXHAUST AIR FLOW
MAXIMUM LENGTH OF
DUCT 14 FEET
(4.3 m)
NOTE: WHERE THE EXHAUST DUCT PIERCES A COMBUSTIBLE WALL
OR CEILING, AN OPENING HAVING A DIAMETER FOUR INCHES (10.2 cm)
LARGER THAN THE DIAMETER OF THE EXHAUST DUCT SHALL BE
PROVIDED, AND THE EXHAUST DUCT CENTERED WITHIN THE OPENING.
Figure 2
NOTE: WHERE THE EXHAUST DUCT PIERCES A COMBUSTIBLE WALL
OR CEILING, AN OPENING HAVING A DIAMETER FOUR INCHES (10.2 cm)
LARGER THAN THE DIAMETER OF THE EXHAUST DUCT SHALL BE
PROVIDED, AND THE EXHAUST DUCT CENTERED WITHIN THE OPENING.
T030IE3B
2" (5.1 cm)
MINIMUM
EXHAUST
OUTLET
NO SCREEN
OR CAP
INSPECTION OR
CLEANOUT COVER
ALKJ I HGF EDCB
NO SCREEN
OR CAP
AIR OUT
DUCT
STATION
MINIMUM DIAMETER
*GAS
ELECTRIC
STEAM
DUCT
STATION
MINIMUM DIAMETER
*GAS
ELECTRIC
STEAM
A 9" (22.9 cm) 10" (25.4 cm) G 23" (58.4 cm) 26" (66 cm)
B 12" (30.5 cm) 14" (35.6 cm) H 25" (63.5 cm) 28" (71.1 cm)
C 15" (38.1 cm) 17" (43.2 cm) I 26" (66 cm) 30" (76.2 cm)
D 17" (43.2 cm) 20" (50.8 cm) J 27" (68.6 cm) 31" (78 cm)
E 19" (48.3 cm) 22" (55.9 cm) K 29" (73.9 cm) 33" (83.8 cm)
F 21" (53.3 cm) 24" (61 cm) L 30" (76.2 cm) 34" (86.4 cm)
Figure 3
34
45˚
T056IE3B
M412616
Page 37

ELECTRICAL REQUIREMENTS
For 30 Pound (13 kg) Narrow Cabinet Tumblers
REQUIREMENTS
Heat Source Electrical Specs Wires Required and Terminal Block Connection
Gas 230-50-1 L1 L2 Ground to PE Busbar
Electric 230-50-1 L1 L2 Ground to PE Busbar
Electric 230-50-3 L1 L2 L3 Ground to PE Busbar
Electric 380-50-3 L1 L2 L3 Ground to PE Busbar
Electric 415-50-3 L1 L2 L3 Ground to PE Busbar
Figure 4
GAS DRYING TUMBLERS
GAS DRYING TUMBLERS
240V, 1 Phase, 50 Hz. 120V, 1 Phase, 30 Hz.
Minimum Wire Size 14 AWG (2.081 mm²) 14 AWG (2.081 mm²)
Circuit Breaker 15 AMP 15 AMP
No. of Poles 2 2
Figure 5
ELECTRIC DRYING TUMBLERS
ELECTRIC DRYING TUMBLERS
240V 50 Hz. 1 Ph 240V 50 Hz. 3 Ph 380V 50 Hz. 3 Ph 415V 50 Hz. 3 Ph
Amp Rating 91 Amp 55 Amp 34 Amp 31 Amp
Circuit Breaker 100 Amp 60 Amp 40 Amp 35 Amp
Poles 2 3 3 3
Minimum Wire Size 2 AWG (33.63 mm²) 6 AWG (13.32 mm²) 8 AWG (8.366 mm²) 8 AWG (8.366 mm²)
Figure 6
GROUNDING INSTRUCTIONS
Drying tumbler must be grounded. In event of malfunction or breakdown, grounding will reduce risk of electric
shock by providing a path of least resistance for electric current. Drying tumbler must be connected to a
grounded metal, permanent wiring system; or an equipment grounding conductor must be run with circuit
conductors and connected to PE Busbar.
維
WARNING
To reduce the risk of fire and electric shock, check with a qualified serviceman for
proper grounding procedures. Improper connection of the equipment grounding
conductor can result in a risk of electric shock.
WARNING
維
To reduce the risk of fire and electric shock, if electrical supply is coming from a
three phase service, DO NOT connect a “Stinger Leg” to a single phase machine.
M412616
35
Page 38

ELECTRICAL REQUIREMENTS
For 30 Pound (13 kg) Tumblers
REQUIREMENTS
Heat Source Electrical Specs Wires Required and Terminal Block Connection
Gas & Steam 230/50/1 L1 L2 Ground to PE Busbar
Electric 230/50/1 L1 L2 Ground to PE Busbar
Electric 380/50/3 L1 L2 L3 Ground to PE Busbar
Electric 415/50/3 L1 L2 L3 Ground to PE Busbar
Steam 380/50/3 L1 L2 L3 Ground to PE Busbar
Figure 7
GAS AND HIGH PRESSURE STEAM DRYING TUMBLERS
GAS AND HIGH PRESSURE STEAM DRYING TUMBLERS
240 V, 1 Phase, 50 Hz. 380 V, 3 Phase, 50 Hz.
Minimum Wire Size 14 AWG (2.081 mm²) 14 AWG (2.081 mm²)
Circuit Breaker 15 AMP 15 AMP
Poles 2 2
Figure 8
ELECTRIC DRYING TUMBLERS
NOTE: DO NOT use aluminum wire.
ELECTRIC DRYING TUMBLERS
240 V, 1 Ph, 50 Hz. 240 V, 3 Ph, 50 Hz. 380 V, 3 Ph, 50 Hz. 415 V, 3 Ph, 50 Hz.
Minimum Wire Size 2 AWG (33.63 mm²) 6 AWG (13.32 mm²) 8 AWG (8.366 mm²) 8 AWG (8.366 mm²)
AMP Rating 90 Amp 54 Amp 33 Amp 30 Amp
Circuit Breaker 100 Amp 60 Amp 40 Amp 35 Amp
Poles 2 3 3 3
Figure 9
36
M412616
Page 39

30 Pound (13 kg) Tumblers
LOW STEAM DRYING TUMBLERS
LOW PRESSURE STEAM DRYING TUMBLERS
240 V, 1 Phase 50 Hz.
Minimum Wire Size 16 AWG (1.309 mm²)
Circuit Breaker 20 AMP
Poles 2
Figure 10
GROUNDING INSTRUCTIONS
Drying tumbler must be grounded. In event of malfunction or breakdown, grounding will reduce risk of electric
shock by providing a path of least resistance for electric current. Drying tumbler must be connected to a
grounded metal, permanent wiring system; or an equipment grounding conductor must be run with circuit
conductors and connected to PE Busbar.
維
WARNING
To reduce the risk of fire and electric shock, check with a qualified serviceman for
proper grounding procedures. Improper connection of the equipment grounding
conductor may result in a risk of electric shock.
WARNING
維
To reduce the risk of fire and electric shock, if electrical supply is coming from a three
phase service, DO NOT connect a “Stinger Leg” to a single phase machine.
M412616
37
Page 40

ELECTRICAL REQUIREMENTS
For 50 Pound (22 kg) Tumblers
REQUIREMENTS
Heat Source Electrical Specs Wires Required and Terminal Block Connection
Non-Reversing Models
Gas & Steam 230/50/1 L1 L2 Ground to PE Busbar
Steam 380-415/50/3 L1 L2 L3 Ground to PE Busbar
Electric 230/50/1 L1 L2 Ground to PE Busbar
Electric 380-415/50/3 L1 L2 L3 Ground to PE Busbar
Reversing Models
Gas & Steam 230/50/1 L1 L2 Ground to PE Busbar
Gas & Steam 380-415/50/3 L1 L2 L3 Ground to PE Busbar
Electric 230/50/3 L1 L2 L3 Ground to PE Busbar
Electric 380-415/50/3 L1 L2 L3 Ground to PE Busbar
Figure 11
GAS AND HIGH PRESSURE STEAM DRYING TUMBLER
GAS AND HIGH PRESSURE STEAM DRYING TUMBLERS
208V / 240 V
1 Phase, 50 Hz.
Minimum Wire Size 14 AWG (2.081 mm²) 14 AWG (2.081 mm²) 14 AWG (2.081 mm²)
Circuit Breaker 15 AMP 15 AMP 15 AMP
Poles 2 3 3
Figure 12
208 / 240 V
3 Phase, 50 Hz.
380 / 415 V
3 Phase, 50 Hz.
ELECTRIC DRYING TUMBLERS
NOTE: DO NOT use aluminum wire.
ELECTRIC DRYING TUMBLERS
240 V, 3 Phase
50 Hz.
Minimum Wire Size 3 AWG (26.67 mm²) 6 AWG (13.32 mm²) 6 AWG (13.32 mm²)
AMP Rating 78 AMP 48 AMP 45 AMP
380 V, 3 Phase
50 Hz.
415 V, 3 Phase
50 Hz.
Circuit Breaker 80 AMP 50 AMP 50 AMP
Poles 3 3 3
Figure 13
38
M412616
Page 41

50 Pound (22 kg) Tumblers
LOW PRESSURE STEAM DRYING TUMBLERS
LOW PRESSURE STEAM DRYING TUMBLERS
240 V
1 Phase, 50 Hz.
Minimum Wire Size 14 AWG (2.081 mm²)
Circuit Breaker 15 AMP
Poles 2
Figure 14
GROUNDING INSTRUCTIONS
Drying tumbler must be grounded. In event of malfunction or breakdown, grounding will reduce risk of electric
shock by providing a path of least resistance for electric current. Drying tumbler must be connected to a
grounded metal, permanent wiring system; or an equipment grounding conductor must be run with circuit
conductors and connected to the PE Busbar.
維
WARNING
To reduce the risk of fire and electric shock, check with a qualified service technician
for proper grounding procedures. Improper connection of the equipment grounding
conductor can result in a risk of electric shock.
WARNING
維
To reduce the risk of fire and electric shock, if electrical supply is coming from a three
phase service, DO NOT connect a “Stinger Leg” to a single phase machine.
M412616
39
Page 42

ELECTRICAL REQUIREMENTS
For 75 Pound (34 kg) Tumblers
REQUIREMENTS
Heat Source Electrical Specs Wires Required and Terminal Block Connection
Gas & Steam 230/50/1 L1 L2 Ground to PE Busbar
Electric 208-230/50-60/3 L1 L2 L3 Ground to PE Busbar
Electric 380/50/3 L1 L2 L3 Ground to PE Busbar
Electric 415/50/3 L1 L2 L3 Ground to PE Busbar
Steam 380/50/3 L1 L2 L3 Ground to PE Busbar
Figure 15
GAS AND HIGH PRESSURE STEAM DRYING TUMBLERS
GAS AND HIGH PRESSURE STEAM DRYING TUMBLERS
208V / 240 V
1 Phase, 50 Hz.
Minimum Wire Size 14 AWG (2.081 mm²) 14 AWG (2.081 mm²) 14 AWG (2.081 mm²)
Circuit Breaker 15 AMP 15 AMP 15 AMP
Poles 2 3 3
Figure 16
208 / 240 V
3 Phase, 50 Hz.
380 / 415 V
3 Phase, 50 Hz.
ELECTRIC DRYING TUMBLERS
NOTE: DO NOT use aluminum wire.
ELECTRIC DRYING TUMBLERS
380 V, 3 Ph, 50 Hz. 415 V, 3 Ph, 50 Hz.
Minimum Wire Size 6 AWG (13.32 mm²) 6 AWG (13.32 mm²)
AMP Rating 48 Amp 45 Amp
Circuit Breaker 50 Amp 50 Amp
Poles 3 3
Figure 17
GROUNDING INSTRUCTIONS
Drying tumbler must be grounded. In event of malfunction or breakdown. Grounding will reduce risk of electric
shock by providing a path of least resistance for electric current. Drying tumbler must be connected to a
grounded metal, permanent wiring system; or an equipment grounding conductor must be run with circuit
conductors and connected to PE Busbar.
aWARNING
To reduce the risk of fire and electric shock, check with a qualified service technician
for proper ground procedures. Improper connection of the equipment grounding
conductor may result in risk of electric shock.
WARNING
維
To reduce the risk of fire and electric shock, if electrical supply is coming from a
three phase service, DO NOT connect a “Stinger Leg” to a single phase machine.
40
M412616
Page 43

ELECTRICAL CONNECTIONS
T260IE1A
NAMEPLATE
GUARD
JUNCTION
BOX
COVER
DISCONNECT
SWITCH
維
WARNING
All electrical connections should be
made by a qualified electrician.
To reduce the risk of electrical shock,
de-energize the electrical circuit being
connected to the tumbler before making any electrical connections. Never
attempt to connect a live circuit.
Use the following steps to connect electrical service
to the tumbler:
1. Install a circuit breaker, as close to tumbler as
possible. If more than one tumbler is being
installed, a circuit breaker should be provided
for each tumbler. This will make it possible to
disconnect each tumbler for maintenance
purposes.
2. a. Connect conduit-encased leads to circuit
breaker.
b. Turn “off” disconnect switch on tumbler and
open junction box.
c. Insert conduit-encased leads through
one of the knockout holes in junction box.
d. Connect wire leads to disconnect switch.
Figure 18
ELECTRICAL CONNECTIONS
1 Phase Units: Connect one lead to top left
connection point. Connect other lead to top
right connection point.
3 Phase Units: Connect one lead to each
connection point.
e. Connect a ground wire to PE Busbar,
Figure 19,
in junction box.
3. Check electrical service phase sequence
(three phase only) as follows:
a. Energize electrical service and momentarily
start tumbler. Check direction of the cylinder
rotation. If cylinder rotates clockwise (viewed
from front), phase sequence is correct. If
cylinder rotates counterclockwise, proceed
with step “b”.
b. Disconnect and reverse any two leads at
connections.
4. Close junction box cover and turn “on”
disconnect
switch.
ELECTRICAL
DISCONNECT
GAS AND STEAM
BUSBAR
MODELS
PE
ELECTRICAL
DISCONNECT
Figure 19
PE
BUSBAR
ELECTRIC
MODELS
T277IE1A
M412616
41
Page 44

POSITIONING DRYING TUMBLER
Tumbler may be removed from skid before moving to
installation location or moved while still attached to
skid. Remove tumbler from skid by unscrewing four
shipping capscrews (one at each corner) and remove
tumbler from skid. Lint panel door will have to be
removed in order to remove two front capscrews.
NOTE: Do not throw these four capscrews away
— they are the leveling legs.
LEVELING DRYING TUMBLER
Each tumbler should be leveled within ¹⁄₈ inch
(3.2 mm) from front to rear, and ¹⁄₈ inch (3.2 mm) from
side to side. Check front to rear level by rotating
clothes cylinder until one rib is at bottom, then place a
Screw four leveling legs back into level adjusting
fittings from top. Slide tumbler to its permanent
location and level. Keep tumbler as close to floor as
possible. All four legs must rest firmly on floor so
weight of tumbler is evenly distributed. Tumbler must
not rock.
level on bottom rib. Side to side level should be
checked by placing a level on front and rear of top
panel.
GAS REQUIREMENTS (Gas Drying Tumblers)
WARNING
Size of gas service pipe is dependent upon many
variables (lengths, tees, etc.). Specific pipe size
information should be obtained from gas supplier.
Refer to table in
It is important that equal gas pressure be maintained
at all tumbler gas connections. This can best be done
by installing a one inch pipe gas loop as shown in
Figures 20 and 21.
Figure 22
for general pipe size data.
維
To reduce the risk of fire or explosion,
if the tumbler is to be connected to
Liquefied Petroleum (L.P.) gas, a vent
to the outdoors must be provided in
the room where the tumbler is
installed.
42
M412616
Page 45

Example of Gas Loop Piping
IMPORTANT: Gas loop piping must be installed
as illustrated to equalize gas pressure for all
tumblers connected to single gas service.
Other gas using appliances should be
connected upstream from loop.
MAIN
REGULATOR
GAS SPACE HEATER
TUMBLERS
GAS
SHUT-OFF
VALVES
GAS LINE
PRESSURE TAP
GAS
METER
IMPORTANT: Line pressure must be maintained at 6-1/2" ± 1-1/2" water column inches (1.62 ± .37 kPa) for Natural Gas
(11 ± .3 water column inches for L.P. Gas) (2.74 ± .07 kPa) with all gas appliances running (tumblers, water heaters, space
heaters, furnace, etc.).
An in-line pressure regulator may be required on Natural Gas models if the line pressure exceeds eight water column inches
(2.00 kPa) pressure with all gas appliances firing.
GAS WATER
HEATERS
PRESSURE
REGULATOR
(If required)
NOTE: Minimum pipe size to
tumbler is 1/2" (1.27 cm)
T034IE3D
ONE INCH
(2.54 cm)
GAS LOOP
Figure 20
Example of Gas Supply Piping
NOTE: See BTU/HR. rating
on dryer nameplate.
GAS SPACE
HEATERS
(70,000 BTU/HR. each)
GAS TUMBLER DRYERS
(75,000 BTU/HR. each)
123456789
FURNACE
(120,000 BTU/HR.)
MAIN
REGULATOR
GAS
GAS WATER
HEATERS
(400,000 BTU/HR. each)
GAS
METER
PIPE
PRESSURE
25' (7.6 m)
SAMPLE CALCULATIONS:
Equivalent Length = Total length of main gas supply pipe from
the gas meter to the far end of the tumbler dryers.
= 25' + 19' (7.6 m + 5.8 m) gas supply pipe.
= 44' (13.4 m) Total Gas Liner
Using the table in Figure 22, the main supply pipe diameter should be 2" (5.08 cm).
REGULATOR
Total BTU/HR = The sum of the BTU/HR. of all
tumblers being fed by the main
gas supply pipe.
= 9 x 75,000
= 675,000 BTU/HR.
Figure 21
M412616
43
19' (5.8 m)
19' (5.8 m)
T035IE3E
Page 46

GAS PIPE SIZE REQUIRED FOR 1,000 BTU NATURAL GAS — .64 SPECIFIC GRAVITY
AT 6½
±±
± 1½ INCH WATER COLUMN PRESSURE (1.62 ± .37 kPa)
±±
EQUIVALENT LENGTH
GAS
APPLIANCES
TOTAL
BTU/HR. (Kcal/hr)
100,000 (25,200)
120,000 (30,240)
140,000 (35,280)
160,000 (40,320)
180,000 (45,360)
200,000 (50,400)
300,000 (75,600)
400,000 (100,800)
500,000 (126,000)
600,000 (151,200)
700,000 (176,400)
800,000 (201,600)
900,000 (226,800)
25 FT.
(7.63 m)
50 FT.
(15.25 m)
75 FT.
(22.88 m)
100 FT.
(30.50 m)
125 FT.
(38.13 m)
150 FT.
(45.75 m)
BASED ON 0.3" WATER COLUMN (0.75 mBar) PRESSURE DROP FOR LENGTH GIVEN
³⁄₄" (1.905cm)
³⁄₄" (1.905cm)
³⁄₄" (1.905cm)
³⁄₄" (1.905cm)
1" (2.54cm)
1" (2.54cm)
1" (2.54cm)
1¹⁄₄" (3.18cm)
1¹⁄₄" (3.18cm)
1¹⁄₂" (3.81cm)
1¹⁄₂" (3.81cm)
1¹⁄₂" (3.81cm)
2" (5.08cm)
³⁄₄" (1.905cm)
1" (2.54cm)
1" (2.54cm)
1" (2.54cm)
1" (2.54cm)
1" (2.54cm)
1¹⁄₄" (3.18cm)
1¹⁄₄" (3.18cm)
1¹⁄₂" (3.81cm)
1¹⁄₂" (3.81cm)
2" (5.08cm)
2" (5.08cm)
2" (5.08cm)
1" (2.54cm)
1" (2.54cm)
1" (2.54cm)
1" (2.54cm)
1" (2.54cm)
1¹⁄₄" (3.18cm)
1¹⁄₄" (3.18cm)
1¹⁄₂" (3.81cm)
1¹⁄₂" (3.81cm)
2" (5.08cm)
2" (5.08cm)
2" (5.08cm)
2" (5.08cm)
1" (2.54cm)
1" (2.54cm)
1" (2.54cm)
1¹⁄₄" (3.18cm)
1¹⁄₄" (3.18cm)
1¹⁄₄" (3.18cm)
1¹⁄₂" (3.81cm)
1¹⁄₂" (3.81cm)
2" (5.08cm)
2" (5.08cm)
2" (5.08cm)
2" (5.08cm)
2¹⁄₂" (6.35cm)
1" (2.54cm)
1" (2.54cm)
1" (2.54cm)
1¹⁄₄" (3.18cm)
1¹⁄₄" (3.18cm)
1¹⁄₄" (3.18cm)
1¹⁄₂" (3.81cm)
1¹⁄₂" (3.81cm)
2" (5.08cm)
2" (5.08cm)
2" (5.08cm)
2¹⁄₂" (6.35cm)
2¹⁄₂" (6.35cm)
1" (2.54cm)
1" (2.54cm)
1¹⁄₄" (3.18cm)
1¹⁄₄" (3.18cm)
1¹⁄₄" (3.18cm)
1¹⁄₂" (3.81cm)
1¹⁄₂" (3.81cm)
2" (5.08cm)
2" (5.08cm)
2" (5.08cm)
2¹⁄₂" (6.35cm)
2¹⁄₂" (6.35cm)
2¹⁄₂" (6.35cm)
1,000,000 (252,000)
1,100,000 (277,200)
1,200,000 (302,400)
1,300,000 (327,600)
1,400,000 (352,800)
1,500,000 (378,600)
1,600,000 (403,200)
1,700,000 (428,400)
1,800,000 (453,600)
1,900,000 (478,800)
2,000,000 (504,000)
2,200,000 (554,400)
2,400,000 (604,800)
2,600,000 (655,200)
2,800,000 (705,600)
3,000,000 (756,000)
2" (5.08cm)
2" (5.08cm)
2" (5.08cm)
2" (5.08cm)
2" (5.08cm)
2" (5.08cm)
2" (5.08cm)
2" (5.08cm)
2¹⁄₂” (6.35cm)
2¹⁄₂" (6.35cm)
2¹⁄₂" (6.35cm)
2¹⁄₂" (6.35cm)
2¹⁄₂" (6.35cm)
2¹⁄₂" (6.35cm)
2¹⁄₂" (6.35cm)
2¹⁄₂" (6.35cm)
2" (5.08cm)
2" (5.08cm)
2" (5.08cm)
2¹⁄₂" (6.35cm)
2¹⁄₂" (6.35cm)
2¹⁄₂" (6.35cm)
2¹⁄₂" (6.35cm)
2¹⁄₂" (6.35cm)
2¹⁄₂" (6.35cm)
2¹⁄₂" (6.35cm)
2¹⁄₂" (6.35cm)
3" (7.62cm)
3" (7.62cm)
3" (7.62cm)
3" (7.62cm)
3" (7.62cm)
2" (5.08cm)
2¹⁄₂" (6.35cm)
2¹⁄₂" (6.35cm)
2¹⁄₂" (6.35cm)
2¹⁄₂" (6.35cm)
2¹⁄₂" (6.35cm)
2¹⁄₂" (6.35cm)
2¹⁄₂" (6.35cm)
3" (7.62cm)
3" (7.62cm)
3" (7.62cm)
3" (7.62cm)
3" (7.62cm)
3" (7.62cm)
3" (7.62cm)
3¹⁄₂" (8.89cm)
2¹⁄₂" (6.35cm)
2¹⁄₂" (6.35cm)
2¹⁄₂" (6.35cm)
2¹⁄₂" (6.35cm)
2¹⁄₂" (6.35cm)
2¹⁄₂" (6.35cm)
3" (7.62cm)
3" (7.62cm)
3" (7.62cm)
3" (7.62cm)
3" (7.62cm)
3" (7.62cm)
3" (7.62cm)
3¹⁄₂" (8.89cm)
3¹⁄₂" (8.89cm)
3¹⁄₂" (8.89cm)
2¹⁄₂" (6.35cm)
2¹⁄₂" (6.35cm)
2¹⁄₂" (6.35cm)
2¹⁄₂" (6.35cm)
3" (7.62cm)
3" (7.62cm)
3" (7.62cm)
3" (7.62cm)
3" (7.62cm)
3" (7.62cm)
3" (7.62cm)
3¹⁄₂" (8.89cm)
3¹⁄₂" (8.89cm)
3¹⁄₂" (8.89cm)
3¹⁄₂" (8.89cm)
3¹⁄₂" (8.89cm)
2¹⁄₂" (6.35cm)
2¹⁄₂" (6.35cm)
2¹⁄₂" (6.35cm)
3" (7.62cm)
3" (7.62cm)
3" (7.62cm)
3" (7.62cm)
3" (7.62cm)
3" (7.62cm)
3" (7.62cm)
3¹⁄₂" (8.89cm)
3¹⁄₂" (8.89cm)
3¹⁄₂" (8.89cm)
3¹⁄₂" (8.89cm)
3¹⁄₂" (8.89cm)
4" (10.16cm)
Figure 22
44
M412616
Page 47

GAS CONNECTIONS (Gas Drying Tumblers)
Before connecting gas piping to tumbler, make
certain gas service is same as that specified on
nameplate (near gas connection), Page 5.
NATURAL GAS service must be supplied at 6¹⁄₂ ± 1¹⁄₂
inch water column pressure (1.62 ± .37 kPa).
L.P. GAS service must be supplied at 11 ± .3 inch
water column pressure (2.74 ± .07 kPa).
If gas service is not same as that specified, DO NOT
CONNECT THE GAS LINE TO TUMBLER! It will first
be necessary to convert gas burner orifice and gas
valve.
IMPORTANT: Any product revisions or
conversions must be made by the Manufacturer’s
Authorized Dealers, Distributors or local service
personnel.
維
WARNING
The tumbler and its individual shut-off
valve must be disconnected from the
gas supply piping system during any
pressure testing of that system at test
pressures in excess of 1/2 psig (3.45
kPa).
Purge air and sediment from gas service line before
connecting it loosely to tumbler. Purge remaining air
until odor of gas is detected, then tighten connection.
Use pipe compound, resistant to actions of L.P.
gas, on all pipe threads.
WARNING
維
Check all pipe connections, internal
and external, for gas leaks using a
soapy solution. To reduce the risk of
explosion or fire, DO NOT USE AN
OPEN FLAME TO CHECK FOR GAS
LEAKS! Gas connections should be
checked annually for leakage.
The tumbler must be isolated from the
gas supply piping system by closing its
individual manual shut-off valve during
any pressure testing of the gas supply
piping system at test pressure equal to
or less than 1/2 psig (3.45 kPa).
M412616
45
Page 48

DRYING TUMBLER ENCLOSURE CONSTRUCTION
維
IMPORTANT: DO NOT block airflow at top rear of
tumbler with laundry, etc. Doing so would prevent
adequate air supply to tumbler’s heat chamber.
A typical tumbler enclosure is shown in
Figure 23.
Note that enclosure does touch tumbler top and side
panels. Note, too, minimum and maximum
dimensions. Be aware that there may be local codes
and ordinances which must be complied with.
NOTICE: CLEARANCE OF TUMBLER CABINET FROM COMBUSTIBLE
CONSTRUCTION MUST BE A MINIMUM OF 12 INCHES (30.5 cm) AT TOP.
WARNING
To reduce the risk of serious injury,
install lockable doors to prevent public
access to rear of tumblers.
IMPORTANT: Install tumblers with sufficient
clearance for servicing and operating, see
Figure 23.
NOTE: Shaded areas
indicate adjacent structure.
0" CLEARANCE
PERMITTED FOR
FIRST 4" (10.16 cm)
4" (10.16 cm)
MAXIMUM
12" (30.5 cm)
MINIMUM
CLEARANCE
GUARD
PROVISION
FOR
MAKE-UP
AIR
T038IE3B
0" CLEARANCE
Figure 23
46
24" (61 cm)
MINIMUM
36" (91.4 cm)
RECOMMENDED
FOR
MAINTENANCE
PURPOSES
M412616
Page 49

STEAM REQUIREMENTS (Steam Drying Tumblers)
Size of steam service pipe is dependent upon many
variables (length, tees, high pressure system, low
pressure system, etc.) Specific pipe size
information should be obtained from the steam
system supplier or a qualified steam fitter.
STEAM CONNECTIONS (Steam Drying Tumblers)
INSTALLING STEAM SOLENOID VALVE
AND MAKING STEAM INLET
CONNECTIONS
High pressure machines require a (constant) 80 to
100 psig (5.62 to 7.03 kg/sq. cm) steam service for
optimum operation. Low pressure machines require a
(constant) 10 to 15 psig (.70 to 1.05 kg/sq. cm) steam
service for optimum operation. The following steps
outline procedure for installing steam solenoid valve
and connecting steam service.
a. Install a manual shut-off gate valve in condensate
return line after steam trap for each coil.
b. Connect steam solenoid valve to related steam
coil inlet connection with nipples, flex hoses,
unions, tee and pressure relief valve. See
24
for a typical installation.
c. Install a gate shut-off valve in steam supply
line,
Figure 24.
outlet to solenoid steam valve inlet connection.
aWARNING
The flexible steam hoses connecting
the solenoid steam valve to the coil
inlets must have a 125 psig (pounds
per square inch gauge) (8.79 kg/sq.
cm) working pressure. A shut-off gate
valve must be installed upstream from
the solenoid steam valve. This way,
steam can be shut off for maintenance
purposes, or in the event the hose
ruptures.
The steam solenoid valve must be
supported so minimum load is exerted
on the steam coil inlet connections.
Connect shut-off gate valve
Figure
INSTALLING STEAM TRAP AND MAKING
CONDENSATE RETURN CONNECTIONS
Steam trap must be installed and coil outlet
connections must be connected to condensate return
lines. The following steps outline the procedure for
installing steam trap and connecting condensate
return lines. See
a. Connect a flexible hose to each steam coil outlet,
Figure 24.
b. Install a strainer to the ends of each flexible hose.
c. Install a steam trap to each strainer.
IMPORTANT: Steam trap must be installed a
minimum of 10 inches (25.4 cm) below steam coil
outlet connections, see
d. Install a gate shut-off valve to each steam trap.
e. Connect to condensate return lines.
aWARNING
The flexible steam hoses connecting
the coil outlet connections and steam
traps must have a minimum of 125
psig (pounds per square inch gauge)
(8.79 kg/sq. cm.) working pressure. A
shutoff gate valve must be installed
downstream from each steam trap so
the condensate return line can be
isolated in event a steam trap requires
maintenance.
Each steam trap must be supported so
minimum load is exerted on the coil
outlet connection.
Figure 24
for a typical installation.
Figure 24.
M412616
47
Page 50

STEAM CONNECTIONS (Steam Drying Tumblers)
NOTE: See Figure 25 for sizing
of steam lines. Piping must
also be sized accordingly for
length of runs, and number
of elbows.
SUPPLY
RETURN
UNION
30.5 cm (12")
RISERS
CHECK
VALVE
TRAP WITH
BUILT-IN
STRAINER
STEAM
BONNET
RELIEF
VALVE
SOLENOID
VALVE
(Supplied with
machine)
OPTIONAL
VACUUM
BREAKER
CONDENSATE
RETURN LINE
FROM
SUPPLY LINE
CHECK
VALVE
Figure 24
TUMBLER
MODEL
STEAM PRESSURE
(PSI)
MINIMUM
PIPE DIAMETER
STEAM TRAP SIZE
(Pounds Condensate/Hour)
30CSL 7-15 3/4" (1.9 cm) 140
GATE
VALVE
T262IE3A
30 CSH 80-100 3/4" (1.9 cm) 140
50 CSL 7-15 3/4" (1.9 cm) 140
50 CSH 80-100 3/4" (1.9 cm) 160
75 CSL 7-15 3/4" (1.9 cm) 140
75 CSH 80-100 3/4" (1.9 cm) 160
Figure 25
48
M412616
Page 51

LIGHTING AND SHUTTING DOWN
GAS IGNITION SYSTEM
1. Turn machine disconnect switch, located on rear
of tumbler, to the “on” position.
2. Turn gas shut-off valve, located on rear of
tumbler, to the “on” position (gas valve handle
should be parallel with gas line).
3. Start tumbler, following operating instructions
which accompanied it.
NOTE: Ignition control circuitry will verify airflow
switch, located on rear of tumbler, is open before
starting cylinder motor. Once cylinder motor is
started, air flowing through tumbler will cause
airflow switch to close. Tumbler will purge air
from tumbler for 18 seconds. Ignition will start by
a three second release of gas from gas valve and
sparking of ignitor. If ignition does not occur
during first three seconds ignition control will
“lockout” causing gas valve to close and a red
button on ignition control to illuminate.
To reset ignition system , open access door and
press red button on ignition control. Close and
lock access door, verify that gas shut-off valve is
in the “on” position and return to step three.
4. If tumbler will not start, remove it from service by
turning machine disconnect switch, located on
rear of tumbler, to the “off” position and turn the
gas shut-off valve, located on rear of tumbler, to
the “off” position (gas valve handle should be at a
right angle to gas line).
SPARK
IGNITER
TO GAS VALVE
GAS
VALVE
ELECTRONIC
IGNITION
POWER TO
IGNITION SYSTEM
T261IE3B
M412616
Figure 26
49
Page 52

ACCESSORY TIMING CAM INSTALLATION
T039IE1A
LINE UP NOTCH
TO CLEAR RATCHET
TOOTH
LIFT GENTLY
WITH NARROW
BLADE
(Coin Meter Models)
REMOVAL OF EXISTING TIMING CAM
No. of Pins in Cam
6
5
4
Cycle Length (Minutes)
10
12
15
Figure 27
1. Rotate cam by hand until "V" notch lines up
beneath the ratchet tooth see
2. Insert narrow screwdriver under nylon cam, close
to the clock shaft. Lift gently off shaft. Make sure
that pressure is directed upward and that the "V"
notch clears the ratchet tooth.
Figure 28.
Cams that allow other timer increments are available
through your distributor.
To figure time increments, use this formula: Timer
Motor Speed (60) divided by number of pins on
cam = Cycle Length (minutes). Cams are available
with 1 to 12 pins.
Example: 60 ÷ 5 (Pin cam) = 12 minute cycle.
INSTALLATION OF NEW TIMING CAM
1. Insert drive into timing cam with wide prong in
wide hole of cam.
2. Position timing cam and drive fork over the timer
shaft, aligning the timer flat with the drive fork and
the "V" notch with one of the ratchet teeth.
3. Press timing cam down firmly to seat timing cam
onto the motor shaft.
Figure 28
4. Remove all accumulated time by turning cam
counterclockwise until switch shuts off. Apply
moderate clockwise pressure to fully seated
timing cam and drive against the timing motor
shaft. Meter must be advanced electrically for one
cycle before an accurate measure of time can be
made.
50
M412616
Page 53

PRELIMINARY OPERATING CHECKS
1. Remove or open all panels and inspect accessible
bolts, nuts, screws, terminals and fittings for
security.
2. Check belt tension, adjust if necessary (refer to
Adjustment Section).
3. Energize electrical circuit to tumbler circuit
breaker and turn on tumbler disconnect switch.
4. Turn on gas supply at manual gas shut off valve in
gas supply line (gas models only). Handle of gas
shut off valve should be parallel with gas supply
line when in “ON” position.
5. Press and hold in Push-to-Start Button for
approximately three (3) seconds. Release button
and open cylinder door. Cylinder should stop
rotating within seven (7) seconds after door is
opened 3" (7.5 cm) plus or minus 1/4" (0.635 cm).
If cylinder does not stop rotating, adjust cylinder
door interlock (refer to Adjustment Section).
6. Load tumbler with clothes or clean rags.
7. Start tumbler and check burner flame, adjust gas
inlet shutter if necessary (refer to Adjustment
Section).
8. Check air flow switch operation by opening lint
panel. Heating system should shut off when
lint panel is opened approximately 1-1/2"
(3.81 cm). Adjust if necessary (refer to
Adjustment Section).
9. Turn off tumbler.
10.Check air flow switch operation by opening lint
panel. Heating systems should shut off when lint
panel is opened approximately 6" (15.24 cm) with
a full load.
FINAL OPERATING CHECKS
Manual Dual Timer Tumbler
1. Set temperature selector to HIGH and set drying
and cool down selectors to their maximum
settings.
2. Press and hold in Push-to-Start Button for
approximately three (3) seconds. Motor will start,
heat system will turn on, drying indicator will light
and drying selector will rotate counterclockwise.
3. When drying selector reaches zero (0) heat
system will shut off, drying indicator will turn off,
cooling indicator will light and cooling selector will
rotate counterclockwise.
4. When cooling selector reaches zero (0) motor will
stop and cooling indicator will turn off indicating
drying cycle is finished.
Coin Operated Tumbler
1. Set temperature selector to HIGH.
2. Insert required amount of coins.
3. Press and hold in Push-to-Start Button for
approximately three (3) seconds. Motor will start
and heat system will turn on.
4. Near end of cycle a preset 2 1/2 minute cool down
cycle will start.
5. When metered time expires, motor will stop
indicating drying cycle is finished.
Electronic Control Tumbler
Tumbler comes equipped with Electronic Control.
Electronic Control gives owner a variety of
programming options. To learn how to use Electronic
Control, consult supplemental manual.
M412616
51
Page 54

NOTES
52
M412616
Page 55

SECTION III
Adjustments
MAIN GAS BURNER AIR SHUTTER
(All Gas Models)
NOTICE: Both air inlet shutters on burner must
be adjusted so sufficient air is metered into
system for proper combustion and maximum
efficiency. Before adjusting inlet shutters be sure
that all lint is removed from lint compartment and
lint screen.
Air shutter adjustments will vary from location to
location and will depend on vent system, number of
units installed, make-up air and line gas pressure.
Opening shutter increases amount of primary air
supplied to burner while closing shutter decreases
primary air supply. Adjust air shutter as follows:
1. Unlock and open access door.
2. Start tumbler and check flame pattern. Correct air
and gas mixture is indicated if flame pattern is
primarily blue, with small yellow tips, and bends to
right of heater section. (See
air is indicated if flame is yellow, lazy and smokey.
3. To adjust air shutter, loosen air inlet shutter
adjusting screw, see
4. Open or close air shutter as necessary to obtain
proper flame intensity.
Figure 29
Figure 29
.
.) Too little
5. After air shutter is adjusted for proper flame,
tighten air shutter adjusting screw securely.
Control panel may have to be removed
temporarily to loosen air shutter screws to turn
shutter.
6. If shutter is correctly adjusted, but flame pattern is
straight up, (
flowing through tumbler and airflow switch is
improperly set. A flame pattern that flares to right
and left (
through tumbler.
Figure 29
Figure 29
), insufficient primary air is
) indicates no air is flowing
AIR FLOW SWITCH
(Gas and Electric Models, see
Air flow switch is set at factory for proper operation.
Steam models do not have an air flow switch.
However, if there is a problem with airflow switch, it
should be adjusted as follows:
NOTICE: Control panel must be in place and
access door closed before attempting to adjust
air flow switch.
IMPORTANT: Air flow switch disc must remain
closed during operation. If it opens and closes
during drying cycle, this indicates insufficient air
flow through tumbler.
Figure 30
)
PROPER
AIR FLOW
T048SE3A
AIR SHUTTER
ADJUSTING
SCREWS
NOTE: Burner configuration will differ between the 30, 50 and 75 pound tumblers, but flame
pattern will be as shown.
M412616
INSUFFICIENT
AIR FLOW
AIR SHUTTER
ADJUSTING
SCREWS
Figure 29
53
NO AIR FLOW
T047SE3A
AIR SHUTTER
ADJUSTING
SCREWS
T049SE3A
Page 56

Electric Models: If switch remains open, or pops
open and closed during cycle, heating system will
shut off. Cylinder and fan will continue to operate
even though air flow switch is malfunctioning.
Gas Models: If switch remains open, entire unit
will shut down when Push-to-start button is
released. Once tumbler starts and continues to
run, a loss of air flow, air flow switch jams or a
bouncing air flow switch will shut entire tumbler
down.
WARNING
維
To reduce the risk of fire, air flow
switch operation may be affected by a
clogged lint screen, lack of make-up
air, obstructions in the vertical
recirculation stack or in the customer
installed main or collector ducts.
These conditions must be checked
and necessary corrections made
before adjusting air flow switch.
Always adjust air flow at installation.
Air flow switch operation is controlled by counterweight position on shaft. Moving counterweight either
increases or decreases air flow switch sensitivity.
Counterweight should be adjusted so air flow will
force disc away from cabinet when lint panel is
opened 6 inches (15.24 cm) with a full load. Adjust air
flow switch as follows:
1. Load tumbler.
NOTE: This adjustment is much faster to make
with one person opening lint panel in front and
another adjusting the counterweight in rear of
tumbler.
2. Start tumbler. Open lint panel 6 inches (15.24 cm).
Airflow disc should move away from cabinet,
opening switch contacts and shutting off heat
system. This indicates proper operation and
proper adjustment.
3. If switch is not opening as described in step “2”, it
should be adjusted so it is MORE sensitive.
Depress spring clip and move counterweight
toward disc. Retest by opening lint panel and
continue moving counterweight toward disc until
switch operates as described in step “2”.
4. If switch opens BEFORE lint panel is opened
proper distance, step “2”, it should be adjusted so
it is LESS sensitive. Depress spring clip and move
counterweight away from disc. Retest by opening
lint panel and continue moving counterweight
away from disc until switch operates as described
in step “2”.
AIR FLOW
SWITCH
COUNTERWEIGHT
MOUNTING
BRACKET
SWITCH
LEVER
DISC
SPRING
CLIP
Figure 30
REAR
PANEL OF
TUMBLER
AIR FLOW
SWITCH
VANE
LEVER
AIR
DISC
SWITCH
ADJUSTING
SCREWS
SCREW
SWITCH
LEVER
SPRING
CLIP
COUNTERWEIGHT
T041IE3A
54
M412616
Page 57

LOADING DOOR SWITCH
CYLINDER DOOR STRIKE
Loading door switch turns off tumbler any time
loading door is opened. To adjust loading door
switch, follow these steps:
1. Start tumbler following operating instructions
which accompanied it.
2. Slowly open loading door. Cylinder and heating
system should stop when door is open 3" (7.5
cm) plus or minus 1/4" (0.635 cm).
3. Slowly close loading door. Loading door switch
should close with an audible “click” when loading
door is closed 3" (7.5 cm) plus or minus 1/4"
(0.635 cm).
4. If loading door switch does not close when
loading door is closed 3" (7.5 cm) plus or minus
1/4" (0.635 cm):
a. Close loading door completely.
b. Loosen lower screw on switch coupler and
rotate switch coupler COUNTERCLOCKWISE
until it stops.
c. Tighten lower screw on switch coupler.
d. Return to step 1 to verify loading door switch
operation.
The door strike must be adjusted to have sufficient
tension to hold loading door closed against force of
load tumbling against it. Proper adjustment is when
8 to 15 pounds (35.6 N - 66.7 N) pull is required to
open door.
To adjust, open door, loosen jamnut and turn door
strike screw in or out as required. Retighten jamnut.
DOOR
STRIKE
Figure 31
LOADING
DOOR
SWITCH
SWITCH
COUPLER
T275IE1A
ACORN
NUT
DOOR
LATCH
T048IE1A
Figure 32
M412616
55
Page 58

DRIVE V-BELT
WARNING
維
To reduce the risk of serious injury or
death, disconnect power to the
tumbler before performing this
operation.
Proper tension is when belt can be depressed
approximately ¹⁄₂ inch (1.27 cm) by applying light
thumb pressure at a point midway between the
sheave and motor pulley.
1. Remove guard from rear of tumbler.
WARNING
維
To reduce the risk of serious injury or
death, guard MUST be installed on
rear of tumbler after belt adjustment is
made.
2. To adjust belt tension, loosen adjusting bolt
holding idler housing assembly to housing
support.
3. To tighten V-belt:
a. Loosen lower nut on adjusting bolt.
b. Turn bolt up until belt has proper tension.
c. Tighten upper and lower nut or adjusting bolt.
4. To loosen V-belt:
a. Loosen top nut on adjusting bolt.
b. Turn bolt down until belt has proper tension.
c. Tighten upper and lower nut or adjusting bolt.
5. Replace guard on rear of tumbler.
6. Upper belt requires no adjustment since it is selfadjusting.
POLY
V-BELT
(Poly V-belt is
self-adjusting)
IDLER
HOUSING
BOLTS
(2)
ADJUSTING
BOLT
DRIVE
V-BELT
IDLER
HOUSING
ASSEMBLY
Figure 33
56
T278IE3A
M412616
Page 59

SECTION IV
Preventive Maintenance Instructions
DAILY
1. Make certain drying cycle has ended.
2. Open loading door.
3. Unlock and remove lint panel.
4. Remove accumulated lint in lint compartment.
Lint left in lint compartment will be drawn back
onto lint screen and restrict air circulation.
5. Clean lint from lint screen. If lint screen is torn
replace immediately. A torn lint screen allows lint
to flow into ductwork system restricting air
circulation.
THERMOSTAT
SENSING PROBE
6. Ensure lint screen covers entire opening in lint
screen hood. Gaps between lint screen and lint
screen hood allows lint to flow into ductwork
system restricting air circulation.
7. Wipe any accumulated lint off thermostat
sensing probe. Lint buildup on sensing probe will
cause overheating of tumbler.
8. Replace and securely lock lint panel.
WARNING
MONTHLY
1. Perform daily cleaning of accumulated lint.
2. Deactivate electrical circuit by turning off electrical
disconnect switch on rear of tumbler.
4. Remove exhaust duct from rear of tumbler and
clean out all accumulated lint.
5. Reinstall exhaust duct.
LINT
SCREEN
T046IE3A
Figure 34
6. Remove bottom cover from vertical exhaust duct
and clean out all accumulated lint.
7. Reinstall vertical exhaust duct cover.
8. Inspect entire duct work assembly and clean out
all accumulated lint.
9. Energize electrical circuit to tumbler by turning on
electrical disconnect switch on rear of tumbler.
M412616
57
Page 60

Quarterly
1. Deactivate electrical circuit by turning off
disconnect switch on rear of tumbler.
2. Perform daily cleaning of accumulated lint.
3. Perform monthly inspection and cleaning of
accumulated lint.
4. Clean accumulated lint and other debris from
front and back motor air vents.
5. Shut off gas supply at manual gas shut off valve
in gas supply line (gas models only). Handle of
gas shut off valve should be at 90
supply line when in “OFF” position.
0
angle to gas
Biannually
1. Deactivate electrical circuit by turning off
disconnect switch on rear of tumbler.
2. Perform daily cleaning of accumulated lint.
3. Perform monthly inspection and cleaning of
accumulated lint.
4. Perform quarterly inspection and cleaning of
accumulated lint.
5. Remove or open all panels and check accessible
bolts, nuts, screws, terminals and fittings for
tightness.
6. Shut off gas supply at manual gas shut off valve
in gas supply line (gas models only). Handle of
gas shut off valve should be at 900 angle to gas
supply line when in “OFF” position.
6. Remove screws holding rear drive guard to back
of tumbler.
7. Inspect belts for wear and proper tension (refer to
Adjustments section).
8. Reinstall rear drive guard to back of tumbler.
9. Energize electrical circuit to tumbler by turning on
electrical disconnect switch on rear of tumbler.
10. Turn on gas supply at manual gas shut off valve
in gas supply line (gas models only). Handle of
gas shut off valve should be parallel with gas
supply line when in “ON” position.
NOTE: Spraying a mild solution of soap and water
on joints will cause bubbles to appear on any
leaking connections.
8. Close and securely lock service panel.
9. Open electrical junction box cover and inspect all
electrical and grounding connections for security.
Tighten any loose electrical connections.
10. Close electrical junction box cover and energize
electrical circuit to tumbler by turning on electrical
disconnect switch.
11. Turn on gas supply at manual gas shut off valve
in gas supply line (gas models only). Handle of
gas shut off valve should be parallel with gas
supply line when in “ON” position.
7. Unlock and open service panel and inspect gas
connections for evidence of leakage or loose
connections.
58
M412616
Page 61

QUARTERLY
MAINTENANCE
Clean air vents on drive motor.
Check and clean steam coils.
(Steam Models Only)
Clean exhaust ducts.
Check flow of combustion air.
Check flow of ventilation air.
Check belt tension.
Check chain tension.
(DATES)
BIANNUAL
MAINTENANCE
Check for loose nuts.
Check for loose bolts.
Check for loose screws.
Check for loose gas
connections.
Check for loose electrical
connections.
Check for loose steam
connections. (Steam Models
Only.)
(DATES)
M412616
59
Page 62

NOTES
60
M412616
Page 63

SECTION V
Decommissioning Instructions
1. Turn off electrical supply external to machine.
2. Turn off electrical disconnect on machine.
3. Turn off gas supply external to machine.
4. Turn off manual gas shut-off valve on machine.
5. Turn off steam supply external to machine.
6. Remove all electric, gas and steam connections.
M412616
61
Page 64

NOTES
62
M412616
Page 65

M412616
63
Page 66

64
M412616
 Loading...