

Page 1
1
USER´S GUIDE
34-37
30-33
26-29
22-25
18-21
14-17
10-13
06-09
02-05
Page 2
2
PACKUNGSINHALT
Webcam
Treiber-CD
Dieses Handbuch
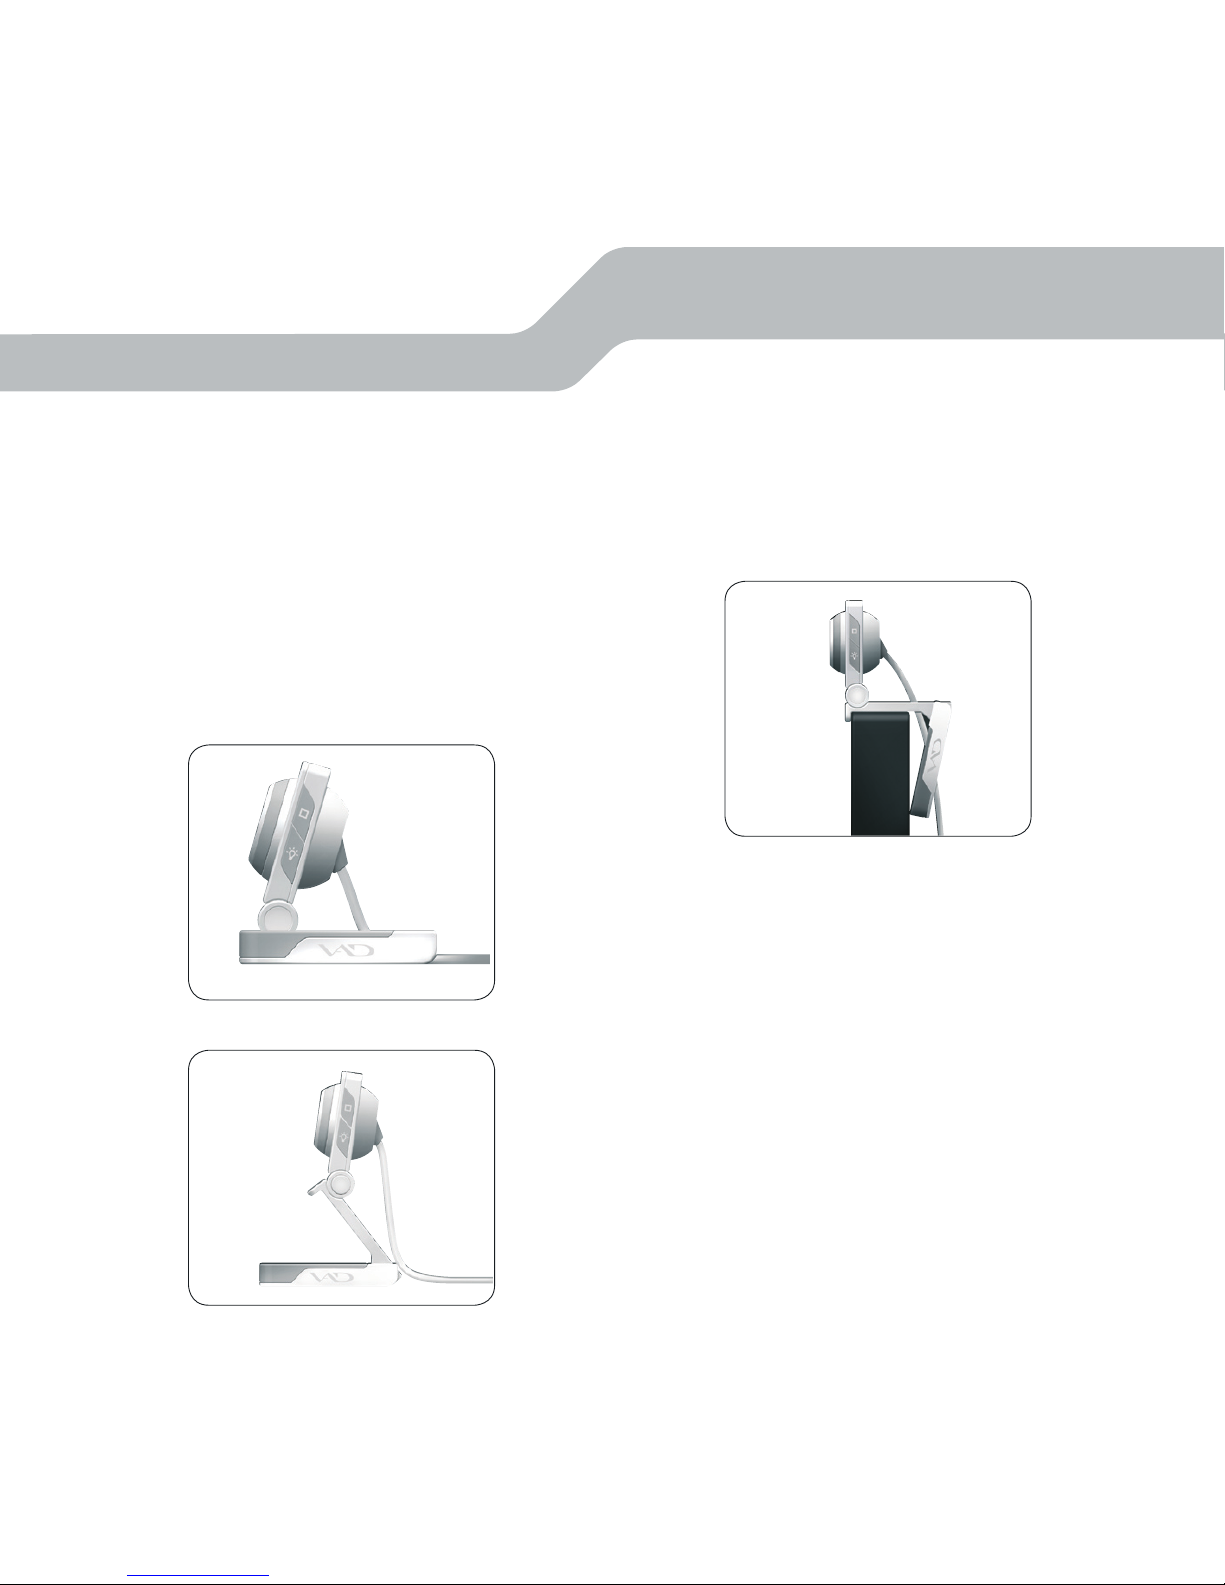
POSITIONIERUNG
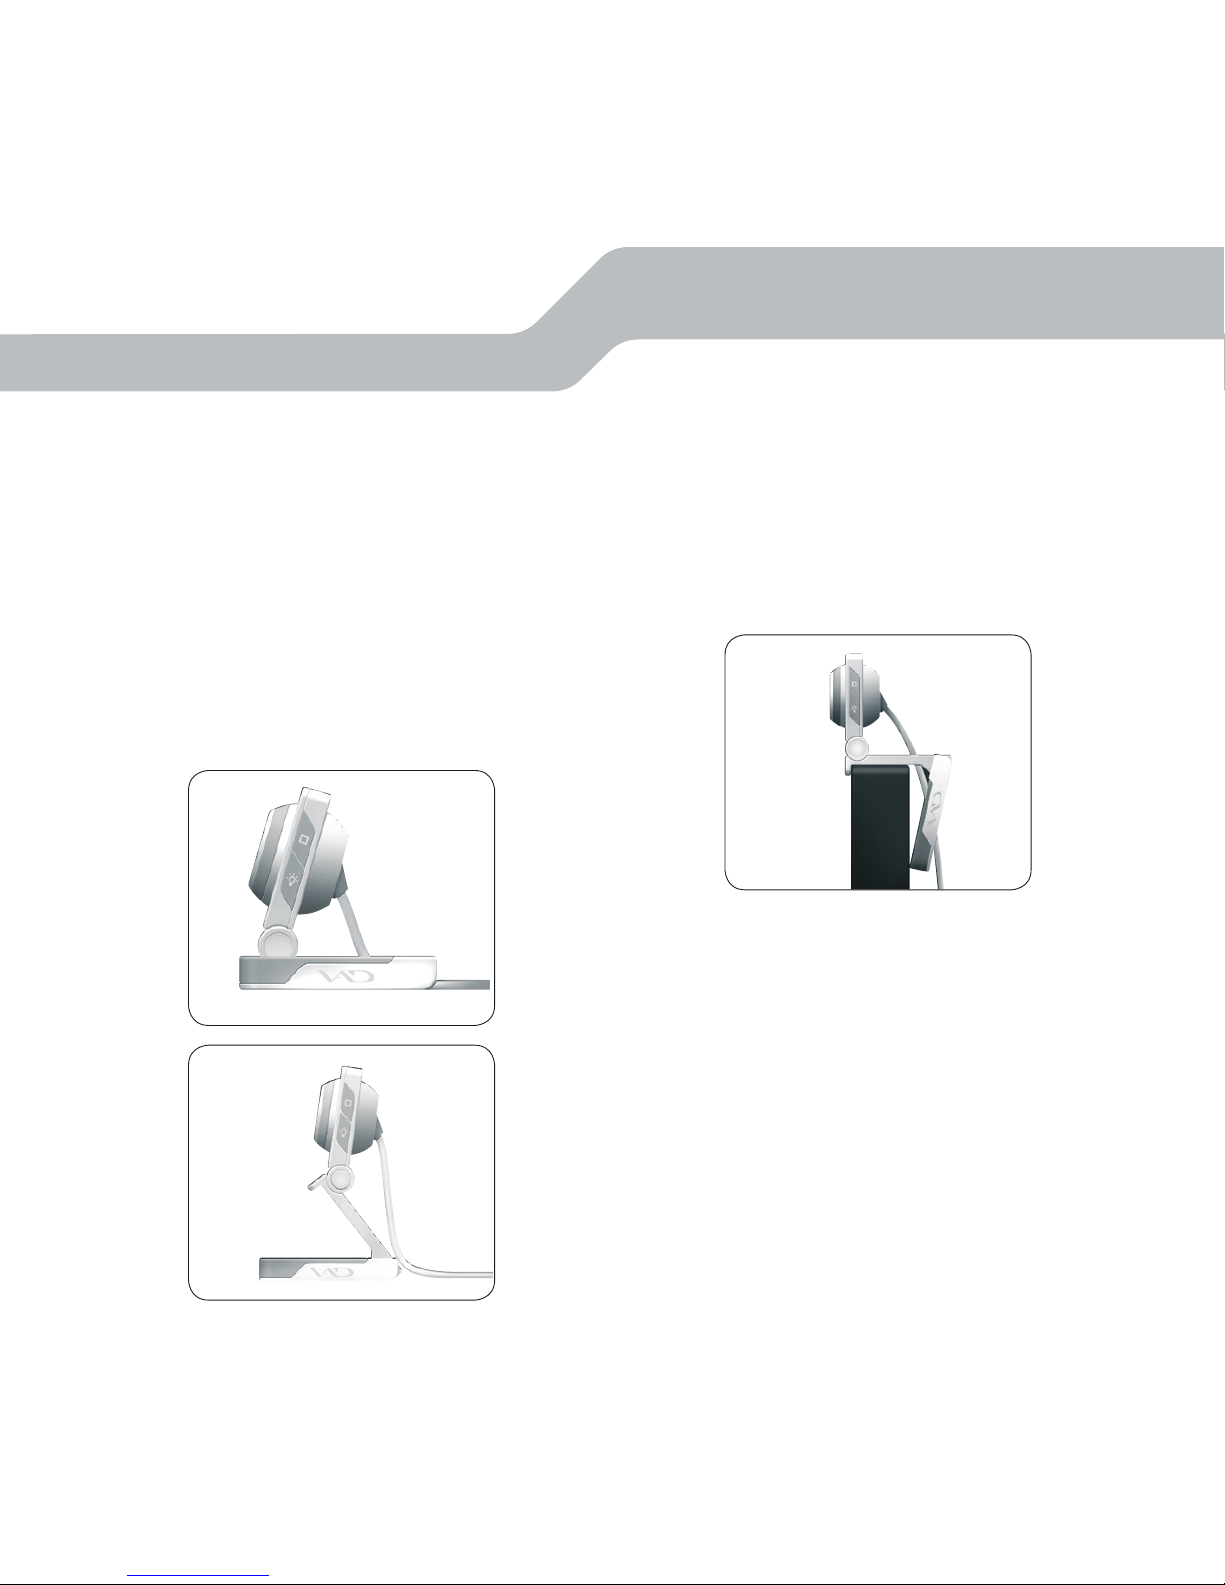
Auf dem Schreibtisch:
Sie können für die Positionierung auf dem
Schreibtisch entweder nur das Kameragehäuse oder auch den Aufstellrahmen aufstellen.
Unten stehende Abbildungen 1 und 2 zeigen die
beiden Varianten.
INBETRIEBNAHME
Abb. 1
Abb. 2
Abb. 3
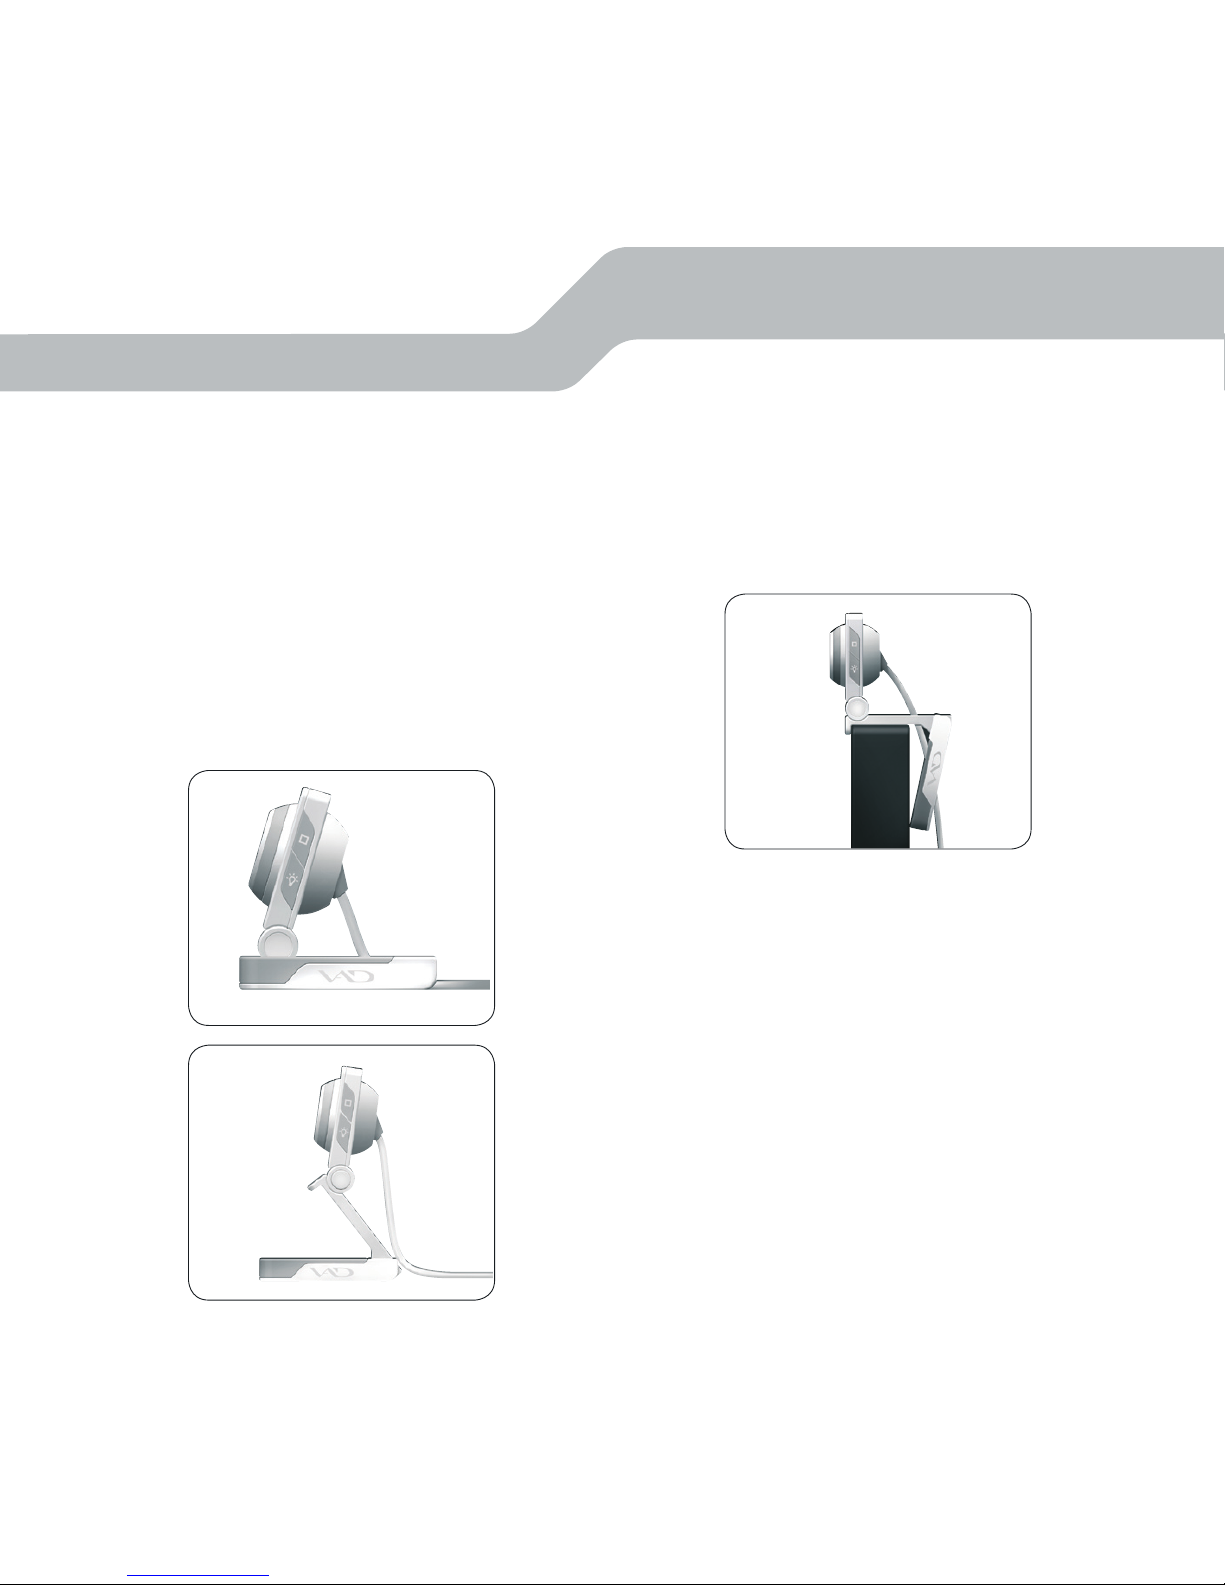
An Monitoren und Notebooks:
Klappen Sie den Rahmen auf und stellen Sie die
Kamera wie in Abbildung 3 auf Ihren Monitor.
Schieben Sie den Aufstellrahmen mit der Kante
an den Monitor und drehen Sie den Rahmenfuß,
bis er am Monitor anliegt.
AUSRICHTUNG
Die Laplace We bcam verfügt über ein horizontal
schwenkbares Linsengehäuse, damit Sie
seitliche Abweichungen Ihrer Sitzposition zur
Ausrichtung des Monitors ausgleichen können.
Berühren Sie zur Drehung des Linsengehäuses
möglichst nicht die Linse selbst, um die
Bildqualität nicht zu beeinträchtigen. Das
Gehäuse ist um +/- 15° schwenkbar.
SCHUTZFOLIE
Entfernen Sie die Schutzfolie von der Linse,
bevor Sie die Kamera in Betrieb nehmen.
Ansonsten kann die Bildqualität beeinträchtigt
werden.
DE
Page 3
3
TREIBERFUNKTIONEN
Anschluss
ACHTUNG: Installieren Sie unbedingt erst
den Treiber von der CD, bevor Sie die Webcam
anschließen.
Legen Sie die Treiber-CD in Ihr CD-ROM
Laufwerk. Sollte nach dem Einlegen der
CD das Startmenü nicht erscheinen, öffnen
Sie bitte den Explorer, klicken Sie auf Ihr
CD-ROM-Laufwerk und doppelklicken Sie auf
die Datei „setup.exe“. Klicken Sie auf „Driver
Installation“. Folgen Sie den Anweisungen
auf dem Bildschirm. Sobald die Installation
abgeschlossen ist, können Sie die Webcam an
Ihren Computer anschließen.
Sollte Windows Sie fragen, ob die Installation
trotz nicht bestandenem Logo-Test fortgeführt
werden soll, klicken Sie auf „Installation
fortsetzen“.
Nach der Installation befindet sich unten
rechts in der Task-Leiste ein Kamerasymbol.
Klicken Sie auf dieses Symbol, um das
Konfigurationsfenster zu starten und
Einstellungen an der Webcam vorzunehmen.
Wenn Sie nun die Snapshottaste betätigen,
öffnet sich das mitinstallierte CaptureProgramm.
Die Webcam verfügt über Funktionstasten
am Gehäuse, mit denen Sie bequem per
Tastendruck Fotos schießen oder die Kamera
stumm schalten können. Die einzelnen
Funktionen dieser Tasten können Sie im
Treibermenü einstellen. Öffnen Sie dazu das
Startmenü und klicken Sie auf Programme >
VaD Laplace Webcam > Control Center:
SNAPSHOT TASTE
Flash Light Off: Das Blitzlicht löst nicht
aus, wenn Sie ein Foto machen.
Flash Light On: Das Blitzlicht löst immer
aus, wenn Sie ein Foto machen.
Flash Light Auto: Die Kamera ermittelt
automatisch die Helligkeit der Umgebung
und entscheidet, ob das Blitzlicht
ausgelöst wird.
MUTE TASTE
Microphone: Bei Tastendruck wird nur
das Mikrofon ausgeschaltet, die Kamera
nimmt weiterhin auf. Das Mikrofon
funktioniert nur, wenn die Webcam Daten
überträgt.
Camera: Bei Tastendruck wird nur die
Kamera ausgeschaltet, das Mikrofon
nimmt weiterhin auf.
Camera + Microphone: Bei Tastendruck
werden Kamera und Mikrofon
ausgeschaltet.
INBETRIEBNAHME
DE
Page 4

4
TREIBERFUNKTION
SICHERHEIT
DE
NACHTBELEUCHTUNG
Die Nachtbeleuchtung ist bei Anschluss
der Webcam ausgeschaltet.
Betätigen Sie die Beleuchtungstaste, um
die Nachtbeleuchtung zu aktivieren.
Drücken Sie zum Ausschalten der
Nachtbeleuchtung die Beleuchtungstaste
ein weiteres Mal.
Bedenken Sie, dass die Nachtbeleuchtung nur
funktioniert, wenn die Webcam Daten überträgt
(siehe dazu Absatz STATUS-LED).
STATUS-LED
Bei Datenübertragung der Kamera an ein
Messaging-Programm leuchtet die Status-LED
konstant. Sobald Sie die Kamera und/oder das
Mikrofon über die Mute-Taste ausschalten,
blinkt die Status-LED. Ein erneutes Betätigen
der Mute-Taste aktiviert die Übertragung. Die
LED leuchtet wieder konstant.
SELECT SNAPSHOT SAVE DIRECTORY
Wählen Sie hier aus, in welchem Verzeichnis Ihre
Fotos abgespeichert werden sollen. Wählen Sie
das Verzeichnis, indem Sie auf die Schaltfläche
klicken. Navigieren Sie in dem sich öffnenden
Fenster zum gewünschten Verzeichnis oder
erstellen Sie ein neues Verzeichnis und klicken
Sie auf OK.
FEUCHTIGKEIT
Verwenden Sie das Gerät nur in trockenen und
geschlossenen Räumen. Verwenden Sie das
Gerät niemals in der Nähe von Wasser und
halten Sie es von Feuchtigkeit, tropfenden oder
spritzenden Flüssigkeiten fern, um Schäden zu
vermeiden.
WÄRMEQUELLEN
Betreiben Sie das Gerät niemals in direkter Nähe
zu Wärmequellen wie Heizungen, Verstärkern
oder anderen Wärme ausstrahlenden Geräten.
Das Gerät könnte überhitzen und erheblichen
Schaden erleiden.
FEHLERBESEITIGUNG/REPARATUR
Versuchen Sie nicht, das Gerät selbst zu
warten oder zu reparieren. Überlassen Sie
jegliche Wartungsarbeiten dem zuständigen
Fachpersonal. Nehmen Sie keine Veränderungen
am Gerät vor. Dadurch verlieren Sie jegliche
Garantieansprüche.
03
Page 5

5
KORREKTE ENTSORGUNG DIESES
PRODUKTS
(Elektromüll)
Anzuwenden in den Ländern der Europäischen
Union und anderen europäischen Ländern mit
einem separaten Sammelsystem
Die Kennzeichnung auf dem Produkt bzw. auf
der dazugehörigen Literatur gibt an, dass es
nach seiner Lebensdauer nicht zusammen
mit dem normalen Haushaltsmüll entsorgt
werden darf. Entsorgen Sie dieses Gerät bitte
getrennt von anderen Abfällen, um der Umwelt
bzw. der menschlichen Gesundheit nicht durch
unkontrollierte Müllbeseitigung zu schaden.
Recyceln Sie das Gerät, um die nachhaltige
Wiederverwertung von stofflichen Ressourcen
zu fördern.
Private Nutzer sollten den Händler, bei dem das
Produkt gekauft wurde, oder die zuständigen
Behörden kontaktieren, um in Erfahrung zu
bringen, wie sie das Gerät auf umweltfreundliche
Weise recyceln können.
Gewerbliche Nutzer sollten sich an Ihren
Lieferanten wenden und die Bedingungen des
Verkaufsvertrags konsultieren. Dieses Produkt
darf nicht zusammen mit anderem Gewerbemüll
entsorgt werden.
ENTSORGUNG
DE
Page 6

6
On monitors and notebooks:
Fold out the stand and place the webcam on your
monitor as shown in Figure 3. Place the lippededge of the stand over the front edge of the
monitor and rotate the stand base until it rests
on the back of the monitor.
ALIGNMENT
The Laplace webcam features a horizontally
rotatable lens casing which allows you to adjust
for sideways differences in your seating position
in relation to the alignment of the monitor. If
possible, avoid touching the lens itself when
turning the lens casing in order not to affect
picture quality. The casing can be swivelled by
+/- 15°.
PROTECTIVE FILM
Remove the protective film from the lens before
using the webcam otherwise picture quality may
be affected.
PACKAGE CONTENTS
• Webcam
• Driver CD
• This user manual
POSITIONING
On the desktop:
You can position the webcam on the desktop
either using the webcam casing itself or the
stand as well. Figures 1 and 2 below show both
options.
GETTING STARTED
Ill. 1
Ill. 2
Ill. 3
GB
Page 7
7
Connecting
PLEASE NOTE: It is essential that you install
the driver on the CD before connecting the
webcam.
Insert the driver CD into your CD-ROM drive.
If the start menu doesn‘t appear after the
CD has been inserted then open Windows
Explorer, click on your CD-ROM drive and
double click on the file “setup.exe”. Click on
“Driver Installation”. Follow the on-screen
instructions. You may connect the webcam
to your computer as soon as the software
installation process is completed.
If Windows asks if the installation should
continue despite not passing Windows Logo
testing click on “Continue Anyway”.
After installing the software a camera symbol
will appear in the bottom right hand corner of
the screen in the Taskbar. Click on this symbol
to open the configuration window in order to
adjust the webcam settings.
If you now press the snapshot button the coinstalled capture program will launch.
The webcam features buttons integrated
into the casing which allow you to easily take
snapshots or mute the built-in microphone
at a touch of a button. You can configure the
individual functions of these buttons in the
driver menu. To do that, open the Start Menu
and click on Programs > VaD Laplace Webcam
> Control Center:
SNAPSHOT BUTTON
Flash Light Off: The flash isn’t triggered
when you take a picture.
Flash Light On: The flash is always
triggered when you take a picture.
Flash Light Auto: The webcam
automatically determines the brightness
and surrounding light levels and decides
whether to trigger the flash or not.
MUTE BUTTON
Microphone: When the button is pressed
only the microphone is switched off; the
webcam will continue to record images.
The microphone will only work if the
webcam is transmitting data.
Camera: When the button is pressed the
camera is switched off; the microphone
will continue to record sounds.
Camera + Microphone: When the button
is pressed both the camera and
microphone are switched off.
DRIvER FUNCTIONS
GB
Page 8

8
NIGHT ILLUMINATION
Night illumination is switched off by
default when the webcam is connected.
Press the illumination button to activate
night illumination.
Press the illumination button again to
deactivate night illumination.
Please note that night illumination only
works if the webcam is transmitting data
(see also the section STATUS LED).
STATUS LED
When the camera is transmitting data to a
messaging program the status LED will remain
constantly lit. As soon as you deactivate the
camera and/or the microphone using the Mute
button the status LED will flash. Pressing the
Mute button again activates the transmission.
Consequently, the LED will remain constantly
lit again.
SELECT SNAPSHOT SAVE DIRECTORY
Here you can select the directory your photos
are to be stored in. Select the directory by
clicking on the button. In the window that opens,
navigate to the desired directory or create a new
directory and click on OK.
MOISTURE
Only use the unit in dry, interior rooms. Do not
operate the device near water and keep it away
from damp areas and areas where liquids are
likely to drip or be sprayed in order to prevent
damage occurring.
HEAT SOURCES
Do not operate this device in the direct vicinity
of sources of heat such as heaters, amplifiers or
other devices which radiate heat. The device may
overheat and suffer considerable damage.
TROUBLESHOOTING/REPAIRS
Do not attempt to service or repair the product
yourself; leave any maintenance to qualified
experts. Do not attempt to modify the product in
any way as doing so will invalidate the warranty.
SAFETy
GB
03
Page 9
9
CORRECT DISPOSAL OF THIS PRODUCT
(Electronic waste)
To be applied in countries of the European Union
and other European countries with a separate
collection system.
The markings on the product and on the
associated literature show that this product
must not be disposed of together with normal
household waste at the end of its useful life.
Please dispose of this device separately from
other waste in order not to cause harm to
the environment or human health through
uncontrolled refuse disposal.
Recycle the device to facilitate the sustainable
recycling of material resources.
Private users should contact the dealer from
whom the product was bought, or the authorities
responsible for recycling, to find out how to
recycle the device in an environmentally friendly
way.
Commercial users should ask their suppliers and
consult the sales contract terms. This product
must not be disposed of together with other
commercial waste.
DISpOSAl
GB
Page 10
10
les deux variantes.
Sur les moniteurs et ordinateurs portables :
Dépliez le cadre et placez la caméra sur le
moniteur comme indiqué sur l’illustration 3.
Poussez le bord du cadre contre le moniteur et
tournez le pied du cadre jusqu’à ce qu’il touche
le moniteur.
ORIENTATION
La webcam Laplace possède un boîtier de
lentille orientable horizontalement afin de
pouvoir compenser vos déplacements latéraux
par rapport au moniteur lorsque vous êtes assis.
Pour tourner le boîtier de la lentille, ne touchez
pas la lentille elle-même dans la mesure du
possible afin de ne pas nuire à la qualité de
l’image. Le boîtier est orientable de +/- 15°.
FILM PROTECTEUR
Retirez le film protecteur de la lentille avant
de mettre en marche la caméra. Dans le cas
contraire, cela pourrait nuire à la qualité de
l’image.
CONTENU DE L’EMBALLAGE
• Webcam
• CD avec pilote
• Ce manuel
POSITIONNEMENT
Sur le bureau :
Pour le positionnement sur le bureau, vous
pouvez utiliser soit juste le boîtier de la
caméra, soit également le cadre support. Les
illustrations 1 et 2 ci-dessous vous montrent
MISE EN SERvICE
FR
Page 11

11
FONCTIONS DU pIlOTE
Raccordement
ATTENTION : commencez toujours par installer
le pilote qui se trouve sur le CD avant de
raccorder la webcam.
Insérez le CD du pilote dans le lecteur de CDROM. Si le menu de démarrage ne s’affiche pas
lorsque vous insérez le CD, ouvrez l’Explorer,
cliquez sur le lecteur de CD-ROM et doublecliquez sur le fichier « setup.exe ». Cliquez sur «
Driver Installation ». Suivez les instructions qui
s’affichent à l’écran. Dès que l’installation est
terminée, vous pouvez raccorder la webcam à
votre ordinateur.
Si Windows vous demande si vous souhaitez
poursuivre l’installation même si le logiciel n’a
pas réussi le test permettant d’obtenir le logo
Windows, cliquez sur « Continuer l’installation ».
Après installation, vous voyez un symbole de
caméra en bas à droite dans la barre des tâches.
Cliquez sur ce symbole pour ouvrir la fenêtre
de configuration et procéder aux réglages de la
webcam.
Si vous actionnez alors la touche Snapshot
(capture d’écran), le programme de capture
d’écran installé avec l’application s’ouvre.
La webcam possède des touches de fonction sur
le boîtier qui vous permettent de prendre des
photos d’une simple pression de touche ou de
couper le son de la caméra. Vous pouvez régler
les différentes fonctions de ces touches dans
le menu du pilote. Pour cela, ouvrez le menu
Démarrer et cliquez sur Programmes > VaD
Laplace Webcam > Control Center :
TOUCHE SNAPSHOT
Flash Light Off : le flash ne se déclenche
pas quand vous prenez une photo.
Flash Light On : le flash se déclenche à
chaque fois que vous prenez une photo.
Flash Light Auto : la caméra détermine
automatiquement la luminosité ambiante
pour décider si le flash doit être
déclenché.
TOUCHE MUTE
Microphone : lorsque vous appuyez sur
cette touche, seul le microphone est
désactivé, la caméra continue à filmer. Le
microphone ne fonctionne que quand la
webcam transmet des données.
Camera : lorsque vous appuyez sur cette
touche, seule la caméra est désactivée, le
microphone continue à enregistrer.
Camera + Microphone : lorsque vous
appuyez sur cette touche, la caméra et le
microphone sont désactivés.
FR
Page 12

12
ÉCLAIRAGE DE NUIT
L’éclairage de nuit est éteint lors du
raccordement de la webcam.
Appuyez sur la touche d’éclairage pour
activer l’éclairage de nuit.
Pour éteindre l’éclairage de nuit, appuyez
à nouveau sur la touche d’éclairage.
Nous attirons votre attention sur le fait
que l’éclairage de nuit ne fonctionne que si la
webcam transmet des données (voir à ce sujet le
paragraphe VOYANT D’ÉTAT).
VOYANT D’ÉTAT
Le voyant d’état est allumé en continu lorsque
la caméra envoie des données à un programme
de messagerie. Dès que vous éteignez la caméra
et/ou le microphone en appuyant sur la touche
Mute, le voyant d’état clignote. Lorsque vous
appuyez à nouveau sur la touche Mute, cela
active la transmission. Le voyant est alors à
nouveau allumé de manière continue.
SELECT SNAPSHOT SAVE DIRECTORY
Sélectionnez ici le répertoire dans lequel
les photos doivent être sauvegardées. Pour
sélectionner le répertoire, cliquez sur le bouton
. Dans la fenêtre qui s’ouvre à l’écran, allez dans
le répertoire de votre choix ou créez un nouveau
répertoire et cliquez sur OK.
HUMIDITÉ
N’utilisez l’appareil que dans des locaux secs et
fermés. N’utilisez jamais l’appareil à proximité
d’eau et gardez-le à l’abri de l’humidité
(éclaboussures ou égouttement) pour prévenir
toute dégradation.
SOURCES DE CHALEUR
N’utilisez jamais l’appareil à proximité de
sources de chaleur telles que des radiateurs,
des amplificateurs ou d’autres appareils
émetteurs de chaleur. L’appareil risquerait
de surchauffer et de subir des dommages
considérables.
ÉLIMINATION DES ERREURS/RÉPARATIONS
N’essayez pas de réparer ou d’entretenir vous-
même l’appareil. Confiez tous les travaux de
maintenance à un technicien qualifié. N’apportez
aucune modification à l’appareil. Cela annulerait
toute possibilité de recours en garantie.
SéCURITé
FR
03
Page 13

13
ÉLIMINATION CORRECTE DE CE PRODUIT
(Déchets électroniques)
À appliquer dans les pays de l’Union européenne
et dans les autres pays européens avec un
système de tri des déchets
Le marquage figurant sur ce produit et sur les
documents correspondants indique qu’il ne
doit pas être placé avec les ordures ménagères
courantes à l’issue de sa durée de vie. Veuillez
séparer cet appareil des autres déchets pour
ne pas nuire à l’environnement et à la santé des
personnes par une élimination non contrôlée des
déchets.
Recyclez l’appareil pour encourager la
récupération durable des ressources
matérielles.
Les utilisateurs privés peuvent contacter
le vendeur auprès duquel ils ont acheté le
produit ou les autorités compétentes pour
savoir comment recycler l’appareil de manière
respectueuse de l’environnement.
Les utilisateurs professionnels doivent
s’adresser à leurs fournisseurs et consulter les
conditions qui figurent dans le contrat de vente.
Ce produit ne doit pas être placé avec d’autres
déchets industriels.
élIMINATION
FR
Page 14

14
Ajustar a monitores y portátiles:
Abre el soporte y coloca la cámara como indica
la figura 3 sobre el monitor. Acerca el soporte
con el borde hacia el monitor y gira el pie hasta
que quede ajustado al monitor.
ENFOQUE
La webcam Laplace dispone de una carcasa
de giro horizontal para poder equilibrar las
desviaciones de su posición básica y enderezar
las imágenes en el monitor. Procura no tocar
la lente cuando gires el objetivo para no influir
en la calidad de la imagen. El objetivo se gira
en +/- 15°
LAMINA PROTECTORA
Retira la lámina que protege la lente, antes de
poner la cámara en funcionamiento. Podría
repercutir sobre la calidad de la imagen si se te
olvida retirarla.
CONTENIDO DEL PACK
• Webcam
• CD con controlador
• Este manual
COLOCACIÓN
Sobre tu mesa de trabajo:
Para la colocación sobre tu mesa de trabajo
puedes servirte de la carcasa de la cámara
o utilizar el soporte que viene adjunto. Las
figuras 1 y 2, que se encuentran más abajo,
muestran ambas opciones.
ES
pUESTA EN
FUNCIONAMIENTO
Page 15

15
CONFIGURACIóN
Conexión
¡ATENCIÓN!: Procede primero a instalar el
controlador desde el CD, antes de conectar la
cámara.
Inserta el CD del controlador adjunto en la
unidad de CDs de tu ordenador. Si el menú de
inicio no aparece automáticamente; haz clic en
Explorador de Windows, haz clic en tu unidad de
CD-ROM y luego doble clic en el archivo „setup.
exe“. Haz clic en Driver instalación/controlador.
Sigue las instrucciones que aparecen en
pantalla. Una vez finalizada la instalación,
puedes conectar la webcam a tu ordenador.
Si Windows pregunta si debe continuar la
instalación aunque no haya pasado el test del
logotipo de Windows, haz clic en „Continuar
instalación“.
Tras haber concluido la instalación, encontrarás
a la derecha, en la barra de tareas, un icono de
cámara. Haz clic en este icono para iniciar la
ventana de configuración y proceder a los ajustes
de la cámara.
Si activas el botón de instantáneas, se abre el
programa Capture ya instalado.
La Webcam dispone de botones de funciones
sobre la carcasa con los que podrás tomar
sencillamente fotos pulsando un botón o
silenciar la cámara. Las diferentes funciones de
estos botones las puedes configurar en el menú
del controlador. Abre para ello el menú de inicio
y haz clic en Programas >. VaD Laplace Webcam
> Control Center:
BOTÓN DE INSTANTÁNEAS
Flash Light Off: La luz del flash no se
activa cuando sacas una foto.
Flash Light On: La luz del flash se activa
cuando sacas una foto.
Flash Light Auto: La cámara calcula
automáticamente la intensidad de luz del
ambiente y decide si se ha de disparar el
flash o no.
BOTÓN SILENCIO
Microphone: Al pulsar el botón se
desconecta el micrófono, pero la cámara
sigue su grabación. El micrófono sólo
funciona, cuando la webcam transmite
datos.
Camera: Al pulsar el botón se desconecta
la cámara, pero el micrófono sigue
grabando.
Camera + Microphone: Al pulsar el botón
se desconectan la cámara y el micrófono.
ES
Page 16

16
ILUMINACIÓN NOCTURNA
La iluminación nocturna está
desconectada al enchufar la webcam.
Para activar la iluminación nocturna, hay
que pulsar el botón de la iluminación.
Para desconectar esta iluminación
nocturna, vuelve a pulsar este mismo
botón.
Ten en cuenta que la iluminación nocturna sólo
funciona si la cámara está transmitiendo datos
(véase el párrafo STATUS LED).
STATUS LED (LED DE ESTADO)
En la transmisión de datos de la cámara a
un programa messaging, el LED se enciende
en continuo. Si desconectas la cámara y/o el
micrófono pulsando el botón mute (silencio),
el LED parpadea. Si vuelves a pulsar el botón
silencio se reactiva la transmisión. El LED
vuelve a encender en continuo.
SELECCIONAR CARPETA PARA GUARDAR
INSTANTÁNEAS
Selecciona la carpeta en la que quieres guardar
tus fotos instantáneas. Selecciona la carpeta
haciendo clic en el cuadro correspondiente.
Navega dentro de la ventana abierta hasta la
carpeta que prefieres, o crea una nueva y haz
clic a continuación en OK/Aceptar.
HUMEDADES
Utiliza este dispositivo sólo en lugares secos
y cerrados. Mantén el aparato alejado del
agua y de humedades, líquidos que goteen o
salpiquen y de la lluvia, evitarás así daños en
este dispositivo.
FUENTES DE CALOR
No uses este dispositivo cerca de fuentes
caloríficas tales como calefacciones, estufas u
otras fuentes que despidan o irradien calor. El
dispositivo podría calentarse en exceso y verse
afectado y estropeado.
ELIMINACIÓN DE ANOMALÍAS/REPARACIÓN
No intentes en ningún caso la reparación
o mantenimiento de este dispositivo. Deja
cualquier trabajo de mantenimiento en manos
de personal especializado. No hagas cambios en
el aparato. De lo contrario perderás la garantía
que te ampara.
SEGURIDAD
ES
03
Page 17

17
RECICLADO DE ESTE PRODUCTO
(Aparatos eléctricos y electrónicos
desechables)
De obligado cumplimiento en países de la Unión
Europea y en otros países de Europa con sistema
de separación de basuras.
En las características del producto o en
las instrucciones anexas se indica que esté
producto tras su vida útil, no debe arrojarse
a la basura común doméstica. Deposítalo en
los contenedores destinados para ello con el
fin de no agredir al medio ambiente ni atentar
contra la salud, eliminando residuos de forma
incontrolada.
Recicla este dispositivo para mejorar la
recuperación de materiales valiosos y de
recursos útiles para todos.
Los usuarios particulares deberían contactar
con el establecimiento en el que han adquirido el
aparato o con las autoridades locales para saber
cómo reciclar este producto de la manera menos
agresiva para el medio ambiente.
Los comerciales se pondrán en contacto con sus
proveedores y deberán consultar las condiciones
generales del contrato de compra-venta. Este
producto no debe arrojarse a la basura común ni
con otros productos industriales de desecho.
RECIClAjE
ES
Page 18

18
ВВод В эксплуатацию
Раскройте раму и установите камеру, как
показано на рисунке 3, на монитор. Надвиньте
раму кромкой на монитор и поворачивайте
ножку рамы до тех пор, пока она не будет
прилегать к монитору.
ВЫРАВНИВАНИЕ
Вебкамера Laplace располагает
поворачиваемым в горизонтальном
направлении корпусом с объективом, чтобы
можно было обеспечить компенсацию Вашего
положения сидя при смещении в сторону по
отношению к монитору. При поворачиваании
корпуса камеры не прикасайтесь к самому
объективу, чтобы не ухудшить качество
изображения. Корпус может поворачиваться
на +/- 15°.
ЗАЩИТНАЯ ПЛЕНКА
Снимите защитную пленку с объектива,
начинайте эксплуатировать камеру только
после этого. В противном случае качество
изображения может ухудшиться.
КОМПЛЕКТ ПОСТАВКИ
• Вебкамера
• Компактдиск с драйверами
• Это руководство
РАСПОЛОЖЕНИЕ
На письменном столе:
Для расположения на письменном столе
можно использовать только корпус камеры
или также раму. На приведенных ниже
рисунках 1 и 2 показаны оба варианта.
На мониторах и ноутбуках:
RU
Page 19

19
Функции драйВероВ
Подключение
ВНИМАНИЕ: Перед подключением вебкамеры
обязательно проинсталлируйте драйвер с
компактдиска.
Вложите CD с драйверами в CD-ROMдисковод компьютера. Если после того, как
CD окажется в дисководе, стартовое меню не
появится, откройте Проводник, нажмите на
CD-ROM-дисковод, а затем два раза нажмите
на файл „setup.exe“. Кликните по „Driver
Installation“. Следуйте указаниям, которые
будут появляться на мониторе. Как только
инсталляция будет завершена, к компьютеру
можно подключать вебкамеру.
Если Windows задаст вопрос, нужно ли
продолжать инсталляцию несмотря на
не пройденный тест Logo, нажмите на
„Продолжить инсталляцию“.
После инсталляции внизу справа на панели
задач будет находиться символ камеры.
Кликните по этому символу, чтобы открыть
окно конфигурирования и произвести
настройку вебкамеры.
Если кликнуть по кнопке для мгновенных
снимком, откроется проинсталлированная
вместе с драйвером программа захвата
изображенияю.
У вебкамеры есть кнопки на корпусе, с
помощью которых можно делать снимки или
выключить звук. Отдельные функции этих
кнопок можно настроить в меню драйвера. Для
этого откройте стартовое меню и нажмите на
Программы > Вебкамера VaD Laplace > Control
Center:
КНОПКА SNAPSHOT
Flash Light Off: Вспышка не срабатывает,
когда вы делаете снимок.
Flash Light On: Вспышка всегда
срабатывает, когда вы делаете снимок.
Flash Light Auto: Камера автоматически
определяет яркость окружения и
принимает решение о том, нужна ли
вспышка.
КНОПКА MUTE
Microphone: При нажатии кнопки
микрофон выключается, камера
продолжает снимать. Микрофон
функционирует только в том случае,
если вебкамера передает данные.
Camera: При нажатии кнопки камера
выключается, микрофон продолжает
записывать.
Camera + Microphone: При нажатии
кнопки камера и микрофон
выключаются.
RU
Page 20

20
НОЧНОЕ ОСВЕЩЕНИЕ
Ночное освещение при подключении
вебкамеры выключается.
Нажмите на кнопку освещения, чтобы
активизировать ночное освещение.
Для выключения ночного освещения
нажмите на кнопку освещения еще раз.
Помните о том, что ночное освещение
функционирует только в том случае,
если вебкамера передает данные (см.
также абзац СВЕТОДИОД ИНДИКАЦИИ
СТАТУСА).
СВЕТОДИОД ИНДИКАЦИИ СТАТУСА
При передаче данных из камеры в программу
передачи сообщений светодиод индикации
статуса горит постоянно. Как только
вебкамера и/или микрофон отключаются
кнопкой Mute, светодиод индикации статуса
начинает мигать. Повторное нажатие на
кнопку Mute включает передачу данных.
Светодиод индикации статуса опять начинает
гореть постоянно.
SELECT SNAPSHOT SAVE DIRECTORY
Здесь вибирается, в каком каталоге будут
сохраняться сделанные фотографии.
Выберите каталог, для этого нажмите кнопку.
Перейдите в открывшемся окне в нужный
каталог или создайте новый каталог и
нажмите OK.
Влажность
Используйте устройство только в сухих
и закрытых помещениях. Никогда не
используйте прибор вблизи от воды, он не
должен подвергаться воздействию влаги,
на него не должны попадать капли и брызги,
иначе он может выйти из строя.
ИСТОЧНИКИ ТЕПЛА
Никогда не эксплуатируйте прибор вблизи от
источников тепла, таких как отопительные
приборы, усилители или других приборов,
которые излучают тепло. Прибор может
перегреться и выйти из строя.
УСТРАНЕНИЕ НЕПОЛАДОК/РЕМОНТ
Не пытайтесь самостоятельно осуществлять
уход за прибором или ремонтировать его.
Этим должны заниматься соответствующие
специалисты. Ничего не изменяйте в приборе.
Из-за этого прекращается гарантия.
Безопасность
RU
03
Page 21

21
ПРАВИЛЬНАЯ УТИЛИЗАЦИЯ ЭТОГО
ИЗДЕЛИЯ
(Электротехнические отходы)
Применять в странах Европейского Союза и
других европейских странах с особой системой
для сбора
Маркировка на изделии или в прилагаемой к
нему документации указывает, что он после
окончания своего срока годности не должен
утилизироваться вместе с обычным домашним
мусором. Пожалуйста, утилизируйте этот
прибор отдельно от других отходов, чтобы не
нанести вред окружающей среде и здоровью
людей вследствие неконтролируемого
устранения мусора.
Подвергайте прибор вторичной переработке,
чтобы способствовать повторному
использованию материальных ресурсов.
Частные пользователи должны обратиться
в магазин, где они купили изделие, или в
соответствующие инстанции, чтобы получить
информацию о том, как наиболее безопасно
для окружающей среды утилизировать прибор.
Промышленные и коммерческие пользователи
должны обратиться к своим поставщикам и
проконсультироваться по поводу условий
контракта по продаже. Это изделие не может
утилизироваться вместе с другим мусором.
утилизация
RU
Page 22

22
Aan beeldschermen en laptops:
Klap het frame open en zet de camera zoals
op afbeelding 3 op uw beeldscherm. Schuif
het installatieframe met de rand aan het
beeldscherm en draai de voet van het frame aan
tot deze tegen het beeldscherm ligt.
RICHTEN
De Laplace webcam beschikt over een
lensbehuizing die horizontaal gedraaid kan
worden zodat u zijdelings afwijkingen van uw
zitpositie ten opzichte van de stand van uw
beeldscherm met elkaar in evenwicht kunt
brengen. Om de behuizing van de lens te draaien,
naar mogelijkheid de lens zelf niet aanraken, om
de beeldkwaliteit niet nadelig te beïnvloeden. De
behuizing is om +/- 15° te draaien.
BESCHERMENDE FOLIE
Haal de beschermfolie van de lens af voordat
u de camera in gebruik neemt. Anders kan de
beeldkwaliteit nadelig worden beïnvloed.
INHOUD VAN HET PAKKET
• Webcam
• CD met stuurprogramma‘s
• Dit handboek
POSITIONERING
Op het bureau:
U kunt voor de positionering op het bureau
of alleen de camerabehuizing of ook het
installatie-frame opstellen. De onderstaande
afbeeldingen 1 en 2 geven beide variaties weer.
INGEBRUIKNAME
NL
Page 23

23
BESTURINGS-
pROGRAMMAFUNCTIES
Aansluiten
OPGELET: in ieder geval eerst de drivers van de
CD installeren voordat u de webcam aansluit.
Leg de CD met de stuurprogramma‘s in uw CDrom drive. Indien na het inleggen van de cd het
startmenu niet verschijnt, open de Explorer en
klik op uw CD-ROM-drive en dubbelklik op het
bestand „setup.exe“. Klik op „Driver installatie“.
Volg de aanwijzingen op het beeldscherm. Zodra
de installatie is afgesloten, kunt u de webcam
aan uw computer aansluiten.
Indien Windows u vraagt of de installatie moet
worden voortgezet ondanks een niet vervulde
Logo-test, klik op „Installatie voortzetten“.
Na de installatie staat er rechtsonder op de
taakbalk een camerasymbool. Klik op dit
symbool om het configuratievenster te starten
en de instelling aan de webcam uit te voeren.
Als u nu de snapshottoets gebruikt, gaat een
Capture programma open, dat tevens werd
geïnstalleerd.
De webcam beschikt over functietoetsen aan
de behuizing waarmee u gemakkelijk met
één druk op de knop foto‘s kunt maken of het
geluid van de camera kunt uitschakelen. De
respectievelijke functies van deze knoppen
kunt u in menu van het besturingsprogramma
instellen. Open hiervoor het startmenu en klik
op Alle programma‘s > VaD Laplace Webcam >
Control Center:
SNAPSHOT KNOP
Flash Light Off: Het flitslicht wordt niet in
werking gezet wanneer u een foto maakt.
Flash Light On: Het flitslicht wordt altijd in
werking gezet wanneer u een foto maakt.
Flash Light Auto: De camera controleert
automatisch de belichting van de
omgeving en bepaalt of het flitslicht in
werking wordt gezet.
MUTE KNOP
M
icrophone: Wannneer u op deze knop drukt
wordt alleen de microfoon uitgeschakeld,
maar de camera neemt dan nog steeds op.
De microfoon functioneert alleen als de
webcam gegevens overdraagt.
Camera: Wanneer u op deze knop drukt
wordt alleen de camera uitgeschakeld, maar
de microfoon neemt dan nog steeds op.
Camera + Microphone: Bij druk op de knop
worden camera en microfoon uitgeschakeld.
NL
Page 24

24
NACHTVERLICHTING
De nachtverlichting is bij het aansluiten
van de webcam uitgeschakeld.
Druk op de verlichtingstoets om de
nachtverlichting te activeren.
Om de nachtverlichting uit te schakelen,
drukt u opnieuw op de verlichtingstoets.
Houd er rekening mee, dat de
nachtverlichting alleen dan functioneert,
als de webcam gegevens overdraagt (zie
hierover paragraaf STATUS-LED).
STATUS-LED
Bij gegevensoverdracht van de camera naar een
messaging-programma brandt de status-LED
constant. Zodra u de camera en/of de microfoon
via de Mute-toets uitschakelt, knippert de
status-LED. Opnieuw gebruik van de Mute-toets
activeert de overdracht. De LED brandt opnieuw
constant.
SELECT SNAPSHOT SAVE DIRECTORY
Kies hier in welke map u uw foto‘s wilt opslaan.
Kies de map door op het veld te klikken.
Navigeer in het zich openende venster naar de
gewenste map of maak een nieuwe map aan en
klik op OK.
VOCHT
Gebruik het product uitsluitend in droge en
gesloten ruimtes. Gebruik het apparaat nooit in
de buurt van water en houd het uit de buurt van
vocht en druppelende of spattende vloeistoffen
om beschadiging te voorkomen.
WARMTEBRONNEN
Gebruik het apparaat nooit in directe nabijheid
van warmtebronnen zoals verwarmingen,
versterkers of andere apparaten die
warmte uitstralen. Het apparaat zou kunnen
oververhitten en beschadigd raken.
STORINGEN VERHELPEN/REPAREREN
Probeer niet het apparaat zelf na
te kijken of te repareren. Laat alle
onderhoudswerkzaamheden over aan erkend
vakpersoneel. Voer geen veranderingen aan
het apparaat uit. Daardoor vervalt de garantie
volledig.
vEIlIGHEID
NL
03
Page 25

25
HET PRODUCT OP DE JUISTE WIJZE
AFVOEREN
(Elektrisch/elektronisch afval)
Van toepassing in de landen van de Europese
Unie en andere Europese landen met een
gescheiden inzamelingssysteem
De markering op het product resp. op de
bijbehorende documentatie geeft aan dat het
product aan het einde van zijn levensduur niet
samen met het normale huisvuil mag worden
afgevoerd. Voer het apparaat gescheiden
van ander afval af, om het milieu resp. de
menselijke gezondheid niet te schaden door
ongecontroleerde afvalverwerking.
Lever het apparaat in bij een kringloopbedrijf om
een langdurig hergebruik van materiële bronnen
mogelijk te maken.
Particuliere gebruikers kunnen bij het
bedrijf waar ze het product hebben gekocht
of bij de hiervoor verantwoordelijke
instanties informeren hoe het apparaat op
milieuvriendelijke wijze kan worden gerecycled.
Bedrijfsmatige gebruikers dienen zich tot hun
leverancier te wenden en de voorwaarden van
het verkoopcontract na te lezen. Dit product
mag niet samen met ander bedrijfsafval worden
afgevoerd.
AFDANKING
NL
Page 26
26
På monitorer og notebooks:
Klap rammen op og opstil kameraet
på monitoren som vist i figur 3. Skub
opstillingsrammen med kanten til monitoren
og drej rammens fod indtil den sidder tæt på
monitoren.
JUSTERING
Laplace kameraet har et vandret drejeligt
linsehus, så du kan justere afvigelser på siden af
din siddeposition i forhold til monitoren. Undgå
helst at berøre selve linsen under justeringen
for ikke at reducere billedkvaliteten. Huset kan
drejes +/- 15°.
BESKYTTELSESEMBALLAGE
Fjern beskyttelsesemballagen fra linsen inden
du tager kameraet i brug. Ellers reduceres
billedkvaliteten.
DET KOMMER MED PAKKEN
• Webcam
• Driver-CD
• Denne vejledning
POSITIONERING
På skrivebordet:
Til positioneringen kan du enten kun opstille
kamerahuset eller også opstillingsrammen.
Figurerne 1 og 2 forneden viser begge
varianter.
OpSTART
DK
Page 27

27
Tilslutning
GIV AGT: Installer først driverne fra Cd’en inden
du tilslutter kameraet.
Læg driver-CD’en ind i dit CD-rom-drev. Hvis
startmenuen ikke vises efter isætning af CD’en
åbner du Explorer, klikker på die CD-rom-drev
og dobbeltklikker filen „setup.exe”. Klik på
„Driver Installation“. Følg anvisningerne på
skærmen. Så snart installeringen er afsluttet
kan du tilslutte webkameraet til din computer.
Hvis Windows spørger dig, om du vil fortsætte
med installeringen selvom logo-test ikke blev
bestået, klikker du på „ Fortsæt alligevel”.
Efter installeringen ser du et kamerasymbol
i opgavelinjen. Klik på symbolet for at starte
konfigurationsvinduet og til at gennemføre
indstillinger på dit webcam.
Hvis du trykker snapshot-knappen åbnes det
installerede Capture-program.
Webkameraet har funktionsknapper på huset
som kan bruges til at ”skyde” fotos med et
bekvemt knaptryk eller til lydløs afstemning.
Du kan indstille de enkelte funktionsknapper
i drivermenuen. Åben hertil startmenuen og
klik på programmer > VaD Laplace Webcam >
Control Center:
SNAPSHOT-KNAP
Flash Light Off: Lynlyset udløses ikke hvis
du fotograferer.
Flash Light On: Lynlyset udløses altid hvis
du fotograferer.
Flash Light Auto: Kameraet oplyser
automatisk omgivelsens lysstyrke og
afgør om lynlyset skal udløses.
MUTE KNAP
Microphone: Hvis knappen trykkes,
afbrydes kun mikrofonen, kameraet selv
fortsætter med at optage. Mikrofonen
fungerer kun hvis webkameraet overfører
data.
Camera: Hvis knappen trykkes, afbrydes
kun kameraet, mikrofonen fortsætter
med at optage.
Camera + Microphone: Hvis knappen
trykkes, afbrydes kameraet og
mikrofonen.
DK
DRIvERFUNKTIONER
Page 28

28
NATBELYSNING
Natbelysningen er slukket hvis kameraet
tilsluttes.
Tryk på belysningsknappen for at aktivere
natbelysningen.
Tryk igen på belysningsknappen for at
slukke natbelysningen.
Husk, at natbelysningen kun fungerer hvis
webkameraet overfører data (se hertil
sektion STATUS-LED).
STATUS-LED
Hvis der overføres data fra kameraet til et
messaging-program, lyser status-LED konstant.
Så snart kameraet og/eller mikrofonen slukkes
via mute-knappen, blinker status-LED. Et nyt
tryk på mute-knappen aktiverer overførslen.
LED lyser igen konstant.
SELECT SNAPSHOT SAVE DIRECTORY
Her udvælger du i hvilken mappe du ønsker at
gemme dine billeder. Udvælg mappen idet du
klikker på knappen. Naviger i det åbne vindue til
den ønskede mappe eller opret en ny mappe og
klik på OK.
FUGTIGHED
Enheden må kun bruges i tørre og lukkede rum.
Enheden bør aldrig bruges i nærheden af vand
og skal holdes fjern fra fugtighed, dryppende
eller sprøjtende væsker for at undgå skader.
VARMEKILDER
Enheden må aldrig bruges direkte i nærheden af
varmekilder som f.eks. radiatorer, forstærkere
eller andre enheden som udstråler varme.
Enheden kan overophedes og udsættes for
betydelige skader.
AFHJÆLP AF FEJL/REPARATIONER
Du må ikke selv vedligeholde eller reparere
enheden. Alle vedligeholdelsesarbejder skal
gennemføres af specialister. Enheden må ikke
forandres. På den måde bortfalder garantien.
SIKKERHED
DK
03
Page 29

29
KORREKT BORTSKAFFELSE AF
PRODUKTET
(El-affald)
Skal anvendes i landene indenfor den
Europæiske Union og andre europæiske lande
som har et separat samlingssystem.
Mærkningen på produktet, hhv. på den
tilhørende dokumentation angiver, at produktet
ikke må bortskaffes sammen med normalt
husholdningsaffald. Enheden skal bortskaffes
separat fra andet affald for ikke at skade
miljøet, hhv. menneskernes sundhed på grund af
ukontrolleret bortskaffelse af affald.
Enheden bør recycles for at fremme genbrugen
af ressourcer.
Private brugere bør kontakte forhandleren
eller de ansvarlige myndigheder for at finde
ud af, hvordan enheden kan bortskaffes på en
miljøvenlig måde.
Industrielle brugere bør henvende sig
til leverandøren og læse betingelserne i
købekontrakten. Dette produkt må ikke
bortskaffes sammen med andet industrielt
affald.
BORTSKAFFElSE
DK
Page 30

30
Monitörlere ve notebooklara:
Çerçeveyi katlayarak açın ve kamerayı 3.
resimde gösterildiği gibi monitörün üzerine kurun.
Kurma çerçevesini kenarı ile monitöre doğru itin
ve çerçeve ayağını monitöre dayanana kadar
döndürün.
HIZALAMA
Laplace Webcam, oturuş pozisyonunuzu
monitörün yönüne doğru dengeleyebilmeniz için,
yatay olarak çevrilebilen bir mercek gövdesine
sahiptir. Mercek gövdesini çevirirken, görüntü
kalitesini olumsuz etkilememek için mercek
gövdesi noktasına dokunmayın. Gövde +/- 15°
açıyla çevrilebilir.
KORUYUCU FOLYO
Kamerayı ilk kez çalıştırmadan önce, merceğin
üzerindeki koruyucu folyoyu çıkarın. Aksi taktirde
görüntü kalitesi olumsuz etkilenebilir.
PAKETIN IÇINDEKILER
• Webcam
• Sürücü CD‘si
• Bu el kitabı
KONUMLANDIRMA
Masanın üstünde:
Masanın üstünde konumlandırmak için
ya sadece kamera gövdesini ya da kurma
çerçevesini de kurabilirsiniz. Aşağıdaki 1. ve 2.
resim her iki versiyonu göstermektedir.
İlk kez çalıştırma
TR
Page 31

31
Bağlantı
DİKKAT: Webcam‘in bağlantısını yapmadan önce
mutlaka sürücüsünü CD‘den yükleyin.
Sürücü CD‘sini CD-Rom sürücünüze koyun.
CD‘yi yerleştirdikten sonra başlat menüsü
görüntülenmezse, lütfen Explorer‘ı açın, CD-ROM
sürücünüze tıklayın ve „setup.exe“ dosyasını
çift tıklayın. „Driver Installation“ seçeneğine
tıklayın. Ekrandaki talimatları takip edin. Kurulum
tamamlandıktan sonra Webcam‘i bilgisayarınıza
bağlayabilirsiniz.
Windows, başarısız Logo testine rağmen
kurulumun devam ettirilip ettirilmeyeceğini
sorarsa, „kuruluma devam et“ tıklayın.
Kurulumdan sonra menü çubuğunun sağ
altında bir kamera sembolü belirir. Yapılandırma
penceresini açmak ve Webcam ayarlarını yapmak
için bu sembolün üzerine tıklayın.
Şimdi Snapshot tuşuna bastığınızda, birlikte
kurulumu gerçekleşen Capture programı açılır.
Webcam gövdede fonksiyon tuşlarına sahiptir.
Bu tuşlarla kolayca fotoğraar çekebilir veya
kamerayı sessize alabilirsiniz. Bu tuşların münferit
fonksiyonları sürücü menüsünde ayarlayabilirsiniz.
Bunun için başlat menüsünü açın ve Programlar >
VaD Laplace Webcam > Control Center tıklayın:
SNAPSHOT TUŞU
Flash Light Off: Bir fotoğraf çektiğinizde aş
patlamaz.
Flash Light On: Bir fotoğraf çektiğinizde
daima aş patlar.
Flash Light Auto: Kamera otomatik olarak
çevre parlaklığını tespit eder ve aşın
patlayıp patlamaması ile ilgili kararı verir.
MUTE TUŞU
Microphone: Tuşa basıldığında sadece
mikrofon kapatılır, kamera kaydetmeye
devam eder. Mikrofon, yalnızca Webcam‘in
veri aktarması durumunda çalışır.
Camera: Tuşa basıldığında sadece kamera
kapatılır, mikrofon kaydetmeye devam eder.
Camera + Microphone: Tuşa basıldığında
kamera ve mikrofon kapatılır.
TR
Sürücü fonkSıyonları
Page 32

32
GECE AYDINLATMASI
Gece aydınlatması webcam bağlandığında
kapalıdır.
Gece aydınlatmasını etkinleştirmek için
aydınlatma tuşuna basın.
Gece aydınlatmasını kapatmak için
aydınlatma tuşuna bir kez daha basın.
Gece aydınlatmasının yalnıcza Webcam‘in
veri aktarması durumunda çalıştığını
dikkate alın (bkz. DURUM LED‘i başlığı).
DURUM LED‘I
Kameranın bir mesajlaşma programında veri
aktarımı yapması sırasında durum LED‘i sabit
yanar. Kamerayı ve/veya mikrofonu Mute (ses
kapatma) tuşu ile kapattığınızda, durum LED‘i
yanıp sönmeye başlar. Mute tuşuna tekrar
basıldığında aktarım etkinleştirilir. LED tekrar
sabit bir şekilde yanar.
SELECT SNAPSHOT SAVE DIRECTORY
Burada, fotoğraarınızın hangi dizine
kaydedileceğini seçin. Butona tıklayarak dizini
seçin. Açılan pencerede istediğiniz dizine gidin
veya yeni bir dizin oluşturun ve OK tıklayın.
NEM
Cihazı sadece kuru ve kapalı alanlarda kullanın.
Cihazı hiçbir zaman suya yakın kullanmayın ve
hasarları önlemek için nemden, damlayan veya
sıçrayan sıvılardan uzak tutun.
ISI KAYNAKLARI
Cihazı hiçbir zaman kalorifer, amplikatör gibi
ısı kaynakların veya ısı yayan başka cihazların
yanında çalıştırmayın. Cihaz aşırı ısınabilir ve
hasar görebilir.
HATA GIDERME/ONARIM
Cihazı kendiniz tamir etmeye veya bakım
yapmaya çalışmayın. Tüm bakım çalışmalarının
yetkili uzman personelin yapmasını sağlayın.
Cihazda herhangi bir değişiklik yapmayın. Bunun
sonucunda tüm garanti hakları iptal olur.
emnıyet
TR
03
Page 33

33
BU ÜRÜNÜN ATIK OLARAK DOĞRU
ORTAN KALDIRILMASI
(Elektronik çöp)
Avrupa Birliği ülkelerinde ve diğer Avrupa
ülkelerinde ayrı bir toplama sistemi ile
uygulanmalıdır
Ürün veya ilgili broşür üzerindeki işaretleme,
kullanım ömründen sonra normal ev çöpü
ile birlikte tahliye edilmemesi gerektiğini
belirtmektedir. Çevreye veya insan sağlığına
kontrolsüz çöp tahliyesi nedeniyle zarar vermemek
için bu cihazı lütfen diğer atıklardan ayrı tahliye
edin.
Malzeme kaynaklarının devamlı kullanımını teşvik
etmek için cihazı geri dönüştürme noktalarına
teslim edin.
Özel kullanıcılar, cihazı çevreye zarar vermeden
nasıl geri dönüştürülebilecekleri ile ilgili bilgi almak
için ürünü aldıkları satıcıya veya yetkili kurumlara
başvurmalıdır.
Kurumsal kullanıcılar tedarikçilerine başvurmalı ve
satış sözleşmesi koşullarını görüşmelidir. Bu ürün
başka sanayi çöpü ile birlikte tahliye edilmemelidir.
ATIK OlARAK ORTADAN KAlDIRMA
TR
Page 34

34
Na monitorze i w notebooku
Rozłóż ramkę i ustaw kamerę na monitorze w
sposób przedstawiony na ilustracji nr 3. Dosuń
krawędź ramki do monitora i obróć nóżkę ramki,
tak aby przylegała do monitora.
POZYCJONOWANIE
Kamera internetowa posiada wychylną w poziomie
obudowę soczewki, co pozwala na wyrównanie
bocznej odchyłki pozycji siedzącej użytkownika
względem monitora. Podczas obracania obudowy
soczewki nie należy dotykać soczewki, aby
nie pogorszać jakości obrazu. Obudowa jest
wychylna w zakresie +/- 15°.
FOLIA OCHRONNA
Przed rozpoczęciem używania kamery należy
zdjąć folię ochronną. W przeciwnym razie może
wystąpić pogorszenie jakości obrazu.
ZAWARTOŚĆ OPAKOWANIA
• Kamera internetowa
• Dysk CD ze sterownikiem
• Instrukcja obsługi
UMIESZCZENIE
Na biurku
Przy ustawieniu kamery na biurku można
ustawić na nim samą obudowę kamery
lub skorzystać z ramki. Oba warianty są
przedstawione na poniższych ilustracjach nr
1 i 2.
PL
UrUchomıenıe
Page 35

35
fUnkcje SterownıKA
Podłączenie
UWAGA! Przed podłączeniem kamery
internetowej należy najpierw zainstalować
sterownik z dysku CD.
Włóż płytę CD ze sterownikiem do napędu
CD-ROM komputera. Jeśli po włożeniu płyty
nie otworzy się menu startowe, otwórz aplikację
Eksplorer, kliknij napęd CD-ROM, poczym kliknij
dwa razy na plik „setup.exe“. Kliknij opcję „Driver
Installation“. Postępuj zgodnie z instrukcjami
pojawiającymi się na ekranie. Po zakończeniu
instalacji kamerę internetową można podłączyć
do komputera.
Jeśli pojawi się komunikat z systemu Windows z
zapytaniem, czy chcesz kontynuować instalację
mimo braku sygnatury, kliknij polecenie
„Kontynuuj instalację“.
Po zakończeniu instalacji, z prawej strony na
pasku zadań pojawi się ikona kamery. Kliknij
tę ikonę, aby otworzyć okno konguracyjne i
skongurować kamerę internetową.
Po naciśnięciu przycisku do zdjęć otwiera się
zainstalowany program do edycji obrazu.
Kamera internetowa posiada w obudowie klawisze
funkcyjne, które umożliwiają wygodne robienie
zdjęć lub wyłączenie fonii kamery jednym
przyciśnięciem Poszczególne funkcje tych
przycisków można ustawić w menu sterownika.
W tym celu otwórz menu startowe i kliknij kolejno
kategorię Programy > VaD Laplace Webcam >
Control Center:
PRZYCISK DO ZDJĘĆ
Flash Light Off: Przy wykonywaniu zdjęć
lampa błyskowa nie włącza się.
Flash Light On: Przy wykonywaniu zdjęć
zawsze włącza się lampa błyskowa.
Flash Light Auto: Kamera mierzy
automatycznie światło na zewnątrz i
wyzwala do zdjęcia lampę błyskową lub
nie.
PRZYCISK MUTE (WYCISZANIE)
Micr
ophone: Naciśnięcie przycisku powoduje
tylko wyłączenie mikrofonu, a kamera
nadal pracuje na wizji. Mikrofon działa tylko
podczas transmisji danych przez kamerę
internetową.
Camera: Naciśnięcie przycisku powoduje
tylko wyłączenie kamery, a mikrofon nadal
pracuje na fonii.
Camera + Microphone: Naciśnięcie przycisku
wyłącza zarówno kamerę jak i mikrofon.
PL
Page 36

36
OŚWIETLENIE NOCNE
Przy podłączeniu kamery internetowej
oświetlenie nocne jest wyłączone.
Aby włączyć oświetlenie nocne, naciśnij
przycisk oświetlenia.
Aby wyłączyć oświetlenie nocne, naciśnij
przycisk oświetlenia jeszcze raz.
Pamiętaj, iż oświetlenie nocne działa
tylko przy transmisji danych przez kamerę
internetową (patrz rozdział „Dioda stanu“).
DIODA STANU
Podczas transmisji danych przez kamerę do
programu komunikacyjnego świeci się dioda
stanu. Po wyłączeniu kamery lub/i mikrofonu
przyciskiem Mute, dioda stanu będzie pulsowała
Status-LED. Ponowne naciśnięcie przycisku Mute
wznawia transmisję danych. Dioda stanu pali się
znowu światłem ciągłym.
SELECT SNAPSHOT SAVE DIRECTORY
W tym miejscu można wybrać miejsce
przechowywania zdjęć. Aby wybrać katalog,
kliknij na przycisk. Przejdź w otwartym oknie do
wybranego katalogu lub utwórz nowy katalog,
poczym kliknij OK.
WILGOTNOŚĆ
Urządzenie należy używać tylko w suchych i
zamkniętych pomieszczeniach. Aby uniknąć
uszkodzeń urządzenia , nie wolno go używać w
pobliżu wody oraz należy trzymać je z dala od
miejsc wilgotnych oraz od miejsc, w których kapią
lub rozbryzgują się ciecze.
ŹRÓDŁA CIEPŁA
Urządzenia nie wolno używać w bezpośrednim
sąsiedztwie źródeł ciepła, takich jak grzejniki,
wzmacniacze lub inne urządzenia emitujące
energię cieplną. W przeciwnym razie urządzenie
może się przegrzać i mogą wystąpić poważne
uszkodzenia.
USUWANIE USTEREK / NAPRAWY
Urządzenia nie wolno konserwować ani naprawiać
samodzielnie. Wszystkie prace konserwacyjne
należy zlecać odpowiednim specjalistom.
Nie wolno wprowadzać zmian do urządzenia.
Prowadzi to do utraty praw z tytułu gwarancji.
BezpıeczeńStwo
PL
03
Page 37

37
PRAWIDŁOWA UTYLIZACJA URZĄDZENIA
(Odpady elektryczne i elektroniczne)
Dotyczy krajów Unii Europejskiej oraz innych
krajów europejskich posiadających odrębny
system zbiórki selektywnej.
Oznaczenie na produkcie lub w dołączonej do
niego dokumentacji przypomina, iż po skończeniu
okresu eksploatacji urządzenia nie wolno go
usuwać wraz ze zwykłymi odpadami komunalnymi.
Urządzenie należy usuwać oddzielnie od innych
odpadów, aby wskutek niekontrolowanego
usuwania odpadów nie spowodować zagrożenia
dla środowiska naturalnego lub zdrowia ludzi.
Urządzenie należy poddać recyklingowi, aby
wspierać długotrwałe wykorzystywanie zasobów
surowcowych.
W celu uzyskania informacji o sposobach
ekologicznej utylizacji urządzenia konsumenci
powinni skontaktować się ze sprzedawcą
urządzenia lub właściwym urzędem.
Użytkownicy przemysłowi powinni zwrócić się
do swego dostawcy i zapoznać się z warunkami
umowy sprzedaży. Produktu nie wolno usuwać
wraz z innymi odpadami przemysłowymi.
Utylızacja
PL
Page 38

38
| Enjoy first class comfort as your
right hand virtually merges with the
mouse
| Navigate effortlessly to any desired
point on the screen with the adjustable 2000dpi precision sensor
| Assign 9 mouse buttos according
to your individual requirements
| Future proof technology with
Windows Vista™ compatible
4D mouse wheel
| Ambient light with corona light
effects in white colour
| Tactile mouse buttons with high
finish surface for a superior feel
| Carefully selected materials for
enhanced quality and looks
| Designed to work with
Windows® 2000/XP/Vista
PROFESSIONAL 2000 DPI PRECISION SENSOR MOUSE
Product No.| VD-1501-SWT
Page 39

39
| Genießen Sie erstklassigen Komfort,
sobald Ihre rechte Hand mit der Maus
verschmilzt
| Navigieren Sie dank des einstellbaren
2000 dpi Präzisionssensors mühelos
zu jedem gewünschten Punkt auf dem
Bildschirm
| Belegen Sie 9 Maustasten beliebig und
ganz nach Ihren Vorstellungen
| Zukunftssichere Technologie mit Win-
dows Vista™ kompatiblem
4D Mausrad
| Mausbeleuchtung mit Korona-Lichtef-
fekt in Weiß
| Maustasten mit fühlbarem Druckpunkt
und Hochglanzlackierung für angenehme Haptik
| Sorgfältig ausgesuchte Werkstoffe für
höchste Qualität und Ästhetik
| Speziell entwickelt für
Windows® 2000/XP/Vista
PROFESSIONAL 2000 DPI PRECISION SENSOR MOUSE
Product No.| VD-1501-SBK
Page 40

40
Support Hotline: +49 (0) 4287 9244 690
E-Mail: support@speed-link.com
Jöllenbeck GmbH
Kreuzberg 2 | 27404 Weertzen | Germany
 Loading...