

Page 1
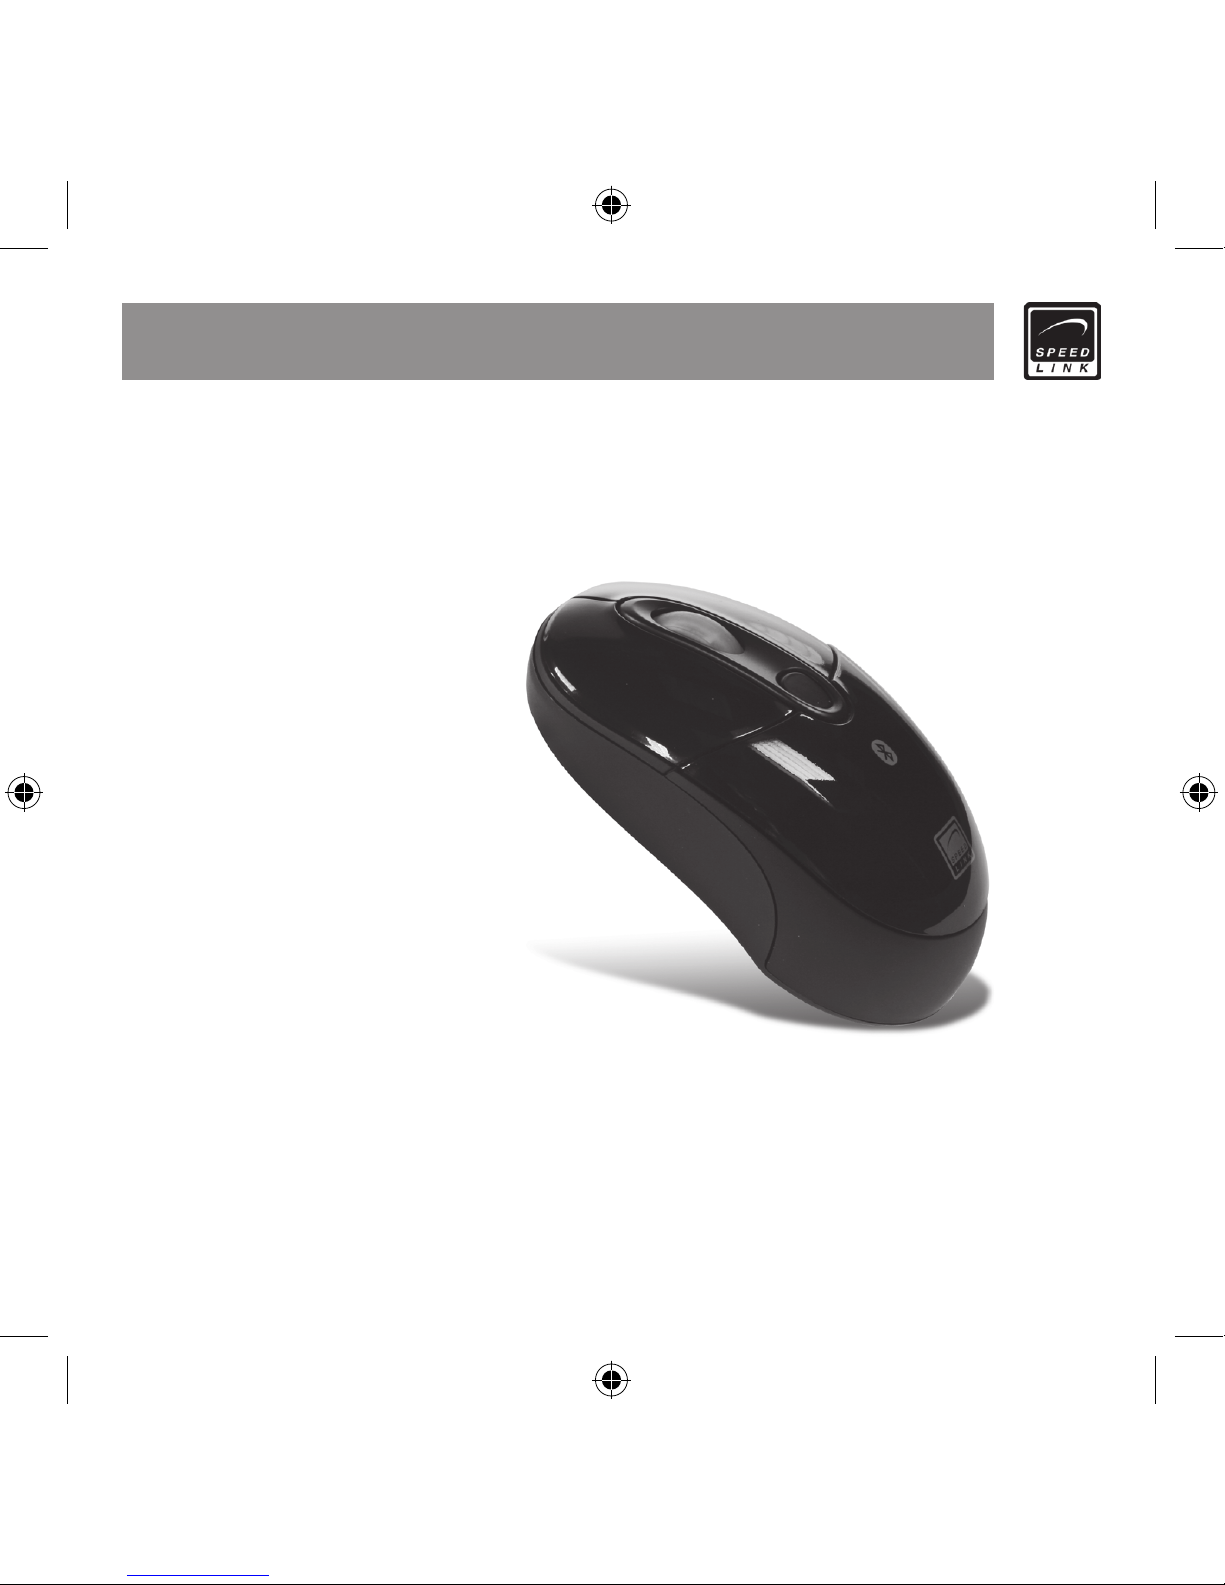
Notebook Laser Mouse
for Bluetooth
®
User‘s Guide
Bedienungsanleitung
Mode d‘emploi
Instrucciones de manejo
Manuale di istruzioni
Brugsanvisning
SL-6197-SBK
Version 1
Page 2

Declaration of Conformity
Für das folgend bezeichnete Erzeugnis/The following equipment
SL-6197-SBK
(Notebook Laser Mouse for Bluetooth®)
Frequency: 2402 – 2480 MHz
EAN-Code 4 027301061970
wird hiermit bestätigt, dass es den wesentlichen Schutzanforderungen
entspricht, die in der R&TTE – Richtlinie 1999/5/EC festgelegt sind. Zur
Beurteilung des Erzeugnisses hinsichtlich der Sicherheit von Einrichtung der
Informationstechnik wurden folgende Normen herangezogen:
Is herewith conrmed to comply with the requirements set out in the R&TTE
Directive 1999/5/EC. For the evaluation regarding the Directives, the following
standards were applied:
1999/5/EC = EN 300 440-2 V1.1.1 2001-09
EN 301 489-01 V1.5.1 2000-11
EN 301 489-03 V1.4.1 2002-08
EN 60950-1 2001
Page 3
Diese Erklärung wird verantwortlich für den Hersteller/Importeur:/
The following manufacturer/importer is responsible for this declaration
Jöllenbeck GmbH
Kreuzberg 2
D 27404 Weertzen
abgegeben durch:/ / Person responsible for this declaration:
Jöllenbeck, Tim
Name, Vorname/Name, Surname
Geschäftsführer/ Managing Director
Stellung im Betrieb des Herstellers/Importeurs/Position/Title
D-27404 Weertzen 18.01. 2007
Ort/ Place Datum/Date Rechtsgültige Unterschrift/Legal Signature
Page 4

DE
4
Inhalt
Inhalt 4
Sicherheitshinweise 5
Systemvoraussetzungen
6
Bedienelemente 7
Wichtige Batteriehinweise
8
Auaden der Maus 9
Anschließen und Verbinden für PC
10
Anschließen und Verbinden für Mac 13
Hinweise zur Verwendung
14
Fehlerbehebung 15
Technische Daten
16
Page 5
DE
5
Sicherheitshinweise
Laser
Diese Maus verwendet
einen Lasersensor der
Klasse 1. Direkter Kontakt des Auges mit dem
Laser kann Sehschäden
verursachen. Schauen
Sie niemals direkt in den
Laserstrahl und richten
Sie den Strahl niemals
auf andere Personen oder
reektierende Oberächen
wie z. B. Spiegel. Schauen
Sie niemals durch vergrößernde Geräte wie Lupen,
Mikroskope oder ähnlichem in den Laserstrahl.
Fehlerbeseitigung/Reparatur
Versuchen Sie nicht, das
Gerät selbst zu warten oder zu reparieren.
Überlassen Sie jegliche
Wartungsarbeiten dem
zuständigen Fachpersonal. Nehmen Sie keine
Veränderungen am Gerät
vor. Dadurch verlieren Sie
jegliche Garantieansprüche.
Feuchtigkeit/Wärmequellen
Verwenden Sie die Maus
nur in trockenen und
geschlossenen Räumen.
Verwenden Sie das Gerät
niemals in der Nähe von
Wasser und halten Sie es
von Feuchtigkeit, tropfenden oder spritzenden
Flüssigkeiten fern, um
Schäden zu vermeiden.
Achtung: Lesen Sie
die Bedienungsanlei-
tung sorgfältig durch
und beachten Sie
die hierin enthalte-
nen Anweisungen.
Heben Sie diese
Anleitung für späteren
Gebrauch auf.
Page 6

DE
6
PC
Um diese Maus verwenden zu können, benötigen
Sie ein Notebook oder
einen Desktop-Computer mit integriertem
Bluetooth®-Empfänger
oder Bluetooth® USBEmpfänger. Dieser
Empfänger muss eines
der folgenden zwei
Bluetooth®-Protokolle unterstützen: Microsoft, IVT
Bluesoleil. Kompatibilität
zu anderen Bluetooth®Protokollen kann nicht
garantiert werden.
Mac
Sie benötigen einen
Macintosh mit integrierter
Bluetooth®-Schnittstelle
und Mac OS X.
Systemvoraussetzungen
Page 7
DE
7
Bedienelemente
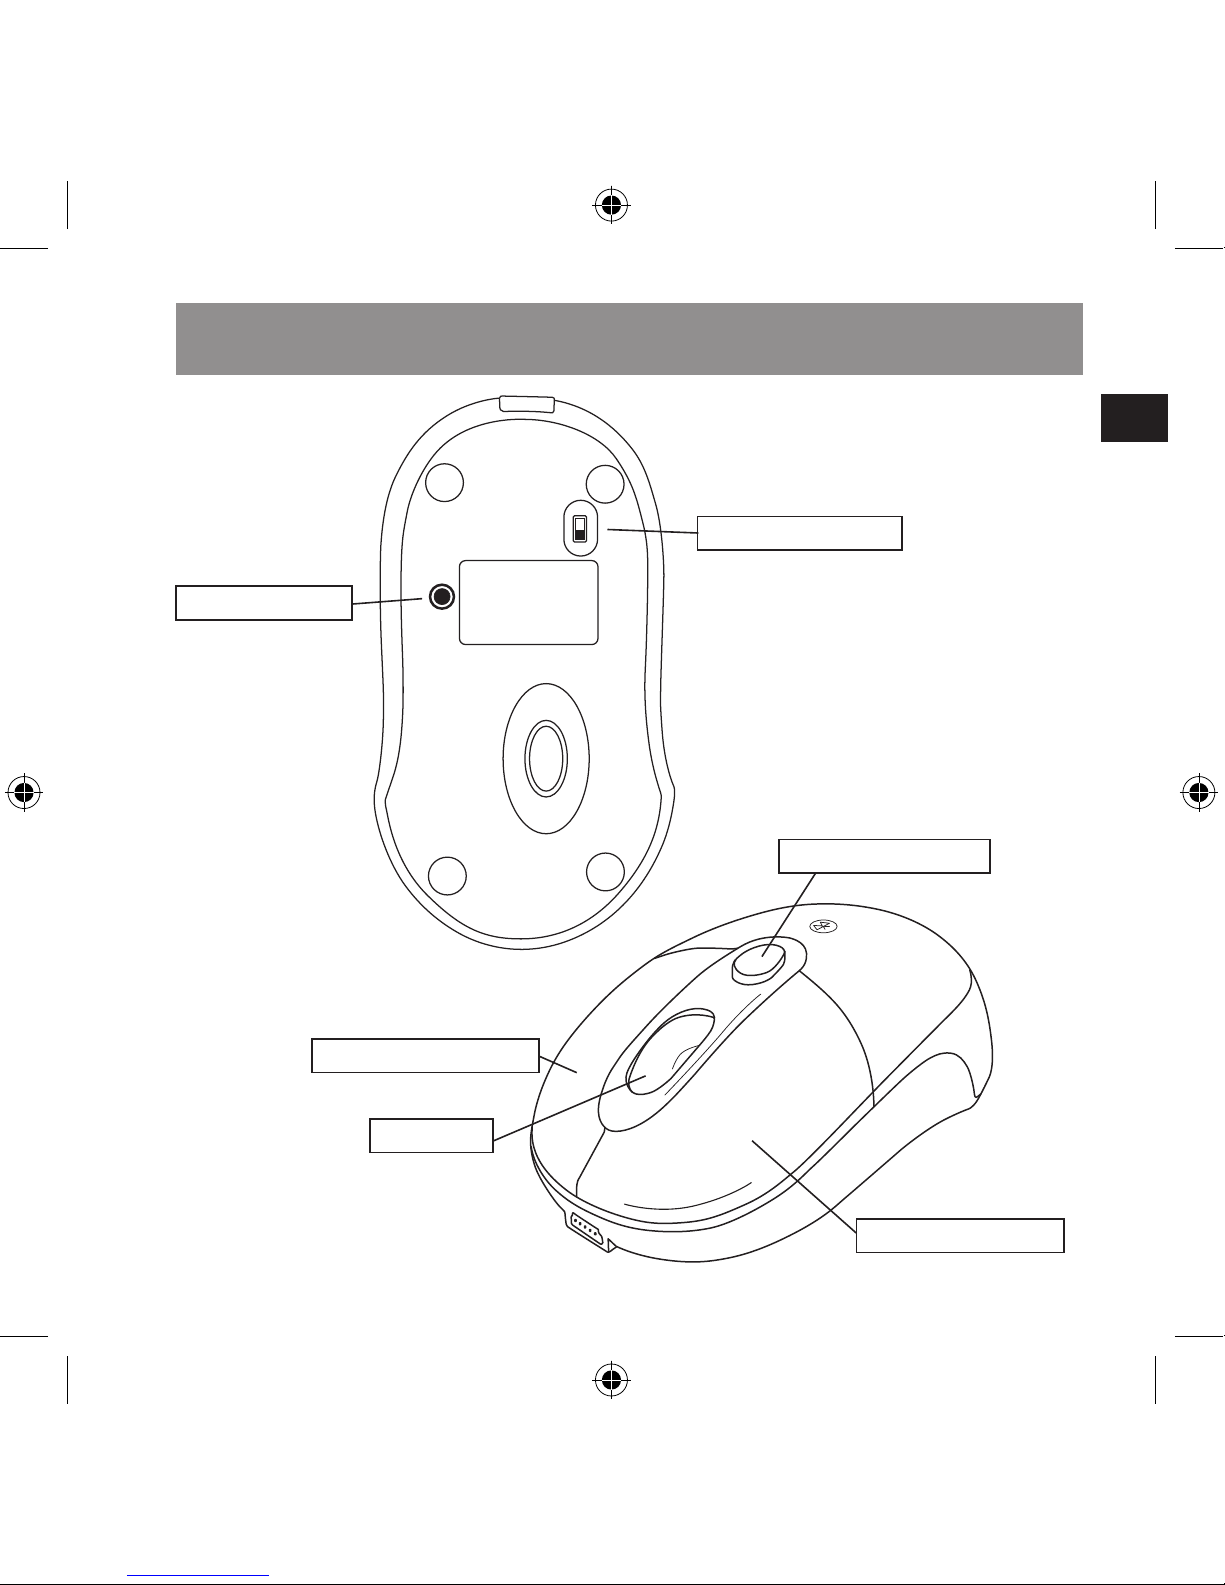
Linke Maustaste
OFF
ON
RESET
Mausrad
Rechte Maustaste
Betriebsschalter
RESET-Taste
Batteriefachtaste
Page 8
DE
8
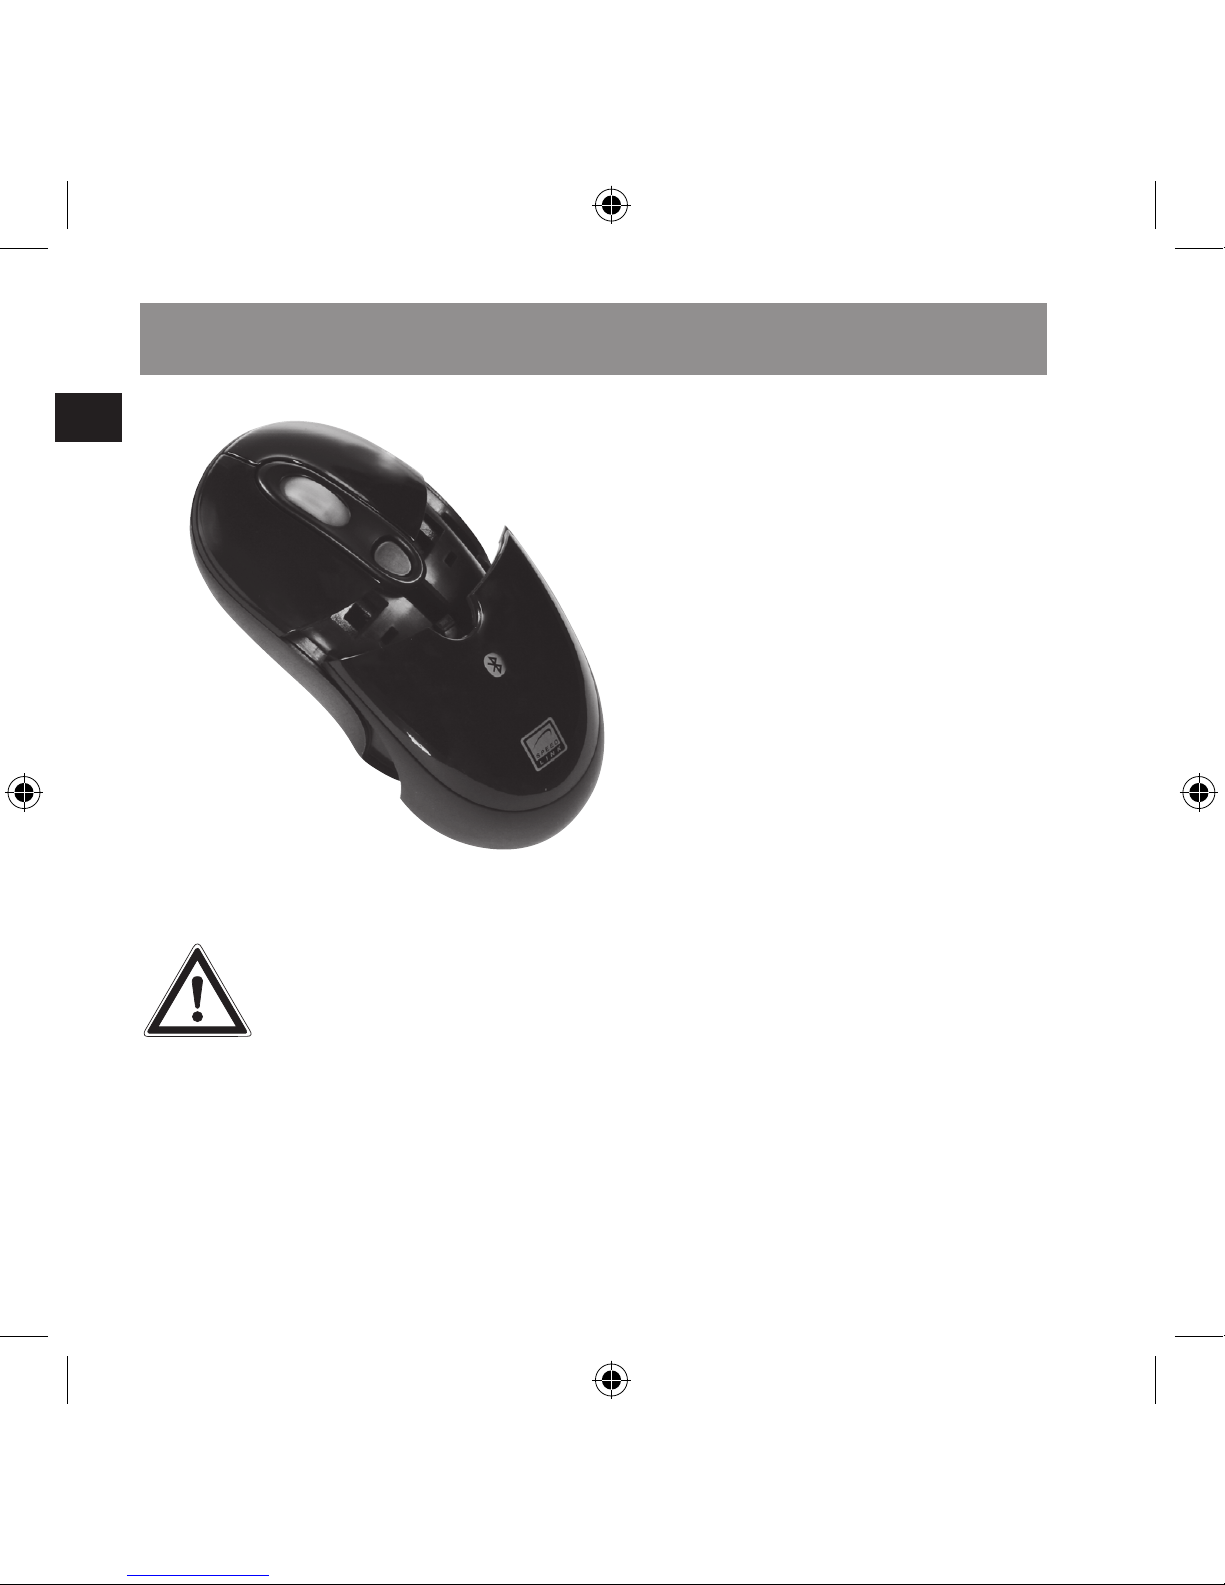
Verwenden Sie nur NiMHBatterien oder andere
wieder auadbare Batterien.
Verwenden Sie keine AlkaliBatterien. Verwenden Sie
keine alten und neuen Batterien zusammen. Bewahren
Sie Batterien außerhalb der
Reichweite von Kindern auf.
Entsorgen und recyceln
Sie verbrauchte Batterien
gemäß den örtlichen Bestimmungen.
Einlegen der Batterien
Stellen Sie sicher, dass die
Maus ausgeschaltet ist. Legen Sie dazu den Betriebsschalter an der Unterseite
der Maus ggf. auf „OFF“.
Drücken Sie auf die Batteriefachtaste. Legen Sie die
Batterien entsprechend der
Markierungen ein. Setzen
Sie den Batteriedeckel
wieder auf die Maus und
schalten Sie die Maus ein.
Wichtige Batteriehinweise
HINWEIS: Bevor Sie
die Maus verwenden,
sollten Sie die Batterien acht Stunden lang
auaden. Informationen zum Auaden der
Batterien nden Sie
im Kapitel „Auaden
der Maus“.
Page 9
DE
9
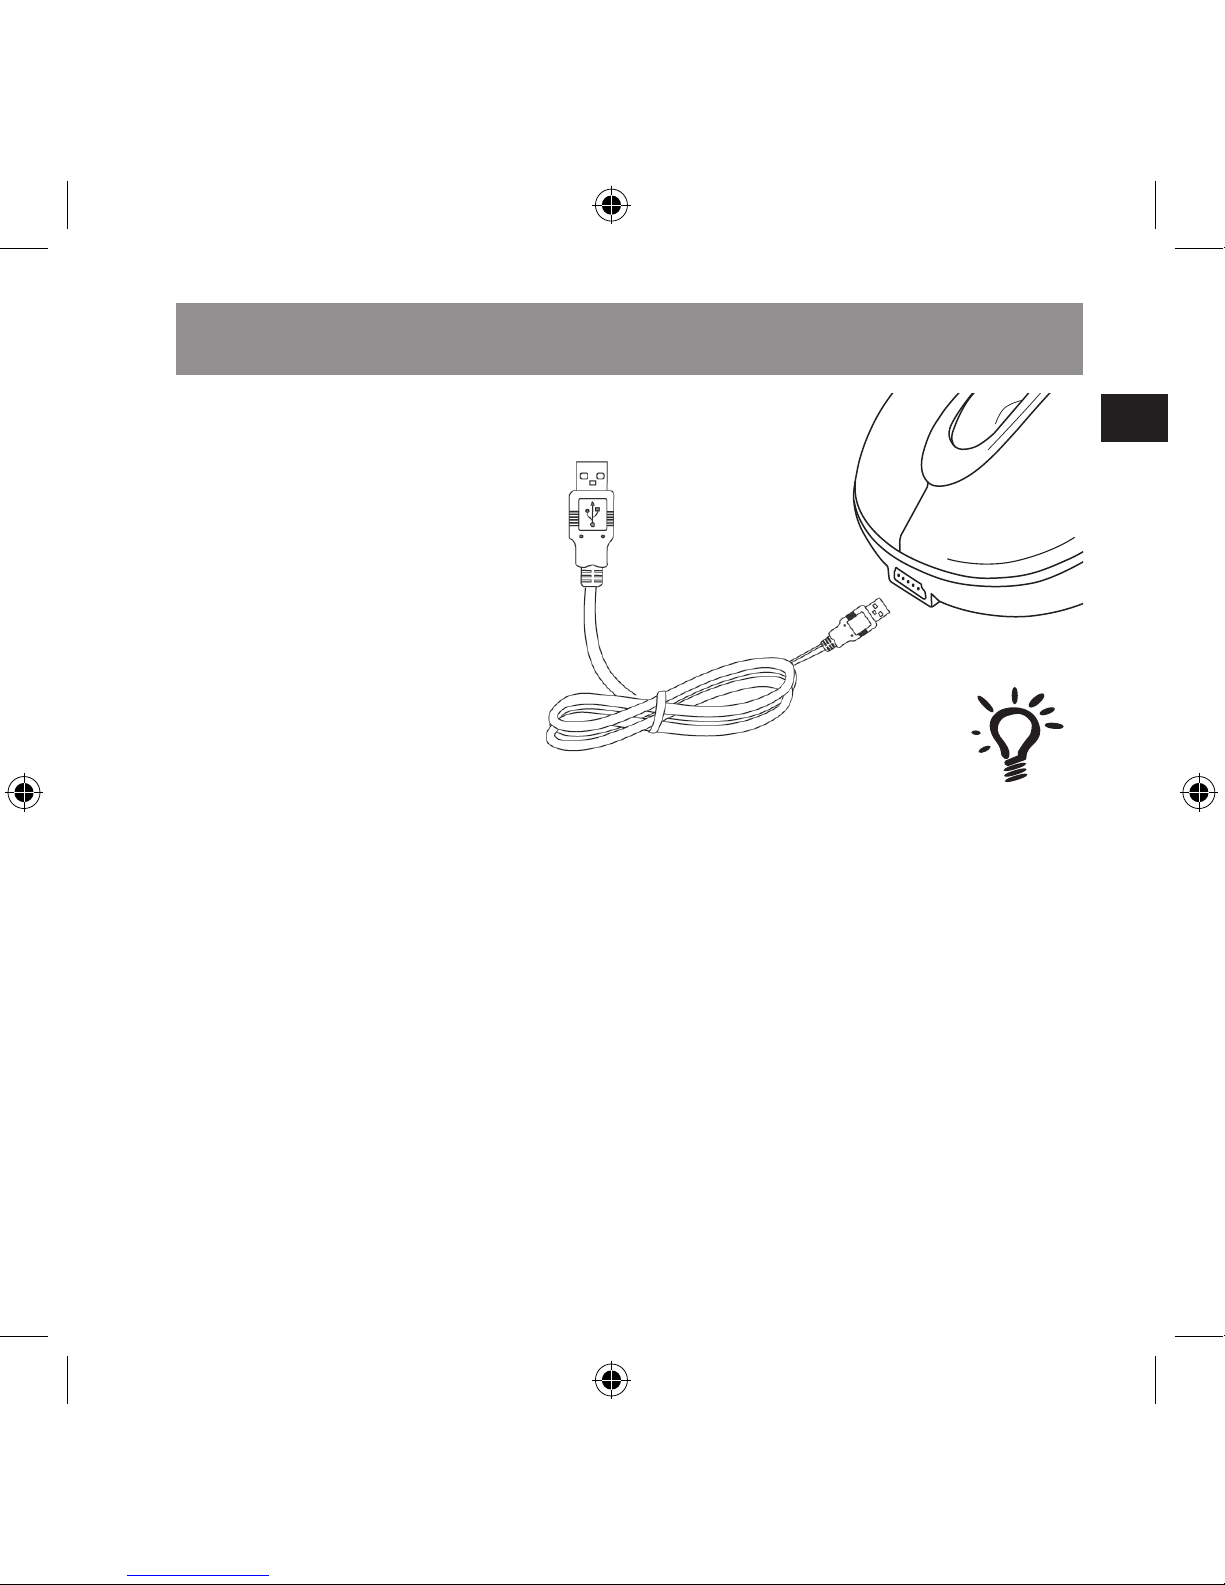
Das Mausrad leuchtet rot
auf, sobald die Batterien
schwach werden.
Schließen Sie das mitgelieferte USB-Ladekabel an
eine freie USB-Schnittstelle an ihrem Computer an.
Schließen Sie die Maus an
den Mini-USB-Stecker des
Kabels an. Ihre Maus lädt,
wenn das Mausrad grün
aueuchtet. Während des
Ladevorgangs bleibt die
Maus einsatzbereit.
Auaden der Maus
HINWEIS: Damit Sie
auch bei ausgeschal-
tetem Computer
die Maus auaden
können, müssen
Sie im BIOS Ihres
Computers das ACPI
(Advanced Con-
guration and Power
Management Inter-
face) aktiviert haben.
Ansonsten werden
die USB-Ports bei
ausgeschaltetem
Computer nicht mit
Spannung versorgt.
Sehen Sie dazu bitte
im Handbuch Ihres
Computers nach.
Page 10
DE
10
IVT Bluesoleil
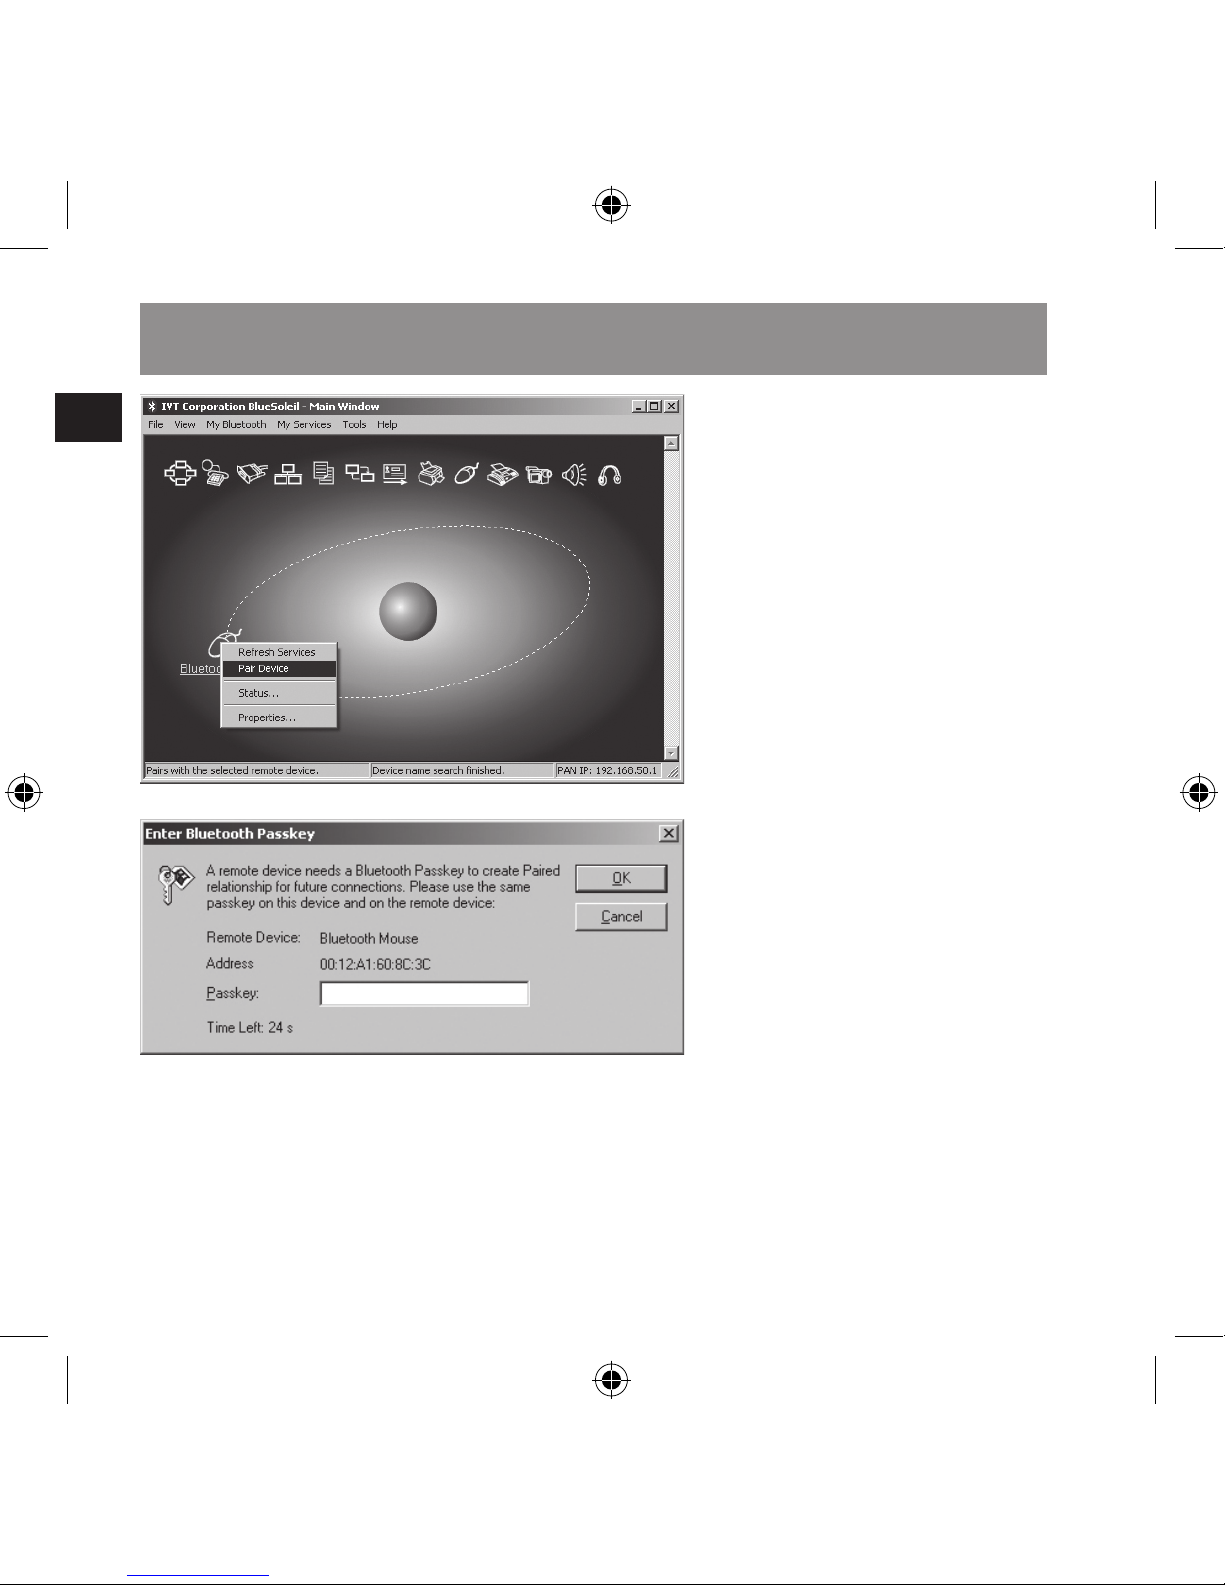
Öffnen Sie IVT Bluesoleil.
Setzen Sie den Betriebsschalter an der Unterseite
der Maus auf ON.
Versetzen Sie die Maus in
den Pairing-Modus, indem
Sie die RESET-Taste an
der Unterseite der Maus
drücken. Das Mausrad
fängt an, rot zu blinken
und die Maus bendet sich
nun im Pairing-Modus.
Klicken Sie in Bluesoleil auf My Bluetooth >
Bluetooth Device Discovery.
Rechtsklicken Sie auf
die Bluetooth Mouse und
klicken Sie anschließend
auf Pair Device.
Klicken Sie im Fenster
Enter Bluetooth Passkey
auf OK, ohne ein Passwort
einzugeben.
Rechtsklicken Sie erneut
auf Bluetooth Mouse und
Anschließen und Verbinden für PC
Page 11
DE
11
klicken Sie anschließed
auf Connect > Bluetooth
Human Interface Device
Service. Sollte bei Ihnen
der Menüpunkt Connect
nicht aktiviert sein, klicken
Sie auf Refresh Services
und wiederholen Sie den
vorangegangenen Schritt.
Ihre Maus ist nun einsatzbereit.
Windows Bluetooth
Service
Setzen Sie den Betriebsschalter an der Unterseite
der Maus auf ON.
Versetzen Sie die Maus in
den Pairing-Modus, indem
Sie den RESET Knopf an
der Unterseite der Maus
drücken. Das Mausrad
fängt an, rot zu blinken
und die Maus bendet sich
nun im Pairing-Modus.
Anschließen und Verbinden für PC
Page 12
DE
12
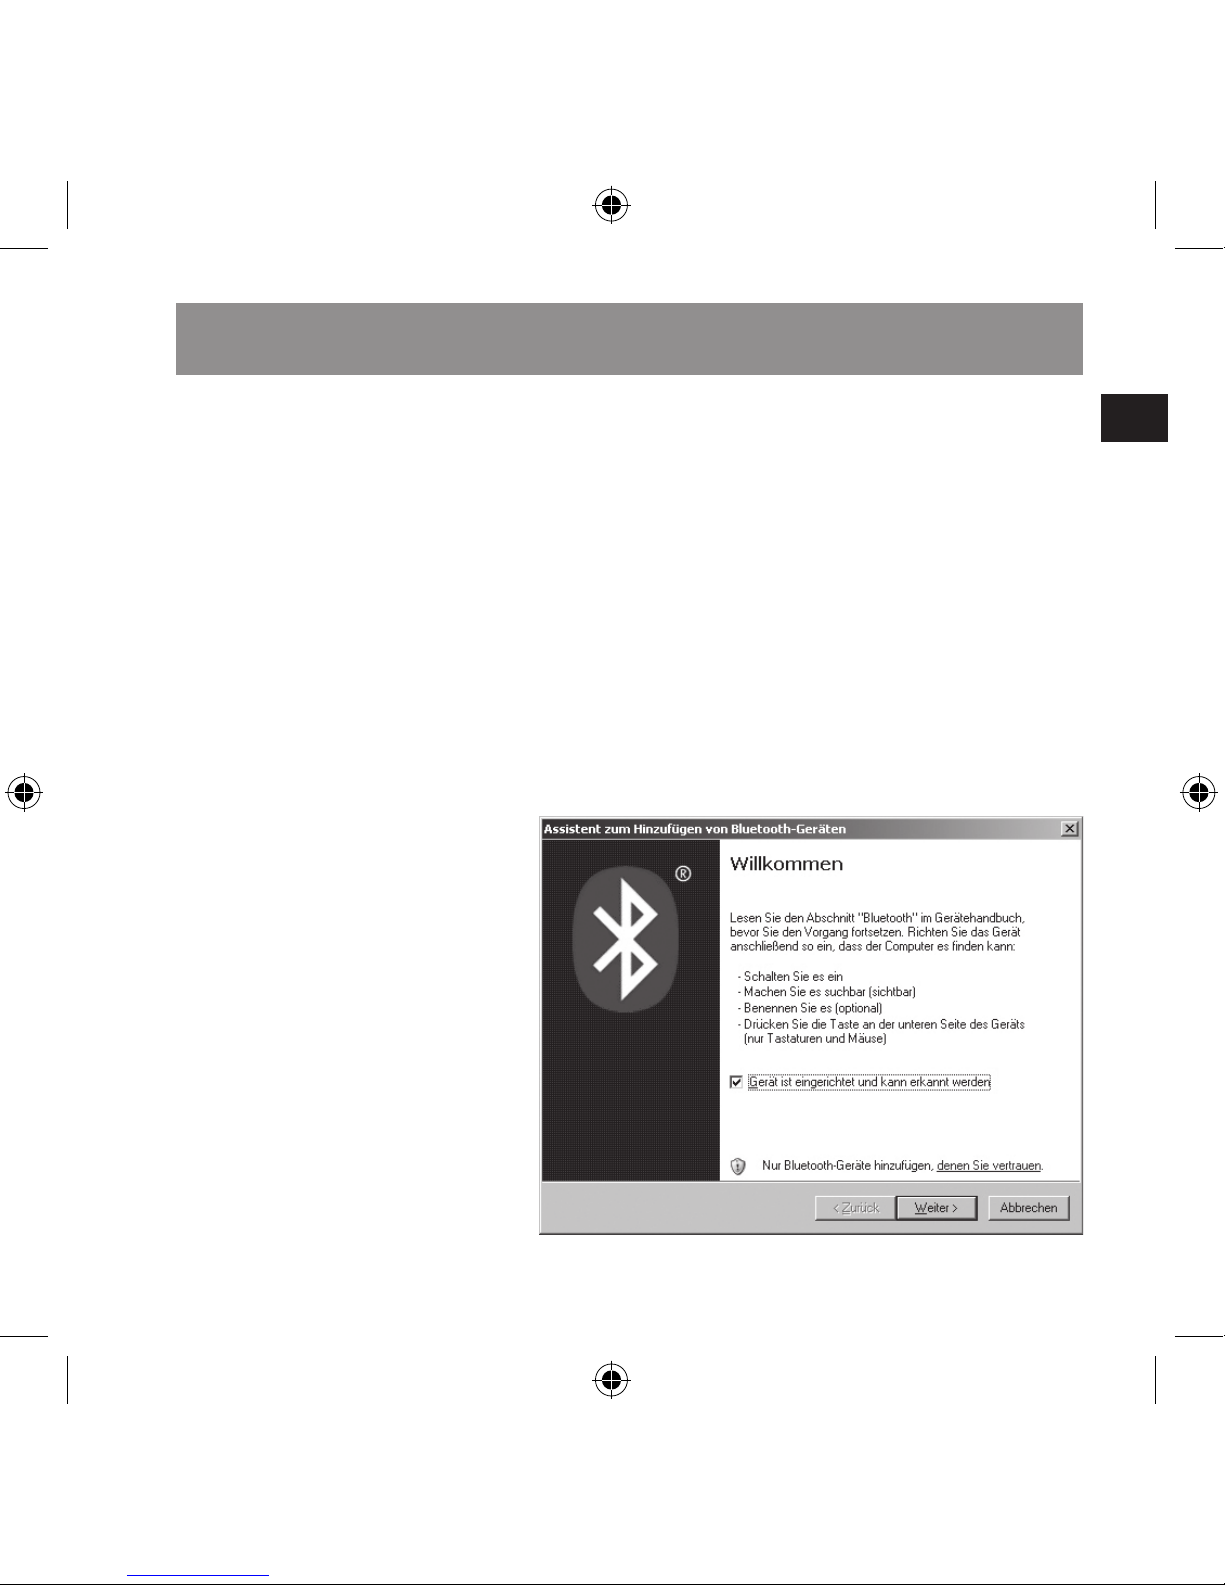
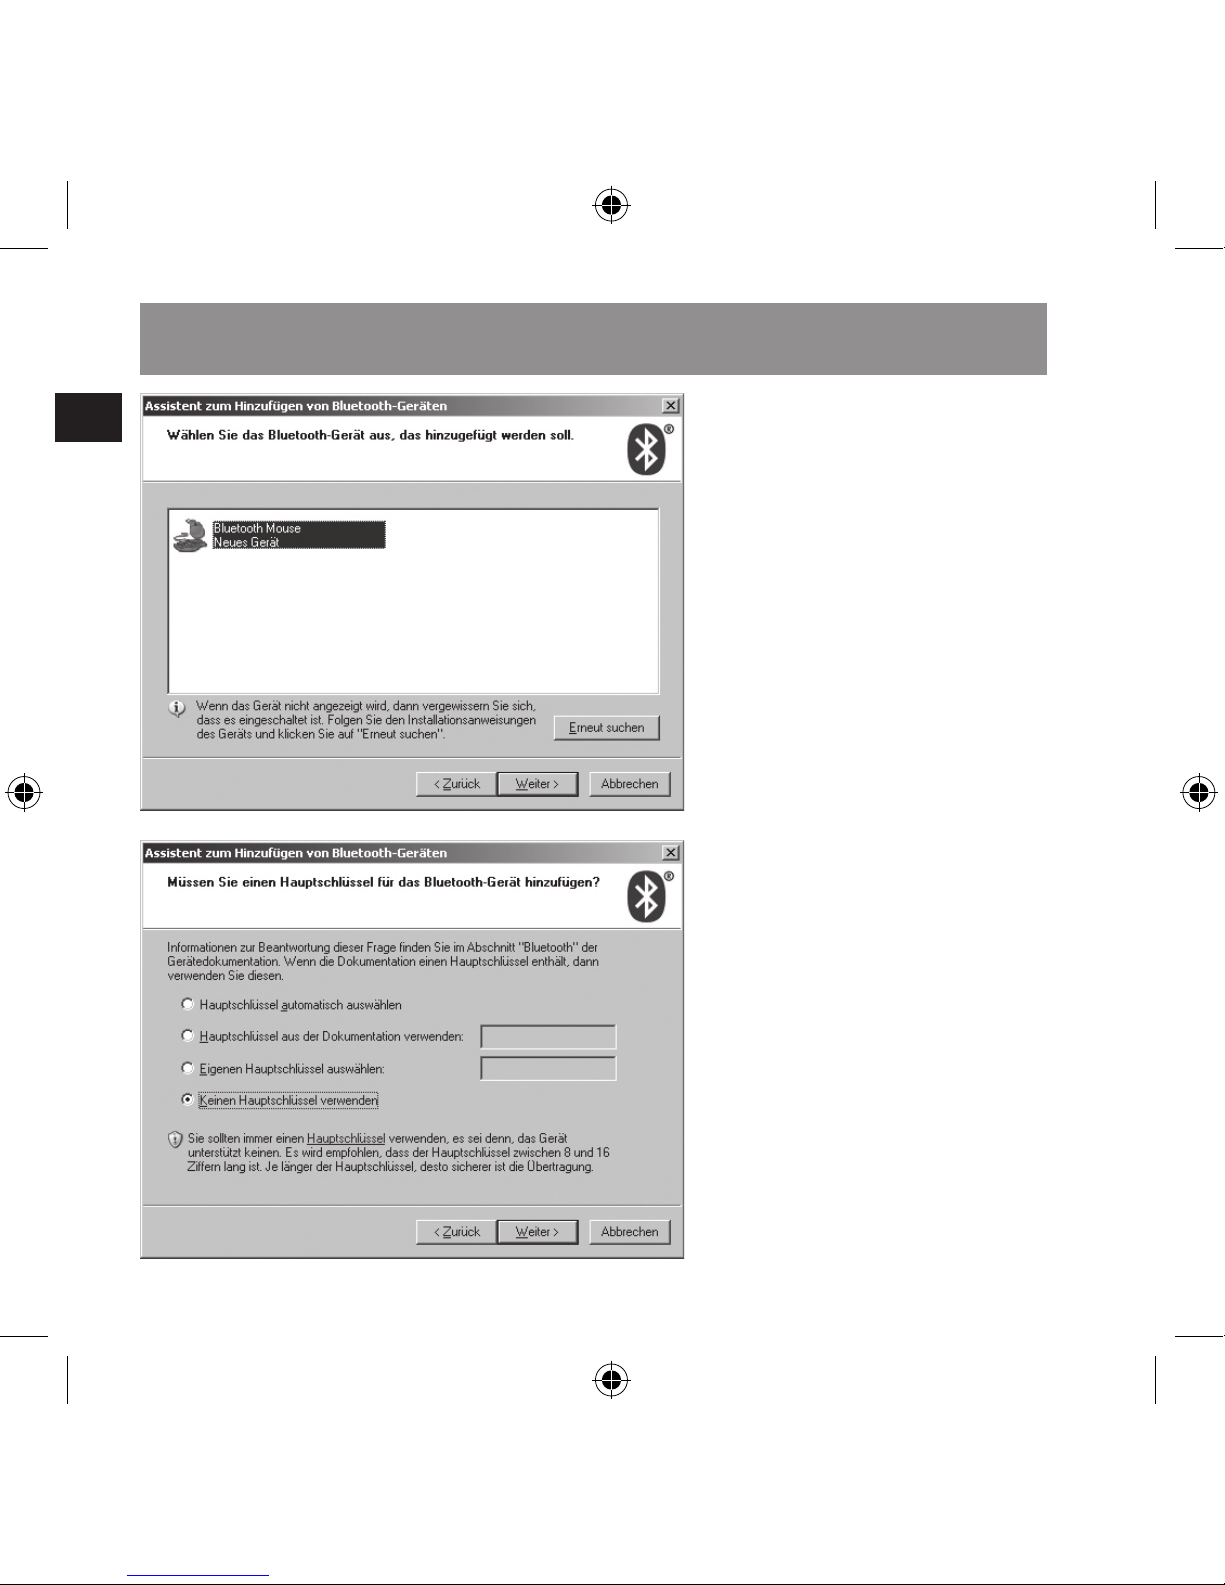
Klicken Sie auf das
Bluetooth Symbol rechts in
der Startleiste und dann auf
Bluetooth-Gerät hinzufügen. Alternativ können Sie
auf das Bluetooth®-Symbol
in der Systemsteuerung
klicken und auf Bluetooth-
Gerät hinzufügen klicken.
Der „Assistent zum Hinzufügen von Bluetooth®Geräten“ wird geöffnet.
Aktivieren Sie Gerät ist
eingerichtet und kann
erkannt werden und klicken
Sie auf Weiter.
Wählen Sie die Bluetooth
Mouse aus und klicken Sie
auf Weiter.
Wählen Sie Keinen Haupt-
schlüssel verwenden und
klicken Sie auf Weiter.
Der Computer stellt nun die
Verbindung her.
Klicken Sie auf Fertig
stellen. Die Maus ist nun
einsatzbereit.
Anschließen und Verbinden für PC
Page 13
DE
13
Mac OS X
Klicken Sie in den Systemeinstellungen in der
Kategorie Hardware auf
das Bluetooth® Symbol.
Sofern noch nicht geschehen, aktivieren Sie
Bluetooth®.
Versetzen Sie die Maus in
den Pairing-Modus, indem
Sie den RESET Knopf an
der Unterseite der Maus
drücken. Das Mausrad
fängt an, rot zu blinken
und die Maus bendet sich
nun im Pairing-Modus.
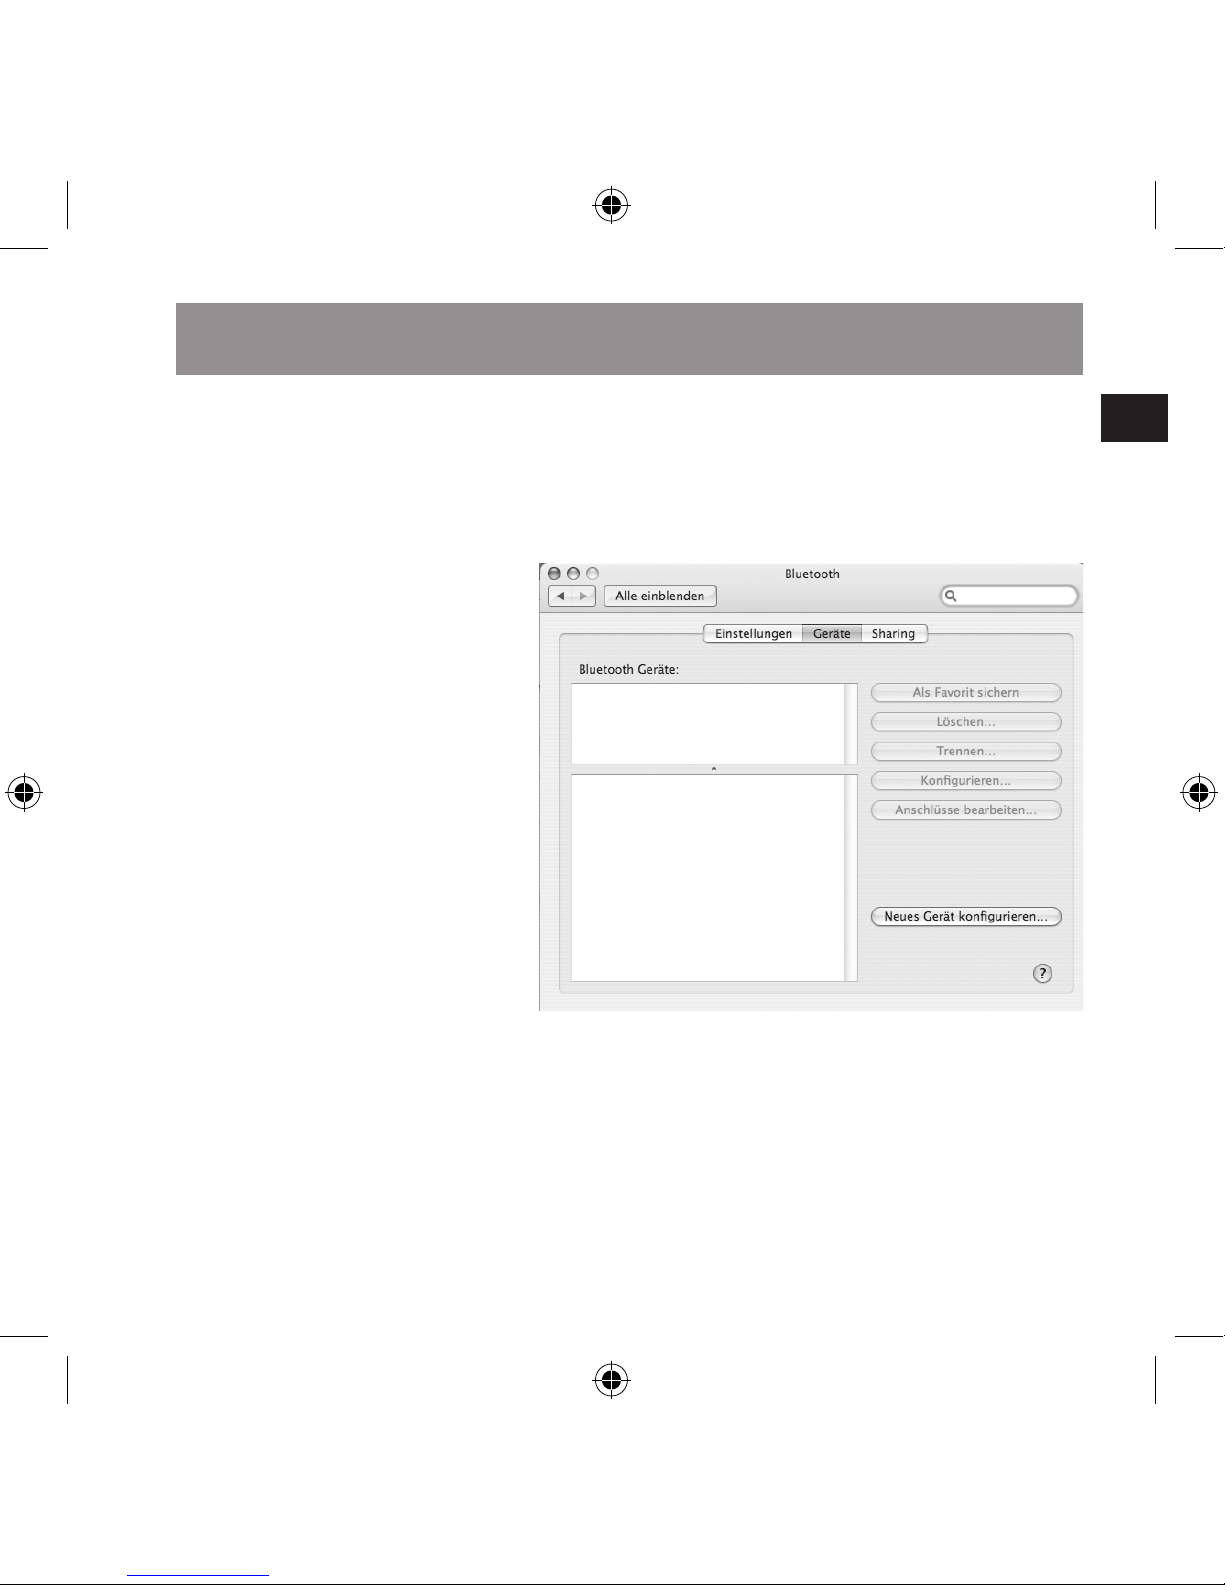
Wählen Sie im Reiter
Geräte den Button Neues
Gerät kongurieren.
Der Bluetooth® Assistent
öffnet sich nun. Klicken
Sie auf Fortfahren und folgen Sie den Anweisungen
auf dem Bildschirm
Nach einigen Sekunden
erkennt Ihr Macintosh
die Maus. Wählen Sie
Bluetooth Maus aus und
klicken Sie auf Fortfahren.
Die Maus ist nun einsatzbereit.
Anschließen und Verbinden für Mac
Page 14

DE
14
Verwenden Sie die Maus
möglichst nicht auf einer
Metalloberäche. Metalle
wie Eisen, Aluminium
oder Kupfer schirmen die
Funkübertragung ab und
können zu Funktionsstörungen der Maus führen.
Die Maus schaltet nach
fünf Minuten automatisch
in den Stromsparmodus.
Um die Maus zu reaktivieren, drücken Sie einfach
eine beliebige Taste oder
bewegen Sie die Maus auf
der Oberäche.
Schalten Sie die Maus bei
Nichtgebrauch aus, um die
Batterielebensdauer zu
erhöhen.
Umschalten der Auösung
Sie können einstellen,
ob sich der Mauszeiger
schnell mit 1600 dpi oder
langsamer mit 800 dpi
bewegt. Zum Umschalten
drücken und halten Sie
bitte die Mausradtaste
und drücken Sie danach
die rechte Maustaste. Das
Mausrad leuchtet nun drei
Sekunden lang rot und
zeigt damit an, dass die
Auösung des Sensors
verändert wurde. Welche
Einstellung Ihnen zusagt,
sollten Sie selbständig
testen.
Hinweise zur Verwendung
Page 15
DE
15
Das Bluetooth® Programm
erkennt die Maus nicht
Stellen Sie sicher, dass
sich die Maus im Pairing-
Modus bendet (Mausrad
blinkt rot). Drücken Sie
dazu die RESET-Taste an
der Unterseite der Maus.
Suchen Sie erneut nach
Bluetooth®-Geräten.
Die Maus funktioniert nicht
Stellen Sie sicher, dass die
Batterien korrekt eingelegt und aufgeladen sind.
Schließen Sie gegebenenfalls das Ladekabel an,
um die Batterien wieder
aufzuladen.
Fehlerbehebung
Page 16
DE
16
Modell-Nr.: SL-6197-SBK
► Optischer Sensor mit
800/1600 dpi Auösung
► Bluetooth® Class 2
kompatibel
► Wellenlänge des La
-
sers: 850 nm
► Stromverbrauch: 6 mA
Garantie
Für dieses Produkt gewähren wir Ihnen eine Garantie von zwei Jahren ab
Kaufdatum auf Verarbeitung und alle eingebauten
Teile.
Falls Sie Hilfe benötigen…
Bei technischen Problemen wenden Sie sich bitte
an unseren technischen
Support.
Korrekte Entsorgung
dieses Produkts
(Elektromüll)
Anzuwenden in den
Ländern der Europäischen Union und anderen
europäischen Ländern mit
einem separaten Sammelsystem
Die Kennzeichnung auf
dem Produkt bzw. auf der
dazugehörigen Literatur
gibt an, dass es nach
seiner Lebensdauer
nicht zusammen mit dem
normalen Haushaltsmüll
entsorgt werden darf. Entsorgen Sie dieses Gerät
bitte getrennt von anderen
Abfällen, um der Umwelt
bzw. der menschlichen
Gesundheit nicht durch
unkontrollierte Müllbeseitigung zu schaden.
Technische Daten
Page 17
DE
17
Recyceln Sie das Gerät,
um die nachhaltige
Wiederverwertung von
stofichen Ressourcen zu
fördern.
Private Nutzer sollten
den Händler, bei dem das
Produkt gekauft wurde,
oder die zuständigen Behörden kontaktieren, um in
Erfahrung zu bringen, wie
sie das Gerät auf umweltfreundliche Weise recyceln
können.
Gewerbliche Nutzer
sollten sich an Ihren
Lieferanten wenden und
die Bedingungen des
Verkaufsvertrags konsultieren. Dieses Produkt
darf nicht zusammen mit
anderem Gewerbemüll
entsorgt werden.
Jöllenbeck GmbH
Kreuzberg 2
27404 Weertzen
GERMANY
Support-Hotline:
+49 (0) 4287 12 51 33
in das deutsche Festnetz
E-Mail:
[email protected]
Technische Daten
Page 18

GB
18
Content
Content 18
Safety Instructions 1
9
System requirements 2
0
Controls 21
Important notes on handling batteries 2
2
Charging the mouse 2
3
Connecting to the PC 2
4
Connecting to the Mac 2
7
Notes on use 2
8
Troubleshooting 2
9
Technical Information 3
0
Page 19
GB
19
Safety Instructions
Laser
This mouse uses a Class
1 laser sensor. Pointing
the laser directly at the
eyes can cause blindness.
Never look directly at the
laser beam and never
point it at other people
or reective objects such
as mirrors, for instance.
Never look at the laser
beam with magnifying devices such as magnifying
glasses, microscopes
or similar. Do not disassemble the mouse into its
individual components and
do not attempt to repair
the mouse.
Troubleshooting & Ser
-
vicing
Do not attempt to service
or repair the device your-
self. Refer all servicing to
qualied service personnel. Do not attempt to modify the device in any way.
Doing so could invalidate
your warranty.
Moisture and heat
sources
Do not use this device
near water (for example,
sinks, baths, pools) or
expose it to rain, moisture,
or dripping or splashing
liquids. Do not expose the
unit to high temperatures,
high humidity or direct
sunlight.
Important: read
this manual carefully and adhere to the
instructions herein.
Keep this manual
for later use.
Page 20

GB
20
PC system requirements
In order to use this mouse,
you will need a notebook
or desktop computer with
an integrated Bluetooth®
receiver or Bluetooth®
USB receiver. This
receiver must support
one of the following two
Bluetooth® protocols:
Microsoft or IVT Bluesoleil. Compatibility with
other Bluetooth® protocols
cannot be guaranteed.
Mac system requirements
You will need a Macintosh with an integrated
Bluetooth® interface and
Mac OS X.
System requirements
Page 21
GB
21
Controls
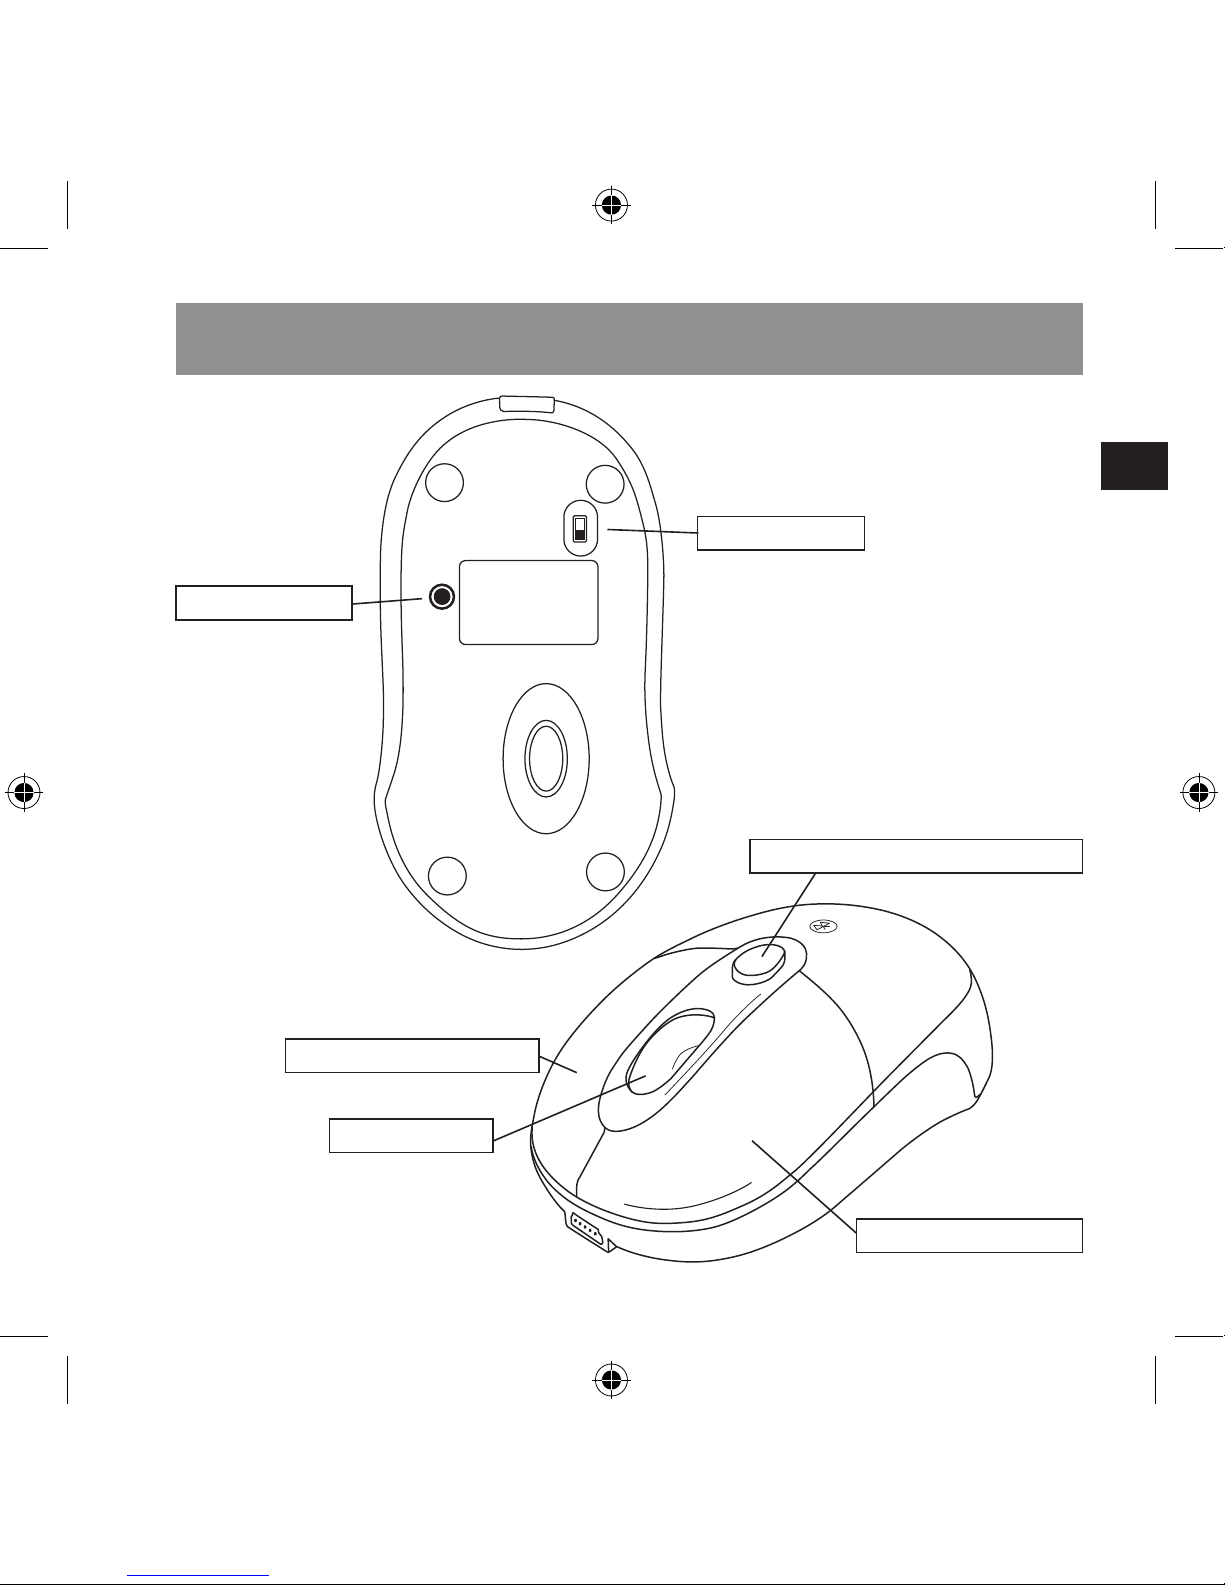
Left mouse button
OFF
ON
RESET
Scroll wheel
Right mouse button
On/off switch
RESET button
Battery compartment button
Page 22
GB
22
Only use NiMH batteries
or other rechargeable batteries. Do not use alkaline
batteries. Do not mix old
and new batteries. Keep
batteries out of children’s
reach.
Dispose of and recycle
your old batteries in
accordance with local
regulations.
Inserting the batteries
Ensure that the mouse is
switched off. To do that,
set the button on the
under side of the mouse to
“OFF”, if necessary.
Press the battery compartment button. Insert the
batteries according to the
markings. Replace the battery cover on the mouse
and switch the mouse on.
Important notes on handling batteries
NOTE: Before using
the mouse, charge
the batteries for eight
hours. Information on
charging the batteries
can be found in the
Chapter „Charging the
mouse“.
Page 23
GB
23
The scroll wheel will light up
red as soon as the batteries
become weak.
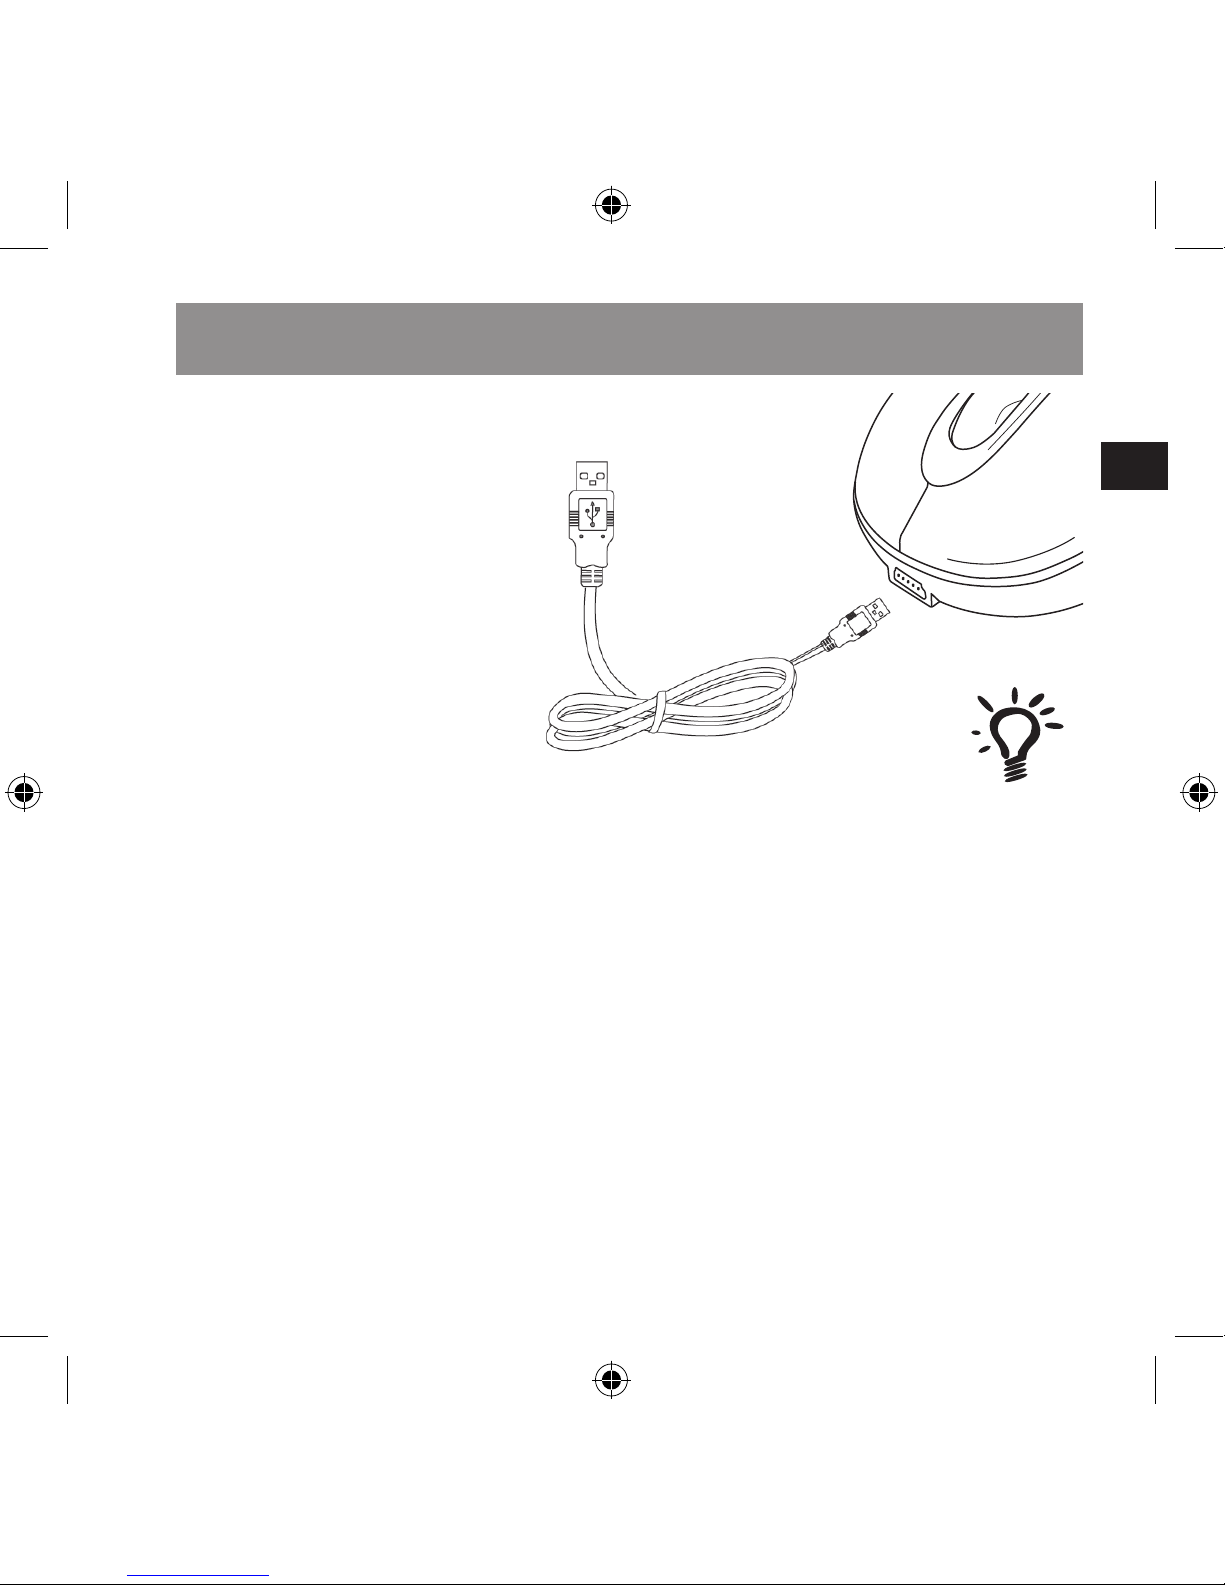
Plug the supplied USB
charger cable into any free
USB port on your computer.
Plug the mini USB
connector on the cable into
the mouse. Your mouse
will be charging when the
scroll wheel lights up green.
The mouse remains fully
functional during charging.
Charging the mouse
NOTE: To allow the
mouse to continue
charging even if the
computer is switched
off, you need to have
activated ACPI (Ad-
vanced Conguration
and Power Manage-
ment Interface) in
your computer’s
BIOS. If this has not
been done then the
USB ports will no lon-
ger be powered if the
computer is switched
off. To do that, please
read your computer
manual.
Page 24
GB
24
IVT Bluesoleil
Open IVT Bluesoleil.
Set the On/Off switch on
the underside of the mouse to ON.
Set your mouse into
pairing mode by pressing
the RESET button on the
underside of the mouse.
The scroll wheel will start
to ash red and the mouse
will now be in pairing
mode.
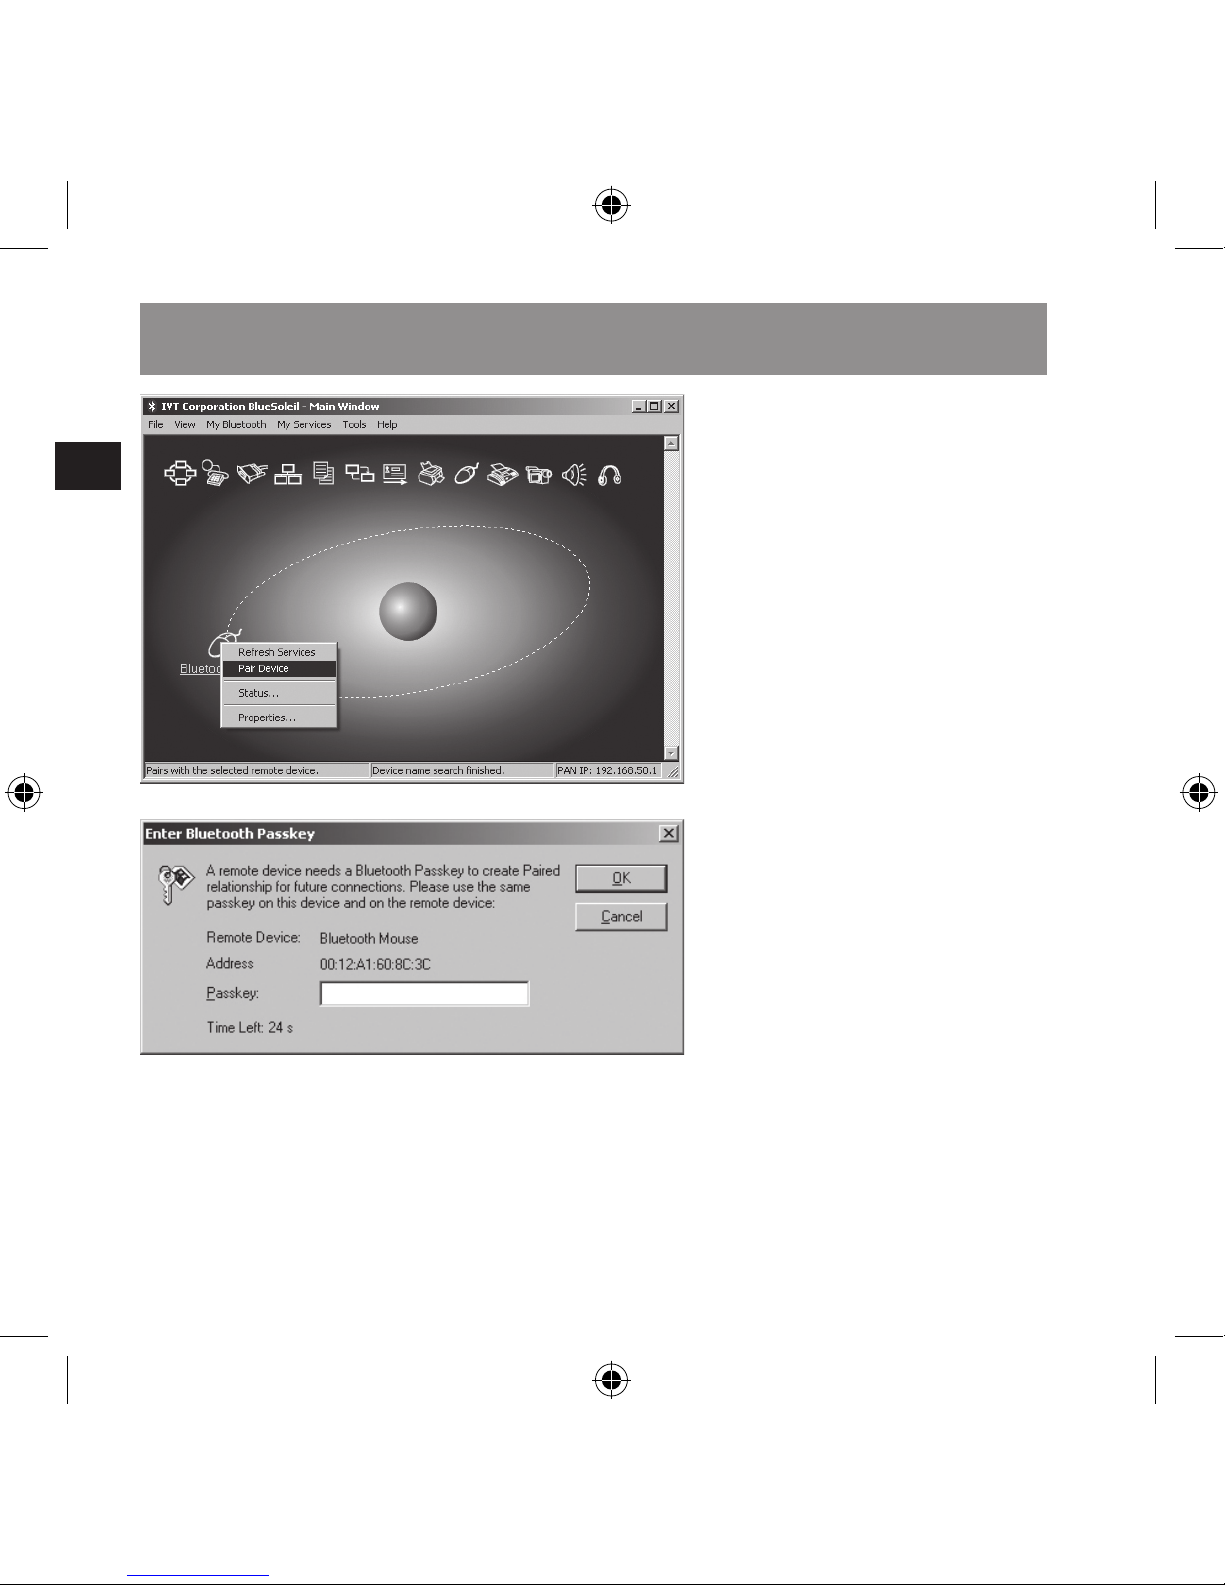
In Bluesoleil, click on My
Bluetooth > Bluetooth
Device Discovery.
Right click on the
Bluetooth mouse and then
click on Pair Device.
In the window Enter
Bluetooth Passkey, click
on OK without entering a
password.
Right click again on the
Bluetooth mouse and
then click on Connect >
Bluetooth Human Interface
Connecting to the PC
Page 25
GB
25
Device Service. If you nd
that the menu item Connect is not activated then
click on Refresh Services
and repeat the preceding
step.
Your mouse is now ready
to use!
Windows Bluetooth
Service
Set the On/Off switch on
the underside of the mouse to ON.
Set your mouse into
pairing mode by pressing
the RESET button on the
underside of the mouse.
The scroll wheel will start
to ash red and the mouse
will now be in pairing
mode.
Click on the Bluetooth®
symbol on the right in the
notication area of the
start bar and then on Add
a Bluetooth Device.
Connecting to the PC
Page 26
GB
26
Alternatively, you can click
on the Bluetooth® symbol
in the Control Panel and
then on Add a Bluetooth
Device.
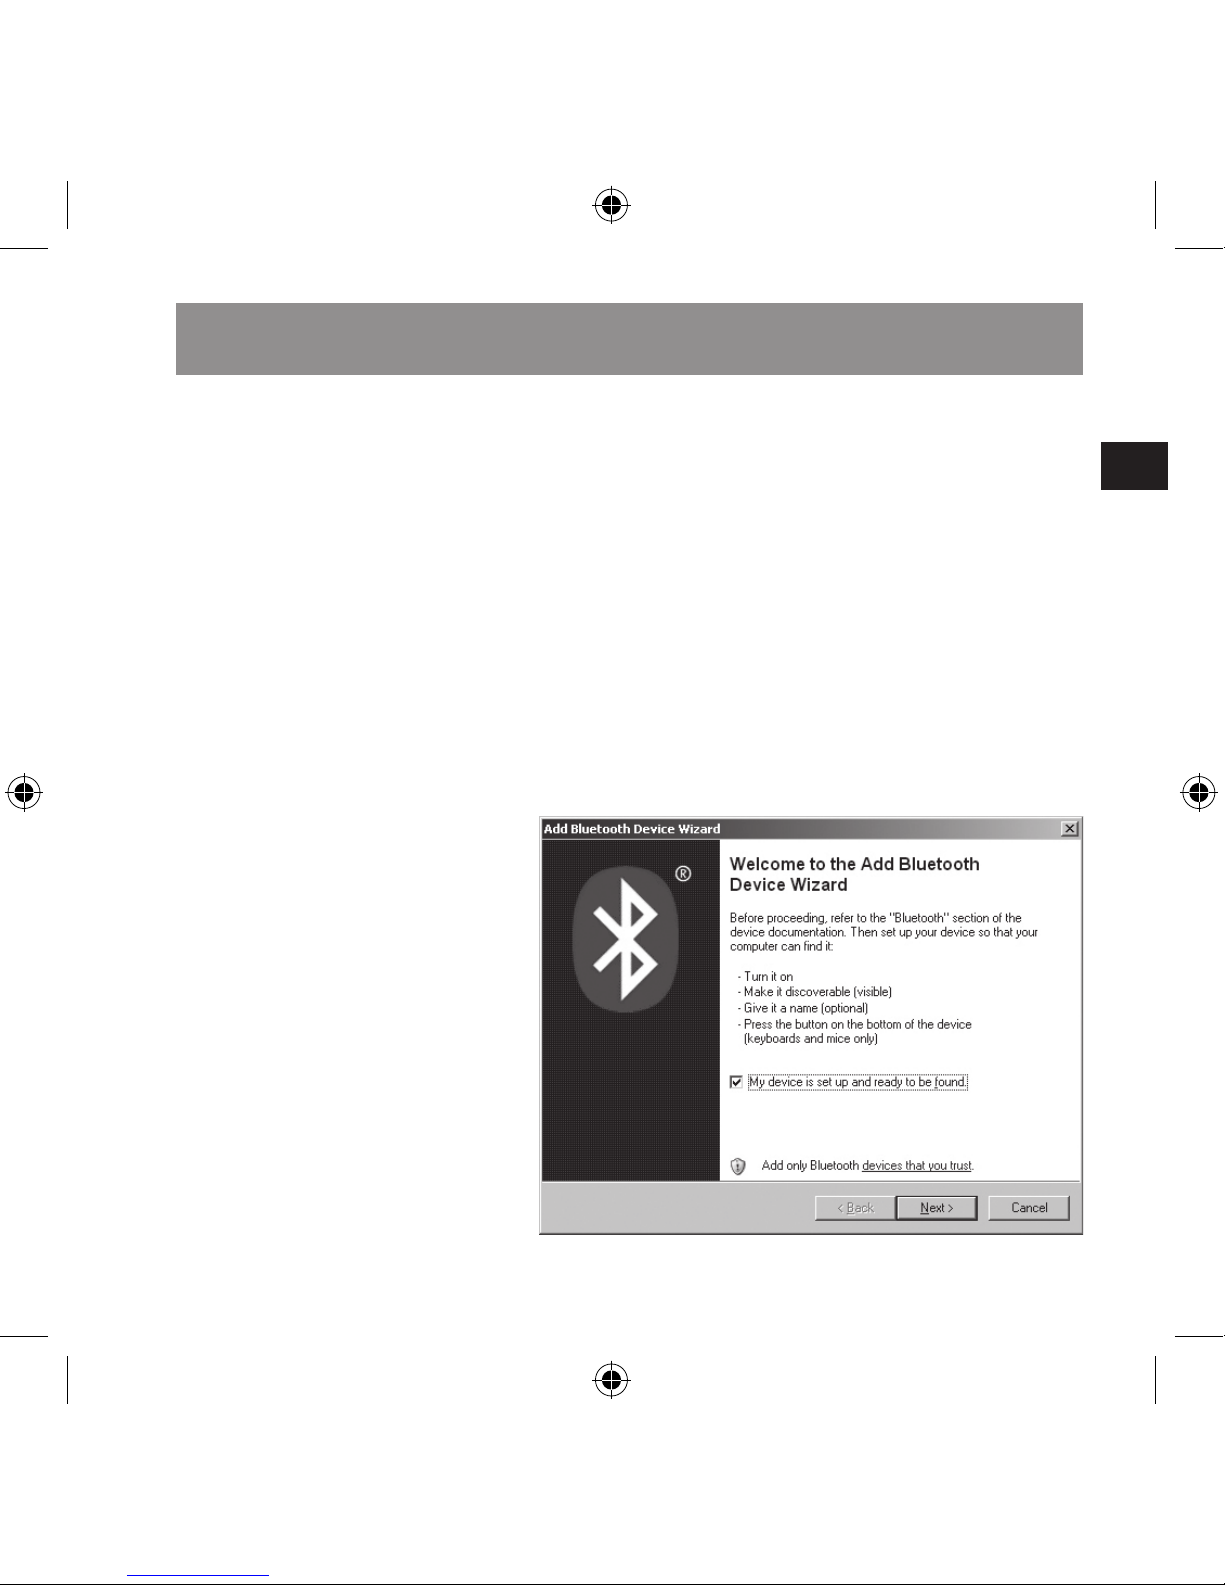
The Add Bluetooth Device
Wizard will start. Tick My
device is set up and ready
to be found and then click
on Next.
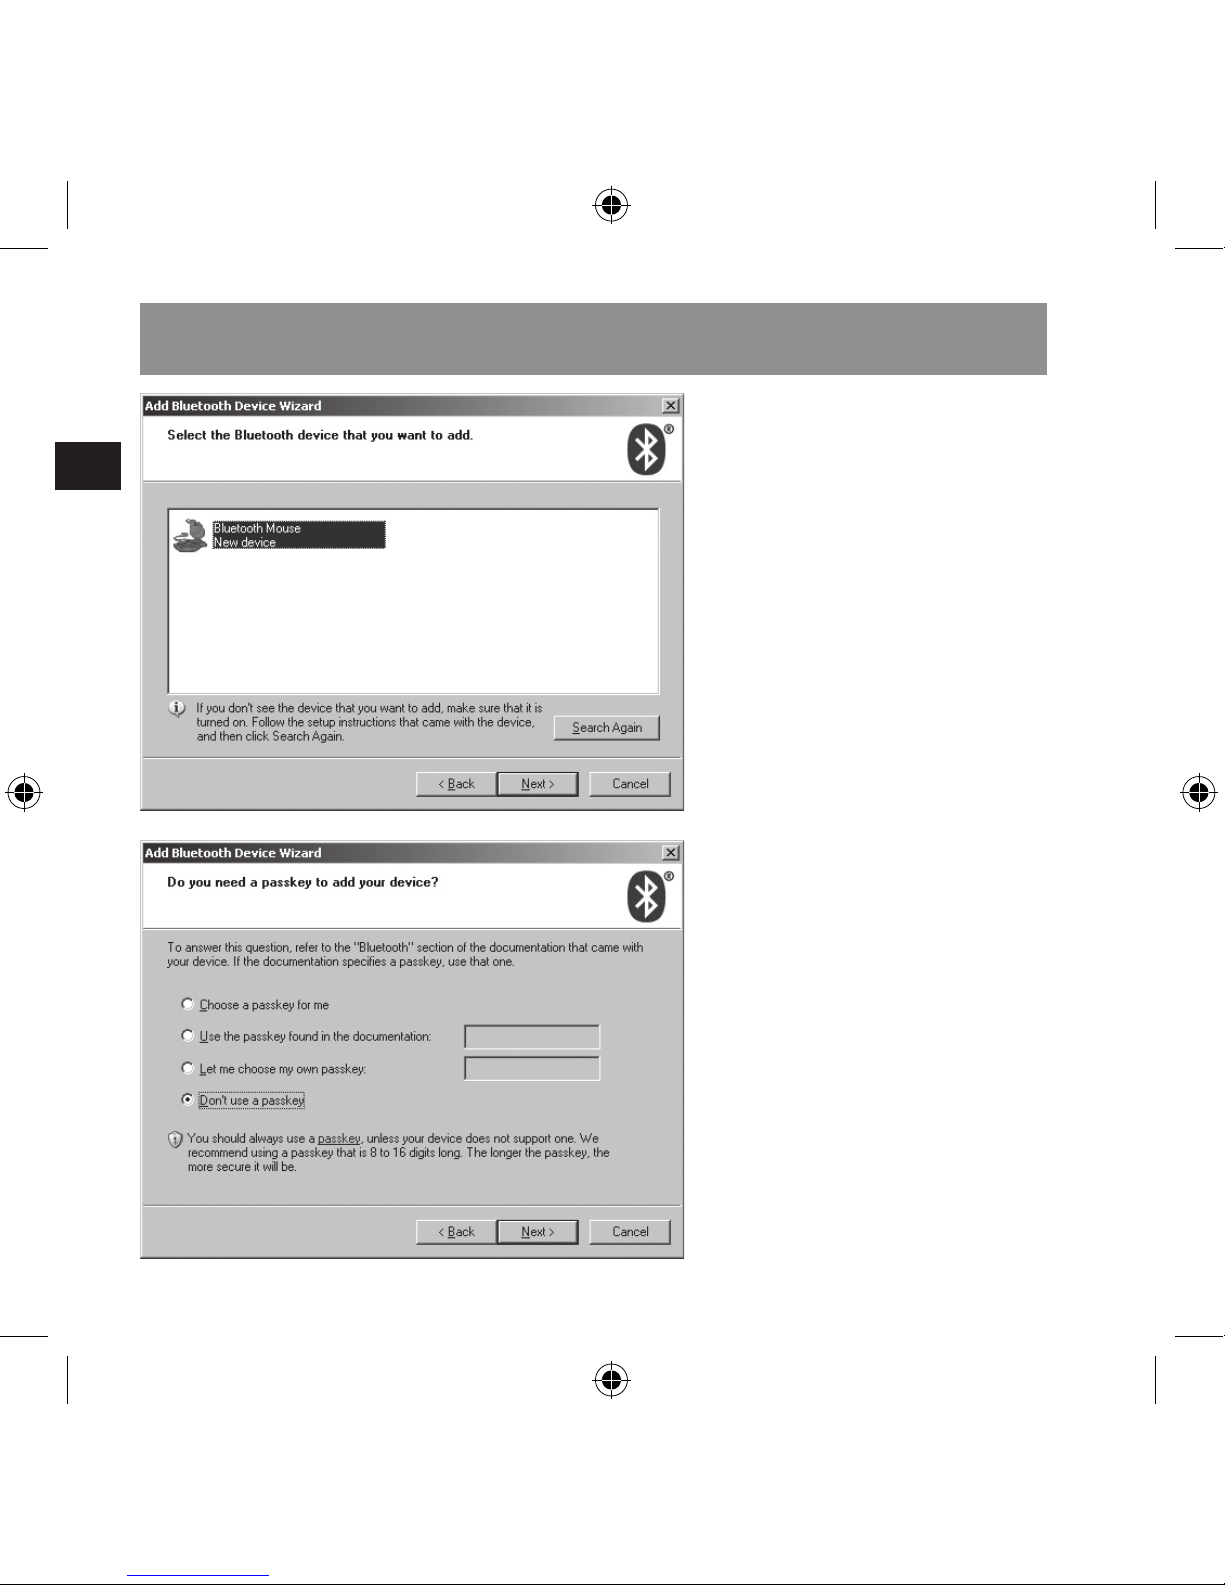
Select the Bluetooth mouse and click on Next.
Select Don’t use a pass-
key and click on Next.
The computer will now
establish the connection.
Click on Finish. The mouse is now ready to use!
Connecting to the PC
Page 27
GB
27
Mac OS X
Click on the Bluetooth®
symbol in the Hardware
category under System
Preferences.
If not already done, activate
Bluetooth®.
Set your mouse into
pairing mode by pressing
the RESET button on the
underside of the mouse.
The scroll wheel will start
to ash red and the mouse
will now be in pairing mode.
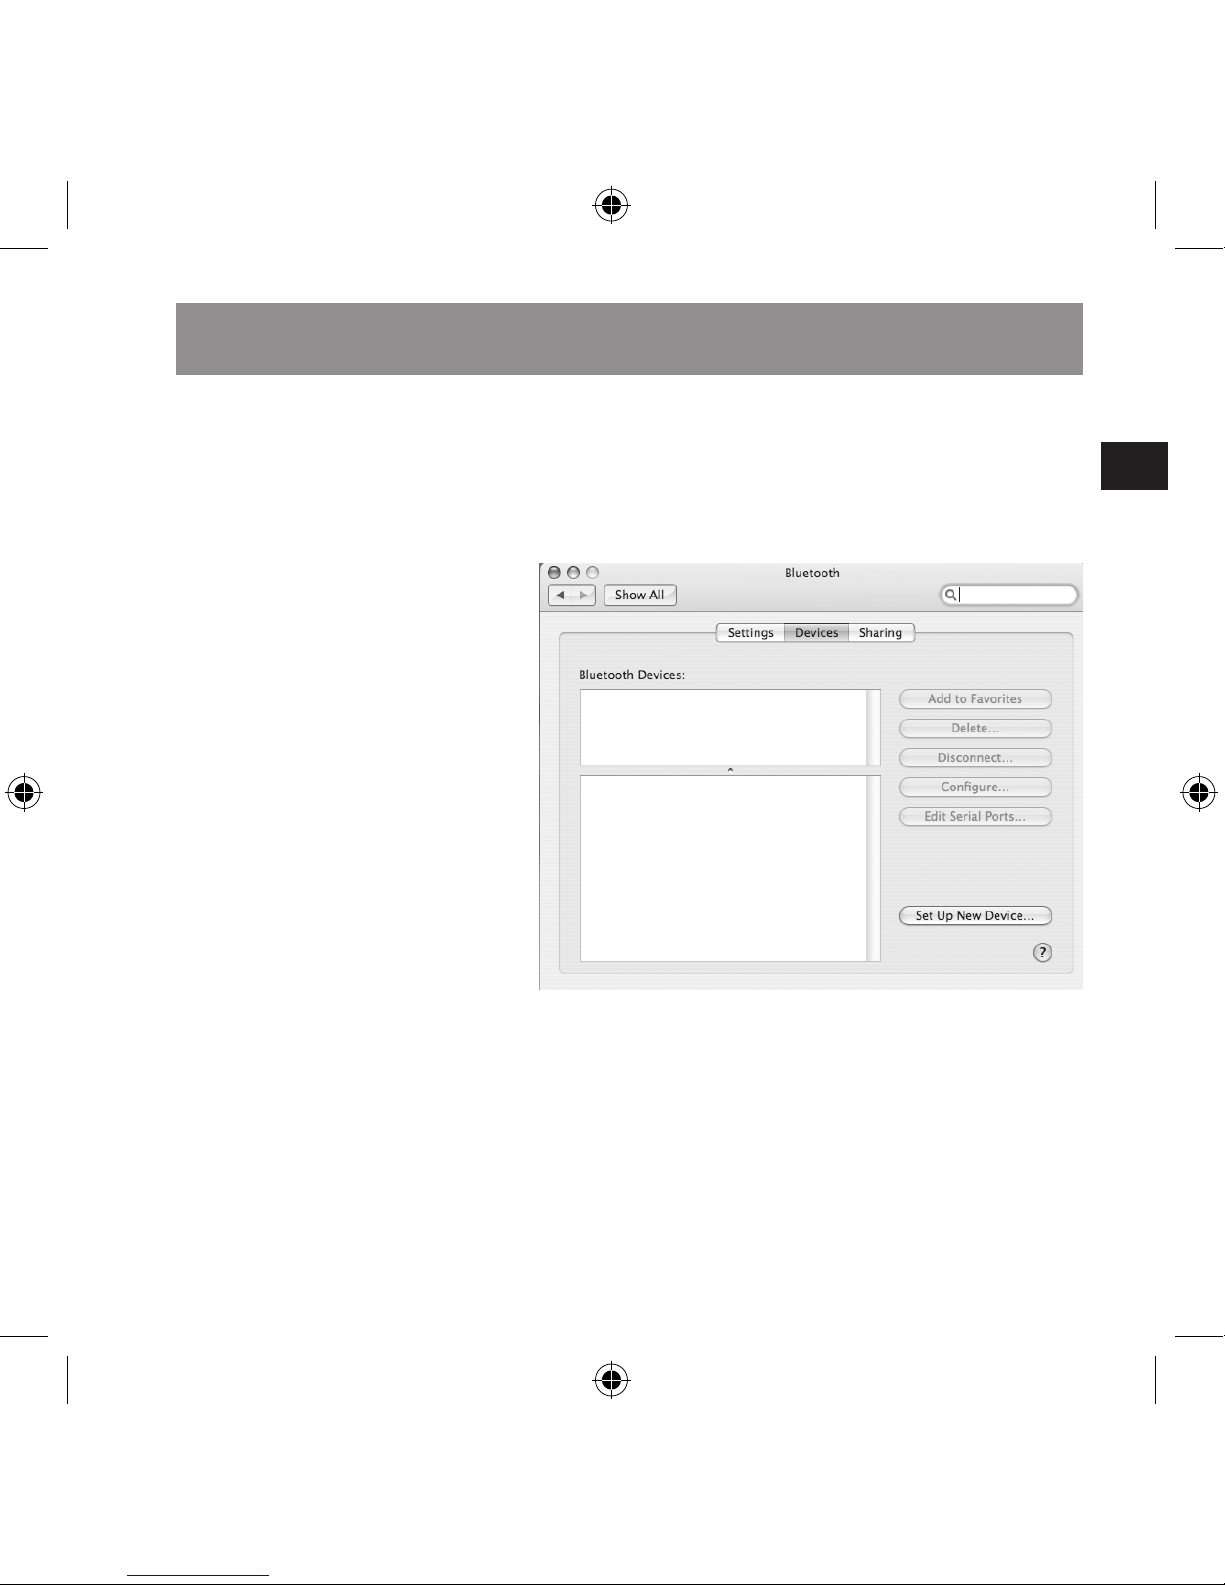
In the Devices tab select
the button Set Up New
Device.
The Bluetooth® Setup Assistant will now start. Click
on Continue and follow the
on-screen instructions.
After a few seconds your
Macintosh will detect
the mouse. Select the
Bluetooth mouse and click
on Continue. The mouse is
now ready to use!
Connecting to the Mac
Page 28

GB
28
Where possible, do not
use the mouse on a metallic surface. Metals such as
iron, aluminium or copper
act as a shield to radio
transmission and can lead
to mouse malfunctions.
The mouse will automatically switch to power
saving mode after ve
minutes. To reactivate the
mouse, simply press any
button or move the mouse.
If not being used, switch
the mouse off to increase
battery life.
Changing the resolution
You can select whether
the mouse moves quickly
at 1600dpi or slowly at
800dpi. To switch between
the two, press and hold
the scroll wheel and then
press the right mouse
button. The scroll wheel
will light up red for three
seconds which shows you
that the sensor resolution
has been changed. It’s
best for you to try out the
resolutions and see which
setting is best for you.
Notes on use
Page 29
GB
29
The Bluetooth® program doesn’t detect the
mouse
Ensure that the mouse
is in pairing mode (scroll
wheel ashes red). To do
that, press the RESET button on the underside of the
mouse. Search again for
Bluetooth® devices.
The mouse doesn’t work
Ensure that the batteries
have been correctly inserted and are charged. If
necessary, plug the charger cable in to recharge
the batteries.
Troubleshooting
Page 30
GB
30
Model No.: SL-6197-SBK
► High resolution optical
sensor (800/1600dpi)
► Bluetooth® Class 2
compatible
► Laser wavelength:
850nm
► Power consumption:
6mA
Warranty
We guarantee this product
to be free of defects in
workmanship and materials for a period of two
years from the original
date of purchase.
Should you need assi
-
stance...
Our technical support
team will be happy to
help with any technical
problems.
Correct disposal of this
product
(Electronic waste)
To be applied in countries
of the European Union and
other European countries
with a separate collection
system.
The markings on the
product and on the associated literature show that
this product must not be
disposed of together with
normal household waste
at the end of its useful life.
Please dispose of this device separately from other
waste in order not to cause
harm to the environment or
human health through uncontrolled refuse disposal.
Technical Information
Page 31
GB
31
Recycle the device to
facilitate the sustainable recycling of material
resources.
Private users should contact the dealer from whom
the product was bought, or
the authorities responsible
for recycling, in order to
nd how the device can be
recycled in an environmentally friendly way.
Commercial users should
ask their suppliers and
consult the sales contract terms. This product
must not be disposed of
together with other commercial waste.
Jöllenbeck GmbH
Kreuzberg 2
27404 Weertzen
GERMANY
Support Hotline:
+49 (0) 4287 12 51 33
German xed-line number
E-mail:
[email protected]
Technical Information
Page 32

FR
32
Table des matières
Table des matières 32
Consignes de sécurité 3
3
Conguration requise 3
4
Éléments de commande 3
5
Remarques importantes concernant les piles 3
6
Recharge de la souris 3
7
Raccordement et liaison pour PC 3
8
Raccordement et liaison pour Mac 4
1
Remarques d’utilisation 4
2
En cas d’erreur 4
3
Caractéristiques techniques 4
4
Page 33
FR
33
Consignes de sécurité
Laser
Cette souris utilise un capteur laser de classe 1. Un
contact direct visuel avec
le laser peut entraîner
des lésions des yeux. Ne
regardez jamais directement le rayon laser et ne
dirigez jamais le rayon
sur d’autres personnes ou
sur des objets rééchissants, tels que des miroirs.
Ne regardez jamais le
rayon laser à travers des
appareils grossissants
tels que des loupes, des
microscopes ou des
appareils similaires. Ne
démontez pas la souris
et n’essayez pas de la
réparer.
Entretien
Ne tenez pas d‘effectuer
vous-même l’entretien du
dispositif ni de le réparer. Pour les opérations
d’entretien, adressezvous à du personnel
qualié. N‘essayez jamais
d‘apporter une quelconque
modication au dispositif.
Cela pourrait annuler votre
garantie.
Humidité et sources de
chaleur
Évitez d’utiliser l’appareil
à proximité de l’eau (évier,
baignoire ou piscine par
ex.) ou de l’exposer aux intempéries, à l’humidité, ou
à des écoulements ou des
projections de liquides.
N‘exposez pas le dispositif
à une température élevée,
une humidité excessive ou
au rayonnement direct du
soleil.
Attention : lisez
soigneusement
ce mode d’emploi
et observez les
instructions qui s’y
trouvent. Conservez
ce mode d’emploi
pour une utilisation
ultérieure.
Page 34

FR
34
Conguration requise
sur PC
Pour pouvoir utiliser
cette souris, vous devez
disposer d’un ordinateur
portable ou de bureau
avec récepteur Bluetooth®
intégré ou USB. Ce
récepteur doit prendre
en charge l’un des deux
protocoles Bluetooth®
suivants : Microsoft, IVT
Bluesoleil. La compatibilité
avec d’autres protocoles
Bluetooth® n’est pas
garantie.
Conguration requise
sur Mac
Vous avez besoin d’un
Macintosh avec interface
Bluetooth® intégrée et
Mac OS X.
Conguration requise
Page 35
FR
35
Éléments de commande
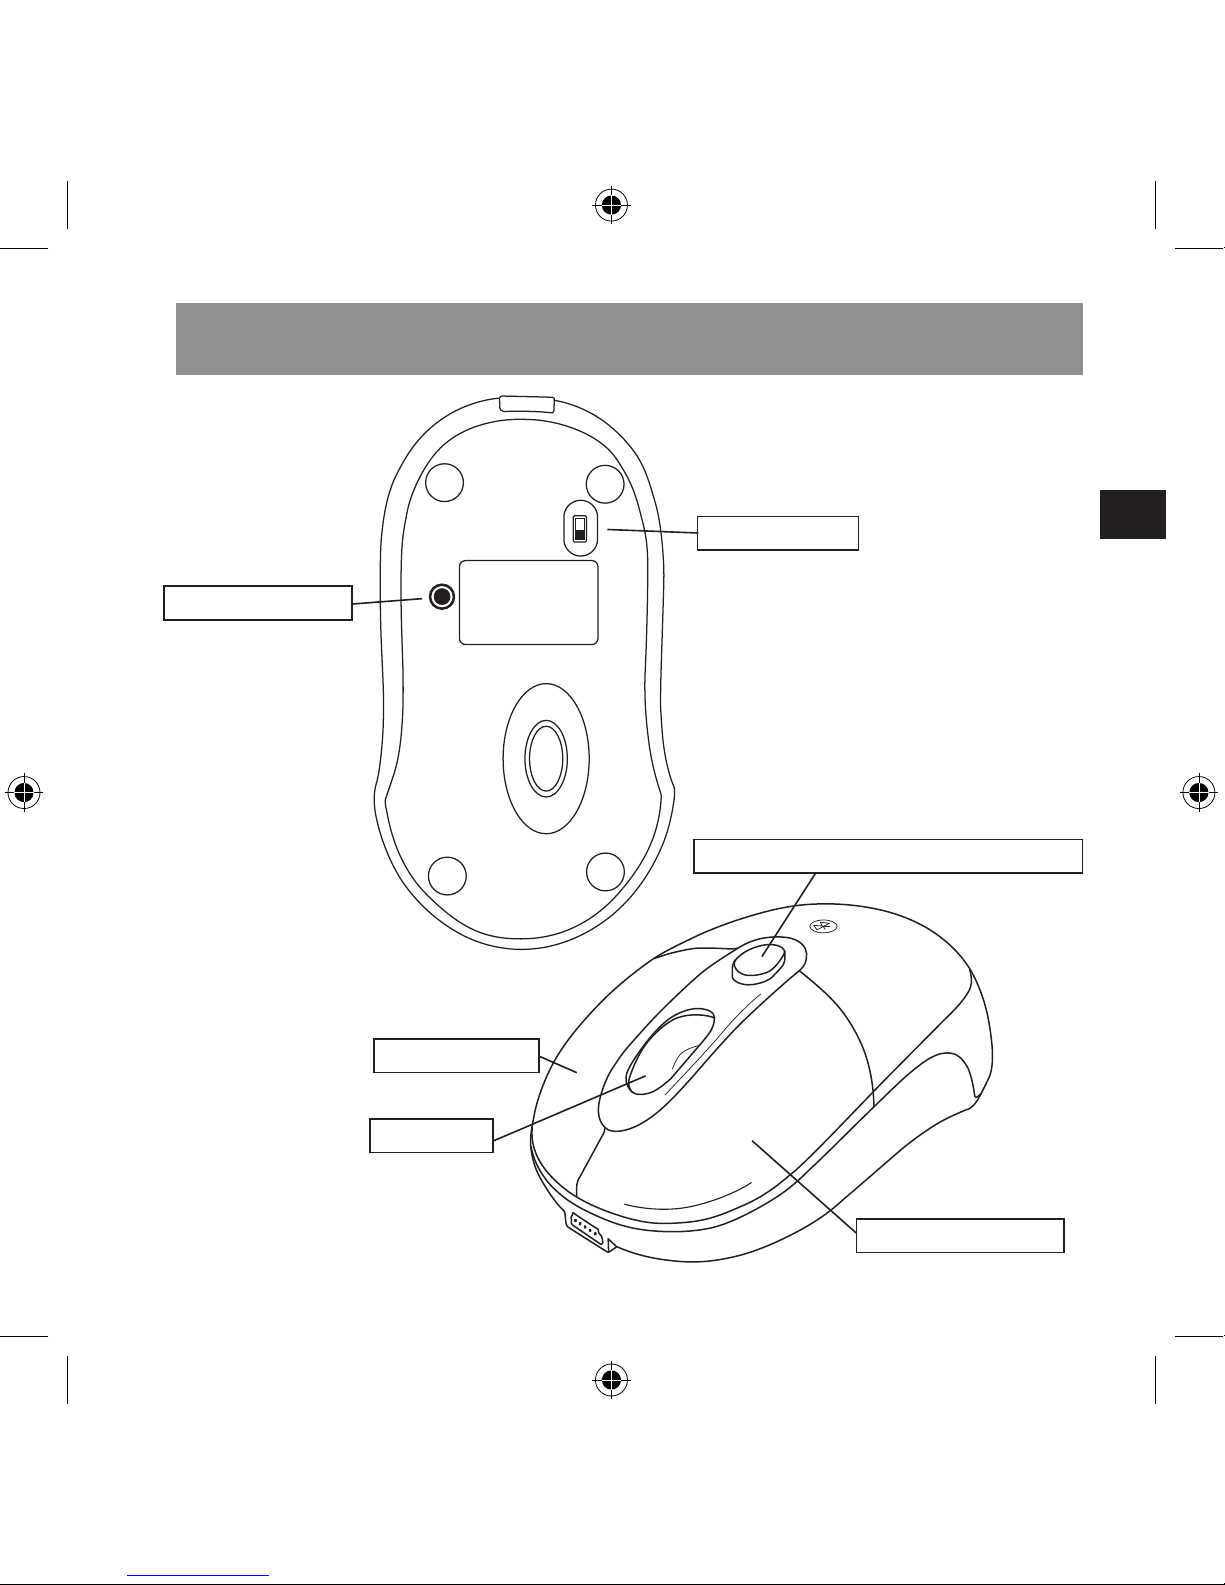
Bouton gauche
OFF
ON
RESET
Roulette
Bouton droit
Interrupteur
Touche RESET
Touche du compartiment à piles
Page 36
FR
36
N’utilisez que des piles
NiMH ou d’autres piles
rechargeables. N’utilisez
pas de piles alcalines.
N’utilisez pas de piles
anciennes et neuves en
même temps. Conservez
les piles hors de portée
des enfants.
Éliminez et recyclez les
piles usées conformément
aux directives locales.
Mise en place des piles
Assurez-vous que la
souris est éteinte. Pour
cela, amenez au besoin
l’interrupteur sur « OFF »
sur la face inférieure de la
souris.
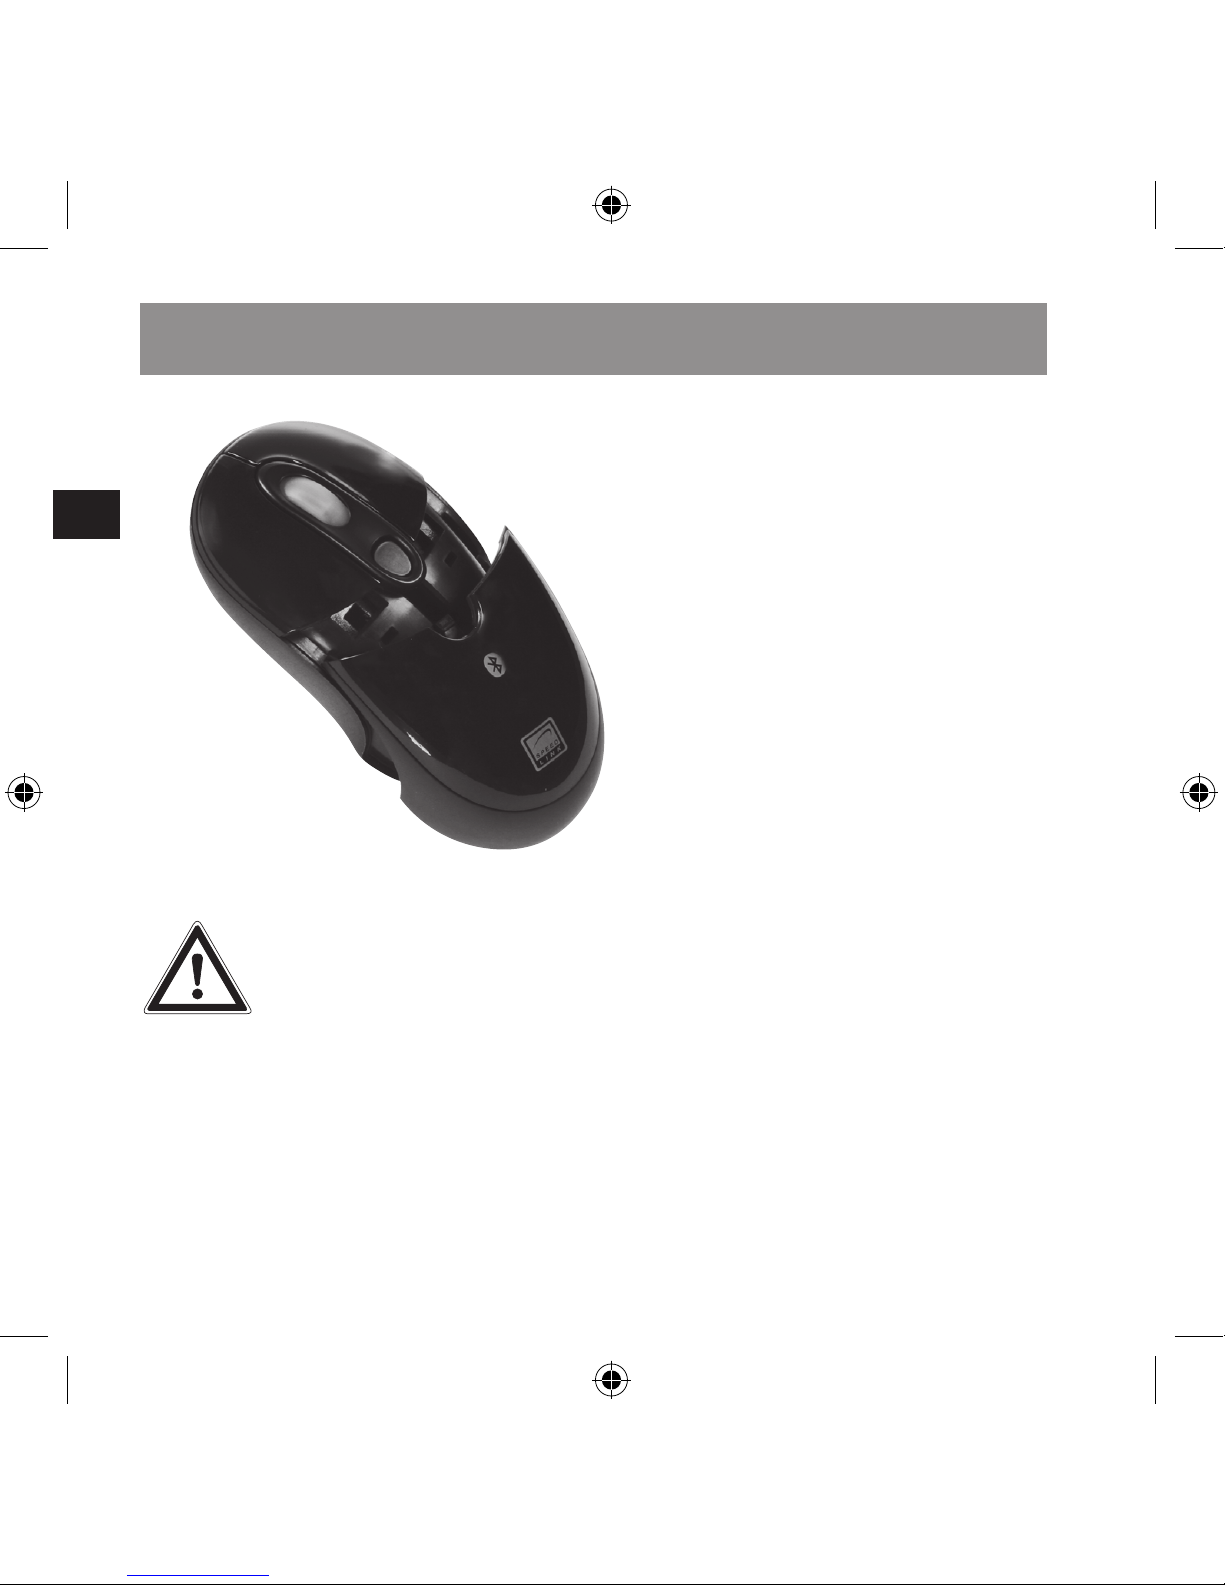
Appuyez sur la touche
du compartiment à
piles. Insérez les piles
conformément aux repères.
Remettez en place le cache
du compartiment à piles et
mettez en marche la souris.
Remarques importantes concernant les piles
REMARQUE : avant
d’utiliser la souris,
rechargez les piles
durant huit heures.
Vous trouverez des
informations sur la
recharge des piles
dans le chapitre
« Recharge de la
souris ».
Page 37
FR
37
La roulette de la souris
s’allume de couleur rouge
dès que les piles sont
déchargées.
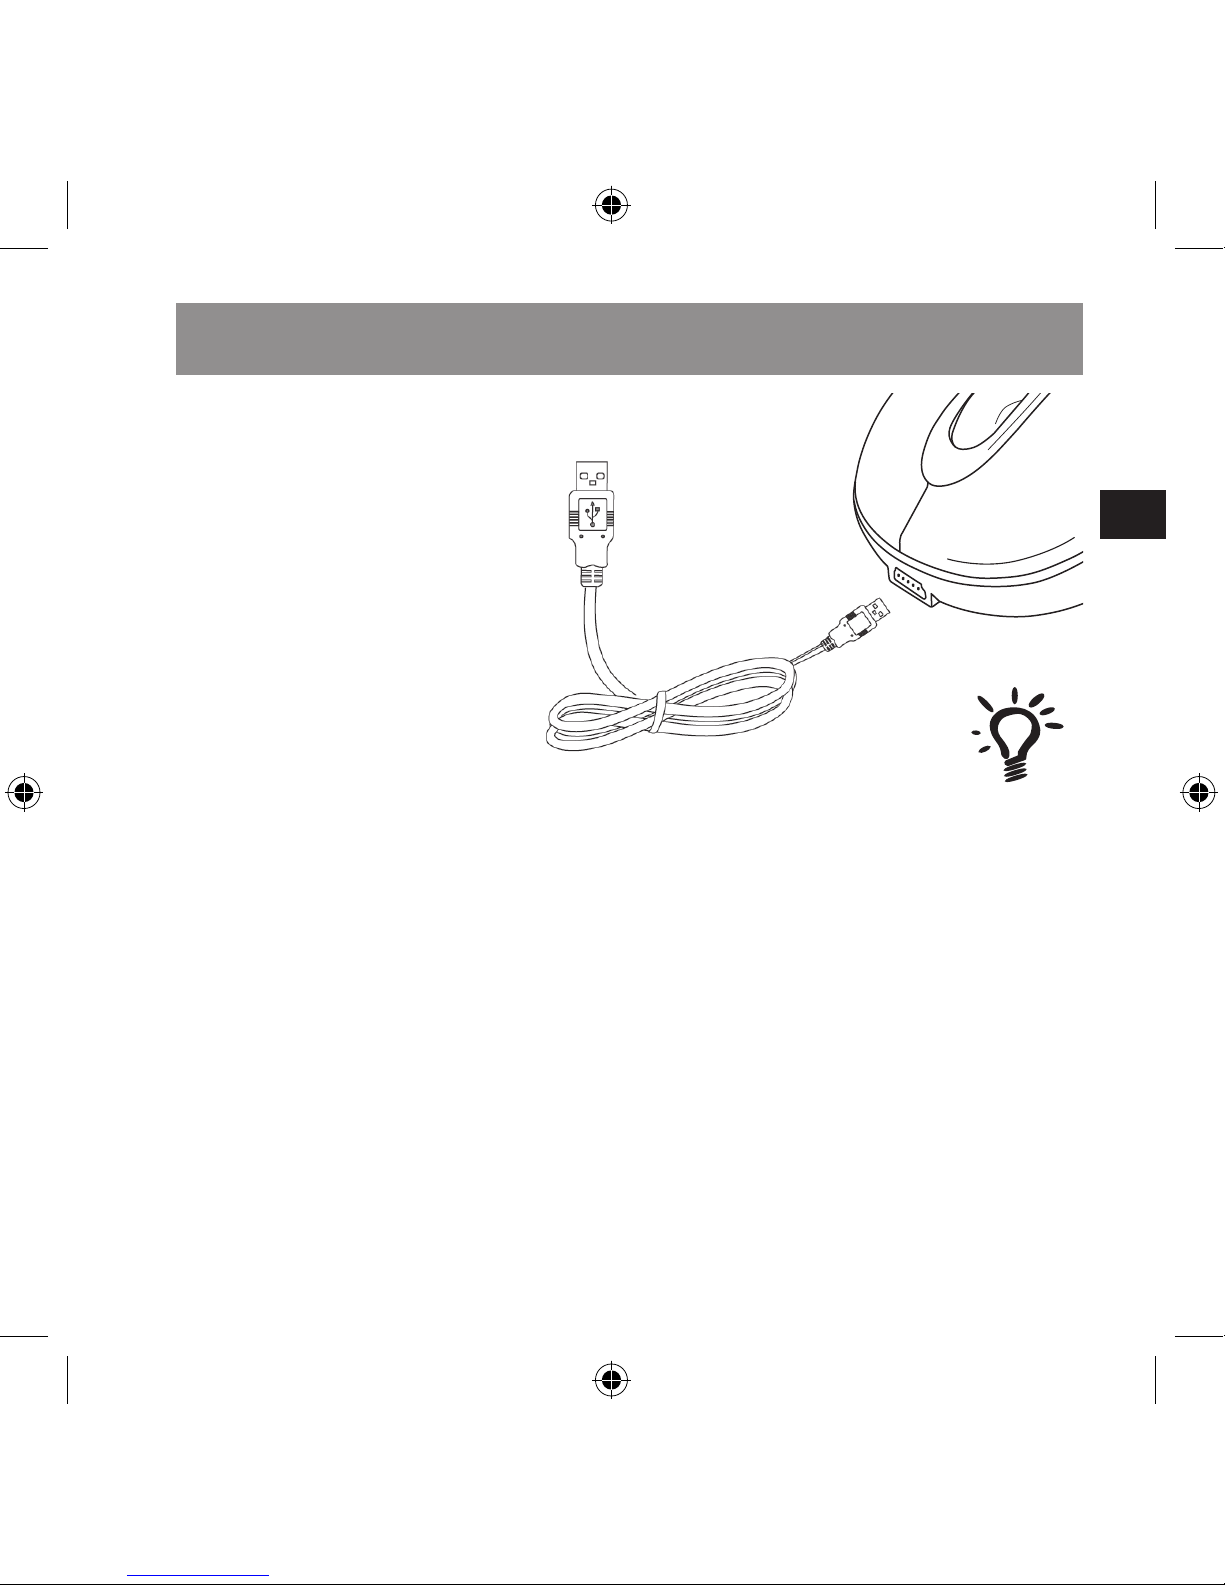
Raccordez le câble de
recharge USB fourni à une
prise USB libre sur votre
ordinateur. Raccordez la
souris à la mini-che USB
du câble. Lorsque la roulette est de couleur verte,
cela signie que la souris
se recharge. La souris
reste en état de marche
durant la recharge.
Recharge de la souris
REMARQUE : pour
pouvoir recharger
également la souris
lorsque l’ordinateur
est éteint, vous devez
avoir activé l’ACPI
(Advanced Con-
guration and Power
Management Inter-
face) dans le BIOS
de votre ordinateur.
Dans le cas contraire,
les ports USB ne sont
pas sous tension lor-
sque l’ordinateur est
éteint. Reportez-vous
à ce sujet au manuel
de votre ordinateur.
Page 38
FR
38
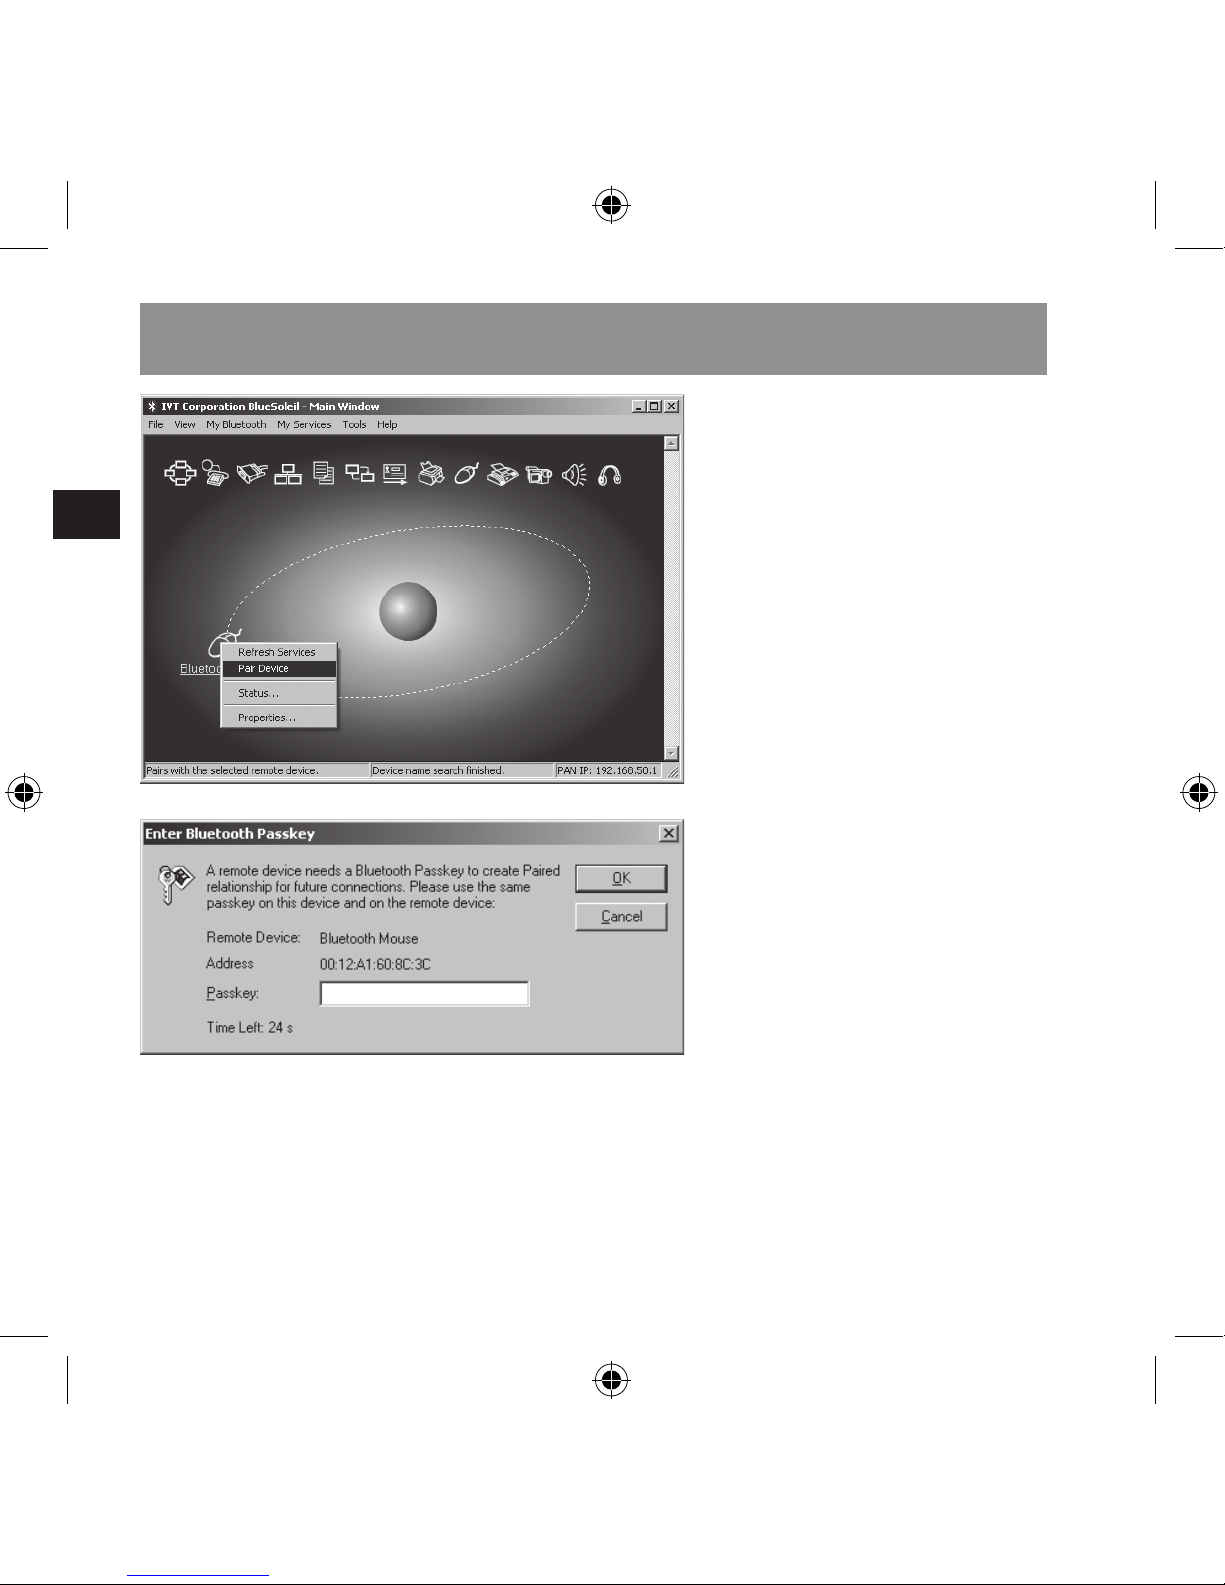
IVT Bluesoleil
Ouvrez IVT Bluesoleil.
Amenez l’interrupteur sur
« ON » sur la face infé
rieure de la souris.
Mettez la souris en mode
pairage en appuyant sur le
bouton RESET sur la face
inférieure de la souris. La
roulette de la souris se
met à clignoter de couleur
rouge ; la souris est à pré
sent en mode pairage.
Allez dans Bluesoleil dans
« My Bluetooth > Blue
tooth Device Discovery ».
Faites un clic droit avec
votre souris Bluetooth
et cliquez sur « Pair De
vice ».
Cliquez sur OK dans la
fenêtre « Enter Bluetooth
Passkey » sans entrer de
mot de passe.
Faites de nouveau un clic
droit avec votre souris
Bluetooth, puis cliquez
Raccordement et liaison pour PC
Page 39
FR
39
sur « Connect > Bluetooth
Human Interface Device
Service ». Si l’élément de
menu « Connect » n’est
pas activé, cliquez sur
« Refresh Services », puis
répétez l’étape précédente.
Votre souris est à présent
prête à l’emploi.
Windows Bluetooth
Service
Amenez l’interrupteur sur
« ON » sur la face inféri
eure de la souris.
Mettez la souris en mode
pairage en appuyant sur le
bouton RESET sur la face
inférieure de la souris. La
roulette de la souris se
met à clignoter de couleur
rouge ; la souris est à
présent en mode pairage.
Raccordement et liaison pour PC
Page 40
FR
40
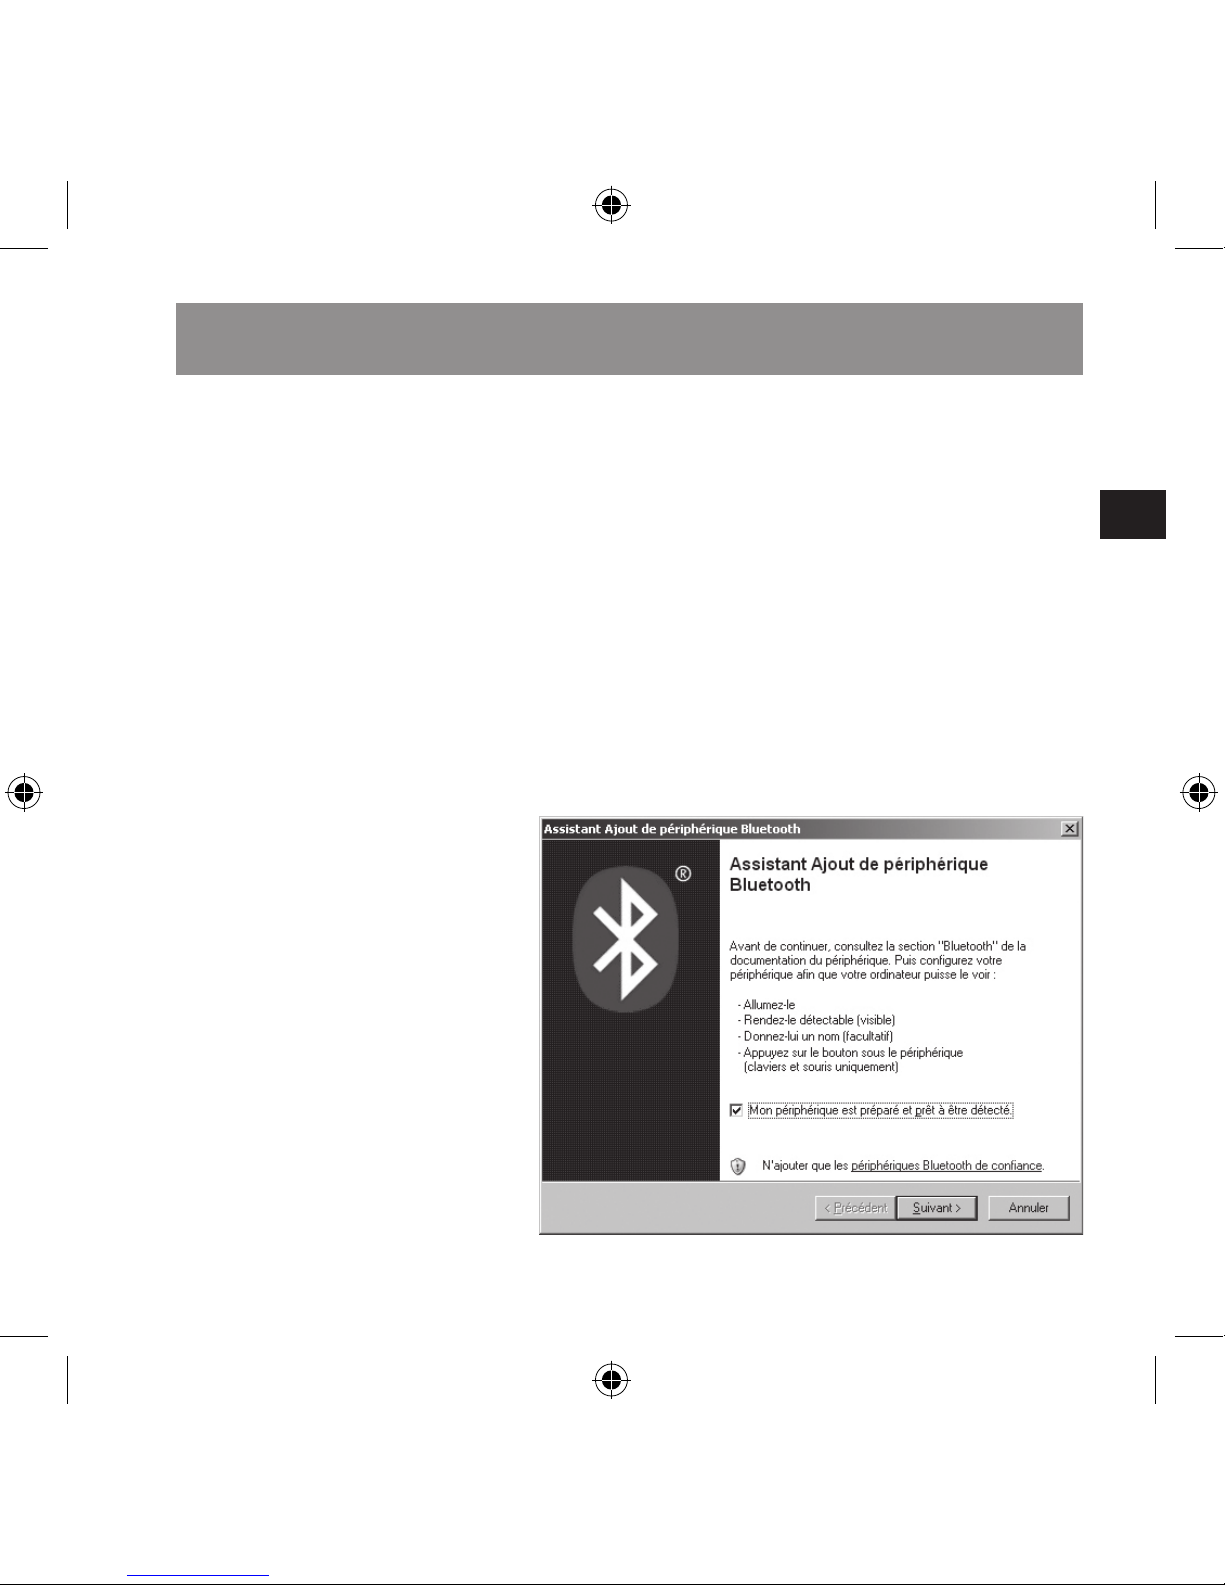
Cliquez sur le symbole
Bluetooth à droite dans la
barre des tâches, puis sur
« Ajout de périphérique
Bluetooth ». Vous pouvez
également cliquer sur le
symbole Bluetooth® dans
le Panneau de conguration
et cliquer sur « Ajout de
périphérique Bluetooth ».
Vous voyez alors s’ouvrir
à l’écran « l’ Assistant
Ajout de périphérique
Bluetooth ». Activez « Mon
périphérique est préparé
et prêt à être détecté » et
cliquez sur Suivant.
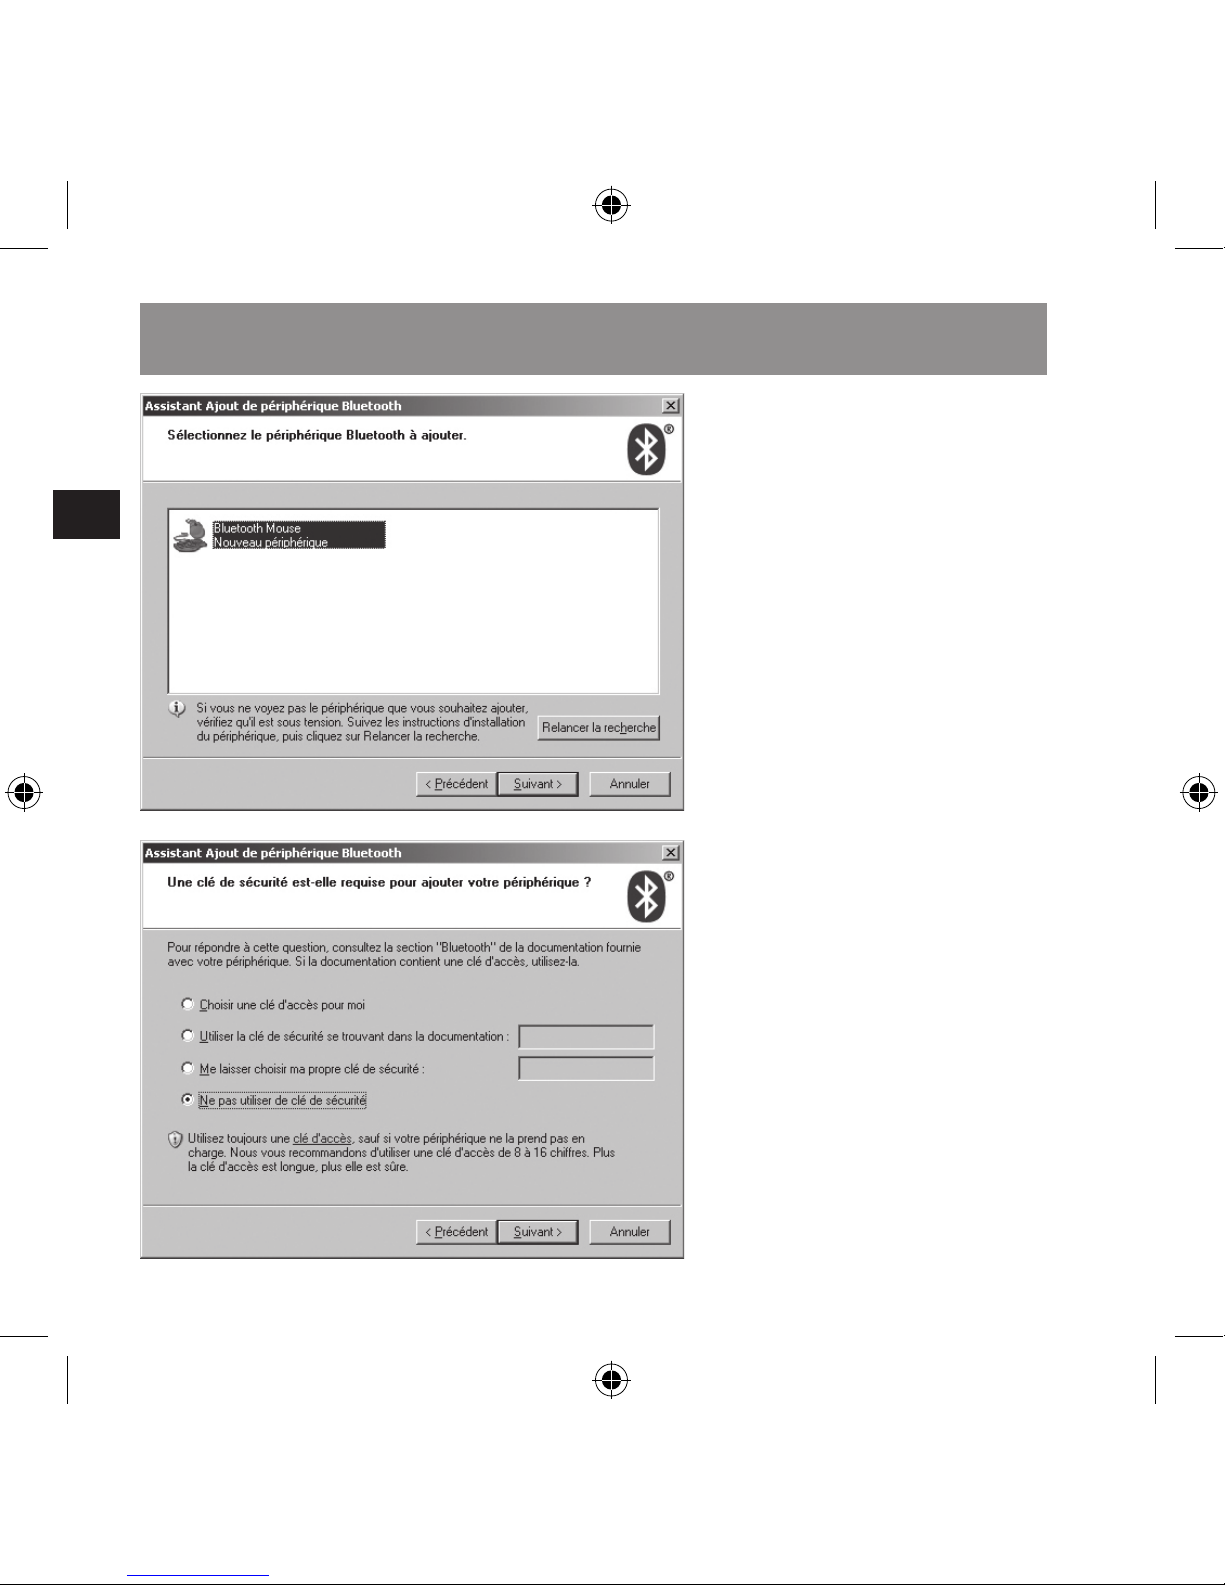
Sélectionnez la souris
Bluetooth et cliquez sur
Suivant.
Sélectionnez « Ne pas
utiliser de clé de sécurité »,
puis cliquez sur « Suivant ».
L’ordinateur établit à présent
la connexion. Cliquez sur
« Terminer ». La souris est
à présent prête à l’emploi.
Raccordement et liaison pour PC
Page 41
FR
41
Mac OS X
Dans les Préférences
système, cliquez sur le
symbole Bluetooth® dans
la catégorie Matériel.
Si ce n’est pas encore fait,
activez Bluetooth®.
Mettez la souris en mode
pairage en appuyant sur le
bouton RESET sur la face
inférieure de la souris. La
roulette de la souris se
met à clignoter de couleur
rouge ; la souris est à
présent en mode pairage.
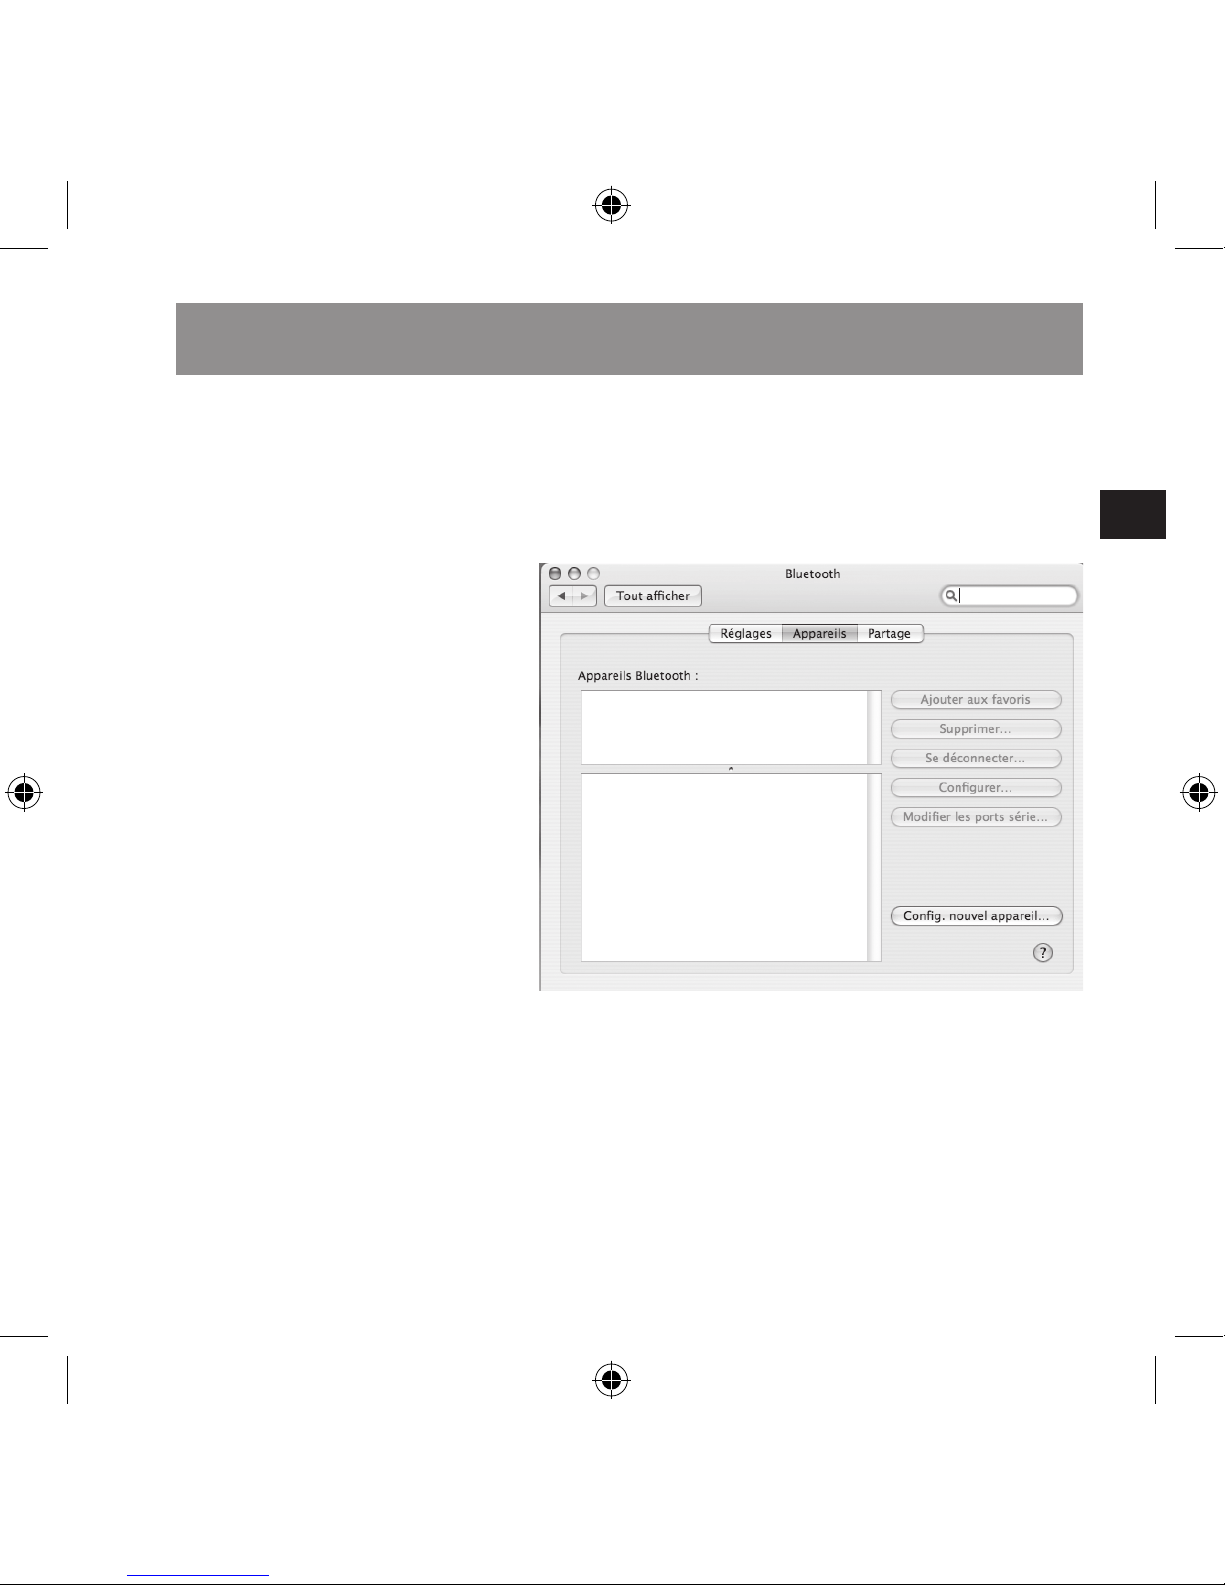
Dans l’onglet « Ap
-
pareils », sélectionnez le
bouton « Cong. nouvel
appareil ».
Vous voyez s’ouvrir
l’assistant Bluetooth®.
Cliquez sur « Continuer »
et suivez les instructions
qui s’afchent à l’écran.
Au bout de quelques
secondes, votre Macintosh
reconnaît la souris. Sélec-
tionnez la souris Bluetooth
et cliquez sur « Conti
nuer ». La souris est à
présent prête à l’emploi.
Raccordement et liaison pour Mac
Page 42

FR
42
N’utilisez de préférence
pas la souris sur une
surface métallique. Les
métaux tels que le fer,
l’aluminium ou le cuivre
empêchent la transmission
radio et peuvent entraîner
des dysfonctionnements
de la souris.
La souris passe automatiquement en mode
d’économie d’énergie au
bout de cinq minutes.
Pour réactiver la souris,
appuyez sur une touche
quelconque ou bougez la
souris sur la surface.
Éteignez la souris quand
vous ne vous en servez
pas an d’accroître la
longévité des piles.
Commutation de la
résolution
Vous pouvez régler si le
pointeur de la souris se
déplace rapidement à une
résolution de 1 600 ppp
ou plus lentement à une
résolution de 800 ppp.
Pour commuter entre les
résolutions, enfoncez le
bouton de la roulette et
maintenez-le enfoncé, puis
appuyez sur le bouton droit
de la souris. La roulette est
alors allumée de couleur
rouge durant trois secondes
pour indiquer que la
résolution du capteur a été
modiée. À vous de tester
quel est le réglage qui vous
plaît le mieux.
Remarques d’utilisation
Page 43

FR
43
Le programme
Bluetooth® ne détecte
pas la souris
Assurez-vous que la souris
est en mode pairage (la
roulette clignote de couleur rouge). Appuyez pour
cela sur le bouton RESETsur la face inférieure
de la souris. Relancez
la recherche d’appareils
Bluetooth®.
La souris ne fonctionne
pas.
Assurez-vous que les
piles sont correctement
insérées et qu’elles sont
chargées. Raccordez
au besoin le câble de
recharge pour recharger
les piles.
En cas d’erreur
Page 44
FR
44
Modèle n° : SL-6197-SBK
► Capteur optique
avec résolution de
800/1 600 ppp
► Compatible Bluetooth®
classe 2
► Longueur d’onde du
laser : 850 nm
► Consommation : 6 mA
Garantie
Nous accordons sur ce
produit une garantie de
deux ans à compter de la
date d’achat couvrant les
défauts de fabrication et
tous les composants.
Si vous avez besoin
d’aide…
En cas de problèmes
techniques, veuillez vous
adresser à notre service
d’assistance technique.
Élimination correcte de
ce produit
(Déchets électroniques)
À appliquer dans les pays
de l’Union européenne et
dans les autres pays européens avec un système de
tri des déchets
La signalétique gurant sur
ce produit et sur les documents correspondants
indique qu’il ne doit pas
être placé avec les ordures
ménagères courantes
à l’issue de sa durée
de vie. Veuillez séparer
cet appareil des autres
déchets pour ne pas nuire
à l’environnement et à la
santé des personnes par
une élimination non contrôlée des déchets.
Caractéristiques techniques
Page 45
FR
45
Recyclez l’appareil pour
encourager la récupération
durable des ressources
matérielles.
Les utilisateurs privés
peuvent contacter le
vendeur auprès duquel ils
ont acheté le produit ou
les autorités compétentes
pour savoir comment
recycler l’appareil de
manière respectueuse de
l’environnement.
Les utilisateurs professionnels doivent s’adresser
à leurs fournisseurs et
consulter les conditions
qui gurent dans le contrat
de vente. Ce produit ne
doit pas être placé avec
d’autres déchets industriels.
Jöllenbeck GmbH
Kreuzberg 2
27404 Weertzen
GERMANY
Hotline :
+49 (0) 4287 12 51 33
au sein du réseau xe
allemand
E-mail :
[email protected]
Caractéristiques techniques
Page 46

ES
46
Contenido 46
Medidas de seguridad 4
7
Requerimientos del sistema 4
8
Elementos de manejo 4
9
Nota importante sobre pilas 5
0
Cargar el ratón 5
1
Conectar y enchufar a PC 5
2
Conectar y enchufar a Mac 5
5
Notas para la utilización 5
6
Solución a problemas 5
7
Datos técnicos 5
8
Contenido
Page 47
ES
47
Medidas de seguridad
Laser
Este ratón utiliza un sensor láser de la clase 1. El
contacto directo de la vista
con el láser puede ser
causa de daños oculares.
No mires nunca directamente en el rayo láser ni
lo dirijas tampoco nunca
hacia otras personas o
supercies que lo reejen,
p. ej. espejos. No mires
tampoco el láser a través
de aparatos de aumento
como lupas y microscopios o similares. No
desmontes el ratón ni sus
componentes y no intentes
nunca reparar el ratón.
Humedad y fuentes de
calor
No utilice este aparato en
lugares cercanos a agua
(por ejemplo, fregadores,
bañeras, piscinas, etc.) ni
lo exponga a lluvia, humedad ni líquidos que pueden
gotear o salpicar. Evite
exponer la unidad a altas
temperaturas, humedad
excesiva o rayos del sol.
Colocación
Coloque el dispositivo
en un lugar estable para
evitar posibles caídas
que pudieran ocasionar
lesiones físicas o dañar el
producto.
¡Atención!: Lee las
instrucciones dete-
nidamente y ten en
cuenta la informa-
ción y advertencias
en ellas contenidas.
Guarda las instruc-
ciones para un uso
posterior que te
será siempre útil.
Page 48

ES
48
Requerimientos del
sistema PC
Para utilizar este ratón
precisas de un portátil o
un ordenador de mesa
con receptor Bluetooth®
integrado o receptor
Bluetooth® USB. Este
receptor debe soportar
uno de los dos protocolos
Bluetooth® siguientes:
Microsoft, IVT Bluesoleil.
No podemos garantizar la
compatibilidad con otros
protocolos Bluetooth®.
Requerimientos del
sistema Mac
Precisas un Macintosh con
puerto Bluetooth® y Mac
OS X.
Requerimientos del sistema
Page 49
ES
49
Elementos de manejo
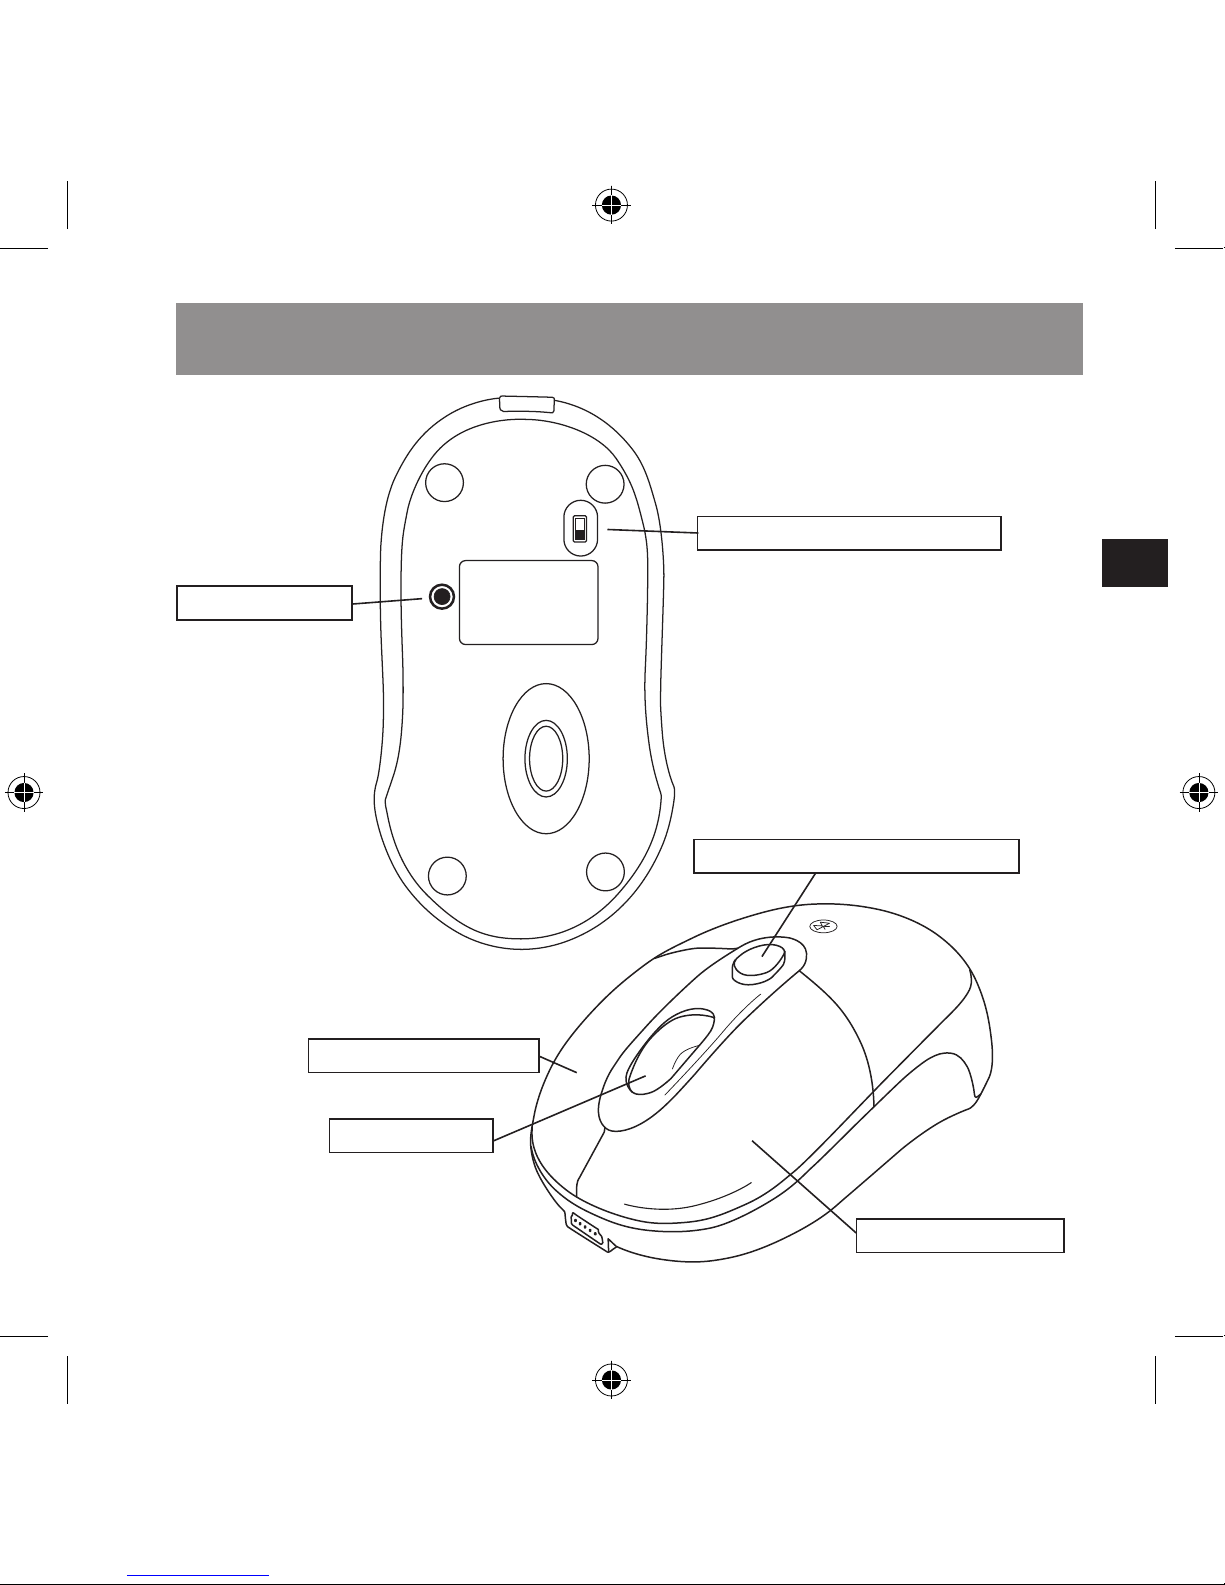
Botón izq. ratón
OFF
ON
RESET
Rueda scroll
Botón dcho. ratón
Interruptor de encendido
Botón RESET
Botón compartimento pilas
Page 50
ES
50
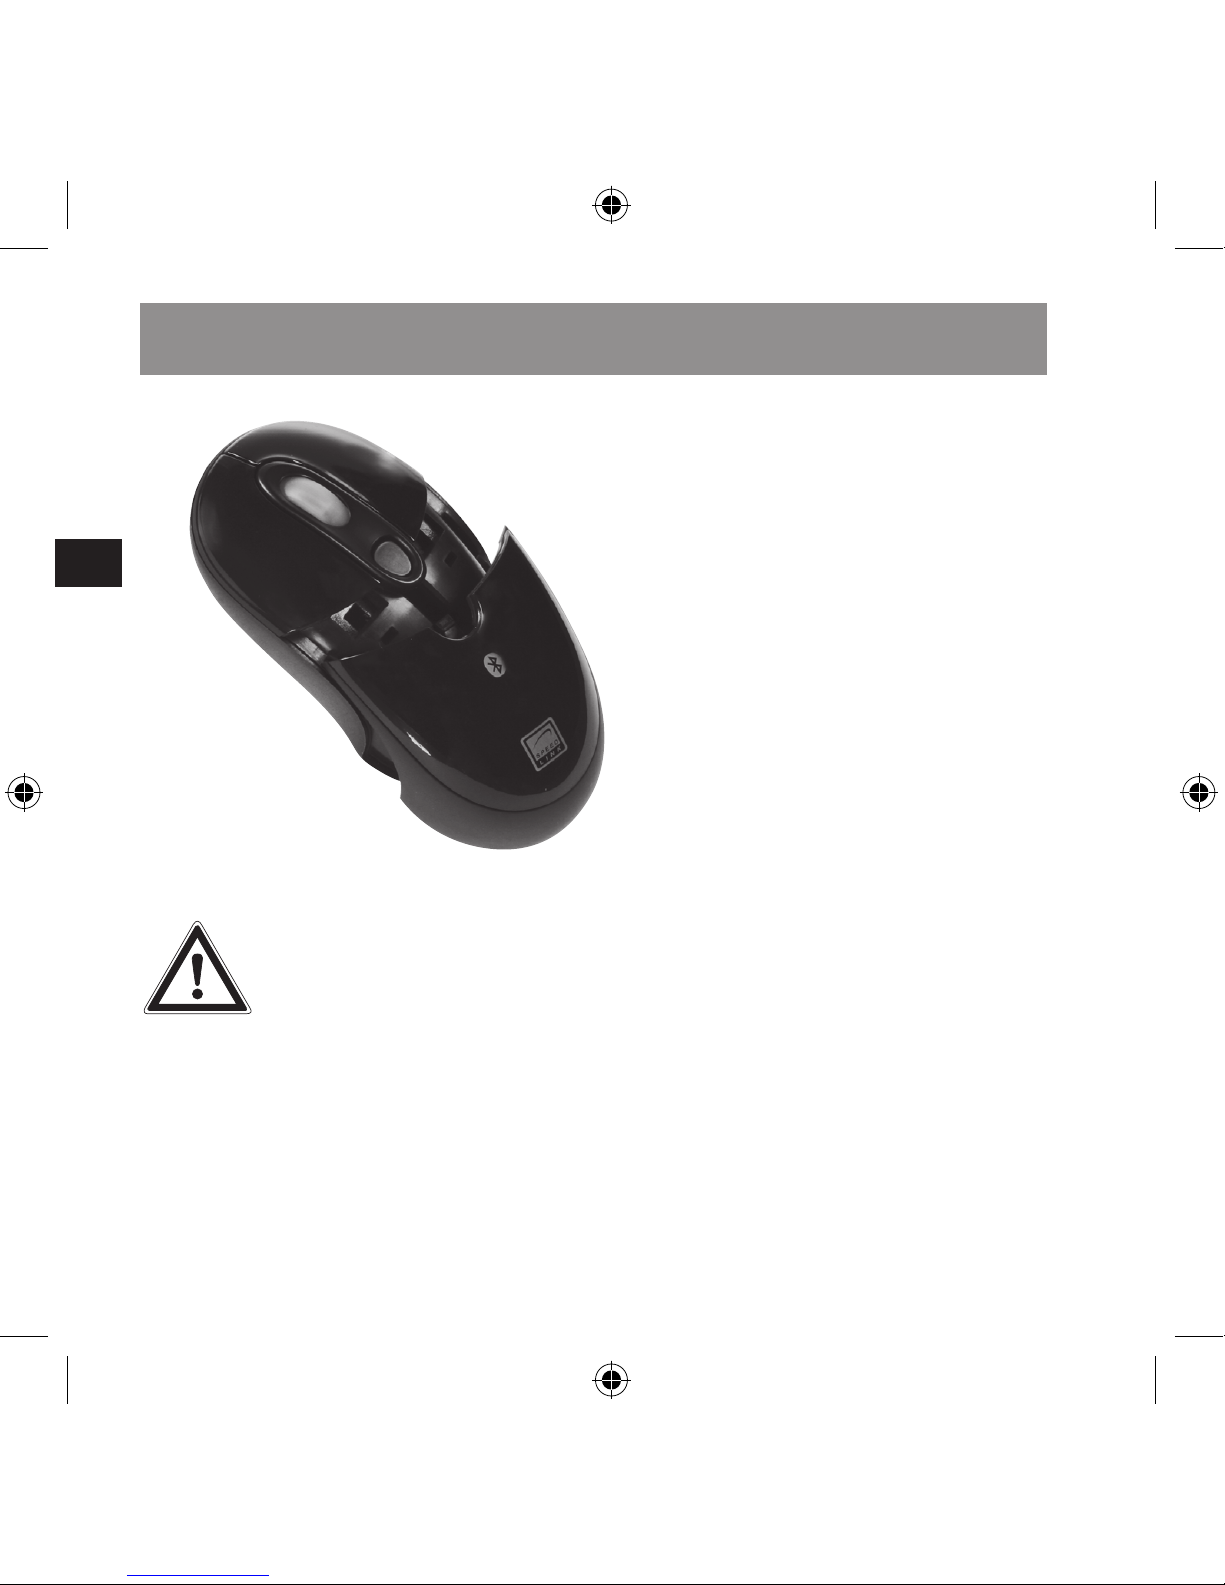
Utiliza exclusivamente pilas NiMH u otras similares
que sean recargables. No
utilices pilas alcalinas. No
utilices pilas viejas junto
con pilas nuevas. Guarda
siempre las pilas fuera del
alcance de los niños.
Recoge y recicla las
pilas usadas en los
contenedores apropiados
de tu comunidad.
Cómo colocar las pilas
Asegúrate de que el ratón
está desconectado. El
interruptor de encendido
que gura en la parte
inferior del ratón tiene que
estar en “OFF”.
Presiona el botón del
compartimiento de pilas.
Coloca las pilas según
están marcadas en el
compartimiento. Vuelve a
colocar la tapa y enciende
el ratón.
Nota importante sobre pilas
AVISO: Antes de
utilizar el ratón por
primera vez, debes
cargar las pilas durante ocho horas. La
información sobre
carga de pilas, la
puedes consultar en
el apartado “Cargar
el ratón”.
Page 51
ES
51
La rueda del ratón se
enciende en color rojo
en cuanto las pilas están
bajas.
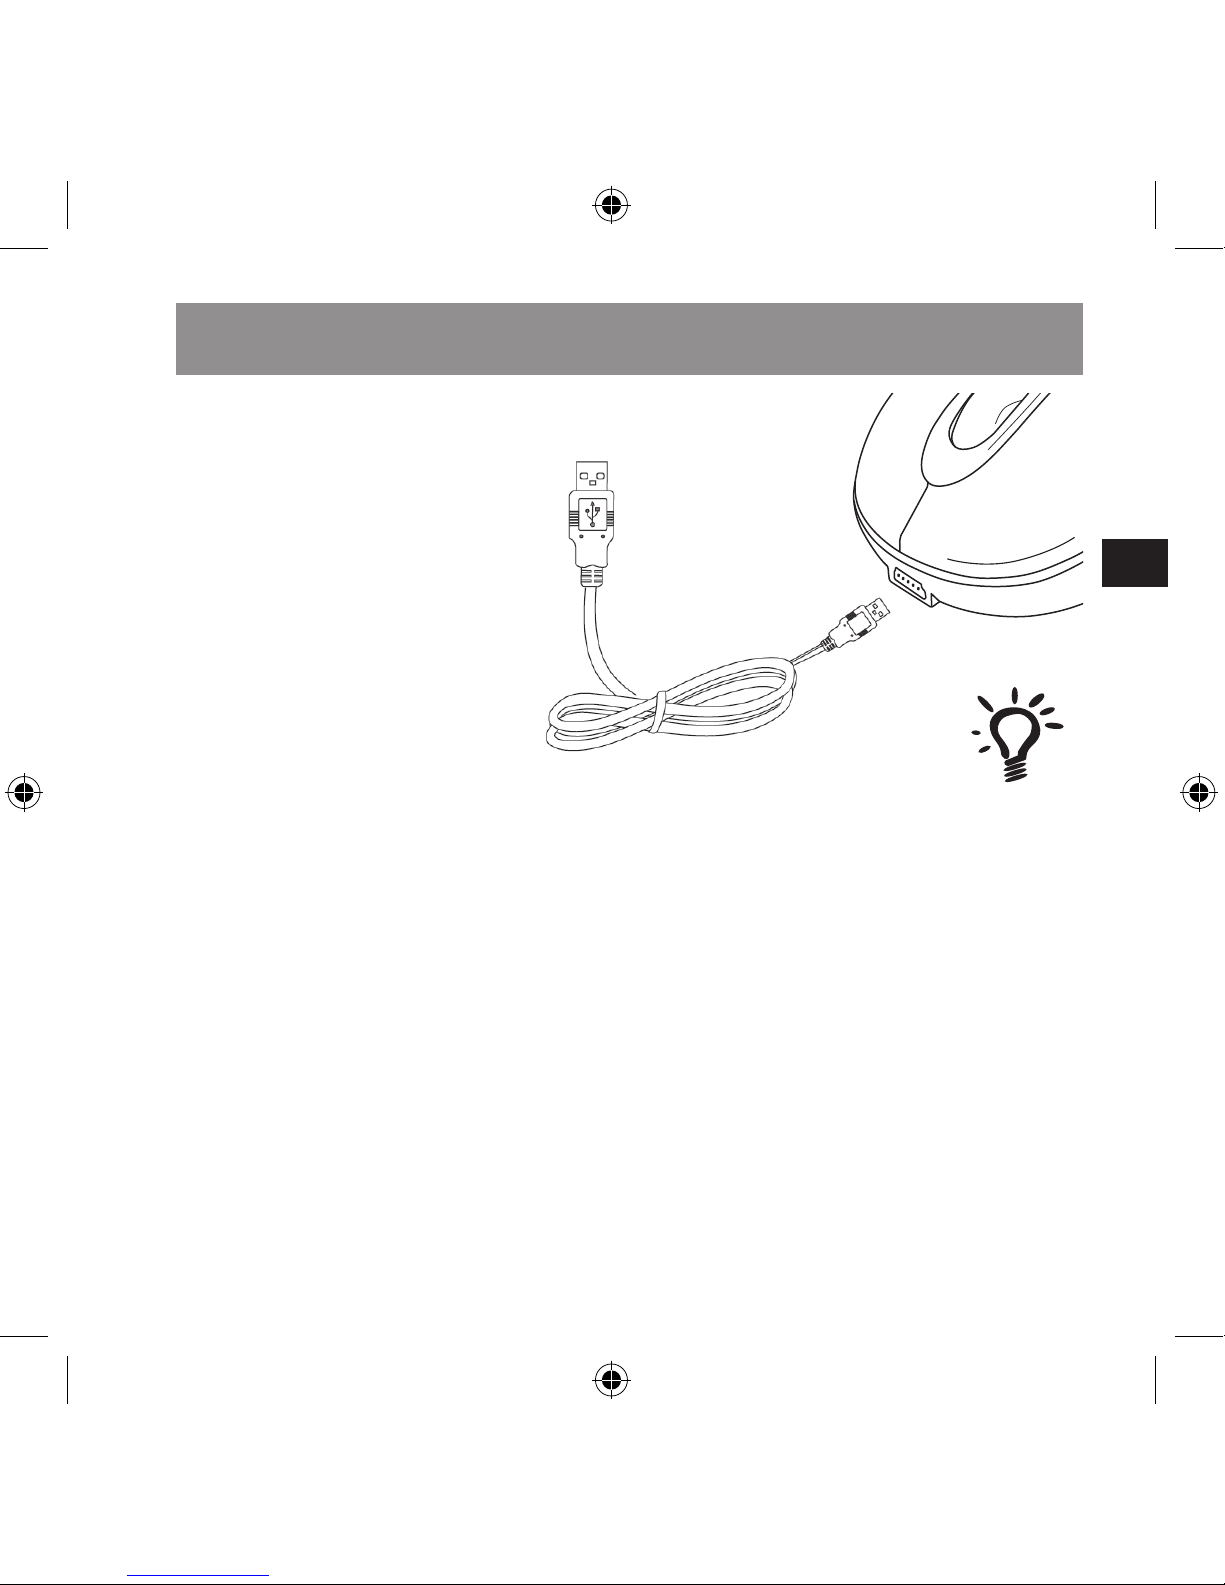
Conecta el cable USB
adjunto a un puerto USB
libre de tu ordenador.
Enchufa el ratón al
miniconector USB del
cable. Tu ratón está
cargando cuando la rueda
se enciende en verde.
Durante el proceso de
carga el ratón está listo
para funcionar.
Cargar el ratón
AVISO: Para que pue-
das cargar el ratón
aunque esté apagado
el ordenador, tendrás
que activar en la
BIOS del ordenador
el ACPI (Advanced
Conguration and
Power Management
Interface). De modo
general los puertos
USB no reciben
tensión cuando
el ordenador está
apagado. Consulta al
respecto el manual de
tu ordenador.
Page 52
ES
52
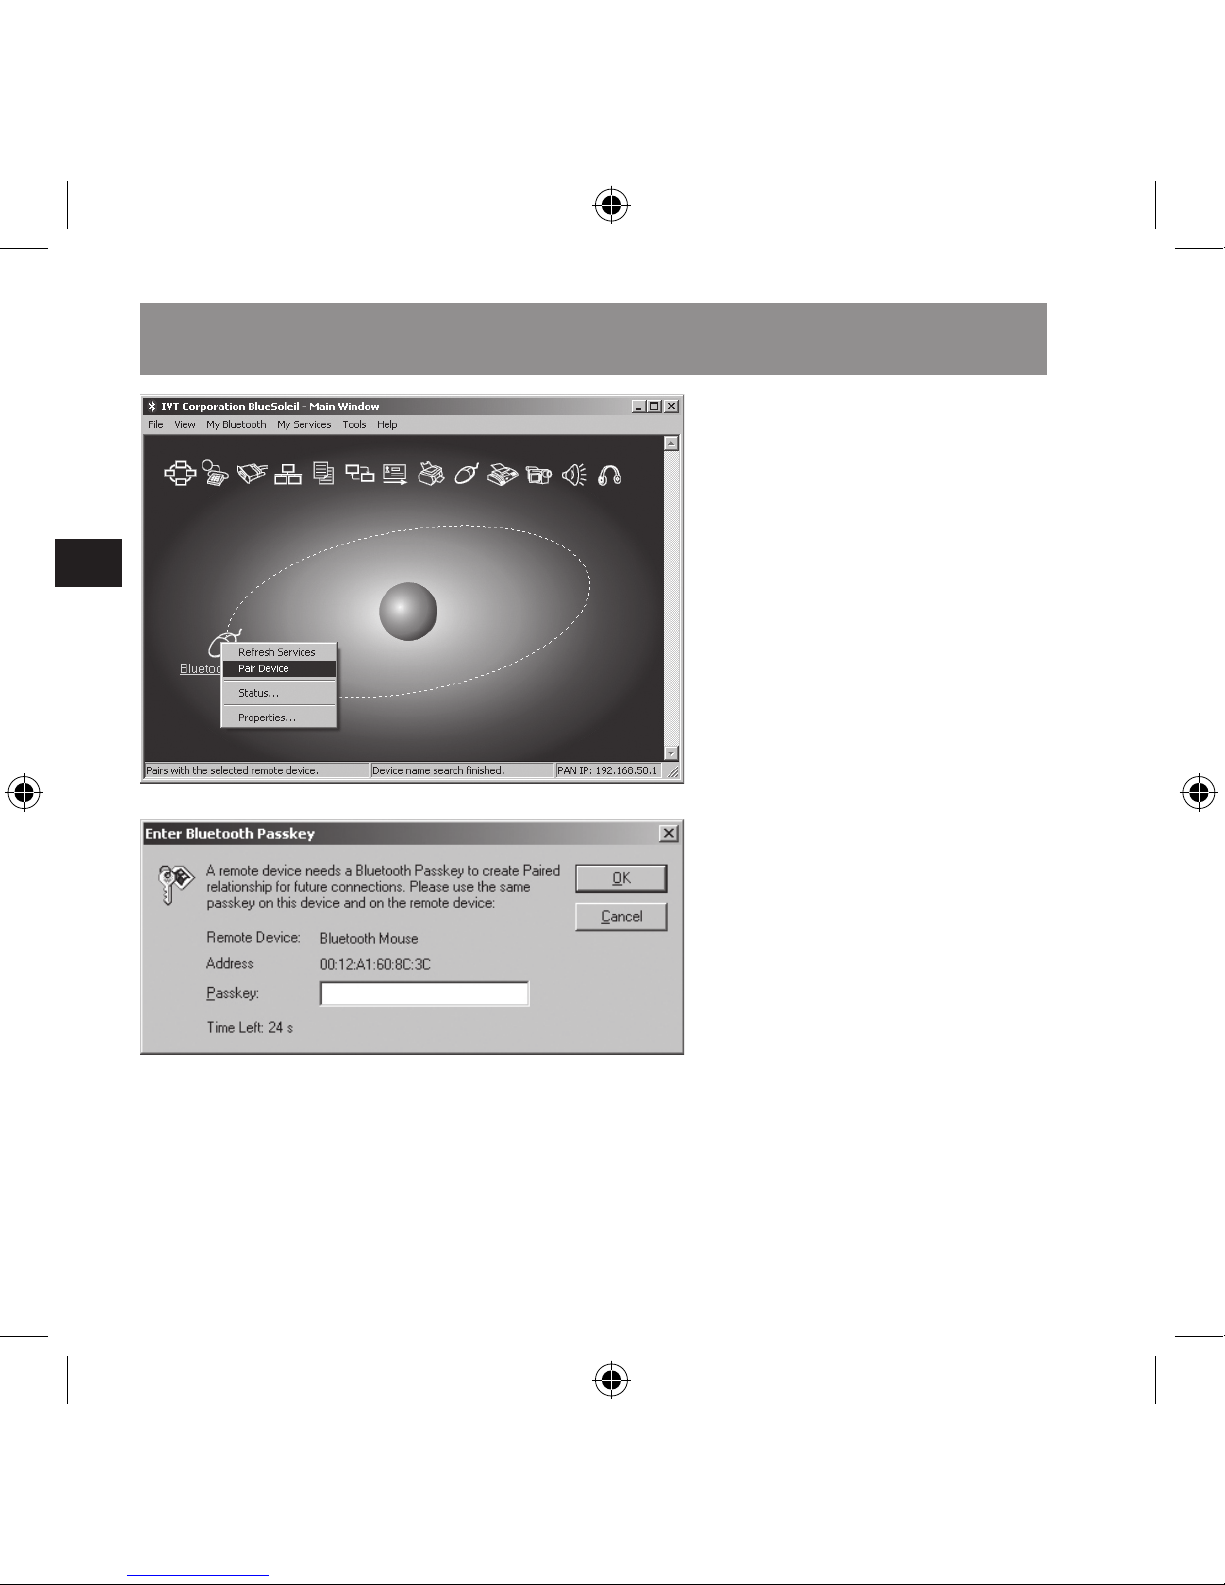
IVT Bluesoleil.
Abre IVT Bluesoleil.
Coloca el interruptor de
encendido que está en la
parte inferior del ratón en
la posición ON.
Pon el ratón en Modo de
Emparejamiento pulsando
el botón RESET que se
encuentra en la parte
inferior del ratón. La rueda
del ratón empieza a parpadear en rojo y el ratón
se encuentra entonces en
Modo de Emparejamiento.
Haz clic desde Bluesoleil
en Mi Bluetooth > Blue-
tooth Device Discovery
Haz clic con el botón derecho en Bluetooth Mouse y
haz clic a continuación en
Dispositivo Emparejamiento.
Haz clic en aceptar de la
ventana Insertar clave de
paso Bluetooth sin dar una
contraseña.
Conectar y enchufar a PC
Page 53
ES
53
Haz clic otra vez con el
botón derecho en Bluetooth Mouse y haz clic a
continuación en Connect >
Bluetooth Human Interface
Device Service. Si no está
activada la opción Connect, haz clic en Refresh
Services y repite el paso
anteriormente descrito.
El ratón está listo para
operar.
Windows Bluetooth
Service
Coloca el interruptor de
encendido que está en la
parte inferior del ratón en
la posición ON.
Pon el ratón en Modo de
Emparejamiento pulsando el botón RESET que
se encuentra en la parte
inferior del ratón. La rueda
del ratón empieza a parpadear en rojo y el ratón se
encuentra entonces
Conectar y enchufar a PC
Page 54
ES
54
en Modo de Emparejamiento.
Haz clic en el icono
Bluetooth a la derecha
en Inicio y a continuación
en Agregar Dispositivo
Bluetooth. También puedes
hacer clic en el icono
Bluetooth del Panel de
Control y luego en Agregar
Dispositivo Bluetooth.
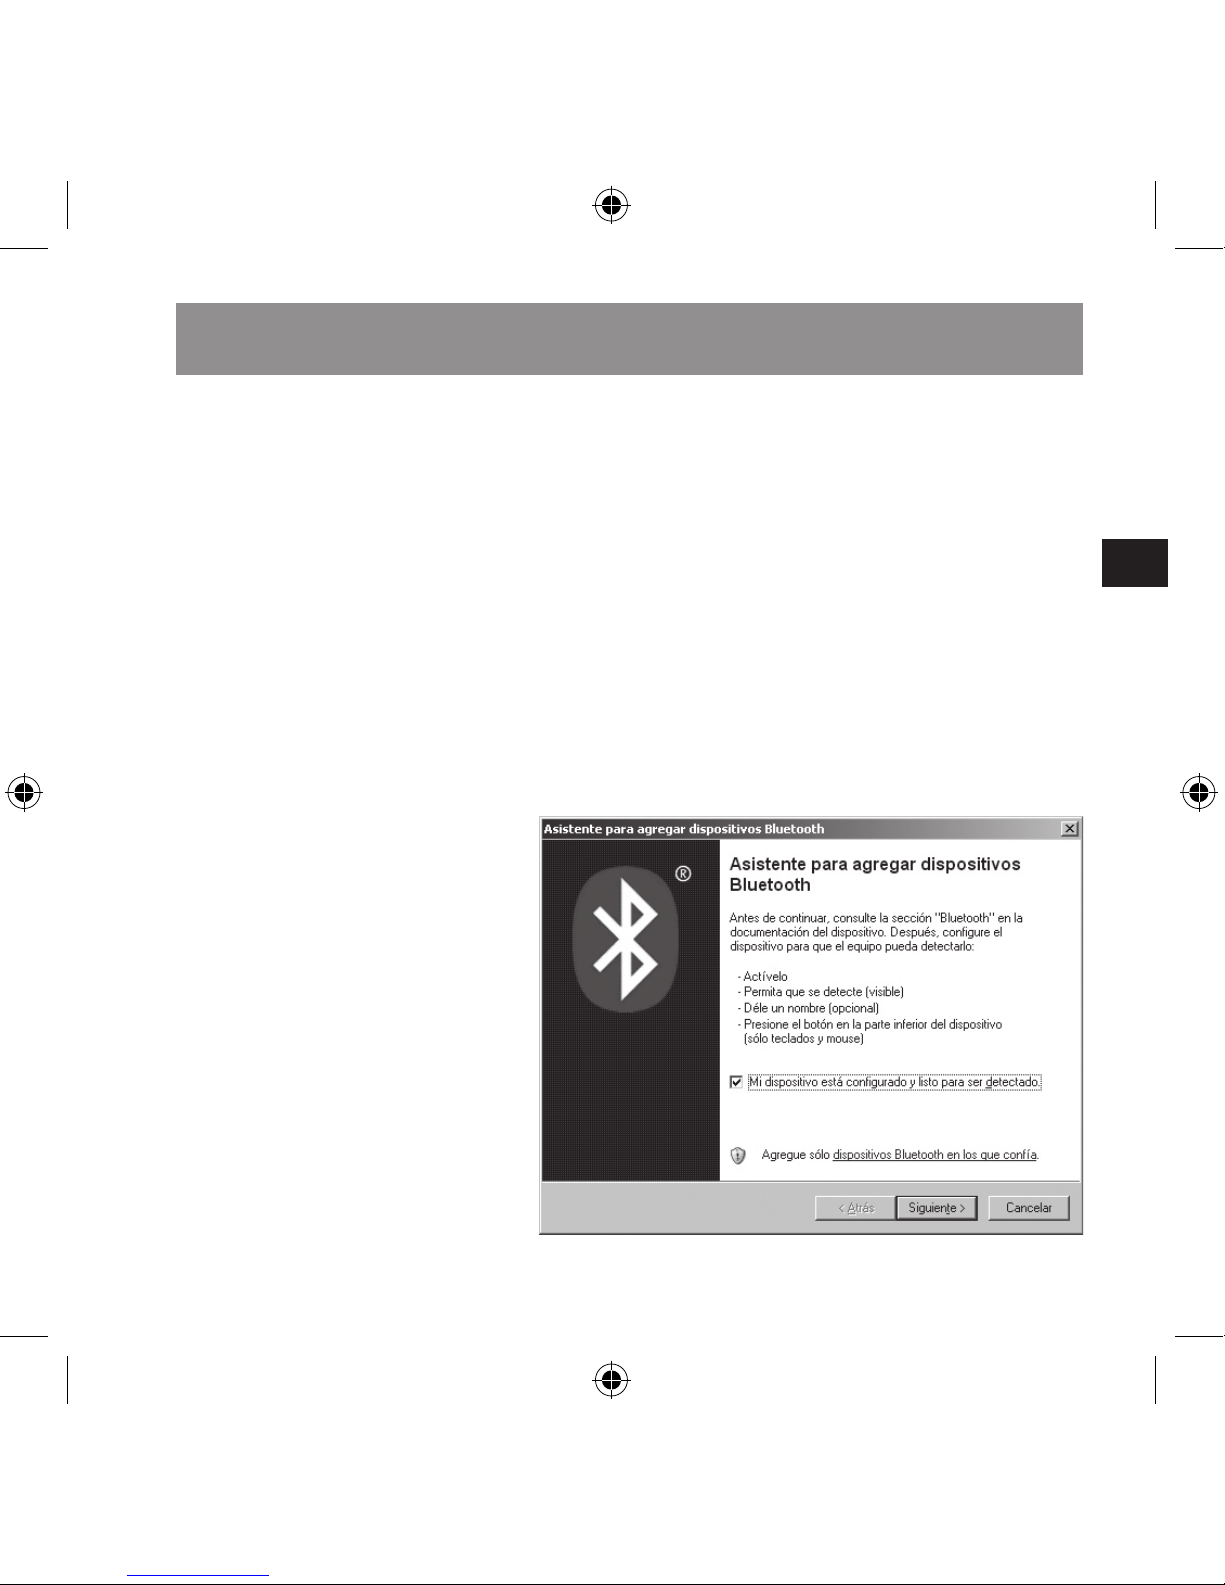
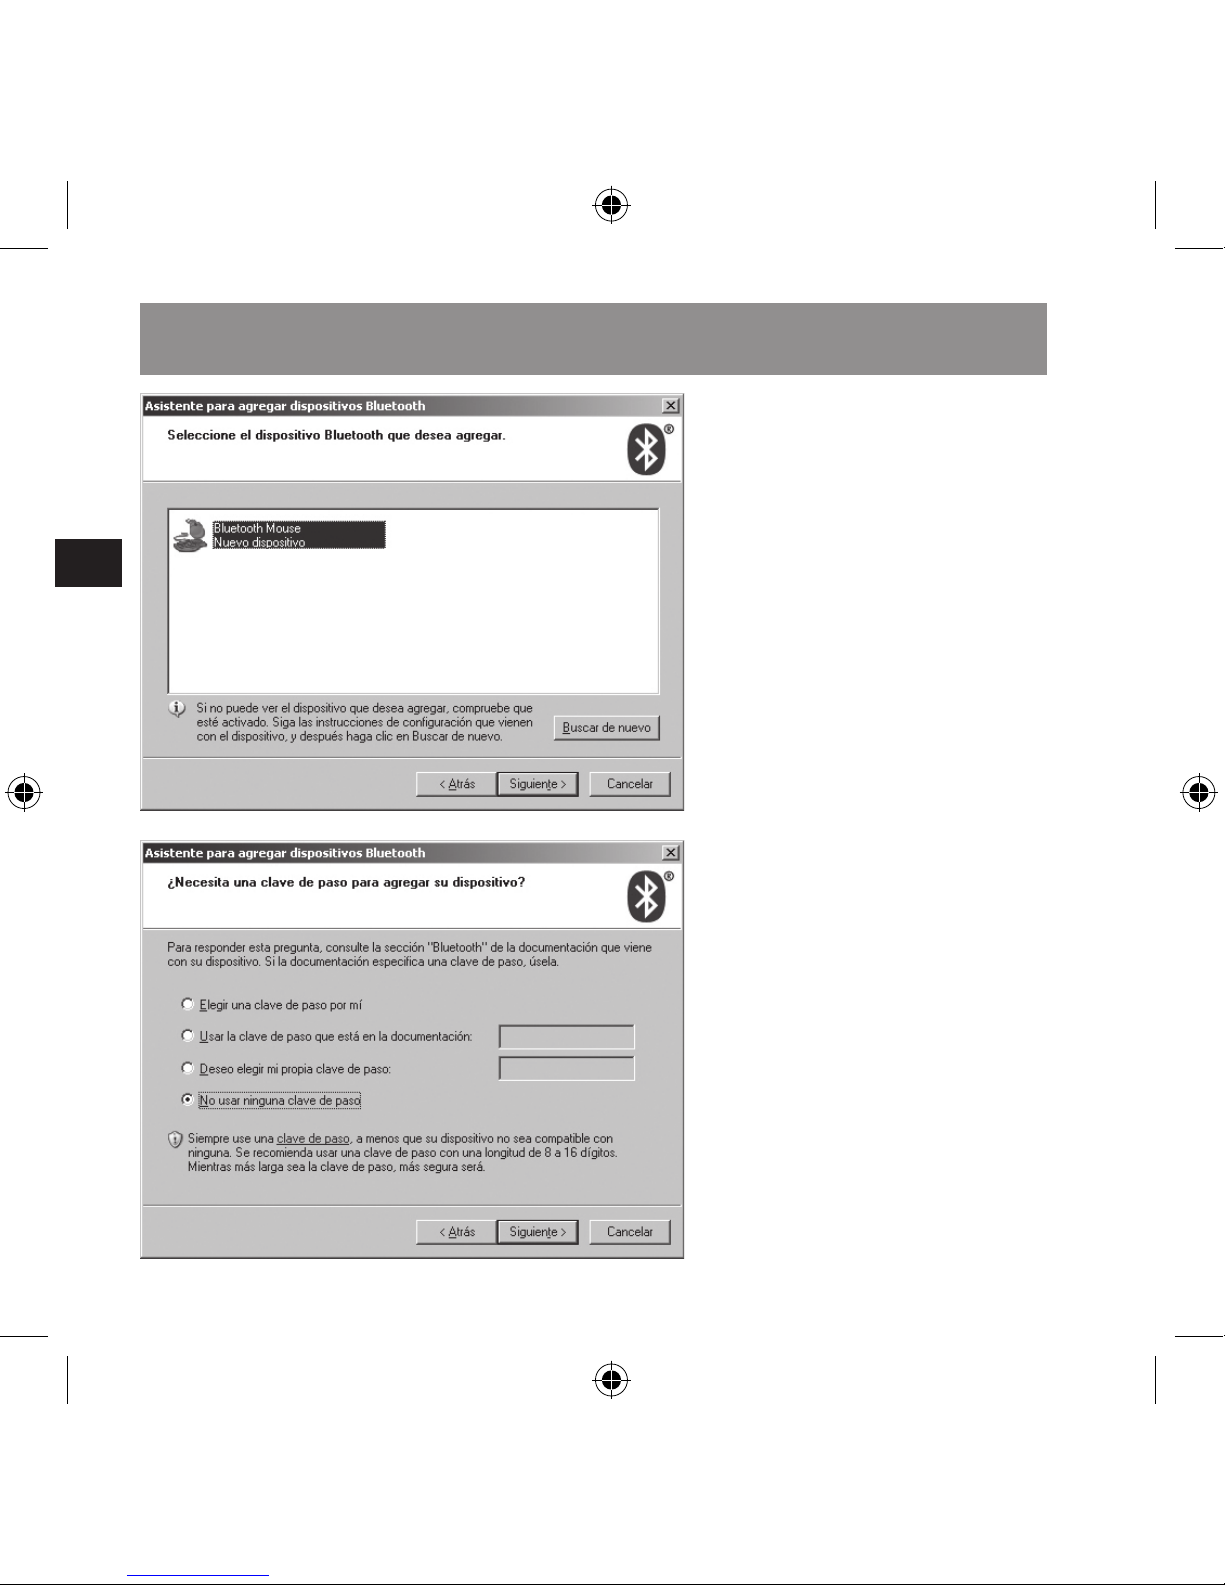
Se abre el Asistente
para añadir dispositivos
Bluetooth®. Activa la
opción Dispositivo está
conectado y ha sido
detectado luego haz clic en
Siguiente.
Selecciona “Bluetooth
Mouse” y haz clic en
Siguiente.
Selecciona No usar ningu-
na clave de paso y haz clic
en Siguiente. El ordenador
establece la conexión. Haz
clic en Finalizar. El ratón
está listo para operar.
Conectar y enchufar a PC
Page 55
ES
55
Mac OS X
En Panel de Control haz
clic en el icono Bluetooth®
de la categoría Hardware.
Si no lo has hecho antes,
activa el Bluetooth®.
Pon el ratón en Modo de
Emparejamiento pulsando el botón RESET que
se encuentra en la parte
inferior del ratón. La rueda
del ratón empieza a parpadear en rojo y el ratón
se encuentra entonces en
Modo de Emparejamiento.
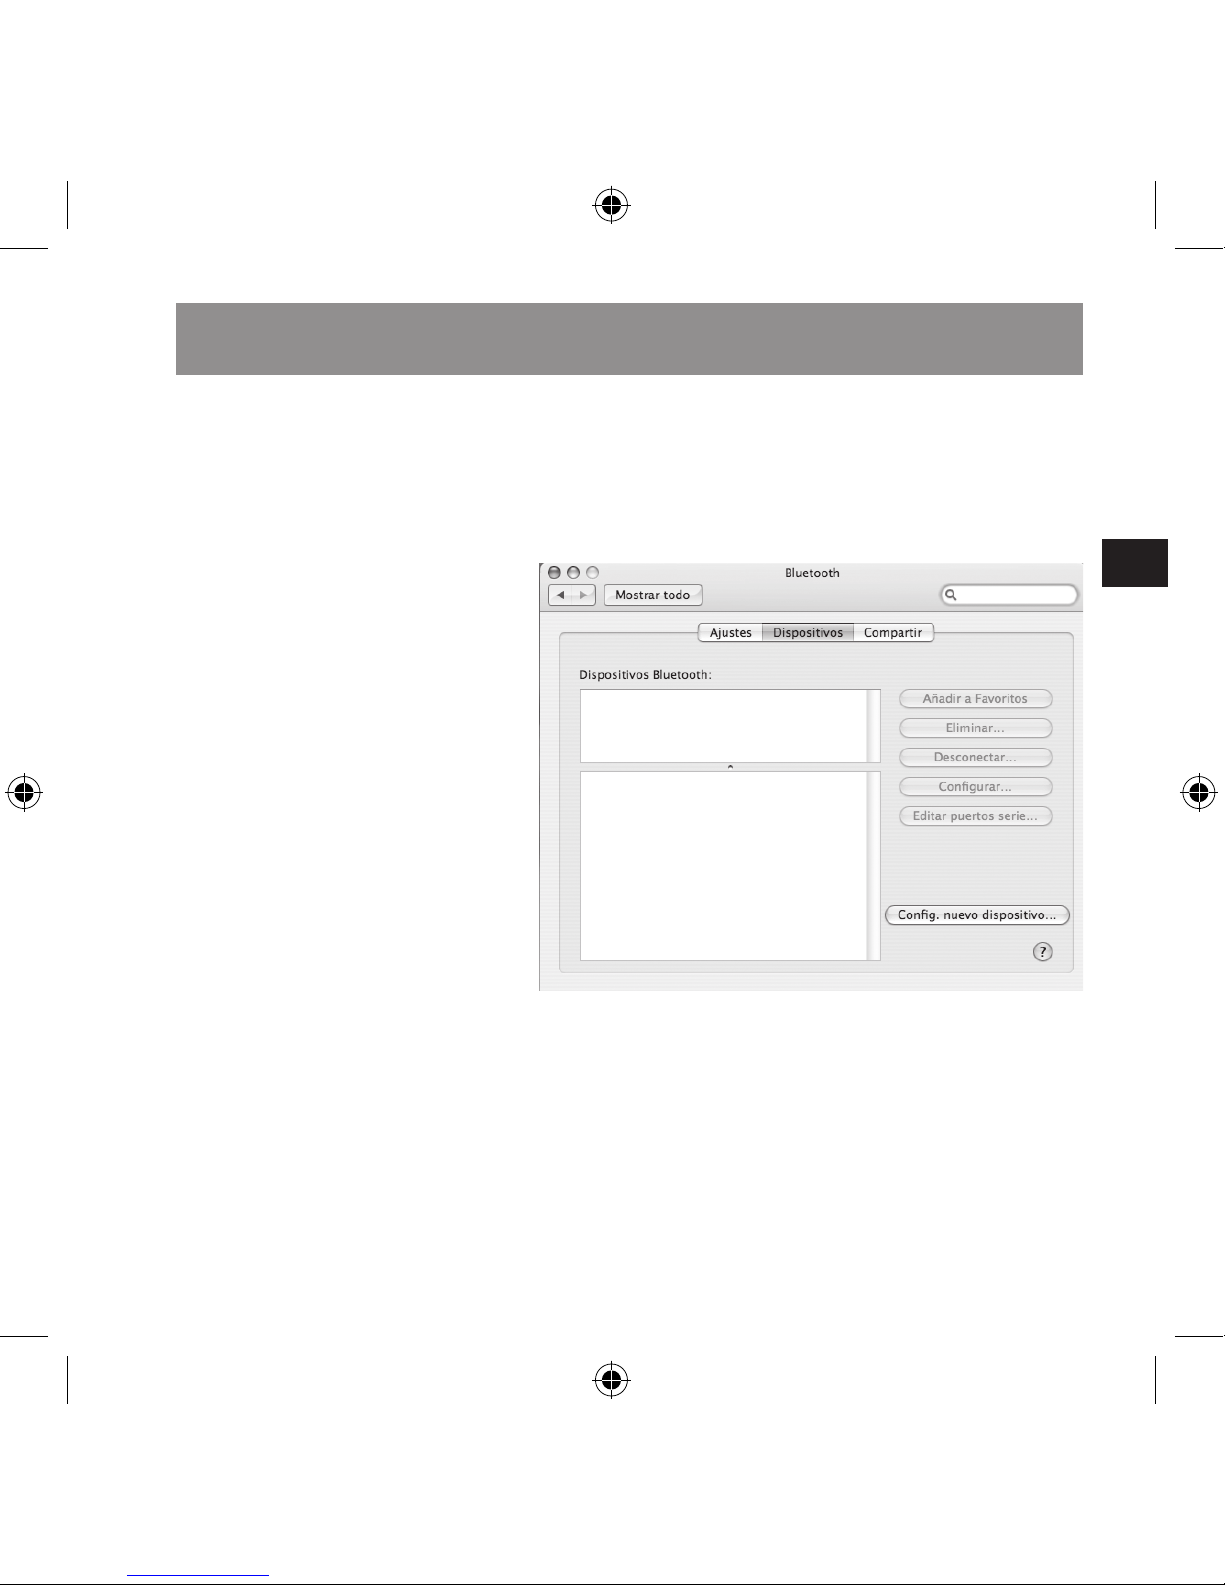
Selecciona en la pestaña
Dispositivos el botón Con-
gurar Nuevos Dispositivos.
Se abre entonces el
asistente para Bluetooth®.
Haz clic en Continuar y
sigue las instrucciones
que vayan apareciendo en
pantalla.
A los pocos segundos
el Macintosh detecta
el ratón. Selecciona
Bluetooth Mouse y haz clic
en Continuar. El ratón está
listo para operar.
Conectar y enchufar a Mac
Page 56

ES
56
A ser posible no uses el
ratón sobre supercies
metálicas. Los metales
como hierro, aluminio o
cobre dicultan la transmisión de RF y acarrean en
algunos casos interferencias.
El ratón pasa a los cinco
minutos de no ser utilizado
al modo de ahorro de
energía. Para reactivar el
ratón basta con pulsar un
botón cualquiera o mover-
lo en la supercie sobre la
cual descansa.
Desconecta el ratón si
no lo vas a usar durante
mucho tiempo para que
las pilas duren más.
Conmutar la resolución
óptica
Puedes ajustar el movimiento del puntero del
ratón de muy rápido 1600
dpi a más lento 800 dpi.
Para realizar la conmutación pulsa y mantén pulsada
la rueda del ratón y pulsa
a continuación el botón
derecho. La rueda del
ratón se enciende el rojo
durante tres segundos,
indicando que se ha mo-
dicado la sensibilidad del
ratón. Tu mismo decides
cual es la resolución que
más se acomoda a tus
necesidades.
Notas para la utilización
Page 57
ES
57
El programa Bluetooth®
no detecta el ratón
Asegúrate de que el
ratón se encuentra en el
modo de emparejamiento
(la rueda parpadea en
rojo). Pulsa para ello el
botón RESET en la parte
inferior del ratón. Busca
otra vez los dispositivos
Bluetooth®.
El ratón no funciona.
Asegúrate de que has
puesto bien las pilas y
de que están cargadas.
Conecta el cable de carga
para volverlas a cargar si
fuera necesario.
Solución a problemas
Page 58
ES
58
Modelo núm.: SL-6197SBK
► Sensor óptico con una
resolución de 800/1600
dpi
► Bluetooth® clase 2
compatible
► Longitud de onda del
láser: 850 nm
► Consumo energía: 6 mA
Garantía
Este producto tiene una
garantía de dos años a
partir de la fecha de compra tanto para defectos de
fabricación como de sus
componentes.
Si precisas ayuda...
En caso de surgir cualquier problema técnico,
acude a los especialistas
que te proporcionarán
todo tipo de soporte
técnico.
Para el reciclado de este
producto
Recogida de productos
eléctricos
De obligado cumplimiento
en países de la Unión
Europea y en otros países
de Europa con sistema de
separación de basuras.
La etiquetación del
producto y la correspondiente indicación en las
instrucciones advierten
de que tras su utilización
este producto no se tira
junto con la demás basura
doméstica. Deposítalo en los contenedores
destinados a ello con el n
de no agredir al medio ambiente ni atentar contra la
salud, eliminando residuos
de forma incontrolada.
Datos técnicos
Page 59
ES
59
Recicla el dispositivo para
mejorar la recuperación de
materiales valiosos y de
recursos útiles para todos.
Los usuarios particulares
deberían contactar con el
establecimiento en el que
han adquirido el aparato
o con las autoridades
locales para saber cómo
reciclar este producto de
la manera menos agresiva
para el medio ambiente.
Los usuarios comerciales
se pondrán en contacto
con sus proveedores y
deberán consultar las
condiciones generales del
contrato de compra-venta.
Este producto no debe arrojarse a la basura común
ni con otros productos
industriales de desecho.
Jöllenbeck GmbH
Kreuzberg 2
27404 Weertzen
GERMANY
Soporte línea directa:
+49 (0) 4287 12 51 33
En la red ja alemana
E-Mail:
[email protected]
Datos técnicos
Page 60

IT
60
Contenuto 46
Indicazioni di sicurezza 4
7
Requisiti di sistema 4
8
Controlli 49
Avvertenze importanti sulle batterie 5
0
Ricaricare il mouse 5
1
Collegamento e connessione per PC 5
2
Collegamento e connessione per Mac 5
5
Indicazioni d’uso 5
6
Risoluzione di problemi 5
7
Dati tecnici 5
8
Contenuto
Page 61
IT
61
Indicazioni di sicurezza
Laser
Questo mouse utilizza
un sensore laser della
classe 1. Il contatto diretto
del laser con gli occhi
può provocare danni alla
vista. Non guardare mai
direttamente nel raggio
laser e non puntare mai
il raggio su altre persone
o su superci riettenti
come p.e. specchi. Non
guardare mai nel raggio
laser attraverso dispositivi
ingrandenti come lenti,
microscopi o simili. Non
scomporre il mouse nelle
sue parti e non cercare di
ripararlo.
Ricerca guasti/ripara
-
zione
Non riparate l’apparecchio
e non effettuate la manu-
tenzione da soli. Per lavori
di riparazione o manutenzione rivolgeteVi a personale competente specializzato. Non apportate
da soli nessuna modica
all’apparecchio. Facendo
ciò, perderete ogni diritto
di garanzia.
Umidità e fonti di calore
Non utilizzate
l’apparecchio in prossimità
d’acqua (p. es. in prossimità di lavandini, vasche da
bagno o piscine) e tenetelo
lontano da luoghi umidi, da
sprizzi o gocce d’acqua,
nonché dalla pioggia. Non
esporre il dispositivo ad
alte temperature, umidità o
luce solare diretta.
Attenzione: Legge-
re con attenzione il
manuale d’istruzioni
e rispettare le istru-
zioni ivi contenute.
Conservare le
istruzioni per future
consultazioni.
Page 62

IT
62
Requisiti di sistema per
PC
Per poter utilizzare
questo mouse occorre un
notebook o un desktop
computer con ricevitore
Bluetooth® integrato o
ricevitore USB Bluetooth®.
Questo ricevitore deve
sopportare uno dei
seguenti due protocolli
Bluetooth®: Microsoft,
IVT Bluesoleil. Non può
essere garantita la compatibilità con altri protocolli
Bluetooth®.
Requisiti di sistema per
Mac
Occorre un Macintosh con
interfaccia Bluetooth® e
Mac OS X.
Requisiti di sistema
Page 63
IT
63
Controlli
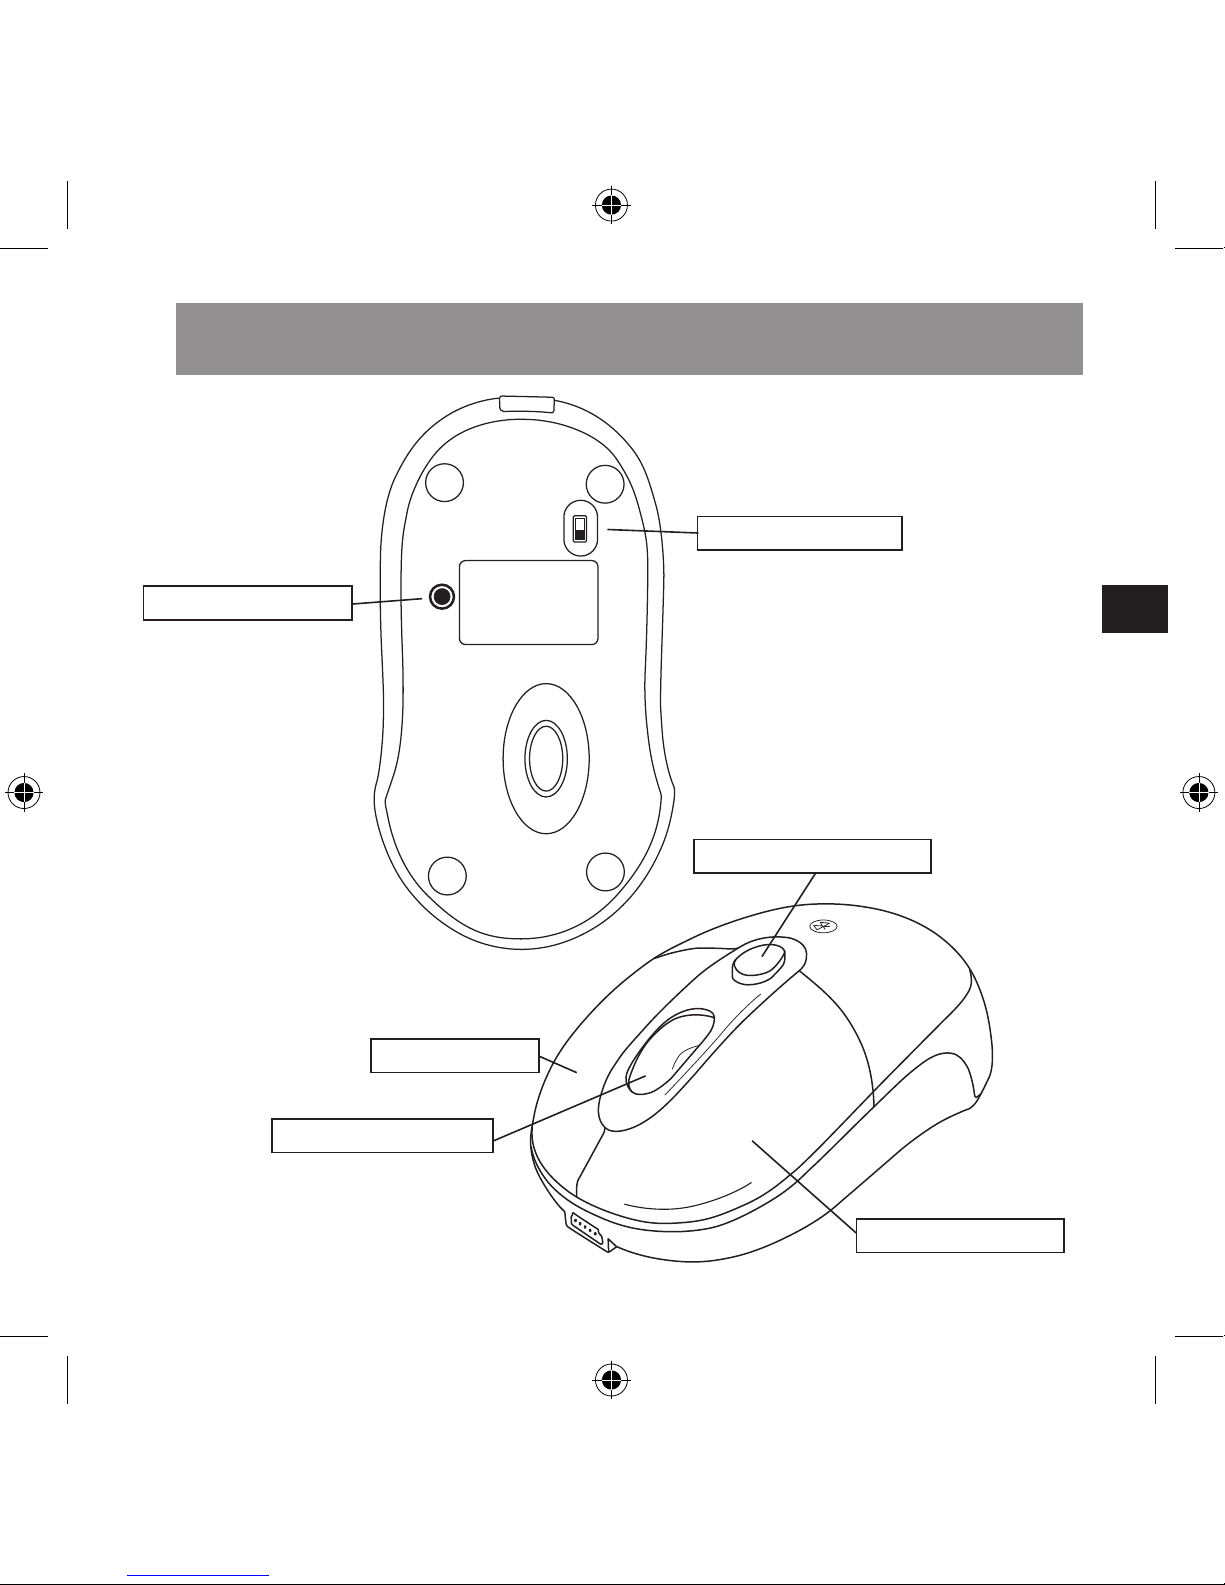
Tasto sinistro
OFF
ON
RESET
Rotella del mouse
Tasto destro
Interruttore
Pulsante RESET
Tasto vano batterie
Page 64
IT
64
Utilizzare soltanto batterie
NiMH o altre batterie
ricaricabili. Non utilizzare
batterie alcaline. Non
utilizzare contemporaneamente batterie nuove e
usate. Conservare le batterie lontano dalla portata
dei bambini.
Smaltire e riciclare le
batterie usate secondo le
norme vigenti locali.
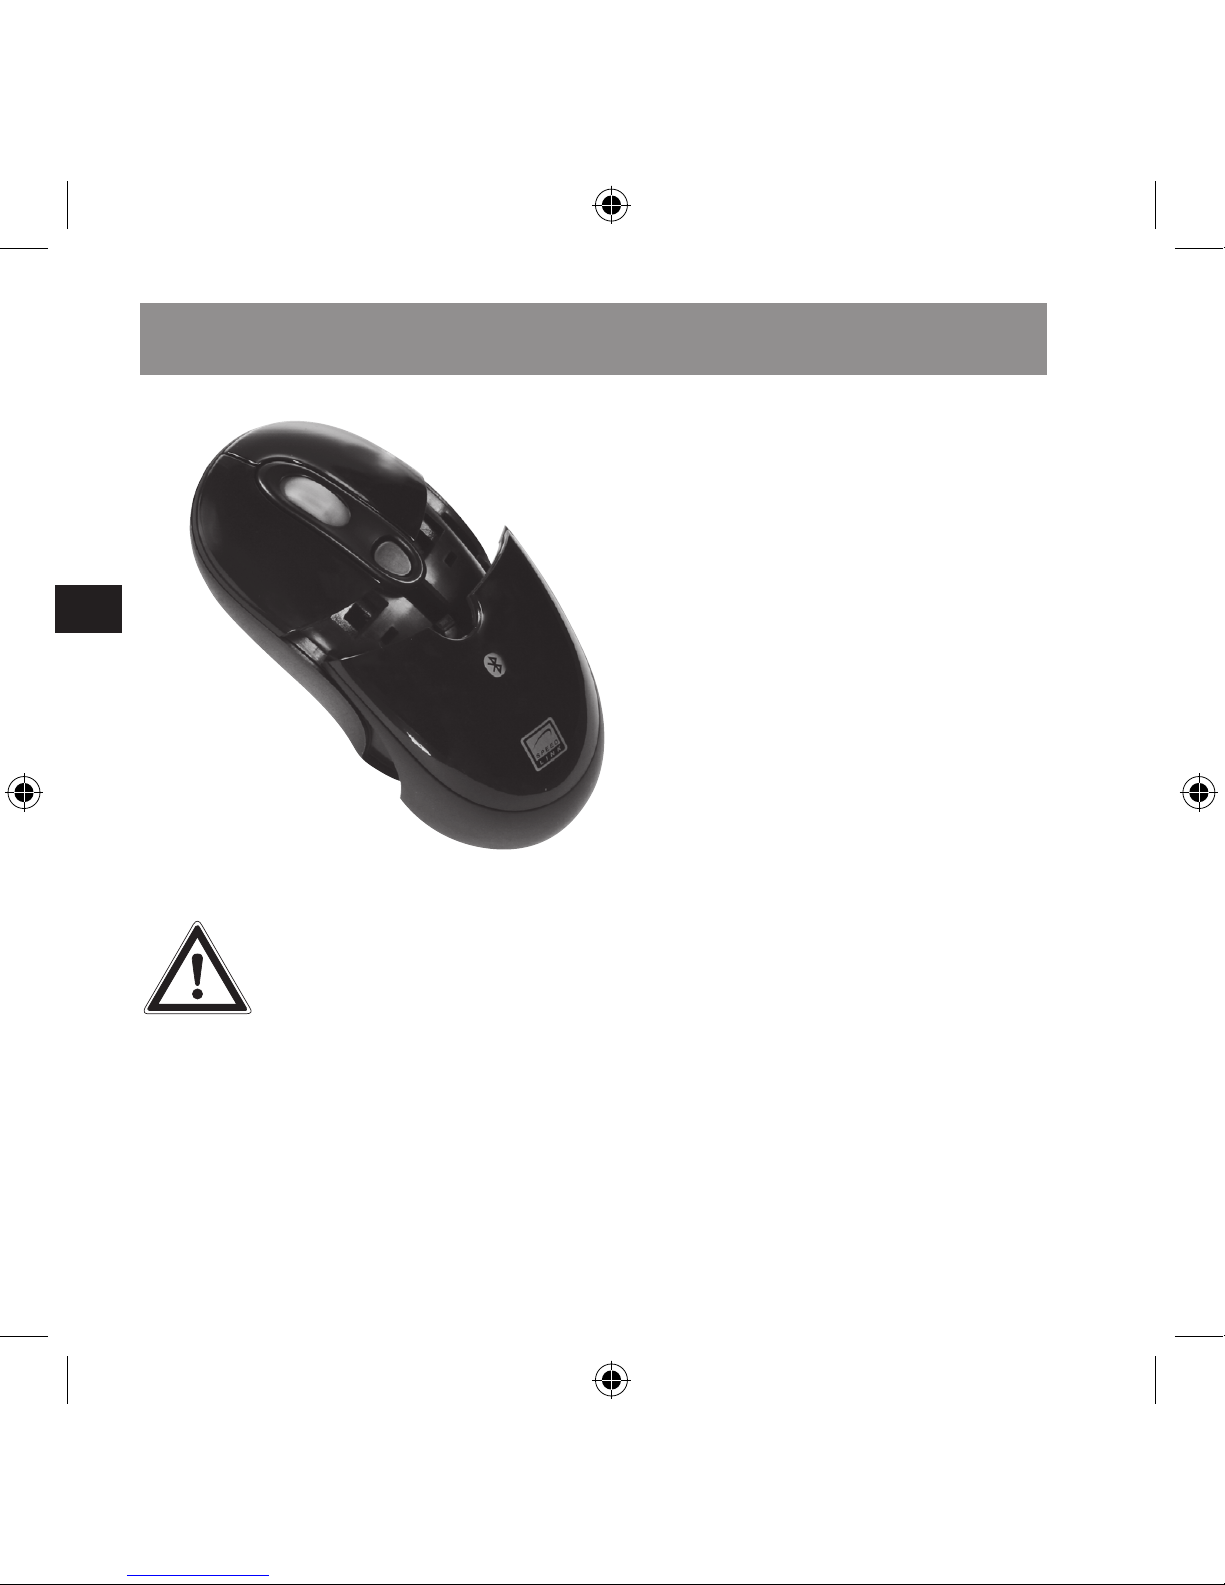
Inserimento batterie
Accertarsi che il mouse
sia spento. A tale scopo,
posizionare su “OFF”
l’interruttore sulla parte
inferiore del mouse.
Premere il tasto del
vano batterie. Inserire
le batterie rispettando la
polarità indicata. Riporre il
coperchio del vano batterie
sul mouse e attivare il
mouse.
Avvertenze importanti sulle batterie
NOTA BENE: prima di
utilizzare il mouse, si
consiglia di caricare
le batterie per otto
ore. Informazioni per
caricare le batterie si
trovano nel capitolo
„Caricare il mouse“.
Page 65
IT
65
La rotella del mouse
s’illumina di rosso, quando
le batterie sono scariche.
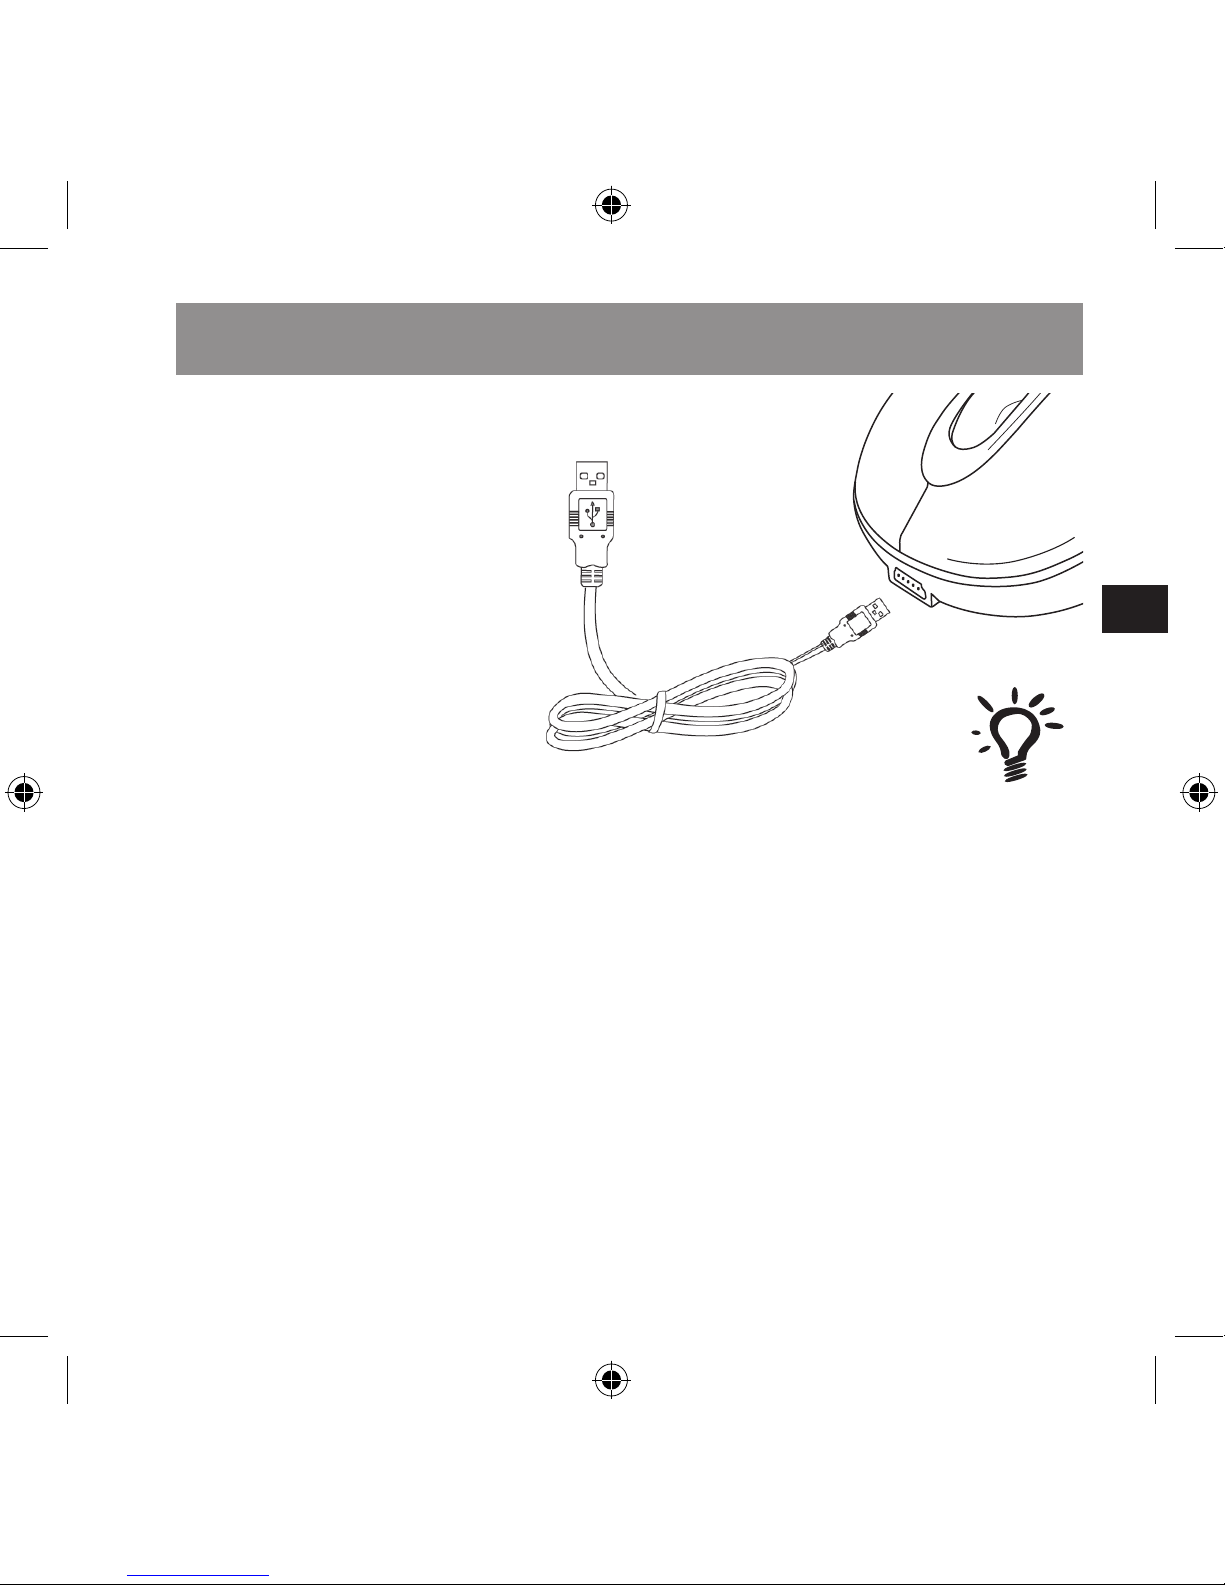
Collegare il cavo USB in
dotazione ad una porta
USB libera del computer.
Collegare il mouse al
connettore Mini-USB del
cavo. Il mouse si carica,
quando la rotella del mouse
s’illumina di verde. Durante
la ricarica il mouse rimane
acceso.
Ricaricare il mouse
NOTA BENE: per
poter caricare il
mouse anche a com-
puter spento, occorre
attivare l’ACPI (Ad-
vanced Conguration
and Power Manage-
ment Interface) nel
BIOS del computer.
Altrimenti le porte
USB non vengono
alimentate a computer
spento. Consultare il
manuale del computer
a riguardo.
Page 66
IT
66
IVT Bluesoleil.
Aprire IVT Bluesoleil.
Posizionare su ON l’interruttore sulla parte inferiore
del mouse.
Mettere il mouse in modalità pairing premendo
il pulsante RESET sulla
parte inferiore del mouse.
La rotella scroll lampeggia
di rosso e il mouse ora si
trova in modalità pairing.
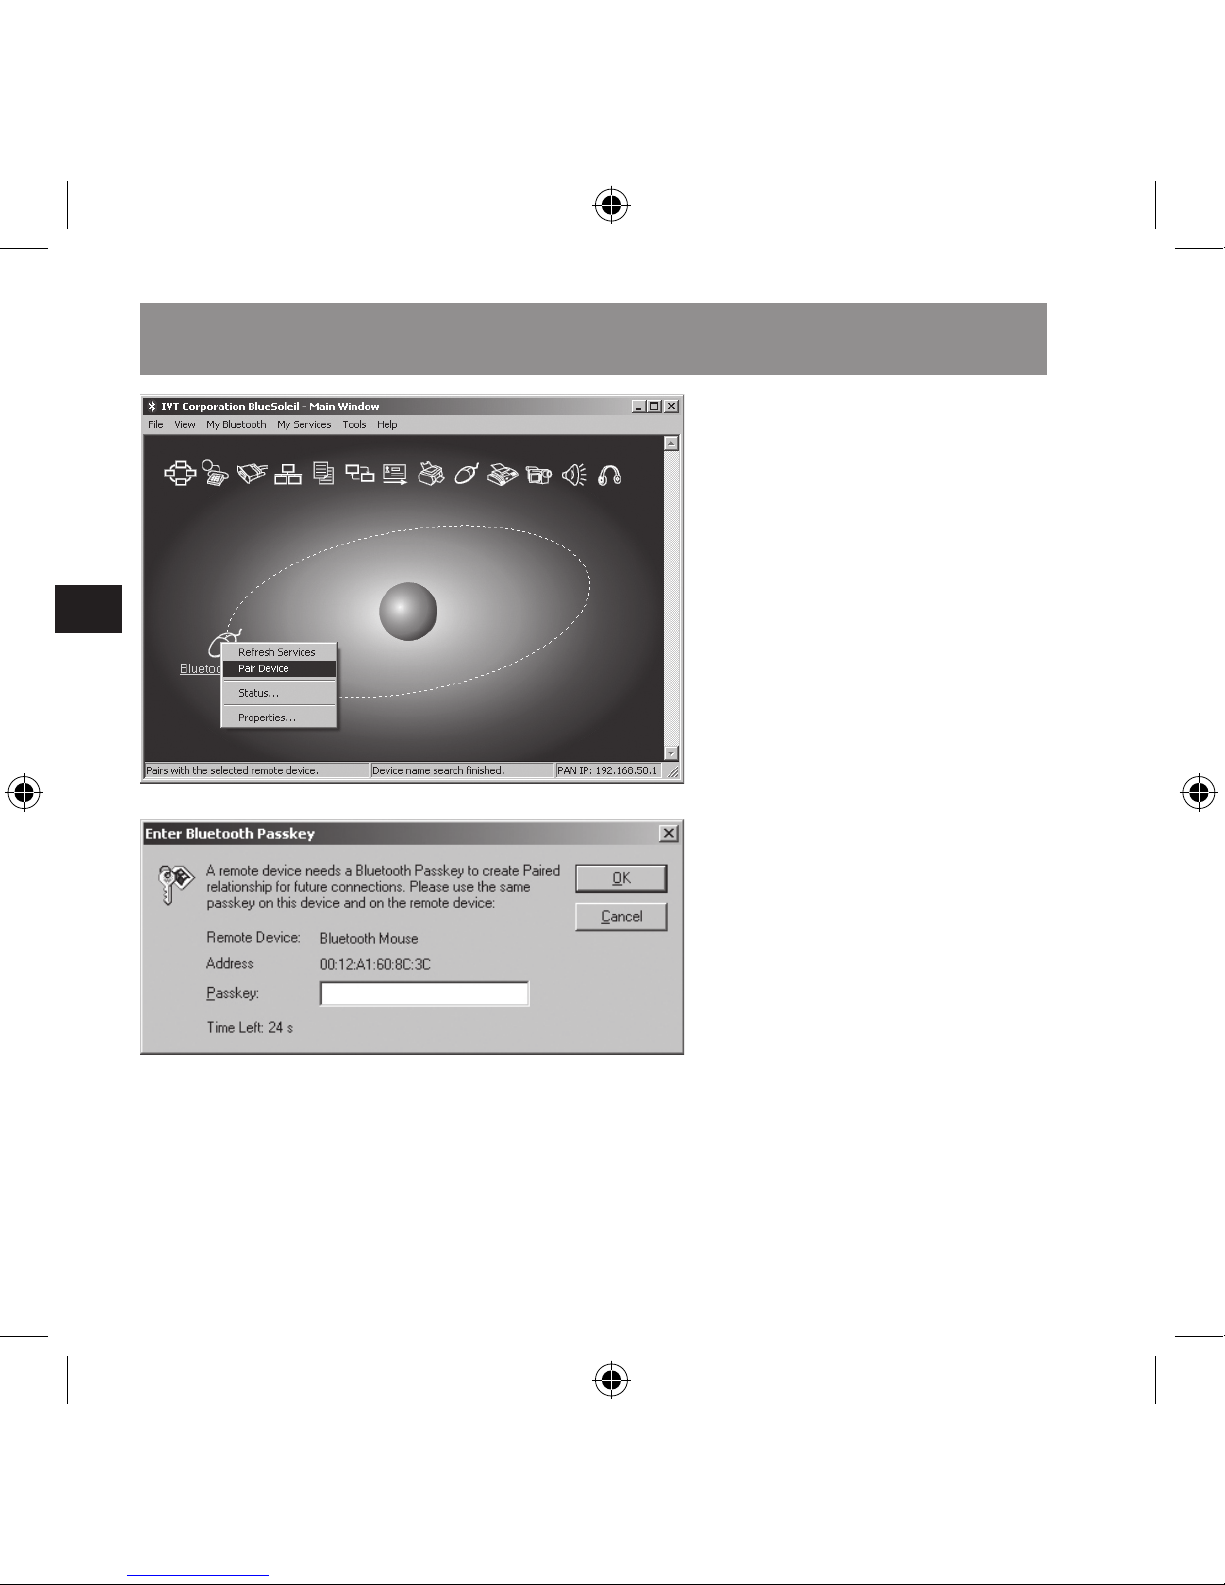
In Bluesoleil fare clic su
My Bluetooth > Bluetooth
Device Discovery.
Fare clic con il tasto destro
del mouse Bluetooth
e cliccare poi su Pair
Device.
Cliccare OK nella nestra
Enter Bluetooth Passkey
senza inserire una passkey.
Fare nuovamente clic su
Bluetooth Mouse con il
tasto destro del mouse
e cliccare poi Connect >
Collegamento e connessione per PC
Page 67
IT
67
Bluetooth Human Interface
Device Service. Nel caso
che la voce del menu
Connect non sia attivata,
cliccare su Refresh Ser-
vices e ripetere il passo
precedente.
Ora il mouse è pronto per
l’uso.
Servizio Windows
Bluetooth
Posizionare su ON
l’interruttore sulla parte
inferiore del mouse.
Mettere il mouse in modalità pairing premendo
il pulsante RESET sulla
parte inferiore del mouse.
La rotella scroll lampeggia
di rosso e il mouse ora si
trova in modalità pairing.
Cliccare sul simbolo
Bluetooth a destra nella
barra delle applicazioni e
poi su Aggiungi dispositivo
Bluetooth.
Collegamento e connessione per PC
Page 68
IT
68
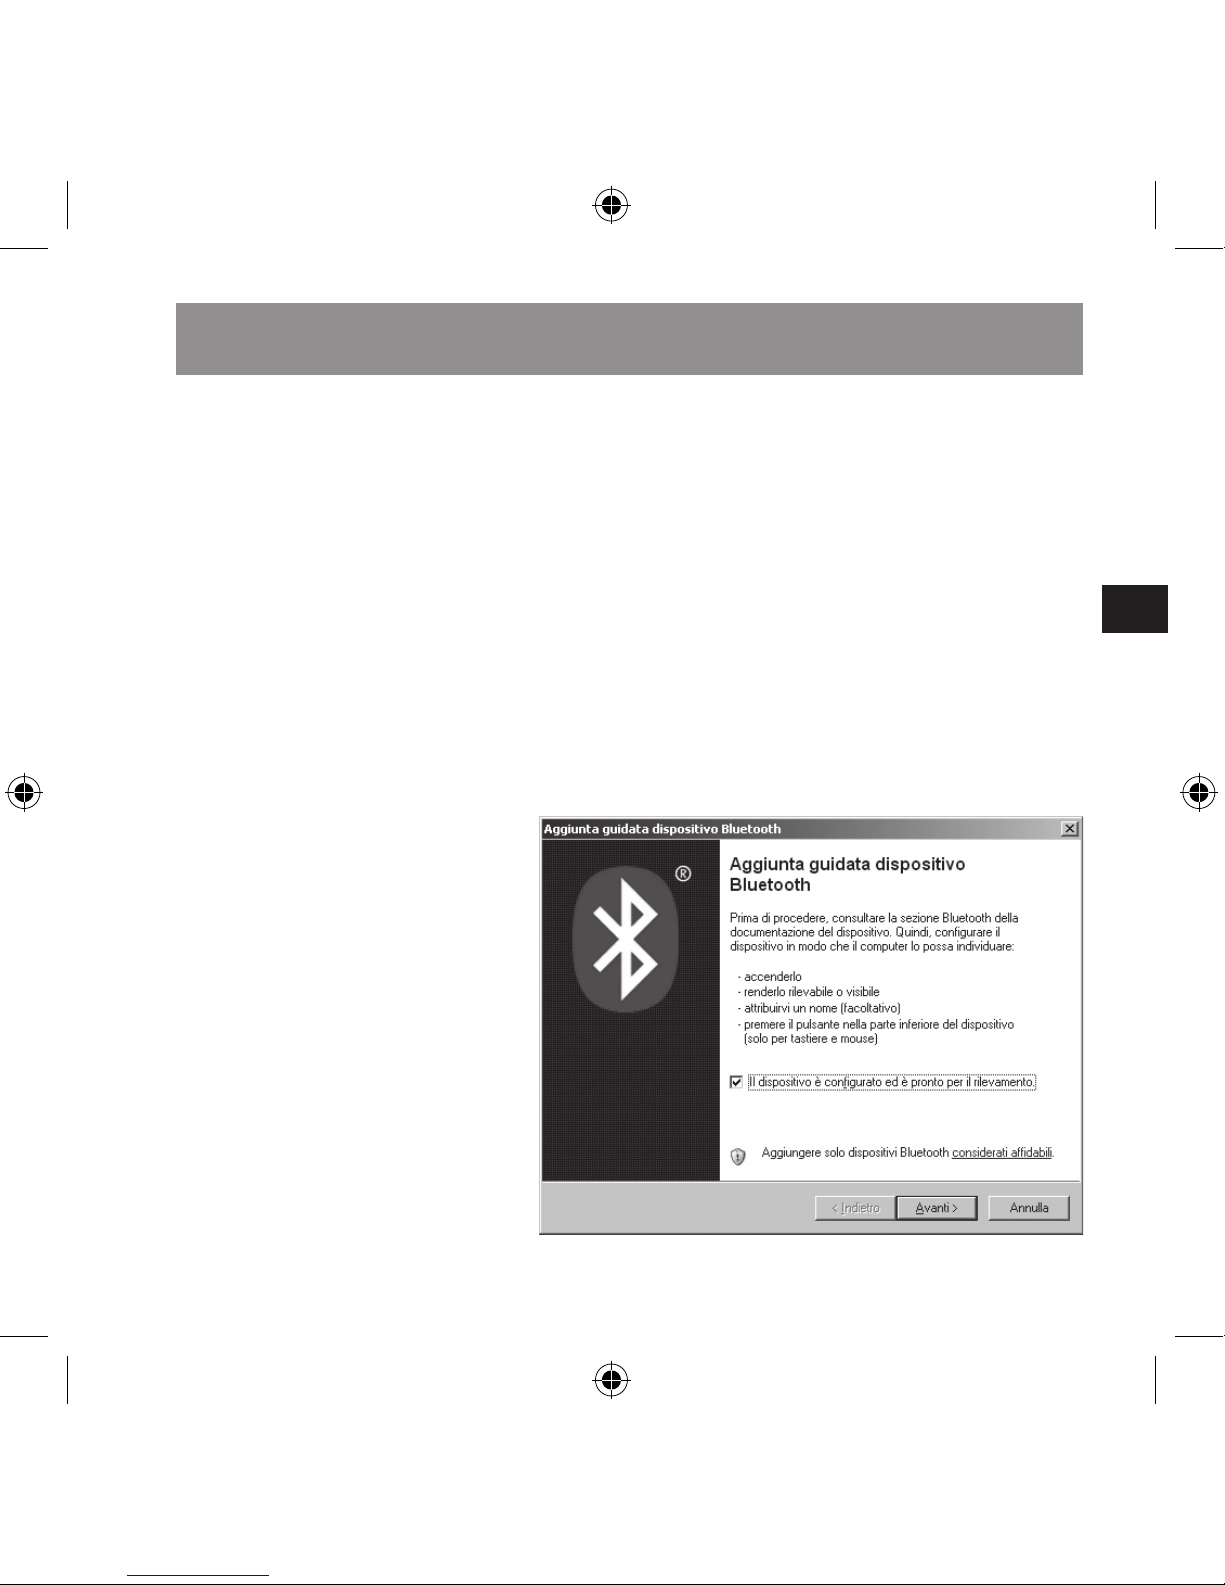
In alternativa si può cliccare sul simbolo Bluetooth®
nel Pannello di controllo e
poi su Aggiungi dispositivo
Bluetooth.
Si apre l’Aggiunta guidata
dispositivo Bluetooth®.
Attivare Il dispositivo è
congurato ed è pronto
per il rilevamento e cliccare poi su Avanti.
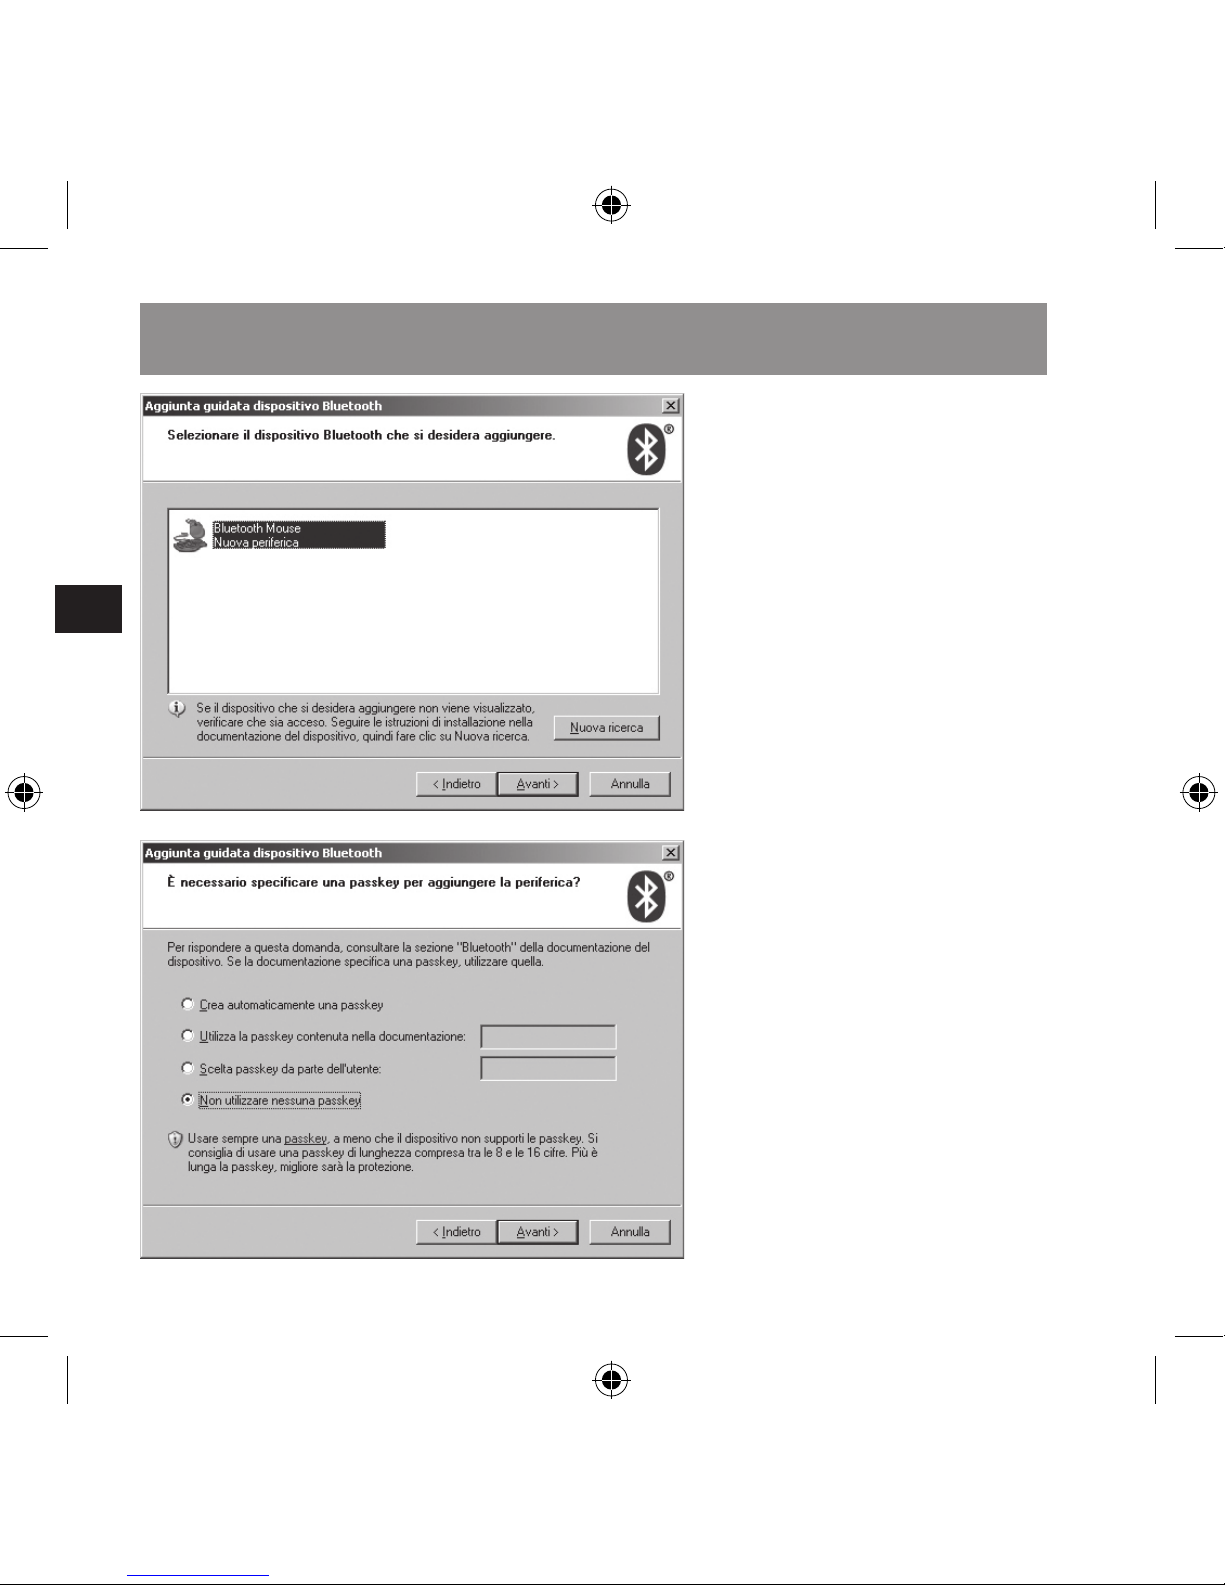
Selezionare il mouse
Bluetooth e cliccare su
Avanti.
Selezionare Non utilizzare
nessuna passkey e cliccare su Avanti.
Il computer ora crea la
connessione.
Cliccare su Fine. Il mouse
ora è pronto per l’uso.
Collegamento e connessione per PC
Page 69
IT
69
Mac OS X
Cliccare sul simbolo
Bluetooth® nella voce
Hardware che si trova
nella cartella Preferenze di
sistema.
Nel caso non sia stato
fatto, attivare Bluetooth®.
Mettere il mouse in modalità pairing premendo
il pulsante RESET sulla
parte inferiore del mouse.
La rotella scroll lampeggia
di rosso e il mouse ora si
trova in modalità pairing.
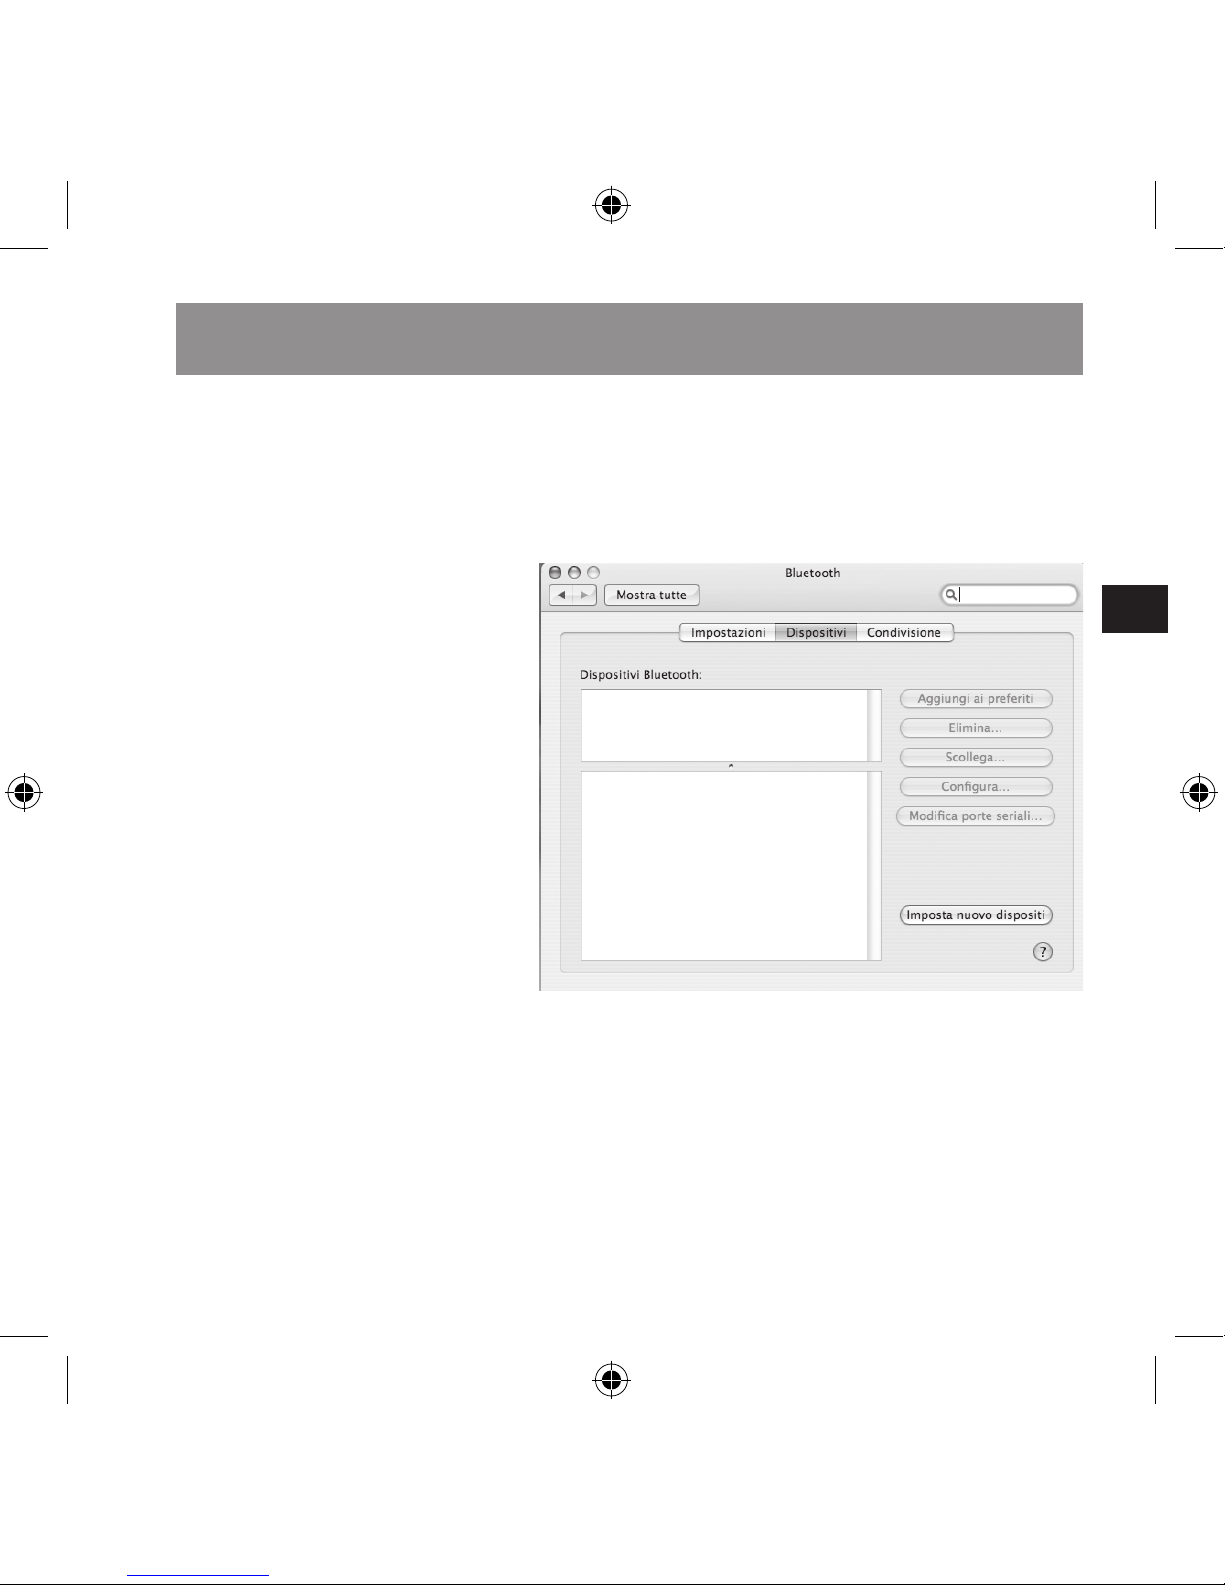
Nel tab Dispositivi selezionare Imposta nuovo
dispositivo.
Ora si apre l’Impostazione
Assistita Bluetooth. Cliccare su Continua e seguire le
istruzioni sullo schermo.
Dopo qualche secondo
il Macintosh individua il
mouse. Selezionare il
mouse Bluetooth e cliccare su Continua.
Il mouse ora è pronto per
l’uso.
Collegamento e connessione per Mac
Page 70

IT
70
Evitare di utilizzare
il mouse su superci
metalliche. Metalli come
ferro, alluminio o rame
schermano la trasmissione
radio e possono provocare
un malfunzionamento del
mouse.
Dopo cinque minuti il mouse va automaticamente
in modalità di risparmio
energetico. Per riattivare il
mouse, premere semplicemente un tasto qualsiasi
o muovere il mouse sulla
supercie.
Spegnere il mouse quando
non viene utilizzato per
aumentare la durata delle
batterie.
Cambio risoluzione
Esiste la possibilità di
selezionare la velocità
del puntatore del mouse
accelerata a 1600 dpi o
meno veloce a 800 dpi.
Per cambiare la risoluzione premere e tenere
premuto il tasto rotella
del mouse e premere il
tasto destro del mouse.
La rotella del mouse ora
s’illumina di rosso per tre
secondi per indicare che
la risoluzione del sensore
è stata cambiata. Si consiglia di fare delle prove per
individuare l’impostazione
appropriata.
Indicazioni d’uso
Page 71

IT
71
Il programma
Bluetooth® non riconos
-
ce il mouse
Accertarsi che il mouse
si trovi in modalità pairing
(rotella del mouse lampeggia di rosso). Premere
il pulsante RESET sulla
parte inferiore del mouse.
Ripetere la ricerca di dispositivi Bluetooth®.
Il mouse non funziona
Accertarsi che le batterie siano inserite correttamente e che siano
caricate. All’occorrenza
collegare il cavo di ricarica
per ricaricare le batterie.
Risoluzione di problemi
Page 72
IT
72
N. del modello: SL-6197SBK
► Sensore ottico con riso
-
luzione a 800/1600 dpi
► Compatibile Bluetooth®
Class 2
► Lunghezza d’onda del
laser: 850 nm
► Consumo energetico:
6 mA
Garanzia
Per questo prodotto
concediamo una garanzia
della durata di due anni
a partire dalla data di acquisto. La garanzia copre
i difetti di fabbricazione,
nonché quelli dei componenti integrati.
In caso di supporto
tecnico...
Nel caso in cui dovessero
vericarsi problemi tecnici,
preghiamo di voler contattare i nostri tecnici.
Smaltimento corretto del
prodotto
(Riuti elettrici)
Da applicare nei paesi
dell’Unione Europea ed
in altri paesi europei con
sistemi di raccolta riuti
differenziata.
Il contrassegno sul prodotto o sulla letteratura relativa indica che a termine
della sua durata non deve
essere smaltito insieme
ai normali riuti domestici. Smaltire il dispositivo
separatamente da altri
riuti per non danneggiare
l’ambiente o la salute
dell’uomo a causa di uno
smaltimento incontrollato
dei riuti.
Riciclare il dispositivo
per favorire il riciclaggio
sostenibile di risorse
Dati tecnici
Page 73
IT
73
materiali.
Si consiglia agli utenti privati di contattare il rivenditore presso il quale è stato
acquistato il prodotto, o le
autorità competenti, per
informarsi come riciclare
il dispositivo in maniera
ecologica.
Si consiglia agli utenti
commerciali di rivolgersi al
loro fornitore e di consultare le condizioni contrattuali di vendita. Questo
prodotto non deve essere
smaltito insieme ad altri
riuti commerciali.
Jöllenbeck GmbH
Kreuzberg 2
27404 Weertzen
GERMANY
Hotline di supporto:
+49 (0) 4287 12 51 33
rete ssa tedesca
E-Mail:
[email protected]
Dati tecnici
Page 74

DK
74
Indhold 74
Sikkerhedsanvisninger 75
Systemforudsætninger 76
Betjeningselementer 77
Vigtige henvisninger til batteriet 7
8
Sådan oplader du musen 7
9
Sådan tilslutter og forbinder du musen (PC) 8
0
Sådan tilslutter og forbinder du musen (Mac)
83
Anvisninger til brugen 8
4
Fejlnding og afhjælp 8
5
Tekniske data 8
6
Indhold
Page 75
DK
75
Sikkerhedsanvisninger
Laser
Denne mus anvender
en klasse 1 lasersensor.
En direkte kontakt med
laseren kan forårsage
skader på øjnene. Se
aldrig direkte in i laserstrålen og vend strålen aldrig
imod andre personer eller
reekterende overader,
som f.eks. spejle. Se aldrig
ind i laserstrålen igennem
forstørrelsesapparater,
som f.eks. forstørrelsesglas, mikroskoper eller
lignende. Adskil musen
aldrig i dens enkelte komponenter og prøv ikke på
at reparere musen.
Fugtighed
Systemet bør aldrig
bruges i nærheden af
vand og skal holdes fjern
fra fugtighed, dryppende
eller sprøjtende væsker
for at undgå skader på
apparatet.
Rengøring
Der må ikke bruges
kemikalier eller andre
rengøringsmidler til at
rengøre apparatet. Brug
kun en tør eller let fugtig
klud.
Giv agt: Læs ven-
ligst betjeningsvej-
ledningen omhyggeligt og overhold
anvisningerne. Op-
bevar vejledningen
til senere brug.
Page 76

DK
76
Systemforudsætninger,
PC
Til brug af denne mus,
skal du have en notebook
eller desktop-computer
med integreret Bluetooth®
modtager eller Bluetooth®
USB modtager. Modtageren skal understøtte
en af de følgende to
Bluetooth®-protokoller:
Microsoft, IVT Bluesoleil.
En kompatibilitet med andre Bluetooth®-protokoller
kan ikke garanteres.
Systemforudsætninger,
Mac
Du skal have en Macintosh med integreret
Bluetooth®-interface og
Mac OS X.
Systemforudsætninger
Page 77
DK
77
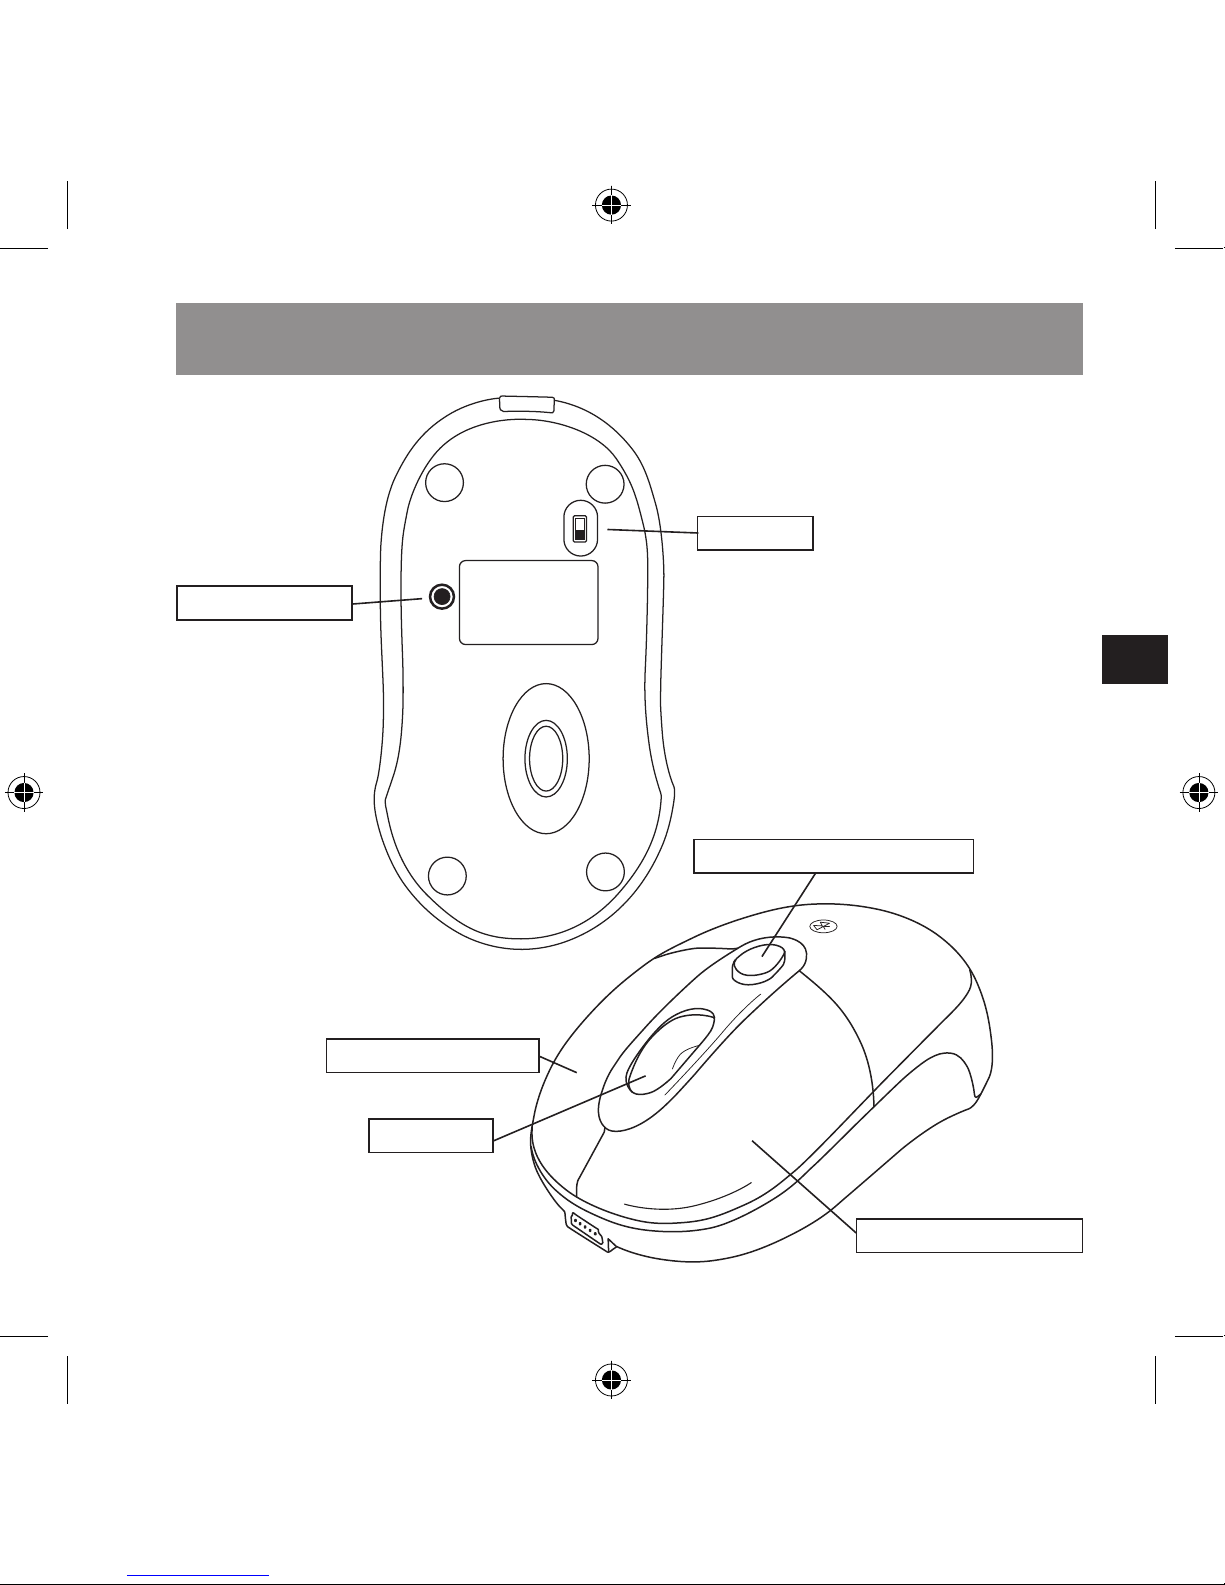
Betjeningselementer
Venstre museknap
OFF
ON
RESET
Musehjul
Højre museknap
Afbryder
RESET-knap
Knap til batterirummet
Page 78
DK
78
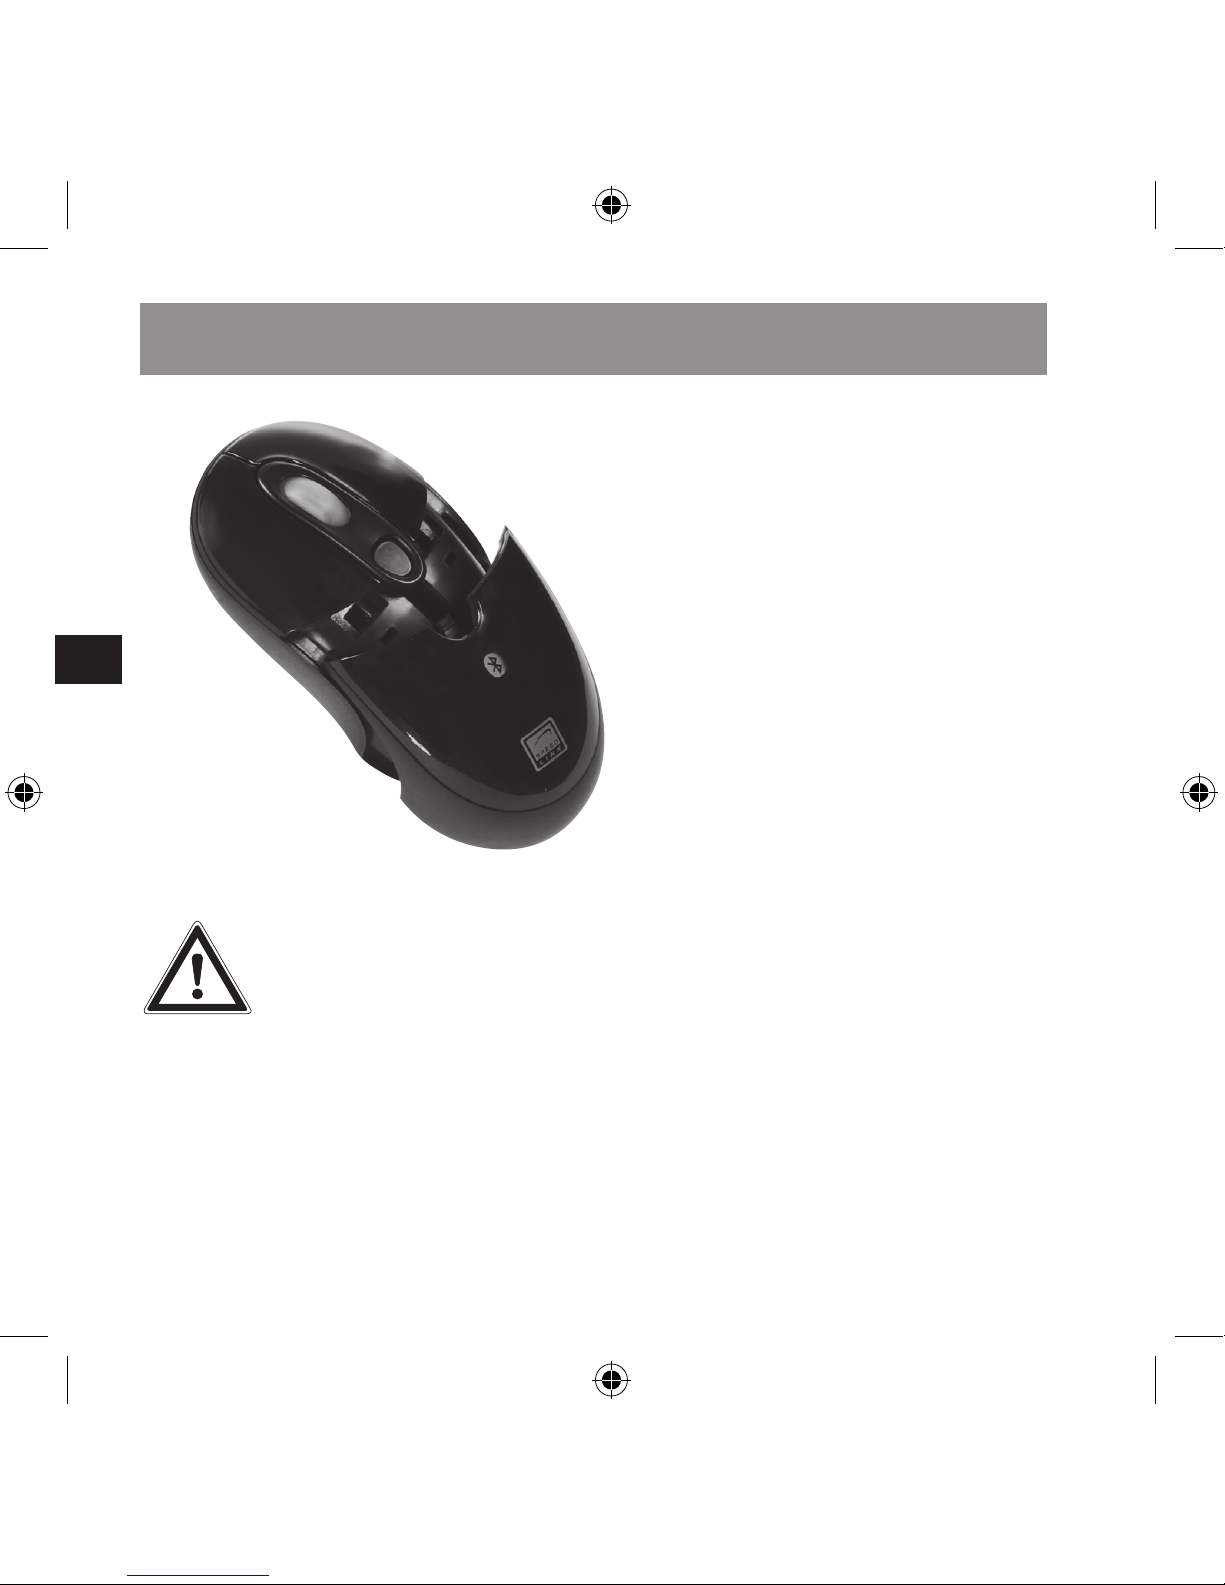
Brug kun NiMH batterier
eller andre genopladelige batterier. Brug aldrig
alkaliske batterier. Brug
aldrig nye og gamle batterier samtidigt. Opbevar
batterierne utilgængeligt
for børn.
Gamle batterier skal
bortskaffes eller gives til
genbrug ifølge de lokale
bestemmelser.
Sådan lægges batte
-
rierne ind
Sørg for at musen er slukket. Sæt hertil afbryderen
på musens bund evt. til
„OFF“.
Tryk på knappen til batterirummet. Læg batterierne
i ifølge markeringen. Sæt
dækslet igen på musen og
tænd for musen.
Vigtige henvisninger til batteriet
Bemærk: Inden du
bruger musen, skal
batterierne oplades
otte timer. Oplysninger til opladning
af batterier nder
du i kapitel ”Oplade
musen”.
Page 79
DK
79
Så snart batterierne er
svage, lyser musehjulet
rødt.
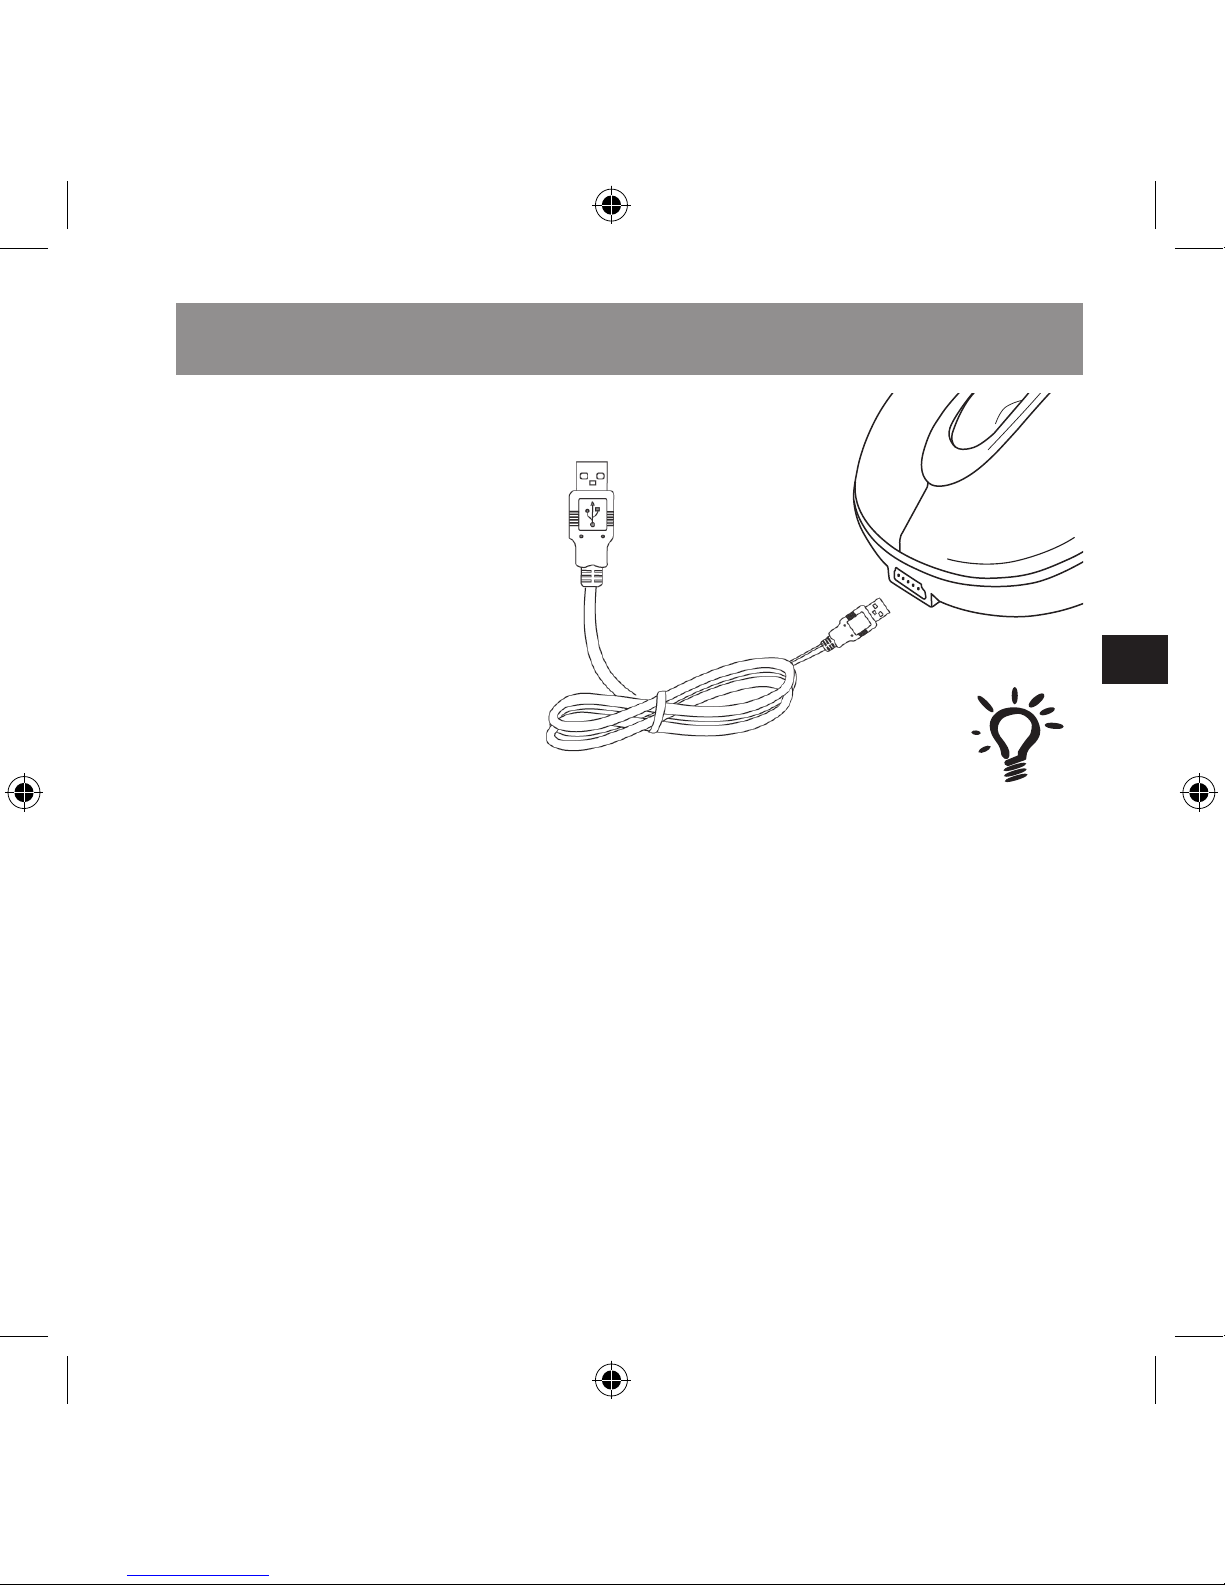
Tilslut det medleverede
USB opladningskabel til
det frie USB interface på
din computer. Tilslut musen til kablets mini USBstik. Musen oplades, hvis
musehjulet lyser grønt.
Under opladningen kan
musen stadigt bruges.
Sådan oplader du musen
Bemærk: Til oplad-
ning af musen mens
din PC er slukket,
skal du i compute-
rens BIOS aktivere
ACPI (Advanced
Conguration and
Power Management
Interface). Ellers
forsynes USB portene
ikke med spænding,
hvis computeren er
slukket. Se hertil
venligst manualen af
din computer.
Page 80
DK
80
IVT Bluesoleil
Åbn IVT Bluesoleil.
Sæt afbryderen på musens bund til ON.
Skift musen til pairing, idet
du trykker på RESETknappen på musens bund.
Musehjulet starter med at
blinke rødt og musen er nu
i pairing-modus.
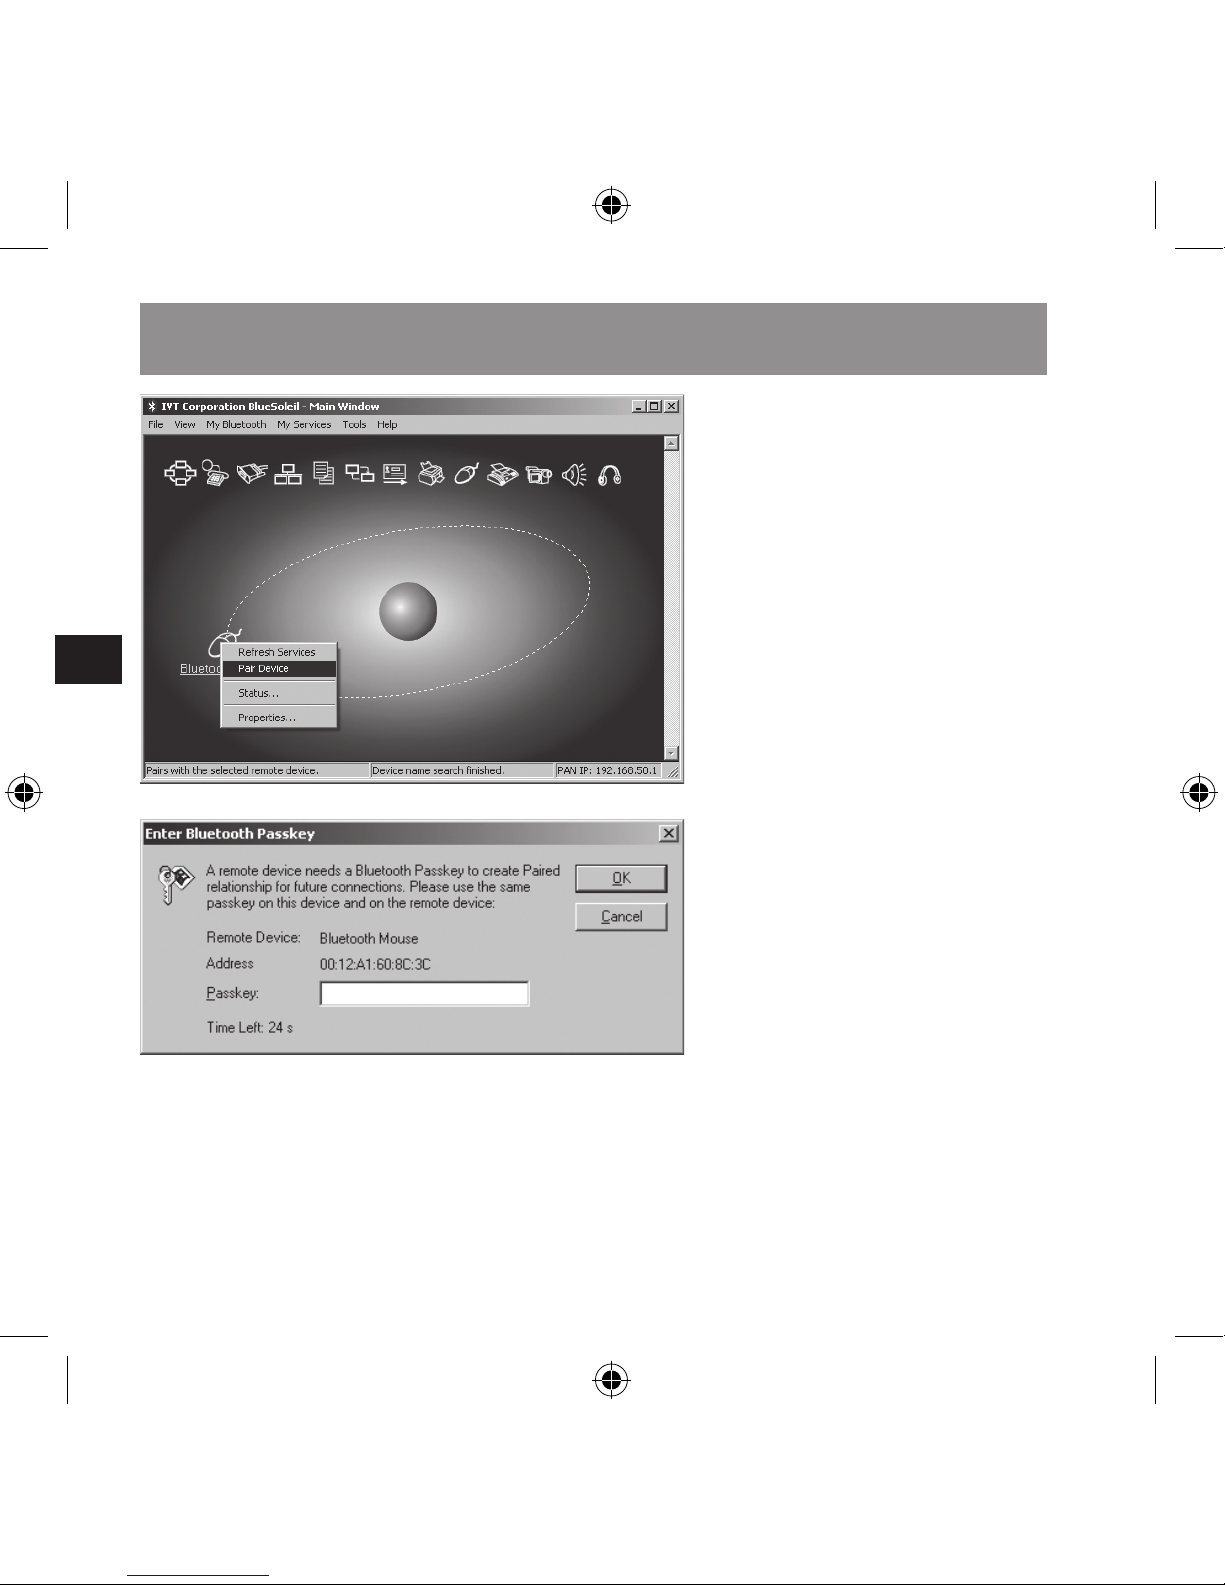
Klik i Bluesoleil på My
Bluetooth > Bluetooth
Device Discovery.
Klik med højre museknap
på Bluetooth-musen og
klik så på Pair Device.
Klik i vinduet Enter
Bluetooth Passkey på OK
uden at skrive et kodeord.
Klik med højre museknap
igen på Bluetooth Mouse
og klik så på Connect >
Bluetooth Human Interface
Device Service. Hvis
menupunkt Connect ikke
er aktiveret, klikker du på
Refresh Services og gen-
Sådan tilslutter og forbinder du musen (PC)
Page 81
DK
81
tager det forudgående trin.
Din mus er nu klar til brug.
Windows Bluetooth
Service
Sæt afbryderen på musens bund til ON.
Skift musen til pairing, idet
du trykker på RESETknappen på musens bund.
Musehjulet starter med at
blinke rødt og musen er nu
i pairing-modus.
Klik på Bluetooth-symbolet
til højre i startlinjen og så
på Tilføj Bluetooth-enhed.
Alternativ dertil, kan du
klikke på Bluetooth®-symbolet i systemstyringen
og så på Tilføj Bluetooth-
enhed.
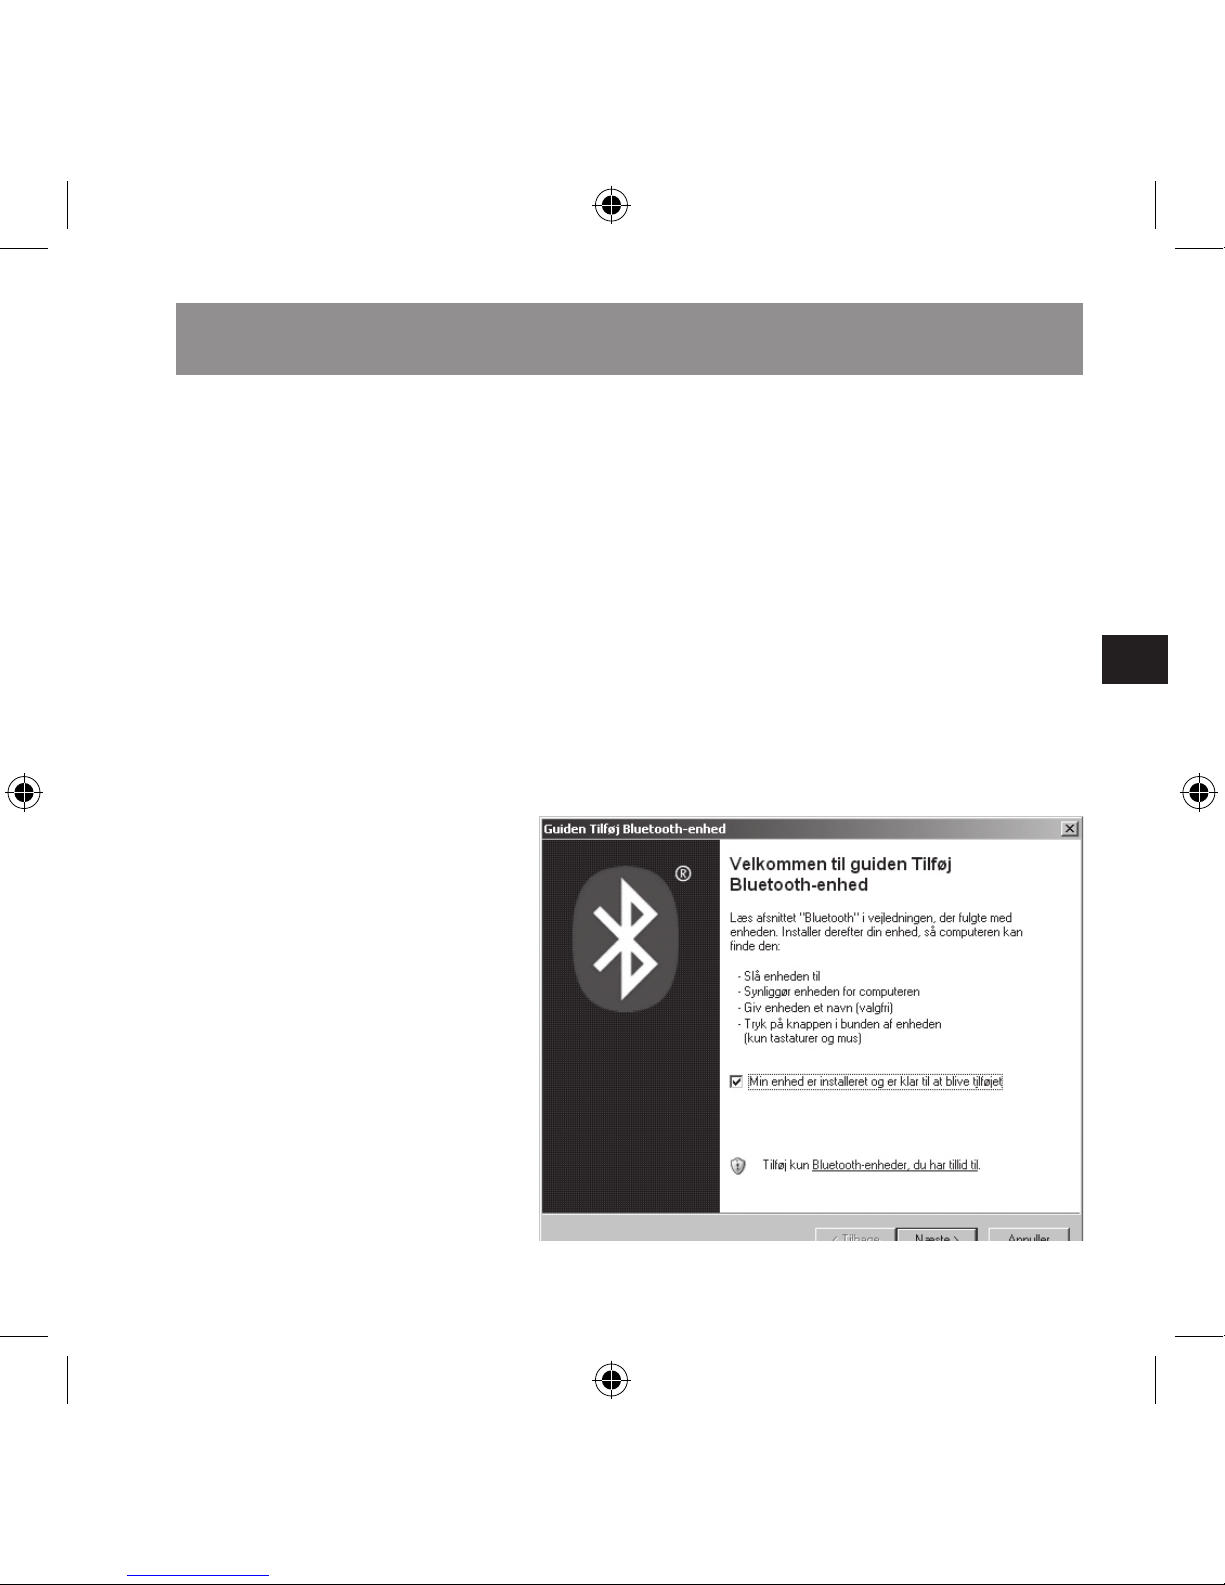
Guiden Tilføj Bluetooth® -
enhed åbnes. Afkryds Min
enhed installeret og er klar
til at blive tilføjet og klik på
Næste.
Sådan tilslutter og forbinder du musen (PC)
Page 82
DK
82
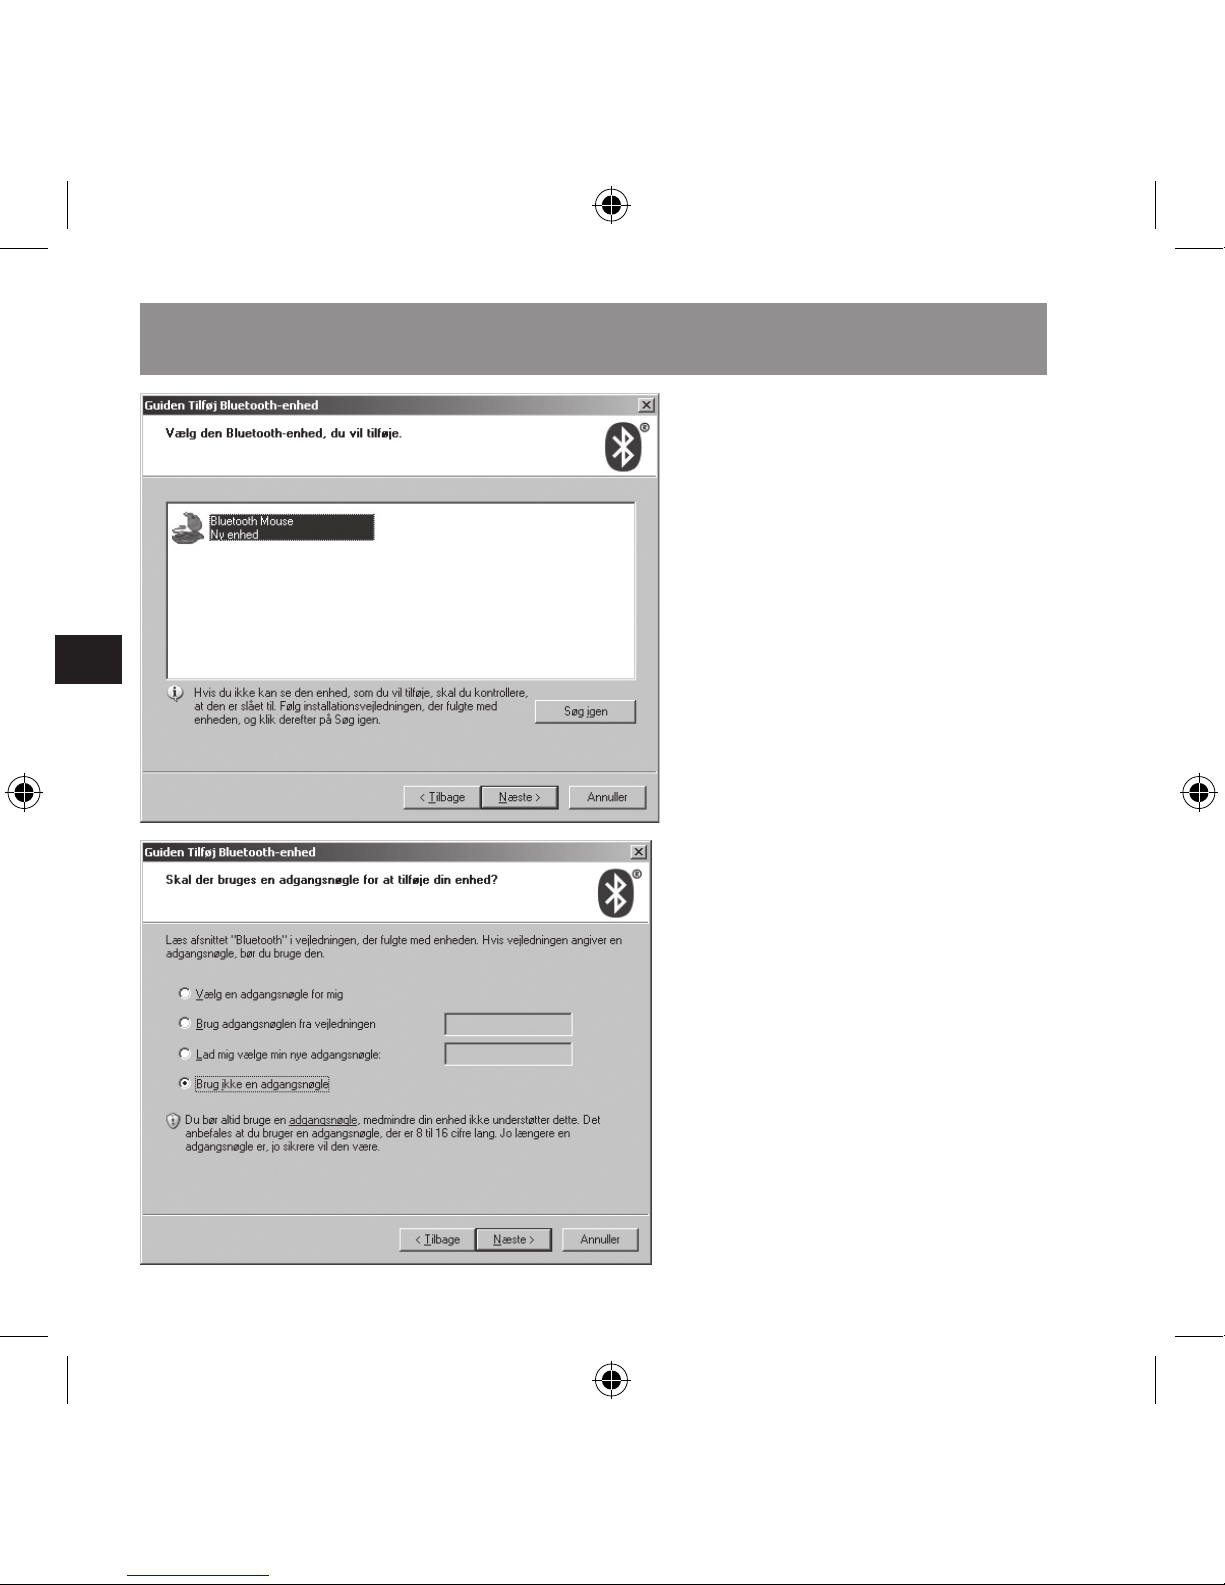
Udvælg Bluetooth Mouse
og klik på Næste.
Vælg Brug ikke adgangs-
nøgle og klik på Næste.
Nu forbinder computeren
enheden.
Klik på Afslut. Din mus er
nu klar til brug.
Sådan tilslutter og forbinder du musen (PC)
Page 83
DK
83
Mac OS X
Klik i systemindstillingen
under punkt Hardware på
Bluetooth®-symbolet.
Hvis det ikke allerede er
sket, skal du afkrydse
Bluetooth®.
Skift musen til pairing, idet
du trykker på RESETknappen på musens bund.
Musehjulet starter med at
blinke rødt og musen er nu
i pairing-modus.
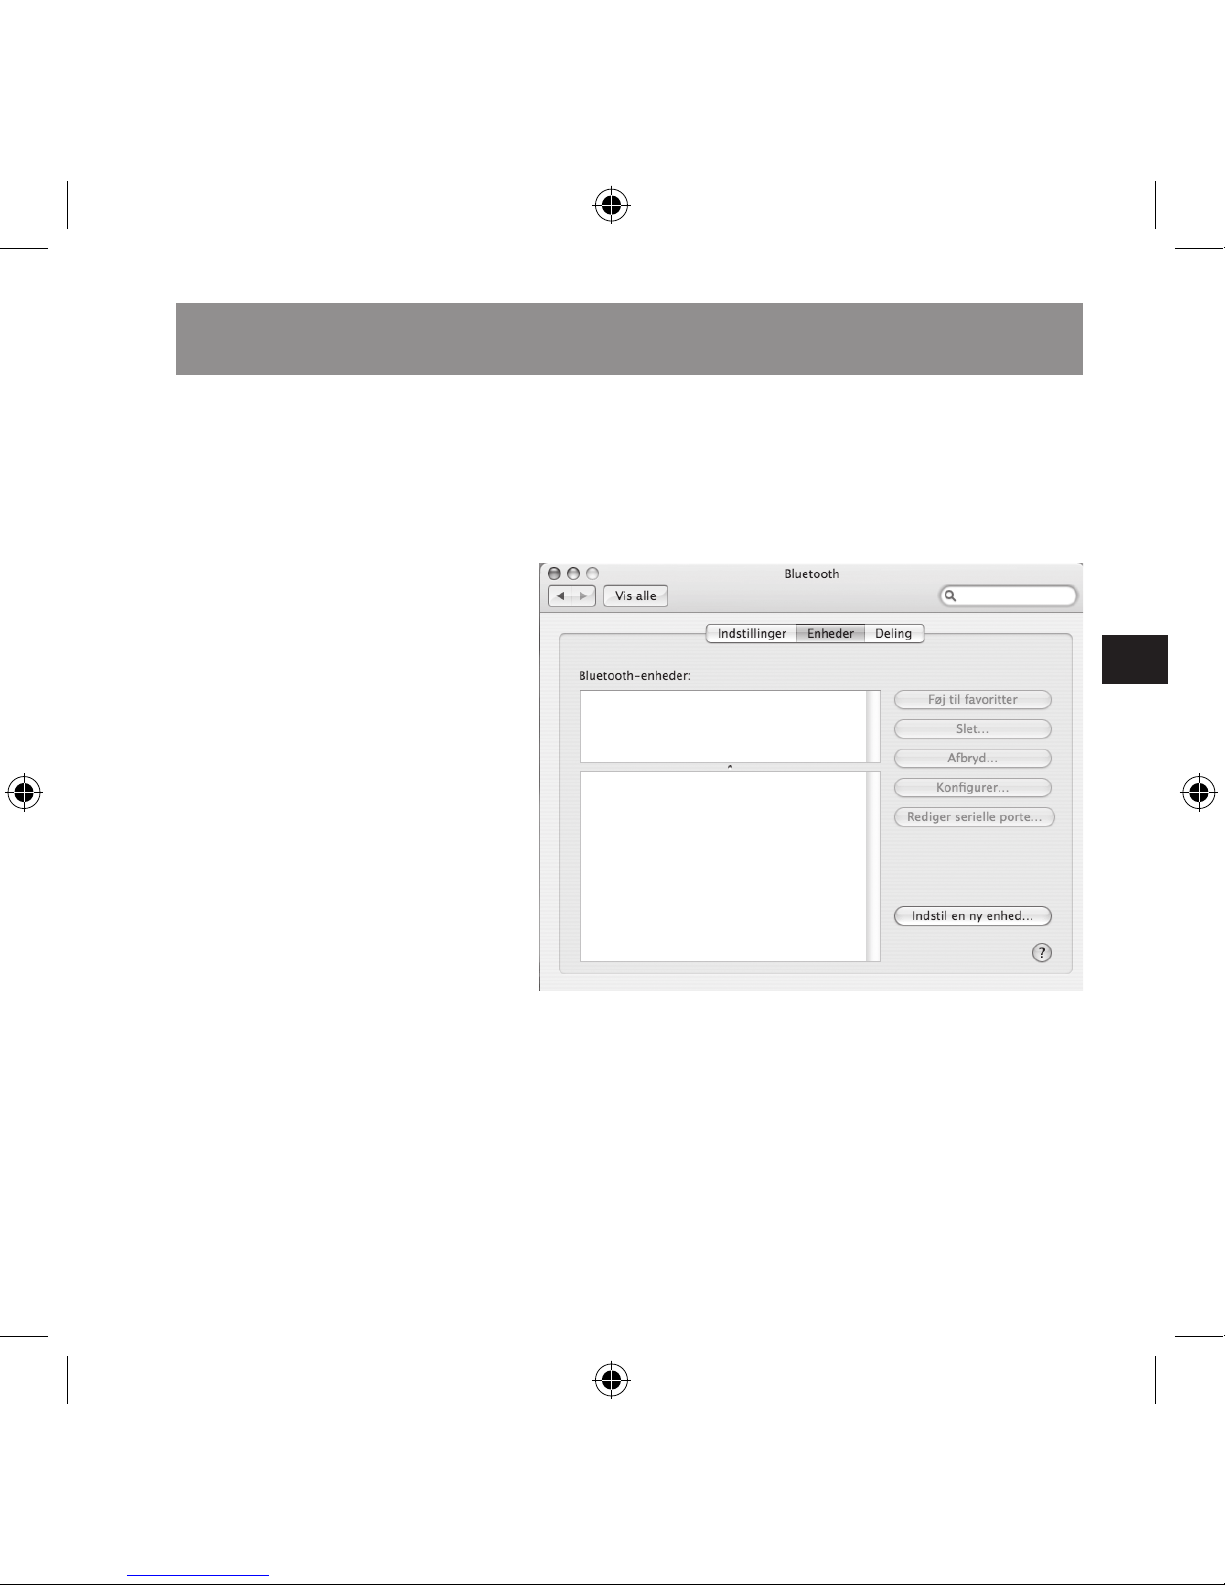
Vælg i fanen Enheder
knappen Indstil en ny
enhed.
Bluetooth®-guiden åbnes.
Klik på Fortsæt og følg anvisningerne på skærmen.
Efter få sekunder nder
din Macintosh musen.
Vælg „Bluetooth Mouse“
og klik på Fortsæt. Din
mus er nu klar til brug.
Sådan tilslutter og forbinder du musen (Mac)
Page 84

DK
84
Undgå helst at bruge mu-
sen på overader af metal.
Metal, som f.eks. jern,
aluminium eller kobber
afskærmer radiotransmissionen og kan føre til
funktionsfejl.
Efter fem minutter skifter
musen automatisk til
strømspar-funkionen. For
at aktivere musen igen,
trykker du bare på en
hvilken som helst knap
eller bevæger musen på
overaden.
Du bør slukke for musen
hvis du ikke bruger den for
at øge batteriets livstid.
Sådan skiftes opløsnin
-
gen
Du kan selv indstille, om
musens markør bevæger
sig hurtigt med 1600 dpi
eller langsommere med
800 dpi. Til omskiftning
trykker og holder du musehjulet og trykker derefter
den højre museknap.
Musehjulet lyser nu rødt
for tre sekunder og viser
på den måde, at følerens
opløsning blev skiftet. Du
bør selv nde ud af hvilken
indstilling du bedst kan
lide.
Anvisninger til brugen
Page 85
DK
85
Bluetooth®-programmet
kan ikke nde musen.
Sørg for at musen er i
pairing-modus (musehjulet
blinker rødt). Tryk hertil
RESET-knappen på musens bund. Søg igen efter
Bluetooth®-enheder.
Musen fungerer ikke
Sørg for, at batterierne er
isat korrekt og opladet.
Tilslut evt. opladningskablet for at genoplade
batterierne.
Fejlnding og afhjælp
Page 86
DK
86
Modelnr.: SL-6197-SBK
► Optisk sensor med
800/1600 dpi opløsning
► Bluetooth® Class 2
kompatibel
► Laserens bølgelængde:
850 nm
► El-forbrug: 6 mA
Garanti
For dette produkt giver
vi et toårs garanti fra
købsdatoen for forarbejdelse og alle integrerede
komponenter.
Hvis du har brug for
hjælp…
Hvis du har tekniske
problemer, kontakt venligst
vores tekniske support.
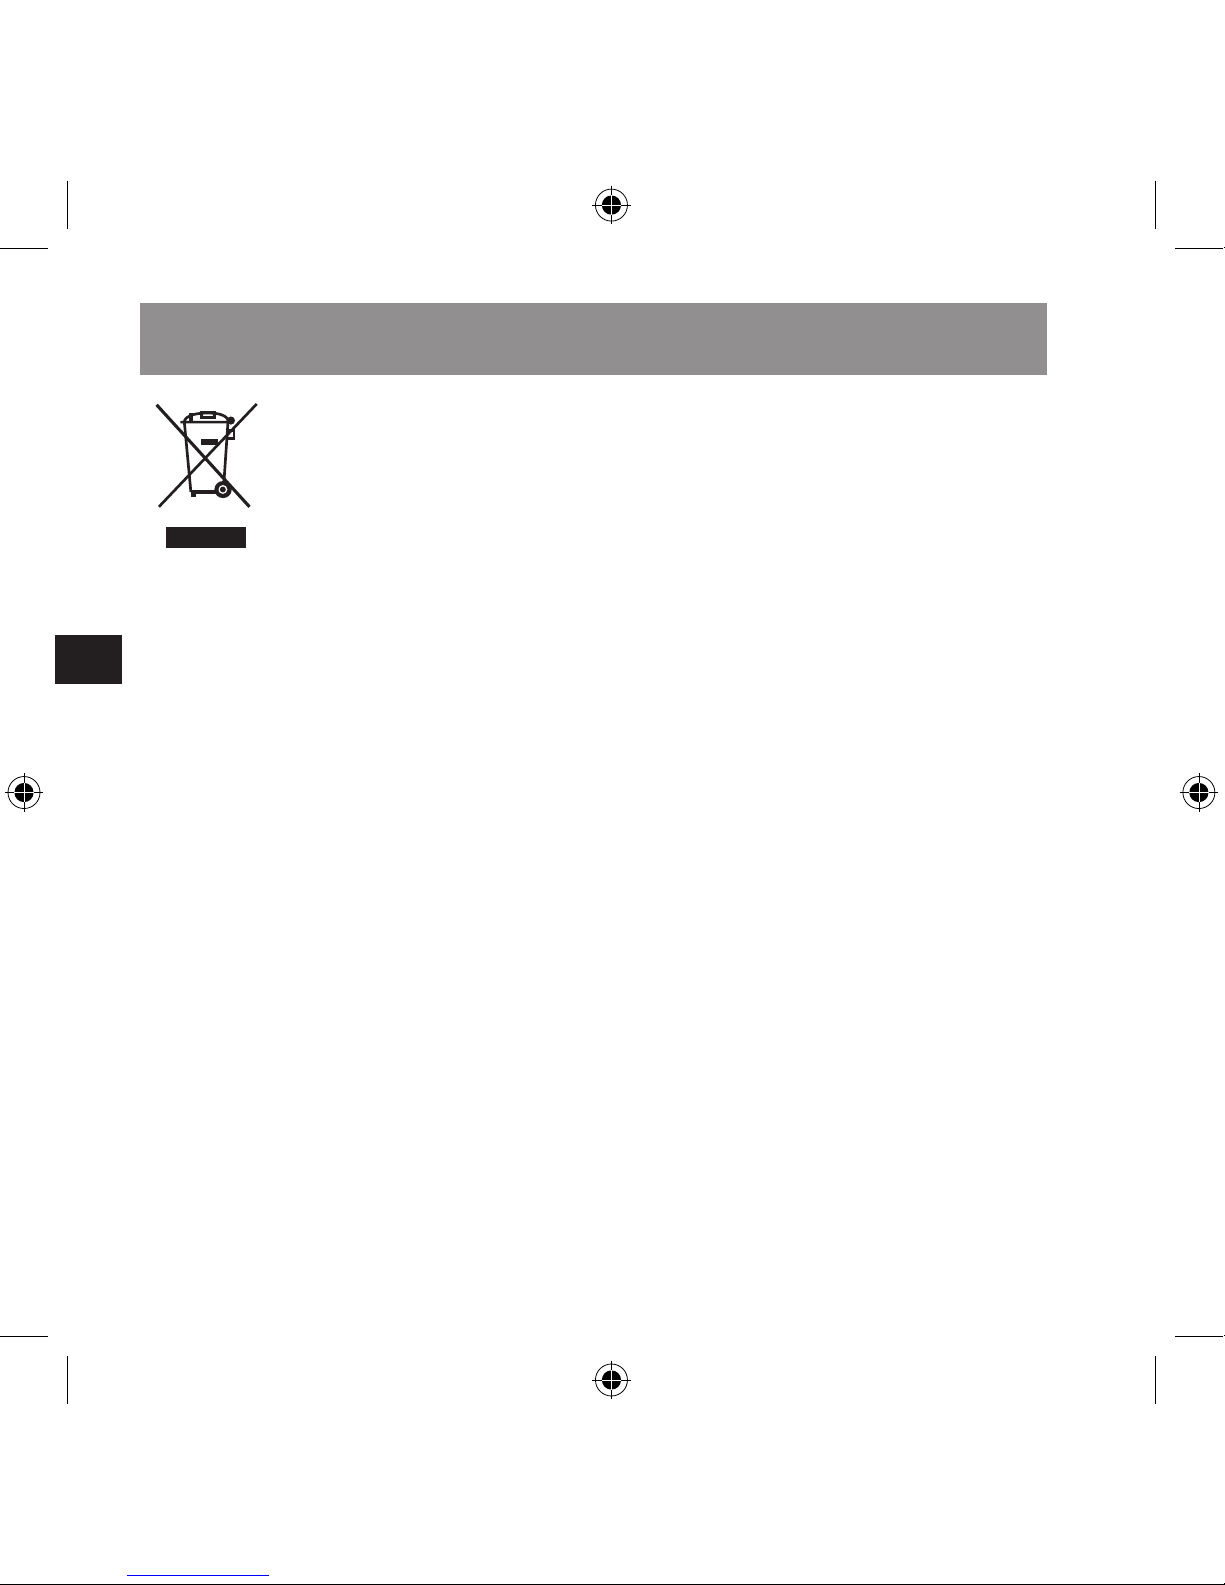
Miljørigtig bortskaffelse
af produktet
(El-affald)
Skal anvendes i landene
indenfor den Europæiske
Union og andre europæiske lande som har et separat samlingssystem.
Mærkningen på produktet,
hhv. på den tilsvarende
dokumentation angiver, at
produktet ikke må bortskaffes sammen med det
almindelige husholdningsaffald. Bortskaf apparatet
venligst separat fra andet
affald for ikke at skade miljøet, hhv. menneskernes
sundhed på grund af en
ukontrolleret bortskaffelse
af affald.
Tekniske data
Page 87
DK
87
Aever apparatet på en
genbrugsstation for at
fremme genbrugen af
materielle ressourcer.
Private brugere bør kontakte forhandleren eller de
vedkommende myndighe-
der og nde ud af, hvordan
apparatet kan genbruges
miljørigtigt.
Industrielle brugere bør
kontakte leverandøren og
læse betingelserne i købekontrakten. Dette produkt
må ikke bortskaffes med
andet industrielt affald.
Jöllenbeck GmbH
Kreuzberg 2
27404 Weertzen
GERMANY
Support-Hotline:
+49 (0) 4287 12 51 33
i det faste tyske netværk
E-mail:
[email protected]
Tekniske data
Page 88
© Jöllenbeck GmbH. This publication
or parts of it may not be published
or copied without the express
consent of the publisher. Jöllenbeck GmbH reserves the right
to changes without prior notice.
This product comlies with the relevant European regultations. You
may request a compete declaration of conformity on our website at
http://www-speed-link.com.
Jöllenbeck GmbH
Kreuzberg 2
27404 Weertzen
GERMANY
[email protected]
+49 (0) 4287 125 133
 Loading...