

Page 1
Bedienungsanleitung
User’s guide
Mode d’emploi
Manual de uso
Manuale di istruzioni
D
GB
F
E
I
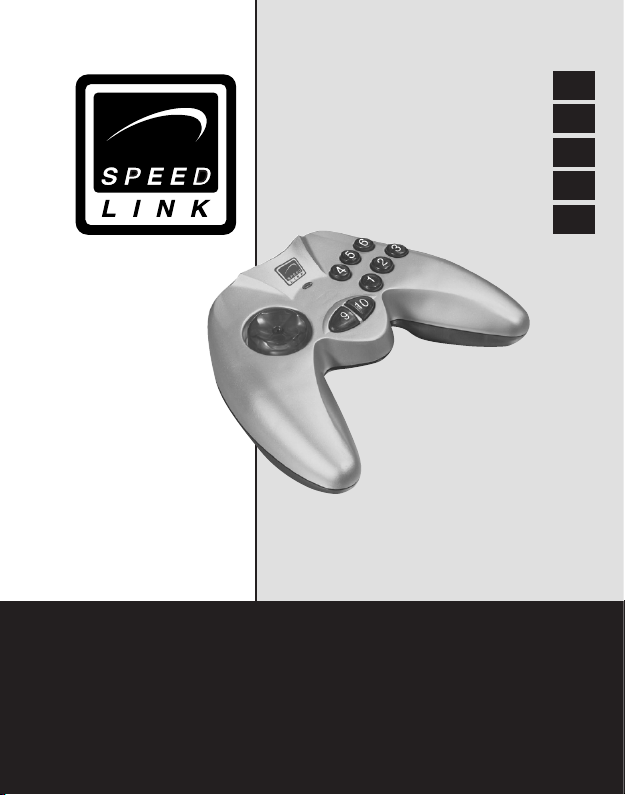
SL-6512
Hornet USB
Gamepad
Page 2

Einleitung
D
Vielen Dank für den Kauf des Hornet USB Gamepad. Dieses
GB
Gamepad für den PC-Gebrauch bietet genügend Spielraum, um
F
jede Situation spielend zu meistern! Einfach anschließen und
E
loslegen!
I
Produkteigenschaften
• Windows 98/ME/2000/XP kompatibel
• Acht digitale Funktionstasten
• Zwei digitale Schultertasten
• Digitales Steuerkreuz
Systemanforderungen
• USB-Port
• Windows 98/98SE/ME/2000/XP
Installation
1. Fahren Sie Ihren PC herunter.
2. Verbinden Sie den USB-Stecker des Gamepads mit einem
freien USB-Port an Ihrem PC.
3. Starten Sie Ihren PC erneut,
Hinweis: Unter Windows 98 werden Sie ggf. aufgefordert die
Windows Installations-CD einzulegen. Befolgen Sie in diesem
Fall die Anweisungen auf dem Bildschirm.
2
Page 3

Funktionstest
1. Klicken Sie auf “Start/Eigenschaften/Systemsteuerung”.
2. Machen Sie einen Doppelklick auf das “Game Controller”
Icon („Game Options/Spieleoptionen“ unter Windows ME).
3. In dem sich öffnenden Fenster wählen Sie die Einstellung
„DragonRise USB Gamepad“ und klicken dann auf
„Eigenschaften“.
4. Wählen Sie nun die Registerkarte „Testen“, um alle
Funktionen zu testen. Sollten einige Funktionen nicht
einwandfrei funktionieren, wählen Sie die Registerkarte
„Einstellungen“ und klicken auf „Kalibrieren“. Befolgen Sie
die Anweisungen auf dem Bildschirm.
5. Klicken Sie auf „OK“, um ggf. vorgenommene
Einstellungen zu übernehmen.
Problembehebung
Windows 98/ME/2000/XP gibt die Meldung aus, dass das
Gamepad nicht verbunden ist.
• Stellen Sie fest, ob noch andere Gamepad/Joystick-Treiber
im Fenster „Gamecontroller“ eingetragen sind. Wenn ja,
entfernen Sie alle Eintragungen und wählen Sie Ihr
Gamepad erneut aus.
D
GB
F
E
I
3
Page 4

Das Fadenkreuz des Testfensters ist nicht zentriert.
D
• Im ersten Fenster des Kalibrierungsprogramms, haben Sie
GB
möglicherweise das Fadenkreuz manuell im Zentrum
F
des Testfensters positioniert und dann einen Feuerknopf
E
gedrückt. Bewegen Sie das Steuerkreuz nicht. Drücken
Sie einfach einen Feuerknopf, selbst wenn das Fadenkreuz
I
nicht zentriert ist.
Sicherheitshinweise
• Versuchen Sie nicht, das Gerät selbst zu warten oder zu
reparieren. Überlassen Sie jegliche Wartungsarbeiten dem
zuständigen Fachpersonal.
• Nehmen Sie keine Veränderungen am Gerät vor. Dadurch
verlieren Sie jegliche Garantieansprüche.
• Verwenden Sie das Gerät nicht in der Nähe von Wasser
(z.B. Waschbecken, Badewannen oder Schwimmbecken),
und halten Sie es von Feuchtigkeit, tropfenden oder
spritzenden Flüssigkeiten sowie Regen fern.
Garantie
Für dieses Produkt gewähren wir Ihnen eine Garantie von zwei
Jahren ab Kaufdatum auf Verarbeitung und alle eingebauten
Teile.
4
Page 5

Falls Sie Hilfe benötigen...
Bei technischen Problemen wenden Sie sich bitte an unseren
technischen Support. Die Hotline-Nummer nden Sie auf der
Rückseite dieser Bedienungsanleitung.
D
GB
F
E
I
5
Page 6

Introduction
D
Thank you for purchasing the Hornet USB Gamepad. This
GB
gamepad for PC use gives you plenty of scope to master any
F
situation with ease! Simply connect up and away you go!
E
Product features
I
• Windows 98/ME/2000/XP compatible
• Eight digital function buttons
• Two digital shoulder buttons
• Digital directional buttons
System requirements
• USB port
• Windows 98/98SE/ME/2000/XP
Installation
1. Switch off your PC.
2. Connect the USB connector of the gamepad to a free
USB port on your PC.
3. Start up the PC again,
Note: Under Windows 98, you may be asked to insert
the Windows installation CD. If that is the case, follow the
instructions on the screen.
6
Page 7

Function test
1. Click on “Start/Settings/Control panel”.
2. Double click on the “Game controller” icon (“Gaming
Options” under Windows Me).
3. In the window that opens, select the item “Hornet USB
Gamepad” and then click on “Properties”.
4. Now click on the “Test” tab to test all functions. If some
functions are not working properly, choose the “Settings”
tab and click on “Calibrate”. Follow the instructions on the
screen.
5. Click on OK to save any setting changes you have made.
Troubleshooting
Windows 98/Me/2000/XP displays a message that the
gamepad is not connected.
• Check whether any other gamepad/joystick drivers are
entered under “Game controller (Gaming options)/
Joysticks/Installed game controllers”. If yes, remove all
entries and select your gamepad again.
The crosshair of the test window isn’t centred.
• In the rst window of the calibration program, you may
have positioned the crosshair manually in the centre of the
test window and then pressed a ring button.
7
D
GB
F
E
I
Page 8

Do not move the directional pad. Simply press a ring
D
button, even if the crosshair is not centred.
GB
Important Safety Information
F
• Do not attempt to service or repair the device yourself.
E
Refer all servicing to qualied service personnel.
I
• Do not attempt to modify the device in any way. Doing so
could invalidate your warranty.
• Do not use this apparatus near water (for example, sinks,
baths, pools) or expose it to rain, moisture, or dripping or
splashing liquids.
Guarantee
We guarantee this product for two years from the date
of purchase in respect of workmanship and all built-in
components.
If you need help...
In the event of technical problems, please contact our technical
support. The hotline number can be found on the back of this
manual.
8
Page 9

Introduction
Merci d’avoir choisi la manette de jeu USB Hornet. Cette
manette pour PC réunit toutes les fonctions nécessaires pour
maîtriser n’importe quelle situation de jeu ! Raccordez-la et c’est
parti !
Caractéristiques
• Compatible avec Windows 98/ME/2000/XP
• Huit touches de fonction numériques
• Deux touches L+R numériques
• Croix directionnelle numérique
Conguration système requise
• Port USB
• Windows 98/98SE/ME/2000/XP
Installation
1. Éteignez votre ordinateur.
2. Reliez la che USB de la manette à un port USB libre de
votre ordinateur.
3. Redémarrez votre ordinateur.
Remarque : sous Windows 98, le programme vous demandera
éventuellement d’insérer le CD d’installation de Windows. Suivez
dans ce cas les instructions qui s’afchent à l’écran.
D
GB
F
E
I
9
Page 10

Test de fonctionnement
D
1. Allez sur « Démarrer/Paramètres/Panneau
GB
F
E
I
de conguration ».
2. Double-cliquez sur l’icône « Contrôleurs de jeu »
(« Options de jeu » dans Windows ME).
3. Dans la fenêtre qui s’ouvre à l’écran, choisissez l’option
« Hornet USB Gamepad », puis cliquez sur « Propriétés ».
4. Allez sur l’onglet « Tester » pour tester toutes les
fonctions. Si certaines fonctions ne marchent pas
correctement, allez sur « Paramètres » et cliquez sur
« Étalonner ». Suivez les instructions qui s’afchent à
l’écran.
5. Cliquez sur « OK » pour appliquer les réglages effectués.
En cas de problème
Windows 98/ME/2000/XP vous indique que la manette
n’est pas connectée.
• Regardez si d’autres pilotes de manette/joystick gurent
dans la fenêtre « Contrôleurs de jeu ». Si c’est le cas,
supprimez toutes les entrées et sélectionnez à nouveau
votre manette.
10
Page 11

Le réticule de la fenêtre test n’est pas centré.
• Dans la première fenêtre du programme d’étalonnage, il
est possible que vous ayez positionné manuellement le
réticule au centre de la fenêtre test avant d’appuyer sur
un bouton de tir. Ne bougez pas la croix directionnelle.
Appuyez tout simplement sur un bouton de tir, même
lorsque le réticule n’est pas centré.
Instructions de sécurité
• Ne tenez pas d‘effectuer vous-même l‘entretien du dispositif
ni de le réparer. Pour les opérations d‘entretien, adressez-
vous à du personnel qualié.
• N’essayez jamais d’apporter une quelconque modication
au dispositif. Cela pourrait annuler votre garantie.
• Évitez d’utiliser l’appareil à proximité de l’eau (évier,
baignoire ou piscine par ex.) ou de l’exposer aux
intempéries, à l’humidité, ou à des écoulements ou des
projections de liquides.
Garantie
Nous offrons sur ce produit une garantie de deux ans à compter
de la date d’achat couvrant les défauts de fabrication et tous
les composants.
D
GB
F
E
I
11
Page 12

Si vous avez besoin d’aide...
D
En cas de problèmes techniques, veuillez vous adresser à notre
GB
service d’assistance technique. Vous trouverez le numéro de
F
téléphone au dos de ce mode d’emploi.
E
I
12
Page 13

Introducción
Muchas gracias por la compra del pad Hornet USB. Este
mando para uso con PCs ofrece mucho juego, tanto como
para dominar cualquier situación con autoridad. Basta con
conectarlo y ¡a jugar!
Características del producto
• Sistemas compatibles: Windows 98/ME/2000/XP
• Ocho botones digitales de funciones
• Dos botones frontales digitales
• Cruceta digital
Requerimientos del sistema
• Puerto USB
• Windows 98/98SE/ME/2000/XP
Instalación
1. Desconecta tu ordenador.
2. Conecta el cable USB del pad a un puerto USB de su
ordenador que esté libre.
3. Vuelve a iniciar tu ordenador.
Advertencia: En Windows 98 puede que el sistema operativo
emita un aviso para que coloques el CD de instalación. Sigue las
instrucciones que aparecen en pantalla.
D
GB
F
E
I
13
Page 14

Test de funciones
D
1. Haz clic en „Inicio/Conguración/Panel de control“.
GB
2. Haz doble clic en el icono „Controlador de juegos“
F
E
I
(„Opciones de juegos“ en Windows ME)
3. En la ventana que se abrirá, selecciona el ajuste
„DragonRise USB Gamepad“ y haz clic luego en
„Propiedades“.
4. Selecciona la cha „tests“ (pruebas) para probar todas las
funciones. Si alguna de las funciones no está
respondiendo, selecciona la cha „Ajustes“ y haz clic
en „Calibrar“. Sigue las instrucciones que aparecen en
pantalla.
5. Haz clic en „Aceptar“ para que las funciones marcadas
sean aplicadas.
Resolución de problemas
Windows 98/ME/2000/XP manda el aviso de que el pad no
está bien conectado.
• Comprueba si hay otro mando/controlador de joystick en
„Controladorde juegos /joystick/controlador instalado“. Si
fuese así borra todos los registros y selecciona de nuevo
tu pad.
14
Page 15

La cruz de precisión de la ventana de prueba no está
centrada.
• En la primera ventana del programa de calibración, es
posible que la cruz haya sido centrada de forma manual
en la ventana de test y a continuación pulsando un
botón de disparo. No muevas la cruz de precisión. Pulsa
simplemente uno de los botones de disparo, aunque no
esté centrada la cruz.
Medidas de seguridad
• No intentes en ningún caso repararlo por su cuenta. Deja
cualquier trabajo de mantenimiento en manos de personal
especializado.
• No hagas cambios en el aparato. De lo contrario perderás
la garantía que te ampara.
• No utilices el aparato cerca del agua (p. ej. lavabos,
bañeras o piscinas) y mantenlo alejado de la humedad,
líquidos que salpiquen, goteen o de la lluvia.
Garantía
Este producto está garantizado durante un periodo de dos años
a partir de la fecha de compra contra materiales defectuosos
o de fabricación.
D
GB
F
E
I
15
Page 16

Si precisas ayuda...
D
En caso de surgir cualquier problema técnico, acude a los
GB
especialistas que te proporcionarán todo tipo de soporte
F
técnico. El número de nuestra línea Hotline, se encuentra al
E
dorso de este manual de instrucciones.
I
16
Page 17

Introduzione
Congratulazioni per aver acquistato il nostro Hornet USB
Gamepad. Questo gamepad, studiato per l’utilizzo con PC, offre
una grande libertà di gioco che Vi permetterà di gestire con
grande facilità ogni situazione di gioco! Grazie alla sua semplicità
di connessione, il gamepad è subito pronto per l’uso!
Caratteristiche del prodotto
• Compatibile con Windows 98/ME/2000/XP
• Otto pulsanti digitali di funzione
• Due pulsanti dorsali digitali
• Un selettore digitale di direzione
Requisiti di sistema
• una porta USB
• Windows 98/98SE/ME/2000/XP
Installazione
1. Spegnete il Vostro PC.
2. Collegate il connettore USB del gamepad ad una porta
USB ancora libera del Vostro PC.
3. Accendete nuovamente il Vostro computer.
Nota bene: In ambiente Windows 98, il sistema operativo Vi
inviterà eventualmente ad inserire il CD d’installazione Windows.
D
GB
F
E
I
17
Page 18

Seguite in questo caso le istruzioni che compariranno sul
D
monitor.
GB
Test di corretto funzionamento
F
1. Cliccate su “Avvio / Impostazioni / Pannello di controllo”.
E
2. Fate doppio clic sull’icona “Periferiche di gioco“
I
(in ambiente Windows ME => “Opzioni di gioco”.
3. Nella nestra che verrà visualizzata selezionate quindi
“Hornet USB Gamepad“ ed cliccate inne sulle “Proprietà”.
4. Selezionate adesso la scheda “Test” per effettuare un test
di corretto funzionamento del dispositivo. Nel caso in cui
alcune funzioni non dovessero funzionare correttamente,
selezionate la scheda “Proprietà” e cliccate inne su
“Calibra”. Seguite quindi le istruzioni che compariranno sul
monitor.
5. Cliccate su “OK” per rendere attive le impostazioni
eventualmente modicate.
18
Page 19

Ricerca guasti
Il sistema operativo Windows 98/ME/2000/XP avverte che
l’Hornet Gamepad non è collegato.
• Controllate se non siano stati già installati in precedenza
ulteriori driver per gamepad o joy-stick andando in
“Periferiche di gioco/Joystick/Periferiche di gioco
installate”. In tale caso, rimuovete tutte le voci che
compaiono nella lista e selezionate nuovamente il driver del
Vostro Gamepad.
Il mirino nella nestra del test non è in posizione centrale.
• Nella nestra del programma di calibratura, comparsa per
prima, avete probabilmente posizionato manualmente al
centro della nestra del test il mirino ed in seguito premuto
il grilletto. Non muovete il selettore di direzione. Premete
semplicemente il grilletto anche nel caso in cui il mirino non
sia in posizione centrale.
Importanti informazioni in materia di sicurezza
• Non cercare di eseguire la manutenzione o effettuare
riparazioni al dispositivo. Afdare tutte le operazioni di
riparazione a personale qualicato.
D
GB
F
E
I
19
Page 20

• Non cercare in alcun modo di modicare il dispositivo. In
D
GB
caso contrario, la garanzia potrebbe perdere di validità.
• No utilizzare l’apparecchio vicino all’acqua (ad esempio,
F
lavandini o vasche), né esporlo a pioggia, umidità, gocce o
E
spruzzi.
I
Garanzia
Questo prodotto è coperto da garanzia contro i difetti di
materiali e di lavorazione per un periodo di due anni dalla data
originale di acquisto sui pezzi di ricambio e il lavoro.
In caso di problemi...
Nel caso in cui dovessero vericarsi ulteriori problemi tecnici, Vi
preghiamo di contattare il nostro customer-care il cui numero
telefonico si trova sul retro di questo manuale d’istruzioni.
20
Page 21

Page 22

SL-6512
 Loading...