

Page 1

| Bedienungsanleitung
| User‘s Guide
| Mode d‘emploi
| Instrucciones de manejo
| Manuale di istruzioni
| Brugsanvisning
SL-6395-SRD
Version 1
BLACK WIDOW
FLIGHT STICK
PC-GAMING
MANUAL
SL-6640-SBK
Page 2

Bedienungsanleitung . . . . . . . . . . . . . . . . . . . . . . . . . . 03-06
User’s Guide . . . . . . . . . . . . . . . . . . . . . . . . . . . . . . . . . 07-10
Mode d’emploi . . . . . . . . . . . . . . . . . . . . . . . . . . . . . . . 11-14
Manual de instrucciones . . . . . . . . . . . . . . . . . . . . . . . 15-18
Manuale d’uso . . . . . . . . . . . . . . . . . . . . . . . . . . . . . . . 19-22
Page 3

3
WICHTIG!
Bevor Sie dieses Produkt verwenden, lesen
Sie bitte die Sicherheits- und Warnhinweise im
Handbuch. Bewahren Sie dieses Handbuch auf,
um zu einem späteren Zeitpunkt darauf zurückgreifen zu können.
HAFTUNGSAUSSCHLUSS
Die Jöllenbeck GmbH übernimmt keine Haftung
für Schäden am Produkt oder Verletzungen
von Personen aufgrund von unachtsamer,
unsachgemäßer, falscher oder nicht dem vom
Hersteller angegebenen Zweck entsprechender
Verwendung des Produkts.
FEHLERBESEITIGUNG/REPARATUR
Versuchen Sie nicht, das Gerät selbst zu warten
oder zu reparieren. Überlassen Sie jegliche
Wartungsarbeiten dem zuständigen
Fachpersonal. Nehmen Sie keine Veränderungen am Gerät vor. Dadurch verlieren Sie jegliche
Garantieansprüche.
FEUCHTIGKEIT/WÄRMEQUELLEN
Verwenden Sie das Gerät nicht in der Nähe von
Wasser (z. B.Waschbecken, Badewannen etc.),
und halten Sie es von Feuchtigkeit, tropfenden oder
spritzenden Flüssigkeiten sowie Regen fern. Setzen
Sie das Gerät keinen hohen Temperaturen, hoher
Luftfeuchtigkeit oder direktem Sonnenlicht aus.
REINIGUNG
Verwenden Sie zum Reinigen des Gerätes bitte
ein weiches, trockenes Tuch. Lassen Sie das
Gerät nie mit Benzol, Verdünner oder anderen
Chemikalien in Berührung kommen.
STANDORT
Stellen Sie das Gerät auf eine stabile Unterlage,
um zu verhindern, dass es herunterfällt und
dabei Personen oder das Gerät zu Schaden
kommen.
BESTIMMUNGSGEMÄSSER
GEBRAUCH
• Das Gerät darf nur mit den dafür vorgesehenen
Originalteilen verwendet werden.
• Das Produkt darf nur in geschlossenen und
trockenen Räumen verwendet werden.
• Die bestimmungsgemäße Verwendung
beinhaltet das Vorgehen gemäß der
Installationsanleitung.
Für Schäden, die durch unsachgemäßen
Gebrauch entstehen, übernimmt der
Hersteller keine Haftung.
GARANTIE
Für dieses Produkt gewähren wir Ihnen eine
Garantie von zwei Jahren ab Kaufdatum auf
Verarbeitung und alle eingebauten Teile.
SicherheitShinweiSe
Page 4
4
SYSTEMVORAUSSETZUNGEN
• Windows® ME / 2000 / Windows® XP/
Windows® Vista / Windows® 7
• USB-Port
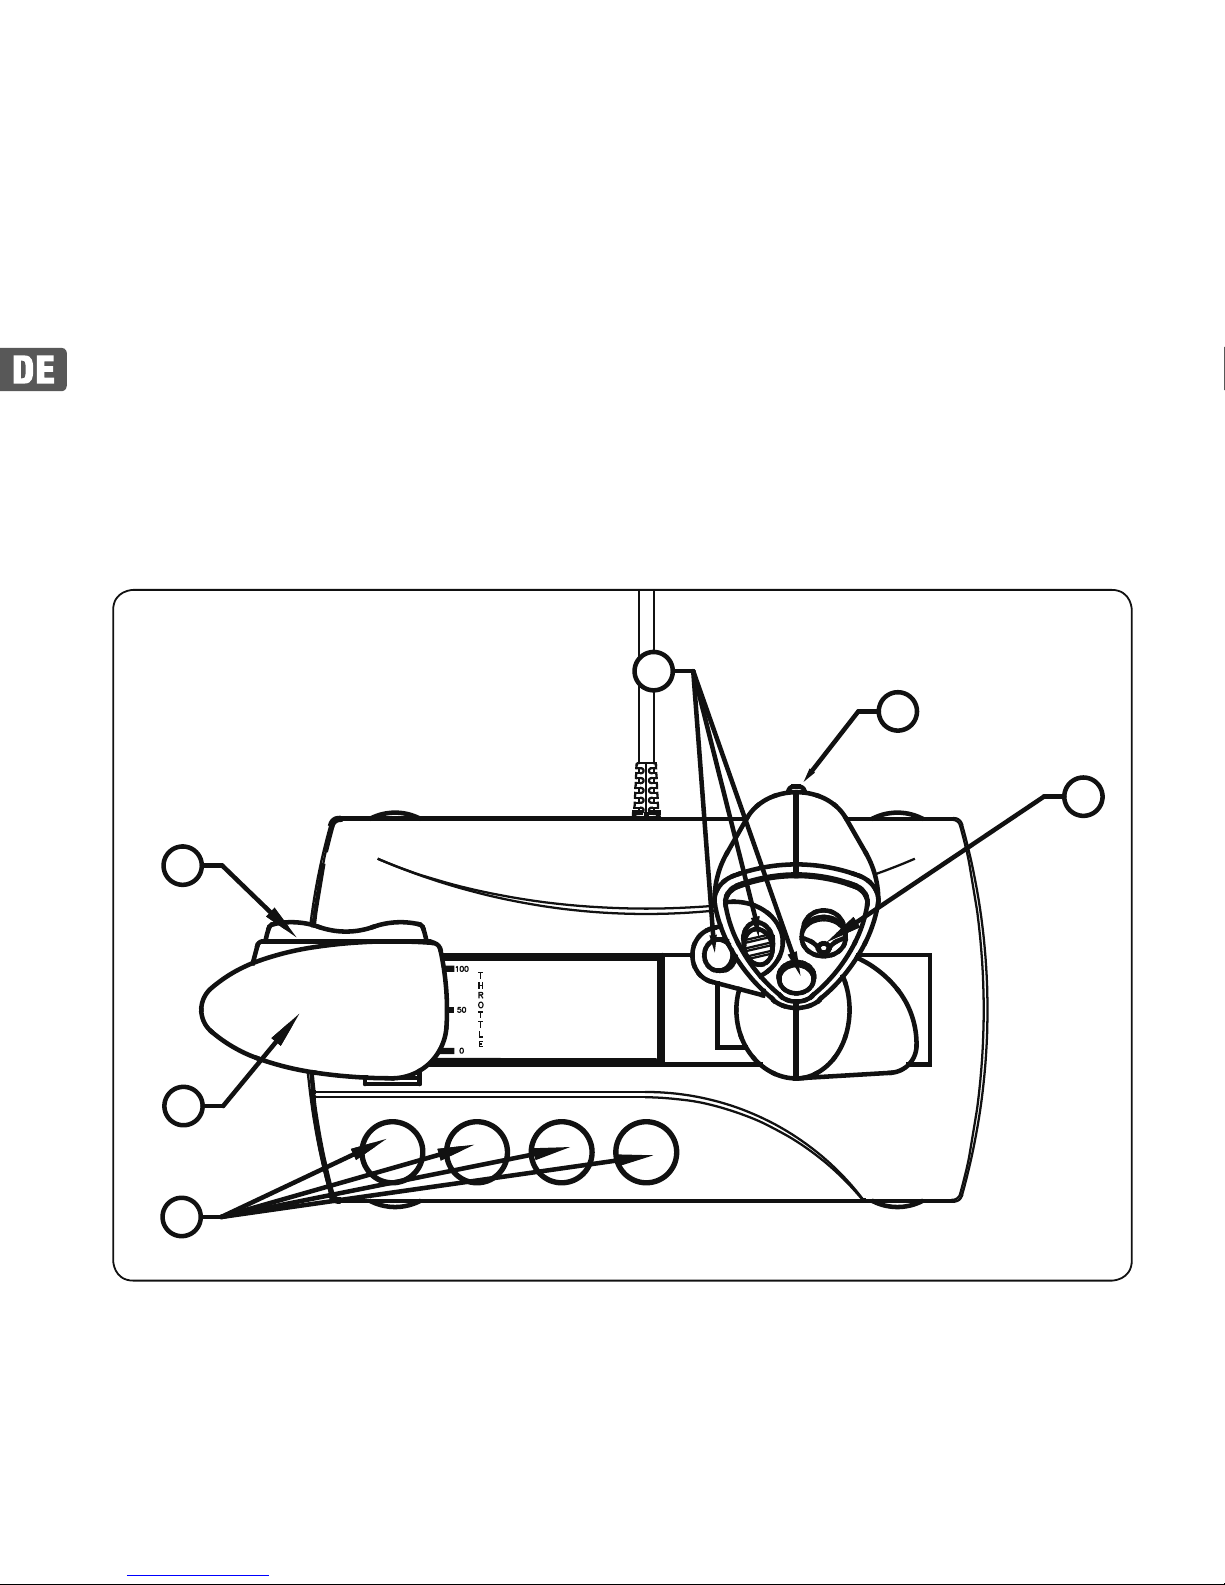
JOYSTICK-FUNKTIONEN
a: Acht-Wege-Rundumsichtkontrolle
(Coolie Hat)
b: Feuertasten
c: Schubkontrolle
d: Ruderkontrolle
a
b
b
b
d
c
Page 5

5
SOFTWARE-INSTALLATION
Hinweis: Bitte installieren Sie zuerst
die mitgelieferte Software und
schließen Sie erst dann den Joystick an den USB-Port Ihres PCs an.
(Bitte beachten Sie, dass USBBetrieb nicht von Windows 95/NT
unterstützt wird.)
1. Schalten Sie Ihren Computer ein
und warten Sie bis Ihr Betriebssystem vollständig hochgefahren wurde.
2. Legen Sie die mitgelieferte Treiber
CD in Ihr CD-ROM-Laufwerk ein.
3. Das Installationsprogramm wird
automatisch gestartet.
4. Falls das Installationsprogramm
nicht automatisch starten sollte,
klicken Sie auf „Start/Ausführen/
Durchsuchen“ und wählen Sie Ihr
CD-ROM-Laufwerk aus.
5. Machen Sie einen Doppelklick auf
die Datei „setup.exe“.
6. Folgen Sie dann den Anweisungen
auf dem Bildschirm.
7. Starten Sie Ihren PC erneut wenn
Sie dazu aufgefordert werden.
ANSCHLUSS DES JOYSTICKS
1. Nach der Treiber-Installation
verbinden Sie den USB-Anschluss
Ihres Joysticks einfach mit dem
USB-Port Ihres Computers
2. Der Joystick ist nun funktionsbereit.
HINWEISE ZUR BENUTZUNG
Um alle Funktionen des Joysticks zu
testen, gehen Sie wie folgt vor:
1. Schließen Sie Ihren Joystick an den
USB-Port Ihres PCs an.
2. Öffnen Sie „Start/Einstellungen/
Systemsteuerung“.
3. Mit einem Doppelklick auf
„Gamecontroller“ („Spieleoptionen“
unter Windows ME) erscheint ein
Kontextmenü.
4. In dem Kontextmenü sollte der
Eintrag „MegaStore Game
Controller v.3“ aufgeführt sein.
5. Klicken Sie auf Eigenschaften, um
die Funktion der Tasten, Achsen,
Schub-, und Ruderkontrolle des
Joysticks zu testen.
6. Wählen Sie die Registerkarte
„Effects“, um die Vibrationsfunktion
Ihres Joysticks zu testen.
7. Wenn alle Funktionen zu Ihrer
Page 6

6
Zufriedenheit funktionieren, klicken
Sie auf „OK“, um das Menü zu
verlassen.
PROBLEMBEHEBUNG
Der Joystick funktioniert nicht, obwohl
er richtig angeschlossen ist.
1. Vergewissern Sie sich, dass im
Gamecontroller-Menü der Eintrag
„8-buttons-with-vibration“ aufgeführt
ist. Befolgen Sie dafür die Schritte
2-4 im Kapitel „Hinweise zur Benutzung“. Unter Windows XP erscheint
der Eintrag unter „Gamecontroller
/Erweitert“, wählen Sie dort das Gerät aus und bestätigen Sie mit „OK“.
2. Deinstallieren Sie ggf. andere instal-
lierte Gamecontroller, starten Sie
Ihren PC neu, und installieren Sie
die mitgelieferte Software erneut.
FALLS SIE HILFE BENÖTIGEN..
Bei technischen Problemen wenden
Sie sich bitte an unseren technischen
Support: support@speedlink.com
Page 7

7
important Safety information
IMPORTANT!
Before using this product, read the instruction
manual for important safety information. Please
retain this manual for future reference and warranty information.
EXCEMPTION FROM LIABILITY
No liability will attach to Jöllenbeck GmbH if
any damage, injury or accident is attributable to
inattentive, inappropriate, negligent or incorrect
operation of the machinery whether or not
caused deliberately.
TROUBLESHOOTING
& SERVICING
Do not attempt to service or repair the device
yourself. Refer all servicing to qualied service
personnel. Do not attempt to modify the device in
any way. Doing so could invalidate your warranty.
MOISTURE AND HEAT SOURCES
Do not use this apparatus near water (for
example, sinks, baths, pools) or expose it to rain,
moisture, or dripping or splashing liquids. Do
not expose the unit to high temperatures, high
humidity or direct sunlight.
CLEANING
When cleaning the device, please use a soft, dry
cloth. Never use benzine, paint thinner, or other
chemicals on the device.
LOCATION
Place the device in a stable location, so it will not
fall causing damage to the device or bodily harm.
Intended use
•
The product may only be used with the original
parts intended for it.
•
The product may only be used in closed and
dry rooms.
•
The intended use includes adherence to the
specied installation instructions.
The manufacturer accepts no liability
for damage arising due to improper use.
•
Don’t moisten the suction pads.
WARRANTY
We guarantee this product to be free of defects
in workmanship and materials for a period of two
years from the original date of purchase.
Page 8

8
SYSTEM REQUIREMENTS
• Windows® ME / 2000 / Windows® XP/
Windows® Vista / Windows® 7
• USB port
JOYSTICK FUNCTIONS
a: Eight-way all-round view control
(coolie hat)
b: Firing buttons
c: Throttle control
d: Rudder control
a
b
b
b
d
c
Page 9

9
SOFTWARE INSTALLATION
Note: First install the supplied
software before you connect the
joystick to the USB port of your PC.
(Please note that USB operation is
not supported by 95/NT.)
1. Switch on your computer and wait
until the operating system
has nished starting up.
2. Insert the supplied driver CD in your
CD ROM drive.
3. The installation program will start
automatically.
4. If the installation program does not
start automatically, click on “Start/
Run/Browse” and select your CD
ROM drive.
5. Double click on the le “setup.exe”.
6. Follow the instructions on the
screen.
7. Restart your PC when you are
asked.
CONNECTING THE JOYSTICK
1. After the driver installation, simply
connect the USB socket of your
joystick to the USB port of your
computer
2. The joystick is now ready to use.
NOTES ON USE
To test all of the Joystick’s functions,
do the following:
1. Connect the joystick to the USB port
of your PC.
2. In Windows, open “Start/Control
panel/System”.
3. Double click on “Game controllers”
(“Sound, video and game
controllers” under Windows Me)
to display a context menu.
4. In the context menu, the entry
“MegaStore Game Controller v.3”
should be listed.
5. Click on properties to test
operation of the buttons, axes, thrust
and rudder control of the joystick.
6. Click on the “Effects” tab to test the
vibration function of your joystick.
7. If all functions work to your
satisfaction, click on “OK” to
exit the menu.
Page 10

10
TROUBLESHOOTING
The joystick does not work even
though it is correctly connected.
1. Make sure, in the game controller
menu, that the entry “8 buttons with
vibration” is listed. To do this, follow
steps 2-4 in the section “Notes on
use”. Under Windows XP, the entry
appears under “Game controllers /
Extended”, select the device
there and conrm with “OK”.
2. If necessary, uninstall other installed
game controllers, restart the PC,
and install the supplied software
again.
SAFETY ADVICE
• Do not take the device apart under
any circumstances.
• Never attempt to maintain or repair
the device yourself. Refer all servi-
cing to qualied service personnel.
• Do not make any modications to the
device. Doing so will invalidate the
guarantee.
IF YOU NEED HELP..
If you experience any technical
problems, please contact our technical
support: support@speedlink.com
Page 11

11
IMPORTANT!
Avant d‘utiliser ce produit, consultez le manuel
d‘instructions. Vous y trouverez des informations importantes sur la sécurité. Conservez ce
manuel pour référence ultérieure.
ENTRETIEN
Ne tenez pas d‘effectuer vous-même l’entretien
du dispositif ni de le réparer. Pour les opérations
d’entretien, adressez-vous à du personnel quali-
é. N‘essayez jamais d‘apporter une quelconque
modication au dispositif. Cela pourrait annuler
votre garantie.
HUMIDITÉ ET SOURCES DE CHALEUR
Évitez d’utiliser l’appareil à proximité de l’eau
(évier, baignoire ou piscine par ex.) ou de
l’exposer aux intempéries, à l’humidité, ou à des
écoulements ou des projections de liquides.
N‘exposez pas le dispositif à une température
élevée, une humidité excessive ou au rayonnement direct du soleil.
EMPLACEMENT
Placez l‘unité sur un support stable, car toute
chute risquerait de les endommager ou de cuser
des dommages corporels.
NETTOYER L‘UNITÉ
Pour nettoyer l‘unité, veuillez utilisez un chiffon
doux et sec. N‘appliquez jamais de benzine, de
diluant ou autre produit chimique sur le dispositif.
Utilisation conforme
• L’appareil ne doit être utilisé qu’avec les pièces
originales prévues à cet effet.
• Le produit ne doit être utilisé que dans des
locaux fermés et secs.
• L’utilisation conforme implique de respecter les
instructions d’installation.
• Le fabricant décline toute responsabilité en cas
de dommages dus à une utilisation incorrecte.
GARANTIE
Nous accordons sur ce produit une garantie de
deux ans à compter de la date d’achat couvrant
les défauts de fabrication et tous les composants.
inStructionS de Sécurité
Page 12

12
CONFIGURATION SYSTÈME
REQUISE
• Windows® ME / 2000 / Windows® XP/
Windows® Vista / Windows® 7
• Port USB
FONCTIONS JOYSTICK
a : Contrôle de vision panoramique à 8
voies (chapeau chinois)
b : Boutons de tir
c : Manette des gaz
d : Contrôle du gouvernail
a
b
b
b
d
c
Page 13

13
INSTALLATION DU LOGICIEL
Remarque : Veuillez installer le
logiciel fourni avant de raccorder
le joystick au port USB de votre
ordinateur.
(Nous attirons votre attention sur
le fait que le mode USB n’est pas
supporté sous Windows 95/NT.)
1. Allumez votre ordinateur et attendez
que le système d’exploitation soit
entièrement chargé.
2. Insérez dans le lecteur de CD-ROM
le CD comprenant le pilote.
3. Le programme d’installation démarre
automatiquement.
4. Si le programme d’installation ne
démarre pas automatiquement, allez
sur « Démarrer/Exécuter/Parcourir »
et sélectionnez le chemin du lecteur
de CD-ROM.
5. Double-cliquez sur le chier « setup.
exe ».
6. Suivez les instructions qui s’afchent
à l’écran.
7. Redémarrez votre ordinateur si le
programme vous y invite.
RACCORDEMENT DU JOYSTICK
1. Après avoir installé le pilote, il vous
suft de raccorder la che USB
du joystick au port USB de votre
ordinateur.
2. Le joystick est désormais prêt à
l’emploi.
CONSEILS D’UTILISATION
Pour tester toutes les fonctions du
joystick, procédez de la manière
suivante :
1. Reliez le joystick au port USB de
votre ordinateur.
2. Allez sur « Démarrer/Paramètres/
Panneau de conguration ».
3. Double-cliquez sur « Contrôleurs de
jeu » (« Options de jeu » sous Windows ME). Vous voyez apparaître un
menu contextuel.
4. Le menu contextuel doit comporter
une entrée intitulée « 8-buttonwith-vibration ».
5. Cliquez sur « Propriétés » pour
tester les touches, les axes, la
manette des gaz et le contrôle de
gouvernail du joystick.
6. Sélectionnez l’onglet « Effets »
pour tester la fonction vibration du
joystick.
Page 14

14
7. Si toutes les fonctions marchent
comme vous le souhaitez, cliquez
sur « OK » pour quitter le menu.
EN CAS DE PROBLÈME
Le joystick ne fonctionne pas alors qu’il
est raccordé correctement.
1. Assurez-vous que le menu « Con-
trôleurs de jeu » comporte une
entrée intitulée « 8-button-withvibration ». Suivez pour cela les
étapes 2 à 4 de la section « Conseils
d’utilisation ». Sous Windows XP,
cette entrée se situe dans l’onglet
« Contrôleurs de jeu/Avancé » ;
sélectionnez l’appareil et cliquez sur
« OK ».
2. Désinstallez au besoin les autres
contrôleurs de jeu déjà installés,
redémarrez votre ordinateur et installez à nouveau le logiciel fourni.
CONSIGNES DE SÉCURITÉ
• Ne démontez l’appareil en aucune
circonstance.
• N’essayez pas de réparer vousmême l’appareil. Adressez-vous à
un technicien qualié pour tous les
travaux de maintenance.
• N’apportez aucune modication à
l’appareil. Cela annulerait toute
possibilité de recours en garantie.
SI VOUS AVEZ BESOIN D’AIDE…
En cas de problèmes techniques,
veuillez vous adresser à notre service
d’assistance technique:
support@speedlink.com
Page 15

15
IMPORTANTE!
Antes de utilizar este producto, lea el manual de
instrucciones para obtener informaciones importantes acerca de la seguridad. Guarde el manual
de instrucciones para consultas en el futuro.
SOLUCIÒN DE PROBLEMAS
No intente reparar el dispositivo usted mismo.
Remita todas las reparaciones al personal de
servicio cualicado. No intente modicar el
dispositivo de ninguna manera. Si lo hace, la
garantía perdería validez.
HUMEDAD Y FUENTES DE CALOR
No utilice este aparato en lugares cercanos
a agua (por ejemplo, fregadores, bañeras,
piscinas, etc.) ni lo exponga a lluvia, humedad ni
líquidos que pueden gotear o salpicar.
Evite exponer la unidad a altas temperaturas,
humedad excesiva o rayos del sol.
COLOCACIÓN
Coloque el dispositivo en un lugar estable para
evitar posibles caídas que pudieran ocasionar
lesiones físicas o dañar el producto.
LIMPIAR EL DISPOSITIVO
Cuando limpie el dispositivo, por favor utilice
un paño suave y seco. Nunca utilice bencina,
removedor u otro químico para limpiarlo.
USO SEGÚN INSTRUCCIONES
• El dispositivo sólo se puede usar con las piezas
originales correspondientes.
• El producto se utilizará siempre en espacios
cerrados y secos.
• El uso según las instrucciones incluye un
procedimiento de instalación según las mismas
instrucciones.
• El fabricante no se hace responsable de los
daños que pudieran derivarse de un uso
inadecuado del producto.
GARANTÍA
Este producto está garantizado durante un periodo de dos años a partir de la fecha de compra
contra materiales defectuosos o de fabricación.
notaS importanteS Sobre la Seguridad
Page 16

16
REQUERIMIENTOS DEL SISTEMA
• Windows® ME / 2000 / Windows® XP/
Windows® Vista / Windows® 7
• Puerto USB
FUNCIONES DEL JOYSTICK
a: Control panorámico de ocho vías
(coolie hat)
b: Botones de disparo
c: Control de empuje
d: Control del timón
a
b
b
b
d
c
Page 17

17
INSTALACIÓN DEL SOFTWARE
Advertencia:1. Instalar primero el
software adjunto y conectar a continuación el joystick al puerto USB de
ordenador.
(Ten en cuenta que Windows 95/NT
no soporta el sistema USB.)
1. Enciende el ordenador y espera
hasta que el sistema operativo haya
terminado de cargarse.
2. Inserta el CD del controlador
adjunto en la unidad de CDs del
ordenador.
3. El programa de instalación se activa
automáticamente.
4. Si no se inicia la instalación
automática del programa, haz clic
en „Inicio/Ejecutar/Examinar“ que
se abre y selecciona la unidad de
CD-ROM.
5. Haz doble clic en el archivo „setup.
exe“.
6. Sigue las instrucciones que aparecen en pantalla.
7. Reinicia el ordenador cuando apa-
rezca esta orden en pantalla.
CONEXIÓN DEL JOYSTICK
1. Después de instalar el controlador,
enchufar el conector USB del Joystick al puerto USB del ordenador
2. El joystick funcionará normalmente.
INSTRUCCIONES PARA
SU UTILIZACIÓN:
Para probar las distintas funciones del
dispositivo, procede de la siguiente
manera:
1. Conecta tu joystick al puerto USB
del ordenador.
2. Abre „Inicio/Conguración/Panel de
control“.
3. Haciendo doble clic en „Dispositivos
de juegos“ del panel (en Windows
ME „Opciones de juegos“) aparece
un menú contextual.
4. En este menú tiene que gurar la
entrada „MegaStore Game
Controller v.3“.
5. Haz clic en propiedades para probar
las funciones de los botones, ejes,
control de empuje y timón del
joystick.
6. Selecciona la tarjeta de registro
„efectos“ para probar la función de
vibración del joystick.
7. Cuando todo funcione a tu entera
Page 18

18
satisfacción, haz clic en „Aceptar“
para salir del programa de prueba.
RESOLUCIÓN DE PROBLEMAS
El joystick no está funcionando, aunque está bien conectado.
1. Comprueba que en el menú Dispositivos de juegos está activada la
entrada „8 botones con vibración“.
Para ello seguir los pasos 2-4 del
capítulo 6 de „Instrucciones para
su utilización“ En Windows XP
esta entrada gura con el nombre
„Dispositivos de juegos / Opciones“,
selecciona el dispositivo y conrma
la selección con „Aceptar“.
2. En caso necesario desinstala otros
controladores de juegos existentes
y vuelve a iniciar el ordenador e
instala de nuevo el software suministrado.
MEDIDAS DE SEGURIDAD
• No desmontes bajo ningún concepto
estos aparatos.
• No intentes en ningún caso la
reparación o mantenimiento de este
dispositivo. Deja cualquier trabajo de
mantenimiento en manos de personal
especializado.
• No hagas cambios en el periférico.
De lo contrario perderás la garantía
que te ampara.
SI PRECISAS AYUDA...
En caso de surgir cualquier problema
técnico, acude a los especialistas que
te proporcionarán todo tipo de soporte
técnico: support@speedlink.com
Page 19

19
importanti informazioni in materia di Sicurezza
IMPORTANTE!
Prima di utilizzare il prodotto, è necessario
leggere attentamente nel manuale d’istruzione
le avvertenze sulla sicurezza, nonché generali.
Conservare accuratamente il presente manuale
d‘istruzioni al ne di poterlo successivamente
consultare nuovamente.
RICERCA GUASTI/RIPARAZIONE
Non riparate l’apparecchio e non effettuate la
manutenzione da soli. Per lavori di riparazione
o manutenzione rivolgeteVi a personale
competente specializzato. Non apportate da soli
nessuna modica all’apparecchio. Facendo ciò,
perderete ogni diritto di garanzia.
UMIDITÀ E FONTI DI CALORE
Non utilizzate l’apparecchio in prossimità
d’acqua (p. es. in prossimità di lavandini, vasche
da bagno o piscine) e tenetelo lontano da luoghi
umidi, da sprizzi o gocce d’acqua, nonché dalla
pioggia. Non esporre il dispositivo ad alte temperature, umidità o luce solare diretta.
PULITURA
Pulire il dispositivo utilizzando un panno morbido
e asciutto. Non usare mai benzina, diluenti o altri
prodotti chimici.
COLLOCAZIONE
Collocare l‘apparecchio su un supporto stabile
per evitare che cada e che vengano danneggiate
persone o l’apparecchio stesso.
Uso appropriato dei dispositivi
• È consentito utilizzare il dispositivo solo ed
esclusivamente con i componenti originali
previsti.
• È consentito utilizzare il prodotto solo ed
esclusivamente in ambienti chiusi, nonché
asciutti.
• Un uso appropriato del dispositivo implica un
procedimento conforme alle disposizioni di
installazione. Il costruttore esclude ogni tipo
di responsabilità per danni derivanti da un uso
improprio del dispositivo.
GARANZIA
Questo prodotto è coperto da garanzia contro i
difetti di materiali e di lavorazione per un periodo
di due anni dalla data originale di acquisto sui
pezzi di ricambio e il lavoro.
Page 20

20
REQUISITI DI SISTEMA
• Windows® ME / 2000 / Windows® XP/
Windows® Vista / Windows® 7
• una porta USB
FUNZIONI DEL JOY-STICK
a: comando a otto direzioni per
funzione panoramica (Coolie Hat)
b: pulsanti grilletto
c: funzione d’accelerazione
d: comando timone
a
b
b
b
d
c
Page 21

21
INSTALLAZIONE SOFTWARE
Nota bene:1. Installate prima il
software con driver, trovato in dotazione, e solo in seguito collegate il
joy-stick alla porta USB del Vostro
computer.
(RicordateVi che in caso di utilizzo
del mouse in ambiente Windows
95 / NT la modalità di collegamento
mediante interfaccia USB non sarà
supportata.
1. Accendete il computer e attendete
n quando il Vostro sistema operativo non sia stato completamente
avviato.
2. Inserite il CD con il driver, trovato in
dotazione, nell’unità CD – ROM.
3. Il programma d’installazione verrà
automaticamente avviato.
4. Nel caso in cui il programma
d’installazione non venga avviato
in automatico, cliccate su “Start /
Esegui / Cerca” e selezionate l’unità
CD-ROM.
5. Fate doppio clic sul le “setup.exe”.
6. Seguite quindi le indicazione visualizzate sullo schermo.
7. Riavviate il Vostro PC quando ne
sarà fatta richiesta.
COLLEGAMENTO DEL JOY-STICK
1. Ad l’istallazione terminata, collegate
semplicemente il connettore USB
del Vostro joy-stick alla porta USB
del Vostro PC
2. Il joy-stick è adesso pronto per
essere utilizzato.
ISTRUZIONI PER L’USO
Al ne di effettuare il test di tutte le
funzioni del joy-stick, procedete come
di seguito:
1. Collegate il joy-stick alla porta USB
del Vostro computer.
2. Selezionate “Start / Impostazioni /
Pannello di controllo”.
3. Facendo quindi doppio clic su
“Periferiche di gioco” (in ambiente
Windows® ME => “Opzione giochi”)
apparirà un menù di contesto.
4. Nel menù di contesto dovrebbe
essere elencata la voce “MegaStore
Game Controller v.3”.
5. Cliccate su “Proprietà“ per effettuare
un test delle funzioni del joy-stick
(tasti, assi, comando timone e leva
dell’accelerazione).
6. Selezionate quindi la scheda di
dialogo “Effects” per effettuare il
Page 22

22
test della funzione di vibrazione del
Vostro joy-stick.
7. Se tutte le funzioni impostate
corrispondono perfettamente alle
Vostre esigenze, cliccate quindi su
“OK” per chiudere il menù.
RICERCA GUASTI
Il joy-stick non funziona sebbene sia
stato collegato correttamente.
1. AccertateVi che la voce “8-buttons-
with-vibration” sia elencata nel menù
delle “Periferiche di gioco”. Ripetete
le operazioni dal punto 2 al 4;
descritte al paragrafo 6 “Istruzioni per l’uso“ di questo manuale
d’istruzioni. In ambiente Windows
XP troverete l’identicazione del
joy-stick alla voce “Periferiche di
gioco installate / Avanzate”;
selezionate quindi la periferica in
questione confermando inne la
selezione mediante “OK”.
2. Eventualmente disinstallate altre
periferiche di gioco precedente-
mente installate; dopo aver fatto ciò,
riavviate il PC e installate il software
trovato in dotazione.
PRECAUZIONI
PER LA SICUREZZA
• Non smontate il dispositivo in nessun
caso.
• Non riparate il dispositivo e non
effettuatene la manutenzione da soli.
Per lavori di riparazione o
manutenzione rivolgeteVi a
personale competente specializzato.
• Non apportate al dispositivo nessun
tipo di modica. In tal caso,
perdereste diritto ad ogni tipo di
garanzia.
IN CASO DI SUPPORTO
TECNICO …
Nel caso in cui dovessero vericarsi
ulteriori problemi tecnici, Vi preghiamo
di contattare i nostri tecnici:
support@speedlink.com
Page 23

23
Konformität
Unter Einwirkung von starken statischen, elek-
trischen oder hochfrequenten Feldern (Funkanlagen,
Mobiltelefonen, Handys, Mikrowellen Entladungen)
kann es zu Funktionsbeeinträchtigungen des Gerätes
(der Geräte) kommen. Versuchen Sie in diesem Fall,
die Distanz zu den störenden Geräten zu vergrößern.
Declaration of Conformity
Operation of the device (the devices) may be affected
by strong static, electrical or high-frequency elds
(radio installations, mobile telephones, microwaves,
electrostatic discharges). If this occurs, try increasing
the distance between the devices that are causing
interference.
Conformité
La présence de champs statiques, électriques ou
à haute fréquence intenses (installations radio,
téléphones sans l, téléphones mobiles, décharges
de micro-ondes) peut perturber le bon
fonctionnement de l‘appareil (ou des appareils).
Dans ce cas, essayez d‘éloigner les appareils à
l’origine des perturbations.
Declaración de conformidad
Bajo los efectos de fuertes campos eléctricos,
estáticos o de alta frecuencia (emisores, teléfonos
inalámbricos y móviles, descargas de microondas)
pueden aparecer señales parasitarias que perturben
el buen funcionamiento del aparato (los aparatos).
En caso necesario conviene que la distancia con los
aparatos implicados sea la mayor posible.
Conformità
L‘esposizione a campi statici, elettrici o
elettromagnetici ad alta frequenza (impianti radio,
cellulari, scariche di microonde) potrebbe
compromettere la funzionalità del dispositivo
(dei dispositivi). In tal caso cercare di
aumentare la distanza dalle fonti di interferenza.
Page 24

©2009 Jöllenbeck. All rights reserved. SPEEDLINK®, the SPEEDLINK word mark and the SPEEDLINK swoosh
are registered trademarks of Jöllenbeck GmbH. Windows, Windows XP, Windows Vista and Windows 7 are
registered trademarks of Microsoft Corporation in the United States and/or other countries.
All other trademarks are the property of their respective owners. Jöllenbeck shall not be made liable for any
errors that may appear in this manual. Information contained herein is subject to change without prior notice.
JÖLLENBECK GmbH, 27404 Weertzen, GERMANY
SL-6640-SBK | VERS. 1.0
 Loading...