

SpeedLeader DVX602 User Manual
Speed Leader
User Manual
DVX602
LED Video Processor

1
Contents
About This Manual .................................................................................................. 3
Trademarks .............................................................................................................. 3
Safety Precautions ................................................................................................... 4
Accessories .............................................................................................................. 5
Product Models ........................................................................................................ 6
Overview ................................................................................................................. 7
Panel ........................................................................................................................ 9
Front Panel ...................................................................................................... 9
Button Combinations ............................................................................. 11
Rear Panel ...................................................................................................... 12
Application Scenarios ............................................................................................ 13
Menu Introduction ................................................................................................. 14
Default Menu ................................................................................................. 14
Main Menu .................................................................................................... 15
Image Setting ......................................................................................................... 16
Image Setting Shortcut .................................................................................. 17
Window and Crop .................................................................................................. 18
Window Setting Shortcut ............................................................................... 19
Crop ............................................................................................................... 19
Crop Setting Shortcut .................................................................................... 20
Output Resolution .................................................................................................. 21
LED ....................................................................................................................... 22
Function Setting .................................................................................................... 24
Overview ....................................................................................................... 24
Setting EDID ................................................................................................. 25
PIP ......................................................................................................................... 26
PIP Setting Shortcut ....................................................................................... 28
Advanced Setting .................................................................................................. 29
Internal Test ................................................................................................... 29
System Information ............................................................................................... 30
Operation Guide .................................................................................................... 31

2
Splicing Setting ............................................................................................. 31
Function Setting ..................................................................................... 31
Equal Splicing ....................................................................................... 32
Unequal Splicing ................................................................................... 33
PIP Mode Setting ........................................................................................... 34
PIP Parameter Setting ............................................................................ 34
Keying Mode ......................................................................................... 35
Presetting Scenarios............................................................................................... 36
Specifications ........................................................................................................ 38
Trouble Shooting ................................................................................................... 40

3
About This Manual
Without written permission of the Company, no unit or individual may imitate,
reproduce or copy this Manual, in full or in part. This Manual shall not be
distributed or used for any commercial purposes in any form (electronic,
mechanical, photocopy, recording or other possible forms).
The product specifications and information mentioned in this Manual are for
reference only and are subject to change without notice. Unless specifically
agreed, this Manual is for guidance only. No statement or information in this
Manual constitutes guarantee in any form.
Trademarks
VGA and XGA are registered trademarks of IBM.
VESA is a trademark of Video Electronics Standards Association.
HDMI mark and High-Definition Multimedia Interface are trademarks of HDMI
Licensing LLC.

4
Safety Precautions
This device must be connected to a ground wire.
This device must use voltage with rated power. Ensure the error of the input
voltage is ±10%.
Do not connect the AC power cable to an AC power cable that may cause
excessive noise.
Use this device in an environment with an ambient temperature between
-10℃ and 40℃ and a relative humidity of 90% or below.
Do not use this device in certain special circumstances, such as places near
heat sources, which may cause damage of the device due to overheat. Use
this device in a place with good ventilation, and prevent the vent of the
device from being blocked.
Do not expose this device to any place where accidental collision or vibration
may occur. If it will be used in a place with vibration, reinforce the device.
Do not place foreign objects, e.g. water or metal into the device, which will
cause damage to the device and result in a fire.
In case any irregular or abnormal phenomenon is found, switch off the power
immediately, disconnect the AC power cable, and handle the phenomenon by
referring to “Troubleshooting Guidance”.
In case of any damage, do not disassemble the device. Contact the
maintenance department of Speed Leader.
5
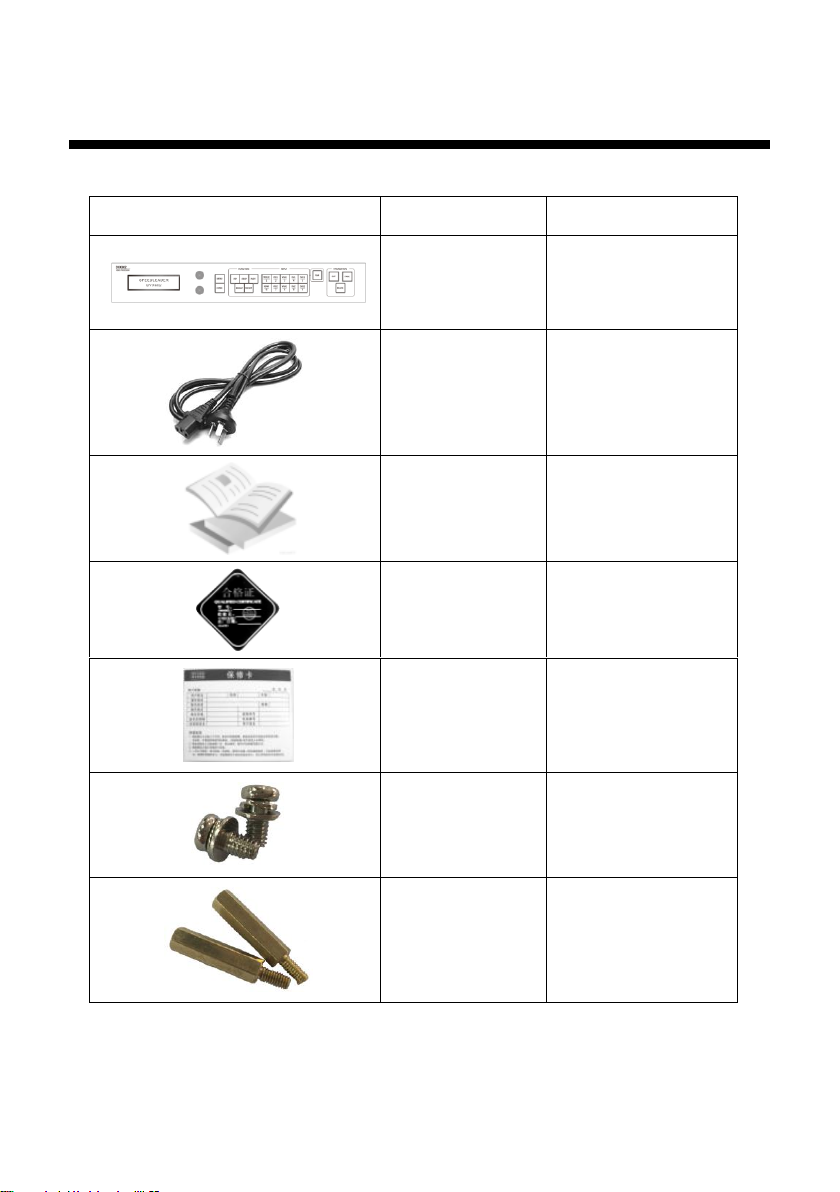
Item
Name
Qty
DVX602
1
AC power cable
1
User manual
1
Qualified
Certificate
1
Warranty Card
1
M3*6 round
head screw
2
Φ5*18 copper
cylinder
2
Accessories
* Accessories can be defined based on customer requirements.
Table 4-1 Package content
6
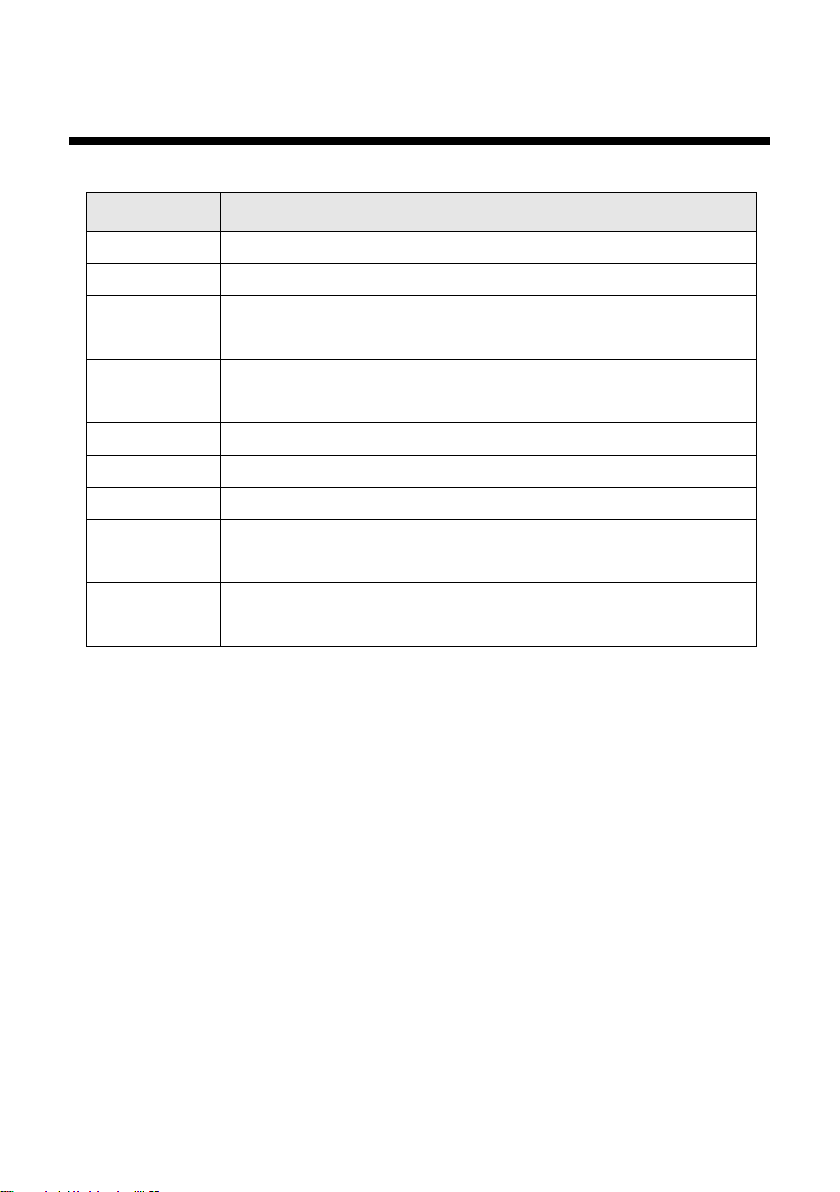
Product Models
Model
Description
DVX602
Basic
DVX602S
Basic + Expanding 1x3G - SDI input
DVX602SD
Basic + Expanding 1x3G - SDI input,
Expanding Program output DVI/VGA
DVX602SF
Basic + Expanding 1x3G - SDI input,
Expanding Program output SDI/DVI/VGA/VID
DVX602F
Basic + Program output SDI/DVI/VGA/VID
DVX602D
Basic + Expanding Program output DVI/VGA
DVX602T
Basic + Expanding 2x3G - SDI input
DVX602TD
Basic + Expanding 2x3G - SDI input,
Expanding Program output DVI/VGA
DVX602TF
Basic + Expanding 2x3G - SDI input, Expanding Program
output SDI/DVI/VGA/VID
Table 4-2 Product models

7
Picture-in-picture Any Size Any Position
Seamless Switch
Splicing LED Video Processor
Internal Test Patterns for Calibration and Setup
Overview
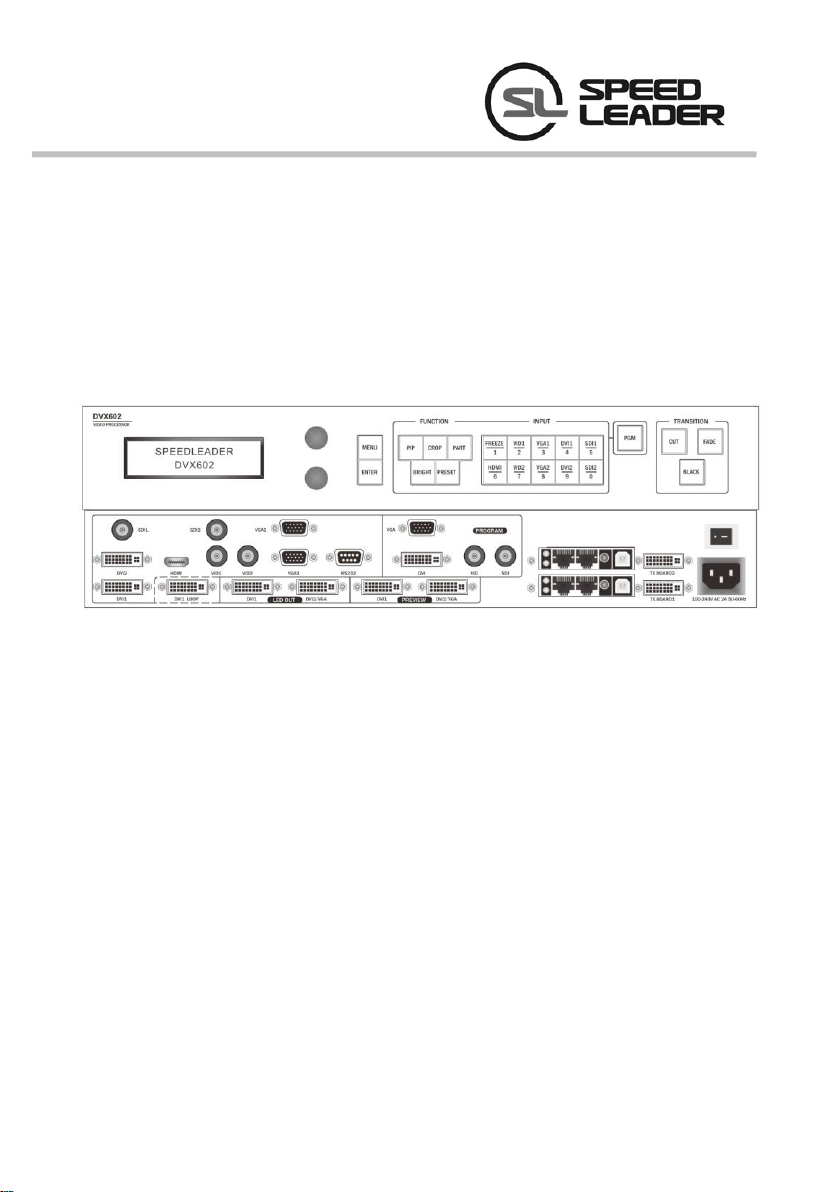
DVX602 series video processor is a high-performance LED video processor
that uses the 30-bit digital signal processing technology, advanced deinterlacing
signal processing and real Seamless Switch technology for professional
demonstration. It supports 1080p and 1920x1200@60Hz full HD resolution
output (up to 2304x1152@60Hz). Point-to-point pixel adjustment can be realized.
It can receive several types of video input formats, such as 3G-SDI, HDMI, DVI,
VGA, and SD video.
DVX602 Series Video Processor supports signal interconnection. Through simple
splicing setup, ultra high resolution displaying can be realized without an
expensive splicing controller.
The seamless switch between single-window and dual-window function and
fade-in fade-out effects are provided to enhance and present demonstration
pictures of professional quality.
A number of test patterns are provided, including square, color bar, gray scale,
alternate pixel, white field, full red, full green, full blue, etc.
The position, size, etc. of picture-in-picture are adjustable and can be controlled
arbitrarily.

8
Preset Scenarios
Output Interfaces
Input Interfaces
Broadcast-Quality Multi-Stage Scaling Engine
Convenient Keys on the Panel
DVX602 Series Video Processor uses high performance 30-bit Faroudja® DCDI
multi-stage scaling engine to convert the resolution of pictures to a lower or
higher one for signals of various definitions, as well as the professional ACC and
ACM video processing engine to present you with a completely new visual
enjoyment.
2 BNC inputs, 2 VGA inputs, 2 DVI inputs, 1 HDMI input, 1 RS232
communication port, 2 3G-SDI inputs (optional).
DVX602 provides three independent video outputs for preview, program, and
LED.
An intuitive LCD interface and the clear key indicators simplify the installation
and control of the system.
DVX602 supports multiple scenarios to be saved and invoked, which is easy to
realize.
9
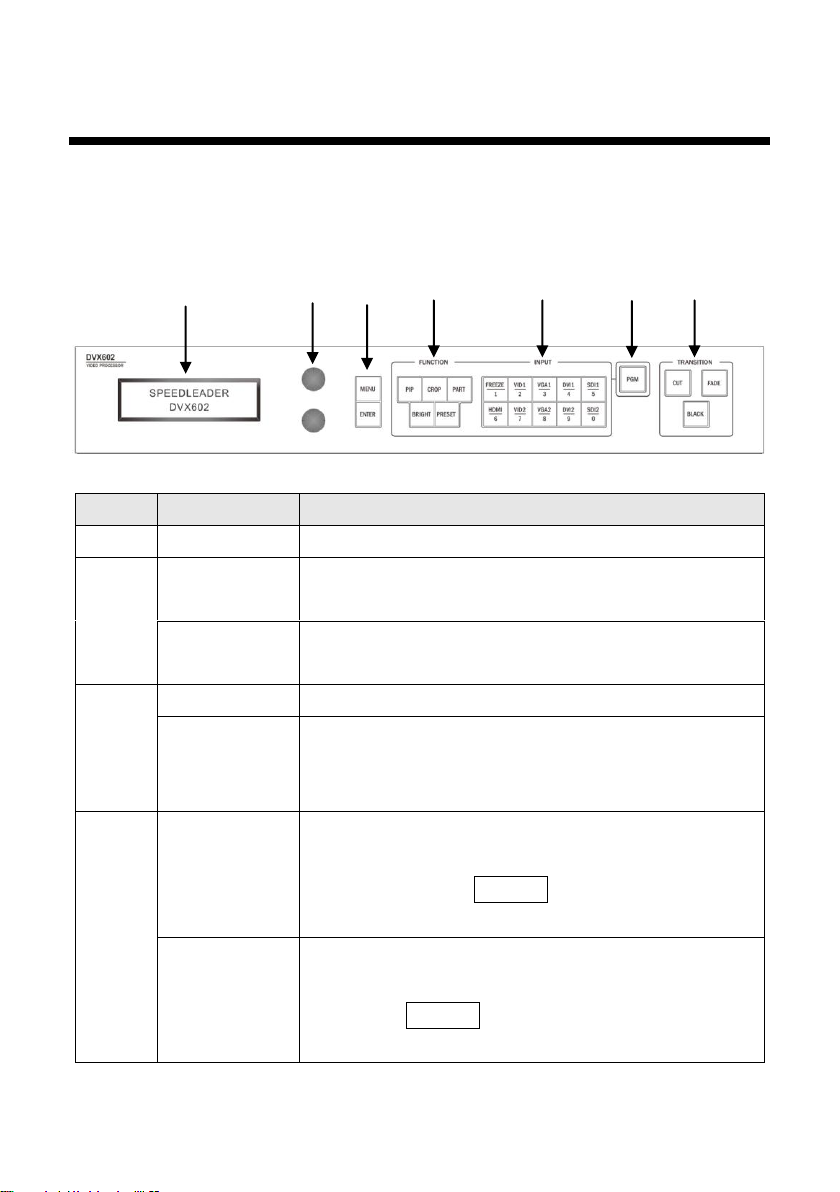
Panel
SN
Name
Operation
1
LCD display
Show menu and current information.
2
Knob (up)
Select up/down/left/right menus and adjust the
parameters. Press this knob for confirmation.
Knob (down)
Select up/down and adjust the parameters. Press this
knob for confirmation.
3
MENU
Enter the main menu or return to the previous menu.
ENTER
Confirm an operation or switch between submenus.
It can be used in combination with other buttons for
specific function as well.
4
PIP
Picture-in-picture button. Press and hold this button
for one second to enter PIP parameters setting
menu. Press the ENTER button to switch the
current operation interface.
CROP
Cropping button. Press and hold this button for one
second to enter CROP parameters setting menu.
Press the ENTER button to switch the current
operation interface.
1
2
3
4
5 6 7
Front Panel
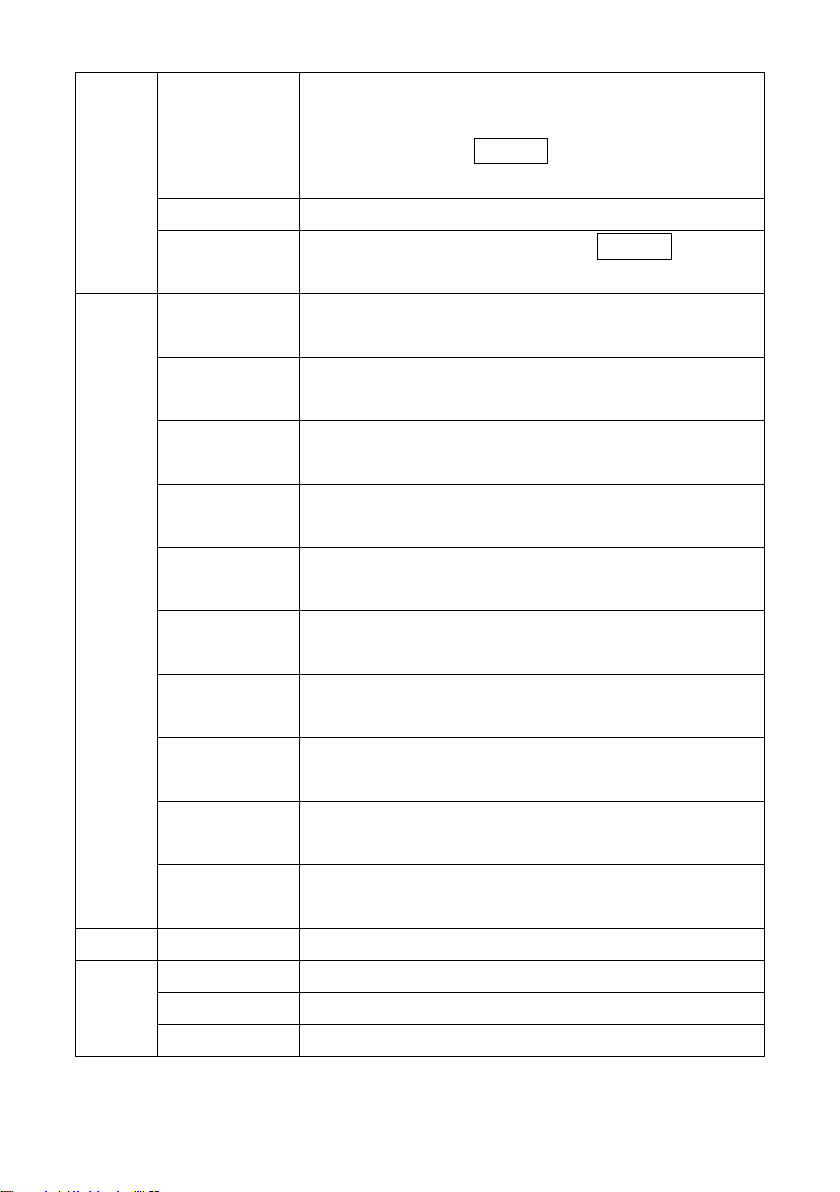
10
PART
Full or Part shortcut key. Press and hold this button
for one second to enter window parameters setting
menu. Press the ENTER button to switch the
current operation interface.
BRIGHT
Adjust image brightness and contrast
PRESET
Scenario switch button. Press the ENTER button to
switch the current operation mode.
5
FREEZE
Freeze or unfreeze a window. In scenario mode, this
operation is realized by the number key 1.
HDMI
Select HDMI channel. In scenario mode, this
operation is realized by the number key 6.
VID1
Select composite video 1 channel. In scenario mode,
this operation is realized by the number key 2.
VID2
Select composite video 2 channel. In scenario mode,
this operation is realized by the number key 7.
VGA1
Select VGA 1 channel. In scenario mode, this
operation is realized by the number key 3.
VGA2
Select VGA 2 channel. In scenario mode, this
operation is realized by the number key 8.
DVI1
Select DVI 1 channel. In scenario mode, this
operation is realized by the number key 4.
DVI2
Select DVI 2 channel. In scenario mode, this
operation is realized by the number key 9.
SDI1
Select SDI 1 channel. In scenario mode, this
operation is realized by the number key 5.
SDI2
Select SDI 2 channel. In scenario mode, this
operation is realized by the number key 0.
6
PGM
Preview and program switch
7
CUT
Immediately switch
FADE
fade-in and fade-out
BLACK
Program/LED output channel black screen
Table 7-1 Descriptions of front panel

11
Button Combinations
ENTER + CROP :
Restore the crop parameters for selected preview/program output back to default
values. Reset the crop parameters of the selected preview/program to default.
ENTER + PART :
Restore the window parameters for selected preview/program output back to
default values. Reset the window parameters of the selected preview/program to
default.
ENTER + BRIGHT :
Restore the image brightness/contrast parameters for selected preview/program
output back to default values. Reset the brightness/contrast of the selected
preview/program to default.
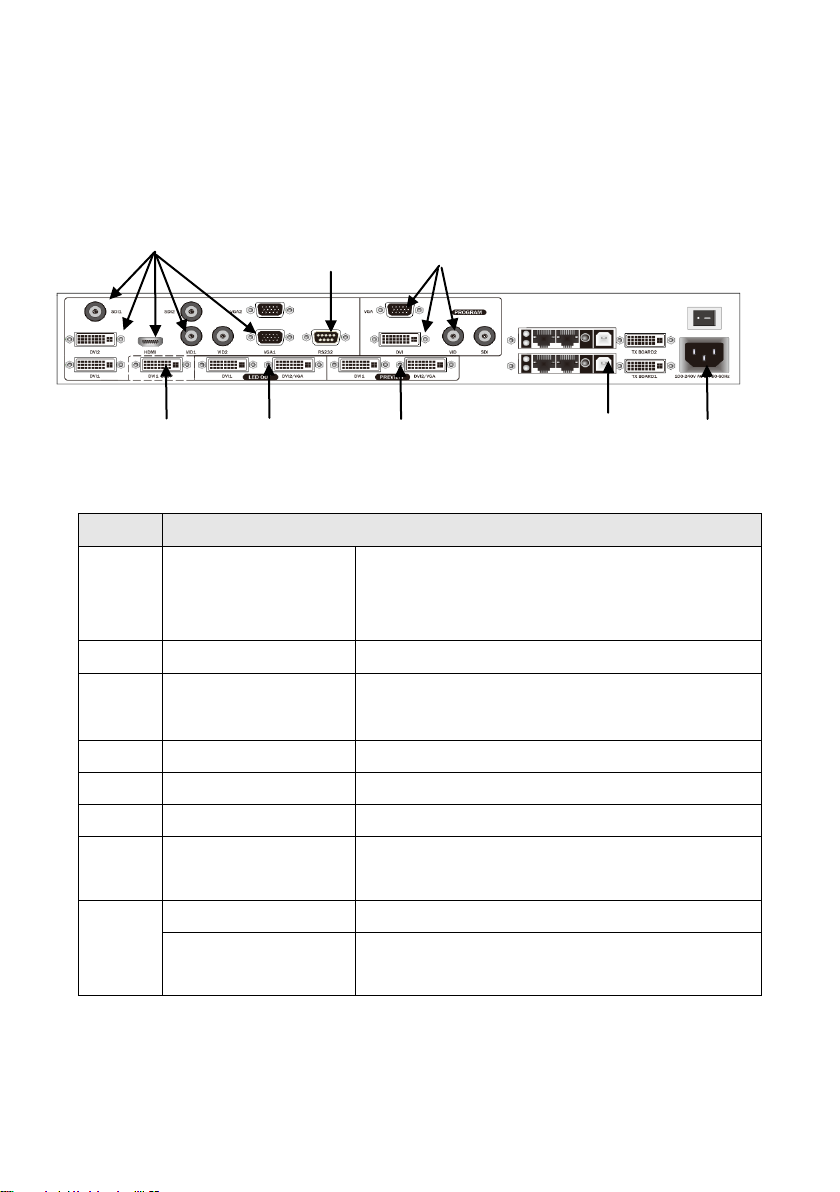
12
SN
Port
1
Video input
DVX602 can receive 2* VGA, 2*DVI,
1*HDMI, 2* VID and 2*SDI (optional)
signal source simultaneously.
2
COM port
One RS-232 port
3
Program output
Expanding program output DVI/VGA and
SDI/DVI/VGA/VID
4
DVI loop-out port
One DVI 1 loop-out port
5
LED output
Two DVI-I output ports
6
Preview output
Two DVI-I output ports
7
Sending card
interface
Reserved for installing a sending card
8
AC power socket
100~240VAC, 50Hz/60Hz
Power switch
"I" indicates power-on; "O" indicates
power-off.
1 4 7
3
8
6
5
2
Rear Panel
Table 7-2 Description of rear panel
 Loading...