


User Guide
GNOME 7.0
Portable Digital
Stereo Voice Recorder
STC-H476
Operation manual

The manufacturer retains the right to make amendments to this manual in connection with improvements made to Gnome design without special notification.
Any such amendments will be published in a new edition of the Gnome manual and on the company’s website: http://www.speechpro.com.
We welcome your feedback, questions and concerns regarding Gnome.
If you have any questions concerning the use of this product, please contact Speech Technology Center’s technical support service or your regional dealer.
For technical support:
St. Petersburg
Phone +7(812) 325-8848
Fax: +7(812) 327-9297
support@speechpro.com
gnome@speechpro.com
http://speechpro.com/support_form
Moscow
Phone: +7(495) 669-7440
Fax: +7(495) 661-7444
Help us assist you by having the following information ready:
– Product name and model/version number;
– Problem description;
– Computer configuration;
– Operating system name/version number.

CONTENTS
CONTENTS
INTRODUCTION ............................................................................................................................................... 4
GENERAL INFORMATION .............................................................................................................................. 5
ALLOCATION .......................................................................................................................................................................5
ABOUT THE PRODUCT ......................................................................................................................................................5
SPECIFICATION ................................................................................................................................................ 6
CAPABILITIES .................................................................................................................................................... 7
GENERAL ...............................................................................................................................................................................7
CONTROL AND DISPLAY FUNCTIONS ...........................................................................................................................7
VOICE RECORDER FUNCTIONS ........................................................................................................................................8
VOICE RECORDER CONTROL SOFTWARE FUNCTIONS..............................................................................................9
RECORDING DURATION ....................................................................................................................................................9
GETTING STARTED ........................................................................................................................................10
INSERTING MEMORY CARD ........................................................................................................................................... 10
INSERTING THE BATTERY ............................................................................................................................................... 10
CONNECTING THE RECORDER TO EXTERNAL DEVICES ......................................................................................... 11
CONTROLS ......................................................................................................................................................12
SWITCHING ON AND OFF ...........................................................................................................................13
SWITCHING THE VOICE RECORDER ON ..................................................................................................................... 13
SWITCHING THE VOICE RECORDER OFF .................................................................................................................... 13
RECOMMENDATIONS FOR BATTERY USE .................................................................................................................. 13
BATTERY TRAINING ......................................................................................................................................................... 13
LOCKING AND UNLOCKING THE RECORDER ........................................................................................14
LOCKING THE RECORDER .............................................................................................................................................. 14
UNLOCKING THE RECORDER ........................................................................................................................................ 14
DISPLAY STATUS INDICATORS ..................................................................................................................15
DISPLAY VIEW WHEN RECORDER IS ON .................................................................................................................... 15
1st SCREEN LINE ................................................................................................................................................................ 16
2nd SCREEN LINE ............................................................................................................................................................... 17
3rd-4th SCREEN LINES ....................................................................................................................................................... 17
5th SCREEN LINE ................................................................................................................................................................ 17
6th-8th SCREEN LINES ....................................................................................................................................................... 18
9th SCREEN LINE ................................................................................................................................................................ 18
10th SCREEN LINE ............................................................................................................................................................. 18
11th SCREEN LINE ............................................................................................................................................................. 19
SIGNAL LEVEL INDICATOR ............................................................................................................................................. 19
FACTORY DEFAULTS ....................................................................................................................................................... 19

CONTENTS
RECORDING ....................................................................................................................................................20
FILE NAMES .....................................................................................................................................................21
ADJUSTING RECORDING PARAMETERS ..................................................................................................23
TIMERS ..............................................................................................................................................................27
LOOP .................................................................................................................................................................32
VOICE ACTIVITY ..............................................................................................................................................34
MEMORY ..........................................................................................................................................................37
PIN-CODE ........................................................................................................................................................39
DATE AND TIME .............................................................................................................................................42
MISCELLANEOUS...........................................................................................................................................44
PLAYBACK .......................................................................................................................................................49
DELETING FILES .............................................................................................................................................54
GETTING INFORMATION ABOUT THE VOICE RECORDER ...................................................................55
ACCUMULATOR CHARGING ......................................................................................................................56
USB-MICROPHONE MODE ..........................................................................................................................57
VOICE RECORDER MANAGER ....................................................................................................................58
INSTALLING THE MANAGER .......................................................................................................................................... 58
LAUNCHING THE MANAGER ........................................................................................................................................ 60
VOICE RECORDER MANAGER ....................................................................................................................61
MAIN WINDOW ................................................................................................................................................................ 61
SETTING UP RECORDING OPTIONS ............................................................................................................................. 63
DATE AND TIME SETUP .................................................................................................................................................. 66
TIMER SETUP ..................................................................................................................................................................... 67
PIN CODE AND USB HASP SECURITY HARDWARE .................................................................................................. 68
INTERNAL PROGRAM UPDATE ..................................................................................................................................... 69
FILE MANAGER WINDOW .............................................................................................................................................. 70
CONVERTING TO MP3 FORMAT ................................................................................................................................... 71
FILE SIGNATURE ............................................................................................................................................................... 73
DIGITAL SIGNATURE VERIFICATION ............................................................................................................................ 74
FILE INTEGRITY CHECK ................................................................................................................................................... 76
PUBLIC KEY EXPORT ........................................................................................................................................................ 78
PRIVATE KEY EXPORT ...................................................................................................................................................... 79
PRIVATE KEY IMPORT ...................................................................................................................................................... 80
ABOUT THE VOICE RECORDER MANAGER ................................................................................................................ 80
EXITING THE VOICE RECORDER MANAGER ............................................................................................................... 80
PACKAGES AND ACCESSORIES .................................................................................................................81
Business Package ............................................................................................................................................................. 81

CONTENTS
Professional Package ...................................................................................................................................................... 81
Optional Equipment and Software ............................................................................................................................. 81
WARRANTY .....................................................................................................................................................82
REGISTRATION CERTIFICATE ......................................................................................................................83

INTRODUCTION
4
INTRODUCTION
The manual uses the following typographical conventions:
Formatting Description
Bold
Indicates names of construction and software components, names of controls and interface elements (headings, buttons, etc.).
Bold italics
Indicates file names and access paths.
Format PCM16 Represents a line on the voice recorder screen.
In the Manager Program description, the word combination “click a button” means: “to place the
mouse pointer on the button and click it.”
The manual uses the following notification symbols:
Note: indicates important information that helps you make better use of the product.
Caution: informs you about potential problems with hardware or software.
Warning: warns you about potentially serious problems in certain situations and tells you how
to avoid them.
The names Windows®, Windows® XP, Windows® 7 and Windows® 8 are trademarks of the Microsoft®
Corporation.
The logotypes and represent Secure Digital (SD) and Secure Digital High Capacity
(SDHC) memory cards developed by Matsushita (Panasonic), SanDisk and Toshiba.
All other company and product names mentioned in this document are the property of their corresponding owners.
To convert audio files to the mp3 format, the Manager program can use lame_enc.dll software (the
LGPL license can be found at: http://www.gnu.org/copyleft/lesser.html).
No part of this manual may be reproduced or transmitted in any form, stored in a searchable system or translated into any
language without the written consent of Speech Technology Centre.

GENERAL INFORMATION
5
GENERAL INFORMATION
ALLOCATION
Gnome 7.0 is a portable digital stereo voice recorder. It is a professional device designed for mono or
stereo recording in noisy acoustic environments.
Gnome 7.0 can be used for real-time speech recording (i.e. needing no preliminary preparation) during investigative activities, business negotiations, lectures, judicial sessions, meetings, interviews, etc.,
both indoors and outdoors.
Audio files recorded with Gnome 7.0 can be used in voice and speech analysis, including for
identification purposes.
ABOUT THE PRODUCT
Name:
Gnome 7.0
portable digital stereo voice recorder
Model
STC-H476
Producer:
Speech Technology Center, Ltd.
Address:
Russia, St. Petersburg, Krasutskogo str. 4a, 196084, PO Box 124
Phone:
+7 (812) 325-88-48
Fax:
+7 (812) 327-92-97

SPECIFICATION
6
SPECIFICATION
Feature Description/Value
Recording channels 2
External microphone inputs 2
Line inputs 2
Flash memory volume 4 GB
Plug-in memory card volume 32 GB
Plug-in memory card micro SDHC
Recording format
PCM 16 and 24 bit without compres-
sion; 8 bit with compression
according to A- or μ-law
Sampling rate
8; 11.025; 16; 22.05; 32; 44.1; 48 and
96 kHz
Amplitude-frequency characteristic ripple 2 dB
Signal-to-noise ratio—recording through microphone
input
minimum 75 dB
Signal-to-noise ratio—recording through line input
minimum 89 dB
Harmonic distortion coefficient –recording through line
input (without compression), nominal level 1000 Hz
maximum 0.06 %
Harmonic distortion coefficient – recording through
microphone input (without compression), nominal level
1000 Hz
maximum 0.15 %
Built-in microphones 2
Microphone type electret
Lithium battery life:
– recording mode minimum 14 hours
– timer mode minimum 200 hours
– Voice Activation mode minimum 72 hours
Running time in recording mode, using Duracell Plus or
Ultra rechargeable battery
minimum 24 hours
PC connection USB 2.0 (hi-speed)
OS compatibility Windows XP, Windows 7, Windows 8
Interface language Russian, English
Product material metal, screen – glass
Product dimensions 114х39х19 mm
Weight, with battery 125 g

CAPABILITIES
7
CAPABILITIES
GENERAL
Audio can be recorded onto removable microSD card or to microSDHC (Secure Digital High Capacity)
flash memory card.
For optimal functioning, use microSD cards with Speed Class 6 or higher.
Audio is recorded using built-in or external microphones, or line outputs of audio equipment.
Recording can be controlled manually and/or automatically (with preset timers or by input signal
level).
The voice recorder has switch controls and LCD screen indicator controls; use these to regulate the
voice recorder and use head phones to listen to recordings.
When the device is connected to PC you can listen to recorded audio files, copy them to the PC hard
drive and change device configuration. You cannot record files to the internal and external device
memory through USB port.
The recorder can be powered in 4 ways: 2 rechargeable batteries (LR03 AAA), non-recoverable batteries, external DC source or from a computer via USB-connector.
CONTROL AND DISPLAY FUNCTIONS
The voice recorder performs the following control and display functions:
– Control audio recording with RECORD-STOP switch and buttons;
– Power ON and OFF;
– Buttons lock;
– Set recording parameters;
– Automatic detection/display of connected accessories;
– Indication of the voice recorder operating modes;
– Erase recorded data;
– Regulate battery charge level;
– Switch on/off noise reduction on playback.

CAPABILITIES
8
VOICE RECORDER FUNCTIONS
The voice recorder, with its control software, performs the following functions:
1. Recording (p. 20):
– Records stereo or mono signals;
– Records audio files and saves them to built-in, non-volatile memory, 4 GB;
– Records audio files and saves them to replaceable, non-volatile microSD cards;
– Records with built-in or external microphones, and through line inputs;
– Automatically detects the input signal type fed to the external jack (IN jack);
– Records in PCM format (16 or 24 bit), with or without compression by μ- or А-law;
– Records with different sample rates according to recording conditions;
– Records by sliding the RECORD-STOP switch (p. 20);
– Records according to a programmable timer (p. 27);
– Records cyclically and stores to a memory-saving microSD card (p. 32);
– Automatically stops recording when signal reaches predetermined threshold (auto-stop mech-
anism, p. 34).
2. Additional recording functions:
– Automatic recording level adjustment in left and right channels;
– Automatic power-saving display mode;
– Automatic menu-lock when recording starts.
3. Audio file list view and playback (p. 48).
4. Playback functions (p. 48):
– Noise cancellation;
– Change playback speed;
– Adjust volume (separately for different channels);
– Set time stamps (marks, tags) during continuous playback;
– Search for fragments containing speech.
5. Safeguard against non-authorized listening and copying (p. 79).
6. Use PIN (Personal Identification Number) to access voice recorder controls (p. 39).
7. Automatic device switching off and blocking (p. 44).

CAPABILITIES
9
VOICE RECORDER CONTROL SOFTWARE FUNCTIONS
The voice recorder control software facilitates the following functions:
– Setting recording parameters (p. 63.);
– Setting date and time (p. 66.);
– Setting timers (p. 67);
– Setting, changing PIN-codes (p. 68);
– Updating voice recorder software (p. 69);
– File management (p. 69);
– Converting from WAV to MP3 (p. 71);
– Digital signature verification (p. 73);
– Exporting and importing private keys (p. 79);
– Exporting public keys (p. 78).
RECORDING DURATION
Recording duration depends on selected parameters and available memory space.
Continuous stereo recording duration is approximately 30 hours – with PCM, 16 kHz, and using lithium batteries of 1.5 V, given sufficient free space in internal memory and/or external
microSD memory card.
Recording durations for various modes and sampling rates (with 4 GB memory):
Mode
Recording duration, hours
Sampling rate, kHz
96 48 44.1 32 22.05 16 11.025 8
μ-law 16 bit, mono
9.6 19.2 20.8 28.8 41.6 57.6 82.2 115.2
μ -law 16 bit, stereo
4.8 9.6 10.4 14.4 20.8 28.8 41.6 57.6
μ-law 24 bit, mono
6.4 12.8 14.0 19.2 28.0 34.4 56.0 68.8
μ -law 24 bit, stereo
3.2 9.6 7.0 9.6 14.0 17.2 28.0 34.4
PCM 16 bit, mono
4.8 9.6 10.4 14.4 20.8 28.8 41.6 57.6
PCM 16 bit, stereo
2.4 4.8 5.2 7.2 10.4 14.4 20.8 28.8
PCM 24 bit, mono
3.2 6.4 7.0 9.6 14.0 17.2 28.0 34.4
PCM 24 bit, stereo
1.6 4.8 3.5 4.8 7.0 9.6 14.0 17.2
Recording duration can be increased with mono recording and data compression.
GETTING STARTED
10
GETTING STARTED
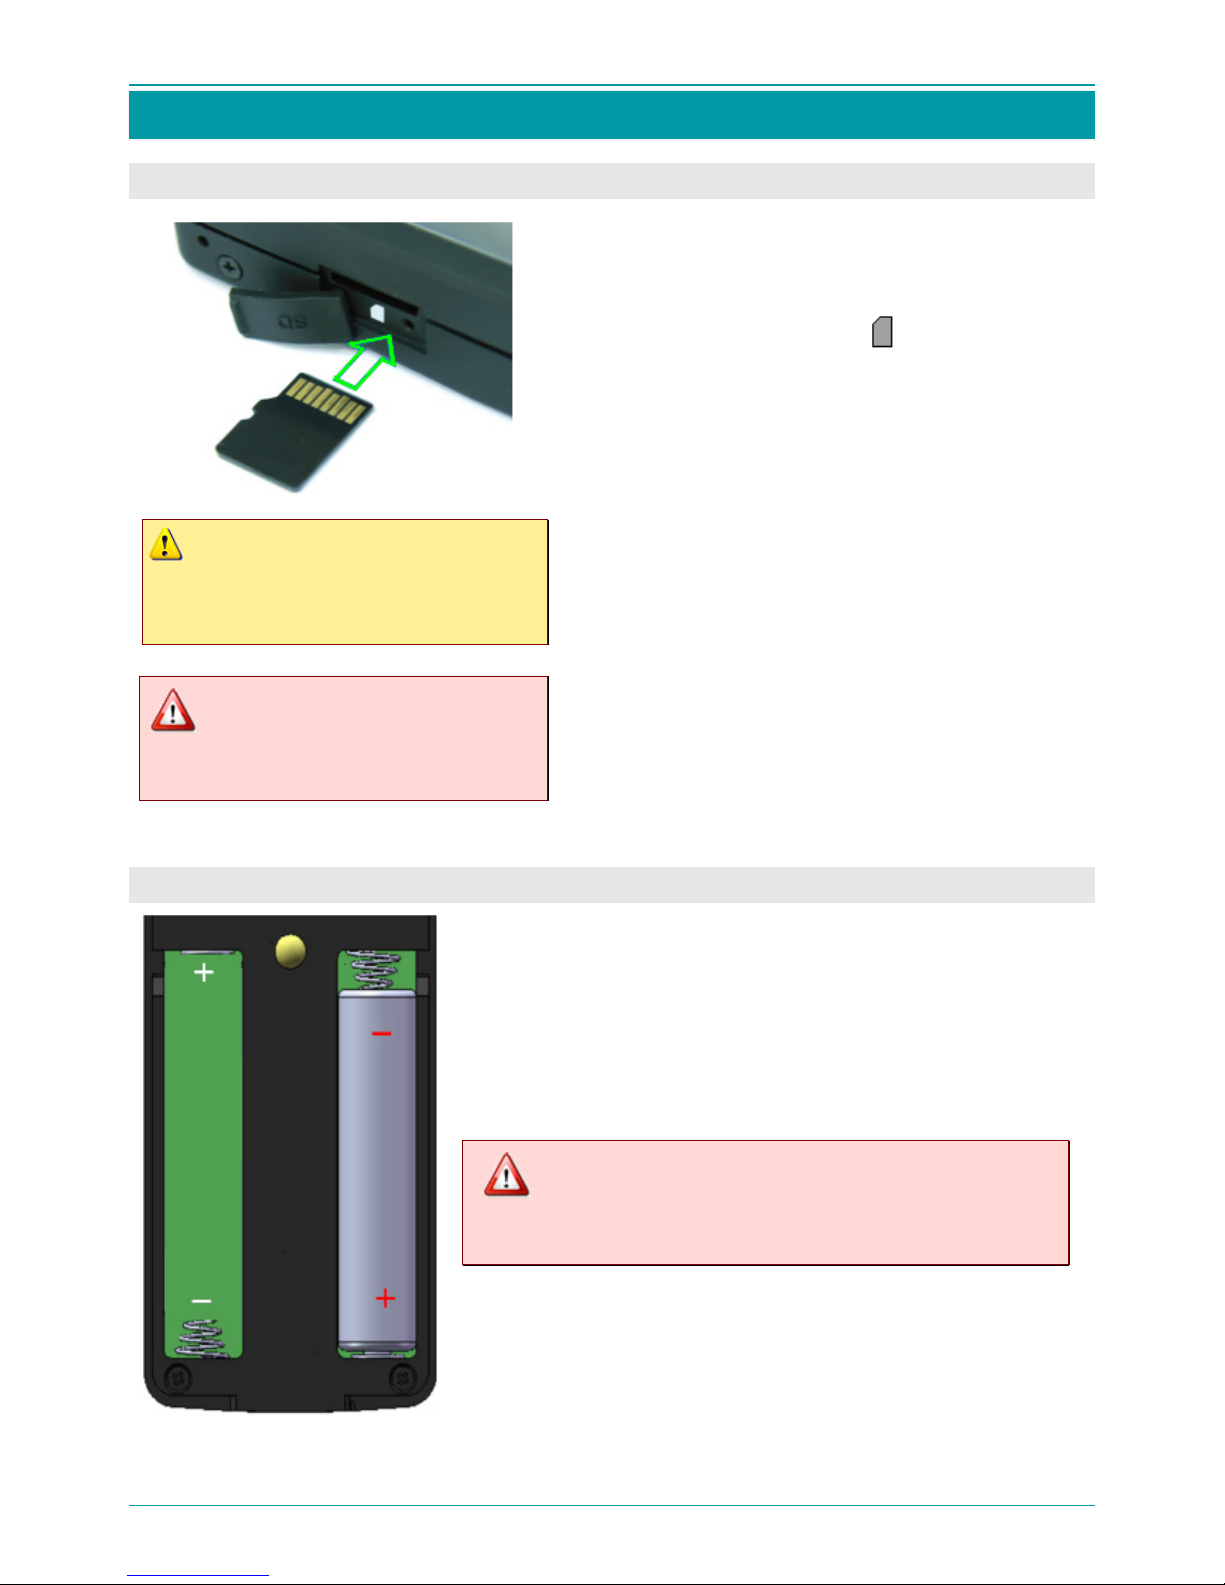
INSERTING MEMORY CARD
Before installing or replacing the
memory card, ensure the recorder is
switched off.
Removing the memory card while
recording may result in complete
data loss.
To save recorded data to external memory, insert a
memory card.
The memory card slot is on the left side panel of the
voice recorder, marked with the icon and covered
with a protective tab marked SD.
To install the memory card:
– Open the protective tab;
– Carefully direct the memory card into the slot;
– Press the edge of the card lightly to secure it in
the slot;
– Close the protective tab.
To extract the memory card:
– Open the protective tab;
– Press the edge of the card lightly and carefully ex-
tract it from the slot;
– Close the protective tab.
INSERTING THE BATTERY
The battery chamber is located on the back panel under the pro-
tective cover.
To insert the batteries:
– open the ptotective cover;
– insert the batteries with regard to polarity;
– close the protective cover.
To avoid malfunction, the type of the batteries must co-
incide with the type stipulated in the settings of the
device.

GETTING STARTED
11
CONNECTING THE RECORDER TO EXTERNAL DEVICES
To connect the voice recorder to external devices, use the following jacks:
USB – mini-USB jack to connect to a PC;
OUT – 3.5 mm headphone jack;
IN – ten-needle jack for external microphone set, line input cable or adaptor for recording from tele-
phone line.
Various connection possibilities are illustrated below:
Connection to a PC
Connection to audio
equipment
External microphone
connection
Phone line connection
USB jack
IN jack
External
microphones
Headphone
connection
Phone line
adaptor
Line input cable
USB cable
АM-miniUSB
Headphones

CONTROLS
12
CONTROLS
To control the voice recorder, use the 9 buttons
on its front panel. An Activation switch on the
right-side panel of the voice recorder starts and
stops Record mode.
To turn on Record mode, slide the Activation
switch to the position. To turn off Record
mode, slide the switch to the position.
Basic functions of each button (more details provided in later sections):
1. Hold the button down (about 3 seconds), to
turn recorder on and off.
2. Press the button once:
a) to display parameters menus;
b) to switch to edit mode;
c) to confirm changes;
d) for playback control.
1. Decrease volume.
2. Move down through parameter selection/
adjustment menus.
1. Open the list of recorded files.
2. Exit the list of recorded files, exit parameter
selection/adjustment
menu.
1. Switch on end-to-end channel.
2. Switch on noise cancellation (and other functions) during playback.
3. Help.
4. PIN-code security/saving.
5. Delete selected phonogram.
1. Increase volume.
2. Move up through parameter
selection/adjustment menus.
In playback mode, jump to the
end of the recording. In Loop
mode, jump to the final time tag.
In playback mode, jump to
the start of the recording. In
Loop mode, jump to the start
time tag.
1. Move left through editable
parameter menus (values and
answers).
2. Hi-speed rewind
.
1. Move right through ed-
itable parameter menus
(values and answers).
2. Fast forward.
3. Switch on Voice Activity
Detection (VAD) during
playback.

SWITCHING ON AND OFF
13
SWITCHING ON AND OFF
SWITCHING THE VOICE RECORDER ON
To switch the voice recorder on, hold the button down for 3 seconds or longer.
A set of indicators will appear on the display. For more information, see DISPLAY VIEW
WHEN RECORDER IS ON (p. 15).
SWITCHING THE VOICE RECORDER OFF
To switch the voice recorder off, hold the button down for 3 seconds or longer.
The voice recorder can only be turned off via the main window (p. 15).
The following message appears as the voice recorder is being switched off:
RECOMMENDATIONS FOR BATTERY USE
Ni-MH and Ni-Cd batteries are subject to “memory effect,” wherein the battery looses its energy capacity if being charged after not being fully discharged.
It is not recommended to charge the battery before it is completely discharged.
If the battery capacity has already reduced, it is possible to restore its capacity partially by means of
battery training.
It takes approximately 3 hours to fully charge the battery.
BATTERY TRAINING
A soon as the battery state of charge reaches its critically low level ( ), the devise goes into an
accelerated discharge mode that lasts approximately 2 hours.
After the accelerated discharge mode is completed the battery must be charged fully.
Charging/discharging cycles should be repeated 3-5 times.

LOCKING AND UNLOCKING THE RECORDER
14
LOCKING AND UNLOCKING THE RECORDER
To avoid accidental button pressing that can lead to changes in settings, it is possible to lock the buttons of the recorder.
LOCKING THE RECORDER
To lock the recorder press and hold buttons and on the front panel of the re-
corder simultaneously for at least 3 seconds.
A red lock icon should appear in the bottom of the screen.
The recorder can be only locked via the main window.
Locking does not influence the work of the recording control switch.
UNLOCKING THE RECORDER
To unlock the recorder press and hold, press and hold buttons and on the
front panel of the recorder simultaneously for at least 3 seconds.

DISPLAY STATUS INDICATORS
15
DISPLAY STATUS INDICATORS
DISPLAY VIEW WHEN RECORDER IS ON
Recorder status is displayed using icons, indicators and messages on eleven lines from screen-top to
screen-bottom.
Display options are described below (pp. 16-19) and in later sections on using and adjusting the voice
recorder.
The following icons and symbols may appear on the display:
Loop mode
Memory
used
indicator
Year
Headphones, noise can-
cellation, end-to-end
channel
Current file name
Recording format
Internal
left channel
microphone
External
left channel
microphones
Left channel
signal level
Automatic adjustment of
left channel signal level
Timer indicator
PIN
Battery type
Battery indicator
Time
RECORDER
Mode
Button guide
display
Automatic adjustment of
right channel signal level
Right channel
signal level
Month, date
Sampling rate
Internal
right channel
microphone
External
right channel
microphones
Right channel
line inputs
Left channel
line inputs

DISPLAY STATUS INDICATORS
16
1st SCREEN LINE
Headphones, noise cancellation and end-to-end channel
Indicator
Description
Headphones are not connected
Headphones are connected
Playback mode is on (end-to-end channel)
Noise cancellation mode is on
Memory used
Indicator
Description
100%
No memory card (% audio recorded to internal memory).
Recording to removable memory card
Recording to locked removable memory card
Timer status
Indicator
Description
No timer is set
At least one timer is on and active
PIN-code
Indicator
Description
PIN-code protection is off
PIN-code protection is on
Battery charge status
Indicator
Description
Alkaline batteries*.
Rechargeable batteries*.
Blinking at the rate of 1 Hz, from yellow to red, indicates critical low charge (recording
will turn off automatically)
Charge level is 20 %
Charge level is 40 %
Charge level is 60 %
Charge level is 80 %
Charge level is 100 %
Charging is complete
* Battery type is selected manually. For more in-depth information, see MISCELLANEOUS, p. 44.

DISPLAY STATUS INDICATORS
17
2nd SCREEN LINE
The 2
nd
screen line displays date and time.
3rd-4th SCREEN LINES
The 3
rd
line displays RECORDER, current recording duration or playback time.
The 4th line displays the current file name.
5th SCREEN LINE
The 5th screen line displays the recording format, recording mode (stereo or mono )and sampling rate.
Recording format
Indicator
Description
PCM16
PCM24
А–law
u–law
Before recording and during recording, recording format shows 16- or 24-bit record-
ing.
During playback, recording format shows A-law or u-law signal.
Recording mode
Indicator
Description
mono
stereo
Left channel is on (single-channel format for WAV files).
Both channels are on (double-channel file format for WAV files).
Sampling rate
Indicator
Description
8000
11025
16000
22050
32000
44100
48000
96000
Sampling rate is 8000 Hz.
Sampling rate is 11025 Hz.
Sampling rate is 16000 Hz.
Sampling rate is 22050 Hz.
Sampling rate is 32000 Hz.
Sampling rate is 44100 Hz.
Sampling rate is 48000 Hz.
Sampling rate is 96000 Hz.

DISPLAY STATUS INDICATORS
18
6th-8th SCREEN LINES
Lines 6 to 8 display internal microphone, external microphone and line input connections.
Internal microphone connection
Indicator
Description
Internal microphone indicators are on the 6th line (IntMic).
Internal microphone is not connected.
Internal microphone is connected.
Additional markers:
L indicates left channel, R indicates right channel.
External microphone connection
Indicator
Description
External microphone indicators are on the 7
th
line (ExtMic).
External microphone is not connected.
External microphone is connected.
Additional markers:
1 indicates first channel, 2 indicates second channel.
Line input connection
Indicator
Description
Line input indicators are on the 8
th
line (Line).
Line input is not connected.
Line input is connected.
Additional markers:
1 indicates first channel, 2 indicates second channel.
9th SCREEN LINE
The 9th line contains the Volume indicator.
10th SCREEN LINE
or
The 10th line contains a range of indicators, including automatic level adjustment (AGC), manual amplification adjustment (in decibels (dB)), Loop mode and Voice Activity mode.
AGC indicates that amplification level is automatic (for either or both channels). If you are in AGC, you
do not see any amplification level in dB.

DISPLAY STATUS INDICATORS
19
The manual adjustment range is from 0 to +59 dB.
The dotted yellow frame indicates manual adjustment (for either or both channels).
To select a channel for manual adjustment, use the right-left arrow , buttons.
Loop mode indicator
Indicator
Description
Loop mode is off.
Loop mode is on.
Voice Activity mode indicator
Indicator
Description
Voice Activity mode is off.
Voice Activity mode is on.
The voice recorder is in stand-by mode (paused). OR
Voice Activity mode is on, given the following conditions:
a) internal or external recording switch is in the ON position;
b) at least one timer is on and active.
11th SCREEN LINE
or or
The 11th line displays current functions for upper left and/or upper right buttons.
The red lock icon means the recorder is locked.
SIGNAL LEVEL INDICATOR
Colored bars (logarithmic scales) are displayed on the left and right sides of the screen. The bar
heights correspond to the current volume of input signal in left and right channels, respectively.
FACTORY DEFAULTS
The following are the manufacturer’s preset parameters:
Parameter
Value
Parameter
Value
Format
PCM16
AGC Left
off
Sampling rate (frequency)
16000 Hz
AGC Right
off
Channels
stereo
Timers
off
Left In
Int mic
Loop
off
Right In
Int mic
Voice Activity
off
Autodetect
on
See MISCELLANEOUS on page 44 for more information about adjusting factory settings.

RECORDING
20
RECORDING
Before recording, verify that audio signal sources, batteries and memory card are connected.
To start recording, do the following:
Switch the voice recorder on, as shown on p. 13.
To turn on Record mode, slide the Activation switch to the position.
Recording duration (length) and filename will appear in the display.
If headphones are connected to the voice recorder, you can listen to current
recording.
To do this, press the
button to turn on the end-to-end channel.
The headphone indicator will change from to , and the current
recording will be reproduced in the headphones.
To stop recording, slide the switch to the position.
Switch the voice recorder off, as shown on p. 13.
Removing the memory card while recording may result in complete data loss.
If Voice Activity mode is on, which threshold level is too high (see p. 18), the switch cannot be
used to start recording. Set threshold value of Voice Activity mode taking into consideration
the level of signal recorded (see p. 34).
When control buttons are not touched, the screen reverts to energy-saving mode, i.e. it turns
black.
Touch any button on the front panel to re-activate the screen.
When recording is done using rechargeable batteries, files may be incorrectly opened or played
by the Windows operating system.
In such cases, the removable disk containing these recordings should be checked with the
CHKDSK utility (Check Disk utility) included in Windows XP and Windows 7 OS standard software.

FILE NAMES
21
FILE NAMES
The voice recorder has two file name formats:
1.
Normal format: “G_:” prefix and six digits.
The prefix is the same for all files, so it does not appear in the Next №: line. You can only select this
format. You cannot change its value.
Normal file names are automatically formed by adding 1 to every new file name.
2. Special format: eight digits. These can be changed by the user.
The special format allows users to record over existing files without changing the original file names
until there is enough space (maximum 2 GB for WAV-files)
. If there is not enough space within the file,
the voice recorder will create automatically new file with normal name format (see above) and will
continue recording.
While recording over existing files, the voice recorder will set the parameters, specific for these
files.
Selecting file name format
To change the file name format, do the following:
Press Enter ( ) once.
The Settings menu will appear on the display.
Use the up-down arrow buttons, and , to select
menu items.
File name formants are indicated by Next №: 001532.
Press Enter ( ).
Press the and buttons to toggle between Normal and Special file
name formats, e.g. Next№: 11111111.
Press Back ( ).
If the file name format has been changed, a Save? prompt will appear.
Use the right-left arrow buttons, and , to select the desired answer.
Select Yes to confirm the change.
Select No to return to the previous screen and continue
making changes.
To confirm the selection and exit the Settings menu, press Enter.

FILE NAMES
22
Selecting special file name format
Press the or button to select a file name format (indicated by
Next №: 11111111
).
To change the file name format, press Enter.
The last digit will be available for changes.
Next №: 111111111
Use the up-down arrows to scroll through values from 0 to 9. Select the desired
value, for example, 2.
Next №: 111111121
Use the left-right arrows to select another digit to edit.
Next № : 11111112 Next №: 11111112
Use the up-down arrows to scroll through values from 0 to 9 and select the de-
sired value.
Next №: 11111112
Repeat this process to select desired values for the other digits.
Press Enter to save the eight-digit number as composed.
For example Next №: 11111112.
To finish editing, press Back ( ).
If the file name format has been changed, a Save? prompt will appear.
Use the right-left arrow buttons, and , to select the desired
answer.
Select Yes to confirm the change.
Select No to return to the previous screen and continue making
changes.
To confirm the selection and exit the Settings menu, press Enter.
Exiting the Settings menu
To exit the Settings menu, press Back.
The screen will revert to main display status. (See p. 15, DISPLAY VIEW WHEN RE-
CORDER IS ON).

ADJUSTING RECORDING PARAMETERS
23
ADJUSTING RECORDING PARAMETERS
To configure recording parameters, perform the following actions.
Switch the voice recorder on, as described on p. 13.
To enter the Settings menu, press Enter.
Select the Record Settings submenu item using the up-down
arrows: Record Settings .
To open the Record settings submenu, press Enter.
The Record settings submenu has eight settings:
Format sets the recording format;
Frequency sets the sampling rate;
Channels selects the number of channels;
Left In sets left channel sound sources;
Right In sets right channel sound sources;
Autodetect turns on the sound source detection mode;
AGC Left switches on AGC left channel mode;
AGC Right switches on AGC right channel mode.
Format
In the
Record settings
submenu, use the up-down arrows, to select
Format settings: Format PCM16.
To change the current setting, press Enter.
Use the up-down arrows, to select the desired Format item from the following
menu: PCM24, PCM16, А-low, u-low.
For example, select Format PCM24.
To apply your selection, press Enter.
Frequency
In the
Record settings
submenu, use the up-down arrows, to select
Frequency
settings:
Frequency 16000.
To change the current setting, press Enter.
Use the up-down arrows, to select the desired sampling rate (Frequency) from the
following menu: 8000, 11025, 16000, 22050, 32000, 44100, 48000, 96000.
For example, select Frequency 48000.
To apply your selection, press Enter.

ADJUSTING RECORDING PARAMETERS
24
Channels
In the Record settings submenu, use the up-down arrows, to select Channel
set-
tings, either Channels stereo or Channels mono.
To change the current setting, press Enter.
Use the up-down arrows, to select between stereo and mono.
For example, select Channels stereo.
To apply your selection, press Enter.
Only left input will be used during mono recording.
Left In, Right In
In the Record settings submenu, use the up-down arrows, to select Left In
(or Right In) settings:
Left In int mic.
Press Enter, to access the Inputs window.
In the
Inputs
window, use the up-down arrows, to select the
desired left channel sound source from the following menu:
Int mic on
Ext mic 1 off
Ext mic 2 off
Line 1 off
Line 2 off
To apply your selection, press Enter.
Use the up-down arrows, and , to select between on and off.
For example, select
Int mic on
.
To apply your selection,
press Enter.
To return to the Record settings submenu, press Back.
If sound source status has changed, a Save? prompt will appear.
Use the right-left arrow buttons,
and , to select the desired an-
swer.
Select Yes to confirm the change.
Select No to return to the previous menu and continue making
changes.
To confirm your selection, press Enter.

ADJUSTING RECORDING PARAMETERS
25
When the voice recorder is in the RECORD mode, a warning message
will appear if NO left or right inputs have been selected:
Left In none and Right In none.
If you see this message, switch recording off.
Press Back, to clear the warning message.
Set at least one sound source as described above.
Autodetect
In the Record settings submenu, use the up-down arrows, or , to select
the Autodetect settings, either Autodetect on or Autodetect off.
To change the current setting, press Enter.
Use the up-down arrows, or , to select betwwen on and off:
For example, select Autodetect on.
To apply your selection, press Enter.
Signal source settings (Left In and Right In) have priority over Autodetect settings.
For example, after switching the voice recorder off and disconnecting the autodetected device
(e.g., external headphones, line-in cable), when switching on the voice recorder again, there
will be audio signal source available that has been connected before the activation of the
Autodetection mode.
AGC Left and AGC Right
In the Record settings submenu, use the up-down arrows, or , to select
Automatic gain control (AGC) settings, for right or left channels.
To change the current setting, press Enter.
Use the up-down arrows, or , to select between on and off.
For example, select AGC Left off
To apply your selection, press Enter.
Exiting the Record settings submenu
After configuring the settings as desired, close the Record settings submenu by
pressing Back ( ).
If settings have been changed, a Save? prompt will appear.
Use the right-left arrow buttons,
and
, to select the desired
answer.
To confirm changes and return to the Settings menu, select Yes
and press Enter.
To return to the Settings menu without saving changes, select No
and press Enter.

ADJUSTING RECORDING PARAMETERS
26
The Save? prompt does not apply to Left In and Right In set-
tings, as those settings are confirmed and saved when existing
the Inputs window.
To exit the Settings menu and return to the main window, press Back.
(See p. 15, DISPLAY VIEW WHEN RECORDER IS ON.)
For optimum recording quality:
– Disable automatic recording level adjusting;
– Turn off data compression;
– Use 16 kHz sampling rate.

TIMERS
27
TIMERS
Up to five sessions can be recorded using preset timers.
For each timer, you can set recording start date and time, reset period in hours, recording priority and
duration of the recording session.
To set the timer:
Switch the voice recorder on, as described on p. 13.
To enter the Settings menu, press Enter.
Select Timers using the up-down arrows.
To enter the Timers submenu, press Enter ( ).
Timer selection
In the Timers submenu, use the up-down arrows to select
one of the timers.
For example, select Timer 1 off.
To enter the Timer 1 submenu, press Enter.
Timer setting
The Timer 1 submenu has five commands:
Enable turns timer switching on and off;
Length, hhh:mm sets recording duration;
Period sets periodicity (time between recordings);
Timer priority designates priority;
Start time: sets recording start time.
The bottom line displays the recording start date and time.
For example: 2020 Sep 25 15:06:39.
Enable
In the Timer 1 submenu, use the up-down arrows to select Enable settings, ei-
ther Enable on or Enable off.
To change the current setting, press Enter.
Use the up-down arrows to select between on and off.
To apply your selection, press Enter.

TIMERS
28
Length, hhh:mm
In the Timer 1 submenu, use the up-down arrows to select Length, hhh:mm set-
tings.
To enter the Length submenu, press Enter.
To set recording length in hours, use the up-down arrows
to select hour and press Enter.
Use the up-
down arrows to select the desired number of
hours, from 0 to 999.
For example: hour 1
Press Enter.
To set recording length in minutes, use the up-down arrows to select minute and
press Enter.
Use the up-down arrows to select the desired number of minutes, from 0 to 59.
For example: minute 30.
Press Enter.
To exit the
Length
submenu, press
Back
( ).
If settings have been changed, a Save? prompt will appear.
Use the left-right arrow buttons to select the desired answer.
Select Yes to confirm changes.
Select No to exit the Length settings submenu without saving
changes.
To confirm your choice, press Enter.
The Timer 1 submenu will appear on the screen.
Period
In the Timer 1 submenu, use the up-down arrows to select Period settings.
To enter the Period submenu, press Enter.
To enable (or disable) periodicity, use the up-down arrows to select Enable and
press Enter.
Use the up-down arrows to select between on and off:
Enable off or Enable on
To apply your selection, press Enter.
The next three menu items in the Period submenu are for
setting recording periodicity (how many days, hours and
minutes between timed recordings).

TIMERS
29
For days, use the up-down arrows to select day and press Enter.
Use the up-down arrows, to select the desired number of days, from 0 to 365:
For example: day 1.
Press Enter.
For hours, use the up-down arrows to select hour and press Enter.
Use the up-down arrows, to select the desired number of hours, from 0 to 23.
For example: hour 1.
Press Enter.
For minutes, use the up-down arrows to select minute and press Enter.
Use the up-down arrows, to select the desired number of hours, from 0 to 59.
For example: minute 1.
Press Enter.
To exit the Period submenu, press Back.
If Period settings have been changed, a Save? prompt will appear.
Use the left-right arrow buttons to select the desired answer.
Select Yes to confirm changes.
Select No to exit the Period submenu without saving changes.
To confirm your choice, press Enter.
The Timer 1 submenu will appear on the screen.
Timer priority
In the Timer 1 submenu, use the up-down arrows to select Timer priority settings, either Timer priority on or Timer priority off.
To change the current setting, press Enter.
Use the up-down arrows, to select between on and off.
To apply your selection, press Enter.
If Timer priority is on, timer-activated recording cannot be switched off.
Start time
In the Timer 1 submenu, use the up-down arrows to select Start time settings.
To enter the Start time submenu, press Enter.
To set the year, use the up-down arrows to select
year
and
press Enter.
Use the up-down arrows to select the desired year
(to 2099).
For example: year 2012.
Press Enter.

TIMERS
30
To set the month, use the up-down arrows to select month and press Enter.
Use the up-down arrows to select the desired month.
For example: month Oct.
Press Enter.
To set the date, use the up-down arrows to select
day
and press
Enter.
Use the up-down arrows to select the desired date, from 1 to 31.
For example: day 16.
Press Enter.
To set the hour, use the up-down arrows to select hour and press Enter.
Use the up-down arrows to select the desired hour, from 0 to 23.
For example: our 16.
Press Enter.
To set the minute, use the up-down arrows to select
minute
and press
Enter.
Use the up-down arrows to select the desired minute, from 0 to 59.
For example: minute 10.
Press Enter.
To set the second, use the up-down arrows to select sec and press Enter.
Use the up-down arrows to select the desired second, from 0 to 59.
For example: sec 45.
Press Enter.
To synchronize all the start time settings with the voice recorder’s current time, in
the Start time submenu press (under the synch menu item).
Press Back to exit the Start time submenu.
If Start time settings have been changed, a Save? prompt will appear.
Use the left-right arrow buttons to select the desired answer.
Select Yes to confirm changes.
Select No to exit the Start time submenu without saving changes.
To confirm your choice, press
Enter
.
The Timer 1 submenu will appear on the screen.
The recording start date and time are displayed in the bottom line, under
Start time.
After setting Timer 1 as desired, press Back to exit the Timer 1 submenu.
If Timer 1 settings have been changed, a Save? prompt will appear.

TIMERS
31
Use the left-right arrow buttons to select the desired answer.
Select Yes to confirm changes.
Select No to exit the Timer 1 submenu without saving changes.
The Save? prompt does not apply to Start time settings, as
those settings are conf
irmed and saved when exiting the
Start time submenu.
To confirm your choice, press
Enter
.
The Timers submenu will appear on the screen.
To set Timers 2 through 5, use the up-down arrows to select the desired timer in
the Timers submenu.
Press Enter.
Adjust timer parameters as described above.
Exiting the Timers submenu
To exit the Timers submenu, press Back.
The Settings menu will appear on the screen.
To exit the Settings menu, and return to the main window, press Back. (See
p. 15, DISPLAY VIEW WHEN RECORDER IS ON.)
If any timers have been enabled, the timer status icon will turn to yellow. It is
dark blue when timers are off.
Recording with timers
2011
14:10:15
Оct 17
00:00:01
G_000006.WAV
Recording begins when the recorder’s current time coincides with any of the
start times designated in Timer settings.
To stop timer-activated recording, slide the right panel switch towards the
right and back to its original position, as in the illustration.

LOOP
32
LOOP
Recording in Loop mode is executed in limited storage capacity designated by user. The cycle (Loop)
function allows automatically erasing previously recorded audio files to make space for the next recording when filling the designated storage capacity. The duration (length) of Loop recording states
user in minutes when setting recorder.
To turn on loop mode:
Switch the voice recorder on as described on p. 13.
To enter the Settings menu, press Enter.
To enter the Loop submenu, select Loop off or Loop on
using the up-down arrows and press Enter.
Recording in Loop mode
The Loop submenu contains two commands:
Enable turns Loop recording on and off;
Length, min sets the duration of Loop recording (in minutes).
A third screen line displays maximum duration of Loop
recording (in
minutes): Max length, min 186
Maximum duration of Loop recording is automatically determined by the
recorder according to recording parameters previously set by user. (See
p. 23, ADJUSTING RECORDING PARAMETERS.)
Enable
In the Loop submenu, use the up-down arrows to select Enable settings, either
Enable on or Enable off.
To change the current setting, press Enter.
Use the up-down arrows to select between on and
off
.
To apply your selection, press Enter.
Length, min
In the Loop submenu, use the up-down arrows to select Length, min settings.
To change the current setting, press Enter.
Use the up-down arrows to select the desired Loop duration (in minutes).
For example: Length, min 10.
To apply your selection, press Enter.

LOOP
33
Exiting the Loop submenu
To exit the Loop submenu, press Back.
If Loop settings have been changed, a Save? prompt will appear.
Use the left-right arrow buttons to select the desired answer.
Select Yes to confirm changes.
Select No to exit the Loop submenu without saving changes.
To confirm your choice, press Enter.
The Settings menu will appear on the screen.
To exit the
Settings
menu and return to the main window, press
Back
.
(See p. 15, DISPLAY VIEW WHEN RECORDER IS ON.)
When
Loop
recording is enabled, the
Loop
recording indicator in the lower
left-hand corner of the main screen will change color from dark-blue (off) to
yellow (on).
Audio files recorded in Loop mode are automatically assigned an .RNG extension, e. g., G_000005.RNG.
During Loop recording, the recording time is displayed on the third line of
the main screen, counting up from zero to the set duration Length, min.

VOICE ACTIVITY
34
VOICE ACTIVITY
Voice Activity mode automatically starts (continues) and stops (pauses) recording according to
source input at preset signal levels.
To turn on Voice Activity recording:
Switch the voice recorder on, as described on p. 13.
To enter the Settings menu, press Enter.
To enter the Voice Activity submenu, select Voice Activity using
the up-down arrows and press Enter.
Voice Activity recording
The Voice Activity submenu contains three commands:
Enable turns Voice Activity recording on and off;
Delay sets Voice Activity recording delay time (in seconds);
Level sets Voice Activity recording threshold values (in dB).
The bar indicator displays the current signal level of
source input. As soon
as signal level exceeds the
Voice Activity threshold (red indicator), recording
will begin.
After signal level has dropped below the Voice Ac-
tivity threshold (green indicator), recording will stop.
Delay allows you to start recording in specified time
period after signal level has dropped below the set
Voice Activity threshold.
Enable
In the Voice Activity submenu, use the up-down arrows to select Enable settings,
either Enable on or Enable off.
To change the current setting, press Enter.
Use the up-down arrows to select between on and off.
To apply your selection, press Enter.

VOICE ACTIVITY
35
Delay
In the Voice Activity submenu, use the up-down arrows to select Delay settings, for
example: Delay, sec 10.
To change the current setting, press Enter.
Use the up-down arrows to select the desired number of seconds, from 10 to 600, at
10-second intervals.
For example: Delay, sec 20.
To apply your selection, press Enter.
Level
In the Voice Activity submenu, use the up-down arrows to select Level settings.
To change the current setting, press Enter.
Use the up-down arrows to select the desired threshold value, from -31 to 0 dB.
For example: Level, dB -11
To apply your selection, press Enter.
The bar indicator displays the current signal level of source input. The user
can monitor the current signal level to help him/her select the desired
threshold level.
Exiting the Voice Activity submenu
To exit the Voice Activity submenu, press Back.
If Voice Activity settings have been changed, a Save? prompt will appear.
Use the left-right arrow buttons to select the desired answer.
Select Yes to confirm changes.
Select No to exit the Voice Activity submenu without saving
changes.
To confirm your choice, press
Enter
.
The Settings menu will appear on the screen.
To exit the Settings menu and return to the main window, press Back. (See
p. 15, DISPLAY VIEW WHEN RECORDER IS ON).
When Voice Activity recording is enabled, the Voice Activity recording indica-
tor in the lower left-hand corner of the main screen will change color from dark-
blue (off) to yellow (on).

VOICE ACTIVITY
36
Recording with using Voice Activity
To turn on Record mode, slide the Activation switch to the position.
The Voice Activity recording indicator will change color to red.
00:00:34
G_000005.WAV
00:00:01
G_000006.WAV
If the signal of source input has exceeded Voice Activity threshold level, recording will begin.
If the signal of source input is lower than threshold level during delay time, recording will stop.
If the signal of source input has exceeded Voice Activity threshold level again,
recording will begin over the next file.
To turn off Record mode, slide the Activation switch to the position.

MEMORY
37
MEMORY
For information about memory type and memory status, perform the following:
Switch the voice recorder on, as described on p. 13
.
To enter the Settings menu, press Enter.
To enter the Memory submenu, select Memory SD card or
Memory Internal using the up-down arrows and press Enter.
Memory
The Memory submenu contains six commands.
Type changes the memory type, between external SD card and internal
memory.
Format fully erases memory (SD card or internal).
Lock locks the SD card.
The Memory submenu contains four indicators for the selected memory.
Capacity indicates total memory capacity.
Free indicates memory capacity remaining.
Used indicates memory capacity used.
Maximum recording duration in days, hours and minutes is shown according
to preset recording parameters.
Type
In the
Memory
submenu, use the up-down buttons to select
Type
settings, either
Type SD card or Type Internal.
To change the current setting, press Enter.
Use the up-down arrows to select between SD card and Internal.
To apply your selection, press Enter.
Changing memory type requires no additional confirmation. (A Save? prompt will
not appear.)
To exit the Memory submenu, press Back.
During recording, memory type is changed automatically in the following cases:
1) If there is insufficient space in internal memory, data will be saved to SD card;
2) If there is insufficient space on the SD card, data will be saved to internal memory.
If the SD card is removed, data will be saved automatically to internal memory.

MEMORY
38
Format
The Format command is used to fully erase the memory of the se-
lected type.
Verify the type of memory you want formatted (erased) by check-
ing the Type line in the Memory submenu.
To change the Type, follow the instructions on p. 37 (TYPE).
To Format the selected memory, use the up-down buttons to se-
lect Format and press Enter.
The Format operation requires confirmation. A Format? prompt
will appear.
Use the left-right arrow buttons to select the desired answer.
Select Yes to confirm formatting.
Select No to return to the Memory submenu without formatting.
To confirm the choice, press Enter.
The Settings menu will appear on the screen.
Lock
External memory (SD card) can be locked to prevent data from being read and copied to other devices.
In the Memory submenu, use the up-down buttons to select Lock
settings.
To change the current setting, press Enter.
Use the up-down arrows to select between on and off.
To apply your selection, press Enter.
Changing Lock settings requires no additional confirmation. (A Save? prompt
will not appear.)
If memory locking is on, the SD card indicator will show a padlock icon.
In other devices the locked memory card can be only reformatted.

PIN-CODE
39
PIN-CODE
A PIN (personal identification number) can be used to protect data from unauthorized use. In PIN
mode, the recorder’s primary functions (playback, file delete, setting changes) can only be performed
after the correct PIN is entered.
It is not necessary to enter a PIN to turn the recorder on and off.
Entering the PIN-code submenu
To enter the Settings menu, press Enter.
To enter the PIN-code submenu to set, change or delete PIN
codes, select PIN-code using the up-down arrows and press
Enter.
Turning on PIN-code protection mode
After entering PIN-code submenu, a NEW PIN-code prompt will
appear.
Use the up-down arrows to designate the first digit of the PIN,
from 0 to 9.
Use the right arrow to move to the next digit of the PIN.
Use the up-down arrows to designate the second digit of the
PIN, from 0 to 9.
Repeat these steps to fill in the desired PIN. (PIN codes can be
from 1 to 8 digits in length.)
When the entire new PIN is entered, press Enter.
To save the new PIN, press Apply.
After saving the new PIN, a saved message will appear.

PIN-CODE
40
Entering a PIN-code
If PIN-code protection is on, a PIN-code prompt will appear when you access se-
cure voice recorder functions.
To enter the PIN, press Enter.
To exit without entering a PIN, press Back.
Use the up-down arrows to enter the first digit of the PIN, from
0 to 9.
Use the right arrow to move to the next digit of the PIN.
Use the up-down arrows to enter the second digit of the PIN,
from 0 to 9.
Repeat these steps to fill in the necessary PIN. (PIN-codes can be
from 1 to 8 digits in length.)
When the entire PIN is entered, press Enter.
To apply the necessary
PIN,
press
Apply
.
If the correct PIN is entered, a success message will appear.
If the incorrect PIN is entered, an error message will appear.
Changing a PIN-code
If PIN-code protection is on, an OLD PIN-code prompt will
appear.
To change the current PIN (OLD PIN-code), press Enter.
Use the up-down and left-right arrows to enter the digits of the
current PIN (see Entering the PIN-code).
Press Enter.
A NEW PIN-code prompt will appear.
Use the up-down and left-right arrows to designate the digits of
the new PIN.
Press Enter.
To save the new PIN, press Apply.
After saving the new PIN, a saved message will appear.

PIN-CODE
41
Deleting a PIN-code/Turning off PIN-code protection mode
To delete the current PIN (OLD PIN-code), press Enter.
Use the up-down and left-right arrows to enter the digits of the
current PIN (see Entering the PIN-code).
Press Enter.
A NEW PIN-code prompt will appear.
Use the up-down and left-right arrows to designate blank
space as the first digit of the PIN.
Press Enter.
To save the new PIN, press Apply.
After saving the new PIN, a saved message will appear.

DATE AND TIME
42
DATE AND TIME
To set or to change the date and time, perform the following:
Switch the voice recorder on, as described on p. 13.
To enter the Settings screen, press Enter.
In the Settings menu, use the up-down arrows to select the
Date & Time menu item.
To enter the Date & Time submenu, press Enter.
Date & Time submenu
The Date & Time submenu contains three date settings (year, month,
day) and three time settings (hour, minute and second).
Setting the date
To set the year, use the up-down buttons to select year, and press Enter.
Use the up-down buttons to select the desired year, from 2000 to 2099.
For example: year 2012.
Press Enter.
To set the month, use the up-down buttons to select month, and press Enter.
Use the up-down buttons to select the desired month, from Jan to Dec.
For example: month Oct.
Press Enter.
To set the date, use the up-down buttons to select day, and press Enter.
Use the up-down buttons to select the desired date, from 1 to 31.
For example: day 16.
Press Enter.

DATE AND TIME
43
Setting the time
To set the hour, use the up-down buttons to select hour, and press Enter.
Use the up-down buttons to select the desired hour, from 0 to 23.
For example: hour 16.
Press Enter.
To set the minute, use the up-down buttons to select
minute
, and press
Enter
.
Use the up-down buttons to select the desired minute, from 0 to 59.
For example: minute 10.
Press Enter.
To set the second, use the up-down buttons to select
second
, and press
Enter
.
Use the up-down buttons to select the desired second, from 0 to 59.
For example: sec 45.
Press Enter.
To exit the Date & Time submenu, press Back.
If Date & Time settings have been changed, a Save? prompt will appear.
Use the left-right arrow buttons to select the desired answer.
Select Yes to confirm changes.
Select No to return to the Settings menu.
To confirm your choice, press Enter.
The Settings menu will appear on the screen.
To exit the Settings menu and return to the main window, press Back. (See p. 13,
DISPLAY VIEW WHEN RECORDER IS ON.)
If Date & Time parameters have been changed and saved, the new Date & Time
settings will appear on the main window.
Date & Time data are saved even when batteries are removed.

MISCELLANEOUS
44
MISCELLANEOUS
The Miscellaneous submenu enables to change the interface language and backlight duration (degree of intensity of the screen), as well as to view factory defaults.
To enter the Miscellaneous submenu:
Switch the voice recorder on, as described on p. 13.
To enter the Settings menu, press Enter.
In the Settings menu, use the up-down arrows to select the
Miscellaneous menu item.
To enter the Miscellaneous submenu, press Enter.
Miscellaneous submenu
The Miscellaneous submenu contains six settings:
Language changes the interface language;
Power supply enables to choose the power supply type;
Backlight enables and sets degree of intensity of the screen;
Auto power off enables to set automatic turning off;
Auto keylock enables to set automatic keylock;
Factory defaults enable to revert to factory settings.
Language
In the Miscellaneous submenu, use the up-down buttons to select the
Language menu item.
To change the current setting, press Enter.
Use the up-down buttons to select between
English
and
Russian
.
To apply your selection, press Enter.
Changing interface language requires no additional confirmation. (A Save?
prompt will not appear.)
Power supply – type of the power supply setting
In the Miscellaneous submenu, use or
buttons select the item:
Power supply accum.
Press .
Use or to choose the type of the power supply:
Power supply accum or Power supply battery

MISCELLANEOUS
45
Backlight
In the Miscellaneous submenu, use the up-down arrows to select the Backlight menu item.
To enter the Backlight submenu, press Enter.
In the Backlight submenu, use the up-down arrows to select a
mode, either Record mode or Other modes (for playback, e.g.).
To enter the Record mode submenu, press Enter.
Backlight RM (Record mode) submenu
The Backlight RM submenu contains two commands:
Always enabled controls backlight on and off (for Record
Mode).
OFF delay, sec sets backlight duration (for Record Mode).
Always enabled
In the Backlight RM submenu, use the up-down arrows to select Always enabled
settings.
To change the current setting, press Enter.
Use the up-down arrows to select between on and off.
To apply your selection, press Enter.
OFF delay, sec
In the Backlight RM submenu, use the up-down arrows to select OFF delay, sec
settings.
To change the current setting, press Enter.
Use the up-down arrows to select the desired backlight duration in seconds, from
10 to 120.
For example: OFF delay, sec 30.
To apply your selection, press Enter.
To exit the Backlight RM submenu, press Back.
If OFF delay, sec settings have been changed, a Save? prompt will appear.
Use the left-right arrow buttons to select the desired answer.
Select Yes to confirm changes.
Select No to cancel changes.
To confirm the choice, press Enter.
The Backlight submenu will appear on the screen.

MISCELLANEOUS
46
Backlight OM (Other modes) submenu
In the Backlight submenu use the up-
down arrows to select
Other modes settings.
Press Enter.
Adjust Always enabled and OFF delay, sec settings, as described above (for Backlight RM).
Exiting the Backlight submenu
To exit the Backlight submenu, press Back.
Auto power off – setting automatic power off
In the
Miscellaneous
submenu, use or to select the
item:
Auto power off .
To set the automatic power off, press .
«Auto power off» submenu
Auto power off submenu contains two commands :
Enable – sets automatic turning off;
OFF delay, sec – sets the period of time that delays automatic turning
off.
Enable – setting automatic turning off
In Auto power off submenu, use or to select
Enable on orEnable off to change the settings.
Press .
Using or select the desired Enable:
Enable on or Enable off
Press .
OFF delay, sec – setting the period of time that delays automatic turning off
In Auto power off, use or to select the period of time that delays auto-
matic turning off:
OFF delay, sec 12
Press .
Use or to set the desired period of time from 10 to 120 seconds.
For example: OFF delay, sec 30
Press .

MISCELLANEOUS
47
Exiting the Auto power off submenu
To exit the Auto power off submenu, press .
If the auto power off settings were changed successfully, the dialog window to
confirm the changes will appear.
Use or to select the desired option.
Select Yes confirm changes.
Select No to cancel changes.
Press to confirm selection.
The Miscellaneous submenu will appear on the screen.
Auto keylock – automatic keylock setting
In the
Miscellaneous
submenu, use or to select the item:
Auto keylock .
To enter the automatic keylock menu, press .
Auto keylock window
The Auto keylock submenu contains two commands:
Enable – turns the automatic keylock on and off;
OFF delay, sec – sets the period of time that delays automatic keylock.
Enable – setting automatic keylock
In the Auto keylock submenu, use or to select
Enable on or Enable off to change the settings.
Press .
Using or select select the desired option of Enable:
Enable on или Enable off
Press to confirm selection.
OFF delay, sec – setting the period of time that delays automatic keylock
In the Auto keylock submenu, use or to select the period of time that de-
lays automatic keylock:
OFF delay, sec 12
Press .
Use or to set the desired period of time from 10 to 120 seconds.
For example: OFF delay, sec 30
Press to confirm selection.
Automatic keylock is possible only via the main window.

MISCELLANEOUS
48
Exiting the Auto keylock submenu
To exit the Auto keylock submenu, press .
If the auto power off settings were changed successfully, the dialog window to
confirm changes will appear.
Choose option using or .
Select yes to confirm changes.
Select no to cancel changes.
Press to confirm selection.
Miscellaneous menu will apper on the screen.
Factory defaults
In the Miscellaneous submenu, use the up-down arrows to se-
lect Factory defaults, which restores the manufacturer’s preset
recording parameters.
Press Enter.
A Save? prompt will appear.
Use the left-right arrows to select the desired answer.
Select Yes to confirm changes.
Select No to cancel changes.
To confirm your choice, press Enter.
Exit the Miscellaneous submenu
To exit the Miscellaneous submenu and return to the main window, press
Back. (See p. 15, DISPLAY VIEW WHEN RECORDER IS ON).

PLAYBACK
49
PLAYBACK
To playback recorded files, listen via the internal speaker or headphones connected to voice recorder.
Switch the voice recorder on, as described on p. 13.
The main window will appear on the screen (see p. 15, DISPLAY VIEW WHEN RECORDER IS ON). Connect the headphones, as described on page 11 (CONNECTING THE RECORDER TO EXTERNAL DEVICES).
The headphone indicator will change color from dark-blue (off) to yellow (on).
Once headphones are connected, playback via internal speaker will switch off.
When there are no files in memory, the file (recording) selection function is unavailable.
Selecting Audio Folder
Pressing (under the Records menu item) displays the
folder list.
The folder list appears by date in this format: YY-MM-DD/.
Use the up-down arrows to select the desired folder and press
Enter.
Selecting Audio File
The file list appears on the screen in normal or special formats,
as either FILE_NAME.WAV or FILE_NAME.RNG.
Files can have the following attributes:
– – –no attributes
A – –Voice Activity recording mode
– L – Loop recording mode
– – T – Timer recording mode
Use the up-down arrows to select a file for playback.
For example, G_001526.WAV or G_0001527.RNG.
The following data associated with the selected file will be displayed:
Start: start date and time of recording
Stop: stop date and time of recording
Size: file size and length
Frmt: format, sampling rate and recording type

PLAYBACK
50
Playback
To start playback of the selected file, press Play.
The icon will change from to .
During playback, the following information is displayed:
– current playback time
– recording length
– file name
– file format, audio type (mono or stereo)
– sampling rate
Signal volume is displayed in bars on the right and left sides
of the screen, corresponding to right and left channels.
To pause playback, press
Play
. Press
Play
again to continue playback.
To return to the file list, press Back.
Playback of the current file will stop.
Playback of files recorded in Loop mode
To playback a selected file, e.g., G_0001526.RNG, press Play.
The icon will change from to .
A file recorded in Loop mode can be played back from the beginning of the file (for the first recording cycle) or from the position at which the recording was stopped (in the second and
subsequent cycles of recording).
During playback, a finite time mark is set automatically. Once
the time mark is reached, playback will revert to the beginning
of the file (or to an initial time mark, if available) and continue to
the end of the file.
This allows you to listen to recording after the starting point and
before it in chronological order.

PLAYBACK
51
Fast Forward/Rewind
During playback, press the right arrow to fast forward and the
left arrow to rewind.
Press the left or right arrow again (or multiple times) to increase
the speed of fast forward and rewind.
Six speeds are available: х02; х04; х08; х16; х32; х64.
To stop fast forward or rewind and return to playback, press
Play.
Voice Activity Detection (VAD)
To turn on Voice Activity Detection (VAD) during playback, press and hold the right arrow button
for 3 seconds.
VAD cannot be turned on if noise cancellation is on.
VAD can only be used when files are played back at normal (100%) speed.
When VAD is turned on, the vad indicator will be displayed.
File playback will continue from where voice activity is detected.
Continuous (Loop) Playback
Before turning on continuous (loop) playback, designate tags for the start
and end times of the piece you wish to play.
Press the button to set the start time tag, e.g. 00:00:02.
Press the button to set the end time tag, e.g. 00:00:44.
To set new start and end time tags, press the or buttons twice during
playback.
To jump to the start time tag or the end time tag, press the corresponding button
( or
)
for 1 second.
If only the start time tag is set, the recording will play to the end of the file.
If only the end time tag is set, the recording will play from the beginning of the file.
Canceling continuous playback
To cancel continuous playback, clear the start and end time tags:
– Stop playback by pressing Play.
– Press to set a new start time tag at the current position. The time tag indi-
cator will turn green.
– Press again to delete the previous start time tag.

PLAYBACK
52
Press to set a new end time tag at the current position. The time tag indica-
tor will turn green.
Press again to delete the previous end time tag.
Available functions
During playback of an audio file, use
Func
to:
– enable noise cancellation
– change playback speed
– control volume in right and left channels separately
– revert to current (active) mode without stopping (or pausing) playback
Activating Noise Cancellation (Denoiser) During Playback
Press Func.
Current noise cancellation status will be displayed, either De-
noiser on or Denoiser off.
Noise cancellation can only be used with audio files rec-
orded with PCM 16 and with 8, 11 and 16 kHz sampling
rates.
Use the up-down arrows to select between Denoiser on and
off.
If noise cancellation is activated, the headphone indicator will
change color from yellow (on) to light blue (noise
cancellation).
If noise cancellation cannot be applied to the current audio file,
an unavailable message will be displayed.
Changing Playback Speed (Stretcher)
Press Func.
The current playback speed will be displayed.
Playback speed cannot be changed for audio files with
PCM 24, sampling rates over 16 kHz and A-law or μ-law
compression.
Use the up-down arrows to set the playback speed relative to
normal (100%) speed. Select among the following values: 50%,
57%, 67%, 75%, 87%, 114%, 133%, 150%, 175%, 200%.
If playback speed cannot be changed for the current audio file,
an unavailable message will be displayed.

PLAYBACK
53
Changing Volume During Playback
Press Func.
The current volume will be displayed.
Use the up-
down arrows to select the desired volume from
values between -57 to +18 dB.
To change the volume in the right or the left channel only, use
the right-left arrows to select the desired channel. Then use the
up-down arrows to select the desired volume.

DELETING FILES
54
DELETING FILES
To delete a file from the SD card, switch the voice recorder on, as described on p. 13.
The main window will appear on the screen (See p. 15, DISPLAY VIEW WHEN RECORDER IS ON).
Selecting a Folder
Press Records to display the folder list.
The folder list appears by date in this format: YY-MM-DD/.
Use the up-down arrows to select the desired folder and
press Enter.
Selecting and Deleting Files
Press the up-down arrows to select a file to delete.
Press Delete.
A Delete? prompt will appear.
Use the left-right arrow buttons to confirm or cancel deletion.
Select Yes to confirm the action.
Select No to cancel the action.
Press Enter to confirm your choice.
The file list will again be displayed. Deleted files will be removed from this
list.
Returning to the main window
To return to the folder list, press Back.
To return to the main window, press Back again. (See p. 15, DISPLAY VIEW
WHEN RECORDER IS ON).

GETTING INFORMATION ABOUT THE VOICE RECORDER
55
GETTING INFORMATION ABOUT THE VOICE RECORDER
For information about the voice recorder and software, switch the voice recorder on, as described
on p. 13.
The main window will appear on the screen (See p. 15, DISPLAY VIEW WHEN RECORDER IS ON).
Press Enter.
The Settings window will appear on the screen.
Press About.
Device name, manufacturer and serial number are displayed in the upper
portion of the screen.
Software versions are displayed in the lower portion of the screen.
FW refers to default firmware. This can be changed using the recorder con-
trol program.
HW refers to hardware (board version).
PLD refers to Programmable Logic Device firmware.
Have this information ready when contacting technical service.
To exit the About submenu and return to the Settings menu, press Back.
To exit the Settings menu and return to the main window, press Back. (See
p. 15, DISPLAY VIEW WHEN RECORDER IS ON).

ACCUMULATOR CHARGING
56
ACCUMULATOR CHARGING
If the accumulator is used in the recorder as a type of power supply, connecting the device to computer USB slot will enable to charge the accumulator.
Set accumulator option in the menu of the recorder: Power supply accum (see. Ошибка!
Источник ссылки не найден.).
Connect the recorder to a free USB slot on the computer.
Accumulator charging
The
USB connected
message will appear on the screen
.
To start a short-time charging, press .
After pressing the recorder will be disconnected from the
USB interface as an external device but will remain connected to
power supply and will use USB slot as an accumulator charger.
The screen of the recorder will look as one described on the
page
Ошибка! Закладка не определена. в подразделе Ошибка!
Источник ссылки не найден..
Disconnecting the recorder from the USB interface without pressing will stop the charging
of the accumulator.
To avoid malfunction, make sure the accumulator is inserted in the battery chamber before
charging.
If battery as a type of power supply Power supply battery is chosen, being connected to computer USB slot or charger, the recorder will not be charging.
Changing the type of power supply to Power supply accum and connecting the recorder to computer USB slot the charging of the device will not start.
To start the charging process, connect the recorder to computer USB slot once again or turn the device off and then on.
It is not recommended to charge the recorder partially connecting it to computer USB slot as
the accumulator is subject to “memory effect,” wherein the accumulator loses its energy capacity if being charged after not being fully discharged.
Charging accumulator if recorder is turned off
If the recorder is turned off and connected to a computer USB slot or charger and the
accumulator is chosen as a power supply type, the charging process will be indicated
with animated picture on the screen of the recorder.
When the device is fully charged the indicator will change its colour from yellow (the accumulator is charging) to green (accumulator is full).

USB-MICROPHONE MODE
57
USB-MICROPHONE MODE
Before using the recorder as a USB microphone switch the slider to on the side panel of the re-
corder.
The data will be saved to computer memory, not to internal storage of the recorder.
Connect the recorder to a computer USB slot with USB cable.
Operating system will define the recorder as a main recording device.
Make sure Gnome-007 has appeared in computer settings as a recording device on default.
For Microsoft Windows 7: Start Control Panel Sound.
In Sound window choose Recording
tab; in the list of recording devices pick
Gnome-007 and click Set Default in
the bottom of the window, or select
Set as Default in the right-click menu
of the recorder.
For Microsoft Windows XP:
Start Control Panel Sounds and Audio Devices. In Properties window: Sounds and Audio De-
vices pick Audio tab, in Sound recording select Gnome-007 as a default device.
The recording is implemented by standard OS components or other sound recording software.
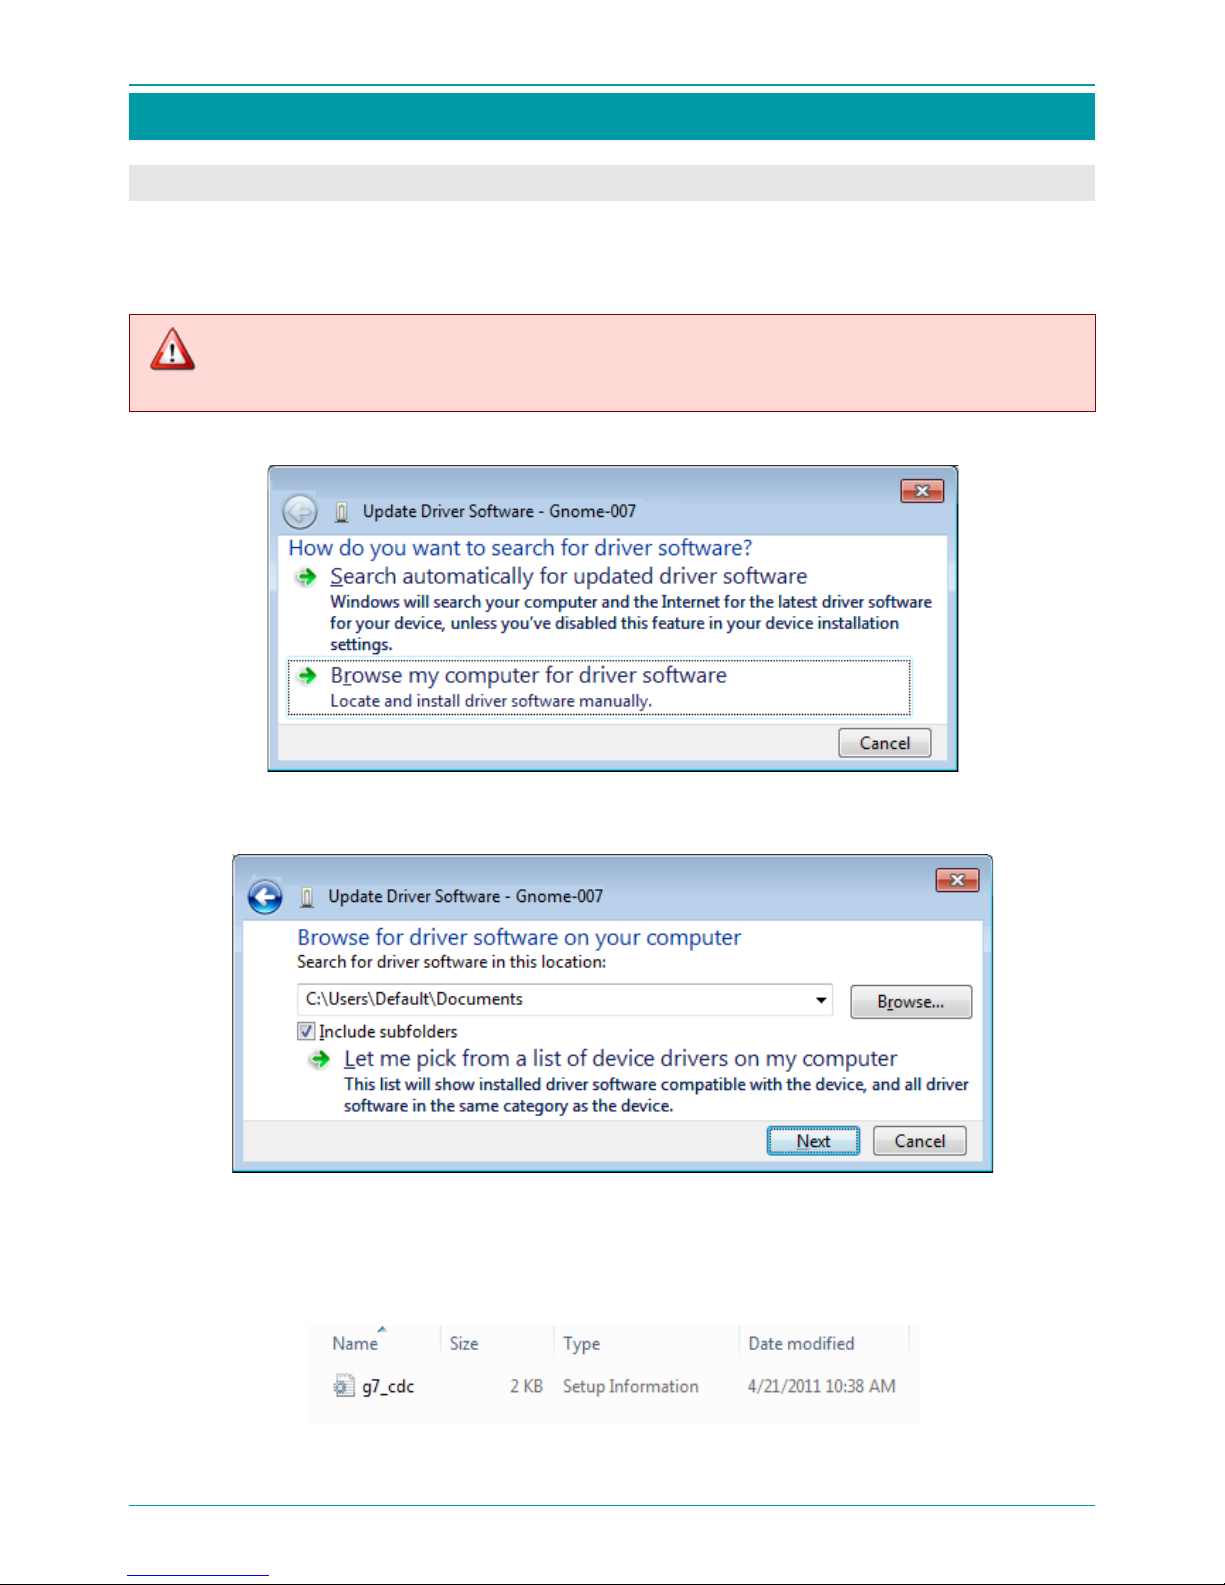
VOICE RECORDER MANAGER
58
VOICE RECORDER MANAGER
INSTALLING THE MANAGER
Some voice recorder settings and functions can be controlled by a PC.
Connect the voice recorder to a PC USB-port using the PC connection USB-cable.
When the new hardware is detected, the Update Driver Software wizard will launch.
Drivers cannot be updated when the voice recorder is protected by PIN-code. Before updating
drivers, make sure PIN-code protection is turned off.
In the Update Driver Software window, select Browse my computer for driver software.
In the next window, click Browse….
A Windows Explorer window will appear.
In the Windows Explorer window, select a folder in which the setup installation file is located.
An example of the file is shown below.
Click Next .

VOICE RECORDER MANAGER
59
The following Windows Security message may appear.
Select Install this driver software anyway.
Wait for software installation to complete.
When software installation is complete, the following window will appear.
Click Close.
The Gnome voice recorder will now appear on the PC as a Removable Disk.
The Removable Disk contains service files and a folder with audio files.

VOICE RECORDER MANAGER
60
LAUNCHING THE MANAGER
When the voice recorder is connected to a PC, the Manager program can be used to manage settings
and functions.
The program is an executable file and does not require installation. It can be located anywhere on the
PC hard drive.
To launch the Manager program, hover the cursor over the Manager-enu.exe file and double-click the
left mouse button.
For more convenient access to the program, create a shortcut to the Manager program on the desktop. Launch the program by double-clicking the Manager shortcut icon.
The lame_enc.dll library (which comes with the package) is needed to convert audio files from
WAV format to MP3. It should be installed in the same directory on your hard drive where the
recorder manager is installed.
When the recorder is connected to the computer via the USB-port, a USB con-
nected message will appear on the recorder screen.
In USB connected mode, the Manager can be used to carry out all the func-
tions described in p. 61-80, VOICE RECORDER MANAGER.
Pressing Back disconnects the recorder from the USB-interface as an external
device. However, the recorder remains connected to the energy supply and
uses the USB-port in charger mode.
The recorder displays the main screen. See p. 15, DISPLAY VIEW WHEN RE-
CORDER IS ON.

VOICE RECORDER MANAGER
61
VOICE RECORDER MANAGER
MAIN WINDOW
Start the program. The Manager main window will appear.
Details about the connected voice recorder are displayed from left to right along the top of the window:
– Serial number
– Firmware version
– Battery status
– Date
– Time
About and Exit buttons are at the bottom of the window.
– Opens an information window containing data about the Manager (see
ABOUT )
– Exits the Manager and closes the main window (see EXITING THE VOICE
RECORDER MANAGER)

VOICE RECORDER MANAGER
62
The central part of the window contains settings and operations buttons.
– Opens the Settings window. Use this window to set and change recording
options (see SETTING UP RECORDING OPTIONS).
– Opens the Date Setup window. Use this window to set and change date
and time (see DATE AND TIME SETUP).
– Opens the Timers window. Use this window to view, set and change voice
recorder timers (see TIMER SETUP).
– Opens the Change PIN window. Use this window to view, set and change
the voice recorder PIN (see Ошибка! Источник ссылки не найден.).
– Opens the Select firmware file window. Use this window to display the
firmware file address (see INTERNAL PROGRAM UPDATE).
– Opens the File Manager window. Use this window to perform standard
operations with files recorded to memory card and to PC hard drive (see
FILE MANAGER WINDOW).
– Opens the Select the audio file window. Use this window to select files
to convert from WAV to MP3 format (see CONVERTING TO MP3 FORMAT).
– Opens the Select file window (see FILE SIGNATURE). Use this window to
create a digital signature for a file.
– Opens the Verify Signature window (see DIGITAL SIGNATURE VERIFICA-
TION).
– Opens the Check File Integrity window (see )
– Opens the Export Private Key window (see PRIVATE KEY EX-
PORT). Use this window to export a private key.
– Opens the Select a file with private key window (see PRIVATE
KEY IMPORT). Use this window to find a file with a private key.
– Opens the Specify a file to save key window (see PUBLIC KEY
EXPORT). Use this window to store the exported public key.

VOICE RECORDER MANAGER
63
SETTING UP RECORDING OPTIONS
Click Settings in the main window (p. 61) to open the Settings window (see below) and set recording
options.
Recording level
If manual adjustment of recording level is desired, select the
Manual adjustment checkbox and use the Level, dB slider
to set the required recording level.
To set different recording levels for left and right channels,
select the Separate control checkbox and use the sliders to
set recording level for each channel.

VOICE RECORDER MANAGER
64
Format
In the Format field, use the dropdown menus to select sample formats
and sampling rates:
– Sample formats: PCM 16 bit, PCM 24 bit, µ-law 8 bit and A-law 8 bit;
– to add watermarks during the recording select Watermarks on
checkbox;
– Sampling rates: 8000, 11025, 16000, 22050, 32000, 44100, 48000,
96000 Hz.
Source
To set recording signal sources, select the desired checkboxes in the
Source field. Select signal sources for left and right channels can be
set separately and are listed under Left and Right.
The options available include Internal Microphone, External Micro-
phone (1, 2) and Line input (1, 2).
If more than one signal source is selected for the right or left channel,
the signals will be mixed during recording.
When the Left only (mono) checkbox is selected, recording will be
mono, using left channel sources only.
Selecting Autodetect source checkbox switches on the source de-
tecting mode.
Voice Activity
To use voice activity detection, select the Use voice activity de-
tection checkbox in the Voice activity field.
Use the Threshold, dB slider to set the voice activity threshold.
Use the up-down arrows in the Delay, s box to set the delay
value (in seconds). It is used to stop recording if signal level is
lower than set threshold.

VOICE RECORDER MANAGER
65
Loop
To use loop recording, select the Use loop checkbox
in the Loop field. Choose values for Loop duration
in hours, minutes using the up-down arrows provided.
Click OK to apply recording settings.
Click Cancel to exit the Settings window without saving changes.

VOICE RECORDER MANAGER
66
DATE AND TIME SETUP
Click Date and Time in the main window (p. 61) to open the Date Setup window.
Date
In the Date field, click the calendar icon to open the monthly calen-
dar.
Use the left-right arrows in the calendar to scroll through months and
years.
To select a date, in the desired month and year, place the mouse over
the desired date and left-click.
To insert the current date, select the checkbox to the left of Today (at
the bottom of the calendar).
Date, month and year can also be changed directly in the Date field.
Left-click date, month or year (which highlights the item in blue) and
type in a new value using the keyboard.
Time
In the Time field, left-click hours, minutes or seconds (which high-
lights the item in blue).
Then, use the up-down arrows to scroll through to the desired value.
Synchronize
To automatically synchronize Date and Time fields to the PC’s internal
clock, click Synchronize with your PC.
Current date and time values will be copied from the PC to the Date
setup field.
Click OK to apply date and time settings.
Click Cancel to exit the Date setup window without saving changes.

VOICE RECORDER MANAGER
67
TIMER SETUP
Click Timers in the main window (p. 61) to open the Timers window. The Timers window displays five
timers, each with the following five options:
Priority gives the selected timer priority over the recording button.
Start sets recording start date and time.
Duration sets recording time in hours and minutes.
Period specifies interval length between repeat recordings in days, hours and minutes.
Next indicates the time at which the next recording will begin.
To set or change timer settings, left-click (highlight) the line of the desired timer in the Timers win-
dow. Then click Setup to open the Timer Setup window.
To set the timer, select the Timer on checkbox.
Select Priority and Repeat checkboxes as desired (see below).
To set Start date and time, select the desired date from the dropdown list. Select the desired time
by using the up-down arrows to scroll through to the desired value.
To insert the current date and time, click Current device time.
To set Duration (hours, minutes), use the up-down arrows to scroll through to the desired values.
To repeat recording after a specified interval (Period), the Repeat checkbox should be selected.
To set the interval length between repeat recordings (Period (days, hours and minutes)), use the
up-down arrows through to the desired values.
Click OK to apply timer settings.
Click Cancel to exit the Timer Setup window without saving changes.

VOICE RECORDER MANAGER
68
PIN CODE AND USB HASP SECURITY HARDWARE
Click Change PIN in the main window (p. 61) to
open the Change PIN window.
In Change PIN window you need to do following
actions:
Type the current PIN in the Current PIN field.
Type a new PIN in the New PIN field.
Type the new PIN in the Confirm new PIN field.
Click OK to apply new PIN.
Click Cancel to exit the Change PIN window without saving changes.
To secure the information with USB HASP security hardware, it is necessary to connect Gnome-007
and HASP to computer at the same time (two spare USB slot are needed). Then you should launch the
recording manager and click Change PIN in the main window (p. 61).
In the Change PIN window you need to enter the PIN code either using a computer keyboard (manu-
al entry), or reading in the code combination from USB-HASP hardware. To read in the secured num-
ber combination from USB HASP hardware you need to click HASP (p. 68).
To remove and change PIN code do as mentioned above.To remove PIN code the fields New PIN and
Confirm new PIN should be left empty.
If PIN code is set or the device is protected with USB HASP hardware, only sound recording is
possible without entering security code.
If PIN code is set without HASP-key the access to settings and recordings is possible only after
entering PIN code.
If PIN code is set with HASP-key the access to settings and recordings is impossible without
USB HASP key code.
The standard scope of supply does not include USB HASP software protection key.

VOICE RECORDER MANAGER
69
INTERNAL PROGRAM UPDATE
Before updating the recorder’s firmware, perform the Safely Remove Hardware and Eject
Media command for the device Gnome 7.0 via OS or remove the recorder’s memory card (see
MEMORY, page 37).
Do not use recording or playback functions during the updating process.
Click Firmware Update in the main window (p. 61) to open the Select firmware file window.
Internal OS update of the recorder is possible only if the memory card is not locked.
Select the folder with the firmware file.
Select the firmware file.
Click Open.
A
Firmware Update
window will open. As the updating
process completes, the bar in this window fills in with
color.
When the updating process is complete, a confir-
mation message will appear, indicating that the
firmware update was successful.
To return to the main window, press OK.
It is not recommended to update firmware with the recorder connected to computer without
accumulators or batteries in the device.

VOICE RECORDER MANAGER
70
FILE MANAGER WINDOW
Click File Manager in the main window (p. 61) to open the File Manager window and manage audio
recordings.
Select from the icons along the top of the File Manager window to perform the following file operations.
Icon Context menu Result
Up
Moves up one level in the folder tree.
Refresh
Refreshes the current folder.
Select folder Opens the Browse (for folders) dialog box.
Repair
Repairs audio files with header errors. This operation becomes available
automatically when such files are detected.
Move Opens the Browse (for folders) dialog box and moves file(s) to the se-
lected folder. The icon becomes actionable when one or more files are
selected.
Copy Opens the Browse (for files) dialog box and copies file(s) to the selected
folder. The icon becomes actionable when one or more files are selected.
Sign
Creates digital signatures for selected files.
Delete
Deletes selected files.
Unroll Copies selected files in RNG format with simultaneous conversion to
WAV format.
Unroll and sign
Copies selected files in
RNG
format with simultaneous conversion to
WAV format and creates a digital signature for the files.

VOICE RECORDER MANAGER
71
CONVERTING TO MP3 FORMAT
Click Convert to MP3 in the main window (p. 61) to open the Select audio file window (see below).
Select a file to convert to MP3 and click Open.
An Encoding window will open.
Data about source file (storage
location, name, size, duration and
format) is given in the Source file
field.
In the Encoded files location
field, storage location of an en-
coded file is automatically suggested by the manager program.
To designate another (nondefault) location, use […] to open
the Browse (for folders) dialog
box and select the necessary
file/path. Or select the Use
source location checkbox to
save an encoded file in source file
location (in this case the […] button is unavailable).
The Encoded file field displays
default name of an encoded file.
Change file name if needed, set
the Bitrate (less/more) slider and
click Begin.

VOICE RECORDER MANAGER
72
The lame_enc.dll library is needed to convert audio files from WAV format to MP3. It should
be located (installed) in the same directory on your hard drive as the voice recorder manager.
If the conversion is performed
successfully, a confirmation
message will appear, indicating
that the file has been encoded.
Click OK to close the window.
Then click Close in the Encod-
ing window (above) to return to
the main window.
To access PCM 24 audio files, install the AC3Filter codec (http://ac3filter.net/).

VOICE RECORDER MANAGER
73
FILE SIGNATURE
Digital signatures preserve the authenticity of recordings, by ensuring no changes are made to recordings.
Click Sign File in the main window (p. 61) to open the Select file window.
To create a digital signature for a file, left-click the desired file and click Open.
A Specify a file to save the signature window will open.
To avoid confusion between file names and locations, it is recommended that default file names and
storage locations (automatically suggested by the manager program) be used.
To use default file names and locations, click Save.
To designate another (non-default) location, in the Save in: field, select or create a folder for saving the signature file.
To designate another (non-default) file name, in the File name: field,
designate a name for the signature file.
Click Save.
If the signature is saved successfully, a confirmation
message will appear, indicating that the digital signature has been written to the file.
To return to the main window, press OK.

VOICE RECORDER MANAGER
74
DIGITAL SIGNATURE VERIFICATION
To verify the authenticity of a recording with its digital signature, click Verify Signature in the main
window (p. 61) to open the Verify Signature window.
In the File field, enter a path to a file for signature verification.
Use […] to open an Open window to select the necessary file/path.
In the Open window, left-click the desired file and click Open.
This action writes the file path to the File field. The Signature file field will now be filled in automati-
cally (set by program default).
If a non-default location or file name was used when creating the digital signature for the se-
lected audio file, the path to the Signature file will need to be found manually, using […] and
the Open window.
In the Public key file field, enter a path to the public key for this voice recorder. Use […] to open an
Open window to select the necessary file/path. In the Open window, left-click the desired file and
click Open.

VOICE RECORDER MANAGER
75
Once all 3 fields in the Verify Signature window are
filled in, click Check.
If the selected audio file has not been modified
and the audio file and the digital signature
match, a confirmation message will appear, indicating that the selected audio file is original.
If the selected audio file has been modified, an
error message will appear, indicating that the
selected audio file has been modified.
If the selected audio file and the signature file
do not match, an error message will appear.

VOICE RECORDER MANAGER
76
FILE INTEGRITY CHECK
Picture 1 – Selecting integrity check file
To check the integrity of a
file click
Check File Integrity in the main window (p. 61).
In Select (pic. 1) window pick .rng or
.wav audio file.
Click Open to begin file checking.
Click Cancel to exit Open window.
Picture 2 – File integrity check results
The results will appear in
table in
Check File Integrity window (pic. 2).
The number of lines depends on the
amount of fragments in a file. Each
fragment has following attributes:
Begin – the beginning of the fragment relative to its ending;
End – the ending of the fragment relative to its beginning;
Duration – duration of the fragment;
Info – checking results.
Info column contains the information about the checking results of
the fragment or whole file.
Watermarks information contains:
– file or fragment time and date;
– name of the device, for example G007_476;
– serial number, for example 99.
Click Close to exit Check File Integrity window.
If a .wav и .rng file does not have watermarks, you will see Water-
marks not found message in the Info column.
If .wav file has watermarks, Info column will contain information
with watermark text.
If .wav file with watermarks has been changed, in Info column there
will apper one or several Watermarks not found messages.

VOICE RECORDER MANAGER
77
File integrity check for .wav files can detect not only intended file correction, but deformations of
file caused by malfunctions of the device in the process of the recording or storage.
Picture 3 – File integrity check results
Usually, the duration of damaged
file is measured in milliseconds
(pic. 3), while the duration of intentionally changed file fragment is
several seconds or minutes.
When checking .rng file with watermarks recorded in loop mode, in
Info column together with the beginning and ending information
there will appear Begin of record loop and
Continue of record
loop messages.
If .rng file data has been changed, in Info column together with
Begin of record loop and Continue of record loop messages there
will appear one or several Watermarks not found messages.

VOICE RECORDER MANAGER
78
PUBLIC KEY EXPORT
The public key is the universal key for all files recorded with this particular voice recorder. This file is
transferred to data receivers and is used to verify the authenticity of data.
To export the public key, click Export Public Key in the main window.
A Specify a file to save key window will appear.
In the Save in: field, select or create a folder in which to store the
exported public key.
In the File name: field, designate a file name for the public key.
Click Save. (Click Cancel to cancel public key export.)
If the public key is exported
successfully, a confirmation
message will appear, indicating that the public key has
been written to the designated file.

VOICE RECORDER MANAGER
79
PRIVATE KEY EXPORT
Users are able to generate their own key pair (consisting of a private key and a public key). A user signs
files using his or her private key. File authenticity can be checked using the public key.
Click Export Private Key in the main window (p. 61)
to open the Export Private Key window.
In the Password field, enter a password that will se-
cure the exported private key.
Re-enter the password in the Confirm password field.
Click OK.
If the password and confirmation entered
do not
match, an error message will appear.
If the password and confirmation entered match, the Specify a file to save key window will appear.
In the Save in: field, select or create a folder in which to store the private key.
In the File name: field, designate a file name for the private key.
Click Save. (Click Cancel to cancel private key export.)
If the private key is exported
successfully, a confirmation
message will appear, indicating
that the private key has been
written to the designated file.

VOICE RECORDER MANAGER
80
PRIVATE KEY IMPORT
To import a private key, click Import Private Key in the main window (p. 61).
A Select a file with pri-
vate key window will appear.
Find the file with the private key. Left-click the file
and click Open. (Or click
Cancel
to cancel private
key import).
An Import Private Key window
will open. Enter the
password in the Password field and click OK. (Or click
Cancel to cancel private key import).
If the correct password is entered, a confirmation message will app
ear, indicating that the private key has
been imported.
If the incorrect password is entered, an error message will appear.
ABOUT THE VOICE RECORDER MANAGER
For information about the voice recorder
manager, click About in the main window
to open the About window.
EXITING THE VOICE RECORDER MANAGER
To exit the voice recorder manager and shut down the program, click Exit in the main window.

PACKAGES AND ACCESSORIES
81
PACKAGES AND ACCESSORIES
Business Package
1. The Gnome 7.0 portable digital stereo voice recorder (STC-H476)
2. MicroSD card, 8 GB
3. USB connection cable
4. Voice recorder manager software
5. Alkaline AAA Battery, (LR03)
6. Delivery box
Professional Package
1. The Gnome 7.0 portable digital stereo voice recorder (STC-H476)
2. MicroSD card, 8 GB
3. USB connection cable
4. Voice recorder manager software
5. Alkaline AAA Battery, (LR03)
6. Headset with 2 microphones and remote control, with 0.8 m cable
7. General-purpose USB charger (220V)
8. Mini headphones
9. Recorder cradle
10. Delivery box
Optional Equipment and Software
1. Line-in (stereo) recorder cable, 0.8 m
2. AC/DC charger (220V/5V) with USB jack
3. MicroSD card, 8 GB
4. Mini-USB connection cable
5. Telephone adapter (STC-H310-01)
6. External microSD reader (USB connection)
7. Headset with 2 microphones and remote control, with 0.8 m cable
8. Desktop (stereo) microphone, with 0.8 m cable
9. Mini headphones
10. Protective storage case
11. Recorder cradle
12. Caesar transcriber

WARRANTY
82
WARRANTY
The manufacturer guarantees that the issued device conforms to technical specifications, whereby the
user observes the conditions and regulations of operation, storage and transport. The warranty period
is 36 months from the date of delivery.
During the warranty period, the manufacturer shall repair or replace spare parts free of charge, provided that the user has observed the proper use, storage and/or transportation of the device.
The guarantee does not apply to batteries.
In case of any defects during the warranty period, warranty claims are accepted at the following address:
Technical support
Russia, St. Petersburg, Krasutskogo str. 4А, 196084, PO Box 124
Tel.: +7 (812) 325-88-48
Fax: +7 (812) 327-92-97
Email: support@speechpro.com
gnome@speechpro.com

REGISTRATION CERTIFICATE
83
REGISTRATION CERTIFICATE
The Gnome 7.0 portable digital stereo voice recorder (STC-H476),
serial number_________________________________________,
conforms to technical specifications and is declared suitable for use.
Adjustment conducted by
Stamp ___________________ ____________________
signature full name
____________________
day, month, year
Date of issue
____________________ ____________________ _________________
day, month, year signature full name
Serial numbers of the device and components

NOTES
011-190614


 Loading...