


Operation Manual
Gnome-Nano II
Ultra-Small Digital Stereo Recorder
STC-H713
Operation Manual

Gnome-Nano II
Note to Customer
Before getting started, please read this Operation Manual carefully. The Operation Manual will allow you to
use this device properly and safely.
In case you have any questions regarding device operation and use, please feel free to contact STC
Support or local resellers.
To contact Technical Support, use the following email: support@speechpro.com
Saint Petersburg
Phone: +7 (812) 325-88-48
Fax +7 (812) 327-92-97
Moscow
Phone: +7 (495) 669-74-40
Fax +7 (495) 669-74-44
You can also open a support ticket with us via our web portal: http://www.speechpro.com/support_form/
The manufacturer retains the right to issue amendments to this Operation Manual following any
improvements to device design without any prior notification.
Speech Technology Center does not warrant that this Manual is error free. This Manual may not include
some last-minute upgrades.
Any such amendments will be published in a new Operation Manual edition, as well as on STC website:
http://www.speechpro.com.
Recent version of the Operation Manual is supplied on CD.

Operation Manual
3
Contents
CONTENTS
BASIC DETAILS ........................................................................................................................ 6 1
1.1 Manufacturer Contacts ................................................................................................................................................... 6
1.2 Service Maintenance and Technical Support ........................................................................................................... 6
DEVICE PURPOSE ..................................................................................................................... 7 2
2.1 Purpose and Scope of Use ............................................................................................................................................. 7
2.2 Legal Warning ................................................................................................................................................................... 7
DATA PROTECTION ................................................................................................................. 8 3
SCOPE OF SUPPLY ................................................................................................................... 9 4
4.1 Standard Package ............................................................................................................................................................. 9
SPECIFICATIONS .................................................................................................................... 10 5
RECORDER DESIGN ................................................................................................................ 11 6
6.1 Control Units, Indicators and Switches ..................................................................................................................... 11
6.2 Device Memory ............................................................................................................................................................... 11
6.3 Microphone set ............................................................................................................................................................... 12
6.4 USB Connecting Cable .................................................................................................................................................. 12
6.5 Headphone Adapter ...................................................................................................................................................... 13
6.6 Power supply ................................................................................................................................................................... 13
6.6.1 Built-in Battery ........................................................................................................................................................ 13
6.6.2 Battery Charge ........................................................................................................................................................ 13
OPERATING THE DEVICE........................................................................................................ 14 7
7.1 Default Configuration ................................................................................................................................................... 14
7.2 Getting Started ................................................................................................................................................................ 14
7.3 Audio Recording ............................................................................................................................................................. 14
7.3.1 Recording Hints ...................................................................................................................................................... 14
7.3.2 Manual Recording ................................................................................................................................................. 15
7.3.3 Volume-Triggered Recording (VOX) .................................................................................................................... 16
7.3.4 Scheduled Recording Mode .................................................................................................................................. 16
7.3.5 Loop Recording ...................................................................................................................................................... 17
7.3.6 Recording Duration ............................................................................................................................................... 17
7.4 Recording Playback and Deletion .............................................................................................................................. 17
7.4.1 Recording Playback ............................................................................................................................................... 17
7.4.2 Deleting Recordings ............................................................................................................................................... 17
7.5 The RESET Button ........................................................................................................................................................... 18
SOFTWARE ............................................................................................................................. 19 8
8.1 Gnome-Nano II Software Features ............................................................................................................................. 19
8.2 Software Installation ...................................................................................................................................................... 19
8.2.1 System Requirements ............................................................................................................................................ 19
8.2.2 Driver Installation ................................................................................................................................................... 19
VOICE RECORDER MANAGER ................................................................................................. 21 9
9.1 Getting Started ................................................................................................................................................................ 21
9.2 Application Main Screen .............................................................................................................................................. 21
9.3 Overview ........................................................................................................................................................................... 22
9.3.1 Main Screen: Overview Area ................................................................................................................................. 22
9.3.2 Getting Public Key .................................................................................................................................................. 23
9.3.3 Digital Signature Verification ............................................................................................................................... 23
9.3.4 Watermark Check .................................................................................................................................................. 24
9.3.5 Formatting Device Memory ................................................................................................................................. 25

Gnome-Nano II
4
9.3.6 Writing Manager to the Device ............................................................................................................................ 25
9.3.7 Updating Device Firmware ................................................................................................................................... 26
9.3.8 The About Option ................................................................................................................................................... 26
9.4 Device Settings ............................................................................................................................................................... 26
9.4.1 The Settings Area .................................................................................................................................................... 27
9.4.2 Signal Source .......................................................................................................................................................... 28
9.4.3 The Sampling Rate Area ........................................................................................................................................ 28
9.4.4 Recording Format .................................................................................................................................................. 29
9.4.5 Volume-Triggered (VOX) Recording .................................................................................................................... 29
9.4.6 Gain Control ............................................................................................................................................................ 30
9.4.7 Loop Recording ...................................................................................................................................................... 30
9.4.8 Real-Time Monitoring............................................................................................................................................ 31
9.4.9 Watermarks ............................................................................................................................................................. 31
9.4.10 Scheduled Recording ........................................................................................................................................... 31
9.4.11 Multifunction Button ........................................................................................................................................... 32
9.4.12 LEDs Status ............................................................................................................................................................ 32
9.4.13 Profiles .................................................................................................................................................................... 32
9.4.14 Change Password ................................................................................................................................................ 33
9.4.15 Deleting Recordings after Entering Invalid Password .................................................................................... 34
9.4.16 Setting Device Time ............................................................................................................................................. 35
9.5 Recordings ....................................................................................................................................................................... 36
9.5.1 The Recordings Area .............................................................................................................................................. 36
9.5.2 Toolbar ..................................................................................................................................................................... 36
9.5.3 Recording List .......................................................................................................................................................... 37
9.5.4 Recording Playback ............................................................................................................................................... 37
9.5.5 Deleting Recordings ............................................................................................................................................... 37
9.5.6 Copying Files to PC ................................................................................................................................................. 38
9.5.7 Digital Signature .................................................................................................................................................... 38
9.6 Exiting the Application ................................................................................................................................................. 38
KNOWN ISSUES AND TROUBLESHOOTING .......................................................................... 39 10
OPERATING CONDITIONS .................................................................................................... 40 11
TANSPORTATION AND STORAGE CONDITIONS................................................................... 41 12
MANUFACTURER WARRANTY .............................................................................................. 42 13
CERTIFICATE OF ACCEPTANCE ............................................................................................ 43 14

Operation Manual
5
INTRODUCTION
Typographic Conventions
The following typographic conventions are applicable to this Manual:
Formatting
Description
Normal Guide body text
Bold
Used for marking out software component names, as well as interface element
names (headers, buttons, etc.).
Bold Italic
Indicates file names and access paths.
Menu selection is marked with an arrow (Menu Option), meaning you should access the Menu first
and then select an Option.
Below there is a notification layout used in the Manual according to notification severity level.
Links to other documents in the body text.
Notes, important notices, and instructions obligatory for fulfilling.
Not fulfilling these requirements may potentially lead to hardware and software
malfunctions and failures.
Trademarks
Windows® is a trademark of Microsoft® Corporation.
Other company and product names mentioned in this document are the property of their respective owners.

Gnome-Nano II
6
BASIC DETAILS 1
1.1 Manufacturer Contacts
Title
Gnome-Nano II Ultra-Small Digital Stereo Recorder STC-H713
Manufacturer: Speech Technology Center Limited
Address: 4A Ul. Krasutskogo, 196084, Saint Petersburg
Phone: (812) 325-88-48
Fax: (812) 327-92-97
1.2 Service Maintenance and Technical Support
To contact Technical Support, use the following methods:
Email:
support@speechpro.com
Web Portal:
http://www.speechpro.com/support_form
When contacting our Technical Support, please include the following details into your call/ticket:
• Device name and serial number;
• Supplementary hardware: microphone set, headphones, etc.;
• Firmware version;
• Detailed issue description.

Operation Manual
7
DEVICE PURPOSE 2
2.1 Purpose and Scope of Use
Gnome-Nano II Ultra-Small Digital Stereo Recorder STC-H713 is a professional sound recording unit
providing high-quality mono and stereo speech signal recording under difficult acoustic conditions.
The device ensures perfect recording quality in any environment, both indoors (meetings, conferences,
interviews) and outdoors.
Its small dimensions and weight, as well as user-friendly controls, make it usable for a wide range of
customers.
Recording process can be performed via either one onboard or two external microphones as well as from
third-party hardware line outputs.
You can select a source signal manually. The recorded sound is stored on the device internal flash memory.
Recording process may be controlled both manually and automatically.
Connecting the device to a PC enables recorded data playback, copying recordings to PC hard drive and
changing recorder options.
2.2 Legal Warning
Recordings made with the device are acceptable for speaker identification or other forensic purposes.
Before using the device, you are encouraged to make yourself familiar with any laws and regulations
regarding voice recording applicable to your country.

Gnome-Nano II
8
DATA PROTECTION 3
To protect recorded data from unauthorized access, key recorder features (deleting recorded data, modifying
recording options, saving and playing recordings on a PC) can only be performed by means of special
software.
If required, the access to recorded data stored on device may also be protected with a password. It is
recommended using at least four digits for password. Password is set and changed by a user. By default,
password is not set. Moreover, the user can enable the option of deleting all recordings from device memory
after entering invalid password five times in a row. For more information on password settings, please refer to
Section 9.4.14.
After copying data to PC hard drive, recorded data authentication is enabled via digital signature (see
Section 9.3.3).

Operation Manual
9
SCOPE OF SUPPLY 4
4.1 Standard Package
Title Quantity
Gnome-Nano II Ultra-Small Digital Stereo Recorder STC-H713
1
AC power supply 1
Micro USB cable 1
Line-in cable 1
Headphone adapter 1
Microphone set with a remote control 1
Compact headphones 1
Specialized Manager software for Gnome-Nano II recorder STC-H713
1
Operation Manual 1
Shipping box 1
Gnome-Nano II
10
SPECIFICATIONS 5
Spec Value/Description
Number of channels
2
Number of built-in microphones
1
Internal hard drive space
16 GB
Number of microphone inputs
2
Number of line inputs
2
Recording standard
mono/stereo 16 or 24 bit PCM
Data compression
μ- law/А- law
Sampling rate
8000, 11025, 16000, 22050,
32000, 44100 Hz
Nonlinear distortion coefficient (at 1 kHz, with 16
kHz sampling rate, with no compression 24 bit
PCM)
line input 0.01 ± 0.009 %
microphone input 0.01 ± 0.009 %
Signal-to-noise ratio (at 1 kHz, with 16 kHz
sampling rate, with no compression 24 bit PCM)
line input 93 ± 3 dB
microphone input 83 ± 5 dB
Dynamic range of recorded signals (at 1 kHz, with
16 kHz sampling rate, with no compression 24 bit
PCM)
line input
93 ± 3 dB
microphone input 83 ± 5 dB
Frequency response unevenness
1 ± 0.8 dB
Depth of AGC 35 ± 5 dB
Internal microphone type Electret
Battery life
Recording duration with settings 8 kHz, mono, 16 bit
PCM
24 h
in the
VOX 70 h
Standby mode (schedule) 4000 h
Maximum recording duration into a built-in 16 GB memory (Mono mode, 16 bit
PCM, 32 kHz sampling rate)
64 h
Maximum recording duration into a built-in 16 GB memory (Stereo mode, 24 bit
PCM, 16 kHz sampling rate)
44 h
PC connection interface USB 2.0
USB mode High-speed
Dimensions 51.7х34.7х8.8 mm, ± 1.0 mm
Case metal
Weight (battery included) 30 ± 5 g
OS Compatibility Microsoft® Windows XP, 7, 8, 10

Operation Manual
11
RECORDER DESIGN 6
6.1 Control Units, Indicators and Switches
The recorder comes in a black metal case. Device overall view with indication of parts is shown on Figure 1.
Device part description is listed in Table 1.
Figure 1: Indication of parts and controls.
Table 1: Device part description.
No Marking Title
1
Built-in microphone
2
Mic connector
3
Recording slide switch
4
Multifunction button (erase or playback)
5
Micro USB connector
6
LED
7
RST
RESET button
6.2 Device Memory
For data storage, the 16GB embedded non-volatile memory system eMMC is used in the device. The storage
keeps audio data for at least 10 years when the device is shut down.
Device storage is divided into 2 sections: a section with pre-recorded device driver and the application, and a
section for storing audio data. You can delete all recordings from the device manually or use supplied
software for selecting and erasing files (Section 7.4.2).
5
3
2
1
7
4
6
Gnome-Nano II
12
6.3 Microphone set
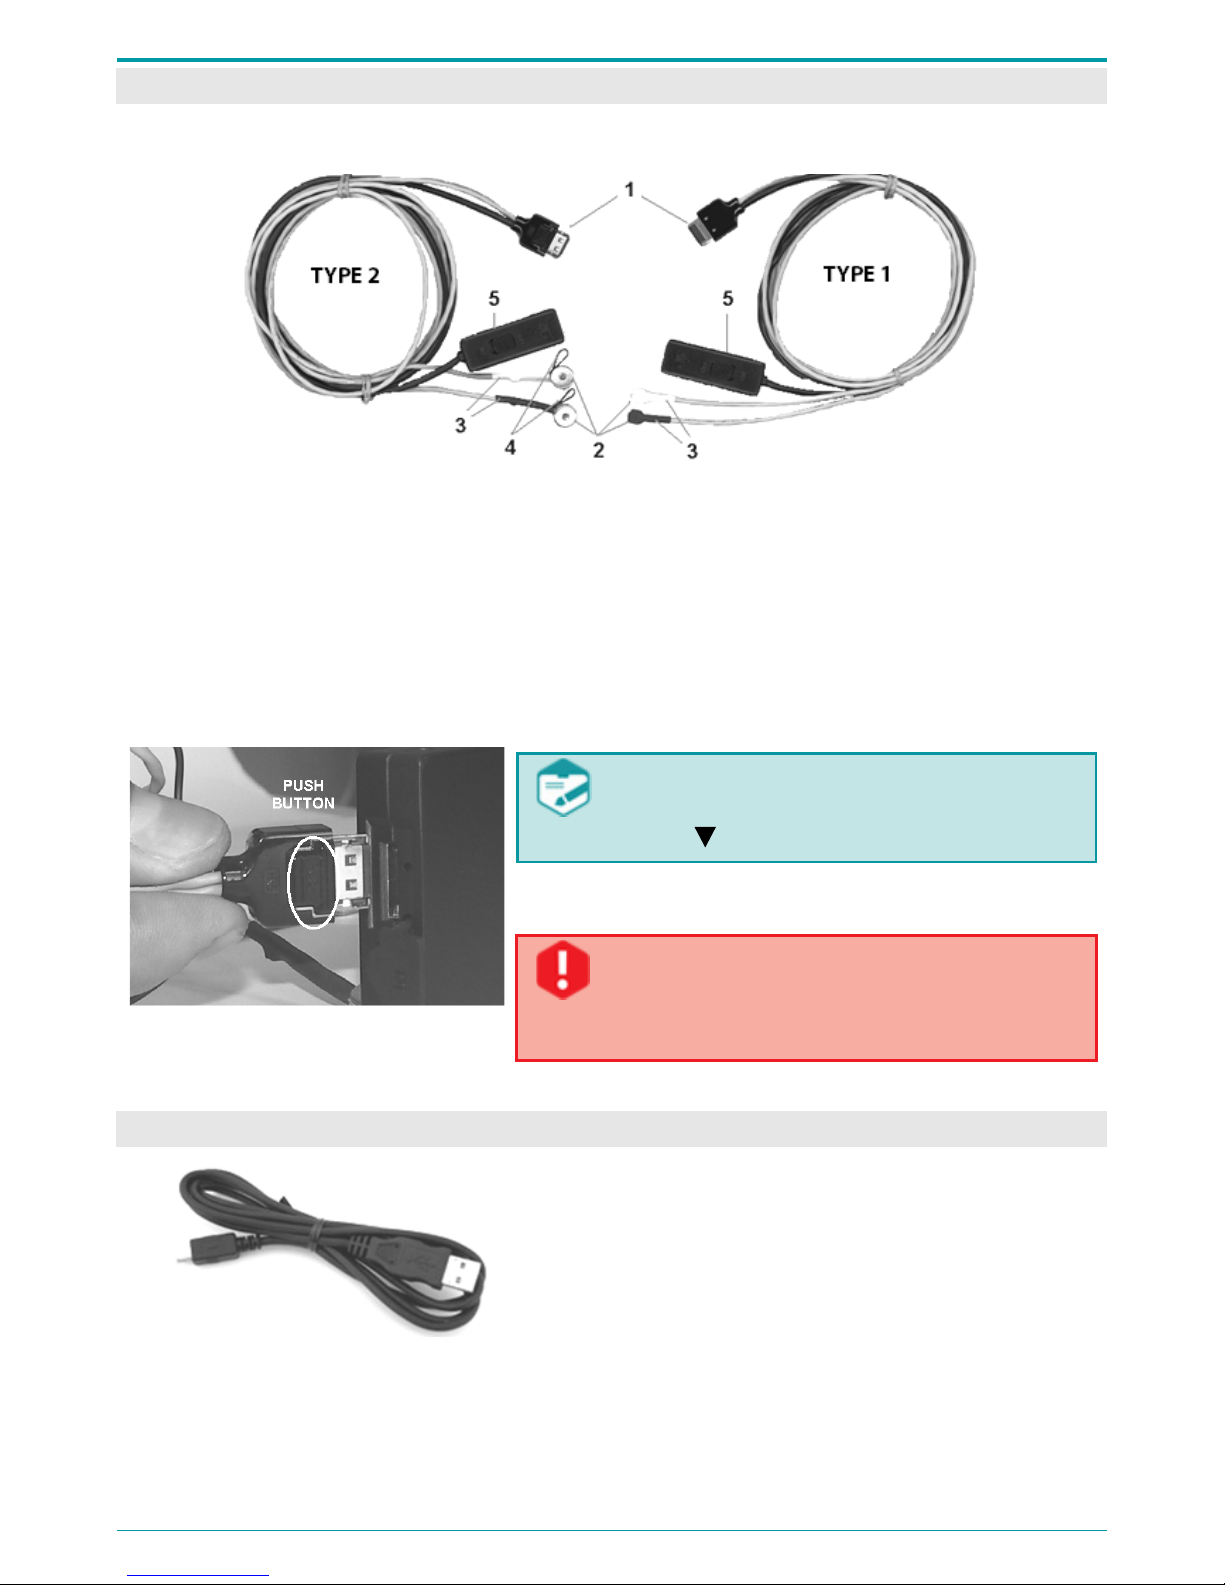
There are two microphone set options (Figure 2).
Figure 2: Microphone sets.
Both microphone sets include two mics (2) and a remote control (5). Mic cables of left and right channels (3)
are marked with different colors: left channel mic is marked with a darker color.
To prevent accidental disconnection from the device connector (2 in Figure 1), the microphone plug (1) is
fitted up with plunger pin. Each Type 2 microphone is also supplied with a wire loop (4) for fastening it to
clothes.
External microphones can be connected to the voice recorder to increase stereo base and recording quality.
Figure 3: Connecting external microphones.
While connecting external mics, make sure the
PUSH sign (Figure 3) on the plug faces the special
symbol .
When disconnecting the cable from the recorder, first press the
PUSH button on the plug and then pull the plug out.
Non-compliance with the instructions above when
plugging in/out external microphones may lead to
jack failure and recorder malfunction.
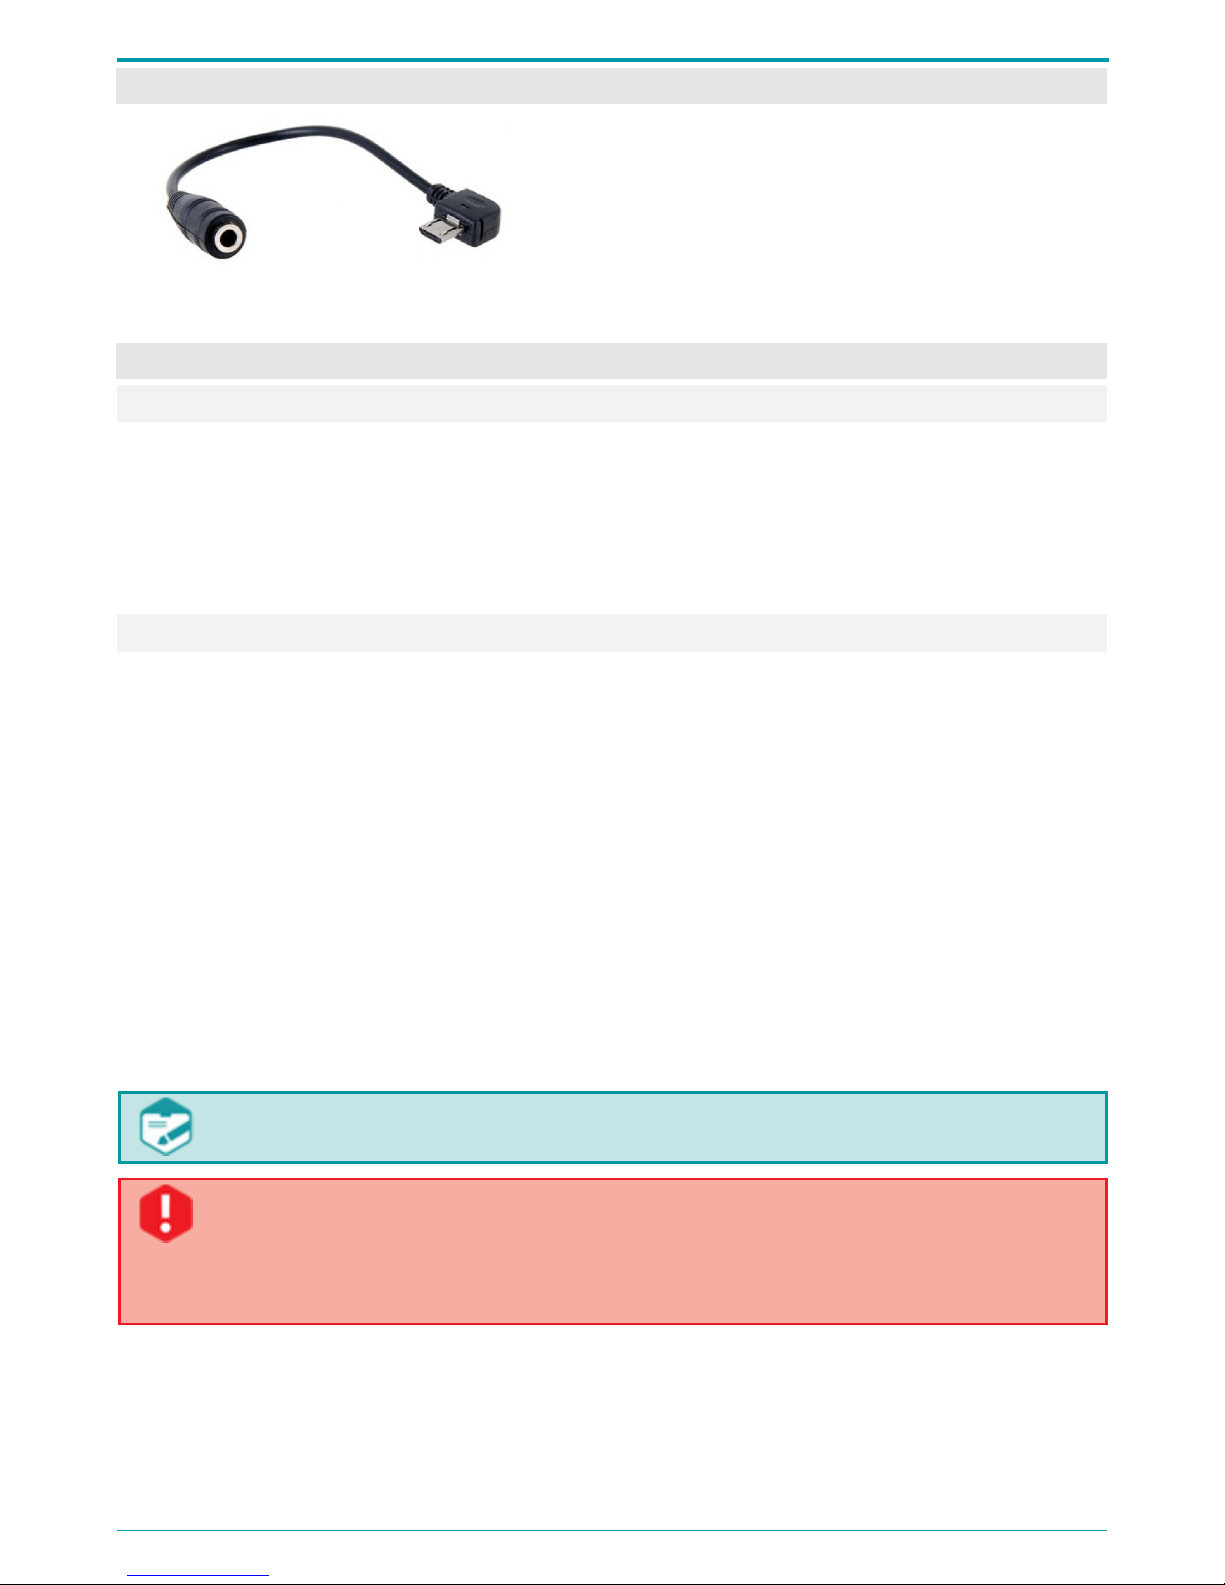
6.4 USB Connecting Cable
Figure 4: USB connection cable.
The recorder is connected to PC with a standard MicroUSB
cable (as shown on Figure 4).
Operation Manual
13
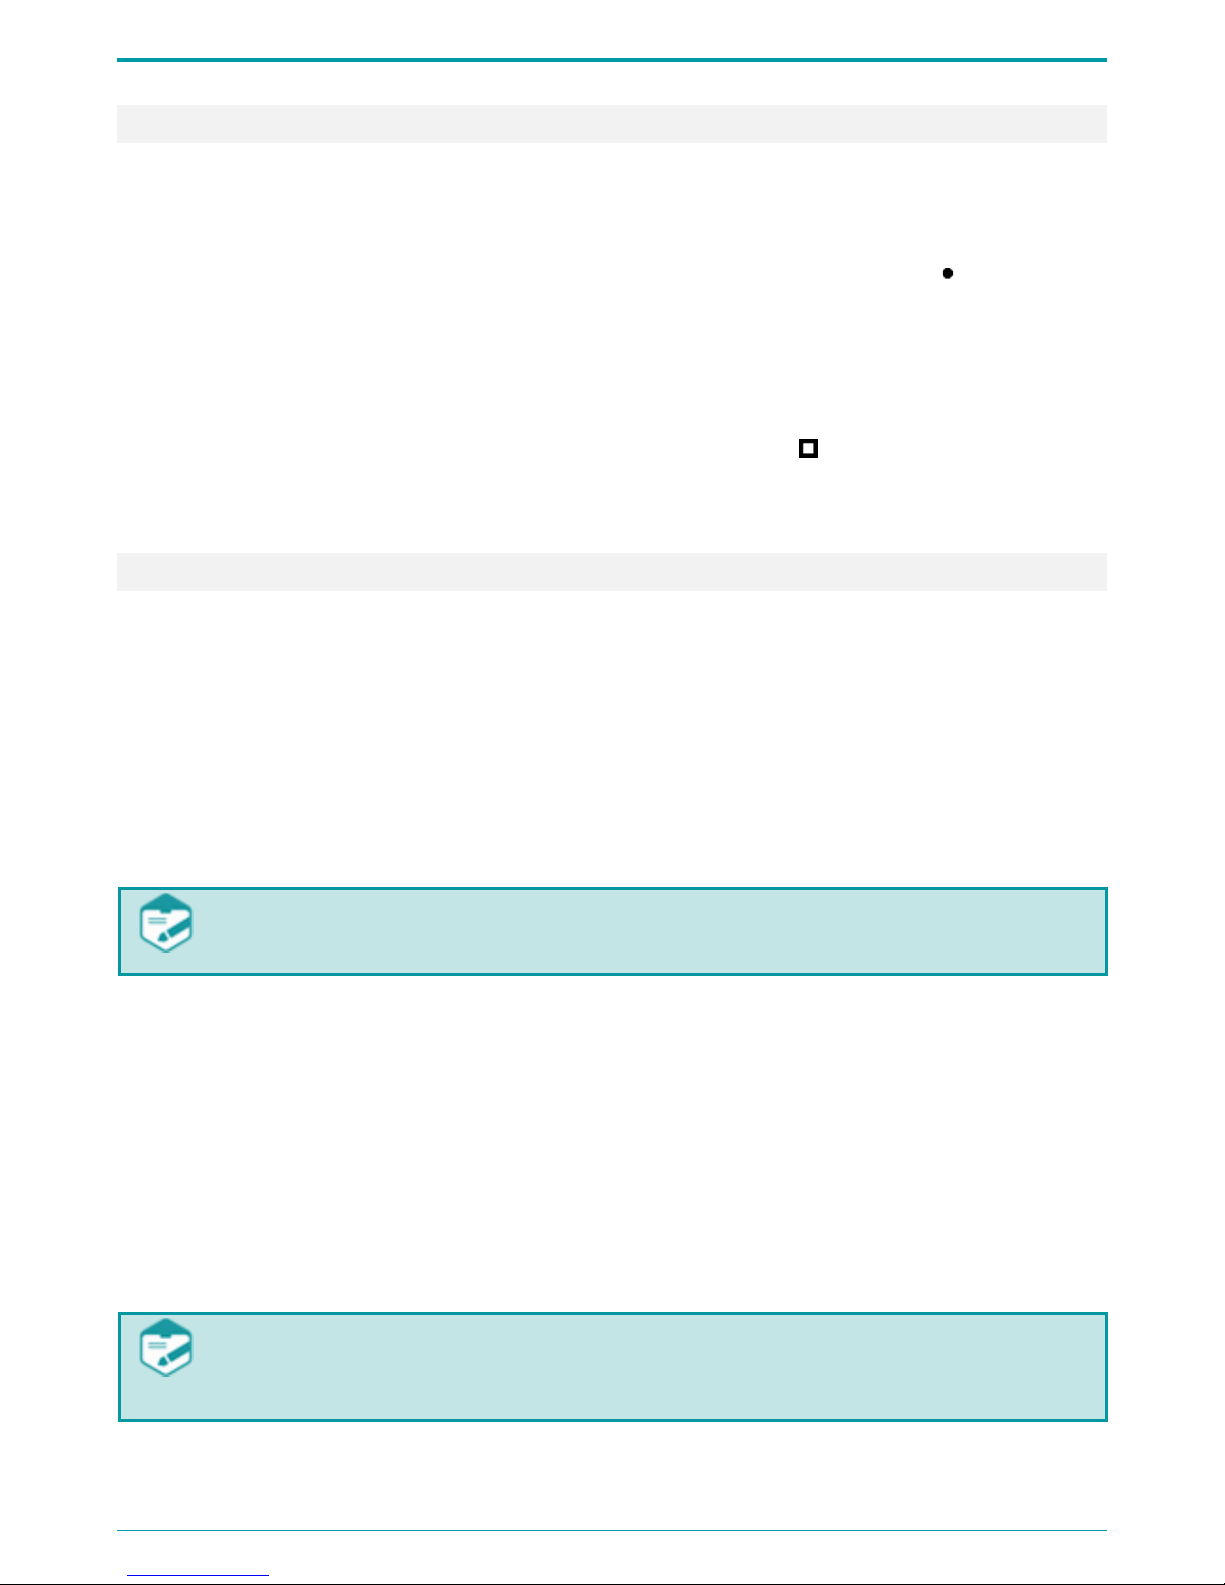
6.5 Headphone Adapter
Figure 5: Headphone adapter.
A standard headphone set can be connected to the device
by means of a micro USB jack 3.5mm adapter (shown in
Figure 5).
6.6 Power supply
6.6.1 Built-in Battery
The voice recorder is powered by a built-in 320 mAh Li-ion battery. While recording, power consumption
amounts to 13 mA; in the Volume-Triggered (VOX) Recording mode, power consumption is up to 4 mA.
Minimum power consumption amounts up to 50 μA in the timer mode.
After approximately a year of continuous usage, you might need to replace the battery due to the battery
wear-out. To replace the battery, please contact Speech Technology Center technical support.
6.6.2 Battery Charge
The voice recorder battery is charged from an external power source (AC/DC 220V/5V) or PC USB port.
Maximum battery charge current is 300 mA; full charge may take up to 5 hours.
When charging the recorder from your PC USB port, you need to consider the following: in case the current in
the port is lower than expected or several devices are connected to a port at the same time, you may
experience temporary connection issues.
The red LED (6 in Figure 1) will light up and remain on continuously until the battery is fully charged.
After the battery is fully charged, the process will be automatically finished and the LED indicator will go
down.
In case the charger is still plugged, after certain battery discharge (or if the battery is not fully charged)
additional charging will start automatically.
In case the external power supply is powered on and off cyclically, an attempt to start additional charge will
be performed.
Charge your device after the purchase or if you have not used your recorder for a long time.
To prevent battery failure due to over-discharging, follow these simple rules:
If you do not use Gnome-Nano II for an extended period of time, fully charge the battery at least
once a month.
Recharge the battery after each intensive recording session.

Gnome-Nano II
14
OPERATING THE DEVICE 7
7.1 Default Configuration
Voice recorder comes complete with an integrated fully charged battery, so that you can get started
immediately using manual (active) mode or connecting it to PC. In the manual mode, the voice recorder can
only perform data recording, playback and deletion. Once enabled for the first time, Gnome-Nano II starts
recording with the following default settings:
• Mono recording;
• 16 kHz sampling rate;
• PCM 16;
• 0 dB input gain control (manual);
• Signal input via internal microphone;
• Password not enabled, date/time not set.
7.2 Getting Started
Before using your Gnome-Nano II, please do the following:
• Connect the device to PC using a PC connection cable (see Section 6.5);
• Install the software from the installation CD (see Section 8.2);
• Set current date/time;
• Configure recording options in accordance with the acoustic environment (see Section 9.4.15);
• Enable and enter your password to protect Gnome-Nano II settings from unauthorized access, if
required (see Section 9.4.14);
• Plug in external microphone, if required (see Section 6.3).
Before connecting your voice recor
der to PC, make sure the PC case is effectively grounded.
Grounding is strictly recommended if you intend to connect your voice recorder to the PC and
an external signal source at the same time.
It is not recommended connecting multiple Gnome-Nano II recorders to the PC at a time. This
may cause the Manager application failures and malfunction.
Before connecting the second voice recorder you should disconnect the first one.
7.3 Audio Recording
7.3.1 Recording Hints
Voice can be recorded in the PCM* 16 or 24 bit format without compression or with A-law or μ-law
compression.
* Pulse-code modulation (PCM) is a digital representation of an analog signal that takes samples of the amplitude of the
analog signal at regular intervals.

Operation Manual
15
To obtain high-quality audio recording, we suggest you follow the guidelines below.
You are not recommended starting recording while the device is connected to PC USB port.
Otherwise, the recorder disconnects from PC and the recording process will be enabled. Because
of PC interference of 5 V, you may experience poor audio recording quality.
After the device memory is 50%-
100% full, you are recommended formatting the device
memory instead of deleting recordings one by one in order to
extend flash memory life
(see Section 9.3.5).
The best mic recording performance can be achieved with PCM 24 bit and 22050 Hz sampling rate. Stereo
recording with high sampling rate provides speech intelligibility and excellent audio quality even in noisy
environment.
Mono recording mode involves audio recording through only one internal or external mic input (left
channel).
To prevent data losses, use volume-triggered recording mode only if input signal level is stable and
predictable.
Place microphones as close to the signal (speech) source as possible (but not closer than 0.5 m) and as far
from the acoustic and electromagnetic noise sources as possible. The closer the microphones are placed to
the acoustic signal (speech) source, the smaller the reverberation (echo) will be and the higher gain level and
speech intelligibility will be achieved.
During stereo recording, external microphones must be placed at least 15 cm away from each other. Try to
place the microphones in such a way as to avoid vibration, and rubbing against other surfaces.
External microphones are more sensitive and at the same time can be easily concealed (under a jacket lapel,
shirt collar, on the cuff). At the same time, they are subject to external electromagnetic interferences.
Avoid permanent contact of the device or external microphones with rough surfaces (such as table, car body,
walls, etc.).
7.3.2 Manual Recording
Recording can be started/stopped both manually and automatically.
To start recording manually, move the ON/OFF slide switch (3 in Figure 1) to the REC position (or the
remote control switch in the ON position). To stop recording, move back the ON/OFF switch to the STOP
position or remote control to the OFF position.
The remote control replicates the positions of the ON/OFF slide switch (3 in Figure 1). See the description in
the table below:
The remote control position
Position of the switch (3 in Figure 1)
Recording mode
ON REC Recording is on
ON STOP Recording is on
OFF REC Recording is on
OFF STOP Stopped
Gnome-Nano II
16
7.3.3 Volume-Triggered Recording (VOX)
To enable the volume-triggered recording mode (VOX), do the following:
• Enable this mode while configuring recording parameters and set recording volume thresholds (see
Section 9.4.5);
• Move the recording slide switch located on the device case (3 in Figure 1) to the REC position or
the remote control switch to the ON position.
• Recording session will begin once the input signal level exceeds the specified start/stop threshold.
Recording stops once the volume level drops below the threshold and remains low over a specified
time.
• To stop a volume-triggered recording, move the slide switch to the STOP position or move remote
control switch to the OFF position. The volume-triggered recording mode can be used in
combination with the scheduled recording mode (see Section 7.3.4).
7.3.4 Scheduled Recording Mode
Use scheduled recording mode when the exact start and stop time of a recording session is known
beforehand. It is useful for recording conferences, meetings, etc. This mode is especially handy if the
recording situation does not allow you to operate the device manually.
This mode allows you to start a recording session automatically at any desired time using built-in timers. To
enable the scheduled recording mode, while configuring the device parameters (see Section 9.4.10), do the
following:
• Activate one or several timers;
• Set the desired start and stop time for each recording session.
If multiple timers are enabled and the end of one recording session overlaps the beginning of
the next recording session, the device will record both sessions into one audio file.
In this case, manual recording controls usually have higher priority over the timer settings. If the button is not
locked, you can stop a scheduled recording by moving the switch button (3 in Figure 1) first to the REC, and
then into the STOP position.
If the switch is disabled, you cannot stop the scheduled recording manually. Thus, the scheduled recording
will be stopped according to the timer, after the memory gets full or if the battery gets fully discharged. This
option is especially helpful while recording crucial information or important data as it ensures the STOP
switch will not be accidentally moved.
Scheduled recording mode can be used in combination with the volume-triggered recording mode (see
Section 7.3.3).
When both scheduled and volume-triggered recording modes are on, recording session starts as
soon as the volume level exceeds the specified threshold within the time frame set in the timer
settings.
Operation Manual
17
7.3.5 Loop Recording
In the loop-recording mode, audio data is recorded into a specified flash memory segment in the loop. Once
this segment is full, the data recorded in the very beginning of the recording session will start being replaced
with the new data. Loop recording duration can be specified in hours and minutes (see Section 9.4.7).
Maximum loop duration cannot exceed 2 GB.
Loop recording may be used in combination with any other recording mode.
7.3.6 Recording Duration
Recording duration depends on the specified parameters and available memory. Table 2 lists approximate
recording time for different recording modes and sampling rate values.
Table 2: Recording duration for various modes and sampling rate values.
Mode
Recording duration with the sampling rate
22050 Hz
8000 Hz
μ-law 8 bit, mono 196 h 541 h
μ-law 8 bit, stereo 98 h 270 h
PCM 24 bit, mono 64 h 180 h
PCM 24 bit, stereo 32 h 90 h
Note, that any recording exceeding 2 GB will be divided into 2 files automatically. Maximum
recording size is 2 GB.
7.4 Recording Playback and Deletion
You can delete and play back recordings stored in the device memory either using device controls or by
means of the managing application.
Playback and deletion process with Voice Recorder Manager is described in Section 9.5.
To play back or delete recording with multifunction button on the device case (4 in Figure 1), you must assign
the relevant function in the application (see Section 9.4.11).
This way, you can play back only the last recorded audio file.
By default, the button 4 in Figure 1 performs playback.
7.4.1 Recording Playback
If the playback function is enabled, to listen to the last recording stored in the memory, plug in the adapter
(Figure 5) and earphones into the jack on the device case and press the button (4 in Figure 1). To stop
playback, press the button again.
7.4.2 Deleting Recordings
If the erase function is selected, to quickly erase all recordings from the voice recorder memory, press the
multifunction button (4 in Figure 1) and hold it down for about 3 seconds. The red LED (6 in Figure 1) will
indicate the process of file deletion and will go down as soon as all files are erased. All recordings will be
removed from the voice recorder memory.

Gnome-Nano II
18
Deleted data cannot be recovered.
In case the password is enabled, you cannot delete recordings from the device storage with the
multifunction button.
7.5 The RESET Button
The RESET button located on the device case (7 in Figure 1), is used for recorder reboot. The RESET button is
located in the small pin sized hole. You will need a paper clip to actually press the button. After pressing
RESET, all user settings will remain intact.
Do not use needles and other sharp objects as they can damage the button and its functions will
no longer be available.

Operation Manual
19
SOFTWARE 8
8.1 G nome-Nano II Software Features
After connecting the device to the PC, you can use it as a FAT32 external memory unit. Nevertheless, to
access all functions, you will need the software that comes with the recorder: device drivers and the Voice
Recorder Manager application.
The device configuration is performed via Manager.
Voice Recorder Manager enables the following:
• Viewing device information (serial number, available memory size, battery charge level, etc.).
• Setting recording options (recording format, signal source, gain control, etc.).
• Viewing the list of recordings and performing standard set of operations (playback, deletion and
copying).
8.2 Software Installation
8.2.1 System Requirements
The minimum system requirements for Manager are:
• PC with available USB port and a CD drive;
• CPU: Intel Pentium III;
• RAM: 256 Mbyte;
• Audio I/O sound card;
• Headphones;
• Mouse, keyboard;
• At least 16 GB of free hard disk space to store recorded data.
8.2.2 Driver Installation
To be able to work with the Voice Recorder Manager application, first you must install the drivers that come
with the device on the CD. The drivers can also be recorded in the device storage.
Only a user with administrator rights can install the drivers.
Password must be disabled before installing the drivers. Before installing the drivers, make sure
the recorder is not protected with a password.
Connect your device to your PC and, if required, insert the installation CD or open the relevant section on the
device storage once the system detects the recorder.
The following instruction describes installation process for Windows 7.

Gnome-Nano II
20
Figure 6: Device manager.
• Select the relevant driver (it must be compatible
with your OS) from the CD or recorder storage
and launch it.
• Once the driver is installed, you must restart your
OS to apply the changes.
• Run Device manager. To do so, open the Start
menu , select Control Panel Hardware
and Sound Device Manager.
•
If the driver is installed successfully, the device
will show up in the Device Manager dialog
(Figure 6):
1. In the Disk drivers section as STC Product USB
Device;
2. In the Portable devices
section as
GNMN2_ХХХХХ
, where ХХХХХ stands for device
serial number;
3. In the Ports (COM & LTP)
section as
Communications Port.
It is not required to install Voice Recorder Manager. To run the application, double-click on the
Manager.exe file.

Operation Manual
21
VOICE RECORDER MANAGER 9
9.1 Getting Started
To run Voice Recorder Manager, click the Manager.exe file located on the supplied CD or device flash
memory.
9.2 Application Main Screen
Voice Recorder Manager main screen (Figure 7) is composed of application title and three client areas
arranged the following way:
1 Main menu;
2 Device state area;
3 Area displaying one of the three operation modes: Overview, Settings and Recordings.
Figure 7: Main screen: Overview area.
Application main screen is composed of the following icons:
Icon Description
Opens the Overview area (see Section 9.3)
Opens the Settings area (see Section 9.4)
Opens the Recordings area (see Section 9.5)
Closes the application (see Section 9.6)
2
1
3

Gnome-Nano II
22
In the Device state area, there are two indicators, Memory and Battery:
Indicator Purpose
Memory
Displays device free memory
Battery
Displays battery charge level
9.3 Overview
To open the Overview area, click located in the application main menu (Figure 7).
9.3.1 Main Screen: Overview Area
The Overview area (3 in Figure 7) displays device info and a set of controls.
The Overview area contains the following device information (Figure 8).
Figure 8: Overview area: Device information.
The Memory state
section lists the following
parameters:
• Total memory, KB: total device memory capacity in
kilobytes;
• Free memory, KB: the amount of free memory in
kilobytes;
• Used memory, KB: the amount of used memory;
• Maximum record time, h:m:s: estimated recording
duration with specified device operation
parameters.
The Miscellaneous section contains the following data:
• Serial number: device serial number;
• Firmware version: device firmware version;
• Hardware version: device version.
The Overview area also contains the following controls:
Name Description
Generate public key file (see Section 9.3.2)
Verifies file authenticity (see Section 9.3.3)
Verifies audio file integrity (see Section 9.3.4)
Formats device memory (see Section 9.3.5)
Is used to write Voice Recorder Manager
to device memory (see
Section 9.3.6)
Updates device firmware (see Section 9.3.7)
Opens the dialog with information about the application (see Section 9.3.8)

Operation Manual
23
9.3.2 Getting Public Key
The Get key button is used for creating public key file on your PC. Public key is needed for audio recording
authenticity verification using digital signature. A public key (public and private), generated with Manager
can be obtained by one OS user.
Click Get key (Figure 7). In the Save as dialog, specify folder you want to save file to.
The default public key name is PublicKey. You can change file name.
9.3.3 Digital Signature Verification
The Verify sign button allows you to verify recording authenticity thus, to make sure audio file has not been
altered after being copied to PC hard drive.
If a digital signature has been created for a recording (see Section 9.5.7), you can verify its authenticity by
analyzing this recording and digital signature file. To perform verification, apart from audio recording, you
need a digital signature file and a public key file. You are recommended locating public key files (.key), digital
signature files (.dsg) and audio recordings (.wav, .rng) in the same folder (Figure 9).
Figure 9: Files prepared for verification.
Figure 10: Specifying access paths.
To start verification, click Verify sign (Figure 7).
In the Verify digital sign dialog (Figure 10), specify assess
path to the file, its digital signature and public key files. Click
Verify.
Verification results are displayed in the dialog, as shown on
Figure 11.
Figure 11: Verification results.
If a file has been modified, you will see
the following message:
File has been
changed.
If a file has not been modified, the
following message will appear:
File is
authentic.
The Get key and Verify sign
options are always accessible, which allows you to perform
verification without connecting the device to PC.
Gnome-Nano II
24
9.3.4 Watermark Check
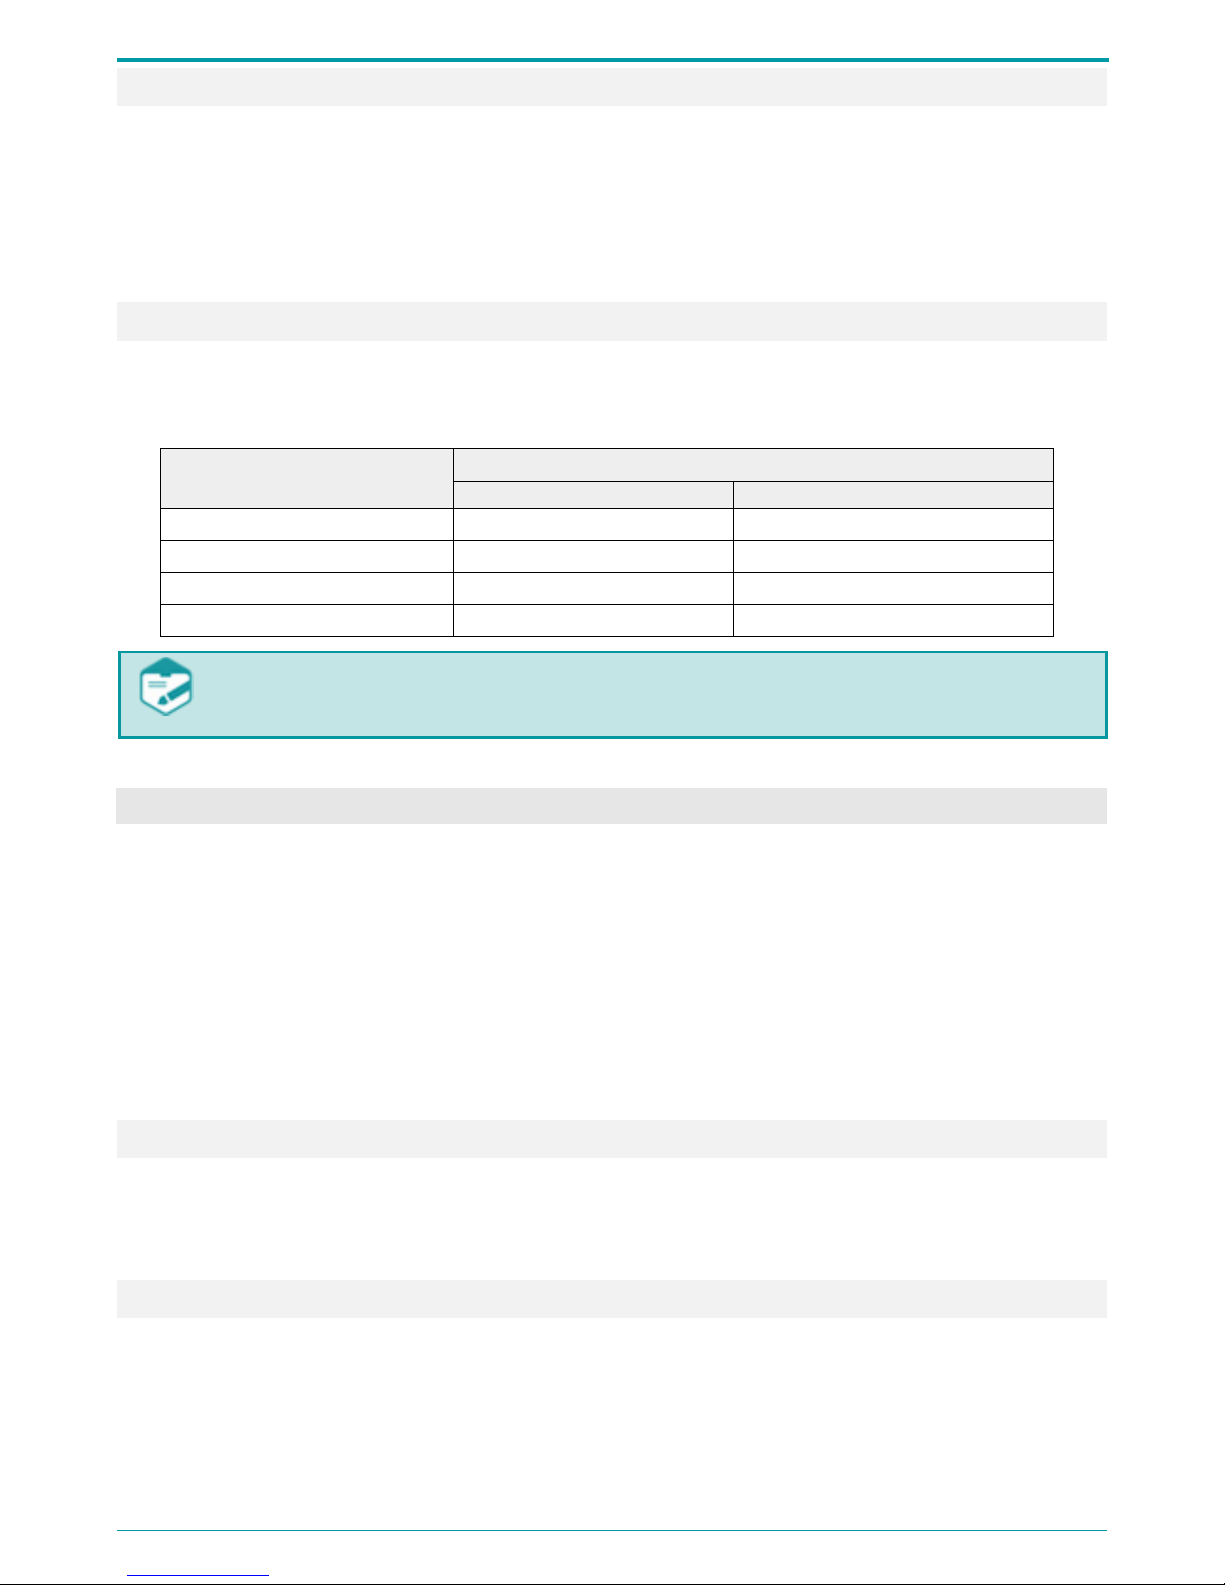
Figure 12: Selecting files for the integrity check.
To perform integrity check, click Check
watermarks in the main screen (Figure 7).
In the Open dialog (Figure 12), select either
.rng or .wav file.
Click Open to start the process. Click Cancel
to close the Open dialog.
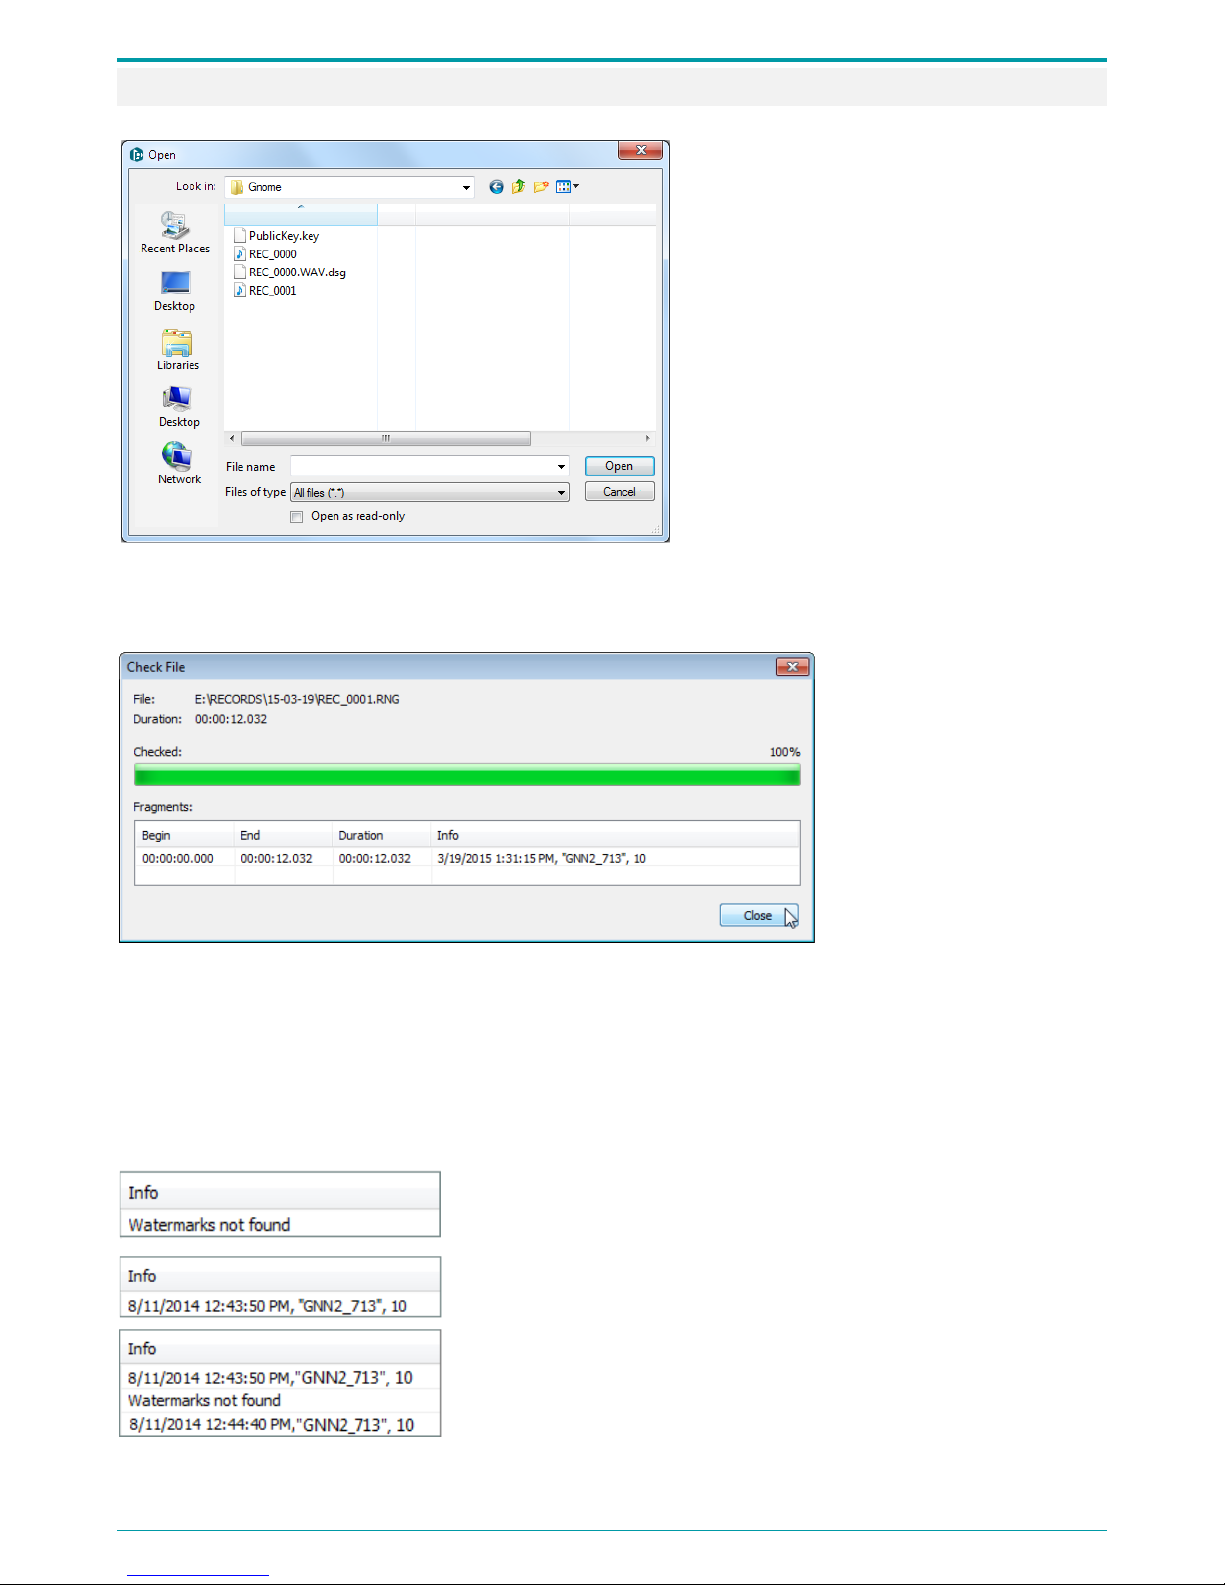
The results are displayed in the Check file dialog (Figure 13) in a table. Number of lines in the table depends
on the number of fragments detected in the file.
Figure 13: Watermark check results.
The table displays the
following parameters for
each fragment:
Begin: fragment start time;
End: fragment end time;
Duration: total fragment
duration;
Info: watermark check
results.
The Info column contains data on the detected fragment or whole file. Watermark consists of the following
information:
Date and time the fragment or file has been created;
Device name, for example GNN2_713;
Device serial number, for example 10.
If no watermarks are detected in the .wav or .rng file, the Info column
will display the following message: Watermarks not found.
If watermarks are found in a .wav file, the Info column will display
watermark text for the entire audio file.
If a .wav file with watermarks has been modified, the Info column will
display one or more messages: Watermarks not found.

Operation Manual
25
When checking a .rng file with watermarks, recorded in the loop mode,
the Info column will show messages marking the beginning of each
recoding loop: Begin of record loop and Continue of record loop.
If an .rng file with watermarks has been modified, apart from recording
loop beginning and continuation, the Info column will display one or
more Watermarks not found messages.
.wav file integrity check can detect not only intentional file modifications but also interferences caused by
recorder malfunctions during the recording process or storage. The duration of a corrupted audio file
fragment is measured in milliseconds while intentionally modified recording part can last several seconds or
minutes. Click Close to exit Check file dialog.
9.3.5 Formatting Device Memory
Figure 14: Memory formatting dialog.
In order to format device storage section the files
are recorded to, click Format memory (Figure 7).
In the dialog (Figure 14), click Yes
. To cancel
formatting device memory, click No or Cancel.
9.3.6 Writing Manager to the Device
Figure 15: Copying Manager to the device.
If you want to copy current
Voice Recorder
Manager to device memory, click Write manager
(Figure 7).
To confirm, click Ye s in the dialog (Figure 15). Click
No or Cancel
if you do not want to write
application to the device.
After device memory is 50%-
100% full, you are recommended formatting the device memory
instead of deleting recordings one by one in order to extend flash memory life. Please note that
formatting will delete all data on the device.

Gnome-Nano II
26
9.3.7 Updating Device Firmware
Figure 16: The device must be restarted.
To update device firmware, click Update
firmware (Figure 7).
In the Explorer dialog, select the .bin
firmware file and click Open.
New firmware version will be applied to the device. A message suggesting rebooting the device (Figure 16)
will show up. Click OK.
9.3.8 The About Option
Figure 17: The About dialog.
To view the Voice Recorder Manager
information, click About (Figure 7).
To close the About dialog (Figure 17), click OK.
9.4 Device Settings
The Settings area is used for configuring device parameters.
To open the Settings area, click in the main menu.

Operation Manual
27
9.4.1 The Settings Area
Figure 18: The Settings area.
Apart from main menu and device state, the Settings area contains the following controls (Figure 18):
1 Device settings;
2 Profile loading and saving buttons;
3 Error message area;
4 Setting and changing password;
5 The Adjust time button.
Configuration is performed via shortcut menu or a dialog of each parameter. To open a shortcut menu, rightclick the parameter title.
To open a parameter dialog, double-click its title.
Below you can see a complete list of adjustable parameters.
There is an error section in the Settings area. This section displays errors that may occur while configuring
the device. If no errors have been detected, this section will display the No errors message.
1 2 4
3
Gnome-Nano II
28
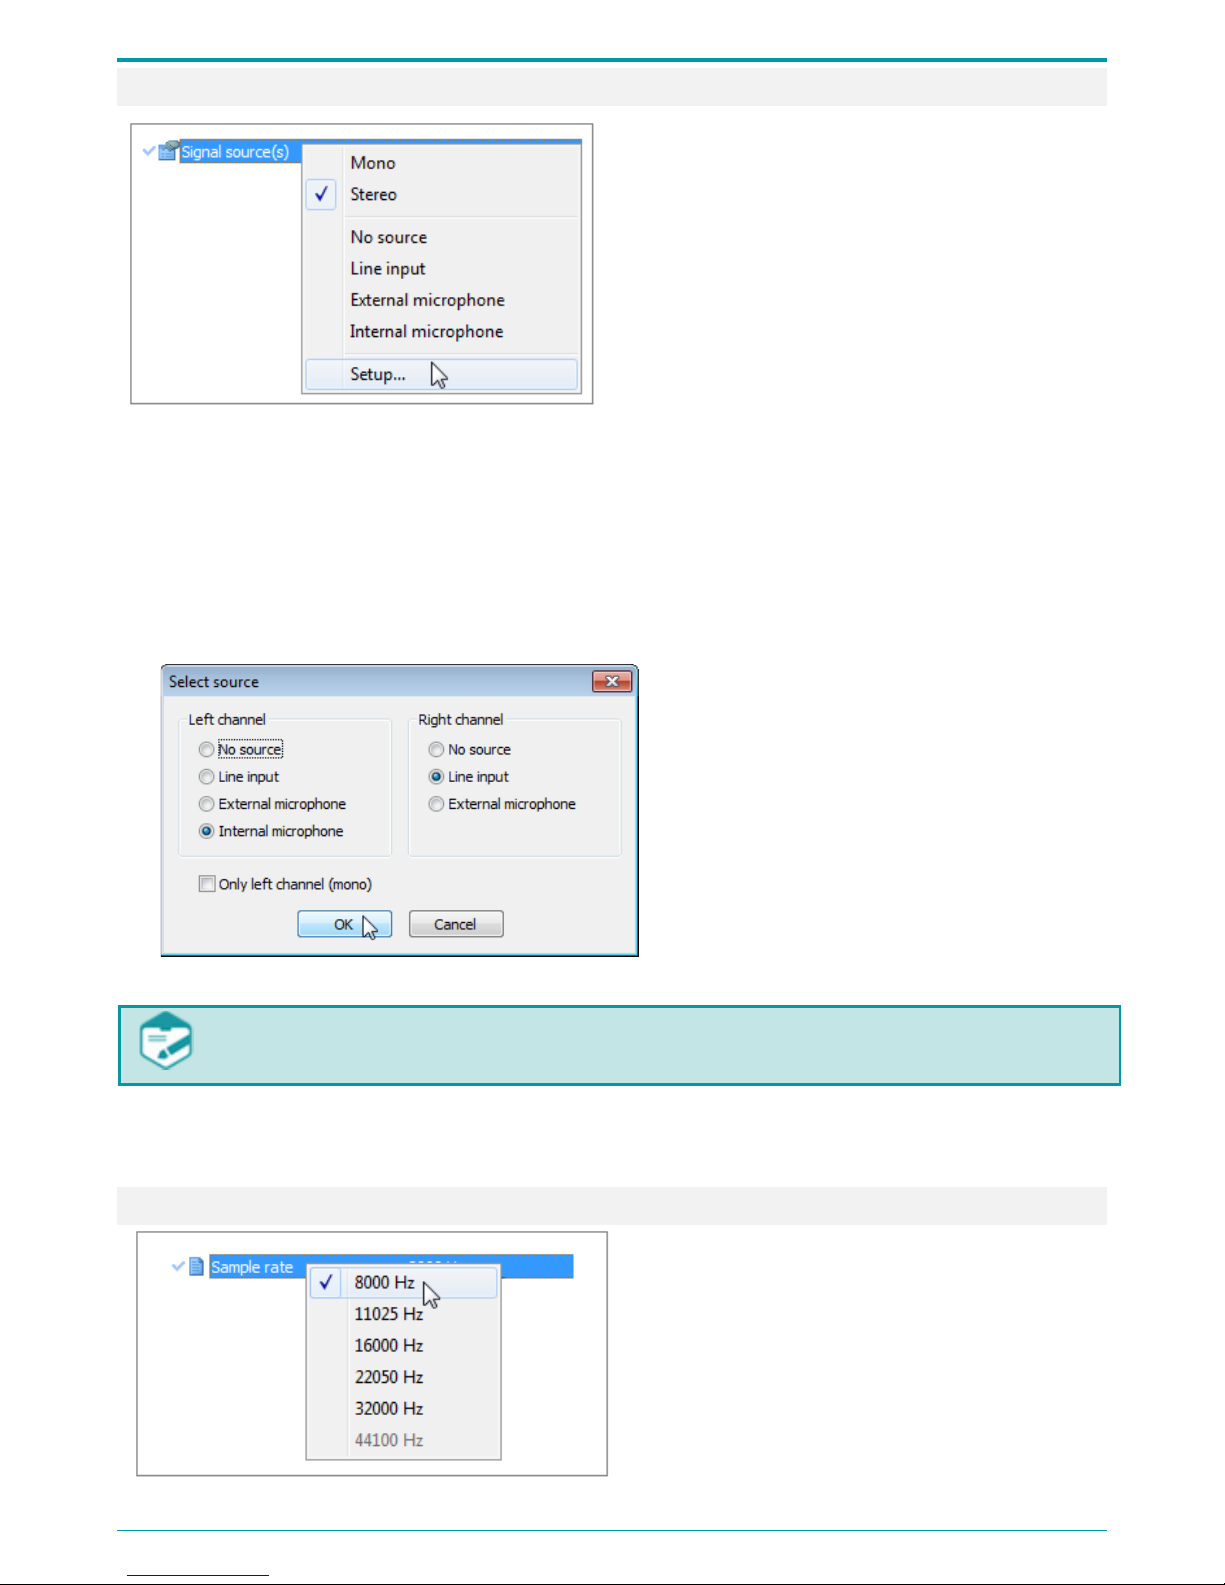
9.4.2 Signal Source
Figure 19: Signal source shortcut menu.
Source signal shortcut menu (Figure 19) is used for
selecting recording source for the left and right
channel.
A signal can be recorded in either mono or stereo
mode.
Stereo recording involves recording onto two
separate channels, one channel for the left sound
input and the other channel for the right sound
input. Mono recording involves recording onto left
sound input only.
The range of audio sources includes the following:
Built-in microphone;
External microphone;
Line input.
To set recording signal source, click Setup of the shortcut menu (Figure 19).
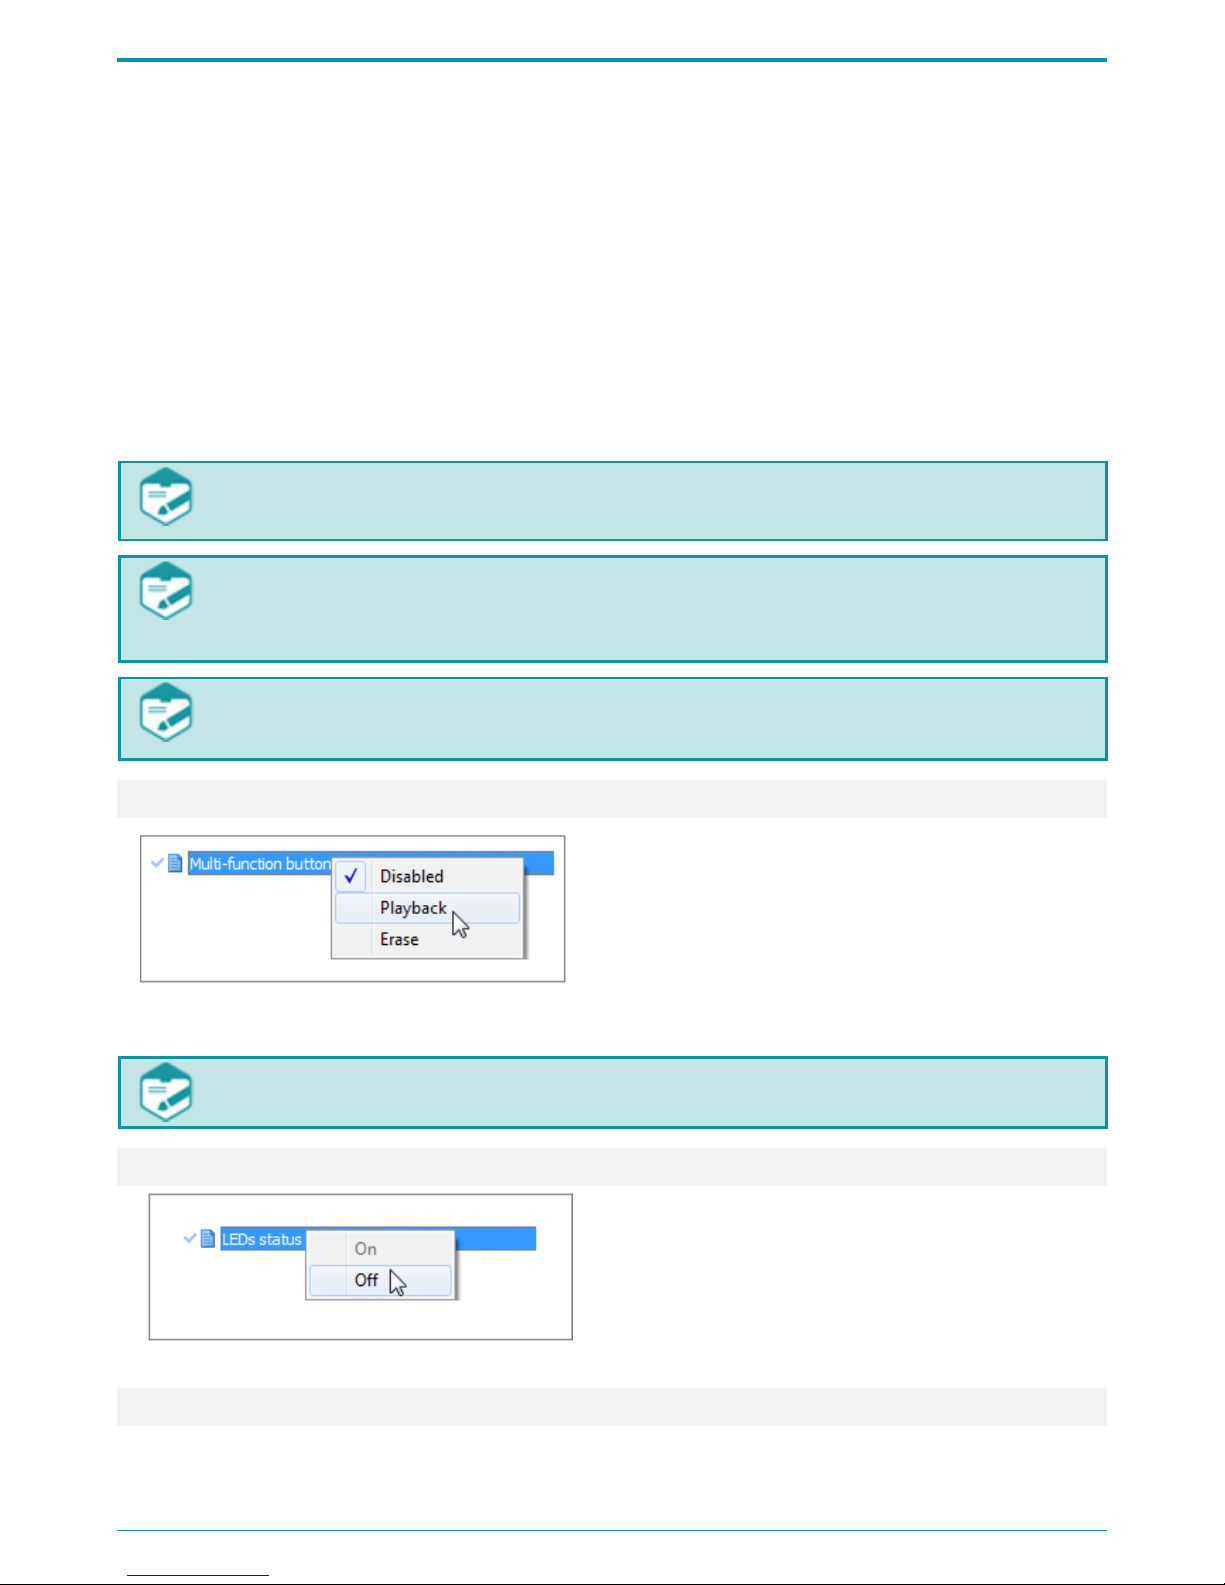
Figure 20: Selecting signal source.
Use the Left channel and Right channel areas
to set signal sources for recording (Figure 20).
For mono recordings, tick the
Only left
channel (mono) option.
If the signal source for both channels is not specified, the application will display the error message
in the area 3 of the main screen (Figure 18).
To apply settings to the recorder, click ОК.
To close the Signal Source dialog and cancel the current selections, click Cancel.
9.4.3 The Sampling Rate Area
Figure 21: The Sampling rate shortcut menu.
Use the Sample rate shortcut menu (Figure 21) to
select recording sampling rate: 8000, 11025, 16000,
22050, 32000 or 44100 Hz.

Operation Manual
29
9.4.4 Recording Format
Figure 22: The Recording format shortcut menu.
The Recording format shortcut menu (Figure 22) is used
for setting audio compression format:
• PCM 16 bits, no compression (cannot be used
for 44100 Hz sampling rate);
• PCM 24 bits, no compression (cannot be used
for 32000 Hz and 44100 Hz sampling rates);
• A-law compression;
• µ-law compression.
9.4.5 Volume-Triggered (VOX) Recording
Figure 23: The Volume-triggered (VOX) recording
shortcut menu.
To open the VOX setting dialog (Figure 24), click Setup of
the VOX recording shortcut menu (Figure 23).
With this mode enabled, the recording process begins as soon as volume level reaches the specified
threshold (triggering threshold). To make the process of threshold setting more convenient, the application
features an indicator displaying the Current signal level. The indicator marks when the signal reaches the
threshold.
The Volume-
triggered recording mode (VOX) operates only left channel signal sources. If source
signal for the left channel is not set, the application will display the error message in the area 3
(Figure 18) and the recording will not begin.
Figure 24: The Volume-activated recording dialog.
Use VOX threshold slider to set the recording threshold.
Use the Off delay, s slider to specify the time during which the
device will keep on recording after the volume level falls down
below the triggering threshold. The set value is shown in the
title: the default value is 10 seconds.
Click On to apply changes and enable the Volume-triggered
(VOX) recording mode.
Click Off to close the dialog, cancel the current selection and
disable the Volume-triggered (VOX) recording mode.
To close the dialog and cancel the current selection, click
Cancel.

Gnome-Nano II
30
9.4.6 Gain Control
Figure 25: The Gain control shortcut menu.
The Gain control shortcut menu (Figure 25
) is used for
selecting gain control type and specifying manual control
parameters.
Figure 26: The Gain control settings dialog.
Select one of the control types in the Control type area of
the Gain control settings dialog (Figure 26).
Tick the Manual option to enable the Left channel and
Right channel setting areas for manual adjustment. Tick
the Change both simultaneously
checkbox to adjust
both channels at the same time.
The Current signal level indicator shows the current input
signal level.
The indicator also informs on the possible input signal
overload that might result in signal distortions.
Set the gain level for one or both channels using the slider.
Possible values for this parameter range from - 6 dB to + 32
dB.
If you want the device to carry out gain control
automatically, select the Automatic control type. Manual
adjustment for the right and left channels will be
unavailable.
Click OK to apply changes.
To close the dialog and cancel the current selection, click
Cancel.
9.4.7 Loop Recording
Figure 27: The Loop recording shortcut menu.
The Loop recording shortcut menu (Figure 27) is used for
enabling the loop-recording mode and setting recording
duration. Once the recording have reached the specified
time limit, the device will overwrite previously recorded
data starting from the beginning.
Figure 28: The Loop recording dialog.
Select the Setup option from the shortcut menu to open the
Loop recording dialog (Figure 28
). Configure the Loop
length (hh:mm) parameter. Click OK
to enable loop
recording mode with specified settings. Click Off to disable
this mode. Click Cancel to cancel the current
selection and
close the dialog.

Operation Manual
31
With this mode enabled, the recording session will not exceed specified time limits. If a recording
with specified parameters exceeds 2 GB, you will see a message informing you the file will have
shorter duration. Loop recording size cannot exceed 2 GB .
9.4.8 Real-Time Monitoring
Figure 29: The Real-time monitoring shortcut
menu.
The Real-time monitoring shortcut menu (Figure 29) is
used for enabling and disabling the real-time
monitoring mode.
9.4.9 Watermarks
Figure 30: The Watermarks shortcut menu.
The Watermarks shortcut menu (Figure 30
) is used for
embedding watermarks into audio files.
With the Watermarks mode enabled, SNR becomes 3 dB lower and the
battery discharges
10 % -15 % faster while recording.
9.4.10 Scheduled Recording
Figure 31: The Scheduled recording shortcut
menu.
The Scheduled recording sessions area allows you to enable
or disable timer triggered recording. Five timers enable up to
five recording sessions that can set in advance.
Adjust the timer before enabling. Click the Setup option from
the selected timer (for example, Timer 1) shortcut menu
(Figure 31).
Figure 32: Adjusting timer recording options.
In the Timer 1 dialog (Figure 32), select one of
the recording Types: Once, Periodic or
Weekly.
If the Once
option is selected, specify start
date (DD:MM:YYYY), time (hh:mm:ss ) and
duration (hh:mm) in the relevant setting areas.
The Device current time
option enables
quick current device time setting for further
time adjustment.
Gnome-Nano II
32
When setting the Periodic recording type, apart from the start date/time and duration parameters, you also
need to set the Repetition cycle (dd:hh:mm): a period of time after which the device must start recording
again.
When selecting Weekly, apart from the start time and duration options tick days on which you want the
device to start recording.
To prevent accidental recording stop, set the timer recording priority over the recording switch. To do so, tick
the Ignore record switch checkbox. After doing so the recording process will be impossible to stop with the
switch button located on the device case or with the remote control.
Once all parameters are set, click OK to enable the timer.
To disable the timer, click Off.
To close the dialog without saving the changes, click Cancel.
If the time set for the timer matches the current time, the recording session will be enabled
immediately,
In case you set two periodic timers with the exact same parameters or if the device detects errors
while setting timer parameters, you will see the error message in the relevant area 3
of the
application main screen (Figure 18).
In the recording pauses the battery accumulates the charge. That is why, if during periodic
recording the battery discharges, audio files might be of shorter duration.
9.4.11 Multifunction Button
Figure 33: Multifunction button shortcut menu.
Use the Multifunction
button shortcut menu
(Figure 33) to set one of the following options for this
button (4 in Figure 1):
Disabled;
Playback (to play the last recorded audio file);
Erase (for quick device memory formatting).
By default, the multifunction button performs recording playback.
9.4.12 LEDs Status
Figure 34: The LEDs status shortcut menu.
The LEDs status shortcut menu (Figure 34) is used for
enabling and disabling LED indicator located on the
device case (6 in Figure 1).
9.4.13 Profiles
A Profile is a set of pre-configured device parameters that are stored in the device memory.
There are 3 types of profiles: default profile, current profile and user profile.

Operation Manual
33
Default profile: a set device parameters configured by manufacturer that cannot be changed.
Current profile: a profile that is loaded automatically after switching the device on, after replacing the
battery or after pressing the RST button (7 in Figure 1).
All user settings configured in Voice Recorder Manager are saved automatically to the current profile and
device memory.
Current profile is not included into any of the three user profiles.
User profile involves user-defined parameters only. User profile can be saved and loaded by means of the
Save profile and Load profile options.
You can generate up to three user profiles.
Figure 35: Saving a profile.
To create and save a profile, configure needed
parameters and click Save profile.
A dialog will show up (Figure 35).
Use the drop-down list to select one of the three profile names: Profile 1, Profile 2 or Profile 3.
Click OK to save the profile to the device memory and apply it as a current profile.
Figure 36: Loading a profile.
To apply one of the profiles to the device, do the
following:
• Click Load profile. In the dialog (Figure 36), select one of the profiles.
• Click OK to confirm. The selected profile settings will be applied to the device.
If you want to change a previously created profile, you need to load this profile first to the Voice Recorder
Manager. To do so, click Load profile.
Follow the profile generation instructions described in this section above.
9.4.14 Change Password
Password is not set by default.
You can set a password to secure the access to device and its settings.
In order to set, change or disable password, click Change password....
The Change password dialog will show up (Figure 37).

Gnome-Nano II
34
Figure 37: Changing password.
While setting password for the first time, leave the Current
password input box empty. In the New password
box, specify
digits (from 1 to 8) you want to use as password
, confirm the
password by entering the same set of digits in the Confirmation
input box, and click OK.
To change password, fill in all input boxes in the dialog (Figure 37).
To disable password, leave the New password
and the
Confirmation boxes empty.
Figure 38: The Change password dialog.
After the password is set,
the application will require entering
password the next time you connect the device to PC.
In the dialog (Figure 38), enter your password in the relevant box
and click OK.
For security purposes you are recommended to use at least four digits for password.
Figure 39: Invalid password.
If the device is not connected or password is wrong (Figure 39),
you cannot access the device and configure device settings.
9.4.15 Deleting Recordings after Entering Invalid Password
Figure 40: The Security dialog
There is an opportunity to delete all recordings
from device memory by clicking the Security
button located in the application main screen.
In the opened dialog box tick the Delete
records in the recorder when enter the
incorrect password option and click Close
(Figure 40).
Figure 41: Confirming the Security option
When enabling or disabling this option, enter
password to confirm this action (Figure 41).

Operation Manual
35
Figure 42: Recording deletion warning
If you enable this option, you will have only five attempts to enter correct password after running the
Voice Recorder Manager (Figure 42).
If you enter invalid password five times in a row, all recordings stored in the device memory will
be deleted.
9.4.16 Setting Device Time
Device time and date are displayed in the Device time area 5 of the Voice Recorder Manager (Figure 18).
Figure 43: Setting device time.
To set device time and date, click the Adjust option,
located in the application main screen (the Settings area).
In the Device time dialog (Figure 43), specify current time
and date in the Device time input box.
Click Synchronize with PC if you want to synchronize device time with the time on your PC.
To save changes and apply them to your device, click OK; to cancel the current selection, click Cancel.
If your device shuts down due to battery discharge, the date and time settings may be reset.

Gnome-Nano II
36
9.5 Recordings
The Recordings area is used for playing back and deleting recordings (.wav files) stored in the device
memory.
To open the Recordings area, click in the main screen (Figure 44).
Figure 44: The Recordings area shortcut menu.
9.5.1 The Recordings Area
Apart from Overview and Device state, the Recordings area contains the following controls (Figure 44):
1 Tool bar;
2 Folder selection drop-down list;
3 List of recordings.
9.5.2 Toolbar
Below you can see a table with icons, their description and relevant shortcut menu options:
Icon
Shortcut menu
option
Description and purpose
Grid Display grid of the recording list
Select string Select the whole string
Refresh Refresh recording list
Up Go one level up
Delete Delete selected recordings
Figure 44 shows the Recordings area with the Grid and Full row select options enabled.
1 2 3

Operation Manual
37
9.5.3 Recording List
PC detects connected recorder as FAT32 external memory.
The records folder is created automatically in the device memory and contains recorded audio files. Files are
located in the internal folders that are named in the yy-mm-dd format, for example 08-10-31.
To operate audio files, open the records folder and then click on the folder with the file you want to open.
Once the needed folder is open, the list of recordings and their main features will be displayed:
• Name: recording name, for example rec_0000.wav or rec_00011.rng (for loop recordings)
• Size, KB: recording size in kilobytes
• Created: date and time of the recording
• Recording mode: the way the recording was triggered:
M: Manually
T: Scheduled Recording
V: Volume-activated recording
L: Loop recording
• Audio summary: sampling rate, mono/stereo, compression type
• Duration: recording duration
• Source: recording source
9.5.4 Recording Playback
The .rng recordings cannot be played back before their conversion.
Figure 45: Windows Media player dialog.
Double-click on a recording you want to play (Figure 44).
Your OS default media player will start playing back the
recording. For example, default Microsoft Windows media
player for .wav files is Windows Media (Figure 45).
9.5.5 Deleting Recordings
Figure 46: Deleting files from device memory.
To delete a recording, select it in the list and click the
icon located in the tool bar or click Delete in the
shortcut menu (Figure 44).
Confirm or cancel the deletion in the dialog (Figure 46).
Make sure the
recording is not in progress when deleting files. This may cause application
malfunctions.

Gnome-Nano II
38
9.5.6 Copying Files to PC
Copying files that are not protected with password can be performed with OS native tools.
In case files are protected with password, you can access the recordings only after entering password in
Voice Recorder Manager.
You can copy selected audio files or the entire folder with recordings.
Select a file or folder you want to export to PC via Voice Recorder Manager, open shortcut menu, and click
Copy (Figure 44). You can also select an object and drag it to another folder on your PC.
The .rng files are files recorded in the loop mode. In these files, the recording time does not always match the
recorded data time. To avoid this issue, convert your .rng file to .wav so that the recording time matches the
data time. To do so, while copying your files to PC, select Unroll from the shortcut menu (Figure 44).
9.5.7 Digital Signature
You can generate digital signature for an audio file while copying it to PC hard drive. To do so, open shortcut
menu of a file you want to create digital signature for and click Sign (Figure 44).
To create digital signature for .rng files, open shortcut menu, and click Unroll and sign (Figure 44).
In the Save as dialog (Figure 47), specify folder you want to save the digital signature file to. Digital signature
file has the same name is the recording except having the .dsg extension.
Figure 47: Saving a digital signature file.
9.6 Exiting the Application
To close the application, click Exit in the tool bar, click in the application title or press Alt+F4.
You must close the Voice Recorder Manager application before recording.

Operation Manual
39
KNOWN ISSUES AND TROUBLESHOOTING 10
While installing the driver or updating your firmware, some error messages may show up: "This driver cannot
be installed on your PC" or "The driver you are trying to install is not compatible with your Windows version".
Errors may occur if:
While installing the driver, you have selected a file with wrong bitness.
Previous driver versions that are not compatible with your Windows version were tried to be installed on your
PC.
If you face any of the mentioned errors, first of all make sure the driver you have installed is compatible with
your Windows version.
If the wrong driver has been installed, you need to reinstall the driver (make sure to select the one compatible
with your OS).
If the driver has been installed correctly but error messages still show up, delete the driver, reboot your PC,
and try to reinstall the driver.

Gnome-Nano II
40
OPERATING CONDITIONS 11
The recorder is designed to be used under the following operating conditions:
Environment temperature: minus 10 to plus 40 °C;
Relative humidity: up to 93% at plus 25° C.
The most fragile recorder part is the
microphone. Avoid storing and operating the device in
humid or dusty conditions. Keep the device away from liquids.

Operation Manual
41
TANSPORTATION AND STORAGE CONDITIONS 12
The recorder may be transported in original manufacturer package by automobiles, railway boxcars or cargo
vessels, according to shipping rules for respective type of transport.
Ambient temperature for storing the recorder in manufacturer package in an enclosed, heated and ventilated
industrial facility or other areas should range from 5 to 40° C. Relative humidity may not exceed 80 %.

Gnome-Nano II
42
MANUFACTURER WARRANTY 13
The recorder liability amounts to at least 10000 h.
The device service life amounts to at least 5 years (without regard to battery service life).
The device must be used strictly in accordance with operating, storage and transportation conditions
described above.
The Manufacturer guarantees product conformity with the specifications unless any of the operating, storage
and transportation conditions was violated.
The warranty period is 12 months from the date of delivery.
The Manufacturer shall perform product warranty maintenance with no extra cost for the Customer. Warranty
maintenance means product performance recovery in case of product failure that is not in any way related to
product misuse within the warranty period.
In case of any defects and/or inconsistencies discovered within the Warranty Period, please send a complaint
letter to: STC Ltd, PO Box 124, Saint Petersburg, 196084, Russian Federation.

Operation Manual
43
CERTIFICATE OF ACCEPTANCE 14
Gnome-Nano II Ultra-Small Digital Stereo Recorder STC-H713
No _________________________________________________________________,
has been manufactured and accepted in compliance with required standards and valid technical
documentation and classified as fit for use.
Head of Quality Control Dept.
Stamp Here ______________________ ______________________
Signature Print Full Name
______________________
Day, Month, Year
Shipping Date
_____________________ __________________ ___________________
Day, Month, Year Signature Print Full Name
Batch Number and Device Number Breakdown
004-110518

 Loading...