

Page 1

Pocket Stereo Digital Voice Recorder
Gnome-2M
c
User Guide
Speech Technology Center
Russia
Page 2

Page 3

Pocket Stereo Digital Voice Recorder
Gnome-2M
c
STC-H203M
User Manual
Copyright
Copyrightc 1999-2005 by Speech Technology Center Limited (STC Ltd.). All rights
reserved.
Disclaimer
Speech Technology Center accepts no liability whatsoever for any loss or injury incurred
by the owner or by any third party while using this product and its User Manual and
specifically disclaims anywarranties,merchantabilityor fitness for any particular purpose.
Contents of this User Manual are subject to change without notice.
3
Page 4

Dear Customer,
Thank you for purchasing this product! For optimum
performance and safety please read these instructions
carefully.
4
Page 5

Contents
1 Introduction 7
2 Delivery set 8
3 Specification 9
4 Overview 10
5 Protection 11
5.1 Protection from unauthorized access . . . . . . . . . . . . . . . . . . . . . . . . . . 11
5.2 Recorded data protection . . . . . . . . . . . . . . . . . . . . . . . . . . . . . . . . 11
6 Device operation 12
6.1 Control panel and commutation sockets . . . . . . . . . . . . . . . . . . . . . . . . 12
6.2 Keyboard . . . . . . . . . . . . . . . . . . . . . . . . . . . . . . . . . . . . . . . . 13
6.3 LCD panel . . . . . . . . . . . . . . . . . . . . . . . . . . . . . . . . . . . . . . . . 14
6.4 Microphones . . . . . . . . . . . . . . . . . . . . . . . . . . . . . . . . . . . . . . 16
6.5 PC connection cable . . . . . . . . . . . . . . . . . . . . . . . . . . . . . . . . . . 16
6.6 Connecting the headphones . . . . . . . . . . . . . . . . . . . . . . . . . . . . . . . 17
6.7 Power supply . . . . . . . . . . . . . . . . . . . . . . . . . . . . . . . . . . . . . . 17
6.7.1 Power supply elements. Setting up. Operating time . . . . . . . . . . . . . . 17
6.7.2 External power supply . . . . . . . . . . . . . . . . . . . . . . . . . . . . . 18
6.8 Memory cards . . . . . . . . . . . . . . . . . . . . . . . . . . . . . . . . . . . . . . 18
7 Gnome-2M
c
operation 20
7.1 Gnome-2M
c
operational states . . . . . . . . . . . . . . . . . . . . . . . . . . . . . 20
7.2 Preparing Gnome-2M
c
for recording . . . . . . . . . . . . . . . . . . . . . . . . . 21
7.2.1 Standard preparation order . . . . . . . . . . . . . . . . . . . . . . . . . . . 21
7.2.2 Switching Gnome-2M
c
on/off . . . . . . . . . . . . . . . . . . . . . . . . . 21
7.2.3 Setting up and controlling operating parameters . . . . . . . . . . . . . . . . 22
7.2.4 Sound recording time . . . . . . . . . . . . . . . . . . . . . . . . . . . . . . 23
7.2.5 Gain level control . . . . . . . . . . . . . . . . . . . . . . . . . . . . . . . . 24
7.2.6 Connecting microphones . . . . . . . . . . . . . . . . . . . . . . . . . . . . 24
7.2.7 Setting and changing PIN-Code and masking algorithm . . . . . . . . . . . . 24
7.3 Sound recording . . . . . . . . . . . . . . . . . . . . . . . . . . . . . . . . . . . . . 24
7.3.1 Sound recording hints . . . . . . . . . . . . . . . . . . . . . . . . . . . . . 24
7.3.2 Manually switching sound recording on/off . . . . . . . . . . . . . . . . . . 25
7.3.3 Voice activation mode . . . . . . . . . . . . . . . . . . . . . . . . . . . . . 25
7.3.4 Timers’ mode . . . . . . . . . . . . . . . . . . . . . . . . . . . . . . . . . . 26
5
Page 6

CONTENTS
7.3.5 Loop mode . . . . . . . . . . . . . . . . . . . . . . . . . . . . . . . . . . . 26
7.4 Playback of sound recordings . . . . . . . . . . . . . . . . . . . . . . . . . . . . . . 26
7.4.1 Playing sound recordings through Gnome-2M
c
. . . . . . . . . . . . . . . . 26
7.4.2 Controlling playback volume, noise suppression and playback speed . . . . . 27
7.5 Deleting recordings from CF memory cards . . . . . . . . . . . . . . . . . . . . . . 27
8 Gnome-2M
c
software 28
8.1 Gnome-2M
c
software kit and its functions . . . . . . . . . . . . . . . . . . . . . . . 28
8.2 Software installation and system requirements . . . . . . . . . . . . . . . . . . . . . 28
8.3 Sound Manager application . . . . . . . . . . . . . . . . . . . . . . . . . . . . . . . 29
8.3.1 Sound Manager Main Window . . . . . . . . . . . . . . . . . . . . . . . . . 29
8.3.2 Setting and changing PIN-Code and masking algorithm . . . . . . . . . . . . 30
8.3.3 Basic sound operations (unmasking, playing, copying, erasing) . . . . . . . . 30
8.4 Upgrading the software . . . . . . . . . . . . . . . . . . . . . . . . . . . . . . . . . 31
9 Transportation and service 32
9.1 Operating conditions . . . . . . . . . . . . . . . . . . . . . . . . . . . . . . . . . . 32
9.2 Transportation and storage . . . . . . . . . . . . . . . . . . . . . . . . . . . . . . . 32
10 Registration certificate 33
6
Page 7

Chapter 1
Introduction
The STC-H203 pocket stereo digital voice recorder (hereafter – Gnome-2M
c
) is a professional
sound recording unit. It is designed to be used for on-line (spontaneous, non-prepared) recording of
speech signals in poor acoustic conditions, indoors and outdoors, using built-in or external microphones.
Recorded sound is stored on removable Compact Flash I memory cards. Mono-recording mode
and data compression can be used to increase overall record duration. Recording may be started and
stopped manually or automatically, according to timers or gain level (Voice Activation Mode).
The device is controlled by a set of external switches, LCD panel and headphones. The built-in
clock automatically sets time and date of start and end of each recording session. All the data are
simultaneously protected. This feature ensures authenticity of recorded data and provides protection
from unauthorized access. Playback of recordings is possible either directly from the Voice Recorder
(an 8-digit PIN code is required) or by means of special software.
Slim design, solid 2mm thick metal case, no kinematic noise and electromagnetic radiation allow
voice recording to be concealed and greatly decrease the probability of recording detection and
suppression by special equipment.
Gnome-2M
c
may be optionally supplied with additional STC’s hard- and software according to
the user’s requirements. Check www.speechpro.com for detailed information.
7
Page 8
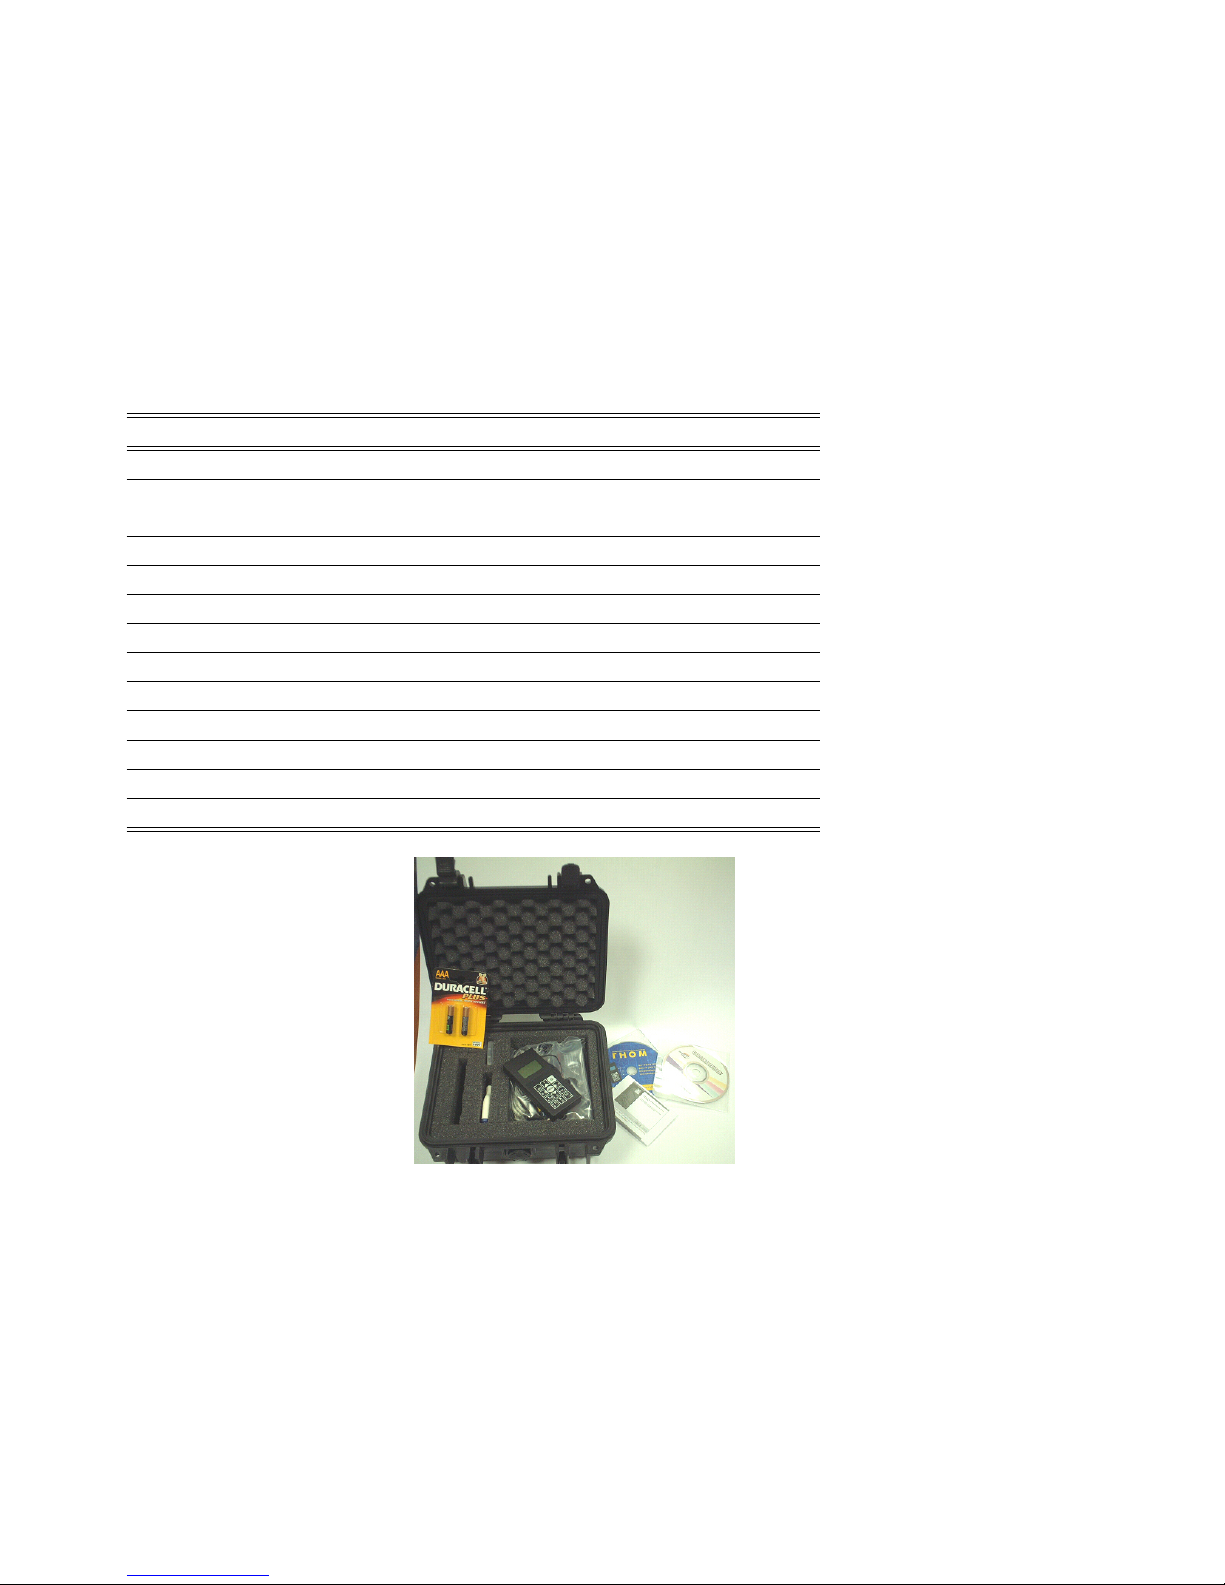
Chapter 2
Delivery set
Nomenclature Device Name Note
Digital Voice Recorder STC-H203 Gnome-2M
c
Memory card Compact Flash I 512 Mb (up to
2GB by request)
220V/50Hz power supply adapter —
LR03 AAA battery — 2 pcs.
Telephone adapter —
External microphones set —
PC-connection cable —
Headphones —
Headphones adapter —
“Sound Manager” software on CD —
User Manual —
Carrying case —
Figure 2.1: Gnome delivery set
8
Page 9

Chapter 3
Specification
Sampling rates 6, 8, 10, 16, 32, 48 kHz
Record format PCM 16 bit
Compression type µ-law, A-law
THD (in direct channel at 1 kHz) not worse than 0.04%
SNR (in direct channel at 1 kHz) not worse than 72 dB
Dynamic range (with respect to Gain Control) 90 dB
Type Electret
Microphone Sensitivity – 55 dB
Noise floor 25 dB
Detachable memory cards type Compact Flash I (CF), FAT16/32
Autonomous 2×LR03 (1.5V AAA alkaline)
Power supply External 3V (+ at central conductor of the
socket)
Power consumption (in
record mode)
not more than 0.4 W
Maximum recording duration (without power supply change) about 14±0.5 hours (using Duracell
Plus or Ultra alcaline batteries)
Size 115×55×15 mm
Weight 130g
9
Page 10

Chapter 4
Overview
Gnome-2M
c
provides a lot of capabilities for easy and comfortable speech recording:
• The data are recorded by built-in or external microphones to removable Compact Flash I memory cards.
• The recording may be started and stopped either manually or automatically at a specified time.
It is possible to schedule recording sessions using up to 5 timers simultaneously. Once the
timer’s priority mode option has been enabled, the recording cannot be stopped manually.
• Switching compression on/off.
• Sampling rate can be changed to better suit the recording conditions.
• Voice Activation mode (VA ) allows the recording to start only if the gain level is higher than
a certain threshold value (Start Threshold ).
• Recording in loop mode (Loop) allows continuous recording into limited disk space. Once the
limit of the disk space has been reached, previously recorded data will be erased and replaced
with new data.
• Noise-cancellation features are now availableduring recording playback (for sound recordings
made at a sampling rate of 8, 10 and 16 kHz). Gnome-2M
c
includes broadband and composite
(i.e. broadband & inverse) filters. Suppression depth for both filters is adjustable within the
0-30 dB range with a 6 dB step.
• Playback speed control. This mode allows acceleration and deceleration of playback tempo
up to 2,5 times. Available for sound data recorded at 8, 10 and 16 kHz.
• LCD may be automatically switched off during recording. This mode perfectly protects the
recording from possible detection.
• List of all the existing recordings can always be viewed.
• Loop playback of any selected recording or its fragment is available.
• Gnome-2M
c
can be used as a standard Sound Blaster. This allows playback of sound files
from a PC connected to the voice-recorder.
• Quick search for voice signal in long sound recordings.
• PIN-code and protect key changing possibility.
10
Page 11

Chapter 5
Protection
5.1 Protection from unauthorized access
To protect Gnome-2M
c
from unauthorized access an 8-digit PIN-code is used. It blocks access to
basic recorder functions (playback and deletion of recorded data, modification of operating parameters). A PIN-code is to be set via the Sound Manager software (Section 8). The manufacturer sets
no PIN-code by default.
5.2 Recorded data protection
To avoid unauthorized access and recorded data forgery, time and date of recording start/end are
set automatically. Moreover, Gnome-2M
c
’s operating parameters are registered for every recording
session. This makes it impossible to interfere with the recorded data using Gnome-2M
c
. Acoustic
signals recorded at 6, 8 or 10 kHz can be masked to prevent recorded data from playing on any other
playback device (including those similar to Gnome-2M
c
). The masking key can be easily set by the
user via Sound Manager (see Section 8).
11
Page 12
Chapter 6
Device operation
6.1 Control panel and commutation sockets
Gnome-2M
c
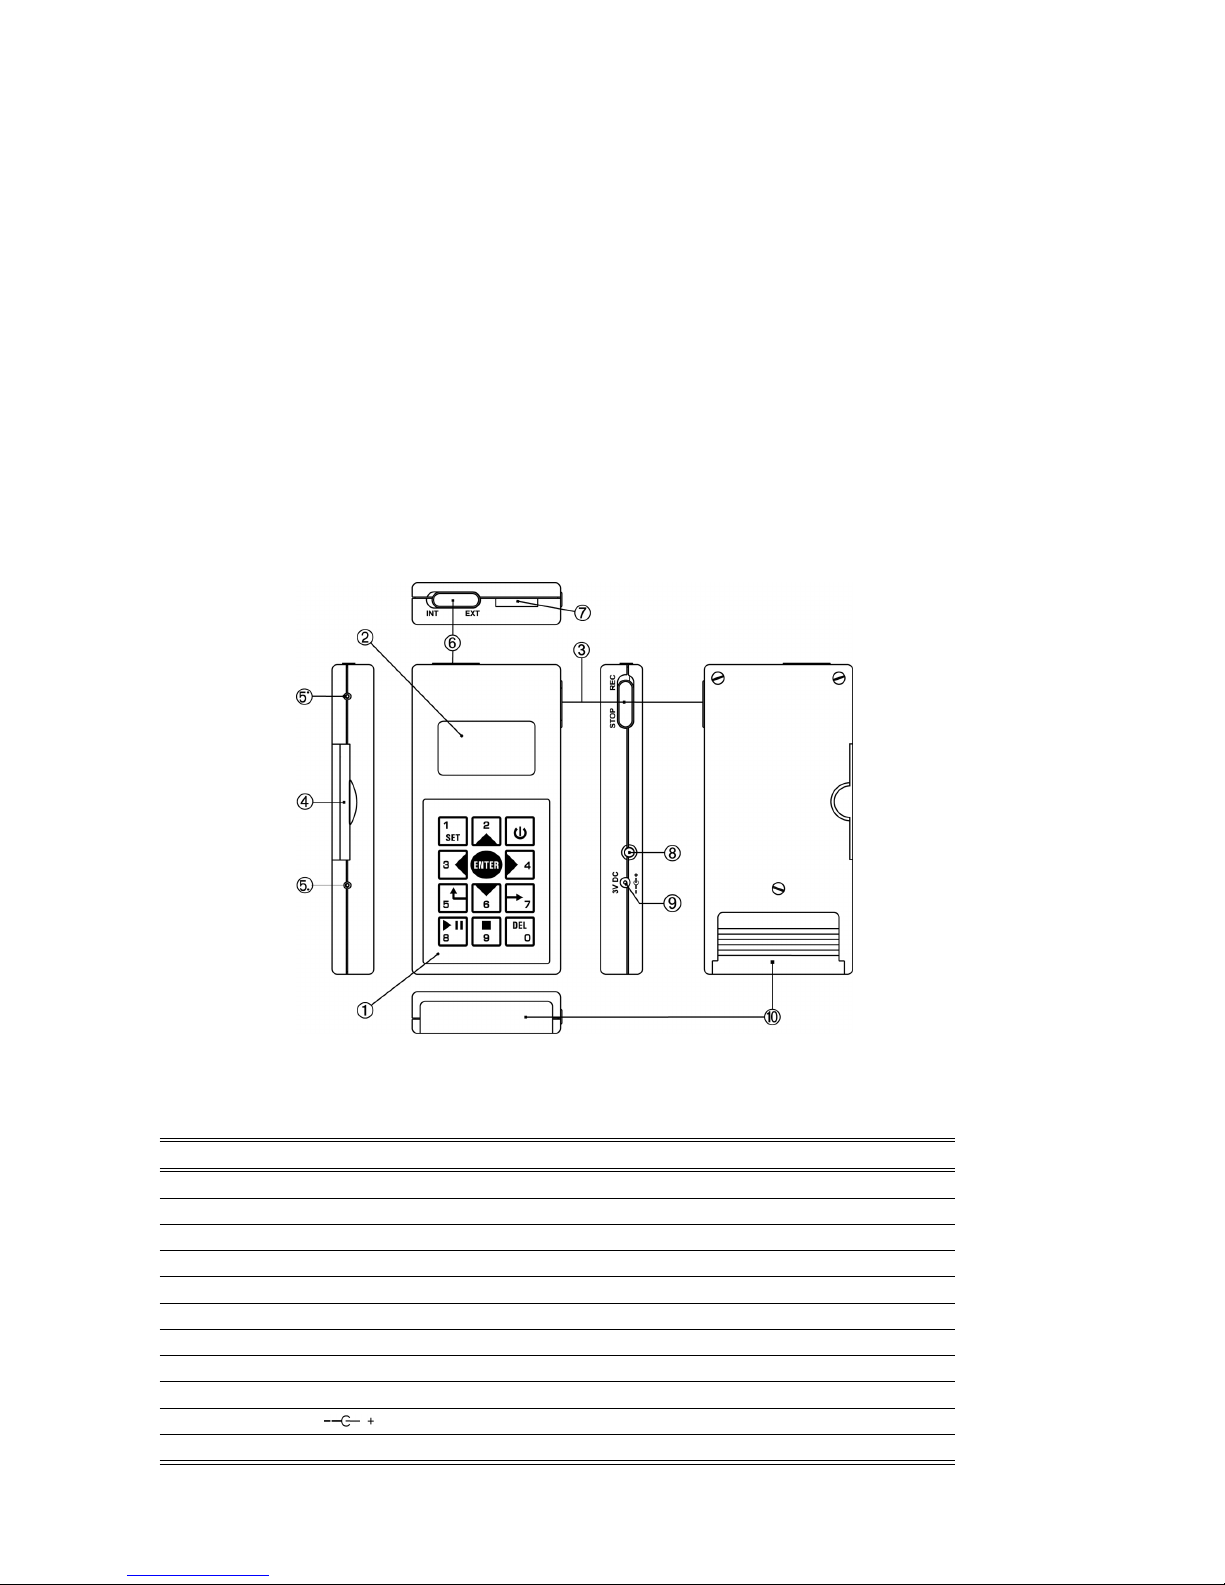
size is 115×55×15 mm. Its control panel and commutation sockets are shown in Fig.
6.1.
Figure 6.1: Voice recorder connectors and controls
Pos. Marking on the box Description
1 Keyboard
2 Built-in LCD
3 Rec/Stop Recording On/Off switch
4 Memory card Compact Flash I socket with ejector
5
•
Microphone left channel jack
5
•
Microphone right channel jack
6 Int/Ext Internal/external microphone switch
7 Connector for external devices (microphones, headphones, PC)
8 Instant erasure button
9 DC 3V Power supply connection jack
10 Power supply module cover plate
12
Page 13
6.2. KEYBOARD
6.2 Keyboard
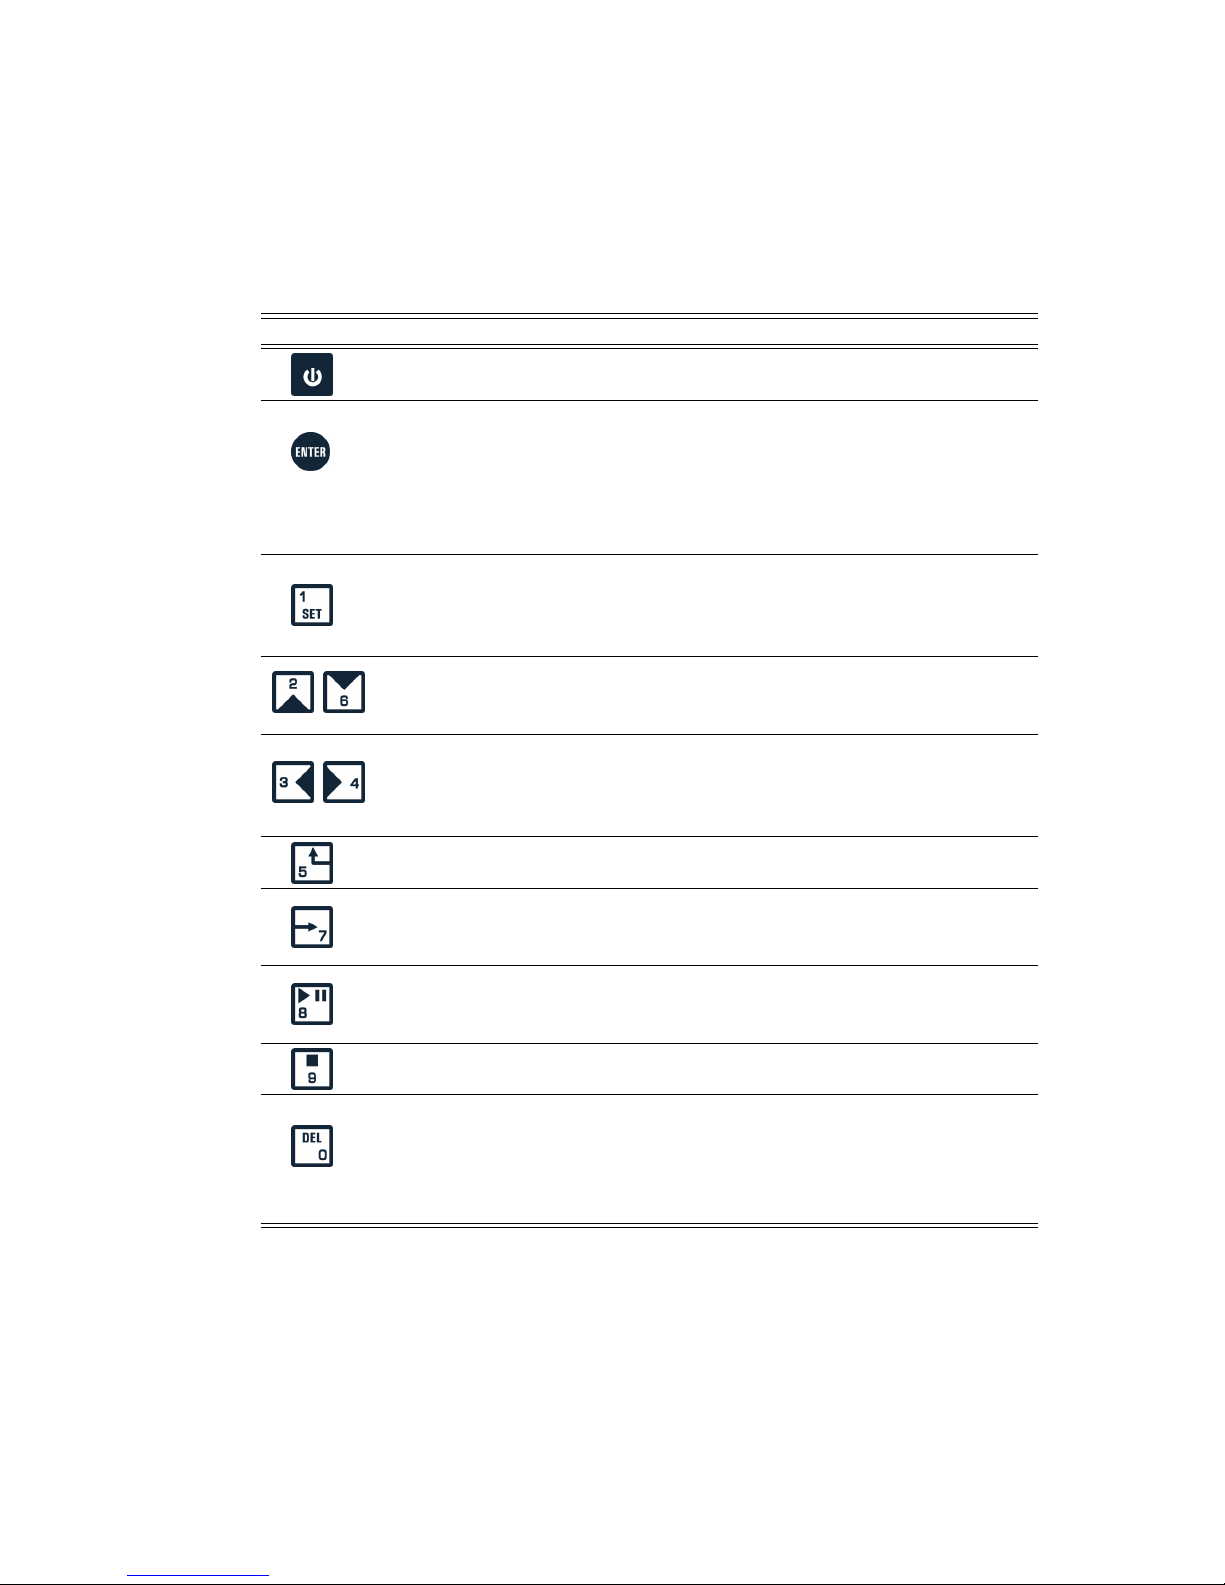
The film coated tactile keyboard is durable and resistant to abrasion and other external influence.
Every key has several different functions listed in Table 6.1.
Table 6.1: Keyboard functions
Key Function
- Switch Gnome-2M
c
on/off
- Selected highlighted menu item
- Save or enter parameter value (PIN-code, record preferences)
- Select playback parameter to be adjusted (Volume — playback volume control; B.B.Filter — broadband and harmonic filter; Composit — composite filter, Stretcher — playback speed control)
- Turn on direct channel mode for 10 seconds
- Input “1”
- Switch to setting parameters and save entered parameter value
- Set left/right loop border during playback
- Set Voice Activation threshold
- Input “2” and “6”
- Screen cursor control
- Increase/decrease selected parameter value
- Input “3” and “4”
- Screen cursor control
- Rewind to the recording start/end
- Automatically search for speech fragment (double-click)
- Input “5”
- Switch to the higher level screen menu (dialog window)
- Input “7”
- Confirm playback of the selected recording
- Play next recording
- Input “8”
- Switch to playback mode
- Playback control: play/pause
- Input “9”
- Stop playback and rewind to recording or selected playback fragment start
- Input “0”
- Delete selected playback fragment borders
- Delete selected recording
- Turn Voice Activation off
13
Page 14
CHAPTER 6. DEVICE OPERATION
6.3 LCD panel
Gnome-2M
c
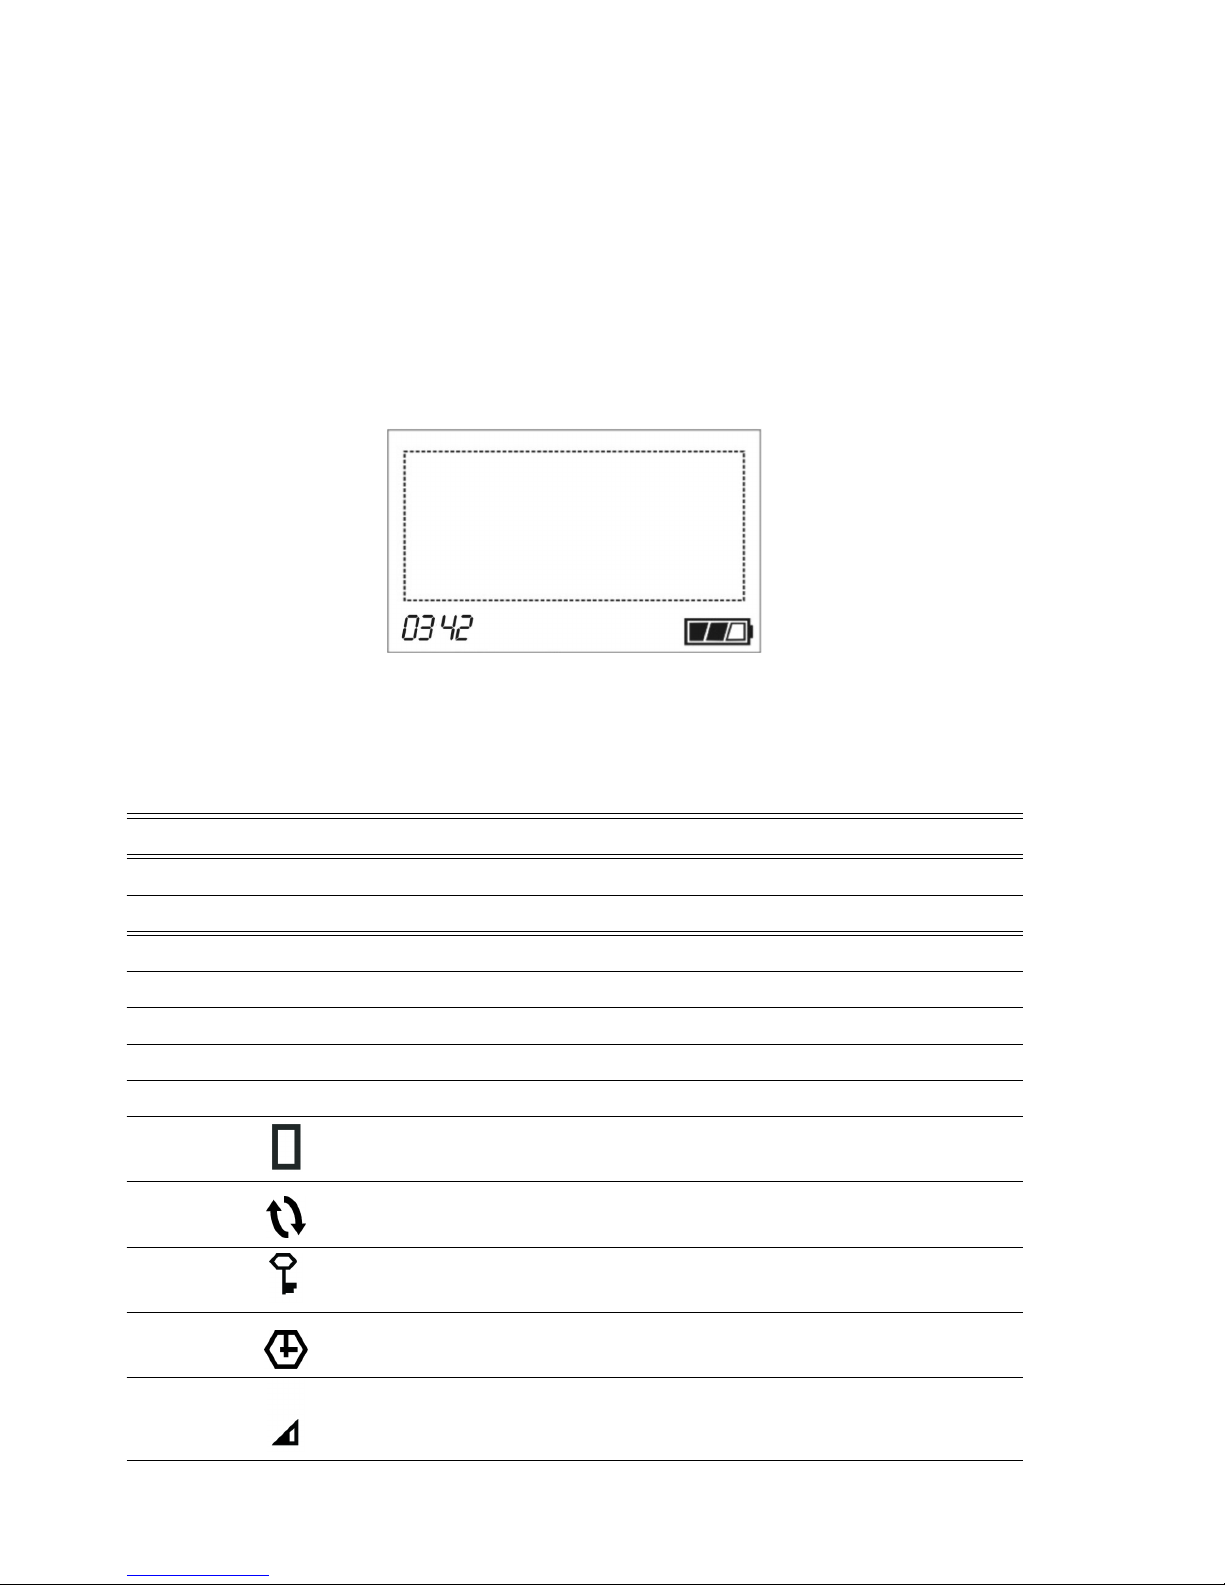
LCD panel is shown in Fig. 6.1. It consists of an operating area (97×32 dots) and
a string of digits and mnemonic symbols located at the bottom of the screen. By default, the screen
operating area (it is marked by a dotted line in Fig. 6.2) is used to display current voice recorder
parameters. Digits and mnemonic symbols show the number of the recordings at the memory card
and current batteries’ state of charge.
Figure 6.2: LCD panel
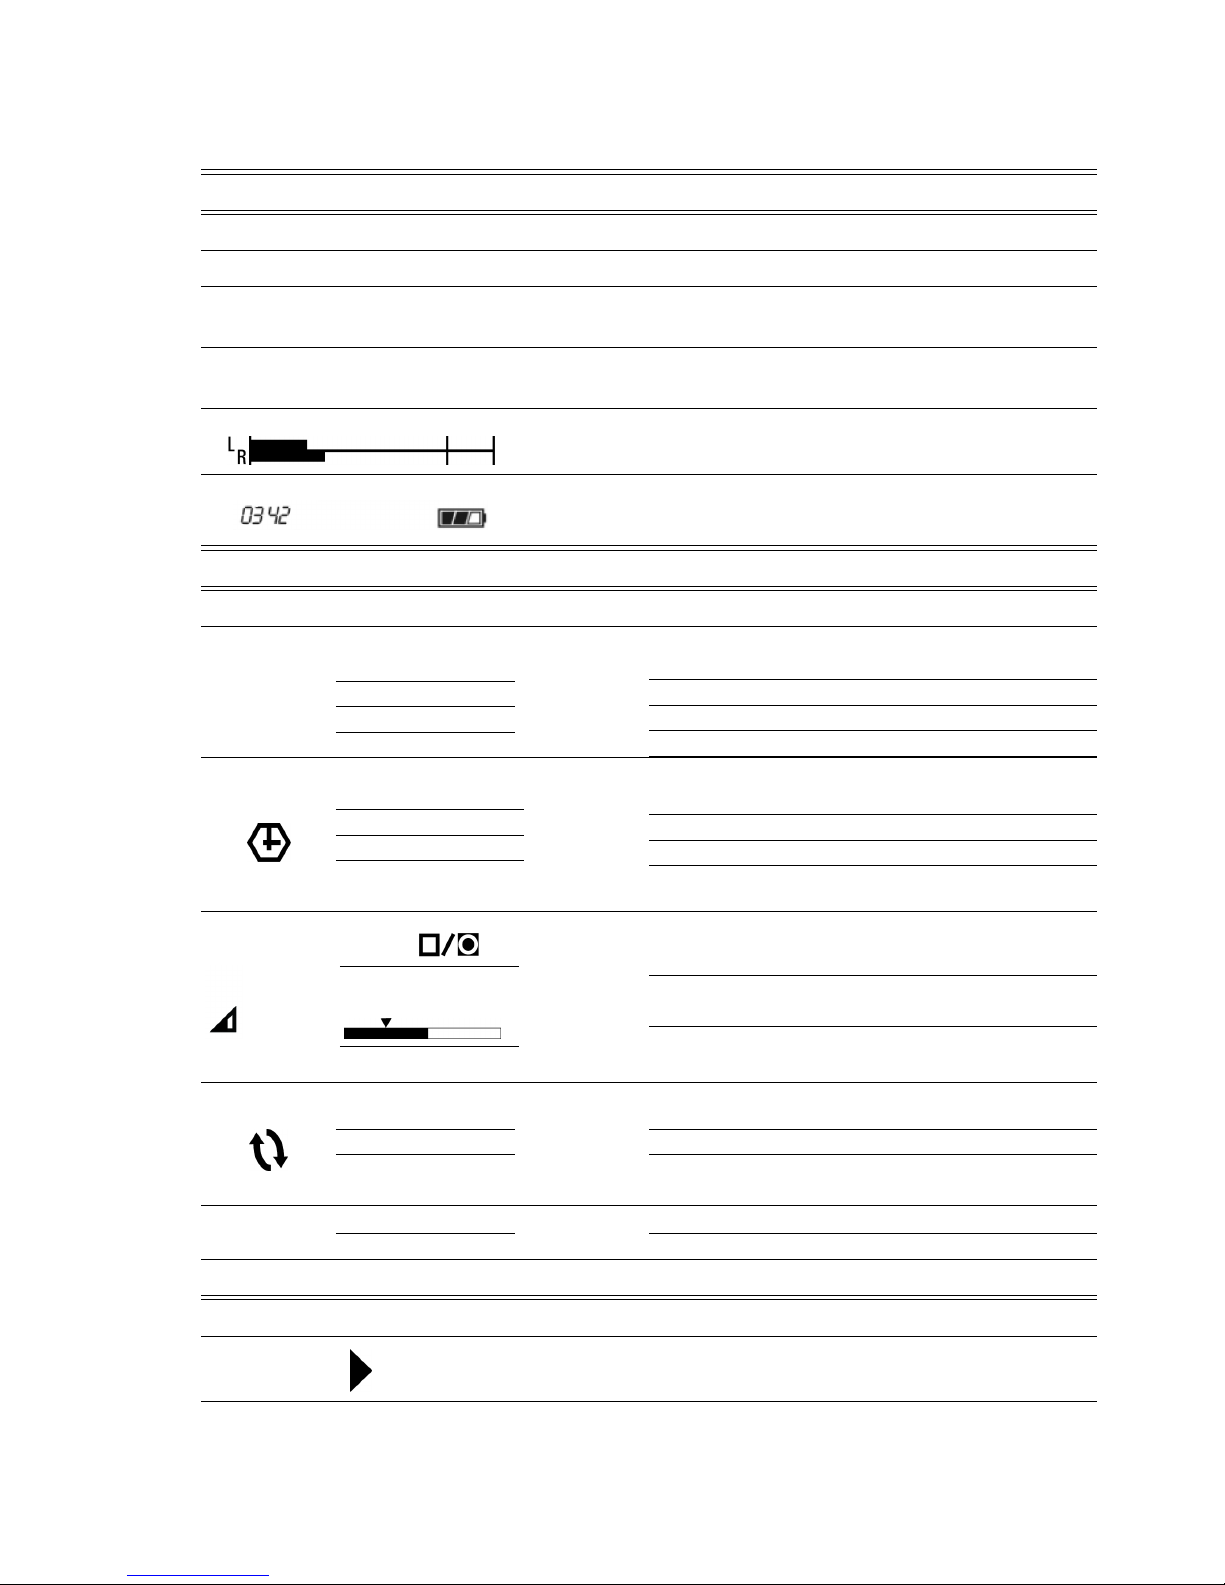
LCD symbols and messages are listed and explained in Table 6.2.
Table 6.2: Graphic symbols
Graphic Symbol
Function
User Identification
ENTER PIN
PIN-code query
LCD Operating Area
REC
Sound record is on
USB connected
Voice recorder is connected to the PC
–34.. .+12 dB
Current input gain level
25May 13:24:17
Current date and time
Automatically switch LCD panel off during record
Loop mode is active
Protect key is active
Record by timers mode is active
Voice activation mode is active
14
Page 15
6.3. LCD PANEL
Table 6.2: continued
Graphic Symbol
Function
Insert a card
No CF card inserted
Bad format
Memory card is damaged or its format is wrong
00:00:00
Maximum recording time (hh:mm) for current voice recorder settings
and memory card free space
H/L6.. .48
High or Low audio record quality and signal sampling rate (06... 48
kHz)
Bar indicator of the signal level in the left and right channels
Number of the recordings at the memory card and power supply current
charge level
Parameter Settings
DATE & TIME
Set current date and time
RECORD
PCM/A-law/µ-law
Mono/Stereo
06.. .48 kHz
Auto/Manual
Record
Settings
Record format: PCM (uncompressed) / A-law compression / µ-law compression
Record Mode: Stereo/Mono
Sampling Rate
Input gain control: Auto/Manual
TIMERS
TIMER #1.. . 5
ON/OFF
St. 01 JAN 00:00
Duration 00:00
Prio.
ON/OFF
Timer Mode
Settings
Timer number and status
Date and time of record session start
Record session duration (hh:mm)
Timers’ priority over user’s commands
VA Level Activate
Time
Voice
Activation
Mode Settings
Voice activation mode (switched on/off)
VA start/stop threshold. Threshold value is schematically shown on the gain level bar indicator
Time during which a recording still goes on after the
signal level gets lower than the threshold value
LOOP
On/Off
Loop mode
Settings
Loop mode on/off
Size 00:00 Loop length (hh:mm)
Left 00:00:00 Maximum possible recording time (with current record
parameters)
DISPLAY
Off in rec On/Off LCD panel
Settings
LCD is automatically turned off during record
Light On/Off LCD light on/off
RESET TO DEF
Reset to default settings
Playback
Play
15
Page 16
CHAPTER 6. DEVICE OPERATION
Table 6.2: continued
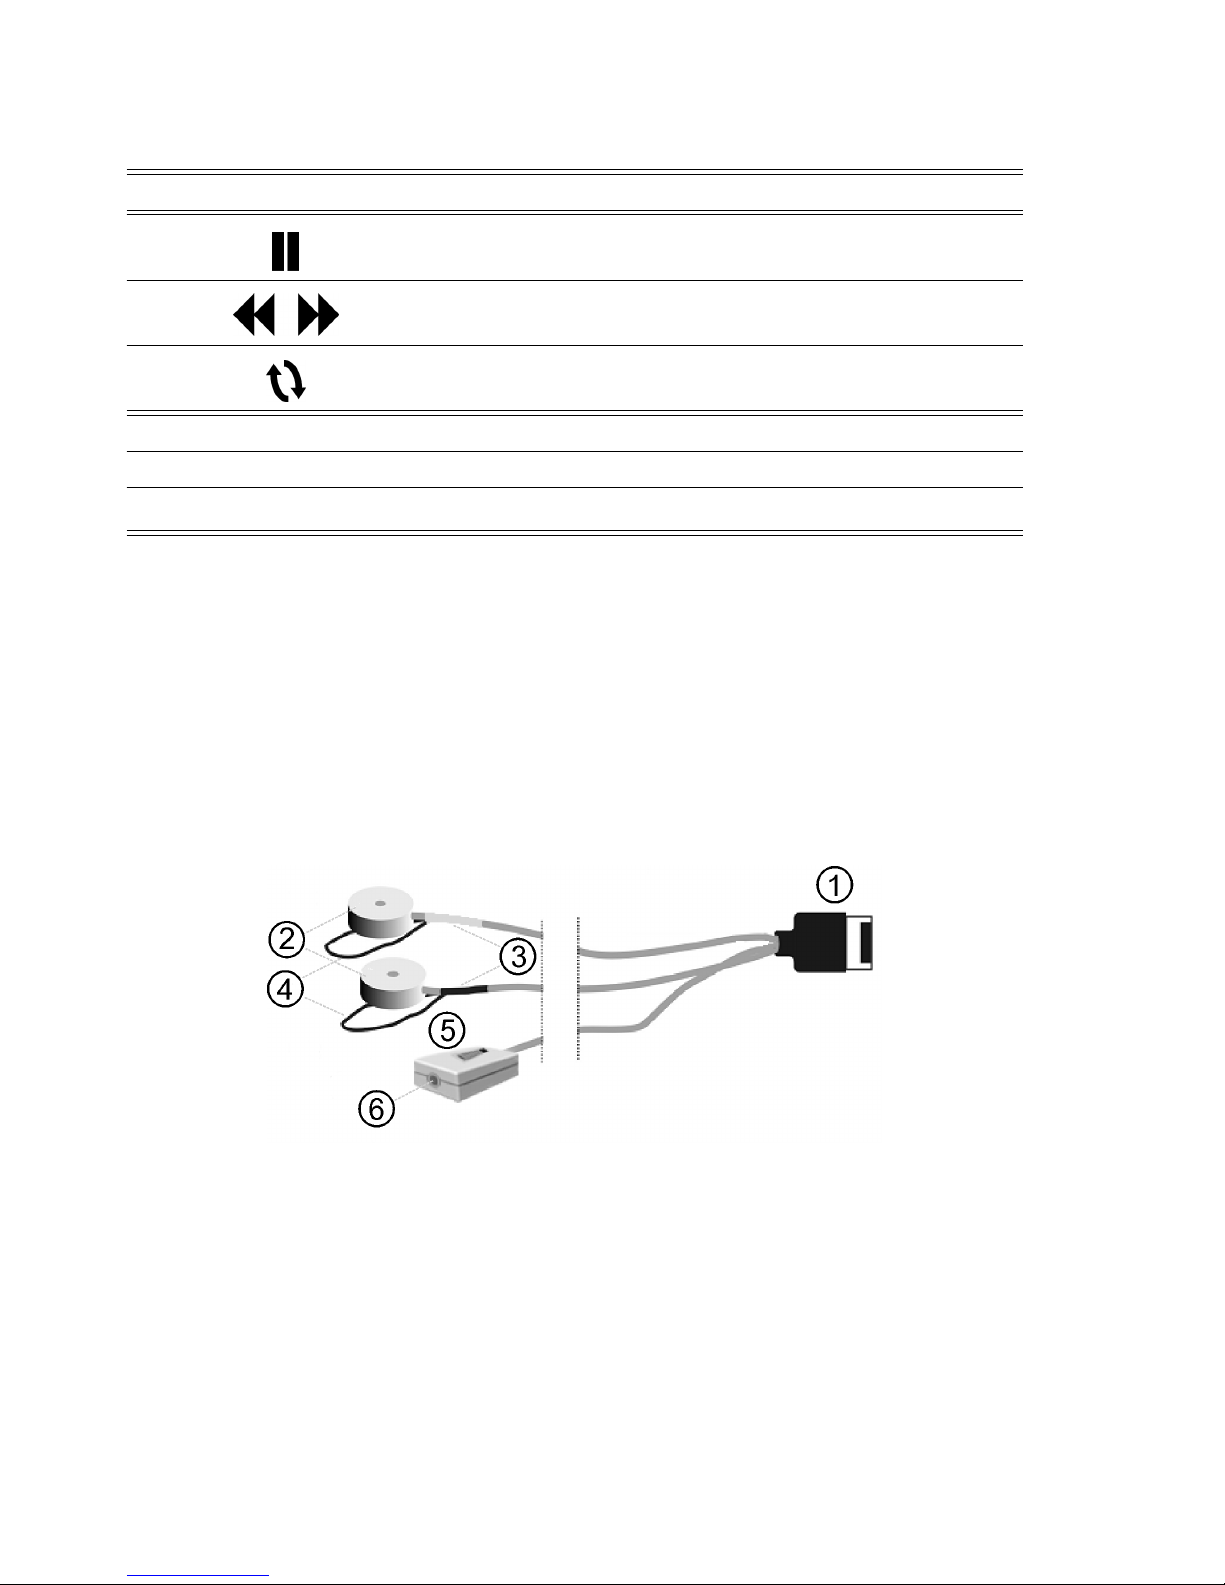
Graphic Symbol
Function
Pause
Rewind/Forward
Play selected fragment in loop
Deleting records
DELETE RECORD YES/NO
Confirm current record deletion
DELETE ALL RECORDS
YES/NO
Confirm all records deletion
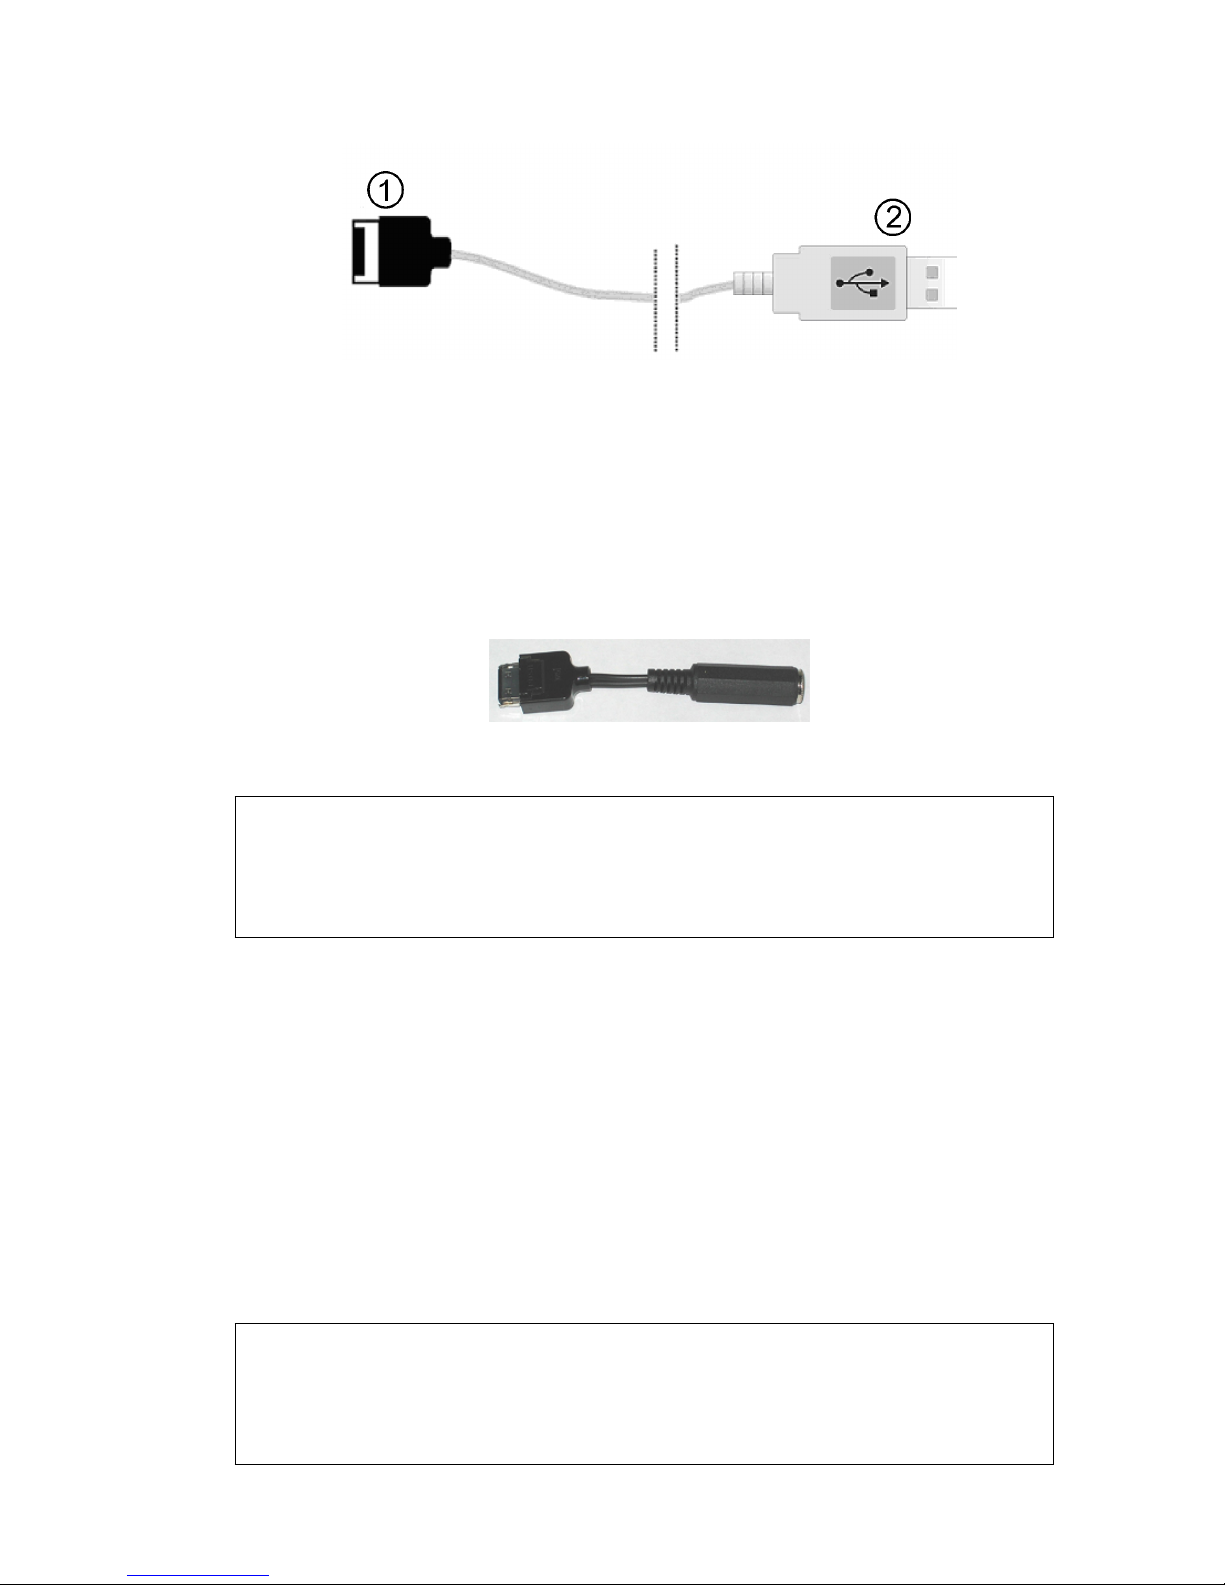
6.4 Microphones
External microphones’ set (see Fig. 6.3) includes two microphones (2), a voice recorder re-
mote control unit (5) with a headphones connection jack (6) and is plugged in Gnome-2M
c
with a
multiple-contact plug (1). The left and right microphone cables are marked (3). The right channel
microphone wire has a darker marking. Each microphone is also supplied with a wire tab (4) for
fastening it to buttons, hooks etc.
Figure 6.3: Microphones set
To start recording from external microphones place the switch (Fig. 6.1, 6) to ”EXT”.
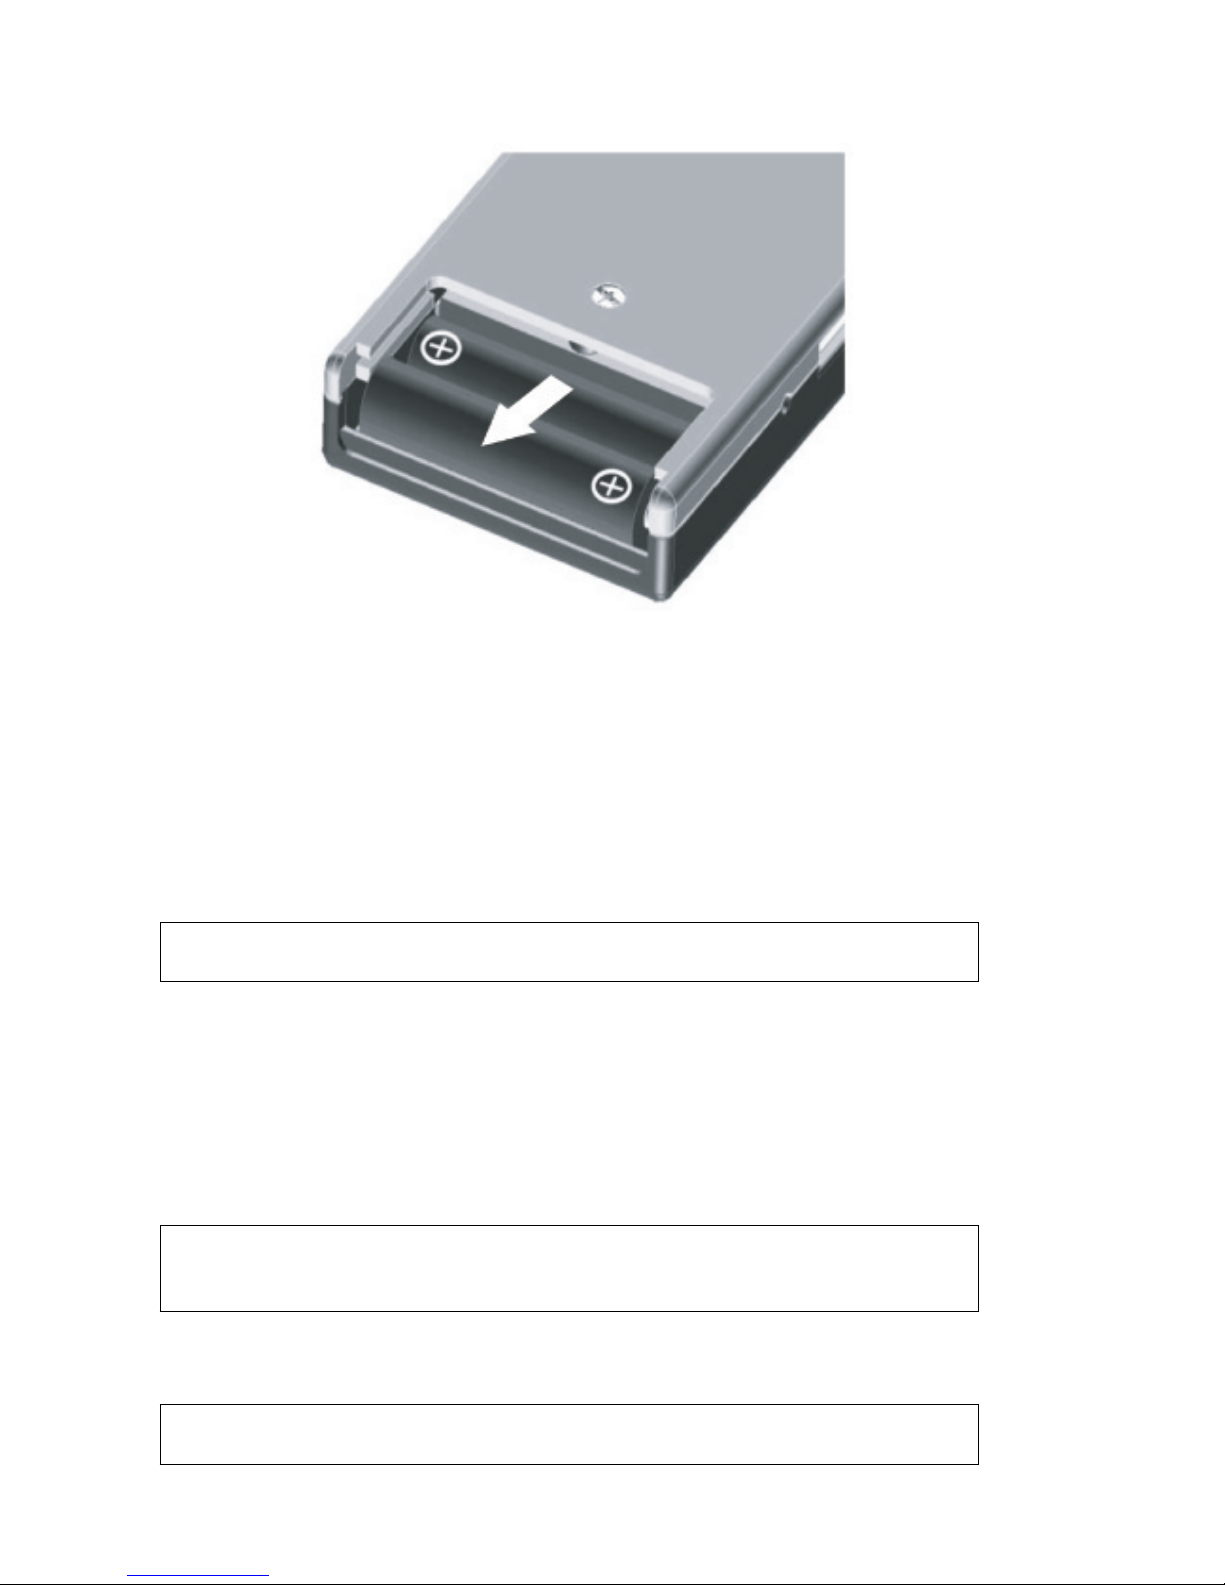
6.5 PC connection cable
Gnome-2M
c
connects to a PC by a special cable shown in Fig. 6.4.
The cable has a multiple-contact plug (1) for connection to the voice recorder (Fig. 6.1, 7) and a
standard USB-connector(2) for connecting Gnome-2M
c
to a PC.
16
Page 17
6.6. CONNECTING THE HEADPHONES
Figure 6.4: PC connection cable
6.6 Connecting the headphones
Headphones can be connected to the voice recorder either using the headphone jack provided on
the remote control unit (Fig. 6.3, 6) or with a headphones adaptor included in the delivery set ( Fig.
6.5) and connectable directly to the voice recorder (Fig. 6.1, 7).
Figure 6.5: Headphones adaptor
Attention!
When connecting external microphones or a PC connection cable to the voice recorder,
make sure that the inscription on the plug is directed opposite to the panel containing the
status indicator LED and the erase button. When disconnecting a cable from the voice
recorder, first press the PUSH button at the plug and then pull out the plug.
6.7 Power supply
6.7.1 Power supply elements. Setting up. Operating time
The voice recorder power supply consists of two alkaline LR03 batteries (AAA type). Each
battery has 1.5 V voltage.
It is not recommended to use accumulators, saline batteries or unknown manufacturer’s batteries.
To change batteries, switch off the recorder and remove the power supply module cover plate, as
shown in Fig. 6.6). Then remove old batteries and insert new ones.
Batteries lifetime is indicated on the LCD panel of the voice recorder. If you use external power
supply, recording length is limited only by the Flash Card capacity.
Important!
- Don’t use old or damaged batteries.
- Don’t mix old batteries with new ones.
- Don’t use different types of batteries.
- Don’t try to recharge old batteries.
17
Page 18
CHAPTER 6. DEVICE OPERATION
Figure 6.6: Power supply module with batteries
6.7.2 External power supply
The power supply adapter is usually used in steady-state conditions, e.g. during joint operation of
the voice recorder and PC or for playing sound recordings. Power supply is plugged in the respective
voice recorder connection jack (Fig. 6.1).
Important! Don’t plug in the power supply if the device is in the recording mode. It can
cause the voice recorder to turn off and the recording will be interrupted.
6.8 Memory cards
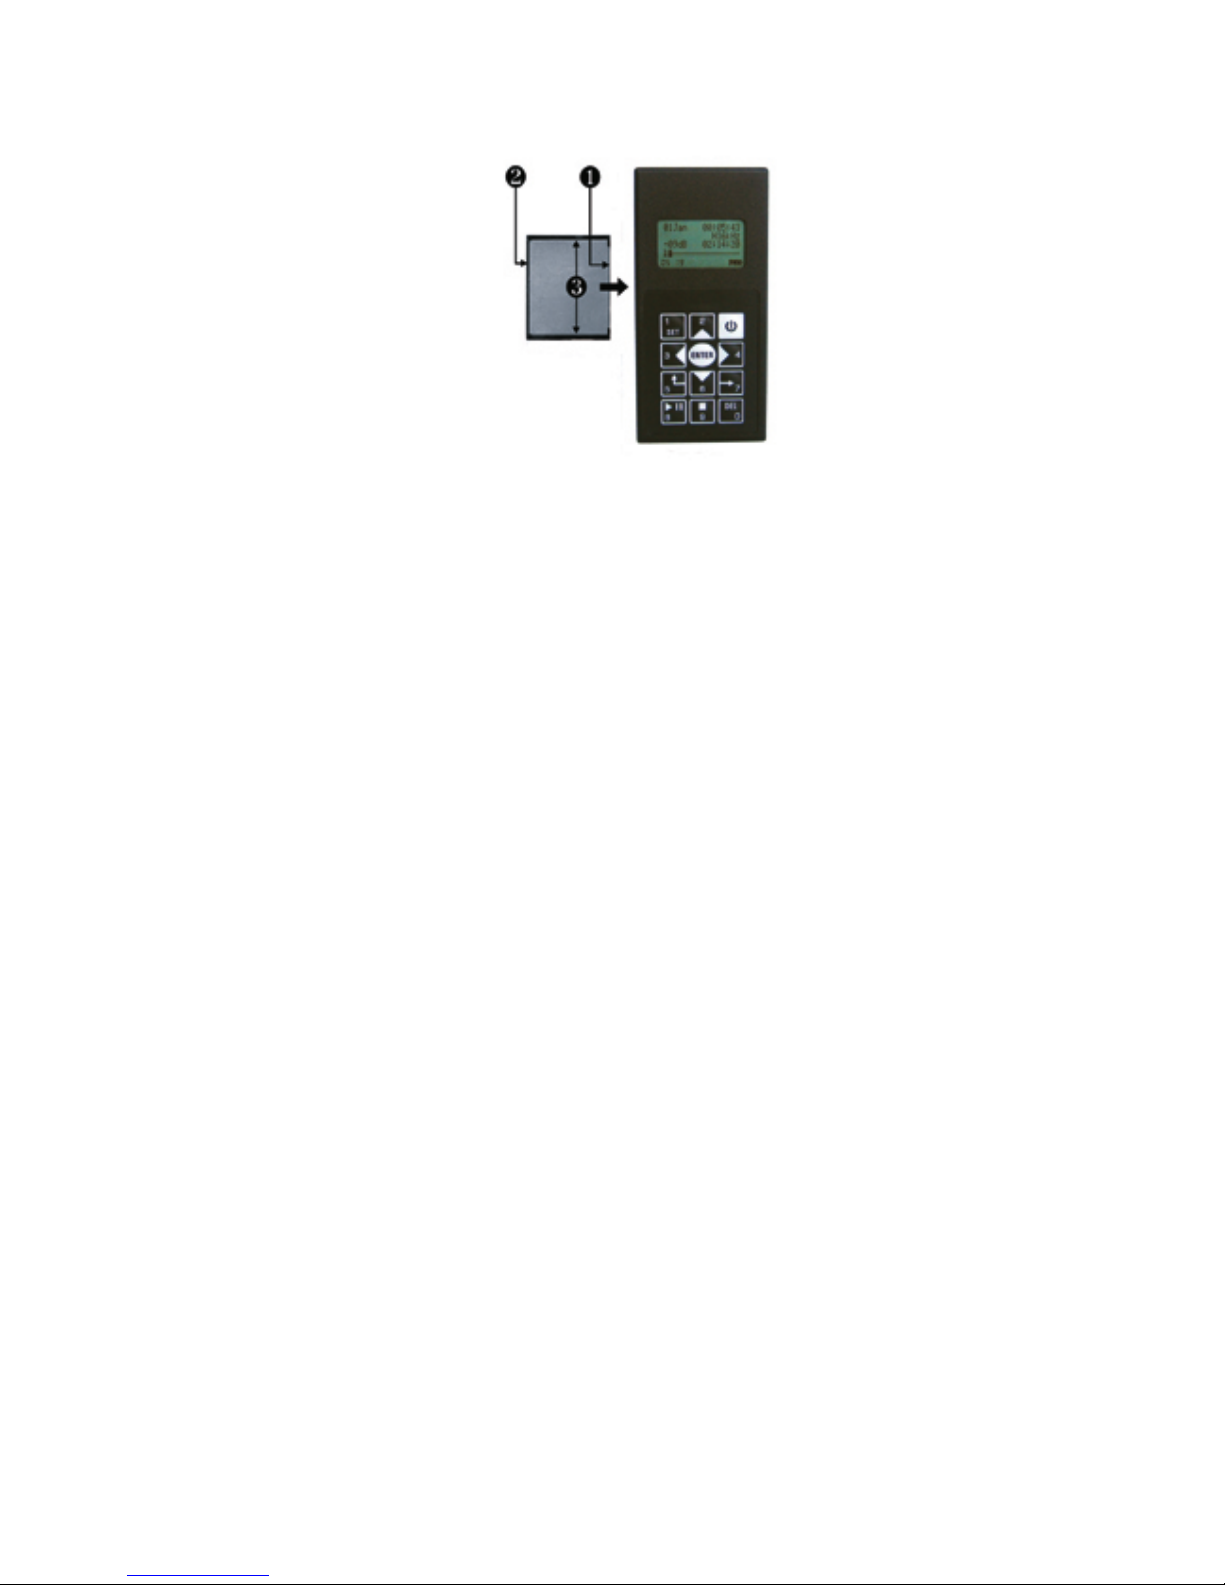
Detachable permanent memory cards Compact Flash I are used for data storage. To set the card,
position the voice recorder and memory card as shown in Fig. 6.7. Then pull the ejector (Fig. 6.1,
p. 4) out till it stops. Place the CF so that its ledge (Fig. 6.7, p. 2) and guide slits (Fig. 6.7, p. 3) are
turned upwards and insert it into the recorder as shown in Fig. 6.7.
Important!
You should never force the CF into its place under any circumstances. If the card does not
seem to fit, ensure that it is properly placed.
To remove the CF, pull the ejector (Fig. 6.1, p. 4) and manually remove the card. Then push the
ejector back to its initial position.
Attention! Don’t try to remove the ejector from the voice recorder or pull it out more than
4 mm, as it may cause recorder’s failure.
18
Page 19
6.8. MEMORY CARDS
Figure 6.7: Setting CF memory card
To safely remove the memory card from your PC or from the voice recorder when it is PC-connected
use the ”Safely Remove Hardware” function accessible after right-clicking on the respective sign in
the system tray (at the bottom right of the screen). Another way to access the device is via ”My
Computer – Removable Disk”: right-click on the device image and select ”Eject”.
19
Page 20
Chapter 7
Gnome-2M
c
operation
7.1 Gnome-2M
c
operational states
Gnome-2M
c
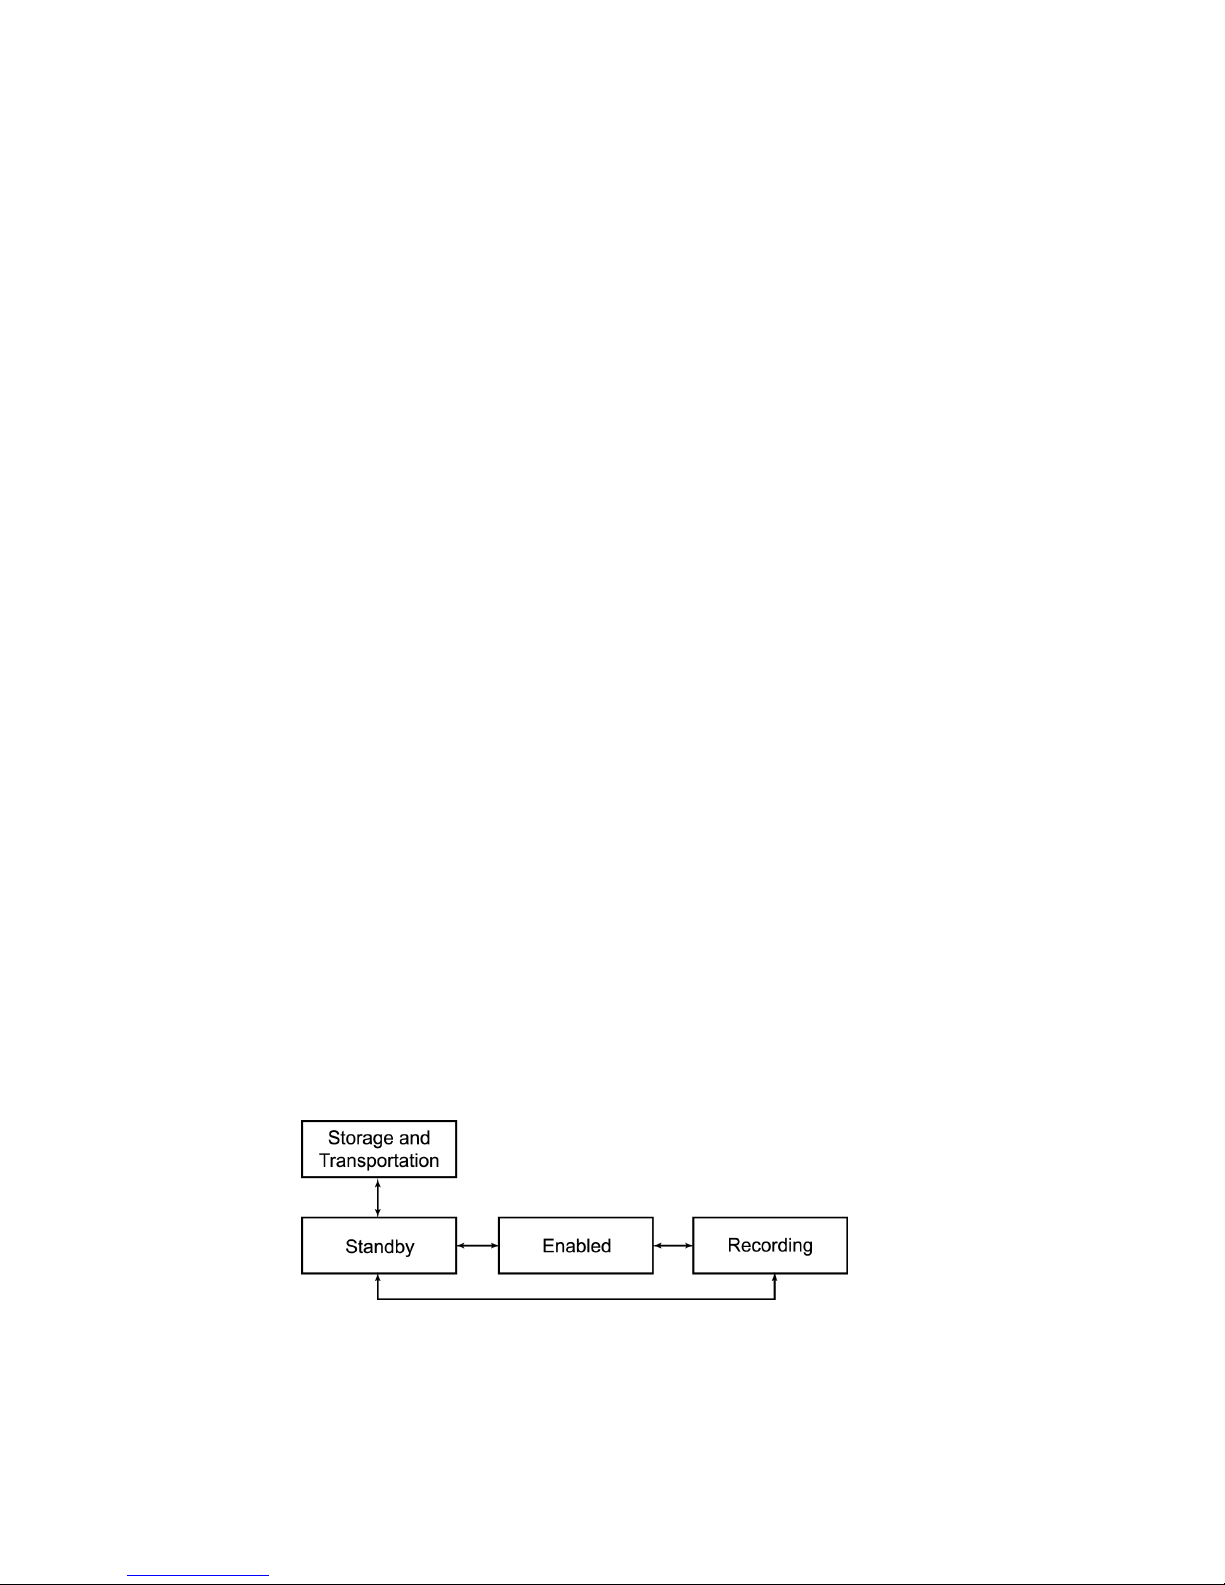
has four operational states:
• storage and transportation
• standby
• enabled
• recording
We recommend that you store and transport the voice recorder in a standard package, without power
supply batteries and memory card CF.
Gnome-2M
c
is in a standby state when the power supply and the memory card are installed.
Gnome-2M
c
is switched from one state to the other according to the following scheme:
When the voice recorder is enabled, it is possible to playback recordings, set the operating parameters and connect to a PC to change the PIN-code or the protect key. Recording start/stop is
possible practically in any state. Set ”REC/STOP” switch (Fig. 6.1) to the appropriate position.
Details of the Voice recorder operations are considered below.
20
Page 21
7.2. PREPARING GNOME-2M
c
FOR RECORDING
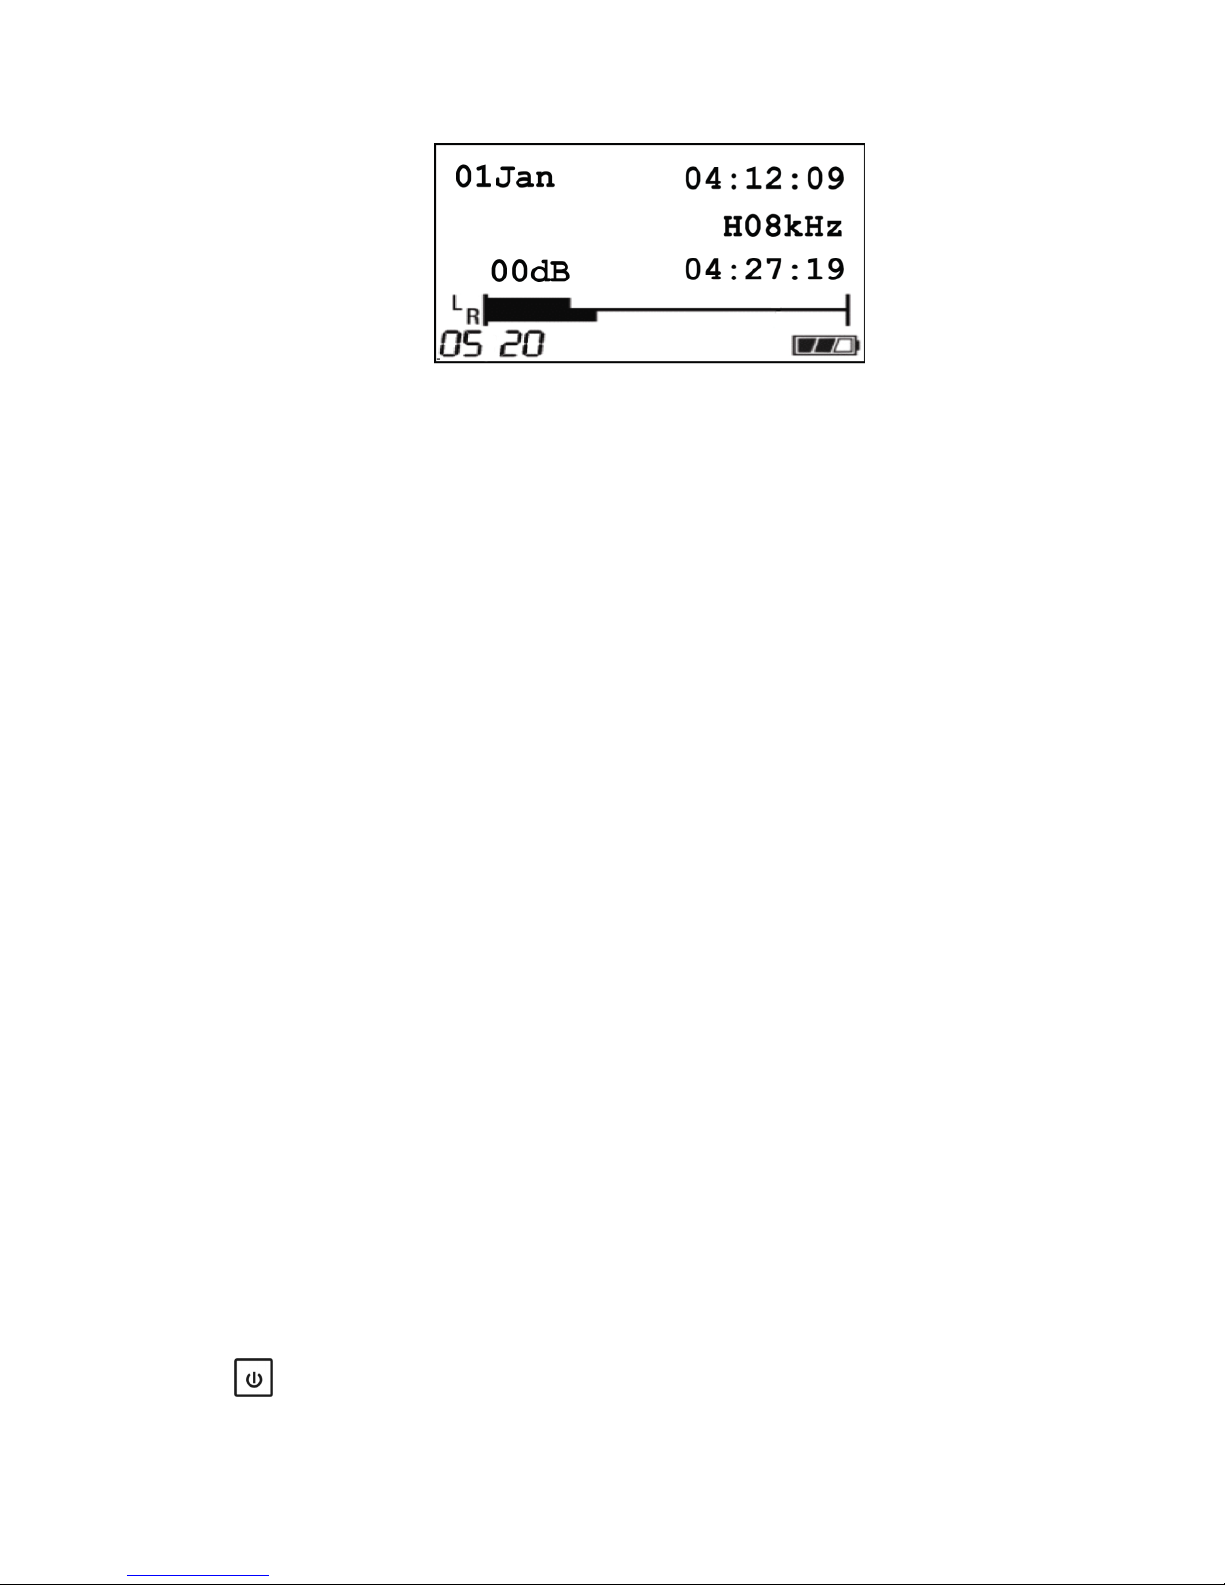
Figure 7.1: LCD panel (operating area) when Gnome-2M
c
is switched on for the first time
7.2 Preparing Gnome-2M
c
for recording
Quick preparation
Install the power supply batteries (or plug in the network adapter) and the memory card for quick
recording. The voice recorder is ready to operate with the default settings (stereo recording at 16 kHz
sampling rate without signal compression and masking; auto gain level control is enabled; PIN-code,
date and time are not set).
7.2.1 Standard preparation order
Prepare the voice recorder as follows:
1. Install the power supply (Section 6) or plug in the adapter (Section 6)
2. Insert the memory card
3. Switch on the voice recorder and set current date and time
4. Select operating parameters with respect to sound recording conditions
5. Set new access code (PIN-code) and masking algorithm (if necessary)
6. Connect microphones and headphones (if necessary)
7.2.2 Switching Gnome-2M
c
on/off
To switch Gnome-2M
c
on, install the power supply batteries, memory card, and press and hold
the key for 1,5 seconds.
After the recorder is switched on, its operating parameters should appear on the LCD screen.
This may take up to three seconds.
21
Page 22
CHAPTER 7. GNOME-2M
c
OPERATION
If a PIN-code was set (Section 8), you will be requested to enter it as you switch Gnome-2M
c
on. The LCD panel after the first Gnome-2M
c
activation is shown in Fig. 7.1.
Functions of the graphic symbols and terms are listed in Table 6.2. If the inappropriate memory
card format message ”BAD FORMAT” appears on the screen after switching ”On”, then it is necessary to format the memory card. To do it, install the memory card into the voice recorder or the
special card reader device, connect it to the PC and use OS Windows tools for formatting.
The voice recorder is switched off by pressing and holding (approximately 2 secs) the key
till the LCD panel switches off.
7.2.3 Setting up and controlling operating parameters
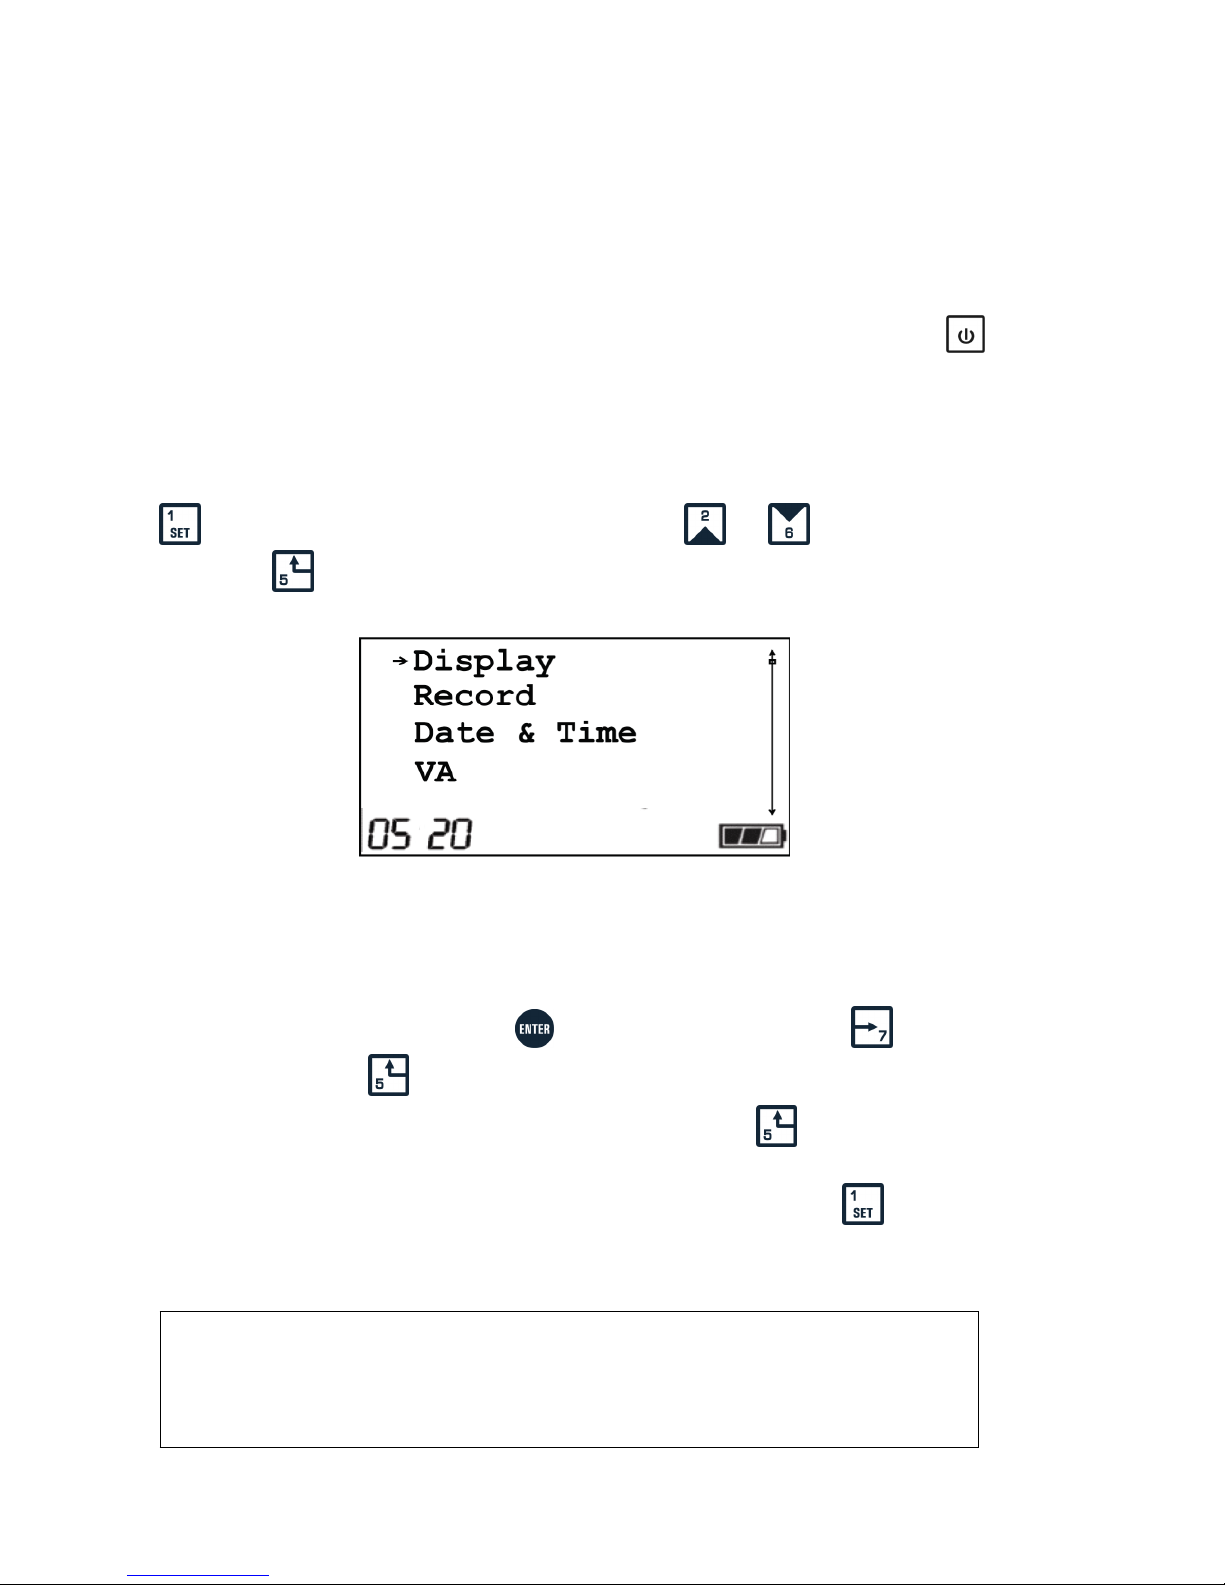
The list of operating parameters (Fig. 7.2) will appear after the voice recorder is switched on and
the key is pressed. To select a parameter to be edited use and . To quit the parameters
menu, press the key.
Figure 7.2: Setting parameters menu
Using cursor keys (Table 6.1 and Table 6.2), activate necessary voice recorder operating modes
and set required parameter values. Use the key to enter submenu items, the key to change
current menu item and the key to return to higher level menus.
To exit the setting parameters mode without saving, just press the key several times till the
operating area appears on the screen (Fig. 7.1).
To exit the setting parameters mode and save changes, you should press the key.
All parameter changes will appear on the screen as symbols representing different modes (see
Fig. 7.3).
Attention!
All voice recorder parameters (except current date and time) are saved in the memory,
independent of the power supply batteries set. Date and time are to be set anew, if the
voice recorder was disconnected from the built-in or external power supply source for
more than one minute.
22
Page 23

7.2. PREPARING GNOME-2M
c
FOR RECORDING
Figure 7.3: LCD panel view after operating parameters have been modified
7.2.4 Sound recording time
Chosen sound recording parameters and free memory space directly determine the maximum
recording time indicated on the screen. Approximate record duration for different recording modes
and CF cards is listed in Table 7.1.
Table 7.1: Sound recording time with different recording parameters
Recording Settings
Recording time for standard CF, hours:minutes (without compression / with compression)
Recording
mode
Sampling
rate, Hz
64 Mb 128 Mb 256 Mb 512 Mb
Stereo
6000
48min/
1h:36min
1h:36min/
3h:12min
3h:12min/
6h:24min
6h:24min/
12h:48min
8000
35min/
1h:10min
1h:10min/
2h:20min
2h:20min/
4h:40min
4h:40min/
9h:20min
10000
28min/
56min
56min/
1h:50min
1h:50min/
3h:40min
3h:40min/
7h:20min
16000
18min/
35min
35min/
1h:10min
1h:10min/
2h:20min
2h:20min/
4h:40min
32000
9min/ 18min 18min/
35min
35min/
1h:10min
1h:10min/
2h:20min
48000
6min/ 11min 11min/
23min
23min/
45min
45min/
1h:30min
Mono
6000
1h:36min/
3h:12min
3h:12min/
6h:24min
6h:24min/
12h:48min
12h:48min/
25h:36min
8000
1h:10min/
2h:20min
2h:20min/
4h:40min
4h:40min/
9h:20min
9h:20min/
18h:40min
10000
56min/
1h:50min
1h:50min/
3h:40min
3h:40min/
7h:20min
7h:20min/
14h:40min
16000
35min/
1h:10min
1h:10min/
2h:20min
2h:20min/
4h:40min
4h:40min/
9h:20min
32000
18min/
35min
35min/
1h:10min
1h:10min/
2h:20min
2h:20min/
4h:40min
23
Page 24
CHAPTER 7. GNOME-2M
c
OPERATION
48000
11min/
23min
23min/
45min
45min/
1h:30min
1h:30min/
3h
Important! You may encounter sound playback problems when using low-speed CF cards
at 32 and 48 kHz sampling rates. In this case try to use faster CF cards or record the sound
at lower sampling rates.
7.2.5 Gain level control
The channel’s gain level can be controlled via headphones or visually – by means of a two-
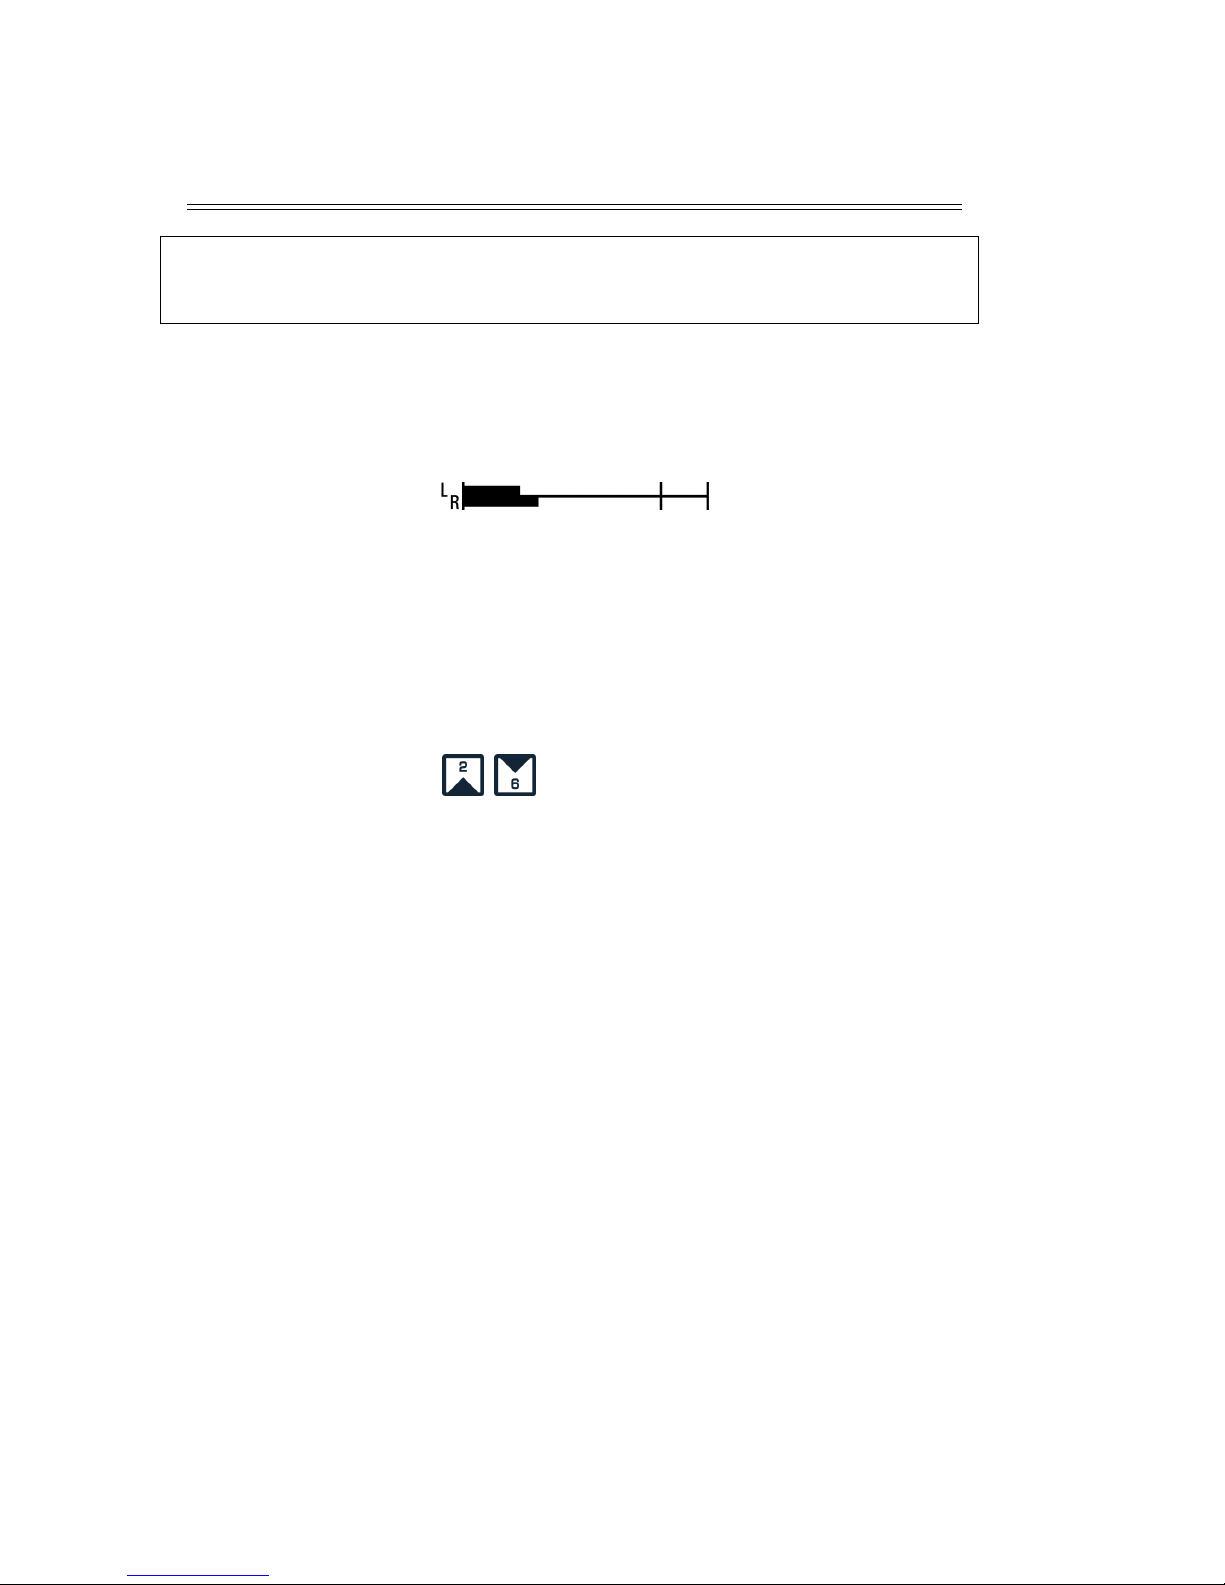
channel indicator bar on the screen (Fig. 7.4).
Figure 7.4: Gain level indicator bar
It is generally assumed that the gain level is optimal when it does not exceed the left and right
boundaries of the indicator bar at weakest and strongest signal levels correspondingly.
Gain level may be adjusted either manually or automatically.
Gain level is adjusted manually before sound recording when the voice recorder is enabled. To
enable manual gain level adjustment, you should set “MANUAL” in the “RECORD” menu (Section
7).
To adjust the gain level use the keys. You may also use them during audio recording.
Switching “MANUAL” in the “RECORD” menu to “AUTO” will enable automatic gain control
mode.
When adjusting gain level, you should keep in mind that external microphones are slightly more
sensitive than internal ones. Microphones’ position relative to signal source should also be taken
into consideration.
7.2.6 Connecting microphones
Microphones (Section 6) are connected to the voice recorder to increase stereo base and recording
quality. After connecting microphones do not forget to set the microphone switch to ”EXT” (Fig.
6.1).
7.2.7 Setting and changing PIN-Code and masking algorithm
To limit access to Gnome-2M
c
general parameters and stored data, PIN-code and masking may
be activated. It is done via the Sound Manager software as described in section 8.
7.3 Sound recording
7.3.1 Sound recording hints
To obtain high-quality audio recording you can follow these guidelines:
24
Page 25

7.3. SOUND RECORDING
Use stereo recording without compression at 16, 32 or 48 kHz sampling rate if possible. Stereo
recording provides speech intelligibility even in noisy conditions.
Mono recording enables you to record longer sound signals.
Use manual gain level adjustment if possible (Section 7).
In order to avoid useful signal loss, use voice activation mode (Section 7) only if signal level is
stable.
Place microphones as close to the useful signal (speech) source as possible and as far from the
acoustic and electromagnetic noise sources as possible. The closer the microphones are placed to
the acoustic signal (speech) source, the smaller is reverberation (echo), and the higher is gain level
and speech intelligibility.
External microphones are more sensitive and at the same time can be easily concealed (under
jacket’s lapel, shirt’s collar, on the cuff). The distance between external microphones should be
more than 15 cm.
Try to place microphones in such a way as to avoid vibration, impact and rubbing against other
surfaces.
Avoid permanent contact of the voice recorder’sbox or external microphones with rough or metal
surfaces (such as table plate, car, concrete structures).
If the mono recording mode is active, the left channel signal will be recorded.
Make a test recording if possible, to be sure that the voice recorder and microphones are correctly
set, and that gain and voice activation levels are adjusted correctly.
To conceal the sound recording process and/or avoid record suppression by special devices (HF
generators) try to keep the voice-recorder with its backside to a supposed detector and/or suppressor.
Automatically switching LCD off is also a good choice in this case. Besides, note that using built-in
microphones greatly decreases the probability of recorder detection.
7.3.2 Manually switching sound recording on/off
You may switch the recording on/off both manually and automatically. If external microphones
are used during sound recording, the microphone switch must be set in the “EXT” position (Fig. 6.1
p.6). To switch sound recording on manually, set the switch on the recorder body (or on the remote
control unit) to “REC” or ”ON” (Fig. 6.1 p.3). The ”REC” message will appear on the screen after
recording is switched on. Record time counter will appear instead of the maximum record duration.
To switch sound recording off, you should set the switch on the recorder (or on the remote control
unit) to “STOP” or “OFF” (Fig. 6.1 p. 3). The voice recorder will return to the parameters menu.
7.3.3 Voice activation mode (VA )
To record sound using voice activation (VA) you should enable this mode (see Section 7) and
define the start/stop recording threshold. If you use VA, Gnome-2M
c
will only record signals exceeding the defined threshold level. This threshold is displayed as a black arrow (↓) To set the
threshold in the “VA” menu select “Level”.
key sets the threshold to 0 dB. The keys and disable voice activation mode. To
save VA settings use key. To adjust threshold value use and keys.
Note that even after the signal level gets lower than the threshold value, recording still goes on
for the given period of time (by default for ten seconds). To specify this period of time in the “VA”
menu select “Time”.
25
Page 26

CHAPTER 7. GNOME-2M
c
OPERATION
To begin recording in the VA mode just place the record switch to “REC” or “ON”. The voice
recorder can be either on or off at this moment. As soon as the signal level exceeds the defined
threshold value, sound recording will start and the “REC” message will appear on the LCD.
Place the switch to “STOP” or “OFF” to stop the recording procedure. This brings the recorder
back to its initial state.
You may use VA along with the timers’ mode (see 7)
7.3.4 Timers’ mode (Timers )
If, for some reason, you cannot start the recording manually or use voice activation, you may
schedule up to 5 different record sessions using the timers’ mode. To do it you have to turn one
or several timers on in the parameters menu (Section 7) and select recording session start time and
duration for each timer. Recording will be started regardless of Gnome-2M
c
being turned on or off.
If you set the duration of the recording session to zero (00 : 00), the timer is turning off. Then,
when you turn on the timer, its duration will be automatically set to 00:01.
The operator’s commands usually have higher priority than the timer settings, i.e. you can always
stop the recording process if it was started by a timer. But if you activate the “Prio.” option in
the timer parameters menu, it will enable the timer to override operators commands. In this case
the scheduled recording session will go on regardless of any circumstances, including turning the
recording or voice-recorder off. The session will stop only after its scheduled end, or if the CF is
full or batteries are completely discharged.
Timers can be used along with the VA mode (see
7).
7.3.5 Loop mode (Loop )
In the loop mode sound data are recorded into a specified fragment of the CF card. After this
fragment is full, the older records are deleted and replaced with new ones. Loop length is specified
as hh:mm in the Loop menu (Section 7). Loop may always be used along with any other mode.
7.4 Playback of sound recordings
While the voice recorder stores recorded data as *.wav files, they may be played (if the data are
not masked) either by the voice recorder, or by standard Windows applications.
7.4.1 Playing sound recordings through Gnome-2M
c
To play recordings stored on the CF memory card via the voice-recorder, plug headphones in the
respective jack on the microphone or headphones adaptor cable, connect the cable to Gnome-2M
c
and press the key. You will have to enter the PIN-code (if set). Then you will see a list of audio
recordings stored on the CF card.
Select a recording you wish to play with the keys and press . The sound recording’sparameters (date and time of recording session start, sound recording length, quality and mode:
compression, sampling rate, mono/stereo) will be displayed on the screen.
26
Page 27
7.5. DELETING RECORDINGS FROM CF MEMORY CARDS
To start playback press . You will see the playback levelindicator bar,playback time counter
and playback status symbols (see Table 6.1). You can control playback and invoke Gnome-2M
c
features (loop playback, speech signal search, playback level adjustment and noise-cancellation) by
pressing respective keys as described in Table 6.1.
7.4.2 Controlling playback volume, noise suppression and playback speed
In the playback mode the following functions are available:
• volume control
• noise suppression (in dB)
• speed control
Parameter selection is performed with the key (“Volume” for playback volume control;
“B.B.Filter” for broadband and harmonic noise suppression; “Composit” for composite noise sup-
pression; “Stretcher” for playback speed control). To adjust the selected parameter use on
the voice recorder keyboard. Playback volume can be changed within the range of -73+6 dB, noise
suppression for both filters is between 0 and 30 dB, speed control allows acceleration and deceleration of playback tempo up to 2,5 times (in the range between 40% and 250% relative to the initial
100%).
Important! Enabling noise suppression and/or speed control in the playback mode causes
considerable increase in power consumption. Therefore it is recommended to use external
power supply. If the device is battery-powered make sure the current batteries’ state of
charge indicator shows at least one graduation mark.
7.5 Deleting recordings from CF memory cards
You may delete records from the CF card using either the voice-recorder or the Sound Manager
software (see Section 8).
To erase all the existing records press the red button (Fig. 6.1 p.8). Enter your PIN-code (if set)
and confirm the action. All the recordings will be erased from the CF card.
To delete only some of the existing records, enter the playback mode (see Section 7), select a
record and press the key.
Important! Do not remove the memory card from the voice recorder until the deletion
process is completely finished. Otherwise part of the CF free memory may remain inaccessible, even though the recordings have been physically deleted.
After you deleted all information from the CF card, check it for available memory space:
if it is less than the initial memory capacity, reformat the card.
27
Page 28

Chapter 8
Gnome-2M
c
software
8.1 Gnome-2M
c
software kit and its functions
The software kit delivered with the voice recorder includes drivers for the Compact Flash disk drive,
Sound Manager STC-S203 application and Gnome-2M
c
device drivers.
The Sound Manager software is necessary to:
• set and change PIN-code
• set and change recorded signal masking algorithm
• view existing records’ parameters and play them via PC
• remove signal masking and save existing records on PC hard drive or other media
8.2 Software installation and system requirements
System requirements for Gnome-2M
c
are:
• PC with a free USB port;
• MS Windows 2000/XP;
• Any common Windows application capable of playing *.wav files (e.g., Windows Media
Player);
• Enough free space on the hard drive for audio files storage;
You may copy or read records stored on the CF card via the voice recorder or a CF card reader.
In the latter case you will have to install its device drivers supplied on the CD.
If you connect Gnome-2M
c
to a PC and do not install voice recorder device drivers, it will be
detected by your MS Windows system as an external CF disk drive. If you plan to use Gnome2M
c
as an external sound device (instead of a common Sound Blaster), you will have to install
its drivers. These drivers are to be found on the “Sound Manager” CD. Just follow the software
installation wizard instructions. After the drivers are installed, you can select Gnome-2M
c
as your
sound recording ans playback device on the control panel.
After the necessary drivers are installed, you should install the Sound Manager software. To do
it run the setup.exe file on the respective CD and follow the instructions of the wizard.
28
Page 29
8.3. SOUND MANAGER APPLICATION
8.3 Sound Manager application
8.3.1 Sound Manager Main Window
To run Sound Manager find its entry in the Start menu (by default it is installed in the “Speech
Technology Center” group).
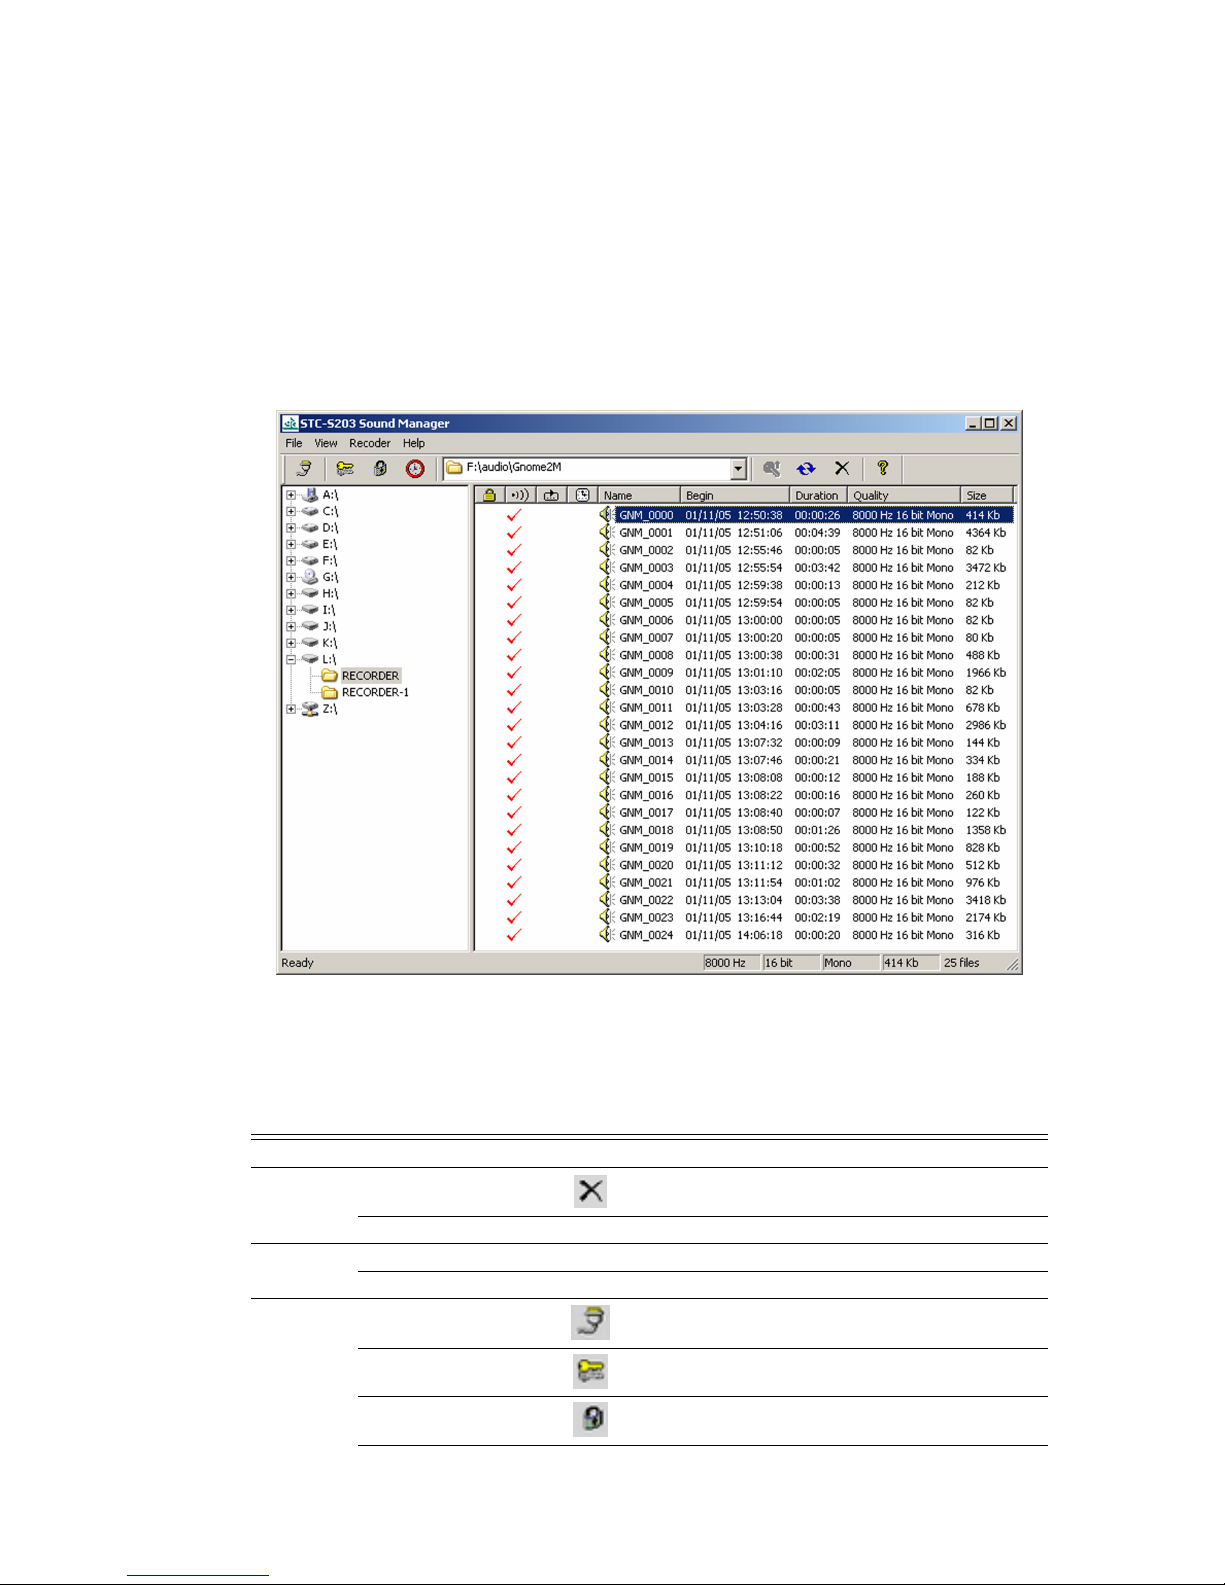
Picture 8.1 displays the Sound Manager main window. It consists of the header, explorer panel,
toolbar and operating area.
Figure 8.1: Sound Manager main window
The Sound Manager operating area displays all wav-files in the currently opened folder and their
basic attributes.
Menu Command Button Effect
File
Delete selected Delete selected sound files
Exit Exit Sound Manager
View
Toolbar Show/hide toolbar
Status bar Show/hide status bar
Recorder
Connect Connect Gnome-2M
c
to PC
Change PIN Change or remove PIN-code
Change Key Change or remove signal masking algorithm
29
Page 30
CHAPTER 8. GNOME-2M
c
SOFTWARE
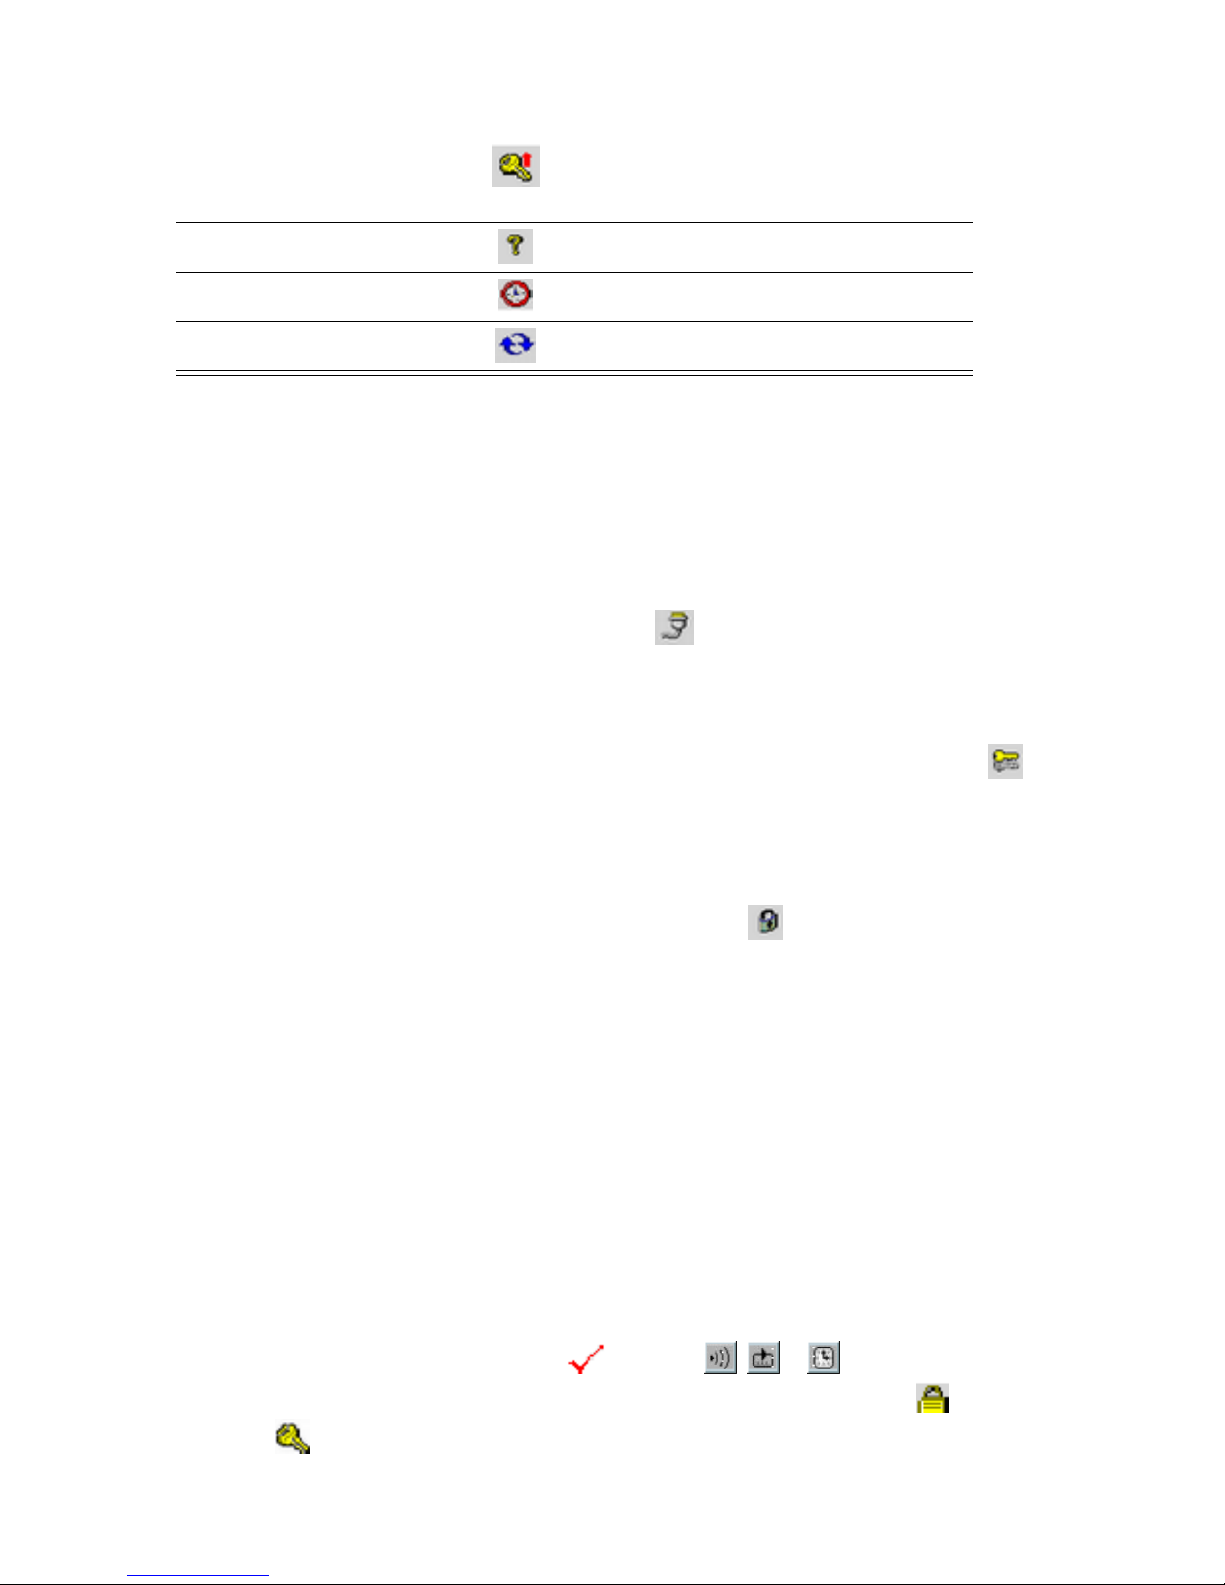
Take off protection Unmask selected audio files and save them on
the hard drive
Help About View short program info
Synchronize time Synchronize voice recorder time with PC timer
Convert to special file Convert selected files to special format
8.3.2 Setting and changing PIN-Code and masking algorithm
The PIN-code and signal masking are not set by default. To set them follow these steps.
Establishing connection between Gnome-2M
c
and PC The first thing you have to do is to con-
nect your Gnome-2M
c
to a free USB-port of a PC with a provided USB-cable. Then you should run
Sound Manager and establish connection by pressing the button or selecting “Connect” from
the “Recorder” menu. You will be requested to enter your PIN-code. Enter it, if it is already set,
otherwise leave the string empty.
Setting and changing your PIN-Code After the connection is established, you can press the
button to set a new PIN-Code or change from the previous one, if it has already been set. You will
have to enter your current PIN-Code and then type the new one twice. To remove the PIN-Code just
enter the existing one and leave both new PIN-Code strings empty.
Setting and changing the signal masking algorithm. Pressing the button will open the signal
masking window. After you enter your PIN-Code and press “OK” all the signals recorded at 6, 8
and 10 kHz will be masked. Masked recordings may be played only by Gnome-2M
c
, which was
used to record it or by Sound Manager (only after the recordings are unmasked).
The “Reset” button enables you to change the current masking algorithm to a new one. “Cancel”
turns signal masking off.
8.3.3 Basic sound operations (unmasking, playing, copying, erasing)
Sound Manager works with .wav files stored on the CF card or PC hard drive. To start the
work use the explorer panel to open a folder containing necessary files. Sound recordings made by
Gnome-2M
c
are always automatically placed in the “RECORDER” folder on the CF card.
Wav files stored in the currently opened folder are listed in the operating area. In addition to
the file name each string also contains recording details: date and time of recording session start, its
duration, recording parameters and file size. The symbol in , or columns means that
the recording was made using voice activation, loop or timers’ mode respectively. The column
may contain the symbol indicating that the recording was masked.
30
Page 31

8.4. UPGRADING THE SOFTWARE
Playback
Double-click on any audio recording in the operating area to play it. Sound Manager will auto-
matically load it into an application used for playing wav files in your system.
Copying to the hard drive
To copy recordings to the hard drive just move the selected recordings with the mouse to the
desired folder.
Unmasking and copying recordings to the hard drive
Before unmasking recordings you should specify a folder on your hard drive where they will be
saved. Select a path to this folder from the droplist in the program toolbar. Then you can select one
or several files with the mouse and press the button. The files will be unmasked and saved in
the selected folder.
Erasing recordings
The button erases selected recordings.
Export to the special format
As in the case with unmasking, select a path to the folder at which converted files should be
saved. Then select one or several files and press the button. The files will be saved in the
selected folder.
8.4 Upgrading the software
For a fast upgrade of your Gnome2-M software copy the GNMUPGR.BIN file into the root
directory of your voice recorder Compact Flash. Then insert the flash into the device (if not yet done
so). You will see the “Upgrade flash?” question displayed on the screen. By default NO is selected.
Select YES using the keys and press . This will initiate the upgrading procedure. The
message “UPGRADING” and the progress indicator will be displayed. Keep the device on until the
process is finished. When upgrading you’re recommended to use a power supply unit to prevent the
device from switching off due to battery discharge. After successful upgrading the message “Please
reboot” will appear. To enable newly added features switch the voice recorder off and on again. The
GNMUPGR.BIN file will be automatically deleted from the Compact Flash.
31
Page 32

Chapter 9
Transportation and service
9.1 Operating conditions
– Temperature: from -5 to +40oC.
– Relative humidity (non-condensing): less than 95% at +30oC.
9.2 Transportation and storage
Transportation is carried out by all transport vehicles and at the temperature between -50 and +
60
o
C with protection from excessive vibration.
Shelf life in warm conditions at temperature between -5 and +40oC and humidity less than 80%
is 5 years.
32
Page 33

Chapter 10
Registration certificate
Tested and approved
The pocket stereo digital voice recorder Gnome-2M
c
, serial number conforms to tech-
nical requirements and is declared suitable for use.
Adjustment conducted by
Date of issue
Warranty
The manufacturer guarantees that the issued devices conform to the technical requirements,
whereby the user observes the conditions and regulations of operation, storage and transport, for
a period of 24 months from the date of sale.
During the time of the guarantee, the manufacturer is obliged to repair the devices at no charge.
Repair of devices disabled as a result of improper use, storage and/or transport, as well as repair
after the time of the guarantee has expired, may be provided by the manufacturer according to a
separate agreement.
Support
Our developers are always ready to assist you. In case of any questions, please don’t hesitate to
contact us:
Tel: +7 (812) 325-8848
Fax: +7 (812) 327-9297
E-mail: [email protected]
Web-site: http://www.speechpro.com
We hope that you will like our product. Please note that we are always ready to develop any
customized solution for you. Any questions regarding our products and development costs should
be addressed to our Sales department: [email protected].
33
Page 34

03-160306
 Loading...