

Page 1

Gnome P
Portable digital
stereo voice-recorder
User Guide
Speech Technology Center
Saint-Petersburg
Page 2

Gnome P. User Guide
Dear Customer!
Thank you for purchasing this product! For
optimum performance and safety please
read this instruction carefully.
2
Page 3

Gnome P. User Guide
Contents
1. Introduction .................................................................................4
2. Delivery set...................................................................................4
3. Technical data..............................................................................5
4. Voice-recorder protection ..........................................................6
5. General information.....................................................................7
6. Operating gnome P....................................................................10
7. Gnome P software......................................................................13
8. Operating conditions.................................................................23
9. Transportation and storage.......................................................23
10. Warranty and technical support.............................................23
11. Registration certificate............................................................24
3
Page 4

Gnome P. User Guide
1. INTRODUCTION
Portable digital voice-recorder Gnome P is a professional sound recording unit allowing
high-quality mono and stereo recording of speech signals using a built-in microphone
and/or one or two external microphones.
Recorded sound is stored in the integrated flash memory. Mono recording mode and
data compression can be used to increase overall recording duration. Recording may be
started and stopped manually or automatically (using built-in timers and/or pre-set Voice Activation threshold).
Recorded data can be copied onto other digital media via a USB PC interface.
Playback of recordings and modification of recording parameters is possible only by means
of a PC using special software.
Model STC-H368-2 is equipped with 2 GB flash memory, model STC-H368-4 – with 4
GB flash memory.
Gnome P may be optionally supplied with additional STC hard- and software according
to the user's requirements.
Use www.speechpro.com for detailed information.
2. DELIVERY SET
Gnome P delivery set includes:
1. Digital Voice-recorder STC-H368-2(4) Gnome P with an integrated battery and
flash memory 2GB (4GB)
2. AC/DC charger (220V/5V) with USB jack
3. USB PC connection cable
4. Sound Manager Gnome P software and voice-recorder drivers on CD
5. External microphones and a remote control unit
6. Headphones
7. User Guide
8. Package
4
Page 5

Gnome P. User Guide
3. TECHNICAL DATA
Number of recording channels 1 or 2
Integrated flash memory size 2 GB or 4 GB
Recording format
mono/stereo PCM 16 bit or with
2x compression (µ-law)
Sampling frequency 8, 16 kHz
Gain ripple 3 dB max.
SNR
at mic input: 72 dB min.
at line input: 78 dB min.
Total Harmonic Distortion for
mic input (at 1kHz, with 16 kHz
sampling frequency)
without compression 0.1% max.
with 2x compression 1% max.
Total Harmonic Distortion for
line input (at 1kHz, with 16 kHz
sampling frequency)
without compression 0.01% max.
with 2x compression 1% max.
Automatic Gain Control range 0…42 dB
Voice Activation range 1…60 dB
Microphone
Type Electret, HF-resistant
Sensitivity -55 dB
Noise floor 28 dB max.
Max. operation time
without battery recharge
Record mode 37 hrs
Stand-by
mode
Timers 1 000 hrs
Voice Activation 250 hrs
Max. recording duration: mono, 8kHz, compressed
74 hrs (2 GB)
149 hrs (4 GB)
Guaranteed recording duration: stereo, 16kHz, without
compression
9.3 hrs (2 GB)
18.6 hrs (4 GB)
5
Page 6

Gnome P. User Guide
Power
supply
Integrated battery Li-ion, 750-900 mAh
External source 6 V
Battery charge time
4 hrs
Rated voltage
at mic input: 8 mVeff
at line input: 0.7 Veff
at output: 0.7 mVeff
Current consumption from
the battery
Active mode 30 mА max.
VA mode 3 mА max.
Stand-by mode 1 mА max.
Current consumption from USB 450 mА max.
Current consumption from external power supply 300 mА max.
Clock deviation from the “real” time max. 5 sec a day
PC interface USB 2.0 High or Full-speed
Size:
75.3×48.7×12.9 mm
Weight (with battery) 70 g
The voice-recorder may be connected to a PC via the USB interface (2.0 High- or Full-
speed). The provided data transfer rate is up to 215 or 460 kB/sec.
4. VOICE-RECORDER PROTECTION
4.1. Protection from unauthorized access
To protect Gnome P from unauthorized access, playback of recorded data and modification of voice-recorder parameters are implemented only by means of dedicated software.
If desired, the user can protect voice-recorder parameters and recorded information with digital PIN-code (it is recommended to set no less than 4 digits).
A PIN-code is to be set using the Gnome P software (see 7.3.2). The manufacturer sets
no PIN-code by default.
4.2. Recorded data protection
To avoid unauthorized access and recorded data forgery, time and date of recording
start/end are set automatically. Moreover, Gnome P’s operating parameters are registered
for every recording session.
Gnome P does not allow any modification of data recorded into the flash memory.
6
Page 7
Gnome P. User Guide
Gnome P provides recorded data authentication after copying them to a PC hard drive
(by means of digital signature, see 7.4).
5. GENERAL INFORMATION
5.1. Overview and structure
Gnome P voice-recorder is 75.3×48.7×12.9 mm in size. The metal case is coated with
either titanium nitride (golden colour) or epoxy (black colour).
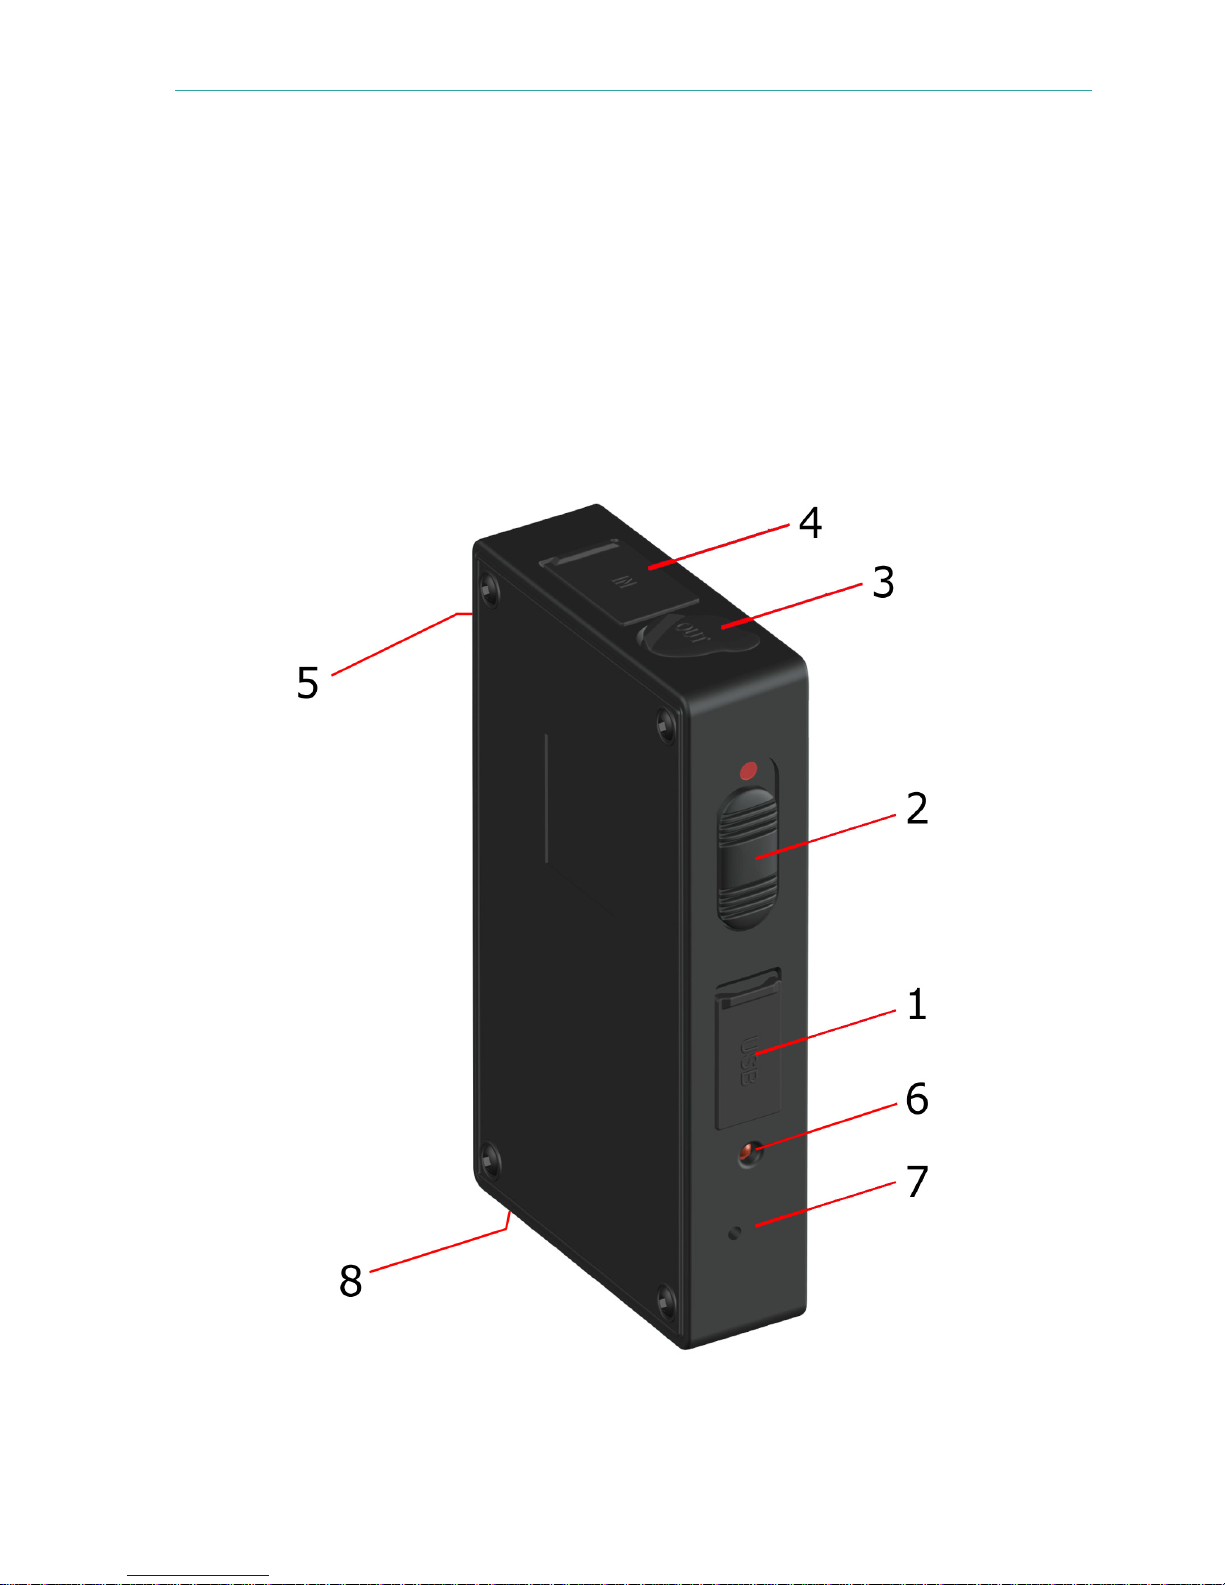
Voice-recorder controls and connectors are indicated in Figure 5.1. For explanation see
Table 5.1.
Figure 5.1 Gnome P voice-recorder viewed from different angles
7
Page 8
Gnome P. User Guide
Table 5.1 (see Figure 5.1)
No. Marking Description
1 USB PC and external power supply connection jack
2
●
Recording ON/OFF switch
3 OUT 3.5 mm headphones jack
4 IN Microphone and Remote Control jack
5 Internal microphone
6 Status indicator LED
7 Erase button
8 RESET button
All the voice-recorder input and output jacks are closed up by rubber gags.
5.2. Microphones
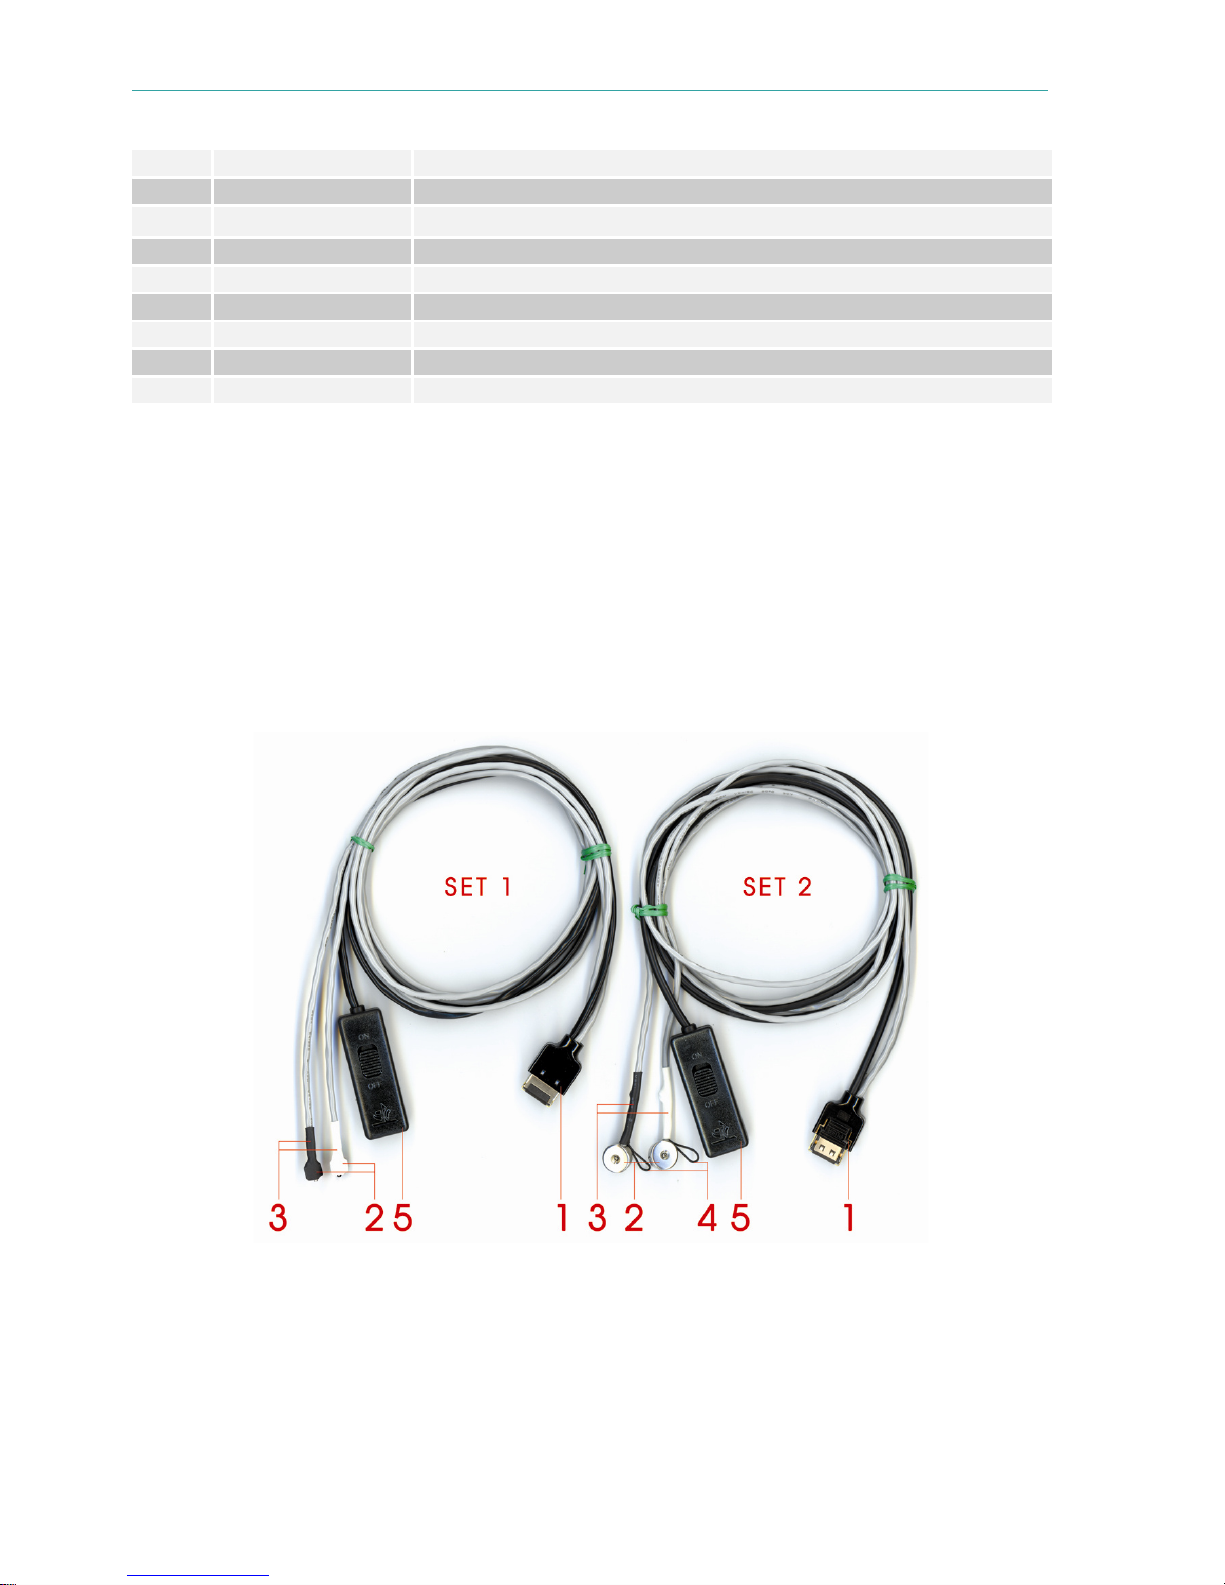
There are two variants of the microphone fitting delivered with the voice-recorder –
SET 1 and SET 2 (see Figure 5.2).
The both external microphones sets include two microphones (2), an 8-pin plug (1) for
connecting to Gnome-P and a voice-recorder remote control unit (5). The left and right microphone cables are marked (3). The left channel microphone wire has darker marking. The
cable length is 1 m. Each microphone is also supplied with a wire tab (4) for fastening it to
buttons, hooks etc ( only in the SET 2).
External microphones are connected to the voice-recorder to increase stereo base and
recording quality.
5.3. PC connection cable
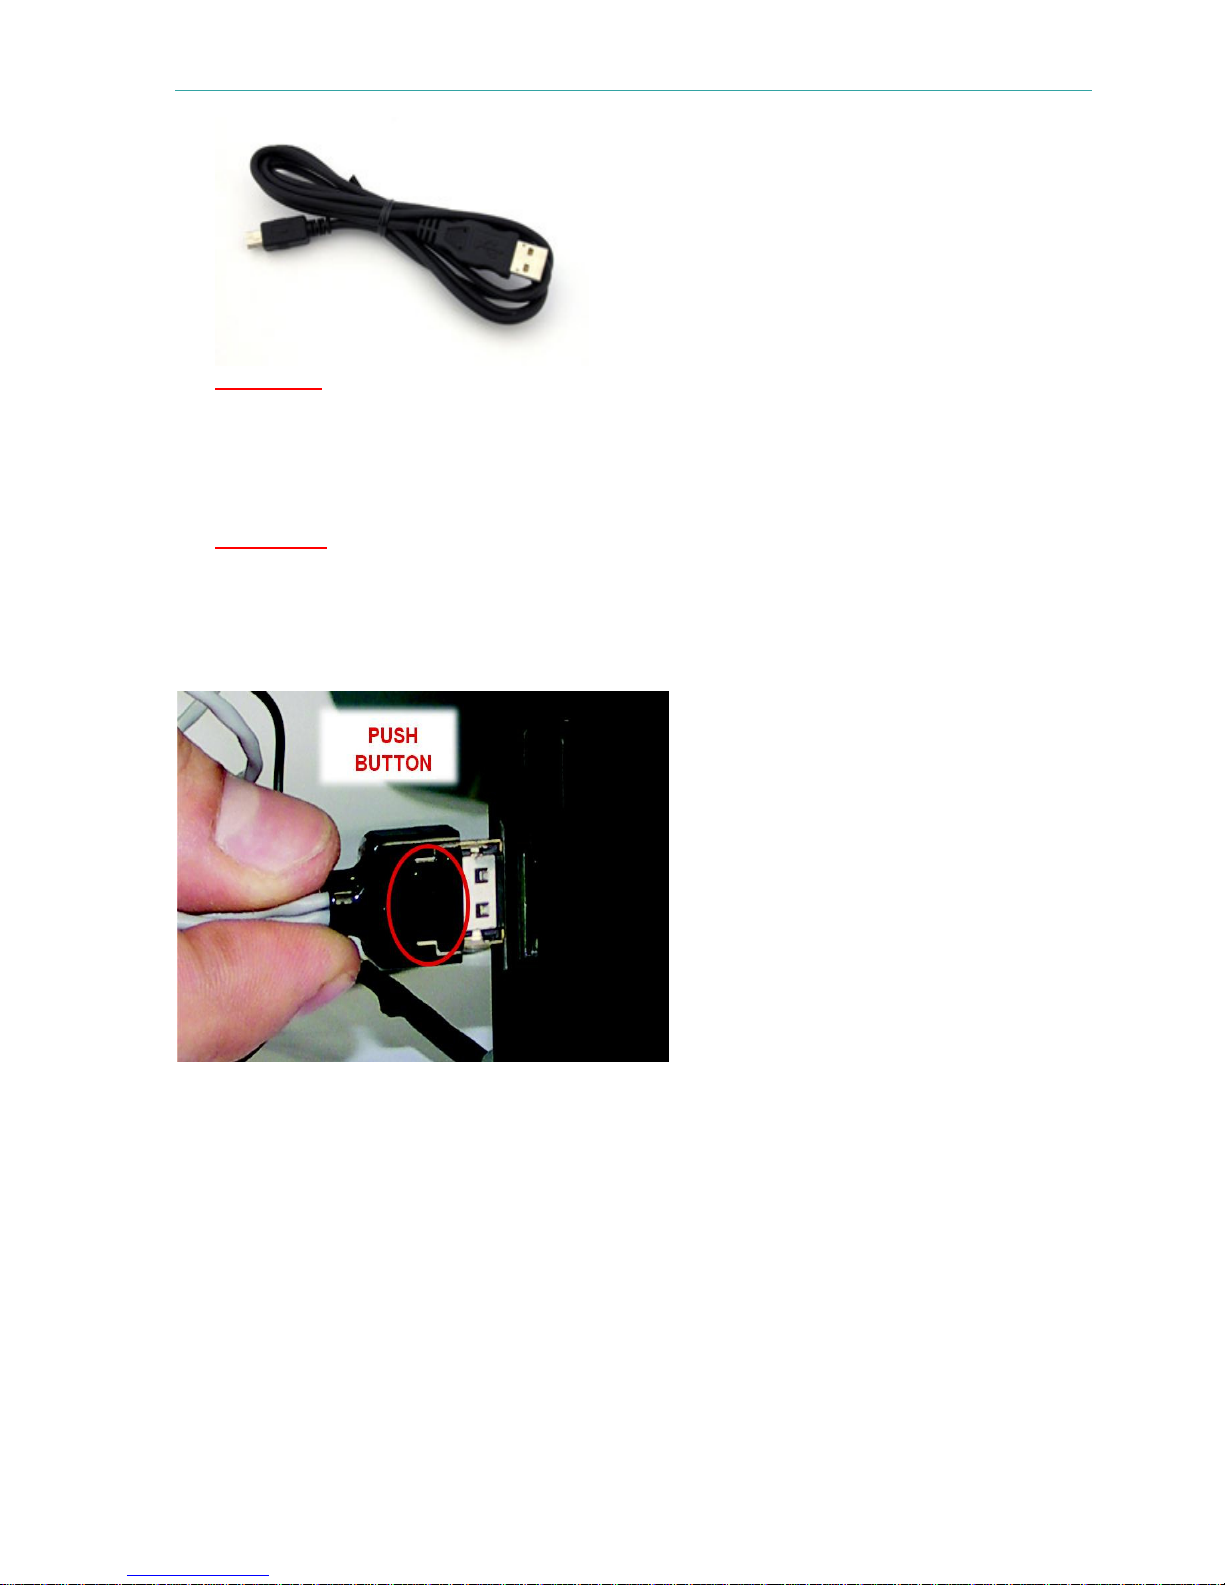
Gnome P is connected to a PC by means of miniUSB connection cable shown in
Figure 5.3.1.
8
Figure 5.2 External microphones
Page 9
Gnome P. User Guide
Attention!
To avoid damage of the voice-recorder due to ungrounded or improperly grounded PC,
follow these steps when connect the voice-recorder to PC:
• First connect USB cable to the voice-recorder,
• then connect another end of the cable to PC.
Important !
When connecting external microphones or a PC connection cable to the voice-recorder,
make sure that the inscription PUSH on the plug is directed opposite tо the panel containing the status indicator LED and the erase button (Figure 5.3.2).
When disconnecting a cable from the voice-recorder, first press the PUSH button at
the plug and then pull out the plug.
5.4. Power Supply
5.4.1. Gnome P battery
The voice-recorder is powered by an integrated Li-ion battery (750-900 mAh) used in
GSM phones Nokia. Power consumption in active mode is 25-30 mA, in Voice Activation
mode (with input amplifiers and VA amplifier enabled) – 3 mA. Minimum power consumption
(1 mA) is achieved in timer- and switch-activated recording. This mode of operation is also
maintained when battery voltage drops below the critical value.
5.4.2. Battery charge rules
Gnome P battery is charged from an external power source (AC/DC charger with
USB jack). If Gnome P is connected to both USB and external power source, the voice-recorder will be charged from an external source, while the USB controller will be USBpowered. Maximum battery charge current is 300 mA; full charge may take up to 4 hours.
9
Figure 5.3.1
PC connection cable
Figure 5.3.2
Connecting cable to the
voice-recorder
Page 10

Gnome P. User Guide
The red LED (N6 in Figure 5.1) will light up and remain on continuously until the battery
is fully charged, after which the charge process will automatically terminate and the LED indicator will switch off.
Before switching on the voice-recorder for the first time after purchase or after voice-recorder being not in use for an extended period of time, charging of the built-in battery during
not less than 5 hours is required. For the first 20 minutes, LED indicator may not light up,
and PC may not detect the voice-recorder.
In this case, you should wait for 20 minutes, then, if the indicator does not light up, disconnect and connect again power supply. This can be repeated up to three times. If, nevertheless, the LED indicator still does not light up, contact with technical support.
Attention!
To prevent battery failure due to over-discharging, follow these rules:
●
If the voice-recorder is out of use for an extended period of time, top up charge
the battery at least once every four weeks.
●
Recharge the battery after each recording session.
5.5. Flash memory
Audio data is written to and stored in an integrated nonvolatile 2GB or 4 GB NAND
flash memory. Even if the voice-recorder is not powered, all data is stored in its flash
memory for up to 10 years.
All recordings can be erased from the voice-recorder memory either manually or by
means of the Sound Manager Gnome P software (see 6.4).
6. OPERATING GNOME P
6.1. Gnome P operational states
Gnome P can be in one of the two operational states:
- standby;
- active.
Gnome P comes complete with an integrated fully charged battery, so that you can get
started immediately.
In active mode the voice-recorder can only perform data recording, playback and deletion. Recording can be started/stopped by setting the ON/OFF switch (N2 in Figure 5.1) to
an appropriate position. This is accompanied by the LED indicator blinking once.
Once enabled, Gnome P starts recording with pre-set default settings: mono recording
at 16 kHz sampling rate, without compression, input gain level 36 dB (manual), signal input
via left channel internal microphone, record switch blocked, PIN code and date/time not set.
6.2. Preparing Gnome P for operation
Before recording with Gnome P do the following:
●
Connect Gnome P to a PC using a PC connection cable (see 5.3) and install drivers
from the installation CD.
●
Install Sound Manager Gnome P software on your PC (see 7.2).
●
Run Sound Manager Gnome P.
10
Page 11

Gnome P. User Guide
●
Set current date/time and recording parameters considering the recording conditions
(see 7.3.3). If you wish, enter (set) a PIN code to protect access to Gnome P settings
(see 7.3.2).
●
If necessary, attach external microphones (see 5.2).
Attention!
Before connecting the voice-recorder to a PC make sure that PC case is effectively
grounded. Connection to ground is strictly recommended if you intend to connect the voicerecorder to a PC and external power supply and/or external signal source at the same time.
Attention!
It is not recommended to connect several voice-recorders Gnome P to a PC at one
time. Before connecting second voice-recorder you should disconnect the first one.
6.3. Recording
6.3.1. Recording hints
To obtain high-quality audio recording we recommend you to follow these guidelines:
1. It is not advisable to perform audio recording while the voice-recorder is USB-connected.
2. Use stereo recording without compression at 16 kHz sampling rate if possible. Stereo recording provides speech intelligibility even in noisy conditions.
3. Mono recording allows you to record longer sound signals.
4. To prevent useful signal loss, use Voice Activation mode only if input signal level is
stable.
5. Place microphones as close to the useful signal (speech) source as possible and as
far from the acoustic and electromagnetic noise sources as possible. The closer the
microphones are placed to the acoustic signal (speech) source, the smaller is reverberation (echo) and the higher is the gain level and speech intelligibility.
6. External microphones are more sensitive and at the same time can be easily concealed (under a jacket lapel, shirt collar, on the cuff). During stereo recording external microphones should be placed at least 15 cm from each other.
7. Try to place the microphones in such a way as to avoid vibration, impact and rubbing
against other surfaces.
8. Avoid permanent contact of the voice-recorder box or external microphones with
rough surfaces (such as table plate, car, concrete structures).
9. Note that if mono recording is enabled, only left channel data will be recorded.
10.To conceal the sound recording process and/or avoid record suppression by special
devices (HF generators) it is advisable to use the internal microphone.
6.3.2. Manual recording start/stop
The recording process can be started/stopped both manually and automatically. To start
recording manually, set the switch on the recorder body (N2 in Figure 5.1) or on the remote
control unit to the ON position.
To stop the recording, set the switch to the OFF position accordingly.
6.3.3. Voice Activated recording
To perform voice activated recording, first enable “Voice Activation” in the “Record settings” window of Sound Manager Gnome P software (see 7.3.3) and specify the required
VA start/stop threshold, then set the switch on the recorder body (N2 in Figure 5.1) or on
11
Page 12

Gnome P. User Guide
the remote control unit to the ON position. The recording will stop 5 seconds after input gain
level falls below the specified threshold.
To terminate voice activated recording, place the switch on the voice-recorder (or re-
mote control) to the OFF position.
VA can be used in combination with timer-scheduled recording (see 6.3.4).
6.3.4 Scheduled recording
Scheduled recording is used if for some reason the recording cannot be started manually or by voice activation. This mode permits automatic recording at any desired time by
using built-in timers. The timers allow you to schedule up to 5 recording sessions.
In the “Record settings” window (see 7.3.3) tick one or several timers and set the desired start time and duration for each recording session.
If the record switch is not blocked, scheduled recording can be stopped manually – by
setting the switch first to ON and then to OFF. However, if the manual switch is blocked (the
“Ignore record switch” option is checked in the “Record settings” window), the recording will
stop only after its scheduled end, or when the memory gets full, or as a result of battery discharge.
If Voice Activation is enabled in this mode, Gnome P will start recording only after the
gain level exceeds the specified VA threshold within the pre-set time period.
6.3.5. Loop recording
In the loop mode sound data are recorded into a specified flash memory segment.
Once this segment is full, the older recordings will be deleted and replaced with new ones.
Loop length is specified as hh:mm in the “Record settings” window (see 7.3.3). Loop recording can be used with all available recording modes.
6.3.6. Recording duration
Recording duration depends on the parameter settings and available memory size. Approximate recording times for different recording modes with maximum memory space
available are given in Table 6.3.1.
Table 6.3.1
Parameter settings
Recording duration, hh:mm
2 GB 4 GB
µ-law, mono, 8/16 kHz
74:30/37:14 149:02/74:31
µ-law, stereo, 8/16 kHz
37:14/18:36 74:31/37:15
PCM 16 bit, mono, 8/16 kHz 37:14/18:36 74:31/37:15
PCM 16 bit, stereo, 8/16 kHz 18:36/09:18 37:15/18:37
When working with the voice-recorder equipped with 4 GB flash memory, keep in mind
that long recordings (more than 2 GB) will be divided into two files. The maximum size of
one file is 2 GB.
6.4. Playback and deleting of sound recordings
Recordings can be played or deleted from the flash memory using either the voicerecorder or the Sound Manager Gnome P software. Playback and deleting by means of
Sound Manager Gnome P software are described in section 7.3.4.
12
Page 13

Gnome P. User Guide
For playback or deleting the recordings by means of the voice-recorder, the corresponding function must be assigned to the erase button (N7 in Figure 5.1) using Sound
Manager Gnome P software (see 7.3.3). Playback is available for the last recording only.
By default the erase button is locked.
6.4.1. Recordings playback
If playback function is selected, then to play the last recording stored at the flash memory, plug headphones in the respective jack at the voice-recorder case and press the erase
button (N7 in Figure 5.1). To stop playback press the button again.
6.4.2. Deleting recordings
If erase function is selected, then to quickly erase all recordings from the voice-recorder
memory, press the voice-recorder erase button (N7 in Figure 5.1) and hold it down for about
3 seconds. The red LED (N6 in Figure 5.1) will light up and will be on continuously until the
deletion process is over. All recordings will be removed from the voice-recorder memory.
Attention !
Information deleted from the voice-recorder flash memory can not be recovered.
7. GNOME P SOFTWARE
7.1. Gnome P software kit and its functions
The software kit delivered with the voice-recorder includes Gnome P device drivers and
Sound Manager Gnome P software.
Sound Manager Gnome P software allows:
●
Viewing voice-recorder information (serial number, available memory size, battery
level etc.).
●
Setting recording parameters (recording format, signal source, gain level etc.).
●
Viewing the list of available recordings and performing the standard set of operations
with them (playback, deletion and copying to disk).
7.2. Software installation and system requirements
Most of the voice-recorder functions are implemented by means of PC software only.
After connecting Gnome P to a PC (see 5.3) the system will detect a new device and
suggest installing an appropriate driver for it. Insert your installation CD into your CD-ROM
drive and follow the installation wizard instructions. Specify the folder containing Gnome P
drivers: \Driver\WIN2000_XP.
After the drivers have been installed you can install the Sound Manager Gnome P
software. Just run the setup.exe file and follow the instructions on the screen. Specify the
target folder to copy the files to (by default it is Start->Programs->Speech Technology
Center->Gnome P->Sound Manager Gnome P).
Minimum system requirements for Gnome P software include1:
• PC with a free USB port;
• CPU: Intel Pentium III or faster;
• RAM: 256 MB or more;
1
If your PC is based on the motherboard with VIA chipset, you may encounter problems with USB 1.0 bus during copying recordings to the PC hard
drive. This is related with USB driver errors and can be resolved by installing a new version of driver. Driver can be downloaded from VIA Technologies, Inc. official site (http://www.via.com.tw).
13
Page 14
Gnome P. User Guide
• OS: MS Windows 2000/XP;
• Audio I/O sound card;
• Headphones;
• Enough hard disk space to store sound files (recommended space is at least 1
GB).
Attention!
Before running Sound Manager Gnome P make sure that recording mode on the
voice recorder is not switched on.
Start recording (Voice Activated, scheduled or using ON switch) only after closing
Sound Manager Gnome P software.
7.3. Using Sound Manager Gnome P software
7.3.1. Running the program. Sound Manager Gnome P main window
To run Gnome P software select its entry in the Start menu (by default it is installed in
the Speech Technology Center group).
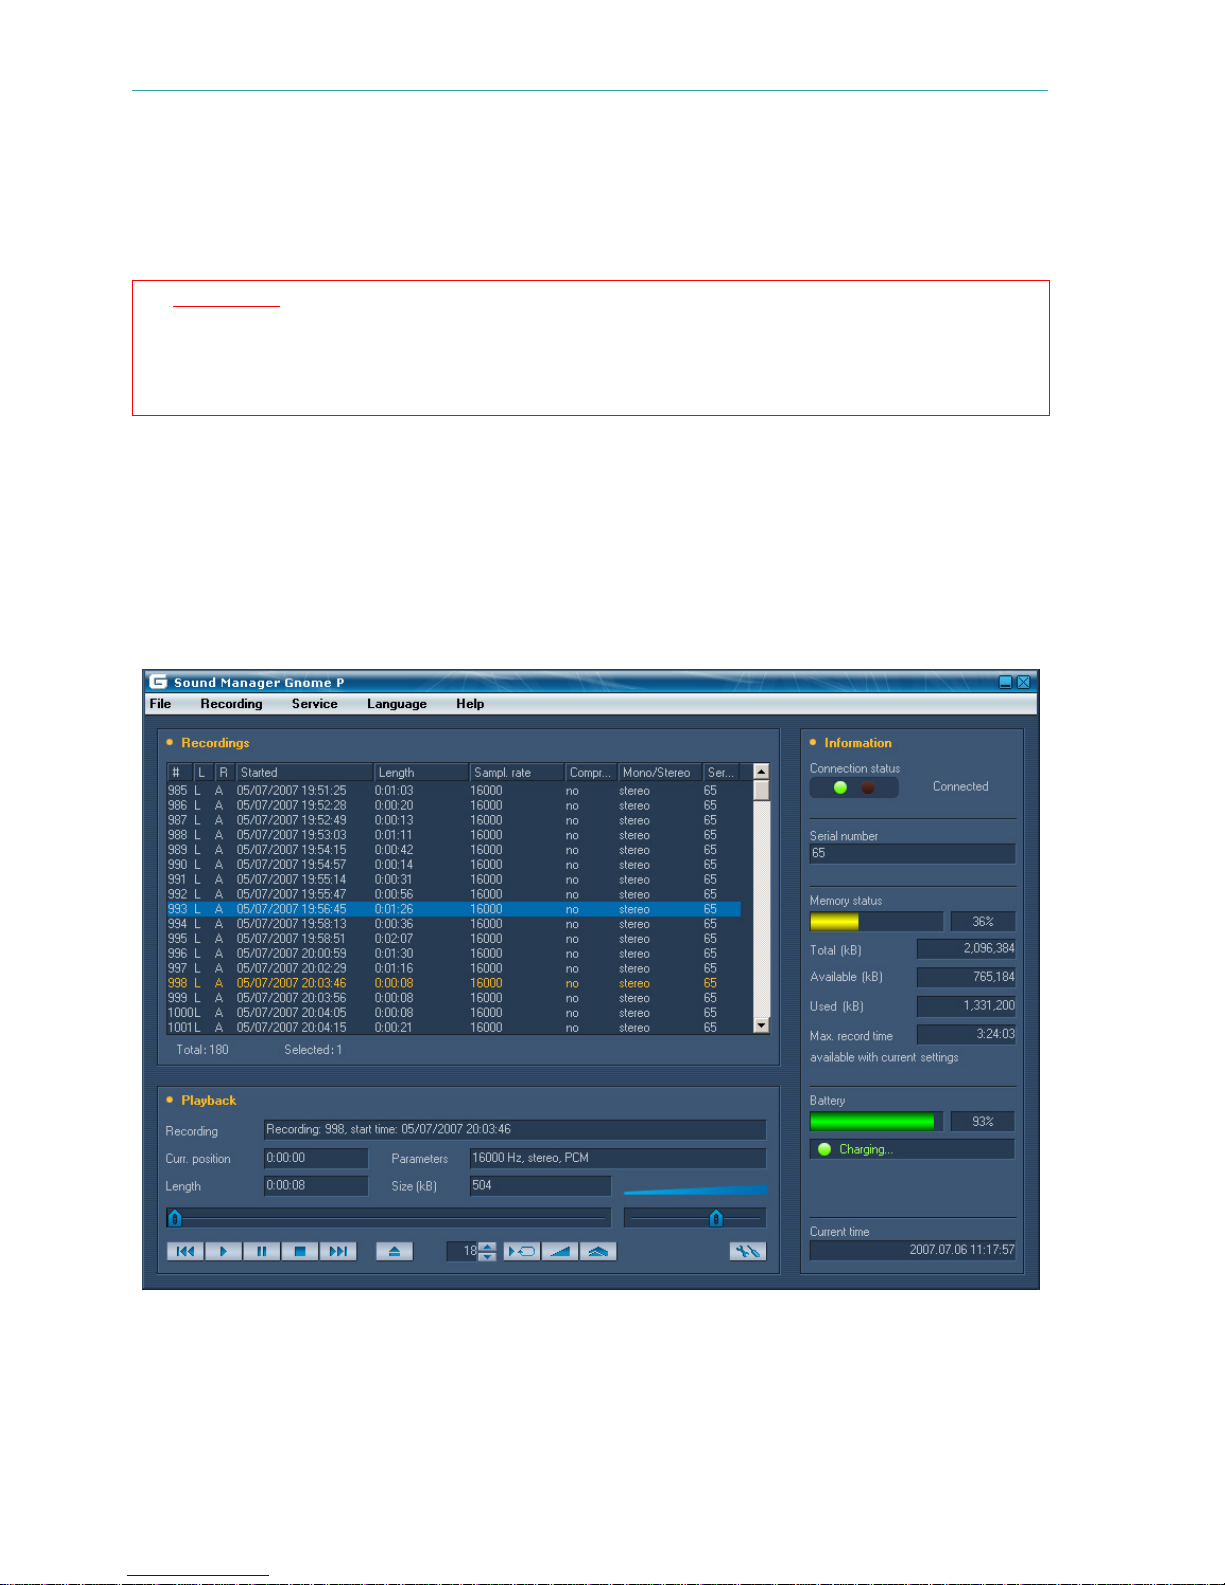
Sound Manager Gnome P main window is shown in Figure 7.3.1.
Figure 7.3.1 Sound Manager Gnome P main window
The main window working area contains a list of recordings with their basic attributes:
●
Recording number (#);
●
Loop mode applied (L);
14
Page 15
Gnome P. User Guide
●
Recording activation method (R): manual (empty field), scheduled by
timers (Т), Voice Activated (А);
●
Recording start time;
●
Recording duration;
●
Sampling rate;
●
Compression (µ-law);
●
Mono/stereo recording;
●
Serial number of the voice-recorder used.
Important!
There is the difference between current recording and selected recording in the
recording list. Current recording is orange colour marked. The Playback group-box in the
lower part of the main window displays current recording parameters. It also contains
current recording playback controls. Other Sound Manager functions relate to the selected
recording.
If you do not need to load all the recordings from the voice-recorder, you may use the
Recording->From oldest command (records list begins from oldest recordings) or the
Recording->From newest command (records list begins from newest recordings). When
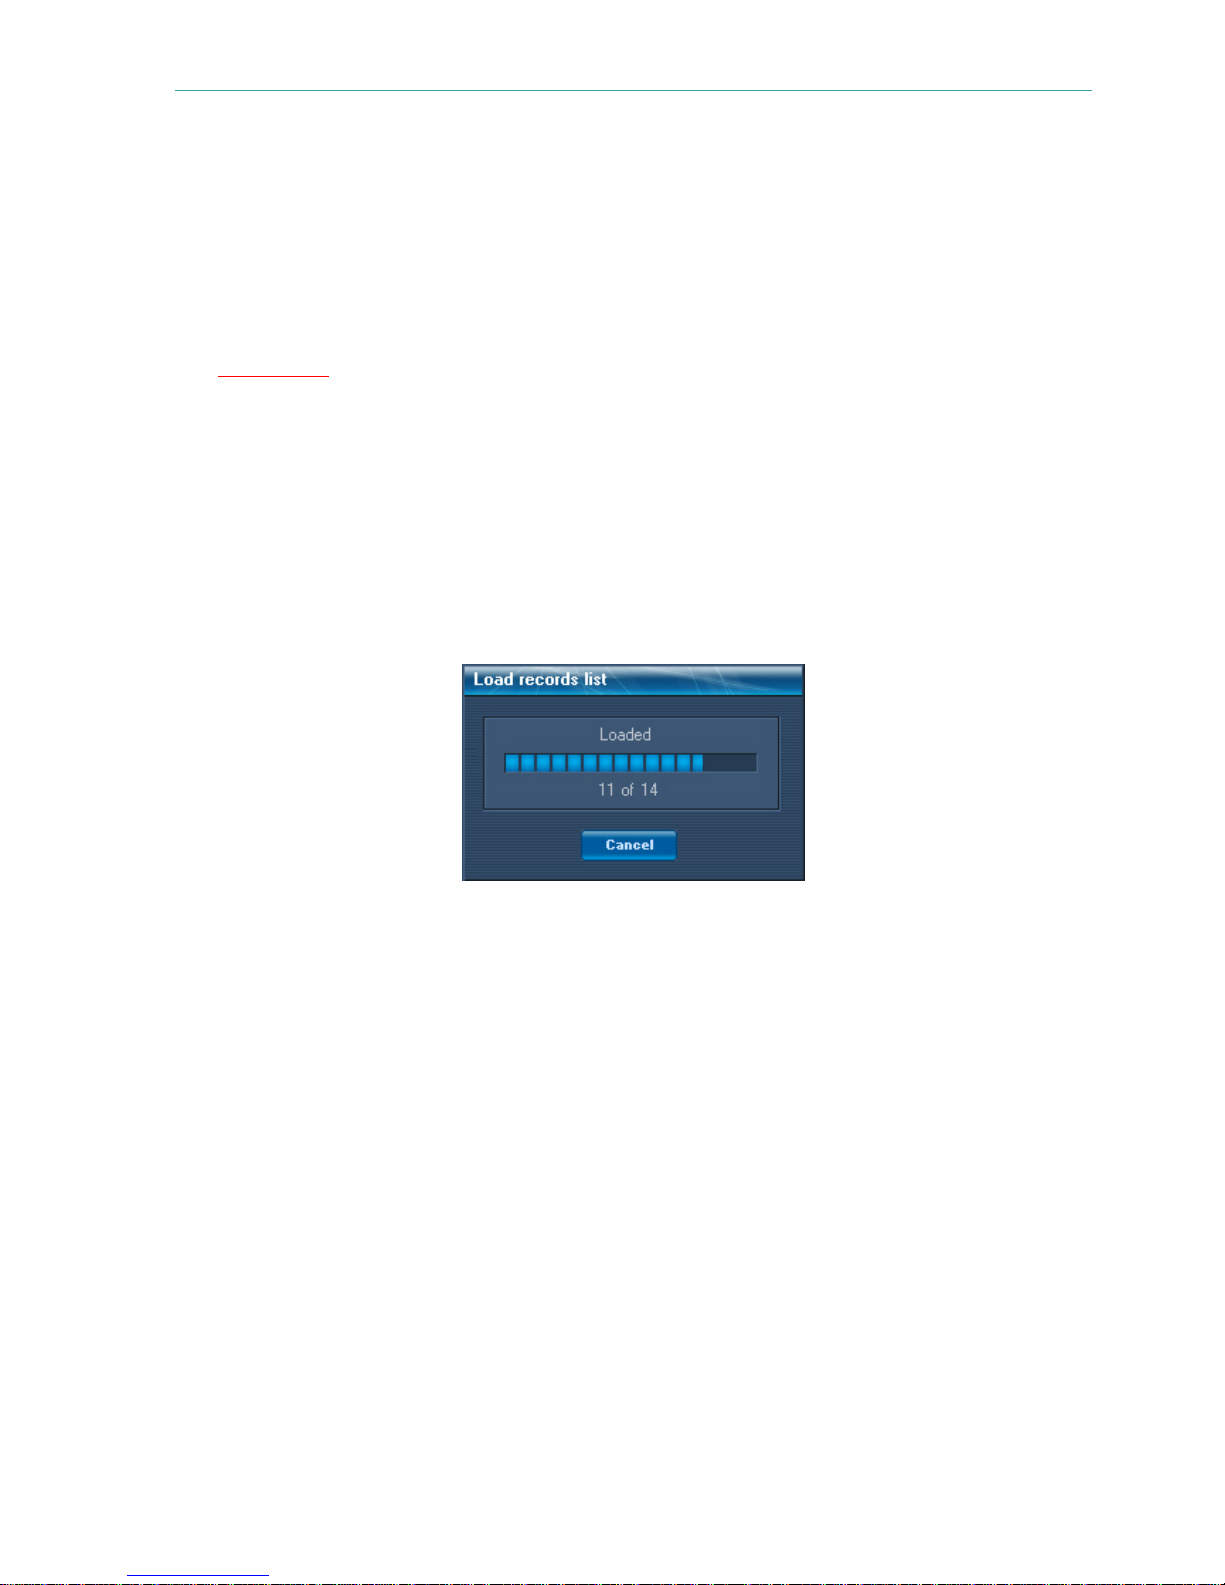
all required recordings are loaded just press Cancel to stop loading (Figure 7.3.2).
Figure 7.3.2 Records list loading window
The right part of the window is taken up by the Information group-box containing the
following voice-recorder information:
●
PC connection status;
●
voice-recorder serial number;
●
Total memory capacity;
●
Available memory size;
●
Maximum recording duration with current settings;
●
Integrated battery charge level;
●
Voice-recorder current time.
7.3.2. Setting and changing a PIN code to access Gnome P functions
If desired, the user can set a PIN-code protection of voice-recorder functions.
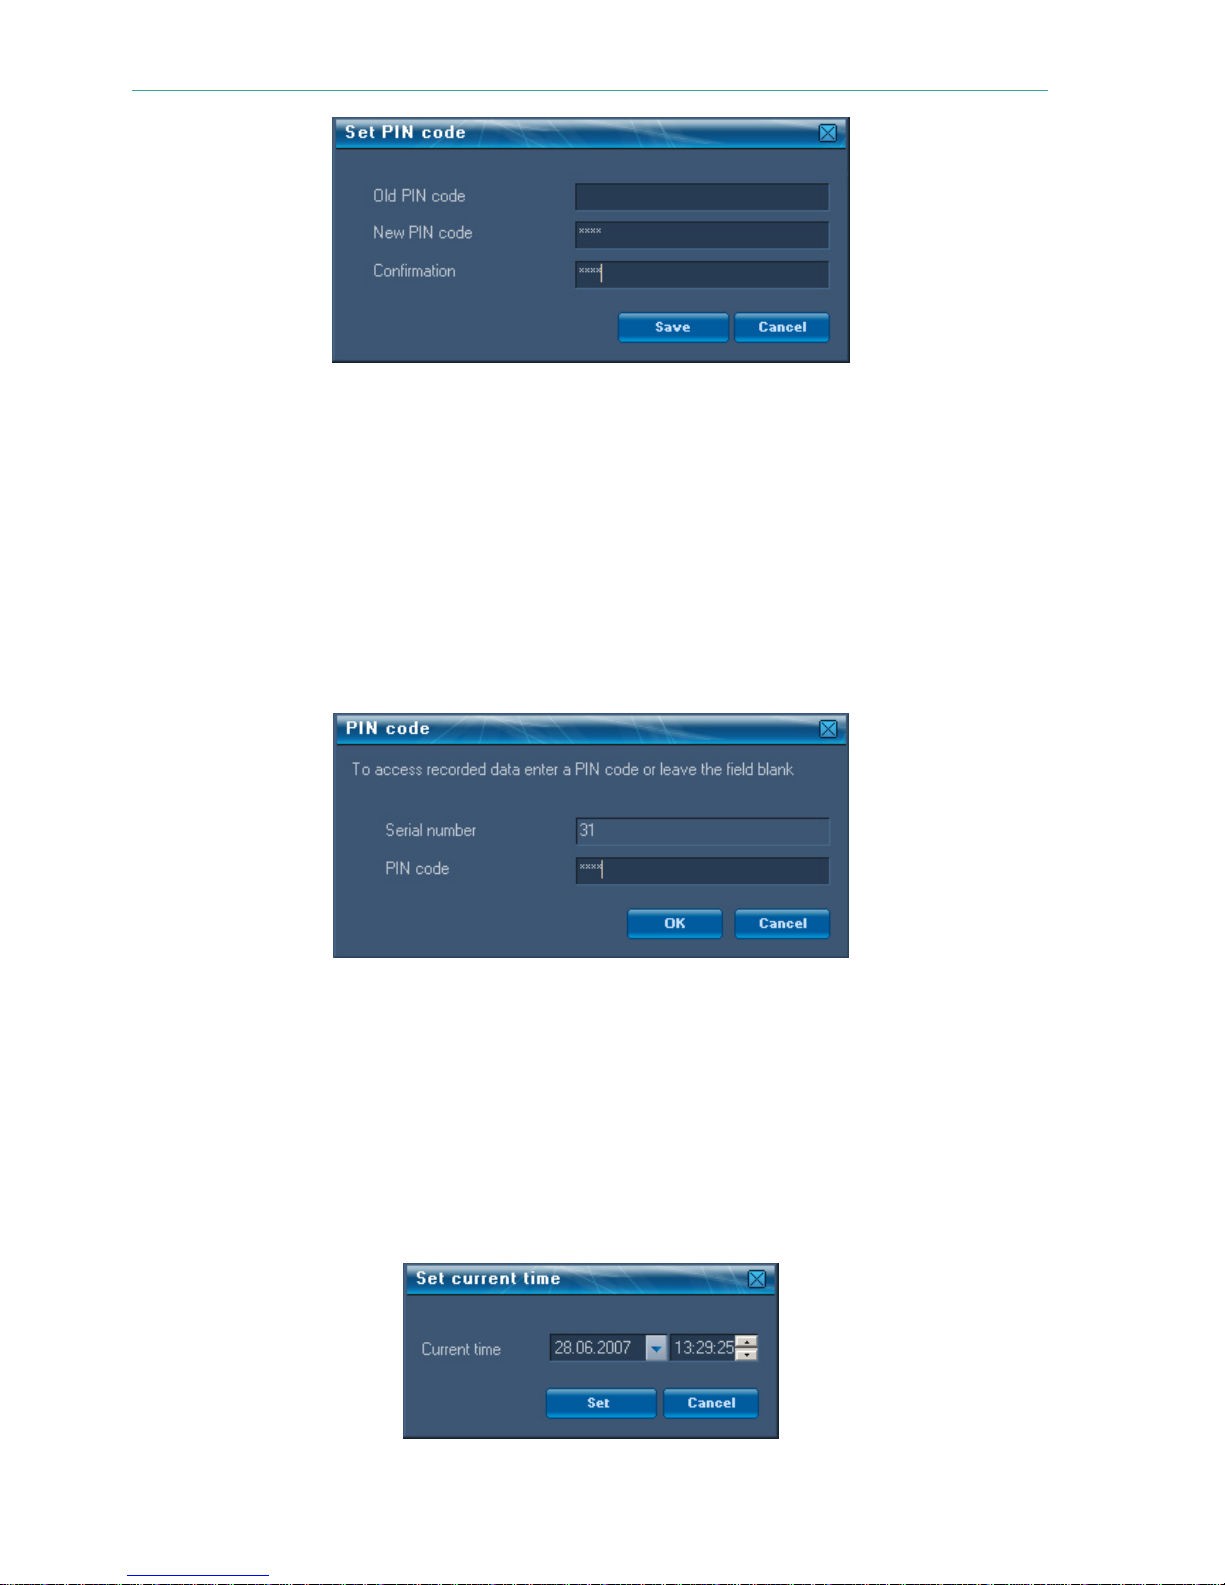
To set a PIN code, select Service->Change PIN code. The following window will be
displayed (Figure 7.3.3).
15
Page 16
Gnome P. User Guide
Figure 7.3.3 The PIN code setting and changing window
Just enter the desired PIN code (an 1- to 8-digit succession) in the “New PIN code”
field, confirm the PIN code in the “Confirmation” field and press Save.
The PIN-code can be subsequently changed or removed at any time using the Service
->Change PIN code command. The same window as that shown in Figure 7.3.3 will be displayed, but in this case you will have to enter a currently used PIN code (“Old PIN code”)
and a new one (“New PIN code”). Confirm the new PIN code by entering it again
(“Confirmation”) and press Save. To remove PIN code protection, leave the last two lines
empty.
After a PIN-code has been set, all subsequent launches of the software will start with a
PIN-code prompt (Figure 7.3.4).
Figure 7.3.4 The PIN code window
If the voice-recorder is not connected to your PC, or if you fail to enter the right PIN code,
access to Gnome P functions will be denied.
7.3.3. Setting Gnome P parameters
To set or change voice-recorder time use the Service->Set current time command. In
the displayed window (Figure 7.3.5) set current date and time (year, day, month, hours,
minutes, seconds) and press Set.
Figure 7.3.5 Setting current date and time
16
Page 17
Gnome P. User Guide
The Language menu allows you to change the language from English to Russian and
vice versa. After the language has been changed, you will have to restart Sound Manager
Gnome P.
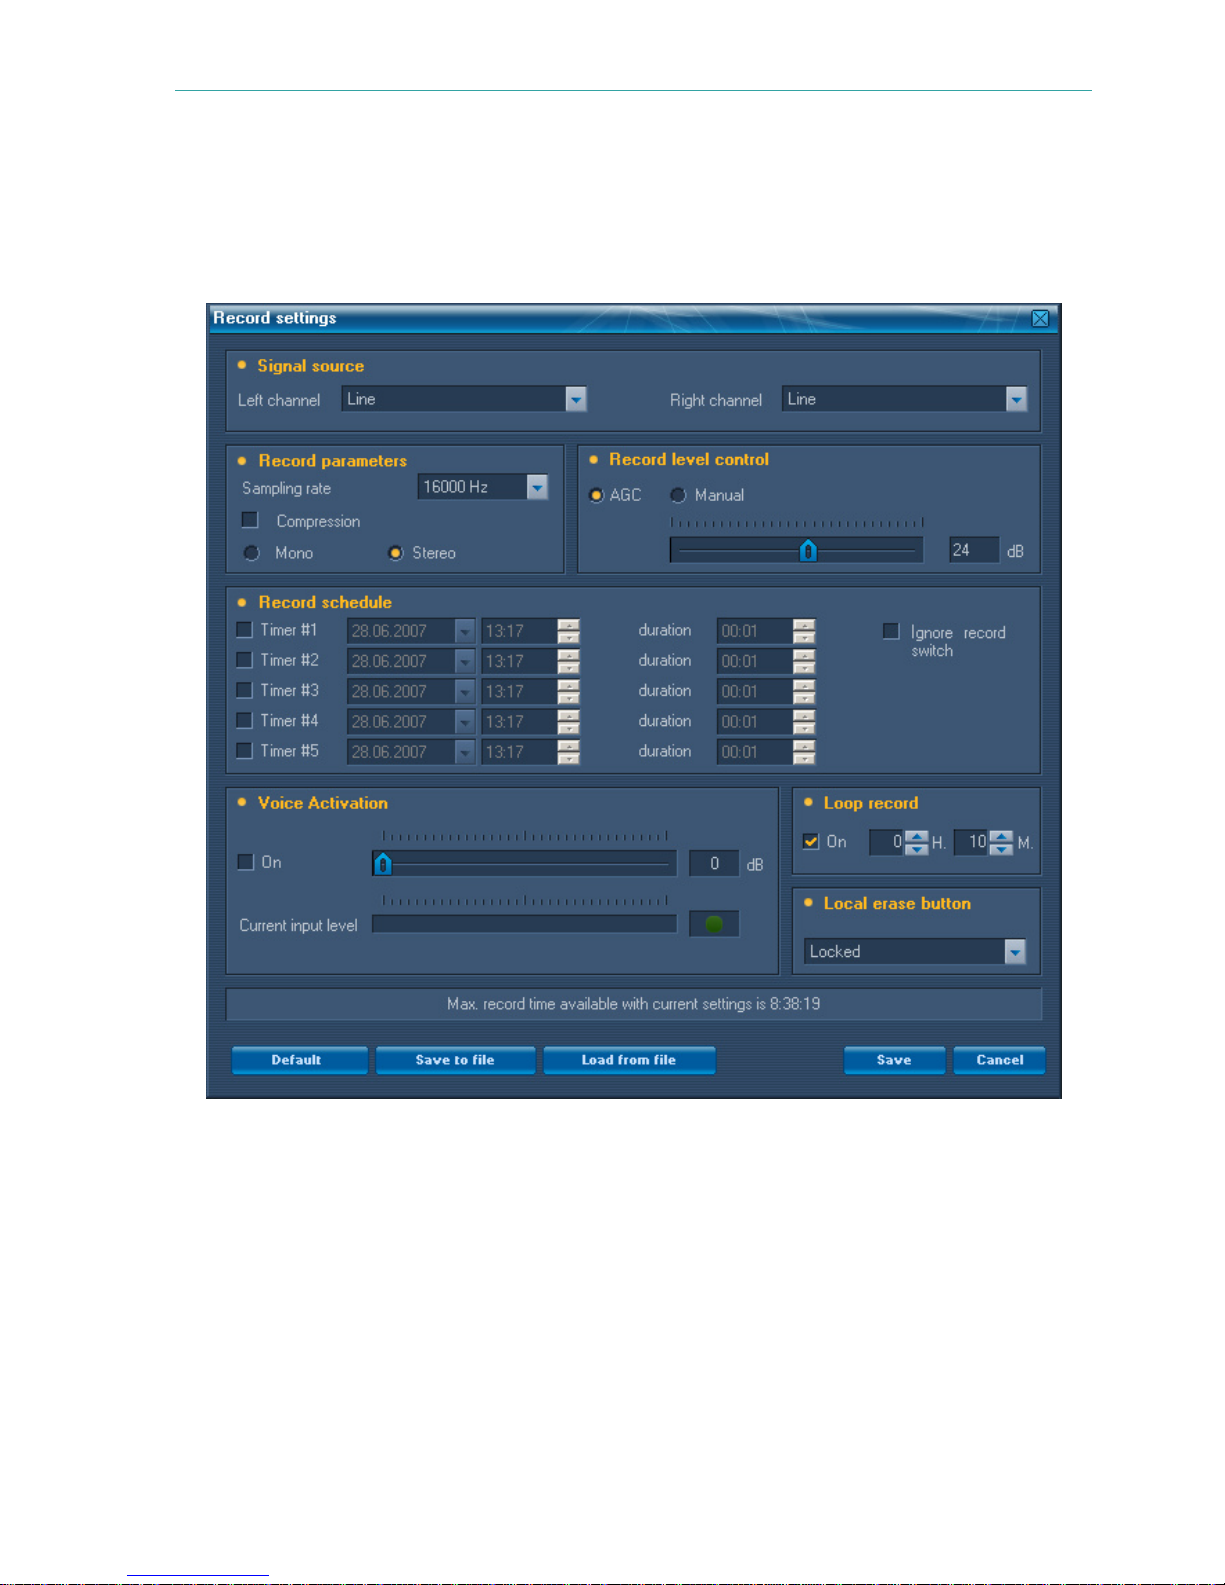
To set (change) other voice-recorder parameters, select Service-> Record settings.
The “Record settings” window will be displayed (see Figure 7.3.6).
Figure 7.3.6 Record settings window
In the Signal source group-box select signal source types for the right and left channel.
Stereo signal is recorded from both channels, while for mono recording only the left channel
is used. The following signal source types can be selected:
●
none;
●
internal microphone;
●
external microphone;
●
line input.
In the Record parameters group-box select the desired sampling rate (8000 or 16000
Hz), mono/stereo mode and tick “Compression” if you wish to use compression.
17
Page 18

Gnome P. User Guide
The Record level control group-box allows you to choose the way to control signal
gain level: automatic (AGC) or manual. In the manual mode drag the slider to set the desired gain level. You can disable gain control by dragging the slider to the leftmost position.
Scheduled recording is controlled by timers (1 to 5) which can be enabled in the
Record schedule group-box. Tick the desired timer(s) and specify recording start time
(date:month:year, hours:minutes) and duration time(hours:minutes). The minimum interval
between successive recording sessions should be 1 minute. To prevent manual recording
interruption by the voice-recorder switch, tick Ignore record switch. In this case scheduled
recording cannot be stopped manually.
Important!
It is impossible to specify a missing (past) start time on the timers.
The Voice Activation group-box allows you to enable automatic recording start at a
preset sound level (VA threshold). This threshold can be set within the 0…60 dB range; the
minimum step is 2 dB. Current input level indicator displayed below can be used for reference.
The Loop record group-box is used to enable loop record mode and set the desired
loop length (hours:minutes). Once the set time period has elapsed, new data will be recorded over previous recordings. Thus, regardless of the overall recording session duration,
the amount of actually recorded data will correspond to the specified loop length.
In the Local erase button group-box the following functions can be assigned to the
voice-recorder erase button (N7 in Figure 5.1):
●
Use for playback
●
Use for erase
●
Locked.
To save current settings in a separate file on the PC hard drive, use the Save to file
button. To restore previously saved settings, press Load from file.
Maximum recording duration with current settings (hours:minutes:seconds) is displayed
in the lower part of the window.
To put newly set parameters into effect, press Save. To discard all changes, press
Cancel.
Pressing the Default button at the low left will restore the default settings.
Important!
All settings except date and time are stored in the voice-recorder memory regardless of
the power supply status.
If the voice-recorder was disconnected from the internal power supply (battery) for
more than one minute, date and time are to be set anew.
7.3.4. Working with sound recordings (playing, saving to disk, deleting)
All recordings stored in the voice-recorder memory with their attributes are displayed in
the Sound Manager Gnome P main window working area (see Figure 7.3.1).
18
Page 19
Gnome P. User Guide
a) Playing sound recordings
Sound recordings from the voice-recorder memory can be played in Sound Manager
Gnome P without previously copying them to the PC hard drive. The program also allows
playback of any PCM sound files.
To play a recording, double-click on it with the mouse or select Play from the
Recording menu. The slider in the Playback group-box will indicate current playback position. Playback can be controlled with buttons , and , as well as by dragging the
slider. Buttons and are used to jump to the beginning of the next or previous re-
cording accordingly.
Button (Loop) enables/disables the loop playback mode of a selected recording
fragment. Fragment length is defined in the Loop length field. Pressing this button will shift
current playback position backwards by the specified time interval. Once the slider reaches
the position where the Loop button was pressed, it will immediately shift back to the loop
start position. To switch to the standard playback mode release the Loop button.
To play sound files stored on the hard drive, use the button or the Recording-
>Play from disk command. Sound files are played the same way as recordings from the
voice-recorder memory.
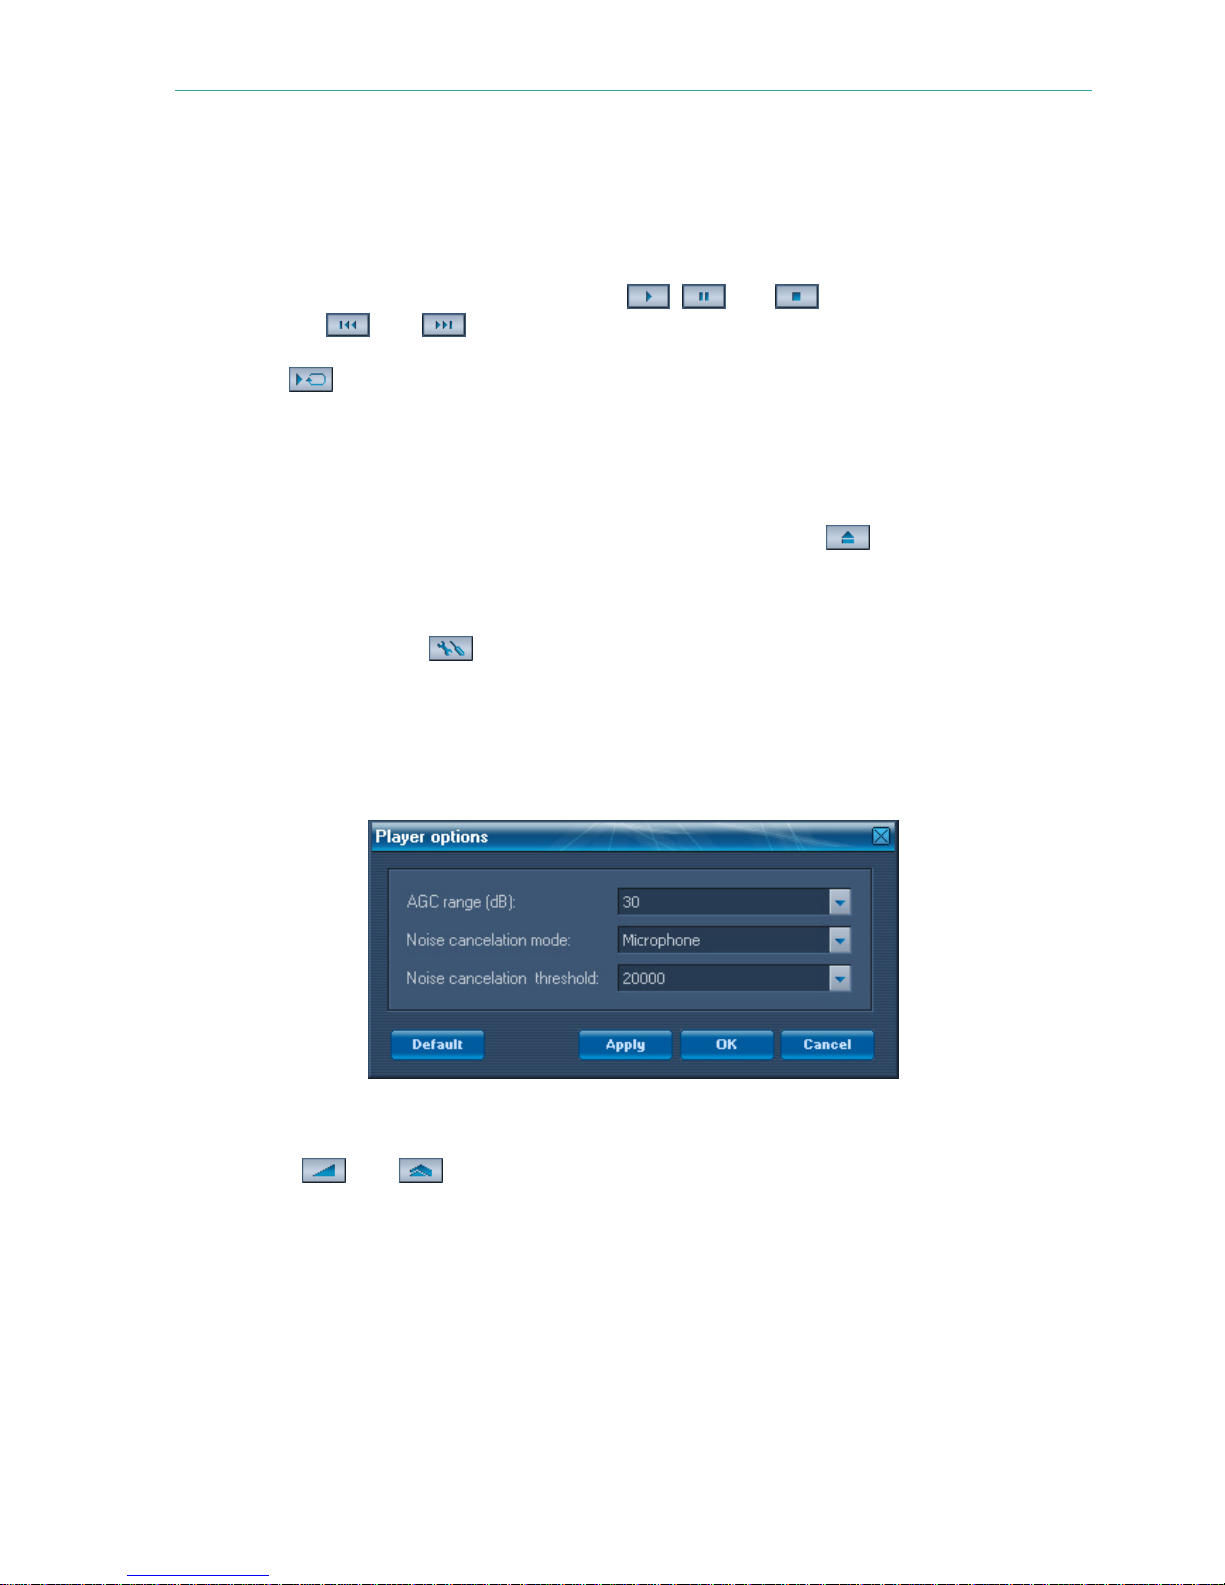
Pressing the button or using the Service->Player options command you may
change player parameters, such as: AGC range, noise cancelation mode (microphone or
telephone line), noise cancelation threshold (see Figure 7.3.7). To save parameters
and to close the window «Player options», press OK button. To save parameters and not to
close the window, press Apply button. Pressing the Default button you may restore the
default player parameters.
Figure 7.3.7 Player parameters window
Buttons and are used for switching on/off AGC mode and noise cancelation
mode accordingly during the record playing.
Volume control can be performed with the Volume slider.
To display newly added recordings in the recordings list use the Recording ->Refresh
menu command.
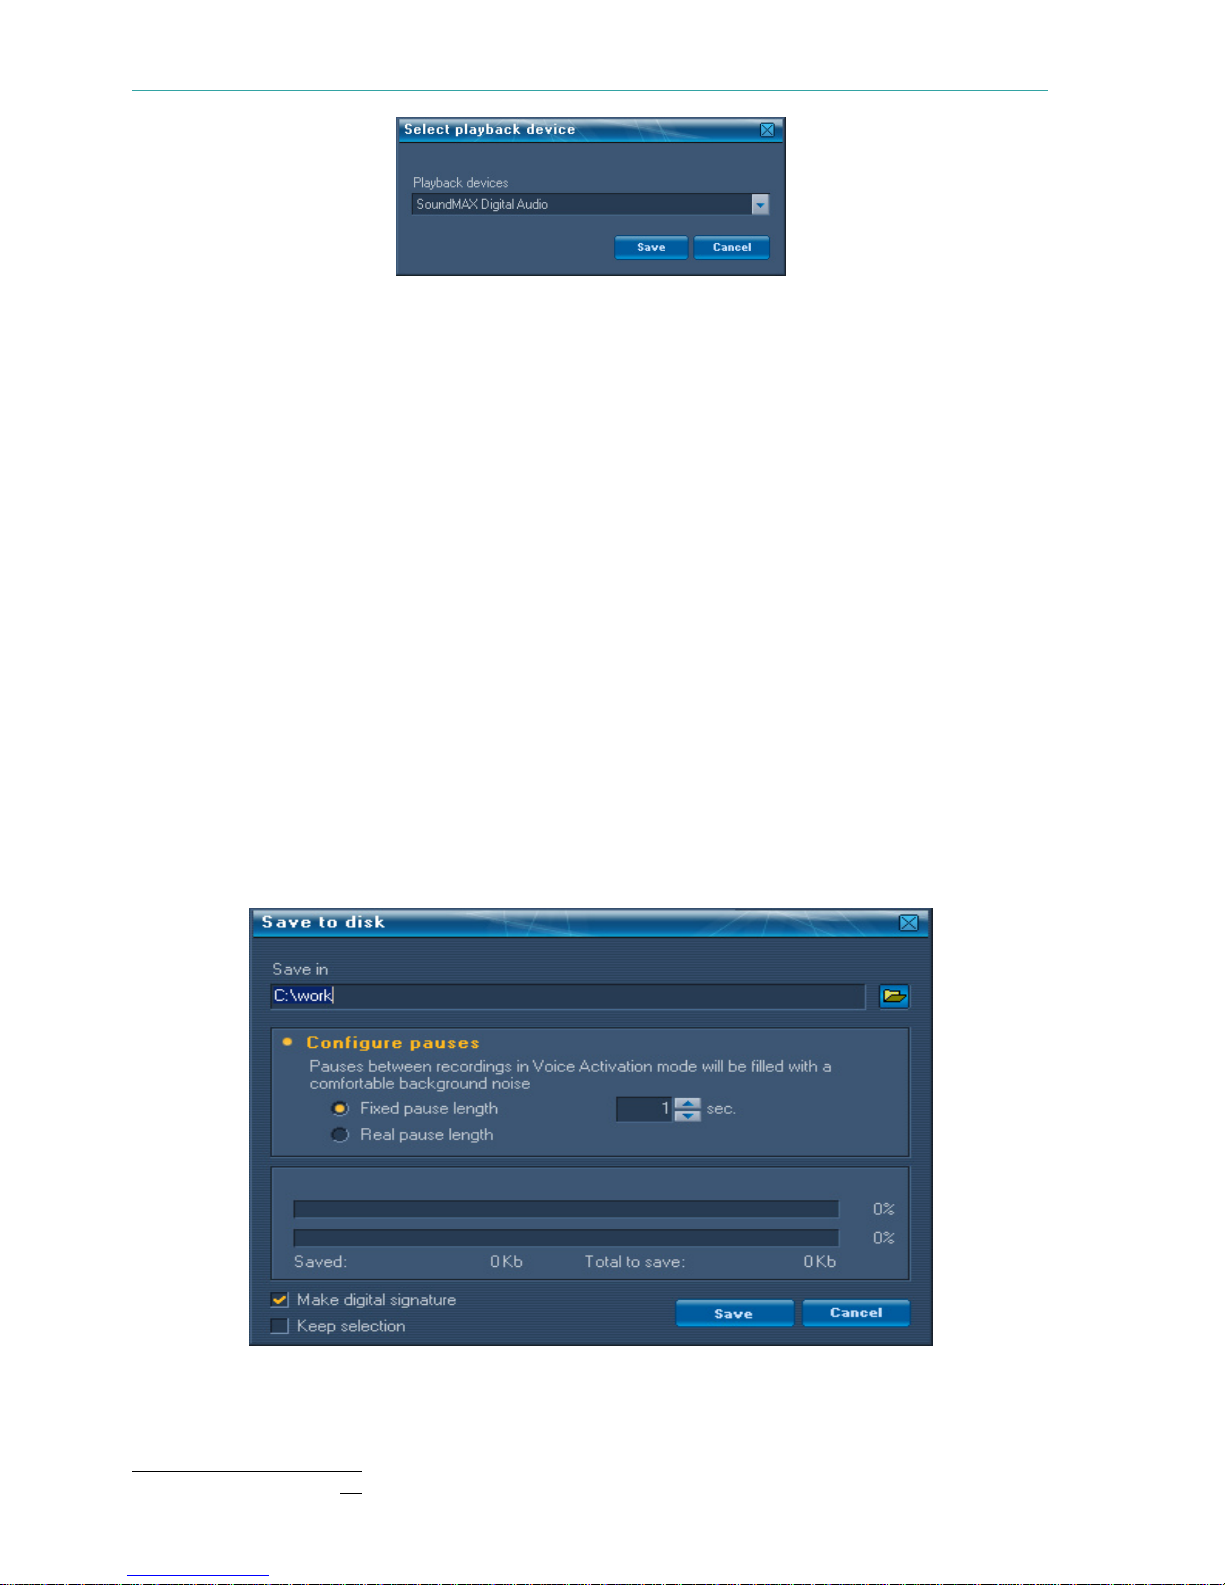
If several playback devices are installed in your PC select the desired device using the
Service->Select playback device command. In the displayed window (Figure 7.3.8) select
the desired device and press Save.
19
Page 20
Gnome P. User Guide
Figure 7.3.8 Playback device selection window
b) Deleting sound recordings
To delete all sound recordings from the voice-recorder memory, use the Recording
->Delete all command. Keep in mind that deleting large amounts of sound data can take
several minutes.
c) Copying recordings to the PC hard drive
Sound Manager Gnome P allows copying sound recordings from the voice-recorder
memory to the PC hard drive. All or selected recordings will be saved as wav-files (PCM 16
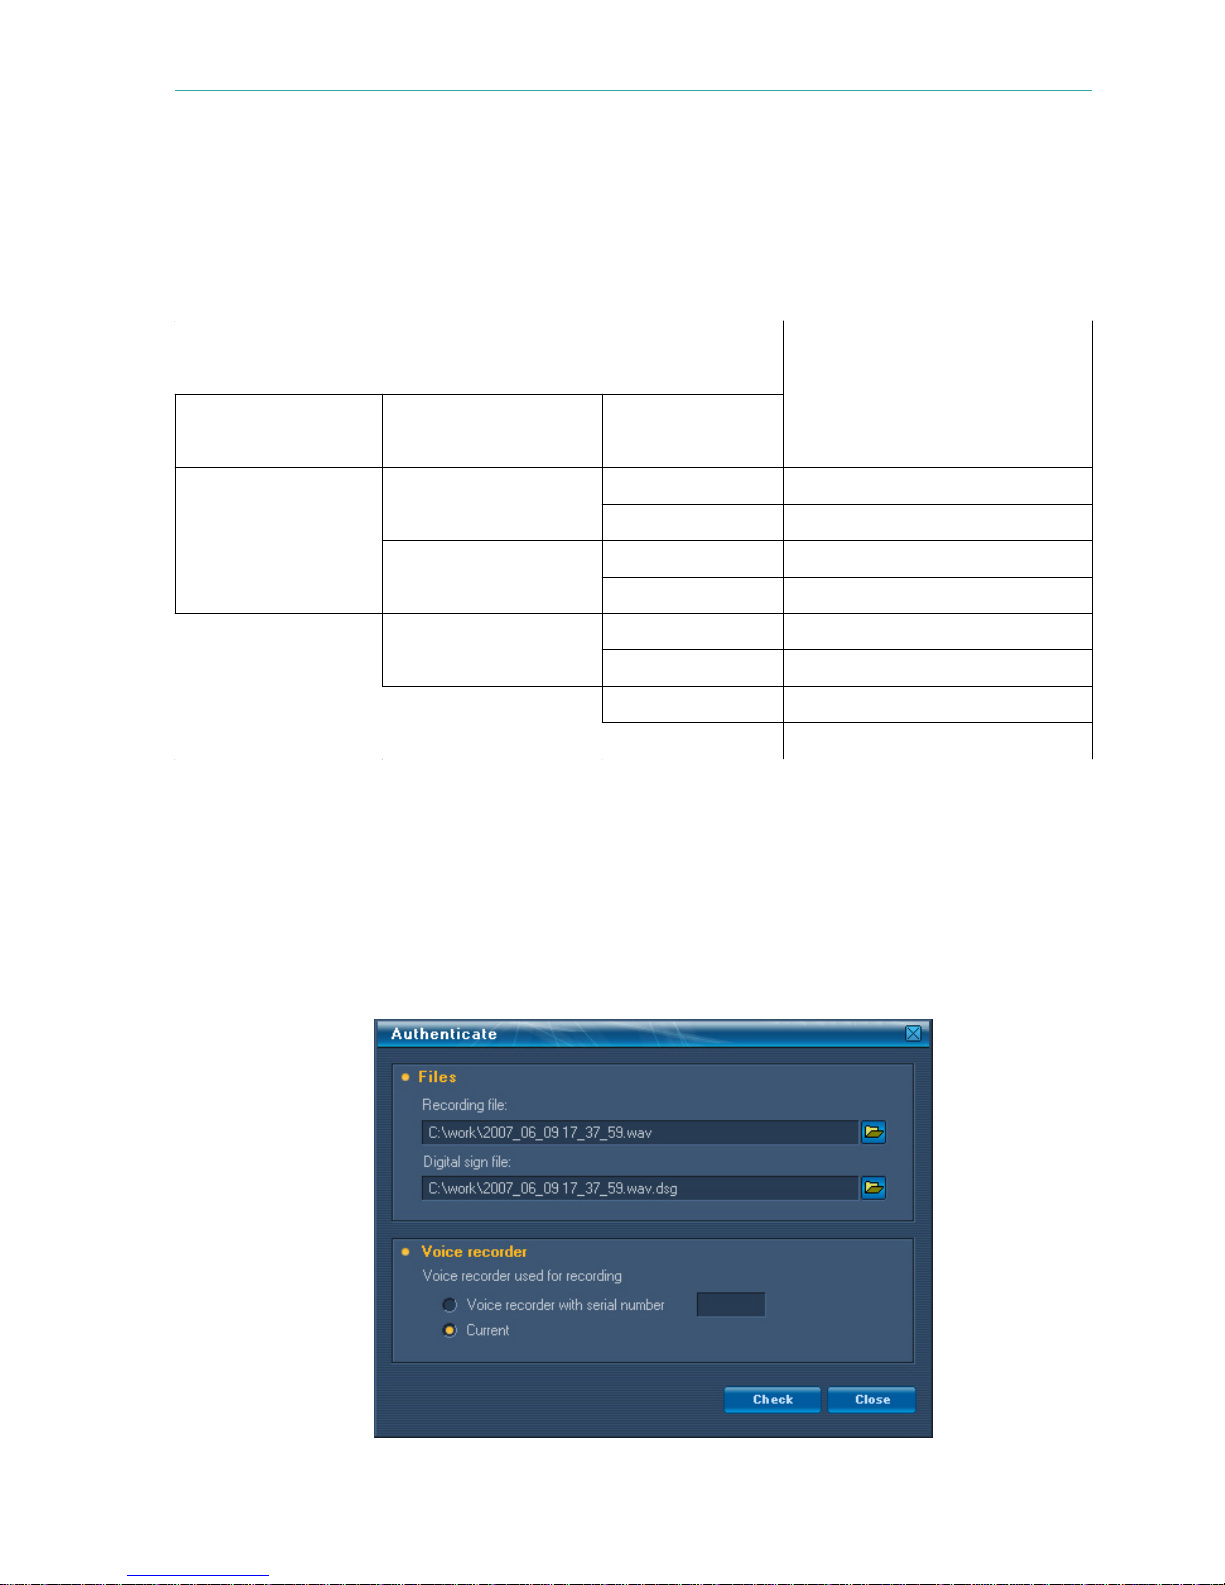
bit). Select the desired recording(s) in the list and use the Recording->Save to disk command. The following window will appear on the screen (see Figure 7.3.9).
Select a folder to write the recordings to. Each recording will be saved as a separate
wav-file. If the data were recorded using voice activation, such recordings will be stored in
one wav-file2, while the pauses separating one recording from another will be filled with
background noise. Pause length can be either set by the user (fixed) or left as in the original
recording (real). File creation date will correspond to date of copying a recording to the hard
drive.
For the subsequent authentication of the recording you may create a digital signature
during copying. To create a digital signature check “Make digital signature” in the Save to
disk window. The file of digital signature will be saved at the same folder as the corresponding sound file.
Figure 7.3.9 Save to disk window
2
Such recordings will be saved in one wav-file regardless of the time interval between them.
20
Page 21
Gnome P. User Guide
Pressing the Save button will initiate the copying process. The progress bars below will
indicate the percentage of completion: upper bar indicates the percentage of saving current
file, lower bar indicates the percentage of saving all selected files.
If you need to keep selection of copied files in the records list, check “Keep selection”
in the Save to disk window.
The duration time of data copying process varies depending on the used recording
parameters - see Table 7.3.1.
Table 7.3.1
Recording parameters
Sampling rate Format Compression
Copying time of 1 hour of
recorded sound, minutes
8000 Hz
mono
yes
no
1.5 min
3 min
stereo
yes
no
3 min
6 min
16000 Hz
mono
yes
no
3 min
6 min
stereo
yes
no
6 min
12 min
7.4. Verifying digital signature
The recordings authentication is based on the standard Digital Signature Algorithm
(DSA). For digital signature, two different keys are generally used, one for creating a signature (private key), and another key for verifying an authentication (public key).
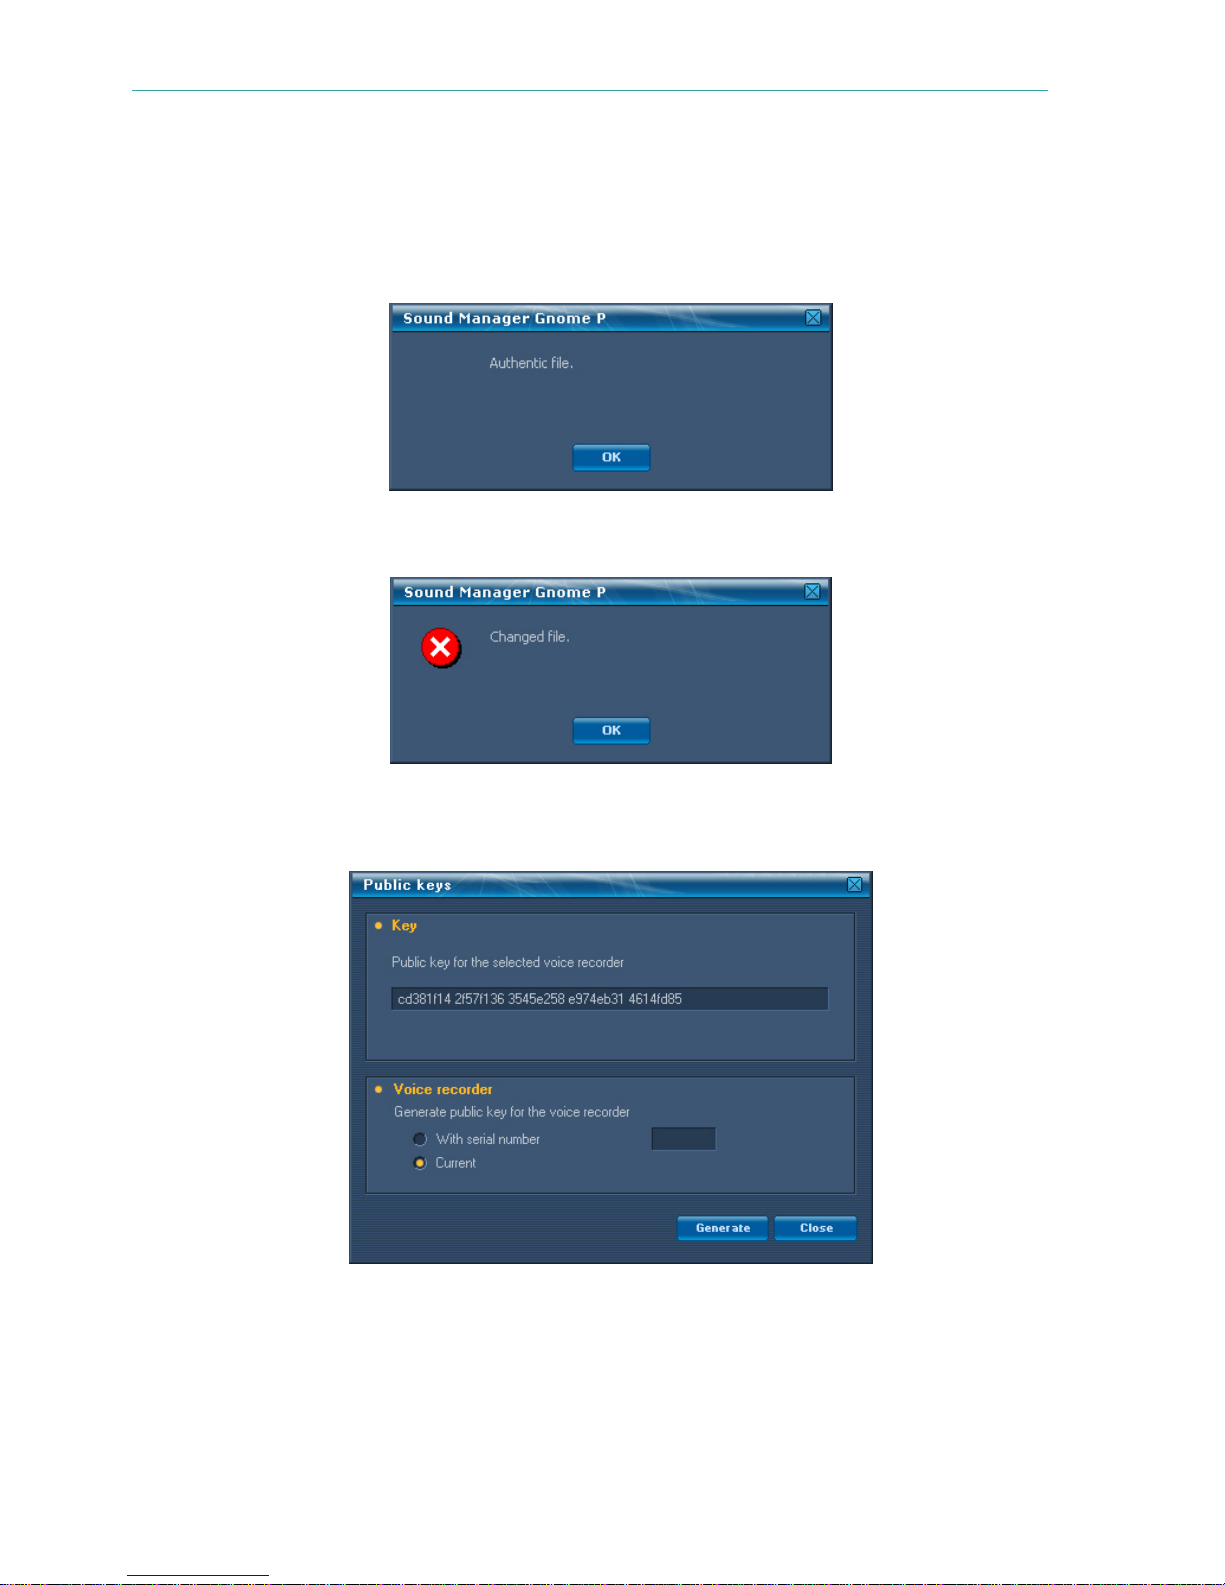
Any digital signature software can be used for verifying a digital signature. To verify the
authenticity of the sound recording by means of Sound Manager select Service->Authen-
ticate. The window shown at Figure 7.4.1 will be displayed.
Figure 7.4.1 Recording authentication window
21
Page 22
Gnome P. User Guide
Enter the file names of the recording and digital signature, the serial number of the
voice-recorder used for recording (or choose “Current”), and press Check button.
If the recording is authentic, the following message will appear:
Otherwise you will see:
To verify signature by other means, you should have a public key. To generate a public
key use the Service->Public Keys… command.
Figure 7.4.2 Public key generation window
In the displayed window (Figure 7.4.2) enter the serial number of the voice-recorder
used for recording (or choose “Current”) and press the Generate button. In the Key groupbox the generated public key will appear. For each Gnome P device the public key is
unique.
22
Page 23

Gnome P. User Guide
8. OPERATING CONDITIONS
●
Temperature: from -5 to +40°C.
●
Relative humidity (non-condensing): less than 95% at +30°C.
9. TRANSPORTATION AND STORAGE
Transportation is carried out by all transport vehicles at the temperature between -50°C
and + 60° C with protection from direct sunlight, atmospheric precipitation and excessive
mechanical vibration.
Shelf life in warm conditions at temperature between +1°C and +40°C and humidity below 80% is 5 years.
10. WARRANTY AND TECHNICAL SUPPORT
Warranty
The manufacturer guarantees that the issued devices conform to the technical requirements, whereby the user observes the conditions and regulations of operation, storage and
transport, for a period of 24 months from the date of sale.
During the warranty period the manufacturer is obliged to repair the devices at no
charge.
Repair of devices disabled as a result of improper use, storage and/or transport, as well
as repair after the time of the guarantee has expired, may be provided by the manufacturer
according to a separate agreement.
Technical Support
Our developers are always ready to assist you. In case of any questions, please don’t
hesitate to contact us:
Tel: +7 (812) 325-8848
Fax: +7 (812) 327-9297
E-mail: help @speechpro.com
Web-site: http://www.speechpro.com
We hope that you will like our product. Please note that we are always ready to develop
any customized solution for you. Any questions regarding our products and development
costs should be addressed to our Sales department: [email protected].
23
Page 24

Gnome P. User Guide
11. REGISTRATION CERTIFICATE
Pocket digital stereo voice-recorder Gnome P H368-2
Pocket digital stereo voice-recorder Gnome P H368-4
serial number
0907/
;
conforms to technical requirements and is declared suitable for use.
Adjustment conducted by
Stamp
place
________________
2007. . .
S.A. Sokolov
subscription year, month, day full name
Date of issue
Stamp
place
________________
2007. . .
T.B. Veis
subscription year, month, day full name
01-090707
24
 Loading...