

Page 1
Owner’s Manual
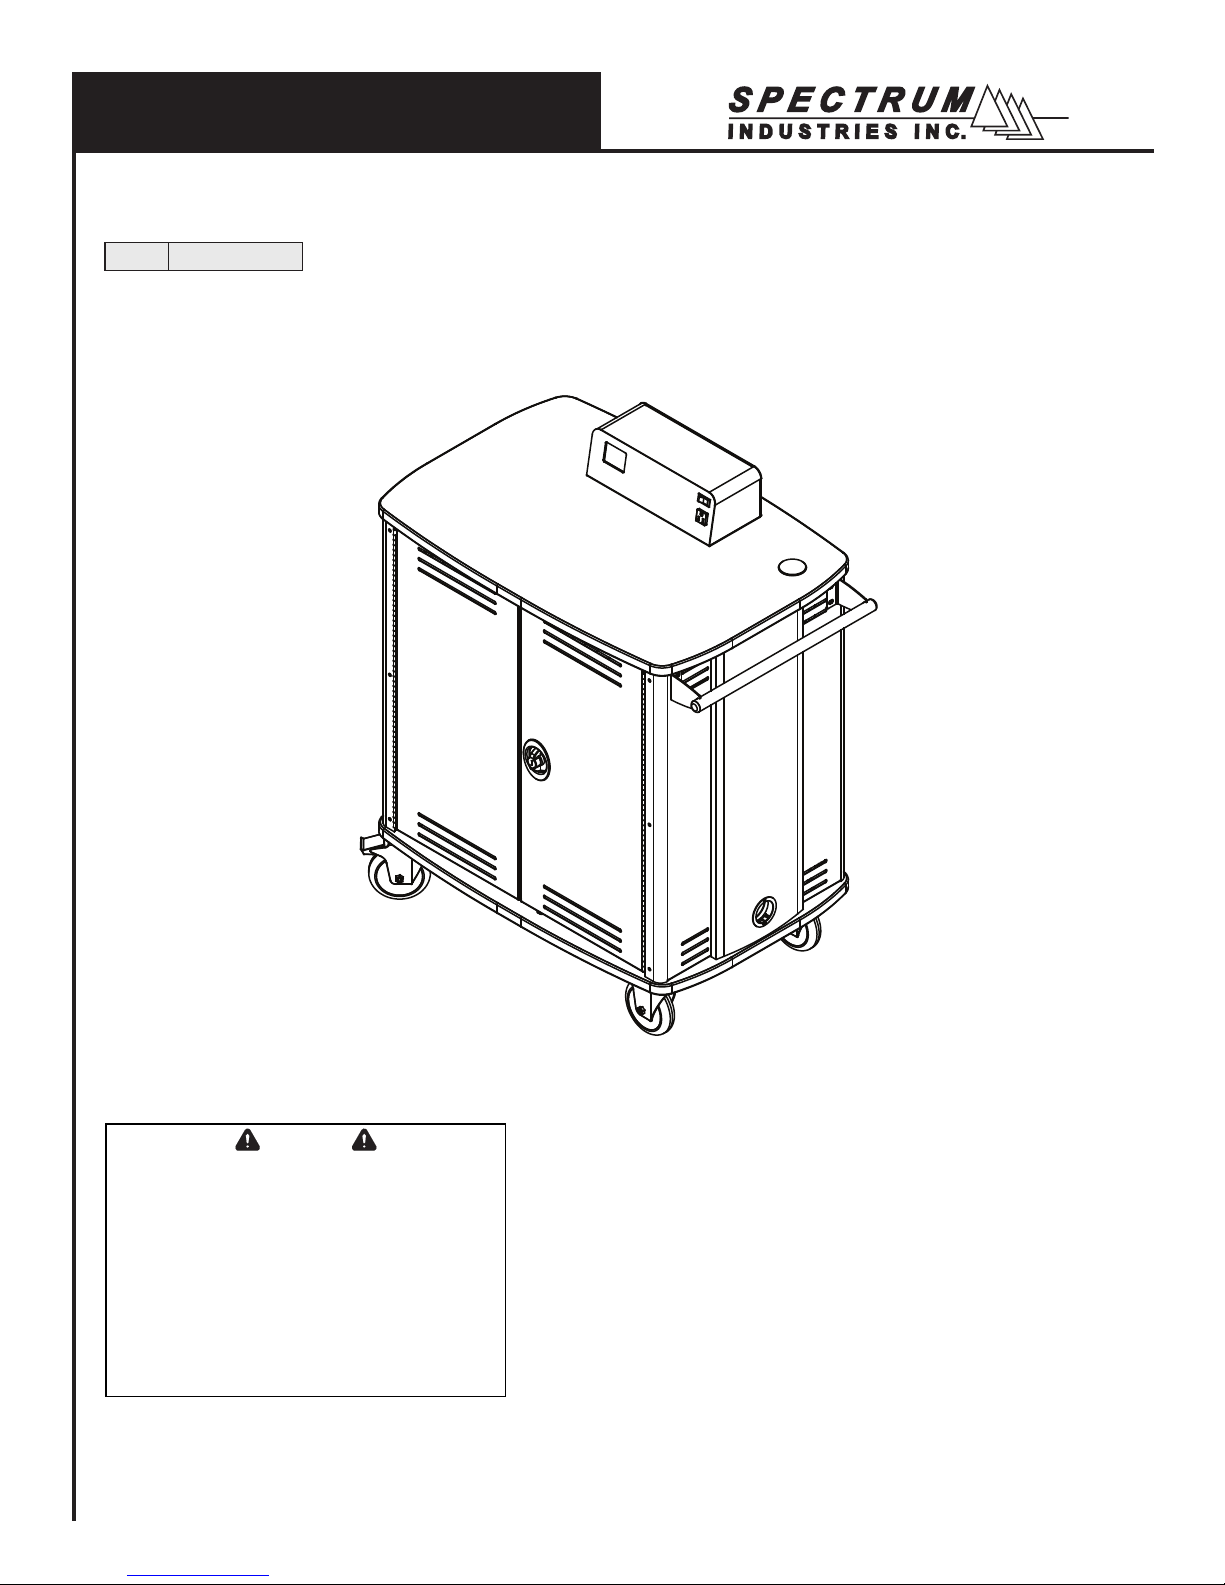
InTouch 20 Cart with Sync / Charge™ System for iPads
55437 with cord wraps
®
Important
Before using this product:
• Read this manual
• Comply with all safety and operating instructions
• Ensure all parts and correct quantities are included
Any parts damaged during shipment must be reported
within 15 days of receipt. To report information regarding missing parts or damage, to purchase parts or
accessories, or if you have any questions, please
contact us.
Thank you for purchasing Spectrum products!
Spectrum Industries, Inc
925 First Avenue, Chippewa Falls, WI 54729 USA
800 235 1262
715 723 6750
www.spectrumfurniture.com
0113214R8 Page 1 of 12
Page 2
Safety
For added safety, plug the unit into a grounded three-prong outlet controlled by a
• Read this owner’s manual before assembly or operation.
• Do not allow children to move cart.
• Move slowly and carefully when mobile.
• For indoor use only. Do not install or store the unit where it will be
exposed to weather. Keep dry.
• Do not block ventilation openings.
• Avoid loading equipment unevenly into the unit - uneven weight
distribution could be a hazard when the unit is mobile.
• Do not allow anyone to sit, stand, or climb on the cart.
• Keep the unit powered OFF before plugging or unplugging from outlet.
• Be sure devices are turned OFF before plugging into cart.
• Ensure total device / equipment load does not exceed 12-amps per power unit.
• Do not plug the power cord into an extension cord.
• Inspect power cords before each use.
• Do not use power cords that are damaged.
• Do not unplug by pulling on the cord.
• Do not step on, drive over, drag, or place objects on the power cord.
•
GFI (Ground Fault Interrupter) circuit breaker.
Hardware Package Contents
(4) 052605
1/4-20 x 15mm JC Bolt
(1) 025039
4mm hex wrench
Assembly / Setup
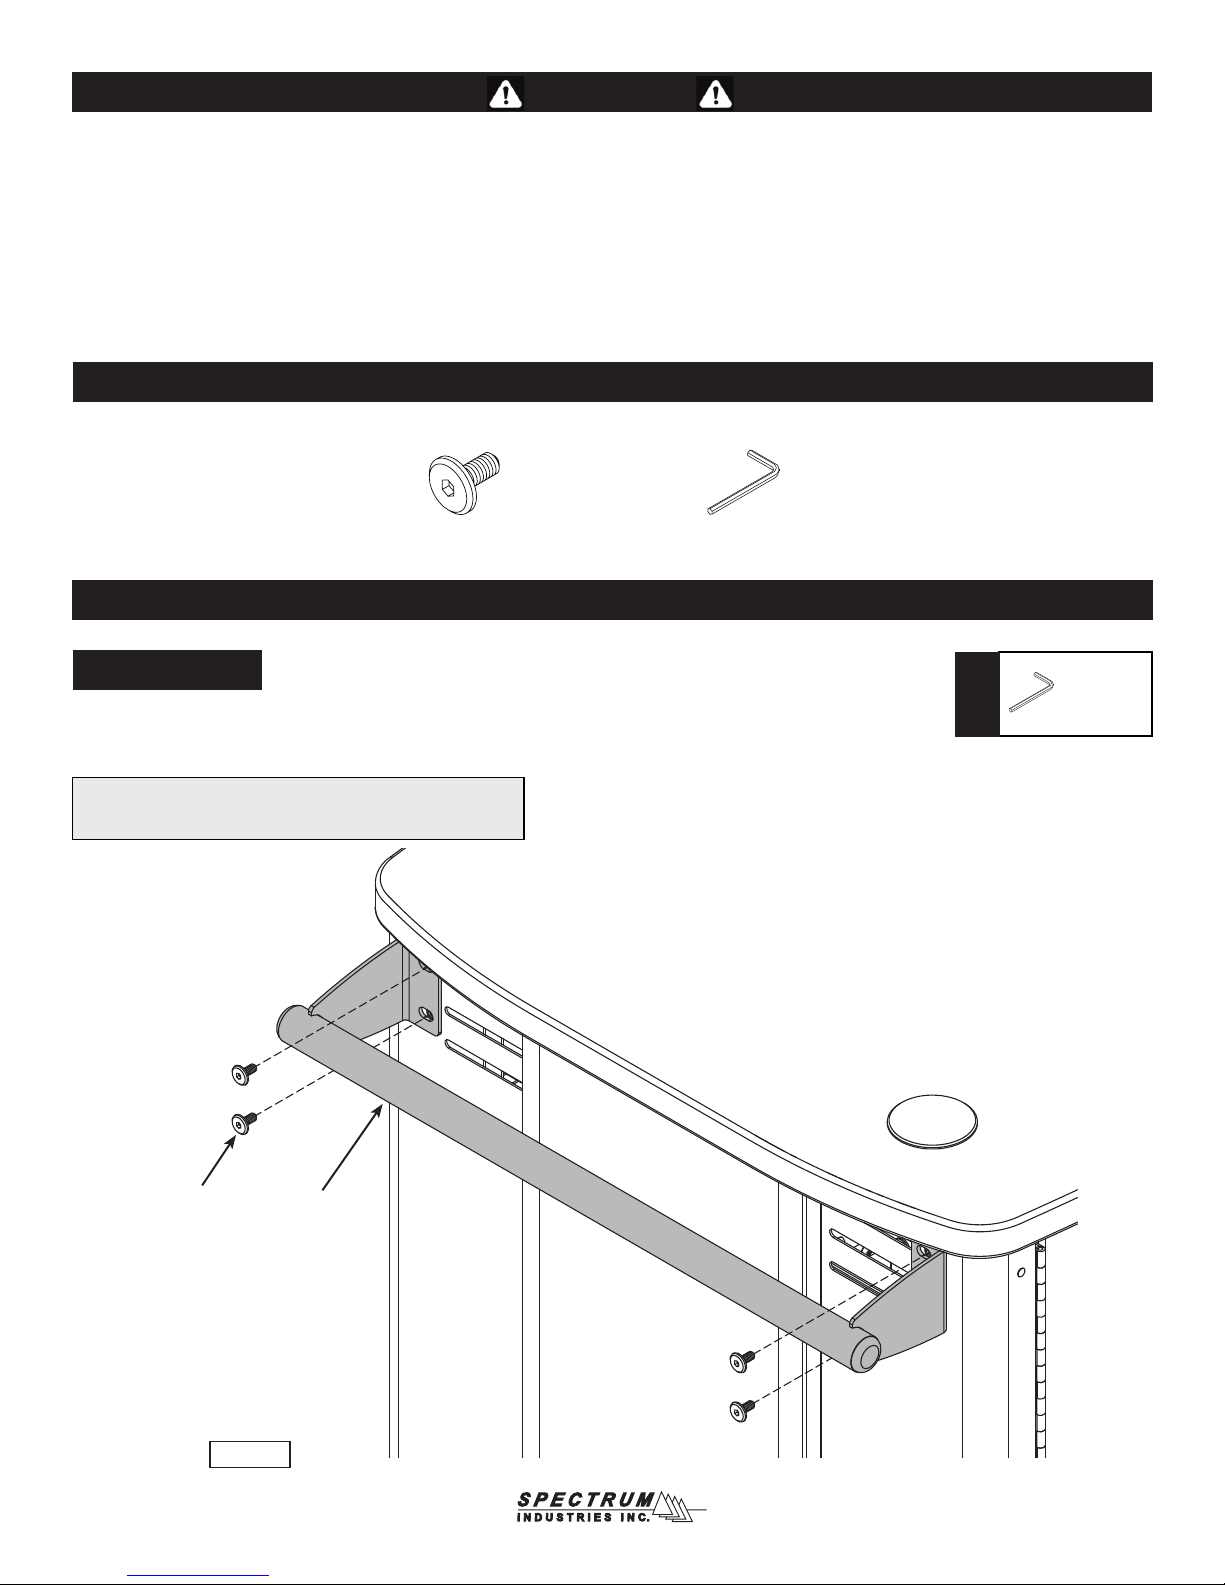
Attach handle
1. Determine which side of the cart the handle is to be mounted.
2. Attach the handle to the cart with (4) 1/4-20 x 15mm JC bolts and tighten securely. Figure 1.
Tools
Required
4mm hex
wrench
(included)
Note: Attaching the handle on the same side of the cart as the
2 swivel balloon wheels will provide more control when mobile.
1/4-20 x 15mm
JC bolts
(4 required)
handle
Figure 1
0113214R8 Page 2 of 12
Page 3
Wire management tray position
Wire management trays
The trays can easily be moved to the upper position to provide an additional
7
⁄16” (1.11 cm) of height to the tablet device storage area below if needed.
The trays are factory-installed in the lower position to provide additional
clearance for chargers and wires in the tray. In this position, the trays accommodate most brick-style chargers on the market.
Upper tray position:
Lower tray position:
(factory-installed)
7
⁄8” (2.22 cm) charger height available
9
⁄16” (24.26 cm) device-height available
9
5
1
⁄16” (3.33 cm) charger height available
1
⁄8” (23.18 cm) device-height available
9
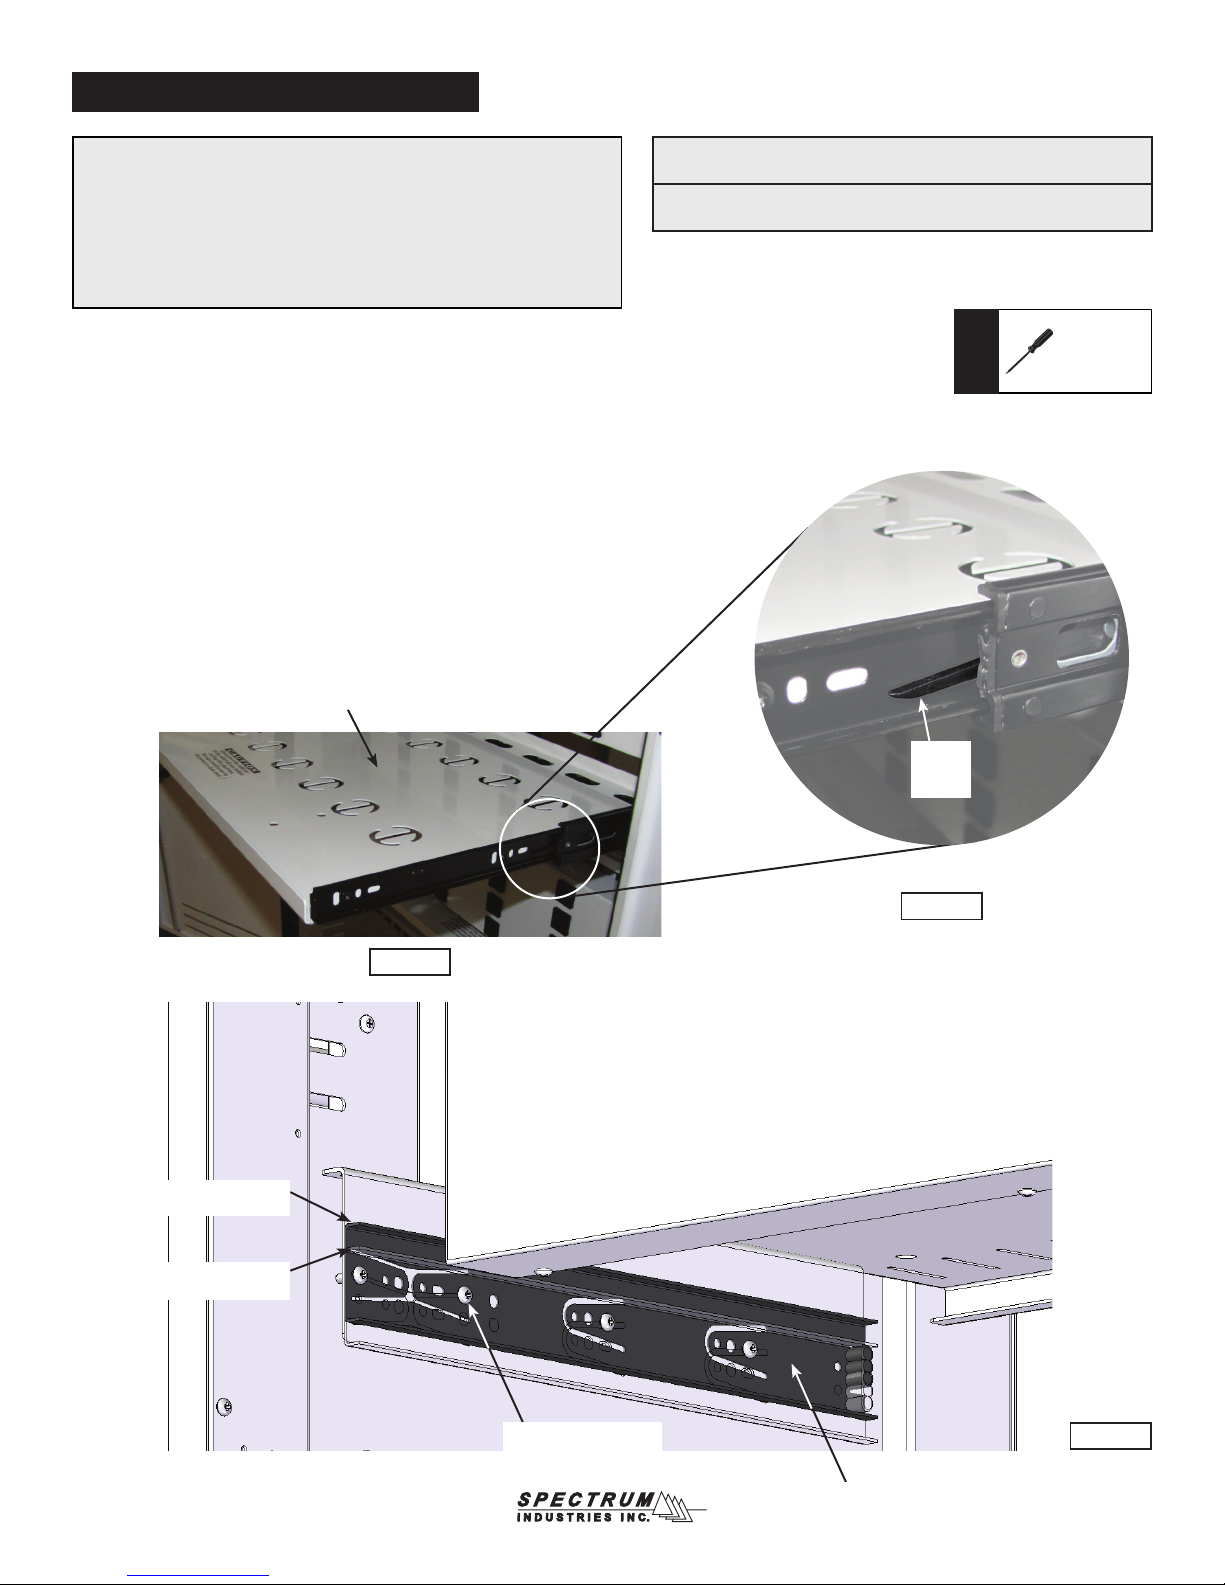
To raise the tray:
1. Open all doors as far as possible.
2. Pull out one of the trays from the power-side. Figure 2.
3. Locate the black plastic slide release levers on each side of the tray. Release the levers while
pulling the tray out from the slides. Figure 3. Set the tray aside.
4. With a Phillips screwdriver, remove the existing (4) 8-32 x 1/2” PH thread-cutting screws from
one of the outer slides. Figure 4. Move the outer slide to the upper position and attach using
the (4) previously removed 8-32 screws. Repeat this same procedure on the other slide.
5. To re-install the tray, re-align the inner and outer tray slides and push the tray back into place.
6. Repeat these same steps on the second tray (InTouch 40 only).
wire management tray
plastic
release
lever
Figure 3
Tools
Required
Phillips
screwdriver
(use for taller tablet devices)
upper position
lower position
(factory-installed position)
Figure 2
8-32 x 1/2” PHMS
(4 required per slide)
Figure 4
outer slide
0113214R8 Page 3 of 12
Page 4
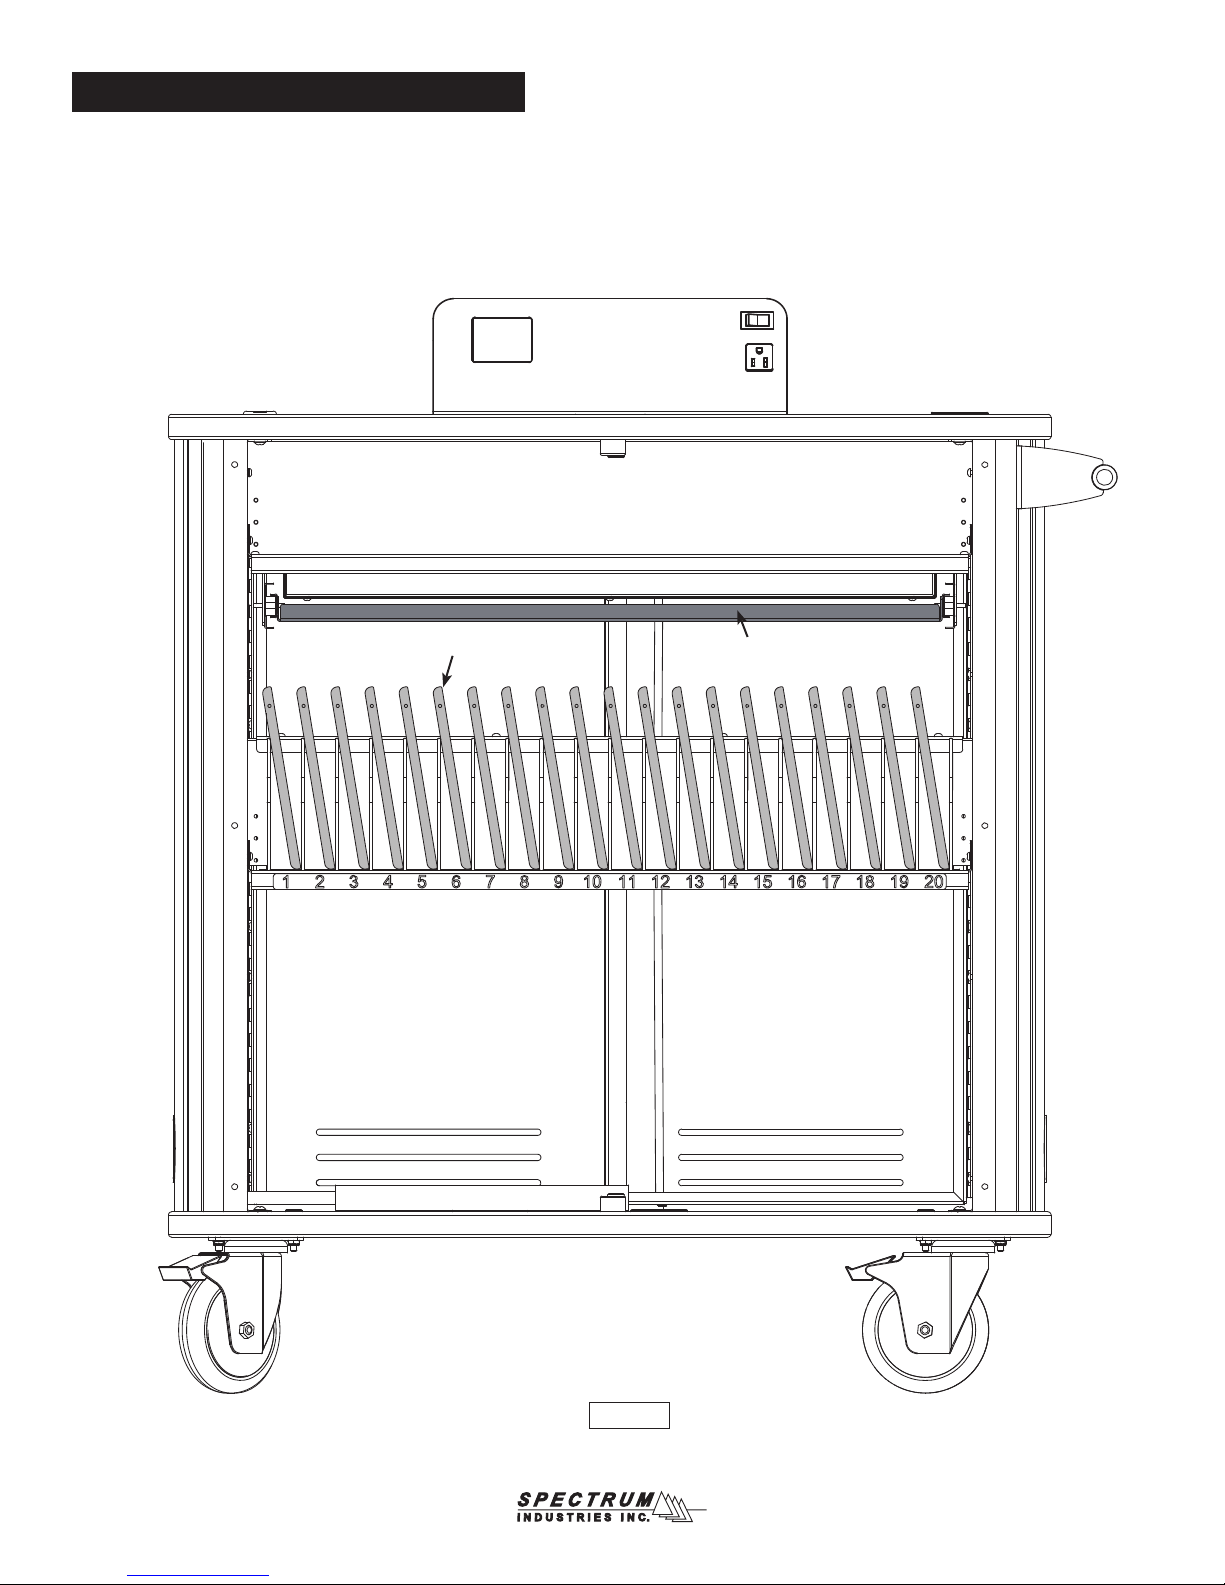
iPad charger wiring (student-side)
1. Open the student-side doors.
2. Place up to 20 iPads in the cart. Figure 2.
3. Leave doors open.
instructor storage area
iPads
wire management tray
(pulls out from instructor-side)
Figure 2
0113214R8 Page 4 of 12
Page 5

iPad wiring (instructor-side)
1. Open the instructor-side doors and pull out the wire management tray(s).
2. Measure out the length of USB cord shown in Figure 3A for each iPad. (approximately 10-11”)
3. Insert the cord end (wide connector) through the opening in the tray and feed through the 10-11” of cord length. Figure 3B.
4. Secure the cord to the tray and wrap excess using the cord management cutouts in the tray. Make sure 10-11” of cord length remains below the tray.
5. Check the student side after the rst wire is set to make sure each iPad can be plugged in without tension on the wire, then plug the USB cord into
one of the USB ports located on the power unit above the tray.
6. Continue this process with each remaining iPad.
insert cord through
tray opening to iPad
Wire
Management
Tray
F. Repeat this procedure on the remaining iPad cords. Figure 7D.
10-11”
Point A
Figure 3A
Point A
plug USB
in here
secure
here
Figure 3C
Figure 3B
G. When the tray is closed, the cords on the student-side (opposite side) should look like Figure 6E.
Figure 3D
CAUTION
ALWAYS UNPLUG USB CORDS
FROM iPADS BEFORE PULLING
OUT AND ACCESSING WIRE
MANAGEMENT TRAY.
wide connectors
Figure 3E
0113214R8 Page 5 of 12
Page 6

Wire management trays
InTouch 20 Cart
section view
The trays can easily be moved to the upper position to provide an additional 7⁄16” of height to the
tablet devices below if needed.
The trays are factory-installed in the lower position to provide additional clearance for chargers
and wires in the tray. In this position, the trays accommodate most brick-style chargers on the
market.
iPad USB cord
Upper tray position: 7⁄8” charger height available
99⁄16” device-height available
Lower tray position: 15⁄16” charger height available
(factory-installed) 91⁄8” device-height available
wire
management
tray
iPad
Figure 3F
0113214R8 Page 6 of 12
Page 7

Sync / Charge & USB power unit wiring
sync / charge unit
power
plug
blue
wire
white
wire
USB cable
(5 per USB
power unit)
2-amp auxiliary
outlet
plug to wall outlet
USB power unit
USB ports
for iPads
power
plug
white wire
blue wire
Figure 4
0113214R8 Page 7 of 12
Page 8

Sync / Charge™ Unit
?
?
X
?
?
X
?
1
:
30
1:29:56
?
? ?
X
?
?
X
?
1
:
30
1:29:56
?
? ?
?
X
?
?
? ?
X
?
?
? ?
X
?
?
? ?
X
?
?
? ?
X
?
1
:
30
1:29:56
?
X
?
1
:
30
1:29:56
?
USB port
power switch
auxiliary outlet
(2 amp)
touch screen intro
on power up
Note: For best syncing results, use an Apple
Mac product as the host computer with enough
memory to download to iPads. Windowsbased products have limitations on quantity of
iPads they can sync at one time.
Note: All cables should
remain plugged in while
power is present. If cables
are removed and reconnected, the power must be
reset to the host computer
and cart.
USB
cable
Plugging a host computer USB cable into
the side USB port at any time while the
unit is powered on will cause the system to
switch to Sync Mode. Unplugging the USB
cable will return system to Charge Mode.
1:29:56
If only one bank is plugged in and detected
(InTouch 20 Cart), the Single Bank Charge
Mode is displayed until the host computer is
plugged in.
If two banks are plugged in and detected
(InTouch 40 Cart), the Dual Bank Charge
mode is displayed until the host computer
is plugged in. Charging will cycle
between banks at 15 minute intervals.
Press the ‘A’ or ‘B’ battery icon hold charge
on either bank and discontinue cycling.
Press the small battery (charge) icon to
return to the Dual Bank Charge Mode.
X
:
30
1
• Syncs up to 40 iPads at once
• Can be set from 30 min to 9.5 hrs by
touching arrows (default setting: 30 min)
• Shows countdown in minutes
• Switches to Charge Mode after time
expires or battery (charge) icon button
is pressed
Note: Be sure to allow enough time
on the automatic sync time-out for
all downloading and syncing to be
completed to iPad’s.
Sync Mode Timer
X
To access the help screen, press in the lower
right corner. When the help screen is displayed,
the system remains on and continues operation in
Charge Mode. Press to return to the previous
screen.
X
To access the help screen, press in the lower
right corner. When the help screen is displayed,
the system remains on and continues operation
in Sync Mode. Press to return to the previous
screen.
X
0113214R8 Page 8 of 12
Page 9

Divider panel reconguration
The divider panels can be removed or recongured to
accept varying widths of tablets devices.
1. To adjust or remove the dividers, use a Phillips screwdriver to remove the
(4) 8-32 x 1/2” PHM screws securing the divider stop bracket. Figure 5.
2. Adjust / remove the dividers as necessary.
3. Replace the bracket and PHM screws. Tighten screws securely.
Door stop adjustment
divider stop
bracket
Tools
Required
Phillips
screwdriver
Figure 5
If necessary, the offset door stop can be rotated slightly to adjust
the closed position of the doors and lock rods.
1. To rotate, loosen the JC bolt slightly with a 4mm hex wrench. Figure 6.
2. Rotate the door stop until the door is positioned correctly.
3. Re-tighten the JC bolt securely.
Wheel operation
Two directional, swivel locking 5” directional balloon wheels are provided and can be rotated
and locked at 180° intervals to be rigid, or unlocked to be swivel. This provides control when
transporting between classrooms, while allowing maneuverability in tight spaces.
1. To lock the wheel direction, align each wheel perpendicular to the handle and
depress the brake lever. Figure 7. (Each directional wheel can be locked at
180° intervals)
2. To resume swivel operation, unlock each brake lever.
Note: Wheel rotation cannot be
locked on directional wheels. To
prevent the cart from rolling, lock the
standard locking balloon wheels on
the other side of the cart.
Moving the cart
• Unplug all power cords.
• Secure cords around the cord wrap brackets. Figure 8.
• Close and lock doors.
• Remove any items from the top of the worksurface.
• Unlock the wheels.
• Push the cart slowly and carefully. Do not move over uneven or
irregular surfaces.
• Do not allow children to move.
• Lock the wheels after moving.
cord wrap
brackets on
lower side of
cart
Figure 6
Tools
Required
power unit cord
4mm hex
wrench
(included)
brake lever
Figure 7
Parking the cart
• Do not park the cart in areas of heavy trafc.
• Do not run power cords across hallways, classrooms, or other areas
where they will be walked on.
• Do not leave cart unattended in areas where children have access.
• Keep doors closed and locked whenever the cart is unattended or
parked for charging or storage.
• Keep wheels locked whenever the cart is unattended.
Figure 8
0113214R8 Page 9 of 12
Page 10

Options
Pull-out instructor shelf
for instructor laptop or storage
2511⁄16”W (65.25 cm) x 113⁄8”D (28.89 cm)
x 21⁄2”H (6.35 cm) (available height)
55442
Additional steel handle
mounts on left or right, (max 2 per unit)
203⁄16”W (51.28 cm)
55393
0113214R8 Page 10 of 12
Page 11

Symptom Problem Solution
On / off switch does not light up, and/or touch
screen remains off
Troubleshooting
Note: For best syncing results use a high-powered Apple Mac
product as host computer when downloading your les to the
iPads through Apple Congurator software.
Make sure all power cords are connected and
No power to control box or system has
exceeded 15-amp breaker capacity.
plugged into a ‘hot’ wall outlet. Turn on/off
switch off and back on to reset breaker. Power
cord reel also has a breaker button on the end
of the cord. Push button to reset.
On / off switch lights up but touch screen
remains off, or no power to USB ports when
charging.
Charging bank of 20 iPads:
Only one bank receiving power during charge
cycle
Neither bank seems to be getting power but
touch screen status shows power is cycling.
Syncing:
After host computer is connected, software
senses and shows fewer iPads than are
connected
Slow / interrupted downloads or system seems
to be “thinking”
Can only sync 7-8 iPads at a time Using a windows-based laptop to sync iPads Use an Apple product as host computer.
Faulty touchscreen or
connection inside sync / charge unit
Possible loose USB connections
Low battery or memory in host laptop
prevents efcient downloading
iPad is not charged
Call Spectrum
Check all connections from the sync / charge
unit to each bank of 20 ports-see Figure 5. Also
check all USB connections from each bank to
each iPad to be sure the USB cables are fully
plugged-in.
Be sure host computer is fully charged, or use a
faster host computer.
Be sure all iPads have a charge or are charging.
If not charged, set 1/2 hr for automatic cycle
charging to provide enough charge to allow time
to sync. If charging, wait a few minutes for iPad
to report.
Only one or a few iPad(s) fail to report
connectivity
Touch screen ashes and continually resets
Loose or defective USB cable
Corrupted iPad
(Plug directly into host computer to test.)
Power connections to the top sync / charge unit.
(Power and/or blue & white data
cables loose or defective)
Completely unplug and plug back in USB cable
from device and cart. If issues persist, switch
with a new, or known operational cable.
Unplug iPad. Hard boot (completely power
cycle) device. Re-connect iPad to cart.
Check all power cables in back of unit for
connectivity. Unplug cart from power source at
wall. Unplug and re-plug-in power cables, and
white / blue wires. Plug cart back into power at
wall and restart system.
0113214R8 Page 11 of 12
Page 12

Warranty
WE WILL MAKE IT RIGHT FOR YOU!
Spectrum is committed to provide complete customer satisfaction. Each of our products is manufactured from the best materials available and each
product is stringently monitored throughout the production process through our P.A.C.E. program (Product Assurance to meet Customer Expectations).
We expressly warrant that Spectrum products will be of good quality and workmanship and free from defect for the period set out in the warranty table
below from the date of delivery. This warranty shall not apply to defects or damage resulting from misuse, abuse, neglect, improper care, modication
or repair not authorized by Spectrum, or any other cause outside the control of Spectrum. Spectrum will, at its sole option, either repair or replace the
defective product.
This warranty is exclusive; no other warranty, written or oral, is expressed or implied. This warranty is given by Spectrum to Buyer and to no other per-
son or legal entity. No Spectrum dealer, distributor, agent or employee is authorized to make any modication or addition to this warranty.
NOTWITHSTANDING ANYTHING TO THE CONTRARY, SPECTRUM WILL NOT UNDER ANY CIRCUMSTANCES BE LIABLE FOR INDIRECT OR
LIQUIDATED DAMAGES, INCLUDING CONSEQUENTIAL, INCIDENTAL AND SPECIAL DAMAGES. IN NO EVENT SHALL SPECTRUM’S LIABILITY, WHETHER UNDER CONTRACT OR WARRANTY, IN TORT OR OTHERWISE, EXCEED THE PURCHASE PRICE RECEIVED BY SPECTRUM
FOR THE PRODUCT AT ISSUE AND “RECALL ACTION” EXPENSES. SPECTRUM SHALL NOT BE SUBJECT TO ANY OTHER OBLIGATIONS
OR LIABILITIES, WHETHER ARISING OUT OF BREACH OF CONTRACT, WARRANTY, TORT (INCLUDING NEGLIGENCE AND STRICT LIABILITY) OR OTHER THEORIES OF LAW, WITH RESPECT TO PRODUCTS SOLD OR SERVICES RENDERED BY SPECTRUM, OR ANY UNDERTAKINGS, ACTS OR OMISSIONS RELATING THERETO.
Our Customer Service Department is ready to provide immediate attention to any questions, comments or concerns. They are available to answer your calls
Monday through Friday from 7 am to 5 pm CST. In addition your product comments or concerns are welcome via e-mail at: spectrum@spectrumfurniture.com.
Warranty Table
Item Warranty Period
• Adjustable Crank/Electric Desk Legs
• Flat Panel Desk Gas Cylinders
• Adjustable Height Chair Parts – including frames,
gas cylinders, wood and plastic parts, and control
handles Adjustable Height Chair Parts Casters
• Adjustable Height Chair Upholstery
• In-Stock Upholstery
• Graded-In Fabrics and Customer Owned Material
• Height Adjustable Columns and Lifts
• General Use Casters
• Electrical
• Keyboard/Mouse Trays
• Flat Panel Monitor Arm – General Parts
• Flat Panel Monitor Arm – Gas Cylinders
• Computer Desk Chassis
• Cart Chassis
• Lectern Chassis
• 1 Year
• 7 Years
• 2 Years
• 2 Years
• No Warranty
• 1 Year
• 5 Years
• 2 Years
• 10 Years
925 First Avenue, PO Box 400, Chippewa Falls, WI 54729 Ph: 800-235-1262, 715-723-6750 Fax: 800-335-0473, 715-738-2309
E-mail: spectrum@spectrumfurniture.com web: www.spectrumfurniture.com
0113214R8 Page 12 of 12
 Loading...