

Page 1
Assembly Instructions
Important
Before you begin, read and comply with all safety and operating instructions,
and ensure all parts and correct quantities are included.
Any parts damaged during shipment must be reported within 5 days of receipt.
To report information regarding missing parts or damage, to purchase parts
or accessories, or if you have any questions, please contact us.
www.spectrumfurniture.com
800-235-1262, 715-723-6750
Thank you for purchasing Spectrum products!
(5) 0100167
8-32 x 1/2” PH
Thread-cutting screw
(2) 037542
#8 x 5/8” PHSM
(1) 0109616
29” Solid
locking door
(2) 026296
Recessed bumper
with washer
(2) 0107139
Offset door stop
(1) 025039
4mm Hex wrench
Note: The 55405 locking door can be used on 36”H or 42”H Inspiration
lectern versions.
• The 42”H lectern is commonly equipped with the door and keyboard
tray options.
• The 36”H lectern can be equipped with the door or keyboard tray.
Not both at the same time.
• If the door is used on a 42”H lectern without the optional keyboard tray,
Spectrum recommends installing a 4RU rack-mount blank above the
door to maintain security.
screw
(2) 0102297
7mm x 30mm JC
Wood screws
(1) 041943
1/4-20 Locknut
(1) 026059
1/4” Washer
(1) 025069
Glide wrench
36”H Inspiration
Lectern
Instructor-side locking door
for Inspiration Lectern
55405
Inspiration lectern
right side panel
Tools Required
42”H Inspiration
Lectern
Phillips
screwdriver
4mm Hex wrench
(included)
Glide wrench
(included)
or 7/16” wrench
(for 42”H lectern)
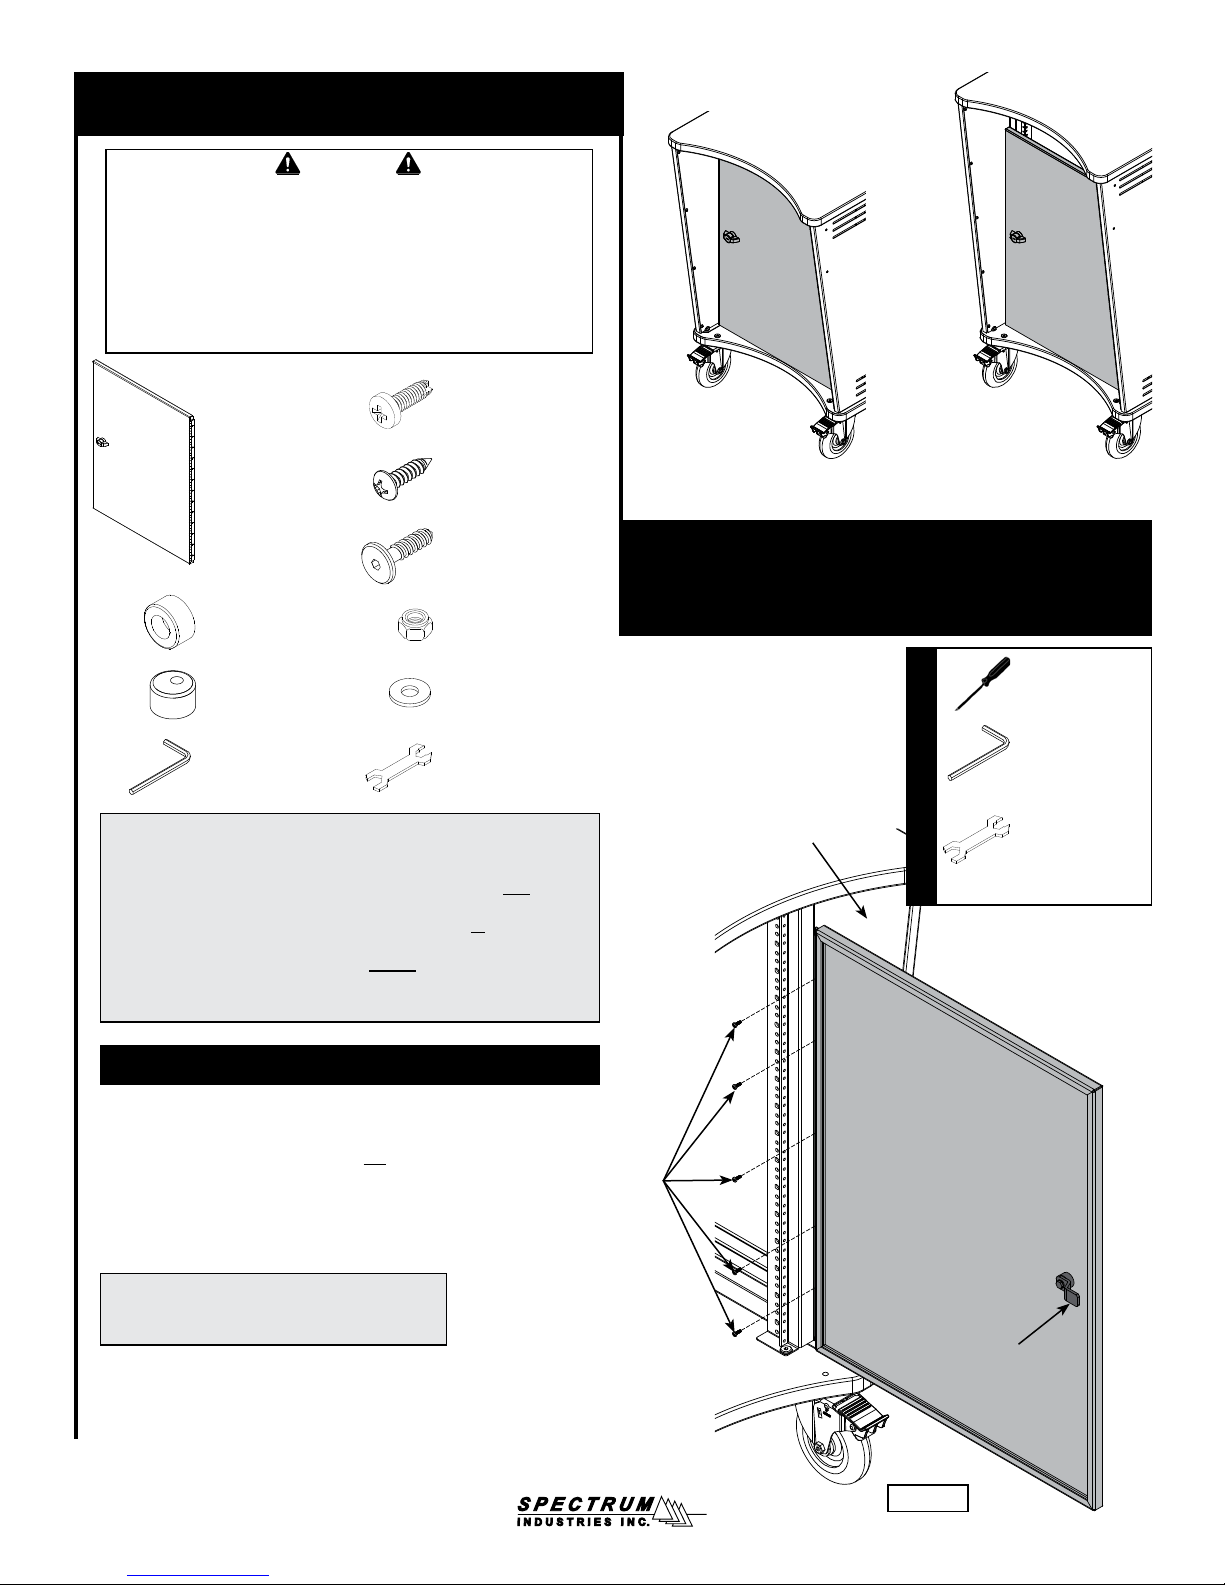
1. Install door to lectern
1. Align and attach the door hinge to the right side panel mounting
holes with (5) 8-32 x 1/2” PH thread-cutting screws. Figure 1.
2. Tighten screws securely, but do not overtighten.
Note: If you are using an electric drill driver, be
careful not to overtighten the screws. Use a low
torque-setting to prevent damage to the threads.
Locking door
8-32 x 1/2” threadcutting screws
(5 required)
Lock pawl
Figure 1
0109742R3 Page 1 of 3
Page 2
2. Install recessed bumpers
1. With the door closed, remove the (2) existing #8 x 5/8” PHM screws
from the right side panel. See Figure 2A for 36”H lecterns, see
Figure 2B for 42”H lecterns.
2. Install a recessed bumper into each open hole location with a #8 x
5/8” PHM screw.
3. Tighten screws securely, but do not overtighten.
Note: On 36”H lecterns, the upper
bumper will be installed in the top hole.
Recessed
Right
side panel
bumper
#8 x 5/8”
PHSM screw
Tools
Required
Note: On 42”H lecterns, the upper bumper
will be installed in the 2nd hole from the top.
Right
side panel
Phillips
screwdriver
Recessed
bumper
#8 x 5/8”
PHSM screw
Locking
door
Figure 2A
Recessed
bumper
#8 x 5/8”
PHSM screw
Locking
door
Recessed
bumper
#8 x 5/8”
PHSM screw
Figure 2B
0109742R3 Page 2 of 3
Page 3

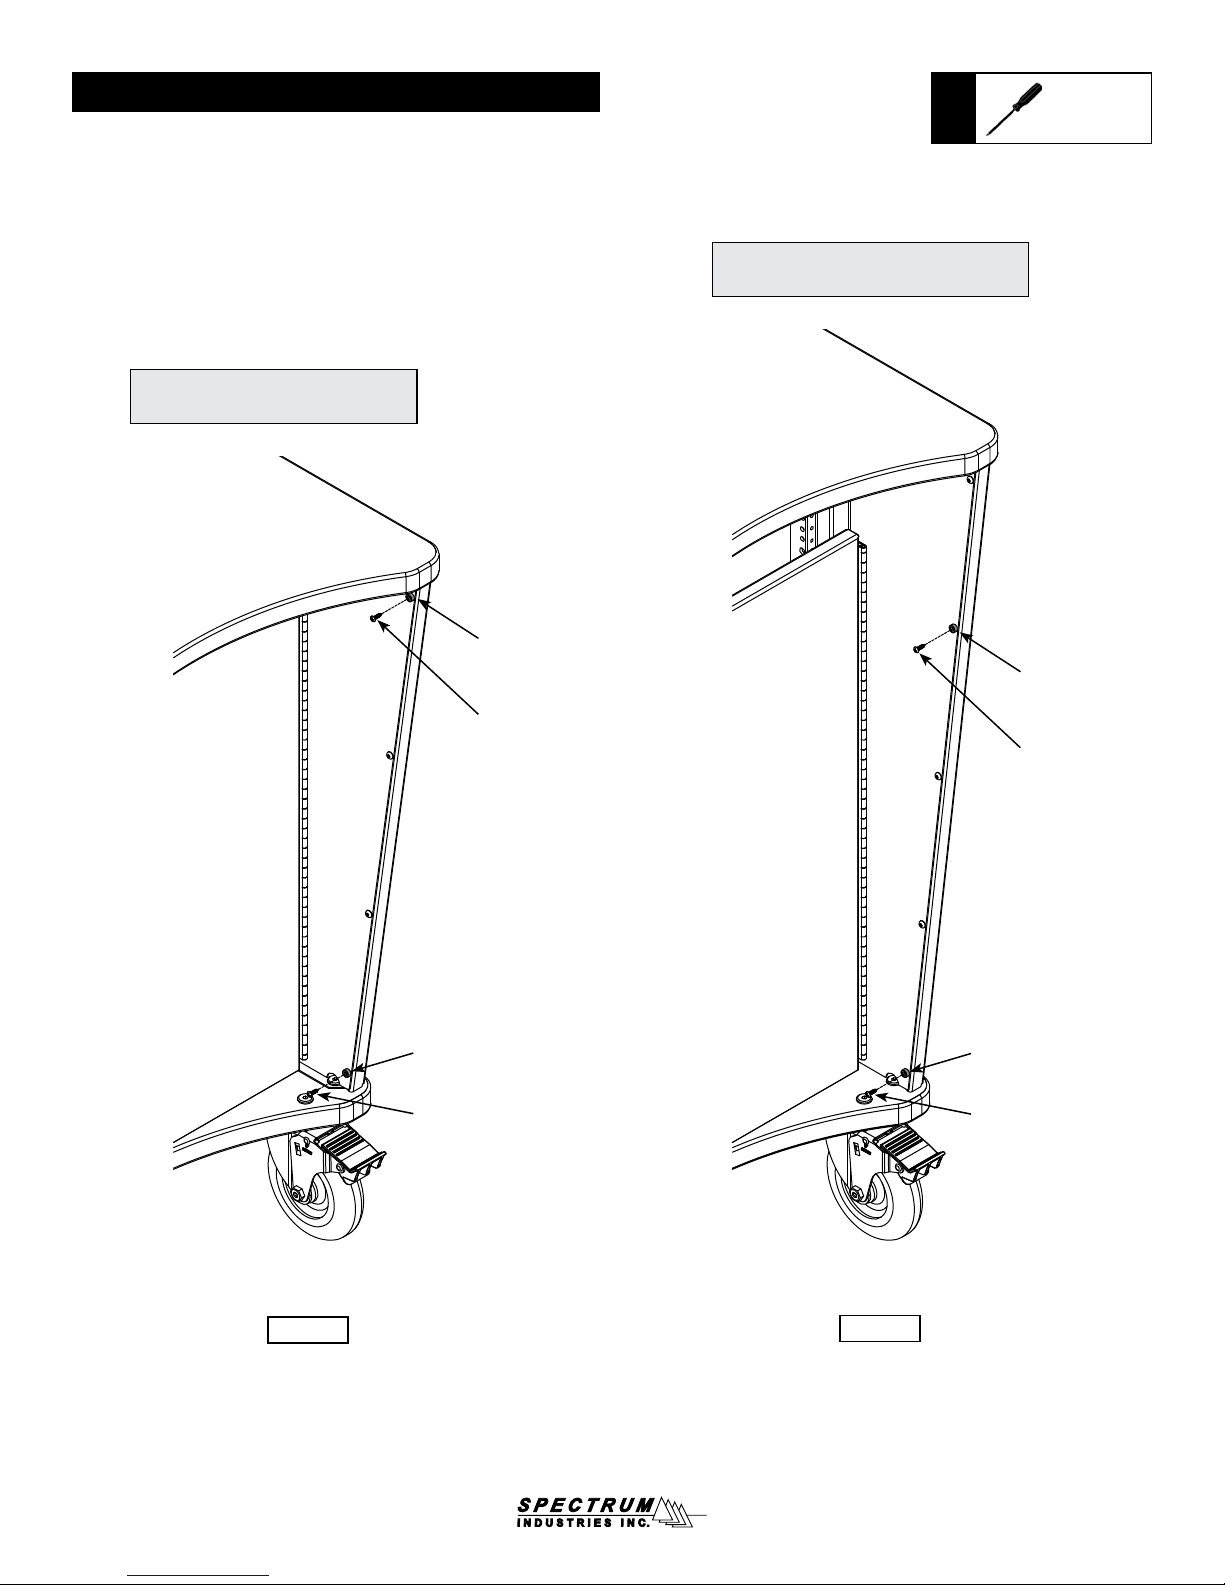
3. Install door stops
Tools
Required
4mm Hex
wrench
(included)
Glide wrench (included)
or 7/16” wrench
(for 42”H lectern)
1. On 36”H Inspiration lecterns, open the door and install the upper
door stop to the worksurface, and the lower door stop to the base
panel-each with a 7mm x 30mm JC wood screw. Figure 3A.
Note: On the upper door stop, use the 1/4”
washer between the worksurface and door stop.
1/4” Washer
Door stop
Worksurface
Left
side panel
Lock slot
7mm x 30mm
JC wood screw
1/4-20
Locknut
1/4” Washer
1. On 42”H Inspiration lecterns, open the door and install the upper door
stop through the notch in the left side panel with a 1/4” washer and 1/4-20
locknut. Figure 3B.
2. Install the lower door stop to the base panel with a 7mm x 30mm JC wood
screw.
Worksurface
Left
side panel
Lock slot
Door stop
7mm x 30mm
JC wood screw
Door stop
Base panel
4. Door stop adjustment
1. The door stop can be rotated slightly to adjust the closed position of
the doors. To rotate, loosen the JC screw (or upper door stop locknut
on 42”H lecterns) slightly with a 4mm hex wrench. Figure 4.
2. Rotate the door stop until the door contacts the upper and lower
bumpers at the same time when closed. Also be sure the lock pawl on
the door will align and engage with the lock slot in the left side panel.
3. Re-tighten the JC bolt (or locknut) securely.
Figure 4
JC screw
Figure 3BFigure 3A
Door stop
Tools
Required
7mm x 30mm
JC wood screw
Door stop
Base panel
4mm Hex
wrench
(included)
925 FIRST AVENUE, CHIPPEWA FALLS, WI 54729 / 800-235-1262 / 715-723-6750 / WWW.SPECTRUMFURNITURE.COM
© 2016 Spectrum Industries Inc., All rights reserved.
0109742R3 Page 3 of 3
 Loading...