

Page 1
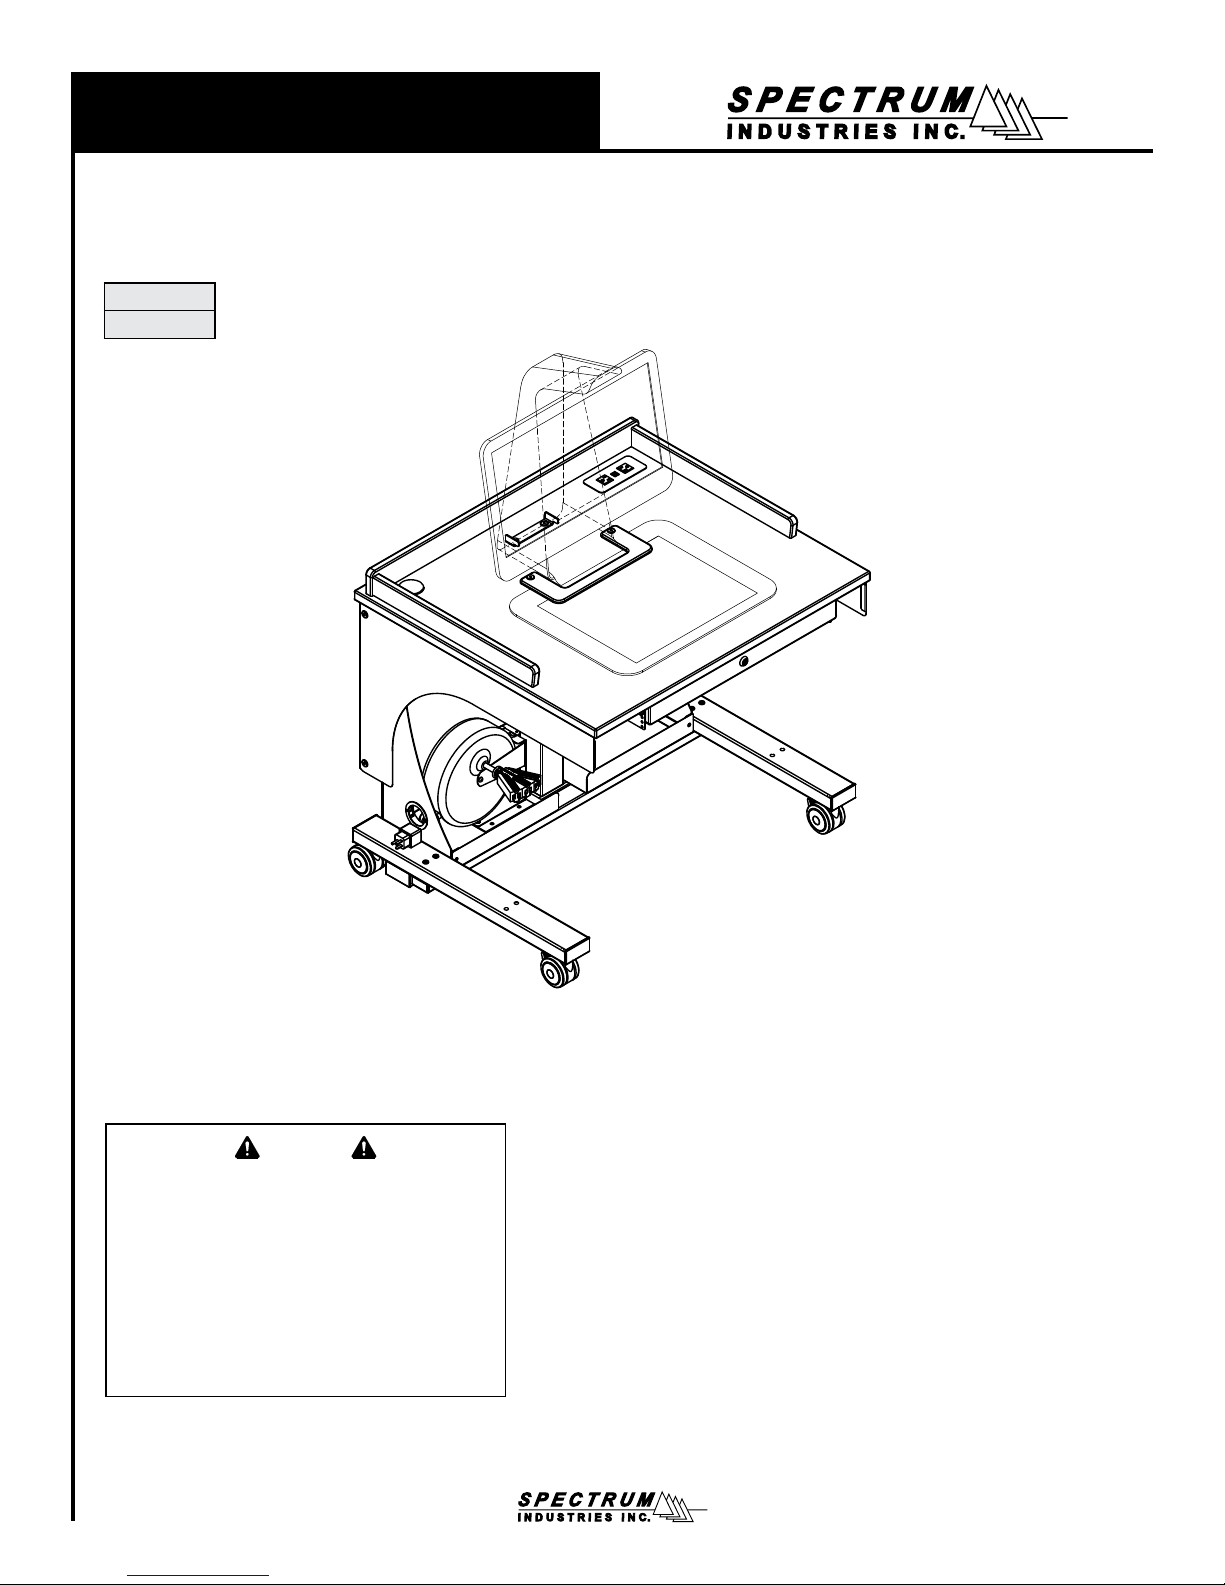
Owner’s Manual
Freedom One Sit-to-Stand (S2S) Workstation
For Sprout 1.55 by HP
55368-Q45
55368-Q46
®
, and Sprout Pro G2
Important
Before using this product:
• Read this manual
• Comply with all safety and operating instructions
• Ensure all parts and correct quantities are included
Any parts damaged during shipment must be reported
within 5 days of receipt. To report information regarding
missing parts or damage, to purchase parts or accessories, or if you have any questions, please contact us.
Thank you for purchasing Spectrum products!
Spectrum Industries, Inc
925 First Avenue, Chippewa Falls, WI 54729 USA
800 235 1262
715 723 6750
www.spectrumfurniture.com
0190103R2 Page 1 of 8
Page 2
IMPORTANT SAFETY INSTRUCTIONS:
Important Safety and Care Instructions
DANGER - Read all instructions before using
DANGER - General Safety:
1. SAVE THESE INSTRUCTIONS
2. Do not allow children to move.
3. Do not leave unit unattended in areas where children have access.
4. Keep unit locked when unattended.
5. Proceed slowly and carefully when moving.
6. Close supervision is necessary when this furnishing is used by, or
near children, invalids, or disabled persons.
7. For indoor use only. Do not install or store where it will be exposed to
moisture.
8. Do not block the ventilation openings.
9. Avoid uneven loading of the equipment into the unit. Uneven weight
distribution could cause unit to tip when mobile.
10. Do not allow anyone to sit, stand, or climb on the unit.
11. When loading, place heavier objects near the bottom of the unit to
avoid tipping.
12. To clean dirty surfaces, use a damp, soft-cloth, or sponge, with mild
soap or detergent solution. Do not use harsh solvents or abrasives.
13. Never drop or insert any object into any opening.
14. This unit is intended for institutional, commercial use only.
15. Use this furnishing only for its intended use as described in these
instructions. Do not use attachments not recommended by the
manufacturer.
16. This unit does not have any user-serviceable parts. If servicing is
necessary, please contact Spectrum Industries for assistance.
DANGER - To reduce the risk of electric shock:
1. This furnishing is only to be used with the power supply unit provided.
2. Always unplug this furnishing from the electrical outlet before cleaning.
3. For added safety, plug the cart into a grounded outlet controlled by a
GFI (Ground Fault Interrupter) circuit breaker.
4. Keep the power switch in the OFF position before plugging or
unplugging from the wall outlet.
5. Turn devices OFF before plugging them in.
6. This furnishing has a polarized plug (one blade wider than the other).
This plug will t into a polarized outlet only one way. If the plug does
not t fully into the outlet, reverse the plug. If it still does not t,
contact a quali ed electrician to install the correct outlet. Do not alter
the plug in any way
7. Do not plug the power cord into an extension cord.
8. Inspect the power cord for damage before each use. Do not operate if
cord or plug has been damaged, or has come into contact with water.
9. To disconnect power, turn all controls to the OFF position, then
remove plug from outlet. Do not pull on cord.
10. Disconnect power before adding or removing components.
11. Do not run power cords across hallways or classrooms. Do not step
on, drive over, drag, or place objects on cord. Keep cord away from
heated surfaces.
12. If servicing is necessary, please contact Spectrum for assistance.
13. Damaged electrical components can create signi cant hazards to
users and is not covered by the warranty. Repairs should always be
performed by a quali ed electrician.
14. Electrical devices are not toys. Children are often unaware of the
hazards associated with electrical devices. This cart must always be
used by adults or with adult supervision.
WARNING
Relocating audio and/or video equipment to furniture not speci cally
designed to support audio and/or video equipment may result in serious
injury or death due to the furnishing collapsing or over turning onto a child.
WARNING
A remote control or toys placed on the furnishing may encourage a child
to climb on the furnishing and as a result the furnishing may tip over
onto the child. Serious injury or death could occur when children climb
on audio and /or video equipment furniture.
CAUTION
• Always unplug workstation before working under the worksurface.
• Do not place anything under worksurface when operating lift.
• Use caution when raising or lowering the worksurface!
• Be sure workstation movement does not interfere with objects
or people
Moving and parking the workstation
• Before moving, unplug and secure all power cords.
• Close and lock doors.
• Remove any items from the top of the worksurface.
• Unlock the casters.
• Push slowly and carefully. Do not move over uneven or irregular surfaces.
• Do not allow children to move.
• Lock the casters after moving.
CAUTION
Risk of Electric Shock. This unit may have multiple power cords. Unplug
all power cords before moving or servicing this furnishing.
WARNING
To reduce the risk of burns, re, electric shock,
or injury to persons, unplug from outlet(s)
before installing or removing components
• Do not park unit in areas of heavy trafc.
• Do not run power cords across hallways, classrooms, or other areas
where they will be walked on.
• Do not leave unit unattended in areas where children have access.
• Keep doors closed and locked whenever unit is unattended or parked.
• Keep casters locked whenever the workstation is unattended.
0190103R2 Page 2 of 8
Page 3
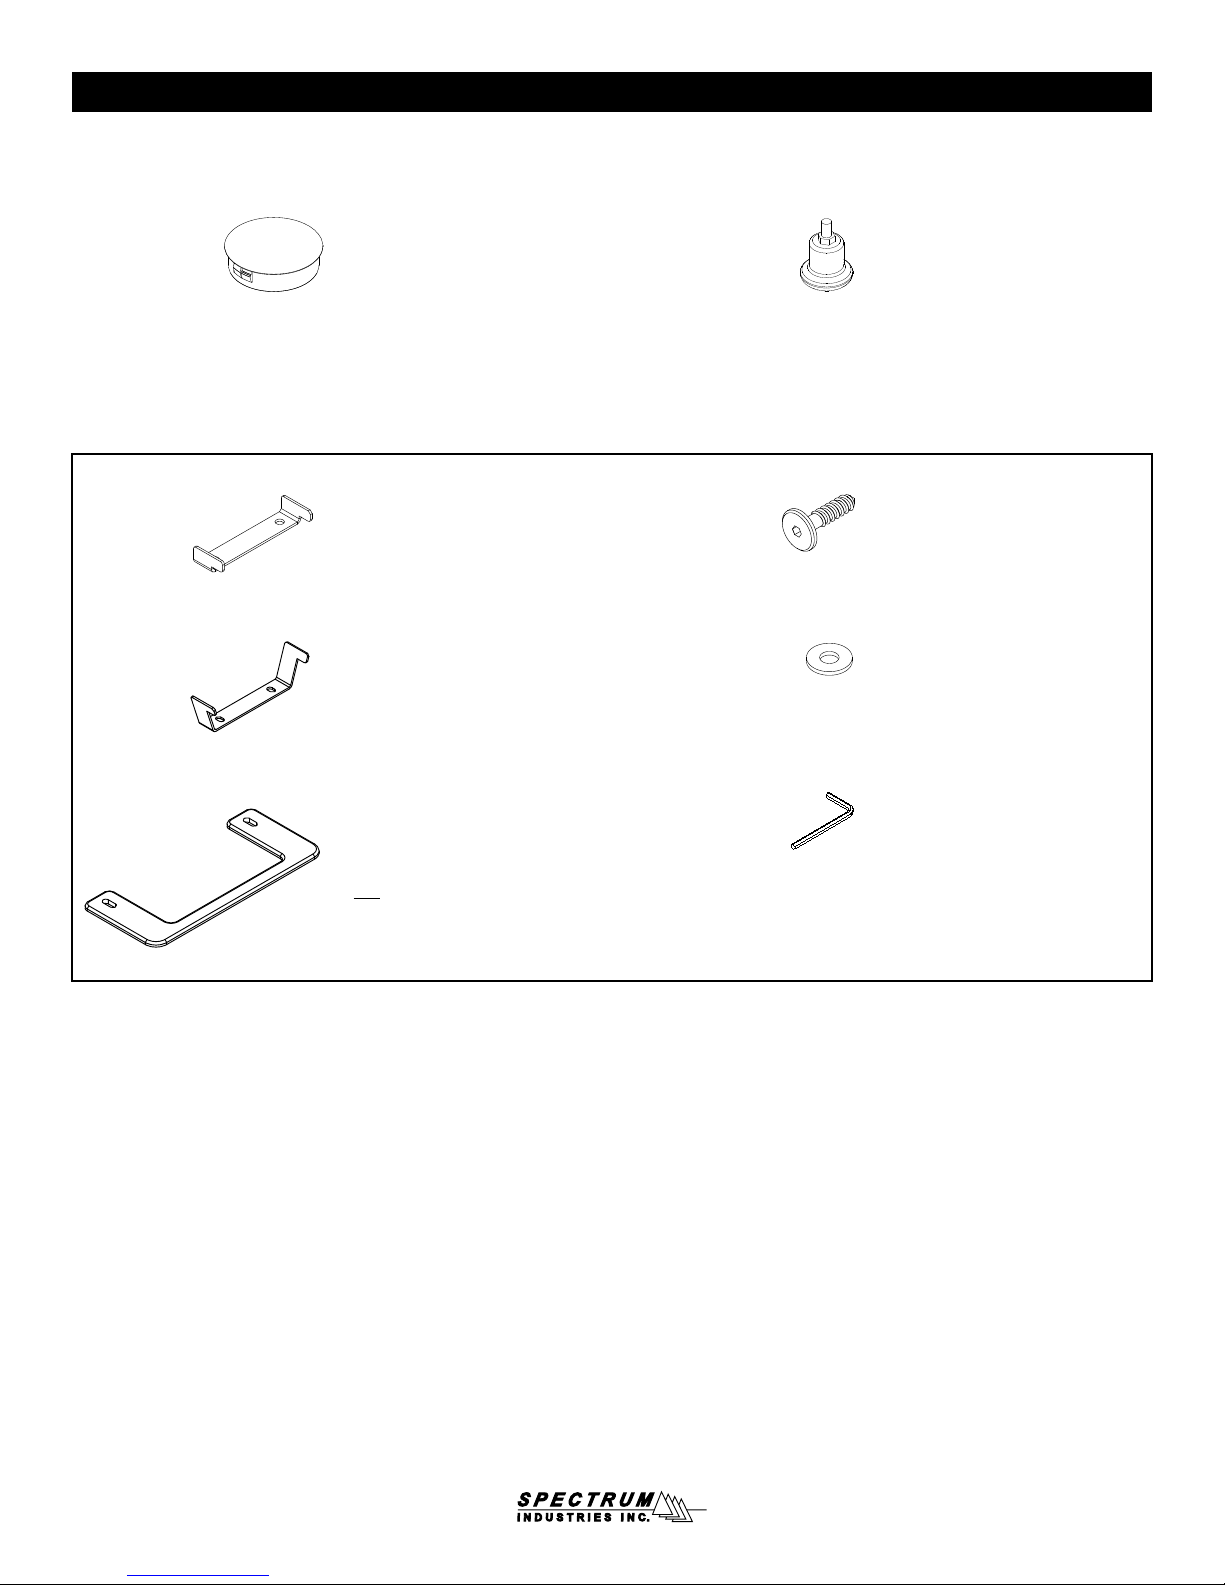
Hardware
(1) 0103500
2.5” Plug
See separate instructions for installation instructions
(1) 0131416
Silver rear security bracket
(Designed exclusively for
Sprout 1.55 by HP)
(1) 0132920
Black rear security bracket
(Designed exclusively for
the Sprout Pro G2)
(1) 0132918
Black plastic retainer bracket
(slotted holes)
(Works with Sprout 1.55 by HP,
and Sprout Pro G2
(4) 0114470
3/8-16 x 5/8” Bell glide
(4) 0102297
7mm x 30mm JCWS
(2) 026059
1/4” Flat steel washer
(1) 025039
4mm Hex wrench
0190103R2 Page 3 of 8
Page 4

Assembly / Setup
1. Install security brackets
1. With the Sprout on worksurface, choose one rear security bracket.
(Bracket for Sprout 1.55, or Sprout Pro G2).
2. Install the rear security bracket with (2) 7mm JCWS. Figure 1. Be
sure bracket is snug up against Sprout before tightening.
3. Install the plastic retainer bracket (with slots) with (2) 7mm JCWS,
and (2) washers under the bracket.
4. Slide the bracket up tight to the Sprout Pro with the touch pad in
place to captivate the pad.
5. Tighten screws securely.
7mm x 30mm
JCWS
Rear security
bracket
HP Sprout
computer
Tools
7mm x 30mm
JCWS
Required
Plastic retainer
bracket (with slots)
4mm Hex
wrench
(included)
1/4” Washer
under plastic bracket
2. Column cylinder adjustment
The worksurface extension speed can be adjusted with
the cable adjustment nut located on the release handle.
1. To adjust, tighten or loosen the nut 1/2 turn. Figure 2.
2. Push down the worksurface, then pull the release
handle to check the worksurface extension speed.
3. Repeat this procedure until the desired extension
speed is reached.
Figure 1
Release handle
Cable adjustment
nut
Figure 2
0190103R2 Page 4 of 8
Page 5

Cord reel option
Select workstations may have the optional cord reel
installed. It can can be mounted on the left or right-side of
the workstation. Figure 3A.
Operating Instructions:
1. To latch cord - Pull cord out to full length. Allow the cord to retract 1-2 feet back into
the reel. Pull the cord out slowly. When a ‘click’ is heard, the cord will latch in place.
2. Plug into 110-125V (single phase), 3-conductor wall outlet.
3. To release cord - Unplug from wall outlet. Pull cord out slowly until clicking stops.
The latch will release and the cord can be guided back into the reel. Do not allow
the cord to y unrestricted back into the reel.
4. Do not overload or circuit breaker (15-amp maximum) will cut off current. To
restore power, remove overload, wait two minutes, then reset the circuit breaker by
pressing the button on the back of the 3-prong male power plug.
Maintenance:
1. Unplug cord reel before performing maintenance.
2. Remove dirt and grime as soon as it accumulates on the reel case by using a soft,
damp cloth (a mild detergent may be used if needed), being careful not to wet
the electrical plug. Never immerse any part of the unit in any solution to clean.
DO NOT use solvents such as gasoline, turpentine, etc. to clean unit.
3. Keep cord clean to assure smoothest automatic retraction. Simply pull cord to its
full length and allow to retract through a dampened rag. Pull out full length again
and sprinkle cord with talcum powder.
Note: The cord reel is intended to provide temporary
access to electrical outlets for Spectrum mobile lecterns. Check local electrical codes prior to use.
Specications:
1875W, 15A, 125V, 15’ retractable, 12 AWG with breaker, UL Listed
WARNING
• This cord reel is intended for general indoor use only. It is not
intended to be used in potentially dangerous locations such as
ammable or explosive atmospheres.
• The cord reel is not waterproof and not intended for use in potentially
wet locations.
• Do not overload (15-amp maximum).
CAUTION
1. USE IN COVERED AREAS. OUT OF RAIN & WEATHER
2. NOT FOR USE IN AREAS REQUIRING EXPLOSION-PROOF
FIXTURES.
3. REELS WITH ELECTRICAL OUTLETS:
• Do not overload - See instruction manual for amperage ratings.
• Pull entire cord from reel when using outlet.
4. WHEN HANGING REEL on ceiling (See Instruction Manual):
• BY HOOK - Close hook with pliers to prevent reel from
coming down.
• BRACKET & PIN - With reel in place, bend end of “L” shaped
pin to PREVENT PIN FALLING OUT and reel falling.
5. INSPECT CORD OFTEN and replace if damaged.
6. READ INSTRUCTION MANUAL BEFORE INSTALLING OR USING.
7. UNPLUG BEFORE PERFORMING SERVICE.
Reset button
Power plug
0190103R2 Page 5 of 8
Page 6

Switching cord reel position
Tools
Required
(1) 0114320
Cord reel with
15’ cord
Phillips
screwdriver
Pliers
Left Right
Figure 3A
1. Remove the (2) 1/4-20 x 5/8” PHM screws, and (1) 1/4-20 x 15mm JC
bolt under the cord reel. Figure 3B.
2. Lift out the cord reel / adapter assembly.
(2) 1/4-20 x 5/8”
PHMS
Cord reel
Adapter
Cord reel
(1) 0115882
Universal mounting bracket
(1) 0131142
Adapter
Adapter
(1) Connector pin
(3) 026064
1/4-20 x 5/8” PHMS
Remove 1/4-20 x 15mm
JC bolt, then re-install
here after adapter has
been moved
3. Remove the 1/4-20 x 15mm JC bolt from the new adapter location.
4. Rotate the cord reel/adapter assembly 180° and attach to the
opposite side with the (2) previously removed 1/4-20 x 5/8” PHM
screws, and 1/4-20 x 15mm JC bolt.
5. Route the power cord out the side grommet. Figure 3C.
Rotate adapter
180°
Remove 1/4-20 x 15mm
JC bolt, then re-install
here after adapter has
been moved
Figure 3B
New adapter
location
Figure 3C
0190103R2 Page 6 of 8
Page 7

Casters / Glides
Note: The Freedom One Lectern comes with factory-installed
casters. If a more permanent non-moving lectern is needed, the
casters can easily be replaced with the included glides. Figure 4A.
1. Carefully tip up one side of the lectern using blocking. Figure 4B.
2. Remove the two casters.
3. Install two glides.
4. Repeat this procedure for the remaining two glides.
5. Remove blocking.
Caster Glide
Figure 4A
Locking caster on
instructor side
11/16” wrench
(for casters)
1/2” wrench
(for glides)
Tools Required
Place blocking here
Locking caster on
instructor side
Place blocking here
Figure 4B
0190103R2 Page 7 of 8
Page 8

Warranty
DESIGNED AND ASSEMBLED IN
CHIPPEWA FALLS
WISCONSIN.USA
WE WILL MAKE IT RIGHT FOR YOU!
Spectrum is committed to provide complete customer satisfaction. Each of our products is manufactured from the best materials available and each
product is stringently monitored throughout the production process through our P.A.C.E. program (Product Assurance to meet Customer Expectations).
We expressly warrant that Spectrum products will be of good quality and workmanship and free from defect for the period set out in the warranty table below
from the date of delivery. This warranty shall not apply to defects or damage resulting from misuse, abuse, neglect, improper care, modifi cation or repair not
authorized by Spectrum, or any other cause outside the control of Spectrum. Spectrum will, at its sole option, either repair or replace the defective product.
This warranty is exclusive; no other warranty, written or oral, is expressed or implied. This warranty is given by Spectrum to Buyer and to no other per-
son or legal entity. No Spectrum dealer, distributor, agent or employee is authorized to make any modifi cation or addition to this warranty.
NOTWITHSTANDING ANYTHING TO THE CONTRARY, SPECTRUM WILL NOT UNDER ANY CIRCUMSTANCES BE LIABLE FOR INDIRECT OR LIQUIDATED DAMAGES, INCLUDING CONSEQUENTIAL, INCIDENTAL AND SPECIAL DAMAGES. IN NO EVENT SHALL SPECTRUM’S LIABILITY, WHETHER
UNDER CONTRACT OR WARRANTY, IN TORT OR OTHERWISE, EXCEED THE PURCHASE PRICE RECEIVED BY SPECTRUM FOR THE PRODUCT AT
ISSUE AND “RECALL ACTION” EXPENSES. SPECTRUM SHALL NOT BE SUBJECT TO ANY OTHER OBLIGATIONS OR LIABILITIES, WHETHER ARISING OUT OF BREACH OF CONTRACT, WARRANTY, TORT (INCLUDING NEGLIGENCE AND STRICT LIABILITY) OR OTHER THEORIES OF LAW, WITH
RESPECT TO PRODUCTS SOLD OR SERVICES RENDERED BY SPECTRUM, OR ANY UNDERTAKINGS, ACTS OR OMISSIONS RELATING THERETO.
Our Customer Service Department is ready to provide immediate attention to any questions, comments or concerns. They are available to answer your calls
Monday through Friday from 7 am to 5 pm CST. In addition your product comments or concerns are welcome via e-mail at: spectrum@spectrumfurniture.com.
Warranty Table
Item
Adjustable Crank / Electric Desk Legs
Flat Panel Desk Gas Cylinders
Chairs
• Adjustable Height Chair Parts – including frames, gas
cylinders, wood and plastic parts, control handles, casters
• Adjustable Height Chair Upholstery
• In-Stock Upholstery
• Graded-In Fabrics and Customer Owned Material
Height Adjustable Columns and Lifts
General Use Casters
Electrical (including timers and LINAK actuators) • 2 Years
Keyboard / Mouse Trays • 1 Year
Flat Panel Monitor Arms
• Flat Panel Monitor Arm – General Parts
• Flat Panel Monitor Arm – Gas Cylinders
Desks and Lecterns
• Computer Desk Chassis
• Cart Chassis
• Lectern Chassis
Warranty Period
effective 1/1/2015
• 1 Year
• 7 Years
• 2 Years
• 2 Years
• No Warranty
• 1 Year
• 5 Years
• 2 Years
• 10 Years
925 FIRST AVENUE, CHIPPEWA FALLS, WI 54729 / 800-235-1262 / 715-723-6750 / WWW.SPECTRUMFURNITURE.COM
© 2017 Spectrum Industries Inc., All rights reserved.
8
0190103R2 Page 8 of 8
 Loading...