

Page 1

Temp / RH / CO2
Wall-Mount Meter
PRODUCT MANUAL
Item # 3445
Page 2
CONTENTS
Specifications 2
Description 3
Operation 4
Troubleshooting 7
Warranty 8
CE Declaration of Conformity 8
Thank you for purchasing the Temp/RH/CO2 Wall-Mount Meter.
With an NDIR (non-dispersive infrared) CO
stable for long-term monitoring. Please read this manual
thoroughly before using your meter.
sensor, this unit is
2
Specifications
CO2 Range 0—2000 ppm
CO2 Accuracy ±50ppm ±5% of reading
Pressure Dependence +0.16% of reading per 1 hPa deviation
from normal pressure of 1000 hPa
Temperature Range 14 to 140°F (-10 to 60°C)
Temperature Accuracy ±0.9°F (±0.6°C)
Humidity Range 0.0 to 99.9% RH
Humidity Accuracy ±3% RH (10 to 90% RH, else ±5% RH)
Warm up 30 seconds
Power Supply 100-240VAC adapter to 12VDC
2
Page 3
Description
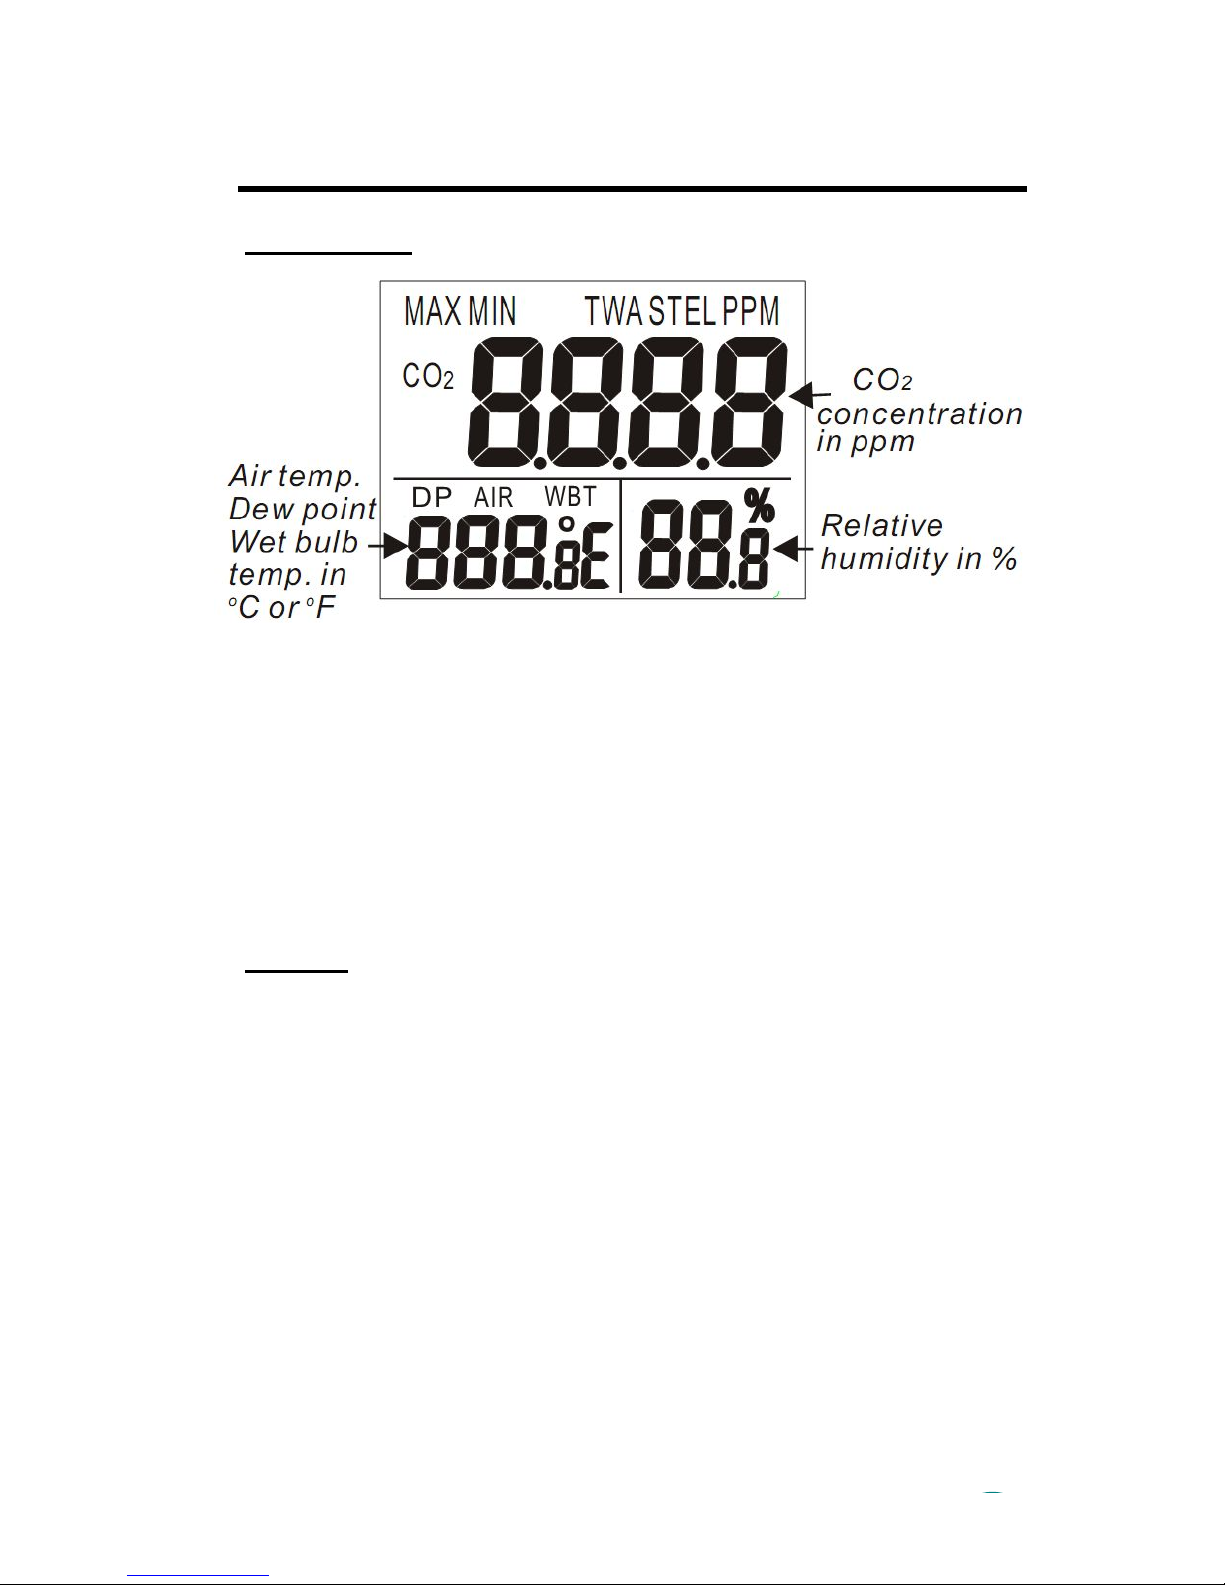
LCD Display
Symbols:
MAX/MIN Maximum/Minimum readings
TWA Time weighted average (8 hours)
STEL Short-term exposure limit (15 minutes
weighted average)
DP Dew point temperature
AIR Air temperature
WBT Wet bulb temperature
Keypad
SET Enter Setup mode
Save and finish settings.
CAL/ESC With Up/DP/WB, enter CO
With M
Exit Setup mode
RESET Reset meter and clear Max/Min values
Terminate calibration process
Up/DP/WB Select AIR/DP/WBT temperature display
Select mode or increase value in setup or
calibration
X
M
N
Select mode or decrease value in setup or
calibration
calibration
X
/AVG/Down, enter RH calibration
N
2
/AVG/Down Activate MAX/MIN/STEL/TWA display
3
Page 4

Operation
Power On/Off
Plug in the adaptor and the meter turns on automatically with
a short beep. It will perform a 30 seconds countdown for meter warm up, then enters normal mode with current CO
perature, and humidity readings displayed.
Taking a Measurement
The meter measures continuously and updates the LCD
every second. With a significant environmental change, the
sensor requires 30 seconds, and the RH sensor 30 min-
CO
2
utes to respond. Note
face because exhalation affects the CO
: Do not hold the meter close to the
reading.
2
Switch Temperature Measurement
Press the Up/DP/WBT key to cycle the temperature display
between air, dew point, and wet bulb temperatures.
MIN, MAX, STEL, TWA
N
Press the M
/AVG/Down button to switch between the nor-
X
mal, minimum, maximum, and weighted average readings.
In MIN and MAX modes the minimum and maximum readings
for CO
, air/dew point/wet bulb temperature, and RH will dis-
2
play.
In STEL and TWA modes, the display shows the weighted
average of the CO
readings for the past 15 minutes (STEL)
2
or 8 hours (TWA), as well as the current readings for air/dew
point/wet bulb temperature, and RH.
Setup
In normal mode, hold down the SET button for at least 1 second to enter setup mode. To exit setup, press the CAL/ESC
button.
P1.0 Set CO
Alarm
2
When entering setup mode, “AL” and “P1.0” are displayed on
the LCD. Press the SET button again to enter “P1.1” to set
the CO
alarm upper limit (exceeding this triggers the alarm).
2
, tem-
2
4
Page 5

The current value will be blinking on the LCD. Press Up/DP/
WB to increase the value, or M
Press the SET button again to enter “P1.2” to set the CO
N
/AVG/Down to decrease it.
X
2
alarm lower limit (when the level drops below this, the alarm
will automatically stop). The current value will be blinking on
the LCD. Press Up/DP/WB to increase the value, or M
N
/
X
AVG/Down to decrease it. Press the SET button to save the
values, or CAL/ESC to exit without saving.
The meter features an audible alarm to warn by emitting
80dB beeps when the CO
concentration exceeds the upper-
2
limit. The alarm can be stopped by pressing any button except SET. It will also stop when readings fall below the lower
limit value.
P3.0 Set Temperature Units
From the P1.0 display, press Up/DP/WB to change to the
P3.0 screen (“Unit” will display on the LCD). Press the SET
button to enter “P3.1” to set the temperature units. The current units, “°C” or “°F”, will be displayed on the lower left area
of the LCD. Press Up/DP/WB or M
N
/AVG/Down to switch
X
between “°C” and “°F”. Press the SET button to save the setting, or CAL/ESC to exit without saving.
P4.0 ABC Selection
ABC (Automatic Baseline Calibration) implements baseline
calibration to eliminate the zero drift of the infrared sensor.
The ABC function default is off when turning on the meter. To
enable it, press M
N
/AVG/Down from P1.0 or Up/DP/WB from
X
P3.0 to change to the P4.0 screen, (“Abc” will display on the
LCD). Press SET to enter P4.1 (“dis” will display on the
LCD). Press Up/DP/WB or M
N
/AVG/Down to switch to
X
“En” (enabled). Press the SET button to save the setting, or
CAL/ESC to exit without saving.
To exit setup, press the CAL/ESC button.
CO
Calibration
2
The meter is calibrated at the factory to a standard 400ppm
concentration. It is suggested to do either ABC or a
CO
2
manual calibration regularly to maintain good accuracy. The
5
Page 6

calibration should be done during sunny weather in fresh outdoor air that is well-ventilated.
CAUTION: Do not calibrate the meter in the air with an unknown CO
concentration. It will be calibrated as 400ppm,
2
which can lead to inaccurate measurements.
Manual Calibration
Place the meter in the calibration site. Turn on the meter and
hold down CAL/ESC and Up/DP/WB simultaneously to enter
CO
calibration mode. “400ppm” and “CAL” will blink on the
2
LCD while performing the calibration. Wait about 5 minutes
for the calibration to complete, which is indicated by the blinking stops and LCD returns to normal mode. To abort the calibration, turn off the meter at any time.
To abort the calibration, press RESET for more than 1 second.
ABC - Automatic Baseline Calibration
After enabling ABC (see Setup P4.0, above), place the meter
in a well-ventilated area for 7 days to set it to an ambient
level of 400ppm.
RH Calibration
Humidity calculations on the meter can be recalibrated using
33% and 75% salt solutions. Ambient conditions should be at
25°C or 77°F, with stable humidity.
Plug the sensor probe into a 33% salt bottle. Hold down the
CAL/ESC and M
N
/AVG/Down buttons until “CAL” is blinking
X
on the LCD display. In approximately 60 minutes “CAL” will
stop blinking, indicating the end of this phase. To skip the
75% recalibration, press CAL/ESC to exit.
Plug the sensor probe into the 75% salt bottle, then press the
SET. “CAL” will blink on the LCD until the calibration is completed in approximately 60 minutes.
The 33% calibration can be skipped by pressing Up/DP/WB
N
or M
/AVG/Down during the first 5 minutes of the 33% cali-
X
bration step above.
6
Page 7

Troubleshooting
Unable to power on
Check that the power adapter is plugged in.
Slow sensor response
Check whether the air flow channels on the back of the meter
are blocked.
Error messages
E01: CO
2
sensor damaged.
E02: The value is under range.
E03: The value is over range.
E04: Error code for dew point or wet bulb accompanying a
primary sensor failure code.
E07: Too low voltage to measure CO
Replace batteries.
E11: Retry humidity calibration.
E17: Retry CO
2
E31: Temperature sensor damaged.
E34: Humidity sensor damaged.
calibration.
.
2
7
Page 8

Warr anty
This product is warranted to be free from defects in material or
workmanship for 1 year from the date of purchase. During the
warranty period Spectrum will, at its option, either repair or replace
products that prove to be defective. This warranty is void if the
Spectrum products have been damaged by customer error or
negligence, or if there has been an unauthorized modification.
Returning Products to Spectrum
Before returning a failed unit, you must obtain a Returned Goods
Authorization (RGA) number from Spectrum. You must ship the
product(s), properly packaged against further damage, back to
Spectrum at your expense. Clearly mark the RGA number on the
outside of the package. Spectrum is not responsible for any
package that is returned without a valid RGA number or for the loss
of the package by any shipping company.
This equipment has been manufactured for
Spectrum Technologies, Inc.
12360 S. Industrial Dr. East
Plainfield, IL 60585 USA
The Manufacturer’s DECLARATION OF CONFORMITY is on file at the above
address, and certifies conformity to the following:
Model Number: 3445
Description: Temp/RH/CO2 Wall-Mount Meter
Type: Electrical Equipment for Measurement, Control, and Laboratory Use
Directive: 2004/108/EC
Standards: EN 61326-1 (2006)
EN 61000-3-2 (2006)
EN 61000-3-3 (1995/A1:2001/A2:2005)
EN 61000-4-2 (1995/A1:1998/A2:2001)
EN 61000-4-3 (2006) /-4(2004) /-5(2006)
EN 61000-4-6 (1996/A1:2001) /-11(2004)
(800) 248-8873 or (815) 436-4440
8
12360 S Industrial Dr. East
Plainfield, IL 60544
FAX: (815) 436-4460
E-Mail: info@specmeters.com
www.specmeters.com
 Loading...