

SpectraPure MaxCap MC-RODI-180-MF, MaxCap MC-RODI-90-MF, MaxCap MC-RODI-180-AF, MaxCap MC-RODI-90-AF Installation And Operating Manual
Page 1

MaxCap® MC-
RODI
- MF (manual flush)
MaxCap® MC-
(Single (-90) or Dual (-180) Membrane Models)
RODI
- AF (automatic flush)
Reverse Osmosis/Deionization
Water Purification Systems
INSTALLATION AND OPERATING MANUAL
WARNING
Please read carefully before proceeding with installation. Failure to
follow any attached instructions or operating parameters may lead
to the product’s failure and possible damage to property.
REV_5 2015-08-24
Page 2

SpectraPure
®
TABLE OF CONTENTS:
System Features ..................................................................................................... 3
System Specifications ............................................................................................ 4
General System Description ............................................................................ 5 - 6
Working With Push Fittings ................................................................................. 7
Front View of MaxCap
Front View of MaxCap® MC-RODI-180 System ..................... ........................... 9
Typical Rear Views for -AF Systems .................................................................. 10
Typical Rear Views for -MF Systems .................................................................. 11
System Installation & Initialization ................................................................... 12
Install the Float Valve ......................................................................................... 13
Float Valve Illustration ....................................................................................... 14
How It Works ....................................................................................................... 14
Flow Restrictors and Test Strips ........................................................................ 15
The Manual Flush Valve (-MF Versions) .......................................................... 16
The Auto Flush Valve (-AF Versions) ................................................................ 16
Booster Pump Installation .................................................................................. 16
Metering and Diagnostics ................................................................................... 17
Using the Pressure Gauge .................................................................................. 18
Sediment Prefilter Replacement ........................................................................ 19
Carbon Block Filter Replacement ..................................................................... 20
MaxCap Super DI Replacement ......................................................................... 21
SilicaBuster Super DI Replacement ................................................................... 21
RO Membrane Replacement .............................................................................. 22
RO Membrane Diagnostics ................................................................................. 23
Testing the Quality of the Membrane ............................................................. 23
Membrane Production Calculation .................................................................. 24
Tips for Long Membrane Life ............................................................................. 25
Membrane Troubleshooting Guide ................................................................. 26
System Troubleshooting Guide ................................................................... 27-28
Terms and Conditions .......................................................................................... 29
Three Year Limited Warranty ............................................................................. 30
Optional Accessories ........................................................................................... 31
Replacement Parts ............................................................................................... 32
®
MC-RODI-90 System .................................................. 8
COPYRIGHT 2002-2013© BY SPECTRAPURE INC
ALL RIGHTS RESERVED
No part of this publication may be reproduced, stored in a retrieval system, or
transmitted in any form or by any means, electronic, mechanical, photocopying,
recording or otherwise without the prior written permission of SpectraPure Inc.
SpectraPure®Inc.
2
2167 East Fifth St, Tempe, Arizona 85281
480.894.5437 Call us toll-free 1.800.685.2783
Page 3

SpectraPure
®
This MaxCap® RO/DI System comes complete with:
• Ultra-high rejection SpectraSelectPlus™ TFC Membrane
(2 membranes in 180GPD system)
• 2:1 waste-to-product ratio produces 50% less waste water
(3:1 for hard water areas)
• Long-life high-efficiency 0.5 micron Sediment prefilter
• High- capacity 0.5 micron Carbon Block prefilter eliminates chlorine,
herbicides and other organic pollutants
• MaxCap
• SilicaBuster™ Extended Life Super DI Cartridge (DI-SB -10HC)
• Dual-probe TDS Meter to monitor pre/post membrane
• Dual-probe TDS Meter to monitor post-DI performance
• Automatic or Manual Flush Valve for longer membrane life
• Automatic Shutoff Valve saves water
• Inline feedwater Ball Valve for manual system shutoff
• Float Valve for filling a reservoir
• Built-in pressure gauge indicates when to change prefilters
• Durable, no rust mounting bracket and clear filter housings
• 6 feet of feed, product and waste tubing included
• Housing wrench for easy filter removal
• Garden hose adapter for feed water hookup
• 3- year warranty
®
Extended Life Super DI Cartridge (DI-MC-10HC)
Warning: SpectraPure does not recommend
drinking deionized water.
Thank You for your purchase of a SpectraPure® System. With proper installation
and maintenance, this system will provide you with high quality water for
years to come. All SpectraPure® products are rigorously tested by us for
safety and reliability. However, SpectraPure® Inc. Assumes No Responsibility
for water damage due to leaks. It is the user’s responsibility to determine that
the system is leak-free. If you have any questions or concerns, please contact our
customer service department at 1.800.685.2783.
SpectraPure®Inc
E-mail: sales@spectrapure.com Visit us on the web www.spectrapure.com
. Fax 480.894.6109 Fax us toll-free 1.877.527.7873
3
Page 4

SpectraPure
®
SYSTEM SPECIFICATIONS:
Sediment Prefilter 0.5 micron MicroTec™ sediment prefilter (SF-MT-0.5-10)
Carbon Filter 0.5 micron carbon block prefilter (CF-0.5-10)
RO Membrane Type 90 GPD SpectraSelect Plus TFC Membrane
DI Cartridges MaxCap
Rejection Rate Typical stabilized conductivity rejection 99%
Input Water Pressure 60 psi (4.15 bar) line pressure*
Input Water Temp 77°F (25°C)
Recovery Rate 33% (i.e. 33% of the water will be collected as pure water)
Dimensions:
MaxCap MC-RODI-180-MF (-AF) 20" W x 16" H x 7" D (Two Membranes)
MaxCap MC-RODI -90-MF (-AF) 20" W x 16" H x 7" D (One Membrane)
Nominal Membrane Flow Rates @ 60 psi, 77° F, & 250 ppm TDS :
GPD Product Water Flow Rate Concentrate Flow Rate (2:1)
90 234 ml/min 468 ml/min
180 468 ml/min 936 ml/min
(Use 2 for 180 GPD Systems)
®
Extended Life Super DI Cartridge (DI-MC-10HC)
SilicaBuster™ Extended Life Super DI Cartridge (DI-SB -10HC)
Minimum conductivity rejection 98%
Permeate flow and TDS rejection is based on the following test conditions:
250 ppm softened tap water, 77° F (25° C), 33% recovery and 60 psi.
Higher TDS, harder tap water, higher temperature, greater recovery rate, or
lower operating pressure may contribute to reduced permeate flow and/or
lower TDS rejection.
Reverse Osmosis Operating Limits:
Operating Pressure* 40 – 80 psi (2.75 – 5.5 bar)
pH Range 2 – 11
Maximum Temperature 113° F (45° C)
Maximum Turbidity 1.0 NTU
Maximum Silt Density Index 5.0 (based on 15 min. test time)
Free Chlorine Tolerance less than 0.1 ppm
Maximum Iron less than 0.1 ppm
Maximum Manganese less than 0.1 ppm
Maximum Hydrogen Sulfide 0 ppm
*Operating pressure less than 40 psi may require a booster pump:
Operating pressure greater than 80 psi may require a pressure regulator.
SpectraPure®Inc.
4
2167 East Fifth St, Tempe, Arizona 85281
480.894.5437 Call us toll-free 1.800.685.2783
Page 5

SpectraPure
®
GENERAL SYSTEM DESCRIPTION:
This SpectraPure® RODI System gives you a continuous supply of sparkling
clear water. The reliability with the SpectraPure® Water Treatment System is
greatly improved over other systems. Costly maintenance can be avoided,
providing high quality water at your fingertips.
The incoming feed water from a cold water source is directed through
BLACK tubing with an inline ball valve and is first passed through a
sediment prefilter. This filter is used to remove excessive turbidity, sand,
dust, silt, etc., that would otherwise cause the carbon filter to plug up.
The next stage of filtration is the carbon block prefilter. This filter is used to
remove organics and chlorine from the feed water that can damage the
membrane. The next stage of the system is the RO membrane.
Household water pressure is used to force tap water through the
semipermeable RO membrane. The membrane only allows the purest of
water molecules to pass through it while over 98% of
all microorganisms and almost all high molecular weight organics in the
water
are rejected by the membrane and sent down the drain.
These RODI systems have two stages of Deionization that polish the RO
water to less than one ppm purity.
MaxCap® Extended Life Super DI cartridge and our SilicaBuster™ Extended
Life Super DI cartridge.
The MaxCap® Extended Life Super DI is used as a high-capacity “roughing”
cartridge and is followed by our SilicaBuster™ Extended Life Super
DI. Typically, if the RO water has 25 ppm TDS (Total Dissolved Solids)
entering a SilicaBuster™ DI cartridge alone, it might process about 266
gallons of pure DI water. By placing a MaxCap® DI cartridge in front
of the SilicaBuster™ cartridge, 800 gallons of water will pass through
both cartridges before the MaxCap® DI is exhausted. The SilicaBuster™
DI cartridge will be only one-third exhausted. A second MaxCap® DI will
process another 800 gallons and the SilicaBuster™ DI cartridge will now
be two-thirds exhausted. Only after a third Max Cap® DI cartridge processes
another 800 gallons should the SilicaBuster™ DI cartridge finally become
fully exhausted.
This example illustrates that three MaxCap® Super DI cartridges plus the
original SilicaBuster Super DI cartridge will process 2400 gallons of pure DI
water. It would have taken as many as ten standard mixed-bed cartridges
to produce the same amount of pure DI water.
The fourth and fifth stage filters are our
most inorganic salts,
SpectraPure®Inc
E-mail: sales@spectrapure.com Visit us on the web www.spectrapure.com
. Fax 480.894.6109 Fax us toll-free 1.877.527.7873
5
Page 6

SpectraPure
®
The MaxCap® RODI system comes equipped with two Dual Inline TDS
monitors. The two TDS meters can monitor every step in the purification
process. The IN probe of the left side meter shows the tap water TDS. The
OUT probe of the left-side meter shows the RO water TDS. The IN probe
of the right-side meter shows the TDS coming out of the MaxCap DI and
the OUT probe of the right-side meter shows the TDS of the final product
water (out of the SilicaBuster DI).
A pressure - operated Shutoff Valve and a Float Valve are provided for
convenient filling of a storage reservoir.
A Manual Flush Valve (-MF) may be used to periodically rinse the
accumulated impurities and concentrated waste water from the surface of
the RO membrane to help increase the life of the membrane. If increased
pressure is needed or desired, use the BPHF-MF-115 Booster Pump Kit for
-MF Systems. This kit has a 24VDC, 2.5A Power Supply.
An Automatic Flush System (-AF) may be used to periodically rinse the
accumulated impurities and concentrated waste water from the surface
of the RO membrane to help increase the life of the membrane. This
system will flush the membrane at startup, every hour, and at shutdown.
If increased pressure is needed or desired, use the BPHF-AF-115 Booster
Pump Kit for -AF Systems. This kit has a 24VDC, 2.5A Power Supply.
Notice: Drinking water add-on kits and bladder tanks are
SpectraPure®Inc.
6
2167 East Fifth St, Tempe, Arizona 85281
not compatible with Automatic Flush (AF) systems.
480.894.5437 Call us toll-free 1.800.685.2783
Page 7
SpectraPure
®
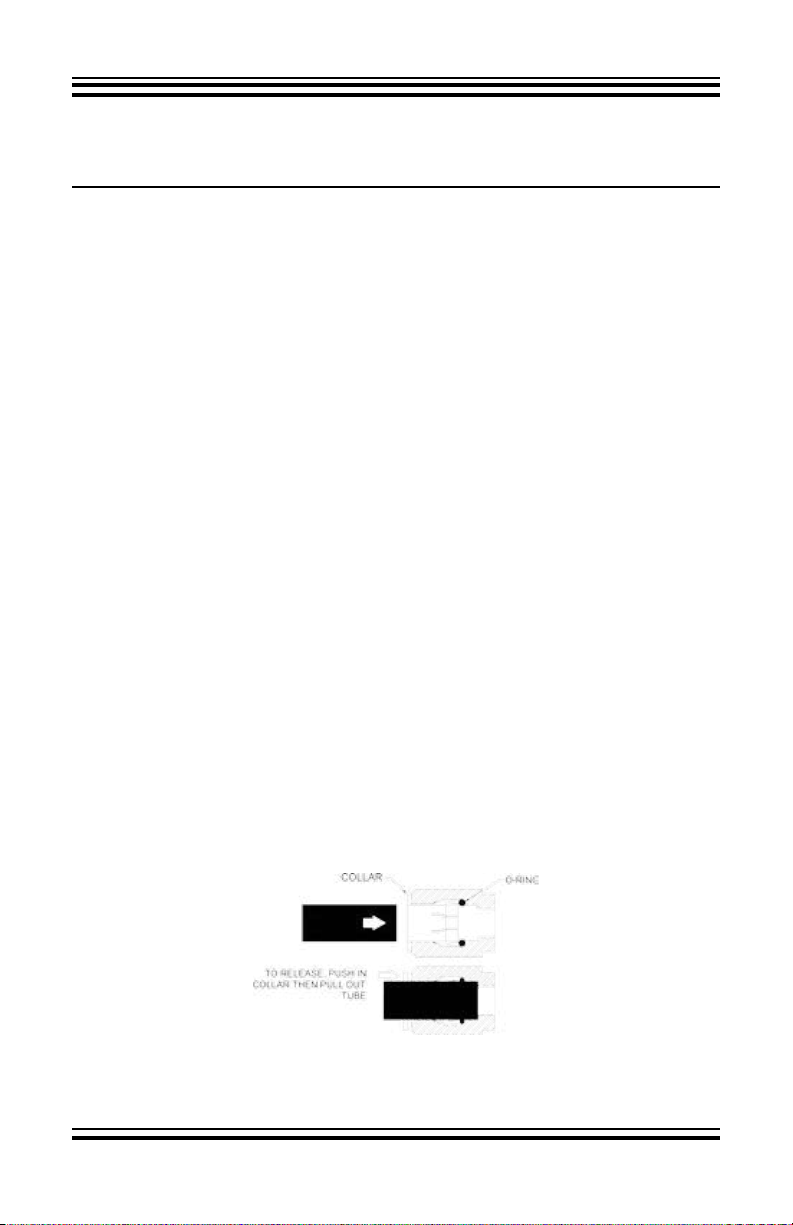
WORKING WITH PUSH FITTINGS:
Push fittings are very reliable and convenient tubing connectors.
To remove the tubing from its push fitting:
1. Firmly depress and hold the push fitting collar down with your thumbnail.
2. While the push fitting collar is depressed, pull the tubing straight out
of the push fitting. Once the tubing is removed, release the collar.
To reinsert the tubing into its push fitting:
1. Moisten the O -ring seal inside the push fitting by dripping a few drops
of clean water into the fitting.
2. Grasp the tubing near the end, and insert the tubing into the push
fitting.
3. Push the tubing into the fitting until resistance is felt, approximately
1/2 inch (12.7 mm). The tubing is now resting on the O-ring seal
inside the fitting.
4. Firmly push the tubing approximately an additional 1/4 inch (6.35 mm)
further into the fitting to completely seat the line into the fitting and
past the O-ring seal.
5. Turn on the system water supply and check for leaks prior to further
use or testing. If a leak is observed, you may not have pushed the
tubing into the push fitting far enough to seal the tubing against the
O-ring. Turn off the system water supply and reseat the tubing as
described above.
SpectraPure®Inc
E-mail: sales@spectrapure.com Visit us on the web www.spectrapure.com
. Fax 480.894.6109 Fax us toll-free 1.877.527.7873
7
Page 8
SpectraPure
®
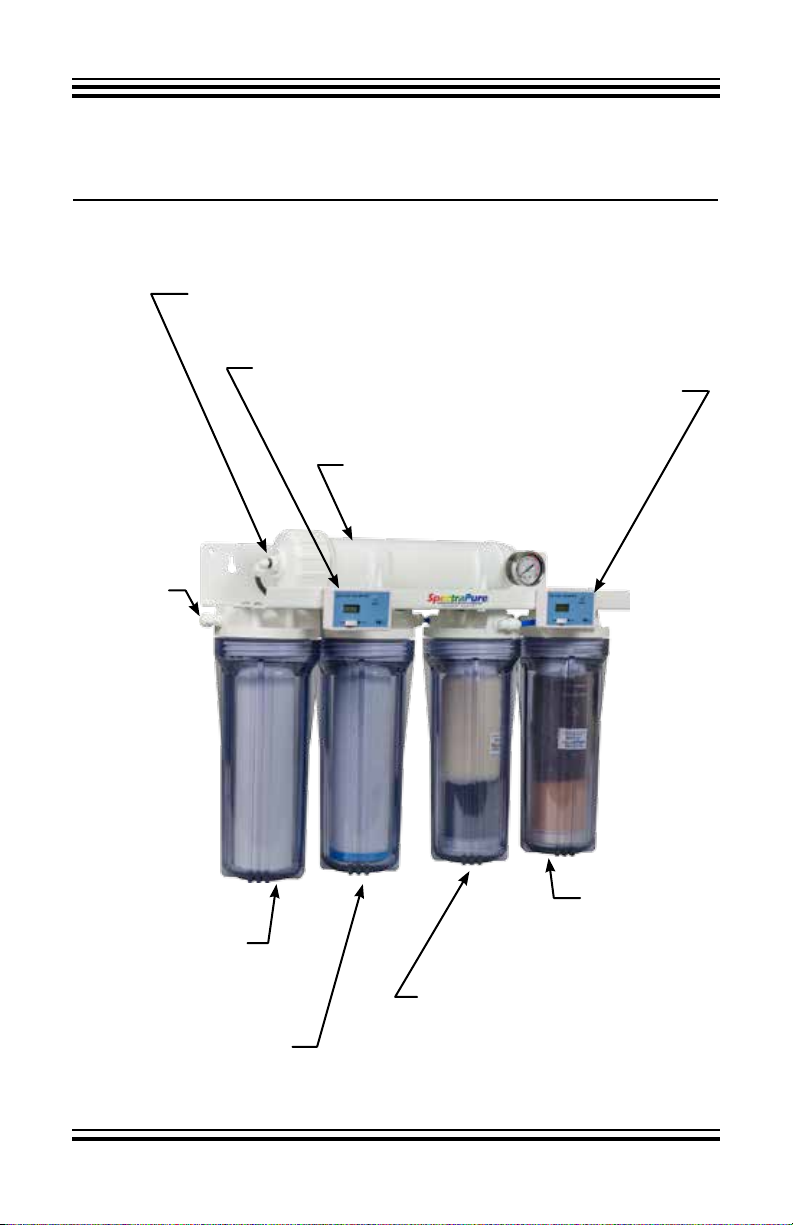
SINGLE MEMBRANE, DUAL-DI RO/DI SYSTEM
MaxCap® MC- RODI-90 :
BE SURE TO CONNECT BLACK TUBING AND
ELBOW TO END OF MEMBRANE HOUSING
Dual-Probe TDS Meter
Dual-Probe TDS Meter
IN = DI-MC Water
OUT = DI-SB Water
Pressure
Gauge
BLACK
1/4"
Tap Water
Tubing
Attaches
Here
IN = Tap Water
OUT = RO Water
TFC RO Membrane
& Housing
0.5 micron
Sediment Prefilter
(SF-MT-0.5-10)
0.5 micron
Carbon Block Filter
(CF-0.5-10)
SpectraPure®Inc.
8
2167 East Fifth St, Tempe, Arizona 85281
High-Capacity
SilicaBuster™
Extended Life
Super DI
High-Capacity
MaxCap
Extended Life
Super DI
(DI-MC-10HC)
480.894.5437 Call us toll-free 1.800.685.2783
®
(DI-SB -10HC)
Page 9

SpectraPure
®
DUAL MEMBRANE, DUAL-DI RO/DI SYSTEM
MaxCap® MC- RODI-180 :
BE SURE TO CONNECT BLACK TUBING AND
ELBOW TO END OF MEMBRANE HOUSING
Dual-Probe TDS Meter
IN = Tap Water
OUT = RO Water
TWO TFC RO Membranes
& Housings
Dual-Probe TDS Meter
IN = DI-MC Water
OUT = DI-SB Water
Pressure
Gauge
BLACK
3/8"
Tap Water
Tubing
Attaches
Here
0.5 micron
Sediment Prefilter
(SF-MT-0.5 -10)
0.5 micron
Carbon Block
Filter (CF-0.5 -10)
SpectraPure®Inc
E-mail: sales@spectrapure.com Visit us on the web www.spectrapure.com
. Fax 480.894.6109 Fax us toll-free 1.877.527.7873
High-Capacity
MaxCap®
Extended Life
Super DI
(DI-MC-10HC)
High-Capacity
SilicaBuster™
Extended Life
Super DI
(DI-SB -10HC)
9
Page 10

SpectraPure
®
REAR VIEWS for - AF SYSTEMS:
Control Module
(AFC-01)
Waste
to
Yellow
Drain
Tubing
Connection for
Booster Pump
(BPHF-AF-115)
(Black-Black)
Pressure
Switch
Solenoid Valve
2.1 mm female Mini Plug connection
for power supply. If using Booster
Pump, you must use a 24VDC, 2.5A
Power Supply here.
SINGLE MEMBRANE SYSTEM
Flow Restrictor is
located in this end of
red (or green) tubing
AUTOMATIC FLUSH MECHANISM
Connection for
Booster Pump
(BPHF-AF-115)
(Black-Black)
Waste
Water
to Yellow
Drain
Tubing
SpectraPure®Inc.
10
Control Module
(AFC-01)
2.1 mm female Mini Plug connection for power
supply. If using Booster Pump, you must use a
24VDC, 2.5A Power Supply here.
Pressure
Switch
Solenoid Valve
DUAL MEMBRANE SYSTEM
480.894.5437 Call us toll-free 1.800.685.2783
2167 East Fifth St, Tempe, Arizona 85281
Page 11

SpectraPure
®
REAR VIEWS for - MF SYSTEMS:
Flush Valve
(Closed Position)
Waste
Open to Flush
Water
Port
Product
Water
Port
NOTE: If Flush Valve is OPEN, product water cannot be produced.
This End has
Small “Plug”
Auto ShutOff Valve
(ASO)
Flow Restrictor in
Red (or Green)Tubing
Product Water
in Blue Tubing
Filtered
Input
Water
Port
Waste
Water
to
Yellow
Drain
Tubing
SINGLE MEMBRANE SYSTEM
Filtered
Input
Water
Port
Auto ShutOff Valve
(ASO)
Connect
Yellow
Drain Tubing
Here
This End has
Small “Plug”
Flow Restrictor
in Red (or Green)
Tubing
NOTE: If Flush Valve is OPEN, product water cannot be produced.
Flush Valve
(Closed Position)
Open to Flush
DUAL MEMBRANE SYSTEM
SpectraPure®Inc
E-mail: sales@spectrapure.com Visit us on the web www.spectrapure.com
. Fax 480.894.6109 Fax us toll-free 1.877.527.7873
11
Page 12

SpectraPure
®
SYSTEM INSTALLATION & INITIALIZATION:
1. Most of the components of this system are plastic and are subject to damage by
ultraviolet light from the sun and other sources such as metal halide lighting.
2. Avoid installing this unit in an area where it may be subjected to bright light
or direct sunlight, as algae is more likely to thrive inside the clear filter housings
when exposed to bright light. The unit must be kept out of areas that are
subject to freezing temperatures.
3. High temperatures greater than 113° F (45° C) must be avoided. If the unit is
used outside, avoid putting the system in direct sunlight or connecting it to a
garden hose that may be exposed to sunlight.
4. Attach the black tap water tubing to the left side of the Sediment Filter Housing
(See page 8 or 9).
5. Attach the yellow drain line to the “Y”- connector at the rear of the system. This “Y”
-connector already has a yellow and green tube attached to it.
6. Attach the blue product line to the rear port (after the “tee”) of the right-hand
DI housing.
7. Attach the black tubing and elbow(s) to the membrane housing cap(s).
8. Attach the garden hose adapter (connected to the black tubing) to your
cold water source. Never run hot water (greater than 113° F/45° C) through
the system.
9. Remove the two DI filter cartridges from the two right-hand filter housings.
Reconnect the two housings to their threaded caps. Hand tighten.
10. A provided ball valve can be located at a convenient place on the black tap
water line. Cut the black tubing in two and reconnect the two cut ends with
the ball valve.
11. Place the yellow concentrate (waste) tubing and the blue purified (product)
water tubing temporarily into a drain. Do not restrict flow from these lines.
12. Let both tubings run water down the drain for one hour.
13. Reinstall the two DI cartridges into the DI housings. Hand tighten.
14. There are two groups of red, white, and blue sensor wires. At the end of the
wires, you will find a white connector. Just insert the connector into the
receptacle on the top of each TDS monitor. You can then use the Velcro on
the back to mount the meters where ever it’s convenient. For example, even
on a wall for easier viewing.
15. Open the cold water supply valve. The pressure should not exceed 80 psi.
SpectraPure®Inc.
12
480.894.5437 Call us toll-free 1.800.685.2783
2167 East Fifth St, Tempe, Arizona 85281
Page 13

SpectraPure
®
16. Upon startup, air may be trapped in the DI cartridges (housing may not
appear full), this is a normal condition and it will not affect the operation of
the DI system. However, when you later install the Float Valve for automatic
operation, all air must be kept purged from the housings by slightly
unscrewing the housing(s) and letting the running water displace the air until
the housings are full of water.
17. Set the right -side meter to “OUT” and run the system until the right-side meter
reads zero. The water is now ready to use. You can set either meter to read
either probe at any time.
18. Close the cold water supply valve.
19. Finish the installation by directing or connecting the yellow line to a
permanent drain.
20. Install the included Float Valve onto a collection reservoir. See below.
21. Attach the blue line to the Float Valve.
22. Check the system to ensure that all fittings are tight and leak-free before leaving
the system unattended. (If anything is leaking, contact SpectraPure for assistance.)
23. It may take several days of normal operation for the membrane to reach its full
production rate.
24. (For - AF Systems) Connect the supplied power supply to the 2.1 mm black
female Mini Plug (see Page 10).
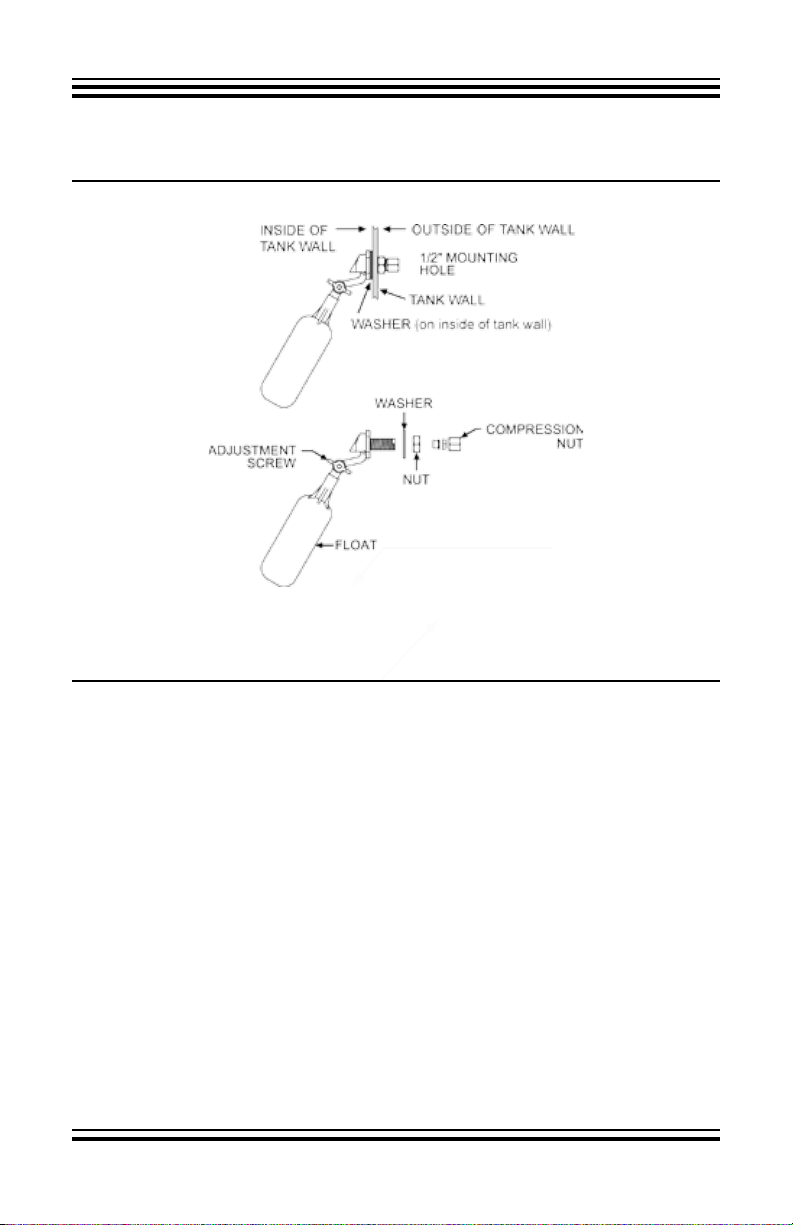
INSTALL THE FLOAT VALVE:
1. Drill a 1/2" hole near the top of your reservoir.
NOTE: If you are installing the Float Valve onto an acrylic tank we recommend
using a new Fostner Bit to reduce the chance of cracking the acrylic.
2. (Refer to Diagram on Page 14) Remove the Compression Nut from the float
body.
3. Insert the 1/4" Blue Tubing into the 1/2" Compression Nut with the threads
towards the end of the tube.
4. Unscrew and remove the remaining nut from the float body.
5. Insert the float body and washer into the 1/2" hole and tighten the nut, which
securely tightens the float to the tank wall.
6. Push the Compression Nut towards the end of the tubing and screw the Compression Nut back onto the float body.
7. To tighten, use one 1/2" wrench on the flats of the plastic threads and another
1/2" wrench on the Compression Nut.
SpectraPure®Inc
E-mail: sales@spectrapure.com Visit us on the web www.spectrapure.com
. Fax 480.894.6109 Fax us toll-free 1.877.527.7873
13
Page 14
SpectraPure
®
FLOAT VALVE ILLUSTRATION:
HOW IT WORKS:
The increasing water level raises the Float Valve in the reservoir and stops
the flow of water. Pressure builds up in the product line and ASO Valve
until the ASO Valve shuts off the flow of waste water to drain. This “OFF”
condition will be maintained until the reservoir needs more water and the
Float Valve drops, allowing both product and waste water to flow again.
NOTE: This configuration maintains house pressure in the prefilters,
membrane, and pressure gauge when in the “OFF” condition. Also, this
system WILL NOT WORK with any kind of “bladder tank” attached to the
product line.
An optional float kit can be used for filling an additional sump or reservoir.
Our Float Kit (SPFK) includes a Float Valve and 1/4" Union Tee.
SpectraPure®Inc.
14
2167 East Fifth St, Tempe, Arizona 85281
480.894.5437 Call us toll-free 1.800.685.2783
Page 15

SpectraPure
®
FLOW RESTRICTORS AND TEST STRIPS:
These systems are supplied with TWO Flow Restrictors (FR) - RED and
GREEN. See Pages 10 and 11. The RED FR (pre-installed) produces a preset
waste-to-product ratio of 3:1 and the optional GREEN FR has a 2:1 ratio.
Two Test Strips are provided to determine the Total Hardness (this is NOT
TDS) of your tap water. To test: Dip the colored end into a small tap water
sample for 3 seconds. Remove and do not shake. Wait for 20 seconds and
then match with the closest color block on the back of the package. Color
is stable for 1 minute.
If the Total Hardness is 180 or greater, you should keep the RED FR installed.
If the Total Hardness is less than 180, you may replace the RED FR with
the GREEN FR (see “Working with Push Fittings”). Be sure to note the
orientation of the small “plug” in the end of the removed FR and install the
new FR with the same orientation.
The RED FR has a waste-to -product ratio of 3:1, which will increase the
amount of water used, but also increase the lifetime of the RO membrane.
In hard water conditions, you may use the GREEN FR to save water, but
the RO membrane will not last as long, as it will plug up with hardness
much more quickly.
SpectraPure®Inc
E-mail: sales@spectrapure.com Visit us on the web www.spectrapure.com
. Fax 480.894.6109 Fax us toll-free 1.877.527.7873
15
Page 16
SpectraPure
®
THE MANUAL FLUSH VALVE (-MF Versions):
The Manual Flush Valve is located in parallel with the flow restrictor (see
page 11) and, when opened, provides a high-flow bypass of waste water
used to purge concentrated brine from the membrane housing and rapidly
flush any particulates from the membrane surface. This is especially useful
in hard-water conditions. The valve can be turned ON for 30 seconds at
the start of a fill cycle and/or at the end of a fill cycle. BE SURE to turn the
Flush Valve OFF before making product water.
An optional Booster Pump can be added for installations with less than 40
psi tap water pressure. Be sure to use the BPHF-MF-115 Booster Pump Kit.
THE AUTOMATIC FLUSH VALVE (-AF Versions):
The Automatic Flush Valve is located in parallel with the flow restrictor
and, when electrically activated, provides a high flow by-pass of waste
water used to purge concentrated brine from the membrane housing and
rapidly flush any particulates from the membrane surface. This is especially
useful in hard water conditions. A Pressure Switch and Flush Control
Module (AFC) will activate the Flush Valve at the start of a fill cycle, at the
end of a fill cycle, and for a short time every hour during the fill cycle. This
module is powered by a 24VDC power supply. An optional Booster Pump
can be added for installations with less than 40 psi tap water pressure.
Only use a power supply rated at 24VDC, 2.5A that comes with the Booster
Pump Kit (BPHF-AF-115). Connect the Pump to the black/black wires on
the AFC Module.
Notice: Drinking water add-on kits and bladder tanks are
not compatible with Automatic Flush (AF) systems.
BOOSTER PUMP INSTALLATION (Both Versions):
If needed, install the Booster Pump on the black tap water feed line. Be
sure the arrow on the pump head is in the direction of the flow. Replace
the small black power supply (-AF Systems) with the larger black power
supply provided with the Booster Pump Kit. Connect the remaining free
wires and connector on the AFC module to the pump. Systems with
25- and 40-GPD RO membranes should first consider upgrading to the
90-GPD membrane before aquiring the Booster Pump.
SpectraPure®Inc.
16
2167 East Fifth St, Tempe, Arizona 85281
480.894.5437 Call us toll-free 1.800.685.2783
Page 17

SpectraPure
®
METERING AND DIAGNOSTICS:
This SpectraPure purification system has been fully equipped with sufficient
instrumentation to make monitoring and troubleshooting an easy process.
The provided pressure gauge is used to determine the tap water pressure
and to evaluate the condition of the sediment and carbon prefilters. The
pressure will drop as the prefilters become clogged by dirt [turbidity] from
the tap water.
The digital TDS meter (left side) will provide a reliable means of evaluating
the efficiency of the RO membrane. This meter will indicate the tap water
conductivity (“IN”) and the RO water conductivity (“OUT”).
The difference between the two meter readings can be used to calculate
the percentage of rejection of the (TFC) RO membrane.
The Digital TDS meter (right-side) will be used to determine the condition
of the two stages of the DI system. As the reading on the meter begin
to rise above zero, the operator will be alerted to the possibility that the
DI system may have deteriorated past the exhaustion point and that the
DI cartridge(s) may need to be replaced.
details.)
(See page 21 for DI exhaustion
DM-1 METER Specifications:
Range 0 -1999 PPM
Resolution 1PPM (1-999 PPM)
Accuracy 2%
Probe 0.25 inches
Power Source (2) 1.5V button batteries (A357 or equiv.)
Battery life Approx 1000 hours
For service or repair of these monitors, please send to:
HM DIGITAL, INC
5819 Uplander Way
Culver City, CA 90230
SpectraPure®Inc
E-mail: sales@spectrapure.com Visit us on the web www.spectrapure.com
. Fax 480.894.6109 Fax us toll-free 1.877.527.7873
17
Page 18

SpectraPure
®
USING THE PRESSURE GAUGE:
The pressure gauge is used to monitor the condition of the Sediment
and Carbon Prefilters. With the Sediment and Carbon filters removed, the
gauge will indicate the “actual” tap water input pressure. When the prefilters
are “new”, the pressure shown on the gauge will be slightly less than the
actual tap water pressure and as the filters age, the pressure will drop
due to the dirt that will collect in the prefilters. When the pressure on the
gauge drops below 40 PSI or as the filters collect particulates and the
pressure drop is greater than 15% to 20% of the normal water pressure,
the prefilters are in need of replacement.
NOTE: When the pressure on the pressure gauge drops below the normal
readings; do not “assume” that the sediment filter is the only cause. In some
geographical areas where the input water contains a high percentage
of very small micron particulates, the carbon filter may become clogged
before the sediment filter. (The filters may look “new” but still cause the
water pressure to drop). Do not judge the condition of the prefilters by
their color, always use the pressure gauge to determine the condition of
the prefilters.
SpectraPure®Inc.
18
480.894.5437 Call us toll-free 1.800.685.2783
2167 East Fifth St, Tempe, Arizona 85281
Page 19

SpectraPure
®
SEDIMENT PREFILTER REPLACEMENT:
A Sediment Filter will usually last approx. 4-6 months, depending on the
quality of the tap water and quantity of water being produced. (The life
span of the filter is determined by the turbidity, iron content, organics,
and total particulate volume in your water source). The best way to
determine when your Sediment Prefilter needs replacement is to monitor
the Pressure Gauge. When you have a drop in pressure of15-20% below
your normal gauge pressure, replace the filter. To verify this, run water
through the system without the filter in its housing. If the pressure returns
to your normal house pressure without the filter, you will know the filter
you just took out was plugged up and causing the pressure drop.
**NOTE: A drop in the system’s production is, in most cases, an indication
that the sediment filter has become saturated with contaminants and
will need to be replaced. If you remove the sediment and the pressure
does not return to normal, the carbon filter may be plugged. If your water
contains a great deal of sediment or chlorine, the prefilters may require
more frequent changes to maintain adequate production rate and
extended membrane life.
Sediment Prefilter Replacement
Materials Required: Sediment prefilter (SF-MT-0.5-10),
Filter Wrench (WR-UNIV)
Procedure:
1. Turn off water supply to the system.
2. Using the provided filter housing
the left. Unscrew it clockwise as viewed from the top.
3. Remove the old filter and discard.
4. Thoroughly wash the housing with a mixture of hot soapy water and a few
teaspoons of household bleach. Rinse well with clean hot water.
5. Insert the new prefilter into the housing, Screw the housing back onto
the assembly and hand-tighten only.
NOTE: Do not use filter wrench to tighten housings. Over-tight-
ening will damage housings and void your warranty.
6. Proceed with carbon block filter replacement.
SpectraPure®Inc
E-mail: sales@spectrapure.com Visit us on the web www.spectrapure.com
. Fax 480.894.6109 Fax us toll-free 1.877.527.7873
wrench, remove the first housing on
19
Page 20

SpectraPure
®
CARBON BLOCK FILTER REPLACEMENT:
A Carbon Filter will usually lasts 4-6 months ,depending on the chlorine
(or chloramine) content of your tap water and quantity of water being
produced. The best way to determine when your Carbon Block Prefilter
needs replacement is to use a chlorine test kit.
Any chlorine level above 0.1 ppm will cause damage to the membrane
and indicates that the carbon block filter must be changed. To test for
chlorine breakthrough, collect a 10 ml sample of the concentrate from
the yellow tubing and test the chlorine concentration using test kit TK-CL10-KIT. If the chlorine concentration is above 0.1ppm, replace the carbon
prefilter.
**NOTE: A drop in the system’s production is, in most cases, an indication
that the sediment filter has become saturated with contaminants, but a
carbon filter can also decrease production if it’s covered with extremely
fine sediment. If the carbon becomes plugged with sediment, it will no
longer be able to remove chlorine.
Carbon Block Filter Replacement
Materials Required: Carbon Block prefilter (CF-0.5-10), Filter Wrench,
Chlorine Test Kit (TK-CL-10-KIT)
Procedure:
1. Turn off water supply to the system.
2. Using the provided filter housing wrench, remove the second housing
from the left. Unscrew it clockwise as viewed from the top.
3. Remove the old filter and discard.
4. Thoroughly wash the housing with a mixture of hot soapy water and
a few teaspoons of household bleach. Rinse well with clean hot water.
5. Insert the new carbon block filter into the housing, Screw the housing
back onto the assembly and hand-tighten only.
NOTE: Do not use filter wrench to tighten housings. Over-tightening
will damage housings and void your warranty.
6. Turn on system water supply and check for leaks.
SpectraPure®Inc.
20
2167 East Fifth St, Tempe, Arizona 85281
480.894.5437 Call us toll-free 1.800.685.2783
Page 21

SpectraPure
®
MAXCAP SUPER DI MAINTENANCE AND REPLACEMENT:
1. When the reading on the right-hand TDS meter (set to “IN”) displays 50% of
the reading on the left-hand TDS meter (set to “OUT”), it is time to replace
the
MaxCap
2. Turn the system off and remove the cartridge housing by rotating it counterclockwise until it is free of the threaded head on the bracket.
3. Make sure the DI cartridge is installed in the correct direction as marked on
the cartridge shell and be sure that the top seal is securely attached to the
top of the cartridge.
4. Tighten the cartridge housing by rotating it clockwise and hand tighten.
5. Turn on system and check for leaks.
SILICABUSTER SUPER DI MAINTENANCE AND REPLACEMENT:
1. When the reading on the right-hand TDS meter (set to “OUT”) displays
“001”, it is time to replace the SilicaBuster™
(DI-SB -10HC).
2. Turn the system off and remove the cartridge housing by rotating it counterclockwise until it is free of the threaded head on the bracket.
3. Make sure the DI cartridge is installed in the correct direction as marked on
the cartridge shell and be sure that the top seal is securely attached to the
top of the cartridge.
4. Tighten the cartridge housing by rotating it clockwise and hand tighten.
5. Turn on system and check for leaks.
®
Extended Life Super DI cartridge (DI-MC-10HC).
Extended Life Super DI
cartridge
SpectraPure®Inc
E-mail: sales@spectrapure.com Visit us on the web www.spectrapure.com
. Fax 480.894.6109 Fax us toll-free 1.877.527.7873
21
Page 22

SpectraPure
®
RO MEMBRANE REPLACEMENT:
1. Turn off the water supply to the RO system. Place the system where the
membrane housing(s) can be easily accessed.
2. Remove the black tubing from the membrane feed push fitting by
depressing the collar on the fitting with your thumb and pulling the
tubing from the push fitting. You should not have to remove the blue
and yellow tubes.
3. Lift the membrane housing from the retention clips and unscrew the
membrane housing cap. This may require two people.
4. Use a pair of pliers to grasp the membrane stem and pull the membrane
from the housing.
5. Remove the black housing O-ring. Wash the empty housing with soapy
water. Rinse thoroughly with hot, clean water.
6. Insert the new membrane into the housing, with the double O-ring
end first. The o-rings and tube must fit into the recess at the bottom
of the membrane housing. When the membrane is aligned with the
recess, firmly push the membrane into the recess until it bottoms out.
7. Place the black housing O-ring on the housing rim and carefully screw
the lid back on to the base. Hand-tighten.
8. Reconnect the black tubing to the membrane feed push fitting.
9. If you have a dual-membrane system (-180), perform steps 2 thru 8 on
the second membrane.
10. Open the Flush Valve and allow the system to flush for several minutes
to remove any loose particles.
11. Close the Flush Valve and turn on the water supply to the system.
12. Check for leaks.
SpectraPure®Inc.
22
480.894.5437 Call us toll-free 1.800.685.2783
2167 East Fifth St, Tempe, Arizona 85281
Page 23

SpectraPure
®
RO MEMBRANE DIAGNOSTICS:
In order to accurately determine the condition and performance of the
RO Membrane, a conductivity tester capable of reading the tap water
conductivity (or TDS) and the product water conductivity (or TDS) would
typically be required.
You may also use an alkalinity test kit (on softened water sources) or a
hardness test kit (on non-softened water sources).
NOTE: All water sources are different and are subject to changes in
conductivity from season to season which could affect the TDS
reading depending on the time of the year. For this reason, we
recommend the use of a conductivity (TDS) tester in order to
determine the most accurate measurement for determining the
condition of the RO membrane.
TESTING THE QUALITY OF THE MEMBRANE:
The performance of a RO membrane is measured by its ability to reject
salts or TDS (Total Dissolved Solids). This procedure will require a TDS
Meter. SpectraPure offers several models:
MTR-TDS-EZ HM Digital Hand-held TDS Meter
MTR-TDS-DM1 HM Digital Inline Dual Probe TDS Meter
General Procedure:
1. Measure tap water TDS. (Call it X)
2. Run the system for 15 -20 minutes.
3. Rinse test instrument cell 2-3 times with RO water.
4. Measure RO water TDS directly from the blue product water line.
(Call it Y).
5. Subtract RO water TDS from tap water TDS. (X - Y)
6. Divide this quantity by tap water TDS. (X - Y) ÷ X
7. Rejection = [(X - Y) ÷ X ] ×100
TDS in the above procedure is measured in ppm or mg/l.
Important: Test the quality of the membrane once every 6 months.
SpectraPure®Inc
E-mail: sales@spectrapure.com Visit us on the web www.spectrapure.com
. Fax 480.894.6109 Fax us toll-free 1.877.527.7873
23
Page 24

SpectraPure
®
Rejection of the RO Membrane Calculation Example
1. Tap water TDS = 150 ppm (X)
2. RO water TDS = 15 ppm (Y)
3. X - Y = 135 ppm
4. (X - Y) ÷ X = 135 ÷ 150 = 0.90
5. Rejection = [ ( X - Y) ÷ X ] ×100 = 0.90 ×100 = 90%
NOTE: Rejection rates less than 95% may indicate that the membrane should be
replaced.
MEMBRANE PRODUCTION CALCULATION:
Membranes produce the rated gallons per day (GPD) at 60 psi (4.1 bars)
operating pressure, 77°F (25°C) operating temperature and with no more
than 500 ppm total dissolved solids.
Membrane output gallons per day (GPD) depends on operating pressure,
water temperature and the TDS in the feed water.
Expected GPD = Rated GPD × PCF × TCF
PCF is the pressure correction factor
TCF is the temperature correction factor
Calculation of Pressure Correction Factor (PCF): The output (GPD) from
the membrane is directly proportional to the applied pressure.
NOTE: The membrane is rated to produce the rated GPD at 60 psi. For any
pressure other than 60 psi the output GPD is multiplied by the PCF.
PCF = Line Pressure (in psi) ÷ 60
Calculation of Temperature Correction Factor (TCF): The output (GPD)
decreases with a decrease in temperature. This is due to water viscosity
increasing with a decrease in water temperature.
SpectraPure®Inc.
24
2167 East Fifth St, Tempe, Arizona 85281
480.894.5437 Call us toll-free 1.800.685.2783
Page 25

SpectraPure
®
Temperature Correction Factor Table (TCF)
°F /°C TCF °F /°C TCF °F /°C TCF
41.0 /5 0.521 59.0 /15 0.730 77.0 /25 1.000
42.8 /6 0.540 60.8 /16 0.754 78.8 /26 1.031
44.6 /7 0.560 62.6 /17 0.779 80.6 /27 1.063
46.4 /8 0.578 64.4 /18 0.804 82.4 /28 1.094
48.2 /9 0.598 66.2 /19 0.830 84.2 /29 1.127
50.0 /10 0.620 68.0 /20 0.857 86.0 /30 1.161
51.8 /11 0.640 69.8 /21 0.884 87.8 /31 1.196
53.6 /12 0.661 71.6 /22 0.912 89.6 /32 1.232
55.4 /13 0.684 73.4 /23 0.941 91.4 /33 1.267
57.2/14 0.707 75.2 /24 0.970 93.2 /34 1.304
Membrane Output Calculation Example
What is the expected GPD from a 100 GPD System at 40 psi pressure
and 60°F water temperature?
PCF = 40 ÷ 60 = 0.666
TCF = 0.754 (from Table above)
Expected GPD = 100 × 0.666 × 0.754 = 50.2 GPD ± 15%
50.2 GPD would be the Actual Production Rate
TIPS FOR LONG MEMBRANE LIFE:
1. Replacement of sediment filter at least once every 6 months.This will
prevent mem brane fouling due to silt or sediment depositing on the
membrane.
2. Replacement of carbon block filter at least once every 6 months or
when chlorine breakthrough occurs. This will ensure good membrane
life and protect the membrane from chlorine damage.
3. Membrane should not be operated at lower than the minimum 2:1
concentrate to purified water ratio.
4. Operating reverse osmosis systems on softened feed water greatly
reduces the chances of membrane fouling.
SpectraPure®Inc
E-mail: sales@spectrapure.com Visit us on the web www.spectrapure.com
. Fax 480.894.6109 Fax us toll-free 1.877.527.7873
25
Page 26

SpectraPure
®
SANITIZING SYSTEM:
(It is recommended that you sanitize the system once a year.)
1. Turn tap water source off and remove all filters from the system,
including the RO membrane.
2. Mix together hot water, soap and a little bleach.
3. Scrub filter housings and rinse with clean tap water to remove soap and
bleach.
4. Place filters back into housings and reconnect lines.
STORAGE:
1. It is recommended that you store your RO System in a cool and dark
place when not being used.
2. Your RO System must always be protected from freezing or
temperatures above 113° F (45° C).
TROUBLESHOOTING GUIDE:
The following chart illustrates the procedure for determination of RO membrane
performance. However, the chart represents only rough guidelines for
determining performance of RO membrane. Depending on your tap water
chemistry, the rejection characteristics of the membrane may vary significantly.
Method of
Testing Calculate % Rejection Test Results Conclusion
TDS/
Conductivity
Tester
Alkalinity
Test Kit
Hardness
Test Kit**
**Caution: This test is not to be used on softened water sources.
SpectraPure®Inc.
26
Measure feed water (X)
RO product water (Y)
for TDS/Conductivity
Measure feed water (X)
RO product water (Y)
for Alkalinity
Measure feed water (X)
RO product water (Y)
for Hardness
Is Rejection
greater than
95%?
Is Rejection
greater than
90%?
Is Rejection
greater than
90%?
480.894.5437 Call us toll-free 1.800.685.2783
2167 East Fifth St, Tempe, Arizona 85281
No - Replace Membrane
Yes - Membrane OK
No - Replace Membrane
Yes - Membrane OK
No - Replace Membrane
Yes - Membrane OK
Page 27

SpectraPure
®
SYSTEM TROUBLESHOOTING GUIDE
1.
Low production rate:
a.
plugged prefilters.
b.
low water temperature
c.
low line pressure.
d.
high TDS content.
e.
fouled membrane.
f.
plugged flow restrictor.
2. Zero production rate:
a.
Missing flow restrictor.
b.
Dried RO membrane.
c.
Plugged flow restrictor.
d.
Flush Valve is open.
i.
Replace prefilters.
ii.
Warm feed water OR use higher GPD
membrane.
iii.
Use booster pump OR use higher GPD
membrane.
iv.
Use booster pump OR use higher GPD
membrane.
v.
Replace membrane to restore flux.
vi.
Replace flow restrictor & membrane.
i.
Install flow restrictor in the yellow line.
ii.
Try to restore flux by soaking in rubbing
alcohol OR replace the membrane.
iii.
Replace flow restrictor and replace the
membrane.
iv.
Close Flush Valve.
3. Extremely high production rate:
a.
Ruptured membrane.
b.
Very high line pressure
(> 80 psi).
4.
Pressure gauge does not register pressure when the system is “ON”
a.
Missing flow restrictor.
b.
Pressure gauge
screwed in too far.
c.
Plugged pressure
gauge orifice.
d.
Defective pressure
gauge.
(continued on next page)
SpectraPure®Inc
E-mail: sales@spectrapure.com Visit us on the web www.spectrapure.com
. Fax 480.894.6109 Fax us toll-free 1.877.527.7873
i.
Replace membrane.
ii.
Use a pressure regulator.
i.
Put flow restrictor in the yellow line.
ii.
Unscrew pressure gauge one-half turn
and retest.
iii.
Clean orifice with a needle.
iv.
Replace it.
27
Page 28

SpectraPure
5.
Low deionization cartridge life:
a.
Defective membrane.
b.
Low pressure (<40 psi).
c.
High CO2 levels in
water (> 5 ppm)
d.
High TDS in feed water
(>1500 ppm).
e.
Bad or faulty DI cartridge.
f.
High pH tap water
(>9.0).
g.
Faulty monitor/probe.
i.
ii.
iii.
iv.
v.
vi.
vii.
®
Replace it.
Use booster pump.
Aerate RO product water.
NO EASY SOLUTION.
Replace DI cartridge.
Acidify feed water to the RO membrane
to improve its rejection.
Test and Replace if required.
SpectraPure®Inc.
28
480.894.5437 Call us toll-free 1.800.685.2783
2167 East Fifth St, Tempe, Arizona 85281
Page 29

SpectraPure
®
TERMS AND CONDITIONS:
1. Shipping charges on units or parts submitted to our facility for repair or
replacement must be borne by the registered purchaser. After repair or
replacement, the factory will return the unit or part freight prepaid to the
customer.
2. We assume no warranty liability in connection with our equipment other
than as herein specified.
3. This warranty is in lieu of all other warranties expressed or implied,
including warranties of fitness for a particular purpose.
4. We do not authorize any person or representative to assume for us any
other obligation on the sale of our equipment. This is the exclusive remedy
and liability for consequential damages under any and all warranties
which are excluded to the extent exclusion is permitted by law.
5. Proof of original purchase date must accompany all warranty claims.
6. SpectraPure, Inc. Reserves the right to change prices without notice when
necessary. All prices in the catalog are quoted in US dollars.
7. Claims for error in quantity or condition must be made within 10 days of
receipt of material. SpectraPure, Inc. will not be responsible for any claimed
shortages not reported within 10 days. Returns other than warranty claims
may be subject to 20% restocking fee.
8. SpectraPure, Inc. cannot be held liable for damage or loss to a shipment by
a freight carrier. Check shipment for damage before acceptance or note
on freight bill subject to inspection for concealed damage. Consignee
must file claim. SpectraPure, Inc. will offer as much assistance as possible.
9. A complete credit check is required prior to shipping on a Net 30 or “C.O.D.
- CUSTOMER CHECK ACCEPTABLE” basis. In the interim period during
which credit references are being evaluated, all orders must be shipped
“C.O.D. - CERTIFIED FUNDS” (cash, cashiers check or money order).
10. All returned checks (due to insufficient funds or closed accounts) will be
subjected to a $25 penalty charge.
11. Invoices on Net 30 accounts not paid within 30 days of shipment will be
considered delinquent and will accrue Finance charges at the rate of 1.5%
per month (18% per annum).
SpectraPure®Inc
E-mail: sales@spectrapure.com Visit us on the web www.spectrapure.com
. Fax 480.894.6109 Fax us toll-free 1.877.527.7873
29
Page 30

SpectraPure
®
THREE YEAR LIMITED WARRANTY:
SpectraPure, Inc.® warrants the product to the original owner only to be free of defects in material
and workmanship for a period of three years from the date of receipt. SpectraPure’s liability under
this warranty shall be limited to repairing or replacing at SpectraPure’s option, without charge,
F.O.B. SpectraPure’s factory, any product of SpectraPure’s manufacture. SpectraPure will not be
liable for any cost of removal, installation, transportation or any other charges which may arise in
connection with a warranty claim. Products which are sold but not manufactured by SpectraPure
are subject to the warranty provided by the manufacturer of said products and not by SpectraPure’s
warranty. SpectraPure will not be liable for damage or wear to products caused by abnormal
operating conditions, accident, abuse, misuse, unauthorized alteration or repair or, if the product
was not installed in accordance with SpectraPure’s or other manufacture’s printed installation and
operating conditions, or damage caused by hot water, freezing, flood, fire or acts of God.
SpectraPure will not be responsible for any consequential damages arising from installation or use
of the product, including any water or mold damage due to flooding which may occur due to
malfunction or faulty installation, including, but not limited to failure by installer to over- or undertighten fittings, housings, and/or push-style fittings, or improper installation of push-style fittings.
Consumable items such as prefilters and membranes are not covered under the 3 year warranty.
SpectraPure warrants (prorated) the performance of Tested SpectraSelect™ RO membrane elements
only, for one year from date of receipt by the buyer, providing that the loss of performance was not
caused by fouling , neglect or water conditions exceeding the feed water parameters listed in the
applicable product manual (refer to detailed membrane warranty information). SpectraPure will,
on confirmation of loss of performance during the warranty period, credit the prorated amount
of the current catalog price of the element. The disposable filters and cartridges are not covered
under the warranty.
To obtain service under this warranty, the defective system or components must be returned to
SpectraPure with proof of purchase, installation date, failure date and supporting installation data.
Any defective product to be returned to the factory must be sent freight prepaid; documentation
supporting the warranty claim and a Return Merchandise Authorization (RMA) number must be
included. SpectraPure will not be liable for shipping damages due to the improper packaging of
the returned equipment and all returned goods must also have adequate insurance coverage and
a tracking number.
SpectraPure will not pay for loss or damage caused directly or indirectly by the presence, growth,
proliferation, spread or any activity of “fungus”, wet or dry rot or bacteria. Such loss or damage is
excluded regardless of any other cause or event that contributes concurrently or in any sequence
to the loss. We will not pay for loss or damage caused by or resulting from continuous or repeated
seepage or leakage of water, or the presence or condensation of humidity, moisture or vapor, that
occurs over a period of 14 days or more. “Fungus” and “fungi” mean any type or form of fungus or
Mycota or any byproduct or type of infestation produced by such fungus or Mycota, including but
not limited to, mold, mildew, mycotoxins, spores, scents or any biogenic aerosols.
SpectraPure will not be liable for any incidental or consequential damages, losses or expenses
arising from installation, use, or any other causes. There are no expressed or implied warranties,
including merchantability or fitness for a particular purpose, which extend beyond those warranties
described or referred to above.
* The three year limited warranty does not apply to consumable items, including but not
limited to, filters and cartridges unless specifically stated above.
SpectraPure®Inc.
30
2167 East Fifth St, Tempe, Arizona 85281
480.894.5437 Call us toll-free 1.800.685.2783
Page 31

SpectraPure
®
OPTIONAL ACCESSORIES:
PIGGY-BACK UPGRADE KITS (PBK-90), - This add-on kit contains everything
you need to double the output (gallons per day) of your existing 90 GPD RO
or RODI System. All necessary fittings, tubing, adapters and flow restrictors are
included.
UV PURIFIER KIT (UV-1GPM-KIT) - Are you on a private well or other potentially
unreliable source of water? You may require a UV kit to destroy harmful bacteria,
viruses and other contaminants. Ultraviolet kills up to 99% of all viruses and
bacteria for the safest water. This kit contains everything you need to add UV to
your Reverse Osmosis System.
BOOSTER PUMP KITS (BPHF-AF-115 & BPHF-MF-115) - SpectraPure
Pump Kits are ideal for use on water sources with pressures below 40 psi such
as private wells, gravity feed water systems and high-rise apartments. A pressure
gauge is used to monitor the booster pump pressure.
ADDITIONAL FLOAT VALVE KIT (SPFK) - Add a second or multiple float valves
to your existing system.
Notice: Drinking water add-on kits and bladder tanks are
not compatible with Automatic Flush (AF) systems.
®
Booster
SpectraPure®Inc
E-mail: sales@spectrapure.com Visit us on the web www.spectrapure.com
. Fax 480.894.6109 Fax us toll-free 1.877.527.7873
31
Page 32

SpectraPure
®
REPLACEMENT PARTS:
Part Number Description
SF-MT-0.5 -10 High Performance 0.5 micron Sediment Filter
CF-0.5-10 High Performance 0.5 micron Carbon Filter
MEM-SP-0090 90
FR-90 -RED, -GRN* Flow Restrictors for 90 gpd System
FR -180-RED, - GRN* Flow Restrictors for 180 gpd System
* Green Flow Restrictors have a 2:1 waste ratio recommended for tap water <180 ppm
Red Flow Restrictors have a 3:1 waste ratio recommended for tap water ≥180 ppm
DI-MC-10HC
DI-SB-10HC
GHA-4 1/4" Garden Hose Adapter
PGK Pressure Gauge Kit
BV-4JG 1/4" Ball Valve
BV-6JG 3/8" Ball Valve
WR-UNIV Filter Wrench
gpd SpectraSelectPlus™ TFC Membrane
(Use 2 for 180 gpd systems)
Extended Life Super DI MaxCap
®
DI
Extended Life Super DI SilicaBuster DI
ACCESSORIES:
Part Number Description
BPHF-MF-115 Booster Pump Kit for -MF Systems
BPHF-AF-115 Booster Pump Kit for -AF Systems
MTR-TDS-EZ Hand-held TDS Meter
MTR-TDS-DM1 Inline Dual-Probe TDS Meter
MTR-PH80 Hand-held pH Meter
FAU-SNP Quick Connect Faucet Adapter
TK-CL-10- KIT Total Chlorine Test Kit
TK-CL -10TABS 10 Replacement Tabs for Chlorine Test Kit
SpectraPure®Inc.
32
Warning: SpectraPure does not recommend
drinking deionized water.
480.894.5437 Call us toll-free 1.800.685.2783
2167 East Fifth St, Tempe, Arizona 85281
 Loading...