

Page 1

Spectra nTier File Migrator
User Guide
PN 90990032 Revision A
Page 2

Notices
Notices
Except as expressly stated herein, Spectra Logic Corporation makes its products and associated documentation on an “AS IS”
BASIS, WITHOUT WARRANTY OF ANY KIND, EITHER EXPRESSED OR IMPLIED, INCLUDING BUT NOT LIMITED TO THE IMPLIED
WARRANTIES OF MERCHANTABILITY OR FITNESS FOR A PARTICULAR PURPOSE, BOTH OF WHICH ARE EXPRESSLY DISCLAIMED.
In no event shall Spectra Logic be liable for any loss of profits, loss of business, loss of use or data, interruption of business, or
for indirect, special, incidental or consequential damages of any kind, even if Spectra Logic has been advised of the possibility of
such damages arising from any defect or error.
Information furnished in this manual is believed to be accurate and reliable. However, no responsibility is assumed by
Spectra Logic for its use. Due to continuing research and development, Spectra Logic may revise this publication from time
to time without notice, and reserves the right to change any product specification at any time without notice.
If you do not agree to the above, do not use the Spectra nTier700; instead, promptly contact Spectra Logic for instructions
on how to return the Spectra nTier700 for a refund.
BlueScale, Spectra, SpectraGuard, TeraPack, and the Spectra Logic logo are registered trademarks and RXT is a trademark
of Spectra Logic Corporation. All rights reserved worldwide. All other trademarks and registered trademarks are the
property of their respective owners.
Spectra nTier File Migrator User Guide
Revision A, July 2008
Copyright © 2008 Spectra Logic Corporation. All rights reserved.
2
Page 3

Contacting Spectra Logic
To obtain general information
Spectra Logic web Site: www.spectralogic.com
United States Headquarters European Office
Contacting Spectra Logic
Spectra Logic Corporation
1700 North 55th Street
Boulder, CO 80301
USA
Phone: (800) 833-1132 or (303) 449-6400
International: 00 (1) 303 449 6400
Fax: (303) 939-8844
Spectra Logic Europe Ltd.
Magdalen Centre
Robert Robinson Avenue
Oxford Science Park
OXFORD
OX4 4GA
United Kingdom
Phone: 44 (0) 870 112 2150
Fax: 44 (0) 870 112 2175
SpectraGuard Technical Support
web Site: www.spectralogic.com/support/index.cfm/
Knowledge Base: www.spectralogic.com/support/kbase/index.cfm/
United States and Canada
Phone: (800) 227-4637
E-mail: support@spectralogic.com
Mexico, Central and South America, Asia, Australia, and New Zealand
Phone: (303) 449-0160
E-mail: support@spectralogic.com
Europe, Middle East, Africa Phone
Phone: 44 (0) 870 112 2185 (UK only)
49 (0) 6028 9796 507
E-mail: spectralogic@stortrec.de
Spectra Logic Sales
web Site: www.SpectraLogic.com
United States and Canada
Phone: (800) 833-1132 or (303) 449-6400
Fax: (303) 939-8844
E-mail: sales@spectralogic.com
Media Sales
E-mail: media@spectralogic.com
European Office
Phone: 44 (0) 870 112 2150
Fax: 44 (0) 870 112 2175
E-mail: eurosales@spectralogic.com
3
Page 4

Contacting Spectra Logic
Notes
4
Page 5

Contents
About This Guide 9
Intended Audience . . . . . . . . . . . . . . . . . . . . . . . . . . . . . . . . . . . . . . . . . . . . . . . . . 9
Related Publications . . . . . . . . . . . . . . . . . . . . . . . . . . . . . . . . . . . . . . . . . . . . . . . . 9
Conventions Used in This Guide . . . . . . . . . . . . . . . . . . . . . . . . . . . . . . . . . . . . . 10
Chapter 1 – Overview 11
Introduction . . . . . . . . . . . . . . . . . . . . . . . . . . . . . . . . . . . . . . . . . . . . . . . . . . . . . 11
Software Feature Overview . . . . . . . . . . . . . . . . . . . . . . . . . . . . . . . . . . . . . . . . . 14
Installations Using a Tape Library . . . . . . . . . . . . . . . . . . . . . . . . . . . . . . . . . . . . . 16
Installations using Stand-alone Drives . . . . . . . . . . . . . . . . . . . . . . . . . . . . . . . . . . 18
Windows Offline Attribute . . . . . . . . . . . . . . . . . . . . . . . . . . . . . . . . . . . . . . . . . . 19
Determining Disk Space Requirements . . . . . . . . . . . . . . . . . . . . . . . . . . . . . . . . . 20
Chapter 2 – Concepts 23
Introduction . . . . . . . . . . . . . . . . . . . . . . . . . . . . . . . . . . . . . . . . . . . . . . . . . . . . . 23
File Groups . . . . . . . . . . . . . . . . . . . . . . . . . . . . . . . . . . . . . . . . . . . . . . . . . . . . . 23
Constructing the File Name, Path Pattern, or Exclude Pattern . . . . . . . . . . . . . . 24
Examples of Allocating Files to File Groups . . . . . . . . . . . . . . . . . . . . . . . . . . . 26
Tapes: Volumes, Volume Sets, and Automatic Replication . . . . . . . . . . . . . . . . . . . 28
Understanding Volume Sets . . . . . . . . . . . . . . . . . . . . . . . . . . . . . . . . . . . . . . . 29
About the Blank Media Set . . . . . . . . . . . . . . . . . . . . . . . . . . . . . . . . . . . . . . . 29
About the Quarantined Media Set . . . . . . . . . . . . . . . . . . . . . . . . . . . . . . . . . . 30
Partial File Restore and Cartridge Spanning . . . . . . . . . . . . . . . . . . . . . . . . . . . . . 31
Off-line File Management . . . . . . . . . . . . . . . . . . . . . . . . . . . . . . . . . . . . . . . . . . . 32
File Version Management . . . . . . . . . . . . . . . . . . . . . . . . . . . . . . . . . . . . . . . . . . . 32
File Security . . . . . . . . . . . . . . . . . . . . . . . . . . . . . . . . . . . . . . . . . . . . . . . . . . . . . 33
5
Page 6

Contents
Chapter 3 – Installing nTier File Migrator 35
Before You Begin . . . . . . . . . . . . . . . . . . . . . . . . . . . . . . . . . . . . . . . . . . . . . . . . 35
Access the nTier Windows Desktop . . . . . . . . . . . . . . . . . . . . . . . . . . . . . . . . . . . 35
Prepare the nTier Windows Server . . . . . . . . . . . . . . . . . . . . . . . . . . . . . . . . . . . . 37
Configure the Archive Drive . . . . . . . . . . . . . . . . . . . . . . . . . . . . . . . . . . . . . . 37
Disable Microsoft Removable Storage Service . . . . . . . . . . . . . . . . . . . . . . . . . 38
Remove Microsoft Services for NFS . . . . . . . . . . . . . . . . . . . . . . . . . . . . . . . . . 38
Enable Internet Information Services (ISS) . . . . . . . . . . . . . . . . . . . . . . . . . . . . 40
Change the Default System Name (Optional) . . . . . . . . . . . . . . . . . . . . . . . . . . 40
Install nTier File Migrator . . . . . . . . . . . . . . . . . . . . . . . . . . . . . . . . . . . . . . . . . . . 41
Install and Activate the Tape Drives . . . . . . . . . . . . . . . . . . . . . . . . . . . . . . . . . . . 41
Install Device Drivers . . . . . . . . . . . . . . . . . . . . . . . . . . . . . . . . . . . . . . . . . . . 41
Enable Stand-Alone Drives . . . . . . . . . . . . . . . . . . . . . . . . . . . . . . . . . . . . . . . 43
Activate the nTier File Migrator License . . . . . . . . . . . . . . . . . . . . . . . . . . . . . . . . 44
Activate the Archive Drive . . . . . . . . . . . . . . . . . . . . . . . . . . . . . . . . . . . . . . . . 44
Start the License Administration Utility . . . . . . . . . . . . . . . . . . . . . . . . . . . . . . 44
Complete the Installation . . . . . . . . . . . . . . . . . . . . . . . . . . . . . . . . . . . . . . . . . . . 45
Next Steps . . . . . . . . . . . . . . . . . . . . . . . . . . . . . . . . . . . . . . . . . . . . . . . . . . . . . . 46
Chapter 4 – Configuring nTier File Migrator 47
Before You Begin . . . . . . . . . . . . . . . . . . . . . . . . . . . . . . . . . . . . . . . . . . . . . . . . 47
Start the Archive Management Console . . . . . . . . . . . . . . . . . . . . . . . . . . . . . . . . . 48
Configure Volume Sets . . . . . . . . . . . . . . . . . . . . . . . . . . . . . . . . . . . . . . . . . . . . . 49
Create a New Volume Set . . . . . . . . . . . . . . . . . . . . . . . . . . . . . . . . . . . . . . . . 49
Configure the Volume Set . . . . . . . . . . . . . . . . . . . . . . . . . . . . . . . . . . . . . . . . 50
Configure Replication for the Volume Set . . . . . . . . . . . . . . . . . . . . . . . . . . . . 51
Allocate Tape Cartridges to the Volume Set . . . . . . . . . . . . . . . . . . . . . . . . . . . 52
Allocate Files to File Groups . . . . . . . . . . . . . . . . . . . . . . . . . . . . . . . . . . . . . . . . 53
Create One or More New File Groups . . . . . . . . . . . . . . . . . . . . . . . . . . . . . . . 54
Configure the File Group Listing Order . . . . . . . . . . . . . . . . . . . . . . . . . . . . . . 55
Allocate Files to a File Group . . . . . . . . . . . . . . . . . . . . . . . . . . . . . . . . . . . . . 55
Set the Policies for the File Groups . . . . . . . . . . . . . . . . . . . . . . . . . . . . . . . . . 56
6
Page 7

Contents
Chapter 5 – Using nTier File Migrator 65
Accessing Files . . . . . . . . . . . . . . . . . . . . . . . . . . . . . . . . . . . . . . . . . . . . . . . . . . . 65
Access the Current Version . . . . . . . . . . . . . . . . . . . . . . . . . . . . . . . . . . . . . . . 65
Access Old or Deleted Versions . . . . . . . . . . . . . . . . . . . . . . . . . . . . . . . . . . . . 65
Working with Tape Cartridges . . . . . . . . . . . . . . . . . . . . . . . . . . . . . . . . . . . . . . . 68
Importing Tapes . . . . . . . . . . . . . . . . . . . . . . . . . . . . . . . . . . . . . . . . . . . . . . . 68
Reformatting Tapes . . . . . . . . . . . . . . . . . . . . . . . . . . . . . . . . . . . . . . . . . . . . . 70
Setting the Administrator-Defined Information for a Tape . . . . . . . . . . . . . . . . 72
Displaying Information About a Tape . . . . . . . . . . . . . . . . . . . . . . . . . . . . . . . 72
Verifying the Data on a Tape . . . . . . . . . . . . . . . . . . . . . . . . . . . . . . . . . . . . . . 73
Finalizing a Tape . . . . . . . . . . . . . . . . . . . . . . . . . . . . . . . . . . . . . . . . . . . . . . 74
Write-Protecting Tapes . . . . . . . . . . . . . . . . . . . . . . . . . . . . . . . . . . . . . . . . . . 75
Exporting a Tape . . . . . . . . . . . . . . . . . . . . . . . . . . . . . . . . . . . . . . . . . . . . . . 75
Managing Volume Sets and File Groups . . . . . . . . . . . . . . . . . . . . . . . . . . . . . . . . 76
Deleting a Volume Set . . . . . . . . . . . . . . . . . . . . . . . . . . . . . . . . . . . . . . . . . . . 76
Renaming a File Group . . . . . . . . . . . . . . . . . . . . . . . . . . . . . . . . . . . . . . . . . . 76
Retensioning Tapes . . . . . . . . . . . . . . . . . . . . . . . . . . . . . . . . . . . . . . . . . . . . . . . 77
Chapter 6 – System Recovery 79
System Rebuild from Tape . . . . . . . . . . . . . . . . . . . . . . . . . . . . . . . . . . . . . . . . . . 79
About File System Rebuild From Tape . . . . . . . . . . . . . . . . . . . . . . . . . . . . . . . 79
Rebuilding a File System from Tape . . . . . . . . . . . . . . . . . . . . . . . . . . . . . . . . 79
Disabling and Re-Enabling a Tape Drive or Library . . . . . . . . . . . . . . . . . . . . . . . . 80
Disabling a Tape Drive or Library . . . . . . . . . . . . . . . . . . . . . . . . . . . . . . . . . . 81
Re-enabling a Tape Drive or Library . . . . . . . . . . . . . . . . . . . . . . . . . . . . . . . . 81
Options In Case of Tape Library or Stand-Alone Drive Failure . . . . . . . . . . . . . 82
7
Page 8

Contents
Chapter 7 – Diagnostics & Maintenance 83
Event Log . . . . . . . . . . . . . . . . . . . . . . . . . . . . . . . . . . . . . . . . . . . . . . . . . . . . . . 83
Opening the Event Log . . . . . . . . . . . . . . . . . . . . . . . . . . . . . . . . . . . . . . . . . . 83
Viewing More Detail about an Error or Warning . . . . . . . . . . . . . . . . . . . . . . . 84
Diagnostic Trace Log . . . . . . . . . . . . . . . . . . . . . . . . . . . . . . . . . . . . . . . . . . . . . . 84
Opening the Trace Log . . . . . . . . . . . . . . . . . . . . . . . . . . . . . . . . . . . . . . . . . . 84
Changing the Level of Detail in the Trace Log . . . . . . . . . . . . . . . . . . . . . . . . . 85
Automatic Generation of Trace Files . . . . . . . . . . . . . . . . . . . . . . . . . . . . . . . . 86
Tape Drive and Library Diagnostics . . . . . . . . . . . . . . . . . . . . . . . . . . . . . . . . . . . 86
Tape Drive Cleaning . . . . . . . . . . . . . . . . . . . . . . . . . . . . . . . . . . . . . . . . . . . . . . 87
Tape Cartridge Error States . . . . . . . . . . . . . . . . . . . . . . . . . . . . . . . . . . . . . . . . . . 88
Index 89
8
Page 9

About This Guide
This guide describes how to configure and use the Spectra® nTier™ File Migrator
software.
Intended Audience
This guide is intended for data center administrators and operators who maintain and
operate backup systems. It also assumes a knowledge of technical tasks such as
configuring operating systems and installing drivers.
Related Publications
The following documents are related to the Spectra nTier Intelligent Storage appliances
used with the nTier File Migrator software. For these documents and additional
information about the Spectra nTier Intelligent Storage appliances and libraries, check
the Spectra Logic web site at www.spectralogic.com/documentation.
Spectra nTier Intelligent Secondary Storage Appliances
The Spectra nTier500 Intelligent Secondary Storage Appliance User Guide provides
detailed information about installing, configuring, and using the Spectra nTier500.
The Spectra nTier700 Intelligent Secondary Storage Appliance User Guide provides
detailed information about installing, configuring, and using the Spectra nTier700.
Microsoft Windows Operating System and Software
The integrated Windows server in the Spectra nTier Intelligent Storage appliances runs
the Windows Storage Server 2003 R2 operating system. You can find information about
this operating system on the Microsoft web site at www.microsoft.com/
windowsserver2003.
9
Page 10

About This Guide
Conventions Used in This Guide
This manual uses the following conventions to highlight important information:
Note: Provides additional information or suggestions about the current
topic.
Caution: Provides information you must know to avoid damage to the
library or tape drives or avoid losing data.
Warning: Provides information you must know to avoid personal injury.
10
Page 11

1 Overview
Introduction
The Spectra® nTier™ File Migrator software manages data tapes and magnetic disk on
a Windows file server (a Spectra nTier Intelligent Secondary Storage appliance) to
create a highly scalable digital archive solution. The solution can be configured with a
wide range of tape libraries, stand-alone tape drives and magnetic storage. It is ideal
for archiving professional digital video, medical images, scientific and engineering
data and any application which requires a high performance data repository ranging
from a few terabytes to multiple petabytes.
The nTier File Migrator software provides the following key functionality:
Standard Windows File System Interface—The magnetic disk storage and
managed tapes appear as a single standard Windows logical drive which means
one or more software applications can write to and read from the archive as
though it were a standard disk-based logical drive letter.
Strong Data Protection—The system combines continuous data protection and
tape cartridge replication.
Hierarchical Storage Management—The solution supports online, nearline and
offline files. A file is online when it is available from magnetic disk. Nearline refers
to a file that is not on magnetic disk but is available from one or more tape
cartridges held in the library or within stand-alone tape drives. Offline refers to a
file that is not on magnetic disk but is written to one or more tape cartridges all of
which have been exported from the library and/or tape drives.
Supports WORM Tape—The solution supports both standard rewritable tape and
unalterable WORM tape. WORM tape is particularly useful for compliance
applications.
Page 12
Chapter 1 – Overview
nTier700 RAID running nTier File Migrator
Spectra T50e library
LAN
Clients
Fibre Channel or SCSI connection
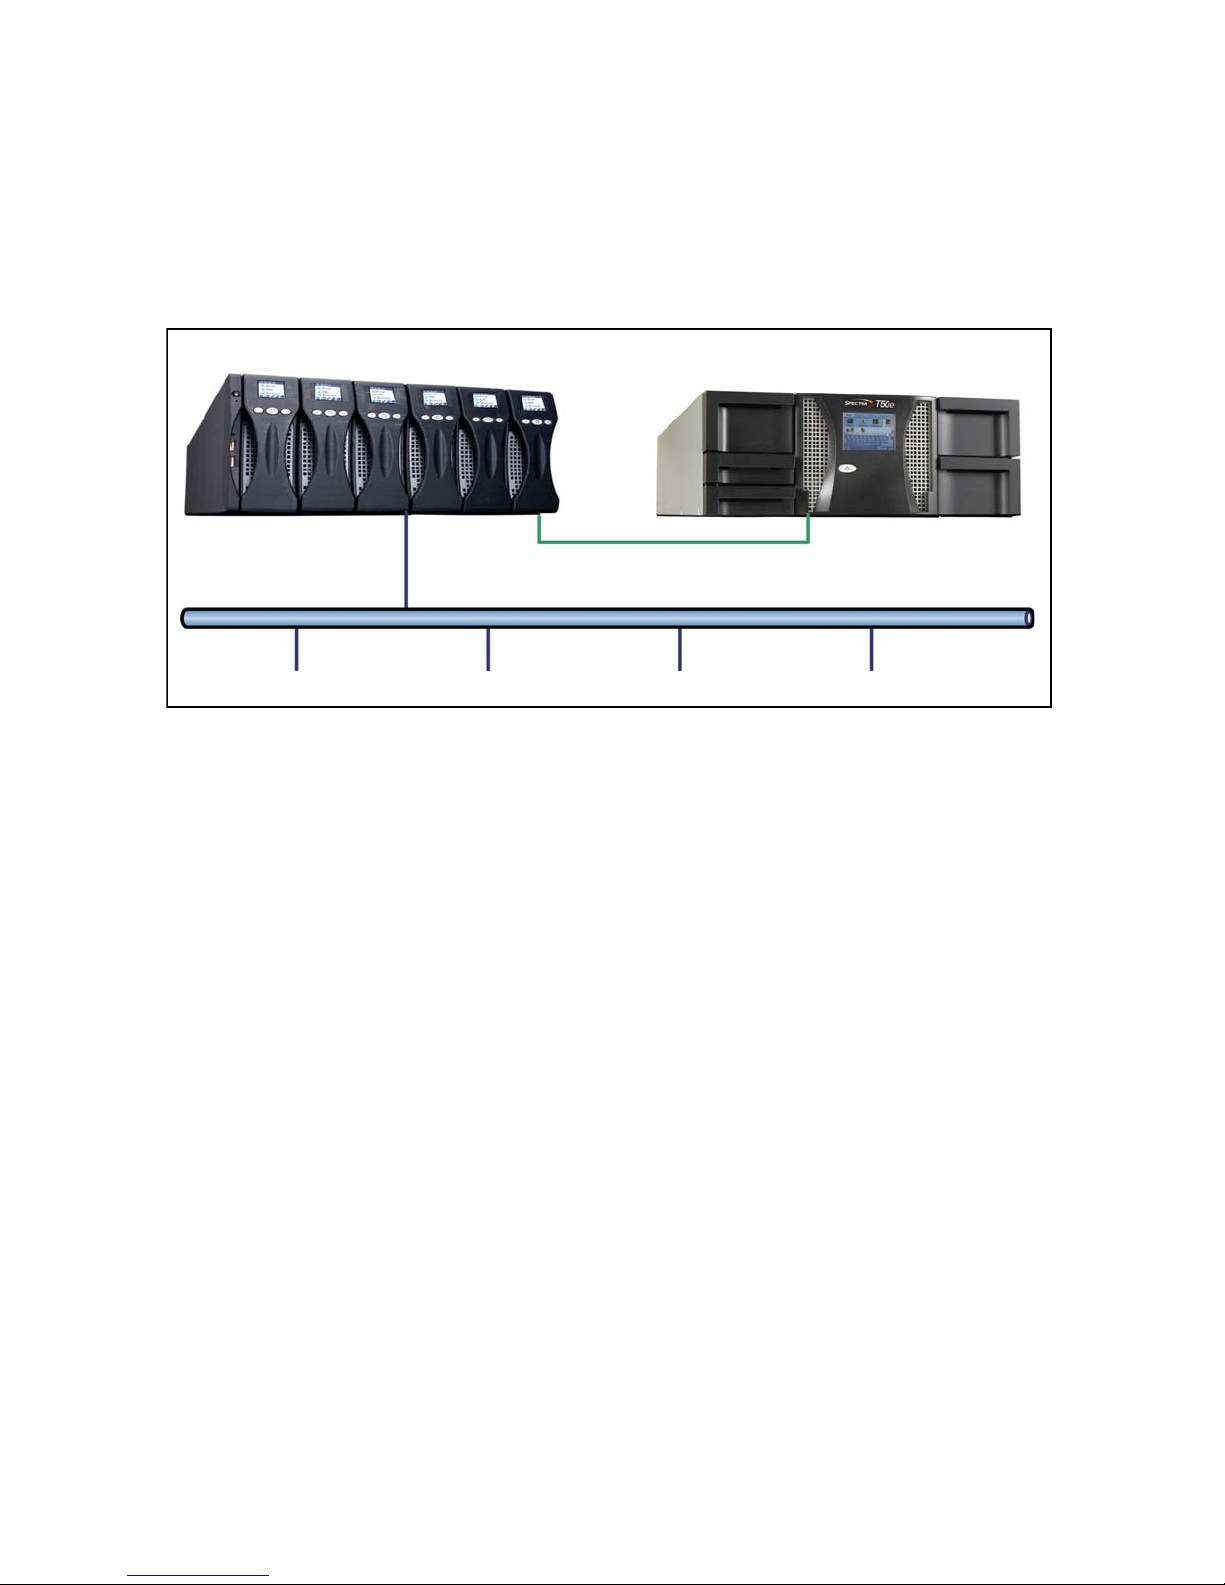
The nTier File Migrator software is hosted on an Windows server (for example, the
Spectra nTier700) running Microsoft Storage Server 2003 R2. The Windows server is
connected to a tape library or stand-alone tape drives and is always configured with a
dedicated logical drive that is managed by the nTier File Migrator software. Figure 1-1
shows a typical system configuration with a Spectra nTier700 and a single Spectra T50e
tape library.
Figure 1-1 An nTier700 running File Migrator and connected to a single T50 tape library.
When writing to and reading from tape, the system always uses the dedicated logical
drive for caching purposes. On writing to tape, a file is first written to magnetic disk
and after it has been successfully written to disk, the file goes into a queue for writing
to tape. On reading a file from tape, it is streamed onto disk cache and simultaneously
transferred over the network to fulfill the read request.
The system administrator defines policies that determine where data files are
physically stored. A single server may have many different policies, tailored to the
needs of the different file types that are being archived.
The file management policies are defined via the nTier File Migrator Archive
Management Console, which is a Microsoft Management Console (MMC) snap-in. Using
this snap-in provides a familiar administration interface which can be easily integrated
with other MMC snap-ins. The policies determine whether a file is written to tape and,
if so, allocates a specific group of tapes for the file. The policies also define whether
the tapes will be replicated and the schedule for replica updates.
12
Page 13

Introduction
The online retention period is set by policy and can range from permanent retention
on magnetic disk to flushing from disk as soon as the last tape replica has been
successfully written. A typical policy is illustrated in Figure 1-2.
Figure 1-2 A file storage policy example.
For example, in the file management policy illustrated in Figure 1-2, a file is written to
both magnetic disk and a specified group of tape cartridges. This policy immediately
provides two copies of the file for high data integrity. The system administrator defines
the replication schedule and the number of tape copies for replication. After all copies
of the file have been produced, the file can be flushed (deleted) from magnetic disk
according to the administrator-defined policy. When a file is read, it is always retrieved
from the fastest available physical storage device. If the file is stored on both magnetic
disk and tape, the file will be read from disk. If the file is available only on tape, it will
be retrieved from tape.
The software supports both rewritable and Write-Once-Read-Many (WORM) tape
cartridges. WORM tape provides an unalterable record of the data written to it and
provides best practice when authenticity of the digital content is important. The nTier
File Migrator software supports the simultaneous use of WORM and rewritable media.
13
Page 14

Chapter 1 – Overview
The software presents the magnetic disk storage and tape library as a standard
rewritable logical drive, even when unalterable WORM tape is being used within the
library. The ability to delete and overwrite files is required by many standard
applications. Consequently, the rewritable nature of the archive allows standard
applications to work with the nTier File Migrator storage solution without need to
write any special interface software. When a file is deleted, it is no longer available
using the standard file system interface. Similarly, when a new version of a file is
written, only the latest version is available using the standard interface. The nTier File
Migrator software also includes a browser-based utility, History Explorer, which makes
it easy to identify, access and restore all old file versions and deleted files from tape.
Software Feature Overview
Standard File System—A magnetic disk logical drive and all managed tapes are
virtualized, making these physical storage devices appear as a file system within a
single logical drive letter. The solution uses the standard Windows offline file
attribute to identify when a file is no longer online.
Benefit: Seamlessly integrates with standard applications and existing network
infrastructure without modification.
Combining HSM and Data Protection—Archive Series software provides policy-
based Hierarchical Storage Management based on file deletion rather than classic
file migration.
Benefit: This approach lets the administrator match the life-cycle of a file to the
physical storage media and provides built-in data protection, removing the need for
conventional backup.
Offline Tape Cartridge Management—The system retains meta-data for offline
tape cartridges.
Benefit: The system supports an unlimited number of tapes on the shelf.
Partial Read of Large Files—Often, only a portion of a very large file needs to be
read. For example, this frequently occurs with multi-gigabyte video files when a
short clip is requested. The nTier File Migrator software supports partial reading of
large files.
Benefit: Enhanced performance when dealing with large files
Automated Tape Cartridge Replication—Tape cartridges are replicated
automatically based on the policies defined by the Administrator. When a tape
cartridge replica is reintroduced into the library after being retained off-site, it is
automatically brought up-to-date by the system.
Benefit: It is easy to rotate tape cartridges off-site for data protection purposes.
14
Page 15

Software Feature Overview
Multiple Tape Set Support—The software allows file groups to be allocated to
specified groups of tapes.
Benefit: The Administrator can group related files together on the same set of
tapes.
Cartridge Spanning—The system supports storage of large files across multiple
tape cartridges.
Benefit: Results in higher use of tape capacity and also supports storage of very
large files with a size greater than that of an individual tape cartridge.
Supports both WORM and Rewritable Tape—The software simultaneously
manages both WORM and rewritable tape cartridges in the same tape library.
Policies that are set by the Administrator define which files are written to which
type of tape cartridge.
Benefit: Allows the Administrator to match tape cartridge type to the data storage
needs of the organization.
Comprehensive File Version Management—The nTier File Migrator software
provides a full audit trail of all file changes and deletions. History Explorer is a
browser-based utility that lets authorized users access all versions of a file and all
deleted files.
Benefit: Provides legal compliance and best business practice, including meeting
SEC17a-4 requirements.
Open Standard Tape Format—Open standard TAR file format is used on the tape,
allowing the tape cartridges to be read using third party utilities.
Benefit: The use of open standards on industry standard hardware ensures the
long-term availability of data.
Dynamic Expansion of Tape Sets—The system dynamically expands tape sets to
meet capacity demands.
Benefit: This minimizes system administration.
Familiar Administration—File policy and tape cartridge management is performed
by the administrator using the Archive Management Console which is a Microsoft
Management Console Snap-In.
Benefit: The Administrator uses a familiar tool for system management.
Microsoft Security—File Migrator software is fully integrated with the Microsoft
Windows security model, based on Active Directory.
Benefit: Effortlessly integrates with existing security, minimizing system
administration.
Supports High Performance Tape Formats—The software supports a number of
leading tape cartridge formats including LTO.
15
Page 16
Chapter 1 – Overview
nTier700 RAID running nTier File Migrator
Spectra T50 library
Fibre Channel or SCSI connections
LAN
Clients
Tape drive
Benefit: These popular industry formats provide high capacities, high data transfer
rates and estimated data lifetimes up to 30 years without need to rewrite data or
rewind tapes.
Highly Scalable—The nTier File Migrator software supports unlimited RAID
capacity and tape libraries with capacities from less than 1 TB to over 1PB.
Benefit: Works easily with tape libraries, independent of their capacities.
API Available—An API is available.
Benefit: This can be used by developers to obtain tight integration with their
applications.
Installations Using a Tape Library
The nTier File Migrator software can be configured and licensed to manage a tape
library, optionally combined with one or more data tape drives.
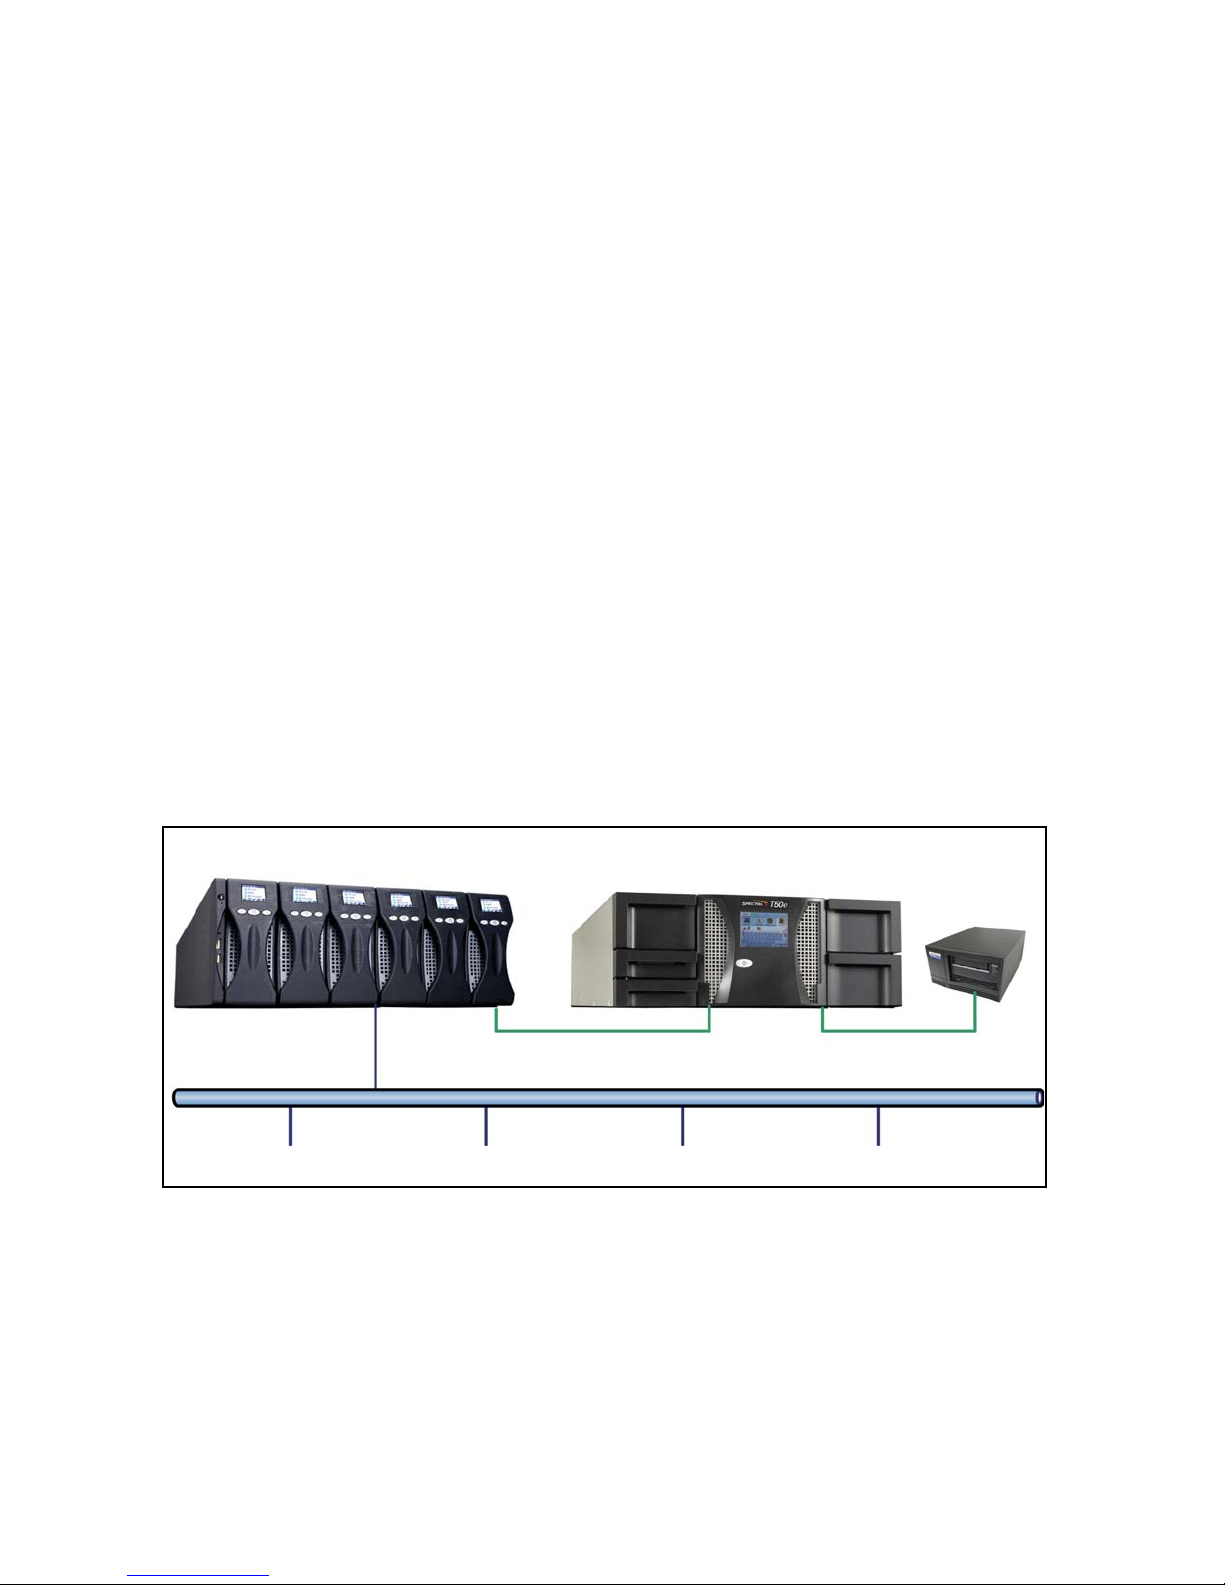
Figure 1-3 shows a Windows server (the nTier700) connected to tape library and a
stand-alone data tape drive. A configuration combining a tape library and a stand-alone
drive is useful when files are retained both nearline and offline. The stand-alone tape
drive is convenient for quickly bringing individual offline tapes back to nearline.
Figure 1-3 An nTier700 running File Migrator, connected to a T50 tape library and a standalone tape drive.
With the configuration shown in Figure 1-3, all archived files appear within one logical
drive on the Windows server (the nTier700), independent of file location—whether
those files are on a tape within the library, on a tape in the tape drive or are offline.
This single logical drive may be shared over the network, making the archive
accessible to network clients.
16
Page 17

Installations Using a Tape Library
When configuring a system using a tape library, consider the following guidelines to
ensure that the library includes the appropriate number of tape drives.
With only one tape drive within the library, it is important to be careful in setting
the file management policies to prevent the single drive from becoming a
bottleneck and in turn degrading performance.
When only one drive is present, we recommend that frequently accessed files are
retained online by employing a large RAID for the dedicated logical magnetic drive
and appropriate RAID retention rules. Make sure that only one set of tapes (Volume
Set) is configured and that tape replication is scheduled to occur at a time when
there is no other writing or reading activity.
With two tape drives within the library, the concern over tape drive bottleneck is
much less severe than for a single drive system. However, we recommend that only
one Volume Set should be configured.
Three or more tape drives within one library are recommended for large or
frequently accessed archives. The nTier File Migrator software intelligently manages
many drives, allowing simultaneous writing and multiple file accesses.
All installations that include a tape library, even if it has only one drive within it,
support tape cartridge replication.
17
Page 18

Chapter 1 – Overview
Fibre Channel or SCSI connection
LAN
Clients
Offline tapes
Tape drives
nTier500 RAID running nTier File Migrator
Installations using Stand-alone Drives
The nTier File Migrator software can be configured and licensed to manage one or
more stand-alone tape drives connected to the Windows server. Figure 1-4 shows a
Windows server (the nTier500) connected to two tape drives. Even though there are
two tape drives in this system, all archived files appear on one logical drive on the
Windows server, independent of whether those files are on a cartridge loaded in one of
the tape drives or on a cartridge stored offline. This single logical drive can be shared
over the network, making the archive accessible to network clients.
Figure 1-4 The nTier500 running File Migrator connected to two stand-alone tape drives.
When a file is written to tape, it is first written to magnetic disk, then the file is
immediately written to tape. The system does not permit a file to be written to disk
unless there is a suitable tape with sufficient available capacity loaded into one of the
tape drives. The following sequence of events occurs when writing a file to tape:
1. The file is first written to disk cache and appears in the file system.
2. The file is immediately written to tape.
3. After the file is on tape, it is then eligible to be flushed (i.e., deleted) from the disk
cache. The disk retention period is determined by administrator settings.
The following sequence of events occurs when reading a file from a tape cartridge
loaded in one of the tape drives:
18
Page 19
Windows Offline Attribute
1. The tape is moved to the beginning of the file (or a specified portion of the file).
Note: When reading a file that is only available on an offline tape, the
system generates a Windows event log entry that identifies the
tape cartridge on which the file is store. The cartridge must be
loaded into a tape drive before the read request can be fulfilled.
2. The file (or portion of file) is streamed to the disk cache making it available for read
request.
3. When the file is closed, it is eligible to be flushed from the disk cache. The disk
retention period is determined by administrator settings.
A system with two drives can be configured to generate two copies of each tape using
the automatic replication capabilities of the nTier File Migrator software. This can be
useful if one set of tape cartridge replicas is to be held off-site for data protection
purposes. This option is not available in a system with only one stand-alone tape drive.
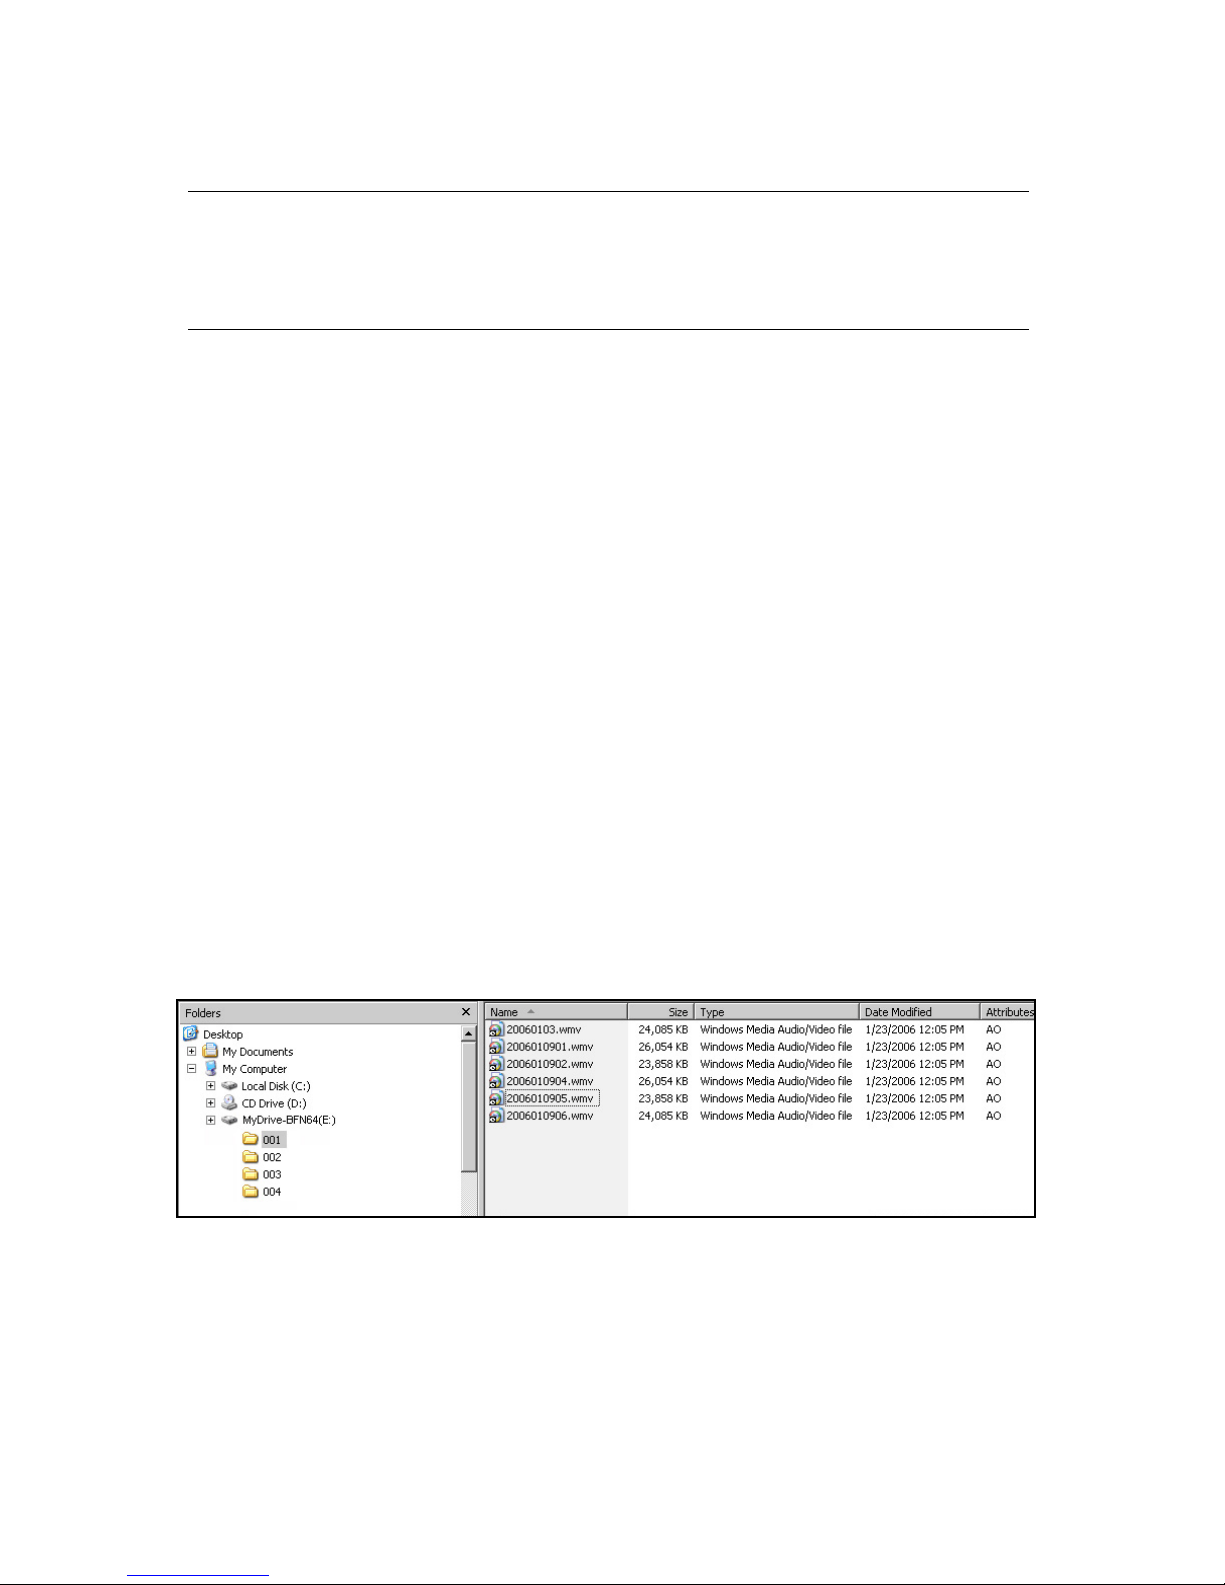
Windows Offline Attribute
The nTier File Migrator software uses the standard Windows offline file attribute to
identify files that are no longer online on magnetic disk storage. After a file has been
successfully written to tape and is no longer on magnetic disk, the offline attribute is
set. This Microsoft file attribute changes network timeout periods to longer access
times. This allows retrieval of files from tape. This attribute also changes the
appearance of a file within Windows Explorer—a small clock is added to the bottom
left of the file icon, as shown in Figure 1-5.
Figure 1-5 Offline file identification, as indicated by clock icon.
19
Page 20

Chapter 1 – Overview
The state of the offline file attribute for the three tiers of HSM is presented in the
following table.
HSM Tier Description Offline Attribute
Online One instance of the file is on magnetic disk and, in addition,
there may be one or more instances on tape.
Nearline At least one instance of the file is on tape within a tape library or
tape drive and no instance is on magnetic disk.
Offline The file is not stored on magnetic disk and the instances on tape,
all of which have been exported from the tape libraries or ejected
from stand-alone drives.
Not set
Set
Set
Determining Disk Space Requirements
The Windows server (for example, the nTier700) must be configured with at least two
logical drives on magnetic disk—a boot drive (usually C:) and another logical drive
dedicated for use by the nTier File Migrator archive. The nTier File Migrator software is
installed on the boot drive but it requires minimal available capacity. The dedicated
logical drive stores file system metadata archive. This archive is used for read and write
caching of files held on tape and for storing all files that are retained online. This
dedicated logical drive must be formatted with NTFS and must be configured as a
dynamic disk.
Capacity requirements for the dedicated logical drive vary considerably depending on
how the system is configured. The total capacity requirement is the sum of the
following.
File system metadata—Each file in the archive file system requires two NTFS
clusters. If the dedicated logical drive is formatted using the default cluster size of
4096 bytes, a file system with one million files will require 8 GB for the metadata.
Read and write caching—The dedicated logical drive provides caching for each
file that is being written and all files that are open due to being read by a program.
Using a capacity allowance of twenty times the largest file size is adequate for most
environments.
Online Files—Any group of files may be retained online. The administrator uses
the Archive Management Console to define policies for online retention. If tape
cartridge replication is not employed, the system can be configured to delete files
immediately after writing and reading, in which case the additional capacity
requirements for online files is zero. At the other extreme, the system can be
configured to keep all current files online, in which case the additional capacity
requirements for online files is the sum of all the file sizes within the file system.
20
Page 21

Determining Disk Space Requirements
Example calculation for an installation with only stand-alone tape drives:
Up to a 250,000 files: 2 GB required for metadata
Maximum file size of 1 GB: 20 GB allowed for caching
Immediate file deletion and no replication: zero allowance is required for online
retention
A total dedicated logical drive capacity of 22 GB or higher is estimated for this
installation.
Example calculation for a 200 TB digital video archive using a large tape library:
100,000 files with high resolution content and 100,000 low resolution proxy files:
1.6 GB required for metadata
Average high resolution file size of 2 GB: 40 GB allowed for caching
Average low resolution proxy file is 100 MB and all must be retained online: 10 TB
required for online retention.
A total dedicated logical drive capacity of just over 10 TB is estimated for this
installation.
21
Page 22

Chapter 1 – Overview
Notes
22
Page 23

2 Concepts
Introduction
Using the nTier File Migrator software, the system administrator defines policies that
allow:
Groups of files (termed File Groups) to be defined based on the file name and
folder (that is, location in the directory structure)
Groups of files to be stored on defined sets of tape cartridges (termed Volume Sets)
Groups of files to be retained online on magnetic disk for predefined periods
Automatic generation of tape replicas for off-site retention
Fast partial restore of very large files and tape cartridge spanning
Notification of requests for files that are stored offline
File version management
Configuration of file security to control file writing and access
File Groups and Volume Sets are configured by the administrator using the Archive
Management Console.
File Groups
A File Group is a collection of files that have the same file management policy and
consequently are all treated in the same way by the system. Every file that is handled
by the system belongs to exactly one File Group. Files are assigned to a File Group on
the basis of name and path. This assignment can be based on the name of the folder
that contains a file, the name of the file or both. For example, the system may be
configured with the following three File Groups.
File Group 1 contains all files with names of the form *.tmp, regardless of folder.
These are saved to magnetic disk but are not saved to tape.
File Group 2 contains all other files saved to the folder \project1\. These are
permanently retained online on magnetic disk and are also saved to tape to a
specific Volume Set called “Tapes01.”
23
Page 24

Chapter 2 – Concepts
File Group 3 contains all other files saved to the folder \project2\. These are
retained online on magnetic disk for 24 hours after they were written or last read.
They are also saved to tape to another Volume Set called “Tapes02.”
A file cannot be written to the system if a File Group is not present that matches its file
name and path. In the example above, files can only be stored if written to the folders
\project1\ or \project2\ of if they have a name of the form *.tmp. Attempts to write
other files is not permitted. If appropriate, the system can be configured with an
additional “catch all” File Group that sets a policy for all other files.
File Group characteristics are defined by the administrator using the Archive
Management Console. The following parameters must be defined for each File Group:
File name or path pattern for the File Group. This, together with the relative
position of the File Group in the Archive Management Console display, defines the
files allocated to this File Group.
The position of the File Group relative to other File Groups in the Archive
Management Console display, which defines the order in which file name or path
pattern selection is applied. If a file name matches the selection criteria for more
than one File Group, it will be assigned to the first matching File Group.
Enable or disable Save all files to tape.
Selection of a Volume Set, if the File Group is saved to tape.
Enable or disable file fragmentation. If enabled, set the fragment size. File
fragmentation must be enabled to provide partial file restore and cartridge
spanning.
Retention periods on magnetic disk, if the File Group is saved to tape.
The policies defined by the administrator determine how files are stored on disk and
tape. The policies do not change folders or files within the Windows file system. For
example, folders cannot be created by using File Group rules; new folders are created
by using standard utilities like Windows Explorer.
Constructing the File Name, Path Pattern, or Exclude Pattern
Whenever a program creates a file, the nTier File Migrator software needs to know
how to treat it. The way the file should be handled is defined by File Group rules, so
the first thing the system does when a file is opened or created is to allocate it to a File
Group.
24
Page 25

File Groups
The system maintains a list of File Groups, each of which has a File name or path
pattern. To establish which File Group to use for a particular file, the system starts at
the top of the list of File Groups and tries to match the file name to the pattern for the
File Group. If the file name matches the pattern for the first File Group then the file is
allocated to the first File Group. If the file name does not match the first path pattern,
the system tries the next File Group in the list, and so on down the list until it finds a
match or reaches the end of the list. If it reaches the end of the list, the system blocks
opening or creation of the file, returning instead an error to the application that tried
to open the file.
Files are allocated to File Groups based on their folder name, file name, file name
extension in any combination. Standard file name and wildcard conventions (such as *
and ?) can be used during the pattern match. As an extension to normal pattern
matching syntax, the special directory wild card ... can be used to match any number of
intermediate sub-folders. The system supports multiple patterns per File Group,
separated by semicolons.
Character Definition
* (that is, an asterisk) any number and type of character; often used before a file
extension, such as *.png
? (that is, a question
mark)
... (that is, three period
characters)
a single alphabetic or numeric character in the file name, such as
image09?.png, that represents image090 - image099
subdirectories \ subfolders, such as \financials\...\*.xls represents
all subfolders under the financials directory and file names that
end in xls (such as
\financials\july\payroll.xls
\financials\july\vacation.xls
\financials\august\payroll.xls
\financials\august\vacation.xls
Some examples file name or path patterns are:
example results
*.tif Selects files with the extension .tif for the File Group.
abc???.tif Selects files that start with abc, have the extension .tif and have
six characters before the extension.
\Images\* Selects files that are in the folder \Images.
\Images\...\*
\Images\...\*.tif
Selects files that are in the folder \Images or any of its sub-folders.
Selects files with the extension .tif that are in the folder \Images
or any of its sub-folders.
25
Page 26

Chapter 2 – Concepts
Examples of Allocating Files to File Groups
The easiest way to illustrate how files are allocated to File Groups is by way of
examples, shown below. In each case, files are allocated to three different File Groups.
Example 1 One File Group contains all files with names ending in .tif; a second File
Group is for all files with names ending in .txt; and a third File Group contains all
other files.
File Group File name or path pattern Exclude pattern
File Group 1 *.tif
File Group 2 *.txt
File Group 3 *
In this example, no path has been specified and consequently the file name rules apply
to all files written to the logical drive managed by Archive Series software, no matter to
which folder they are written. Note that the Exclude pattern fields are blank in this
example. Note also that we used * instead of *.* in File Group 3 to ensure that all files
are included in the File Group including those without a name extension. This set
includes any files that do not have the extensions tif and txt.
Example 2 One File Group contains all files written to a folder at the root called
\project01\; another contains all files written to a folder at the root called \project02\;
and a third File Group contains all other files.
File Group File name or path pattern Exclude pattern
File Group 1 \project01\*
File Group 2 \project02\*
File Group 3 *
Note that Exclude pattern field is left blank in this example. Note also that we used *
instead of *.* to ensure that all files are included in the file group including those
without a name extension.
26
Page 27

File Groups
Example 3 This is similar to example 2, but includes all sub-folders for the first two
File Groups. One File Group contains all files written to a folder at the root called
\project01\ and its sub-folders; another contains all files written to a folder at the root
called \project02\ and its sub-folders; and a third File Group contains all other files.
File Group File name or path pattern Exclude pattern
File Group 1 \project01\...\*
File Group 2 \project02\...\*
File Group 3 *
In this example, the use of …\ denotes all folders below the specified path.
Example 4 This is similar to example 3, but all temporary files are excluded from the
first two File Groups by using the Exclude pattern field. Consequently, all file names
ending in .tmp are allocated to the third File Group.
File Group File name or path pattern Exclude pattern
File Group 1 \project01\...\* *.tmp
File Group 2 \project02\...\* *.tmp
File Group 3 *
Example 5 This is similar to example 4, where all temporary files are excluded from
the first two File Groups by using the Exclude pattern field. As for example 4, all file
names ending in .tmp are allocated to the third File Group. However, the administrator
has not set up a catch-all File Group rule at the bottom of the File Group list. In this
case, the system does not write files unless they are written to the folders proect01\,
project02\ or their sub-folders or the files end with *.tmp.
File Group File name or path pattern Exclude pattern
File Group 1 \project01\...\* *.tmp
File Group 2 \project02\...\* *.tmp
File Group 3 *.tmp
27
Page 28

Chapter 2 – Concepts
Example 6 This example illustrates the importance of File Group order.
File Group File name or path pattern Exclude pattern
File Group 1 \project01\*
File Group 2 *.txt
File Group 3 *
In this example, files ending in .txt in folder project01\ are allocated to the same File
Group as the other files in this folder. If the order of the first two rules was changed,
files ending in .txt would be allocated to the same File Group as the.txt files in the
other folders.
Tapes: Volumes, Volume Sets, and Automatic
Replication
The nTier File Migrator software can automatically create multiple tape cartridge
replicas. For this software, the term “Volume” refers a complete set of replica tapes
which, when up-to-date, all contain the same data. If replication is not enabled a
Volume refers to an individual tape cartridge.
A Volume Set stores files from designated File Groups and consists of one or more
Volumes. As more data is written to a Volume Set, the initial Volume eventually
becomes full. At a preset threshold, defined by the administrator, the system
automatically adds another Volume by taking the appropriate number of tapes from the
blank media set and extends the Volume Set.
The data on replicated tapes in a Volume Set are kept synchronized whenever the tapes
are available to the system. If one or more tapes in a Volume Set are removed from the
library, the system maintains a record of which files need to be written to those tapes.
When tapes are reintroduced into the library, the data on them is automatically brought
up to date.
With the exception of the blank media set and quarantined media set, all media within
a Volume Set must be either WORM tape or rewritable. Tape replicas must all be of the
same capacity.
One unique Volume Set, termed the blank media set, contains all the tapes that are
recognized by the system but are not formatted for storing data. These may be new
(unused) tapes or rewritable tapes that have been reformatted by the system
administrator.
28
Page 29

Tapes: Volumes, Volume Sets, and Automatic Replication
Another unique Volume Set, termed the quarantined media set, contains all tapes that
have been imported into the library but are unrecognized by the system. Typically,
they are not recognized because a cartridge has previously been used by a different
application (such as a backup application) or because an error occurred while the
system was trying to identify the contents of the cartridge.
Following configuration of the File Groups, Volume Sets and any associated replication
requirements, the system operates completely automatically. Files written to the logical
drive under nTier File Migrator control are automatically allocated to File Groups. Files
allocated to File Groups with “Save files to tape” enabled have an assigned Volume Set
and are automatically written to both RAID and tape. If replication is enabled for the
assigned Volume Set, this occurs automatically.
Understanding Volume Sets
A Volume Set consists of a set of tape cartridges with a defined media type (WORM or
rewritable) and replication strategy. Each Volume Set stores files from one or more File
Groups. Automatic tape cartridge replication can be defined for each Volume Set.
When a new system is installed, four default Volume Sets are created: the blank media
set, which contains all the blank media in the library; the quarantined media set, which
contains all unrecognized media; a cleaning cartridge set; and an initial operational
Volume Set, ready for configuration.
About the Blank Media Set
The blank media set is a unique Volume Set of tape cartridges that have been imported
into a library or inserted in a stand-alone tape drive but are not yet allocated to an
operational Volume Set. These may be new (unused) tapes or rewritable tapes that
have been reformatted by the system administrator. Tapes in the blank media set are
allocated to an operational Volume Set either manually by the administrator or
automatically by the Archive Series software when all the existing Volumes in a Volume
Set are nearly full. The first Volume must be allocated manually to each Volume Set.
29
Page 30

Chapter 2 – Concepts
For automatic operation using a tape library, make sure sufficient tape cartridges of the
correct type are maintained in the blank media set. When the Volumes within a Volume
Set become full, the system automatically attempts to take the appropriate number of
tapes from the blank media set to extend the Volume Set. If insufficient tapes of the
right type are available in the blank media set, the system stops accepting data from
users and reports disk full when a user tries to write to the Volume Set.
Figure 2-1 The blank media set.
About the Quarantined Media Set
The quarantined media set contains media that the system could not recognize, usually
because the cartridge contains data that was written in a format that is not compatible
with the nTier File Migrator system or because an error occurred while the system was
trying to identify a cartridge. Tape cartridges in the quarantined media set must be
reformatted before they can be used by the nTier File Migrator system.
Figure 2-2 The quarantined media set.
30
Page 31

Partial File Restore and Cartridge Spanning
Partial File Restore and Cartridge Spanning
The ability to quickly restore a portion of a file from tape is often useful. For example,
in professional video, administrators may want to retrieve a short video clip from a
very large multi-gigabyte file. It might take many minutes to restore the whole file from
tape, so restoring only the clip—a partial restore—greatly improves the performance of
the total solution.
The ability to restore a selected portion of a file relies on file fragmentation. The term
file fragmentation refers to the way in which computer systems break large files into
smaller, more manageable units for transfer to or from storage devices. For files stored
on magnetic disks, fragmentation results because gaps are created when files are
deleted. In this case, fragmentation leads to performance degradation that can be
corrected using de-fragmentation utilities.
Data recorded on tape using a tape drive does not inherently suffer from file
fragmentation problems because the data is recorded linearly from one end of the tape
to the other, with individual files recorded as complete entities. However with tape,
controlled file fragmentation provides the ability to read partial files, which can
provide significant performance improvements with large files. Furthermore,
controlled file fragmentation allows a large file to be spanned across multiple Volumes.
Partial file restore requires the administrator to enable file fragmentation for a File
Group in nTier File Migration. File fragmentation typically provides the most benefit
for File Groups with multi-gigabyte files.
If file fragmentation is enabled, the system has the following characteristics:
When a portion of a file is read from tape, only the applicable fragments are
restored to disk, saving both transfer time and space on the disk cache.
When writing a file, the system automatically spans multiple Volumes (tapes) as
necessary and writes complete fragments to each of the spanned Volumes.
When an application modifies a large file by appending, the appended data is
written to tape as one or more additional fragments, saving space on the tape
cartridge.
If an application modifies a small part of a large file, for example by updating an
index at the beginning of the file, then only the fragments containing modified data
are written to tape.
If file fragmentation is not enabled, the system has the following characteristics:
When a file or portion of a file is read from tape, the complete file is restored to
disk cache.
When writing a file, the system always writes the complete file to a single Volume.
When a file is modified, the new version of the entire file is written to tape.
31
Page 32

Chapter 2 – Concepts
Off-line File Management
The nTier File Migrator software can be configured to provide three tiers of storage
hierarchy:
Online—One instance of the file on magnetic disk and typically one or more
instances on tape. In this case the file is retrieved from disk when accessed.
Nearline—No instances of the file are stored on disk. At least one instance is
available on a tape loaded in a tape drive or stored in a library ready to be loaded
into a tape drive. Nearline files are automatically retrieved from tape when
accessed.
Offline—No instances of the file are stored on disk. One or more instances of the
file are available on tapes, all of which have been ejected from the tape drives and
exported from the tape libraries. To access an offline file, the tape must be brought
nearline by manually importing the tape with the file into a tape library or inserting
the tape into a stand-alone tape drive.
Offline files appear in the Windows file system but when they are accessed by a
program, the file system returns a message indicating that the file is not available.
The nTier File Migrator software also posts a message in the nTier File Migrator
area of the Windows Event Log that identifies which tape cartridge or cartridges
contain the file. The cartridge(s) containing the file must be loaded into a tape drive
before the file can be accessed.
File Version Management
The Windows file system interface provides access to only the latest version of a file—
the interface does not show old file versions and deleted files. However, if old file
versions or deleted files were saved to tape, they can be accessed using nTier File
Migrator History Explorer.
If a file is updated with a newer version by overwriting or appending, the nTier File
Migrator software assigns a new version number. A file’s version number increases by
one every time it has data written to it. Note that the version number does not increase
for every individual write operation, just for every file open that is followed by a write.
Version 0 of a file never contains any data; the first time an application writes to the
file, the version number is increased to 1.
If a file is deleted and then a new file containing data is created using the same name,
the system starts again with version 1 of the new file. The deleted file and its prior
versions can still be accessed by enabling Show deleted files using History Explorer.
32
Page 33

File Security
File Security
The nTier File Migrator software integrates fully with the Microsoft Windows security
model, based on Active Directory. Files and directories have user-definable security
attributes just as they do with standard Microsoft file systems and access control checks
are performed in the same way. The security model is extended to deleted files and old
versions of files made available to users via the History Explorer, or another
application written using the nTier File Migrator interface. In these cases, the security
allocated to prior versions of a file or directory is the same as that applied to the most
recent version, regardless of the security applied when the old version was originally in
use. With this feature, system administrators can update access controls for old files
based on changing business requirements.
33
Page 34

Chapter 2 – Concepts
Notes
34
Page 35

3 Installing nTier File Migrator
Before You Begin
Before installing and configuring the nTier File Migrator software:
Complete the installation and initial configuration of your nTier Intelligent
Secondary Storage appliance as described in the User Guide that accompanied it.
Make sure you can access the internet—preferably with a direct connection to the
nTier. You can also access the internet from a computer that is physically located
near the nTier or connected to the same network.
Have on hand the activation code that was shipped with the nTier.
Identify the drive letter you want to dedicate to the File Migrator application.
Attach the tape library or stand-alone tape drive to the nTier.
Access the nTier Windows Desktop
The configuration steps described in this chapter require accessing the Windows
Desktop through the nTier BlueScale web interface.
Note: Refer to the User Guide that accompanied your nTier appliance for
detailed information about making connections to the nTier,
accessing and using the BlueScale web interface, and accessing the
Windows Desktop.
1. Open a web browser on a computer connected to the same network as your nTier.
Note: You must use Microsoft Internet Explorer to access the Windows
desktop. The Windows Remote Desktop application used to access
the desktop does not support the Mozilla Firefox browser.
Internet Explorer may prompt you to install an ActiveX control the
first time that you use this feature. ActiveX is required in order to
access the Windows desktop through the BlueScale web interface.
35
Page 36

Chapter 3 – Installing nTier File Migrator
2. Enter the IP address of your nTier in the browser address bar using the form
https://nnn.nnn.nnn.nnn, where nnn.nnn.nnn.nnn is the IP address.
Note: The BlueScale web interface uses a secure internet connection.
You must prefix the IP address with https:// instead of just
entering the IP address.
3. Log into the BlueScale web interface, then select General > Windows Desktop to
access the Windows Desktop on the nTier.
A message displays that provides the option to connect to Windows Remote
Desktop (Figure 3-1).
Figure 3-1 The Windows Desktop message.
4. Select Connect. Windows Remote Desktop displays the Windows login dialog box
(Figure 3-2). Use the same User name and Password as you use to log into the
BlueScale web interface.
Figure 3-2 The Windows Storage Server login.
36
Page 37

Prepare the nTier Windows Server
Prepare the nTier Windows Server
The Windows server in your nTier Intelligent Secondary Storage appliance (also
referred to as the nTier) must be configured before you install and use the nTier File
Migrator software.
Configure the Archive Drive
The nTier File Migrator software requires a dedicated logical drive on the Windows
server for storing the file system archive metadata. If you have not already configured a
logical volume on the nTier and formatted it with the NTFS file system, refer to your
nTier’s User Guide for detailed instructions.
1. From the nTier Windows Desktop Start menu, right-click on the My Computer to
display the context menu, then select Manage.
Note: By default, the My Computer icon does not appear on the Window
Desktop. Instead, it is accessed from the Start menu. If desired,
you can customize the Windows Desktop to show the My
Computer icon.
2. Select Disk Management.
3. Choose the drive letter of the logical volume you want to use for the File Migrator
archive in the list at the bottom of the right hand pane.
4. Make sure that the logical volume that is configured as a dynamic disk. If the disk
type is currently set to Basic, right-click on the drive letter and select Upgrade to
Dynamic Disk.
5. Confirm that the logical volume is formatted using the NTFS file system.
6. Make sure that the logical volume does not contain any files. If files have been
previously written to it, perform a quick format to remove all files.
7. Check to see that the Microsoft Removable Storage service is disabled or set to
manual start-up. If necessary, use the steps in Disable Microsoft Removable Storage
Service to set this service to manual. Otherwise, skip to Remove Microsoft Services
for NFS on page 38.
37
Page 38

Chapter 3 – Installing nTier File Migrator
Disable Microsoft Removable Storage Service
Use the following steps to disable the Microsoft Removable Storage service.
1. From the nTier Windows Desktop, right-click on the My Computer icon under the
Start menu, then select Manage.
2. Select Services and Applications > Services.
3. Double click on Removable Storage in the right hand pane.
4. Change Startup Type to Manual, then select OK.
Remove Microsoft Services for NFS
When running the nTier File Migrator software on your nTier, the Windows Network
File System (NFS) service must be removed.
Note: If you stop using nTier File Migrator software, you may want to re-
enable NFS so that the nTier drives can be mapped by other
systems over the network. See Re-Enabling NFS on page 39 for
instructions.
Determining Whether NFS Is Enabled
1. From the nTier Windows Desktop, select Start > Run.
2. Type cmd to open a command prompt box.
3. At the command prompt, type fltmc to view a list of the filters currently running on
the system.
4. If msnfsflt is listed under Filter Name, you must remove the NFS service before
installing File Migrator as described in the remaining steps of this procedure.
5. Close the command prompt box.
msnfsflt is not listed under Filter Name, skip to Install nTier File Migrator on
6. If
page 41. If it is listed, proceed to Removing NFS.
38
Page 39

Prepare the nTier Windows Server
Removing NFS
1. From the nTier Windows Desktop, select Start > Settings > Control Panel > Add/
Remove Programs.
2. On the left side of the Add or Remove Programs window, select Add/Remove
Windows Components.
3. Scroll through the list of Windows components and select Other Network File and
Print Services.
4. Select Details.
5. Clear the check box next to Microsoft Services for NFS, then select OK to return to
the list of Windows components.
6. Select Next, then select Finish.
7. If you are prompted to Restart Windows, select Yes .
8. After the nTier server completes its restart, reconnect to the BlueScale web interface
and access the Windows Desktop (see Access the nTier Windows Desktop on
page 35).
9. Repeat Steps 1 through 5 to confirm that msnfsflt is no longer listed.
Re-Enabling NFS
If you stop using the nTier File Migrator software, you may want to re-enable NFS so
that the nTier drives can be mapped by other systems over the network.
1. Connect to the nTier’s BlueScale web interface and access the Windows Desktop
(see Access the nTier Windows Desktop on page 35).
2. From the nTier Windows Desktop, select Start > Settings > Control Panel > Add/
Remove Programs.
3. On the left side of the Add or Remove Programs window, select Add/Remove
Windows Components.
4. Scroll through the list of Windows components and select Other Network File and
Print Services.
5. Select Details.
6. Select the check box next to Microsoft Services for NFS, then select OK to return to
the list of Windows components.
7. Select Next, then select Finish.
8. If you are prompted to Restart Windows, select Yes .
39
Page 40

Chapter 3 – Installing nTier File Migrator
Enable Internet Information Services (ISS)
Internet Information Services (ISS) must be enabled before you install the nTier File
Migrator software.
1. From the nTier Windows Desktop, select Start > Administrative Tools > Manage
Your Server.
2. Select Add or remove a role in the Manage Your Server window to start the
configuration wizard.
3. Make sure you have completed the steps described in the Preliminary Steps screen,
then select Next.
4. When the security alert displays, select Unblock > Continue. The Configuration
Options screen displays.
5. Select Custom configuration, then select Next to display the Server Role screen.
6. Select Application Server (IIS) from the list of server roles, then select Next. A
summary screen showing the options that will be enable displays.
7. Select Next. A series of progress screens display as the required components are
installed.
8. When the installation is complete, a screen stating “The Server is Now an
Application Server” displays. Select Finish, then close the Manage Your Server
window.
Change the Default System Name (Optional)
If desired, you can change the default system name for the Windows server (the nTier)
to something more meaningful in your environment (for example, a name that
indicates the location). You can then use this name instead of the IP address when
connecting to the nTier from a host on the same network. For detailed information,
refer to the Windows Storage Server 2003 documentation (see Microsoft Windows
Operating System and Software on page 14).
Note: If you have multiple nTier Intelligent Secondary Storage appliances
on the same network, make sure that each has a unique system
name.
40
Page 41

Install nTier File Migrator
Install nTier File Migrator
Use the following steps to install the nTier File Migrator software.
1. Ensure that the tape library or stand-alone drive is powered on and connected to
the nTier. Refer to the User Guide that accompanied your nTier for information
about connecting a library or stand-alone tape drive to the nTier.
2. Connect to the nTier’s BlueScale web interface and access the Windows Desktop
(see Access the nTier Windows Desktop on page 35).
3. From the nTier Windows Desktop, use Windows Explorer to locate the nTier File
Migrator installation file, which is located at:
C:\Program Files (x86)\SpectraLogic\nTier File Migrator (x64).msi
4. Double-click the file name to run the installation program.
5. Follow the instructions provided by the setup wizard accepting defaults.
6. When the setup is complete, restart the nTier.
a. From the Windows Start menu, select Shut Down > Restart.
b. When prompted for a reason for the restart, select an appropriate option. If
desired, enter additional information in the Comment box.
c. Click OK to restart the server.
Install and Activate the Tape Drives
After installing the nTier File Migrator software, install the device drivers and enable
any stand-alone tape drives as described in the following sections.
Install Device Drivers
You must install device drivers for each of the different types of tape drive in your
configuration in order for the nTier File Migrator software to control them. You must
also replace the default Windows Medium Changer device driver (for libraries) with the
device driver specifically designed for use with nTier File Migrator.
41
Page 42

Chapter 3 – Installing nTier File Migrator
Installing the Tape Drive Device Drivers
Device drivers for all of the tape drives used in Spectra Logic libraries are included on
the nTier Windows server.
1. From the nTier Windows Desktop, use Windows Explorer to locate the folder
containing drivers, which is located at:
C:\Program Files (x86)\SpectraLogic\Drivers
2. Select and install the drivers for the tape drives that are present in your
configuration.
Replacing the Windows Medium Changer Device Driver
The Medium Changer device driver required for use with the nTier File Migrator
software is included on the nTier Windows server.
1. From the nTier Windows Desktop, select Start > Control Panel > System to open
the System Properties window.
2. Select the Hardware tab, then select Device Manager.
3. Expand the Medium Changers category and right-click on Unknown Medium Changer
to display the context menu.
4. Select Update Driver to launch the Hardware Update wizard. When asked to choose
whether Windows can connect to Windows update to search for software, select No,
not at this time, then select Next.
5. When asked to choose what the wizard does, select Install from a list or specific
location, then select Next.
6. When asked to choose your search and installation options, select Don’t search. I
will choose the driver to install.
7. Select Next to display a list of available drivers, then select Have Disk.
8. Browse to the following folder and select the SpectraMC.inf file:
C:\Program Files\nTier File Migrator\Drivers\Win2003\SpectraMC.inf
9. Select Open, then select OK in the Install from Disk dialog box to begin the
installation.
10. When a warning about an unsigned driver displays, select Continue Anyway.
42
Page 43

Install and Activate the Tape Drives
11. When the driver is installed, the Properties screen redisplays showing the new
Spectra Logic T-Series Medium Changer (Figure 3-3).
Figure 3-3 The Spectra Logic T-Series
Medium Changer Properties screen.
Enable Stand-Alone Drives
If the nTier is connected to one or more stand-alone tape drives, use the Hardware
Configuration Utility to enable them for use with nTier File Migrator.
1. From the nTier Windows Desktop, use Windows Explorer to locate the Hardware
Configuration Utility program, which is located at:
C:\Program Files\nTier File Migrator\Archive\HWConfig.exe
2. Double-click the program file name to run the utility.
3. Browse to the drive you want to configure. Right click on it and select Enable or
Disable as appropriate.
43
Page 44

Chapter 3 – Installing nTier File Migrator
Activate the nTier File Migrator License
Before you can begin configuring nTier File Migrator, you must activate the software.
Activate the Archive Drive
1. From the nTier Windows Desktop, use Windows Explorer to locate the License
Administration Utility located at:
C:\Program Files\nTier File Migrator\Archive\Drives.msc
2. Double-click the file name to launch the utility.
3. Select the drive letter for the logical volume you assigned as the nTier File Migrator
archive (see Configure the Archive Drive on page 37) and then select Activate.
4. Select OK to reboot the Windows server. When the reboot is complete, access the
Windows Desktop again (see Access the nTier Windows Desktop on page 35).
Start the License Administration Utility
1. From the nTier Windows Desktop, select Start > Programs > nTier File Migrator.
The License Administration Utility detects the unique identity for the nTier server.
2. Enter the activation code for the nTier File Migrator software.
The steps you take to obtain the activation code for the software depend on
whether the nTier has a connection to the internet.
Activating with Internet Access
Activating Without Internet Access on page 45
Activating with Internet Access
If the nTier has an internet access, use the following steps to activate the license.
1. Select Internet as the Activation Option.
2. Enter the Activation code you received with the nTier File Migrator software in the
appropriate box and then select
automatically generated and transferred to the nTier server. This completes the
licensing process.
OK. A digitally signed activation file is then
44
Page 45

Complete the Installation
Activating Without Internet Access
If Internet access is not available for the nTier but is available on another computer,
use the following steps to activate the license.
1. Enter the Activation code you received with the nTier File Migrator software in the
appropriate box.
2. Select the Generate request for license option and then select Apply. The License
Administration program prompts you for a file name.
3. Enter a name for the request file and select Save. Make sure you know where the
file is saved.
4. Using Windows Explorer, locate and copy the saved request file to a USB device
connected to the nTier or to a storage location that is accessible to both the nTier
and a computer with internet access.
5. Copy the saved file to the computer with internet access.
6. Double-click the name of the saved file to open it in a web browser.
7. Right-click on the link in the displayed page and select Save target as...
8. Select a location to save the XML license file, either on a USB device or on a storage
location that is accessible to the nTier running nTier File Migrator.
9. Copy the XML license file to a folder on the C drive of the nTier system disk.
10. From the License Administration utility, select the Import file option.
11. Browse to the saved XML license file and select it.
12. Select Apply.
Complete the Installation
After activating the software you must restart the nTier Windows server to complete
the software installation.
Note: Refer to the User Guide that accompanied your nTier for detailed
information about resetting (rebooting) the Windows server.
1. Connect to the nTier’s BlueScale web interface and access the Windows Desktop
(see Access the nTier Windows Desktop on page 35).
2. From the Windows Start menu, select Shut Down > Restart. When prompted for a
reason for the restart, select an appropriate option. If desired, enter additional
information in the Comment box, then click OK to restart the server.
45
Page 46

Chapter 3 – Installing nTier File Migrator
3. After the nTier restart completes, import tapes into the tape library using the tape
library controls, or for configurations with only a stand-alone tape drive, manually
insert one of the tapes.
The nTier File Migrator software automatically tries to identify any tape cartridge
that is imported into a library or tape drive under its control. Blank tapes are
assigned to the blank media set.
Note: Refer to the User Guide for your library for information about
importing cartridges into the library.
Next Steps
Read Chapter 4– Configuring nTier File Migrator to configure the nTier File Migrator
software.
46
Page 47

4 Configuring nTier File Migrator
Before You Begin
Review the following check list of key points to be considered when configuring the
nTier File Migrator for your environment. Read Chapter 2 – Concepts to learn about
Volume Sets and File Groups and their relationship to how nTier File Migrator handles
files.
How many different Volume Sets are required? A Volume Set is a set of tapes that
are all treated in the same way. Note that multiple File Groups can be allocated to
the same Volume Set.
For each Volume Set:
Determine the capacity and type (WORM or rewritable) of tape cartridges
assigned to each Volume Set.
Determine how many identical copies (replicas) of each tape are required, if
any.
If you plan to enable replication, the decide how often you want to generate the
replicas.
How many different File Groups are required? A File Group is a collection of files
that are all treated in the same way.
For each File Group:
Decide whether files written to disk will also be saved to tape.
For files saved to tape, identify the Volume Set to be associated with the tapes.
Decide whether you need to enable file fragmentation to allow for restoring
partial files. If so, determine what fragment size you want to use.
For files archived to tape, define whether the files are to be flushed (deleted)
from disk after they are written to tape.
For files archived to tape and then flushed from disk, decide whether a file read
request writes the file to disk after it is retrieved from tape and if so, how long it
is retained on disk after it is read.
47
Page 48

Chapter 4 – Configuring nTier File Migrator
When configuring the File Group and Volume Settings, make sure you consider the
capabilities of the hardware in your configuration, including the capacity of the
logical drive used for the nTier File Migrator archive on the nTier, the cartridge
storage capacity of the library, the number of available tape drives, and the data
capacity of the cartridges.
The available capacity of the logical drive used for the nTier File Migrator
archive limits the file deletion policies, as there must always be sufficient
capacity to store all files retained online.
The number of tape drives within a library affects the number of Volume Sets
that can be written simultaneously while still maintaining good performance—if
significantly more tapes are being simultaneously accessed than there are
available tape drives, the excessive tape access slows down performance.
Start the Archive Management Console
The Archive Management Console provides the interface for configuring, using, and
troubleshooting the nTier File Migrator software.
1. Connect to the nTier’s BlueScale web interface and access the Windows Desktop
(see Access the nTier Windows Desktop on page 35).
2. From the Windows Desktop, select Start > Programs > nTier File Migrator >
System Configuration to start the Archive Management Console.
Figure 4-1 The Archive Management Console.
3. Click on the + sign next to the name of the system you want to configure (for
example, “Local” in Figure 4-1) to display the drive letter for the logical drive
assigned to the nTier File Migrator software (see Configure the Archive Drive on
page 37).
48
Page 49

Configure Volume Sets
4. Click on the + sign next to the drive letter to display the available options, then
expand the option you want to configure. When first configuring the system, you
must use these options in the following order:
Configure Volume Sets on page 49
Allocate Files to File Groups on page 53.
Configure Volume Sets
A Volume Set consists of a set of tape cartridges of a single media type (WORM or
rewritable) and replication strategy. Each Volume Set can store files from one or more
File Groups.
Create a New Volume Set
1. Start the Archive Management Console (see Start the Archive Management Console
on page 48).
2. Navigate to the Volume set configuration section.
3. Right-click on Volume set configuration to display the context menu, then select New
> Volume Set.
Figure 4-2 The New option for creating a Volume Set.
49
Page 50

Chapter 4 – Configuring nTier File Migrator
4. If desired, change the default name assigned to the Volume Set to something more
meaningful.
a. Right-click on the name of the newly created Volume Set and select Rename.
b. Type the new name.
c. Select the Enter.
Configure the Volume Set
1. From the Archive Management Console, navigate to the Volume set configuration
section.
2. Select the Volume Set you want to configure. The Configuration of volume set panel
displays in the right pane of the Archive Management Console window.
3. Click the Configuration button in the right pane to display the Volume Set
Configuration dialog box.
Figure 4-3 The Volume Set configuration options.
4. In the Volume Set Configuration, select WORM or Rewritable tape cartridges, as
appropriate.
5. Use the Compressed field to set whether to enable tape drive data compression. If
the systems stores uncompressed data, then selecting this option reduces the
number of tape cartridges needed. Note that many applications perform their own
data compression, so selecting this option may offer minimal further compression.
6. Select the block size (in bytes) used by the tape drive when writing data from the
drop-down list. For LTO tapes, select 8192 as the number of bytes per block.
7. If desired, select the Media capacity for tape cartridges capacity from the drop-down
list. The default value is Any.
50
Page 51

Configure Volume Sets
8. Enter a value to specify the percent full point at which nTier File Migrator
automatically allocates additional tape cartridges (Volumes) from the Blank Media
Set to this Volume Set.
9. When you are satisfied with the configuration options, select OK. Select Cancel to
discard changes you made.
Configure Replication for the Volume Set
Configure the replication settings for a Volume Set before manually adding the first
Volume (tape cartridge). After you add a Volume, with its associated allocation of tape
cartridges, only the replication schedule can be changed, not the number of replicas
created.
Note: Replication is not an option for configurations with only one stand-
alone tape drive.
Enable Replication
1. From the Archive Management Console, navigate to the Volume set configuration
section.
2. Select the Volume Set you want to configure. The right pane displays the
Configuration of volume set panel.
3. Click the Replication button in the right pane. The Replication Configuration dialog
box displays.
Figure 4-4 The Replication Configuration dialog.
51
Page 52

Chapter 4 – Configuring nTier File Migrator
4. To enable replication for the Volume Set, check Enable replication and enter the
number of replicas you want created into the Number of additional copies of each
cartridge field.
5. Configure the replication timing.
An essential part of defining the replication strategy for a Volume Set is defining the
timing of replica updates. Replication can be schedule to take place immediately,
periodically, or at a specific time each day.
Note: If you have a library with only one drive, frequent replication may
cause a great deal of tape swapping, leading to a serious loss of
system throughput.
Immediate replication—To begin replication immediately, check the Replicate
immediately box.
Note: Immediate replication cannot be selected in conjunction with any
other replication schedule. Immediate replication is not
recommended for single drive library systems, as it requires
increased cartridge swapping, that leads to degraded performance.
Periodic replication—To define a periodic replication schedule, check the
Replicate every box and enter the replication schedule, choosing minutes or
hours and the entering the desired number. For example, you can choose to
replicate every 8 hours.
Scheduled replication—To configure replication at the same time every day,
check the Replicate at box and select the replication time.
6. When you are satisfied with the configuration options, select OK. Select Cancel to
discard changes you made.
Allocate Tape Cartridges to the Volume Set
Note: This process is only required if your configuration includes a tape
library.
After you create and configure a new Volume Set, use the steps in this section to add
one or more tapes (Volumes) to the Volume Set. After you add the initial set of tapes to
the Volume Set, the system automatically adds a new tape to the Volume Set from the
Blank Media Set when the initial volumes is nearly full. The point at which a new
volume is added to the Volume set is defined in the basic configuration for the Volume
Set (see Step 8 on page 51).
52
Page 53

Allocate Files to File Groups
If insufficient fresh media is available, then the system reports that it is out of disk
space when any attempt is made to write data to files that have been allocated to that
Volume Set.
Use the following steps to allocate cartridges to a Volume Set.
1. From the Archive Management Console, navigate to the Volume Set configuration
section.
2. Right-click on the name of the Volume Set to which media you want to add media
and select Add Volume.
Figure 4-5 The Add Volume option for the selected Volume Set.
If the Blank Media set contains sufficient tapes, the system automatically allocates
only the number of tapes to the selected Volume Set to create a complete Volume.
This means that if replication is not enabled for the selected Volume Set, only one
tape is allocated. If replication is enabled, enough tape cartridges are allocated to
satisfy the specified number of copies of each cartridge that was defined in the
replication configuration (see Step 4 on page 52).
Allocate Files to File Groups
A File Group is a collection of files that have the same file management policy and
consequently are all treated in the same way by the system. Every file that is handled
by the system belongs to exactly one File Group. Files are assigned to a File Group on
the basis of their name and path. This assignment can be based on the name of the
directory that contains a file, the name of the file or both. To learn more about File
Groups and for examples of allocating files to groups, see File Groups on page 23.
53
Page 54

Chapter 4 – Configuring nTier File Migrator
Create One or More New File Groups
By default, nTier File Migrator software has a single Default File Group defined into
which all files it manages are placed. If you want more specific groupings, use the
following steps to define one or more File Groups into which files can be allocated.
1. Start the Archive Management Console (see Start the Archive Management Console
on page 48).
2. Navigate to the File group configuration section and right-click on File group
configuration to display the context menu.
3. Click on New and select File Group.
The new File Group with the name <<new>> is added to the list.
Figure 4-6 Use the New option to create a new file group.
4. If desired, rename the new File Group to something more meaningful.
a. Right-click on the <<new>> File Group and select Rename.
b. Type a new name for the File Group.
c. Press Enter.
5. Repeat Steps 3 and 4 to create any additional File Groups you need.
54
Page 55

Allocate Files to File Groups
Configure the File Group Listing Order
The order in which File Groups are listed in the Archive Management Console is
important because an individual file can be allocated to only one File Group. The rules
governing the allocation of files to File Groups are applied in the order that the File
Groups appear in the left pane of the console. Files are allocated to the uppermost
applicable File Group. See Constructing the File Name, Path Pattern, or Exclude
Pattern on page 24 to learn more about how nTier File Migrator allocates files to File
Groups.
Use the following steps to change the order in which File Groups are listed.
1. Start the Archive Management Console (see Start the Archive Management Console
on page 48).
2. Navigate to the File group configuration section.
3. Right-click on the File Group that is to be moved and select Move up or Move
down.
Figure 4-7 The Move up and Move down options for file groups.
Allocate Files to a File Group
After you create one or more File Groups, use the following steps to define how files
are allocated to each File Group.
1. From the Archive Management Console, navigate to the File group configuration
section.
55
Page 56

Chapter 4 – Configuring nTier File Migrator
2. Click on the name of the File Group to which you want to allocate files. The
Configuration of file group panel displays in the right pane of the Archive
Management Console window.
Figure 4-8 Enter the file name extensions or path pattern and exclude
pattern for the File Group.
3. Enter the file name extensions or path patterns used identify files that belong in the
File Group in the File name or path pattern text box. See Constructing the File Name,
Path Pattern, or Exclude Pattern on page 24 for detailed information.
4. If required, enter file name extensions or path patterns you do not want included in
the group in the Exclude pattern text box.
5. If you do not need to configure policies for the File Group, click Apply. Otherwise,
proceed to Set the Policies for the File Groups.
Set the Policies for the File Groups
You can define storage rules for each File Group by setting the following policy
options:
File system physical storage, including whether the File Group is stored on tape
and, if so, on which Volume Set.
Settings for File Fragmentation.
Disk Retention Rules
Advanced Settings
Use the following steps to configure the storage options for a File Group.
1. From the Archive Management Console (see Start the Archive Management Console
on page 48), navigate to the File group configuration section.
2. Click on the name of the File Group for which you want to set the storage options.
The Configuration of file group panel displays in the right pane of the Archive
Management Console window (Figure 4-8 on page 56).
3. If you want to save the files in the File Group to tape, select the Save files to tape
option and enter the name of the Volume Set containing the tapes you want to use
in the Volume set text box.
56
Page 57

Allocate Files to File Groups
4. Select Enable file fragmentation if you want to be able to perform partial file
restores. File fragmentation is typically required only for very large files (see Partial
File Restore and Cartridge Spanning on page 31.)
5. If you enable file fragmentation, enter the size of the fragment in the Fragment size
box. Recommended fragment sizes depend on the application and tape drive
transfer rates but are typically around 1 or 2 GB. You may also want to set the
Archive file fragments... option under the Advanced options (see Configure
Advanced Policies on page 61.
6. If you enabled the Save files to tape option, you can configure disk retention rules
as described in Disk Retention Rules on page 57. Setting disk retention rules helps
conserve disk space on the nTier. If you do not configure any disk retention rules,
the system retains all current files within the File Group on magnetic disk
indefinitely.
Note: The disk retention rules are only available for File Groups where
the Save files to tape option has been enabled.
7. Select the Advanced button to set advanced policy features, refer to the next section
Configure Advanced Policies.
8. When you have completed all of the configuration settings for the File Group, select
Apply to save your changes. Select Cancel to discard changes you made.
Disk Retention Rules
Disk retention rules let you configure how the system handles files stored on the
system disk drives.
Figure 4-9 The Disk Retention Rules options pane in the Configuration of
file group panel.
57
Page 58

Chapter 4 – Configuring nTier File Migrator
Flush Written Files From Disk When a file is first written to the drive letter under
nTier File Migrator control, it is always first written to the system disk drive. The Flush
written files from disk options lets you configure the system so that, after a file has
been securely written to tape, the instance stored on disk is flushed (deleted) to release
the disk space that was occupied by the file. The File Migrator software ensures that
files are not flushed from disk until the last replica has been securely written to tape.
See Options for Disk Retention on page 58 for examples of setting the Flush written files
from disk options.
Flush Read Files From Disk
Files are available to users even if they have been flushed from disk and are only
stored on tape. Flushing from disk does not affect the location of a file within the file
system or make it inaccessible in any other way. The only impact of flushing is to
increase the time taken to read the file because it first has to be retrieved from tape.
When the nTier File Migrator software receives a request to read the file that is only
available on tape, the system reads the file from tape and stores it on to disk. You
configure how long the file then remains on disk before it is once again flushed. See
Options for Disk Retention on page 58 for examples of setting the Flush read files from
disk options.
Options for Disk Retention
Option Description
All current files are
retained on disk
indefinitely
Files are flushed
immediately after
writing
Uncheck all boxes in the Disk Retention Rules area.
Select Flush written files from disk and When the tape replica has
been written. With these options selected, files are flushed as soon as
the last replica has been completely written to tape. By also checking
Flush read files from disk, the files are flushed immediately after
writing and after each subsequent read. You can also specify whether
the files are flushed immediately after reading or at a preset time after
each subsequent read.
58
Page 59

Option Description
4
Leave unchecked
Leave unchecked
4
Allocate Files to File Groups
Files are flushed a
preset length of time
after writing
Files are flushed
immediately after
being read
Select Flush written files from disk and After and put an appropriate
number in the box. With these options selected, files will be flushed a
defined length of time after they were written, or when the last
replica has been completely written to tape, whichever comes later.
To prevent the file from being stored to disk indefinitely after a
restore: select Flush read files from disk and As soon as file is read.
With this, files are flushed from disk at a preset interval after the file is
written to disk; when the file is restored, it is then flushed as soon as
the file is read from disk.
Select Flush read files from disk and As soon as the file is read.
Ensure that the option Flush written files from disk is unchecked.
With these options selected, files are flushed as soon as the file is
closed. Note that files that have been written to the system are
retained on disk indefinitely, until they are read.
Files are flushed a
preset length of time
after being read
Select Flush read files from disk and After and put an appropriate
number in the box. Ensure that Flush written files from disk is
unchecked. This option is similar to the Files are flushed immediately
after being read option, but waits for the defined period before it
applies its rule. As with that option, files are retained on disk
indefinitely, unless they are read.
59
Page 60

Chapter 4 – Configuring nTier File Migrator
4
4
Option Description
Files are flushed
immediately after
writing and after
each subsequent read
Files are flushed
immediately after
writing and a preset
time after each
subsequent read
Select Flush written files from disk and When tape replica has been
written. Also, select Flush read files from disk and As soon as the file
is read. With these options selected, files are flushed as soon as the
last replica has been completely written to tape. Each time a file is
subsequently read, it is temporarily restored to disk. When the file is
closed, it is immediately flushed from disk again.
Select Flush written files from disk and When tape replica has been
written. Also, select Flush read files from disk. Then select After
under the Flush read files from disk option and enter the required
number of hours or days for retention of the file on disk after it is last
read. With these options selected, files are flushed as soon as the last
replica has been completely written to tape. However, each time a file
is subsequently read, it is temporarily restored to disk. It is flushed
from disk again when the defined time has elapsed following the last
time the file was closed.
Files are flushed from
disk a preset time
after writing,
combined with
immediate flushing
after being read
Check both the Flush written files from disk and Flush read files from
disk boxes. Then select After under the Flush written files from disk
box and enter the required timing for the flush operation following
writing. Then select As soon as the file is read under the Flush read
files from disk box. Under this set of options, following completion of
replication, the system keeps files on disk until they are read or until
the defined time has elapsed since they were written, whichever
comes first.
60
Page 61

Option Description
4
4
Allocate Files to File Groups
File are flushed from
disk a preset time
after writing unless
the file is read within
a (possibly different)
preset time
Select both the Flush written files from disk and Flush read files from
disk boxes. Select the required timing of the flush operation following
writing. Then select the After option under the Flush read files from
disk box and enter the required time for retention of the file on disk
after it is last read. Under this set of options, following completion of
replication, the system keeps files on disk until completion of the
specified written or the read interval, whichever is later.
Configure Advanced Policies
The advanced policy options can provide improved performance in certain situations,
or offer enhanced data integrity at the expense of performance for some applications.
Figure 4-10 The Advanced file group options dialog.
1. Select the Advanced near the bottom of the Configuration of file group pane in the
Archive Management Console window (Figure 4-8 on page 56) to display the
Advanced file group options dialog box.
61
Page 62

Chapter 4 – Configuring nTier File Migrator
2. Select the advanced options you want to use.
Keep all versions on disk. The nTier File Migrator software normally maintains a
complete version history of every file under its control. However, only the most
recent version of a file is available to standard applications through the file
system interface; older versions of files are usually never accessed and if they
are needed, they are recovered using the History Explorer or a similar utility. To
conserve disk space, the system removes old versions of files from magnetic
disk, making them available only from tape. Selecting the Keep all versions on
disk option changes this behavior so that all old versions of a file are retained on
disk.
Do not preserve history for deleted files. In normal operation, the nTier File
Migrator software maintains the entire version history of all files under its
control. For compliance applications, this is required. However, certain
applications produce large numbers of intermediate files that are valuable at the
time they are created, but at some later time the intermediate files are no longer
required and the application deletes them.
Applications that display this behavior might be collecting incoming data into
intermediate files and later merging them into larger container files for longterm archival storage—some email archiving systems work this way. Because the
incoming files, such as individual email messages, are valuable, they should be
archived to tape, providing a backup of the disk. However, after the application
has deleted them, the intermediate files are no longer needed and there is no
requirement to continue to maintain their history.
Maintaining a file’s history consumes a small amount of space on the magnetic
disk to store the metadata. If the system is maintaining metadata for a very large
number of deleted files, the space consumed by their metadata may become
unacceptably large. Selecting the Do not preserve history for deleted files option
removes the metadata for deleted files and lets the system recover this space.
Files that belong to file groups with this option selected are not visible in
History Explorer after they have been deleted.
Use a background process to archive old files. In normal operation, the nTier File
Migrator software writes files to tape as soon as they have been successfully
written to disk. By doing this, the system provides the improved data integrity
and security necessary for an archival storage system by ensuring that a second
instance of all data written to the disk is generated almost instantly. In the case
of WORM media, it further ensures that an unalterable copy of the data is
created in a timely fashion, as required by many regulatory authorities.
62
Page 63

Allocate Files to File Groups
However, in the event of a shortage of blank tapes or a failure of the tape library
hardware, no data can be written to the system. For high-integrity applications
that require data to be written immediately to WORM media there is no
alternative but to stop writing data until the error condition has been resolved.
In some less critical applications it may be acceptable to write data only to the
magnetic disk cache for a short time, waiting until the error has been resolved
before writing the data to tape. A system administrator can achieve this by
turning off the save to tape file group option.
When the error has been resolved, the system administrator re-enables the write
to tape option and enables the Use a background process to archive old files
option. This option specifies that files that were not previously archived should
now be archived. The system immediately resumes archiving new data to tape
while at the same time locating and archiving old files were not archived while
writing to tape was disabled. The archival of old files occurs as a background
process so that the archival of new files is not interrupted.
Use compact metadata representation to save space by reducing the amount of
information retained for the History Explorer. Part of the information shown by the
History Explorer is the creation date of every version of a file. This information
is stored in the file’s metadata, and used only by the History Explorer (or any
other application that fetches it using the nTier File Migrator interface). If many
versions of a file are created, this extra information in the metadata increases the
size of the metadata file, consuming space on the disk cache. Using the Use
compact metadata representation... option changes the format of the metadata so
that file version modification dates are not saved, thereby reducing the size of
the metadata. For most archiving applications, this optimization is not
worthwhile because the number of file versions created is small and the space
saving will be negligible.
Force applications to wait for completion of archive operations. The nTier File
Migrator software combines high performance with a very high degree of data
integrity. To achieve the best performance with tape drives, the system needs to
keep the drive’s write buffer full, enabling the drive to operate in a streaming
mode. However, most applications only write a single file at a time, waiting for
one file to be completely written before starting on the next file. This mode of
operation leads to pauses in the data stream, which can prevent the tape drive
from operating in a streaming mode and lead to reduced performance.
63
Page 64

Chapter 4 – Configuring nTier File Migrator
To overcome this, File Migrator implements a data pipeline that allows the
application to continue writing data to the next file before the last file is
completely written to tape. Selecting the Force applications to wait... option turns
off the data pipeline, forcing applications to wait until the data has been written
to the tape drive before they can continue. With some applications, this may
lead to slightly improved data integrity at the cost of a loss of system
throughput. Some applications may be incompatible with this option and may
not function at all with the option selected. The degree of these effects is highly
application dependent, and system administrators who want to explore the
effects of this option are advised to experiment with non-critical data.
Archive file fragments as soon as they are available. In normal operation, a file’s
data is written to tape after it has been successfully written to magnetic disk.
Some application types, for example certain backup applications, can create
very large files that are written sequentially—that is, the application starts to
write data at the beginning of the file and proceeds linearly through the file,
gradually extending it as more data is written. In this situation it is more
efficient to write data to tape as soon as the application has finished writing the
first fragment, rather than waiting for the application to write the entire file. To
do this, enable file fragmentation (see Step 4 on page 57) and select the Archive
file fragments... option.
Force the first read of a file after it is written to come from the archive, so that the
integrity of the archive may be checked. Some applications employ a read-after-
write check to verify the integrity of data written to the archive. However, the
normal behavior of the system is always to read data from the location that will
provide the data the fastest. For data that has just been written to the system,
this usually is the magnetic disk cache or even an intermediate RAM cache.
Performing a read-after-write check then checks the integrity of the data in the
cache, rather than on the tape.
The Force the first read of a file after it is written... option forces data to be read
from the tape, even if it is available from an intermediate cache, thereby
allowing applications to verify the integrity of data on the tape. Note that only
the first read is forced to come from the tape; subsequent reads are satisfied
from the cache if possible.
Make files read-only. This option forces all files in the file group to be marked
read-only. This read-only attribute cannot be changed after a file has been
created.
3. When you have selected all of the desired Advanced options, select Ok to save your
changes. Select Cancel to discard changes you made.
64
Page 65

5 Using nTier File Migrator
This chapter describes using the nTier File Migrator software to perform day-to-day
operations.
Accessing Files
The magnetic disk storage and tapes managed by the nTier File Migrator software
appear as a single standard Windows logical drive to computers on the same network
as the nTier system. This means that all of the files managed by the nTier File Migrator
software appear in folders under the drive letter assigned to the logical drive used by
the nTier File Migrator archive. As a result, software applications can write to and read
from the archive as though it were a standard disk-based logical drive.
Access the Current Version
To access the current version of a file, simply select and open the file using Windows
Explorer or any standard Windows interface on any computer on the same network as
the nTier system. You can also select the file using the Archive Management Console.
When you open the file, the nTier File Migrator software retrieves the file either from
the RAID disk in the nTier or from tape if the data is not available on disk.
Access Old or Deleted Versions
You can retrieve old and deleted versions of files using the nTier File Migrator History
Explorer utility. The History Explorer provides access to the complete history and
status of any file that the system knows about. History Explorer lists all available
versions of all files, all file instances and their media locations, including deleted and
renamed files. It allows retrieval of all file versions and instances from disk or tape.
File access via History Explorer is fully compliant with the Microsoft security model for
current files and this model has been extended to delete files and old versions. Full
compliance with Microsoft security model means that a user’s access rights to files and
folders over the network are preserved when using History Explorer.
65
Page 66

Chapter 5 – Using nTier File Migrator
Start History Explorer
Use the following steps to start History Explorer.
1. Using a computer connected to the same network as your nTier, access the
Windows Desktop on your nTier (see Access the nTier Windows Desktop on
page 35).
Note: You must use Microsoft Internet Explorer to access the Windows
desktop. The Windows Remote Desktop application used to access
the desktop does not support the Mozilla Firefox browser.
Internet Explorer may prompt you to install an ActiveX control the
first time that you use this feature. ActiveX is required in order to
access the Windows desktop through the BlueScale web interface.
2. From the nTier Windows Desktop, start Microsoft Internet Explorer (version 5.5 or
higher).
3. Enter http://<nTier System Name>/history into the address bar (for example,
http://nTier500/history in Figure 5-1) and select Go to start the History Explorer.
See Change the Default System Name (Optional) on page 40 for information about
setting the system name for your nTier.
Figure 5-1 The History Explorer interface.
The History Explorer has three panes:
The upper left pane shows a tree view of the folder hierarchy on the nTier File
Migrator archive drive. This tree is similar to the folders view in Windows
Explorer.
66
Page 67

Accessing Files
To view the files in a particular folder, click on the folder name in the left pane.
Click the + sign next to the folder icon to expand a folder to show a list of
subfolders. Clicking again on the folder icon collapses the folder list.
The upper right pane lists files (and subfolders) contained within the folder
selected on the left pane.
The file list provides a details view of the files in the selected folder. The
rightmost column that indicates the number of versions that exist for a file. Click
on a file in the listing to display its history in the bottom pane.
The bottom pane shows the history of the file selected in the right pane.
4. If necessary, you can resize the panes by dragging the gray divider separating any
two panes to a new position.
5. If you also want to see deleted folders and files, select the Show deleted files in the
upper left corner of the History Explorer window (see Figure 5-1 on page 66).
Deleted folders display in the left pane and deleted files appear in the right pane.
Deleted files are identified with a red-cross icon. Click on any deleted file listed in
the right pane to see its history in the bottom pane.
Opening and Restoring Old and Deleted Versions of a File
History Explorer lists all available versions of all files, including deleted and renamed
files. Use the following steps to open the desired version of a file.
1. Select the folder containing the desired file in the left pane of the History Explorer.
The right pane displays a list of the files in the folder.
2. Select the desired file from the file list in the right pane. The bottom pane displays
a list of the available versions.
3. Select the Fetch link next to version of the file you want to open. Depending on
where the file is located in the system, it is retrieved either from disk or from tape.
If the file version is available on disk, a Fetch from disk link appears next to the
file name (see Figure 5-1 on page 66).
If the file version is available on tape, a Fetch from tape link appears next to the
file name.
If the file version is available on both disk and tape, links to both locations
appear next to the file name
67
Page 68

Chapter 5 – Using nTier File Migrator
4. To save the file for later use, right-click Fetch link and select Save Target As...
(Figure 5-2).
Figure 5-2 Saving file retrieved from disk or tape.
5. To close the History Explorer, simply close the browser window.
Working with Tape Cartridges
As part of the tiered storage provided by nTier File Migrator, files can be moved to tape
cartridges for storage. This section describes the Archive Management Console tools
for importing and managing tape cartridges.
Importing Tapes
Tape cartridges are imported into a tape library using the library controls, which vary
from one model to another. In Spectra Logic libraries, the BlueScale user interface is
used to import (and export) cartridges. If the nTier system is connected to a standalone tape drive, a tape cartridge is manually inserted into the drive.
The nTier File Migrator software automatically tries to identify any tape cartridge that is
imported into a library or tape drive under its control.
If the tape has been previously written by the nTier File Migrator software it is
assigned to its original Volume Set.
If the tape is blank, it is assigned to the blank media set.
If the tape is written with an unrecognized format, it is assigned to the quarantined
media set.
68
Page 69

Working with Tape Cartridges
If you import a tape cartridge that was managed by nTier File Migrator software on
a different Windows server (nTier) and the Volume Set does not exist on this server,
the nTier File Migrator software automatically creates the required Volume Set.
However, files from the imported tape are not be available until you import the tape
(or its catalog) into the nTier File Migrator archive on this server (Importing an
External Tape).
Importing an External Tape
1. Start the Archive Management Console (Start the Archive Management Console
on page 48).
2. Navigate to the Volume Set configuration section and click on the + sign to
expand the section.
3. Click on the + sign next to the Volume Set that was created for the imported
tape.
4. Right-click on the tape to display the context menu and select either Import
catalog or Import data option.
Figure 5-3 The Add Volume option for the selected Volume Set.
Import catalog—The files remain on the tape and can be fetched from
there.
Import data—The files are copied to disk and can be fetched from there.
69
Page 70

Chapter 5 – Using nTier File Migrator
Reformatting Tapes
Reformatting a tape erases all the data that is stored on the tape and moves the tape
into the Blank Media Set. When a tape is reformatted, the files that were stored only on
that tape (for example, files that have been flushed from magnetic disk in accordance
with the File Group policies) become inaccessible. The History Explorer shows the
files that were on the tape as Archived on unknown tape.
Some tape drives do not support all of the possible reformatting functions described in
this section. Only the options that are supported by the drive are available the Archive
Management Console.
Tape Write Properties Description
Standard, or
rewritable tape
Write-Once Read
Many (WORM) tape
Data on rewritable tapes can be over-written or erased; the cartridges
reformatted. This version of nTier File Migrator software supports
SAIT-1, SAIT-2, LTO-2, LTO-3 and LTO-4 rewritable cartridges.
After data is written to a WORM tape cartridge, it cannot be erased or
altered. WORM cartridges cannot be reformatted.This version of the
nTier File Migrator software supports SAIT-1, LTO-3 and LTO-4
WORM tape cartridges.
Use the following steps to reformat a rewritable tape.
1. Start the Archive Management Console (Start the Archive Management Console on
page 48).
2. Navigate to the Volume Set configuration section and expand it.
3. Click on the + sign next to the appropriate Volume Set to expand it and show the
tapes that are allocated to that Volume Set.
70
Page 71

Working with Tape Cartridges
4. Select the tape you want to reformat to display the Medium Properties in the right
pane.
Figure 5-4 The Medium Properties pane for a tape cartridge.
5. Click Reformat.
6. Choose a reformat option, then click Ok to begin reformatting the tape.
Mark as Blank will instruct the system to treat the tape as blank, and move it to
the blank media set. However, it will not be overwritten until it is assigned to a
new Volume Set. Up to this point, the data may be retrieved by exporting and
then re-importing the tape.
Low-Level format will repartition the tape. This is a quick operation that is
normally used when another application has formatted a tape in a legacy format
(for example, when an AIT tape is formatted in DDS compatible format). Once
this operation has been performed, it is not possible to recover data from the
tape using standard utilities. This option is not offered if the type of drive being
used does not support the operation.
Quick Erase uses the SCSI quick erase command, which writes an end of tape
mark at the beginning of the tape (thereby marking the rest of the tape blank).
This operation does not physically overwrite the data on the tape; however,
once this operation has been performed it is not possible to recover data from
the tape using standard utilities.
71
Page 72

Chapter 5 – Using nTier File Migrator
Long Erase uses the SCSI long erase command which overwrites all the data on
the tape. This can be a time consuming operation but it provides a good degree
of certainty that the data on the tape cannot be recovered.
Overwrite Entire Medium uses write commands to overwrite all the data
recorded on the tape with a different data pattern than that used by long erase.
Using this operation followed by a long erase command more thoroughly
overwrites all the data on the tape, for very sensitive applications.
Setting the Administrator-Defined Information for a Tape
1. Start the Archive Management Console (Start the Archive Management Console on
page 48).
2. Navigate to the Volume Set configuration section and expand it.
3. Click on the + sign next to the desired Volume Set to expand it and show the tapes
that are allocated to that Volume Set.
4. Click on a tape to display the Medium Properties in the right pane (Figure 5-4 on
page 71).
5. Enter the desired information in the Info field.
6. Click Update to save your changes.
Displaying Information About a Tape
1. Start the Archive Management Console (Start the Archive Management Console on
page 48).
2. Navigate to the Volume Set configuration section and expand it.
3. Click on the + sign next to the desired Volume Set to expand it and show the tapes
that are allocated to that Volume Set.
4. Click on a tape to display the Medium Properties in the right pane (Figure 5-4 on
page 71).
5. Select either the Information tab or the Identity tab, depending on the type of
information you want.
Information—Provides details about the condition of the tape, including the
location of the tape, the number of times it has been mounted in a drive, and the
last tape drive alert that occurred when the tape was mounted in a drive. A pie
chart shows the amount of used and available space on the tape. The blue
segment represents used space, the pink represents free space and the red
represents overhead. The pie chart is darkened when the tape is off-line.
Identity—Provides additional information about the tape including the
manufacturer and the tape serial number.
72
Page 73

Working with Tape Cartridges
Verifying the Data on a Tape
The verify function allows you to confirm that the data on a tape can still be read,
without transferring it to magnetic disk (that is, it performs media verification). You
can use this function to check the integrity of your archived data.
1. Start the Archive Management Console (Start the Archive Management Console on
page 48).
2. Navigate to the Volume Set configuration section and expand it.
3. Click on the + sign next to the desired Volume Set to expand it and show the tapes
that are allocated to that Volume Set.
4. Right-click on the desired tape and select Verify.
Figure 5-5 The Verify option for the selected tape.
73
Page 74

Chapter 5 – Using nTier File Migrator
Finalizing a Tape
Finalizing a tape cartridge results in special tape marks being written to the tape that
prevent additional data files or file fragments being written to that tape. In addition,
when a tape is finalized, a Tape Contents Catalog is automatically written to the
tape.The presence of a Tape Contents Catalog on a tape greatly reduces the time
required to perform an Import Catalog operation. This is an advantage when
transferring tape cartridges from one nTier File Migrator archive to another and when
rebuilding the archive file system on magnetic disk cache.
When a tape becomes 98% full, the system automatically finalizes it. You can also use
the following steps to finalize a tape before it is 98% full.
1. Start the Archive Management Console (Start the Archive Management Console on
page 48).
2. Navigate to the Volume Set configuration section and expand it.
3. Click on the + sign next to the desired Volume Set to expand it and show the tapes
that are allocated to that Volume Set.
4. Right-click on the desired tape and select Finalize.
Figure 5-6 The Finalize option for the selected tape.
5. Press Enter to finalize the tape and write the Tape Contents Catalog to the tape.
74
Page 75

Working with Tape Cartridges
Write-Protecting Tapes
To stop the system from writing data to a particular tape (or Volume) before the tape is
full, you can write-protect the cartridge through the Archive Management Console. You
may want to write protect a volume or a volume set, for example, if the archive strategy
requires that the system start writing to a new Volume at the beginning of each month.
Accomplish this by write protecting the tape (or replicated set of tapes representing a
Volume). If all the tapes in a Volume Set are write-protected, the you will have to add a
new Volume before more data can be written to the Volume Set.
To write protect a tape:
1. Start the Archive Management Console (Start the Archive Management Console on
page 48).
2. Navigate to the Volume Set configuration section and expand it.
3. Click on the + sign next to the desired Volume Set to expand it and show the tapes
that are allocated to that Volume Set.
4. Right-click on the desired tape and select Write protect.
Figure 5-7 The Write-protect option for the selected tape.
Exporting a Tape
1. Start the Archive Management Console (Start the Archive Management Console on
page 48).
2. Navigate to the Volume Set configuration section and expand it.
3. Click on the + sign next to the desired Volume Set to expand it and show the tapes
that are allocated to that Volume Set.
4. Right-click on the desired tape and select Export (see Figure 5-7).
75
Page 76

Chapter 5 – Using nTier File Migrator
Managing Volume Sets and File Groups
When you configured File Migrator, you created one or more Volume Sets (Configure
Volume Sets on page 49) and File Groups (Create One or More New File Groups on
page 54). This section describes how to delete Volume Sets and rename File Groups.
Deleting a Volume Set
1. Open the Archive Management Console.
2. Navigate to the Volume set configuration section.
3. Right-click on the Volume Set that you want to delete and select Delete.
Figure 5-8 The Delete option for the selected Volume Set.
Note: A Volume Set can only be deleted if it contains no media and it has
not been selected as the Save to Tape target of any File Group.
Renaming a File Group
1. Open the Archive Management Console.
2. Navigate to the File group configuration section.
3. Right-click on the File Group that you want to rename and select Rename.
4. Type a new name for the File Group.
5. Select Enter.
76
Page 77

Retensioning Tapes
Retensioning Tapes
Under normal circumstances it should not be necessary to retension tapes. In
exceptional circumstances, the administrator can retension a tape cartridge. Some drive
types do not support the retension operation. In these cases, the option is not available
in the Archive Management Console.
To retension a tape:
1. Open the Archive Management Console.
2. Select the tape in the Archive Management Console.
3. Right-click on the tape and select Retension.
Figure 5-9 The Retension option for the selected tape.
77
Page 78

Chapter 5 – Using nTier File Migrator
Notes
78
Page 79

6 System Recovery
System Rebuild from Tape
About File System Rebuild From Tape
The system provides a facility to rebuild the file system from tape, for example in the
event of a hardware failure. If an imported cartridge belongs to a Volume Set that has
not previously been defined on this particular server, the new Volume Set is created
and the tape cartridge is allocated to it automatically. To rebuild the file system and
associated data from an imported tape cartridge (or from a set of cartridges) the
administrator uses one of two options in the Archive Management Console: Import
Catalog or Import Data.
Selecting Import Catalog loads file and folder information (metadata) into the system,
making the entire directory tree visible to users, but it does not restore the actual file
data to disk, so any files that are subsequently read from the system are restored from
tape at the time they are read.
The Import Data option also loads file and directory metadata but additionally, it loads
file data into the system, in accordance with the File Group rules and the Disk
Retention Rules. The Import Catalog option scans the tape more quickly, particularly if
the tape contains mainly large files and it can be helpful when a system must be
brought back on line quickly. The Import Data option performs a more complete
operation, restoring the system’s disk to approximately the state it had before a
hardware failure, thereby optimizing performance.
Rebuilding a File System from Tape
1. Open the Archive Management Console (see Start the Archive Management Console
on page 48).
2. Import the tape cartridge into the library or insert it into stand-alone tape drive.
The system automatically creates a Volume Set containing the newly imported
cartridge.
3. Select the tape in the Archive Management Console.
79
Page 80

Chapter 6 – System Recovery
4. Right-click on the tape and select Import catalog or Import data.
Import Catalog loads file and folder information (metadata) into the system
making the entire directory tree visible to users, but it does not restore the
actual file data to disk cache.
Import Data also loads metadata, but in addition, it selectively loads file data
onto disk, in accordance with the Disk Retention Rules for written files. Files
imported this way can be read directly from the disk cache without further
access to the tape.
Files are restored in the same state as when they were written to the tape. For example,
files that were deleted are only visible via History Explorer.
Figure 6-1 The Import catalog option for making all file and folder
information visible.
Disabling and Re-Enabling a Tape Drive or
Library
Occasionally, it may be necessary to temporarily take one or more tape drives or a
library offline, perhaps for preventive maintenance. The nTier File Migrator software
allows the system administrator to selectively disable hardware while the remainder of
the system continues running.
80
Page 81

Disabling and Re-Enabling a Tape Drive or Library
Disabling a Tape Drive or Library
1. Open the Archive Management Console.
2. Navigate to the Diagnostics section.
3. Right-click on the component and select Disable.
Figure 6-2 The Disable option of the Diagnostics section.
Re-enabling a Tape Drive or Library
1. Open the Archive Management Console.
2. Navigate to the Diagnostics section.
3. Right-click on the component and select Enable.
Figure 6-3 The Enable option of the Diagnostics section.
81
Page 82

Chapter 6 – System Recovery
Options In Case of Tape Library or Stand-Alone Drive Failure
In normal operation, the nTier File Migrator software writes files to tape as soon as
they have been written to magnetic disk. By doing this, the system provides the
improved data integrity and security necessary for an archival storage system by
ensuring that a second instance of all data written to disk is generated almost instantly.
This provides continuous data protection. In the case of WORM media, it further
ensures that an unalterable and non-erasable version of the data is made in a timely
fashion, as required by many regulatory authorities.
However, in the event of a shortage of blank tapes or a failure of the tape library
hardware, no data can be written to the system. For some applications that require data
to be written immediately to WORM media, the system stops writing data until the
error condition has been resolved.
In some less critical applications it may be acceptable to write data only to disk for a
short time, waiting until the problem has been resolved before writing the data to tape.
To do this, turn off the Save files to tape option for each File Group.
When the problem has been resolved, re-enable the Save files to tape option and
enable the Use a background process... advanced option as well. The system
immediately starts archiving new data to tape while at the same time performing a
background scan, writing old files to tape that should now be archived.
82
Page 83

7 Diagnostics & Maintenance
Event Log
Whenever the nTier File Migrator software encounters an unexpected error condition,
it puts a message in the nTier File Migrator Event Log and generates a Trace Log file.
Certain other conditions, such as running out of space because all available tapes are
full, writes warnings to the event log. In general, if the system is not behaving as
expected, look first at the Event Log.
Opening the Event Log
1. Connect to the nTier’s BlueScale web interface and access the Windows Desktop
(see Access the nTier Windows Desktop on page 35).
Note: Refer to the User Guide that accompanied your nTier appliance for
information about making connections to the nTier, using the
BlueScale web interface, and accessing the Windows Desktop.
2. From the nTier Windows Desktop, right-click on the My Computer icon under the
Start menu, then select Manage.
3. Navigate to the File Migrator section of the Event Viewer in the Computer
Management console, as shown in Figure 7-1.
Figure 7-1 The nTier File Migrator event log.
83
Page 84

Chapter 7 – Diagnostics & Maintenance
Viewing More Detail about an Error or Warning
Double-click on the error or warning of interest to view more information. An Event
Properties dialog opens for the event.
Figure 7-2 The Event Properties for a selected event.
Diagnostic Trace Log
It is sometimes useful to be able to see what is happening internally within the system.
The Trace Log saves a trace of all actions performed by the system.
Opening the Trace Log
1. Open the Archive Management Console.
2. Navigate to the Diagnostics section.
84
Page 85

Diagnostic Trace Log
3. Click on the System icon to open the trace log in the right pane of the window.
Figure 7-3 The trace log.
Changing the Level of Detail in the Trace Log
The trace log can generate a large amount of information, which can scroll past very
quickly. Right-clicking on the System icon reveals the Configure option, which brings
up a dialog box that allows configuration of the components to be traced and the level
of detail of the trace, as shown in Figure 7-4.
Figure 7-4 The Configure Trace Log dialog box.
85
Page 86

Chapter 7 – Diagnostics & Maintenance
Automatic Generation of Trace Files
Whenever the nTier File Migrator software encounters an unexpected error condition,
it puts a message in the nTier File Migrator Event Log and generates a trace file. The
trace file contains a record of what the system was doing in the time preceding the
®
error, and is especially useful to assist SpectraGuard
determining the cause of a problem.
Technical Support in
Tape Drive and Library Diagnostics
The nTier File Migrator software provides a comprehensive set of diagnostic
information about the hardware under its control, and allows the system administrator
to selectively disable hardware that may need attention. To do this, use the Diagnostics
section of the Archive Management Console.
1. Open the Archive Management Console.
2. Navigate to the Diagnostics section.
3. Click on a hardware component to display information about that component.
Figure 7-5 Hardware diagnostic information displayed.
86
Page 87

Tape Drive Cleaning
Tape Drive Cleaning
Most types of tape drive require periodic cleaning to maintain peak performance.
Normally, a drive automatically issues a request for cleaning at the appropriate time.
When the nTier File Migrator software receives this request from drives within tape
libraries, the File Migrator sends a command that inserts a cleaning cartridge in the
drive. In the case of stand-alone tape drives or if no cleaning cartridge is available in a
tape library, the system puts a message in the event log and an indication in the
Diagnostics panel for the drive (see Figure 7-5 on page 86).
To manually clean a drive within a tape library:
1. Open the Archive Management Console.
2. Navigate to the Diagnostics section.
3. Expand the Library icon and find the appropriate drive.
4. Right-click on the drive and select Clean.
Figure 7-6 The Clean option for manually cleaning a tape drive.
87
Page 88

Chapter 7 – Diagnostics & Maintenance
Tape Cartridge Error States
Certain error conditions, such as media errors, leave the affected tape (or, in the case of
replicated tapes, the affected Volume) in an Error state. The system does this to protect
data by ensuring that it will not attempt to write to media that have problems
associated with them. When such an error occurs, the system also puts a message in
the event log. After consideration of the error message in the event log, the system
administrator may decide that it is appropriate to ignore the error and continue to use
the affected tape(s). The system provides a mechanism to reset the error state, as
follows.
Use the following steps to resetting the error state on a cartridge.
1. Open the Archive Management Console
2. Select the tape in the Archive Management Console
3. Right click on the tape and select Reset error. Note that the Reset Error option is
only available for tapes that are in the Error state.
Figure 7-7 Resetting a tape error state.
88
Page 89

Index
A
advanced policies
disk retention
options for file
groups
allocating files to groups using
wildcards
allocation rules, impact of list
order
25, 55
archive drive
activating
configuring
size requirements
Archive Management Console
configuring volume
sets
setting policies for file
groups
starting
using to allocate files to file
groups
57 to 61
61 to 64
25
44
37
20
49 to 53
56 to 64
48
53 to 56
B
blank media set, description 29
block size, setting for a volume
set
50
BlueScale web interface, using to
access Windows Remote
Desktop
35
C
cache requirements, read and
write
20
capacity, calculating
requirements
20
cartridges
allocating to a volume
set
52 to 53
error states
See also tapes
tape cartridges, See tapes
cleaning tape drives
configuration
Archive Management
Console
considerations
creating file groups
file group policies
file groups
volume set
replication
volume sets
contacting Spectra Logic
88
87 to 87
48
47
54
56 to 64
55 to 56
51 to 52
49 to 53
3
D
data cartridges
See cartridges
See tapes
data, verifying on tape
device drivers,
installing
diagnostic trace log, using for
troubleshooting
diagnostics
hardware
using the trace log
disk retention
advanced polices for file
options
41 to 43
86
groups
58 to 61
57 to 61
73
84 to 86
84 to 86
disk space
configuration
requirements
file storage capacity
requirements
for read/write cache
required for file system
metadata
documentation
nTier Secondary Storage
Appliances
Windows Storage Server
2003
9
drive performance,
optimizing
63
20 to 21
20
20
20
9
E
e-mail addresses, Spectra Logic 3
enabling stand-alone tape
drives
43
event log, using to diagnose
problems
exporting tapes
83 to 84
75
F
fax numbers, Spectra Logic
offices
3
Fetch
from disk
from tape
file fragmentation
enabling
role in partial restore
67
67
57
operations
31
89
Page 90

Index – H
file groups
advanced policies
allocating files
allocating using wildcards
allocation rules
assigning files to
changing list order
configuration
overview
creating
definition
disk retention
file allocation
fragmentation polices
pattern matching with
renaming
required configuration
setting policies
setting storage
file management, advanced
policies
file system
metadata storage
restoring from tape
files
accessing current version
accessing with History
allocating to file
fragmentation
grouping using wildcards
identifying offline
managing versions
opening with History
performing a partial
saving to disk only
54
23
polices
examples
wildcards
57 to 61
76
parameters
options
62 to 64
requirements
Explorer
groups
Explorer
restore
55 to 56
31
61 to 64
55 to 56
25, 55
53
55 to 56
23 to 25
26 to 28
57
25
24
56 to 64
56 to 57
20
79 to 80
65 to 68
31
16
32
67
82
25
65
25
files (continued)
saving using History
Explorer
tracking with Windows offline
attribute
use Fetch to retrieve
viewing old or deleted
versions
finalizing tapes
68
19
67
67
74 to 74
H
hardware, disabling for
maintenance
hierarchical storage management,
See HSM
History Explorer
description
opening a file
saving a file
starting
using to access files
viewing old or deleted file
versions
views
HSM
description
file attributes
tiers
81
32, 65
67
68
66
65 to 68
67
66
11
20
20
I
importing tapes 68 to 69
installation
completing
nTier File Migrator
software
preparing the Windows
server
Internet Information Service (ISS),
enabling
45
41
37 to 40
40
K
Knowledge Base, accessing for
technical support
3
L
library, See tape libraries
license, activating nTier File
Migrator
44 to 45
M
mailing address, Spectra Logic 3
maintenance, preparing hardware
for
81
media sales, Spectra Logic
metadata, using compact format to
save space
Microsoft Removable Storage
service, disabling
Microsoft Services for NFS
re-enabling
removing
63
39
38
3
38
N
nearline, definition 32
nTier File Migrator
accessing files with History
Explorer
activating license
completing installation
configuring
diagnostic trace log
event log
features
installing
operating with a tape
library
operating with stand-alone
tape drives
65 to 68
44 to 45
45
47 to 64
84 to 86
83 to 84
14 to 16
41
16 to 17
18 to 19
90
Page 91

Index – O
nTier File Migrator (continued)
overview
preinstallation
using to manage tape drive
Windows offline attribute
with a tape library
nTier Intelligent Secondary
Storage appliance
accessing the Windows
activating the archive
configuring the archive
See also Windows server
11 to 14
requirements
cleaning
Desktop
drive
drive
87 to 87
36
44
37
35
16
12
O
offline attribute, description 16
online, definition
operating system
documentation
32
9
P
path patterns, using to group
files
25
phone numbers, Spectra Logic
offices
3
Q
quarantined media set,
description
30
R
read cache capacity
requirements
reformatting options for tapes
20
71
replicate immediately option
replication
configuring for a volume
set
51 to 52
configuring timing
daily
52
scheduled
scheduling immediate
resetting cartridge error state
retensioning tapes
52
77
52
52
52
88
S
sales, contacting 3
Save files to tape option,
description
software license, activating nTier
File Migrator
Spectra Logic
contacting
manuals, obtaining
media sales
SpectraGuard Technical Support,
contacting
storage options
description
setting for file
system recovery, using
tape
79 to 80
3
groups
82
44 to 45
3
9
3
56
56 to 57
T
tape catalog, description 74
tape contents catalog,
creating
tape drive device drivers,
installing
tape drives
74 to 74
42
cleaning
disabling
enabling stand-alone
re-enabling
87 to 87
81
81
43
tape drives (continued)
stand-alone, using with nTier
File Migrator
troubleshooting problems
tape libraries
disabling
e-enabling
replacing the default Windows
troubleshooting
using with nTier File
tapes
administrator-defined
allocating to a volume
exporting
finalizing
importing
medium properties
reformatting
retensioning
using to restore the file
verifying
write-protecting
See also cartridges
technical support
contacting
using Knowledge Base web
tiered storage, See HSM
troubleshooting
using hardware
using the diagnostic trace
using the event log
typographical conventions
81
driver
42
Migrator
information
set
52 to 53
75
74 to 74
68 to 69
system
73
site
3
diagnostics
log
84 to 86
18 to 19
81
86
16 to 17
72
72
70 to 72
77
79 to 80
75
3
86
83 to 84
86
10
91
Page 92

Index – V
V
verifying data on tape 73
versioning, maintaining multiple
file versions
volume sets
allocating tape
basic configuration
blank media set
configuring
configuring
configuring replication
creating new
deleting
description
error state
quarantined media set
renaming
volume, definition
32
cartridges
description
49 to 53
replication
timing
52
49
76
29
88
description
50
52 to 53
50
29
51 to 52
30
28
Windows server
description
preparing to install File
Migrator
rebooting
See also nTier Intelligent
Secondary Storage
Appliance
Windows Storage Server 2003,
documentation
WORM tape
write cache capacity
requirements
write-protecting tapes
12
37 to 40
45
9
11
20
75
W
web site
obtaining Spectra Logic
manuals
Spectra Logic home
wildcards, using to create file
groups
Windows desktop, See Windows
Remote Desktop
Windows Explorer, using to access
files
Windows Media Changer device
driver, replacing
Windows Remote Desktop
25
65
accessing
browser compatibility
logging into
9
3
42
35, 66
66
36
92
 Loading...