

Page 1
Implementing nTier
Deduplication
featuring FalconStor
®
Software
Page 2

Implementing Spectra nTier Deduplication
Spectra Logic, Inc. Spectra European office FalconStor Software, Inc.
1700 N. 55th Street Magdalen Center, Robert Robinson Avenue 2 Huntington Quadrangle, Suite 2S01
Boulder CO 80304 Oxford Science Park, OXFORD 0X44GA Melville, NY 11747
www.SpectraLogic.com United Kingdom 631-777-5188 Fax: 631-501-7633
Spectra, Spectra Logic, and BlueScale are registered trademarks of Spectra Logic, Inc. FalconStor Software, FalconStor, and IPStor are registered trademarks of FalconStor Software, Inc. in the United
States and other countries. Windows is a registered trademark of Microsoft Corporation. All other brand and product names are trademarks or registered trademarks of their respective owners.
Spectra Logic and FalconStor Software reserve the right to make changes in the information contained in this publication without prior notice. The reader should in all cases consult with Spectra Logic and
FalconStor Software to determine whether any such changes have been made.
www.falconstor.com
Copyright © 2003-2008 FalconStor Software. All Rights Reserved.
90990035 revision A
Page 3

Page 4

Contents
Contents
Introduction
nTier VTL featuring FalconStor SIR Deduplication . . . . . . . . . . . . . . . . . . . . . . . . . . . . . .5
Single Instance Repository (SIR) . . . . . . . . . . . . . . . . . . . . . . . . . . . . . . . . . . . . . . . . . . .6
VTL configurations . . . . . . . . . . . . . . . . . . . . . . . . . . . . . . . . . . . . . . . . . . . . . . . . . . . . . .6
Standard VTL Configuration . . . . . . . . . . . . . . . . . . . . . . . . . . . . . . . . . . . . . . . . . . .7
Advanced VTL Configuration . . . . . . . . . . . . . . . . . . . . . . . . . . . . . . . . . . . . . . . . . . .8
Getting Started
Delivered components . . . . . . . . . . . . . . . . . . . . . . . . . . . . . . . . . . . . . . . . . . . . . . . . . . .9
Install the nTier VTL appliance . . . . . . . . . . . . . . . . . . . . . . . . . . . . . . . . . . . . . . . . . . . . .9
Cable the VTL appliance to your storage network . . . . . . . . . . . . . . . . . . . . . . . . . . . . .10
Install the VTL Console on an administrative computer . . . . . . . . . . . . . . . . . . . . . . . . .10
Launch the VTL Console . . . . . . . . . . . . . . . . . . . . . . . . . . . . . . . . . . . . . . . . . . . . . . . .11
Configure network connections to the nTier VTL appliance . . . . . . . . . . . . . . . . . . . . . .11
Backup server access to the nTier VTL appliance . . . . . . . . . . . . . . . . . . . . . . . . . . . . .12
Using the built-in Everyone_iSCSI client . . . . . . . . . . . . . . . . . . . . . . . . . . . . . . . . . . . .12
Prepare client initiators to access your nTier VTL appliance . . . . . . . . . . . . . . . . . .13
Create a target for the iSCSI client to log onto . . . . . . . . . . . . . . . . . . . . . . . . . . . .13
Assign the virtual tape library/drives to the iSCSI target . . . . . . . . . . . . . . . . . . . . .14
Log the client onto the target . . . . . . . . . . . . . . . . . . . . . . . . . . . . . . . . . . . . . . . . . .15
Using the built-in Everyone_FC client . . . . . . . . . . . . . . . . . . . . . . . . . . . . . . . . . . . . . . .16
Assign the virtual tape library to the Everyone_FC client . . . . . . . . . . . . . . . . . . . .16
Discover the virtual tape library from your backup server . . . . . . . . . . . . . . . . . . . . . . . .17
Create and run backup jobs . . . . . . . . . . . . . . . . . . . . . . . . . . . . . . . . . . . . . . . . . . . . . .17
Confirm successful backup . . . . . . . . . . . . . . . . . . . . . . . . . . . . . . . . . . . . . . . . . . . . . . .18
Configure optional services . . . . . . . . . . . . . . . . . . . . . . . . . . . . . . . . . . . . . . . . . . . . . . .18
Save your VTL system configuration . . . . . . . . . . . . . . . . . . . . . . . . . . . . . . . . . . . . . . .18
Set deduplication options . . . . . . . . . . . . . . . . . . . . . . . . . . . . . . . . . . . . . . . . . . . . . . . .19
The VTL Console
Launching the Console . . . . . . . . . . . . . . . . . . . . . . . . . . . . . . . . . . . . . . . . . . . . . . . . . .21
Understanding the objects in the tree . . . . . . . . . . . . . . . . . . . . . . . . . . . . . . . . . . . . . . .21
VirtualTape Library System object . . . . . . . . . . . . . . . . . . . . . . . . . . . . . . . . . . . . . .21
SAN Resources object . . . . . . . . . . . . . . . . . . . . . . . . . . . . . . . . . . . . . . . . . . . . . . .22
SAN Clients object . . . . . . . . . . . . . . . . . . . . . . . . . . . . . . . . . . . . . . . . . . . . . . . . . .22
Reports object . . . . . . . . . . . . . . . . . . . . . . . . . . . . . . . . . . . . . . . . . . . . . . . . . . . . .22
Physical Resources object . . . . . . . . . . . . . . . . . . . . . . . . . . . . . . . . . . . . . . . . . . . .23
Search for tapes . . . . . . . . . . . . . . . . . . . . . . . . . . . . . . . . . . . . . . . . . . . . . . . . . . . . . . .24
Set console options . . . . . . . . . . . . . . . . . . . . . . . . . . . . . . . . . . . . . . . . . . . . . . . . . . . . .24
Manage users and administrators . . . . . . . . . . . . . . . . . . . . . . . . . . . . . . . . . . . . . . . . . .25
Implementing nTier Deduplication i
Page 5

Contents
View the Event Log . . . . . . . . . . . . . . . . . . . . . . . . . . . . . . . . . . . . . . . . . . . . . . . . . . . . .26
Version Info tab . . . . . . . . . . . . . . . . . . . . . . . . . . . . . . . . . . . . . . . . . . . . . . . . . . . . . . . .27
Attention Required tab . . . . . . . . . . . . . . . . . . . . . . . . . . . . . . . . . . . . . . . . . . . . . . . . . .27
Changing pre-configured defaults . . . . . . . . . . . . . . . . . . . . . . . . . . . . . . . . . . . . . . . . . .28
Changing the default IP address . . . . . . . . . . . . . . . . . . . . . . . . . . . . . . . . . . . . . . .28
Changing the default hostname . . . . . . . . . . . . . . . . . . . . . . . . . . . . . . . . . . . . . . . .30
Changing the default password . . . . . . . . . . . . . . . . . . . . . . . . . . . . . . . . . . . . . . . .30
Changing the default deduplication properties . . . . . . . . . . . . . . . . . . . . . . . . . . . .30
Key Features
Creating virtual tape libraries . . . . . . . . . . . . . . . . . . . . . . . . . . . . . . . . . . . . . . . . . . . . .32
Creating virtual tapes . . . . . . . . . . . . . . . . . . . . . . . . . . . . . . . . . . . . . . . . . . . . . . . . . . .35
Controlling backup server access to the nTier appliance . . . . . . . . . . . . . . . . . . . . . . . .38
Assigning virtual tape libraries to backup servers . . . . . . . . . . . . . . . . . . . . . . . . . . . . . .38
Auto Archive . . . . . . . . . . . . . . . . . . . . . . . . . . . . . . . . . . . . . . . . . . . . . . . . . . . . . . . . . .39
Physical tape libraries and import/export . . . . . . . . . . . . . . . . . . . . . . . . . . . . . . . . . . . .40
Prepare physical libraries/drives for use with FalconStor VTL . . . . . . . . . . . . . . . . .41
Assign physical libraries/drives to the virtual tape library . . . . . . . . . . . . . . . . . . . .42
Importing/Exporting tapes . . . . . . . . . . . . . . . . . . . . . . . . . . . . . . . . . . . . . . . . . . . . . . . .43
Import a tape . . . . . . . . . . . . . . . . . . . . . . . . . . . . . . . . . . . . . . . . . . . . . . . . . . . . . .43
Export data to a physical tape . . . . . . . . . . . . . . . . . . . . . . . . . . . . . . . . . . . . . . . . .45
Advanced Features
Protecting your FalconStor VTL configuration . . . . . . . . . . . . . . . . . . . . . . . . . . . . . . . .47
Automatically save the configuration . . . . . . . . . . . . . . . . . . . . . . . . . . . . . . . . . . . .47
Manually save the configuration as needed . . . . . . . . . . . . . . . . . . . . . . . . . . . . . .49
Restore the configuration . . . . . . . . . . . . . . . . . . . . . . . . . . . . . . . . . . . . . . . . . . . . .49
Virtual tape drive compression . . . . . . . . . . . . . . . . . . . . . . . . . . . . . . . . . . . . . . . . . . . .50
Setting server properties . . . . . . . . . . . . . . . . . . . . . . . . . . . . . . . . . . . . . . . . . . . . . . . . .51
Configuring FalconStor VTL to send SNMP traps . . . . . . . . . . . . . . . . . . . . . . . . . . . . .51
Monitor Deduplication
Status of running jobs . . . . . . . . . . . . . . . . . . . . . . . . . . . . . . . . . . . . . . . . . . . . . . . . . . .53
Scanner history . . . . . . . . . . . . . . . . . . . . . . . . . . . . . . . . . . . . . . . . . . . . . . . . . . . . . . . .54
Repository statistics . . . . . . . . . . . . . . . . . . . . . . . . . . . . . . . . . . . . . . . . . . . . . . . . . . . .55
Virtual index tape status . . . . . . . . . . . . . . . . . . . . . . . . . . . . . . . . . . . . . . . . . . . . . . . . .57
Reclaiming Disk Space . . . . . . . . . . . . . . . . . . . . . . . . . . . . . . . . . . . . . . . . . . . . . . . . . .57
Replication
Replication process . . . . . . . . . . . . . . . . . . . . . . . . . . . . . . . . . . . . . . . . . . . . . . . . . . . . .59
Replication requirements . . . . . . . . . . . . . . . . . . . . . . . . . . . . . . . . . . . . . . . . . . . . . . . .60
Replication to another nTier VTL appliance . . . . . . . . . . . . . . . . . . . . . . . . . . . . . . . . . .60
Configure replication for virtual index tapes . . . . . . . . . . . . . . . . . . . . . . . . . . . . . . .61
Checking replication status . . . . . . . . . . . . . . . . . . . . . . . . . . . . . . . . . . . . . . . . . . . . . . .67
Implementing nTier Deduplication ii
Page 6

Contents
Accessing data on a replicated VIT . . . . . . . . . . . . . . . . . . . . . . . . . . . . . . . . . . . . . . . .68
Manually start the replication process . . . . . . . . . . . . . . . . . . . . . . . . . . . . . . . . . . . . . . .69
Changing replication configuration properties . . . . . . . . . . . . . . . . . . . . . . . . . . . . . . . . .69
Suspending/resuming the replication schedule . . . . . . . . . . . . . . . . . . . . . . . . . . . . . . .69
Stopping a replication in progress . . . . . . . . . . . . . . . . . . . . . . . . . . . . . . . . . . . . . . . . . .69
Removing replication configuration . . . . . . . . . . . . . . . . . . . . . . . . . . . . . . . . . . . . . . . . .69
iSCSI Clients
Overview . . . . . . . . . . . . . . . . . . . . . . . . . . . . . . . . . . . . . . . . . . . . . . . . . . . . . . . . . . . . .73
Supported platforms . . . . . . . . . . . . . . . . . . . . . . . . . . . . . . . . . . . . . . . . . . . . . . . .73
Managing iSCSI clients . . . . . . . . . . . . . . . . . . . . . . . . . . . . . . . . . . . . . . . . . . . . . . . . . .73
iSCSI users . . . . . . . . . . . . . . . . . . . . . . . . . . . . . . . . . . . . . . . . . . . . . . . . . . . . . . .74
Windows client configuration . . . . . . . . . . . . . . . . . . . . . . . . . . . . . . . . . . . . . . . . . . . . .74
Requirements . . . . . . . . . . . . . . . . . . . . . . . . . . . . . . . . . . . . . . . . . . . . . . . . . . . . .74
Prepare client initiators to access your nTier appliance . . . . . . . . . . . . . . . . . . . . .74
Add your iSCSI client . . . . . . . . . . . . . . . . . . . . . . . . . . . . . . . . . . . . . . . . . . . . . . . .75
Create targets for the iSCSI client to log onto . . . . . . . . . . . . . . . . . . . . . . . . . . . . .77
Log the client onto the target . . . . . . . . . . . . . . . . . . . . . . . . . . . . . . . . . . . . . . . . . .78
Setup using Open iSCSI . . . . . . . . . . . . . . . . . . . . . . . . . . . . . . . . . . . . . . . . . . . . . . . . .79
Prepare the iSCSI initiator . . . . . . . . . . . . . . . . . . . . . . . . . . . . . . . . . . . . . . . . . . . .79
Add your iSCSI client . . . . . . . . . . . . . . . . . . . . . . . . . . . . . . . . . . . . . . . . . . . . . . . .80
Create targets for the iSCSI client to log onto . . . . . . . . . . . . . . . . . . . . . . . . . . . . .80
Linux client configuration . . . . . . . . . . . . . . . . . . . . . . . . . . . . . . . . . . . . . . . . . . . . . . . .81
Prepare the iSCSI initiator . . . . . . . . . . . . . . . . . . . . . . . . . . . . . . . . . . . . . . . . . . . .81
Add your iSCSI client . . . . . . . . . . . . . . . . . . . . . . . . . . . . . . . . . . . . . . . . . . . . . . . .81
Create targets for the iSCSI client to log onto . . . . . . . . . . . . . . . . . . . . . . . . . . . . .81
Log the client onto the target . . . . . . . . . . . . . . . . . . . . . . . . . . . . . . . . . . . . . . . . . .82
Solaris client configuration with iSCSI only . . . . . . . . . . . . . . . . . . . . . . . . . . . . . . . . . . .82
Prepare the iSCSI initiator . . . . . . . . . . . . . . . . . . . . . . . . . . . . . . . . . . . . . . . . . . . .82
Add your iSCSI client . . . . . . . . . . . . . . . . . . . . . . . . . . . . . . . . . . . . . . . . . . . . . . . .83
Create targets for the iSCSI client to log onto . . . . . . . . . . . . . . . . . . . . . . . . . . . . .83
Log the client onto the target . . . . . . . . . . . . . . . . . . . . . . . . . . . . . . . . . . . . . . . . . .83
Disable iSCSI . . . . . . . . . . . . . . . . . . . . . . . . . . . . . . . . . . . . . . . . . . . . . . . . . . . . . . . . .83
Fibre Channel Clients
Overview . . . . . . . . . . . . . . . . . . . . . . . . . . . . . . . . . . . . . . . . . . . . . . . . . . . . . . . . . . . . .84
Fibre Channel hardware configuration . . . . . . . . . . . . . . . . . . . . . . . . . . . . . . . . . . . . . .85
QLogic HBAs . . . . . . . . . . . . . . . . . . . . . . . . . . . . . . . . . . . . . . . . . . . . . . . . . . . . . .85
Adding a Fibre Channel client . . . . . . . . . . . . . . . . . . . . . . . . . . . . . . . . . . . . . . . . . . . . .87
CallHome
Configure CallHome . . . . . . . . . . . . . . . . . . . . . . . . . . . . . . . . . . . . . . . . . . . . . . . . . . . .88
Modify CallHome properties . . . . . . . . . . . . . . . . . . . . . . . . . . . . . . . . . . . . . . . . . . . . . .94
Script/program trigger information . . . . . . . . . . . . . . . . . . . . . . . . . . . . . . . . . . . . . . . . .94
Custom email destination . . . . . . . . . . . . . . . . . . . . . . . . . . . . . . . . . . . . . . . . . . . .94
Implementing nTier Deduplication iii
Page 7

Contents
New script/program . . . . . . . . . . . . . . . . . . . . . . . . . . . . . . . . . . . . . . . . . . . . . . . . .94
Troubleshooting
General Console operations . . . . . . . . . . . . . . . . . . . . . . . . . . . . . . . . . . . . . . . . . . . . . .96
Physical resources . . . . . . . . . . . . . . . . . . . . . . . . . . . . . . . . . . . . . . . . . . . . . . . . . . . . .97
Logical resources . . . . . . . . . . . . . . . . . . . . . . . . . . . . . . . . . . . . . . . . . . . . . . . . . . . . . .98
Client cannot see tape library/drive as provisioned by FalconStor VTL . . . . . . . .100
Deduplication . . . . . . . . . . . . . . . . . . . . . . . . . . . . . . . . . . . . . . . . . . . . . . . . . . . . . . . .101
System configuration . . . . . . . . . . . . . . . . . . . . . . . . . . . . . . . . . . . . . . . . . . . . . . . . . .102
Import/Export . . . . . . . . . . . . . . . . . . . . . . . . . . . . . . . . . . . . . . . . . . . . . . . . . . . . . . . .103
Take an X-ray of your system for technical support . . . . . . . . . . . . . . . . . . . . . . . . . . .104
Appendix
System security . . . . . . . . . . . . . . . . . . . . . . . . . . . . . . . . . . . . . . . . . . . . . . . . . . . . . . .105
Index
Implementing nTier Deduplication iv
Page 8
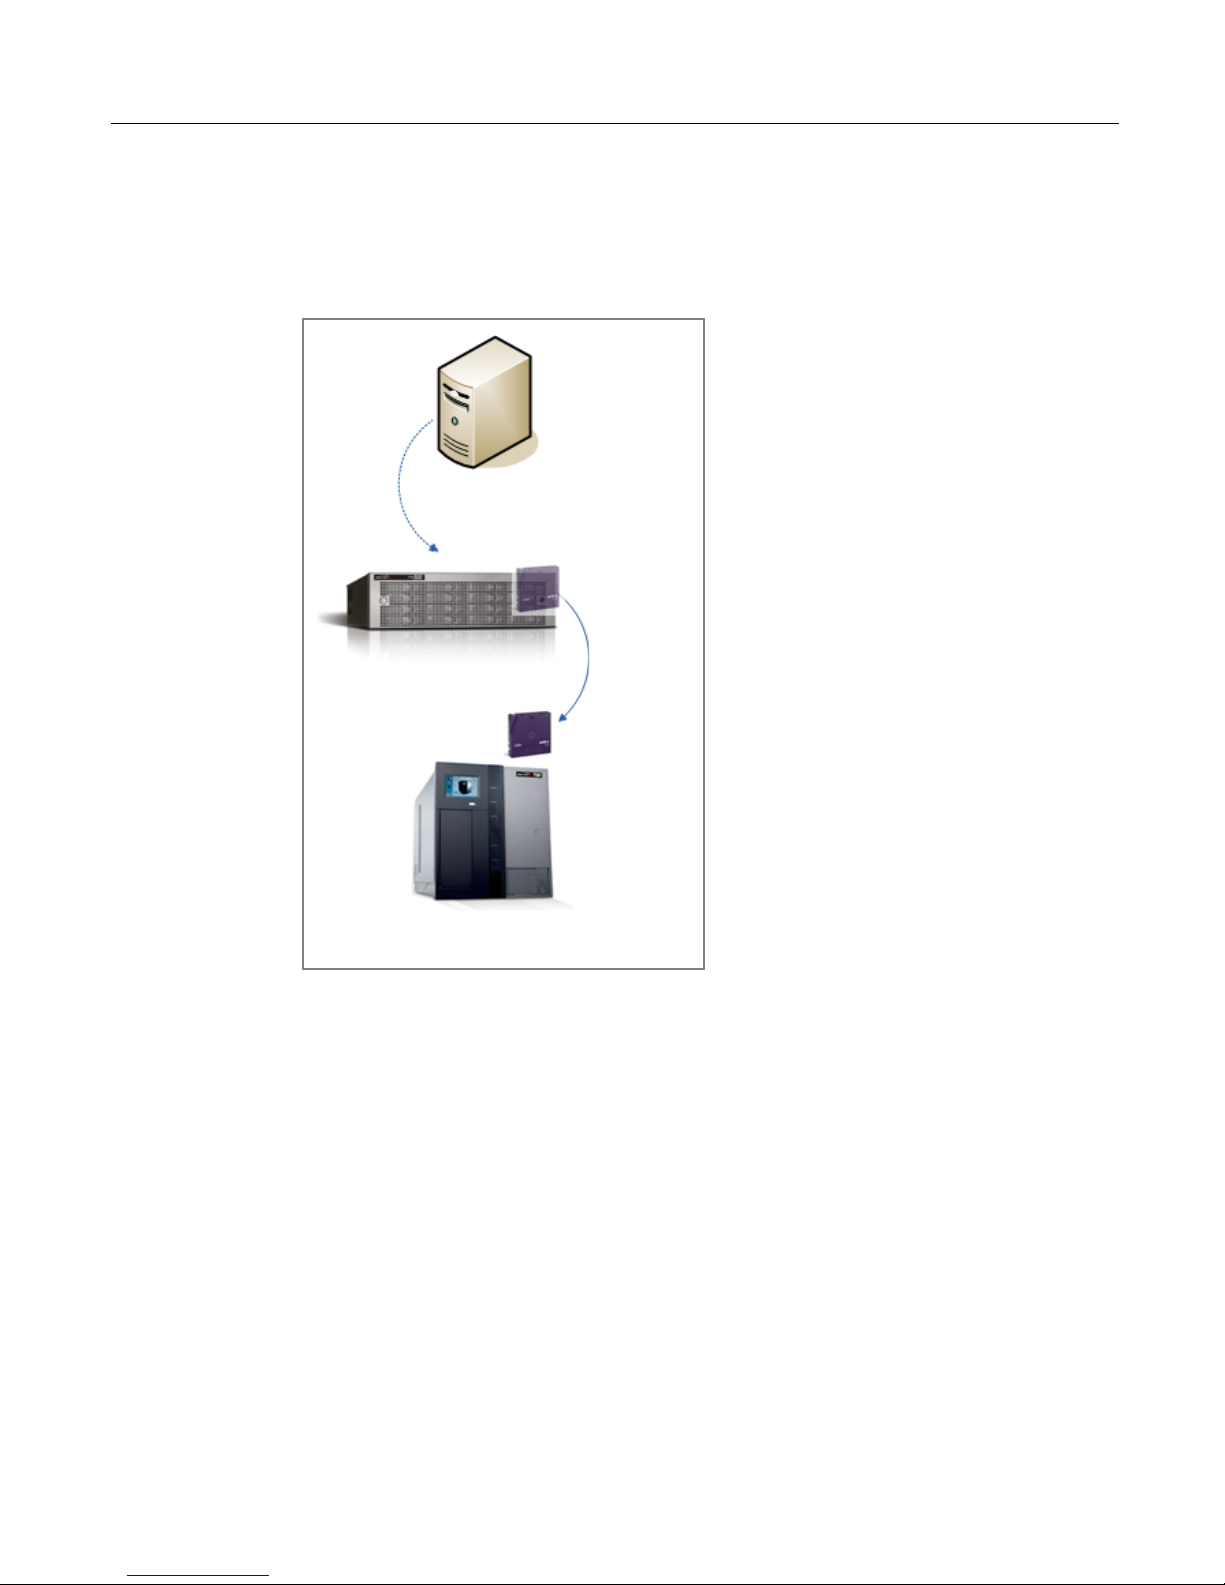
Introduction
iSCSI/FC
High-speed backup using the VTL interface
Direct tape export
Spectra tape
library
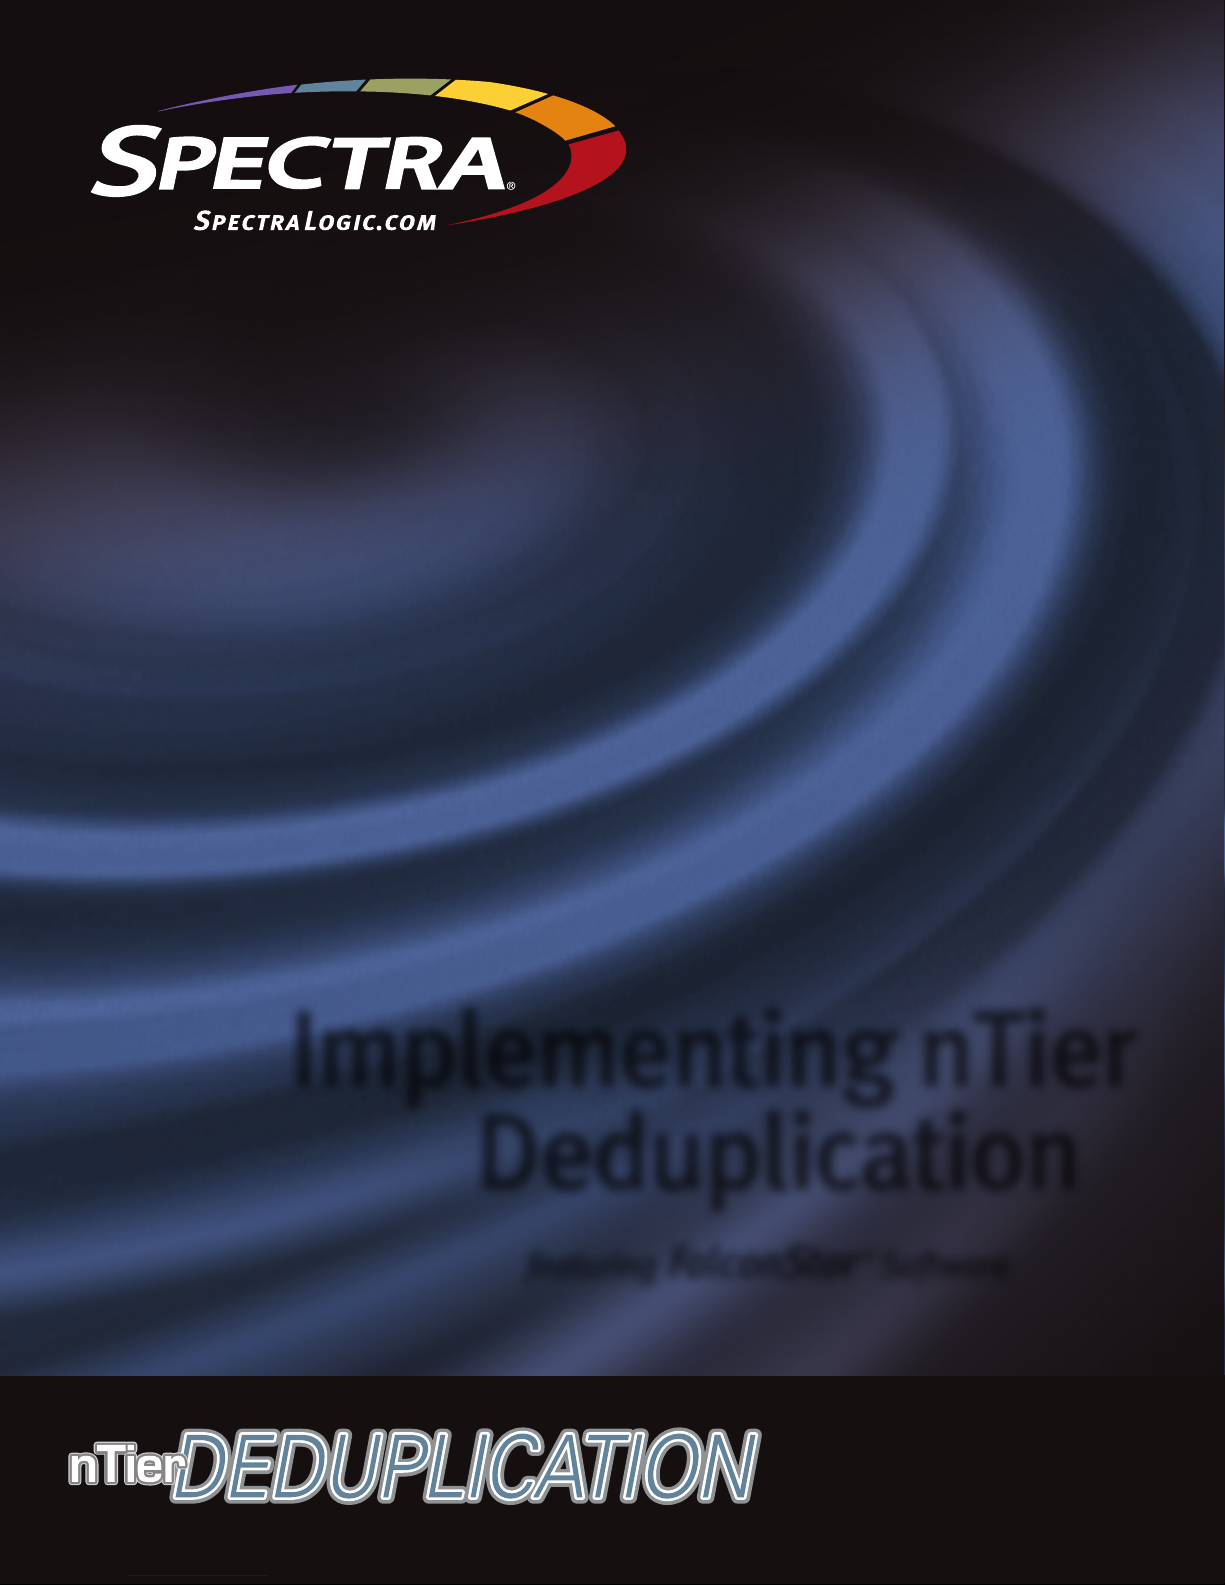
nTier VTL architecture
nTier VTL featuring FalconStor SIR Deduplication
nTier VTL provides FalconStor Virtual Tape Library (VTL) and Single Instance
Repository (SIR) functionality in a single, pre-configured appliance.
VTL comprises the following components:
• VTL Storage Appliance - A pre-configured appliance that includes all
storage used by VTL and SIR, including the VTL database, SIR index, and
SIR repository.
• VTL Console - The graphical administration tool, installed on a separate
workstation, where you configure VTL, add/configure clients, set properties,
manage the import/export of tapes, and view statistics.
• VTL Clients - The backup servers that use VTL. VTL supports Fibre
Channel (FC) and iSCSI backup servers on most major platforms.
nTier with FalconStor VTL increases the speed and reliability of backups that use
standard backup applications by leveraging disk to emulate industry-standard tape
libraries, such as Spectra tape libraries. VTL takes advantage of your iSCSI or Fibre
Channel network to transfer data to and restore data from a disk-based virtual tape
at ultra-high speeds.
Because VTL can emulate more tape drives than the physical library has, more
backup streams can run simultaneously, letting organizations easily complete
backups in the allotted window.
If you have physical tapes that you would like to protect using VTL, simply import
data from physical tape into the nTier VTL. To recover files from a physical tape, you
can use your nTier VTL to access those tapes for immediate recovery.
Note: Check www.SpectraLogic.com for the most recent nTier guides.
Implementing nTier Deduplication 5
Page 9
Single Instance Repository (SIR)
Single Instance Repository (SIR) with FalconStor VTL to eliminate redundant data
without impacting your established backup window, thereby minimizing storage
requirements.
Introduction
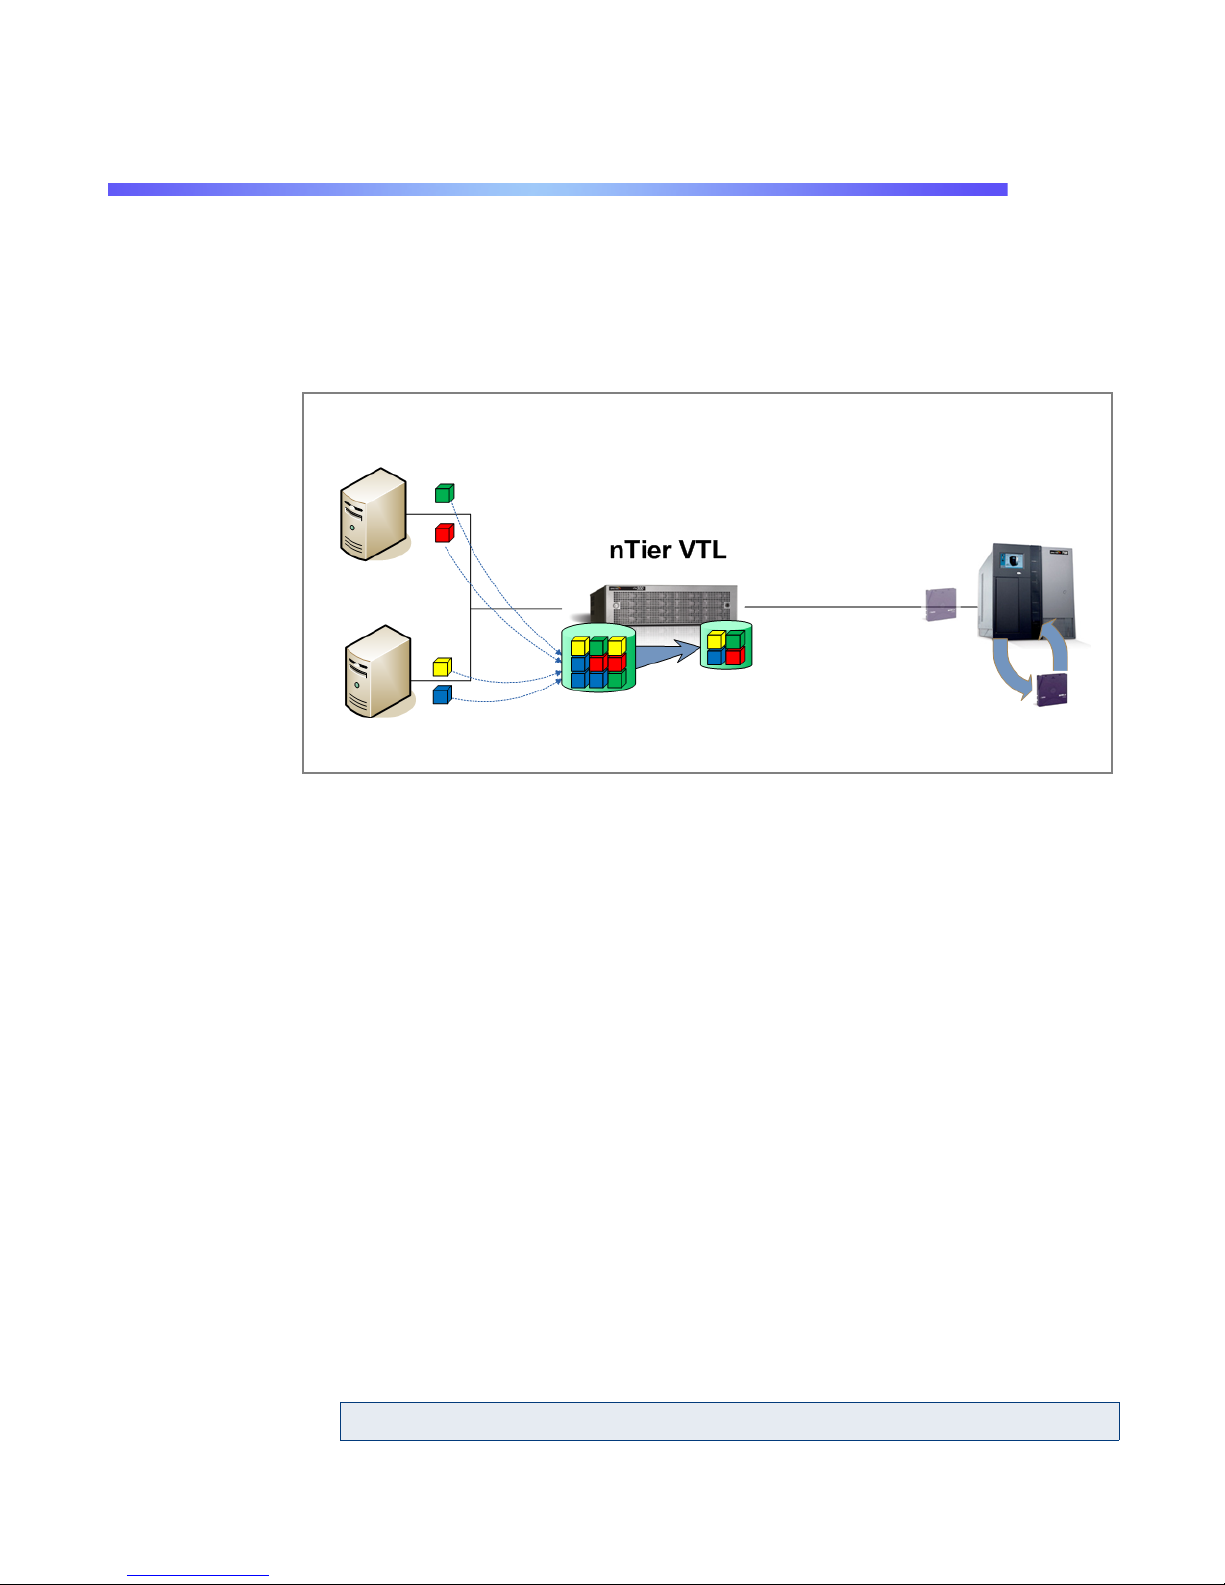
After a virtual tape is unloaded
from a tape drive and moved to
a slot, the deduplication
process scans the virtual tape,
analyzes the data, and
determines whether data is
unique or has already been
copied to the SIR repository.
The process then passes only
single instances of unique data
to the SIR repository; data is
compressed automatically. The
original virtual tape is replaced
with a virtual index tape (VIT)
pointing to SIR storage, freeing
considerable space on the tape
for more data.
Deduplication occurs as a separate, off-line process. Backup and restore jobs have
higher priority than the deduplication process. Deduplication jobs are temporarily
suspended when the tape being deduplicated is needed for backup or restore; when
the backup application finishes using that particular tape, the deduplication job
automatically resumes from where it left off.
If replication is configured, SIR replicates its repository and metadata. Data
duplicated across remote sites is deduplicated at the central site, enabling only
globally unique data to be replicated to the disaster recovery site.
VTL configurations
VTL supports two disk-to-disk-to tape (D2D2T) configurations that let you choose
how to configure the various components: third-party backup software, the VTL
appliance, and one or more physical libraries. In either configuration, VTL makes it
easier for you to manage virtual tapes and physical tapes.
• Standard Configuration - Backup software runs on a backup server or on
• Advanced Configuration - Backup software runs on a backup server and
the VTL appliance and manages all tapes—virtual and physical. Data is
copied to physical tape using the backup software’s tape copy function.
manages the backup to virtual tape. VTL manages the disk storage and the
export of data to the physical tape library.
Implementing nTier Deduplication 6
Page 10
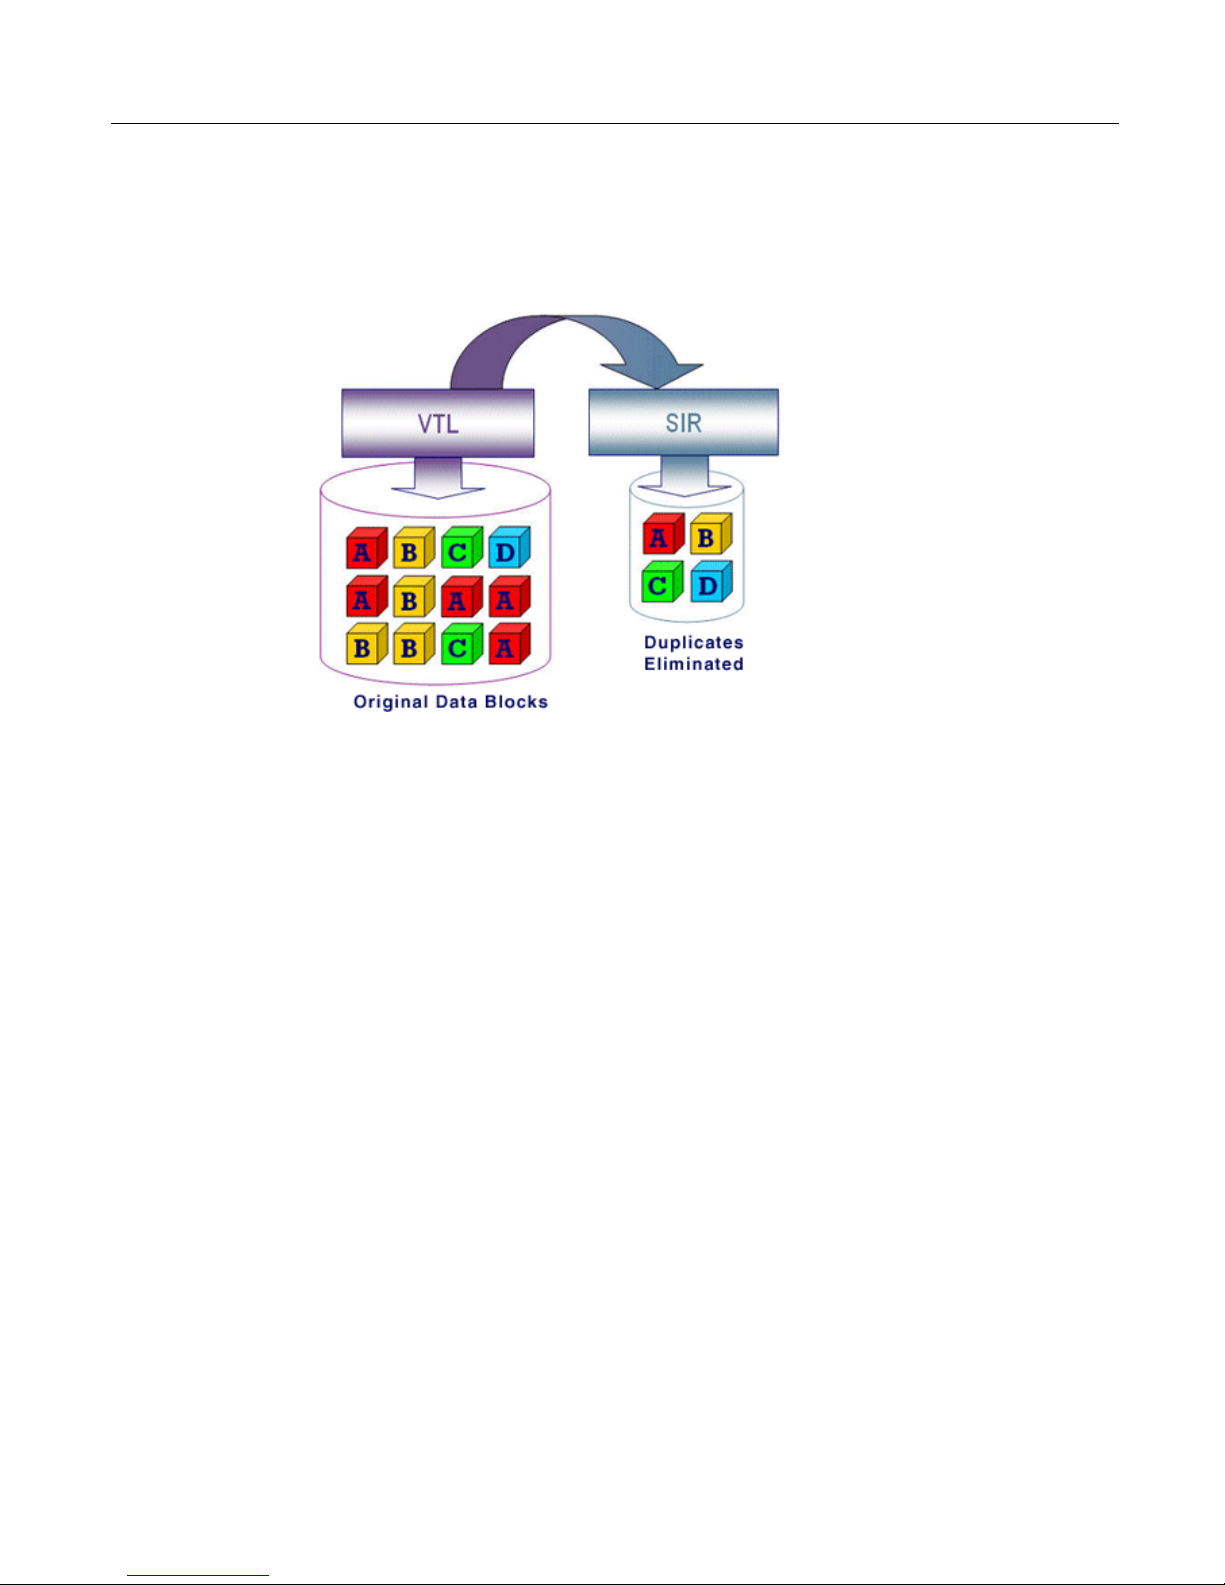
Standard VTL Configuration
Backup server
Standard configuration
Backup to
virtual tape
Backup to
physical tape
using backup
application
nTier VTL with
FalconStor
software
Spectra tape
library
In the Standard VTL Configuration, the backup software manages all tapes—virtual
and physical—by treating the virtual tape library as though it were just another
standalone tape library attached to the backup server. To copy data from virtual to
physical tapes, the backup software’s Tape Copy function is utilized.
Introduction
The Standard VTL
Configuration is ideal for
organizations that already have
a backup process in place with
which they are comfortable but
which is not meeting all of their
backup objectives. Adding a
VTL appliance as another tape
library allows you to easily
increase your parallel backup
streams and take advantage of
VTL rapid data recovery
without having to alter your
current configuration. With the
backup application managing
the entire backup process,
virtual tapes and physical tapes
are seen in the same way: a
virtual tape is just another tape.
With the Standard VTL Configuration, backups to virtual tapes occur quickly. Then,
at a later time, the backup server can copy the data to physical tapes without
impacting the production environment. Because the backup server performs the
tape copying function in addition to backups, additional overhead can be incurred by
the backup server. Therefore, it is best to perform tape copying at off-peak hours.
Implementing nTier Deduplication 7
Page 11
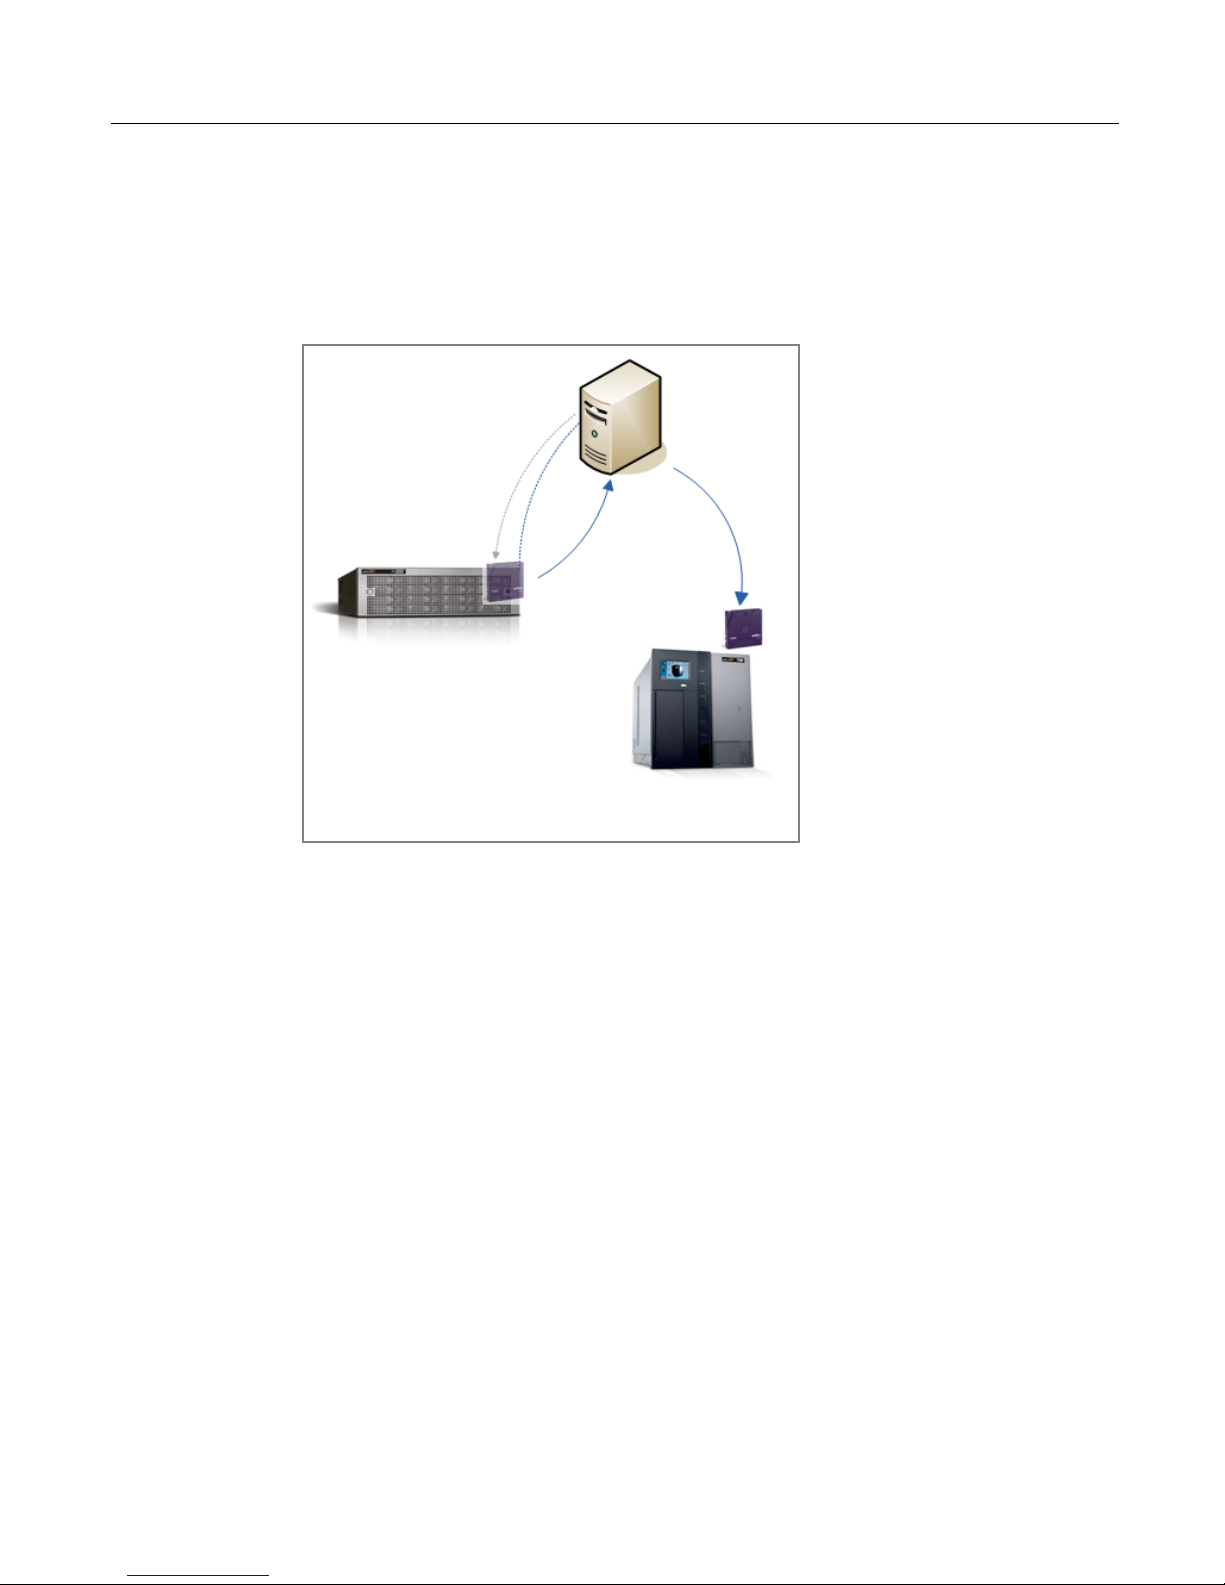
Advanced VTL Configuration
nTier VTL with
FalconStor
software
Backup to
virtual tape
Advanced Configuration
Backup to
physical
tape using
VTL Export
Backup server
Spectra tape
library
In the Advanced VTL Configuration, the backup software manages backups to the
virtual tape library while the VTL appliance controls the export of data from virtual
tapes to physical tapes.
Introduction
VTL dramatically accelerates backups by
acting as a de facto cache to your
physical tape library and enables data to
be moved to physical tapes as a
background process without impacting
production servers. This innovative
approach to backup addresses the
limitations of conventional tape backup.
Moreover, since VTL manages the export
of data from virtual to physical tapes,
there is no additional overhead for the
backup server.
With the Advanced VTL Configuration,
backups to virtual tapes occur very
quickly. Then, at a later time, when you
are done using a given tape, you can
export data to physical tape for offsite
vaulting or disaster recovery without
impacting the production environment.
VTL can also be set up in Auto Archive
mode so that after each backup to virtual
tape completes, data is automatically
exported to physical tape.
The Advanced VTL Configuration
requires you to set up the initial physical
tape library emulation from within the VTL Console so that there is a 1:1 mapping,
with identical barcodes, between virtual and physical tapes. This enables the
backup software to keep track of backup tapes and prevents tapes from being
created that would be unidentifiable by the backup software.
Whenever data is written to physical tape, the virtual tape can then be deleted or the
copy can be left on the virtual tape for rapid recovery. The physical tape will always
have the same barcode as its virtual tape counterpart. This gives you the flexibility to
easily restore from either virtual or physical tape.
When it comes time to restore, the backup software identifies the barcode of the
tape containing the needed data. If the data still resides on virtual tape (it was never
exported or it was exported with the virtual tape left intact), it can be restored very
quickly because it is being read from disk. If the data is only on physical tape, the
tape must first be re-imported into VTL with a few simple keystrokes in the VTL
Console so that the backup software can access it and restore in its usual manner.
Implementing nTier Deduplication 8
Page 12

Getting Started
nTier VTL appliances are designed for quick setup using pre-configured defaults.
This section guides you through setting up VTL using these defaults. Refer to
“Changing pre-configured defaults” for information about modifying defaults.
Delivered components
Verify that you have received the following items:
• nTier VTL appliance with FalconStor software
• Two or three power cords, depending upon the nTier VTL configuration
• Slide rail assembly kit
• VTL Management Console CD
• Product keycode certificates
• Installation guide for the nTier VTL configuration
Product keycodes have already been installed on the appliance.
Install the nTier VTL appliance
Install the nTier VTL by following the instructions in the nTier VTL Installation Guide.
Implementing nTier Deduplication 9
Page 13

Cable the VTL appliance to your storage network
1. Optional: connect your monitor, keyboard, and mouse to the appliance. You may
use a KVM device if necessary. You may also use the USB ports for connecting
a keyboard and/or mouse, instead of the PS/2 ports. Note that the nTier
operating system automatically detect USB devices upon system startup. Check
the monitor to determine when the nTier VTL is completely initialized.
2. Connect an Ethernet cable to the appropriate port.
• If your network has a DHCP server and you would like the appliance to
obtain an IP address automatically, connect an Ethernet cable to ETH0.
Connect the other end of the same cable to a network switch or other
Ethernet interface accessible by an administrative computer running the
VTL Console.
• If your network does not have a DHCP server, connect an Ethernet cable to
ETH1 (IP address 192.168.1.2). Connect the other end of the same cable to
a network switch or other Ethernet interface accessible by an administrative
computer running the VTL Console.
Note: If necessary, you can change network settings later.
Getting Started
3. If your appliance has a Fibre Channel card, connect a FC cable from your switch
to each of the FC ports on the rear of the appliance.
4. Some appliances contain a SCSI card for import from/export to physical tape. If
you are using a SCSI cable to connect to your backup server, connect the cable
from the SCSI connector on the rear of the appliance to your backup server.
5. Attach one end of a power cord to the appliance and plug the other end into a
standard AC outlet. Repeat this step for the remaining power cords.
Note: To ensure redundancy, be sure to use all power cords.
6. Power on the nTier VTL using the power button on the front of the appliance.
7. When the server has completed the startup process, a login prompt is displayed
on the attached monitor. You do not need to log in.
Install the VTL Console on an administrative computer
The VTL Console is the graphical administration tool where you configure VTL, add/
configure clients, set properties, and manage the import/export of tapes.
Install the Console on your backup server. Alternately, you can install the Console
on any number of Windows machines. To install the Console on a Windows machine
you must be a Power User or Administrator.
1. Insert the VTL Management Console CD into a CD/DVD drive.
Implementing nTier Deduplication 10
Page 14
The setup program should start automatically. If autoplay is not enabled on your
Windows machine, navigate to the \Console\Windows directory on the CD and
run Setup.exe to launch the VTL Console install program.
2. Click the Install Products button on the first screen.
3. Click the VTL Console for Windows button.
4. Follow the steps in the Install Wizard to complete installation.
Launch the VTL Console
To launch the Console, select Start --> Programs --> FalconStor. Select the version
of the VTL Console that corresponds to your installation and then click VTL Console.
You can also double-click the VTL Console shortcut on your desktop.
Configure network connections to the nTier VTL appliance
Note: When you are connected to a server, the server icon will change to show
that you are connected:
Getting Started
DHCP If you used ETH0 to physically connect to the network:
1. Right-click on the VTL Servers object in the left pane of the Console and select
Discover.
2. Specify the subnet range of your VTL appliance and click OK.
3. Wait for the nTier VTL appliance hostname to appear in the navigation tree. The
hostname has the format xxxxx, where xxxxx is the number of your VTL
appliance, which is displayed on a label on your appliance.
4. When the hostname appears in the navigation tree, right-click on it and select
Connect.
5. Log in using the default user name root and the default password spectra (all
lower case and case sensitive).
Note: If your administrative computer and the VTL appliance are on different
subnets, you must either change the default subnet range when using the
discovery process in the previous step or use a static IP address as explained
below.
Static IP
address
If you used ETH1 to physically connect to the network:
1. Right-click on the VTL Servers object in the left pane of the console and select
Add.
2. Enter the default IP address for ETH1 (192.168.1.2).
Implementing nTier Deduplication 11
Page 15

3. Log in using the default user name root and the default password spectra (case
sensitive and all lower case).
4. Click OK and wait for the nTier VTL appliance hostname to appear in the
navigation tree.
The hostname has the format FSxxxxx, where xxxxx is a unique number for your
VTL appliance, which is displayed on a label on your appliance.
Backup server access to the nTier VTL appliance
Use one of these access schemes, which determine how backup servers access the
nTier VTL appliance:
• In the default "Open Access" scheme, the pre-defined Everyone_iSCSI or
Everyone_FC client represents the backup server and all or some of your
virtual tape libraries/drives must be assigned to this client. This scheme is
applied when you follow guidelines for Everyone clients below.
• In a “Secured Access” scheme, access is dictated by creating specific
clients to represent specific backup servers. A backup server can access
only its own designated virtual tape library or drives via a dedicated port.
This scheme is applied when you add a SAN client as described in
’Controlling backup server access to the nTier appliance’.
Getting Started
Using the built-in Everyone_iSCSI client
Note: Complete these steps if your backup server will communicate with the VTL
appliance using the iSCSI protocol.
On all nTier VTL appliances, iSCSI is enabled by default and the client
Everyone_iSCSI is already created. This special SAN client represents your backup
server but does not correspond to any specific client machine. Using this client, you
can create iSCSI targets that are accessible by any iSCSI client that connects to the
nTier VTL appliance. Refer to ’Create a target for the iSCSI client to log onto’.
Typically, assign your default virtual tape libraries/drives to the Everyone_iSCSI
client.
While such a publicly available target is convenient, it may not be appropriate for all
organizations. If your nTier VTL appliance will be shared by multiple backup servers,
you may want to use a “secured access” scheme, where access is dictated by
creating specific clients to represent specific backup servers instead of using the
built-in Everyone_iSCSI client. In this mode, each backup server can access only its
own designated virtual tape library or drives. Refer to ’Managing iSCSI clients’.
Implementing nTier Deduplication 12
Page 16

Prepare client initiators to access your nTier VTL appliance
Before a backup server (the client initiator) can communicate with a nTier VTL
appliance, the two entities need to mutually recognize each other. To do this, install
an iSCSI software initiator on every backup server that will use Everyone_iSCSI.
This software will let you add the nTier VTL appliance as a target portal and log the
client onto the iSCSI target you create on the nTier VTL appliance.
For Windows servers, you can download software from Microsoft’s website:
http://www.microsoft.com/windowsserversystem/storage/iscsi.mspx. The following
steps are for the Microsoft iSCSI Initiator. If you are using a different iSCSI initiator,
refer to the documentation provided by the vendor.
1. Run Microsoft iSCSI Initiator on the backup server using the shortcut on your
desktop or by selecting Start --> Programs --> Microsoft iSCSI Initiator -->
Microsoft iSCSI Initiator.
2. Click the Discovery tab, then click Add under the Target Portals group box.
3. Enter the nTier VTL appliance’s IP address or name (if resolvable).
Getting Started
To determine the IP address, go to the VTL Console. Select the nTier VTL
appliance object. The IP address is on the Login Machine Name line in the righthand pane of the Console.
Use the default port (3260).
Click OK to add the client.
Create a target for the iSCSI client to log onto
To create a target on the Everyone_iSCSI client:
1. In the VTL Console, expand the SAN Clients object in the left pane of the
console.
2. Expand the Everyone_iSCSI object.
3. Right-click the iSCSI object and select Create Target
Implementing nTier Deduplication 13
Page 17

Getting Started
4. Enter a name for the target or accept the default and select the IP address of the
adapter on the nTier VTL appliance. The list includes all Ethernet adapters you
have configured on the server.
5. Use the default starting LUN.
LUN IDs must start with zero.
Once the iSCSI target is created for a client, LUNs can be assigned under the
target using available virtual iSCSI devices.
6. Confirm all information and click Finish to show the iSCSI target in the navigation
tree.
7. A message is displayed when the iSCSI target has been created successfully.
When you close the message, a prompt asks if you want to assign a resource
(virtual tape library or drive) to the target.
Select No to close the prompt or Yes to continue with step 2 under ’Assign the
virtual tape library/drives to the iSCSI target’. If you select No, refer to ’Assigning
virtual tape libraries to backup servers’ at a later time for information on
assigning virtual resources to client targets.
Assign the virtual tape library/drives to the iSCSI target
1. Expand the SAN Clients object until you see the target object. For iSCSI clients,
this is the object below the client name and iSCSI.
Right-click the target object and select Assign.
Implementing nTier Deduplication 14
Page 18

Getting Started
2. Select the default virtual library/drives to be assigned to the target. All tape
drives in the library will be assigned to the selected client. If you want to assign
tape drives in the library individually, select the checkbox for that option.
You can assign a device (library or drive) to a target only once.
Click Next when you are done.
3. In the next screen, change the LUN for the resource (if necessary) to resolve
any conflict.
4. Confirm all information and click Finish.
Log the client onto the target
The following steps are for the Microsoft iSCSI Initiator. If you are using a different
iSCSI initiator, refer to the documentation provided by the vendor.
1. Return to the backup server. To see the iSCSI targets from the client machine,
run Microsoft iSCSI Initiator again or, if the application is still open, click the
Tar ge t s tab.
If the iSCSI target assigned to the client is not listed, click Refresh. Assigned
iSCSI targets should now appear.
2. Select the added target and click Log On. If it is desirable to have a persistent
target, select Automatically restore this connection when the system boots.
Click OK.
3. Click OK to log on to the target.
The status for the target will change from Inactive to Connected.
The Targ et s tab lists all iSCSI targets, whether or not they are connected. To log
off a backup server from its connection, select the target, click Details, select the
Target Identifier, and then click Log Off.
Implementing nTier Deduplication 15
Page 19
If you selected the option to Automatically restore this connection, the iSCSI
target is listed in the Persistent Targets tab.
4. Click OK to close the iSCSI Initiator.
The backup server must now discover the assigned virtual tape library and drives
(refer to ’Discover the virtual tape library from your backup server’).
Using the built-in Everyone_FC client
Note: Complete these steps if your backup server will communicate with the VTL
appliance using the Fibre Channel protocol.
Depending on the configuration you ordered, your nTier VTL may have a dual-port
Fibre Channel card installed and have Fibre Channel enabled by default. The SAN
client Everyone_FC is already created and FC HBAs are already set to target mode.
Note: If your nTier VTL appliance will be shared by multiple backup servers, you
must add a SAN client to represent each backup server and ensure that each
backup server can access only its own designated virtual tape library/drives.
Refer to ’Adding a Fibre Channel client’.
Getting Started
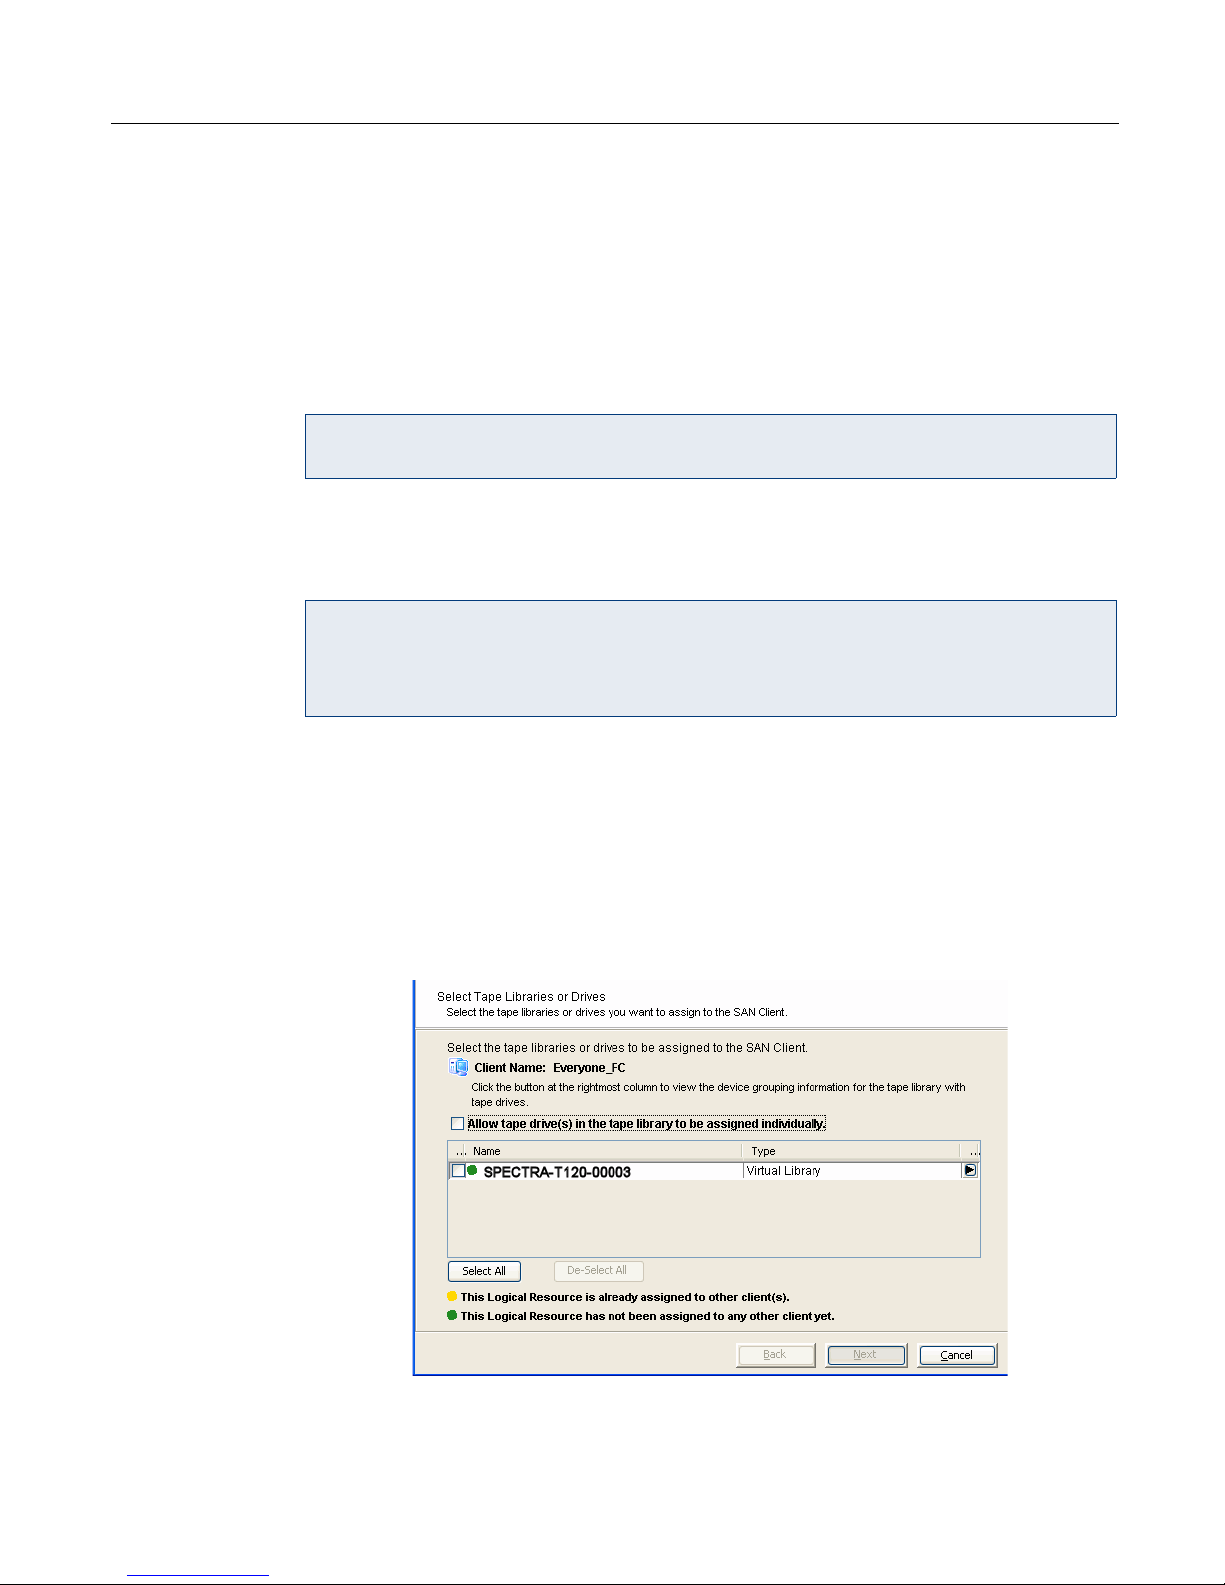
Assign the virtual tape library to the Everyone_FC client
1. Expand the SAN Clients object in the left pane of the console.
2. Right-click the Everyone_FC object and select Assign.
3. Select the default virtual library to be assigned to the client. You can also select
Allow tape drives in the tape library to be assigned individually to display the
virtual drives in the library.
You can assign a virtual device (tape library or tape drive) to a client only once,
even if the client has multiple targets.
Implementing nTier Deduplication 16
Page 20

Click Next when you are done.
4. Confirm all information and click Finish.
The backup server must now discover the assigned virtual tape library and drives.
Refer to “Discover the virtual tape library from your backup server”
Discover the virtual tape library from your backup server
To enable your backup server to recognize the default virtual tape library and drives,
perform a device scan on your backup server at the operating system level and then
use your backup software to scan for new devices as well.
Getting Started
Use your
operating
system to scan
for hardware
changes
Use your
backup
software to
detect new
devices
The steps to do this vary according to the backup server’s operating system. To do
this on a backup server with Windows OS:
1. Select Control Panel --> Administrative Tools --> Computer Management.
2. In the left pane, under System Tools, select Device Manager.
3. In the right pane, right-click the backup server and select Scan for hardware
changes.
New devices representing the specific VTL resources will appear (the library
under Medium Changers and tape drives under Tape Drives) and if the
appropriate tape drive and tape library device drivers are installed on the backup
server, the correct device name and type are associated and the devices will
become ready for use by the backup software.
If a new device is unknown, right-click it to display its Properties. Acquire and
update the driver according to your Windows documentation. Your backup
software may include a procedure that updates drivers.
The steps to do this vary according to your backup software.
After you complete the procedure, you are ready to create and run backup jobs.
Note: For all other platforms, such as Unix and Linux, consult the appropriate
reference material that came with your backup software for details on how to load
drivers and how to perform discovery for hardware changes.
Create and run backup jobs
Use your backup software to create backup jobs that point to the tapes in the virtual
tape library. Generally, backup comprises these steps but they can vary according to
your backup software:
1. Start a "tape inventory" process in your backup software.
Implementing nTier Deduplication 17
Page 21

2. Define backup jobs and associate tapes with each job.
Important: If available when defining a backup job, set the option to unload a
tape when it is not needed. If this option is not available, you may need to run
deduplication manually. Refer to Deduplication.
3. Run your backup jobs.
Backup data is sent to tapes until the backup job is done. Afterwards, the tape is
virtually “ejected” by the backup software and deduplication begins.
You can confirm that the deduplication policy is running by highlighting the nTier
VTL appliance and selecting the Scanner processes tab in the right panel.
Note: Refer to Set deduplication options for information on specifying when
deduplication should begin.
4. Verify that the backup job is working properly, as described below.
Confirm successful backup
Getting Started
While a backup job is running, you can use the VTL Console to verify that data is
being written to virtual tapes.
1. In the VTL Console, expand the VirtualTape Library System object.
2. Expand Virtual Tape Libraries, the specific library, and then Tapes.
3. Under the Tape s object, select each tape that is included in a backup job.
In the right-hand pane, you should see a value for Data Written, which updates
dynamically during a backup job.
After the backup job completes, use your backup software to verify that the data was
written completely and can be restored.
Configure optional services
Replication is an optional feature. Refer to “Replication” for information about
replicating virtual tapes.
Save your VTL system configuration
After your VTL setup is complete, you should save your nTier VTL system
configuration to a secure location on another machine. To do this, Highlight your
nTier VTL appliance, select Too ls menu --> Save Configuration.
Note that you should re-save your configuration any time you change it, including
any time you add/change/delete a client or resource. For more information about
saving or restoring your system configuration, refer to ’Protecting your FalconStor
VTL configuration’.
Implementing nTier Deduplication 18
Page 22

Set deduplication options
Data deduplication takes place after a tape is unloaded from a tape drive and
moved to a slot. By default, Deduplication is enabled and deduplication starts
one minute after the tape is unloaded. For your convenience, you can set
options that control when deduplication starts, as well as how much data must
have been written to a tape before it is deduplicated. You can also disable
deduplication.
1. Right-click the VirtualTape Library System object and select Properties. A screen
displays showing options you can set.
2. Choose on of the start options:
• Delay start imposes a delay before deduplication begins. This option is
preselected and set to 1 minute. Setting this value to 0 imposes a delay of
30 seconds.
• Start deduplication at lets you avoid an overlap between backup jobs and
deduplication.
3. Minimum amount of data written prevents deduplication unless at least this
amount of data has been written to a tape. The default is 1 MB; you cannot
specify a lower value.
Getting Started
4. Click OK when you are done.
Note: During system maintenance or if advised by technical support, disable
deduplication by unchecking Enable deduplication. Otherwise, do no disable this
feature.
Implementing nTier Deduplication 19
Page 23
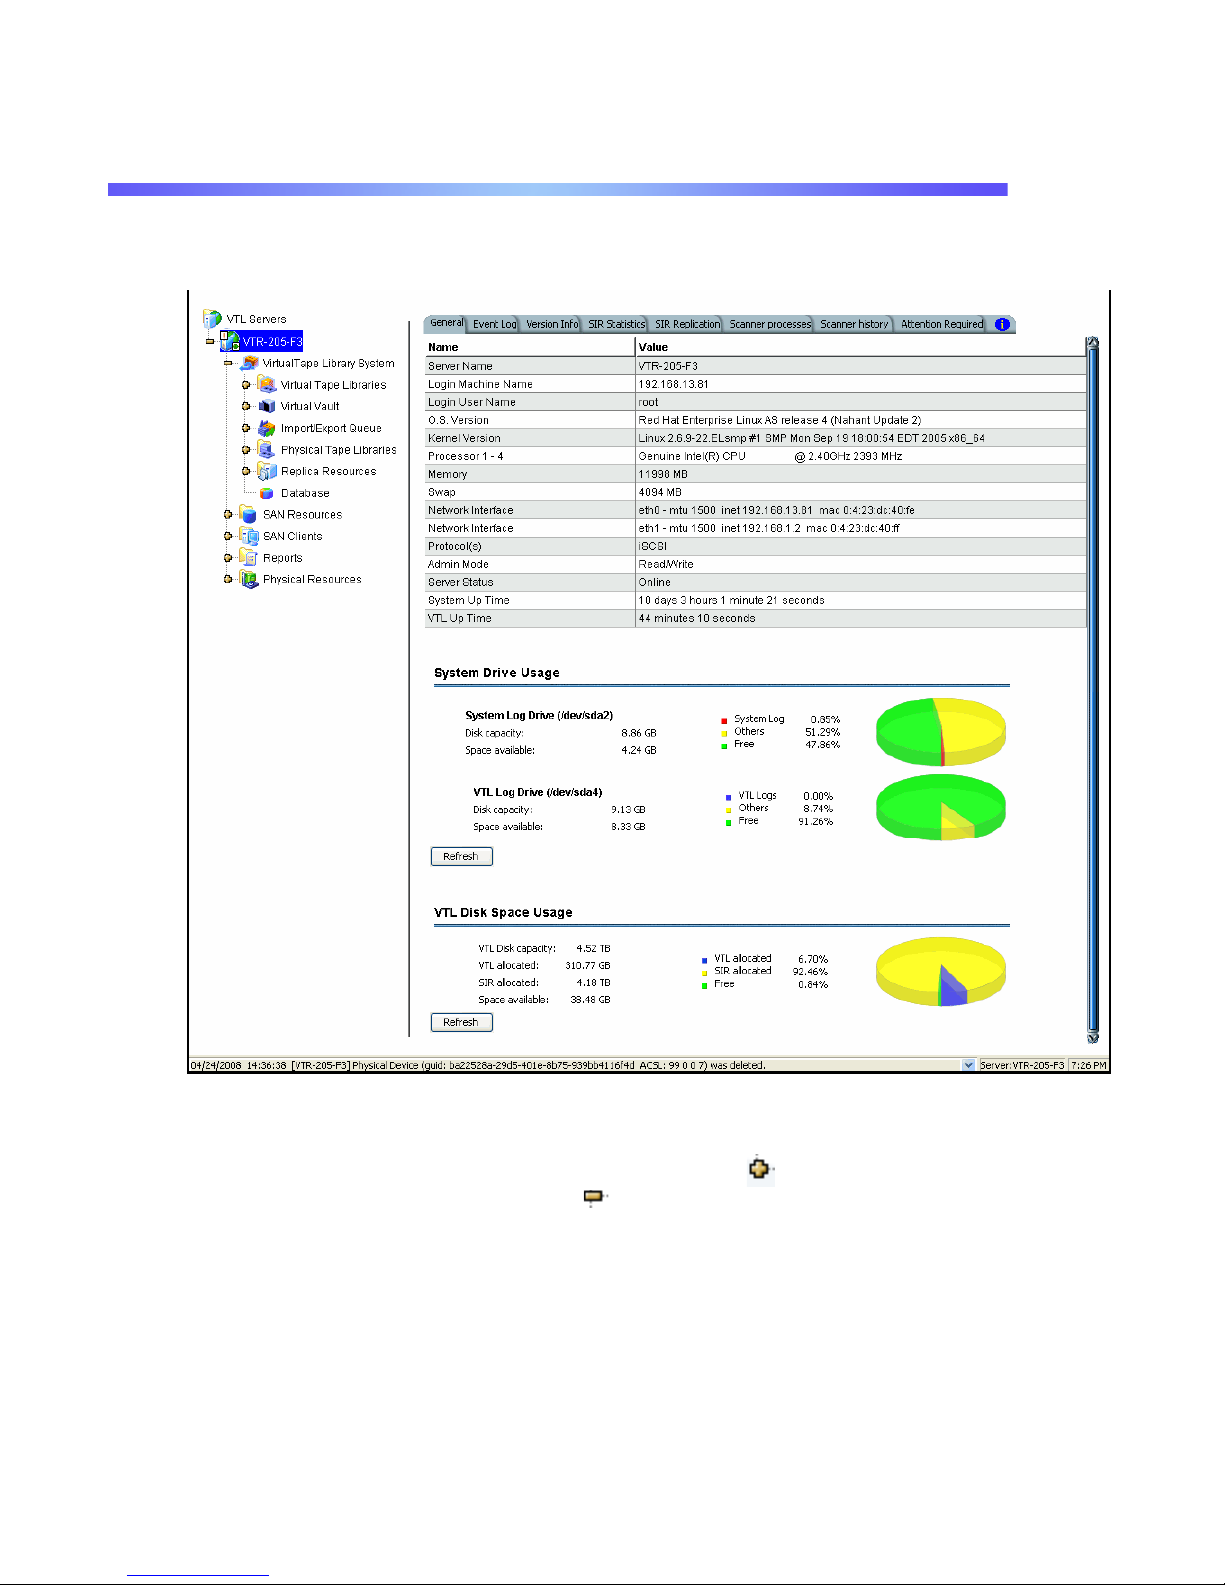
The VTL Console
The VTL Console displays the configuration of your FalconStor VTL appliance,
organized in a familiar Explorer-like tree view.
Use the tree to navigate the nTier s appliance and its configuration objects. You can
expand or collapse the display to show only the information that you wish to view. To
expand an item that is collapsed, click on the symbol next to the item. To
collapse an item, click on the symbol next to the item. Double-clicking on the item
will also toggle the expanded/collapsed view of the item.
You need to connect to the server before you can expand the server object.
When you highlight any object in the tree, the right-hand pane contains detailed
information about the object. You can select one of the tabs for more information.
Implementing nTier Deduplication 20
Page 24

The Console log located at the bottom of the window displays information about the
local version of the Console. The log features a drop-down list that allows you to see
activity from this Console session. The bottom right also displays the local server
name and time.
Launching the Console
To launch the Console, select Start --> Programs --> FalconStor --> VTL --> VTL
Console or double-click the VTL Console shortcut on your desktop.
Understanding the objects in the tree
VirtualTape Library System object
The VirtualTape Library System object contains all of the information about your VTL
system:
The VTL Console
Virtual Tape
Libraries
Virtual Vault This object lists the virtual tapes that are currently in the virtual vault. The virtual
This object lists the virtual tape libraries that are currently available. Each virtual
tape library consists of one or more virtual tape drives and one or more virtual tapes.
Each virtual tape library and drive can be assigned to one or more backup servers
(SAN clients). Each library’s virtual tapes are sorted in barcode order.
For each library, you can:
• Create/delete virtual tapes
• Create/delete virtual tape drives
• Enable replication for tapes in the library
• Set tape properties for the library (enable/modify tape capacity on demand,
change maximum tape capacity)
For each virtual tape, you can:
• Move the virtual tape to a slot, drive, or to the virtual vault
• Enable replication for that tape
• Change tape properties (change barcode, enable/modify tape capacity on
demand, enable write protection, and configure Auto Archive properties).
vault is a tape storage area for tapes that are not inside a virtual tape library. Virtual
tapes will only appear in the virtual vault after they have been moved from a virtual
tape library. Virtual tapes in the vault can be replicated, exported to a physical tape,
or moved to a virtual library. There is no limit to the number of tapes that can be in
the virtual vault. Tapes in the vault are sorted in barcode order.
Import/Export
Queue
This object lists the import and export jobs that have been submitted. If needed, you
can cancel a pending job from here. You can have up to 32 concurrent import/export
jobs running, depending on the number of physical tape drives attached to your
nTier appliance.
Implementing nTier Deduplication 21
Page 25

The VTL Console
Physical Tape
Libraries
Replica
Resources
Database This object contains configuration information for the FalconStor VTL.
This object lists the physical tape libraries that are available to nTier appliance. For
each physical tape library, you can inventory the slots and import or move a tape.
For each physical tape, you can export the physical tape, copy the physical tape to a
virtual tape, or link the physical tape to a virtual tape for direct access.
This object lists the Replica Resources that are on this nTier appliance. Replica
Resources store data from virtual tapes that have been replicated from a remote
server. Clients do not have access to Replica Resources.
SAN Resources object
SAN resources are the virtualized disks that have been configured as the FalconStor
SIR index resource, SIR scratch resource, and SIR configuration repository
resource on the nTier appliance.
SAN Clients object
SAN clients are the backup servers that use the FalconStor VTL. FalconStor VTL
supports Fibre Channel and iSCSI backup servers. For client configuration
information, refer to the appropriate sections in this guide.
Reports object
FalconStor VTL provides reports that offer a wide variety of information:
• Throughput
• Physical resources - allocation and configuration
• Disk space usage
• Fibre Channel adapters configuration
• Replication status
• Virtual tape/library information
• Job status
Create a report 1. To create a report, right-click on the Reports object and select New.
2. Select a report.
Depending upon which report you select, additional windows appear to allow
you to filter the information for the report.
3. If applicable, set the date or date range for the report and indicate which SAN
Resources (virtual/physical tape libraries/drives) and Clients to use in the report.
Selecting Past 30 Days or Past 7 Days will create reports that generate data
relative to the time of execution.
Include All SAN Resources and Clients includes all current and previous
configurations for this server (including virtual/physical tape libraries/drives and
clients that you may have changed or deleted).
Implementing nTier Deduplication 22
Page 26
The VTL Console
Include Current Active SAN Resources and Clients Only includes only those
tape libraries/drives and clients that are currently configured for this server.
The Replication Status Report has a different dialog that lets you specify a range
by selecting starting and ending dates.
4. Enter a name for the report.
5. Confirm all information and click Finish to create the report.
View a report When you create a report, it is displayed in the right-hand pane and is added
beneath the Reports object in the configuration tree.
Expand the Reports object to see the existing reports available for this server.
When you select an existing report, it is displayed in the right-hand pane.
Export data
from a report
You can save the data from the server and device throughput and usage reports.
The data can be saved in a comma delimited (.csv) or tab delimited (.txt) text file. To
export information, right-click on a report that is generated and select Export.
Physical Resources object
Physical resources are all of your adapters/FC HBAs and storage devices. Hard
disks are used for creating virtual tape libraries/drives and virtual tapes.
Physical
resource icons
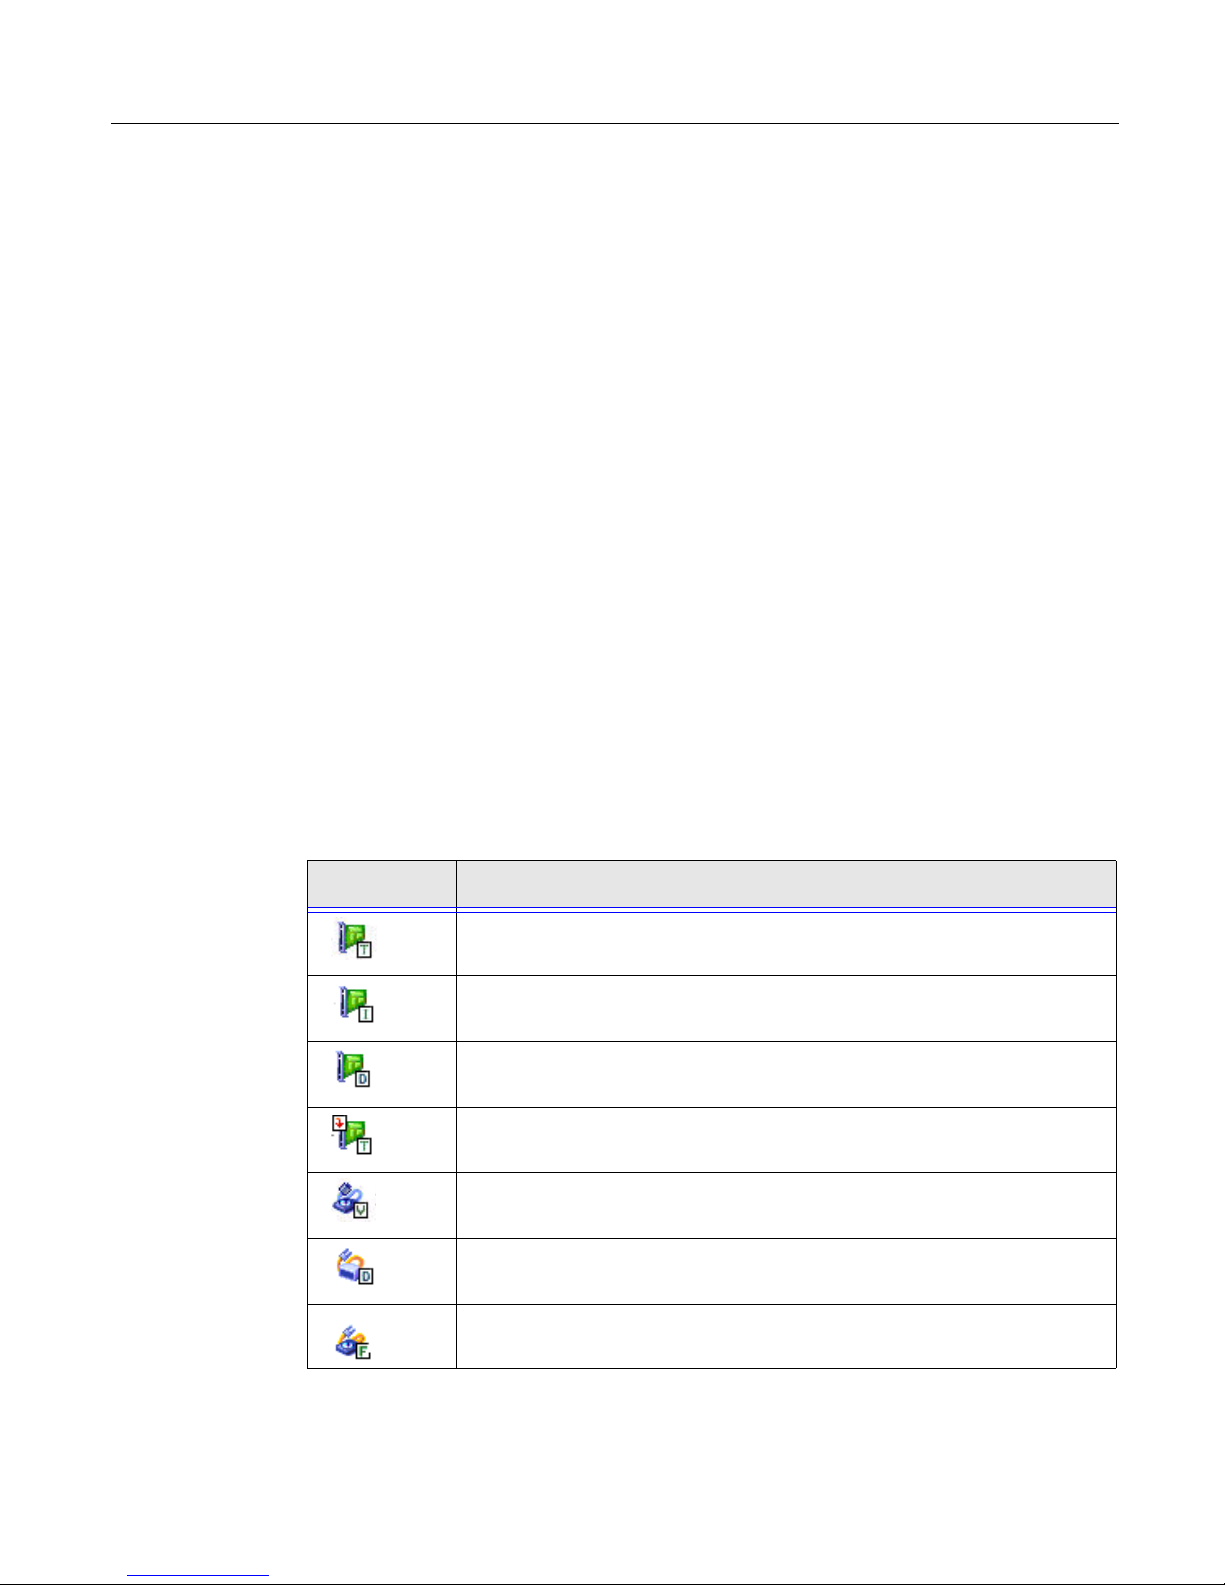
The following table describes the icons that are used to describe physical resources
in the console:
Icon Description
The T icon indicates that this is a target port.
I icon indicates that this is an initiator port.
The
D icon indicates that this is a dual port.
The
The red arrow indicates that this Fibre Channel HBA is down and cannot
access its storage.
V icon indicates that this disk has been virtualized.
The
D icon indicates that this is a physical tape library or drive.
The
F icon indicates that this is shared storage and is being used by
The
another server. The Owner field lists the other server.
Implementing nTier Deduplication 23
Page 27

Search for tapes
The Console has a search feature that helps you find any virtual tape. To search:
1. Select Edit menu --> Find.
2. Enter the full barcode.
Once you click Search, you will be taken directly to that tape in the tree.
Set console options
You can set a variety of options for the Console:
1. In the Console, select Tools --> Console Options.
2. Select checkboxes or radio buttons to enable an option.
• Remember password for session reuses the credentials that were used for
• Automatically time out servers collapses a server that has been idle for the
• Do not show the welcome screen for wizards skips an introductory screen
• Enable advanced tape creation method offers advanced options when you
• Console log options let you control how information for each session is
The VTL Console
the last successful connection when you attempt to open subsequent
servers. If this option is unchecked, you will be prompted to enter a
password for every server you try to open.
number of minutes you specify. If you need to access the server again, you
have to reconnect to it. The default is 10 minutes; you can enter 0 minutes
to disable the timeout.
that starts each wizard.
create tapes, such as capacity on demand, settings for virtual libraries, tape
capacity, and device, name, and barcode selection.
maintained in vtlconsole.log, which is kept on the local machine and stores
information about the local version of the Console. The Console log is
displayed at the very bottom of the Console screen.
• Overwrite log file - When you start a new session, overwrite the
information from the previous session.
• Append to log file - Keep all session information.
Implementing nTier Deduplication 24
Page 28
• Do not write to log file - Do not maintain a Console log.
3. Click OK when you are done.
The VTL Console
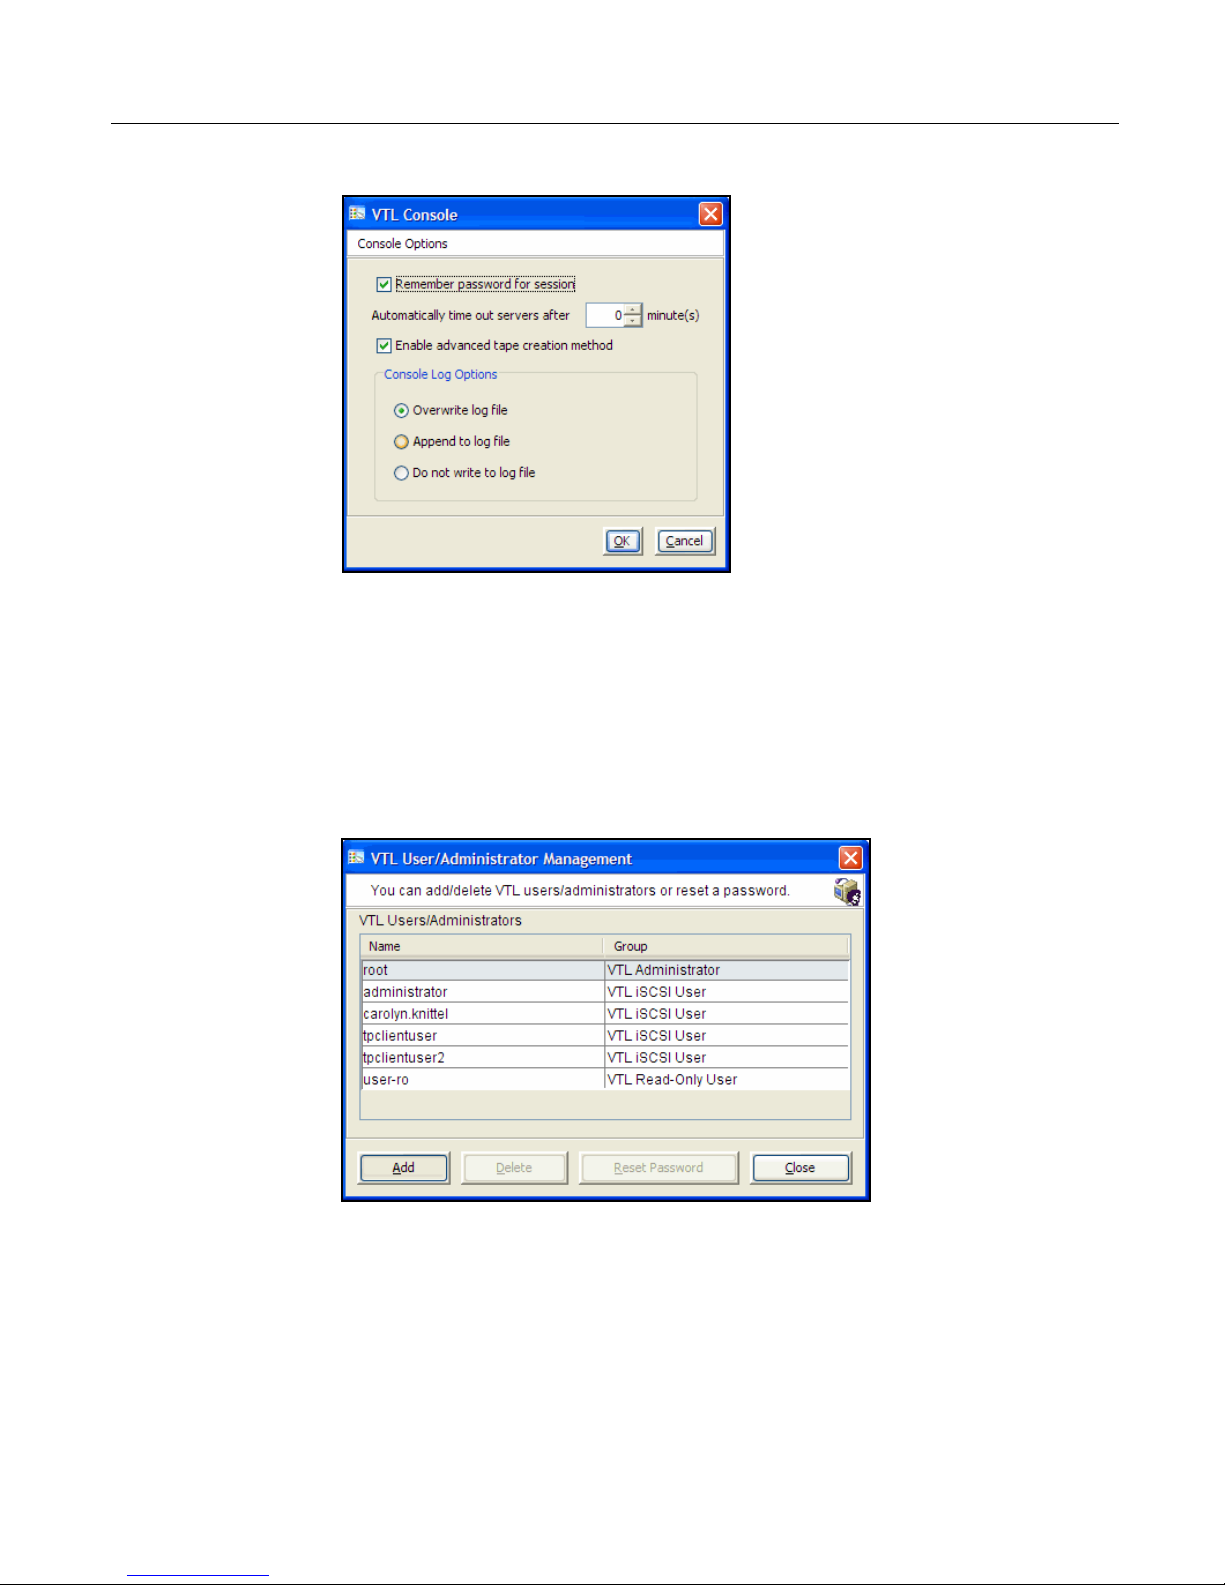
Manage users and administrators
Only the root user can add or delete a VTL user/administrator or change passwords.
1. Right-click on the server and select Administrators.
There are several types of users/administrators:
- VTL Administrators are authorized for full Console access.
- VTL Read-Only Users are only permitted to view information in the Console.
They are not authorized to make changes and they are not authorized for client
authentication.
- VTL iSCSI Users are used for iSCSI protocol login authentication (from iSCSI
initiator machines). They do not have Console access. You can add this type of
Implementing nTier Deduplication 25
Page 29

user if iSCSI is enabled. Refer to ’Managing iSCSI clients’ for information on
setting up authenticated access for backup servers.
2. Select the appropriate option.
From here you can add, delete, or reset passwords.
You cannot delete the root user or change the root user’s password from this
screen. Use the Change Password option instead.
View the Event Log
The Event Log details significant occurrences during the operation of the nTier
appliance. The Event Log can be viewed in the VTL Console when you highlight a
server in the tree and select the Event Log tab in the right pane.
The columns displayed are:
Type I: This is an informational message. No action is required. (Severity
The VTL Console
level 4)
W: This is a warning message that states that something occurred
that may require maintenance or corrective action. However, the
VTL system is still operational. (Severity level 3)
E: This is an error that indicates a failure has occurred such that a
device is not available, an operation has failed, or a licensing
violation. Corrective action should be taken to resolve the cause of
the error. (Severity level 2)
C: These are critical errors that stop the system from operating
properly. (Severity level 1)
Sort the Event
Log
Filter the Event
Log
Date The date on which the event occurred.
Time The time at which the event occurred.
ID This is the message number.
Event
This is a text description of the event describing what has occurred.
Message
When you initially view the Event Log, all information is displayed in chronological
order (most recent at the top). If you want to reverse the order (oldest at top) or
change the way the information is displayed, you can click on a column heading to
re-sort the information. For example, if you click on the ID heading, you can sort the
events numerically. This can help you identify how often a particular event occurs.
By default, all informational system messages, warnings, and errors are displayed.
To filter the information that is displayed:
1. Right-click on a server and select Event Log --> Filter.
2. Select which message types you want to include.
Implementing nTier Deduplication 26
Page 30
3. Search for records that contain/do not contain specific text.
4. Specify the maximum number of lines to display.
5. Select a time or date range for messages.
The VTL Console
Print/export the
Event Log
You can print the Event Log to a printer or save it as a text file. These options are
available (once you have displayed the Event Log) when you right-click on the
server and select the Event Log options.
Version Info tab
The Version Info tab displays the version of the server and console that you are
using.
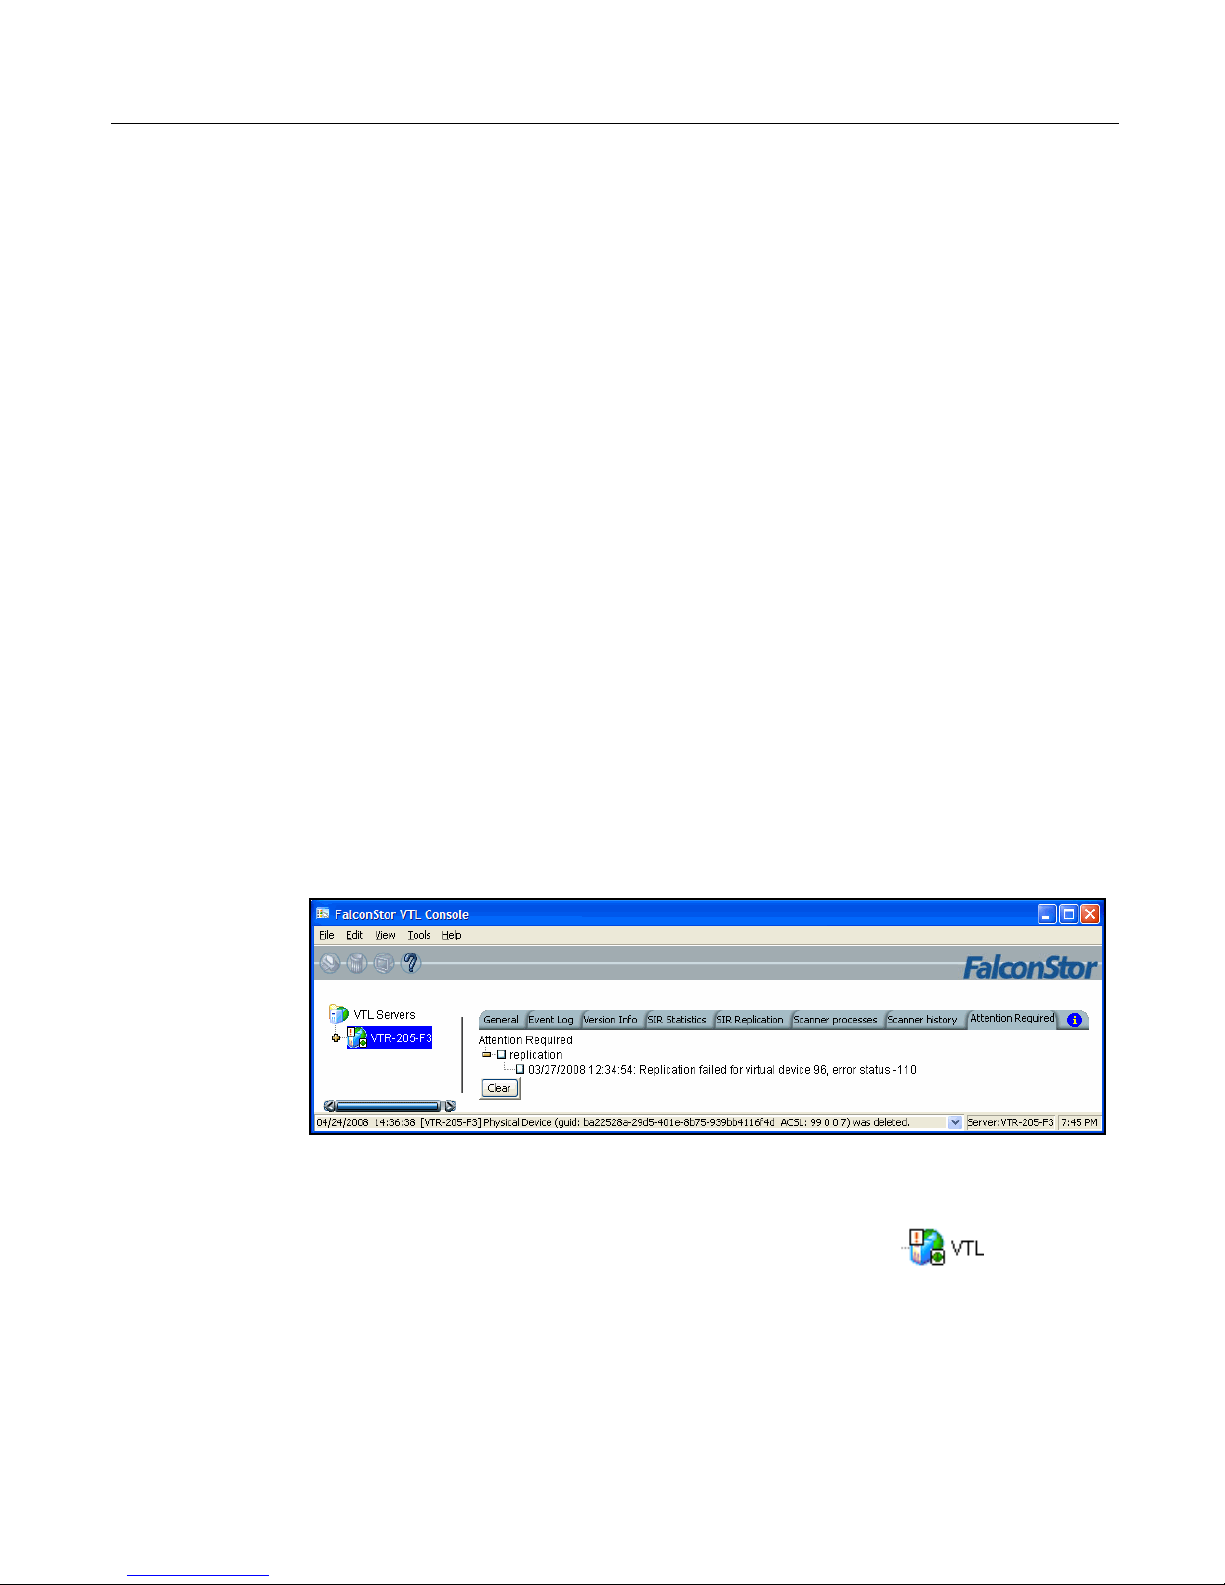
Attention Required tab
The Attention Required tab displays information that may require your attention,
such as:
• Physical library failures
• Hardware appliance errors
• Replication errors
It also notifies you when an import/export job has completed.
You can view this information in the VTL Console when you highlight a server in the
tree and select the Attention Required tab in the right pane.
The Attention Required tab appears for a nTier appliance with FalconStor VTL only
when an error/notification occurs; it will not appear at other times. When the tab
does appear, you will see an exclamation icon on the server.
Clear issues
from the list
After you have resolved an issue, you can click the check box next to it and then
click the Clear button. You can clear individual issues or you can click the box next
to one of the categories to delete all issues in that section.
Implementing nTier Deduplication 27
Page 31

Changing pre-configured defaults
After your nTier appliance with FalconStor VTL has been set up, you can use the
VTL Console to modify various pre-configured defaults.
Changing the default IP address
You can change the default IP address and other network information to suit the
needs of your environment. Typically, you might need to change the IP address and
netmask.
1. Right-click the nTier VTL appliance name and select System Maintenance -->
Network Configuration.
2. Replace the default network configuration with information about your network.
The VTL Console
Domain name - Internal domain name.
Append suffix to DNS lookup - If a domain name is entered, it will be appended
to the machine name for name resolution.
DNS - IP address of your Domain Name Server.
Default gateway - IP address of your default gateway.
NIC - List of Ethernet cards in the server. (Changing the IP address and netmask
is described in the next numbered step.)
Enable SSH - Enable/disable the ability to use the SSH protocol.
Enable FTP - Enable/disable the ability to FTP into the server.
Allow root to login to telnet session - Log in to your telnet session using root.
Network Time Protocol - Allows you to keep the date and time of your nTier VTL
appliance in sync with Internet NTP servers. Click Config NTP to enter the IP
addresses of up to five Internet NTP servers.
Implementing nTier Deduplication 28
Page 32

3. Click Config NIC to configure each network interface card (NIC).
The VTL Console
MTU - Set the maximum transfer unit of each IP packet. If your card supports it,
set this value to 9000 for jumbo frames.
Click Add and enter the new IP address, then click OK. Enter the information
supplied by your network administrator for primary name server, netmask,
network interface card, and any other options.
4. Click OK.
5. When prompted, click Yes to restart the network connector.
6. Re-connect to the appliance.
Implementing nTier Deduplication 29
Page 33

Changing the default hostname
You can change the default nTier VTL appliance name that is displayed in the VTL
Console navigation tree.
1. Right-click the nTier VTL appliance object and select System Maintenance -->
Set Hostname.
2. Enter a valid name for your VTL appliance and then click OK.
Valid characters are letters, numbers, or dash.
3. When prompted, click Yes to reboot your VTL appliance.
The VTL Console
Changing the default password
After initial setup, it is recommended that you change the default password.
1. Right-click the nTier VTL appliance name and select Change Password.
2. Enter the original password (spectra), new password, confirm the new
password, then click OK.
Changing the default deduplication properties
By default, the deduplication process begins after a tape is ejected by the backup
software once a backup job completes. You cannot change this default behavior.
You can change two options that control when deduplication will occur. You can also
disable deduplication.
Implementing nTier Deduplication 30
Page 34

The VTL Console
1. Right-click the VirtualTape Library System object and select Properties.
2. Modify the appropriate value:
• Delay start imposes a delay between the time a tape is ejected and the time
deduplication begins. The default is 1 minute. Setting this value to 0
imposes a delay of 30 seconds.
• Minimum amount of data written prevents deduplication unless at least this
amount of data has been written to the tape. The default value is 1 MB; you
cannot specify a lower value.
3. Click OK when you are done.
Note: During system maintenance or if advised by technical support, you can
disable deduplication by unchecking Trigger deduplication upon tape ejection.
Otherwise, do not disable this feature.
Implementing nTier Deduplication 31
Page 35

Key Features
SPECTRA
SPECTRA
SPECTRA
SPECTRA
SPECTRA
SPECTRA
SPECTRA
SPECTRAT120-0003
T120
T50
T200
T50
T200
T380
T120
6
120
2
8
50
200
2
8
50
200
12
380
6
120
10.2
10.2
10.1
10.2
10.1
10.2
10.2
Creating virtual tape libraries
If your backup server uses a different library from the one that is emulated by the
default library on your nTier appliance, you can create a new virtual tape library.
1. Right-click the Virtual Tape Libraries object and select New.
2. Select the physical tape library that you are emulating.
3. Enter information about the tape drives in your library.
If you have a physical tape library, you need to create a virtual tape library that
resembles it, in order for the virtual tapes to use the same format as the physical
tapes. This is important for importing and exporting functions and guarantees
that your backup application will accept the tapes.
Virtual Drive Name Prefix - The prefix is combined with a number to form the
name of the virtual drive.
Total Virtual Drives - Determines the number of virtual tape drives available. This
translates into the number of concurrent backup jobs that can run. Backup
software licensing considerations may affect the number of tape drives you wish
to present to each backup server. This number can exceed the standard number
of drives for the library as long as the backup software supports it.
Implementing nTier Deduplication 32
Page 36
Key Features
SPECTRA-T120-0003
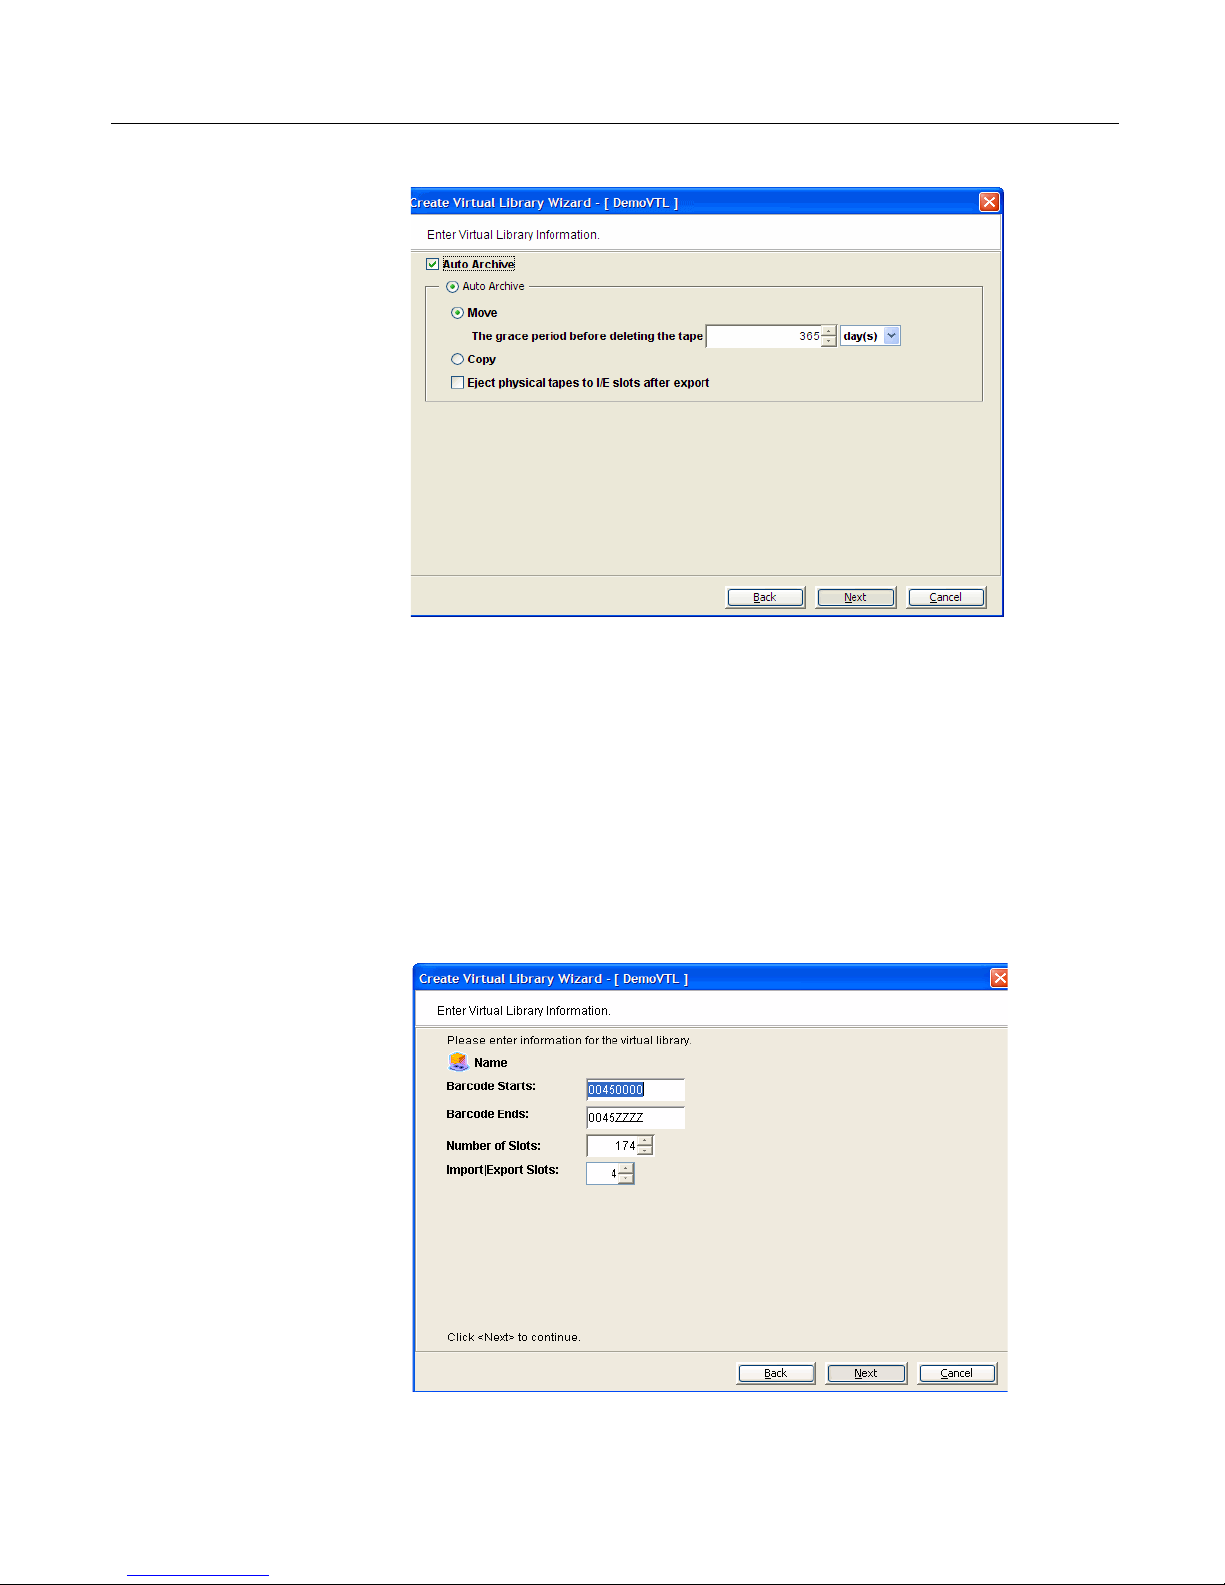
4. Determine if you want to enable Auto Archive for this virtual library.
Auto Archive writes data to physical tape whenever a virtual tape is moved to an
Import/Export slot from a virtual library by a backup application or other utility
after a backup. In order for the Auto Archive function to work, the physical tape
library must support barcodes; when FalconStor VTL attempts to export to a
physical tape it must find a matching barcode in the physical library.
• Determine if you want the virtual tape copied (retained) or moved (removed)
after the data is transferred. If you select Move, indicate how long to wait
before deleting it.
• Indicate if you want to eject physical tapes to the library’s Import/Export slots
after export.
5. Enter barcode information for the virtual library.
Barcode Starts/Ends - Indicate a range of barcodes that will be used when
creating virtual tapes. By default, barcodes increment in an alphanumeric
Implementing nTier Deduplication 33
Page 37
Key Features
sequence; for example, XXX0009 to XXX000A. In order to set the barcode to
increment in a numeric sequence (XXX0009 to XXX0010), you have to set the
last three digits of the Barcode Ends field to 999; for example, XXX0999
Note that for IBM libraries, the default barcode range is set to six characters.
Slots - Maximum number of tape slots in your tape library.
Import/Export Slots - Number of slots used to take tapes in and out of the bin.
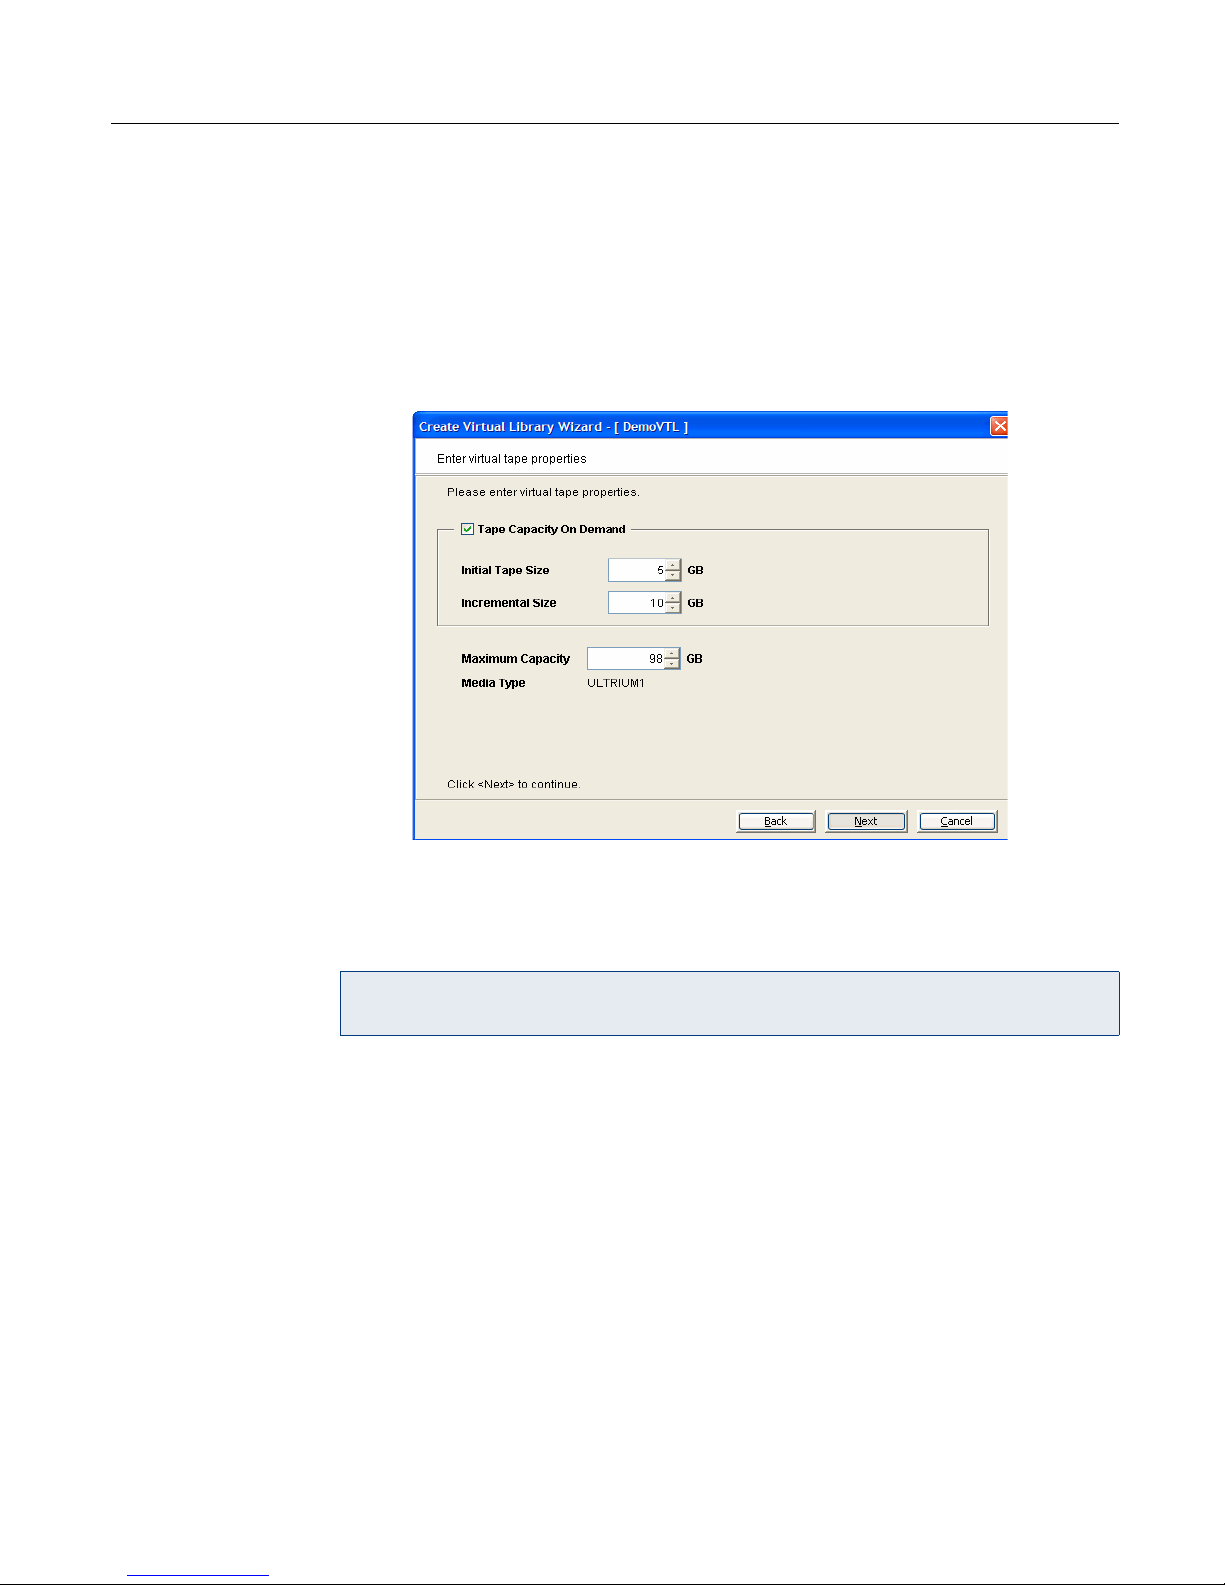
6. Enter the guidelines for expanding virtual tape capacity.
Tape Capacity On Demand - Allows you to create small resources for your
tapes and then automatically allocate additional space when needed. This can
save considerable amounts of disk space without affecting system performance.
It is highly recommended that you use this option.
Note: For some media types, if you do not select this option, FalconStor VTL
allocates each virtual tape at the full size of the tape you are emulating.
This option is set by default for the preconfigured virtual tapes. You can duplicate
the default settings as indicated below.
Initial Tape Size/Incremental Size - The pre-configured initial size is 5 GB and
the default amount by which it will be incremented is 10 GB. You can enter
alternate values for your tapes. (Different tape types have different defaults.)
Maximum Capacity - Indicate the maximum size for each tape. The default is 98
GB.
• If you will not be exporting data to physical tape, you can enter any
maximum capacity.
• If you will be exporting data to physical tape but you will not be using
FalconStor VTL software compression, you can enter any maximum
capacity, but if you enter a capacity that exceeds the native uncompressed
capacity for the media, you may not be able to export to physical tape.
Implementing nTier Deduplication 34
Page 38
• If you will be exporting data to physical tape and you will be using
FalconStor VTL software compression, you should set the maximum
capacity to 10-15% less than the uncompressed capacity of the selected
media. This is because the FalconStor VTL compression algorithm can vary
depending upon the data set; certain file types (ZIP, PDF, GIF, RAR, etc.)
are already compressed and cannot be compressed further.
7. Verify all information and then click Finish to create the virtual tape library.
After you create the library successfully, you will be prompted to create virtual
tapes. Answer Yes to continue. Refer to the following section for information
about creating virtual tapes, beginning with step 2.
Creating virtual tapes
You can create virtual tapes for the default virtual tape library or for a library you
created.
1. Right-click on a virtual tape library object or on the Tapes object and select New
Tape(s).
Key Features
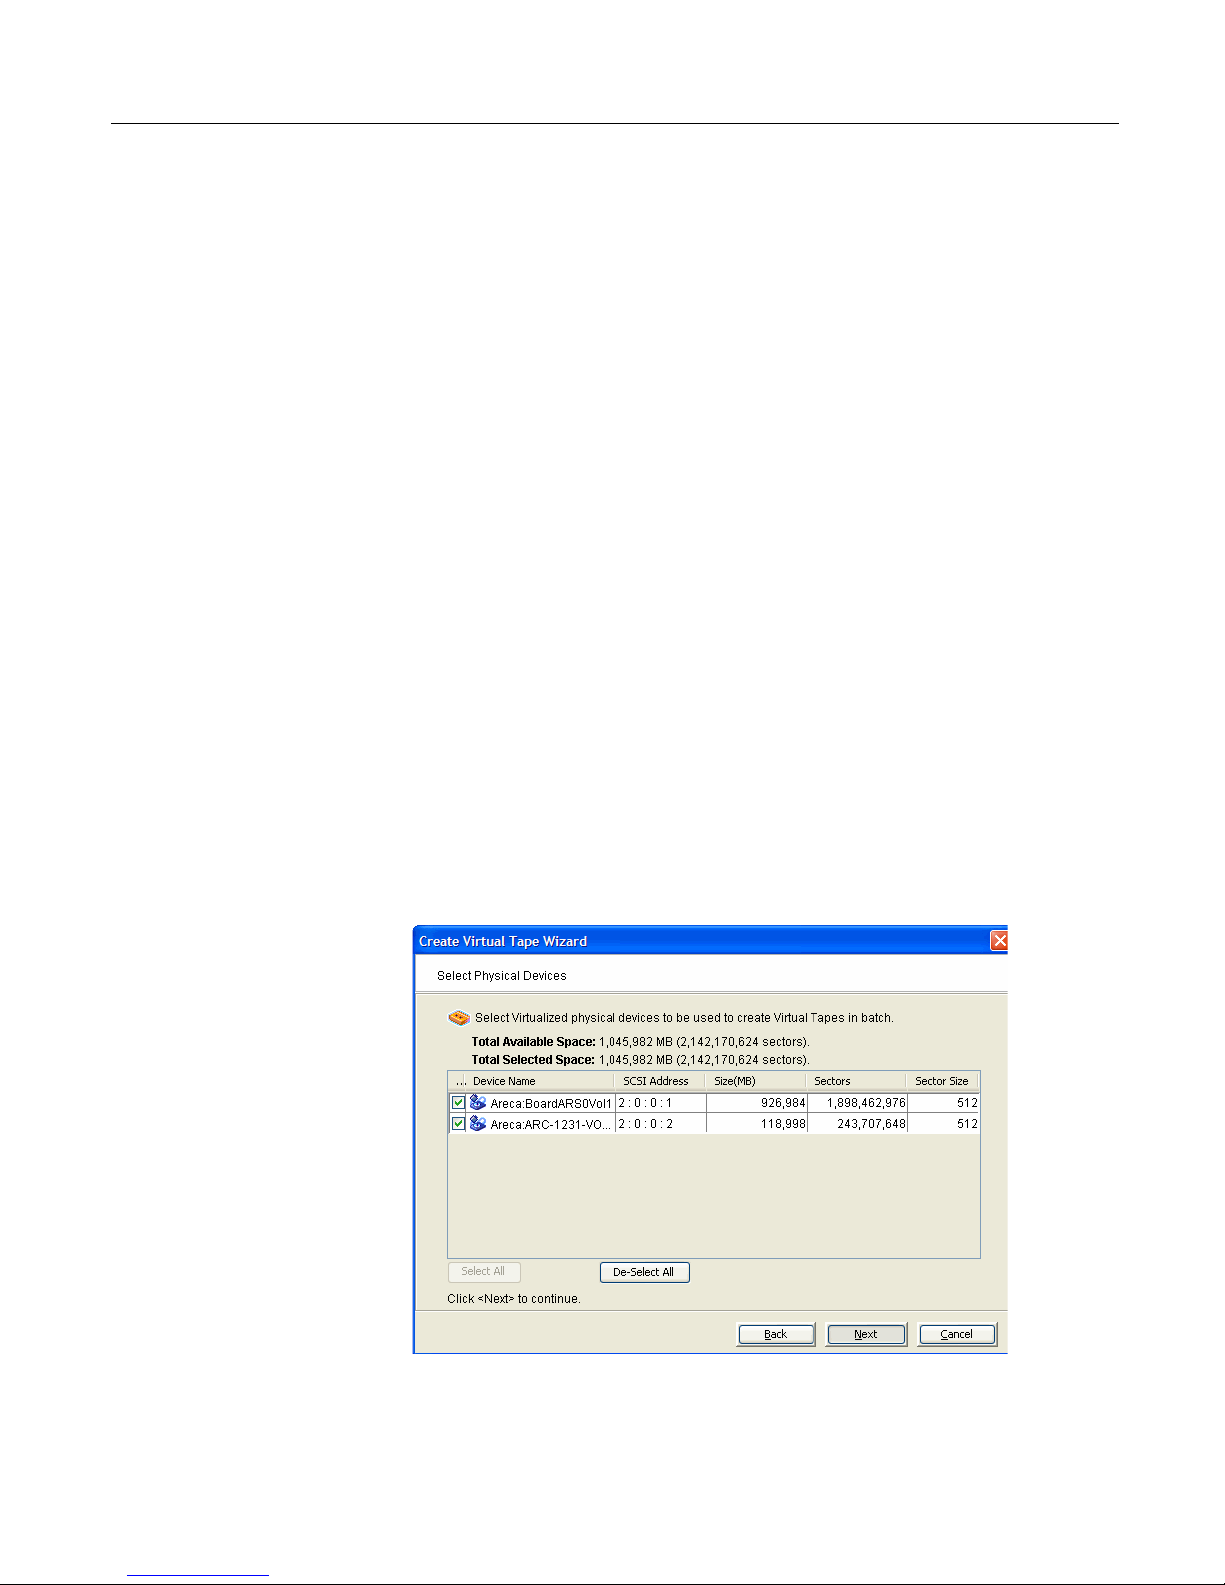
2. Select how you want to create the virtual tape(s).
Custom lets you select which physical device(s) to use and lets you designate
how much space to allocate from each.
Express automatically creates the resource(s) for you using available device(s).
If you select Express, you can create multiple virtual tapes at the same time.
Express is recommended.
3. Specify which physical device should be used to create the virtual tapes.
Implementing nTier Deduplication 35
Page 39

Key Features
SPECTRA-T120-00004
SPECTRA
T120 2000
4. If Auto Archive is enabled for the virtual library, select the physical tape library
whose tapes you want to match.
This enables you to create barcoded virtual tapes that match your physical
tapes. This is important for exporting functions.
5. If you are matching physical tapes, select the physical tapes for which you want
to create matching virtual tapes.
Implementing nTier Deduplication 36
Page 40

Key Features
6. Specify the size of the tape(s), name, and number of tapes to create.
7. If you are not matching physical tapes, you can set a barcode range for the
virtual tapes you are creating.
8. Verify all information and then click Finish to create the virtual tape(s).
Implementing nTier Deduplication 37
Page 41

Controlling backup server access to the nTier appliance
In a “Secured Access” scheme, a backup server can access only its own designated
virtual tape library or drives via a dedicated port, instead of using the built-in
Everyone_iSCSI or Everyone_FC client.
When you want to control access for a single server or for multiple backup servers
that need to share a single nTier appliance, use Add SAN Client in the VTL Console
(refer to ’Managing iSCSI clients’ and ’Adding a Fibre Channel client’).
Assigning virtual tape libraries to backup servers
You can assign a virtual tape library or drive to the target of a backup server listed in
the VTL Console under the SAN Clients object. The backup server can then access
the assigned virtual tape library/drive(s) according to the type of access that has
been configured for the backup server. Refer to ’Backup server access to the nTier
VTL appliance’ and ’Controlling backup server access to the nTier appliance’.
You can assign a library to a client using a client object or virtual tape library object
in the VTL Console.
Key Features
Using a client
object
1. Expand the SAN Clients object until you see the target object. For Fibre Channel
clients, this is the object named Fibre Channel below the client name. For iSCSI
clients, this is the object below the client name and iSCSI.
Right-click the target object and select Assign.
2. Select the virtual tape library. All tape drives in the library will be assigned to the
selected client.
If you want to assign tape drives in the library individually, select the checkbox
for that option. The nTier appliance and backup server treat each individually
assigned drive as if it were a standalone tape drive.
You can assign a device (library or drive) to only one target.
3. In the next screen, change the LUN for the resource (if necessary) to resolve
any conflict.
4. Confirm all information and click Finish.
5. Use the backup server’s operating system to discover the nTier appliance (refer
to ’Use your operating system to scan for hardware changes’).
6. Use the backup software to discover the library (refer to ’Use your backup
software to detect new devices’).
Using a virtual
tape library
object
1. Right-click a virtual tape library object and select Assign.
2. Select the appropriate protocol for the backup server to which you want to
assign the library.
Implementing nTier Deduplication 38
Page 42

Key Features
3. Select the backup server. (The image shown below is for a backup server that is
connected using the Fibre Channel protocol.)
4. Click Next and then click Finish when you are done.
Auto Archive
5. Use the backup server’s operating system to discover the nTier VTL appliance
(refer to ’Use your operating system to scan for hardware changes’).
6. Use the backup software to discover the library (refer to ’Use your backup
software to detect new devices’).
If you intend to export data to physical tapes, you must configure the Auto Archive
function for the virtual tape library.
The Auto Archive function writes data to physical tape whenever a virtual tape is
moved to an Import/Export slot from a virtual library by a backup application or other
utility after a backup. In order for the Auto Archive function to work, the physical tape
library must support barcodes; when FalconStor VTL attempts to export to physical
tape it must find a matching barcode in the physical library.
You can configure Auto Archive when you create a virtual tape library (refer to
“Creating virtual tape libraries”) or you can change the properties of an existing
library as described below.
To configure Auto Archive:
Implementing nTier Deduplication 39
Page 43

1. Right-click on a virtual tape library and select Properties.
2. Select the Auto Archive checkbox.
Key Features
3. Determine if you want the virtual tape copied (retained) or moved (removed)
after the data is transferred.
If you select Move, indicate how long to wait before deleting it.
4. Indicate if you want to eject physical tapes to the library’s Import/Export slots
after export.
Physical tape libraries and import/export
You can import data from physical tapes into your virtual tape library or export virtual
tapes to physical tapes. Before you can perform these operations, do the following:
• Connect the physical tape library to the nTier VTL appliance. Fibre Channel
is supported and, if the appliance has a SCSI card, you can use a SCSI
connection.
• In the VTL Console, prepare the physical tape library/drives for use with the
virtual tape library.
• In the VTL Console, assign the physical library/drives to the virtual tape
library.
• For export purposes, in the VTL Console, create virtual tapes that
correspond to the barcoded physical tapes (refer to “Creating virtual tapes”).
• In the VTL Console, make sure the Auto Archive function is configured for
the virtual tape library (refer to “Auto Archive”).
Implementing nTier Deduplication 40
Page 44

Prepare physical libraries/drives for use with FalconStor VTL
When you connect a physical library while the nTier appliance is running, complete
this procedure in order to prepare the physical devices for use with FalconStor VTL.
Otherwise, the FalconStor VTL automatically scans for new devices when you
reboot.
1. Right-click the Physical Resources object and select Prepare Devices.
2. For the Device Category, select Reserved for Direct Device.
Key Features
3. Select the devices you want to prepare; deselect any device that you do not
want to include.
4. Confirm your choices and select Finish.
Implementing nTier Deduplication 41
Page 45

You can now assign your physical devices to a virtual tape library.
SPECTRA T120
Assign physical libraries/drives to the virtual tape library
If you will be importing data from physical tapes into your virtual tape library or
exporting virtual tapes to physical tapes, you must assign your physical tape
libraries/drives to the virtual tape library.
This process also inventories the physical tapes in your library/drive so that you can
create virtual tapes that match your physical tapes.
First, assign the physical library and then assign the drives.
1. Right-click on the Physical Tape Libraries object and select Assign.
Key Features
2. Select the physical libraries to be assigned to the virtual tape library.
3. Click Assign.
Implementing nTier Deduplication 42
Page 46

Key Features
IBM:ULTRIUM3
IBM:ULTRIUM3
IBM:ULTRIUM3
IBM:ULTRIUM3
4. Right-click on the Physical Tape Drives object and select Assign.
5. Select the physical drives to be assigned to the FalconStor VTL system.
6. Click Assign.
In the VTL Console, the physical library/drives are listed under their respective
objects.
Importing/Exporting tapes
One of the advantages of using a virtual tape library is that you can protect data on
your existing physical tapes by importing them into your virtual tape system.
You can also import data from virtual tapes being used by another nTier VTL
appliance.
If you need to recover files from a physical tape, you can use the import function to
directly access the physical tape for immediate recovery.
In addition, you can export data on virtual tapes to physical tapes for long-term data
archiving. This process builds a full physical tape.
For deduplicated tapes that have been replicated, exporting the tape is useful for
disaster recovery purposes so that data can be accessed from the replicated tape.
Note that you can have up to 32 concurrent import/export jobs running, depending
upon the number of physical tape drives attached to your nTier appliance.
Import a tape
The import function allows you to:
• Copy the contents of a physical tape to a virtual tape
• Directly access a physical tape without copying the entire tape
Implementing nTier Deduplication 43
Page 47

• Recycle a physical tape
Key Features
Before you
import a tape
To import data
from a physical
tape
You must verify the following before you can import tapes:
• The drive type (i.e. IBM:ULTRIUM-TD3) and the media type (i.e. Ultrium3) of
the library you are importing from must match the library to which you are
importing.
• If you are connecting through a switch, the nTier appliance must be in the
same zone as the physical tape library or other nTier appliance from which
you are importing.
1. Expand the Physical Tape Libraries object in the tree and right-click on the
physical tape library/drive.
Select Import Tape.
2. Select the virtual library to which you want to import a tape.
Be sure to pick a drive/library with the same tape size capacity.
3. Select how you want the data copied.
Copy Mode - Copies the entire contents of a physical tape onto a virtual tape
and leaves the physical tape unchanged.
Direct Access Mode - Links a physical tape to its virtual counterpart. This gives
the backup application immediate access to the tape data without waiting for a
complete copy. This is useful when you need to restore a small amount of data
from a physical tape.
Recycle Mode - Recycles a physical tape after its retention period has been
reached. If you import a tape in recycle mode and the virtual tape is
subsequently initialized, the physical tape is now considered recycled and can
be used for future export operations.
4. Select the physical tape you want to import.
Implementing nTier Deduplication 44
Page 48

Key Features
You can select a tape based on its barcode or slot location. You can then use the
same barcode for the virtual tape or you can enter a new barcode. You can also
select a slot for the virtual tape.
5. Indicate how you want to create the virtual tape.
Custom lets you select which physical device(s) to use and lets you designate
how much space to allocate from each.
Express automatically creates the resource(s) for you using an available
device(s). If you select Express, you can create multiple virtual tapes at the
same time.
6. Specify which physical device should be used to create the virtual tapes.
7. Specify a name, size, and starting number for the tape(s).
8. Verify the information and then click Finish to import the tape(s).
You can view status by highlighting the job in the Import/Export Queue. You will
see a Percent Complete progress bar in the right-hand frame.
When import is completed, the virtual tape is automatically moved to the virtual
vault.
Export data to a physical tape
Moving data from virtual tape to physical tape can be accomplished in several ways:
• From your backup software using the software’s own Tape Copy function
• Using the FalconStor VTL export function, either manually or automatically
after each backup using the Auto Archive function.
Note: Because some third-party backup applications alter what they write to the
tape depending on the type of cartridge used, FalconStor VTL only exports tapes
to like media. You cannot export to a dissimilar physical tape. This guarantees
that the backup application will accept the tape as valid; from the backup
application’s point of view, there is no difference between the virtual and physical
tape.
The FalconStor VTL export methods are explained below.
Export
manually
1. If the virtual tape is not already in the vault, right-click on a tape and select Move
to Vault.
2. Select the tape(s) you want to move.
3. If you have not already done so, inventory the physical tapes in your library by
right-clicking on the physical library and selecting Inventory.
4. Right-click on the virtual tape under Virtual Vault and select Export Tape.
Implementing nTier Deduplication 45
Page 49
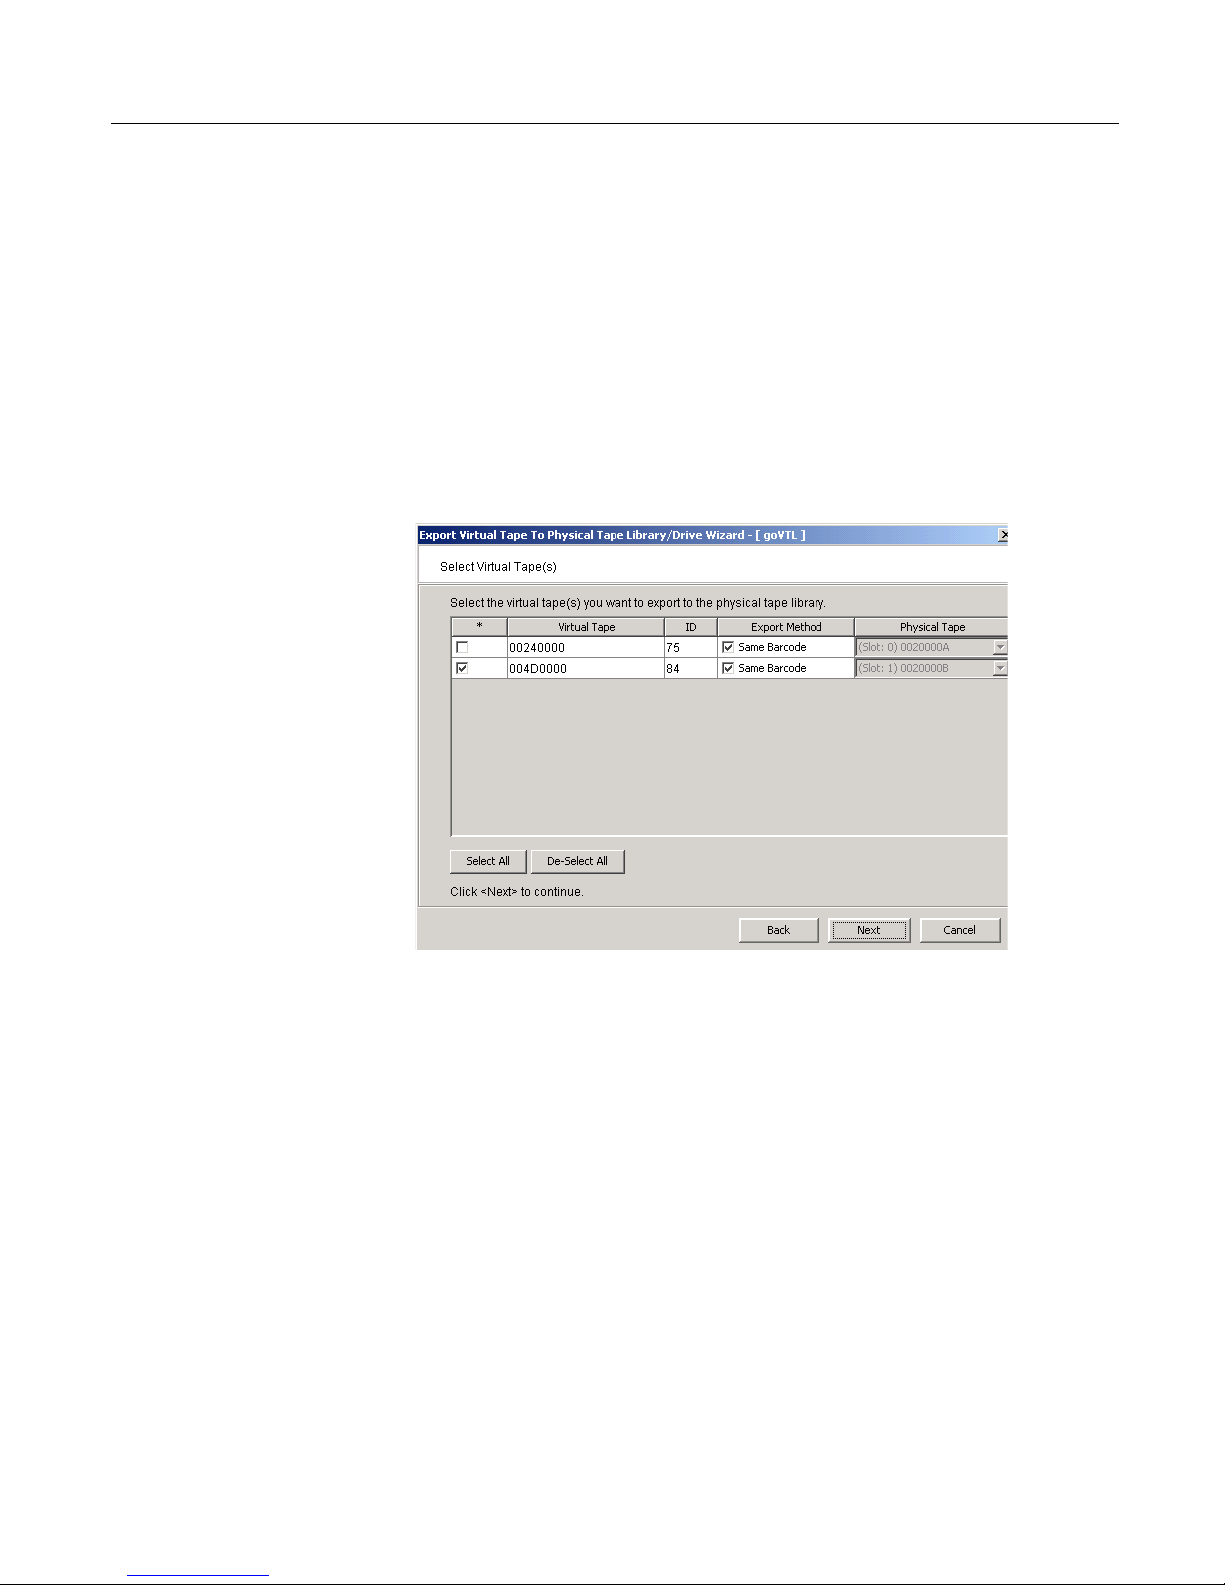
Key Features
5. Select the physical tape library to which you want to export.
6. Select how you want the data exported and if you want the physical tape
exported to the import/export slots.
Move Mode - Copies the contents of the virtual tape to its physical counterpart
and then removes the virtual tape from the system. Specify a grace period if you
want to keep the virtual tape for a time before deleting it.
Copy Mode - Copies the contents of the virtual tape to its physical counterpart
and retains the virtual tape after the data is transferred.
7. Select or clear the Export physical tapes to I/E slots after export check box.
8. Select the virtual tape you want to export.
If your physical tape drive/library uses barcodes, we highly recommend that you
select to use the same barcode as the physical tape.
If your physical tape drive/library does not use barcodes, you can select which
slot to use for the physical tape.
9. Verify the information and then click Finish to export the tape.
Implementing nTier Deduplication 46
Page 50

Advanced Features
Protecting your FalconStor VTL configuration
Protecting your FalconStor VTL configuration is important so that you can recover
the most current version of the configuration.
There are several things you can do to protect your FalconStor VTL configuration:
•Use Auto Save to replicate your configuration to another server. This
protects your configuration.
• Manually save the configuration any time you change it.
For optimal protection, you should use both of these features to protect your
FalconStor VTL configuration. Each feature is described below.
Automatically save the configuration
Saving your FalconStor VTL system configuration on a regular basis can make your
life easier should you ever need to replace your nTier appliance.
You should have saved your system configuration to a secure location on a different
computer after your FalconStor VTL installation/configuration was completed.
For consistent protection, you can set your system to automatically save your
system configuration to another location on a regular basis. Auto Save saves the
FalconStor VTL configuration, including all virtual tape libraries, virtual tape drives,
virtual tapes, clients, client assignments, and replication configuration.
To set Auto Save:
1. Right-click on your nTier appliance and select Properties.
Implementing nTier Deduplication 47
Page 51
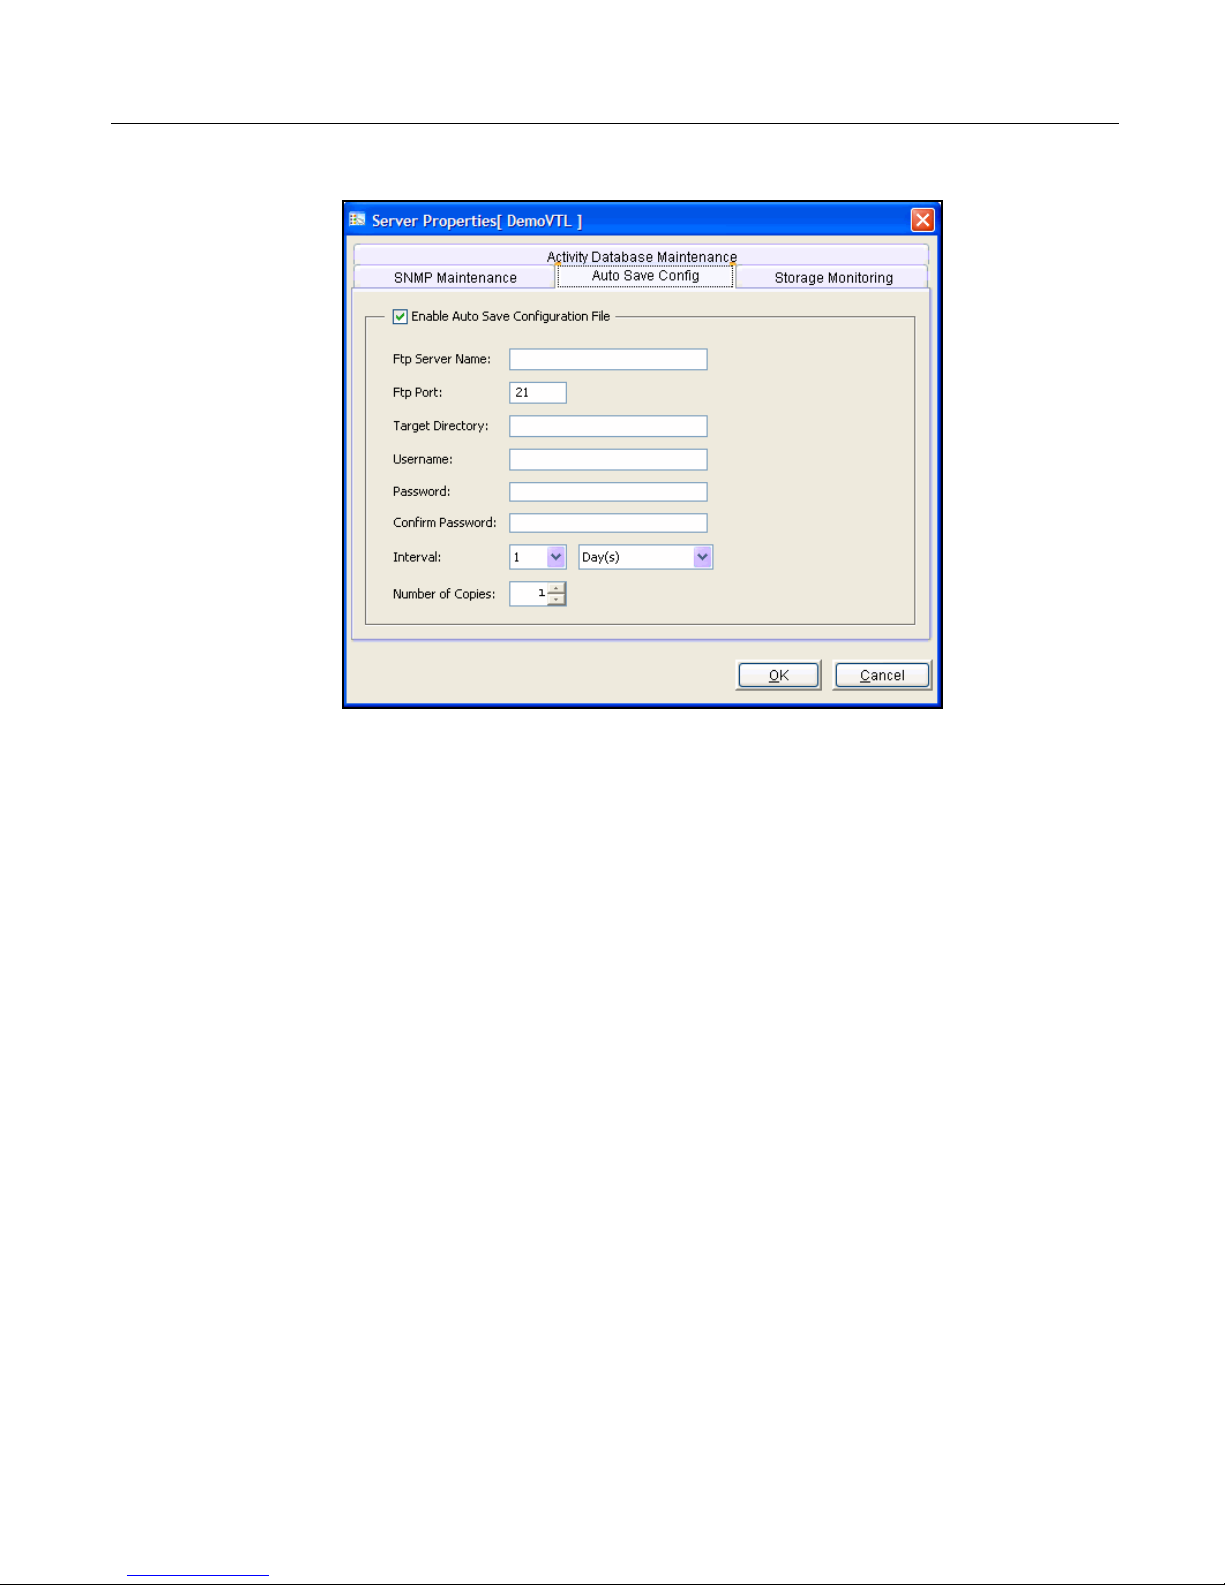
Advanced Features
2. Select the Auto Save Config tab and enter FTP server information.
The target server must have FTP server installed and enabled.
The Target Directory is the directory on the FTP server where the files will be
stored. The directory name you enter here (such as
the FTP server (for example
like
c:\vtlconfig.
ftp\vtlconfig). This should not be an absolute path
vtlconfig) is a directory on
The Username is the user that your FalconStor VTL system will log in as. You
must create this user on the FTP server. This user must have read/write access
to the directory named here. You will also have to enter the user’s password.
In the Interval field, determine how often to replicate the configuration.
Depending upon how frequently you make configuration changes to FalconStor
VTL, set the interval accordingly. You can always save manually in between if
needed.
In the Number of Copies field, enter the maximum copies to keep. The oldest
copy will be deleted as each new copy is added.
Implementing nTier Deduplication 48
Page 52

Manually save the configuration as needed
You can manually save your system configuration any time you make a change in
the Console, including any time you add/change/delete a backup server or resource.
To manually save the configuration:
1. Select the nTier VTL appliance object.
2. Select Too l s menu --> Save Configuration.
3. Select a file name and location.
Restore the configuration
You can restore a FalconStor VTL configuration from a file that was created using
the Save Configuration option. This is for disaster recovery purposes and should not
be used in day-to-day operation of the server.
Restoring a configuration overwrites existing virtual device and client configurations
for the server. FalconStor VTL partition information is not restored. This feature
should only be used if your configuration is lost or corrupted.
Advanced Features
To restore the configuration:
1. Select the nTier VTL appliance object and select To ol s menu --> Restore
Configuration.
2. Click OK to confirm and then locate the saved configuration file.
The nTier VTL appliance will be restarted.
• Resources added after the configuration was saved will show up in the
Virtual Vault after the configuration is restored.
• Deleted resources will show up with a red dot icon in the Virtual tape library
with an "incomplete" status.
Implementing nTier Deduplication 49
Page 53

Virtual tape drive compression
On VTL appliances, tape compression is enabled by default for the built-in virtual
tape library to enhance performance.
FalconStor VTL compression saves disk space by compressing files so that more
data can be stored by a virtual tape drive. The increase in capacity is directly related
to the compressibility of the data being stored. If you can compress the data by a
factor of up to 2:1, you can store up to twice as much information on the virtual tape.
Disk compression can vary depending upon the dataset; certain file types (ZIP, PDF,
GIF, RAR, etc.) are already compressed and cannot be compressed further.
Software compression uses an LZO algorithm that runs on the nTier appliance. To
enable software compression, you must also enable tape drive compression in your
backup application.
Note: If you are already using software compression that is supplied by your
backup application, you should not use FalconStor VTL compression. Using both
types of compression will cause FalconStor VTL to try to compress alreadycompressed data and this can slow down your backups.
Advanced Features
Enable/disable
compression
To enable or disable compression:
1. Enable tape drive compression in your backup software.
2. In the VTL Console, right-click on the Virtual Tape Library System object and
select Properties.
3. Select the Enable VirtualTape Library compression mode checkbox.
Compression is a global setting, which means that it will apply to all tapes in your
system.
If compression is enabled in the FalconStor VTL, you can still disable or enable
compression on each individual virtual tape drive in the same manner as real
tape drives -- via your backup application. Depending on your operating system,
do one of the following:
UNIX — On backup servers that run UNIX operating systems, specify a
compressed tape device file such as /dev/rmt/0cbn to enable compression or
/dev/rmt/0ubn to disable compression.
Windows — On Windows servers, select the option in your backup software to
enable or disable tape drive compression. If global FalconStor VTL compression
is disabled, it is possible to enable individual drive compression, but it will have
no effect.
When this dialog closes, you will see a compression icon next to each virtual
tape drive with compression enabled.
Implementing nTier Deduplication 50
Page 54

Setting server properties
To set properties for the server:
1. Right-click the nTier VTL appliance object and select Properties.
2. On the Activity Database Maintenance tab, indicate how often FalconStor VTL
activity data should be purged.
The Activity Log is a database that tracks all system activity, including all data
read, data written, number of read commands, write commands, number of
errors, etc. This information is used to generate information for FalconStor VTL
reports.
3. On the SNMP Maintenance tab, enable FalconStor VTL to send traps to your
SNMP manager.
Refer to ’Configuring FalconStor VTL to send SNMP traps’ for more information.
4. On the Auto Save tab, enter information to replicate your FalconStor VTL
configuration to another server.
This protects your configuration if the nTier VTL appliance experiences
problems. Refer to ’Automatically save the configuration’ for more information.
Advanced Features
5. On the Storage Monitoring tab, enter the maximum amount of storage that can
be used by FalconStor VTL before you should be alerted.
When the utilization percentage is reached, a warning message will be sent to
the Event Log.
Configuring FalconStor VTL to send SNMP traps
FalconStor VTL provides Simple Network Management Protocol (SNMP) support to
integrate FalconStor VTL management into an existing enterprise management
solution, such as HP OpenView, CA Unicenter, IBM Tivoli NetView, or BMC Patrol.
By default, event log messages will not be sent, but you may want to configure
FalconStor VTL to send certain types of messages. To do this:
1. In the Console, right-click the nTier VTL appliance object and select Properties.
2. Select the SNMP Maintenance tab.
3. Indicate the information that should be included in traps sent to your SNMP
manager.
SysLocation - Enter the location that should be included in traps.
SysContact - Enter any contact information that should be included in traps. This
could be a name or an email address.
4. Specify the type of message that should be sent.
Five levels of messages are available:
Implementing nTier Deduplication 51
Page 55

Advanced Features
• None – No messages will be sent.
• Critical (severity level 1) - Only critical errors that stop the system from
operating properly will be sent.
• Error (severity level 2) – Errors (failure such as a resource is not available or
an operation has failed) and critical errors will be sent.
• Warning (severity level 3) – Warnings (something occurred that may require
maintenance or corrective action), errors, and critical errors will be sent.
• Informational (severity level 4) – Informational messages, errors, warnings,
and critical error messages will be sent.
5. Click Add to enter the name of your SNMP server and a valid SNMP community.
6. To verify that SNMP traps are set up properly, set the level to Informational and
then do anything that causes an entry to be added to the event log (such as
logging into the VTL console or creating a new virtual tape library).
You should see an SNMP trap for the event.
Implementing nTier Deduplication 52
Page 56

Monitor Deduplication
Data deduplication takes place after a virtual tape is unloaded from a tape drive and
moved to a slot. Deduplication options define when the process actually starts (refer
to “Set deduplication options”).
Before deduplication, the virtual tape’s backup data is stored on the disk(s) of the
nTier VTL appliance. When the deduplication process begins, an intelligent “Tape
Scanner” process analyzes the backup data and determines whether data is unique
or has already been copied to the SIR repository. The process then passes only
single instances of unique data to the SIR repository. Upon completion, the original
virtual tape is replaced with a “Virtual Index Tape” (VIT) which contains pointers to
the data on SIR storage instead of the actual data.
The VTL Console offers a variety of information about the performance of your
deduplication efforts. From the VTL Console, you can view the following:
• Status of running jobs
• Scanner history
• Repository statistics
Status of running jobs
To view information for jobs that are currently running on a specific server, highlight
the nTier VTL appliance object and select the Scanner processes tab in the right
panel.
Implementing nTier Deduplication 53
Page 57
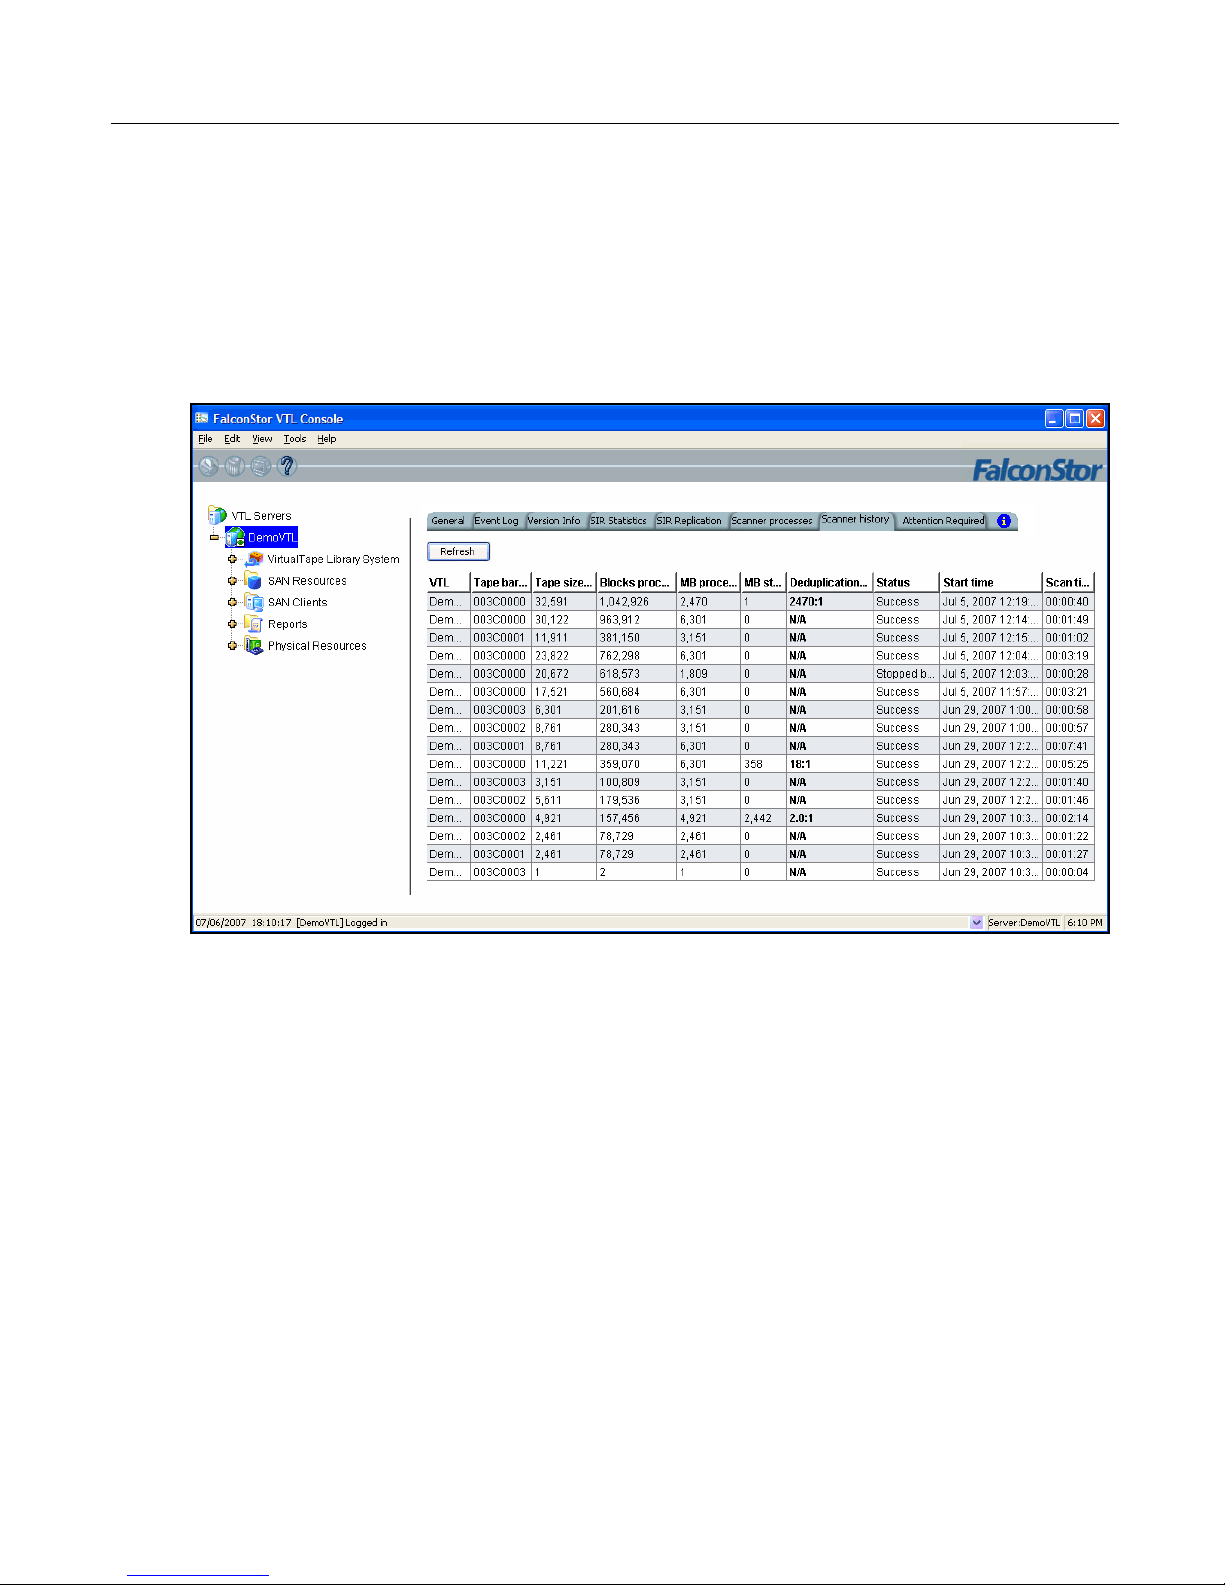
Here you can view the progress of the job. You can see which virtual tape is being
deduplicated, how large the tape is, how much has been processed, and the speed,
measured in MB per second.
Scanner history
To view details of past activity for a specific server, highlight the server and select
the Scanner history tab in the right panel.
Monitor Deduplication
You will see the history of virtual tapes that have been deduplicated, including:
• VTL server name
• Tape barcode
• Tape size
• Blocks processed - The number of blocks of data that were deduplicated
• MB processed - The amount of original data sent from the tape
• MB stored - The amount of unique data on the tape that has been stored in
SIR storage
• Deduplication ratio - The ratio of the amount of data scanned to the amount
of data stored. If this value is N/A, the amount of data stored is zero.
• Status - Possible values are Success, Error, or Stopped by user.
• Start time - The time deduplication began
•Scan time - The amount of time it took for deduplication to complete
Implementing nTier Deduplication 54
Page 58

Repository statistics
To view repository statistics for the server, highlight the server and select the SIR
Statistics tab in the right panel.
Monitor Deduplication
The values displayed for Data written represent data scanned in FalconStor VTL.
Data stored values represent the amount of unique data stored in the repository.
The Redundancy elimination ratio (also referred to as the deduplication ratio)
represents this formula: [(data scanned)
The SIR Statistics display provides three ways to look at these values:
• Repository usage
• Deduplication results
• SIR statistics
÷(data stored)].
Implementing nTier Deduplication 55
Page 59

Monitor Deduplication
Repository
usage
Deduplication
results
This section of the display shows the current state of the physical disk used as the
SIR repository, which includes SIR data and SIR Index storage. Values are based on
all tape scans performed during the life span of the selected server.
Disk Usage values show how much disk space has been allocated to each SIR
storage component and how much space has been used.
The Repository object capacity graphic represents memory usage.
Select Refresh to update the display to include activity that has occurred since the
last refresh.
This section of the display combines data written and data stored statistics for all
accumulated data to show deduplication activity over time. Viewing data in this way
allows you to calculate the redundancy elimination ratio for any period of time.
Reviewing deduplication operations for successive weeks of full backup reveals the
true redundancy ratios of week-to-week data evolution and can be used to
accurately forecast repository requirements. You can identify how quickly you are
using your repository disk space and when you are likely to need to add more.
Select a Unit of time from the drop-down list to adjust the granularity of the graph.
Use the arrow buttons to scan through accumulated data. Click Refresh to include
data for deduplication activity that has occurred since the last refresh.
SIR statistics This section of the display shows current statistics: a view of the redundancy
elimination ratio based on tape scans performed since a user last reset the display.
For example, statistics might reflect 7 days, 1 hour, 2 minutes, and 2 seconds of SIR
deduplication processing, during which 125 GB of data was scanned by SIR. 45 GB
of data was unique and therefore stored in the repository, resulting in a redundancy
elimination ratio of 2.8:1.
Statistics are automatically updated every 30 seconds. You can click the Reset
button to reset values to zero and reset the time to the current time. Subsequent
updates will reflect activity since the reset. If you view the display after a few
minutes, the redundancy elimination ratio will reflect tapes currently being scanned.
Note: It is not uncommon to see a ratio of 1000:1 for a particular tape; this simply
indicates that extremely little data has changed.
Implementing nTier Deduplication 56
Page 60

Virtual index tape status
VITs replace virtual tapes after they have been deduplicated. Use the VTL Console
to review the status of these virtual tapes:
1. Expand the Virtual Tape Libraries object.
2. Expand the library and the Tap es object.
3. Select a tape and locate the VIT field on the General tab.
If the VIT field displays Yes, all data on this VIT has been deduplicated. The tape
contains only pointers to its data on SIR storage.
If the VIT field displays Mixed, this VIT contains pointers to its data on SIR
storage as well as data that has not been deduplicated yet. This status can occur
due to a specified delay prior to deduplication (refer to ’Changing the default
deduplication properties’) or due to power factors that may affect the number of
deduplication jobs that can run simultaneously.
If the VIT field displays No, the tape is not a VIT; the data on the tape has not
been deduplicated.
Monitor Deduplication
4. Select the Layout tab to display information about the physical devices that were
used to create this VIT.
Reclaiming Disk Space
During the reduplication process, only single instances of unique data are passed to
the deduplication repository. The original virtual tape is replaced with a VIT pointing
to deduplication storage.
Over time, VITs can be erased, formatted, or overwritten by your backup application
(such as when a tape has expired). It is also possible that you may have manually
deleted a VIT. When a VIT is eliminated, the pointers to deduplication storage are
deleted but the actual deduplicated data is not.
Note: Putting a VIT in the scratch pool of a backup application does not mean
that the storage used by that VIT can be reclaimed. Storage can be reclaimed
only when a VIT is deleted from the console or erased/formatted/overwritten by
the backup application.
To reclaim disk space, right-click the nTier VTL and select SIR --> Reclaim Disk
Space.
A message is displayed when the process begins and again to confirm that the
process is complete. Click OK to close the confirmation.
When the process is complete, you can look at the Repository Usage Area on the
SIR Statistics tab to see how much Data Space Used has decreased.
Implementing nTier Deduplication 57
Page 61

Replication
nTier VTL
nTier VTL
Replication is an optional feature on FalconStor VTL that protects the data on
deduplicated tapes by maintaining a copy on the same server (local replication) or,
more likely, on another server (remote replication).
Replicating deduplicated tapes replicates the virtual index tape and metadata.
You can configure replication between two nTier VTL appliances via iSCSI.
FalconStor VTL supports a many-to-one configuration, where multiple FalconStor
VTL systems replicate to a single system, which would be the case where remote
offices replicate data to a corporate data center.
Data duplicated across remote sites is deduplicated at the central site, enabling only
globally unique data to be stored.
If a disaster occurs and the replica is needed, the administrator can move the
replicated tape from the virtual vault to its virtual tape library or export the replicated
tape to a physical tape so that it can be accessed by backup software.
Implementing nTier Deduplication 58
Page 62

Replication process
Local virtual
index tapes in
the Virtual Vault
after replication
Foreign virtual
index tape
under Replica
Resources
Replication of SIR data occurs in several stages:
• When replication occurs (manually or as configured for individual tapes), the
• The FVIT is scanned to determine whether or not the data blocks it uses
• The target server automatically creates a local virtual index tape (LVIT) and
Replication
virtual index tape (VIT) from the source server is copied to the target server
and becomes a foreign virtual index tape (FVIT) listed under Replica
Resources.
exist locally. Missing data blocks are replicated from the source server to the
target server. After all missing data blocks are replicated, the target server
has all the data blocks used by the FVIT.
puts it in the target server’s virtual vault; the LVIT is now a replica of the
source VIT and contains pointers to the replicated blocks of data.
• Replication is complete when you see the LVIT in the target server’s
virtual vault. The name of the LVIT corresponds to the name of the FVIT.
The image below shows the FalconStor VTL target server, with FVITs
under the Replica Resources object and the LVITs for replicated data
under the Virtual Vault object.
Note: This final step may not occur immediately after the initial replication of
data and can take some time to complete, depending on the availability of
SIR tape drives on the target server and the amount of data on the FVIT.
Implementing nTier Deduplication 59
Page 63

Replication requirements
The following are the requirements for setting up a replication configuration:
• You must have enough space on the target server for the replica resource.
• (Remote Replication) You must have two nTier VTLs.
• (Remote Replication) You must have administrative rights on both servers.
• (Remote Replication) You must enable replication between the nTier VTL
appliances by adding the target server to the primary server using the
console for the nTier VTL appliance.
Replication to another nTier VTL appliance
Before you can configure replication for a tape, you must enable replication between
the two nTier VTL appliances by adding the VTL target server to the source server.
To do this:
1. In the VTL Console, right-click the server and select SIR --> Replication --> Add
VTL Target.
Replication
2. Select Add.
3. When you click Next to continue, a warning message is displayed. The iSCSI
initiator needs to be restarted on the target server.
Implementing nTier Deduplication 60
Page 64
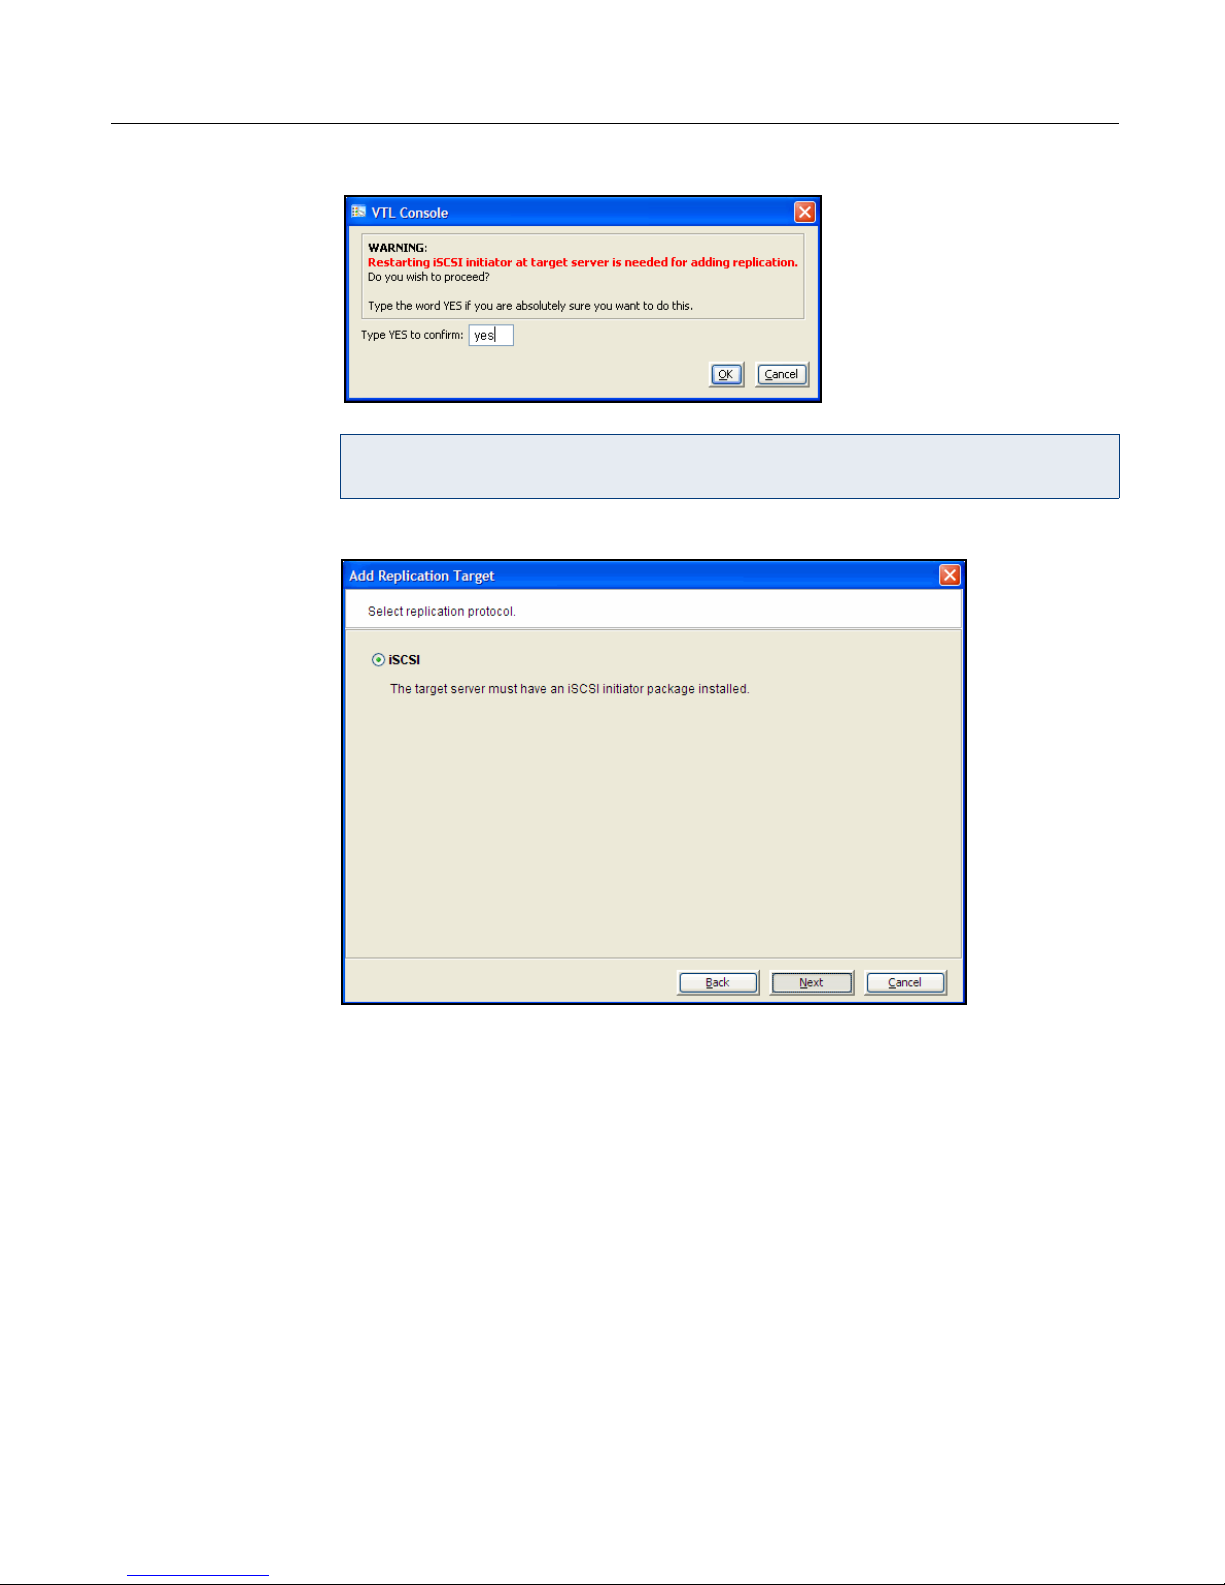
Replication
Enter Yes and then click OK.
Note: If replication processes are running on the target (including creating the
replica VIT from the FVIT), target setup fails. Re-try at a later time.
4. In the next screen, iSCSI is selected by default. Select Next to continue.
5. In the next screen, confirm the information and click Finish. The target server is
configured to be the replication target.
The SIR Replication tab appears in the right-hand pane for both servers when
replication has been configured. Content identifies the replicator (the data
source) and the replica (the nTier VTL appliance to which data is replicated).
Configure replication for virtual index tapes
You must enable replication for each virtual index tape (VIT) that you want to
replicate. A virtual tape for which replication has been configured for replication is
referred to as a primary virtual tape.
• The VIT must have Yes status (refer to ’Virtual index tape status’).
• The VIT must be in a slot in a virtual tape library and cannot be in use. You
cannot replicate a VIT that is in the virtual vault.
Implementing nTier Deduplication 61
Page 65
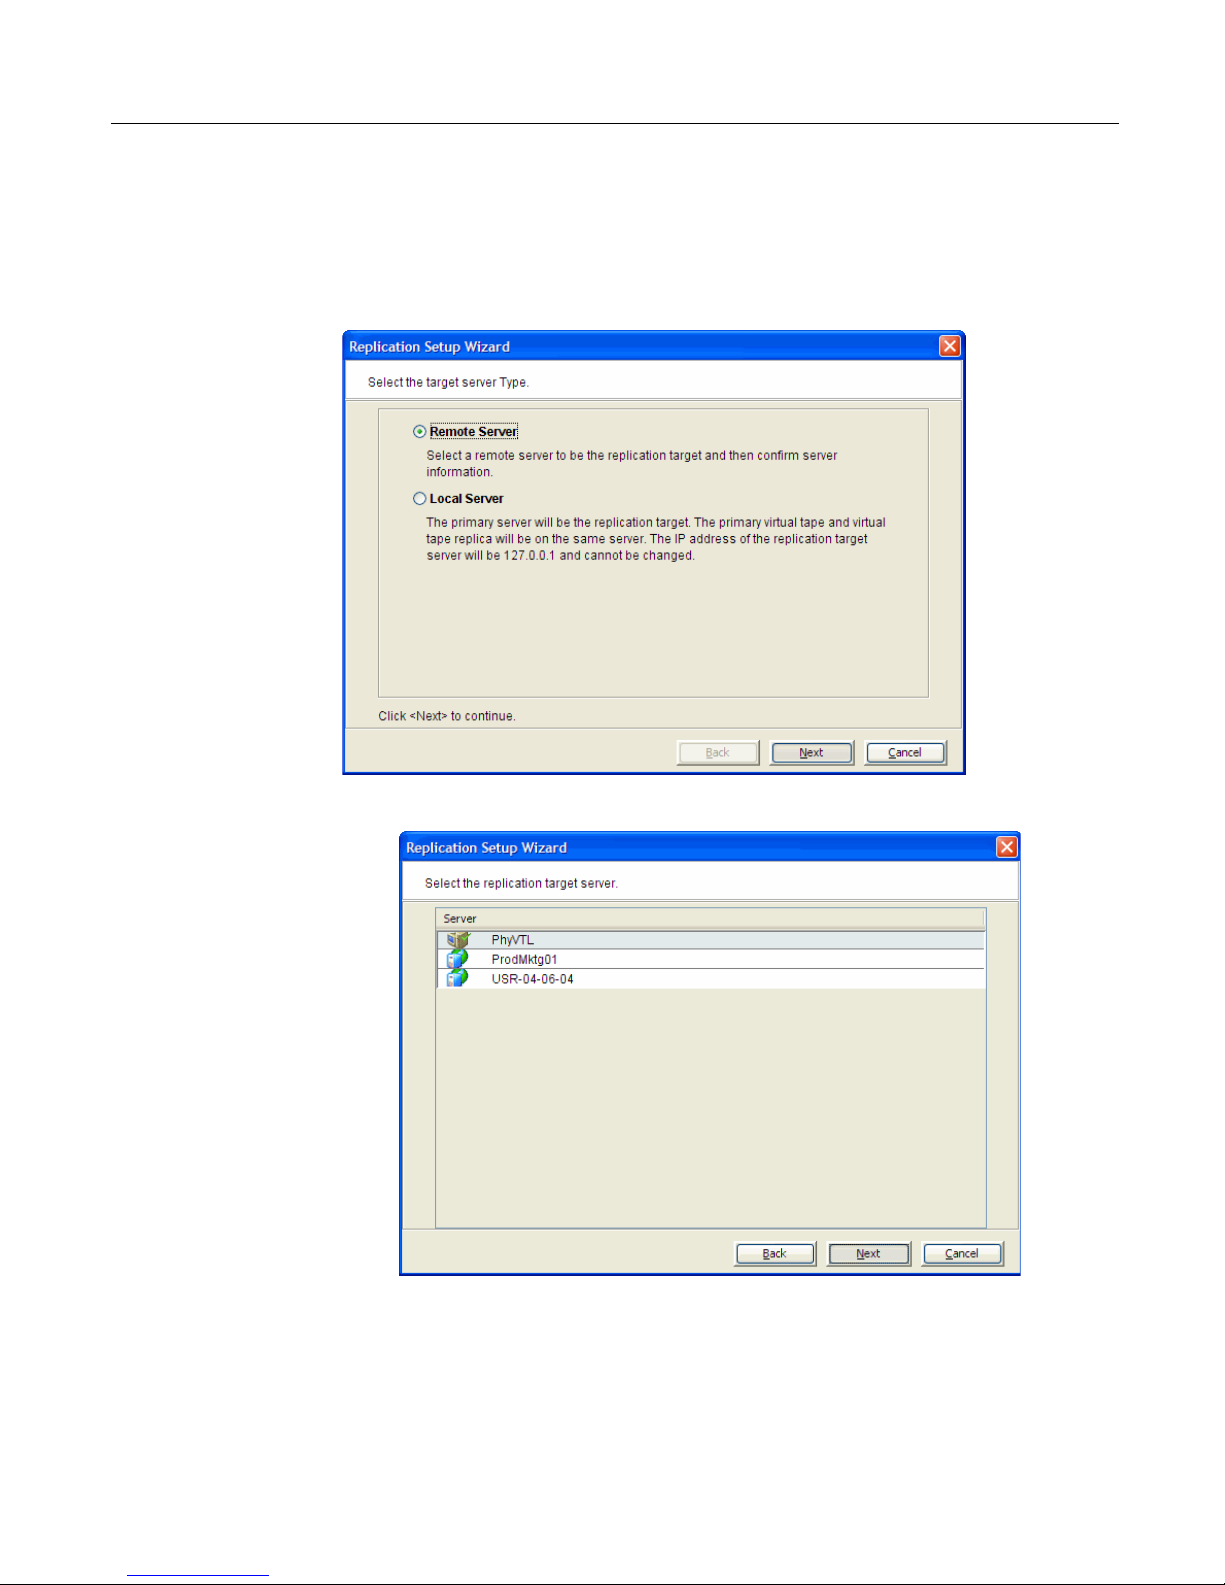
Replication
• You cannot replicate a VIT for which auto-archive has been enabled.
1. On the source server, right-click on a VIT and select Replication --> Add.
Each VIT can be replicated to a single target.
2. Indicate whether you want to use remote replication or local replication.
3. Select the target server.
Implementing nTier Deduplication 62
Page 66

4. Confirm/enter the target server’s IP address.
5. Configure how often replication should occur.
Replication
Start first replication on mm/dd/yyyy at hh:mm and repeat every n hours Indicate when replication should begin and how often it should be repeated. Be
sure to allow enough time for deduplication to complete before replication should
begin. If a tape has data that has not been deduplicated, the data will not be
replicated.
If a replication is already occurring when the next time interval is reached, the
new replication request will be ignored.
Implementing nTier Deduplication 63
Page 67

Replication
6. Indicate what to do if a replication attempt fails.
Replication can occur only when the virtual tape is in the library and is not in use.
Indicate how long the system should attempt to replicate data before timing out
and how often it should attempt to retry before skipping a scheduled replication.
7. Indicate if you want to use the Compress Data and/or Encrypt Data options
(remote replication only).
The Compress Data option provides enhanced throughput during replication by
compressing the data stream.
The Encrypt Data option secures data transmission over the network during
replication.
These options will affect performance speed and are not recommended.
Implementing nTier Deduplication 64
Page 68

Replication
8. Select how you want to create the replica resource.
Custom lets you select which physical device(s) to use and lets you designate
how much space to allocate from each.
Express automatically creates the replica for you from available hard disk
segments.
Note: If you select Express, all data on the target will be overwritten.
If you select Custom, you will see the following screens:
Implementing nTier Deduplication 65
Page 69

Only one disk can be
selected at a time from this
dialog. To create a replica
resource from multiple
physical disks, add the
disks one at a time. After
selecting the first disk, an
option lets you add more
disks.
Indicate how much space
to allocate from this disk.
The segment must be at
least the same size as the
virtual tape.
Click Add More if
you need to add
another physical
disk to this replica
resource. This
displays the
physical device
selection screen to
select another disk.
Replication
Implementing nTier Deduplication 66
Page 70

9. Enter a name for the replica resource or accept the default.
The name is not case sensitive.
Replication
10. Confirm that all information is correct and then click Finish to create the
replication configuration.
An initial replication will occur according to the policy you set during
configuration.
Note: Once you create your replication configuration, you should not change
the hostname of the primary server. If you do, you will need to recreate your
replication configuration.
Checking replication status
You can check replication status of VITs. Note that you will see the status of the
replication of the VIT itself, not the status of the unique data that is replicated.
Notes:
If there is no FC connection between the source and target servers, make sure
the iSCSI option is licensed and enabled on all servers.
• FVITs are listed under the Replica Resources object for the target server;
an FVIT is referred to as a replica resource.
• When replication is complete, the replica VIT will be visible under the
Virtual Vault object for the target server.
There are several ways to check replication status:
• Replication tab of the primary virtual tape - displays the policies set for
replication as well as the replication status.
Implementing nTier Deduplication 67
Page 71

Replication
• General tab of the replica resource on the target server - displays status of
replication in progress. Note that because replication jobs occur very
quickly, it may not be possible to catch the status here. Check the Event Log
or run a Replication Status Report instead.
• Event Log - displays status and operational information, as well as any
errors.
• Replication Status Report - can be run from the Reports object. It provides a
centralized view for displaying real-time replication status for all tapes
enabled for replication. It can be generated for an individual tapes, multiple
tapes, primary server or target server, for any range of dates. This report is
useful for administrators managing multiple servers that either replicate data
or are the recipients of replicated data. The report can display information
about existing replication configurations only or it can include information
about replication configurations that have been deleted (you must select to
view all replication activities in the database). The following is a sample
Replication Status Report:
Accessing data on a replicated VIT
If a replicated virtual tape is needed (due to a failure at the source site), the
administrator can do one of the following so that the data can be accessed by
backup software:
• Move the virtual tape from the virtual vault to a virtual library on the target
server.
• If the source server has been repaired, you can replicate the virtual tape
back to that server. This replicates the entire tape, which can be time
consuming.
• Export the data on the virtual tape to a physical tape.
Implementing nTier Deduplication 68
Page 72

Manually start the replication process
To force a replication that is not scheduled, right-click a primary virtual tape and
select Replication --> Synchronize.
Changing replication configuration properties
You can change the following replication configuration properties:
• Static IP address of your target server
• Policies that trigger replication (interval, time)
• Timeout and retry policies
• Data transmission options (encryption, compression)
To change replication properties for a virtual index tape:
1. On the primary server, right-click a primary virtual tape and select Replication -->
Properties.
2. Make the appropriate changes and click OK.
Replication
Suspending/resuming the replication schedule
You can suspend future replications from automatically being triggered by your
replication policies. This will not stop a replication that is currently in progress. You
can still manually start the replication process while the schedule is suspended. To
suspend/resume replication, right-click a primary virtual tape and select Replication -
-> Suspend (or Resume).
You can see the current settings by checking the Replication Schedule field on
Replication tab of the primary virtual tape.
Stopping a replication in progress
To stop a replication that is currently in progress, right-click a primary virtual tape
and select Replication --> Stop.
Removing replication configuration
When the target is another nTier VTL
Removing the
target server
1. Right-click the source server and select SIR --> Replication --> Remove VTL
Tar ge t .
Implementing nTier Deduplication 69
Page 73

Replication
2. Select the replica you want to remove and click OK.
3. Enter Yes and then click OK to restart the iSCSI initiator on the target server.
When the target
server is not
reachable
Note: If replication processes are running on the target (including creating the
replica VIT from the FVIT), target removal will fail. Re-try at a later time.
A series of dialogs is displayed while replication configuration is removed from
the source and target servers. The SIR Replication tab is also removed. The
Remove SIR Replication dialog closes when the process is complete.
If the replication target server is not reachable, you must manually remove
information about the source server from the target server.
1. On the target server, locate the file /etc/iscsi.conf.
2. In iscsi.conf, do a search for the IP address of the source server.
3. Delete these rows:
DiscoveryAddress=[source server IP address]
Username=[SIR...]
Password=...
Implementing nTier Deduplication 70
Page 74

Continuous=...
ConFailTimeout=...
4. Locate the file $ISHOME/etc/hostname/sircluster.conf.
Search for SIRReplicator tags that match the replication source name.
Delete any line that contains this tag. For example, if the replication source
server h124-128 is to be removed, delete this line:
<SIRReplicator guid="ac1e8037-0000-47db-5a50-4229cd56cde8"
name="guigroup_h124-182"/>
Replication
Removing
replication
configuration
from a virtual
tape
This procedure removes replication configuration from the primary virtual tape and
at the same time deletes the replica resource (FVIT) on the target server. The
replica tape in the target server’s virtual vault is not deleted.
There are two ways to do this:
1. Navigate to the primary virtual tape.
2. Right-click the tape and select Replication --> Remove.
3. Click OK to confirm the configuration changes.
The confirmation screen displays the names of the primary virtual tape on the
primary server and the virtual tape replica (FVIT) on the target server.
Or,
1. Navigate to the Replica Resources object on the target server.
2. Right-click the FVIT and select Delete.
3. Click OK to confirm the configuration changes.
The confirmation screen displays the names of the primary virtual tape on the
primary server and the virtual tape replica (FVIT) on the target server.
Removing
replication
configuration
from a virtual
tape
Note: Always use the console for the primary (nTier VTL) server for this procedure.
This procedure removes replication configuration from the primary virtual tape and
at the same time deletes the replica resource (FVIT) on the target server. The
replica tape in the target server’s virtual vault is not deleted.
There are two ways to do this:
1. In the VTL console, navigate to the primary virtual tape.
2. Right-click the tape and select Replication --> Remove.
3. Click OK to confirm the configuration changes.
The confirmation screen displays the names of the primary virtual tape on the
primary server and the virtual tape replica (FVIT) on the target server.
Implementing nTier Deduplication 71
Page 75

Replication
OR
1. In the VTL console, navigate to the Replica Resources object on the target
server.
2. Right-click the FVIT and select Delete.
3. Click OK to confirm the configuration changes.
The confirmation screen displays the names of the primary virtual tape on the
primary server and the virtual tape replica (FVIT) on the target server.
Implementing nTier Deduplication 72
Page 76

iSCSI Clients
Overview
The nTier FalconStor VTL is protocol-independent and supports multiple outbound
target protocols, including iSCSI Target Mode.
iSCSI builds on top of the regular SCSI standard by using the IP network as the
connection link between various entities involved in a configuration. iSCSI inherits
many of the basic concepts of SCSI. For example, just like SCSI, the entity that
makes requests is called an initiator, while the entity that responds to requests is
called a target. Only an initiator can make requests to a target; not the other way
around. Each entity involved, initiator or target, is uniquely identified.
By default, when a backup server is added as an iSCSI client of a nTier FalconStor
VTL appliance, it becomes an iSCSI initiator.
The initiator name is important because it is the main identity of an iSCSI initiator.
Supported platforms
iSCSI target mode is supported for the following platforms:
• Windows; refer also to ’Controlling backup server access to the nTier
appliance’
• Linux
• Solaris
Use of Open iSCSI for backup server setup is also supported.
Managing iSCSI clients
On FalconStor VTL storage appliances, iSCSI is enabled by default and the SAN
client Everyone_iSCSI has already been created. This special SAN client does not
correspond to any specific backup server. Using this client, you can create iSCSI
targets that are accessible by any backup server that connects to the nTier VTL
appliance using the iSCSI protocol (refer to ’Using the built-in Everyone_iSCSI
client’).
While such a publicly available target is convenient, it may not be appropriate for all
organizations. If your nTier VTL appliance will be shared by multiple backup servers,
you may want to use a “secured access” scheme, where access is dictated by
creating specific clients to represent specific backup servers instead of using the
built-in Everyone_iSCSI client. In this mode, each backup server can access only its
own designated virtual tape library or drives.
Implementing nTier Deduplication 73
Page 77

iSCSI users
VTL iSCSI Users are used for iSCSI protocol login authentication from iSCSI backup
servers. When you configure secured access for backup servers, you designate
users who can authenticate for the client.
There are several ways to create iSCSI users:
• Use the VTL User/Administrator Management function in the VTL Console
(refer to ’Manage users and administrators’):
• Right-click the server object and select Administrators.
• Select Add and then select VTL iSCSI User in the Group list.
• Enter a username and password and select OK.
• Create at least one unique user for each client.
• Add users when the Add SAN Client function requires you to add/select
users who can authenticate for the client.
• Add users to an existing client in iSCSI Client Properties.
Windows client configuration
iSCSI Clients
Requirements
• A nTier VTL appliance with an Ethernet adapter installed.
• A Windows backup server.
• iSCSI software initiator installed on each backup server. (iSCSI initiator
software/hardware is available from many sources. For Windows servers,
you can download software from Microsoft’s website: http://
www.microsoft.com/windowsserversystem/storage/iscsi.mspx.)
Prepare client initiators to access your nTier appliance
Before a backup server (the client initiator) can communicate with a nTier VTL
appliance, the two entities need to mutually recognize each other. To do this, install
an iSCSI software initiator on every backup server that will access the nTier VTL
appliance. This software lets you add the nTier VTL appliance as a target portal and
log the client onto the iSCSI target you create on the nTier VTL appliance.
The following steps are for the Microsoft iSCSI Initiator. If you are using a different
iSCSI initiator, refer to the documentation provided by the vendor.
1. Run Microsoft iSCSI Initiator on the backup server using the shortcut on your
desktop or by selecting Start --> Programs --> Microsoft iSCSI Initiator -->
Microsoft iSCSI Initiator.
2. Click the Discovery tab, then click Add under the Target Portals group box.
3. Enter the nTier VTL appliance’s IP address or name (if resolvable).
Implementing nTier Deduplication 74
Page 78

To determine the IP address, go to the VTL Console. Select the nTier VTL
appliance object. The IP address is on the Login Machine Name line in the righthand pane of the Console.
Use the default port (3260).
Click OK to add the client.
Add your iSCSI client
1. In the VTL Console, right-click the SAN Clients object and select Add.
2. Enter the client name. You can click Find to discover the client and make sure it
is running.
iSCSI Clients
3. Select the iSCSI protocol and indicate if the client is a mobile client. If this is not
a mobile client, continue with step 5, below.
A mobile client is simply a username and password used to authenticate to the
nTier VTL appliance from any iSCSI backup server. A mobile user can access
authorized iSCSI targets from any host as long as it has the proper credentials.
Note that when you right-click a mobile client in the VTL Console, the Properties
option is disabled because the properties, such as the list of assigned iSCSI
initiator names, do not apply to mobile clients. If you want to change the
username or password for a mobile client, you must delete the client and then
recreate it with the desired username and password.
Implementing nTier Deduplication 75
Page 79

iSCSI Clients
4. If you indicated that this is a mobile client, select from iSCSI users you have
already created in the VTL Console (refer to ’iSCSI users’) or click Add to create
a new user.
Review client information in the next dialog and click Finish when you are done.
5. If this is a stationary client and you already added the nTier VTL appliance as a
Target Portal using the iSCSI initiator on your backup server, select the initiator
name associated with the backup server’s IP address or click Add and add an
initiator name manually (the IP address will not display).
An available initiator shows a green dot.
Stationary iSCSI clients correspond to specific iSCSI client initiators and
consequently, the client machines that own the specific initiator names. When a
stationary client connects to the nTier VTL appliance, it can access only the
resources assigned to a specific initiator name.
Implementing nTier Deduplication 76
Page 80
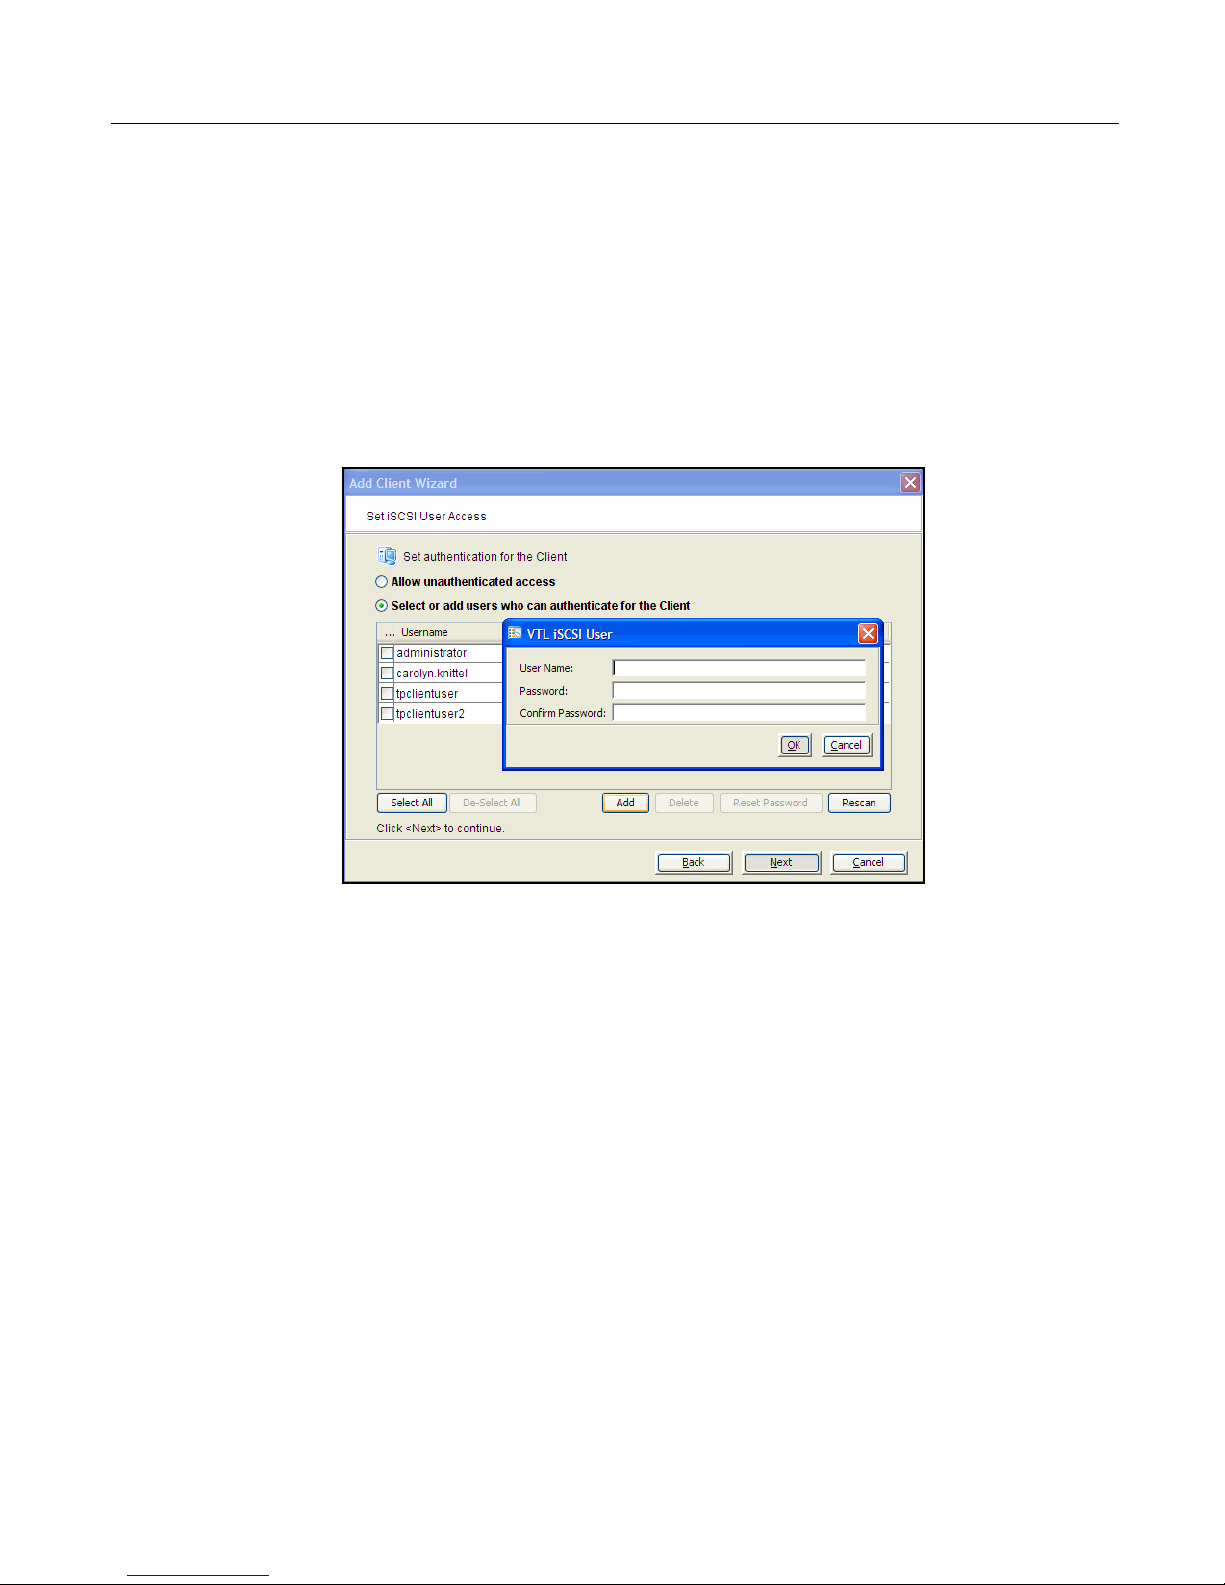
iSCSI Clients
By default, when a backup server is added as an iSCSI client of a nTier VTL
appliance, it becomes an iSCSI initiator. The initiator name is important because
it is the main identity of an iSCSI initiator.
6. To define authenticated access (using CHAP), select Select or add users who
can authenticate for the client. Select from iSCSI users you have already
created in the VTL Console (refer to ’iSCSI users’) or select Add to create a new
user.
More than one username/password pair can be assigned to the client, but they
will be useful only when coming from a machine with an authorized initiator
name.
7. For unauthenticated access, select Allow unauthenticated access. The nTier
VTL appliance will recognize the client as long as it has an authorized initiator
name.
8. Click Finish when you are done.
The new client is added under the SAN Clients object.
Create targets for the iSCSI client to log onto
1. In the VTL Console, expand the new SAN Clients object until you see the iSCSI
object.
2. Right-click the iSCSI object and select Create Target.
Implementing nTier Deduplication 77
Page 81

iSCSI Clients
3. Enter a name for the target or accept the default; select the IP address of the
adapter on the nTier VTL appliance. The list includes all Ethernet adapters you
have configured on the server.
Note: Network adapter(s) on the backup server need to be on the same
subnet(s) as the selected adapter(s) on the nTier VTL appliance.
4. Use the default starting LUN.
LUN IDs must start with zero.
Once the iSCSI target is created for a client, LUNs can be assigned under the
target using available virtual iSCSI devices.
5. Confirm all information and click Finish to show the iSCSI target in the navigation
tree.
6. Close the confirmation message.
7. In the next message, select Yes to assign a resource (virtual tape library or
drive) to the target. Continue with step 2 under ’Using a client object’.
If you select No, refer to ’Assigning virtual tape libraries to backup servers’ at a
later time for information on assigning virtual resources to client targets.
Log the client onto the target
The following steps are for the Microsoft iSCSI Initiator. If you are using a different
iSCSI initiator, refer to the documentation provided by the vendor.
1. Return to the backup server. To see the iSCSI targets from the client machine,
run Microsoft iSCSI Initiator again or, if the application is still open, click the
Tar ge t s tab.
Implementing nTier Deduplication 78
Page 82

iSCSI Clients
If the iSCSI target assigned to the client is not listed, click Refresh. Assigned
iSCSI targets should now appear.
2. Select the added target and click Log On. If it is desirable to have a persistent
target, select Automatically restore this connection when the system boots.
3. Click Advanced and select CHAP logon information in the Advanced Settings
dialog. Replace the initiator name with any of the usernames you selected as an
iSCSI user for this client. In Target Secret, enter the password associated with
that username.
Click OK.
4. Click OK to log on to the target.
The status for the target will change from Inactive to Connected.
The Targ et s tab lists all iSCSI targets, whether or not they are connected. To log
off a backup server from its connection, select the target, click Details, select the
Target Identifier, and then click Log Off.
If you selected the option to Automatically restore this connection, the iSCSI
target is listed in the Persistent Targets tab.
5. Click OK to close the iSCSI Initiator.
Setup using Open iSCSI
This example adds a backup server running CentOS 5.
Prepare the iSCSI initiator
1. On the client side, type the following command to find out the initiator name:
[root@vm-centos5-fs ~]# cat /etc/iscsi/initiatorname.iscsi
Result:
InitiatorName=iqn.2005-03.com.redhat:01.98190cbd482
2. In the VTL Console, create a client using the client’s initiator name and assign
the library to the client.
3. On the client side, type the following command to discover the target name:
[root@vm-centos5-fs ~]# iscsiadm -m discovery -t
sendtargets -p 172.30.128.36:3260
Result:
172.30.128.36:3260,0 iqn.2000-03.com.falconstor:vtl.h128-
36.fsad-1
4. On the client side, type the following command to add a custom iSCSI portal to
the database:
[root@vm-centos5-fs ~]# iscsiadm -m node -o new -T
iqn.2000-03.com.falconstor:vtl.h128-36.fsad-1 -p
Implementing nTier Deduplication 79
Page 83

iSCSI Clients
172.30.128.36:3260
Result: new iSCSI node record added.
5. On the client side, type the following command to log in:
[root@vm-centos5-fs ~]# iscsiadm -m node -T iqn.2000-
03.com.falconstor:vtl.h128-36.fsad-1 -p
172.30.128.36:3260 -l
6. On the client side, type the following command to see if the library has been
attached by the system:
[root@vm-centos5-fs ~]# cat /proc/scsi/scsi
Attached devices:
• Host: scsi2 Channel: 00 Id: 00 Lun: 00
• Vendor: SPECTRA Model: T120 Rev: 2000
• Type: Medium Changer ANSI SCSI revision: 03
Host: scsi2 Channel: 00 Id: 00 Lun: 01
• Vendor: IBM Model: ULTRIUM-TD3 Rev: 2150
• Type: Sequential-Access ANSI SCSI revision: 03
Host: scsi2 Channel: 00 Id: 00 Lun: 02
• Vendor: IBM Model: ULTRIUM-TD3 Rev: 2150
• Type: Sequential-Access ANSI SCSI revision: 03
7. To log out, type the following command:
iscsiadm -m node -T iqn.2000-03.com.falconstor:vtl.h128-
36.fsad-1 -p 172.30.128.36:3260 -u
8. To remove the discovery entry in the database, type the following command:
iscsiadm -m node -o delete -T iqn.2000-
03.com.falconstor:vtl.h128-36.fsad-1 -p
172.30.128.36:3260
9. To display all entries in the database, type the following command:
iscsiadm -m node”
Add your iSCSI client
Refer to ’Add your iSCSI client’.
Create targets for the iSCSI client to log onto
Refer to ’Create targets for the iSCSI client to log onto’.
Implementing nTier Deduplication 80
Page 84

Linux client configuration
Prepare the iSCSI initiator
You must install and configure an iSCSI software initiator on each of your Linux
client machines.
1. Download the latest production iSCSI initiator from the following website: http://
sourceforge.net/projects/linux-iscsi/
2. Extract the files from the .gz file that you downloaded by typing:
tar xfvz filename
For example: tar xfvz linux-iscsi-3.4.3.gz
3. Compile the iSCSI initiator.
iSCSI Clients
To do this, go to the newly created directory (such as
the following commands:
make clean
make
make install
4. Edit the /etc/iscsi.conf file.
If you are not using CHAP, add the following line to the end of the file:
DiscoveryAddress=IP address of VTL server
For example: DiscoveryAddress=192.10.10.1
If you are using CHAP, add the following lines to the end of the file:
DiscoveryAddress=IP address of VTL server
OutgoingUsername=CHAP username
OutgoingPassword=CHAP password
You must make a note of the CHAP username and password because you will
have to enter it in the VTL Console.
5. Start the initiator by typing:
/etc/init.d/iscsi start
Add your iSCSI client
linux-iscsi-3.4.3) and type
Refer to ’Add your iSCSI client’.
Create targets for the iSCSI client to log onto
Refer to ’Create targets for the iSCSI client to log onto’.
Implementing nTier Deduplication 81
Page 85

Log the client onto the target
On the client machine, type the following command to log the client onto the target:
/etc/init.d/iscsi reload
Afterwards, you can display a list of all the disks that this client can access (including
the target) by typing:
cat /proc/scsi/scsi
Solaris client configuration with iSCSI only
This example adds a backup server running Solaris 9 with the Sun iSCSI Device
Driver.
Prepare the iSCSI initiator
1. On the client side, type the following command to find out the initiator name:
[root@h42-72 /]# iscsiadm list initiator-node
iSCSI Clients
Initiator node name: iqn.1986-03.com.sun:01:f503a3fbffff.46f9fdb6
Initiator node alias: h42-72
• Login Parameters (Default/Configured):
Header Digest: NONE/Data Digest: NONE/-
• Authentication Type: NONE
• RADIUS Server: NONE
• RADIUS access: unknown
2. On the nTier VTL appliance, create a client using the client’s initiator node name
and assign the library to the client.
3. On the client side, type the following command to add the discovery address:
[root@h42-72 /]# iscsiadm add discovery-address
172.30.128.36
4. On the client side, type the following command to make sure the address has
been added.
[root@h42-72 /]# iscsiadm list discovery-address
The discovery address is displayed: 172.30.128.36:3260
5. On the client side, type the following command to enable the SendTargets
option.
[root@h42-72 /]# iscsiadm modify discovery -t enable
6. Type the following command to rescan the devices:
devfsadm -i iscsi
Implementing nTier Deduplication 82
Page 86

7. On the client side, type the following command to list a target's current
parameters, connection state, and the method that was used for the target's
discovery:
[root@h42-72 /]# iscsiadm list target -S
Target: iqn.2000-03.com.falconstor:vtl.h128-36.fsdaf-2
• Target Portal Group Tag: 0
• Connections: 1
• LUN: 1
Vendor: SPECTRA
Product: ULTIRUM3
OS Device Name: /dev/rmt/0
Add your iSCSI client
Refer to ’Add your iSCSI client’.
Create targets for the iSCSI client to log onto
iSCSI Clients
Refer to ’Create targets for the iSCSI client to log onto’.
Log the client onto the target
Refer to ’Log the client onto the target’.
Disable iSCSI
To disable iSCSI for a nTier VTL appliance, right-click on the server object in the
VTL Console and select Options --> Disable iSCSI.
Note that before you can disable iSCSI, you must remove all iSCSI initiators and
targets for this nTier VTL appliance.
Implementing nTier Deduplication 83
Page 87
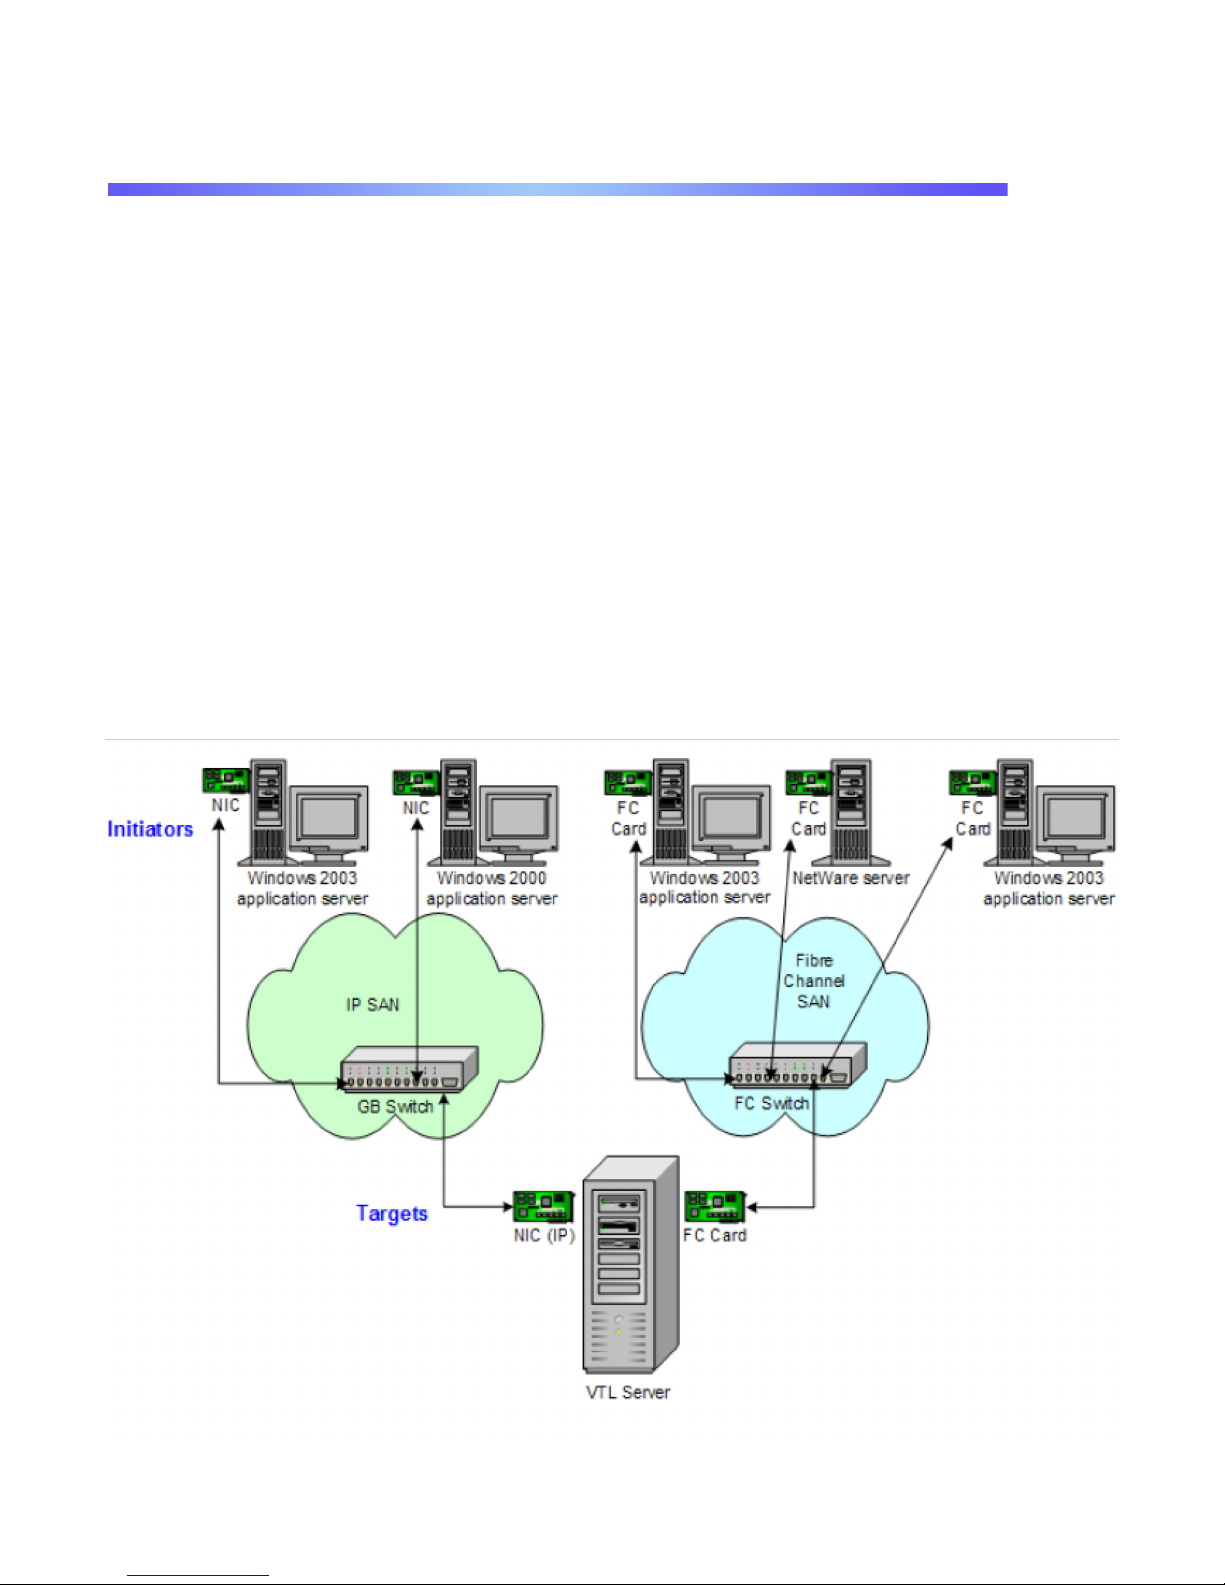
Fibre Channel Clients
Overview
Just as the nTier FalconStor VTL appliance supports different types of storage
devices (Fibre Channel and iSCSI), the nTier FalconStor VTL appliance is protocolindependent and supports multiple outbound target protocols, including Fibre
Channel Target Mode.
FalconStor VTL support for the Fibre Channel protocol allows any Fibre Channelenabled system to take advantage of the extensive FalconStor VTL storage
capabilities such as virtualization, replication, and security. FalconStor VTL supports
all Fibre Channel topologies including point-to-point, fabric, and arbitrated loop.
This chapter provides configuration information for Fibre Channel Target Mode as
well as the associated Fibre Channel SAN equipment (i.e. switch, T3, etc.).
As you can see from the illustration above, an application server can be either an
iSCSI client or a Fibre Channel client, but not both. Using separate cards and
switches, you can have all types of FalconStor VTL Clients (FC and iSCSI) on your
storage network. \
Implementing nTier Deduplication 84
Page 88

Fibre Channel Clients
Fibre Channel hardware configuration
FalconStor VTL supports HBAs for the nTier VTL appliance:
Refer to the certification matrix on the Spectra Logic website for a list of HBAs that
are currently certified. The certification matrix can be found at:
http://www.spectralogic.com; navigate to
Home : Service and Support: Documentation: Compatibility Matrices
Isolated zoning Each zone can contain no more than two ports or two WWPNs. This applies to both
initiator zones (storage) and target zones (clients).
FC switches For the best performance, make sure your cards are the highest capacity supported
by your switch. Check the certification matrix on Spectra Logic’s website to see a
complete list of certified cards.
QLogic HBAs
Configure
QLogic HBAs
You must configure your QLogic HBAs.
Please check with the manufacturer of your specific HBA for instructions on how to
make these configuration changes.
1. When the QLogic Corporation notice appears onscreen, press Ctrl+Q to enter
the QLogic Fibre Channel card configuration utility.
You will see a list of adapters if you have more than one card in your machine.
2. Hit Enter to select the card you wish to configure and then select Configuration
Settings.
3. Select Advanced Adapter Settings from the Configuration Settings menu.
4. Set the Execution Throttle to 255 and the Port Down Retry Count from 8
(default) to 1.
5. Depending upon the topology of the switch/hub you are using, follow the
directions in the appropriate section below for each card.
Afterwards, be sure to save your settings.
6. Scroll down to Exit Fast!UTIL on the Fast!UTIL Options menu, hit Enter, and
then select Reboot System.
Arbitrated Loop
topology
When setting up nTier VTL appliances and Clients on a Fibre Channel network
using an Arbitrated Loop topology (i.e., a hub or a switch set in Loop or Stealth
mode), we recommend that each Fibre Channel card be configured in the following
way:
1. Enable hard addressing and set each ALPA (Arbitrated Loop Port Address) in
the environment to a unique address.
Implementing nTier Deduplication 85
Page 89

Fibre Channel Clients
For example, if using a QLogic 2200 HBA, the following settings must be set
through the QLogic BIOS:
Configure Settings --> Host Adapter Settings --> Adapter Hard Loop ID: Enabled
Configure Settings --> Host Adapter Settings --> Hard Loop ID: ##
where ## is a number between 1 to 124.
2. Set the topology the HBA will use to Loop Only.
If you are using a QLogic 2200 HBA, the topology is set through the QLogic
BIOS: Configure Settings --> Extended Firmware settings --> Connection
Option: Loop Only
Fabric topology When setting up nTier VTL appliances and Clients on a Fibre Channel network
using a Fabric topology, we recommend that you set the topology that each HBA will
use to log into your switch to Point-to-Point Only.
If you are using a QLogic 2200 HBA, the topology is set through the QLogic BIOS:
Configure Settings --> Extended Firmware settings --> Connection Option: Point-to-
Point Only.
Implementing nTier Deduplication 86
Page 90

Adding a Fibre Channel client
1. In the VTL Console, right-click the SAN Clients object and select Add.
2. Enter the client name. You can click Find to discover the client and make sure it
is running.
Fibre Channel Clients
3. Select the Fibre Channel protocol.
4. For a backup server using Fibre Channel, select the target WWPN for this
initiator.
The target WWPN is the nTier VTL appliance.
If FC initiator ports on the backup server are already zoned with the VTL target
port and are properly connected/powered up, they are listed automatically and
you can select specific initiators.
If only one initiator WWPN is found, FalconStor VTL selects it for you and the
selection dialog is not displayed.
If no WWPNs are listed, the backup server is not currently zoned with the VTL
appliance.
• Enable Volume Set Addressing may be required for particular Fibre
Channel clients, such as HP-UX clients that require VSA to access
storage devices.
• Select Enable Celerra Support if you have a licensed EMC Celerra
client.
5. Click Finish when you are done.
Implementing nTier Deduplication 87
Page 91

CallHome
administrator@your_company.com
admin2@your_company.com;on-call@your_company.com
CallHome is a unique customer support utility that proactively identifies and
diagnoses potential system or component failures and automatically notifies system
administrators via email.
Using pre-configured scripts (called triggers), CallHome monitors a set of pre-
defined, critical system components (SCSI drive errors, offline device, etc.). With its
open architecture, administrators can easily register new elements to be monitored
by these scripts.
When an error is triggered, CallHome uses the built-in X-ray feature to capture the
appropriate information, including the FalconStor VTL event log, as well as a
snapshot of the FalconStor VTL appliance’s current configuration and environment.
The technical information needed to diagnose the reported problem is then sent to a
system administrator.
Note that if a trigger report is bigger than 4 Kb, the report will be zipped and attached
as a file to the CallHome email. The report text will be replaced in the email body
with an informational message to inform the user about the attachment.
With CallHome, system administrators are able to take corrective measures within
the shortest amount of time, ensuring optimum service uptime and IT efficiency.
Configure CallHome
1. In the Console, right-click on your nTier VTL appliance and select Options -->
Enable CallHome.
2. Enter general information for your CallHome configuration.
SMTP Server - Specify the mail server that CallHome should use to send out
notification emails.
Implementing nTier Deduplication 88
Page 92

CallHome
SMTP Port - Specify the mail server port that CallHome should use.
SMTP Username/Password - Specify the user account that will be used by
CallHome to log into the mail server.
User Account - Specify the email account that will be used in the “From” field of
emails sent by CallHome.
Target Email - Specify the email address of the account that will receive emails
from CallHome. This will be used in the “To” field of emails sent by CallHome.
CC Email - Specify any other email accounts that should receive emails from
CallHome.
Subject - Specify the text that should appear on the subject line.
Interval - Specify the time period between each activation of CallHome.
3. On the Signature tab, enter the contact information that should appear in each
CallHome email.
Implementing nTier Deduplication 89
Page 93

CallHome
4. On the Trigger tab, set the triggers that will cause CallHome to send an email.
Triggers are the scripts/programs that perform various types of error checking
when CallHome activates. By default, the nTier FalconStor VTL includes scripts/
programs that check for low system memory, changes to the FalconStor VTL
XML configuration file, and relevant new entries in the system log.
The following are the default scripts that are provided:
chkcore.sh 10 (Core file check) - This script checks to see if a new core file has
been created by the operating system in the
bin directory of FalconStor VTL. If a
core file is found, CallHome compresses it, deletes the original, and sends an
email report but does not send the compressed core file (which can still be
large). If there are more than 10 (variable) compressed core files, they will all be
deleted.
kfsnmem.sh 10 (FalconStor VTL memory management check) - This script
checks to see if the maximum number of memory pages has been set. If not,
CallHome sends an email report. If it is set, the script checks the available
memory pages. If the percentage is lower than the specified percentage (default
is 10), CallHome sends an email report.
memchk.sh 95 (Memory check) - This script takes in a percentage as the
parameter and checks whether the available system memory is below this
percentage. If yes, CallHome sends an email report.
ipstorsyslogchk.sh (System log check) - This script looks at the system log for
specific entries that it needs to report on. This is determined by information
specified on the System Log Check and System Log Ignore tabs. If matches are
found, CallHome sends an email report.
ipstorckcfg check ipstor.conf (FalconStor VTL configuration check) - This
script checks for any changes made to the XML configuration file for FalconStor
VTL, ipstor.conf. If no previous version exists, the script creates a duplicate of
the current ipstor.conf so that next time the script is run, a comparison can be
Implementing nTier Deduplication 90
Page 94

CallHome
made. If there is already a file for comparison, the script goes ahead and checks
for changes. If changes are found, they are recorded in a file called
ipstorconf.diff and an email report is sent. The next time changes are found,
ipstorconf.diff will be renamed to ipstorconf.diff.001, and the new changes will
replace the content in ipstorconf.diff. This process repeats each time new
changes are found, with the number at the end of older diff filename
incremented.
diskusagechk.sh / 95 (Disk usage check) - This script checks the disk space
usage of the root file system. If the current percentage is over the specified
percentage (default is 95), CallHome sends an email report. You can add
multiple
diskusagechk.sh triggers for different mount points (for example, /home
could be used in another trigger).
defaultipchk.sh eth0 10.1.1.1 (NIC IP address check) - This script checks that
the IP address for the specified NIC matches what is specified here. If it does
not, CallHome sends an email report. You can add multiple
defaultipcheck.sh
triggers for different NICs (for example eth1 could be used in another trigger). Be
sure to specify the correct IP address for each NIC.
ipstorstatus.sh (FalconStor VTL status check) - This script calls “vtl status” and
checks if any module of FalconStor VTL has stopped. If so, CallHome sends an
email report.
If you need to modify an existing script or create a new script/program, refer to
’Script/program trigger information’ for more information.
5. On the XRay tab, select the components that will be included in the X-ray.
Note: Because of its size (minimum of 2 MB), the X-ray file is not sent by
default with each notification email. It will, however, be available, should the
system administrator require it.
Implementing nTier Deduplication 91
Page 95

CallHome
System Information - When this option is selected, the X-ray creates a file called
info which contains information about the entire system, including: host name,
disk usage, operating system version, mounted file systems, kernel version,
CPU, running processes, IOCore information, and memory.
VTL Configuration - This information is retrieved from the /usr/local/vtl/etc/
<hostname> directory. All configuration information (vtl.conf, vtl.dat,
vtlSNMP.conf, etc.), except for shared secret information, is collected.
SCSI Devices - SCSI device information. This information is included in the
file.
VTL Virtual Device - Virtual device information. This information is included in
the
info file.
Fibre Channel - Fibre Channel information.
Log File - The system message file,
appliance messages, including status and error messages.
Loaded Kernel - Loaded kernel modules. This information is included in the
file.
Network Configuration - Network configuration information is included in the
file.
Kernel Symbols - This information is collected in the event it will need to be used
for debugging purposes.
Core File - The /usr/local/vtl path will be searched for any core files that might
have been generated to further help in debugging reported problems.
Scan Physical Devices - Physical devices will be scanned and information about
them will be included.
6. On the System Log Check tab, indicate the terms that should be tracked in the
system log by CallHome.
messages, stores all nTier FalconStor VTL
info
info
info
Implementing nTier Deduplication 92
Page 96
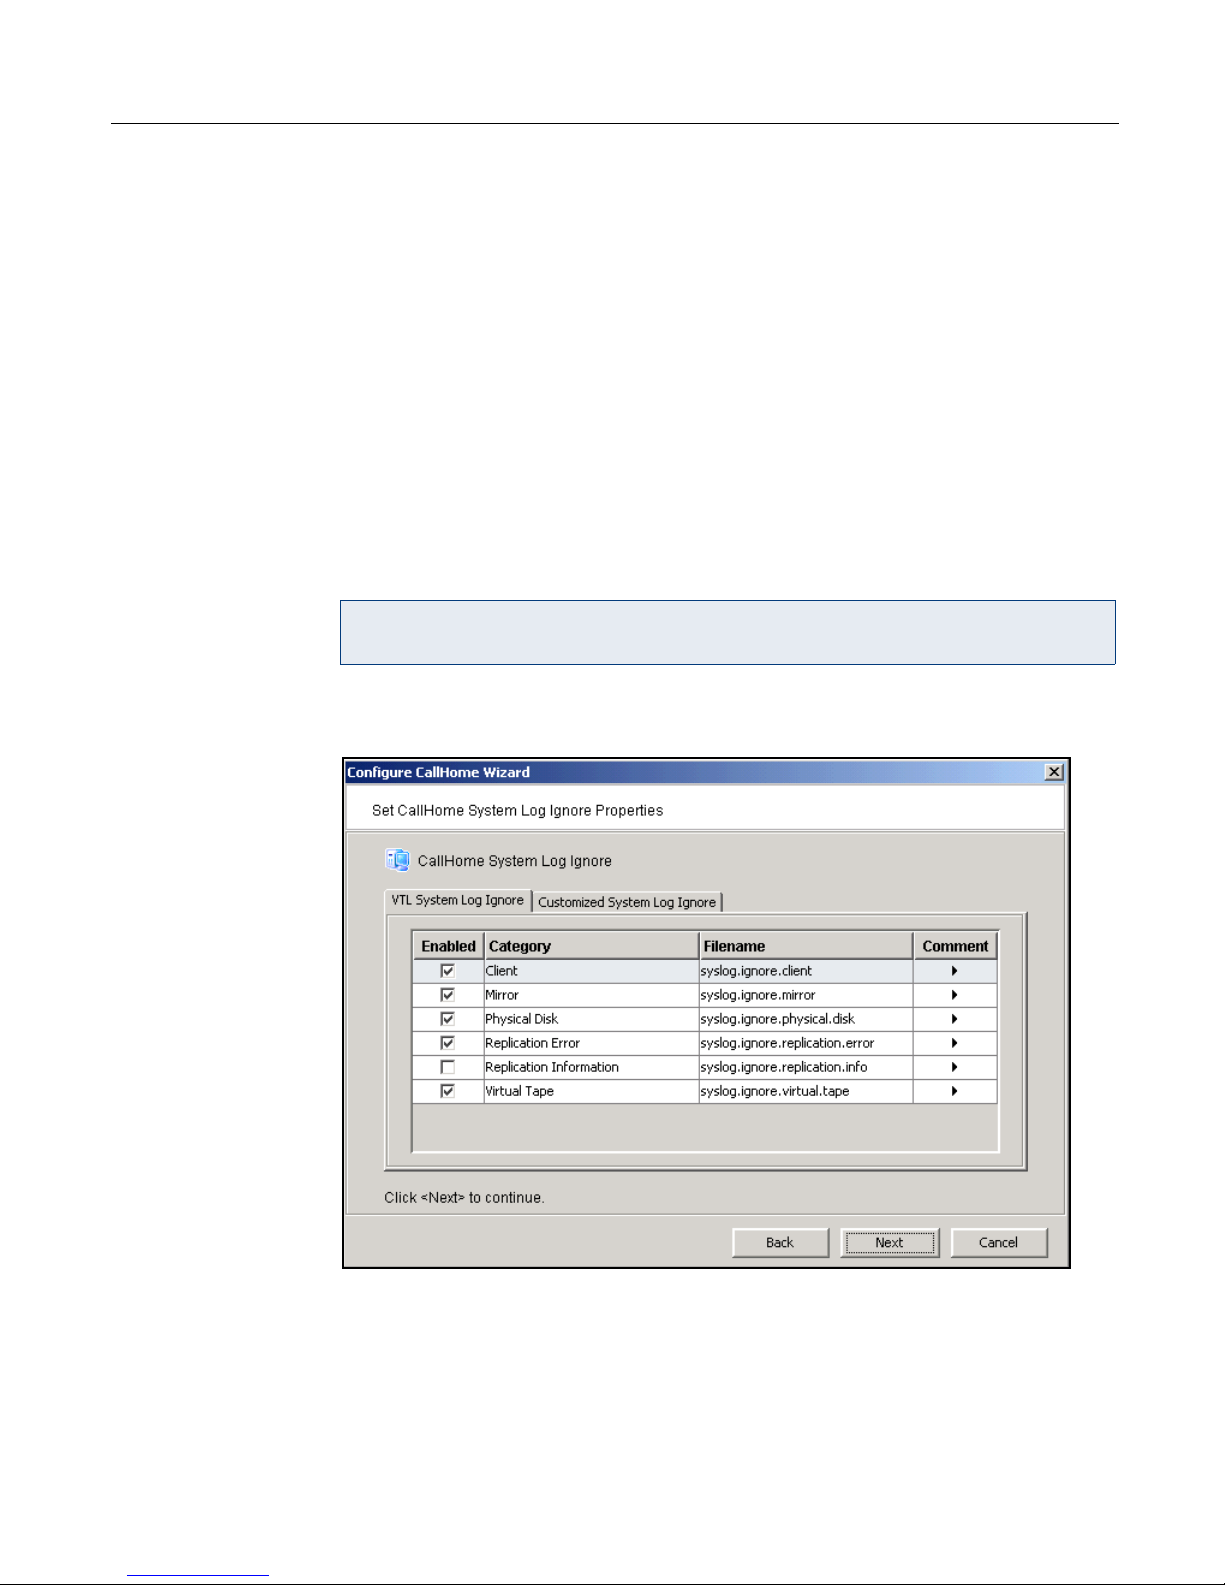
CallHome
The system log records important events or errors that occur in the system,
including those generated by FalconStor VTL.
This tab allows you to rule out entries in the system log that have nothing to do
with FalconStor VTL, and to list the types of log entries generated by FalconStor
VTL that CallHome needs to examine. Entries that do not match the entries
entered here will be ignored, regardless of whether or not they are relevant to
FalconStor VTL.
The trigger for monitoring the system log is
vtlsyslogchk.sh. To inform the trigger
of which specific log entries need to be captured, you can specify the general
types of entries that need to be inspected by CallHome. On the next tab, you can
enter terms to ignore, thereby eliminating entries that match these general types,
yet can still be disregarded. The resulting subset contains all entries for which
CallHome needs to send out email reports.
Each line is a regular expression. The regular expression rules follow the pattern
for AWK (a standard Unix utility).
Note: By default, the system log file is included in the X-ray file, which is not
sent with each notification email.
7. On the System Log Ignore tab, indicate the items that should not be tracked by
CallHome.
Select the Customized System Log Ignore tab to exclude system log entries that
were included by the previous tab. You can enter terms to ignore, thereby
eliminating entries that will cause CallHome to send out email reports.
Each line is a regular expression. The regular expression rules follow the pattern
for AWK (a standard Unix utility).
Implementing nTier Deduplication 93
Page 97

Modify CallHome properties
Once CallHome is enabled, you can modify the information by right-clicking on your
nTier VTL appliance and selecting CallHome.
Click on the appropriate tab to update the desired information.
Script/program trigger information
CallHome uses script/program triggers to perform various types of error checking.
By default, the FalconStor VTL includes several scripts/programs that check for low
system memory, changes to the FalconStor VTL XML configuration file, and
relevant new entries in the system log.
Custom email destination
You can specify an email address to override the default Target Email or a text
subject to override the default Subject. To do this:
1. Right-click on your nTier VTL appliance and select CallHome --> Trigger tab.
CallHome
2. For an existing trigger, highlight the trigger and click Edit.
For a new trigger, click Add.
Note: If you specify an email address, it overrides the return code. Therefore, no
attachment will be sent, regardless of the return code.
New script/program
The trigger can be a shell script or a program (Java, C, etc.). If you create a new
script/program, you must add it in the Console, so that CallHome knows of its
existence.
To do this:
1. Right-click on your nTier VTL appliance and select CallHome --> Trigger tab.
2. Click Add.
Return codes Return codes determine what happens as a result of the script’s/program’s
execution. The following return codes are valid:
• 0: No action is required and no email is sent.
• 1: CallHome attaches all files in $ISHOME/etc and $ISHOME/log to the
email.
• 2: CallHome sends the X-ray file as an attachment (which includes all files in
$ISHOME/etc and $ISHOME/log). Because of its size (minimum of 2 MB),
we do not recommend attaching the X-ray file with each notification email.
• 3: CallHome sends email without any attachments.
Implementing nTier Deduplication 94
Page 98

CallHome
The $ISHOME/etc directory contains an FalconStor VTL configuration file
(containing virtual device, physical device, HBA, NAS, database agent, etc.
information). The $ISHOME/log directory contains CallHome logs (containing events
and output of triggers).
Output from
trigger
In order for a trigger to send useful information in the email body, it must redirect its
output to the environment variable $IPSTORCLHMLOG.
Sample script The following is the content of the FalconStor VTL status check trigger,
#!/bin/sh
RET=0
if [ -f /etc/.is.sh ]
then
. /etc/.is.sh
else
echo Installation is not complete. Environment profile is missing in
/etc.
echo
exit 0 # don't want to report error here so have to exit with error
code 0
fi
$ISHOME/bin/vtl status | grep STOPPED >> $VTLCLHMLOG
if [ $? -eq 0 ] ; then
RET=1
fi
exit $RET
If any FalconStor VTL module has stopped, this trigger generates a return code of 1
and sends an attachment of all files under $ISHOME/etc and $ISHOME/log.
vtlstatus.sh:
Implementing nTier Deduplication 95
Page 99

Troubleshooting
General Console operations
The VTL Console is unable to connect to a nTier VTL appliance
There are several operations that occur when the Console connects to the server. A
dialog indicates the current step. If there is a failure, the word Failed appears at the
end of the step. Determining the current phase of connection can help you pinpoint
the problem. It is also possible that the server is busy. Wait for a while and retry. At
what step did the connection fail?
• Connecting to the nTier VTL appliance - If the IP address of the server
has recently changed, delete the server from the Console and re-add it. If
you entered a server name, try entering its IP address instead. If this does
not help or if the IP address has not changed, ping the target machine.
If ping does not reply, ping other machines in the same subnet. If there is
still no response, there is a network problem. Run a network command or
utility to show the status of the network.
• Verifying user name and password - Check the user name and the
password. You may use the root password or any other administrator or
read-only user that you have created with FalconStor VTL previously. Make
sure the user name and password exist on the server by opening a local
session. The password is case-sensitive. Make sure the Caps Lock key is
not pressed on the keyboard.
From the machine where VTL Console is installed open a SSH session to the
nTier VTL appliance. Log on to the server with the same user name and password. If the connection between the two machines is fine, the Console should be
able to connect to the server unless some important server module is not running, such as the communication module. To see the status of all modules, at the
machine where FalconStor VTL is running, go to the system console and type:
ipstor status.
If a module has stopped, restart it with the command:
vtl restart <module name>
Afterwards, go back to the Console and retry connecting to the server.
• Retrieving the server configuration - If there is something wrong with the
configuration, an error message may appear. Contact technical support.
• Checking the FalconStor VTL license - Contact technical support.
• Expanding the nTier VTL appliance node - This may be due to high
memory usage. Check the memory consumption on the machine. If it is very
high, stop all unnecessary processes. If the problem persists or if the
memory consumption is normal, contact technical support.
Implementing nTier Deduplication 96
Page 100

Requested operations cannot be performed from the Console
Troubleshooting
Check server
activity
Sometimes the nTier VTL appliance is very busy with operations that cause high
CPU utilization (such as expanding tapes or data compression).
You can check the Event Log or syslog for messages that show you the current
activity of the system.
If you see messages such as Server Busy or RPC Timeout, you should wait awhile
and retry your action after the current operation finishes.
If the problem persists or the server is not really busy, contact technical support.
Console operations are very slow
Check Console
machine
memory usage
Check server
activity
On the machine where you are using the VTL Console, use the appropriate system
utility (such as Task Manager) to show the memory usage of all running processes.
If the memory usage is unusual, stop all unnecessary processes from running or
provide more memory.
Sometimes the nTier VTL appliance is very busy performing heavy processing. You
can check the Event Log or syslog for excessive pending SCSI commands on a
single SCSI queue that may delay update requests coming from the Console. Also,
try starting a second instance of the Console. If the second Console cannot
establish connections, that means the server is busy with previous RPC operations.
If this is the case, you should wait awhile and retry your action after the current
processing finishes.
If the problem persists or the server is not really busy, contact technical support.
Physical resources
The VTL Console does not show physical storage devices as expected
There are several steps to try when physical storage devices have been connected/
assigned to the nTier VTL appliance yet they are not showing in the VTL Console.
Rescan devices Perform a rescan from the VTL Console (right-click on the Physical Resources
object and select Rescan). Make sure that the Discover New Devices option is
specified. Specify a LUN Range that you reasonably expect will include the LUN.
Check system
log messages
Check device
type
Check the Event Log or syslog for error messages that may correspond to the
rescan operation and report failures on SCSI devices. It may be that even though
the devices were discovered, they were not accessible due to errors.
For external SCSI devices, make sure you check the following:
• Make sure the system is powered on. Perform a power cycle to make sure.
• Physically make sure all the cable connectors are securely plugged in.
Implementing nTier Deduplication 97
 Loading...