

Page 1
Remote Library Controller User Guide
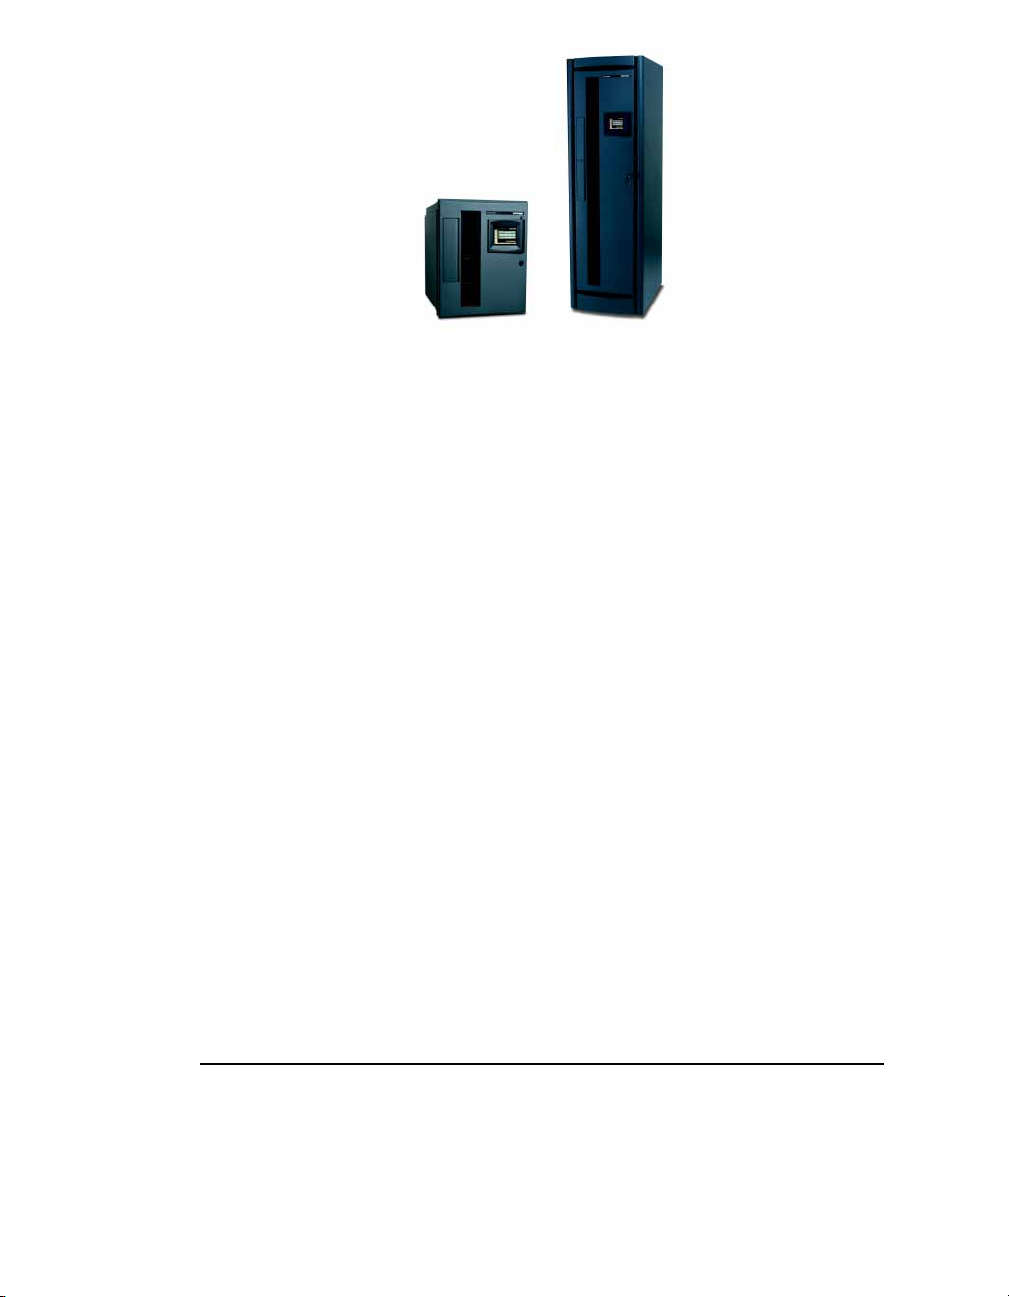
Spectra 12000™ Library
Spectra 64000™ Library
This Guide
This guide describes the Remote operation of the Spectra 12000
library and the Spectra 64000 library. This guide is intended to be
used with, not in place of, the Spectra 12000 Library User Guide, or
the Spectra 64000 Library User Guide.
Related Publications
These publications are also available from Spectra Logic:
Spectra 12000 Library User Guide (90910889) and the Spectra 64000
Library User Guide
the use of each library.
Release Notes: Spectra 12000, Spectra 64000 (90910852): provides
last-minute information about the library.
Developer Guide: Spectra 12000, Spectra 64000 (90910850):
provides SCSI reference material and other reference information
useful to application developers.
(90910851): provides detailed information for
© 2001 Spectra Logic Corporation. All Rights Reser ved.
Document # 90910059 Revision A December 2001
Page 2

2Notices
Notices
Except as expressly stated herein, Spectra Logic Corporation makes
available the Spectra 12000 and Spectra 64000 libraries and associated
documentation on an “as is” basis, without warranty of any kind, either
expressed or implied, including but not limited to the implied warranties
of merchantability or fitness for a particular purpose. In no event shall
Spectra Logic be liable for any loss of profits, loss of business, loss of use
or data, interruption of business, or for indirect, special, incidental or
consequential damages of any kind, even if Spectra Logic has been advised
of the possibility of such damages arising from any defect or error.
Information furnished in this manual is believed to be accurate and reliable. However, no
responsibility is assumed by Spectra Logic for its use. Due to continuing research and development,
Spectra Logic may revise this publication from time to time without notice, and reserves the right to
change any product specification at any time without notice.
Some products or services mentioned in this manual are provided by companies other than Spectra
Logic. Inquiries about one or more of these products or services should be sent directly to the
company in question. This manual refers to the following brand or product names, registered
trademarks, and trademarks that are listed according to their respective owners. These trademarks
may be registered in this country, other countries, or both.
Spectra Logic Corporation Microsoft Silicon Graphics I ncorporated
Gator™ Microsoft
Spectra 12000™ Windows 95
Spectra 64000™ Windows NT
Exa byte Cor porati on Qua ntum Co rporat ion Sol aris
TM
Exabyte
TM
EXB-210
TM
Mammoth
Hewlett Packard Seagate
TM
HP
®
IRIX
TM
TM
TM
DLT
TM
Quantum
Seagate Corporation X/Open Company, Ltd.
TM
®
Sun Mi crosystems
®
Java
®
®
Sun
®
SunOS
exclusively licenses the following:
®
UNIX
Page 3

Notices 3
License
You have acquired a Spectra 12000 library or a Spectra 64000 library that includes software owned
or licensed by Spectra Logic from one or more software licensors (“Software Suppliers”). Such
software products, as well as associated media, printed materials and “online” or electronic
documentation (“SOFTWARE”) are protected by copyright laws and international copyright treaties,
as well as other intellectual property laws and treaties.
If you do not agree to this end user license agreement (“EULA”), do not use the Spectra 12000
library or the Spectra 64000 library; instead, promptly contact Spectra Logic for instructions on
return of the Spectra 12000 or Spectra 64000 library for a refund. Any use of the SOFTWARE,
including but not limited to use on the Spectra 12000 or Spectra 64000 library, will constitute your
agreement to this eula (or ratification of any previous consent).
Grant of License. The SOFTWARE is licensed on a non-exclusive basis, not sold. This EULA grants
you the following rights to the SOFTWARE:
You may use the SOFTWARE only on the Spectra 12000 and Spectra 64000 libraries.
Not Fault Tolerant. The SOFTWARE is not fault tolerant. Spectra Logic has independently
determined how to use the SOFTWARE in the Spectra 12000 and Spectra 64000 libraries, and
suppliers have relied upon Spectra Logic to conduct sufficient testing to determine that the
SOFTWARE is suitable for such use.
No Warranties For the SOFTWARE. Except as expressly stated herein, the SOFTWARE is
provided “AS IS” and with all faults. The entire risk as to satisfactory quality, performance,
accuracy, and effort (including lack of negligence) is with you. Also, there is no warranty
against interference with your enjoyment of the SOFTWARE or against infringement. If you
have received any warranties regarding the SOFTWARE, those warranties do not originate from, and
are not binding on SOFTWARE suppliers.
Note on Java Support. The SOFTWARE may contain support for programs written in Java. Java
technology is not fault tolerant and is not designed, manufactured, or intended for use of resale as
online control equipment in hazardous environments requiring fail-safe performance, such as in the
operation of nuclear facilities, aircraft navigation or communications systems, air traffic control,
direct life support machines, or weapons systems, in which the failure of Java technology could lead
directly to death, personal injury, or severe physical or environmental damage.
No Liability for Certain Damages. Except as prohibited by law, SOFTWARE suppliers shall
have no liability for any indirect, special, consequential or incidental damages arising from or
in connection with the use or performance of the SOFTWARE. This limitation shall apply even
if any remedy fails of its essential purpose. In no event shall SOFTWARE suppliers,
individually, be liable for any amount in excess of U.S. two hundred fifty dollars (U.S.
$250.00).
Limitations on Reverse Engineering, Decompilation, and Disassembly. You may not reve r s e
engineer, decompile, or disassemble the SOFTWARE, except and only to the extent that such activity
is expressly permitted by applicable law notwithstanding this limitation.
Software transfer allowed with restrictions. You may permanently transfer rights under this EULA
only as part of a permanent sale or transfer of the Spectra 12000 or Spectra 64000 library, and only
if the recipient agrees to this EULA. If the SOFTWARE is an upgrade, any transfer must also include
all prior versions of the SOFTWARE.
Export restrictions. Export of the SOFTWARE from the United States is regulated by the Export
Administration Regulations (EAR, 15 CFR 730-744) of the U.S. Commerce Department, Bureau of
Export Administration. You agree to comply with the EAR in the export or re-export of the
SOFTWARE: (i) to any country to which the U.S. has embargoed or restricted the export of goods or
services, which as May 1999 include, but are not necessarily limited to Cuba, Iran, Iraq, Libya, North
Korea, Sudan, Syria, and the Federal Republic of Yugoslavia (including Serbia, but not Montenegro),
or to any national or any such country, wherever located, who intends to transit or transport the
SOFTWARE back to such country; (ii) to any person or entity who you know or have reason to know
will utilize the SOFTWARE or portion thereof in the design, development or production of nuclear,
chemical, or biological weapons; or (iii) to any person or entity who has been prohibited from
participating in U.S. export transactions by any federal agency of the U.S. government. You warrant
Page 4

4Notices
and represent that neither the BXA nor any other U.S. federal agency has suspended, revoked or
denied your export privileges.
For additional information see http://www.microsoft.com/exporting/.
Warranty
The Spectra 12000 and Spectra 64000 libraries are warranted for one year from date of shipment
from the factory. This warranty includes a Next Business Day (On-Site) service contract for sites
located in North America and the European Union, and is explained as follows:
Access to a Spectra Logic support representative any business day (not including evenings,
weekends or holidays) from 8:00 a.m. to 5:00 p.m. Mountain Time.
Service visit from a field service representative-upon verification that the unit purchased has
malfunctioned, Spectra Logic must be notified by 4:00 p.m. (local time) for a field service
representative to be dispatched that day for arrival the following business day.
Warnings and Cautions
Tap es
Caution: Use only the data cartridges approved for use with
the drives in the Spectra 12000 library or Spectra 64000
library. Improper data cartridges can cause damage to the
drives, library and cartridges.
Page 5

Conte nts 5
Chapter 1. Introduction 7
Introduction . . . . . . . . . . . . . . . . . . . . . . . . . . . . . . . . . . . . . . . . . . . . 8
Option Enablement . . . . . . . . . . . . . . . . . . . . . . . . . . . . . . . . . . . . . . 9
Setting Up the Remote Library Controller (RLC) . . . . . . . . . . . . . . . . 10
To Enable the RLC . . . . . . . . . . . . . . . . . . . . . . . . . . . . . . . . 10
To Set IP Address . . . . . . . . . . . . . . . . . . . . . . . . . . . . . . . . . 11
Before You Begin . . . . . . . . . . . . . . . . . . . . . . . . . . . . . . . . . . . . . . 12
A Tour of the Remote Library Controller . . . . . . . . . . . . . . . . . . . . . . 13
Remote Login . . . . . . . . . . . . . . . . . . . . . . . . . . . . . . . . . . . . 13
The Remote General Status Screen . . . . . . . . . . . . . . . . . . . . . . . . . . 14
Refresh . . . . . . . . . . . . . . . . . . . . . . . . . . . . . . . . . . . . . . . . . 14
Exceptions . . . . . . . . . . . . . . . . . . . . . . . . . . . . . . . . . . . . . . 14
Toolbars . . . . . . . . . . . . . . . . . . . . . . . . . . . . . . . . . . . . . . . . . . . . . 15
General Toolbar . . . . . . . . . . . . . . . . . . . . . . . . . . . . . . . . . . 15
Configuration Toolbar . . . . . . . . . . . . . . . . . . . . . . . . . . . . . . 16
Maintenance Toolbar . . . . . . . . . . . . . . . . . . . . . . . . . . . . . . . 16
Security Toolbar . . . . . . . . . . . . . . . . . . . . . . . . . . . . . . . . . . 17
Chapter 2. General 19
Inventory . . . . . . . . . . . . . . . . . . . . . . . . . . . . . . . . . . . . . . . . . . . . . 20
General Status . . . . . . . . . . . . . . . . . . . . . . . . . . . . . . . . . . . . . . . . . 22
Robotics . . . . . . . . . . . . . . . . . . . . . . . . . . . . . . . . . . . . . . . . . . . . . . 23
Drives . . . . . . . . . . . . . . . . . . . . . . . . . . . . . . . . . . . . . . . . . . 24
Media . . . . . . . . . . . . . . . . . . . . . . . . . . . . . . . . . . . . . . . . . . 24
Chapter 3. Configuration 25
Page 6

6Contents
Partition . . . . . . . . . . . . . . . . . . . . . . . . . . . . . . . . . . . . . . . . . . . . . . 26
Configure Partitions . . . . . . . . . . . . . . . . . . . . . . . . . . . . . . . 26
Resources . . . . . . . . . . . . . . . . . . . . . . . . . . . . . . . . . . . . . . . 30
Drives . . . . . . . . . . . . . . . . . . . . . . . . . . . . . . . . . . . . . . . . . . . . . . . 31
Configuring SCSI IDs, Emulation and Dip Switch Settings . . . 31
Controller . . . . . . . . . . . . . . . . . . . . . . . . . . . . . . . . . . . . . . . . . . . . 33
Configuring S-QIPs and L-QIPs . . . . . . . . . . . . . . . . . . . . . . . 33
Configuring F-QIPs . . . . . . . . . . . . . . . . . . . . . . . . . . . . . . . . 36
Chapter 4. Maintenance 41
Update Firmware . . . . . . . . . . . . . . . . . . . . . . . . . . . . . . . . . . . . . . . 42
Traces . . . . . . . . . . . . . . . . . . . . . . . . . . . . . . . . . . . . . . . . . . . . . . . 45
Diagnostic Traces . . . . . . . . . . . . . . . . . . . . . . . . . . . . . . . . . 46
Chapter 5. Security 49
Users . . . . . . . . . . . . . . . . . . . . . . . . . . . . . . . . . . . . . . . . . . . . . . . . 50
User Types . . . . . . . . . . . . . . . . . . . . . . . . . . . . . . . . . . . . . . 50
To Add or Edit a User . . . . . . . . . . . . . . . . . . . . . . . . . . . . . . 50
To Delete a User . . . . . . . . . . . . . . . . . . . . . . . . . . . . . . . . . . 52
Switch Users . . . . . . . . . . . . . . . . . . . . . . . . . . . . . . . . . . . . . . . . . . 53
Glossary of Terms 55
Page 7

1Introduction
This guide is for users who have remote management capability for their
Spectra 12000 library or Spectra 64000 library.
This chapter covers:
Introduction
Setting Up the Remote Library Controller (RLC)
A Tour of the Remote Library Controller
Toolbars
Page 8

8 Remote Library Controller User Guide
Introduction
The Spectra 12000 library and Spectra 64000 library provide a
combination of high reliability, speed, large capacity, ease of use, and
built-in redundancy to minimize or eliminate downtime. The library
features include:
Hot swappable tape drives—you can easily switch drives without
tools and without interrupting other backups.
Multiple logical libraries partitioned within a single physical library
Color touchscreen interface.
A single Spectra 12000 or Spectra 64000 library can communicate via
Fibre Channel, SCSI, Ethernet or any combination of the three.
A capacity of up to eight drives and 120 cartridges in a Spectra 12000
library, or 32 drives and 640 cartridges in a Spectra 64000 library.
Support for AIT drives.
High reliability: system redundancy allows the library to continue
operating while it is being serviced.
Import and Export tapes either individually or in removable
cartridge packs of 15.
Page 9

Chapter 1. Introduction 9
Option Enablement
Spectra Logic has added a new feature to its Spectra 12000 library and
Spectra 64000 library called Option Enablement. Option Enablement
allows the user to add several functions to their library:
CoD™ is a capacity on demand system that allows you to add library
storage capacity in increments as small as 15 slots, virtually
instantaneously. Slots are key activated and can be purchased in advance
or as needed. CoD allows you to efficiently manage your data growth,
while eliminating the need for long-range forecasting and expensive
retrofits.
NDMP Enabled by TAOS™ in your library provides a simple and effective
storage networking solution for the network attached storage (NAS) filer
environment. In this solution, the NDMP (Network Data Management
Protocol) feature enables shared backup and restore between multiple
filers via your library, which can also be attached directly to the network.
The need for dedicated hardware and shared storage software is
eliminated, reducing risk and complexity, and lowering the total cost of
ownership.
Serverless Backup Enabled by TAOS in your library shifts management of the
backup and restore process from the server to the library. With this
feature enabled, the library is able to communicate directly with other
storage devices and can backup data from a disk device directly to tape.
The server is no longer needed to manage the data I/O (input/output),
therefore freeing up the CPU for other tasks. Additionally, now that there
is one less device/step in the process, backup and restore performance is
improved.
Remote Library Controller (RLC) allows for convenient, remote (off-site)
access to your library. The Remote Library Controller can manage all
library actions, including moving tapes, creating partitions, managing
library inventory, monitoring drive and library status and performing
configurations. In addition, feature modules, such as CoD and TAOSenabled NDMP and Serverless Backup can be activated with the RLC.
To add any of these functions to your library contact Spectra Logic
Technical Support at (800) 227-4637. You will need to know the serial
number of your device (as displayed in the Serial # field after tapping the
Robotics bar) when you call. Or, go to the Spectra Logic Web site at:
http://www.spectralogic.com, for ordering information.
Page 10

10 Remote Librar y Controller User Guide
Setting Up the Remote Library Controller (RLC)
Note: You must purchase an Option Enablement Key for
RLC access from Spectra Logic.
To purchase a key call Spectra Logic Technical Support at
(800) 227-4637. Tell the representative that you would like
to purchase the Remote Library Controller Option
Enablement key. You will need the serial number of the
device (as displayed in the Serial # field after tapping the
Robotics bar) when you call. Or, go to the Spectra Logic
Web site at: http://www.spectralogic.com, for ordering
information.
To Enable the RLC
1. From the General Status screen on the Library Controller (LC) of your
library, tap Robotics. The System Setup screen displays (Figure 1-1).
Figure 1-1 The System Setup screen.
2. Tap the white section next to the Submit Key button in the Gator
Configuration section. A virtual keyboard appears.
Page 11

Chapter 1. Introduction 11
3. Enter the key on the virtual keyboard and tap OK. The key will
appear in the white box.
4. Tap Submit Key. The ability to access the RLC function will be added
to your library. You should see the RLC key located in the scroll
menu under Gator Configuration.
To Set IP Address
You must set the IP address for your library.
Caution: Spectra Logic strongly recommends entering an IP
address (or static IP address) to ensure access to your
library. By selecting Use DCHP you may lose access to
your library.
1. In the IP Address section of the System Setup screen (Figure 1-1),
enter the IP address, Subnet Mask and Gateway that you want the
library to use, and then tap Set Address.
2. Use the IP address to access your library with the RLC.
Note: Your library must connected to a network in order to
access it by remote.
Page 12

12 Remote Librar y Controller User Guide
Before You Begin
The RLC should only be used after the initial setup and configuration of
the library has occurred on site. The RLC is not intended for initial setup
and configuration.
You must know the Interne Protocol (IP) address of your library to
access it remotely. Spectra Logic recommends you use a static IP address
for RLC.
If you have a remote proxy server, see the Using Chapter in the Spectra
12000 Library User Guide or Spectra 64000 Library User Guide.
Page 13

A Tour of the Remote Library Controller
Chapter 1. Introduction 13
Figure 1-1 The Remote Login screen.
Remote Login
To access RLC:
1. Open your internet browser, and type in the library’s IP address. The
Remote Login screen (Figure 1-1) will appear.
2. To access the library, type in your user name and password and select
Login.
Note: Depending on your level of permissions, you may
not be able to perform all of the functions available in
RLC. See User Types on page 50 to determine your level of
permissions.
Page 14
14 Remote Librar y Controller User Guide
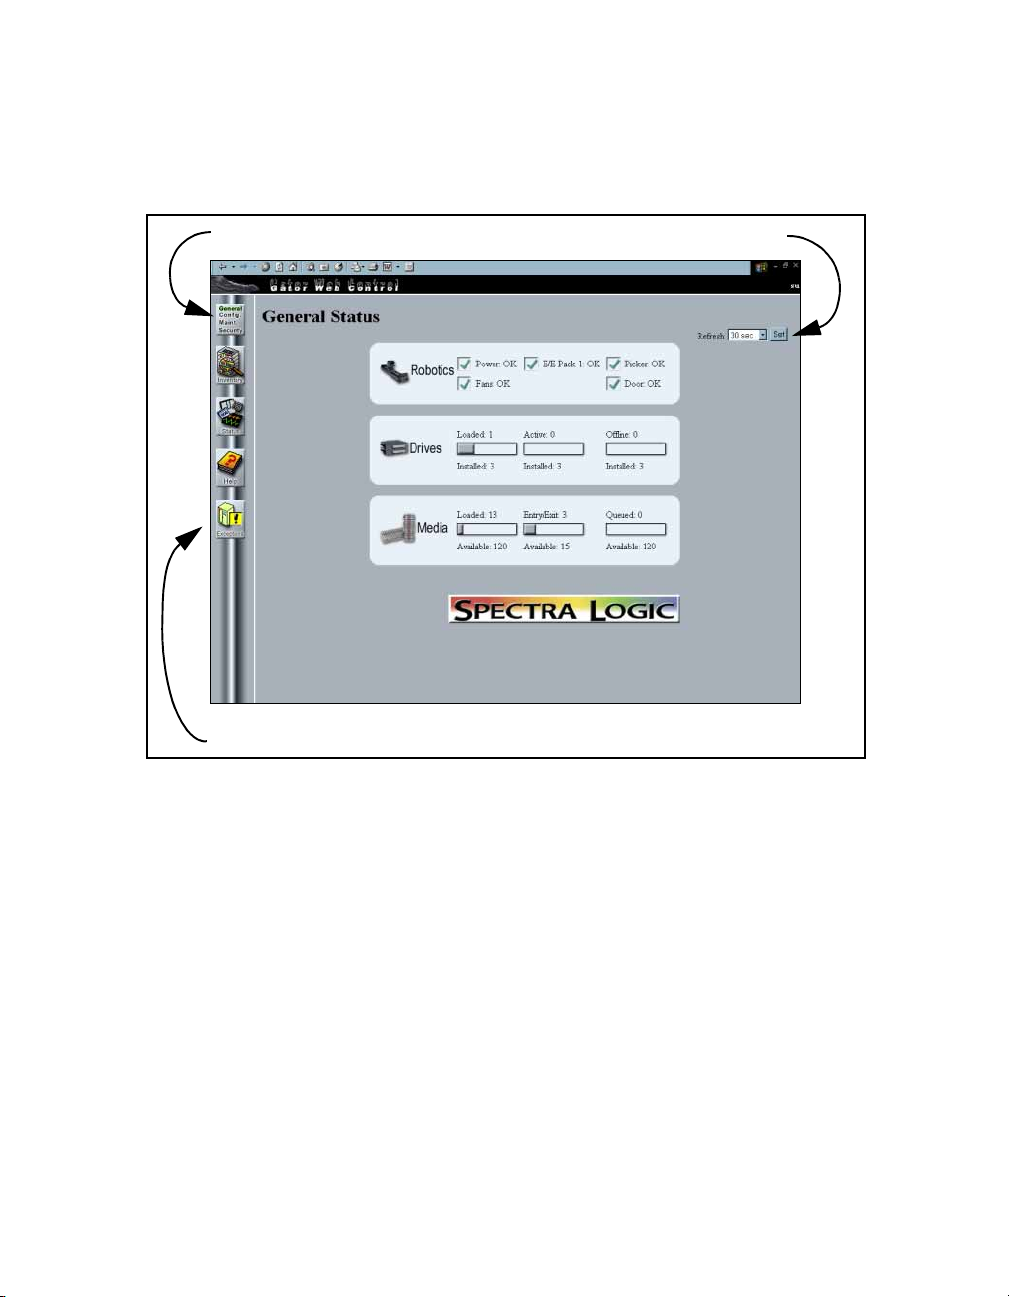
The Remote General Status Screen
Too lb ar s
Exceptions
Figure 1-2 The Remote General Status screen.
Refresh
Refresh
The Refresh box allows you to set different time increments for
refreshing the General Status and Inventory screens by using a drop
down menu. Select Set to apply the time increment. To refresh all other
screens, use your Internet browser refresh button.
Exceptions
The Exceptions button will only appear when an error has occurred.
Click on Exceptions to view the details.
Page 15
Chapter 1. Introduction 15
Toolbar s
The RLC has a General toolbar, a Configuration toolbar, a Maintenance
toolbar, and a Security toolbar; the General toolbar displays by default.
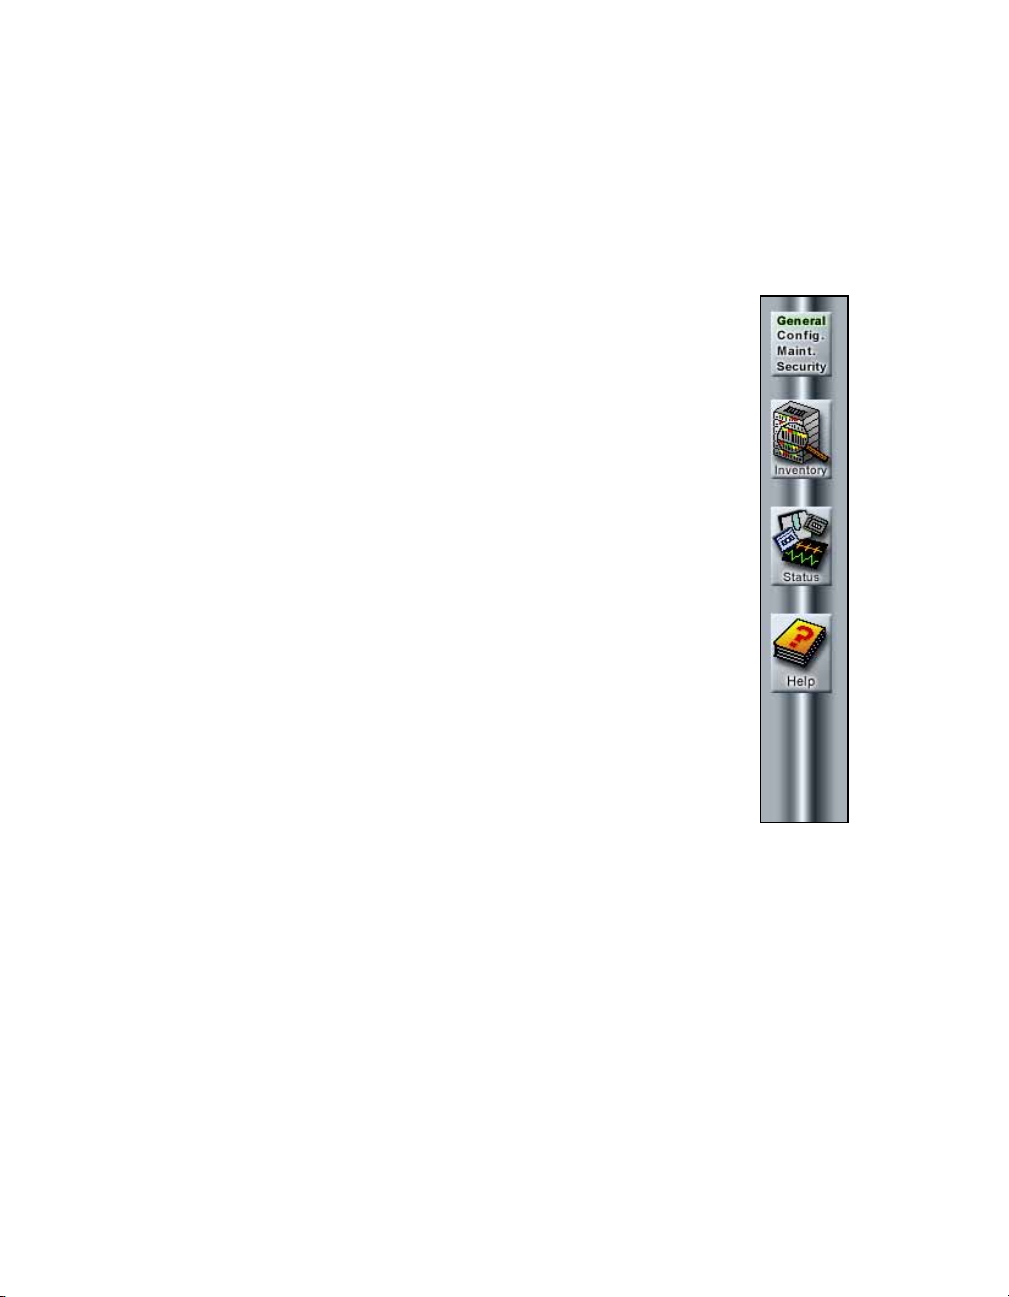
General Toolbar
The General toolbar displays commonly used options,
including:
Inventory Shows transport locations: use this to move tapes
between slots and drives. Select the Inventory icon to access
logical libraries and slot inventory information.
Status Shows information about robotics, drives and media
elements.
Help Displays online help for the RLC.
Figure 1-3
General
Toolbar.
Page 16
16 Remote Librar y Controller User Guide
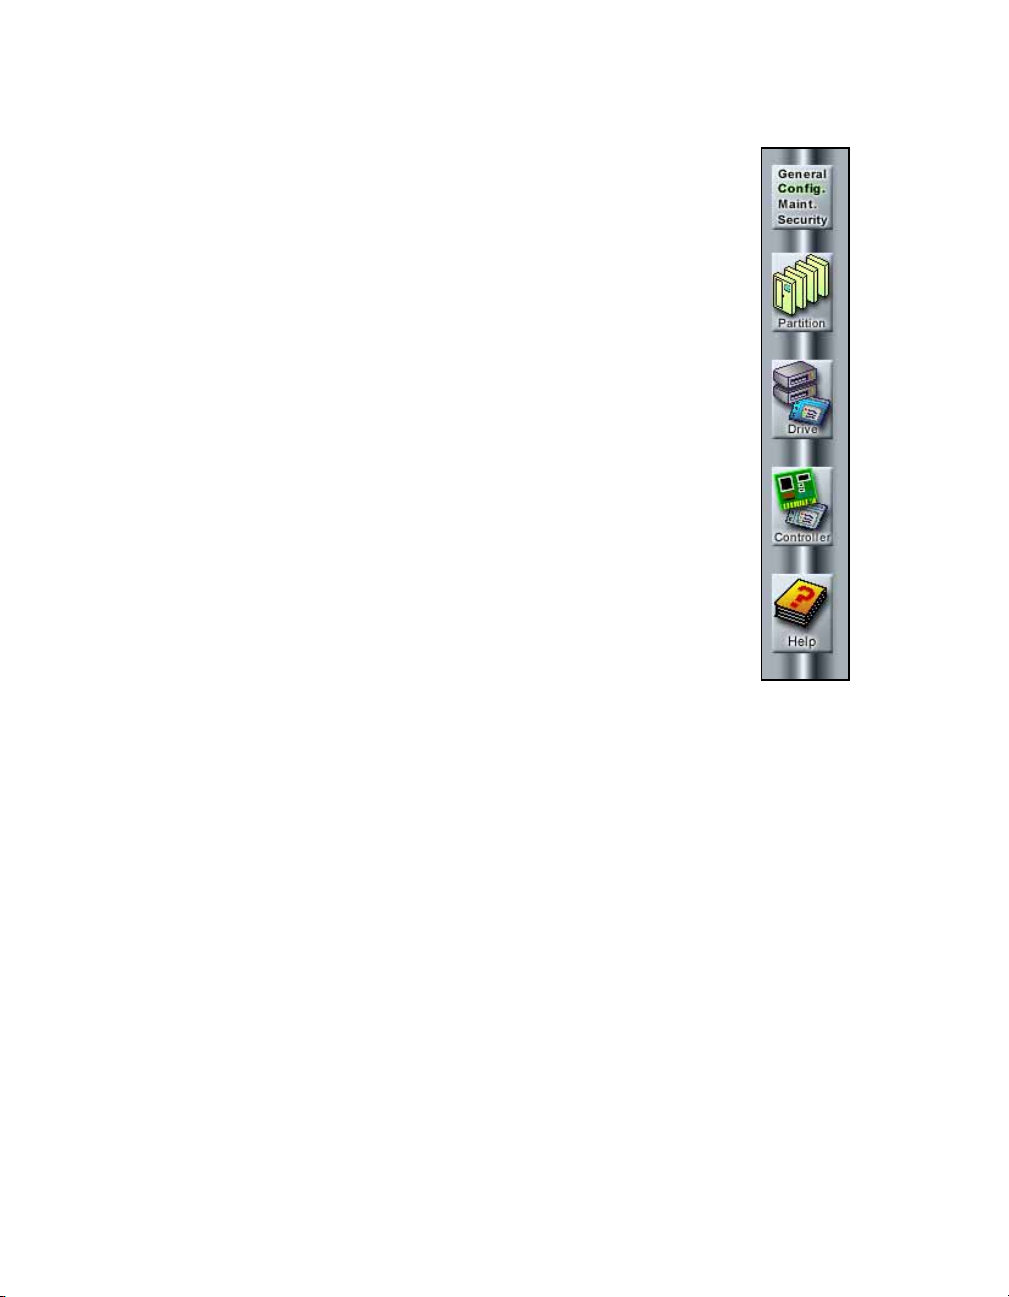
Configuration Toolbar
Use the Configuration toolbar to configure the library:
Partition Shows partition status. This lets you set up and
alter library partitions, assign drives to each partition,
assign the number of slots, and name the partition.
Drive Shows drive configuration information, and lets you
configure drives. Drive information includes the emulation
of the drive, the firmware level, and the SCSI ID assigned
to each drive.
Controller Shows QIP information and lets you configure
QIPs.
Help Displays online help for the RLC.
Maintenance Toolbar
Use the Maintenance toolbar to handle firmware updates
and trace diagnostics:
Figure 1-4
Configuration
toolbar.
Page 17
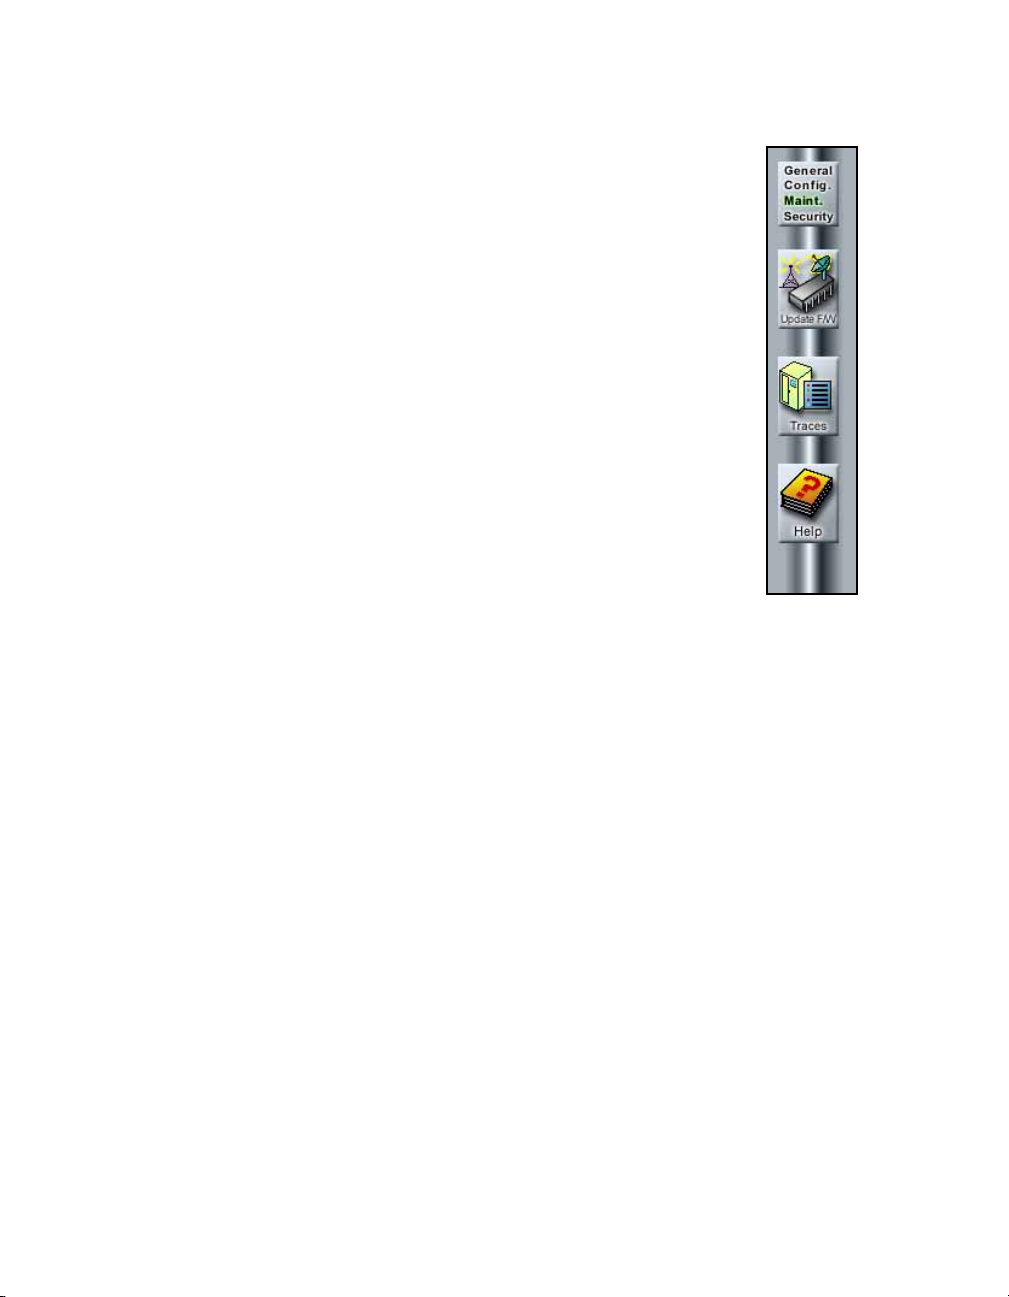
Update F/W Use Update Firmware to update QIPs, GCP
Server, GCP Front Panel, GCP Web Server, GCP OS, and
Robotics.
Trac es Use the Traces icon to troubleshoot library errors.
Help Displays on-line help for the RLC.
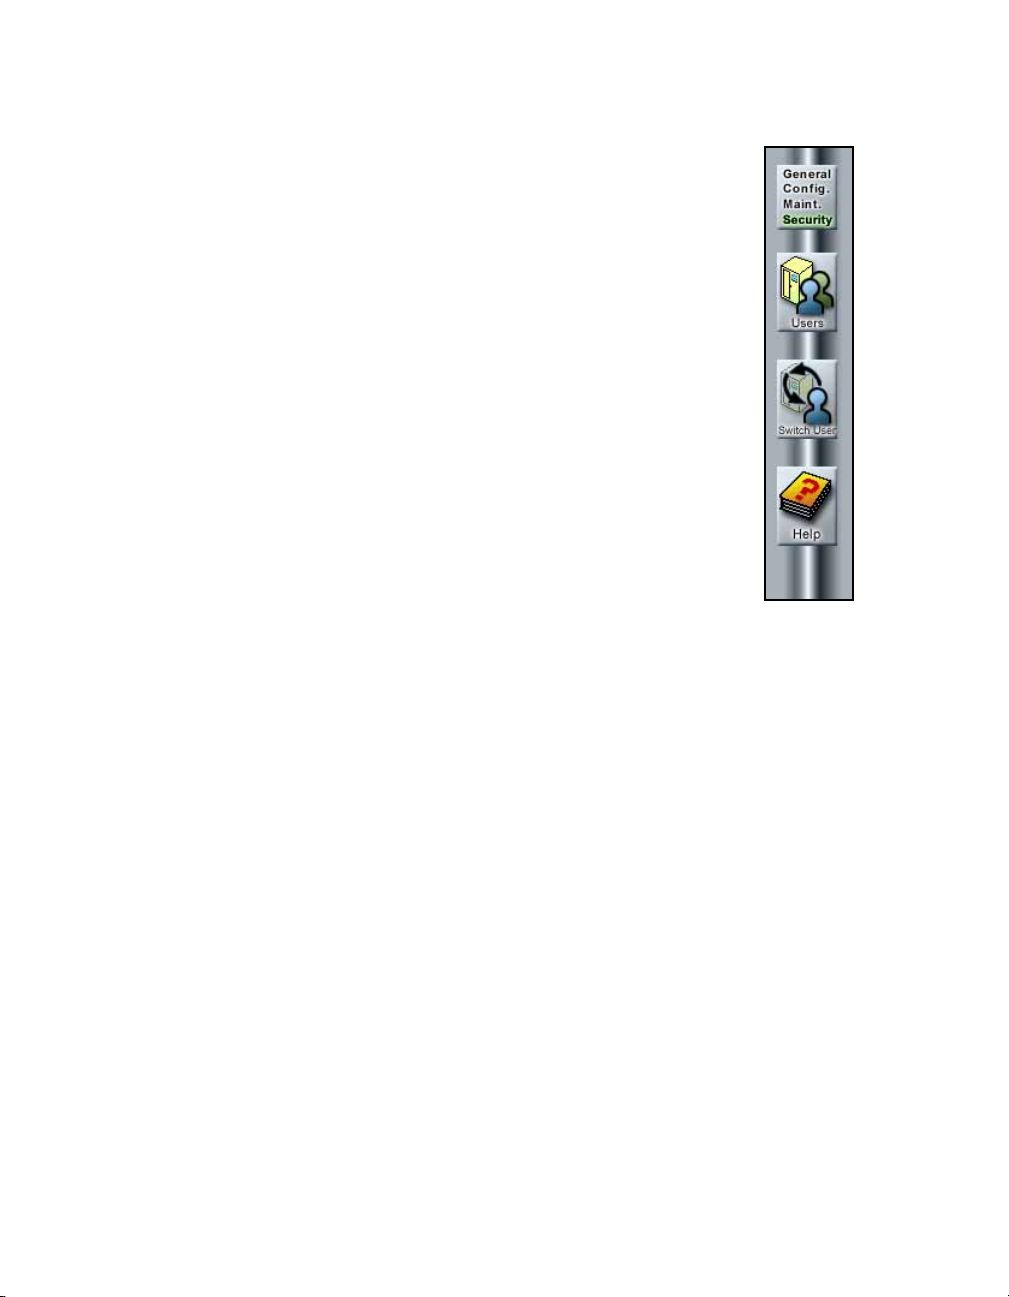
Security Toolbar
Use the Security toolbar to handle security controls,
including:
Chapter 1. Introduction 17
Figure 1-5
Maintenance
Toolbar.
Page 18
18 Remote Librar y Controller User Guide
Users Use this icon to add, remove or edit library users and
prevent unauthorized users from tampering with the library.
Switch User Selecting this icon will send you to the Login
screen.
Help Displays on-line help for RLC.
Figure 1-6
Security
Toolbar.
Page 19

2 General
This chapter reviews:
Inventory
General Status
Robotics
Drives
Media
Page 20

20 Remote Librar y Controller User Guide
Inventory
Note: Opening and closing the Entry/Exit (E/E) port is not
possible using the RLC. This function is disabled because
of possible damage that may occur if the E/E port is
opened off site.
To move a data tape from one location to another location:
1. From the General Status screen select Media, or select the General
toolbar, and then select the Inventory icon. The Inventory screen
displays (Figure 2-1).
Figure 2-1 The Inventory Screen.
2. Select the partition that contains the tape you would like to move
from the Partition drop down menu.
3. Select the Go button next to Partition.
Page 21

Chapter 2. General 21
4. Select the pack where the tape you want to move is located from the
Pack pull down menu.
5. Select the Go button next to Pack.
6. Select the specific slot location you want to move a tape from, that
tape will appear under Move from: in the Move Tapes section.
7. Select the slot location to where you want the tape moved, that slot
location will appear under Move to: in the Move Tapes section.
8. Select Move to complete the move. A window will appear letting you
know the move is taking place.
Figure 2-2 The Inventory screen (Library 1).
You can move tapes to different tape slots, to the E/E port slots, to
specific drives, or bulk load all the tapes in the E/E port slots to the slots
of the selected partition by using the Bulk Load button.
Page 22
22 Remote Librar y Controller User Guide
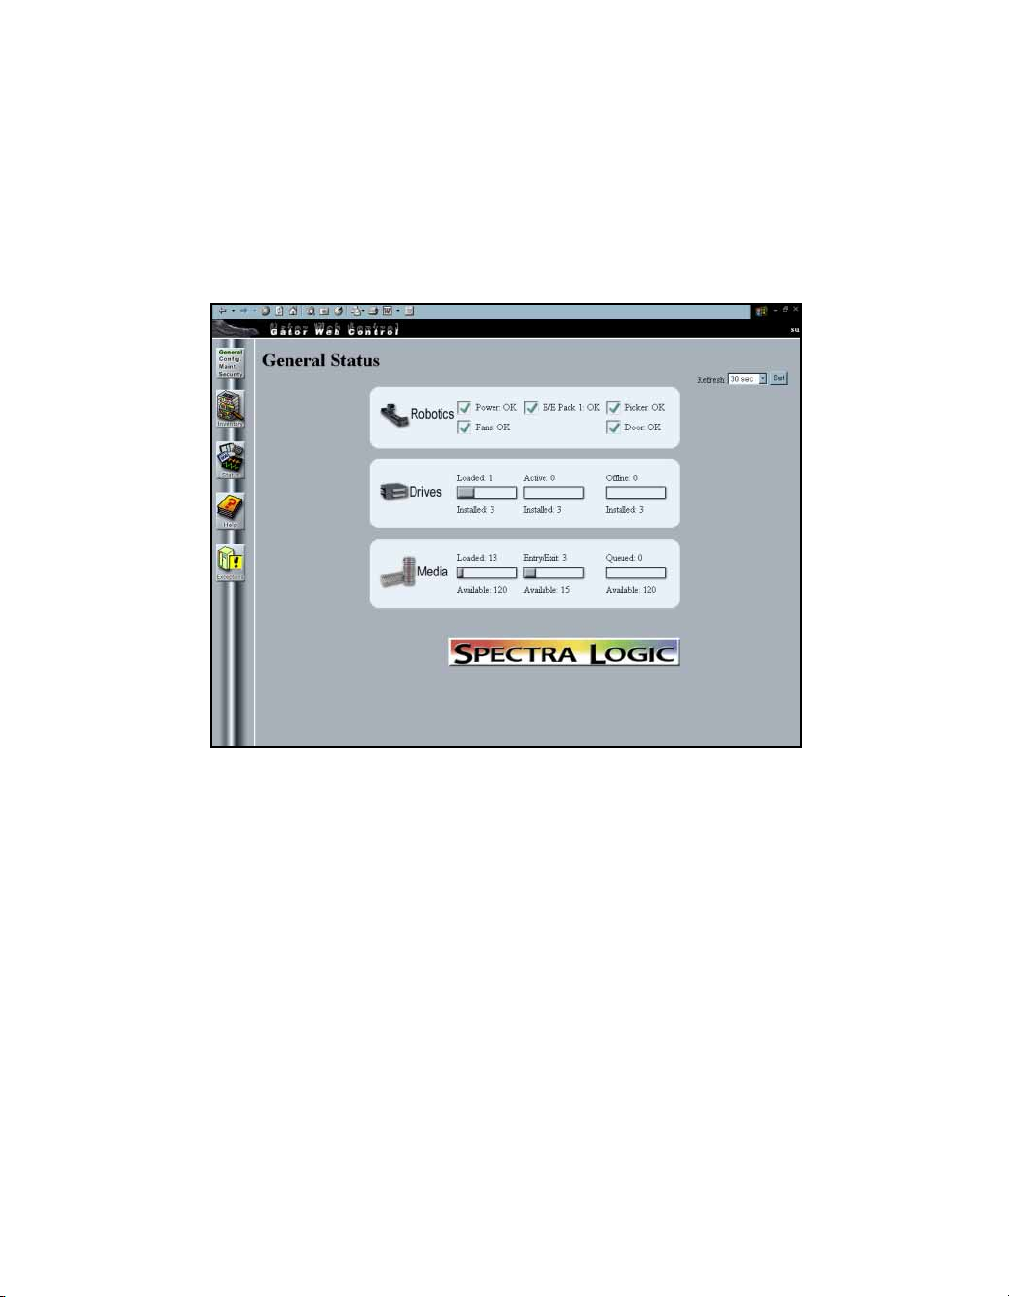
General Status
To display the library status, from the General toolbar select Status. The
General Status screen displays and shows details about the library’s
robotics, its drives and its media.
Figure 2-3 General Status screen.
Page 23
Chapter 2. General 23
Robotics
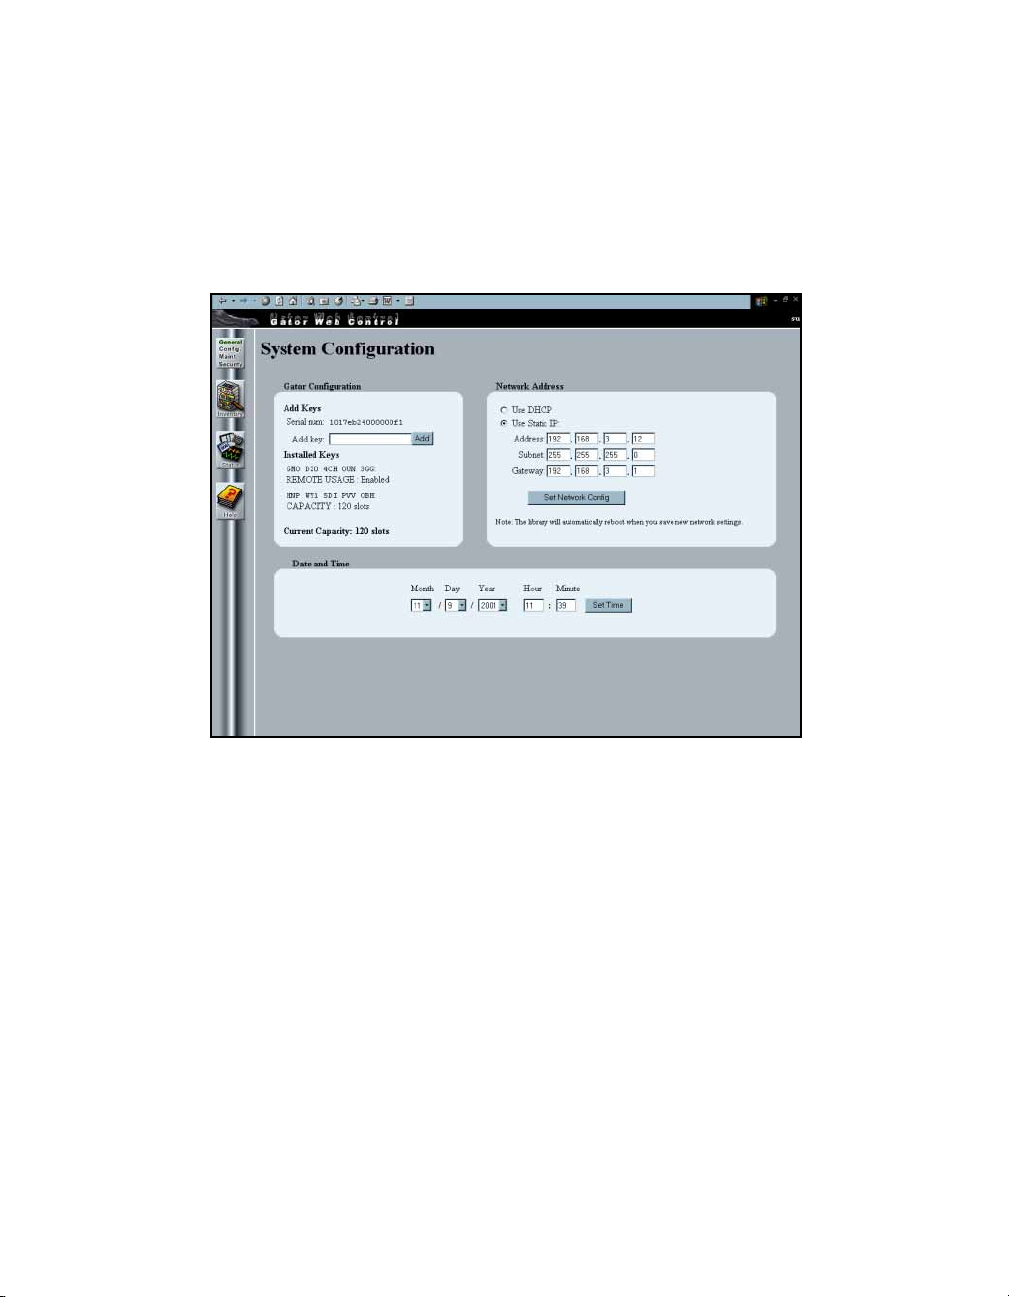
To set system time, add keys, or set IP addresses select Robotics.
The System Configuration screen displays (Figure 2-4).
Figure 2-4 System Configuration screen.
In the System Configuration screen the following fields will be available:
Gator Configuration This section shows the installed keys, current capacity,
and allows the user to add extra functions to the library including: RLC,
NDMP enabled by TAOS, Serverless Backup enabled by TAOS, and add
extra tape capacity with CoD.
To enable a key, you will need to obtain an activation key from
Spectra Logic. Contact Spectra Logic Technical Support at
(800) 227-4637 with the serial number of the device, as displayed in
the Serial # field, to purchase the activation key. Once you have
purchased the activation key, enter the key into the Add Key section,
then select Add.
Page 24

24 Remote Librar y Controller User Guide
Network Address Use this section to Set IP Addresses:
Select DHCP if your network provides IP addresses through DHCP.
When you are finished, select Set Network Config.
Select Use Static IP if you want to assign an IP address, and type in
the addresses you would like to use. When you are finished, select
Set Network Config.
Caution: Spectra Logic strongly recommends selecting Use
Static IP to ensure accessibility to your library.
Note: The Library Control Module (LCM) will reboot after
setting a new network configuration and RLC will be off
line until the LCM comes up at the new address. This
process may take up to a minute to complete.
Date and Time Use this section to set the date and time of the library. When
you are finished setting the date and time, select Set Time.
Drives
To review the drive status, see Drives on page 31.
Media
To review the media status, see Inventory on page 20.
Page 25

3 Configuration
This chapter includes:
Partition
Drives
Controller
Page 26

26 Remote Librar y Controller User Guide
Note: For additional information on Configuration, see the
Spectra 12000 Library User Guide, or the Spectra 64000
Library User Guide.
Partition
The Spectra 12000 library and Spectra 64000 library provide Shared
Library Services™ (SLS). You may partition the physical library so that it
performs and looks like more than one library. Each library can be
dedicated for a specific host or application. You will always need to set
up a partition on a new library, even if you are using only one partition.
To create additional partitions on a library, you will have to un-assign
slots from the default library partition. You must have at least one
unassigned set of 15 slots and one unassigned drive to create a new
partition. To do this use the following steps.
Configure Partitions
1. From the RLC, select the Configuration toolbar. The Configuration
icons display.
2. Select the Partition icon on the Configuration toolbar.
Page 27

Chapter 3. Configuration 27
3. The Shared Library Services screen displays a bar for the entire
library and a bar for each configured partition (Figure 3-1).
Figure 3-1 Shared Library Services screen.
Page 28

28 Remote Librar y Controller User Guide
4. To create a new partition, select New Partition (you will need at least
one unassigned set of 15 slots and one unassigned drive to create a
new partition); to edit an existing partition, select Configure in the
appropriate Partition bar. The Edit Partition screen displays
(Figure 3-2).
Figure 3-2 The Edit Partition Screen.
5. Create or edit a partition using the following functions in this screen:
Name Type in the name of a partition you want to create or edit.
Emulation Use the drop down menu to select an identity you want the
library to emulate. This is recommended only if software does not have
native support. Select No Change to have the library emulate a SPECTRA
GATOR.
Slots Use the scroll down menu to add/remove slots in increments of 15.
When creating multiple partitions, make sure you have enough
unassigned slots remaining for any other partitions you may be creating.
Page 29

Chapter 3. Configuration 29
Drives Use the Drives section to add and remove drives.
To add a pair of drives, select the drive/drives in the Available Drives
section by selecting the Add check box next to the drive/drives you
want to add. The drive/drives will move to the This Partition section
and the assigned controller bus will move to the controller list, after
you select Save Changes.
To remove a pair of drives, select the drive/drives in the This
Partition section by selecting the Remove check box next to the drive/
drives you want removed. The drive will be removed from the This
Partition section to the Available Drives section, after you select Save
Changes.
To set the QIP that will export as a logical library, select Exports. This
will configure this half of the QIP as having robotic control for a
logical library.
Note: All drives on a bus must be allocated to the same
partition, but all drive locations need not be populated.
One-half of a QIP in each partition must be configured as
an exporting controller.
Enable Queued Unloads and Defer Queued Unloads We strongly recommend you
leave both of these checked.
When Enable Queued Unloads is checked, your library responds
immediately to the host software that an eject was successful. The
front panel then moves the “queued” tapes to the E/E port as slots
become available.
If all E/E slots are full, the tapes are marked as having been logically
ejected, and it will be reported to the software that they have been
ejected. They will then be physically ejected as E/E slots become
available. This is different when Defer Queued Unloads is checked.
When Defer Queued Unloads is checked, the library waits until you
have tapped the Eject Queued Tapes in the Inventory screen before
moving the cartridges you have ejected to the E/E port. Queued
ejects allow the library to share the E/E resource and also allow the
host software to eject more tapes than a single E/E pack holds.
6. Select Save Changes to save the changes you have made, or click
Cancel to exit without saving any changes.
Page 30

30 Remote Librar y Controller User Guide
Resources
To identify partition resources in a library:
1. From the Remote Library Controller, select Configuration.
2. Select the Partition icon on the Configuration toolbar. The Shared
Library Services screen displays.
3. Select a specific library or Total Library, by selecting Resources on the
right side of the library bar, or select the partition icon on the left
side of library bar. The Partition Resources screen displays
(Figure 3-3), showing data about drives and controllers, and their
SCSI IDs. It also shows information about magazines in use.
Figure 3-3 Partition Resources screen for Library 1.
To edit partitions, see Partition on page 26.
Page 31

Chapter 3. Configuration 31
Drives
Configuring SCSI IDs, Emulation and Dip Switch Settings
Note: Setting SCSI IDs applies to S-QIPs and L-QIPs only.
F-QIP and E-QIP drive IDs are fixed and cannot be
modified.
1. Select Drive from the Configuration toolbar. This brings up the Drive
Configuration screen.
Figure 3-4 The Drive Configuration screen.
Page 32

32 Remote Librar y Controller User Guide
2. Select Configure for the drive that you would like to configure. The
Edit Drive Configuration screen displays (Figure 3-5).
Figure 3-5 Edit Drive Configuration screen.
The Edit Drive Configuration screen displays the drive you selected, as
well as any other drive on the same bus. For example, Drive 1 and Drive
2 are on the same bus, so the Drive Configuration screen displays them
both if you select either one.
In the Edit Drive Configuration screen the following fields will be
available:
Emulation Use the drop down menu to select an identity you want the
drive to emulate. This is recommended only if software does not have
native support.
SCSI ID Use the SCSI ID drop down menu to select a unique ID for your
drive.
Page 33

Chapter 3. Configuration 33
Note: The drive’s SCSI ID must be unique from the QIP
bus, other drives on the QIP bus and any device on the
host bus it is attached to.
You cannot set the SCSI ID for a drive on a Fibre Channel
QIP.
The following are only necessary in special circumstances. Refer to the
Preparing the Server document located on the Spectra Logic Web site at
www.spectralogic.com, to see if you need to set drive switch settings or
drive emulation for your operating system.
Switches Use the Switches section to turn on or off the drive switches.
Caution: Do not change the drive switches manually unless
directed by a Spectra Logic Technical Support
representative to do so.
If you think you need to set drive switches manually, call
Spectra Logic Technical Support at (800) 227-4637 for
help.
Bus Mode Use Bus Mode to modify the drive’s bus mode.
Caution: Do not change Bus Mode unless instructed to do
so by Spectra Logic Technical Support.
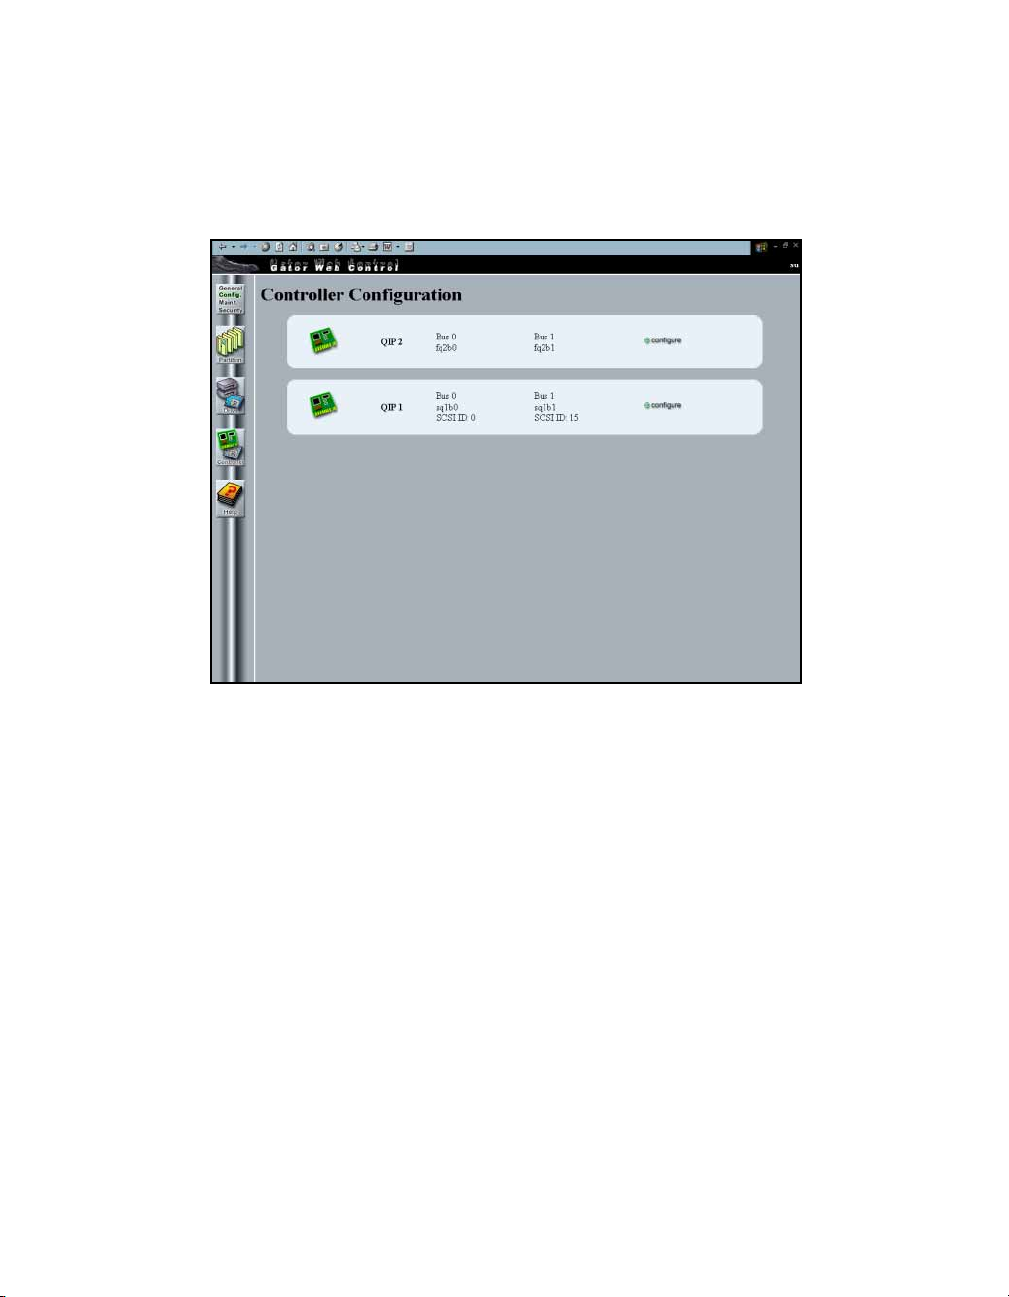
Controller
Configuring S-QIPs and L-QIPs
The RLC allows the user to configure SCSI controllers
(S-QIPs and L-QIPs).
To configure S-QIPs and L-QIPs:
1. From the RLC, select the Configuration toolbar.
Page 34

34 Remote Librar y Controller User Guide
2. From the icons on the Configuration toolbar, select Controller. This
brings up the Controller Configuration screen.
Figure 3-6 The Controller Configuration screen.
Page 35

Chapter 3. Configuration 35
3. Select Configure for the controller that you would like to configure.
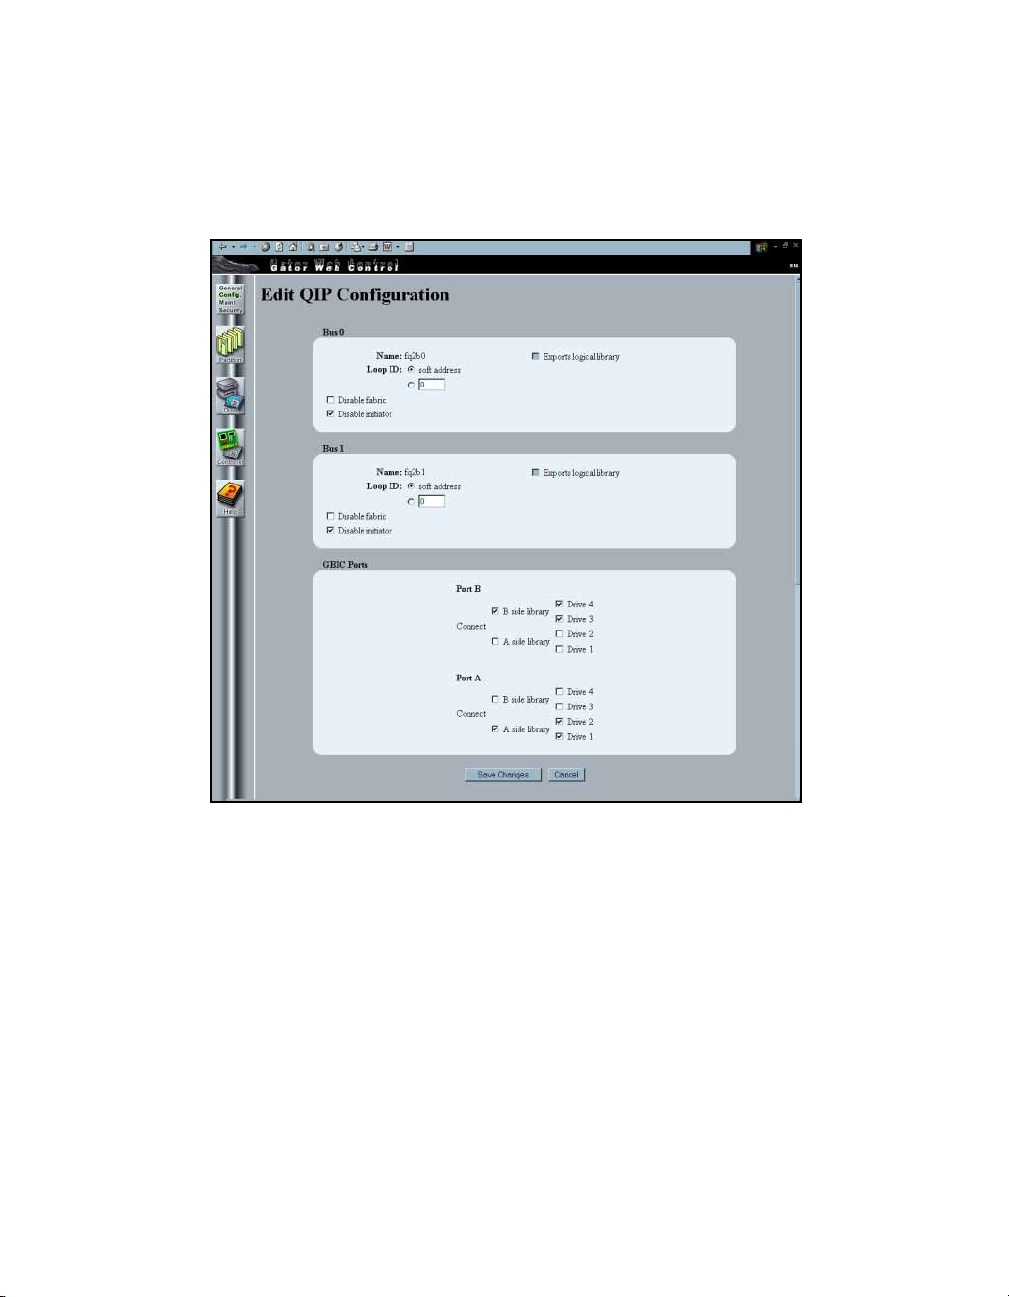
The Edit QIP Configuration screen displays (Figure 3-7).
Figure 3-7 The Edit QIP Configuration screen.
Each QIP uses two SCSI busses, and each bus must have an ID unique to
that SCSI bus.
In the Edit QIP Configuration screen the following fields will be
available:
Name The assigned bus name displays here.
SCSI ID Use the drop down menu to set SCSI ID.
Exports a Logical Library Notes whether or not the QIP exports a logical
library. To apply this function, go to Drives on page 29, under Partition.
Emulation Displays the identity the library emulates. To apply this
function, go to Emulation on page 28, under Partition.
Page 36

36 Remote Librar y Controller User Guide
Note: When configuring the library as one logical library,
one bus on any QIP must have the option Exports a
Logical Library enabled to provide the robotics control
interface to a host. The Exports a Logical Library check
box indicates that this bus is the one that will be assigned
to control robotics
When partitioning the library into more than one logical
library, each of the partitions must have one QIP bus
export a logical library for robotics interface. The bus
which exports a library must also be configured so that
the QIP SCSI ID is unique from all drives on the QIP bus,
and any device on the host bus it is attached to.
4. Select Save Changes to save the new configuration.
Configuring F-QIPs
The RLC allows the user to configure Fibre Channel controllers (F-QIPs).
To co nfigure F-QIPs:
1. From the RLC, select the Configuration toolbar.
Page 37
Chapter 3. Configuration 37
2. From the icons on the Configuration toolbar, select Controller. This
brings up the Controller Configuration screen.
Figure 3-8 The Controller Configuration screen.
Page 38
38 Remote Librar y Controller User Guide
Select Configure for the controller that you would like to configure. The
Edit QIP Configuration screen displays (Figure 3-9).
Figure 3-9 The Edit F-QIP Configuration screen.
In the Edit QIP Configuration screen, the following fields will be
available:
Name The assigned bus name displays here.
Loop ID Soft Address is the default setting. Otherwise, select the empty
name box and type the desired Hard Address.
Soft and Hard Addresses When a Fibre Channel loop initializes, it tries to
assign requested ID numbers to devices that use hard addresses. It then
dynamically assigns soft addresses to other devices from remaining
Page 39

Chapter 3. Configuration 39
available numbers. Each device must have a unique address on the loop
from 0 to 125. Conflicts arise if two devices try to use the same hard
address number, or if more than 126 devices and hosts are connected to
the loop.
When the library’s address type is set to “soft,” the library’s loop ID is
assigned dynamically whenever the Fibre Channel loop is initialized.
When the library’s address type is set to “hard,” the library always
requests the loop ID number you specify in the Configuration screen. If
you assign a hard address to the library, make sure no other device on
the loop uses the same hard address. If two devices on the same loop
have hard addresses set to the same number, only one of the two devices
will be accessible. Setting the library address type to “soft” avoids
duplication of addresses, but the library address is subject to change any
time the Fibre Channel loop initializes.
Note: A hard address is recommended.
Disable Fabric Select this box to have the F-QIP switch login as a loop ID
instead of on fabric.
Disable Initiator Select this box to disable the F-QIP as an initiator on the
Loop or Fabric Switch. Initiator disabled is the default. Unless you are
absolutely sure you have an environment that supports multi-initiators,
you must disable the F-QIP as initiator. If you don’t, this could cause
conflicts on the loop.
Exports a Logical Library To apply this function, go to Drives on page 29,
under Partition.
Note: When configuring the library as one logical library,
one bus on any QIP must have the option Exports a
Logical Library enabled to provide the robotics control
interface to a host. The Exports a Logical Library check
box indicates that this bus is the one that will be assigned
to control robotics
When partitioning the library into more than one logical
library, each of the partitions must have one QIP bus
export a logical library for robotics interface.
Page 40

40 Remote Librar y Controller User Guide
Emulation Displays the identity the library emulates. To apply this
function, go to Emulation on page 28, under Partition.
GBIC Ports Use the GBIC Ports section to configure the GBIC ports.
This determines which drives and libraries are available from each GBIC.
Side A includes Library 1 and you can assign any or all of the four
available drives by checking them. Side B includes Library 2 and you can
assign any drives you have not assigned to Side A by checking them. Or,
for redundancy and failover, you can check both sides to see all drives.
If multiple hosts are configured to access an overlapping set of drives,
access to those drives must be restricted/managed through the backup
software.
Page 41

4 Maintenance
This chapter reviews:
Update Firmware
Traces
Page 42

42 Remote Librar y Controller User Guide
Update Firmware
Note: Although the library does not need to be idle to
perform firmware updates, the specific part of the library
receiving the firmware must be idle. For example, when
loading picker firmware, the picker must not be in use.
Periodically, updates to internal library software (i.e., firmware) are
available from Spectra Logic.
Note: If you are updating more than one component, the
recommended order for updating each component is:
• GCP OS
• GCP Front panel
• GCP Server
• GCP Web Server
• QIP
• Picker
Note: Gator Control Panel (GCP) has changed to Library
Controller (LC). The two terms are used interchangeably.
Update Firmware
1. From the RLC, select Maint. The Maintenance toolbar displays.
Page 43

Chapter 4. Maintenance 43
2. Select the Update F/W button. The Update Firmware screen displays
(Figure 4-1).
Figure 4-1 The Update Firmware screen.
3. In the Firmware Server section, select the server from where you
would like to obtain the most current firmware. You can choose
firmware from the local files, or firmware from a remote site,
including the Spectra Logic Web site.
4. After you select the firmware server, select Update. This will update
the current firmware list to the Component Detail list under the
Select New drop down menu.
5. Once you have the newest firmware available, select the component
you would like to update in the Components section.
6. The current level of firmware for the component you have selected
will display in the Components Detail section.
7. From the Select New drop down menu in the Components Detail
section, select the firmware level for the component you want to
update.
Page 44

44 Remote Librar y Controller User Guide
Caution: If you select a QIP to update, you can update all
QIPs of that type by selecting the Update all QIPs of same
type box. However, if that box is selected all QIPs must be
idle.
8. Select Update Firmware to update this component.
9. Repeat Step 5 through Step 8 for each component you want to
update.
Edit or Remove Firmware Severs
1. From the RLC, select Maint. The Maintenance toolbar displays.
2. Select the Update F/W button. The Update Firmware screen displays.
3. Select Edit Servers, the Edit Firmware Servers screen displays
(Figure 4-2).
Figure 4-2 The Edit Firmware Servers screen.
Page 45

Chapter 4. Maintenance 45
To delete a server, select delete next to the server you want to delete.
To add a server, use the Add/Update Server section. Type a name,
address, and directory, and then select Add/Update Server to update.
To edit a server, use the Add/Update Server section. Type the name
of the server you want to edit, and then edit that server. Select Add/
Update Server to update.
Traces
This screen is used to help diagnose problems that may occur with the
library. The specific logs and traces help Spectra Logic Technical Support
representatives determine the source of a library error.
To view the Traces screen:
1. From the RLC, select Maint. The Maintenance toolbar displays.
Page 46

46 Remote Librar y Controller User Guide
2. Select the Traces button. The Diagnostic Traces screen displays
(Figure 4-3).
Figure 4-3 The Diagnostic Traces screen.
Diagnostic Traces
The following fields are available in the Diagnostic Traces screen:
Server Traces
Error Log Details library errors.
Action Log Details the time, date, and server requests of users.
CAN Log Details the time and date of LCM requests sent and received.
Connection Log Details what clients have connected to the server and who
logged in on the connection.
Page 47

Event Log Not presently available.
GPIO Log Not presently available.
Lock Log Details the lock requests and grants of users.
Dump Manager
For use by Spectra Logic Technical Support.
Controller Trace
Traces a particular QIP’s internal actions.
Picker Trace
Traces the picker’s internal actions.
Chapter 4. Maintenance 47
Page 48

48 Remote Librar y Controller User Guide
Page 49

5Security
This chapter includes:
Users
Switch Users
Page 50

50 Remote Librar y Controller User Guide
Users
Before you set up security, the user must determine who is going to be in
control of the library. Use the list below to determine who is going to be
which type of user.
User Types
The security feature on Spectra 12000 library and Spectra 64000 library
allows for three types of users:
Super User—A Super User is allowed ultimate control of the library
and controls who has access to the library.
Administrator—An Administrator is allowed control of the library,
but cannot control who has access to the library.
Operator—An Operator is allowed only limited access to the library.
The Operator can move, remove and add inventory via the Entry/Exit
port, but is denied access to more sensitive areas of the library, like
configuration and diagnostics.
To Add or Edit a User
1. From the RLC, select the Security toolbar. The Security toolbar
displays.
Page 51
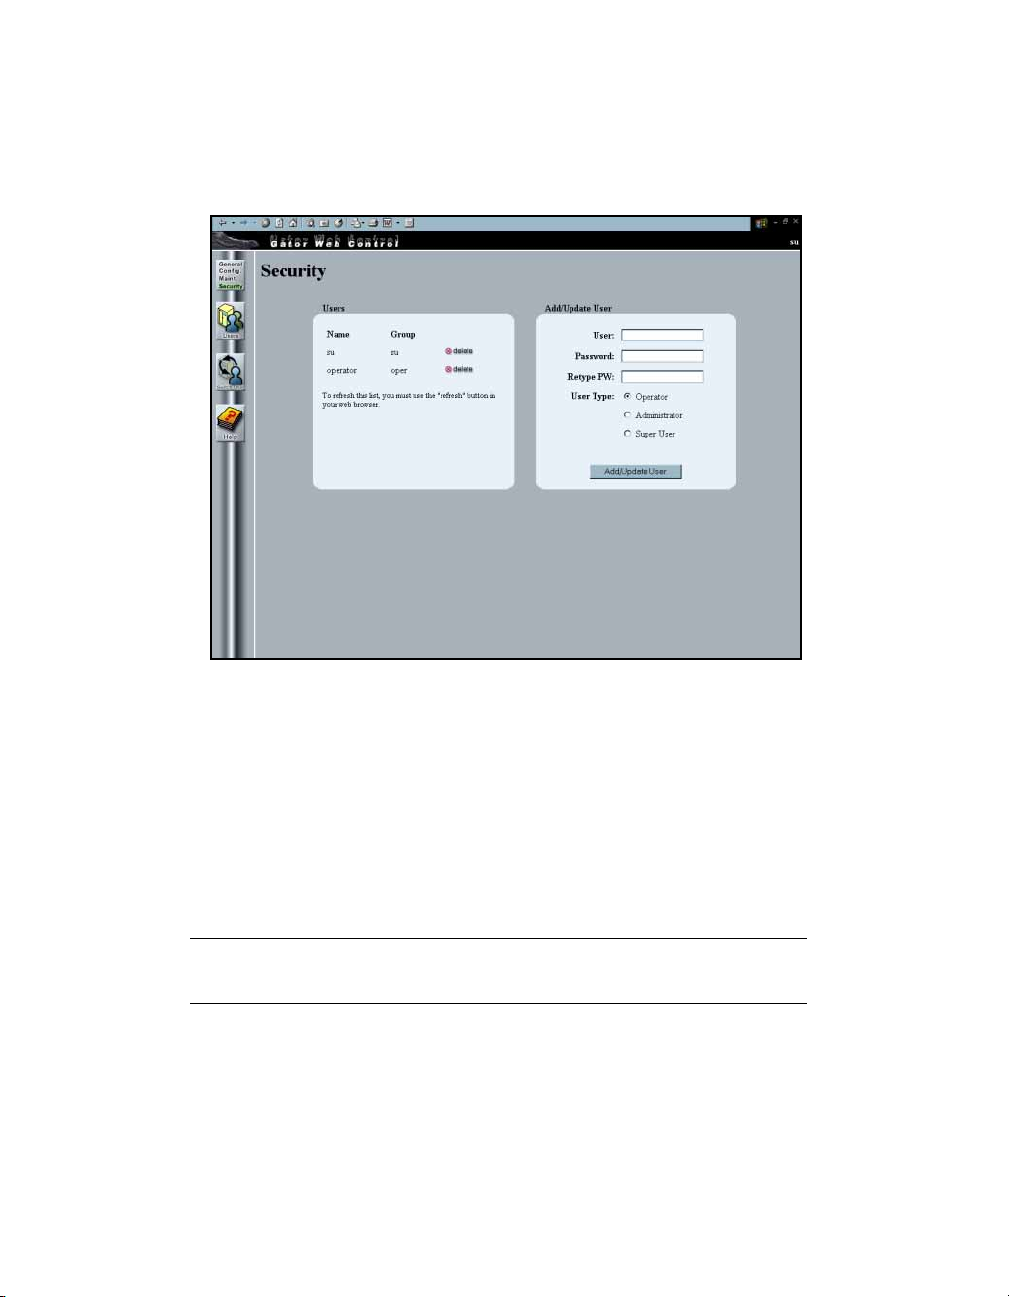
Chapter 5. Security 51
2. Select the Users icon to display the Security screen (Figure 5-1).
Figure 5-1 The Security screen.
3. Select the user type you want to add in the Add/Update User
section—Super User, Administrator, or Operator.
4. Type whatever name you would like to use for the user in the User
name box.
5. Type a password for the user in the Password box, then retype the
password in the Retype PW box.
Note: Take care when selecting a password, make a note of
it and keep it in a safe place.
6. Select Add/Update User, the confirmation window will confirm that
your security settings have been saved.
You are now ready to log in as a new user.
Page 52

52 Remote Librar y Controller User Guide
To Delete a User
1. Select Delete next to the user you wish to delete.
2. A confirmation screen will confirm that your security settings have
been saved.
Note: You will not be able to delete the last Super User
available.
Page 53

Chapter 5. Security 53
Switch Users
Selecting the Switch Users icon will send you to the Login screen. From
the Login screen, you can switch the current user to a different user.
Page 54

54 Remote Librar y Controller User Guide
Page 55

Glossary of Terms
10BaseT 10-Mbps baseband Ethernet specification using two
pairs of twisted-pair cabling, one pair for transmitting
data and the other for receiving data. 10BaseT has a
distance limit of approximately 328 feet or 100 meters
(see Ethernet).
100BaseT 100-Mbps baseband Fast Ethernet specification using
UTP wiring. 100BaseT link pulses contain more
information than those used in 10BaseT (see Ethernet).
AIT Advanced Intelligent Tape. Sony tape drive products
featuring different capacities and transfer rates: AIT-1–
35 GB native capacity, 3 MB/s transfer rate; AIT-2–50
GB native capacity, 6 MB/s data transfer rate; AIT-3–
100 GB native capacity, 12 MB/s data transfer rate.
Glossary 55
AME Advanced Metal Evaporated. A type of Sony data tapes
that use a process which allows larger amounts of tape
to be stored in smaller cartridges and maximizes data,
while increasing reliability.
Bus When referring to a computer system, a bus is a
collection of wires through which data is transmitted
from one part of a computer to another.
CAN Controller Area Network. The internal bus system on
which the library is controlled.
Page 56

56 Remote Librar y Controller User Guide
CoD A capacity on demand feature of Spectra Logic libraries
that allows the user to purchase additional storage
capacity instantaneously.
Controller The controller is the QIP assigned to control each
partition. See also, QIP and Partition.
DHCP Dynamic Host Configuration Protocol. An Ethernet
protocol used in heterogeneous networks.
E-QIP Ethernet Quad Interface Pro cessor . A type of Q IP used
to control the library over an Ethernet interface
connection.
ECC Error correction code.
E/E Port Entry/Exit Port. The port through which you insert and
remove data tape cartridges into your Spectra 12000 or
Spectra 64000 libraries.
Ethernet Ethernet uses a bus or star topology and supports data
transfer rates of 10 Mbps and is one of the most widely
implemented LAN standards. (See Mbps, and GIG E.)
F-QIP Fibre Channel Quad Interface Processor. A type of QIP
used to control the library over a Fibre Channel
interface connection.
Fibre Channel Fibre Channel is a type of interface connection that
uses optical and copper cables.
Firmware Software embedded within library hardware. Firmware
can be updated with the Library Controller (LC).
GBIC Gigabit Interface Converter.
Page 57

GCP See LC.
GIG E Gigabit Ethernet. The latest version of Ethernet,
supporting data transfer rates of 1 Gigabit per second.
GUI Graphical User Interface. The GUI for the Spectra
12000 library and the Spectra 64000 library is the
Library Controller (LC).
HBA Host Bus Adaptor.
Host The computer system to which your library is
connected.
HVD High Voltage Differential. HVD is a type of interface
connection.
IP Address Internet Protocol address allows users to access their
library remotely.
Glossary 57
I/O Input/Output.
iSCSI Enables the transport of SCSI I/O traffic over standard
IP networks, such as Gigabit Ethernet.
ITP Internet Tape Protocol.
L-QIP Low Voltage Differential Quad Interface Processor. A
type of QIP used to control the library over an LVD
SCSI connection.
LAN Local Area Network. A computer network that spans a
relatively small area.
LC Library Controller. Formerly the Gator Control Panel
(GCP).
LCM Library Control Module. Formerly called Gator Entry
Exit Controller (GEEC).
Page 58

58 Remote Librar y Controller User Guide
LED Light Emitting Diode. An electronic device that lights
up when electricity is passed through it.
Logical Library An independently operating subset of the physical
library. The subset behaves as though it were its own
physical library, using only drives and slots assigned to
that logical library on its creation. Logical libraries are
configured through the LC. See Partition.
LUN Logical Unit Number.
LVD Low Voltage Differential. LVD is a type of interface
connection.
MIC Memory In Cassette. Referring to a memory chip used
in Sony AIT data tape cartridges.
M2 Mammoth 2 is a tape drive developed by Exabyte
Corporation. M2 has a native capacity of 60 GB and a
12 MB/s native transfer rate.
®
Mbps Megabits per second, a measure of data transfer speed.
MB/sec Megabytes per second, a measure of data transfer
speed.
NAS Network Attached Storage. NAS is a type of network
environment that uses a NAS device solely dedicated to
fil e sharing. Storage is not an i nt e g r a l part of the server
in a NAS environment. The server still processes the
data, but the NAS device delivers the data to the user.
A NAS device can exist outside the server in a Local
Area Network (LAN).
NDMP Network Data Management Protocol. Defines a
common architecture for the way heterogeneous file
servers on a network are backed up.
Page 59

OS Operating System. An OS is used to run applications on
your computer interface.
Partition A process used to assign specific slot addresses and
drives of the physical Spectra 12000 library or Spectra
64000 library to one or more logical libraries.
Physical Library The entire library, regardless of how it is viewed or
used across the network (that is, it may be viewed as
one or more logical, or virtual libraries). See also,
Logical Library.
QIP Quad Interface Processor. QIPs run independent
logical libraries in a Spectra 12000 library or Spectra
64000 library. QIPs are the controllers of the library
partition.
Glossary 59
RLC Remote Library Controller. Remote management for the
Spectra 12000 library and Spectra 64000 library. Using
a specific IP address, the library can be accessed and
run via the internet. Formerly Remote Gator Control
Panel (RGCP).
RGCP See RLC.
S-QIP HVD-SCSI Quad Interface Processor.
SAN Storage Area Network. A SAN is a network
environment involving a high speed subnetwork
allowing storage devices to be shared via a server.
SCSI Small Computer System Interface. SCSI is an interface
connection used to connect peripheral devices to
computer systems.
Page 60

60 Remote Librar y Controller User Guide
SLS Shared Library Services
libraries that allows users to allocate the libraries
resources across various platforms.
™
. A feature of Spectra Logic
TAOS™ TAOS is a tape appliance operation system that shares
tape backup resources among a large number of users.
TAOS makes a tape drive or library accessible to users
on a network. TAOS compatible devices are seen by
systems with corresponding drivers as natively
attached; all applications that work with your existing
SCSI backup devices will work seamlessly with TAOS
empowered devices. TAOS supports many popular
operating systems backup and software applications.
TDR Tape device roll-up, used in Silicon Graphics
Incorporated (SGI) operating system.
UI User Interface.
Virtual Library See Logical Library.
VXA A type of tape drive developed by Ecrix with a native
capacity of 66 GB and a data transfer rate of 6 MB/sec.
Windows Windows is a Mircrosoft operating system.
 Loading...