

Page 1
Spectra 50-Series Library
Tape Drive Replacement Guide
P.N. 90970008 Revision A
Page 2

Spectra 50-Series Library Tape Drive Replacement Guide
2
Notices
Spectra Logic® Corporation provides the unit “as is” without warranty of any kind, either
expressed or implied, including but not limited to the implied warranties of merchantability or
fitness for a particular purpose. In no event shall Spectra Logic be liable for any loss of profits,
loss of business, loss of use or data, interruption of business, or for indirect, special, incidental,
or consequential damages of any kind, even if Spectra Logic has been advised of the possibility of
such damages arising from any defect or error.
Information furnished in this manual is believed to be accurate and reliable. However, no responsibility
is assumed by Spectra Logic for its use. Due to continuing research and development, Spectra Logic may
revise this publication from time to time without notice, and reserves the right to change any product
specification at any time without notice.
Spectra 50-Series Library Tape Drive Replacement Guide
Copyright © 2005 Spectra Logic Corporation. All rights reserved.
Page 3

3
Contents
Introduction . . . . . . . . . . . . . . . . . . . . . . . . . . . . . . . . . . . . . . . . . . . . . . . . . . . 4
About This Guide. . . . . . . . . . . . . . . . . . . . . . . . . . . . . . . . . . . . . . . . . . . . . 4
Estimated Time Required . . . . . . . . . . . . . . . . . . . . . . . . . . . . . . . . . . . . . . . 4
Materials and Tools Required . . . . . . . . . . . . . . . . . . . . . . . . . . . . . . . . . . . . 4
Preparing the Library . . . . . . . . . . . . . . . . . . . . . . . . . . . . . . . . . . . . . . . . . . . . 5
Moving the Carousel . . . . . . . . . . . . . . . . . . . . . . . . . . . . . . . . . . . . . . . . . . 5
Using the Run Robotics Utility . . . . . . . . . . . . . . . . . . . . . . . . . . . . . . . . . . . 6
Removing the Library Cover. . . . . . . . . . . . . . . . . . . . . . . . . . . . . . . . . . . . . 7
Removing the Old Drive . . . . . . . . . . . . . . . . . . . . . . . . . . . . . . . . . . . . . . . . . . 8
Removing the DBA from the Library. . . . . . . . . . . . . . . . . . . . . . . . . . . . . . . 8
Removing the Drive from the DBA . . . . . . . . . . . . . . . . . . . . . . . . . . . . . . . . 10
Installing the New Drive . . . . . . . . . . . . . . . . . . . . . . . . . . . . . . . . . . . . . . . . . . 11
Installing the Drive in the DBA . . . . . . . . . . . . . . . . . . . . . . . . . . . . . . . . . . 11
Reinstalling the DBA in the Library . . . . . . . . . . . . . . . . . . . . . . . . . . . . . . . 11
Returning the Library to Operation . . . . . . . . . . . . . . . . . . . . . . . . . . . . . . . . . . 14
Replacing the Cover. . . . . . . . . . . . . . . . . . . . . . . . . . . . . . . . . . . . . . . . . . . 14
Testing the New Drive . . . . . . . . . . . . . . . . . . . . . . . . . . . . . . . . . . . . . . . . . 15
Page 4
4
Spectra 50-Series Library Tape Drive Replacement Guide
Introduction
About This Guide
This guide describes the procedure for replacing a tape drive in the Spectra 50-Series library.
Note: This guide shows pictures of a library that has two full-height drives installed.
The same procedure can be followed for any drive configuration.
Estimated Time Required
This procedure takes about 30 minutes.
Materials and Tools Required
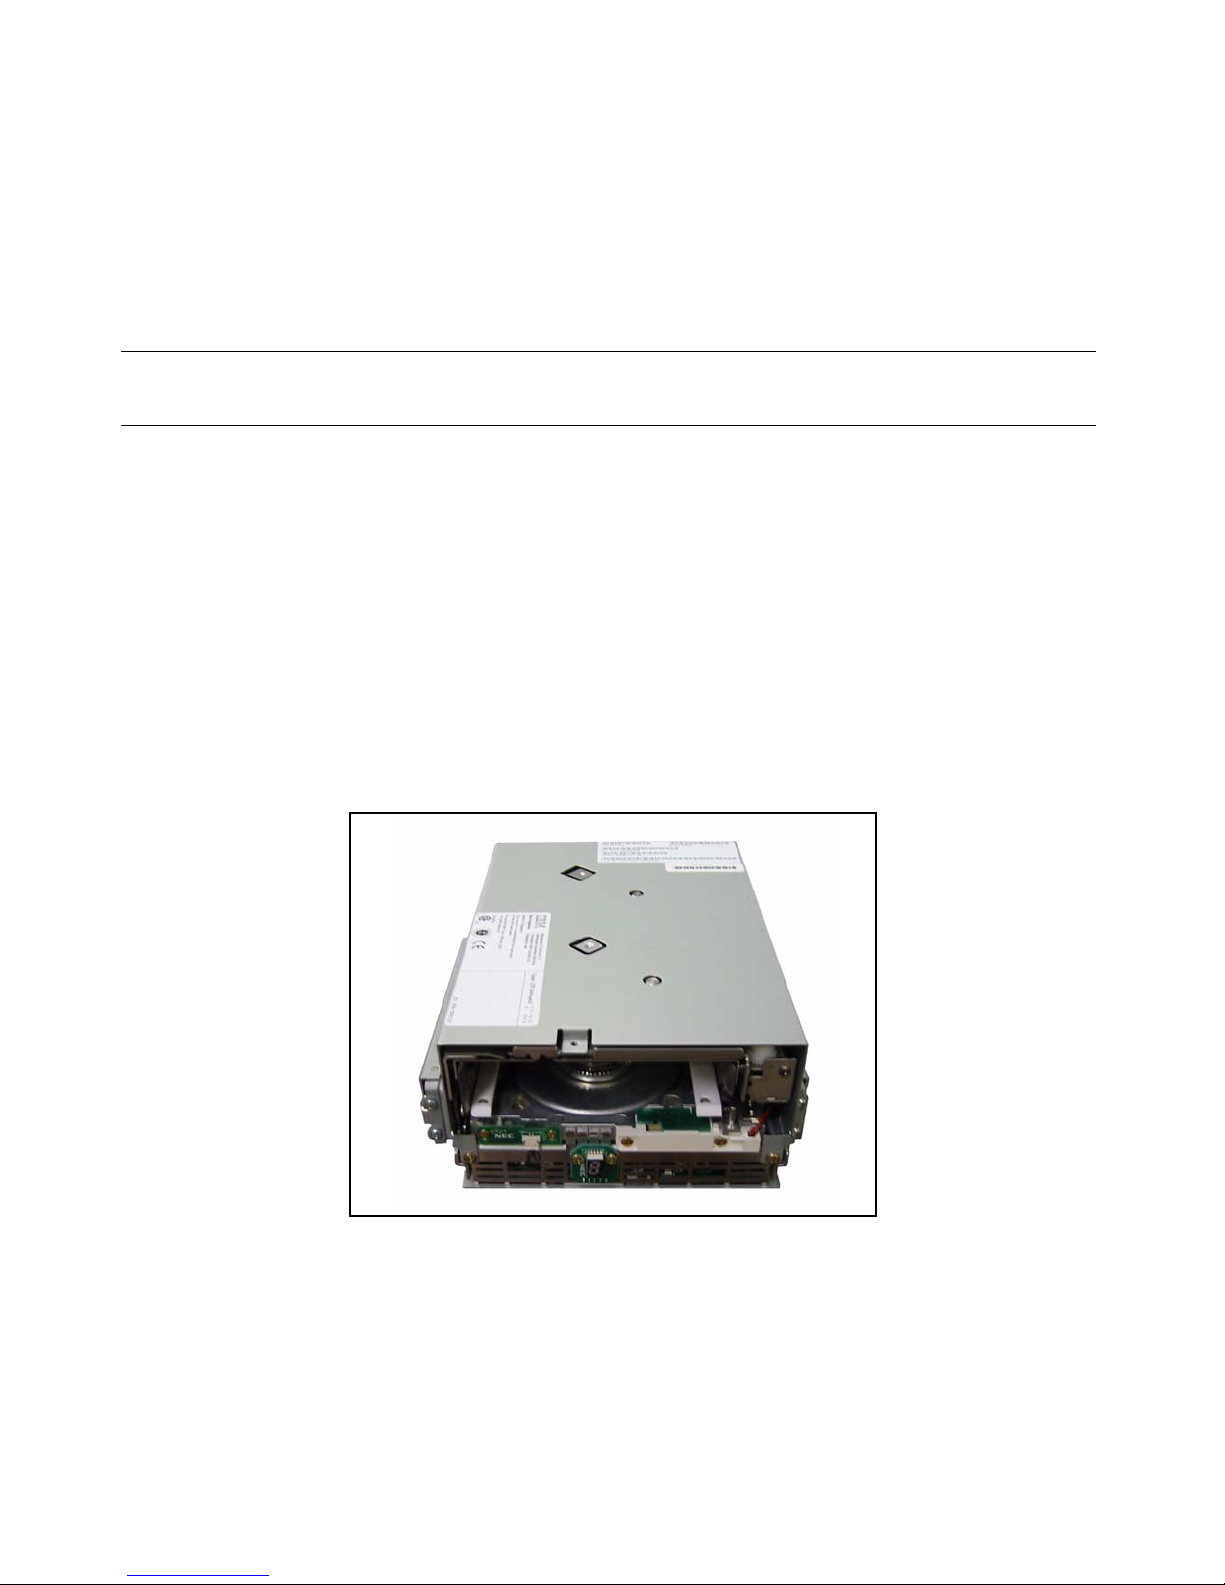
You need a replacement LTO tape drive as shown in Figure 1. Note that the drive needs to be:
• The same type as you already have installed in the library.
• The drive must be already installed in a Spectra 50-Series library drive sled.
You also need:
• A #1 Phillips screwdriver
• An anti-static wrist strap
Figure 1 An LTO tape drive in a Spectra 50-Series library drive sled.
Page 5
5
Spectra 50-Series Library Tape Drive Replacement Guide
Preparing the Library
Moving the Carousel
Before you can replace a drive, you must position an empty TeraPack carrier space behind the drive
bay assembly (DBA). This makes it possible to access and remove the DBA.
If your library is fully loaded, you must remove a TeraPack magazine first.
Both these procedures are covered in the following pages; be sure to read them in order.
Before you begin this process, read the following useful information on how magazines and carriers
are numbered inside the library.
• Physical magazine numbers have nothing to do with the logical chambers found in a library
partition.
• Magazines are numbered clockwise.
For example, if Magazine 1 is at the TAP, and you are facing the front of the library, then
Magazine 2 is the next magazine to the left, Magazine 10 is the next magazine to the right, and
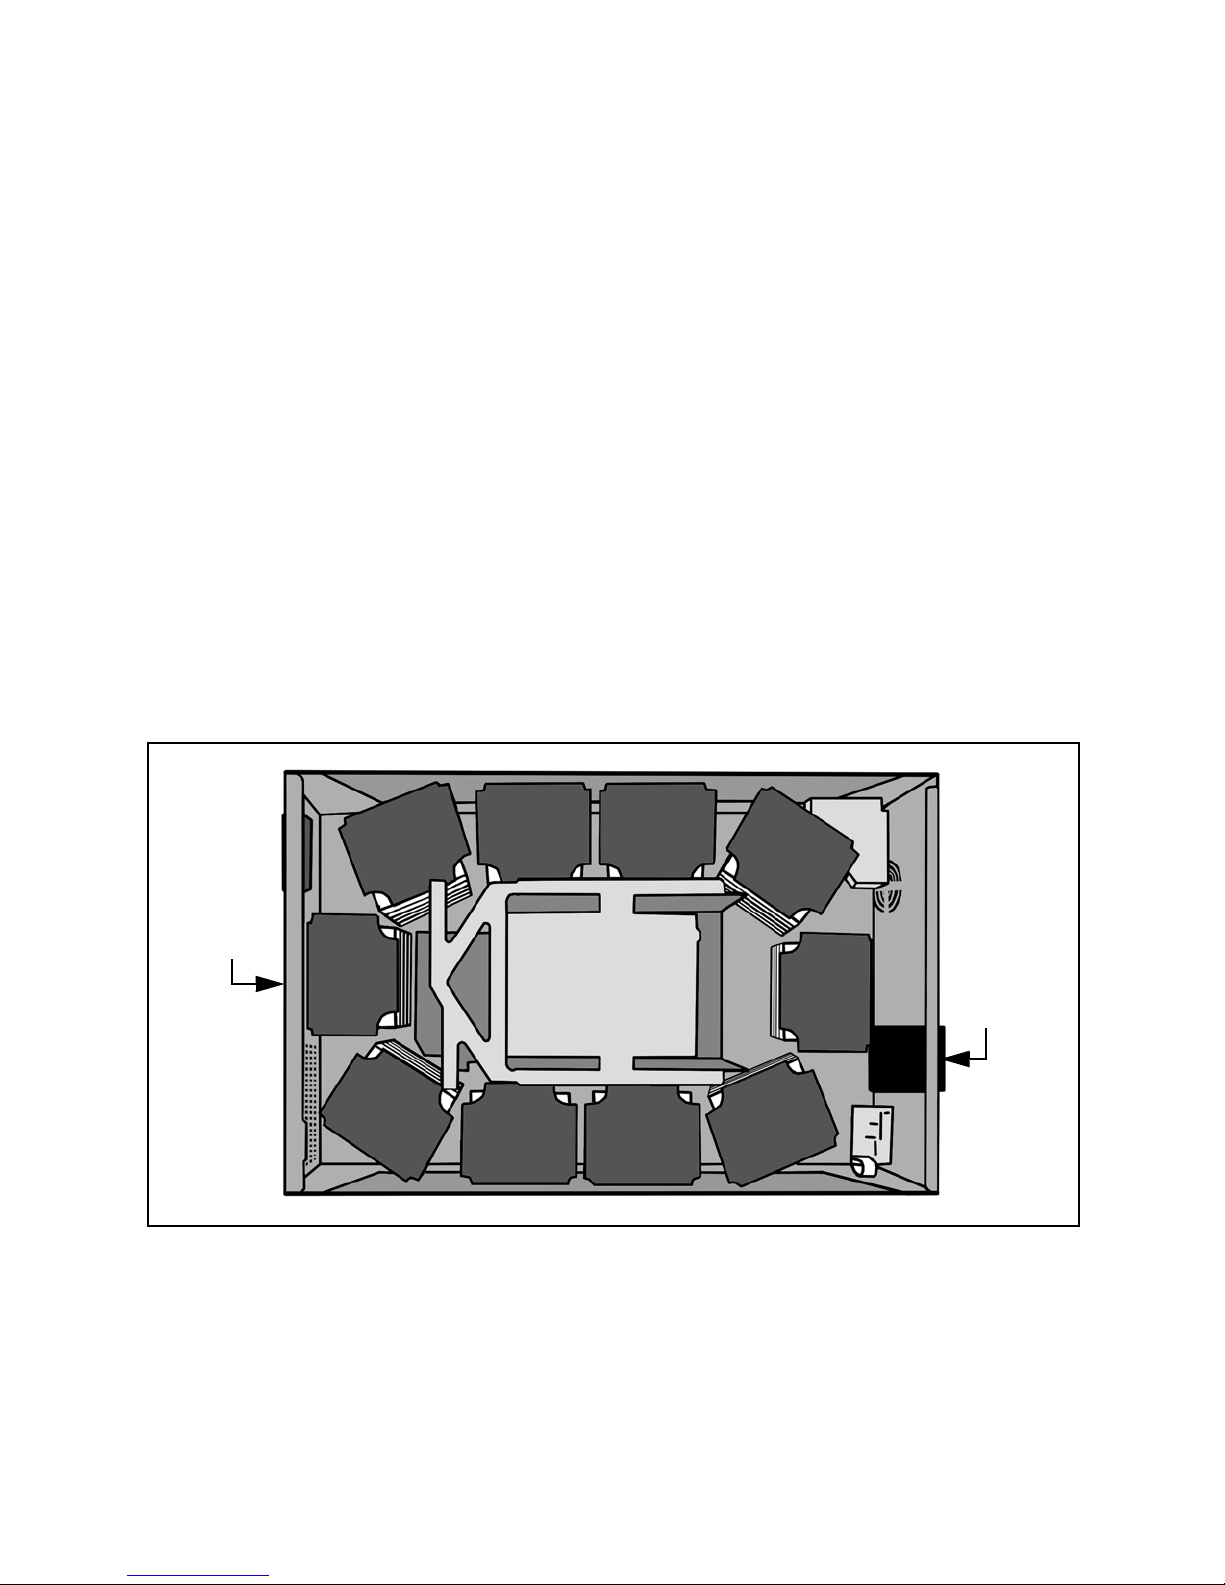
Magazine 6 is behind the DBA (see Figure 2).
Figure 2 How the magazines are numbered.
DBA
Bar
Code
Reader
TAP
1
2
3
4
5
6
7
8
9
10
Page 6

6
Spectra 50-Series Library Tape Drive Replacement Guide
Using the Run Robotics Utility
9. Once you know which magazine carrier is empty, use the Belt and Door Diagnostics screen to
move the magazine carrier behind the drives.
You accomplish this by moving to the door the magazine that is opposite the empty magazine
carrier; simply calculate the opposite it by adding or subtracting five to or from the empty
magazine number. For example:
• If Magazine 3 is empty, move Magazine 8 to the door.
• If Magazine 6 is empty, move Magazine 1 to the door.
1. Use the library’s front panel to select Maintenance >
Utilities; the Basic Utilities screen appears.
2. Select Show Advanced; a confirmation screen appears.
3. Select Yes; the Advanced Utilities screen appears.
4. Scroll down the list of utilities; find and
select the Run Robotics Utility.
5. Tap Select; a Description screen appears that describes
this utility.
6. Select Run.
A progress screen appears for a few seconds,
then the Robotic Tests screen appears (Figure 3).
7. Select Belt and Door; the Belt and Door
Diagnostics screen appears (Figure 4).
8. If you don’t know which magazine carrier is empty, use
the Belt and Door Diagnostics screen to move each
magazine to the door, and open and close the door to
check if you have selected an empty one.
If there are no empty magazines, open the door and
remove one, then close the door.
Figure 3 The Robotic Tests screen.
Figure 4 The Belt and Door Diagnostics screen.
Page 7

7
Spectra 50-Series Library Tape Drive Replacement Guide
Removing the Library Cover
1. Turn off power to the library.
2. Put an anti-static strap on your wrist and connect it to the back of the library.
Caution: If you do not wear an anti-static strap, any damage caused to the library by
static will not be covered by the library’s warranty.
5. Pull the cover back (Figure 6), and finally up (Figure 7).
6. Place the cover in a safe place; do not set anything on top of the cover.
7. Proceed to Removing the Old Drive on page 8.
3. Remove the seven Phillips screws from
the library cover (Figure 5).
• Four screws in the top center of
the cover.
• Three screws on the rear of the
cover.
4. Lift the rear of the cover up slightly to
loosen it from the chassis.
Figure 5 The seven screws in the library cover.
Figure 6 Pulling the cover back. Figure 7 Lifting the cover up.
Screws
Page 8

8
Spectra 50-Series Library Tape Drive Replacement Guide
Removing the Old Drive
Removing the DBA from the Library
1. Disconnect the fan cable(s) from the
drive interface board (DIB).
The fan cables are yellow, red, and black,
and they are plugged into the top of the
DIB (Figure 8).
Figure 8 The fan cables plugged into the board.
2. Pinch the tabs on the sides of the fan(s)
to slide the fan(s) gently upward and out
of the DBA (Figure 9).
Figure 9 Removing the fans from the library.
3. Disconnect the drive power and
communication cables from the DIB.
The drive power and communication
cables are black cables shrinkwrapped in
green sheathing and plugged into the top
of the DIB (Figure 10).
Figure 10 The drive communication and power cables plugged into the board.
Page 9

9
Spectra 50-Series Library Tape Drive Replacement Guide
4. Disconnect the SCSI or Fibre Channel cable(s)
from the drive(s).
SCSI cables are flat and white (shown in
Figure 11). Remove them by holding the sides
of the connector and gently pulling outward.
Fibre Channel cables are thin and orange.
Remove them by pinching the top and bottom
of the connector, then gently pulling outward.
Figure 11 The SCSI cables.
5. Loosen the two thumbscrews located near the
back of the DBA (Figure 12).
Figure 12 The thumbscrews as seen from above.
6. Slide the DBA back, toward the rear of the
library, until the base of the DBA is clear of the
captive pin (Figure 13).
Figure 13 The captive pin.
7. Lift the DBA up and out of the library (Figure 14)
and place it on a flat work surface.
Figure 14 Pulling the DBA out of the library.
Pin
Page 10

10
Spectra 50-Series Library Tape Drive Replacement Guide
Removing the Drive from the DBA
1. Unplug the drive that needs to be replaced from the DIB.
• Drives in a Spectra 50-Series library are numbered from the bottom up.
• If you have a library with full-height (FH) drives, the bottom drive
is Drive 1, and the top drive is Drive 2. They are plugged into the
DIB in ports 1A and 2A respectively.
• If you have a library with half-height (HH) drives, they are
numbered from Drive 1A at the bottom to Drive 2B at the top.
• Figure 15 at right shows the drive interface portion of the DIB.
It shows how drives in the library are installed from the bottom up.
2. Remove the screws for the drive you
want to replace (Figure 16).
There are two screws on each side of the
DBA.
Figure 16 A side view of the DBA.
3. Carefully slide the drive out through the
front of the DBA (Figure 17).
Figure 17 Sliding the drive out through the front of the DBA.
Figure 15 The DIB.
Drive 1
Drive 2
Drive 3
Drive 4
HH Drives FH Drives
Drive 1
Drive 2
Page 11

11
Spectra 50-Series Library Tape Drive Replacement Guide
Installing the New Drive
Installing the Drive in the DBA
Reinstalling the DBA in the Library
1. Carefully slide the drive out through the
front of the DBA (Figure 18).
2. Plug the drive cable into the DIB in the
correct port (see the cabling description
next to Figure 15 on page 10).
3. Secure the drive in the DBA with two
screws on each side of the drive.
Figure 18 Sliding the drive in through the front of the DBA.
1. Carefully lower the DBA into the
library while making sure that all
cabling is safely out of the way
(Figure 19).
Caution: It is extremely
important that no
cabling be pinched
under the DBA.
If necessary, enlist the
help of a second
person to hold the
cabling out of the way
while you position the
DBA in place.
Figure 19 Placing the DBA into the library.
Page 12

12
Spectra 50-Series Library Tape Drive Replacement Guide
2. Slide the DBA forward, toward the front
of the library, until the base of the DBA is
locked in by the captive pin (Figure 20).
Figure 20 The captive pin.
3. Tighten the two thumbscrews located
near the back of the DBA (Figure 21).
Figure 21 The thumbscrews as seen from above.
4. Reconnect the SCSI or Fibre Channel
cable(s) to the drive(s).
For SCSI cables (shown in Figure 11),
hold the sides of the connector(s) and
gently yet firmly push in, taking care
not to bend any pins.
For Fibre Channel cables, simply push
the connector(s) into the port(s) until
you hear a click.
Figure 22 The SCSI cables.
Pin
Page 13

13
Spectra 50-Series Library Tape Drive Replacement Guide
5. Reconnect the drive power and
communication cables to the DIB.
The drive power and communication
cables are black cables shrinkwrapped in
green sheathing; they plug in to the top
of the DIB (Figure 23).
Figure 23 The drive communication and power cables plugged into the board.
6. Pinch the tabs on the sides of the fan(s)
and slide the fan(s) gently downward and
into the DBA (Figure 24).
Figure 24 Reinstalling the fans in the library.
7. Reconnect the fan cable(s) to the DIB.
The fan cables are yellow, red, and black,
and they are plugged into the top of the
DIB (Figure 25).
Note that the bottom fan plugs in to the
port labeled Fan 1, and the top fan plugs
in to the port labeled Fan 2.
Figure 25 The fan cables plugged into the board.
Page 14

14
Spectra 50-Series Library Tape Drive Replacement Guide
Returning the Library to Operation
Replacing the Cover
1. Place the cover back onto the library (Figure 26), and gently push it forward (Figure 27) until it
clicks into place.
Figure 26 Placing the cover back on the library. Figure 27 Sliding the cover forward.
2. Tighten the seven Phillips screws in
the library cover (Figure 28).
• Four screws in the top center of
the cover.
• Three screws on the rear of the
cover.
Figure 28 The seven screws in the library cover.
Screws
Page 15

15
Spectra 50-Series Library Tape Drive Replacement Guide
Testing the New Drive
1. Reconnect the AC cable and turn on power to the library.
2. After the library initializes, check if a message comes up on the front panel.
• If there is a message, read it and follow any instructions in the listed remedy.
• If there are no messages, proceed to Step 3.
3. Have your host system or backup application perform a short read and write operation.
• This can be done manually on the command line in UNIX or LINUX (tar).
• On Windows, the backup application confirms read and write status.
• If time is an issue, you can use the backup application to identify a single piece of
previously written media. If that identification process completes without error, it confirms
that the drive can read previously written media.
This completes the drive replacement procedure.
If You Need Assistance
If you need assistance correcting problems with your new drive, or with any part of this procedure,
contact SpectraGuard Technical Support by calling 800.227.4637 or 303.449.0160, or by sending an
e-mail to support@spectralogic.com.
 Loading...