

Page 1
Spectra 4000-10000™ Library
Power Supply Replacement Guide
P.N. 90840072 Revision E
Page 2

Spectra 4000-10000™ Library Power Supply Replacement Guide
Notices
Spectra Logic Corporation provides the Spectra 10000 library “as is” without warranty of any
kind, either expressed or implied, including but not limited to the implied warranties of
merchantability or fitness for a particular purpose. In no event shall Spectra Logic be liable for
any loss of profits, loss of business, loss of use or data, interruption of business, or for indirect,
special, incidental, or consequential damages of any kind, even if Spectra Logic has been advised
of the possibility of such damages arising from any defect or error in this publication.
Information furnished in this manual is believed to be accurate and reliable. However, no responsibility
is assumed by Spectra Logic for its use. Due to continuing research and development, Spectra Logic may
revise this publication from time to time without notice, and reserves the right to change any product
specification at any time without no tice.
Some products or services mentioned in this manual are provided by companies other than Spectra
Logic. Inquiries about one or more of these products or services should be sent directly to the company
in question .
Contact Information
Support
(800) 227-4637, (3 03) 449-6444, extensi on 3175
Sales
(800) 833-1132, (3 03) 449-6444
International Sales
011 44 870 112 2150
Web site
www. spectralogic.com
Spectra 10000 Lib r ary Power Supply Repl acement Guide
Copyright © 2002 by Spectra Logic Corporation. All rights reserved.
2
Page 3

Contents
Introduction................................................................................................4
Prepare the Library.....................................................................................5
Remove the Po wer Supply..........................................................................6
Replace the Power Supply........................................................................12
Spectra 4000-10000™ Library Power Supply Replacement Guide
3
Page 4

Spectra 4000-10000™ Library Power Supply Replacement Guide
Introduction
About This Guide
This manual describes the procedure fo r replacing the power supply assembly in
Spectra 4000-10000 tape libraries.
Estimated Time Required
This procedure should take less than one hour.
Materials and Tools Required
You will need a Power Supply Assembly Kit to install a new Power Supply into your
library. These kits are available from Spectra Logic, or an authorized Spectra Logic
reseller.
• Spectra 4000-9000 Power Supply Kit: P.N. 90841634
• Spectra 10000 Power Supply Kit: P.N. 92848069
You Will Also Need:
• A #1 Phillips screwdriver
• A #2 Phillips screwdriver
• A flat blade screwdriver
4
Page 5

Spectra 4000-10000™ Library Power Supply Replacement Guide
Prepare the Library
1. Quit all programs and shut down your computer.
2. Turn off power to your computer.
3. Turn off power to your library. Switch off power to any other connected
equipment.
Warning: Shock hazard inside the library can cause injury or death.
Disconnect AC power to the library before removing the cover.
Never connect AC power to the library with the cover removed.
Caution: The power supply is a stat ic sens itive d e vice. Pl ease use a sta tic
dissipative wrist strap or other ESD equipment/tools for this
process.
4. Disconnect all cables from the library.
• Disconnect the AC power cord from the wall outlet and the rear of the library.
• Disconnect the SCSI cables from the rear of the library.
• If applicable, disconnect the serial cable(s) from the R S–232 port(s) on the rear of
the library.
5. Move the library to a location where you have access to all sides of the library.
Warning: The library is heavy, about 56 pounds (25.4 kilograms). Get he lp
when moving the library.
5
Page 6
Spectra 4000-10000™ Library Power Supply Replacement Guide
Remove the Power Supply
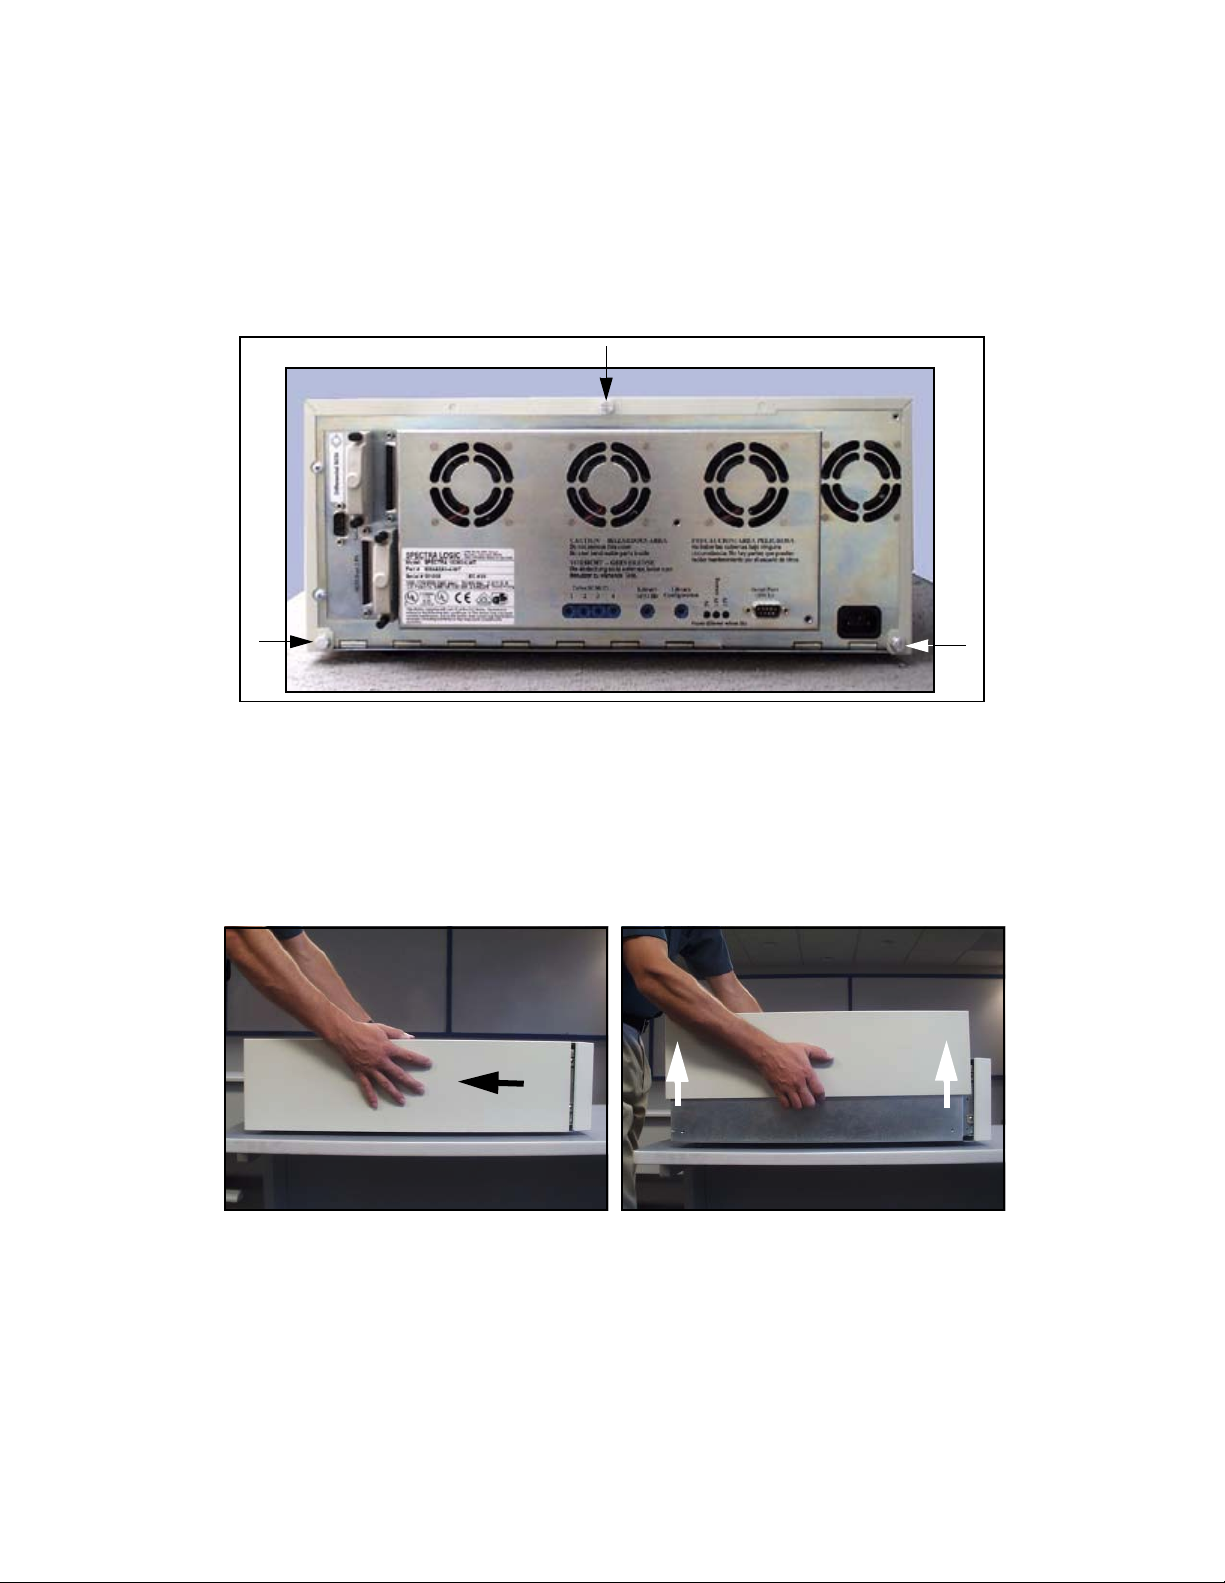
1. Use the appropriate screwdriver to completely remove the three library cover
screws on the rear of the library (Figure 1).
Figure 1 Remove the screws.
2. Slide the cover toward the rear of the library about one-half inch. This releases the
side clips holding the cover to the front panel (Figure 2).
3. Lift the cover straight up and off of the library (Figure 3).
Figure 2 Slide cover back. Figure 3 Lift cover off.
4. Set the library’s cover off to the side and out of the way.
6
Page 7

Spectra 4000-10000™ Library Power Supply Replacement Guide
5. Use the appropriate screwdriver t o remove the s crews holding the rear panel of the
library in place (Figure 4 and Figure 5).
Figure 4 Screws holding the rear panel in place. Figure 5 Detach the rear panel.
Note: If the library is rack mounted, the lower screws on each side are
not installed.
6. Lower the rear panel away from the library.
7. For SCSI units, disconnect the two yellow SCSI ribbon cables from the SDC board
(Figure 6) and the blue serial port cable from the UCM board (Figure 7).
Caution: Do not bend or put stress on the yellow SCSI ribbon cables.
Figure 6 Disconnect the SCSI ribbon cables. Figure 7 Disconnect the serial port cable.
7
Page 8

Spectra 4000-10000™ Library Power Supply Replacement Guide
8. Disconnect the DC power plugs from the rear of each drive (Figure 8).
Figure 8 Rear panel lowered and drives unplugged.
9. Detach the yellow SCSI ribbon cable from Drive 1.
10. Detach Drive 1’s nine-pin, rainbow-colored ID cable from the rear panel
(Figure 9).
11. Remove Drive 1 (Figure 10).
Figure 9 Detach Drive 1’s ID cable from the rear
Figure 10 Drive 1 removed.
panel.
8
Page 9

Spectra 4000-10000™ Library Power Supply Replacement Guide
12. Disconnect the AC power switch cable at the connector located next to the rotary
motor (Figure 11).
Figure 11 Detach the power switch cable.
Note: Check to see if the 13-pin power supply DC cable connection (red,
black and yellow wires) is located outside of the cage. If it is, go to
Step 17 on page 10, to complete the power supply removal.
If the 13-pin power supply DC cable connection (red, black and
yellow wires) is located inside of the cage, go to the next step.
13. Use the appr opriate screwdriver to loosen the two captive screws that attach the
power supply bracket to the casting (Figure 12).
Figure 12 Loosen the two captive screws.
9
Page 10

Spectra 4000-10000™ Library Power Supply Replacement Guide
14. Tilt the power su pply toward th e drives an d remove the two sc rews on the back of
the power supply that hold the cage in place (Figure 13).
15. Turn the power sup ply upside down and remove the two screws on the bottom of
the power supply that hold the power supply cage in place (Figure 14).
Figure 13 Remove the two screws on the back of the
power supply that hold the cage in place.
Figure 14 Remove the two screws on the bottom of
the power supply that hold the cage in place.
16. Pull back the power supply cage (Figure 15).
17. Unplug the 13-pin power supply DC cable with red, black and yellow wires
(Figure 15 for SCSI; Figure 16 for Fibre Channel).
Figure 15 Pull back the power supply cage and
unplug the SCSI unit’s 13-pin DC cable.
Figure 16 Unplug the Fibre Channel unit’s 13-pin
DC cable.
10
Page 11

Spectra 4000-10000™ Library Power Supply Replacement Guide
18. Remove the power supply (Figure 17 and Figure 18).
Figure 17 The library with the power supply
removed.
Figure 18 The power supply by itself.
11
Page 12

Spectra 4000-10000™ Library Power Supply Replacement Guide
Replace the Power Supply
1. Remove the protective packaging from the new power supply.
Note: If you are installing a Spectra 10000 Power Supply Kit, P.N.
92848069, you do not need to remove the cage. The 13-pin power
supply DC cable (red, black a nd yellow wires) is located outside of
the cage. Go to Step 7 on page 13, to complete the power supply
replacement.
If you are installing a Spectra 4000-9000 Power Supply Kit, P.N.
90841634, you will need to remove the cage in order to access the
13-pin power supply DC cable (red, bla ck and yellow wires). Go to
the next step.
2. Remove the two screws on the back of the new power supply which h old the cage
in place (Figure 19).
3. Remove the two screws on the bottom of the new power sup ply that h old the cage
in place (Figure 20).
Figure 19 Remove the two screws on back of power
supply that hold cage in place.
4. Pull back the cage of the new power supply.
Figure 20 Remove the two screws on bottom of
power supply that hold cage in place.
12
Page 13

Spectra 4000-10000™ Library Power Supply Replacement Guide
5. Plug in the 13-pin power supply DC cable with red, black and yellow wires
(Figure 21).
Figure 21 Plug in the SCSI unit’s 13-pin DC cable. Figure 22 Plug in the Fibre Channel unit’s 13-pin
DC cable.
6. Replace the four screws that hold the power supply cage in place.
Go to Step 8 once you have replaced the screws.
7. Plug in the 13-pin power supply DC cable with red, black and yellow wires loc ated
on the outside on the power supply (Figure 22).
8. Position the power supply within the library chassis.
9. Use the appropriate screwdriver to tighten the two cap tive screws that attach the
power supply bracket to the casting (Figure 23).
13
Page 14

Spectra 4000-10000™ Library Power Supply Replacement Guide
Caution: When reinstalling the power supply, ensure that there are no
pinched cables or wires prior to tightening the captive screws.
Figure 23 Tighten the two captive screws.
10. Attach the AC po wer switch cable at the connector located by the rotary motor
(Figure 24).
Figure 24 Attach the power switch cable.
11. Reinstall Drive 1.
14
Page 15

Spectra 4000-10000™ Library Power Supply Replacement Guide
12. Attach the drive’s nine- pin, rainbow-colored ID cable to the rear panel (Figure 25).
Figure 25 Attach the ID cable to the rear panel.
13. Attach the yellow SCSI ribbon cable to Drive 1.
14. Reconnect the DC power plugs to each drive.
15. For SCSI units, attach the two ye llow SCSI ribbon cables to the SDC board
(Figure 26).
16. Attach the serial port cable to the UCM board (Figure 27).
Figure 26 Attach the SCSI ribbon cables to the SDC
board.
Figure 27 Attach the serial port cable to the UCM
board.
17. Bring up the rear panel to close it.
15
Page 16

Spectra 4000-10000™ Library Power Supply Replacement Guide
Caution: For Fibre Channel units only, make sure that the brass EMI clip
on the rear panel is properly aligned around the Fibre Channel
port (Figure 28).
Brass EMI
Clip
Figure 28 Location of the brass EMI clip on a Fibre Channel library.
18. Use the appropriate screwdriver to replace the four screws which attach the rear
panel of the library to the library chassis (Figure 29).
Note: Lower screws are not installed on rack mounted libraries.
Figure 29 Replace the screws holding the rear panel
of the library.
16
Page 17

Spectra 4000-10000™ Library Power Supply Replacement Guide
19. Place the top cover on the library. Leave about one inch of space between the front
of the cover and the front panel (Figure 30).
20. Using both hands, ligh tly squeeze the front sides of the cover together and slide the
cover forward (Figure 31). Make sure that the clips on the cover engage the front
panel.
Figure 30 Lower the cover onto the library. Figure 31 Slide the cover forward.
21. Replace the thumb screws on the rear of the library cover (Figure 32). Hand-start the
screws before you tighten them with the screwdriver. This ens ures that all the holes
on the cover will meet correctly with the screw holes on the library.
Figure 32 Replace the thumbscrews.
22. Return the library to its normal operating location.
17
Page 18

Spectra 4000-10000™ Library Power Supply Replacement Guide
Warning: The library is heavy, about 56 pounds. Get help moving the
library.
Caution: If the host computer or other equipment was restarted while the
library was disconnected, you must exit all programs and shut
down all equipment before reconnecting the library.
23. Reconnect all cables to the library.
24. Power on the library and confirm that “Unit Ready” appears on the li brary’s front
panel.
25. Power on all computer equipment and start all applications including your backup
utility software.
If you have difficulty
If you have difficulty with any part of this procedure, contact Spectra Logic Technical
Support at (800) 227-4637, or (303) 449-6444, extension 3175. Make sure to give the
support representative the model and serial number of your library, and say that you
are replacing the power supply.
18
 Loading...