

Page 1

Spectra nTier700
Backup and Archive Appliance
Release Notes and Documentation Updates
SpectraLogic.com
Page 2

Copyright Copyright © 2008–2010 Spectra Logic Corporation. All rights reserved. This item and the
information contained herein are the property of Spectra Logic Corporation.
Notices Except as expressly stated herein, Spectra Logic Corporation makes its products and
associated documentation on an “AS IS” BASIS, WITHOUT WARRANTY OF ANY
KIND, EITHER EXPRESSED OR IMPLIED, INCLUDING BUT NOT LIMITED TO
THE IMPLIED WARRANTIES OF MERCHANTABILITY OR FITNESS FOR A
PARTICULAR PURPOSE, BOTH OF WHICH ARE EXPRESSLY DISCLAIMED. In no
event shall Spectra Logic be liable for any loss of profits, loss of business, loss of use or
data, interruption of business, or for indirect, special, incidental or consequential
damages of any kind, even if Spectra Logic has been advised of the possibility of such
damages arising from any defect or error.
Information furnished in this manual is believed to be accurate and reliable. However, no
responsibility is assumed by Spectra Logic for its use. Due to continuing research and
development, Spectra Logic may revise this publication from time to time without notice,
and reserves the right to change any product specification at any time without notice.
Trademarks BlueScale, Spectra, SpectraGuard, TeraPack, and the Spectra Logic logo are registered
trademarks. BlueScale Vision, nTier, and RXT are trademarks of Spectra Logic
Corporation. All rights reserved worldwide. All other trademarks and registered
trademarks are the property of their respective owners.
Part Number 90990019 Revision F
Revision
History
BlueScale Version
2.3.0.2 B April 2008 Updated formatting.
2.6.0.6 C April 2009 User Guide updates, firmware updates, known issues.
2.6.0.7 D May 2009 Firmware updates, add File Migrator install files, resolved
2.7.1.7-20100107 E February 2010 BlueScale firmware 2.7.1.7 updates and known issues.
2.7.2.5-20100512 F May 2010 Implemented fan speed controls to reduce power
2.8.0.1-20100615 G June 2010 BlueScale firmware 2.8.0.1 updates and known issues.
Document
Revision
Date Description
Added information about RMM, power cord
specifications
issues
Remove DPM and File Migrator from system disk.
consumption and operating noise levels.
Add 2TB drives
Note: To make sure you have the release notes for the most current version of
the BlueScale firmware, check the Spectra Logic Web site at
www.spectralogic.com/documents. The release notes also include
updates to the product documentation.
2
Release Notes 90990019
Page 3

License You have acquired a Spectra product that includes software owned or licensed by
Spectra Logic from one or more software licensors (“Software Suppliers”). Such
software products, as well as associated media, printed materials and “online” or
electronic documentation (“SOFTWARE”) are protected by copyright laws and
international copyright treaties, as well as other intellectual property laws and treaties.
If you do not agree to this end user license agreement (EULA), do not use the Spectra
product; instead, promptly contact Spectra Logic for instructions on return of the Spectra
product for a refund. Any use of the Software, including but not limited to use on the
Spectra product, will constitute your agreement to this EULA (or ratification of any
previous consent).
Grant of License. The Software is licensed on a non-exclusive basis, not sold. This EULA
grants you the following rights to the Software:
You may use the Software only on the Spectra product.
Not Fault Tolerant. The Software is not fault tolerant. Spectra Logic has independently
determined how to use the Software in the Spectra product, and suppliers have relied
upon Spectra Logic to conduct sufficient testing to determine that the Software is
suitable for such use.
No Warranties for the SOFTWARE. The Software is provided “AS IS” and with all
faults. The entire risk as to satisfactory quality, performance, accuracy, and effort
(including lack of negligence) is with you. Also, there is no warranty against
interference with your enjoyment of the Software or against infringement. If you have
received any warranties regarding the SOFTWARE, those warranties do not originate
from, and are not binding on Software suppliers.
Note on Java Support. The Software may contain support for programs written in Java.
Java technology is not fault tolerant and is not designed, manufactured, or intended for
use of resale as online control equipment in hazardous environments requiring fail-safe
performance, such as in the operation of nuclear facilities, aircraft navigation or
communications systems, air traffic control, direct life support machines, or weapons
systems, in which the failure of Java technology could lead directly to death, personal
injury, or severe physical or environmental damage.
No Liability for Certain Damages. Except as prohibited by law, Software suppliers shall
have no liability for any indirect, special, consequential or incidental damages arising
from or in connection with the use or performance of the Software. This limitation shall
apply even if any remedy fails of its essential purpose. In no event shall Software
suppliers, individually, be liable for any amount in excess of U.S. two hundred fifty
dollars (U.S. $250.00).
Limitations on Reverse Engineering, Decompilation, and Disassembly. You m ay n o t
reverse engineer, decompile, or disassemble the Software, except and only to the extent
that such activity is expressly permitted by applicable law notwithstanding this
limitation.
Software T ransfer Allowed with Restrictions. You may permanently transfer rights under
this EULA only as part of a permanent sale or transfer of the Spectra product, and only
if the recipient agrees to this EULA. If the Software is an upgrade, any transfer must
also include all prior versions of the Software.
Export Restrictions. Export of the Software from the United States is regulated by the
Export Administration Regulations (EAR, 15 CFR 730-744) of the U.S. Commerce
Department, Bureau of Export Administration. You agree to comply with the EAR in
the export or re-export of the Software: (i) to any country to which the U.S. has
embargoed or restricted the export of goods or services, which as May 1999 include, but
are not necessarily limited to Cuba, Iran, Iraq, Libya, North Korea, Sudan, Syria, and
the Federal Republic of Yugoslavia (including Serbia, but not Montenegro), or to any
national or any such country, wherever located, who intends to transit or transport the
Software back to such country; (ii) to any person or entity who you know or have
reason to know will utilize the Software or portion thereof in the design, development
or production of nuclear, chemical, or biological weapons; or (iii) to any person or
entity who has been prohibited from participating in U.S. export transactions by any
federal agency of the U.S. government. You warrant and represent that neither the BXA
nor any other U.S. federal agency has suspended, revoked or denied your export
privileges. For additional information see http://www.microsoft.com/exporting/.
June 2010 nTier700 Backup and Archive Appliance
3
Page 4

Contacting Spectra Logic
To obtain general information
Spectra Logic Web Site: www.spectralogic.com
United States Headquarters European Office
Spectra Logic Corporation
6285 Lookout Road
Boulder, CO 80301
USA
Phone: 1.800.833.1132 or 1.303.449.6400
International: 1.303.449.6400
Fax: 1.303.939.8844
Spectra Logic Europe Ltd.
Magdalen Centre
Robert Robinson Avenue
Oxford Science Park
OXFORD
UK-OX4 4GA
United Kingdom
Phone: 44 (0) 870.112.2150
Fax: 44 (0) 870.112.2175
Spectra Logic Technical Support
Web Site: www.spectralogic.com/support
Knowledge Base: www.spectralogic.com/knowledgebase
United States and Canada
Phone:
Toll free US and Canada: 1.800.227.4637
International: 1.303.449.0160
Email: support@spectralogic.com
Europe, Middle East, Africa
Phone: 44 (0) 870.112.2185
Email: support@spectralogic.com
Deutsch sprechende Kunden
Phone: 49 (0) 6028.9796.507
Email: spectralogic@stortrec.de
Mexico, Central and South America, Asia, Australia, and New Zealand
Phone: 1.303.449.0160
Email: support@spectralogic.com
Spectra Logic Sales
Web Site: www.spectralogic.com/shop
United States and Canada
Phone: 1.800.833.1132 or 1.303.449.6400
Fax: 1.303.939.8844
Email: sales@spectralogic.com
Europe
Phone: 44 (0) 870.112.2150
Fax: 44 (0) 870.112.2175
Email: eurosales@spectralogic.com
To obtain documentation
Spectra Logic Web Site: www.spectralogic.com/documents
4
Release Notes 90990019
Page 5

Contents
Introduction 7
RELATED PUBLICATIONS . . . . . . . . . . . . . . . . . . . . . . . . . . . . . . . . . . . . . . . . . . . . . . . . . . . . . . 7
USER FEEDBACK . . . . . . . . . . . . . . . . . . . . . . . . . . . . . . . . . . . . . . . . . . . . . . . . . . . . . . . . . . . . 9
REGISTER YOUR NEW NTIER700 . . . . . . . . . . . . . . . . . . . . . . . . . . . . . . . . . . . . . . . . . . . . . . . 9
TYPOGRAPHICAL CONVENTIONS . . . . . . . . . . . . . . . . . . . . . . . . . . . . . . . . . . . . . . . . . . . . . . . 9
nTier700 BlueScale Firmware 11
FIRMWARE PACKAGE INFORMATION . . . . . . . . . . . . . . . . . . . . . . . . . . . . . . . . . . . . . . . . . . . 11
Firmware Package Support . . . . . . . . . . . . . . . . . . . . . . . . . . . . . . . . . . 11
Updating Firmware . . . . . . . . . . . . . . . . . . . . . . . . . . . . . . . . . . . . . . . . 12
Firmware Version Requirements . . . . . . . . . . . . . . . . . . . . . . . . . . . . . 12
FIRMWARE PACKAGE HISTORY . . . . . . . . . . . . . . . . . . . . . . . . . . . . . . . . . . . . . . . . . . . . . . . . 12
BlueScale2.8.0.1 . . . . . . . . . . . . . . . . . . . . . . . . . . . . . . . . . . . . . . . . . . . . 13
BlueScale 2.7.2.5 . . . . . . . . . . . . . . . . . . . . . . . . . . . . . . . . . . . . . . . . . . . . 13
BlueScale 2.7.1.7 . . . . . . . . . . . . . . . . . . . . . . . . . . . . . . . . . . . . . . . . . . . . 14
BlueScale2.6.0.7 . . . . . . . . . . . . . . . . . . . . . . . . . . . . . . . . . . . . . . . . . . . . 16
BlueScale2.6.0.6 . . . . . . . . . . . . . . . . . . . . . . . . . . . . . . . . . . . . . . . . . . . . 17
BlueScale 2.3.0.2-20080421 . . . . . . . . . . . . . . . . . . . . . . . . . . . . . . . . . . . 18
Important Information 23
SUPPORTED BROWSERS . . . . . . . . . . . . . . . . . . . . . . . . . . . . . . . . . . . . . . . . . . . . . . . . . . . . . 23
IP ADDRESSING . . . . . . . . . . . . . . . . . . . . . . . . . . . . . . . . . . . . . . . . . . . . . . . . . . . . . . . . . . . . 23
INDOWS OPERATING SYSTEM . . . . . . . . . . . . . . . . . . . . . . . . . . . . . . . . . . . . . . . . . . . . . . . 24
W
U
PDATING TAPE DRIVE DEVICE DRIVERS . . . . . . . . . . . . . . . . . . . . . . . . . . . . . . . . . . . . . . . 24
WORKING WITH THE HARDWARE COMPONENTS . . . . . . . . . . . . . . . . . . . . . . . . . . . . . . . . . 27
OVING OR SHIPPING THE NTIER700 . . . . . . . . . . . . . . . . . . . . . . . . . . . . . . . . . . . . . . . . . . 28
M
R
ECYCLING YOUR NTIER700 . . . . . . . . . . . . . . . . . . . . . . . . . . . . . . . . . . . . . . . . . . . . . . . . . 28
5
Page 6

Contents
Updates to the User Guide 29
CHAPTER 1—OVERVIEW . . . . . . . . . . . . . . . . . . . . . . . . . . . . . . . . . . . . . . . . . . . . . . . . . . . . 29
Features . . . . . . . . . . . . . . . . . . . . . . . . . . . . . . . . . . . . . . . . . . . . . . . . . . 29
HAPTER 2—INSTALLING THE NTIER700 . . . . . . . . . . . . . . . . . . . . . . . . . . . . . . . . . . . . . . . 30
C
Install in a Restricted Access Location . . . . . . . . . . . . . . . . . . . . . . . . . 30
Connect the Power Cords . . . . . . . . . . . . . . . . . . . . . . . . . . . . . . . . . . . 31
Install the Data Drives in the Blades . . . . . . . . . . . . . . . . . . . . . . . . . . 32
Connect the Cables and Power On . . . . . . . . . . . . . . . . . . . . . . . . . . . . 36
Next Steps . . . . . . . . . . . . . . . . . . . . . . . . . . . . . . . . . . . . . . . . . . . . . . . . 39
C
HAPTER 3—CONFIGURING THE NTIER700 . . . . . . . . . . . . . . . . . . . . . . . . . . . . . . . . . . . . 40
Access the BlueScale Web Interface . . . . . . . . . . . . . . . . . . . . . . . . . . 40
Access the Windows Desktop . . . . . . . . . . . . . . . . . . . . . . . . . . . . . . . . 45
Install Antivirus Software . . . . . . . . . . . . . . . . . . . . . . . . . . . . . . . . . . . 49
Install Additional Application Software . . . . . . . . . . . . . . . . . . . . . . . 49
CHAPTER 4—USING THE NTIER700 . . . . . . . . . . . . . . . . . . . . . . . . . . . . . . . . . . . . . . . . . . . 53
Displaying the Status of Components . . . . . . . . . . . . . . . . . . . . . . . . . 53
Using the Blade Operator Panel . . . . . . . . . . . . . . . . . . . . . . . . . . . . . . 53
CHAPTER 8—MAINTAINING THE NTIER700 . . . . . . . . . . . . . . . . . . . . . . . . . . . . . . . . . . . . . 54
Moving or Shipping the nTier700 . . . . . . . . . . . . . . . . . . . . . . . . . . . . . 54
Updating Firmware . . . . . . . . . . . . . . . . . . . . . . . . . . . . . . . . . . . . . . . . 54
Updating Tape Drive Device Drivers . . . . . . . . . . . . . . . . . . . . . . . . . 60
APPENDIX A—SERVICE AND SUPPORT . . . . . . . . . . . . . . . . . . . . . . . . . . . . . . . . . . . . . . . . . 63
Before Contacting Spectra Logic Technical Support . . . . . . . . . . . . . 63
Opening a Support Ticket . . . . . . . . . . . . . . . . . . . . . . . . . . . . . . . . . . . 63
Returns . . . . . . . . . . . . . . . . . . . . . . . . . . . . . . . . . . . . . . . . . . . . . . . . . . . 64
APPENDIX B – SPECIFICATIONS . . . . . . . . . . . . . . . . . . . . . . . . . . . . . . . . . . . . . . . . . . . . . . . 64
RAID Storage Specifications . . . . . . . . . . . . . . . . . . . . . . . . . . . . . . . . . 64
Power Cords . . . . . . . . . . . . . . . . . . . . . . . . . . . . . . . . . . . . . . . . . . . . . . 65
PPENDIX D—TUNING GIGABIT ETHERNET NETWORK PERFORMANCE . . . . . . . . . . . . . . . 66
A
Enable Jumbo Frames for 10 GigE Network Interface Cards . . . . . . 66
Teaming NICs . . . . . . . . . . . . . . . . . . . . . . . . . . . . . . . . . . . . . . . . . . . . . 69
6
Release Notes 90990019
Page 7

These release notes give you the latest information available about the
BlueScale® firmware for the Spectra® nTier700™ Backup and Archive
Appliance (referred to as the nTier700). They provide updates to the
Spectra nTier700 Backup and Archive Appliance User Guide.
Notes: To make sure you have the most current version of the
BlueScale firmware release notes and the Spectra nTier700
Backup and Archive Appliance User Guide, check the Spectra
Logic Web site at www.spectralogic.com/documents.
The Spectra nTier700 was previously called the Spectra
nTier700 Intelligent Secondary Storage Appliance.
RELATED PUBLICATIONS
The following publications related to the Spectra nTier700 are available
from the Spectra Logic web site at www.spectralogic.com/documents.
Introduction
For additional information about the nTier700, refer to the following
publications.
nTier700
The following documents related to the nTier700 are available on the
Spectra Logic web site at www.spectralogic.com/documents.
The Spectra nTier700 Backup and Archive Appliance User Guide provides
detailed information about installing, configuring, using, and
maintaining your nTier700.
Note: The current version of the user guide is entitled Spectra nTier700
Intelligent Secondary Storage Appliance User Guide. The title will
change the next time the guide is updated.
Spectra nTier700 Backup and Archive Appliance Read This First gives tips
and other important information that you should know before
installing the nTier700 in your storage environment.
7
Page 8

Introduction
Microsoft Windows Operating System and Software
Check the following web sites for information and documentation related
to the Microsoft Windows Storage Server 2003 operating system and other
Microsoft software used with the nTier700.
The integrated application server in the nTier700 runs the Windows
Storage Server 2003 R2 operating system. You can find information
about this operating system on the Microsoft web site at
www.microsoft.com/windowsserver2003.
The nTier700 uses the Microsoft Distributed File System (DFS), a
feature of Windows Storage Server 2003, as its replication engine. You
can find information about DFS on the Microsoft web site at
www.microsoft.com/windowsserver2003/technologies/storage/dfs/
default.mspx.
Microsoft Data Protection Manager (DPM) is a software option that can
be installed and run on the nTier700. You can find information about
Microsoft Data Protection Manager (DPM) on the Microsoft web site at
www.microsoft.com/dpm.
Note: DPM is no longer available for purchase with the nTier700. It is
supported as legacy software only.
Intel Remote Management Module 2
The integrated Intel Remote Management Module 2 (Intel RMM2)
provides remote power management so that you can power cycle the
nTier700 from a remote host. You can obtain the Intel Remote Management
Module 2 User Guide from the Intel web site at
www.intel.com/support/motherboards/server/sb/cs-025399.htm.
QLogic Fibre Channel Host Bus Adapter
To configure the option QLogic Fibre Channel Host Bus Adapter, use the
QLogic SANsurfer Application for Windows. Search the QLogic web site
for additional information about obtaining and using SANsurfer.
Spectra nTier File Migrator
Note: Spectra nTier File Migrator is no longer available for purchase
with the nTier700. It is supported as legacy software only.
Spectra nTier File Migrator is a software option that can be installed and
run on the nTier700. The following publication related to the Spectra nTier
Migrator software are available from the Spectra Logic web site at
www.spectralogic.com/documents.
The Spectra nTier File Migrator User Guide provides information on how to
install, configure, use, maintain, and troubleshoot the nTier File Migrator
software.
8
Release Notes 90990019
Page 9

USER FEEDBACK
Important
Caution
Warning
Please give us suggestions for and opinions on our products and their
documentation by calling us at (800) 833-1132 or sending e-mail to
feedback@spectralogic.com.
REGISTER YOUR NEW NTIER700
Register your nTier700 quickly and easily on the Spectra Logic web site, by
visiting www.spectralogic.com/register.
TYPOGRAPHICAL CONVENTIONS
These release notes use the following conventions to highlight important
information:
User Feedback
Note: Read notes for additional information or suggestions about the
current topic.
Read text marked by the “Important” icon for information that will help you
complete a procedure or avoid extra steps.
Read text marked by the “Caution” icon for information you must know to avoid
damaging the library, the tape drives, or losing data.
Read text marked by the “Warning” icon for information you must know to avoid
personal injury.
Warnung: Lesen Sie markierten Text durch die “Warnung”-Symbol für die
Informationen, die Sie kennen müssen, um Personenschäden zu vermeiden.
These release notes use an arrow (>) to describe a series of menu
selections. For example:
Select Configuration > Network.
means
Select Configuration, then select Network.
June 2010 Spectra nTier700 Backup and Archive Appliance
9
Page 10

Introduction
Notes
10
Release Notes 90990019
Page 11

nTier700 BlueScale Firmware
Important
FIRMWARE PACKAGE INFORMATION
Firmware packages are groupings of program code that are used to update
the BlueScale software and firmware for the nTier700.
The Windows Storage Server operating system requires you to install device drivers
before application software can correctly communicate with tape drives, either in a
library or standalone, connected to the nTier700.
Do not use the Hardware Update Wizard in the Windows Device Manager to install
the tape drive device drivers. The wizard does not install the drivers correctly on the
nTier700. If you previously installed device drivers using the wizard, you must
remove the drivers and then reinstall the drivers. Follow the instructions in
Updating Tape Drive Device Drivers on page 24 to remove the drivers and then
reinstall them.
Firmware Package Support
Spectra Logic recommends that you keep your nTier700 firmware up-todate. Spectra Logic provides complete support for the two most recently
shipped releases of firmware packages. If you are using a firmware
package other than the most current one, Spectra Logic urges you to
upgrade to the current release as soon as possible. If the firmware you are
running is more than two releases behind, you may be required to upgrade
firmware to resolve an issue or to verify that a problem still exists in
current firmware.
11
Page 12

nTier700 BlueScale Firmware
Important
Important
Updating Firmware
Note: Until further notice, firmware updates for the nTier700 are
To ensure that you have the most current firmware for your nTier700:
1. Connect to the BlueScale web interface.
2. Select About on the menu bar to check the currently installed BlueScale
firmware version.
3. If the version you have is older than the most current version described
in these release notes, contact Spectra Logic Technical Support to obtain
an update.
4. If a more current firmware version is available, download the update
and install it. Refer to the current version of the Spectra nTier700 Backup
and Archive Appliance User Guide for instructions.
Note: A current support contract is required before you can download
currently managed on an individual basis by Spectra Logic
Technical Support. Contact Spectra Logic Technical Support for
assistance (see Contacting Spectra Logic on page 4).
firmware updates.
Contact Spectra Logic Technical Support at www.spectralogic.com/support
if you have any questions.
Firmware Version Requirements
The update to BlueScale 2.6.0.6 or later from any earlier version of the BlueScale
firmware must be performed by Spectra Logic Technical Support personnel (see
Contacting Spectra Logic on page 4).
FIRMWARE PACKAGE HISTORY
The following sections list information about the BlueScale firmware
packages and how they affect the nTier700 and its components. The
BlueScale firmware releases are listed in reverse chronological order, with
the most recent release listed first. All package names are followed with
the date of release (YYYYMMDD).
Unless otherwise stated, the known issues remain active until moved to the
resolved issues section. Always read the known issues section for each firmware
release to make sure you are aware of any potential problems.
12
Release Notes 90990019
Page 13

BlueScale2.8.0.1
This release implements hardware changes to the nTier700. It also updates
the Windows operating system with the patches that were available as of
June 14, 2010 (with the exception of Internet Explorer 8) and the drivers for
the internal cards.
Enhancements and Changes
The Spectra nTier700 Backup and Archive Appliance User Guide incorrectly
states that Ethernet ports 2 through 4 have a fixed IP addresses as the
default. The default IP address for all four Ethernet ports is set to DHCP.
Refer to Spectra nTier700 Backup and Archive Appliance User Guide for
information about using a blade operator panel to determine the DHCPassigned address for Ethernet port 1 and if necessary configure a fixed IP
address.
BlueScale 2.7.2.5
Firmware Package History
This release improves the operation of the nTier700.
Enhancements
The nTier700 now supports using 2 TB data drives; the 500 GB drives
are no longer available for purchase.
The operating speed of the fans in the chassis is now regulated by the
temperature inside the chassis. Depending on the temperature, the fans
can operate at lower speeds, reducing power consumption and the
overall noise from the system.
Resolved Issues
The operator panel Drive Status tab now indicates when a drive in the blade
is in a failed state.
June 2010 Spectra nTier700 Backup and Archive Appliance
13
Page 14

nTier700 BlueScale Firmware
Known Issues
Problem Workaro und
When accessing the nTier500 through the
BlueScale web interface, you may be prompted to
install an ActiveX control when you select
Remote Desktop to connect to the Windows
Desktop. If the installation of the ActiveX control
fails, the connection cannot be established.
When sending a manual AutoSupport Log (ASL),
a message displays stating that “Log set sent
successfully.” However, inside the New Log Set
box it states “Cannot send log set. - Description is
required.”
The RMM module creates four virtual CD-ROM
drives, each of which is listed as a separate drive
letter listed under My Computer.
Access the Windows Desktop using the Remote
Desktop Connections application from a
Windows-based computer on the same network
as the nTier700.
1. From your computer, select Start > Programs
> Accessories > Remote Desktop to display
the Remote Desktop Connection screen.
2. Enter the IP address of the nTier700 and select
Connect.
3. Log into Windows using the same User name
and Password as you use to log into the
nTier700 BlueScale web interface.
Ignore the message in the New Log Set window.
The ASL was sent successfully. After the ASL is
sent, the New Log Set screen clears the
Description field in preparation for sending the
next ASL.
Refer to Spectra KB Article #667 for information
about disable these virtual drives so that they are
no longer listed under My Computer.
BlueScale 2.7.1.7
This release improves the overall reliability of the nTier700.
Enhancements and Changes
Microsoft Data Protection Manager (DPM) and Spectra nTier File
Manager are no longer available for purchase with the nTier700.
The RAID tab on the BlueScale web interface now includes a
Alarm
that sounds when a RAID is experiencing problems.
Resolved Issues
The BlueScale firmware prevents updating the Adaptec RAID
controller firmware and /or driver if a RAID is either building or
rebuilding. A system message is posted indicating that the RAID
controller firmware was not updated because the RAID was
building/rebuilding.
The BlueScale firmware prevents updating the Adaptec RAID
controller firmware and /or driver if a task is currently active on the
RAID.
Silence HBA
button to let a remote operator silence the audible HBA alarm
14
Release Notes 90990019
Page 15

BlueScale services are now more robust when using different types of
network configurations.
When RAIDs are rebuilding, the Bluescale progress screen now
correctly updates as the rebuild progresses.
Error reporting by the BlueScale web interface has been improved.
You can now export the System log maintained by File Migrator. The
system log records all operations, including reads, writes, seeks, moves,
and transfer rates. Refer to the Spectra nTier File Migrator Installation
Guide for information about exporting system logs.
Note: Spectra nTier File Migrator software is no longer available for
purchase with the nTier700. The information in this section is
provided for legacy support only.
Known Issues
Problem Workaro und
Firmware Package History
The Driver Install/Update wizard in Windows
Device Manager does not correctly install tape
drive device drivers on the nTier700.
The device drivers for IBM LTO-4 tape drives
included in the BlueScale 2.7.1.7 firmware
package does not support half-height IBM LTO-4
tape drives.
When sending ASL files generated by
AutoSupport, the send log operation fails if the
E-mail From field in the AutoSupport Mail
Recipients configuration contains an “@” symbol.
If the Windows password is left blank, you
cannot login into BlueScale from either a direct
connection to the Windows operating system or
through the BlueScale web interface.
Follow the instructions in Updating Tape Drive
Device Drivers on page 24 to download the
appropriate drivers and install them.
Note: If you previously installed/updated the
device drivers using the wizard, you must first
uninstall the drivers and devices, then reinstall
them. See Updating Tape Drive Device Drivers
on page 24.
Download and install the most current LTO-4
device drivers. Refer to Updating Tape Drive
Device Drivers on page 24 for instructions.
When configuring mail recipients in
AutoSupport, leave the E-mail From field empty
or simply include the domain (for example,
spectralogic.com).
Make sure that you set the Windows password.
Do not leave it blank. Refer to the Spectra nTier700
Backup and Archive Appliance User Guide for
information about setting the Windows
Administrator password.
The BlueScale web interface may not operate
correctly when accessed by a server running
Windows Server 2008 AND Internet Explorer 7.
When multiple servers are connected to the
nTier700 and actively transferring data, you
occasionally lose access to shared folders when
the BlueScale web interface is running.
June 2010 Spectra nTier700 Backup and Archive Appliance
Use Mozilla Firefox or a different version of
Internet Explorer.
If you have a large number of clients attached to
the system and lose access to shared folders,
configure the system to restart the Server service
automatically.
15
Page 16

nTier700 BlueScale Firmware
BlueScale2.6.0.7
This release improves the overall reliability of the nTier700.
Resolved Issues
The File Migrator installation files have been added to system disk on the
the 64-bit Windows version of the nTier700.
Note: As of BlueScale 2.7.1.7, File Migrator is no longer included with
the nTier700.
Known Issue
Problem Workaround
When RAIDs are rebuilding, the
Bluescale progress screen does not
update to reflect the actual progress,
even when the process is nearly
complete.
Note: This issue is resolved in BlueScale
2.7.1.7.
If you need to determine the status of the RAID rebuild, do
one of the following:
Monitor the BlueScale messages. The rebuild is complete
when you see a message similar to this:
Raid <raid name> in Enclosure <Enclosure #>
Chassis <Chassis #> Hba <Hba #> Expander
<Expander #> changed state from <previous
state> to OK
Use the Windows command line to determine the status.
1. Connect to the Windows desktop.
2. Select Start > Accessories > Command Prompt to open a
command prompt window.
3. Type the following command:
%ntiercurrent%\adaptec\arcconf.exe getstatus
<ctrl #>
where <ctrl #> is the number of the RAID controller on
which the RAID was being rebuilt (either 1 or 2).
4. Repeat Step 2 until the status returned is “None.”
16
Release Notes 90990019
Page 17

BlueScale2.6.0.6
This firmware release improves overall reliability of the nTier700.
Resolved Issues
Disconnecting and reconnecting the cables to the Ethernet ports on the
nTier700 back panel no longer causes the system to hang.
Known Issues
Problem Workaround
Firmware Package History
Update from BlueScale 2.2 or 2.3 to 2.6.0.6 fails
unless specific procedures are carefully followed.
After disabling a NIC through the BlueScale web
interface, the operator panel no longer operates
correctly.
If you are updating the firmware for the root
expanders from a previous version, the firmware
update fails if there is I/O to the drives during the
update.
Occasionally, you may not be able to navigate to
the BlueScale Network screen when the optional
10 GigE NIC is installed.
Following a reboot of the nTier700, the BlueScale
web interface shows the status for all system
components as unknown and Last Update as old.
This update must be performed by Spectra Logic
Technical Support personnel (see Contacting
Spectra Logic on page 4).
Do not disable NICs.
Before you update the nTier700 firmware for the
root expanders, stop all I/O to the drives, then
stop BlueScale. The expander firmware is
updated as part of the BlueScale 2.2 or 2.3 to
BlueScale 2.6.0.6 update procedure performed by
Spectra Logic Technical Support.
1. Access the Windows desktop.
2. Configure the IP addressing for the installed
network interface cards through Windows.
(Start > Settings > Network Connections,
select the desired connection, and then select
Properties to configure the IP addressing.
Reboot the system again.
BlueScale posts critical error messages about
missing blades immediately following a system
start or reboot.
If you have a proxy server defined for Internet
Explorer you cannot use the Download From
Spectra option to update the nTier700 BlueScale
firmware.
June 2010 Spectra nTier700 Backup and Archive Appliance
Ignore critical messages concerning the missing
blades IF they are posted immediately following
a BlueScale restart (for example, a system reboot).
Mark the messages as Read and then continue to
monitor the messages for subsequent critical
alerts for the same components.
Download the firmware update file to either a
USB drive or a firmware package server and
update the firmware from there.
17
Page 18

nTier700 BlueScale Firmware
Problem Workaround
Occasionally you may receive an internal server
error when changing IP settings for Ethernet
port 2 through BlueScale.
The BlueScale login page does not display
following a firmware update. Instead the status
page that the system is restarting remains.
File Migrator. The nTier File Migrator installation
file is not currently stored on the nTier700
integrated application server system disk.
Notes:
This issue is resolved in BlueScale 2.6.07.
As of BlueScale 2.7.1.7 File Migrator is no
longer included with the nTier700.
File Migrator. The License Administration Utility
and Activating without Internet Access process
described in the nTier File Migrator User Guide
does not work.
Note: As of BlueScale 2.7.1.7 File Migrator is no
longer included with the nTier700.
Restart the browser you are using to access the
BlueScale web interface and reconnect to the
nTier700.
Refresh the BlueScale web interface by pressing
function key 5 (F5) on your keyboard.
Contact SpectraGuard Technical Support for
assistance (see Contacting Spectra Logic on
page 4).
Connect the nTier appliance to a network that has
internet connectivity and select Internet as the
activation option. If you do not have web access,
contact Spectra Logic Technical Support for
assistance (see Contacting Spectra Logic on
page 4).
BlueScale 2.3.0.2-20080421
This is the first general-availability firmware release for the Spectra
nTier700.
Known Issues
Problem Workaround
If you are updating the firmware for the blades or
root expanders from a previous version, the
firmware update fails if there is I/O to the drives
during the update.
Occasionally, the operator panel Drive Status tab
does not indicate when a drive is in a failed state.
Note: This issue is resolved in BlueScale2.7.2.5.
When DPM is installed, the names of the SQL
services it installs are not listed correctly on the
Applications page.
Note: As of BlueScale 2.7.1.7 DPM is no longer
included with the nTier700.
If you need to update the nTier700 firmware for
the blades or root expanders, stop all I/O to the
drives and then stop BlueScale before beginning
the update.
Use the BlueScale web interface to determine the
status of the component in question.
Access the Windows desktop and run
services.msc to verify that the SQL services
are running.
Changing the cables connected to Ethernet ports
1 and 2 on the nTier700 back panel cause the
system to hang.
18
Release Notes 90990019
Do not unplug/plug cables to Ethernet ports 1
and 2 while the nTier700 is powered on.
Page 19

Problem Workaround
Firmware Package History
The nTier700 root expanders are not
hot-swappable. If a root expander is removed
while the nTier700 is powered on:
The nTier700 status information is no longer
available through the BlueScale web interface
and the blade operator panels.
The AutoSupport feature does not function
correctly.
You cannot restart the nTier700 through
Windows until the root expander is
re-installed.
When installing the nTier700, make sure that it
can access a properly configured DHCP/DNS
server. Or, enter a known good IP address if you
are using a static IP address. Otherwise, Remote
Desktop may not work. If it doesn’t, attach a
monitor, keyboard and mouse to the nTier700 so
you can review the event log. Look for the
following error, which corresponds to the Remote
Desktop connection attempt:
Event Type: Error
Event Source: TermDD
Event ID: 50
Description:
The RDP protocol component “DATA
ENCRYPTION” detected an error in the protocol
stream and has disconnected the client.
Power down the nTier700 before removing a root
expander.
If you see this error, follow the directions found
in Microsoft’s KnowledgeBase article KB323497
http://support.microsoft.com/kb/323497 to repair
the problem.
At the end of a package update, you may not be
automatically redirected to the BlueScale Web
interface login page.
If one or more drives assigned to a logical volume
have failed or are missing, there is no information
about the drives on Logical Volumes page of the
BlueScale web interface.
If the upgrade seems to have stalled after
rebooting, manually connect to the login page.
Check the Drives tab on the blade’s operator
panel or the Overview screen on the web
interface to identify the missing drives.
June 2010 Spectra nTier700 Backup and Archive Appliance
19
Page 20
nTier700 BlueScale Firmware
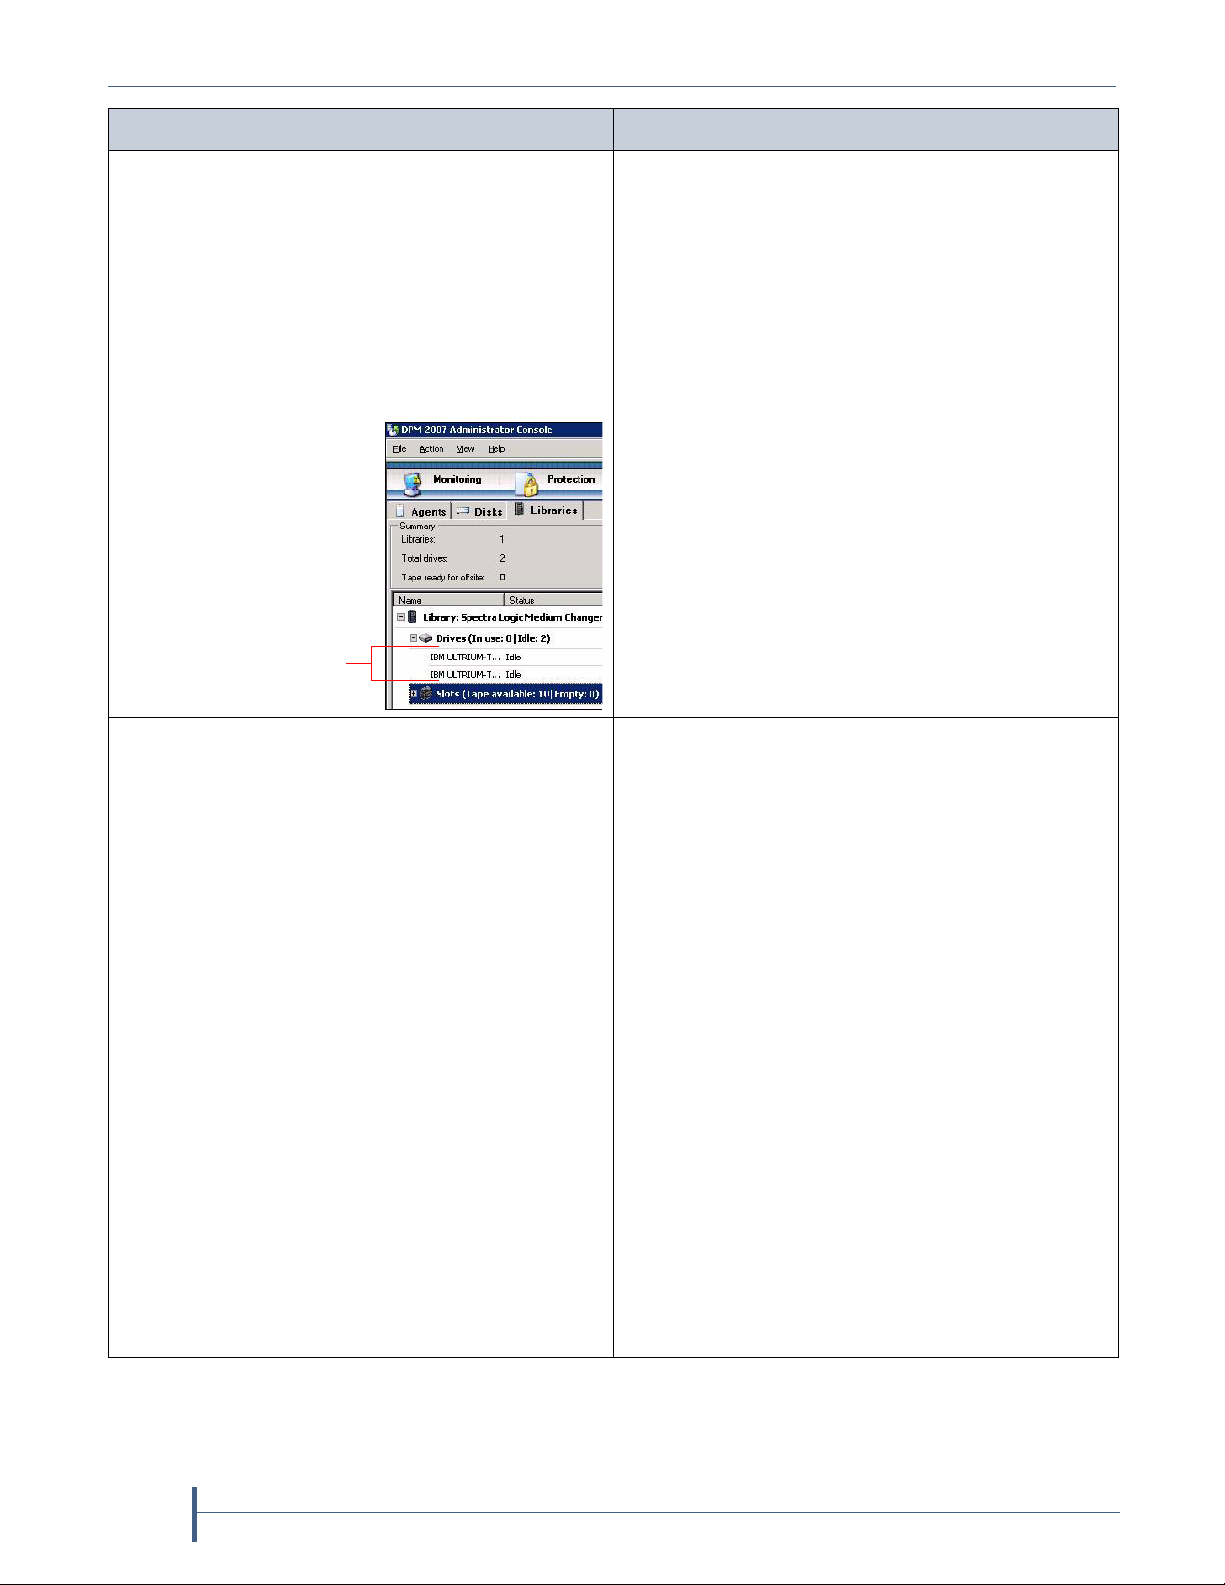
Drives are indented
showing that they are
associated with the Spectra
Logic library (Spectra Logic
Medium Changer-2)
Problem Workaround
If Microsoft System Center Data Protection
Manager (DPM) 2007 writes to tape do not
succeed, check the drive mapping. The drives
must be associated with a library—for example,
refer to the following screen, which shows
correctly mapped drives. This is a known
Microsoft bug, and Spectra Logic is waiting for
the patch to fix this problem.
Note: As of BlueScale 2.7.1.7 DPM is no longer
included with the nTier700.
If you are using a tape library with IBM LTO tape
drives in conjunction with your nTier, the
standard Windows device driver installation (via
the Add New Hardware wizard) does not install
all the software needed to take advantage of the
tape drives’ features.
If the drives are not mapped correctly:
1. Stop DPM.
2. Start the Microsoft Removable Storage
Manager (RSM) service and map the tape
drives.
3. Stop the RSM service.
4. Restart DPM. The drives should be mapped
correctly and writes should now succeed.
If the system automatically assigned drivers to
the tape drives, uninstall the device drivers for
the tape drives after you install the unit. Then,
use the following procedure to install the correct
device drivers:
1. Open a command prompt window (Start >
Accessories > Command Prompt).
2. Type the following command to switch to the
directory where the LTO tape device drivers
are located:
cd C:\Program Files (x86)
\SpectraLogic\drivers\IBM LTO Tape
Drives 6.1.7.8
Note: The number included in the IBM LTO
Tapes 6.1.7.8 sub-directory name may not be
same as in this step (for instance, IBM LTO Tapes
6.1.7.9 instead of IBM LTO Tapes 6.1.7.8).
3. Type
install if you are not using Microsoft
Data Protection Manager (DPM) or Microsoft
Removable Storage Manager (RSM).
– or –
Type
install -n if you are using DPM or
RSM.
20
Release Notes 90990019
Page 21

Problem Workaround
Firmware Package History
When entering information through the
BlueScale web interface, using the keyboard Enter
key may not work as expected.
After power-cycling the nTier700, you may
experience a problem connecting to the BlueScale
Web interface through Ethernet port 1 even
though the unit is functioning normally (that is,
the IP information for Ethernet port 1 is correct
and unchanged, the BlueScale service is running,
and the BlueScale login screen is available
locally).
If you leave the focus of your Web browser on the
Blades page for a long period of time, a memory
leak may occur. When this happens, the browser
and the Windows operating system begin to lag,
with functions like opening the Start menu taking
much longer than normal.
Use the buttons in the interface instead of the
keyboard. For example, after entering the folder
information, click the OK button on the user
interface instead of pressing the Enter key to
create the folder.
One workaround is to power-cycle the nTier700
again. The other workaround is to log into the
nTier700 locally and then disable and enable the
network interface card through the Windows
interface.
To recover the memory, close your browser
session.
June 2010 Spectra nTier700 Backup and Archive Appliance
21
Page 22

nTier700 BlueScale Firmware
Notes
22
Release Notes 90990019
Page 23

This section provides information that is essential for ensuring that your
Important
data is accessible at all times and ensuring optimal operation of your
Spectra nTier700 Backup and Archive appliance (referred to as the
nTier700).
SUPPORTED BROWSERS
The following browsers are supported for accessing the BlueScale web
interface for the nTier700:
Microsoft’s Internet Explorer versions 6.0 and above
Mozilla Firefox versions 2.0 and later
The first time you attempt to access the nTier BlueScale web interface, a
warning about the web site’s security certificate displays. Before you can
connect, you must address this warning. If you are using Mozilla Firefox,
the method you use to address this warning depends on the version of
Firefox. See Access the BlueScale Web Interface on page 40 for detailed
instructions.
Important Information
Do not use the Enter key on your keyboard when making selections or entering
information in any of the text fields in the BlueScale web interface. Various web
browsers handle the Enter key differently, causing inconsistent behavior in the
BlueScale web interface.
Always use your mouse to make selections and click the buttons in BlueScale
screens instead of using your keyboard.
IP ADDRESSING
The nTier700 requires a valid IP address for Ethernet port 1 before you can
connect to the BlueScale web interface for the first time. By default, the
nTier700 uses DHCP to obtain an IP address. When installing an nTier700,
make sure that it can access a properly configured DHCP/DNS server.
If a DHCP/DNS server is unavailable, use the operator panel on any blade
to configure Ethernet port 1 to use static (fixed) addressing with a known
good IP address on an available network. Refer to the Spectra nTier700
Backup and Archive Appliance User Guide for instructions.
23
Page 24

Important Information
Important
Important
Important
WINDOWS OPERATING SYSTEM
Performing a Windows Update for the Windows Storage Server 2003 operating
system presents versions of the hardware drivers that are different from what has
been tested and released for the nTier700. Do not download and install drivers from
Microsoft. If the nTier700 requires an updated driver, the appropriate driver will be
provided by Spectra Logic.
Bootup during a RAID rebuild. It can take up to 15 minutes for Microsoft
Windows Server 2003 to boot up when the nTier700 is rebuilding a RAID
array.
UPDATING TAPE DRIVE DEVICE DRIVERS
The Windows Storage Server operating system requires you to install device drivers
before the application software can correctly communicate with tape drives, either
in a library or standalone, connected to the nTier700. Always confirm that you have
the most current driver available for any tape drives in the tape libraries you have
connected to the nTier700.
Do not use the Hardware Update Wizard in Windows Device Manager to install
device drivers for tape drives or other devices. The wizard does not install the
drivers correctly on the nTier700. If you previously installed device drivers using the
wizard, you must remove the drivers and then reinstall the drivers. Use the
instructions in the following sections to remove the drivers and then reinstall them.
Notes: The following instructions are for updating the device
drivers for IBM LTO tape drives. The instructions for other
types of tape drive may differ slightly.
For libraries that use one of the tape drives to provide the
robotic control path through ADI, you may also need to
install the Media Changer driver.
Obtain the Updated Device Driver
Use the following steps to update the drivers for tape drives.
1. Connect to the Windows Desktop on the nTier700.
24
Release Notes 90990019
Page 25

Updating Tape Drive Device Drivers
2. Download the updated drivers to the nTier700 server.
Note: If your nTier700 has internet access, download the driver archive
file directly to a known location on the nTier700 system disk.
Otherwise, save the downloaded driver archive file to a USB
drive using a computer that does have internet access and then
copy the file to a known location on the nTier700 system disk.
a. Using a web browser, go to the IBM Tape Device Driver for
Windows Platforms page, which displays a list of download
directories.
Note: You can also reach this page from the Drive Firmware & Drivers
page on the Spectra Logic web site
(www.spectralogic.com/downloads > Tape Drive Firmware & Drivers).
b. Scroll down to the Download Pages section and select Windows
directory
on the IBM Tape Device Drivers FTP site.
c. Select Win2003.
The IBM FTP page displays a list of download directories, including
one titled “Latest” and one titled “WHQL_Cert” (Windows
Hardware Quality Labs certified).
d. Select the download directory to display a list of zipped file archives
(.zip files).
Select... If your organization...
Latest Does not have a policy against using non-WHQL certified drivers.
WHQL_Cert Has a policy against using non-WHQL certified drivers.
e. Select the file with .x64 in the file name (for example,
IBMTape.x64_6204.zip).
f. Save the zip file containing the drivers to a known location on the
nTier700 system drive.
3. Extract (unzip) the file into the following folder:
C:\Program Files (x86)\SpectraLogic\drivers\
This creates a new folder whose name includes the latest driver version
number. For example:
C:\Program Files (x86)\SpectraLogic\drivers\IBMTape.x64_6204
June 2010 Spectra nTier700 Backup and Archive Appliance
25
Page 26

Important Information
Remove Current Drivers or Devices
If you previously installed device drivers for your tape drives using the
wizard in Windows Device Manager, use the following steps to remove the
drivers. Otherwise, skip to Install the Updated Device Driver.
1. Connect to the Windows Desktop on the nTier700, if you are not
already connected.
2. Using Windows Explorer, navigate to the folder containing the
extracted drivers files. For example:
C:\Program Files (x86)\SpectraLogic\drivers\IBMTape.x64_6204
3. Double click the uninst.exe to run the driver uninstall utility.
4. Open the Device Manager and uninstall any of the following devices, if
present:
For this device... Uninstall...
Tape Drives Any IBM tape drives
System Devices Changer Bus Enumerator and Tape Bus Enumerator
Medium Changers Spectra Logic Medium Changer driver
Other Devices Any tape drives
5. Reboot the nTier700.
Install the Updated Device Driver
Note: If the Windows Add New Hardware Wizard starts, ignore it.
The installation script for the device driver automatically
manages the wizard.
1. Open a Command Prompt window and change to the folder containing
the extracted drivers file.
2. Using the command prompt, run the command to install the tape drive
device driver.
Note: If the driver is unsigned, choose
prompted.
Run the following command... If you are using...
®
install_exclusive.exe Tivoli
Note: The exclusive driver performs automatic SCSI Reserve and
Release commands upon open and close of the tape drive device.
Additionally, the driver enforces a single handle to the device on
the backup server.
Storage Manager
Continue Anyway when
install_nonexclusive.exe Microsoft Data Protection Manager (DPM), Removable Storage
Manager (RSM), or any other software that does not require the
exclusive driver.
26
Release Notes 90990019
Page 27

Working with the Hardware Components
Caution
Caution
3. If the library uses one of the tape drives to provide the robotic control
path through ADI, you may need to reinstall the Media Changer driver
using the Windows Add Hardware wizard. The Spectra Logic device
driver is located on the nTier700 system disk at:
C:\Program Files (x86)\SpectraLogic\drivers\
Spectra T Series Library Driver\SpectraMC.inf
Note: A medium changer driver is unnecessary in most configurations.
The general practice is for the software to control the library
directly, so there is no need for a robotics driver at the OS level.
Three known exceptions are for Windows RSM (Removable
Storage Manager), DPM (Data Protection Manager), and File
Migrator (or XenData). If you have one of these, right-click on
the Unknown Medium Changer and choose Update Driver…. Use
the Windows Add Hardware wizard to install the driver.
WORKING WITH THE HARDWARE COMPONENTS
Extending blades. After powering off a drive that needs replacing, pull
the blade containing the drive out from the chassis gently to prevent
possible vibration issues with the other drives, which are still powered
on and running.
Moving drives between blades or units. The drives in each blade are
configured as a single RAID set. Spectra Logic strongly recommends
against moving drives from one blade to another or from one Spectra
nTier product to another. Contact SpectraGuard Technical Support if
you want to move drives (see Contacting Spectra Logic on page 4).
Moving drives from one blade to another or from one nTier to another can
potentially result in lost data.
Expanding capacity. Any upgrade to add one or more blades to the
originally purchased configuration must be performed by Spectra
Logic Technical Support (see Contacting Spectra Logic on page 4).
Removing a blade. The blades in the nTier700 are not hot-swappable or
hot-pluggable. Contact Spectra Logic Technical Support (see
Contacting Spectra Logic on page 4) if you need to remove a blade.
Do not remove a blade unless specifically instructed to do so by Spectra Logic
Technical Support.
June 2010 Spectra nTier700 Backup and Archive Appliance
27
Page 28

Important Information
Important
Replacing a root expander. The nTier700 root expanders are not
hot-swappable or hot-pluggable. If a root expander is removed while
the nTier700 is powered on, the nTier700 status information is no
longer available through the BlueScale web interface and the blade
operator panels.
Note: Do not remove a root expander unless specifically instructed to
do so by Spectra Logic Technical Support.
Using a PS2 keyboard. Only USA-style PS2 keyboards are supported.
If using a non-USA type keyboard, you will need to find the equivalent
for some characters like the back slash or forward slash.
MOVING OR SHIPPING THE NTIER700
Before moving or shipping the nTier700, remove all of the data drives from the
chassis and carefully pack them in their original shipping box to prevent damage to
the drives.
ECYCLING YOUR NTIER700
R
For information on recycling your nTier700, check the Spectra Logic web
site.
28
Release Notes 90990019
Page 29

Updates to the User Guide
This section includes updates to the Spectra nTier700 Backup and Archive
Appliance User Guide. These updates will be added to the user guide the
next time it is revised.
Notes: The current version of the user guide is entitled Spectra
nTier700 Intelligent Secondary Storage Appliance User Guide.
The title will be changed the next time the user guide is
updated.
Always make sure that you have the latest version of the
documentation for the nTier700 by checking the Spectra
Logic web site at www.spectralogic.com/documents.
Task Described beginning on...
Chapter 1—Overview this page
Chapter 2—Installing the nTier700 page 30
Chapter 3—Configuring the nTier700 page 40
Chapter 8—Maintaining the nTier700 page 54
Appendix A—Service and Support page 63
Appendix B – Specifications page 64
Appendix D—Tuning Gigabit Ethernet Network
Performance
CHAPTER 1—OVERVIEW
The following sections update the information in this chapter.
Features
RAID-protected data disks The nTier700 includes up to six sets of high-
performance disk drives mounted in removable enclosures called blades.
For security, the blades can be locked to prevent unauthorized removal.
A minimum of one blade must be installed in the nTier700. Each blade
contains ten 1 Terabyte (TB) or 2 TB disk drives. The drives in each blade
are preconfigured as a single NTFS-formatted RAID 6 NAS volume.
page 66
29
Page 30

Updates to the User Guide
Important
CHAPTER 2—INSTALLING THE NTIER700
The following sections update the information in this chapter.
Tas k Described beginning on...
Install in a Restricted Access Location this page
Connect the Power Cords page 31
Install the Data Drives in the Blades page 32
Connect the Cables and Power On page 36
Before moving or shipping the nTier700, remove all of the data drives from the
chassis and carefully pack them in their original shipping box to prevent damage to
the drives.
Install in a Restricted Access Location
The nTier700 chassis serves as a protective enclosure when the blades are
in their normal operating position. Pulling the blades out to service the
drives opens the protective enclosure. When installing the nTier700, make
sure that it is only accessible to users who are aware of possible safety risks
when the blades are extended.
Do not operate the nTier700 with the blades pulled out of the enclosure
except when servicing the drives. If you pull a blade out from the
enclosure:
do not allow conductive objects to contact the circuit board and
connector that are exposed when a drive is removed (to prevent
potential risk of heat and fire associated with high energy short
circuits).
make sure you slide the blade completely into the enclosure as soon as
you are finished.
30
Release Notes 90990009
Page 31

Connect the Power Cords
Caution
AC power cords Cord lock
To provide chassis grounding and electrostatic discharge protection while
you install the data drives, connect the power cords to the nTier700 before
installing the drives.
DO NOT power-on the nTier700 until you finish installing ALL of the drives for the
first time. If you install the drives with the nTier700 powered on, the RAID controller
immediately begins rebuilding the RAID volume in the blade, which may destroy
the preconfigured RAID 6 volume.
Use the following steps to connect the power cords.
1. Connect a power cord to each of the power supply connectors on the
rear panel.
Chapter 2—Installing the nTier700
Figure 1 Connect the power cables to the rear panel (N+1 power configuration shown).
2. Push the cord lock on each connector to the left so that it fits over the
power cord, locking it in place.
3. Plug the other end of each cord to an AC power outlet.
June 2010 Spectra nTier700 Backup and Archive Appliance
31
Page 32

Updates to the User Guide
Latch
Chassis management
module
Caution
Install the Data Drives in the Blades
The blades in the nTier700 are numbered consecutively from left to right
when viewed from the front, beginning with Blade 1 at the furthest left. For
each fully-populated blade in the nTier700, two rows of five drives are
mounted in slots along the length of the blade.
Unlock the Blades
For security, the blades in the nTier700 appliance are locked, even when the
power is turned off. An internal latch lets you manually unlock the blades
without powering on the unit.
1. Push inward on each blade to make sure it is fully seated in its bay.
2. Angle a #2 Phillips screwdriver into the opening in the bottom of the
chassis management module and slide it in as far as it will go.
32
Figure 2 Manually unlocking the nTier700 blades.
3. With the screwdriver still in place, pull outward on the chassis
management module until you feel it disengage from its internal
connector.
Only slide the chassis management module out about 2 inches (5 cm). Do not
remove it from chassis.
Note: You may need to push down slightly on the screwdriver to lift
the latch. The internal latch shown in Figure 2 is not visible until
you pull the chassis management module out of the chassis.
4. All of the blades are now unlocked.
5. Remove the screwdriver from the chassis management module.
6. Leave the chassis management module extended.
Release Notes 90990009
Page 33

Chapter 2—Installing the nTier700
Warning
Caution
Handle
Drive 1 Drive 3 Drive 5 Drive 7 Drive 9
Latch 1Latch 2Latch 3Latch 4Latch 5Latch 6Latch 7Latch 8Latch 9Latch 10
Drive 2 Drive 4 Drive 6 Drive 8 Drive 10
Install the Data Drives
Do not pull more than one blade out of the chassis at a time. Extending multiple
blades may cause the nTier700 to tip forward.
Warnung: Ziehen Sie nicht mehr als einen Einschub zu gleicher Zeit aus dem
Gehäuse. Das gleichzeitige Ziehen mehrerer Einschübe kann dazu führen, dass das
nTier700 nach vorne kippt.
Each box of drives is preconfigured as a RAID 6 for a single blade. Mixing the drives
from one box with the drives from another box may destroy the RAID volume.
Each of the nTier700’s data drives is mounted on a drive sled for easy
installation. The drive sleds are inserted into individual slots in the blade,
as shown in Figure 3. When viewed from the front of the nTier700, the
odd-numbered slots (1, 3, 5, 7, 9) are located on the left side of the blade;
the even-numbered slots (2, 4, 6, 8, 10) are located on the right side. This
numbering scheme is used to identify the drives on the Drive Status screen
of the operator panel and in the BlueScale web interface.
Latches between the two rows of drives secure the drives in the blades.
Each latch has a label on it that points to the drive that is attached to the
latch. When unlocked, the latch extracts the drive from the internal
connector so the drive sled can be removed.
Figure 3 Identifying the drive numbers and latches in a blade.
June 2010 Spectra nTier700 Backup and Archive Appliance
33
Page 34

Updates to the User Guide
Caution
The drives for each blade are shipped together as a set. The drives in each
set are labeled from 1 to 10, corresponding the blade slots they occupied
when the RAID 6 volume was originally built. Spectra Logic strongly
recommends installing the drives into the blade slot corresponding to the
number on the drive. Refer to Figure 3 to determine the slot numbers.
Use the following instructions to install the drives in a blade.
1. Put on the provided anti-static wristband and attach it to an unpainted
Any damage to the nTier700 caused by failure to protect it from electrostatic
discharge (ESD) voids the warranty. To protect the nTier700 and its drives from
damage:
Connect the AC power cords to the power supplies, but DO NOT turn on the
Wear the provided anti-static wristband, properly grounded, throughout the
Leave the drives in their anti-static bags until you are ready to install them.
Do not place un-bagged drives on any metal surfaces.
Do not power on the nTier700 until all of the drives are installed in every blade.
Note: Although the system dynamically detects the locations of the
drives and can reconfigure the RAID to reflect the current drive
positions, installing the drives in the same positions as they were
when the RAID was originally built provides enhanced disaster
recovery.
metallic surface.
power (see Connect the Power Cords on page 31).
procedure.
2. Unlock the blades as described (see Unlock the Blades on page 32).
3. Grasp the blade handle and carefully slide the blade out until all of the
drive slots are accessible.
4. Open the first box of drives and remove the top foam packaging to
reveal the drives inside.
Figure 4 Drives for a single blade.
5. Take one drive from the box and remove it from its anti-static bag.
6. Look at the number on the drive to determine which drive bay to install
it in (see Figure 3 on page 33).
34
Release Notes 90990009
Page 35

Chapter 2—Installing the nTier700
Tab
Caution
7. Release the latch on the drive sled by pushing the locking tab to the left,
then pulling the latch slightly toward the top of the drive to open it (see
Figure 5 and Figure 6).
Note: You only need to pull up on the latch enough to release it.
Figure 5 Release the drive sled latch.
8. Position the drive sled over a drive slot in the blade with the latch
toward the center of the blade and the edges aligned with the guides in
the drive slot.
When handling the drives, grasp only the outer edges. Squeezing the top cover of
the drive could warp the lid, causing the drive to fail.
Figure 6 Align the drive sled with the drive slot.
9. Slide the drive sled into the drive slot and press down firmly on the
latch until an audible click indicates that the drive sled is seated.
drive, press down firmly on the latch until you hear the click.
10. Repeat Step 5 through Step 9 to install the remaining drives in the
blade.
If the drive sled latch does not automatically latch when you seat the
June 2010 Spectra nTier700 Backup and Archive Appliance
35
Page 36

Updates to the User Guide
Ethernet
RMM port
Ethernet
port 1port 2
Ethernet
port 4
Ethernet
port 3
Monitor
Keyboard
Mouse
USB Ports
11. Using the blade handle, slide the blade completely into the nTier700
enclosure until it is firmly seated.
12. Repeat Step 3 through Step 10 to install the drives in all of the
remaining blades.
13. After you finish installing the drives in all of the blades, slide the
chassis management module into the chassis as far as it will go. Pull out
slightly on the handle to confirm it is firmly seated.
Connect the Cables and Power On
After installing the drives in the blades, connect the cables to the system
and perform the initial power-up. Figure 7 shows the location of the
connectors used.
Figure 7 Connectors on the rear panel (N+1 power configuration shown).
Note: The types of network connection between the application server
in the nTier700, the backup servers, and any physical storage
devices (a library, tape drive, or another nTier appliance),
depend on your configuration.
36
Release Notes 90990009
Page 37

Chapter 2—Installing the nTier700
Use the following steps to connect the interface cables to the nTier700 and
power it on.
1. Connect an Ethernet cable to the RJ-45 Ethernet connector for Ethernet
port 1 or port 2 on the rear panel. Connect the other end of the cable to
an active network over which a computer can access the BlueScale web
interface using a web browser.
Note: Ethernet port 1 is preconfigured to use DHCP addressing on a
network with a DHCP server. The address for Ethernet port 1
displays on the operator panel of each blade. If no DHCP server
is available, the IP address displays as 0.0.0.0. You can use the
operator panel on any blade to configure Ethernet port 1 to use a
fixed IP address.
2. If you plan to use remote power management, connect an Ethernet
cable to the RJ-45 RMM port on the rear panel. Connect the other end of
the cable to an active network with a computer that can be used to
access the Remote Management Module (RMM) from a remote host
using a standard web browser.
3. If desired, connect a keyboard, mouse and monitor to the appropriate
connectors on the back panel. You can use the keyboard, mouse, and
monitor to directly access the nTier700 Windows operating system on
the integrated application server for installing software.
Note: Using a USB keyboard and mouse simplifies connecting these
devices.
4. Connect the interface cable from your backup server to the appropriate
connector on the rear panel of the nTier700. This connection is used to
access to the RAID storage on the system.
Network Type Connect the cable from your network switch to...
Gigabit Ethernet One of the Ethernet ports on the nTier700 rear panel. If desired, you can use the
same port you plan to use for accessing the BlueScale web interface.
Fibre Channel One of the ports to the optional Fibre Channel host bus adapter (HBA) installed
in the nTier700. Connect the other end of the optical fiber cable to your switch
for the Fibre Channel fabric to provide connections to the host.
10 Gigabit Ethernet
(10 GigE)
The port on the optional 10 GigE card installed in the nTier700 if the host is on a
10 Gigabit Ethernet (10 GigE) network.
June 2010 Spectra nTier700 Backup and Archive Appliance
37
Page 38

Updates to the User Guide
Power button
5. As required for your configuration, connect the Fibre Channel or
10 GigE port or the SCSI connector on the nTier700 rear panel to a
physical storage device (a tape library, a standalone tape drive, or
another nTier appliance).
Interface Type Connect the cable from your nTier700 to...
Fibre Channel The Fibre Channel network switch where the physical storage device is
connected.
Important: The Fibre Channel connection to the physical storage device must
use a different Fibre Channel port than the Fibre Channel connection from the
backup server to the nTier700.
SCSI bus The SCSI connector on your physical SCSI device (for example, a tape library or
tape drive).
Important: If you connect a SCSI device to the nTier700 while it is powered on,
you must reboot the nTier700 before the SCSI device will be recognized. Refer
to the Spectra nTier700 Backup and Archive Appliance User Guide for instructions.
10 Gigabit Ethernet
(10 GigE)
If you plan to replicate the data on your nTier700 to another nTier appliance
over a 10 GigE network, connect both appliances to a 10 GigE network using
one of the ports on the optional 10 GigE NIC installed in each appliance.
6. Power on the system.
Press the power button on the left side of the front panel. A blue LED
indicates that the power is on, as shown in Figure 8.
Figure 8 The location of the power button.
38
Release Notes 90990009
Page 39

Next Steps
Chapter 2—Installing the nTier700
7. Wait for the system to complete its power-on sequence. During the
power-on sequence, the nTier700 initializes all of its installed
components and starts the BlueScale web server.
Notes: It can take up to ten minutes for the nTier700 to boot up for
the first time as it automatically starts the operating system,
loads software, and attempts to acquire an IP address.
The fans in the nTier700 produce a loud, high-pitched whine.
This sound is normal.
8. If desired, configure a fixed IP address for Ethernet port 1 as described
in the Spectra nTier700 Backup and Archive Appliance User Guide.
Your nTier700 hardware is now installed. For information about the
BlueScale web interface and how to use it to configure the nTier700, read
the following:
Read Chapter 3—Configuring the nTier700 on page 40 and
“Chapter 3 – Configuring the nTier500” in the Spectra nTier700 Backup
and Archive Appliance User Guide to learn how to configure the nTier700
for operation in your environment. This chapter also describes the
BlueScale web interface and how to access the Windows operating
system to install anti-virus and other application software on the
system.
Configure the network connections to the nTier700.
The Fibre Channel HBA uses soft addressing. By default, both ports
on the Fibre Channel HBA are set to initiator mode, meaning that
they send commands and data to another physical device (for
example, a tape library or tape drive) and receive status information
from that device.
When connecting a backup server to the nTier700, the port you use
on the Fibre Channel HBA must be set to target mode. Use the
QLogic SANsurfer Application for Windows to configure the Fibre
Channel HBA.
By default, the optional 10 GigE NIC card uses DHCP addressing.
Select Configuration > Network in the BlueScale web interface to
change the IP addresses as required for your environment.
June 2010 Spectra nTier700 Backup and Archive Appliance
39
Page 40

Updates to the User Guide
Important
CHAPTER 3—CONFIGURING THE NTIER700
The following sections update the information in this chapter.
Tas k Described beginning on...
Access the BlueScale Web Interface page 40
Access the Windows Desktop page 45
Install Antivirus Software page 49
Install Additional Application Software page 49
Access the BlueScale Web Interface
The BlueScale web interface lets you configure how the nTier700 operates,
manage RAID volumes, and monitor the status of system components,
including the drives and the battery backup. You can also view systemwide metrics, monitor system health, and update the BlueScale firmware.
Read the Spectra nTier700 Backup and Archive Appliance User Guide for
detailed information about using the BlueScale web interface.
Do not use the Enter key on your keyboard when making on-screen selections in
the BlueScale web interface. Various web browsers handle the Enter key differently,
causing inconsistent behavior in the BlueScale web interface.
Always use your mouse to make selections and click the buttons in BlueScale
screens instead of using your keyboard.
Use the following steps to connect to the BlueScale web interface.
1. Open a web browser on a computer on an active network that has
access to the nTier700.
The BlueScale web interface supports the following standard web
browsers.
Microsoft Internet Explorer versions 6.0 or later
Mozilla FireFox 2.0 or later
40
Release Notes 90990009
Page 41

Chapter 3—Configuring the nTier700
Important
2. Enter the IP address for the Ethernet port you used in the browser
address bar using the form:
https://nnn.nnn.nnn.nnn
where nnn.nnn.nnn.nnn is the IP address of the Ethernet port you
connected to the network.
The BlueScale web interface uses a secure Internet connection. You must prefix the
IP address with https:// instead of just entering the IP address.
By default, all four Ethernet ports are configured to use DHCP
addressing.
Notes: If you connected to the network using Ethernet port 1, the
DHCP-assigned IP address is displayed on the operator
panel on each blade.
If your network does not use a DHCP server, use the operator
panel on any of the blades to configure a fixed IP address for
Ethernet port 1 as described in the Spectra nTier700 Backup
and Archive Appliance User Guide. Connect Ethernet port 1 to
the network and use it to connect to the BlueScale web
interface for the first time.
3. Resolve the warning about the web site’s security certificate. The
warning displays because the nTier700 does not have a valid security
certificate.
Notes: This warning only appears if you have not resolved the
security certificate warning as described in this step.
If you choose to skip this step, you will receive the warning
about the security certificate each time you access the
BlueScale web interface.
As new browser versions are released, the process for
resolving the security certificate warning may be different
from what is described here.
The absence of the certificate does not affect functionality. If
you want to eliminate this warning, purchase your own
security certificate from www.verisign.com,
www.instantssl.com, or another SSL certificate vendor and
install on the nTier700 server.
June 2010 Spectra nTier700 Backup and Archive Appliance
41
Page 42

Updates to the User Guide
When using Internet Explorer or Firefox 2.x:
Figure 9 shows an example of the security certificate warning from
Internet Explorer 7. The format of the warning may be different
with the web browser you are using.
Figure 9 The web site security certificate warning
shown in Internet Explorer 7.
Select Continue to this website to display the BlueScale Login page
(Figure 12 on page 43).
When using Firefox 3.x
Figure 10 shows an example of the warning about the web site’s
security certificate from Firefox 3.0.
Figure 10 Invalid Spectra Logic nTier security
certificate.
Use the following steps to add an exception to the Firefox browser
for the nTier700 web server.
a. In the Secure Connection Failed warning box, select Or you can
add an exception, then select Add Exception.
42
Release Notes 90990009
Page 43

Chapter 3—Configuring the nTier700
b. In the Add Security Exception dialog box, select Get Certificate.
Figure 11 Invalid Spectra Logic nTier security
certificate.
c. Select View to confirm that the certificate is for the Spectra Logic
nTier, then select Close to return to the Add Security Exception
dialog box.
d. Select Permanently store this exception > Confirm Security
Exception to generate the exception and display the nTier700
display the display the BlueScale login page.
The exception you created remains in affect on the machine
where it is stored until you delete it.
Figure 12 The BlueScale Login page.
June 2010 Spectra nTier700 Backup and Archive Appliance
43
Page 44

Updates to the User Guide
4. Enter your login information.
If you added thenTier700 to a domain and want to log in as a
domain user, enter a domain name. Otherwise, leave the Domain
field blank to log in as a local user.
If you are accessing the BlueScale interface for the first time, enter
administrator as the default user name and spectra as the default
password, all in lower case. If you changed the Windows user name
and password, enter the new user name and password.
Notes: Most configuration steps require local administrator
privileges, which the default user name (administrator)
provides.
Spectra Logic recommends that you change the default
Windows user name and password.
The default system name is nTier500. If desired, you can
change it to something more meaningful in your
environment.
Configuring DPM and Replication requires logging into an
Active Directory domain with domain administrator
privileges.
The user name you uses does not affect the Windows
ownership and permissions properties for folders and shares
on the RAID volumes. The BlueScale login is for
authentication only.
44
Release Notes 90990009
Page 45

Chapter 3—Configuring the nTier700
Important
5. Select Login. The Windows operating system on the nTier700
automatically starts the BlueScale web interface and displays the
Overview page.
Figure 13 The Overview page.
6. If desired, use the BlueScale web interface to set the IP addresses for
each of the Ethernet ports as required for your environment as
described in “Chapter 3 – Configuring the nTier500” in the Spectra
nTier700 Backup and Archive Appliance User Guide.
Access the Windows Desktop
Some configuration operations require working directly with the Windows
Storage Server operating system. The Windows Desktop option under the
General menu on the BlueScale web interface lets you access the Windows
Storage Server operating system running on the nTier700.
You must use Microsoft Internet Explorer to access the nTier700 Windows desktop
through the BlueScale web interface. The Windows Remote Desktop application
does not support the Firefox browser.
Internet Explorer may prompt you to install an ActiveX control the first time that
you use this feature. ActiveX is required in order to access the Windows desktop
through the BlueScale web interface.
June 2010 Spectra nTier700 Backup and Archive Appliance
45
Page 46

Updates to the User Guide
If you do not want to install ActiveX on the system, you can access the
Windows operating system directly using a keyboard, mouse, and monitor
connected directly to the nTier700 application server (see Figure 1 on
page 31 for the connector locations). Log in using the same user name and
password that you use to connect to the BlueScale web interface.
Connect and Log In
Use the following steps to access the Windows desktop.
1. Log into the BlueScale web interface (see Access the BlueScale Web
2. Select General > Windows Desktop. The Windows Desktop screen
Note: Using a USB keyboard and mouse lets you connect these devices
without power-cycling the nTier700.
Note: If you are accessing Windows using a direct connection to the
nTier700 application server, skip to Step 3 on page 47 to log in.
Interface on page 40).
displays.
Figure 14 The Windows Desktop message.
Note: If you attempt to connect to the remote desktop using Firefox,
you will receive a notification that you must using Internet
Explorer.
46
Release Notes 90990009
Page 47

Chapter 3—Configuring the nTier700
Important
3. Select Connect to start a Windows Remote Desktop session. Windows
Remote Desktop displays the Windows login dialog box.
The system supports a maximum of two Remote Desktop sessions at a time.
Figure 15 The Windows Storage Server login.
4. Log into Windows using the same User name and Password as you use
to log into the nTier700 BlueScale web interface.
The default Windows user name and password are administrator and
spectra, respectively.
Note: You remain logged into the BlueScale web interface even when
you are using the Windows operating system. You return to the
BlueScale web interface when you log off of the desktop (see
Step on page 48).
June 2010 Spectra nTier700 Backup and Archive Appliance
47
Page 48

Updates to the User Guide
Important
5. The Windows desktop displays. From here, you interact directly with
the Windows operating system
Figure 16 The Windows Storage Server Remote Desktop.
Notes: When the Remote Desktop window is maximized, a yellow
bar across the top of the screen shows that you are accessing
the desktop through the Windows Remote Desktop
application.
You can access the BlueScale web interface from the
Windows operating system by selecting nTier700
Management Console from the Start menu.
If you are unfamiliar with the Windows operating system or the
Windows Remote Desktop application, refer to the Windows Storage
Server documentation for detailed information (see Microsoft Windows
Operating System and Software on page 14).
Log Off and Return to BlueScale
You can use either of the following methods to return to the nTier700’s
BlueScale web interface when you are finished installing and configuring
the software:
Log off of the Windows desktop by selecting Start > Log Off.
Do not select Shutdown unless you want to power off the nTier700.
If you want to access the Windows desktop again without having to log
in, select the minimize button in the upper right corner of the Remote
Desktop bar.
48
Note: If you minimize the Windows desktop or exit the Remote
Desktop application without logging off, you remain logged into
the Windows operating system. When you are finished, be sure
to log off so others can use the remote session to log in.
Release Notes 90990009
Page 49

Install Antivirus Software
Spectra Logic recommends that you install antivirus software on the
nTier700 application server.
Note: If you plan to use the optional data replication feature of
Windows Storage Server, make sure your antivirus software is
compatible with the DFS Replication service. Contact your
antivirus software vendor to check for compatibility. Refer to the
Spectra nTier700 Backup and Archive Appliance User Guide for
additional information.
1. Obtain a licensed copy of the antivirus software you plan to use.
2. Use one of the methods described in Make the Installation Files
Accessible to Windows to make the antivirus software installations files
accessible to the Windows operating system.
3. Install the software as described in Install the Software on page 52.
Install Additional Application Software
Chapter 3—Configuring the nTier700
If desired, you can install additional Windows software applications,
including Symantec® Backup Exec, on your nTier700. You use the
Windows operating system to install application software on the nTier700.
For detailed information about installing software, refer to the Windows
Storage Server documentation (see Microsoft Windows Operating System
and Software on page 14).
Note: Spectra nTier File Migrator software and Microsoft Data
Protection Manager (DPM) are no longer available for purchase
with the nTier700.
Make the Installation Files Accessible to Windows
Use one of the following methods to make the installation files accessible
to the Windows operating system on the nTier700 and then install the
software.
Connect a USB CD or DVD drive to one of the USB ports on the back
panel (see Figure 7 on page 36). If you use this method, skip to Install
the Software on page 52.
Copy the installation files to a USB flash drive and connect it to a USB
port on the nTier700 (see Figure 7 on page 36). If you use this method,
skip to Install the Software on page 52.
Copy the files to a location on the network to which the nTier700 is
connected and access the files there. If you plan to use this method, skip
to Install the Software on page 52.
June 2010 Spectra nTier700 Backup and Archive Appliance
49
Page 50

Updates to the User Guide
Share a CD or DVD drive on a computer connected to a network
Share a CD or DVD Drive on a Remote Computer
Use the steps in the following sections if you want to use a CD or DVD
drive on a remote computer to install the software. The computer must be
on an active network that is accessible to the nTier700.
Share the Drive
Before you can use a CD or DVD drive on another computer, you must
share the drive to make it accessible from the nTier700 Windows operating
system.
1. Open Windows Explorer or My Computer on the computer whose
2. Right-click on the drive letter for the CD or DVD drive and select
location that is accessible from the nTier700. If you use this method,
begin with the instructions in Share a CD or DVD Drive on a Remote
Computer.
drive you plan to use.
Sharing and Security.
50
Figure 17 Preparing to share a CD or DVD drive.
Release Notes 90990009
Page 51

Chapter 3—Configuring the nTier700
3. Select Share this folder. Change the Share name, if desired.
Figure 18 Setting the share properties.
4. Select OK to save your changes.
Map the Shared CD or DVD Drive to a Drive Letter
1. Launch Windows Explorer and select Tools > Map Network Drive.
Figure 19 Mapping a drive letter to the CD or
DVD drive.
June 2010 Spectra nTier700 Backup and Archive Appliance
51
Page 52

Updates to the User Guide
2. Type in the name of the remote computer with the CD or DVD drive
3. Select Finish to create the drive letter. The remote CD or DVD drive is
Install the Software
1. Obtain a licensed copy of the software you plan to install.
2. Connect to the nTier700 Windows desktop (see Access the Windows
3. Use the Add/Remove Software option in the Windows Control Panel, or
and the name of the share you just created (for example,
\\lynnealaptop\D) in the Folder text box. Alternatively, you can enter
the IP address of the remote computer and the name of the share (for
example, \\192.168.7.32\D).
now available just as if it was physically installed in the nTier700.
Desktop on page 45).
navigate to the location of the installation files, to install the antivirus
software.
Refer to the Windows Storage Server documentation and the software
documentation for detailed installation instructions.
52
Release Notes 90990009
Page 53

CHAPTER 4—USING THE NTIER700
The following sections update the information in this chapter.
Displaying the Status of Components
The RAID tab on the Overview page now includes a Silence HBA Alarm
button to let a remote operator silence the audible alarm that sounds when
a RAID is experiencing problems.
Chapter 4—Using the nTier700
Figure 20 The Silence HBA Alarm button on the RAID tab of
the Overview page.
Using the Blade Operator Panel
Note: When a blade is overheating, the over-temperature indication is
only shown on the Enclosure status screen on the affected blade.
If the Enclosure status screen on a blade indicates an overtemperature condition, check the BlueScale Overview screen to
determine which component is affected.
June 2010 Spectra nTier700 Backup and Archive Appliance
53
Page 54

Updates to the User Guide
Important
CHAPTER 8—MAINTAINING THE NTIER700
The following sections update the information in this chapter.
Tas k Described beginning on...
Moving or Shipping the nTier700 this page
Updating Firmware this page
Updating Tape Drive Device Drivers page 60
Moving or Shipping the nTier700
Before moving or shipping the nTier700, remove all of the data drives from the
chassis and carefully pack them in their original shipping box to prevent damage to
the drives. Reverse the instructions in Install the Data Drives in the Blades on
page 32 to remove the drives and repackage them.
Updating Firmware
Some problems with the nTier700 may be fixed by updating firmware
packages. Spectra Logic provides complete support for the most currently
shipped releases of firmware packages. Customers using previously
released firmware packages are asked to upgrade to the current release as
soon as possible.
Note: Until further notice, firmware updates for the nTier700 are
Check the Current Firmware Version
Use the following steps to determine the current firmware version your
nTier700 is using. You can then compare it with the most current version
available on the Spectra Logic web site.
1. Log into the nTier700 BlueScale web interface (see Access the BlueScale
Web Interface on page 40).
currently managed on an individual basis by Spectra Logic
Technical Support. Contact Spectra Logic Technical Support for
assistance (see Contacting Spectra Logic on page 4).
54
Release Notes 90990009
Page 55

Chapter 8—Maintaining the nTier700
Important
2. Select About to display information about the version of the firmware
package currently installed on the nTier700 (circled in Figure 21).
Figure 21 The current BlueScale version on the About menu.
Determine Whether an Update is Available
If the version you have is older than the most current version described in
the current version of the Spectra nTier700 Backup and Archive Appliance
Release Notes and Documentation Updates, contact Spectra Logic Technical
Support to obtain an update (see Contacting Spectra Logic on page 4).
You must have a current service contract with Spectra Logic Technical Support
before you can download firmware updates for the nTier700.
If you have questions about your service agreement, contact Spectra Logic
Technical Support (see Contacting Spectra Logic on page 4).
Note: The most helpful information on updated firmware packages
can be found in the Spectra nTier700 Backup and Archive Appliance
Release Notes and Documentation Updates, which are available
from the nTier Firmware page. The release notes also include
any documentation updates since the last release.
June 2010 Spectra nTier700 Backup and Archive Appliance
55
Page 56

Updates to the User Guide
Download the Updated Firmware
If there is a more current version of the firmware available, you will be
given instructions for downloading the firmware. You can then use one of
the methods in this section to save the firmware to a known location and
then perform the update as described in Update the Firmware on page 57.
If... Then...
You plan to use the default Spectra Logic
package server to update the firmware,
The nTier700 cannot access an outside web
site because of security or firewall
requirements,
—OR—
The default Spectra Logic package server
option is not available,
The firmware is downloaded when you start the
firmware update process. There is no need to
download it beforehand.
Note: Under most circumstances, this is the preferred
method for updating the BlueScale firmware to
download and install the firmware in a single step.
However, this option is not currently supported.
1. Download the current firmware package from the
location provided by Spectra Logic Technical
Support.
2. Save the downloaded firmware file to a USB drive.
3. Connect the USB drive to one of the USB ports on
the back of the nTier700.
4. Select the firmware package from the ones listed
under Drives on the Package Update screen (see
Figure 22 on page 57).
—OR—
1. Download the current firmware package from the
location provided by Spectra Logic Technical
Support.
2. Save downloaded firmware file to a previously
configured package server that is accessible from the
nTier700.
3. Enter the URL for this package server as the remote
package server (see Figure 22 on page 57).
56
Release Notes 90990009
Page 57

Chapter 8—Maintaining the nTier700
Update the Firmware
After you obtain the updated firmware, use the following steps to perform
the update.
1. Select Maintenance > Package Update to display the Package Update
page. The nTier700 automatically scans the following locations for
firmware files:
Drives. A USB drive connected to one of the USB ports on the back
of the nTier700. Packages are only listed under this option if a USB
drive is connected to the nTier700.
Remote. The specified remote package server. The default package
server is the downloads page on the Spectra Logic web site.
Archived Packages. The C:\Program Files (x86)\
SpectraLogic\nTier\Packages
After the nTier700 firmware is updated using a new package, the
package is moved to this folder and listed under Archived
Packages.
folder on the system boot drive.
Figure 22 The Package Update page with available firmware
package files listed.
June 2010 Spectra nTier700 Backup and Archive Appliance
57
Page 58

Updates to the User Guide
Important
2. Select the firmware package you want to use. The selected package
Do not install a package that is older than the currently installed version unless you
are specifically instructed to do so by Spectra Logic Technical Support.
displays in the Update To field.
The most current available firmware package found during the scan
displays in the Update to field. In Figure 22, the most current version
is on the nTier firmware downloads page on the Spectra Logic web
site.
If you want to install the firmware from a different remote package
server, enter a valid URL in the Scan this web page for remote
packages text field and click Save. The nTier700 scans the specified
web page for available firmware packages.
Note: The default package server is the nTier firmware downloads
page on the Spectra Logic web site.
If you want to use a different firmware version, use the Update To
drop-down menu to display all of the available firmware package
files at each location.
3. Select Start Update.
A progress page shows the step-by-step progress of the update.
Information about the firmware update progress also appears in the
Messages page. The update may take several minutes to complete.
58
Release Notes 90990009
Page 59

Chapter 8—Maintaining the nTier700
4. If the firmware package includes updates to the firmware for the
Adaptec RAID controller HBA, the blades, or the root expanders, a
Confirmation Needed page similar to the one shown in Figure 23
displays.
Figure 23 Confirmation message to update the HBA.
Note: The BlueScale firmware prevents the Adaptec RAID controller
firmware and /or driver from being updated if a RAID is actively
performing any task (for example, a RAID volume is either
building or rebuilding).
In this case, a message displays to indicate that the RAID
controller firmware was not updated because the RAID was
actively performing another task. The only available option in
this case is Cancel. Wait until the RAID tasks are complete, then
begin the update process again.
Choose... If...
Continue Install Your nTier700 is prepared for the system to reboot. The progress page
redisplays and the update continues.
Cancel Your nTier700 is in a state where a reboot would impact operations. Wait until
the nTier700 is in a state where it is ready for a reboot, then simply begin the
update process again.
Note: If the RAID is actively performing any task (for example, a RAID volume
is being built), the only option available is Cancel.
5. When the firmware update is finished the system reboots.
Note: If the firmware for the root expanders or blades was updated,
the nTier700 will shutdown. Power on the system and wait for
the Windows operating system to restart.
6. Reconnect to the BlueScale web interface.
June 2010 Spectra nTier700 Backup and Archive Appliance
59
Page 60

Updates to the User Guide
Important
Important
Updating Tape Drive Device Drivers
The Windows Storage Server operating system requires you to install device drivers
before the application software can correctly communicate with tape drives, either
in a library or standalone, connected to the nTier700. Always confirm that you have
the most current driver available for any tape drives in the tape libraries you have
connected to the nTier700.
Do not use the Hardware Update Wizard in Windows Device Manager to install
device drivers for tape drives or other devices. The wizard does not install the
drivers correctly on the nTier700. If you previously installed device drivers using the
wizard, you must remove the drivers and then reinstall the drivers. Use the
instructions in the following sections to remove the drivers and then reinstall them.
Notes: The following instructions are for updating the device
drivers for IBM LTO tape drives. The instructions for other
types of tape drive may differ slightly.
For libraries that use one of the tape drives to provide the
robotic control path through ADI, you may also need to
install the Media Changer driver.
Obtain the Updated Device Driver
Use the following steps to update the drivers for tape drives.
1. Connect to the Windows Desktop on the nTier700.
2. Download the updated drivers to the nTier700 server.
Note: If your nTier700 has internet access, download the driver archive
file directly to a known location on the nTier700 system disk.
Otherwise, save the downloaded driver archive file to a USB
drive using a computer that does have internet access and then
copy the file to a known location on the nTier700 system disk.
a. Using a web browser, go to the IBM Tape Device Driver for
Windows Platforms page, which displays a list of download
directories.
Note: You can also reach this page from the Drive Firmware & Drivers
page on the Spectra Logic web site (www.spectralogic.com/
downloads > Tape Drive Firmware & Drivers).
b. Scroll down to the Download Pages section and select Windows
directory on the IBM Tape Device Drivers FTP site.
c. Select Win2003.
60
The IBM FTP page displays a list of download directories, including
one titled “Latest” and one titled “WHQL_Cert” (Windows
Hardware Quality Labs certified).
Release Notes 90990009
Page 61

Chapter 8—Maintaining the nTier700
d. Select the download directory to display a list of zipped file archives
(.zip files).
Select... If your organization...
Latest Does not have a policy against using non-WHQL certified drivers.
WHQL_Cert Has a policy against using non-WHQL certified drivers.
e. Select the file with .x64 in the file name (for example,
IBMTape.x64_6204.zip).
f. Save the zip file containing the drivers to a known location on the
nTier700 system drive.
3. Extract (unzip) the file into the following folder:
C:\Program Files (x86)\SpectraLogic\drivers\IBM LTO Tape Drives
This creates a new folder whose name includes the latest driver version
number. For example:
C:\Program Files (x86)\SpectraLogic\drivers\IBM LTO Tape Drives\
IBMTape.x64_6204
Remove Current Drivers or Devices
If you previously installed device drivers for your tape drives using the
wizard in Windows Device Manager, use the following steps to remove the
drivers. Otherwise, skip to Install the Updated Device Driver.
1. Connect to the Windows Desktop on the nTier700, if you are not
already connected.
2. Using Windows Explorer, navigate to the folder containing the
extracted drivers files.
3. Double click the uninst.exe to run the driver uninstall utility.
4. Open the Device Manager and uninstall any of the following devices, if
present:
For this device... Uninstall...
Tape Drives Any IBM tape drives
System Devices Changer Bus Enumerator and Tape Bus Enumerator
Medium Changers Spectra Logic Medium Changer driver
Other Devices Any tape drives
5. Restart the nTier700.
June 2010 Spectra nTier700 Backup and Archive Appliance
61
Page 62

Updates to the User Guide
Install the Updated Device Driver
Note: If the Windows Add New Hardware Wizard starts, ignore it.
The installation script for the device driver automatically
manages the wizard.
1. Open a Command Prompt window and change to the folder containing
the extracted drivers file.
2. Using the command prompt, run the command to install the tape drive
device driver.
Note: If the driver is unsigned, choose Continue Anyway when
prompted.
Run the following command... If you are using...
®
install_exclusive.exe Tivoli
Note: The exclusive driver performs automatic SCSI Reserve and
Release commands upon open and close of the tape drive device.
Additionally, the driver enforces a single handle to the device on
the backup server.
Storage Manager
install_nonexclusive.exe Microsoft Data Protection Manager (DPM), Removable Storage
Manager (RSM), or any other software that does not require the
exclusive driver.
3. If the library uses one of the tape drives to provide the robotic control
path through ADI, you may need to reinstall the Media Changer driver
using the Windows Add Hardware wizard. When prompted for the
location of the driver, navigate to the following folder:
C:\Program Files (x86)\SpectraLogic\drivers\Spectra <Series>
Library Driver\
Notes: A medium changer driver is unnecessary in most
configurations. The general practice is for the software to
control the library directly, so there is no need for a robotics
driver at the OS level.
Three known exceptions are for Windows RSM (Removable
Storage Manager), DPM (Data Protection Manager), and File
Migrator (or XenData). If you have one of these, right-click
on the Unknown Medium Changer and choose Update
Driver…. Use the Windows Add Hardware wizard to install
the driver.
62
Release Notes 90990009
Page 63

Appendix A—Service and Support
APPENDIX A—SERVICE AND SUPPORT
This section replaces Appendix A, “Technical Support.”
SpectraGuard™ Support provides a worldwide service and maintenance
structure, refined over many years to provide timely, professional service.
Go to Spectra Logic’s web site at: www.spectralogic.com/warranty-service
for information about the warranty and service options for your Spectra
nTier700.
Before Contacting Spectra Logic Technical Support
If you have a problem with your nTier700, use the information in this
section to obtain help with resolving the problem. If the problem persists,
open a support ticket.
System Messages If you are encountering problems, review any System
Messages that have been posted and take any action described in the
message(s).
Product Support For additional troubleshooting information, check the
Spectra Logic Product Support page at www.spectralogic.com/support and
the Knowledge Base and FAQ page at www.spectralogic.com/
knowledgebase.
Opening a Support Ticket
You can use AutoSupport to open a ticket, if you have AutoSupport
configured. Refer to the Spectra nTier700 Backup and Archive Appliance User
Guide for detailed information about configuring and using AutoSupport
to open a support ticket.
If you need to open a ticket using telephone, email, or the Spectra Logic
web site, use the following instructions.
1. Note the problem, including what happened just before the failure
occurred.
2. Gather the following information:
Your Spectra Logic customer number
Company name, contact name, phone number, and email address
nTier700 serial number
Type of host system being used
Type and version of operating system being used
Type and version of application software installed on the nTier700
3. Contact Spectra Logic Technical Support (see Contacting Spectra Logic
on page 4).
June 2010 Spectra nTier700 Backup and Archive Appliance
63
Page 64

Updates to the User Guide
Caution
Returns
Your Spectra Logic Technical Support representative may ask you to return
a problem component to Spectra Logic for servicing and failure analysis.
After you complete a replacement procedure, return the defective part
using ALL the packaging that the replacement part arrived in (including
any anti-static bags or foam inserts).
Severe damage can occur if the component is not packaged correctly. You may be
invoiced if it is damaged due to improper or insufficient packaging.
Use the return label and instructions that were included with the
replacement part when preparing to ship the component you are
returning. If you cannot locate these, contact Spectra Logic for another
copy (see Contacting Spectra Logic on page 4). The return label and RMA
printed on it are used to associate the returned component with your
account. To avoid being invoiced for failure to return the component, do not
ship the component back to Spectra Logic without the RMA return label.
APPENDIX B – SPECIFICATIONS
This section updates Appendix B, “Specifications.”
RAID Storage Specifications
The following table shows the RAID storage specifications for the
nTier700.
Parameter Specification
Drive Type 7200 RPM SATA
Single Drive capacity, native 1 TB or 2 TB
Capacity Options, native
Minimum, one blade c
Maximum, six blades
RAID
RAID level
RAID controller write cache
Write cache memory battery backup
time
a, b
c
10 TB
120 TB
RAID 6
256 MB
Up to 72 hours with fully-charged
battery
64
a. The native capacity numbers refer to raw disk capacity; RAID configuration and system overhead reduce
the actual usable space; the usable capacity numbers are approximate.
b. In 10 drive increments, each increment being equal to one blade, up to sixty drives
c. Each blade contains ten 2 TB SATA drives.
Release Notes 90990009
Page 65

Power Cords
IEC 60320 C13
female connector
NEMA 5-15P
male connector
Appendix B – Specifications
North American 120 Volt-AC Power Cord he criteria for a 120-volt power
cord for use in the United States and Canada are as follows:
Parameter Specification
Power cordage Three-conductor, 14 AWG
Power input connectors NEMA 5-15P or IEC-60320 C14, male
IEC 60320-C13, female
Figure 24 120 Volt-AC Power Cord for Use in North America
(Spectra Logic P.N. 8289).
North American 220 Volt-AC Power Cord The criteria for a 220-volt AC
power cord for the nTier700 are as follows:
Parameter Specification
Power cordage SJT type, three-conductor, 14 AWG minimum
Power input connectors Male connector must be of the proper type,
rating, and safety approval.
IEC 60320-C13, female
a. Power cord must comply with local electrical code.
a
International 220 Volt-AC Power Cord The criteria for an international
220-volt AC power cord are as follows:
Parameter Specification
Power cordage Flexible, HAR (harmonized) type H05VV-F, three
conductor, cord with minimum conductor size of
0.03 square inches (1.0 square millimeter).
Power input connectors Male connector must be of the proper type,
rating, and safety approval for the intended
country.
IEC 60320 C13, female
a
June 2010 Spectra nTier700 Backup and Archive Appliance
a. Must meet the specifications for the intended country.
65
Page 66

Updates to the User Guide
APPENDIX D—TUNING GIGABIT ETHERNET NETWORK
ERFORMANCE
P
This new appendix describes advanced configuration procedures for
improving the performance of connections to Gigabit Ethernet networks.
Enable Jumbo Frames for 10 GigE Network Interface Cards
If you have the optional 10 Gigabit Ethernet (GigE) NIC card installed in
the nTier700, you can use the instructions in this section to improve the
performance of the card if your network supports jumbo frames.
The Maximum Transfer Unit (MTU) specifies the maximum transmission
unit size of an interface. Each interface used by TCP/IP may have a
different MTU value specified. The MTU is usually determined through
negotiation with the lower-level driver and by using that lower-level driver
value. However, that value may be overridden.
Change the MTU Setting for the NIC Card
Use the following steps to change the MTU setting to enable jumbo frames.
1. Access the Windows Desktop on the nTier700 (see Access the Windows
Desktop on page 45).
2. Select Start > Settings > Control Panel to open the Control Panel.
3. Select the Network Connections icon to open Network Connections
window.
66
Release Notes 90990009
Page 67

Appendix D—Tuning Gigabit Ethernet Network Performance
4. In the Local Area Connections pane, double-click the Local Area
Connection corresponding to the 10 Gigabit Ethernet (GigE) NIC card and
select Properties to display the Local Area Connection Properties window.
Figure 25 Local Area Connection
Properties.
5. On the General tab, select Configure to display the Intel driver
configuration dialog box.
6. On the Advanced tab, select Max Jumbo Buffers and use the drop-down
list to select the desired maximum transmission unit size.
Figure 26 Set the Max Jumbo Buffers
value.
7. Select OK to save your changes and close the configuration dialog box.
8. Close the Local Area Connection Properties dialog box.
June 2010 Spectra nTier700 Backup and Archive Appliance
67
Page 68

Updates to the User Guide
Caution
Enable Window Scaling
For more efficient use of high bandwidth networks, a larger TCP window
size can be used. The TCP window size field controls the flow of data and
is limited to 2 bytes, or a window size of 65,535 bytes.
Since the size field cannot be expanded, a scaling factor is used. The TCP
window scale option is used to increase the maximum window size from
65,535 bytes to 1 Gigabyte.
The instructions in this section involve editing the Windows registry. Serious
problems can occur if you modify the registry incorrectly. Therefore, make sure that
you follow these steps carefully. For added protection, back up the registry before
you modify it. Then, you can restore the registry if a problem occurs. For more
information about how to back up and restore the registry, read article 322756 in
the Microsoft Knowledge Base (How to back up and restore the registry in
Windows).
Use the following steps to add the Tcp1323Opts DWORD registry key and
set its value set to enable window scaling.
1. Access the Windows Desktop on the nTier700 (see Access the Windows
Desktop on page 45).
2. Back up the registry (recommended).
3. Select Start > Run and type regedit. Select OK to launch the Registry
Editor.
4. Navigate to the following location:
HKEY_LOCAL_MACHINE\SYSTEM\CurrentControlSet\Services\
Tcpip\Parameters
5. Highlight the Parameters submenu.
6. From the Edit menu, select New > DWORD Value.
7. In the New Value box, type Tcp1323Opts and press Enter.
Note: DWORD values are case sensitive. Be sure to type
Tcp1323Opts exactly as shown.
8. From the Edit menu, select Modify.
9. Enter 1 (window scale enabled only) for the MTU size and select
Decimal.
68
10. Click OK to save your changes.
11. Exit the Registry Editor.
12. Select Start > Shutdown > Restart to reboot the Windows operating
system.
Release Notes 90990009
Page 69

Teaming NICs
Appendix D—Tuning Gigabit Ethernet Network Performance
NIC teaming (link aggregation) is a function of the Intel Pro NIC driver in
Windows Storage Server 2003 which lets you use multiple Ethernet ports
in parallel to increase the link speed beyond the limits of any one NIC. In
high-performance network environments you can aggregate the Gigabit
Ethernet ports in the nTier700 into a single logical network link for added
performance. If you have additional Gigabit Ethernet NICs installed, you
can also include them in the team.
Notes: You cannot team the optional 10 GigE NIC.
Refer to Spectra Logic Knowledge Base Article 456 for
additional technical information about determining whether
teaming is appropriate for your environment.
The additional configuration tabs for the NICs in the
Windows Device Manager on the nTier700 are only visible
through the console session on the nTier700 server. They are
not available through a standard Remote Desktop connection.
Use the following steps to team the Gigabit Ethernet ports in the nTier700
into a single logical network link.
1. From a Windows-based computer on the same network as the nTier700,
select Start > Run to open the Run dialog box.
2. Type mstsc /v:server /console, where server is the DNS name
or IP address of the nTier700.
3. Select OK to connect to the console session on the nTier700 server.
Note: You can only run one console session at a time. When you
connect to the console session remotely, other users may be
unable to log on to the nTier700 locally.
4. Select Start > Settings > Control Panel to open the Control Panel.
5. Select the Network Connections icon to open Network Connections
window.
6. In the Local Area Connections pane, double-click the Local Area
Connection you want to configure and select Properties to display the
Local Area Connection Properties dialog box.
7. On the General tab, select Configure to display the Intel driver
configuration dialog box.
8. On the Teaming tab, select Team with other adapters.
9. Select New Team and enter a name for the new team.
10. Select the NICs you want to include in the team.
You can choose the two standard GigE NICs included in the nTier700. If
you have any optional Gigabit Ethernet NICs installed, you can also
include them in the team.
June 2010 Spectra nTier700 Backup and Archive Appliance
69
Page 70

Updates to the User Guide
11. Based on the requirements of your switch, select the team type from the
list.
Team Type Description
Adapter Fault
To le ra n ce
Adaptive Load
Balance
Static Link
Aggregation (SLA)
IEEE 802.3ad
Dynamic Link
Aggregation
Provides for one active connection with the remaining connections in a standby
state.
The transmitted data is balanced across the team with one port acting as the
receiver.
All ports act together presenting one MAC for throughput performance
increase. Switch must be configured for SLA before the team is created.
Note: Most contemporary switches support SLA.
All ports act together presenting one MAC for throughput performance
increase. Switch must be configured with 802.3ad support.
12. Select OK to save your changes and close the configuration dialog box.
13. Close the Local Area Connection Properties dialog box.
70
Release Notes 90990009
 Loading...