

Page 1
BlueScale
PN 90940012 Revision E
User Guide
™
Encryption
Page 2

Notices
Unless specifically negotiated and except as expressly stated herein, Spectra Logic Corporation makes available its products and
associated documentation on an “AS IS” BASIS, WITHOUT WARRANTY OF ANY KIND, EITHER EXPRESSED OR IMPLIED, INCLUDING BUT NOT LIMITED TO THE IMPLIED WARRANTIES OF MERCHANTABILITY OR FITNESS FOR A PARTICULAR PURPOSE, BOTH OF
WHICH ARE EXPRESSLY DISCLAIMED. In no event shall Spectra Logic be liable for any loss of profits, loss of business, loss of use
or data, interruption of business, or for indirect, special, incidental or consequential damages of any kind, even if Spectra Logic
has been advised of the possibility of such damages arising from any defect or error.
Information furnished in this manual is believed to be accurate and reliable. However, no responsibility is assumed by Spectra
Logic for its use. Due to continuing research and development, Spectra Logic may revise this publication from time to time without notice, and reserves the right to change any product specification at any time without notice.
If you do not agree to the above, do not use the Spectra library; instead, promptly contact Spectra Logic for instructions on how to
return the library for a refund.
Copyright © 2007 Spectra Logic Corporation. All rights reserved worldwide.
License
You have acquired a Spectra library that includes software owned or licensed by Spectra Logic from one or more software
licensors (“Software Suppliers”). Such software products, as well as associated media, printed materials and “online” or
electronic documentation (“SOFTWARE”) are protected by copyright laws and international copyright treaties, as well as other
intellectual property laws and treaties.
If you do not agree to this end user license agreement (EULA) or to the terms and conditions under Notices above, do not use
the Spectra library; instead, promptly contact Spectra Logic for instructions on return of the Spectra library for a refund. Any
use of the Software, including but not limited to use on the Spectra library, will constitute your agreement to this EULA (or
ratification of any previous consent).
Grant of License. The Software is licensed on a non-exclusive basis, not sold. This EULA grants you the following rights to the
Software:
• You may use the Software only on the Spectra library.
• Not Fault Tolerant. The Software is not fault tolerant. Spectra Logic has independently determined how to use the Software in
the Spectra library, and suppliers have relied upon Spectra Logic to conduct sufficient testing to determine that the Software
is suitable for such use.
• No Warranties for the SOFTWARE. The Software is provided “AS IS” and with all faults. The entire risk as to satisfactory quality, performance, accuracy, and effort (including lack of negligence) is with you. Also, there is no warranty against interference
with your enjoyment of the Software or against infringement. If you have received any warranties regarding the SOFTWARE,
those warranties do not originate from, and are not binding on Software suppliers.
• Note on Java Support. The Software may contain support for programs written in Java. Java technology is not fault tolerant and
is not designed, manufactured, or intended for use of resale as online control equipment in hazardous environments requiring
fail-safe performance, such as in the operation of nuclear facilities, aircraft navigation or communications systems, air traffic
control, direct life support machines, or weapons systems, in which the failure of Java technology could lead directly to death,
personal injury, or severe physical or environmental damage.
• No Liability for Certain Damages. Except as prohibited by law, Software suppliers shall have no liability for any indirect, special, consequential or incidental damages arising from or in connection with the use or performance of the Software. This limitation shall apply even if any remedy fails of its essential purpose. In no event shall Software suppliers, individually, be liable
for any amount in excess of U.S. two hundred fifty dollars (U.S. $250.00).
• Limitations on Reverse Engineering, Decompilation, and Disassembly. You may not reverse engineer, decompile, or disassemble the Software, except and only to the extent that such activity is expressly permitted by applicable law notwithstanding
this limitation.
• Software Transfer Allowed with Restrictions. You may permanently transfer rights under this EULA only as part of a perma-
nent sale or transfer of the Spectra library, and only if the recipient agrees to this EULA. If the Software is an upgrade, any
transfer must also include all prior versions of the Software.
• Export Restrictions. Export of the Software from the United States is regulated by the Export Administration Regulations (EAR,
15 CFR 730-744) of the U.S. Commerce Department, Bureau of Export Administration. You agree to comply with the EAR in the
export or re-export of the Software: (i) to any country to which the U.S. has embargoed or restricted the export of goods or
services, or to any national or any such country, wherever located, who intends to transit or transport the Software back to
such country; (ii) to any person or entity who you know or have reason to know will utilize the Software or portion thereof in
the design, development or production of nuclear, chemical, or biological weapons; or (iii) to any person or entity who has
been prohibited from participating in U.S. export transactions by any federal agency of the U.S. government. You warrant and
represent that neither the BXA nor any other U.S. federal agency has suspended, revoked or denied your export privileges. For
additional information see http://www.microsoft.com/exporting/.
Page 3

Contents
Chapter 1. Introduction
About This Guide . . . . . . . . . . . . . . . . . . . . . . . . . . . . . . . . . . . . . . . . . . . . . . . . . . . . . . . . . . . . . . . . . . . . . . . 7
Shipped Items . . . . . . . . . . . . . . . . . . . . . . . . . . . . . . . . . . . . . . . . . . . . . . . . . . . . . . . . . . . . . . . . . . . . . . . . . 9
BlueScale Encryption Overview
Chapter 2. Encryption Architecture & Strategies
BlueScale Encryption Overview . . . . . . . . . . . . . . . . . . . . . . . . . . . . . . . . . . . . . . . . . . . . . . . . . . . . . . . . . . . 11
Site-Specific Decisions . . . . . . . . . . . . . . . . . . . . . . . . . . . . . . . . . . . . . . . . . . . . . . . . . . . . . . . . . . . . . . . . . . 11
Best Practices . . . . . . . . . . . . . . . . . . . . . . . . . . . . . . . . . . . . . . . . . . . . . . . . . . . . . . . . . . . . . . . . . . . . . . . . . 16
Site Security Example: Low Security Site . . . . . . . . . . . . . . . . . . . . . . . . . . . . . . . . . . . . . . . . . . . . . . . . . . . 20
Site Security Example: Medium Security Site . . . . . . . . . . . . . . . . . . . . . . . . . . . . . . . . . . . . . . . . . . . . . . . 21
Site Security Example: High Security Site . . . . . . . . . . . . . . . . . . . . . . . . . . . . . . . . . . . . . . . . . . . . . . . . . . 22
Before You Begin Installation . . . . . . . . . . . . . . . . . . . . . . . . . . . . . . . . . . . . . . . . . . . . . . . . . . . . . . . . . . . . 23
Summary: Mandatory Security Procedures . . . . . . . . . . . . . . . . . . . . . . . . . . . . . . . . . . . . . . . . . . . . . . . . . 24
Spectra T950 and T120 BlueScale Encryption
Chapter 3. Installing and Activating Encryption in Spectra T950 and T120 Libraries
Installing Encryption: Upgrading Your Library . . . . . . . . . . . . . . . . . . . . . . . . . . . . . . . . . . . . . . . . . . . . . . . 27
Activating Encryption . . . . . . . . . . . . . . . . . . . . . . . . . . . . . . . . . . . . . . . . . . . . . . . . . . . . . . . . . . . . . . . . . . . 28
Next Steps . . . . . . . . . . . . . . . . . . . . . . . . . . . . . . . . . . . . . . . . . . . . . . . . . . . . . . . . . . . . . . . . . . . . . . . . . . . . 29
3
Page 4

.
Chapter 4. Using Standard Edition in Spectra T950 and T120 Libraries
Using Encryption . . . . . . . . . . . . . . . . . . . . . . . . . . . . . . . . . . . . . . . . . . . . . . . . . . . . . . . . . . . . . . . . . . . . . . 30
Configuring Encryption . . . . . . . . . . . . . . . . . . . . . . . . . . . . . . . . . . . . . . . . . . . . . . . . . . . . . . . . . . . . . . . . . 30
Creating an Encryption Key . . . . . . . . . . . . . . . . . . . . . . . . . . . . . . . . . . . . . . . . . . . . . . . . . . . . . . . . . . . . . . 33
Assigning a Key to a Partition . . . . . . . . . . . . . . . . . . . . . . . . . . . . . . . . . . . . . . . . . . . . . . . . . . . . . . . . . . . . 35
Protecting Keys . . . . . . . . . . . . . . . . . . . . . . . . . . . . . . . . . . . . . . . . . . . . . . . . . . . . . . . . . . . . . . . . . . . . . . . . 37
Deleting a Key . . . . . . . . . . . . . . . . . . . . . . . . . . . . . . . . . . . . . . . . . . . . . . . . . . . . . . . . . . . . . . . . . . . . . . . . . 40
Restoring Data . . . . . . . . . . . . . . . . . . . . . . . . . . . . . . . . . . . . . . . . . . . . . . . . . . . . . . . . . . . . . . . . . . . . . . . . 40
Chapter 5. Using Professional Edition in Spectra T950 and T120 Libraries
Using Encryption . . . . . . . . . . . . . . . . . . . . . . . . . . . . . . . . . . . . . . . . . . . . . . . . . . . . . . . . . . . . . . . . . . . . . . 45
Professional Edition Overview . . . . . . . . . . . . . . . . . . . . . . . . . . . . . . . . . . . . . . . . . . . . . . . . . . . . . . . . . . . 46
Configuring Encryption . . . . . . . . . . . . . . . . . . . . . . . . . . . . . . . . . . . . . . . . . . . . . . . . . . . . . . . . . . . . . . . . . 47
Creating an Encryption Key . . . . . . . . . . . . . . . . . . . . . . . . . . . . . . . . . . . . . . . . . . . . . . . . . . . . . . . . . . . . . . 51
Assigning a Key to a Partition . . . . . . . . . . . . . . . . . . . . . . . . . . . . . . . . . . . . . . . . . . . . . . . . . . . . . . . . . . . . 53
Protecting Keys . . . . . . . . . . . . . . . . . . . . . . . . . . . . . . . . . . . . . . . . . . . . . . . . . . . . . . . . . . . . . . . . . . . . . . . . 57
Restoring Data . . . . . . . . . . . . . . . . . . . . . . . . . . . . . . . . . . . . . . . . . . . . . . . . . . . . . . . . . . . . . . . . . . . . . . . . 63
Deleting a Key . . . . . . . . . . . . . . . . . . . . . . . . . . . . . . . . . . . . . . . . . . . . . . . . . . . . . . . . . . . . . . . . . . . . . . . . . 67
Chapter 6. Recycling Encrypted LTO-4 Media in Spectra T950 and T120 Libraries
Recycling Media . . . . . . . . . . . . . . . . . . . . . . . . . . . . . . . . . . . . . . . . . . . . . . . . . . . . . . . . . . . . . . . . . . . . . . . 68
4
Page 5

.
Spectra T50
BlueScale Encryption
Chapter 7. Installing and Activating Encryption in Spectra T50 Libraries
Installing Encryption: Upgrading Your Library . . . . . . . . . . . . . . . . . . . . . . . . . . . . . . . . . . . . . . . . . . . . . . . 72
Activating Encryption . . . . . . . . . . . . . . . . . . . . . . . . . . . . . . . . . . . . . . . . . . . . . . . . . . . . . . . . . . . . . . . . . . . 73
Next Steps . . . . . . . . . . . . . . . . . . . . . . . . . . . . . . . . . . . . . . . . . . . . . . . . . . . . . . . . . . . . . . . . . . . . . . . . . . . . 75
Encryption Icon . . . . . . . . . . . . . . . . . . . . . . . . . . . . . . . . . . . . . . . . . . . . . . . . . . . . . . . . . . . . . . . . . . . . . . . . 76
BlueScale Encryption Editions . . . . . . . . . . . . . . . . . . . . . . . . . . . . . . . . . . . . . . . . . . . . . . . . . . . . . . . . . . . 77
Data to Encrypt . . . . . . . . . . . . . . . . . . . . . . . . . . . . . . . . . . . . . . . . . . . . . . . . . . . . . . . . . . . . . . . . . . . . . . . . 79
Getting Started . . . . . . . . . . . . . . . . . . . . . . . . . . . . . . . . . . . . . . . . . . . . . . . . . . . . . . . . . . . . . . . . . . . . . . . . 80
Media Recycling . . . . . . . . . . . . . . . . . . . . . . . . . . . . . . . . . . . . . . . . . . . . . . . . . . . . . . . . . . . . . . . . . . . . . . . 80
Best Practices . . . . . . . . . . . . . . . . . . . . . . . . . . . . . . . . . . . . . . . . . . . . . . . . . . . . . . . . . . . . . . . . . . . . . . . . . 81
Chapter 8. Using Standard Edition in Spectra T50 Libraries
Using Encryption . . . . . . . . . . . . . . . . . . . . . . . . . . . . . . . . . . . . . . . . . . . . . . . . . . . . . . . . . . . . . . . . . . . . . . 85
Restoring Data . . . . . . . . . . . . . . . . . . . . . . . . . . . . . . . . . . . . . . . . . . . . . . . . . . . . . . . . . . . . . . . . . . . . . . . . 94
Recycling Encrypted Media . . . . . . . . . . . . . . . . . . . . . . . . . . . . . . . . . . . . . . . . . . . . . . . . . . . . . . . . . . . . . . 98
Chapter 9. Using Professional Edition in Spectra T50 Libraries
Using Encryption . . . . . . . . . . . . . . . . . . . . . . . . . . . . . . . . . . . . . . . . . . . . . . . . . . . . . . . . . . . . . . . . . . . . . 101
Professional Edition Overview . . . . . . . . . . . . . . . . . . . . . . . . . . . . . . . . . . . . . . . . . . . . . . . . . . . . . . . . . . 101
Configuring Encryption . . . . . . . . . . . . . . . . . . . . . . . . . . . . . . . . . . . . . . . . . . . . . . . . . . . . . . . . . . . . . . . . 102
Creating an Encryption Key . . . . . . . . . . . . . . . . . . . . . . . . . . . . . . . . . . . . . . . . . . . . . . . . . . . . . . . . . . . . . 105
Assigning a Key to a Partition . . . . . . . . . . . . . . . . . . . . . . . . . . . . . . . . . . . . . . . . . . . . . . . . . . . . . . . . . . . 107
Restoring Data . . . . . . . . . . . . . . . . . . . . . . . . . . . . . . . . . . . . . . . . . . . . . . . . . . . . . . . . . . . . . . . . . . . . . . . 115
Chapter 10. Recycling Encrypted Media in Spectra T50 Libraries
Recycling Encrypted Media . . . . . . . . . . . . . . . . . . . . . . . . . . . . . . . . . . . . . . . . . . . . . . . . . . . . . . . . . . . . . 119
5
Page 6

.
EDU
and
BlueScale Encryption Support
Chapter 11. Endura Decryption Utility
Endura Decryption Utility Overview . . . . . . . . . . . . . . . . . . . . . . . . . . . . . . . . . . . . . . . . . . . . . . . . . . . . . . 124
Requirements . . . . . . . . . . . . . . . . . . . . . . . . . . . . . . . . . . . . . . . . . . . . . . . . . . . . . . . . . . . . . . . . . . . . . . . . 124
Decrypting Data: EDU Command Line . . . . . . . . . . . . . . . . . . . . . . . . . . . . . . . . . . . . . . . . . . . . . . . . . . . . 125
Using EDU to Decrypt Data: One Drive . . . . . . . . . . . . . . . . . . . . . . . . . . . . . . . . . . . . . . . . . . . . . . . . . . . . 126
Using EDU to Decrypt Data: Two Drives . . . . . . . . . . . . . . . . . . . . . . . . . . . . . . . . . . . . . . . . . . . . . . . . . . . 128
Restoring Data . . . . . . . . . . . . . . . . . . . . . . . . . . . . . . . . . . . . . . . . . . . . . . . . . . . . . . . . . . . . . . . . . . . . . . . 129
Chapter 12. Technical Support & Spectra Logic Contact Information
BlueScale Encryption Support . . . . . . . . . . . . . . . . . . . . . . . . . . . . . . . . . . . . . . . . . . . . . . . . . . . . . . . . . . 130
Contacting Spectra Logic . . . . . . . . . . . . . . . . . . . . . . . . . . . . . . . . . . . . . . . . . . . . . . . . . . . . . . . . . . . . . . . .131
Index 132
6
Page 7

1 Introduction
About This Guide
This guide contains information about BlueScale Encryption for Spectra T950, T120, and T50
libraries. This reviews information on the configuration and use of encryption. Note that the
encryption procedures for the Spectra T950 and T120 libraries cover both library-based and
drive-based encryption; the Spectra T50 library supports drive-based encryption only.
The guide has been divided into the following sections:
BlueScale Encryption Overview on page 10 reviews both encryption best practices and
information on using BlueScale Encryption and key management on your site, and
includes a short glossary.
Spectra T950 and T120 BlueScale Encryption on page 26 reviews using Spectra T950/T120
BlueScale Encryption and key management.
Spectra T50 BlueScale Encryption on page 71 reviews using Spectra T50 BlueScale
Encryption and key management.
EDU and BlueScale Encryption Support on page 123 reviews an optional utility that lets
you recover data without a library; this section also provides support information.
Intended Audience
This guide assumes that you are familiar with data backup and data protection strategies.
7
Page 8

1. Introduction
Related Publications
This guide outlines the configuration and use of BlueScale Encryption software in your
Spectra library.
For detailed information on the configuration and use of the library itself, see the Spectra
Logic publications specific to your library.
• The library’s user guide describes the configuration and use of the library, including
specifications and troubleshooting information.
•The library’s release notes provide the most up-to-date information about the library,
drives, and media.
The most up-to-date versions of all library documentation are available on Spectra Logic’s
Web site at www.SpectraLogic.com.
Conventions Used in this Guide
Important information is called out as follows:
Note: Provides additional points or suggestions.
Caution: Provides information about how to avoid damage to equipment.
Warning: Describes ways to avoid personal injury.
A caret (>) describes a series of menu selections. For example:
Select Configuration > Network
means
Select Configuration, then select Network.
8
Page 9

1. Introduction
Shipped Items
The following items are included with the purchase of BlueScale Encryption:
• One encryption activation key
• One software support agreement
•This user guide
•One t-shirt
If you ordered the Endura
®
Decryption Utility (EDU), you also receive one EDU CD.
9
Page 10
BlueScale Encryption
Overview
Page 11

2 Encryption Architecture & Strategies
BlueScale Encryption Overview
BlueScale Encryption is tightly integrated into your Spectra library. Encryption can be handled
through the library’s encryption-enabled Quad Interface Processors (QIPs), if any are in use,
and through LTO-4 drives working with LTO-4 media. BlueScale encryption key management is
provided through the library’s graphical interface.
If a single library has encryption-ready QIPs and LTO-4 drives installed, both can be used for
encryption. Set up an encryption-enabled partition for each.
The system is based on two major components:
• The encryption chip on the QIP or LTO-4 drive. By implementing encryption in both types
of hardware, the encryption is extremely fast and places no burden on your network.
• Key management software through the library’s graphical interface. The interface displays
using the library’s touch-screen front panel Library Controller (LC). It also displays from
anywhere through the Web, using a Web browser to display the Remote Library Controller
(RLC). Optionally, you can secure the Web browser using SSL, which is part of the
Telescope suite of management tools.
Together, these components let you easily implement the strongest encryption available, as
recognized by the federal government: AES encryption using a 256-bit key. BlueScale
Encryption incorporates multiple layers of security, some of which are discussed in this
chapter. Others are technically implemented and invisible to the user.
Site-Specific Decisions
To determine a BlueScale Encryption strategy appropriate for your site and your data, decide
on the security level appropriate for your site, and the amount and kinds of data to encrypt.
Then you can make some choices about how best to implement BlueScale Encryption.
11
Page 12

2. Encryption Architecture & Strategies
BlueScale Encryption: Standard Edition vs. Professional Edition
All data encrypted using BlueScale Encryption and Key Management—Standard and
Professional Editions, and LTO-4 drive-based encryption—is secured by the strongest
available encryption method, AES-256. Through BlueScale Encryption and Key Management,
you have additional choices in defining the level of security you can implement in your data
center. Whether to implement BlueScale Standard Edition or Professional Edition is your first
choice.
Feature Standard Edition Professional Edition
Keys - Single encryption key on a library
at a time
- Easier to manage and track
Encryption Login
Passwords
Key Export and
Import
Compression
Compatibility
between
Versions
Summary - Less secure, but less to manage - Fewer tapes through compression
- Single encryption password
- Easier to manage and track
- Import and export functions
require a single password
- Easier to manage
a
- Not available for QIP-based
encryption
- Data encrypted using either version can be decrypted by a library running the other
version.
- Data encrypted and compressed by a library using LTO-4 drives, Professional Edition, or
both, can be decrypted and decompressed by a library running Standard Edition.
- Multiple simultaneous encryption keys
(maximum is 30 keys)
- More secure, with a key for each of multiple data
sets
- Choice of either one encryption password or three
- More secure, with the option of requiring multiple
users to export and import keys, etc.
- Choice of single password or M-of-N shares with
multiple passwords to export/import keys
- More secure
- Available for QIP-based encryption
- More secure, but more to manage
a. If you are using drive-based encryption, compression is handled through the drive. Further references to compression in this
manual apply to library-based, not drive-based, encryption.
12
Page 13

2. Encryption Architecture & Strategies
BlueScale Standard Edition
For sites with a primary goal of securing data while it is transported to a remote site and
stored there, or only for data that will be stored for a long period of time, BlueScale Standard
Edition works well.
For information about configuring and using BlueScale Encryption Standard Edition, see
Chapter 4. Using Standard Edition in Spectra T950 and T120 Libraries on page 30.
BlueScale Professional Edition
For sites that want to implement compression along with greater flexibility and security, to
protect data wherever it’s stored and regardless of the retention period, BlueScale Encryption
Professional Edition works well.
For information about configuring and using BlueScale Professional Edition, see Chapter 5.
Using Professional Edition in Spectra T950 and T120 Libraries on page 45.
Security on Initialization
Both editions of BlueScale Encryption give you security options at library startup. Choose
whether to start the library:
• In standard mode, so that at library startup, data is encrypted with no further action
required.
• In secure initialization mode, so that at startup, drives are not automatically enabled;
encryption is only available and backups only run after a superuser has logged in and the
encryption password is entered.
13
Page 14

2. Encryption Architecture & Strategies
Multiple Encryption Password Support
The Standard Edition of BlueScale Encryption supports one encryption password.
The Professional Edition of BlueScale Encryption lets you choose whether to support one
encryption password, or three encryption passwords that enforce another level of security. If
you choose to implement the triple-password option, then:
• Three different passwords must be entered when configuring encryption.
• Any one of the three passwords must be entered to enable encryption when the library is
in Secure Initialization mode.
• Any one of the three passwords must be entered to access
encryption key management
and configuration options, excluding key import and export.
• Two of the three passwords must be entered to import and export keys.
Data to Encrypt
Decide whether to encrypt all data or a subset; then determine if the encrypted data can be
grouped together or if it must be isolated into sets. For example, your site may store financial
data as one set, separate from consumer identity information.
If all data can be encrypted together, the library requires only a single, encryption-enabled
partition. Otherwise, create multiple encryption-enabled partitions, one for each set of data,
and one or more partitions for data that is not to be encrypted.
Users with Professional Edition typically set up multiple partitions, each with its own key. For
example, if you are encrypting all your data, you only need one partition. If you are encrypting
only some of your data, create a partition dedicated to encryption along with a non-encryption
partition. If you want to keep your encrypted data sets isolated, create an encryption-enabled
partition for each encrypted data set, along with non-encryption partitions as needed.
Note: Implementing encryption after the library has been configured to
handle encryption simply requires creating backup jobs with your
backup software, which sends data to the proper partitions. Data is
automatically encrypted as it is backed up.
14
Page 15

2. Encryption Architecture & Strategies
Encryption Methods
Choose how to encrypt data. You can use encryption-enabled QIPs, LTO-4 drives, or both to
encrypt data. With QIPs, the library handles encryption, and can encrypt data written to any
tape type (such as LTO-3 and SAIT). With LTO-4 drives, the drive handles encryption, and
encrypts data written to LTO-4 tapes.
Note: If a partition uses LTO-4 drive-based encryption, the library can load
LTO-3 media into that partition. However, attempts to write to LTO-3
media fail. Note that LTO-4 drives can successfully read data on LTO-3
tapes.
Further, if an encryption-enabled QIP and a Fibre Channel LTO-4 drive share a partition, you
can only encrypt data using the LTO-4 drive.
To decrypt data encrypted using a QIP, use a partition with QIP-based encryption. To decrypt
data encrypted using an LTO-4 drive, use a partition with drive-based encryption.
Only one encryption key is allowed per LTO-4 tape. Once you stop using that key, you can no
longer directly encrypt data to any LTO-4 tape that stores data encrypted using the old key. To
write encrypted data using a different key, you must first recycle the tape. Recycling media is
easily managed through BlueScale Encryption Key Management.
LTO-4 Media Recycling
LTO-4 tapes can store only data encrypted using a single key. If you have an LTO-4 tape storing
data encrypted using a different key, or encrypted using a QIP, you have to recycle the tape
before you can re-use it in an encryption-enabled LTO-4 drive.For more information about
recycling media using a T950 or T120 library, refer to Chapter 6. Recycling Encrypted LTO-4
Media in Spectra T950 and T120 Libraries on page 68. For more information about recycling
media using a T50, refer to Chapter 10. Recycling Encrypted Media in Spectra T50 Libraries on
page 119.
15
Page 16

2. Encryption Architecture & Strategies
Best Practices
To effectively use BlueScale Encryption and to ensure data security, plan an encryption
strategy and back it up with processes and best practices. Once you’ve implemented
BlueScale Encryption, which always uses the strongest keys (AES-256), build custom
strategies based on your security requirements. As stated in the NIST publication
1
Recommendation for Key Management
“Ultimately, the security of information protected by cryptography directly depends on [...]
the effectiveness of [...] protocols associated with keys, and the protection afforded the
keys.”
Sound key management policies and procedures and appropriate staff are essential to
successful encryption.
:
People
Identify the people on your site who are responsible for backing up data. They will be
responsible for encrypting data written to tape and to other portable media, such as mobile
®
RXT
Media packs. Identify:
• The person to have superuser privileges on the Spectra Logic library with BlueScale
Encryption.
• The person to have the library’s encryption password.
Next, identify how many users are to have responsibilities that involve encryption. It may be
wise to have more than a single user familiar with passwords, depending on the size of your
organization, so that if one person is not available, another can take over. Make sure only the
authorized users know the encryption passwords, and that the passwords themselves are
secure. Refer to Passwords and Other Identifiers on page 19 for more information on setting
up passwords and monikers.
1. Barker, Elaine, W. Barker, W. Burr, W. Polk, and M. Smid. Recommendation for Key Management Part 1:
General. NIST Publication 800-57, 2005, p. 25
16
Page 17

2. Encryption Architecture & Strategies
Processes
On an organizational level, you need to identify the level of security your site requires, and the
data to be encrypted—for example, you may choose to encrypt all data, or any combination of
financial, identity-related information, and strategic data.
Consider the following when establishing your encryption procedure:
• Determine the level of security to use at startup. Both editions of BlueScale encryption
permit a standard mode and a secure initialization mode, described in Security on
Initialization on page 13.
• Identify any data sets that must be isolated from other encrypted data sets, described in
Data to Encrypt on page 14.
• Identify when to make copies of encryption keys. AES-256 encryption, a symmetric
encryption method, is a private key method. Users must track each key, which BlueScale
Encryption identifies only by a nickname, or moniker. The key itself is never displayed,
and is encrypted prior to export. Best practices dictate that you make copies of the key
immediately following the key’s creation.
• Identify the number of copies to make of each key, and note the location of each key copy.
Consider storing multiple copies of keys, that you then track carefully, storing the copies
away from the data encrypted using those keys. It is important to make sure that at least
one copy of each key is secure and readable (that is, uncorrupted), to make sure you can
restore your data. This is important in that keys, once deleted, are not recoverable—and
once the key is gone, the data is inaccessible; this is typically considered deleted for legal
and practical purposes.
• Identify the key rotation plan—how often to create and use new keys. BlueScale
Encryption Standard Edition stores one key on the library at a time. Professional Edition
permits multiple keys per library, with a one key per encryption-enabled partition. In
Standard Edition, you must delete the key currently on the library before you can create
another key.
• Before you delete a key, make sure that at least one copy has been exported and stored
securely.
17
Page 18

2. Encryption Architecture & Strategies
• Identify methods of tracking user passwords, key passwords and monikers. If the data is
stored on a computer, make sure it is stored on a computer that enforces encryption and is
not available on a network.
• Optionally, identify a primary and secondary team, so that you have redundancy in your
encryption strategy. Although that means the information required to decrypt data is
spread across more people, it also means that restoration of encrypted data may be much
easier, and you may ultimately have more data protection given the extra layer of
coverage; for example, if a user leaves, you aren’t in a position to lose data. This returns to
your initial decisions on how tightly and in what manner to enforce security for your site.
• Run drills confirming that your data is being encrypted properly, that keys are stored
properly, and that you can recover your data efficiently. Make sure that these drills are
included with your overall organizational security strategy.
• Create procedures to handle encrypted data that has been, or may have been,
compromised. For example, you may want to take all data and decrypt it, then re-encrypt it
and store it in an alternate location. You will also need to investigate the incident
involving compromised data, and take appropriate actions if identity-related data may
have been exposed.
• Archive the Endura Decryption Utility (EDU) for emergency use, such as to recover from a
disaster. Use this utility if you have no Spectra Logic libraries on hand but need to decrypt
and write data, which you can then restore using backup software.
• If you are using Professional Edition and multiple keys, make sure that data stored to one
tape shares a common expiration date or period (e.g., fourth quarter), regardless of the
number of keys used to encrypt data written to the tape. This simplifies tape management
and re-use.
• If you are using Professional Edition, make sure that critically important data is stored
using a single key on its own tape, to simplify restoration in case of disaster recovery and
to achieve business continuity goals.
• If you are using Professional Edition, you may want to take advantage of the M-of-N
shares option. This lets you select the M-of-N (such as 2 of 3) option to split a single file of
encrypted key data into multiple parts, or shares (N, which in this example is 3), and then
requires some specified subset (M, which in this example is 2) to import the file containing
key data. This further protects data from unauthorized use.
18
Page 19

2. Encryption Architecture & Strategies
Passwords and Other Identifiers
BlueScale Encryption requires that you supply passwords and monikers (key names). Your
site may want to consider whether specific rules govern these.
Superuser Login/Encryption Passwords Passwords are standard user security that restrict
access. Spectra Logic BlueScale Encryption requires that a superuser is logged in, then an
encryption password is supplied. A Professional Edition feature lets you optionally require
two of three different encryption passwords to be entered. The passwords involved with all
editions of BlueScale Encryption are:
• Superuser Password: Lets you access all administrative privileges except encryption
privileges. To access encryption features, the superuser must be logged in prior to
entering the encryption password.
• Encryption Password: Lets you access encryption features. This password must be
entered after the superuser login; then you can select Security --> Encryption to display
the encryption password screen.
• Import/Export Key Password: Lets you import and export encryption keys. This feature is
only available after the superuser has logged in and the encryption password has been
entered. Optionally, in Professional Edition, you can require two different passwords prior
to importing and exporting keys.
Password(s) for Key Import and Export Passwords are also used to encrypt keys for export.
Your site may consider whether to create different rules for these passwords, such as
requiring that these passwords are longer than the encryption access password(s), and
therefore more secure.
Monikers Your site may want to create rules governing naming conventions for key
monikers, an alphanumeric identifier used to refer to the never-revealed true key value, which
is a 256-bit key.
Password and Naming Standards Examples Create password and naming standards, in part
again depending on your site’s security requirements. For example, your site may require a
high level of security for access to encryption partitions, in which case you need to require
some combination of the following:
• A long password
• A combination that requires alphabetic and numeric characters
• No password that corresponds to a dictionary entry
• Passwords to be reset at predefined schedules
19
Page 20

2. Encryption Architecture & Strategies
Site Security Example: Low Security Site
Description of organization: Small company with 75 employees.
Security
Considerations
Security goals Protecting company from legal liability associated with unauthorized access to data
stored on tape, both onsite and offsite, including transport to the offsite location.
Encryption principals IT administrator, company president, corporate legal counsel.
Data to encrypt Financial and consumer identity data.
Level of security to
implement
Data sets requiring
isolation
Key escrow method Staff at company will escrow keys at a site remote from the data storage location.
Copies of each key to
store and their locations
Key rotation plan Create a new key every six months.
Tracking key monikers
and passwords
Multiple encryption
teams (optional)
Schedule and run drills Formalized approach deemed unnecessary. Instead, incorporate review of data
BlueScale Standard Edition: single key per library is sufficient.
Standard initialization mode: encryption partitions are enabled at all times.
None. A single partition for encrypted data is sufficient.
Keep three copies of each key: one with the senior IT administrator, one with the
company president, one in a corporate safety deposit box.
On a non-networked computer that supports encryption, create one or more charts
or lists with this data, including key moniker, dates used, encryption and superuser
passwords, and password used to encrypt exported key. (Because BlueScale
prompts for the required encryption key moniker when restoring encrypted data,
this company chose not to track monikers and their relationship to media.)
Deemed unnecessary given the users already identified as those responsible for
encryption.
decryption into standard six-month check to make sure that backups and restores
are working properly. This now includes a test involving data decryption.
Passwords • Password to access encryption features: minimum of 12 characters,
including at least one number and one letter
• Password to export and import encryption keys: minimum of 30 characters,
including at least one number and one letter
20
Page 21

2. Encryption Architecture & Strategies
Site Security Example: Medium Security Site
Description of organization: Medium-sized organization with 250 employees.
Security Considerations
Security goals Protecting company from legal liability associated with unauthorized access to
data stored on tape onsite and offsite, including transport to the offsite location.
Encryption principals IT senior staff, chief operating officer.
Data to encrypt Intellectual property, financial, customer, and inventory data.
Level of security to
implement
Data sets requiring
isolation from other
encrypted data
Key escrow method Store key copies with corporate legal counsel and a paid, trusted, third-party
Number of copies of each
key to store, and locations
Key rotation plan Create a new key every quarter for each partition dedicated to encryption.
Tracking key monikers,
exported key passwords,
and password to permit
access to encryption
features
Multiple encryption teams Three IT administrators, along with the senior IT admin and the COO.
• BlueScale Professional Edition, with multiple keys
• Standard initialization mode: encryption partitions enabled at start-up
• Multi-user mode, with three encryption passwords
Separate partitions and keys for these data sets: financial data, inventory data,
customer data, and intellectual property data. With this requirement, the site
must use a minimum of four encryption-enabled partitions, along with partition(s)
for non-encrypted data.
escrow service.
Keep three copies of each key: store one with corporate legal counsel, two with
the key escrow service.
Send to key escrow service an encrypted document that includes the password
used to access encryption features, superuser password, and all passwords
necessary to import encryption keys. This file cannot be created or stored on a
networked computer. Delete file from computer after the document or file is
transmitted securely to key escrow service.
Schedule and run drills Annual evaluation and review, along with wider corporate security plan.
Passwords • Passwords to access encryption features: minimum of 12 characters,
including at least one number and one letter
• Password to export and import encryption keys: minimum of 30 characters,
including at least one number and one letter
21
Page 22

2. Encryption Architecture & Strategies
Site Security Example: High Security Site
Description of organization: Enterprise organization.
Security
Considerations
Security goals Protecting all stored data.
Encryption principals IT senior staff, chief operating officer, chief security officer, chief technology officer.
Data to encrypt All.
Level of security to
implement
Data sets requiring
isolation
Key escrow method Store key copies with two remote corporate legal counsel offices and also with a
Copies of each key to
store, and the stored
key locations
Key rotation plan Create a new key every month for each partition dedicated to encryption.
Tracking key monikers
and passwords
Multiple encryption
teams (optional)
• BlueScale Professional Edition, with multiple keys
• Secure Initialization Mode: After library power is turned on, encryption user must
enter password to enable partitions dedicated to encryption
• Multi-user mode, with three encryption passwords.
Each data set is separately keyed, as defined by the department generating data.
paid, trusted third-party escrow service.
Keep three copies of each key: one to the main office of corporate legal counsel, two
to the key escrow service.
Send to the key escrow service an encrypted file with encryption access passwords
and superuser passwords. Send to corporate legal office a list of passwords used to
export keys. Files with this data cannot be created or stored on a networked
computer; delete file or files from computer once data is transmitted securely.
Senior IT admin, chief operating officer, chief security officer, chief technology
officer.
Schedule and run drills Quarterly evaluation and review, in conjunction with wider corporate security plan.
Passwords • Passwords to access encryption features: minimum of 15 characters, including at
least one number and one letter
• Password to export and import encryption keys: minimum of 40 characters,
including at least one number and one letter
22
Page 23

2. Encryption Architecture & Strategies
Before You Begin Installation
Glossary
AES-256: Advanced Encryption Standard (AES) algorithm that uses a 256-bit key. AES is the
NIST-approved encryption algorithm that is used by the federal government and that is
being broadly adopted.
BlueScale: Software available on Spectra Logic libraries that supports library intelligence
along with the Spectra Logic encryption solution and key management.
Cleartext: Text that is not encrypted.
EDU: Endura Decryption Utility is a command-line data decryption utility that can be installed
on any computer running the Linux operating system, to be used if no Spectra library is
available at time of data decryption and restoration. To use EDU, attach the recommended
two tape drives to the Linux host running the utility, then use EDU to decrypt data from the
encrypted tape and write the decrypted data back to tape. If you have only one tape drive,
make sure that the Linux host has enough available disk space to store the data as it’s
decrypted from the tape. Once the data is decrypted and written to tape, it can then be
restored using backup software.
Endura Decryption Utility: See EDU.
Endura Key Management: The software that permits encryption key creation, deletion, and
management, all within the library. Use the library front panel or a Web browser to
manage the library and encryption.
Moniker: The nickname an administrator assigns to an encryption key. This moniker hides
the true value of the key, while still giving administrators a method of managing and
referring to the key.
NIST: National Institute of Standards and Technology.
Partition: A logical library; that is, a part of a physical library that appears to the external
backup environment as its own physical library.
23
Page 24

2. Encryption Architecture & Strategies
Summary: Mandatory Security Procedures
The most important key management tasks are:
• Always make two or more copies of each key. The key must be protected, but it must also
be available. If you choose to store only a single copy of a key, and then something
happens to the device storing the key, you’ve lost both your key and all data encrypted
using the key.
To emphasize: if you lose the key, your data is unrecoverable. You need to balance the
number of copies of the key to store to guarantee access to the encrypted data against the
security risk associated with storing multiple keys. Make sure that the key has been
successfully stored prior to removing a key from the library.
• Store keys in a location apart from the location used to store the data encrypted using one
of the keys.
• Create a list of every password associated with each key and securely store the list. Never
keep this list as cleartext on a networked computer, or send it through email as cleartext,
etc. To decrypt and restore data, you need the data, key, and password protecting the key
and data.
• Track every copy of each key. This is critical to meet requirements that may govern data
retention and data destruction. Destroying all keys associated with encrypted data is
sufficient to satisfy data destruction requirements, since encrypted data can’t be accessed
without the key used to encrypt it.
For example, you may want to track the information about your keys. For suggestions, see the
table on page 25.
24
Page 25

2. Encryption Architecture & Strategies
Spectra Logic recommends tracking the following information about every key that you create.
Key Moniker:
_______________________
Number of key copies ______
and location of each copy:
Password(s) associated with
exported copy of the moniker:
Location of data stored on
mobile media, which has been
encrypted using this moniker:
Dates of moniker creation and
proposed expiration:
Detailed Information
1.
2.
3.
. . .
25
Page 26
Spectra T950 and T120
BlueScale Encryption
Page 27

3 Installing and Activating Encryption in
Spectra T950 and T120 Libraries
Installing Encryption: Upgrading Your Library
If your library uses BlueScale 9.5 firmware or higher, then your library supports BlueScale
Encryption that is library-based (handled by QIPs); no firmware upgrade is required for this
encryption method. For drive-based encryption, you must install a minimum firmware level of
BlueScale 10.0, if it is not already installed.
Check with SpectraGuard
your library.
Encryption is handled either through the library or through LTO-4 drives. Configuring
encryption and managing encryption keys are handled through the LC or RLC.
1. Make sure that you have the appropriate library hardware installed:
• A QIP that supports encryption (such as the G3 or G5 F-QIP)
or
• An LTO-4 tape drive is installed and LTO-4 media loaded
or
• Both are installed and LTO-4 media loaded if you intend to use drive-based
encryption for a partition with both types of hardware installed.
If you intend to use library-based encryption, any type of supported media can be
loaded.
2. Update your library firmware level to BlueScale 9.5 or higher. See the description
above for more information.
Note that the firmware upgrade may require up to twelve minutes or more to
complete, during which time the library enters a quiescent state.
®
Support to see if upgrades to this firmware should be installed for
Warning: Do not turn off the library once you begin the firmware upgrade.
3. Have on hand the activation key code that came with your BlueScale Encryption
package to enable encryption features and key management on your library.
27
Page 28
3. Installing and Activating Encryption in Spectra T950 and T120 Libraries
Activating Encryption
Once your library has an encryption-enabled QIP installed, or an LTO-4 tape drive installed and
LTO-4 media loaded, you can activate encryption with a BlueScale Encryption key.
To activate encryption for the Spectra T950 and T120 libraries:
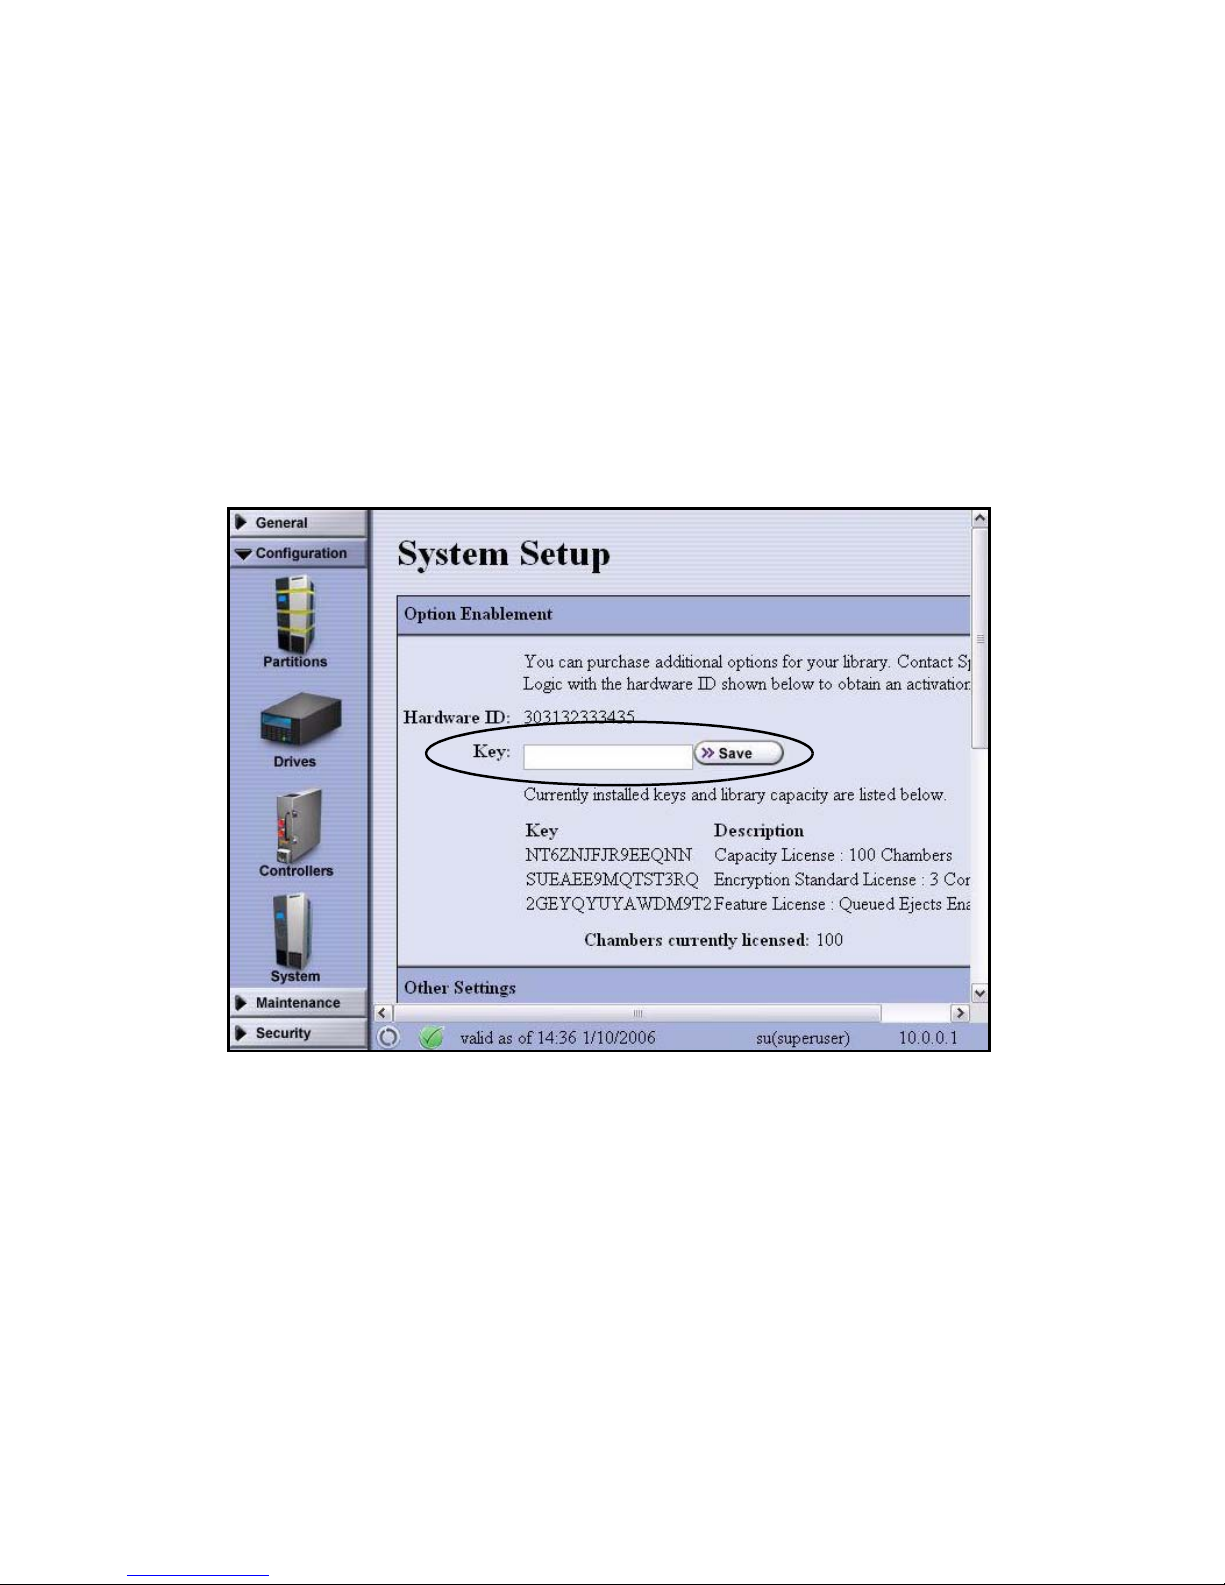
1. Log in as superuser and then select Configuration > System. The System Setup
screen displays.
2. To enable encryption, enter the BlueScale Encryption activation key in the Key field
(circled above) and then select Save.
The screen refreshes to show Encryption in the list of activated keys. Encryption is
now activated and can be configured.
28
Page 29

3. Installing and Activating Encryption in Spectra T950 and T120 Libraries
Next Steps
Once you have activated BlueScale Encryption, you can configure and use it.
Configuration
Encryption configuration entails selecting an encryption mode and creating one or more
encryption passwords (the number of passwords depends on if you have BlueScale Standard
Edition or BlueScale Professional Edition). The encryption password enables you to access the
encryption features.
Configuring encryption is described in Configuring Encryption on page 30 for BlueScale
Standard Edition and Configuring Encryption on page 47 for BlueScale Professional Edition.
Accessing and Using Encryption Features
To access BlueScale Encryption features, the following steps are required for every session
(that is, every time a user logs in using the library front panel or every instance of running the
RLC through a Web browser).
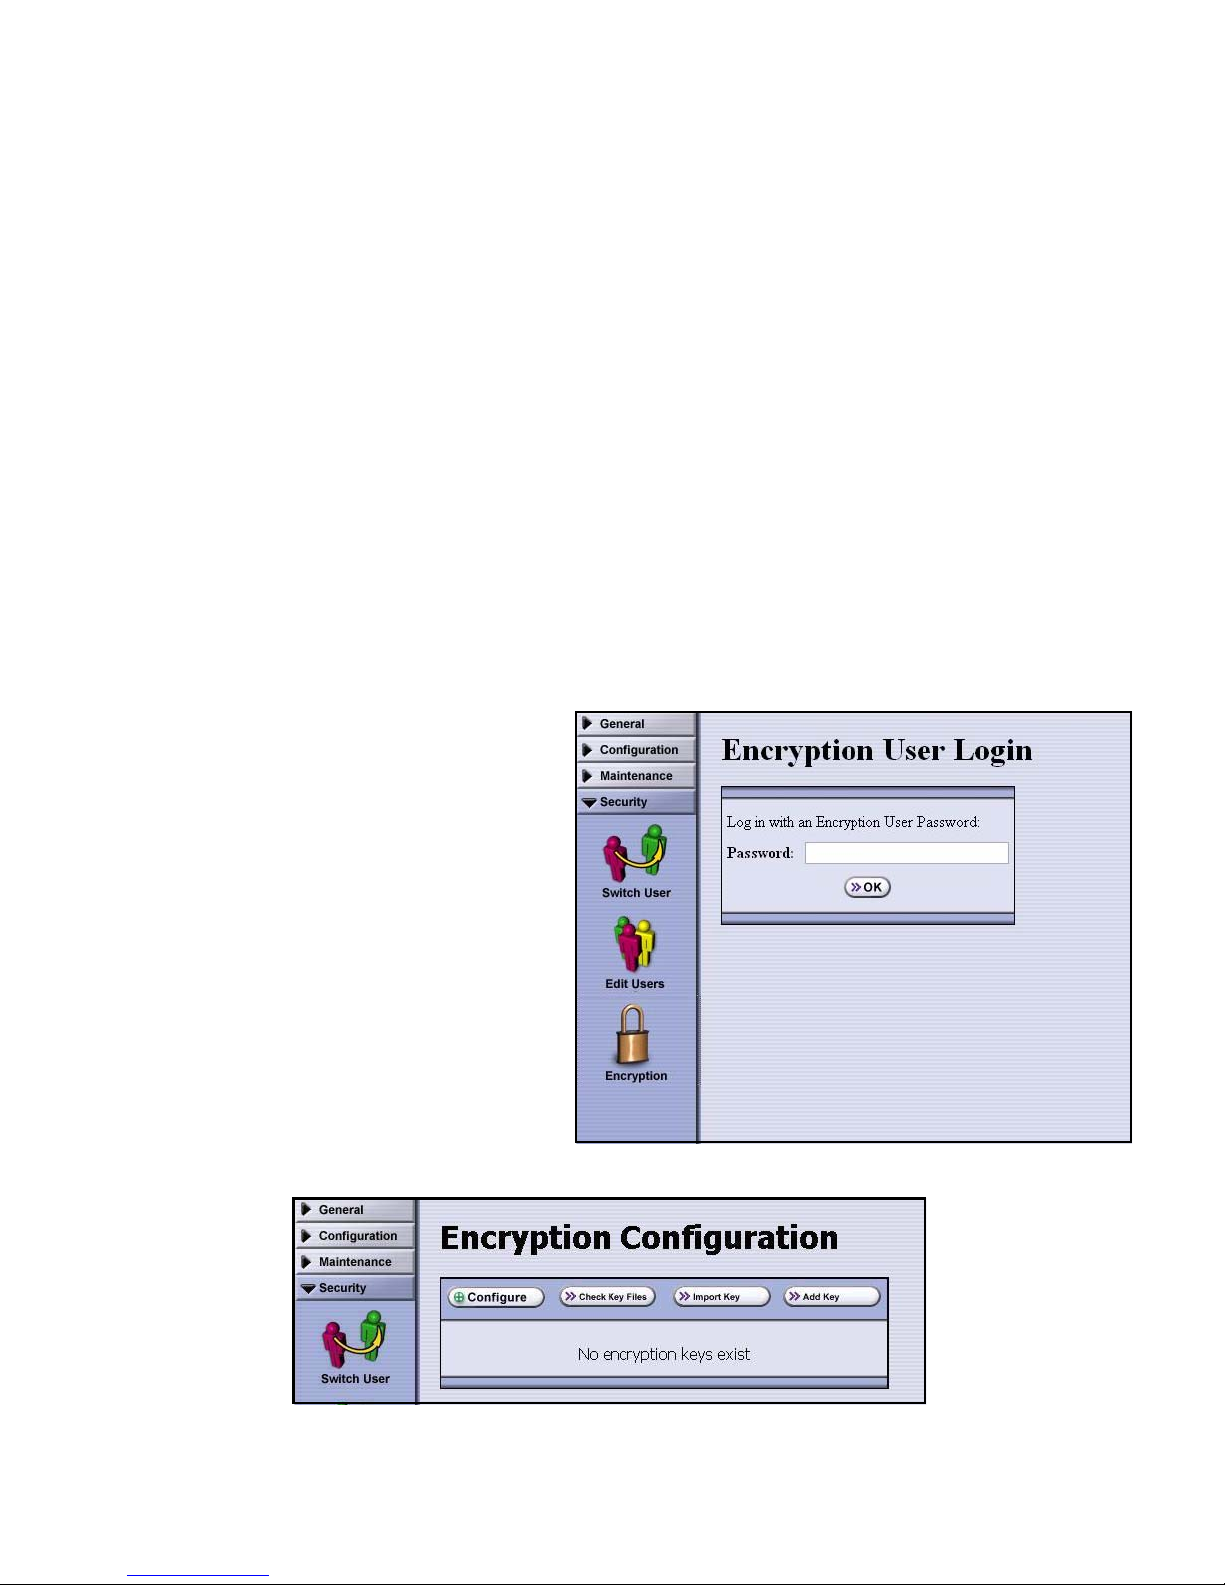
• A user with superuser privileges logs in and selects Security
The Encryption User Login screen displays.
• A user who is entrusted with the password(s) enters an encryption password in the
Password field, then selects OK.
The Encryption Configuration screen that enables access to all encryption features
displays.
Note that security is greatly enhanced when the user who knows the password is different
than the one logging into the system. If you have three passwords, consider having different
individuals responsible for each password.
Working with the encryption features is described in Using Encryption on page 30 for
BlueScale Standard Edition and Using Encryption on page 45 for BlueScale Professional
Edition.
> Encryption.
29
Page 30
4 Using Standard Edition in Spectra
T950 and T120 Libraries
Using Encryption
Once BlueScale Encryption is configured on your library, configure your backup software so
that data to be encrypted while it is backed up is sent to a partition that has encryption
enabled and has been assigned an encryption key.
Restoring data is also transparent. If the encryption key required to decrypt the data is not on
the library, the library displays the moniker of the key to import. Restoring Data on page 40
contains information about data restoration.
Configuring Encryption
Accessing Encryption Features
for the First Time
1. Log in as a superuser, then select
Security
Encryption User Login screen
displays.
2. Select OK. No login or password is
required the first time you log in.
The Encryption Configuration
screen displays.
> Encryption. The
30
Page 31

4. Using Standard Edition in Spectra T950 and T120 Libraries
Configuring Encryption
1. From the Encryption Configuration screen, select Configure. The Encryption Settings
screen displays.
2. Configure how you want the library to be used:
• Standard Mode: When the library is powered on during startup, data can be
backed up to partitions that support encryption without entering an
encryption password.
• Secure Initialization Mode: When the library is powered on during startup,
partitions dedicated to encryption are not available, so backups sent to them
cannot run. To initialize the encryption partitions, someone must log in as a
superuser, then enter the encryption password.
To use Secure Initialization Mode, select Enable Secure Initialization.
To use Standard Mode, make sure that Enable Secure Initialization is not selected.
31
Page 32

4. Using Standard Edition in Spectra T950 and T120 Libraries
3.
In the New Encryption User Password field, type in a password, using any combination
of the numbers 0-9, lower and upper case alphabetic characters (a-z and A-Z), and the
at sign (@), dash (-), underscore (_), and colon (:) characters.
4. Re-enter the password in the Retype Password field, then select OK.
The Encryption Configuration screen again displays.
At this point, no encryption key has been created, so no key moniker displays, as
illustrated in the screen below.
32
Page 33

4. Using Standard Edition in Spectra T950 and T120 Libraries
Rules for Creating Monikers
• Each moniker must be a unique string of characters, independent of case.
• Make a habit of using a single case (all upper or all lower) for monikers. After
export, case is ignored, so that keys associated with the monikers Moniker1,
moniker1, and MONIKER1 are interpreted as a single key. If you have two monikers
that are identical except for case, then you may not be able to retrieve some of your
data after importing such a key.
Creating an Encryption Key
1. From the Encryption Configuration
screen, select Add Key. The New
Encryption Key screen displays.
2. Enter a name in the Moniker field
that has not been used for any
other encryption key, and that uses
any combination of the numbers
0-9, lower and upper case
alphabetic characters (a-z and A-Z),
and the at sign (@), dash (-), and
colon (:) characters.
Use an underscore character
instead of an empty space to
separate characters.
This moniker is the name that you will use to reference the key.
Note that the real key value never displays and that administrators don’t ever need to
specify the real key value in order to encrypt data or manage keys. The moniker helps
to protect data encrypted using the key; it does so by making sure that the true key
value isn’t displayed.
33
Page 34

4. Using Standard Edition in Spectra T950 and T120 Libraries
3.
Select OK.
The Encryption Configuration screen displays, showing the key moniker, along with its
creation time and date and a message reminding you to create a copy of the key for
safekeeping.
If the key is lost, data cannot be recovered, so promptly copying the key and storing it
safely (that is, away from the data encrypted using the key) is extremely important to
data decryption and recovery. This is covered in Protecting Keys on page 37.
Because the key, identified by its moniker, isn’t yet assigned to a partition—that is,
used by a partition to encrypt data—None is listed in the Primary Key For column.
Also, because BlueScale Standard Edition only supports using one key, the Import Key
and Add Key selections no longer display. If you delete the key, they display again.
34
Page 35

4. Using Standard Edition in Spectra T950 and T120 Libraries
Assigning a Key to a Partition
After creating a key, you can assign it to one or more library partitions when adding or editing
a partition through the partition configuration wizard.
The Encryption screen for partition configuration lets you enable encryption for the partition.
It only displays if the encryption password has been entered and there is at least one key
available on the library.
Depending on your library and partition configuration, you may have up to three choices
available on the partition configuration encryption screen:
• No encryption
• QIP-based encryption
• LTO-4 drive-based encryption
Partitions with encryption-enabled QIPs offer an additional option: Enable Clear File at BOT.
Choose this option if you want to enable all drives to be able to read the headers of encrypted
tapes, which is a useful option for sites with a large number of tapes to manage.
To assign a key to a partition:
1. Log in as a superuser, then select Security > Encryption. The Encryption User
Login screen displays.
2. Enter the encryption password, then select OK.
3. Select Configuration > Partitions. The Shared Library Services screen displays.
4. Select New to add a partition, or select Edit to modify the settings for an existing
partition.
5. Navigate through the partition configuration screens by selecting Next until the
Encryption screen displays.
6. If the partition can support encryption, the encryption choices that display and are
available depend on the hardware for the partition.
Note that the content of the Encryption screen varies accordingly. See the options
described on the next page.
35
Page 36

4. Using Standard Edition in Spectra T950 and T120 Libraries
• To encrypt data using the QIP, select QIP-based Encryption.
Also, if you want readable (that is, non-encrypted) data at the beginning of the tape,
also select Enable Clear File at BOT.
– or –
• Select Drive-based Encryption.
– or –
If the data written through this partition does not need to be encrypted, make sure the
No Encryption option is selected.
36
Page 37

4. Using Standard Edition in Spectra T950 and T120 Libraries
7.
Navigate through the remaining partition configuration screens by selecting Next.
8. Once the Save Partition screen displays, select Save.
All data sent to this partition will be encrypted, using the key currently active on the
library.
Protecting Keys
Data cannot be recovered without the encryption key used to encrypt the data, so protecting
encryption keys is extremely important to data decryption and recovery.
Protect encryption keys by:
• Making copies of every key through Key Export
• Storing the keys in a secure location
• Tracking the location of the keys and the passwords required to import them
Protect your keys by making sure that copies of the keys reside elsewhere. Two methods are
available for key export: copying the encrypted key to a USB device, and emailing an
encrypted version of the key as an attachment to a user who has been configured as a mail
user through the library.
Best practices recommend storing keys offsite in a location other than the site used for media
storage. Confirm that the key is stored correctly on the USB device or has been received by the
intended recipient before deleting the key from your system. If you delete the key, you must
import the key to decrypt the data. Importing keys is described in Importing Keys on page 41.
You may want to make two copies of a key, storing each in a secure location. Note the location
of these keys, so that you can easily find the key when you need to restore or delete data.
37
Page 38

4. Using Standard Edition in Spectra T950 and T120 Libraries
Exporting Encryption Keys
To export the current encryption key:
1. Log in as a superuser, then select Security > Encryption. The Encryption User
Login screen displays.
2. Enter the encryption password, then select OK. The Encryption Configuration screen
displays.
3. Select Export Key. The Export Type screen displays.
4. Select either Export Single File to USB or Email Exported Key.
• If you select Export Single File to USB, plug a USB device into the USB library port
(see the library documentation for information about the location of this port). Then,
select Next.
• If you select Email Exported Key, select an email user from the Mail single key file
to drop-down menu.
To send the key to a user who isn’t listed as a library user, you must first create the
email recipient. For instructions on how to do this, see the library’s user guide.
5. After you either insert the USB device or select an email alias, select Next.
6. Enter a password, which is used to encrypt the key.
38
Page 39

4. Using Standard Edition in Spectra T950 and T120 Libraries
7.
Note the password, which you will need to import the key. Without it, you cannot
import the key, and the data encrypted using the key is lost.
8. Select Next.
• If you exported the key to a USB device:
Confirm that the encrypted key copied correctly by selecting Check Key Files.
If you are not sure, delete all data from the USB device so that no trace of the failed
key attachment remains, then use another USB device and start again with Step 2
above.
• If you exported the key using email:
Confirm the receipt of the attachment by checking with the user to whom you sent
the encrypted key file.
Caution: Make sure you track, in conformance with your security plan, where
you have stored the key or who received an email message with the
key. You need the password created when exporting the key and the
encrypted file containing the key to import the encryption key.
39
Page 40

4. Using Standard Edition in Spectra T950 and T120 Libraries
Deleting a Key
To use a new key to encrypt data, you must first delete the existing key. Then you can create
the new key and assign it to one or more partitions. Note that you will need a copy of the
existing key to restore data that was encrypted with the existing key.
With drive-based encryption, only one key is allowed per LTO-4 tape. To use a tape encrypted
with a deleted encryption key, you must first scratch the tape through BlueScale Encryption.
This procedure is described in Chapter 6. Recycling Encrypted LTO-4 Media in Spectra T950
and T120 Libraries on page 68.
To d el ete a key:
1. Log in as a superuser, then select Security > Encryption. The Encryption User
Login screen displays.
2. Enter the encryption password, then select OK. The Encryption Configuration screen
displays.
3. Confirm that at least one copy of the key has been exported and stored safely.
4. Select Delete Key and respond to the confirmation screens to delete the key.
Restoring Data
Restoring encrypted data from tape follows the standard data restore processes that you use
with your backup software. The only difference is that the key used to encrypt the data being
restored needs to be on the library and assigned to the partition with the encrypted media, so
the data can be decrypted. If the key is available, standard restore procedures simply work.
If the key isn’t on the library, the library displays the moniker of the key to import. You can use
the key moniker to identify the key, then import the key from a USB device or through the RLC.
You also need the password used to encrypt the key when it was exported.
Endura Decryption Utility (EDU) is an optional safeguard, providing a method that lets you
restore data without a library. Review information about the command-line encryption utility
in Chapter 11. Endura Decryption Utility.
40
Page 41

4. Using Standard Edition in Spectra T950 and T120 Libraries
Restoring Data if Required Key is Available
If the right key isn’t available on the library when you need to restore encrypted data, the
library prompts you with the moniker of the key that is required to decrypt the data. You can
then import the key so that it is on the library as long as there isn’t already a key on it (if there
is, delete the existing one first). After you assign it to the partition with the encrypted media, it
is available for decryption.
If you don’t have a library available and need to restore the key, you need the password
created when exporting the key, the key, and the command-line encryption utility described in
Chapter 11. Endura Decryption Utility, along with a Linux computer to run the utility.
To r es tore data :
1. Load the tape to be decrypted.
2. Assign the key to the partition with the tape if it is not already assigned to it.
3. Use the backup software to automatically decrypt and restore data.
If the key is not available, a message indicates this. To import a key so that you can
restore data, continue to the next set of steps.
Importing Keys
If the key is not available on the library, you can import it from a USB device or through the
RLC. The RLC option only displays if you are logged in remotely. See the following sections for
details instructions:
• Importing Keys from a USB Device and Restoring Data on page 42
• Importing Keys through the RLC and Restoring Data on page 43
41
Page 42

4. Using Standard Edition in Spectra T950 and T120 Libraries
Importing Keys from a USB Device and Restoring Data
To import a key stored on a USB device:
1. Log in as a superuser, then select Security > Encryption. The Encryption User
Login screen displays.
2. Enter the encryption password, then select OK. The Encryption Configuration screen
displays.
3. Insert the USB device into the library’s USB port.
4. Select Import Key. The Import Key Selection screen displays.
5. Choose the key to import from the Key List field, then select Next. The Import
Password screen displays.
6. Enter the password that was used to encrypt the key when it was being exported, then
select Next.
The Encryption Configuration Import Password screen displays, showing the moniker
of the newly imported key.
7. Assign the imported key to the partition with the encrypted media.
8. Use your backup software to restore the data.
42
Page 43

4. Using Standard Edition in Spectra T950 and T120 Libraries
Importing Keys through the RLC and Restoring Data
You can import keys using the RLC if you can access the key from your computer.
To import a key using the RLC:
1. Log in as a superuser, then select Security > Encryption. The Encryption User
Login screen displays.
2. Enter the encryption password, then select OK. The Encryption Configuration screen
displays, showing Import Key and Add Key.
3. Select Import Key. The Encryption Key Files Source screen displays. Note that this
screen only displays when you are using the RLC.
43
Page 44
4. Using Standard Edition in Spectra T950 and T120 Libraries
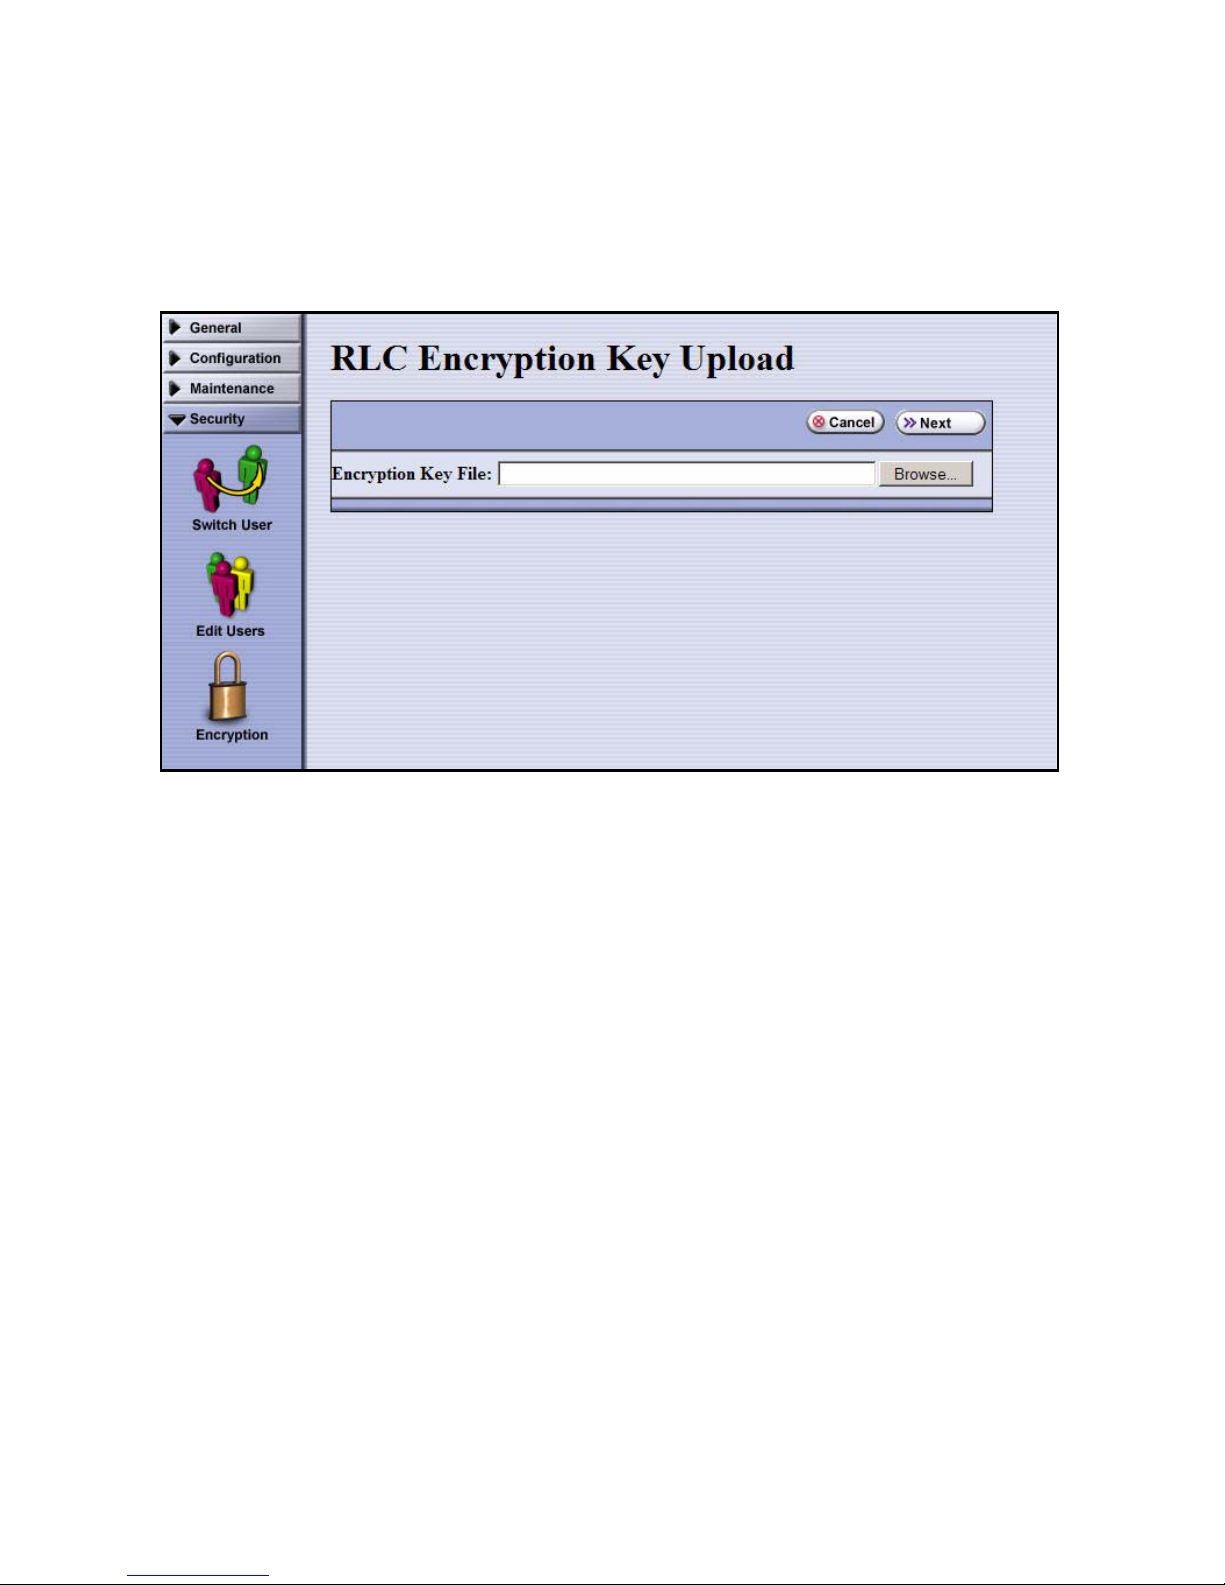
4.
Select Import key from RLC, then select Next. The RLC Encryption Key Upload screen
displays.
5. To identify the key file, either
• Type in the full path and file name in the Encryption Key File field.
• Select Browse. Locate and select the key, then select Open. The path for the key
displays in the Encryption Key File field.
6. Select Next. The Import Password screen displays.
7. Enter the password that was used to encrypt the key when it was being exported, then
select Next.
The Encryption Configuration Import Password screen displays, showing the moniker
of the newly imported key.
8. Assign the imported key to the partition with the encrypted media.
9. Use your backup software to restore the data.
44
Page 45

5 Using Professional Edition in Spectra
T950 and T120 Libraries
Using Encryption
Once BlueScale Encryption is configured on your library, configure your backup software for
your encrypted backups. the software sends the data to be encrypted to a partition that has
encryption enabled and that has been assigned an encryption key. Encryption during backup
is transparent—it happens automatically.
Restoring data is also transparent. If the encryption key required to decrypt the data is not on
the library, the library displays the moniker of the key to import. Once the key is on the library
and applied to the partition with the encrypted media, the data restores without requiring
additional steps. Restoring Data on page 63 contains more information about data
restoration.
45
Page 46

5. Using Professional Edition in Spectra T950 and T120 Libraries
Professional Edition Overview
Professional Edition supports multiple keys on the library simultaneously. Each partition that
is enabled for encryption uses one key to encrypt data backed up through that partition. To
streamline decryption, you can further configure the system to associate multiple monikers
with a single partition. When you need to restore data, the Endura Key Management software
looks at the keys you’ve assigned to the partition for both encryption and decryption. If it finds
the right key, that key is used. If a key is required that isn’t assigned to the partition, the
software displays the moniker of the key it needs to decrypt and restore the data.
For example, a single tape or RXT pack may contain data encrypted using multiple keys (that
is, during Week 1, the data is encrypted with Key1; during Week 2,the key is Key2 and so on).
You may want to keep Key1 on the library for decryption only, while Key2 is used to encrypt
data currently written through that partition. Key2 is automatically used for decryption as
needed.
Best practices recommend that you track keys associated with data on the media, so that you
can readily decrypt and restore data.
Library-based Encryption
Professional Edition provides additional advantages for partitions that encrypt data through a
QIP:
• Compression
• Rapid decryption of data on a single tape
Compression greatly reduces the number of tapes required to store encrypted data and
reduces the time that it takes to back up data.
46
Page 47

5. Using Professional Edition in Spectra T950 and T120 Libraries
Configuring Encryption
Accessing Encryption Features
To access encryption features:
1. Log in as a superuser, then select Security > Encryption. The Encryption User
Login screen displays.
2. Select OK. No login or password is required the first time you log in. The Encryption
Configuration screen displays.
47
Page 48
5. Using Professional Edition in Spectra T950 and T120 Libraries
Configuring Encryption Features
To configure encryption features:
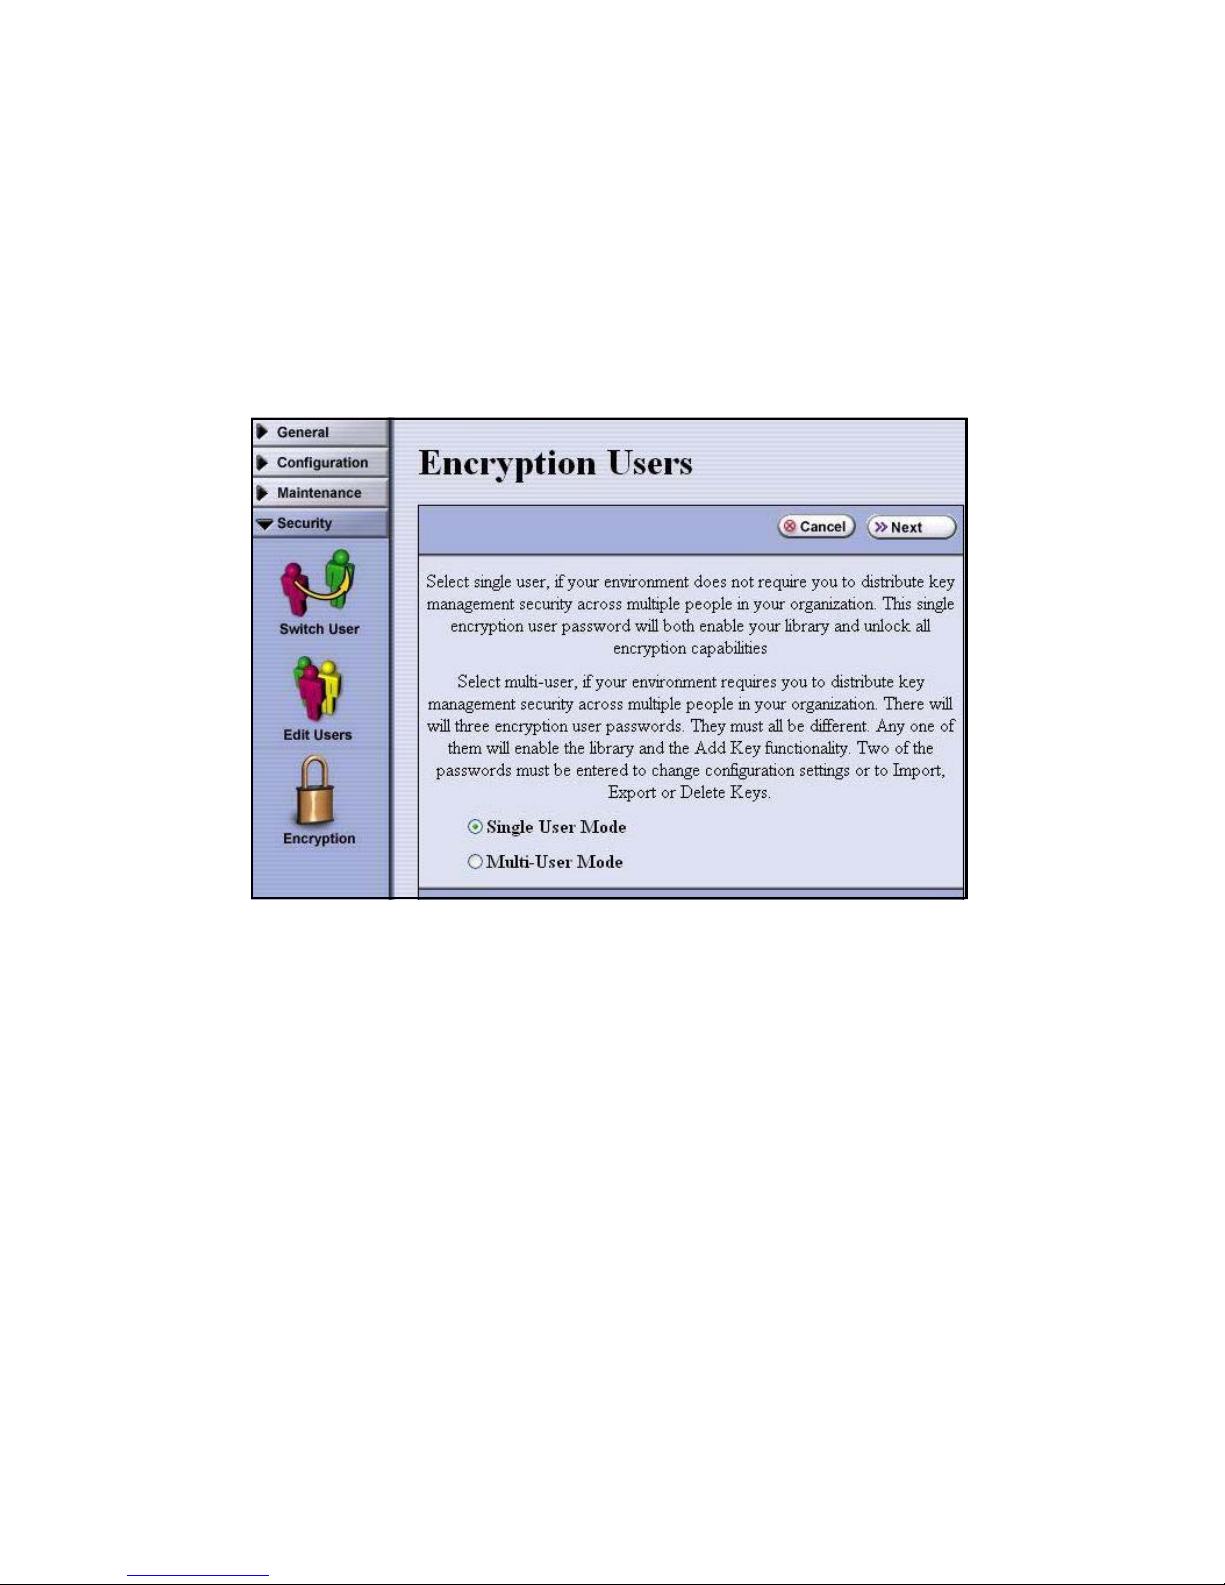
1. From the Encryption Configuration screen, select Configure. The Encryption Users
screen displays.
2. Select either:
• Single User Mode: Requires one encryption password to access all encryption
features.
• Multi-User Mode: Requires three unique encryption passwords. Once you have set
up the three passwords, use them as follows:
– Enter any one of the three to permit a library in Secure Initialization mode to
initialize encryption when the library is starting up and to otherwise access most
encryption features, excluding export and import encryption features.
– Enter a second password, when prompted, to access export and import encryption
features.
48
Page 49

5. Using Professional Edition in Spectra T950 and T120 Libraries
3.
Select Next. The Encryption Settings screen displays.
Note: If you selected Single User Mode, only one set of New Encryption
User Password and Retype Password fields display.
4. Configure how you want the library to be used:
• Standard Mode: When the library is powered on, data can be backed up to partitions
that support encryption without entering an encryption password.
• Secure Initialization Mode: When the library is powered on, partitions dedicated to
encryption are unavailable, so those backups do not run. To initialize encryption
partitions, someone must log in as a superuser and enter the encryption password.
To use Secure Initialization Mode, select Enable Secure Initialization.
To use Standard Mode, make sure that Enable Secure Initialization is not selected.
49
Page 50

5. Using Professional Edition in Spectra T950 and T120 Libraries
5.
Enter the number of passwords requested, using any combination of the numbers 0-9,
lower and upper case alphabetic characters (a-z and A-Z), and the at sign, dash,
underscore, and colon characters (@-_:).
6. Enter each password again in the Retype Password field.
7. When all passwords have been entered, select OK. The Encryption Configuration
screen again displays.
50
Page 51

5. Using Professional Edition in Spectra T950 and T120 Libraries
Rules for Creating Monikers
• Each moniker must be a unique string of
characters, independent of case.
• Make a habit of using a single case (all upper or all
lower) for monikers. After export, case is ignored,
so that keys associated with the monikers
Moniker1, moniker1, and MONIKER1 are
interpreted as a single key. If you have two
monikers that are identical except for case, then
you may not be able to retrieve some of your data
after importing such a key.
Creating an Encryption Key
1. From the Encryption Configuration screen, select Add Key. The New Encryption Key
screen displays.
2. Enter a name in the Moniker field that has not been used for any other encryption key,
and that uses any combination of the numbers 0-9, lower and upper case alphabetic
characters (a-z and A-Z), and the at sign (@), dash (-), underscore (_), and colon (:)
characters. Use an underscore character instead of a space to separate characters.
This name references
the key.
The real key value
never displays, and
administrators don’t
need to specify the real
key value to encrypt
data or manage keys.
The moniker protects
encrypted data by
making sure that the
true key value isn’t
displayed.
51
Page 52

5. Using Professional Edition in Spectra T950 and T120 Libraries
-
3.
Select OK.
The Encryption Configuration screen displays, showing the key moniker, along with its
creation time and date and a message reminding you to create a copy of the key for
safekeeping.
If the key is lost, data cannot be recovered, so copying the key and storing it safely is
extremely important to data decryption and recovery.
Because the key, identified by its moniker, isn’t yet assigned to a partition—that is,
used by a partition to encrypt data—None is listed under Primary Key For and
Decryption-Only Key For.
After you create a key, it’s very important the you create a copy of it, as covered in
Protecting Keys on page 57.
52
Page 53

5. Using Professional Edition in Spectra T950 and T120 Libraries
Assigning a Key to a Partition
After creating keys, you can assign one primary encryption key to each library partition. You
can also specify multiple decryption-only keys.
Displaying the Partition Configuration Encryption Screen
You can assign keys to a library partition when adding the partition or editing its settings
through the partition configuration wizard.
The Encryption screen for partition configuration lets you to enable encryption for the
partition and associate keys with it. It only displays if the encryption password has been
entered and there is at least one key available on the library.
Depending on your library and partition configuration, you may have up to three choices
available on the partition configuration encryption screen:
• No encryption
• QIP-based encryption
• LTO-4 drive-based encryption
Partitions with encryption-enabled QIPs offer additional options: Enable Compression and
Enable Clear File at BOT. Choose compression if you want to use less media by backing up
more data to each tape. Choose the file clearing option if you want to enable all drives to be
able to read the headers of encrypted tapes. These options do not display for drive-based
encryption because those functions are handled by the drive, not by BlueScale Encryption.
To display the Encryption screen:
1. Log in as superuser, then select Security > Encryption. The Encryption User Login
screen displays.
2. Enter the encryption password, then select OK.
3. Select Configuration > Partitions. The Shared Library Services screen displays.
4. Choose a partition and select Edit.
5. Navigate through the partition configuration screens by selecting Next until the
Encryption screen displays. The encryption method options and a list of keys available
on the library appear on this screen.
53
Page 54

5. Using Professional Edition in Spectra T950 and T120 Libraries
Associating Keys with a Partition
If the partition can support encryption, the encryption choices that display and are available
depend on the hardware for the partition. The content of the Encryption screen varies
accordingly.
With drive-based encryption, only one encryption key is allowed per LTO-4 tape. If you
associate a different encryption key with a partition, you must first scratch tapes encrypted
with the previous key to re-use them. Refer to Chapter 6. Recycling Encrypted LTO-4 Media in
Spectra T950 and T120 Libraries on page 68 for more information.
To associate keys with a partition:
1. If the partition can support encryption, these encryption choices display:
• QIP-based Encryption — to encrypt data using the QIP.
• If you want readable (that is, non-encrypted) data at the beginning of the tape,
select Enable Clear File at BOT.
• To compress the data for the partition, select Enable Compression.
54
Page 55

5. Using Professional Edition in Spectra T950 and T120 Libraries
– or –
• Drive-based Encryption — to encrypt data using the drives.
– or –
If the data written through this partition does not need encryption, make sure that you
select the No Encryption option.
2. Select the key to use to encrypt data. Only one key can be assigned as the active
encryption key.
3. From the list of keys at the bottom of the screen, select none, one, or more keys to be
associated with this partition and for use in decrypting data through this partition.
Note: Keys selected for data decryption are not used for encryption.
4. Navigate through the remaining partition configuration screens by selecting Next.
5. Once the Save Partition screen displays, select Save.
55
Page 56

5. Using Professional Edition in Spectra T950 and T120 Libraries
When you display the Security > Encryption screen, the results of the key
6.
assignment are listed.
In this example, the key Bob is used as the active (primary) encryption key for both
Partition 1 and Partition 2. The key Jeff is kept available for rapid data decryption for
data restored using library partitions one and two.
7. To assign this or another key to another partition, select the partition through the
partition configuration wizard and repeat the procedure.
56
Page 57

5. Using Professional Edition in Spectra T950 and T120 Libraries
Protecting Keys
Protect encryption keys by:
• Making copies of every key through Key Export
• Storing the keys in a secure location
• Tracking the location of the keys and the passwords required to import them.
Protect your keys by making sure that copies of the keys reside elsewhere. Two methods are
available for key export: copying the encrypted key to one or more USB devices and emailing
an encrypted version of the key as an attachment to one or more users who have been
configured as library mail users.
Methods of Securing Keys
You can add another layer of key protection by using the three encryption passwords option,
so that two of three different passwords must be entered to access export and import key
functions. Review Configuring Encryption Features on page 48 for information about
configuring the library to support multiple passwords.
M-of-N Shares in Exporting Keys to USB Devices and Mail Users
To export the key, you can copy the encrypted key to USB devices or send encrypted copies
through email. Note that the only way to import a key is to use a USB device.
You may choose to add another safeguard to key export and import by choosing to split the
key into multiple portions when you export it. This is referred to as M-of-N shares; this option
lets you define a total number of portions (N) to split the key into and the subset of that
number (M) required to access the encrypted key file protected using this method.
57
Page 58

5. Using Professional Edition in Spectra T950 and T120 Libraries
For your site, select one of these as your M-of-N shares:
•2-of-3
•2-of-4
•3-of-4
•2-of-5
•3-of-5
•4-of-5
For example, if you choose 2 of 3, then the encrypted key, already encrypted using a
key-specific password, is split into three shares (i.e., files). You can then export the key shares
using USB devices or through email. If you choose to export using USB devices, you will be
prompted to supply three USB devices, one after the other. To email shares using 2 of 3, select
three different users (configured on the library with email information), each receiving one
share as an email attachment.
Keys that have been split into shares can only be imported using USB devices; they cannot be
uploaded through the RLC. To restore data that has been sent through email, copy the
attachment to a USB device. Building on this example, note that only two of the three USB
devices, along with the password, are needed to import the key.
Selecting the M-of-N shares option when exporting a key is covered below in Exporting
Encryption Keys.
Storing Exported Keys
Best practices recommends storing keys offsite in a location other than the site used for
media storage. Make sure that the key has been sent and can be accessed, is stored correctly
on the USB device, or both, before deleting the key from your system. You may want to make
two copies of a key, storing each in a secure location. Note the location of these keys, so that
you can easily find the key when you need to restore or delete data.
58
Page 59

5. Using Professional Edition in Spectra T950 and T120 Libraries
Exporting Encryption Keys
To export the current encryption key:
1. Log in as superuser, then select Security > Encryption. The Encryption User Login
screen displays.
2. Enter the encryption password, then select OK. The Encryption Configuration screen
displays.
3. Select Export Key.
• If you selected multi-user mode and supplied only one encryption password, a
prompt asks you to enter another password. Enter it, then select Next. The Export
Type screen displays.
• Otherwise, the Export Type screen immediately displays.
59
Page 60
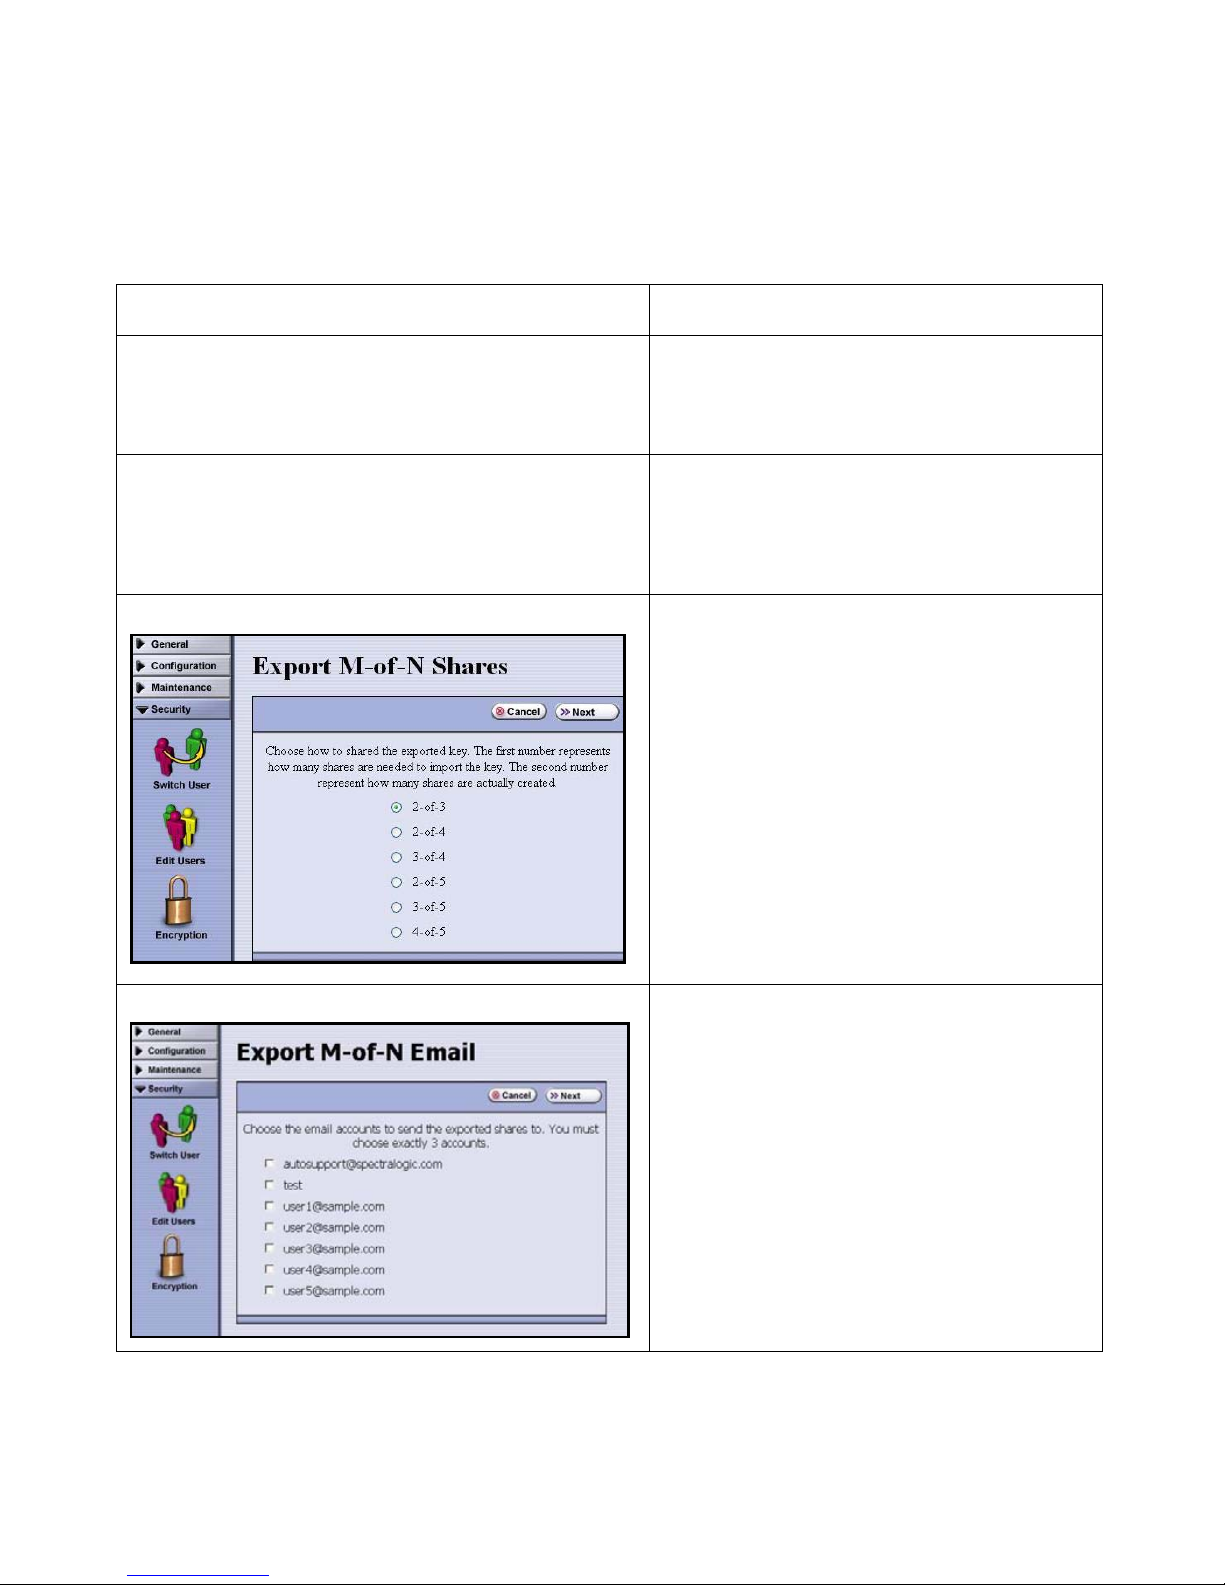
5. Using Professional Edition in Spectra T950 and T120 Libraries
4.
Select to export the key as a single file or as M-of-N shares to either USB or email.
Export Method Steps to Follow
• Select this option, then put a USB device
Export Single File to USB
(Standard and Professional Editions)
Email Exported Key
(Standard and Professional Editions)
Export M-of-N Shares to USB
into the library’s USB port. See the library’s
user guide for the location of this port.
• Select Next.
• Select this option, then select an email
user. If the intended recipient is not
available as an email user, first create the
email recipient; see the library’s user guide.
• Select Next.
• A screen displays that asks you to select
the minimum shares required to restore the
encrypted key, along with the total number
of shares.
• Put the first USB device into the USB library
port. See the library documentation for
information about the location of this port.
Have on hand the number of USB devices
that equals the total number of shares.
• Select
Next.
Email M-of-N Shares
60
• A screen displays that asks you to select
the minimum shares required to restore the
encrypted key, along with the total number
of shares.
• Select from the list email users; you must
select the same number of email users as
the total number of shares.
• Select
Next.
Page 61

5. Using Professional Edition in Spectra T950 and T120 Libraries
5.
Enter a password twice, then select Next. This password is used to encrypt the key,
and needs to be available before you can import and use the key. The key encrypted
with this password is copied to one or more USB devices or attached in an email to
one or more users
.
•USB
• If you exported the key to a single USB device, confirm that the encrypted key
copied correctly by selecting Check Key Files. If you are not sure, delete all data
from the USB devices so that no trace of the failed key attachment remains, then
start again with Step 2 of this procedure.
• If you selected the option to split the key across M-of-N shares on multiple USB
devices, eject the USB device after a share has been written to it, and at every
prompt, insert another USB device.
• After the shares have been written, insert each USB device into the library, one by
one, and select Check Key Files. If you are not sure if the key has been copied
correctly, delete all data from the USB device so that no trace of the failed key
attachment remains, then use another USB device and start again.
•Email
• If sending keys using email, you may want to confirm the receipt of the
attachment by checking with each user to whom you sent the encrypted key file.
61
Page 62

5. Using Professional Edition in Spectra T950 and T120 Libraries
6.
Note the password, which you will need to import the key. Without it, you cannot
import the key and the data encrypted using the key is lost.
Caution: Track where you have stored the key or who received an email
message with the key, in conformance with your security plan. You
need both the password and the encrypted file containing the key to
import the encryption key.
62
Page 63

5. Using Professional Edition in Spectra T950 and T120 Libraries
Restoring Data
Restoring encrypted data from tape follows the standard data restore processes that you use
with your backup software. The only difference is that the key used to encrypt the data being
restored needs to be on the library and assigned to the partition with the tape, so the data can
be decrypted. If it’s available and assigned, then standard restore procedures simply work.
If the key either isn’t on the library or is on the library but not assigned to the partition with
the encrypted media, the library displays the moniker of the key to import. To import the key,
you need the exported key (or keys, if the M-of-N shares option was used) and a copy of the
password used to encrypt it.
Endura Decryption Utility (EDU) is an optional safeguard, providing a method that lets you
restore data without a library. Review information about the command-line encryption utility
in Chapter 11. Endura Decryption Utility.
Restoring Data if Required Key is Available
To r es tore data :
1. Load the tape to be decrypted.
2. Assign the key or keys to the partition with the tape if they are not already assigned to
it.
3. Use the backup software to automatically decrypt and restore data. If the key or keys
are not available, a message indicates this.
To import a key so that you can restore data, continue to the next set of steps.
Importing Keys
If a key is not available on the library, you can import it from a USB device.
Or, if you are using the RLC and can access the key, you can use it to upload the encryption
key. This option only displays if you are logged in remotely. Note that you cannot import a key
through this method if it has been split into M-of-N shares.
63
Page 64

5. Using Professional Edition in Spectra T950 and T120 Libraries
Importing Keys from a USB Device
To import a key stored on a USB device:
1. Log in as a superuser.
2. Select Security > Encryption. The Encryption User Login screen displays.
3. Enter the password, then select OK. The Encryption Configuration screen displays.
4. Select Import Key.
• If you selected multi-user mode, and only one encryption password has been
supplied, a prompt asks you to enter another password. Enter it, then select Next.
5. A screen displays asking that you insert a USB device.
6. Insert the USB device with the exported key (or a share of the exported key) into the
library’s USB port. The Import Key Selection screen displays.
Note: You must use a USB device to import a key if it has been split into
M-of-N shares. If attachments with the shares of the encrypted key
were transmitted through email, they must be copied to USB devices
before the key can be imported and used to decrypt and restore data.
7. Choose the key to import from the Key List field, then select Next.
8. Enter the password that was used to encrypt the key when exporting it.
If you are using the M-of-N shares option, insert multiple USB devices one after the
other, as requested.
The Encryption Configuration Import Password screen displays, showing the newly
imported key.
9. Assign the imported key or shares of a key to the partition with the encrypted media.
10. Use your backup software to restore the data.
64
Page 65

5. Using Professional Edition in Spectra T950 and T120 Libraries
Importing Keys through the RLC
As long as you are importing a single key, not one split into M-of-N shares, you can upload it
through the RLC. To do so, you must be able to access the key from your computer.
To import a key using the RLC:
1. Log in as a superuser, then select Security > Encryption. The Encryption User
Login screen displays.
2. Enter the encryption password, then select OK. The Encryption Configuration screen
displays.
3. Select Import Key. The Encryption Key Files Source screen displays.
Note that this screen only displays when you are using the RLC.
65
Page 66

5. Using Professional Edition in Spectra T950 and T120 Libraries
4.
Select Import key from RLC, then select Next. The RLC Encryption Key Upload
screen displays.
5. To identify the key, either:
• Type the path for the key in the Encryption Key File field.
• Select Browse, locate and select the key, and select Open. The path for the key
displays in the Encryption Key File field.
6. Select Next. The Import Password screen displays.
7. Enter the password that was used to encrypt the key when it was being exported, then
select Next.
The Encryption Configuration Import Password screen displays, showing the moniker
of the newly imported key.
8. Assign the imported key to the partition with the encrypted media.
9. Use your backup software to restore the data.
66
Page 67

5. Using Professional Edition in Spectra T950 and T120 Libraries
Deleting a Key
To d el ete a key:
1. Log in as a superuser.
2. Select Security > Encryption. The Encryption User Login screen displays.
3. Enter the password, then select OK. The Encryption Configuration screen displays.
4. Export at least one copy of the key you will be deleting or you will never be able to
access data encrypted using that key.
5. Select Delete Key and respond to confirmation screens to delete the key.
67
Page 68

6 Recycling Encrypted LTO-4 Media in
Spectra T950 and T120 Libraries
Recycling Media
LTO-4 drives require that all data encrypted and written to a single tape is encrypted using the
same key—that is, a single key is associated with each tape storing encrypted data. Once the
encrypted data is written to a tape, the drive won't overwrite the encrypted data to re-use the
tape until you recycle the tape through BlueScale Encryption.
This option is available on the Import/Export screen that displays only in partitions using
drive-based encryption.
To recycle the media so you can re-use it
with LTO-4 drives:
1. From the toolbar menu, select
General > Import/Export.
For the Spectra T120 library, the
Import/Export Media screen
displays.
For the Spectra T950 library, the
Import/Export TeraPacks screen
displays.
2. Select Recycle Encryption Media.
The Partition screen displays.
68
Page 69

6. Recycling Encrypted LTO-4 Media in Spectra T950 and T120 Libraries
3.
Select the partition with the media from the Partition drop-down list, then select Next.
The Select Media to Recycle screen displays.
69
Page 70

6. Recycling Encrypted LTO-4 Media in Spectra T950 and T120 Libraries
4.
Select the media to recycle from the Available Media list, then select Add Media. The
items appear in the Media to Recycle list.
To narrow down the media choices in the Available Media list, enter a partial or entire
bar code in the Find by Barcode field and select Find. The list displays media with bar
codes that match the values that you entered.
5. Select Next. The Select Drive to Recycle Media screen displays.
6. Select the drive to scratch the media from the Drive list, then select Recycle
Encryption Media.
Note: Make sure that the backup software cannot use the drive during the
media recycling operation.
70
Page 71

Spectra T50
BlueScale Encryption
Page 72

7 Installing and Activating Encryption in
Spectra T50 Libraries
If your library has LTO-4 drives, your library supports encryption and key management. Data is
encrypted by the LTO-4 drives during backup, and the encryption process and keys are
managed through the BlueScale Encryption and Key Management features. You can choose
between Standard and Professional Editions of BlueScale Encryption and key management for
the features you need at your site; overviews of both are provided in this chapter.
Installing Encryption: Upgrading Your Library
For drive-based encryption, you must install on the library a minimum firmware level of
BlueScale 10.0, if it is not already installed. Check with SpectraGuard
further upgrades to this firmware should be installed for your library.
®
Support to see if
Encryption is handled through the LTO-4 drives. Configuring encryption and managing
encryption keys are handled through the library’s graphical interface.
1. Make sure that an LTO-4 tape drive is installed and LTO-4 media is loaded.
2. Update your library firmware level to BlueScale 10.0 or higher. Note that the firmware
upgrade may require up to twelve minutes or more to complete, during which time the
library enters a quiescent state.
Warning: Do not turn off the library once you begin the firmware upgrade.
3. Have on hand the Spectra Logic activation key code that came with your BlueScale
Encryption package to enable encryption features and key management on your
library.
72
Page 73

7. Installing and Activating Encryption in Spectra T50 Libraries
Activating Encryption
Once your library has at least one LTO-4 tape drive installed and LTO-4 media loaded, you can
activate the encryption option with a BlueScale Encryption key.
To activate BlueScale encryption:
1. Have the option key(s) on hand.
2. Log into the library as a superuser or administrator.
3. Select Configuration --> Option Keys. The Option Keys screen displays.
73
Page 74

7. Installing and Activating Encryption in Spectra T50 Libraries
4.
Select New. The New Option Key screen displays.
5. Enter the activation key then select Save.
6. Enter your activation key in the Enter Key field.
7. Select Save.
The LC goes through a short series of progress screens, then refreshes to again show
the Option Keys screen. The encryption option key and its description appear in the
list.
74
Page 75

7. Installing and Activating Encryption in Spectra T50 Libraries
Next Steps
Once you have activated BlueScale Encryption, you can configure and use it.
Configuration
Encryption configuration entails selecting an encryption mode and creating one or more
encryption passwords (the number of passwords depends on if you have BlueScale Standard
Edition or BlueScale Professional Edition). The encryption password enables you to access the
encryption features.
Configuring encryption is described in Configuring Encryption on page 85 for BlueScale
Standard Edition and Configuring Encryption on page 102 for BlueScale Professional Edition.
Accessing and Using the Encryption Features
To access the encryption features, the following steps are required for every session (that is,
every time a user logs in using the library front panel or every instance of running the RLC
through a Web browser).
• A user with superuser privileges logs in and selects Security > Encryption.
The Encryption User Login screen displays.
• A user who is entrusted with the password enters an encryption password in the Password
field, then selects OK.
The Encryption Configuration screen that enables access to all encryption features
displays.
Note that security is greatly enhanced when the user who knows the password is different
than the one logging into the system. If you have three passwords, consider having different
individuals responsible for each password.
Working with the encryption features is described in Using Encryption on page 85 for
BlueScale Standard Edition and Using Encryption on page 101 for BlueScale Professional
Edition.
75
Page 76

7. Installing and Activating Encryption in Spectra T50 Libraries
Encryption
icon
Encryption Icon
Use the encryption icon, displayed by selecting the Security menu, to access library
encryption features such as encryption configuration and key generation.
76
Page 77

7. Installing and Activating Encryption in Spectra T50 Libraries
BlueScale Encryption Editions
BlueScale Standard Edition: For sites with a primary goal of securing data while it is
transported to a remote site and stored there, or only for data that will be stored for a long
period of time, BlueScale Standard Edition works well. Standard edition lets you store one key
on the library at a time.
For information about configuring and using BlueScale Standard Edition, see Chapter 8. Using
Standard Edition in Spectra T50 Libraries.
BlueScale Professional Edition: For sites that want with greater flexibility and security, to
protect data wherever it’s stored and regardless of the retention period, BlueScale
Professional Edition works well. Professional edition provides additional security features,
and permits the use of multiple keys on the library at single time.
For information about configuring and using BlueScale Professional Edition, see Chapter 9.
Using Professional Edition in Spectra T50 Libraries.
The table below provides a brief comparison between the two versions of BlueScale
Encryption.
Feature Standard Edition Professional Edition
Keys • Single encryption key on a library at
a time
• Easier to manage and track
Encryption
Login
Passwords
Key Export
and Import
Compatibility
between
versions
• Single encryption password
• Easier to manage and track
• Import and export functions require
a single password, so easier to
manage
• Data encrypted using either version can be decrypted by a library running the other version.
• Data encrypted and compressed by a library using drive-based encryption and running
Standard Edition can be decrypted and decompressed using Professional Edition. LTO-4
drives natively compress data while encrypting it. Standard Edition through the QIP does
not support compression.
• Multiple simultaneous encryption keys (maximum
is 30 keys)
• More secure, with a key for each data set
• Choice of either one encryption password or three
• More secure, with the option of requiring multiple
users to export and import keys, etc.
•Choice of a single password or M-of-N shares with
multiple passwords to export/import keys
•More secure
Summary Less secure, but less to manage More secure, but more to manage
77
Page 78

7. Installing and Activating Encryption in Spectra T50 Libraries
Security on Initialization
Both editions of BlueScale Encryption give you security options at library startup. You can
choose whether to start the library:
• In standard mode, so that at library startup, data is encrypted with no further action
required.
• In secure initialization mode, so that at startup, drives that encrypt data are not
automatically enabled; encryption is only available and backups only run after a
superuser has logged in and the encryption password is entered.
Multiple Encryption Password Support
To access the Standard Edition of BlueScale Encryption, create and use a single encryption
password.
To access the Professional Edition of BlueScale Encryption, choose whether to create one
encryption password, or three encryption passwords. If you choose to implement the triplepassword option, then you will need to:
• Create three different passwords for access to encryption features.
• Enter any one of the three passwords enable encryption when the library is in Secure
Initialization mode.
• Enter any one of the three passwords to access encryption key management and
configuration options, excluding key import and export.
• Enter two of the three passwords to import and export keys.
78
Page 79

7. Installing and Activating Encryption in Spectra T50 Libraries
Data to Encrypt
When you implement BlueScale Encryption, decide whether to encrypt all data or a subset;
then determine if the encrypted data can be grouped together or if it must be isolated into
sets. For example, your site may store financial data as one set, separate from consumer
identity information.
If all data can be encrypted together, you can use a single, encryption-enabled partition.
Otherwise, create multiple encryption-enabled partitions, one for each set of data, and one or
more partitions for data that is not to be encrypted.
Note: To set up more than one library partition, purchase a key for each
additional partition and enter the key to activate the partition. Further,
note that the T50 permits only one partition per drive.
Users with Professional Edition typically set up multiple partitions, each with its own key.
For example, if you are encrypting all your data, you only need one partition. If you are
encrypting some of your data, but not all, create a partition dedicated to encryption along with
a non-encryption partition. If you want to keep your encrypted data sets isolated, create one
encryption-enabled partition for each encrypted data set, and another partition for
non-encrypted data.
Note: It’s easy to implement encryption once the library has been configured
to handle encryption. Simply create backup jobs with your backup
software, which sends data to the proper partitions. The data is
automatically encrypted as it is backed up.
79
Page 80

7. Installing and Activating Encryption in Spectra T50 Libraries
Getting Started
Activate BlueScale Encryption and key management; then you can configure and use it.
Configuring Encryption: Configuration procedures are different for the two editions. If you are
using Standard Edition, refer to Configuring Encryption on page 85. If you are using
Professional Edition, refer to Configuring Encryption on page 102.
Accessing Encryption Features
For every session that requires access to the encryption features (after configuration),
complete the following steps:
• Make sure a user with superuser privileges logs in and selects Security --> Encryption.
The Encryption User Login screen displays.
• Have a user who is entrusted with the password enter an encryption password in the
Password field, then select OK.
This provides access to Encryption Configuration features.
Media Recycling
For both editions of BlueScale Encryption, only one encryption key is allowed per tape. If you
want to re-use a tape that was encrypted with another key, you must first scratch it through
BlueScale Encryption. See Chapter 10. Recycling Encrypted Media in Spectra T50 Libraries for
more information on scratching encryption media.
80
Page 81

7. Installing and Activating Encryption in Spectra T50 Libraries
Best Practices
To effectively use BlueScale Encryption and to ensure data security, plan an encryption
strategy and back it up with processes and best practices. Once you’ve implemented
BlueScale Encryption, build custom strategies based on your security requirements.
Sound key management policies and procedures and appropriate staff are essential to
successful encryption.
People
Identify the people at your site who are responsible for backing up data. They will be
responsible for encrypting data written to tape and to other portable media. Identify:
• The person to have superuser privileges on the Spectra Logic library with BlueScale
Encryption.
• The person to have the library’s encryption password.
Next, identify how many users are to have responsibilities that involve encryption. It may be
wise to have more than a single user familiar with passwords, depending on the size of your
organization, so that if one person is not available, another can take over. Make sure only the
authorized users know the encryption passwords, and that the passwords themselves are
secure. Refer to Passwords and Other Identifiers on page 83 for more information on setting
up passwords and monikers.
81
Page 82

7. Installing and Activating Encryption in Spectra T50 Libraries
Processes
On an organizational level, identify the level of security your site requires, and the data to be
encrypted—for example, you may choose to encrypt all data, or any combination of financial,
identity-related information, and strategic data.
Consider the following when establishing your encryption procedure:
• Determine the level of security to use at startup. Both editions of BlueScale encryption
permit a standard mode and a secure initialization mode, described in Security on
Initialization on page 78.
• Identify any data sets that must be isolated from other encrypted data sets, described in
Data to Encrypt on page 79.
• Identify when to make copies of encryption keys. AES-256 encryption, a symmetric
encryption method, is a private key method. Users must track each key, which BlueScale
Encryption identifies only by a nickname, or moniker. The key itself is never displayed,
and is encrypted prior to export. Best practices dictate that you make copies of the key
immediately following the key’s creation.
• Identify the number of copies to make of each key, and note the location of each key copy.
Consider storing multiple copies of keys that you then track carefully, storing the copies
away from the data encrypted using those keys. It is important to make sure that at least
one copy of each key is secure and readable (that is, uncorrupted) to make sure you can
restore your data. This is important in that keys, once deleted, are not recoverable—and
once the key is gone, the data is inaccessible; this is typically considered deleted for legal
and practical purposes.
• Identify the key rotation plan—how often to create and use new keys. BlueScale
Encryption Standard Edition stores one key on the library at a time. In Standard Edition,
you must delete the key currently on the library before you can create another key.
Professional Edition permits multiple keys per library at a single time, with one key per
encryption-enabled partition.
• Before you delete a key, make sure that at least one copy has been exported and stored
securely so that data encrypted with the key can be decrypted later.
• Identify methods of tracking user passwords, key passwords, and monikers. If the data is
stored on a computer, make sure it is stored on a computer that enforces encryption and is
not available on a network.
82
Page 83

7. Installing and Activating Encryption in Spectra T50 Libraries
• Optionally, identify a primary and secondary team, so that you have redundancy in your
encryption strategy. Although that means the information required to decrypt data is
spread across more people, it also means that restoration of encrypted data may be much
easier, and you may ultimately have more data protection given the extra layer of
coverage; for example, if a user leaves, you aren’t in a position to lose data. This returns to
your initial decisions on how tightly and in what manner to enforce security for your site.
• Create procedures to handle encrypted data that has been, or may have been,
compromised. For example, you may want to take all data and decrypt it, then re-encrypt it
and store it in an alternate location. You will also need to investigate the incident
involving the compromised data, and take appropriate actions if identity-related data may
have been exposed.
• Archive the Endura Decryption Utility (EDU) for emergency use, such as recovering from a
disaster. Use this utility if you have no Spectra Logic libraries on hand but need to decrypt
and write data, which you can then restore using backup software. See Chapter 11. Endura
Decryption Utility for information on EDU.
• If you are using Professional Edition, you may want to take advantage of the M-of-N
shares option. This lets you select the M-of-N (such as 2-of-3) option to split a single file of
encrypted key data into multiple parts, or shares (N, which in this example is 3), and then
requires some specified subset (M, which in this example is 2) to import the file containing
key data. This further protects data from unauthorized use.
Passwords and Other Identifiers
BlueScale Encryption requires that you supply passwords and monikers (key names). Your
site may want to consider whether specific rules govern these.
Monikers Your site may want to create rules governing naming conventions for key
monikers, an identifier used to refer to the never-revealed true key value, which is a 256-bit
key.
Superuser Login/Encryption Passwords To access BlueScale Encryption, first a superuser
logs in, then an encryption password is supplied separately. A Professional Edition feature
lets you optionally require two of three different encryption passwords to be entered to
access specific features. The passwords involved with all editions of BlueScale Encryption are:
• Superuser password: Lets you access all administrative privileges except encryption.
• Encryption password: Lets you access encryption features. After the superuser login,
select Security > Encryption to display the encryption password screen.
83
Page 84

7. Installing and Activating Encryption in Spectra T50 Libraries
• Import/Export Key password: Lets you import and export encryption keys. This feature is
only available after the superuser has logged in and the encryption password has been
entered. Optionally, in Professional Edition, you can require two different passwords prior
to importing and exporting keys.
Note that security is greatly enhanced when the user who knows the password is different
than the superuser logging into the system. If you have three passwords, consider having
different individuals responsible for each password.
Mandatory Security Procedures
The most important key management tasks are:
• Always make two or more copies of each key. The key must be protected, but it must also
be available. If you choose to store only a single copy of a key, and then something
happens to the device storing the key, you’ve lost both your key and all data encrypted
using the key.
• To emphasize: if you lose the key, your data is unrecoverable. You need to balance the
number of copies of the key to store to guarantee access to the encrypted data against the
security risk associated with storing multiple keys. Make sure that the key has been
successfully stored prior to removing a key from the library.
• Store keys in a location apart from the location used to store the data encrypted using one
of the keys.
• Create a list of every password associated with each key and securely store the list. Never
keep this list as cleartext on a networked computer, or send it through email as cleartext,
etc. To decrypt and restore data, you need the data, key, and password protecting the key
and data.
• Track every copy of each key. This is critical to meet requirements that may govern data
retention and data destruction. Destroying all keys associated with encrypted data is
sufficient to satisfy data destruction requirements, since encrypted data can’t be accessed
without the key used to encrypt it.
84
Page 85

8 Using Standard Edition in Spectra T50
Libraries
Using Encryption
Once BlueScale Encryption Standard Edition is configured on your library, configure your
backup software so that data to be encrypted during backup is sent to a partition that has
encryption enabled and has been assigned an encryption key.
Restoring data is also transparent. If the encryption key required to decrypt the data is not on
the library, the library displays the moniker of the key to import. Restoring Data on page 94
contains information about data restoration.
Configuring Encryption
To configure BlueScale Encryption Standard Edition:
1. Log in as a superuser.
2. Select Security --> Encryption. The Encryption User Login screen displays.
3. Select OK. No login or password is required the first time you log in. The Encryption
Configuration screen displays.
85
Page 86

8. Using Standard Edition in Spectra T50 Libraries
4.
Select Configure. The Encryption Settings screen displays.
5. Configure how you want the library to be used:
• Standard Mode: When the library is powered on during startup, data can be backed
up to partitions that support encryption without entering an encryption password.
To use Standard Mode, make sure that Enable Secure Initialization is not
selected.
• Secure Initialization Mode: When the library is powered on during startup, partitions
dedicated to encryption are not available, so backups sent to them cannot run. To
initialize the encryption partitions, someone must log in as a superuser, then enter
the encryption password. To use Secure Initialization Mode, select Enable Secure
Initialization.
6. In the Password field, type in a password, using any combination of alphanumeric
characters and the at sign (@), dash (-), and underscore (_) characters.
86
Page 87

8. Using Standard Edition in Spectra T50 Libraries
7.
Re-enter the password in the
Confirm field, then select OK.
The Encryption Configuration
screen again displays.
At this point, no encryption key
has been created, so no key
moniker displays, as illustrated
in the screen at right.
Creating an Encryption Key
To create an encryption key:
1. From the Encryption Configuration screen, select Add Key. The New Encryption Key
screen displays.
2. Enter a name in the Moniker field that has not been used for any other encryption key,
and that uses any combination of alphanumeric characters and the at sign (@),
dash (-), and underscore (_) characters. Use an underscore character instead of an
empty space to separate characters.
This moniker is the name that you will use to reference the key.
Note that the real key value never displays and that administrators don’t ever need to
specify the real key value in order to encrypt data or manage keys. The moniker helps
to protect data encrypted using the key; it does so by making sure that the true key
value isn’t displayed.
87
Page 88

8. Using Standard Edition in Spectra T50 Libraries
Important Notes on Creating Passwords and Monikers
• Each moniker must be a unique string of characters, independent of case.
• Monikers entered with the same name but with alphabetical characters in different
cases may display as entered using upper and lower case. However, they are
recognized as a single key—that is, Key1, key1, and KEY1 are seen as a single key.
• Do not re-use a moniker. If you use a moniker for a key, later delete the key, then
create a new key using the same moniker, then attempt to restore data from the first
tape using the first moniker, the library would use the wrong encryption key and the
data would not be recoverable.
3.
Select OK.
The Encryption Configuration
screen displays, showing the
key moniker, its creation time
and date, and a message
reminding you to create a copy
of the key for safekeeping. If
the key is lost, data cannot be
recovered, so promptly copying
the key and storing it safely
(that is, away from the data
encrypted using the key) is
extremely important to data
decryption and recovery.
Because the key, identified by its moniker, isn’t yet assigned to a partition—that is,
used by a partition to encrypt data—None is listed in the Primary Key For column.
Also, because BlueScale Standard Edition only supports using one key, the Import
Key and Add Key selections no longer display. If you delete the key, they display
again.
88
Page 89

8. Using Standard Edition in Spectra T50 Libraries
Assigning a Key to a Partition
After creating a key, you can assign it to one or more library partitions. Assign it by selecting
the option to enable encryption in this partition, when adding or editing a partition through
the partition configuration wizard.
The Encryption screen for partition configuration lets you enable encryption for the partition.
It only displays if the encryption password has been entered and there is at least one key
available on the library.
When you assign a new key to a partition, or replace the existing one, BlueScale Encryption
uses the new key the next time that the library loads a tape for the partition. If a key is
removed or assigned while a drive is loaded, the drive continues using the previous key
configuration with the tapes that are loaded.
Only one encryption key is allowed per tape. If you replace the encryption key for a partition,
you must first scratch tapes encrypted with the previous key to re-use them. Refer to
Recycling Encrypted Media on page 98 for more information.
To assign a key to a partition:
1. Log in as a superuser, then select Security --> Encryption. The Encryption User
Login screen displays.
2. Enter the encryption password, then select OK.
3. Select MENU --> Configuration --> Partitions. The Partitions screen displays.
4. Select New to add a partition, or choose a partition and select Edit to modify the
settings for an existing partition.
5. Navigate through the partition
configuration screens by selecting
Next until the Encryption screen
displays.
6. Select Enable Encryption, then
select Next.
7. Navigate through the remaining
partition configuration screens by selecting Next.
8. Once the Summary screen displays, select Save. All data sent to this partition will be
encrypted, using the key currently active on the library.
89
Page 90

8. Using Standard Edition in Spectra T50 Libraries
Protecting Keys
Data cannot be recovered without the encryption key used to encrypt the data, so protecting
encryption keys is extremely important to data decryption and recovery.
Protect encryption keys by:
• Making copies of every key through Key Export
• Storing the keys in a secure location
• Tracking the location of the keys and the passwords required to import them
Protect your keys by making sure that copies of the keys reside elsewhere. Two methods are
available for key export: copying the encrypted key to a USB device, and emailing an
encrypted version of the key as an attachment to a user who has been configured as a mail
user through the library.
Best practices recommend storing keys offsite in a location other than the site used for media
storage. Confirm that the key is stored correctly on the USB device or has been received by the
intended recipient before deleting the key from your system. If you delete the key, you must
import the key to decrypt the data. Importing keys is described in Importing Keys on page 95.
You may want to make two copies of a key, storing each in a secure location. Note the location
of these keys, so that you can easily find the key when you need to restore or delete data.
90
Page 91

8. Using Standard Edition in Spectra T50 Libraries
Exporting Keys
To export the current encryption key:
1. Log in as a superuser, then select Security --> Encryption. The Encryption User
Login screen displays.
2. Enter the encryption password, then select OK. The Encryption Configuration screen
displays.
3. Select Export. The Export Type screen
displays.
4. Select either Export Single File to USB
or Email Exported Key.
•If you select Export Single File to
USB, plug a USB device into the USB
library port (see the library’s user
guide for information about the
location of this port).
•If you select Email Exported Key, select an email user from the Mail single key file
to drop-down menu.
To send the key to a user who isn’t listed as a library user, you must first create the
email recipient. For instructions on how to do this, refer to the library’s user guide.
5. After you either insert the USB device or select an email alias, select Next. The Export
Password screen displays.
91
Page 92

8. Using Standard Edition in Spectra T50 Libraries
6.
Enter a password, which is used to encrypt the key.
Note the password, which you will need to import the key. Without it, you cannot
import the key, and the data encrypted using the key is lost.
7. Select Next. The Encryption Configuration screen displays.
• If you exported the key to a USB device:
Confirm that the encrypted key copied correctly by selecting Check Key Files.
If you are not sure, delete all data from the USB device so that no trace of the failed
key attachment remains, then use another USB device and start again with Step 2
above.
• If you exported the key using email:
Confirm the receipt of the attachment by checking with the user to whom you sent
the encrypted key file.
Caution: Make sure you track, in conformance with your security plan, where
you have stored the key or who received an email message with the
key. You need both the password created when exporting the key
and the encrypted file containing the key to import the encryption
key.
92
Page 93

8. Using Standard Edition in Spectra T50 Libraries
Deleting a Key
To use a new key to encrypt data, you must first delete the existing key. Then you can create
the new key and assign it to one or more partitions. Note that you will need a copy of the
existing key to restore data that was encrypted with the existing key.
Only one key is allowed per LTO-4 tape. To use a tape encrypted with a deleted encryption key,
you must first scratch the tape through BlueScale Encryption. This procedure is described in
Recycling Encrypted Media on page 98.
To d el ete a key:
1. Log in as a superuser, then select Security --> Encryption. The Encryption User
Login screen displays.
2. Enter the encryption password, then select OK. The Encryption Configuration screen
displays.
3. Confirm that at least one copy of the key has been exported and stored safely.
4. Select Delete. The Delete Encryption Key screen displays.
5. Select OK.
93
Page 94

8. Using Standard Edition in Spectra T50 Libraries
Restoring Data
Restoring data is transparent. If the encryption key required to decrypt the data is not on the
library, the library displays the moniker of the key to import.
Restoring encrypted data from tape follows the standard data restore processes that you use
with your backup software. The only difference is that the key used to encrypt the data being
restored needs to be on the library and assigned to the partition with the encrypted media, so
the data can be decrypted. If the key is available, standard restore procedures simply work.
If the key isn’t on the library, the library displays the moniker of the key to import. You can use
the key moniker to identify the key, then import the key from a USB device or through the RLC.
You also need the password used to encrypt the key when it was exported.
Endura Decryption Utility (EDU) is an optional safeguard, providing a method that lets you
restore data without a library. If you choose to purchase the command-line encryption utility,
review information in Chapter 11. Endura Decryption Utility.
Restoring Data if Required Key is Available
If the right key isn’t available on the library when you need to restore encrypted data, the
library prompts you with the moniker of the key that is required to decrypt the data. You can
then import the key so that it is on the library as long as there isn’t already a key on it. After
you assign it to the partition with the encrypted media, it is available for decryption.
If you don’t have a library available and need to restore the key, you need the password
created when exporting the key, the key, media for the decrypted data, and the command-line
encryption utility described in Chapter 11. Endura Decryption Utility, along with a Linux
computer to run the utility.
To r es tore data :
1. Load the encrypted tape in the library.
2. Assign the key to the partition with the tape if it is not already assigned to it.
3. Use the backup software to automatically decrypt and restore data.
If the key is not available, a message indicates this. To import a key so that you can
restore data, continue to the next set of steps.
94
Page 95

8. Using Standard Edition in Spectra T50 Libraries
Importing Keys
If the key is not available on the library, you can import it from a USB device or through the
RLC. The RLC option only displays if you are logged in remotely.
Importing Keys from a USB Device
To import keys from a USB device to restore data:
1. Log in as a superuser, then select Security --> Encryption. The Encryption User
Login screen displays.
2. Enter the encryption password, then select OK. The Encryption Configuration screen
displays.
3. Insert the USB device into the library’s USB port.
4. Select Import Key. The Import Key Selection screen displays.
5. Choose the key to import from the Key List field, then select Next. The Import
Password screen displays.
6. Enter the password that was used to encrypt the key when it was being exported, then
select Next.
The Encryption Configuration screen displays, showing the moniker of the newly
imported key.
7. Assign the imported key to the partition with the encrypted media.
8. Use your backup software to restore the data.
95
Page 96

8. Using Standard Edition in Spectra T50 Libraries
Importing Keys through the RLC
You can import keys using the RLC if you can access the key from your computer.
To import a key using the RLC:
1. Log in as a superuser, then select Security --> Encryption. The Encryption User
Login screen displays.
2. Enter the encryption password, then select OK. The Encryption Configuration screen
displays, showing Import Key and Add Key.
3. Select Import Key. The Encryption Key Files Source screen displays. Note that this
screen only displays when you are using the RLC.
4. Select Import key from RLC, then select Next. The RLC Encryption Key Upload screen
displays.
96
Page 97

8. Using Standard Edition in Spectra T50 Libraries
5.
To specify the key file, you can:
• Type in the full path and file name in the Encryption Key File field.
• Select Browse, then locate and select the key. Select Open. The path for the key
displays in the Encryption Key File field.
6. Select Next. The Import Password screen displays.
7. Enter the password that was used to encrypt the key when it was being exported, then
select Next. The Encryption Configuration screen displays, showing the moniker of
the newly imported key.
8. Assign the imported key to the partition with the encrypted media.
9. Use your backup software to restore the data.
97
Page 98

8. Using Standard Edition in Spectra T50 Libraries
Recycling Encrypted Media
LTO-4 drives require that all data encrypted and written to a single tape be encrypted using
the same key (that is, a single key is associated with each tape storing encrypted data). Once
the encrypted data is written to a tape, the drive won't overwrite the encrypted data to re-use
the tape until you scratch the tape through BlueScale Encryption.
Note that this option is available on the Import/Export screen that displays only in partitions
using encryption.
To recycle encrypted media:
1. From the toolbar menu, select General --> Import/Export. The Import/Export screen
displays.
2. If your library has more than one partition, use the Import/Export drop-down menu to
select the partition with the media to be recycled, then select Go. The Import/Export
screen refreshes with the information for the selected partition displayed.
Note: If you only have one partition, the drop-down menu does not appear.
98
Page 99

8. Using Standard Edition in Spectra T50 Libraries
3.
Select Recycle. The Select Tapes
screen displays.
4. Select a tape to recycle, then
select Add. The Tapes to Recycle
screen appears with the tape
displayed in the list.
5. To add other tapes to recycle:
• Select Add Tape. The Select
Tapes screen displays.
• Repeat Step 4 to add the tape.
• Repeat the entire procedure to
add further tapes.
To delete tapes from the list of
tapes to recycle:
• Select the tape in the Tapes to Recycle screen list.
• Select Delete Selected. The tape is removed from the list.
• Repeat this procedure to delete additional tapes.
- or -
• Select Delete All to remove all tapes from the list.
99
Page 100

8. Using Standard Edition in Spectra T50 Libraries
6.
Select Next in the Tapes to Recycle screen once you have selected all of the tapes that
you want to recycle. The Select Drive screen displays.
7. Choose the drive that you want to use to scratch the media, then select Next. The
Summary screen displays.
Figure 8-1 The Summary screen for recycling media.
8. Verify your selections, then select Recycle to scratch the tapes.
100
 Loading...