

Page 1

Spectralink 7522/7532 Handset
User Guide
14226900-IG, Edition 10.0
July2017, Original document
Page 2

Copyright Notice
© 2013 - 2017 Spectralink Corporation All rights reserved. SpectralinkTM, the Spectralink logo and
the names and marks associated with Spectralink’s products are trademarks and/or service marks of
Spectralink Corporation and are common law marks in the United States and various other countries. All other trademarks are property of their respective owners. No portion hereof may be reproduced or transmitted in any form or by any means, for any purpose other than the recipient’s
personal use, without the express written permission of Spectralink.
All rights reserved under the International and pan-American Copyright Conventions. No part of this
manual, or the software described herein, may be reproduced or transmitted in any form or by any
means, or translated into another language or format, in whole or in part, without the express written
permission of Spectralink Corporation.
Do not remove (or allow any third party to remove) any product identification, copyright or other
notices.
Notice
Spectralink Corporation has prepared this document for use by Spectralink personnel and customers. The drawings and specifications contained herein are the property of Spectralink and shall
be neither reproduced in whole or in part without the prior written approval of Spectralink, nor be
implied to grant any license to make, use, or sell equipment manufactured in accordance herewith.
Spectralink reserves the right to make changes in specifications and other information contained in
this document without prior notice, and the reader should in all cases consult Spectralink to determine whether any such changes have been made.
NO REPRESENTATION OR OTHER AFFIRMATION OF FACT CONTAINED IN THIS
DOCUMENT INCLUDING BUT NOT LIMITED TO STATEMENTS REGARDING CAPACITY,
RESPONSE-TIME PERFORMANCE, SUITABILITY FOR USE, OR PERFORMANCE OF
PRODUCTS DESCRIBED HEREIN SHALL BE DEEMED TO BE A WARRANTY BY
SPECTRALINK FOR ANY PURPOSE, OR GIVE RISE TO ANY LIABILITY OF SPECTRALINK
WHATSOEVER.
Warranty
The Product Warranty and Software License and Warranty and other support documents are available at http://support.spectralink.com/.
Contact Information
US Location
+ 1 800-775-5330
Spectralink Corporation
2560 55th Street
Boulder, CO 80301
USA
info@spectralink.com
UK Location
+44 (0) 20 3769 9800
Spectralink Europe UK
329 Bracknell, Doncastle Road
Brancknell, Berkshire, RG12 8PE
United Kingdom
infoemea@spectralink.com
Denmark Location
+45 75602850
Spectralink Europe ApS
Bygholm Søpark 21 E Stuen
8700 Horsens
Denmark
infoemea@spectralink.com
Page 3

Contents
Getting Started 9
Handset Information 9
Handset Operational Warnings 10
Battery and Charger Information 10
Battery Safety Notices 11
Battery Disposal 12
Replacing Battery 12
Charger Options 14
Charging Battery 15
Turning Handset On/Off 16
To Turn Handset On 16
To Turn Handset Off 16
About Your Handset 17
Handset Keys 17
Handset Display 18
Status Icons 19
Voice Mail 20
Backlight 20
Navigating the Handset 22
Entering Main Menu 22
Scrolling in Menus 23
Confirming Choices 23
Navigating Cursor 23
Adjusting Volume 23
Returning to Previous Menu 23
Leaving Menus 23
Software Update Over the Air 23
Hearing Aid Compability (HAC) 23
To View Status of/Enable/Disable HAC 24
Adjusting Speaker Volume 24
To Turn Speaker Volume Up 24
To Turn Speaker Volume Down 24
Locking Keypad 24
To Lock/Unlock Keypad 24
14226900-IG, Edition 10.0
July2017, Original document
Page 4

Making Calls 25
Making Internal/External Calls 25
Off Hook Dialling (Dial Directly) 25
On Hook Dialling (Pre-Dial) 25
Dial from Phone Book (Local) 25
Dial from CallList/Call Register 26
Dial from Call List 26
Dial from Missed Call List 26
Dial from Call Register 26
Redial 27
Speed Dial 27
Corporate Directory Calls (System Dependant) 27
Company Phone Book Calls (System Dependant) 28
Answering Calls 29
Answering/Ending a Call 29
Auto Answer 29
To Turn Auto Answer On/Off 29
Muting a Call 30
Rejecting a Call 30
During Calls 31
Call Transfer 31
Call Transfer (Blind) 31
Call Transfer (Attended) 31
Call Hold 32
Call Hold 32
Call Waiting 32
Call Waiting 32
Call Forward Unconditional 33
Turning Speakerphone On/Off 33
To Turn Speakerphone On/Off 33
Turning Microphone Mute On/Off 33
To Turn Microphone Mute On/Off 33
Enter Phone Book (Local) 34
Using Shortcuts 35
Types of Shortcuts 35
Predefined Shortcuts 35
Personal Shortcuts 37
To Add a Shortcut 37
To Use a Shortcut 37
To Remove a Shortcut 37
Using the Menu 38
Description of Menus 38
Phone Book (Local) 38
14226900-IG, Edition 10.0
July2017, Original document
Page 5

Call Register 38
Messages 38
Presence 39
MSF Function 39
External Services 40
Status 40
Settings 40
List of Menu Functions 41
Phone Book 41
Call Register 41
Messages 41
Presence 41
MSF Function 41
External Services (System Dependant) 42
Status 42
Settings 42
Phone Book (Local) 44
Using Alphanumeric Keyboard 44
Managing Contacts 44
Finding Contact in Phone Book 44
Adding a New Contact to Phone Book 45
Editing Name/Number 45
Adding New Number 46
Adding Number to Speed Dial 46
Deleting Number 47
Deleting Contact 47
Deleting All Contacts 48
Speed Dial 48
Speed Dial Calls 48
Adding Number to Speed Dial 48
Deleting a Speed Dial Number 49
Delete All Speed Dial Numbers 49
Call Register 50
Incoming Calls 50
Viewing List of Incoming Calls 50
Adding an Incoming Call to Phone Book 50
Deleting an Incoming Call from List 51
Outgoing Calls 51
Viewing List of Outgoing Calls 51
Adding an Outgoing Call to Phone Book 51
Deleting an Outgoing Call from List 52
Missed Calls 52
Viewing List of Missed Calls 52
Adding a Missed Call to Phone Book 53
Deleting a Missed Call from List 53
14226900-IG, Edition 10.0
July2017, Original document
Page 6

Delete Call List 54
Deleting All Entries in a Call List 54
Deleting All Calls from All Lists 54
Messages 55
Writing, Sending and Saving Messages 55
Writing and Sending a New Message 55
Clearing Text Field 56
Saving a New Message in Outbox 56
Edit a Message That Has Not Been Sent 56
Using Templates 57
To Use a Template When You Begin a Message 57
To Insert a Template in a Message 57
To Save a New Message as a Template 57
Saving a Received Message as a Template 58
Deleting a Single Template 58
Reading Messages 59
To Read a Message 59
To Save a Message (Remove from Display) 59
Replying Messages 59
Replying to a Message 59
Reply Using an Empty Screen 59
Reply in Continuation of Original Text 60
Reply Using a Template 60
Calling the Phone that Sent a Message 60
Forwarding a Message 61
Resending a Message 61
Deleting Messages 62
Deleting a Single Message 62
Delete All Read Messages from Inbox 62
Delete All Messages from Inbox or Outbox 62
Delete All Messages 62
Status 63
Status Settings 63
Silent 63
Headset (only 7522) 63
Auto Answer 64
Economy Mode 64
Battery 65
Ringer Tone 65
Volume 65
RSSI 66
General Information 66
14226900-IG, Edition 10.0
July2017, Original document
Page 7

Settings 67
Ringing Volume 67
To Adjust the Volume of the Ring Tone 67
Ringing Tone 67
To Choose a New Ring Tone 67
Message Alert Volume 68
To Adjust Message Alert Volume 68
Vibrator 68
To Turn Vibrator On/Off 68
Silent Mode 69
To Turn Silent Mode On/Off 69
Changing Silent Mode Settings 69
Auto Key Lock 70
To Turn Auto Key Lock On/Off 70
Backlight 70
Setting Backlight Automatically at Dimmed (On) or Off 70
Turning Backlight Automatically On 71
Adjusting Backlight Delay 71
Auto Answer 72
To Turn Auto Answer On/Off 72
Changing Auto Answer Settings 72
Out of Range 73
To Turn Out of Range Indicator On/Off 73
Changing Out of Range Settings 73
Missed Calls 74
To Show/Hide Missed Calls 74
Absent in Charger 74
To Turn Absent in Charger On/Off 74
Bluetooth (only 7532) 75
To Activate the Bluetooth Function 75
Pair Wireless Headset with the Handset 75
Deactivate Bluetooth 75
Activate Bluetooth Again 76
Disconnect Wireless Headset 76
Connect Wireless Headset Again 76
Remove Wireless Headset from the Device List 76
Auto Connect 77
Wireless Headset Volume 77
Switch Between Wireless Headset and Handset 77
Last Number Redial 77
Advanced... 78
Changing Language 78
Using a Headset (only 7522) 78
Hearing Aid Comp 79
Microphone Gain 79
Using Long Key 80
Changing Economy Mode 80
14226900-IG, Edition 10.0
July2017, Original document
Page 8

Master Handset (System Dependant) 80
Login 81
Setting Time & Date 83
Minimum Ring Time 84
Old DECT Servers 84
Deployment Level 84
Local Tones 85
Message List Content 85
Noisy Environment 85
Product Compatibility 86
Technical Specifications 88
Troubleshooting 89
Spectralink Handset 89
14226900-IG, Edition 10.0
July2017, Original document
Page 9
Spectralink7522/7532 Handset User Guide
Getting Started
It is recommended that you read all information in this section before you use your handset.
Safety and Handling information is available online at http://support.spectralink.com/products.
Regulatory information is available online at http://support.spectralink.com/products.
Handset Information
Warning:
Ensure that the adapter voltage is the same as the electrical outlet voltage. The handset
uses radio signals and does not guarantee a connection in all circumstances. Do not rely
on a cordless handset to make emergency calls.
Warning: Magnetic earpiece
The earpiece may retain magnetic objects.
Warning: Hearing loss
Excessive use of earphones and headphones can cause hearing loss.
Caution: Authority to operate this equipment
Changes or modifications to this equipment that are not approved by Spectralink may
cause this equipment to fail to comply with part 15 of the FCC rules, voiding the user’s
authority to operate this equipment.
Caution: Not user serviceable
Spectralink products contain no user-serviceable parts inside. Refer servicing to qualified
service personnel.
l Never use your handset under the following conditions:
o
in the vicinity of electrical detonators
o
in shielded rooms
o
in areas where radio transmission is forbidden
14226900-IG, Edition 10.0
July2017, Original document
9
Page 10
Spectralink7522/7532 Handset User Guide
l Do not place a handset near:
o
water, moisture or damp areas
o
heat sources, direct sunlight or unventilated areas
o
devices which generate strong magnetic fields
o
areas where the handset can be covered, its ventilation impaired, liquid spilled on the unit
or objects inserted into the handset through any openings.
o
areas with temperature extremes
l Check for small metal objects in the handset earpiece/mouthpiece before using the handset.
l Do not store or locate flammable liquids, gases, or explosive materials in the same com-
partment or vicinity as the cordless handset, its parts or accessories.
Handset Operational Warnings
Certain operational environments are potentially hazardous. Please read the following text carefully
to ensure that you understand the handset’s operating conditions.
Potentially Explosive Atmospheres
Do not take your handset into any area with a potentially explosive atmosphere. Do not remove,
install, or charge batteries in such areas. Sparks in a potentially explosive atmosphere can cause an
explosion or fire resulting in bodily injury or even death.
Warning: Explosive Atmospheres
Avoid areas with potentially explosive atmospheres include fueling areas such as lower
decks on boats, fuel, or chemical transfer or storage facilities, areas where the air contains chemicals or particles such as grain, dust, or metal powders, and any other area
where you would normally be advised to turn off your vehicle engine. Areas with potentially explosive atmospheres are often marked with signs, but not always.
Battery and Charger Information
Your handset is powered by a removable battery that you will need to fully charge before first using
the handset and then recharge periodically.
Caution: Battery and charger compatibility
Only use batteries and chargers compatible with your handset. For more information, see
"Product Compatibility" on page86.
Caution: Overheated battery
If an overheated battery is detected, charging will suspend.
l Periodically clean the charge contacts on both the charger and handset.
l Do not leave a battery where it could be subjected to extremely high temperatures.
14226900-IG, Edition 10.0
July2017, Original document
10
Page 11
Spectralink7522/7532 Handset User Guide
l Do not charge battery when the ambient room temperature is above 40°C/104°F or below
0°C/32°F.
l Do not replace batteries in potentially explosive environments, such as rooms where flam-
mable liquids or gases are present.
l Do not charge batteries unless you use the approved power adaptor and the proper batteries.
l Use only rechargeable LI-Ion Battery Pack in the Spectralink 7xxx Handset.
l Do not disassemble, short circuit or dispose of in fire.
l Do not let battery or power adaptor come into contact with conductive metal objects.
l Power handset off before removing the battery.
Note: Battery life
How intensively you use your handset determines how frequently the battery will need to
be charged. Under intensive use, battery replacement may be needed during a normal
shift.
Certain handset features require more battery capacity than others. Any battery life estimates are highly dependent on phone usage and the features that are deployed as well as
the environment itself.
After a length of time, batteries will lose the ability to maintain a charge and to perform at
maximum capacity and will need to be replaced. This is normal for all batteries.
Battery Safety Notices
Warning: Risk of explosion and fire
The battery used in this device may present a risk of fire or chemical burn if mistreated.
Do not disassemble, heat above 55°C, or incinerate. Charging temperature must not
exceed 40°C
THERE IS A RISK OF EXPLOSION ORFIREIF YOU REPLACE THE BATTERY
PACK WITH AN INCORRECT TYPE. USE ONLY SPECTRALINK BATTERY PACK
MODEL DM322.
Warning: Shock risk
Risk of electric shock. Do not expose charger or battery to liquid, vapor, or rain.
Warning: Handle batteries with care
All batteries can cause property damage and/or bodily injury, such as burns, if a conductive material such as jewelry, keys, or beaded chains touches exposed terminals. The
conductive material may complete an electrical circuit (short circuit) and become quite
hot. Exercise care in handling any charged battery, particularly when placing it inside a
pocket, purse, or other container with metal objects.
14226900-IG, Edition 10.0
July2017, Original document
11
Page 12
Spectralink7522/7532 Handset User Guide
Battery Disposal
Warning: Proper disposal of batteries and recycling
Do not throw away the battery with your domestic waste. Return used batteries to your
supplier or servicing agent. The battery must be discarded according to instructions for
battery collection for each local area.
The batteries are recyclable. You can help preserve the environment by returning your
unwanted batteries to your nearest recycling center for recycling or proper disposal.
Visit www.spectralink.com/products/dect/waste-equipment-and-battery-recycling for fur-
ther guidance on battery recycling.
Replacing Battery
Caution: Battery and charger compatibility
Only use batteries and chargers compatible with your handset. For more information, see
"Product Compatibility" on page86.
Warning: Risk of explosion and fire
The battery used in this device may present a risk of fire or chemical burn if mistreated.
Do not disassemble, heat above 55°C, or incinerate. Charging temperature must not
exceed 40°C
THERE IS A RISK OF EXPLOSION ORFIREIF YOU REPLACE THE BATTERY
PACK WITH AN INCORRECT TYPE. USE ONLY SPECTRALINK BATTERY PACK
MODEL DM322.
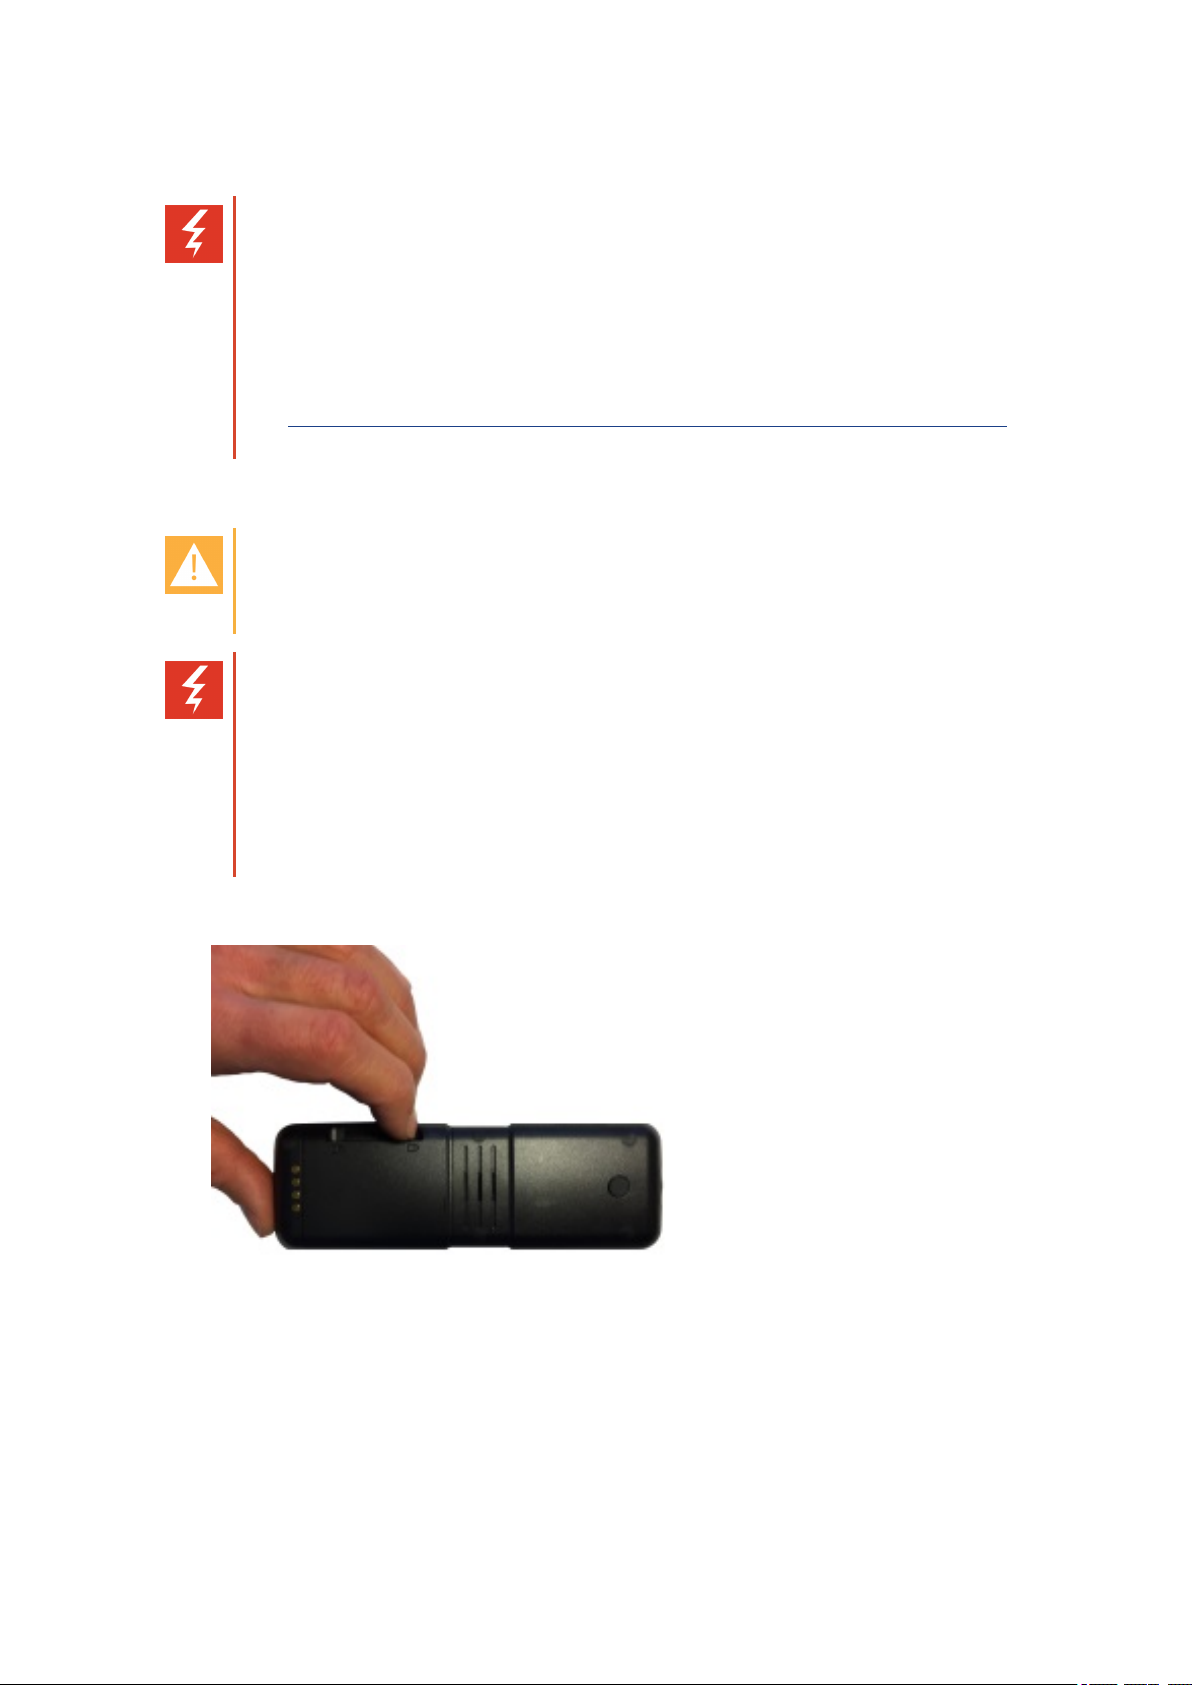
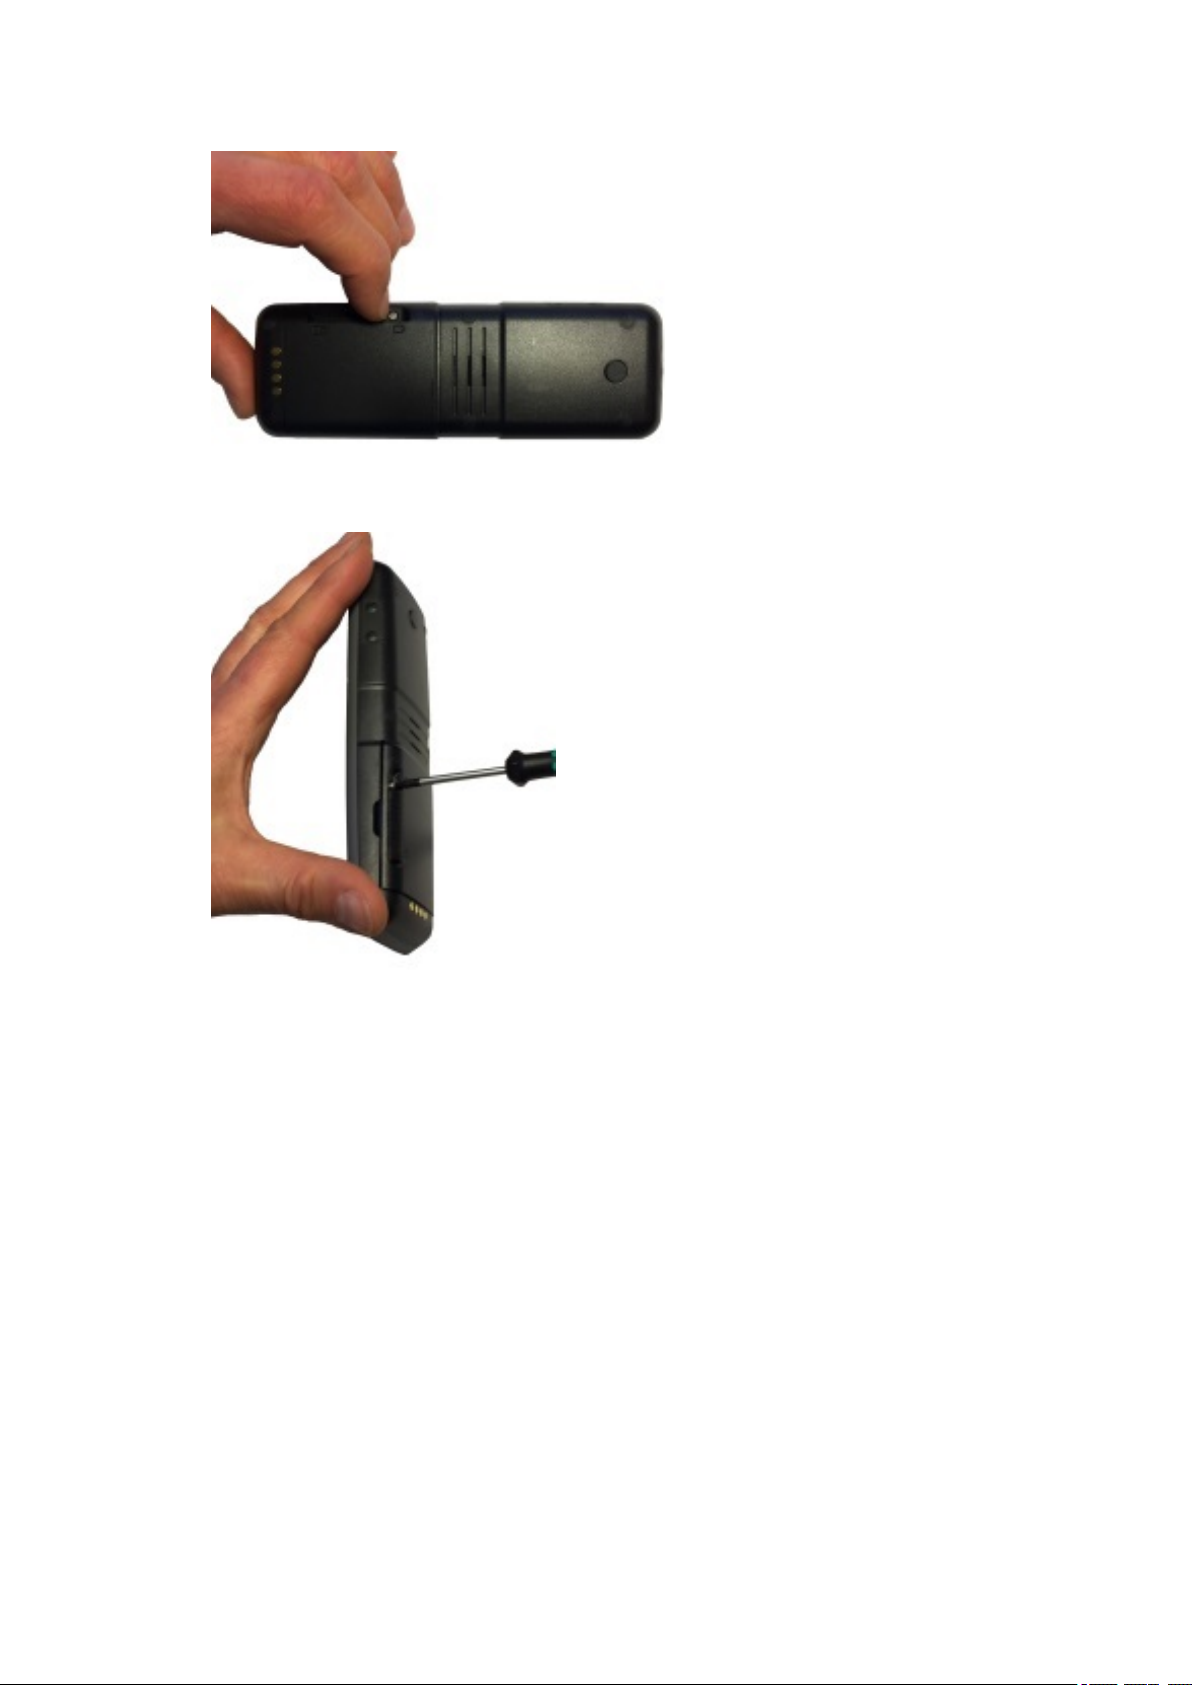
1. Push left to unlock the back cover.
14226900-IG, Edition 10.0
July2017, Original document
12
Page 13
Spectralink7522/7532 Handset User Guide
2. Remove the screw.
3. Lift off back cover.
14226900-IG, Edition 10.0
July2017, Original document
13
Page 14
Spectralink7522/7532 Handset User Guide
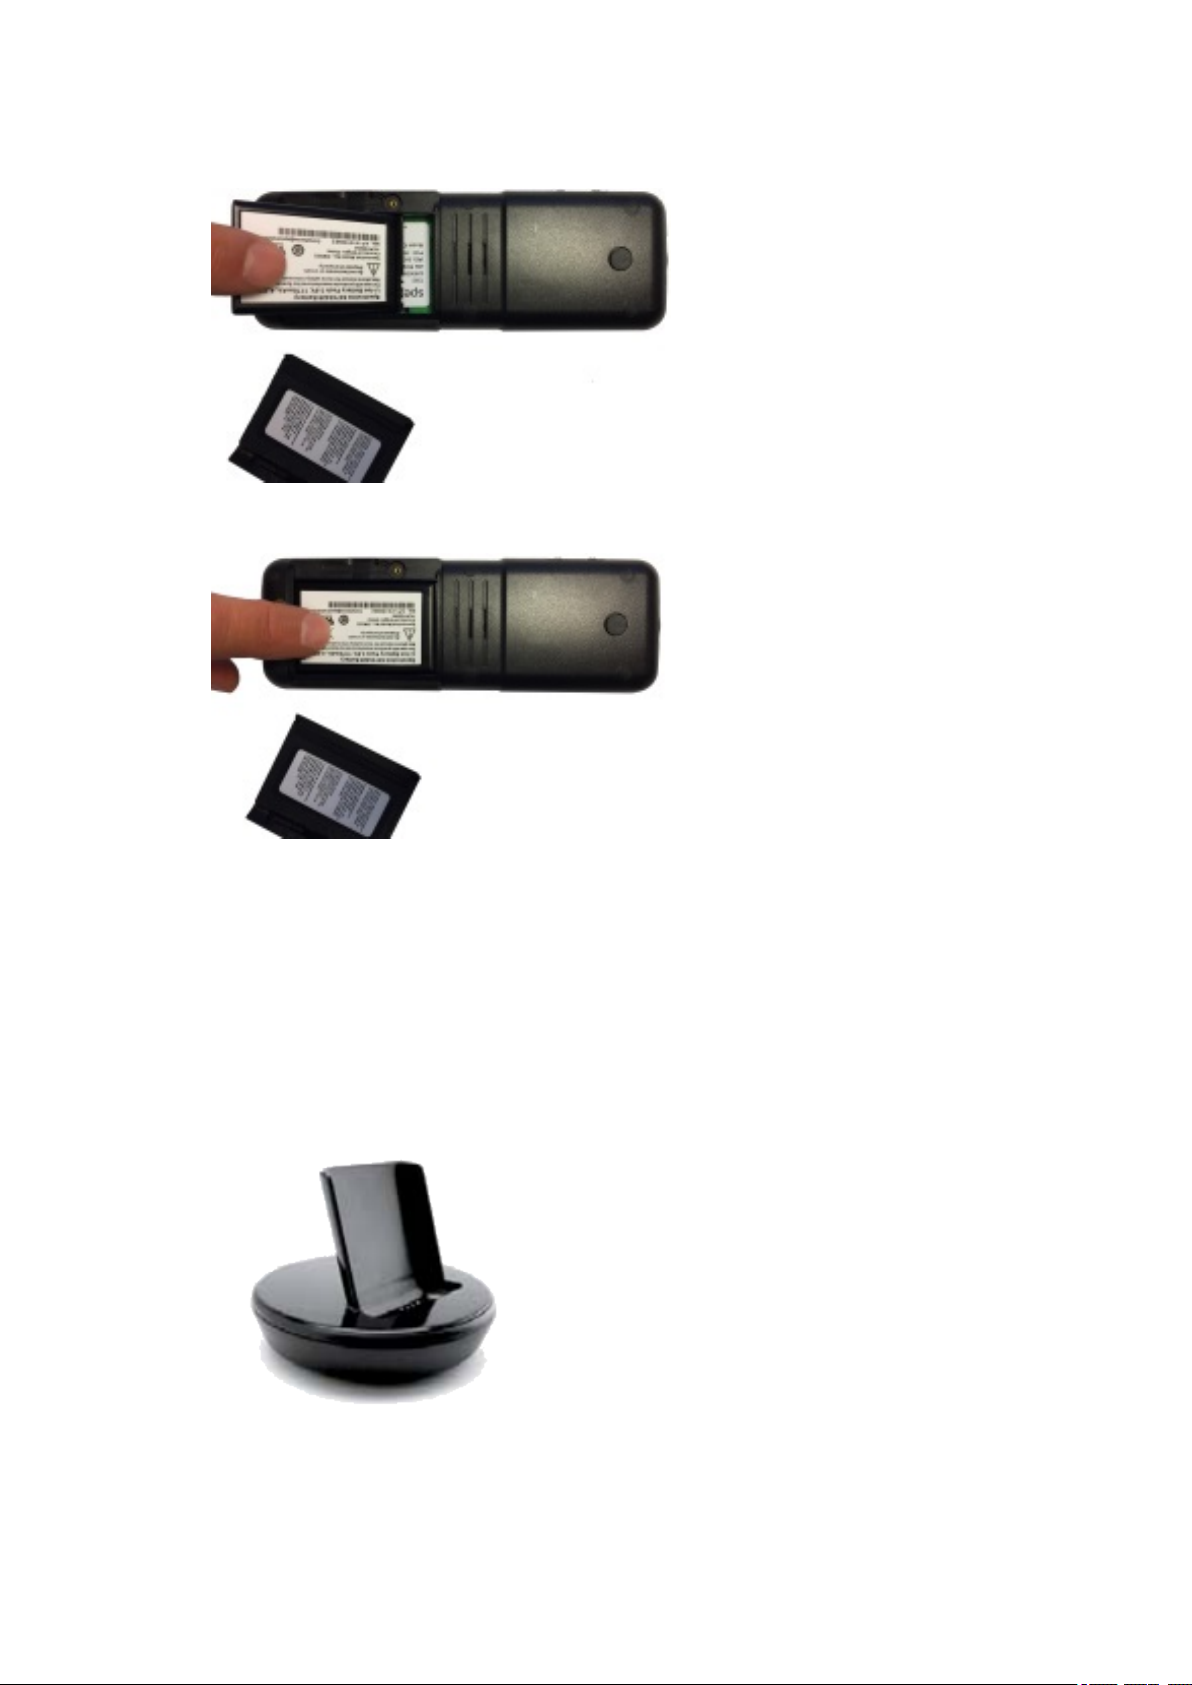
4. Remove the battery.
You find the product label, including the CE logo in the battery compartment.
5. Insert the battery with the label readable. Align the contacts of the battery with the corresponding connectors in the battery compartment.
6. Replace the back cover and replace the screw.
7. Push right to lock the back cover again.
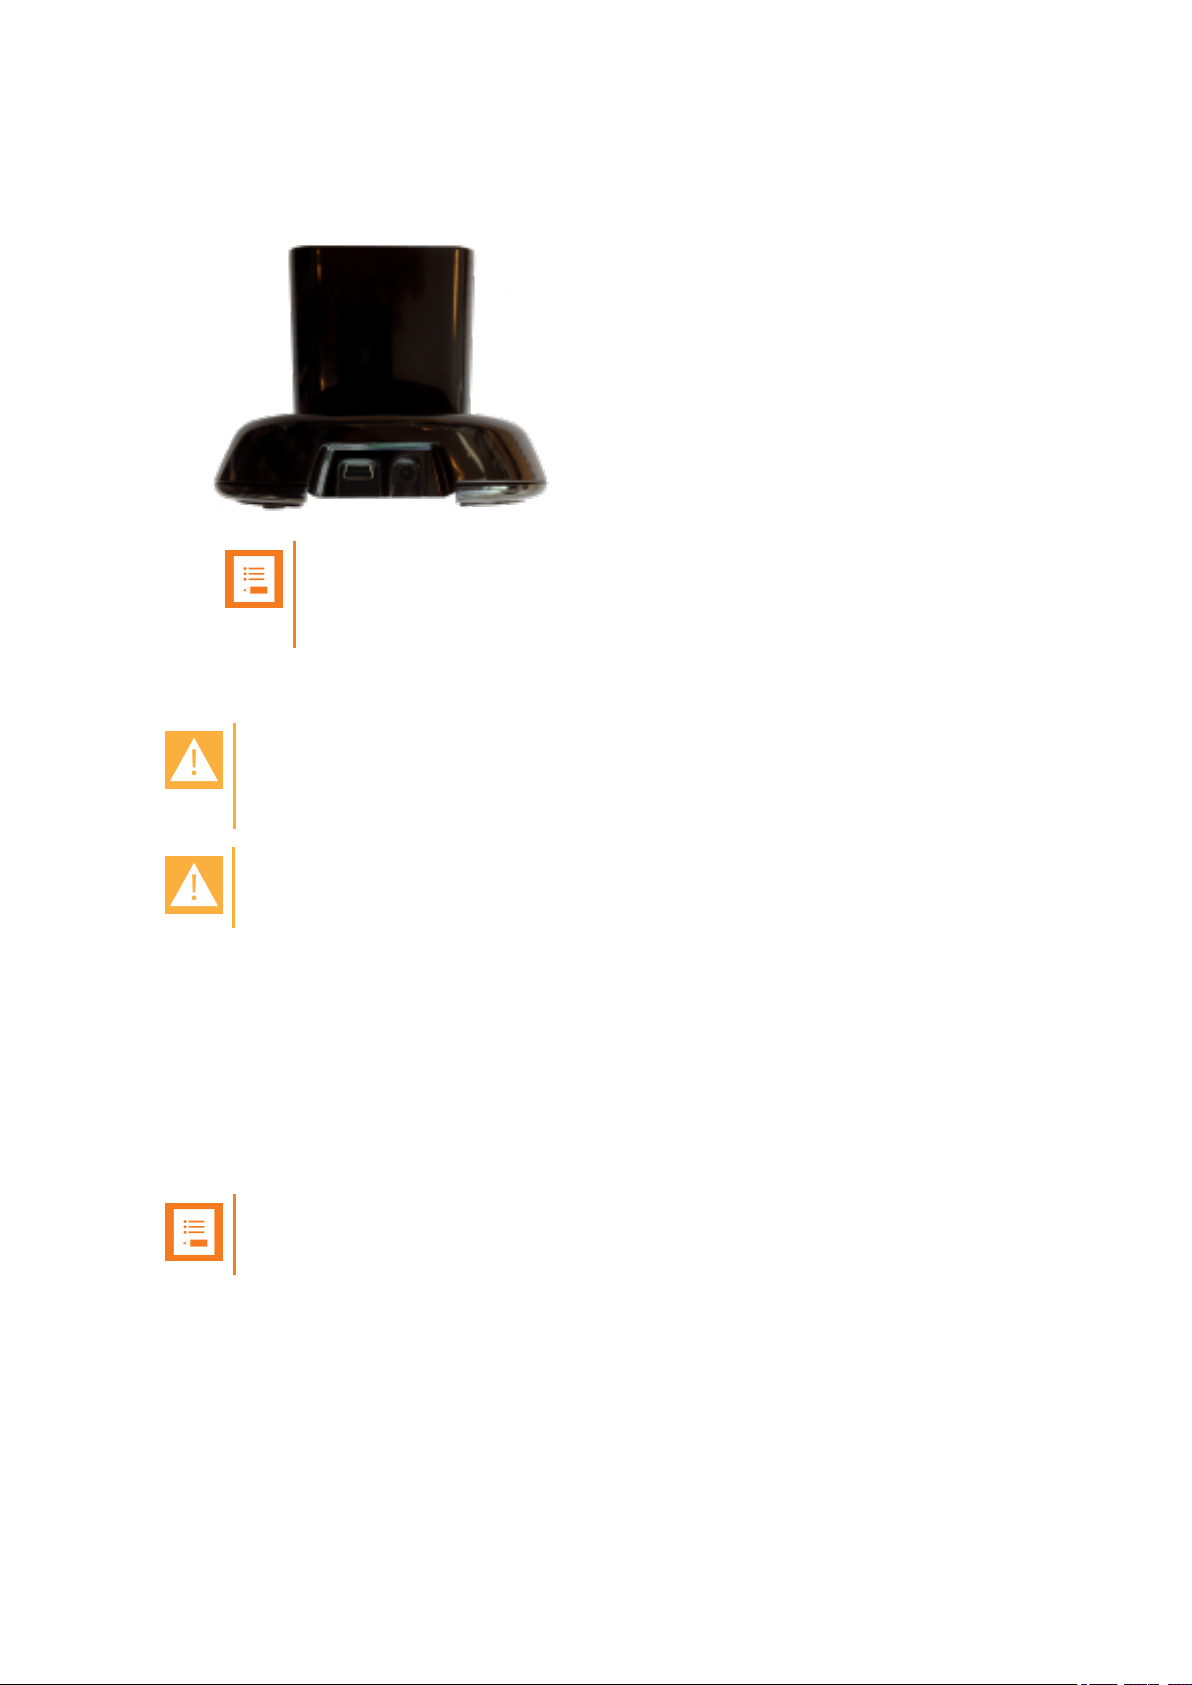
Charger Options
The following types of chargers are available:
l Single Charger
14226900-IG, Edition 10.0
July2017, Original document
14
Page 15
Spectralink7522/7532 Handset User Guide
l Management Cradle with USB. The Management Cradle supports a PC phone book man-
agement program (Handset Management Tool), provided for the system administrator. For
more information, see the Handset Management Tool User Guide.
Note:
The Handset Management Cradle is a tool only for configuring the handset. It
should not be used for charging the handset.
Charging Battery
Caution: Battery and charger compatibility
Only use batteries and chargers compatible with your handset. For more information, see
"Product Compatibility" on page86.
Caution: Overheated battery
If an overheated battery is detected, charging will suspend.
You must fully charge your handset’s battery before you use it for the first time in order to maximize
the battery's storage capacity and lifespan.
When charging battery for the first time, it is necessary to leave handset in charger for 5 hours for the
battery to be fully charged. The battery is fully charged when the battery indicator becomes solid. For
more information, see "Charging Battery", "Handset Display" on page18 and "Status Icons" on
page19.
During normal operation, it takes approximately 5 hours to charge the handset from fully discharged
to its full capacity. Turning the backlight off reduces charging time with approximately 2 hours.
Note:
The battery drains slowly even while the handset is turned off.
l Place handset in charger.
For correct charging, be sure the room temperature is between 0°C/32°F and 40°C/104°F. Do not
place the handset in direct sunlight. The battery has a built-in heat sensor which will stop charging if
the battery temperature is too high.
14226900-IG, Edition 10.0
July2017, Original document
15
Page 16

Spectralink7522/7532 Handset User Guide
If the handset is turned off when charging, the display shows the blue charging icon in the display
center. The charging icon is replaced by the green fully charged icon , when the battery is fully
charged. If the handset is turned off when placed in the charger, there will be no reaction on incoming calls.
If the handset is turned on when charging, the display shows the yellow charging icon in the status
bar. The charging icon is replaced by the green fully charged icon , when the battery is fully
charged (when handset is removed from charger, the charging icon disappears). The handset will
not vibrate. Auto answer is inactive. The handset reacts normally for incoming calls.
It is necessary to recharge battery when display shows the battery low icon , or if the handset cannot be turned on. When the battery is completely discharged, the battery must be charged for a
period before the handset can be turned on.
Turning Handset On/Off
For more information about the handset keys and display, see "Handset Keys" on page17 and
"Handset Display" on page18.
To Turn Handset On
l Press left softkey to turn on handset.
To Turn Handset Off
1. Press left softkey until the question ‘Turn off?’ appears in display.
2. Press Yes to confirm.
14226900-IG, Edition 10.0
July2017, Original document
16
Page 17
Spectralink7522/7532 Handset User Guide
About Your Handset
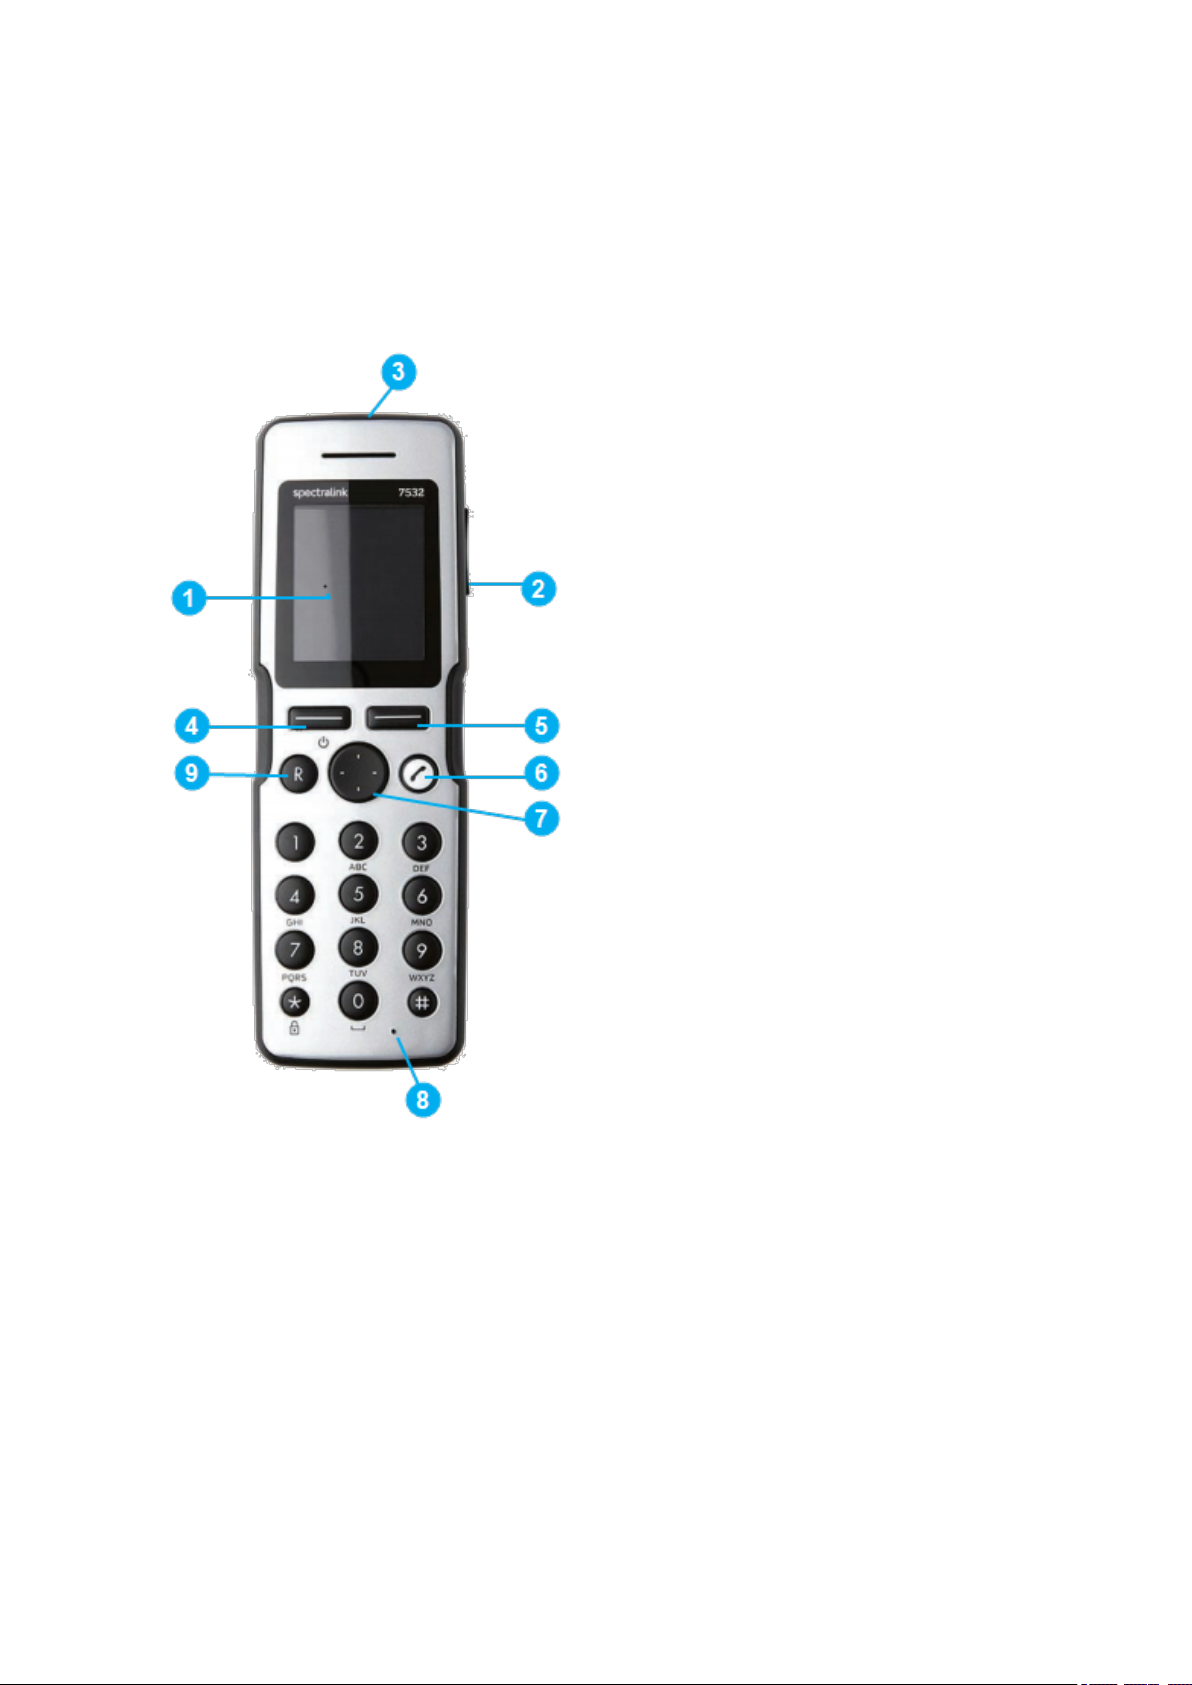
Handset Keys
1 Display
2 Volume Control
3 Headset Connector (only7522)
4 Left Softkey
5 Right Softkey
6 On/Off Hook
7 Four WayNavigation Key
8 Microphone
9 CallTransfer
14226900-IG, Edition 10.0
July2017, Original document
17
Page 18
Spectralink7522/7532 Handset User Guide
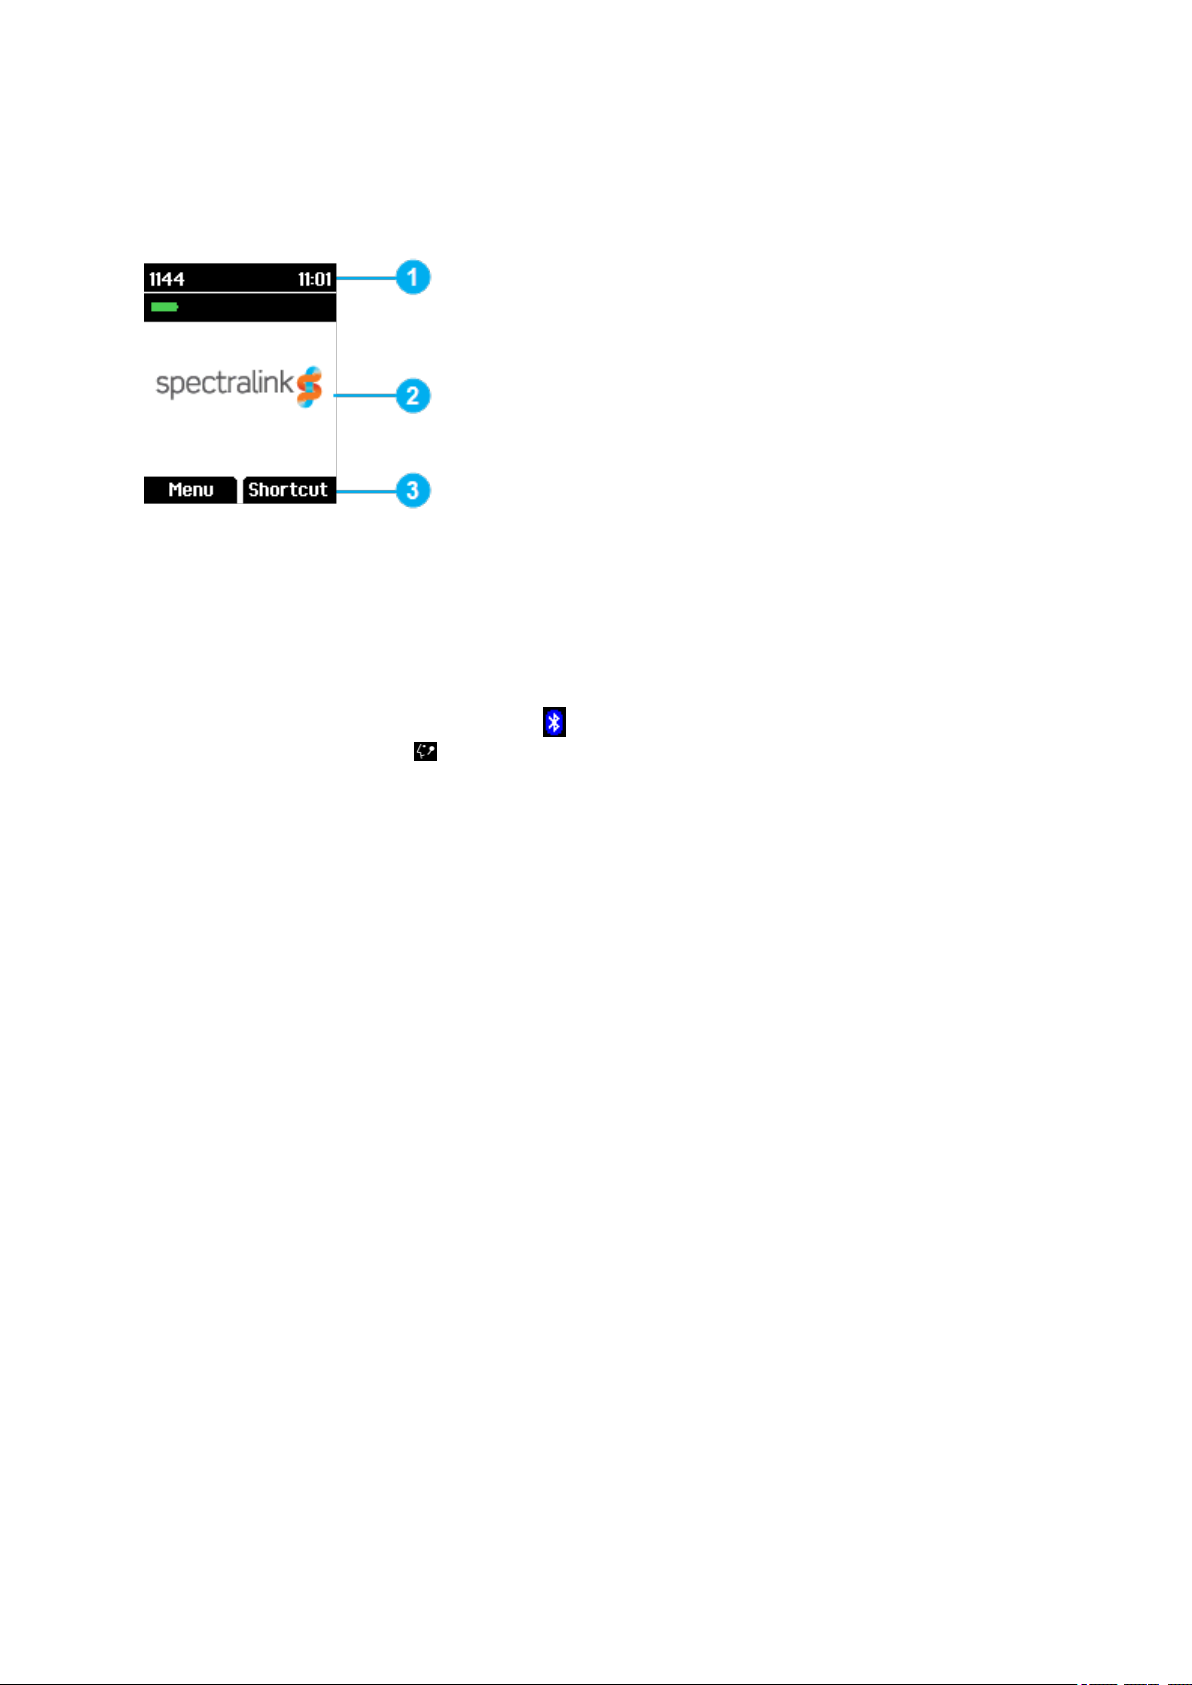
Handset Display
The display is divided in three parts:
1 Status Bar
Information shown:
l on hook (idle) - display shows user ID, personal settings and time. If bluetooth activated
(only 7532), the bluetooth icon is visible. If wireless headset connected (only 7532)
the headset icon is visible.
l off hook - display shows user ID.
2 Display Center
Information shown:
l on hook (idle) - display shows standby logo or call information when receiving an incom-
ing call.
l off hook - display shows a telephone icon. If a wireless headset is connected to the hand-
set (only 7532), the display shows a telephone icon if the audio is in the handset, and it
shows a headset icon if the audio is in the headset.
3 Softkey Text
Information shown:
l on hook (idle) - display shows Menu and Shortcut.
o
Menu: gives access to the different functions of the handset. For more information,
see "List of Menu Functions" on page41.
o
Shortcut: personal shortcuts consist of functions you have chosen to add to a list of
shortcuts. For more information, see "Personal Shortcuts" on page37.
l off hook - display shows various terms according to the context of the specific function.
14226900-IG, Edition 10.0
July2017, Original document
18
Page 19
Spectralink7522/7532 Handset User Guide
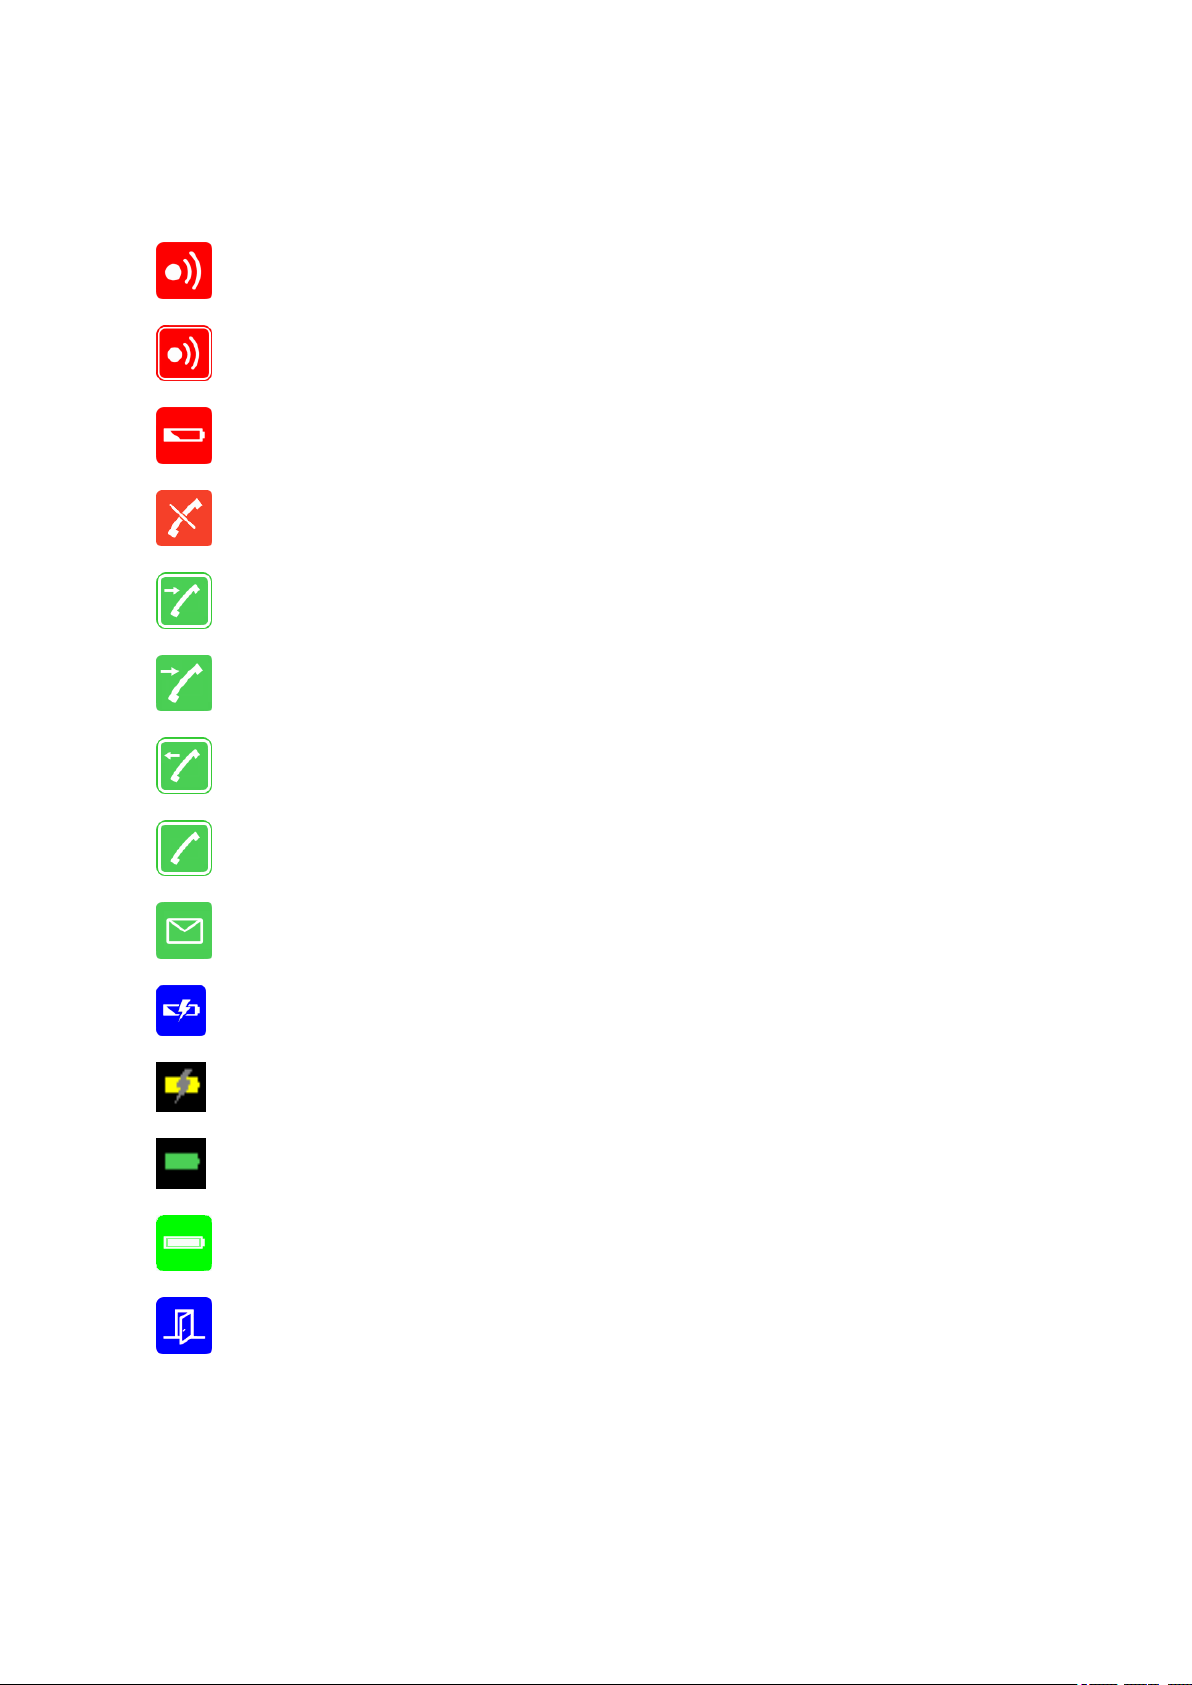
Status Icons
The following icons may appear in Status Bar or Display Center:
Indicates that the handset will soon be out of range.
Indicates that the handset is out of range or that the system is busy (no speech channels
available).
Indicates that battery capacity is low.
Appears when you miss a call.
Appears when an external incoming call arrives.
Appears when an internal incoming call arrives.
Appears when you make a call.
Appears when the handset is off hook or a call is connected.
Appears when you receive a message.
Appears when the handset is placed in charger.
Appears when the battery is charging (when handset is turned on in charger)
Appears when the battery is fully charged (when handset is turned on in charger).
Appears when the battery is fully charged (when handset is turned off in charger).
Appears when absent in charger is turned on.
14226900-IG, Edition 10.0
July2017, Original document
19
Page 20
Spectralink7522/7532 Handset User Guide
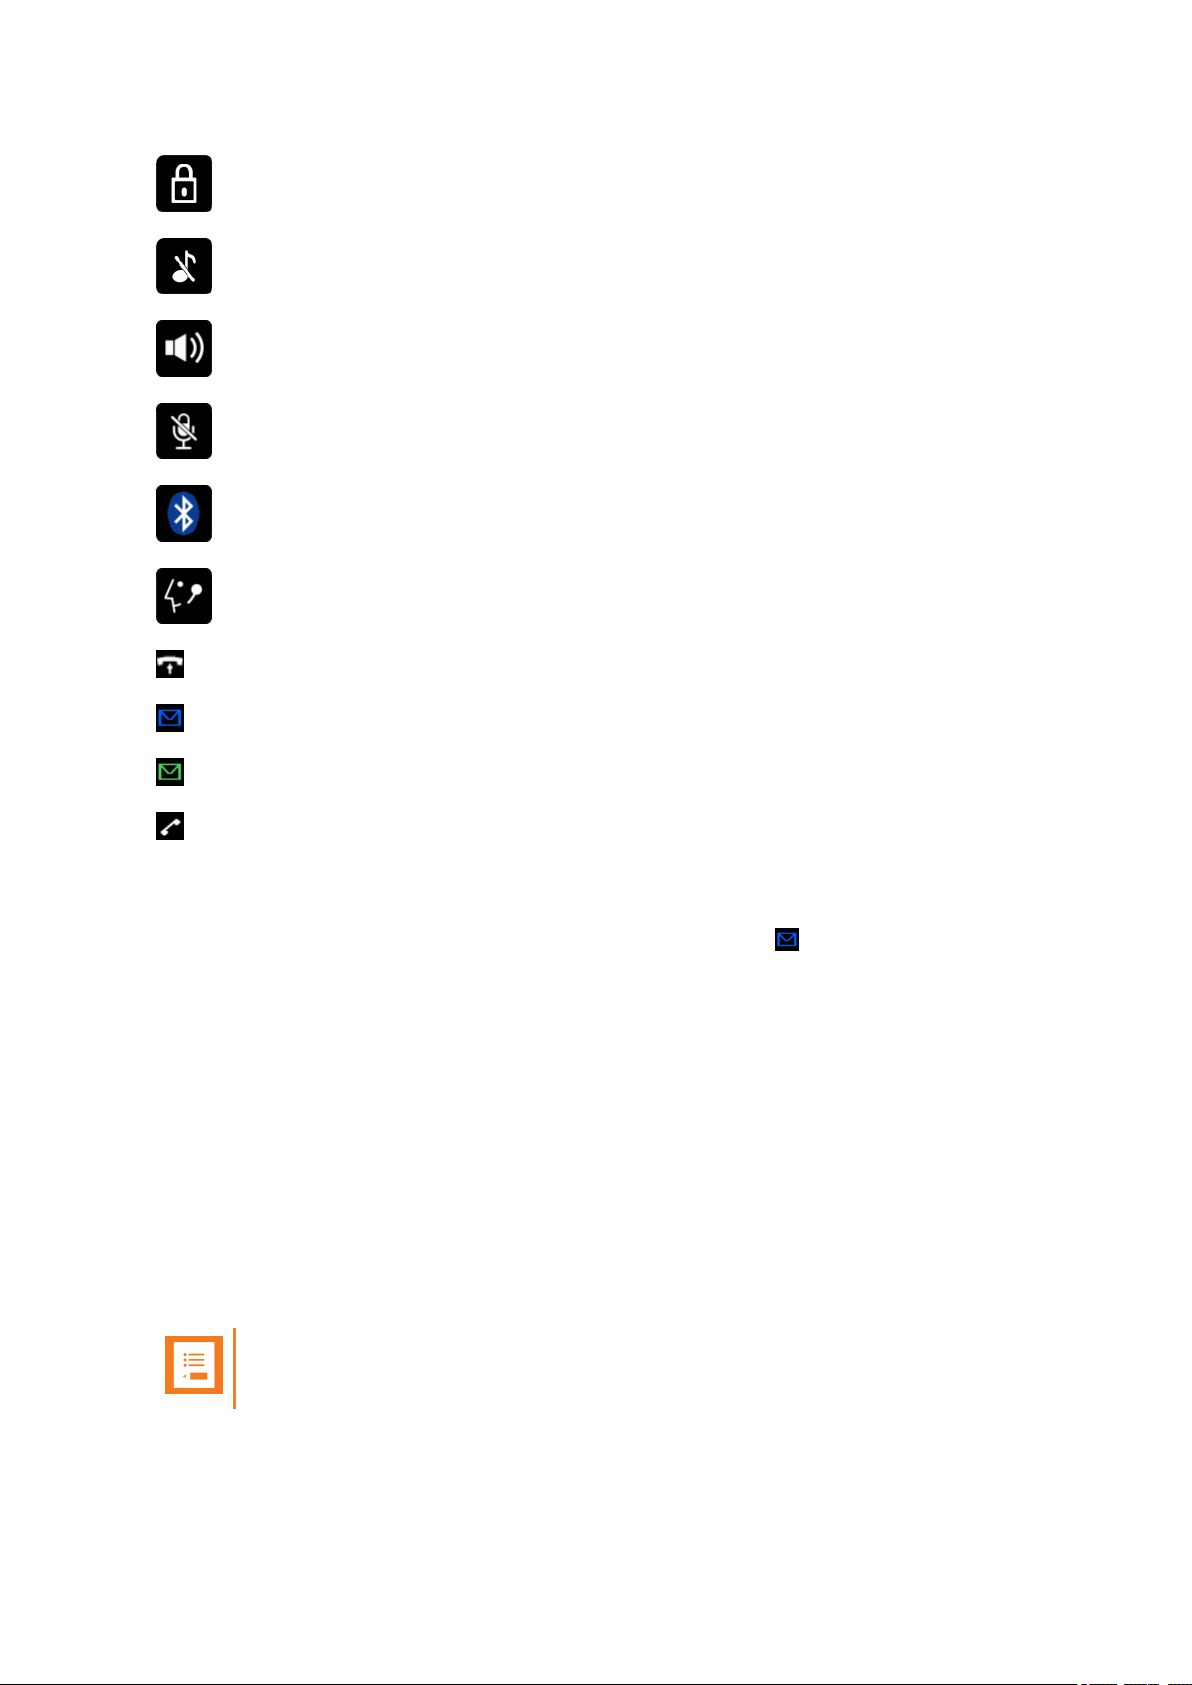
Indicates that the keypad or screen is locked.
Appears when all sounds are disabled.
Appears when loadspeaker is turned on.
Appears when mic mute is turned on. Mic mute is a abbreviation of microphone mute.
Appears when bluetooth is activated. The icon disappears when a wireless headset is
connected.
Appears when a wireless headset is connected.
Appears when auto answer is turned on.
Appears when a voice mail message arrives.
Appears when there is an unread message in the inbox.
Appears when you can call back to the person who has sent you a message.
Voice Mail
If you have a new voice mail message waiting, a blue envelope icon appears in the display. The
procedure for retrieving voice mail is system dependant. Contact your system administrator for more
information.
Backlight
To save power the backlight can be set to automatically either dim or turn off. This will happen after
the handset has been idle for a configurable time delay.
The display backlight automatically turns on again when e.g. an incoming call or message arrives, or
if a key is pressed.
The backlight turns off when handset is idle after a preset period of time delay.
The time delay can be adjusted between eight levels. The highest level will result in infinite time
delay, and the backlight will never dim or turn off. If the backlight is set to dim, and the lowest time
delay level is chosen, the backlight will always stay dimmed.
Note:
Turning display backlight off when handset is idle will save battery power.
14226900-IG, Edition 10.0
July2017, Original document
20
Page 21

Spectralink7522/7532 Handset User Guide
Setting Backlight Automatically at Dimmed (On) or Off
When setting display backlight at dimmed, display information can still be seen vaguely when handset is idle. If set to off, backlight turns off.
1. Press Menu to enter main menu.
2. Scroll to Settings and press Select.
3. Scroll to Backlight and press Select.
4. Press Change to set backlight to Dimmed or Off.
Turning Backlight Automatically On
1. Press Menu to enter main menu.
2. Scroll to Settings and press Select.
3. Scroll to Backlight and press Select.
4. Press Change to set backlight to Dimmed. Backlight is now turned on.
Adjusting Backlight Delay
You can adjust the period of time before backlight turns off or dimms when handset is idle.
1. Press Menu to enter main menu.
2. Scroll to Settings and press Select.
3. Scroll to Backlight and press Select.
4. Scroll to Delay and press Change.
5. Press the left and right side of the navigation key to adjust backlight delay.
Note:
If adjusting backlight delay to maximum, then the backlight never turns off!
If backlight is set to Dimmed, and backlight delay is adjusted to minimum, then
backlight is always dimmed.
6. Press Set.
14226900-IG, Edition 10.0
July2017, Original document
21
Page 22
Spectralink7522/7532 Handset User Guide
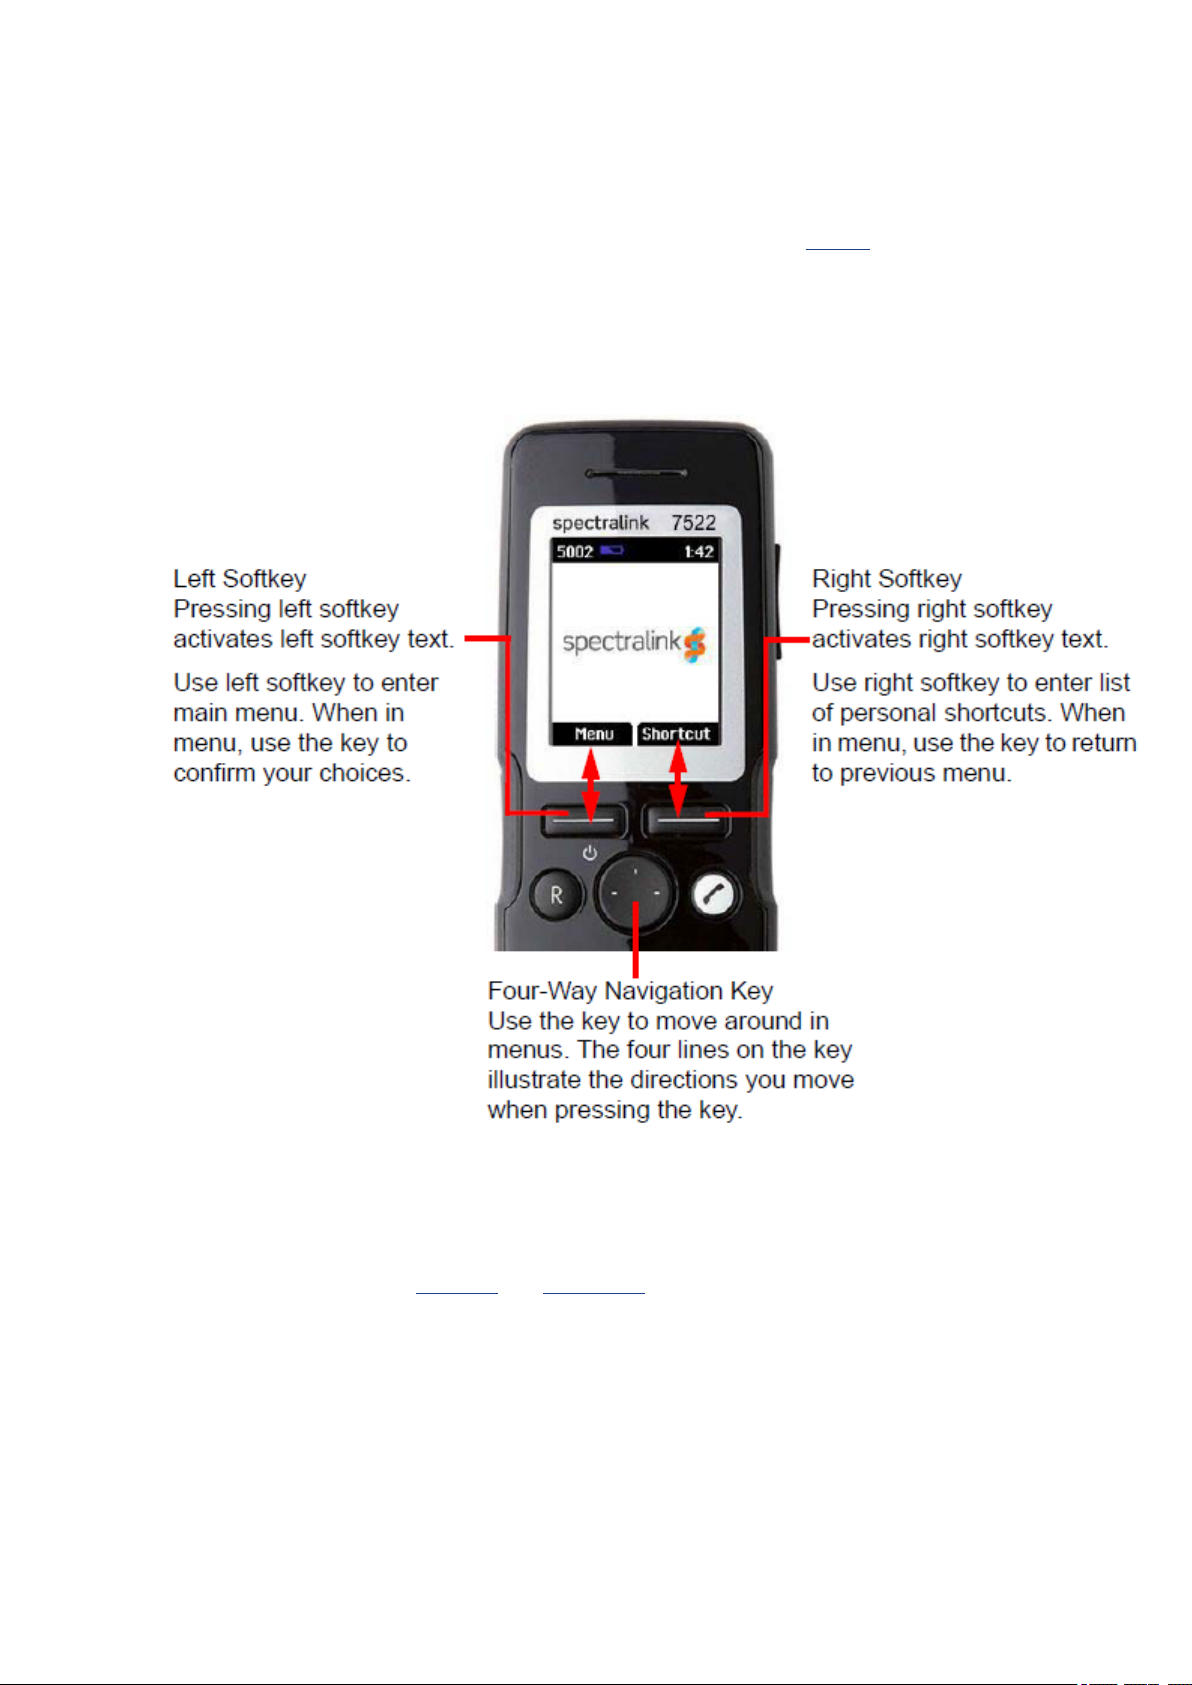
Navigating the Handset
The main part of the functions of the handset are grouped into different menus. In the following sections you will find a description of how to navigate these menus.
You navigate the handset using two softkeys and a four-way navigation key. The following figure illustrates the connection between these keys and the text shown in display.
The handset also offers both personal and predefined shortcuts to selected functions in the menu.
Entering Main Menu
l To enter main menu press left softkey to activate Menu.
14226900-IG, Edition 10.0
July2017, Original document
22
Page 23

Spectralink7522/7532 Handset User Guide
Scrolling in Menus
l When in Menu, press top or bottom of navigation key to scroll up and down in menu.
Confirming Choices
l When in the relevant menu, press left softkey to confirm your choices. Various terms are
being used in the softkey text according to the context of the specific function.
Navigating Cursor
l When in the relevant menu, press left or right side of navigation key to move cursor from
side to side. This is especially relevant when you are writing/editing words or entering/editing
numbers and want to delete a letter or digit.
l To delete, simply place cursor behind letter or digit and press right softkey to activate
Delete.
Adjusting Volume
l Press top or bottom of volume key to adjust ringing, alerting and speaker volumes.
l Press top or bottom of volume key in idle mode to adjust the ringing and alerting volume.
l Press top or bottom of volume key in active mode to adjust the speaker volume.
l Press bottom of volume key to turn the volume down, or press top of volume key to turn
the volume up.
Returning to Previous Menu
l When in menu, press right softkey to activate Back or Exit. You now return to previous menu.
Leaving Menus
l To leave menu, press the R key. This key will exit menu at once.
Software Update Over the Air
l This is handled through the Server.
Hearing Aid Compability (HAC)
Your handset has a hearing aid compatibility mode that adjusts the frequency response for users
who have hearing aids equipped with telecoil inductive pickups. Acoustic pickup hearing aids will not
respond to this adjustment.
14226900-IG, Edition 10.0
July2017, Original document
23
Page 24

Spectralink7522/7532 Handset User Guide
To View Status of/Enable/Disable HAC
1. Press Menu to enter main menu.
2. Scroll to Settings and press Select.
3. Scroll to Advanced and press Select.
4. Scroll to Hearing aid comp and press Select.
5. Press Change to select between On or Off.
Adjusting Speaker Volume
Adjusting speaker volume can only be done when handset is off hook. The handset will remember
the speaker volume until you make a new adjustment.
During a telephone conversion you can adjust the speaker volume at any time in relation to the noise
level of the surrounding environment.
Use key placed at the upper right side of handset for volume control.
To Turn Speaker Volume Up
l While off hook, press top of volume key to turn up volume.
To Turn Speaker Volume Down
l While off hook, press bottom of volume key to turn down volume.
Locking Keypad
You can lock keypad to prevent keys from being accidentally pressed.
To Lock/Unlock Keypad
l Press Menu followed by * to lock keypad.
l Press Unlock followed by * to unlock keypad.
To answer a call when keypad is locked, press . When you end the call, the keypad automatically
locks.
14226900-IG, Edition 10.0
July2017, Original document
24
Page 25

Spectralink7522/7532 Handset User Guide
Making Calls
Making Internal/External Calls
Note:
The handset must be subscribed and registered to make/answer a call.
l For internal calls, dial extension number. Contact your system administrator for a list of these
extension numbers.
l For external calls, dial external code (or line pool code) to access an external line, then dial
external number. Contact your system administrator to confirm what external code or line pool
code to use.
Off Hook Dialling (Dial Directly)
1.
Press .
2. Dial number.
3.
Press to end the call.
On Hook Dialling (Pre-Dial)
1. Dial number.
2.
Press .
3.
Press to end the call.
Dial from Phone Book (Local)
The Find Name function of the handset’s phone book makes it easy for you to find a contact.
1. Press Menu to enter main menu.
2. Scroll to Phone Book and press Select.
3. Scroll to Find name and press Select.
4. To find a name you can:
l Scroll until you reach the desired name. To scroll through the names quickly press the nav-
igation key continuously.
l Use quick search by pressing the first letter(s) (max. 5 letters) of the desired name.
5.
Press .
6.
If more than one number: scroll to the desired number and press .
14226900-IG, Edition 10.0
July2017, Original document
25
Page 26
Spectralink7522/7532 Handset User Guide
7.
The display icon appears until call is connected.
8.
Press to end the call.
Timesaver:
Alternatively, press the bottom of the navigation key to enter the phone book. Scroll to
the desired name or number and press .
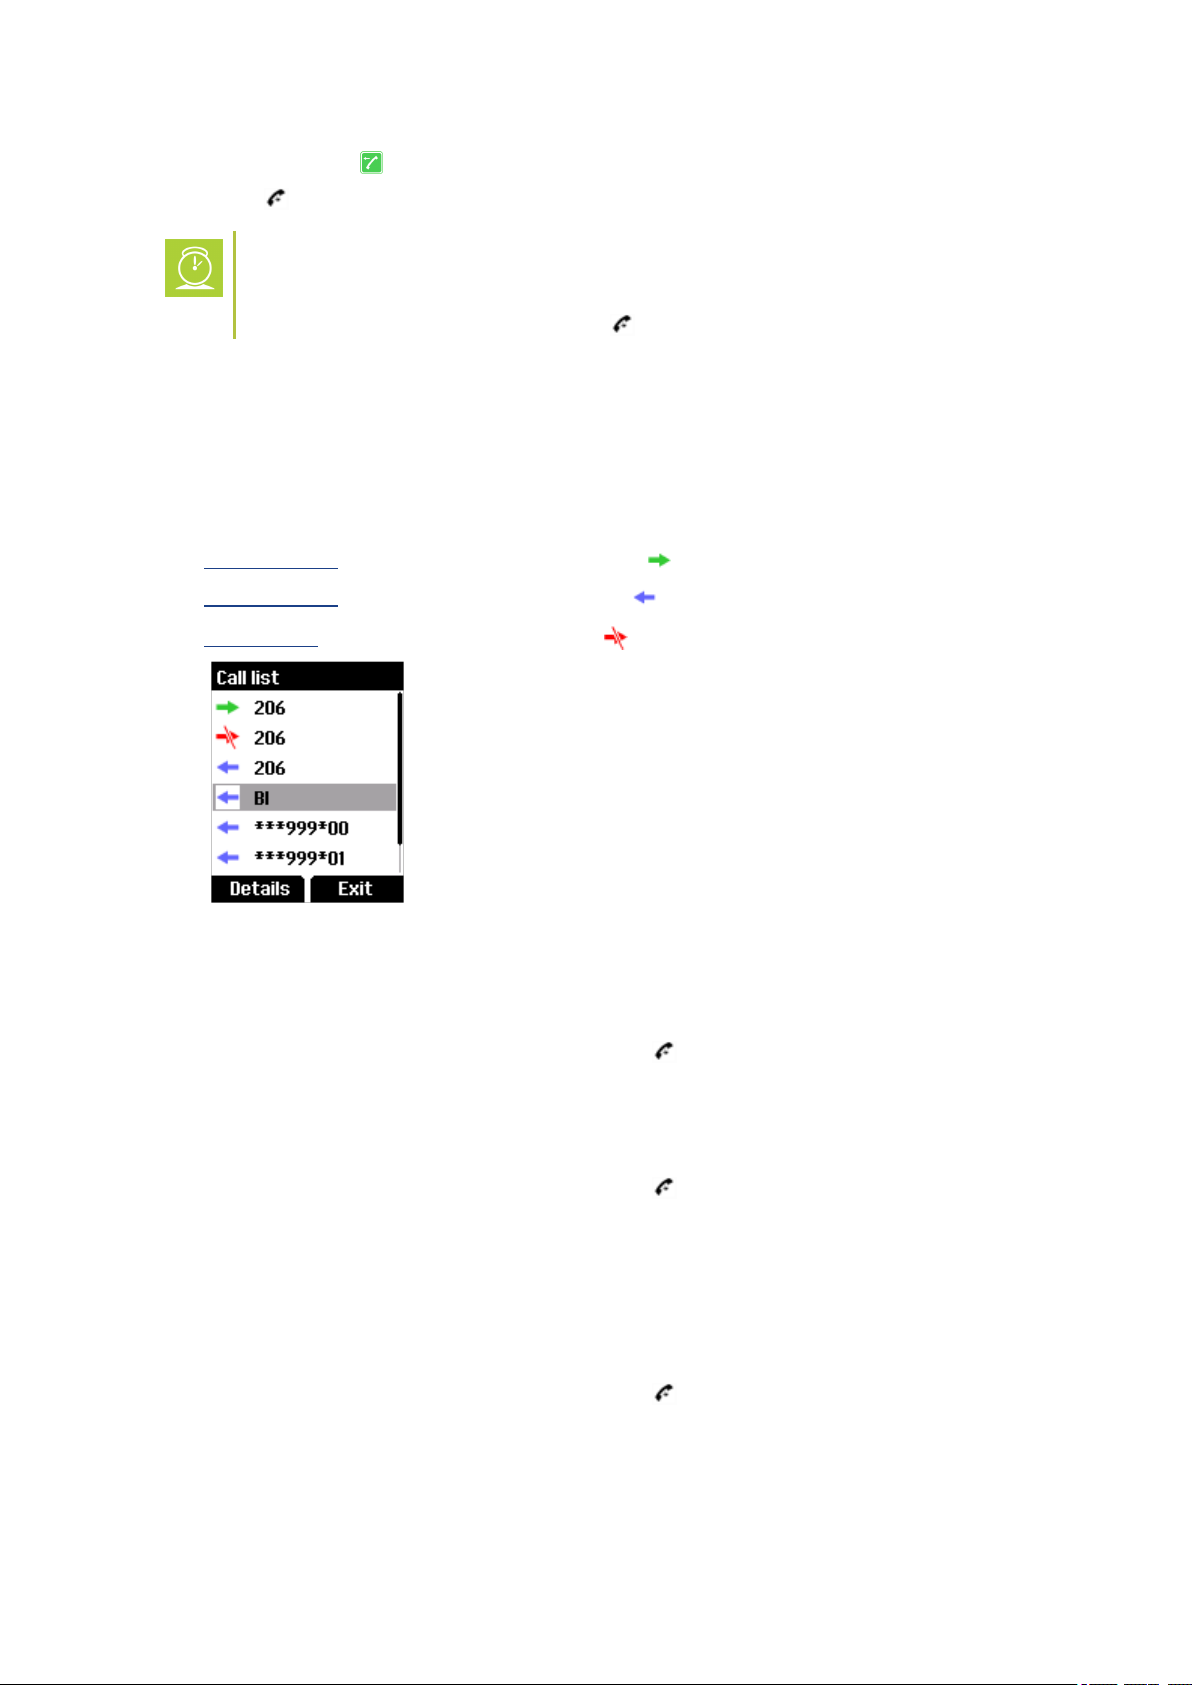
Dial from CallList/Call Register
Call list/call register shows up to 40 of your latest incoming, outgoing and missed calls (system
dependent feature). When the call list/call register memory is full, the handset automatically erases
the oldest call when a new call is received in call list.
l
Incoming calls are illustrated with green arrows .
l
Outgoing calls are illustrated with blue arrows .
l
Missed calls are illustrated with red arrows .
Dial from Call List
1. While on hook, press left side of navigation key to enter call list.
2.
Scroll to the desired name or number and press .
Dial from Missed Call List
1. While on hook, press right side of navigation key to enter missed call list.
2.
Scroll to the desired name or number and press .
Dial from Call Register
1. Press Menu to enter main menu.
2. Scroll to Call register and press Select.
3. Scroll to the desired list and press Select.
4.
Scroll to the desired name or number and press .
14226900-IG, Edition 10.0
July2017, Original document
26
Page 27

Spectralink7522/7532 Handset User Guide
Redial
1. Press Menu to enter main menu.
2. Scroll to Call register and press Select.
3. Scroll to Outgoing Calls and press Select.
4.
Scroll to the desired name or number and press .
Timesaver:
Alternatively, press the left side of the navigation key to enter the call list. Scroll to the
desired name or number and press .
Speed Dial
If you have assigned a number to one of the speed-dialing keys 0-9, do the following:
l Press and hold a key (0-9) for three seconds, until the call is initiated.
Corporate Directory Calls (System Dependant)
You can enter a corporate directory and search by e.g. Name, Phone, Givenname or Mobile
(these names can differ as they are system dependant). When searching the corporate directory, the
T9 (Text on 9 keys) search method is used.
1. Press Menu to enter main menu.
2. Scroll to External services and then press Select.
3. Press the left or right side of the navigation key to select the desired search mode and
press OK.
4. Press the left or right side of the navigation key to scroll to find the name or spell the
name out using the keys (0-9). If entering a wrong key, press # to delete it.
5.
When the desired name is displayed, press to dial the number.
14226900-IG, Edition 10.0
July2017, Original document
27
Page 28

Spectralink7522/7532 Handset User Guide
Company Phone Book Calls (System Dependant)
Note:
To support the company phone book feature, the Spectralink DECT Handset must have
firmware version PCS17Ja or newer, Spectralink IP-DECT Server must have firmware
version PCS17Ca or newer, and the Spectralink DECT Server must have firmware version PCS17Da or newer. Contact your system administrator for more information.
You can enter a company phone book pointing to a corporate directory list and search by selected
column in server (e.g. Name). The corporate directory is a common phone book for all handsets subscribed to the actual system, and all handsets subscribed to the system are listed in this corporate directory. Additional numbers can be added to the phone book by the system administrator.
When searching the corporate directory from the company phone book, the T9 (Text on 9 keys)
search method or Multi-tap (abc) search method is used. Long press # to change between the two
possible search methods T9 (Text on 9 keys) or Multi-tap (abc). You can only change the search
method prior to searching.
1. While on hook, press the top of the navigation key to enter the company phone book.
Either T9 (default) or abc is displayed in the status bar.
If you want to change between the two possible search methods, long press #. Using the T9
search method it is possible to search for letters as well as numbers. The Multi-tap search
method only lets you search for letters.
2. Scroll to the desired name or search for the name or number (if using T9 search method) and
press Select.
If searching, you can see which search string the match was made on in the status bar.
If entering a wrong key, press < to delete it. Long pressing < will delete the entire search
string.
3. When the desired name is selected, scroll to either telephone number or mobile number and
press Dial or to dial the number.
Tip:
After ending the call, it is possible to add the number to your local phone book:
l After ending the call, press the left side of the navigation key to enter the call
list.
l Press Details.
l Press Options. The option Add to phone book is automatically selected.
l Press Select.
l Press Save.
14226900-IG, Edition 10.0
July2017, Original document
28
Page 29

Spectralink7522/7532 Handset User Guide
Answering Calls
Answering/Ending a Call
Note:
The handset must be subscribed and registered to make/answer a call.
When handset rings, display shows the icon for incoming calls and the caller information appears
below if supported by the subscribed system.
l
To answer or end a call, press .
Note:
You can distinguish between an internal and external call by the ring tone. This is a system dependant feature.
Auto Answer
When auto answer is turned on , the handset automatically goes off hook when an incoming call
arrives.
If subscribed to a Spectralink wireless solution, the handset automatically goes on hook when calls
are ended.
To Turn Auto Answer On/Off
1. Press Menu to enter main menu.
2. Scroll to Settings and press Select.
3. Scroll to Auto answer and press Select.
4. Press Change to select between On or Off.
For more information about auto answer settings, see "Auto Answer" on page72.
14226900-IG, Edition 10.0
July2017, Original document
29
Page 30

Spectralink7522/7532 Handset User Guide
Muting a Call
l When the handset rings, press Silence to mute the ring signal.
Rejecting a Call
Rejecting a call is system dependent. If supported by the subscribed system, do the following:
l When the handset rings, press Reject to refuse the call. The rejected call is registered as a
missed call.
14226900-IG, Edition 10.0
July2017, Original document
30
Page 31

Spectralink7522/7532 Handset User Guide
During Calls
Call Transfer
Call Transfer is a system dependant feature.
Call Transfer (Blind)
1. While on a call, press R.
2. Dial the extension or external number.
3.
Press to send the call through and to hang up.
If handset is subscribed to a SIP IPBX, you can also do the following:
1. While on a call, press R, and then dial the extension or external number.
2. Press Transfer to send the call through and to hang up.
OR
1. While on a call, press Options.
2. Select New call, and then dial the extension or external number.
3. Press Transfer to send the call through.
Call Transfer (Attended)
1. While on a call, press R.
2. Dial the extension or external number.
3.
When the other caller answers, press to send the call through and to hang up.
If handset is subscribed to a SIP IPBX, you can also do the following:
1. While on a call, press R, and then dial the extension or external number.
2.
Press .
3. When the other caller answers, press Transfer to send the call through and to hang up.
OR
1. While on a call, press Options.
2. Select New call, and then dial the extension or external number.
3.
Press .
4. When the other caller answers, press Transfer to send the call through and to hang up.
14226900-IG, Edition 10.0
July2017, Original document
31
Page 32

Spectralink7522/7532 Handset User Guide
Call Hold
Call Hold is a system dependant feature. When an active call is on hold, the icon is shown in the
display.
Call Hold
1. To place an active call on hold, press R.
2. To retrieve the call, press R.
If handset is subscribed to a SIP IPBX, you can also do the following:
1. To place an active call on hold, press Options and press Select to select Hold.
2. To retrieve the call, press Resume.
Call Waiting
Call Waiting is a system dependant feature.
Call Waiting
l While on a call, press R to answer a second incoming call. The first call is automatically put on
hold.
l To reject a second incoming call, press left side of the navigation key for three seconds.
l
To disconnect the active call and return to the waiting call, press .
l
To end both calls, press twice.
l To swap between two calls, press R.
If handset is subscribed to a SIP IPBX, you can also do the following:
l While on a call, pressOK to answer a second incoming call. The first call is automatically put
on hold.
l To reject a second incoming call, press Reject.
l
To disconnect the active call and return to the waiting call, press .
l
To end both calls, press twice.
l To swap between two calls, press Options and select Swap calls or press R.
14226900-IG, Edition 10.0
July2017, Original document
32
Page 33

Spectralink7522/7532 Handset User Guide
Call Forward Unconditional
Call forward unconditional (CFU) is a system dependant feature.
l To enable CFU press *21* followed by a number, then press #.
l
Press to enable CFU. Confirmation in display and a tone indicates that the feature has
been activated.
l
Press to hang up.
l
To disable CFU, press #21#, then press .
l
Press to hang up.
Note:
It is possible to change the code *21* on the Spectralink IP-DECT/DECT Server to fit
your standard. For more information, see the relevant documentation available at
http://support.spectralink.com/
Turning Speakerphone On/Off
Turning speakerphone on allows other people in the room to listen to and participate in the conversation. You may set the handset on a desk and leave your hands free.
To Turn Speakerphone On/Off
1. While on a call, press Options, scroll to Spkr. on to enable speakerphone.
2. To disable speakerphone, press Options, scroll to Spkr. off to disable speakerphone.
Timesaver:
While in a call, you can also press the top of the navigation key to enable/disable
speakerphone.
Turning Microphone Mute On/Off
You can mute the microphone so that you can hear the other party but they cannot hear you.
To Turn Microphone Mute On/Off
1. While on a call, press Mic Mute to turn microphone mute on.
2. To turn microphone mute off, press Mic on.
14226900-IG, Edition 10.0
July2017, Original document
33
Page 34

Spectralink7522/7532 Handset User Guide
Enter Phone Book (Local)
l While on a call, you can access the find name function to scroll through names and numbers
by pressing the bottom of the navigation key.
For more information, see "Managing Contacts" on page44.
14226900-IG, Edition 10.0
July2017, Original document
34
Page 35

Spectralink7522/7532 Handset User Guide
Using Shortcuts
Types of Shortcuts
The handset contains two types of shortcuts:
l Personal Shortcuts
l Predefined Shortcuts
Predefined Shortcuts
Predefined shortcuts are unchangeable and assigned to different keys.
In the following you find a list of predefined shortcuts and a description of how to access and use
them.
l Call list (system dependent feature) While on hook, press left side of navigation key to
enter call list.
o
Incoming calls are illustrated with green arrows .
o
Outgoing calls are illustrated with blue arrows .
o
Missed calls are illustrated with red arrows .
l Exit menu: When in menu, press R.
l Find name: While on hook, press the bottom of the navigation key to enter the name list.
l Company Phone Book: While on hook, press the top of the navigation key to enter the
company phone book. Either T9 (default) or abc is displayed in the status bar. Long press # to
change between the two possible search methods T9 (Text on 9 keys) or Multi-tap (abc). You
can only change the search method prior to searching. For more information, see "Company
Phone Book Calls (System Dependant)" on page28.
Note:
To support the company phone book feature, the Spectralink DECT Handset must
have firmware version PCS17Ja or newer, Spectralink IP-DECT Server must
have firmware version PCS17Ca or newer, and the Spectralink DECT Server
must have firmware version PCS17Da or newer. Contact your system administrator for more information.
If the company phone book feature is not available, pressing the top of the nav-
igation key, while on hook, will enter the corporate phone book (External Services).
l Keypad locked/unlocked: While on hook, press Menu followed by * (Display shows the key
lock icon ).
14226900-IG, Edition 10.0
July2017, Original document
35
Page 36

Spectralink7522/7532 Handset User Guide
l Missed calls: While on hook, press right side of navigation key to enter a list of missed
call.
l Redirect a call: While on a call, press R. The feature is system dependent.
l Save name and number: While on hook, enter number and press Save.
l Silent on/off: Press Menu, followed by the # button to turn the handset silent mode on/off. In
silent mode there is no sound for incoming calls and notifications.
(Display shows the silent icon followed by the text Silent mode on/of, and a small icon is
placed in status line).
l Speed dial: While on hook, press and hold digit equivalent to number of the contact in the
speed dial list until call is started.
14226900-IG, Edition 10.0
July2017, Original document
36
Page 37

Spectralink7522/7532 Handset User Guide
Personal Shortcuts
Personal shortcuts consist of functions you have chosen to add to a list of shortcuts. The list is
assigned to the right softkey. Personal shortcuts give you easy access to the functions you use most
often. You can only use personal shortcuts when the handset is in standby mode (on hook).
The following functions can be added as personal shortcuts:
l Add name/number
l Auto answer
l Auto key lock
l Backlight
l Headset
l Inbox
l Write message
l Templates
l Ringing tone
l Silent mode
l Status
l Vibrator
l Task list
l Noisy environment
l Phone Book (Local Phone Book)
l External Services
To Add a Shortcut
1. While on hook, press Shortcut to enter the shortcut function.
2. Scroll to Edit shortcuts and press Select.
3. Scroll to the function, you want to make a shortcut to.
4. Press Select to add the function to the list of personal shortcuts.
To Use a Shortcut
1. While on hook, press Shortcut to enter the shortcut function.
2. Scroll to the desired shortcut and press Select.
To Remove a Shortcut
1. While on hook, press Shortcut to enter the shortcut function.
2. Scroll to Edit shortcuts and press Select.
3. Scroll to the desired shortcut and press Select to remove the function from the list of shortcuts.
14226900-IG, Edition 10.0
July2017, Original document
37
Page 38

Spectralink7522/7532 Handset User Guide
Using the Menu
Description of Menus
The handset offers a range of functions that are grouped into menus. The main menu consists of the
following menus: Phone Book, Call Register, Messages, MSF Function, External Services, Status
and Settings.
Note:
If the handset is in menu mode, and an incoming call arrives, then menu will be dropped
and the call handled as usual. When call is terminated, the handset returns to menu
mode.
In the following you will find a short description of the menus.
Phone Book (Local)
You can store numbers and names in your local phone book.
Note:
Besides your local phone book that can be reached and managed from the main menu,
there is also a company phone book and external services - both pointing to a corporate
directory list (common phone book) containing numbers to call. For more information,
see "Company Phone Book Calls (System Dependant)" on page28, "Corporate Dir-
ectory Calls (System Dependant)" on page27 and "External Services" on page40.
To support the company phone book feature, the Spectralink DECT Handset must have
firmware version PCS17Ja or newer, Spectralink IP-DECT Server must have firmware
version PCS17Ca or newer, and the Spectralink DECT Server must have firmware version PCS17Da or newer. Contact your system administrator for more information.
The Phone Book can store up to 350 names with up to four numbers (2 numbers containing digits
and 2 SIP URIs) each. A maximum of 24 digits, including spaces, is allowed for each number.
Names are sorted alphabetically starting with their first character.
If the display shows Memory full, it is necessary to delete one or more names from the phone book.
Call Register
The Call Register keeps track of all your recent calls. It can store a total of 40 incoming, outgoing or
missed calls.
Messages
Messaging is a system dependant feature.
If supported by the subscribed system, you can send and receive messages from the Messages
menu. You write messages using the alphanumeric keyboard.
All messages are automatically stored in inbox or outbox.
14226900-IG, Edition 10.0
July2017, Original document
38
Page 39

Spectralink7522/7532 Handset User Guide
The inbox is a list of all received messages, while the outbox is a list of all sent messages. Both lists
are sorted by time and date, starting with the most recent.
If the name and number of a message already exist as a contact in your phone book, the message in
the inbox or outbox will display the name of the sender or recipient. If the name and number do not
exist in your phone book, the message will display the number of the sender or recipient.
Messages that have not yet been sent, will display an excerpt of the text.
Inbox and outbox can store up to 20 messages in total. A maximum of 180 letters, including spaces,
is allowed for each message.
Note:
If the memory of inbox and outbox is full, the handset will automatically erase the oldest
message when a new message needs to be stored.
Presence
The Presence feature is system dependant and only supported by Skype for Business Server or
Lync Server. Contact your system administrator for more information.
From the Presence menu you can set the following status about your presence:
l Available
l Busy
l Do Not Disturb
l Be Right Back
l Appear Away
The selected status is shown with an icon in the handset display.
MSF Function
MSF Function is based on MSF (Message Service Function).
The MSF Function is system dependant and requires special software in the main system. Contact
your system administrator for more information.
14226900-IG, Edition 10.0
July2017, Original document
39
Page 40

Spectralink7522/7532 Handset User Guide
External Services
The External Services function is system dependant and requires special software in the main system. To dial from the corporate directory list, the External Services in the handset menu must be
selected. For more information, see "Corporate Directory Calls (System Dependant)" on page27.
External Services are features placed in the main system, and only available if the handset is subscribed to a Spectralink solution. The corporate directory is a common phone book for all handsets
subscribed to the actual system, and all handsets subscribed to the system are listed in this corporate directory. Additional numbers can be added to the phone book by the system administrator.
Contact your system administrator for more information.
Status
The Status menu provides a quick overview of some of the handset settings and works as a shortcut,
which makes it easy to change the basic settings according to your needs. The Status menu also
provides information about battery capacity.
Settings
Settings offer you the opportunity to customize the handset according to your needs. The settings
can be changed at any time.
14226900-IG, Edition 10.0
July2017, Original document
40
Page 41

Spectralink7522/7532 Handset User Guide
List of Menu Functions
In the following you will find a list of the different menu functions. The list gives a quick overview
where to find the desired function of the handset.
Phone Book
1. Find name
2. Add name/number
3. Speed dial
4. Delete
Call Register
1. Incoming calls
2. Outgoing calls
3. Missed calls
4. Delete
Messages
1. New message
2. Inbox
3. Outbox
4. Erase messages
5. Templates
Presence
1. Reset Status
2. Available
3. Busy
4. Do Not Disturb
5. Be Right Back
6. Appear Away
MSF Function
1. Number: system dependant
14226900-IG, Edition 10.0
July2017, Original document
41
Page 42

Spectralink7522/7532 Handset User Guide
External Services (System Dependant)
Status
1. Silent
2. Headset (only available on 7522)
3. Auto answer
4. Economy mode
5. Battery
6. Ringer tone
7. Volume
8. RSSI
9. Survey
10. General Information
Settings
1. Ringing volume
2. Ringing tone
3. Alerting volume
4. Vibrator
5. Silent mode
6. Auto key lock
7. Backlight
8. Auto answer
9. Out of range
10. Missed calls
11. Absent in charger
12. Bluetooth (only available on 7532)
14226900-IG, Edition 10.0
July2017, Original document
42
Page 43

Spectralink7522/7532 Handset User Guide
13. Advanced...
l Language
l Headset (only available on 7522)
l Hearing aid comp
l Microphone gain
l Long key
l Economy mode
l Master handset (system dependant)
l Login
l Time & date
l Minimum ring time
l OldDECT servers
l Deployment level
l Local tones
l Message list content
l Noisy environment
14226900-IG, Edition 10.0
July2017, Original document
43
Page 44

Spectralink7522/7532 Handset User Guide
Phone Book (Local)
You can store numbers and names in your local phone book.
Note:
Besides your local phone book that can be reached and managed from the main menu,
there is also a company phone book and external services - both pointing to a corporate
directory list (common phone book) containing numbers to call. For more information,
see "Company Phone Book Calls (System Dependant)" on page28, "Corporate Dir-
ectory Calls (System Dependant)" on page27 and "External Services" on page40.
To support the company phone book feature, the Spectralink DECT Handset must have
firmware version PCS17Ja or newer, Spectralink IP-DECT Server must have firmware
version PCS17Ca or newer, and the Spectralink DECT Server must have firmware version PCS17Da or newer. Contact your system administrator for more information.
The Phone Book can store up to 350 names with up to four numbers (2 numbers containing digits
and 2 SIP URIs) each. A maximum of 24 digits, including spaces, is allowed for each number.
Names are sorted alphabetically starting with their first character.
If the display shows Memory full, it is necessary to delete one or more names from the phone book.
Using Alphanumeric Keyboard
The normal dialling keys (0-9) are used for writing the name to be placed in the phone book. By pressing the keys a certain number of times the related letters will appear in the display.
l Spaces are made by using the 0-key.
l Key * changes between uppercase and lowercase letters, which is indicated on the top left-
hand corner of the display.
l Pressing left or right side of navigation key will move the cursor.
l To delete letters, place cursor behind letter and press Delete.
Managing Contacts
The phone book menu offers a range of possibilities to manage existing contacts and makes it easy
to add, edit or delete name and number. It is possible to add up to four numbers (2 numbers containing digits and 2 SIP URIs) to a contact.
Finding Contact in Phone Book
1. Press Menu to enter main menu.
2. Scroll to Phone Book and press Select.
3. Scroll to Find name and press Select.
14226900-IG, Edition 10.0
July2017, Original document
44
Page 45

Spectralink7522/7532 Handset User Guide
4. To find a name you can:
l Scroll until you reach the desired name. To scroll through the names quickly press the nav-
igation key continuously.
l Use quick search by pressing the first letter(s) (max. 5 letters) of the desired name.
Adding a New Contact to Phone Book
Use the Add name/number function when you want to add a new contact to phone book.
It is possible to add up to four numbers (2 numbers containing digits and 2 SIP URIs) to a contact.
1. Press Menu to enter main menu.
2. Scroll to Phone Book and press Select.
3. Scroll to Add name/number and press Select.
4. Type the name of the contact using the keys 0-9.
5. Scroll to number and enter the number of the contact (max 24 digits). Before entering a
SIPURI press and hold # until SIP: is shown.
6. Press Save to store name and number.
If the display shows Memory full, it is necessary to delete one or more contacts from phone book.
Tip:
If you have just dialed a number from the company phone book, this number can be easily added to your local phone book:
l After ending the call, press the left side of the navigation key to enter the call
list.
l Press Details.
l Press Options. The option Add to phone book is automatically selected.
l Press Select.
l Press Save.
For more information about making calls from the company phone book, see "Company
Phone Book Calls (System Dependant)" on page28.
Editing Name/Number
You can edit name and number of a contact in phone book at any time.
1. Press Menu to enter main menu.
2. Scroll to Phone Book and press Select.
3. Scroll to Find name and press Select.
14226900-IG, Edition 10.0
July2017, Original document
45
Page 46

Spectralink7522/7532 Handset User Guide
4. To find a name you can:
l Scroll until you reach the desired name. To scroll through the names quickly press the nav-
igation key continuously.
l Use quick search by pressing the first letter(s) (max. 5 letters) of the desired name.
5. Press Details.
6. If more than one number: scroll to the desired number and press Select.
7. Scroll to Edit name/number and press Select.
8. Edit Name using the digits 0-9.
9. Scroll to Number and edit number using the digits 0-9. Before entering a SIPURI press and
hold # until SIP: is shown.
10. Press Save to store your changes.
Adding New Number
You can add a new number to a contact in phone book at any time. It is possible to add up to four
numbers (2 numbers containing digits and 2 SIP URIs) to a contact.
1. Press Menu to enter main menu.
2. Scroll to Phone Book and press Select.
3. Scroll to Find name and press Select.
4. To find a name you can:
l Scroll until you reach the desired name. To scroll through the names quickly press the nav-
igation key continuously.
l Use quick search by pressing the first letter(s) (max. 5 letters) of the desired name.
5. Press Details.
6. If more than one number, press Select.
7. Scroll to Add new number and press Select.
8. Enter the new number using the digits 0-9 and press Save. Before entering a SIPURI press
and hold # until SIP: is shown.
9. Repeat step 7- 8 to add another number to the contact.
Adding Number to Speed Dial
You can assign a number to one of the speed-dialing keys 0-9. This way you only need to press a
single digit to find the name and number of the contact, you want to call. You can assign up to 10
speed dial numbers.
1. Press Menu to enter main menu.
2. Scroll to Phone Book and press Select.
3. Scroll to Find name and press Select.
14226900-IG, Edition 10.0
July2017, Original document
46
Page 47

Spectralink7522/7532 Handset User Guide
4. To find a name you can:
l Scroll until you reach the desired name. To scroll through the names quickly press the nav-
igation key continuously.
l Use quick search by pressing the first letter(s) (max. 5 letters) of the desired name.
5. Press Details.
6. If more than one number: scroll to the desired number and press Select.
7. Scroll to Add to speed dial and press Select.
8. Scroll to the desired position and press Add name.
9. If position is occupied, press Yes to replace existing speed dial.
Deleting Number
You can delete a single number at any time and still keep the rest of the belonging numbers of a contact.
1. Press Menu to enter main menu.
2. Scroll to Phone Book and press Select.
3. Scroll to Find name and press Select.
4. To find a name you can:
l Scroll until you reach the desired name. To scroll through the names quickly press the nav-
igation key continuously.
l Use quick search by pressing the first letter(s) (max. 5 letters) of the desired name.
5. Press Details.
6. If more than one number: scroll to the desired number and press Select..
7. Scroll to Delete number and press Select.
8. Press OK to confirm.
Deleting Contact
Use the delete name and number function if you want to delete a contact and all the belonging numbers.
1. Press Menu to enter main menu.
2. Scroll to Phone Book and press Select.
3. Scroll to Delete and press Select.
4. Scroll to Name & Number and press Select.
5. To find a name you can:
l Scroll until you reach the desired name. To scroll through the names quickly press the nav-
igation key continuously.
l Use quick search by pressing the first letter(s) (max. 5 letters) of the desired name.
6. Press Select.
7. Press Yes to confirm.
14226900-IG, Edition 10.0
July2017, Original document
47
Page 48

Spectralink7522/7532 Handset User Guide
OR
1. Press Menu to enter main menu.
2. Scroll to Phone Book and press Select.
3. Scroll to Find name and press Select.
4. To find a name you can:
l Scroll until you reach the desired name. To scroll through the names quickly press the nav-
igation key continuously.
l Use quick search by pressing the first letter(s) (max. 5 letters) of the desired name.
5. Press Details.
6. If more than one number, press Select.
7. Scroll to Delete name/number and press Select.
8. Press OK to confirm.
Deleting All Contacts
Use the delete all function if you want to delete all contacts and speed dial numbers.
1. Press Menu to enter main menu.
2. Scroll to Phone Book and press Select.
3. Scroll to Delete and press Select.
4. Scroll to Delete all and press Select.
5. Enter password 0000 and press OK.
All contacts and speed dial numbers are deleted.
Speed Dial
Speed Dial Calls
l Press and hold a key (0-9) for three seconds, until the call is initiated. You can set the keys 0-9
to long press Speed dial or Send MSF. For more information, see "Using Long Key" on
page80.
Adding Number to Speed Dial
You can assign a number to one of the speed-dialing keys 0-9. This way you only need to press a
single digit to find the name and number of the contact, you want to call. You can assign up to 10
speed dial numbers.
1. Press Menu to enter main menu.
2. Scroll to Phone Book and press Select.
3. Scroll to Speed dial and press Select.
4. Scroll to the desired speed dial and press Add name.
5. Scroll to desired number and press Ok.
14226900-IG, Edition 10.0
July2017, Original document
48
Page 49

Spectralink7522/7532 Handset User Guide
Deleting a Speed Dial Number
Use this function to delete a speed dial number.
1. Press Menu to enter main menu.
2. Scroll to Phone Book and press Select.
3. Scroll to Delete and press Select.
4. Scroll to Speed dial number and press Select.
5. Scroll to the desired speed dial number and press Delete.
Delete All Speed Dial Numbers
Use the delete all function if you want to delete all contacts and speed dial numbers.
1. Press Menu to enter main menu.
2. Scroll to Phone Book and press Select.
3. Scroll to Delete and press Select.
4. Scroll to Delete all and press Select.
5. Enter password 0000 and press OK.
All contacts and speed dial numbers are deleted.
14226900-IG, Edition 10.0
July2017, Original document
49
Page 50

Spectralink7522/7532 Handset User Guide
Call Register
The Call Register menu can store a total of 40 incoming, outgoing and missed calls. Call Register is
divided into lists of: incoming calls, outgoing calls and missed calls.
If the memory of call register is full, the handset will automatically erase the oldest call when a new
call is received in call register.
Incoming Calls
Incoming call is a list of all your incoming calls sorted by date and time of the call, starting with the
latest call. Incoming calls are illustrated with green arrows .
If name and number of incoming call already exist in your phone book, the incoming call will be represented with the name of the contact. If name and number do not exist in your phone book, the handset cannot recognize the number and the incoming call will only be represented by the calling
number.
In both cases, incoming call register provides details about incoming calls, such as time, date and
length of conversation.
It is possible to add name and number of an incoming call to phone book or to delete an incoming call
from the list.
Viewing List of Incoming Calls
1. Press Menu to enter main menu.
2. Scroll to Call register and press Select.
3. Scroll to Incoming Calls and press Select.
4.
To call a number from the list, scroll to the desired number and press .
Adding an Incoming Call to Phone Book
If you have an incoming call and the number is not in the phone book it is possible to add it to the
phone book from the incoming call list.
1. Press Menu to enter main menu.
2. Scroll to Call register and press Select.
3. Scroll to Incoming Calls and press Select.
4. Scroll to the desired call and press Details.
5. Press Options.
6. Scroll to Add to phone book and press Select.
7. Write the name of the contact using the digits 0-9 and then press Save.
14226900-IG, Edition 10.0
July2017, Original document
50
Page 51

Spectralink7522/7532 Handset User Guide
Deleting an Incoming Call from List
1. Press Menu to enter main menu.
2. Scroll to Call register and press Select.
3. Scroll to Incoming Calls and press Select.
4. Scroll to the desired call and press Details.
5. Press Options and scroll to Delete from list.
6. Press Select to confirm.
Timesaver:
Alternatively, while on hook, press the left side of the navigation key to enter call list.
To call a number from the list, scroll to the desired number and press . By pressing
Details and Options it is possible to add number to phone book or delete number from
list.
Outgoing Calls
Outgoing calls is a list of all your outgoing calls sorted by date and time of the call, starting with the
latest call. Outgoing calls are illustrated with blue arrows .
If name and number of the outgoing call already exist in your phone book, the outgoing call will be represented with the name of the contact. If name and number do not exist in your phone book, the outgoing call is only represented by the calling number.
In both cases, outgoing call register provides details about outgoing calls, such as time, date and
length of conversation.
It is possible to add name and number of an outgoing call to your phone book, or to delete an outgoing call from the list.
Viewing List of Outgoing Calls
1. Press Menu to enter main menu.
2. Scroll to Call register and press Select.
3. Scroll to Outgoing Calls and press Select.
4.
To call a number from the list, scroll to the desired number and press .
Adding an Outgoing Call to Phone Book
If you have made a call and the number is not in the phone book, it is possible to add it to the phone
book from the outgoing call list.
1. Press Menu to enter main menu.
2. Scroll to Call register and press Select.
3. Scroll to Outgoing Calls and press Select.
4. Scroll to the desired call and press Details.
14226900-IG, Edition 10.0
July2017, Original document
51
Page 52

Spectralink7522/7532 Handset User Guide
5. Press Options.
6. Scroll to Add to phone book and press Select.
7. Write the name of the contact using the digits 0-9 and then press Save.
Deleting an Outgoing Call from List
1. Press Menu to enter main menu.
2. Scroll to Call register and press Select.
3. Scroll to Outgoing Calls and press Select.
4. Scroll to the desired call and press Details.
5. Press Options and scroll to Delete from list.
6. Press Select to confirm.
Timesaver:
Alternatively, while on hook, press the left side of the navigation key to enter call list.
To call a number from the list, scroll to the desired number and press . By pressing
Details and Options it is possible to add number to phone book or delete number from
list.
Missed Calls
Missed calls is a list of all your missed calls sorted by date and time of the call, starting with the latest
call. Missed calls are illustrated with red arrows .
If the name and number of the missed call already exist in your phone book, the missed call is represented with the name of the contact. If the name and number do not exist in your phone book, the
missed call is only represented by the calling number.
In both cases, missed call register provides details about missed calls, such as time and date.
It is possible to add name and number of a missed call to your phone book or to delete a missed call
from the list.
Viewing List of Missed Calls
1. Press Menu to enter main menu.
2. Scroll to Call register and press Select.
3. Scroll to Missed Calls and press Select.
4.
To call a number from the list, scroll to the desired number and press .
Timesaver:
Alternatively, while on hook, press right side of navigation key to enter missed call list.
To call a number from the list, scroll to the desired number and press . By pressing
Details and Options it is possible to add number to phone book or delete number from
list.
14226900-IG, Edition 10.0
July2017, Original document
52
Page 53

Spectralink7522/7532 Handset User Guide
Adding a Missed Call to Phone Book
If you have made a call and the number is not in the phone book, it is possible to add it to the phone
book from the outgoing call list.
1. Press Menu to enter main menu.
2. Scroll to Call register and press Select.
3. Scroll to Missed Calls and press Select.
4. Scroll to the desired missed call and press Details.
5. Press Options.
6. Scroll to Add to phone book and press Select.
7. Write the name of the contact using the digits 0-9 and then press Save.
Deleting a Missed Call from List
1. Press Menu to enter main menu.
2. Scroll to Call register and press Select.
3. Scroll to Missed Calls and press Select.
4. Scroll to the desired missed call and press Details.
5. Press Options and scroll to Delete from list.
6. Press Select to confirm.
Timesaver:
Alternatively, while on hook, press the left side of the navigation key to enter call list.
To call a number from the list, scroll to the desired number and press . By pressing
Details and Options it is possible to add number to phone book or delete number from
list.
14226900-IG, Edition 10.0
July2017, Original document
53
Page 54

Spectralink7522/7532 Handset User Guide
Delete Call List
The call register menu can store a total of 40 incoming, outgoing and missed calls. If the memory of
call register is full, the handset automatically erases the oldest call when a new call needs to be
stored in the call register.
Use the following delete functions to empty the lists in the call register manually.
Deleting All Entries in a Call List
1. Press Menu to enter main menu.
2. Scroll to Call register and press Select.
3. Scroll to Delete and press Select.
4. Scroll to the incoming, outgoing or missed call list, and then press Select.
5. Press Yes to empty list.
Deleting All Calls from All Lists
1. Press Menu to enter main menu.
2. Scroll to Call register and press Select.
3. Scroll to Delete and press Select.
4. Scroll to All calls and press Select.
5. Press Yes to empty all folders.
14226900-IG, Edition 10.0
July2017, Original document
54
Page 55

Spectralink7522/7532 Handset User Guide
Messages
Messaging is a system dependant feature.
If supported by the subscribed system, you can send and receive messages from the Messages
menu. You write messages using the alphanumeric keyboard.
All messages are automatically stored in inbox or outbox.
The inbox is a list of all received messages, while the outbox is a list of all sent messages. Both lists
are sorted by time and date, starting with the most recent.
If the name and number of a message already exist as a contact in your phone book, the message in
the inbox or outbox will display the name of the sender or recipient. If the name and number do not
exist in your phone book, the message will display the number of the sender or recipient.
Messages that have not yet been sent, will display an excerpt of the text.
Inbox and outbox can store up to 20 messages in total. A maximum of 180 letters, including spaces,
is allowed for each message.
Note:
If the memory of inbox and outbox is full, the handset will automatically erase the oldest
message when a new message needs to be stored.
Writing, Sending and Saving Messages
Writing and Sending a New Message
1. Press Menu to enter main menu.
2. Scroll to Messages and press Select.
3. Scroll to New message and press Select.
4. Write a message.
Optionally, you can use a template:
l Press Options, scroll to Use template, press Select.
l Scroll to desired template, press Options, scroll to Select and press Select.
5. Press Options, scroll to Send, and then press Select.
6. Enter the recipient’s number or press Search to find the recipient’s number.
7. To find a name you can:
l Scroll until you reach the desired name. To scroll through the names quickly press the nav-
igation key continuously.
l Use quick search by pressing the first letter(s) (max. 5 letters) of the desired name.
8. Press Select.
14226900-IG, Edition 10.0
July2017, Original document
55
Page 56

Spectralink7522/7532 Handset User Guide
9. If more than one number: scroll to the desired number and press Select.
10. Press Send.
Clearing Text Field
Use the clear text function, when you are writing a new message and want to start all over.
1. Press Options.
2. Scroll to Clear text and press Select.
Saving a New Message in Outbox
You can write a message and then save it in outbox for later handling.
1. Press Menu to enter main menu.
2. Scroll to Messages and press Select.
3. Scroll to New message and press Select.
4. Write a message and press Options.
5. Scroll to Save message and press Select.
6. Scroll to Outbox and press Select.
Edit a Message That Has Not Been Sent
1. Press Menu to enter main menu.
2. Scroll to Messages and press Select.
3. Scroll to Outbox and press Select.
4. Scroll to the message you want to edit, and press Select.
5. Press Options and press Select.
6. Scroll to Resend and press Select.
7. Edit text.
8. Press Options and press Send.
14226900-IG, Edition 10.0
July2017, Original document
56
Page 57

Spectralink7522/7532 Handset User Guide
Using Templates
You can create up to 10 templates. When using a template in a message you have two options:
l Use a template when you begin the process.
l Insert a template in a message when you are in the process of writing a message.
To Use a Template When You Begin a Message
1. Press Menu to enter main menu.
2. Scroll to Messages and press Select.
3. Scroll to Templates and press Select.
4. Scroll to the desired template and press Option.
5. Scroll to Select and press Select.
6. If relevant, write additional text.
7. Press Options.
8. Scroll to Send and press Select.
9. Press Search to enter number or find the recipient.
10. To find a name you can:
l Scroll until you reach the desired name. To scroll through the names quickly press the nav-
igation key continuously.
l Use quick search by pressing the first letter(s) (max. 5 letters) of the desired name.
11. Press Select.
12. If more than one number: scroll to the desired number and press Select.
13. Press Send.
To Insert a Template in a Message
1. While in a message, press Options.
2. Scroll to Use template, press Select.
3. Scroll to the desired template and press Option.
4. Scroll to Select and press Select.
To Save a New Message as a Template
1. Press Menu to enter main menu.
2. Scroll to Messages and press Select.
3. Scroll to New message and press Select.
4. Write a message and press Options.
5. Scroll to Save message and press Select.
6. Scroll to Templates and press Select.
14226900-IG, Edition 10.0
July2017, Original document
57
Page 58

Spectralink7522/7532 Handset User Guide
7. If memory is full, press OK to replace an old template.
8. Scroll to the template you want to replace and press Select.
Saving a Received Message as a Template
You can save a message from inbox as a template for later use.
1. Press Menu to enter main menu.
2. Scroll to Messages and press Select.
3. Scroll to Inbox and press Select.
4. Scroll to desired message and press Select.
5. Press Options.
6. Scroll to Forward and press Select.
7. Press Options.
8. Scroll to Save message and press Select.
9. Scroll to Templates and press Select.
10. If memory is full, press OK to replace an old template.
11. Scroll to the template you want to replace and press Select.
Deleting a Single Template
Use this function to delete a template, or replace the template with a new template when the memory
is full.
1. Press Menu to enter main menu.
2. Scroll to Messages and press Select.
3. Scroll to Templates and press Select.
4. Scroll to the desired template and press Option.
5. Scroll to Erase and press Select.
6. Press Yes to erase the template.
14226900-IG, Edition 10.0
July2017, Original document
58
Page 59

Spectralink7522/7532 Handset User Guide
Reading Messages
To Read a Message
When a message arrives, a green envelope icon , the text message and the contact information (if
available) appear in the display.
l Scroll up and down pressing top or bottom of the navigation key to read the entire mes-
sage.
If you have an unread message in your inbox, a green envelope icon is displayed in the status line.
To Save a Message (Remove from Display)
When appears in the display do one of the following:
l Press OK. The message is stored in the inbox as read.
l Press the R key. The message is stored in the inbox as unread.
Replying Messages
Replying to a Message
When you want to reply a message from your inbox, you have the following options:
l Write a new message in an empty screen
l Write in continuation of original text (received message)
l Insert a template
l
Call back by pressing .
Reply Using an Empty Screen
1. Press Menu to enter main menu.
2. Scroll to Messages and press Select.
3. Scroll to Inbox and press Select.
4. Scroll to the desired received message and press Select.
5. Press Options.
6. Scroll to Reply and press Select.
7. Scroll to Empty screen and press Select.
8. Write a message and press Options.
9. Scroll to Send and press Select.
10. Press Send.
14226900-IG, Edition 10.0
July2017, Original document
59
Page 60

Spectralink7522/7532 Handset User Guide
Reply in Continuation of Original Text
Original text refers to the received text message.
1. Press Menu to enter main menu.
2. Scroll to Messages and press Select.
3. Scroll to Inbox and press Select.
4. Scroll to the desired received message and press Select.
5. Press Options.
6. Scroll to Reply and press Select.
7. Scroll to Original text and press Select.
8. Write a message in continuation of received message and press Options.
9. Scroll to Send and press Select.
10. Press Send.
Reply Using a Template
1. Press Menu to enter main menu.
2. Scroll to Messages and press Select.
3. Scroll to Inbox and press Select.
4. Scroll to the desired message and press Select.
5. Press Options.
6. Scroll to Reply and press Select.
7. Scroll to Templates and press Select.
8. Scroll to the desired template and press Option.
9. Scroll to Select and press Select.
10. If relevant, write additional text.
11. Press Options.
12. Scroll to Send and press Select.
13. Press Send.
Calling the Phone that Sent a Message
You can call back the phone that sent a message, when a is displayed in the status bar. You can
do this when a message arrives, and when you are in the message inbox:
1. Press Menu to enter main menu.
2. Scroll to Messages and press Select.
3. Scroll to Inbox and press Select.
4. Scroll to the desired message and press Select.
5.
Press .
14226900-IG, Edition 10.0
July2017, Original document
60
Page 61

Spectralink7522/7532 Handset User Guide
Forwarding a Message
If you want to forward a message to a contact, do the following:
1. Press Menu to enter main menu.
2. Scroll to Messages and press Select.
3. Scroll to Inbox and press Select.
4. Scroll to the desired message and press Select.
5. Press Options.
6. Scroll to Forward and press Select.
7. Press Send and then press Search.
8. To find a name you can:
l Scroll until you reach the desired name. To scroll through the names quickly press the nav-
igation key continuously.
l Use quick search by pressing the first letter(s) (max. 5 letters) of the desired name.
9. Press Select.
10. Press Select and then press Send.
Resending a Message
If you want to resend a message to a contact, do the following:
1. Press Menu to enter main menu.
2. Scroll to Messages and press Select.
3. Scroll to Outbox and press Select.
4. Scroll to the desired message and press Select.
5. Press Options.
6. Scroll to Resend and press Select.
7. Press Options.
8. Scroll to Send and press Select.
9. Press Send.
14226900-IG, Edition 10.0
July2017, Original document
61
Page 62

Spectralink7522/7532 Handset User Guide
Deleting Messages
Deleting a Single Message
The handset automatically deletes the oldest message when the inbox and outbox memory is full.
If you want to delete a message manually, do the following:
1. Press Menu to enter main menu.
2. Scroll to Messages and press Select.
3. Scroll to Inbox or Outbox and press Select.
4. Scroll to the desired message and press Select.
5. Press Options.
6. Scroll to Erase and press Select.
7. Press Yes to delete the message.
Delete All Read Messages from Inbox
Use this function to delete all read messages from inbox. This way you do not risk deleting unread
messages.
1. Press Menu to enter main menu.
2. Scroll to Messages and press Select.
3. Scroll to Erase messages and press Select.
4. Scroll to All read and press Select.
5. Press Yes to delete all read messages from inbox.
Delete All Messages from Inbox or Outbox
Use this function to delete all messages from your outbox.
1. Press Menu to enter main menu.
2. Scroll to Messages and press Select.
3. Scroll to Erase messages and press Select.
4. Scroll to Inbox or Outbox and press Select.
5. Press Yes to delete all messages from inbox or outbox.
Delete All Messages
Use this function to delete all messages from inbox and outbox.
1. Press Menu to enter main menu.
2. Scroll to Messages and press Select.
3. Scroll to Erase messages and press Select.
4. Scroll to All and press Select.
5. Press Yes to delete all messages from all folders.
14226900-IG, Edition 10.0
July2017, Original document
62
Page 63

Spectralink7522/7532 Handset User Guide
Status
The Status menu provides a quick overview of some of the handset settings and works as a shortcut,
which makes it easy to change the basic settings according to your needs. The Status menu also
provides information about battery capacity.
Status Settings
Silent
When silent mode is turned on, there is no sound for incoming calls and notifications. However, you
will still be able to see an incoming call and notifications in the display.
To Turn Silent Mode On/Off
1. Press Menu to enter main menu.
2. Scroll to Status and press Select.
3. Scroll to Silent mode and press Select.
4. Press Change to select between On or Off.
Timesaver:
Alternatively, you can also turn silent mode on/off by pressing Menu followed by #, while
on hook.
Changing Silent Mode Settings
When silent mode is turned on, you can select other ways of indicating incoming calls or messages:
l Display flashing: When turned on, the display flashes when an incoming call arrives.
l Vibrator: When turned on, the handset vibrates when an incoming call arrives.
l Short ring: When turned on, a short ring sounds when an incoming call arrives.
To Change Silent Mode Settings:
1. Press Menu to enter main menu.
2. Scroll to Status and press Select.
3. Scroll to Silent mode and press Select.
4. Scroll to Settings and press Change.
5. Scroll to the desired setting and press Select.
Headset (only 7522)
Using headset allows you to keep up your activities and use the phone at the same time.
14226900-IG, Edition 10.0
July2017, Original document
63
Page 64

Spectralink7522/7532 Handset User Guide
To Enable/Disable Ring Tone and Alert Sounds in the Headset
1. Press Menu to enter main menu.
2. Scroll to Status and press Select.
3. Scroll to Headset and press Select.
4. Press Change to select between the options.
To Set Headset Volume
1. Press Menu to enter main menu.
2. Scroll to Status and press Select.
3. Scroll to Headset and press Select.
4. Scroll to Headset volume and press Change.
5. Press the left or right side of navigation key to adjust the volume.
6. Press Set.
Auto Answer
When auto answer is turned on , the handset automatically goes off hook when an incoming call
arrives.
If subscribed to a Spectralink wireless solution, the handset automatically goes on hook when calls
are ended.
To Turn Auto Answer On/Off
1. Press Menu to enter main menu.
2. Scroll to Status and press Select.
3. Scroll to Auto answer and press Select.
4. Press Change to select between On or Off.
Note:
Auto answer is always inactive when the handset is charging.
Economy Mode
When economy mode is turned on, the handset dynamically controls the transmitted power to
increase talk time.When economy mode is turned off, the transmitted power is at a fixed level.
To Change Economy Mode
1. Press Menu to enter main menu.
2. Scroll to Status and press Select.
3. Scroll to Economy mode and press Select.
4. Press Change to select between On or Off.
14226900-IG, Edition 10.0
July2017, Original document
64
Page 65

Spectralink7522/7532 Handset User Guide
Battery
The battery function shows remaining battery capacity.
The indication on the display is not necessarily an exact reflection of the remaining speech time, but
only an indication of the voltage on the battery.
To Check Remaining Battery Capacity
1. Press Menu to enter main menu.
2. Scroll to Status and press Select.
3. Check the battery indicator.
Ringer Tone
The ring tone is followed by a number indicating the chosen tone of the ringer. It is possible to choose
between 12 different ring tones. The last two ring tones are suitable for noisy environments. You can
distinguish between an internal and external call by the ring tone. The ring tone of an internal call is
followed by three short beeps (system dependent feature).
To Choose a New Ring Tone
1. Press Menu to enter main menu.
2. Scroll to Status and press Select.
3. Scroll to Ringing tone and press Select.
4. Scroll to the desired ring tone and press the right side of the navigation key to listen to the
ring tone. Repeat the process if you want listen to other ring tones.
5. Press the left side of the navigation key to listen to the internal calls ring tone (system
dependant feature).
6. Scroll to the desired ring tone and press Change to select the new ring tone.
Note:
To listen to the ring tone, Silent mode must be set to off.
Volume
Adjusts ringing volume according to the noise level of the surrounding environment.
To Adjust the Volume of the Ring Tone
1. Press Menu to enter main menu.
2. Scroll to Status and press Select.
3. Scroll to Volume and press Select.
4. Press the left or right side of navigation key to adjust the volume of the ring tone.
5. Press Set.
14226900-IG, Edition 10.0
July2017, Original document
65
Page 66

Spectralink7522/7532 Handset User Guide
RSSI
This feature can be used to check the signal strength of the base stations and the signal quality of the
handset while in a call.
To Check RSSI Values
1. Press Menu to enter main menu.
2. Scroll to Status and press Select.
3. Scroll to RSSI and press Select. The bearer quality is shown in the display.
For more information about RSSI values and bearer quality, see Synchronization and Deployment
Guide.
General Information
You will find general handset information about:
l Model type/name (if available)
l IPEI number of the handset (International Portable Equipment Identity)
l Firmware version
l Hardware version
l Bluetooth (MAC adress for Bluetooth and Bluetooth software version)
l Unique Product ID (P-ID)
l Frequency band (frequency band of handset)
To Check General Information
1. Press Menu to enter main menu.
2. Scroll to Status and press Select.
3. Scroll to General Information and press Select.
14226900-IG, Edition 10.0
July2017, Original document
66
Page 67

Spectralink7522/7532 Handset User Guide
Settings
Settings offer you the opportunity to customize the handset according to your needs. The settings
can be changed at any time.
Ringing Volume
To Adjust the Volume of the Ring Tone
1. Press Menu to enter main menu.
2. Scroll to Settings and press Select.
3. Scroll to Ringing volume and press Select.
4. Press the left or right side of the navigation key to adjust the volume of the ring tone.
5. Press Set.
Ringing Tone
The ring tone is followed by a number indicating the chosen tone of the ringer. It is possible to choose
between 12 different ring tones. The last two ring tones are suitable for noisy environments. You can
distinguish between an internal and external call by the ring tone. The ring tone of an internal call is
followed by three short beeps (system dependent feature).
To Choose a New Ring Tone
1. Press Menu to enter main menu.
2. Scroll to Settings and press Select.
3. Scroll to Ringing tone and press Select.
4. Scroll to the desired ring tone and press the right side of the navigation key to listen to the
ring tone. Repeat the process if you want listen to other ring tones.
5. Press the left side of the the navigation key to listen to the internal calls ring tone (system
dependant feature).
6. Scroll to the desired ring tone and press Change to select the new ring tone.
Note:
If you cannot hear the ring tones, check that Silent mode is turned off.
14226900-IG, Edition 10.0
July2017, Original document
67
Page 68

Spectralink7522/7532 Handset User Guide
Message Alert Volume
Alerts are different tones that appear during notifications and events, e.g.:
l You receive a new message.
l You send a message.
l The handset is moving out of range.
l The handset is out of range.
l The battery capacity is low.
l You create a login.
To Adjust Message Alert Volume
1. Press Menu to enter main menu.
2. Scroll to Settings and press Select.
3. Scroll to Message Alert vol and press Select.
4. Press the left or right side of the navigation key to adjust the alerting volume.
5. Press Set.
Note:
You cannot set the vibrator to work with message alerts.
Vibrator
When vibrator is turned on, the handset vibrates when an incoming call arrives. The handset does
not vibrate when you receive a message or when the handset is charging.
To Turn Vibrator On/Off
1. Press Menu to enter main menu.
2. Scroll to Settings and press Select.
3. Scroll to Vibrator and press Select.
4. Press Change to select between On or Off.
14226900-IG, Edition 10.0
July2017, Original document
68
Page 69

Spectralink7522/7532 Handset User Guide
Silent Mode
When silent mode is turned on, there is no sound for incoming calls and notifications. However, you
will still be able to see an incoming call and notifications in the display.
To Turn Silent Mode On/Off
1. Press Menu to enter main menu.
2. Scroll to Settings and press Select.
3. Scroll to Silent mode and press Select.
4. Press Change to select between On or Off.
Timesaver:
Alternatively, you can also turn silent mode on/off by pressing Menu followed by #, while
on hook.
Changing Silent Mode Settings
When silent mode is turned on, you can select other ways of indicating incoming calls or messages:
l Display flashing: When turned on, the display flashes when an incoming call arrives.
l Vibrator: When turned on, the handset vibrates when an incoming call arrives.
l Short ring: When turned on, a short ring sounds when an incoming call arrives.
To Change Silent Mode Settings:
1. Press Menu to enter main menu.
2. Scroll to Settings and press Select.
3. Scroll to Silent mode and press Select.
4. Scroll to Settings and press Change.
5. Scroll to the desired setting and press Select.
14226900-IG, Edition 10.0
July2017, Original document
69
Page 70

Spectralink7522/7532 Handset User Guide
Auto Key Lock
Use auto key lock to prevent keys from being accidentally pressed.
With auto keylock turned on the handset will automatically lock keypad after 30 seconds.
To Turn Auto Key Lock On/Off
1. Press Menu to enter main menu.
2. Scroll to Settings and press Select.
3. Scroll to Auto key lock and press Select.
4. Press Change to select between On or Off.
5.
To answer a call when Auto key lock is on, press . When you end the call, keypad automatically locks.
Note:
Alternatively, you can also turn auto key lock on/off by pressing Menu followed by *, while
on hook.
Backlight
To save power the backlight can be set to automatically either dim or turn off. This will happen after
the handset has been idle for a configurable time delay.
The display backlight automatically turns on again when e.g. an incoming call or message arrives, or
if a key is pressed.
The backlight turns off when handset is idle after a preset period of time delay.
The time delay can be adjusted between eight levels. The highest level will result in infinite time
delay, and the backlight will never dim or turn off. If the backlight is set to dim, and the lowest time
delay level is chosen, the backlight will always stay dimmed.
Note:
Turning display backlight off when handset is idle will save battery power.
Setting Backlight Automatically at Dimmed (On) or Off
When setting display backlight at dimmed, display information can still be seen vaguely when handset is idle. If set to off, backlight turns off.
1. Press Menu to enter main menu.
2. Scroll to Settings and press Select.
3. Scroll to Backlight and press Select.
4. Press Change to set backlight to Dimmed or Off.
14226900-IG, Edition 10.0
July2017, Original document
70
Page 71

Spectralink7522/7532 Handset User Guide
Turning Backlight Automatically On
1. Press Menu to enter main menu.
2. Scroll to Settings and press Select.
3. Scroll to Backlight and press Select.
4. Press Change to set backlight to Dimmed. Backlight is now turned on.
Adjusting Backlight Delay
You can adjust the period of time before backlight turns off or dimms when handset is idle.
1. Press Menu to enter main menu.
2. Scroll to Settings and press Select.
3. Scroll to Backlight and press Select.
4. Scroll to Delay and press Change.
5. Press the left and right side of the navigation key to adjust backlight delay.
Note:
6. Press Set.
If adjusting backlight delay to maximum, then the backlight never turns off!
If backlight is set to Dimmed, and backlight delay is adjusted to minimum, then
backlight is always dimmed.
14226900-IG, Edition 10.0
July2017, Original document
71
Page 72

Spectralink7522/7532 Handset User Guide
Auto Answer
When auto answer is turned on , the handset automatically goes off hook when an incoming call
arrives.
If subscribed to a Spectralink wireless solution, the handset automatically goes on hook when calls
are ended.
To Turn Auto Answer On/Off
1. Press Menu to enter main menu.
2. Scroll to Settings and press Select.
3. Scroll to Auto answer and press Select.
4. Press Change to select between On or Off.
Changing Auto Answer Settings
When auto answer is turned on, you can select different situations where to use auto answer during
incoming calls.
Note:
If Absent in charger is set to On this setting overrules any Auto Answer settings.
Auto Answer Settings
l Lift from charg.: the handset automatically answers the call when removed from charger.
l After 1. ring: the handset automatically answers the call after the first ring.
l When headset: the handset automatically answers the call, when you are using a headset.
l Loudspeaker on: the handset automatically answers the call and turns on loudspeaker.
l Also in charger: the handset automatically answers the call when placed in charger.
To Change Auto Answer Settings
1. Press Menu to enter main menu.
2. Scroll to Settings and press Select.
3. Scroll to Auto answer and press Select.
4. Scroll to Settings and press Change.
5. Scroll to the desired setting and press Select.
14226900-IG, Edition 10.0
July2017, Original document
72
Page 73

Spectralink7522/7532 Handset User Guide
Out of Range
The out of range indicator appears when handset is moving out of range or already is out of range of
base station.
With the out of range indicator turned on, the following appears in the display:
l
If handset is moving out of range, the low signal icon appears in the display.
l
If the handset gets out of range, the no signal icon appears in the display. If tone + icon is
selected, beeps sounds when the handset comes out of range.
Note:
When the handset has been outside the range area, it can take up to 30 seconds before
the handset is back on the system after re-entering range area.
To Turn Out of Range Indicator On/Off
1. Press Menu to enter main menu.
2. Scroll to Settings and press Select.
3. Scroll to Out of range and press Select.
4. Press Change to select between On or Off.
Changing Out of Range Settings
When out of range is turned on, the handset offers two types of out of range alerts:
l Icon only
l Tone (beep) + icon
To Change Out of Range Settings
1. Press Menu to enter main menu.
2. Scroll to Settings and press Select.
3. Scroll to Out of range and press Select.
4. Scroll to Settings and press Change.
5. Scroll to the desired alert and press Select.
14226900-IG, Edition 10.0
July2017, Original document
73
Page 74

Spectralink7522/7532 Handset User Guide
Missed Calls
It is possible to get notifications of missed calls shown in the display. If Show missed calls is turned
on, the following icon shows in the display. To see details about the missed calls, you can press
Details.
To Show/Hide Missed Calls
1. Press Menu to enter main menu.
2. Scroll to Settings and press Select.
3. Scroll to Missed calls and press Select.
4. Press Change to select between Show or Hide.
Absent in Charger
When absent in charger is turned on, the icon appears in the display when handset is placed in
charger.
Note:
If Absent in charger is set to On this setting overrules any Auto Answer settings.
To Turn Absent in Charger On/Off
1. Press Menu to enter main menu.
2. Scroll to Settings and press Select.
3. Scroll to Absent in charger and press Select.
4. Press Change to select between On or Off.
14226900-IG, Edition 10.0
July2017, Original document
74
Page 75

Spectralink7522/7532 Handset User Guide
Bluetooth (only 7532)
Bluetooth allows you to connect the handset to a compatible device with bluetooth connectivity within
10 metres (32 feet). When a wireless headset is connected to the Spectralink 7532 Handset, you
can perform the following actions.
To Activate the Bluetooth Function
1. Press Menu to enter main menu.
2. Scroll to Settings and press Select.
3. Scroll to Bluetooth and press Select.
4. Scroll to Active and press Select.
5. Press Change to select On. The Bluetooth function is now activated.
Pair Wireless Headset with the Handset
Note:
Bluetooth function must be set to On.
When setting up a bluetooth connection, you will need to search for a compatible device with
bluetooth connectivity in order to pair this device to your handset.
You will need a pin code of 1-16 numeric characters. (Consult the user guide of the Bluetooth headset for the pin code information).
You are only asked to enter this pin code the first time you connect to the device. The icon
appears in the handset display when a wireless headset is connected.
1. Press Menu to enter main menu.
2. Scroll to Settings and press Select.
3. Scroll to Bluetooth and press Select.
4. Scroll to Search to search for compatible bluetooth headset and press Select.
5. Select the headset code number listed in the display of the handset, press Stop, then press
Add.
6. Enter pin code and press Ok.
7. Press Ok, and press Options in order to connect to the headset.
8. Scroll to Connect and press Select.
9. Press Ok. The wireless headset is now connected to your Spectralink 7532 Handset.
Deactivate Bluetooth
1. Press Menu to enter main menu.
2. Scroll to Settings and press Select.
3. Scroll to Bluetooth and press Select.
4. Scroll to Active and press Select.
14226900-IG, Edition 10.0
July2017, Original document
75
Page 76

Spectralink7522/7532 Handset User Guide
5. Press Change to select Off. Bluetooth is now deactivated, and any bluetooth device connected to the handset has now been disconnected.
Activate Bluetooth Again
The Device list provides a list of paired devices.
1. Press Menu to enter main menu.
2. Scroll to Settings and press Select.
3. Scroll to Bluetooth and press Select.
4. Scroll to Device list and press Select.
5. Press Yes, and Bluetooth is activated again.
6. Press Options and scroll to Connect.
7. Press Select to connect to the headset again.
Disconnect Wireless Headset
1. Press Menu to enter main menu.
2. Scroll to Settings and press Select.
3. Scroll to Bluetooth and press Select.
4. Scroll to Active and press Select.
5. Scroll to Disconnect headset, press Change and press Yes to disconnect the headset.
Connect Wireless Headset Again
1. Press Menu to enter main menu.
2. Scroll to Settings and press Select.
3. Scroll to Bluetooth and press Select.
4. Scroll to Active and press Select.
5. Activate On by pressing Select, then press Exit.
6. Scroll to Device list and press Select.
7. Press Options and scroll to Connect.
8. Press Select, then press Ok. The wireless headset is now connected to your Spectralink
7532 Handset.
Remove Wireless Headset from the Device List
1. Press Menu to enter main menu.
2. Scroll to Settings and press Select.
3. Scroll to Bluetooth and press Select.
4. Scroll to Device list and press Select.
5. Press Options.
14226900-IG, Edition 10.0
July2017, Original document
76
Page 77

Spectralink7522/7532 Handset User Guide
6. Scroll to Delete and press Select.
7. Press Yes to remove the headset from the device list.
Auto Connect
It is possible to connect automatically to paired devices.
1. Press Menu to enter main menu.
2. Scroll to Settings and press Select.
3. Scroll to Bluetooth and press Select.
4. Scroll to Active and press Select.
5. Scroll to Settings and press Select.
6. Press Change to select Auto connect. The wireless headset will now connect automatically
to the handset when the headset is turned on.
Wireless Headset Volume
When the handset is on hook, it is possible to adjust the start speaking volume of the wireless headset.
1. Press Menu to enter main menu.
2. Scroll to Settings and press Select.
3. Scroll to Bluetooth and press Select.
4. Scroll to Active and press Select.
5. Scroll to Settings and press Select.
6. Scroll to Headset volume and press Select.
7. Press the left or right side of navigation key to adjust the volume.
8. Press Set.
Switch Between Wireless Headset and Handset
When the headset is active and the handset is in a call, the audio can be switched between the headset and the handset
l If headset is active, press Options, scroll to Audio to handset and press Select.
l If handset is active, press Options, scroll to Audio to headset and press Select.
Last Number Redial
Consult the user guide of the wireless headset for last number redial instructions.
14226900-IG, Edition 10.0
July2017, Original document
77
Page 78

Spectralink7522/7532 Handset User Guide
Advanced...
In the Settings menu it is possible to define the following advanced settings:
l Language
l Headset (only available on 7522)
l Hearing aid comp
l Microphone gain
l Long key
l Economy mode
l Master handset (system dependant)
l Login
l Time & date
l Minimum ring time
l OldDECT servers
l Deployment level
l Local tones
l Message list content
l Noisy environment
Changing Language
There are 14 predefined languages in the handset: English, Spanish, French, German, Dutch,
Czech, Italian, Danish, Norwegian, Swedish, Polish, Finnish, Russian and Portuguese.
1. Press Menu to enter main menu.
2. Scroll to Settings and press Select.
3. Scroll to Advanced and press Select.
4. Scroll to Language and press Select.
5. Scroll to the desired language and press Select.
Using a Headset (only 7522)
Using headset allows you to keep up your activities and use the phone at the same time.
To Enable/Disable Ring Tone and Alert Sounds in the Headset
1. Press Menu to enter main menu.
2. Scroll to Settings and press Select.
3. Scroll to Advanced and press Select.
4. Scroll to Headset and press Select.
5. Press Change to select between the options.
14226900-IG, Edition 10.0
July2017, Original document
78
Page 79

Spectralink7522/7532 Handset User Guide
To Set Headset Volume
1. Press Menu to enter main menu.
2. Scroll to Settings and press Select.
3. Scroll to Advanced and press Select.
4. Scroll to Headset and press Select.
5. Scroll to Headset volume and press Change.
6. Press the left or right side of navigation key to adjust the volume.
7. Press Set.
Hearing Aid Comp
Your handset has a hearing aid compatibility mode that adjusts the frequency response for users
who have hearing aids equipped with telecoil inductive pickups. Acoustic pickup hearing aids will not
respond to this adjustment.
To View Status of/Enable/Disable HAC
1. Press Menu to enter main menu.
2. Scroll to Settings and press Select.
3. Scroll to Advanced and press Select.
4. Scroll to Hearing aid comp and press Select.
5. Press Change to select between On or Off.
Microphone Gain
You can suppress echo and noisy surroundings by adjusting the microphone gain. The default setting is 0 dB.
To Change Microphone Gain
1. Press Menu to enter main menu.
2. Scroll to Settings and press Select.
3. Scroll to Advanced and press Select.
4. Scroll to Microphone gain and press Select.
5. Scroll to the relevant option and press Change.
14226900-IG, Edition 10.0
July2017, Original document
79
Page 80

Spectralink7522/7532 Handset User Guide
Using Long Key
The long key function supports system features and defines a long key press to digits between 0-9.
The long key press can be defined as speed dials or as predefined MSF signals.
MSF signals are system dependent. The MSF signal is sent to a server and not a specific number. If
supported by the subscribed system, a MSF signal sent to the system could for example return system features to the handset. Contact your system administrator for more information.
Speed dials are phone calls. For speed dials you can define Push to talk, meaning that talking
requires pressing left softkey while talking. When not pressing the left softkey you are muted. For
more information, see "Handset Keys" on page17.
To Change Long Key Definition:
1. Press Menu to enter main menu.
2. Scroll to Settings and press Select.
3. Scroll to Advanced and press Select.
4. Scroll to Long key and press Select.
5. If you want to have all digits between 0-9 set as either Speed dial or MSF, press Change to
select either Speed dial or MSF.
l If Speed dial is selected, you can also define Push to talk for the relevant digit under Indi-
vidual Settings. Scroll to Individual Settings, select relevant Speed dial and press
Change, scroll to Push to talk and press Change again.
6. If you want to define individual settings for each digit (a mix of Speed dial and MSF), scroll to
Individual Settings and define the relevant action for each digit.
l If Speed dial is selected, you can also define Push to talk by scrolling to Push to talk and
pressing Change.
Changing Economy Mode
In economy mode, the transmitted power is dynamically controlled to increase talk time.
To Change Economy Mode Settings
1. Press Menu to enter main menu.
2. Scroll to Settings and press Select.
3. Scroll to Advanced and press Select.
4. Scroll to Economy mode and press Select.
5. Press Change to select between On or Off.
Master Handset (System Dependant)
The Master handset feature is system dependant. Contact your system administrator for more
information.
When using the handset as a Master handset it is possible to replace another handset by moving the
directory number (e.g. local number) from the handset to be replaced to the new handset.
14226900-IG, Edition 10.0
July2017, Original document
80
Page 81

Spectralink7522/7532 Handset User Guide
To Replace a Handset using Master Handset
1. Ensure that you have the new handset charged and ready for use. You do not need the old
handset.
2. Press Menu to enter main menu.
3. Scroll to Settings and press Select.
4. Scroll to Advanced and press Select.
5. Scroll to Master handset and press Select.
6. Press OK to replace handset.
7. Enter the directory number of the handset to be replaced and press OK.
8. Enter the IPEI of the new handset. For more information, see "To Check General Information"
on page66.
9. Press OK to confirm the replacement.
The data is updated automatically.
10. Press OK and subscribe the new handset. For more information, see "Login" below.
Login
Before you can use the registered handset it is necessary to subscribe the handset to a system
(login). The handset can be subscribed to up to 15 different systems.
Selecting a Login
If you want to change to another system manually, do the following:
1. Press Menu to enter main menu.
2. Scroll to Settings and press Select.
3. Scroll to Advanced and press Select.
4. Scroll to Login and press Select.
5. Scroll to Select Login and press Select.
6. Scroll to the desired login and press Select.
Removing a Login
Logins can be removed from the system in use and from the 14 other systems (if connected). A password is required to remove a login. The default password is factory set at 0000.
1. Press Menu to enter main menu.
2. Scroll to Settings and press Select.
3. Scroll to Advanced and press Select.
4. Scroll to Login and press Select.
5. Scroll to Remove login and press Select.
6. Scroll to the desired login and press Select.
7. Enter your password and press Ok.
14226900-IG, Edition 10.0
July2017, Original document
81
Page 82

Spectralink7522/7532 Handset User Guide
8. If the system in use is removed, it is necessary to select one of the remaining systems or to subscribe to a new one.
Creating a Login
To create a login, the system must allow subscriptions to be made. Some systems also require an
Authentication Code (AC). You can create a login by performing a search for a system. If more than
one system currently permits subscription, you will need to know the ID of the system to which you
want to subscribe. Authentication Codes and system ID’s will be provided by the system administrator.
You can subscribe up to 15 different systems, meaning that you can create 15 logins.
To Create Login by Searching for System
1. Press Menu to enter main menu.
2. Scroll to Settings and press Select.
3. Scroll to Advanced and press Select.
4. Scroll to Login and press Select.
5. Scroll to Create login and press Select.
6. When Search is selected, press Select. The handset will start searching for a system.
7. Scroll to the relevant system and press Select.
8. If required, enter an AC Code and press Ok to connect to the system.
9. Press Ok.
Note:
If the handset is already subscribed to 15 systems, you will have to remove a subscription
before creating a new subscription.
Activating Automatically Login
Note:
To activate auto login your handset must be subscribed to at least two systems.
Auto login should only be used when systems are separate, with no overlaps.
When auto login is turned on, the handset automatically change to another system when necessary.
1. Press Menu to enter main menu.
2. Scroll to Settings and press Select.
3. Scroll to Advanced and press Select.
4. Scroll to Login and press Select.
5. Scroll to Auto login and press Select.
6. If Off is selected, press Change to select On.
The handset automatically selects a system. The selected system is marked with an A.
14226900-IG, Edition 10.0
July2017, Original document
82
Page 83

Spectralink7522/7532 Handset User Guide
Setting Time & Date
When you turn off the handset, time and date settings are deleted if the subscribed system does not
resend the information to the handset.
Choose Time Format
You can choose between the two formats: 24 hours or 12 hours.
1. Press Menu to enter main menu.
2. Scroll to Settings and press Select.
3. Scroll to Advanced and press Select.
4. Scroll to Time & date and press Select.
5. Scroll to Time format and press Select.
6. Press Change to select between the options.
Change Time
1. Press Menu to enter main menu.
2. Scroll to Settings and press Select.
3. Scroll to Advanced and press Select.
4. Scroll to Time & date and press Select.
5. Scroll to Change time and press Select.
6. Place cursor on the digit, you want to change by pressing the left or right side of the nav-
igation key.
7. Press a digit. The cursor will then automatically jump to the next digit.
8. Press Change.
Choose Date Format
You can choose between the date formats: MM/DD/YYYY, DD/MM/YYYY or YYYY-MM-DD.
1. Press Menu to enter main menu.
2. Scroll to Settings and press Select.
3. Scroll to Advanced and press Select.
4. Scroll to Time & date and press Select.
5. Scroll to Date format and press Select.
6. Scroll to the desired option and press Change.
Change Date
1. Press Menu to enter main menu.
2. Scroll to Settings and press Select.
3. Scroll to Advanced and press Select.
14226900-IG, Edition 10.0
July2017, Original document
83
Page 84

Spectralink7522/7532 Handset User Guide
4. Scroll to Time & date and press Select.
5. Scroll to Change date and press Select.
6. Scroll to desired date format and press Change.
7. Place cursor on the digit, you want to change by pressing the left or right side of the nav-
igation key.
8. Press a digit. The cursor will then automatically jump to the next digit.
9. Press Change.
Minimum Ring Time
It is possible to adjust the minimum length of the ringing tone. As default this setting is set to Off and
uses the default setting from the server.
Change Minimum Length of Ringing Tone
1. Press Menu to enter main menu.
2. Scroll to Settings and press Select.
3. Scroll to Advanced and press Select.
4. Scroll to Minimum ring time and press Select.
5. Scroll to the desired option and press Change..
Old DECT Servers
It is possible to make your DECT handset compatible with older DECT servers.
Ensure Compatibility with Old DECT Servers
1. Press Menu to enter main menu.
2. Scroll to Settings and press Select.
3. Scroll to Advanced and press Select.
4. Scroll to Old DECT servers and press Select.
5. To define compatibility with CS1K (CommunicationServer 1000), press Select.
6. Press Change to select between On or Off.
7. If the handset should send extended location information to the DECT server, scroll to Use
extend location and press Select.
l Press Change to select between No or Yes.
Deployment Level
You can define the deployment level to be either Normal, Weak or Bad. Normal is the standard and
default value. Contact your system administrator for more information.
14226900-IG, Edition 10.0
July2017, Original document
84
Page 85

Spectralink7522/7532 Handset User Guide
To Change Deployment Level
1. Press Menu to enter main menu.
2. Scroll to Settings and press Select.
3. Scroll to Advanced and press Select.
4. Scroll to Deployment level and press Select.
5. Scroll to the desired option and press Change.
Local Tones
You can change the call progress tones (busy/dial/ringback tones) in your handset. Also if you are in
a different area, than the chosen call progress tone.
To Change Local Tone
1. Press Menu to enter main menu.
2. Scroll to Settings and press Select.
3. Scroll to Advanced and press Select.
4. Scroll to Local tones and press Select.
5. Scroll to the desired option and press Change.
Message List Content
You can define whether your list of MSF messages in the inbox/outbox is to show the call back number or part of the text message.
1. Press Menu to enter main menu.
2. Scroll to Settings and press Select.
3. Scroll to Advanced and press Select.
4. Scroll to Message list Conten and press Select.
5. Press Change to select between the options.
Noisy Environment
If you are working in a noisy environment it is possible to define this in the handset.
Note:
If Noisy environment is set to On, you may experience echo when moving to quiet environments.
1. Press Menu to enter main menu.
2. Scroll to Settings and press Select.
3. Scroll to Advanced and press Select.
4. Scroll to Noisy environment and press Select.
5. Press Change to select between On or Off.
14226900-IG, Edition 10.0
July2017, Original document
85
Page 86

Spectralink 7202/7212, 7622/7642, 7722/7742
Spectralink 7202 Handset K023
Spectralink 7212 Handset K023
Spectralink 7622 Handset K023
Spectralink 7642 Handset K023
Spectralink 7722 Handset K023
Spectralink 7742 Handset K023
Single Charger (6.0V DC, 350mA) 8464 2488 / 8464 2493
Dual Charger (6.0V DC, 1.0A) K024 (8464 2500)
Dual Charger (6.0V DC, 1.0A) K024 (8484 2501)
Power Supply (5.99V DC, 1.0A) 8464 2601
Charger Rack (Multi Charger) (6.0V DC, 5.0A) K004
Power Supply for Charger Rack:EU version 0250 9500
Power Supply for Charger Rack:UK version 0250 9501
Power Supply for Charger Rack:AU version 0250 9502
Power Supply for Charger Rack:US version 0250 9503
Management Cradle (6.0V DC, 350mA) 8464 2489 / 8464 2494
Power Supply (5.99V DC, 1.0A) 8464 2601
USB cable for Management Cradle 8471 8504
Power Supply (5.99V DC, 1.0A) 8464 2601
LI-Ion Battery Pack DM322
Spectralink7522/7532 Handset User Guide
Product Compatibility
If you have any questions about product compatibility, contact your system administrator.
Use only Spectralink Handset with other Spectralink products as identified by the type approval
model ID and/or part number located on the label of the product.
14226900-IG, Edition 10.0
July2017, Original document
86
Page 87

Spectralink 7522/7532
Spectralink 7522 Handset K022
Spectralink 7532 Handset K022
Single Charger (6.0V DC, 350mA) 8464 2472
Maintenance Cradle (8.0V DC, 350mA) 8464 2473
Power Supply (5.99V DC, 1.0A) 8464 2601
USB cable for Management Cradle 8471 8504
LI-Ion Battery Pack DM322
Spectralink Butterfly
Spectralink Butterfly K001
Micro USB Charger/Power Supply (5.0V DC, 1.0A) 8464 2604
Ni-MH AAA 1.2 V Battery
Spectralink7522/7532 Handset User Guide
14226900-IG, Edition 10.0
July2017, Original document
87
Page 88

Spectralink7522/7532 Handset User Guide
Technical Specifications
Approvals
l EMC: EN 301 489 - 1
l EMC: EN 301 489 - 6
l EMC: EN 301 489 - 17 (only 7532)
l Radio: EN 301 406
l Radio: EN 300 328 (only 7532)
l Safety: EN 60950 - 1
l SAR:EN 50360
Size and weight
l Size: 146 x 48 x 19.7 mm/5.75 x 1.89 x 0.78 in
l Weight incl. battery: 110 g ± 10 g/3.9 oz ± 0.35 oz
Capacity Spectralink 7522 and 7532
l Active talking time (Economy mode) up to 21 hours.
l Standby time Spectralink 7522 up to 122 hours.
l Standby time Spectralink 7532 up to 115 hours.
Capacity Spectralink 7532 with Bluetooth Turned on
l Active talking time up to 14 hours.
l Standby time up to 120 hours .
Temperature
l Charging temperature: 0° - 40°C/32° - 104°F
l Operating temperature: 0° - 40°C/32° - 104°F
Air pressure
l Air pressure: Normal atmosphere condition
14226900-IG, Edition 10.0
July2017, Original document
88
Page 89

Problem Action Reference
The handset freezes. Remove and replace batteries.
Press left softkey to turn on handset.
"Replacing Battery" on
page12
The handset does not ring. Check whether Silent mode is
turned On.
"Silent Mode" on page69
The handset cannot find a
system ID at Create Login.
Check whether the system is set to
allow subscriptions.
The handset cannot subscribe even if system ID has
been found.
Check if Authentication Code is
necessary.
If you are subscribing to an older
DECT server or other servers, try to
set Use extend location to No .
Check if Authentication
Code is necessary.
"Old DECT Servers" on
page84
Not possible to turn on the
handset.
Check if battery is connected. If yes,
charge the battery.
"Charging Battery" on
page15
The handset turns off when it
receives a call or goes offhook.
Charge the battery. If the problem
continues, change the battery as it
might be defective.
"Charging Battery" on
page15
"Replacing Battery" on
page12
Getting error information If the handset is not functioning prop-
erly, the infrastructure that the handset is connected to may not be
working properly.
Therefore, before you return a handset for repair ensure that the main
system is operating properly.
Spectralink7522/7532 Handset User Guide
Troubleshooting
In general, always check if there is newer software to be downloaded.
Spectralink Handset
14226900-IG, Edition 10.0
July2017, Original document
89
 Loading...