

Page 1

721-0048-000 Rev: B
February 2018
Spectralink 84-Series Wireless Telephone
Deployment Guide
Using Spectralink CMS
Spectralink Software Versions 5.4 and above
Page 2

Spectralink 84-Series Wireless Telephones Deployment Guide with CMS
721-0048-000_B.docx
February 2018 2
Copyright Notice
© 2017-2018 Spectralink Corporation All rights reserved. SpectralinkTM, the Spectralink logo and the
names and marks associated with Spectralink’s products are trademarks and/or service marks of
Spectralink Corporation and are common law marks in the United States and various other countries. All
other trademarks are property of their respective owners. No portion hereof may be reproduced or
transmitted in any form or by any means, for any purpose other than the recipient’s personal use, without
the express written permission of Spectralink.
All rights reserved under the International and pan-American Copyright Conventions. No part of this
manual, or the software described herein, may be reproduced or transmitted in any form or by any
means, or translated into another language or format, in whole or in part, without the express written
permission of Spectralink Corporation.
Do not remove (or allow any third party to remove) any product identification, copyright or other notices.
Notice
Spectralink Corporation has prepared this document for use by Spectralink personnel and customers.
The drawings and specifications contained herein are the property of Spectralink and shall be neither
reproduced in whole or in part without the prior written approval of Spectralink, nor be implied to grant any
license to make, use, or sell equipment manufactured in accordance herewith.
Spectralink reserves the right to make changes in specifications and other information contained in this
document without prior notice, and the reader should in all cases consult Spectralink to determine
whether any such changes have been made.
NO REPRESENTATION OR OTHER AFFIRMATION OF FACT CONTAINED IN THIS DOCUMENT
INCLUDING BUT NOT LIMITED TO STATEMENTS REGARDING CAPACITY, RESPONSE-TIME
PERFORMANCE, SUITABILITY FOR USE, OR PERFORMANCE OF PRODUCTS DESCRIBED
HEREIN SHALL BE DEEMED TO BE A WARRANTY BY SPECTRALINK FOR ANY PURPOSE, OR
GIVE RISE TO ANY LIABILITY OF SPECTRALINK WHATSOEVER.
Warranty
The Product Warranty and Software License and Warranty and other support documents are available at
http://support.spectralink.com.
Contact Information
US Location Denmark Location UK Location
+1 800-775-5330 +45 7560 2850 +44 (0) 20 3284 1536
Spectralink Corporation Spectralink Europe ApS Spectralink Europe UK
2560 55th Street Bygholm Soepark 21 E Stuen 329 Bracknell, Doncastle Road
Boulder, CO 80301 8700 Horsens Bracknell, Berkshire, RG12 8PE
USA Denmark United Kingdom
info@spectralink.com infoemea@spectralink.com infoemea@spectralink.com
Page 3

721-0048-000_B.docx
February 2018 3
Contents
Introduction ...................................................................... 6
How does CMS Facilitate Deployment? .......................................................................... 6
What You Need to Know ................................................................................................... 6
Recommended Software Tools ........................................................................................ 6
XML editor ................................ .................................................................................... 6
Release Notes ............................................................................................................. 7
Product Support ............................................................................................................... 7
Spectralink References .................................................................................................... 7
Specific Documents ..................................................................................................... 8
White Papers ............................................................................................................... 9
Conventions Used in This Guide ..................................................................................... 9
Icons ............................................................................................................................ 9
Typography .................................................................................................................10
Part I: Getting Started ...................................... 12
Chapter 1: Infrastructure ..................................................... 13
Network Components ......................................................................................................13
Recommended Reading ..................................................................................................13
Quality of Service.............................................................................................................14
WLAN Security .................................................................................................................14
Security Methods ........................................................................................................14
System Diagram ...............................................................................................................16
System Requirements .....................................................................................................17
System Components .......................................................................................................17
Spectralink 84-Series handsets. ..................................................................................17
Servers .......................................................................................................................18
Access points ..............................................................................................................19
Ethernet switch ...........................................................................................................20
Chapter 2: Designing the Configuration .................................. 21
QNC Settings ................................................................ ....................................................21
Wi-Fi Setup ................................................................................................ .................21
Server settings ............................................................................................................21
Phone Settings ............................................................................................................22
Handset Usage Scenarios ...............................................................................................22
Enterprise Settings ..........................................................................................................23
Logging .......................................................................................................................23
Page 4

Spectralink 84-Series Wireless Telephones Deployment Guide with CMS
721-0048-000_B.docx
February 2018 4
SIP Registration ................................................................................................ ..........23
Wireless ................................................................ ......................................................23
Mostly Enterprise Settings ..............................................................................................24
Feature Config ............................................................................................................24
Tones ..........................................................................................................................24
Enhanced Feature Keys ..............................................................................................24
Group or Enterprise Settings ..........................................................................................24
Personal Alarm ...........................................................................................................24
PTT .............................................................................................................................24
Web App ................................ ................................................................ .....................24
Device Settings ................................................................................................................25
Device settings ............................................................................................................26
Chapter 3: Deployment Summaries ....................................... 27
Green Field Deployment ..................................................................................................27
High Level Overview ...................................................................................................27
DETAILED STEPS ......................................................................................................28
Step #1 Unpack Phones & Charge Batteries ............................................................... 28
Step #2 Install Spectralink CMS on Spectralink Local Host .........................................28
Step #3 Build SIP Configuration ..................................................................................33
Step #4 84-Series SW Update, CMS Configuration & Initial Provisioning via QNC ......33
Test Features and Make Calls… Done! .......................................................................36
Existing 84-Series Deployment with Provisioning Server ............................................37
High Level Overview ...................................................................................................37
DETAILED STEPS ......................................................................................................37
Step #1 Update 84-Series SW to R 5.4.x or newer ......................................................37
Step #2 Install Spectralink CMS on Spectralink Local Host .........................................37
Step #3 Build SIP Configuration ..................................................................................43
Test Features and Make Calls… Done! .......................................................................46
Existing 84-Series Deployment w/o Provisioning Server ..............................................47
High Level Overview ...................................................................................................47
DETAILED STEPS ......................................................................................................47
Step #1 Install Spectralink CMS on Spectralink Local Host .........................................47
Step #2 Build SIP Configuration ..................................................................................53
Step #3 84-Series SW Update, CMS Configuration & Initial Provisioning via QNC ......53
Test Features and Make Calls… Done! .......................................................................56
Part II: Configuration Details .............................. 57
Chapter 4: Create the Batch Configuration File ......................... 58
Listing Handsets/Users for Batch Deployment ............................................................58
Page 5

Spectralink 84-Series Wireless Telephones Deployment Guide with CMS
721-0048-000_B.docx
February 2018 5
Chapter 5: Wireless Settings using QNC ................................. 60
Initial wireless provisioning ..........................................................................................60
Chapter 6: Use CMS ........................................................... 62
Approve the Handsets .....................................................................................................62
Chapter 7: Configure Remaining Enterprise Settings ................. 64
Chapter 8: Configure Group Settings ..................................... 65
Chapter 9: Configure Custom Settings ................................... 68
Import Configuration Files ..............................................................................................68
Create Configuration Files ..............................................................................................69
Chapter 10: Testing the Handsets ......................................... 71
Test Configured Features ................................................................................................71
Part III: Appendices ......................................... 72
Appendix A: Software Copyrights and Open Source Information .. 73
Software Copyright ..........................................................................................................73
OFFER for Source for GPL and LGPL Software ............................................................ 73
Contact Information for Requesting Source Code .......................................................74
Appendix B: Spectralink Certificates ...................................... 75
Page 6

721-0048-000_B.docx
February 2018 6
Introduction
This guide introduces the requirements for provisioning the Spectralink 84-Series Wireless
Telephones using Spectralink’s Configuration Management System.
How does CMS Facilitate Deployment?
The Spectralink 84-Series handset is a powerful device with thousands of possible settings.
Spectralink’s Configuration Management System provides a GUI interface so that you can
configure only the settings you need for your deployment. Then the GUI allows you to manage
the phones easily by providing information about deployment, usage, locations, battery usage,
etc
However, CMS cannot provide every possible parameter and so it provides a Custom Settings
page to allow you to refine the deployment with your own xml files for a highly customized
installation.
What You Need to Know
This guide assumes you are familiar with:
• Computer networking and driver administration for your operating system
• An XML editor
• Wireless client administration
• WLAN infrastructure parameters and equipment
• Your phone system and how to add SIP telephones extensions to it
Admin Tip: Microsoft Lync becomes Microsoft Skype for Business (SfB)
Microsoft has re-branded its software products formerly sold under the Lync name
to Skype for Business. In this document, the names are used interchangeably.
Recommended Software Tools
XML editor
In order to view, edit and create custom xml files, you will need to use an XML editor.
Page 7
Spectralink 84-Series Wireless Telephones Deployment Guide with CMS
721-0048-000_B.docx
February 2018 7
Release Notes
Every software release is accompanied by release notes that provide the new and changed
features and resolved issues in the latest version of the software. Please review these for the
most current information about your software.
Product Support
Spectralink wants you to have a successful installation. If you have questions please contact the
Customer Support Hotline at 1-800-775-5330.
The hotline is open Monday through Friday, 6 a.m. to 6 p.m. Mountain time.
For Technical Support: mailto:technicalsupport@spectralink.com
For Knowledge Base: http://support.spectralink.com
For Return Material Authorization: mailto:nalarma@spectralink.com
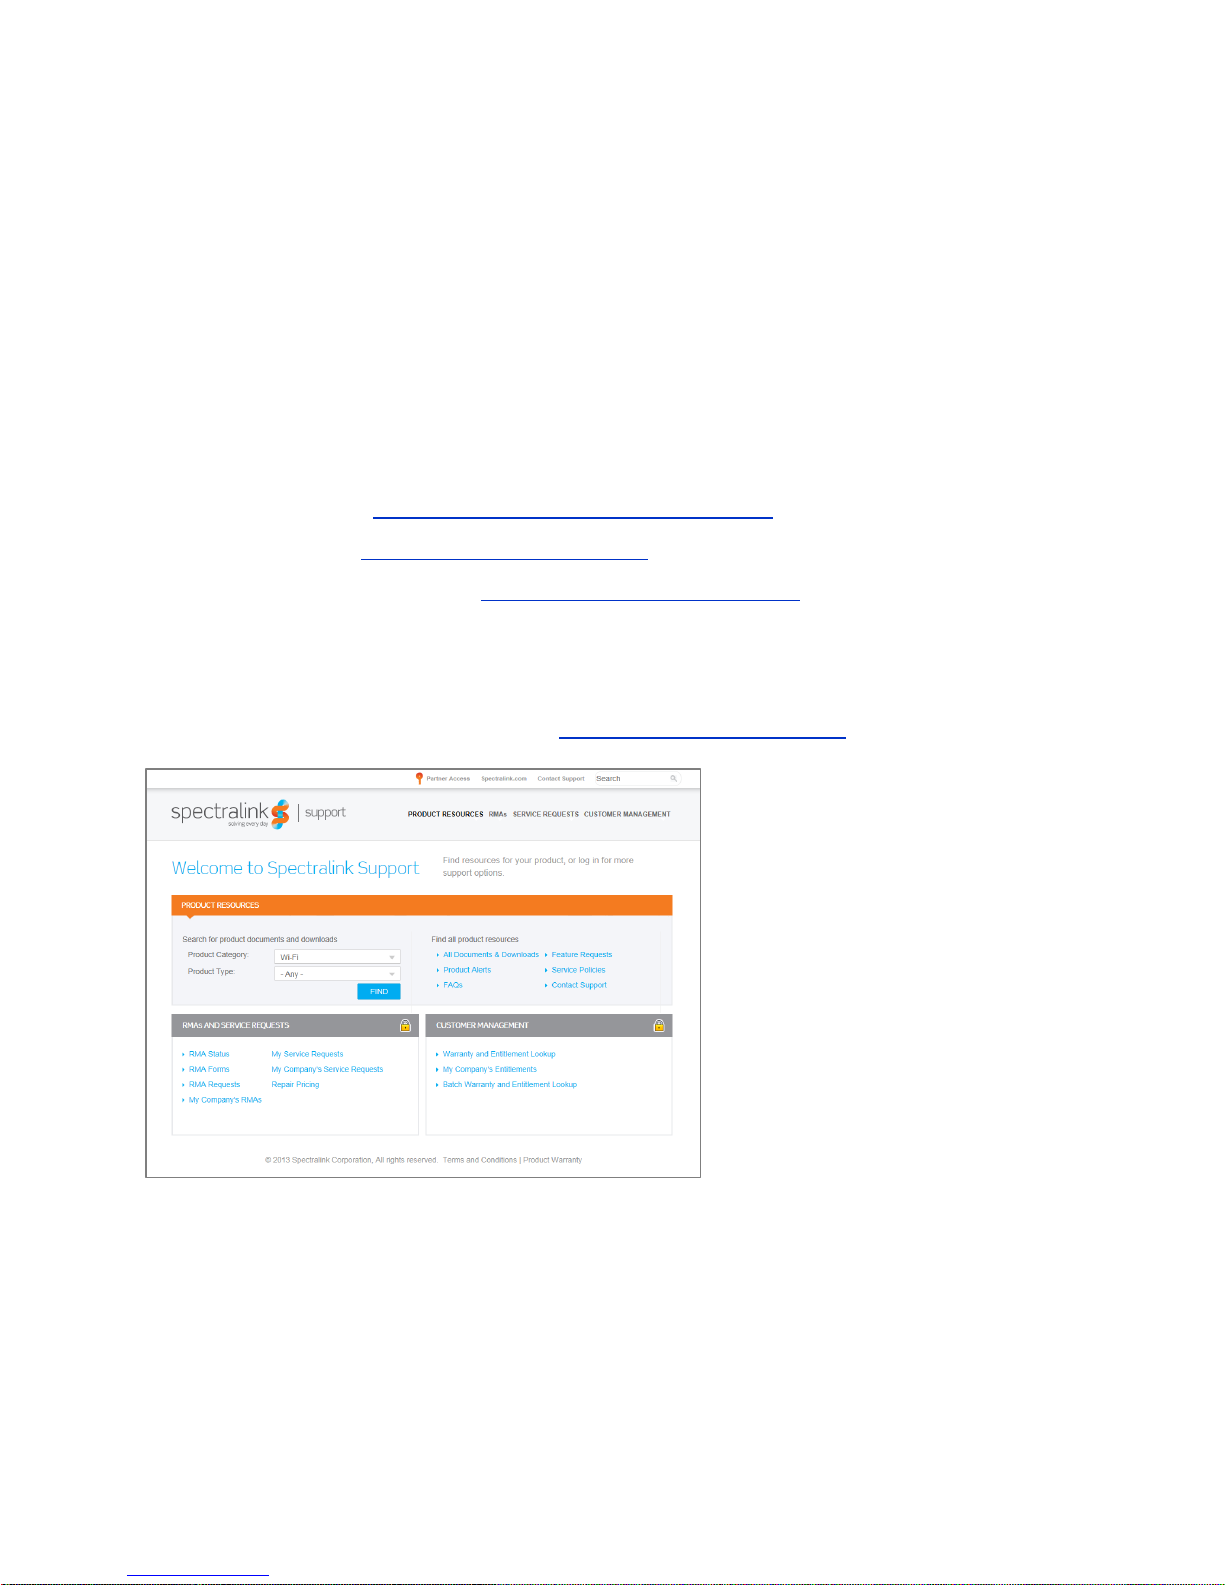
Spectralink References
All Spectralink documents are available at http://support.spectralink.com.
To go to a specific product page:
Select the Product Category and Product Type from the dropdown lists and then select the
product from the next page. All resources for that particular product are displayed by default
under the All tab. Documents, downloads and other resources are sorted by the date they were
created so the most recently created resource is at the top of the list. You can further sort the
Page 8

Spectralink 84-Series Wireless Telephones Deployment Guide with CMS
721-0048-000_B.docx
February 2018 8
list by the tabs across the top of the list to find exactly what you are looking for. Click the title to
open the link.
Specific Documents
Spectralink 84-Series system documents are available on the Spectralink support site at
http://support.spectralink.com/products/wi-fi/spectralink-84-series-wireless-telephone.
Spectralink Configuration Management System Administration Guide The CMS Administration
Guide provides information about every setting and option available to the administrator on
Spectralink 84-Series handsets and CMS. Time-saving shortcuts, troubleshooting tips and other
important maintenance instructions are also found in this document. CMS software and
documents are available on the Spectralink support site at http://support.spectralink.com/cms.
The Spectralink 84-Series Wireless Telephone Administration Guide provides a comprehensive
list of every parameter available on Spectralink 84-Series Wireless Telephones.
Quick Network Connect Administration Guide QNC provides step-by-step instructions for
configuring wireless settings required for the smartphones to associate with the wireless LAN.
QNC software and documents are available on the Spectralink support site at
http://support.spectralink.com/products/wi-fi/qnc.
The Spectralink 84-Series Barcode Administration Guide provides information about barcode
symbologies and how to configure and implement the barcode feature on the handset. The
Spectralink 84-Series User Guide also contains information about using the barcode feature.
Quick Barcode Connector Administration Guide Provides instruction for implementation of the
barcode application. The Spectralink 84-Series User Guide contains information about using the
barcode feature.
The Spectralink 84-Series User Guide offers comprehensive instructions on using each of the
features deployed on the handsets.
The Web Configuration Utility User Guide is used for troubleshooting in certain isolated cases
as explained in the text.
For information about combining Polycom desksets and Spectralink 84-Series handsets in the
same facility, see the Interoperability Guide: Spectralink 84-Series Coexistence with Polycom
Desksets.
For additional information about deploying Microsoft Skype for Business (formerly Lync) in your
phone environment, see Microsoft Skype for Business Interoperability Guide.
For information on IP PBX and softswitch vendors, see the Spectralink 84-Series Call Server
Interoperability Guide.
Technical Bulletins and Feature Descriptions explain workarounds to existing issues and
provide expanded descriptions and examples.
Page 9

Spectralink 84-Series Wireless Telephones Deployment Guide with CMS
721-0048-000_B.docx
February 2018 9
AP Configuration Guides explain how to correctly configure access points and WLAN controllers
(if applicable) and identify the optimal settings that support Spectralink 84-Series handsets. You
can find them on the VIEW Certified webpage.
White Papers
Spectralink White Papers are available at http://www.spectralink.com/resources/white-papers.
For the Spectralink 84-Series Wireless Telephones, please refer to Best Practices Guide for
Deploying Spectralink 84-Series Handsets for detailed information on wireless LAN layout,
network infrastructure, QoS, security and subnets.
For additional details on RF deployment please see The challenges of ensuring excellent voice
quality in a Wi-Fi workplace and Deploying Enterprise-Grade Wi-Fi Telephony.
These White Papers identify issues and solutions based on Spectralink’s extensive experience
in enterprise-class Wi-Fi telephony. It provides recommendations for ensuring that a network
environment is adequately optimized for use with Spectralink Wireless Telephones.
Conventions Used in This Guide
Icons
Icons indicate extra information about nearby text.
Warning
The Warning icon highlights an action you must perform (or avoid) to avoid
exposing yourself or others to hazardous conditions.
Caution
The Caution icon highlights information you need to know to avoid a hazard that
could potentially impact device performance, application functionality, successful
feature configuration and/or affect phone or network performance.
Spectralink recommends
Our recommendations for successful deployments.
Note
The Note icon highlights information of interest or important information that will
help you be successful in accomplishing a procedure or understanding a concept.
Page 10

Spectralink 84-Series Wireless Telephones Deployment Guide with CMS
721-0048-000_B.docx
February 2018 10
Tip
The Tip icon highlights information that may be valuable or helpful for users to
know, such as special techniques, shortcut methods, or information that will make
user tasks easier to perform.
Web
The Web Info icon highlights supplementary information available online such as
documents or downloads on support.spectralink.com or other locations.
Timesaver
A time-saving tip is typically used to mention or highlight a faster or alternative
method for users who may already be familiar with the operation or method being
discussed.
Admin Tip
This tip advises the administrator of a smarter, more productive or alternative
method of performing an administrator-level task or procedure.
Power User
A Power User Tip is typically reserved for information directed specifically at highlevel users who are familiar with the information or procedure being discussed and
are looking for better or more efficient ways of performing the task. For example,
this might highlight customization of a feature for a specific purpose.
Troubleshooting
This element can be used in any type of document and is typically used to highlight
information to help you solve a relevant problem you may encounter, or to point to
other relevant troubleshooting reference information.
Settings
The Settings icon highlights information to help you zero in on settings you need to
choose for a specific behavior, to enable a specific feature, or access
customization options.
Typography
A few typographic conventions, listed next, are used in this guide to distinguish types of in-text
information.
Page 11

Spectralink 84-Series Wireless Telephones Deployment Guide with CMS
721-0048-000_B.docx
February 2018 11
Convention
Description
Bold
Highlights interface items such as menus, soft keys, file names, and
directories. Also used to represent menu selections and text entry to the
phone.
Italics
Used to emphasize text, to show example values or inputs, and to show
titles of reference documents available from the Spectralink Support Web
site and other reference sites.
Underlined blue
Used for URL links to external Web pages or documents. If you click on
text in this style, you will be linked to an external document or Web page.
Bright orange text
Used for cross references to other sections within this document. If you
click on text in this style, you will be taken to another part of this
document.
Fixed-width-font
Used for code fragments and parameter names.
This guide also uses a few writing conventions to distinguish conditional information.
Convention
Description
<MACaddress>
Indicates that you must enter information specific to your installation,
phone, or network. For example, when you see <MACaddress>, enter
your phone’s 12-digit MAC address. If you see <installed-directory>, enter
the path to your installation directory.
>
Indicates that you need to select an item from a menu. For example,
Settings> Basic indicates that you need to select Basic from the
Settings menu.
Page 12

721-0048-000_B.docx
February 2018 12
Part I: Getting Started
Part I: Getting Started covers basic information you will need to understand the hardware and
software components that comprise a wireless SIP implementation. This Part introduces you to
SIP and managing the configuration parameters that the 84-Series handset requires.
• Infrastructure requirements
• Deployment sequence and usage scenarios
• Configuration parameters and design
• Types of settings
Page 13

721-0048-000_B.docx
February 2018 13
Chapter 1: Infrastructure
Provisioning a wireless handset is somewhat more complex than plugging a phone cable into a
wall jack and getting a dial tone. You will need to establish a wireless infrastructure specifically
designed for voice communications that takes into consideration the unique quality of service
requirements of voice transmissions. Then you will need to consider the issue of communication
security and decide which method is appropriate for your facility.
Network Components
Delivering enterprise-grade VoWLAN (Voice over Wireless Local Area Network) means that
wireless networks must be designed to provide the highest audio quality throughout the facility.
Voice has different attributes and performance requirements than wireless data applications
making VoIP WLAN pre-deployment planning necessary.
A Wi-Fi handset requires a continuous, reliable connection as the user moves throughout the
coverage area of the facility. In addition, voice applications have a low tolerance for network
errors, packet retries and packet delays. Whereas data applications are able to accept frequent
packet delays and retransmissions, wireless voice quality will deteriorate with just a few hundred
milliseconds of delay or a very small percentage of lost packets. Additionally, data applications
are typically bursty in terms of bandwidth utilization; whereas voice conversations use a
consistent and a relatively small amount of network bandwidth throughout the length of a
conversation.
This chapter covers the basic elements in a relatively simple system. Recommendations for
your specific requirements are part of the service Spectralink includes with the installation of
Spectralink wireless telephones. The following information will give you an overview of what
each component does and how it is used by the wireless telephones.
Recommended Reading
Spectralink White Papers are available at http://www.spectralink.com/resources/white-papers.
For the Spectralink 84-Series Wireless Telephones, please refer to Best Practices Guide for
Deploying Spectralink 84-Series Handsets for detailed information on wireless LAN layout,
network infrastructure, QoS, security and subnets.
For additional details on RF deployment please see The challenges of ensuring excellent voice
quality in a Wi-Fi workplace and Deploying Enterprise-Grade Wi-Fi Telephony.
These White Papers identify issues and solutions based on Spectralink’s extensive experience
in enterprise-class Wi-Fi telephony. It provides recommendations for ensuring that a network
environment is adequately optimized for use with Spectralink Wireless Telephones.
Page 14

Spectralink 84-Series Wireless Telephones Deployment Guide with CMS
721-0048-000_B.docx
February 2018 14
Quality of Service
The Spectralink 84-Series handset uses Wi-Fi Multimedia (WMM), WMM Power Save and
WMM Admission Control mechanisms to deliver enterprise-grade Quality of Service (QoS). The
use of WMM and WMM Power Save are required. You can disable WMM Admission Control in
the access points if needed. However the use of all three WMM specifications is highly
recommended by Spectralink and is the default operating mode of the handset.
Refer to Best Practices Guide to Network Design Considerations for Spectralink Wireless
Telephones.
AP Configuration Guides show you how to correctly configure access points and WLAN
controllers (if applicable) and identify the optimal settings that support Spectralink 84-Series
handsets. The guides can be found at the View Certified page.
WLAN Security
Wireless technology does not provide any physical barrier from malicious attackers since radio
waves penetrate walls and can be monitored and accessed beyond the wall even from outside
the facility. The extent of security measures used is typically proportional to the value of the
information accessible on the network. The security risk for VoWLAN is not limited to the typical
wired telephony concerns of eavesdropping on telephone calls or making unauthorized toll calls,
but is equivalent to the security risk of the data network that connects to the APs. Several
different security options are supported on Spectralink 84-Series Wireless Telephones.
Determining the proper level of security should be based on identified risks, corporate policy
and an understanding of the pros and cons of the available security methods.
Security Methods
The security methods available for Spectralink Wireless Telephones are industry standard
implementations used in typical Enterprise VoIP installations. The scope of this document does
not include a complete analysis of security methods. Refer to Best Practices for Wireless
Security for detailed information.
Wireless
Security
Method
Security in
Enterprise
Environments
Audio
Ease of Configuration and Other General Information
WEP
Poor
Excellent
Easy to administer, little processing overhead, adequate
security for many home Wi-Fi networks. Easily
compromised with hacking tools readily available on the
internet. Every phone can decrypt every other phone’s
data. Still in use on some older enterprise networks.
WPA-PSK
Acceptable
Excellent to
Good
Acceptable security for many small business Wi-Fi
networks. Each phone negotiates a key (see TKIP
below) with the AP so phones can’t decrypt each other’s
data, although a sophisticated hacking device that
Page 15

Spectralink 84-Series Wireless Telephones Deployment Guide with CMS
721-0048-000_B.docx
February 2018 15
Wireless
Security
Method
Security in
Enterprise
Environments
Audio
Ease of Configuration and Other General Information
knows the PSK can decode anyone’s traffic. The
problem can be minimized with periodic rotation of long,
hard-to-hack passwords.
WPA2PSK
Acceptable to
Good
Excellent to
Good
Good security for most small business Wi-Fi networks.
Similar to WPA with the addition of AES/CCMP, one of
the most secure encryption algorithms available. The
PSK limitation is still an issue, however.
WPA2Enterprise1
Excellent
Excellent to
Poor
Excellent security for enterprise Wi-Fi network. PSK is
replaced by some form of EAP and a RADIUS server,
and each phone is configured with its own username
and password, making the conversation between phone
and AP completely private. The processing
requirements of a RADIUS server, however, can
compromise handoffs, so a fast-roaming technique such
as OKC or CCKM must be employed.
1
WPA2-Enterprise variables:
84-Series handsets use authentication types: EAP-TLS, EAP-FAST or PEAPv0 with MSCHAPv2. EAPTLS uses a certificate to authenticate both the device and server. EAP-FAST is used by products of
Cisco, its creator, and by a growing number of other WLAN vendors. It uses a PAC file, which is similar
to a certificate. PEAPv0 with MSCHAPv2 is the most common form of PEAP, which uses a certificate
to authenticate the server.
84-Series handsets use either of two fast-handoff techniques as they roam among APs: CCKM or
OKC. CCKM is used exclusively by Cisco APs. OKC is used by most non-Cisco APs.
Page 16
Spectralink 84-Series Wireless Telephones Deployment Guide with CMS
721-0048-000_B.docx
February 2018 16
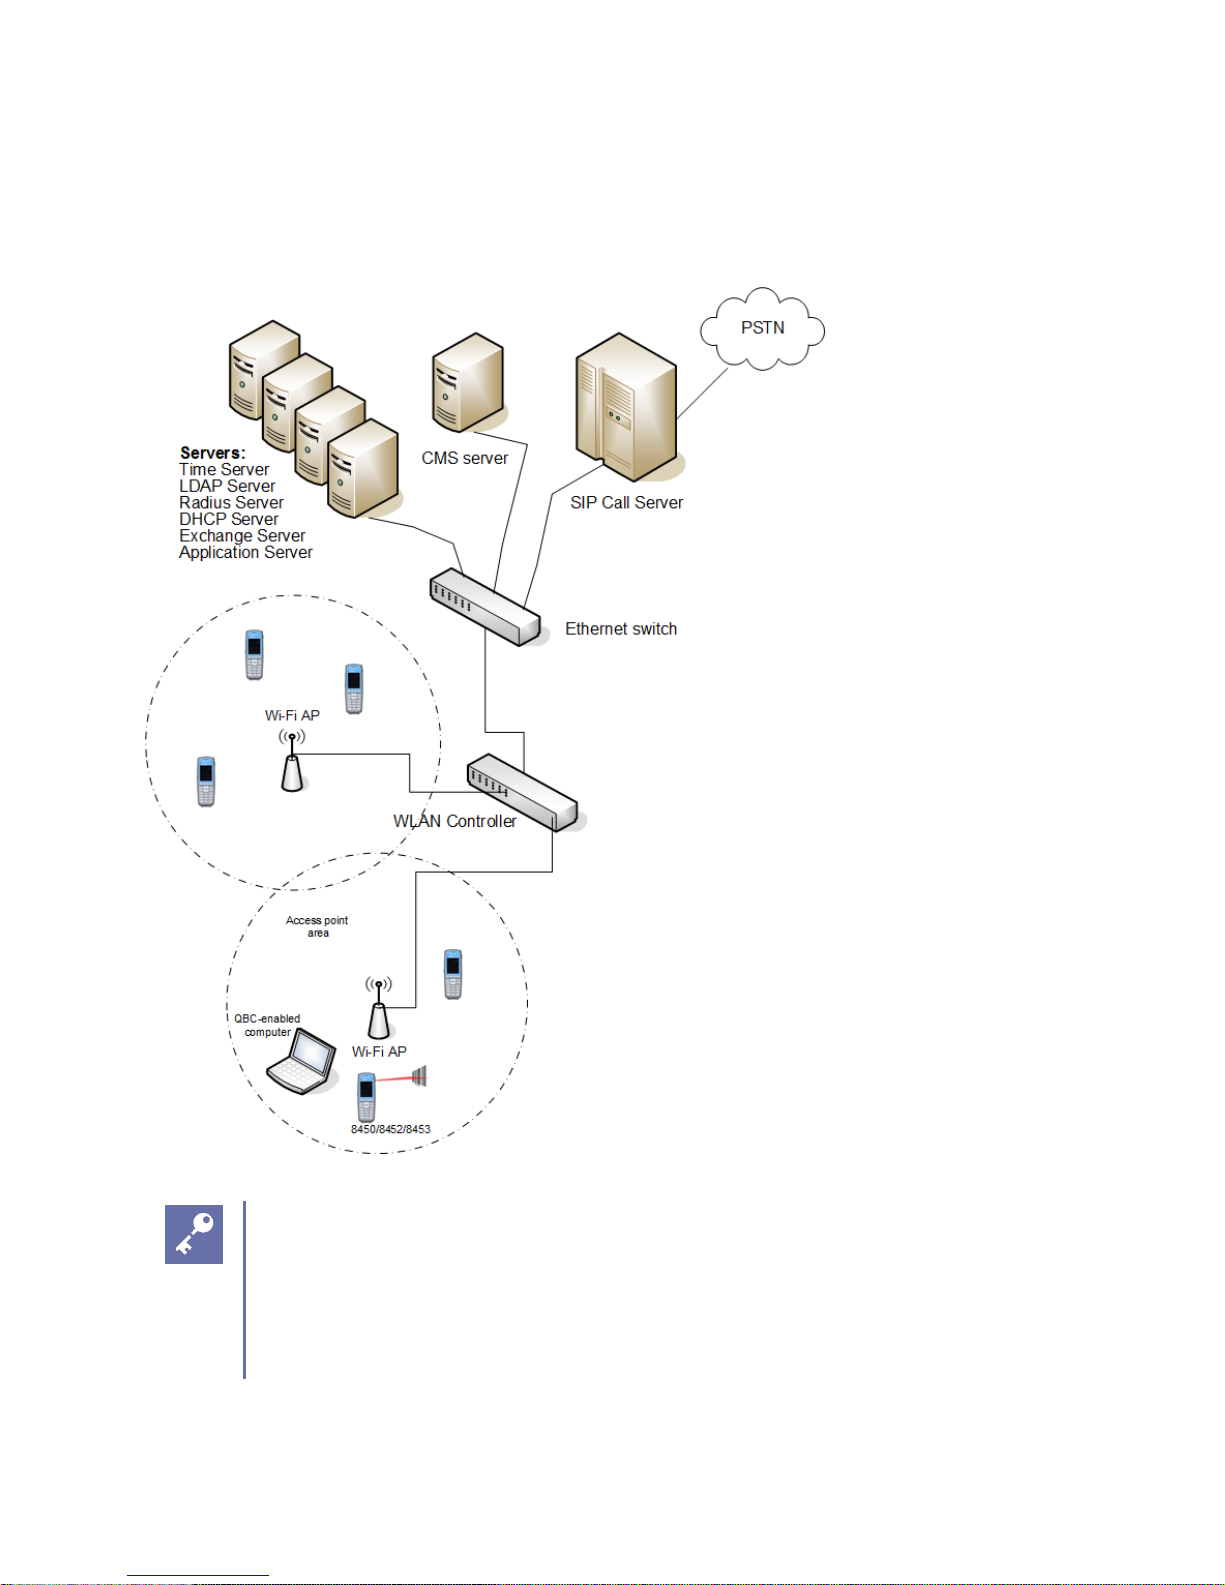
System Diagram
The following diagram shows the Spectralink components residing on a typical network with
APs and wireless LAN Ethernet Switch.
Tip: Are multiple servers necessary?
Sometimes a single piece of hardware may provide multiple services, for example
some AP controllers can also provide radius services. Consult your service
provider for more information about how to tailor your system configuration for your
requirements.
Page 17

Spectralink 84-Series Wireless Telephones Deployment Guide with CMS
721-0048-000_B.docx
February 2018 17
System Requirements
A typical installation requires the following components:
• Access Points (APs) and Controller
• Ethernet Switch
• Call Server (SIP server)
• CMS Server
• Simple Network Time Protocol Server
• Authentication (RADIUS) Server
• DHCP Server
Optional components:
• Exchange Server
• LDAP Server
• Application Server
System Components
Spectralink 84-Series handsets.
Available in several models, the 84-Series handsets provide essential communication resources
for facility wide implementation. Each model has a unique hardware ID that is printed on the
label.
Handset hardware ID numbers
Model Name
Hardware ID
SL8440
SL8450
SL8452
SL8441
SL8453
3111-36150-001
3111-36152-001
3111-36154-001
3111-67360-001
3111-67361-001
8440
The basic model that includes basic and advanced wireless telephone features.
8441
An accelerometer has been added to the 8440 that enables it to utilize the Personal Alarm
feature.
Page 18

Spectralink 84-Series Wireless Telephones Deployment Guide with CMS
721-0048-000_B.docx
February 2018 18
8450
The features of the 8440 model plus barcode scanning for 1D scanning for use with or without
the Quick Barcode Connector application.
8452
The features of the 8440 model plus barcode scanning for both 1D and 2D scanning for use
with or without the Quick Barcode Connector application.
8453
An accelerometer has been added to the 8454 that enables it to utilize the Personal Alarm
feature.
Servers
CMS Server
See Spectralink Configuration Management System Administration Guide for detailed
requirements and installation procedures.
Time Server
Simple Network Time Protocol Server or SNTP server. When WPA2 Enterprise security is used,
the handset will use this data to confirm the PAC or certificate has a valid date and time. If an
NTP Server is not available, the certificate will be assumed valid and operate accordingly,
without the date and time check.
RADIUS Server
A RADIUS authentication server must be used to provide username/password-based
authentication using RSA certificates for EAP-TLS, PEAPv0/MSCHAPv2 or PAC files for EAPFAST.
The following authentication servers have been validated for use with Spectralink 84-Series
handsets:
• Juniper Networks Steel-belted Radius Enterprise Edition (formerly Funk), v6.1
• Microsoft® Internet Security and Acceleration (ISA) Server 2003, Windows 2008 NPS
• Cisco Secure Access Control Server (ACS), v5.2, 4.1
• FreeRADIUS v2.1.10, 2.0.1 and 1.1.7
Other RADIUS servers may work properly with Spectralink handsets, but have not been tested.
Inquiries on untested servers will receive limited, “Best Effort”, support.
Page 19

Spectralink 84-Series Wireless Telephones Deployment Guide with CMS
721-0048-000_B.docx
February 2018 19
DHCP Server
Dynamic Host Configuration Protocol (DHCP) is a standardized protocol that enables clients to
be dynamically assigned with various configuration parameters, such as an IP address, subnet
mask, default gateway, and other critical network configuration information. DHCP servers
centrally manage such configuration data, and are configured by network administrators with
settings that are appropriate for a given network environment. The handset will use the DHCP
options shown in the following table if DHCP use is enabled. The DHCP setting will usually take
precedence if it is set and if it is available but can be overridden by certain parameters.
Option
SIP Parameter
Meaning
1
NA
Subnet mask
3
NA
Default gateway
6
DNSSRVR
DNS server
7
LOGSRVR
Syslog server logging
15
DOMAIN
Domain name
42
SNTPSRVR
NTP Server
43
sec.TLS.customCaCert.x
Auto discovery of the root CA
certificate. If this setting is
unavailable, set the parameter per
this guide.
66
TFTPSRVR
TFTP server
Consult with your service provider if you choose to use static configuration.
SIP Call Server
The call server provides SIP telephony support.
Access points
Enterprise-grade Wi-Fi access points provide the connection between the wired LAN and the
wireless LAN. VIEW Certified APs must be positioned in all areas where Spectralink handsets
will be used to ensure seamless radio coverage. The number, type and placement of access
points will affect the coverage area and capacity of the wireless system. Careful planning of the
WLAN is necessary to ensure excellent voice quality. An’ optimized for voice’ WLAN will yield
great benefits to the wireless telephone user community.
APs must be properly configured to support the corresponding QoS and security methods
selected for the 84-Series handset.
Page 20

Spectralink 84-Series Wireless Telephones Deployment Guide with CMS
721-0048-000_B.docx
February 2018 20
Ethernet switch
One or more Ethernet switches interconnect multiple network devices. Enterprise Ethernet
switches provide the highest performance networks, which can handle combined voice and data
traffic, and are required when using the Spectralink 84-Series Wireless Telephones.
Ensure the WLAN and network infrastructure provides connectivity from the wireless telephone
to all its required network resources (SIP Server, etc.) once the 84-Series handset connects to
the network and obtains an IP address.
Spectralink 84-Series Wireless Telephones cannot roam with uninterrupted service between
subnets unless specific LAN components are present. Certain AP/Ethernet switch combinations
establish a Layer-3 tunnel across subnets that enable the handsets to roam. Without this
capability, any call in progress will be dropped when the user moves out of range and the
handset must be power cycled in order to resume functionality in the new subnet area. Consult
your AP vendor document for more information about Layer 3 tunneling.
If you do not have Layer 3 capability, ensure that the SSID your phones associate with uses the
same subnet on all APs for proper operation.. The handset can change subnets if DHCP is
enabled and the handset is powered off then back on when within range of APs on the new
subnet. Note that the wireless telephones cannot “roam” across subnets, since they cannot
change IP addresses while operational.
Page 21

721-0048-000_B.docx
February 2018 21
Chapter 2: Designing the Configuration
QNC is used to load wireless settings into the phone so it can associate with the Wireless LAN.
CMS utilizes three levels for parameter settings.
• Enterprise settings affect all configured phones. Wireless settings are a subset of
Enterprise settings.
• Group settings affect only those phones that have been assigned to a specific Group.
Not all installations utilize Groups.
• Device settings affect only a specific phone. All installations have Device settings for
each phone.
This Chapter will identify the parameters normally configured in each level along with some
discussion on variations for certain purposes.
QNC Settings
Wireless and other settings are provisioned through QNC. See Spectralink Quick Network
Connect Administration Guide for detailed information about the following settings:
Wi-Fi Setup
WLAN identity
• SSID
Security parameters fir wireless communication
• Open network
• WEP
• WPA-PSK
• WPA2-PSK
• WPA2-Ent
Radio settings
• Domain (Country)
• 2.4GHz or 5GHz or both
• Transmit power settings
Server settings
• CMS Server name or IP
Page 22

Spectralink 84-Series Wireless Telephones Deployment Guide with CMS
721-0048-000_B.docx
February 2018 22
• Account key
• Heartbeat
• CMS Certificate
• Server type (FTP,TFTP, HTTP, HTTPS)
• User name
• Password
• DHCP or Static entry
DNS server information
• Domain (name system)
• IP address
• Alternate IP address
Phone Settings
• Admin Password
• SNTP address
• GMT offset
QoS (consult your AP documentation)
• AC mandatory
Handset Usage Scenarios
Read through this document to get an idea of what a basic deployment looks like and then
develop your own configuration plan that incorporates all the features you intend to deploy in
your facility.
Two types of deployment scenarios are offered by Spectralink CMS.
• The Flat scenario is where all phones use virtually the same features, like ordinary office
desk phones. This scenario is common in smaller or more homogenous facilities where
handsets are assigned by extension and there is little variation in the features assigned
to different users.
The Flat scenario gives each phone the same features. All phones can make and
receive calls, of course, but phones may additionally be able to participate in Push-totalk broadcasts, have Personal alarms available and use barcode reader functionality (if
using the 8453 handsets).
• The Groups scenario is used when a facility requires different features for different
users. Push-to-talk channels, for example, are frequently assigned in groups. For
example, in a hardware store different channels may be assigned to customer service,
Page 23

Spectralink 84-Series Wireless Telephones Deployment Guide with CMS
721-0048-000_B.docx
February 2018 23
plumbing and hardware but supervisors must monitor all channels. In another example,
a hospital setting may require different PTT channels for maternity and ICU nurses while
facilities staff could be assigned to completely separate channels and all supervisors
monitor all channels. A phone can only belong to one Group.
If using Groups, read through the Flat scenario first and then see the special configuration
parameters we have provided to Groups.
Both scenarios require the same infrastructure setup. These are your Enterprise settings.
Both scenarios require you to identify each phone you will be deploying.
The Groups scenario requires you to identify each group and which phone belongs to which
group. Note that a phone can belong to only one group.
• Identifying the groups
• Identifying the phones in the groups
• Identifying which features belong to which groups
Enterprise Settings
At the Enterprise level you would typically set every parameter used by every phone. Wireless
parameters are set by QNC and apply to every phone for initial wireless provisioning.
The Batch file provisions every phone with the call server address and port number.
Remaining Enterprise settings are set within the CMS pages for all phones on Configuration
pages:
Logging
Global Log Settings
Module Log Level Limits
SIP Registration
Message Center
Server Settings
Wireless
Page 24

Spectralink 84-Series Wireless Telephones Deployment Guide with CMS
721-0048-000_B.docx
February 2018 24
Mostly Enterprise Settings
The following settings are usually set for all phones but occasionally some phones do not
require these parameters and then Groups are established for the phones that do require them.
Feature Config
Call Handling
Phone Lock
Tones
Enhanced Feature Keys
Group or Enterprise Settings
Typically, group settings are used for barcode, security, Push-to-talk, Personal Alarms, Web API
and Web Apps. They are also used for Feature deployment such as Emergency Dial.
When settings are configured at a Group level, they override the same setting if it is also set at
an Enterprise level. That way you can set a parameter at one value for all the phones and then
set a different value for a specific subset of phones. For example, you could configure everyone
for PTT on certain channels but only Security personnel could have access to specific other
additional channels.
A 84xx handset can belong to only one group.
Personal Alarm
PTT
Web App
Application Settings (up to 12 applications can be entered)
Web Browser
Phone State Polling
Push Request
Page 25

Spectralink 84-Series Wireless Telephones Deployment Guide with CMS
721-0048-000_B.docx
February 2018 25
Device Settings
Device settings are settings that pertain to a single user such as user names, passwords and
identifiers. Several Device settings are configured in the Batch file and sent to the phones as
soon as they register with the CMS server.
The unique aspect to Device settings is that they override both Group and Enterprise settings.
They are configured on the specific handset(s) that has been selected from the Device List.
Therefore, only those settings that pertain to specific handsets should be configured at the
device level. Typically, the only settings that are configured at the device level would be SIP
extension settings or other user-specific parameters within phone features.
When a device is selected in the Device List and the Change config option is chosen, each
configured (non-default) setting displays a set of icons on the right side of the page. These icons
provide editing opportunities and indicate the level where the value has been set -- Enterprise,
Group or Device. Note that some settings do not support the level icons.
Example
Level icons
Enterprise: This setting is configured at the Enterprise level. Click the checkbox to
clear the setting.
Group: This setting is configured at the Group level. Click the checkbox to clear the
setting.
When an Enterprise or Group setting has been cleared, the Device icon appears
with a redo icon. Use redo to restore the cleared Enterprise or Group value.
Since we are at the Device level, only editing icons appear next to fields that have
been set at the Device level. Clicking the trash can icon clears the field. If cleared,
the setting will revert to the Group level if it has been set or to the Enterprise level if
no Group level exists. If no Enterprise level has been set, the parameter will revert
to the default.
Example
Let’s say you want to zero in on a particular handset that is behaving strangely. You can set that
handset to log at an Info level with an appropriate filter while all the other handsets remain at a
Warning level. This gives you a close-up of just one device without the unnecessary syslog
traffic that would occur if all devices were set to the Info level.
Page 26

Spectralink 84-Series Wireless Telephones Deployment Guide with CMS
721-0048-000_B.docx
February 2018 26
Device settings
• User name
• Extension address
• Display Name
• Label
• Authentication
• Password
Page 27

721-0048-000_B.docx
February 2018 27
Chapter 3: Deployment Summaries
This Chapter describes the Best Practice for deploying Spectralink 84-Series phones to be used
with CMS 2.4 and above.
We layout the deployment blue prints for three different deployment scenarios:
• Green Field Deployment
• Existing Deployment w/Provisioning Server
• Existing Deployment w/o Provisioning Server
Note: Existing deployments
For exiting deployments, we require the customer’s current configuration file so we
can populate our Toolkit.
Green Field Deployment
If you are starting out with a new deployment follow these steps:
High Level Overview
When installing a new system, follow these steps:
1 Unpack 84-Series Phones, Charge Batteries
2 Install CMS on Spectralink Local ESXi Host
3 Configure CMS with Customers IP/Subnet Mask/GW, From Tool kit
4 Copy & save to Doc file with CMS URL, Acct Key and https cert to be input into QNC
5 Configure SIP clients in CMS per Toolkit, Import CSV
6 QNC Wireless Wizard – Input customer Wireless Parameters, CMS URL, acct key and
https cert
7 Perform Initial Provisioning on Phones via QNC
8 Check Phone SW Version, see if SW update is needed (R 5.4.5.1143)
9 Configure PTT Feature in CMS per Toolkit (Optional)
10 Configure Personal Alarms /PANIC Feature in CMS per Toolkit (Optional)
11 Verify Phone have received SIP & Feature configuration(s) via CMS.
12 Save/Backup CMS configuration
Page 28

Spectralink 84-Series Wireless Telephones Deployment Guide with CMS
721-0048-000_B.docx
February 2018 28
13 Clone CMS VM & Save to file(s)
DETAILED STEPS
Step #1 Unpack Phones & Charge Batteries
1 Unpack Phones, batteries and Chargers
2 Plug chargers in to wall outlet
3 Insert batteries in to Charger
4 Insert batteries in to Phones when fully charged
5 Or, Connect charger in to Phone USB to charge
Step #2 Install Spectralink CMS on Spectralink Local Host
VM ESXi 5.x Server Installation Overview
For assistance on the installation of VM ESXi 5.x, please refer to VMWare installation video:
http://kb.vmware.com/selfservice/microsites/search.do?language=en_US&cmd=displayKC&exte
rnalId=2052439
Install vSphere to connect & manage your ESXi VM
CMS 2.x Infrastructure Installation Instructions
Note
These instructions require the reader to be knowledgeable about using VMWare
vSphere. See VMWare’s website for more information.
CMS code is available from Spectralink.
1 Download the CMS zip file from the Spectralink support representative.
Page 29

Spectralink 84-Series Wireless Telephones Deployment Guide with CMS
721-0048-000_B.docx
February 2018 29
2 Unzip VM files onto a machine that can talk to your ESXi host server and that has a
compatible version of VMWare vSphere® Client installed.
3 Connect to your ESXi host server using vSphere.
4 Select File> Deploy OVF Template… from VSphere.
5 Browse to the OVF file inside the unzipped folder from step 2. Select Next.
6 Select Next again. Name the new machine something like "Spectralink CMS". Select
Next.
Page 30

Spectralink 84-Series Wireless Telephones Deployment Guide with CMS
721-0048-000_B.docx
February 2018 30
7 Select the resource pool you want to run this VM on. (You may only have one ESXi
server to choose from).
8 Select the datastore that you want to deploy this VM onto. You may only have one
datastore. Click Next.
9 Select Thick Provision Lazy Zeroed for the disk format. Select Next.
10 Change the Network Mapping to a network that your devices have access to. Select
Next.
11 Leave Power on after deployment unchecked. Click Finish. You will see the OVF
being deployed to your server. When it is finished, go to the next step.
12 Right-click the new machine in the tree on the left of vSphere and select Power> Power
On.
13 Go to the console (in vSphere) for the CMS VM and wait for the login prompt at which
you will login as cms2, password=cms2 (You will want to change this at some time
later).
Caution: Keep track of passwords!
If you change the root password and forget what it is, you cannot reset the system
and you will need to reinstall from the original VM image.
14 Switch to bash shell (optional but recommended)
bash
15 Run the command
cd bin
Page 31

Spectralink 84-Series Wireless Telephones Deployment Guide with CMS
721-0048-000_B.docx
February 2018 31
16 Run the command
sudo python network_init.py
and follow the prompts to configure your network interfaces:
○ DHCP
○ address {your static IP address here}
○ netmask {your static network mask here}
○ gateway {your default gateway here}
○ DNS nameserver
17 Run the command
sudo python application_init.py
and follow the prompts.
○ address {your static IP address here}
Admin Tip: HTTPS and IP addressing
When configuring the device to connect to CMS using https, the URL must match
what is entered here (IP, short hostname, or fully qualified hostname). i.e. If CMS is
at 10.20.30.40, and the hostname my-cms is entered into this field, only https://mycms will work for the device's CMS setting. https://my-cms.restofmydomain.com
and https://10.20.30.40 will not work.
○ DNS or Hostname {your hostname here}
○ Administrator Name {your administrator name here}
○ Administrator Email {your administrator email here}
○ Country Code {your 2 digit country code}
○ State {your 2 digit state code}
○ City {your city}
○ Company {your company name}
○ Organization {your organization}
18 Your CMS should now be initialized. This step installs the certificate.
Caution
For the CMS update feature to work, a DNS server must be defined in step 19 that
can resolve to Internet domain names and the CMS must have access to the
Internet.
At this point, you can browse to the CMS.
https://spectralink-cms/cms/
Or (e.g.)
Page 32

Spectralink 84-Series Wireless Telephones Deployment Guide with CMS
721-0048-000_B.docx
February 2018 32
https://[10.225.15.200]/cms/
=========
19 Login in to CMS with credentials you just created.
20 Navigate to “About Us. Save CMS Acct Key and https Cert information to word/text doc.
This information will be used with QNC during the Initial Provisioning stage.
Page 33

Spectralink 84-Series Wireless Telephones Deployment Guide with CMS
721-0048-000_B.docx
February 2018 33
Step #3 Build SIP Configuration
1 Open new CMS for 84-Series SIP CSV file
2 Open Customer Toolkit
3 Populate Phone MAC addresses, Type, SIP Server address, Port, Extension, UserId,
Password, Display Name, Label per ToolKit and save file.
Upload saved .csv file to CMS
4 Login to CMS and navigate to > Batch configuration.
5 Click Browse Batch Files and browse to and open the saved .csv file you have created.
6 Click Submit.
Admin Tip
Once you upload the .csv file to the CMS, when the handset first associates with
the wireless LAN and finds the CMS, the CMS will identify it by its MAC address
and list it in the Device Holding Area where it can be accepted or rejected. Once it
is accepted, it will be listed in the Device list and will download the configuration
options in the .csv file at its next heartbeat.
The settings are pushed to handsets the next time the handset heartbeats to the
system. This could occur on normal heartbeat interval, when an inactive handset
becomes active, or when a handset boots up.
Step #4 84-Series SW Update, CMS Configuration & Initial Provisioning via QNC
1 Unpack and setup QNC, connect via ethernet cable
Page 34

Spectralink 84-Series Wireless Telephones Deployment Guide with CMS
721-0048-000_B.docx
February 2018 34
2 From PC/Laptop, ftp 84-Series SW (Lync.ld or SIP.ld) on to QNC
a Login: administrator
a Password: admin123
b Command Prompt> bin
c > hash
d > put *.ld
3 Browse to QNC (192.168.1.1) and select 84-Series Wireless Wizard
a Input customers Wireless & Advanced Wireless configuration per Toolkit
b Open saved Doc with CMS URL, Acct Key and https certificate
c Input CMS URL, https Certificate and Account Key
d Set optional setting and save configuration
4 Connect phone to QNC via USB cable
5 Once phone boots, it will do the SW update
6 Phone will receive Wireless and CMS configuration and attempt to connect to CMS
7 Browse to CMS and verify Phones appear in the Device Holding area
8 Approve all 84-Series Devices in Holding area
9 View Device List to ensure all Phones appear
10 Phones will receive SIP configuration from CMS as they Heartbeat into CMS
11 Verify Phone has received SIP configuration from CMS (Test Call)
12 Apply Feature configuration file(s) and/or Custom configurations to devices or Group of
devices.
Admin Tip: Device Option
To add a feature configurations file (PTT, PersAlarms, etc…) to a device, select the
device from the Device List, from the pull-down action menu select “Apply Custom
Config”. Then select the feature configuration file to be applied to this device.
Page 35

Spectralink 84-Series Wireless Telephones Deployment Guide with CMS
721-0048-000_B.docx
February 2018 35
Group Option
Create a Group by selecting the Group Icon . Input the Group Name in the field provided
and select “Save”. The new Group will appear below.
Page 36

Spectralink 84-Series Wireless Telephones Deployment Guide with CMS
721-0048-000_B.docx
February 2018 36
.
Note
We can’t add devices yet. Devices must Heartbeat into CMS first, so skip for now.
To add a feature configurations file (PTT, PersAlarms, etc…) to a Group, select the
Group from the Group List, from the pull-down action menu select “Apply Custom
Config”. Then select the feature configuration file to be applied to this device and
select “OK”.
Test Features and Make Calls… Done!
Page 37

Spectralink 84-Series Wireless Telephones Deployment Guide with CMS
721-0048-000_B.docx
February 2018 37
Existing 84-Series Deployment with Provisioning
Server
Note: Asking for help
This section assumes that you are familiar with 84-Series provisioning server
deployments and CMS server deployments so the presentation is fairly technical.
Please contact Spectralink if you need any help with this type of deployment.
High Level Overview
1 Install CMS on Spectralink Local ESXi Host
○ Configure CMS with Customers IP/Subnet Mask/GW, From Toolkit
○ Copy & save to Doc file CMS URL, Acct Key and https cert
2 Configure SIP clients in SIP.csv file per Toolkit, If PTT and/or Personal Alarms is used
identify phones for these Groups, Import SIP.csv file via CMS batch configuration.
3 Configure PTT Feature in CMS per Toolkit (Optional)
4 Configure Personal Alarms /PANIC Feature in CMS per Toolkit (Optional)
5 Update 84-Series SW to R 5.4.x or newer
6 Configure “cms.cfg” file with CMS info (CMS URL, Acct Key, Prov Server, SSL Cert)
7 Verify Phone appear in CMS and have received SIP & Feature configuration(s).
DETAILED STEPS
Step #1 Update 84-Series SW to R 5.4.x or newer
1 Download 84-Series SW from http://support.spectralink.com
2 Place 84-Series SW (SIP.LD or LYNC.LD) on Provisioning Server
3 Restart phones to start the SW update
4 Verify phones are updated to latest SW
Step #2 Install Spectralink CMS on Spectralink Local Host
VM ESXi 5.x Server Installation Overview
For assistance on the installation of VM ESXi 5.x, please refer to VMWare installation video:
http://kb.vmware.com/selfservice/microsites/search.do?language=en_US&cmd=displayKC&exte
rnalId=2052439
Page 38

Spectralink 84-Series Wireless Telephones Deployment Guide with CMS
721-0048-000_B.docx
February 2018 38
Install vSphere to connect & manage your ESXi VM
CMS 2.x Infrastructure Installation Instructions
Note
These instructions require the reader to be knowledgeable about using VMWare
vSphere. See VMWare’s website for more information.
CMS code is available from Spectralink.
5 Download the CMS zip file from the Spectralink support representative.
6 Unzip VM files onto a machine that can talk to your ESXi host server and that has a
compatible version of VMWare vSphere® Client installed.
7 Connect to your ESXi host server using vSphere.
8 Select File> Deploy OVF Template… from VSphere.
9 Browse to the OVF file inside the unzipped folder from step 2. Select Next.
Page 39

Spectralink 84-Series Wireless Telephones Deployment Guide with CMS
721-0048-000_B.docx
February 2018 39
10 Select Next again. Name the new machine something like "Spectralink CMS". Select
Next.
Page 40

Spectralink 84-Series Wireless Telephones Deployment Guide with CMS
721-0048-000_B.docx
February 2018 40
11 Select the resource pool you want to run this VM on. (You may only have one ESXi
server to choose from).
12 Select the datastore that you want to deploy this VM onto. You may only have one
datastore. Click Next.
13 Select Thick Provision Lazy Zeroed for the disk format. Select Next.
14 Change the Network Mapping to a network that your devices have access to. Select
Next.
15 Leave Power on after deployment unchecked. Click Finish. You will see the OVF
being deployed to your server. When it is finished, go to the next step.
16 Right-click the new machine in the tree on the left of vSphere and select Power> Power
On.
17 Go to the console (in vSphere) for the CMS VM and wait for the login prompt at which
you will login as cms2, password=cms2 (You will want to change this at some time
later).
Caution: Keep track of passwords!
If you change the root password and forget what it is, you cannot reset the system
and you will need to reinstall from the original VM image.
18 Switch to bash shell (optional but recommended)
bash
19 Run the command
cd bin
20 Run the command
sudo python network_init.py
and follow the prompts to configure your network interfaces:
○ DHCP
○ address {your static IP address here}
○ netmask {your static network mask here}
○ gateway {your default gateway here}
○ DNS nameserver
Page 41

Spectralink 84-Series Wireless Telephones Deployment Guide with CMS
721-0048-000_B.docx
February 2018 41
21 Run the command
sudo python application_init.py
and follow the prompts.
○ address {your static IP address here}
Admin Tip: HTTPS and IP addressing
When configuring the device to connect to CMS using https, the URL must match
what is entered here (IP, short hostname, or fully qualified hostname). i.e. If CMS
is at 10.20.30.40, and the hostname my-cms is entered into this field, only
https://my-cms will work for the device's CMS setting. https://mycms.restofmydomain.com and https://10.20.30.40 will not work.
○ DNS or Hostname {your hostname here}
○ Administrator Name {your administrator name here}
○ Administrator Email {your administrator email here}
○ Country Code {your 2 digit country code}
○ State {your 2 digit state code}
○ City {your city}
○ Company {your company name}
○ Organization {your organization}
22 Your CMS should now be initialized. This step installs the certificate.
Caution
For the CMS update feature to work, a DNS server must be defined in step 19 that
can resolve to Internet domain names and the CMS must have access to the
Internet.
At this point, you can browse to the CMS.
https://spectralink-cms/cms/
Or (e.g.)
https://[10.225.15.200]/cms/
=========
Page 42

Spectralink 84-Series Wireless Telephones Deployment Guide with CMS
721-0048-000_B.docx
February 2018 42
23 Login in to CMS with credentials you just created.
24 Navigate to “About Us. Save CMS Acct Key and https Cert information to word/text doc.
This information will be used with QNC during the Initial Provisioning stage.
Page 43

Spectralink 84-Series Wireless Telephones Deployment Guide with CMS
721-0048-000_B.docx
February 2018 43
Step #3 Build SIP Configuration
1 Open new CMS for 84-Series SIP CSV file
2 Open Customer Toolkit
3 Populate Phone MAC addresses, Type, SIP Server address, Port, Extension, UserId,
Password, Display Name, Label per ToolKit and save file.
Upload saved .csv file to CMS.
4 Login to CMS and navigate to > Batch configuration.
5 Click Browse Batch Files and browse to and open the saved .csv file you have created.
6 Click Submit.
Note
Once you upload the .csv file to the CMS, when the handset first associates with
the wireless LAN and finds the CMS, the CMS will identify it by its MAC address
and list it in the Device Holding Area where it can be accepted or rejected. Once it
is accepted, it will be listed in the Device list and will download the configuration
options in the .csv file at its next heartbeat.
The settings are pushed to handsets the next time the handset heartbeats to the
system. This could occur on normal heartbeat interval, when an inactive handset
becomes active, or when a handset boots up.
Update 84-Series SW to R 5.4.x or newer
1 Download 84-Series SW from http://support.spectralink.com
Page 44

Spectralink 84-Series Wireless Telephones Deployment Guide with CMS
721-0048-000_B.docx
February 2018 44
2 Place 84-Series SW (SIP.LD or LYNC.LD) on Provisioning Server
3 Restart phones to start the SW update
4 Verify phones are updated to latest SW
Configure “cms.cfg” file with CMS info
5 Open/configure “cms.cfg” file with CMS info (CMS URL, Acct Key, Prov Server name,
SSL Cert)
6 Copy “cms.cfg” file to provisioning server
7 Edit MAC.cfg or 000000000000.cfg file to include cms.cfg in the config file path.
Example:
8 Restart or Update Configuration on phones to pickup the new CMS info.
9 Phone will receive the CMS configuration and attempt to connect to CMS
10 Browse to CMS and verify Phones appear in the Device Holding area
11 Approve all 84-Series Devices in Holding area
12 View Device List to ensure all Phones appear
Page 45

Spectralink 84-Series Wireless Telephones Deployment Guide with CMS
721-0048-000_B.docx
February 2018 45
13 Phones will receive SIP configuration from CMS as they Heartbeat into CMS
14 Verify Phone has received SIP configuration from CMS (Test Call)
15 Apply Feature configuration file(s) and/or Custom configurations to devices or Group of
devices.
Note: Device Option
To add a feature configurations file (PTT, PersAlarms, etc…) to a device, select the
device from the Device List, from the pull-down action menu select “Apply Custom
Config”. Then select the feature configuration file to be applied to this device.
Page 46

Spectralink 84-Series Wireless Telephones Deployment Guide with CMS
721-0048-000_B.docx
February 2018 46
Group Option:
Create a Group by selecting the Group Icon . Input the Group Name in the field provided
and select “Save”. The new Group will appear below.
.
Note
We can’t add devices yet. Devices must Heartbeat into CMS first, so skip for now.
To add a feature configurations file (PTT, PersAlarms, etc…) to a Group, select the Group from
the Group List, from the pull-down action menu select “Apply Custom Config”. Then select the
feature configuration file to be applied to this device and select “OK”.
Test Features and Make Calls… Done!
Page 47

Spectralink 84-Series Wireless Telephones Deployment Guide with CMS
721-0048-000_B.docx
February 2018 47
Existing 84-Series Deployment w/o Provisioning Server
Note: Asking for help
This section assumes that you are familiar with 84-Series parameters and CMS
server deployments so the presentation is fairly technical. Please contact
Spectralink if you need any help with this type of deployment.
High Level Overview
1 Install CMS on Spectralink Local ESXi Host
○ Configure CMS with Customers IP/Subnet Mask/GW, From Tool kit
○ Copy & save to Doc file CMS URL, Acct Key and https cert to be input into QNC
2 Configure SIP clients in CMS per Toolkit, If PTT and/or Personal Alarms is used, identify
phones for these Groups, Import CSV
3 Configure PTT Feature in CMS per Toolkit (Optional)
4 Configure Personal Alarms /PANIC Feature in CMS per Toolkit (Optional)
5 84-Series SW Update, CMS Configuration & Initial Provisioning via QNC
6 Perform Initial Provisioning on Phones via QNC
7 Verify Phone have received SIP & Feature configuration(s) via CMS.
DETAILED STEPS
Step #1 Install Spectralink CMS on Spectralink Local Host
VM ESXi 5.x Server Installation Overview
For assistance on the installation of VM ESXi 5.x, please refer to VMWare installation video:
http://kb.vmware.com/selfservice/microsites/search.do?language=en_US&cmd=displayKC&exte
rnalId=2052439
Install vSphere to connect & manage your ESXi VM
Page 48

Spectralink 84-Series Wireless Telephones Deployment Guide with CMS
721-0048-000_B.docx
February 2018 48
CMS 2.x Infrastructure Installation Instructions
Note
These instructions require the reader to be knowledgeable about using VMWare
vSphere. See VMWare’s website for more information.
CMS code is available from Spectralink.
1 Download the CMS zip file from the Spectralink support representative.
2 Unzip VM files onto a machine that can talk to your ESXi host server and that has a
compatible version of VMWare vSphere® Client installed.
3 Connect to your ESXi host server using vSphere.
4 Select File> Deploy OVF Template… from VSphere.
5 Browse to the OVF file inside the unzipped folder from step 2. Select Next.
Page 49

Spectralink 84-Series Wireless Telephones Deployment Guide with CMS
721-0048-000_B.docx
February 2018 49
6 Select Next again. Name the new machine something like "Spectralink CMS". Select
Next.
Page 50

Spectralink 84-Series Wireless Telephones Deployment Guide with CMS
721-0048-000_B.docx
February 2018 50
7 Select the resource pool you want to run this VM on. (You may only have one ESXi
server to choose from).
8 Select the datastore that you want to deploy this VM onto. You may only have one
datastore. Click Next.
9 Select Thick Provision Lazy Zeroed for the disk format. Select Next.
10 Change the Network Mapping to a network that your devices have access to. Select
Next.
11 Leave Power on after deployment unchecked. Click Finish. You will see the OVF
being deployed to your server. When it is finished, go to the next step.
12 Right-click the new machine in the tree on the left of vSphere and select Power> Power
On.
13 Go to the console (in vSphere) for the CMS VM and wait for the login prompt at which
you will login as cms2, password=cms2 (You will want to change this at some time
later).
Caution: Keep track of passwords!
If you change the root password and forget what it is, you cannot reset the system
and you will need to reinstall from the original VM image.
14 Switch to bash shell (optional but recommended)
bash
15 Run the command
cd bin
16 Run the command
sudo python network_init.py
and follow the prompts to configure your network interfaces:
○ DHCP
○ address {your static IP address here}
○ netmask {your static network mask here}
○ gateway {your default gateway here}
○ DNS nameserver
Page 51

Spectralink 84-Series Wireless Telephones Deployment Guide with CMS
721-0048-000_B.docx
February 2018 51
17 Run the command
sudo python application_init.py
and follow the prompts.
○ address {your static IP address here}
Admin Tip: HTTPS and IP addressing
When configuring the device to connect to CMS using https, the URL must match
what is entered here (IP, short hostname, or fully qualified hostname). i.e. If CMS
is at 10.20.30.40, and the hostname my-cms is entered into this field, only
https://my-cms will work for the device's CMS setting. https://mycms.restofmydomain.com and https://10.20.30.40 will not work.
○ DNS or Hostname {your hostname here}
○ Administrator Name {your administrator name here}
○ Administrator Email {your administrator email here}
○ Country Code {your 2 digit country code}
○ State {your 2 digit state code}
○ City {your city}
○ Company {your company name}
○ Organization {your organization}
18 Your CMS should now be initialized. This step installs the certificate.
Caution
For the CMS update feature to work, a DNS server must be defined in step 19 that
can resolve to Internet domain names and the CMS must have access to the
Internet.
At this point, you can browse to the CMS.
https://spectralink-cms/cms/
Or (e.g.)
https://[10.225.15.200]/cms/
=========
Page 52

Spectralink 84-Series Wireless Telephones Deployment Guide with CMS
721-0048-000_B.docx
February 2018 52
19 Login in to CMS with credentials you just created.
20 Navigate to “About Us. Save CMS Acct Key and https Cert information to word/text doc.
This information will be used with QNC during the Initial Provisioning stage.
Page 53

Spectralink 84-Series Wireless Telephones Deployment Guide with CMS
721-0048-000_B.docx
February 2018 53
Step #2 Build SIP Configuration
1 Open new CMS for 84-Series SIP CSV file
2 Open Customer Toolkit
3 Populate Phone MAC addresses, Type, SIP Server address, Port, Extension, UserId,
Password, Display Name, Label per ToolKit and save file.
Upload saved .csv file to CMS.
4 Login to CMS and navigate to > Batch configuration.
5 Click Browse Batch Files and browse to and open the saved .csv file you have created.
6 Click Submit.
Note
Once you upload the .csv file to the CMS, when the handset first associates with
the wireless LAN and finds the CMS, the CMS will identify it by its MAC address
and list it in the Device Holding Area where it can be accepted or rejected. Once it
is accepted, it will be listed in the Device list and will download the configuration
options in the .csv file at its next heartbeat.
The settings are pushed to handsets the next time the handset heartbeats to the
system. This could occur on normal heartbeat interval, when an inactive handset
becomes active, or when a handset boots up.
Step #3 84-Series SW Update, CMS Configuration & Initial Provisioning via QNC
1 Unpack and setup QNC, connect QNC to PC/Laptop via ethernet cable
Page 54

Spectralink 84-Series Wireless Telephones Deployment Guide with CMS
721-0048-000_B.docx
February 2018 54
2 From PC/Laptop, ftp 84-Series SW (Lync.ld or SIP.ld) on to QNC
a Login: administrator
b Password: admin123
c Command Prompt> bin
d > hash
e > put *.ld
3 Browse to QNC (192.168.1.1) and select 84-Series Wireless Wizard
a Input customers Wireless & Advanced Wireless configuration per Toolkit
b Open saved Doc with CMS URL, Acct Key and https certificate
c Input CMS URL, https Certificate and Account Key
d Set optional setting and save configuration
4 Connect phone to QNC via USB cable
5 Once phone boots, it will do the SW update
6 Phone will receive Wireless and CMS configuration and attempt to connect to CMS
7 Browse to CMS and verify Phones appear in the Device Holding area
8 Approve all 84-Series Devices in Holding area
9 View Device List to ensure all Phones appear
10 Phones will receive SIP configuration from CMS as they Heartbeat into CMS
11 Verify Phone has received SIP configuration from CMS (Test Call)
12 Apply Feature configuration file(s) and/or Custom configurations to devices or Group of
devices.
Note: Device Option
To add a feature configurations file (PTT, PersAlarms, etc…) to a device, select the
device from the Device List, from the pull-down action menu select “Apply Custom
Config”. Then select the feature configuration file to be applied to this device.
Page 55

Spectralink 84-Series Wireless Telephones Deployment Guide with CMS
721-0048-000_B.docx
February 2018 55
Group Option:
Create a Group by selecting the Group Icon . Input the Group Name in the field provided
and select “Save”. The new Group will appear below.
Page 56

Spectralink 84-Series Wireless Telephones Deployment Guide with CMS
721-0048-000_B.docx
February 2018 56
.
Note
We can’t add devices yet. Devices must Heartbeat into CMS first, so skip for now.
To add a feature configurations file (PTT, PersAlarms, etc…) to a Group, select the
Group from the Group List, from the pull-down action menu select “Apply Custom
Config”. Then select the feature configuration file to be applied to this device and
select “OK”.
Test Features and Make Calls… Done!
Page 57

721-0048-000_B.docx
February 2018 57
Part II: Configuration Details
Now that you have the exact parameters you will need to configure, Part II: Configuration will
step you through the configuration process. We will rely heavily on two documents:
• Spectralink Configuration Management System Administration Guide CMS uses a GUI
interface for you to provision the devices with the settings required in your facility.
• Quick Network Connect Administration Guide The phones must connect to the wireless
LAN in order to access CMS. QNC provisions the handsets with the wireless settings.
We will refer to this document for Custom Settings:
• Spectralink 84-Series Wireless Telephone Administration Guide This is your
comprehensive reference for information about every parameter that the Spectralink 84Series handsets support.
Page 58

721-0048-000_B.docx
February 2018 58
Chapter 4: Create the Batch
Configuration File
Admin Tip: Spectralink 84-Series configuration settings
Please see the Spectralink 84-Series Wireless Telephone Administration Guide for
specific configuration parameters and guidelines. The below instructions provide
general instructions for batch deployment.
Listing Handsets/Users for Batch Deployment
CMS uses a batch deployment system to import any number of phones into the server. Only a
few parameters are required to successfully import and provision phones for basic telephony.
Admin Tip: The batch file configures settings for registration (line) 1
The batch file allows you to set up multiple phones at once. Once phones associate
with CMS and are accepted into the Device list they can heartbeat into CMS and
download batch file settings. At this point, phones can register with the call server
and make and receive calls on line 1.
Setting up the batch file
1 Obtain the .csv template from Spectralink service. Upload the .csv file used for batch
configuration.
Caution: Do not change .csv file columns
Do not change any fields or column headings in the .csv file. All cells must be
completed for each entry. Save the file as a .csv file with an appropriate name in a
convenient location.
2 Unpack each phone and enter its MAC address in the .csv file. The MAC address is a
unique identifier found on the label inside the battery compartment of each handset that
follows the convention 00.90.7A.xx.yy.xx. The last three sets of numbers and letters are
unique for each phone.
Page 59

Spectralink 84-Series Wireless Telephones Deployment Guide with CMS
721-0048-000_B.docx
February 2018 59
Label example:
3 As you enter the MAC address in the .csv file, also enter the other device-identifying
information as described in Spectralink Configuration Management System
Administration Guide. The phone will display the text from the Line Label field in the
Home banner once it associates with CMS and picks up its configuration.
○ Extension
○ UserID
○ Password
○ Display Name
○ Line Label
4 Enter the address and port of the SIP server in the .csv file. This will be the same for
each phone so just copy down each column.
5 The batch file should be complete now. Ensure every field is populated and save it.
6 Open CMS and upload the batch file per the directions.
Page 60

721-0048-000_B.docx
February 2018 60
Chapter 5: Wireless Settings using QNC
Quick Network Connect is a tool that provides a browser-based GUI that allows you to configure
the wireless configuration parameters you need to set in order for your Spectralink phones to
associate with the wireless LAN. You can procure the tool from your Spectralink service
representative. See Quick Network Connect Administration Guide.
QNC software and documents are available on the Spectralink support site at
http://support.spectralink.com/products/wi-fi/qnc.
Initial wireless provisioning
1 Connect QNC to a PC and start the browser to open the Wireless Wizard and configure
wireless settings. Then use the tool to load the settings onto the handset.
2 The handset will associate with the wireless LAN and find the CMS. It will be listed in the
Device Holding Area.
Page 61

Spectralink 84-Series Wireless Telephones Deployment Guide with CMS
721-0048-000_B.docx
February 2018 61
3 Open CMS and navigate to the Device Holding Area. Click the phone icon at the top of
the Navigation bar, switch to the 84 Series pages if necessary and click Device Holding
Area. If the phones are all there, this step is successful.
Page 62

721-0048-000_B.docx
February 2018 62
Chapter 6: Use CMS
From this point on, the deployment process centers on Spectralink Configuration Management
System. See Spectralink Configuration Management System Administration Guide for specific
parameters and comprehensive guidance to using CMS. The below information is a high level
guide for using CMS to step through an initial deployment.
Approve the Handsets
Be sure that all the phones are turned on and within range of the wireless LAN for this step.
1 Open CMS and navigate to the Device Holding Area. Click the phone icon at the top of
the Navigation bar, switch to the 84 Series pages if necessary and click Device Holding
Area.
Devices will be listed by MAC Address, Serial number etc.
2 Using your Batch File spreadsheet as a reference, verify and check the devices that you
want to approve and approve them.
The phones will heartbeat into CMS and download the parameters for each phone. Give
it a few minutes.
Spectralink recommends: Approve devices in groups of 100
To prevent the infrastructure from being overwhelmed by a large number of phones
trying to find the CMS and download parameters at the same time, Spectralink
recommends approving devices in groups of 100 or fewer.
Page 63

Spectralink 84-Series Wireless Telephones Deployment Guide with CMS
721-0048-000_B.docx
February 2018 63
3 Click the phone icon in the navigation bar again and open the Device List. Verify that
the phones are all there.
4 Change the column locations as desired by dragging the headings right or left. Add or
delete columns by clicking the Change Columns button and make your selections.
5 Verify the settings are correct. Navigate to Configuration> SIP Registration>. Note that
the Line 1 tab displays. The settings are all for SIP registration/line 1
Note that the Enterprise tab displays in the banner. The settings you see here are set on
all phones.
6 Navigate to Server Settings. Check the Server Address and Port values. The values
should be the values entered in the Batch .csv file.
7 Test the handsets to ensure each can send and receive a call.
8 The approval step is complete.
Page 64

721-0048-000_B.docx
February 2018 64
Chapter 7: Configure Remaining
Enterprise Settings
Only the SIP server address and port are configured by the Batch file. The Enterprise settings
list contains many more settings that you will need or want to configure. Step through that list
and configure the rest of the settings you need for your deployment. These may include:
• Logging
• Voicemail
• Additional network settings
• Additional Call Handling settings
• Emergency Dial
• Global Feature settings
• Web App settings
If the parameter(s) you want to configure are not available in the CMS UI, see Configure
Custom Settings chapter for additional information.
Page 65

721-0048-000_B.docx
February 2018 65
Chapter 8: Configure Group Settings
Being able to group devices and customize configurations for device groups gives you
tremendous flexibility in your deployment options. Use the Device Groups page to set up and
manage your groups. With CMS, groups do not need any special parameters or other manual
configuration methods. Groups are created and administered within the CMS GUI.
Admin Tip: A device can belong to only one group
Note that any device can belong to only one group.
When a device is added to a group, the Group settings are applied to it, overriding any
conflicting Enterprise settings.
How to configure a Group
1 Establish the names for your Group(s) and which handsets will be in which Group.
Handsets must be available in the Device List.
2 Open the Groups page, name the Group.
3 Click the Select Devices button and select the devices for this Group.
The Select Device window:
Page 66

Spectralink 84-Series Wireless Telephones Deployment Guide with CMS
721-0048-000_B.docx
February 2018 66
The selected devices are now listed on the Groups page by the model and serial
number.
4 Click Save.
The Group will now appear in the Group list and is ready to be configured and managed.
Note: Press the Reset button instead of the Save button if you want to clear the fields
and start over.
Manage Groups
Groups are listed by the name assigned to the group. The devices assigned to the Group are
listed by serial number. The CMS administrator who created the Group is also listed in the User
Name column.
Select the Group and select the action.
These are the actions you can do in Manage Groups:
• Delete Group(s) will erase the selected Group(s) entirely.
• Edit Group will allow you to change the Group name and add or delete Group members
• Change Config takes you to the Configuration pages where you can enter or change
parameters for the selected Group(s)
• Apply Custom Config takes you to the Custom Settings page where you can add custom
config files. See Configure Custom Settings.
Page 67

Spectralink 84-Series Wireless Telephones Deployment Guide with CMS
721-0048-000_B.docx
February 2018 67
Page 68

721-0048-000_B.docx
February 2018 68
Chapter 9: Configure Custom Settings
You may want to customize your installation even further. CMS provides a Custom Settings
page that allows you to create a custom file or import your own .xml files at the Enterprise level.
Custom settings can also be applied at the Device and Group levels from those respective
pages.
When using custom settings aA couple of caveats apply so please be aware:
• .xml files must be well formed. Use a template from Spectralink software as shown
below for an example.
• Use an XML editor to create or edit xml or .cfg files.
Foxe is an editor from First Object that shows a tree view and text view and allows you
to make edits in either. It apparently does not have the field limitations of XML Notepad
so you could use it if you have lengthy certificates. Examples in this document use Foxe.
Foxe is free and available at:
http://www.firstobject.com/dn_editor.htm
Three actions are provided for each custom file:
• Apply to Enterprise; applies the custom setting file to all handsets at the Enterprise level.
• Delete: removes the custom settings file from the list.
• Disassociate: retains the custom settings file on the list but removes it from active use by
devices.
Import Configuration Files
Unless you are an expert with XML, you will find it easiest to create new .xml files by opening an
existing file and saving it as a new name. The templates are designed to make this easy so that
usually only a few values need to be changed to customize the file. Some filenames must be
very specific and you will find precise naming instructions in the configuration sections in Part II.
When you need to refine the .cfg files to suit your own requirements, parameters can be copied
from sample files provided with the downloaded code and pasted into the files you have
developed for this initial deployment. Or you may decide to establish your own feature structure
by locating the parameters you wish to modify in one of the sample files, editing the contents
accordingly and saving it with a file name that conforms to your file structure strategy.
Page 69

Spectralink 84-Series Wireless Telephones Deployment Guide with CMS
721-0048-000_B.docx
February 2018 69
Example template for RTLS deployment
Use the Import Configuration button to place the file on the list and apply it to the handsets.
If you need to edit the imported file, you can do it directly in CMS. Click the edit pencil icon in
the Actions column, view and expand the parameters and edit as needed.
Create Configuration Files
Instead of importing a configuration file, you can manually enter the configuration parameters
directly into CMS by selecting the Create Configuration button.
Ensure the exact name of each parameter in the Name field. Capitalizations are specific and
must be followed. Enter the value for that parameter in the Value field.
Page 70

Spectralink 84-Series Wireless Telephones Deployment Guide with CMS
721-0048-000_B.docx
February 2018 70
Here is the same template entered directly into CMS using the GUI. Note that the .xml extension
was added to the filename. Select the name from the list and click the edit pencil in the action
column to open the file.
Page 71

721-0048-000_B.docx
February 2018 71
Chapter 10: Testing the Handsets
Once the handsets have associated with the wireless LAN, loaded files from CMS and
registered with the SIP server it should be able to make and receive calls and utilize all other
features that have been configured.
Test Configured Features
Now is the time to test configured features, one at a time, to ensure they are working on a few
representative phones before deploying all of them.
Caution: Testing parameter interaction is required
Though individual parameters are checked to see whether they are in range, the
interaction between parameters is not checked. If a parameter is out of range, an
error message will display in the log file and parameter will not be used.
Incorrect configuration can put the phones into a reboot loop. For example, server
A has a configuration file that specifies that server B should be used, and server B
has a configuration file that specifies that server A should be used.
To detect errors, including IP address conflicts, Spectralink recommends that you
test the new configuration files on two phones before initializing all phones.
Return to Chapter 9 and finish deploying the rest of the phones.
Page 72

721-0048-000_B.docx
February 2018 72
Part III: Appendices
Page 73

721-0048-000_B.docx
February 2018 73
Appendix A: Software Copyrights and
Open Source Information
Software Copyright
Portions of the software contained in this product are:
Copyright © 1998, 1999, 2000 Thai Open Source Software Center Ltd. and Clark Cooper
Copyright © 1998 by the Massachusetts Institute of Technology
Copyright © 1998-2008 The OpenSSL Project
Copyright © 1995-1998 Eric Young (eay@cryptsoft.com). All rights reserved
Copyright © 1995-2002 Jean-Loup Gailly and Mark Adler
Copyright © 1996-2008, Daniel Stenberg, <daniel@haxx.se>
Permission is hereby granted, free of charge, to any person obtaining a copy of this software
and associated documentation files (the “Software”), to deal in the Software without restriction,
including without limitation the rights to use, copy, modify, merge, publish, distribute, sublicense,
and/or sell copies of the Software, and to permit persons to whom the Software is furnished to
do so, subject to the following conditions:
The above copyright notice and this permission notice shall be included in all copies or
substantial portions of the Software.
OFFER for Source for GPL and LGPL Software
You may have received a Spectralink 84-Series handset from Spectralink that contains—in part—
some free software (software licensed in a way that allows you the freedom to run, copy,
distribute, change, and improve the software).
A complete list of all open source software included in the Spectralink 84-Series handset, as
well as related license and copyright information, is available at http://support.spectralink.com.
You may also obtain the same information by contacting Spectralink by regular mail or email at
the addresses listed at the bottom of this notice.
For at least three (3) years from the date of distribution of the applicable product or software, we
will give to anyone who contacts us at the contact information provided below, for a charge of no
more than our cost of physically distributing, the items listed in “Spectralink OFFER of Source
for GPL and LGPL Software”, which is available at http://support.spectralink.com.
Page 74

Spectralink 84-Series Wireless Telephones Deployment Guide with CMS
721-0048-000_B.docx
February 2018 74
Contact Information for Requesting Source Code
Spectralink Open Source Manager
2560 55th Street
Boulder, CO 80301
OpenSource@Spectralink.com
Page 75

721-0048-000_B.docx
February 2018 75
Appendix B: Spectralink Certificates
Spectralink CA certificates can be obtained from:
http://pki.spectralink.com/aia/Spectralink%20Issuing%20CA.crt
http://pki.spectralink.com/aia/Spectralink%20Root%20CA.crt
http://pki.spectralink.com/aia/Spectralink%20Issuing%20CA%20BLCAI01.crt
END OF DOCUMENT
 Loading...