

Page 1

USER GUIDE | CLOUD COMMUNICATIONS
Spectralink
Quick Network
Connect (QNC) Guide
Document Version 1.2
February 2019
Page 2

SPECTRALINK QUICK NETWORK CONNECT (QNC) GUIDE
The Spectralink 84-series phone is a wireless device; however, it will not have any wireless conguration by default;
it would not understand what network it is going to be set up with. There is a device called the Spectralink Quick
Network Connect (QNC), where you can congure the Spectralink 84-series wireless setting as described in this
QNC guide. The QNC allows you to congure up to 4 Spectralink 84-series phones at a time. The main purpose of
this QNC guide is to enable the phone to acquire the IP address from the wireless network.
QNC device has a built-in IP address of 192.168.1.1. You need to connect the QNC directly with the PC point to
point. You will need to dene a static IP address in the PC in order to communicate with the QNC. Once connected,
the QNC can be browsed with the address 192.168.1.1.
In the rst screen, we need to select Spectralink 84-series.
There are ve wireless security types congurable on the Spectralink phones. You can choose to use any one of
them. The following are two examples of conguring two of the ve Wireless security types.
Note: Step A must be chosen for each Wireless Security Type and steps B, C, D, and E are common to all.
Wireless Security type congurations:
a. WPA2- Enterprise Wireless Security Type
In the Wi-Fi settings,
• Put the SSID. Below it is shown
as ‘MasergyLab’.
• Choose the security type. Below,
it is WPA2-Enterprise.
• Fast Roaming is ‘OKC’
• WPA2-Enterprise security type is
chosen to PEAP.
• If PEAP is chosen, then we need
to load Root CA certicate of the
authenticating server. We can do
that by choosing ‘Upload Files’.
If we choose some other security
types such as WPA2-PSK, we
need not load any certicate.
NOTE: The certicate le must
be in TEXT format. If you upload
certicate in CER or binary
(*.cer) format, it will let you
upload it; however, when the
certicate is in CER format, the
data from the QNC cannot be
loaded to the phone.
• Then we need to put ‘Username’
and ‘Password’ which can
authenticate with the radius server and the user can log in.
2
Page 3
SPECTRALINK QUICK NETWORK CONNECT (QNC) GUIDE
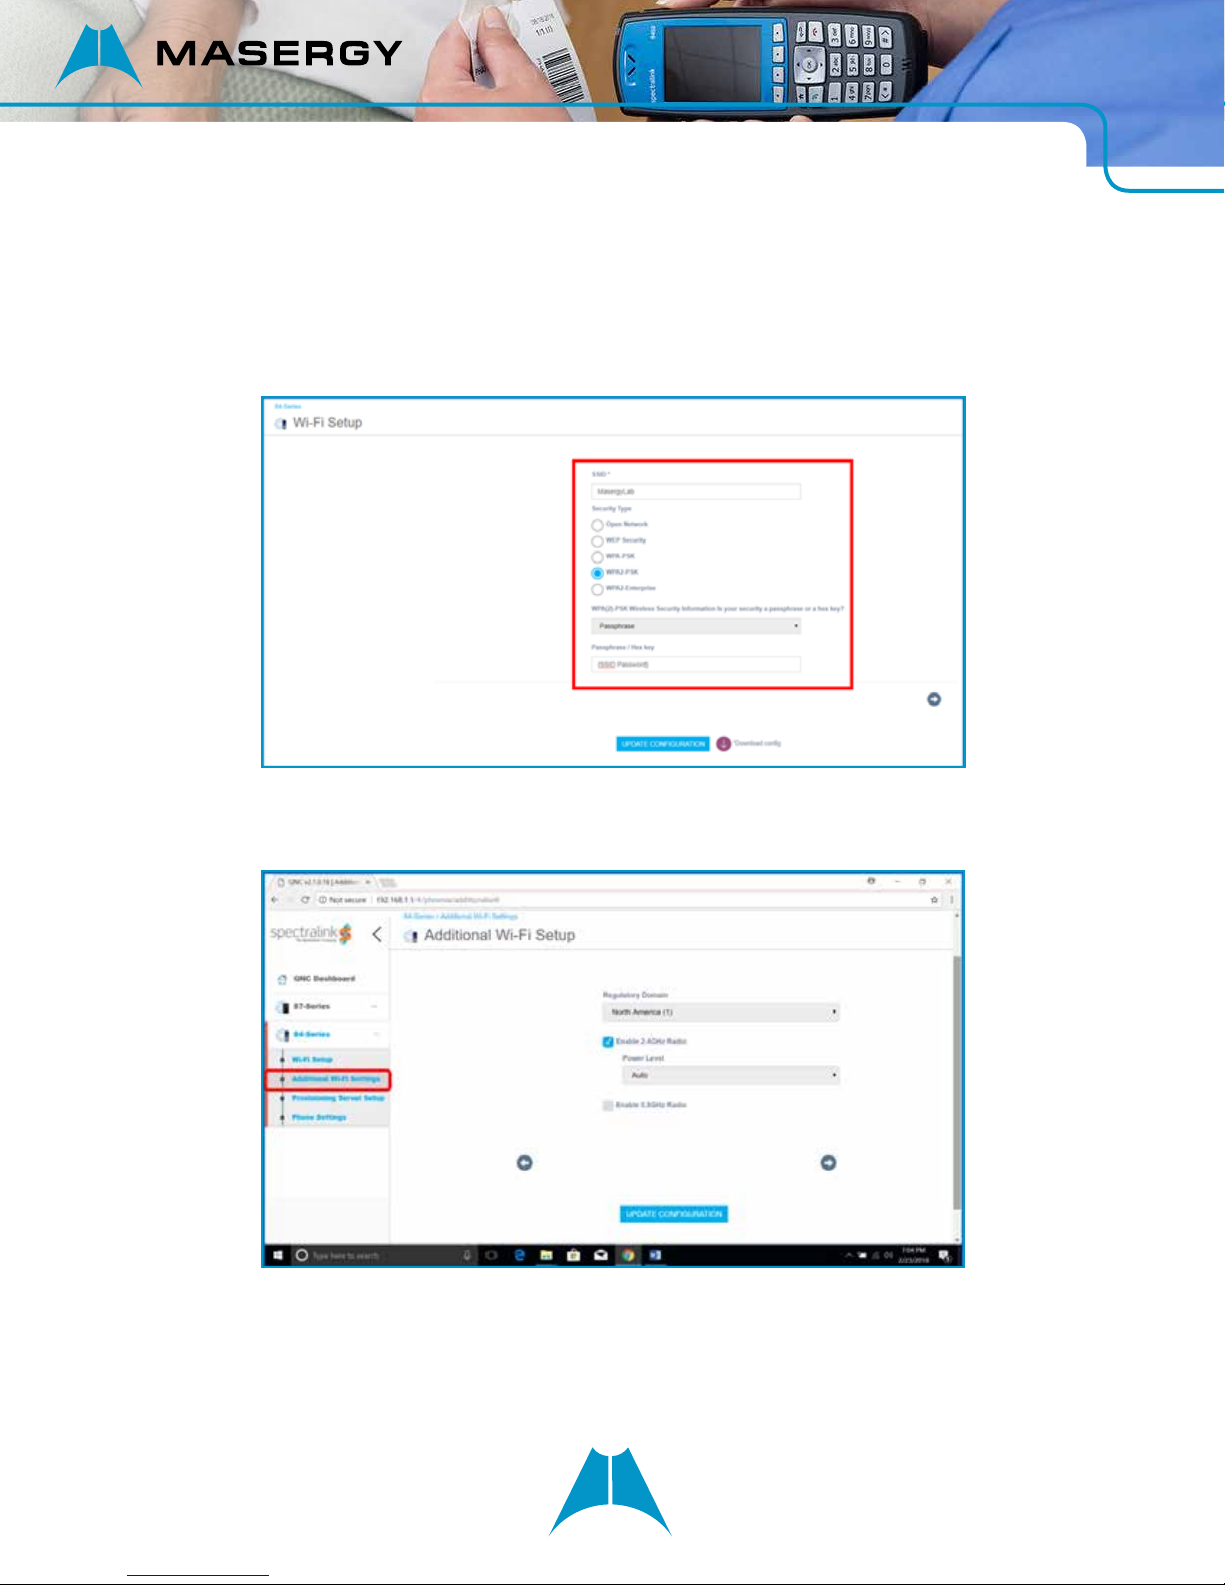
b. WPA2-PSK Wireless Security Type
In the Wi-Fi settings,
• Put the SSID. Below it is shown as ‘MasergyLab’.
• Choose the security type. Below, it is WPA2-PSK
• Put the appropriate paraphrase (passcode) for the network SSID.
c. Additional Wi-Fi Setup
Regulatory domain is region based. It is chosen as ‘North America’. Then, we can chose the frequency
level 2.4 GHz or 5.0 GHz.
d. Provisioning Server Setup.
You can dene the provisioning serve in one of the two ways – DHCP or static. If it is DHCP, it will
automatically grab the server. Below, we have shown how you may enter a static server. The server is
‘ftp.broadcore.com’.
3
Page 4

SPECTRALINK QUICK NETWORK CONNECT (QNC) GUIDE
IMPORTANT:
In some cases, you may need to enter the username and password for the FTP user. The default username and
password for the Spectralink is:
Username:
Password:
adminstrator
admin123
Or, as below by enabling the DHCP, whereby the phones grabs the server using Option 66. We may also dene DNS
or SNTP if required.
4
Page 5

SPECTRALINK QUICK NETWORK CONNECT (QNC) GUIDE
e. Transferring above data to the phone:
At the end of the QNC conguration, please click on the ‘UPDATE CONFIGURATION’ at the bottom
center of the screen. This saves the conguration with the QNC.
5
Page 6

SPECTRALINK QUICK NETWORK CONNECT (QNC) GUIDE
Now, the wireless data that QNC has will need to be transferred (downloaded) to the phone. The transfer of data
is done using a USB cable which comes with the QNC device. (You can connect up to 4 phones at a time using the
4 USB ports, provided you have four connecting cables.) In order to download the wireless conguration from the
QNC, the phone must be done in a FACTORY RESET mode. Normally, a brand new phone is already factory reset.
Factory reset procedure (if needed):
• Go to the phone menu:
• Settings ► Advanced Settings ►
• Password: 456 (the default password is 456 unless it was changed by someone).
• Administration Settings ► Reset to Defaults ► Reset to Factory ► Yes
The factory reset phone needs to be connected with the QNC with the USB cable. As you connect the phone with
the QNC, the phone will make a peculiar sound, and starts rebooting. You should see the phone rebooting within
15 seconds. At this point, you will no longer need to keep the phone connected to the QNC. Even if you keep the
phone connected, it will not matter. (Also, when you start factory resetting the phone should not matter while it is
connected to the QNC).
If the phone does not reboot, you may need to manually update conguration as follows:
• Go to the phone menu:
• Settings ► Basic Settings ► Update Conguration
The phone should now start rebooting. If not, there could be some issue.
As the phone reboots, it will take the wireless information, and the phone will get an IP address. To check if the
phone gets the IP address:
• Go to the phone menu:
• Settings ► Status ► Network ► TCP/IP Parameters
There you will see the IP address, subnet mask, and the default gateway per your wireless network conguration.
Again, the main purpose of this QNC guide is to enable the phone to acquire the IP address from the wireless
network.
Manual Conguration of the Wireless Phone (without the QNC)
Except for loading certicate (if necessary), you can congure/edit the phone's wireless settings manually – without
using the QNC – albeit this could be cumbersome for some. In the phone, we can navigate to the following:
Settings ► Advanced Settings ► Administration ► Network Conguration ► Network Interfaces ► Wi-Fi Menu
6
Page 7

SPECTRALINK QUICK NETWORK CONNECT (QNC) GUIDE
Under the Wi-Fi Menu, you should complete the following congurations:
a. Enabled: Yes
b. DHCP: Enabled
c. SSID: {Put the name of your wireless network SSID}
d. Security: Choose as per customer's conguration: WPA2-PSK, WPA2-Enterprise, etc.
For example:
• If you choose WPA2-PSK above, Click on WPA2-PSK, then, you enter the paraphrase.
• If you choose WPA2-Enterprise, click on WPA2-Enterprise, then data-ll other options as desired.
Here is the example of how you enter passphrase with WPA2-PSK security.
You need to go to the security type under the Wi-Fi menu. In the Wi-Fi menu, the security types are:
• WEP
• WPA2-PSK
• WPA2-Enterprise
Click on the "WPA2-PSK" as above. Then, you can enter the passphrase.
It says:
• PSK Type: Passphrase
• Passphrase: *******
You click on the Passphrase, and you will be able to enter the new passphrase.
e. Radio: Choose either 2.4 Hz or 5.0 Hz and the same MUST be enabled.
Radio ► Regulatory domain: 01 – for North America (SHOULD NOT BE ‘None’)
Troubleshooting the QNC Bug
Some of the QNC versions have been found to contain a corrupt conguration le; thanks to the same, the wireless
settings could not be downloaded from the QNC to the phone.
Spectralink is going to correct this error in the next release. However, this error can be manually corrected by the
following procedure:
1. Verication of the issue:
a. Connect QNC with your PC as usual. Type the following in the browser: http://192.168.1.1/usb/ftp/
You will see the le 00000000.cfg is with 0 byte. This is the issue and it should have 281 bytes.
7
Page 8

SPECTRALINK QUICK NETWORK CONNECT (QNC) GUIDE
The procedure below addresses this particular issue.
2. Manual Correction:
a. SSH into the QNC. IP address 192.168.1.1.
b. Put the following login credential:
• login: root
• password: raspberry
c. Delete the above le, then do a shutdown:
• $ rm /media/usb/ftp/00000*.cfg
• $ shutdown now
d. After 5 seconds. Pull the power plug out. After 5 seconds. Plug it back in.
e. Do the same verication step (1) above to verify if the le has 281 bytes.
CONTACT US: USA +1 (866) 588.5885 | UK +44 (0) 207 173 6900 | sales@masergy.com
 Loading...