

Page 1
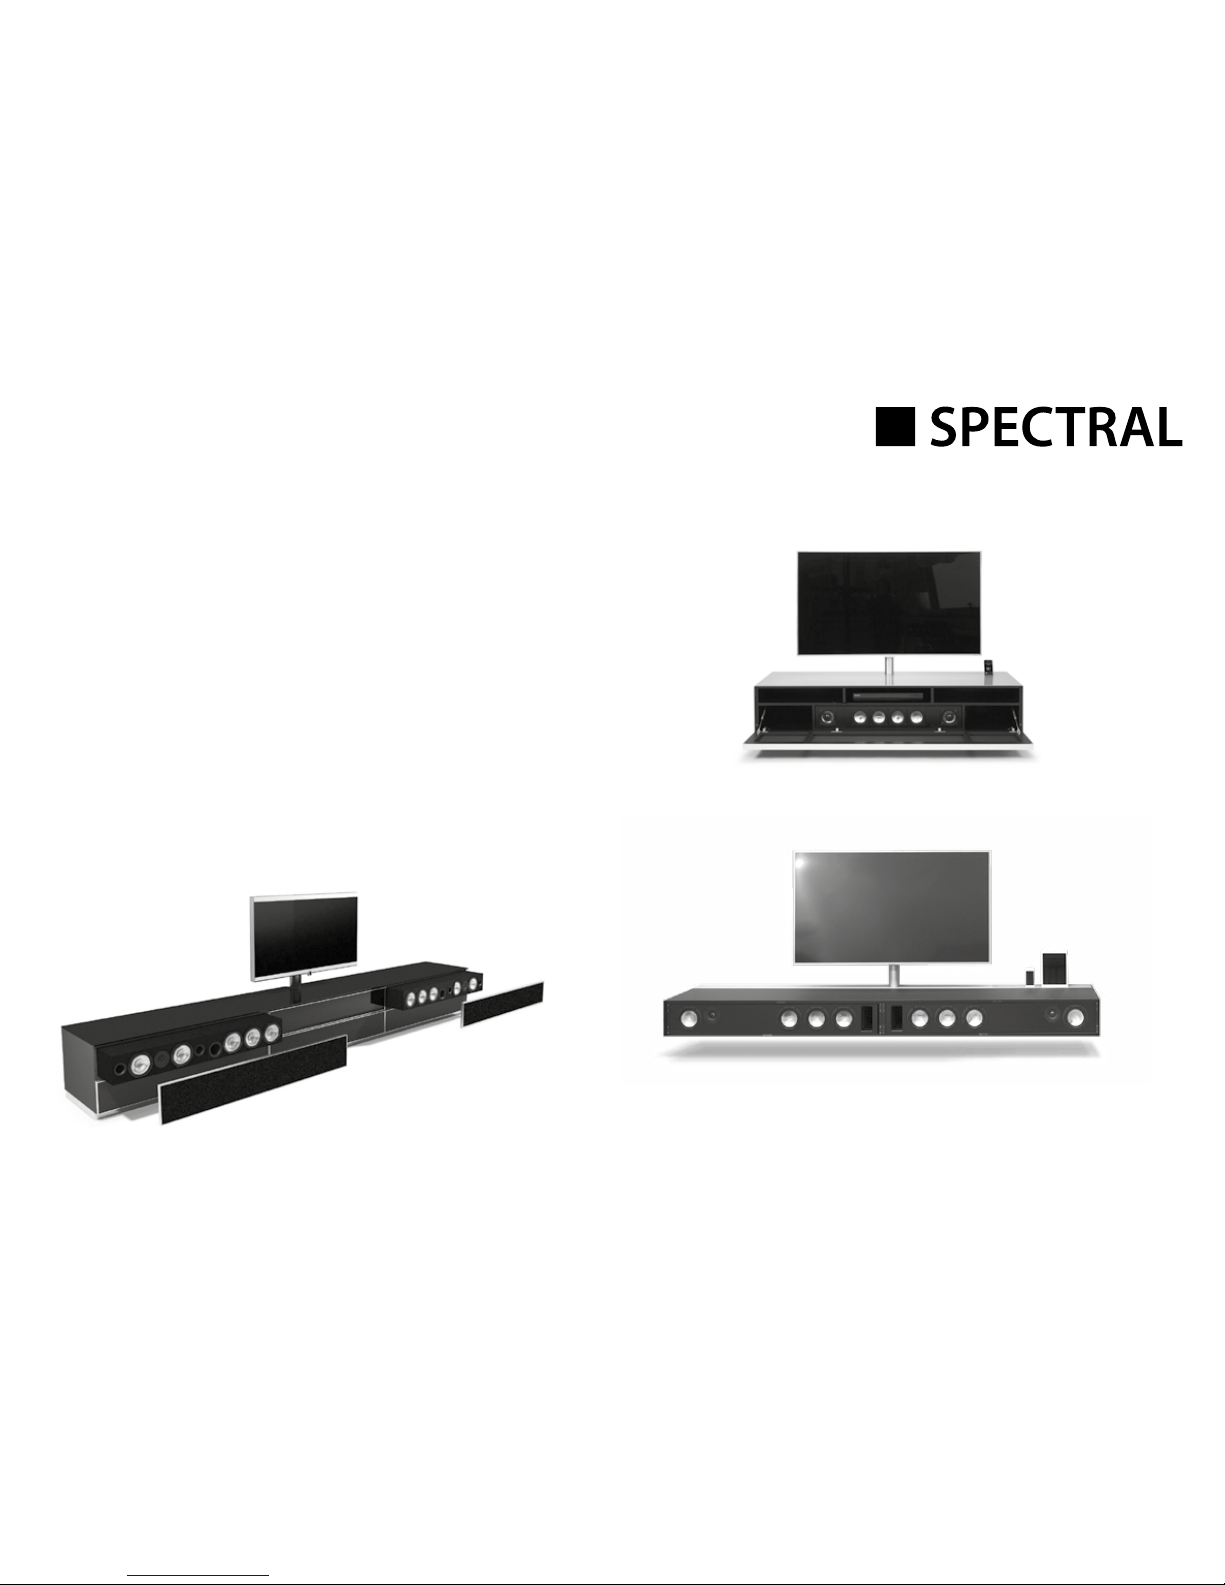
Active Virtual Surround System
CTA1-V2 / CTA2-V2
BRA1-V2 / CLA-V2 / VRA1
Artikel-Nr.: AN1023
Bedienungsanleitung
Operating Instructions
Page 2

2
SICHERHEITSHINWEIS
1. Lesen Sie die Anleitung sorgfältig durch.
2. Bewahren Sie die Anleitung auf.
3. Beachten Sie alle Warn- und Sicherheitshinweise.
4. Befolgen Sie alle Anweisungen.
5. Verwenden Sie das Gerät nicht in der Nähe von Wasser.
6. Verwenden Sie zur Reinigung ein sauberes, trockenes Tuch.
7. Achten Sie darauf, Lüftungsönungen frei zu halten. Beachten Sie bezüglich Belüftung die Herstellerhinweise Ihres Geräts.
8. Stellen Sie das Gerät nicht in der Nähe von Wärmequellen wie z. B. Heizkörpern, Wärmespeichern, Öfen oder anderen Geräten (auch Verstärkern) auf, die Wärme
erzeugen.
9. Beeinträchtigen Sie in keinem Fall die Schutzfunktion von gepolten oder geerdeten Steckern.
Ein gepolter Stecker hat zwei Stifte, wobei einer davon breiter ist. Ein geerdeter Stecker hat zwei Stifte und einen dritten Erdungsstift.
Der breite bzw. dritte Stift dient Ihrer Sicherheit. Falls der mitgelieferte Stecker nicht in Ihre Steckdose passt, wenden Sie sich bitte an einen qualizierten
Elektriker, um die veraltete Steckdose auszutauschen.
10. Achten Sie darauf, dass das Netzkabel keine Stolperfalle darstellt und nicht beschädigt wird - insbesondere im Bereich von Stecker, Steckdosen und
an Stellen, wo das Kabel aus dem Gerät herausgeführt wird.
11. Verwenden Sie nur Zubehör-/Anbauteile, die vom Hersteller zugelassen sind.
12. Verwenden Sie für das Gerät nur Rollwagen, Ständer, Stative, Träger oder Tische, die vom Hersteller angegeben
oder zusammen mit dem Gerät verkauft werden. Wenn Sie einen Rollwagen verwenden,
bewegen Sie die Einheit Gerät/Rollwagen nur vorsichtig, um Verletzungen durch Umkippen zu vermeiden.
13. Ziehen Sie bei Gewitter oder wenn das Gerät längere Zeit nicht verwendet wird den Netzstecker.
14. Wenden Sie sich bei allen Reparatur- und Wartungsarbeiten an qualizierte Fachleute.
Dies ist dann er forderlich, wenn das Gerät in irgendeiner Weise beschädigt ist, wie z.B. bei Beschädigungen von Netzkabel oder Stecker, wenn Flüssigkeiten oder
Gegenstände in das Gerät gelangt sind, das Gerät Regen oder Feuchtigkeit ausgesetzt wurde, nicht ordnungsgemäß funktioniert oder fallen gelassen wurde.
15. Um einen Brand oder Stromschlag zu vermeiden, darf das Gerät weder Regen noch Feuchtigkeit ausgesetzt werden.
16. Setzen Sie das Gerät keinem Tropf- oder Spritzwasser aus und stellen Sie keine Gegenstände auf das Gerät, die mit Flüssigkeit gefüllt sind.
17. Stellen Sie keine brennenden Kerzen oder Ähnliches auf oder in die Nähe des Geräts.
18. Um das Gerät vollständig von der Stromversorgung zu trennen, muss der Netzstecker gezogen werden.
19. Stellen Sie sicher, dass der Netzstecker jederzeit frei zugänglich ist.
20. Dieses Produkt ist nur für den Innenbereich geeignet. Nicht im Außenbereich oder in Feuchträumen verwenden.
Page 3
3
Deutsch
• SPECTRAL kann für Schäden, die aus Nichtbeachtung der Sicherheitshinweise resultieren, nicht haftbar gemacht werden.
• Wählen Sie für Ihr Lautsprechersystem einen ebenen, trockenen und sauberen Platz, entfernt von Fenstern mit direkter Sonneneinstrahlung,
Wärmequellen, Erschütterungen, hoher Feuchtigkeit und extremer Kälte.
• Um Schäden zu vermeiden, darf Ihr Verstärker-Modul nur mit der auf dem Typenschild spezizierten Spannung betrieben werden.
• Um Feuergefahr und die Möglichkeit eines elektrischen Schlages zu vermeiden, darf das Verstärker-Modul weder Regen noch hoher Luftfeuchtigkeit (> 80%)
ausgesetzt werden. Das Gerät entspricht den gültigen EMV Vorschriften bei einer Umgebungstemperatur von +10°C bis +40°C.
• Üben Sie keine Gewalt auf die Bedienungselemente, Anschlüsse und Kabel aus. Zum Aufstellen an einem anderen Ort lösen Sie zuerst das Netzkabel und dann die
Verbindungskabel zu anderen Geräten. Immer an den Steckern und nicht an den Kabeln ziehen. Fassen Sie das Netzkabel nie mit nassen Händen an.
• Stellen Sie nichts vor die Bassreexönung. Schwingungen und Vibrationen können zur Beschädigung von Gegenständen führen.
• Stecken Sie keine Gegenstände oder Körperteile in die Bassreexönung. Stromführende Teile im Innern des Gehäuses könnten berührt und beschädigt werden.
Dies kann zu Kurzschluss, elektrischen Schlägen und Feuerentwicklung führen. Falls bei der Wiedergabe Tonverzerrungen wie z.B. unnatürliches Klopfen, Pochen
oder hoch-frequentes Klicken auftreten, ist der Lautstärkepegel umgehend zu reduzieren.
• Verwenden Sie keine chemischen Lösungen zur Reinigung der Geräte. Bei starken Temperaturschwankungen kann es zu Kondensniederschlag (Wassertropfen)
im Innern des Verstärker-Moduls kommen. Warten Sie mit der Inbetriebnahme bis sich die entstandene Feuchtigkeit verüchtigt hat (mindestens 2 Stunden).
• Batterien müssen entsprechend dem Polungsaufdruck korrekt eingelegt werden. Verwenden sie ausschließlich die für dieses System spezizierten Batterien (LR03
AAA 1,5V) oder Akkus. Es handelt sich bei den mitgelieferten Batterien nicht um Akkus, d.h. diese dürfen nicht aufgeladen werden.
• Die richtige Aufstellung sowie der richtige Anschluss des Verstärker-Moduls fällt in die Verantwortung des Anwenders. SPECTRAL übernimmt keine Verantwortung
für Schäden oder Unfälle, die durch unsachgemäße Aufstellung oder falsches Anschließen verursacht wurden.
21. Achten Sie auf den korrekten Sitz des Steckers, um einen Stromschlag zu vermeiden.
22. Enthält Kleinteile, die verschluckt werden können. Nicht geeignet für Kinder unter drei Jahren.
VORSICHT: - Zur Vermeidung eines Stromschlags, das Gehäuse nicht önen. Das Gerät enthält keine Teile, die vom Benutzer
gewartet werden müssen. Wartungs- und Reparaturarbeiten nur von qualiziertem Fachpersonal durchführen lassen.
- Nehmen Sie keine Veränderungen am System oder am Zubehör vor. Nicht autorisierte Veränderungen können die Sicherheit,
die Einhaltung von Richtlinien und die Systemleistung beeinträchtigen. In diesem Fall kann die Garantie ungültig werden.
Dieses Symbol weist auf nicht isolierte, gefährliche Spannung hin.
Es besteht die Gefahr von Bränden oder Stromschlägen.
Dieses Symbol weist auf wichtige Bedienungs- und Wartungsanweisungen hin.
Gebrauchte Batterien müssen getrennt entsorgt werden und gehören nicht in den Hausmüll.
Page 4

4
Vermerk der FCC (Federal Communications Commission)
Dieses Gerät wurde geprüft und entsprechend Teil 15 der FCC-Regelungen als übereinstimmend mit den Bestimmungen für digitale Geräte der Klasse B befunden.
Diese Bestimmungen wurden erlassen, um den bei sachgemäßer Benutzung erreichbaren Schutz gegen schädliche Störungen bei Installation in der Wohnung sicherzustellen. Dieses Gerät erzeugt, verwendet und strahlt Hochfrequenzenergie aus und ist bei nicht der Beschreibung entsprechender Installation und Benutzung in der
Lage, gefährliche Störungen des Rundfunks hervorzurufen. Es gibt grundsätzlich keine Garantie dafür, dass in einer bestimmten Installationssituation keine Störungen
auftreten werden. Ob dieses Gerät gefährliche Störungen des Radio- oder Fernsehempfangs hervorruft, kann durch Ein- und Ausschalten des Gerätes getestet werden.
Wenn dies der Fall ist, wird der Benutzer gebeten, die Störungen abzustellen, indem er eine oder mehrere der folgenden Maßnahmen durchführt:
· Richten Sie die Empfangsantenne neu aus oder installieren Sie sie an einem anderen Standort
· Vergrößern Sie den Abstand zwischen dem Gerät und dem Empfänger
· Schließen Sie das Gerät an eine Steckdose eines Stromkreises an, der nicht derjenige ist, an den das Empfangsgerät angeschlossen ist
· Wenden Sie sich an Ihren Händler oder an einen erfahrenen Radio-/Fernsehtechniker
Um kontinuierliche Übereinstimmung mit den Bestimmungen zu gewährleisten, nehmen Sie bitte keine Veränderungen an dem Gerät vor, die nicht ausdrücklich von
der für die Prüfung [eigentl. Übereinstimmung] verantwortlichen Stelle genehmigt sind. Sollten Sie dies dennoch tun, verlieren Sie die Berechtigung, dieses Gerät zu
benutzen. (Ausnahme: Benutzen Sie bitte ausschließlich abgeschirmte Interface-Kabel, wenn Sie das Gerät an einen Computer oder an Computerzubehör anschließen.)
Vermerk der FCC zur Strahlenbelastung
Dieses Gerät entspricht den Grenzwerten der FCC zur Strahlenbelastung, die für eine unkontrollierte Umgebung ausgelegt sind; es entspricht außerdem Teil 15 der
FCC-RF-Regelungen. Es darf nur unter folgenden zwei Bedingungen betrieben werden:
1. Dieses Gerät darf keine Störungen hervorrufen
2. Dieses Gerät muss jegliche Störungen aufnehmen, inklusive solcher, die den ungewünschten Betrieb des Gerätes auslösen können
Warnung
Der Hersteller ist nicht verantwortlich für jegliche Störungen beim Radio- oder Fernsehempfang, die durch unerlaubte Veränderungen an dem Gerät hervorgerufen
werden. Sollten Sie Veränderungen an dem Gerät vornehmen, verlieren Sie die Berechtigung, es zu benutzen.
Page 5

5
Deutsch
Page 6

6
Sehr geehrter Kunde,
willkommen in der SPECTRAL-Familie und vielen Dank für Ihr Vertrauen, das Sie uns mit dem Kauf dieses Systems entgegenbringen. Sie haben
sich für ein hochwertiges Lautsprecher-System entschieden und damit Ihren hohen Anspruch an Klang- und Verarbeitungsqualität bewiesen.
Bitte lesen Sie vor dem Aufstellen und Anschließen Ihres Sound Systems diese Bedienungsanleitung sorgfältig durch.
Sie wird Ihnen bei der optimalen Nutzung Ihrer Systeme helfen. SPECTRAL verfügt über ein Vertriebsnetz in über 40 Ländern. Bei eventuellen
Fragen wird Ihnen dieses Team von erfahrenen Distributoren gemeinsam mit dem autorisierten Fachhandel gerne weiterhelfen.
Viel Freude und lange Zufriedenheit mit Ihrem Sound System wünscht das SPECTRAL-Team.
Page 7

7
Deutsch
Systembeschreibung
Die Virtual Surround Systeme CTA1/2 / BRA1 / CLA1 / VRA1 erzeugen ein vollwertiges Klangfeld, wie es sonst nur bei 5.1 Systemen möglich ist. Hierzu werden die einzelnen Kanäle einer Mehrkanalaufnahme in einem speziellen Verfahren frequenzspezisch aufbereitet und derart auf zwei Kanäle gemischt, dass
bei der Wiedergabe ein räumlicher Surround-Eindruck entsteht. Das bedeutet
minimaler Installationsaufwand bei großem Klangvergnügen. Die Systeme
verfügen über einen integrierten FM-Tuner und eine lernfähige Fernbedienung,
über die auch eine zweite Hörzone (Multiroom) gesteuert werden kann.
Packungsinhalt Virtual Surround System CTA1 / BRA1:
1) Ein Lautsprecher-Modul mit integriertem Audio Receiver (einschl. FM Tuner)
2) Ein Multi-Signalkabel
3) Zwei optische Kabel
4) Ein Antennenkabel
5) Eine Wurfantenne für UKW-Empfang
6) Ein Netzkabel zur Stromversorgung des Verstärker-Moduls
7) Eine displayunterstützte und einfach zu bedienende Universalfernbedienung
8) Drei Batterien (LR03 AAA 1,5V) für die Fernbedienung
Packungsinhalt Virtual Surround System CLA1:
1) Ein zentrales Verstärker-Modul mit integriertem Audio Receiver (einschließl. FM Tuner)
2) Zwei Satellitenlautsprecher
3) Ein Signalkabel
4) Zwei optische Kabel
5) Ein Antennenkabel
6) Ein Satz Lautsprecherkabel zur Verbindung zwischen Verstärker-Modul und Satelliten
7) Ein Netzkabel zur Stromversorgung des Verstärker-Moduls
8) Eine Wurfantenne für UKW-Empfang
9) Eine displayunterstützte und einfach zu bedienende Universalfernbedienung
10) Drei Batterien (LR03 AAA 1,5V) für die Fernbedienung
Packungsinhalt Virtual Surround System CTA2:
1) Ein aktiver Subwoofer (CTA2-Amp) mit integriertem Audio Receiver (einschließl. FM Tuner)
2) Ein passiver Subwoofer (CTA2-Sub)
3) Zwei passive Satellitenlautsprecher (CTA2-Sat)
4) Ein Multi-Signalkabel
5) Zwei optische Kabel
6) Ein Antennenkabel
7) Eine Wurfantenne für UKW-Empfang
8) Ein Satz Lautsprecherkabel zur Verbindung zwischen Verstärker-Modul und Satelliten
9) Ein Netzkabel zur Stromversorgung des Verstärker-Moduls
10) Eine displayunterstützte und einfach zu bedienende Universalfernbedienung
11) Drei Batterien (LR03 AAA 1,5V) für die Fernbedienung
Packungsinhalt Virtual Surround System VRA1:
1) Ein aktives Lautsprecher-Modul (Right/Active) mit integriertem Audio Receiver (einschl. FM Tuner)
2) Ein passives Lautsprecher-Modul (Left/Passive)
3) Ein Multi-Signalkabel
4) Zwei optische Kabel
5) Ein Antennenkabel
6) Eine Wurfantenne für UKW-Empfang
7) Ein Satz Lautsprecherkabel zur Verbindung zwischen den Lautsprecher-Modulen
8) Ein Netzkabel zur Stromversorgung des Verstärker-Moduls
9) Eine displayunterstützte und einfach zu bedienende Universalfernbedienung
10) Drei Batterien (LR03 AAA 1,5V) für die Fernbedienung
Platzierung des Sound Systems
Das Sound System wird in das Möbel bzw. den Soundsockel eingeschoben. Anschließend werden die
Lautsprecherabdeckungen montiert. Das CLA1-System ist im Möbel fertig eingebaut.
CTA1 / VRA1: Das Sound System sollte mittig unterhalb des TVs angeordnet sein.
CTA2: Für einen optimalen Raumklang sollten die Satellitenlautsprecher links und rechts außen im
Möbel platziert werden. Die beiden Subwoofer können beliebig platziert werden, bevor-
zugt jedoch in der Mitte.
BRA1: Das BRA1-System wird in den Soundsockel eingeschoben.
CLA1: An der Rück seite der Lautsprecher sind B assreexönungen, durch die der Lautsprecher
nach hinten abstrahlt. Das System sollte mit einem Abstand von min. 5 cm zur Wand
aufgestellt werden, um einen optimalen Klang zu erhalten.
Page 8
8
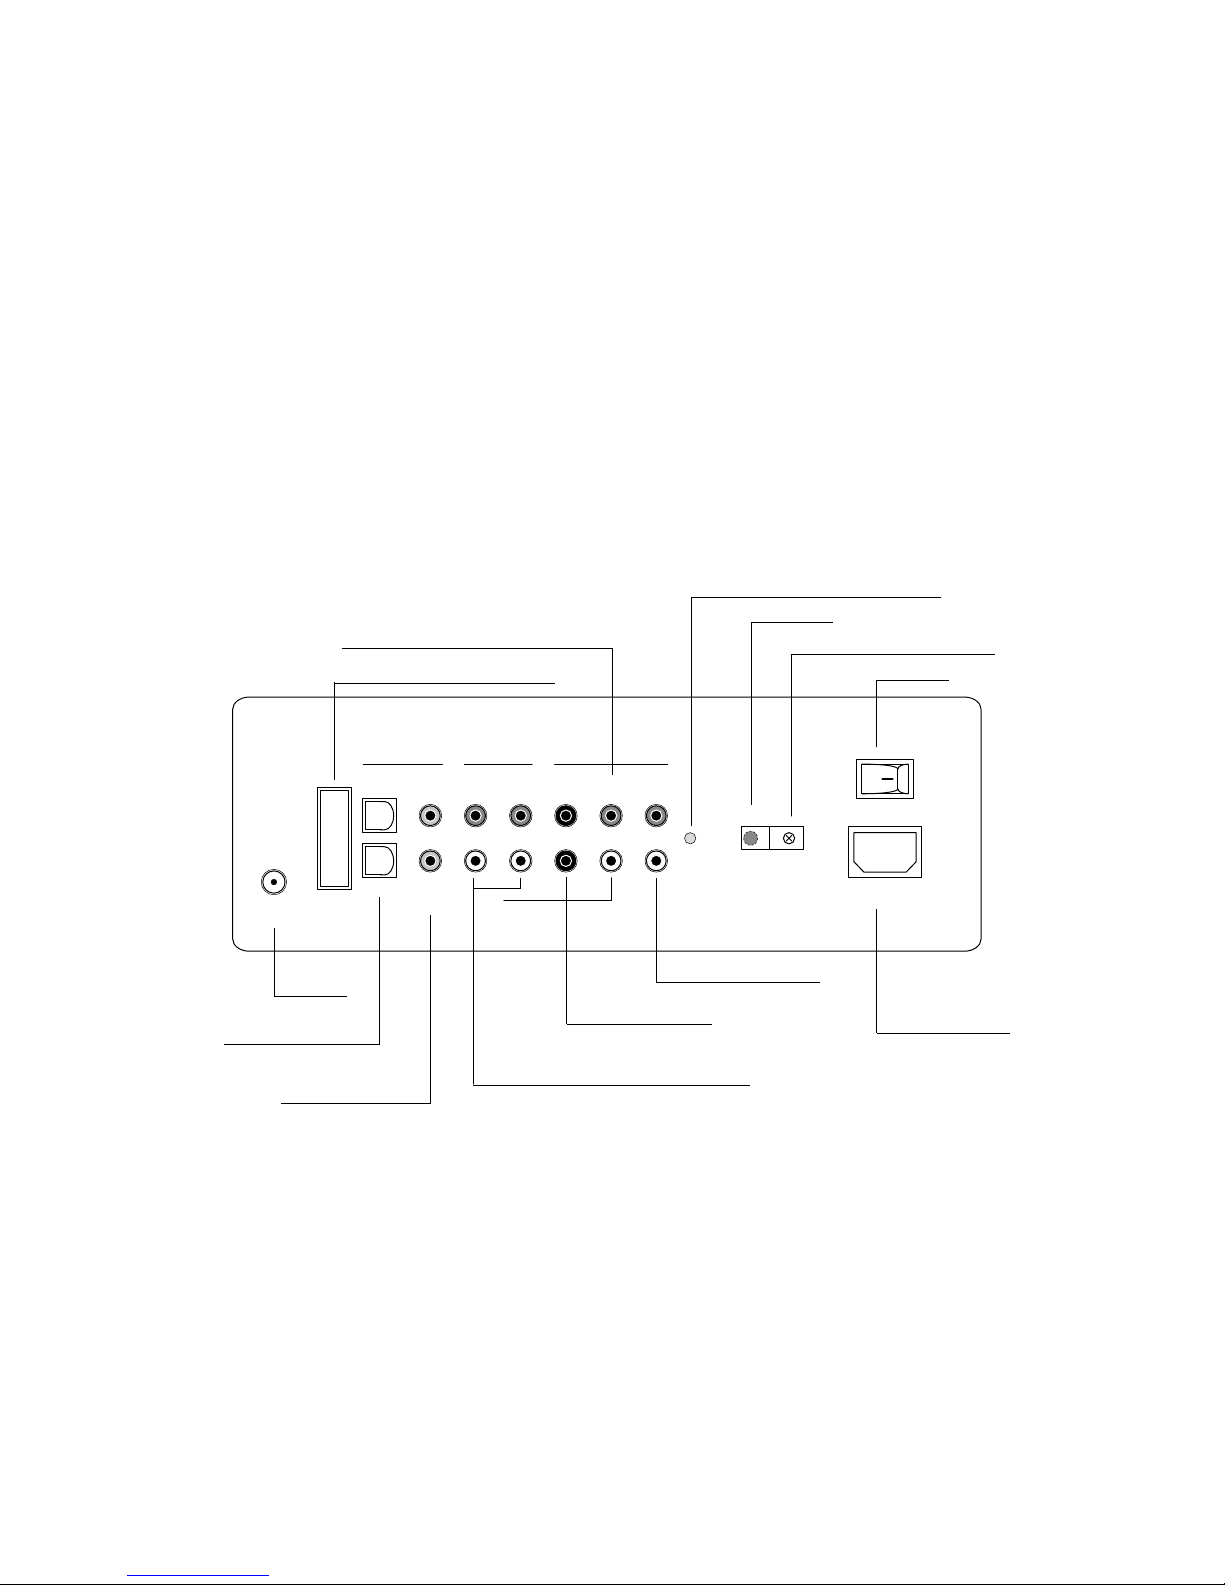
Rückansicht des BRA1-V2 / CTA1-V2 - Systems
IR
DIGITAL INPUTS ANALOG INPUTS ANALOG OUTPUTS
OPT 1
OPT 2
COAX 1
COAX 2
LINE 1
LINE 2 /
PHONO
SUB
[MONO]
PRE
ZONE 2 /
LINE
RIGHT
LEFT
OPERATION
FM RADIO
ANTENNA
2.1 MODE = FRONT L+R
5.1 MODE = SURROUND L+R
ON
100-240V~
50-60Hz max.200W
Befestigungsklemme für IR-Sender
Netzschalter
Betriebsanzeige (rot = standby, grün = ein)
IR-Empfänger
PRE OUT 2.1/5.1 Mode Vorverstärker - Ausgang
Schnittstelle nur für Software-Updates
FM-Antennenanschluss
Digital Eingänge (coaxial)
für z. B. SAT, BluRay, TV...
Analoge Eingänge für VCR, Plattenspieler ...
Digital Eingänge (optisch)
für z. B. SAT, BluRay, TV...
Buchse zum Anschluss
des Netzkabels
Subwoofer - Ausgang
Zone 2 / Line - Ausgang
Page 9
9
Deutsch
IR
DIGITAL INPUTS ANALOG INPUTS ANALOG OUTPUTS
OPT 1
OPT 2
COAX 1
COAX 2
LINE 1
LINE 2 /
PHONO
SUB
[MONO]
PRE
ZONE 2 /
LINE
RIGHT
LEFT
OPERATION
FM RADIO
ANTENNA
2.1 MODE = FRONT L+R
5.1 MODE = SURROUND L+R
ON
100-240V~
50-60Hz max.200W
SPEAKERS
FL+
FR+
C+
S+
FL-
FR-
C-
S-
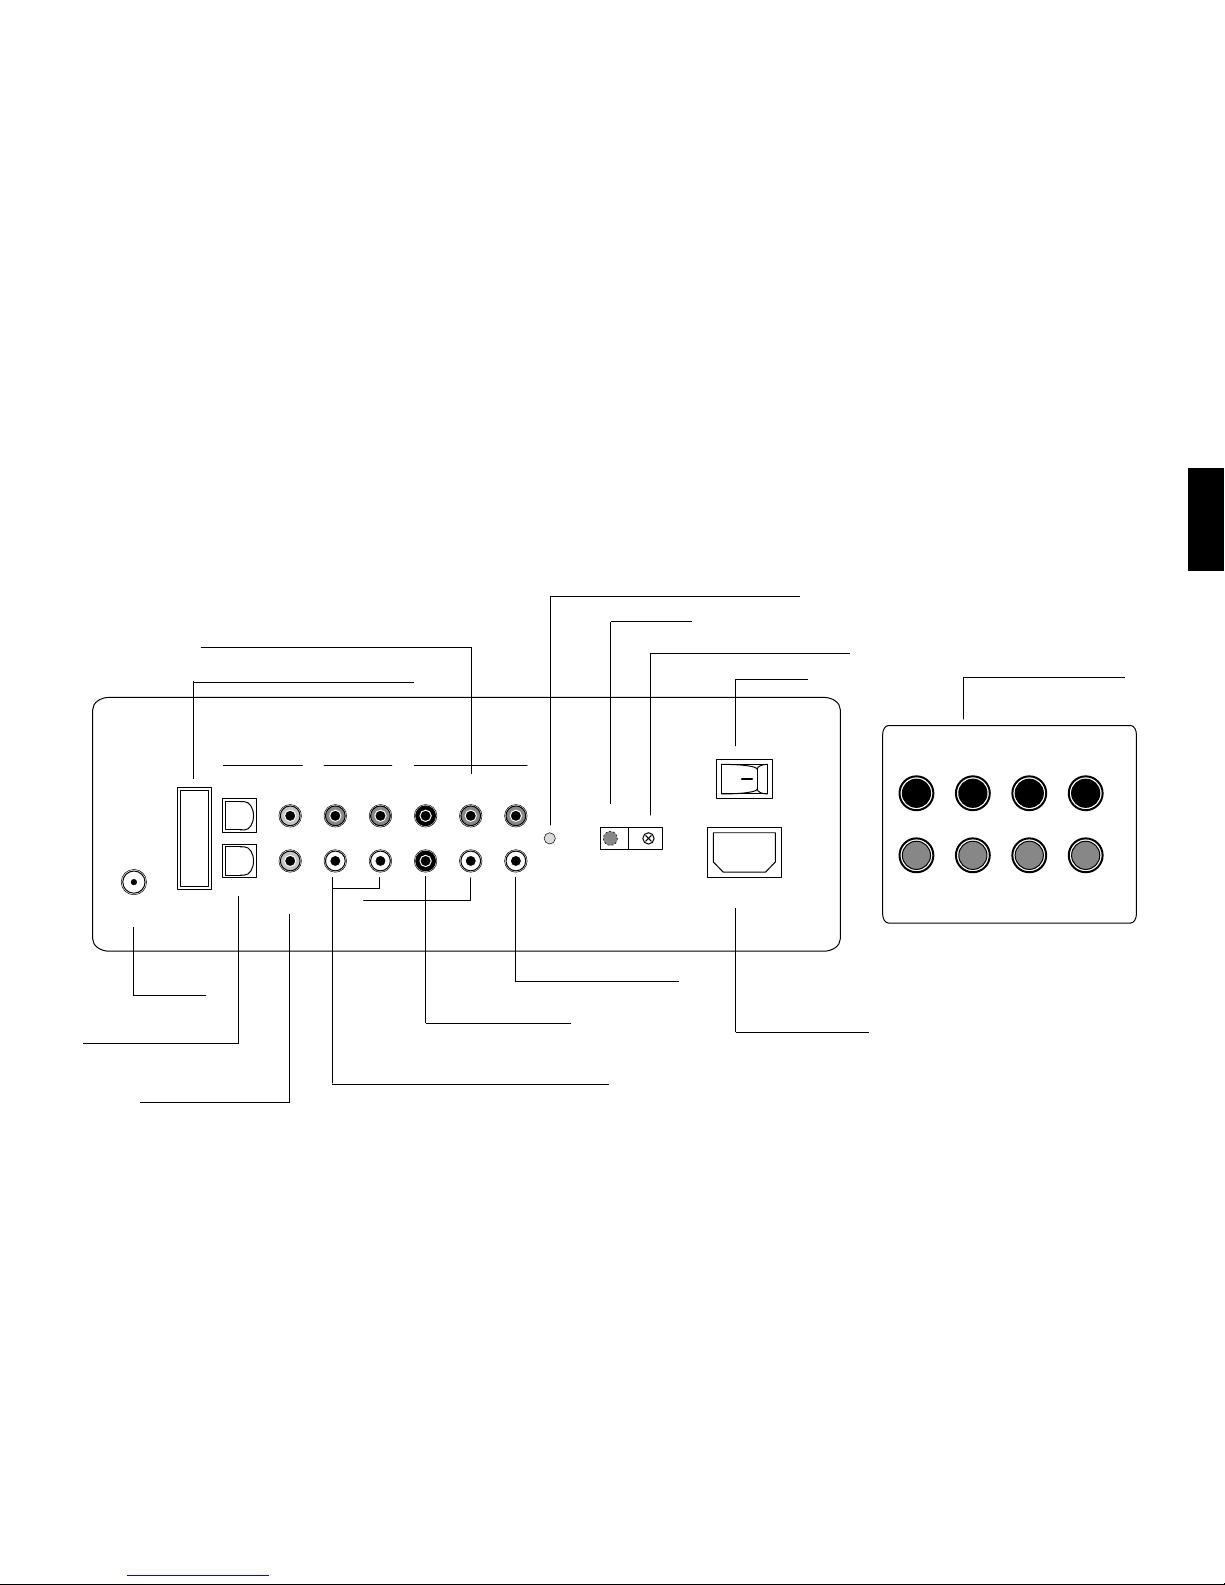
Rückansicht des CTA2-V2 / CLA1-V2 - Systems
Befestigungsklemme für IR-Sender
Netzschalter
Betriebsanzeige (rot = standby, grün = ein)
IR-Empfänger
PRE OUT 2.1/5.1 Mode Vorverstärker - Ausgang
Schnittstelle nur für Software-Updates
FM-Antennenanschluss
Digital Eingänge (coaxial)
für z. B. SAT, BluRay, TV...
Analoge Eingänge für VCR, Plattenspieler ...
Digital Eingänge (optisch)
für z. B. SAT, BluRay, TV...
Buchse zum Anschluss
des Netzkabels
Subwoofer - Ausgang
Zone 2 / Line - Ausgang
Anschlüsse für die Satelitten
(links und rechts),
den Subwoofer und einen
optionalen Centerspeaker
Page 10
10
IR
DIGITAL INPUTS ANALOG INPUTS ANALOG OUTPUTS
OPT 1
OPT 2
COAX 1
COAX 2
LINE 1
LINE 2 /
PHONO
SUB
[MONO]
PRE
ZONE 2 /
LINE
RIGHT
LEFT
OPERATION
FM RADIO
ANTENNA
2.1 MODE = FRONT L+R
5.1 MODE = SURROUND L+R
ON
100-240V~
50-60Hz max.200W
HF
LF
+
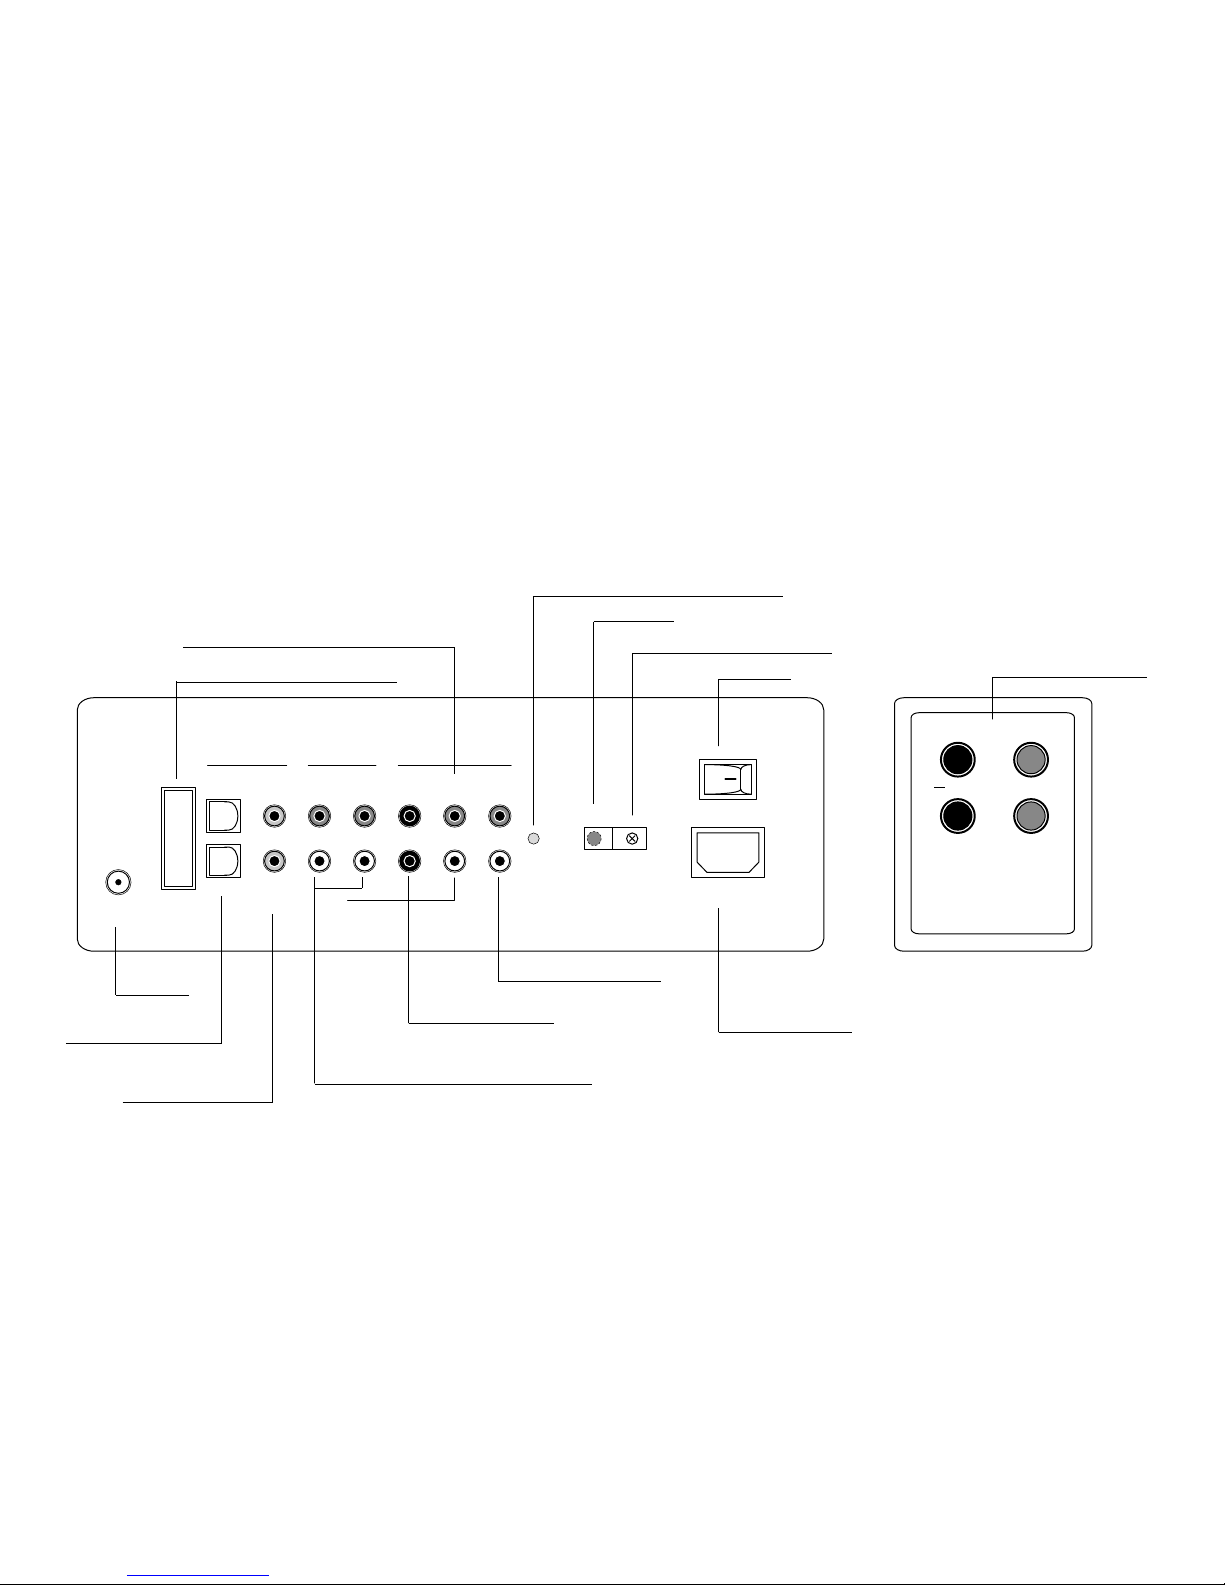
Rückansicht des VRA1 - Systems
Befestigungsklemme für IR-Sender
Netzschalter
Betriebsanzeige (rot = standby, grün = ein)
IR-Empfänger
PRE OUT 2.1/5.1 Mode Vorverstärker - Ausgang
Schnittstelle nur für Software-Updates
FM-Antennenanschluss
Digital Eingänge (coaxial)
für z. B. SAT, BluRay, TV...
Analoge Eingänge für VCR, Plattenspieler ...
Digital Eingänge (optisch)
für z. B. SAT, BluRay, TV...
Buchse zum Anschluss
des Netzkabels
Subwoofer - Ausgang
Zone 2 / Line - Ausgang
Anschlüsse für das passive
Lautsprecher-Modul
Page 11
11
Deutsch
SAT
LEFT
SUBAMPSAT
RIGHT
SPEAKERS
FL+
FR+C+S+
FL-
FR-C-S-
SUB
SAT
RIGHT
SAT
LEFT
SPEAKERS
FL+
FR+C+S+
FL-
FR-C-S-
Right / Active
Left / Passive
HF
LF
+
HF
LF
+
HF
LF
+
HF
LF
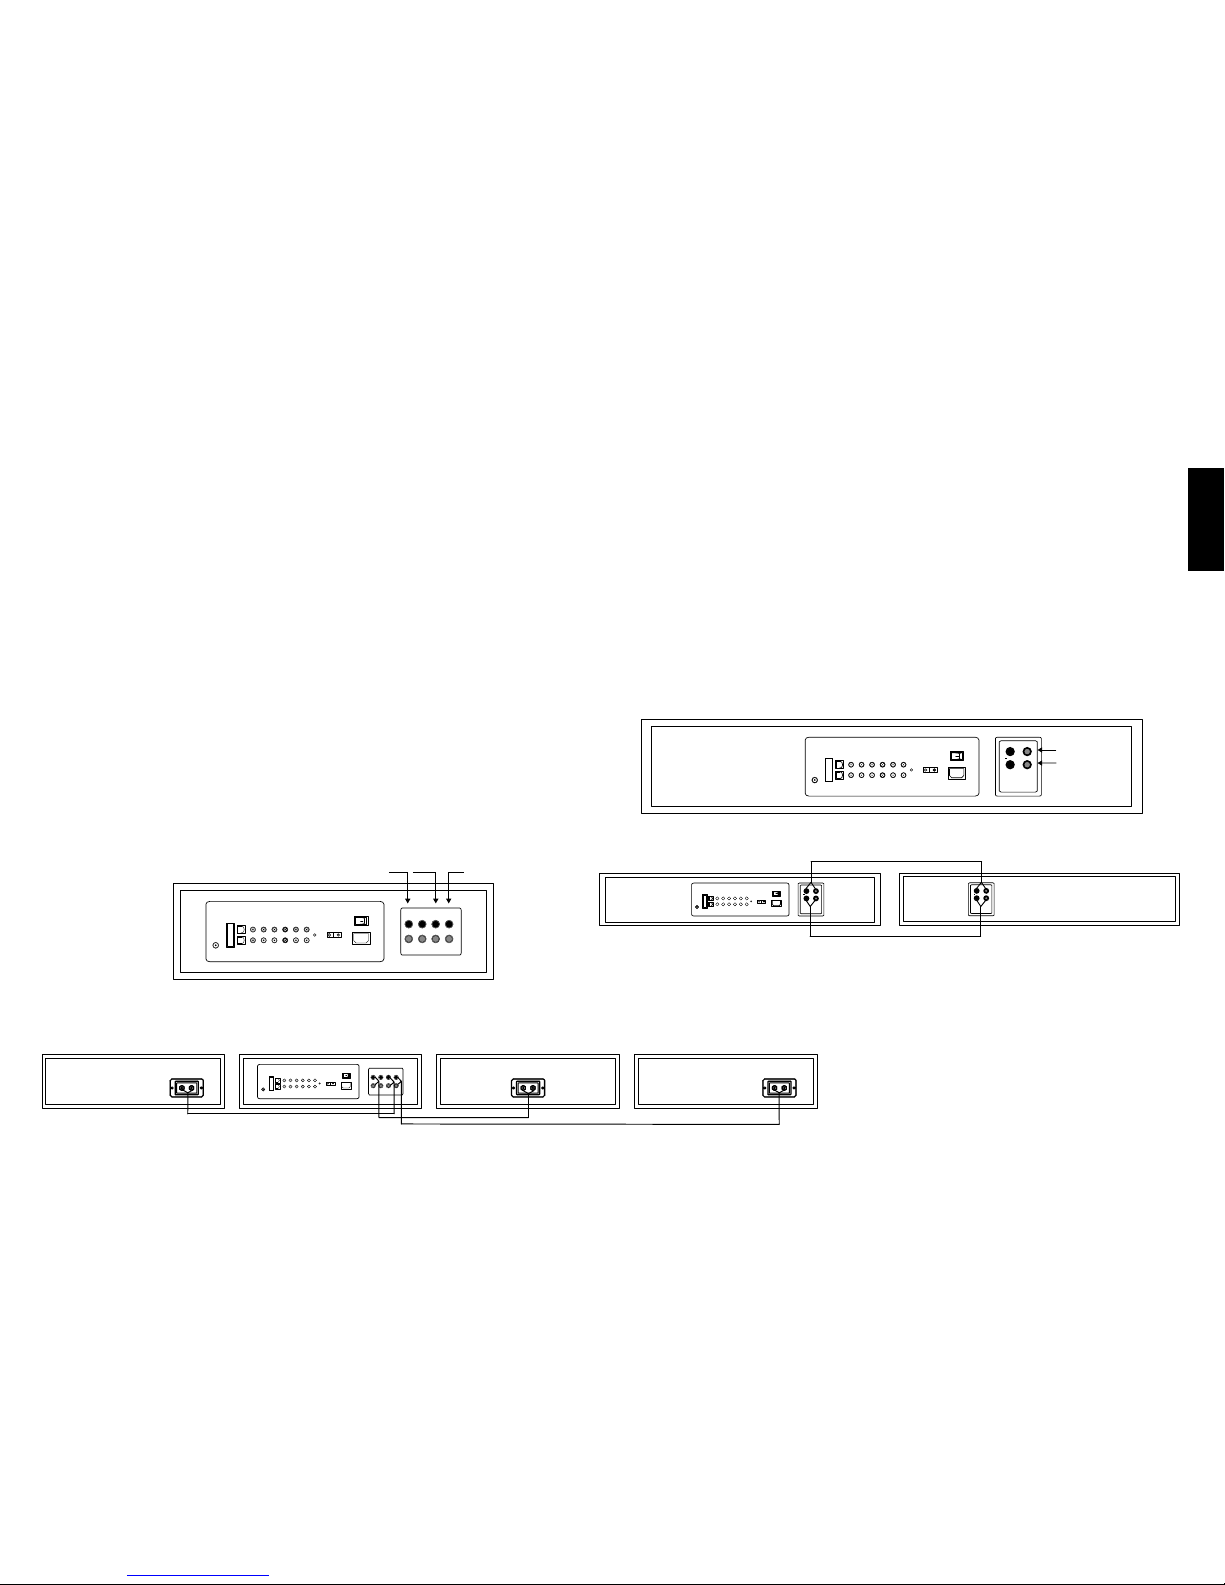
Anschluss der Lautsprecher
Sound System CTA1 / BRA1: Sound System CLA1:
Die Lautsprecher sind intern verkabelt, Das CLA1-System ist im Möbel fertig eingebaut,
hier müssen nur die Quellgeräte (DVD, etc.) angeschlossen werden. hier müssen nur die Quellgeräte (DVD, etc.) angeschlossen werden.
Sound System CTA2 / VRA1:
Siehe Anschlussschema unten. Verwenden Sie die im Lieferumfang enthaltenen
Lautsprecherkabel zum Anschluss der Lautsprecher an den Schraubklemmen
„Front Left“, „Front Right“ und „Sub“ (CTA2) bzw.„HF“ und „LF“ (VRA1) auf der
Rückseite des Verstärker-Moduls (Kabelenden ca. 1 cm abisolieren). Bitte beachten
Sie die richtige Polung, rot für plus (+) und schwarz für minus (-). Nutzen Sie hierzu
die Markierung auf dem mitgelieferten Kabel. Achten Sie darauf, dass das abisolierte
Kabelende keinen Kontakt zur Gehäuserückseite hat. (Kurzschlussgefahr!)
CTA2
VRA1
Page 12

12
Anschluss der Quellgeräte
Das SPECTRAL Sound System bietet eine Vielzahl von Anschlussmöglichkeiten für fast alle gängigen Quellgeräte, wie zum Beispiel DVD-Player, Videorecorder,
Satelliten-Receiver, Multimedia-Konsolen (Playstation®, X-Box®, ...) etc. Hierbei werden die Audioanschlüsse Ihrer Quellgeräte mit den entsprechenden Anschlüssen auf
der Rückseite des Sound Systems verbunden. Quellgeräte, die über einen digitalen Ausgang für Dolby Digital und DTS Bitstreams verfügen, sollten auch digital mit
dem Sound System verbunden werden. Dies gewährleistet volle Dolby Digital und DTS Klangqualität.
Die Videosignal-Verbindungen werden direkt zwischen den Quellgeräten und dem Bildwiedergabegerät hergestellt.
Die Auswahl der wiederzugebenden Bildquelle wird direkt im Auswahlmenü des Bildwiedergabegerätes vorgenommen.
Damit Sie den integrierten FM-Tuner des Sound Systems nutzen können, müssen Sie die mitgelieferte Wurfantenne an der vorgesehenen Buchse des
Systems anschließen. Zum besseren Empfang sollte die Wurfantenne aufgespannt werden. Für einen optimalen Empfang empfehlen wir den Anschluss an ein BreitbandKabelnetz oder eine Dachantenne mittels des mitgelieferten Antennenkabels.
Bevor Sie mit der Tonwiedergabe über das Sound System beginnen können, müssen Sie die Erstinstallation durchführen und die Eingänge den Quellgeräten zuweisen.
Hierzu werden Sie beim ersten Einschalten automatisch aufgefordert (Seite 14).
Im System Menü der Fernbedienung können die Einstellungen der Anschlüsse vorgenommen werden (Seite 21).
Wichtig: Verbinden Sie Ihr Verstärker-Modul erst mit dem Stromnetz, nachdem alle Verbindungen zu den anderen Audio-/Video-Komponenten hergestellt sind.
Danach können Sie den Netzschalter in die Position „ON“ bringen.
Page 13
13
Deutsch
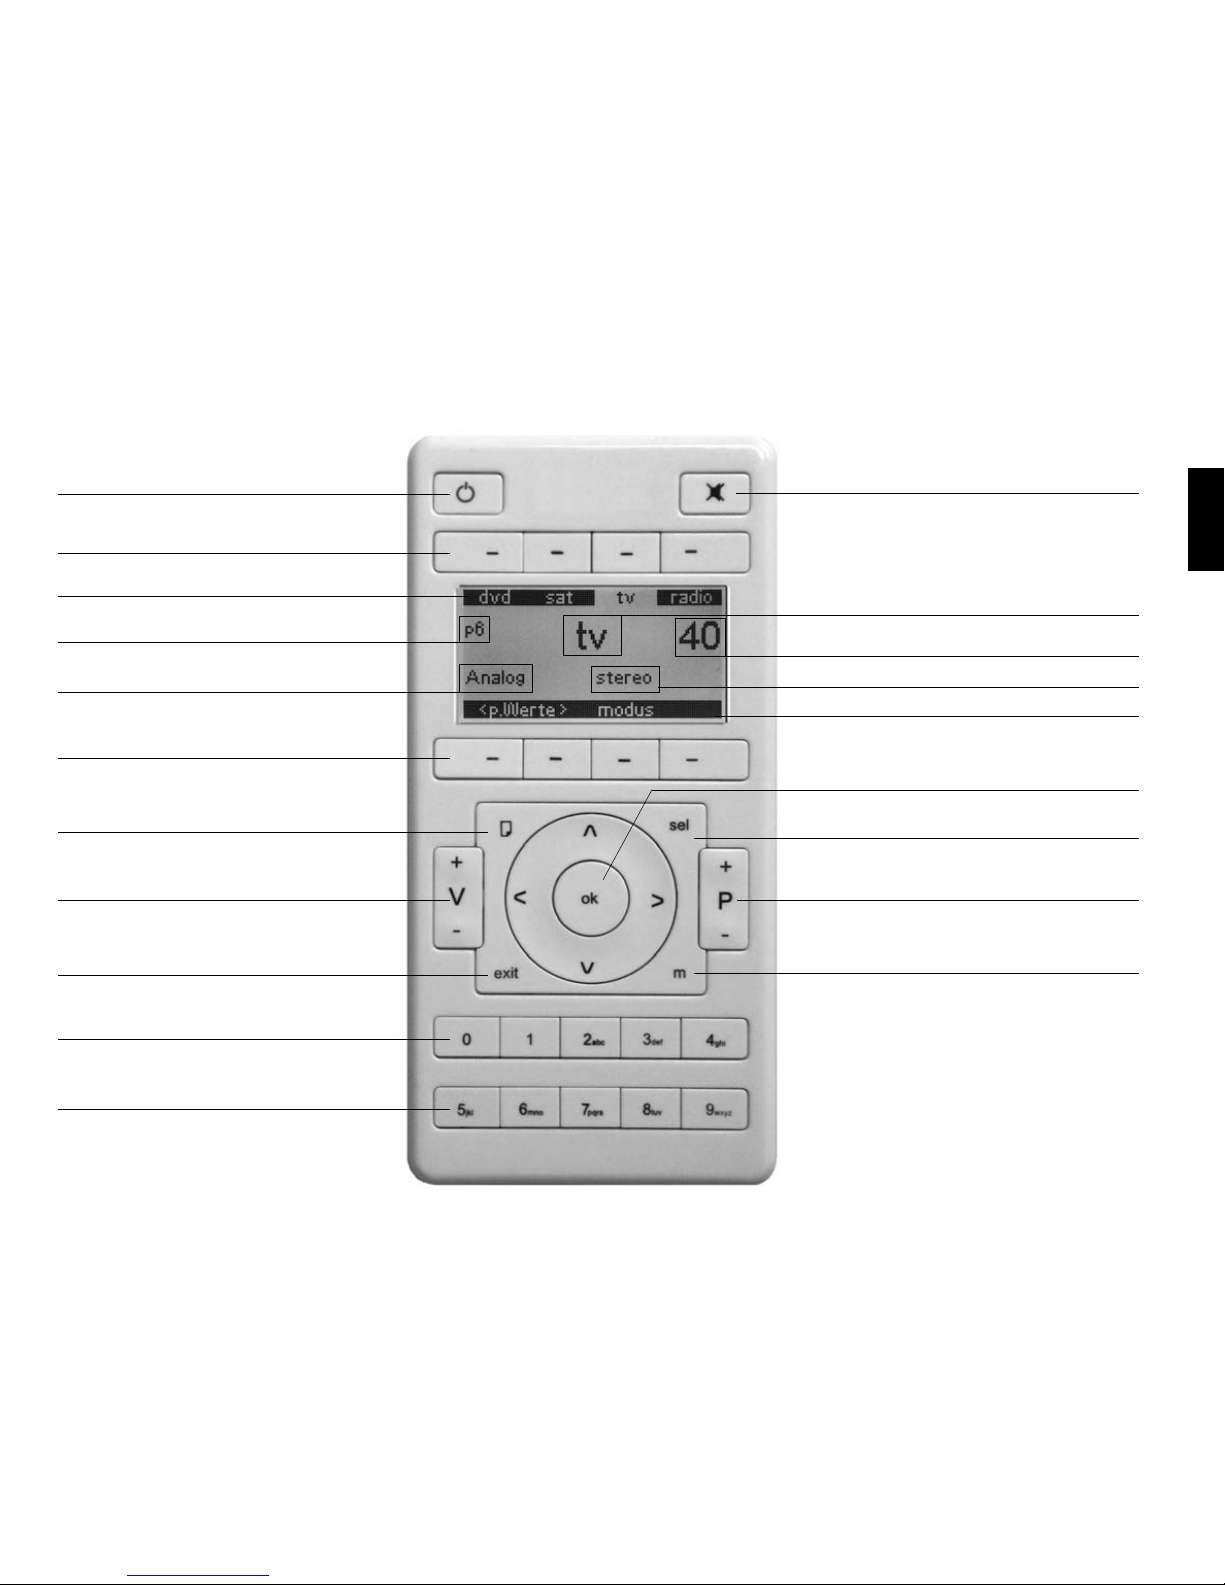
Fernbedienung
Funktionstasten, menüabhängige Funktionen
Numerische Tasten
Lautstärketasten
OK-Taste
Ein/Standby-Taste
Funktionstasten, menüabhängige Funktionen
Numerische Tasten
Stumm-Taste (Mute)
Menü-Taste
Programmtasten (nur IR-Modus)
Geräteauswahl-Taste
Persönliche Einstellungen (<p.Werte>)
Dekodier-Modus
Eingestellte Lautstärke
Wiedergabe-Modus
Ausgewählte Quelle
Blättern-Taste
Verlassen-Taste
Über Funktionstasten auswählbare Quellen
Über Funktionstasten auswählbare Modi und <p.Werte>
Page 14

14
Inbetriebnahme der Fernbedienung
Bitte legen Sie die mitgelieferten Batterien in die Fernbedienung ein. Achten Sie darauf, dass diese entsprechend der Polaritätsmarkierungen (+/-) korrekt eingelegt werden.
Gebrauch der Fernbedienung
Wenn alle Geräte miteinander verbunden sind und der Netzschalter am Verstärk er-Modul eingeschaltet ist, bendet
sich das System im Standby-Modus. Durch einmaliges Drücken einer beliebigen Taste wird die Fernbedienung
aktiviert. Wird sie länger als 30 Sek. nicht benutzt, geht sie in den Ruhezustand über. Durch Drücken einer beliebigen Taste wird sie wieder aktiviert.
Hinweis: Beim ersten Einschalten gelangen Sie automatisch zur Erstinstallation (s. Seite 14).
Spracheinstellung: Im „System Menü“ (m => System Menü => factory set => Sprache / language) die gewünschte
Sprache auswählen.
Durch Drücken der Power-Taste wird das System eingeschaltet bzw. in den Standby-Modus gesetzt.
Wird im Display „Keine Verbindung“ angezeigt, besteht keine Funkverbindung zwischen der Fernbedienung und
dem Sound System. Überprüfen sie bitte, ob das Sound System eingeschaltet ist bzw. mit Strom versorgt wird
oder verringern Sie ggf. die Reichweite zwischen der Fernbedienung und dem Sound System.
Bedienung des Sound Systems
Drücken Sie die Ein/Standby-Taste, um das Sound System zu starten.
Wenn Sie das Sound System wieder ausschalten möchten, drücken Sie erneut die Ein/Standby-Taste. Das Sound
System wird in den Standby-Modus versetzt.
Hinweis: Wird das Sound System in eingeschaltetem Zustand vom Netz getrennt, so schaltet es sich nach dem
Wiederanlegen der Netzspannung (z.B. über eine Master-Slave-Steckdosenleiste) automatisch wieder in den
aktiven Zustand.
stand by
Keine
Verbindung
Keine
Verbindung
Page 15
15
Deutsch
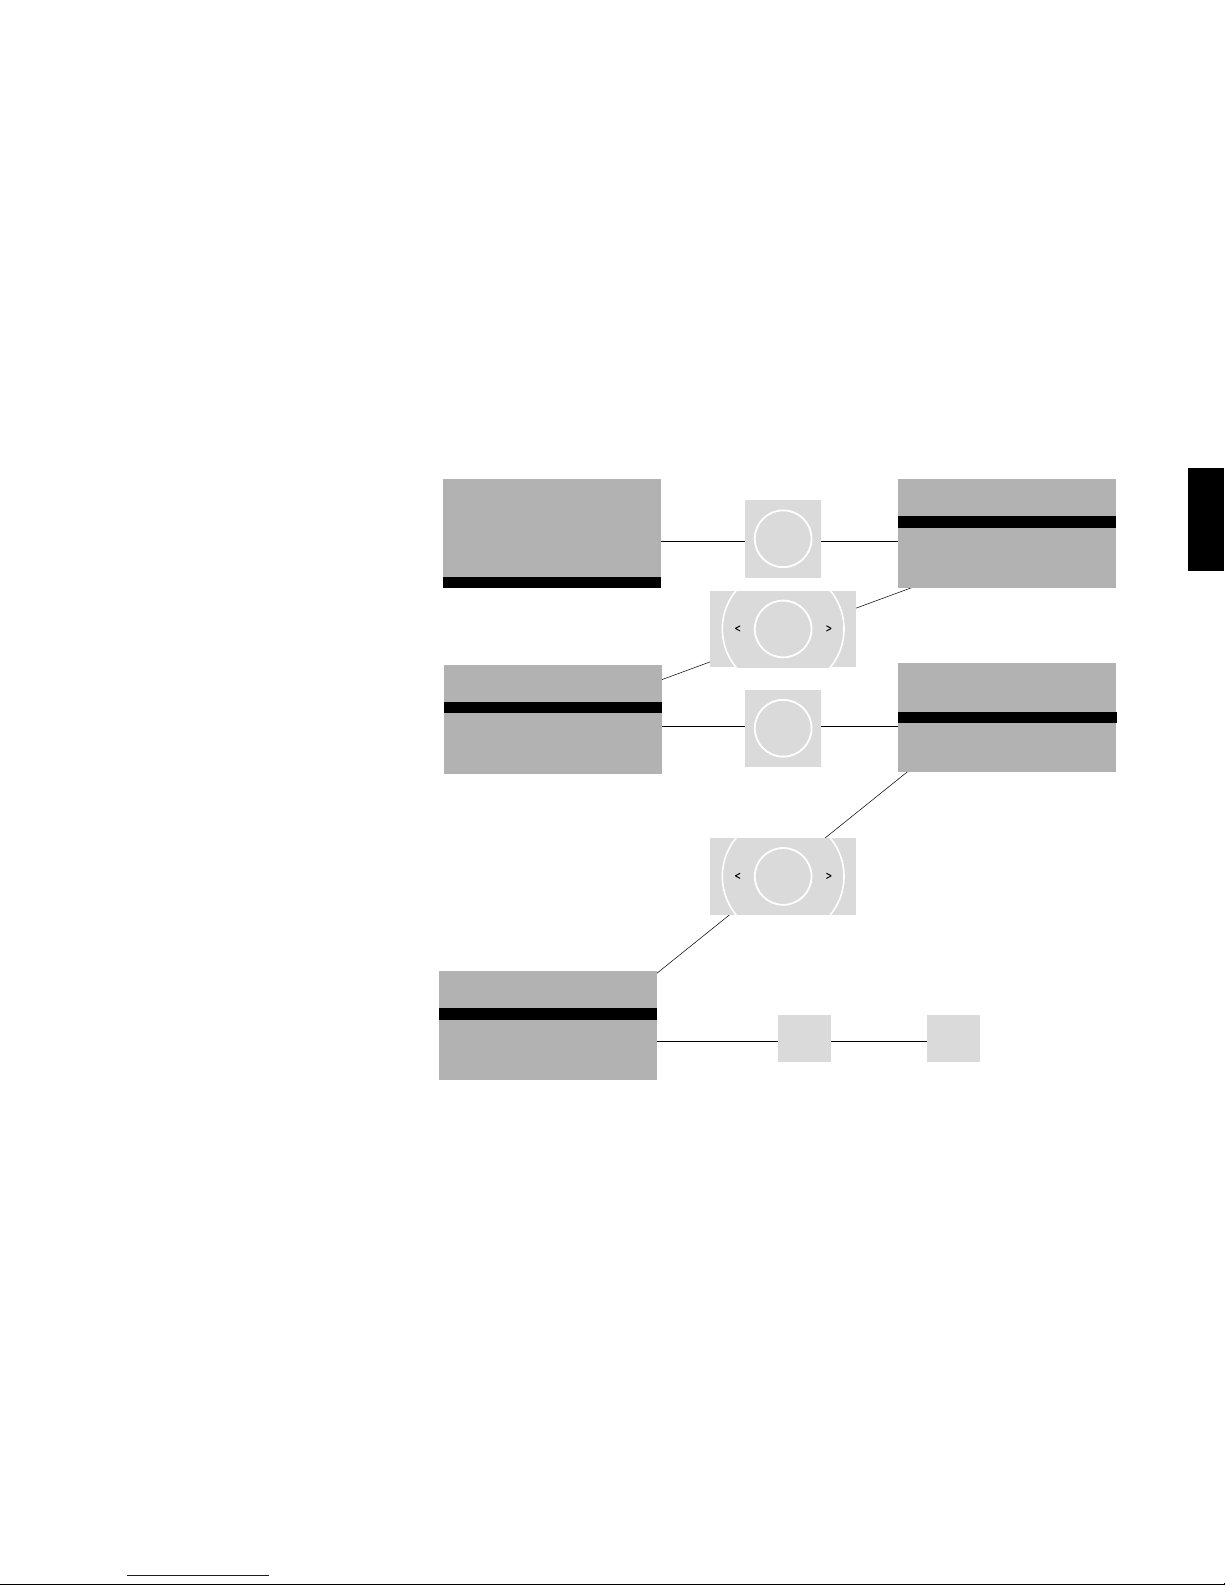
Erstinstallation
Bevor Sie das Sound System benutzen können,
müssen Sie die Eingänge den angeschlossenen
Quellgeräten zuweisen. Hierzu werden Sie beim
ersten Einschalten aufgefordert.
Um zur Eingangskonguration zu gelangen, drücken
Sie die OK-Taste.
Mit den Pfeiltasten „<“ und „>“ können Sie Namen
für die angeschlossenen Geräte auswählen und
müssen diese jeweils mit <ok> bestätigen.
Zum Verlassen des Menüs „Eingangskong“ müssen
Sie die Taste „m“ drücken, um alle Eingaben zu
speichern. Danach können Sie mit „exit“ die Erstinstallation beenden und in das Hauptmenü
gelangen.
Achtung: Die Pfeiltasten „auf“ und „ab“ dürfen
bei der Zuweisung der Eingänge nicht
verwendet werden.
Eingänge, die als „nicht aktiv“ deniert sind, werden im Hauptmenü nicht angezeigt.
Select Device
bra1
dvd sat tv light
stand by
Keine
Verbindung
Eingangskonfi
g
in opt1 nicht aktiv
in opt2 nicht aktiv
in coax1 nicht aktiv
in coax2 nicht aktiv
in line1 nicht aktiv
in line2 nicht aktiv
Eingangskonfi
g
Kein Eingang konfiguriert
Zum Konfigurieren bitte
mit OK fortfahren
Eingangskonfi
g
in opt1 dvd
in opt2 nicht aktiv
in coax1 nicht aktiv
in coax2 nicht aktiv
in line1 nicht aktiv
in line2 nicht aktiv
Eingangskonfi
g
in opt1 dvd
in opt2 nicht aktiv
in coax1 nicht aktiv
in coax2 nicht aktiv
in line1 nicht aktiv
in line2 nicht aktiv
Eingangskonfi
g
in opt1 dvd
in opt2 bd pl
in coax1 sat
in coax2 cd
in line1 tv
in line2 vcr
stand by
Keine
Verbindung
Eingangskonfi
g
in opt1 nicht aktiv
in opt2 nicht aktiv
in coax1 nicht aktiv
in coax2 nicht aktiv
in line1 nicht aktiv
in line2 nicht aktiv
Eingangskonfi
g
in opt1 dvd
in opt2 nicht aktiv
in coax1 nicht aktiv
in coax2 nicht aktiv
in line1 nicht aktiv
in line2 nicht aktiv
Eingangskonfi
g
in opt1 dvd
in opt2 nicht aktiv
in coax1 nicht aktiv
in coax2 nicht aktiv
in line1 nicht aktiv
in line2 nicht aktiv
Eingangskonfi
g
in opt1 dvd
in opt2 bd pl
in coax1 sat
in coax2 cd
in line1 tv
in line2 vcr
Keine
Verbindung
Eingangskonfi
g
in opt1 dvd
in opt2 nicht aktiv
in coax1 nicht aktiv
in coax2 nicht aktiv
in line1 nicht aktiv
in line2 nicht aktiv
Eingangskonfi
g
in opt1 dvd
in opt2 nicht aktiv
in coax1 nicht aktiv
in coax2 nicht aktiv
in line1 nicht aktiv
in line2 nicht aktiv
Eingangskonfi
g
in opt1 dvd
in opt2 bd pl
in coax1 sat
in coax2 cd
in line1 tv
in line2 vcr
Eingangskonfi
g
in opt1 dvd
in opt2 nicht aktiv
in coax1 nicht aktiv
in coax2 nicht aktiv
in line1 nicht aktiv
in line2 nicht aktiv
Eingangskonfi
g
in opt1 dvd
in opt2 bd pl
in coax1 sat
in coax2 cd
in line1 tv
in line2 vcr
Eingangskonfi
g
in opt1 dvd
in opt2 bd pl
in coax1 sat
in coax2 cd
in line1 tv
in line2 vcr
ok
sel
ok
sel
ok
sel
ok
sel
m
sel
ok
exit
m
sel
Page 16
16
Hauptmenü
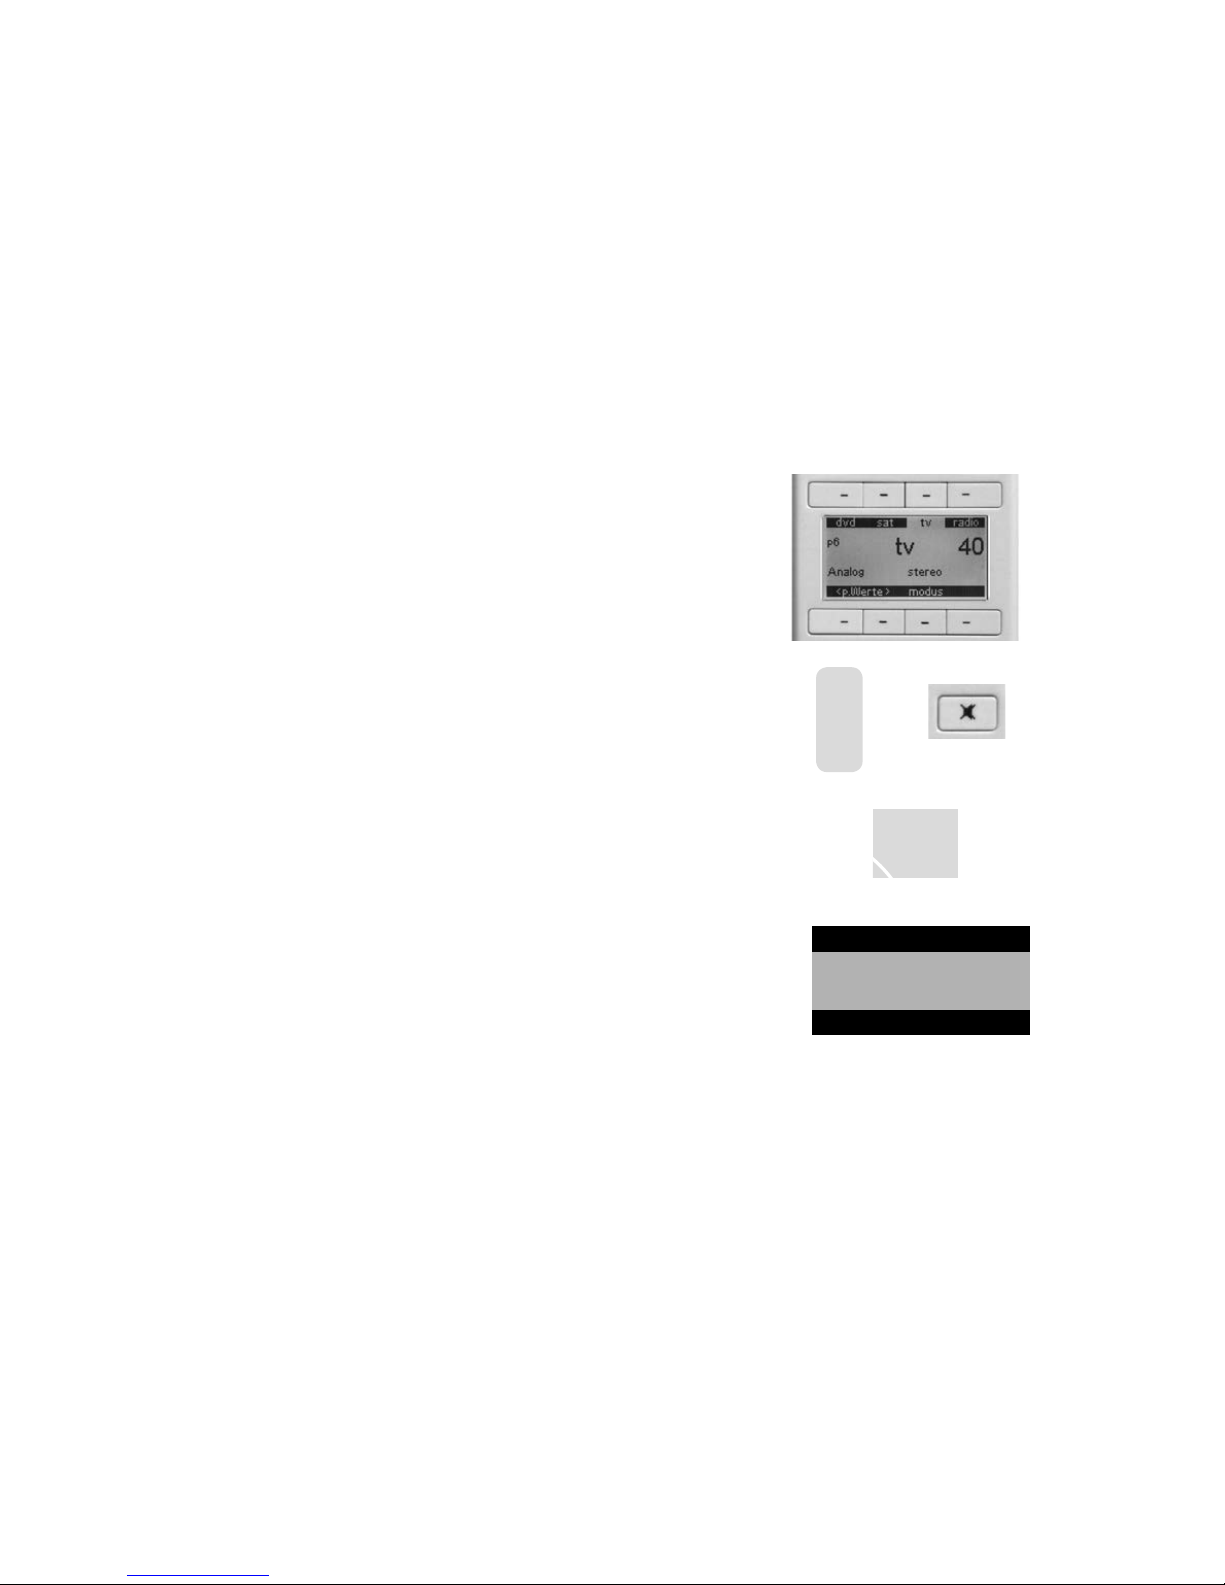
Die mitgelieferte Fernbedienung verfügt über 8 Funktionstasten, die je nach
Betriebsmodus unterschiedlich belegt sein können. Im oberen und unteren
Teil des Displays werden die Funktionen der entsprechenden Tasten angezeigt.
Die Quellen können mit den direkt darüber liegenden (oberen) Funktionstasten
ausgewählt werden. Sollten Sie mehr als 3 Quellen angelegt haben, können Sie
mit der Blättern-Taste auf die nächste Seite blättern und wieder zurück.
Über Volume (V+/-) kann die Lautstärke des Sound Systems in allen Menüs (auch
bei der Steuerung von IR-Geräten) in 100 Stufen von 0..99 eingestellt werden.
Mute schaltet den Ton aus bzw. an.
Mit <select> können Sie eines der angemeldeten RF-Geräte oder ein erlerntes
IR-Gerät auswählen. Sollten mehr als 8 Geräte angemeldet/erlernt worden sein,
so können Sie mit der Blättern-Taste zu den nicht angezeigten Geräten wechseln.
Mit <pWerte> können Sie zwischen 6 persönlichen Einstellungen wählen, die
Sie im Lautsprecher Menü festlegen können (Seite 19).
+
V
-
sel
Select Device
bra1
dvd sat tv light
stand by
Keine
Verbindung
Page 17
17
Deutsch
stand by
Keine
Verbindung
Eingangskonfi
g
in opt1 nicht aktiv
in opt2 nicht aktiv
in coax1 nicht aktiv
in coax2 nicht aktiv
in line1 nicht aktiv
in line2 nicht aktiv
Eingangskonfi
g
in opt1 dvd
in opt2 nicht aktiv
in coax1 nicht aktiv
in coax2 nicht aktiv
in line1 nicht aktiv
in line2 nicht aktiv
dvd sat tv radio
p6
Analog stereo
<p.Werte
>
modus
m
/
st
89.30
01
0
40
dvd sat tv radio
p6
Analog wide
<p.Werte
>
modus
m
/
st
89.30
01
0
40
dvd sat tv radio
p6
PLII surround 1
<p.Werte
>
modus
m
/
st
89.30
01
0
40
virtuell
dvd sat tv radio
p6
PLII surround 2
<p.Werte
>
modus
m
/
st
89.30
01
0
40
virtuell
Eingangskonfi
g
in opt1 dvd
in opt2 nicht aktiv
in coax1 nicht aktiv
in coax2 nicht aktiv
in line1 nicht aktiv
in line2 nicht aktiv
Eingangskonfi
g
in opt1 dvd
in opt2 bd pl
in coax1 sat
in coax2 cd
in line1 tv
in line2 vcr
dvd sat tv radio
p6
Analog stereo
<p.Werte
>
modus
m
/
st
89.30
01
00
40
Keine
Verbindung
Eingangskonfi
g
in opt1 dvd
in opt2 nicht aktiv
in coax1 nicht aktiv
in coax2 nicht aktiv
in line1 nicht aktiv
in line2 nicht aktiv
dvd sat tv radio
p6
Analog wide
<p.Werte
>
modus
m
/
st
89.30
01
0
40
dvd sat tv radio
p6
PLII surround 1
<p.Werte
>
modus
m
/
st
89.30
01
0
40
virtuell
dvd sat tv radio
p6
PLII surround 2
<p.Werte
>
modus
m
/
st
89.30
01
0
40
virtuell
Eingangskonfi
g
in opt1 dvd
in opt2 nicht aktiv
in coax1 nicht aktiv
in coax2 nicht aktiv
in line1 nicht aktiv
in line2 nicht aktiv
Eingangskonfi
g
in opt1 dvd
in opt2 bd pl
in coax1 sat
in coax2 cd
in line1 tv
in line2 vcr
dvd sat tv radio
p6
Analog stereo
<p.Werte
>
modus
m
/
st
89.30
01
00
40
dvd sat tv radio
p6
PLII surround 2
<p.Werte
>
modus
m
/
st
89.30
01
0
40
virtuell
Eingangskonfi
g
in opt1 dvd
in opt2 bd pl
in coax1 sat
in coax2 cd
in line1 tv
in line2 vcr
dvd sat tv radio
p6
Analog stereo
<p.Werte
>
modus
m
/
st
89.30
01
00
40
dvd sat tv radio
p6
PLII surround 1
<p.Werte
>
modus
m
/
st
89.30
01
0
40
virtuell
dvd sat tv radio
p6
PLII surround 2
<p.Werte
>
modus
m
/
st
89.30
01
0
40
virtuell
Eingangskonfi
g
in opt1 dvd
in opt2 nicht aktiv
in coax1 nicht aktiv
in coax2 nicht aktiv
in line1 nicht aktiv
in line2 nicht aktiv
Eingangskonfi
g
in opt1 dvd
in opt2 bd pl
in coax1 sat
in coax2 cd
in line1 tv
in line2 vcr
dvd sat tv radio
p6
Analog stereo
<p.Werte
>
modus
m
/
st
89.30
01
00
40
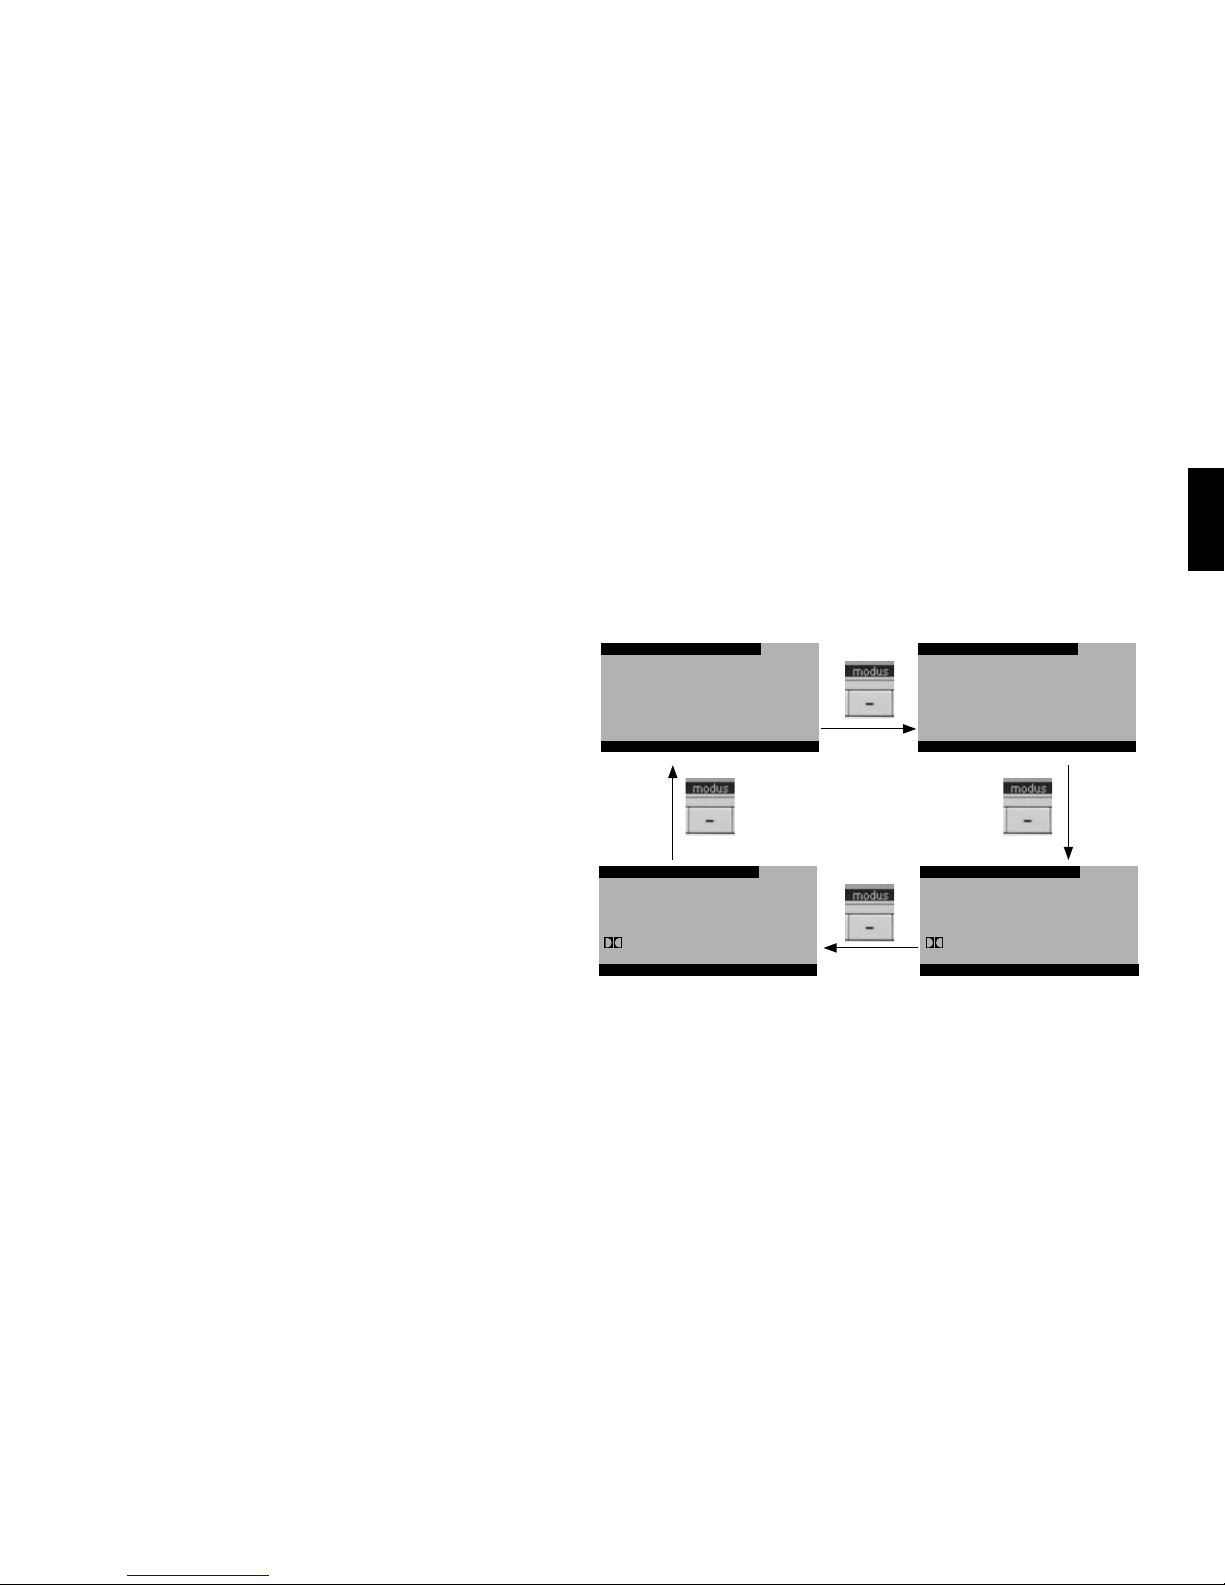
Mit „modus“ wählen Sie aus, ob die Tonwiedergabe im einem der zwei Stereo- oder Surround-Modi erfolgen soll. Zusätzlich zu dem „herkömmlichen“
Stereo-Modus bietet das Sound System einen Wide-Modus mit virtuell
erweiterter Stereobasis.
Um den verschiedenen Aufnahmephilosophien speziell bei Musikaufnahmen
Rechnung zu tragen, haben wir zwei Surround Modi implementiert. Nutzen Sie
„surround 2“ vor allem in Fällen schlechter Sprachverständlichkeit (wenn z.B.
die Stimmenwiedergabe ungewohnt dumpf und unverständlich erscheint).
Das System stellt je nach Eingangssignal automatisch den entsprechenden
Dekodier-Modus ein. Folgende Dekodiermodi sind möglich:
Analog Stereo Analog
Surround virtuell Dolby PLII
PCM (digital) Stereo PCM
Surround virtuell Dolby PLII
Dolby 2.0 Stereo Dolby Digital 2.0
Surround virtuell Dolby Digital 2.0 PLII
Dolby 5.1 Stereo Dolby Digital
Surround virtuell Dolby Digital
DTS Stereo DTS
Surround virtuell DTS
Page 18

18
Tuner
Das SPECTRAL Sound System verfügt über einen integrierten FM-Tuner (UKW) mit RDS-Funktion. Dieser wird über die Funktionstaste (radio)
im Hauptmenü der Fernbedienung angewählt. Dort können Sie folgende Einstellungen vornehmen:
Der automatische Suchlauf wird durch langes Drücken (>2 Sek.) auf die Pfeil-Tasten „<“ und „>“ (Suchlauf abwärts oder aufwärts) aktiviert.
Während des Suchlaufs wird im Display „Seek“ angezeigt. Das Sound System stoppt automatisch bei jedem Sender mit ausreichender Signalstärke.
Der manuelle Suchlauf wird durch kurzes Drücken auf die Tasten „<“ und „>“ gesteuert. Nutzen Sie diese Funktion ggf. zur Feinabstimmung
eines Radiosenders oder zur manuellen Suche schwacher Radiosender.
Reduzierung von Rauschen bei Stereowiedergabe:
Das Sound System stellt abhängig von der Signalstärke automatisch Stereo- oder Mono-Wiedergabe ein. Sollte Ihnen eine Wiedergabe in Stereo
zu verrauscht erscheinen, können Sie durch Drücken der Funktionstaste „m/st“ eine Wiedergabe in Mono erzwingen und das Rauschen reduzieren.
Abspeichern eines Radiosenders:
Zum Abspeichern eines Radiosenders auf einem Programmplatz drücken Sie zunächst die Taste „ok“, die Programmplatz-Anzeige beginnt zu
blinken. Mit den Pfeil-Tasten „auf“ und „ab“ können Sie einen von 50 Programmplätzen auswählen. Alternativ können Sie den Programmplatz
über die numerischen Tasten direkt eingeben. Nach 5 Sekunden ohne Tastendruck wird der Radiosender auf dem im Display angezeigten
Programmplatz abgespeichert. Die Programmplatz-Anzeige blinkt danach nicht mehr.
Hinweis: Damit der per RDS übermittelte Sendername (z.B. HR 1, BR 2, SWR 3, ...) nach der Auswahl eines abgespeicherten Radiosenders
angezeigt werden kann, muss dieser zum Zeitpunkt des Drückens der OK-Taste (Einleitung des Speichernvorgangs) im Display zu sehen sein.
Auswählen eines abgespeicherten Radiosenders:
Mit den Pfeiltasten „auf“ und „ab“ können Sie einen der Programmplätze auswählen. Alternativ können Sie den Programmplatz über die numerischen Tasten direkt eingeben.
00
40040
g
dvd sat tv radio
p6
89.30
01
00
40
Stereo Mono
stand by
Keine
Verbindung
Eingangskonfi
g
Eingangskonfi
g
in opt1 dvd
in opt2 nicht aktiv
in coax1 nicht aktiv
in coax2 nicht aktiv
in line1 nicht aktiv
in line2 nicht aktiv
89.30
01
0
40
dvd sat tv radio
p6
89.30
01
0
40
dvd sat tv radio
p6
89.30
01
0
40
dvd sat tv radio
p6
89.30
01
0
40
Eingangskonfi
g
in opt1 dvd
in opt2 nicht aktiv
in coax1 nicht aktiv
in coax2 nicht aktiv
in line1 nicht aktiv
in line2 nicht aktiv
Eingangskonfi
g
in opt1 dvd
in opt2 bd pl
in coax1 sat
in coax2 cd
in line1 tv
in line2 vcr
dvd sat tv radio
p6
89.30
01
00
40
Page 19
19
Deutsch
Optionale Einstellungen des Sound Systems
Nachdem Sie Ihr Sound System erfolgreich angeschlossen und in Betrieb genommen haben, können Sie auf Wunsch verschiedene Parameter anpassen.
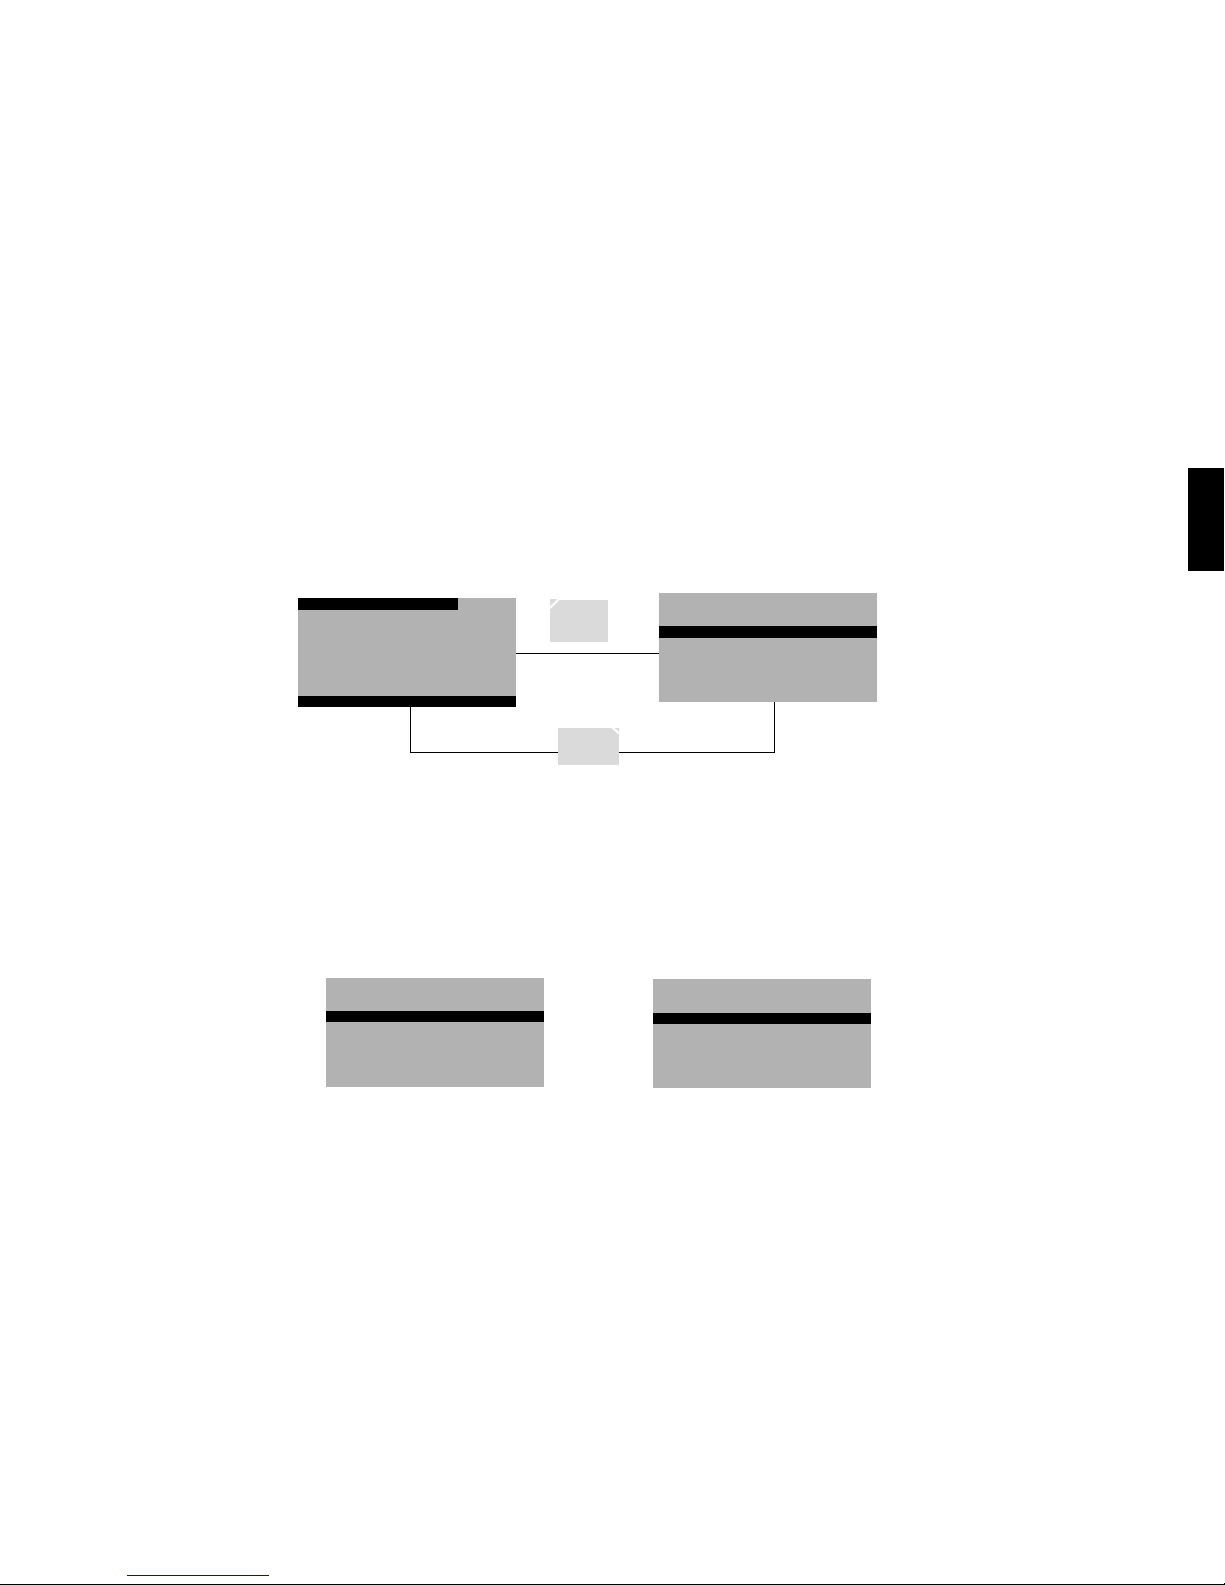
Wenn Sie Einstellungen am Sound System vornehmen wollen, schalten Sie dieses bitte ein und wählen Sie durch Drücken (länger als 3 Sek.) der
Taste <m> das Menü aus. Durch erneutes Drücken der Tasten <m> oder <exit> beenden Sie das Einstell-Menü.
> 3 Sek.
m
sel
stand by
Keine
Verbindung
Eingangskonfi
g
in opt1 nicht aktiv
in opt2 nicht aktiv
in coax1 nicht aktiv
in coax2 nicht aktiv
in line1 nicht aktiv
in line2 nicht aktiv
Eingangskonfi
g
in opt1 dvd
in opt2 nicht aktiv
in coax1 nicht aktiv
in coax2 nicht aktiv
in line1 nicht aktiv
in line2 nicht aktiv
dvd sat tv radio
p6
Analog stereo
<p.Werte
>
modus
m
/
st
89.30
01
0
40
dvd sat tv radio
p6
Analog wide
<p.Werte
>
modus
m
/
st
89.30
01
0
40
dvd sat tv radio
p6
PLII surround 1
<p.Werte
>
modus
m
/
st
89.30
01
0
40
virtuell
dvd sat tv radio
p6
PLII surround 2
<p.Werte
>
modus
m
/
st
89.30
01
0
40
virtuell
Eingangskonfi
g
in opt1 dvd
in opt2 nicht aktiv
in coax1 nicht aktiv
in coax2 nicht aktiv
in line1 nicht aktiv
in line2 nicht aktiv
Eingangskonfi
g
in opt1 dvd
in opt2 bd pl
in coax1 sat
in coax2 cd
in line1 tv
in line2 vcr
dvd sat tv radio
p6
Analog stereo
<p.Werte
>
modus
m
/
st
89.30
01
00
40
IR Lernen
haupttasten
►
blu ray
dvd
dvd rec
sat
tv1
Eingangskonfi
g
in opt1 nicht aktiv
in opt2 nicht aktiv
in coax1 nicht aktiv
in coax2 nicht aktiv
in line1 nicht aktiv
in line2 nicht aktiv
Eingangskonfi
g
Kein Eingang konfiguriert
Zum Konfigurieren bitte
mit OK fortfahren
Eingangskonfi
g
in opt1 dvd
in opt2 nicht aktiv
in coax1 nicht aktiv
in coax2 nicht aktiv
in line1 nicht aktiv
in line2 nicht aktiv
dvd sat tvtvradio
p6
Analog stereo
<p.Werte
>
modus
dvd sat tv radio
p6
Analog stereo
<p.Werte
>
modus
m
/
st
89.30
01
0
40
dvd sat tv radio
p6
Analog wide
<p.Werte
>
modus
m
/
st
89.30
01
0
40
dvd sat tv radio
p6
PLII surround 1
<p.Werte
>
modus
m
/
st
89.30
01
0
40
virtuell
dvd sat tv radio
p6
PLII surround 2
<p.Werte
>
modus
m
/
st
89.30
01
0
40
virtuell
dvd
bra1
play
skipskip
pausestop
sat
red
epg
yello blue
info text
green
tv
/
r
tv
red
media
yello blue
tools info
green
sourc
lighting
power
rgb
Lern Menu
IR Lernen
►
RF Lernen
IR Lernen
Lernen
►
Löschen
IR Lernen
prog -
prog +
vol -
vol +
stumm
IR Lernen
haupttasten
blu ray
dvd
►
dvd rec
sat
tv1
IR Lernen
Lernen
►
Löschen
Name
IR Lernen
power
ok
menü(m)
exit
links
rechts
IR Lernen
Taste auf FB drücken
IR Lernen
Speicherung erfolgreich
IR Lernen
Speicherung fehlgeschlagen
RF Lernen
spectral bra1
new device
►
RF Lernen
RF Gerät einstecken
OK drücken
RF Lernen
Installation erfolgreich
RF Lernen
Gerät wählen
cla1
cta1
cta2
bra1
RF Lernen
Installation fehlgeschlagen
lighting
power
rgb
sprache
deutsch
english
kontrast
75
Eingangskonfi
g
in opt1 dvd
in opt2 nicht aktiv
in coax1 nicht aktiv
in coax2 nicht aktiv
in line1 nicht aktiv
in line2 nicht aktiv
Eingangskonfi
g
in opt1 dvd
in opt2 bd pl
in coax1 sat
in coax2 cd
in line1 tv
in line2 vcr
Lautsprecher Menü
persönliche Werte
►
Pegelanpassung ►
LS Abstand
►
Klangregelung
►
Bass expand aus
Raumanpassung
►
Werte speichern
aktuelle Werte
►
Standardwerte
►
Verlassen o. speichern
pers. Werte
pers. Werte 1 standard
pers. Werte 2 standard
pers. Werte 3 standard
pers. Werte 4 standard
pers. Werte 5 standard
pers. Werte 6 standard
Menü
Lautsprecher Menü
►
System Menü
►
IR Lernen
ja
Gerät löschen
Sind Sie sicher?
nein
IR Lernen
Lernen
Löschen
Name
►
ok
exit
m
sel
Hinweis: Grundsätzlich können Sie mit der Taste <exit> das Einstell-Menü aus nahezu allen Untermenüs direkt verlassen. Mit der Taste <m> springen Sie jeweils eine
Menüebene zurück.
Einstell-Menü
Im Menü können Sie zunächst zwischen dem „Lautsprecher Menü“ und dem „System Menü“ wählen. Auf den nächsten Seiten nden Sie eine Übersicht der Menüs.
IR Lernen
haupttasten
►
blu ray
dvd
dvd rec
sat
tv1
Eingangskonfi
g
in opt1 nicht aktiv
in opt2 nicht aktiv
in coax1 nicht aktiv
in coax2 nicht aktiv
in line1 nicht aktiv
in line2 nicht aktiv
Eingangskonfi
g
in opt1 dvd
in opt2 nicht aktiv
in coax1 nicht aktiv
in coax2 nicht aktiv
in line1 nicht aktiv
in line2 nicht aktiv
dvd sat tv radio
p6
Analog stereo
<p.Werte
>
modus
m
/
st
89.30
01
0
40
dvd sat tv radio
p6
Analog wide
<p.Werte
>
modus
m
/
st
89.30
01
0
40
dvd sat tv radio
p6
PLII surround 1
<p.Werte
>
modus
m
/
st
89.30
01
0
40
virtuell
dvd sat tv radio
p6
PLII surround 2
<p.Werte
>
modus
m
/
st
89.30
01
0
40
virtuell
sat
red
epg
yello blue
info text
green
tv
/
r
tv
red
media
yello blue
tools info
green
sourc
lighting
power
rgb
IR Lernen
Lernen
►
Löschen
IR Lernen
prog -
prog +
vol -
vol +
stumm
IR Lernen
haupttasten
blu ray
dvd
►
dvd rec
sat
tv1
IR Lernen
Lernen
►
Löschen
Name
IR Lernen
power
ok
menü(m)
exit
links
rechts
IR Lernen
Taste auf FB drücken
IR Lernen
Speicherung erfolgreich
IR Lernen
Speicherung fehlgeschlagen
RF Lernen
spectral bra1
new device
►
RF Lernen
RF Gerät einstecken
OK drücken
RF Lernen
Installation erfolgreich
RF Lernen
Gerät wählen
cla1
cta1
cta2
bra1
RF Lernen
Installation fehlgeschlagen
kontrast
75
Eingangskonfi
g
in opt1 dvd
in opt2 nicht aktiv
in coax1 nicht aktiv
in coax2 nicht aktiv
in line1 nicht aktiv
in line2 nicht aktiv
Eingangskonfi
g
in opt1 dvd
in opt2 bd pl
in coax1 sat
in coax2 cd
in line1 tv
in line2 vcr
Lautsprecher Menü
persönliche Werte
►
Pegelanpassung
►
LS Abstand
►
Klangregelung
►
Bass expand aus
Raumanpassung
►
Werte speichern
aktuelle Werte
►
Standardwerte
►
Verlassen o. speichern
pers. Werte
pers. Werte 1 standard
pers. Werte 2 standard
pers. Werte 3 standard
pers. Werte 4 standard
pers. Werte 5 standard
pers. Werte 6 standard
IR Lernen
ja
Gerät löschen
Sind Sie sicher?
nein
IR Lernen
Lernen
Löschen
Name
►
IR Lernen
amp
apple tv
audio rec
beamer
blue ray
cd
dvd sat tv radio
p6
Analog stereo
<p.Werte
>
modus
m
/
st
89.30
01
00
40
IR Lernen
haupttasten
►
blu ray
dvd
dvd rec
sat
tv1
dvd sat tv radio
p6
Analog stereo
<p.Werte
>
modus
m
/
st
89.30
01
0
40
dvd sat tv radio
p6
Analog wide
<p.Werte
>
modus
m
/
st
89.30
01
0
40
dvd sat tv radio
p6
PLII surround 1
<p.Werte
>
modus
m
/
st
89.30
01
0
40
virtuell
dvd sat tv radio
p6
PLII surround 2
<p.Werte
>
modus
m
/
st
89.30
01
0
40
virtuell
sat
red
epg
yello blue
info text
green
tv
/
r
tv
red
media
yello blue
tools info
green
sourc
lighting
power
rgb
IR Lernen
Lernen
►
Löschen
IR Lernen
prog -
prog +
vol -
vol +
stumm
IR Lernen
haupttasten
blu ray
dvd
►
dvd rec
sat
tv1
IR Lernen
Lernen
►
Löschen
Name
IR Lernen
power
ok
menü(m)
exit
links
rechts
IR Lernen
Taste auf FB drücken
IR Lernen
Speicherung erfolgreich
IR Lernen
Speicherung fehlgeschlagen
RF Lernen
spectral bra1
new device
►
RF Lernen
RF Gerät einstecken
OK drücken
RF Lernen
Installation erfolgreich
RF Lernen
Gerät wählen
cla1
cta1
cta2
bra1
RF Lernen
Installation fehlgeschlagen
kontrast
75
Lautsprecher Menü
persönliche Werte
►
Pegelanpassung ►
LS Abstand
►
Klangregelung
►
Bass expand aus
Raumanpassung
►
Werte speichern
aktuelle Werte
►
Standardwerte
►
Verlassen o. speichern
pers. Werte
pers. Werte 1 standard
pers. Werte 2 standard
pers. Werte 3 standard
pers. Werte 4 standard
pers. Werte 5 standard
pers. Werte 6 standard
System Menü
Ausgangskonfig
►
Sub Ausgang inaktiv
Eingangskonfig
►
IR lernen
►
lip sync 0 ms
Dynamik voll
IR Lernen
ja
Gerät löschen
Sind Sie sicher?
nein
IR Lernen
Lernen
Löschen
Name
►
IR Lernen
amp
apple tv
audio rec
beamer
blue ray
cd
dvd sat tv radio
p6
Analog stereo
<p.Werte
>
modus
m
/
st
89.30
01
00
40
Page 20
20
Lautsprecher Menü
Im Lautsprecher Menü können folgende Parameter zur Anpassung des Sound Systems an den Hörraum eingestellt werden:
persönliche Werte:
Zum Abspeichern aller im Lautsprechermenü vorgenommenen Einstellungen auf bis zu 6 Speicherplätzen (<p.Werte>).
Vorgehensweise:
Zuerst werden die Werte im Lautsprecher Menü angepasst. (Beschreibung der Parameter: siehe folgende Punkte)
Anschliessend (ohne das Menü zu verlassen) auf < persönliche Werte > gehen, dann < aktuelle Werte > wählen und einen
per. Wert, der auf „Standard“ steht, auswählen und überschreiben. In der Liste wird dieser mit „manuell“ angezeigt.
Vorgang für bis zu sechs Einstellungen wiederholen.
Die gespeicherten Werte können im Hauptmenü mit den Funktionstasten <p-werte> aufgerufen werden.
IR Lernen
haupttasten
►
blu ray
dvd
dvd rec
sat
tv1
Eingangskonfi
g
in opt1 nicht aktiv
in opt2 nicht aktiv
in coax1 nicht aktiv
in coax2 nicht aktiv
in line1 nicht aktiv
in line2 nicht aktiv
Eingangskonfi
g
in opt1 dvd
in opt2 nicht aktiv
in coax1 nicht aktiv
in coax2 nicht aktiv
in line1 nicht aktiv
in line2 nicht aktiv
dvd sat tv radio
p6
Analog stereo
<p.Werte
>
modus
m
/
st
89.30
01
0
40
dvd sat tv radio
p6
Analog wide
<p.Werte
>
modus
m
/
st
89.30
01
0
40
dvd sat tv radio
p6
PLII surround 1
<p.Werte
>
modus
m
/
st
89.30
01
0
40
virtuell
dvd sat tv radio
p6
PLII surround 2
<p.Werte
>
modus
m
/
st
89.30
01
0
40
virtuell
sat
red
epg
yello blue
info text
green
tv
/
r
tv
red
media
yello blue
tools info
green
sourc
lighting
power
rgb
IR Lernen
Lernen
►
Löschen
IR Lernen
prog -
prog +
vol -
vol +
stumm
IR Lernen
haupttasten
blu ray
dvd
►
dvd rec
sat
tv1
IR Lernen
Lernen
►
Löschen
Name
IR Lernen
power
ok
menü(m)
exit
links
rechts
IR Lernen
Taste auf FB drücken
IR Lernen
Speicherung erfolgreich
IR Lernen
Speicherung fehlgeschlagen
RF Lernen
spectral bra1
new device
►
RF Lernen
RF Gerät einstecken
OK drücken
RF Lernen
Installation erfolgreich
RF Lernen
Gerät wählen
cla1
cta1
cta2
bra1
RF Lernen
Installation fehlgeschlagen
kontrast
75
Eingangskonfi
g
in opt1 dvd
in opt2 nicht aktiv
in coax1 nicht aktiv
in coax2 nicht aktiv
in line1 nicht aktiv
in line2 nicht aktiv
Eingangskonfi
g
in opt1 dvd
in opt2 bd pl
in coax1 sat
in coax2 cd
in line1 tv
in line2 vcr
Lautsprecher Menü
persönliche Werte
►
Pegelanpassung
►
LS Abstand
►
Klangregelung
►
Bass expand aus
Raumanpassung
►
Werte speichern
aktuelle Werte
►
Standardwerte
►
Verlassen o. speichern
pers. Werte
pers. Werte 1 standard
pers. Werte 2 standard
pers. Werte 3 standard
pers. Werte 4 standard
pers. Werte 5 standard
pers. Werte 6 standard
IR Lernen
ja
Gerät löschen
Sind Sie sicher?
nein
IR Lernen
Lernen
Löschen
Name
►
IR Lernen
amp
apple tv
audio rec
beamer
blue ray
cd
dvd sat tv radio
p6
Analog stereo
<p.Werte
>
modus
m
/
st
89.30
01
00
40
Pegelanpassung:
Zum Anpassen der Lautstärkepegel der einzelnen Kanäle (Front links und rechts, Subwoofer, ...).
Zur Lautstärkeanpassung der Sound System-Komponenten untereinander dient der < test tone >. Einstellbereich ist -6dB bis +6dB in 1dB - Schritten.
Der Testton ist nicht für die virtuellen Lautsprecher verfügbar. Das heißt, im 2.1 Modus kann der Subwoofer, Front links und Front rechts eingestellt werden.
Achtung! Bevor Sie den Testton aktivieren, stellen Sie die Lautstärke des Systems im Hauptmenü auf einen moderaten Wert (40-50).
Es kann für jeden Lautsprecher, auch für die virtuellen, der Lautstärkepegel angepasst werden. Sollten z.B. die Stimmen zu leise sein, können diese mit „Virtual center“
angehoben werden.
LS Abstand:
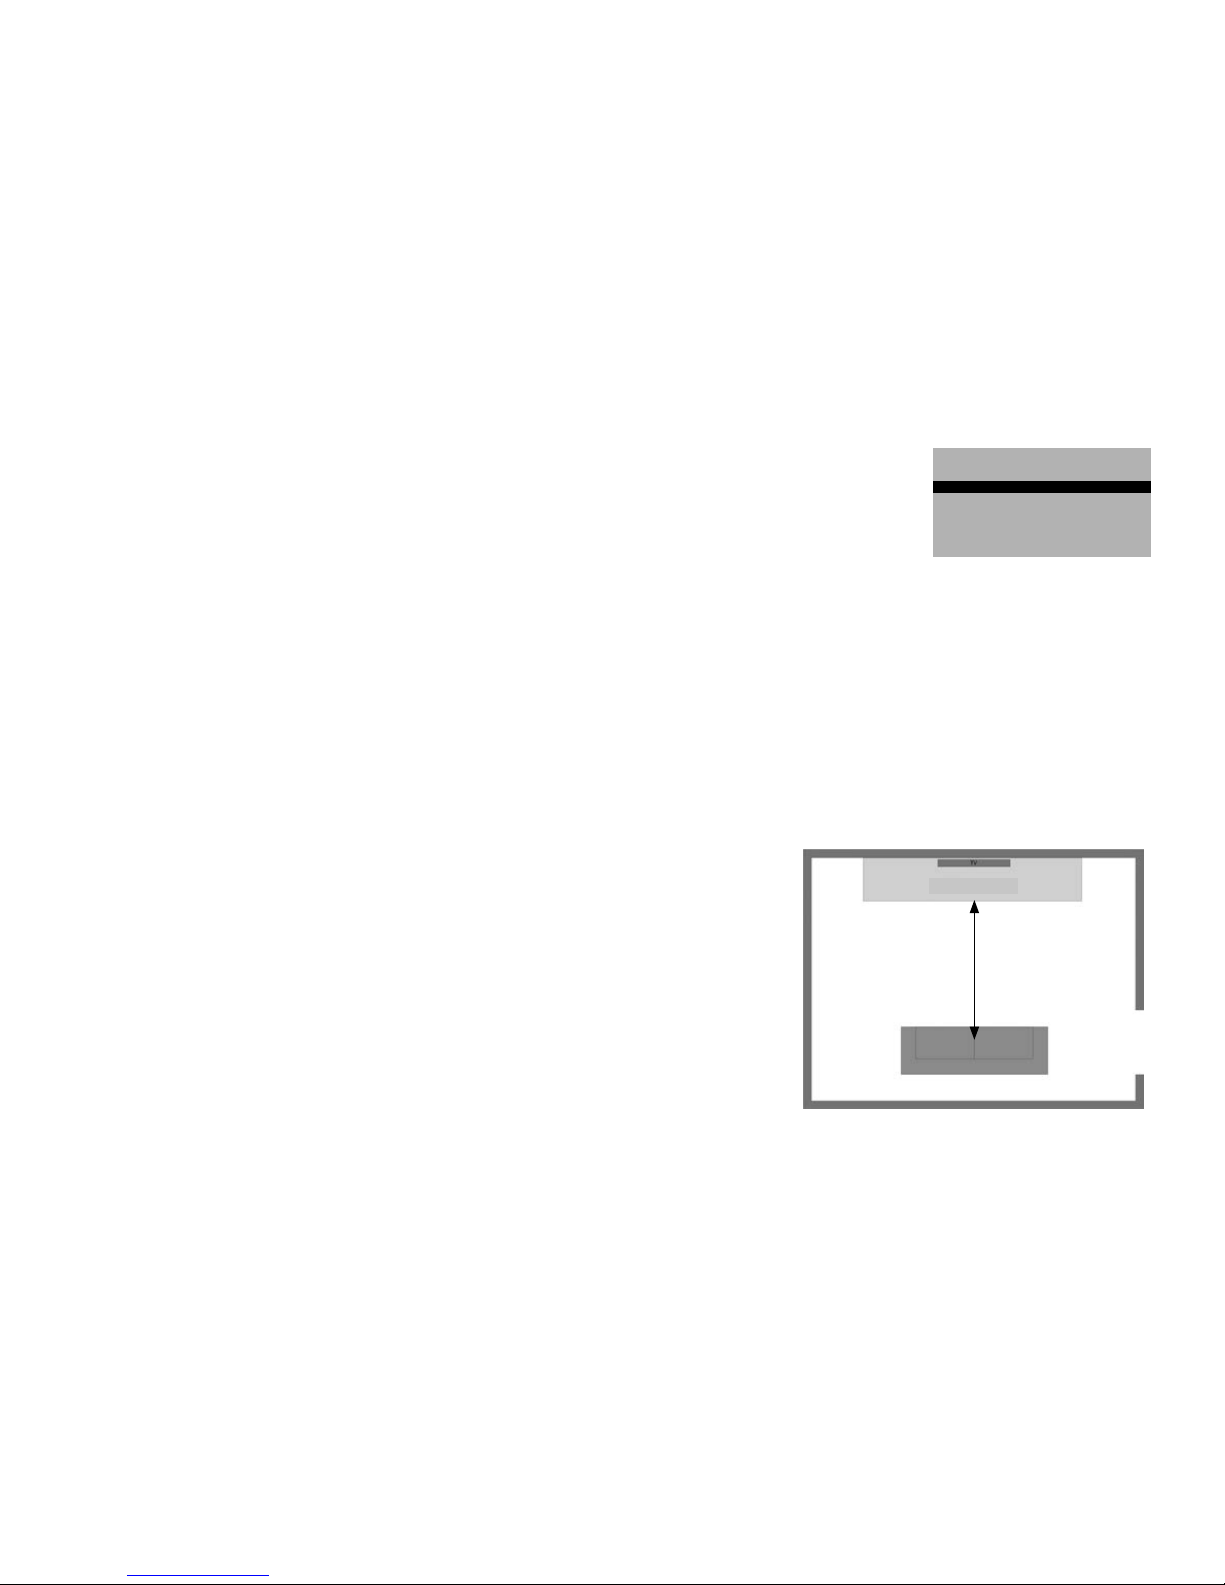
Zum Ausgleichen unterschiedlicher Abstände zwischen den Lautsprechern und dem Hörplatz.
Wählen Sie den einzustellenden Lautsprecher aus. Messen Sie zunächst die Entfernung
zwischen dem System und Ihrer bevorzugten Hörposition .
Tragen Sie diesen Wert im Menü bei den entsprechenden Lautsprechern (subwoofer, vorne links,
vorne rechts) unter LS Abstand ein.
Der Lautsprecher Abstand ist nicht für die virtuellen Lautsprecher einstellbar.
Das heißt, im 2.1 Modus kann der Subwoofer, Front links und Front rechts eingestellt werden.
Wenn z.B. Funklautsprecher für hinten links und rechts angeschlossen sind (siehe Seite 24) und der
4.1 Modus eingestellt ist, sind die Einstellungen auch dafür möglich.
Sound System
Abstand
Page 21

21
Deutsch
Klangregelung:
Zum Anpassen der Höhen und der Bässe an den Hörraum und den persönlichen Geschmack.
Einstellbereich für beide Filter ist von -6dB bis +6dB in 1dB Schritten veränderbar.
Bass expand:
Zur automatischen lautstärkeabhängigen Anpassung des Tiefton-Lautstärkepegels.
Die dynamische Basskorrektur des Verstärker-Moduls (bass expand) passt gehörphysiologisch lautstärkeabhängig die Tieftonintensität an.
Bei der Wiedergabe von Kinolmen empfehlen wir, die Einstellungen „wenig“ oder „hoch“ zu nutzen. Bei audiophiler Stereowiedergabe empfehlen wir die Einstellung
„aus“.
Raumanpassung:
Zum Ausgleichen von Raumeinüssen stehen mehrere parametrische Equilizer zur Verfügung.
Nur für fortgeschrittene Benutzer. Es wird empfohlen, die Standardeinstellungen nicht zu verändern.
Güte Equalizer: Mit der Güte lässt sich die Bandbreite, also die Größe des Einussbereichs um die Mittenfrequenz eines Equalizers regulieren. Eine hohe Güte
bedeutet, dass das Filter eine geringe Bandbreite besitzt, während eine geringe Güte bedeutet, dass das Filter eine große Bandbreite besitzt.
Verstärkung: Hiermit lässt sich bei einem Equalizer die Verstärkung bei der eingestellten Frequenz einstellen.
Page 22

22
System Menü
Im System Menü können folgende System-Parameter eingestellt werden:
Ausgangskong:
Zur Einstellung der Parameter des Zone 2/Line-Ausgangs.
Der Zone 2/Line Ausgang verfügt wahlweise über zwei Ausgangsoptionen:
IR Lernen
haupttasten
►
blu ray
dvd
dvd rec
sat
tv1
dvd sat tv radio
p6
Analog stereo
<p.Werte
>
modus
m
/
st
89.30
01
0
40
dvd sat tv radio
p6
Analog wide
<p.Werte
>
modus
m
/
st
89.30
01
0
40
dvd sat tv radio
p6
PLII surround 1
<p.Werte
>
modus
m
/
st
89.30
01
0
40
virtuell
dvd sat tv radio
p6
PLII surround 2
<p.Werte
>
modus
m
/
st
89.30
01
0
40
virtuell
sat
red
epg
yello blue
info text
green
tv
/
r
tv
red
media
yello blue
tools info
green
sourc
lighting
power
rgb
IR Lernen
Lernen
►
Löschen
IR Lernen
prog -
prog +
vol -
vol +
stumm
IR Lernen
haupttasten
blu ray
dvd
►
dvd rec
sat
tv1
IR Lernen
Lernen
►
Löschen
Name
IR Lernen
power
ok
menü(m)
exit
links
rechts
IR Lernen
Taste auf FB drücken
IR Lernen
Speicherung erfolgreich
IR Lernen
Speicherung fehlgeschlagen
RF Lernen
spectral bra1
new device
►
RF Lernen
RF Gerät einstecken
OK drücken
RF Lernen
Installation erfolgreich
RF Lernen
Gerät wählen
cla1
cta1
cta2
bra1
RF Lernen
Installation fehlgeschlagen
kontrast
75
Lautsprecher Menü
persönliche Werte
►
Pegelanpassung ►
LS Abstand
►
Klangregelung
►
Bass expand aus
Raumanpassung
►
Werte speichern
aktuelle Werte
►
Standardwerte
►
Verlassen o. speichern
pers. Werte
pers. Werte 1 standard
pers. Werte 2 standard
pers. Werte 3 standard
pers. Werte 4 standard
pers. Werte 5 standard
pers. Werte 6 standard
System Menü
Ausgangskonfig
►
Sub Ausgang inaktiv
Eingangskonfig
►
IR lernen
►
lip sync 0 ms
Dynamik voll
IR Lernen
ja
Gerät löschen
Sind Sie sicher?
nein
IR Lernen
Lernen
Löschen
Name
►
IR Lernen
amp
apple tv
audio rec
beamer
blue ray
cd
dvd sat tv radio
p6
Analog stereo
<p.Werte
>
modus
m
/
st
89.30
01
00
40
Zone 2: mit separat einstellbarer Lautstärke, zum Anschluss eines aktiven Multiroom- bzw. Wireless Lautsprechersystems
Line: mit fest eingestellter Lautstärke, zum Anschluss eines analogen Aufnahmegerätes, etc.
Achtung: Um 5.1 Mehrkanalaufnahmen (Dolby Digital oder DTS) über den ZONE 2/LINE OUT ausgeben zu können, muss „Dynamik“ im System Menü auf „komp.“
stehen. Für die normale Wiedergabe wird die Position „voll“ empfohlen.
Um Dolby Digital/DTS Signale (Bitstream) auch über Zone 2/LINE OUT wiedergeben zu können, müssen Sie Zone 1 (Haupthörzone) als Eingang gewählt haben.
Sub Ausgang:
Zum Aktivieren oder Deaktivieren des Subwoofer-Ausgangs.
Der Sub Ausgang ermöglicht den Anschluss eines aktiven Subwoofers. Dieser muss im System Menü aktiviert werden. Ist der Sub Ausgang aktiviert, wird der interne
Subwoofer des Sound Systems bei 80Hz hochpassgeltert, der externe Subwoofer wird bei 80Hz tiefpassgeltert.
Die Übernahmefrequenz des externen Subwoofers sollte immer auf max eingestellt sein.
Eingangskonguration:
Zur Aktivierung und Namensvergabe der 6 Signaleingänge (siehe auch Kapitel „Erstinstallation“)
Hier können Sie die Eingänge den angeschlossenen Quellgeräten zuweisen.
IR lernen:
Zum Erlernen diverser IR-Fernbedienungen (DVD-Player, TV-Gerät..., siehe auch Kapitel „Lern Menü“)
lip sync:
Zur Synchronisation des Tons mit zeitlich verzögerten Fernsehbildern.
Mit lip sync kann das Bild mit dem Ton synchronisiert werden, um z.B. Stimmen an zeitlich verzögerte Mundbewegungen anzupassen. Einstellbar ist eine Audio
Signal-Verzögerung von 0 bis 380ms.
Page 23

23
Deutsch
Dynamik:
Zum Anpassen der Signalkompression bei der Wiedergabe von Mehrkanalsignalen.
Es ist theoretisch möglich, dass es bei der Wiedergabe von Mehrkanal-Ton von DVD oder BD durch eine Übersteuerung in der Signalverarbeitung zu Verzerrungen
kommt. Ist die Funktion „Dynamik“ auf „komp.“ gestellt, wird automatisch eine Signalkomprimierung vorgenommen. Auf „voll“ wird keine Komprimierung vorgenommen. Diese Funktion wird von Dolby® vorgeschrieben.
Um 5.1 Mehrkanalaufnahmen (DolbyDigital oder DTS) über den ZONE 2/LINE OUT ausgeben zu können, muss „Dynamik“ auf „komp.“ stehen. Für die
„normale“ Wiedergabe wird die Position „voll“ empfohlen.
Anmerkung: nur bei Verwendung von zusätzlichen externen Lautsprechern
factory set:
Einschaltlautstärke: Zum Begrenzen der maximalen Einschaltlautstärke (Volume).
Dieser Wert legt die maximale Lautstärke fest, die beim Einschalten des Systems anliegt. Wird das Gerät bei einer geringeren
Lautstärke ausgeschaltet, bleibt diese erhalten.
max. Lautstärke: Zum Festlegen der maximal einstellbaren Lautstärke (Volume).
Dieser Wert stellt die maximal einstellbare Lautstärke im normalen Betrieb dar, um zu hohe Wiedergabelautstärken zu verhindern
(z.B. zum Schutz von Kindern). Einstellbereich ist 0…99, Werkseinstellung ist 99 (Maximum).
Gerätenamen: Zum Auswählen der Gerätekonguration (2.1 Mode, 5.1. Mode ...).
Das SPECTRAL Soundsystem kann durch den Anschluss weiterer Lautsprecher auch im 4.1 oder 5.1 Modus betrieben werden.
Hier kann der Modus gewählt werden. Werkseinstellung ist der 2.1 Modus. (siehe auch Punkt „4.1 und 5.1 Modus“)
Sprache: Zur Spracheinstellung Deutsch oder Englisch. Werkseinstellung ist Deutsch.
line2 Kong: Zum Auswählen von Line-Level-Input oder Phono-Level-Input.
Der Eingang Line 2 / Phono ermöglicht den Anschluss sowohl einer Tonquelle mit Line-Pegel (bis 2V), z.B. CD oder MP3-Player
als auch eines Plattenspielers (bis 5mV). Je nach gewählter Einstellung im System Menü kann dieser belegt werden.
Die Erdungsleitung des Plattenspielers wird an der Schraube, mit der die Befestigungsklemme für IR-Sender angeschraubt ist, befestigt.
Werkseinstellungen: Zum Zurücksetzen des Sound Systems auf den Auslieferungszustand.
Hiermit werden ALLE Einstellungen des SPECTRAL Systems auf den Auslieferzustand zurückgesetzt, auch die persönlichen
Einstellungen (p1 bis p6). Einzige Ausnahme bildet die Einstellung „Gerätename“, diese bleibt erhalten. Nach dem Wiederherstellen
der Werkeinstellungen beginnt das System wieder mit der Zuordnung der Eingänge.
rmware: Zum Anzeigen der Software-Versionen.
Hier können die Software-Versionsnummern überprüft werden. Es gibt drei Softwares: Fernbedienung, Transceiver und Hauptsystem.
Bei Serviceanfragen bitte mit angeben.
Kontrast: Zur Kontrasteinstellung des Displays.
Hiermit kann man den Kontrast des Displays der FB erhöhen oder verringern. Einstellbereich ist 65 bis 90. Werkeinstellung ist 75.
Über die Tastenkombination 0 + 4 kann der Kontrast auch direkt angewählt werden. Einstellbar über die Pfeiltasten „<“ und „>“,
Verlassen über „exit“.
Page 24
24
Lern Menü
Durch gleichzeitiges Drücken der Tasten <exit> und <m> gelangen Sie in das „Lern Menü“. Hier können Sie infrarotgesteuerte Geräte erlernen und weitere Sound
Systeme anmelden.
IR Lernen
haupttasten
►
blu ray
dvd
dvd rec
sat
tv1
Select Device
bra1
dvd sat tv light
stand by
Keine
Verbindung
Eingangskonfi
g
in opt1 nicht aktiv
in opt2 nicht aktiv
in coax1 nicht aktiv
in coax2 nicht aktiv
in line1 nicht aktiv
in line2 nicht aktiv
Eingangskonfi
g
Kein Eingang konfiguriert
Zum Konfigurieren bitte
mit OK fortfahren
Eingangskonfi
g
in opt1 dvd
in opt2 nicht aktiv
in coax1 nicht aktiv
in coax2 nicht aktiv
in line1 nicht aktiv
in line2 nicht aktiv
dvd sat tvtvradio
p6
Analog stereo
<p.Werte
>
modus
dvd sat tv radio
p6
Analog stereo
<p.Werte
>
modus
m
/
st
89.30
01
0
40
dvd sat tv radio
p6
Analog wide
<p.Werte
>
modus
m
/
st
89.30
01
0
40
dvd sat tv radio
p6
PLII surround 1
<p.Werte
>
modus
m
/
st
89.30
01
0
40
virtuell
dvd sat tv radio
p6
PLII surround 2
<p.Werte
>
modus
m
/
st
89.30
01
0
40
virtuell
dvd
bra1
play
skipskip
pausestop
sat
red
epg
yello blue
info text
green
tv
/
r
tv
red
media
yello blue
tools info
green
sourc
lighting
power
rgb
Lern Menu
IR Lernen
►
RF Lernen
IR Lernen
Lernen
►
Löschen
IR Lernen
prog -
prog +
vol -
vol +
stumm
Eingangskonfi
g
in opt1 dvd
in opt2 nicht aktiv
in coax1 nicht aktiv
in coax2 nicht aktiv
in line1 nicht aktiv
in line2 nicht aktiv
Eingangskonfi
g
in opt1 dvd
in opt2 bd pl
in coax1 sat
in coax2 cd
in line1 tv
in line2 vcr
dvd sat tv radio
p6
Analog stereo
<p.Werte
>
modus
89.30
01
IR Lernen
haupttasten
►
blu ray
dvd
dvd rec
sat
tv1
stand by
Keine
Verbindung
Eingangskonfi
g
in opt1 nicht aktiv
in opt2 nicht aktiv
in coax1 nicht aktiv
in coax2 nicht aktiv
in line1 nicht aktiv
in line2 nicht aktiv
Eingangskonfi
g
in opt1 dvd
in opt2 nicht aktiv
in coax1 nicht aktiv
in coax2 nicht aktiv
in line1 nicht aktiv
in line2 nicht aktiv
dvd sat tv radio
p6
Analog stereo
<p.Werte
>
modus
m
/
st
89.30
01
0
40
dvd sat tv radio
p6
Analog wide
<p.Werte
>
modus
m
/
st
89.30
01
0
40
dvd sat tv radio
p6
PLII surround 1
<p.Werte
>
modus
m
/
st
89.30
01
0
40
virtuell
dvd sat tv radio
p6
PLII surround 2
<p.Werte
>
modus
m
/
st
89.30
01
0
40
virtuell
sat
red
epg
yello blue
info text
green
tv
/
r
tv
red
media
yello blue
tools info
green
sourc
lighting
power
rgb
IR Lernen
Lernen
►
Löschen
IR Lernen
prog -
prog +
vol -
vol +
stumm
IR Lernen
haupttasten
blu ray
dvd
►
dvd rec
sat
tv1
IR Lernen
Lernen
►
Löschen
Name
IR Lernen
power
ok
menü(m)
exit
links
rechts
IR Lernen
Taste auf FB drücken
Eingangskonfi
g
in opt1 dvd
in opt2 nicht aktiv
in coax1 nicht aktiv
in coax2 nicht aktiv
in line1 nicht aktiv
in line2 nicht aktiv
Eingangskonfi
g
in opt1 dvd
in opt2 bd pl
in coax1 sat
in coax2 cd
in line1 tv
in line2 vcr
dvd sat tv radio
p6
Analog stereo
<p.Werte
>
modus
m
/
st
89.30
01
00
40
Keine
Verbindung
Eingangskonfi
g
in opt1 dvd
in opt2 nicht aktiv
in coax1 nicht aktiv
in coax2 nicht aktiv
in line1 nicht aktiv
in line2 nicht aktiv
dvd sat tv radio
p6
Analog wide
<p.Werte
>
modus
m
/
st
89.30
01
0
40
dvd sat tv radio
p6
PLII surround 1
<p.Werte
>
modus
m
/
st
89.30
01
0
40
virtuell
dvd sat tv radio
p6
PLII surround 2
<p.Werte
>
modus
m
/
st
89.30
01
0
40
virtuell
tv
red
media
yello blue
tools info
green
sourc
lighting
power
rgb
IR Lernen
Lernen
►
Löschen
IR Lernen
prog -
prog +
vol -
vol +
stumm
IR Lernen
Lernen
►
Löschen
Name
IR Lernen
power
ok
menü(m)
exit
links
rechts
IR Lernen
Taste auf FB drücken
Eingangskonfi
g
in opt1 dvd
in opt2 nicht aktiv
in coax1 nicht aktiv
in coax2 nicht aktiv
in line1 nicht aktiv
in line2 nicht aktiv
Eingangskonfi
g
in opt1 dvd
in opt2 bd pl
in coax1 sat
in coax2 cd
in line1 tv
in line2 vcr
dvd sat tv radio
p6
Analog stereo
<p.Werte
>
modus
m
/
st
89.30
01
00
40
dvd sat tv radio
p6
PLII surround 1
<p.Werte
>
modus
m
/
st
89.30
01
0
40
virtuell
dvd sat tv radio
p6
PLII surround 2
<p.Werte
>
modus
m
/
st
89.30
01
0
40
virtuell
lighting
power
rgb
IR Lernen
prog -
prog +
vol -
vol +
stumm
IR Lernen
power
ok
menü(m)
exit
links
rechts
IR Lernen
Taste auf FB drücken
Eingangskonfi
g
in opt1 dvd
in opt2 nicht aktiv
in coax1 nicht aktiv
in coax2 nicht aktiv
in line1 nicht aktiv
in line2 nicht aktiv
Eingangskonfi
g
in opt1 dvd
in opt2 bd pl
in coax1 sat
in coax2 cd
in line1 tv
in line2 vcr
dvd sat tv radio
p6
Analog stereo
<p.Werte
>
modus
m
/
st
89.30
01
00
40
dvd sat tv radio
p6
PLII surround 2
<p.Werte
>
modus
m
/
st
89.30
01
0
40
virtuell
IR Lernen
Taste auf FB drücken
Eingangskonfi
g
in opt1 dvd
in opt2 bd pl
in coax1 sat
in coax2 cd
in line1 tv
in line2 vcr
dvd sat tv radio
p6
Analog stereo
<p.Werte
>
modus
m
/
st
89.30
01
00
40
Haben Sie das gewünschte Gerät mit der zu erlernenden Funktion auswählt, erscheint nach der Bestätigung
mit <ok> die Meldung „Taste auf FB drücken“.
Positionieren Sie die Original-Fernbedienung (z.B. Ihres DVD-Players) gegenüber der Ihres SPECTRAL Sound
Systems (ca. 5cm Abstand). Drücken Sie an der Original-Fernbedienung kurz die Taste mit der zu erlernenden
Funktion und warten Sie bis der Vorgang im Display bestätigt wird.
Die Funktionstasten soft x1 - soft x8 und soft y1 - soft y8 können mit beliebigen Funktionen des jeweiligen
Geräts belegt werden. Im Menü sind Vorschläge programmiert, um diese zu übernehmen, mit <ok> bestätigen. Wenn eine andere Funktion belegt werden soll, kann der Name mit Hilfe der Tasten 0 - 9 überschrieben
werden. Es können maximal fünf Zeichen vergeben werden.
War die Programmierung erfolgreich, erhalten Sie die Meldung „Speicherung erfolgreich“.
Wiederholen Sie diesen Vorgang, bis alle gewünschten Funktionen übertragen sind. Um wieder ins
vorherige Menü zurückzuspringen, drücken Sie <m>.
Sollte die Übertragung der Fernbedienungsdaten missglückt sein, erscheint für ca. 5 Sek. die Meldung
„Speicherung fehlgeschlagen “. Danach wird das vorhergehende Menü angezeigt und Sie können
entweder die Programmierung wiederholen oder den Vorgang abbrechen.
IR Lernen
haupttasten
►
blu ray
dvd
dvd rec
sat
tv1
stand by
Keine
Verbindung
Eingangskonfi
g
in opt1 nicht aktiv
in opt2 nicht aktiv
in coax1 nicht aktiv
in coax2 nicht aktiv
in line1 nicht aktiv
in line2 nicht aktiv
Eingangskonfi
g
in opt1 dvd
in opt2 nicht aktiv
in coax1 nicht aktiv
in coax2 nicht aktiv
in line1 nicht aktiv
in line2 nicht aktiv
dvd sat tv radio
p6
Analog stereo
<p.Werte
>
modus
m
/
st
89.30
01
0
40
dvd sat tv radio
p6
Analog wide
<p.Werte
>
modus
m
/
st
89.30
01
0
40
dvd sat tv radio
p6
PLII surround 1
<p.Werte
>
modus
m
/
st
89.30
01
0
40
virtuell
dvd sat tv radio
p6
PLII surround 2
<p.Werte
>
modus
m
/
st
89.30
01
0
40
virtuell
sat
red
epg
yello blue
info text
green
tv
/
r
tv
red
media
yello blue
tools info
green
sourc
lighting
power
rgb
IR Lernen
Lernen
►
Löschen
IR Lernen
prog -
prog +
vol -
vol +
stumm
IR Lernen
haupttasten
blu ray
dvd
►
dvd rec
sat
tv1
IR Lernen
Lernen
►
Löschen
Name
IR Lernen
power
ok
menü(m)
exit
links
rechts
IR Lernen
Taste auf FB drücken
IR Lernen
Speicherung erfolgreich
IR Lernen
Speicherung fehlgeschlagen
Eingangskonfi
g
in opt1 dvd
in opt2 nicht aktiv
in coax1 nicht aktiv
in coax2 nicht aktiv
in line1 nicht aktiv
in line2 nicht aktiv
Eingangskonfi
g
in opt1 dvd
in opt2 bd pl
in coax1 sat
in coax2 cd
in line1 tv
in line2 vcr
IR Lernen
ja
Gerät löschen
Sind Sie sicher?
nein
IR Lernen
Lernen
Löschen
Name
►
IR Lernen
amp
apple tv
audio rec
beamer
blue ray
cd
dvd sat tv radio
p6
Analog stereo
<p.Werte
>
modus
m
/
st
89.30
01
00
40
Keine
Verbindung
Eingangskonfi
g
in opt1 dvd
in opt2 nicht aktiv
in coax1 nicht aktiv
in coax2 nicht aktiv
in line1 nicht aktiv
in line2 nicht aktiv
dvd sat tv radio
p6
Analog wide
<p.Werte
>
modus
m
/
st
89.30
01
0
40
dvd sat tv radio
p6
PLII surround 1
<p.Werte
>
modus
m
/
st
89.30
01
0
40
virtuell
dvd sat tv radio
p6
PLII surround 2
<p.Werte
>
modus
m
/
st
89.30
01
0
40
virtuell
tv
red
media
yello blue
tools info
green
sourc
lighting
power
rgb
IR Lernen
Lernen
►
Löschen
IR Lernen
prog -
prog +
vol -
vol +
stumm
IR Lernen
Lernen
►
Löschen
Name
IR Lernen
power
ok
menü(m)
exit
links
rechts
IR Lernen
Taste auf FB drücken
IR Lernen
Speicherung fehlgeschlagen
Eingangskonfi
g
in opt1 dvd
in opt2 nicht aktiv
in coax1 nicht aktiv
in coax2 nicht aktiv
in line1 nicht aktiv
in line2 nicht aktiv
Eingangskonfi
g
in opt1 dvd
in opt2 bd pl
in coax1 sat
in coax2 cd
in line1 tv
in line2 vcr
IR Lernen
ja
Gerät löschen
Sind Sie sicher?
nein
IR Lernen
Lernen
Löschen
Name
►
IR Lernen
amp
apple tv
audio rec
beamer
blue ray
cd
dvd sat tv radio
p6
Analog stereo
<p.Werte
>
modus
m
/
st
89.30
01
00
40
Page 25
25
Deutsch
Löschen von IR Geräten:
Um ein erlerntes Gerät komplett zu löschen, verwenden Sie die Funktion „Löschen“. Nach
Drücken der Funktion werden Sie gefragt, ob das Gerät wirklich gelöscht werden soll.
Bestätigen Sie dies durch Drücken der Funktionstaste „Ja“. Zum Abbruch drücken Sie „Nein“.
Danach kehrt die Fernbedienung wieder in das Geräteauswahlmenü zurück. Mit <exit>
gelangen Sie in das „Lern Menü“. Zum vollständigen Verlassen des Programmiermodus
drücken Sie erneut <exit>.
Umbenennen der IR Geräte:
Wollen Sie ein IR Gerät umbenennen, können Sie eine Bezeichnung
aus einer umfangreichen Liste von vorprogrammierten Gerätenamen
auswählen. Gehen Sie hierfür wie zuvor gezeigt vor.
Keine
Verbindung
Eingangskonfi
g
in opt1 dvd
in opt2 nicht aktiv
in coax1 nicht aktiv
in coax2 nicht aktiv
in line1 nicht aktiv
in line2 nicht aktiv
dvd sat tv radio
p6
Analog wide
<p.Werte
>
modus
m
/
st
89.30
01
0
40
dvd sat tv radio
p6
PLII surround 1
<p.Werte
>
modus
m
/
st
89.30
01
0
40
virtuell
dvd sat tv radio
p6
PLII surround 2
<p.Werte
>
modus
m
/
st
89.30
01
0
40
virtuell
tv
red
media
yello blue
tools info
green
sourc
lighting
power
rgb
IR Lernen
Lernen
►
Löschen
IR Lernen
prog -
prog +
vol -
vol +
stumm
IR Lernen
Lernen
►
Löschen
Name
IR Lernen
power
ok
menü(m)
exit
links
rechts
IR Lernen
Taste auf FB drücken
Eingangskonfi
g
in opt1 dvd
in opt2 nicht aktiv
in coax1 nicht aktiv
in coax2 nicht aktiv
in line1 nicht aktiv
in line2 nicht aktiv
Eingangskonfi
g
in opt1 dvd
in opt2 bd pl
in coax1 sat
in coax2 cd
in line1 tv
in line2 vcr
dvd sat tv radio
p6
Analog stereo
<p.Werte
>
modus
m
/
st
89.30
01
00
40
dvd sat tv radio
p6
PLII surround 1
<p.Werte
>
modus
m
/
st
89.30
01
0
40
virtuell
dvd sat tv radio
p6
PLII surround 2
<p.Werte
>
modus
m
/
st
89.30
01
0
40
virtuell
lighting
power
rgb
IR Lernen
prog -
prog +
vol -
vol +
stumm
IR Lernen
power
ok
menü(m)
exit
links
rechts
IR Lernen
Taste auf FB drücken
Eingangskonfi
g
in opt1 dvd
in opt2 nicht aktiv
in coax1 nicht aktiv
in coax2 nicht aktiv
in line1 nicht aktiv
in line2 nicht aktiv
Eingangskonfi
g
in opt1 dvd
in opt2 bd pl
in coax1 sat
in coax2 cd
in line1 tv
in line2 vcr
IR Lernen
ja
Gerät löschen
Sind Sie sicher?
nein
IR Lernen
Lernen
Löschen
Name
►
IR Lernen
amp
apple tv
audio rec
beamer
blue ray
cd
dvd sat tv radio
p6
Analog stereo
<p.Werte
>
modus
m
/
st
89.30
01
00
40
dvd sat tv radio
p6
PLII surround 2
<p.Werte
>
modus
m
/
st
89.30
01
0
40
virtuell
IR Lernen
Taste auf FB drücken
Eingangskonfi
g
in opt1 dvd
in opt2 bd pl
in coax1 sat
in coax2 cd
in line1 tv
in line2 vcr
IR Lernen
Lernen
Löschen
Name
►
IR Lernen
amp
apple tv
audio rec
beamer
blue ray
cd
dvd sat tv radio
p6
Analog stereo
<p.Werte
>
modus
m
/
st
89.30
01
00
40
IR Lernen
amp
apple tv
audio rec
beamer
blue ray
cd
dvd sat tv radio
p6
Analog stereo
<p.Werte
>
modus
m
/
st
89.30
01
00
40
Programmieren der Haupttasten:
Das Sound System verfügt über 5 Haupttasten (Programm +/-, Volume +/- und Stumm/Mute), die mit IR-Codes anderer infrarotgesteuerter Geräte
belegt werden können. Hierzu gehen Sie wie oben aufgeführt vor.
Achtung: Die Tasten Volume +/- und Stumm (Mute) können nur dann für infrarotgesteuerte Geräte verwendet werden, wenn kein Sound System
angemeldet ist. Die Lautstärkesteuerung des Sound Systems hat Priorität vor allen andern IR-Geräten.
IR Lernen
haupttasten
►
blu ray
dvd
dvd rec
sat
tv1
Select Device
bra1
dvd sat tv light
stand by
Keine
Verbindung
Eingangskonfi
g
in opt1 nicht aktiv
in opt2 nicht aktiv
in coax1 nicht aktiv
in coax2 nicht aktiv
in line1 nicht aktiv
in line2 nicht aktiv
Eingangskonfi
g
Kein Eingang konfiguriert
Zum Konfigurieren bitte
mit OK fortfahren
Eingangskonfi
g
in opt1 dvd
in opt2 nicht aktiv
in coax1 nicht aktiv
in coax2 nicht aktiv
in line1 nicht aktiv
in line2 nicht aktiv
dvd sat tvtvradio
p6
Analog stereo
<p.Werte
>
modus
dvd sat tv radio
p6
Analog stereo
<p.Werte
>
modus
m
/
st
89.30
01
0
40
dvd sat tv radio
p6
Analog wide
<p.Werte
>
modus
m
/
st
89.30
01
0
40
dvd sat tv radio
p6
PLII surround 1
<p.Werte
>
modus
m
/
st
89.30
01
0
40
virtuell
dvd sat tv radio
p6
PLII surround 2
<p.Werte
>
modus
m
/
st
89.30
01
0
40
virtuell
dvd
bra1
play
skipskip
pausestop
sat
red
epg
yello blue
info text
green
tv
/
r
tv
red
media
yello blue
tools info
green
sourc
lighting
power
rgb
Lern Menu
IR Lernen
►
RF Lernen
IR Lernen
Lernen
►
Löschen
IR Lernen
prog -
prog +
vol -
vol +
stumm
Eingangskonfi
g
in opt1 dvd
in opt2 nicht aktiv
in coax1 nicht aktiv
in coax2 nicht aktiv
in line1 nicht aktiv
in line2 nicht aktiv
Eingangskonfi
g
in opt1 dvd
in opt2 bd pl
in coax1 sat
in coax2 cd
in line1 tv
in line2 vcr
dvd sat tv radio
p6
Analog stereo
<p.Werte
IR Lernen
haupttasten
►
blu ray
dvd
dvd rec
sat
tv1
stand by
Keine
Verbindung
Eingangskonfi
g
in opt1 nicht aktiv
in opt2 nicht aktiv
in coax1 nicht aktiv
in coax2 nicht aktiv
in line1 nicht aktiv
in line2 nicht aktiv
Eingangskonfi
g
in opt1 dvd
in opt2 nicht aktiv
in coax1 nicht aktiv
in coax2 nicht aktiv
in line1 nicht aktiv
in line2 nicht aktiv
dvd sat tv radio
p6
Analog stereo
<p.Werte
>
modus
m
/
st
89.30
01
0
40
dvd sat tv radio
p6
Analog wide
<p.Werte
>
modus
m
/
st
89.30
01
0
40
dvd sat tv radio
p6
PLII surround 1
<p.Werte
>
modus
m
/
st
89.30
01
0
40
virtuell
dvd sat tv radio
p6
PLII surround 2
<p.Werte
>
modus
m
/
st
89.30
01
0
40
virtuell
sat
red
epg
yello blue
info text
green
tv
/
r
tv
red
media
yello blue
tools info
green
sourc
lighting
power
rgb
IR Lernen
Lernen
►
Löschen
IR Lernen
prog -
prog +
vol -
vol +
stumm
Eingangskonfi
g
in opt1 dvd
in opt2 nicht aktiv
in coax1 nicht aktiv
in coax2 nicht aktiv
in line1 nicht aktiv
in line2 nicht aktiv
Eingangskonfi
g
in opt1 dvd
in opt2 bd pl
in coax1 sat
in coax2 cd
in line1 tv
in line2 vcr
dvd sat tv radio
p6
Analog stereo
<p.Werte
>
modus
m
/
st
89.30
01
00
40
Keine
Verbindung
Eingangskonfi
g
in opt1 dvd
in opt2 nicht aktiv
in coax1 nicht aktiv
in coax2 nicht aktiv
in line1 nicht aktiv
in line2 nicht aktiv
dvd sat tv radio
p6
Analog wide
<p.Werte
>
modus
m
/
st
89.30
01
0
40
dvd sat tv radio
p6
PLII surround 1
<p.Werte
>
modus
m
/
st
89.30
01
0
40
virtuell
dvd sat tv radio
p6
PLII surround 2
<p.Werte
>
modus
m
/
st
89.30
01
0
40
virtuell
tv
red
media
yello blue
tools info
green
sourc
lighting
power
rgb
IR Lernen
Lernen
►
Löschen
IR Lernen
prog -
prog +
vol -
vol +
stumm
Eingangskonfi
g
in opt1 dvd
in opt2 nicht aktiv
in coax1 nicht aktiv
in coax2 nicht aktiv
in line1 nicht aktiv
in line2 nicht aktiv
Eingangskonfi
g
in opt1 dvd
in opt2 bd pl
in coax1 sat
in coax2 cd
in line1 tv
in line2 vcr
dvd sat tv radio
p6
Analog stereo
<p.Werte
>
modus
m
/
st
89.30
01
00
40
dvd sat tv radio
p6
PLII surround 1
<p.Werte
>
modus
m
/
st
89.30
01
0
40
virtuell
dvd sat tv radio
p6
PLII surround 2
<p.Werte
>
modus
m
/
st
89.30
01
0
40
virtuell
lighting
power
rgb
IR Lernen
prog -
prog +
vol vol +
stumm
Eingangskonfi
g
in opt1 dvd
in opt2 nicht aktiv
in coax1 nicht aktiv
in coax2 nicht aktiv
in line1 nicht aktiv
in line2 nicht aktiv
Eingangskonfi
g
in opt1 dvd
in opt2 bd pl
in coax1 sat
in coax2 cd
in line1 tv
in line2 vcr
dvd sat tv radio
p6
Analog stereo
<p.Werte
>
modus
m
/
st
89.30
01
00
40
dvd sat tv radio
p6
PLII surround 2
<p.Werte
>
modus
m
/
st
89.30
01
0
40
virtuell
IR Lernen
Taste auf FB drücken
Eingangskonfi
g
in opt1 dvd
in opt2 bd pl
in coax1 sat
in coax2 cd
in line1 tv
in line2 vcr
dvd sat tv radio
p6
Analog stereo
<p.Werte
>
modus
m
/
st
89.30
01
00
40
Page 26

26
SPECTRAL Sound System löschen:
Zur Abmeldung der Fernbedienung von einem Sound System starten Sie bitte das Lern-Menü durch gleichzeitiges Drücken von <exit> und <m>, wählen „RF Lernen“
und bestätigen es mit <ok>. Wählen Sie das zu „löschende“ System aus und bestätigen Sie Ihre Auswahl mit <ok>. Wählen und bestätigen Sie die Funktion „Löschen“
um fortzufahren. Vervollständigen Sie die Abmeldung mit der Funktionstaste „ja“ oder brechen Sie den Vorgang mit „nein“ ab.
IR Lernen
haupttasten
►
blu ray
dvd
dvd rec
sat
tv1
stand by
Keine
Verbindung
Eingangskonfi
g
in opt1 nicht aktiv
in opt2 nicht aktiv
in coax1 nicht aktiv
in coax2 nicht aktiv
in line1 nicht aktiv
in line2 nicht aktiv
Eingangskonfi
g
in opt1 dvd
in opt2 nicht aktiv
in coax1 nicht aktiv
in coax2 nicht aktiv
in line1 nicht aktiv
in line2 nicht aktiv
dvd sat tv radio
p6
Analog stereo
<p.Werte
>
modus
m
/
st
89.30
01
0
40
dvd sat tv radio
p6
Analog wide
<p.Werte
>
modus
m
/
st
89.30
01
0
40
dvd sat tv radio
p6
PLII surround 1
<p.Werte
>
modus
m
/
st
89.30
01
0
40
virtuell
dvd sat tv radio
p6
PLII surround 2
<p.Werte
>
modus
m
/
st
89.30
01
0
40
virtuell
sat
red
epg
yello blue
info text
green
tv
/
r
tv
red
media
yello blue
tools info
green
sourc
lighting
power
rgb
IR Lernen
Lernen
►
Löschen
IR Lernen
prog -
prog +
vol -
vol +
stumm
IR Lernen
haupttasten
blu ray
dvd
►
dvd rec
sat
tv1
IR Lernen
Lernen
►
Löschen
Name
IR Lernen
power
ok
menü(m)
exit
links
rechts
IR Lernen
Taste auf FB drücken
IR Lernen
Speicherung erfolgreich
IR Lernen
Speicherung fehlgeschlagen
RF Lernen
spectral bra1
new device
►
RF Lernen
RF Gerät einstecken
OK drücken
RF Lernen
Installation erfolgreich
RF Lernen
Gerät wählen
cla1
cta1
cta2
bra1
Eingangskonfi
g
in opt1 dvd
in opt2 nicht aktiv
in coax1 nicht aktiv
in coax2 nicht aktiv
in line1 nicht aktiv
in line2 nicht aktiv
Eingangskonfi
g
in opt1 dvd
in opt2 bd pl
in coax1 sat
in coax2 cd
in line1 tv
in line2 vcr
IR Lernen
ja
Gerät löschen
Sind Sie sicher?
nein
IR Lernen
Lernen
Löschen
Name
►
IR Lernen
amp
apple tv
audio rec
beamer
blue ray
cd
dvd sat tv radio
p6
Analog stereo
<p.Werte
>
modus
m
/
st
89.30
01
00
40
Keine
Verbindung
Eingangskonfi
g
in opt1 dvd
in opt2 nicht aktiv
in coax1 nicht aktiv
in coax2 nicht aktiv
in line1 nicht aktiv
in line2 nicht aktiv
dvd sat tv radio
p6
Analog wide
<p.Werte
>
modus
m
/
st
89.30
01
0
40
dvd sat tv radio
p6
PLII surround 1
<p.Werte
>
modus
m
/
st
89.30
01
0
40
virtuell
dvd sat tv radio
p6
PLII surround 2
<p.Werte
>
modus
m
/
st
89.30
01
0
40
virtuell
tv
red
media
yello blue
tools info
green
sourc
lighting
power
rgb
IR Lernen
Lernen
►
Löschen
IR Lernen
prog -
prog +
vol -
vol +
stumm
IR Lernen
Lernen
►
Löschen
Name
IR Lernen
power
ok
menü(m)
exit
links
rechts
IR Lernen
Taste auf FB drücken
IR Lernen
Speicherung fehlgeschlagen
RF Lernen
RF Gerät einstecken
OK drücken
RF Lernen
Installation erfolgreich
RF Lernen
Gerät wählen
cla1
cta1
cta2
bra1
Eingangskonfi
g
in opt1 dvd
in opt2 nicht aktiv
in coax1 nicht aktiv
in coax2 nicht aktiv
in line1 nicht aktiv
in line2 nicht aktiv
Eingangskonfi
g
in opt1 dvd
in opt2 bd pl
in coax1 sat
in coax2 cd
in line1 tv
in line2 vcr
IR Lernen
ja
Gerät löschen
Sind Sie sicher?
nein
IR Lernen
Lernen
Löschen
Name
►
IR Lernen
amp
apple tv
audio rec
beamer
blue ray
cd
dvd sat tv radio
p6
Analog stereo
<p.Werte
>
modus
m
/
st
89.30
01
00
40
dvd sat tv radio
p6
PLII surround 1
<p.Werte
>
modus
m
/
st
89.30
01
0
40
virtuell
dvd sat tv radio
p6
PLII surround 2
<p.Werte
>
modus
m
/
st
89.30
01
0
40
virtuell
lighting
power
rgb
IR Lernen
prog -
prog +
vol -
vol +
stumm
IR Lernen
power
ok
menü(m)
exit
links
rechts
IR Lernen
Taste auf FB drücken
RF Lernen
Installation erfolgreich
RF Lernen
Gerät wählen
cla1
cta1
cta2
bra1
Eingangskonfi
g
in opt1 dvd
in opt2 nicht aktiv
in coax1 nicht aktiv
in coax2 nicht aktiv
in line1 nicht aktiv
in line2 nicht aktiv
Eingangskonfi
g
in opt1 dvd
in opt2 bd pl
in coax1 sat
in coax2 cd
in line1 tv
in line2 vcr
IR Lernen
ja
Gerät löschen
Sind Sie sicher?
nein
IR Lernen
Lernen
Löschen
Name
►
IR Lernen
amp
apple tv
audio rec
beamer
blue ray
cd
dvd sat tv radio
p6
Analog stereo
<p.Werte
>
modus
m
/
st
89.30
01
00
40
dvd sat tv radio
p6
PLII surround 2
<p.Werte
>
modus
m
/
st
89.30
01
0
40
virtuell
IR Lernen
Taste auf FB drücken
RF Lernen
Gerät wählen
cla1
cta1
cta2
bra1
vra1
Eingangskonfi
g
in opt1 dvd
in opt2 bd pl
in coax1 sat
in coax2 cd
in line1 tv
in line2 vcr
IR Lernen
Lernen
Löschen
Name
►
IR Lernen
amp
apple tv
audio rec
beamer
blue ray
cd
dvd sat tv radio
p6
Analog stereo
<p.Werte
>
modus
m
/
st
89.30
01
00
40
SPECTRAL Sound System verbinden:
Zur Anmeldung der Fernbedienung an ein (weiteres) Sound System starten Sie bitte
das Lern-Menü durch gleichzeitiges Drücken von <exit> und <m>, wählen „RF Lernen“
und bestätigen es mit <ok>. Wählen Sie „new device“ um ein Sound System an der
Fernbedienung anzumelden.
Nach der Bestätigung werden Sie aufgefordert, das zu erlernende Sound System mit
dem Netz zu verbinden und den Netzschalter einzuschalten.
Warten Sie danach mind. 3 Sek. und bestätigen Sie dann mit <ok>.
Bitte achten Sie darauf, dass das Sound System zuvor für mindestens 1 Minute vom
Netz getrennt war.
Die Fernbedienung versucht nun, sich mit dem gerade aktivierten Sound System zu
verbinden.
Eine erfolgreiche Verbindung wird im Display mit „Installation erfolgreich“ angezeigt, das
Scheitern mit „Installation fehlgeschlagen“. Beheben Sie in letzterm Fall die Fehlerursache
(Gerät nicht eingeschaltet, Abstand zu groß, Sound System nicht lange genug vom Netz
getrennt, o.ä.) und starten Sie den Vorgang erneut.
Nach der erfolgreichen Installation müssen Sie einen Namen für das Sound System
vergeben. Vergeben Sie einen Namen ein weiteres Mal (z.B. BRA1), so wird von der
Fernbedienung automatisch eine Indizierung vorgenommen (z.B. BRA1.1, BRA1.2, ...).
Danach können Sie das „RF-Lernen“ Menü durch zweimaliges Drücken der Taste <exit>
verlassen.
Möchten Sie ein bereits existierendes Sound System überschreiben, wählen Sie statt
„new device“ das zu ersetzende System aus und bestätigen Sie Ihre Auswahl mit <ok>.
Wählen Sie die Funktion „Lernen“ um fortzufahren. Bestätigen Sie das Überschreiben mit
der Funktionstaste „ja“ oder brechen Sie den Vorgang mit „nein“ ab.
Fahren Sie wie zuvor unter „new device“ beschrieben fort.
Page 27

27
Deutsch
SPECTRAL Sound System über eine
IR-Fernbedienung steuern
Die Grundfunktionen des SPECTRAL Sound Systems können auch über andere
lernfähige Fernbedienungen gesteuert werden.
Funktionen, die mit Infrarot Signalen gesteuert werden können:
• Power,
• Mute
• Lautstärke +/-
• Klangmodus
• Eingangssignal
• Blättern-Taste
• Pfeiltasten
Bitte beachten:
Für die Bedienung des SPECTRAL Sound Systems mit IR ist das IR-Link System
erforderlich. Das Infrarot Auge wird an der Geräterückseite angebracht und mit
der Metalllasche gesichert. (siehe Grak „Rückansicht...“, Seite 8/9)
Erlernen der IR-Befehle:
Starten Sie bitte das Lern-Menü durch gleichzeitiges Drücken von <exit> und
<m>, wählen Sie „IR Lernen“ und hier die letzte Position „sound system“.
Bestätigen Sie Ihre Auswahl mit <ok>. Danach können Sie das Menü durch
Drücken der Taste <exit> verlassen.
Mit der Taste <sel> kann jetzt das Sound System ausgewählt werden. Es können nun die einzelnen Befehle der SPECTRAL Fernbedienung auf eine andere
lernfähige Fernbedienung übertragen werden.
4.1 und 5.1 Modus
Der Pre (2.1/5.1 Mode) Ausgang ermöglicht den Anschluss zum Beispiel aktiver
Funklautsprecher. Je nach gewählter Einstellung im System Menü (Factory Set/
Gerätenamen) werden im 2.1 Mode die Frontkanäle oder im 4.1 bzw. 5.1 Mode
die Lautsprecher-Signale für hinten links und hinten rechts ausgegeben.
Das SPECTRAL Sound System kann durch den Anschluss weiterer Lautsprecher
auch im 4.1 oder 5.1 Modus betrieben werden:
BRA1, CLA1, CTA1/2, VRA1: 4.1 Modus durch Anschluss zusätzlicher aktiver Laut-
sprecher für hinten links und rechts möglich.
Option: zusätzlicher aktiver Subwoofer
CLA1, CTA2: 5.1 Modus durch Anschluss zusätzlicher aktiver
Lautsprecher für hinten links und rechts und einem
zusätzlichen passiven Center-Lautsprecher möglich.
Option: zusätzlicher aktiver Subwoofer
Wenn entsprechende Lautsprecher angeschlossen sind, muss im System Menü
„factory set / Gerätenamen“ der passende Modus ausgewählt werden.
Im Lautsprecher Menü können für diese Lautsprecher die Klangeinstellungen
angepasst werden. (Pegelanpassung, Abstand und Raumanpassung)
Page 28
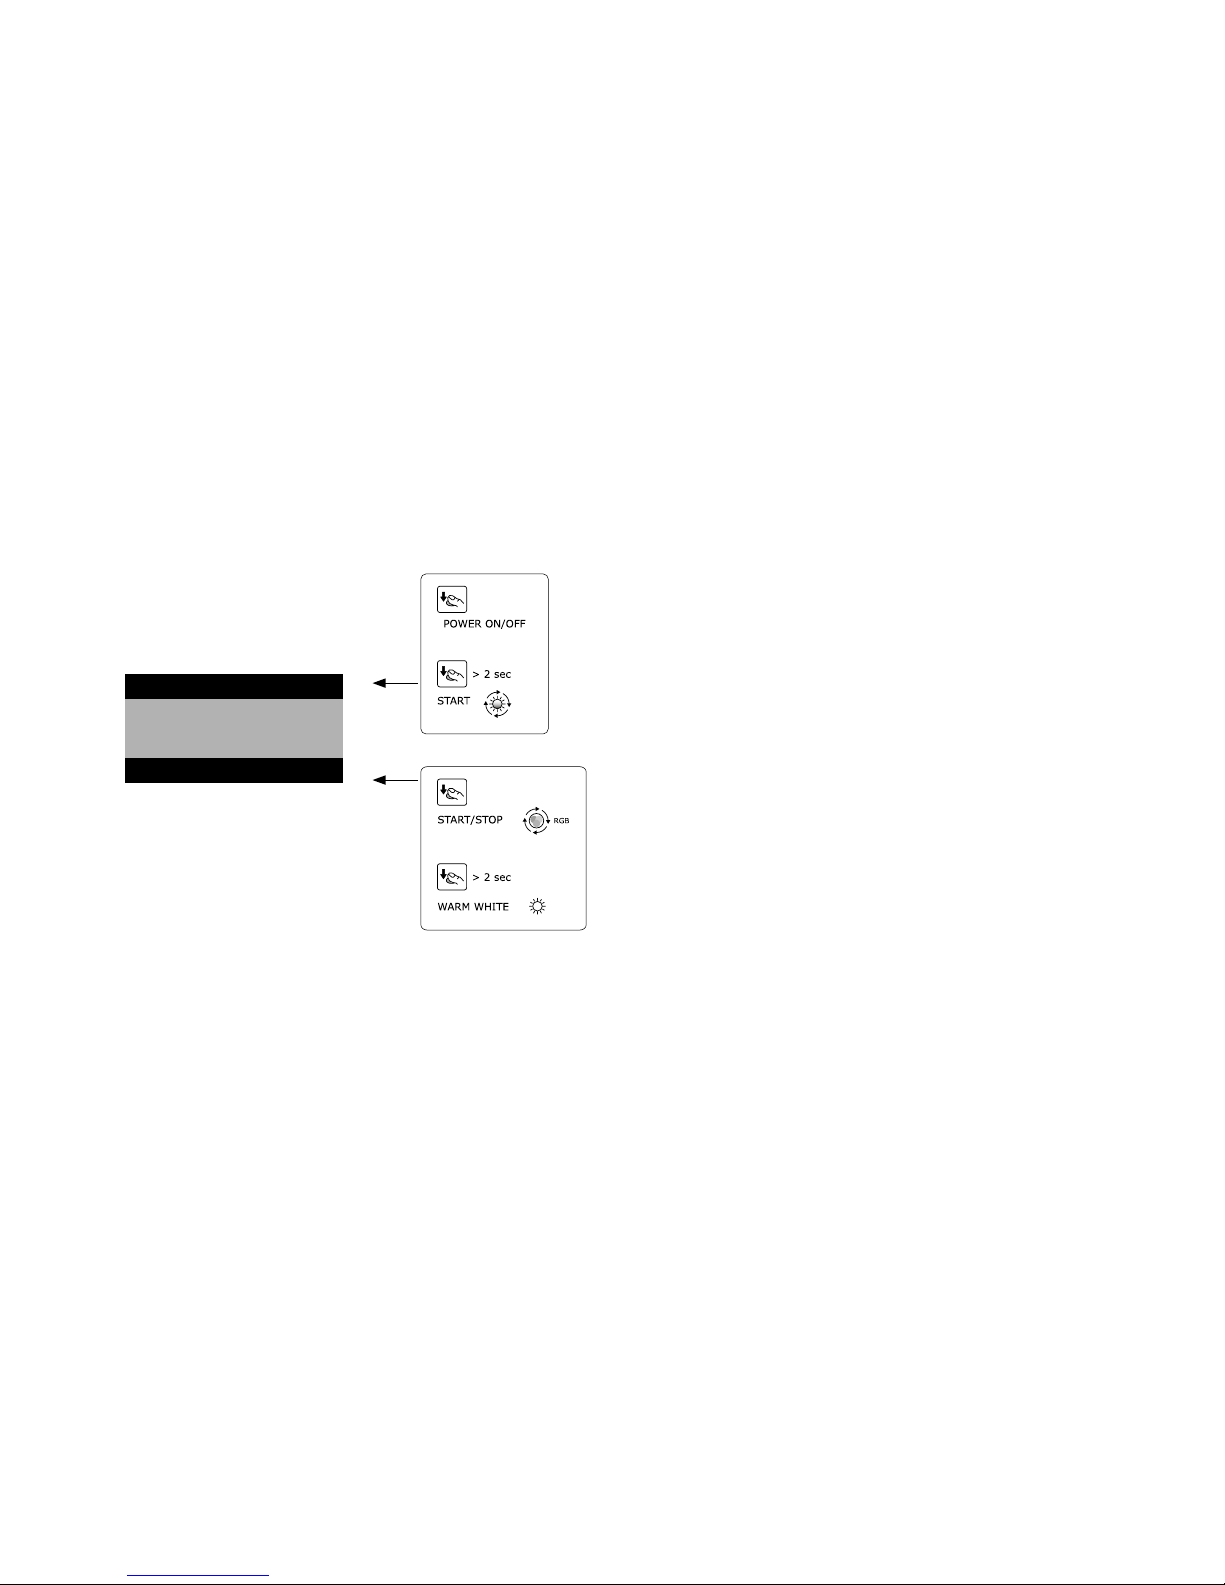
28
IR Lernen
haupttasten
►
blu ray
dvd
dvd rec
sat
tv1
Select Device
bra1
dvd sat tv light
stand by
Keine
Verbindung
Eingangskonfi
g
in opt1 nicht aktiv
in opt2 nicht aktiv
in coax1 nicht aktiv
in coax2 nicht aktiv
in line1 nicht aktiv
in line2 nicht aktiv
Eingangskonfi
g
Kein Eingang konfiguriert
Zum Konfigurieren bitte
mit OK fortfahren
Eingangskonfi
g
in opt1 dvd
in opt2 nicht aktiv
in coax1 nicht aktiv
in coax2 nicht aktiv
in line1 nicht aktiv
in line2 nicht aktiv
dvd sat tvtvradio
p6
Analog stereo
<p.Werte
>
modus
dvd sat tv radio
p6
Analog stereo
<p.Werte
>
modus
m
/
st
89.30
01
0
40
dvd sat tv radio
p6
Analog wide
<p.Werte
>
modus
m
/
st
89.30
01
0
40
dvd sat tv radio
p6
PLII surround 1
<p.Werte
>
modus
m
/
st
89.30
01
0
40
virtuell
dvd sat tv radio
p6
PLII surround 2
<p.Werte
>
modus
m
/
st
89.30
01
0
40
virtuell
dvd
bra1
play
skipskip
pausestop
sat
red
epg
yello blue
info text
green
tv
/
r
tv
red
media
yello blue
tools info
green
sourc
lighting
power
rgb
Lern Menu
IR Lernen
►
RF Lernen
IR Lernen
Lernen
►
Löschen
IR Lernen
prog -
prog +
vol -
vol +
stumm
IR Lernen
haupttasten
blu ray
dvd
►
dvd rec
sat
tv1
IR Lernen
Lernen
►
Löschen
Name
IR Lernen
power
ok
menü(m)
exit
links
rechts
IR Lernen
Taste auf FB drücken
IR Lernen
Speicherung erfolgreich
IR Lernen
Speicherung fehlgeschlagen
RF Lernen
spectral bra1
new device
►
RF Lernen
RF Gerät einstecken
OK drücken
RF Lernen
Installation erfolgreich
RF Lernen
Gerät wählen
cla1
cta1
cta2
bra1
RF Lernen
Installation fehlgeschlagen
lighting
power
rgb
Eingangskonfi
g
in opt1 dvd
in opt2 nicht aktiv
in coax1 nicht aktiv
in coax2 nicht aktiv
in line1 nicht aktiv
in line2 nicht aktiv
Eingangskonfi
g
in opt1 dvd
in opt2 bd pl
in coax1 sat
in coax2 cd
in line1 tv
in line2 vcr
IR Lernen
ja
Gerät löschen
Sind Sie sicher?
nein
IR Lernen
Lernen
Löschen
Name
►
Bedienung der LED Lichtanlage
Nur verwendbar in Verbindung mit einer SPECTRAL LED-Beleuchtung.
Page 29

29
Deutsch
Fehlerbeschreibung
Das Display der FB zeigt
nichts an
FB zeigt dauerhaft „Welcome
SPECTRAL“, „Good Bye SPECTRAL“
oder “bitte warten“ an
Die FB zeigt „Keine Verbindung“
Anzeige der FB ist schlecht lesbar
Die Anzeige erfolgt in der „falschen“
Sprache
(Deutsch und Englisch sind möglich)
Die FB springt aus dem IR Modus in
den Sound System Modus
Mögliche Ursache(n)
1. Die FB bendet sich im Ruhezustand
2. Batterien sind nicht oder falsch eingelegt
3. Batterien sind fast „leer“
1. Der Prozessor der FB ist „abgestürzt“
2. Der Prozessor des Sound Systems ist „abgestürzt“
1. Das Sound System ist nicht betriebsbereit
2. Der Abstand zwischen den FBen ist zu groß
3. Der Prozessor des Sound Systems oder der FB ist
„abgestürzt“
4. Die FB ist nicht am Sound System angemeldet
1. Ungünstige Kontrasteinstellung
1. Die Anzeigesprache der FB wurde umgeschaltet
2. Die Sprache im Sound System wurde umgeschaltet
1. Batterien sind fast „leer“
Fehlerbehebung
1. Eine beliebige Taste zum Aktivieren drücken
2. Batterien gemäß Polaritätsaufdruck (+/-) korrekt einlegen
3. Neue Batterien gemäß Polaritätsaufdruck (+/-) korrekt
einlegen oder Akkus auaden
1. Eine Batterie der FB für min. 30s entnehmen und wieder
korrekt einlegen
2. Das Sound System am Netzschalter für min. 30s aus- und
wieder einschalten
1. Das Sound System mit dem Stromnetz verbinden und / oder
den Netzschalter auf „ON“ stellen
2. Den Abstand auf unter 10m verringern
3. Sound System am Netzschalter für min. 30s aus- und wieder
einschalten und / oder eine Batterie der FB für min. 30s
entnehmen und wieder korrekt einlegen Anmeldung gemäß
der Beschreibung „SPECTRAL Sound System verbinden“
durchführen
4. Anmeldung gemäß der Beschreibung „Sound System
verbinden“ durchführen.
1. Die Tasten „0“ und „4“ gleichzeitig drücken, bis „kontrast
xx“ angezeigt wird und mit „<“ oder „>“ den Kontrast
wunschgemäß einstellen. Fenster mit „exit“ verlassen.
1. Die Tasten „5“ und „9“ gleichzeitig drücken, bis „sprache“
angezeigt wird und mit den Funktionstasten die gewünschte
Sprache (Anzeige) auswählen
2. Im „System Menü“ (m => System Menü => factory set =>
Sprache / language) die gewünschte Sprache auswählen.
1. Neue Batterien gemäß Polaritätsaufdruck (+/-) korrekt
einlegen oder Akkus auaden
Problembehebung und Optimierung
Page 30

30
Im IR Modus werden Befehle 2x
ausgeführt
IR Gerät lässt sich nicht (korrekt) bedienen
Keine Eingänge außer „radio“ auswählbar
Sound System erkennt keinen Dolby
Digital bzw. DTS Datenstrom
(es wird nur „analog“ oder „pcm“
angezeigt)
Aus dem Zone2 / Line – Ausgang kommt
kein Signal
1. Beim lernen des Codes wurde die Taste auf der Original-FB
zu lange gedrückt gehalten
2. Die Taste auf der SPECTRAL–FB wurde zu lange gedrückt
gehalten
1. Gerät wurde nicht (korrekt) programmiert (erlernt)
2. Der Abstand zwischen den FBen war zur groß / zu klein
3. Der Code der Original-FB kann nicht erlernt werden
1. Im Menü „Eingangskong“ wurden keine Eingänge
angemeldet (z.B. Erstinstallation mit „exit“ verlassen)
2. Während der Konguration wurden die Tasten „Pfeil hoch“,
„Pfeil runter“ und / oder „exit“ verwendet.
1. Die Quelle ist nur analog angeschlossen (Line 1 oder 2)
2. An der Quelle sind falsche Einstellungen gewählt
1. Es soll ein Mehrkanalsignal über Zone2 / Line ausgeben
werden
2. Die Lautstärke für Zone2 ist sehr niedrig eingestellt
1. Beim lernen der Funktion die Taste auf der OriginalFB nur (sehr) kurz drücken
2. Die Taste auf der SPECTRAL–FB nur sehr kurz drücken.
1. Die SPECTRAL–FB erneut mit der Original-FB des IR
Gerätes anlernen (programmieren)
2. Einen Abstand von ca. 5cm zwischen den FBen beim
Programmieren sicherstellen
3. Aufgrund der hohen Gerätevielfalt kann es
vorkommen, dass Codes nicht erlernt werden
können. Hierfür gibt es leider keine Lösung
1. Im Menü „Eingangskong“ (m => System Menü =>
Eingangskong) die belegten Eingänge anmelden.
Dabei exakt der Beschreibung „Erstinstallation“
folgen!
2. Im Menü „Eingangskong“ (m => System Menü
=> Eingangskong) die entsprechenden Eingänge
anmelden und nur die gemäß der Beschreibung
„Erstinstallation“ erlaubten Tasten verwenden
1. Einen digitalen Ausgang der Quelle an Opt 1 / 2 oder
Coax 1 / 2 anschließen
2. An der Quelle „Bitstream“ oder „Raw“ als Datenformat
auswählen (hierzu insbes. die Anleitung des
Quellgerätes beachten)
1. „Dynamik“ (m => System Setup => Dynamik) auf
„komp.“ stellen, unter „Ausgangskong“ (m => System
Setup => Ausgangskong => Eingang) „zone 1“ als
Eingang wählen und im Hauptbildschirm als Eingang
die wiederzugebende Quelle auswählen
2. Die Lautstärke für den Zone2 – Ausgang unter
„Lautstärke“ (m => System Setup => Ausgangskong
=> Lautstärke) erhöhen
Page 31

31
Deutsch
In der FB wird nur „surround“ statt
„surround 1“ und „surround 2“
angezeigt
Gestörter Radioempfang
Ein eingestellter Radiosender ist
nach dem Aus- und Einschalten
nicht mehr vorhanden (Anzeige
wieder 87.50)
Ton und Fernsehbild sind nicht
(lippen)synchron
Keine (Musik-)Wiedergabe
Lautstärke lässt sich nicht über
einen bestimmten Wert (< / = 99)
einstellen
1. Das Sound System wurde auf einen 4.1 oder 5.1 Modus gestellt
1. Ungünstige Antennenposition
2. Ungünstige geographische Lage
3. Der Sender wurde nicht richtig eingestellt
1. Der Sender wurde nicht auf einem Speicherplatz abgelegt
1. Lange Verarbeitungszeiten im Fernseher verzögern das Bild.
1. Das Sound System ist ausgeschaltet oder im Standby
2. Die Lautstärke ist niedrig eingestellt oder auf stumm gestellt
3. Es wurde ein falscher Eingang ausgewählt
4. Das Signal (Datenstrom) der Quelle wird vom Sound System
nicht erkannt
5. Falsche Einstellung des Line2 / Phono Eingangs bei Verwendung eines Plattenspielers
1. Die „max. Lautstärke“ ist auf diesen max. möglichen Wert
eingestellt.
1. Das System unter „Gerätenamen“ (m => System Setup
=> factory setup => Gerätenamen) auf einen 2.1
Modus einstellen
1. Die aufgespannte(!) Wurfantenne möglichst frei,
entfernt von metallischen Flächen, anbringen
2. Eine Dachantenne oder einen BreitbandKabelanschluss verwenden
3. Den Sender manuell abstimmen, gemäß Beschreibung
„Tuner“
1. Einfach die „ok“ – Taste drücken, um einen Sender auf
Programmplatz 01 abzuspeichern.
1. Den Ton zeitlich über „lip sync“ (m => System Menü
=> lip sync) verzögern, so dass Bild und Ton synchron
(zeitgleich) wiedergegeben werden
1. Das Sound System einschalten, so dass die FB den
Hauptbildschirm anzeigt
2. Über Volume + ( V+) die Lautstärke erhöhen
3. Den Eingang auswählen, an dem die wiederzugebende
Quelle angeschlossen ist.
4. Die Quelle auf ein anderes Datenformat einstellen oder
während der Wiedergabe ein anderes Audioformat
auswählen (hierzu insbes. die Anleitung des
Quellgerätes beachten)
5. Den Line 2 / Phono – Eingang „line2 Kong“ (m =>
System Setup => factory set => line2 Kong) auf
„phono“ stellen
1. Den Lautstärke-Begrenzer (m => System Setup =>
factory set => max. Lautstärke) auf den gewünschten
Wert (max. 99) einstellen
Page 32

32
Sound System spielt nach dem
Einschalten leiser als vor dem Ausschalten
Die Balance ist verschoben (Ortung
liegt außerhalb der Mitte)
Im Surround – Modus entsteht kein
oder nur ein schwacher SurroundEindruck
Im Surround – Modus sind Stimmen
schlecht verständlich
1. Die „Einschaltlautstärke“ ist auf einen Wert eingestellt,
der niedriger ist als die eingestellte Lautstärke vor dem
Ausschalten
1. Die Pegeleinstellung der Satelliten ist verstellt oder die
Hörposition bendet sich außerhalb der Mitte
1. Der Wiedergabe – Modus steht auf „stereo“ oder „wide“
2. Hörposition zu weit außerhalb der Mitte
3. Die Quelle liefert nur ein 2-Kanal Signal
4. Das Sound System ist auf einen 4.1 / 5.1 Modus gestellt.
1. Bei der Aufnahme (BD oder DVD) wurden die Stimmen auf
die rechten und linken Kanäle gemischt.
2. Das Sound System steht im 5.1 Modus
1. Die „Einschaltlautstärke“ (m => System Setup
=> factory set => Einschaltlautstärke) auf den
gewünschten Wert (max. 99, aber nicht höher als
„max. Lautstärke“) einstellen
1. Im Lautsprecher Menü unter (m => Lautsprecher
Menü => Pegelanpassung) die richtigen Pegel und
unter (m => Lautsprecher Menü => LS Abstand) die
richtigen Abstände einstellen
1. Die Wiedergabe – Modi „surround 1“ oder „surround
2“ einstellen
2. Im Lautsprecher Menü unter (m => Lautsprecher
Menü => Pegelanpassung) die richtigen Pegel und
unter (m => Lautsprecher Menü => LS Abstand) die
richtigen Abstände zum Hörplatz einstellen
3. Um einen optimalen räumlichen Eindruck zu
bekommen, benötigt das Sound System einen
Mehrkanal – Datenstrom. Die FB zeigt bei diesen
„Virtual Dolby Digital“ oder „Virtual DTS“ an. Bei allen
anderen Anzeigen (z.B. „Virtual Dolby PLII) handelt es
sich nicht um solche Mehrkanal – Datenströme, der
Surround-Eindruck ist folglich geringer
4. Das System unter „Gerätenamen“ (m => System
Setup => factory setup => Gerätenamen) auf einen
2.1 Modus mit Virtual Surround – Modus einstellen
1. „surround 2“ als Wiedergabe – Modus auswählen
2. Das System unter „Gerätenamen“ (m => System
Setup => factory setup => Gerätenamen) auf einen
2.1 oder 4.1 Modus einstellen.
Page 33

33
Deutsch
Das Sound System hat zu wenig oder
keinen Tiefbass
Das Sound System hat zu viel Tiefbass
Das Sound System hat zu wenig oberen
Bass
Das Sound System hat zu viel oberen
Bass
1. Hören mit (sehr) geringer Lautstärke
2. Der Ausgang für einen ext. Subwoofer ist aktiviert, aber
kein Subwoofer ist angeschlossen oder betriebsbereit
3. Das Sound System ist akustisch ungünstig positioniert
4. Im Menü „Raumanpassung“ sind Equalizer eingestellt.
(Pegelanhebung)
1. Hören mit hoher Lautstärke und zusätzlich aktiviertem
„Bass expand“
2. Verwendung eines ext. Subwoofer mit zu viel Pegel
3. Das Sound System ist akustisch ungünstig positioniert
4. Im Menü „Raumanpassung“ sind Equalizer eingestellt.
(Pegelabsenkung)
1. Das Sound System ist akustisch ungünstig positioniert
2. Im Menü „Raumanpassung“ sind Equalizer eingestellt
(Pegelabsenkung)
3. Der Bass-Pegel im Menü „Klangregelung“ ist neutral oder
abgesenkt eingestellt
4. Verwendung eines externen Subwoofer mit falscher
Phasenlage (Phasenanpassung) zw. internem und
externem Subwoofer
1. Das Sound System ist akustisch ungünstig positioniert
2. Im Menü „Raumanpassung“ sind Equalizer eingestellt.
1. „Bass expand“ (m => Lautsprecher Setup => Bass expand)
auf „wenig“ oder „hoch“ einstellen
2. Den Ausgang für einen externen Subwoofer unter
„Sub Ausgang“ (m => System Menü => Sub Ausgang)
deaktivieren oder einen funktionsfähigen externen
Subwoofer an den Sub–Out anschließen
3. Das System (wenn möglich) an einer anderen Position (z.B.
näher an der Wand) aufstellen
4. Die Einstellungen für die Raumanpassung (m =>
Lautsprecher Menü => Raumanpassung => subwoofer)
korrigieren oder löschen
1. „Bass expand“ (m => Lautsprecher Setup => Bass expand)
auf „wenig“ oder „aus“ stellen
2. Den externen Subwoofer korrekt einstellen (mit weniger
Pegel)
3. Das System (wenn möglich) an einer anderen Position (z.B.
weiter von der Wand entfernt) aufstellen
4. Die Einstellungen für die Raumanpassung (m =>
Lautsprecher Menü => Raumanpassung => subwoofer)
korrigieren oder löschen
1. Das System (wenn möglich) an einer anderen Position (z.B.
näher an der Wand) aufstellen
2. Die Einstellungen für die Raumanpassung (m =>
Lautsprecher Menü => Raumanpassung => subwoofer)
korrigieren oder löschen
3. Den Bass – Pegel im Menü „Klangregelung“ (m =>
Lautsprecher Menü => Klangregelung => Bass) anheben
4. Am externen Subwoofer die Phasenlage zur Anpassung
an den systeminternen Subwoofer korrigieren oder die
Position des ext. Subwoofers verändern
1. Das System (wenn möglich) an einer anderen Position (z.B.
entfernter von der Wand) aufstellen
2. Die Einstellungen für die Raumanpassung (m =>
Lautsprecher Menü => Raumanpassung => subwoofer)
korrigieren oder löschen
Page 34

34
Das Sound System hat im gesamten
Bassbereich zu wenig oder zu viel Pegel
Das Sound System klingt „dumpf“ (zu
wenig Höhen)
Das Sound System klingt „scharf“ /
„aggressiv“ (zu viele Höhen)
Das Tonsignal klingt (stark) verzerrt
3. Der Bass-Pegel im Menü „Klangregelung“ ist neutral oder
angehoben eingestellt
1. Die „Pegelanpassung“ für den Subwoofer ist „falsch“
eingestellt
1. Der Hörraum ist akustisch stark bedämpft oder die KlangRegelung „Höhen“ ist abgesenkt.
2. Ein reines Stereo-Signal wird in einem der Surround-Modi
wiedergegeben
3. Im Menü „Raumanpassung“ sind Equalizer eingestellt.
1. Der Hörraum ist akustisch „hart“ (wenig bedämpft) oder
die Klangregelung „Höhen“ ist angehoben
2. Im Menü „Raumanpassung“ sind Equalizer eingestellt.
1. Hören mit sehr hoher Lautstärke, was zu einer
Übersteuerung des Sound Systems führt
2. Verwenden eines analogen Eingangs mit zu hohem
Signalpegel (Pegel der Quelle ist höher als 2Ve)
3. Verwendung des Line2 / Phono Eingangs mit einer LinePegel-Quellen und der Einstellung „Phono“
4. Verwendung des Zone2 – Ausgang zur Ansteuerung
eines externen Geräts mit zu hoch eingestelltem Pegel
5. Bei Mehrkanalaufnahmen ist es theoretisch möglich, dass
der Signalprozessor des Sound System übersteuert wird
3. Den Bass – Pegel im Menü „Klangregelung“ (m =>
Lautsprecher Menü => Klangregelung => Bass)
absenken
1. Im Lautsprecher Menü (m => Lautsprecher Menü =>
Pegelanpassung => subwoofer) den gewünschten Pegel
für den Subwoofer einstellen
1. Die Höhen im Menü „Klangregelung“ (m => Lautsprecher
Menü => Klangregelung => Höhen) anheben
2. Das Sound System auf einen Stereo – Wiedergabe –
Modus einstellen
3. Die Einstellungen für die Raumanpassung (m =>
Lautsprecher Menü => Raumanpassung => vorne)
korrigieren oder löschen
1. Die Höhen im Menü „Klangregelung“ (m => Lautsprecher
Menü => Klangregelung => Höhen) absenken
2. Die Einstellungen für die Raumanpassung (m
=>Lautsprecher Menü => Raumanpassung => vorne)
korrigieren oder löschen
1. Umgehend die Lautstärke reduzieren (auch um Schäden
am Gerät zu vermeiden)
2. Den Pegel der Quelle absenken, sofern diese über einen
Pegelsteller (Volume) verfügt.
3. Den Line 2 / Phono – Eingang unter „line2 Kong“ (m =>
System Setup => factory set => line2 Kong) auf „line“
stellen
4. Die Lautstärke für den Zone2 – Ausgang unter
„Lautstärke“ (m => System Setup => Ausgangskong =>
Lautstärke) reduzieren
5. „Dynamik“ (m => System Setup => Dynamik) auf „komp.“
Stellen
Page 35
35
Deutsch
Einspielphase
Um seine maximale Leistungsfähigkeit zu entwickeln, benötigt ein Lautsprecher
eine Einlaufzeit von ca. 15-20 Betriebsstunden. In dieser Zeit verändern sich die
Eigenschaften aller mechanischen Bauteile bis sie die bei der Entwicklung des
Lautsprechers festgelegten Werte erreichen, d. h. die Aufhängung der Chassis
wird beweglicher und die Wiedergabequalität positiv beeinusst.
Manufactured under license from Dolby Laboratories. Dolby and the double-D symbol are
registered trademarks of Dolby Laboratories.
For DTS patents, see http://patents.dts.com.
Manufactured under license from DTS Licensing
Limited. DTS, the Symbol, & DTS and the Symbol
together are registered trademarks, and DTS
TruSurround is a trademark of DTS, Inc. © DTS,
Inc. All Rights Reserved.
Page 36

36
IMPORTANT SAFETY INSTRUCTION
1. Read these instructions.
2. Keep these instructions.
3. Heed all warnings.
4. Follow all instructions.
5. Do not use this apparatus near water.
6. Clean only with a dry cloth.
7. Do not block any ventilation openings. Install in accordance with the manufacturer’s instructions.
8. Do not install near any heat sources such as radiators, heat registers, stoves, or other apparatus (including ampliers) that produce heat.
9. Do not defeat the safety purpose of the polarized or ground plug:
A polarized plug has two blades with one wider than the other. The wide blade is provided for your safety.
When the provided plug does not t into your outlet, consult an electrician for replacement of the obsolete outlet.
10. Protect the power cord from being walked on or pinched particularly at plug,
convenience receptacles, and the point where they exit from the apparatus.
11. Only use attachments/accessories specied by the manufacturer.
12. Use only with a cart, stand, tripod, bracket, or table specied by the manufacturer, or sold with the apparatus.
When a cart is used, use caution when moving the cart/apparatus combination to avoid injury from tip-over.
13. Unplug this apparatus during lighting storms or when unused for long periods of time.
14. Refer all servicing to qualied service personnel.
Servicing is required when the apparatus has been damaged in any way, such as power-supply cord or plug is damaged,
liquid has been spilled or objects have fallen into the apparatus, the apparatus has been exposed to rain or moisture,
does not operate normally, or has been dropped.
15. To reduce the risk of re or electric shock, do not expose this apparatus to rain or moisture.
16. Apparatus shall not be exposed to dripping or splashing, and objects lled with liquids shall not be placed on the apparatus.
17. No naked ame sources, such as lighted candles, should be placed on the apparatus.
18. To completely disconnect this equipment from the mains, disconnect the power supply cord plug form the receptacle.
19. The mains plug of the power supply cord (or appliance coupler) shall be remain readily operable.
20. Use indoors. Do not use outdorrs or in humid rooms.
21. Please make sure to insert the plug correctly in order to avoid the risk of an electric shock.
22. Contains small parts that may be a choking hazard. Not suitable for children under age 3.
Page 37
37
English
• SPECTRAL does not accept liability for any damages resulting from the non-observance of the following points.
• Select a base that is as level as possible for your sound system. Make sure the location is dry and clean and away from windows with direct sunlight, heat sources,
vibrations, moisture and extreme cold.
• In order to avoid damaging your sound system it should only be used with the voltage specied on the nameplate.
• In order to avoid the risk of re or electric shocks the sound system should not be subjected to rain or high humidity (>80%). The equipment complies with the
current EMV regulations at an ambient temperature of + 10°C …+40°C.
• Do not apply force to the operating elements, connections or cables. To move the sound system to another location rst unplug the mains cable and then disconnect
it from other devices. Always pull on the plugs rather than the cable. Never touch the mains cable with wet hands.
• Do not put anything on top of the cabinet of the sound system or in front of the bass reex opening, in particular no containers lled with liquids. Movement and
vibration can lead to objects being damaged.
• Do not insert any objects or parts of the body into the opening of the cabinet as live components inside the cabinet may be touched and damaged. This could
lead to short circuits, electric shock or re. If the sound reproduction is marred by distortions such as unnatural knocking, throbbing or high frequency clicking the
volume should be turned down immediately.
• Do not use any chemical solutions to clean the device. Use a dry, clean cloth.
• Extreme changes in temperature can cause condensation to form inside the sound system. Do not use the device until the moisture has evaporated (at least 2 hours).
• The remote control batteries must be disposed of at a proper battery recycling centre. Batteries should be kept out of reach of children. Batteries must be inserted
the right way up. Only use the batteries specied for use with this system (LR03 AAA 1.5V) or rechargeable batteries. The batteries supplied are not rechargeable
and may therefore not be recharged.
• The user is responsible for making sure that the device is correctly set up and correctly connected to the mains. SPECTRAL does not accept any liability for damages
or accidents caused by improper set up or connection.
CAUTION - To reduce the risk of electric shock, do not remove the unit‘s front cover or back cover.
There are no serviceable parts inside. Refer servicing to qualied personnel only.
- Do not make any modication to the system or to accessoiries. Unauthorized alterations may
aect safety, regulatory compliance and system performance. In this case, the warranty can get invalid.
CAUTION!
RISK OF ELECTRICAL SHOCK
DO NOT OPEN
CAUTION! TO REDUCE THE RISK OF ELECTRIC SHOCK, DO
NOT REMOVE THE UNIT‘S FRONT COVER OR BACK COVER.
THERE ARE NO SERVICEABLE PARTS INSIDE. REFER
SERVICING TO QUALIFIED PERSONNEL ONLY.
This symbol is intended to alert the user to the presence of un-insulated dangerous voltage within the
product‘s enclosure that may be of sucient magnitude to constitute risk of re or electric shock.
This symbol is intended to alert the user to the presence of important operating and maintenance
instructions in the literature accompanying this product.
Please dispose used batteries properly, following local regulations.
Page 38

38
FCC Statement:
This equipment has been tested and found to comply with the limits for a Class B Digital Device, pursuant to Part 15 of the FCC Rules. These limits are designed
to provide reasonable protection against harmful interference in a residential installation. This equipment generates, uses and can radiate radio frequency energy
and, if not installed and used in accordance with the instructions, may cause harmful interference to radio communications. However, there is no guarantee that
interference will not occur in a particular installation. If this equipment does cause harmful interference to radio or television reception, which can be determined
by turning the equipment o and on, the user is encouraged to try to correct the interference by one or more of the following measures:
• Reorient or relocate the receiving antenna.
• Increase the separation between the equipment and the receiver.
• Connect the equipment into an outlet on a circuit dierent from that to which the receiver is connected.
• Consult the dealer or an experienced radio/TV technician for help.
To assure continued compliance, any changes or modications not expressly approved by the party responsible for compliance could void the user’s authority to
operate this equipment. (Example: Use only shielded interface cables when connecting to computer or peripheral devices.)
FCC Radiation Exposure Statement:
This equipment complies with FCC radiation exposure limits set forth for an uncontrolled environment and it also complies with Part 15 of FCC RF Rules.
Operation is subject to the following two conditions:
1. This device may not cause interference and
2. this device must accept any interference, including interference that may cause undesired operation of the device.
Caution!
The manufacturer is not responsible for any radio or TV interference caused by unauthorised modications to this equipment. Such modication could void the
user authority to operate the equipment.
Page 39

39
English
Page 40

40
Dear customer,
Welcome to the SPECTRAL family and many thanks for the trust you have shown us by purchasing this system. You have chosen
a top-quality loudspeaker system, thus demonstrating the high demands you place on sound and nishing quality.
Please read these instructions carefully before setting up and connecting your sound system. They will help you to get optimum
benets from your systems. SPECTRAL operates a distribution network in more than 40 countries. Should you have any questions,
this team of experienced distributors will be pleased to assist you, along with our authorized dealers.
The SPECTRAL Team wishes you lots of pleasure and many years of satisfaction with your sound system.
Page 41

41
English
System description
The virtual surround systems CTA1/2 / BRA1 / CLA1 / VRA1 creates a rich and
full sound eld that is normally only possible with 5.1 Systems.To achieve this
sound quality the individual channels of a multi-channel recording are put
through a special frequency-specic process and mixed onto two channels,
which then creates the impression of surround sound in the room. The result
is outstanding listening pleasure for minimum installation costs. The systems
have an integrated, RDS-enabled FM Tuner and adaptive remote control, which
can be used to control a second listening zone (Multiroom).
Pack contents virtual surround system CTA1 / BRA1:
1) One Speaker-Amplier-Modul with integrated audio receiver
(including FM tuner)
2) One multi signal cable
3) Two optical cable
4) One aerial for VHF reception
5) One throw-out antenna for FM reception
6) One mains cable for the power supply of the Amplier-Modul
7) One display-supported and easy to operate universal remote control
8) Three batteries (LR03 AAA 1,5V) for the remote control
Pack contents virtual surround system CLA1:
1) One Amplier-Modul with integrated audio receiver (including a FM tuner)
2) Two satellit speakers
3) One signal cable
4) Two optical cable
5) One set loudspeaker cable for connecting the Amplier-Modul
with the satellites
6) One mains cable for the power supply of the Amplier-Modul
7) One throw-out antenna for FM reception
8) One aerial for VHF reception
9) One display-supported and easy to operate universal remote control
10) Three batteries (LR03 AAA 1,5V) for the remote control.
Pack contents virtual surround system CTA2:
1) One active subwoofer (CTA2-Amp) with integrated audio receiver (including an FM tuner)
2) One passive subwoofer (CTA2-Sub)
3) Two satellite speakers (CTA2-Sat)
4) One multi signal cable
5) Two optical cable
6) One set loudspeaker cable for connecting the Amplier-Modul with the satellites and subwoofer
7) One mains cable for the power supply of the Amplier-Modul
8) One throw-out antenna for FM reception
9) One aerial for VHF reception
10) One display-supported and easy to operate universal remote control
11) Three batteries (LR03 AAA 1,5V) for the remote control
Package Contents for VRA1 Virtual Surround System:
1) 1 active speaker module (right/active) with integrated audio receiver (including FM tuner)
2) 1 passive speaker module (left/passive)
3) 1 multi-line signal cable
4) 2 optical cables
5) 1 antenna cable
6) 1 aerial antenna for FM reception
7) 1 set of speaker cables for connecting between loudspeaker modules
8) 1 lead to power amplier module
9) 1 display supported and easy-to-use universal remote control
10) 3 batteries (LR03 AAA 1.5 V) for the remote control
Positioning the system
The sound system is inserted into the furniture unit or sound base. The loudspeaker covers are then
attached. The CLA1 system is delivered already built in the furniture unit.
CTA1/VRA1: The sound system should be centrally located below the TV.
The CLA1 system is already inserted in the furniture.
CTA2: For perfect surround sound the satellite speakers should be placed left and right at the
furniture. The subwoofer should be placed below or in the middle of the furniture.
BRA1: The BRA1 system should be placed into the BRICK sound base.
CLA1: At the backside of the loudspeakers are bass reex holes that emit rearwards. For
achieving a perfect sound the system should be placed with a minimum distance of
5 cm to the wall.
Page 42
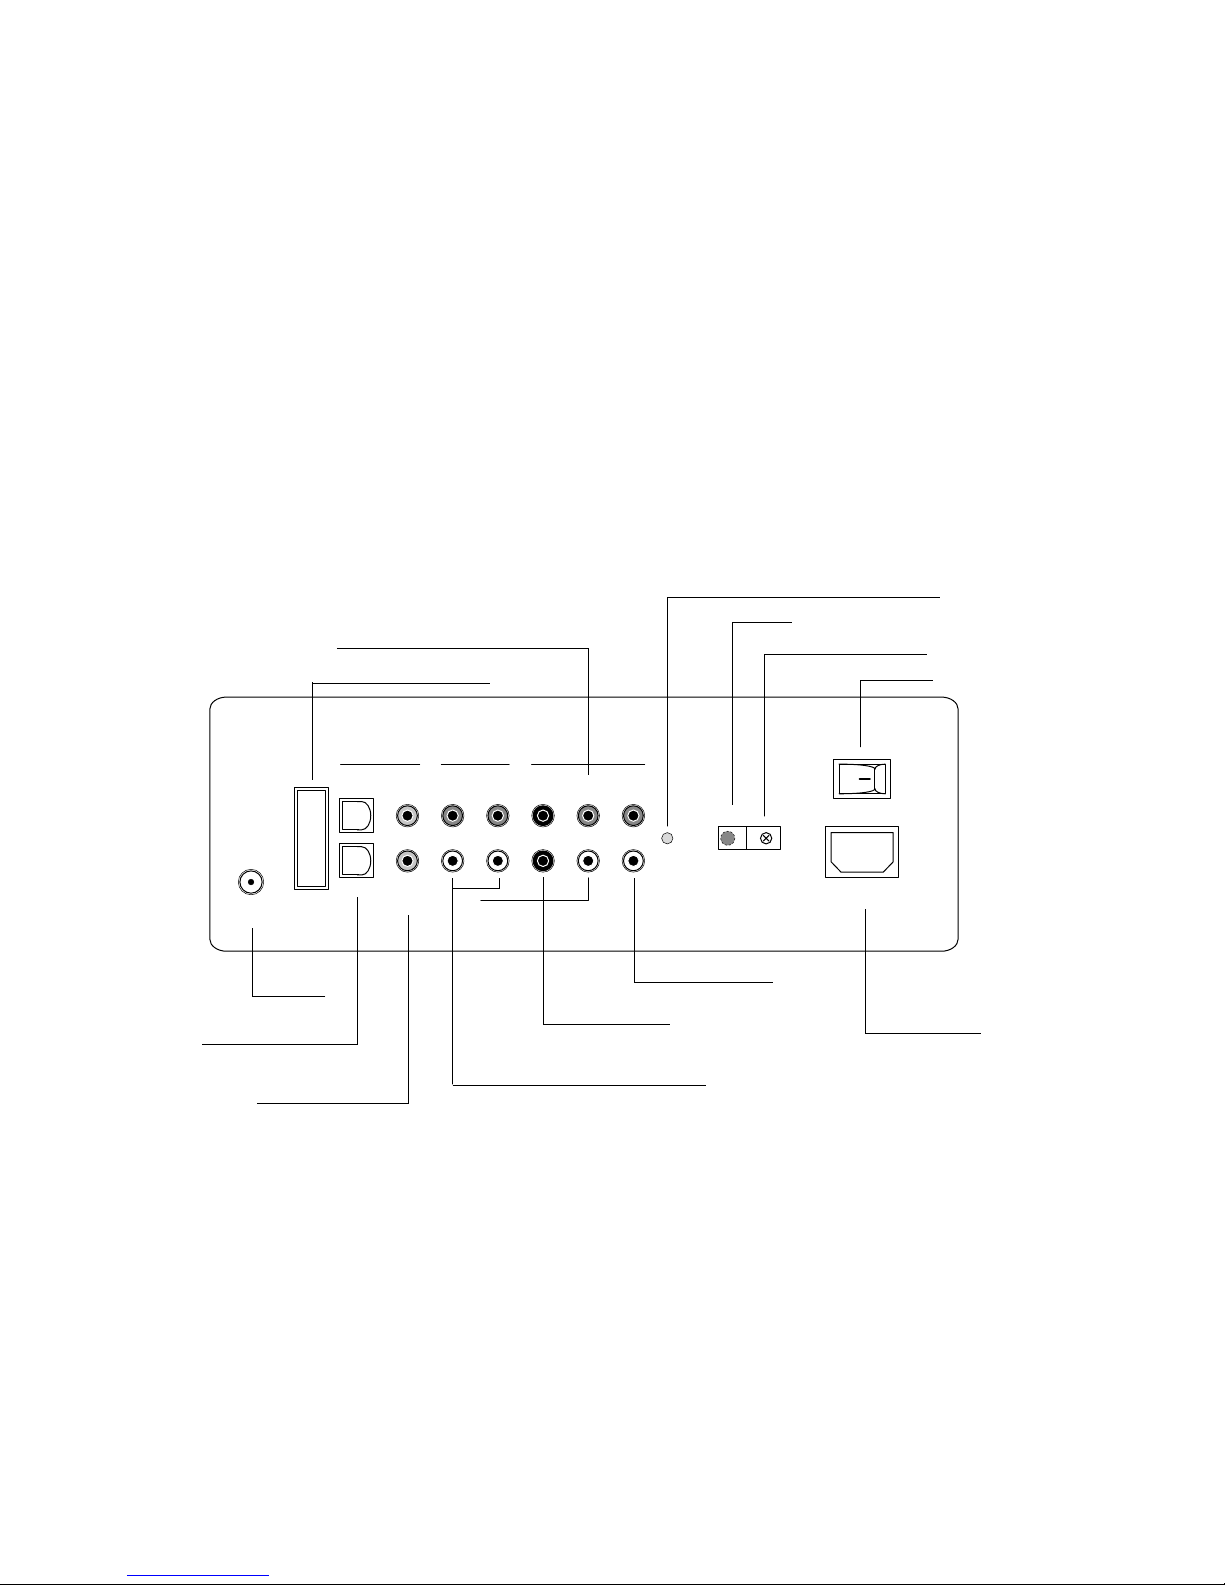
42
Rear view of the BRA1-V2 / CTA1-V2 system
IR
DIGITAL INPUTS ANALOG INPUTS ANALOG OUTPUTS
OPT 1
OPT 2
COAX 1
COAX 2
LINE 1
LINE 2 /
PHONO
SUB
[MONO]
PRE
ZONE 2 /
LINE
RIGHT
LEFT
OPERATION
FM RADIO
ANTENNA
2.1 MODE = FRONT L+R
5.1 MODE = SURROUND L+R
ON
100-240V~
50-60Hz max.200W
Fixing clip for IR transmitters
Power switch
Operation indicator (red = standby, green = on)
IR receiver
Pre Out 2.1 / 5.1 Mode preamplier output
Port only for software updates
FM aerial
connection
Digital inputs (coaxial) for
SAT / BluRay / T V / ...
Analog inputs for VCR / record player ...
Digital inputs (optical) for
SAT / BluRay / T V / ...
Power cable socket
Subwoofer - output
Zone 2 / Line - output
Page 43
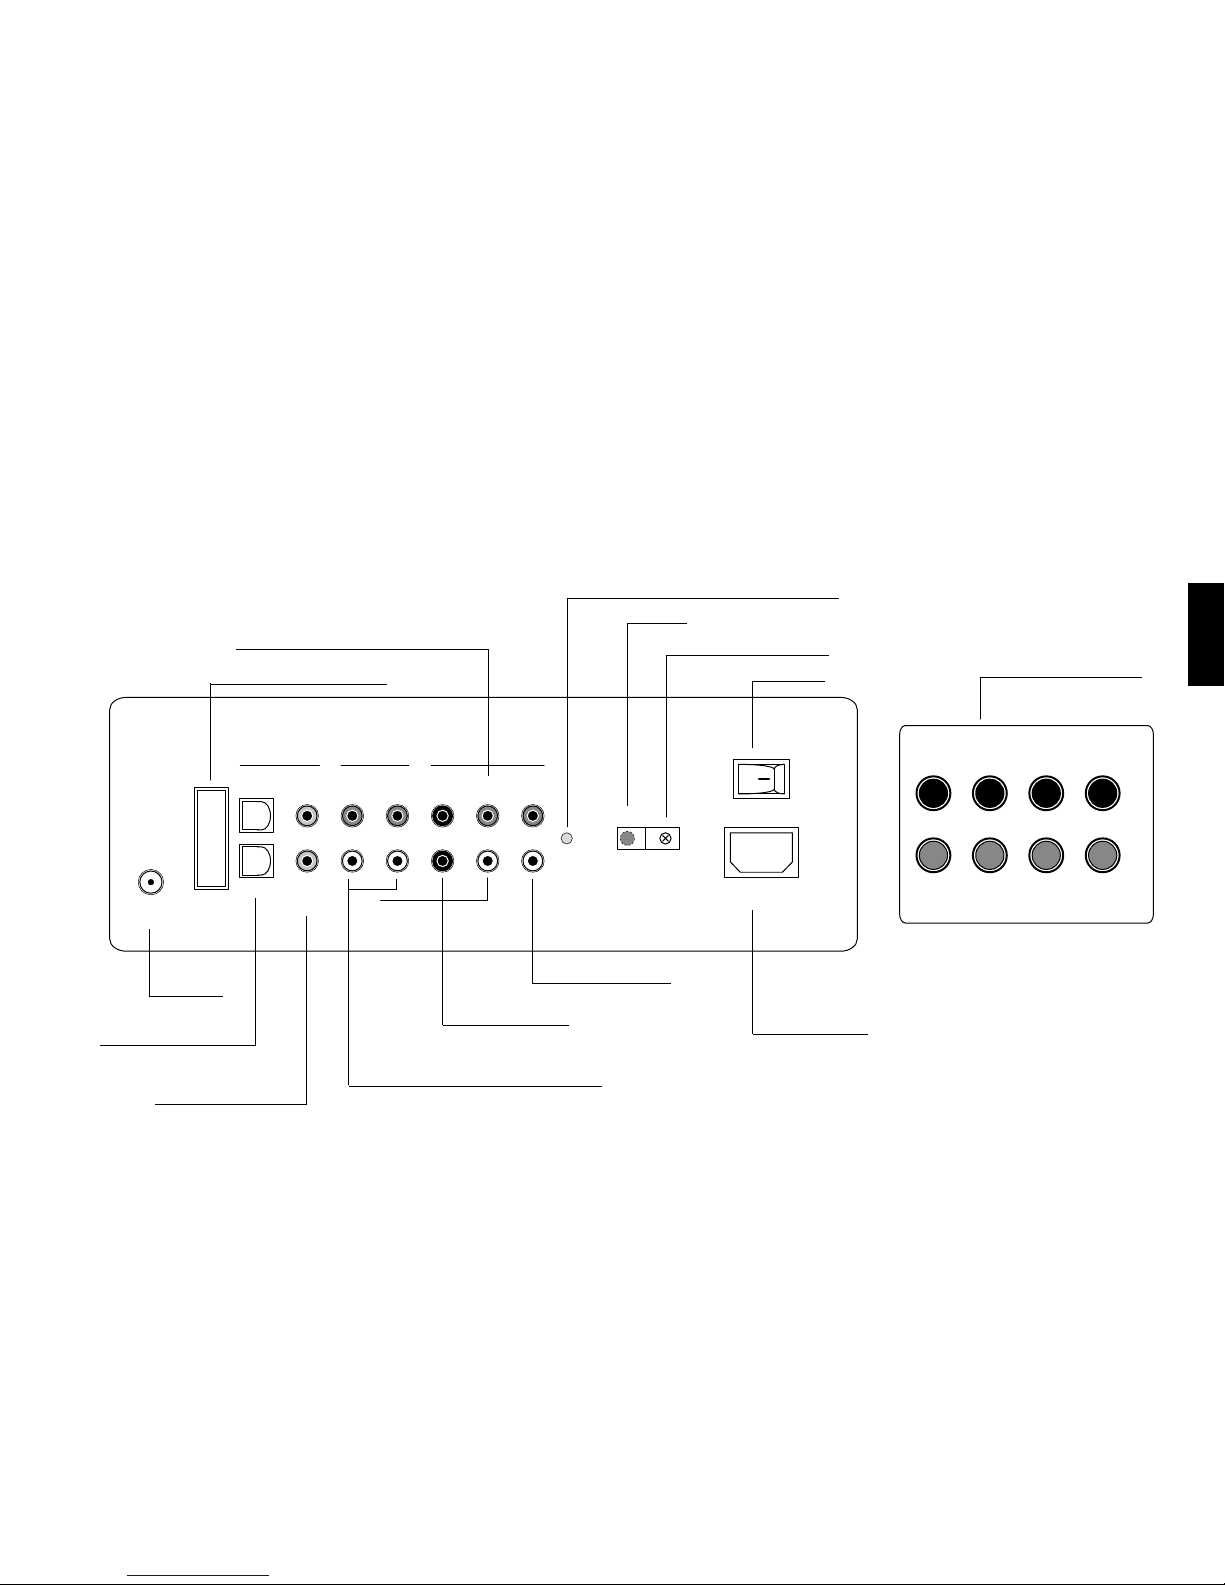
43
English
Rear view of the CTA2-V2 / CLA1-V2 system
IR
DIGITAL INPUTS ANALOG INPUTS ANALOG OUTPUTS
OPT 1
OPT 2
COAX 1
COAX 2
LINE 1
LINE 2 /
PHONO
SUB
[MONO]
PRE
ZONE 2 /
LINE
RIGHT
LEFT
OPERATION
FM RADIO
ANTENNA
2.1 MODE = FRONT L+R
5.1 MODE = SURROUND L+R
ON
100-240V~
50-60Hz max.200W
SPEAKERS
FL+
FR+
C+
S+
FL-
FR-
C-
S-
Ports for the satellites (left
and right), the subwoofer
and one optional center
speaker
Fixing clip for IR transmitters
Power switch
Operation indicator (red = standby, green = on)
IR receiver
Pre Out 2.1 / 5.1 Mode preamplier output
Port only for software updates
FM aerial
connection
Digital inputs (coaxial) for
SAT / BluRay / T V / ...
Analog inputs for VCR / record player ...
Digital inputs (optical) for
SAT / BluRay / T V / ...
Power cable socket
Subwoofer - output
Zone 2 / Line - output
Page 44
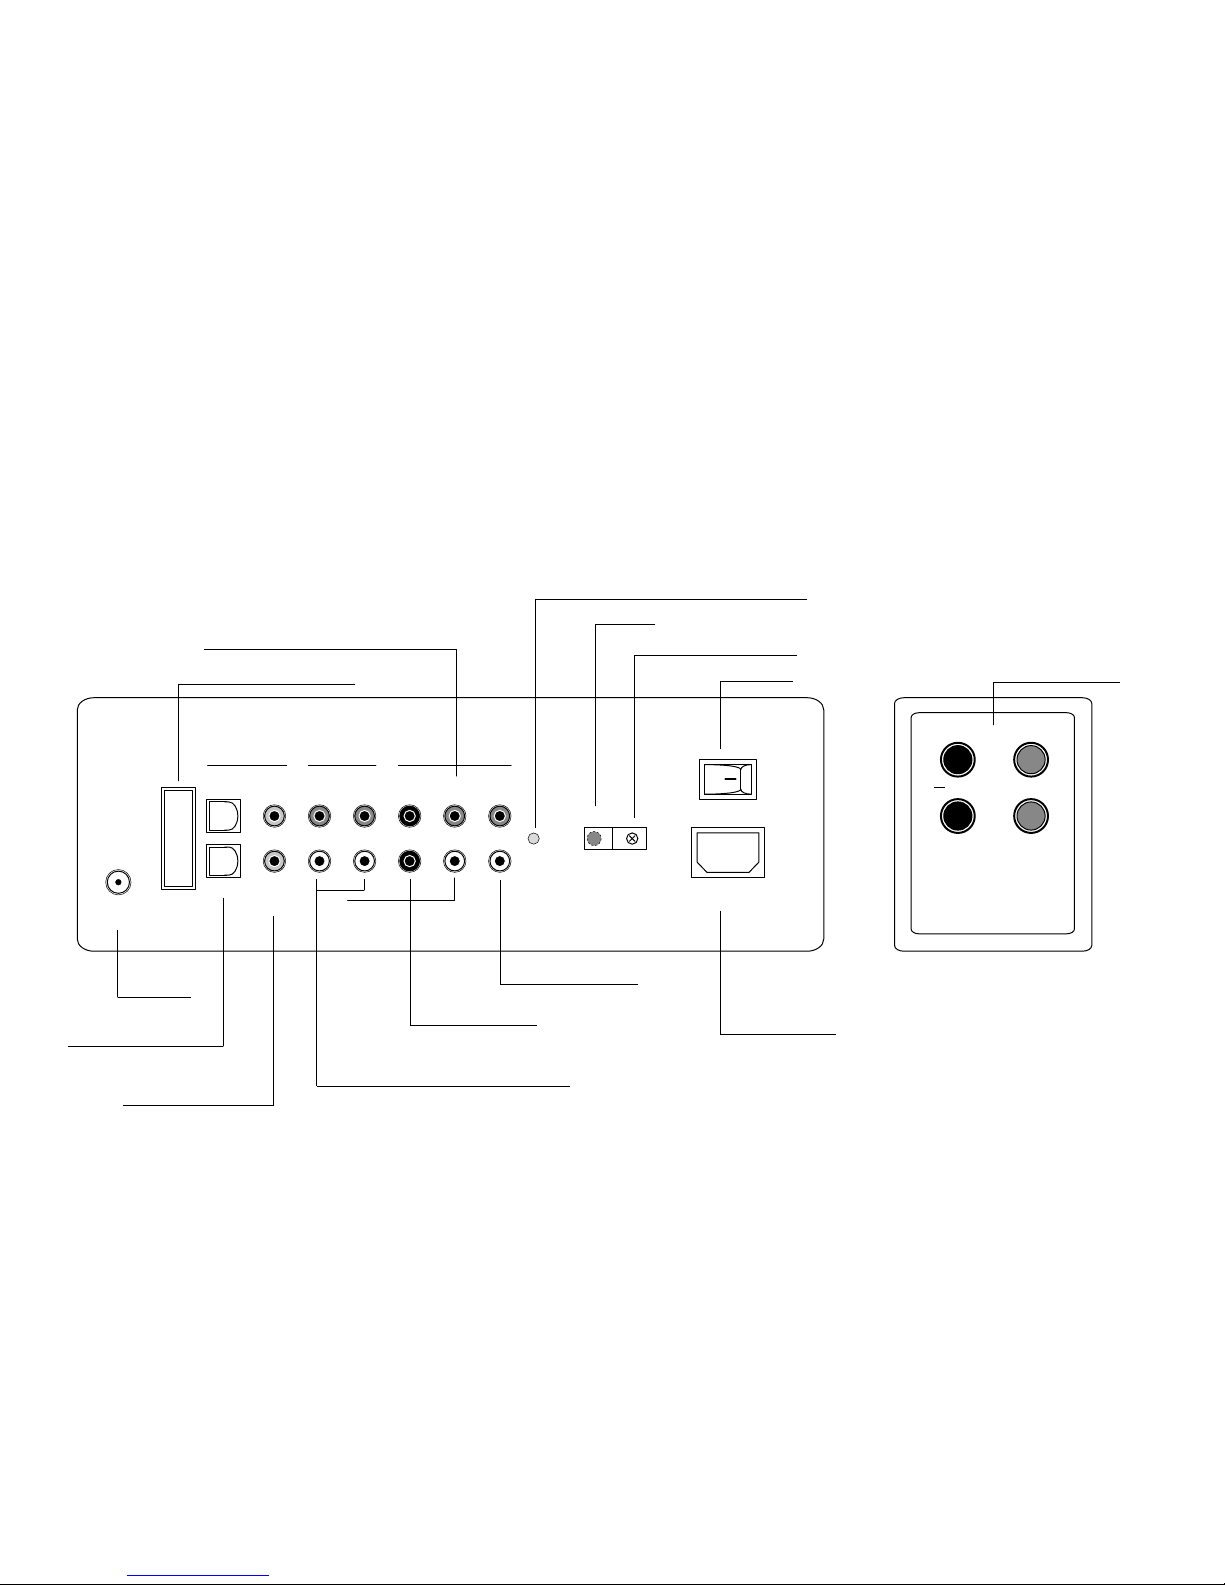
44
IR
DIGITAL INPUTS ANALOG INPUTS ANALOG OUTPUTS
OPT 1
OPT 2
COAX 1
COAX 2
LINE 1
LINE 2 /
PHONO
SUB
[MONO]
PRE
ZONE 2 /
LINE
RIGHT
LEFT
OPERATION
FM RADIO
ANTENNA
2.1 MODE = FRONT L+R
5.1 MODE = SURROUND L+R
ON
100-240V~
50-60Hz max.200W
HF
LF
+
Rückansicht des VRA1 - Systems
Ports for passive
loudspeaker module
Fixing clip for IR transmitters
Power switch
Operation indicator (red = standby, green = on)
IR receiver
Pre Out 2.1 / 5.1 Mode preamplier output
Port only for software updates
FM aerial
connection
Digital inputs (coaxial) for
SAT / BluRay / T V / ...
Analog inputs for VCR / record player ...
Digital inputs (optical) for
SAT / BluRay / T V / ...
Power cable socket
Subwoofer - output
Zone 2 / Line - output
Page 45
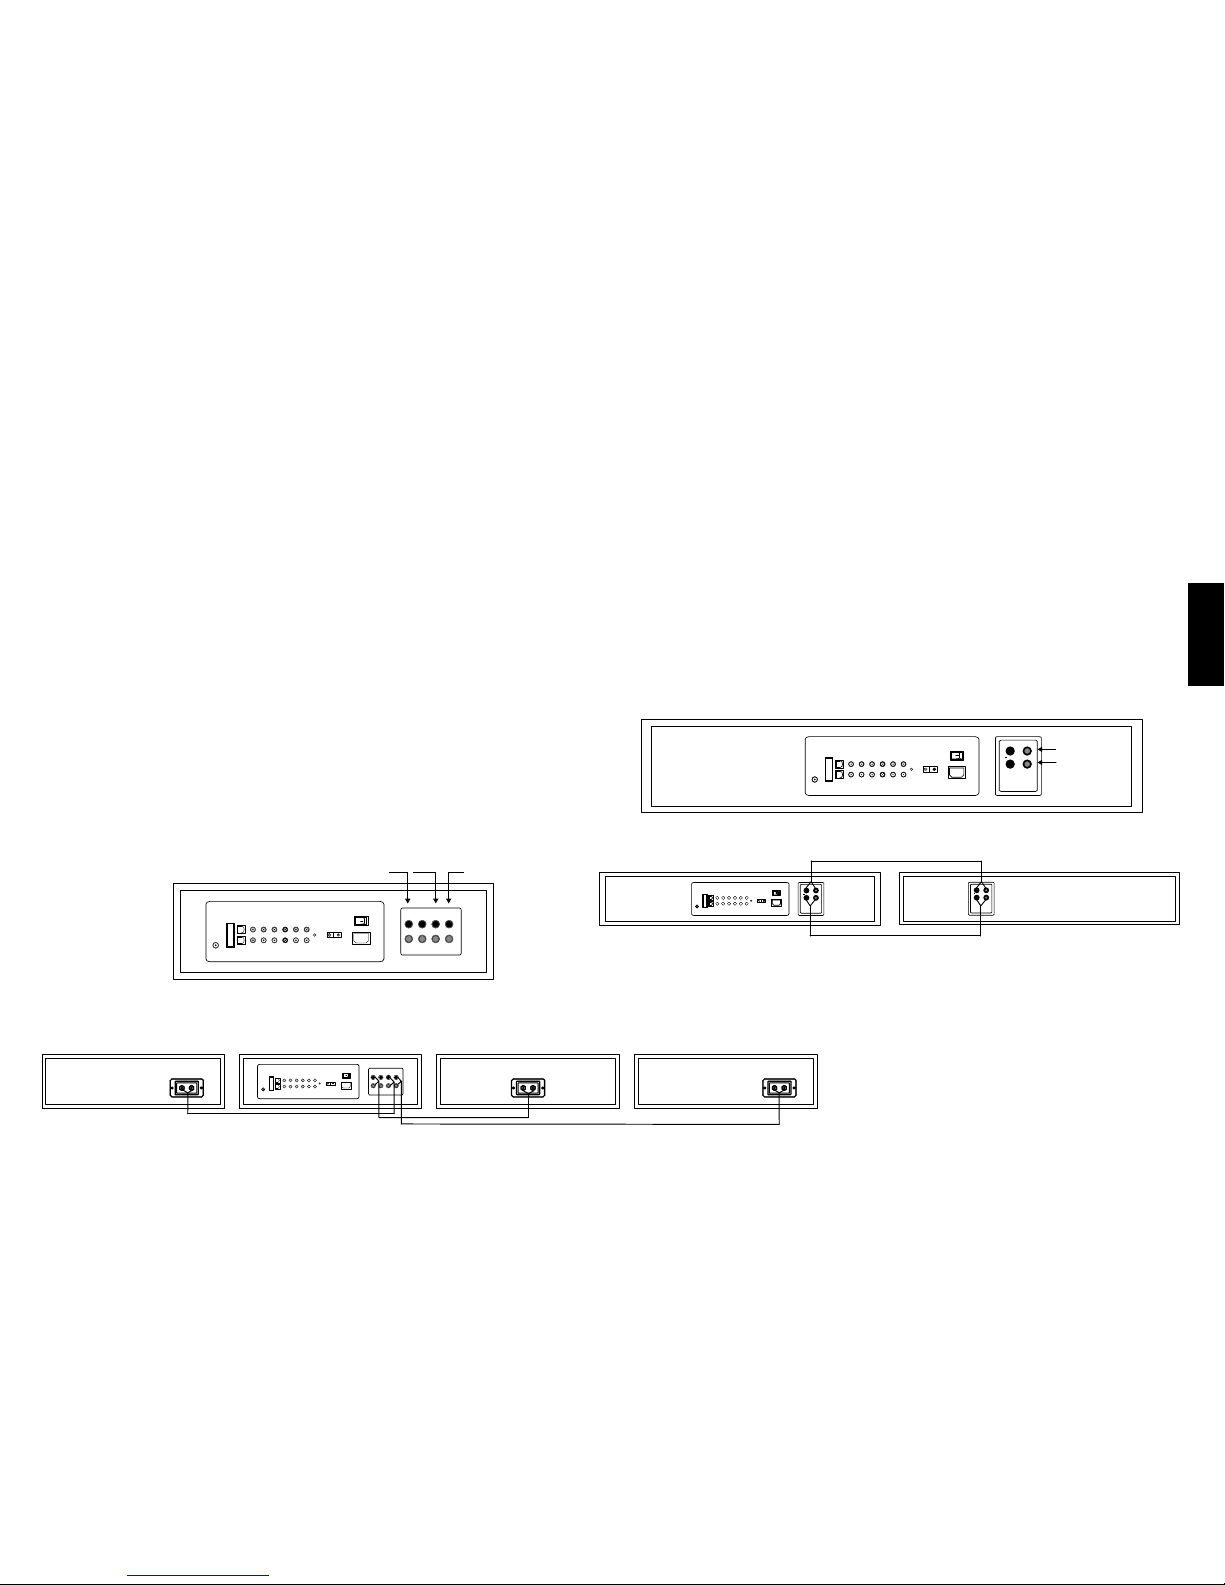
45
English
Connecting the loudspeakers
Sound system CTA1 / BRA1:
The speaker system is internal connected. Only the source devices like DVD must be
connected with the system.
CTA2 / VRA1 Sound System:
Please refer to the connection diagram below. Use only the speaker cables included
in the delivery to connect the speakers to the screw terminals „Front Left“, „Front Right“
and „Sub“ (CTA2) or „HF“ and „LF“ (VRA1) on the back of the amplier module (strip
cable ends by about 1 cm). Please note the correct polarity, red for plus (+) and black
for minus (-). Simply use the marking on the supplied cable.
Make sure the stripped cable end does not come into contact with the rear panel.
(Risk of short circuit!)
Sound system CLA1:
The CLA1 system is already inserted in the furniture. Only the source devices like DVD,
etc. must be connected with the system.
SAT
LEFT
SUBAMPSAT
RIGHT
SPEAKERS
FL+
FR+C+S+
FL-
FR-C-S-
SUB
SAT
RIGHT
SAT
LEFT
SPEAKERS
FL+
FR+C+S+
FL-
FR-C-S-
Right / Active
Left / Passive
HF
LF
+
HF
LF
+
HF
LF
+
HF
LF
CTA2
VRA1
Page 46

46
Connecting source devices
The SPECTRAL sound system oers a variety of connection options for all standard source devices, such as DVD players, video recorders, satellite receivers, multimedia
consoles (Playstation®, X-Box®, ...) etc. To do so, the audio connections of your source devices are connected to the corresponding terminals on the back of the AmplierModul. Source devices with a digital output for Dolby Digital and DTS Bitstreams should also be connected digitally to the sound system. This guarantees full Dolby
Digital and DTS sound quality.
The video signal connections are made directly between the source devices and the image display device.
The image source to be used is selected directly from the menu of the image display device.
In order to use the integrated FM Tuner of the sound system you need to connect the aerial supplied to the appropriate socket on the sound system.
Better reception will be achieved if the aerial is extended. For optimal reception we recommend connection to a broadband cable network or a roof-mounted aerial
using the coaxial cable supplied.
Before you can start using the sound system for sound reproduction you need to go through the initial installation process and assign the inputs to the source devices.
You will be asked to do this automatically when you rst switch on the device (refer to page 46).
To adjust the parameters of the conncetions please use the system menu of the remote control (refer to page 53).
Important: Only connect your active Amplier-Modul to the mains once all connections to the other audio/video components have been made.
You can then turn the power switch to the „ON“ position.
Page 47
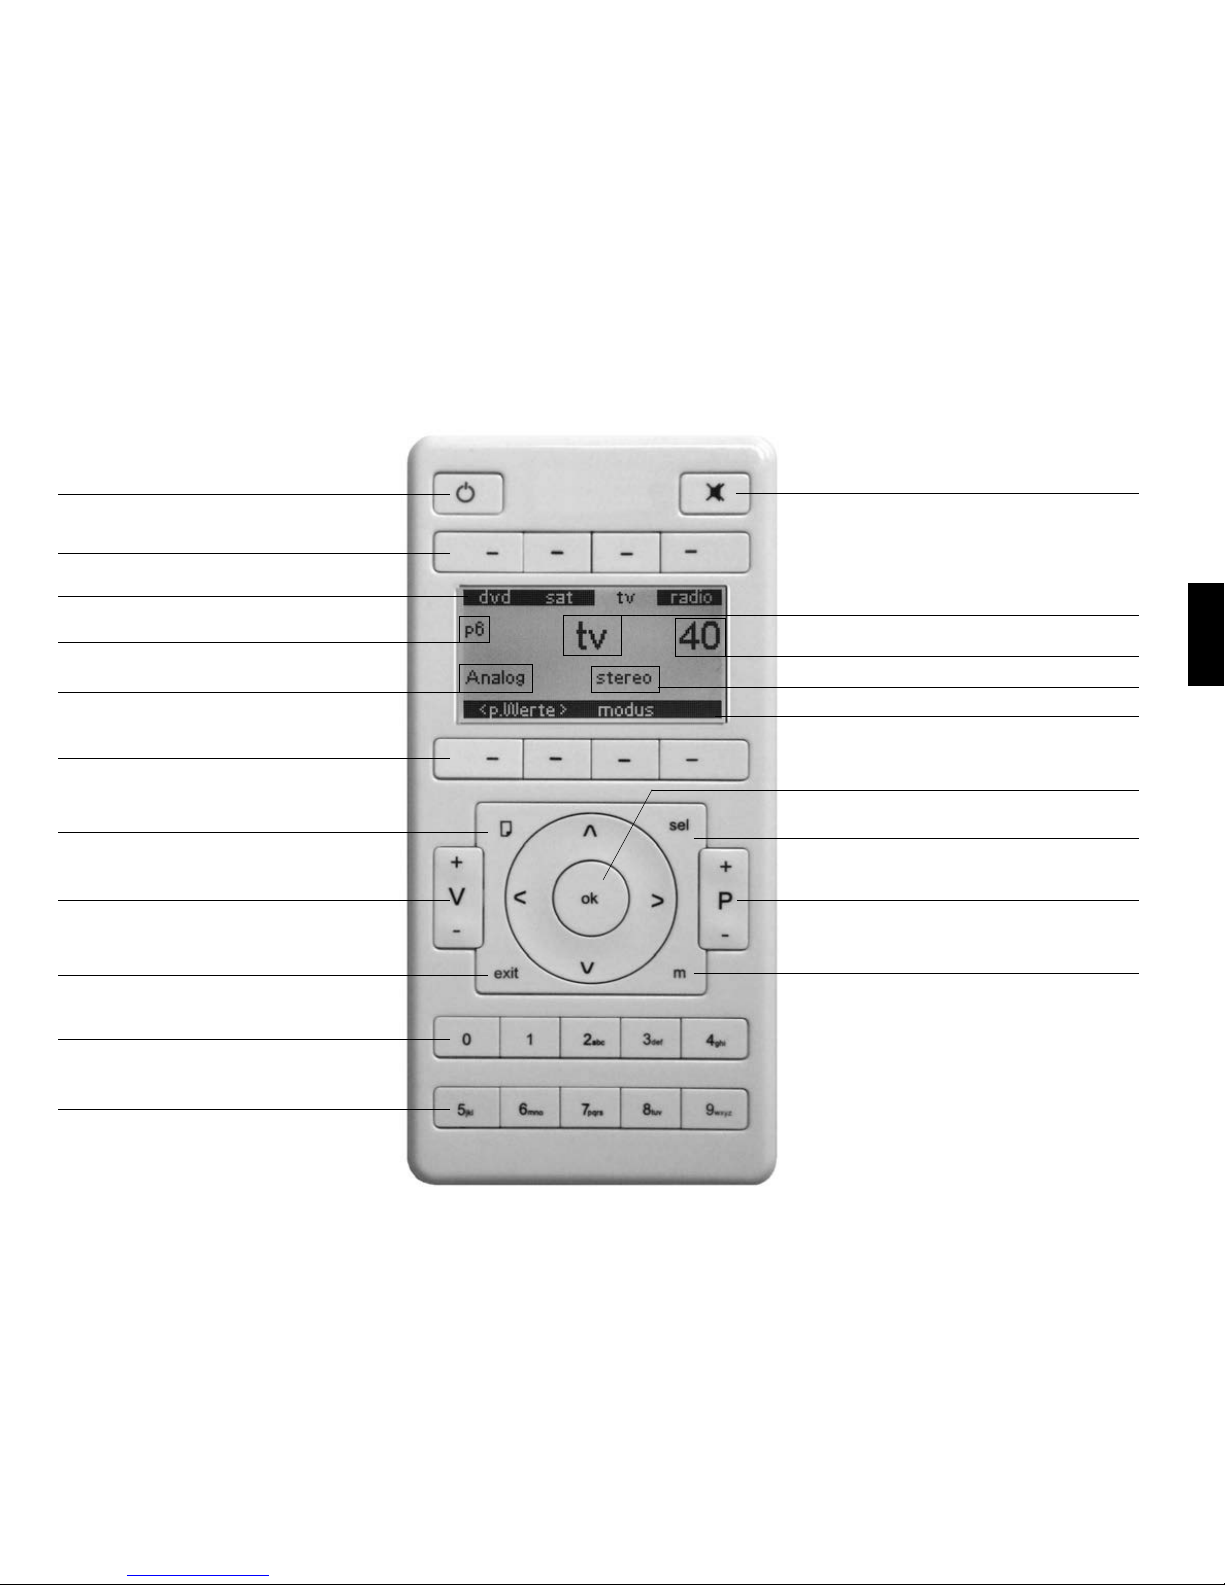
47
English
Remote Control
Function keys, menu-dependent functions
Number keys
Volume keys
OK key
On/Standby key
Function keys, menu-depending functions
Number keys
Mute key
Menu key
Program key (only IR mode)
Device selection key
Personal settings (<preset>)
Decoder mode
Selected volume
Playback mode
Selected source
Scroll key
Exit key
Sources selected using the function keys
Modes and <preset> selected using the function keys
Page 48

48
Setting up the remote control
Insert the batteries supplied into the remote control. Be careful to insert them the correct way up according to
the polarity markings (+/-).
Using the remote control
When all devices are connected to each other and the power has been switched on the
SPECTRAL sound system goes into Standby mode. Press any key to activate the remote control. If the remote
control is not used for longer than 30 seconds it goes into idle mode. Press any key to reactivate it.
Note:
When the device is turned on for the rst time it starts the initial installation process automatically (refer to page 46).
Language setting: In the “System Menu” (m = > System Menu => factory set => language) select the desired
language.
The sound system is switched on and/or put into standby mode by pressing the Power key.
If the display shows “no connection” then there is no radio connection between the remote control and the sound
system. Check that the sound system is switched on and connected to the mains power supply or reduce the
distance between the remote control and the sound system.
Operating the sound system
Press the Power key to start the sound system.
If you want to turn the sound system o again press the Power key again. The sound system will go back into Standby
mode.
Note: If the sound system is disconnected from the mains power supply when it is still switched on it will automatically go back into an active state when it is reconnected to the mains power supply (e.g. via a master or slave
multiple socket lead).
stand by
Keine
Verbindung
no
connection
Page 49
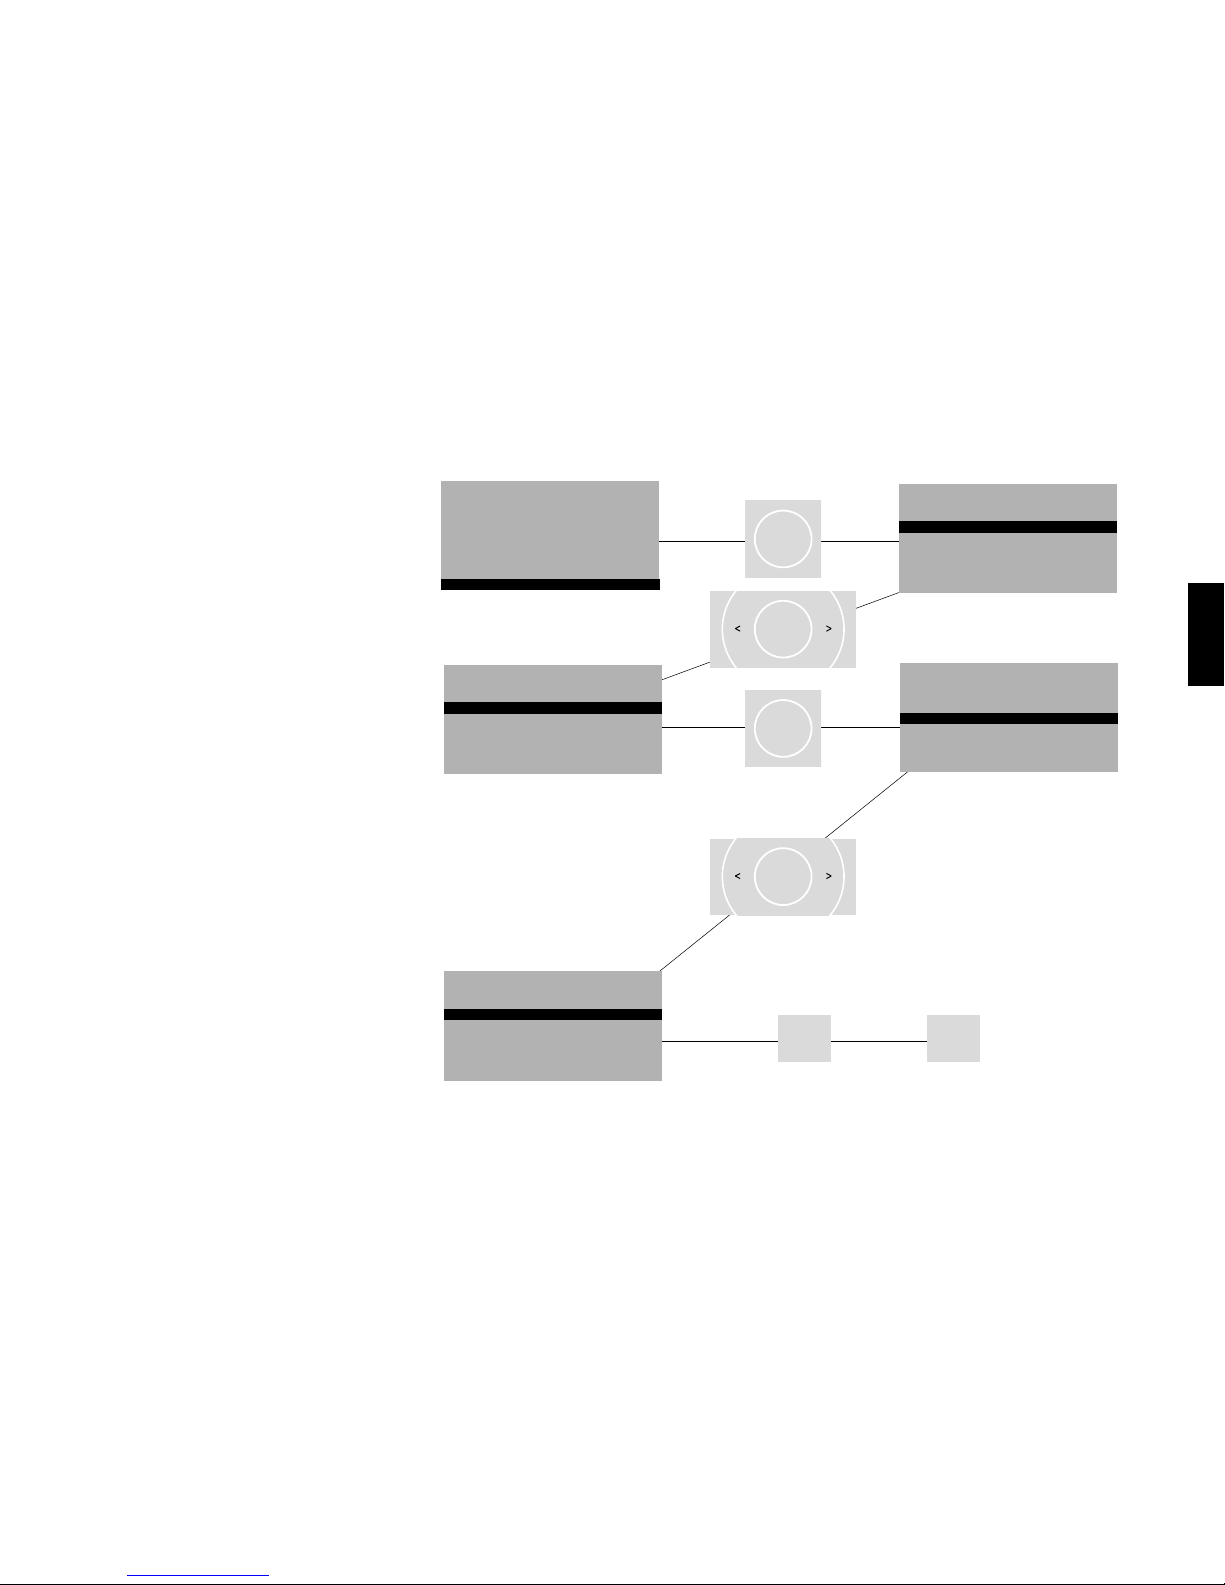
49
English
Initial installation
Before you can use the sound system you need
to assign the inputs to the connected source
devices. You will be asked to do this when you rst
switch the device on.
To get to the input conguration press „ok“.
Use the “<” and “>” arrow keys to choose names for
the connected devices. You must conrm these
by pressing “ok”.
To exit the input cong menu press „m“ to save
all the entries. Then press „exit“ to end the initial
installation and return to the main menu.
Please note: The arrow keys „up“ and „down“ may
not be used when assigning the inputs.
Inputs that are dened as “not active” are not shown
in the main menu.
Select Device
bra1
dvd sat tv light
stand by
no
connection
input config
in opt1 not active
in opt2 not active
in coax1 not active
in coax2 not active
in line1 not active
in line2 not active
input config
no configuration done
all inputs not active
to configure press ok
input config
in opt1 dvd
in opt2 not active
in coax1 not active
in coax2 not active
in line1 not active
in line2 not active
input config
in opt1 dvd
in opt2 bd pl
in coax1 sat
in coax2 cd
in line1 tv
in line2 vcr
input config
in opt1 dvd
in opt2 not active
in coax1 not active
in coax2 not active
in line1 not active
in line2 not active
stand by
no
connection
input config
in opt1 not active
in opt2 not active
in coax1 not active
in coax2 not active
in line1 not active
in line2 not active
input config
in opt1 dvd
in opt2 not active
in coax1 not active
in coax2 not active
in line1 not active
in line2 not active
input config
in opt1 dvd
in opt2 bd pl
in coax1 sat
in coax2 cd
in line1 tv
in line2 vcr
input config
in opt1 dvd
in opt2 not active
in coax1 not active
in coax2 not active
in line1 not active
in line2 not active
no
connection
input config
in opt1 dvd
in opt2 not active
in coax1 not active
in coax2 not active
in line1 not active
in line2 not active
input config
in opt1 dvd
in opt2 bd pl
in coax1 sat
in coax2 cd
in line1 tv
in line2 vcr
input config
in opt1 dvd
in opt2 not active
in coax1 not active
in coax2 not active
in line1 not active
in line2 not active
input config
in opt1 dvd
in opt2 not active
in coax1 not active
in coax2 not active
in line1 not active
in line2 not active
input config
in opt1 dvd
in opt2 bd pl
in coax1 sat
in coax2 cd
in line1 tv
in line2 vcr
input config
in opt1 dvd
in opt2 bd pl
in coax1 sat
in coax2 cd
in line1 tv
in line2 vcr
ok
sel
ok
sel
ok
sel
ok
sel
m
sel
ok
exit
m
sel
Page 50
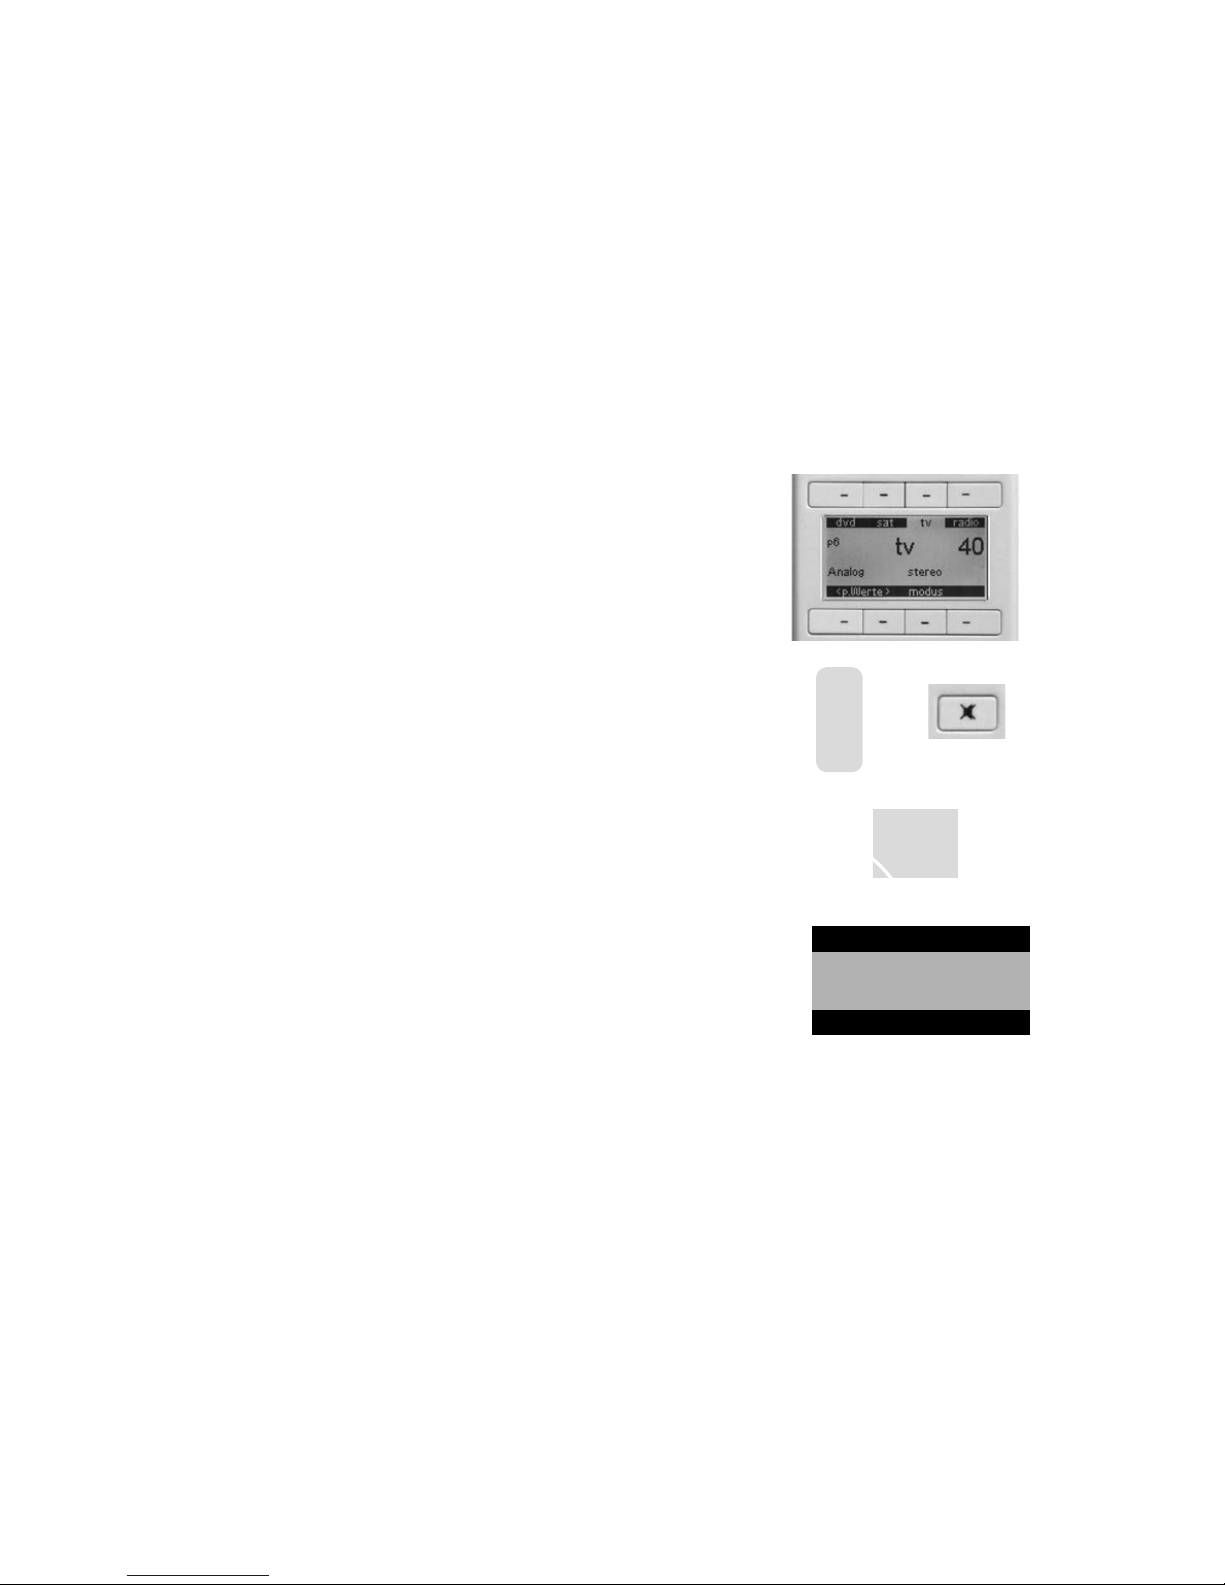
50
Main menu
The remote control supplied has 8 function keys that can be used in dierent
ways for dierent operating modes. The upper and lower sections of the display
show the functions of each key.
The sources can be selected using the (upper) function keys lying directly above
them. If you have more than 3 sources you can use the scroll key to scroll on to
the next page and back.
The Volume (V+/-) can be used to adjust the volume of the sound system in all
menus (even when controlling IR devices) over 100 levels from 0 to 99.
Mute turns the volume o or on.
With <select> you can select one of the registered RF devices or a programmed
IR device. If more than 8 devices have been registered/programmed you can use
the scroll key to scroll to the devices that are not currently displayed.
With <preset> you can select your personal settings (6 memory cells) set in the
loudspeaker menu (refer to page 51).
+
V
-
sel
Select Device
bra1
dvd sat tv light
stand by
no
connection
Page 51
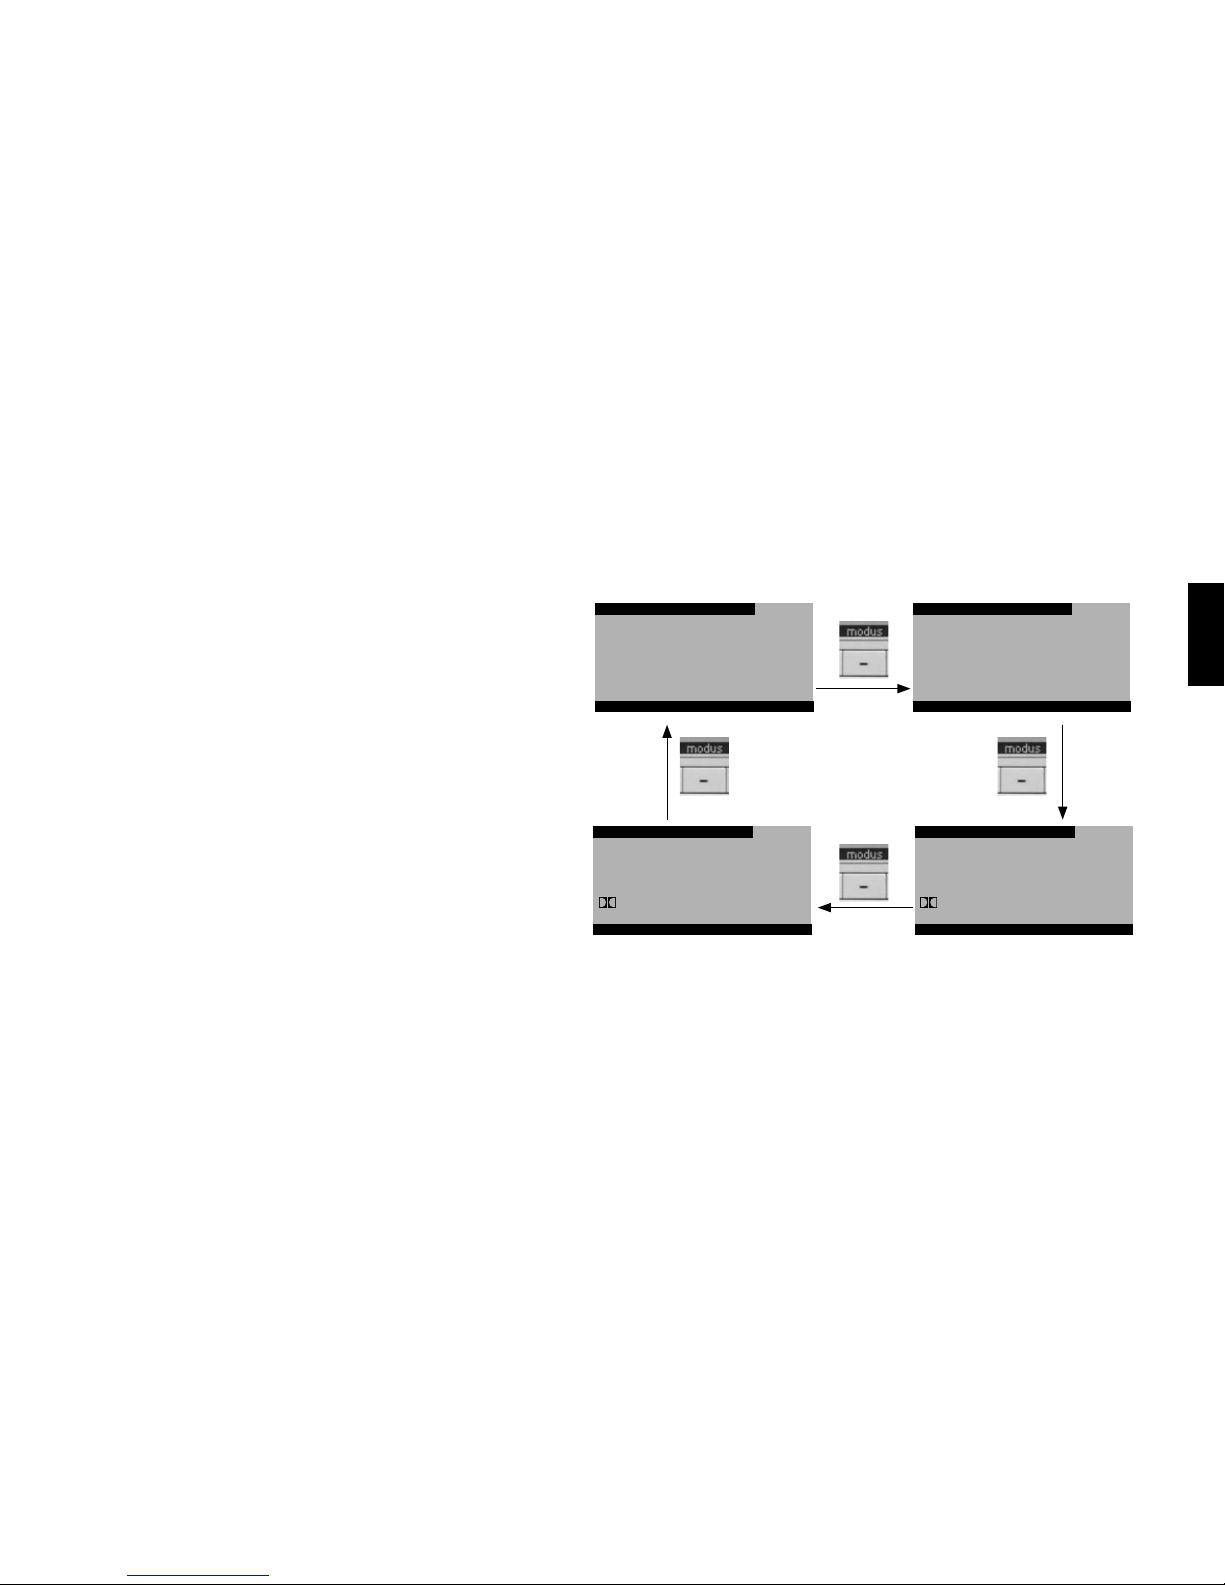
51
English
With „mode“ you select whether the playback should be in one of the two
stereo or surround modes. In addition to the “conventional” Stereo
mode the sound system also oers a Wide mode with virtually extended
stereo base.
In order to allow for the dierent recording philosophies that are present in
music recordings we have implemented two surround modes. Use
“surround 2”, above all in cases of poor intelligibility (e.g. if the voice reproduction is unusually at and incomprehensible).
The system automatically adjusts to the appropriate decoder
mode according to the input signal.
The following decoder modes are possible:
Analog Stereo Analog
Surround Virtual Dolby PLII
PCM (digital) Stereo PCM
Surround Virtual Dolby PLII
Dolby 2.0 Stereo Dolby Digital 2.0
Surround Virtual Dolby Digital 2.0 PLII
Dolby 5.1 Stereo Dolby Digital
Surround Virtual Dolby Digital
DTS Stereo DTS
Surround Virtual DTS
stand by
no
connection
input config
in opt1 not active
in opt2 not active
in coax1 not active
in coax2 not active
in line1 not active
in line2 not active
input config
in opt1 dvd
in opt2 not active
in coax1 not active
in coax2 not active
in line1 not active
in line2 not active
dvd sat tv tuner
p6
Analog stereo
<
preset
>
modus
m
/
st
89.30
01
0
40
dvd sat tv tuner
p6
Analog wide
<
preset
>
modus
m
/
st
89.30
01
0
40
dvd sat tv tuner
p6
PLII surround 1
<
preset
>
modus
m
/
st
89.30
01
0
40
virtuell
dvd sat tv tuner
p6
PLII surround 2
<
preset
>
modus
m
/
st
89.30
01
0
40
virtuell
input config
in opt1 dvd
in opt2 bd pl
in coax1 sat
in coax2 cd
in line1 tv
in line2 vcr
input config
in opt1 dvd
in opt2 not active
in coax1 not active
in coax2 not active
in line1 not active
in line2 not active
dvd sat tv tuner
p6
Analog stereo
<
preset
>
modus
m
/
st
89.30
01
00
40
no
connection
input config
in opt1 dvd
in opt2 not active
in coax1 not active
in coax2 not active
in line1 not active
in line2 not active
dvd sat tv tuner
p6
Analog wide
<
preset
>
modus
m
/
st
89.30
01
0
40
dvd sat tv tuner
p6
PLII surround 1
<
preset
>
modus
m
/
st
89.30
01
0
40
virtuell
dvd sat tv tuner
p6
PLII surround 2
<
preset
>
modus
m
/
st
89.30
01
0
40
virtuell
input config
in opt1 dvd
in opt2 bd pl
in coax1 sat
in coax2 cd
in line1 tv
in line2 vcr
input config
in opt1 dvd
in opt2 not active
in coax1 not active
in coax2 not active
in line1 not active
in line2 not active
dvd sat tv tuner
p6
Analog stereo
<
preset
>
modus
m
/
st
89.30
01
00
40
dvd sat tv tuner
p6
PLII surround 2
<
preset
>
modus
m
/
st
89.30
01
0
40
virtuell
input config
in opt1 dvd
in opt2 bd pl
in coax1 sat
in coax2 cd
in line1 tv
in line2 vcr
dvd sat tv tuner
p6
Analog stereo
<
preset
>
modus
m
/
st
89.30
01
00
40
input config
in opt1 dvd
in opt2 not active
in coax1 not active
in coax2 not active
in line1 not active
in line2 not active
dvd sat tv tuner
p6
PLII surround 1
<
preset
>
modus
m
/
st
89.30
01
0
40
virtuell
dvd sat tv tuner
p6
PLII surround 2
<
preset
>
modus
m
/
st
89.30
01
0
40
virtuell
input config
in opt1 dvd
in opt2 bd pl
in coax1 sat
in coax2 cd
in line1 tv
in line2 vcr
dvd sat tv tuner
p6
Analog stereo
<
preset
>
modus
m
/
st
89.30
01
00
40
Page 52

52
Tuner
The SPECTRAL sound system has an integrated FM Tuner ( VHF) with RDS function. This can be selected using the function keys (radio) in the
main menu of the remote control. There you can make the following adjustments:
The automatic search is activated by pressing and holding (>2 sec.) the “<” or “>” arrow keys (to search backwards or forwards). During the search
process the word “Seek” will appear in the display. The sound system stops automatically at every station with a suciently strong signal.
The manual search is controlled by pressing on the “<” or “>” keys. This function can be used to ne-tune a radio station or to search manually for
stations with a weaker signal.
Reduction of hissing in stereo reproduction:
The sound system automatically uses stereo or mono reproduction depending on the strength of the signal. If you nd a stereo reproduction
has too much hissing you can use the „m/st“ function key to change it to mono reproduction and reduce the hissing.
Saving a radio station:
To save a radio station in a programme slot press „ok“ and the programme slot number will start to ash. Use arrow keys „up“ and „down“ to select
from among 50 programme slots. Alternatively you can use the number keys to enter the programme slot number directly. After 5 seconds with no
keys pressed the radio station will be saved in the programme slot shown on the display and the programme slot number will stop ashing.
Note: The station name, transmitted via RDS, (e.g. HR 1, BR 2, SWR 3, …) will only appear upon selecting a saved radio station if the name
appeared on the display at the point of pressing the ok key (the starting point of the saving process).
Selecting a saved radio station:
Use the arrow keys „up“ and „down“ to select a programme slot. Alternatively you can use the number keys to enter the programme slot number
directly.
00
40040
dvd sat tv tuner
p6
89.30
01
00
40
Stereo Mono
stand by
no
connection
input config
input config
in opt1 dvd
in opt2 not active
in coax1 not active
in coax2 not active
in line1 not active
in line2 not active
89.30
01
0
40
dvd sat tv tuner
p6
89.30
01
0
40
dvd sat tv tuner
p6
89.30
01
0
40
dvd sat tv tuner
p6
89.30
01
0
40
input config
in opt1 dvd
in opt2 bd pl
in coax1 sat
in coax2 cd
in line1 tv
in line2 vcr
input config
in opt1 dvd
in opt2 not active
in coax1 not active
in coax2 not active
in line1 not active
in line2 not active
dvd sat tv tuner
p6
89.30
01
00
40
Page 53
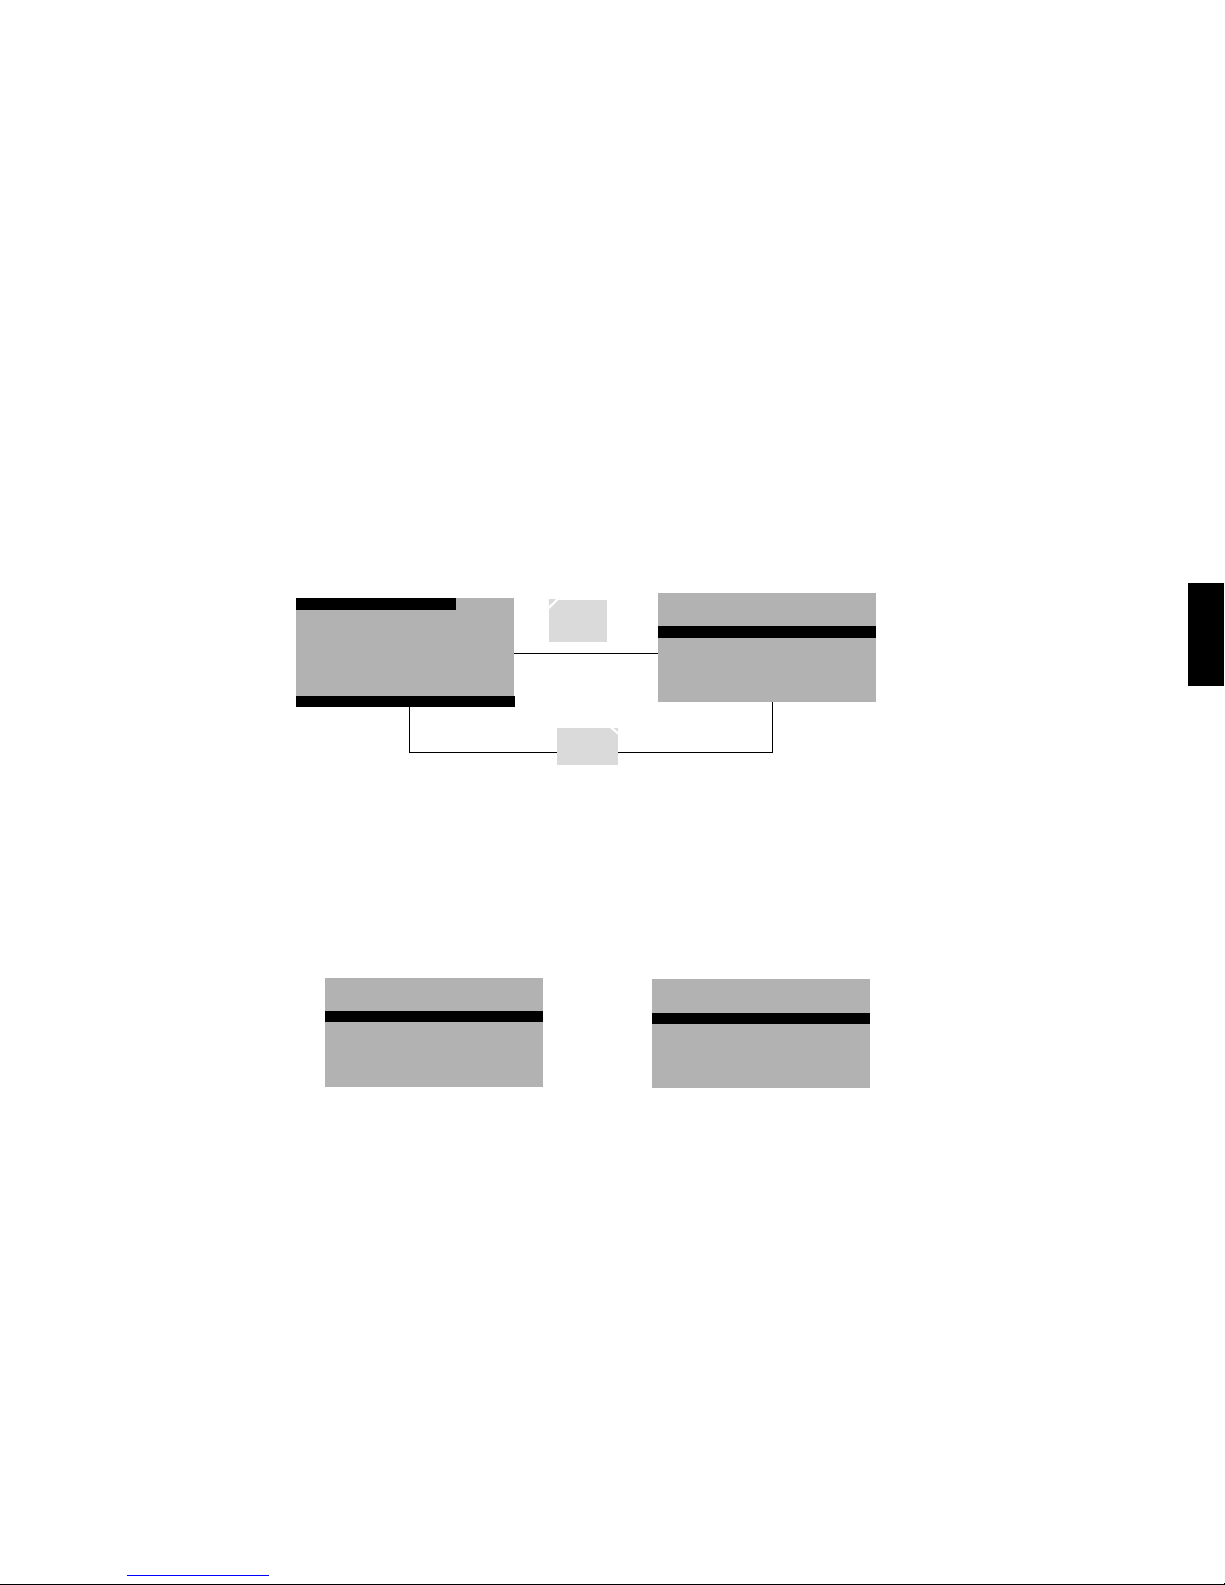
53
English
Optional settings of the sound system
Once your sound system is successfully connected and operational you have the option of setting various parameters. If you want to make any adjustments
to the settings of the sound system just turn it on and press and hold <m> (longer than 3 sec.). To exit the Settings Menu press <m> again or use <exit> .
> 3 Sek.
m
sel
stand by
no
connection
input config
in opt1 not active
in opt2 not active
in coax1 not active
in coax2 not active
in line1 not active
in line2 not active
input config
in opt1 dvd
in opt2 not active
in coax1 not active
in coax2 not active
in line1 not active
in line2 not active
dvd sat tv tuner
p6
Analog stereo
<
preset
>
modus
m
/
st
89.30
01
0
40
dvd sat tv tuner
p6
Analog wide
<
preset
>
modus
m
/
st
89.30
01
0
40
dvd sat tv tuner
p6
PLII surround 1
<
preset
>
modus
m
/
st
89.30
01
0
40
virtuell
dvd sat tv tuner
p6
PLII surround 2
<
preset
>
modus
m
/
st
89.30
01
0
40
virtuell
input config
in opt1 dvd
in opt2 bd pl
in coax1 sat
in coax2 cd
in line1 tv
in line2 vcr
input config
in opt1 dvd
in opt2 not active
in coax1 not active
in coax2 not active
in line1 not active
in line2 not active
dvd sat tv tuner
p6
Analog stereo
<
preset
>
modus
m
/
st
89.30
01
00
40
IR Learn
main key
►
blu ray
dvd
dvd rec
sat
tv1
input config
in opt1 not active
in opt2 not active
in coax1 not active
in coax2 not active
in line1 not active
in line2 not active
input config
no configuration done
all inputs not active
to configure press ok
input config
in opt1 dvd
in opt2 not active
in coax1 not active
in coax2 not active
in line1 not active
in line2 not active
dvd sat tvtvtuner
p6
Analog stereo
<
preset
>
mode
40
dvd sat tv tuner
p6
Analog stereo
<
preset
>
modus
m
/
st
89.30
01
0
40
dvd sat tv tuner
p6
Analog wide
<
preset
>
modus
m
/
st
89.30
01
0
40
dvd sat tv tuner
p6
PLII surround 1
<
preset
>
modus
m
/
st
89.30
01
0
40
virtuell
dvd sat tv tuner
p6
PLII surround 2
<
preset
>
modus
m
/
st
89.30
01
0
40
virtuell
dvd
bra1
play
skipskip
pausestop
sat
red
epg
yello blue
info text
green
tv
/
r
tv
red
media
yello blue
tools info
green
sourc
lighting
power
rgb
Learn Menu
IR Learn
►
RF Learn
IR Learn
Learn
►
Clear
IR Learn
prog -
prog +
vol -
vol +
mute
IR Learn
main key
blu ray
dvd
►
dvd rec
sat
tv1
IR Learn
Learn
►
Clear
Name
IR Learn
power
ok
menu(m)
exit
left
right
IR Learn
press remote button
IR Learn
Programming successful
IR Learn
Programming failed
RF Learn
spectral bra1
new device
►
RF Learn
Plug in RF Device
press OK
RF Learn
Installation successful
RF Learn
Select Device
cla1
cta1
cta2
bra1
RF Learn
Installation failed
lighting
power
rgb
language
deutsch
english
contrast
75
input config
in opt1 dvd
in opt2 bd pl
in coax1 sat
in coax2 cd
in line1 tv
in line2 vcr
input config
in opt1 dvd
in opt2 not active
in coax1 not active
in coax2 not active
in line1 not active
in line2 not active
speaker set
preset
►
level trim
►
speaker distance
►
tone control
►
bass expand bypass
room comp
►
preset save
current value
►
default value
►
exit without save
preset
preset p1 default
preset p2 default
preset p3 default
preset p4 default
preset p5 default
preset p6 default
setup
speaker setup
►
system setup
►
IR Learn
yes
Clear Device
Are you sure ?
no
IR Learn
Learn
Clear
Name
►
ok
exit
m
sel
Note: Basically you can use <exit> to exit the Settings Menu from almost all sub-menus. <m> will just take you back one menu level.
Settings Menu
In the Settings Menu you can choose between the “Loudspeaker Menu” and the “System Menu”. A more detailed description can be found on the following pages.
IR Learn
main key
►
blu ray
dvd
dvd rec
sat
tv1
input config
in opt1 not active
in opt2 not active
in coax1 not active
in coax2 not active
in line1 not active
in line2 not active
input config
in opt1 dvd
in opt2 not active
in coax1 not active
in coax2 not active
in line1 not active
in line2 not active
dvd sat tv tuner
p6
Analog stereo
<
preset
>
modus
m
/
st
89.30
01
0
40
dvd sat tv tuner
p6
Analog wide
<
preset
>
modus
m
/
st
89.30
01
0
40
dvd sat tv tuner
p6
PLII surround 1
<
preset
>
modus
m
/
st
89.30
01
0
40
virtuell
dvd sat tv tuner
p6
PLII surround 2
<
preset
>
modus
m
/
st
89.30
01
0
40
virtuell
sat
red
epg
yello blue
info text
green
tv
/
r
tv
red
media
yello blue
tools info
green
sourc
lighting
power
rgb
IR Learn
Learn
►
Clear
IR Learn
prog -
prog +
vol -
vol +
mute
IR Learn
main key
blu ray
dvd
►
dvd rec
sat
tv1
IR Learn
Learn
►
Clear
Name
IR Learn
power
ok
menu(m)
exit
left
right
IR Learn
press remote button
IR Learn
Programming successful
IR Learn
Programming failed
RF Learn
spectral bra1
new device
►
RF Learn
Plug in RF Device
press OK
RF Learn
Installation successful
RF Learn
Select Device
cla1
cta1
cta2
bra1
RF Learn
Installation failed
contrast
75
input config
in opt1 dvd
in opt2 bd pl
in coax1 sat
in coax2 cd
in line1 tv
in line2 vcr
input config
in opt1 dvd
in opt2 not active
in coax1 not active
in coax2 not active
in line1 not active
in line2 not active
speaker set
preset
►
level trim
►
speaker distance
►
tone control
►
bass expand bypass
room comp
►
preset save
current value
►
default value
►
exit without save
preset
preset p1 default
preset p2 default
preset p3 default
preset p4 default
preset p5 default
preset p6 default
dvd sat tv tuner
p6
Analog stereo
<
preset
>
modus
m
/
st
89.30
01
00
40
IR Learn
yes
Clear Device
Are you sure ?
no
IR Learn
amp
apple tv
audio rec
beamer
blue ray
cd
IR Learn
Learn
Clear
Name
►
IR Learn
main key
►
blu ray
dvd
dvd rec
sat
tv1
dvd sat tv tuner
p6
Analog stereo
<
preset
>
modus
m
/
st
89.30
01
0
40
dvd sat tv tuner
p6
Analog wide
<
preset
>
modus
m
/
st
89.30
01
0
40
dvd sat tv tuner
p6
PLII surround 1
<
preset
>
modus
m
/
st
89.30
01
0
40
virtuell
dvd sat tv tuner
p6
PLII surround 2
<
preset
>
modus
m
/
st
89.30
01
0
40
virtuell
sat
red
epg
yello blue
info text
green
tv
/
r
tv
red
media
yello blue
tools info
green
sourc
lighting
power
rgb
IR Learn
Learn
►
Clear
IR Learn
prog -
prog +
vol -
vol +
mute
IR Learn
main key
blu ray
dvd
►
dvd rec
sat
tv1
IR Learn
Learn
►
Clear
Name
IR Learn
power
ok
menu(m)
exit
left
right
IR Learn
press remote button
IR Learn
Programming successful
IR Learn
Programming failed
RF Learn
spectral bra1
new device
►
RF Learn
Plug in RF Device
press OK
RF Learn
Installation successful
RF Learn
Select Device
cla1
cta1
cta2
bra1
RF Learn
Installation failed
contrast
75
speaker set
preset
►
level trim
►
speaker distance
►
tone control
►
bass expand bypass
room comp
►
preset save
current value
►
default value
►
exit without save
preset
preset p1 default
preset p2 default
preset p3 default
preset p4 default
preset p5 default
preset p6 default
system set
output config
►
sub lineout disabled
input config
►
ir learn
►
lip sync 0 ms
dynamic full
dvd sat tv tuner
p6
Analog stereo
<
preset
>
modus
m
/
st
89.30
01
00
40
IR Learn
yes
Clear Device
Are you sure ?
no
IR Learn
amp
apple tv
audio rec
beamer
blue ray
cd
IR Learn
Learn
Clear
Name
►
Page 54
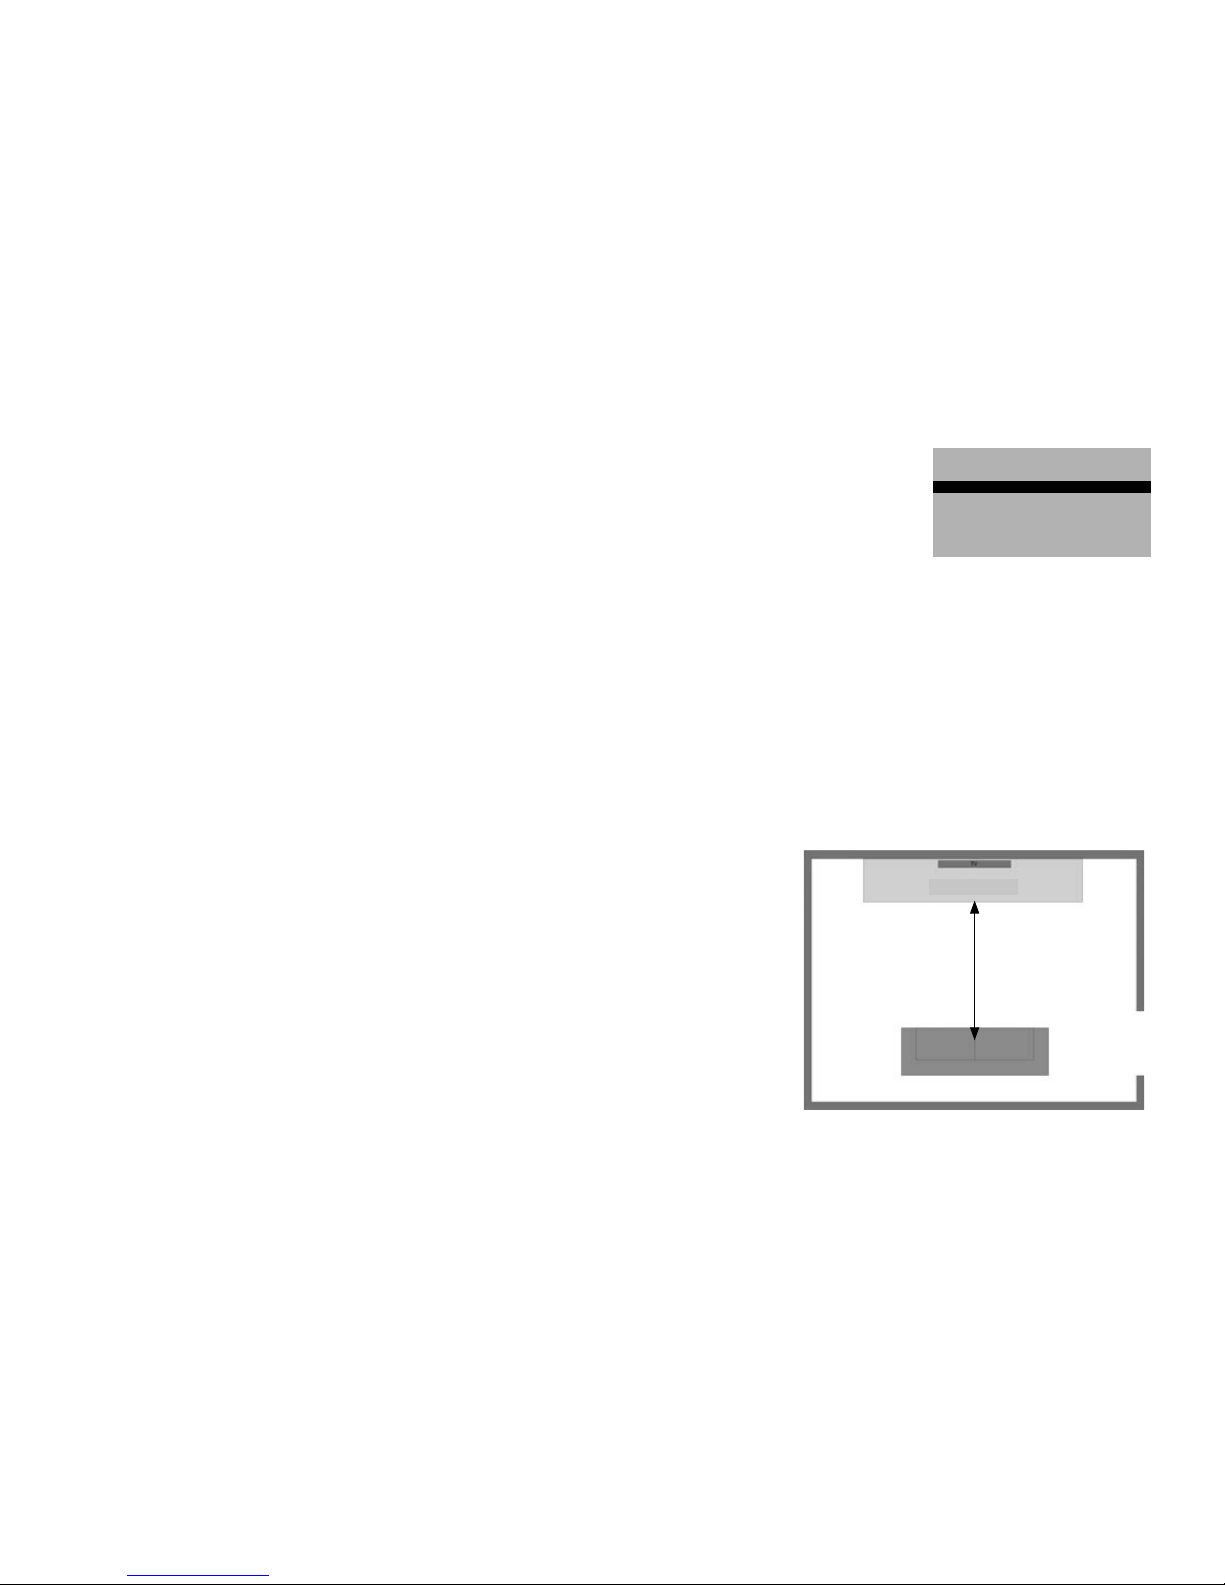
54
Loudspeaker Menu
In the Loudspeaker Menu the following parameters can be set to adjust the sound system to the room:
preset:
To save all settings set in the loudspeaker menu up to 6 memory cells (<preset>).
Procedure:
First adjust the values in the loudspeaker menu (Description of the parameters: see the following points). Select <preset>
(without leaving the menu) => <current value>, then select a default preset and overwrite the values. In the list your preset
is shown as „manual“.
This procedure is repeatable up to 6 times.
Use the functional keys <preset> to select your personal settings in the main menu.
IR Learn
main key
►
blu ray
dvd
dvd rec
sat
tv1
input config
in opt1 not active
in opt2 not active
in coax1 not active
in coax2 not active
in line1 not active
in line2 not active
input config
in opt1 dvd
in opt2 not active
in coax1 not active
in coax2 not active
in line1 not active
in line2 not active
dvd sat tv tuner
p6
Analog stereo
<
preset
>
modus
m
/
st
89.30
01
0
40
dvd sat tv tuner
p6
Analog wide
<
preset
>
modus
m
/
st
89.30
01
0
40
dvd sat tv tuner
p6
PLII surround 1
<
preset
>
modus
m
/
st
89.30
01
0
40
virtuell
dvd sat tv tuner
p6
PLII surround 2
<
preset
>
modus
m
/
st
89.30
01
0
40
virtuell
sat
red
epg
yello blue
info text
green
tv
/
r
tv
red
media
yello blue
tools info
green
sourc
lighting
power
rgb
IR Learn
Learn
►
Clear
IR Learn
prog -
prog +
vol -
vol +
mute
IR Learn
main key
blu ray
dvd
►
dvd rec
sat
tv1
IR Learn
Learn
►
Clear
Name
IR Learn
power
ok
menu(m)
exit
left
right
IR Learn
press remote button
IR Learn
Programming successful
IR Learn
Programming failed
RF Learn
spectral bra1
new device
►
RF Learn
Plug in RF Device
press OK
RF Learn
Installation successful
RF Learn
Select Device
cla1
cta1
cta2
bra1
RF Learn
Installation failed
contrast
75
input config
in opt1 dvd
in opt2 bd pl
in coax1 sat
in coax2 cd
in line1 tv
in line2 vcr
input config
in opt1 dvd
in opt2 not active
in coax1 not active
in coax2 not active
in line1 not active
in line2 not active
speaker set
preset
►
level trim
►
speaker distance
►
tone control
►
bass expand bypass
room comp
►
preset save
current value
►
default value
►
exit without save
preset
preset p1 default
preset p2 default
preset p3 default
preset p4 default
preset p5 default
preset p6 default
dvd sat tv tuner
p6
Analog stereo
<
preset
>
modus
m
/
st
89.30
01
00
40
IR Learn
yes
Clear Device
Are you sure ?
no
IR Learn
amp
apple tv
audio rec
beamer
blue ray
cd
IR Learn
Learn
Clear
Name
►
level trim:
To adjust the volume level of the individual channels (front left and right, subwoofer, …).
Select <test tone> to adjust the volume of the sound system components among one another. Setting range: from -6dB to +6dB in 1dB steps.
The testtone is not available for the virtual loudspeakers. This means, in the 2.1 mode you can adjust the subwoofer, front left and front right.
Warning! Set the volume of the system to a moderate value (40-50) in the main menu before activating the test tone.
The volume is adjustable for every loudspeaker, also for the virtual speakers.
Example: If the voices are too quiet you can increase the volume with „virtual center“.
speaker distance:
To balance out dierent distances between the loudspeakers and the listening spot.
Select the loudspeaker to be adjusted. First measure the the distance between the sound system
and your preferred listening position.
Enter this value in the menu at/to the corresponding speaker (subwoofer, front left and front right)
under ‘speaker distance’. The distance is not adjustable for the virtual speakers.
This means, in the 2.1 mode you can adjust the subwoofer, front left and front right.
Example: If wireless loudspeakers (Rear left and right) are connected and the 4.1 mode is selected
these speakers are also adjustable.
Sound System
Distance
Page 55

55
English
tone control:
For the automatic volume-dependent adjustment of the bass volume level.
Setting range for both lters: from -6dB to +6dB in 1dB steps.
bass expand:
For the automatic volume-dependent adjustment of the bass volume level.
The dynamic bass regulator of the Amplier-Modul (bass expand) adjusts the intensity of the bass tones to the physiological properties of human hearing depending
on the volume. When playing movies, we recommend the „low“ or „high“ settings. When playing audiophile stereo recordings, we recommend the „bypass“ setting.
room comp:
Various parametric equalisers are available to balance out ambient factors.
Only for advanced users. It is recommanded not to change the default settings.
Form equalizer: With the form you can regulate the bandwith (area of inuence around the medium frequency of an equalizer).
High form means low lter bandwith, low form means high lter bandwith.
Gain: Here you can adjust the gain of the selected frequency.
Page 56

56
System Menu
In the System Menu the following parameters can be set:
Output cong:
To set the parameters for the Zone 2 /Line output.
The output Zone 2/Line provides two output options:
IR Learn
main key
►
blu ray
dvd
dvd rec
sat
tv1
dvd sat tv tuner
p6
Analog stereo
<
preset
>
modus
m
/
st
89.30
01
0
40
dvd sat tv tuner
p6
Analog wide
<
preset
>
modus
m
/
st
89.30
01
0
40
dvd sat tv tuner
p6
PLII surround 1
<
preset
>
modus
m
/
st
89.30
01
0
40
virtuell
dvd sat tv tuner
p6
PLII surround 2
<
preset
>
modus
m
/
st
89.30
01
0
40
virtuell
sat
red
epg
yello blue
info text
green
tv
/
r
tv
red
media
yello blue
tools info
green
sourc
lighting
power
rgb
IR Learn
Learn
►
Clear
IR Learn
prog -
prog +
vol -
vol +
mute
IR Learn
main key
blu ray
dvd
►
dvd rec
sat
tv1
IR Learn
Learn
►
Clear
Name
IR Learn
power
ok
menu(m)
exit
left
right
IR Learn
press remote button
IR Learn
Programming successful
IR Learn
Programming failed
RF Learn
spectral bra1
new device
►
RF Learn
Plug in RF Device
press OK
RF Learn
Installation successful
RF Learn
Select Device
cla1
cta1
cta2
bra1
RF Learn
Installation failed
contrast
75
speaker set
preset
►
level trim
►
speaker distance
►
tone control
►
bass expand bypass
room comp
►
preset save
current value
►
default value
►
exit without save
preset
preset p1 default
preset p2 default
preset p3 default
preset p4 default
preset p5 default
preset p6 default
system set
output config
►
sub lineout disabled
input config
►
ir learn
►
lip sync 0 ms
dynamic full
dvd sat tv tuner
p6
Analog stereo
<
preset
>
modus
m
/
st
89.30
01
00
40
IR Learn
yes
Clear Device
Are you sure ?
no
IR Learn
amp
apple tv
audio rec
beamer
blue ray
cd
IR Learn
Learn
Clear
Name
►
Zone 2: with individually adjustable volume, to connect an active multiroom and/or wireless loudspeaker system
Line: with rmly adjusted volume, to connect an analog recording device, etc.
Please note:
To play 5.1 multi-channel recordings (DolbyDigital or DTS) through ZONE 2/LINE OUT, „dynamic“ must be set at „comp“ in the system menu.
The „full“ position is recommended for „normal“ play back.
To play DolbyDigital/DTS signals (Bitstream) also through ZONE 2/LINE OUT, you have to choose ZONE1 (main zone) as input.
Sub output:
To activate or deactivate the subwoofer output.
The Sub output enables the connection of an active subwoofer, which needs to be activated in the system menu. With an active
sub output the internal subwoofer of the sound system is high-pass ltered at 80Hz, the external subwoofer is low-pass ltered at 80Hz.
The crossover frequency of the external subwoofer should always be set on max.
Input cong:
To activate and name the 6 signal inputs (see the chapter “Initial installation”).
Here you can assign the inputs to the source devices.
IR programming:
To programme various remote operations (DVD player, TV, …, see the chapter “Learn Menu”).
Lip sync:
To synchronise the sound with time-delayed TV images.
With lip sync you can synchronise the sound and the image, for example to adjust retarded mouth movements.
Setting range of audio signal delay: 0 - 380ms
Page 57

57
English
Dynamics:
To adjust the signal compression in the playback of multi-channel signals.
Due to an over-regulation in the signal processing, distortions are possible when recording a multi-channel tone of DVD or BD. Signals are compressed automatically
if the function „dynamic“ is set to „comp“. No compression if „full“ is selected. This function is prescribed by Dolby®.
To play 5.1 multi-channel recordings (DolbyDigital or DTS) through ZONE 2/LINE OUT, „dynamic“ must be set at „comp“.
The „full“ position is recommended for „normal“ play back.
Note: only when using additional external loudspeakers
factory set:
Switch-on volume: To limit the maximum switch-on volume.
This value species the max. volume when starting the system. If you switch o the system with a lower volume, this value remains.
Max. volume: To establish the maximum volume possible.
This value species the max. volume for a normal play mode, to avoid a volume that‘s too high (for example to protect children).
Setting range: 0 - 99. Factory setting is 99 (maximum).
Device name: To select the device conguration (2.1 Mode or 5.1 Mode …).
Connecting additional loudspeakers you can use the SPECTRAL sound system in 4.1 or 5.1 mode.
Here you can select the mode. Factory setting is 2.1 mode (refer to „4.1 and 5.1 mode“)
Language to select: German or English. Factory setting is German.
Line 2 cong: To select Line Level Input or Phono Level Input.
The input Line 2 / Phono enables the connection of either a sound source with line level (up to 2V, e.g. CD or MP3 player) or a record
player (up to 5mV). Depending on the setting selected in the system menu you can use this input.
Use the screw of the xing clip for IR transmitter to fasten the grounding cable of the record player.
Factory setting: To return the sound system to the factory setting it was supplied with.
Except the selection „system preset“, ALL adjustments, also the personal presets (p1 - p6), will be reset.
After resetting, the system starts again with assigning the inputs.
Firmware: To display the software versions.
To check the numbers of the software versions. There are three softwares: Remote control, transceiver and main system.
Please quote this reference in case of service requests.
Contrast: To adjust the contrast settings of the display.
To increase or reduce the contrast of the display.
Setting range: 65 - 90. Factory setting is 75.
By pressing <0> and <4> simultaneously you can select the contrast directly. Adjustable with the arrow keys „<“ and „>“,
press „exit“ to quit.
Page 58
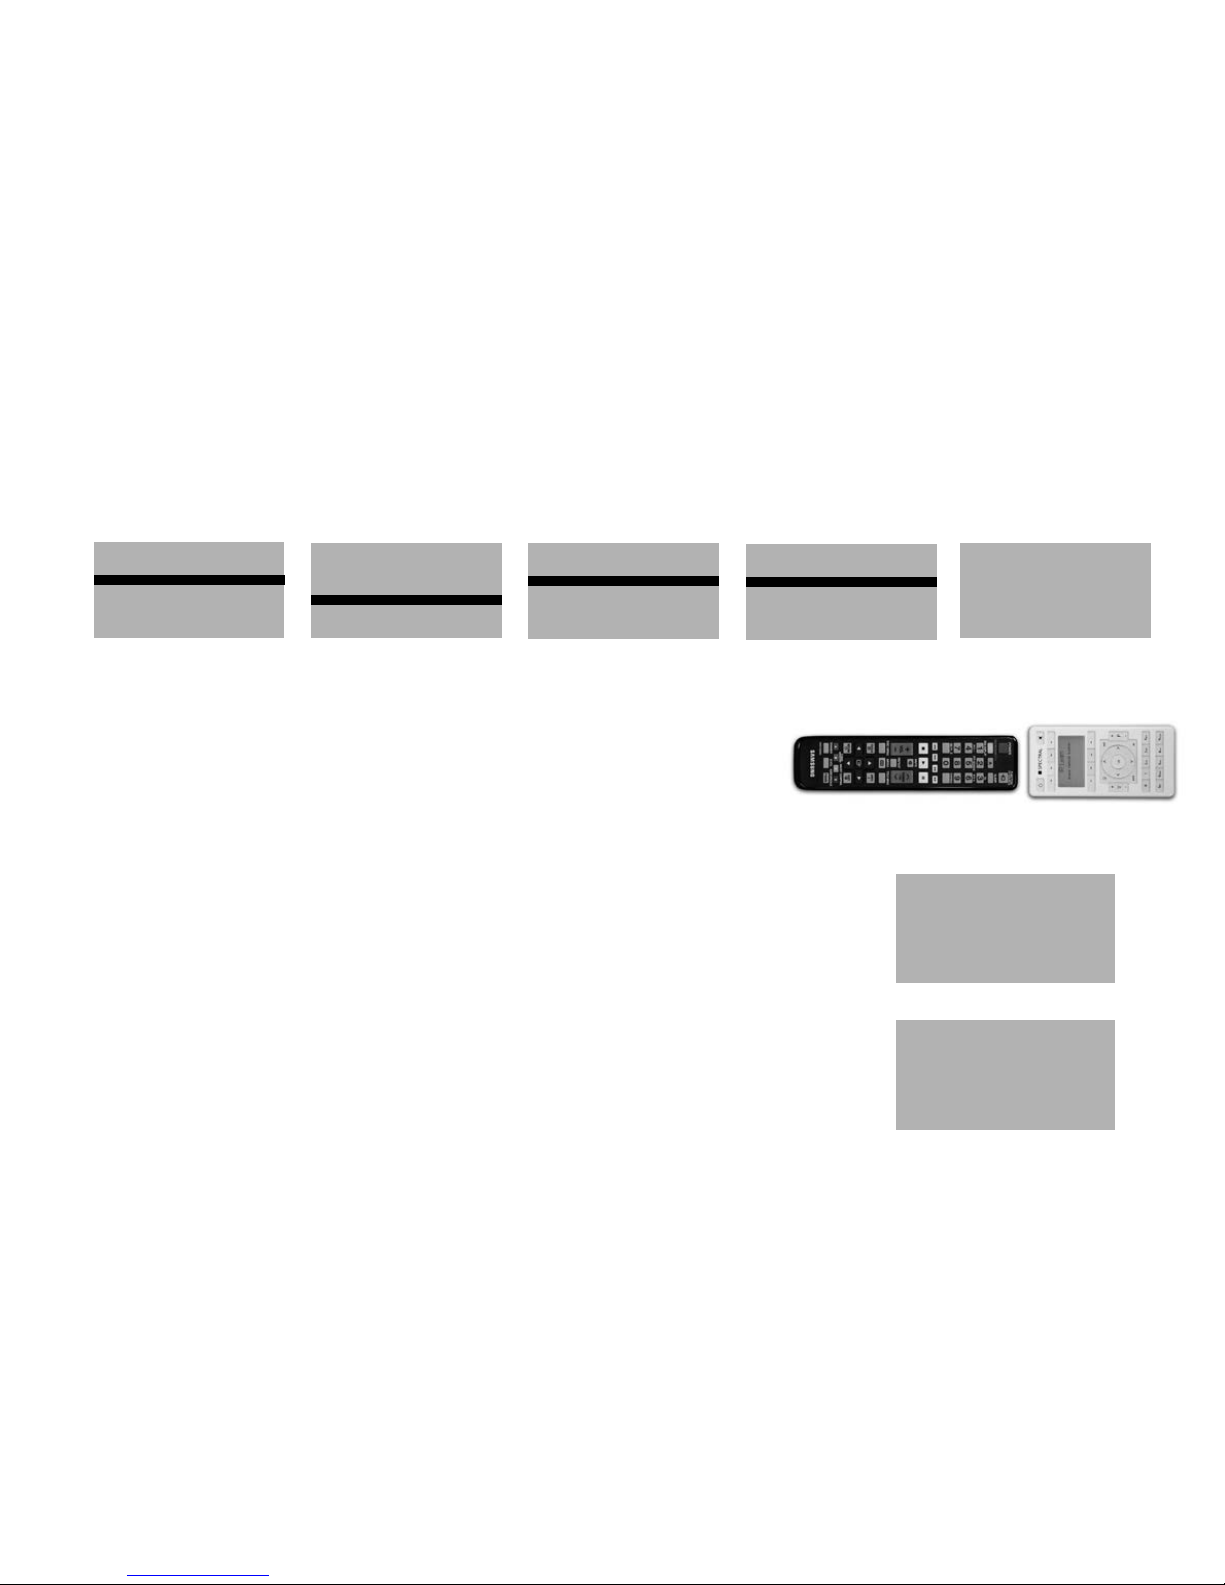
58
Learn Menu
Pressing <exit> and <m> at the same time brings you to the “Learn Menu”, where you can lern infrared-controlled devices and register other sound systems.
IR Learn
main key
►
blu ray
dvd
dvd rec
sat
tv1
Select Device
bra1
dvd sat tv light
stand by
no
connection
input config
in opt1 not active
in opt2 not active
in coax1 not active
in coax2 not active
in line1 not active
in line2 not active
input config
no configuration done
all inputs not active
to configure press ok
input config
in opt1 dvd
in opt2 not active
in coax1 not active
in coax2 not active
in line1 not active
in line2 not active
dvd sat tvtvtuner
p6
Analog stereo
<
preset
>
mode
40
dvd sat tv tuner
p6
Analog stereo
<
preset
>
modus
m
/
st
89.30
01
0
40
dvd sat tv tuner
p6
Analog wide
<
preset
>
modus
m
/
st
89.30
01
0
40
dvd sat tv tuner
p6
PLII surround 1
<
preset
>
modus
m
/
st
89.30
01
0
40
virtuell
dvd sat tv tuner
p6
PLII surround 2
<
preset
>
modus
m
/
st
89.30
01
0
40
virtuell
dvd
bra1
play
skipskip
pausestop
sat
red
epg
yello blue
info text
green
tv
/
r
tv
red
media
yello blue
tools info
green
sourc
lighting
power
rgb
Learn Menu
IR Learn
►
RF Learn
IR Learn
Learn
►
Clear
IR Learn
prog -
prog +
vol -
vol +
mute
input config
in opt1 dvd
in opt2 bd pl
in coax1 sat
in coax2 cd
in line1 tv
in line2 vcr
input config
in opt1 dvd
in opt2 not active
in coax1 not active
in coax2 not active
in line1 not active
in line2 not active
dvd sat tv tuner
p6
Analog stereo
<
preset
>
modus
89.30
01
IR Learn
main key
►
blu ray
dvd
dvd rec
sat
tv1
stand by
no
connection
input config
in opt1 not active
in opt2 not active
in coax1 not active
in coax2 not active
in line1 not active
in line2 not active
input config
in opt1 dvd
in opt2 not active
in coax1 not active
in coax2 not active
in line1 not active
in line2 not active
dvd sat tv tuner
p6
Analog stereo
<
preset
>
modus
m
/
st
89.30
01
0
40
dvd sat tv tuner
p6
Analog wide
<
preset
>
modus
m
/
st
89.30
01
0
40
dvd sat tv tuner
p6
PLII surround 1
<
preset
>
modus
m
/
st
89.30
01
0
40
virtuell
dvd sat tv tuner
p6
PLII surround 2
<
preset
>
modus
m
/
st
89.30
01
0
40
virtuell
sat
red
epg
yello blue
info text
green
tv
/
r
tv
red
media
yello blue
tools info
green
sourc
lighting
power
rgb
IR Learn
Learn
►
Clear
IR Learn
prog -
prog +
vol -
vol +
mute
IR Learn
main key
blu ray
dvd
►
dvd rec
sat
tv1
IR Learn
Learn
►
Clear
Name
IR Learn
power
ok
menu(m)
exit
left
right
IR Learn
press remote button
input config
in opt1 dvd
in opt2 bd pl
in coax1 sat
in coax2 cd
in line1 tv
in line2 vcr
input config
in opt1 dvd
in opt2 not active
in coax1 not active
in coax2 not active
in line1 not active
in line2 not active
dvd sat tv tuner
p6
Analog stereo
<
preset
>
modus
m
/
st
89.30
01
00
40
no
connection
input config
in opt1 dvd
in opt2 not active
in coax1 not active
in coax2 not active
in line1 not active
in line2 not active
dvd sat tv tuner
p6
Analog wide
<
preset
>
modus
m
/
st
89.30
01
0
40
dvd sat tv tuner
p6
PLII surround 1
<
preset
>
modus
m
/
st
89.30
01
0
40
virtuell
dvd sat tv tuner
p6
PLII surround 2
<
preset
>
modus
m
/
st
89.30
01
0
40
virtuell
tv
red
media
yello blue
tools info
green
sourc
lighting
power
rgb
IR Learn
Learn
►
Clear
IR Learn
prog -
prog +
vol -
vol +
mute
IR Learn
Learn
►
Clear
Name
IR Learn
power
ok
menu(m)
exit
left
right
IR Learn
press remote button
input config
in opt1 dvd
in opt2 bd pl
in coax1 sat
in coax2 cd
in line1 tv
in line2 vcr
input config
in opt1 dvd
in opt2 not active
in coax1 not active
in coax2 not active
in line1 not active
in line2 not active
dvd sat tv tuner
p6
Analog stereo
<
preset
>
modus
m
/
st
89.30
01
00
40
input config
in opt1 dvd
in opt2 not active
in coax1 not active
in coax2 not active
in line1 not active
in line2 not active
dvd sat tv tuner
p6
PLII surround 1
<
preset
>
modus
m
/
st
89.30
01
0
40
virtuell
dvd sat tv tuner
p6
PLII surround 2
<
preset
>
modus
m
/
st
89.30
01
0
40
virtuell
lighting
power
rgb
IR Learn
prog -
prog +
vol -
vol +
mute
IR Learn
power
ok
menu(m)
exit
left
right
IR Learn
press remote button
input config
in opt1 dvd
in opt2 bd pl
in coax1 sat
in coax2 cd
in line1 tv
in line2 vcr
dvd sat tv tuner
p6
Analog stereo
<
preset
>
modus
m
/
st
89.30
01
00
40
dvd sat tv tuner
p6
PLII surround 2
<
preset
>
modus
m
/
st
89.30
01
0
40
virtuell
IR Learn
press remote button
input config
in opt1 dvd
in opt2 bd pl
in coax1 sat
in coax2 cd
in line1 tv
in line2 vcr
dvd sat tv tuner
p6
Analog stereo
<
preset
>
modus
m
/
st
89.30
01
00
40
Once you have selected the source with the function to be programmed and conrmed your selection
using <ok> you will see the message “press remote button”.
Position the original remote control (e.g. from your DVD player) opposite the one from your sound system
(approx. 5 cm distance). On the original remote control briey press the key with the function to be programmed and wait until the process has been conrmed on the display.
The functional keys soft x1 - soft x8 and soft y1 - soft y8 can be assigned with arbitrary functions of the
respective device. In the menu suggestions are programmed, conrm with <ok> to accept. If you want to
assign another function, the name can be overwritten by using the keys 0 - 9. A maximum of ve marks
can be assigned.
If the programming has been successful you will see the message “Programming successful”.
Repeat the process until all desired functions have been transferred. Press <m> to return to the
previous menu.
If the transfer of the remote control data is unsuccessful the message “Programming failed” will
appear for approx. 5 seconds. After that the previous menu will be displayed and you can either repeat
the programming or abort the process.
IR Learn
main key
►
blu ray
dvd
dvd rec
sat
tv1
stand by
no
connection
input config
in opt1 not active
in opt2 not active
in coax1 not active
in coax2 not active
in line1 not active
in line2 not active
input config
in opt1 dvd
in opt2 not active
in coax1 not active
in coax2 not active
in line1 not active
in line2 not active
dvd sat tv tuner
p6
Analog stereo
<
preset
>
modus
m
/
st
89.30
01
0
40
dvd sat tv tuner
p6
Analog wide
<
preset
>
modus
m
/
st
89.30
01
0
40
dvd sat tv tuner
p6
PLII surround 1
<
preset
>
modus
m
/
st
89.30
01
0
40
virtuell
dvd sat tv tuner
p6
PLII surround 2
<
preset
>
modus
m
/
st
89.30
01
0
40
virtuell
sat
red
epg
yello blue
info text
green
tv
/
r
tv
red
media
yello blue
tools info
green
sourc
lighting
power
rgb
IR Learn
Learn
►
Clear
IR Learn
prog -
prog +
vol -
vol +
mute
IR Learn
main key
blu ray
dvd
►
dvd rec
sat
tv1
IR Learn
Learn
►
Clear
Name
IR Learn
power
ok
menu(m)
exit
left
right
IR Learn
press remote button
IR Learn
Programming successful
IR Learn
Programming failed
input config
in opt1 dvd
in opt2 bd pl
in coax1 sat
in coax2 cd
in line1 tv
in line2 vcr
input config
in opt1 dvd
in opt2 not active
in coax1 not active
in coax2 not active
in line1 not active
in line2 not active
dvd sat tv tuner
p6
Analog stereo
<
preset
>
modus
m
/
st
89.30
01
00
40
IR Learn
yes
Clear Device
Are you sure ?
no
IR Learn
amp
apple tv
audio rec
beamer
blue ray
cd
IR Learn
Learn
Clear
Name
►
no
connection
input config
in opt1 dvd
in opt2 not active
in coax1 not active
in coax2 not active
in line1 not active
in line2 not active
dvd sat tv tuner
p6
Analog wide
<
preset
>
modus
m
/
st
89.30
01
0
40
dvd sat tv tuner
p6
PLII surround 1
<
preset
>
modus
m
/
st
89.30
01
0
40
virtuell
dvd sat tv tuner
p6
PLII surround 2
<
preset
>
modus
m
/
st
89.30
01
0
40
virtuell
tv
red
media
yello blue
tools info
green
sourc
lighting
power
rgb
IR Learn
Learn
►
Clear
IR Learn
prog -
prog +
vol -
vol +
mute
IR Learn
Learn
►
Clear
Name
IR Learn
power
ok
menu(m)
exit
left
right
IR Learn
press remote button
IR Learn
Programming failed
input config
in opt1 dvd
in opt2 bd pl
in coax1 sat
in coax2 cd
in line1 tv
in line2 vcr
input config
in opt1 dvd
in opt2 not active
in coax1 not active
in coax2 not active
in line1 not active
in line2 not active
dvd sat tv tuner
p6
Analog stereo
<
preset
>
modus
m
/
st
89.30
01
00
40
IR Learn
yes
Clear Device
Are you sure ?
no
IR Learn
amp
apple tv
audio rec
beamer
blue ray
cd
IR Learn
Learn
Clear
Name
►
Page 59

59
English
Deleting source devices:
In order to totally delete a programmed device use the “Clear” function.
After pressing this function you will be asked if you really want to delete the device.
Conrm this by pressing the “yes” function key. To abort the process press “no”. The remote
control will then return to the Device Selection Menu. Use <exit> to enter the “Learn
Menu”. To leave programming mode press <exit> again.
Renaming the source devices:
If you want to rename a source device you can select a description from a comprehensive
list of pre-programmed device names. Follow the steps described above.
no
connection
input config
in opt1 dvd
in opt2 not active
in coax1 not active
in coax2 not active
in line1 not active
in line2 not active
dvd sat tv tuner
p6
Analog wide
<
preset
>
modus
m
/
st
89.30
01
0
40
dvd sat tv tuner
p6
PLII surround 1
<
preset
>
modus
m
/
st
89.30
01
0
40
virtuell
dvd sat tv tuner
p6
PLII surround 2
<
preset
>
modus
m
/
st
89.30
01
0
40
virtuell
tv
red
media
yello blue
tools info
green
sourc
lighting
power
rgb
IR Learn
Learn
►
Clear
IR Learn
prog -
prog +
vol -
vol +
mute
IR Learn
Learn
►
Clear
Name
IR Learn
power
ok
menu(m)
exit
left
right
IR Learn
press remote button
input config
in opt1 dvd
in opt2 bd pl
in coax1 sat
in coax2 cd
in line1 tv
in line2 vcr
input config
in opt1 dvd
in opt2 not active
in coax1 not active
in coax2 not active
in line1 not active
in line2 not active
dvd sat tv tuner
p6
Analog stereo
<
preset
>
modus
m
/
st
89.30
01
00
40
input config
in opt1 dvd
in opt2 not active
in coax1 not active
in coax2 not active
in line1 not active
in line2 not active
dvd sat tv tuner
p6
PLII surround 1
<
preset
>
modus
m
/
st
89.30
01
0
40
virtuell
dvd sat tv tuner
p6
PLII surround 2
<
preset
>
modus
m
/
st
89.30
01
0
40
virtuell
lighting
power
rgb
IR Learn
prog -
prog +
vol -
vol +
mute
IR Learn
power
ok
menu(m)
exit
left
right
IR Learn
press remote button
input config
in opt1 dvd
in opt2 bd pl
in coax1 sat
in coax2 cd
in line1 tv
in line2 vcr
dvd sat tv tuner
p6
Analog stereo
<
preset
>
modus
m
/
st
89.30
01
00
40
IR Learn
yes
Clear Device
Are you sure ?
no
IR Learn
amp
apple tv
audio rec
beamer
blue ray
cd
IR Learn
Learn
Clear
Name
►
dvd sat tv tuner
p6
PLII surround 2
<
preset
>
modus
m
/
st
89.30
01
0
40
virtuell
IR Learn
press remote button
input config
in opt1 dvd
in opt2 bd pl
in coax1 sat
in coax2 cd
in line1 tv
in line2 vcr
dvd sat tv tuner
p6
Analog stereo
<
preset
>
modus
m
/
st
89.30
01
00
40
IR Learn
amp
apple tv
audio rec
beamer
blue ray
cd
IR Learn
Learn
Clear
Name
►
dvd sat tv tuner
p6
Analog stereo
<
preset
>
modus
m
/
st
89.30
01
00
40
IR Learn
amp
apple tv
audio rec
beamer
blue ray
cd
Programming the main keys:
The sound system has 5 main keys (Programme +/-, Volume +/- and Mute), which can be allocated to the IR codes of other infrared-controlled devices. Follow the steps
shown above.
Warning: The Volume +/- and Mute keys can only be used for infrared-controlled devices if no sound system has been registered. The volume control of the sound
system will take priority over all other IR devices.
IR Learn
main key
►
blu ray
dvd
dvd rec
sat
tv1
Select Device
bra1
dvd sat tv light
stand by
no
connection
input config
in opt1 not active
in opt2 not active
in coax1 not active
in coax2 not active
in line1 not active
in line2 not active
input config
no configuration done
all inputs not active
to configure press ok
input config
in opt1 dvd
in opt2 not active
in coax1 not active
in coax2 not active
in line1 not active
in line2 not active
dvd sat tvtvtuner
p6
Analog stereo
<
preset
>
mode
40
dvd sat tv tuner
p6
Analog stereo
<
preset
>
modus
m
/
st
89.30
01
0
40
dvd sat tv tuner
p6
Analog wide
<
preset
>
modus
m
/
st
89.30
01
0
40
dvd sat tv tuner
p6
PLII surround 1
<
preset
>
modus
m
/
st
89.30
01
0
40
virtuell
dvd sat tv tuner
p6
PLII surround 2
<
preset
>
modus
m
/
st
89.30
01
0
40
virtuell
dvd
bra1
play
skipskip
pausestop
sat
red
epg
yello blue
info text
green
tv
/
r
tv
red
media
yello blue
tools info
green
sourc
lighting
power
rgb
Learn Menu
IR Learn
►
RF Learn
IR Learn
Learn
►
Clear
IR Learn
prog -
prog +
vol -
vol +
mute
input config
in opt1 dvd
in opt2 bd pl
in coax1 sat
in coax2 cd
in line1 tv
in line2 vcr
input config
in opt1 dvd
in opt2 not active
in coax1 not active
in coax2 not active
in line1 not active
in line2 not active
dvd sat tv tuner
p6
Analog stereo
<
preset
IR Learn
main key
►
blu ray
dvd
dvd rec
sat
tv1
stand by
no
connection
input config
in opt1 not active
in opt2 not active
in coax1 not active
in coax2 not active
in line1 not active
in line2 not active
input config
in opt1 dvd
in opt2 not active
in coax1 not active
in coax2 not active
in line1 not active
in line2 not active
dvd sat tv tuner
p6
Analog stereo
<
preset
>
modus
m
/
st
89.30
01
0
40
dvd sat tv tuner
p6
Analog wide
<
preset
>
modus
m
/
st
89.30
01
0
40
dvd sat tv tuner
p6
PLII surround 1
<
preset
>
modus
m
/
st
89.30
01
0
40
virtuell
dvd sat tv tuner
p6
PLII surround 2
<
preset
>
modus
m
/
st
89.30
01
0
40
virtuell
sat
red
epg
yello blue
info text
green
tv
/
r
tv
red
media
yello blue
tools info
green
sourc
lighting
power
rgb
IR Learn
Learn
►
Clear
IR Learn
prog -
prog +
vol -
vol +
mute
input config
in opt1 dvd
in opt2 bd pl
in coax1 sat
in coax2 cd
in line1 tv
in line2 vcr
input config
in opt1 dvd
in opt2 not active
in coax1 not active
in coax2 not active
in line1 not active
in line2 not active
dvd sat tv tuner
p6
Analog stereo
<
preset
>
modus
m
/
st
89.30
01
00
40
no
connection
input config
in opt1 dvd
in opt2 not active
in coax1 not active
in coax2 not active
in line1 not active
in line2 not active
dvd sat tv tuner
p6
Analog wide
<
preset
>
modus
m
/
st
89.30
01
0
40
dvd sat tv tuner
p6
PLII surround 1
<
preset
>
modus
m
/
st
89.30
01
0
40
virtuell
dvd sat tv tuner
p6
PLII surround 2
<
preset
>
modus
m
/
st
89.30
01
0
40
virtuell
tv
red
media
yello blue
tools info
green
sourc
lighting
power
rgb
IR Learn
Learn
►
Clear
IR Learn
prog -
prog +
vol -
vol +
mute
input config
in opt1 dvd
in opt2 bd pl
in coax1 sat
in coax2 cd
in line1 tv
in line2 vcr
input config
in opt1 dvd
in opt2 not active
in coax1 not active
in coax2 not active
in line1 not active
in line2 not active
dvd sat tv tuner
p6
Analog stereo
<
preset
>
modus
m
/
st
89.30
01
00
40
input config
in opt1 dvd
in opt2 not active
in coax1 not active
in coax2 not active
in line1 not active
in line2 not active
dvd sat tv tuner
p6
PLII surround 1
<
preset
>
modus
m
/
st
89.30
01
0
40
virtuell
dvd sat tv tuner
p6
PLII surround 2
<
preset
>
modus
m
/
st
89.30
01
0
40
virtuell
lighting
power
rgb
IR Learn
prog -
prog +
vol vol +
mute
input config
in opt1 dvd
in opt2 bd pl
in coax1 sat
in coax2 cd
in line1 tv
in line2 vcr
dvd sat tv tuner
p6
Analog stereo
<
preset
>
modus
m
/
st
89.30
01
00
40
dvd sat tv tuner
p6
PLII surround 2
<
preset
>
modus
m
/
st
89.30
01
0
40
virtuell
IR Learn
press remote button
input config
in opt1 dvd
in opt2 bd pl
in coax1 sat
in coax2 cd
in line1 tv
in line2 vcr
dvd sat tv tuner
p6
Analog stereo
<
preset
>
modus
m
/
st
89.30
01
00
40
Page 60

60
Delete SPECTRAL sound system:
To de-register your remote control from a sound system open the Programme Menu by pressing <exit> and <m> simultaneously, select “RF Learn”
and conrm with <ok>. Select the system you wish to “delete” and conrm your selection with <ok>. Select and conrm the “Clear” function to
continue. Complete the de-registration process by pressing the “yes” function key or abort the process with “no”.
IR Learn
main key
►
blu ray
dvd
dvd rec
sat
tv1
stand by
no
connection
input config
in opt1 not active
in opt2 not active
in coax1 not active
in coax2 not active
in line1 not active
in line2 not active
input config
in opt1 dvd
in opt2 not active
in coax1 not active
in coax2 not active
in line1 not active
in line2 not active
dvd sat tv tuner
p6
Analog stereo
<
preset
>
modus
m
/
st
89.30
01
0
40
dvd sat tv tuner
p6
Analog wide
<
preset
>
modus
m
/
st
89.30
01
0
40
dvd sat tv tuner
p6
PLII surround 1
<
preset
>
modus
m
/
st
89.30
01
0
40
virtuell
dvd sat tv tuner
p6
PLII surround 2
<
preset
>
modus
m
/
st
89.30
01
0
40
virtuell
sat
red
epg
yello blue
info text
green
tv
/
r
tv
red
media
yello blue
tools info
green
sourc
lighting
power
rgb
IR Learn
Learn
►
Clear
IR Learn
prog -
prog +
vol -
vol +
mute
IR Learn
main key
blu ray
dvd
►
dvd rec
sat
tv1
IR Learn
Learn
►
Clear
Name
IR Learn
power
ok
menu(m)
exit
left
right
IR Learn
press remote button
IR Learn
Programming successful
IR Learn
Programming failed
RF Learn
spectral bra1
new device
►
RF Learn
Plug in RF Device
press OK
RF Learn
Installation successful
RF Learn
Select Device
cla1
cta1
cta2
bra1
input config
in opt1 dvd
in opt2 bd pl
in coax1 sat
in coax2 cd
in line1 tv
in line2 vcr
input config
in opt1 dvd
in opt2 not active
in coax1 not active
in coax2 not active
in line1 not active
in line2 not active
dvd sat tv tuner
p6
Analog stereo
<
preset
>
modus
m
/
st
89.30
01
00
40
IR Learn
yes
Clear Device
Are you sure ?
no
IR Learn
amp
apple tv
audio rec
beamer
blue ray
cd
IR Learn
Learn
Clear
Name
►
no
connection
input config
in opt1 dvd
in opt2 not active
in coax1 not active
in coax2 not active
in line1 not active
in line2 not active
dvd sat tv tuner
p6
Analog wide
<
preset
>
modus
m
/
st
89.30
01
0
40
dvd sat tv tuner
p6
PLII surround 1
<
preset
>
modus
m
/
st
89.30
01
0
40
virtuell
dvd sat tv tuner
p6
PLII surround 2
<
preset
>
modus
m
/
st
89.30
01
0
40
virtuell
tv
red
media
yello blue
tools info
green
sourc
lighting
power
rgb
IR Learn
Learn
►
Clear
IR Learn
prog -
prog +
vol -
vol +
mute
IR Learn
Learn
►
Clear
Name
IR Learn
power
ok
menu(m)
exit
left
right
IR Learn
press remote button
IR Learn
Programming failed
RF Learn
Plug in RF Device
press OK
RF Learn
Installation successful
RF Learn
Select Device
cla1
cta1
cta2
bra1
input config
in opt1 dvd
in opt2 bd pl
in coax1 sat
in coax2 cd
in line1 tv
in line2 vcr
input config
in opt1 dvd
in opt2 not active
in coax1 not active
in coax2 not active
in line1 not active
in line2 not active
dvd sat tv tuner
p6
Analog stereo
<
preset
>
modus
m
/
st
89.30
01
00
40
IR Learn
yes
Clear Device
Are you sure ?
no
IR Learn
amp
apple tv
audio rec
beamer
blue ray
cd
IR Learn
Learn
Clear
Name
►
input config
in opt1 dvd
in opt2 not active
in coax1 not active
in coax2 not active
in line1 not active
in line2 not active
dvd sat tv tuner
p6
PLII surround 1
<
preset
>
modus
m
/
st
89.30
01
0
40
virtuell
dvd sat tv tuner
p6
PLII surround 2
<
preset
>
modus
m
/
st
89.30
01
0
40
virtuell
lighting
power
rgb
IR Learn
prog -
prog +
vol -
vol +
mute
IR Learn
power
ok
menu(m)
exit
left
right
IR Learn
press remote button
RF Learn
Installation successful
RF Learn
Select Device
cla1
cta1
cta2
bra1
input config
in opt1 dvd
in opt2 bd pl
in coax1 sat
in coax2 cd
in line1 tv
in line2 vcr
dvd sat tv tuner
p6
Analog stereo
<
preset
>
modus
m
/
st
89.30
01
00
40
IR Learn
yes
Clear Device
Are you sure ?
no
IR Learn
amp
apple tv
audio rec
beamer
blue ray
cd
IR Learn
Learn
Clear
Name
►
dvd sat tv tuner
p6
PLII surround 2
<
preset
>
modus
m
/
st
89.30
01
0
40
virtuell
IR Learn
press remote button
RF Learn
Select Device
cla1
cta1
cta2
bra1
vra1
input config
in opt1 dvd
in opt2 bd pl
in coax1 sat
in coax2 cd
in line1 tv
in line2 vcr
dvd sat tv tuner
p6
Analog stereo
<
preset
>
modus
m
/
st
89.30
01
00
40
IR Learn
amp
apple tv
audio rec
beamer
blue ray
cd
IR Learn
Learn
Clear
Name
►
Connecting SPECTRAL sound system:
To register the remote control on a (further) sound system open the Programme Menu
by pressing <exit> and <m> simultaneously. Select “RF Learn”
and conrm this with <ok> . Select “new device” to register a sound system on the
remote control.
After conrmation you will be asked to connect
the sound system to be programmed to the mains power supply and to switch it on.
Wait at least 3 sec., then conrm with <ok>.
Before doing this you should ensure that the sound system had been
disconnected from the mains power supply for at least 1 minute.
The remote control will now try to connect with the newly activated sound system.
A successful connection will be shown in the display as “Installation successful”, while
failure will bring the message “Installation failed”. If the connection
has failed you should identify the problem (device not switched on, distance too great,
sound system not disconnected from the mains power supply
for long enough, etc) and start the process again.
After successful installation you must enter a name for the sound system. If you enter
a name (e.g. BRA1) more than once the remote control will automatically allocate it a
subscript (e.g. BRA1.1, BRA1.2 …). You can then exit the “RF-Learn” menu by
pressing <exit> twice.
If you wish to overwrite an existing sound system, instead of selecting “new device” you
should select the system you wish to replace and conrm your
selection with <ok> . Select the “Learn” function to proceed. Conrm the overwriting
with the “yes” function key or abort the process with “no”.
Continue as previously described under “new device”.
Page 61

61
English
Using a universal remote control for a
SPECTRAL sound system
The main functions of the SPECTRAL sound system can also be controlled by
other universal remote controls.
The following functions can be controlled by IR signals:
• Power
• Mute
• Volume +/-
• mode
• input signal
• scroll key
• arrow keys
Please note:
The IR link system is required to use a universal remote control for a SPECTRAL
sound system.
Fix the IR transmitter at the back of the device with the xing clip (please refer to
picture „Rear view...“, page 40/41).
Learning IR commands:
Start the „Learn Menu“ by pressing <exit> and <m> at the same time, select
„IR Learn“ and take the last position „sound system“.
Conrm you selection by pressing <ok>. Press „exit“ to leave the menu.
Use <sel> to select the sound system. Now you can assign the single functions
of your SPECTRAL sound sytem to another universal remote control.
4.1 and 5.1 mode
The Pre (2.1/5.1 Mode) output enables the connection of active wireless
loudspeakers, for example.
Depending on the selected setting in the system menu (Factory Set/system preset),
the front channels are put out in the 2.1 mode or the surround loudspeakers in
the 4.1/5.1 mode.
Connecting additional loudspeakers you can use the SPECTRAL sound system
also in 4.1 or 5.1 mode:
BRA1, CLA1, CTA1/2, VRA1: Connecting additional active loudspeakers for
rear right and left enables 4.1 mode.
Option: additional active subwoofer
CLA1, CTA2: Connecting additional active loudspeakers for rear
right and left and an additional passive center
speaker enables 5.1 mode.
Option: additional active subwoofer
If additional speakers are connected you have to select the corresponding mode
in the system menu (factory set => system preset).
The sound parameters of these speakers are adjustable in the speaker setup (level
trim, speaker distance and room comp).
Page 62
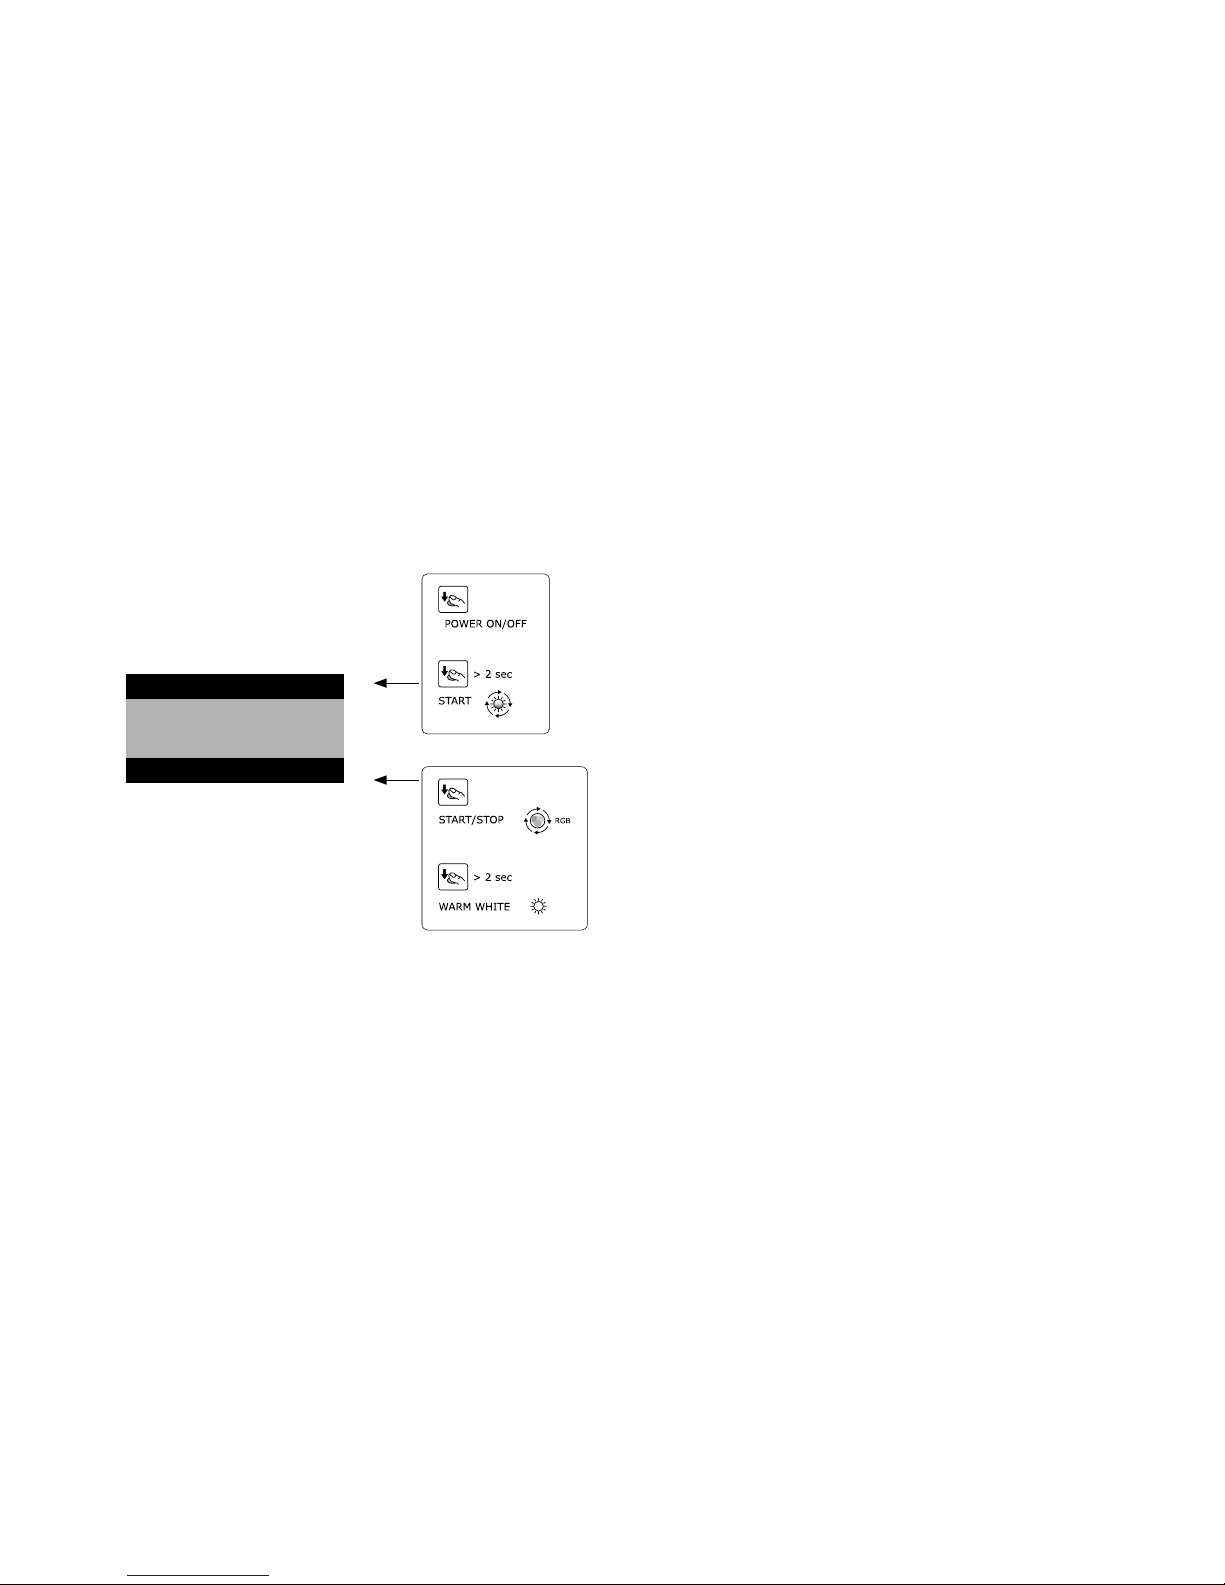
62
IR Lernen
haupttasten
►
blu ray
dvd
dvd rec
sat
tv1
Select Device
bra1
dvd sat tv light
stand by
Keine
Verbindung
Eingangskonfi
g
in opt1 nicht aktiv
in opt2 nicht aktiv
in coax1 nicht aktiv
in coax2 nicht aktiv
in line1 nicht aktiv
in line2 nicht aktiv
Eingangskonfi
g
Kein Eingang konfiguriert
Zum Konfigurieren bitte
mit OK fortfahren
Eingangskonfi
g
in opt1 dvd
in opt2 nicht aktiv
in coax1 nicht aktiv
in coax2 nicht aktiv
in line1 nicht aktiv
in line2 nicht aktiv
dvd sat tvtvradio
p6
Analog stereo
<p.Werte
>
modus
dvd sat tv radio
p6
Analog stereo
<p.Werte
>
modus
m
/
st
89.30
01
0
40
dvd sat tv radio
p6
Analog wide
<p.Werte
>
modus
m
/
st
89.30
01
0
40
dvd sat tv radio
p6
PLII surround 1
<p.Werte
>
modus
m
/
st
89.30
01
0
40
virtuell
dvd sat tv radio
p6
PLII surround 2
<p.Werte
>
modus
m
/
st
89.30
01
0
40
virtuell
dvd
bra1
play
skipskip
pausestop
sat
red
epg
yello blue
info text
green
tv
/
r
tv
red
media
yello blue
tools info
green
sourc
lighting
power
rgb
Lern Menu
IR Lernen
►
RF Lernen
IR Lernen
Lernen
►
Löschen
IR Lernen
prog -
prog +
vol -
vol +
stumm
IR Lernen
haupttasten
blu ray
dvd
►
dvd rec
sat
tv1
IR Lernen
Lernen
►
Löschen
Name
IR Lernen
power
ok
menü(m)
exit
links
rechts
IR Lernen
Taste auf FB drücken
IR Lernen
Speicherung erfolgreich
IR Lernen
Speicherung fehlgeschlagen
RF Lernen
spectral bra1
new device
►
RF Lernen
RF Gerät einstecken
OK drücken
RF Lernen
Installation erfolgreich
RF Lernen
Gerät wählen
cla1
cta1
cta2
bra1
RF Lernen
Installation fehlgeschlagen
lighting
power
rgb
Eingangskonfi
g
in opt1 dvd
in opt2 nicht aktiv
in coax1 nicht aktiv
in coax2 nicht aktiv
in line1 nicht aktiv
in line2 nicht aktiv
Eingangskonfi
g
in opt1 dvd
in opt2 bd pl
in coax1 sat
in coax2 cd
in line1 tv
in line2 vcr
IR Lernen
ja
Gerät löschen
Sind Sie sicher?
nein
IR Lernen
Lernen
Löschen
Name
►
Controlling of the lighting system
Can only be used in connection with a Spectral LED lighting.
Page 63

63
English
Fehlerbeschreibung
The RC display is blank
The RC keeps showing “Welcome
SPECTRAL”, “Good bye SPECTRAL” or
“please wait”
The RC shows “no connection”
Display on the RC is hard to read
The display is in the “wrong”
language (German and English are
the 2 options)
The RC jumps from IR mode into
sound system mode
Possible cause(s)
1. The RC is in idle mode
2. The batteries are missing or wrongly inserted
3. The batteries are “empty”
1. The RC processor has crashed
2. The sound system processor has crashed
1. The sound system is not ready
2. The distance between the sound system and the RC is
too great
3. The sound system processor or the RC processor has
crashed
4. The RC is not registered with the sound system
1. Poor contrast setting
1. The display language of the RC has been switched
2. The language of the sound system has been switched
1. The batteries are almost “empty”
Solution
1. Press any key to activate the RC
2. Insert the batteries correctly (+/-)
3. Insert new batteries correctly (+/-) or charge rechargeable
1. Remove a battery from the RC for min. 30 minutes then
reinsert correctly
2. Switch the sound system o at the mains for min. 30 minutes
then switch it back on
1. Connect the sound system to the mains power supply and /
or switch it “ON”
2. Reduce the distance to less than 10 m
3. Turn the sound system o at the mains for min. 30 minutes
then turn it back on and / or remove a battery from the RC for
min. 30 minutes then re-insert correctly
4. Register the sound system following the instructions of
chapter „Connecting SPECTRAL sound system“
1. Press the “0” and “4” keys simultaneously until “contrast xx” is
displayed and use “<” or “>” to adjust the contrast. Press “exit”
to close the window
1. Press the “5” and “9” keys simultaneously until “language”
(German and English are the 2 options) is displayed and use
the function keys to select the desired language (display)
2. In the “System Menu” (m = > System Menu => factory set =>
language) select the desired language
1. Insert new batteries correctly (+/-) or charge rechargeable
batteries
Troubleshooting and Optimisation
Page 64

64
In IR mode commands are carried
out 2x
IR device is not operating
(correctly)
No inputs except “radio” can be
selected
The sound system does not
recognise Dolby Digital or DTS data
stream (only „analog“ or „pcm“ are
displayed)
No signal from Zone2 / Line Output
RC only displays “surround” instead
of “surround 1” and “surround 2”
1. When programming the code the key on the original RC was
pressed for too long
2. The key on the SPECTRAL – RC was pressed for too long
1. The device has not been correctly programmed
2. The distance between the RCs was too great / too short
3. The code of the original RC cannot be programmed
1. No inputs have been registered in the “input cong” menu (e.g.
initial installation was terminated with “exit”)
2. During the conguration process the “up” or “down” arrow keys
and / or the “exit” key were used
1. The source is only connected to the analog port (Line 1 or 2)
2. The wrong settings have been selected on the source device
1. There should be a multi-channel signal from Zone2 / Line
2. The volume for Zone2 is set too low
1. The sound system has been set to 4.1 or 5.1 mode
1. When programming the function only press the key on
the original RC for a (very) short time
2. Only press the key on the SPECTRAL – RC for a very
short time
1. Repeat the programming process for the SPECTRAL RC
with the original RC of the IR device
2. Ensure a distance of approx. 5 cm between the RCs
when programming
3. Due to the wide range of devices on the market it
can happen that codes cannot be programmed.
Unfortunately this problem has no solution
1. Register the relevant inputs in the “input cong” menu
(m => System Setup => input cong). Follow the exact
instructions of chapter „Initial Installation“
2. Register the relevant inputs in the “input cong” menu
(m => System Setup => input cong) and only use the
correct keys (chapter „Initial Installation“)
1. Connect a digital output from the source device to
Opt 1 / 2 or Coax 1 /2
2. Select “Bitstream” or “Raw” as the data format on the
source device (referring to the instructions given for the
source device)
1. Set “dynamic” (m => System Setup => Dynamic) to
„comp“, under “Output Cong” (m => System Setup =>
Output Cong => Input) select “zone 1” as the input
and on the main screen select the desired source as
input
2. Increase the volume for Zone2 – output under “Volume”
(m => System Setup => Output Cong => Volume)
1. Set the system to 2.1 mode under “system preset” (m
=> “surround 2” , System Setup => factory setup =>
System Preset)
Page 65

65
English
Distorted radio reception
A set radio station is no longer
available once the system has been
switched o and on again (display
back on 87.50)
Sound and image are not (lip)
synched
No (music) playback
Volume will not go above a certain
value (</=99)
The sound system is quieter when
switched on than when switched
o
1. Poor aerial position
2. Poor geographical location
3. The station has not been properly set
1. The station was not allocated a programme slot
1. Long processing times in the TV delay the image
1. The sound system is switched o or in Standby mode
2. The volume is set low or on mute
3. The wrong input has been selected
4. The signal (data stream) from the source has not been
recognised by the sound system
5. Wrong setting of Line2 / Phono input when using a record
player
1. The “max volume” is set to the maximum possible value
1. The “start volume” is set to a value that is lower than the
volume set before switching o
1. Arrange the extended (!) aerial as openly as possibly,
well away from metal surfaces
2. Use a roof-mounted aerial or a broadband cable
connection
3. Tune the station manually, following the instructions of
chapter „Tuner“
1. Simply press the “ok” key to save a station in Programme
Slot 1
1. Delay the sound in “lip sync” (m => System Menu =>
lip sync) so that the image and sound are synchronised
(simultaneous)
1. Switch the sound system on so that the RC displays the
main screen
2. Use Volume + (V+) to increase the volume
3. Select the input that is connected to the relevant
source
4. Set the source to a dierent data format or select
another recognised by the sound system audio format
during playback (referring to the instructions of the
source device)
5. Set Line 2 / Phono – Input “line2 cong” to “phono”
(m=>System Setup => factory set => line2 cong)
1. Set the volume limiter (m => System Setup => factory
set =>max volume) to the desired value (max. 99)
1. Set the “start volume” (m => System Setup => factory
set => start volume) to the desired value (max. 99 but
not higher than “max volume”)
Page 66

66
The balance is wrong (location is
not central)
In Surround mode there is little or
no surround sound
In Surround mode the voices are
hard to understand
The sound system has little or no
low bass
1. The volume adjustment of the satellite speakers is wrongly set
or the listening spot is not central
1. The Play mode is set on “stereo” or “wide”
2. The listening spot is not central enough
3. The source only supplies a 2-channel signal
4. The sound system is set to 4.1/5.1 mode
1. During recording (BD or DVD) the voices were mixed between
the right and left channels
2. The sound system is in 5.1 mode
1. Listening at a (very) low volume
2. The output for an external subwoofer is activated but no
subwoofer has been connected or is operating
3. The sound system is in a poor acoustic location
4. Equalisers have been set in the “Room Comp” menu (volume
level increase)
1. In the Loudspeaker Menu use (m => Speaker Setup =>
Level Trim) to set the correct volume levels and (m =>
Speaker Setup => Speaker Distance) to set the correct
distances
1. Set Play modes to “surround 1” or “surround 2”
2. In the Loudspeaker Menu use (m => Speaker Setup =>
Level Trim) to set the correct volume levels and (m =>
Speaker Setup => Speaker Distance) to set the correct
distances to the listening spot
3. To achieve optimal sound in the room the sound
system requires a multi-channel data stream. In this
case the RC displays “Virtual Dolby Digital” or “Virtual
DTS”. All other displays (e.g. “Virtual Dolby PLII) mean
that it is not a multi-channel data stream, which leads
to less of a surround sound impression
4. Set the system to a 2.1 mode with Virtual surroundmode at “System Preset” (m => System Setup =>
factory setup => System Preset)
1. Select “surround 2“ as Play mode
2. Set the system to a 2.1 or 4.1 mode at “System Preset”
(m => System Setup => factory setup => System
Preset)
1. Set “Bass expand” (m => Speaker Setup => Bass expand)
to “low” or “high”
2. Deactivate the output for an external subwoofer at
“Sub Output” (m => System Menu => Sub Output) or
connect it to an operational external subwoofer using
Sub-Out
3. Where possible, set up the system in a dierent position
(e.g. closer to the wall)
4. Correct or delete the settings for the room adjustment
(m => Speaker Menu => Room Comp => subwoofer)
Page 67

67
English
The sound system has too much
low bass
The sound system has too little
top bass
The sound system has too much
upper bass
The sound system has too little or
too much level in the whole bass
range
The sound system sounds “at” (too
little treble)
1. Listening at a high volume and activating the “Bass expand”
2. Using an external subwoofer with too high a level
3. The sound system is in a poor acoustic location
4. Equalisers have been set in the “Room Comp” menu (volume
level increase)
1. The sound system is in a poor acoustic location
2. Equalisers have been set in the “Room Comp” menu (volume
level increase)
3. The bass level in the “Tone Control” menu is set to neutral or
reduced
4. Use of an external subwoofer with the wrong phasing (phase
adjustment) between internal and external subwoofers
1. The sound system is in a poor acoustic location
2. Equalisers have been set in the “Room Comp” menu (volume
level increase)
3. The bass level in the “Tone Control” menu is neutral or too high
1. The volume level adjustment for the subwoofer is set wrong
1. The listening area has severely dampened acoustics or the
treble sound setting is set very low
2. A pure stereo signal is being played in one of the surround
modes
3. Equalisers have been set in the “Room Comp” menu (volume
level increase)
1. Set “Bass expand” (m => Speaker Setup => Bass
expand) to “low” or “o”
2. Adjust the external subwoofer (to a lower level)
3. Where possible, set up the system in a dierent position
(e.g. closer to the wall)
4. Correct or delete the settings for the room adjustment
(m =>Speaker Menu => Room Comp => subwoofer)
1. Where possible, set up the system in a dierent position
(e.g. closer to the wall)
2. Correct or delete the settings for the room adjustment
(m => Speaker Menu => Room Comp => subwoofer)
3. Increase the bass level in the Sound Regulation menu
(m => Speaker Menu => Tone Control => Bass)
4. Correct the phasing on the external subwoofer to suit
the system internal subwoofer or change the position
of the external subwoofer
1. Where possible, set up the system in a dierent position
(e.g. closer to the wall)
2. Correct or delete the settings for the room adjustment
(m => Speaker Menu => Room Comp => subwoofer)
3. Decrease the bass – level in the Sound Regulation
menu (m => Speaker Menu => Tone Control => Bass)
1. In the Speaker Menu (m => Speaker Menu => Level
Trim => subwoofer) set the desired volume level for the
subwoofer
1. Increase the treble setting in the sound settings menu
(m => Speaker Menu => Tone Control => treble )
2. Set the sound system to stereo play mode
3. Correct or delete the settings for the room adjustment
(m => Speaker Menu => Room Comp => front)
Page 68

68
The sound system sounds sharp or
aggressive (too much treble)
The sound signal sounds (very)
distorted
1. The listening area is acoustically hard (less dampened) or the
treble sound setting is too high
2. Equalisers have been set in the “Room Comp” menu (volume
level increase)
1. Listening at very high volume, which leads to overmodulation
of the sound system
2. Use of an analog input with a signal level that is too high (level
of the source is higher than 2Ve)
3. Use of Line2 / Phono input with a Line-level source and the
“Phono” setting
4. Use of Zone2 – Output to operate an external device with a
level that is set too high
5. With multi-channel recordings it is theoretically possible
that the signal processor of the sound system will be
overmodulated
1. Decrease the treble setting in the sound settings menu
(m => Speaker Menu => Tone Control => treble)
2. Correct or delete the settings for the room adjustment
(m => Speaker Menu => Room Comp => front)
1. Immediately reduce the volume (also to avoid
damaging the device)
2. Decrease the level of the source if this has a volume
control
3. Set the Line 2 /Phono – Input to “line” at “line2 cong”
(m => System Setup => factory set => line2 cong)
4. Reduce the volume for the Zone2 – Output using the
Volume menu (m => System Setup => Output Cong
=> zone2 vol)
5. Set the “dynamic” to “comp” (m => System Setup =>
dynamic)
Page 69
69
English
Play-In Phase
To develop its maximum performance, a loudspeaker requires a running-in period
of approx. 15-20 operating hours. During this period, the properties of all mechanical components change until they achieve the values determined during the
development of the speaker, i.e. the chassis suspension becomes more exible,
which has a positive inuence on sound reproduction.
Manufactured under license from Dolby Laboratories. Dolby and the double-D symbol are
registered trademarks of Dolby Laboratories.
For DTS patents, see http://patents.dts.com.
Manufactured under license from DTS Licensing
Limited. DTS, the Symbol, & DTS and the Symbol
together are registered trademarks, and DTS
TruSurround is a trademark of DTS, Inc. © DTS,
Inc. All Rights Reserved.
Page 70

70
Page 71

71
English
Page 72
Garantie-Urkunde | Warranty-Card
Certicat de garantie | Certicato di garanzia
Seriennummer | Serial number | Numéro de série | Numero di serie
Name d. Käufers | Buyer’s name | Nom de l’acheteur | Nome dell‘acquirente
Adresse | Address | Adresse | Indirizzo
Händlerstempel | Dealer’s Stamp | Tampon du commerçant | Timbro del rivenditore
GARANTIE
Über die gesetzlich vorgeschriebene Gewährleistung hinaus übernimmt SPECTRAL für alle Passiv-Lautsprecher eine Garantie
von 5 Jahren. Für die Aktivsubwoofer und teilaktiven Boxen werden 2 Jahre Garantie gewährt. Die Garantiezeit beginnt mit dem
Kauf und gilt nur für den Erstkäufer. Ein Garantieanspruch besteht nur bei Verwendung der Originalverpackung. Ausgeschlossen
sind Transportschäden und Schäden, die durch unsachgemäßen Gebrauch verursacht wurden. Der Anspruch verlängert sich
nicht durch den Austausch von Bauteilen innerhalb der Garantiezeit. Dies gilt für alle Lautsprecher, die bei einem autorisierten
SPECTRAL Fachhändler gekauft wurden. Wenden Sie sich im Schadensfall bitte an ihn oder direkt an den SPECTRAL Service.
WARRANTY
SPECTRAL provides a 5 year warranty against factory defects for all passive loudspeakers. There is a 2 year warranty against
factory defects for active subwoofers and semi-active speakers. The warranty period starts with the purchase and applies only to
the rst purchaser. Warranty can only be granted when using the original packaging. Transport damage and damage caused by
improper use are excluded from the warranty. Warranty cannot be extended by exchanging components during the guarantee
period. This applies to all loudspeaker systems purchased from an authorised SPECTRAL specialist trader. In the case of a claim,
please contact your SPECTRAL dealer or the SPECTRAL Service depar tment directly.
GARANTIE
Outre la garantie prescrite légale, SPECTRAL garantit tous les haut-parleurs passifs faisant pendant 5 ans. Les caissons de basse
actifs et les appareils partiellement actifs sont garantis 2 ans. La durée de garantie prend eet à la date d’achat et ne vaut que
pour le premier acheteur. Sont exclus de la garantie les dommages causés par le transport et ceux provoqués par un usage
inapproprié de l’appareil. Le droit à garantie ne se prolonge pas par le remplacement de composants eectué pendant la durée
de garantie. Ceci est valable pour tous les haut-parleurs vendus par un commerçant spécialisé et homologué par SPECTRAL. En
cas de dommage, s’adresser à ce commerçant ou directement au service SPECTRAL.
GARANZIA
Oltre alla garanzia prevista per legge, SPECTRAL ore una copertura di 5 anni per tutti gli altoparlanti passivi. Mentre i subwoofer
attivi e le casse parzialmente attive sono garantite per 2 anni. Il periodo di garanzia comincia con l‘acquisto ed è valido solo per
il primo acquirente. Il diritto di garanzia è valido solo con l‘uso della confezione originale. La garanzia esclude i danni causati dal
trasporto e quelli provocati da un uso non conforme. Il diritto di garanzia non si estende in caso di sostituzione di componenti
nel periodo di garanzia. Ciò si applica a tutti gli altoparlanti che sono stati acquistati presso un rivenditore SPECTRAL autorizzato.
In caso di guasto coperto da garanzia, rivolgersi al proprio rivenditore oppure direttamente all‘assistenza clienti di SPECTRAL.
SPECTRAL Audio Möbel GmbH
Robert-Bosch-Str.1, 74385 Pleidelsheim (Germany)
Tel.: +49 7144 88418-80, Fax: +49 7144 88418-40
E-Mail: [email protected], Internet: www.SPECTRAL.eu
 Loading...