


CalMAN Client 3
Quick Start Guide
CalMAN Client 3 is a test pattern source and display control utility, available for both Windows and Mac.
Client 3 is installed on a Windows or Mac computer that has a monitor to be tested or calibrated.
CalMAN (or CalMED), installed on the same or another computer, connects to Client 3 via an IP socket
connection.
CalMAN controls Client 3 to automatically produce the required test patterns (patches) on the selected
monitor as CalMAN measures the monitor. CalMAN also controls Client 3’s interface to the computer’s
monitor calibration profiles. As CalMAN develops monitor calibration data, it sends the data to Client 3,
which writes the data to the appropriate computer data file. This includes creating and managing ICC
profiles.
Required CalMAN Software Version:
Version 5.0 or later
Required CalMAN Workflow:
Any workflow
Required Operating System:
Client 3 for Windows - Windows® Vista™ or later, with latest system updates installed.
Client 3 for Mac - OS X Mountain Lion 10.8.x or later, with latest system updates installed.
Note1: If you are using OS X Yosemite, version 10.10.2 or later is required.
Note2: A legacy install of Client 3 for Mac is available for OS X Lion 10.7.x
Client 3 Installation
Install CalMAN Client 3 by downloading the installer from the Client 3 Downloads page to the computer
that is driving the monitor(s) to be tested or calibrated. Run the installer on the target computer.
http://calman.spectracal.com/calman-client-3-download.html
NOTE: If you are updating from a version of Client 3 that is older than 3.0.2.73, uninstall the existing
version of Client 3 before installing the new version.
To check the current version of Client 3, right-click on the Client 3 shortcut icon on the menu bar or task
bar, then select About (Figure 1).
Corporate: +1 206 420 7514 | Tech Support: +1 206 457 8949 | www.spectracal.com
17544 Midvale Ave. N. Shoreline, WA 98133 USA

Figure 1: The Client 3 About screen shows the version of the current Client 3 installation.
CalMAN Installation Configurations
The main CalMAN Display Calibration Software can be installed in a number of different configurations
to control Client 3 for test pattern output and display control. These possible CalMAN configurations are
described below, starting with whether the monitor under test is connected to a Mac or Windows
computer.
To test or calibrate a monitor on a Mac computer (including a laptop screen):
Client 3 for Mac needs to be installed on the Mac computer that is driving the monitor under
test.
1. CalMAN can be installed on the same Mac computer as the monitor under test, running in a
VMware Fusion* virtual Windows machine.
2. CalMAN can be installed on a separate Windows computer.
3. CalMAN can be installed on a separate Mac computer, running in a VMware Fusion virtual
Windows machine or under Boot Camp with Windows.
* CalMAN can also run on a Mac in a virtual Windows machine within Parallels, but due to
occasional USB device driver issues with Parallels, it is not currently recommended.
To test or calibrate a monitor on a Windows computer (including a laptop screen):
Client 3 for Windows needs to be installed on the Windows computer that is driving the monitor
under test.
1. CalMAN can be installed on the same Windows computer as the monitor under test.
2. CalMAN can be installed on a separate Windows computer.
3. CalMAN can be installed on a separate Mac computer, running in a VMware Fusion virtual
Windows machine or under Boot Camp with Windows.
In each of the above installation configurations, CalMAN will connect to Client 3 over TCP/IP to control
the monitor under test and produce desired test patterns on the monitor. The computer running
CalMAN needs to be on the same network as the computer that is driving the monitor under test.
CalMAN Connection to Client 3
Corporate: +1 206 420 7514 | Tech Support: +1 206 457 8949 | www.spectracal.com
17544 Midvale Ave. N. Shoreline, WA 98133 USA
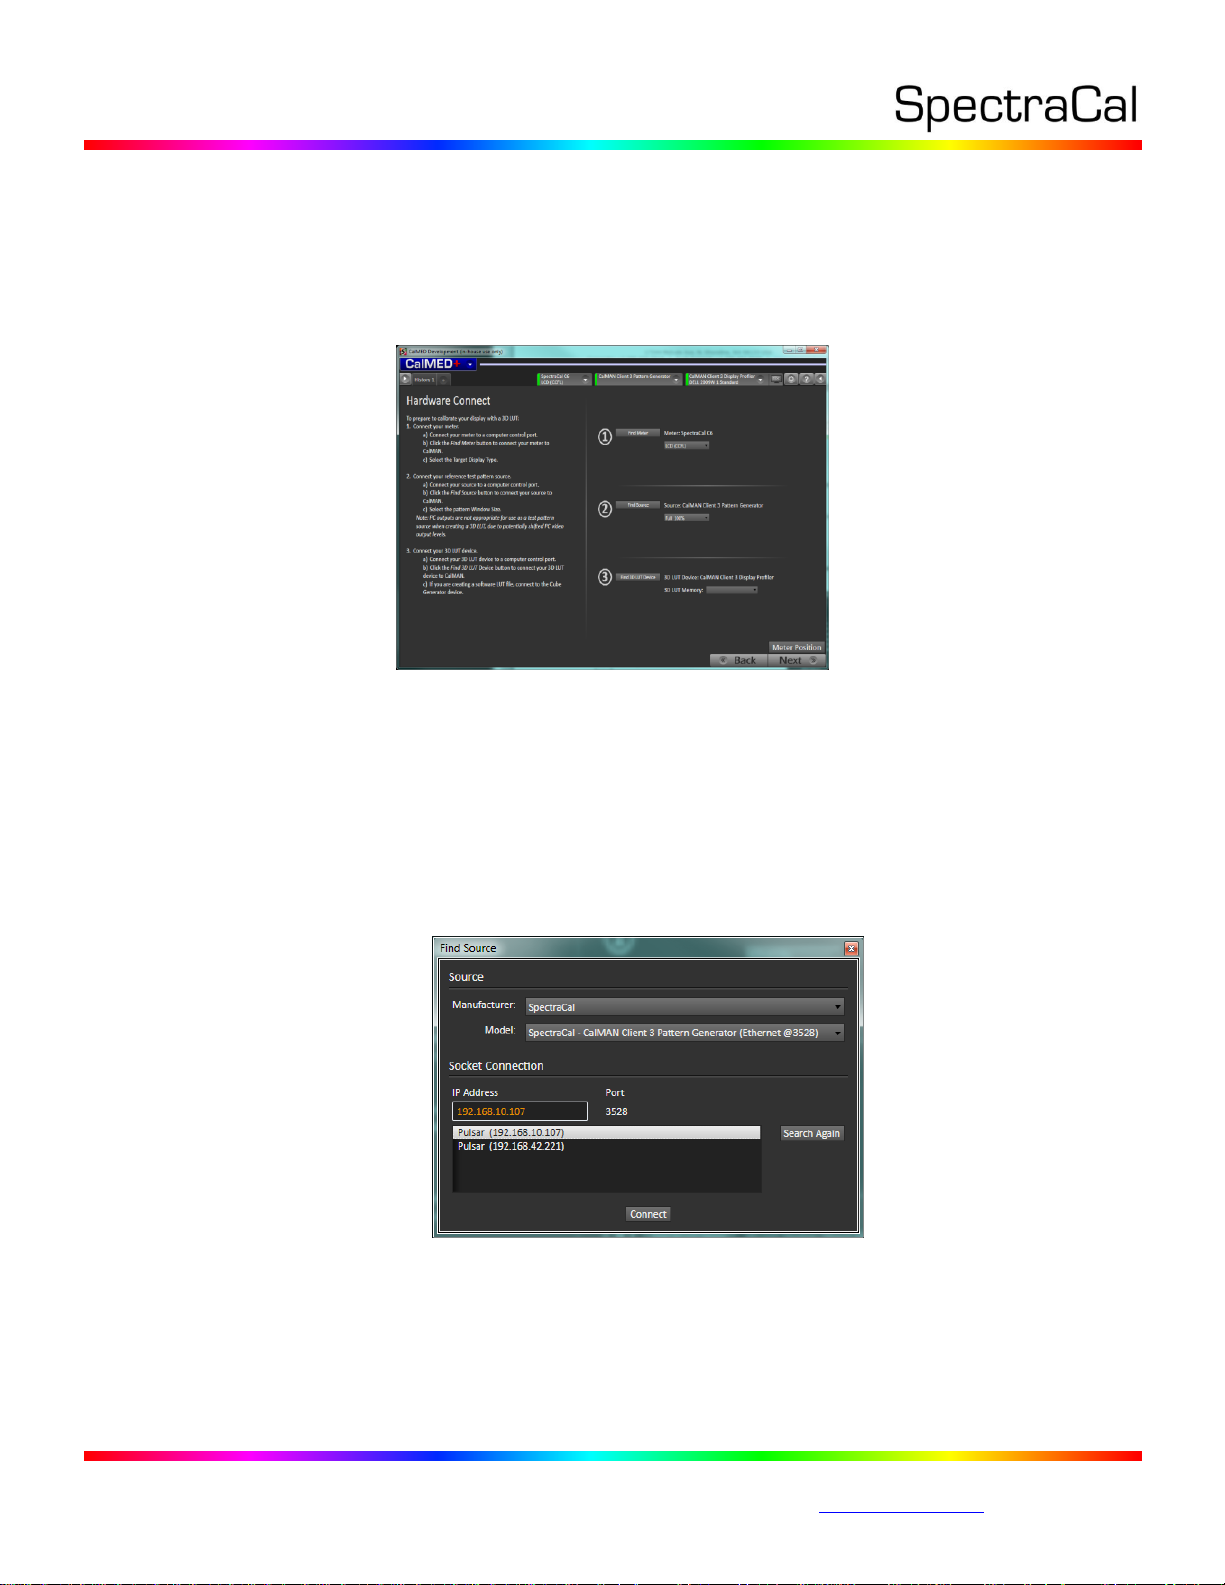
In each CalMAN workflow, there is usually a page called either Session Setup or Device Connect (Figure
2). On that page, you can click the Find Source button to connect CalMAN to Client 3 as a test pattern
source on the target computer. You can click the Find Display button to connect CalMAN to Client 3 for
display control on the target computer. Or, you can open the Source Settings and the Display Control
tabs to make the connections, at the upper right corner of the CalMAN screen.
Figure 2: A Session Setup or Device Connect page in a CalMAN workflow provides instructions
and action buttons for connecting CalMAN to Client 3.
a. Source Connect
1. Click the Find Source button.
2. On the Source dialog (Figure 3), under Manufacturer, select “SpectraCal.”
3. Under Model, select “SpectraCal – CalMAN Client 3 Pattern Generator.”
4. Select the IP address of the target computer.
5. Click Connect.
Figure 3: The Find Source dialog automatically searches for all installed instances of Client 3 on
the local network to allow you to connect CalMAN to the desired computer with Client 3.
b. Display Connect
1. Click the Find Display button.
Corporate: +1 206 420 7514 | Tech Support: +1 206 457 8949 | www.spectracal.com
17544 Midvale Ave. N. Shoreline, WA 98133 USA

2. On the Find Display dialog (Figure 4), under Manufacturer, select “SpectraCal.”
3. Under Model, select “SpectraCal – CalMAN Client 3 Display Profiler.”
4. Select the IP address of the target computer.
5. Click Connect.
Figure 4: The Find Display dialog automatically searches for all installed instances of Client 3 on
the local network to allow you to connect CalMAN to the desired computer with Client 3.
Client 3 Licensing
Each Client 3 installation that is used for display control requires a client license. When CalMAN
connects to a new Client 3 installation for the first time, a Client License dialog (Figure 5) will inform you
that the client is not yet licensed. The dialog will also indicate how many client licenses remain available
in CalMAN. If you wish to use one of your available client licenses to license the new client, click the
Authorize button.
Figure 5: The Client Licensing dialog allows you to authorize one of your available Client 3
licenses for a newly connected instance of Client 3.
When you click Authorize, the new Client 3 installation will be licensed and CalMAN will connect to the
client for calibration capabilities.
Note: The client authorization action is not reversible.
Corporate: +1 206 420 7514 | Tech Support: +1 206 457 8949 | www.spectracal.com
17544 Midvale Ave. N. Shoreline, WA 98133 USA

You can purchase additional Client 3 Licenses to replenish in CalMAN by contacting
sales@spectracal.com or by visiting:
http://store.spectracal.com/residential-av/license-support-meter-services.html.
If you have any questions or concerns when licensing Client 3 via CalMAN, please contact:
support@spectracal.com.
Client 3 Preferences
You can open the Client 3 Preferences window to see which monitors Client 3 has detected on the local
computer, to view information for each of those monitors, and to manage the calibration profiles for
each of the monitors. To open the Preferences window, right-click on the Client 3 shortcut icon on the
menu bar or task bar, then select Preferences (Figure 6).
Figure 6: The Client 3 Preferences window allows you to view information about the detected
monitors and manage calibration profiles for each monitor.
Available Monitors
The drop-down box under Available Monitors lists each of the locally connected monitors that has been
detected by Client 3. Select one of the listed monitors to view information about that monitor.
Corporate: +1 206 420 7514 | Tech Support: +1 206 457 8949 | www.spectracal.com
17544 Midvale Ave. N. Shoreline, WA 98133 USA

If a monitor has just been connected to the computer, press the Detect Monitors button to detect the
new monitor. Only those monitors connected through the computer’s standard graphics adapter can be
detected.
Monitor Profiles
The text box under Monitor Profiles (Figure 6) lists each of the currently available CalMAN calibration
profiles for the currently selected monitor. The default list of Monitor Profiles may be different for
different installed versions of Client 3.
You can add or delete CalMAN monitor profiles by clicking the Add New Profile or Delete Profile buttons.
When you select a profile in the Monitor Profiles list, you can also change the name of the profile by
editing it in the separate edit box. After you have made any changes to the monitor profiles, click the
Save Profile Changes button to make those changes permanent.
Each of the monitor profiles can be calibrated separately by CalMAN. On the Display Control tab in
CalMAN, under Display Mode Selection, select the monitor profile that you wish to test or calibrate.
Client 3 Profile Management
After CalMAN testing or calibration is complete, Client 3 remains as an active tray application on the
installed computer. Each time the computer is booted, Client 3 automatically loads the last selected
CalMAN profile for each of the connected monitors.
To select a different calibration profile for one of the monitors, right-click on the Client 3 icon, hover the
mouse over the desired monitor listing, and the current list of profiles for that monitor will be displayed,
with the currently active profile checked (Figure 7). To select one of the other monitor profiles, click on
the desired profile.
Figure 7: Client 3 runs as an active tray application on the installed computer to manage the
monitor calibration profiles.
Corporate: +1 206 420 7514 | Tech Support: +1 206 457 8949 | www.spectracal.com
17544 Midvale Ave. N. Shoreline, WA 98133 USA

Corporate: +1 206 420 7514 | Tech Support: +1 206 457 8949 | www.spectracal.com
17544 Midvale Ave. N. Shoreline, WA 98133 USA
 Loading...