

Page 1
INSTRUCTION
4MP Flexible Intensier Technology
TVI Motorized Zoom Focus Camera
MANUAL
HFB4M
(Bullet Camera)
HFD4M
(Dome Camera)
Speco Technologies is constantly developing product improvements.
We reserve the right to modify product design and specications without notice and without incurring any obligation.
Speco(Fit).indd 1 2020-05-21 오전 9:52:03
Rev. 01/01/2020
Page 2
Contents
◑
Contents ...................................................... 2
◑
Precautions ................................................. 3, 4
◑
Safety Instructions ...................................... 5
◑
Package Contents ....................................... 6
◑
Camera Installation ..................................... 7-10
◑
Specications .............................................. 11,12
◑
Camera Dimension ..................................... 13
◑
Features ...................................................... 14
◑
OSD Menu Details ...................................... 15- 28
◑
Trouble Shooting ......................................... 29
- 2 -
Speco(Fit).indd 2 2020-05-21 오전 9:52:03
Page 3
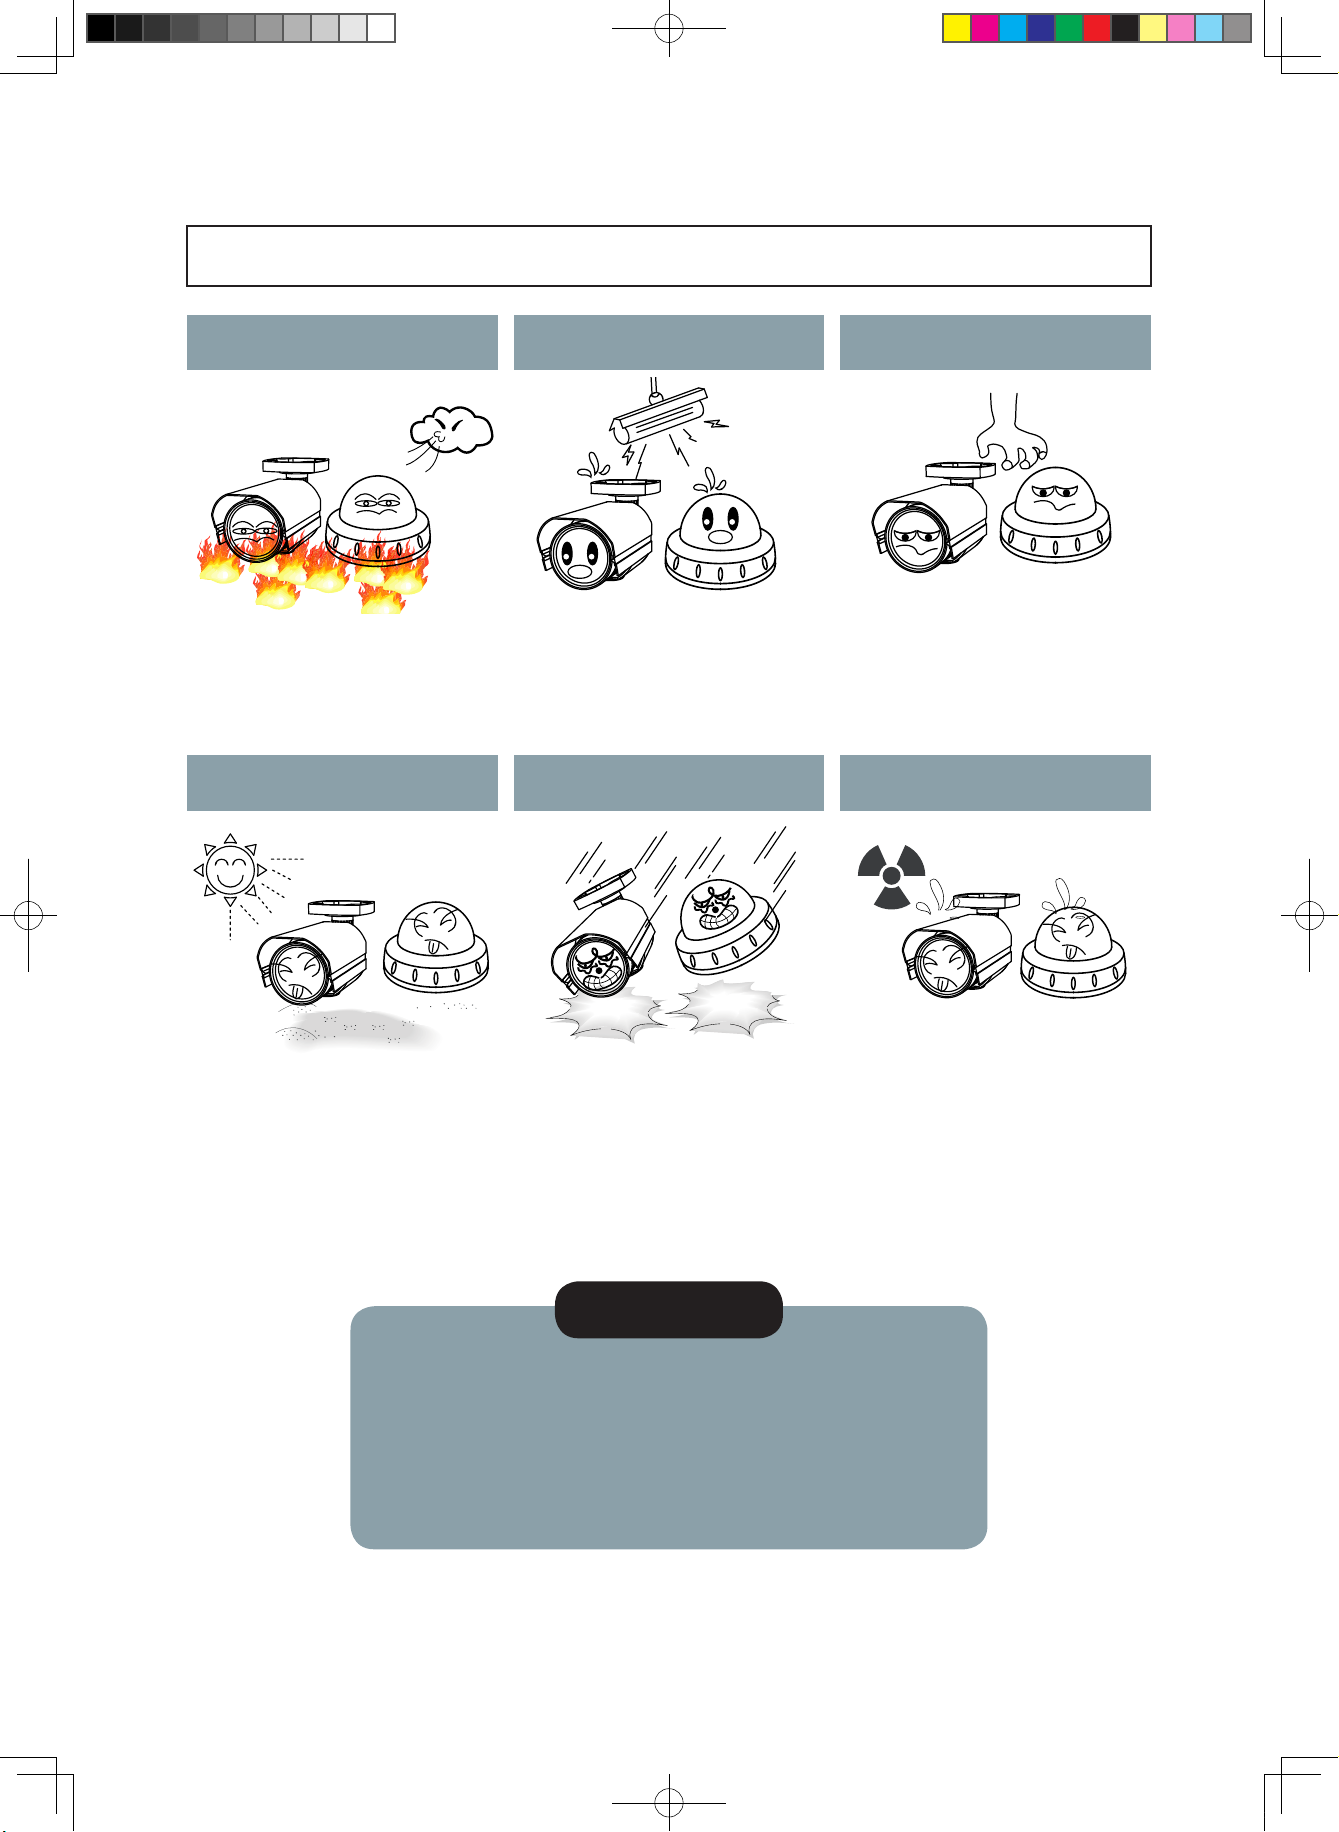
Precautions
Do not install the camera in
extreme temperature conditions.
Only use the camera under conditions
where temperatures are between
-10°C and +50°C. Be especially careful to
provide ventilation when operating under
high temperatures.
Never keep the camera pointed
directly at strong light.
Do not install the camera under
unstable lighting conditions.
Severe lighting change or flicker can
cause the camera to work improperly.
Do not drop the camera or subject
it to physical shocks.
Do not touch the front lens of the
camera.
This is one of the most important parts of
the camera. Be careful not to leave
fingerprints on the lens cover.
Do not expose the camera to
radioactivity.
It can cause malfunctions to occur.
* If the camera is exposed to spotlight or object reflecting strong light,
smear or blooming may occur.
* please check that the power satisfies the normal specification before
connecting the camera.
Housing damage can compromise
weatherproof ratings.
NOTE
If exposed to radioactivity the CCD
will fail.
- 3 -
Speco(Fit).indd 3 2020-05-21 오전 9:52:07
Page 4
CAUTION
RISK OF ELECTRIC SHOCK
DO NOT OPEN
CAUTION:TO REDUCE THE RISK OF ELECTRIC SHOCK
DO NOT REMOVE COVER(OR BACK).
NO USER-SERVICEABLE PARTS INSIDE.
REFER SERVICING TO QUALIFIED SERVICE PERSONNEL.
ISO14001
The lightning flash with an arrowhead symbol, within an equilateral
triangle is intended to alert the user to the presence of uninsulated
dangerous voltage within the product's enclosure that may be of
sufficient magnitude to constitute a risk of electric shock to persons.
The exclamation point within an equilateral triangle is intended to alert
the user to the presence of important operating and maintenance
(servicing) instructions in the literature accompanying the appliance.
INFORMATION - This equipment has been tested and found to comply with
limits for a Class A digital device, pursuant to part 15 of the FCC Rules & CE Rules.
These limits are designed to provide reasonable protection against harmful
interference when the equipment is operated in a commercial environment.
This equipment generates, uses, and can radiate radio frequency energy and, if
not installed and used in accordance with the instruction manual, may cause
harmful interference to radio communications.
Operation of this equipment in a residential area is likely to cause harmful
interference in which case the user will be required to correct the interference at
their own expense.
WARNING - Changes or modifications not expressly approved by the
manufacturer could void the user’s authority to operate the equipment.
Apparatus shall not be exposed to dripping or splashing and no objects
filled with liquids, such as vases, shall be placed on the apparatus.
CAUTION : To prevent electric shock and risk of fire hazards:
ō
Do NOT use power sources other than those specified.
WARNING - To prevent electric shock and risk of fire hazards:
Do NOT use power sources other than that specified.
Do NOT expose this appliance to rain or moisture.
In USA and Canada, Use Class 2 Power Supply Only
Speco(Fit).indd 4 2020-05-21 오전 9:52:10
- 4 -
Page 5

Safety Instructions
Precautions for use
This camera should be installed by qualied personnel only
◑
There are no user serviceable parts inside
◑
Do not disassemble this camera other than to make initial adjustments
◑
Use a UL approved regulated 24 volt AC or 12 volt DC power supply
◑
Use appropriate low voltage power cable to prevent re or electrical shock
◑
Please insure that your installation area can support the weight of the camera
◑
Please handle this camera carefully :
Do not use a strong or abrasive detergent when cleaning the camera
◑
Do not install near cooling or heating device
◑
- 5 -
Speco(Fit).indd 5 2020-05-21 오전 9:52:10
Page 6

Package Contents
Please make sure that the following items are included in the Package:
1) HFB4M Included Junction Box
• 1 Power Jack
• 1 Mount Base Sticker
• 1 Wrench
• Set Screw
- 3 Tapping Screws 4x25
- 4 Hexagon Socket Screws M4x14
- 3 Plastic Anchor
2) HFD4M Included Junction Box
• 1 Power Jack
• 1 Chameleon Cover
• 1 Junction Box Sponge
• 1 Wrench
• Set Screw
- 4 Tapping Screws 4x25
- 3 MachineScrews M4x15
- 4 Plastic Anchor
- 6 -
Speco(Fit).indd 6 2020-05-21 오전 9:52:10
Page 7
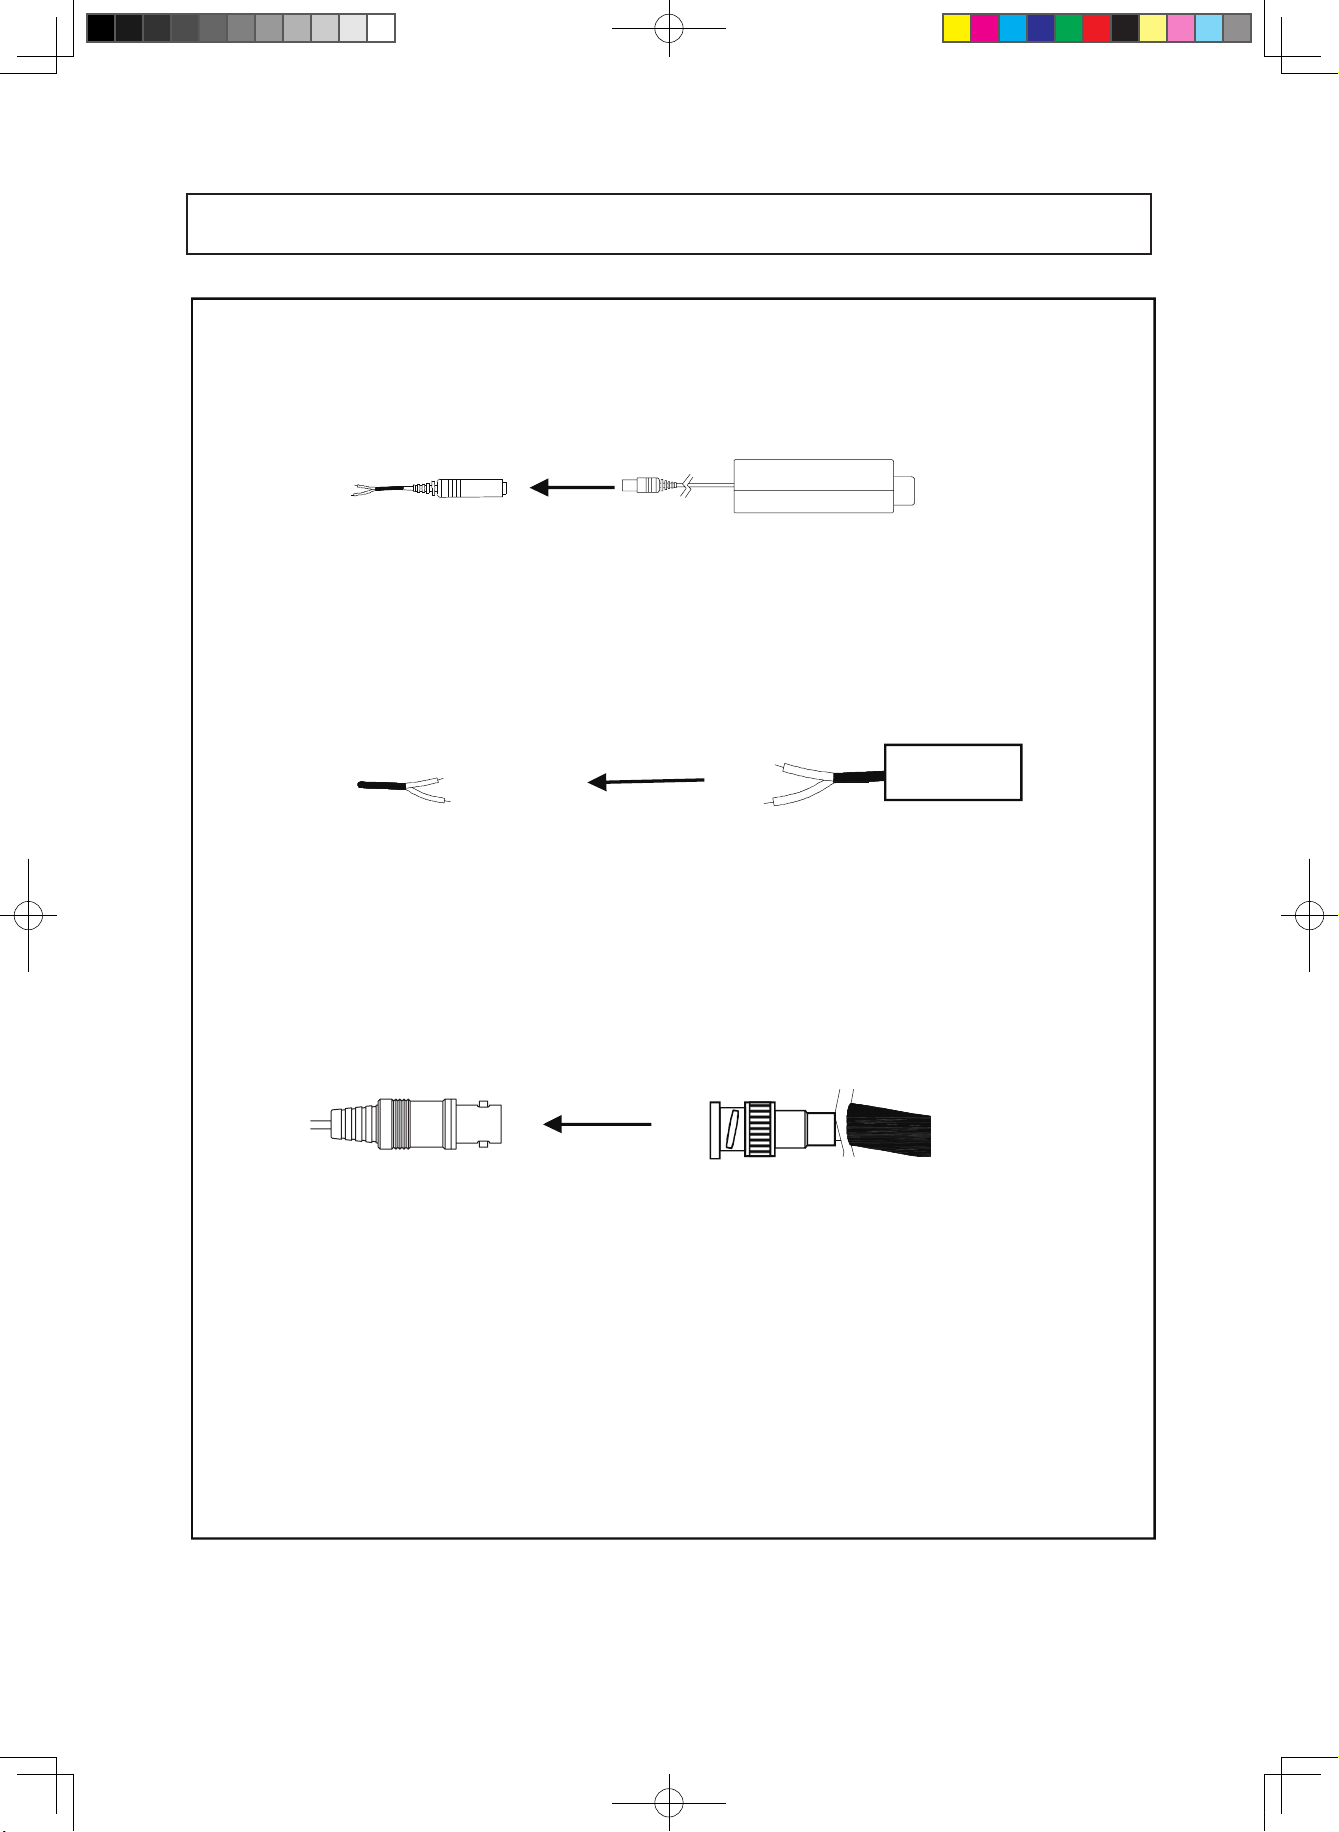
Camera Installation
CAMERA INSTALLATION
CONNECT POWER CABLE
1. WHEN USING 12 VOLTS DC (constant voltage 500mA)
2. WHEN USING 24 VOLTS AC (40 Volt Amps)
3. CONNECT VIDEO CABLE
CONNECT BLACK COLOR BNC CABLE TO THE BNC JACK.
DC 12V Powe r Supply
Power In put :RED
Center : (+)
LBACK:(-)
RED(+)
Power Supply
AC 24V
- 7 -
Speco(Fit).indd 7 2020-05-21 오전 9:52:11
Page 8
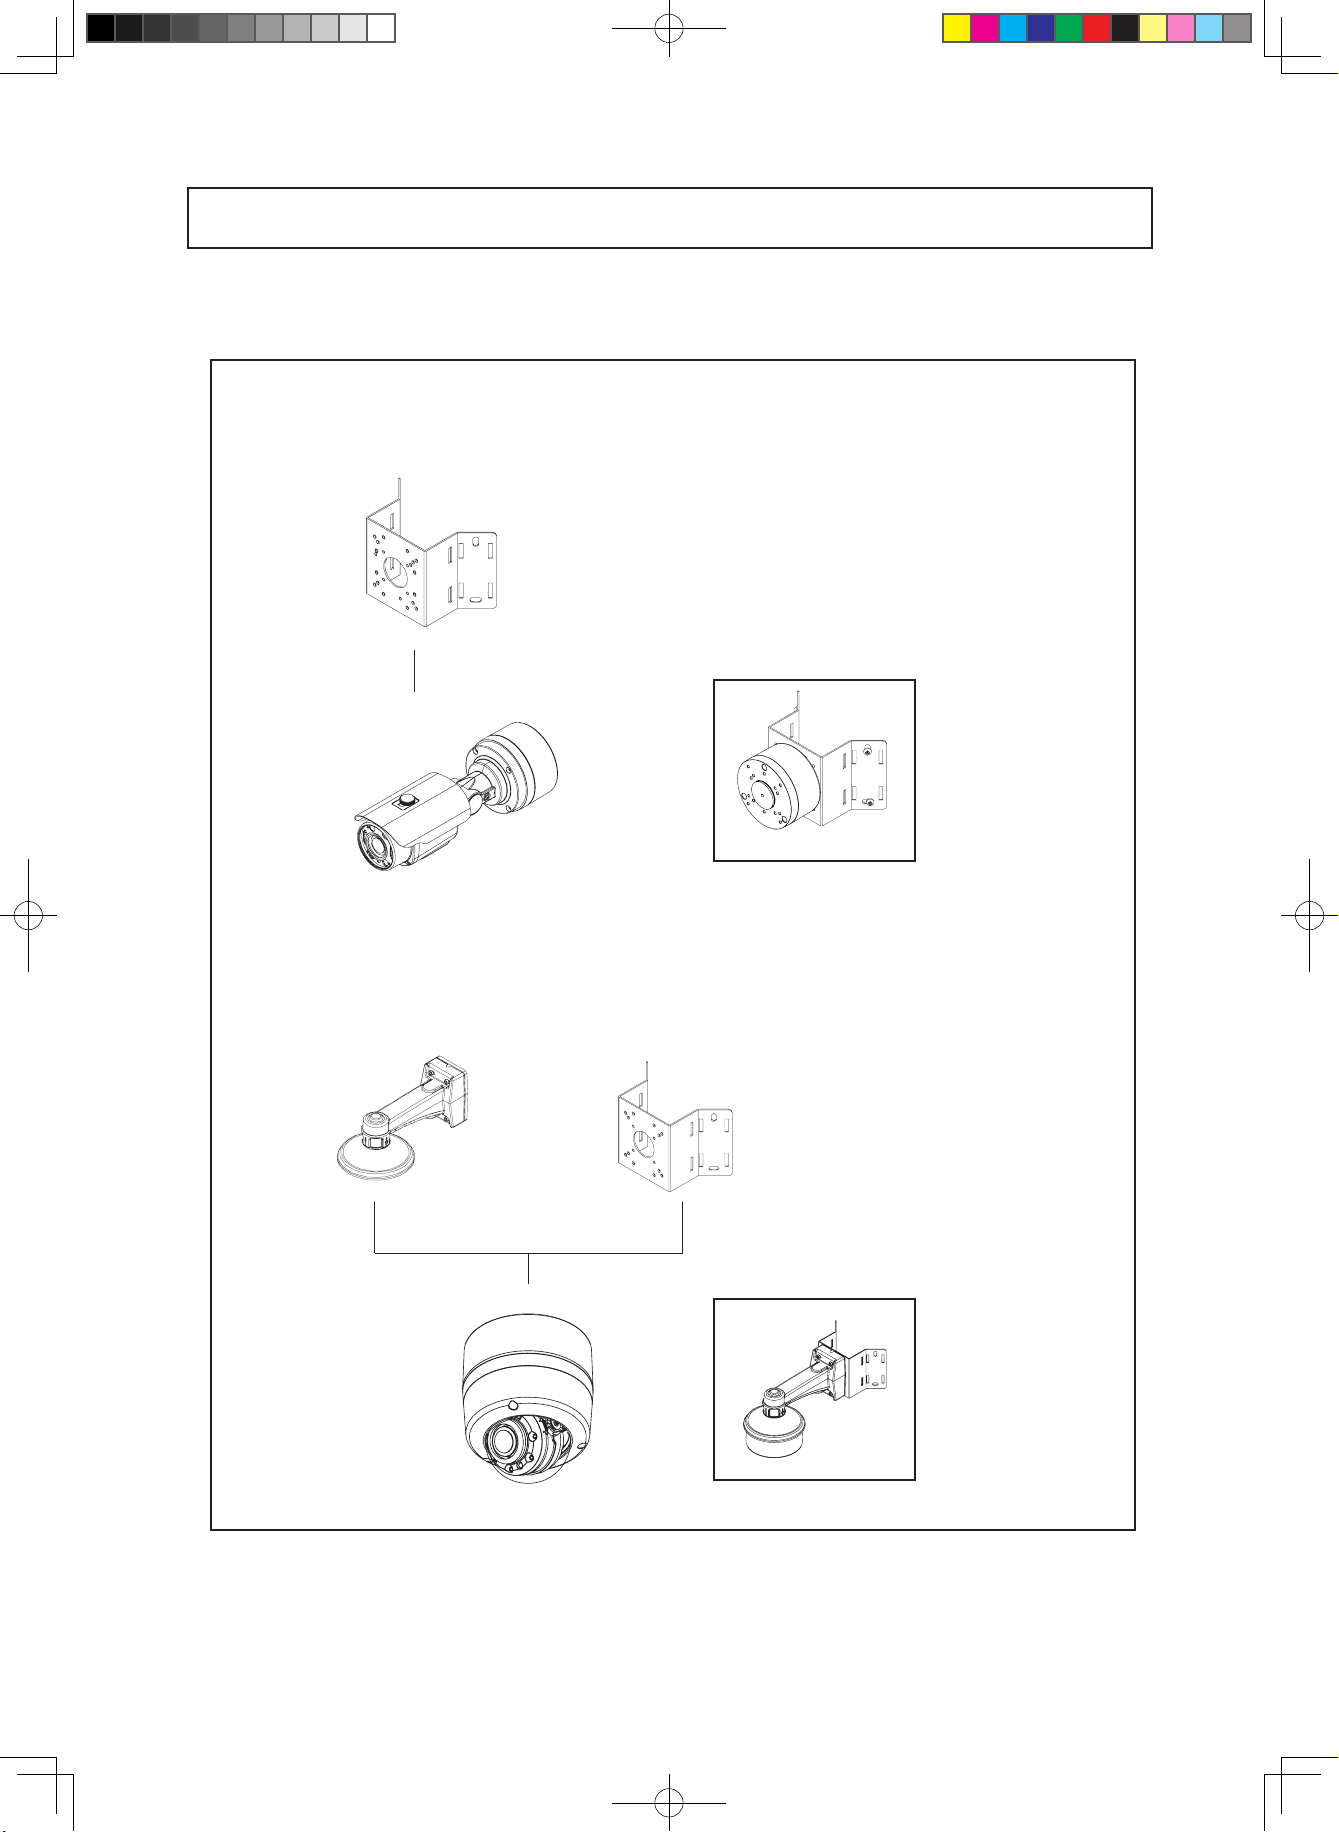
Compatibility
1) HFB4M
Camera Installation
INTCM
2) HFD4M
INTCMINTWM
- 8 -
Speco(Fit).indd 8 2020-05-21 오전 9:52:14
Page 9
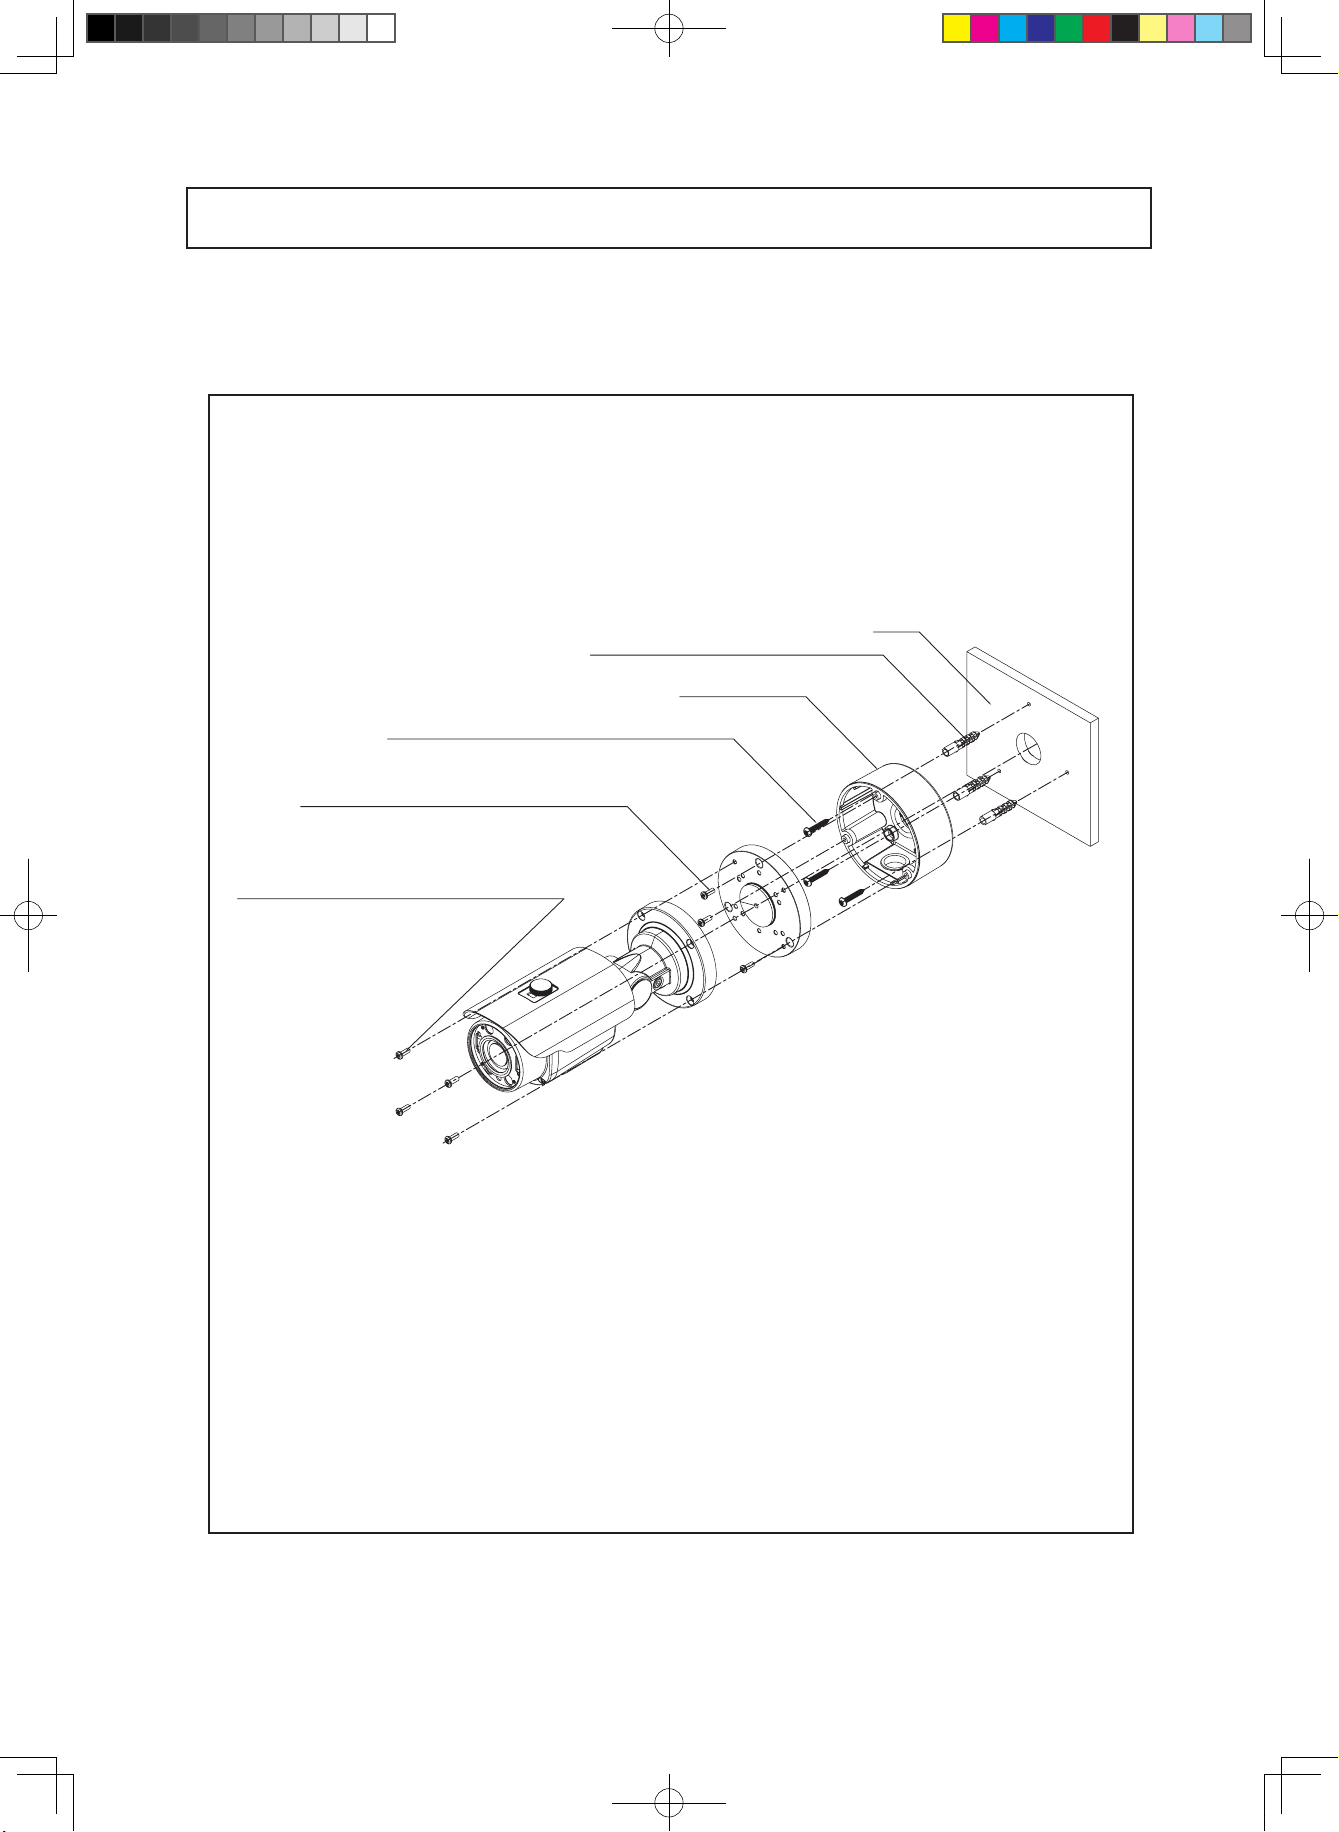
1. HFB4M
Camera Installation
WALL
ANCHOR, WHT, 6X30, PLASTIC, 4EA
JUNCTION BOX
SCREW-TAP, SLV, SUS, BH_4X25, TP1, 3EA
SCREW-MS, WHT, SUS, PH_M4X10, 3EA
SCREW-MS, WHT, SUS, PH_M4X14, 4EA
- 9 -
Speco(Fit).indd 9 2020-05-21 오전 9:52:15
Page 10
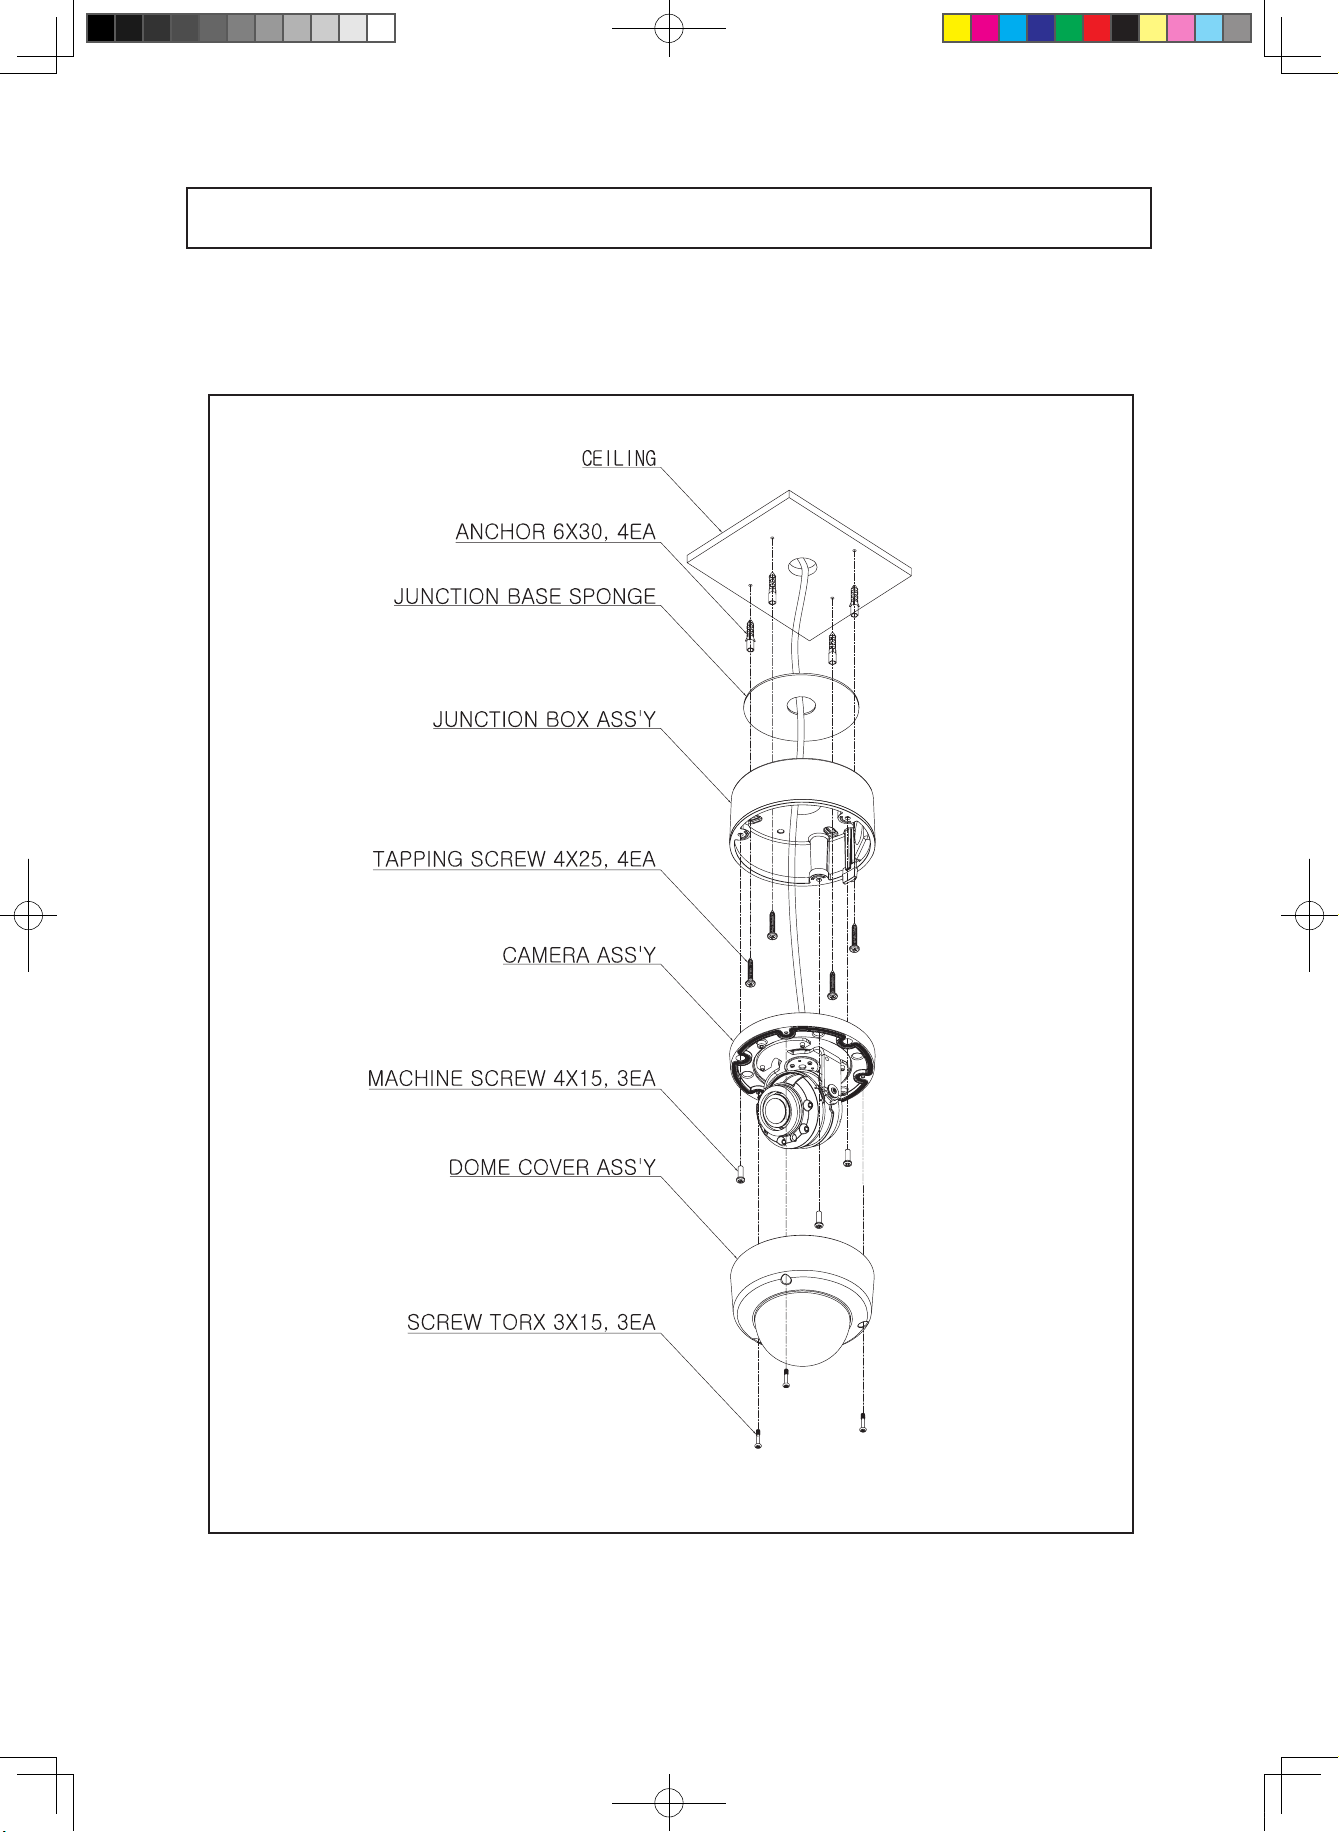
2. HFD4M
Camera Installation
- 10 -
Speco(Fit).indd 10 2020-05-21 오전 9:52:15
Page 11

4MP FIT TVI Motorized Zoom Focus Camera
2.8-12mm MFZ Lens
HFB4M (2.8-12mm)
■
1/2.8”
0.01Lux
SPECIFICATIONS
F
MODEL
Sensor type
Image sensor
Resolution
Framelate
Scanning system
Min. illumination
Video Output
S/N Ratio
Lens
Function
Power Consumption
Operating Temperature
Storage Temperature
Dimensions
Weight
Effective pixels
Total pixels
HD-Analog
Drive Type
AGC
Shutter Speed
Brightness
Sens-UP
WDR
BLC
HLC
ACE(D-WDR/ATR-EX)
Privacy Masking
DEFOG
D-ZOOM
Day & Night
Smart -IR
White Balance
DNR
Mirror
Sharpness
Defog
Gamma Correction
Shading
Language
HFB4M
1/2.8" SONY STARVIS 5.69Mega CMOS Sensor
2616(H) X 1964(V), 5.14M Pixels
2704(H) X 2104(V), 5.69M Pixels
720P/1080P/1440P/1944P
NTSC 30P , PAL 25P, 20P, 12.5P
Progressive Scan
0.01 Lux @ F1.2
TVI,CVBS
More than 50dB
2.8-12mm Motorized Lens with Auto Focus
0 ~ 10 Level Adjustable
AUTO /FLK/ MAMUAL(1/30Sec ~ 1/30000Sec)
0 ~ 20 Level Adjustable
OFF/AUTO (x2 ~ x32)
OFF/ON(LINE/FRAME)LOW/MIDDLE/HIGH
OFF/ON
OFF/ON
OFF/ON(LOW/MIDDLE/HIGH)
OFF/ON (16 Zone)
OFF/ON(LOW/MIDDLE/HIGH)
1.0x ~ 16.0x
Auto(AGC)/COLOR/BW/EXTERN(Lux CTL, PWM CTL)
0~20 Level Adjustable
AUTO(1,700K ~ 11,000K)/AUTOext/PRESET/Manual
2D, 3DNR
MIRROR/FLIP
0~10 Level Adjustable
OFF/ON
O.45 ~ 0.75
OFF/ON
ENG/KOR/CHN1/CHA2/JPN
DC 12V : Max 8.5W / 0.71A, AC 24V : Max 7.9W / 0.53A
-10 ~ +50 Deg C. RH 95% Max.
-20 ~ +60 Deg C. RH 95% Max.
3.74"(W)*3.4"(H)*9"(D)
1.54Ibs
- 11 -
Speco(Fit).indd 11 2020-05-21 오전 9:52:18
Page 12

4MP FIT TVI Motorized Zoom Focus Camera
2.8-12mm MFZ Lens
HFD4M (2.8-12mm)
■
1/2.8”
0.01Lux
SPECIFICATIONS
F
MODEL
Sensor type
Image sensor
Resolution
Framelate
Scanning system
Min. illumination
Video Output
S/N Ratio
Lens
Function
Power Consumption
Operating Temperature
Storage Temperature
Dimensions
Weight
Effective pixels
Total pixels
HD-Analog
Drive Type
AGC
Shutter Speed
Brightness
Sens-UP
WDR
BLC
HLC
ACE(D-WDR/ATR-EX)
Privacy Masking
DEFOG
D-ZOOM
Day & Night
Smart -IR
White Balance
DNR
Mirror
Sharpness
Defog
Gamma Correction
Shading
Language
HFD4M
1/2.8" SONY STARVIS 5.69Mega CMOS Sensor
2616(H) X 1964(V), 5.14M Pixels
2704(H) X 2104(V), 5.69M Pixels
720P/1080P/1440P/1944P
NTSC 30P , PAL 25P, 20P, 12.5P
Progressive Scan
0.01 Lux @ F1.2
TVI,CVBS
More than 50dB
2.8-12mm Motorized Lens with Auto Focus
0 ~ 10 Level Adjustable
AUTO /FLK/ MAMUAL(1/30Sec ~ 1/30000Sec)
0 ~ 20 Level Adjustable
OFF/AUTO (x2 ~ x32)
OFF/ON(LINE/FRAME)LOW/MIDDLE/HIGH
OFF/ON
OFF/ON
OFF/ON(LOW/MIDDLE/HIGH)
OFF/ON (16 Zone)
OFF/ON(LOW/MIDDLE/HIGH)
1.0x ~ 16.0x
Auto(AGC)/COLOR/BW/EXTERN(Lux CTL, PWM CTL)
0~20 Level Adjustable
AUTO(1,700K ~ 11,000K)/AUTOext/PRESET/Manual
2D, 3DNR
MIRROR/FLIP
0~10 Level Adjustable
OFF/ON
O.45 ~ 0.75
OFF/ON
ENG/KOR/CHN1/CHA2/JPN
DC 12V : Max 8.5W / 0.71A, AC 24V : Max 7.9W / 0.53A
-10 ~ +50 Deg C. RH 95% Max.
-20 ~ +60 Deg C. RH 95% Max.
4.76"(Dia)*3.85"(H)
1.0 Ibs
- 12 -
Speco(Fit).indd 12 2020-05-21 오전 9:52:20
Page 13

1) HFB4M
3.74” 9”
3.4”
3.4”
Camera Dimension
3.74” 9”
2) HFD4M
4.76”
3.85”
3.14”
4.76”
- 13 -
Speco(Fit).indd 13 2020-05-21 오전 9:52:21
Page 14

General Features
●
Transfer Video Interface
The combination of a 5Mega CMOS image sensor and TVI DSP provides an excellent resolution
of TVI picture.
●
DNR
Smart DNR prevents the image blurring of moving object and activates only if moving objects
are appearing on the scene.
●
Smart-IR
No saturation image, vivid image in darkness! "TVI" camera makes very sharp video image in
darkness! This technology eliminates saturation of video image of the closer object in darkness
by control of the IR sensitivity. Saturation never happens in our "TVI"cameras, you can enjoy
vivid image in any dark condition!
●
Sens-Up
Despite a limited & low light condition, Sens-Up - Max. x32 helps the viewer to get visible and
clear images.
●
Defog
Defog function “improves” the clarity of images taken in poor conditions such as fog, smoke,
rain or snow.
●
WDR
A powerful and advanced technology that captures a high resolution picture even where
images appear dark.
●
CVBS(Composite Video Blanking and Sync)
TV system is switchable 'NTSC' or 'PAL' with built-in OSD.
●
Intelligent Function
An extraordinary technology that enables Speco Technologies TVI to become the ultimate
solution by providing intelligent features based on motion detection. It also strengthens crime
prevention and detection.
- 14 -
Speco(Fit).indd 14 2020-05-21 오전 9:52:21
Page 15

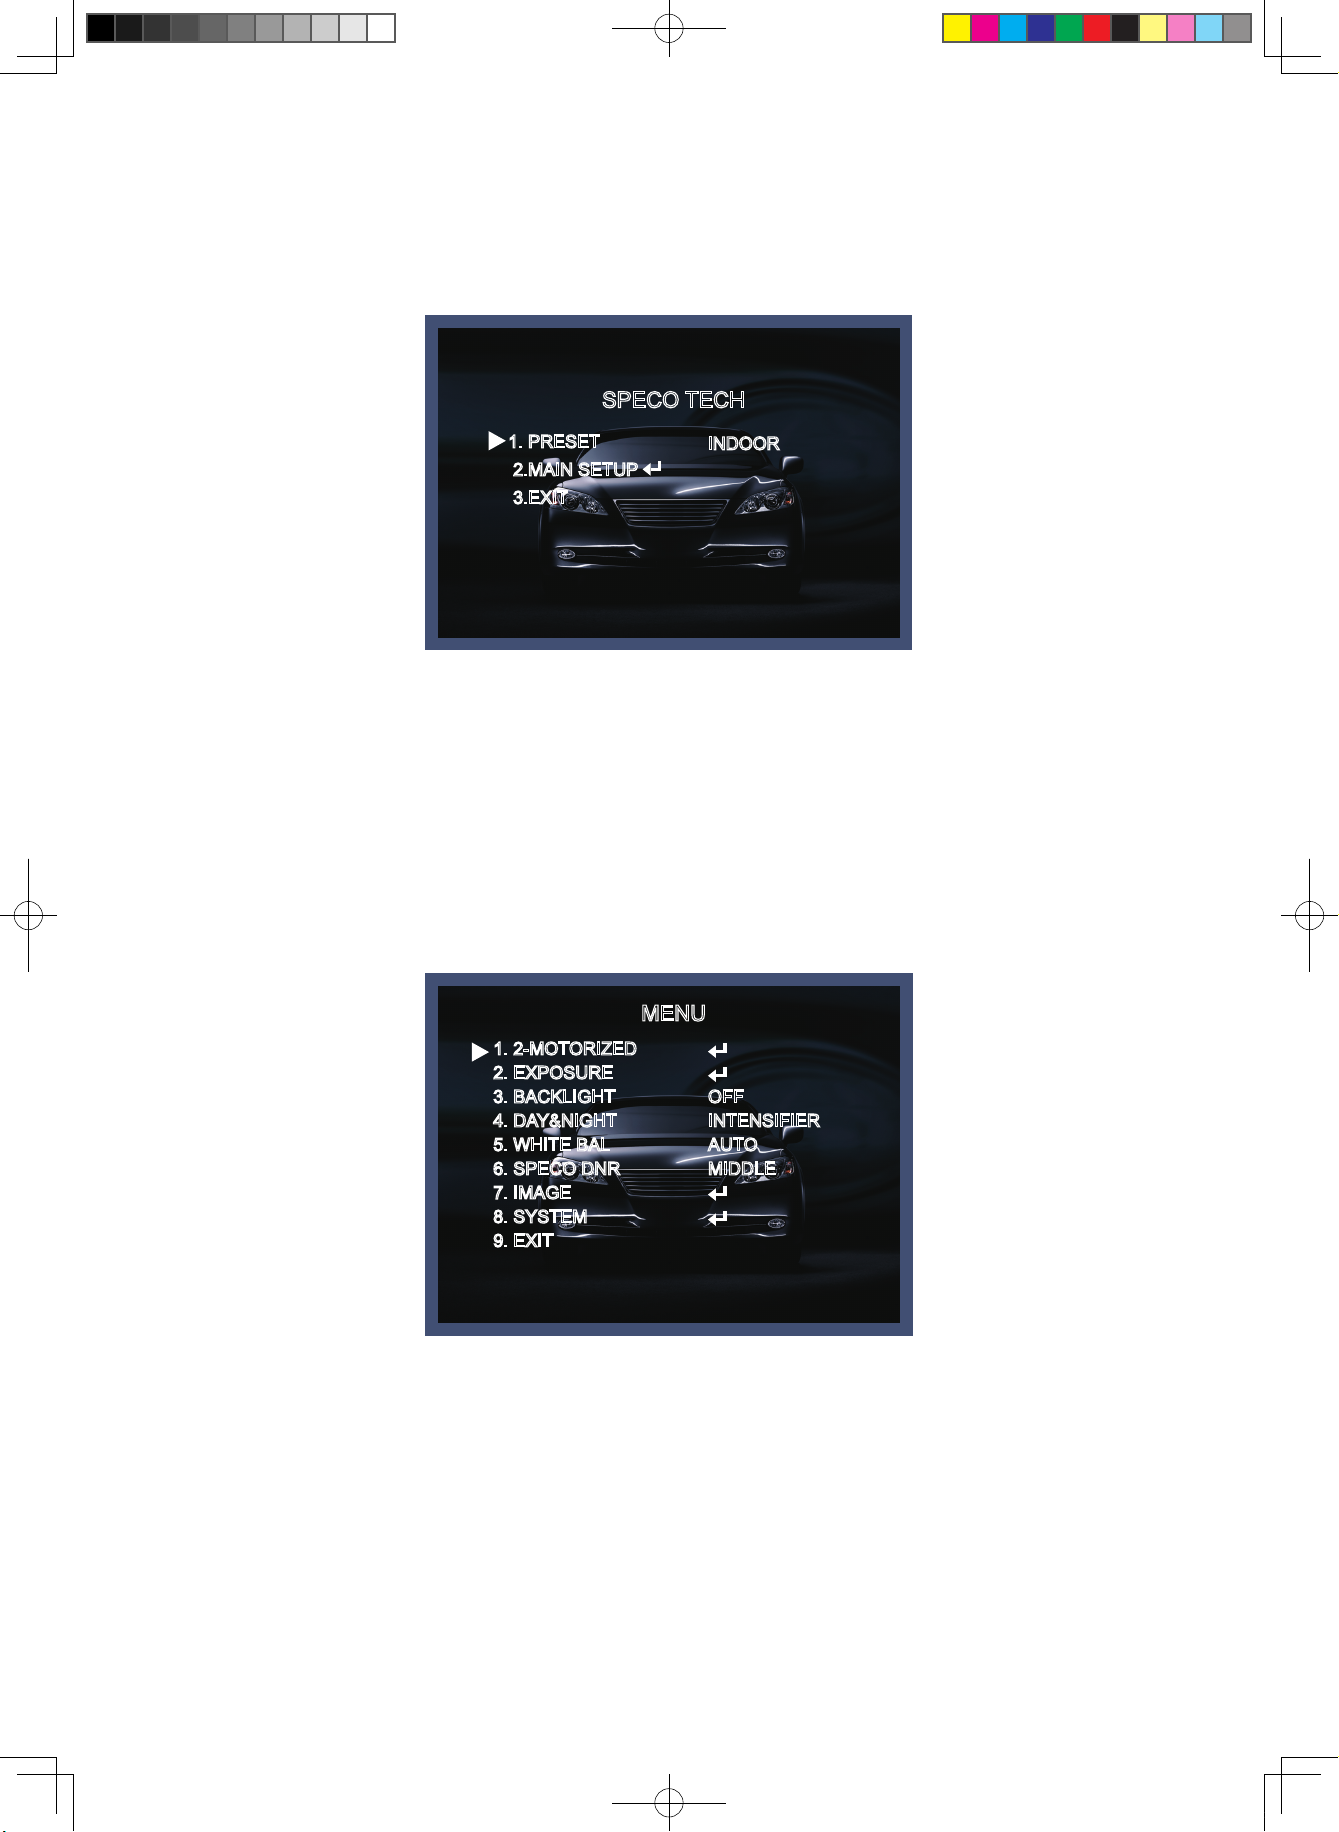
How to Set Up the camera menu
Setup Menu
●
INDOOR
LENS
SENS-UP
BACKLIGHT
DNR
1.PRESET
2.MAIN SETUP
DC LENS : INDOOR
MANUAL LENS : AUTO
X8
OFF
HIGH
INDOOR / OUTDOOR / LOW LIGHT / HALLWAY / LOBBY(WDR) / ELEVATOR
1.2-MOTORIZED
2.EXPOSURE
3.BACKLIGHT
SPECO PRESET MODE default
OUTDOOR
DC LENS : OUTDOOR
MANUAL LENS : AUTO
X16
OFF
HIGH
AF MODE
D&N FILTER
INITIALIZE
RETURN (SAVE/CANCEL)
BRIGHTNESS
SHUTTER
SENS-UP
AGC
RETURN (SAVE/CANCEL)
OFF
HLC
BLC
WDR
DC LENS : INDOOR
MANUAL LENS : AUTO
ONESHOT/MANUAL
SYNC OFF/SYNC ON
ON(PUSHING)
0~20 default : 10
AUTO
MANUAL
FLICKER
OFF, X2, X4, X8, X16, X32
0~10 default : 10
LEVEL
MODE
RETURN
H-POS
V-POS
H-SIZE
V-SIZE
RETURN (SAVE/CANCEL)
WDR MODE
WEIGHT
RETURN (SAVE/CANCEL)
MENU
LOWLIGHT
X32
OFF
HIGH
SPECO TECH
HALLWAY
DC LENS : INDOOR
MANUAL LENS : AUTO
X8
OFF
MIDDLE
INDOOR/OUTDOOR/DEBLUR
RETURN (SAVE/CANCEL)
1/30, 1/60, 1/120, 1/250, 1/700, 1/1000, 1/1600, 1/2500, 1/5000, 1/7000, 1/10000, 1/30000(30P)
1/60, 1/120, 1/250, 1/700, 1/1000, 1/1600, 1/2500, 1/5000, 1/7000, 1/10000, 1/30000, 1/50000(60P)
0~20 default : 10
BLK/WHT/YEL/CYN/GRN/MAG/RED/BLU
0~20 default : 11
0~19 default : 10
0~20 default : 3
0~12 default : 3
LINE/FRAME
OFF
BOX
POLYGON
LOW/MIDDLE/HIGH
LOBBY
DC LENS : INDOOR
MANUAL LENS : AUTO
X8
WDR
LOW
WINDOW ZONE
WINDOW USE
H-POS
V-POS
H-SIZE
V-SIZE
RETURN (SAVE/CANCEL)
WINDOW ZONE
WINDOW USE
POS0-X
POS0-Y
POS1-X
POS1-Y
POS2-X
POS2-Y
POS3-X
POS3-Y
RETURN (SAVE/CANCEL)
DC LENS : INDOOR
MANUAL LENS : AUTO
0 ~ 3 default : 0
ON/OFF
0 ~ 1920 default : 426
0 ~ 1080 default : 240
0 ~ 1920 default : 512
0 ~ 1080 default : 432
0 ~ 3 default : 0
ON/OFF
default : 420
default : 240
default : 730
default : 240
default : 426
default : 540
default : 726
default : 540
ELEVATOR
X8
OFF
LOW
- 15 -
Speco(Fit).indd 15 2020-05-21 오전 9:52:22
Page 16

How to Set Up the camera menu
Setup Menu
●
MENU
4.DAY&NIGHT
5.WHITE BAL
6.SPECO DNR
7.IMAGE
D>N THRES(AGC)
AUTO
COLOR
B&W
EXTERN
AUTO/AWB/AWC-SET
MANUAL
OFF/LOW/MIDDLE/HIGH
SHARPNESS
COLOR GAIN
GAMMA
MIRROR
FLIP
D-ZOOM
ACE
DEFOG
SHADING
PRIVACY
N>D THRES(AGC)
DELAY
RETURN (SAVE/CANCEL)
SMART - IR
GHOST_CAT
LED LEVEL
D>N THRES(CDS)
N>D THRES(CDS)
DELAY
RETURN (SAVE/CANCEL)
C-TEMP
R-GAIN
B-GAIN
RETURN (SAVE/CANCEL)
0 ~ 10 default : 10
0 ~ 20 default : 10
0.45, 0.55, 0.6, 0.65
ON/OFF
ON/OFF
1.0X ~ 16X default : 1.0X
OFF, LOW, MIDDLE, HIGH
ON
OFF
ON
OFF
BOX
POLYGON
0~20 default : 13
0~20 default : 3
LOW, MIDDLE, HIGH
0~20 default : 2
ON/OFF
0~10 default : 10
0~20 default : 13
0~20 default : 7
LOW, MIDDLE, HIGH
3000K/5000K/8000K
0~20 default : 10
0~20 default : 10
MODE
LEVEL
RETURN (SAVE/CANCEL)
WEIGHT
RETURN (SAVE/CANCEL)
ON
OFF
ON
AUTO/MANUAL
LOW,MIDDLE,HIGH
0% ~ 100% default : 100%
ZONE NUM
ZONE DISP
H-POS
V-POS
H-SIZE
V-SIZE
Y LEVEL
CB LEVEL
CR LEVEL
TRANS
RETURN (SAVE/CANCEL)
ZONE NUM
ZONE DISP
POS0-X
POS0-Y
POS1-X
POS1-Y
POS2-X
POS2-Y
POS3-X
0~15 default : 0
ON/OFF
0~60 default : 12
0~34 default : 2
0~60 default : 3
0~34 default : 3
0~20 default : 10
0~20 default : 10
0~20 default : 10
0~3 default : 0
0~15 default : 0
ON/OFF
default : 80
default : 5
default : 88
default : 5
default : 88
default : 13
default : 80
- 16 -
Speco(Fit).indd 16 2020-05-21 오전 9:52:22
Page 17

How to Set Up the camera menu
Setup Menu
●
MENU
3.EXIT
8.SYSTEM
9.EXIT
RETURN (SAVE/CANCEL)
OUTPUT
FRAME RATE
VIDEO OUTPUT
IMAGE RANGE
LANGUAGE
CAM TITLE
RESET
RETURN (SAVE/CANCEL)
SAVE/CANCEL
FREQ
CONFIRM
RETURN (SAVE/CANCEL)
FULL
COMP
USER
ENG, CHN, CHN(S), JPN, KOR
OFF
RIGHT UP
LEFT DOWN
ON-PUSHING
POS3-Y
Y LEVEL
CB LEVEL
CR LEVEL
TRANS
RETURN (SAVE/CANCEL)
OFF
TVI
720/30P, 1080/30P, 1440/30P, 1944/20P, 1944/12.5P
50HZ/60HZ
YES(PUSH)
OFFSET
RETURN
0~32 default : 10
default : 13
0~20 default : 10
0~20 default : 10
0~20 default : 10
0~3 default : 2
- 17 -
Speco(Fit).indd 17 2020-05-21 오전 9:52:22
Page 18
Menu Set Up
Menu items can be selected by using the OSD buttons of the camera.
1. PRESET
SPECO TECH
1. PRESET
2.MAIN SETUP
3.EXIT
INDOOR
1-1. Preset : INDOOR / OUTDOOR / LOW LIGHT / HALLWAY / LOBBY(WDR) / ELEVATOR.
- Used for a quick and easy setup for the installation environment.
* The Advaned Set Up menu will be displayed on the monitor.
2. Move and select the required function using the Up and Down button.
* Move the triangular indicator Up or Down to select the desired feature by pressing
the Up or Down button.
MENU
1. 2-MOTORIZED
2. EXPOSURE
3. BACKLIGHT
4. DAY&NIGHT
5. WHITE BAL
6. SPECO DNR
7. IMAGE
8. SYSTEM
9. EXIT
OFF
INTENSIFIER
AUTO
MIDDLE
3. Change menu settings using the Left or Right button.
* Available values or Status are displayed by pressing the Left or Right buttons.
Press the button until desired value / status is displayed.
4. After Changing the setting move the arrow indicator to EXIT and press the
SET button to EXIT.
- 18 -
Speco(Fit).indd 18 2020-05-21 오전 9:52:23
Page 19

NOTE
* Move to the available submenu by moving arrow to desired feature.
* Submenu is not available when this symbol displayed “---“.
1. 2-MOTORIZED
1. Move the triangular indicator to 2-MOTORIZED using the Up and Down buttons on the Set Up menu screen.
2. Select the desired lens type by pressing the Left of Right button.
MENU
1. 2-MOTORIZED
2. EXPOSURE
3. BACKLIGHT
4. DAY&NIGHT
5. WHITE BAL
6. SPECO DNR
7. IMAGE
8. SYSTEM
9. EXIT
OFF
INTENSIFIER
AUTO
MIDDLE
1. 2-MOTORIZED
AF MODE
D&N FILTER
INITIALIZE
RETURN
ONESHOT
SYNC OFF
ON
◆ AF MODE
- ONESHOT : Adjust zoom and focus automatically.
- MANUAL : Adjust zoom and focus manually.
◆ D&N FILTER[ON/OFF] : Adjust zoom and focus when Day & Night is changing.
◆ INITIALIZE : If you press OSD button 3~4 seconds, Lens Initializing start.
- 19 -
Speco(Fit).indd 19 2020-05-21 오전 9:52:24
Page 20

2. EXPOSURE
1. On the Set Up menu, Select EXPOSURE by using the Up or Down button.
MENU
1. 2-MOTORIZED
2. EXPOSURE
3. BACKLIGHT
4. DAY&NIGHT
5. WHITE BAL
6. SPECO DNR
7. IMAGE
8. SYSTEM
9. EXIT
2. Select the desired shutter mode by pressing the Left or Right button.
OFF
INTENSIFIER
AUTO
MIDDLE
2. EXPOSURE
BRIGHTNESS
SHUTTER
SENS-UP
AGC
RETURN
10 IIIIIIIIIIIIIIIIIII|
AUTO
X8
10 IIIIIIIIIIIIIIIIIII|
◆ BRIGHTNESS : The brightness can be adjusted. The brightness control range is 1~20.
◆ SHUTTER : DC lens is launched with the setting of 1/30 and the manual lens is launched
with the setting of Auto shutter, but the shutter speed can be adjusted from 1/30 to 1/50,000.
→ FLK : Select FLK mode if flickering occurs ; caused by the unmatched frequency of electric light.
◆ SENS-UP : The bright screen can be displayed by sensing the degree of the darkness automatically
under the circumstance of low light condition or at night.
→ Off ~x32 Level Adjustable.
◆ AGC (Auto Gain Control) : The higher the AGC level is, the more noises appear.
→ 0~10 Level selectable.
NOTE
* Sens-Up mode is not worked when Electronic shutter is selected as Manual.
- 20 -
Speco(Fit).indd 20 2020-05-21 오전 9:52:24
Page 21
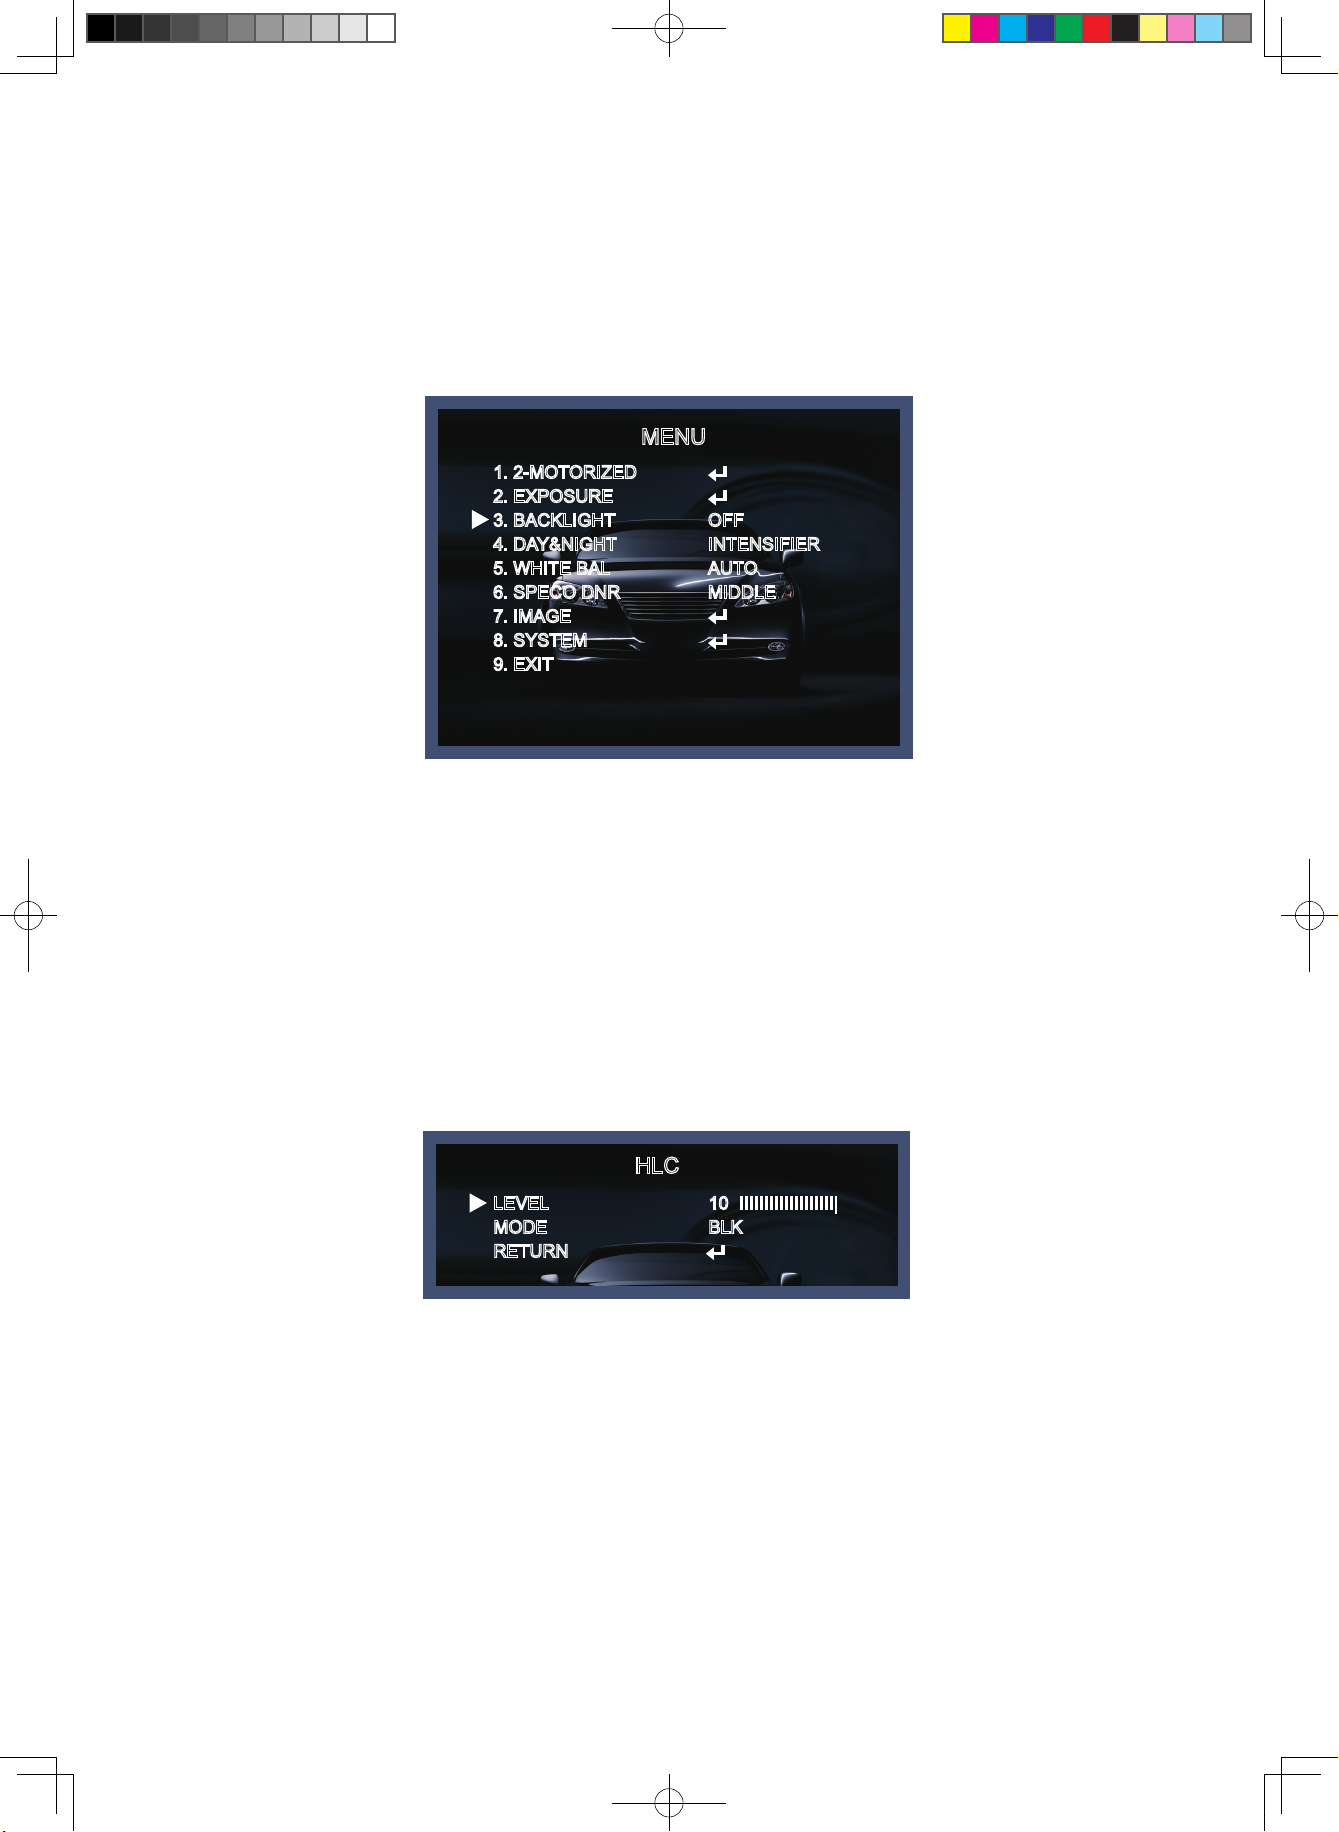
3. BACKLIGHT
On this menu, backlight image can be compensated by users selecting one of modes. (HLC, BLC, WDR)
1. Move the triangular indicator to BACKLIGHT on the SETUP menu screen using the Up and Down button.
2. Select the desired mode by using the left or Right button.
MENU
1. 2-MOTORIZED
2. EXPOSURE
3. BACKLIGHT
4. DAY&NIGHT
5. WHITE BAL
6. SPECO DNR
7. IMAGE
8. SYSTEM
9. EXIT
OFF
INTENSIFIER
AUTO
MIDDLE
◆ Off : Deactivated status.
◆ HLC : This function is used to surpress or strong light source (for example, headlights of cars during
nighttime) so that other subjects can be seen in more detail. If you select HLC, a submenu appears
where you can make finer adjustments.
- LEVEL : Adjust the brightness level from which on the light source is to be masked out.
0~20 level adjustable.
- MODE : Select the color of HLC range.
HLC
LEVEL
MODE
RETURN
10 IIIIIIIIIIIIIIIIIII|
BLK
◆ BLC : This function is used to counterbalance the screen image by increasing the brightness so that a
subject which appears dark due to a strong backlight can be displayed in more detail. If you select BLC,
a submenu appears where you can make finer adjustments.
- H-POS/V-POS/H-SIZE/V-SIZE : Define the position and size of the area of interest by changing the position
& size.
- 21 -
Speco(Fit).indd 21 2020-05-21 오전 9:52:24
Page 22

BLC
H-POS
V-POS
H-SIZE
V-SIZE
RETURN
11
10
3
3
◆ WDR : The WDR (Wide Dynamic Range) function works to correct excessive light within the frame to
produce a usable image. When the image has simultaneous bright and dark areas, it makes both areas
distinct. If you select WDR, a submenu appears where you can make finer adjustments.
WDR
WDR MODE
WEIGHT
RETURN
FRAME
OFF
- WDR MODE : The Specific WDR area can be selected.
* BOX
WINDOW ZONE [0~3]
WINDOW USE [ON/OFF]
H-POS [1~1920] : You can select the horizontal starting position of the monitoring area.
V-POS [1~1080] : You can select the vertical starting position of the monitoring area.
H-ZISE [1~1920] : You can select the horizontal size of the monitoring area.
V-SIZE [1~1080] : You can select the vertical size of the monitoring area.
* POLYGON
WINDOW ZONE [0~3]
WINDOW USE [ON/OFF]
POS0-X : You can select the horizontal & Diagonal starting position of the monitoring area.
POS0-Y : You can select the vertical & Diagonal starting position of the monitoring area.
POS1-X : You can select the horizontal & Diagonal starting position of the monitoring area.
POS1-Y : You can select the vertical & Diagonal starting position of the monitoring area.
POS2-X : You can select the horizontal & Diagonal starting position of the monitoring area.
POS2-Y : You can select the vertical & Diagonal starting position of the monitoring area.
POS3-X : You can select the horizontal & Diagonal starting position of the monitoring area.
POS3-Y : You can select the vertical & Diagonal starting position of the monitoring area.
- WEIGHT [MIDDLE, HIGH, LOW] : Select the WDR level of the camera.
- 22 -
Speco(Fit).indd 22 2020-05-21 오전 9:52:24
Page 23

4. DAY&NIGHT
You can change the color mode of color or black / white by setting up the mode.
1. Select Day&Night using the Up or Down button on the Set Up menu screen.
2. Select the desired mode using the Left or Right buttons.
MENU
1. 2-MOTORIZED
2. EXPOSURE
3. BACKLIGHT
4. DAY&NIGHT
5. WHITE BAL
6. SPECO DNR
7. IMAGE
8. SYSTEM
9. EXIT
OFF
INTENSIFIER
AUTO
MIDDLE
◆ INTENSIFIER : The bright screen can be displayed by sensing the degree of the darkness automatically
under the circumstance of low light condition or at night.
◆ AUTO : Automatically, It shifts into the color mode in the bright environment and the B/W mode in the
low light condition. It can adjust the delay time, starting brightness and end brightness according to the
ambient conditions by pressing the Set button.
4. DAY&NIGHT
SMART-IR
GHOST_CAT
LED LEVEL
D&N THRES(CDS)
N&D THRES(CDS)
DELAY
RETURN
2 IIIIIIIIIIIIIIIIIII|
OFF
10 IIIIIIIIIIIIIIIIIII|
13 IIIIIIIIIIIIIIIIIII|
7 IIIIIIIIIIIIIIIIIII|
LOW
- SMART IR. : 0~20 smart IR level adjustable.
- GHOST_CAT[ON/OFF] : Get rid of Ghost phenomenon (image dragging) when set-up the SENS-UP.
- LED LEVEL : 0~10 IR ADJUST level adjustable.
- D>N THRES(CDS) : 0~20 CDS THRES level adjustable.
- N>D THRES(CDS) : 0~20 CDS THRES level adjustable.
- DELAY [LOW/MIDDLE/HIGH] : Set the delay time for switching between COLOR and B/W.
- 23 -
Speco(Fit).indd 23 2020-05-21 오전 9:52:25
Page 24

5. WHITE BAL
Use this function when the color adjustment of a screen is needed.
1. Move the triangular indicator to WHITE BAL on the SETUP menu screen using the Up and Down button.
2. Select the desired mode by using the left or Right button.
MENU
1. 2-MOTORIZED
2. EXPOSURE
3. BACKLIGHT
4. DAY&NIGHT
5. WHITE BAL
6. SPECO DNR
7. IMAGE
8. SYSTEM
9. EXIT
◆ AUT0 : Use this mode when the color temperature is from 3,000k to 8,000k.
OFF
INTENSIFIER
AUTO
MIDDLE
◆ AWB : The function to search for the color which is matched well with the ambient environment.
◆ AWC→SET : After letting camera focus on the blank white paper to the best condition of current
lighting environment, press the SET button. If the lighting condition is changed, Re-adjustment
should be needed.
◆ MANUAL : Manual compensation make the more detailed control possible. First, after adjusting the
white balance using the ATW or AWB mode, change the mode into the manual compensation mode
and then press Set button. While looking at the color change of the subject seen on the screen after
setting up the proper color temperature, increase the each value of the blue and the red.
- C-TEMP : 3000K/5000K/8000K level adjustable.
- R-GAIN : 0~20 level adjustable.
- B-GAIN : 0~20 level adjustable.
- Return : Every function is set up at the WHITE BAL menu, and then return the previous menu.
NOTE
The White Balance may not be worked properly in the following conditions. If this doesn’t work, use the AWB mode.
* When there is a very high color temperature in the circumstances of the subject. ( for example, clear sky, Sunset)
*▶It is very dark.
*▶If the camera is headed to the fluorescent light directly or if there is a drastic lighting change, The operation of
White balance may become unstable.
- 24 -
Speco(Fit).indd 24 2020-05-21 오전 9:52:25
Page 25

6. SPECO DNR
This function is used to improve the picture quality by filtering the noise which is generated under low
brightness conditions. You can set different levels here.
1. Move the triangular indicator to SPECO DNR by useing the Up and Down button.
2. Select the mode to use by pressing the left or Right button and OFF/LOW/MIDDLE/HIGH level selectable.
MENU
1. 2-MOTORIZED
2. EXPOSURE
3. BACKLIGHT
4. DAY&NIGHT
5. WHITE BAL
6. SPECO DNR
7. IMAGE
8. SYSTEM
9. EXIT
OFF
INTENSIFIER
AUTO
MIDDLE
7. IMAGE
When selecting, the following submenu will appear.
MENU
1. 2-MOTORIZED
2. EXPOSURE
3. BACKLIGHT
4. DAY&NIGHT
5. WHITE BAL
6. SPECO DNR
7. IMAGE
8. SYSTEM
9. EXIT
Here you can optimise the image quality by adjusting different options.
OFF
INTENSIFIER
AUTO
MIDDLE
- 25 -
Speco(Fit).indd 25 2020-05-21 오전 9:52:25
Page 26

7. IMAGE
SHARPNESS
COLOR GAIN
GAMMA
MIRROR
FLIP
D-ZOOM
ACE
DEFOG
SHADING
PRIVACY
RETURN
10 IIIIIIIIIIIIIIIIIII|
10 IIIIIIIIIIIIIIIIIII|
0.65
OFF
OFF
1.0X
OFF
OFF
OFF
◆ SHARPNESS [1 ~ 10] : Adjusts the image sharpness. If the level goes up excessively, it may affect the
video image and generate a noise.
◆ COLOR GAIN [0 ~ 20] : Changes the color gain of the camera.
◆ GAMMA [0.45 ~ 0.65] : Changes the gamma curve of the camera.
◆ MIRROR [ON, OFF] : Mirrors the image horizontally on the screen.
◆ FLIP [ON, OFF] : Flips the image vertically on the screen.
◆ D-ZOOM: You can use the digital zoom with x1~x16 magnifications.
◆ ACE [OFF/LOW/MIDDLE/HIGH] : Intelligent lighting level control to over come even strong backlight
conditions.
◆ DEFOG [ON, OFF] : This function helps to recognize the object in a dusty weather condition.
ON, a submenu appears where you can make finer adjustments.
◆ SHADING [ON, OFF] : Compensates the shading effects of lenses when the lens is set to a very wide angle.
This function will reduce the brightness difference between the centre and the edges. If you select
ON, a submenu appears where you can make finer adjustments.
◆ PRIVACY [ON, OFF] : This is used to hide certain areas on the monitor. You can designate each different
15 area. The size of a designated area can be adjusted. The color of a privacy area can be selected
various colors. When you select the return, the setting values in this function menu are saved, then get
out of this menu.
- 26 -
Speco(Fit).indd 26 2020-05-21 오전 9:52:25
Page 27

* BOX
ZONE NUM [0~15] : Select a mask out of the 16 mask areas and set the options below for the selected
mask.
ZONE DISP [ON, OFF] : Choose ON to activate privacy masks and press OFF to deactivate masks.
H-POS [0~60] : Define the horizontal start position of the privacy mask.
V-POS [0~34] : Define the vertical start position of the privacy mask.
H-SIZE [0~60] : Define the horizontal size of the privacy mask.
V-SIZE [0~34] : Define the vertical size of the privacy mask.
Y LEVEL [0~20] : Define the brightness of the mask color.
CB LEVEL [0~20] : Define the blue amount of the mask color.
CR LEVEL [0~20] : Define the red amount of the mask color.
TRANS [0~3] : Applies a tone from the window to act on the selected area.
* POLYGON
ZONE NUM [0~15] : Select a mask out of the 16 mask areas and set the options below for the selected
mask.
ZONE DISP [ON, OFF] : Choose ON to activate privacy masks and press OFF to deactivate masks.
POS0-X : You can select the horizontal & Diagonal starting position of the monitoring area.
POS0-Y : You can select the vertical & Diagonal starting position of the monitoring area.
POS1-X : You can select the horizontal & Diagonal starting position of the monitoring area.
POS1-Y : You can select the vertical & Diagonal starting position of the monitoring area.
POS2-X : You can select the horizontal & Diagonal starting position of the monitoring area.
POS2-Y : You can select the vertical & Diagonal starting position of the monitoring area.
POS3-X : You can select the horizontal & Diagonal starting position of the monitoring area.
POS3-Y : You can select the vertical & Diagonal starting position of the monitoring area.
Y LEVEL [0~20] : Define the brightness of the mask color.
CB LEVEL [0~20] : Define the blue amount of the mask color.
CR LEVEL [0~20] : Define the red amount of the mask color.
TRANS [0~3] : Applies a tone from the window to act on the selected area.
8. SYSTEM
This can be used when you want to select the additional function control.
1.When the SETUP menu is displayed, select SYSTEM using the Up and Down button.
2. Select one of the mode using the Up and Down button.
- 27 -
Speco(Fit).indd 27 2020-05-21 오전 9:52:26
Page 28

1. 2-MOTORIZED
2. EXPOSURE
3. BACKLIGHT
4. DAY&NIGHT
5. WHITE BAL
6. SPECO DNR
7. IMAGE
8. SYSTEM
9. EXIT
8.SYSTEM
VIDEO OUTPUT
IMAGE RANGE
LANGUAGE
CAM TITLE
RESET
RETURN
MENU
OFF
INTENSIFIER
AUTO
MIDDLE
FULL
ENG
OFF
ON
◆ VIDEO OUTPUT
- OUTPUT : TVI.
- FRAME RATE[720/30P, 1080/30P, 1440/30P, 1944/20P, 1944/12.5P] : Choose output type.
- FREQ[60Hz/50Hz] : You can select PAL (25FPS) or NTSC (30FPS).
- CONFIRM : Apply the setting value of output mode.
(If confirm is not applied after changing the output mode, the setting value is not changed.)
◆ IMAGE RANGE : Adjust the rate of YC signal to 100%(FULL), 75%(COMP) or 100%~75%(USER).
◆ LANGUAGE : ENG, CHN, CHN(S), JPN, KOR
◆ CAM TITLE : It can be adjusted when you get into the Cam Title menu. This function is to
display the letters of the camera on the monitor.
◆ RESET [ON] : All settings will be restored to factory default.
Exit
Press the Set button in the exit menu to save the current settings and exit the Set Up menu.
- 28 -
Speco(Fit).indd 28 2020-05-21 오전 9:52:26
Page 29

Trouble Shooting
PROBLEM
Nothing appears on
the screen.
The image on the
screen is dim.
The image on the
screen is dark.
The camera is not
working properly
and the surface of
the camera is hot.
Motion Detection
is not activated.
POSSIBLE CAUSE
Check the power cable, power supply output and video
☞
connection between the camera and monitor.
Are the camera lens or the lens glass dirty?
☞
Clean the lens / glass with a soft clean cloth.
Adjust the monitor controls, as required.
☞
If the camera is facing a very strong light, change
☞
the camera position.
Adjust the lens focus.
☞
Adjust the contrast control of the monitor.
☞
If there is an intermediate device, correctly set the 75Ω/Hz.
☞
Check the camera is correctly connected to an appropriate
☞
regulated power source.
Has MOTION DET been set to ON in the menu?
☞
Has MD AREA been properly dened?
☞
The color of the
picture is not correct.
The image on the
screen ickers.
The SENS-UP does
not work.
Auto-Focusing Is Not
Working Properly.
Check the settings in WHITE BALANCE menu.
☞
Make sure that the camera isn’t facing direct sunlight or
☞
uorescent lighting. If necessary,change the camera position.
Check that the AGC setting in the EXPOSURE menu is’t set to OFF.
☞
☞
1. VERY RARELY, the auto-focusing may not work.
But, this is not a defect. This symptom occurs due to the product’s
specific feature.
For this reason, if you experience this symptom, then please manually
move the control board once to the left and once to the right.
Then, the focusing will be corrected and working properly as it should.
☞
2. (Recommendation) ONE PUSH Feature
In case the focusing does not work, please do the following to correct
this problem.
Menu -> 1. 2MOTOR -> 3. ONEPUSHAF -> Push the “ON” button for 1
second. -> The Auto Focusing will begin upon changing to “PUSHING”.
- 29 -
Speco(Fit).indd 29 2020-05-21 오전 9:52:26
Page 30
- 30 -
Speco(Fit).indd 30 2020-05-21 오전 9:52:27
Page 31

Speco(Fit).indd 31 2020-05-21 오전 9:52:28
Page 32

200 New Highway
Amityville, NY 11701
631-957-8700
1 800 645 5516
www.specotech.com
Speco(Fit).indd 32 2020-05-21 오전 9:52:28
 Loading...