

Page 1
f
f
e
n
l
d
s
t
d
n
Ø100
<Ceiling mount>
<Ceiling mount>
<Wall mount>
SCREW TP1
3.5X20 2EA
◈NOTES:
1. Do not install the camera outdoors.
2. Choose a location for the camera which is free o
moisture and vibration.
3. Be careful not to scratch the camera lens or dome
cover.
4. Do not operate camera beyond listed temperature
(-49°F~122°F)
5. Handle with care. Dropping it can cause serious
damage to the camera.
6. Avoid any direct sun light into the lens.
7. To avoid shorting or damaging the camera, use
only power supplies which meet the listed
specifications (12VDC / 24VAC Dual voltage, 1A)
◈FEATURE
1. 650 TVL High Resolution Image
2. Smart DNR technology; reduces noise in low light.
3. 75’ range visible in total darkness with 24pcs of IR
LEDs. (Indoor).
4. This camera is flexible to install with its 3-axis
camera construction, this allows for the camera to
be mounted to ceiling, wall or slope surfaces.
5. True Day/Night, camera changes function based
on illumination, IR illuminators in dark (option)
6. 8 individual privacy zones
7. DWDR (Digital Wide Dynamic Range)
8. Multi function: High Light Mask, Lens Shading
Compensation, Smart Motion Detection
9. Smart IR: Objects can be clearly identified due to
the function that decreases screen saturation o
objects within a short distance when the IR s are
active.
10. Multi-language OSD.
11. 12VDC / 24VAC Dual Voltage operation.
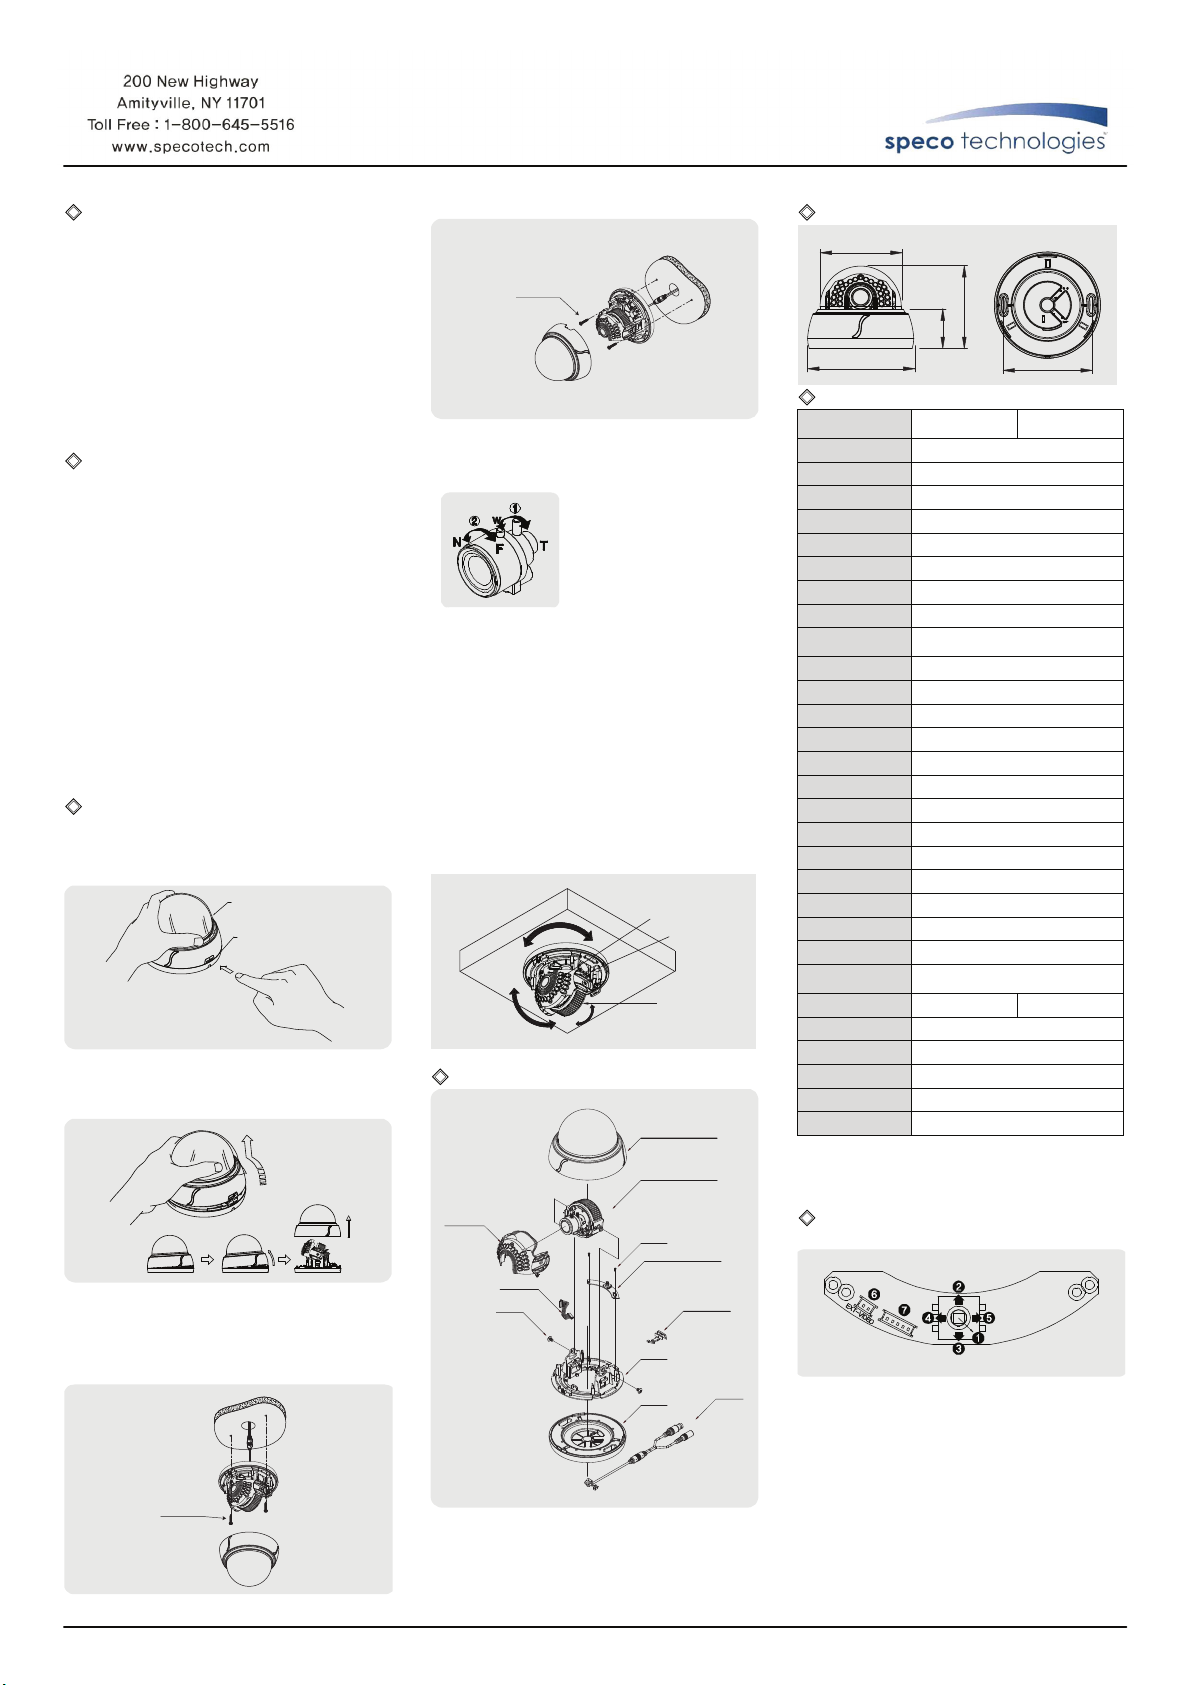
◈HOW TO INSTALL
1. Openi ng the dome
Push in the latch button and pull back dome.
(Remove the protection sheet after installation is
completed).
Protection sheet
LATCH BUTTON
2. Removing the dome
Lift the dome. W hen you push the latch button, it is
unlocked and you can lift the dome.
3. Camer a instal lati on
a. Mount the camera set with the supplied screws on
ceiling or wall.
It is recommended to utilize the supplied screws.
<Ceiling mount >
SCREW TP1
3.5X20 2EA
HLED31D1B, HLED31D1W
HLED31D7B, HLED31D7W
<Wall moun t>
SCREW TP1
3.5X20 2EA
b. Please refer to Section 4 for details on Camera angl
adjustments
c. Lens adjustment (Vari-focal Lens only)
After opening the LED cover,
d. Re-assemble the camera.
4. Camer a angle adjustment
a. Pan adjustment: Turn the disk of camera and the
adjust direction to the right or left (-180˚ to 180˚)
b. Tilt adjustment: Turn the camera holder (shown
below) to adjust the direction up or down (6˚ to
90˚)
c. Rol l adjus tment : Rotate the camera holder (-178˚
to 178˚)
<Caution > If the camera is adjusted beyond the
angle limit, it may cause damage to the camera.
L
U
◈ASSEMBLY
LED COVER
ASS’Y
HARNESS
SCREW
① By turning the “Tele-
Wide” knob, you ca
access a range of foca
lengths within specifie
limits.
②Once the focal length i
determined, turn the
“Near-Far” knob to se
the focus for the desire
scene.
LED COVER
DISK
CAMERA
HOLDER
DOME COVER ASS’Y
CAMERA
MODULE ASS’Y
SCREW
CONTROL PCB ASS’Y
PUSH BUTTON
DISK
BASE
D
R
ROTATION
CABLE
◈DIMENSION
101
48.1
Ø130.8
SPECIFICATION
◈
Model No.
Ima ge Se nsor 1/3" COLOR SONY SUPE R HAD CCD II
Effective P ixe l 768(H) x 494(V) Pixel
Cell Siz e
Scan ning S yst em 2 : 1 Interl ace
Sy nc. Type Inter nal
Resolution 650 TV -L ine
S/N 52dB or More (AG C O F F)
Vi deo Output 1.0 V p-p(S ync. Ne gativ e) Termina tion 75Ω
Mi n. Illumination
Ga mma γ = 0.45 typ.(0.2 ~ 1.0)
OS D Yes(M ulti Language)
W hite B alance ATW (2,50 0°K ~ 9,500°K )/MA NU AL /AWC
Sh utter S peed 1/60 ~ 1/100,000 sec
Se nse up Auto(Selectable l imit 2X~1024X)/FIXED/OFF
Backli ght OF F/BLC /HLC/D WD R
AG C LO W/MI DD LE /HIG H/OF F
DN R (3D) AU TO /LOW /MID D LE /HIGH /OFF
Motion D etecti on ON /OFF (4 Zone)
Privacy Zone ON /OF F(8 Zone)
Mir ror ON /OFF
Day & Ni ght AU TO , CO LO R, B/W
LE D Bri ghtness 24pcs, Smart IR
Blemish
Com pensa tion
Len s f = 3.6mm f = 2.8 ~ 12m m
Power S upply 12V DC / 24VA C D ual V oltage
Cur rent C onsu mption M ax. 600mA (at 12V DC / 24VA C)
Oper ation Tem p. -49°F~122°F
Dime nsion Ø130.8(W) x 96(H ) mm
Wei ght 14.5 oz
※The specification is subject to change without any prior
notice to improve the quality.
HLE D 31D 7B
HLE D 31D 7W
6.35
㎛
(H) x 7.4㎛(V )
0.01L ux(F /1.2)
0Lux (75’ Range with 24pcs LED) - Indoor
AU TO /OFF
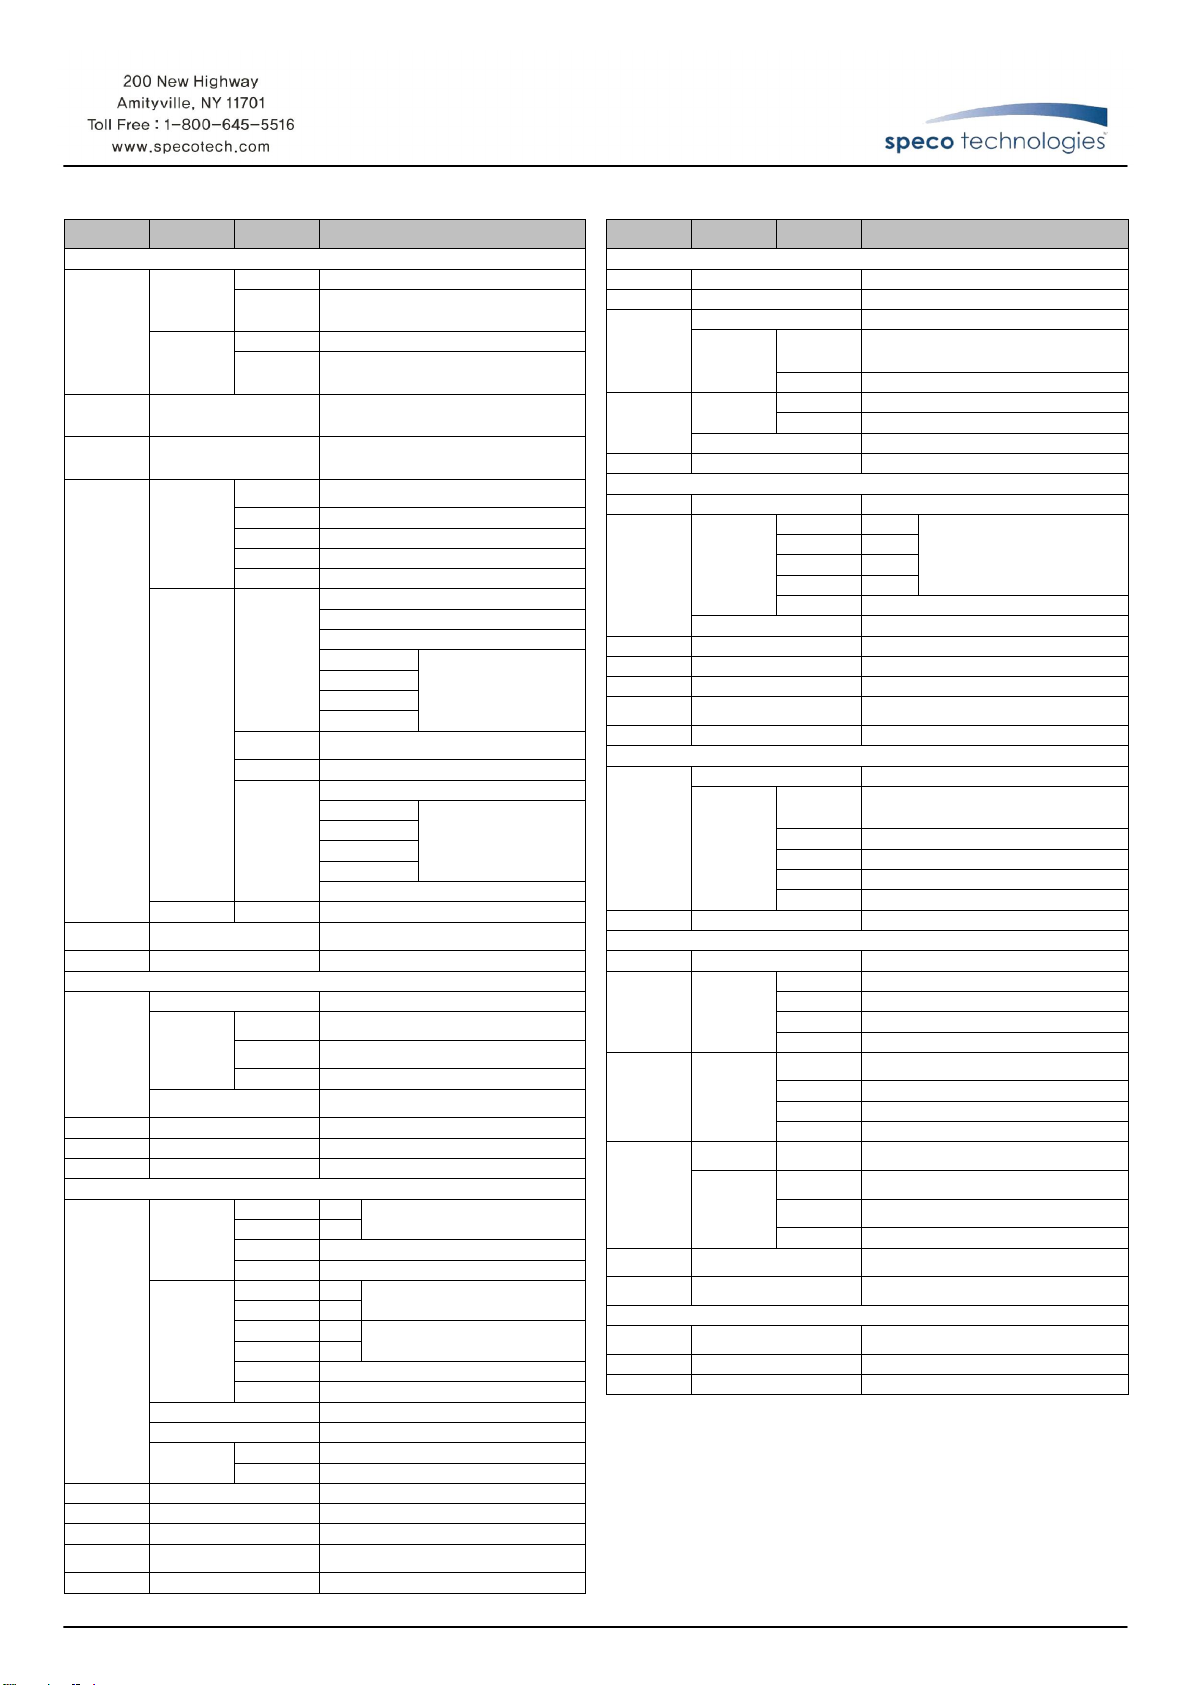
◈FUNCTION SETTING
1. How to use the jog lever
①SET : Used to access the menu and confirm
selection.
②
UP, ③ DOWN : Used to move the cursor to up or
down.
④LE FT, ⑤R IGHT : Used to move the cursor to left
or right and change the value.
⑥
EXT-VIDEO : Additional video output terminal for
test monitor during installation.
⑦DEBUG PORT : It is used for upgrading the product
function and after-sales services.
Ø109
HLE D 31D 1B
HLE D 31D 1W
Page 2
3B25276A
2
. OSD Menu Structure
HLED31D1B, HLED31D1W
HLED31D7B, HLED31D7W
OSD Menu Select Menu Sub Menu Summary
1. EXPOSURE
BRIGHTNESS 0~99 : Adjust brightness with a manual iris lens
MANUAL
LENS
DC
AGC OFF, LOW, MIDDLE, HIGH
SENSE-UP
BACKLIGHT
3D-DNR OFF, LOW, MID, HIGH, AUTO
RETURN Move back to previous menu
2. WHITE BALANCE
AWB MODE
R-Y GAIN 0~255 Adjust Red tone of the image
B-Y GAIN 0~255 Adjust Blue tone of the image
RETURN Move back to previous menu
3. DAY&NIGHT
D&N MODE
BURST ON, OFF Transmit the burst signal or not in B/W mode
C_SUP 0~100 Color suppress controllable
A_SUP 0~100 Iris suppress controllable
SMART IR ON, OFF
RETURN Move back to previous menu
AUTO, OFF, X2, X4, X8, X16,
X32, X64,X128, X256, X512,
X1024
BLC
HLC
D-WDR SET LEVEL 0~20 : DWDR level adjust
ATW
MANUAL
PUSH
AUTO
AUTO-CDS
COLOR Fixed at color
B&W Fixed at B/W
EXT
E. SHUTTER
BRIGHTNESS 0~99 : Adjust brightness with a DC iris lens
E. SHUTTER
BLC LEVEL
TOP 0~15 : Adjust top position of BLC zone
BOTTOM 1~16 : Adjust bottom position of BLC zone
LEFT 0~15 : Adjust left position of BLC zone
RIGHT 1~16 : Adjust right position of BLC zone
HBLC
MODE
HLC LEVEL 1~100 : Level adjust
MASK 1~4
M-WR
M-WB
RETURN Move back to previous menu
DAY→NIGHT
NIGHT→DAY
DELAY TIME 0~15 : Select the duration time
RETURN Move back to previous menu
A.DAY→NIGHT
A.NIGHT→DAY
C.DAY→NIGHT
C.NIGHT→DAY
DELAY TIME 0~15 : Select the duration time
RETURN Move back to previous menu
DELAY TIME
RETURN Move back to previous menu
AUTO, 1/60, 1/100FLK, 1/120, 1/250, 1/500,
1/1000, 1/2000, 1/4000, 1/10000, 1/100000
: Adjust shutter speed
AUTO, 1/60, 1/100FLK, 1/120, 1/250, 1/500,
1/1000, 1/2000, 1/4000, 1/10000, 1/100000
: Adjust shutter speed
Determines that use the AGC function or not
and AGC level selectable(You can not use the
Auto D&N change mode when AGC is off)
Using sense up when it is low luminance
(x2~x1024)
OFF, LOW, MID, HIGH : Use BLC function or
not / level selectable
OFF : Deactivates HBLC function
MANUAL
HBLC LEVEL : OFF, LOW, MID, HIGH
TOP : 0~15
BOTTOM : 1~16
LEFT : 0~15
RIGHT : 1~16
ALL DAY : Activates HBLC function all day
NIGHT : Use the function at night only
ON
TOP : 0~33
BOTTOM : 1~34
LEFT : 0~44
RIGHT : 1~45
OFF : HLC MASK OFF
Reduce noise in low illumination
(Level selectable)
Color temperature 2500~9500°K
0~128 : Adjust the Red value to shift the color of
the object
0~128 : Adjust the Blue value to shift the color
of the object
Find the optimal white balance for current
luminance environment
7~30
Select brightness of illumination about
changing the day↔night mode by AGC
6~29
6~36
Select brightness of illumination about
changing the day↔night mode by AGC
6~36
0~255
Select brightness of illumination about
changing the day↔night mode by CDS
0~255
0~15 : Change the color↔B/W by external signal(N/A)
Decreases screen saturation of objects within a
short range
Make a zone for HBLC
Make a zone for HLC mask
OSD Menu Select Menu Sub Menu Summary
4. IMAGE ADJUST
MIRROR MIRROR, OFF Set a vertical image inversion
SHARPNESS 0~30 Sharpness adjustable
0.45, 0.55, 0.65 Set a gamma value
GAMMA
LSC
RETURN Move back to previous menu
5. MOTION
MOTION ON, OFF Motion detection function activate/deactivate
AREA
SENSITIVITY 1~30 Motion detection sensitivity
DISPLAY OFF, MESSAGE, TRACE Select notification method of motion detection
HOLD TIME 0~15 Set the duration of alarm out
ALARM
OUTPUT
RETURN Move back to previous menu
6. PRIVACY
MASK 1~8
RETURN Move back to previous menu
7. SPECIAL
LANGUAGE ENGLISH, … : Select language(9 languages)
TITLE OFF--ON
COMMUNICATION
(N/A)
DPC
FACTORY
SET
RETURN
8. EXIT
SAVE AND
EXIT
EXIT Escape the menu without save
RETURN Move back to previous menu
USER
ON
OFF LSC OFF
AREA 1~4
RETURN Move back to previous menu
ON, OFF Alarm ON/OFF
OFF Display each privacy mask or not
ON
OFF--ON
OFF
AUTO
YES, NO Reset your cam era to factory default condition
Save the value and exit menu
GAMMA
RETURN Move back to previous menu
SET LEVEL 0~30 : Use the LSC and level adjustable
RETURN Move back to previous menu
TOP 0~143
BOTTOM 2~145
LEFT 0~190
RIGHT 2~192
RETURN Move back to previous menu
DOT SEL
DOT XY ENTER SETTING : Determines the coordinate
MOVE XY ENTER SETTING : Move the mask
COLOR BLACK, WHITE, … : Select mask color(8 colors)
RETURN Move back to previous menu
EDIT Display the camera name on the screen
RESET Camera name reset
POSITION Camera name position
RETURN Move back to previous menu
ID
BAUDRATE 2400, 4800, 9600 : Select baud rate
PROTOCOL P ELCO-D : Camera protocol
RETURN Move back to previous menu
WHITE THR
LUMA THR
RETURN Move back to previous menu
0.20, 0.25, 0.30, 0.35, 0.40, 0.45, 0.50, 0.55,
0.60, 0.65, 0.70, 0.75, 0.80, 0.85, 0.90, 0.95,
1.00 : Gamma adjustable
Make a zone for motion detection
L_TOP, L_BOT, R_BOT, R_TOP
: Determines which of the 4 vertices of each MD
area is to be used
1~255 : Select the camera ID for RS-485
communication
Deactivates Defect Pixel Correction in low
illumination
0~255 : Setup the l imited value of white pixel
correction
0~255 : Setup the l imited value of white pixel
correction
Return to previous menu
(Communication setting is not changed)
Speco Technol ogies is constantly developing product improvements. We reserve the right
to modify product design and specifications without notice and without incurring any
obligation.
Rev. 08/17/12.
3B25276B
 Loading...