

Page 1
Page 2
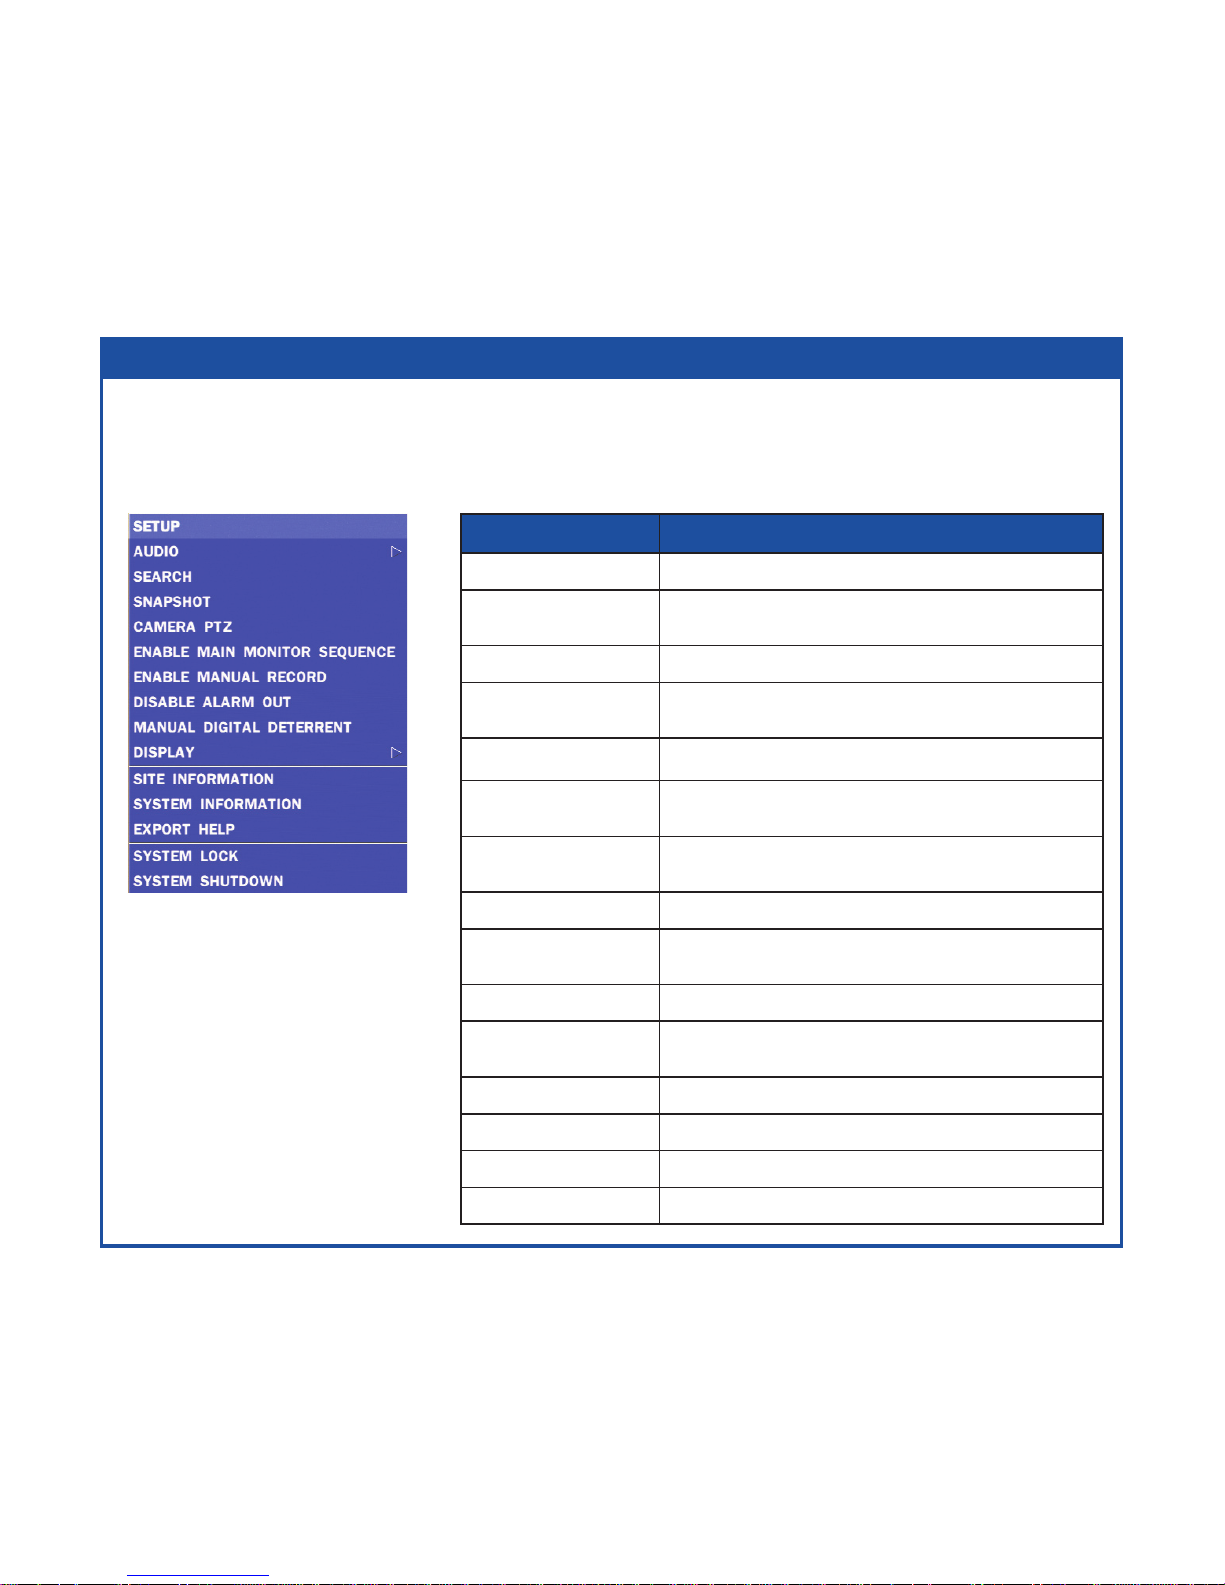
OSD Main Menu
• To enter the main menu, press the setup button on the remote control or right click on the
mouse and select setup from the submenu
• Enter username and password. The default username is admin and password is 1111.
Option Description
SETUP Select this option to enter the Setup menu.
AUDIO
Select this option to set an audio channel to output.
(Channel 1 through 4, Audio Mute)
SEARCH Select this option to enter the Search menu.
SNAPSHOT
Select this option to create a JPEG snapshot
of the selected channel.
CAMERA PTZ Select this option to access the PTZ interface.
ENABLE MAIN
MONITOR SEQUENCE
Select this option to enable/disable video sequence function.
ENABLE MANUAL
RECORD
Select this option to enable/disable manual recording. Also known
as Panic Record. Default is set to continuous recording.
DISABLE ALARM OUT Select this option to enable/disable Alarm outputs.
MANUAL
DIGITAL DETERRENT
Displays a window where the user can manually
trigger the Digital Deterrent audio message.
DI SPL AY Select between dierent multi-view display formats.
SITE INFORMATION
Displays a window with the recording
settings of a selected channel.
SYSTEM INFORMATION Displays a window with the system information.
EXPORT HELP Displays window with instructions for exporting video.
SYSTEM LOCK Locks the DVR from unauthorized user access.
SYSTEM SHUTDOWN Select this option to showdown system.
Page 3

Playback
EZSearch
• Select EZSEARCH and click NEXT.
• Select the specic MONTH, DATE
and click NEXT.
• Select the specic CHANNEL and
click NEXT. Thumbnail view of each
hour will be shown.
• Double click on the hour of interest.
Thumbnail view of each 2.5 minutes
within the hour will be shown.
• Double click on the thumbnail to
begin playback.
• Select SEARCH from the sub-menu
Page 4

Time Line
• Select TIME LINE and click NEXT.
• Select the specic MONTH, DATE, and click NEXT.
• Select the specic HOUR, MINUTE, and CHANNEL and click PLAY. Playback will begin.
Event
• Select EVENT and click NEXT.
• Select the specic MONTH, DATE and click NEXT.
• Select the specic EVENT and click PLAY. Playback will begin.
Specic Time
• Select GO TO SPECIFIC TIME and select the specic time to begin playback.
• Click on PLAY to begin playback.
• Go into playback mode as described in the previous section.
Export
• Click on EXPORT near the bottom of the playback screen.
Export
Page 5

EZCopy
• Click on EZCOPY START near the bottom of the playback screen. This will begin the start
time of the recorded data to be exported.
• The DVR will continue to play the recorded video.
• Move cursor to the end time.
• Click on EZCOPY STOP and this will end the data export.
• Select the FILE FORMAT and click NEXT.
• Select the specic CHANNEL and click START to begin export.
• Select the ARCHIVE MEDIA TYPE and click NEXT.
◦ STILL IMAGE: snapshots
◦ NSF: proprietary *.nsf video format
◦ AVI: * .avi video format, integrated subtitles, separated subtitles (Mac compatible)
• Select the MEDIA TYPE (USB DRIVE) and click NEXT.
• Select the specic CHANNEL and DURATION and click START to begin export.
Page 6

Event Export
• To export an event, go into Live mode and go to SEARCH from the sub-menu.
• Select EVENT and click NEXT.
• Select the specic MONTH, DATE and click NEXT. The list of events will be shown.
• Select the specic EVENT and click BACKUP.
• Select the MEDIA TYPE (USB DRIVE) and click BACKUP to begin export of event.
• Start Internet Explorer and enter the IP address and port of the DVR.
◦ For example http://[ip address] : [port] → http://192.168.80.6.80
• The ActiveX controls and plug-ins dialog will be prompted for installation.
• Install the plug-ins.
• Click on CONNECT and enter the IP, port number, username and password of the DVR.
◦ The default usernames and passwords are admin / 1111 and user1 / 1111.
• Click on SEARCH to go into PLAYBACK.
Export via Web-Browser Viewer
Page 7

iPhone® / iPad
®
• Click on EZCOPY START near the bottom of the playback screen. This will indicate the
start time of the recorded data to be exported.
• The DVR will continue to play the recorded video.
• Move time bar cursor to go to the time to end backup.
• Click on EZCOPY END and this will indicate the end time of the data export.
• Select AVI BACKUP button.
• Select the CHANNEL, FILE FORMAT, FILE PATH and click OK to begin export.
The RS provides mobile surveillance software for the iPhone® , iPad® and the Android™.
• Search for ‘Speco Player’ in the Apple App Store and install the app.
• Press (+) on the upper right and enter site information.
• Click SAVE to save the site information.
• Select the saved site from “Devices”
• Select a channel(s) to view.
• Select Playback/Live then click CONNECT
Viewing DVR via Mobile Devices
Page 8

Android
™
• Search for ‘Speco Player’ in
the Android™ Market and
install the app.
• Select the ADD menu and
enter site information.
• Click ADD to save the
site information.
• Select the saved site from
“Devices” for network connection.
• Select which channels to view
and press Live View
• The app will now display the
live streaming video.
SpecoTech Multi-Client Viewer Software is a multiple site
monitoring client software that allows streaming of video and
audio, and transmission of alarm signals from the DVRs over
the network. The SpecoTech Multi-Client can display up to 16
DVRs and supports dual monitors. PTZ camera control is also
supported by this software.
By attaching a microphone and speaker system to devices on
site, the user may make bi-directional audio communication over
the network.
Refer to the complete manual for more information.
SpecoTech Multi-Client Viewer
The SpecoTech Multi-Client Viewer Software and manual are included on the CD.
 Loading...