

Speck pumpen B9 Series, B9-7/0, 45, B9-15G/1, B9-11/0 Installation And Operation Instructions Manual
...
02/07
VG 766.2100.054 Kopien 02/07 D-GB-BA
Montage- und
Betriebsanleitung
Selbstansaugende Umwälzpumpen
Installation and
Operation Instructions
Self-priming Circulation Pumps
B
AUREIHE
/S
ERIES
B9-..
D
GB

Inhaltsverzeichnis
Contents
1. Allgemeines...........................................................................................................1
1. General ...............................................................................................................12
2. Sicherheit ..............................................................................................................3
2. Safety..................................................................................................................14
3. Transport und Zwischenlagerung..........................................................................5
3. Transport and storage.........................................................................................16
4. Beschreibung ........................................................................................................5
4. Description ..........................................................................................................16
5. Aufstellung / Einbau .............................................................................................6
5. Location / installation...........................................................................................17
6. Erstinbetriebnahme...............................................................................................7
6. Initial start-up.......................................................................................................18
7. Wartung/Instandhaltung .......................................................................................8
7. Maintenance / repair ...........................................................................................19
8. Störungen...........................................................................................................10
8. Faults / causes / comments ................................................................................21
9. Zugehörige Unterlagen
9. Associated documentation
9. Ersatzteilzeichnung.............................................................................................22
9. Parts drawing ......................................................................................................22
9. Ersatzteilliste und Werkstoffe..............................................................................23
9. Parts list and materials........................................................................................23

Montage- und Betriebsanleitung
für Pumpen aus Kunststoff, Baureihe B 9-..
1. Allgemeines
Speck Pumpen Verkaufsgesellschaft Karl Speck GmbH & Co.,
Neunkirchen am Sand
Baureihe B 9-..
Ursprungsland: Bundesrepublik Deutschland
Einsatzbereich:
Die Baureihe B 9.. ist eine Sonderausführung und ist ausschließlich zur Umwälzung von Salzsole (Dichte ca. 1,2 kg/l) für Nasssalzstreuung in Verbindung mit
einer speziellen Anlage und in Abstimmung mit dem Anwender einzusetzen ist.
Leistungsangaben und Verbrauchswerte
Maximale Förderhöhen:
B 9- 7/0,45 H
max.
= 12,0 m
B 9-11/0,55 H
max.
= 14,0 m
B 9-15G/1,0 H
max.
= 15,5 m
B 9-20G/1,3 H
max.
= 17,0 m
B 9-25G/1,5 H
max.
= 17,0 m
Maßzeichnung
Maße in mm
Technische Änderungen vorbehalten! Z.-Nr. D 90.04.012
1
Type L Saug Druck
B 9-7/0,45 1~ 3~ 485
B 9-11/0,55 1~ 3~ 507
Rp 1
1
/2 Rp 11/2
B 9-15G/1,0 1~ 3~ 517
B 9-15G/1,0 1~ 3~ 507
B 9-20G/1,3 1~ 3~ 517
Rp 2 Rp 1
1
/2
B 9-25G/1,5 1~ 3~ 545
B 9-25G/1,5 1~ 3~ 517
Ausbaumaß
Druck
Saug
Ausbaumaß
D

Schutzart IP X4
Wärmeklasse F
Drehzahl (min.
-1
) ca. 2840
Dauerschalldruckpegel dB (A) ≤ 70
1)
Wassertemperatur (°C) max. 60
Gehäuseinnendruck (bar) max. 2,5
2
Kennlinien
Baureihe B 9-..,
gültig für Wasser
mit 20°C
Für Normspannung nach IEC 38 und DIN EN 60034 (Eurospannung).
Geeignet für Dauerbetrieb bei
1~ 220-240 V und bei 3~ Y/∆ 380-420 V 220-240V.
Toleranzen ± 5%. GS geprüfte Pumpen nach EN 60335-1.
*
)
Innengewinde nach DIN 2999 Teil 1 und ISO 7/1, (eindichten nur mit
Teflonband).
1)
Gemessen mit Schallpegelmeßgerät nach DIN 45635.
KL 90.015
Gesamtförderhöhe H (m)
Förderstrom Q (m3/h)
Technische Daten bei 50 Hz
B 9-7/0,45 B 9-11/0,55 B 9-15G/1,0 B 9-20G/1,3 B 9-25G/1,5
Saug/Druck (Rp) *
)
11/2/ 11/211/2/ 11/22 / 11/22 / 11/22 / 11/
2
Empf. Saug-/Druckleitung, PVC-Rohr, d 50/50 63/50 63/63 75/63 75/75
Leistungsaufnahme P
1
(kW) 1~ 230 V 0,69 0,85 1,40 1,75 2,10
Leistungsabgabe P
2
(kW) 1~ 230 V 0,45 0,55 1,00 1,301)1,50
1)
Nennstrom (A) 1~ 230 V 3,00 4,00 6,70 7,60 8,50
Leistungsaufnahme P
1
(kW) 3~ Y/∆ 400/230 V 0,66 0,75 1,32 1,65 2,00
Leistungsabgabe P
2
(kW) 3~ Y/∆ 400/230 V 0,45 0,55 1,00 1,301)1,50
1)
Nennstrom (A) 3~ Y/∆ 400/230 V 1,25/2,15 1,55/2,70 2,50/4,30 3,00/5,20 3,30/5,70
Gewicht (kg) 1~ 9,2 11,0 16,6 17,7 17,4
Gewicht (kg) 3~ 9,0 11,0 12,6 15,5 16,7
3
2. Sicherheit
Diese Betriebsanleitung enthält grundlegende Hinweise, die bei Aufstellung,
Betrieb und Wartung zu beachten sind. Daher ist diese Betriebsanleitung unbedingt vor Montage und Inbetriebnahme vom Monteur sowie dem zuständigen
Fachpersonal/Betreiber zu lesen und muß ständig am Einsatzort der Maschine/Anlage verfügbar sein.
Es sind nicht nur die unter diesem Hauptpunkt Sicherheit aufgeführten, allgemeinen Sicherheitshinweise zu beachten, sondern auch die unter den anderen
Hauptpunkten eingefügten, speziellen Sicherheitshinweise, so z.B. für den privaten Gebrauch.
2.1 Kennzeichnung von Hinweisen in der Betriebsanleitung
Die in dieser Betriebsanleitung enthaltenen Sicherheitshinweise, die bei Nichtbeachtung Gefährdungen für Personen hervorrufen können, sind mit allgemeinen Gefahrensymbolen
Sicherheitszeichen nach DIN 4844 - W 9
bei Warnung vor elektrischer Spannung mit
Sicherheitszeichen nach DIN 4844 - W 8
besonders gekennzeichnet.
Bei Sicherheitshinweisen, deren Nichtbeachtung Gefahren für die Maschine
und deren Funktionen, sowie Schäden an der Umgebung hervorrufen kann, ist
das Wort
eingefügt.
Direkt an der Maschine angebrachte Hinweise wie z.B.
– Drehrichtungspfeil
– Kennzeichen für Fluidanschlüsse
müssen unbedingt beachtet und in vollständig lesbarem Zustand gehalten werden.
!
ACHTUNG

4
2.2 Personalqualifikation und -schulung
Das Personal für Bedienung, Wartung, Inspektion und Montage muß die entsprechende Qualifikation für diese Arbeiten aufweisen. Verantwortungsbereich,
Zuständigkeit und die Überwachung des Personals müssen durch den Betreiber genau geregelt sein. Liegen bei dem Personal nicht die notwendigen
Kenntnisse vor, so ist dieses zu schulen und zu unterweisen. Dies kann, falls
erforderlich, im Auftrag des Betreibers der Maschine durch den Hersteller/Lieferanten erfolgen. Weiterhin ist durch den Betreiber sicherzustellen, daß der
Inhalt der Betriebsanleitung durch das Personal voll verstanden wird.
2.3 Gefahren bei Nichtbeachtung der Sicherheitshinweise
Die Nichtbeachtung der Sicherheitshinweise kann sowohl eine Gefährdung für
Personen als auch für Umwelt und Maschine zur Folge haben. Die Nichtbeachtung der Sicherheitshinweise kann zum Verlust jeglicher Schadensersatzansprüche führen.
Im einzelnen kann Nichtbeachtung beispielsweise folgende Gefährdungen
nach sich ziehen:
– Versagen wichtiger Funktionen der Maschine/Anlage
– Versagen vorgeschriebener Methoden zur Wartung und Instandhaltung
– Gefährdung von Personen durch elektrische, mechanische und chemische
Einwirkungen
– Gefährdung der Umwelt durch Leckage von gefährlichen Stoffen
– Beschädigung von Einrichtungen und Bauwerken
2.4 Sicherheitsbewußtes Arbeiten
Die in dieser Betriebsanleitung aufgeführten Sicherheitshinweise, die bestehenden nationalen Vorschriften zur Unfallverhütung sowie eventuelle interne Arbeits-, Betriebs- und Sicherheitsvorschriften des Betreibers sind zu beachten.
2.5 Allgemeine Sicherheitshinweise für den Betreiber / Bediener
Führen heiße oder kalte Maschinenteile zu Gefahren, müssen diese Teile bauseitig gegen Berührung gesichert sein.
Berührungsschutz für sich bewegende Teile (z.B. Kupplung) darf bei sich in Betrieb befindlicher Maschine nicht entfernt werden.
Leckagen (z.B. der Wellendichtung) gefährlicher Fördergüter (z.B. explosiv, giftig, heiß) müssen so abgeführt werden, daß keine Gefährdung für Personen
und die Umwelt entsteht. Gesetzliche Bestimmungen sind einzuhalten.
Gefährdungen durch elektrische Energie sind auszuschließen, Einzelheiten
hierzu siehe z.B. in den Vorschriften des VDE und der örtlichen Energieversorgungsunternehmen.
2.6 Sicherheitshinweise für Wartungs-, Inspektions- und Montagearbeiten
Der Betreiber hat dafür zu sorgen, daß alle Wartungs-, Inspektions- und Montagearbeiten von autorisiertem und qualifiziertem Fachpersonal ausgeführt werden, das sich durch eingehendes Studium der Betriebsanleitung ausreichend
informiert hat.
Die Unfallverhütungsvorschriften sind zu beachten.

5
Grundsätzlich sind Arbeiten an der Maschine nur im Stillstand durchzuführen.
Die in der Betriebsanleitung beschriebene Vorgehensweise zum Stillsetzen der
Maschine muß unbedingt eingehalten werden.
Pumpen oder -aggregate, die gesundheitsgefährdende Medien fördern, müssen dekontaminiert werden.
Unmittelbar nach Abschluß der Arbeiten müssen alle Sicherheits- und
Schutzeinrichtungen wieder angebracht bzw. in Funktion gesetzt werden.
Vor der Wiederinbetriebnahme sind die im Abschnitt Erstinbetriebnahme aufgeführten Punkte zu beachten.
2.7 Eigenmächtiger Umbau und Ersatzteilherstellung
Umbau oder Veränderungen der Maschine sind nur nach Absprache mit dem
Hersteller zulässig. Originalersatzteile und vom Hersteller autorisiertes Zubehör
dienen der Sicherheit. Die Verwendung anderer Teile kann die Haftung für die
daraus entstehenden Folgen aufheben.
2.8 Unzulässige Betriebsweisen
Die Betriebssicherheit der gelieferten Maschine ist nur bei bestimmungsgemäßer Verwendung entsprechend Abschnitt 1 – Allgemeines – der Betriebsanleitung gewährleistet. In den Datenblättern angegebene Grenzwerte dürfen
auf keinen Fall überschritten werden.
Zitierte Normen und andere Unterlagen
DIN 4844 Teil 1 Sicherheitskennzeichnung; Sicherheitszeichen W 8
Beiblatt 13
DIN 4844 Teil 1 Sicherheitskennzeichnung; Sicherheitszeichen W 9
Beiblatt 14
3. Transport und Zwischenlagerung
Längere Zwischenlagerung in einer Umgebung mit hoher Luftfeuchtigkeit und
wechselnden Temperaturen ist zu vermeiden. Kondenswasserbildung kann
Wicklungen und Metallteile angreifen. In diesem Fall erlischt die Garantie.
4. Beschreibung
Die Kunststoffpumpen der Baureihe B 9 sind zur Förderung von Salzsole für
Nasssalzstreuung in Kombination mit einer entsprechenden Anlage konzipiert.
Die medienberührten Kunststoffteile sind überwiegend aus glasfaserverstärktem Polypropylen PP GF 30 hergestellt und haben damit eine hervorragende Korrosionsbeständigkeit gegenüber dem Fördermedium. Im Pumpengehäuse sind keine Inserts enthalten. Damit ist auch das Pumpengehäuse
recyclingfähig.
Die Motorwelle dient gleichzeitig als Pumpenwelle, auf der das Laufrad befestigt ist. Als Wellendichtung dient eine Balg-Gleitringdichtung, die auf der
Laufradnabe aus Kunststoff sitzt. Hierdurch ist eine sichere Trennung zwischen
Fördermedium und Elektromotor gegeben. Durch die Blockbauweise haben
die Pumpen einen geringen Platzbedarf. Sie werden durch Dreh- oder

6
Wechselstrommotoren angetrieben. Im Pumpengehäuse ist ein Saugsieb (143)
integriert, der gröbere Verunreinigungen aus dem Pumpeninneren fernhält.
5. Aufstellung / Einbau
5.1
Die Pumpe ist mit einem Motor der Schutzart IP X4 ausgestattet. Wir empfehlen aber trotzdem, bei der Aufstellung im Freien einen einfachen Regenschutz
vorzusehen. Dies erhöht die Lebensdauer Ihrer Pumpe. In einem geschlossenem Raum wie z. B. Keller, muss unbedingt ein für das Fördermedium
1)
geeigneter Ablauf vorhanden sein. Ist die Pumpe in einem feuchten Installationsraum
aufgestellt, muss für eine wirksame Be- und Entlüftung gesorgt werden, damit
sich kein Kondenswasser bilden kann. Bei kleinen Aufstellungsräumen kann
die natürliche Luftkühlung so gering sein, dass auch hier eine Be- und Entlüftung erforderlich ist, damit die Umgebungstemperatur von 40°C nicht überschritten wird.
Durch geeignete Maßnahmen ist sicherzustellen, dass Körper- oder Luftschall
der Pumpen nicht in unzulässige Weise die Umgebung beeinträchtigt.
Es ist darauf zu achten, dass genügend Platzreserve vorhanden ist, damit die
Motoreinheit in Richtung Motorlüfter mind. 120 mm und das Saugsieb (143)
nach oben mind. 140 mm ausgebaut werden können; siehe Angaben in der
Maßzeichnung. Zur Befestigung der Pumpe sind ausschließlich Schrauben,
Gewinde oder Dübel im Fundament zu verwenden, um einen Ausbau der Motoreinheit nicht zu blockieren. Saug- und Druckleitung sind spannungsfrei am
Pumpengehäuse anzubringen.
Achtung: Anschlussteile nur mit Teflonband eindichten.
5.2
Mechanisch / hydraulisch:
Die Pumpe muß horizontal und trocken aufgestellt werden. Sie kann sowohl
unterhalb (Zulaufbetrieb, max. 5 m) als auch oberhalb des Flüssigkeitsniveaus
1)
(Saugbetrieb) montiert werden. Hierbei darf die Saughöhe zwischen
Flüssigkeitspiegel
1)
und Pumpe (geodätische Höhe) 3 m nicht überschreiten.
Die Saughöhe wird durch Strömungswiderstände in der Saugleitung bei längeren und/oder zu klein bemessenen Rohrleitungen erheblich herabgesetzt. Die
Leitungen dürfen nur mit Dichtungsband in den Anschlußmuffen der
Pumpen abgedichtet werden. Bei undichter Saugleitung saugt die Pumpe
schlecht oder gar nicht an. Der Klarsichtdeckel muß ebenfalls dicht aufgeschraubt sein. Die Saugleitung soll so kurz wie möglich sein. Dadurch verringert sich die Ansaugzeit, die vom Luftvolumen in der Saugleitung abhängig ist.
Bei sehr langen Saugleitungen kann sie bis zu 12 min. betragen. Die Saugleitung sollte bis zur Pumpe möglichst unter dem Niveau des Flüssigkeitsspiegels
1)
verlegt werden. Es empfiehlt sich, dort, wo die Pumpe über dem Flüs-
sigkeitsspiegel
1)
installiert wird, in der Saugleitung ein Fußventil einzubauen.
Die Saugleitung kann sich somit beim Stillstand der Pumpe nicht entleeren. Dadurch bleibt die Ansaugzeit kurz z.B. nach dem Reinigen des Saugsiebes
(143).
ACHTUNG
ACHTUNG
1)
Salzsole für Nasssalzstreuung
7
5.3
Elektrisch: Elektroanschluß nur durch einen Fachmann!
Bitte darauf achten, daß in der Elektroinstallation eine Trennvorrichtung vorgesehen ist, die das Abtrennen vom Netz mit mindestens 3 mm Kontaktöffnung
jedes Poles gestattet. Diese Pumpe ist nach Schutzklasse I gebaut. Die Umgebungstemperatur darf max. 40°C nicht überschreiten. Bei Pumpen mit Drehstrommotor muß ein richtig eingestellter Motorschutzschalter installiert sein.
Bitte die Werte auf dem Typenschild beachten. Es erlischt sonst jeglicher Garantieanspruch bei Motorschaden. Pumpen mit Wechselstrommotoren sind serienmäßig mit einem Überlastschutzschalter ausgerüstet.
Die Motoren sind nach ISO Kl. F (Wärmeklasse) gebaut und können außen an
den Rippen Temperaturen bis 70°C erreichen.
Vorsicht: Benutzung der Pumpe für Schwimmbecken und deren Schutzbereich nur zulässig, wenn diese nach DIN/VDE 0100 Teil 702 errichtet
sind. Bitte fragen Sie Ihren Elektrofachmann!
Der versorgende Stromkreis ist mit einer Fehlerstromschützeinrichtung
mit einem Nennfehlerstrom von I
∆N
≤ 30 mA zu schützen.
Die verwendeten Leitungstypen H05RN - F für innen, H07RN - F für außen
müssen einen Mindestquerschnitt von 1 mm
2
haben.
6. Erstinbetriebnahme
6.1
Den Gewindering (160.2) über dem Saugsieb (143) durch Drehen gegen den
Uhrzeigersinn lösen, gegebenenfalls geschlossenen Meterstab zwischen die
Nocken des Gewinderinges legen und diesen als Öffnungshilfe benutzen. Den
Klarsichteinsatz (160.1) abheben. Die Pumpe langsam mit dem Fördermedium
bis zum Sauganschluß füllen. Den Klarsichteinsatz (160.1) aufsetzen und darauf achten, dass sich der Runddichtring (412.1) in der Gehäusenut befindet.
Den Gewindering (160.2) mit Handkraft anziehen. Anderenfalls kann die
Pumpe nicht oder nicht mit voller Kraft ansaugen.
Die Pumpe nicht trocken
laufen lassen! Auch nicht zur Drehrichtungskontrolle!
6.2
Pumpe vor Inbetriebnahme, nach längerer Stillstands- bzw. Lagerzeit, auf
Leichtgängigkeit prüfen. Hierzu einen Schraubendreher in den Schlitz am Motorwellenende (Lüfterseite) stecken und von Hand in Motordrehrichtung bewegen. Oder, falls erforderlich, die Lüfterhaube entfernen und gleichfalls von Hand
am Lüfterrad in Motordrehrichtung bewegen. Nach Inbetriebnahme auf Dichtigkeit der Gleitringdichtung achten.
ACHTUNG
ACHTUNG
!

8
6.3
Die Pumpe darf nicht ohne Saugsieb (143) bzw. Saugsieb-Griff (Gefahr des
Aufschwimmens vom Saugsieb) in Betrieb genommen werden, da sie sonst
verstopfen und blockieren könnte.
6.4
Bei Pumpen mit Drehstrommotor ist beim ersten Einschalten darauf zu achten, daß der Motor sich in Richtung des aufgeklebten Pfeiles dreht (vom Lüfter
aus betrachtet im Uhrzeigersinn). Ist dies nicht der Fall, unbedingt einen Fachmann rufen! (Zwei Phasen tauschen).
6.5
Bitte darauf achten, daß die eingebauten Absperrorgane in Saug- und Druckleitung bei Betrieb völlig geöffnet sind, weil die Pumpe nie bei geschlossenen Absperrorganen laufen darf!
7. Wartung / Instandhaltung
Das Saugsieb (143) muß von Zeit zu Zeit gereinigt werden. Bei verschmutztem
oder vollem Sieb geht der Förderstrom der Pumpe zurück und es findet keine
ausreichende Filtration statt.
7.1 Reinigen des Saugsiebe
s:
1. Pumpe ausschalten.
2. Absperrorgane schließen.
3. Den Gewindering (160.2) öffnen, siehe auch Punkt 6.1,
Klarsichteinsatz (160.1) abheben.
Saugsieb (143) herausnehmen, reinigen und wieder einsetzen.
Klarsichteinsatz (160.1) aufsetzen und Gewindering (160.2) anziehen.
(siehe Punkt 6.1 und 6.3).
4. Absperrorgane öffnen.
5. Pumpe wieder einschalten.
ACHTUNG
ACHTUNG
ACHTUNG
ACHTUNG
!

9
7.2
Wird die Pumpe durch den Wicklungsschutzkontakt oder den Motorschutzschalter außer Betrieb gesetzt, ist die Stromzufuhr zu unterbrechen und zu prüfen, ob sich die Pumpe leicht durchdrehen lässt. Dazu die Motorwelle an der
Lüfterseite mit einem Schraubendreher o.ä. durchdrehen. Ist die Motorwelle
schwergängig, muss die Pumpe von einem Fachmann überprüft werden. Ist sie
leichtgängig, Schraubendreher o.ä. herausziehen, Stromzufuhr wieder herstellen. Nach dem Abkühlen des Motors schaltet der Wicklungsschutzkontakt
selbstständig wieder ein, bzw. den Knopf des Motorschutzschalters wieder eindrücken. Dies darf nur noch einmal geschehen. Bitte die Stromaufnahme überprüfen! Nach einem weiteren Auslösen des Wicklungsschutzkontaktes oder
des Motorschutzschalters, ist von einem Fachmann die Ursache der Störung
festzustellen (z.B. Blockieren der Pumpe durch Verunreinigungen, Sand beim
Bodenreinigen). Stromzufuhr und Sicherungen kontrollieren.
7.3
Sitzt die Pumpe fest, muß sie gereinigt werden. Mehrmaliges Einschalten der
blockierten Pumpe kann Motorschäden zur Folge haben. In diesem Fall erlischt
der Garantieanspruch!
7.4
Der Leckageabfluß unten zwischen Pumpengehäuse und Motor darf nicht verstopft/abgedichtet werden, da sonst das Fördermedium innen aufsteigt und der
Motor beschädigt wird! Stellen Sie bitte sicher, daß durch eventuelle Leckagen
keine Folgeschäden auftreten können! Gegebenenfalls eine entsprechende
Auffangvorrichtung vorsehen.
7.5
Wichtige Reparaturhinweise
Demontage:
Austausch der Gleitringdichtun
g:
Die Pumpe ist auszuschalten und vom Netz zuverlässig zu trennen. Der Aus-
tausch ist von einem Fachmann vorzunehmen. Die Gleitringdichtung
(433) muss immer komplett ausgetauscht werden. Zu diesem Zweck muß
nicht die ganze Pumpe ausgebaut werden. Es muß lediglich die Motoreinheit
durch Lösen der 8 Schneidschrauben (900) aus dem Gehäuse (101) ausgebaut
werden.
Ausbau des Laufrade
s:
Die Laufradkappe (260) mit Runddichtring (412.6) herausdrehen. Das Laufrad
(230) mit einer Schraube M 6 x 50 (B 9-7/0,45 - B 9-11/0,55) bzw. M 10 x 50
(für B 9-15G/1,0 - B 9-25G/1,5) von der Motorwelle (800) abdrücken, dazu das
Laufrad mit der Hand festhalten und die Schraube eindrehen.
ACHTUNG
ACHTUNG
ACHTUNG
ACHTUNG

10
Montage:
Einbau der
neuen kompletten Gleitringdichtung:
Laufradnabe (230) und Manschette des kompletten Gegenringes leicht mit Seifenwasser befeuchten und mit beiden Daumen die Gleitringdichtung (433) auf
die Laufradnabe aufpressen bzw. den Gegenring in das Dichtungsgehäuse
(161.2) einpressen.
Wiederaufpressen des Laufrade
s:
Vor dem Wiedereinbau des Laufrades, Gleitfläche des Gegenringes und der
Gleitringdichtung säubern z. B. mit Spiritus oder Papiertaschentuch.
Zunächst die Laufradkappe (260) mit Runddichtring (412.6) in die Laufradnabe
einschrauben, dann mit möglichst gleichmäßiger Aufpreßkraft auf die Laufradkappe das Laufrad bis zum Anschlag aufpressen. Hierbei zur Aufnahme der
Gegenkraft das Ende der Motorwelle (Zentrum der Lüfterhaube) aufsetzen bzw.
unterstützen. Die Aufpreßkraft belastet sonst das Kugellager!
Wiedereinbau der Motoreinheit ins Pumpengehäus
e:
Die 8 Schneidschrauben (900) vor dem Wiedereinschrauben zunächst nach
links drehen, bis der geschnittene Gewindegang durch Einrasten wieder erreicht ist, dann erst festschrauben. Bitte achten Sie darauf, daß die Schrauben
nicht zu fest angezogen werden (Anziehmoment 7 Nm).
Keine Gewalt anwenden!
7.6
Bei Frostgefahr und Verwendung von anderen Medien ist die Pumpe rechtzeitig
zu entleeren. Hierzu die Verschlußschraube (903) öffnen und das Fördermedium aus der Pumpe fließen lassen. Frostgefährdete Leitungen ebenfalls entleeren.
8. Störungen
Als Wellendichtung dient eine Gleitringdichtung (433). Es ist normal, wenn von
Zeit zu Zeit einige Tropfen Flüssigkeit
1)
austreten, vor allem während der Ein-
laufzeit. Je nach Konzentration des Fördermediums
1)
und Betriebsstundenzahl
kann diese Dichtung im Lauf der Zeit undicht werden. Wenn laufend Fördermedium
1)
austritt, ist eine neue komplette Gleitringdichtung (433) einzubauen
(siehe 7.5).
Wir empfehlen, sich im Falle von Unregelmäßigkeiten zunächst an den
Fachmann zu wenden.
Beim Austausch der Kugellager des Motors müssen Lager mit C3-Luft und
Hochtemperaturfett (ca. 180°C) verwendet werden!
Beim Wiedereinschalten Punkt 6 beachten.
ACHTUNG
1)
Salzsole für Nasssalzstreuung

11
9. Zugehörige Unterlagen
Ersatzteilzeichnung sowie Ersatzteilliste mit
Werkstoffen finden Sie auf den Seiten 22 bis 24.

12
Installation and Operation Instructions
for Plastic Pumps, Series B 9-..
1. General
Speck Pumpen Verkaufsgesellschaft Karl Speck GmbH & Co.,
Neunkirchen am Sand
Series B 9-..
Country of Origin: Federal Republic of Germany
Field of Application:
The series B 9 is exclusively designed for the circulation of brine (density
approx. 1,2 kg/l) for wet salt road clearance which is to be used together with a
special unit in accordance with the user.
Characteristics and consumption data
Maximal heads:
B 9- 7/0,45 H
max.
= 12,0 m
B 9-11/0,55 H
max.
= 14,0 m
B 9-15G/1,0 H
max.
= 15,5 m
B 9-20G/1,3 H
max.
= 17,0 m
B 9-25G/1,5 H
max.
= 17,0 m
Dimensional Drawing
Dimensions in mm
Subject to technical modifications! Z.-Nr. D 90.04.012
Type L In Out
B 9-7/0,45 1~ 3~ 485
B 9-11/0,55 1~ 3~ 507
Rp 1
1
/2 Rp 11/2
B 9-15G/1,0 1~ 3~ 517
B 9-15G/1,0 1~ 3~ 507
B 9-20G/1,3 1~ 3~ 517
Rp 2 Rp 1
1
/2
B 9-25G/1,5 1~ 3~ 545
B 9-25G/1,5 1~ 3~ 517
min. space for
servicing
Out
In
min. space for
servicing
GB

13
Type of motor enclosure IP X4
Thermal class F
Motor speed approx. (rpm) 2840
Continuous sound intensity level dB (A)
≤ 70
1)
Max. water temperature (°C) 60
Max. casing interior pressure (bar)
2,5
Characteristics
Series B 9-..
applicable for water
of 20°C
For standard voltage according to IEC 38 and DIN EN 60034 (Euro-voltage).
Suitable for continuous operation at
1~ 220-240 V und bei 3~ Y/∆ 380-420 V 220-240 V.
Tolerances ± 5%. GS-tested pumps according to EN 60335-1.
*
)
Internal thread according to DIN 2999, part 1 and ISO 7/1,
seal with Teflon tape only.
1)
Measured with a phonometer according to DIN 45635.
KL 90.015
Total dynamic head H (m)
Flow rate Q (m3/h)
Technical data at 50 Hz
B 9-7/0,45 B 9-11/0,55 B 9-15G/1,0 B 9-20G/1,3 B 9-25G/1,5
Inlet/outlet (Rp) *
)
11/2/ 11/211/2/ 11/22 / 11/22 / 11/22 / 11/
2
Recommended inlet/outlet pipe, PVC pipe, hose diameter
50/50 63/50 63/63 75/63 75/75
Power input P
1
(kW) 1~ 230 V 0,69 0,85 1,40 1,75 2,10
Power output P
2
(kW) 1~ 230 V 0,45 0,55 1,00 1,301)1,50
1)
Rated current (A) 1~ 230 V 3,00 4,00 6,70 7,60 8,50
Power input P
1
(kW) 3~ Y/∆ 400/230 V 0,66 0,75 1,32 1,65 2,00
Power output P
2
(kW) 3~ Y/∆ 400/230 V 0,45 0,55 1,00 1,301)1,50
1)
Rated current (A) 3~ Y/∆ 400/230 V 1,25/2,15 1,55/2,70 2,50/4,30 3,00/5,20 3,30/5,70
Weight (kg) 1~ 9,2 11,0 16,6 17,7 17,4
Weight (kg) 3~ 9,0 11,0 12,6 15,5 16,7

14
2. Safety
This Operation Manual contains basic instructions, which must be observed
during mounting, operation and maintenance. Therefore the Operation Manual
should be carefully read before installation and start-up by the person in charge
of the installation as well as by all other technical personnel/operators and
should at all times be available at the installation site.
It is important that not only all general safety measures appearing under the
above heading “Safety” should be adhered to but also all other, specialized
safety instructions appearing under the other headings, e.g. for private use.
2.1 Symbols for Safety Instructions in the Operation Manual
All safety warnings contained in the Operation Manual which, when ignored,
may constitute danger for humans, are specially marked with general danger
symbols:
Safety symbol according to DIN 4844 - W 9
In case of electrical hazards they are specially marked with:
Safety symbol according to DIN 4844 – W8
For safety warning which, when ignored may constitute a hazard for the machine and its functions as well as for the surrounding, the word
is added.
Symbols directly attached to the machine like e.g.
– arrow denoting the direction of rotation
– symbol for fluid connections
must be heeded and kept fully legible at all times.
!
CAUTION

15
2.2 Personnel Qualification and Training
All personnel for the operation, maintenance, inspection and installation must
be fully qualified to perform that type of job. Responsibility, competence and the
supervision of such personnel must be strictly regulated by the user. Should the
available personnel be lacking the necessary qualification, they must be trained
and instructed accordingly. If necessary, the operator may require the manufacturer/supplier to provide such training. Furthermore the operator/user must
make sure that the personnel fully understands the contents of the Operation
Instructions.
2.3 Dangers of Ignoring the Safety Symbols
Ignoring the safety directions and symbols may pose a danger to humans as
well as to the environment and the machine itself. Non-observance may void
any warranties.
Non-observance of safety directions and symbols may for example entail the
following:
– Failure of important functions of the machine/plant
– Failure of prescribed methods for maintenance and repair
– Endangerment of persons through electrical, mechanical and
chemical effects
– Danger to the environment because of leakage of hazardous material
– Danger of damage to equipment and buildings
2.4 Safety-oriented Operation
The safety directions contained in the Operation Instructions, existing national
regulations for the prevention of accidents as well as internal working-, operational- and safety-regulations of the operator/user must be observed at all
times.
2.5 General Safety Directions for the Operator/User
If hot or cold machine parts pose a danger, such parts must be protected by the
operator/user against contact with personnel.
Protective covers for moving parts (e.g. coupling) must not be removed when
the machine is running.
Leakages (e.g. at the shaft seal) of hazardous pumping media (e.g. explosive,
toxic, hot liquids) must be disposed of in such a way that any danger for personnel and the environment is removed. All government regulations must be
observed at all times. Any danger to persons etc. by electrical energy must be
excluded. For details see e.g. regulations of VDE and the local utilities.
2.6 Safety Directions for Maintenance, Inspection and Assembly Work
It is the user’s responsibility to make sure that all maintenance, inspection and
assembly work is performed exclusively by authorized and qualified experts
sufficiently informed through careful perusal of the Operating Instructions.
The accident prevention regulations must be observed.

16
Basically, all work on the machine is to be performed while the machine is not
in operation. The sequence for shutting the machine down described in the
Operating Instructions must be strictly observed. Pumps or pump units handling
hazardous liquids must be decontaminated.
Immediately upon completion of the work, all safety and protective equipment
must be restored and activated.
Before restarting the machine, all points contained in chapter “Initial Start-up”
must be observed.
2.7 Unauthorized Changes and Manufacturing of Spare Parts
Any conversion or changes of the machine may only be undertaken after
consulting the manufacturer. Original spare parts and accessories authorized
by the manufacturer guarantee operational safety. Using non-authorized parts
may void any liability on the part of the manufacturer in case of consequential
damage.
2.8 Unauthorized Operation
The operational safety of the machine delivered is only guaranteed if the
machine is used in accordance with the directions contained in Section 1 –
General – of the Operating Instructions. Limits stated in the data sheets may
not be exceeded under any circumstances.
Cited Standards and other Documentations
DIN 4844 Part 1 Safety marking; Safety symbols W 8
Supplement 13
DIN 4844 Part 1 Safety marking; Safety symbols W 9
Supplement 14
3. Transportation and Intermediate Storage
Prolonged intermediate storage in an environment of high humidity and
fluctuating temperatures must be avoided. Moisture condensation may damage
windings and metal parts. Non-compliance will void any warranty.
4. Description
The series B 9 is exclusively designed for the circulation of brine for wet salt
road clearance which is to be used together with a special unit. The plastic
parts in contact with the transported medium are mostly of glass fibre reinforced
polypropylene PP GF 30 and thus possess excellent corrosion resistance
against the transported medium. The pump housing does not contain any
inserts, therefore it can easily be recycled.
The motor shaft also serves as the pump shaft on which the impeller is mounted. The seal for the shaft is a bellows-type mechanical seal arranged on a
plastic impeller hub. This guarantees a positive electrical separation between
the transported medium and the electric motor. Because of the pump’s close
coupled design, a minimum of space is required. The pumps are driven by
three-phase or single-phase motors. Integrated in the pump housing is a
strainer basket (143), which keeps coarse impurities from the pump’s interior.

17
5. Placement / Installation
5.1
The pump is equipped with a motor protection type IP X4. When installed
outside we recommend providing some protection against the rain. This will
increase the longevity of your pump. When installed in a closed room, like for
example a cellar a drainage must be foreseen which is suitable for the
transported medium
1)
. The installation site of the pump must be dry. If the pump
is installed in a humid environment, effective ventilation and aeration must be
provided in order to prevent condensation. In case of extremely small, confined
installation places, the natural cooling of the air may be so insignificant that,
here too, a ventilation and aeration is necessary in order to avoid exceeding
environmental temperatures of 40°C.
Make sure by applying appropriate measures, that the environment will not be
impaired by any sound produced by the pump.
During installation, make sure that there is enough space available to permit
subsequent disassembly of the motor unit in the direction of the motor fan
(minimum 120 mm) and the strainer basket (143) towards above (minimum 140
mm), see directions in the dimensional drawing. Fastening the pump to the
foundation should be effected exclusively by means of bolts, threads (or
dowels) in order to avoid blocking the removal of the motor unit! Inlet- and
outlet-pipes must be mounted to the pump housing free of tension.
Caution: Sealing of connecting parts only by means of Teflon tape!
5.2
Mechanical / Hydraulic:
The pump must be installed in a horizontal position in dry condition. It may be
installed either max. 5 m below (gravity feed) or above of the liquid level
1)
(suction mode). Thereby the geodetic head between liquid level and pump inlet
must not exceed 3 m. The suction lift may be significantly reduced by flow
resistance in the suction line, if the pipes are very long and/or insufficiently
dimensioned. Only use sealing tape for connecting sleeves to pump!
Make sure that the suction line is not leaky, otherwise the pump will prime
insufficiently or not at all. The transparent lid must be screwed on tightly and
the suction/intake line should be as short as possible. This will reduce priming
time, which is dependent on the air volume in the intake line. If the intake line is
very long this may take up to 12 minutes. If possible the intake line to the pump
should be installed below the liquid level. Whenever the pump is installed
above the liquid level it is recommended to install a foot valve in the intake line.
Thus the suction pipe cannot drain itself when the pump has been turned off.
This keeps priming times short e.g. after having cleaned the strainer basket
(143).
CAUTION
CAUTION
1)
Brine for wet salt road clearance

18
5.3
Electrical: All electrical connections should be performed by a qualified
expert only!
Please make sure that the electrical installation has a disconnecting device,
which allows disconnecting from the power supply with a minimum of 3 mm
contact gap at each pole. This pump is built according to Protection Class 1.
The ambient temperature must not exceed max. 40°C. Pumps with three-phase
motors require the installation of a correctly adjusted motor overload switch.
Observe the data on the rating plate. Non-compliance will void any warranty in
case of motor failure. Pumps with A.C. motors are equipped with an overload
protection switch as standard.
The motors are built according to thermal class F, the ribs may achieve temperatures up to 70°C.
Caution: The use of pumps for swimming pools and the restricted area
around them is only permitted if pumps are installed in accordance with
DIN/VDE 0100 part 702. Please consult your licensed electrician!
The supply circuit has to be protected with a fault current contactor with a
nominal fault current of I
∆N
≤ 30 mA zu schützen.
The electrical wiring used (HO5RN – F for inside, HO7RN – for outside) must
have a minimum cross section of 1 mm
2
.
6. Initial Start-up
6.1
Loosen the ring nut (160.2) above the strainer basket (143) by turning
anticlockwise, if necessary one can use a closed folding ruler as opening
device by placing it between the cams of the ring nut. Remove the transparent
lid (160.1). Slowly fill the pump with transported medium until its level reaches
the inlet connection. Put on the transparent lid (160.1) and make sure that the
o-ring seal (412.1) is well in the housing groove. Tighten the ring nut (160.2) by
hand. Otherwise the pump will prime insufficiently or not at all. Never let the
pump run dry, not even for the purpose of checking the direction of
rotation!
6.2
Make sure pump and motor turns freely, especially after extended periods of
downtime. To do this put a screwdriver into the slot at the fan end and turn it by
hand in the direction of rotation (see directional arrow). If necessary remove the
fan cover and turn the fan by hand. Make sure the mechanical seal doesn’t
leak.
CAUTION
CAUTION
!

19
6.3
Never operate the pump without the strainer basket (143) and strainer basket
handle respectively (danger of the suction strainer bobbing up), otherwise the
pump may get clogged and blocked.
6.4
When starting pumps with three-phase current motor for the first time, make
sure the motor turns in the direction of the affixed arrow (clockwise, seen from
the fan). If the motor rotates in the wrong direction, two phases must be
switched, by a licensed electrician only!
6.5
Please make sure that the installed shutoff valves in the suction and pressure
lines are completely open. Since the pump must never be allowed to run with
shutoff valves closed!
7. Maintenance / Repair
The strainer basket (143) must be periodically emptied. A full or dirty strainer
will impair the pump’s flow rate and the filtration.
7.1 Cleaning the strainer:
1. Shut down pump
2. Close shutoff valves
3. Open ring nut (160.2), see par. 6.1, lift transparent lid (160.1). Remove
strainer basket (143), clean and replace it. Put transparent lid (160.1) back in
place and tighten ring nut (160.2), see par. 6.1 and 6.3.
4. Open shutoff valves
5. Restart pump
CAUTION
CAUTION
CAUTION
CAUTION
!

20
7.2
When the pump is shut off by the thermal security in the windings or by the
motor overload switch, the power supply must be cut off and one must check
whether the pump can still turn unobstructed. To do so try rotating the motor
shaft at the fan side with a screwdriver or other tool that will do. If rotating the
motor shaft requires considerable force, the pump must be checked by an
expert. If it rotates easily, remove your tool and restore the power supply. As
soon as the motor has cooled down the thermal security in the windings will
reactivate itself, respectively the motor overload switch can be pressed down.
This only may happen one more time. If the pump still shuts off because of the
thermal security in the windings or because of the motor overload switch the
cause of the malfunction is to be determined by an expert (e.g. blocking of the
pump due to impurities or sand swept up while vacuuming the bottom of a
pool). Check current supply and fuses.
7.3
If the pump seizes, it has to be cleaned. Repeated starting of a blocked pump
may cause damage to the motor. In that case any guarantee is voided!
7.4
The leakage pipe on the underside between pump housing and motor must
never be clogged or sealed; otherwise the water in it will rise and the motor will
be damaged! Please make sure that leakage cannot cause consequential
damages! If necessary provide a suitable drip pan.
7.5
Important hints for repair work
Dismantling:
Replacement of the mechanical seal:
Switch off the pump and disconnect it from the power supply. The exchange of
the mechanical seal has to be done by an expert. The mechanical seal
always has to be replaced completely (433). To do so, it is not necessary to
dismount the complete pump, only the motor unit has to be removed from the
housing (101) by loosening the 8 tapping screws (900).
Removing of the impeller:
Take off the impeller cap (260) with o-ring (412.6) by unscrewing it. Separate
the impeller (230) from the motor shaft (819) with a screw M 6 x 50 for versions
B 9-7//0,45 to B 9-11/0,55, with a screw M 10 x 50 for versions B 9-15/1,0 to
B 9-25G/1,5. Hold the impeller by hand while turning the screw.
CAUTION
CAUTION
CAUTION
CAUTION

21
Assembly:
Mounting of the
new mechanical seal:
Slightly moisten the impeller hub (230) as well as the sleeve of the complete
lock ring with soap water. Press the mechanical seal (433) onto the impeller
hub regularly with both thumbs, press the lock ring into the gland housing
(161.2), respectively.
Re-assembly of the impeller:
Before re-assembly of the impeller, clean the surface of the lock ring and of the
mechanical seal with alcohol or with a clean paper tissue.
First screw–in the impeller cap (260) with o-ring (412.6) into the impeller hub,
then press the impeller, with constant force at the impeller cap, until it catches.
For the reception of the counterforce, support the end of the motor shaft (centre
of the fan cowl), otherwise there would be too much pressure to the ball
bearing!
Re-assembly of the motor unit into the pump casing:
First turn the 8 tapping screws (900) to the left until reaching the cut thread by
latching, tighten only afterwards. Please make sure that the screws are not tightened too strong (tightening moment 7 Nm).
Do not use force!
7.6
If there is danger of freezing, the pump must be drained ahead of time. For this
purpose open the drain plug (903) in order to drain off all liquid. Also drain all
pipes subject to freezing.
8. In Case of Malfunction
The sealing between the motor and the pump housing is done by means of a
mechanical seal (433). It is normal that a few drops of medium
1)
seep through
once in a while, especially during the break-in period. Depending on the
concentration of the transported medium and the duration of operation said
mechanical seal may become leaky after some time. If the liquid penetrates
continuously, replace the complete mechanical seal (433) by a new one (see
par. 7.5).
In case of malfunction we recommend contacting the pool builder of the
unit first.
If ball bearings must be replaced, bearings with C3 air and high-temperature
grease (approx. 180°C) are to be used!
When restarting the pump, refer to item 6.
CAUTION
1)
Brine for wet salt road clearance

22
9. Zugehörige Unterlagen / Associated Documentation
Ersatzteilzeichnung / Parts drawing
Z.-Nr. W 90.04.056

23
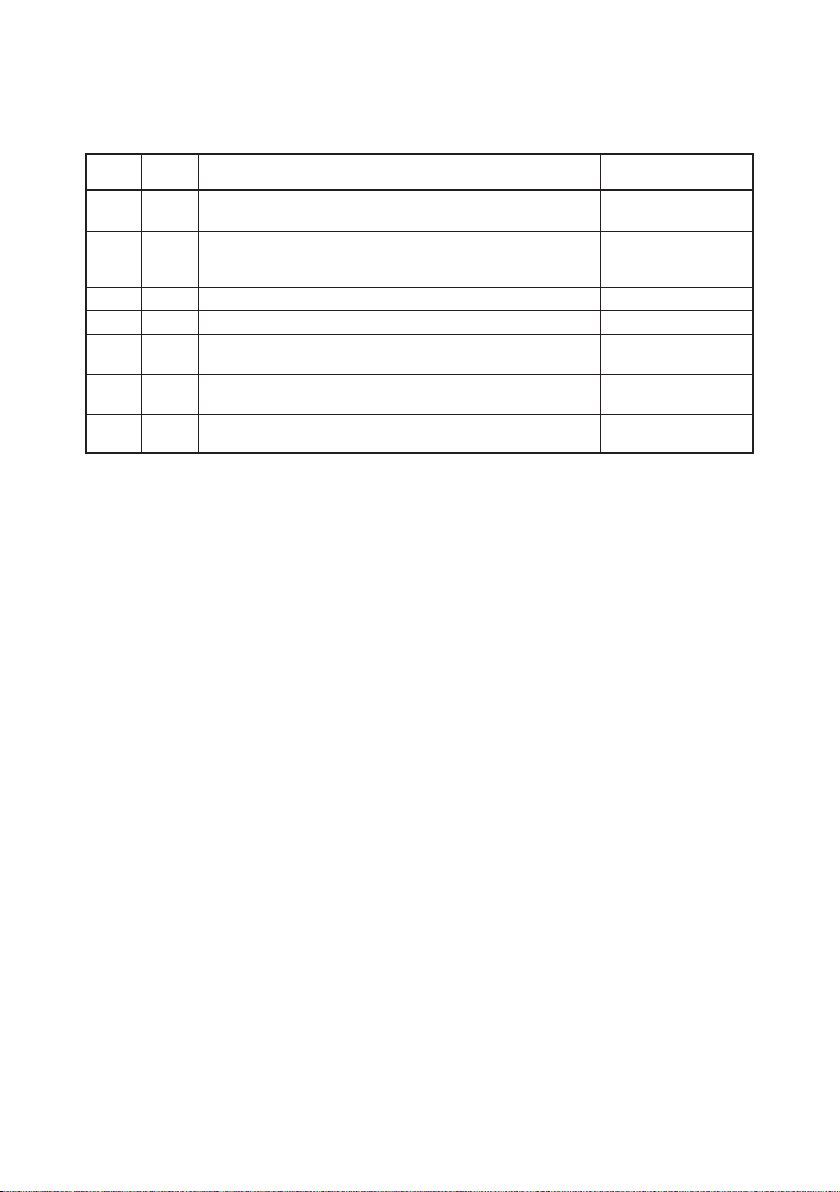
Teil-Nr. Stück Benennung
Werkstoff / Bemerkung
Serial # Qty. Description
Material / Remarks
Saug/Druck
Inlet/outlet
101 1 Gehäuse Rp 1
1
/2/Rp 11/2 B 9-7/0,45, B 9-11/0,55 PP GF 30
Casing Rp 2/Rp 1
1
/2 B 9-15G/1,0, B 9-20G/1,3 PP GF 30
B 9-25G/1,5 PP GF 30
113 1 Zwischengehäuse PP TV 40
Intermediate flange
143 1 Saugsieb (mit Griff) PP
Strainer basket (complete with handle)
160.1 1 Klarsichteinsatz PC
Transparent lid
160.2 1 Gewindering PP 66 GF 30
Ring nut
161.2 1 Dichtungsgehäuse PP TV 40
Gland housing
174.2 1 Leitschaufeleinsatz PP GF 30
Diffuser
230 1 Laufrad PP GF 30
Impeller
260 1 Laufradkappe PP
Impeller
412.1 1 Runddichtring Perbunan
O-ring
412.2 1 Runddichtring Perbunan
O-ring
412.4 1 Runddichtring Perbunan
O-ring
412.5 1 Runddichtring Perbunan
O-ring
412.6 1 Runddichtring Viton
O-ring
433 1 Gleitringdichtung kpl.
Mechanical seal
- Gleitringdichtung - mechanical seal Q54 PG
- Gegenring - lock ring AL
2O3
- Manschette - sleeve Perbunan
507 1 Spritzring Perbunan
Splash ring
515 2 Toleranzring 1.4310
Staring
516 1 V-Ring Perbunan
V-ring
554.2 4 Unterlegscheibe A 2
Washer
Ersatzteilliste mit Werkstoffen / Parts list and materials
24
Teil-Nr. Stück Benennung
Werkstoff / Bemerkung
Serial # Qty. Description
Material / Remarks
Bei Bestellung von Ersatzteilen bitten wir um Bekanntgabe des Pumpentyps, der
Pumpennummer, der Motorleistung und der Nummer der betreffenden Teile!
Technische Änderungen vorbehalten!
When ordering spare parts, please quote pump type, pump no., motor capacity and
the serial-no. of the spare parts required!
Subject to technical modifications!
595 1 Gummipuffer Perbunan
Rubber puffer
800 1 Motor
(Motorwelle) (1.0727.07)
(motor shaft)
894.1 3 Adapter B 9-7/0,45, B 9-11/0,55 PP
894.1 2 Adapter B 9-15G/1,0, B 9-20G/1,3 (nur bei 3~) PP
900 8 Schneidschraube mit Scheibe A 2
Self-tapping screw with washer
903 1 Verschlußschraube PP GK 20
Drain plug
914.2 4 Innensechskantschraube A 2
Allan screw
Kundendienst, Reparaturservice und Ersatzteile
Telefon 09123-949-700
Telefax 09123-949-216
E-Mail service@speck-pumps.com
After-sales service, repair and replacement parts
Telephone 09123-949-700
Fax 09123-949-216
E-Mail service@speck-pumps.com

EG-Konformitätserklärung
EC declaration of conformity / Déclaration „CE“ de conformité
im Sinne der EG-Maschinenrichtlinie 89/392 /EWG, Anhang II A
as defined by machinery directive 89/392/EEC, annex II A
conformément à la directive „CE“ relative aux machines 89/392/EWG-annexe II A
Hiermit erklären wir, dass das Pumpenaggregat
Herewith we declare that the pump unit / Par la présente, nous déclarons que le groupe moteur-pompe
Type:
Type / Type:
Auftrags-Nr.:
Commisions nr. / N° d’ordre:
Baureihe:
Series / Série:
T Baureihe B 9-..
folgenden einschlägigen Bestimmungen entspricht:
complies with the following provisions applying to it:
correspond aux dispositions pertinentes suivantes:
EG
-Maschinenrichtlinie 98 /37 /EG
EC-Machinery directive 98/37/EC / CE-Directives européennes 98/37/ CE
EMV-Richtlinie 89/ 336/ EWG, i.d.F. 93/ 68/ EEC
EMC-Machinery directive 89/336/EEC, changed 93/68/EEC / Directives relatives à la basse
tension 89/336/CEE modifièes par 93/68/CEE
EG-Niederspannungsrichtlinie (73/ 23/ EWG) i.d.F. 93/ 68/ EWG
EC-Low voltage directive (73/23/EEC) in succession 93/68/EEC / CE-Directives basse tension
(73/23/CEE) suivies de 93/23/CEE
EG-Richtlinie 2002/96/EG (WEEE):
Directive 2002/95/CE (WEEE) / Directive 2002/96/EC (DEEE)
EG-Richtlinie 2002/95/EG (RoHS):
Directive 2002/96/CE (RoHS) / Directive 2002/95/EC (RoHS)
Angewendete harmonisierte Normen, insbesondere
applied harmonized standard, in particular / Normes harmonisées utilisées, notamment
EN 809 EN 50081-1-2
EN 60335-1 EN 50082-1-2
EN 60335-2 - Teil 41
D-91233 Neunkirchen a. Sand, 01.02.07
i.V. F. Eisele ppa. A. Herger
Ort Datum (Technischer Leiter) (Vertriebs- und Marketingleiter)
place date (Technical Director) (Director of Sales)
Fait à ,le (Directeur Technique) (Directeur des Ventes)
Adresse / Address / Adresse:
Hauptstraße 1-3, D-91233 Neunkirchen a. Sand

VG 766.2100.054 Kopien 02/07 D-GB-BA
 Loading...