

Page 1

MODEL SSM
Synth and Line Mixer
Model SSM-24
l
Model SSMEX-16
l
Model SSMEX-32
l
Operation Manual
Page 2

ii
Notice
Warranty
Edition
Speck Electronics makes no warranty of any kind with regard to this material,
including, but not limited to, the implied warranties of merchantability and
fitness for a particular purpose. Speck Electronics shall not be liable for errors
contained herein or for incidental consequential damages in connection with the
furnishing, performance, or use of this material.
This document contains proprietary information which is protected by
copyright. All rights are reserved. No part of this document may be
photocopied, reproduced, or translated into another language without the prior
written consent of Speck Electronics.
The information contained in this document is subject to change without notice.
Speck Electronics products are warranted to the original owner to be free of
defects in material or workmanship.
This warranty does not apply to incandescent lamps, slide potentiometers, or
any product subject to accident, misuse, neglect or failure to comply with
normal maintenance procedures or if the serial number has been defaced,
altered, or removed; nor will Speck Electronics accept responsibility for
damages resulting from improper installation, alteration or unauthorized parts
or repairs. If the product is modified by the customer without permission, the
customer agrees to pay for parts and labor necessary to remove the modification
before repair. The cause of the defect is in the sole judgment of Speck
Electronics.
Should a defect develop within one year of purchase from Speck Electronics or
an authorized dealer, Speck Electronics will supply the part or parts necessary
at no charge. Labor is covered in this warranty for a period of one year.
Outside service, repairs or pickups are not covered under this warranty.
Any item returned for warranty repair should be sent, if possible, in the original
packing container, prepaid to Speck Electronics, 925 S. Main Street, Fallbrook,
California, 92028. If in our opinion the packing container is improper for
return shipping, we reserve the right to supply a new container at a minimal
charge.
In the interest of improving Speck Mixers and related products; designs and
specifications are subject to change without notice. It should be mentioned that
if a change is necessary for any reason, we make every effort to document
that change and send an "update notice" to all customers at no charge.
First Printing - April 1990
Edition 2 - July 1994
Edition 3 - April 1997
Page 3

Contents
Contents
iii
Chapter 1 Introduction
Chapter 2 Initial Preparation
General ......................................................................................
Operator Safety Summary .........................................................
Power Source ......................................................................
Grounding the product ........................................................
Use the proper power cord ..................................................
Use the proper fuse .............................................................
Panels and Covers ...............................................................
Ground Terminal..................................................................
General Description ...................................................................
Input section ........................................................................
Effects section .....................................................................
Master section .....................................................................
Features .....................................................................................
Standard Accessories .................................................................
Regulated power supply ......................................................
Rack mount adapters ...........................................................
Interface Harness .................................................................
Optional Accessories .................................................................
SSM 16 Input Expander ......................................................
Assign 28 Subgroup Module ...............................................
Microphone Preamps ..........................................................
Rack Mount Slide/Tilt Adapter ...........................................
Expression Pedal Harness ...................................................
Specifications ............................................................................
Unpacking and Inspection .........................................................
Environmental Considerations ..................................................
Grounding ...........................................................................
Rack grounding ...................................................................
Repacking for Shipment ............................................................
1
1
1
1
1
1
4
4
4
4
5
5
5
6
6
6
6
6
6
6
7
7
7
8
10
10
10
11
11
Page 4

Contents
Chapter 3 Installation
iv
Chapter 4 Operation
General ......................................................................................
Mechanical Installation .............................................................
Physical Placement of Adjacent Equipment ..............................
Power supply .............................................................................
Mounting location ...............................................................
Configuring the AC .............................................................
AC wiring chart ...................................................................
Fuse chart ............................................................................
Connecting the Power Supply ...................................................
Power Supply DC pin assignment .......................................
Ground terminal ..................................................................
Rack Mount Adapters ................................................................
Installation ..........................................................................
Optional Slide/Tilt Rack Adapters .............................................
Default Control Settings ............................................................
Cleaning ....................................................................................
Interfacing Expanders ................................................................
Mounting location ...............................................................
Installing the Interface Cable ..............................................
Expander pin assignment ....................................................
Interfacing the Assign 28 ...........................................................
Mounting location ...............................................................
Connecting the Assign 28 ...................................................
Expression Pedal .......................................................................
Connecting the Cable ..........................................................
Expression Pedal Enable Switch .........................................
Pedal connector pin assignment ..........................................
General ......................................................................................
Front Panel Controls ...............................................................
Input Channel ............................................................................
Equalizer Section .......................................................................
Effects Send and Return Section ...............................................
Master Section ...........................................................................
Stereo Cue Return Section .........................................................
Mono Click Return Section .......................................................
Stereo Aux Return Section ........................................................
12
12
12
13
13
13
14
14
15
15
15
15
15
16
16
16
17
17
17
18
18
18
18
18
18
19
19
20
20
20
22
27
29
35
35
36
Page 5

Contents
v
Chapter 5 Wiring and
Other
Rear Panel Controls ................................................................
Input Channel Connections and Switches .................................
Effects Send and Return Connections .......................................
Master Input/Output Connections ..............................................
Stereo Cue Return Section .........................................................
Mono Click Return Section .......................................................
General ......................................................................................
Start simple .........................................................................
Audio Cable ...............................................................................
Multipair wire harnesses .....................................................
Connectors .................................................................................
Proper AC Grounding ................................................................
Quality AC system ..............................................................
AC distribution ....................................................................
Clock noise and AC ............................................................
Safety earth connection .......................................................
Electronics earth ..................................................................
Proper Audio Grounding and Shielding ....................................
EMI and RFI ..............................................................................
Sources of EMI ...................................................................
Reducing EMI .....................................................................
Balanced to Unbalanced Connections .......................................
38
38
41
43
47
48
52
52
52
52
53
53
53
53
54
54
54
54
55
55
55
56
Page 6

Chapter 1 Introduction Section
Introduction
General
Operator Safety
Summary
Power source
Grounding the product
Use the proper power cord
Use the proper fuse
Thank you for purchasing our Model SSM Synth and Sampler Mixer.
The Model SSM was designed from the ground up as a high
performance mixer dedicated to the professional synth player.
The Model SSM has operational features that are unique to our products
and are somewhat technical in nature. We hope this manual is easy to
understand. If you have any questions regarding the Model SSM or any
Speck product, do not hesitate to contact Speck Electronics. Our phone
number is (760) 723-4281.
This product and its power supply are intended to operate from an AC
power source that does not apply more than 240 Volts RMS between the
supply conductors or between either supply conductor and ground.
The external power supply for the Model SSM is grounded through the
grounding conductor of the power cord. To avoid electrical shock, plug
the power cord into a properly wired receptacle before making any audio
connection to the mixer. A protective ground connection, by way of the
grounding conductor in the power cord, is essential for safe operation.
Upon loss of the protective ground connection, all accessible
conductive parts, including knobs and controls that may appear to be
insulating, can render an electric shock.
Use only the power cord and connector that is supplied with your power
supply. The power cord must be in good condition.
To avoid a fire hazard, use only a fuse of the correct type, voltage rating
and current rating as specified on the chassis of the power supply and
this manual.
Two fuses are required for the operation of the Model SSM. One fuse is
for the main mixer and optional expander (if installed), and the other is
for the headphone circuit on the main mixer.
Refer to the section in this manual regarding specific details on fuses.
1
Page 7
Chapter 1 Introduction Section
2
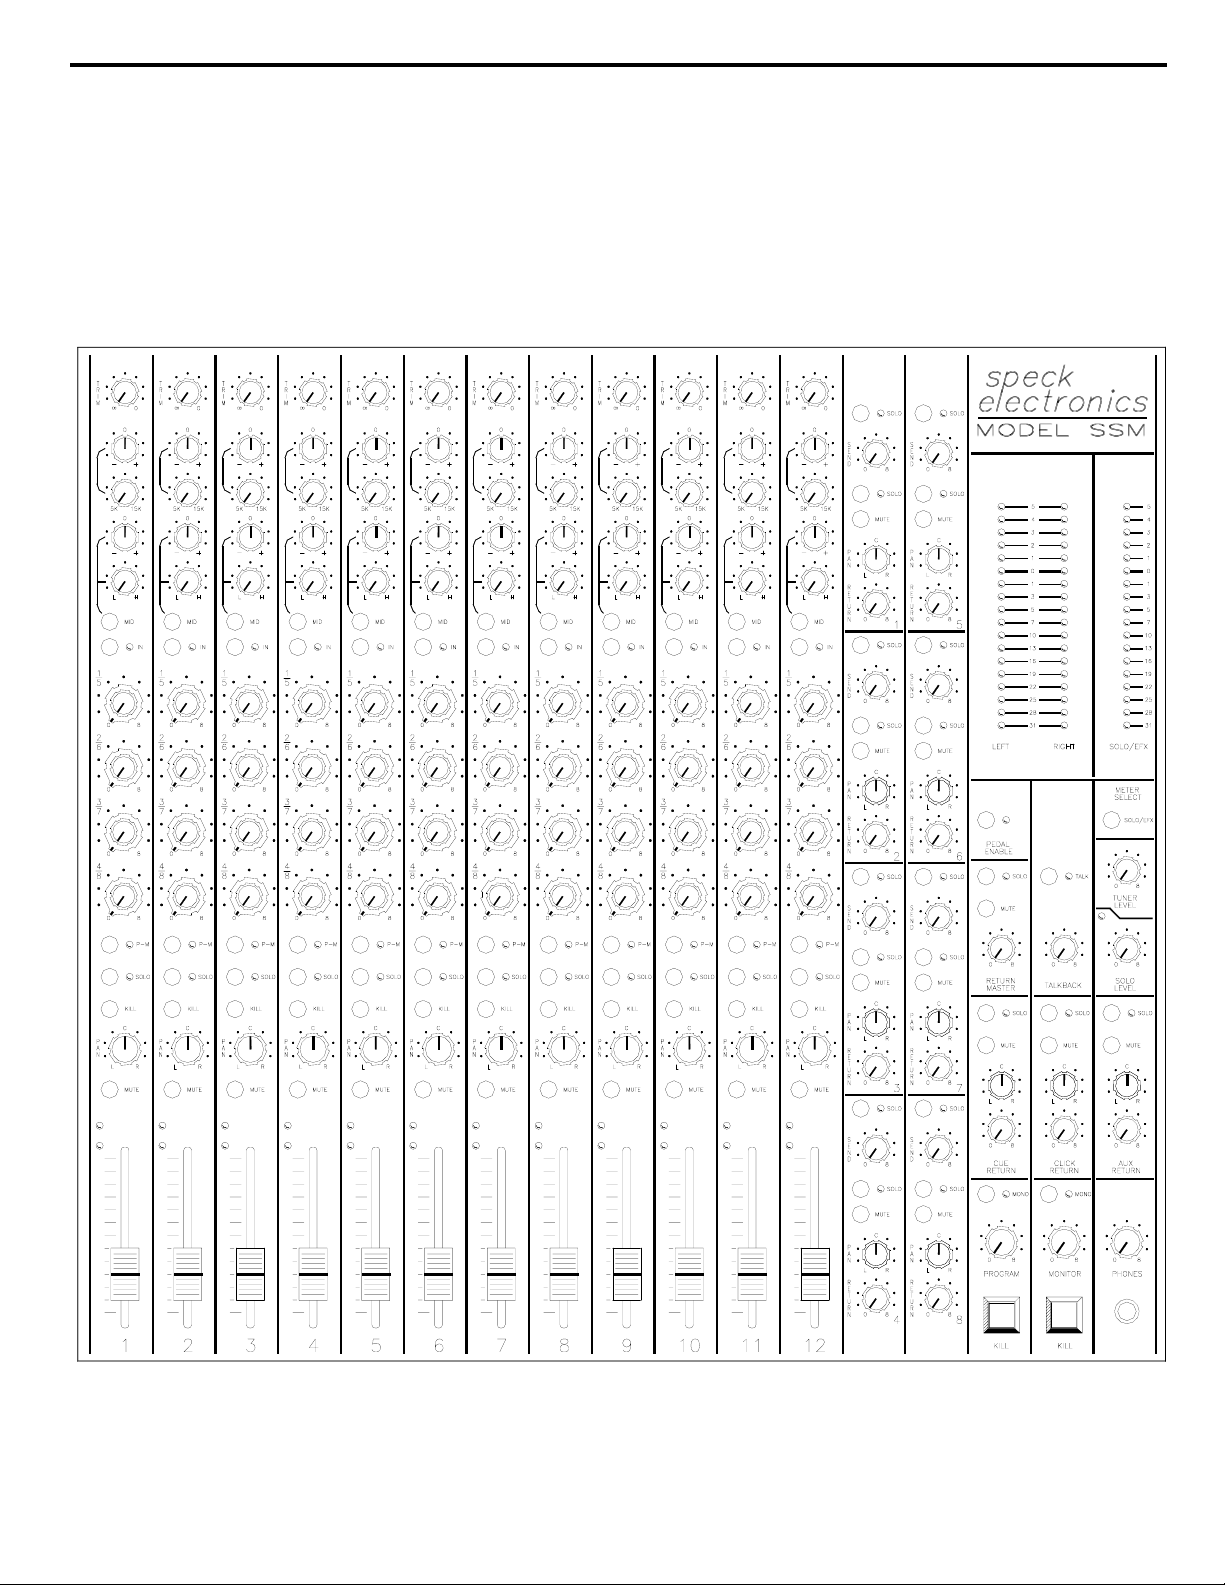
Figure 1. Front Panel Layout
Page 8
Chapter 1 Introduction Section
3
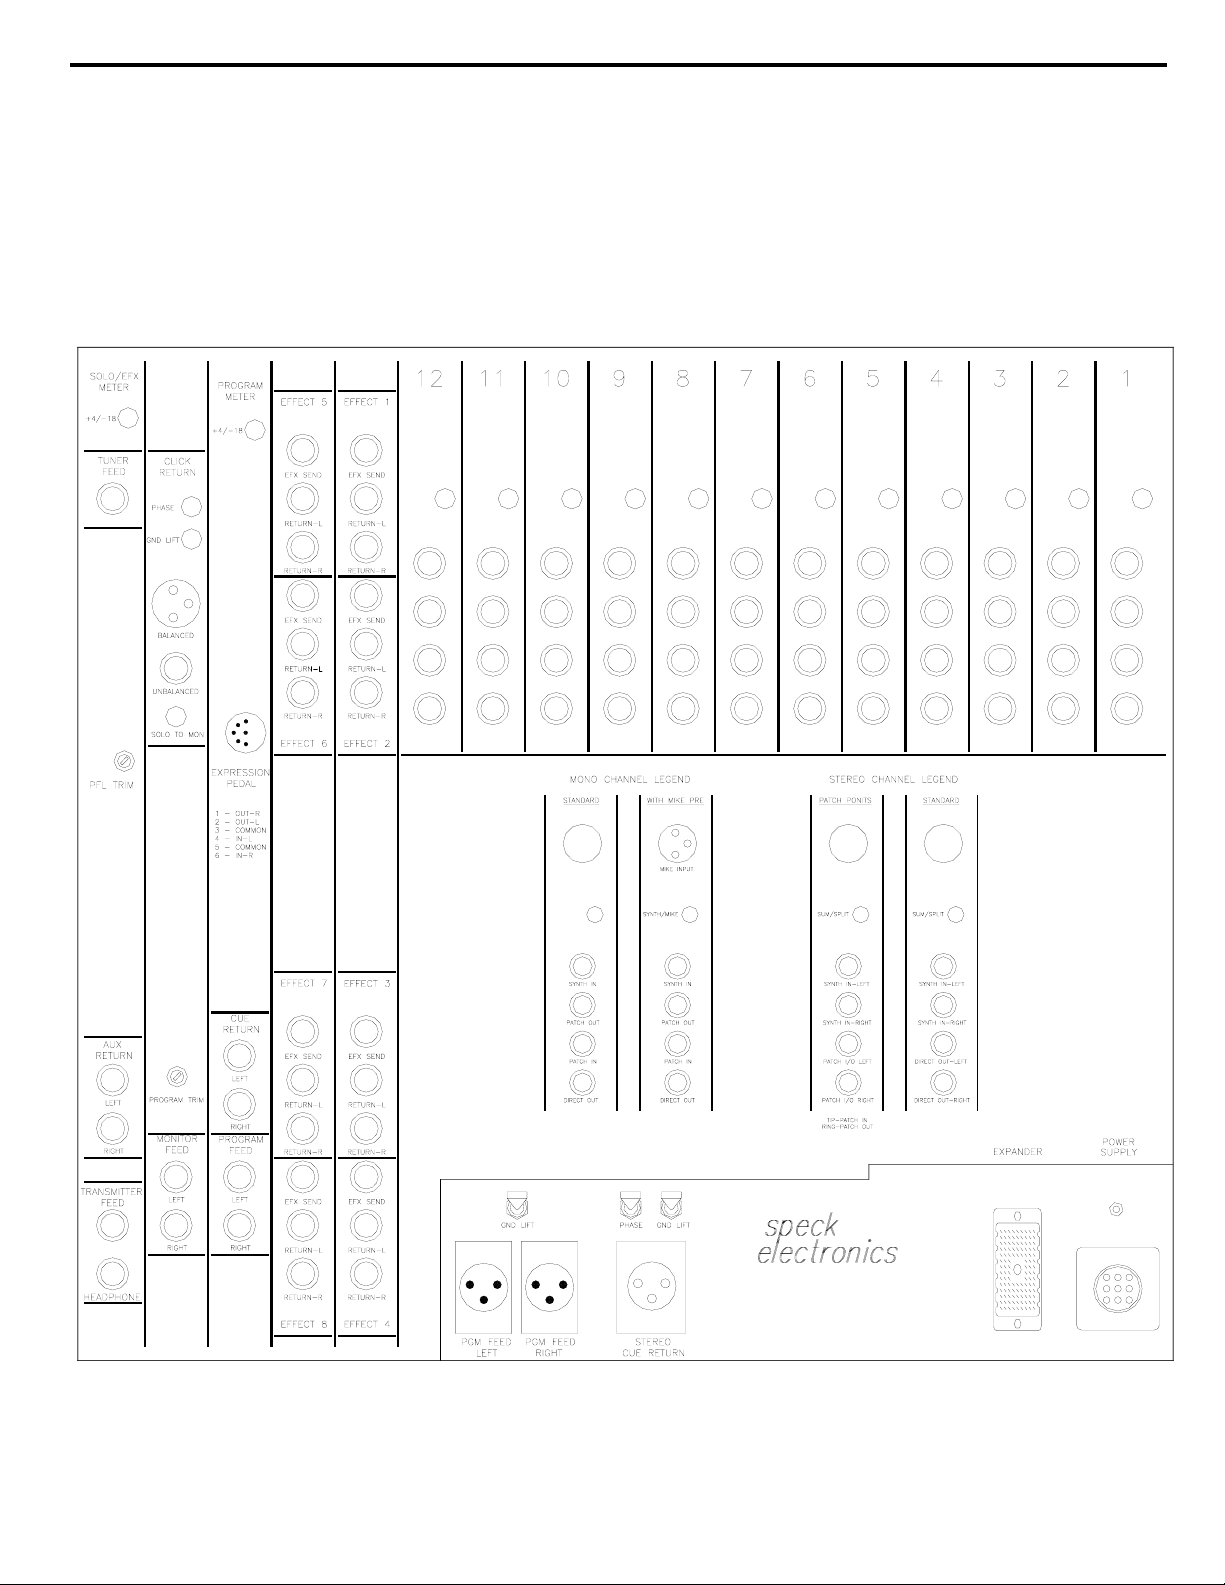
Figure 2. Rear Panel Layout
Page 9

Chapter 1 Introduction Section
4
Do not remove covers or panels
Ground Terminal
General Description
Input section
To avoid personal injury, do not remove the cover from the power
supply, or the rear panel of the Model SSM or optional Expander.
Never operate the external power supply without the covers and panels
properly installed. If it becomes necessary to remove the rear panels of
the SSM or optional Expander for service, always unplug the AC power
and disconnect the DC interface cable before proceeding.
A grounding terminal is available at the rear of the SSM and the optional
Expander. This terminal is available when a star grounding technique is
employed as part of a larger wiring system. The ground terminal must
not be used as a substitute for the power supply's AC grounding
conductor.
The Model SSM is a dedicated synthesizer and sampler audio mixer that
may be used separately or as part of a larger mixing system.
When used as a traditional synth and sampler rack mixer, the Model
SSM provides up to 56 synth inputs (28 stereo inputs), and the ability to
access up to 8 stereo effects devices. The SSM has a comprehensive
master section that allows the synth player to maintain total control over
all equipment connected to the mixer.
The mixer is divided into three basic sections. The input section, the
effects send and return section, and the master section. The optional
Expander has 16 input channels identical to that of the main mixer.
The input section consists of 12 input channels that are available as
either mono input or stereo inputs. The input channels have all the
controls necessary to effectively control synth and sampler operation.
Channels include synth trim, sweepable equalization, independent
effects sends, a pan/balance control, the ability to mute or solo the
signal, and an overall level control. The rear panel for each input
channel offers 1/4" T.R.S (tip, ring, sleeve) balanced connectors for
synth or sampler interface, as well as 1/4" connectors for direct outputs
and patch points.
The optional Expander has 16 input channels that are available as either
mono or stereo inputs. Its features are the same as those mentioned
above.
Page 10

Chapter 1 Introduction Section
5
Effects section
Master section
Features
The effects section provides total control for up to 8 stereo effects
devices.
Each of the effects channels include an effects send master and
associated solo. The effects return includes a stereo effects return level,
pan, in-place solo, and mute. Each effects channel has a 1/4" send jack
and two 1/4" jacks for the left and right effects returns.
The master section provides the SSM with many choices for routing
and controlling the synth signals from the input section and effects
devices from the effects section.
The master section includes a stereo program, stereo monitor, and stereo
headphone controls. The stereo cue, stereo aux, and mono click return
sections allow a variety of signals to be mixed with the synth signals to
the monitor and headphone outputs. The master section provides a full
compliment of 1/4" and XL type input and output connectors that allow
the SSM to adapt to a wide range of professional situations.
The SSM mixing system is available in three models: the SSM-24, 12
stereo input channels; the SSMEX-16 Expander, 16 mono channels;
and the SSMEX-32 Expander, 16 stereo input channels.
The mixers can be rack mounted vertically or horizontally using the
optional slide/tilt accessory. This can save up to five rack spaces.
The "Zero flex" integrated chassis design is virtually impervious to rack
stresses.
Eight discrete effects sends per channel are complimented by eight
stereo effects returns.
Each stereo or mono input channel employs a unique channel "Kill"
switch that deletes the dry input signal from the stereo program but
leaves all other functions, such as the effect send and channels direct
outputs, active.
Presence of signal LED's show which inputs are active at a glance.
Impedance balanced patch points allow for long connections to a passive
stereo volume pedal for dynamic control of the entire mix.
A separate tuner output follows the solo for quick isolation.
Page 11

Standard Accessories
6 Chapter 1 Introduction Section
Regulated power supply
CAUTION!
IMPORTANT!
Rack Mount Adapters
Interface Harness
(Expander only)
Optional Accessories
SSM 16 Input Expander
Assign 28 Subgroup Module
The SSM is supplied with an external rack mount power supply that is
capable of powering the Model SSM main unit and one additional
Model SSM 16 input channel expander.
The SSM requires the Model PS3-1.5 regulated power supply.
The power supply is supplied with a 6 foot, 3 conductor AC power
cord and a 8 foot shielded DC cable. The DC cable has a circular
locking connector that insures a positive connection to the SSM.
ALWAYS CHECK THE PROPER OPERATING
VOLTAGE BEFORE OPERATING THE SSM.
USE ONLY THE POWER SUPPLY THAT IS
SPECIFIED FOR YOUR PRODUCT.
The Model SSM and optional Expander are supplied with a set of rack
mount adapters. If the intention is to mount the SSM in a standard 19"
equipment rack, these adapters must be mounted to the left and right
sides of the mixer.
The optional 16 channel SSM Expander is supplied with a 6' interface
harness. This harness is required to connect the Expander to the Main
Unit. The harness consists of high quality, shielded multiconductor
cable with 38 pin Elco connectors attached at each end. Shorter cable
lengths are available from the factory.
The Model SSM is prewired for input expansion. With the addition of
the 16 input Expander and its interface harness, a SSM Mixing System
may be expanded to a total of 28 positions (56 inputs).
Expanders are available in two versions: the SSMEX-32, 16 stereo
channels; and the SSMEX-16, 16 mono channels. All input channel
functions, stereo or mono, are identical to those found on the main SSM
mixer.
The Assign 28 is an assign/subgroup module that is designed as an
output expander for the Model SSM series mixers. The Assign 28
allows multiple sample drum sounds or multi-synth patches to be
combined and discretely bussed in a recording console fashion, but with
dedicated effects.
Page 12

Chapter 1 Introduction Section
Microphone preamps
Rack mount Slide/Tilt adapter
Expression pedal harness
7
This three rack space module incorporates 28 stereo or mono assign
banks, 8 master outputs, 8 stereo effects returns, a complete monitoring
section, and a stereo grand master feed.
Any mono or stereo input channel from the Model SSM may be
assigned to any of eight buss outputs. The eight busses may be used as
individual outputs or as stereo groups. The eight busses have an
associated level control and may be muted with a master kill switch. The
8x2 monitor section provides an isolated solo capable mix of the eight
busses to the SSM for complete monitoring flexibility. Eight stereo
effects returns may be used in conjunction with, or in addition to the
SSM's existing effects returns.
Mono input channels are available with microphone preamps as an
option. Channels with mike preamps incorporate a high quality
microphone transformer, a XL type input connector, and a Mike/Synth
select switch. Any quantity may be ordered and may be installed in any
input position of the Main Unit or the Expander. Mike preamps are not
available on stereo input channels.
The SSM main unit or 16 channel Expander may be fitted with an
optional rack mount slide and tilt mechanism in place of the standard
vertical mount rack adapters.
The slide/tilt option will allow the SSM to be mounted flat, like a sliding
drawer, and moved in and out of a standard 19" equipment rack. When
moved to the front of the rack, the mixer may be tilted and locked into a
0, 45 or 90 degree position. For traveling, the mixer may then be pushed
back into the rack in its flat horizontal position.
An optional wire harness is available to connect the Model SSM to a
stereo volume pedal (not available from Speck). This 20' harness is
wired with a 6 pin DIN connector at one end and four 1/4" plugs at the
other end. The use of the expression pedal allows the operator a "What
you hear, is what you get" master volume control adjustment from the
stereo program, monitor and headphone outputs of the SSM.
Page 13
Chapter 1 Introduction Section
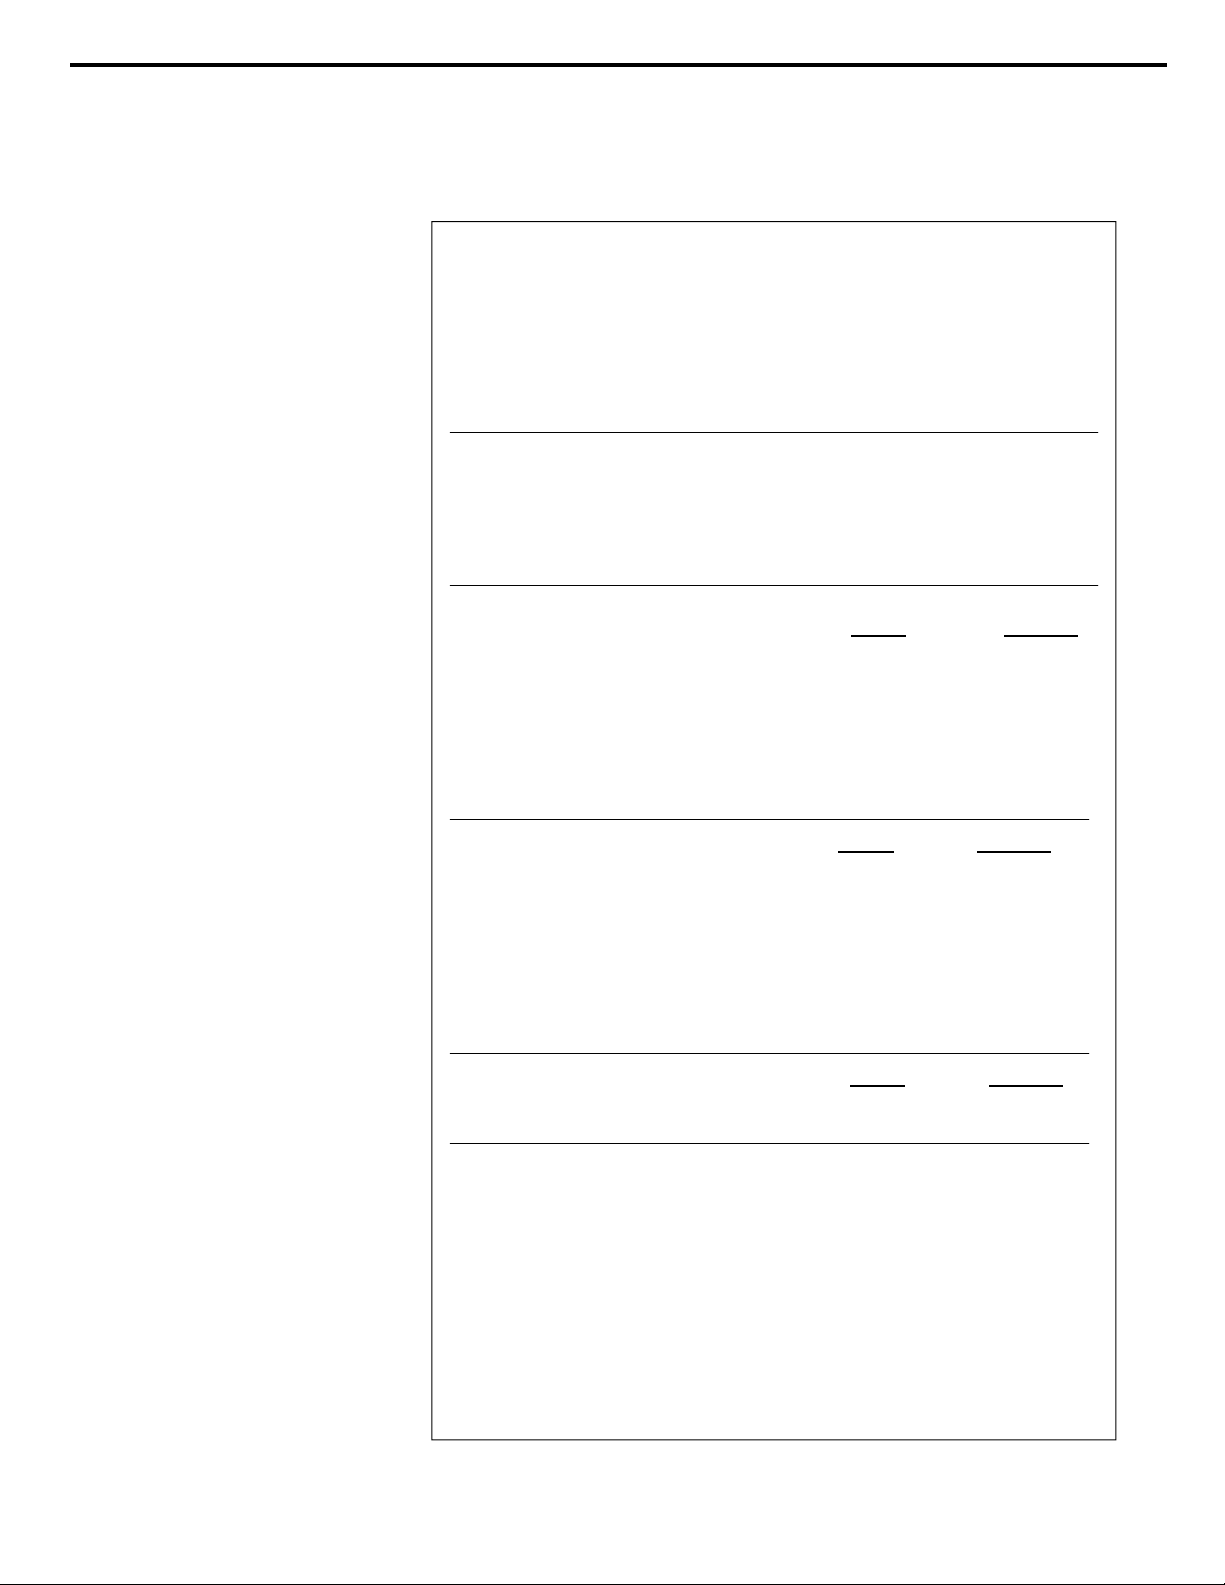
Specifications
Synthesizer Input Impedence
Patch Point Return Impedence
Effects Return Input Impedence
Cue Return Input Impedence (Unbalanced)
(Transformer Isolated)
Click Return Input Impedence (Unbalanced)
(Transformer Isolated)
Aux Return Input Impedence
Microphone Input Impedence (Optional)
8
10k Ohms
10k Ohms
10k Ohms
10k Ohms
600 Ohms
10k Ohms
600 Ohms
10k Ohms
150 Ohms
Patch Point Output Impedence
Direct Out Impedence
Effect Send Output Impedence
Program Feed Output Impedence
Monitor Feed Output Impedence
Tuner Feed Output Impedence
Synth Input Level
Patch Point Input Level (High Level Synth)
Effects Return Input Level
Cue Return Input Level
Click Return Input Level
Aux Return Input Level
Microphone Input Level
Direct Output Level
Program Feed Output Level
Monitor Feed Output Level
Effects Send Output Level
Tuner Feed Output Level
Transmitter Feed Output Level
Headphone Output Level
All line outputs are designed to drive
a 600 ohm load and may be operated
into any load 600 ohms or greater.
Normal
-20dBu
0dBu
+4dBu
+4dBu
0dBu
+4dBu
-50dBu
Normal
+4 dBu
+4 dBm=0VU
-18dBm=0VU
+4dBu
+4dBu
+4dBu
-10dBu
Maximum
+15dBu
+21dBu
+21dBu
+21dBu
+21dBu
+21dBu
+5dBu
Maximum
+21dbu
+21dBm
+21dBm
+21dBu
+21dBu
+21dBu
+21dBu
4 Watts
Output Distortion(THD+n)
Frequency Response
(Synth In to Program Out)
Test Conditions:
-10dBu signal at synth input.
Input slide fader set at #10 position.
Trim control set fully clockwise.
Equalizer In/Out swtich set to Out.
Program master adjusted to indicate 0 VU.
Frequency response measured at program feed-left
with a high quality AC voltmeter.
Normal
.005%@+4dBm
12Hz(-3dB) to 160kHz(-3dB)
18Hz (-.5dB) to 140kHz (-.5dB)
Maximum
.0072%@+22dBm
Page 14

Chapter 1 Introduction Section
Specifications (Cont.)
9
Residual Noise Measurement
(Synth In to Program Out)
Low Band Equalization
Mid Band Equalization
High Band Equalization
Power requirements (Mixer)
Power requirements (Power Supply)
Dimensions - SSM Main Unit
Dimensions - SSM Expander
Dimensions - Power Supply
Test Conditions:
-10dBu signal at synth input.
Input slide fader set to #10 position.
Pan pot centered.
Adjust program master to indicate 0VU (+4dBm)
at program feed jack-left.
Input signal removed and terminated with 10k
ohms.
Noise measured at program feed-left with a
unweighted filter.
-82dBu
50Hz-500Hz, 15dB Boost or Cut
500Hz-5kHz, 15dB Boost or Cut
5kHz-15kHz, 15dB Boost or Cut
Bi-polar 16.5 volts DC, 1.3 Amp
120 VAC, 1.0 Amp
HxWxD = 15.75" x 19" x 4.25"
(400mm x 483mm x 108mm)
HxWxD = 15.75" x 19" x 4.25"
(400mm x 483mm x 108mm)
HxWxD = 3.75" x 11.25" x 5.25"
95mm x 286mm x 133mm)
Shipping weight - SSM Main Unit
Shipping weight - SSM Expander
Shipping weight - Power Supply
Approximately 32 lbs (14.4Kg)
Approximately 30 lbs (13.5Kg)
Approximately 10 lbs (4.5 Kg)
Page 15

Chapter 2 Initial Preparation
Initial
Unpacking and
Inspection
Environmental
Considerations
Grounding
10
The Model SSM is delivered in a special, protective container and was
carefully inspected both mechanically and electrically before shipment.
It should be physically free of mars and scratches and in perfect
electrical order upon receipt. To confirm this, the product should be
inspected for physical damage that may have occurred in transit. Any
damage should be reported to your dealer and delivery company as
soon as possible.
The Model SSM will operate satisfactorily over a wide range of
ambient temperatures, and the power supply will operate from 10 to 50
degrees C. If the power supply is installed in an equipment rack that
also contains heat producing equipment such as power amplifiers or
other power supplies, adequate ventilation should be provided. This will
prolong component life and maximize operational stability.
While the internal circuitry of the SSM is fully shielded by the steel
chassis, installation should nevertheless be planned to avoid locating the
SSM, optional SSM Expander, or any low level audio equipment
immediately adjacent to power amplifiers, power supplies, or any source
of Electromagnetic emissions.
To protect operating personnel, the National Electrical
Manufacturers Association (NEMA) recommends that the
instrument panel and rack cabinet be grounded. All Speck power
supplies are equipped with a three conductor power cord which, when
plugged into an appropriate receptacle, grounds the power supply. The
offset pin on the power cord's three-prong plug is the ground wire.
The three conductor line cord and plug assembly is wired in
accordance with NEMA convention (line - black, Neutral - white, and
safety earth - green). Audio signal grounds and DC grounds from the
mixer are isolated from the AC safety earth.
When using the Model SSM and its power supply outside North
America, it will be necessary to adapt a different power plug for that
specific country.
CAUTION!
DO NOT REMOVE, DEFEAT, OR DISABLE THE
SAFETY EARTH TERMINAL ON THE POWER
CORD. DO NOT USE A GROUND LIFT ON THE
POWER SUPPLY.
Page 16

Chapter 2 Initial Preparation
11
Rack grounding
Repacking For
Shipment
Merely affixing the Model SSM or optional SSM Expander into an
equipment rack is no guarantee that the product is making a reliable
ground connection. The mounting rails in the equipment rack should
never be depended upon for a ground connection.
The following information is provided as a general guide for
repackaging your Model SSM for shipment. If you have any questions,
contact your local Speck Dealer or Speck Electronics direct. Our phone
number is (760) 723-4281.
If the product is to be shipped to Speck Electronics for service or repair,
attach a tag to the product, identifying the owner and indicating the
service or repair to be accomplished. Include the model number and
serial number of the product. Place the product in the original container
if available. If the original container in not available, a suitable one can
be purchased from Speck Electronics.
If the original container is not used, wrap the product in heavy plastic
before placing in an inner container. Use plenty of packing material
around all sides of the product and protect panel faces with cardboard
strips. Mark shipping container with "Delicate Instrument" or "Fragile",
and insure the shipment for the proper amount.
In most cases, it will be necessary to remove the rack mount
adapters if the unit is returned in its original shipping container. When
remounting the rack mount adapters, make certain you use the original
mounting screws supplied with the Model SSM.
Page 17

Chapter 3 Installation Section
Installation
General
Mechanical Installation
Physical Placement of
Adjacent Equipment
12
The following information should give you the basics on how to install
the Model SSM Main Unit, optional SSM Expander, and Model PS3
Power Supply. The proper installation of the SSM as a part of a larger
system requires a clear understanding of audio wiring, AC distribution,
grounding, and shielding techniques.
When the Model SSM is being installed into a larger system it may be
necessary to retain the services of someone experienced in these matters.
Before the mixer may be placed into its normal operating position, it
will be necessary to install the appropriate rack mount adapters.
The Model SSM may be installed in the vertical position using the
standard 19" rack mount adapters or may be mounted in a horizontal
(flat) position using the optional slide/tilt rack sliders. The mixer may
be installed into any 19" wide equipment rack that uses standard E.I.A.
universal spacing. The SSM and optional Expander may be affixed to
standard E.I.A. rack rails using (8) 10-32 machine screws.
The location of the SSM and Expander should be such that the operator
has a clear, unobstructed view of the front panels from his normal
operating position. The unit should also be within easy reach of the
operators normal position in order to facilitate the use of the front panel
controls.
Any device that emits a high EMI (Electro Magnetic Interference) or
RFI (Radio Frequency Interference) energy field should be treated with
suspicion. EMI is considered any unwanted signal which adversely
affects the operation of the mixer or the mixing system. This subject is
discussed in Chapter 5.
Electronic equipment such as power amplifiers, power supplies
(especially wall mount type), video monitors, computers, certain synths
and samplers must be located away from the SSM Main Unit, the SSM
Expander, Assign 28, and their associated cables. It may be necessary to
alter the positions of certain equipment that you feel would cause buzzes
or hums in the mixer system.
Page 18

Chapter 3 Installation Section
13
Power Supply
Mounting location
Configuring the AC
The Model SSM is supplied with the Model PS3-1.5 power supply that
offers a variety of mounting options. The power supply may be placed
on any flat surface, permanently affixed to a flat surface, or mounted on
a single rack rail with the optional rack mount adapter.
One of the primary reasons that the power supply of the SSM is external
is to insure that the power transformer enclosed within the power supply
chassis maintains a safe distance from the active electronics of the SSM
and the Expander. For that matter, any power supply (especially the
small wall mount supplies), power amplifiers, or any strong power field
device should be kept at a reasonable distance from the SSM and
Expander. It is also important to keep the above mentioned devices clear
of all interface cables, audio cables and harnesses.
The external power supply for the SSM does not provide an AC power
switch. It is recommended the power supply be plugged into an AC
strip that uses a power switch.
The power supply should not be installed directly above or below the
mixers. It is recommended that it be installed in the rear of the
equipment rack, providing that it remains at a reasonable distance from
the mixers and cables, and has adequate ventilation.
The power supply normally generates a small amount of heat during
operation. It is important that adequate ventilation is provided when
planning the mounting location.
The power supply may be wired to operate with 120 VAC, 220 VAC,
230 VAC, or 240 VAC 50/60hz. Before applying AC power, you
should verify that the voltage setting on your power supply is configured
to match the AC requirements of your country. This procedure should
be performed and checked by a qualified technician.
Unless otherwise specified on the panel of the supply, the power supply
is wired for 120 VAC 50/60Hz operation and uses a North American
style AC plug.
To gain access to the inside of the power supply, it will be necessary to
remove the top cover. This is accomplished by removing the 4 screws on
the bottom of the power supply chassis.
Make certain that the power
supply is unplugged from the AC before proceeding.
Page 19
Chapter 3 Installation Section
AC wiring chart
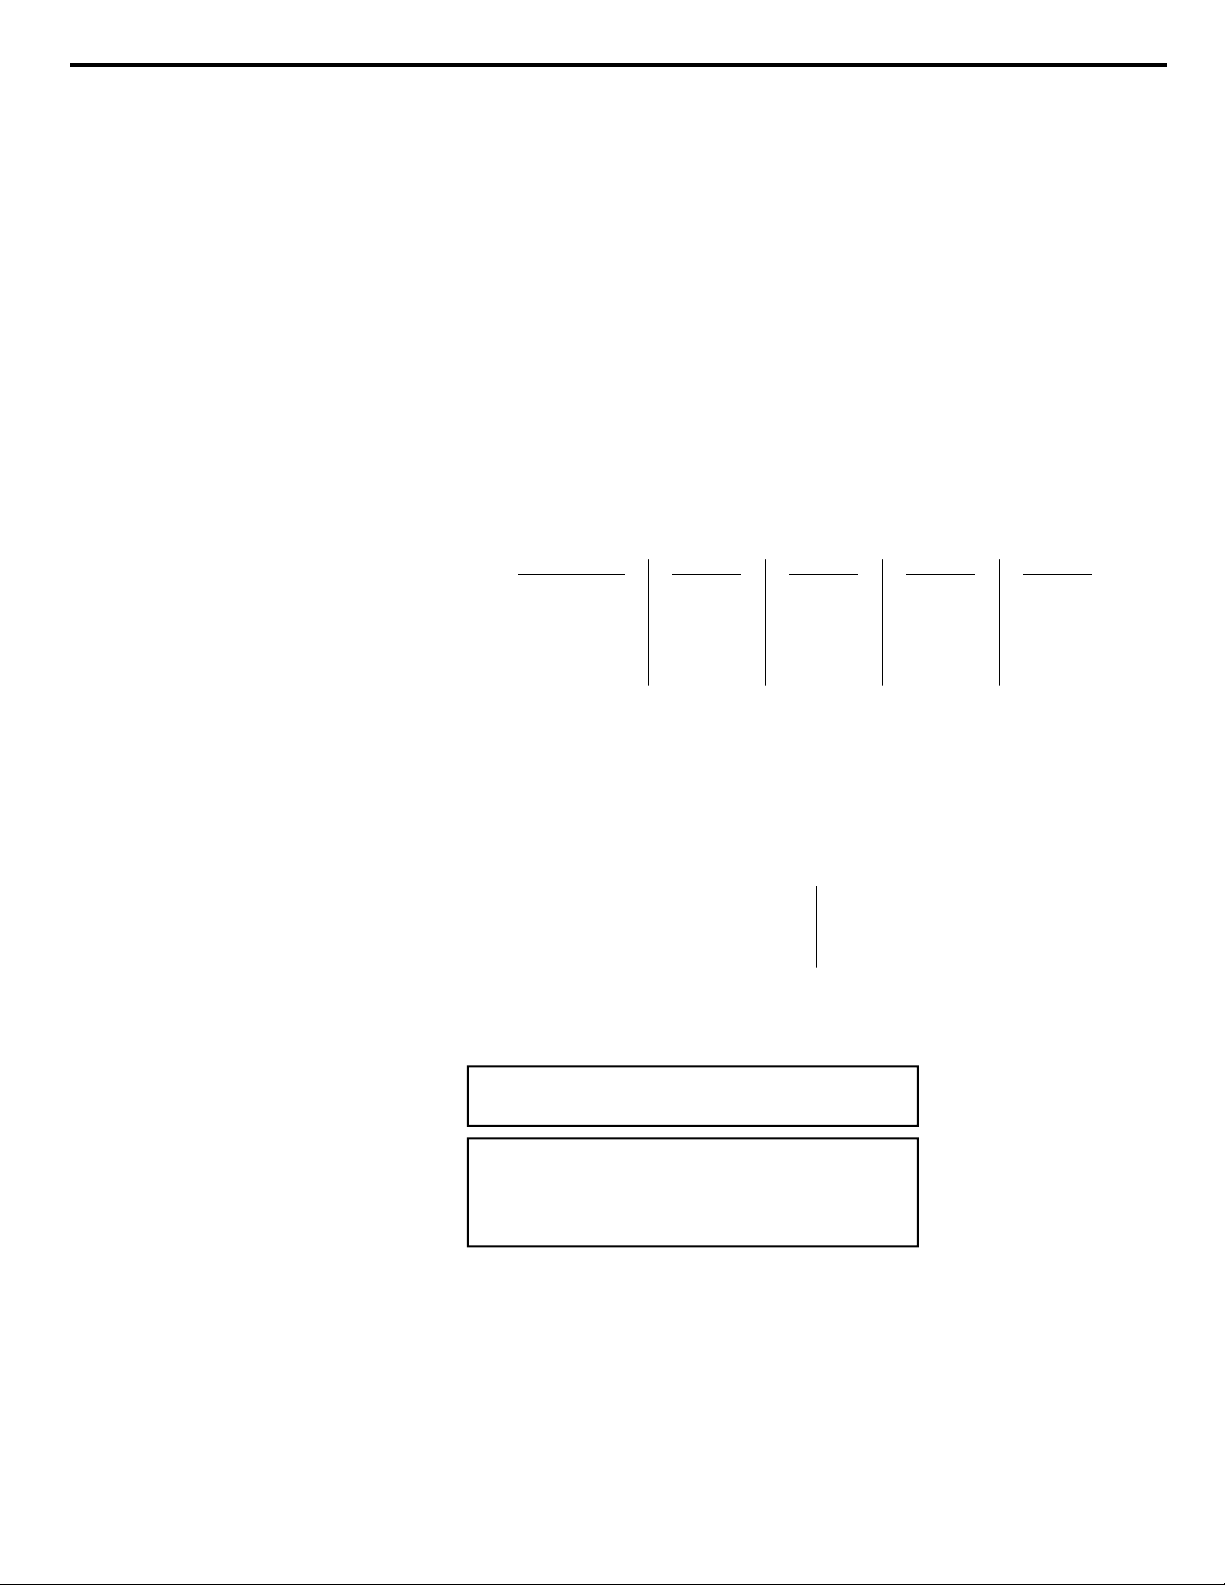
There are five terminals available on the power transformer of the power
supply. The configuration of the five terminals determines the operating
voltage of the power supply. It is only necessary to change the black
(line) and white (neutral) AC wires. Do not attempt to remove or
change the Green AC safety wire or the multicolored wires used at the
DC terminals. It is recommended that you measure the DC voltages at
the circular DC connector before reconnection to the mixer.
The following chart represents the proper AC terminal configuration for
the Model PS3-1.5 power supply.
14
Fuse chart
CAUTION!
FOR USE AT:
JUMPER AT:
APPLY AC AT:
120 VAC
1 & 3
2 & 4
4 & 1
220 VAC
2 & 3
1 & 5
230 VAC
2 & 3
4 & 1
240 VAC
2 & 3
4 & 1
The following chart represents the proper fuse rating for the
Model PS3-1.5 power supply. All fuses are 3AG Slow-Blow type.
120 VOLTS AC
220 VOLTS AC
230 VOLTS AC
240 VOLTS AC
ALWAYS CHECK THE PROPER OPERATING
VOLTAGE BEFORE OPERATING THE SSM.
1 AMP
.5 AMP
.5 AMP
.5 AMP
CAUTION!
DO NOT REMOVE, DEFEAT, OR DISABLE THE
SAFETY EARTH TERMINAL ON THE POWER
CORD. DO NOT USE A GROUND LIFT ON THE
POWER SUPPLY.
Page 20

Chapter 3 Installation Section
15
Connecting the
Power Supply
Power supply DC pin-outs
Ground Terminal
Rack Mount Adapters
Installation
Before connecting the circular DC power supply connector to the SSM,
make certain the power supply is not plugged in.
To connect the power supply to the main mixer, fit the circular
connector from the DC power supply cable to the circular chassis mount
receptacle mounted at the rear of the Model SSM. The respective
connectors are keyed so the plug and chassis mount receptacle can fit in
only one direction. When the connectors have been mated, rotate the
circular lock clockwise until it stops.
The following chart represents the DC voltages available at the 9 pin
circular connector on the Model PS3 power supply.
PIN 1 - DC COMMON (AUDIO)
PIN 2 - MINUS 16.25 VDC (AUDIO)
PIN 3 PIN 4 PIN 5 PIN 6 - PLUS 16.25 VDC (AUDIO)
PIN 7 -
PIN 8 -
PIN 9 -
A grounding terminal is provided just below the circular power supply
receptacle on the SSM main unit, and immediately to the left of the
interface connector on the SSM expander.
The grounding terminal should be used when it is necessary to connect
the SSM and Expander to a qualified ground. This ground terminal
should not be relied upon as a source of ground for other electronic
equipment. The ground terminal must not be used as a substitute for the
power supplies AC grounding conductor.
In order to install the SSM in a 19" equipment rack, it will be necessary
to attach the two rack mount adapters to the main chassis of the SSM
and optional Expander. Each rack mount adapter is attached to the main
chassis of the mixer with four 6-32 x 3/16" Phillips machine screws.
Using a Phillips screwdriver, remove the eight screws installed on both
sides of the mixer. Position the adapters so the side with the small round
holes match the threaded holes on the sides of the SSM, and the side
with the oval shaped holes are towards the front panel of the mixer.
Page 21

Chapter 3 Installation Section
Optional Slide/Tilt
Rack Adapters
IMPORTANT!
Default Control
Settings
Cleaning
16
Attach the rack mount adapters to the left and right sides of the chassis
with the eight screws and tighten.
In order to install the optional slide/tilt adapters it will be necessary to
remove the standard rack mount adapters. The slide/tilt adapters are
available in many sizes and mounting configurations depending on the
dimensions and style of your equipment rack. Please contact your
dealer or Speck Electronics for specific details on the ordering and
installation of the rack sliders.
ONLY USE THE SHORT SCREWS THAT ARE
SUPPLIED WITH THE MIXER. USING LONGER
SCREWS WILL DAMAGE THE INTERNAL
CIRCUITRY OF THE MIXER.
Before any attempt is made to operate the mixer, it would be a good idea
to set all the mixer's controls to their neutral positions. This gives you a
reference point to work from when adjusting controls and switches.
All volume controls such as effects sends, effects returns, and master
level controls should be set to their full counter-clockwise setting. All
pan controls and equalizer Boost/Cut controls should be set centered. All
pushbutton switches on the front and rear panel should be set to the out
position, and the three toggle switches at the rear should be set in the up
position.
When any future reference is made to the controls or switches of the
Model SSM, is will be assumed that they have been set to their neutral
positions.
The front and rear panels are a high quality painted surface and the panel
lettering is applied using a silkscreen printing technique.
To clean the front or rear panel, wipe the surface gently using a soft lintfree cloth to avoid scratching the panel or markings. Paper towels are
not recommended. Commercially available window cleaner solutions
may be used; however, the solution should be applied to the cloth and
not the panel to avoid the seepage of liquid to the inside of the
enclosure.
IMPORTANT!
DO NOT USE BRUSHES OR FEATHER DUSTERS
TO REMOVE DUST. THIS MAY CAUSE DUST TO
FALL INTO THE OPENINGS AROUND THE
PUSHBUTTON SWITCHES.
Page 22

Chapter 3 Installation Section
17
Interfacing Expanders
Mounting location
Installing the Interface Cable
The Model SSM has been prewired with a multipin pin connector to
accept any of the SSM series of Expanders. SSM Expanders are
available in two versions: The SSMEX-32, 16 stereo channels; and the
SSMEX-16, 16 mono channels.
The Expander is connected to the main mixer with a special 6 foot
shielded multiconductor interface cable that utilizes 38 pin Elco
connectors at each end. The Expander does not require an additional
power supply, as it receives its power when connected to the main
mixer.
The Expander is considered an extension of the main mixer and is not
intended to be remotely mounted. It was designed to be installed
directly above or below the main unit and should follow the same
installation guidelines as described for the main unit.
Due to the mounting proximity requirements of the Expander, the length
of the interface cable has been limited to 6 feet. No attempt should be
made to modify or extend this cable. Any attempt to modify or extend
this cable could result in extreme noise, oscillation, hum or buzzes, or
total failure of the Model SSM.
Before connecting the SSM Expander to the SSM main unit it is
important that the power supply be turned off.
To attach the interface cable, gently fit the 38 pin Elco connector into
the main mixers receptacle and turn the actuator screw clockwise. The
connector and receptacle are keyed so they can only fit in one direction.
If any resistance is met when installing the connector, reverse the
actuator screw, remove the connector, inspect for any obstruction and
try again. Install the other connector end into the Expander in the same
manner.
If there is an excess amount of interface cable remaining after the units
have been connected, it should be bundled neatly with a cable tie. It is
important that the interface cable be kept away from sources of EMI and
RFI. These EMI sources include power supplies, power amplifiers, or
any power creating device that could cause undesirable buzzes or hums
in the mixer system.
Page 23

Chapter 3 Installation Section
18
Expander pin assignment
Interfacing the
Assign 28
Mounting location
Connecting the Assign 28
Expression Pedal
Connecting the Cable
The following chart represents the audio and power connections vailable
at the 38 pin interface connector at the rear of the SSM.
PIN A
PIN B
PIN C
PIN L
PIN M
PIN N
PIN P
PIN R
PIN S
COMMON
PLUS 16.25 VDC
MINUS 16.25 VDC
EFFECT SEND 1
EFFECT SEND 2
EFFECT SEND 3
EFFECT SEND 4
EFFECT SEND 5
EFFECT SEND 6
-
PIN T
PIN U
PIN JJ
PIN KK
PIN LL
PIN MM
PIN NN
PIN PP
PIN RR
-
EFFECT SEND 7
-
EFFECT SEND 8
-
PFL SIGNAL
-
PFL SENSE
-
SOLO SENSE
-
SOLO SIGNAL-LEFT
-
SOLO SIGNAL-RIGHT
-
PROGRAM-RIGHT
-
PROGRAM-LEFT
The Assign 28 is a self contained, 8 output assign/subgroup module
designed to operate in conjunction with the Model SSM and SSM
Expander. The Assign 28 receives its signals from the 1/4" direct output
jacks at the rear of the SSM and SSM Expander. There are no special
requirements for installation and interface to the Assign 28 except to use
reasonable care in the layout of the audio cables.
It it recommended that the Assign 28 be installed directly above or
below the Model SSM. This will keep the cable lengths short, thereby
reducing the susceptibility to hums and buzzes caused by EMI
emissions.
A 1/4" T.S. (tip, sleeve) to 1/4" T.S. cable is required for each "direct
out" to "assign in" connection. If your mixer has 24 direct outputs (12
stereo pairs), this would require 24 cables for connection to the Assign
28.
The Assign 28 also provides 8 stereo effects returns that may be
interconnected to the 8 effects returns of the Model SSM. This would
require 16 cables. It is recommended that multipair harnesses be used in
lieu of numerous single cables.
For more complete installation details, refer to the documentation that is
supplied with the Assign 28.
If you have decided to use the expression pedal feature on the SSM, it
will be necessary to connect the cable and pedal to the system.
The optional interface cable is wired with a 6 pin DIN connector on one
end and four 1/4" plugs on the other end. The 6 pin DIN connector must
be plugged into the female expression pedal connector located at the rear
of the SSM. The four 1/4" phone plugs will be inserted into the
corresponding jacks on any standard passive stereo volume pedal.
Page 24

Chapter 3 Installation Section
19
Expression Pedal Enable Switch
Pedal Connector Pin
The Expression Pedal Enable Switch on the front panel of the main
mixer must be depressed in order to operate the volume pedal.
The following chart represents the audio connections available at the 6
pin DIN connector at the rear of the SSM main unit.
PIN 1 - INSERT OUT-RIGHT
PIN 2 - INSERT OUT-LEFT
PIN 3 - COMMON
PIN 4 - INSERT IN-LEFT
PIN 5 - COMMON
PIN 6 - INSERT IN-RIGHT
Page 25

Chapter 4 Operation Section
Operation
General
Input Channel
We hope to give you basic information on the operation of the Model
SSM and adequately describe its controls, switches, and connectors.
It is assumed that you have a working knowledge of audio and signal
flow. If this is your first mixer it is suggested that you purchase a book
on the basic operation of audio mixers. Speck Electronics or your dealer
will be happy to suggest some publications on this subject.
FRONT PANEL CONTROLS
The Model SSM may be configured with either mono or stereo input
channels. The stereo channel will accept any stereo synth signal and all
controls and switches in the signal path will simultaneously adjust the
parameters of the left and right signals. The mono input channel accepts
a single (mono) synth signal, and all controls and switches are designed
to adjust that signal in a conventional manner.
The stereo input channels are identified with a black slide fader knob
and a yellow LED adjacent to the P-M pushbutton switch. The Mono
input channels are identified with a grey slide fader knob and a red LED
adjacent to the P-M pushbutton switch.
The following input channel descriptions are for a stereo input channel
but generally apply to a mono input channel unless otherwise noted.
20
Page 26
Chapter 4 Operation Section 21
Figure 3. Input Channel
Page 27

Chapter 4 Operation Section
22
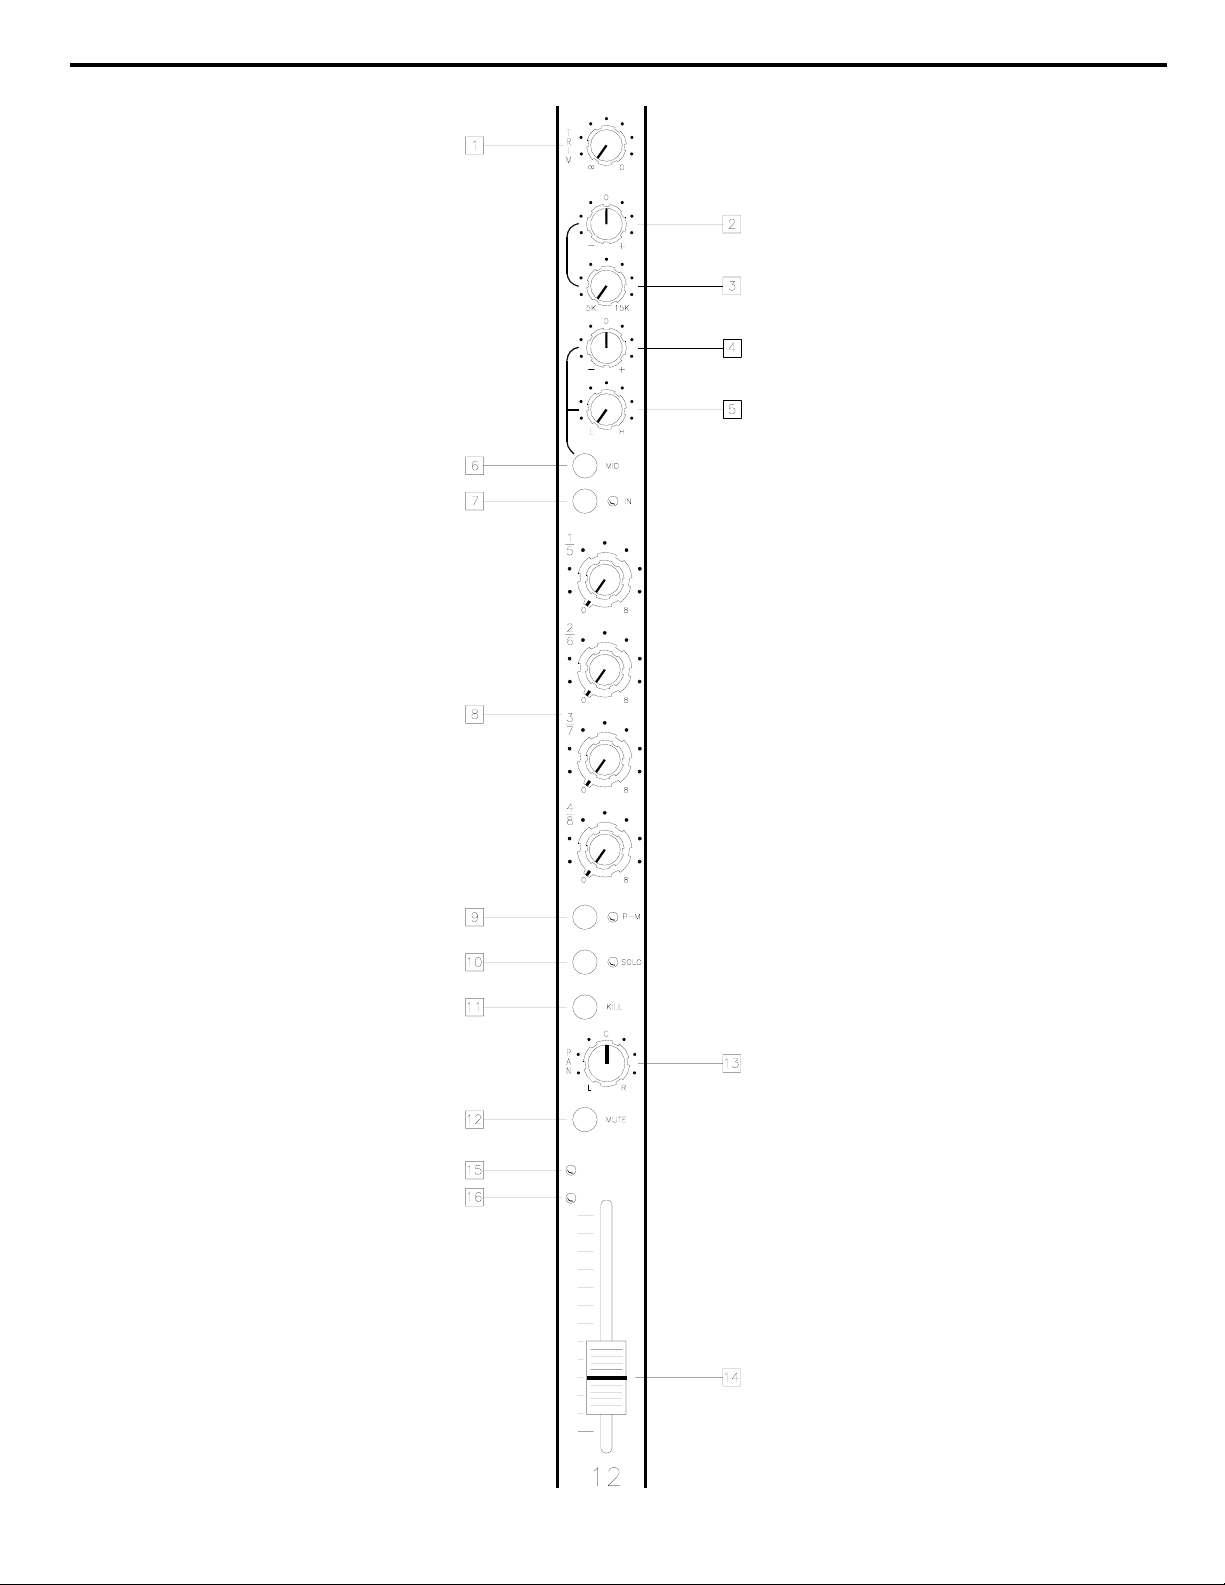
Refer to Figure 3 for location of items 1 thru 16.
1. Synth Trim Control
Equalizer Section
2. High Boost/Cut Control
3. High Frequency
Sweep Control
4. Low and Mid
Boost/Cut Control
The dual Synth Trim Control simultaneously adjusts the gain (level) of
the left and right channel inputs. Its normal operating or starting
position is when set fully counterclockwise. In order to help maintain
the extremely high frequency response and low noise characteristics of
the Model SSM, utilize this control only as needed.
If an individual synth or sampler proves too weak, it is good practice to
add level by first pushing up the channel's slide fader if possible, or by
making sure that the synth or sampler plugged into that channel is set to
its maximum output. Should these adjustments fall short, then turn the
Synth Trim Control clockwise until the required mixing level is
obtained. Repeat this procedure each time a new patch, or sample is
chosen.
The equalization section has two independent signal paths and utilize
dual pots that simultaneously adjust the left and right parameters of the
equalizer.
The equalizer for the SSM is a semi-parametric type, whereas the
Frequency Sweep Control adjusts one of the parameters, and the Boost/
Cut Control adjusts the second of the parameters. The third possible
parameter available on a parametric equalizer would be the frequency
bandwidth adjustment. The bandwidth (Q) for the low, mid, and high
bands on the SSM equalizer are fixed at approximately 12db/octave.
This control provides 15db of bell shaped Boost or Cut for the high
frequency range (5K to 15Khz), and is used in conjunction with the
High Frequency Sweep Control (see below). 0db boost/cut (flat) is
obtained when this control is set to its center position.
The High Frequency Sweep Control is used in conjunction with the
High Boost/Cut Control and provides continuous adjustment from 5Khz
(fully counterclockwise) to 15Khz (fully clockwise).
This control provides 15db of bell shaped Boost or Cut in either the low
band (50 to 500hz) or mid band (500hz to 5khz) frequency ranges
dependent on the position of the Low/Mid Band Select Switch (see
below). This control is used in conjunction with the Low/Mid Sweep
Control. 0db boost/cut (flat) is obtained when this control is set to its
center position.
Page 28

Chapter 4 Operation Section
23
5. Low and Mid Frequency
Sweep Control
6. Low/Mid Select Switch
7. Equalizer In/Out Switch
8. Effects Sends 1 thru 8
9. P-M Switch
Stereo/Mono Select Switch
The Low/Mid Frequency Sweep Control is used in conjunction with the
Low/Mid - Boost/Cut Control and provides continuous adjustment from
50hz (fully counterclockwise) to 500hz (fully clockwise) when the Low/
Mid Band Select Switch (see below) is in the Low position. This
control provides continuous adjustment from 500hz (fully
counterclockwise) to 5Khz (fully clockwise) when the Low/Mid Band
Select Switch is in the Mid position.
This switch determines the frequency range affected by both the Low/
Mid - Boost/Cut control and the Sweep control. The up position selects
the low (50 to 500hz) range while the down position selects the mid
(500hz to 5khz) range.
In the up position the equalizer section is totally bypassed. When this
switch is depressed, the equalizer is inserted in the channels audio path.
The green LED to the right of this switch illuminates indicating that the
equalizer is enabled.
Eight discrete effect sends are configured as four dual concentric
potentiometers. The center (smaller) knobs are numbered 1 thru 4 (top
to bottom) and the outer (larger) knobs are numbered 5 thru 8 (top to
bottom).
Each stereo channel also incorporates an effects Sum/Split switch
(located at the rear). When this switch is in the Sum position, the source
for effects sends 1 thru 8 is the algebraic sum of the left and right synth
signals, post (after) the input level control. When the Sum/Split switch
is in the split position, the source for effects sends 1 thru 4 is the left
synth signal, and the source for effects sends 5 thru 8 is the right synth
signal.
The effects sends may be operated in the pre mode with the operation of
the Kill switch.
The P-M switch has two designations. "P" is the designation for the pre
fader listen (PFL) switch, and is found only on mono input channels.
"M" is the designation for the Stereo/Mono switch, and is found only on
stereo input channels.
On the stereo channel, this switch acts as the Stereo/Mono select. When
depressed, this switch sums the left and right inputs together, creating a
mono composite. When the channel is in the mono mode, the Pan/
Balance Control is then used for traditional left to right panning of the
mono (mono composite) synth signal.
Page 29

Chapter 4 Operation Section
Pre Fader Listen (PFL) Switch
10. In-Place Solo Switch
11. Kill Switch
24
A yellow LED to the right of this switch will illuminate indicating the
Mono status of operation.
When the Model SSM is configured with mono input channels, this
switch acts as a Pre Fader Listen (PFL) Switch. Depressing this button
allows the selected channel's signal to be soloed (in mono) even if the
slide fader is down or the channel is muted.
The source for the PFL signal is post (after) the equalizer circuit so any
EQ changes will be reflected. As with the in-place solo circuit, PFL
feeds only the master monitor and/or headphone outputs as well as the
dedicated tuner output.
A red LED to the right of this switch, as well as the master Solo/PFL
LED will illuminate indicating its status.
Depressing this switch allows you to isolate any input channel to the
monitor and/or headphone outputs while maintaining stereo perspective.
This means that the Pan/Balance Control remains active, and any left/
right position set by the Pan/Balance Control to the stereo mix will be
maintained when the In-Place Solo Switch is depressed. The direct
outputs on each input channel also remain unaffected by the operation of
the solo switch.
The source of the solo signal is post (after) the channels equalization and
the slide fader control. When a solo switch is enabled, any adjustment
to the channels level control or equalization will be evident in the
monitor and/or headphone playback.
Any combination of input channels or effects returns may be soloed
without interrupting the flow of the signal to the program master feed.
A red LED to the right of this switch as well as the master Solo/PFL
indicator will illuminate if a channel is soloed.
Depressing this switch deletes only the channels dry signal from the
SSM's stereo mix but leaves the rest of the channels signal flow
(equalizer, effects sends, and direct outputs) intact. This allows you to
send a synth or sampler signal to any number of effects devices without
hearing the original signal.
Page 30

Chapter 4 Operation Section
12. All Mute Switch
13. Input Pan/Balance Control
14. Input Level Control
15. Maximum Output LED
16. Presence of Signal LED
25
Unlike traditional pre-fader modes, here the sends are still post fader.
So if, for example, you create a delicately balanced multi effects only
patch, changing its overall level is simply a matter of adjusting the
channel fader and not the individual effect sends. Layering one synths
effects over another synths dry sound is one other way of creatively
utilizing this function.
Because the direct outputs are post fader, it is also possible to extract an
individual channel from the SSM by enabling its associated Program
Kill Switch and accessing the channels direct outputs.
Unlike the Program Kill Switch, depressing this button eliminates all
signal flow to its respective channels direct output, left/right program
mix, as well as the effect sends. The PFL switch on mono input channel
is unaffected by the operation of the Mute Switch. Any signal present at
the channels patch point (if that channel is so equipped) remains
unaffected by the operation of the Mute Switch.
When a stereo source is being used, this control acts as a balance for the
left and right inputs. The left to right movement of this control will
adjust the respective volumes of the left and right synth signals. If the
channels Mono Switch is enabled, this control acts like a traditional pan
pot, placing the mono signal anywhere in the stereo left/right
perspective.
The stereo input channel employs a dual linear motion slide
potentiometer that simultaneously and equally adjusts both the left and
right signals. A good starting position for this slide fader is to align the
slider knob to the #10 mark on the panel. Due to the SSM's unique gain
structure, it is perfectly acceptable to set the fader higher if needed (see
Synth Trim Control).
The operation of the slide fader will control the level to the stereo
program mix, the eight effects sends, and the direct outputs.
This red LED will only activate when the channels synth preamplifier is
near its maximum output. If the LED does illuminate, it's possible that
the Synth Trim Control has been increased higher than required for the
audio signal plugged into its respective channel. The solution is to
reduce gain at the Synth Trim Control until you are certain the LED will
not illuminate. If necessary, increase the channel slide fader to
compensate for the loss of volume.
This green LED will illuminate when a signal is present at the left or
right channel. This provides for easy identification of an active synth
even when a channel is muted and sound is inaudible.
Page 31
Chapter 4 Operation Section 26
Figure 4. Effects Send and Return Channel
Page 32

Chapter 4 Operation Section
27
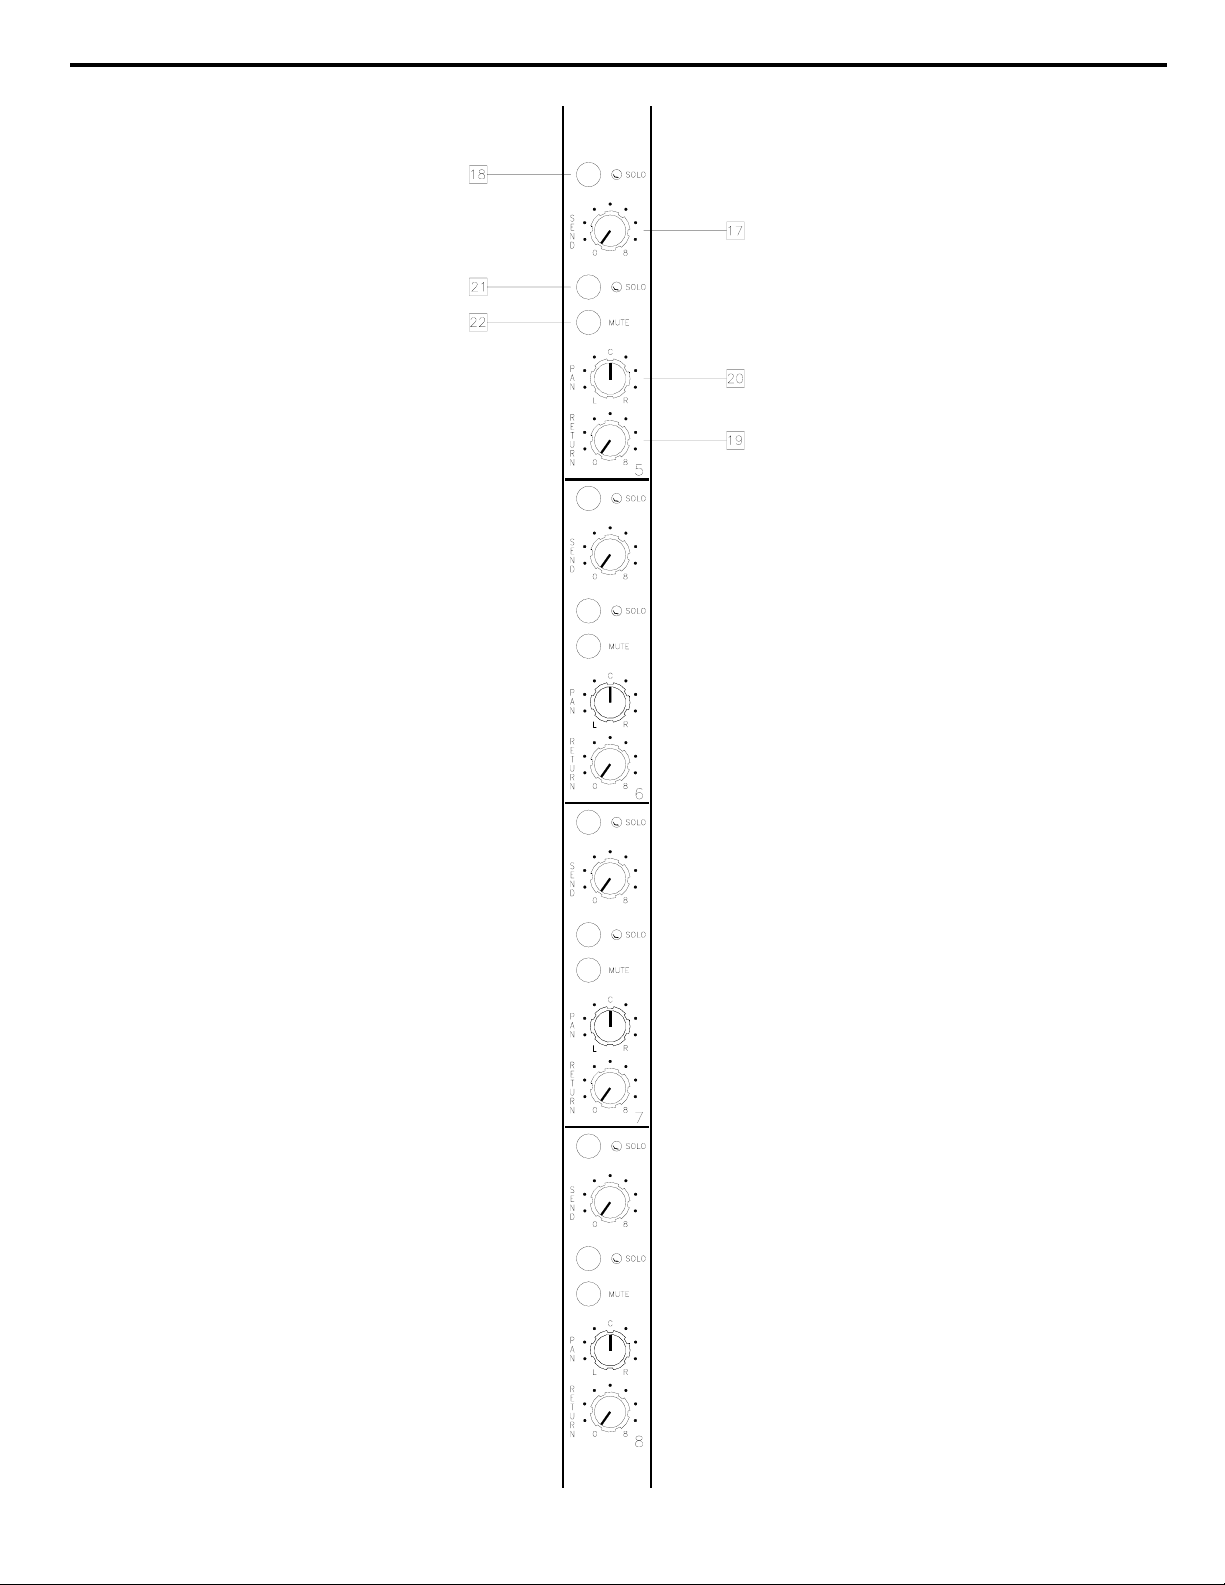
Refer to Figure 4 for location of items 17 thru 22.
Effects Send and
Return Section
17. Effects Send Master Control
18. Effects Send Master
Solo Switch
19. Stereo Effects Return Level
20. Effects Return Pan Control
21. Effects Return Solo Switch
22. Effects Return Mute Switch
There are eight effect send and return sections incorporated into the
Model SSM. Each section provides a master level control and solo for
the effect sends. The eight stereo effects returns include a master return
level control, in-place solo switch, and mute switch.
This potentiometer adjusts the overall send output level (to the outboard
effects device itself) of all channel signals routed to the Effect Send
Master via its associated channel Effect Send Controls. When matched
with an effects unit that is operated at a professional input level of
+4dbm, the optimum setting for this pot is typically anywhere from two
to three o'clock.
Depressing this button will provide a mono solo of all channel signals
routed to an Effects Send Master via its associated channel Effect Send
Controls. This can help determine if there is indeed signal present at a
given effect send master output and establish the relative balance of
multiple channels signals routed to a given effect send master.
This dual pot simultaneously and equally adjusts the left and right
effects return level. With the Effects Return Group Master (see Master
Section) set fully clockwise, a setting of approximately two to three
o'clock could yield an adequate level of effect when matched with an
effects unit that is properly operated at a professional input/output level
of +4dbm.
This control acts as the left/right balance for any stereo output effects
device connected to an effects return. When a mono output effects
device is connected to the effects return, then this control would act as a
traditional pan.
Depressing this switch allows you to isolate any effect return to the
monitor and/or headphone outputs while maintaining stereo perspective.
The source for the in-place solo circuit is post (after) the Effects Return
Level Control. This allows you to solo multiple effects returns while
retaining their relative levels.
Any combination of effects returns, or input channels may be soloed
without interrupting the flow of the signal to the program master. A red
LED to the right of this switch as well as the master Solo/PFL LED will
illuminate when the return is soled.
This switch eliminates an individual effect return from the master
program and monitor outputs as well as the headphone circuits.
Page 33
Chapter 4 Operation Section 28
Figure 5. Master Section
Page 34

Chapter 4 Operation Section
29
Master Section
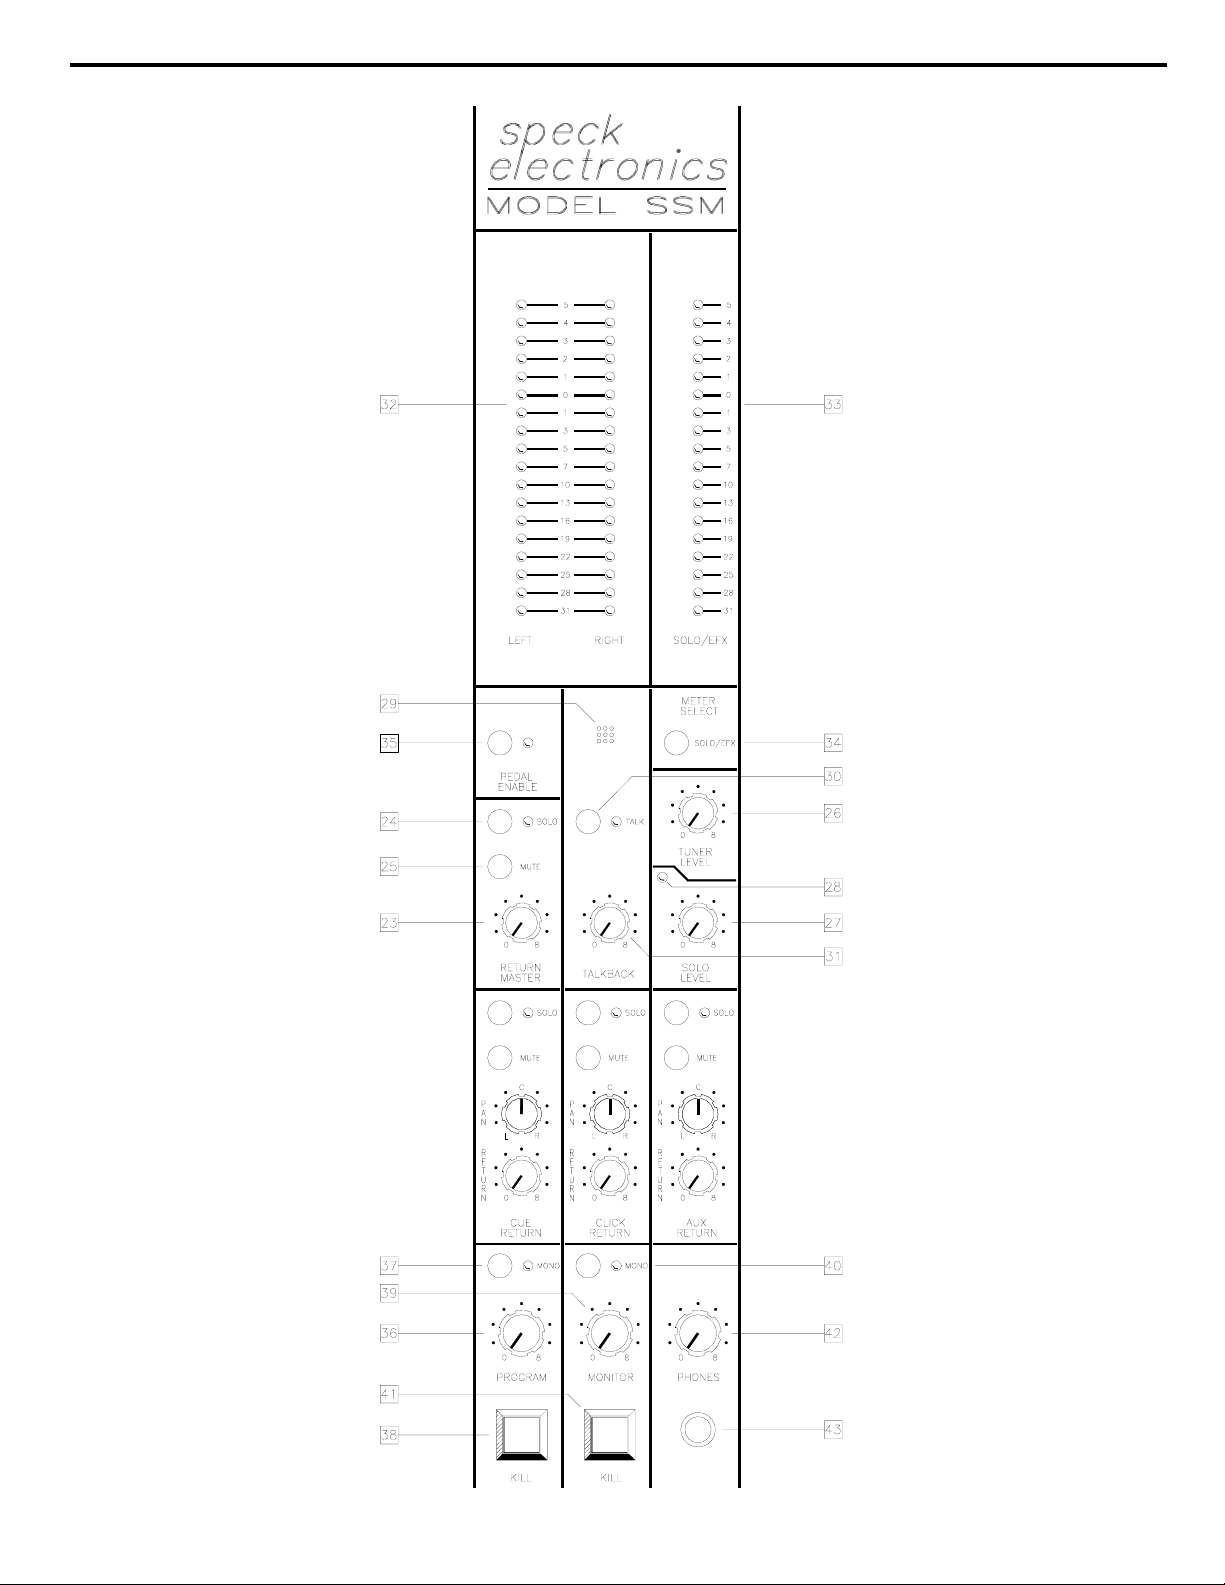
23. Effects Return Group
Master Control
24. Effects Return Group
Solo Switch
25. Effects Return Group
Mute Switch
26. Tuner Level Control
Refer to Figure 5 for location of items 23 thru 43.
This control acts as a master level adjustment for all eight stereo effects
returns and is normally set to its fully clockwise position.
In reality, there is no additional level available in the effects return
signal path. Unity gain, meaning no level lost or added, is obtained
when the Group Master Control is set to its fully clockwise position.
If the effects devices being utilized with the SSM are properly operated
at a professional input/output level of +4dbm, it would be acceptable to
adjust this control to the three o'clock mark. This will afford an
additional overall effects level boost when needed. Otherwise, set the
Effects Return Master Level Control to its fully clockwise position and
forget it.
The Effects Return Group Solo Switch permits an instantaneous In-place
solo of all eight stereo effects returns.
At times it is convenient to be able to listen to all of the effects returns
at once. This can be particularly useful if you are creating multieffects only patches.
As with all the solos on the SSM, only the monitor and/or headphone
outputs are affected. Effects returns may be individually muted or
unmuted even if the Group Master Solo is activated.
This is a convenient master mute function for all eight stereo effects
returns. When the Group Mute is activated, the Effects Return Group
Solo is unavailable. However, any individual effect return may be
soloed even if the Effects Group Mute is depressed.
This control adjusts the output volume to a dedicated tuning device (see
rear panel). The source for this output is either the sum of all signals
feeding the program master or any in-place solo or PFL signals.
If, for example, you need to tune only one synth module while others are
active, simply depress its associated solo or PFL switch and it will be
isolated to the tuner output.
There is ample gain available at this output so that even the softest synth
patches will trigger the tuners circuitry. Start by positioning the control
at the twelve o'clock mark, and adjust if necessary.
Page 35

Chapter 4 Operation Section
30
27. Solo Master Level Control
28. Master Solo/PFL LED
29. Talkback Mic
30. Talkback Switch
31. Talkback Level Control
32. Left/Right VU Displays
33. Solo/Efx VU display
This control adjusts the overall stereo in-place solo listening level to the
monitor and/or headphone outputs (see the Solo to Monitor Switch, rear
panel section). The adjustment of this control permits the volume of a
soloed signal to match the level of the normal stereo mix.
Keep in mind that the monitor and/or headphone output level controls
still function even when the solo output is activated.
This LED illuminates when any solo or PFL switch is depressed.
The talkback section of the SSM incorporates an internal omnidirectional microphone. This sensitive microphone will operate most
efficiently when the operator speaks at a distance of about two feet from
the mike. This mic is activated by the Talkback Switch and is adjusted
with the Talkback Level Control.
This momentary switch activates the talkback circuit for control room or
house mix communication. When this circuit is activated, it effectively
interrupts the stereo program mix, and allows talkback to the stereo
program 1/4" and XL outputs. The signal to the stereo monitor feed is
muted when the Talkback Switch is enabled.
This control adjusts the volume of the talkback circuit to the program
output. The suggested setting for this control is approximately the two
o'clock range and adjust as necessary.
These 18 segment VU (volume units) meters indicate the relative levels
of the stereo program feed and are sensitive from -31db to +5db.
Depending on the position of the rear panel Meter Sensitivity Switch
(see rear panel), a meter reading of 0VU reflects a mixer output level of
either +4dbm, the industry professional standard, or -18dbm. The latter
is sufficiently low enough to allow the SSM to be plugged into an
external consoles synth or mike inputs. This circuit was designed to
approximate the ballistics of a "taut band" analog style VU meter.
These 18 segment VU (volume units) meters indicate the relative levels
of the solo/PFL signals or the effects send signals, and are sensitive from
-31db to +5db.
Page 36

Chapter 4 Operation Section
34. Solo/Efx Meter
Select Switch
35. Expression Pedal
Enable Switch
36. Stereo Program
Master Control
31
The status of this VU meter is determined by the selection of the Solo/
Efx Meter Switch. When the Solo/Efx Meter Switch is in the normal
position (up) the VU indicates the overall stereo mix of the Model SSM
until any solo or PFL switch is depressed. When any solo or PFL switch
is depressed, this VU meter displays that respective signal. When the
Solo/Efx Select Switch is depressed, this VU meter displays the sum of
all effects send signals.
This switch determines the source for the Solo/Efx VU display. In the
normal position (up) the VU displays any solo or PFL signal; when this
switch is depressed, it displays the sum of the effects sends.
Depressing this switch will insert a stereo volume pedal (connected at
rear) into the master signal path allowing dynamic control of the entire
mix. Level changes made by the volume pedal will be reflected in the
program, monitor and headphone outputs.
We strongly recommend the use of a passive volume pedal as opposed
to an active (powered) device. The reason for this is that the SSM's
expression pedal circuit is optimized for a passive pedal which will
always afford far better sonic results than its active counterparts.
Remember, the moment you insert a powered pedal at this point, you are
subjecting your entire mix to its frequency response limitations,
inherently greater distortion, higher noise, and significantly lower head
room.
This pot acts as the master volume to the balanced and unbalanced
stereo program feed. It should be pointed out that any adjustment to the
Program Master Control will be displayed by the left and right VU
meters.
With the Program Meter Sensitivity Switch (see rear panel) set to its
+4dbm position, a typical starting point for the program master is the
three o'clock position. This setting should make it reasonably easy to
achieve a 0VU reading when using multiple synth and sampler patches
without having to rely on excessive input trim (see input channel)
adjustments. If, however, a 0VU reading is desired when using only one
source (a single synth), it is perfectly acceptable to set the Program
Master Control higher that the three o'clock position to obtain the
necessary output.
The Program Master Control does not affect the monitor level or
headphone level.
Page 37

Chapter 4 Operation Section
32
37. Program Stereo/Mono
Select Switch
38. Program Kill Switch
39. Stereo Monitor
Master Control
40. Monitor Stereo/Mono
Select Switch
41. Monitor Kill Switch
Depressing this switch applies a monaural version of the program mix to
the left and right program outputs. This means it is possible to send the
control room or house mix a mono feed while retaining stereo operation
for a set of personal monitors or the headphone feed.
The monitor and headphone outputs are unaffected by the operation of
the Program's Stereo/Mono Select Switch.
This large white pushbutton switch mutes the master program signals to
the 1/4" jacks and XL connectors without affecting the monitor or
headphone outputs.
Signal will remain present at the left/right program meters when the
Program Kill Switch is depressed. When depressed, this switch
illuminates indicating the program signal has been muted.
This controls the overall level to the stereo monitor feed and operates
independent of the Program Master and Headphone Master. Typically,
the monitor outputs would be connected to a stereo power amplifier for
purposes of driving a personal monitoring system.
In situations where the Model SSM is interfaced to, for instance, a large
frame recording console and solo capability desired, then it is
completely acceptable to utilize the solo capable monitor outputs for this
purpose. The integrity of this signal is virtually equivalent to that of the
program output.
In so far as metering the output is concerned (the program meters follow
just the program); as long as the Program Trim (see rear panel) is
adjusted fully clockwise, then the monitor and program levels, given the
same physical adjustment (2,3,4 o'clock etc.), will be equal. Establishing
the monitor output level is simply a matter of matching the program and
monitor master controls.
Depressing this switch applies a monaural version of the program mix to
the left and right monitor outputs. This also includes any stereo
information that has been applied to the Cue, Click, and Aux return
inputs.
The program outputs and headphone outputs are unaffected by the
operation of the Monitor's Stereo/Mono Select Switch.
This large red pushbutton switch mutes the master monitor output
without affecting the program and headphone outputs. When depressed,
this switch illuminates, indicating the monitor signal has been muted.
Page 38

Chapter 4 Operation Section
33
42. Stereo Headphone
Level Control
CAUTION!
43. Stereo Headphone Jack
This dual potentiometer controls the volume of the stereo headphone
circuit. The Headphone Master Control operates the headphones that
are plugged into the front and rear headphone jacks, as well as the
transmitter feed jack.
The operation of the Headphone Master Control does not affect the
operation of the program level or monitor level.
USE CAUTION AS EAR DAMAGING LEVELS ARE
MOST CERTAINLY POSSIBLE WITH THIS
HEADPHONE CIRCUIT.
This standard 1/4" stereo phone jack will operate with any impedance
headphones. This jack is identical in operation to the rear jack.
The tip of the stereo jack is the left headphone signal, and the ring of the
jack is the right headphone signal.
Page 39
Chapter 4 Operation Section 34
Figure 6. Cue, Click, Aux Return Sections
Page 40

Chapter 4 Operation Section
35
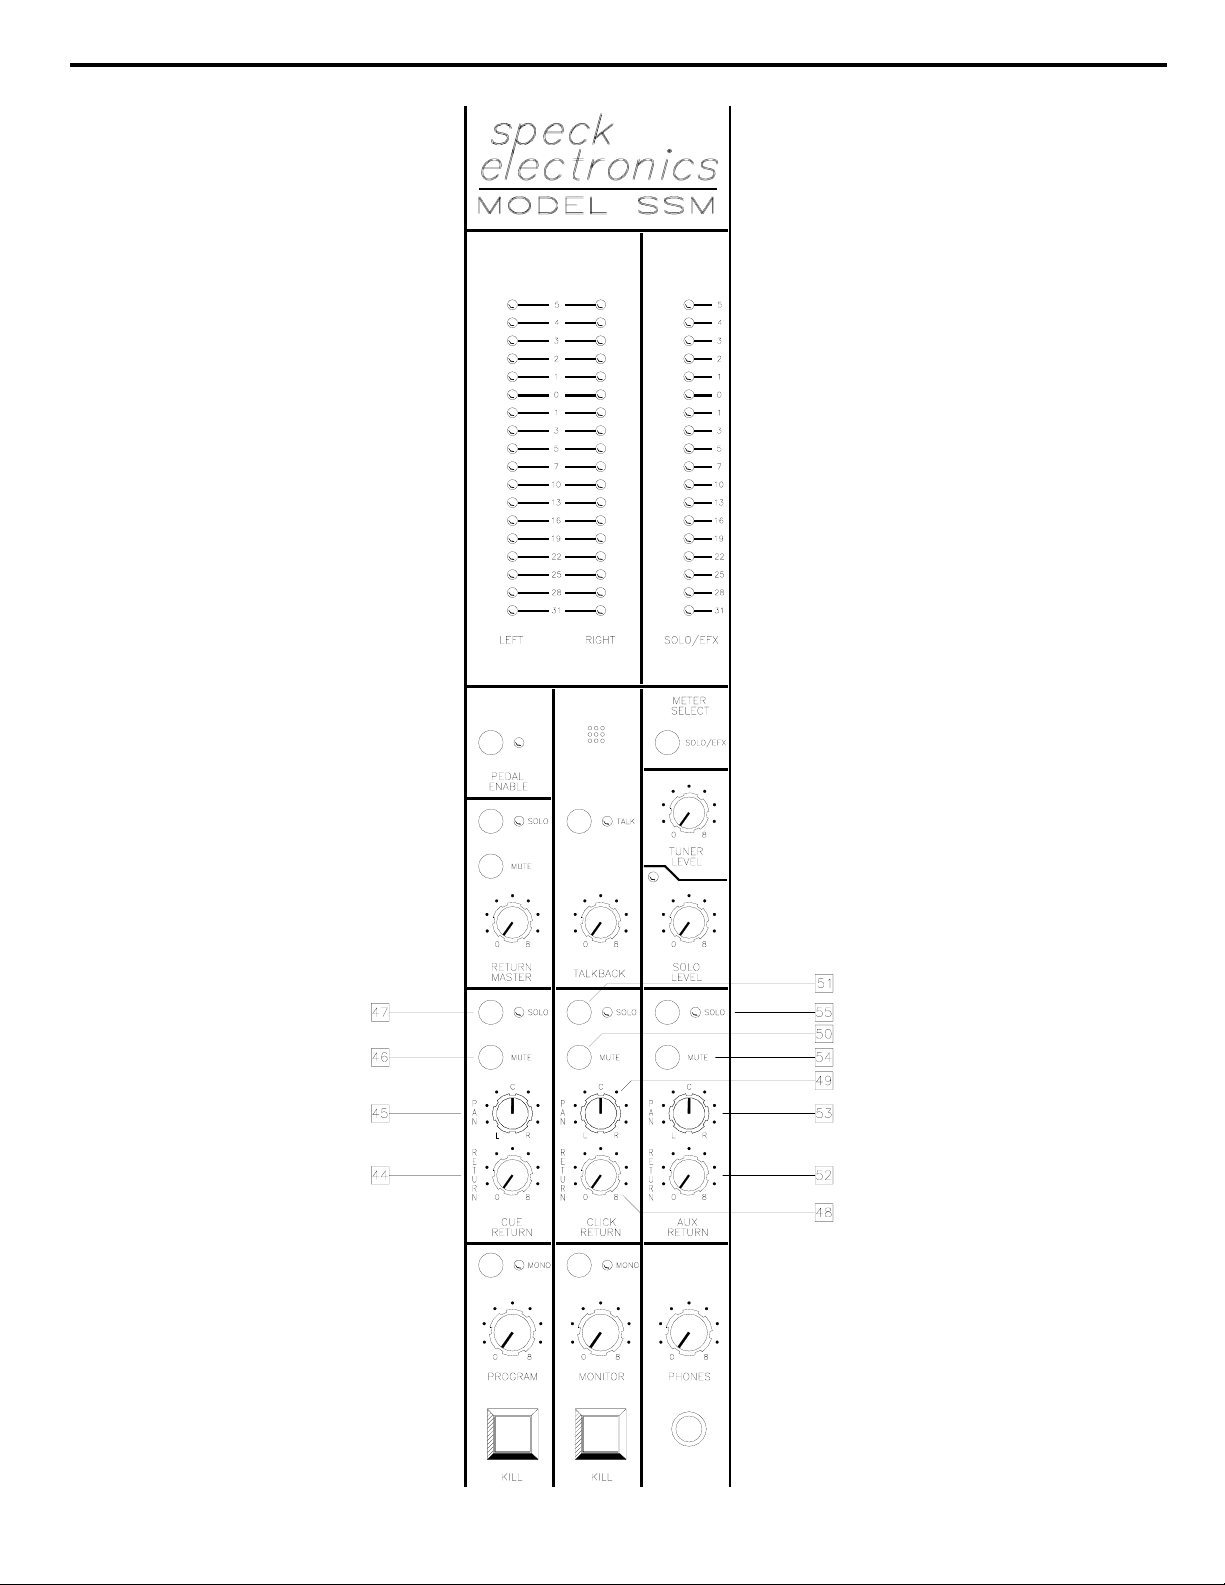
Refer to Figure 6 for location of items 44 thru 55.
Stereo Cue
Return Section
44. Cue Return Level Control
45. Cue Return Pan Control
46. Cue Mute Switch
47. Cue In-Place Solo Switch
Mono Click
Return Section
This feature of the SSM allows an external stereo cue source (otherwise
known as headphone or foldback) or any stereo line level signal to be
integrated into the SSM's monitor and/or headphone feeds. This makes
it possible to customize a balance between the SSM's stereo mix and, for
instance, the cue feed from a studio control room.
The Cue Return can be accessed via two unbalanced 1/4" phone type
jacks or via a transformer isolated XL type connector. For more on
these connections, see their rear panel descriptions. Since the source for
the Cue signal is most likely the high level output of a power amplifier
(via a dedicated headphone box), the input sensitivity of the Cue Return
has been adjusted accordingly.
Do not attempt to connect the speaker terminals of any power amplifier
directly into the Cue Returns of the SSM.
The stereo Cue Return Section includes the return level control, the
Return Pan Control, the return mute switch, and the return in-place solo
switch.
The Cue Return Control adjusts the level of an external stereo cue
source and returns only to the monitor master and/or the headphone
outs.
This control allows the Cue Return to be panned anywhere in the stereo
perspective.
This switch allows muting of the stereo cue return. Enabling this switch
removes the stereo cue return signal from the monitor and headphone
outputs. The operation of this switch does not affect the operation of the
aux or click returns.
Depressing this switch allows you to isolate the Cue Return to the
monitor and/or headphone outputs while maintaining stereo perspective.
Similar in operation to the Stereo Cue Section, the Click Return is
designed to allow an external mono click source (metronome type) or
any mono line level signal to be integrated into the SSM's monitor and/
or headphone outputs.
The Click Return can be accessed via a single 1/4" phone type jack or
via a balanced transformer isolated XL connector. For more on these
connections, see their rear panel descriptions.
Page 41

Chapter 4 Operation Section
48. Click Return Level Control
49. Click Return Pan Control
50. Click Mute Switch
51. Click In-Place Solo Switch
Stereo Aux
Return Section
52. Aux Return Level Control
53. Aux Return Pan Control
54. Aux Mute Switch
55. Aux In-Place Solo Switch
36
The Mono Click Return Section includes the return level control, the
return pan control, the return mute switch, and the return in-place solo
switch.
The Click Return Level Control adjusts the level of an external Click
source or any monaural signal. This signal returns only to the monitor
master and headphone outs.
This control allows the Click Return to be panned anywhere in the
stereo perspective.
This switch allows muting of the stereo Click Return. Enabling this
switch removes the stereo click return signal from the monitor and
headphone outputs. The operation of this switch does not affect the
operation of the cue or aux returns.
Depressing this switch allows you to isolate the Click Return to the
monitor and/or headphone outputs while maintaining stereo perspective.
This section allows an external stereo auxiliary source such as a DAT
player or the monitor output of Speck's "Assign 28" subgroup module to
be routed to the monitor and/or headphone outputs of the SSM.
The Stereo Aux Return Section includes the return level control, the
return pan control, the return mute switch, and the return in-place solo
switch.
The Aux Return Control adjusts the level of an external auxiliary source
such as a DAT player or the monitor output of Speck's "Assign 28"
assign subgroup module.
This control allows the Aux return to be panned anywhere in the stereo
perspective.
This switch allows Muting of the Stereo Aux Return. Enabling this
switch removes the stereo aux return signal from the monitor and
headphone outputs. The operation of this switch does not affect the
operation of the cue or click returns.
Depressing this switch allows you to isolate the Aux Return to the
monitor and/or headphone outputs while maintaining stereo perspective.
Page 42
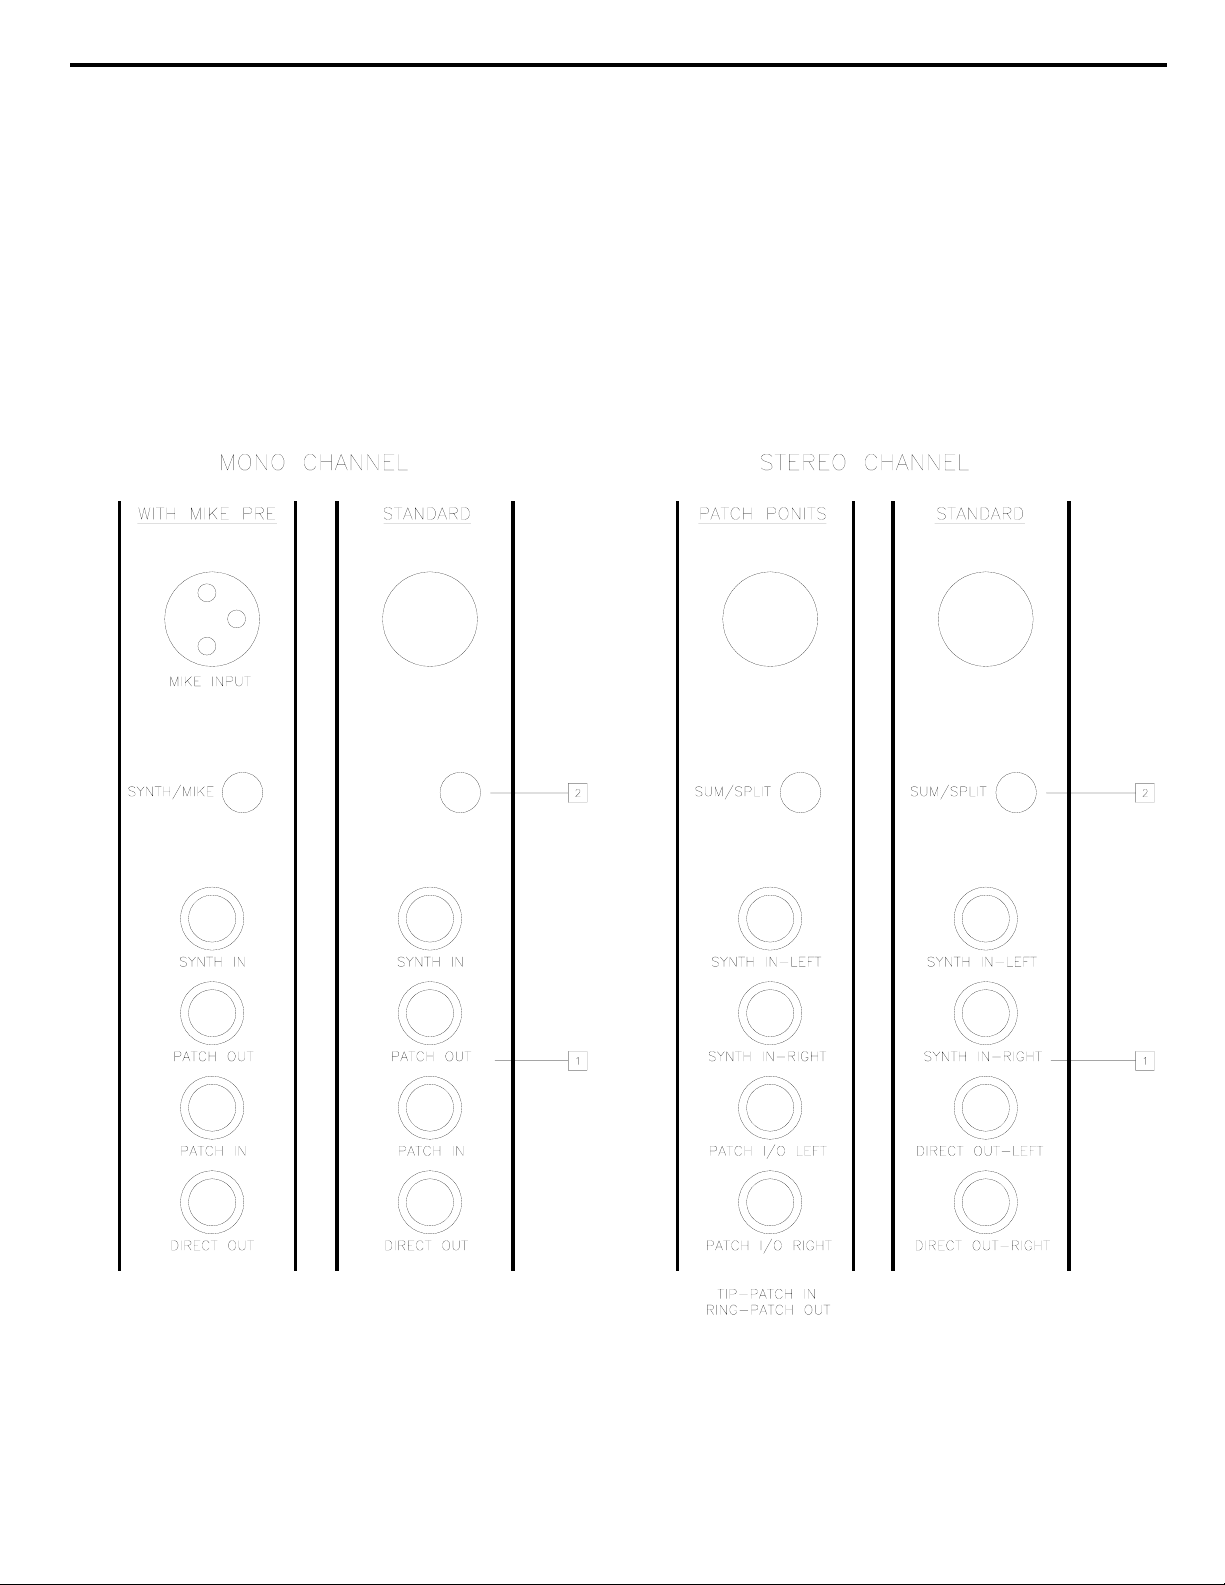
Chapter 4 Operation Section 37
Figure 7. Input Channel Connectors and Switches
Page 43

Chapter 4 Operation Section
38
Input Channel
Connections and
Switches
1. Input Channel Jacks
Mono Input Channel Jacks
Stereo Input Channel Jacks
REAR PANEL CONTROLS
Refer to Figure 7 for location of items 1 and 2.
Each input channel has four 1/4" jacks. The configuration of these four
jacks depend on whether your Model SSM is configured with mono
channels, stereo channels or a combination of both.
Each mono input channel has synth input, patch output, patch input, and
direct output jacks (from top to bottom). The synth input jack is the
primary input connector for most synth/samplers that have a low to
medium strength signal (-20dbu to 0dbu). With synth and samplers that
have higher strength signals (0dbu to +18dbu), the patch input jack may
be used. Using the patch input jack bypasses the synth preamp stage
and its synth trim control.
The patch output and patch input jacks provide line level interstage
access to the input channel before (pre) the equalizer and slide fader
control. This means that any device interfaced to these jacks will be
processed after the channels synth preamp and synth trim control, and
will not be affected by any adjustments by the equalizer, slide fader,
mute switch, or kill switch.
The insert jacks may be used to connect limiters, additional equalization,
noise gates, etc.
The direct output jack provides a line level signal for connection to the
input of a sampler or multitrack recorder. The direct output also
provides an interface to the Speck "Assign 28" subgroup module.
Stereo channels are configured with balanced left and right line input
jacks, and unbalanced left and right direct output jacks (from top to
bottom). This is the standard configuration for the stereo input channel.
The left and right synth input jacks will accommodate any stereo synth,
sampler, or line level signal. The two direct output jacks provide a
stereo line level signal to the input of a stereo sampler or the Speck
"Assign 28" subgroup module.
Connections to the balanced left and right inputs should be made
with a 1/4" T.R.S. (tip, ring, sleeve) plug. Connections to the
unbalanced direct outputs should be made with a 1/4" T.S (tip,
sleeve) plug.
Page 44

Chapter 4 Operation Section
2. Sum/Split Switch
(Synth/Mic )
Effects Sum/Split Switch
Synth/Mic Select Switch
39
As an option, the stereo input channels may be configured with stereo
patch points instead of the direct outputs. When configured with patch
points, the four jacks are the left synth input, right synth input, left
channel patch In/Out, and right channel patch In/Out (from top to
bottom).
Each patch In/Out provides a 1/4" T.R.S. (tip, ring, sleeve) jack. The
ring of the jack is the "patch out" signal, the tip is the "patch in" signal,
and the sleeve is the signal ground. Consult Speck Electronics or your
dealer regarding this option.
This switch has two designations. On the stereo channel this switch
selects the Sum or Split mode for the eight effects sends. If an optional
mike preamplifier is installed on the mono input channel, this switch
selects the Synth or Mic mode of operation.
The Sum/Split Switch is only available on a stereo input channel and is
identified with a black pushbutton immediately above the four 1/4"
channel jacks. The Synth/Mic Switch and its associated XL mike input
connector is only available on a mono input channel and is identified
with a grey pushbutton immediately above the four 1/4" jacks.
The absence of any switch in this position indicates a standard mono
input channel without a microphone preamp installed.
Each stereo channel incorporates an effects Sum/Split switch. When
this switch is in the Sum (up) position, the source for effects sends 1 thru
8 is the algebraic sum of the left and right synth signals, post (after) the
input level control. When the Sum/Split switch is in the Split (down)
position, the source for effects sends 1 thru 4 is the left synth signal, and
the source for effects sends 5 thru 8 is the right synth signal.
On a mono input channel, this switch appears only when the channel is
outfitted with an optional microphone preamp (indicated by a standard
XL type connector). This switch selects between the signal connected at
the synth input or the optional transformer mike inputs.
While the synth and microphone inputs can be simultaneously
connected, only one is active at any given moment as determined by the
position of the Synth/Mic switch. Up for Synth, down for Mic.
Page 45
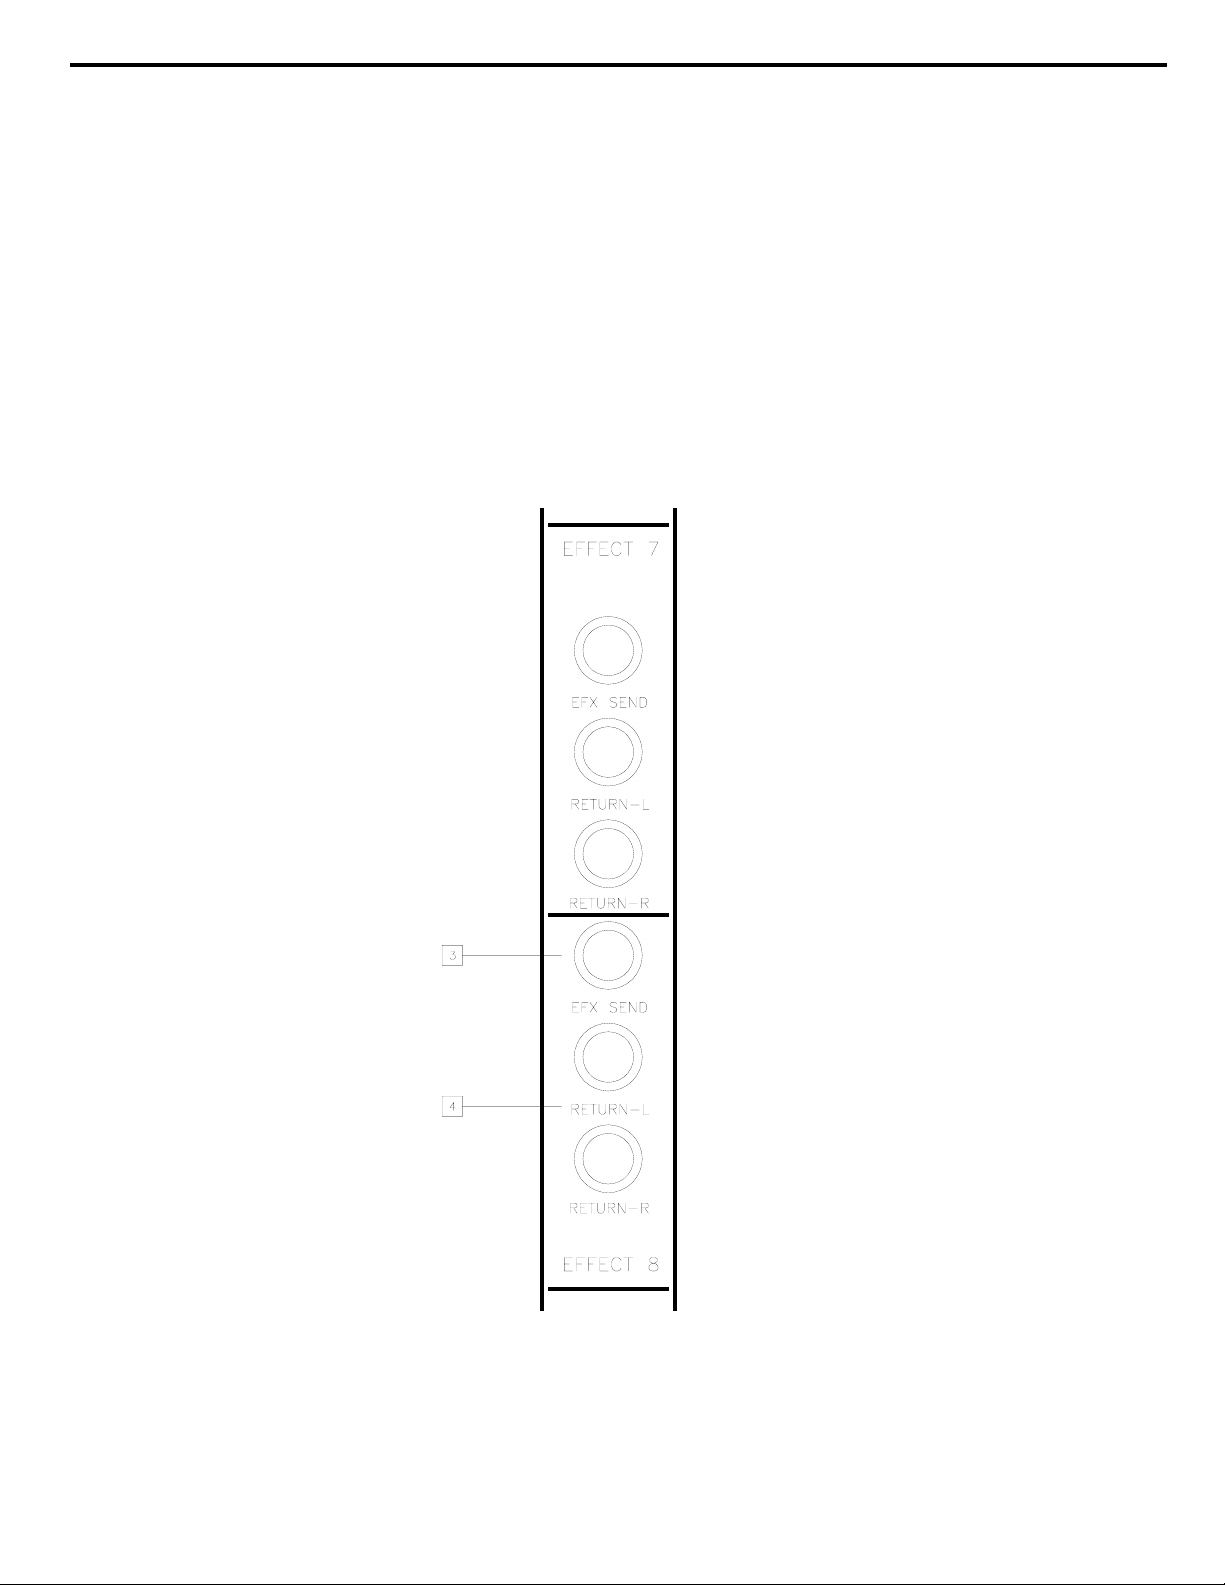
Chapter 4 Operation Section
40
Figure 8. Effects Send and Return Connectors
Page 46

Chapter 4 Operation Section
Effects Send and
Return Connections
41
Refer to Figure 8 for location of items 3 and 4.
3. Effects Send Jack
4. Effects Return Input Jacks
Each of the eight effect send channels has a separate unbalanced 1/4"
T.S. jack to interface to the input of an effects device.
It is completely acceptable, from an electronic standpoint, to adapt this
connector to the input of any effects device, regardless of the type of
input connector utilized on the effects unit (phone, RCA, XL, barrier
strip, etc.).
Each effects return provides two discrete unbalanced 1/4" T.S. jacks for
connection from the outputs of a left/right stereo effects device. In order
to operate the stereo effects return as a mono return, it is necessary to
connect the mono output of the effect to both the left and right return
jacks.
Page 47
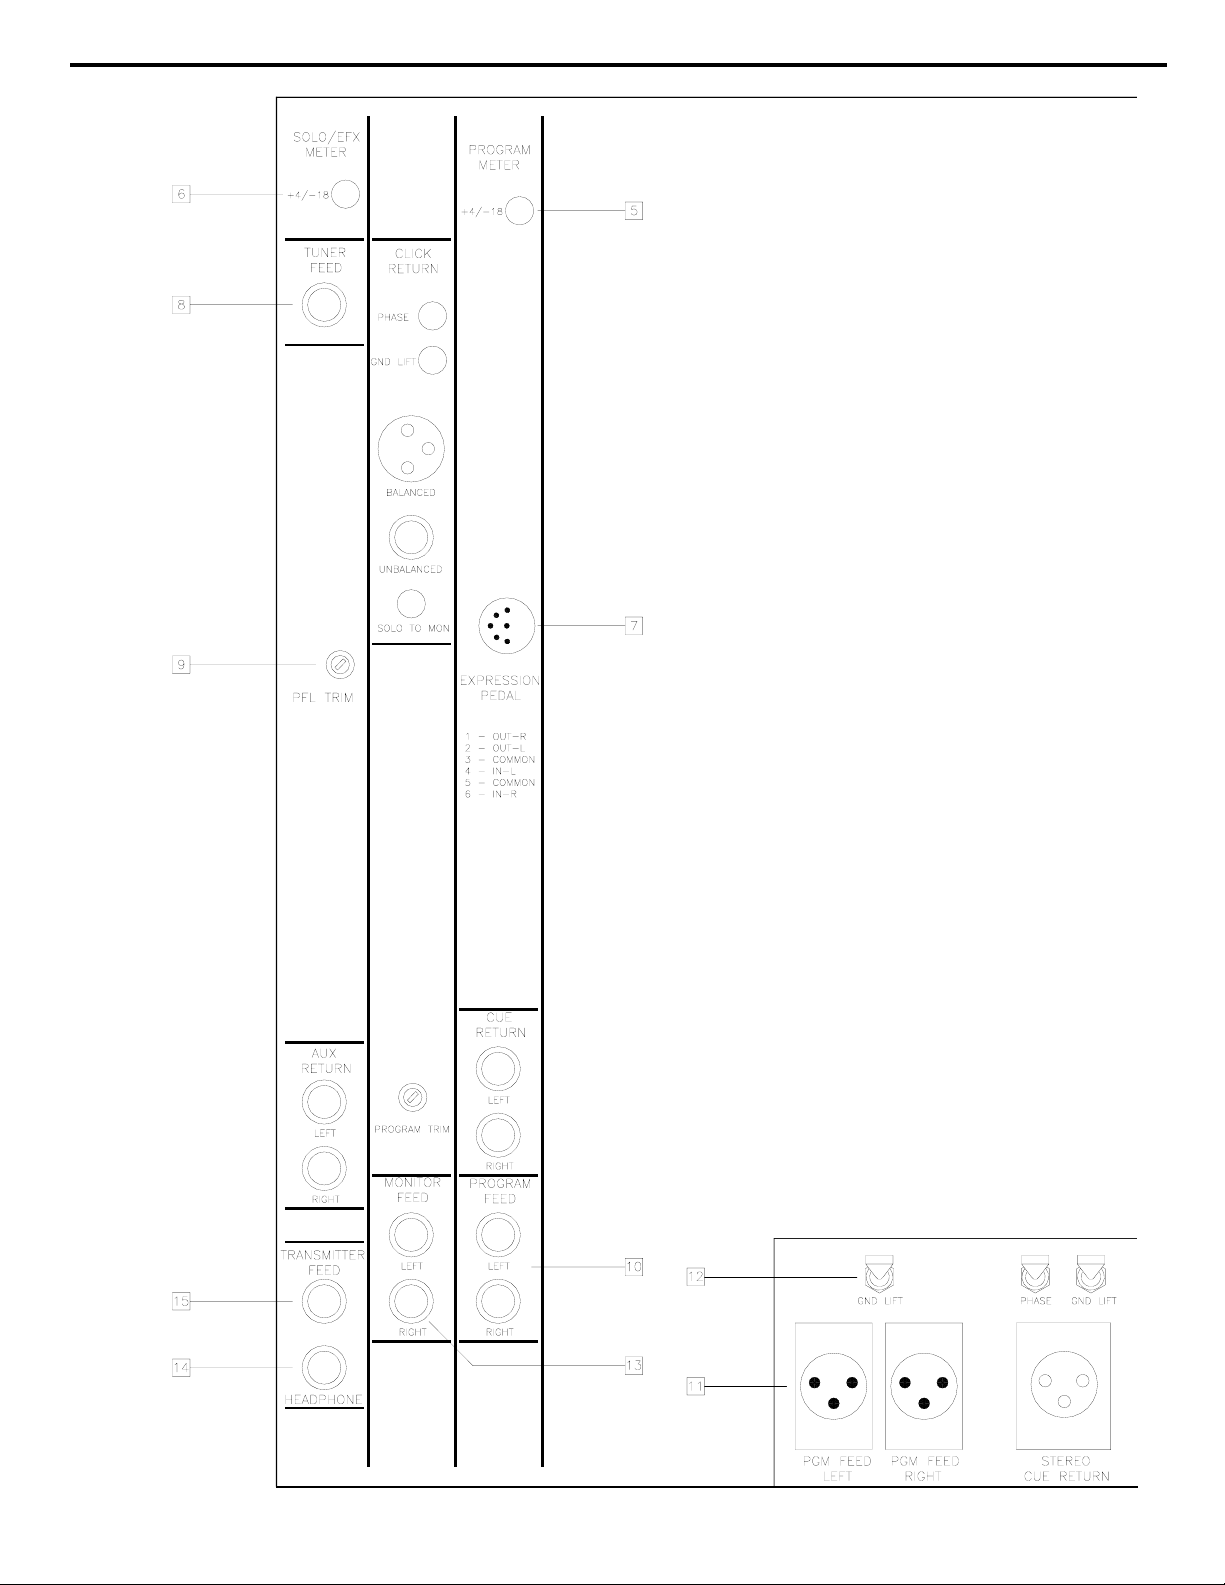
Chapter 4 Operation Section
42
Figure 9. Master Input/Output Connectors
Page 48

Chapter 4 Operation Section
Master Input/Output
Connections
43
Refer to Figure 9 for location of items 5 thru 15.
5. Left/Right Meter Sensitivity
Select Switch
6. Solo/Effects Meter Sensitivity
Select Switch
7. Expression Pedal Connector
8. Tuner Feed Jack
This pushbutton switch selects the sensitivity of the left and right
Program VU meters; +4dbm operation in the normal (up) position, and 18dbm operation when depressed. The operation of this switch in no
way modifies the electronic operation of the mixer.
If the switch is set to its normal (up) position, then a 0VU reading on the
meter indicates that a signal value of +4dbm is being yielded at the
program output. If the switch is depressed, then the meters become
22db more sensitive, thereby making it necessary, given the same input
levels, to turn down the Stereo Program Master Control to once again
achieve a 0VU meter reading. However, this same 0VU reading now
yields a signal value of -18dbm at the program outputs as a result of the
lower Program Master Control setting. This setting should prove
sufficiently low enough for the Microphone or Synth inputs of a
recording console.
As with the Program Meter Sensitivity Switch, this switch selects only
the sensitivity of the Solo/Effects VU meter and in no way modifies the
electronic operation of the mixer. The same two different operating
levels are available; +4dbm or -18dbm.
The 6 pin DIN connector provides a convenient interface to any passive
stereo volume pedal via an optional interface cable. This connector
provides a stereo send and stereo return insert for the stereo mix signal.
The left/right send to this connector is the sum of all input channels and
effects returns. The left/right returns are "Pre" the program, monitor and
headphone controls. This allows a "what you hear, is what you get"
adjustment when the expression pedal is operated.
This connector is only active when the Expression Pedal Switch is
enabled. The operation of the pedal does not affect the levels from the
cue, click, aux returns, and solo signal. For the pin assignment
configuration for the 6 pin DIN connector and installation instructions,
refer to the Interface Section of this manual.
This unbalanced 1/4" T.S. phone type jack provides a dedicated feed to
an external tuning device. The source for the output is either the sum of
all signals feeding the program master or any signal(s) that are soloed.
If, for example, you need to tune only one synth module while others are
active as well, simply depress its associated solo or PFL switch and it
will be isolated to the tuner output.
Page 49

Chapter 4 Operation Section
44
9. PFL Level Trim Control
10. Program Feed Jacks
(Unbalanced)
11. Program Feed Connectors
(Balanced XL)
Transformer Isolation
Program XL Pin Configuration
For SSM systems incorporating mono input channels, the Pre Fader
Listen (PFL) level may be adjusted with this recessed trim pot. Use care
when inserting a screwdriver as other components could be damaged.
These unbalanced 1/4" T.S. phone type jacks are the left/right outputs
for the stereo program master. The signal present at these jacks is
adjusted by the Program Master Control on the front panel.
The use of these connectors does not affect the operation of the balanced
XL connectors.
The balanced left and right program feeds utilize the highest quality
nickel core output transformers for hum rejection and sonic purity. The
signal present at these connectors is adjusted by the Program Master
Control on the front panel.
The left and right program feed is capable of driving up to three high
impedance bridging inputs simultaneously. The program feed
connectors are available for interface to the input of an external console,
stereo tape recorders etc.
The use of the balanced XL connectors does not affect the operation of
the unbalanced 1/4" connectors.
As long as the potential for an electrical disparity exists between the
Model SSM and any interconnected equipment not on the same AC
circuit as the SSM (eg: a cue feed from a control room console),
transformers will remain a key element in resolving some of the primary
audio problems that may result such as unwanted hums and buzzes.
Speck has provided input and output transformers
in key positions on the mixer; cue and click inputs and the left/right
program outputs. For more specific user information, refer to the
sections on cue and click returns and program feeds.
The following chart represent the pin assignment for the balanced
program feed XL connectors.
PIN 1 - GROUND
PIN 2 - HIGH SIGNAL
PIN 3 - LOW SIGNAL
Page 50

Chapter 4 Operation Section
45
12. Program Ground Lift Switch
13. Monitor Feed Jacks
14. Stereo Headphone Jack
15. Transmitter Feed Jack
When used, this switch disconnects the shields (pin 1) from the left and
right balanced XL connectors thereby inducing any piece of gear
interfaced at these points to search out a ground path external to the
Model SSM. This can reduce the chance of ground loops and eliminate
unwanted hums or buzzes.
The operation of the Ground Lift Switch does not affect the program
feed's unbalanced 1/4" jacks.
These unbalanced 1/4" T.S. phone type jacks are available for hooking
up a power amp that would be used for keyboard rack speakers or stage
monitoring system. The signal present at these jacks is adjusted by the
Monitor Master Control on the front panel.
This 1/4" stereo jack is a duplicate of the front panel headphone jack
(see the front panel Master Section) allowing a second set of stereo
headphones to be connected to the SSM.
Although not required, it is recommended that headphones of the same
type and impedance be used when using the front and rear headphone
jacks.
The tip of the stereo jack is the left headphone signal, and the ring of the
jack is the right headphone signal.
This 1/4" jack is similar in operation to the headphone feed but with its
signal level modified to allow interface to a wireless headphone system.
The transmitter feed signal is a mono composite of the left/right
headphone signals and may be updated in the future for stereo operation
when stereo headphone transmitters become available.
The level for the transmitter feed is adjusted with the Headphone Master
Level on the front panel. The use of the Transmitter Feed Jack does not
affect the operation of the front or rear stereo headphone jacks.
Page 51
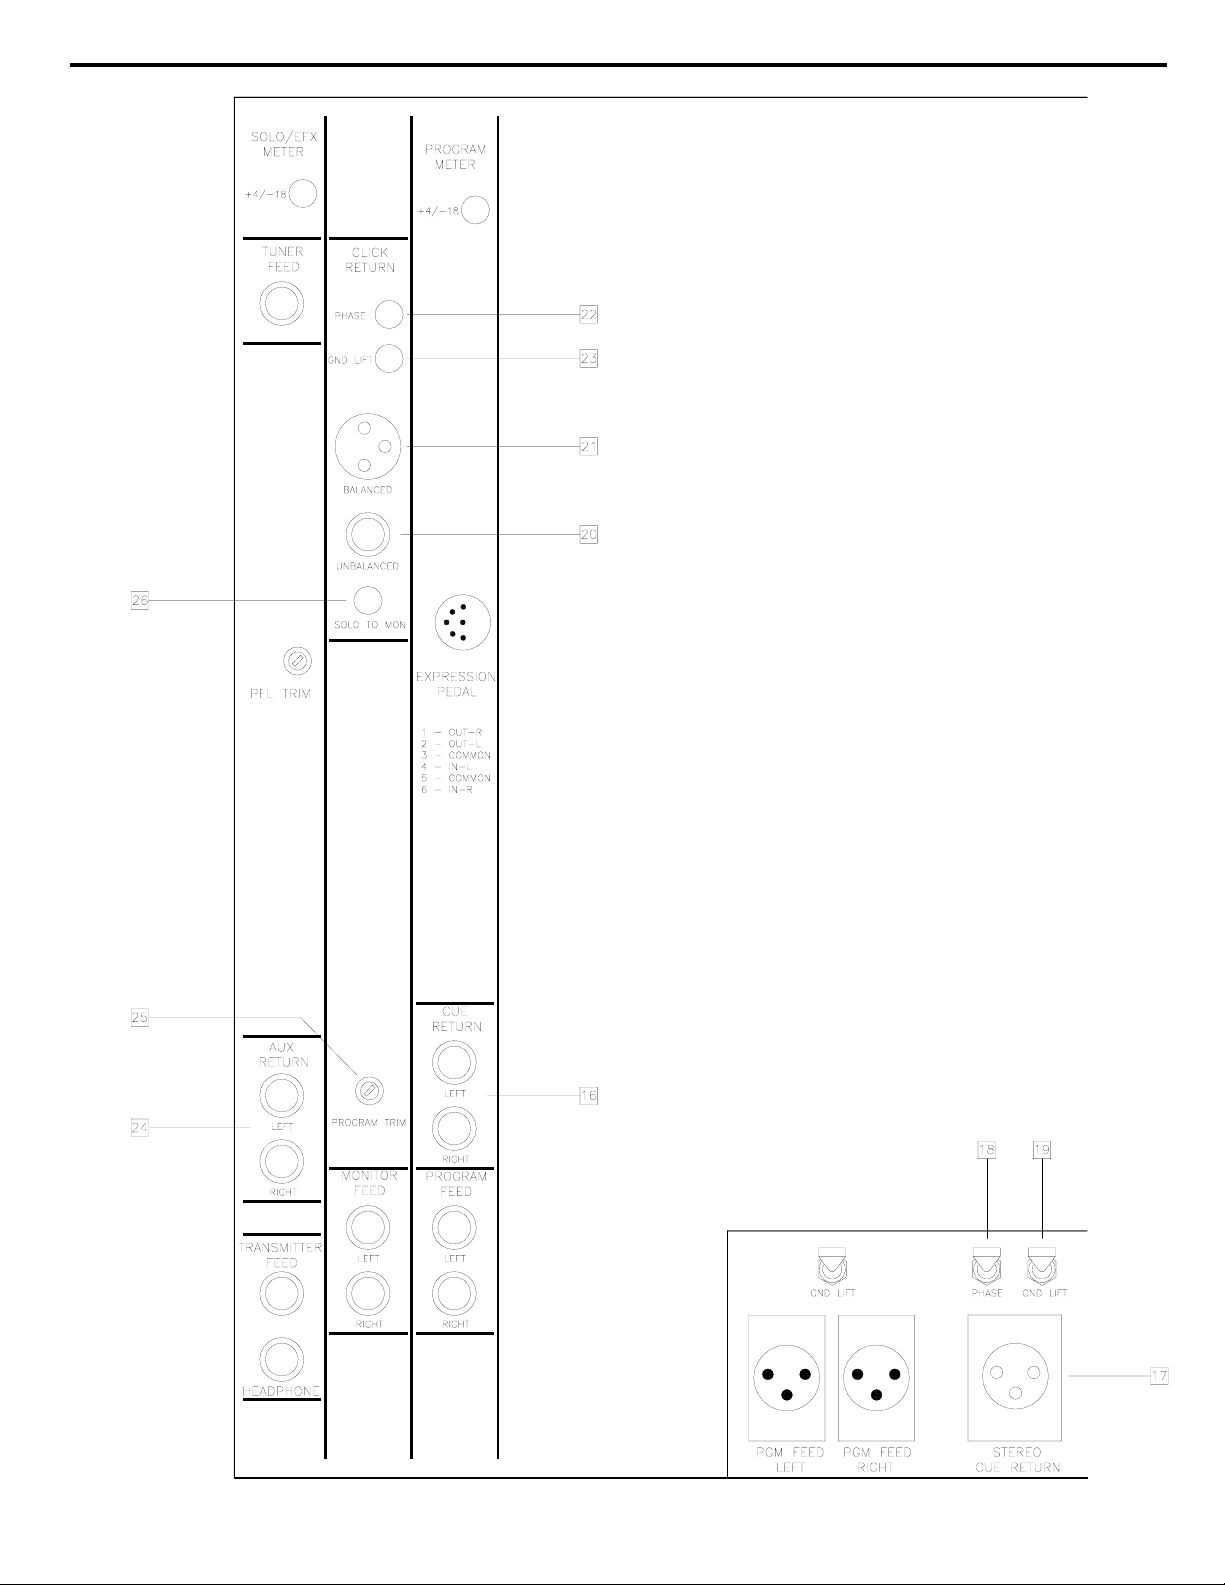
Chapter 4 Operation Section
46
Figure 10. Cue, Click, Aux Return Connectors and Switches
Page 52

Chapter 4 Operation Section
47
Refer to Figure 10 for location of items 16 thru 26.
Stereo Cue
Return Section
16. Cue Return Input Jacks
(Unbalanced)
17. Cue Return Connector
(Transformer Isolated XL)
Cue XL Pin Configuration
18. Cue Return Phase Switch
19. Cue Ground Lift Switch
The Stereo Cue Return provides two means of connection. Two
unbalanced 1/4" T.S. jacks and a XL transformer isolated input
connector with phase reverse and ground lift switches.
These standard unbalanced 1/4" T.S. jacks are available for the
connection of a stereo cue signal or any stereo audio signal. The use of
the unbalanced 1/4" jacks does not affect the operation of the balanced
XL connector.
This XL input connector provides transformer isolation for the Stereo
Cue Return. This connector may be used for interface to an external
consoles cue feed.
The use of the balanced XL connector does not affect the operation of
the unbalanced 1/4" jacks, although it is possible that phase cancellation
may exist if the Phase Switch is enabled.
Do not connect the speaker terminals of any power amplifier directly
into the Cue Return input connectors.
The following chart represents the proper pin configuration for the Cue
XL connector.
PIN 1 - GROUND
PIN 2 - LEFT SIGNAL
PIN 3 - RIGHT SIGNAL
There is always the possibility that a balanced cue feed provided by, for
example, a control room to the SSM may in fact be 180 degrees out of
phase with the SSM's balanced input. This is the result of a nonconforming pin out configuration being applied to the SSM's balanced
connector.
The operation of the Cue Phase Switch does not directly affect the phase
of the unbalanced 1/4" jacks.
When used, this switch disconnects the shields (pin 1) from the
associated balanced connector thereby inducing any piece of gear
interfaced at these points to search out a ground path external to the
Model SSM. This can reduce the chance of ground loops and eliminate
unwanted hums or buzzes.
The operation of the Ground Lift Switch does not affect the Cue
Return's unbalanced 1/4" jacks.
Page 53

Chapter 4 Operation Section
48
Mono Click
Return Section
20. Click Return Input Jacks
(Unbalanced)
21. Click Return Connector
(Balanced XL)
Click XL Pin Configuration
22. Click Return Phase Switch
23. Click Ground Lift Switch
The Mono Click Return provides two means of connection; a standard
1/4" jack and a balanced transformer isolated XL input connector with
phase reverse and ground lift switches.
A standard unbalanced 1/4" T.S. jack is available for the connection of a
mono click signal or any mono audio signal that you would like returned
to the Click Return Section. The use of the unbalanced 1/4" jack does
not affect the operation of the balanced XL connector.
This standard female XL input provides balanced transformer isolation
for the Mono Click Return.
The use of the balanced XL connector does not affect the operation of
the unbalanced 1/4" connector, although it is possible that phase
cancellation may exist if the Phase Switch is enabled.
The following chart represents the proper pin configuration for the Click
XL connector.
PIN 1 - GROUND
PIN 2 - HIGH SIGNAL
PIN 3 - LOW SIGNAL
There is always the possibility that a balanced click feed provided by,
for example, a control room to the SSM may in fact be 180 degrees out
of phase with the SSM's balanced input. This is the result of a nonconforming pin out configuration being applied to the SSM's balanced
connector.
When the Phase Switch is in the normal position (out) the high and low
inputs of the isolation transformer are connected to pins 2 and 3
respectively. When the phase switch is depressed, pins 2 and 3 of the
XL connector are reversed, pin 3 becomes the high input and pin 2 is the
low input. The operation of the Click Phase Switch does not directly
affect the phase of the unbalanced 1/4" jacks.
When used, this switch disconnects the shields (pin 1) from the
associated balanced XL connector thereby inducing any piece of gear
interfaced at these points to search out a ground path external to the
Model SSM. This can reduce the chance of ground loops and eliminate
unwanted hums or buzzes.
The operation of the Ground Lift Switch does not affect the Click
Return's unbalanced 1/4" jacks.
Page 54

Chapter 4 Operation Section
49
24. Aux Return Input Jacks
25. Program Trim Control
26. Solo to Monitor Switch
These standard unbalanced 1/4" T.S. jacks allow the interface of an
external stereo signal, such as a DAT, CD player or the output of Specks
"Assign 28" subgroup module.
This recessed stereo trim pot controls the level of program signal (stereo
mix) to the monitor and headphone feeds relative to the cue, click and
aux returns.
There can be four signal sources feeding the monitor and/or headphone
outs; the cue, click, aux and the SSM's stereo mix. As the first three
each have a volume control, it is easiest to think of the Program Trim as
a volume control for the SSM's stereo mix. The nominal setting (factory
preset) for this trim control is fully clockwise.
The main program left/right feed and VU meter levels of the SSM
remain unaffected by this adjustment of the Program Trim.
This pushbutton switch (recessed behind the rear panel) introduces the
solo function, cue, click and aux returns to the master monitor outputs as
well as the headphones.
In the normal position (off), the solo, cue, click and aux returns are
removed, and only the stereo mix is present at the monitor feed. When
this switch is depressed (on), both the monitor and headphone feeds
receive the solo signal, cue, click, and aux returns together with the
stereo mix. The operation of this switch does not affect the program
feed.
Page 55
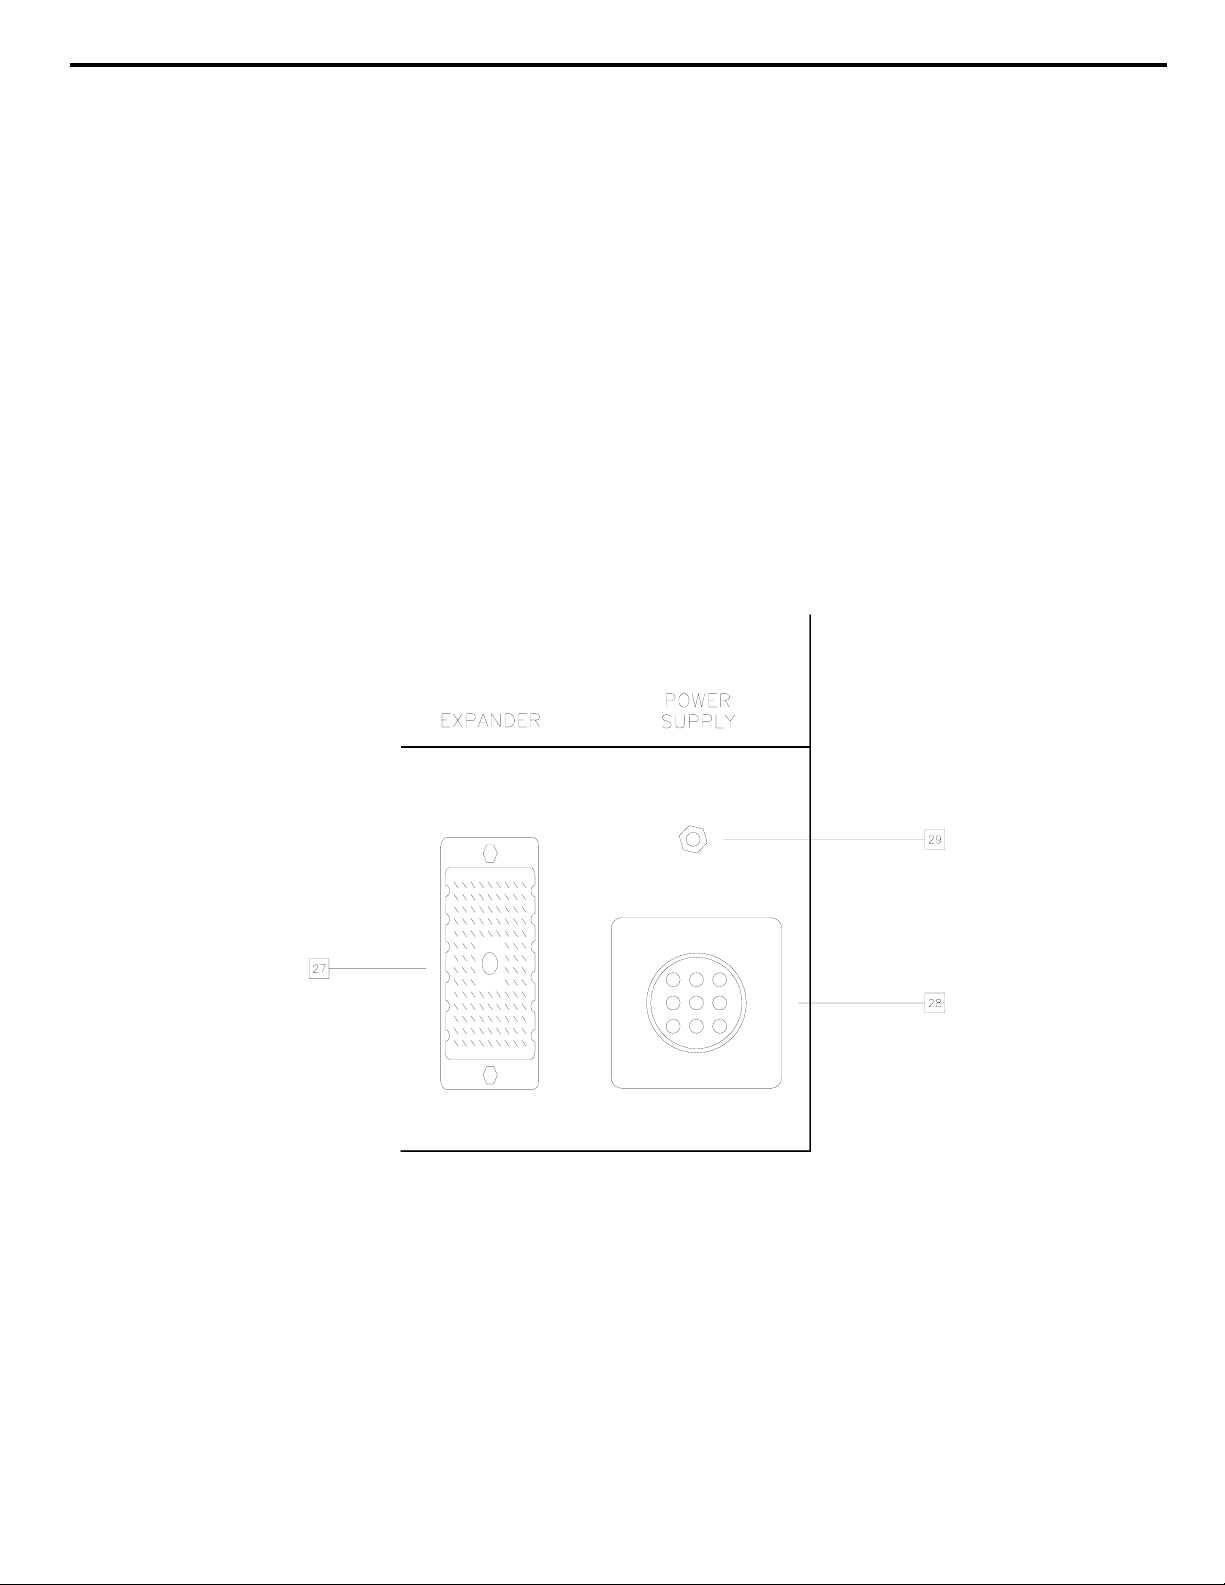
Chapter 4 Operation Section
50
Figure 11. Expander and Power Supply Connectors
Page 56

Chapter 4 Operation Section
51
Refer to Figure 11 for location of items 27 and 29.
27. Expander Connector
28. Power Supply Connector
29. Ground Terminal
This multipin connector will accommodate any of the Model SSM
Expanders for a potential of 56 inputs (28 stereo channels). For the
proper pin out configuration and installation instructions, refer to the
Interface Section of this manual.
This 9 pin circular connector will accommodate the connector from the
power supply cable. The connectors are keyed so they will only fit in
one direction. For installation instructions refer to the Interface Section
of this manual.
This grounding terminal should be used when it is necessary to connect
the Model SSM to a qualified ground. This terminal is internally
connected directly to the metal chassis of the SSM and does not connect
to the DC power supply common or audio grounds.
Page 57

Chapter 5 Wiring and Other 52
Wiring and Other
General
Start Simple
Audio Cable
Multipair Wire Harnesses
It is assumed that in addition to the Model SSM, a considerable
investment has been made in electronic equipment such as synthesizers,
samplers, effects, and computers. We believe that the overall
performance of the SSM and your mixing system is dependent on the
condition and quality of this equipment.
A general discussion about AC, AC grounding, audio grounding, EMI,
and quality wiring is discussed in this section. These subjects are very
often overlooked or misunderstood, and should be given consideration
when interfacing your equipment to any Speck product.
A quality installation is essential when wiring any Speck product. When
the time comes to actually interconnect your equipment, proceed
slowing. Interfacing the many pieces of electronic equipment to your
mixer should be a logical, methodical process.
Start by connecting your headphones or monitor power amp, and then
add one synth to the mixer at a time; carefully listening and monitoring
your progress. If a problem arises, such as a buzz, hum, intermittent
signal, or nonexistent signal, stop at that point and solve the problem
before proceeding.
Due to the high performance of the Model SSM mixing system, it is
recommended that you use only the highest quality audio cable. A high
quality cable by definition, is a cable that provides good mechanical
strength, high microphonic noise immunity, high frequency response,
low crosstalk and 100% shielding ability. All audio cable used with the
Model SSM should be a 3 conductor foil shield type (2 inner conductors
and a shield drain conductor). It is not recommended that the 2
conductor "off the shelf cables" be used.
When multiple cables are necessary (which is generally the case with
our products), multipair cable should be considered as an alternative to
individual cables. Multipair cable and harnesses are generally available
in 4, 8, 12, 16, 24, and 32 pair.
Page 58

Chapter 5 Wiring and Other
53
Connectors
Proper AC Grounding
Quality AC System
AC Distribution
All wire and cable interfaced to the Model SSM and Speck products
should be terminated with high quality connectors. A 1/4" plug or XL
connector should make a positive connection to its respective mating
jack and provide adequate strain relief to its cable. All connectors
should also have a metal shell to provide 100% shield for exposed
conductors.
Feel free to check with Speck Electronics or your dealer when selecting
cable and connectors. Our phone number is (760) 723-4281.
When you are evaluating voltage and current requirements for your
audio system, it is important that your SSM mixing system and/or rack
system does not exceed the capacity of your AC service. You should
make certain that the earth (green) wire for the AC system makes a
reliable earth connection, and determine as best as possible that the AC
system is free of noise that could generate unwanted audible sounds or
cause problems in microprocessor based equipment.
When using a larger rack system it is recommended that a dedicated and
isolated AC service be provided. This service should have its own AC
wires, isolated receptacle, and breaker and not be shared with other
unrelated equipment.
Even with an isolated AC system, it may still be necessary to make use
of surge protectors, line filters, isolation transformers, or all of the
above.
Power conditioners should be selected with care, since they sometimes
generate undesirable switching noises in audio systems.
When connecting many pieces of electronic equipment to an AC system
it is important that the AC is properly distributed. It is better to connect
all plugs to a common AC source than to have AC receptacles in
different locations.
When installing a large audio system, it may be necessary to consult a
qualified electrician that is familiar with the specialized style of
electrical wiring required for recording studios.
CAUTION!
DO NOT REMOVE, DEFEAT, OR DISABLE THE
SAFETY EARTH TERMINAL ON THE POWER
CORD. DO NOT USE A GROUND LIFT ON THE
POWER SUPPLY.
Page 59

Chapter 5 Wiring and Other
54
Clock Noise and AC
Safety Earth Connection
Electronics Earth
Proper Audio
Grounding
and Shielding
Clock noise is one of the greatest enemies of the audio racks AC system.
If a synth or any microprocessor based device emits or somehow
couples its clock signal with the neutral or earth of its own power cable,
it will contaminate your AC system and carry the clock noise into other
equipment; almost always with undesirable results.
The earth connection exists to protect you, your equipment and possibly
your building from an electrical disaster. In a properly wired system, if
a 120 volt AC wire were to break within your equipment's chassis, it
should make contact with the Safety Earth Wire that is connected to the
chassis, and blow the fuse or trip the circuit breaker until the problem
has been corrected. Given the same circumstances, if the AC safety
ground has been defeated with a ground lift or the AC
service is incorrectly wired, the equipment's chassis and quite possibly
everything attached in that rack would be "live" with 120 volts.
In an electronics context, an earth provides a path for unwanted EMI
noise to be carried away from your audio equipment. If you disable
your earth with a ground lift or do not have a reliable earth connection,
the unwanted noise (EMI or RFI), will find an electrical path of least
resistance. That will most likely be your audio equipment and would
result in unwanted buzzes or hums.
In order for any audio signal, such as a synth signal to get from the synth
to the mixer, it requires a minimum of 2 conductors. One conductor is
the hot, or high, or whatever you are familiar with; the other conductor
is the ground or common. Additionally, all audio wires must be
protected from environmental occurrences such as EMI (Electro
Magnetic Interference) and RFI (Radio Frequency Interference) with an
outer shield. An outer shield protects the 2 inner conductors from
outside interference, and prevents that cable from inducing its signal
onto adjacent audio cables.
One common misconception is that the shield of a cable should act as
the common. This may be acceptable for guitar cords or semiprofessional applications, but not for professional applications. The
audio signals must be carried only by the 2 inner conductors and the
shield must act only to cover these 2 conductors without transmitting the
signal from one location to another. It is recommended that the shield
be attached to the common (ground) at one connector's end, and the
shield not be connected at the other connector's end. It is recommended
that all shields be connected at the mixer end, and the shields not be
connected at the other ends (synths, effects, power amps, etc.).
Page 60

Chapter 5 Wiring and Other
EMI and RFI
Sources of EMI
Reducing EMI
55
If a patchbay is utilized in your mixing system, the rules for shielding
change. With a patchbay, normally all shields are connected at the
patchbay jacks, and not connected at the mixer or external audio
equipment.
The occurrence of EMI (Electro Magnetic Interference) and RFI
(Radio Frequency Interference) in a synth and sampler based system
should be of great concern and not overlooked when installing the
Model SSM. EMI is defined as any unwanted signal which adversely
affects the operation of the mixer or mixing system.
Stated simply, the undesirable effects of EMI may be perceived as a low
frequency smooth sounding 60Hz hum; a low frequency "edgy"
sounding 120Hz buzz; or a higher frequency "whine" caused by the
timing circuits in microprocessor based devices.
Almost every electronic device generates some amount of EMI
emissions. These emissions can be transmitted as electromagnetic
radiation or simply conducted though audio cables and power cords. In
the same respect, most electronic devices are also very susceptible to the
EMI emissions generated by other electronic devices.
There are natural and man made sources of EMI that you can't do
anything about. These sources include radio, TV, and radar transmitters,
as well as motors, lights, and computers. Even the Sun and atmospheric
conditions can be contributors to noise that you experience in your audio
system.
There are generally three elements that must be present for EMI to exist.
These include the source of the EMI (conducted or radiated), the
propagation medium by which EMI is transmitted (directly on the cables
or through the air), and the receptor that suffers the adverse affects of
EMI. If any of these three elements are eliminated or reduced, the EMI
interference will be eliminated or reduced.
The more electronic equipment operating within an equipment rack, the
higher the EMI emissions. The more audio cable and low level audio
equipment that exists within the same rack, the greater possibility of
unwanted noise. The result of EMI in an audio system manifests itself
as a buzz, hum, whine, or all three.
The most common EMI occurrence in an audio system is radiated
emissions from microprocessors in synths and samplers, and magnetic
field sources from transformers and power supplies.
Page 61
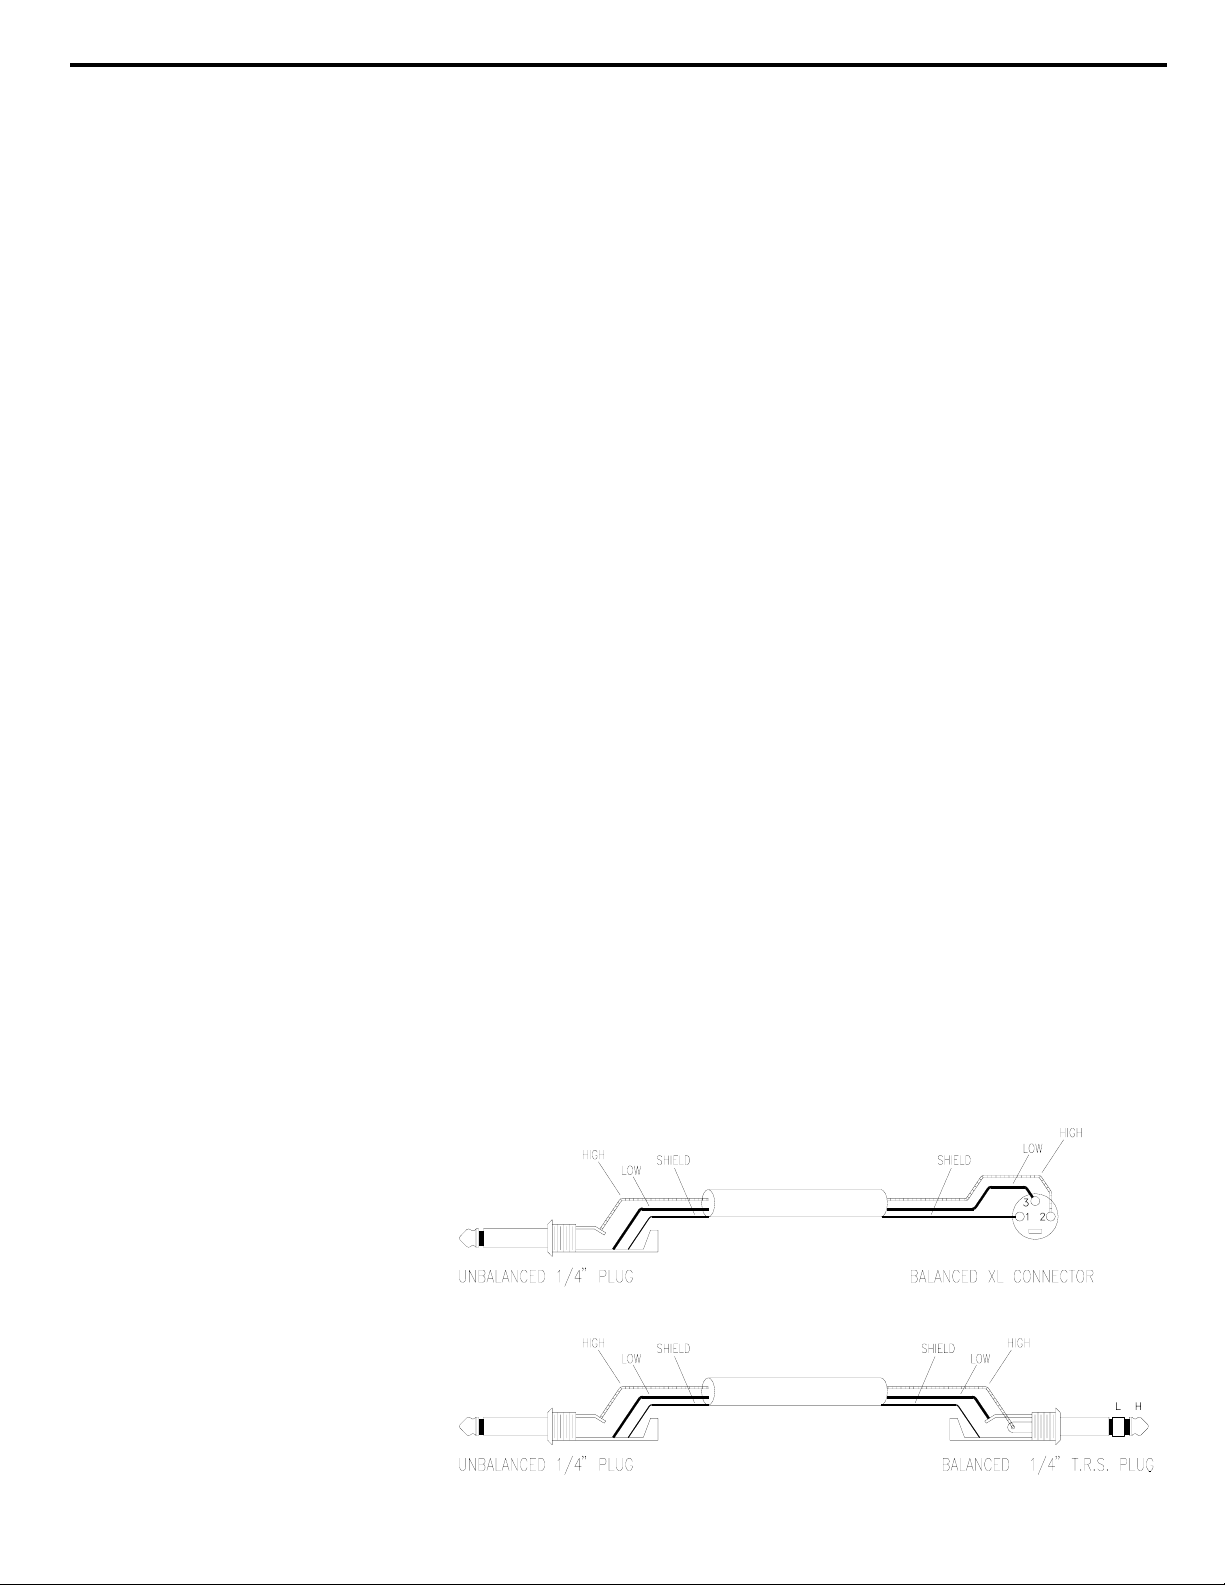
Chapter 5 Wiring and Other
56
Balanced to
Unbalanced
Connections
When connecting the 1/4" unbalanced (TS) inputs and outputs of the
Model SSM to balanced equipment, it will be necessary to configure
your cables in order to unbalance the signal.
There are 2 types of balanced output circuits; transformer and
transformerless (electronically balanced). Balanced audio outputs are
normally terminated with 3 pin XL type connectors, 1/4" TRS (stereo)
type jacks, or on rare occasions, with screw terminals.
When connecting the unbalanced (TS) input of the Model SSM to a
transformer output, it will be necessary to connect the low (-) signal to
the ground conductor; pin 3 to pin 1 of the XL, or the ring to the sleeve
of a TRS plug. When connecting to a transformerless output, it is
standard practice to connect to the high (+) output only and not connect
the low (-) signal to ground. Check the manual of each piece of audio
equipment for specific details.
Due to the lack of standards for XL connectors, some equipment may
use pin 3 of the XL for the high signal. For this configuration, connect
pin 2 to pin 1 on the XL, and connect the high to pin 3.
There are 2 types of balanced input circuits; transformer and
transformerless (electronically balanced). Balanced audio inputs are
normally terminated with 3 pin XL type connectors, 1/4" TRS (stereo)
type jacks, or on rare occasions, with screw terminals.
When connecting the unbalanced (TS) output of the Model SSM to a
balanced input it is almost always necessary to connect the low (-) input
to the ground conductor; pin 3 to pin 1 for XL, or the ring to the sleeve
of a TRS plug.
Due to the lack of standards for XL connectors, some equipment may
use pin 3 of the XL for the high signal. For this configuration, connect
pin 2 to pin 1 on the XL, and connect the high to pin 3.
Figure 12 below shows the recommended method of connecting the
Model SSM's unbalanced jack to a balanced device.
Fig 12. Balanced to Unbalanced Cables
 Loading...