

Page 1
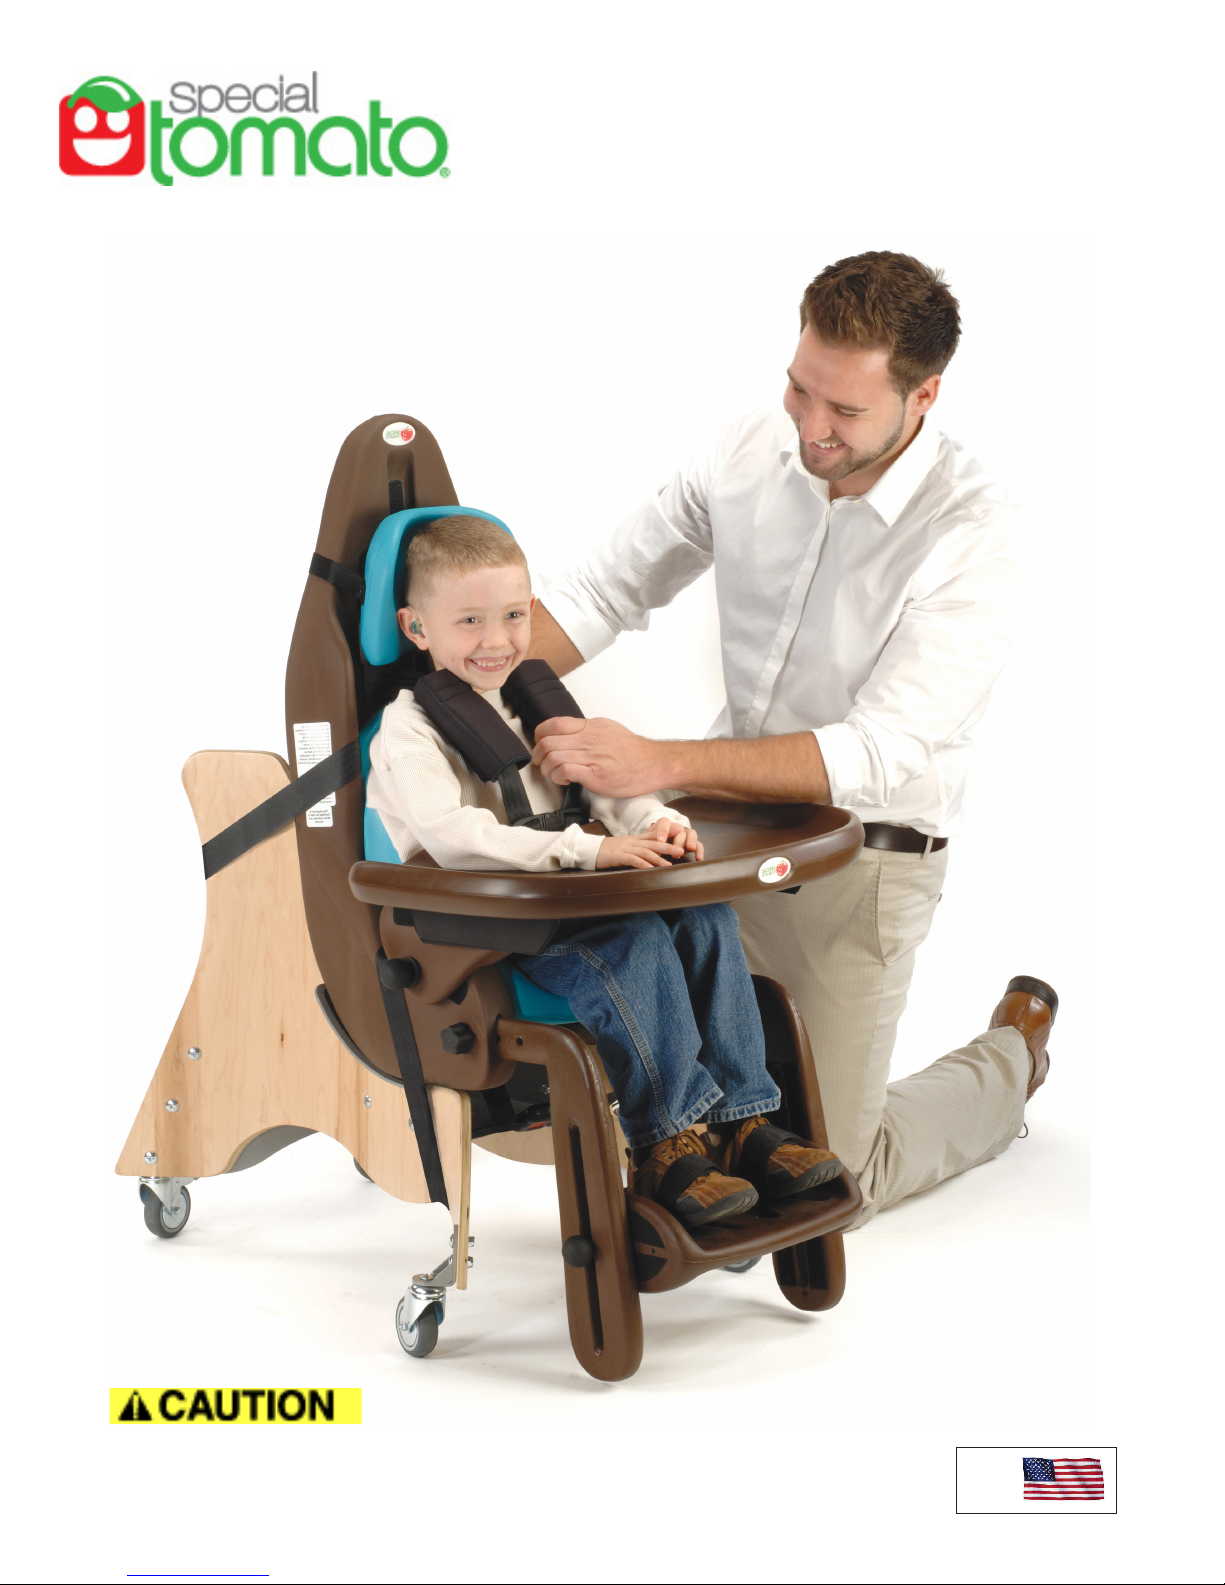
User’s Guide
Multi-Positioning Seat
SMALL
USA
Model# Series
79XXXXXX
Revision 03/13
UMSMPS03-13LIT
Read Instructions Before Using!
Save This Guide For Future Reference
This product is NOT a certified car seat in Europe or Canada.
Made
in the
USA
Page 2

For Customer Service Support:
Contact your dealer directly.
Or...
Special Tomato® Customer Service
Website: www.specialtomato.com
Before Contacting Customer Service Support:
Please ll in the following. We will be able to help you more quickly if you have the
exact information indicated.
Serial number1: _________________________________________
Model: ________________________________________________
Date of Purchase: __________________________________________
Notice:
The information contained in this document is subject to change without notice.
No part of this document may be photocopied, reproduced, transmitted, transcribed, stored
in a retrieval system or translated to another language or computer language, in any form
or by any means, electronic, mechanical, magnetic, optical, chemical, manual, or otherwise
without the prior written consent of Bergeron Health Care.
Use only Special Tomato accessories and parts on Special Tomato products. Special
Tomato parts are not interchangeable with other manufacturers’ products. Replace any
worn parts immediately for safety.
1. Located on back of seat shell.
Copyright Bergeron Health Care. All rights reserved.
2 Special Tomato™ Multi-Positioning Seat - SMALL: User’s Guide
Page 3
Table of Contents
…………………………………………………………………………………………
What is a
Special Tomato™ Story behind the brand…........ 4
…………………………………………………………………………………………
Setting Up Your MPS* Unpack..………………......... 5
Assembly……………......... 5
Footrest Assembly….............. 6
Adjustments…………..............… 7
………………………………………………………………………………..............
MPS Optional Accessories Mobile Floor Base..................… 9
Extended Seat Cushion........ 9
Tray................................... 11
Push Chair Base...........… 11
……………………………………………………………………….......……………
Car Seat Installation** Safety Information................... 12
General Information............... 15
Lap/Shoulder Belt..................... 16
5-Point Harness...................... 22
Securing Your Child................. 23
...........................................................................................................................
Consumer Information Maintenance....………….............. 24
Warranty………………........… 24
………………………………………………..........................................................
Please Note:
Special Tomato™
products are latex-free.
*MPS = Multi-Positioning Seat
**All users MUST read and
understand this instruction manual
before using this product. Store
instruction manual in pocket on
back of MPS so that it can be
consulted at any point to ensure
proper use!
Special Tomato™ Multi-Positioning Seat - SMALL: User’s Guide 3
Page 4
The Story Behind the Brand...
Special Tomato™ is Tim Bergeron’s latest product line. He has over 25 years of experience designing, building,
and selling adaptive positioning equipment, including founding the Tumble Forms® product line as its original
designer. Tim has coupled his design experience with a new manufacturing process
that provides soft durable, impermeable cushions for positioning children with
special needs. The rst Special Tomato™ Brand Product is the Multi-Positioning
Seat.
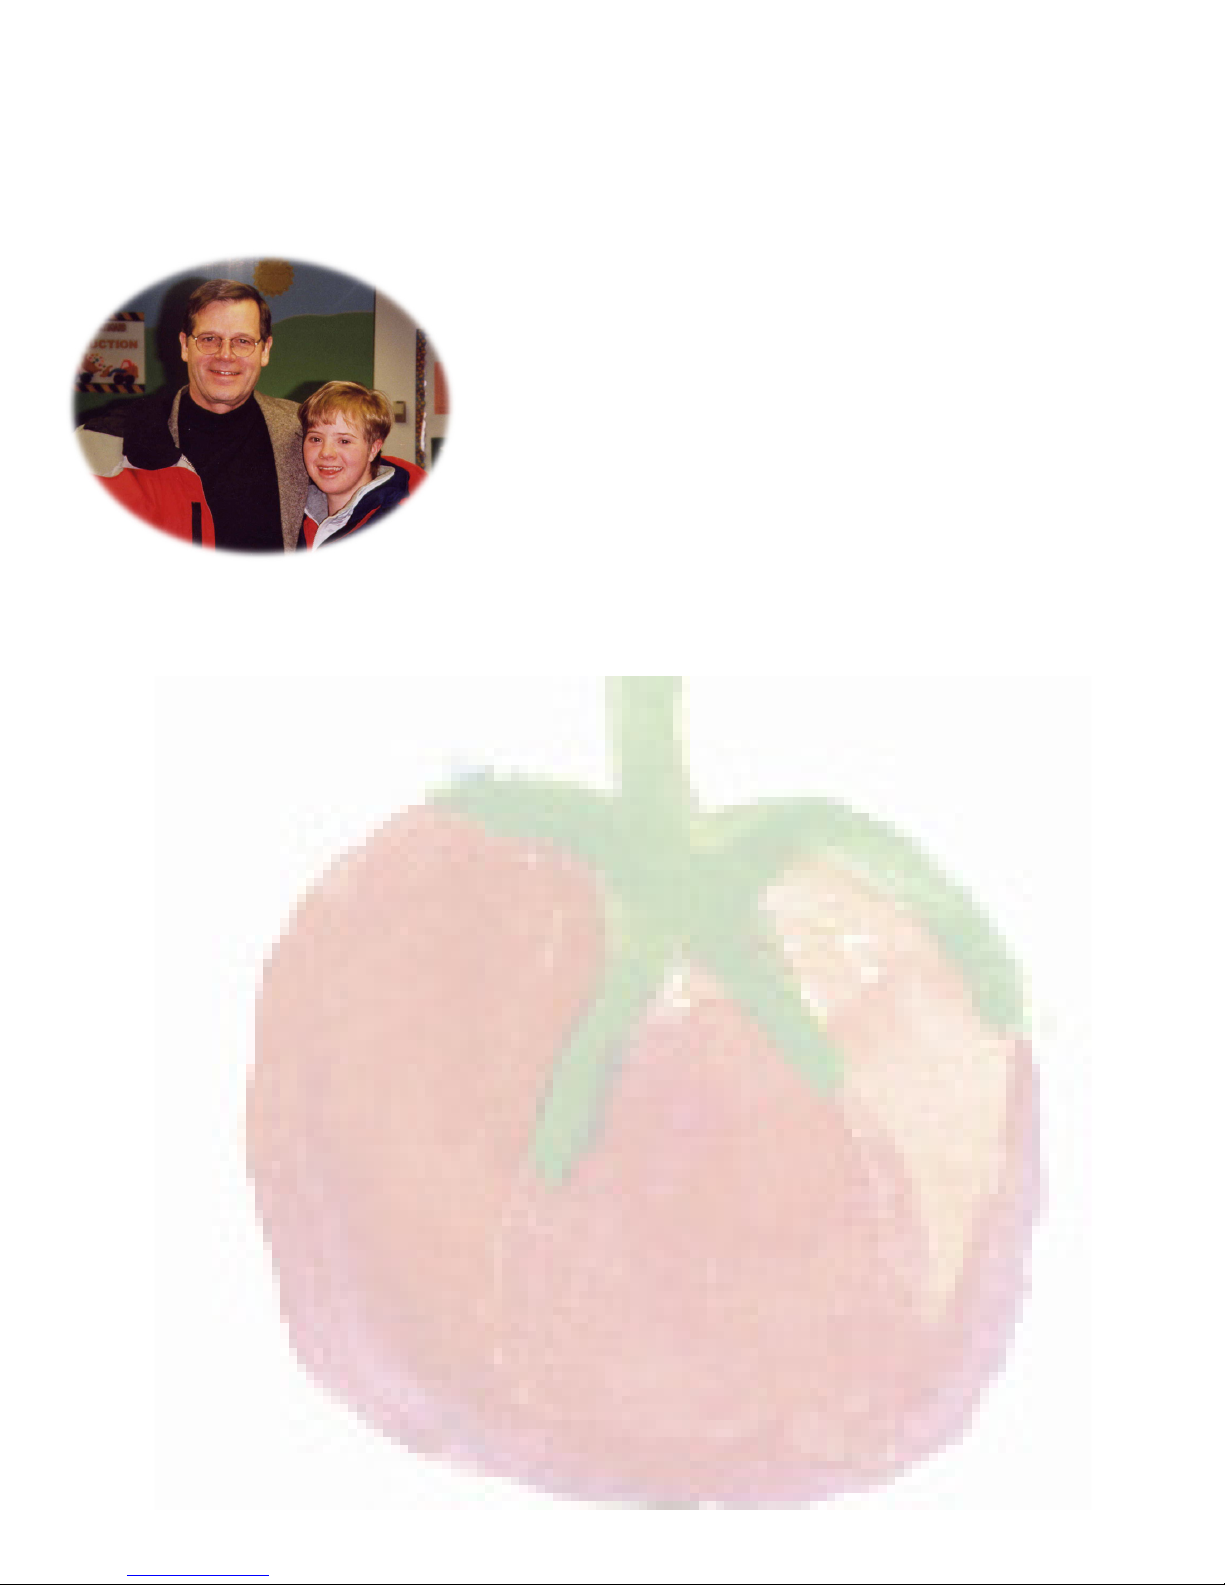
Now you may be asking, “What’s so Special about Tomatoes”? Tim is
pictured here with his youngest daughter, Carrie, a young adult with
Down syndrome. Carrie’s story, “The Special Tomato”, summarizes what
Tim believes that most parents feel about their child with special needs.
“Every child is special in their own unique way. It’s a parent’s job to nd ways
to facilitate their child’s growth in a way that includes them equally within the
family and community.” For children with physical disabilities, adaptive equipment
can play an important role in helping them reach their highest functioning level.
The Special “Tomato” on the Bergeron Bush
y dad and mom had four children. The rst three
children were healthy and regular people. Then I came
along, a baby with a difference, Down Syndrome. I had
a hole in my heart, a rip in my heart valve, jaundice, a big tongue and a
wobbly head. As I got older I also realized that I am a slow learner.
One day it was bothering me that I was having a hard time doing my
school work. I told my dad about this problem and he shared a story about
when he was out in his garden picking tomatoes the year I was born. Every
year my dad grows a garden and loves to plant tomatoes. At harvest time
there were Beefsteak tomatoes on a bush. When he saw a differently shaped
tomato it got his attention. It had a large, smooth, bright red enlarged side
that made my dad want to pick it up and study the bump because it was
so unique and looked appetizing. At supper, that tomato was just as
juicy as the others.
Even though I’m different like the tomato as a person with Down
Syndrome, my family and friends love me even more and want to
help me when I need it. My dad tells me that even though I have
more difculty learning than my brother and sisters, my lovable
and outgoing personality and strong character make me just
as special as they are. I guess I am the special “tomato”
on our family’s bush!
M
Carrie Bergeron, copyright 2001
www.carriebergeron.org
4 Special Tomato™ Multi-Positioning Seat - SMALL: User’s Guide
Illustrateur : Michael Johnson
www.psln.com/sharingds/Michael/
Page 5
Setting Up Your MPS
Unpack
Check to see that the following items are included
with your Multi-Positioning Seat (MPS):
· Seat Shell
· Head Cushion installed
· Headrest Tether Strap
· Back Cushion installed
· Seat Cushion (Regular or Extended size) installed
· Two Safety Attachment Straps installed
· Five Point Harness System installed
· Top Tether Strap
· Left and Right Leg Rest Extensions
· 2 Leg Rest GROOVED Knobs (1 3/16”)
· 2 Footrest BALL Knobs (1 1/2”)
· Footrest with 2 Foot Straps
When purchased as a
Car Seat only, these
items not included
}
standard
Assembly
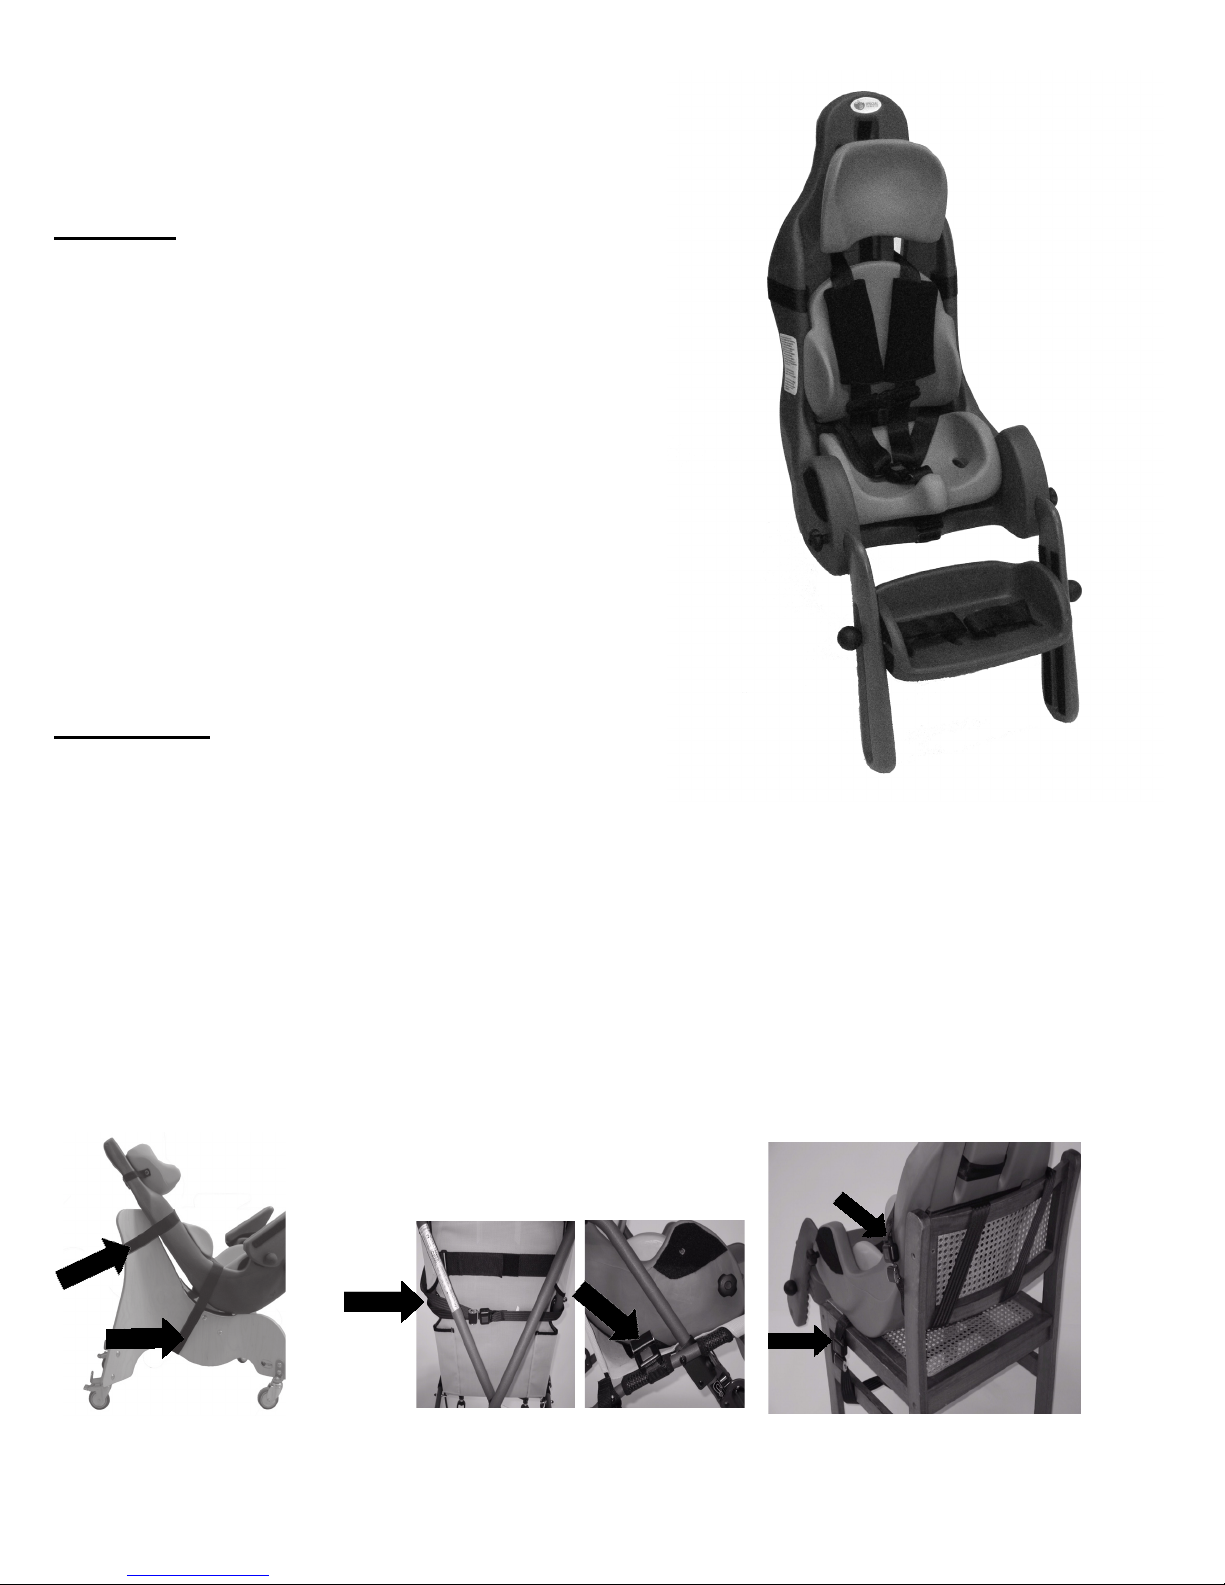
First attach the MPS to the appropriate base of choice
with the Attachment Straps:
Mobile Floor Base
- Secure tightly the Rear Strap
under lip of Mobile Floor Base
- Secure tightly the Bottom Strap
under Mobile Floor Base
between both sets of wheels
Figure 1.
Push Chair Base
- Secure tightly the Rear
Strap around back of Push
Chair Base, between the fabric and the cross bars
Figure 2a.
- Secure tightly the Strap
under Push Chair Base un-
der the seat making sure to
thread between the seat back
frame and the front leg frame
Figure 2b.
Standard Chair
- Secure tightly the Rear Strap around
back of chair (spiral method below or
straight method in Figure 1.)
- Secure tightly the Bottom Strap under seat of chair Figure 3.
- Note: Make sure the chair is stable!
Figure 1.
Figure 2a.
Special Tomato™ Multi-Positioning Seat - SMALL: User’s Guide 5
Figure 3.Figure 2b.
Page 6
Setting Up Your MPS
Footrest Assembly
Your Special Tomato™ Multi-Positioning Seat (MPS) comes partially assembled for your
convenience.
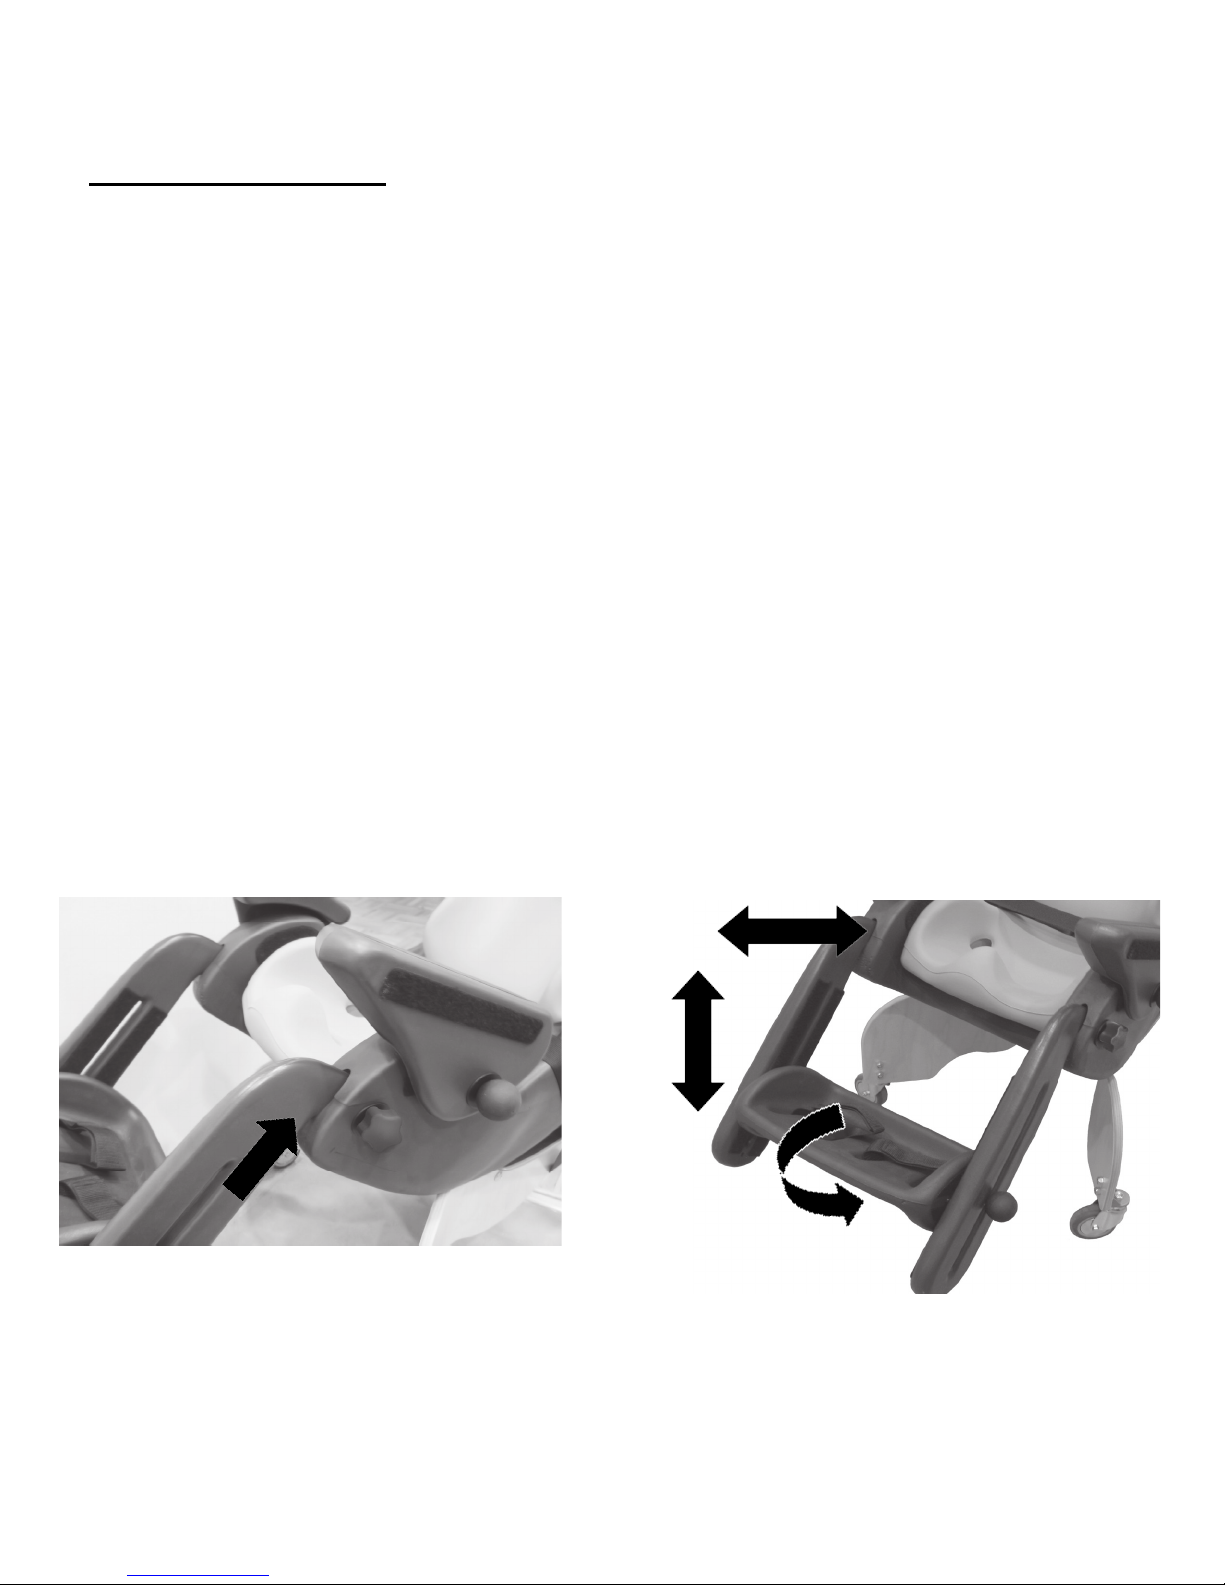
1. Insert both ends of the Leg Rest Extensions into the corresponding holes in the front
of the seat shell.
2. Make sure to insert the leg rests far enough so that the Leg Rest GROOVED Knobs
(1 3/16”) go through one of the three corresponding holes in the leg rests, giving the
appropriate depth for your child. Figure 4.
3. Tighten the 2 Leg Rest GROOVED Knobs (1 3/16”). Overtightening is not
necessary! Turn it until you feel resistance. There is a block to prevent tightening it too
much.
4. Place the footrest at the appropriate height, depth, and angle for your child. Figure 5.
5. Insert the 2 Footrest BALL Knobs (1 1/2”) into one of the three appropriate holes on
the side of the footrest. These Footrest BALL Knobs (1 1/2”) should be tight!
Figure 4.
Please Note: It is NOT necessary to overtighten any of the knobs. They are designed to hold
with a SNUG t!
6 Special Tomato™ Multi-Positioning Seat - SMALL: User’s Guide
Figure 5.
Page 7
Setting Up Your MPS
Adjustments
The Special Tomato™ Multi-Positioning
Seat provides a comfortable and
adjustable seating surface for your child.
The durability of this unique product along
with built-in adjustability allow for years of
use as it grows with your child.
Adjustability is accomplished as follows:
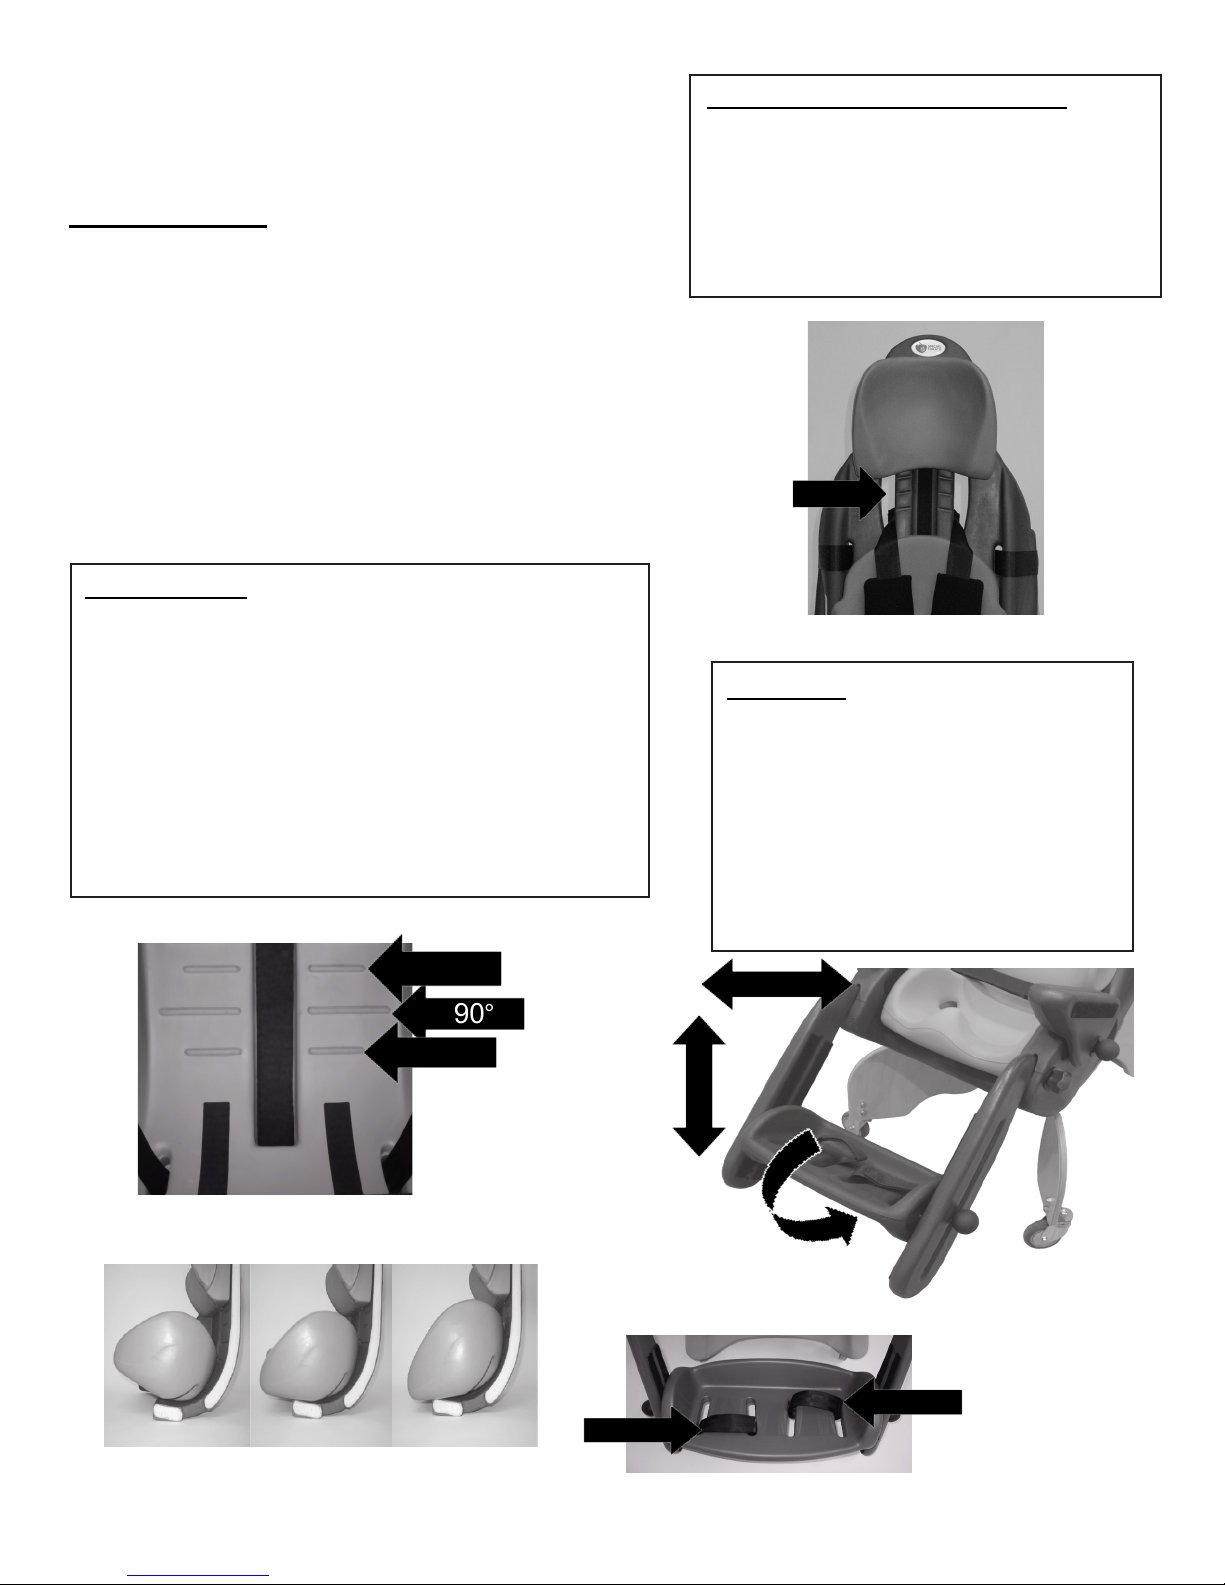
Seat Cushion:
Head Cushion & Back Cushion:
Adjust up and down easily. Hook
and loop strips and our track reference
mark system allow you to
quickly reposition the modular
cushions to t your child. Figure 6.
Uses hook and loop strips plus
our track system for easy adjustment. Under
the Seat Cushion are three guide lines. Figure
7a. The middle line positions the hips at 90°.
The top line provides 15° of Hip Extension. The
bottom line provides 15° of Hip Flexion. Our
Hip Flex™ Adjustment provides 15° of Hip
Flexion or 15° of Hip Extension without recline.
Figure 7b.
Small
105°
90°
75°
75°
Figure 7a.
Figure 6.
Foot Rest:
Provides maximum
adjustment allowing for height,
depth, and angle adjustability.
hook and loop straps secure your
child’s feet to the footrest for
proper positioning. Figure 8a.
Adjust the depth of the footstraps
as needed. Figure 8b.
15° of Hip Flexion
Neutral Hip neutre
Figure 7b.
Figure 8a.
15° of Hip Extension
Figure 8b.
Special Tomato™ Multi-Positioning Seat - SMALL: User’s Guide 7
Page 8
Setting Up Your MPS
Adjustments
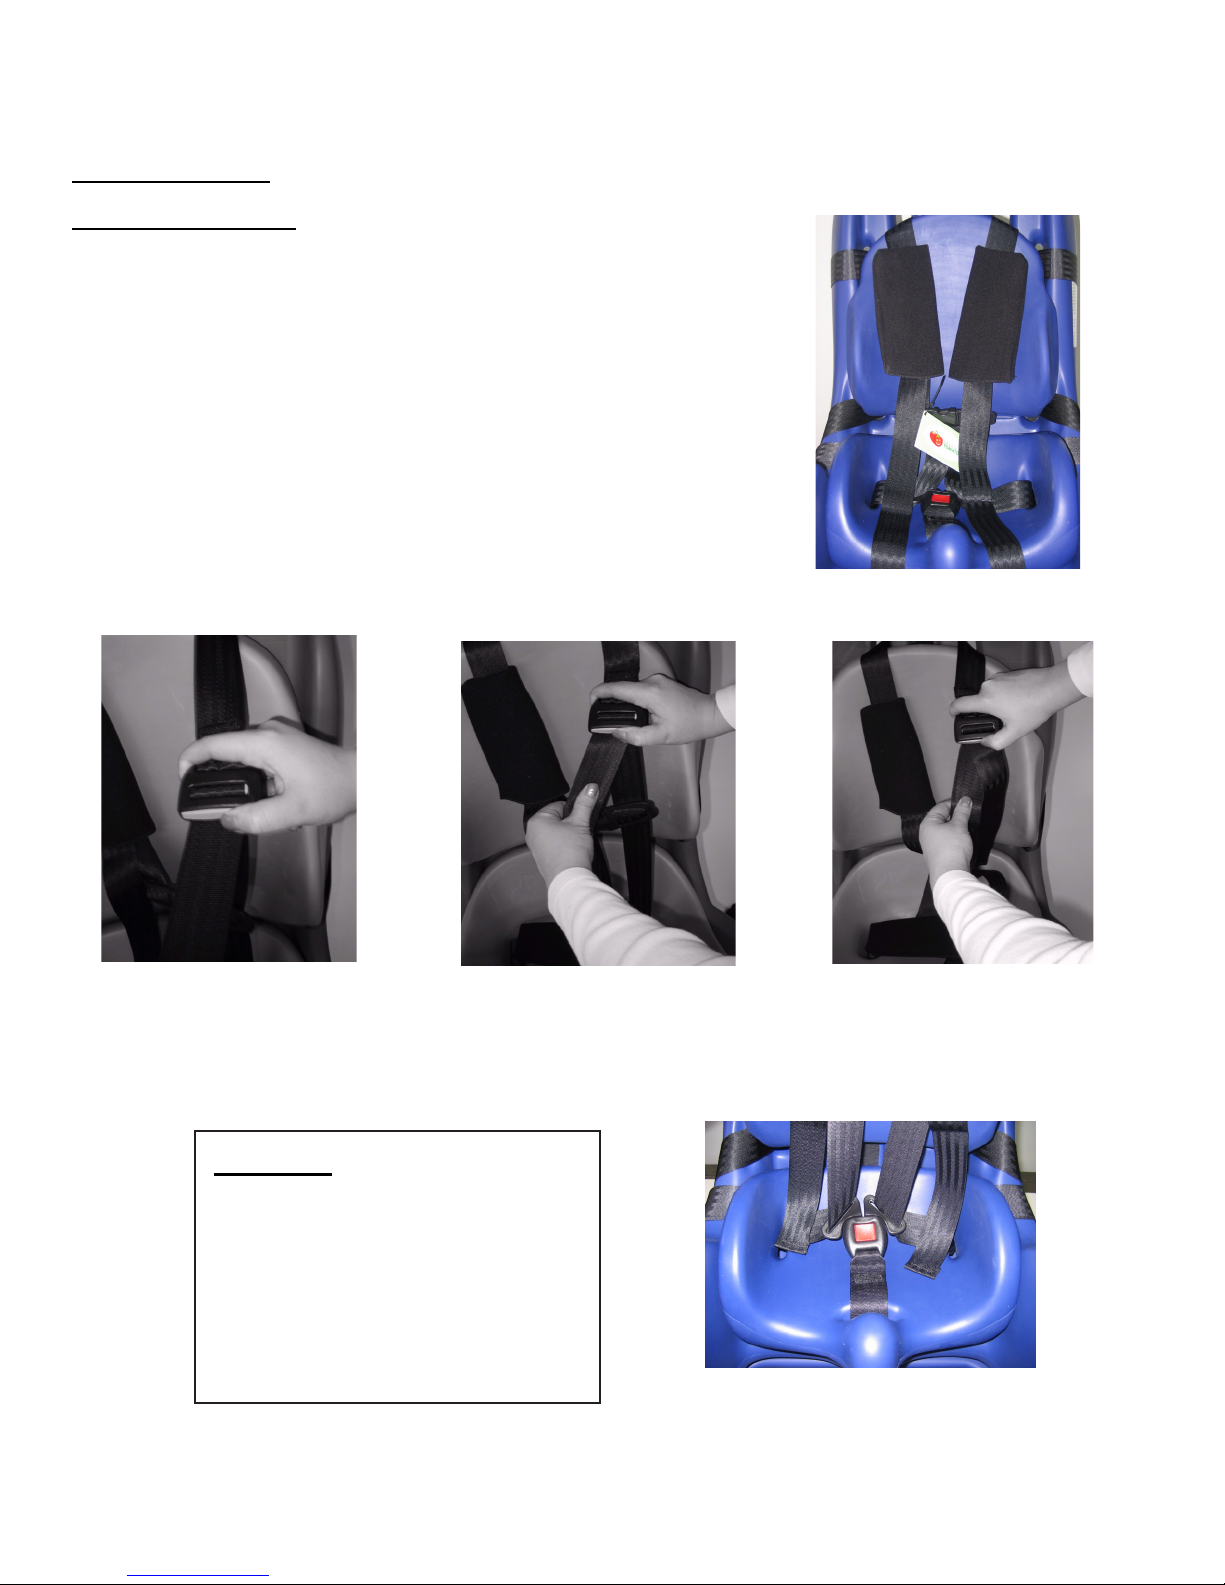
Five-Point Harness: Provides comfort and adjustment
needed to properly support and position your child. A
soft built in chest pad promotes comfort and provides
support by simply tightening the over the shoulder straps
as needed. Figure 9a. To adjust the Five-Point Harness,
remove the black covers from the shoulder straps. Press
in the gray button. Figure 9b. Pull the top strap to
tighten. Figure 9c. Pull the bottom strap to loosen.
Figure 9d.
Figure 9a.
Figure 9b.
Lap Strap: Press the center red
button to release both sides of the
lap strap. Re-insert each
metal buckle into the corresponding
socket to secure the lap strap por-
tion of the 5-point harness.
Figure 10.
Figure 9c.
Figure 10.
8 Special Tomato™ Multi-Positioning Seat - SMALL: User’s Guide
Figure 9d.
Page 9
MPS Optional Accessories
Mobile Floor Base
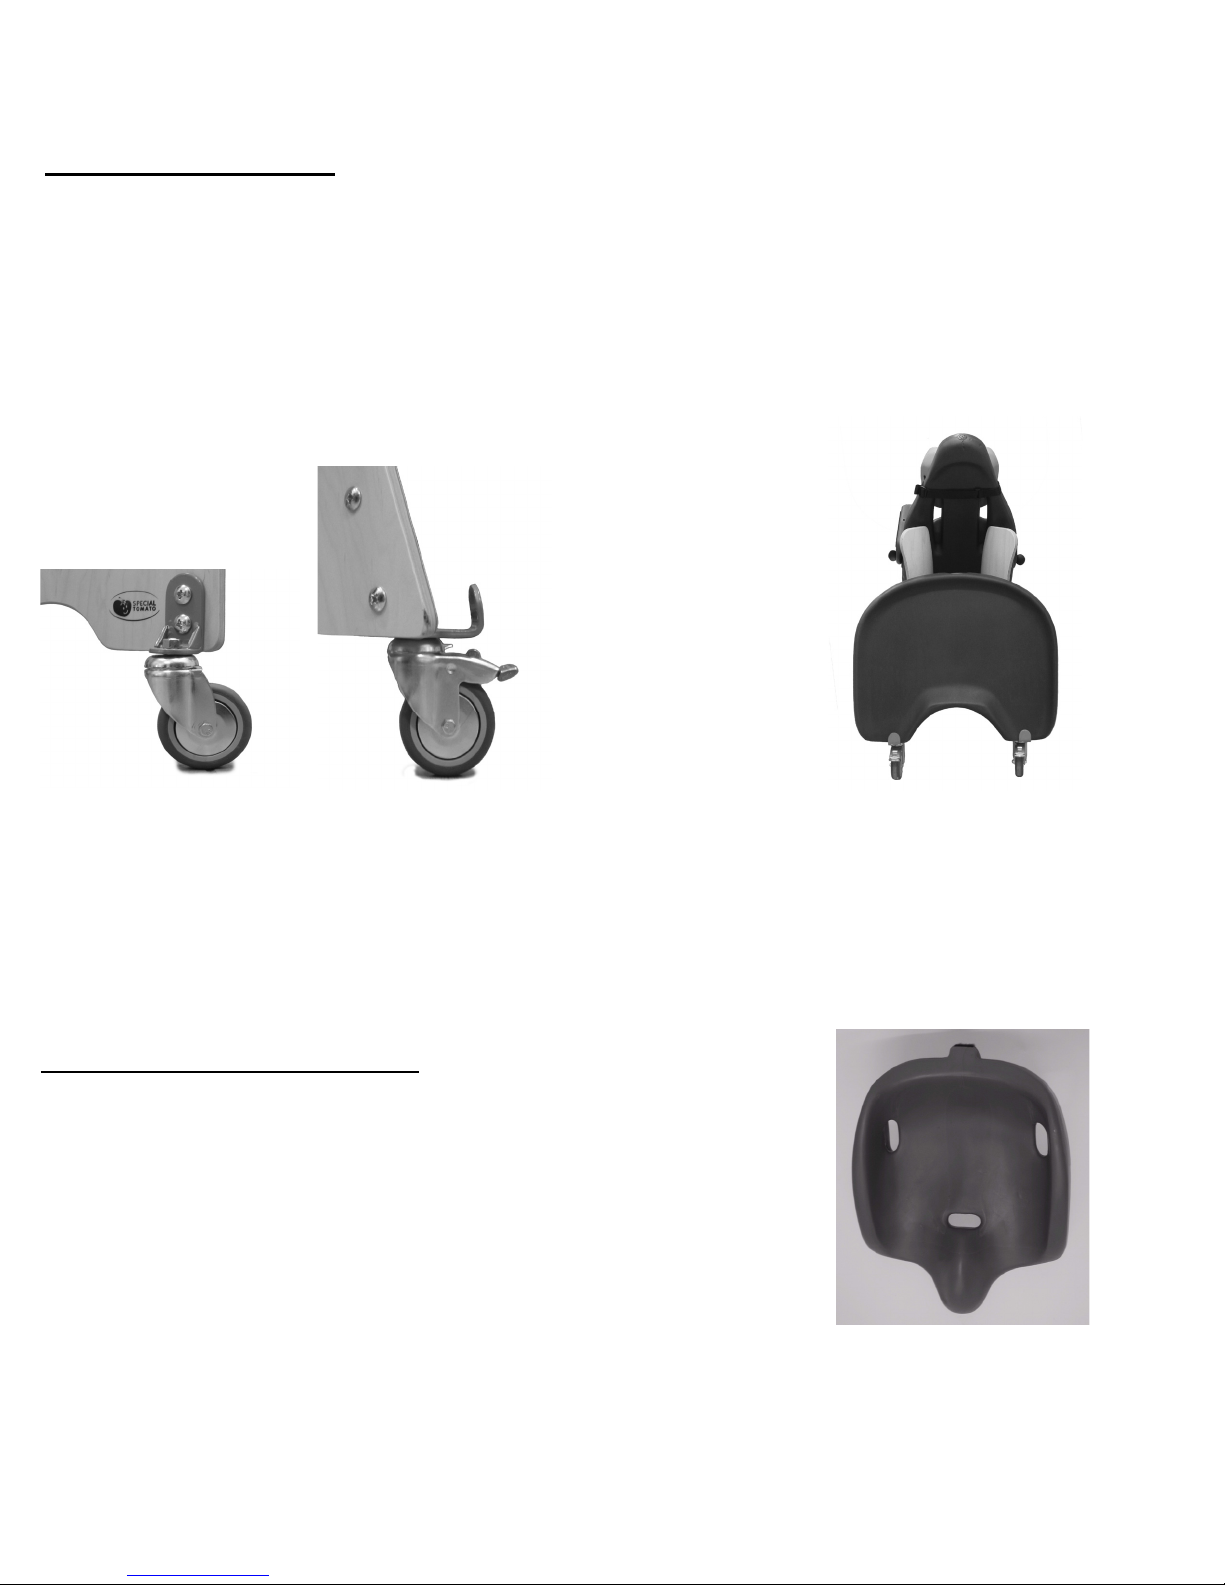
1. Complete with four swivel casters. Figure 11.
2. Rear casters have foot-operated locks. Figure 12.
4. Tray Storage in rear of Mobile Floor Base. Stay secure with hook placements. Figure 14.
Figure 11.
Figure 12.
Extended Seat Cushion
1. Can be purchased as the standard seat cushion with your
MPS depending on your child’s dimensions. Figure 15a.
2. Can be purchased at a later date as an optional accessory
if your child needed the Regular Seat Cushion at the time of
your original purchase. This way you can extend the “life” of
the MPS without having to buy a completely new seating
system.
Figure 14.
Figure 15a.
Special Tomato™ Multi-Positioning Seat - SMALL: User’s Guide 9
Page 10
MPS Optional Accessories
Extended Seat Cushion Continued
Switching Seat Cushions:
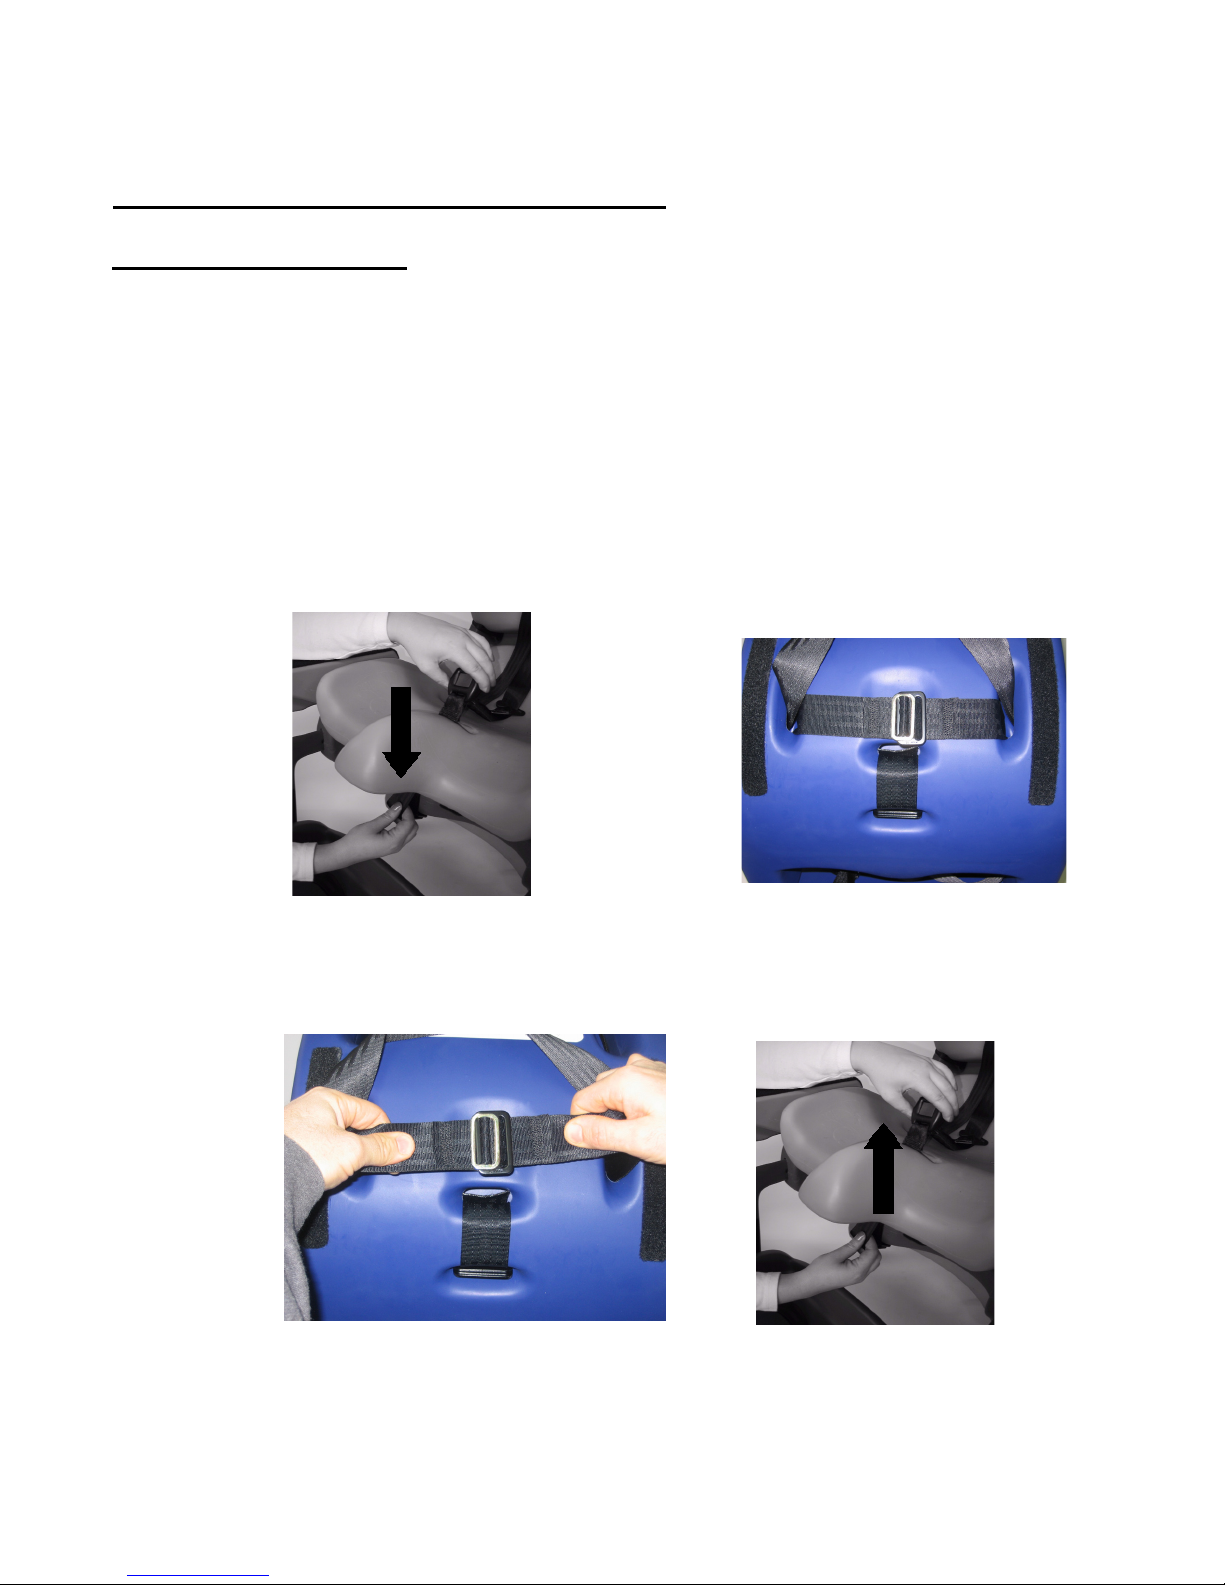
1. Unclip crotch strap and pull down through hole in seat cushion. Figure 15b.
2. Remove seat cushion.
3. Verify that the 5-Point Harness Clip is securely fastened. Push small metal clip through slot
of large metal clip to secure the 5-Point Harness. Figure 15c.
4. Test it by pulling on both straps to make sure that they stay connected. Figure 15d.
5. Place new cushion in seat shell.
6. Pull crotch strap back up through seat cushion. Figure 15e.
Figure 15b.
Figure 15d.
Figure 15c.
Figure 15e.
10 Special Tomato™ Multi-Positioning Seat - SMALL: User’s Guide
Page 11
MPS Optional Accessories
Tray
Tray items include:
• Tray • 2 Tray Risers • 2 Tray Riser BALL Knobs (1 1/2”) • 2 Washers
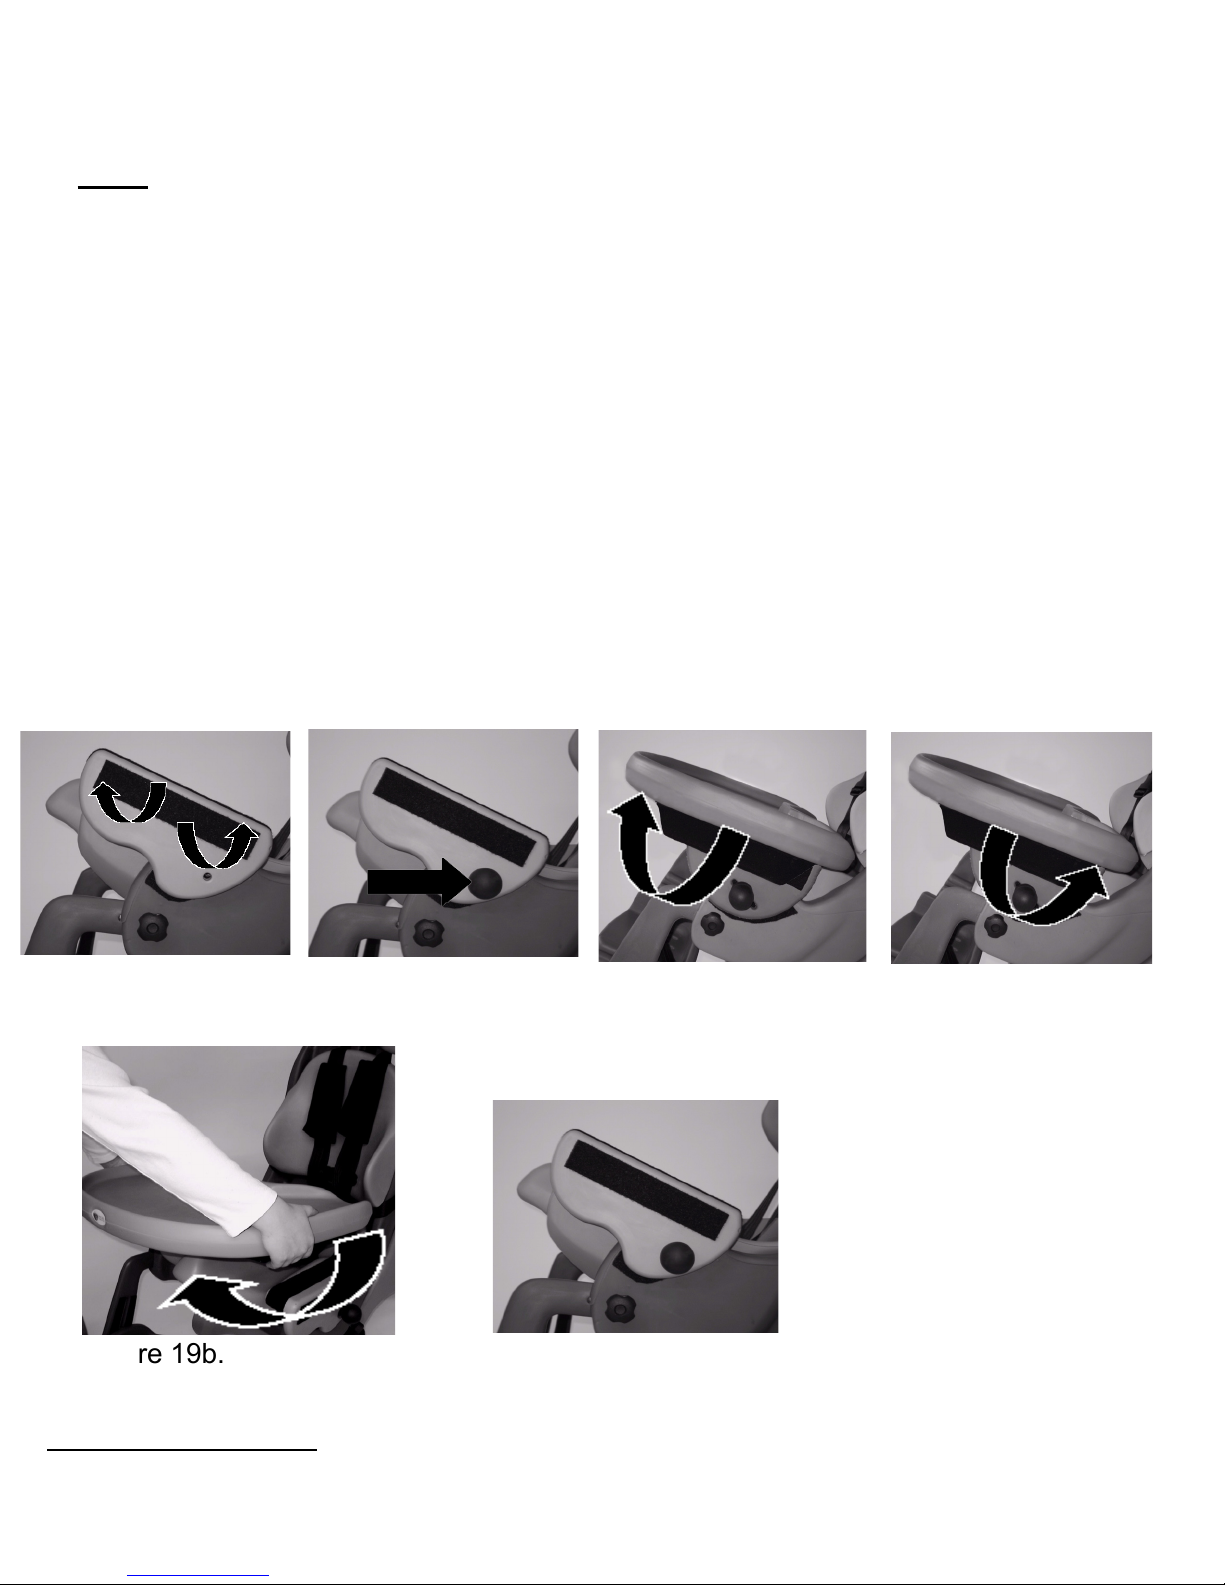
1. Secure both Tray Risers to the Seat Shell at desired angle (0º - 30º) with the attached
hook and loop strips. Figure 16.
2. Place Washers on BALL Knobs (1 1/2”) and insert them into the corresponding slot and
hole. Tighten both BALL Knobs (1 1/2”). Figure 17. (Not necessary to over tighten.)
3. Place the Tray on the Tray Risers with the attached hook and loop strips on the bottom
of the Tray surface considering the appropriate amount of depth for your child. Use the
hook and loop ap to secure the Tray to the Tray Risers. Figure 18.
4. To remove the tray, rst pull up on the hook and loop ap. Figure 19a. Second, pull the
tray off by holding onto the curved sides and rotating one side towards you. Figure 19b.
5. The Tray Risers can remain on the Seat Shell (Figure 20).
Figure 16.
Figure 19b.
Push Chair Base
Figure 17.
If you have purchased the MPS Push Chair Base, you will
receive a separate manual with your MPS Push Chair Base.
Special Tomato™ Multi-Positioning Seat - SMALL: User’s Guide 11
Figure 18.
Figure 20.
Figure 19a.
Page 12
Car Seat Installation
Safety Information
The Special TomatoTM Multi-Positioning Seat is designed to provide proper positioning in sitting
for children and young adults with special needs. This child restraint system conforms to all applicable Federal motor vehicle safety standards (FMVSS). However, the FMVSS #213 addresses
child re-straints for children up to 65 pounds (29 kilograms). For children and young adults over 65
pounds, the vehicle belt is typically sufcient for restraint. For those children and young adults over
65 pounds that need positioning support to maintain a sitting position in a vehicle, the Small and
Large Special TomatoTM Multi-Positioning Seats were designed and tested in the spirit and intent
of FMVSS #213. With proper installation and use, the Small & Large Special TomatoTM Multi-Positioning Seats provide a safe positioning system for your child or young adult.
The SMALL Special TomatoTM Multi-Positioning Seat is designed for use only by children who
weigh between 20 and 80 pounds (9 and 36 kilograms) and whose height is between 32.5 and
50 inches (82.5 and 127 centimeters) for Type I & Type II belts. The LATCH Belt is designed for
children who weight between 20 and 50 pounds (9 and 22 kilograms).
The LARGE Special TomatoTM Multi-Positioning Seat is designed for use only by children who
weigh between 80 and 150 pounds (36 and 68 kilograms) and whose height is between 50 and
63 inches (127 and 160 centimeters).
Child restraints could be recalled for safety reasons. You must register this restraint to be
reached in a recall. Send your name, address and the restraint’s model number and manufacturing date to: Bergeron Health Care, 15 Second St, Dolgeville, NY 13329 or call 1-866-529-8407
(315-429-8407). For recall information, call the U.S. Government’s Auto Safety Hotline at 1-800424-9393 (202-366-0123 in DC area).
Note: The cushion covers, tray & footrest are not part of the Special TomatoTM Multi-Positioning
Seat child restraint system as tested to Federal Motor Vehicle Safety Standard No. 213. Those
accessories are designed for use while not in the vehicle.
WARNING! Failure to follow each of the following instructions can result in your child striking
the vehicle’s interior during a sudden stop or crash. Secure this child restraint with a vehicle
belt as specied in this instruction booklet and printed on the seat back.
Snugly adjust the belts provided with this child restraint around your child.
Secure the top anchorage strap provided with this child restraint as specied in this instruction
book-let.
!
12 Special TomatoTM Multi-Positioning Seat - SMALL: User’s Guide
WARNING
Page 13
Car Seat Installation
Safety Information
1) Verify that the restraint is secure to your vehicle before placing your child in the MPS each
time you use it.
2) The 5-Point Harness will need to be adjusted to accommodate different clothing (i.e. - winter
vs. summer clothing).
3) Refrain from leaving the child restraint in direct sunlight for long periods of time. The metal
buckles can become hot enough to burn.
4) When not in use, store in a safe place. Do not place heavy objects on the child restraint for
storage.
5) Due avoid injury due to hidden damage or deterioration, no longer use the system after six
years or if it has been in a crash.
6) According to the National Highway Trafc Safety Administration, the safest place to put your
child in a restraint system in your vehicle is in the rear seat. DO NOT place a child in the front seat
of the vehicle that has an airbag unless the airbag has been turned off. The impact of an airbag on
a child can cause SERIOUS INJURY, and even DEATH.
7) Make sure all users of this restraint understand all information in this booklet.
8) Install this child restraint in a FORWARD FACING vehicle seat ONLY! Never install in a
vehicle seat that faces sideways or backwards!
9) Secure this child restraint with the vehicle belts even when there is not a child in the restraint. In the event of a crash, an unsecured child restraint could injure vehicle occupants if it
moves.
!
WARNING
Special TomatoTM Multi-Positioning Seat - SMALL: User’s Guide 13
Page 14
Car Seat Installation
Safety Information
10) The Headrest Tether MUST remain secure when using the MPS as a child restraint.
11) Children should not be left in a vehicle alone for any length of time.
12) Do not disassemble or change this child restraint in any manner, except those steps described in this booklet.
13) If your vehicle seats fold forward, make sure they are latched before installing this child restraint.
14) Do not let children play with this child restraint.
15) Do not place anything between the vehicle seat and the child restraint to raise the height of
the child restraint. In the event of an accident, the object could slip and disrupt the stability of the
child restraint.
16) Primary protection for occupants of a vehicle comes from the vehicle itself in the event of an
accident. Child restraints will not completely protect a child in the event of a serious impact. The
roll of the child restraint, when properly installed, is to signicantly improve the chance for survival
in most crashes.
17) Unless specied by your vehicle’s manufacturer, assume that the vehicle LATCH anchor
limit is 50 pounds (22 kilograms).
18) Carry your child restraint by the hard seat shell. Do NOT carry it by the 5-Point Harness
to prevent damage.
19) The child restraint Top Tether Strap MUST be used at all times in a vehicle.
!
WARNING
14 Special TomatoTM Multi-Positioning Seat - SMALL: User’s Guide
Page 15
Car Seat Installation
Front View Back View
Head Cushion
Back Cushion
Seat Cushion
LATCH Strap
Crotch Strap
Figure 22a.
Tether Strap
Attachment Strap
Shoulder Strap Covers
5-Point Harness
LATCH Adjuster
LATCH Straps
5-Point Harness Strap
Attachment Strap
Figure 22b.
Instruction
Booklet/Holder
Adjustable
Tether Strap
& Hook
LATCH Strap
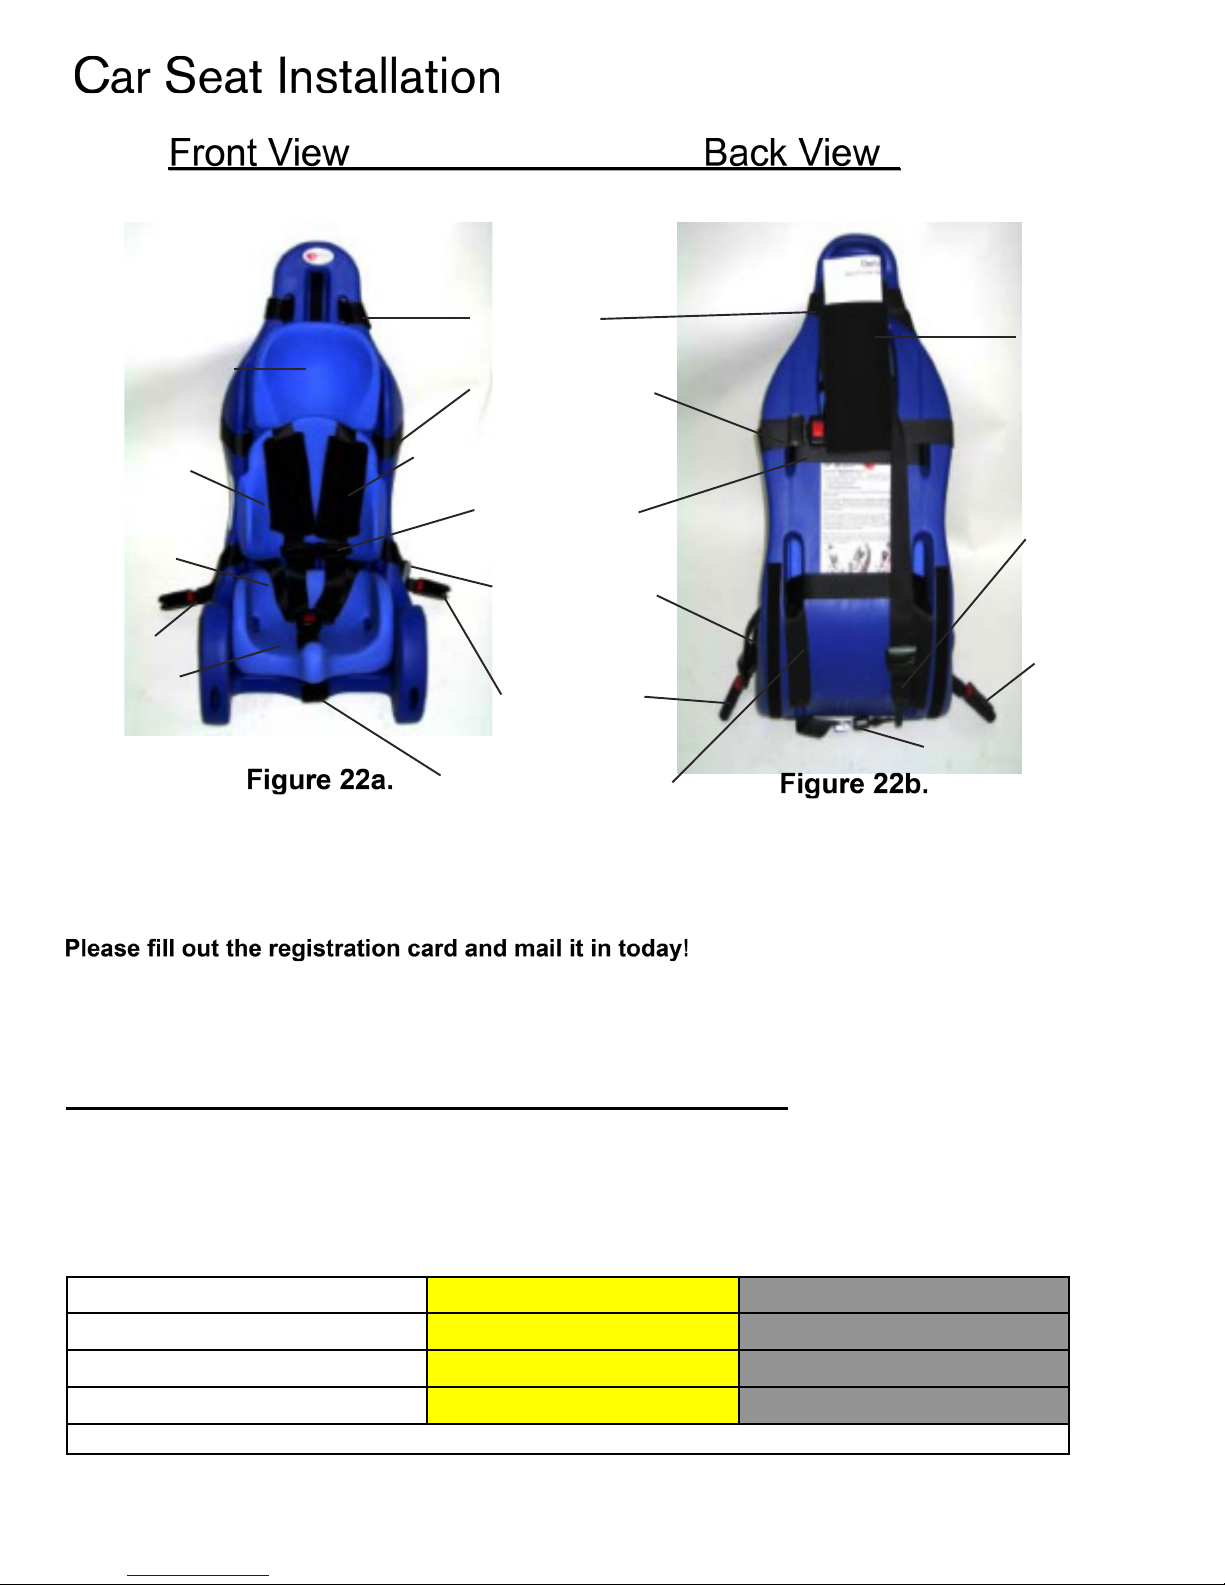
The Special TomatoTM Multi-Positioning Seat Car Seat comes with several standard safety features.
See Figures 22a & 22b above for these features.
Please ll out the registration card and mail it in today!
Child restraints could be recalled for safety reasons at any time. In case of a recall, we can reach you
only if we have your name and address, so please send in the registration card today to be on our
recall list.
This restraint IS Certied for use in aircraft.
Use the following chart to decide which installation method is required for your child.
Installation Method SMALL MPS LARGE MPS
LATCH Belt & Tether 20 - 50 lbs. (9 - 22 kg) Not Applicable
Lap Belt & Tether 20 - 80 lbs. (9 - 36 kg)* 80 - 150 lbs. (36 - 68 kg)
Lap/Shoulder Belt & Tether 20 - 80 lbs. (9 - 36 kg)* 80 - 150 lbs. (36 - 69 kg)
* Use these methods for children between 20 - 48 lbs. if your vehicle is not equipped with the LATCH mechanism.
Special TomatoTM Multi-Positioning Seat - SMALL: User’s Guide 15
Page 16
Car Seat Installation
Belt & Tether Installation
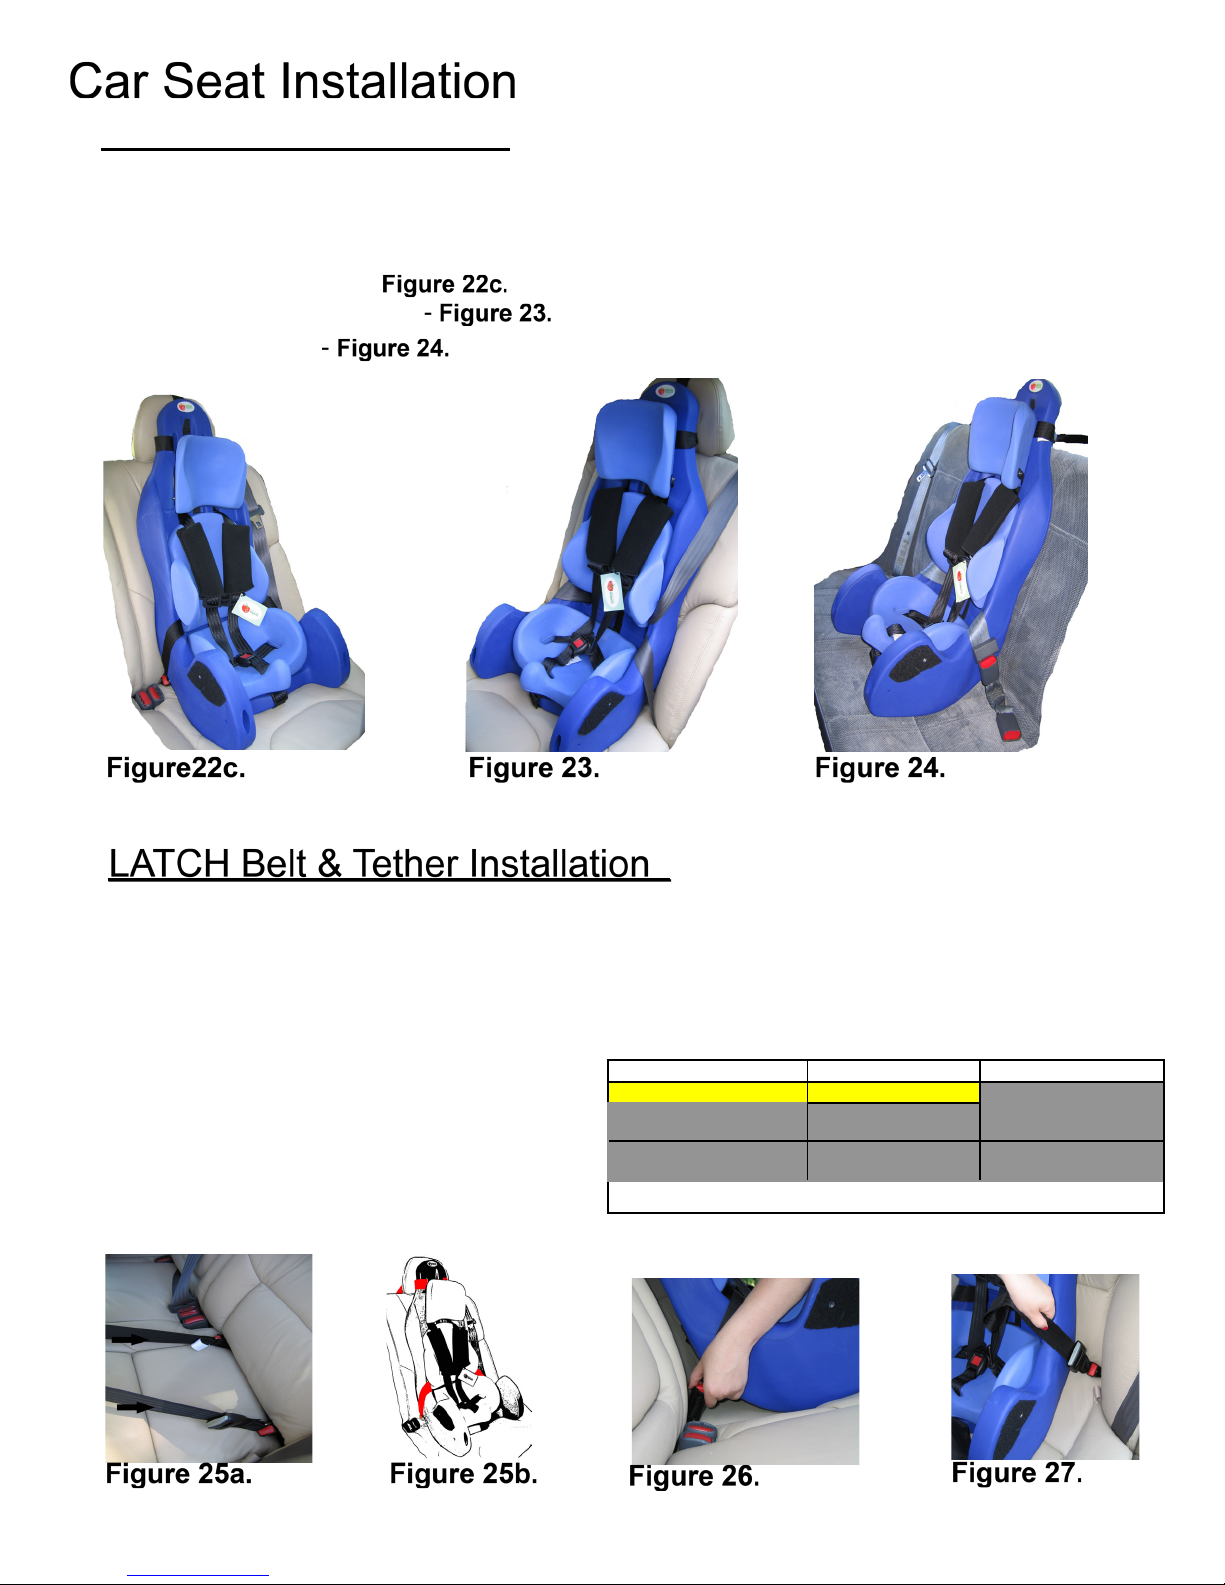
PLEASE NOTE: The Tether Strap MUST be used with ALL Belt Congurations to secure
your Special TomatoTM Multi-Positioning Seat Car Seat to your vehicle:
1) LATCH Belt & Tether - Figure 22c.
2) Lap/Shoulder Belt & Tether -
Figure 23.
3) Lap Belt & Tether -
Figure 24.
Figure22c. Figure 23. Figure 24.
LATCH Belt & Tether Installation
1) Verify that your vehicle is equipped with LATCH anchors (Figure 25a - shown with LATCH strap).
Consult your vehicle manual to locate the exact position of the LATCH anchors.
2) Verify that your vehicle is equipped with a Tether anchor. Refer to Steps 1 -5 on Page 17.
3) Verify that the 5-Point Harness is secured. See Page 22 for details.
4) Install the MPS with the LATCH Belt & top Tether Strap. Figure 25b.
5) Snap both LATCH belt buckle into corresponding LATCH anchors until you hear an audible “Click”
for each buckle. Figure 26.
6) Place your knee in the MPS, bearing
weight on the seat, to make it t snuggly to
your vehicle. Pull tightly until slack is removed
from LATCH adjuster strap. Figure 27.
***SEE NEXT PAGE TO COMPLETE INSTALLATION PROCESS!***
Installation Method SMALL MPS LARGE MPS
LATCH Belt & Tether 20 - 50 lbs. (9 - 22 kg) Not Applicable
Lap Belt & Tether
Lap/Shoulder Belt &
Tether
* Use these methods for children between 20 - 48 lbs. if your vehicle is not equipped with the LATCH
mechanism.
20 - 80 lbs. (9 - 36
kg)*
20 - 80 lbs. (9 - 36
kg)*
80 - 150 lbs. (36 - 68
kg)
80 - 150 lbs. (36 - 69
kg)
Figure 25a. Figure 25b.
16 Special TomatoTM Multi-Positioning Seat - SMALL: User’s Guide
Figure 26.
Figure 27.
Page 17
Car Seat Installation
LATCH Belt & Tether Installation - Continued
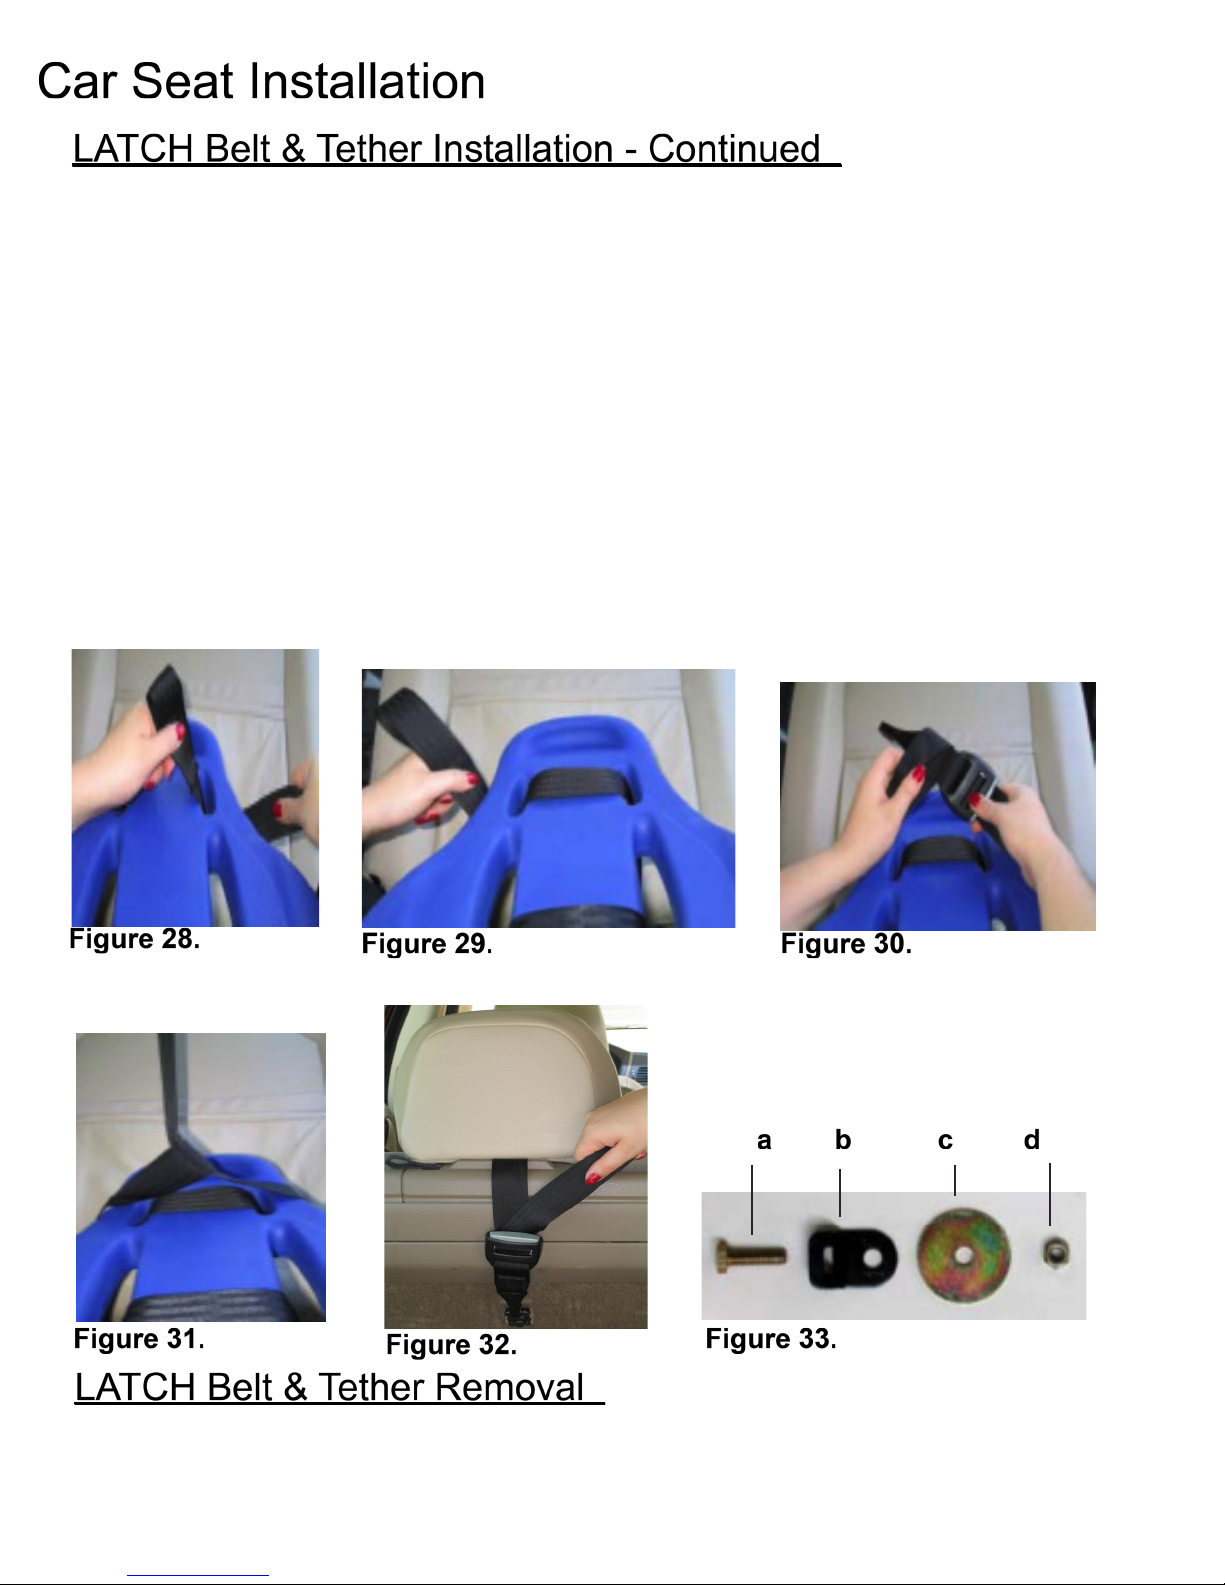
1) Verify that your MPS has the Tether Strap attached correctly. If not, follow steps 2 - 5 below before
continuing with the installation.
2) Face MPS Seat Back to you. Thread loop end of Tether Strap through rst Tether Strap slot. Figure
28.
3) Thread loop end of Tether Strap through second Tether Strap slot. Figure 29.
4) Thread Tether hook through loop end of Tether Strap. Figure 30.
5) Pull hook end of Tether Strap taut. Figure 31.
6) Now that the Tether Strap is attached correctly, verify that the LATCH belt is secured and tight.
7) Hook the Tether hook to the vehicle anchor and tighten belt. Figure 32.
8) If your vehicle does NOT have a Tether anchor, install the Tether Anchor with the hardware provided
in this order: Figure 33. - a) 3/8” bolt, b) Tether Anchor, d) Large Washer, and e) Nut.
Please Note: The vehicle body goes between the Tether Anchor and the Large Washer with the Large
Washer directly underneath the vehicle body.
Please Note: Please contact your vehicle manufacturer to determine the best place to install the Tether
Anchor in your vehicle.
Figure 28.
Figure 29.
Figure 30.
a b c d
Figure 31.
Figure 32.
Figure 33.
LATCH Belt & Tether Removal
To remove the restraint, depress both red release buttons on the LATCH buckles. Release the
top Tether anchor to completely detach the restraint from the vehicle.
Special TomatoTM Multi-Positioning Seat - SMALL: User’s Guide 17
Page 18
Car Seat Installation
Lap/Shoulder Belt & Tether Installation
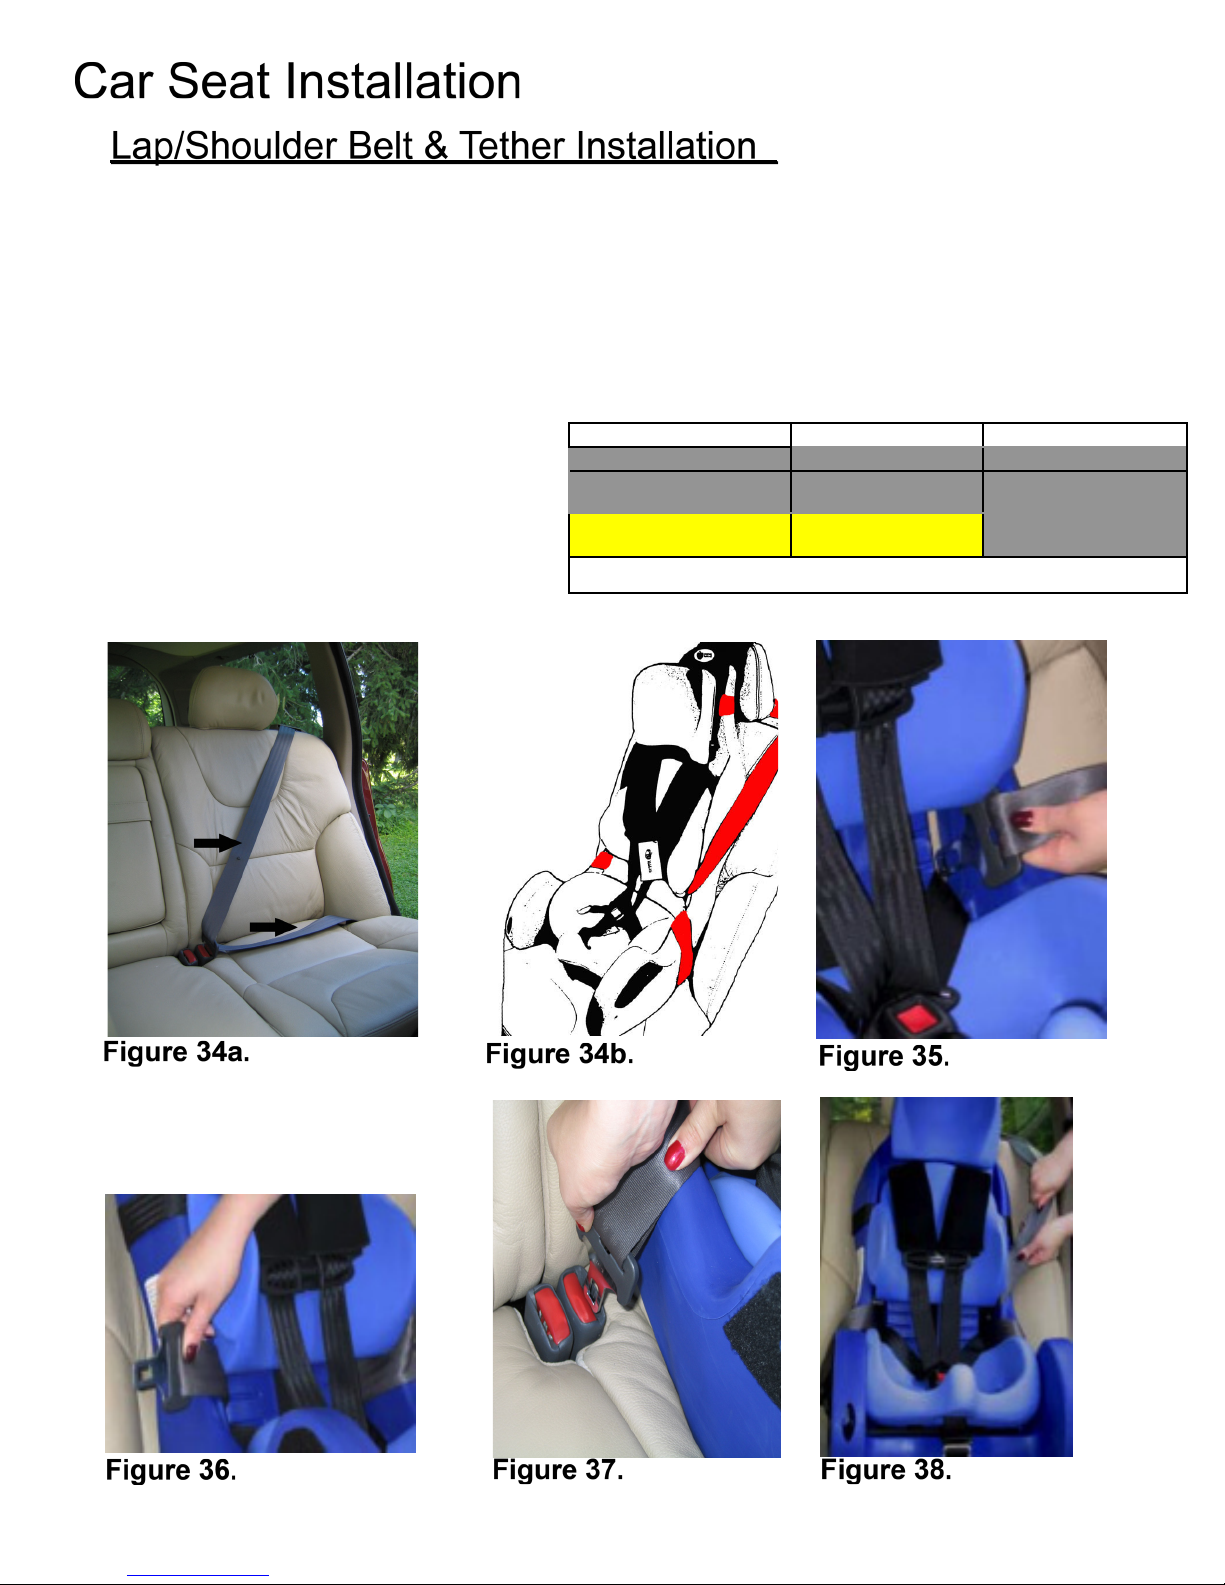
1) Identify your vehicle’s Lap/Shoulder Belt. Figure 34a.
2) Verify that your vehicle is equipped with a Tether anchor. Refer to Steps 1 -5 on Page 19.
3) Verify that the 5-Point Harness is secured. See Page 22 for details.
4) Install the MPS with the Lap/Shoulder Belt & top Tether Strap. Figure 34b.
5) Thread the Lap/Shoulder Belt from the front to the back through the slot in the seat shell located
between the seat and back cushions. Figure 35.
6) Thread the Lap/Shoulder Belt across the back of the seat shell.
7) Thread the Lap/Shoulder Belt from the back to the front through the opposite slot in the seat shell
located between the seat and back cushions. Figure 36.
8) Buckle the Lap/Shoulder Belt, making
sure you hear an audible “Click”. Figure 37.
9) Place your knee in the MPS, bearing
weight on the seat, to make it t snuggly
to your vehicle. Pull tightly until slack is
removed from Lap/Shoulder Belt.
Figure 38.
***SEE NEXT PAGE TO COMPLETE INSTALLATION PROCESS!***
Installation Method SMALL MPS LARGE MPS
LATCH Belt & Tether 20 - 50 lbs. (9 - 22 kg) Not Applicable
Lap Belt & Tether
Lap/Shoulder Belt &
Tether
* Use these methods for children between 20 - 48 lbs. if your vehicle is not equipped with the LATCH
mechanism.
20 - 80 lbs. (9 - 36
kg)*
20 - 80 lbs. (9 - 36
kg)*
80 - 150 lbs. (36 - 68
kg)
80 - 150 lbs. (36 - 69
kg)
Figure 34a.
Figure 36.
18 Special TomatoTM Multi-Positioning Seat - SMALL: User’s Guide
Figure 34b.
Figure 37. Figure 38.
Figure 35.
Page 19
Car Seat Installation
Lap/Shoulder Belt & Tether Installation - Continued
1) Verify that your MPS has the Tether Strap attached correctly. If not, follow steps 2 - 5 below before
continuing with the installation.
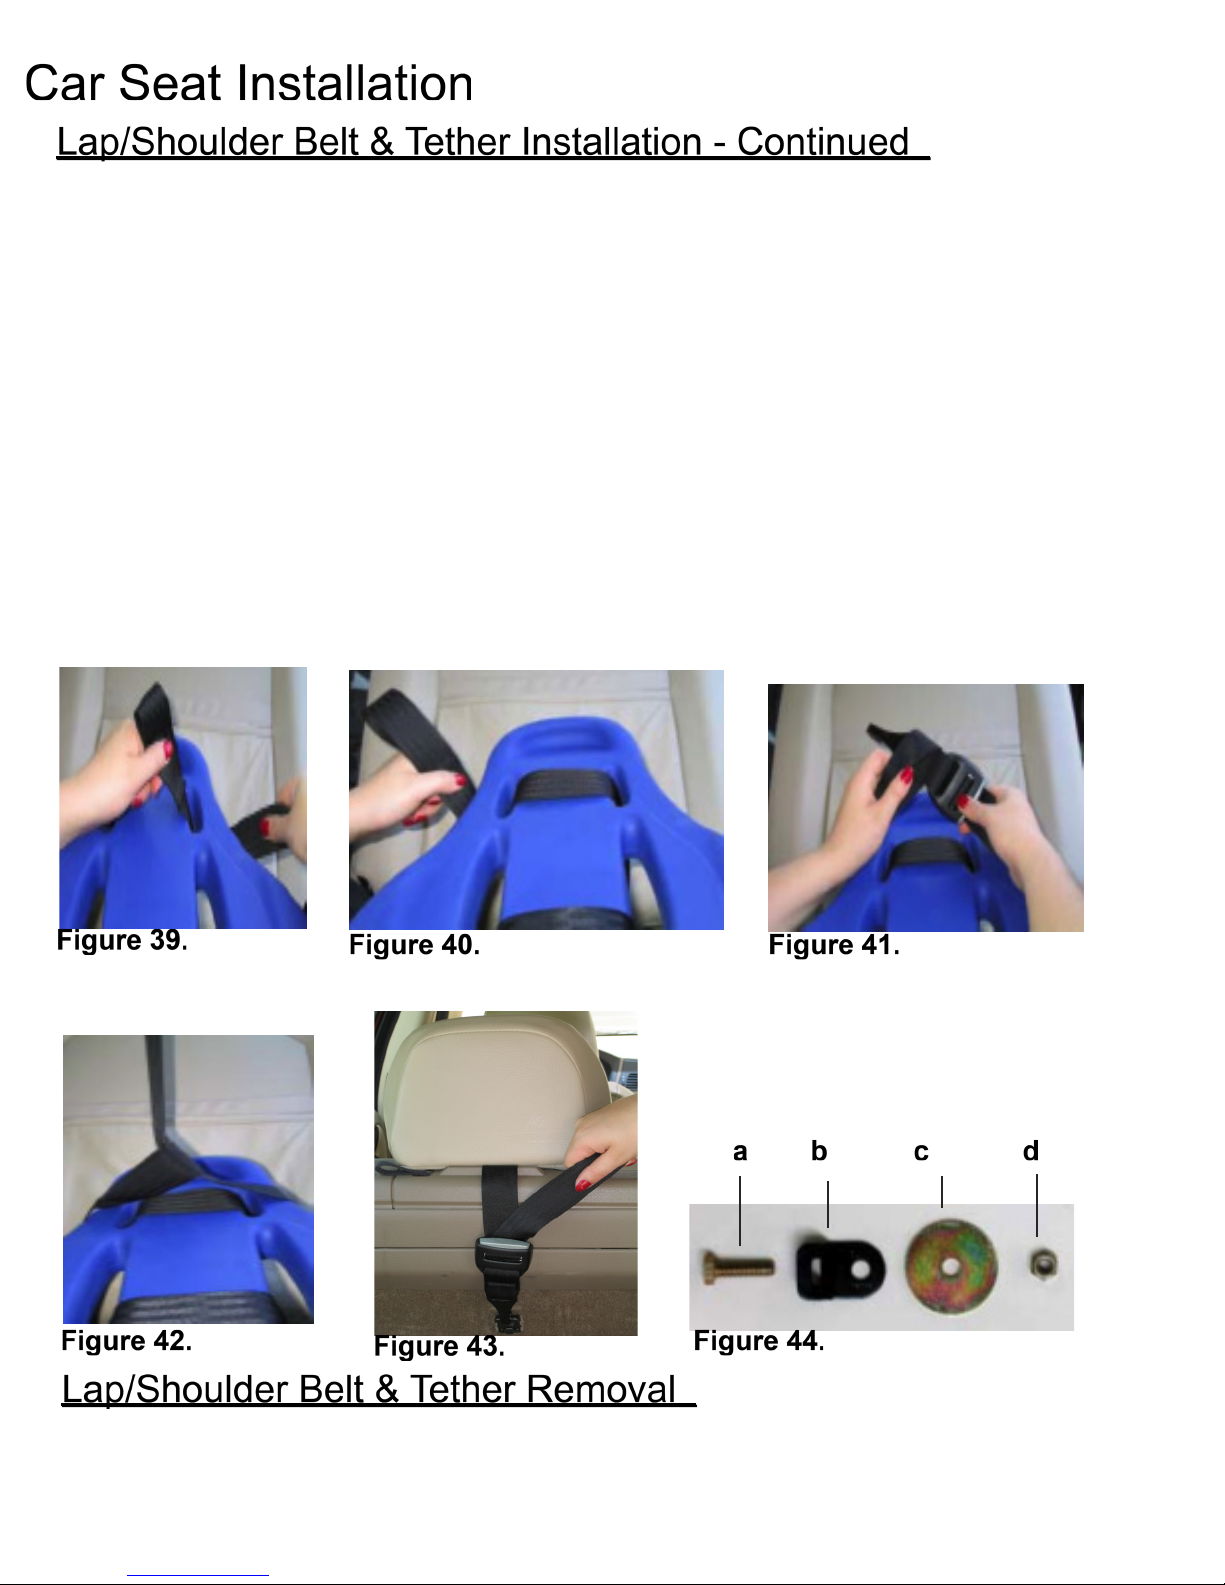
2) Face MPS Seat Back to you. Thread loop end of Tether Strap through rst Tether Strap slot. Figure
39.
3) Thread loop end of Tether Strap through second Tether Strap slot. Figure 40.
4) Thread Tether hook through loop end of Tether Strap. Figure 41.
5) Pull hook end of Tether Strap taut. Figure 42.
6) Now that the Tether Strap is attached correctly, verify that the LATCH belt is secured and tight.
7) Hook the Tether hook to the vehicle anchor and tighten belt. Figure 43.
8) If your vehicle does NOT have a Tether anchor, install the Tether Anchor with the hardware provided
in this order: Figure 44. - a) 3/8” bolt, b) Tether Anchor, d) Large Washer, and e) Nut.
Please Note: The vehicle body goes between the Tether Anchor and the Large Washer with the Large
Washer directly underneath the vehicle body.
Please Note: Please contact your vehicle manufacturer to determine the best place to install the Tether
Anchor in your vehicle.
Figure 39.
Figure 40.
Figure 41.
a b c d
Figure 42.
Figure 43.
Figure 44.
Lap/Shoulder Belt & Tether Removal
To remove the restraint, depress the red release button on the Lap/Shoulder buckle. Release the
top Tether anchor to completely detach the restraint from the vehicle.
Special TomatoTM Multi-Positioning Seat - SMALL: User’s Guide 19
Page 20
Car Seat Installation
Lap Belt & Tether Installation
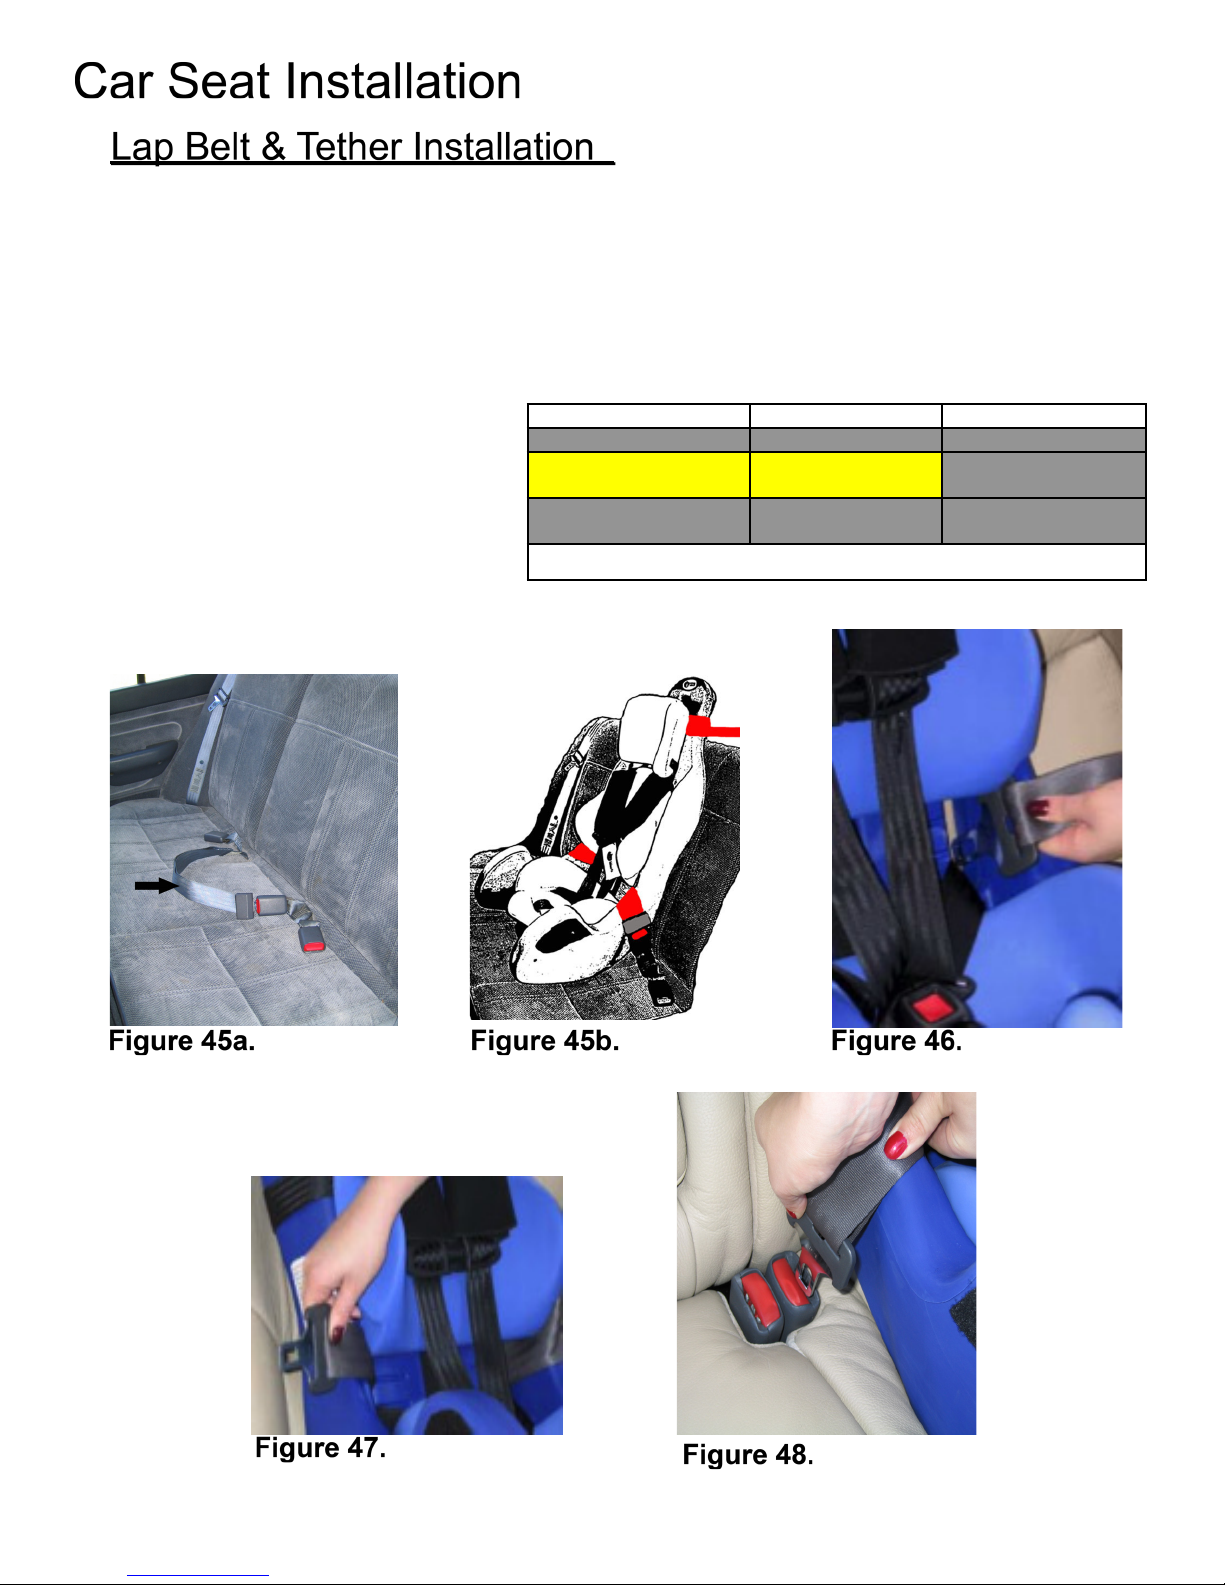
1) Identify your vehicle’s Lap Belt. Figure 45a.
2) Verify that your vehicle is equipped with a Tether anchor. Refer to Steps 1 -5 on Page 21.
3) Verify that the 5-Point Harness is secured. See Page 22 for details.
4) Install the MPS with the Lap Belt & top Tether Strap. Figure 45b.
5) Thread the Lap Belt from the front to the back through the slot in the seat shell located between the
seat and back cushions. Figure 46.
6) Thread the Lap Belt across the back of the seat shell.
7) Thread the Lap Belt from the back to the front through the opposite slot in the seat shell located
between the seat and back cushions.
Figure 47.
8) Buckle the Lap Belt, making sure
you hear an audible “Click”.
Figure 48.
9) Place your knee in the MPS,
bearing weight on the seat, to
make it t snuggly to your vehicle.
Pull tightly until slack is removed
from Lap Belt.
***SEE NEXT PAGE TO COMPLETE INSTALLATION PROCESS!***
Installation Method SMALL MPS LARGE MPS
LATCH Belt & Tether 20 - 50 lbs. (9 - 22 kg) Not Applicable
Lap Belt & Tether
Lap/Shoulder Belt &
Tether
* Use these methods for children between 20 - 48 lbs. if your vehicle is not equipped with the LATCH
mechanism.
20 - 80 lbs. (9 - 36
kg)*
20 - 80 lbs. (9 - 36
kg)*
80 - 150 lbs. (36 - 68
kg)
80 - 150 lbs. (36 - 69
kg)
Figure 45a. Figure 45b. Figure 46.
Figure 47.
20 Special TomatoTM Multi-Positioning Seat - SMALL: User’s Guide
Figure 48.
Page 21
Car Seat Installation
Lap Belt & Tether Installation - Continued
1) Verify that your MPS has the Tether Strap attached correctly. If not, follow steps 2 - 5 below before
continuing with the installation.
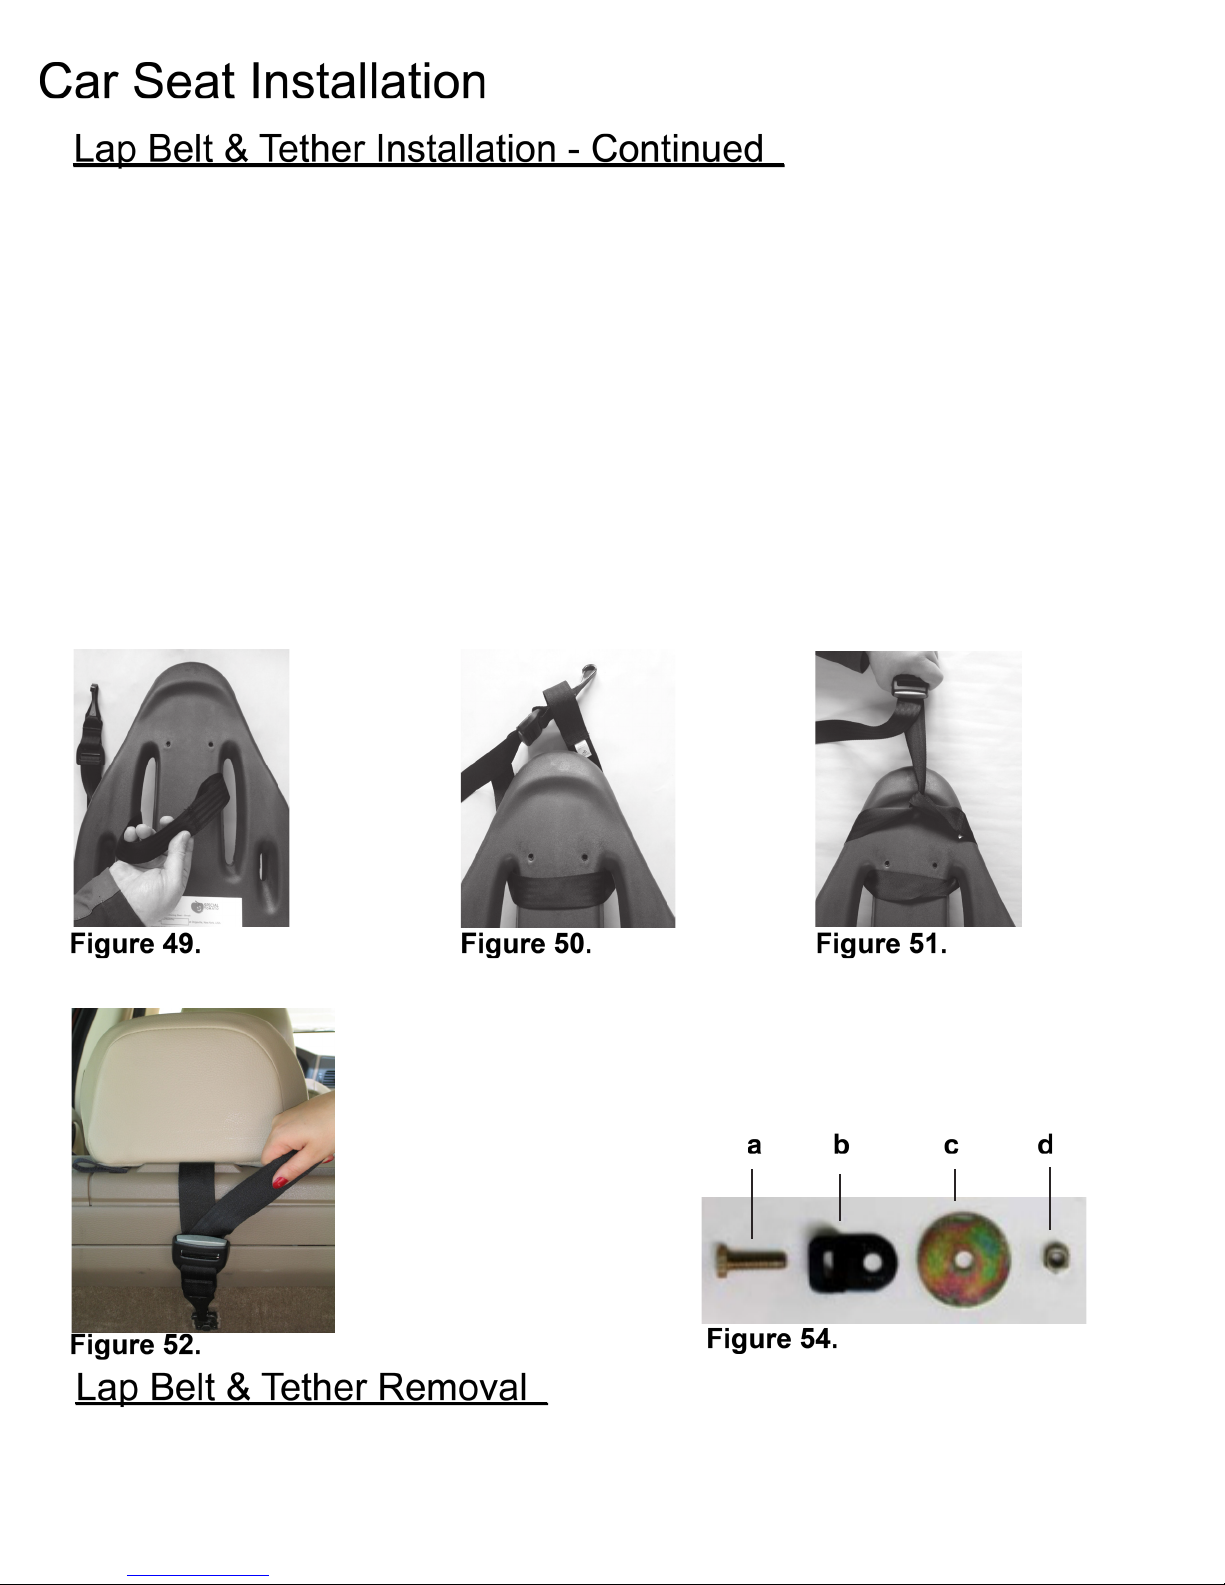
2) Face MPS Seat Back to you. Thread loop end of Tether Strap through rst Tether Strap slot. Figure
49.
3) Thread loop end of Tether Strap through second Tether Strap slot. Figure 49.
4) Thread Tether hook through loop end of Tether Strap. Figure 50.
5) Pull hook end of Tether Strap taut. Figure 51.
6) Now that the Tether Strap is attached correctly, verify that the LATCH belt is secured and tight.
7) Hook the Tether hook to the vehicle anchor and tighten belt. Figure 52.
8) If your vehicle does NOT have a Tether anchor, install the Tether Anchor with the hardware provided
in this order: Figure 54. - a) 3/8” bolt, b) Tether Anchor, d) Large Washer, and e) Nut.
Please Note: The vehicle body goes between the Tether Anchor and the Large Washer with the Large
Washer directly underneath the vehicle body.
Please Note: Please contact your vehicle manufacturer to determine the best place to install the Tether
Anchor in your vehicle.
Figure 49. Figure 50.
Figure 51.
a b c d
Figure 52.
Figure 54.
Lap Belt & Tether Removal
To remove the restraint, depress the red release button on the Lap Strap buckle. Release the
top Tether anchor to completely detach the restraint from the vehicle.
Special TomatoTM Multi-Positioning Seat - SMALL: User’s Guide 21
Page 22
Car Seat Installation
5-Point Harness
Securing the 5-Point Harness
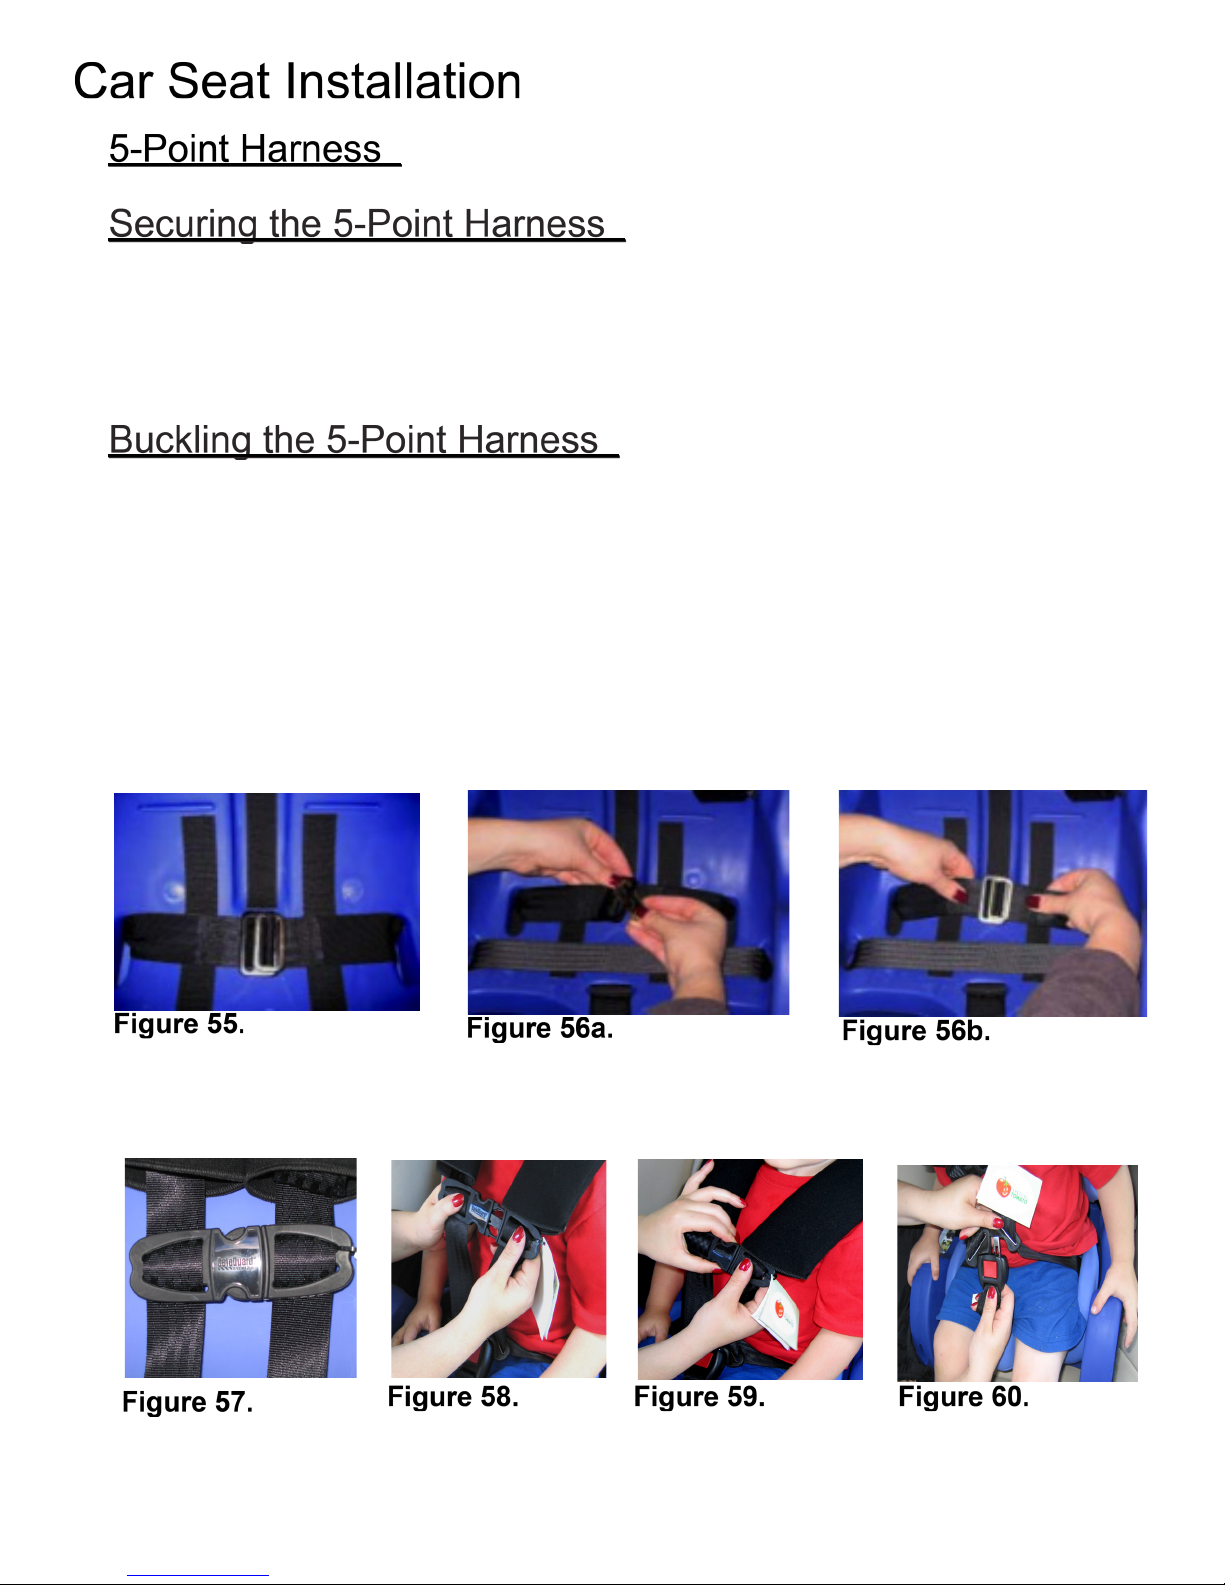
1) Remove the seat cushion. Figure 55 shows the correct position of the two clips that hold the
5-Point Harness in place.
2) To secure the belt if it has come undone, push the small metal clip through the slot of large metal
clip. Figure 56a. Test it by pulling on both straps to make sure that they stay connected. Figure 56b.
Buckling the 5-Point Harness
1) The Chest Clip is provided to keep the 5-Point Harness in place to protect your child. Figure 57.
2) Once your child is in the MPS, engage the Chest Clip by connecting the two halves. Figure 58. You
will hear an audible “Click” when it is properly engaged.
3) To disengage the Chest Clip, to remove your child after your are nished using the restraint, depress the two black prongs in the center of the Chest Clip and pull the two halves apart. Figure 59.
4) To complete securing the 5-Poing Harness, insert each of the silver buckle tongues into the
corresponding sockets of the the black buckle. Figure 60. You will hear an audible “Click” when it is
properly engaged.
Figure 55.
Figure 57.
22 Special TomatoTM Multi-Positioning Seat - SMALL: User’s Guide
Figure 58. Figure 59. Figure 60.
Figure 56a.
Figure 56b.
Page 23
Car Seat Installation
Securing Your Child
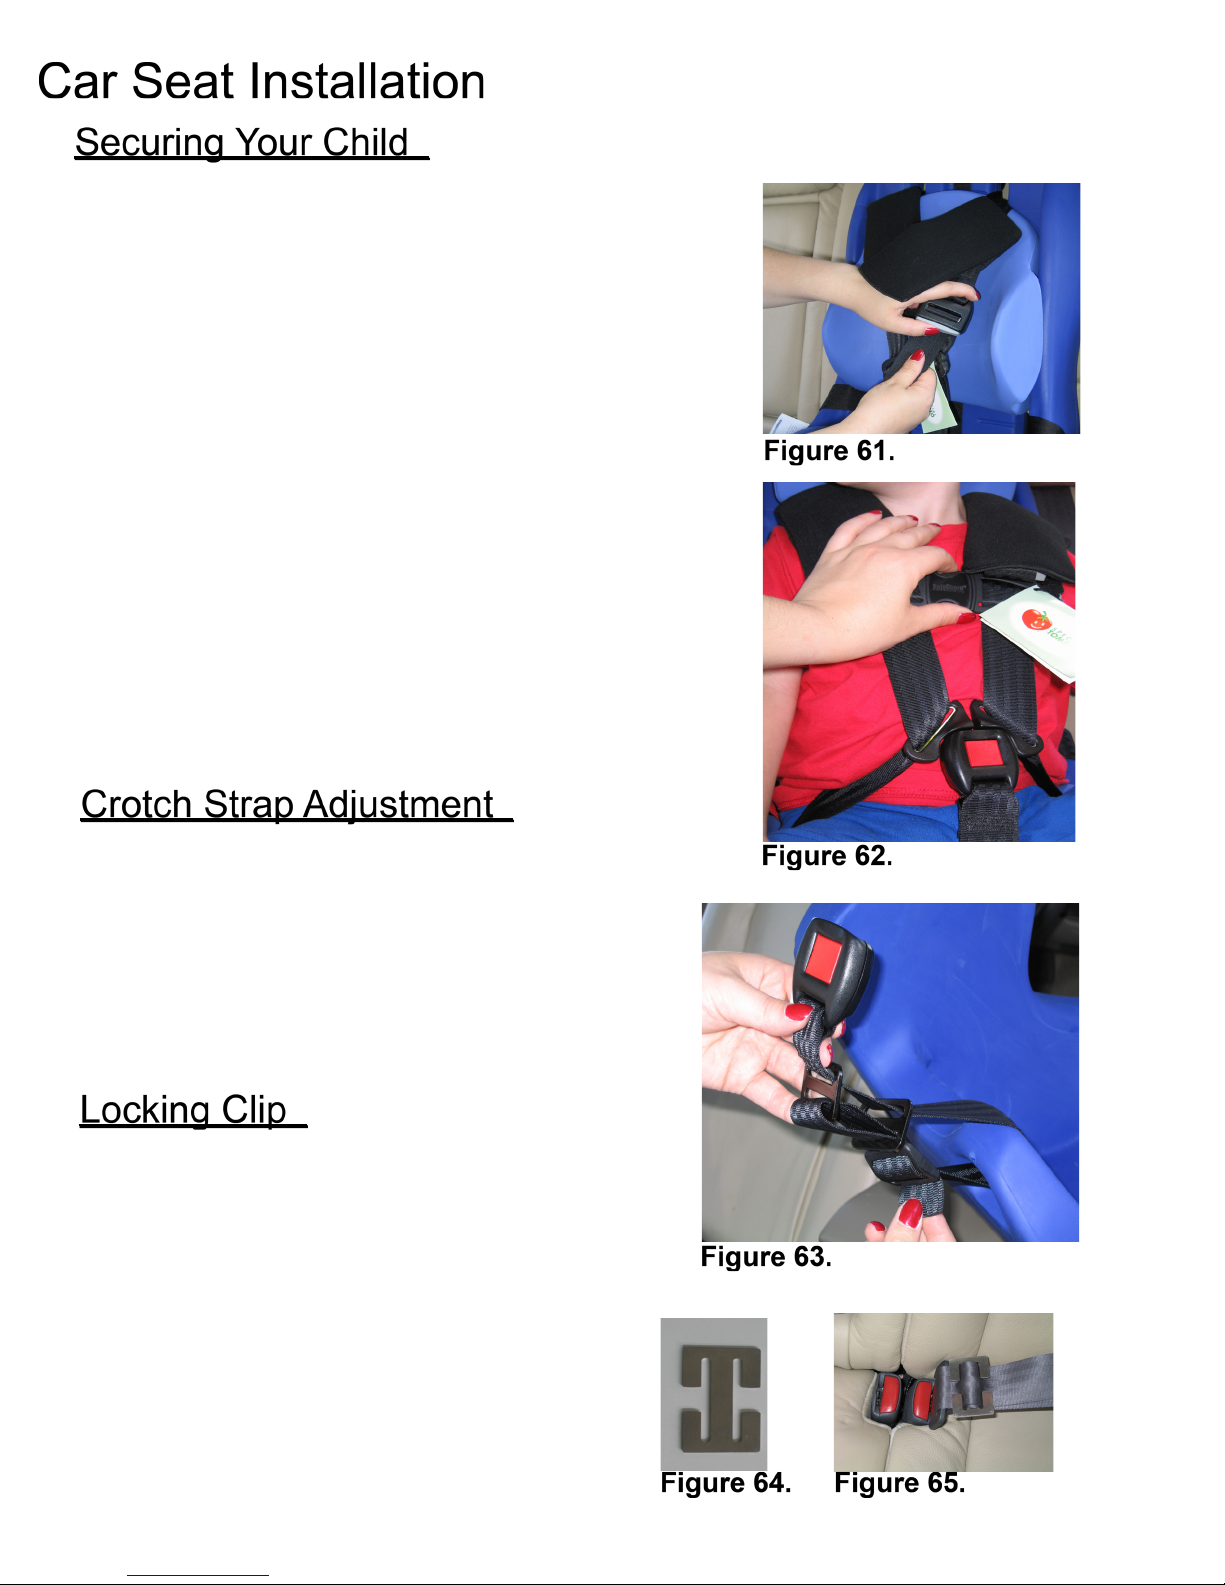
1) Once the 5-Point Harness is buckled, adjust the shoulder
straps so that the 5-Point Harness is comfortable, but
SNUG. Adjust the Shoulder Straps by opening the Shoulder
Strap Covers. Underneath you will nd the Shoulder
Strap Adjustment buckles. Depress the gray button and
pull slowly on the excess strap to tighten the straps. If you
need to loosen them, keep the gray button depressed
and pull on the tightened portion of the strap. Figure 61.
Close the Shoulder Strap Covers.
Please Note: The 5-Point Harness should be tight enough
to hold your child securely while allowing you to place
one nger between the 5-Point Harness and your child’s
collar bone. Please Note: A snug strap should not allow
any slack. It lies in a relatively straight line without
sagging. It does not press on the child’s esh or push the
child’s body into an unnatural position.
2) Once the 5-Point Harness is properly adjusted, slide
the Chest Clip so that it is level with your child’s armpit.
Figure 62.
Figure 61.
Crotch Strap Adjustment
The Crotch Strap portion of the 5-Point Harness
can be adjusted to the correct length for your
child. The appropriate threading method is pictured
in Figure 63. It is not necessary to unthread
this strap to adjust its length. You can loosen each
section of the strap to adjust the length.
Locking Clip
1) Some vehicles are manufactured with a “Sliding
Tongue” which allows the Lap/Shoulder Belt
to move freely when buckled. The Locking Clip is
provided to prevent the Lap/Shoulder Belt from
loosening. (Figure 64.)
2) To install, secure the restraint with the Lap/
Shoulder Belt. Slide the Locking Clip around both
ends of the belt, positioning it a few inches from
the buckle. (Figure 65.)
Figure 62.
Figure 63.
Figure 64. Figure 65.
Special TomatoTM Multi-Positioning Seat - SMALL: User’s Guide 23
Page 24

Consumer Information
Maintenance
Special Tomato™ Products are impermeable to uids. Use a mild detergent/cleaner to wipe
the chair periodically.
To extend the life of the hook and loop strips, comb out the hook portion (hard side) to remove lint and other debris.
Limited Warranty
Please ll out and mail your warranty card!
Bergeron Health Care warrants to the original retail purchaser of the Special Tomato™
product, that if any part or component proves defective in material or workmanship within
ve years of the purchase date, the defective part will be repaired or replaced (at Bergeron
Health Care’s discretion) free of charge. Warranty service may be performed by an
authorized service center or (at Bergeron Health Care’s discretion) the factory.
This warranty does not cover normal wear and tear, or damage caused by accident or
misuse.
To exercise this limited warranty, the user should rst obtain a Return Authorization Number
from the dealer the Special Tomato™ product was purchased from. The product must be
delivered charges pre-paid (UPS recommended) to the factory or to an authorized service
center, together with a copy of the original invoice, the Return Authorization Number and a
written description of the problem.
For Customer Service Support:
Contact your dealer directly.
Or...
Website: www.specialtomato.com
©2013 Bergeron Health Care. All rights reserved.
 Loading...