

Page 1
Page 2
Page 3

Group.X MONSTER Portable PA
Table of Contents
Page
1. Introduction
2. Safety
3. Environment
4. Wireless Notes
5. Quick Start Guide
6. Group.X MONSTER Portable PA
6.1 Things to remember
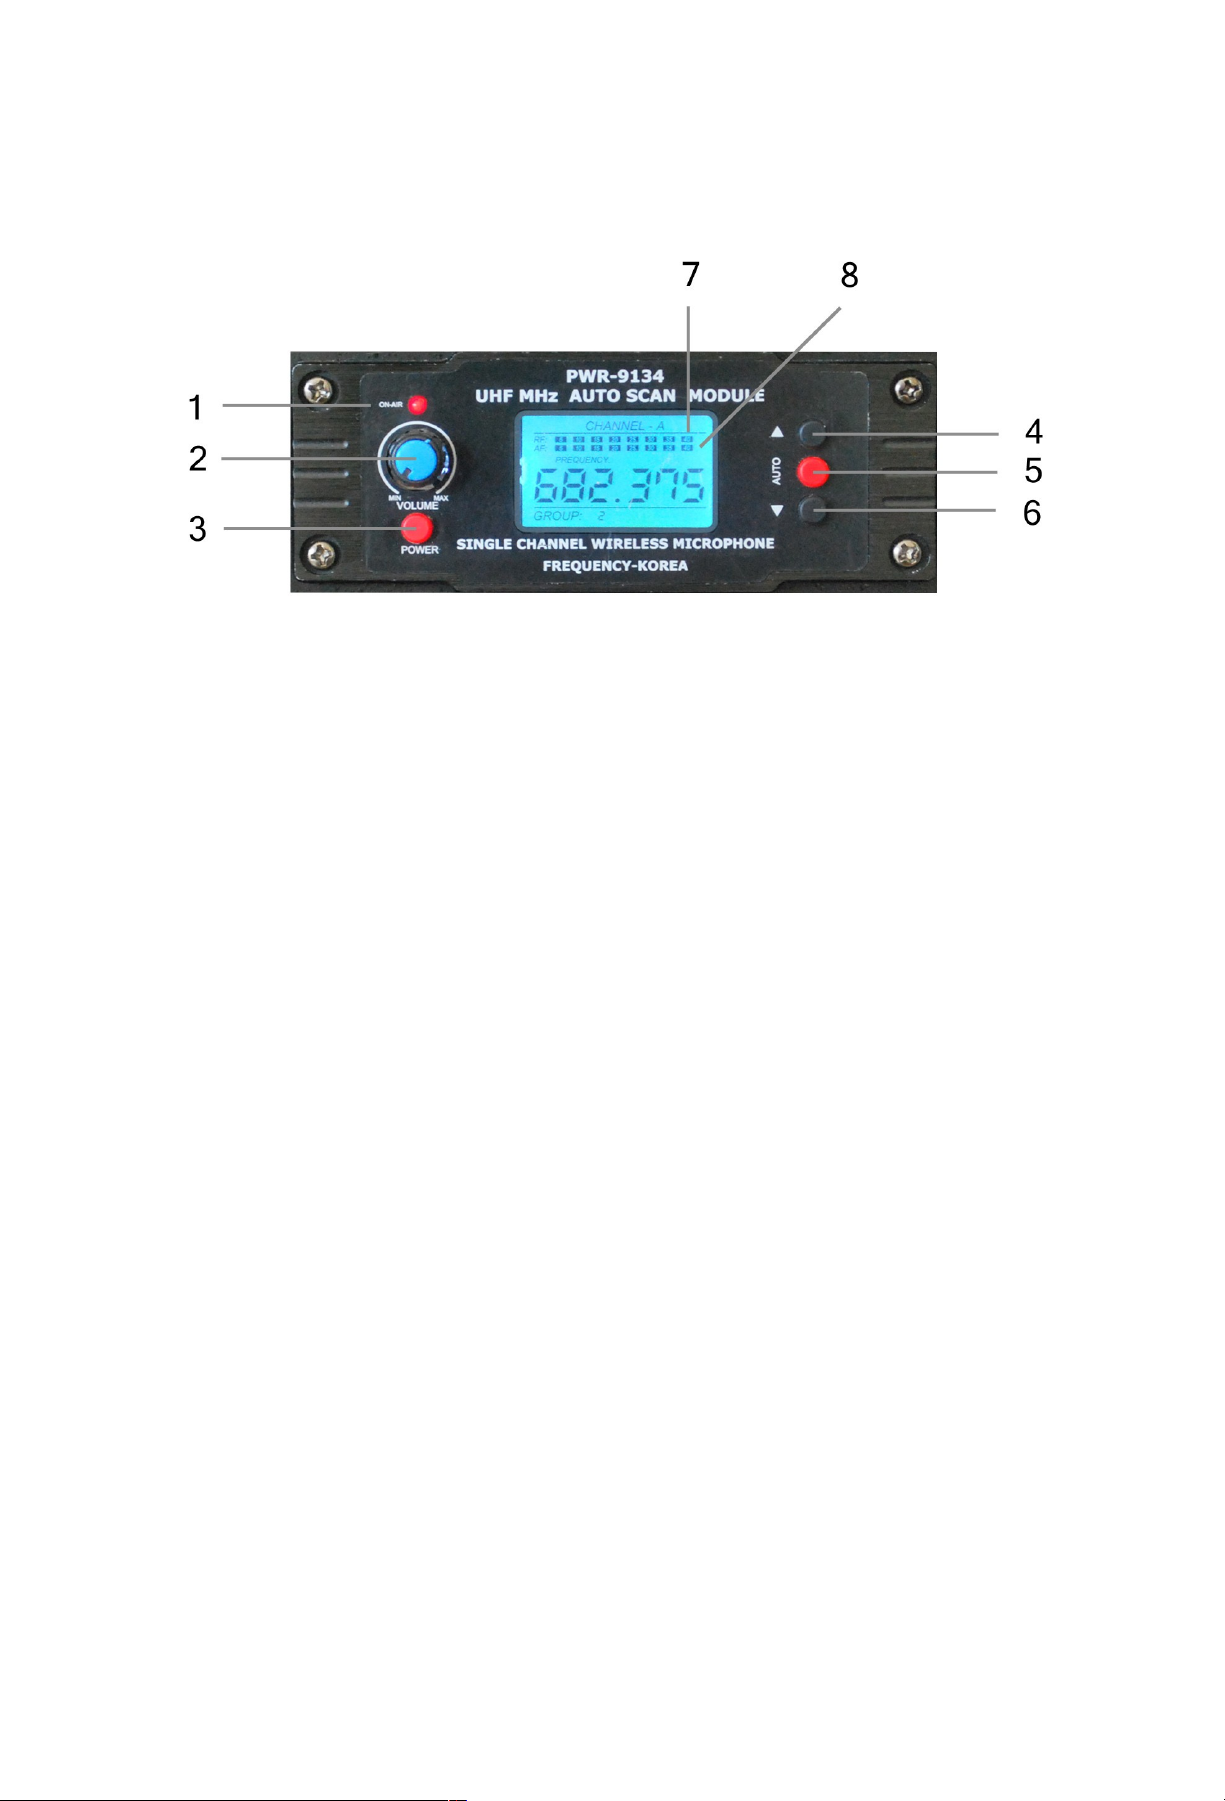
6.2 Wireless Receiver Module
6.3 Multi Input CD Player
6.4 Control Panel
7. Evo Headworm Microphone with Transmitter
7.1 Charging the Evo
7.2 Evo transmitter channel set
8. System Specifications
9. Troubleshooting
2
2
2
2
3
4
4
5
6
10
12
13
14
15
16
10. Warranty
11. Notes
16
17
Page 4

1. Introduction
Thank you for purchasing the the only portable PA systems featuring the Evo True Wireless
transmitter. This Patent Pending PLL synthesized wireless microphone system operates in an FCC
approved UHF band frequency with 16 selectable channels. Please read this instruction manual
carefully before operating your system. This manual covers the function and operation of the wireless
microphone system and portable PA system.
2. Safety
• While the Evo transmitter is water resistant, the Group.X portable electronics are not. Please
observe all safety precautions.
• Do not spill liquid on the Group.X MONSTER and do not drop either unit.
• Do not place the units near heat sources such as radiators, amplifiers, or etc.
• Do not expose it to direct sunlight, extremely dusty conditions, excessive moisture, or vibration.
3. Environment
• Do not throw used electronics into a fire or garbage bin with domestic rubbish. Be sure to dispose
of used batteries in accordance with local waste disposal rules.
• You want to say you are green? Both the Evo Headworn Transmitter and the Group.X portables
feature recharging battery systems. Even better, you don't have to keep buying batteries!
4. Wireless Notes
• Before setting up, make sure that the transmitter and receiver are tuned to the same frequency.
• Do not use two transmitters tuned to the same frequency.
• Always operate your system with a fully charged battery.
• While checking sound, move the transmitter around the area where you use the system to look for
dead spots (loss of signal). If you find any dead spots, change the receiver position. If it does not
work, avoid such places.
• To help avoid interference, do not put the receiver too near substantial metal or reflective objects
and avoid obstructions between transmitter and receiver.
• Avoid the interference from TV, radio, other wireless appliances and etc..
• Wireless systems depend on fully charged batteries. Low batteries will seriously degrade
performance. Be certain to allow charge time prior to use.
• Be certain that the Group.X MONSTER portable PA is exposed and in 'line of sight' with the
transmitter.
2
Page 5

5. Quick Start Guide
• Fully charge the Evo transmitter by connecting the Evo to the supplied wall plug transformer.
Leave your Evo transmitter powered OFF while charging.
• Fully charge the Group.X MONSTER Portable PA.
• Set master volume to minimum, switch Group.X MONSTER portable PA power on. Leave Evo
off.
• With wireless receiver turned on, but with volume turned down, set the receiver to the desired
channel. If the RF lights (with the Evo transmitter OFF), select another channel with no RF
activity.
• Turn on your Evo transmitter and select the matching channel. Note the below table describing
the channels! Note that position 0 indicates channel 16. See Section 7 for details. Also –
be sure to watch the receiver RF indicator for activity as you select the transmitter channel, as
described in the next step. If the RF lights lights fully on one switch position, you have likely
found the correct channel.
Evo Transmitter Switch Transmit Channel Evo Transmitter Switch Transmit Channel
1 1 9 9
2 2 A 10
3 3 B 11
4 4 C 12
5 5 D 13
6 6 E 14
7 7 F 15
8 8 0 16
• Raise wireless volume to approximately midway.
• Slowly raise main PA volume to desired level. If needed, wireless volume may also be
adjusted.
• If setting up a second Evo and PA receiver (optional), follow the first five steps for the second
unit before checking volume on each. It is good practice to skip at least one channel when
using multiple transmitter/receivers.
• Go forth and be truly wireless!
3
Page 6

6. Group.X MONSTER Portable PA
The Group.X Monster is designed for use only with Ansr Audio / Special Projects 16channel selectable channel transmitters. The receiver operates in UHF 682-697 MHz f
requency band with PLL synthesized control.
6.1 Things to Remember:
– Be certain that the Master volume is down before powering on
– Be certain the Master volume is down before powering the wireless receiver on
– Best practice is to leave the Monitor level all the way down unless you need it
If using an MP3 player, connect to the AUX inputs with a stereo 3.5 mm (mini jack or mini TRS)
to stereo RCA cable. Volume can then be controlled at the AUX volume knob.
Charge the batteries if needed – there is a battery meter on the rear panel
Before using the built-in wireless system, be certain the antenna is attached. You'll find
it packaged with the system accessories.
If you power the unit on with a CD already in the player, press the CD button on the player to
activate CD mode.
If you wish to have the music automatically lowered when you speak into the mic, set the
Music Mute switch to 'MUTE ON'. In a fitness class, you will likely want this set to 'MUTE OFF'.
Remember that the each component or input has it's own volume (wireless mic, wired mic, CD,
AUX). Set the blend as you want it, the use the MASTER volume to raise or lower your
blended mix to the desired level.
4
Page 7
6.2 Wireless Receiver Module
1: ON AIR LED
2: Wireless Microphone Volume
3: Wireless Receiver Power On/Off
4: Channel UP Selector
5: AUTO (used only to access sub-menu items, see item 9 below)
6: Channel DOWN Selector
7: RF Meter
8: AF Meter
Using the built-in wireless receiver
1. Start with your transmitter ( Evo, Handheld mic or bodypack) OFF
2. Set the receiver volume to MIN (Item 2 in the above picture)
3. Set the MONSTER Master Volume to MIN (the red knob)
4. Turn the wireless receiver ON
5. Observe the RF meter (Item 7 above). If you see any segments lit, select another
channel with the Channel UP or DOWN buttons until you see no activity: when either
the UP or DOWN buttons are pressed, you will momentarily see the channel indicator
(1-16) before the display returns to the actual frequency. Make a note of the number 116- this is the channel that your transmitter should be set to match.
6. Set your transmitter to the same channel that you ultimately selected on the receiver.
For an Evo, see page 3 in this manual.
For a handheld, see the handheld microphone description in this manual.
For a bodypack, see the bodypack transmitter description in this manual.
7. While talking into the mic of choice, slowly raise the wireless receiver volume until you
see activity on the AF meter (Item 8 in the picture above). At full voice, the meter
should not peak. Set this volume to average in the middle of the segment range.
8. Slowly raise the red Master Volume to the desired level. You may want to create a
more precise 'blend' using the wireless receiver’s volume and the Master volume.
9. Quickly pressing the AUTO button will access a sub-menu with the following:
Loc on:
Loc off:
Squelch: for most uses, the factory setting is good. If you cannot get rid of interference
by changing channels, you may be able 'block it out' by increasing the squelch.
Increasing the squelch decreases the operating area of the wireless mic, to you want to
strike a balance between blocking interference and maintaining a suitable operating
distance.
5
Page 8
6.3 Multi-input CD Player
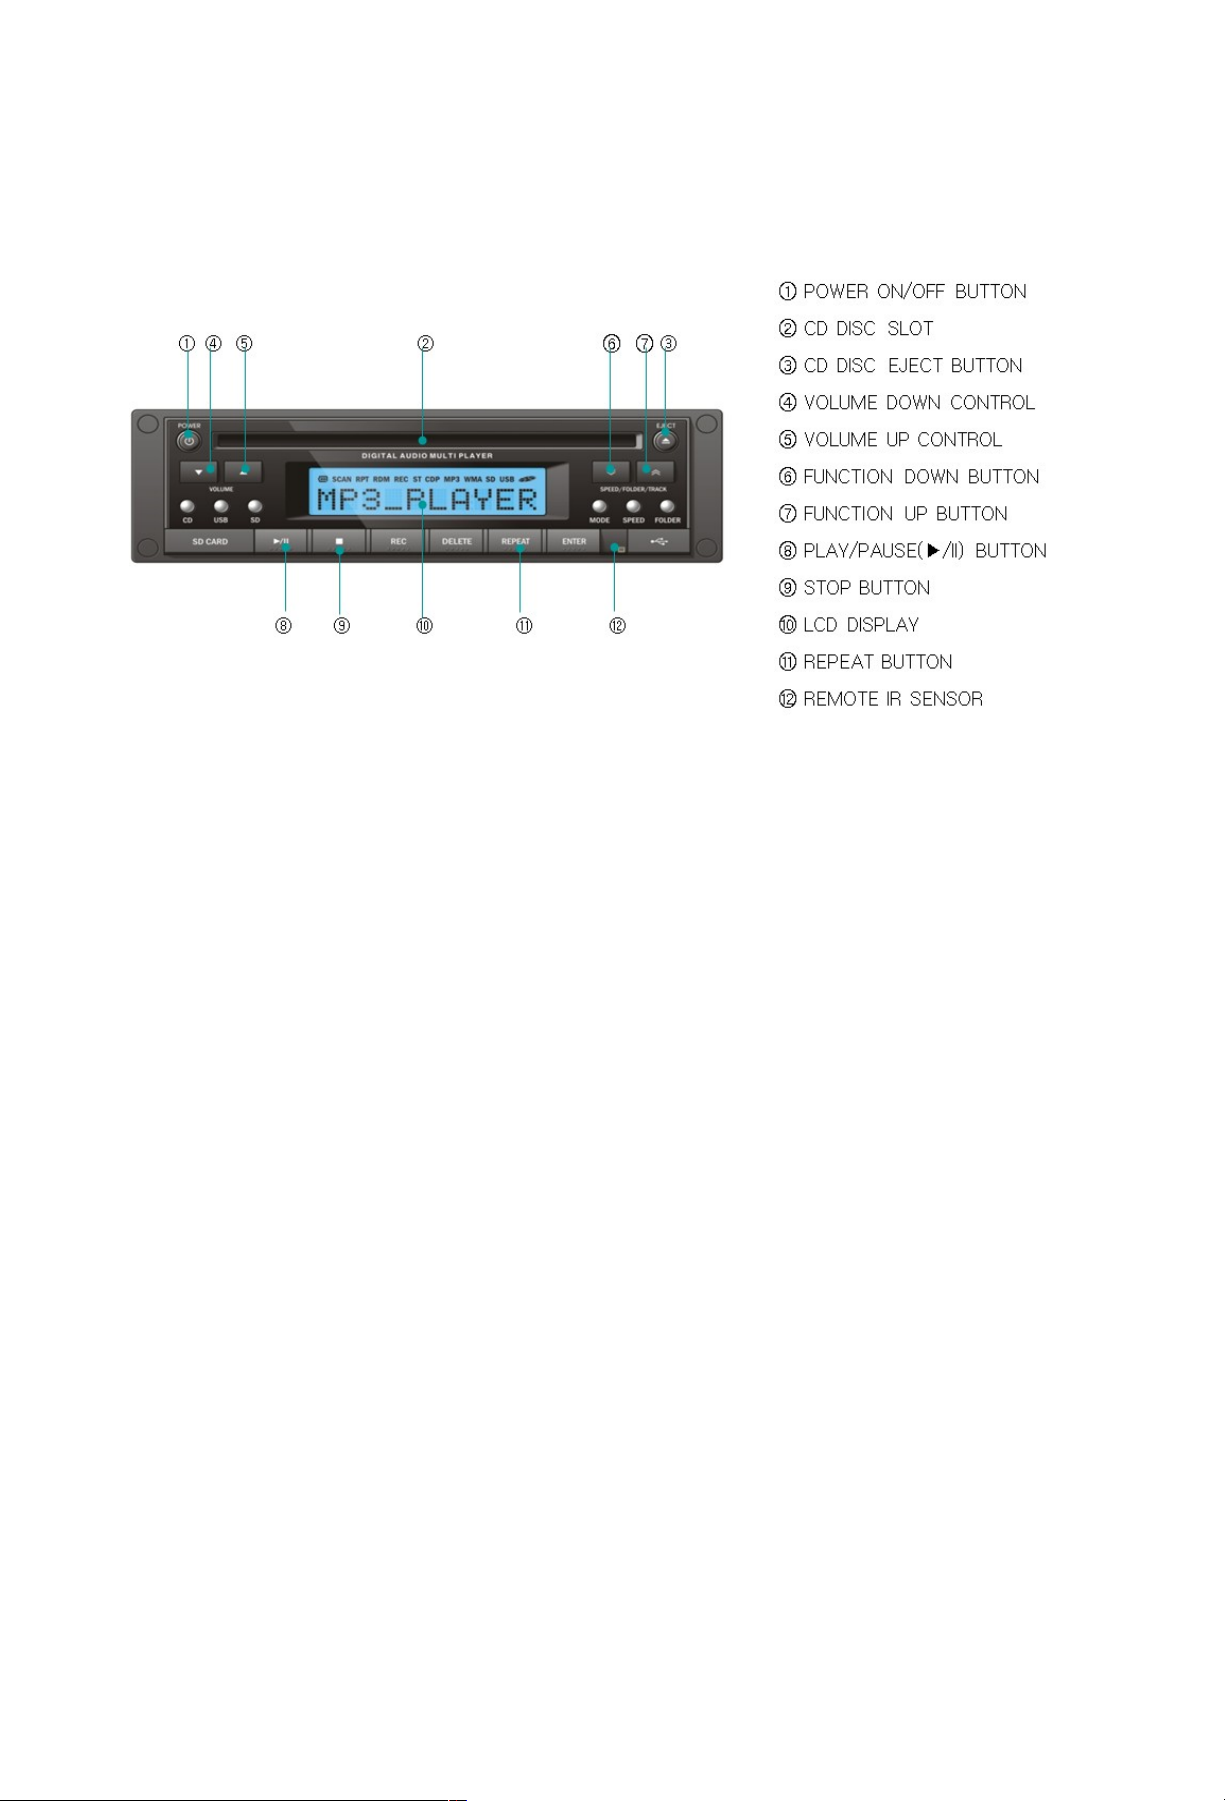
1. POWER ON/OFF: Press Button ①, to turn the CD player On or Off (clever, huh?)
2. DISC SLOT: You probably figured this one out too, but we have to say it, otherwise someone
will say they can't find where to put the CD.
3. DISC EJECT BUTTON: By pressing “DISC EJECT” button ③, the disc will be ejected (if CD
is present).
4. VOLUME DOWN CONTROL In addition to the dedicated green volume knob in the main
control panel, the CD player has it's own volume function to allow for more precise mixing
between I nputs at various levels. Most users will never need to use this, but it's here if
needed. Holding the control ④ down will decrease the volume faster.
5. VOLUME UP CONTROL Same as the 'volume down control', except it turns the volume up.
6. FUNCTION DOWN CONTROL If playing CDs, this is your 'track skip backward' control.
When the MODE key ( below)Ⓓ Is selected, this is the scroll down control for the options
below:
* Bass/Treble : decrease the level
* Balance : increase the L-CH
* LOUD on/off select
* Recorder position : Select USB or SD CARD
7. FUNCTION UP CONTROL If playing CDs, this is your 'track skip forward' control. When the
MODE key ( below)Ⓓ Is selected, this is the scroll down control for the options below:
* Bass/Treble : increase the level
* Balance : increase the R-CH
* LOUD on/off select
* Recorder position : Select USB or SD
8. PLAY/PAUSE( /II)▶ BUTTON Pauses the currently playing file or resumes the paused file.
6
Page 9

9. STOP BUTTON This cleverly named button stops the currently playing file.
10. LCD DISPLAY
11. REPEAT BUTTON During disc play, press button ⑪ to play the selected track repeatedly.
“RPT” will appear on the display panel. Play of the track will continue to repeat until the button
is pressed again and the “RPT” disappears from the display panel. Repeat play mode can also
be canceled by activating random play button.
Note: In case of playing MP3/WMA discs, press button ⑪ to play the selected track repeatedly. “RPT”
will appear on the display panel. One more press button ⑪, “RPT” will blink on the display panel and
play all the files in the selected directory. The playback will be repeated until the directory repeat mode
is canceled by pressing the repeat button again, or by activating random play button. “RPT” will then
disappear from the display.
12. REMOTE IR SENSOR Not used in this configuration
7
Page 10
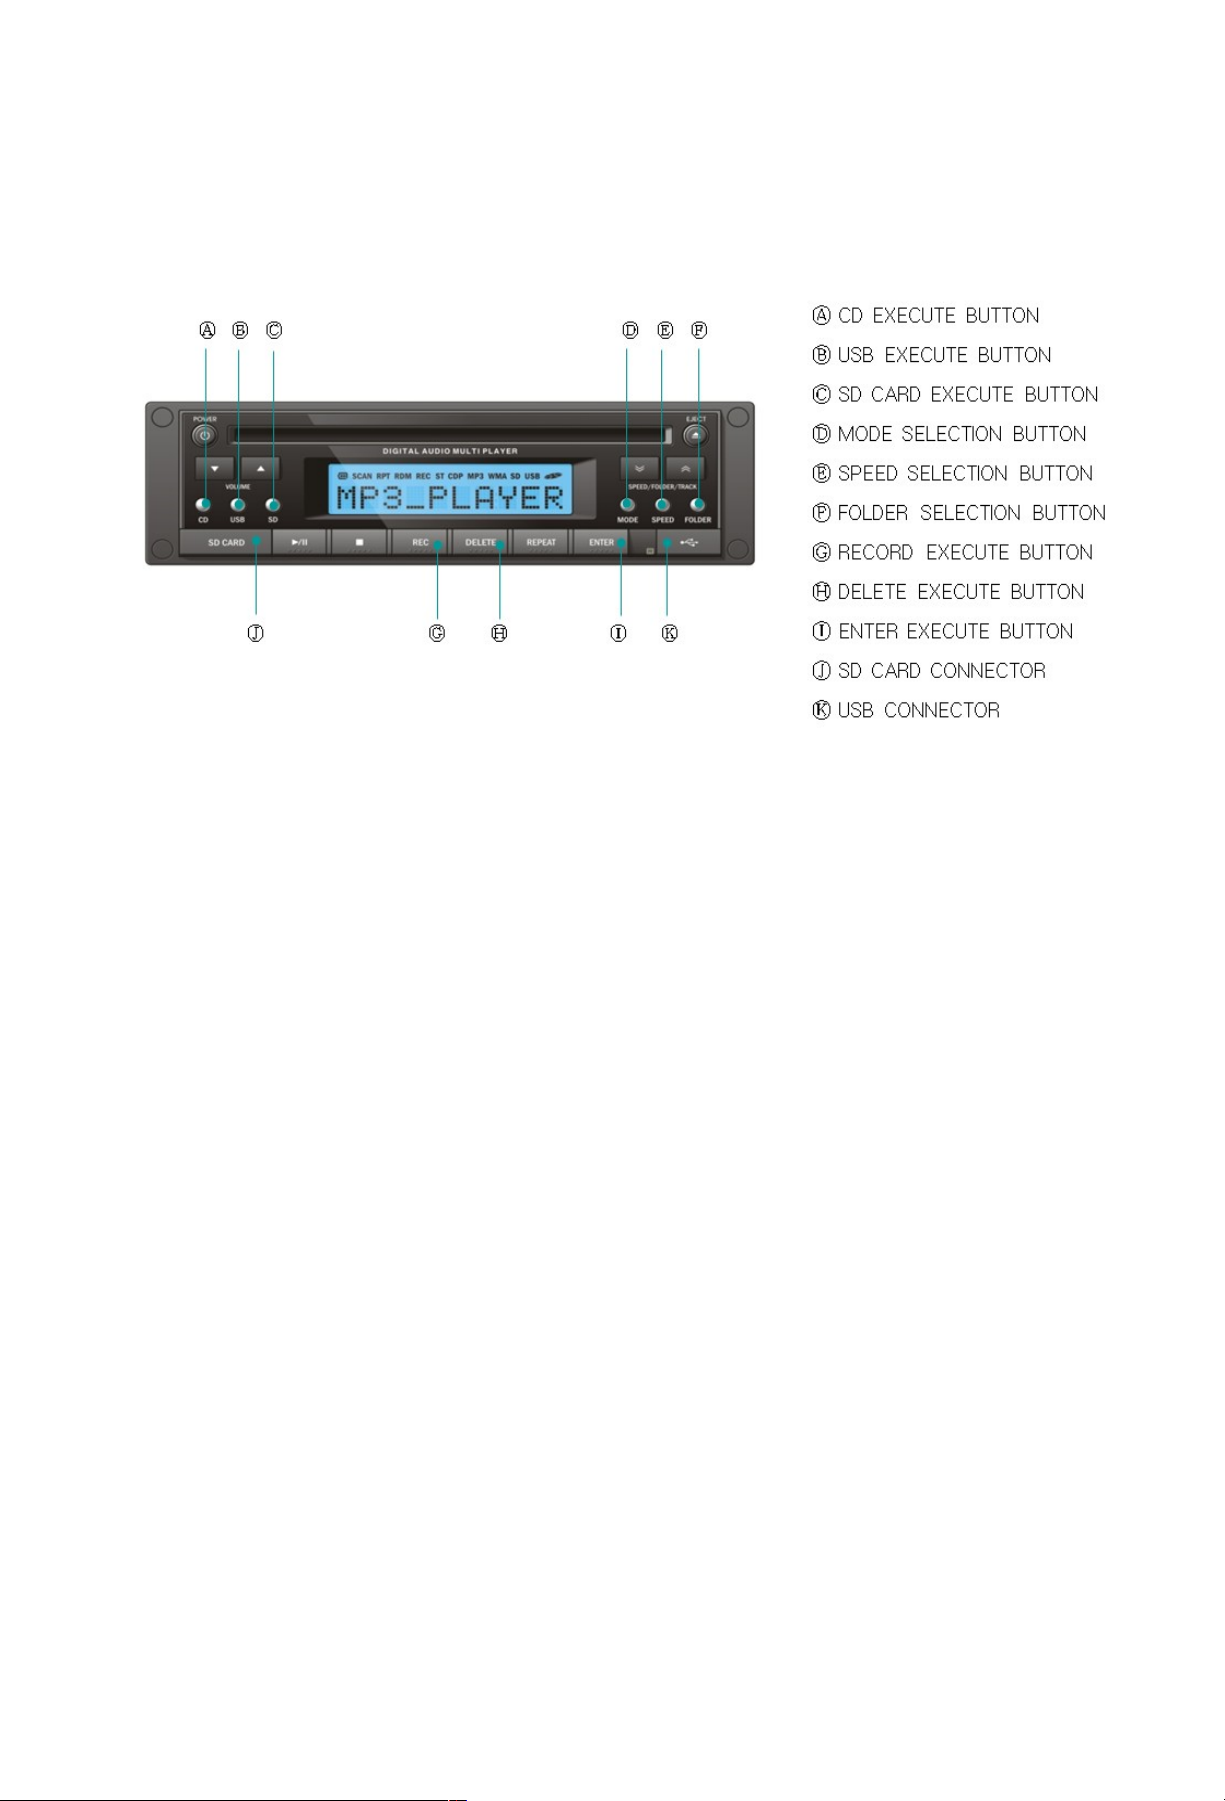
6.3 Multi-input CD Player (continued)
A. CD: Play the song in CD after changing the CD mode. If the unit is turned on with a CD
inserted, select this button to activate the CD.
B. USB: Play the song in USB after changing the USB mode.
C. SD: Play the song in SD after changing the SD mode.
D. MODE: This button activates a menu so you can adjust EQ (this is handy because it allows
you to EQ the CD/MP3 without effecting the mics), Balance (not likely relevant in this
configuration), Loudness (like in your car- it's your preference) and Recorder destination (more
in Ⓖ below). On each setting, the level can be controlled by the up/down buttons ,⑥ ⑦. The
display will automatically return to the previous display mode 3 seconds after the last
adjustment is made.
E. SPEED: This is your pitch control for the CD, USB, SD control play. Press SPEED and
then the up or down arrows , ⑥ ⑦ to desired tempo.
F. FOLDER SEEK: For navigating MP3s within folders;
- Each time you press button ⑥, track number is decreased on the LCD.
- Each time you press button ⑦, track number is increased on the LCD.
G. REC: While in recording mode (by any connected microphone), pressing button Ⓖ will record
the sound into USB or SD. “REC START” will appear on the display panel. To store desired
any of the sound into USB or SD, press the button ⓘ(ENTER) then recording is completed
and “REC END” will appear on the display panel.
- Recoding file name : Audio_001.mp3 to Audio_XXX.mp3
Memory Sequence※
(1) Select USB and activating USB : Record into USB
(2) Select USB but inactivating USB and activating SD : Record into SD automatically
(3) Select SD and activating SD : Record into SD
(4) Select SD but inactivating SD and activating USB : Record into USB automatically
8
Page 11

6.3 Multi-input CD Player (continued)
H. DELETE: Deletes the recorded file. “DELETE” will appear on the display panel. To execute
deleting the file, press the button ⓘ(ENTER).
NOTE : DELETE FILE NAME - “Audio_XXX.mp3” Recording FILE ONLY※
I. ENTER: In recording mode, button Ⓘ can be used to select as follows:
1. complete the file for recording
2. confirm the file for deleting
J. SD INPUT: When you use the SD MODE, insert the SD into this.
K. USB INPUT: When you use the USB MODE, insert the USB into this.
9 9
Page 12
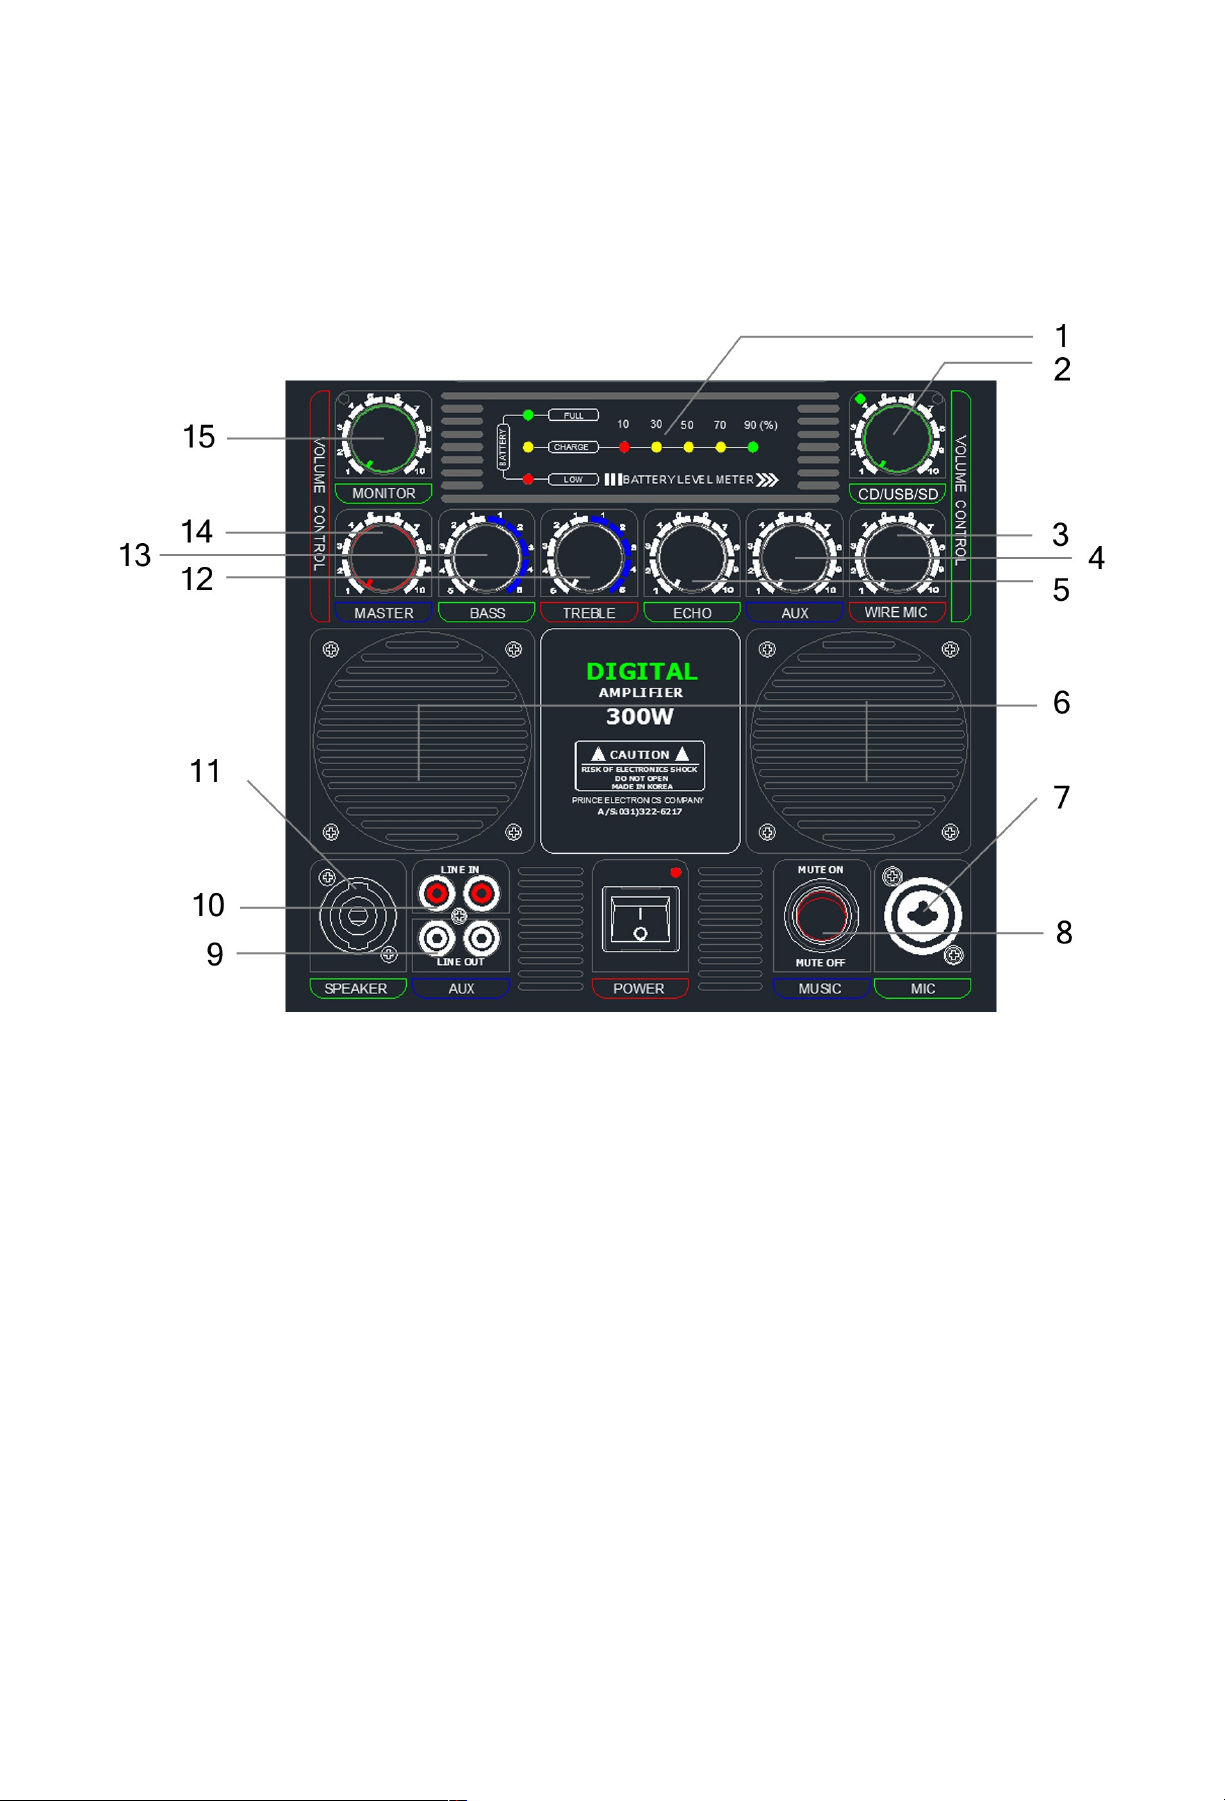
6.4 Control Panel
1. Battery Level Meter: Pretty self explanatory, but learn to keep an eye on the really helpful
feature. Take a look at it before and after use if you are using the unit on batteries. You'll learn
quickly how your particular usage habits affect the battery life and you'll always be prepared.
2. CD/USB/SD: Independent volume control for the CD component. If you want the CD louder,
but your voice is perfect, use this to boost the CD level.
3. Wire Mic: If using a mic connected to the MIC connector (7), use this to independently control
the mic volume.
4. AUX: If using a device (external CD, MP3, tape, etc) connected to the Line In points (10), use
this to independently control the AUX device volume.
5. ECHO: If you're singing karaoke, or if you just want to sound big and important, add a little
echo. Otherwise, keep this off (at minimum) for best performance in group exercise.
6. Built-in Monitor: This is helpful if you need to cue some audio and you don't need to play it for
the class – just turn the Master volume down and use the Monitor volume (15) to control these
speakers.
7. MIC: Combination connector accepts either XLR or ¼ inch microphone input. Volume is
controlled by Wire Mic volume (3).
10
Page 13

6.4 Control Panel (continued)
8. MUSIC MUTE: Voice priority control will automatically lower the music volume when either the
wireless or wired mic is used. For group fitness, most users will want this in the OFF position.
9. AUX LINE OUT: Provides an output for a variety of uses – need to record your presentation or
class? Connect here to any recorder.
10. AUX LINE IN: Connect any auxiliary device here. Use this point to connect MP3 players.
You'll need to supply the cable: either 3.5mm stereo to RCA or iPod to RCA. Volume is
controlled by the AUX control (4).
11. SPEAKER: OUTPUT only connector, for connecting to extra PASSIVE (not powered) speaker.
Connect with a Speak-on type speaker cable.
12. TREBLE: Overall treble control
13. BASS: Overall bass control
14. MASTER Volume: Master volume control over all fuctions except the Monitor. Once you set a
preferred mix of music to voice, you can control the overall volume with this. Set this to
minimum for powering on and off.
15. MONITOR: Controls volume of the monitor speakers (6). Set this to minimum when using the
main (front) speakers.
11
Page 14
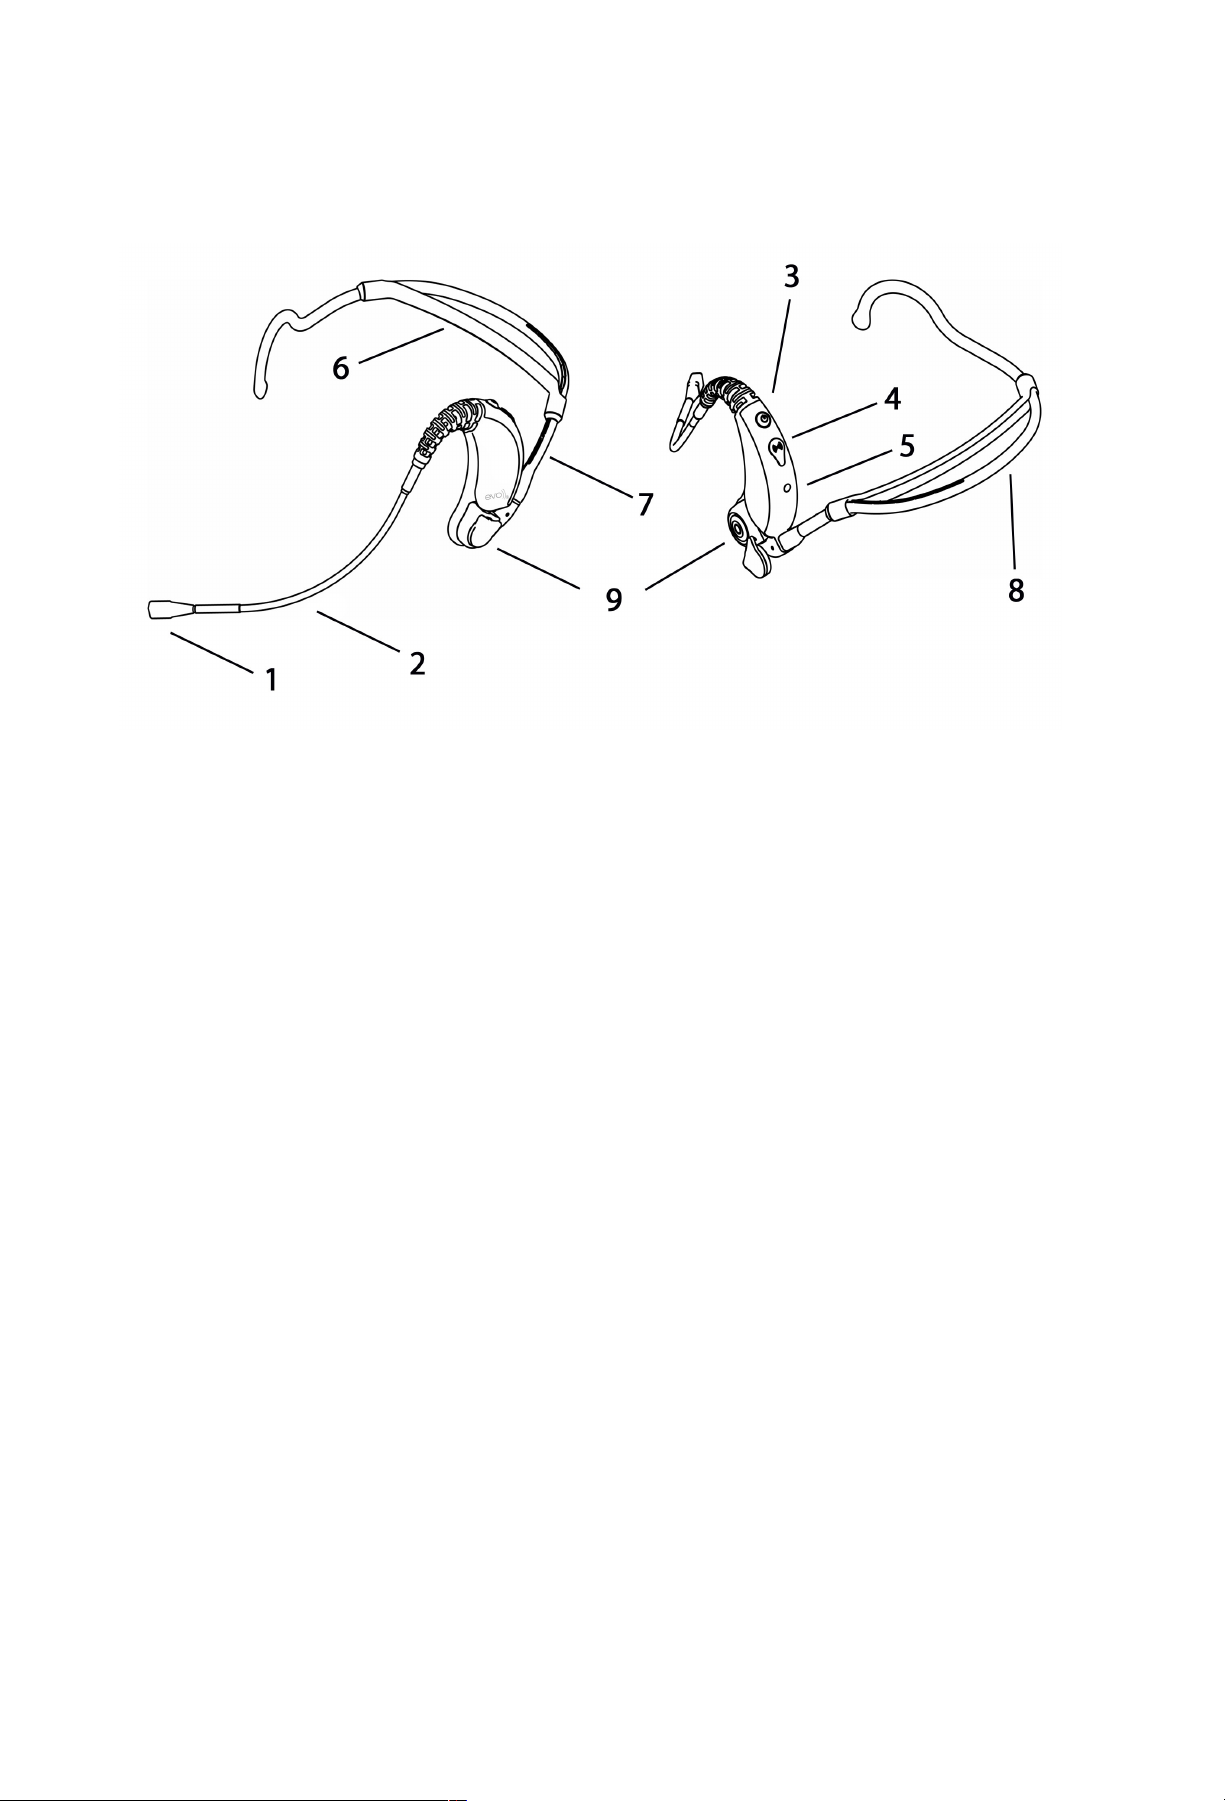
7. Evo True Wireless Headworn Transmitter
1. Microphone Element: Shown without the windscreen. Always be sure the side with the yellow
dot is toward the mouth. In the event that you experience a low audio level with excessive
feedback, check the direction of the microphone element. DO NOT twist the element.
2. Flexible Boom: Adjust so that the microphone element is at the corner or just under the mouth.
To prevent feedback, the Evo uses a noise-canceling element. Mic placement is very
important for a good experience. If you notice the volume 'dip', check to be certain the
element is placed properly.
3. Power On/Off Switch: Turns transmitter power on and off. Press and hold one second to
power on, three seconds to power off. The LED will flash to indicate a change in power status.
After powering on, LED will flash red at 4-5 second intervals to indicate the Evo is on.
4. Channel Selector and Cover: Lift cover to set the transmitter channel via the rotary selector
with the included mini screwdriver. Always be certain that this cover is completely closed
prior to use. Failure to do so may affect water resistance and void your warranty!
5. LED Indicator: Green indicates charging, single red indicates power ON, multiple red indicates
power OFF.
6. Adjustable Strap: The Evo headband is designed so that most users can comfortably use the
system with no adjustment. If you need a more snug fit, you may slip this strap forward. Also
see (7) below.
7. Recessed Antenna: Prior to use, always be certain the antenna is securely recessed into the
headband. If you need to adjust the strap, be certain the antenna is still properly recessed.
8. Form Fitting Headband: The Evo headband is designed for maximum comfort on most users
without adjustment. See points (6) and (7) for details. The headband will flex for comfort, but
don't test it's limits by spreading it wider than a human head! Really, we know someone out
there will...
9. Charging Connector and Cover: For use with the supplied external charging adapter. Be
certain to replace the cover before use – failure to do so may void your warranty.
12
Page 15
7.1 Charging The Evo True Wireless Fitness Transmitter
NOTICE: Prior to use, it is necessary to fully charge your Evo transmitter. Initial charge
from a depleted state may take up to two hours or more.
NOTICE: The supplied charger is designed specifically for use with the Evo True Wireless
system. Use of any other charger may cause system damage and will void your
warranty. Do not use the receiver DC out to charge the Evo!
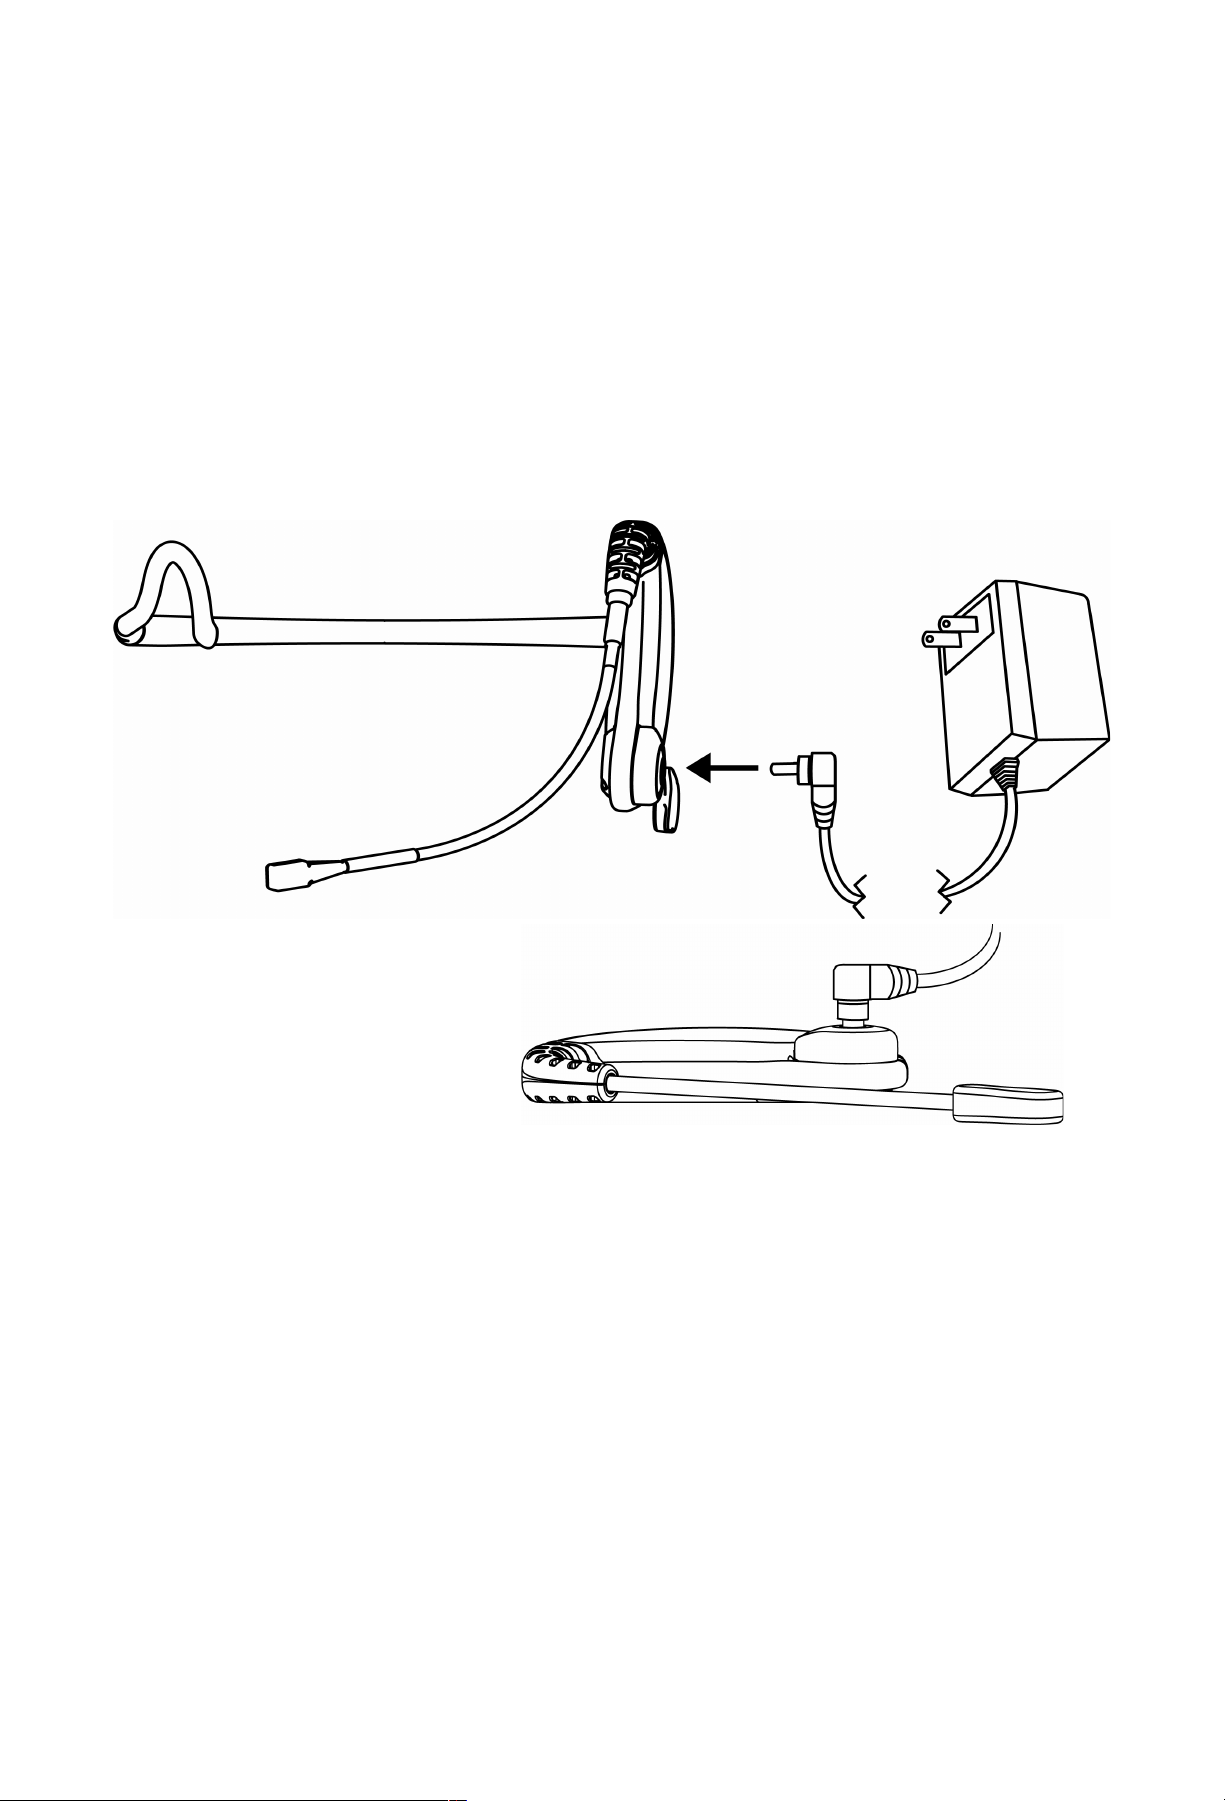
• Open the charger cover and insert the charging connector into the Evo as illustrated below.
Only the supplied wall charger should be used. Do not use the receiver’s DC out to charge
the Evo.
• Insert the charging cable into the
charging adapter as illustrated at
right. Insert the cable fully.
• Connect the charging transformer to AC power (that's 'manual talk' for 'plug it in to the wall').
• Note that the Evo transmitter should be powered OFF while charging.
• GREEN LED indicates battery charging.
• GREEN LED will turn off when battery is charged.
IMPORTANT : If your Evo was supplied with a YELLOW, removable charging adapter (part
9 on page 8), be certain to dry the headset and charging points before charging and remove
the adapter before use.
If your Evo was supplied with a BLACK charging adapter and cover, DO NOT attempt to
remove it. Just charge normally and replace the cover before use.
13
Page 16

7.2 Evo Headworn Transmitter Channel Set
NOTICE: Prior to setting up, please check that the transmitter and receiver are tuned to the
same frequency. Two or more transmitters operating in the same frequency can not be used at
the same time and area. So for each extra transmitter, please select a different frequency which
can be used simultaneously at local area.
Power the Evo transmitter ON by pressing the POWER button for one second.
• Open the channel selector cover and set the rotary selector to the desired channel. Note that the
rotary selector is alpha-numeric. You may refer to the chart below:
Channel Selector Channel Selector
1 1 9 9
2 2 10 A
3 3 11 B
4 4 12 C
5 5 13 D
6 6 14 E
7 7 15 F
8 8 16 0
• Note that to set the transmitter to channel 16, you must use the '0' setting on the rotary selector.
• When the transmitter is set to the same channel as the receiver, the receiver’s RF meter should
indicate a strong signal, regardless of whether or not you are speaking into the mic.
• Be certain that the selector cover is securely closed prior to use. Failure to close the cover
may affect water resistance and void your warranty.
14
Page 17

8. System Specifications
Evo True Wireless Transmitter
Carrier Frequency Range: UHF band, 682 – 697 MHz
RF Power Output: 7.5 mW
Microphone Element: Noise canceling, bi-directional condenser
Battery: Rechargeable Lithium-Polymer
Operating Range: Up to 300 feet
Talk Time: Up to 4+ hours, depending on use
Group.X Monster Portable PA System
Inputs: Wireless receiver, USB, AUX, MIC
Power: 200W RMS, 300W Peak
RF Channels: 16, user selectable
Carrier Frequency Range: UHF band, 682 – 697 MHz
Charge Time: 6-7 hours, depending on charge status
Talk Time, GXM: Up to 12 hours, depending on volume
Dimensions: 14.5 (D) x 13.4 (W) x 23 (H)
GXM: 52 pounds with batteries
Batteries: (2) 12V 7A sealed
15
Page 18

9. Troubleshooting
NOTICE: Most 'problems' associated with wireless systems are caused by low transmitter
battery power. Always keep your transmitter fully charged. If operating your Group.X units on
battery power, be certain that you are operating on a full charge for best performance.
Symptom Possible Solution
No sound Be certain that the Group.X primary power and the components
(receiver, CD) are switched ON. Be certain that the Evo transmitter is
switched ON.
Be certain that both receiver and transmitter are set to the same
frequency.
Re-check all levels on your PA system.
Be certain that the transmitter is not out of range.
Audio interference If using two or more systems, be sure all systems are operating in
different frequencies.
Re-check your operating frequency according to the procedure noted in
the Quick Start Guide (Section 5).
Note that interference can come from a variety of sources. If interference
is experienced on multiple channels, the source is likely nearby (other
electronic systems in the same building).
Note that some cell phone signals are known to interfere with audio
systems, regardless of operating frequency.
Distortion Check the receiver’s volume control – if it is too high, it may overload
your system.
Those with loud voices may move the element away from the mouth.
Below the lips or to the side of the mouth are recommended positions.
Incorrect placement may cause distortion by overloading the
microphone.
Diminished performance Be certain the transmitter battery is fully charged.
Be certain the Group.X battery is fully charged.
11. Warranty
Your Evo True Wireless Fitness System is covered for one year against defects in materials and
workmanship. MONSTER CD player is covered similarly for 6 months. In the event of such defects,
Ansr Audio will repair our product free of charge unless otherwise specified in detail, or replace with a new
product of equal or greater value .This warranty excludes defects due to normal wear, shipping damages or
failure to use products according to instructions for proper use. This warranty is void in the event of
unauthorized repairs or modifications not made by Ansr Audio. Any attempt to open or service any
component of your wireless system will void this warranty. If you have any questions, please call us at 866491-2677 or email [email protected].
16
Page 19

12. NOTES
What kind of notes? How about which channel worked well in different locations? Default
volume settings in different classes? Any particular points you might tend to forget (like be
sure to close the channel selector cover!). You can even use it for your grocery list, it's up to
you – we're just offering this space to use as you see fit.
17
Page 20

Ansr Audio, Inc.
3800 HWY 271 N
Powderly, TX 75473
Phone: 866-491-2677
Fax: 866-746-4366
www.ansraudio.com
www.specialprojectsaudio.com
Copyright Ansr Audio, Inc., 2009
 Loading...