

Page 1

3000W
Electric
Blower & Vac
GY8900
ORIGINAL
INSTRUCTION
MANUAL
Important - Please read these instructions
fully before starting assembly
These instructions contain important information that will help
you get the best from your blower & vac, ensuring it is assembled
correctly and safely. If you need help or have damaged or missing parts,
call the Customer Helpline on 0345 605 2067
AFTER SALES SUPPORT
0345 605 2067
Page 2

SPEAR & JACKSON SINCE 1760
For more than 250 years gardeners have enjoyed high quality performance and
great results using Spear & Jackson tools.
Our garden power tools combine continuous innovation and the latest in
manufacturing technologies with a proud heritage.
Each product is carefully designed with performance, comfort and durability
rmly in mind, which has earned Spear & Jackson an enviable reputation as a
maker of tools to trust.
3 YEARS GUARANTEE
As a testament to the quality of our products, we offer a 3 year manufacturers warranty and a comprehensive after sales service.
The warranty covers manufacturing faults, however in the event that the item has
been deliberately damaged, used in a commercial environment or disassembled then
the warranty will be null and void.
Please retain proof of purchase.
7 DAYS A WEEK TECHNICAL SUPPORT
We want you to get the best out of your products. Our easy-to-read instruction manual guides you with best practice use and maintenance tips. Please call 0345 605 2067
for technical support, we can solve around 80% of questions directly over the phone.
We hope you enjoy your product and we look forward to any feedback, as this allows
us to develop even better products for the future.
2 AFTER SALES SUPPORT 0345 605 2067
Page 3

CONTENTS
Safety Information 4
Description of symbols 4
General safety 5
Personal safety 5
Operating safety 6
Maintenance and storage safety 10
Intended use 10
Box Content / Parts 12
Assemble 13
Height adjustment 13
Shoulder strap installation 13
Fitting the collection bag 13
Front handle adjustment 14
Rake adjustment 14
Operate 15
Before starting 15
Starting the blower & vac 15
Stopping the blower & vac 15
Using the blower mode 16
Using the vacuum mode 17
Rake function 17
Maintenance 18
Cleaning debris 18
Storing Your Product 18
Maintenance 19
Disposing of the machine 19
Disposing of the packaging 19
Technical Data 20
Troubleshooting 22
Warranty 23
3 AFTER SALES SUPPORT 0345 605 2067
Page 4

SAFETY INFORMATION
Please read these instructions fully before operating or maintaining your machine
DESCRIPTION OF SYMBOLS
The following warning symbols appear throughout
safety measures you should take when operating and maintaining the blower & vac.
this manual and indicate the appropriate
IMPORTANT!
Please read all of the safety and
operating instructions carefully
before using this tool. Please pay
particular attention to all sections
of this user guide that carry
warning symbols and notices.
WARNING!
This is a warning symbol. This
symbol is used throughout the
user guide whenever there is a
risk of personal injury. Ensure
that these warnings are read and
understood at all times.
Wear eye and ear protections.
Warning!Flying objects
Wear gloves to protect your hands
Rotating impeller blades can cause
serious injury
Keep bystanders away
Danger-rotating blades
Do not expose to rain
Switch off and unplug the device
before cleaning or performing
maintenance on it
Vacuum mode
Blower mode
AFTER SALES SUPPORT 0345 605 2067
4
The product complies with the
applicable European directives
and an evaluation method of
conformity for these directives
was done.
Guaranteed sound power level.
104
Page 5

SAFETY INFORMATION
Please read these instructions fully before operating or maintaining your machine
GENERAL SAFETY
physical, sensory or
IMPORTANT!
■
Keep this instruction
manual in a safe
place for future reference.
■
Read the instructions
carefully. Be familiar
with the controls and
the proper use of the
equipment.
■
Never allow children or
people unfamiliar with
these instructions to use
the blower&vac. Local
regulations can restrict the
age of the operator.
mental capabilities,
or lack of experience
and knowledge, unless
they have been given
supervision or instruction
concerning use of the
appliance by a person
responsible for their safety.
■
Don’t use the appliance
without reading the
instruction sheet.
■
Children should be
supervised to ensure that
they do not play with the
appliance.
■
Never use the machine
while people, especially
children, or pets are
nearby. Keep in mind that
the operator or user is
responsible for accidents
or hazards occurring
to other people or their
property.
■
This appliance is not
intended for use by
persons (including
children) with reduced
PERSONAL SAFETY
■
Stay alert, watch what
you are doing and use
common sense when
operating a power tool. Do
not use a power tool when
you are tired or under
the influence of drugs,
alcohol or medication.
A moment of inattention
when operating a power
tool may result in serious
AFTER SALES SUPPORT 0345 605 2067
5
Page 6

SAFETY INFORMATION
Please read these instructions fully before operating or maintaining your machine
personal injury.
■
Use safety equipment.
Always wear eye
protection. Using safety
equipment such as a
dust mask, nonskid
safety shoes, a hard hat,
or hearing protection
whenever it is needed will
reduce the risk of personal
injury.
■
Avoid accidental starts.
Ensure the switch is in the
off position before inserting
the plug. Carrying power
tools with your finger on
the switch or plugging
in power tools when the
switch is in the on position
makes accidents more
likely.
the ground at all times.
This will enable you retain
control over the power tool
in unexpected situations.
■
Dress properly. Do not
wear loose clothing or
jewellery. Keep your hair,
clothing and gloves away
from the power tool. Loose
clothes, jewellery or long
hair can become entangled
in the moving parts.
■
If there are devices for
connecting dust extraction
and collection facilities,
please ensure that they
are attached and used
correctly. Using such
devices can reduce dustrelated hazards.
■
Remove any adjusting
keys or spanners before
turning on the power
tool. A spanner or key
left attached to a rotating
part of the power tool may
result in personal injury.
■
Do not reach out too far.
Keep your feet firmly on
6 AFTER SALES SUPPORT 0345 605 2067
OPERATING SAFETY
Working area
■
Keep working area clean
and well lit. Untidy and
dark areas can lead to
accidents.
■
Do not operate power
Page 7

SAFETY INFORMATION
Please read these instructions fully before operating or maintaining your machine
tools in potentially
explosive surroundings, for
example, in the presence
of inflammable liquids,
gases or dust. Power tools
create sparks which may
ignite the dust or fumes.
■
A leaf blower is not
intended for wet
conditions! Avoid wet
materials such as leaves
and dirt, twigs, branches,
pine needles, grass, earth,
sand, mulch, cuttings,
etc. Do not use on wet
lawns, grass areas or
fields. Misuse may lead
to congestion in the
shredding unit and lead
to reduced functionality.
The machine may need to
be completely dismantled
and cleaned. This work
should be carried out by a
qualified service technician
and is not covered by
warranty.
Electrical safety
■
Always check that the
power supply corresponds
to the voltage on the rating
plate.
■
Power tool plugs must
match the outlet. Never
modify the plug in any
way. Do not use adapter
plugs with earthed power
tools. Unmodified plugs
and matching outlets
will reduce the risk of an
electric shock.
■
Avoid body contact with
earthed surfaces such as
pipes, radiators, kitchen
ranges and refrigerators.
There is an increased risk
of an electric shock if your
body is earthed.
■
Do not expose power tools
to rain or wet conditions. If
water gets inside a power
tool, it will increase the risk
of an electric shock.
■
Do not damage the
cord. Never use the cord
for carrying, pulling or
unplugging the power tool.
Keep the cord away from
heat, oil, sharp edges or
moving parts. Damaged or
entangled cords increase
7 AFTER SALES SUPPORT 0345 605 2067
Page 8

SAFETY INFORMATION
Please read these instructions fully before operating or maintaining your machine
the risk of an electric
shock.
■
When operating a power
tool outdoors, use an
extension cable suitable
for outdoor use. Using a
cord suitable for outdoor
use reduces the risk of an
electric shock.
■
If operating a power tool
in a damp location is
unavoidable, use a power
supply protected by a
residual current device
(RCD). using an RCD
reduces the risk of an
electric shock.
Power tool use and care
■
Only use the tool in the
context it was designed
for.
■
Do not use the power tool
if the switch cannot turn it
on and off. A power tool
with a broken switch is
dangerous and must be
repaired.
■
Disconnect the plug from
the power source before
making adjustments,
changing accessories, or
storing power tools. Such
preventive safety measures
reduce the risk of starting
the power tool accidentally.
MACHINE SAFETY WARNINGS
■
Always direct the cable
to the rear, away from the
appliance.
■
If a cord becomes
damaged during use,
disconnect the supply cord
from the mains supply
immediately.
■
Operate the appliance
only in daylight or in good
artificial light.
■
Walk, never run when using
appliance.
■
Keep all cooling air inlets
clear.
■
Do not attempt to modify
the power tool in any way.
The use of any attachment
or accessory other than
those recommended in this
AFTER SALES SUPPORT 0345 605 2067 8
Page 9

SAFETY INFORMATION
Please read these instructions fully before operating or maintaining your machine
instruction manual could
result in damage to the
power tool and injury to the
operator.
■
Never feed hard objects
such as stones, bottles,
cans or pieces of metal
into the Blower & Vac.
They can cause damage to
the machine and possibly
injury to the operator and
bystanders.
■
If a foreign body, or other
debris, is accidentally
collected by the Blower &
Vac, stop it immediately
and do not use the Blower
& Vac until it has been
checked and you are sure
that the entire Blower &
Vac is in a safe operating
condition.
■
If the Blower & Vac makes
any unusual noise or starts
to vibrate abnormally
STOP immediately remove
the plug from the mains
supply and investigate the
cause. Excessive vibration
can cause damage to the
Blower & Vac and injury to
the operator.
■
Never operate the
appliance while people,
especially children, or pets
are nearby.
■
The operator or user is
responsible for accidents
or hazards occurring
to otherpeople or their
property.
■
Before use always check
the appliance including
supply and extension cord
for signs of damage and
aging.
■
Never operate the
appliance with defective
guards or shields, or
without safety devices, for
example debris collector in
place.
■
The device must not
be employed in areas
where there is health
endangering dusts or as a
wet suction device.
AFTER SALES SUPPORT 0345 605 2067 9
Page 10

SAFETY INFORMATION
Please read these instructions fully before operating or maintaining your machine
MAINTENANCE AND STORAGE
SAFETY
WARNING!
■
To ensure appliance safety,
use only original spare
parts from the manufacturer
or approved by the
manufacturer.
■
Retrofitting or making any
unauthorized changes to
the machine, as well as the
use of unapproved parts will
invalidate your warranty.
■
Do not attempt to repair
the equipment yourself. All
work not indicated in these
instructions is to be carried
out only by service stations
authorized by us.
■
Store the equipment in a
dry location and when not
in use, out of the reach of
children and do not allow
people who are not familiar
with the equipment or these
instructions to operate it.
Equipment is potentially
dangerous in the hands of
untrained users.
■
Handle the equipment with
care. Keep the equipment
clean for safe and more
efficient working. Follow the
maintenance directions.
■
Check for misalignment,
jammed moving parts,
breakages or any other
feature that might affect
the operation of the
machine.If it is damaged,
the equipment must be
repaired. Many accidents
are caused by using poorly
maintained machines.
INTENDED USE
This Blower & Vac is
designed for domestic use
only:
■
The device is designed only
for blowing and suction
of light DRY debris, such
as leaves, grass, mulch
and clippings, from
10 AFTER SALES SUPPORT 0345 605 2067
Page 11

SAFETY INFORMATION
Please read these instructions fully before operating or maintaining your machine
domestic gardens. Avoid
wet materials, as it may
lead to congestion in the
shredder unit and lead to
reduced functionality. Every
other utilization, which is
not explicitly approved in
these directions, can lead
to damage to the device
and represents a serious
danger to the user.
■
To use with accessories,
replacement
parts and detergents
approved by
Spear & Jackson.
Any use of the machine that
deviates from its intended
use and is not included
in these instructions is
considered unauthorized
use and relieves the
manufacturer from his or her
legal liability.
11 AFTER SALES SUPPORT 0345 605 2067
Page 12
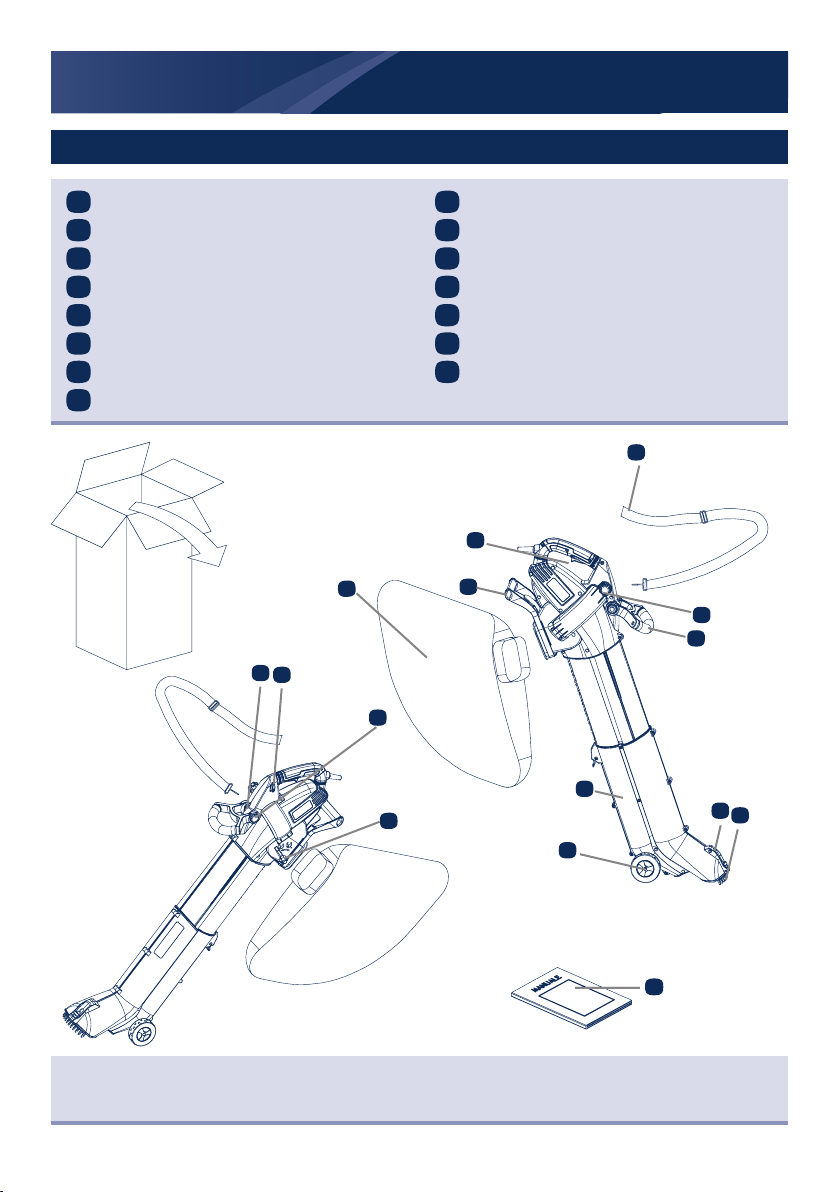
BOX CONTENT
PARTS
1 9
Shoulder strap x1
2 10
On/off trigger
3 11
Impeller access release
4 12
Collection bag holder
5 13
Collection bag
6 14
Vacuum/Blower tube
7
Operate manual
8
Hook
Adjustable front handle
Speed controller
Angle adjusting button
Vacuum/Blow selector lever
Wheel
Rake knob
15
Rake
7
2
1
5
8
10
11
12
4
6
13
If there are any parts missing, please call the customer helpline on 0345 605 2067
Please store the packaging in a safe place for warranty purposes.
12 AFTER SALES SUPPORT 0345 605 2067
3
9
14
15
7
Page 13

ASSEMBLE
A
B
WARNING:
outlet before removing vacuum bag for emptying.
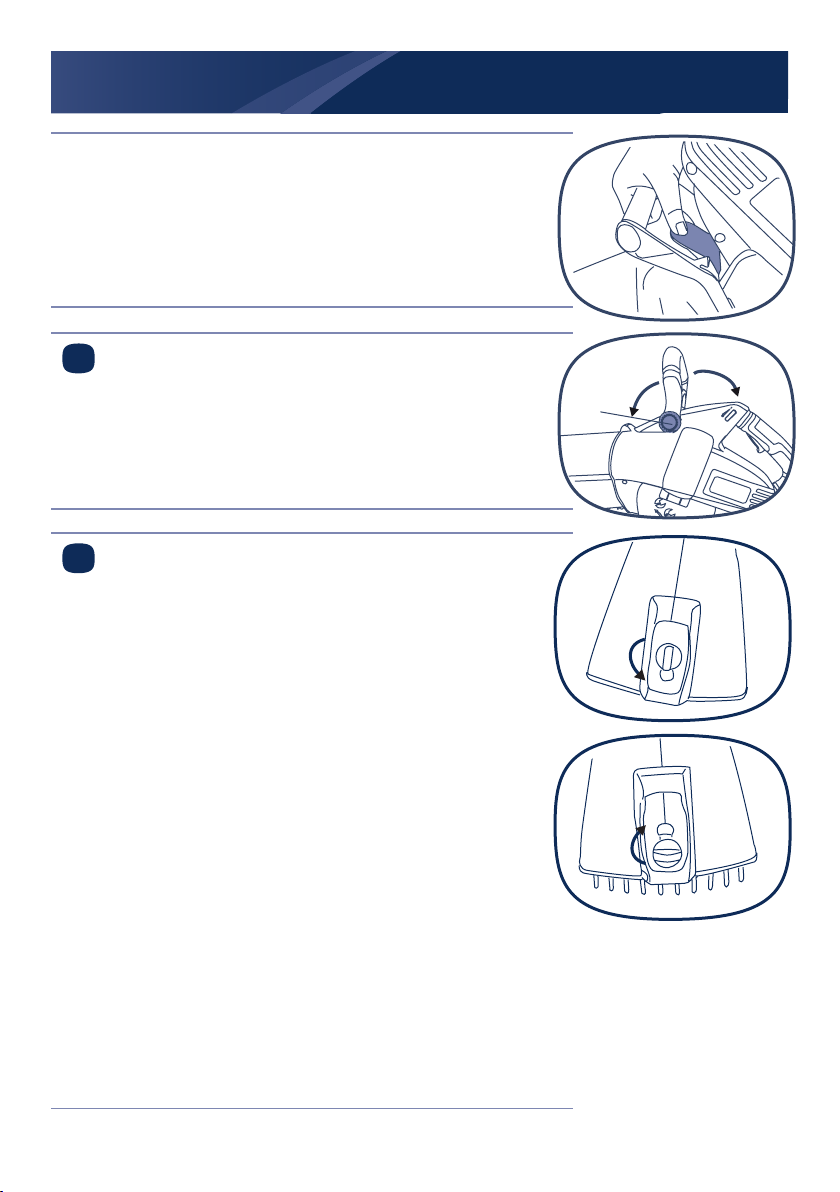
HEIGHT ADJUSTMENT
1
Press the height adjusting button (A) and slide the
Vacuum/Blower tube (B) to desired length.
It can be extended up to 300mm.
SHOULDER STRAP INSTALLATION
2
Attach the strap clip to the top of main body.
With machine on operation’s right hand side, place
shoulder strap across chest and over left shoulder.
Always switch off tool and unplug from
FITTING THE COLLECTION BAG
3
To install the collection bag, insert the buckle of
support frame into the slot of the housing. Frame
will click into position when properly fitted.
13 AFTER SALES SUPPORT 0345 605 2067
Page 14
ASSEMBLE
To dismantle the collection bag:
Press the spring lever to release the bag.
FRONT HANDLE ADJUSTMENT
4
Adjust the front handle to a comfortable angle.
Press the adjusting buttons at both sides(A) and
rotate the handle to desired position.
RAKE ADJUSTMENT
5
Rotate the rake knob 90° anticlockwise and then
the rake will automatically pop-up.
Lock the knob by rotating 90° clockwise.
A
14 AFTER SALES SUPPORT 0345 605 2067
Page 15

OPERATE
Before starting
1. Ensure the Blower & Vac tube is fitted correctly and attach
the collection bag. Without the collection bag assembled,
you cannot start the Blower & Vac.
2. Plug the Blower & Vac into the mains
supply and switch on.
WARNING: Before selecting either Vacuum
or Blower function ensure that the selector
lever operates smoothly and that it is not
obstructed by debris from the previous use.
More information check P16
Starting the Blower & Vac
Select either the Vacuum or Blower function using the
selector lever (A) on the side of the machine and press the
on/off trigger (B). If more power is required, slide the speed
controller from position “1” to position “max” (C).
C
B
Stopping the Blower & Vac
To turn off the machine you can simply release the
On/off trigger.
A
15 AFTER SALES SUPPORT 0345 605 2067
Page 16

OPERATE
WARNING: Any hard objects, such as stones,
tin cans glass etc, will damage the suction
fan.
Do not use the Blower/Vacuum/Shredder to
suck up water or very wet debris.
Never operate the Blower/Vacuum/Shredder
without the debris collection bag tted.
Using the blower mode
Select the blow function using the selector lever on the side
of the machine and switch on. With the Blower & Vac resting
on its wheels, move it forward directing the nozzle at the
debris to be cleared.
Adjust the speed with the speed control button if more
power is required.
Alternatively hold nozzle just above the ground and swing
the machine from side to side. Moving forward and direct
the nozzle at the debris to be cleared. Blow the debris into a
convenient heap then use the vacuum function to collect the
debris.
Vacuum mode(A)
Blower mode(B)
16 AFTER SALES SUPPORT 0345 605 2067
A B
Page 17

OPERATE
Using the Vacuum mode
Inspect the area to be worked before starting. Remove
any objects or debris that could be thrown, jammed or
become entangled in the Blower & Vac.
Inspect the area to be worked before starting. Remove
any objects or debris that could be thrown, jammed or
become entangled in the Blower & Vac. Select the
vacuum function using the selector lever on the side of
the machine and switch on.
With the Blower & Vac resting on its wheels move the
Blower & Vac forwards directing the nozzle at the debris
to be collected. Alternatively with the Blower & Vac held
just above the ground swing the machine from side to
side, moving forwards and directing the nozzle at the
debris to be collected. Do not force the nozzle into the
debris as this will block the suction tube and reduce the
efficiency of the machine.
Adjust the speed with the speed control button if more
power is required.
Clearing the impeller from debris add warning (unplug the
machine before clearing the impeller, use gloves)
Unscrew the knob of the impeller access door.
Wearing gloves, carefully clear the impeller from debris
Close the access door and hand tighten the screw, no
force is needed.
Organic materials such as leaves contain a large
amount of water that can cause them to stick to the
inside of the suction tube. To reduce sticking the
material should be left for a few days to dry out.
Rake function
The integrated rake will help to loosen debris between
gravel.
17 AFTER SALES SUPPORT 0345 605 2067
Page 18

MAINTENANCE
WARNING: Never use water for cleaning
your product, use only a dry cloth. Do not
clean with chemicals or solvents, some can
destroy critical plastic parts.
Always wear gloves to remove debris from
this product
Cleaning debris
1. Switch off and disconnect from the mains electricity
supply before cleaning your product.
2. Always empty the collection bag, using the zip.
3. Unscrew the Impellor access release (3) anticlockwise, until the door opens.
4. Wearing gloves, carefully rotate the fan and remove
debris by hand. Clean the fan with a soft brush ensuring
it is free from debris
5. Clean the tube with a soft brush or cloth.
6. Close up the motor housing unit by tightening the
impellor access release screw until secure (do not
overtighten).
7. Clean the air vents with a soft brush
8. Turn over the product and carefully check the tube for
debris.
9. Refit the collection bag.
Storing Your Product
Always store the product in a dry place ensuring the
cable is not likely to be damaged on sharp edges etc.
18 AFTER SALES SUPPORT 0345 605 2067
Page 19

MAINTENANCE
Maintenance
Our machines have been designed to operate over a
long period of time with a minimum of maintenance.
Continuous satisfactory operation depends upon proper
machine care and regular cleaning.
Keep all nuts, bolts and screws tight to be sure the
appliance is in safe working condition.
1. Check the collection bag frequently for wear or
deterioration.
2. Replace worn or damaged parts.
3. Use only genuine replacement parts and accessories.
4. Store the appliance only in a dry place.
Disposal of the machine
Machines which are labelled with the this symbol must
not be disposed of in household rubbish. You must
dispose of such old electrical and electronic appliances
separately.
Please check with your local authority about the
possibilities for correct disposal. You will thus help to
avoid that damaging into the environment.
Disposing of the packaging
The packaging consists of cardboard and
correspondingly marked sheets that can be recycled.
Make these materials available for recycling.
19 AFTER SALES SUPPORT 0345 605 2067
Page 20

TECHNICAL DATA
Model GY8900
Rated Voltage 230 -240V~/50Hz
Rated Power 3000W
No-Load Speed 11500-15500 /min
Capacity Of Collection Bag 45L
Tube Length 47-75cm
Air Speed 100-300km/h
Volume 10-16m3/min
Part number Accessories
8047-870001 shoulder strap
8045-872001 collection bag
8058-880001 access door screw
20 AFTER SALES SUPPORT 0345 605 2067
Page 21

TECHNICAL DATA
Measured sound pressure level LpA:90.8dB(A), K=3dB(A)
Measured sound power level LwA:102.3 dB(A), K=2.1dB(A)
Guaranteed sound power level LwA:104dB(A)
The following information :
-That declared vibration total value has been measured in accordance with a standard test
method and may be used for comparing one tool with another.
-That declared vibration total value may also be used in a preliminary assessment of
exposure.
WARNING:
-The vibration emission during actual use of the power tool can differ from the declared
total value depending on the ways in which the tool is used.
-Of the need to identify safety measures to protect the operator that are based on an
estimation of exposure in the actual conditions of use( taking account of all parts of the
operating cycle such as the times when the tool is switched off and when it is running idle
in addition to the trigger time).
Noise and vibration values were determined according to the standards and stipulations
mentioned in the declaration of conformity. Technical and optical changes can be carried
out in the course of further development without notice. All dimensions, references and
information of this instruction manual are therefore without guarantee. Legal claims, which
are made on the basis of the instruction manual, cannot thusbe considered as valid.
21 AFTER SALES SUPPORT 0345 605 2067
Page 22

TROUBLESHOOTING
Problem Possible cause Solution
Install the collection bag,
Device does not
start
Device works with
interruptions
Low suction capacity
or suction not
present
Mains voltage is not
present
Defective on/off switch
Defective motor
Impeller fan cover still
open
Damaged power cable Check cable; call service helpline
Internal loose connection
Defective on/off switch
Collection bag (5) is full Empty collection bag
Collection bag is dirty Clean collection bag
Selector switch (12) is in
the wrong position
Device clogged up or
blocked by foreign bodies
Check plug socket, cable, line,
plug and fuse, where appropriate,
repair through electrical specialist
Repair through customer serviceWorn carbon brushes
Close impeller fan cover and
screw it down properly
Repair through customer service
Set selector switch to the
suction symbol
Remove blockages (see
chapter Cleaning and Maintenance)
Selector switch (12) in in-
Small or missing
blowing power
Device works with
interruptions
22 AFTER SALES SUPPORT 0345 605 2067
correct position
Speed controller (10) in
wrong position
Foreign body blocks
impeller wheel
Set selector switch to the
blowing symbol
Rotate speed controller to high
position
Remove blockage (see chapter
Cleaning and Maintenance)
Page 23

WARRANTY
If your device develops a fault, please don’t hesitate to contact our customer service
department on 0345 605 2067, we can solve 80% of problems via the phone.
1. These warranty terms cover additional warranty rights and do not affect your statutory
warranty rights. All our products are covered by a 3 year manufacturer warranty.
2. Claims must be accompanied by proof of purchase. This must be in the form of a sales
receipt or bank statement and must show that the product has been purchased within the
warranty period as described under point 1, from the retailer that it was originally bought
from. Please keep your receipt safe or staple it to the back of this manual for future
reference.
3. Our warranty covers problems caused by material or manufacturing defects, and will
result in the repair of these defects or replacement of the device with a like for like or
similar article.
4. Our devices have not been designed for commercial, trade or industrial applications, any
signs of use of the equipment in these application or equivalent activities, invalidates the
warranty.
5. The following are also excluded from our warranty:
A. Faults due to accidents, customer misuse or unauthorized repairs
B. Consumable Parts such as cutting line, plant protectors, handles, knobs, extension
cable and other accessories that are compatible with the product.
C. Failure due to lack of routine maintenance.
D. Failure as a result of not using the equipment in accordance with the manual and
safety instructions
E. The adjustment of cables
Warranty claims should be submitted before the end of the warranty period, see point 1,
but a paid service exists for repairs commissioned after this period. The original warranty
period remains applicable to the device even if repairs are carried out or parts are replaced.
In such cases, the work performed or parts tted will not result in an extension of the
warranty period, and no new warranty will become active for the work performed or
parts tted.
If you have any problems or questions concerning your garden power tool, please contact
our after sales service at 0345 605 2067.
23 AFTER SALES SUPPORT 0345 605 2067
 Loading...